Embed Size (px)
Citation preview

Microsoft NPS Configuration Guide
Introduction 1
Last Update: 12th April 2018
Microsoft NPS Configuration Guide eduroam (UK)

Microsoft NPS Configuration Guide
Introduction 2
Contents
1. Introduction ........................................................................................................... 4
2. Limitations of Network Policy Server ..................................................................... 5
3. Installing NPS ........................................................................................................ 6
4. Certificates and Certificate Authority ................................................................... 10
5. Install and configure a Standalone Certificate Authority ....................................... 12
6. Change the Certificate Authority - Validity period ................................................ 22
7. Change the Certificate Authority - CRL Distribution Points .................................. 23
8. Creating the Server Certificate ............................................................................. 25
9. Signing your certificate requests with your CA ...................................................... 33
10. Import the Server Certificate ............................................................................. 39
11. Configure NRPS Shared Secrets Template ........................................................ 41
12. Add NRPS as RADIUS Clients ............................................................................ 42
13. Add local Access Points / Wireless Infrastructure RADIUS Clients ...................... 44
14. Add NRPS as RADIUS Proxy Servers ................................................................. 45
15. Add a Connection Request Policy for your roaming users .................................. 48
16. Add a Connection Request Policy for local users ................................................ 52
17. Add a Connection Request Policy for eduroam visitors ....................................... 57
18. Reorder Connection Request Policies ................................................................ 60
19. Create Network Policy....................................................................................... 61
20. Register server in Active Directory ..................................................................... 68

Microsoft NPS Configuration Guide
Introduction 3
Changelog
Version Modification Author Date
0.1 Original version posted to
eduroam (UK) community site
Edward Wincott and eduroam (UK) team. 24 February 2015
0.2 Updated with further details and
sections about CAs and
Certificates.
Edward Wincott and Jon Agland 9th March 2018
0.5 (current
release)
Updated screenshots to 2016
versions.
Re-order guide and replace all
screenshots
Change guidance on EAP override
in Connection Request Policies
Update userPrincipalName /
Network Access Identifier
considerations
Jon Agland 12th April 2018

Microsoft NPS Configuration Guide
Introduction 4
1. Introduction This guide describes the setup of Microsoft Network Policy Server as your Organisational RADIUS Server (ORPS)
for use with eduroam in the UK. Whilst the ORPS is the key component of your eduroam deployment there are a
number of other important elements and this guide must be read in conjunction with the following documents:
i) Implementing eduroam Roadmap https://community.ja.net/library/janet-services-
documentation/implementing-eduroam-roadmap
ii) the eduroam(UK) Technical Specification https://community.ja.net/library/janet-services-
documentation/eduroamuk-technical-specification
iii) Attribute Filtering for Microsoft IAS and NPS: https://community.ja.net/library/janet-services-
documentation/radius-attribute-filtering-microsoft-ias-and-nps
There are also additional technical reference documents and advisory notices published in the Jisc Community
Library web site with which the eduroam sys admin should familiarise him or herself.
Whilst this guide is sufficient to enable you to set up a basic eduroam deployment, it does not cover setup of further
(non-eduroam) VLANs and dynamic assignment of users to such VLANs, which you may wish to implement for the
support of your local users connecting with their own devices or for connecting local users to VLANs giving access
to restricted resources and/or which could have content filtering applied.
For Home sites, you will also need to consider ‘on-boarding’ of user devices, most effectively achieved through
the use of automation tools such as eduroam CAT which generates installer utilities. If there are difficulties with
internet access via mobile data, then possibly setting up a ‘walled garden’ service to provide users with access to
your CAT installer utilities is also possible see Walled Garden for on-boarding user devices to eduroam
This guide does not cover logging and accounting, which is covered in Section 6 of the GÉANT guide: CBP-13
Using Windows NPS as RADIUS in eduroam
The examples in this document are collected from a mix of both Windows Server 2016, although will be relevant
to older versions such as Windows Server 2012 and Windows Server 2008 R2 Enterprise. The dialogue screens
differ slightly between the two versions, but the configuration items are very similar.
Pre-requisites:
It is assumed that you have provisioned a suitable server platform, installed Microsoft Windows Server and that
suitable connectivity is in place to your wireless access points/controller and to the internet and that the server has
a fully qualified domain name and fixed IP address reachable by the eduroam(UK) national proxy servers. It is also
assumed that you have a basic setup of Active Directory.
Acknowledgements
This guide contains material drawn in part from the Best Practice Document ‘Using Windows® NPS as RADIUS in eduroam’ published by the GÉANT Association and such material is included in this guide under the free license terms specified on page (ii) of that document. Copyright of such material remains the property of GÉANT.

Microsoft NPS Configuration Guide
Limitations of Network Policy Server 5
2. Limitations of Network Policy Server Network Policy Server (NPS) is the Microsoft Windows implementation of a Remote Access Dial-in User Service (RADIUS) server and proxy. NPS is a popular choice amongst organisations deploying eduroam due to its accessibility, familiar graphical user interface and low cost. However, it should be recognised that for use as your organisational RADIUS proxy server (ORPS) it has certain limitations and lesser flexibility than the likes of FreeRADIUS and Radiator etc.
The limitations mean that whilst a perfectly serviceable solution can be put in place, your eduroam deployment will not meet all of the best practice recommendations described in the eduroam(UK) Technical Specification and certain ‘warn’ flags will be indicated in the eduroam(UK) Support portal.
The following limitations are addressed, where applicable, in the instructions contained later in this guide:
You cannot add RADIUS attributes into outbound authentication requests your ORPS sends to the eduroam(UK) national proxies (NRPSs). In particular adding an ‘Operator-Name’ attribute to indicate the organisation where a visitor is connecting is not possible in NPS. Since the presence of Operator-Name is desirable for troubleshooting purposes (and also for working with CUI) it is on the eduroam(UK) development roadmap to introduce Operator-Name insertion at the NRPS, therefore this limitation can be mitigated.
NPS does not support Status-Server and will not respond to Status Server requests. Status-Server is the best practice method for RADIUS servers to check the availability of peered servers, the alternative being to utilise retries and timeouts. It is on the eduroam(UK) development roadmap to introduce Status-Server checks with ORPS, but NPS servers will not be able to benefit from this and will continue to rely on current methods.
RADIUS attributes cannot be stripped from authentication requests by NPS. They can only be overwritten. It is desirable for your ORPS to be able to strip or overwrite attributes, for instance an Access-Accept returned for a visitor by the user’s home organisation may contain VLAN attributes that are only relevant for that user on the home campus (to enable the user to be connected to a group VLAN), but such VLAN attributes may cause problems on your network. To avoid these problems you will need to explicitly set VLAN values applicable to your environment if you work with VLANs and set other values to prevent invalid attributes.
The ‘outer’ username (used in phase 1 of the authentication process to identify the user’s home organisation) can be rewritten (via the Connection Request Policy) as an ‘anonymous@realm’ , whereas the ‘inner’ username (the encrypted identifier used for user authentication) which is handled by the Network Policy, cannot be modified. (Nb. often users configure inner and outer identities to be the same).
o The effect of this is that your users will have to use their respective userPrincipalName to authenticate as their user@realm -their Network Access Identifier (RFC7542)-, in many case this looks similar to an e-mail address.
o If your UPN suffix and resulting userPrincipalName’s use an unregistered domain name such as those ending ‘.local’, then you may be best to consider adding a UPN Suffix and changing the userPrincipalName for affected users. If not, there will additional requirements such as:
Additional Connection Request Policies, with Attribute rules see using the pattern matching syntax in NPS
Users being mandated to use separate inner and outer identities.
Microsoft NPS Configuration Guide
Installing NPS 6
In respect of your Home (IdP) service provision, using anonymous outer identities is not possible, unless Override network policy authentication settings is enabled in the Connection Request Policies. We recommend that this is used, but this may have an effect on “Constraints and Settings” in “Network Policies”.
Logging in Event Manager is rather poor (compared to FreeRADIUS) – there is not much detail shown, making the debugging of any connection problems difficult. Be prepared to install Wireshark for this purpose.
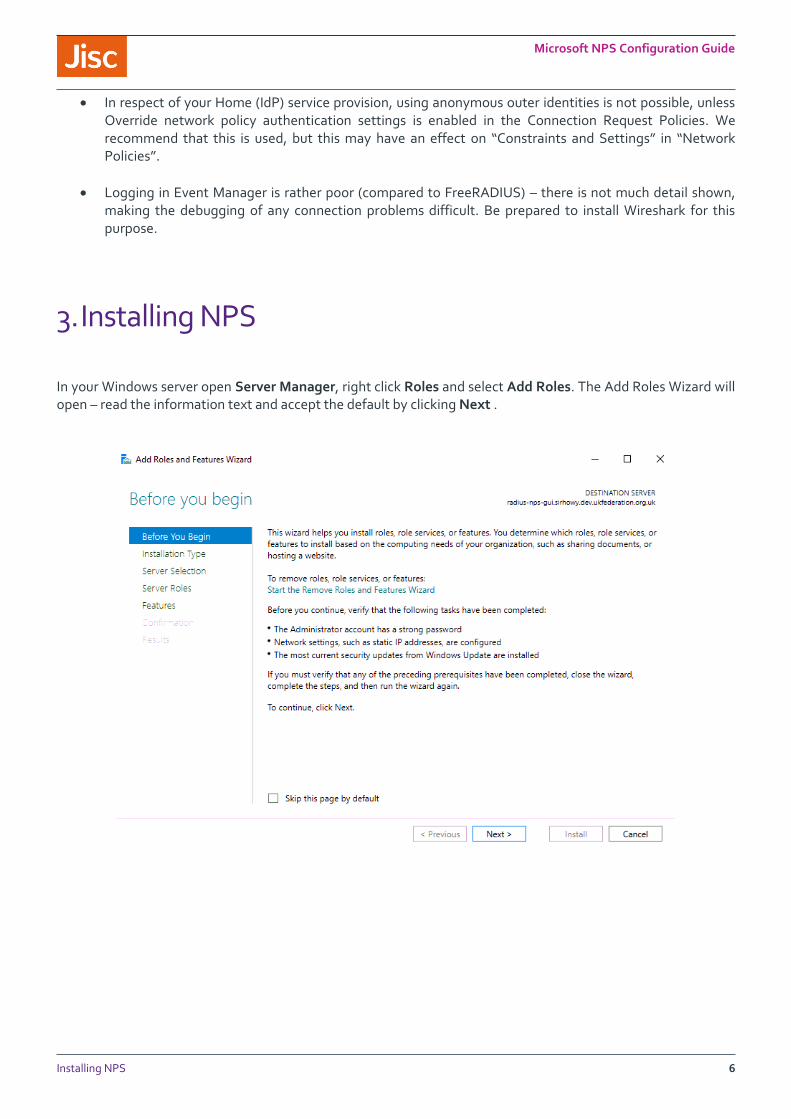
3. Installing NPS
In your Windows server open Server Manager, right click Roles and select Add Roles. The Add Roles Wizard will open – read the information text and accept the default by clicking Next .
Microsoft NPS Configuration Guide
Installing NPS 7
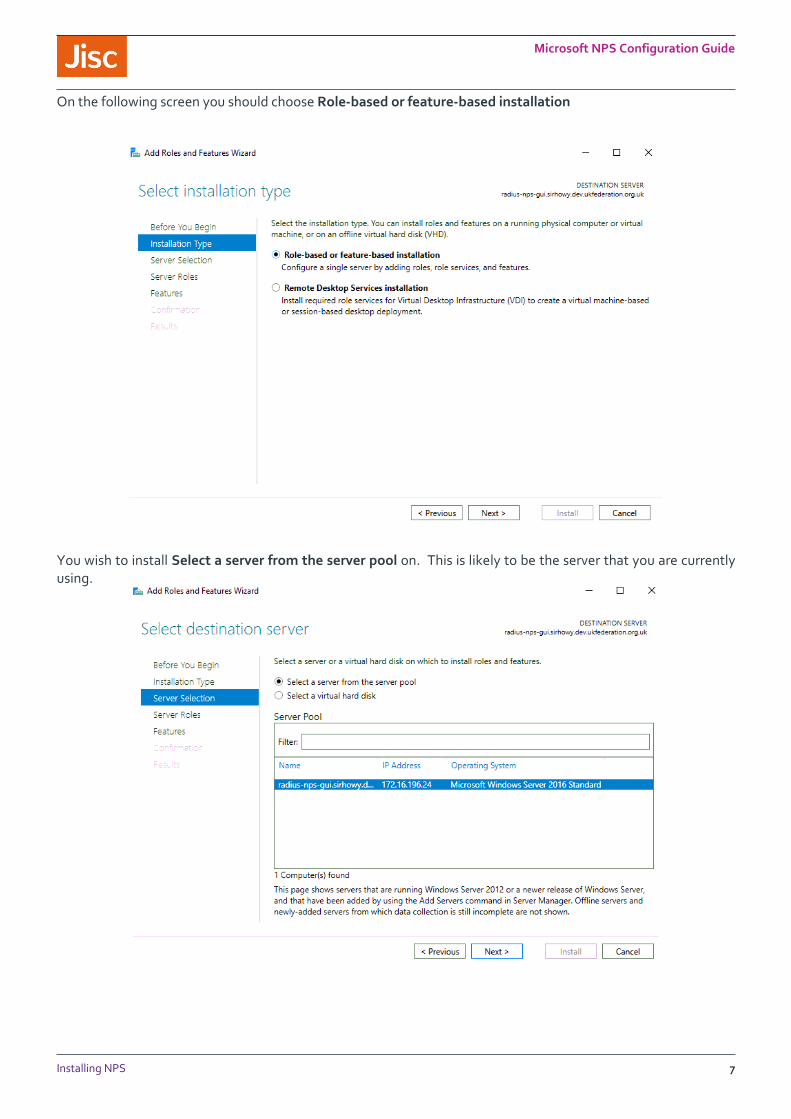
On the following screen you should choose Role-based or feature-based installation
You wish to install Select a server from the server pool on. This is likely to be the server that you are currently using.

Microsoft NPS Configuration Guide
Installing NPS 8
Select Network Policy and Access Services – then Next:
The following dialogue will appear, click Add Features, when you return to the Add Roles and Features Wizard click Next

Microsoft NPS Configuration Guide
Installing NPS 9
No additional features are required, click Next
Read this page, and click Next

Microsoft NPS Configuration Guide
Certificates and Certificate Authority 10
Hit Install on the confirmation dialogue, it is unlikely you will need to restart the server.
4. Certificates and Certificate Authority
Most organizations would like to act as a Home participant (IdP) and to authenticate its own users. PEAP-MSCHAPv2 and EAP-TLS authentication methods, in common with all other EAP methods (with the exception of EAP-PWD - which is not supported in NPS) require an X.509 server certificate to be installed on the authenticating RADIUS server. The certificate is used to establish the secure authentication tunnel and by the RADIUS server to identify itself to the user’s device.
Should you decide to participate only as a Visited (Wi-Fi service provider for visitors only) participant, you don’t need a certificate and your ORPS can act as a proxy to receive requests from Wi-Fi access points, to log, filter, and forward authentication requests to the eduroam(UK) infrastructure. Most organisations participate as both Home and Visited service providers and so the ORPS needs to have a server certificate.
PEAP-MSCHAPv2 is the most commonly used authentication method in the Microsoft environment since it utilises username and password credentials, which are easy to distribute and PEAP is straightforward to set up on NPS.
PEAP (Protected Extensible Authentication Protocol) sets up a secure tunnel using TLS (just like HTTPS does for websites) in order to protect the credentials and is an important part of the mutual authentication. Firstly, the
Microsoft NPS Configuration Guide
Certificates and Certificate Authority 11
authentication server needs to prove to the user that he or she will be providing credentials to the right authority, then the users need to prove who they are. The RADIUS server (NPS in this case) will send its certificate to the client before authentication of the user takes place. The client must have the public certificate of the Certification Authority (CA) installed already. This will issue and sign the NPS server’s certificate. The CA certificate may be distributed using e-mail, a web page such as eduroam CAT (eduroam Configuration Assistant Tool), or a management system such as AD Group Policy. The client checks the validity of the RADIUS server’s certificate using the CA certificate. The client should also check the name (CommonName and/or SubjectAltName) of the certificate.
You can use a server certificate from a public commercial certificate authority; such certificates are available from the very cost effective Jisc Certificate Service through which you will pay a fraction of the cost of commercial providers. This will save you having to set up your own ‘local’ CA service, manage certificates and distribute your public certificate to your users’ devices. However commercial CAs certs do have an expiry date, so periodically a large administrative task will be encountered. If you are taking this option then you can skip to Section 8. Creating a Server Certificate.
If you set up your own ‘local’ CA, rather than using certificates from a large commercial CA, the possibility of phishing is reduced since commercial CA certificates are readily available and could be used in exploits such as Man-in-the-Middle attack, whereas as with a local CA you controls generation of the public CA certificate and can assure its use is restricted to your own servers. If you are taking this option you should continue into the next section; Section 5. Install and configure a Standalone Certificate Authority.
Other options such as using an existing Enterprise Certificate Authority are available too, but not documented here.
If taking that option ensure that your CAs lifetime is long for example 20+ years. This will be the certificate that goes onto end user devices, so you would like to avoid the need of replacement as little as possible. You should add a valid CRL Distribution point added, this will be a URL that should reference a domain name that you have control over and could feasibly host a file if required for example http://www.camford.ac.uk/eduroam-ca.crl. See Section 7. Change the Certificate Authority - CRL Distribution Points
You should also tweak the default validity of the certificates issued by your CA as the default one year is too short, you could align this to the lifetime of the CA or slightly greater. See Section 8.Change the Certificate Authority - Validity period

Microsoft NPS Configuration Guide
Install and configure a Standalone Certificate Authority 12
5. Install and configure a Standalone Certificate
Authority From Server Manager, Choose Add and Remove Roles.
On the following screen you should choose Role-based or feature-based installation

Microsoft NPS Configuration Guide
Install and configure a Standalone Certificate Authority 13
Select a server from the server pool you wish to install this on. This is like to be the server that you are currently using.
Select the Active Directory Certificate Services role

Microsoft NPS Configuration Guide
Install and configure a Standalone Certificate Authority 14
The following dialogue will appear, click Add Features. When you return to the Add Roles and Features Wizard click Next
Click Next .

Microsoft NPS Configuration Guide
Install and configure a Standalone Certificate Authority 15
Take note of this dialogue in relation to DNS/Hostname of the server and then click Next
There is no need to select any additional Role Services and keep it as below

Microsoft NPS Configuration Guide
Install and configure a Standalone Certificate Authority 16
Hit Install on the confirmation dialogue, there is no need to tick the Restart
Once installed, click on Configure Active Directory Certificate Services on the destination server

Microsoft NPS Configuration Guide
Install and configure a Standalone Certificate Authority 17
You can now configure your Standalone CA. Here you will select the credentials of the appropriate administrative account, this can usually be left as default
Select role services to configure, as there is only one Certification Authority then just hit Next

Microsoft NPS Configuration Guide
Install and configure a Standalone Certificate Authority 18
We recommend the use of a Standalone CA, as this should be more portable than an Enterprise CA, which is heavily integrated with Active Directory. Select Standalone CA and click Next Tip: if you want to setup an Enterprise CA there are some instructions in the GÉANT guide.
Select Root CA and then hit Next.

Microsoft NPS Configuration Guide
Install and configure a Standalone Certificate Authority 19
Select Create a new private key and hit Next
Set a minimum Key length of 2048, and at least SHA256 for your hash algorithm.
Nb.Do not use SHA1 or MD5.

Microsoft NPS Configuration Guide
Install and configure a Standalone Certificate Authority 20
The Common Name for this CA can be modified, and should be something friendly for users, as they may see this
whilst configuring their device. E.g. Camford University eduroam service
Please give the Certificate Authority a long-life, we recommendation 20 years or more.

Microsoft NPS Configuration Guide
Install and configure a Standalone Certificate Authority 21
Your CA will be stored at the Certificate database location, ensure that it is backed up regularly to a secure location.
This is the final page of the wizard, click Configure, the next dialogue will advise that the “Configuration Succeeded” click Close. You should complete the additional tasks mentioned in Sections 6 and 7 of this guide.

Microsoft NPS Configuration Guide
Change the Certificate Authority - Validity period 22
6. Change the Certificate Authority - Validity period This means that the CA will issue certificates that are valid for a long period, align this with the validity period of the CA i.e. 20 years+.
Search for the command prompt cmd in Start, and then right click choose Run as Administrator, following this you will need to choose Yes in the User Account Control dialogue.
On the command prompt enter the following commands; (the number 20 here is the number of years, so adjust this as required) certutil -setreg CA\ValidityPeriodUnits 20
certutil -setreg CA\ValidityPeriod Years
net stop certsvc && net start certsvc
You can see the successful output of this below;

Microsoft NPS Configuration Guide
Change the Certificate Authority - CRL Distribution Points 23
7. Change the Certificate Authority - CRL Distribution
Points The CRL Distribution points created by the CA in Windows may not be compatible with devices looking for a URL
starting http://, as a result we would recommend the following steps.
Add the Certification Authority Snap-in to MMC
Choose Local Computer

Microsoft NPS Configuration Guide
Change the Certificate Authority - CRL Distribution Points 24
You should see Certification Authority on the right hand side under Selected Snap-ins
In MMC with certificate authority snap-in selected, right click and choose Properties.

Microsoft NPS Configuration Guide
Creating the Server Certificate 25
In the Extensions tab, Add a CRL Distribution Point (CDP) location, this should be somewhere you could feasibly
place a CRL distribution file, for our example http://www.camford.ac.uk/eduroam-ca.crl
Choose Include in the CDP extension of issued certificates for the above CRL, make sure to untick this from
any of the other CRLs or remove all other CRLs. There is no requirement for Include in CRLs. Client us this to
find Delta CRL locations and, Include in the IDP extension of issued CRLs to be ticked or unticked.
8. Creating the Server Certificate
PEAP-MSCHAPv2 and EAP-TLS authentication methods, in common with all other EAP methods (with the
exception of EAP-PWD - which is not supported in NPS) require an X.509 server certificate to be installed on the
authenticating RADIUS server. The certificate is use to establish the secure authentication tunnel and is used by
the RADIUS server to identify itself to the user’s device.
To acquire a server certificate from your certificate provider you must generate a certificate signing request (CSR)
on the NPS server that you want the certificate for. If deploying more than one ORPS,
normally you acquire one certificate and then copy that and the private key to all ORPSs.
The following describes how to generate your CSR for submission to your certificate
provider (e.g. Jisc Certificate Service). If you operate you own private CA and generate
self-signed certificates you should see the instructions provided in the GÉANT guide
GN3-NA3-T4-UFS140.
Go to Start , run and type mmc and click on it.

Microsoft NPS Configuration Guide
Creating the Server Certificate 26
In the mmc console click File, Add/Remove Snap-in…. Then from the list of Available snap-ins choose
Certificates and click Add.
Choose Computer account and click Next.

Microsoft NPS Configuration Guide
Creating the Server Certificate 27
Choose Local Computer: and then click Finish. Then click OK
In the menu on the left, under Certificates (Local Computer), right click on Certificates under Personal. Then
under All Tasks, Advanced Operations, click Create Custom Request….

Microsoft NPS Configuration Guide
Creating the Server Certificate 28
Click Next on the Certificate Enrollment – Before your begin page, on the Select Certificate Enrollment Policy
page shown below choose ‘Proceed without enrollment policy under Custom Request. Then click Next.
Choose Request format: PKCS #10 and click Next.

Microsoft NPS Configuration Guide
Creating the Server Certificate 29
On the Certificate Information page click the Details button and click Properties.
Enter a Friendly name: for the certificate reflecting your organisation name e.g. Camford University
eduroam service.

Microsoft NPS Configuration Guide
Creating the Server Certificate 30
Click on the Subject tab then enter relevant information for your server in the Subject name:
Common name – CN (fully-qualified domain name - FQDN) e.g. radius.camford.ac.uk
Country – C (country) i.e. GB
Email – E (a contact e-mail address) e.g. [email protected]
Locality – L (town / city) e.g. Camford
Organization – O (Organisation Name) e.g. Camford University
State – S (County) e.g. Camfordshire
Under Alternate Name choose DNS, enter the fully-qualified domain name - FQDN e.g. radius.camford.ac.uk

Microsoft NPS Configuration Guide
Creating the Server Certificate 31
Click on the Extensions tab and then under Extended Key Usage (application policies) from the available options add Server Authentication.
Under Basic Constraints, choose Enable this extension and Make the basic constraints extension critical
Click on the Private Key tab, under Key options choose a Key size: of 2048, tick Make private key exportable.
Then under Select Hash Algorithm choose sha256.

Microsoft NPS Configuration Guide
Creating the Server Certificate 32
Then click OK and click Next. Browse to a location e.g. Desktop and save the certificate signing request in base
64 format, e.g. as server.req, then click Finish.
Send the CSR file to your Certificate Authority, if using your own CA then follow Section 9. If sending to an
external CA for signing e.g. Jisc Certificate Service, then skip to Section 10.

Microsoft NPS Configuration Guide
Signing your certificate requests with your CA 33
9. Signing your certificate requests with your CA
If you’ve completed Section 7 you will already have the Certification Authority Snap-in added to MMC and can skip the next three steps. Add the Certification Authority Snap-in to MMC
Choose Local Computer

Microsoft NPS Configuration Guide
Signing your certificate requests with your CA 34
You should see Certification Authority on the right hand side under Selected Snap-ins
Right click on the Certificate Authority (Local), and choose under All Tasks, Submit new Request
Microsoft NPS Configuration Guide
Signing your certificate requests with your CA 35
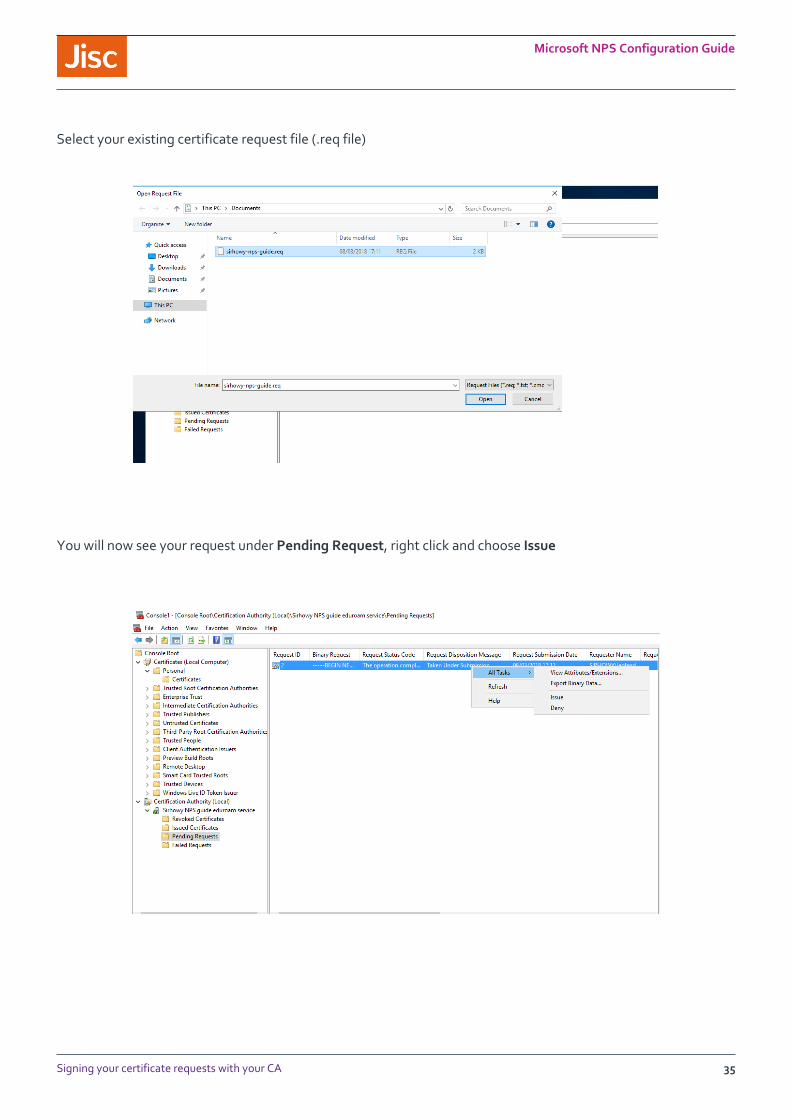
Select your existing certificate request file (.req file)
You will now see your request under Pending Request, right click and choose Issue

Microsoft NPS Configuration Guide
Signing your certificate requests with your CA 36
The certificate will now appear under Issued Certificates
Double-click on the certificate to open the properties window.

Microsoft NPS Configuration Guide
Signing your certificate requests with your CA 37
Move to the details tab and choose Copy to File…
This will launch the Certificate Export Wizard

Microsoft NPS Configuration Guide
Signing your certificate requests with your CA 38
You can use the default format of DER Encoded Binary x.509 (.cer)
Specify a .cer filename e.g. server.cer

Microsoft NPS Configuration Guide
Import the Server Certificate 39
You can now complete the Certificate Export Wizard, click Finish and you should get a message to say “The export was successful”, click OK
10. Import the Server Certificate
Once you receive your Certificate from the Certificate Authority you will need to install it together with any root
Certificate Authority or Intermediate certificates.
To install your new certificate, download it to your NPS server Desktop and go back to the MMC console. Under
Certificates (Local Computer) and Personal, right click on Certificates and under All Tasks click Import….

Microsoft NPS Configuration Guide
Import the Server Certificate 40
In the Certificate Import Wizard window click Browse... and go to your server certificate file and click Next.
Click ‘Next’ and the certificate will be imported into the certificate store.
Nb. Repeat this procedure for any root or intermediate certificates.

Microsoft NPS Configuration Guide
Configure NRPS Shared Secrets Template 41
11. Configure NRPS Shared Secrets Template Your NPS ORPS will need to configure each of the NRPS as both RADIUS Client and Remote RADIUS Server
Group. Using a Shared Secret template will reduce duplication. You can obtain your Shared secrets from the
eduroam UK support site.
In Network Policy Server, choose Templates Management, then right click Shared Secrets and choose New
Enter a template name corresponding to the NRPS (roaming0) and enter the Shared Secret and repeat, clicking
OK.
Nb.Repeat this for each NRPS (roaming1 and roaming2)
Microsoft NPS Configuration Guide
Add NRPS as RADIUS Clients 42
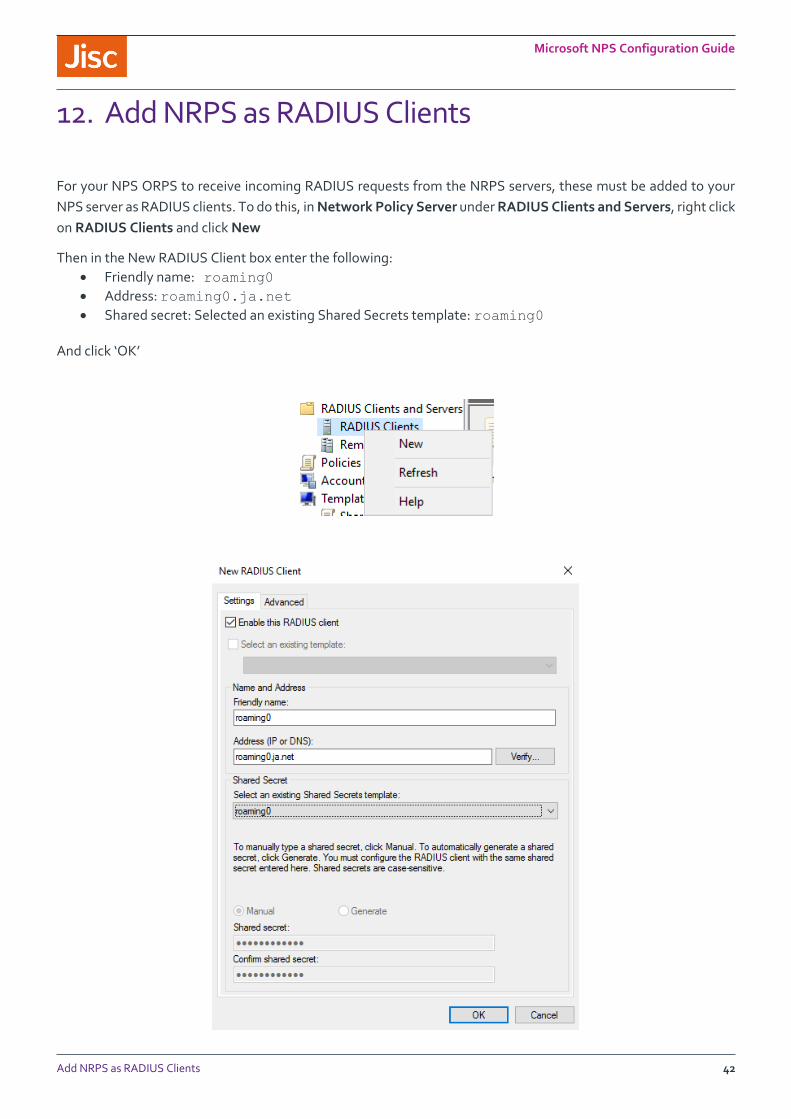
12. Add NRPS as RADIUS Clients
For your NPS ORPS to receive incoming RADIUS requests from the NRPS servers, these must be added to your
NPS server as RADIUS clients. To do this, in Network Policy Server under RADIUS Clients and Servers, right click
on RADIUS Clients and click New
Then in the New RADIUS Client box enter the following:
Friendly name: roaming0
Address: roaming0.ja.net
Shared secret: Selected an existing Shared Secrets template: roaming0
And click ‘OK’

Microsoft NPS Configuration Guide
Add NRPS as RADIUS Clients 43
Nb.Repeat this procedure to add roaming1 and roaming2.

Microsoft NPS Configuration Guide
Add local Access Points / Wireless Infrastructure RADIUS Clients 44
13. Add local Access Points / Wireless Infrastructure
RADIUS Clients To receive incoming RADIUS requests from the wireless infrastructure, access points / controllers must be added
to the NPS server as RADIUS clients. To do this, in Network Policy Server under RADIUS Clients and Servers,
right click on RADIUS Clients and click New
Then enter a Friendly name, Address, and Shared secret for your wireless device. Then click OK.
Repeat this step for any additional access points / controllers.

Microsoft NPS Configuration Guide
Add NRPS as RADIUS Proxy Servers 45
14. Add NRPS as RADIUS Proxy Servers
To be able to forward visitor authentications to the NRPS, Remote RADIUS servers need to be added to the
configuration. To do this, in Network Policy Server under RADIUS Clients and Servers, right click on Remote
RADIUS Server Groups and click New
For the Group name enter NRPS then click Add.
In Server enter roaming0.ja.net then click on the Authentication/Accounting tab.

Microsoft NPS Configuration Guide
Add NRPS as RADIUS Proxy Servers 46
Enter the following settings:
Shared secret – Select an existing Shared Secrets template: roaming0
Request must contain the message authenticator attribute – Ticked
Forward network access server start and stop notifications to this server – Unticked

Microsoft NPS Configuration Guide
Add NRPS as RADIUS Proxy Servers 47
Click on the ‘Load Balancing’ tab. Then enter the following settings:
Priority – a number between 1 and 3 ( choose a random priority for the three NRPS )
Weight – 33
Number of seconds without a response before request is considered dropped – 30
Click OK to add the server and then repeat the process for roaming1 and roaming2.

Microsoft NPS Configuration Guide
Add a Connection Request Policy for your roaming users 48
15. Add a Connection Request Policy for your roaming
users This step adds a connection request policy for authentication requests incoming from NRPS from your roaming
users. Authentication requests coming from the NRPS servers must always be responded to by the ORPS.
Therefore a policy should be added to authenticate requests coming from the NRPS locally. To do this, in Network
Policy Server under Policies, right click on Connection Request Policies and click New.
In Policy name enter “authenticate requests from NRPS locally”, then click Next.
Microsoft NPS Configuration Guide
Add a Connection Request Policy for your roaming users 49
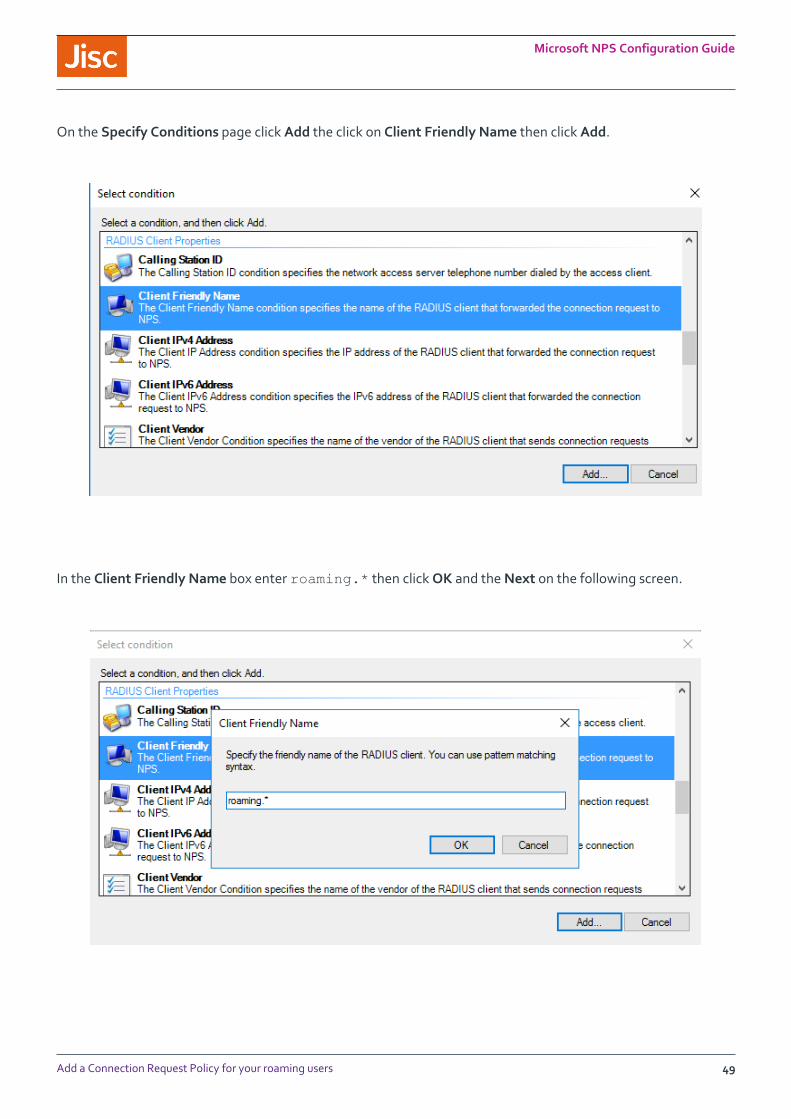
On the Specify Conditions page click Add the click on Client Friendly Name then click Add.
In the Client Friendly Name box enter roaming.* then click OK and the Next on the following screen.

Microsoft NPS Configuration Guide
Add a Connection Request Policy for your roaming users 50
For Authentication select Authenticate requests on this server and click Next.
Click Next on the Configure Settings screen.

Microsoft NPS Configuration Guide
Add a Connection Request Policy for your roaming users 51
We recommend you support anonymous outer identities, so choose Override-network policy authentication setting’ and Add EAP Type of Microsoft: Protected EAP (PEAP)
Click Finish on the final screen.

Microsoft NPS Configuration Guide
Add a Connection Request Policy for local users 52
16. Add a Connection Request Policy for local users To authenticate local users a policy needs to be created. To do this, in Network Policy Server under Policies, right
click on Connection Request Policies and click New.
In Policy name enter authenticate local users, and then click Next.

Microsoft NPS Configuration Guide
Add a Connection Request Policy for local users 53
On the Specify Conditions page click Add, then click on User Name, then click Add.
In the ‘User Name’ box enter a regularly expression formatted as @realm$, where realm is your organization’s realm e.g. camford.ac.uk, ensure to put a backslash before each full-stop @camford\.ac\.uk$ then click OK.
See using the pattern matching syntax in NPS

Microsoft NPS Configuration Guide
Add a Connection Request Policy for local users 54
Click Next then for Authentication choose Authenticate requests on this server and click Next.

Microsoft NPS Configuration Guide
Add a Connection Request Policy for local users 55
We recommend you support anonymous outer identities, so choose Override-network policy authentication setting’ and Add EAP Type of Microsoft: Protected EAP (PEAP)
In the list of EAP Types: select Microsoft: Protected EAP (PEAP) and click Edit…. Then select the correct
certificate in the Certificate issued list and ensure Secured password (EAP-MSCHAP v2) is in the list of EAP
Types. Then click OK.

Microsoft NPS Configuration Guide
Add a Connection Request Policy for local users 56
Click Next on the Configure Settings screen.
Click Finish on the final screen.

Microsoft NPS Configuration Guide
Add a Connection Request Policy for eduroam visitors 57
17. Add a Connection Request Policy for eduroam
visitors
To proxy visitor authentications to the NRPS a policy needs to be created. To do this, in Network Policy Server
under Policies, right click on Connection Request Policies and click New.
In Policy name enter proxy to eduroam, then click Next.

Microsoft NPS Configuration Guide
Add a Connection Request Policy for eduroam visitors 58
On the Specify Conditions page click Add the click on User Name then click Add.
In the User Name box enter @{1}[-a-zA-Z0-9_]+(\.[-a-zA-Z0-9_]+)+$ then click OK.
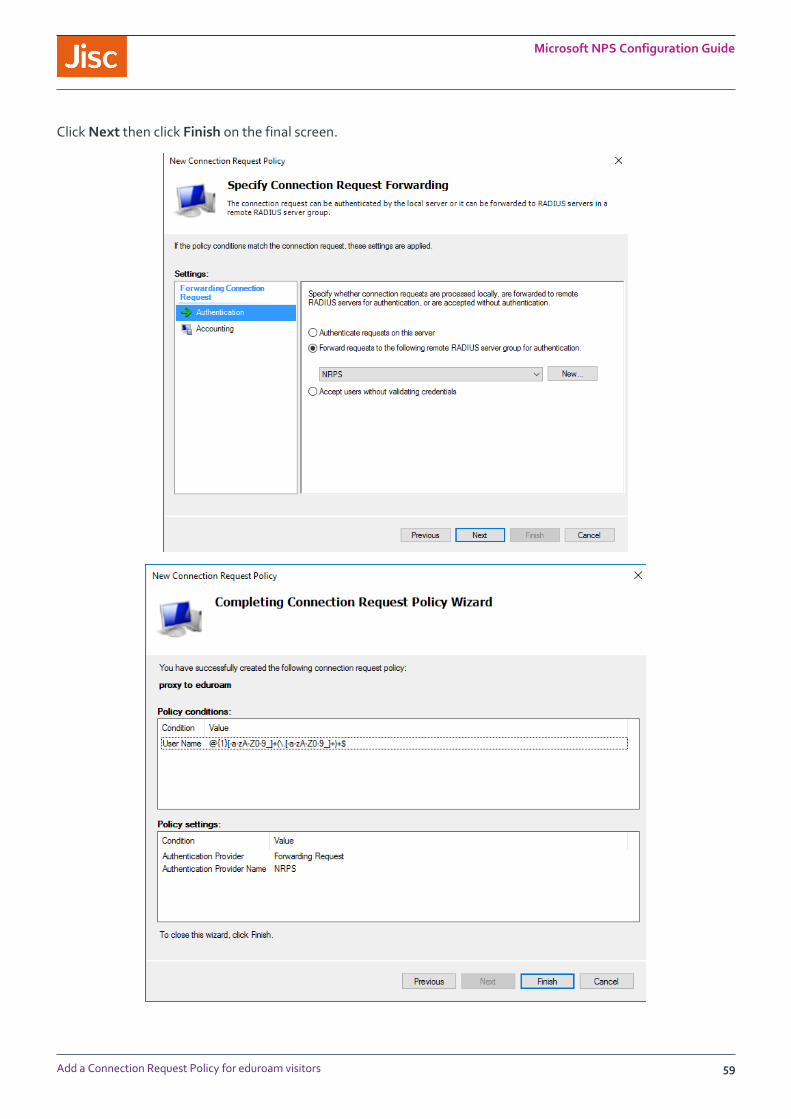
Click Next then for Authenticate tick Forward requests to the following RADIUS server group for
authentication: and select NRPS from the dropdown list.
See using the pattern matching syntax in NPS
Microsoft NPS Configuration Guide
Add a Connection Request Policy for eduroam visitors 59
Click Next then click Finish on the final screen.

Microsoft NPS Configuration Guide
Reorder Connection Request Policies 60
18. Reorder Connection Request Policies To ensure that local requests are processed first before proxying to eduroam, reorder the list into the following
order:
1. authenticate requests from NRPS locally 2. authenticate local users 3. proxy to eduroam
To do this right click on a policy and then click Move up or Move down until it is in the correct position in the list.
If the “Use Windows authentication for all users” policy exists, then delete it.
Microsoft NPS Configuration Guide
Create Network Policy 61
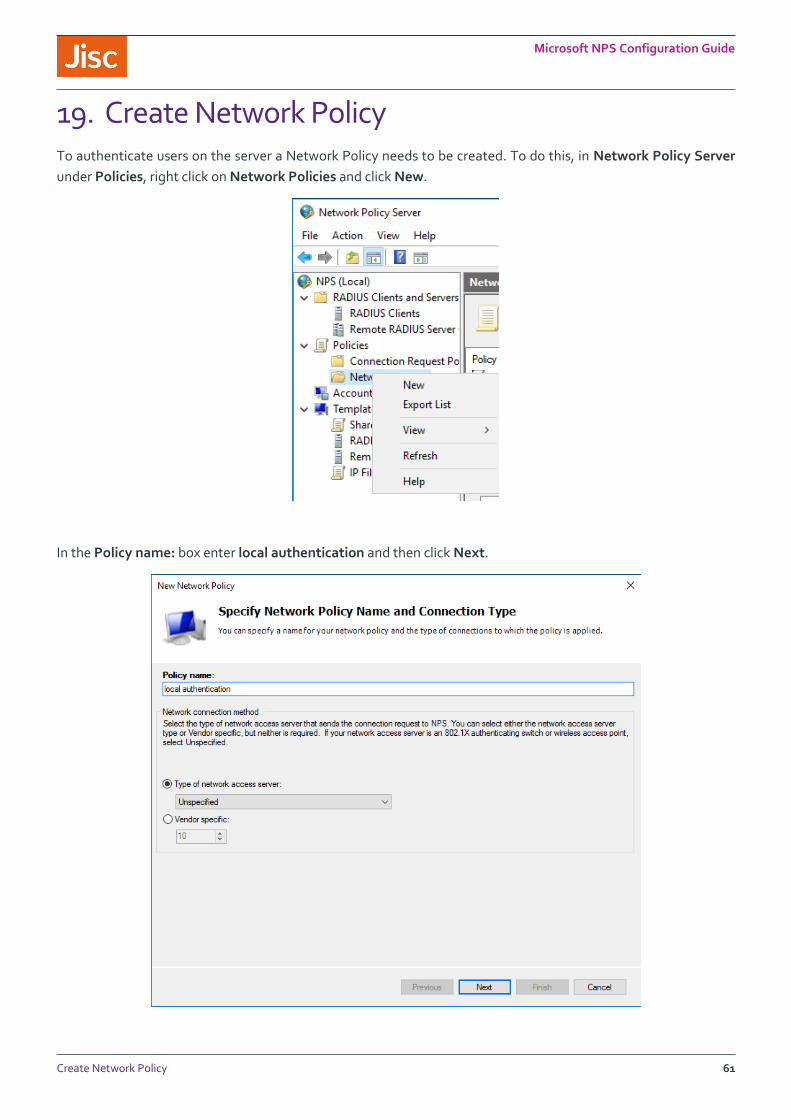
19. Create Network Policy To authenticate users on the server a Network Policy needs to be created. To do this, in Network Policy Server
under Policies, right click on Network Policies and click New.
In the Policy name: box enter local authentication and then click Next.

Microsoft NPS Configuration Guide
Create Network Policy 62
In the Specify Conditions window click Add… then from the list choose Authentication Type and click Add….
From the Authentication Method list choose EAP and PEAP then click OK.

Microsoft NPS Configuration Guide
Create Network Policy 63
Click Next then tick Access granted on the Specify Access Permission page, then click Next again.

Microsoft NPS Configuration Guide
Create Network Policy 64
On the Configure Authentication Methods page click Add…
In the list of EAP Types: select Microsoft: Protected EAP (PEAP) and click ‘Edit…’. Then select the correct
certificate in the Certificate issued list and ensure Secured password (EAP-MSCHAP v2) is in the list of EAP
Type’. Then click OK.
On the Configure Authentication Methods page untick all Less secure authentication methods. Then click
Next.

Microsoft NPS Configuration Guide
Create Network Policy 65
On the Configure Constraints page click Next. Then on the Configure Settings page, under RADIUS Attributes,
Standard remove both Framed-Protocol PPP and Service-Type Framed from the list.
Microsoft NPS Configuration Guide
Create Network Policy 66
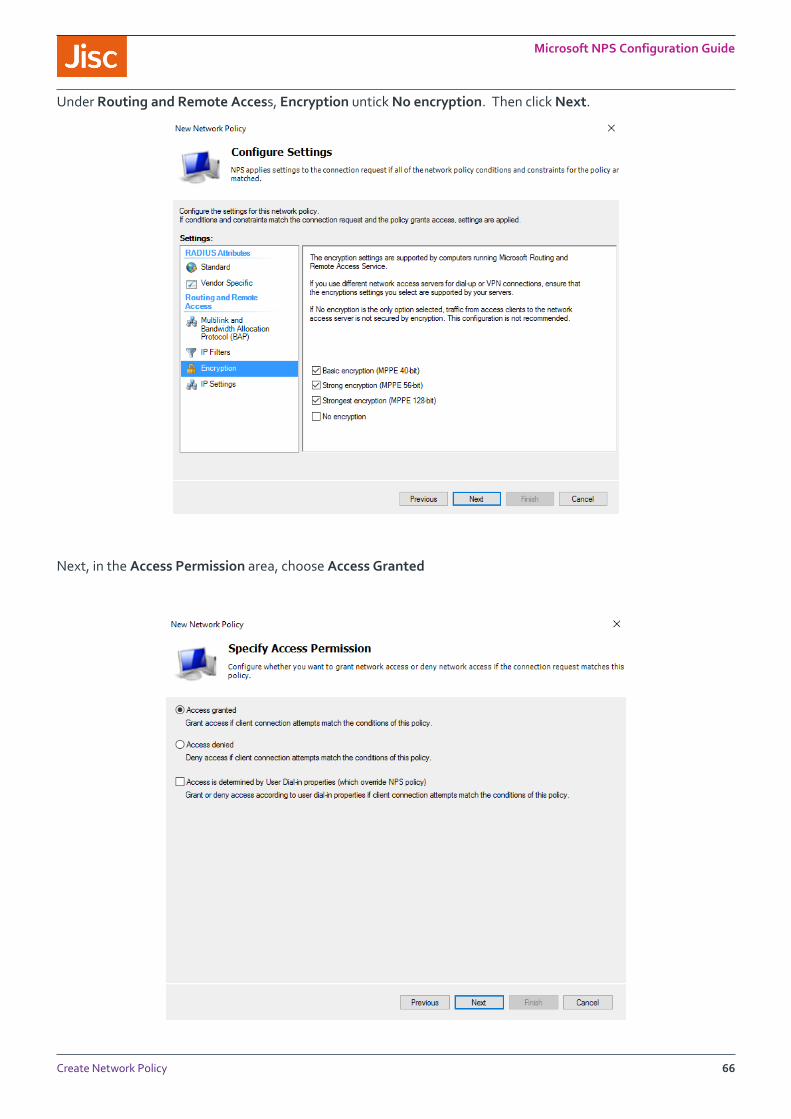
Under Routing and Remote Access, Encryption untick No encryption. Then click Next.
Next, in the Access Permission area, choose Access Granted

Microsoft NPS Configuration Guide
Create Network Policy 67
Then click Finish on the Completing New Network Policy page.
Optional: This setting will depend on whether you would like to control access via the Dial-in Properties in Active
Directory Users and Computers on a per user basis. If not, change the settings to Ignore user account dial-in
properties from the Active Directory. To do this double click on the local authentication policy.

Microsoft NPS Configuration Guide
Register server in Active Directory 68
To ensure that local authentication is processed first, reorder the list so that local authentication is first. To do this
right click on a policy and then click Move up or Move down until it is in the correct position in the list.
20. Register server in Active Directory You should follow the process of registering the server in Active Directory.
Right click on NPS (Local), choose Register server in Active Directory
Click OK on the next two dialogues.

Microsoft NPS Configuration Guide
Register server in Active Directory 69