Embed Size (px)
Citation preview
PocketConsultant
Microsoft Exchange Server 2013 Databases, Services, & ManagementWilliam R. StanekAuthor and Series Editor

PUBLISHED BYMicrosoft PressA Division of Microsoft CorporationOne Microsoft WayRedmond, Washington 98052-6399
Copyright © 2013 by William R . Stanek
All rights reserved . No part of the contents of this book may be reproduced or transmitted in any form or by any means without the written permission of the publisher .
Library of Congress Control Number: 2013949891ISBN: 978-0-7356-8175-0
Printed and bound in the United States of America .
First Printing
Microsoft Press books are available through booksellers and distributors worldwide . If you need support related to this book, email Microsoft Press Book Support at mspinput@microsoft .com . Please tell us what you think of this book at http://www .microsoft .com/learning/booksurvey .
Microsoft and the trademarks listed at http://www .microsoft .com/en-us/legal/intellectualproperty/trademarks/en-us .aspx are trademarks of the Microsoft group of companies . All other marks are property of their respective owners .
The example companies, organizations, products, domain names, email addresses, logos, people, places, and events depicted herein are fictitious. No association with any real company, organization, product, domain name, email address, logo, person, place, or event is intended or should be inferred .
This book expresses the author’s views and opinions . The information contained in this book is provided without any express, statutory, or implied warranties . Neither the authors, Microsoft Corporation, nor its resellers, or distributors will be held liable for any damages caused or alleged to be caused either directly or indirectly by this book .
Acquisitions Editor: Anne HamiltonDevelopmental Editor: Karen Szall Project Editor: Karen Szall Editorial Production: Online Training Solutions, Inc . (OTSI) Technical Reviewer: Todd Meister; Technical Review services provided by Content Master, a member of CM Group, Ltd . Copyeditor: Denise Bankaitis (OTSI) Indexer: Krista Wall (OTSI) Cover: Best & Company Design

iii
Acknowledgments
To my readers—Microsoft Exchange Server 2013 Pocket Consultant: Databases, Services, & Management is my 42nd book for Microsoft Press . Thank you for
being there with me through many books and many years .
To my wife—for many years, through many books, many millions of words, and many thousands of pages she's been there, providing support and encouragement and making every place we've lived a home .
To my kids—for helping me see the world in new ways, for having exceptional patience and boundless love, and for making every day an adventure .
To Anne, Karen, Martin, Lucinda, Juliana, and many others who’ve helped out in ways both large and small .
Special thanks to my son Will for not only installing and managing my extensive dev lab for all my books since Windows 8 Pocket Consultant but for also performing check reads of all those books as well .
—William R . Stanek


v
What do you think of this book? We want to hear from you! Microsoft is interested in hearing your feedback so we can continually improve our books and learning resources for you. To participate in a brief online survey, please visit:
microsoft.com/learning/booksurvey
Contents
Acknowledgments iii
Introduction xvii
Who is this book for? . . . . . . . . . . . . . . . . . . . . . . . . . . . . . . . . . . . . .xviii
How is this book organized? . . . . . . . . . . . . . . . . . . . . . . . . . . . . . . .xix
Conventions used in this book . . . . . . . . . . . . . . . . . . . . . . . . . . . . . . xx
Other resources . . . . . . . . . . . . . . . . . . . . . . . . . . . . . . . . . . . . . . . . . . xx
Errata and book support . . . . . . . . . . . . . . . . . . . . . . . . . . . . . . . . . . .xxi
We want to hear from you . . . . . . . . . . . . . . . . . . . . . . . . . . . . . . . . .xxi
Stay in touch . . . . . . . . . . . . . . . . . . . . . . . . . . . . . . . . . . . . . . . . . . . . .xxi
Chapter 1 Microsoft Exchange organizations: the essentials 1
Understanding Exchange Server 2013 organizations . . . . . . . . . . . 2
Organizational architecture 2
Front-end transport 4
Back-end transport 6
Site-based and group-based routing . . . . . . . . . . . . . . . . . . . . . . . . . 8
Routing boundaries 8
IP site links 9
On-premises, online, and cross-premises routing 12
Understanding data storage in Exchange Server 2013 . . . . . . . . . 13
Working with the Active Directory data store 14
Working with the Exchange store 16
Chapter 2 Managing data and availability groups 25
Navigating the Information Store . . . . . . . . . . . . . . . . . . . . . . . . . . . 25
Basic database options 26
High availability database options 28
Working with Active Manager 30
vi Contents
Understanding managed availability 32
Creating and managing database availability groups . . . . . . . . . . 34
Pre-staging and preparing for database availability groups 34
Creating database availability groups 39
Managing availability group membership 42
Managing database availability group networks 45
Changing availability group network settings 49
Configuring database availability group properties 52
Removing servers from a database availability group 54
Removing database availability groups 54
Maintaining database availability groups . . . . . . . . . . . . . . . . . . . . 55
Switching over servers and databases 55
Checking continuous replication status 58
Restoring operations after a DAG member failure 59
Chapter 3 Exchange database administration 63
Working with active mailbox databases . . . . . . . . . . . . . . . . . . . . . . 63
Understanding mailbox databases 64
Preparing for automatic reseed 65
Creating mailbox databases 66
Setting the default offline address book 70
Setting mailbox database limits and deletion retention 71
Recovering deleted mailboxes 75
Recovering deleted items from mailbox databases 77
Working with mailbox database copies . . . . . . . . . . . . . . . . . . . . . . 78
Creating mailbox database copies 79
Setting replay, truncation, and preference values for database copies 81
Suspending and resuming replication 83
Activating lagged database copies 84
Updating mailbox database copies 87
Monitoring database replication status 90
Removing database copies 94
Managing mailbox databases . . . . . . . . . . . . . . . . . . . . . . . . . . . . . . 95
Mounting and dismounting databases 95
Setting the maintenance interval 98
Moving databases 100
viiContents
Renaming databases 102
Deleting databases 103
Content indexing . . . . . . . . . . . . . . . . . . . . . . . . . . . . . . . . . . . . . . . . 103
Understanding indexing 103
Managing Exchange Store Search 104
Troubleshooting indexing 106
Chapter 4 Configuring transport services 107
Working with SMTP connectors, sites, and links . . . . . . . . . . . . . 108
Connecting source and destination servers 108
Managing Active Directory site details 109
Managing Active Directory site link details 112
Creating Send connectors 114
Viewing and managing Send connectors 122
Configuring Send connector DNS lookups 125
Setting Send connector limits 126
Creating Receive connectors 128
Viewing and managing Receive connectors 135
Creating Inbound and Outbound connectors with Exchange Online 139
Configuring transport limits . . . . . . . . . . . . . . . . . . . . . . . . . . . . . . . 141
Setting organizational transport limits 142
Setting connector transport limits 143
Setting server transport limits 144
Completing Transport services setup . . . . . . . . . . . . . . . . . . . . . . . 147
Configuring the postmaster address and mailbox 147
Configuring shadow redundancy 148
Configuring Safety Net 153
Enabling anti-spam features 154
Subscribing Edge Transport servers 156
Chapter 5 Managing and maintaining mail flow 163
Managing message pickup, replay, throttling, and back pressure . . . . . . . . . . . . . . . . . . . . . . . . . . . . . . . . . . . . . . . . 163
Understanding message pickup and replay 164
Configuring and moving the Pickup and Replay directories 165
Changing the message processing speed 166
Configuring messaging limits for the Pickup directory 167

viii Contents
Configuring message throttling 168
Understanding back pressure 169
Creating and managing accepted domains . . . . . . . . . . . . . . . . . 170
Understanding accepted domains, authoritative domains, and relay domains 170
Viewing accepted domains 171
Creating accepted domains 173
Changing the accepted domain type and identifier 174
Removing accepted domains 176
Creating and managing email address policies . . . . . . . . . . . . . . 176
Viewing email address policies 176
Creating email address policies 178
Editing and applying email address policies 182
Removing email address policies 183
Configuring journal rules . . . . . . . . . . . . . . . . . . . . . . . . . . . . . . . . . 184
Working with journal rules 184
Setting the NDR journaling mailbox 184
Creating journal rules 185
Managing journal rules 186
Creating and managing remote domains . . . . . . . . . . . . . . . . . . . 186
Viewing remote domains 186
Creating remote domains 187
Configuring messaging options for remote domains 187
Removing remote domains 189
Configuring antispam and message filtering options . . . . . . . . . 189
Filtering spam and other unwanted mail by sender 190
Filtering spam and other unwanted email by recipient 193
Filtering connections with IP block lists 195
Defining block list exceptions and global allow/block lists 201
Preventing internal servers from being filtered 205
Configuring transport rules . . . . . . . . . . . . . . . . . . . . . . . . . . . . . . . 205
Understanding transport rules 205
Creating transport rules 206
Managing transport rules 208

ixContents
Chapter 6 Managing client access 209
Mastering Outlook Web App essentials . . . . . . . . . . . . . . . . . . . . . 210
Getting started with Outlook Web App 210
Connecting to mailboxes and public folder data over the web 212
Working with Outlook Web App 213
Enabling and disabling web access for users 216
Troubleshooting Outlook Web App 217
Managing web and mobile access . . . . . . . . . . . . . . . . . . . . . . . . . 221
Using Outlook Web App and Exchange ActiveSync with IIS 221
Working with virtual directories and web applications 222
Enabling and disabling Outlook Web App features 226
Configuring ports, IP addresses, and host names used by websites 230
Enabling SSL on websites 232
Restricting incoming connections and setting time-out values 235
Redirecting users to alternate URLs 236
Controlling access to the HTTP server 237
Throttling Client Access 241
Starting, stopping, and restarting websites 244
Configuring URLs and authentication for the OAB 244
Configuring URLs and authentication for OWA 246
Configuring URLs and authentication for Exchange ActiveSync 247
Configuring URLs and authentication for ECP 248
Configuring POP3 and IMAP4 . . . . . . . . . . . . . . . . . . . . . . . . . . . . . 249
Enabling the Exchange POP3 and IMAP4 services 250
Configuring POP3 and IMAP4 bindings 252
Configuring POP3 and IMAP4 authentication 253
Configuring connection settings for POP3 and IMAP4 254
Configuring message retrieval settings for POP3 and IMAP4 256
Managing Outlook Anywhere . . . . . . . . . . . . . . . . . . . . . . . . . . . . . 257
Working with Outlook Anywhere 257
Configuring URLs and authentication for Outlook Anywhere 258

x Contents
Chapter 7 Managing mobile messaging 261
Mastering mobile device and wireless access essentials . . . . . . . 261
Using Exchange ActiveSync and Outlook Web App for Devices 262
Managing Exchange ActiveSync and Outlook Web App for Devices 262
Moving from remote mail to Outlook Anywhere 263
Managing Exchange Server features for mobile devices . . . . . . 267
Using Autodiscover 268
Using Direct Push 271
Using remote device wipe 272
Using password recovery 276
Configuring direct file access 277
Configuring remote file access 282
Using WebReady Document Viewing 283
Working with mobile devices and device policies . . . . . . . . . . . . 285
Viewing existing mobile device mailbox policies 285
Creating mobile device mailbox policies 288
Optimizing mobile device mailbox policies 291
Assigning mobile device mailbox policies 293
Removing mobile device mailbox policies 294
Managing device access . . . . . . . . . . . . . . . . . . . . . . . . . . . . . . . . . . 295
Chapter 8 Exchange Server 2013 maintenance, monitoring, and queuing 299
Performing tracking and logging activities in an organization . . . . . . . . . . . . . . . . . . . . . . . . . . . . . . . . . . . . . . . 299
Using message tracking 299
Using protocol logging 307
Using connectivity logging 314
Monitoring events, services, servers, and resource usage . . . . . 317
Viewing events 317
Managing essential services 320
Monitoring Exchange messaging components 321
Using performance alerting 323
Working with queues . . . . . . . . . . . . . . . . . . . . . . . . . . . . . . . . . . . . . 328
Understanding Exchange queues 328
Accessing the Queue Viewer 330

xiContents
Managing queues . . . . . . . . . . . . . . . . . . . . . . . . . . . . . . . . . . . . . . . . 331
Understanding queue summaries and queue states 331
Refreshing the queue view 332
Working with messages in queues 333
Forcing connections to queues 334
Suspending and resuming queues 334
Deleting messages from queues 335
Chapter 9 Troubleshooting Exchange Server 2013 337
Troubleshooting essentials . . . . . . . . . . . . . . . . . . . . . . . . . . . . . . . . 337
Tracking server health 337
Tracking user and workload throttling 342
Tracking configuration changes 343
Testing service health, mail flow, replication, and more 344
Diagnosing and resolving problems . . . . . . . . . . . . . . . . . . . . . . . . 348
Identifying recovery actions 348
Identifying responders 350
Identifying monitors 352
Identifying probes 353
Viewing error messages for probes 354
Tracing probe errors 356
Using Log Parser Studio . . . . . . . . . . . . . . . . . . . . . . . . . . . . . . . . . . 359
Getting started with Log Parser Studio 359
Performing queries in Log Parser Studio 360
Index 363
About the author 381

xiii
Introduction
Microsoft Exchange Server 2013 Pocket Consultant: Databases, Services, & Management is designed to be a concise and compulsively usable resource
for Exchange Server 2013 administrators . This is a resource guide that you’ll want on your desk at all times . The book covers everything you need to perform the core administrative tasks for Exchange databases, transport services, mail flow, and Client Access servers, whether your servers are running on Windows Server 2012 or Windows Server 2008 R2 . Because the focus of this book is on giving you maximum value in a pocket-size guide, you don’t have to wade through hundreds of pages of extraneous information to find what you’re looking for. Instead, you’ll easily find exactly what you need to get the job done.
This book zeroes in on daily administrative procedures, frequently performed tasks, documented examples, and options that are representative although not necessarily inclusive . One of my goals is to keep the content so concise that the book remains compact and easy to navigate while at the same time ensuring that the book is packed with as much information as possible . Thus, instead of a hefty 1,000-page tome or a lightweight 100-page quick reference, you get a valuable resource guide that can help you quickly and easily perform common tasks, and solve problems .
Although you might not install Exchange Server 2013 on touch-enabled compu-ters, you can still manage Exchange Server 2013 from your touch-enabled com-puters; therefore, understanding the touch UI in addition to the revised interfaces options will be crucial to your success . For this reason, I discuss both the touch UI and the traditional mouse and keyboard techniques throughout this book .
When you are working with touch–enabled computers, you can manipulate on-screen elements in ways that weren’t possible previously . You can enter text by using the on-screen keyboard and also in the following ways:
■■ Tap Tap an item by touching it with your finger. A tap or double-tap of ele-ments on the screen generally is the equivalent of a mouse click or double-click .
■■ Press and hold Press your finger down and leave it there for a few sec-onds . Pressing and holding elements on the screen generally is the equiva-lent of a right-click .
■■ Swipe to select Slide an item a short distance in the opposite direction compared to how the page scrolls . This selects the items and also might bring up related commands . If pressing and holding doesn’t display com-mands and options for an item, try using swipe to select instead .
■■ Swipe from edge (slide in from edge) Starting from the edge of the screen, swipe or slide in . Sliding in from the right edge opens the Charms panel . Sliding in from the left edge shows open apps and allows you to easily switch between them . Sliding in from the top or bottom edge shows com-mands for the active element .

xiv Introduction
■■ Pinch Touch an item with two or more fingers and then move the fingers toward each other . Pinching zooms in or shows less information .
■■ Stretch Touch an item with two or more fingers and then move the fingers away from each other . Stretching zooms out or shows more information .
As you’ve probably noticed, a great deal of information about Exchange Server 2013 is available on the web and in other printed books. You can find tutorials, reference sites, discussion groups, and more to make using Exchange Server 2013 easier . However, the advantage of reading this book is that much of the informa-tion you need to learn about Exchange Server 2013 is organized in one place and presented in a straightforward and orderly fashion . This book has everything you need to master Exchange databases, transport services, mail flow, and Client Access servers .
In this book, I teach you how features work, why they work in the way that they do, and how to customize features to meet your needs. I also offer specific examples of how certain features can meet your needs, and how you can use other features to troubleshoot and resolve issues you might have . In addition, this book provides tips, best practices, and examples of how to optimize Exchange Server 2013 . This book won’t just teach you how to work with Exchange databases, transport services, mail flow, and Client Access servers; it will teach you how to squeeze every last bit of power out of these features and options while making the most of what Exchange Server 2013 provides .
Unlike many other books about administering Exchange Server 2013, this book doesn’t focus on a specific user level. This isn’t a lightweight beginner book. Regard-less of whether you are a beginning administrator or a seasoned professional, many of the concepts in this book will be valuable to you, and you can apply them to your Exchange Server 2013 installations .
Who is this book for?
Microsoft Exchange Server 2013 Pocket Consultant: Databases, Services, & Manage-ment covers the Standard and Enterprise editions of Exchange Server 2013 . The book is designed for the following readers:
■■ Current Exchange Server 2013 administrators■■ Current Windows administrators who want to learn Exchange Server 2013■■ Administrators upgrading to Exchange Server 2013 from Exchange Server
2007 or Exchange Server 2010■■ Administrators transitioning to Exchange Server 2013 from Exchange
Server 2003■■ Administrators transferring from other messaging servers■■ Managers and supervisors who have been delegated authority to manage
mailboxes or other aspects of Exchange Server 2013To pack in as much information as possible, I had to assume that you have basic
networking skills and a basic understanding of email and messaging servers . With this in mind, I don’t devote entire chapters to explaining why email systems are

xv Introduction
needed or how they work, nor do I devote entire chapters to installing Exchange Server 2013 . I do, however, provide complete details on the components of Exchange organizations and how you can use these components to build a fully redundant and highly available messaging environment. You will also find com-plete details on all the essential Exchange administration tasks for availability groups, Exchange databases, mail flow, transport services, Client Access servers, and much more .
I also assume that you are fairly familiar with Windows Server . If you need help learning Windows Server, I highly recommend that you buy Windows Server 2012 Pocket Consultant or Windows Server 2012 Inside Out .
How is this book organized?
Rome wasn’t built in a day, nor was this book intended to be read in a day, or in a week, or even in a month for that matter . Ideally, you’ll read this book at your own pace, a little each day as you work your way through each of the nine chapters . The chapters are arranged in a logical order, taking you from planning for availability groups and databases to Exchange Server maintenance and disaster recovery .
Ease of reference is an essential part of this hands-on guide . This book has an expanded table of contents and an extensive index for finding answers to problems quickly . Many other quick-reference features have been added to the book as well, including quick step-by-step procedures, lists, tables with fast facts, and extensive cross references .
As with all Pocket Consultants, Microsoft Exchange Server 2013 Pocket Consultant: Databases, Services, & Management is designed to be a concise and easy-to-use resource for managing Exchange servers . This is the readable resource guide that you’ll want on your desktop at all times . The book covers everything you need to perform the core administration tasks for the following:
■■ Managing availability groups and Exchange databases■■ Managing mail flow and transport services■■ Working with Client Access servers■■ Managing mobile messaging users■■ Maintaining and monitoring Exchange servers■■ Backing up and restoring Exchange servers
Although designed and written to stand on its own, this book also can be used with Microsoft Exchange Server 2013 Pocket Consultant: Configuration & Clients, which focuses on the following:
■■ Deploying Exchange Server 2013■■ Exchange administration essentials■■ Managing Exchange clients■■ Administration of users, contacts, and mailboxes■■ Configuring distribution groups and address lists■■ Implementing Exchange Server security and permissions

xvi Introduction
Because the focus is on giving you maximum value in a pocket-size guide, you don’t have to wade through hundreds of pages of extraneous information to find what you’re looking for. Instead, you’ll find exactly what you need to get the job done, and you’ll find it quickly.
Conventions used in this book
I’ve used a variety of elements to help keep the text clear and easy to follow . You’ll find code terms and listings in monospace type, except when I tell you to actually enter a command; in which case, the command appears in bold type . When I intro-duce and define a new term, I put it in italics.
Other conventions include the following:■■ Best practices To examine the best technique to use when working with
advanced configuration and administration concepts■■ Caution To warn you of potential problems■■ Important To highlight important concepts and issues■■ More info To provide more information on the subject■■ Note To provide details on a point that needs emphasis■■ Real world To provide real-world advice when discussing advanced topics■■ Security alert To point out important security issues■■ Tip To offer helpful hints or additional information
I truly hope you find that Microsoft Exchange Server 2013 Pocket Consultant: Databases, Services, & Management provides everything you need to perform essential administrative tasks as quickly and efficiently as possible. You are welcome to send your thoughts to me at [email protected] . Follow me on Twitter at WilliamStanek and on Facebook at www.facebook.com/William.Stanek.Author .
Other resources
No single magic bullet for learning everything you’ll ever need to know about Exchange Server 2013 exists . Although some books are offered as all-in-one guides, there’s simply no way one book can do it all . With this in mind, I hope you use this book as it is intended to be used—as a concise and easy-to-use resource . It covers everything you need to perform core administration tasks for availability groups, databases, transport services, mail flow, and Client Access servers, but it is by no means exhaustive .
Your current knowledge will largely determine your success with this or any other Exchange resource or book . As you encounter new topics, take the time to practice what you’ve learned and read about . Seek out further information as necessary to get the practical hands-on know-how and knowledge you need .
xvii Introduction
For topics this book doesn’t cover, you might want to look to Microsoft Exchange Server 2013 Pocket Consultant: Configuration & Clients . I also recommend that you regularly visit the Microsoft website for Exchange Server (microsoft.com/exchangeserver/ ) and support.microsoft.com to stay current with the latest changes . To help you get the most out of this book, you can visit my corresponding website at pocket-consultant.com . This site contains information about Exchange Server 2013 and updates to the book .
Errata and book support
Every effort has been made to ensure the accuracy of this book and its companion content . Any errors that have been reported since this book was published are listed on our Microsoft Press site at oreilly .com:
http://aka.ms/ExDSM/errata
If you find an error that is not already listed, you can report it to us through the same page .
If you need additional support, email Microsoft Press Book Support at [email protected] .
Please note that product support for Microsoft software is not offered through the addresses above .
We want to hear from you
At Microsoft Press, your satisfaction is our top priority, and your feedback is our most valuable asset . Please tell us what you think of this book at:
http://www.microsoft.com/learning/booksurvey
The survey is short, and we read every one of your comments and ideas . Thanks in advance for your input!
Stay in touch
Let’s keep the conversation going! We’re on Twitter: http://twitter.com/MicrosoftPress .


1
CHAP TER 1
Microsoft Exchange organizations: the essentials
■■ Understanding Exchange Server 2013 organizations 2
■■ Site-based and group-based routing 8
■■ Understanding data storage in Exchange Server 2013 13
Microsoft Exchange Server 2013 has a significantly different architecture than its predecessors . Whereas Exchange Server 2007 and Exchange Server 2010
components were split into different server roles for scaling out Exchange organi-zations, Exchange Server 2013 streamlines the server roles and architecture while still allowing you to fully scale Exchange organizations to meet the needs of enter-prises of all sizes .
Exchange 2013 server roles are loosely rather than tightly coupled, which elimi-nates any previous session affinity requirements. The Mailbox server that stores the active database copy for a mailbox performs all the data processing, rendering, and transformation required . The Client Access server is used only to connect the client to the Mailbox server . The Client Access server provides authentication, redi-rection, and proxy services as needed. Session affinity between the Mailbox server and the Client Access server is not required . Mailbox servers maintain the session affinity, and clients always connect to the Mailbox server hosting the related user’s mailbox . For connections, the supported protocols include HTTP, POP, IMAP, RPC over HTTP, and SMTP, but no longer include RPC .
Exchange Server 2013 is designed to work with Microsoft Outlook 2007 and later and also continues to support the Outlook Web App . Rather than connecting to servers by using Fully Qualified Domain Names (FQDN) as was done in the past, Outlook 2007 and later use Autodiscover to create connection points based on the domain portion of the user’s primary SMTP address and the GUID of a user’s mailbox .

ChAptEr 1 Microsoft Exchange organizations: the essentials 2
Understanding Exchange Server 2013 organizations
The root of an Exchange environment is an organization . It’s the starting point for the Exchange hierarchy, and its boundaries define the boundaries of any Exchange environment . Exchange Server 2013 organizations are nearly identical to those of Exchange Server 2010 .
Organizational architectureWhen you install Exchange Server 2013, you install your Exchange servers within the organizational context of the domain in which the server is a member . The physical site boundaries and subnets defined for Active Directory Domain Services are the same as those used by Exchange Server 2013, and the site details are determined by the IP address assigned to the server. If you are installing the first Exchange server in a domain, you set the name of the Exchange organization for that domain . The next Exchange server you install in the domain joins the existing Exchange organization automatically .
Exchange 2013 organizations natively have only two server types: Client Access servers and Mailbox servers . In this new architecture, Client Access servers act as the front end for Exchange services, and Mailbox servers act as the back end, as shown in Figure 1-1 . Exchange 2013 does not have separate server roles for Hub Transport servers or Unified Messaging servers; instead, the related components are now part of the Mailbox server role .
IMPORTANT Exchange 2013 as originally released doesn’t include an Edge transport role or functionality, though this may be released in a future update to Exchange 2013. You can, however, continue to use and deploy legacy Edge transport servers, which can be installed by using Exchange 2007 or Exchange 2010.
As part of the major architecture changes for Exchange 2013, Client Access servers now act only as lightweight, stateless proxy servers. They provide a unified namespace, authentication, and network security for the Exchange organization . Although they also provide the proxy and redirection logic for client protocols, Client Access servers no longer handle all of the client-related messaging tasks in an Exchange implementation, nor do they perform content conversion . In addition, all other components that were previously associated with Client Access servers are now moved to Mailbox servers .

Microsoft Exchange organizations: the essentials ChAptEr 1 3
Client Access servers are designed to work with TCP affinity; therefore, load bal-ancing is easier because application session affinity is not required. RPC over TCP has been removed in Exchange 2013 as well, and all Outlook connections now take place using Outlook Anywhere (RPC over HTTP). These changes have simplified the proto-col stack, eliminated the need for RPC Client Access arrays and the related namespace, and moved the maintenance of the RPC sessions to the Mailbox servers .
FIGURE 1-1 Client-server architecture in Exchange 2013

ChAptEr 1 Microsoft Exchange organizations: the essentials 4
Front-end transport Mail transport is provided by the Front End Transport service, which provides mail-box locator services and proxy services for incoming and outgoing SMTP messages, as shown in Figure 1-2 . The Front End Transport service loads routing tables based on information from Active Directory and uses this information to route messages to the Transport service on Mailbox servers . The Mailbox server is selected based on the location of mailbox databases associated with the recipients .
FIGURE 1-2 Front End Transport architecture

Microsoft Exchange organizations: the essentials ChAptEr 1 5
A recipient is an entity that can receive Exchange mail and includes users, con-tacts, distribution groups, public folders, and resources (such as rooms and equip-ment used for scheduling) .
You refer to recipients as either mailbox-enabled or mail-enabled . Mailbox-enabled recipients (users and resources) have mailboxes for sending and receiving email messages . Mail-enabled recipients (contacts, distribution groups, and public folders) have email addresses but no mailboxes, which allow users in your organiza-tion to send messages to mail-enabled recipients . Keep in mind that when you mail-enable a public folder and grant a user Send As permission on the public folder, the user can send mail on behalf of the public folder .
In addition to users, contacts, groups, resources, and public folders, Exchange Server 2013 has two unique types of recipients: linked mailboxes and dynamic distri-bution groups . Basically, a linked mailbox represents a mailbox that is accessed by a user in a separate, trusted forest . A dynamic distribution group is a type of distribu-tion group that you can use to build a list of recipients whenever mail addressed to the group is received, rather than having a fixed member list.
To manage recipients in your organization, you need to know these key concepts:■■ How email policies are used Email address policies define the technique
Exchange uses to create email addresses for users, resources, contacts, and mail-enabled groups . For example, you can set a policy that creates email addresses by combining an email alias with @cpandl .com . Thus, during setup of an account for William Stanek, the email alias williams is combined with @cpandl.com to create the email address [email protected] .
■■ How address lists are used Address lists are used to organize recipients and resources, making it easier to find the ones that you want to use, along with their related information . During setup, Exchange creates a number of default address lists, the most common of which is the global address list, which includes all the recipients in the organization . You can create custom address lists as well .
■■ How retention policies are used Retention policies are used to specify how long mail items remain in mailboxes and the actions to be taken when mail items reach their specified retention age. During setup, Exchange cre-ates a default retention policy and this policy is applied automatically when you create an in-place archive mailbox for a user, provided that no other retention policy is already applied .

ChAptEr 1 Microsoft Exchange organizations: the essentials 6
The Routing tables used by the Front End Transport service contain a special list of Mailbox servers in the local Active Directory site . This list is based on the mailbox databases of message recipients . Routing in the front-end revolves around resolving message recipients to mailbox databases . For each mailbox database, the Front End Transport services looks up the routing destination .
Each routing destination has a delivery group, which is generally a routable Data-base Availability Group (DAG), a Mailbox delivery group, or an Active Directory site, but can also be a group of connector source servers or a list of expansion servers for dynamic distribution groups . A Mailbox delivery group is a collection of one or more transport servers that are responsible for delivering messages to a routing destina-tion . When the routing destination is a Mailbox delivery group, the delivery group may contain Exchange 2013 Mailbox servers, Exchange 2010 Hub Transport servers, or Exchange 2007 Hub Transport servers .
The process by which the message is routed depends on the relationship between the source transport server and the destination delivery group . If the source transport server is in the destination delivery group, the routing destination itself is the next hop for the message . The message is delivered by the source transport server to the mailbox database or connector on a transport server in the delivery group .
On the other hand, if the source transport server is outside the destination deliv-ery group, the message is relayed along the least-cost routing path to the destina-tion delivery group . In a complex Exchange organization, a message may be relayed either to other transport servers along the least-cost routing path, or directly to a transport server in the destination delivery group .
For an incoming message, the Front End Transport service selects a single Mail-box server to receive the message regardless of the number or type of recipients . If the message has a single recipient, a Mailbox server in the target delivery group is selected, with a preference based on the proximity of the Active Directory site . If the message has multiple recipients, the Front End Transport service uses the first 20 recipients to select a Mailbox server in the closest delivery group . If the message has no mailbox recipients, such as when the message is addressed to a distribution group, a Mailbox server in the local Active Directory site is randomly selected .
Back-end transport The Transport service runs on all Mailbox servers and is responsible for all mail flow within an Exchange organization, as shown in Figure 1-3 . The Transport service relies on the Mailbox Transport service, which consists of two separate helper services: the Mailbox Transport Delivery service used with incoming messages and the Mailbox Transport Submission service used with outgoing messages . The Transport service receives SMTP messages from the Transport service and establishes an RPC MAPI connection with the local mailbox database to deliver a message . The delivery service connects to the local mailbox database by using RPC MAPI to retrieve messages and submits messages over SMTP to the Transport service .

Microsoft Exchange organizations: the essentials ChAptEr 1 7
FIGURE 1-3 Back End Transport architecture

ChAptEr 1 Microsoft Exchange organizations: the essentials 8
The Mailbox Transport service only communicates with the Transport service and local mailbox databases . When the Mailbox Transport service receives a message for delivery it accepts the message if the recipient resides in an active copy of a local mailbox database. Otherwise, the service rejects the message and returns a non-delivery response to the Transport service for retrying delivery, generating a non-delivery report or rerouting the message .
When the Mailbox Transport service receives a message for submission, the service resolves the message recipients to mailbox databases . For each mailbox database, the service looks up the routing destination . Each routing destination has a delivery group, which is either a routable DAG, a Mailbox delivery group, or an Active Directory site—and the rest of the process continues as with incoming messages for the Front End Transport service .
Exchange 2013 uses directory-based recipient resolution for all messages that are sent from and received by users throughout an Exchange organization . The Exchange component responsible for recipient resolution is the Categorizer . The Categorizer processes all email messages and uses the final recipient to determine what journal-ing policies, Information Rights Management policies, data loss prevention rules, and transport rules should be applied .
The Categorizer must be able to associate every recipient in every message with a corresponding recipient object in Active Directory. All senders and recipients must have a primary SMTP address . If the Categorizer discovers a recipient without a primary SMTP address, it will determine what the primary SMTP address should be or replace a non-SMTP address . Replacing a non-SMTP address involves encapsulat-ing the address in a primary SMTP address that will be used while transporting the message .
Site-based and group-based routing
For routing messages, Exchange Server 2013 uses either Active Directory site-based routing or routing based on Database Availability Group (DAG) membership . The use of these routing approaches substantially changes the way you configure and manage Exchange Server 2013 .
With Exchange Server 2013, site-based routing is possible because Exchange servers can determine their own Active Directory site membership and that of other servers by querying Active Directory . Using Active Directory for routing eliminates the need for Exchange to have its own routing infrastructure .
routing boundariesActive Directory sites and DAGs are delivery group boundaries . When Mailbox serv-ers aren’t part of a DAG, they use site membership information to determine whether other Mailbox servers are located in the same site, which allows the Mailbox server to submit messages for routing and transport to another Mailbox server that has the same site membership . Site-based routing is also used for interoperability with Exchange 2010 and Exchange 2007 .

Microsoft Exchange organizations: the essentials ChAptEr 1 9
When the destination delivery group is a collection of Mailbox servers in a single Active Directory site, the mailbox databases on those servers are the routing desti-nations . After a message is routed to the Transport service on a Mailbox server in a particular site, the Transport service in turn routes the message to the Mailbox Trans-port service on the Mailbox server in the site that has the active copy of the destina-tion mailbox database . The Mailbox Transport service on this server then delivers the message to the local mailbox database .
As routing destinations and delivery groups are separated by the major release version of Exchange, the Active Directory site may contain multiple Mailbox delivery groups. Specifically, each major release version of Exchange deployed in a particular site will have one delivery group . Regarding routing and delivery, keep the following in mind:
■■ Mailbox databases on Exchange 2007 Mailbox servers are serviced by Exchange 2007 Hub Transport servers in the site . Mailbox databases on Exchange 2010 Mailbox servers are serviced by Exchange 2010 Hub Trans port servers in the site . After a message is routed to a random Hub Trans port server in the site, the store driver on that server uses RPC to deliver the message into the mailbox database .
■■ Mailbox databases on Exchange 2013 Mailbox servers are serviced by the Transport service on Exchange 2013 Mailbox servers in the site . After a mes-sage is routed to the destination Mailbox server in the site, the Transport service uses SMTP to transfer the message to the Mailbox Transport service, which then uses RPC to deliver the message into the local mailbox database .
When the destination delivery group is a routable DAG, the mailbox databases in the DAG are the routing destinations . After a message is routed to the Transport service on a Mailbox server in the DAG, the Transport service routes the message to the Mailbox Transport service on the Mailbox server in the DAG that has the active copy of the destination mailbox database . The Mailbox Transport service in this server then delivers the message to the local mailbox database . Because the DAG itself is the delivery group boundary rather than the Active Directory site associated with a particular Mailbox server, Mailbox servers may be physically located in more than one site even though they are members of the same delivery group .
Ip site linksExchange servers determine site membership by matching their assigned IP address to a subnet that is defined in Active Directory Sites and Services and associated with an Active Directory site . The Exchange server then uses this information to determine which domain controllers, Global Catalog servers, and other Exchange servers exist in that site, and it communicates with those directory servers for authentication, author- ization, and messaging purposes . Exchange 2013 always tries to retrieve informa-tion about recipients from directory servers that are in the same site as the Exchange 2013 server .

ChAptEr 1 Microsoft Exchange organizations: the essentials 10
TIP In Active Directory, you can associate a site with one or more Ip subnets. Each subnet that is part of a site should be connected over reliable, high-speed links. You should configure any business locations connected over slow or unreliable links as part of separate sites. Because of this, individual sites typically represent well-connected local area networks (LANs) within an organization, and wide area network (WAN) links between business locations typically mark the boundaries of these sites. Sites cannot have overlapping subnet configurations because replication and message routing would not work correctly.
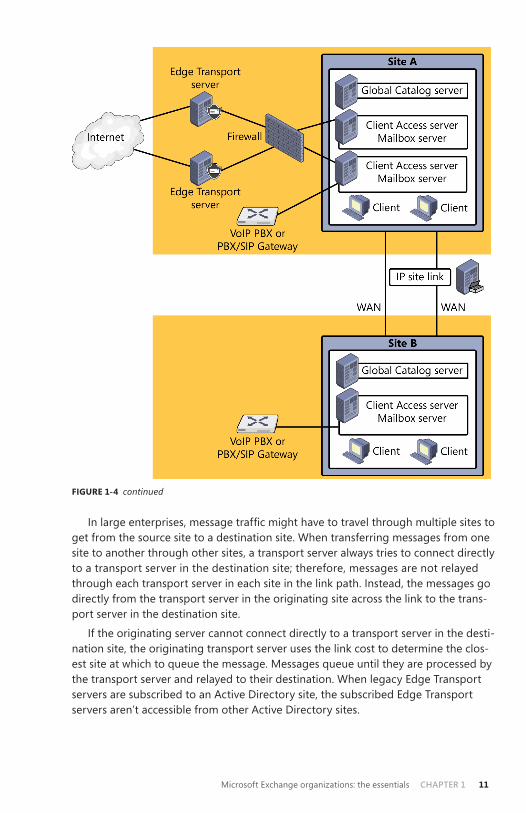
As Figure 1-4 shows, Active Directory sites are connected through IP site links, which can connect two or more sites. Each site link has a specific schedule, interval, and cost . The schedule and interval determine the frequency of Active Directory replication, and the cost value determines the cost of using the link relative to other links that might be available . Active Directory replication uses the link with the low-est cost when multiple paths to a destination exist . The cost of a route is determined by adding together the cost of all site links in a transmission path . In Active Direc-tory Domain Services, Administrators assign the cost value to a link based on rela-tive network speed, available bandwidth, and reliability compared to other available connections. By default, IP site links always allow traffic to flow into or out of a site.
FIGURE 1-4 Message traffic between sites is routed over IP site links .
Microsoft Exchange organizations: the essentials ChAptEr 1 11
FIGURE 1-4 continued
In large enterprises, message traffic might have to travel through multiple sites to get from the source site to a destination site . When transferring messages from one site to another through other sites, a transport server always tries to connect directly to a transport server in the destination site; therefore, messages are not relayed through each transport server in each site in the link path . Instead, the messages go directly from the transport server in the originating site across the link to the trans-port server in the destination site .
If the originating server cannot connect directly to a transport server in the desti-nation site, the originating transport server uses the link cost to determine the clos-est site at which to queue the message . Messages queue until they are processed by the transport server and relayed to their destination . When legacy Edge Transport servers are subscribed to an Active Directory site, the subscribed Edge Transport servers aren’t accessible from other Active Directory sites .

ChAptEr 1 Microsoft Exchange organizations: the essentials 12
The transport server can also use the site link information to optimize the rout-ing of messages that users send to multiple recipients . The transport server expands a distribution list and creates multiple copies of a message only when multiple paths are in the routing topology . This feature is called delayed fan-out .
Delayed fan-out is used only when the delivery group is an Active Directory site . When multiple recipients share part of the routing path, delayed fan-out tries to reduce the number of message copies, thereby reducing the number of message transmissions .
On-premises, online, and cross-premises routingMicrosoft introduced Exchange Online with Exchange Server 2007 . Exchange Online is referred to as a cloud service, meaning the service is provided via the Internet, and it allows you to outsource all or part of your Exchange services . Exchange Online differs from Exchange on-premises (the standard implementation) in several funda-mental ways . The Exchange Online hardware resides elsewhere and users access their mailboxes over the Internet; however, administrators still retain control and manage-ment over the outsourced mailboxes .
In Exchange Server 2007, the on-premises and online Exchange configurations weren’t tightly integrated but starting with Exchange Server 2010 and improving with Exchange Server 2013, Microsoft made it possible to manage both online and on-premises Exchange configurations using the same set of management tools. You can simultaneously connect to and manage both online and on-premises configura-tions in the Exchange Admin Center .
Although Exchange Online has some advantages over an Exchange on-premises implementation, it has disadvantages as well . For users, Exchange Online provides:
■■ Mailbox hosting■■ ActiveSync■■ Microsoft Outlook Anywhere■■ Microsoft Outlook Web App(OWA)■■ Spam filtering
For administrators, Exchange Online provides:■■ Service Level Agreements■■ Storage quotas■■ Automatic backups■■ Automatic archiving
What Exchange Online doesn’t provide is immediacy of access . Users must always be connected to the Internet to get their mail . Messages typically are routed and transferred across the Internet, which can cause delays . Exchange Online also does not offer some popular Exchange features .
Microsoft Exchange organizations: the essentials ChAptEr 1 13
When you configure your Exchange organization, it’s important to keep in mind that Exchange Online is not an all-or-nothing implementation . You can host some mailboxes online and others on-premises . Exchange Server 2013 makes it easy to manage mailboxes regardless of where they are located . Before you transition mail-boxes off-site, however, you’ll probably want to perform a trial with a limited sub-set of users while keeping mailboxes for executives and most managers in house . In fact, you might want to plan to always keep highly sensitive mailboxes, such as those for executives and other high-level managers, in house .
Exchange Server 2013 uses cross-premises routing to transfer messages between on-premises and hosted mailboxes . If you send a message to a user with a hosted mailbox, your organization’s transport servers will route the message across the Internet to the hosted Exchange server . If you send a message to a user with an on-premises mailbox, your organization’s transport servers will route the message across your organization to the appropriate Exchange server .
Exchange provides features for migrating mailboxes from online to on-premises environments and vice versa . During the migration, a mailbox might temporar-ily exist in both locations but when Exchange completes the migration, the mail-box exists only in the destination environment . Outlook 2007 and later include an Autodiscover feature that automatically connects messaging clients to the correct Exchange server . This feature uses the user’s SMTP email address during automatic discovery to determine where the mailbox is currently located .
Normally, Autodiscover works very well; however, a conflict could occur if a user has a mailbox both in Exchange Online and in Exchange on-premises or if a user has the same primary SMTP email address in Exchange Online and Exchange on-premises . In these scenarios, the Autodiscover feature normally does not configure Outlook for the Exchange Online environment and instead uses Exchange on-premises, which has priority over Exchange Online when there is a conflict and the user’s computer is connected to the Active Directory domain . To resolve the problem, delete the origi-nal mailbox from its location as soon as possible after a mailbox migration . If a user needs both an online and on-premises mailbox, do not use the same primary SMTP email address for both Exchange Online and Exchange on-premises .
Understanding data storage in Exchange Server 2013
Depending on its role, Exchange Server stores information in several locations, including:
■■ Active Directory data store■■ Exchange Server store■■ Exchange Server queues

ChAptEr 1 Microsoft Exchange organizations: the essentials 14
Working with the Active Directory data storeThe Active Directory data store contains most directory information for Exchange Server 2013 configurations and recipients in addition to other important directory resources. Domain controllers maintain the data store in a file called Ntds .dit . The location of this file is set when Active Directory is installed and should be on an NTFS file system drive formatted for use with Windows Server. Domain controllers save some directory data separately from the main data store .
Two key concepts on which to focus when looking at Active Directory are multi-master replication and Global Catalog servers .
Using multimaster replication Domain controllers replicate most changes to the data store by using multimaster replication, which allows any domain controller to process directory changes and replicate those changes to other domain controllers . Replication is handled auto-matically for key data types, including the following:
■■ Domain data Contains information about objects within a domain, such as users, groups, and contacts
■■ Configuration data Describes the topology of the directory, and includes a list of important domain information
■■ Schema data Describes all objects and data types that can be stored in the data store
Using global catalogsActive Directory information is also made available through global catalogs . Global catalogs are used for information searches and, in some cases, domain logon . A domain controller designated as a Global Catalog server stores a full replica of all objects in the data store (for its host domain).
By default, the first domain controller installed in a domain is designated as the Global Catalog server . Consequently, if only one domain controller is in the domain, the domain controller and the global catalog are on the same server; otherwise, the global catalog is on domain controllers configured as such.
Information searches are one of the key uses of the global catalog . Searches in the global catalog are efficient and can resolve most queries locally, thus reducing the network load and allowing for quicker responses . With Exchange, the global cata-log can be used to execute Lightweight Directory Access Protocol (LDAP) queries for dynamic distribution groups . The members of the distribution group are based on the results of the query sent to the Global Catalog server rather than being fixed.
Why use LDAP queries instead of a fixed member list? The idea is to reduce administrative overhead by being able to dynamically determine the members of a distribution group. Query-based distribution is most efficient when the member list is relatively small (fewer than 100) . If the member list has potentially hundreds or thousands of members, however, dynamic distribution can be inefficient and might require a great deal of processing to complete .

Microsoft Exchange organizations: the essentials ChAptEr 1 15
At a high-level, here’s how dynamic distribution works:
1. When email messages that are addressed to the group are received, the Exchange Categorizer (a transport component) sends the predefined LDAP query to the Global Catalog server for the domain .
2. The Global Catalog server executes the query and returns the resulting address set .
3. The Exchange Categorizer then uses the address set to generate the recipient list and deliver the message . If the Categorizer is unable to generate the list for any reason—for instance, if the list is incomplete or an error was returned— the Categorizer might start the process over from the beginning .
Using dedicated expansion serversTo make the dynamic query process more efficient, Exchange 2013 shifts the proc-essing requirements from Global Catalog servers to dedicated expansion servers by specifying a collection of one or more expansion servers as a delivery group . Unlike Mailbox delivery groups, this special delivery group can contain a mix of Exchange 2013 Mailbox servers, Exchange 2010 Hub Transport servers and Exchange 2007 Hub Transport servers .
The routing destination is still the ultimate destination for a message . A distribu-tion group expansion server is the routing destination when a dynamic distribution group has a designated expansion server that’s responsible for expanding the mem-bership list of the group . As with other types of routing, how the message is routed depends on the relationship between the source transport server and the destina-tion delivery group . Keep in mind that when a distribution group expansion server is the routing destination, the distribution group is already expanded when a message reaches the routing stage of categorization on the distribution group expansion server . Therefore, the routing destination from the distribution group expansion server is always a mailbox database or a connector .
By default, Exchange 2013 uses the closest Exchange server that has the Mail-box server role installed as the dedicated expansion server . Because routing desti-nations and delivery groups can also include Exchange 2010 and Exchange 2007 Hub Transport servers in mixed environments, Exchange 2010 and Exchange 2007 Hub Transport servers could perform dynamic distribution group expansion in mixed Exchange organizations .
On occasion, you might want to explicitly specify the dedicated expansion server to handle expansion processing for some or all of your dynamic distribution groups in order to manage where the related processing occurs, thereby shifting the proc-essing overhead from other servers to this specified server. You can specify a dedi-cated expansion server for a dynamic distribution group using the -ExpansionServer Parameter of the Set-DynamicDistributionGroup cmdlet .

ChAptEr 1 Microsoft Exchange organizations: the essentials 16
Working with the Exchange storeThe Exchange store is the core storage repository for managing Exchange data-bases . Unlike previous releases of Exchange, Exchange 2013 has only one type of database: the mailbox database . Mailbox databases contain the data, data defini-tions, indexes, flags, checksums, and other information that comprise mailboxes in your Exchange organization .
Understanding mailbox types and data storage componentsExchange 2013 supports many types of mailboxes, including:
■■ Arbitration mailbox An arbitration mailbox is used to manage approval requests, such as handling moderated recipients and distribution group membership approval .
■■ Archive mailbox An alternative mailbox used to store historical mail items .■■ Discovery mailbox A resource mailbox that is the target for Discovery
searches .■■ Equipment mailbox A resource mailbox for equipment scheduling .■■ Forwarding mailbox A mailbox that can receive mail and forward it
off-site .■■ Linked mailbox A mailbox for a user from a separate, trusted forest .■■ Public folder mailbox A shared mailbox for storing public folder data .■■ Room mailbox A resource mailbox for room scheduling . ■■ Shared mailbox An alternative mailbox that is shared by multiple users,
such as a general mailbox for customer inquiries .■■ User mailbox The primary mailbox type for users to store mail items .
The Information Store processes were rewritten in Exchange 2013 . The new Infor-mation Store (Microsoft .Exchange .Store .Service .exe) is written in C# and is fully integrated with the Microsoft Exchange Replication service (MSExchangeRepl .exe) . Officially, the new store is referred to as the Managed Store .
Although the Microsoft Exchange Information Store service still hosts the Exchange store, which uses the Extensible Storage Engine (ESE) as the database engine, the management of the store is divided between the store service and the replication service . As you’d expect, the store service handles the primary store functions while the replication service provides replication and ancillary functions, including log shipping, log replay, log truncation and database seeding opera-tions . The replication service also is responsible for all service availability for Mail-box servers .
The Active Manager component of the replication service is responsible for fail-ure monitoring and failover within DAGs . The Active Manager is also responsible for message resubmissions from the shadow redundancy safety net . As examples, automatic resubmission of messages can occur after you activate the lagged copy of a mailbox database as well as after failover of a mailbox database in a DAG . Every Mailbox server runs Active Manager inside the replication service . If a Mailbox server isn’t part of a DAG, the server has a single, Standalone Active Manager . In a DAG,

Microsoft Exchange organizations: the essentials ChAptEr 1 17
there are two Active Manager roles: Primary Active Manager and Standby Active Manager . The Primary Active Manager determines which database copies are active and which are passive and also handles failover and notifies other members of topology changes .
The VSS writer in the replication service, named the Microsoft Exchange Writer, is responsible for backing up active and passive mailbox database copies and for restoring backed up database copies . Although this writer runs within the replication service, it is the store service that advertises the availability of the VSS writer . Thus, both the store service and the replication service must be running to back up and restore Exchange databases .
After a database backup, the transaction logs are usually truncated as the data is no longer needed for recovery; however, if backups aren’t being taken, logs aren’t truncated and you can prevent a buildup of logs by enabling circular logging for replicated databases . Exchange can use standard circular logging or continuous rep-lication circular logging .
With standard circular logging, which is performed and managed by the store service, the Extensible Storage Engine (ESE) doesn’t create additional log files because the current log file is overwritten when needed.
Combining standard circular logging with continuous replication is referred to as continuous replication circular logging . This type of logging is performed and man-aged by the replication service with a goal of maintaining log continuity . Logs are deleted only when they are no longer needed for replication .
Mailbox database essentialsThe Managed Store uses the worker process model . To isolate any issues with the Managed Store to a particular database, each database runs under its own process . Exchange Server uses transactions to control changes in databases and as with tradi-tional databases, these transactions are recorded in a transaction log . Exchange Server then commits or rolls back changes based on the success of the transaction . The facil-ity that manages transactions is the store service .
When working with databases, keep the following in mind:■■ Each Mailbox server can have up to 100 databases (including both active and
passive databases), with a maximum size per database of 64 terabytes (TB) . ■■ Each Mailbox server can be a member of only one database availability
group and can host only one copy (either the active or passive copy) of a particular database . Because each group can have up to 16 copies of a data-base, up to 16 different servers can be part of a database availability group .
To create a new mailbox database, you need about 50 megabytes (MB) of free disk space. The files required by the database use a minimum of 23 MB of disk space, and you’ll need the extra space during creation and for read/write operations .
Other key concepts to focus on when working with the Exchange store and data-bases are the following:
■■ How Exchange server data files are used■■ How data is stored in Exchange database files

ChAptEr 1 Microsoft Exchange organizations: the essentials 18
How are Exchange Server data files used?With Exchange Server 2013, Mailbox servers have a single database file for each mailbox database . Exchange 2013 stores all messages and attachments in the pri-mary data file. Because attachments are encapsulated and written in binary format, you don’t need to convert them to Exchange format . Exchange Server uses a link table within the database to reference the storage location of attachments within it .
As Figure 1-5 shows, each database has a primary data file and several other types of shared working files and transaction logs .
FIGURE 1-5 The Exchange data store has primary data files for each database in addition to working files .
The file types are used as follows:■■ Primary data file (Database.edb) A physical database file that holds the
contents of the data store. By default, the name of the data file is the same as the name of the associated data store with the .edb file extension added; however, you can rename a database without renaming the database file.
■■ Checkpoint file (E##.chk) A file that tracks the point up to which the trans actions in the log file have been committed to databases in the storage group. Generally, the name of the checkpoint file is derived from the data-base prefix.
■■ Temporary data (Tmp.edb) A temporary workspace for processing transactions .
■■ Current log file (E##.log) A file that contains a record of all changes that have yet to be committed to the database. Generally, the name of the log file is derived from the database prefix.
■■ Preprovisioned log file (E##tmp.log) The next preprovisioned log, which is created in advance .

Microsoft Exchange organizations: the essentials ChAptEr 1 19
■■ Secondary log files (E##00000001.log, E##00000002.log, …) Additional log files that are used as needed. Up to 4 billion unique log files can be created for each database .
■■ Reserve log files (E##Res00001.jrs, E##Res00002.jrs, …) Files that are used to reserve space for additional log files if the current log file becomes full.
■■ Temporary log (E##tmp.log) A temporary workspace for logging .By default, the primary data file, working files, and transaction logs are all stored
in the same location. On a Mailbox server, you’ll find these files in a per-database sub-folder of the %SystemRoot%\Program Files\Microsoft\Exchange Server\V15\Mailbox folder. Although these are the main files used for the data store, Exchange Server uses other files, depending on the roles for which you have configured the server.
How is data stored in Exchange database files?Exchange uses object-based storage. The primary data file contains several indexed tables, including a data table that contains a record for each object in the data store. Each referenced object can include object containers, such as mailboxes, and any other type of data that is stored in the data store .
Think of the data table as having rows and columns; the intersection of a row and a column is a field. The table’s rows correspond to individual instances of an object, and the table’s columns correspond to folders. The table’s fields are populated only if a folder includes stored data. The data stored in fields can be a fixed length or a variable length .
Records in the data table are stored in data pages that have a fixed size of 32 kilobytes (KB, or 32,768 bytes). The 32-KB page file size was changed from the 8-KB data pages used with Exchange Server 2007 to improve performance .
In an Exchange database, each data page has a page header, data rows, and free space that can contain row offsets . The page header uses the first 96 bytes of each page, leaving 32,672 bytes for data and row offsets . Row offsets indicate the logi-cal order of rows on a page, which means that offset 0 refers to the first row in the index, offset 1 refers to the second row, and so on . If a row contains long, variable-length data, the data might not be stored with the rest of the data for that row . Instead, Exchange can store an 8-byte pointer to the actual data, which is stored in a collection of 32-KB pages that are written contiguously. In this way, an object and all its stored values can be much larger than 32 KB .
Changes to the mailbox database are written first to the transaction log and then committed to the database . The current active log file (E##.log) has a fixed size of 1 MB. When this log file fills up, Exchange closes the current active log file (E##.log) and renames it as E##NNNNNNNN .log (except when you are using circular log-ging). E##tmp.log is then renamed E##.log and becomes the current active log file.
The secondary log files are also limited to a fixed size of 1 MB. Exchange uses the reserve log files to reserve disk space for log files that it might need to create. Because several reserve files are already created, this speeds up the transactional logging process when additional logs are needed .
ChAptEr 1 Microsoft Exchange organizations: the essentials 20
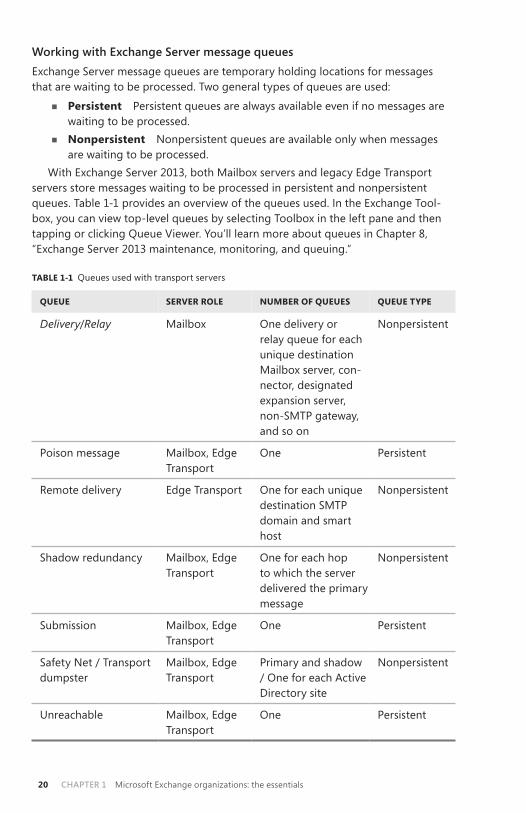
Working with Exchange Server message queuesExchange Server message queues are temporary holding locations for messages that are waiting to be processed . Two general types of queues are used:
■■ Persistent Persistent queues are always available even if no messages are waiting to be processed .
■■ Nonpersistent Nonpersistent queues are available only when messages are waiting to be processed .
With Exchange Server 2013, both Mailbox servers and legacy Edge Transport servers store messages waiting to be processed in persistent and nonpersistent queues . Table 1-1 provides an overview of the queues used . In the Exchange Tool-box, you can view top-level queues by selecting Toolbox in the left pane and then tapping or clicking Queue Viewer . You’ll learn more about queues in Chapter 8, “Exchange Server 2013 maintenance, monitoring, and queuing .”
TABLE 1-1 Queues used with transport servers
QUEUE SERVER ROLE NUMBER OF QUEUES QUEUE TYPE
Delivery/Relay Mailbox One delivery or relay queue for each unique destination Mailbox server, con-nector, designated expansion server, non-SMTP gateway, and so on
Nonpersistent
Poison message Mailbox, Edge Transport
One Persistent
Remote delivery Edge Transport One for each unique destination SMTP domain and smart host
Nonpersistent
Shadow redundancy Mailbox, Edge Transport
One for each hop to which the server delivered the primary message
Nonpersistent
Submission Mailbox, Edge Transport
One Persistent
Safety Net / Transport dumpster
Mailbox, Edge Transport
Primary and shadow / One for each Active Directory site
Nonpersistent
Unreachable Mailbox, Edge Transport
One Persistent

Microsoft Exchange organizations: the essentials ChAptEr 1 21
Shadow redundancy and Safety Net are two important concepts that you need to understand when working with queues . While shadow redundancy keeps a redun-dant copy of messages in transit, Safety Net keeps a redundant copy of a message after the message is successfully processed . Thus, in effect, Safety Net takes over where shadow redundancy finishes.
Exchange Server 2013 implements shadow redundancy for queued messages . In the event of an outage or server failure, this feature works to prevent the loss of messages that are in transit by storing queued messages until the next trans-port server along the route reports a successful delivery of the message . If the next transport server doesn’t report successful delivery, the message is resubmitted for delivery .
Shadow redundancy eliminates the reliance on the state of any specific Mailbox or Edge Transport server and eliminates the need for storage hardware redundancy for transport components . As long as redundant message paths exist in your rout-ing topology, any transport component is replaceable and you don’t have to worry about emptying a server’s queues or losing messages due to transport failure .
In Exchange 2013, the Transport service now makes a redundant copy of a mes-sage as soon as it receives it and then acknowledges receipt . Previously, the Trans-port service would acknowledge receipt and then make a redundant copy of a message . Finally, it’s important to note that it doesn’t matter whether the sending server supports shadow redundancy . If Exchange 2013 determines that a message was lost in transit, Exchange delivers the messages using the redundant copy .
TIP Shadow redundancy uses less bandwidth than creating duplicate copies of messages on multiple servers. The only additional network traffic is the exchange of discard status between transport servers. Discard status indicates when a message is ready to be discarded from the transport database.
Exchange Server 2013 also implements Safety Net for queued messages . Safety Net replaces and enhances the transport dumpster available in Exchange 2010 . By default, Safety Net stores copies of messages that were successfully processed by a Mailbox server for two days . For Mailbox servers that aren’t part of DAGs, Safety Net stores copies of messages delivered to other Mailbox servers in the local Active Directory site . For Mailbox servers that are part of DAGs, Safety Net stores copies of messages delivered to other Mailbox servers in the DAG .
Because Safety Net uses shadow redundancy, it is always fully redundant with a primary and a shadow queue . The Primary Safety Net queue stores the primary copy of a delivered message . The Shadow Safety Net queue stores a shadow copy of a delivery message . If the Primary Safety Net queue is unavailable for more than 12 hours, any messages that need to be redelivered are redelivered from the Shadow Safety Net queue .

ChAptEr 1 Microsoft Exchange organizations: the essentials 22
When Mailbox servers are part of a DAG, Safety Net is used for some shadow redundancy functions . Previously, in a DAG, shadow redundancy would keep a copy of messages in the shadow queue until they were replicated to passive copies of the database . As Safety Net already has a copy of delivered messages, shadow redun-dancy doesn’t need to keep another copy of these messages and messages can be resubmitted from Safety Net if necessary .
As Figure 1-6 shows, the various message queues are all stored in a single data-base . Like the Exchange store, the message queues database uses the ESE for mes-sage storage as well as for data pages .
FIGURE 1-6 The Exchange message queues are all stored in a single database .
The database has a single data file associated with it and several other types of working files and transaction logs. These files are used as follows:
■■ Primary data file (Mail.que) A physical database file that holds the contents of all message queues
■■ Checkpoint file (Trn.chk) A file that tracks the point up to which the transactions in the log file have been committed to the database
■■ Temporary data (Tmp.edb) A temporary workspace for processing transactions
■■ Current log file (Trn.log) A log file that contains a record of all changes that have yet to be committed to the database
■■ Preprovisioned log file (Trntmp.log) The next preprovisioned log, which is created in advance
■■ Secondary log files (TRN00000001.log, TRN00000002.log, …) Additional log files that are used as needed
■■ Reserve log files (TRNRes00001.jrs, TRNRes00002.jrs, …) Files that are used to reserve space for additional log files if the current log file becomes full

Microsoft Exchange organizations: the essentials ChAptEr 1 23
The facility that manages queuing transactions is the Microsoft Exchange Trans-port service (MSExchangeTransport .exe) . Because logs used with message queues are not continuously replicated, these log files have a fixed size of 5 MB. Changes to the queue database are written first to the transaction log and then committed to the database. When the current active log (trn.log) file fills up, Exchange closes the file and renames it as TRNNNNNNNNN .log . Trntmp .log is then renamed Trn .log and becomes the current active log file.
Exchange uses the reserve log files to reserve disk space for log files that might need to be created. Because several reserve files are already created, this speeds up the transactional logging process when additional logs are needed .
By default, the data file, working files, and transaction logs are all stored in the same location. On a Mailbox server or Edge Transport server, you’ll find these files in the %SystemRoot%\Program Files\Microsoft\Exchange Server\V15\TransportRoles\data\Queue folder .


25
CHAP TER 2
Managing data and availability groups
■■ Navigating the Information Store 25
■■ Creating and managing database availability groups 34
■■ Maintaining database availability groups 55
One of your most important tasks as a Microsoft Exchange Server 2013 admin-istrator is managing the Information Store . The Information Store processes
were rewritten in Exchange 2013 to improve performance and manageability . The new Information Store (Microsoft .Exchange .Store .Service .exe) is written in C# and is fully integrated with the Microsoft Exchange Replication service (MSExchange- Repl .exe) and the Microsoft Exchange DAG Management service (MSExchangeDag-Mgmt .exe) .
Each Mailbox server deployed in an organization has an information store, which can contain databases and information about database availability groups (DAGs) . This chapter introduces databases and focuses on the management of database availability groups . After completing this chapter, you should know how to:
■■ Enable, create, and use database availability groups .■■ Manage databases and their related transaction logs .■■ Improve Mailbox server availability .■■ Manage full-text indexing of Exchange databases .
To learn how to manage databases, see Chapter 3, “Exchange database administration .”
Navigating the Information Store
Exchange 2013 integrates high availability and messaging resilience into the core architecture, providing a simple unified framework for high availability, manage-ment, and disaster recovery . This approach allows Exchange 2013 to improve continuous replication, provide a robust solution that doesn’t require expensive clustering hardware, and reduce maintenance overhead .

ChAptEr 2 Managing data and availability groups26
Basic database optionsExchange Server 2013 uses Extensible Storage Engine (ESE) databases for mailbox storage . When you install a Mailbox server in an Exchange 2013 organization, this server’s information store has a single, default mailbox database . Mailbox databases have a single, dedicated log stream, which is represented by a series of sequentially named log files. Each log file is 1 megabyte (MB) in size. In addition to log files, data-bases have several other types of files associated with them, including one or more checkpoint files, a temporary working file, and one or more transaction log files. Depending on the state of Exchange Server, you might see other working files as well.
NOTE Exchange 2013 does not use public folder databases. public folders are now stored in a special type of mailbox.
When you create a mailbox database, you can specify separate folder locations to use for database files and transaction logs. Each database has content-indexing files associated with it as well. These files are generated by the Exchange Search service, which is enabled by default and running on all Mailbox servers . Exchange Search indexes new mail items in the transport pipeline or immediately after the items are created and delivered to a mailbox .
You use Exchange databases to ease the administrative burden that comes with managing large installations . For example, instead of having a single 10-terabyte (TB) database for the entire organization, you can create ten 1-TB databases that you can manage more easily .
TIP As a best practice, 2 tB is the largest recommended size for Exchange Server 2013 databases. Often you’ll find that large databases make it easier to support the large mailboxes that might be required by your organization’s managers and execu-tives. Still, most mailboxes should be limited to between 2 GB and 10 GB in size.
When you create a mailbox database, you specify the name for the database, and this name sets the name of the primary database file as well. For example, if you create a mailbox database called MarketingDept, the primary database file is set as MarketingDept .edb . With Exchange Server 2013, the default location for database files is the same as the log folder. If you want a database to be in a different location, you can specify the location you want to use. Separating database files and log files from the same database and putting them on different volumes backed by different physical disks can help you scale your organization while ensuring high performance and recoverability .
TIP Recoverability is a key reason for separating database files and log files. For example, in the case of a failure on a drive where a database is stored, the transac-tion logs needed for complete recovery would then be on a different (and probably functioning) drive. Whether you want to use this approach depends on the size and configuration of your Exchange Mailbox servers in addition to the service level agreements with which you need to comply.

Managing data and availability groups ChAptEr 2 27
The many files associated with databases provide granular control over Exchange Server, and if you configure the data files properly, they can help you scale your Exchange organization efficiently while ensuring optimal performance. In a small implementation of Exchange, you might want to place all the data files on the same drive . As you scale from a small organization to a larger organization, you’ll gener-ally want to organize data according to databases, placing all the data for each database on physically separate drives . You can’t always do this, however, in a small-to-medium sized organization with limited resources . For example, if you have ten 1-TB databases and only five data drives, you might want to have the five data drives configured as follows:
■■ Drive 1 with Database 1 and Database 2 and all related data files■■ Drive 2 with Database 3 and Database 4 and all related data files■■ Drive 3 with Database 5 and Database 6 and all related data files■■ Drive 4 with Database 7 and Database 8 and all related data files■■ Drive 5 with Database 9 and Database 10 and all related data files
In a storage area network (SAN) implementation in which you are using logical unit numbers (LUNs) and don’t know about the underlying disk structure, placing the databases on separate LUNs should be sufficient. To protect the data, you might want to consider using hardware RAID (redundant array of inexpensive disks), which is likely already implemented if you are using a SAN. However, if you configure a database availability group with multiple member servers that each have one or more copies of mailbox databases, you likely don’t need to use any type of RAID, and you likely won’t need daily backups either . Just remember that Microsoft rec-ommends having at least three database copies in addition to the active copy .
REAL WORLD If the idea of not needing rAID seems like a radical concept, the idea of not needing to perform backups of your Exchange data might seem revolutionary. however, when you have multiple copies of your data on separate servers, you really might not need to create daily backups of your Exchange data. this doesn’t mean that you won’t need to create backups ever—it just means you might not need daily back-ups of Exchange data. You will probably still want to create regular backups of your Exchange servers and still create periodic full backups of all server and Exchange data to rotate to off-site storage as a safeguard against catastrophe.
Database available groups can also make you rethink your use of SANs. rather than having a single, massive (and likely very expensive) storage device, you might want to rely on a server’s internal drives or multiple smaller (and likely much less complex) storage devices. One reason to use internal drives is that reliable, multiple-terabyte hard drives are becoming increasingly available, and several servers with multiple, large internal hard drives will likely cost a fraction of the price of a single massive SAN. If you use SANs, you might find that multiple smaller storage devices are better than a single, massive storage device because you’ll then be protected against a single source of failure (the storage device) causing an outage on all your mailbox servers. I know, I know…the SAN should never go down, but it can (and does) happen.

ChAptEr 2 Managing data and availability groups28
high availability database optionsExchange 2013 allows you to protect mailbox databases and the data they contain by configuring your mailbox databases for high availability automatically when you use database availability groups . Database availability groups allow you to group databases logically according to the servers that host a set of databases . Each Mail-box server can have multiple databases, and each database can have as many as 16 copies . A single database availability group can have up to 16 Mailbox servers that host databases and provide automatic database-level recovery from failures that affect individual databases . Any server in a database availability group can host a copy of a mailbox database from any other server in the database availability group .
Mailbox servers in a database availability group can also host the Client Access server role . Member servers must be in the same Active Directory domain .
Exchange 2013 integrates high availability and messaging resilience into the core architecture, providing a simple unified framework for both high availability and disaster recovery . This approach reduces the cost and complexity of deploying a highly available solution . How does this work? Exchange 2013 has enhanced con-tinuous replication and has replaced clustering features in Exchange 2007 with a more robust solution that doesn’t require expensive hardware and also requires less maintenance .
In early versions, Exchange was a clustered application that used the cluster resource management model for high availability . In contrast, Exchange 2013 is not a clustered application and therefore does not use the cluster resource model for high availability . Instead, Exchange 2013 uses its own internal high-availability model . Although some components of Windows Failover Clustering are still used, these components are now managed exclusively by Exchange 2013 .
To support continuous replication, early versions of Exchange offered several approaches, including Local Continuous Replication (LCR), Cluster Continuous Replication (CCR), and Standby Continuous Replication (SCR) . LCR was a single-server solution for asynchronous log shipping, replay, and recovery . CCR combined the asynchronous log shipping, replay, and recovery features with the failover and man-agement features of the Cluster service, and it was designed for configurations in which you had clustered Mailbox servers with dedicated active and passive nodes . SCR was an extension of LCR and CCR that used the same log shipping, replay, and recovery features of LCR and CCR but was designed for configurations in which you used or enabled the use of standby recovery servers .
Exchange 2013 includes some aspects of the continuous replication technology previously found in CCR and SCR, but the technology has changed substantially . Because storage groups have been removed from Exchange 2013, continuous repli-cation operates at the database level . Exchange 2013 still uses an Extensible Storage Engine (ESE) database that produces transaction logs that are replicated and replayed into copies of mailbox databases . Because each mailbox database can have as many as 16 copies, you can have one or more database copies on up to 16 different servers .
When a Mailbox server is added to DAG, the server works with other members of the DAG to provide automatic recovery from failures that affect mailbox data-bases, including disk failures, server failures, and other critical failures . When a failure
Managing data and availability groups ChAptEr 2 29
affecting a database occurs and a new database becomes the active copy automati-cally, this process is known as a failover . When an administrator establishes a data-base copy as the active mailbox database, this process is known as a switchover .
Failover and switchover occur at the database level for individual databases and at the server level for all active databases hosted by a server . When either a switch-over or failover occurs, other Exchange 2013 server roles become aware of the switchover almost immediately and redirect client and messaging traffic automati-cally as appropriate .
Although you can perform most management tasks for availability groups in the Exchange Admin Center, you have additional options when you work with the Exchange Management Shell . Table 2-1 provides an overview of commands you can use to manage availability groups and their various features .
TABLE 2-1 Cmdlets for working with database availability groups
MANAGEMENT AREA RELATED COMMANDS
Database availability group management
Get-DatabaseAvailabilityGroup New-DatabaseAvailabilityGroup Remove-DatabaseAvailabilityGroup Set-DatabaseAvailabilityGroup
Database copy management Add-MailboxDatabaseCopy Get-MailboxDatabaseCopyStatus Remove-MailboxDatabaseCopy Resume-MailboxDatabaseCopy Set-MailboxDatabaseCopy Suspend-MailboxDatabaseCopy Update-MailboxDatabaseCopy
Database management Dismount-Database Get-MailboxDatabase Move-DatabasePath New-MailboxDatabase Remove-MailboxDatabase Set-MailboxDatabase
Network configuration Get-DatabaseAvailabilityGroupNetwork New-DatabaseAvailabilityGroupNetwork Remove-DatabaseAvailabilityGroupNetwork Set-DatabaseAvailabilityGroupNetwork
Switchover management Move-ActiveMailboxDatabase Start-DatabaseAvailabilityGroup Stop-DatabaseAvailabilityGroup Restore-DatabaseAvailabilityGroup
Server membership Add-DatabaseAvailabilityGroupServer Remove-DatabaseAvailabilityGroupServer

ChAptEr 2 Managing data and availability groups30
As part of database availability group planning, keep in mind that you can create database copies only on Mailbox servers in the same database availability group that do not host the active copy of a database . An active copy differs from a passive copy in that it’s in use and being accessed by users rather than offline. You cannot create two copies of the same database on the same server . Other guidelines to keep in mind when working with database copies include the following:
■■ Mailbox databases can be replicated only to other Mailbox servers in the same database availability group . You cannot replicate a database outside a database availability group .
■■ All copies of a database use the same path on each server containing a copy . The database and log file paths for a database copy on each Mailbox server must not conflict with any other database paths.
■■ All Mailbox servers in a database availability group must be in the same Active Directory domain . Database copies can be created in the same or different Active Directory sites and on the same or different network sub-nets . However, database copies are not supported between Mailbox servers with roundtrip network latency greater than 250 milliseconds (by default) .
The Microsoft Exchange Replication service is responsible for replicating data-bases . The replication service and components that run within the service, includ-ing Active Manager, the TCP listener, and the Volume Shadow Copy Service writer, write results to the event logs. In Event Viewer, you can find these logs by navigating to Applications and Services Logs > Microsoft > Exchange > High Availability . In these logs, you’ll find details on database actions, such as database mount opera-tions, log truncation, and cluster action within DAGs . Events related to failures that affect replicated mailbox databases are written to the logs under Applications and Services Logs > Microsoft > Exchange >MailboxDatabaseFailureItems .
Working with Active ManagerIn Exchange 2013, Active Manager provides the resource model and failover man-agement features previously provided by the Cluster service . When you create your first database availability group in an Exchange organization, Exchange creates a Windows Failover Cluster, but there are no cluster groups for Exchange and no stor-age resources in the cluster . Therefore, as shown in Figure 2-1, Failover Cluster Man-ager shows only basic information about the cluster, which includes the cluster name and networks, and the quorum configuration. Cluster nodes and networks will also exist, and their status can be checked in Failover Cluster Manager; however, Exchange manages all cluster resources, including nodes and networks . Exchange makes use of the cluster’s node and network management functions, and you can check the node and network status in Exchange Admin Center .
Managing data and availability groups ChAptEr 2 31
FIGURE 2-1 Check the status of clustering in Failover Cluster Manager .
REAL WORLD Failover Cluster Manager is the primary management tool for working with the Cluster service. Although you need to use the Exchange Management tools to view and manage database availability groups and related features, Failover Cluster Manager does show the status of clustering in the following ways:
■■ By selecting the cluster name in the left pane, you get a quick overview of the cluster configuration, including the current quorum configuration, which can be either Node Majority or Node and File Share Majority depending on the number of nodes in the database availability group.
■■ By selecting the Nodes entry in the left pane, you can quickly check the status of all the nodes in the database availability group.
■■ By expanding the Networks entry in the left pane and then selecting available cluster networks, you can check the status of the network and individual network connections.
■■ By selecting the Cluster Events node, you can check the event logs on all cluster nodes for errors and warnings.
Active Manager runs on all Mailbox servers as a subcomponent of the Microsoft Exchange Replication service . On Mailbox servers that aren’t part of a DAG, Active Manager operates as a Standalone Active Manager . On Mailbox servers that are members of a DAG, Active Manager operates as either a primary role holder or a standby secondary role holder with respect to a particular database . The primary role holder, referred to as the Primary Active Manager, decides which database copies will be active and which copies to activate . It also receives topology change notifications and reacts to server failures. Only one copy of a database can be active at any given time, and that copy can be mounted or dismounted .
The group member that holds the primary role is always the member that cur-rently owns the cluster quorum resource and the default cluster group . If the server that owns the cluster quorum resource fails, the primary role automatically moves to another server in the group and that server takes ownership of the default cluster group. Before you take the server that hosts the cluster quorum resource offline for maintenance or an upgrade, you must first move the primary role to another server in the group .

ChAptEr 2 Managing data and availability groups32
Secondary role holders, referred to as Standby Active Managers, provide infor-mation about which server hosts the active copy of a mailbox database to other Exchange components . The secondary role holder detects failures of replicated, local databases and the local information store, and it issues failure notifications to the primary role holder and asks the primary role holder to initiate a failover . The sec-ondary role holder does not determine which server takes over, nor does it update the database location state with the primary role holder . With respect to its local system, the primary role holder also performs the functions of the secondary role by detecting local database and local information store failures and issuing related notifications.
Active Manager determines which database copy should be activated by attempting to locate a mailbox database that has characteristics similar to the following:
■■ The database has a status of Healthy, DisconnectedAndHealthy, Disconnected- AndResynchronizing, or SeedingSource .
■■ The database has a content index with a status of Healthy .■■ The database has a copy queue length that is less than 10 log files.■■ The database has a replay queue length of less than 50 log files.■■ The server hosting the database has all components in a healthy state .
If no database copy meets all of these criteria, Active Manager continues looking for the best choice by lowering the selection requirements through successive itera-tions . Active Manager uses the managed availability framework to perform health checks . After one or more copies have been selected, Active Manager attempts to copy any missing log files from the original source to a potential new active copy by using a process called attempt copy last logs (ACLL) . After the ACLL process is com-plete, Active Manager compares the value of the AutoDatabaseMountDial property for Mailbox servers hosting copies of the database to the copy queue length of the database being activated . If the value of the AutoDatabaseMountDial property is greater than the number of missing log files, the Primary Active Manager tries to activate the next best copy (if one is available) .
If the value of the AutoDatabaseMountDial property is equal to or less than the number of missing log files, the Primary Active Manager issues a mount request. At this point, either the database mounts and is made available to clients or the data-base doesn’t mount and the Primary Active Manager tries to activate the next best copy (if one is available) .
Understanding managed availabilityIn Exchange 2013, the active monitoring and high availability functions are integrated into a single architecture called managed availability, which is implemented on Mail-box servers and Client Access servers . Managed availability is a framework that includes a probe engine for taking measurements and collecting data, a monitor engine for determining the status of Exchange components, and a responder engine for taking recovery actions .

Managing data and availability groups ChAptEr 2 33
Managed availability is implemented by using:■■ Exchange Health Manager Worker process (MSExchangeHMWorker.
exe) A working process that performs the runtime management tasks .■■ Exchange Health Manager Service (MSExchangeHMHost.exe) A con-
troller process used to execute and manage the work process . If the worker process becomes nonresponsive or otherwise fails, the controller process is used to recover the worker process .
During startup, the health manager worker process reads XML configuration files and initializes the probes, monitors, and responders used by the managed availabil-ity framework . The worker process stores runtime data in the registry and writes results to the event logs as well. In Event Viewer, you can find these logs by navigat-ing to Applications and Services Logs > Microsoft > Exchange > ManagedAvailability .
As discussed further in Chapter 9, “Troubleshooting Exchange Server 2013,” in the “Tracking server health” section, you can check the state and health of Exchange resources by using Get-HealthReport and Get-ServerHealth . Each tracked resource has customized sets of probes, monitors, and responders that help to ensure its availability. Probe definitions identify the Exchange resource to track and the time interval in which the resource is checked. Monitor definitions identify the specific state of the resource based on the collected data. In Event Viewer, you can find definitions and results for probes, monitors, and responders under Applications and Services Logs > Microsoft > Exchange > ActiveMonitoring .
Exchange tracks the transition state internally by using the TargetHealthState property associated with a responder, where
■■ 0 indicates an alert threshold is no longer met .■■ 1 indicates a healthy state .■■ 2 indicates a degraded state .■■ 3 indicates an unhealthy state .■■ 4 indicates an unrecoverable state .■■ 5 indicates a Degraded1 state .■■ 6 indicates a Degraded2 state .■■ 7 indicates an Unhealthy1 state .■■ 8 indicates an Unhealthy2 state .■■ 9 indicates an Unrecoverable1 state .■■ 10 indicates an Unrecoverable2 state .
When a resource transitions from one state to another is determined by the moni-tor definition. As soon as the monitor engine detects an unhealthy or degraded state for a responder, the transition state of that resource is shown as Unhealthy or Degraded respectively, which will trigger a recovery action . Whether a resource is shown as Unhealthy or Degraded depends on the data collected . For example, if a resource is unavailable, the resource might be listed as Unhealthy . If a resource is available but is slow to respond due to high latency or a high level of activity, the resource might be listed as Degraded .

ChAptEr 2 Managing data and availability groups34
Once in an Unhealthy state, the health manager might transition the resource to another state . For example, after 30 seconds in an unhealthy state, the resource may be transitioned to an Unhealthy1 state . After 300 seconds in an unhealthy state, the resource may be transitioned to an Unhealthy2 state . After 3000 seconds in an unhealthy state, the resource may be transitioned to an Unrecoverable state . Once in an Unrecoverable state, the health manager may transition the resource through the related Unrecoverable, Unrecoverable1, and Unrecoverable2 states .
Responder definitions detail the specific recovery actions to take based on the transition state of the Exchange resource . The exact response to an unhealthy state depends on the affected resource . Although the initial response to an unhealthy state might be to restart the related service or application pool, a subsequent response might be to restart the server, and a final response might be to take the server offline so that it no longer accepts traffic.
Creating and managing database availability groups
Database availability groups are a container in Active Directory and a logical layer on top of Windows Clustering . You can create and manage database availability groups in a variety of ways . Establishing a database availability group and making it operational requires the following at a minimum:
1. Pre-staging and preparing for each deployment2. Creating a database availability group3. Adding member servers to the group4. Designating a witness server5. Creating an availability group networkThese tasks and general management tasks for database availability groups are
discussed in the sections that follow .
pre-staging and preparing for database availability groupsA database availability group defines a set of servers that provide automatic database-level recovery from database failures . Only members of the Organization Management group or the Database Availability Groups Role can create database availability groups . Only members of the Organization Management group or the Database Copies Role can manage mailbox database copies .
When you create a database availability group, you can specify a witness server or let Exchange choose one for you . The witness server’s role is to help maintain the state of the group . It does this by maintaining the quorum when there is an even number of members in the group . On the witness server, you can designate a direc-tory, called the witness directory, for use by the database availability group, or you can let Exchange create a default directory for you . By default, the witness directory is created as a subdirectory of %SystemDrive%\DAGFileShareWitnesses with the name set the same as the fully qualified domain name of the DAG.
Managing data and availability groups ChAptEr 2 35
Exchange creates and secures the witness directory automatically as part of con-figuring the witness server for use . The witness directory should not be used for any purpose other than for the database availability group witness server . The require-ments for the witness server are as follows:
■■ The witness server cannot be a member of the database availability group .■■ The witness server must be in the same forest as the database availability
group .■■ The witness server must be running a current version of Windows Server .
To be sure that Exchange administrators are aware of the availability of the wit-ness server and that the server remains under the control of an Exchange adminis-trator, Microsoft recommends using an Exchange 2013 server to host the witness directory . Using an Exchange 2013 server as the witness also ensures that Exchange has sufficient permissions to remotely create and share the witness directory. The preferred witness server is a Client Access server in the same Active Directory site as the majority of the members of the database availability group.
A single server can serve as a witness for multiple database availability groups; however, every database availability group must have a separate witness directory .
The witness directory doesn’t need to be fault tolerant and doesn’t require any other special considerations . If you need to reset permissions on the witness directory or recreate the witness directory in its original location, you can use Set-Database-AvailabilityGroup as long as the cluster quorum is intact .
NOTE Cluster quorum ensures consistency of the DAG. Quorum represents a shared view of members and resources and also is used to describe the shared physical con - figuration within the DAG. Having quorum ensures that only one subset of cluster members is functioning in the DAG.
TIP Ideally, you’ll locate the witness server in the same datacenter as DAG members. Although a server cannot act as a witness server for a DAG of which it is a member, a DAG member can act as a witness server for another DAG.
To set up the database availability group, Exchange creates an msExchMDB-AvailabilityGroup object and related objects in Active Directory Domain Services (AD DS). These objects represent the database availability group, its members, net-works, and attributes. The msExchMDBAvailabilityGroup directory object is used to store information about the database availability group, such as server membership information . Information about the included databases is stored in the cluster data-base. When you add the first server to a database availability group, a failover clus-ter is automatically created for the database availability group and failover monitoring is initiated . The failover cluster heartbeat mechanism and cluster database are then used to track and manage information about the database availability group .

ChAptEr 2 Managing data and availability groups36
After a database availability group has been created, you can add servers to or remove existing servers from the database availability group. When the first Mailbox server is added to a database availability group, the following occurs:
■■ The Windows Failover Clustering component and related management tools are installed, if they are not already installed .
IMPORTANT Windows Failover Clustering is available on servers that are run-ning Windows Server 2008 r2 Enterprise or Datacenter, Windows Server 2012 Standard or Datacenter, or Windows Server 2012 r2 Standard or Datacenter. Each Mailbox server in the database availability group should have at least two network interface cards in order to have separate replication and messaging networks.
■■ A failover cluster is created using the name of the database availability group . For the purposes of authentication and access permissions, the cluster is represented by a computer account that is created in the default container for computers . This computer account is referred to as the cluster virtual network name account or the cluster network object.
■■ The server is added to the msExchMDBAvailabilityGroup object in Active Directory .
■■ When you create a database availability group, an IP address is assigned to the group. When you add the first server to the group, the name and IP address of the database availability group are registered in Domain Name System (DNS) using a Host (A) record . The name must be no longer than 15 characters and must be unique within the Active Directory forest .
■■ The cluster database is updated with information about the databases that are mounted on the server .
■■ Exchange examines the current network configuration, as presented by the cluster. If the server has a properly configured network card, the configura-tion of that network card is used to create the replication network . If the server has two network cards, the configuration settings of those network cards are used to create separate replication and messaging networks .
■■ A base directory is created on the witness server. If you specified a directory during DAG creation, this directory is created . Otherwise, the %SystemDrive% \DAGFileShareWitnesses directory is created . Permissions are set so that the local Administrators group has full control .
NOTE The witness directory and witness file share aren’t created until needed. Permis-sions are set so that the network name account representing the cluster has full control.
When you add the second and subsequent servers to the DAG, the following occurs:
■■ The server is joined to the failover cluster for the DAG.■■ The server is added to the msExchMDBAvailabilityGroup object in Active
Directory Domain Services .■■ The cluster database is updated with information about the databases that
are mounted on the server .
Managing data and availability groups ChAptEr 2 37
When a database availability group has a single member server, the failover cluster initially uses the Node Majority quorum mode. When you add the second Mailbox server to the database availability group, Exchange changes the cluster quorum to the Node and File Share Majority quorum model and begins by using the Universal Naming Convention (UNC) path and directory for the cluster quorum . If the witness directory does not exist, Exchange automatically creates it at this point and configures its security with full control permissions for local administrators and the cluster network computer account for the database availability group .
REAL WORLD Every failover cluster has a resource that is responsible for maintaining the witness logs. this resource is called the quorum or witness resource. the quorum resource writes information about all cluster database changes to the witness logs, ensuring that the cluster configuration and state data can be recovered. When you create a database availability group, Exchange automatically determines the appropriate quorum configuration for your cluster based on the number of member servers. When a DAG has an odd number of members, Exchange uses the Node Majority quorum model. When a DAG has an even number of members, Exchange uses a Node and File Share Majority quorum model.
In a Node Majority cluster configuration, servers have a local quorum device. This device stores the cluster configuration information. In a Node and File Share Majority cluster configuration, servers use a witness file share rather than a quorum (witness) device. Otherwise, the Node and File Share Majority configuration works like the Node Majority configuration. The change from one model to the other should happen auto- matically. If it doesn’t, run Set-DatabaseAvailabilityGroup with only the -Identity parameter, which will update the quorum settings for the DAG.
Before you create a database availability group, you should pre-stage and pre-pare the cluster name object. Although these preparations aren’t required with Windows Server 2008 R2 (unless account creation is restricted or computer accounts are creating in a container other than the default Computers container), these prep-arations are required with Windows Server 2012 RTM and Windows Server 2012 R2 . You pre-stage the cluster name object by creating a computer account that will be used as the cluster’s name resource . The name resource is a Kerberos-enabled object that acts as the cluster’s identity and provides the cluster’s security context.
To pre-stage the cluster name object, complete the following steps:
1. In the Active Directory Users And Computers console tree, press and hold or right-click the container in which you want to place the computer account, tap or click New, and then tap or click Computer . This starts the New Object—Computer wizard shown in Figure 2-2.
2. In the Computer Name text box, enter the name that you want to use for the DAG. For example, if you are creating the first DAG in the Active Directory forest, you may want to enter DAG01 as the name . The name can be up to 15 characters . The name must be unique in the Active Directory forest and cannot contain spaces or other special characters .

ChAptEr 2 Managing data and availability groups38
FIGURE 2-2 Create a new computer account by using the New Object—Computer wizard.
3. If Windows Deployment Services are not installed, tap or click OK to create the computer account . Otherwise, tap or click Next twice, and then tap or click Finish .
If the witness server isn’t running Exchange 2013 or Exchange 2010, you must add the Exchange Trusted Subsystem group to the local Administrators group on the witness server prior to creating the DAG . Adding this group ensures that Exchange 2013 can create and share the witness directory . To add the Exchange Trusted Subsystem group to the local Administrators group, follow these steps:
1. In Control Panel, select User Accounts, and then select Give Other Users Access To This Computer .
2. In the User Accounts dialog box, on the Advanced tab, select Advanced, which opens the Local Users And Groups console .
3. In the left pane, select the Groups node, and then double-tap or double-click Administrators .
4. In the Administrators properties dialog box, select Add .5. In the Select Users, Computers, Service Accounts, Or Groups dialog box,
enter Exchange Trusted Subsystem and then tap or click OK .You prepare the cluster name object by completing the following steps:
1. In Active Directory Users And Computers, press and hold or right-click the computer account for the DAG, and then select Disable Account . When prompted to confirm that you want to disable the account, select Yes and then select OK .
2. If Advanced Features aren’t enabled in Active Directory Users And Comput-ers, enable them by selecting Advanced Features on the View menu .
3. Press and hold or right-click the computer account for the DAG, and then select Properties .

Managing data and availability groups ChAptEr 2 39
4. In the properties dialog box, select the Security tab and then select Add .5. In the Select User, Computer, Service Account, Or Group dialog box, enter
Exchange Trusted Subsystem as the name of the group to which you want to grant privileges, and then tap or click OK .
6. With Exchange Trusted Subsystem selected in the Group Or User Names list, select Full Control in the Allow column, and then select OK to grant full control permissions on the cluster name object to the Exchange Trusted Subsystem .
SECURITY ALERT the Exchange trusted Subsystem group has as members all the machine accounts for Exchange servers in the domain and as such, this group can be used to manage the cluster name object. Alternatively, you can enter the name of the first Mailbox server you are adding to the DAG and then grant full control permissions to the related computer object to ensure that the LOCAL SYStEM security context on that server will be able to manage the cluster name object.
REAL WORLD When Windows Firewall is enabled, you must enable inbound excep-tions for Windows Management Instrumentation (WMI) and File And printer Sharing on the witness server. Keep in mind that if you don’t specify a witness server, Exchange searches the local Active Directory site for a Client Access server that doesn’t have the Mailbox Server role installed and configures this server as the witness server. To create the required inbound exceptions for Windows Firewall, follow these steps:
1. In Control panel, select System And Security, and then select Windows Firewall.
2. In the left pane, select Allow An App Or Feature through Windows Firewall.
3. If File And Printer Sharing is not selected for the Domain profile, select it under Allowed Apps And Features.
4. If Windows Management Instrumentation (WMI) is not selected for the Domain profile, select it under Allowed Apps And Features.
5. If you made changes to the Windows Firewall configuration, select OK.
If Windows Firewall is enabled and these exceptions are not created, you may see error messages warning that Exchange wasn’t able to create the default witness directory or that Exchange is unable to access file shares on the witness server. You might see an error message stating: the network path was not found. Or you might see an error message stating: WMI exception occurred on the server. the rpC server is unavailable.
Creating database availability groupsOnce you’ve pre-staged and prepared the cluster name object, you can create the database availability group by completing the following steps:
1. In the Exchange Admin Center, select Servers in the feature pane, and then select Database Availability Groups .
2. Select the New button to create the DAG . You should now see the New Database Availability Group dialog box, as shown in Figure 2-3 .
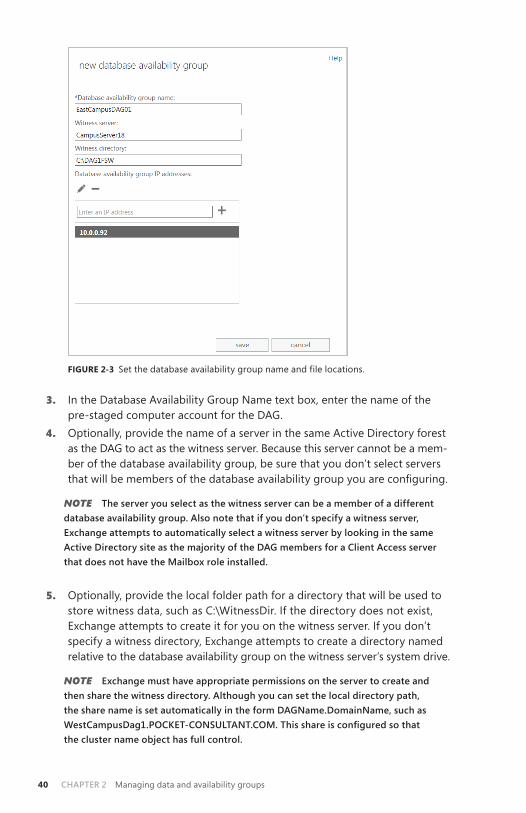
ChAptEr 2 Managing data and availability groups40
FIGURE 2-3 Set the database availability group name and file locations .
3. In the Database Availability Group Name text box, enter the name of the pre-staged computer account for the DAG .
4. Optionally, provide the name of a server in the same Active Directory forest as the DAG to act as the witness server . Because this server cannot be a mem-ber of the database availability group, be sure that you don’t select servers that will be members of the database availability group you are configuring.
NOTE the server you select as the witness server can be a member of a different database availability group. Also note that if you don’t specify a witness server, Exchange attempts to automatically select a witness server by looking in the same Active Directory site as the majority of the DAG members for a Client Access server that does not have the Mailbox role installed.
5. Optionally, provide the local folder path for a directory that will be used to store witness data, such as C:\WitnessDir . If the directory does not exist, Exchange attempts to create it for you on the witness server . If you don’t specify a witness directory, Exchange attempts to create a directory named relative to the database availability group on the witness server’s system drive .
NOTE Exchange must have appropriate permissions on the server to create and then share the witness directory. Although you can set the local directory path, the share name is set automatically in the form DAGName.DomainName, such as WestCampusDag1.POCKET-CONSULTANT.COM. This share is configured so that the cluster name object has full control.
Managing data and availability groups ChAptEr 2 41
TIP■ As long as the witness server is an Exchange server in the same forest, Exchange should be able to create and share the directory. If Exchange is unable to create and share the directory, you’ll see an error message and will need to take appropriate corrective actions. You can use the Set-DatabaseAvailabilityGroup with the –WitnessDirectory parameter to specify a new directory to use at any time. You also can set a new directory by double-tapping or double-clicking the DAG in the Exchange Admin Center, entering a new directory path in the Witness Directory field, and then tapping or clicking OK.
If the witness server is not an Exchange 2013 server, you have to add the Exchange trusted Subsystem security group to the local Administrators group on the witness server.
6. You can assign one or more static IPv4 addresses to the DAG or allow any necessary IPv4 addresses to be assigned by DHCP . To assign a static IP address, enter an IP address to use, and then select Add. Repeat this process to specific other static IP addresses to use . To use dynamically assigned IP addresses, don’t enter any IP addresses .
7. Select Save to create the database availability group . If an error occurred, you’ll need to take the appropriate corrective action . Otherwise, you can now add member servers to the database availability group .
In the Exchange Management Shell, you can create database availability groups by using the New-DatabaseAvailabilityGroup cmdlet . Listing 2-1 provides the syntax and usage. Set the -Name parameter to the name of the pre-staged computer object. Set the -DatabaseAvailabilityGroupIpAddresses parameter to the static IP address or addresses that the DAG should use . Alternatively, if the DAG should use dynamically assigned IP addresses, enter 0 .0 .0 .0 as the IP address to use .
NOTE Don’t confuse the local witness directory with the witness file share. The local witness directory has a local file path on the witness server, such as C:\WitnessShare. When you specify the witness directory, Exchange creates the base directory and then creates and shares a subdirectory within this directory as appropriate.
LISTING 2-1 New-DatabaseAvailabilityGroup cmdlet syntax and usage
Syntax
New-DatabaseAvailabilityGroup -Name DAGName [-DatabaseAvailabilityGroupIpAddresses IPAddress1, IPAddress2, IPAddressN] [–WitnessServer ServerName] [–WitnessDirectory LocalDirOnWitnessServer] [-DomainController FullyQualifiedName] [-ThirdPartyReplication <Disabled | Enabled>]
Usage
New-DatabaseAvailabilityGroup -Name "EastCampusDAG1" -WitnessServer "CAServer19" -WitnessDirectory "C:\EastCampusDAG1" New-DatabaseAvailabilityGroup -Name "WestCampusDAG1" -WitnessServer "CAServer19"

ChAptEr 2 Managing data and availability groups42
-WitnessDirectory "C:\WestCampusDAG1" -DatabaseAvailabilityGroupIpAddresses 192.168.10.52,192.168.11.18 New-DatabaseAvailabilityGroup -Name "NorthCampusDAG1" -DatabaseAvailabilityGroupIpAddresses 0.0.0.0
Managing availability group membershipWhen you add a server to a database availability group, the server works with the other servers in the group to provide automatic, database-level recovery from data-base, server, and network failures . When member servers have only one network adapter card, the DAG uses the same network for both messaging and replication traffic. When member servers have two network cards, the DAG uses one network card primarily for messaging traffic and the other network card is typically dedi-cated to replication traffic. If you add more than two network cards to member servers, these additional network cards can be configured for replication, giving the DAG additional replication networks to handle increased workloads .
NOTE Member servers in a DAG can have zero or more replication networks but only one messaging network. For optimal operation, servers should have at least two network interface cards with each network interface card configured to use a different subnet.
Keep the following in mind when planning database availability group membership:
■■ All servers in a DAG must be running the same operating system, which can be Windows Server 2008 R2 Enterprise or Datacenter, Windows Server 2012 Standard or Datacenter, or Windows Server 2012 R2 Standard or Datacenter .
■■ When you add the first Mailbox server to a database availability group, the group must be assigned an IP address . If no IP address is assigned, Exchange uses DHCP to obtain an IP address for the group .
■■ If you no longer want a server to be a member of a group, you can remove it from the group and the server will no longer be automatically protected from failures . Keep in mind that you must remove all replicated database copies from the server before you can remove it from the group .
You can add a Mailbox server to or remove a Mailbox server from a database availability group by completing the following steps:
1. In the Exchange Admin Center, select Servers in the feature pane, and then select Database Availability Groups to view existing availability groups, as shown in Figure 2-4 .
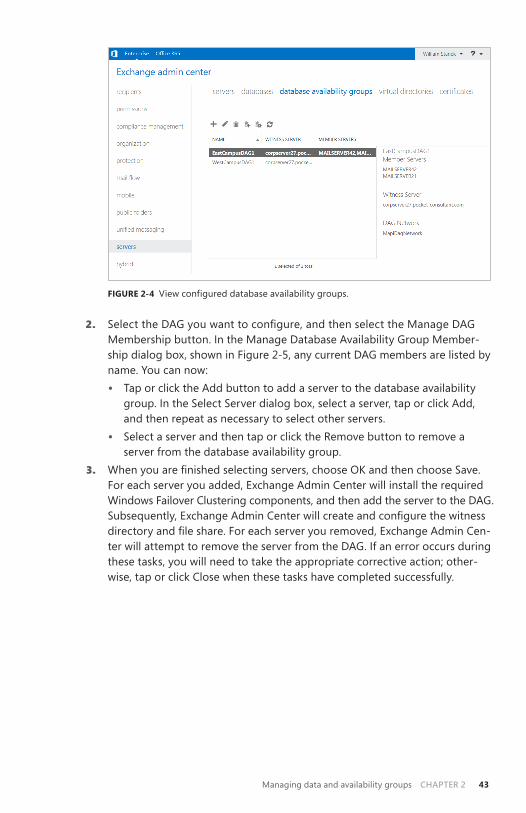
Managing data and availability groups ChAptEr 2 43
FIGURE 2-4 View configured database availability groups .
2. Select the DAG you want to configure, and then select the Manage DAG Membership button . In the Manage Database Availability Group Member-ship dialog box, shown in Figure 2-5, any current DAG members are listed by name . You can now:• Tap or click the Add button to add a server to the database availability
group . In the Select Server dialog box, select a server, tap or click Add, and then repeat as necessary to select other servers .
• Select a server and then tap or click the Remove button to remove a server from the database availability group .
3. When you are finished selecting servers, choose OK and then choose Save. For each server you added, Exchange Admin Center will install the required Windows Failover Clustering components, and then add the server to the DAG . Subsequently, Exchange Admin Center will create and configure the witness directory and file share. For each server you removed, Exchange Admin Cen-ter will attempt to remove the server from the DAG . If an error occurs during these tasks, you will need to take the appropriate corrective action; other-wise, tap or click Close when these tasks have completed successfully .
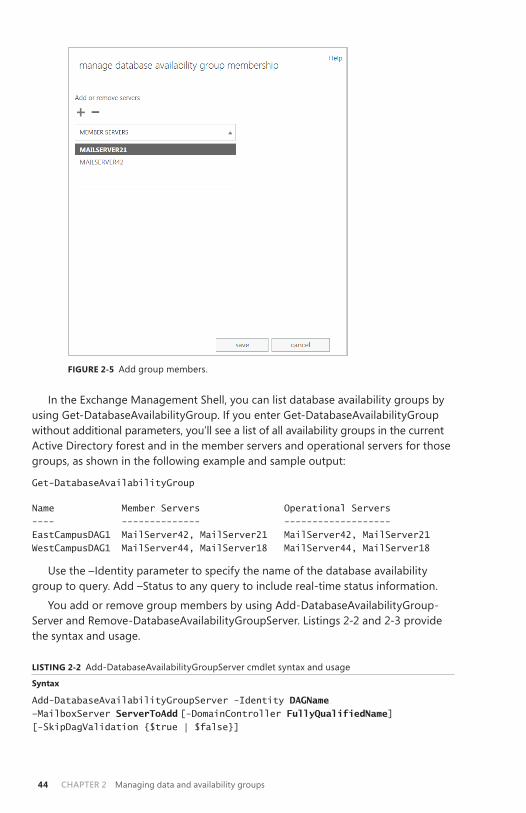
ChAptEr 2 Managing data and availability groups44
FIGURE 2-5 Add group members .
In the Exchange Management Shell, you can list database availability groups by using Get-DatabaseAvailabilityGroup . If you enter Get-DatabaseAvailabilityGroup without additional parameters, you’ll see a list of all availability groups in the current Active Directory forest and in the member servers and operational servers for those groups, as shown in the following example and sample output:
Get-DatabaseAvailabilityGroup
Name Member Servers Operational Servers ---- -------------- ------------------- EastCampusDAG1 MailServer42, MailServer21 MailServer42, MailServer21 WestCampusDAG1 MailServer44, MailServer18 MailServer44, MailServer18
Use the –Identity parameter to specify the name of the database availability group to query . Add –Status to any query to include real-time status information .
You add or remove group members by using Add-DatabaseAvailabilityGroup-Server and Remove-DatabaseAvailabilityGroupServer . Listings 2-2 and 2-3 provide the syntax and usage .
LISTING 2-2 Add-DatabaseAvailabilityGroupServer cmdlet syntax and usage
Syntax
Add-DatabaseAvailabilityGroupServer -Identity DAGName –MailboxServer ServerToAdd [-DomainController FullyQualifiedName] [-SkipDagValidation {$true | $false}]

Managing data and availability groups ChAptEr 2 45
Usage
Add-DatabaseAvailabilityGroupServer –Identity "EastCampusDAG1" -MailboxServer "MailServer62"
LISTING 2-3 Remove-DatabaseAvailabilityGroupServer cmdlet syntax and usage
Syntax
Remove-DatabaseAvailabilityGroupServer -Identity DAGName –MailboxServer ServerToRemove [-ConfigurationOnly <$true | $false>] [-DomainController FullyQualifiedName] [-SkipDagValidation {$true|$false}]
Usage
Remove-DatabaseAvailabilityGroupServer –Identity "EastCampusDAG1" -MailboxServer "MailServer62"
Managing database availability group networksEach database availability group should have a minimum of two networks: one for replication traffic, referred to as the group’s replication network, and one for MAPI and other traffic, referred to as the group’s messaging network . Although a DAG can have only one messaging network, you can create additional replication networks in a database availability group and configure them by using the Exchange Manage-ment tools . Having multiple replication networks helps scale the DAG to meet increasing requirements .
By default, Exchange 2013 automatically creates DAG networks based on the configuration of network adapter cards installed on member servers. If a DAG mem-ber has multiple network cards and those cards are configured on separate networks, Exchange normally will configure the DAG members with one messaging network and one or more dedicated replication networks automatically . You can manually configure DAG networks as well but must first disable automatic network configuration.
You can enable manual network configuration for a DAG by completing the following steps:
1. In the Exchange Admin Center, select Servers in the feature pane, and then select Database Availability Groups to view existing availability groups .
2. Double-tap or double-click the DAG you want to manually configure.3. In the properties dialog box, on the General page, select the Configure Data-
base Availability Group Networks manually check box, and then select Save .4. You can now manually configure and manage the networks for the DAG.
Keep in mind that if you later disable manual configuration, any manually created networks and related settings will be removed and Exchange Admin Center will create new DAG networks based on the current configuration of DAG members .
NOTE You can enable a manual network configuration by using the –ManualDag-NetworkConfiguration parameter of the Set-DatabaseAvailabilityGroup cmdlet. Set the parameter to $true to enable or $false to disable manual network configuration.

ChAptEr 2 Managing data and availability groups46
After you enable manual network configuration, you can manually create and manage network settings for the DAG . Each database availability group network must have a unique name of up to 128 characters, one or more subnet associations, and an optional description of up to 256 characters. When you configure a network, you can dedicate the network to replication traffic or dedicate the network to MAPI traffic.
NOTE Disabling replication does not guarantee that Exchange will not use a network for replication. If all configured replication networks are offline, failed, or otherwise unavailable, and only a nonreplication network remains, Exchange will use that net-work for replication until a replication-enabled network becomes available.
REAL WORLD Every network address has a network identifier that identifies the network and a host identifier that identifies the individual host on the network. The network ID is seen as the prefix of an IPv4 or IPv6 address, and the host ID is the suffix. When you define an availability group network, you need to identify the network and then specify the number of bits in the network number that are part of the network ID (and the remaining bits are understood to be part of the host ID). to write a block of Ipv4 addresses and specify which bits are used for the network ID, you write the network number followed by a forward slash and the number of bits in the network ID, as follows:
NetworkNumber/# of bits in the network ID
the slash and the number of bits in the network ID are referred to as the network prefix. By default, Class A IPv4 networks have 8 bits in the network ID, Class B IPv4 networks have 16 bits, and Class C Ipv4 networks have 24 bits.
Ipv6 doesn’t use subnet masks to identify which bits belong to the network ID and which bits belong to the host ID. Instead, each Ipv6 address is assigned a subnet prefix length that specifies how the bits in the network ID are used. The subnet prefix length is represented in decimal form. If 48 bits in the network ID are used, the subnet prefix length is written as FEC0:1234:5678::/48 to represent the IPv6 addresses FEC0:1234:5678:: through FEC0:1234:5678::FFFF:FFFF:FFFF:FFFF.
You can create a network for a database availability group by completing the following steps:
1. In the Exchange Admin Center, select Servers in the feature pane, and then select Database Availability Groups to view existing availability groups .
2. Select the DAG you want to configure and then select the New DAG Network button .
3. In the New Database Availability Group Network dialog box, shown in Figure 2-6, enter a unique name for the database availability group network of up to 128 characters and then provide an optional description for the database availability group network of up to 256 characters .
4. Under Subnets, tap or click Add to add a network subnet to the database availability group network . Subnets should be entered by using a format of
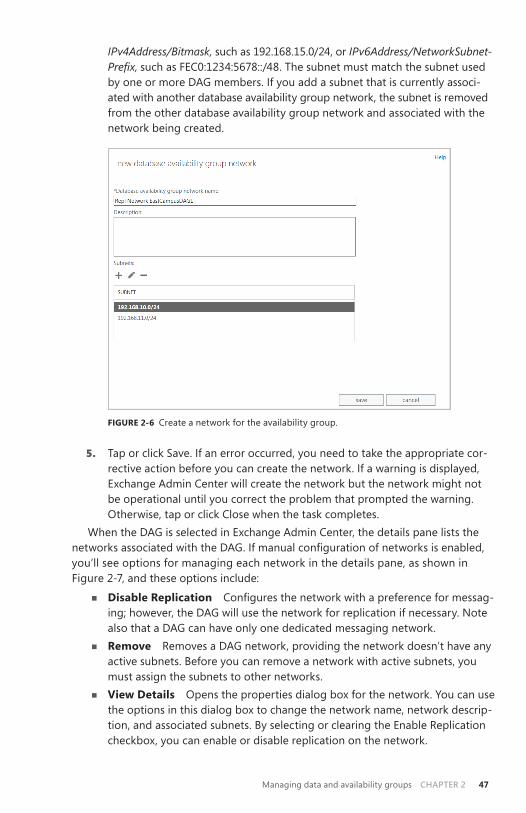
Managing data and availability groups ChAptEr 2 47
IPv4Address/Bitmask, such as 192 .168 .15 .0/24, or IPv6Address/NetworkSubnet-Prefix, such as FEC0:1234:5678::/48 . The subnet must match the subnet used by one or more DAG members . If you add a subnet that is currently associ-ated with another database availability group network, the subnet is removed from the other database availability group network and associated with the network being created .
FIGURE 2-6 Create a network for the availability group .
5. Tap or click Save . If an error occurred, you need to take the appropriate cor-rective action before you can create the network . If a warning is displayed, Exchange Admin Center will create the network but the network might not be operational until you correct the problem that prompted the warning . Otherwise, tap or click Close when the task completes .
When the DAG is selected in Exchange Admin Center, the details pane lists the networks associated with the DAG. If manual configuration of networks is enabled, you’ll see options for managing each network in the details pane, as shown in Figure 2-7, and these options include:
■■ Disable Replication Configures the network with a preference for messag-ing; however, the DAG will use the network for replication if necessary . Note also that a DAG can have only one dedicated messaging network .
■■ Remove Removes a DAG network, providing the network doesn’t have any active subnets . Before you can remove a network with active subnets, you must assign the subnets to other networks .
■■ View Details Opens the properties dialog box for the network . You can use the options in this dialog box to change the network name, network descrip-tion, and associated subnets . By selecting or clearing the Enable Replication checkbox, you can enable or disable replication on the network .

ChAptEr 2 Managing data and availability groups48
The properties dialog box for a DAG network also shows the status of sub-nets and network interfaces . Subnets and interfaces listed as Up are active . Subnets and interfaces listed as Down are inactive .
FIGURE 2-7 View the networks configured for a DAG .
In the Exchange Management Shell, you can list availability DAG networks and their status by using Get-DatabaseAvailabilityGroupNetwork . If you enter Get- DatabaseAvailabilityGroupNetwork without additional parameters, you see a list of all configured networks for all availability groups. Use the –Identity parameter to specify the name of the network to query . Use the –Server parameter to obtain health information for the network from a specific Mailbox server. This example lists detailed information for all the networks associated with EastCampusDAG1:
Get-DatabaseAvailabilityGroupNetwork -Identity EastCampusDAG1 | fl
The following example lists detailed information for network associated with EastCampusDAG1 that have names starting with Repl:
Get-DatabaseAvailabilityGroupNetwork -Identity EastCampusDAG1\Repl* | fl
The detailed information is helpful as it lists the status of associated subnets and interfaces as shown in the following sample:
Name : Repl Network EastCampusDAG1 Description : Subnets : {{10.0.0.0/24,Up}} Interfaces : {{MailServer21,Up,10.0.0.50}, {MAILSERVER42,Up,10.0.0.60}} MapiAccessEnabled : True ReplicationEnabled : True IgnoreNetwork : False Identity : EastCampusDAG1\Repl Network EastCampusDAG1 IsValid : True
Managing data and availability groups ChAptEr 2 49
You create or remove group networks by using New-DatabaseAvailabilityGroup-Network and Remove-DatabaseAvailabilityGroupNetwork . Listings 2-4 and 2-5 provide the syntax and usage .
LISTING 2-4 New-DatabaseAvailabilityGroupNetwork cmdlet syntax and usage
Syntax
New-DatabaseAvailabilityGroupNetwork -Name NetworkName -DatabaseAvailabilityGroup DAGName [-Description Description] [-DomainController FullyQualifiedName] [-IgnoreNetwork <$true | $false>] [-ReplicationEnabled <$true | $false>] [-Subnets SubnetIds]
Usage
New-DatabaseAvailabilityGroupNetwork –DatabaseAvailabilityGroup "EastCampusDAG1" -Name "Primary DAG Network" -Description "" -Subnets "{192.168.10.0/24, 192.168.15.0/24}" -ReplicationEnabled $true
LISTING 2-5 Remove-DatabaseAvailabilityGroupNetwork cmdlet syntax and usage
Syntax
Remove-DatabaseAvailabilityGroupNetwork -Identity NetworkName [-DomainController FullyQualifiedName]
Usage
Remove-DatabaseAvailabilityGroupNetwork –Identity "EastCampusDAG1\Primary DAG Network"
Changing availability group network settingsDatabase availability group networks have several properties that you can configure, including the network name, description, associated subnets, and replication status . The replication status determines whether the network is used as the replication net-work for the group or the messaging network for the group . When replication is enabled, the network is used as the replication network for the group . When repli-cation is disabled, the network is used as the messaging network for the group .
When manual network configuration is enabled, you can manage the settings for a group network by completing the following steps:
1. In the Exchange Admin Center, select Servers in the feature pane, and then select Database Availability Groups to view existing availability groups .
2. When you select the DAG you want to work with, the details pane lists the associated networks . Each network has a related set of management options . Select the View Details option for the network you want to configure. This opens the properties dialog box for the network, as shown in Figure 2-8 .
3. You can enter a new name if desired and optionally change the network description .

ChAptEr 2 Managing data and availability groups50
4. Each network must contain at least one subnet . Subnets must be added by using a format of IPAddress/Bitmask, such as 192 .168 .15 .0/24, or IPv6Address/NetworkSubnetPrefix, such as FEC0:1234:5678::/48 . Use the options provided to add, edit, or remove subnets for the network .
5. To establish the network as the replication network for the group, select the Enable Replication check box . Otherwise, clear the check box to use the net-work as the messaging network for the group .
6. Tap or click Save to apply your settings .
FIGURE 2-8 Change the settings of the DAG network as needed .
You can use Set-DatabaseAvailabilityGroupNetwork to configure basic settings for Set-DatabaseAvailabilityGroupNetwork . Listing 2-6 provides the syntax and usage .

Managing data and availability groups ChAptEr 2 51
LISTING 2-6 Set-DatabaseAvailabilityGroupNetwork cmdlet syntax and usage
Syntax
Set-DatabaseAvailabilityGroupNetwork -Identity NetworkName [-Description Description] [-DomainController FullyQualifiedName] [-IgnoreNetwork <$true | $false>] [-Name NewName] [-ReplicationEnabled <$true | $false>] [-Subnets Subnets]
Usage
Set-DatabaseAvailabilityGroupNetwork –Identity "EastCampusDAG1\Primary DAG Network" -ReplicationEnabled $False
Advanced options for the networks associated with availability groups are set at the group level. Advanced options you can configure include encryption, compres-sion, and the TCP port used for replication . Database availability groups support data encryption by using the built-in encryption capabilities of the Windows Server oper-ating system . When you enable encryption, database availability groups use Kerberos authentication between Exchange servers to encrypt and decrypt messages . Encryp-tion helps maintain the integrity of the data . Network encryption is a property of the database availability group and not a property of a database availability group network .
You can configure database availability group network encryption by using the –NetworkEncryption parameter of the Set-DatabaseAvailabilityGroup cmdlet in the Exchange Management Shell . The possible encryption settings are as follows:
■■ Disabled Network encryption is not used for any database availability group networks .
■■ Enabled Network encryption is used on all database availability group networks for replication and seeding .
■■ InterSubnetOnly Network encryption is used only with database availabil-ity group networks on the same subnet .
■■ SeedOnly Network encryption is used on all database availability group networks for seeding only .
Database availability groups also support built-in compression. You configure network compression by using the –NetworkCompression parameter of the Set-DatabaseAvailabilityGroup cmdlet in the Exchange Management Shell . The possible compression settings are as follows:
■■ Disabled Network compression is not used for any database availability group networks .
■■ Enabled Network compression is used on all database availability group networks for replication and seeding .
■■ InterSubnetOnly Network compression is used only with database avail-ability group networks on the same subnet .
■■ SeedOnly Network compression is used on all database availability group networks for seeding only .

ChAptEr 2 Managing data and availability groups52
You can specify the TCP port to use for replication by using the –ReplicationPort parameter of the Set-DatabaseAvailabilityGroup cmdlet in the Exchange Manage-ment Shell .
Configuring database availability group propertiesYou can use the Exchange Admin Center or the Exchange Management Shell to con-figure the properties of a database availability group, including the witness server and witness directory used by the database availability group . By using the Exchange Management Shell, you can configure additional properties, such as encryption and compression settings, network discovery, the TCP port used for replication, alternate file share witness settings, and data center activation coordination mode.
To view or modify the properties of an availability group, complete the following steps:
1. In the Exchange Admin Center, select Servers in the feature pane, and then select Database Availability Groups to view existing availability groups .
2. Double-tap or double-click the database availability group with which you want to work .
3. In the Properties dialog box, shown in Figure 2-9, you’ll see a list of member servers, the witness server’s fully qualified domain name, and the location of the witness directory on the witness server .
FIGURE 2-9 View or modify properties of the availability group .
4. Using the Witness Server text box, you can specify a new witness server by entering the fully qualified domain name of the new witness server. This server should be in the same Active Directory forest as the member servers and cannot be a current or future member of the database availability group .

Managing data and availability groups ChAptEr 2 53
5. Using the Witness Directory text box, you can specify a new witness directory on the witness server . If the directory does not exist, it will be created on the witness server .
6. Tap or click Save .In the Exchange Management Shell, you can configure properties of database
availability groups by using the Set-DatabaseAvailabilityGroup cmdlet . Listing 2-7 provides the syntax and usage .
LISTING 2-7 Set-DatabaseAvailabilityGroup cmdlet syntax and usage
Syntax
Set-DatabaseAvailabilityGroup -Identity DAGName [-DatabaseAvailabilityGroupIpAddresses IPAddresses] [-DatacenterActivationMode {"Off"|"DagOnly"}] [-DiscoverNetworks] [-DomainController FullyQualifiedName] [-NetworkCompression {"Disabled"|"Enabled"|"InterSubnetOnly"|"SeedOnly"} [-NetworkEncryption {"Disabled"|"Enabled"|"InterSubnetOnly"|"SeedOnly"} [-ReplicationPort TCPPort] [-AlternateWitnessServer ServerName] [-AlternateWitnessServerDirectory DirectoryPath] [-WitnessServer ServerName] [-WitnessServerDirectory DirectoryPath]
Usage
Set-DatabaseAvailability –Identity "EastCampusDAG1" -NetworkCompression "Enabled" -NetworkEncryption "Enabled" -ReplicationPort 33898 –DatacenterActivationMode "Off"
Options for working with encryption, compression, and replication ports were discussed previously in “Changing availability group network settings .” Options that weren’t discussed include the datacenter activation coordinator mode, the alternate witness server, and alternate witness server directory . These options can be used as part of a datacenter switchover process . The alternate witness server must not be a part of the database availability group .
The data-center coordinator mode should be set for all database availability groups with three or more members that are extended to two or more physical locations . This mode cannot be enabled for groups with less than three members . When the datacenter coordinator is enabled, you can start, stop, and restore mem-ber servers in an availability group individually or collectively by using the following:
■■ Start-DatabaseAvailabilityGroup Activates member Mailbox servers in a recovered data center after a data-center switchover, as part of the failback process to the recovered data center. This command sets the configuration and state so that the servers are incorporated into the operating database availability group and joined to the group’s cluster. You use the –Mailbox-Server parameter to start a specific member server or the –ActiveDirectory-Site parameter to start all members in a particular site .
Start-DatabaseAvailabilityGroup –Identity DAGName [-MailboxServer ServerName | -ActiveDirectorySite SiteName] [-ConfigurationOnly <$true | $false>] [-DomainController FullyQualifiedName]

ChAptEr 2 Managing data and availability groups54
NOTE You can also reactivate servers from a previously failed datacenter that has been restored to service. Before you can reactivate member Mailbox servers in a primary data center, the servers must first be integrated back into the operational database availability group. You reintegrate servers by running the Start-Database-AvailabilityGroup cmdlet and then using the Move-ActiveMailboxDatabase cmdlet to activate databases in the primary data center.
■■ Stop-DatabaseAvailabilityGroup Deactivates member Mailbox servers after a datacenter switchover . You use the –MailboxServer parameter to deactivate a specific member server or the –ActiveDirectorySite parameter to deactivate all members in a particular site .
Stop-DatabaseAvailabilityGroup –Identity DAGName
[-MailboxServer ServerName | -ActiveDirectorySite SiteName] [-ConfigurationOnly <$true | $false>]
[-DomainController FullyQualifiedName]
■■ Restore-DatabaseAvailabilityGroup Activates member Mailbox servers in a standby data center . Typically, this process is performed after the failure or deactivation of the active member servers in a primary data center . You use the –ActiveDirectorySite parameter to activate all members in a particu-lar site .
Restore-DatabaseAvailabilityGroup –Identity DAGName
[-ActiveDirectorySite SiteName]
[-AlternateWitnessServer ServerName]
[-AlternateWitnessDirectory DirectoryPath]
[-DomainController FullyQualifiedName]
[-UsePrimaryWitnessServer <$true | $false>
removing servers from a database availability groupBefore you can remove a server from a database availability group, you must also remove all database copies from the server . To remove member servers from a DAG, select the DAG you want to manage, and then select the Manage DAG Membership button . In the Manage Database Availability Group Membership dialog box, select a server on the list of current members, and then select the Remove button . Repeat as necessary to remove members . Tap or click Save to apply the changes . If an error occurs during these tasks, you will need to take the appropriate corrective action . Otherwise, tap or click Close when these tasks have completed successfully .
After you remove the member servers, you can remove the database availability group by selecting it and selecting the Delete button. When prompted to confirm, tap or click Yes .
removing database availability groupsYou can remove a database availability group only if it has no member servers . Therefore, before you can remove a database availability group, you must first remove any member servers from the group .

Managing data and availability groups ChAptEr 2 55
You can remove an empty availability group by completing the following steps:
1. In the Exchange Admin Center, select Servers in the feature pane, and then select Database Availability Groups to view existing availability groups .
2. On the Database Availability Group tab, select the database availability group you want to remove, and then select the Delete button .
3. When prompted to confirm the action, tap or click Yes.In the Exchange Management Shell, you can remove database availability groups
by using the Remove-DatabaseAvailabilityGroup cmdlet . Listing 2-8 provides the syntax and usage .
LISTING 2-8 Remove-DatabaseAvailabilityGroup cmdlet syntax and usage
Syntax
Remove-DatabaseAvailabilityGroup -Identity DAGName [-DomainController FullyQualifiedName]
Usage
Remove-DatabaseAvailabilityGroup –Identity "EastCampusDAG1"
Maintaining database availability groups
The Microsoft Exchange Information Store service manages the active and passive databases configured on a Mailbox server. To improve performance, the service running on each server maintains a database cache of changes to active databases that haven’t been applied to passive copies . In the event of a failover or switchover, the service can apply the changes in the cache to a passive copy and then make the passive copy the active copy . Most of the time, failover completes in about 30 seconds .
The difference between failover and switchover is important . When Exchange detects a failure of an active database, regardless of whether it is from database failure, server failure, or network failure, Exchange uses failover processes to mark the active database as inactive and dismount it and then mount and mark a passive database copy as the active copy . Prior to performing maintenance on a server or for testing or troubleshooting, you might want Exchange to switch from one data-base to another by marking an active database as inactive and then marking a pas-sive database copy as the active copy .
Switching over servers and databasesFailover and switchover occur at the database level for individual databases and at the server level for all active databases hosted by a server . When either a switchover or failover occurs, other Exchange 2013 server roles become aware of the switch-over almost immediately and redirect client and messaging traffic automatically as appropriate .

ChAptEr 2 Managing data and availability groups56
You can switch over all active databases on a server by completing the following steps:
1. In the Exchange Admin Center, select Servers in the feature pane, and then select Servers . In the main pane, select the server that you are performing maintenance on, testing, or troubleshooting .
2. In the details pane, select Server Switchover . In the Server Switchover dialog box, shown in Figure 2-10, the default option is to allow Exchange to handle the switchover and select a server to take over the databases from the source server automatically . To accept the default, select Save . Otherwise, select Specify A Server As Target For Switchover and then select Browse . In the Select Server dialog box, select the server to take over, select OK . Keep in mind that you can select only a server that is already a member of the database availability group . You can’t have copies outside the group either .
3. Select Save to apply the changes. When prompted to confirm the action, tap or click Yes .
FIGURE 2-10 Switch over the active databases .
You can perform a switchover of an individual database by completing the fol-lowing steps:
1. In the Exchange Admin Center, select Servers in the feature pane, and then select Databases .
2. In the main pane, select the database you want to work with . In the details pane, you see the available database copies, which are listed according to their copy status and health . Only the active copy will have a status of Active Mounted . All other database copies will display the current status of replica-tion for the database copy, such as Passive Healthy .
3. Using the management options for the passive copy you want to activate, you can select View Details to display detailed information about the data-base copy, including the content index status, the overall status, the copy queue length, the replay queue length, and error messages .

Managing data and availability groups ChAptEr 2 57
4. To activate the copy, tap or click the related Activate option . When you tap or click Yes to confirm that you want to activate this copy, Exchange will dismount the current active mailbox database and establish the selected database copy as the active mailbox database .
5. If an error occurred, you need to take the appropriate corrective action before you can create the network . If a warning is displayed, Exchange Admin Center will create the network but the network may not be operational until your correct the problem that prompted the warning . Otherwise, tap or click Close when the task completes .
When you are working with the Exchange Management Shell, you can initiate switchover by using Move-ActiveMailboxDatabase . Listing 2-9 shows the syntax and usage .
LISTING 2-9 Move-ActiveMailboxDatabase cmdlet syntax and usage
Syntax
Move-ActiveMailboxDatabase -Identity DatabaseName [-SkipClientExperienceChecks <$true | $false>] [-SkipHealthChecks <$true | $false>] [-SkipLagChecks <$true | $false>] {AddtlParams} Move-ActiveMailboxDatabase -Server ServerName {AddtlParams} {AddtlParams} [-ActivateOnServer ServerOnWhichToActivate] [-MountDialOverride {"Lossless" | "GoodAvailability" | "BestAvailability" "BestEffort" | "None"} [-DomainController FullyQualifiedName] [-MoveComment Comment] [-SkipActiveCopyChecks <$true | $false>] [-SkipClientExperienceChecks <$true | $false>] [-SkipHealthChecks <$true | $false>] [-SkipLagChecks <$true | $false>] [-TerminateOnWarning <$true | $false>]
Usage
Move-ActiveMailboxDatabase –Identity "Engineering Primary Database" -ActivateOnServer "MailServer86" -MountDialOverride "Lossless"
The –MountDailOverride parameter of the Move-ActiveMailboxDatabase cmdlet controls the way databases mount on switchover or failover . Every Mailbox server has a database automount setting and the default is Best Availability . Values you can select to control the database mount behavior include:
■■ None The database uses the currently configured setting for automatically mounting .
■■ Lossless The database does not automatically mount until all logs that were generated on the original source server have been copied to the target node .
■■ Good Availability The database automatically mounts if the copy queue length is less than or equal to 6 . If the queue length is greater than 6, Exchange attempts to replicate the remaining logs to the target server and mounts the databases once the queue length is less than or equal to 6 .

ChAptEr 2 Managing data and availability groups58
■■ Best Availability The database automatically mounts if the copy queue length is less than or equal to 12 . The copy queue length is the number of logs that need to be replicated . If the queue length is greater than 12, Exchange attempts to replicate the remaining logs to the target server and mounts the databases once the queue length is less than or equal to 12 .
■■ Best Effort The database automatically mounts regardless of the length of the copy queue . As this option essentially forces the database to mount with any amount of log loss, I don’t recommend using this value unless you are certain you want to accept what could be a large amount of data loss .
REAL WORLD You can set the default database automount setting for a Mailbox server by using the –AutoDatabaseMountDail parameter of the Set-MailboxServer cmdlet. If you specify either Best Availability or Good Availability and all of the data has not been replicated to the target server, you might lose some mailbox data; how ever, the transport dumpster feature (which is enabled by default) helps protect against data loss by resubmitting messages that are in the transport dumpster queue. Because of latency problems or other issues, specifying one of these values can result in a database not being mounted, and you might need to use the -AcceptDataLoss parameter with Mount-Database to force the database to mount after a specified amount of time.
Checking continuous replication statusYou can use Test-ReplicationHealth to monitor continuous replication and deter-mine the health and status of the underlying cluster service, quorum, and network components . By default, Test-ReplicationHealth performs the following tests:
■■ ActiveManager Verifies that the instance of Active Manager is running on the server
■■ ClusterNetwork Verifies that all cluster-managed networks on the server are available
■■ ClusterService Verifies that the Cluster service is running and reachable on the server
■■ DagMembersUp Verifies that all DAG members are available, running, and reachable
■■ DBCopyFailed Checks whether any mailbox database copies are in a state of Failed on the server
■■ DBCopySuspended Checks whether any mailbox database copies are in a state of Suspended on the server
■■ DBDisconnected Checks whether any mailbox database copies are in a state of Disconnected on the server
■■ DBInitializing Checks whether any mailbox database copies are in a state of Initializing on the server
■■ DBLogCopyKeepingUp Verifies that log copying and inspection by the passive copies of databases on the server are able to keep up with log gen-eration activity on the active copy

Managing data and availability groups ChAptEr 2 59
■■ DBLogReplayKeepingUp Verifies that replay activities for the passive copies of databases on the server are able to keep up with log copying and inspection activity
■■ FileShareQuorum Verifies that the witness server and witness directory and share configured for the DAG are reachable
■■ QuorumGroup Verifies that the default cluster group (quorum group) is in a healthy and online state
■■ ReplayService Verifies that the Microsoft Exchange Replication service is running and reachable on the server
■■ TasksRpcListener Verifies that the tasks remote procedure call (RPC) server is running and reachable on the server
■■ TcpListener Verifies that the TCP log copy listener is running and reachable on the server
Listing 2-10 shows the syntax and usage for Test-ReplicationHealth . If you want to include monitoring events and performance counters in the results, set the -MonitoringContext parameter to $true. Use -OutputObjects to output an array of results .
LISTING 2-10 Test-ReplicationHealth cmdlet syntax and usage
Syntax
Test-ReplicationHealth [-Identity MailboxServerToCheck] [-ActiveDirectoryTimeout Timeout] [-DomainController DCName] [-MonitoringContext <$true | $false>] [-OutputObjects] [-TransientEventSuppressionWindow Timeout]
Usage
Test-ReplicationHealth –Identity MailServer15 -ActiveDirectoryTimeout 30 -OutputObjects
restoring operations after a DAG member failureIf a Mailbox server has failed and cannot be recovered, you can recover operations in one of two ways:
■■ You can remove the configuration settings for the Mailbox server from the database availability group .
■■ You can install a new server and then restore the roles and settings for the original server .
Before you can remove the configuration settings for a Mailbox server, you’ll need to remove any mailbox database copies that the server hosted . You can list mailbox database copies by using Get-MailboxDatabaseCopyStatus and then remove the copies by using Remove-Mailbox-DatabaseCopy. Next, remove the configuration settings for the Mailbox server from the database availability group by using the Remove-DatabaseAvailabilityGroupServer cmdlet. After you remove the configura-tion settings, all settings associated with the Mailbox server are gone .
ChAptEr 2 Managing data and availability groups60
REAL WORLD Before you install a new server and then restore the roles and settings of the original server, you should confirm the install location for Exchange 2013 on the original server. If Exchange 2013 is installed in a location other than the default loca-tion, you can use the /TargetDir option during the setup of the new server to specify an install location. Otherwise, setup will use the default location for the installation. You can determine the install location for the original server by completing the follow-ing steps:
1. In AdsiEdit.msc or LDp.exe, navigate to CN=ExServerName,CN=Servers, CN= First Administrative Group,CN=Administrative Groups,CN=ExOrg Name, CN=Microsoft Exchange,CN=Services,CN=Configuration,DC=DomainName, CN=Com.
2. press and hold or right-click the Exchange server object for the failed server, and then select properties.
3. the value of the msExchInstallpath attribute shows the installation path for the failed server.
To install a new server and then restore the roles and settings of the original server, complete the following steps:
1. Use Get-MailboxDatabase to list any replay lag or truncation lag settings for mailbox database copies that were hosted on the server being recovered . Enter the following command to list the databases associated with a specific server by their display name and lag settings:
Get-MailboxDatabase -server ServerName
ServerName is the name of the failed server . After you list the databases asso-ciated with the server, list the lag settings for each database in turn by enter-ing the following command:
Get-MailboxDatabase DatabaseName | fl *lag*
DatabaseName is the name of a database hosted on the failed server . NOTE■ Alternatively, you can list all the databases associated with a specific server by their display name and lag settings by entering the following:
Get-MailboxDatabase -server Name | Get-MailboxDatabase |
fl name, *lag*
Name is the name of the failed server. In this example, you examine the mailbox databases on MailServer24:
Get-MailboxDatabase -server MailServer24 | Get-MailboxDatabase
| fl name, *lag*
2. After you list the databases associated with the server by name and lag times, you need to remove any mailbox database copies the server hosted by entering:
Remove-MailboxDatabaseCopy DatabaseName\ServerName
Managing data and availability groups ChAptEr 2 61
DatabaseName is the name of the database copy to remove and ServerName is the name of the failed server, such as:
Remove-MailboxDatabaseCopy EngDatabase\MailServer24
3. Remove the failed server’s configuration from the DAG by entering the following command:
Remove-DatabaseAvailabilityGroupServer -Identity DagName
-MailboxServer ServerName -ConfigurationOnly
DagName is the name of the DAG and ServerName is the name of the failed server, such as:
Remove-DatabaseAvailabilityGroupServer -Identity EastCampusDag1
-MailboxServer MailServer24 -ConfigurationOnly
4. In Active Directory Users And Computers, locate and select the computer account for the failed server . On the Action menu, select Reset Account . When prompted to confirm, select Yes and then select OK.
5. Rename the new server so that it has the same name as the failed server . On the new server, run Exchange 2013 Setup with the /m:RecoverServer switch to have Setup read the failed server’s configuration information from Active Directory. After Setup gathers the server’s configuration information from Active Directory, Setup installs the original Exchange files and services on the server, restoring the roles and settings that were stored in Active Directory .
6. When the setup of the new server is complete, add the server to the DAG by entering the following command:
Add-DatabaseAvailabilityGroupServer -Identity DagName
-MailboxServer ServerName
DagName is the name of the DAG and ServerName is the name of the failed server, such as:
Add-DatabaseAvailabilityGroupServer -Identity EastCampusDag1
-MailboxServer MailServer24
7. Add mailbox database copies to the server by entering the following com-mand for each database copy to add:
Add-MailboxDatabaseCopy -Identity DatabaseName -MailboxServer
ServerName
DatabaseName is the name of the database copy to add and ServerName is the name of the server you are configuring, such as:
Add-MailboxDatabaseCopy -Identity EngDatabase
-MailboxServer MailServer24
If any of the database copies had replay lag or truncation lag times greater than 0, you can set those lag times by using the -ReplayLagTime and -TruncationLagTime parameters .

ChAptEr 2 Managing data and availability groups62
8. After the database copies have been configured, you can check their status by entering the following command:
Get-MailboxDatabaseCopyStatus -Server ServerName
ServerName is the name of the server you are configuring, such as:
Get-MailboxDatabaseCopyStatus -Server MailServer24
The databases and their content indexes should have a healthy status .9. Verify replication health for the server by entering the following command:
Test-ReplicationHealth -Identity ServerName

63
CHAP TER 3
Exchange database administration
■■ Working with active mailbox databases 63
■■ Working with mailbox database copies 78
■■ Managing mailbox databases 95
■■ Content indexing 103
Databases are containers for information . Microsoft Exchange Server 2013 uses mailbox databases to maintain user data . The information in a particular data-
base isn’t exclusive to mailboxes and their associated user data—Exchange Server maintains related information within databases as well . Within mailbox databases, you’ll find information about Exchange logons and mailbox usage. Exchange also maintains information about full-text indexing, although the actual content indexes are stored in separate files. In this chapter, you’ll learn how to manage databases and the information they contain .
Working with active mailbox databases
Each Mailbox server installed in the organization has an information store . The information store operates as a service and manages the server’s databases . Each mailbox database has a database file associated with it. This file is stored in a loca-tion that you specify when you create or modify the mailbox database .
Mailbox databases can be either active databases or passive copies of data-bases . Users access active databases to get their mailbox data . Passive copies of databases are not actively being used and are the subject of the section, “Work-ing with mailbox database copies” later in this chapter . You create passive copies of databases as part of a high-availability configuration as discussed in Chapter 2, “Managing data and availability groups .”

ChAptEr 3 Exchange database administration64
Understanding mailbox databasesMailboxes are the normal delivery location for messages delivered within an organ-ization . They contain messages, attachments, and other types of information that the user might have placed in the mailbox . Mailboxes, in turn, are stored in mailbox databases .
When you install a Mailbox server, Setup creates a default mailbox database . The default mailbox database is meant to be a starting point, and most Exchange organ-izations can benefit from having additional mailbox databases, especially as the number of users in the organization grows . Additional mailbox databases are cre-ated for many reasons, but the following reasons are the most common:
■■ To provide a smaller unit of management Exchange has a practical limit of 2 terabytes (TB) on the size of databases, though you may find it easier to work with databases between 1 TB and 1 .5 TB . Large databases require more time to move, restore, and recover compared to smaller databases . Addition-ally, when you establish database availability groups and create copies of a database, the entire database must be replicated from the source database to the database copies . During recovery, you can restore individual data-bases without affecting the performance or uptime of other databases on the system .
■■ To impose a different set of mailbox rules on different sets of users Each additional mailbox database can have its own property settings for maintenance, storage limits, deleted item retention, indexing, security, and policies . By placing a user’s mailbox in one mailbox database instead of another, you can apply a different set of rules .
■■ To optimize Exchange performance Each mailbox database can have its own storage location . By placing the mailbox databases on different physical drives, you can improve the performance of Exchange Server 2013 .
■■ To create separate mailbox databases for different purposes For exam-ple, you might want to create a mailbox database called General In-Out to handle all general-purpose mailboxes being used throughout the organiza-tion . These general-purpose mailboxes could be set up as shared mailboxes for Postmaster, Webmaster, Technical Support, Customer Support, and other key functions .
When you create a mailbox database, you can specify the following information:■■ What the name of the database should be■■ Where the database file is to be located■■ When maintenance on the database should occur■■ Any limitations on mailbox size■■ Whether deleted items and mailboxes should be retained
Each mailbox database has a default offline address book (OAB). Microsoft Outlook 2007 and later clients access the default OAB and default public folder hierarchy on your organization’s Client Access servers . Exchange 2013 uses the mailbox provi-sioning load balancer to automatically select a database to use when you create or move a mailbox and do not explicitly specify the mailbox database to use . As the
Exchange database administration ChAptEr 3 65
name implies, the purpose of the load balancer is to try to balance the workload across mailbox databases in the organization .
Although the load balancer uses multiple criteria to try to determine where a mail-box should be created or moved, the selection criteria does not take into account the proximity of the Mailbox server on which a database is stored to the computer or computers used by the user . Instead, the load balancer uses the Active Directory site where the mailbox task is being performed to determine which mailbox data-bases should be selected and only includes databases that are in the local site .
You can control the way automatic distribution works in several ways . You can tem-porarily or permanently exclude databases from the distribution process by using the -IsSuspendedFromProvisioning and -IsExcludedFromProvisioning parameters of the Set-MailboxDatabase cmdlet respectively . When either of these parameters is set to $True, Exchange excludes the related database from the automatic distribution process .
When selecting a database to use, the mailbox provisioning load balancer also checks the database management scopes of the administrator creating a mailbox . Database management scopes are part of the role-based access control (RBAC) per-missions model and are a way to limit the databases administrators can view and manage .
NOTE By default, all administrators in an Exchange organization can see all the mail-box databases in the organization. When you create database management scopes in the organization, administrators will only be able to see databases included in a scope applied to them.
If you create custom scopes, Exchange uses these scopes to select databases . Specifically, the load balancer only selects mailbox databases included in a scope applied to the administrator creating a mailbox . Therefore, if a database isn’t included in a scope applied to an administrator, the database won’t be selected for automatic distribution .
preparing for automatic reseedAutomatic reseed, new for Exchange 2013, allows you to quickly restore database redundancy after a disk failure, database corruption event, or other event that requires a reseed of a database to recover operations . For automatic reseed to work, however, you must pre-provision one or more spare disks . These spare disks are then used during the automatic reseed to recover the database copy . Here’s how automatic reseed works:
1. The Microsoft Exchange Replication service scans the Information Store peri-odically for database copies that have a status of FailedAndSuspended .
2. If the replication service finds a database copy with the FailedAndSuspended status, it performs prerequisite checks to evaluate the situation, which includes determining whether spares are available, whether anything could prevent the system from performing an automatic reseed, whether only a single copy of the database is available, and more .

ChAptEr 3 Exchange database administration66
3. If the prerequisite checks pass successfully, the Microsoft Exchange Replica-tion service allocates and remaps an available spare before starting the seed operation .
4. After the seed has been completed, the Microsoft Exchange Replication ser-vice verifies that the new copy has a Healthy status.
To prepare spare volumes on a server, you must complete the following steps:
1. Mount the volumes that will contain databases under a single mount point, such as C:\PrimaryVols .
2. Mount the volumes to mount points under this volume . For example, you could mount the first volume as C:\PrimaryVols\Volume1, the second volume as C:\PrimaryVols\Volume2, and so on .
3. Create databases on the server in locations within the specified volumes, ensuring that there are fewer databases than mounted volumes .
Consider the following scenario to see how this would work in practice:
You have five volumes mounted under C:\PrimaryVols as C:\PrimaryVols\Volume1, C:\PrimaryVols\Volume2, C:\PrimaryVols\Volume3, C:\PrimaryVols\Volume4, and C:\PrimaryVols\Volume5 .You create three databases, locating the first database under C:\PrimaryVols\Volume1, the second under C:\PrimaryVols\Volume2, and the third under C:\PrimaryVols\Volume3 .You then have two spare volumes, mounted as C:\PrimaryVols\Volume4 and C:\PrimaryVols\Volume5 .If a disk fails, a database copy becomes corrupted, or another event requiring reseed occurs, the failed database is automatically reseeded to one of the spare volumes .
You can identify the failure and automatic reseed tasks by reviewing the event logs . Related events are logged in the event logs under Applications and Services Logs > Microsoft > Exchange > High Availability and under Applications and Ser-vices Logs > Microsoft > Exchange >MailboxDatabaseFailureItems .
Creating mailbox databasesYou can create mailbox databases by using the New Mailbox Database Wizard . The default database file path and default log folder path are set automatically to be the same as those used for other Exchange data .
Any new mailbox databases you create using the Exchange Admin Center are configured to use the mailbox provisioning load balancer by default. When you create mailbox databases using the Exchange Management Shell, you can set the –IsExcludedFromProvisioning parameter to $True to specify that the database should not be considered by the mailbox provisioning load balancer . Excluding a database from provisioning means new mailboxes are not automatically added to this database . Rather than excluding a database from provisioning, you can set the –IsSuspendedFromProvisioning parameter to $True to specify that a database tem-porarily not be considered by the mailbox provisioning load balancer . Keep in mind

Exchange database administration ChAptEr 3 67
that whether you exclude or suspend a database from provisioning is semantics as in either case the database won’t be used for provisioning .
To create a mailbox database, complete the following steps:
1. In the Exchange Admin Center, select Servers in the feature pane, and then select Databases . In the main pane, you should see a list of active databases that are available in the Exchange organization .
2. Tap or click the New button to open the New Database dialog box, shown in Figure 3-1 .
FIGURE 3-1 Configure the new mailbox database .
3. In the Mailbox Database text box, type a name for the mailbox database . The database name must be unique within the Exchange organization . Although the database name can contain spaces and special characters, it’ll be easier to work with the database if the name uses standard characters .
4. Tap or click Browse to the right of the Server text box to open the Select Server dialog box . Figure 3-2 shows Mailbox servers listed by name, version, and exact build as well as associated database availability group, if applicable .

ChAptEr 3 Exchange database administration68
FIGURE 3-2 Select a Mailbox server .
5. Select the Mailbox server that will host the mailbox database, and then tap or click OK . Only Mailbox servers in the Active Directory forest to which you are connected are available .
6. The database file path and log folder path are set to the default location for Exchange data on the selected server . A subfolder with the mailbox database name will be created under the default database file path and the name of the .edb file for the database will be set the same as the database name. Sim-ilarly, a subfolder with the same name as the database name is created under the default log folder path . If you don’t want to use the default locations, enter the paths you want to use for the database file and the related logs in the text boxes provided .
REAL WORLD Exchange creates folders if they do not exist, which is a good thing except when you mistype the intended path. Rather than type in a long file path, you might want to use copy and paste. In File Explorer, navigate to the exact folder path you want to use. Click in the folder path on the Address bar to display and automatically select the folder path. press Ctrl+C to copy the path. In the New Database dialog box, click in the path text box, press Ctrl+A, and then press the Delete key. Finally, press Ctrl+V to paste in the path you copied previously.
7. Select the Mount This Database check box if you want to mount this data-base . Mounting a database puts it online, making it available for use .
8. Tap or click Save to create the mailbox database, and then tap or click OK . If an error occurred, you need to take the appropriate corrective action . Other-wise, you can now modify the properties of the mailbox database as neces-sary . To make the new database accessible to mailbox users, you must restart the Microsoft Exchange Information Store service .
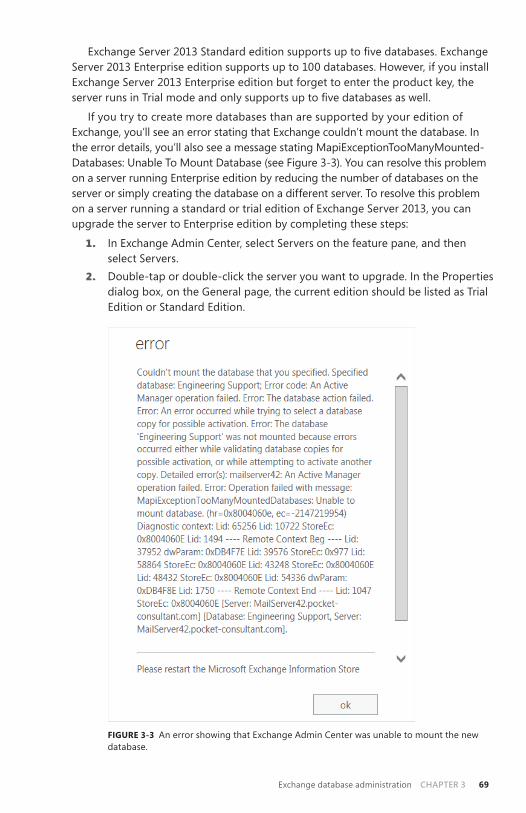
Exchange database administration ChAptEr 3 69
Exchange Server 2013 Standard edition supports up to five databases. Exchange Server 2013 Enterprise edition supports up to 100 databases . However, if you install Exchange Server 2013 Enterprise edition but forget to enter the product key, the server runs in Trial mode and only supports up to five databases as well.
If you try to create more databases than are supported by your edition of Exchange, you’ll see an error stating that Exchange couldn’t mount the database . In the error details, you’ll also see a message stating MapiExceptionTooManyMounted-Databases: Unable To Mount Database (see Figure 3-3) . You can resolve this problem on a server running Enterprise edition by reducing the number of databases on the server or simply creating the database on a different server . To resolve this problem on a server running a standard or trial edition of Exchange Server 2013, you can upgrade the server to Enterprise edition by completing these steps:
1. In Exchange Admin Center, select Servers on the feature pane, and then select Servers .
2. Double-tap or double-click the server you want to upgrade . In the Properties dialog box, on the General page, the current edition should be listed as Trial Edition or Standard Edition .
FIGURE 3-3 An error showing that Exchange Admin Center was unable to mount the new database .

ChAptEr 3 Exchange database administration70
3. If the server is running Trial Edition, upgrade by entering a valid Enterprise product key in the text boxes provided, and then selecting Save . If the server is running Standard Edition, upgrade by selecting Change Product Key, enter-ing a valid Enterprise product key in the text boxes provided, and then select-ing Save .
4. Tap or click OK . For the change to take effect, you must restart the Microsoft Exchange Information Store service .
In the Exchange Management Shell, you can create mailbox databases by using the New-MailboxDatabase cmdlet . Listing 3-1 provides the syntax and usage .
NOTE You use a separate cmdlet to mount the database. See the section “Mounting and dismounting databases” later in this chapter for details.
LISTING 3-1 New-MailboxDatabase cmdlet syntax and usage
Syntax
New-MailboxDatabase -Name DatabaseName -Server ServerName [-EdbFilePath DbFilePath] [-LogFolderPath FolderPath] {AddtlParams} {AddtlParams} [-DomainController FullyQualifiedName][-IsExcludedFromProvisioning <$true | $false}] [-IsSuspendedFromProvisioning <$true | $false>] [-OfflineAddressBook OfflineAddressBook]
New-MailboxDatabase -Recovery <$true | $false> -Server ServerName [-DomainController FullyQualifiedName] [-EdbFilePath DbFilePath] [-LogFolderPath FolderPath]
Usage
New-MailboxDatabase –Server "CorpServer88" –Name "Accounting Database" -EdbFilePath "C:\Databases\Accounting\AccountingMail.edb" -LogFolderPath "D:\DatabaseLogs\Accounting"
Setting the default offline address bookMailbox databases can have different types of information associated with them, including a default OAB . You set related options for mailbox databases by using the Client Settings page of the related Properties dialog box . To view this dialog box and update the messaging options, follow these steps:
1. In the Exchange Admin Center, select the Servers feature, and then select Databases . Next, double-tap or double-click the database you want to configure.
2. In the Properties dialog box, tap or click the Client Settings page .
NOTE If you can’t update the text boxes on the Client Settings page, it means that a policy has been applied to the mailbox database. You must directly edit or remove the policy and then make the necessary changes.
Exchange database administration ChAptEr 3 71
3. The Offline Address Book text box shows the OAB for the mailbox database. OABs contain information regarding mail-enabled users, contacts, and groups in the organization, and they are used when users aren’t connected to the network . If the text box is empty, the global default is used . If you’ve created additional OABs beyond the global default, you can specify one of these additional OABs as the default for the mailbox database . Tap or click Browse, select the OAB you want to use, and then tap or click OK . Tap or click Save to apply the changes .
In the Exchange Management Shell, you can set the default OAB for mailbox databases by using the Set-MailboxDatabase cmdlet . Listing 3-2 provides the syntax and usage .
LISTING 3-2 Using the Set-MailboxDatabase cmdlet to set the default OAB
Syntax
Set-MailboxDatabase –Identity MailboxDatabase [-OfflineAddressBook OABIdentity
Usage
Set-MailboxDatabase –Identity "Accounting Mail" -OfflineAddressBook "\US Corporate"
Setting mailbox database limits and deletion retentionMailbox database limits are designed to control the amount of information that users can store in their mailboxes . Users who exceed the designated limits might receive warning messages and might be subject to certain restrictions, such as the inability to send messages . Deleted item retention is designed to ensure that mes-sages and mailboxes that might be needed in the future aren’t deleted inadvertently . If retention is turned on, you can retain deleted messages and mailboxes for a speci-fied period before they are permanently deleted and are nonrecoverable.
An average retention period for messages is about 14 days . The minimum reten-tion period for mailboxes should be about 7 days . In most cases, you’ll want deleted messages to be maintained for a minimum of 5 to 7 days and deleted mailboxes to be maintained for a minimum of three to four weeks . An interval of 5 to 7 days is used for messages because users usually realize within a few days that they shouldn’t have deleted a message . A three-week to four-week interval is used for mailboxes because several weeks can (and often do) pass before users realize that they need a deleted mailbox or messages within a deleted mailbox . To understand why, consider the following scenario .
Sally leaves the company . A coworker is given permission to delete Sally’s user account and mailbox . Three weeks later, Sally’s boss realizes that she was the only person who received and archived the monthly reports sent through email from corporate headquarters . The only way to get reports for previous years is to recover Sally’s mailbox, and you can do this if you’ve set a sufficiently long retention period.

ChAptEr 3 Exchange database administration72
NOTE Exchange has several features to ensure that mailbox items are retained ac-cording to policies set forth by an organization for legal reasons, including automatic archiving of old messages and retention policies. Deletion settings on the Limits page control the minimum length of time deleted items are retained if no retention tags specifically apply to deleted items.
To view or set limits and deletion retention for a mailbox database, follow these steps:
1. In the Exchange Admin Center, select the Servers feature, and then select Databases . Next, double-tap or double-click the database you want to configure.
2. In the Properties dialog box, on the Limits page (shown in Figure 3-4), use the following options to set storage limits and deleted item retention:• Issue a warning at (GB) Sets the size limit, in gigabytes, that a mailbox
can reach before Exchange Server issues a warning to the user . The warn-ing tells the user to clear out the mailbox . If you don’t want Exchange to issue warnings, set the value to 0 or Unlimited .
• Prohibit send at (GB) Sets the size limit, in gigabytes, that a mailbox can reach before the user is prohibited from sending any new mail . The restriction ends when the user clears out the mailbox and the total mail-box size is under the limit . If you don’t want Exchange to prohibit sending mail, set the value to 0 or Unlimited .
• Prohibit send and receive at (GB) Sets the size limit, in gigabytes, that a mailbox can reach before the user is prohibited from sending and receiving mail . The restriction ends when the user clears out the mailbox and the total mailbox size is under the limit . If you don’t want Exchange to prohibit sending and receiving mail, set the value to 0 or Unlimited .
CAUTION prohibiting send and receive might cause users to lose email. When a user sends a message to a user who is prohibited from receiving messages, a non-delivery report (NDr) is generated and delivered to the sender. the recipient never sees the email. Because of this, you should prohibit send and receive only in very rare circumstances. Your organizational policy will likely spell out those circum-stances. to remove this restriction, set prohibit Send And receive to Unlimited or enter a value of 0.
• Keep deleted items for (days) Sets the number of days to retain deleted items . An average retention period is 14 days . If you set the retention period to 0, deleted messages aren’t retained, and you can’t recover them in the same way you could if retention was enabled .
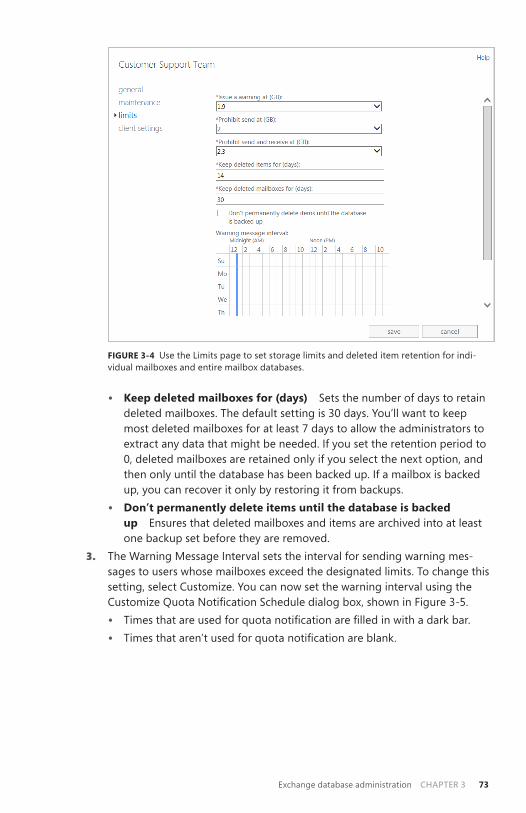
Exchange database administration ChAptEr 3 73
FIGURE 3-4 Use the Limits page to set storage limits and deleted item retention for indi-vidual mailboxes and entire mailbox databases .
• Keep deleted mailboxes for (days) Sets the number of days to retain deleted mailboxes . The default setting is 30 days . You’ll want to keep most deleted mailboxes for at least 7 days to allow the administrators to extract any data that might be needed . If you set the retention period to 0, deleted mailboxes are retained only if you select the next option, and then only until the database has been backed up . If a mailbox is backed up, you can recover it only by restoring it from backups .
• Don’t permanently delete items until the database is backed up Ensures that deleted mailboxes and items are archived into at least one backup set before they are removed .
3. The Warning Message Interval sets the interval for sending warning mes-sages to users whose mailboxes exceed the designated limits . To change this setting, select Customize . You can now set the warning interval using the Customize Quota Notification Schedule dialog box, shown in Figure 3-5.• Times that are used for quota notification are filled in with a dark bar.• Times that aren’t used for quota notification are blank.

ChAptEr 3 Exchange database administration74
FIGURE 3-5 Customize quota notification for mailboxes stored in the database .
IMPORTANT the default interval for sending warning messages is daily be-tween 1 A.M. and 1:15 A.M, which is an acceptable initial interval for small deploy-ments. As your organization grows, however, you’ll want to optimize this interval to ensure that servers aren’t overburdened and that servers have enough time to process all the mailboxes.
4. Show the time in hours or in 15-minute intervals by using the options pro-vided . Click or tap the time interval to change the setting .• Hourly or 15-minute interval buttons are used to select or clear a particu-
lar interval for all the days of a week .• Days of the week buttons allow you to clear or select all the hours in a
particular day .• The All button allows you to clear or select all the time periods .
5. If you customized the notification schedule, tap or click OK to close the Customize Quota Notification Schedule dialog box.
6. Tap or click Save to apply your settings .In the Exchange Management Shell, you can set limits for mailbox databases by
using the Set-MailboxDatabase cmdlet . Listing 3-3 provides the syntax and usage . When you set a limit, you can specify the value with KB (for kilobytes), MB (for mega-bytes), or GB (for gigabytes) . The default value type is bytes . Additionally, it’s impor-tant to point out that the -MaintenanceSchedule and -QuotaNotificationSchedule parameters are not used with Exchange 2013 .

Exchange database administration ChAptEr 3 75
LISTING 3-3 Using the Set-MailboxDatabase cmdlet to set limits
Syntax
Set-MailboxDatabase [-Identity MailboxDatabase] [-AllowFileRestore <$true | $false>] [-BackgroundDatabaseMaintenence <$true | $false>] [-CircularLoggingEnabled <$true | $false>] [-DataMoveReplicationConstraint <None | SecondyCopy | SecondDatacenter | AllDatacenters | AllCopies>] [-DeletedItemRetention NumberDays] [-DomainController DCName] [-EventHistoryRetentionPeriod NumberDays] [-IndexEnabled <$true | $false>] [-IsExcludedFromProvisioning <$true | $false>] [-IssueWarningQuota Limit] [-JournalRecipient RecipientId] [-MailboxRetention NumberDays] [-MountAtStartup <$true | $false>] [-Name Name] [-OfflineAddressBook OABId] [-ProhibitSendQuota Limit] [-ProhibitSendReceiveQuota Limit] [-RecoverableItemsQuota Limit] [-RecoverableItemsWarningQuota Limit] [-RetainDeletedItemsUntilBackup <$true | $false>]
Usage
Set-MailboxDatabase –Identity "Accounting Mail" -IssueWarningQuota 1.9GB -DeletedItemRetention 14 -MailboxRetention 30 -ProhibitSendQuota 2GB -ProhibitSendReceiveQuota 2.4GB -RetainDeletedItemsUntilBackup $true
recovering deleted mailboxesWhen you delete a mailbox from a user account, the mailbox is retained as a discon-nected mailbox according to the mailbox retention setting . You can reconnect the mailbox to the original user account or another user account if necessary . Similarly, when you delete a user account and the related mailbox, the mailbox is retained as a disconnected mailbox according to the mailbox retention setting . You can connect the mailbox to an existing user account if necessary .
When you move mailboxes between databases, mailboxes in the original (source) database are soft deleted . This means they are disconnected, marked as soft deleted, but retained in the original database until the deleted mailbox retention period expires . In Exchange Management Shell, you can use a DisconnectReason of “Soft-Deleted” to find soft-deleted mailboxes .
To recover a deleted mailbox, complete the following steps:
1. In the Exchange Admin Center, select Recipients in the feature pane, and then select Mailboxes .
2. Tap or click the More button (this button shows three dots), and then select Connect A Mailbox . The Connect A Mailbox dialog box shows all mailboxes marked for deletion but currently retained regardless of whether those mail-boxes were disabled, deleted, or soft deleted .
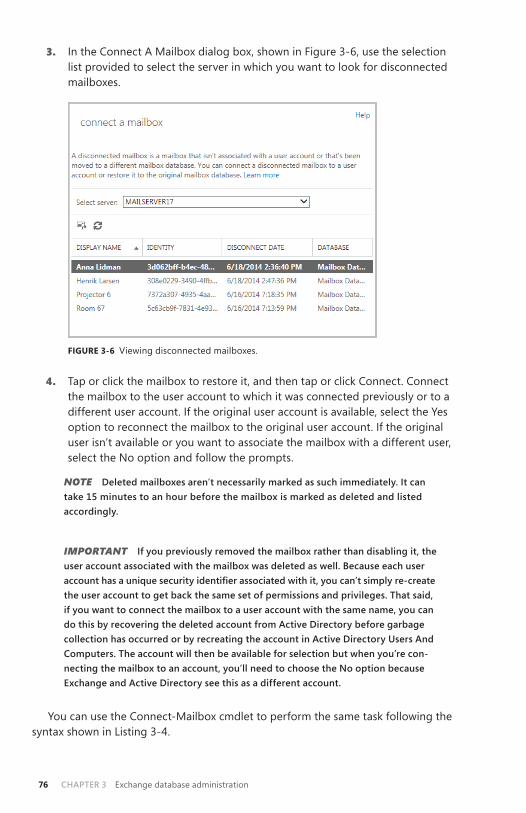
ChAptEr 3 Exchange database administration76
3. In the Connect A Mailbox dialog box, shown in Figure 3-6, use the selection list provided to select the server in which you want to look for disconnected mailboxes .
FIGURE 3-6 Viewing disconnected mailboxes .
4. Tap or click the mailbox to restore it, and then tap or click Connect . Connect the mailbox to the user account to which it was connected previously or to a different user account . If the original user account is available, select the Yes option to reconnect the mailbox to the original user account . If the original user isn’t available or you want to associate the mailbox with a different user, select the No option and follow the prompts .
NOTE Deleted mailboxes aren’t necessarily marked as such immediately. It can take 15 minutes to an hour before the mailbox is marked as deleted and listed accordingly.
IMPORTANT If you previously removed the mailbox rather than disabling it, the user account associated with the mailbox was deleted as well. Because each user account has a unique security identifier associated with it, you can’t simply re-create the user account to get back the same set of permissions and privileges. that said, if you want to connect the mailbox to a user account with the same name, you can do this by recovering the deleted account from Active Directory before garbage collection has occurred or by recreating the account in Active Directory Users And Computers. the account will then be available for selection but when you’re con-necting the mailbox to an account, you’ll need to choose the No option because Exchange and Active Directory see this as a different account.
You can use the Connect-Mailbox cmdlet to perform the same task following the syntax shown in Listing 3-4 .

Exchange database administration ChAptEr 3 77
LISTING 3-4 Connect-Mailbox cmdlet syntax and usage
Syntax
Connect-Mailbox -Identity OrigMailboxIdentity -Database DatabaseIdentity -User NewUserIdentity [-ActiveSyncMailboxPolicy PolicyId] [-Alias Alias] [-DomainController DCName] [-ManagedFolderMailboxPolicy PolicyId] [-ManagedFolderMailboxPolicyAllowed <$true | $false>] [-Archive <$true | $false>] [-Equipment <$true | $false>] [-Room <$true | $false>] [-Shared <$true | $false>] [-ValidateOnly <$true | $false>] [-LinkedCredential Credential] [-LinkedDomainController DCName] [-LinkedMasterAccount UserId]
Usage
Connect-Mailbox -Identity "Per Reitzel" -Database "Accounting Mail" -User "CPANDL\perr" -Alias "perr" Connect-Mailbox -Identity "Per Reitzel" -Database "Accounting Mail" –LinkedDomainController CorpServer72 -LinkedMasterAccount "CPANDL\perr"
recovering deleted items from mailbox databasesYou can recover deleted items from mailbox databases as long as you’ve either set a deleted item retention period for the database from which the items were deleted and the retention period hasn’t expired, or you have specified that Exchange should not permanently delete items from mailboxes until the database has been backed up and Exchange hasn’t been backed up yet . If either of these conditions are met, you can recover deleted items from mailbox databases .
To use Outlook 2010 or Outlook 2013 for recovery, complete the following steps:
1. Log on as the user who deleted the message, and then start Outlook .2. Tap or click the Folders pane, and then select Recover Deleted Items .3. The Recover Deleted Items From dialog box appears . Select the items you
want to recover, and then tap or click the Recover Selected Items button .4. Items you’ve recovered are copied to the Deleted Items folder . In the left
pane, tap or click Deleted Items .5. In the Deleted Items folder, press and hold or right-click items you want to
keep, select Move, and then tap or click Other Folder .6. In the Move Items dialog box, select the folder to which the item should be
moved, and then tap or click OK .
NOTE the steps are similar for Outlook 2007, except you start by tapping or clicking recover Deleted Items on the tools menu.

ChAptEr 3 Exchange database administration78
To use Outlook Web App (OWA) for recovery, complete these steps:
1. In a web browser, type https://servername.yourdomain.com/owa, where servername is a placeholder for the HTTP virtual server hosted by Exchange Server 2013 and yourdomain.com is a placeholder for your external domain name, such as https://mail .cpandl .com/owa .
2. Next, log on as the user (or have the user log on) . Type the user name in domain\username format, such as pocket-consulta\bertk, or user@domain format, such as [email protected] . Type the password, and then tap or click Sign In .
3. In the left pane, press and hold or right-click Deleted Items, and then select Recover Deleted Items .
4. In the Recover Deleted Items dialog box, you’ll see a list of recoverable items . Each listed item will have a selection check box . Select this check box for items you want to recover .
5. Tap or click the Recover button, and then tap or click OK . Items you select will be restored to their default folders .
Working with mailbox database copies
When your Exchange organization uses database availability groups, Exchange rep-licates transaction logs from an active mailbox database on a source Mailbox server to other Mailbox servers in the database availability group that have passive copies of the database . On these servers, Exchange replays the transaction logs into the pas-sive copy of the mailbox database by using either file mode or block mode replica-tion . You can monitor the health and status of replication and database copies by using the Exchange Management tools .
The Mailbox server that hosts the active copy of a database is referred to as the mailbox database primary for that database . A Mailbox server that hosts a passive copy of a database is referred to as a mailbox database secondary for that database . You can move the active database to another Mailbox server in the database avail-ability group by using the switchover process discussed in “Switching over servers and databases” in Chapter 2 . In a switchover, the active copy of a database is dis-mounted on the current Mailbox server and a passive copy of the database is acti-vated and mounted on another Mailbox server in the database availability group .
TIP You can quickly distinguish between an active mailbox database and a passive copy of a database by reviewing the Copy Status column under the Database Copies page in the Exchange Admin Center. Only the active database will have a status of Mounted or Dismounted. For passive database copies, you’ll see the current status of replication for the database copy.

Exchange database administration ChAptEr 3 79
Creating mailbox database copiesAfter you create a database availability group and add Mailbox servers to the group, you can create copies of mailbox databases to initiate replication . Within the group, replication occurs between the active mailbox database on a source Mailbox server and other Mailbox servers that host copies of the database . You cannot replicate a database outside of a database availability group, nor can you replicate an Exchange 2013 mailbox database to a server running an earlier version of Exchange .
Each database availability group can have up to 16 member servers, and you can create up to 16 instances of a database, including one active instance and 15 passive instances . You can create mailbox database copies only on Mailbox servers that do not host the active copy of a mailbox database, and you cannot create two copies of the same database on the same server .
Because all copies of a database use the same path on each server containing a copy, the database and log file paths for a database copy on each Mailbox server must not conflict with any other database paths. You need to ensure the database and log file paths for the database copy can be created in the same location as all other copies and that the paths do not conflict with any other database paths on the target server .
With respect to Active Directory, the member servers in an availability group must all be in the same Active Directory domain . You can create database copies on Mail-box servers in the same or different Active Directory Sites, and on the same or dif-ferent network subnets . However, database copies are not supported between Mailbox servers with roundtrip network latency greater than 250 milliseconds (by default) . Database copies are automatically assigned an identity in the format DatabaseName\HostMailboxServerName, such as Engineering Primary Database\MailServer36 .
To create a copy of a mailbox database, complete the following steps:
1. In the Exchange Admin Center, select Servers in the feature pane, and then select Databases . In the main pane, you should see a list of active databases that are available in the Exchange organization .
2. Select the mailbox database that you want to copy to see a list of all copies of that database in the details pane . Whereas the active copy of a database normally is listed with a status of Active Mounted or Active Dismounted, pas-sive copies are normally listed with a status of Passive Healthy .
3. Tap or click the More button (this button shows three dots), and then select Add A Database Copy . This opens the Add Mailbox Database Copy dialog box .As shown in Figure 3-7, the dialog box shows you which servers already have a copy of the database and sets the activation preference number to the next value for the next database instance . You can set a lower preference value if desired .

ChAptEr 3 Exchange database administration80
FIGURE 3-7 Add a mailbox database copy .
4. Tap or click Browse . Select the Mailbox server that will host the mailbox data-base copy, and then tap or click OK . Although servers outside the database availability group and servers running earlier versions of Exchange may be listed in the Select Server dialog box, you’ll only want to select an Exchange 2013 Mailbox server in the same database availability group that doesn’t have a copy of the database already . Each Mailbox server in a database avail-ability group can host only one copy of a database .
5. Optionally, in the Activation Preference Number text box, specify the pref-erence value for the database copy . The activation preference number rep-resents the order of activation preference for a database copy after a failure or outage of the active copy . The preference value is a number equal to or greater than 1, where 1 has the highest preference . The preference value cannot be larger than the total number of database copies .
NOTE Active Manager uses the preference value only to break ties in the best-copy selection process. If two or more database copies are seen as the best choice for activation, the database copy with the highest preference is selected. Following this, when there is a tie, a database copy with a preference value of 3 would be selected before a database copy with a preference value of 4. For more information on Active Manager, see “Working with active manager” in Chapter 2.
6. If you want to configure replay lag time or postpone seeding, select More Options . You’ll then be able to specify a replay lag time in days and postpone seeding . If you postpone seeding of the database, you’ll need to manually seed the database later .
Exchange database administration ChAptEr 3 81
7. Tap or click Save to create the mailbox database copy, and then click Close when the process completes . If an error occurred, you need to take the appropriate corrective action . Otherwise, you can now work with the data-base copy .
In the Exchange Management Shell, you can create mailbox database copies by using the Add-MailboxDatabaseCopy cmdlet . Listing 3-5 provides the syntax and usage . Use the –ReplayLagTime parameter to specify how long the Exchange Rep-lication Service should wait before replaying log files. Use the –TruncationLagTime parameter to specify how long the Exchange Replication Service should wait before truncating logs that have been replayed .
TIP Different database copies can have different lag times. If you want logs to be replayed immediately, set a relatively short replay lag time or none at all. If you want a cushion for protection against inadvertent changes, set a longer replay lag time. As an example, if you have three database copies, you might want two copies to have short replay lag times and one copy to have a long replay lag time.
NOTE the new database copy will remain in a Suspended state if you use the –Seedingpostponed parameter. When the database copy status is set to Suspended, the SuspendMessage is set to “replication is suspended for database copy ‘<Name>’ because database needs to be seeded.” You can seed the database as discussed in the “Updating Mailbox Database Copies” section.
LISTING 3-5 Add-MailboxDatabaseCopy cmdlet syntax and usage
Syntax
Add-MailboxDatabaseCopy -Identity SourceDatabase -MailboxServer TargetServer [-ActivationPreference PrefValue] [-ReplayLagTime Days.Hours:Minutes:Seconds] [-SeedingPostponed <$true | $false>] [-TruncationLagTime Days.Hours:Minutes:Seconds] [-DomainController FullyQualifiedName]
Usage
Add-MailboxDatabaseCopy -Identity "Engineering Primary Database" -MailboxServer "MailServer36" -ReplayLagTime 00:03:00 -TruncationLagTime 00:10:00 -ActivationPreference 2
Setting replay, truncation, and preference values for database copiesReplay and truncation values are designed to let you fine-tune the way replication works for each database copy . Replay lag time is the amount of time to delay log replay . Truncation lag time is the amount of time that you want to delay log trunca-tion after a log has been successfully replayed . You can also set a relative preference value for database copies . The preference value sets the order of activation prefer-ence after a failure or outage affecting the active database, with a value of 1 indicat-ing the highest preference, a value of 2 the next highest preference, and so on . You cannot set a database copy to a value higher than the number of database copies .

ChAptEr 3 Exchange database administration82
Active Manager uses the preference value in the case of a tie during the best-copy selection process .
To set preference values for a database copy, complete the following steps:
1. In the Exchange Admin Center, select Servers in the feature pane, and then select Databases . In the main pane, you should see a list of active databases that are available in the Exchange organization .
2. Select the mailbox database with the copy that you want to manage . In the details pane, you’ll see a list of active and passive copies of the database, along with separate management options for each . Tap or click the View Details option for the database copy you want to modify .
3. The current activation preference number and replay lag time are listed . Change the values as necessary, and then tap or click Save .
In the Exchange Management Shell, you can set replay, truncation, and prefer-ence values for mailbox database copies by using the Set-MailboxDatabaseCopy cmdlet . Listing 3-6 provides the syntax and usage .
LISTING 3-6 Set-MailboxDatabaseCopy cmdlet syntax and usage
Syntax
Set-MailboxDatabaseCopy -Identity Database\Server [-ActivationPreference PrefValue] [-ReplayLagTime Days.Hours:Minutes:Seconds] [-TruncationLagTime Days.Hours:Minutes:Seconds] [-DomainController FullyQualifiedName]
Usage
Set-MailboxDatabaseCopy -Identity "Tech Mail Database\MailServer36" -ReplayLagTime 00:02:00 -TruncationLagTime 00:05:00 -ActivationPreference 6
In Exchange 2013, lagged copies automatically play down log files as necessary to accommodate adverse conditions, such as the following:
■■ If Exchange 2013 detects that page patching is required for a lagged copy, the logs will be automatically replayed into the lagged copy to perform page patching .
■■ If Exchange 2013 detects that a low disk space threshold has been reached or that no other log copies are available, the logs will be automatically replayed into the lagged copy .
■■ If Exchange 2013 detects that there are too few available healthy copies (active and passive) of a database for more than 24 hours, the logs will be automatically replayed into the lagged copy .
However, you must enable these options specifically. You enable lagged copy replay for all lagged copies in a particular database availability group by using the following command:
Set-DatabaseAvailabilityGroup DAGName -ReplayLagManagerEnabled $true

Exchange database administration ChAptEr 3 83
DAGName is the name of the database availability group to configure.
You specify the low diskspace threshold as a percentage of free disk space before log replay occurs by using the registry value:
HKLM\Software\Microsoft\ExchangeServer\v15\Replay\Parameters\ ReplayLagPlayDownPercentDiskFreeSpace
For example, if you want Exchange to automatically play down lagged copies when the free disk space on the volume used by the active database reaches 10 per-cent, you’d edit the ReplayLagPlayDownPercentDiskFreeSpace value in the registry and set it to 10 .
You specify the number of available healthy copies that triggers replay by using the following registry value:
HKLM\Software\Microsoft\ExchangeServer\v15\Replay\Parameters\ ReplayLagManagerNumAvailableCopies
By default, this value is set to 3, meaning replay is triggered whenever there are fewer than 3 copies of a database available for a 24-hour period . Although this value may work well in large deployments of Exchange, this value is not ideal for small deployments. Specifically, in deployments in which you have three or fewer Mailbox servers in a DAG, setting this value to 3 will cause lagged logs to play down every 24 hours whether you want them to or not .
NOTE As lagged copies can use SafetyNet, recovery or activation of lagged copies is much easier than in Exchange 2010. Exchange 2013 also issues single copy alerts as part of the managed availability architecture. previously, single copy alert was imple-mented as a script that ran periodically as a scheduled task.
Suspending and resuming replicationAs part of planned maintenance or for other reasons, it might be necessary to tem-porarily suspend replication activity for a database copy . In addition, prior to per-forming some administrative tasks, you need to suspend replication activity before you can complete the task—for example, before performing seeding . You can sus-pend and resume database copy activity by completing the following steps:
1. In the Exchange Admin Center, select Servers in the feature pane, and then select Databases . In the main pane, you should see a list of active databases that are available in the Exchange organization .
2. Select the mailbox database with the copy that you want to manage . In the details pane, you’ll see a list of active and passive copies of the database . Whereas the active copy of a database is normally listed with a status of Active Mounted or Active Dismounted, passive copies are normally listed with a status of Passive Healthy .
3. Select the Suspend option for the passive database copy (not an active data-base) for which you want to suspend replication .

ChAptEr 3 Exchange database administration84
4. In the Suspend Database Copy dialog box, enter a comment as to why you are suspending replication . If you want to ensure replication can only be activated by you or another administrator, select This Copy Can Be Activated Only By Manual Intervention .
5. Tap or click Save to suspend continuous replication .To resume replication later, tap or click Resume . If a suspend comment was
provided, you can read the comment . Then tap or click Yes to resume continuous replication .
In the Exchange Management Shell, you can suspend and resume replication by using Suspend-MailboxDatabaseCopy and Resume-MailboxDatabaseCopy, respec-tively . Listings 3-7 and 3-8 provide the syntax and usage . If you only suspend activa-tion by using the –ActivationOnly parameter, the database cannot be activated until you resume replication without specifying the –ReplicationOnly parameter . The –ReplicationOnly parameter resumes replication without affecting the act i-vation setting . For example, if the –ActivationSuspended parameter was set to $True, the parameter remains set to $True .
LISTING 3-7 Suspend-MailboxDatabaseCopy cmdlet syntax and usage
Syntax
Suspend-MailboxDatabaseCopy -Identity Database\Server [-ActivationOnly <$true | $false>] [-EnableReplayLag <$true | $false>] [-DomainController FullyQualifiedName] [-SuspendComment Comment]
Usage
Suspend-MailboxDatabaseCopy -Identity "Tech Mail Database\MailServer36" -ActivationOnly
LISTING 3-8 Resume-MailboxDatabaseCopy cmdlet syntax and usage
Syntax
Resume-MailboxDatabaseCopy -Identity Database\Server [-DisableReplayLag <$true | $false>] [-DisableReplayLagReason "Comment"] [-ReplicationOnly <$true | $false>] [-DomainController FullyQualifiedName]
Usage
Resume-MailboxDatabaseCopy -Identity "Tech Mail Database\MailServer36"
Activating lagged database copiesLagged database copies have a replay lag time great than 0 . You can activate a lagged copy by recovering the database copy from SafetyNet, by replaying all uncommitted log files, or by performing a point in time activation.

Exchange database administration ChAptEr 3 85
Before you activate a lagged copy, you may want to preserve the original files for the lagged copy . If so, you need to create a snapshot of the volumes containing the database copy and its log files by suspending replication of the lagged copy you want to activate, and then creating a shadow copy of these volumes as detailed in the steps that follow:
1. Suspend replication of the lagged copy you want to activate using the fol-lowing command:
Suspend-MailboxDatabaseCopy Database\Server -SuspendComment "Comment"
-Confirm $False
Database is the name of the lagged copy, Server is the name of the server hosting the lagged copy, and Comment is a descriptive comment, such as:
Suspend-MailboxDatabaseCopy "Engineering DB\MailServer18"
-SuspendComment "Suspending replication to take a db snapshot"
-Confirm $False
2. Create a snapshot of the database and log folders by using the following command:
Vssadmin create shadow /For="c:\Databases\Engineering DB"
Vssadmin create shadow /For="c:\Logs\Engineering DB"
3. Optionally, copy the database and log files to another volume where you want to perform the recovery .
To recover a lagged copy from SafetyNet, complete the following steps:
1. Because you don’t want the log files to replay when the database is mounted, move the log files for the database copy to an archive folder. This preserves the log files in case they are subsequently needed.
2. To allow the database to mount without all the necessary transaction logs files, you’ll need to confirm that you accept the data loss. To do this, mount the database with the -AcceptDataLoss parameter as shown in this example:
Mount-Database "Engineering DB" -AcceptDataLoss
3. Exchange will mount the database and then request redelivery of missing messages from SafetyNet. You can confirm that the lagged copy was suc-cessfully activated by viewing the database properties . In Exchange Admin Center, select Servers in the feature pane, and then select Databases . Next, select the database copy you activated . In the Details pane, click View Details .
4. After you verify that the database copy was successfully activated, you can delete the log files you moved to an archive folder, as these logs are no longer needed .

ChAptEr 3 Exchange database administration86
To activate a lagged copy by replaying all uncommitted log files, complete the following steps:
1. Activate the lagged copy on a specified server by using the following command:
Move-ActiveMailboxDatabase Database -ActivateOnServer Server
-SkipLagChecks
Database is the name of the lagged copy and Server is the name of the server hosting the lagged copy, such as:
Move-ActiveMailboxDatabase "Engineering DB" -ActivateOnServer
MailServer18 -SkipLagChecks
2. Exchange will mount the database on the designated server and replay all the log files. The duration of the replay process depends on the amount of data to replay and the speed at which your server hardware can replay the logs .
3. You can confirm that the lagged copy was successfully activated by view-ing the database properties . In Exchange Admin Center, select Servers in the feature pane, and then select Databases . Next, select the database copy you activated . In the Details pane, click View Details .
To activate a lagged copy to a point in time, complete the following steps:
1. Before you can activate a lagged copy to a point in time, you must first determine which log files are required to meet your recovery requirements. Use the log file date and time to identify which log files you need and which log files should be moved to an archive directory until the recovery process is successfully completed. Specifically, any log file created after your recovery time should be moved to the archive directory .
2. Next, you need to delete the checkpoint file for the lagged copy. This file has the .chk extension .
3. At an elevated command prompt, use Eseutil to perform the recovery opera-tion . The basic syntax is:
Eseutil /r ENN /a
ENN is the log generation prefix for the database, such as E00 or E01. This prefix is used with all the database files, so it’s easily identified when you access the database folder for the lagged copy .
4. When all the logs have been replayed, the database will be in a clean state and you can optionally copy the database and log files to another volume where you want to perform the recovery . Keep in mind that the duration of the replay process depends on the amount of data to replay and the speed at which your server hardware can replay the logs .
5. You can confirm that the lagged copy was successfully activated by view-ing the database properties . In Exchange Admin Center, select Servers in the feature pane, and then select Databases . Next, select the database copy you activated . In the Details pane, click View Details .

Exchange database administration ChAptEr 3 87
Updating mailbox database copiesSeeding is the process of initially replicating an active or passive database into a data-base copy . This creates a baseline passive copy of a database . Normally, seeding occurs automatically, and the length of time required to completely seed a database depends on the size of the source database, the available bandwidth on the net-work, and the level of activity on the servers involved . However, automatic seeding can fail, and in this case, you then need to manually initiate seeding .
REAL WORLD An automatic seed produces a copy of an active or passive database on a target Mailbox server. Automatic seeding occurs only during the creation of a new database or for a database that has never been backed up.
You can identify a problem with seeding by checking the state of the database copy. When you create a database copy, the database should enter the Initializing state and then the Seeding state. When seeding is complete, the database copy should be in the healthy state. If the database remains in a Suspended state and does not complete initialization or seeding, there is a problem. Note also that if you are seeding when creating the copy, the task will not complete successfully until the seed is completed. So, you simply watch the task progress and do not need to check copy status.
You can reseed a mailbox database copy anytime you suspect divergence has occurred . However, divergence isn’t necessarily a problem because incremental reseed (incremental resync) takes care of resolving the divergence . You would not need to do a full reseed except in circumstances in which resync isn’t possible—for example, when there is no overlap in log files between diverged copies, or when you’ve done something you shouldn’t have, like an offline defragmentation of a copy that causes uncorrectable divergence .
When you reseed a database, Exchange empties the database copy and repli-cates a new passive database copy . Typically, you won’t need to reseed database copies after the initial seeding has occurred; however, in some situations you might need to reseed a database copy . One state you can check for is the FailedAnd Suspended state . In this state, Exchange has detected a failure and suspended repli-cation replay because resolution of the failure explicitly requires administrator inter-vention . For example, if Exchange detects an unrecoverable divergence between the active mailbox database and a database copy, Exchange marks the database copy as FailedAndSuspended . If an incremental resync doesn’t eventually resolve the prob-lem, you need to resolve the underlying cause of the failure before the database copy can be transitioned to a healthy state, which includes reseeding the database .
Before you can seed or reseed a database, you must suspend replication . For very large databases—that is, those that are multiple terabytes (TB) in size—the pre-ferred technique for seeding the initial passive copy of the database, if service level agreements allow or such an outage is acceptable, is to dismount the active copy of the database and copy the database file to the same location on the target Mailbox server in the same database availability group . Rather than copying the database
ChAptEr 3 Exchange database administration88
over the network, which could take several days for a multiterabyte database, you should consider the following:
■■ Copying the database to one or more disk drives, preferably hot-swappable drives that can be moved between the source and target servers
■■ Copying the database to one or more logical unit numbers (LUNs) in your storage array that can be assigned to or is assigned to the target server
With this approach, the database will be unavailable until seeding is completed and you can mount the database . Alternatively, you can leave the active database online and use the Exchange Management tools to initiate the seeding process . After you’ve created at least one baseline passive copy of a database, you can seed new passive copies from the baseline passive copy at any time by using an online or offline approach.
The size of the database, the available network bandwidth, network latency, and the activity levels on the source and target servers determine how long an over-the-network transfer or update takes . After the seeding process has started, don’t close the Exchange Admin Center or Exchange Management Shell until the process has completed . If you do, the seeding operation will be terminated and will need to be restarted .
Keep the following in mind when you are considering updating database copies:■■ When you seed a database using the Exchange Admin Center, both the
database copy and the content index catalog are seeded . In the Exchange Management Shell, you can specify that only the database copy should be seeded using the –DatabaseOnly parameter or that only the context index catalog should be seeded using the –CatalogOnly parameter .
■■ Before you seed the database copy, you may want to manually remove exist-ing files on the server that hosts the database copy. You can delete existing files in the Exchange Management Shell by using the –DeleteExistingFiles parameter; however, these options remove only the files Exchange checks for and might fail if other files are present.
■■ When seeding is complete, Exchange automatically resumes replication . If you want to resume replication manually instead, you can use the –Manual-Resume parameter in the Exchange Management Shell .
■■ By default, seeding data is transferred over the replication network for the database availability group, unless you are seeding to a remote site, in which case it will default to the messaging network . You can override the defaults by using the –Network parameter . The network compression and encryp-tion settings are used and determine whether the transferred data is com-pressed, encrypted, or both . You specify the networks to use by name in both management tools . In the Exchange Management Shell, you can over-ride the network compression and encryption settings by using –Network-Compression-Override and –NetworkEncryptionOverride, respectively .

Exchange database administration ChAptEr 3 89
You can seed a database manually by completing the following steps:
1. In the Exchange Admin Center, select Servers in the feature pane, and then select Databases . In the main pane, you should see a list of active databases that are available in the Exchange organization .
2. Select the mailbox database with the copy that you want to manage . In the details pane, you’ll see a list of active and passive copies of the database .
3. Select the Update option for the passive database copy (not an active data-base) that you want to update (see Figure 3-8) .
TIP the Exchange Admin Center won’t let you reseed a database that’s in a healthy or other normal state. however, you can force a reseed by suspending the database, copying it, and then updating the database copy.
FIGURE 3-8 Update a database copy .
4. By default, Exchange will seed the database from the active copy of the data-base . If you want to use a passive copy for seeding, tap or click Browse . In the Select Mailbox Server dialog box, select the source server hosting the passive copy you want to use and then tap or click OK .
5. Tap or click Save to begin seeding . If an error occurred, you need to take the appropriate corrective action . Tap or click Close .
To seed a database copy in the Exchange Management Shell, you use the Update-MailboxDatabaseCopy cmdlet . Listing 3-9 provides the syntax and usage . Use the –Force parameter when seeding programmatically, and you will not be prompted for administrative input .
ChAptEr 3 Exchange database administration90
LISTING 3-9 Update-MailboxDatabaseCopy cmdlet syntax and usage
Syntax
Update-MailboxDatabaseCopy -Identity Database\Server -SourceServer ServerName [-CancelSeed <$true | $false>] [-BeginSeed <$true | $false>] [-CatalogOnly <$true | $false>] [-DatabaseOnly <$true | $false>] [-DeleteExistingFiles <$true | $false>] [-DomainController FullyQualifiedName] [-Force <$true | $false>] [-ManualResume <$true | $false>] [-MaximumSeedsInParallel MaxNumSeeds] [-NetworkCompressionOverride {"UseDAGDefault"|"Off"|"On"}] [-NetworkEncryptionOverride {"UseDAGDefault"|"Off"|"On"}] [-Network NetworkID] [-SafeDeleteExistingFiles <$true | $false>]
Usage
Update-MailboxDatabaseCopy -Identity "CS Mail\MailServer25" -CatalogOnly -Force Update-MailboxDatabaseCopy -Identity "CS Mail\MailServer25" -DatabaseOnly Update-MailboxDatabaseCopy -Identity "CS Mail\MailServer25" -Network "EastCampusDAG1\Primary DAG Network" -NetworkCompressionOverride "On" -NetworkEncryptionOverride "Off"
Monitoring database replication statusAs an Exchange administrator, you need to monitor the health and status of data-base copies to ensure that they are available when needed . You can view key health and status information for a database copy by completing the following steps:
1. In the Exchange Admin Center, select Servers in the feature pane, and then select Databases . In the main pane, you should see a list of active databases that are available in the Exchange organization .
2. Select the mailbox database with the copy that you want to manage . In the details pane, you’ll see a list of active and passive copies of the database along with the current status of each . Table 3-1 lists the possible status values and any corrective action that might be required .
3. Tap or click the View Details option for the database copy with which you want to work . This opens a properties dialog box .
4. Use the information provided to determine the health and status of replica-tion for the database copy . The information provided includes:• Database Displays the name of the selected database• Mailbox Server Displays the name of the Mailbox server that hosts the
database copy• Content Index State Displays the status of content indexing for the
database copy

Exchange database administration ChAptEr 3 91
• Status Displays the current health and status of replication for the data-base copy
• Copy Queue Length Shows the number of log files waiting to be cop-ied and checked
• Replay Queue Length Shows the number of log files waiting to be replayed into this copy of the database
• Error Messages Displays any current error status or error message for the database copy
• Latest Available Log Time Shows the time associated with the latest available log generated by the active database copy
• Last Inspected Log Time Shows the modification time of the last log that was successfully validated by the Mailbox server hosting the database copy
• Last Copied Log Time Shows the modification time of the last log that was successfully copied
• Last Replayed Log Time Shows the modification time of the last log that was successfully replayed by the Mailbox server hosting the database copy
• Activation Preference Number Shows the activation preference value for the database copy
• Replay Lag Time Shows the current replay lag time in days, if anyIn the Exchange Management Shell, you can check the health and status of rep-
lication by using the Get-MailboxDatabaseCopyStatus cmdlet . Listing 3-10 provides the syntax and usage .
LISTING 3-10 Get-MailboxDatabaseCopyStatus cmdlet syntax and usage
Syntax
Get-MailboxDatabaseCopyStatus -Server ServerName {AddtlParams} Get-MailboxDatabaseCopyStatus [-Identity LocalDatabaseName] [-Active <$true | $false>] [-Local <$true | $false>]] {AddtlParams} {AddtlParams} [-ConnectionStatus <$true | $false>] [-DomainController FullyQualifiedName] [-ExtendedErrorInfo <$true | $false>] [-UseServerCache <$true | $false>]
Usage
Get-MailboxDatabaseCopyStatus –Server "MailServer35" -ConnectionStatus –ExtendedErrorInfo Get-MailboxDatabaseCopyStatus Get-MailboxDatabaseCopyStatus –Identity "Accounting Mail"

ChAptEr 3 Exchange database administration92
TABLE 3-1 Copy status values
COPY STATUS STATUS OF THE MAILBOX DATABASE COPY CORRECTIVE ACTION
Activation Suspended
Has been manually blocked from activation by an administrator .
Allow activation, if appropriate .
Disconnected And Healthy
Has been disconnected, and was in the Healthy state when the loss of connection occurred .
This state can be reported during network failures between the active copy and the database copy .
Disconnected And Resynchronizing
Is no longer connected to the active database copy, and was in the Resynchronizing state when the loss of connection occurred .
This state can be reported during network failures between the active copy and the database copy .
Dismounted Is offline and not accepting client connections . Applies only to the active mailbox database .
Mount the database if maintenance is complete .
Dismounting Is going offline and terminating client connections . Applies only to the active mailbox database .
N/A
Failed Is in a failed state because it is not suspended, and is not able to copy or replay log files.
Exchange periodically checks to see whether the problem that caused the copy status to change to Failed has been resolved . If so, and barring no other issues, the copy status automatically changes to Healthy .
Failed And Suspended
Is in the Failed And Suspended state because a failure was detected and because resolution of the failure explicitly requires administrator intervention .
Take corrective action as appropriate . Exchange does not periodically check to see whether the prob-lem has been resolved and does not automatically recover .

Exchange database administration ChAptEr 3 93
COPY STATUS STATUS OF THE MAILBOX DATABASE COPY CORRECTIVE ACTION
Healthy Is successfully copying and replaying log files, or has suc-cessfully copied and replayed all available log files.
N/A
Initializing Is being created, or the Microsoft Exchange Repli - cation service is starting up or has just been started, or the Mailbox Database copy is transitioning to another state .
While the copy is in this state, Exchange is verifying that the database and log stream are in a consistent state . It should generally not be in this state for lon-ger than 30 seconds .
Mounted Is online and accepting client connections . Applies only to active mailbox database .
N/A
Mounting Is coming online and not yet accepting client connections . Applies only to active mailbox database .
N/A
Resynchronizing Is being checked for any diver-gence between the active copy and this passive copy .
The copy status remains in this state until any diver-gence is detected and resolved .
Seeding Is being seeded, the related content index is being seeded, or both .
Upon successful comple-tion of seeding, the copy status should change to Initializing .
Service Down Cannot connect to the replica-tion service .
Start or restart the Microsoft Exchange Replication service on the server that hosts the mailbox database copy .
Single Page Restore
Had a single page error, and this error is being corrected automatically .
N/A
Suspended Is in a suspended state as a result of an administrator manually sus-pending the database copy .
Resume replication if appropriate
ChAptEr 3 Exchange database administration94
removing database copiesYou can remove a passive database copy at any time by using the Exchange Man-agement tools . After removing a database copy, you need to manually delete any database and transaction log files from the server.
NOTE You cannot use these procedures to remove the active copy of a mailbox database. To remove a database that is an active copy, you must first switch the data-base over to a new active copy. Alternatively, if you no longer want a database and its copies, you first need to remove all passive copies, and then you need to remove all mailboxes from the active database before you can delete it.
TIP You can remove mailbox database copies only from a database availability group with a healthy status. If the database availability group doesn’t have a healthy status, you won’t be able to remove any mailbox database copies.
To remove a database copy, complete the following steps:
1. In the Exchange Admin Center, select Servers in the feature pane, and then select Databases . In the main pane, you should see a list of active databases that are available in the Exchange organization .
2. Select the mailbox database with the copy that you want to manage . In the details pane, you’ll see a list of active and passive copies of the database along with the current status of each .
3. Tap or click the Remove option for the database copy you want to remove .4. When prompted to confirm, tap or click Yes. If an error occurred, you need to
take the appropriate corrective action . Tap or click Close .In the Exchange Management Shell, you can remove a database copy by using
the Remove-MailboxDatabaseCopy cmdlet . Listing 3-11 provides the syntax and usage .
LISTING 3-11 Remove-MailboxDatabaseCopy cmdlet syntax and usage
Syntax
Remove-MailboxDatabaseCopy -Identity DatabaseName\ServerName] [-DomainController FullyQualifiedName]
Usage
Remove-MailboxDatabaseCopy –Identity "CS Mail Database\MailServer24"
Before you remove a database using the shell, you may need to identify available copies of the database . To do this, enter the following command:
Get-MailboxDatabase DatabaseName | fl DatabaseCopies
Where DatabaseName is the name of the database you want to work with, such as:
Get-MailboxDatabase Development | fl databasecopies
As shown in this example, the output lists where copies of the database are available:
DatabaseCopies : {Development\MAILSERVER42, Development\MAILSERVER21}

Exchange database administration ChAptEr 3 95
Managing mailbox databases
Now that you know how to create and use databases, let’s look at some general techniques you’ll use to manage databases .
NOTE these techniques apply only to active mailbox databases. passive copies of mailbox databases are managed as discussed in the “Working with mailbox database copies” section earlier in this chapter.
Mounting and dismounting databasesYou can only access databases that are mounted . If a database isn’t mounted, the database isn’t available for use . If a database isn’t mounted it means that an administrator has probably dismounted the database or that the drive on which the database is located isn’t online . It could also mean that the Exchange Informa-tion Store service is not running or that the drive, log drive, or both are online but out of disk space .
REAL WORLD A dismounted database can also indicate that there are problems with the database, transaction log, and system files used by the database. During startup, Exchange Server 2013 obtains a list of database files registered in Active Directory and then checks for the related files before mounting each database. If files are missing or corrupted, Exchange Server 2013 will be unable to mount the database. Exchange Server 2013 then generates an error and logs it in the application event log on the Exchange server. A common error is Event ID 9547. An example of this error follows:
The Active Directory indicates that the database file D:\Exchsrvr\mdbdata\Marketing.edb exists for the Microsoft Exchange Database; however, no such files exist on the disk.
this error tells you that the Exchange database (Marketing.edb) is registered in Active Directory but Exchange Server 2013 is unable to find the file on the disk. When Exchange Server 2013 attempts to start the corrupted mailbox database, you’ll see an additional error as well. the most common error is Event ID 9519. An example of this error follows:
Error 0xfffffb4d starting database Marketing on the Microsoft Exchange Information Store.
this error tells you that Exchange Server 2013 couldn’t start the Marketing database. You can try to restore the database to recover its data. If you are unable to restore the database file, you can create a copy of all database files and store them elsewhere and then recreate the database structures in the Exchange Admin Center by mounting the database. When you mount the database, Exchange Server 2013 creates a new database file. As a result, the data in the original database files (and not the copies) is lost and cannot be recovered. Exchange Server 2013 displays a warning before mount-ing the database and recreating the database file. Tap or click Yes only when you are absolutely certain that you cannot recover the database.

ChAptEr 3 Exchange database administration96
Be sure you don’t overwrite the database files containing the data you want to try to recover. You can still work on the database while users access the newly created empty database. this is effectively a dial-tone database that you are creating. then, take the damaged database file elsewhere, run repair, make the database consistent, and then use it to complete the dial-tone recovery process.
If you can’t restore or repair a database and you need as much of the data as you can get back, you might have clients in cached or offline mode with viable copies of the data that can be exported and imported.
Determining the status of databasesMailbox databases have several associated states, including the following:
■■ Mounted■■ Backup In Progress■■ Background Database Maintenance
You can determine the status of a database by following these steps:
1. In the Exchange Admin Center, select Servers in the feature pane, and then select Databases . In the main pane, you should see a list of active databases that are available in the Exchange organization .
2. Select the mailbox database that you want to work with to see a list of all copies of that database in the details pane . The status of each database copy also is listed in the details pane .
In the Exchange Management Shell, you can determine the status of all databases or specific databases by using the Get-MailboxDatabase . Listing 3-12 provides the syntax and usage for this cmdlet . To see status details, you can specify the status flags associated with each state you want to see as part of the formatted output. In the example, the Mounted, Backup In Progress, and Background Database Mainte-nance status values are listed as True or False .
LISTING 3-12 Getting database status details
Syntax
Get-MailboxDatabase [-Identity MailboxDatabase | -Server Server] [-DomainController DCName] [-DumpsterStatistics <$true | $false>] [-IncludePreExchange2013 <$true | $false>] [-Status <$true | $false>] | format-table Name, Mounted, BackupInProgress, BackgroundDatabaseMaintenance
Usage for specific database
Get-MailboxDatabase –Identity "Eng DB" –Status | format-table Name, Mounted, BackupInProgress, BackgroundDatabaseMaintenance
Usage for all databases on a server
Get-MailboxDatabase –Server "CORPSVR127" –Status | format-table Name, Mounted, BackupInProgress, BackgroundDatabaseMaintenance
Usage for all databases
Get-MailboxDatabase –Status | format-table Name, Mounted, BackupInProgress, BackgroundDatabaseMaintenance
Exchange database administration ChAptEr 3 97
Dismounting and mounting databasesBefore you perform maintenance on a Mailbox server in a database availability group, you should perform a server switchover so that the server’s active databases are transitioned and made active on one or more additional servers in the group . You might also want to suspend replication or block activation of passive copies on the server being maintained . For mailbox databases that are not part of an availability group, you should rarely dismount an active database, but if you need to do so, fol-low these steps:
1. In the Exchange Admin Center, select Servers in the feature pane, and then select Databases . In the main pane, you should see a list of active databases that are available in the Exchange organization .
2. Select the mailbox database that you want to copy to see a list of all copies of that database in the details pane . Note the status of the active database copy . If the copy is mounted, the status normally is listed as Active Mounted .
3. Tap or click the More button (this button shows three dots), and then select Dismount. When prompted, confirm the action by tapping or clicking Yes. Exchange Server dismounts the database . Users will no longer be able to access the database and work with their server-based folders .
After you’ve dismounted a database and performed maintenance, recovery, or other procedures as necessary, you can remount the database by selecting the database, tapping or clicking the More button, and then selecting Mount . When prompted, confirm the action by tapping or clicking Yes.
In the Exchange Management Shell, you can dismount and mount databases by using the Dismount-Database and Mount-Database cmdlets, respectively . Listing 3-13 provides the syntax and usage for these cmdlets .
LISTING 3-13 Dismounting and mounting databases
Syntax
Dismount-Database –Identity DatabaseIdentity [-DomainController FullyQualifiedName] Mount-Database –Identity DatabaseIdentity [-AcceptDataLoss <$true | $false>] [-DomainController FullyQualifiedName] [-Force <$true | $false>]
Usage for dismounting a database
Dismount-Database –Identity "Eng DB"
Usage for mounting a database
Mount-Database –Identity "Eng DB"
Specifying whether a database should be automatically mountedNormally, Exchange Server automatically mounts databases on startup . You can, however, change this behavior . For example, if you’re recovering an Exchange server from a complete failure, you might not want to mount databases until you’ve com-pleted recovery . In this case, you can disable automatic mounting of databases .

ChAptEr 3 Exchange database administration98
To enable or disable automatic mounting of a database, complete the following steps:
1. In the Exchange Admin Center, select Servers in the feature pane, and then select Databases . In the main pane, you should see a list of active databases that are available in the Exchange organization .
2. Double-tap or double-click the database with which you want to work .3. On the Maintenance page, do one of the following and then tap or click
Save:a. To ensure that a database isn’t mounted on startup, select the Don’t
Mount This Database At Startup check box .b. To mount the database on startup, clear the Don’t Mount This Database
At Startup check box .In the Exchange Management Shell, you can enable or disable automatic mount-
ing at startup by using the Set-MailboxDatabase . Listing 3-14 provides the syntax and usage for controlling automatic mounting .
LISTING 3-14 Controlling automatic mounting
Syntax
Set-MailboxDatabase –Identity DatabaseIdentity –MountAtStartup <$true | $false>
Usage
Set-MailboxDatabase –Identity "Eng DB" –MountAtStartup $false
Setting the maintenance intervalYou should run maintenance routines against databases on a daily basis . The main-tenance routines organize the databases, clear out extra space, and perform other essential housekeeping tasks . By default, the automatic background maintenance does some of this work, and Exchange Server runs extended, foreground mainte-nance tasks daily from 1:00 A.M. to 5:00 A.M. If this conflicts with other scheduled administrative tasks or activities on the Exchange server, you can change the main-tenance settings by following these steps:
1. In the Exchange Admin Center, select Servers in the feature pane, and then select Databases . In the main pane, you should see a list of active databases that are available in the Exchange organization .
2. Double-tap or double-click the database with which you want to work . This opens a properties dialog box for the database .
3. On the Maintenance page, note the current Maintenance Schedule, and then select Customize . You can now set the times when maintenance should occur by using the options in the Customize Maintenance dialog box, shown in Figure 3-9 .• Times that are used for maintenance are filled in with a dark bar.• Times that aren’t used for maintenance are blank .

Exchange database administration ChAptEr 3 99
FIGURE 3-9 Customize the background maintenance schedule .
IMPORTANT Ideally, you want to schedule background maintenance to occur during off-peak hours. As the size of databases and activity levels change, you’ll want to optimize this schedule to ensure that servers aren’t overburdened and that servers have enough time to perform necessary maintenance tasks.
4. Show the time in hours or in 15-minute intervals using the options provided . Change the setting for a time interval by tapping or clicking it .• Hourly or 15-minute interval buttons are used to select or clear a particu-
lar interval for all the days of a week .• Days of the week buttons allow you to clear or select all the hours in a
particular day .• The All button allows you to clear or select all the time periods .
5. Tap or click OK to close the Customize Maintenance Schedule dialog box .6. By default, Exchange performs background maintenance tasks by scanning
the ESE 24 hours a day, seven days a week . Select or clear the related check box as appropriate . Note that if you change this setting, you must dismount and then remount the database for the change to take effect . Tap or click OK .
In the Exchange Management Shell, you can configure the maintenance schedule for a database by using Set-MailboxDatabase . Listing 3-15 provides the syntax and usage. In the example, replication is configured to occur between Friday at 9:00 P.M. and Monday at 1:00 A .M .

ChAptEr 3 Exchange database administration100
LISTING 3-15 Setting the maintenance schedule
Syntax
Set-MailboxDatabase –Identity DatabaseIdentity [–MaintenanceSchedule Schedule] [-BackgroundDatabaseMaintenance <$true | $false>]
Usage
Set-MailboxDatabase –Identity "Eng DB" –MaintenanceSchedule "Fri.9:00 PM-Mon.1:00 AM"
Moving databasesAs discussed earlier, each database has a database file associated with it, and the location of this file has an important role in managing Exchange Server perfor-mance. You can view the current file and folder paths the database is using by entering:
Get-MailboxDatabase DatabaseName | fl *path
DatabaseName is the name of the database to check, such as:
Get-MailboxDatabase "Engineering" | fl *path
In the command output, the database file path is listed as EdbFilePath, the log folder path is listed as LogFolderPath and any associated temporary data folder is listed under TemporaryDataFolderPath, as shown in this example:
EdbFilePath : G:\Databases\Engineering\Engineering.edb LogFolderPath : H:\Logs\Engineering TemporaryDataFolderPath :
In the Exchange Management Shell, you can move databases by using the Move-DatabasePath cmdlet. Listing 3-16 provides the syntax and usage. If the specified database is mounted, the database is automatically dismounted and then remounted, and it is unavailable to users while it’s dismounted . Additionally, you can perform a database move only while logged on to the affected Mailbox server, with one excep-tion. If you are performing a configuration-only move, you can perform the configu-ration-only move from your management computer .
LISTING 3-16 Move-DatabasePath cmdlet syntax and usage
Syntax
Move-DatabasePath -Identity DatabaseIdentity [-ConfigurationOnly <$true | $false>] [-EdbFilePath EdbFilePath] [-DomainController DCName] [-Force <$true | $false>] [-LogFolderPath FolderPath]
Usage
Move-DatabasePath -Identity "Engineering" -EdbFilePath "K:\Databases\Engineering\Engineering.edb" -LogFolderPath "L:\Logs\Engineering"

Exchange database administration ChAptEr 3 101
You cannot move a database that is being backed up or a replicated mailbox database . To move a replicated mailbox database, you must disable circular logging if enabled, remove all replicated copies, and then perform the move operation . After the move is complete, you can add copies of the mailbox database and re-enable circular logging . You’ll also want to rebuild the content indexes for each copy of the database . To perform these and other related tasks, complete the following steps:
1. Identify any replay lag or truncation lag settings for all copies of the mailbox database being moved by entering the following command:
Get-MailboxDatabase DatabaseName | fl *lag*
DatabaseName is the name of the database that you want to move .2. Disable circular logging if the option is enabled by entering the following
command:
Set-MailboxDatabase DatabaseName -CircularLoggingEnabled $false
3. Identify all copies of the database by entering the following command:
Get-MailboxDatabase DatabaseName | fl DatabaseCopies
4. Remove the mailbox database copies by entering the following command for each copy:
Remove-MailboxDatabaseCopy DatabaseName\ServerName
DatabaseName is the name of the database copy to remove and ServerName is the name of the server .
5. On each server that hosted a copy of the database, move the data files and log files for the database copy to a local archive folder, such as C:\Archives\Database for the database files and C:\Archives\Logs for the log files. This preserves the files on the server so that the database copies don’t need to be reseeded after they have been recreated .
6. Use the Move-DatabasePath cmdlet to move the database path and log path to a new location . The syntax is:
Move-DatabasePath -Identity DatabaseName
-EdbFilePath EdbFilePath -LogFolderPath FolderPath
During the move operation, the database will be dismounted . When Exchange finishes moving the database, Exchange will automatically mount the database.
7. On each server that hosted a passive copy of the database, create the required folders for the database and logs . For example, if you moved the database to K:\Databases\Engineering\Engineering .edb, you must create the K:\Databases\Engineering folder on each server . If you moved the log folder to L:\Logs\Engineering, you must also create the L:\Logs\Engineering folder on each server . Because the active copy of the database was moved already, you don’t need to create folders for the active copy .

ChAptEr 3 Exchange database administration102
8. On each server that hosted a passive copy of the database, move the pre-served database files to the database folder and then move the preserved log files to the log folder. As the active copy of the database was moved already, you don’t need to move the preserved files for the active database.
9. Use the Add-MailboxDatabaseCopy cmdlet to add a passive copy of the database to each server that previously hosted a passive copy of the data-base . The basic syntax is:
Add-MailboxDatabaseCopy -Identity SourceDatabase
-MailboxServer TargetServer
Don’t set any replay lag or truncation lag times yet because you want to ensure the databases are recovered using the local files (and without reseeding) .
10. Recreate the context indexes on each server that hosts an active or passive copy of the database . To do this, use the following commands to stop and then start the Microsoft Exchange Search service:
Stop-Service MSExchangeSearch
Start-Service MSExchangeSearch
11. If you want to enable circular logging of the active copy of the database, enter the following command:
Set-MailboxDatabase DatabaseName -CircularLoggingEnabled $true
12. Use the Set-MailboxDatabseCopy cmdlet to reconfigure replay lag and trun-cation lag times, as appropriate . The basic syntax is:
Set-MailboxDatabaseCopy -Identity Database\Server
[-ReplayLagTime Days.Hours:Minutes:Seconds]
[-TruncationLagTime Days.Hours:Minutes:Seconds]
After you’ve completed all these tasks, you should confirm that replication is working as expected by using the Get-MailboxDatabaseCopyStatus cmdlet . You also should use the Test-ReplicationHealth cmdlet to verify the health and status of the database availability group .
renaming databasesTo rename a database, follow these steps:
1. In the Exchange Admin Center, double-tap or double-click the database with which you want to work . This opens a properties dialog box for the database .
2. In the Name text box, type the new name for the database . Tap or click Save .
NOTE All objects in Active Directory are located by a unique identifier. This identi-fier uses the directory namespace and works through each element in the directory hierarchy to a particular object. When you change the name of a database, you change the namespace for all the objects in the database.

Exchange database administration ChAptEr 3 103
In the Exchange Management Shell, you can rename databases by using the –Name parameter of the Set-MailboxDatabase . Listing 3-17 provides the syntax and usage .
LISTING 3-17 Renaming a database
Syntax
Set-MailboxDatabase –Identity DatabaseIdentity –Name NewName
Usage
Set-MailboxDatabase –Identity "Eng DB" –Name "Engineering Mail Database"
Deleting databasesBefore deleting a mailbox database, you must delete or move the mailboxes it con-tains . After you’ve moved items that you might need and deleted items you don’t need, you can delete the database by completing the following steps:
1. In the Exchange Admin Center, select the database you want to delete, and then select the Delete button .
2. When prompted, confirm the action by tapping or clicking Yes.3. After removing the database, you need to delete any database and transac-
tion log files from the server.In the Exchange Management Shell, you can delete databases by using the
Remove-MailboxDatabase . Listing 3-18 provides the syntax and usage .
LISTING 3-18 Removing databases
Syntax
Remove-MailboxDatabase –Identity DatabaseIdentity [-DomainController FullyQualifiedName]
Usage
Remove-MailboxDatabase –Identity "Eng DB"
Content indexing
Content indexing is a built-in Exchange feature . Every Exchange server in your organ-ization supports and uses some type of indexing . To manage indexing more effec-tively, use the techniques discussed in this section .
Understanding indexingContent indexing enables fast searches and lookups through server-stored mail-boxes . Exchange Server 2013 uses the content indexing engine from the Microsoft Search Foundation . The Exchange Server storage engine automatically implements and manages Exchange Search . Exchange Search is used with searches for common

ChAptEr 3 Exchange database administration104
key fields, such as message subjects. Users take advantage of Exchange Search every time they use the Find feature in Microsoft Office Outlook. With server-based mail folders, Exchange Search is used to quickly search To, From, Cc, and Subject fields. With public folders, Exchange Search is used to quickly search From and Subject fields.
As you probably know, users can perform advanced searches in Office Outlook as well . For example, in Outlook 2010, all users need to do is tap or click in the Search box or press Ctrl+E to access the Search tools, tap or click Search Options, and then tap or click Advanced Find . In the Advanced Find dialog box, users can enter their search parameters and then tap or click Find Now .
When Exchange Server receives an advanced query for personal folders, it searches through every message in every folder . This means that as Exchange mailboxes grow, so does the time it takes to complete an advanced search . With standard searching, Exchange Server is unable to search through message attachments .
With server-based folders, Exchange Server builds an index of all searchable text in a particular mailbox database before users try to search . The index can then be updated or rebuilt at a predefined interval. Then, when users perform advanced searches, they can quickly find any text within a document or attachment.
A drawback of content indexing is that it can be resource-intensive . As with any database, creating and maintaining indexes requires CPU time and system mem-ory, which can affect Exchange performance . Full-text indexes also use disk space . A newly created index uses approximately 10 to 20 percent of the total size of the Exchange database (and is directly related to what’s in the database’s mailboxes) . This means that a 1-TB database would have an index of about 100 to 200 GB .
Each time you update an index, the file space that the index uses increases. Don’t worry—only changes in the database are stored in the index updates . This means that the additional disk space usage is incremental . For example, if the original 1-TB database grew by 1 GB, the index could use up to 201 GB of disk space (up to 200 GB for the original index and 1 GB for the update) .
Managing Exchange Store SearchExchange Server 2013 doesn’t allow administrators to configure how indexing works. Full-text indexes are stored as part of the Exchange data files. Because of this, what-ever folder location you use for Exchange data files will have an indexing subfolder, which contains all the Exchange Search data for the related database and all its related databases. By default, you’ll find full-text index files for a database in the %SystemDrive%\Program Files\Microsoft\Exchange Server\V15\Mailbox\Database Name\GUID folder where GUID is the database’s globally unique identifier.
NOTE Exchange maintains full-text indexes as part of the database maintenance schedule. See the “Setting the maintenance interval” section earlier in this chapter for more information.
Exchange database administration ChAptEr 3 105
Each database has an index . If you make a database copy, you are also making an index copy . There’s often no need to rebuild an index . That said, as part of the recovery process for a mailbox database, you might want to rebuild the related full-text index catalog to ensure it’s current . You might also want to rebuild the full-text index after you’ve made substantial changes to a database or if you suspect the full-text index is corrupted .
You can rebuild an index manually at any time . Exchange Server rebuilds an index by recreating it . This means that Exchange Server takes a new snapshot of the data-base and uses this snapshot to build the index from scratch . To manually rebuild an index, enter the following commands to stop and then start the Exchange Search service:
Stop-Service MSExchangeFastSearch Start-Service MSExchangeFastSearch
Exchange Discovery relies on Exchange Search for databases and mailboxes within databases . You can enable or disable indexing for individual databases by setting the -IndexEnabled parameter of the Set-MailboxDatabase cmdlet to $true or $false, respectively . The following example disables indexing of the Engineering database:
Set-MailboxDatabase "Engineering Database" -IndexEnabled $false
When you disable indexing of a database, you also prevent the Exchange 2013 Discovery feature from returning messages from the database or server .
You can disable indexing for all databases on a server by stopping and disabling the Microsoft Exchange Search service . Here’s an example using the Exchange Management Shell in which you stop and disable the Exchange Search service on a remote server named Server18:
Stop-Service MSExchangeFastSearch -ComputerName Server22 Set-Service MSExchangeFastSearch -StartupType Disabled -ComputerName Server22
You can enable indexing for all databases on a server by enabling the Microsoft Exchange Search service for automatic startup and starting the service . An example using the Exchange Management Shell follows:
Set-Service MSExchangeFastSearch -StartupType Automatic -ComputerName Server18 Start-Service MSExchangeFastSearch -ComputerName MailServer11
When you disable indexing on a server, you also prevent Exchange Discovery for all databases on the server .

ChAptEr 3 Exchange database administration106
troubleshooting indexingYou can quickly determine which databases have indexing enabled by using the fol-lowing command:
Get-MailboxDatabase | ft Name,IndexEnabled
You can determine whether content indexing has a healthy status by using the following command:
Get-MailboxDatabaseCopyStatus | ft Identity, ActiveDatabaseCopy, ContentIndexState -Auto
If you find that the context index for a passive database copy is outdated, you can rebuild or reseed the index . To reseed the index, enter the following command:
Update-MailboxDatabaseCopy -Identity Database\Server -CatalogOnly
Database is the name of the database and Server is the name of the server host-ing the database, such as:
Update-MailboxDatabaseCopy -Identity Engineering\MailServer12 -CatalogOnly
If you need to troubleshoot Exchange Search issues, you can use Test-Exchange Search . When you use the -Server parameter to specify the name of a server to check, the cmdlet tests all mailbox databases on the server simultaneously . If the server is a member of a DAG and has a passive copy of a database, the test is auto-matically performed against the server that has the active database copy .

107
CHAP TER 4
Configuring transport services
■■ Working with SMTP connectors, sites, and links 108
■■ Configuring transport limits 141
■■ Completing Transport services setup 147
You can configure your Microsoft Exchange Server 2013 organization with only Mailbox servers for message routing and delivery, or you can configure it with
Mailbox servers and Edge Transport servers . When you use only Mailbox servers, these servers are responsible for:
■■ Message routing and delivery within the organization .■■ Receiving messages from outside the organization and delivering them to
Mailbox servers within the organization .■■ Receiving messages from Mailbox servers within the organization and
routing them to destinations outside the organization .When you use both Mailbox servers and Edge Transport servers, message
routing and delivery works like this:■■ Mailbox servers handle message routing and delivery within the
organization .■■ Edge Transport servers receive messages from outside the organization
and route them to Mailbox servers within the organization which, in turn, deliver them to other Mailbox servers if necessary .
■■ Mailbox servers receive messages from Mailbox servers within the organi-zation and route them to Edge Transport servers, which, in turn, route them to destinations outside the organization .
When you use legacy Edge Transport servers in a hybrid deployment, your Edge Transport servers can be configured to handle communications between on-premises Exchange and Exchange Online . Here, the Edge Transport servers act as relays between your internal Exchange servers and Exchange Online, as long as the Edge Transport servers are externally accessible from the Internet on port 25 . Additionally, at this time, only Edge Transport servers running Exchange 2010 Ser-vice Pack 2 or later support hybrid deployments .

ChAptEr 4 Configuring transport services108
The primary mail protocol used by Exchange Server 2013 is Simple Mail Trans-fer Protocol (SMTP) . This chapter discusses how transport servers use SMTP for rout-ing and delivery, in addition to how you can view and manage transport server configurations.
REAL WORLD Microsoft recommends that you install the Edge transport server role on a computer that is not part of the internal Active Directory domain. the server can, however, be part of an external Active Directory domain, which isolates the computer and is the most secure implementation. Although you can install the Edge transport server on a domain-joined computer, the Edge transport server role will always use Active Directory Lightweight Directory Services (AD LDS) to store recipient and con-figuration information for the Edge stack, and the underlying Windows stack will use Active Directory Domain Services (AD DS). to send and receive messages from your organization to the Internet, Edge transport servers use Send connectors and receive connectors.
prior to installing the Edge transport role, you need to set the Domain Name System (DNS) suffix for the server and install the AD LDS role. Generally, you’ll want to use a DNS suffix for your organization’s primary domain. To install the AD LDS role, use the Add roles Wizard in the Server Manager. Accept the default settings during installa-tion with one exception: you do not need to create an application partition because AD LDS will be configured for the Edge Transport server role when you install the role, and the required application partition will also be created at that time.
Working with SMTP connectors, sites, and links
SMTP connectors, Active Directory sites, and Active Directory links all have important roles to play in determining how Exchange routes and delivers messages in your organization . You can work with connectors, sites, and links in a variety of ways, but first you need to have a strong understanding about how connectors are used.
Connecting source and destination serversExchange Server 2013 uses SMTP connectors to represent logically the connection between a source server and a destination server. How you configure an SMTP con-nector determines how Exchange Server transports messages using that connection . Because each SMTP connector represents a one-way connection, Exchange Server uses both Send and Receive connectors .
A Send connector is a logical gateway through which transport servers send all outgoing messages . When you create a Send connector, it is stored in Active Directory Domain Services or in Active Directory Lightweight Directory Services as a connec-tor object. Send connectors are not scoped to a single server; in fact, multiple serv-ers can use a single Send connector for sending messages . Send connectors deliver mail by looking up a mail exchanger (MX) record on a DNS server, by looking up an Address (A) record, or by using a smart host as a destination . With DNS records,

Configuring transport services ChAptEr 4 109
the DNS server settings you configure on the Transport server are used for name resolution. You can configure different settings for internal and external DNS look-ups if necessary. See the “Configuring Send connector DNS lookups” section of this chapter .
A Receive connector is a logical gateway through which all incoming messages are received . When you create a Receive connector, it is stored in AD DS or in AD LDS as a connector object. Unlike Send connectors, Receive connectors are scoped to a single server and determine how that server listens for connections . The per-missions on a Receive connector determine from which other servers the connector will accept connections . The authentication mechanisms you configure for a Receive connector determine whether anonymous connections are allowed and the types of authentication that are permitted .
When you install your Mailbox servers, Exchange 2013 creates the connectors required for mail flow within your organization; however, to send mail outside your domain, you must create a Send connector to send mail to the Internet .
If your organization also uses Edge Transport servers, Exchange creates the addi-tional Send and Receive connectors during the Edge Subscription process . You can also explicitly create Send and Receive connectors or automatically compute them from the organization topology by using Active Directory sites and site-link information .
REAL WORLD to enhance security and prevent malicious users from trying to determine internal infrastructure components, Exchange 2013 applies the header firewall feature to remove X-headers and routing headers from inbound and outbound messages automatically. X-headers are user-defined, unofficial headers added to mes - sages during processing, filtering, or virus/spam checking that detail how a message was processed, filtered, or checked. Routing headers are standard SMtp headers that provide information about the various messaging servers used to deliver a message.
the exact headers removed from a message depend on the connector type. receive connectors with the Internal type remove organization and forest X-headers from messages. receive connectors with the Custom type remove routing headers (as long as permissions groups are not assigned). Internal or partner type Send connectors remove organization and forest X-headers from messages. Custom type Send connec-tors remove routing headers (as long as permissions groups are not assigned).
Managing Active Directory site detailsWhen routing messages, Exchange 2013 determines the ultimate destination for a message and then uses a least-cost method to determine how to route the message . By default, Mailbox servers use Active Directory sites and the costs that are assigned to the Active Directory Internet Protocol (IP) site links to determine the least-cost routing path to other Mailbox servers in the organization . You can also specify an Exchange cost for links .
ChAptEr 4 Configuring transport services110
After a Mailbox server determines the least-cost routing path, the server routes messages over the link or links in this path, and in this way, a source Mailbox server relays messages to target Mailbox servers . By default, when there are multiple Active Directory sites between the source and destination server, the Mailbox servers along the path between the source server and the target server don’t process or relay the messages in any way—with the following exceptions:
■■ If you want messages to be processed en route, you can configure an Active Directory site as a hub site so that Exchange routes messages to the hub site to be processed by the site’s Mailbox servers before being relayed to a tar-get server . The hub site must exist along the least-cost routing path between source and destination Mailbox servers .
■■ If a message cannot be delivered to the target site, the Mailbox server in the closest reachable site along the least-cost routing path of the target site queues the message for relay . The message is then relayed when the destination Mailbox server becomes available .
Sometimes during routing, messages must pass through transport servers in a hub site that isn’t the ultimate destination but is part of the least-cost routing path . All transport servers in a hub site are considered part of the delivery group for that hop and a transport server is randomly selected to handle the message . As a mes-sage passes through a hub site, the randomly selected transport server queues and processes the message, routing the message along the least-cost path .
In cases in which a subscribed Edge Transport server is accessible only from the Active Directory site to which it is subscribed, messages must pass through a specific hub site to get to an Edge Transport server to be routed to the Internet or across premises . This happens because a subscribed Edge Transport server is only acces-sible from the Active Directory site to which it is subscribed .
Each routing destination has a delivery group that handles its message delivery . As discussed in Chapter 1, ”Microsoft Exchange organizations: the essentials” in the “Front-end transport” section, an Active Directory site can be a delivery group but so can a routable DAG, a Mailbox delivery group, a group of connector source serv-ers, or a list of expansion servers for dynamic distribution groups . When a DAG is the delivery group, the DAG itself is a routing boundary and the mailbox databases in the DAG are the routing destinations services by the related delivery group . Thus, a message can be sent from a mailbox on any transport server in the DAG to a mail-box on that server or on any other server in the DAG directly . Because site boundar-ies don’t apply, the member servers can be in different sites as well .
When a site is the delivery group, Exchange 2013 can use delayed fan-out to reduce the number of message transmissions by identifying recipients that share part of the routing path .
When a site isn’t the delivery group, Exchange 2013 selects one site in the desti-nation delivery group with the least-cost routing path as the primary site . If multiple least-cost routing paths are available, the path with the fewest number of hops is chosen . If multiple paths are still available, the site nearest the destination is chosen based on the site name. Specifically, Exchange 2013 selects the site with the lowest alphanumeric sort order . For example, Seattle Site 1 is chosen before Seattle Site 2 and Alpha Site is chosen before Beta Site .

Configuring transport services ChAptEr 4 111
You can use the Get-AdSite cmdlet to display the configuration details of an Active Directory site. If you do not provide an identity with this cmdlet, configura-tion information for all Active Directory sites is displayed .
Listing 4-1 provides the syntax and usage, in addition to sample output, for the Get-AdSite cmdlet. Note that the output specifies whether the site is enabled as a hub site .
LISTING 4-1 Get-AdSite cmdlet syntax and usage
Syntax
Get-AdSite [-Identity 'SiteIdentity'] [-DomainController 'DCName']
Usage
Get-AdSite -Identity 'First-Seattle-Site' | fl
Output
RunspaceId : HubSiteEnabled : False InboundMailEnabled : True PartnerId : -1 MinorPartnerId : -1 ResponsibleForSites : {} Name : First-Seattle-Site-Name AdminDisplayName : ExchangeVersion : 0.0 (6.5.6500.0) DistinguishedName : CN=First-Seattle-Site-Name,CN=Sites,CN=Configuration ,DC=pocket-consultant,DC=com Identity : pocket-consultant.com/Configuration/Sites/ First-Seattle-Site-Name Guid : ObjectCategory : pocket-consultant.com/Configuration/Schema/Site ObjectClass : {top, site} WhenChanged : 6/4/2014 9:02:22 PM WhenCreated : 6/4/2014 9:02:22 PM WhenChangedUTC : 6/5/2014 4:02:22 AM WhenCreatedUTC : 6/5/2014 4:02:22 AM OrganizationId : OriginatingServer : CorpServer27.pocket-consultant.com IsValid : True ObjectState : Unchanged
You can use the Set-AdSite cmdlet to configure an Active Directory site as a hub site to override the default message routing behavior . When a hub site exists along the least-cost routing path between source and destination Mailbox servers, mes-sages are routed to the hub site for processing before they are relayed to the desti-nation server .
Listing 4-2 provides the syntax and usage for the Set-AdSite cmdlet . To enable a site as a hub site, set the –HubSiteEnabled parameter to $true . To disable a site as a hub site, set the –HubSiteEnabled parameter to $false . You must have Enterprise Administrator rights to use the –Name parameter to change a site’s name .

ChAptEr 4 Configuring transport services112
LISTING 4-2 Set-AdSite cmdlet syntax and usage
Syntax
Set-AdSite -Identity 'SiteIdentity' [-HubSiteEnabled <$true | $false>] [-InboundMailEnabled <$true | $false>] [-DomainController 'DCName'] [-Name 'NewSiteName']
Usage
Set-AdSite -Identity 'First-Seattle-Site' –HubSiteEnabled $true
Managing Active Directory site link detailsYou can use the Get-AdSiteLink cmdlet to view the configuration information about an Active Directory IP site link. This configuration information includes the value of the Exchange-specific cost, the cost assigned to the Active Directory IP site link, and a list of the sites in the IP site link .
NOTE A good resource to learn more about Active Directory sites and site links is Windows Server 2012 Inside Out (Microsoft Press, 2012). See Chapter 27, “Configuring Active Directory Sites and replication,” and Chapter 32, “Active Directory Site Admin-istration.”
Listing 4-3 provides the syntax and usage, in addition to sample output, for the Get-AdSiteLink cmdlet. Use the –Identity parameter to retrieve the configuration information about a specific IP site link. If you do not provide an identity, the con-figuration information about all IP site links is returned.
LISTING 4-3 Get-AdSiteLink cmdlet syntax and usage
Syntax
Get-AdSiteLink [-Identity 'SiteIdentity'] [-DomainController 'DCName']
Usage
Get-AdSiteLink -Identity 'PORTLANDSEATTLELINK' | fl
Output
RunspaceId : Cost : 100 ADCost : 100 ExchangeCost : MaxMessageSize : Unlimited Sites : {pocket-consultant.com/Configuration/Sites/ First-Seattle-Site} AdminDisplayName : ExchangeVersion : 0.0 (6.5.6500.0) Name : PORTLANDSEATTLELINK DistinguishedName : CN=PORTLANDSEATTLELINK,CN=IP,CN=Inter-Site Transports,CN=Sites,CN=Configuration, DC=pocket-consultant,DC=com Identity : pocket-consultant.com/Configuration/Sites/Inter-Site
Configuring transport services ChAptEr 4 113
Transports/IP/PORTLANDSEATTLELINK Guid : ObjectCategory : pocket-consultant.com/Configuration/Schema/Site-Link ObjectClass : {top, siteLink} WhenChanged : 6/4/2014 9:02:22 PM WhenCreated : 6/4/2014 9:02:22 PM WhenChangedUTC : 6/5/2014 4:02:22 AM WhenCreatedUTC : 6/5/2014 4:02:22 AM OrganizationId : OriginatingServer : CorpServer27.pocket-consultant.com IsValid : True ObjectState : Unchanged
By default, Exchange Server 2013 determines the least-cost routing path by using the cost that is assigned to the Active Directory IP site links . You can change this behavior by using the Set-AdSiteLink cmdlet to configure an Exchange-specific cost for Active Directory IP site links. After you configure it, the Exchange-specific cost is used to determine the Exchange routing path rather than the Active Directory–assigned cost .
Listing 4-4 provides the syntax and usage, for the Set-AdSiteLink cmdlet . When there are multiple wide area network (WAN) paths between sites, you can set a higher site-link cost to reduce the likelihood that a link will be used and a lower site-link cost to increase the likelihood that a link will be used . You must have Enterprise Administrator rights to use the –Name parameter to change the name of a site link .
You can use the –MaxMessageSize parameter to set the maximum size for mes-sages that are relayed across a specified link. The default value is “unlimited,” which allows messages of any size to be relayed . You can specify the units for values by using B for bytes, KB for kilobytes, MB for megabytes, or GB for gigabytes . The valid range for maximum size is from 64 KB to the largest value in bytes that can be set using a 64-bit integer (9,223,372,036,854,775,807) .
LISTING 4-4 Set-AdSiteLink cmdlet syntax and usage
Syntax
Set-AdSiteLink -Identity 'SiteIdentity' [-DomainController 'DCName'] [-ExchangeCost Cost] [-MaxMessageSize <'Size' | 'Unlimited'>] [-Name 'NewSiteLinkName']
Usage
Set-AdSiteLink -Identity 'PORTLANDSEATTLELINK' -ExchangeCost 20 Set-AdSiteLink -Identity 'LASACRAMENTOLINK' -MaxMessageSize 'Unlimited' Set-AdSiteLink -Identity 'LASACRAMENTOLINK' -MaxMessageSize '256MB'

ChAptEr 4 Configuring transport services114
Creating Send connectorsSend connectors are the gateways through which transport servers send messages, and only transport servers have Send connectors . Exchange automatically creates the Send connectors required for internal mail flow but does not create the Send connectors required for mail flow to the Internet. Send connectors are stored in Active Directory and are available to all transport servers in the Exchange organiza-tion by default .
As an administrator, you can explicitly create Send connectors for Internet mail flow and other necessary connectors, and then manage the configuration of these explicitly created Send connectors as needed . You cannot, however, manage the configuration of Send connectors created implicitly by Exchange to enable mail flow. The key reasons for creating Send connectors are to:
■■ Control explicitly how message routing works within domains or between domains .
■■ Control explicitly the hosts used as destinations or the way messages are routed over the Internet .
■■ Send mail to systems that are not Exchange servers .When you create Send connectors, you can encrypt message traffic sent over the
link and require strict authentication . You can transmit messages to a designated internal server—called a smart host—or you can use DNS records to route mes-sages . If you use a smart host, Exchange Server 2013 transfers messages directly to the smart host, which then sends out messages over an established link . The smart host allows you to route messages on a per-domain basis . If you use DNS records, Exchange Server 2013 performs a DNS lookup for each address to which the con-nector sends mail .
As part of the new architecture in Exchange 2013, Mailbox servers run the Trans-port service, and Client Access servers run the Front End Transport service . The Transport service is responsible for all mail flow, and the Front End Transport ser-vice acts as a stateless proxy for all external SMTP traffic. The Transport service on a Mailbox server can use a Send connector to route outbound messages through the Front End Transport service on a Client Access server in the local Active Directory site . In a large messaging environment, you may want to route messages in this way to simplify and consolidate mail flow.
If the Mailbox Server role and the Client Access Server role are located on the same server, mail routing occurs internally; otherwise, a Client Access server in the same site as the Mailbox server is selected . When an Active Directory site has sub-scribed Edge Transport servers, outbound mail is passed directly from a Mailbox server to an Edge Transport server, bypassing the Client Access servers in the site .
Configuring transport services ChAptEr 4 115
When you create a Send connector, you must define the address space, which determines when the Send connector is used as well as the domain names to which the connector sends messages . For example, if you want to connect two domains in the same Exchange organization—dev .cpandl .com and corp .cpandl .com—you can create a Send connector in dev .cpandl .com, and then add an SMTP address type for the email domain corp .cpandl .com .
IMPORTANT In previous versions of Exchange, you could link a Send connector to a specific Receive connector to control mail flow and routing; however, this option is deprecated in Exchange 2013 and Microsoft recommends that you don’t use this op-tion as it will be removed in a future update or release of Exchange Server.
Send connectors can be used by multiple transport servers . When you create a Send connector within an Exchange organization, you can specify the Mailbox servers that are permitted to use the Send connector . When you create a Send connector on an Edge Transport server, the connector is configured only for that server.
Typically, the first Send connector you’ll create in an Exchange organization is one that enables mail flow to the Internet. To create a Send connector for Internet mail flow, follow these steps:
1. In Exchange Admin Center, select Mail Flow in the Feature pane and then select Send Connectors .
2. Tap or click New . This starts the New Send Connector Wizard, shown in Figure 4-1 .
FIGURE 4-1 Create a new SMTP Send connector for Internet mail flow .

ChAptEr 4 Configuring transport services116
3. In the Name text box, type a descriptive name for the connector, such as Pri-mary Internet Send Connector, and then set the connector type as Internet .
4. On the Network Settings page, confirm that MX Record Associated With Recipient Domain is selected, and then tap or click Next .
5. On the Address Space page, tap or click Add . In the Add Domain dialog box, SMTP is set as the address space type. In the Fully Qualified Domain Name box, enter * to specify that you are creating the connector for routing out-bound mail to all external domains . By default, the address space cost is set to 1, which assigns the highest preference to the connector . If you plan to create other Send connectors, you may want to assign a higher cost to ensure mail is routed appropriately . For example, if you set the cost to 100 and the cost of other Send connectors to a value less than 100, this connec-tor will be used only when no other connector would otherwise apply . Tap or click Save to close the Add Domain dialog box . Tap or click Next .
6. On the Source Server page, tap or click Add to associate the connector with the Mailbox server or servers that will be used to send mail to the Internet . In the Select A Server dialog box, select a Mailbox server that will be used as the source server, and then tap or click Add . Repeat as necessary to add more Transport servers . If you make a mistake, tap or click the Remove link next to the server name .
7. When you are finished selecting servers, tap or click OK to close the Select A Server dialog box, and then tap or click Finish to create the connector . You can verify that the connector is configured properly by sending mail to an external recipient and confirming that the message arrives.
8. By default, the new Send connector is enabled and configured to allow a maximum message size of 35 MB . To change the default maximum message size, open the related properties dialog box by double-tapping or double-clicking the connector’s entry in Exchange Admin Center . Next, enter the desired Maximum Send Message Size in the combo box provided and then tap or click Save . Valid maximum send message sizes range from 1 to 2096128 MB. If you don’t want the connector to have a specific limit, set the maximum size to 0 .
To create other Send connectors, complete the following steps:
1. In Exchange Admin Center, select Mail Flow in the Feature pane, and then select Send Connectors .
2. Tap or click New to start the New Send Connector Wizard, shown in Figure 4-2 .

Configuring transport services ChAptEr 4 117
FIGURE 4-2 Create a new SMTP Send connector .
3. In the Name text box, type a descriptive name for the connector, and then set the connector type . The available options are as follows:• Custom Creates a customized Send connector for connecting with sys-
tems that are not Exchange servers .• Internal Creates a Send connector for sending mail to another transport
server in the organization, and sets the default permissions so that the connector can be used by Exchange servers . This connector will be con-figured to route mail by using smart hosts.
• Internet Creates a Send connector that sends mail to external users over the Internet. This connector will be configured to use DNS records to route mail .
• Partner Creates a Send connector that sends mail to partner domains . Partner domains cannot be configured as smart hosts. Only connections that authenticate with Transport Layer Security (TLS) certificates are allowed by default . Partner domains must also be listed on the TLS Send Domain Secure list, which can be set by using the –TLSSendDomain-SecureList parameter of the Set-TransportConfig command.
ChAptEr 4 Configuring transport services118
4. On the Network Settings page, shown in Figure 4-3, select how you want to send email with the Send connector . If you select MX Record Associated With Recipient Domain, the Send connector uses the DNS client service on the Transport server to query a DNS server and resolve the destination address . Skip steps 5–8 if you select the MX Record option .
FIGURE 4-3 Specify the network settings for the Send connector .
5. If you select Route Mail Through Smart Host, you have to specify the smart hosts to which mail should be forwarded for processing . Tap or click Add .
6. In the Add Smart Host dialog box, enter the IP address or the Fully Qualified Domain Name (FQDN) of the smart host . The Transport server must be able to resolve the FQDN .
7. Tap or click Save to close the Add Smart Host dialog box . Repeat steps 5–7 as necessary to add more smart hosts to this connector . If you make a mistake, select the smart host, and then tap or click Edit or Remove as appropriate . When you are finished, tap or click Next to continue.
8. Optionally, specify that you want the connector to use the external DNS lookup settings of the Mailbox server .
9. After you’ve configured smart hosts, you’ll see the Configure Smart Host Authentication Settings page . On this page, select the method that you want to use to authenticate your servers to the smart host .

Configuring transport services ChAptEr 4 119
Choose one of the following options, and then tap or click Next:• None No authentication . Use this option only if the smart host is
configured to accept anonymous connections.• Basic Authentication Standard authentication with wide compatibil-
ity. With basic authentication, the user name and password specified are passed as cleartext to the remote domain .
• Offer Basic Authentication Only After Starting TLS When you use Basic Authentication, you can select this check box to enable basic authentication over TLS . In this case, TLS authentication is combined with basic authentication to allow encrypted authentication for servers with smart cards or X.509 certificates.
• Exchange Server Authentication Secure authentication for Exchange servers . With Exchange Server authentication, credentials are passed securely .
• Externally Secured Secure authentication for Exchange servers . With externally secured authentication, credentials are passed securely using an external security protocol for which the server has been separately configured, such as Internet Protocol security (IPSec).
NOTE With the Basic Authentication, you must provide the user name and pass-word for the account authorized to establish connectors to the designated smart hosts. All smart hosts must use the same user name and password.
10. Tap or click Next . On the Address Space page, shown in Figure 4-4, tap or click Add . In the Add Domain dialog box, you can use the following options to specify the domain names to which this connector will send mail:• Type SMTP is the default address space type . Use this type for connec-
tors routing mail to Exchange server and other SMTP servers . For routing mail directly to non-SMTP servers, specify the address space type of the server, such as X400, X500, or MSMAIL .
• Fully Qualified Domain Name The domain or domains to which this connector will send mail, such as adatum .com . With SMTP addresses, you can enter the wildcard character (*) directly in the address space as defined in RFC 1035. For example, you can enter * for all domains, *.com for all .com domains, or *.adatum.com for the adatum .com domain and all subdomains of adatum .com . With X .400 addresses, you must specify the address space as defined in RFC 1685.
• Cost The address space cost is used for relative weighting . Valid address space costs range from 1, which assigns the highest possible preference, to 100, which assigns the lowest possible preference . When you create a Send connector, the default address space cost is 1 . If you set all address spaces to this cost, all address spaces have equal preference for routing mail .

ChAptEr 4 Configuring transport services120
FIGURE 4-4 Set the address space for the SMTP Send connector .
11. Tap or click Save to close the SMTP Address Space dialog box . Repeat as nec-essary to add more address spaces to this connector . If you make a mistake, select the address space and then tap or click Edit or Remove as appropriate .
12. If you’d like to scope the Send connector to the current site, select the Scoped Send Connector check box . When a Send connector is scoped, only Mailbox servers in the same Active Directory site as the Send connector’s source serv-ers consider that Send connector in routing decisions . Tap or click Next to continue .
13. Next, you see the Source Server page . Tap or click Add to associate the con-nector with Mailbox servers and Edge subscriptions . In the Select A Server dialog box, select a Mailbox server or an Edge subscription that will be used as the source server for sending messages to the address space that you pre-viously specified, and then tap or click Add. Repeat as necessary to add more Transport servers . If you make a mistake, tap or click the Remove link next to the server name .
14. When you are finished, tap or click OK to close the Select A Server dialog box, and then tap or click Finish to create the connector . You can verify that the connector is configured properly by sending mail to an external recipient in a domain associated with the connector and confirming that the message arrives .

Configuring transport services ChAptEr 4 121
15. By default, the new Send connector is enabled and configured to allow a maximum message size of 35 MB . To change the default maximum message size, open the related properties dialog box by double-tapping or double-clicking the connector’s entry in Exchange Admin Center . Next, enter the desired Maximum Send Message Size in the combo box provided, and then tap or click Save . Valid maximum send message sizes range from 1 to 2048 MB . If you don’t want the connector to have a specific limit, set the maximum size to 0 or select Unlimited in the dropdown list .
16. When you create a Send connector, you can also enable front-end proxying . If you want to enable front-end proxying and route outbound messages through the Client Access servers in the local Active Directory site, open the related properties dialog box by double-tapping or double-clicking the connector’s entry in Exchange Admin Center . Next, select the Proxy Through Client Access Server check box, and then tap or click Save .
In the Exchange Management Shell, you can create Send connectors by using the New-SendConnector cmdlet . The –Usage parameter sets the Send connector type as Custom, Internal, Internet, or Legacy . The –AddressSpaces parameter sets the address spaces for the Send connector by FQDN or IP address . The –DNSRouting-Enabled parameter determines whether DNS records or smart hosts are used for lookups . To use DNS records, set DNSRoutingEnabled to $true . To use smart hosts, set –DNSRoutingEnabled to $false, and then use the –SmartHosts parameter to des-ignate the smart hosts . To enable front-end proxying, set –FrontEndProxyEnabled to $true .
Listing 4-5 provides the syntax and usage for the New-SendConnector cmdlet . With basic authentication or basic authentication over TLS, you will be prompted to provide credentials . To scope the Send connector to the current Active Directory site, set the –IsScopedConnector parameter to $true .
LISTING 4-5 New-SendConnector cmdlet syntax and usage
Syntax
New-SendConnector –Name Name -AddressSpaces Addresses [-AuthenticationCredential Credentials] [-CloudServicesMailEnabled <$true | $false>] [-Comment Comment] [-ConnectionInactivityTimeout TimeSpan] [-Custom <$true | $false>] [-DNSRoutingEnabled <$true | $false>] [-DomainController DCName] [-DomainSecureEnabled <$true | $false>] [-ErrorPolicies <Default|DowngradeDnsFailures|DowngradeCustomFailures>] [-Enabled <$true | $false>] [-Force <$true | $false>] [-ForceHELO <$true | $false>] [-Fqdn FQDN]

ChAptEr 4 Configuring transport services122
[-FrontEndProxyEnabled <$true | $false>] [-IgnoreStartTLS <$true | $false>] [-Internal <$true | $false>] [-Internet <$true | $false>] [-IsScopedConnector <$true | $false>] [-MaxMessageSize <Size | Unlimited>] [-Partner <$true | $false>] [-Port PortNumber] [-ProtocolLoggingLevel <None | Verbose>] [-RequireTLS <$true | $false>] [-SmartHostAuthMechanism <None|BasicAuth|BasicAuthRequireTLS |ExchangeServer|ExternalAuthoritative>] [-SmartHosts SmartHosts] [SmtpMaxMessagesPerConnection MaxMessages] [-SourceIPAddress IPAddress] [-SourceTransportServers TranportServers] [-TlsAuthLevel <EncryptionOnly|CertificateValidation|DomainValidation>] [-TlsCertificateName "X509:<I>Issuer<S>CommonName"] [-TlsDomain DomainNameForVerificationofTLSCert] [-Usage <Custom|Internal|Internet|Partner>] [-UseExternalDNSServersEnabled <$true | $false>]
Usage for DNS MX records
New-SendConnector -Name "Adatum.com Send Connector" -Usage "Custom" -AddressSpaces "smtp:*.adatum.com;1" -IsScopedConnector $true -DNSRoutingEnabled $true -UseExternalDNSServersEnabled $false -SourceTransportServers "CORPSVR127"
Usage for smart hosts
New-SendConnector -Name "Cohovineyards.com" -Usage "Custom" -AddressSpaces "smtp:*.cohovineyards.com;1" -IsScopedConnector $false -DNSRoutingEnabled $false -SmartHosts "[192.168.10.52]" -SmartHostAuthMechanism "ExternalAuthoritative" -UseExternalDNSServersEnabled $false -SourceTransportServers "CORPSVR127"
Viewing and managing Send connectorsThe Exchange Management tools provide access only to the Send connectors you’ve explicitly created . On Mailbox servers, Send connectors created by Exchange Server are not displayed or configurable. On Edge Transport servers, you can view and manage the internal Send connector used to connect to the Mailbox servers in your Exchange organization, as shown in Figure 4-5 .
Configuring transport services ChAptEr 4 123
FIGURE 4-5 Viewing Send connectors in your on-premises Exchange organization .
In Exchange Admin Center, you can view the Send connectors and manage their configuration. When you select Mail Flow in the Feature pane and then select Send Connectors, Send connectors you’ve created are listed by name and status . You can now do the following:
■■ Change a connector’s properties To change a connector’s properties, double-tap or double-click the connector entry, and then use the Proper-ties dialog box to manage the connector’s properties . You’ll also be able to specify the maximum message size and protocol logging level . By default, the maximum message size is set to 35 MB and the protocol logging level is set to None .
■■ Enable a connector To enable a connector, select it, and then select Enable in the details pane .
■■ Disable a connector To disable a connector, select it, and then select Disable in the details pane .
■■ Remove a connector To remove a connector, select it, and then select Remove .
In the Exchange Management Shell, you can view, update, or remove Send connectors by using the Get-SendConnector, Set-SendConnector, or Remove-Send Connector cmdlets, respectively . Listings 4-6 through 4-8 provide the syntax and usage . With Get-SendConnector, if you don’t specify an identity, the cmdlet returns a list of all administrator-configured Send connectors.
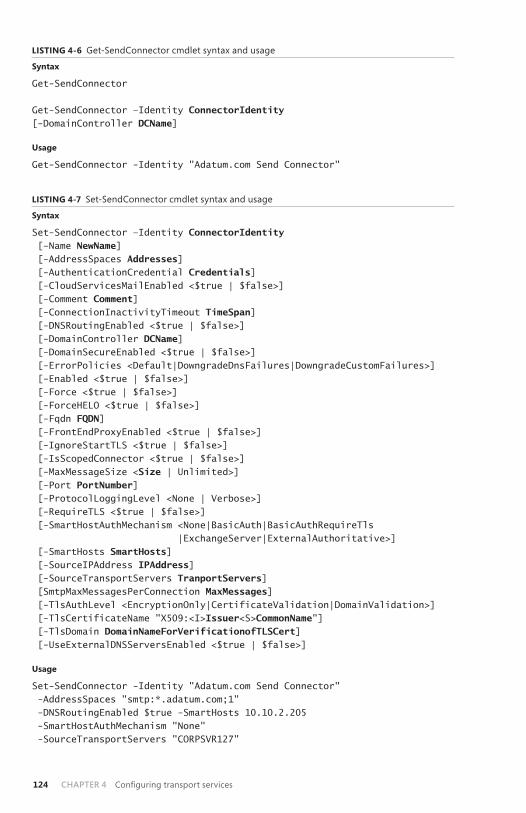
ChAptEr 4 Configuring transport services124
LISTING 4-6 Get-SendConnector cmdlet syntax and usage
Syntax
Get-SendConnector Get-SendConnector –Identity ConnectorIdentity [-DomainController DCName]
Usage
Get-SendConnector -Identity "Adatum.com Send Connector"
LISTING 4-7 Set-SendConnector cmdlet syntax and usage
Syntax
Set-SendConnector –Identity ConnectorIdentity [–Name NewName] [-AddressSpaces Addresses] [-AuthenticationCredential Credentials] [-CloudServicesMailEnabled <$true | $false>] [-Comment Comment] [-ConnectionInactivityTimeout TimeSpan] [-DNSRoutingEnabled <$true | $false>] [-DomainController DCName] [-DomainSecureEnabled <$true | $false>] [-ErrorPolicies <Default|DowngradeDnsFailures|DowngradeCustomFailures>] [-Enabled <$true | $false>] [-Force <$true | $false>] [-ForceHELO <$true | $false>] [-Fqdn FQDN] [-FrontEndProxyEnabled <$true | $false>] [-IgnoreStartTLS <$true | $false>] [-IsScopedConnector <$true | $false>] [-MaxMessageSize <Size | Unlimited>] [-Port PortNumber] [-ProtocolLoggingLevel <None | Verbose>] [-RequireTLS <$true | $false>] [-SmartHostAuthMechanism <None|BasicAuth|BasicAuthRequireTls |ExchangeServer|ExternalAuthoritative>] [-SmartHosts SmartHosts] [-SourceIPAddress IPAddress] [-SourceTransportServers TranportServers] [SmtpMaxMessagesPerConnection MaxMessages] [-TlsAuthLevel <EncryptionOnly|CertificateValidation|DomainValidation>] [-TlsCertificateName "X509:<I>Issuer<S>CommonName"] [-TlsDomain DomainNameForVerificationofTLSCert] [-UseExternalDNSServersEnabled <$true | $false>]
Usage
Set-SendConnector -Identity "Adatum.com Send Connector" -AddressSpaces "smtp:*.adatum.com;1" -DNSRoutingEnabled $true -SmartHosts 10.10.2.205 -SmartHostAuthMechanism "None" -SourceTransportServers "CORPSVR127"

Configuring transport services ChAptEr 4 125
LISTING 4-8 Remove-SendConnector cmdlet syntax and usage
Syntax
Remove-SendConnector –Identity ConnectorIdentity [-Confirm <$true | $false>] [-DomainController DCName]
Usage
Remove-SendConnector -Identity "Adatum.com Send Connector"
Configuring Send connector DNS lookupsYou can configure different settings for internal and external DNS lookups by con-figuring a Transport server’s External DNS Lookups and Internal DNS Lookups prop-erties . External DNS Lookup servers are used to resolve the IP addresses of servers outside your organization . Internal DNS Lookup servers are used to resolve IP addresses of servers inside the organization .
In Exchange Admin Center, you can specify enable or disable external DNS look-ups for each Send connector by selecting Mail Flow in the Feature pane, and then selecting Send Connectors . Next, double-tap or double-click the Send connector you want to configure. In the properties dialog box, select Delivery to display the Delivery options . The Use The External DNS Lookup… check box controls whether external DNS lookups are permitted . To allow external DNS lookups when the selected connector is used, select this check box, and then tap or click Save .
If you’ve enabled external DNS lookups for Send connectors, you can specify how external lookups should be performed for each Mailbox server in the organi-zation. You also can configure internal DNS lookups for each Mailbox server in the organization. To configure DNS Lookup servers, complete these steps:
1. In Exchange Admin Center, select Servers in the Feature pane, and then select Servers . Next, double-tap or double-click the server you want to manage .
2. In the properties dialog box, select DNS Lookups to display DNS lookup options .
3. On the External DNS Lookups panel, shown in Figure 4-6, specify how external lookups should be performed:• To use DNS settings from the server’s network card or cards for external
lookups, choose either All Network Adapters (All Available IPv4) to use all configured IPv4 settings or a specific network card to use the configured IPv4 settings of that card .
• To use a custom list of DNS servers for external lookups, select Custom Settings . Next, tap or click Add . In the Add IP Address dialog box, type the IPv4 or IPv6 address of a DNS server to use for external lookups, and then tap or click Save . Repeat this process to specify multiple servers . Keep in mind that Mailbox servers perform lookups in the order the DNS servers are listed .

ChAptEr 4 Configuring transport services126
FIGURE 4-6 Configure external DNS lookups .
4. On the Internal DNS Lookups panel, specify how internal lookups should be performed:• To use DNS settings from the server’s network card or cards for internal
lookups, choose either All Network Adapters (All Available IPv4) to use all configured IPv4 settings or a specific network card to use the configured IPv4 settings of that card .
• To use a custom list of DNS servers for internal lookups, select Custom Settings . Next, tap or click Add . In the Add IP Address dialog box, type the IPv4 or IPv6 address of a DNS server to use for internal lookups, and then tap or click Save . Repeat this process to specify multiple servers .
5. Tap or click Save to apply your settings .
Setting Send connector limitsSend connector limits determine how mail is delivered after a connection has been established and the receiving computer has acknowledged that it’s ready to receive the data transfer . After a connection has been established and the receiving com-puter has acknowledged that it’s ready to receive the data transfer, Exchange Server attempts to deliver messages queued for delivery to the computer . If a message can’t be delivered on the first attempt, Exchange Server tries to send the message again after a specified time. Exchange Server keeps trying to send the message at the inter-vals you’ve specified until the expiration time-out is reached. When the time limit is reached, the message is returned to the sender with a non-delivery report (NDR) . The default expiration time-out is two days .

Configuring transport services ChAptEr 4 127
After multiple failed attempts to deliver a message, Exchange Server generates a delay notification and queues it for delivery to the sender of the message. Notifi-cation doesn’t occur immediately after failure; instead, Exchange Server sends the delay notification message after the notification delay interval and then only if the message hasn’t already been delivered. The default delay notification is four hours.
With SMTP, you have much more control over outgoing connections than you do over incoming connections . You can limit the number of simultaneous connections and the number of connections per domain . These limits set the maximum number of simultaneous outbound connections . By default, the maximum number of con-nections is 1,000 and the maximum number of connections per domain is 20 .
You can view or change the Send connector limits by completing the following steps:
1. In Exchange Admin Center, select Servers in the Feature pane, and then select Servers . Next, double-tap or double-click the server you want to manage .
2. On the Transport Limits page, shown in Figure 4-7, use the following options for retrying unsuccessful outbound connections:• Outbound Connection Failure Retry Interval (Seconds) Sets the
retry interval for subsequent connection attempts to a remote server where previous connections have failed . The default is 600 seconds .
• Transient Failure Retry Interval (Minutes) Sets the interval at which the server immediately retries when it encounters a connection failure with a remote server. The default is five minutes.
• Transient Failure Retry Attempts Sets the maximum number of times that the server immediately retries when it encounters a connection fail-ure with a remote server . The default is six . If you enter 0 as the number of retry attempts or the maximum number of attempts has been reached, the server no longer immediately retries a connection and instead waits according to the outbound connection failure retry interval .
3. When messages that cannot be delivered reach the Maximum Time Since Submission value, they expire, and Exchange Server generates a Non-delivery report . To set the expiration time-out for messages, enter the desired message expiration value in the Maximum Time Since Submission (Days) text box . The default expiration time-out for messages is two days .
4. When messages are delayed longer than the allowed delay interval, Exchange Server sends a delay notification to the sender. To set the amount of time to wait before notifying senders of a delay, enter the desired wait time in the Notify Sender When Message Is Delayed After (Hours) text box . The default wait time is four hours .
5. To set an outgoing connection limit, select the Maximum Concurrent Out-bound Connections check box, and then type the limit value . The default limit is 1,000 outbound connections . To remove outgoing connection limits, set the value to 0 or select Unlimited in the drop-down list .

ChAptEr 4 Configuring transport services128
FIGURE 4-7 Configure connection limits .
6. To set an outgoing connection limit per domain, select the Maximum Con-current Outbound Connections Per Domain check box, and then type the limit value . The default limit is 20 outbound connections per domain . To remove the outgoing connection limit per domain, set the value to 0 or select Unlimited in the drop-down list .
7. Tap or click Save to apply your settings .
Creating receive connectorsReceive connectors are the gateways through which Transport servers receive mes-sages. Exchange creates the Receive connectors required for mail flow automatically. The receive permissions on a Receive connector determine who is allowed to send mail through the connector .
Two Receive connectors are created on Mailbox servers, and three Receive con nectors are created on Client Access servers . On Mailbox servers, the Default connector accepts connections from Mailbox servers running the Transport service and from Edge Transport servers, and the Client Proxy connector accepts connec-tions from Client Access servers . On Client Access servers, the Default front-end connector accepts connections from SMTP senders over port 25, the Client front-end connector accepts secure connections over TLS and the Outbound Proxy front-end connector accepts connections from Mailbox servers when front-end proxying is enabled . As these default Receive connectors are created, you gener-ally don’t need to create Receive connectors to receive mail from the Internet .
That said, as an administrator, you can explicitly create Receive connectors, and then manage the configuration of those Receive connectors as necessary. You

Configuring transport services ChAptEr 4 129
cannot, however, manage the configuration of connectors created implicitly by Exchange to enable mail flow. The key reasons for creating SMTP connectors are when you want to:
■■ Control explicitly how messages are received within domains or between domains .
■■ Control explicitly the permitted incoming connections .■■ Receive mail from systems that are not Exchange servers .
Unlike Send connectors, Receive connectors are used by only a single, desig-nated Transport server . When you create a Receive connector within an Exchange organization, you can select the Mailbox or Edge Transport server with which the connector should be associated and configure the specific binding for that connec-tor . A binding is a combination of local IP addresses, ports, and remote IP address ranges for the Receive connector . You cannot create a Receive connector that dupli-cates the bindings of existing Receive connectors . Each Receive connector must have a unique binding .
NOTE Exchange Server 2013 uses standard SMtp or Extended SMtp (ESMtp) to deliver mail. Because the ESMTP standard is more efficient and allows for extensions, SMtp connectors always try to initiate ESMtp sessions before trying to initiate stan-dard SMtp sessions. SMtp connectors initiate ESMtp sessions with other mail servers by issuing an EhLO start command. SMtp connectors initiate SMtp sessions with other mail servers by issuing the hELO start command.
SMTP was originally defined in RFC 821, and ESMTP was originally defined in RFC 1869. With SMTP, the MAIL FROM and RCPT TO fields are limited to a maximum of 512 characters. With ESMTP, these fields can have more than 512 characters. Additionally, EhLO replies can include a status code, domain, and a list of keywords that indicate supported extensions.
Because the ESMTP standard is more efficient and allows for extensions, SMTP connec-tors always try to initiate ESMtp sessions before trying to initiate standard SMtp ses-sions. SMtp connectors initiate ESMtp sessions with other mail servers by issuing an EhLO start command. SMtp connectors initiate SMtp sessions with other mail servers by issuing the hELO start command.
To create a Receive connector, complete the following steps:
1. In Exchange Admin Center, select Mail Flow in the Feature pane, and then select Receive Connectors .
2. On the Receive Connectors page, select the server on which you want to create the Receive connector. Generally, when you want to control mail flow from external sources, you configure the Receive connector on a Front End Transport server rather than a back-end transport server . Thus, you normally would:• Configure a Receive connector for receiving messages from the Internet
or an external partner on a Client Access server .• Configure a Receive connector for receiving messages from an internal
messaging appliance or an internal Exchange server on a Mailbox server .

ChAptEr 4 Configuring transport services130
3. Start the New Receive Connector Wizard, shown in Figure 4-8, by tapping or clicking New . In the Name text box, type a descriptive name for the connec-tor, and then specify the connector role . Select Hub Transport for a Receive connector that you want to associate with the Transport service on a Mailbox server . Or select Frontend Transport for a Receive connector that you want to associate with the Front End Transport service on a Client Access server .
FIGURE 4-8 Create a new SMTP Receive connector .
4. Set the connector type . The available options are as follows:• Custom Creates a Receive connector bound to a specific port or IP
address on a server with multiple receive ports or IP addresses . It can also be used to specify a remote IP address from which the connector receives messages . Generally, a custom Receive connector is used to connect with systems that are not Exchange servers . You also can use custom Receive connectors to receive mail from a Mailbox server in another forest or from an SMTP transfer agent .
• Internal Creates a Receive connector to receive messages from another Transport server in the organization, such as may be necessary for com-munication between Mailbox servers or between Mailbox servers and third-party transfer agents . For Edge Transport servers, the Internal con-nector type sets the default permissions so that the connector can be used by Exchange servers . For Mailbox servers, it sets the default per-missions so that the connector is configured to accept connections from Exchange servers .
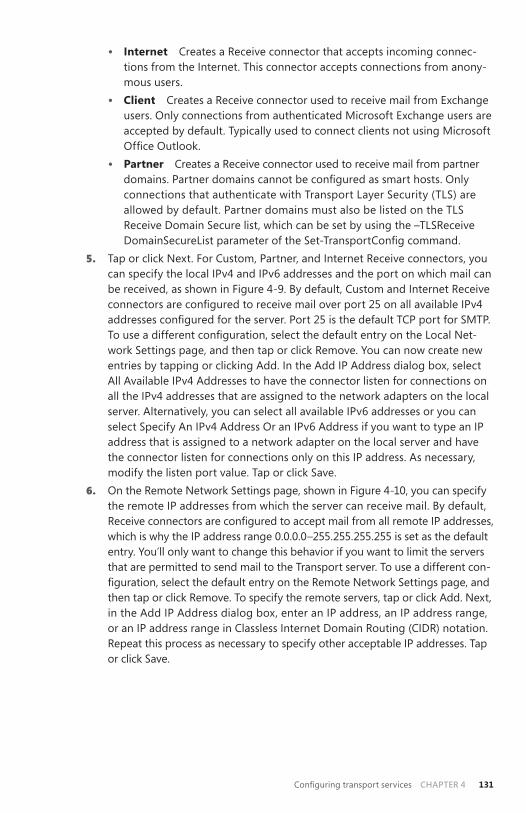
Configuring transport services ChAptEr 4 131
• Internet Creates a Receive connector that accepts incoming connec-tions from the Internet . This connector accepts connections from anony-mous users .
• Client Creates a Receive connector used to receive mail from Exchange users . Only connections from authenticated Microsoft Exchange users are accepted by default . Typically used to connect clients not using Microsoft Office Outlook.
• Partner Creates a Receive connector used to receive mail from partner domains. Partner domains cannot be configured as smart hosts. Only connections that authenticate with Transport Layer Security (TLS) are allowed by default . Partner domains must also be listed on the TLS Receive Domain Secure list, which can be set by using the –TLSReceive Domain SecureList parameter of the Set-TransportConfig command.
5. Tap or click Next . For Custom, Partner, and Internet Receive connectors, you can specify the local IPv4 and IPv6 addresses and the port on which mail can be received, as shown in Figure 4-9 . By default, Custom and Internet Receive connectors are configured to receive mail over port 25 on all available IPv4 addresses configured for the server. Port 25 is the default TCP port for SMTP . To use a different configuration, select the default entry on the Local Net-work Settings page, and then tap or click Remove . You can now create new entries by tapping or clicking Add . In the Add IP Address dialog box, select All Available IPv4 Addresses to have the connector listen for connections on all the IPv4 addresses that are assigned to the network adapters on the local server . Alternatively, you can select all available IPv6 addresses or you can select Specify An IPv4 Address Or an IPv6 Address if you want to type an IP address that is assigned to a network adapter on the local server and have the connector listen for connections only on this IP address . As necessary, modify the listen port value . Tap or click Save .
6. On the Remote Network Settings page, shown in Figure 4-10, you can specify the remote IP addresses from which the server can receive mail . By default, Receive connectors are configured to accept mail from all remote IP addresses, which is why the IP address range 0 .0 .0 .0–255 .255 .255 .255 is set as the default entry . You’ll only want to change this behavior if you want to limit the servers that are permitted to send mail to the Transport server . To use a different con-figuration, select the default entry on the Remote Network Settings page, and then tap or click Remove . To specify the remote servers, tap or click Add . Next, in the Add IP Address dialog box, enter an IP address, an IP address range, or an IP address range in Classless Internet Domain Routing (CIDR) notation . Repeat this process as necessary to specify other acceptable IP addresses . Tap or click Save .
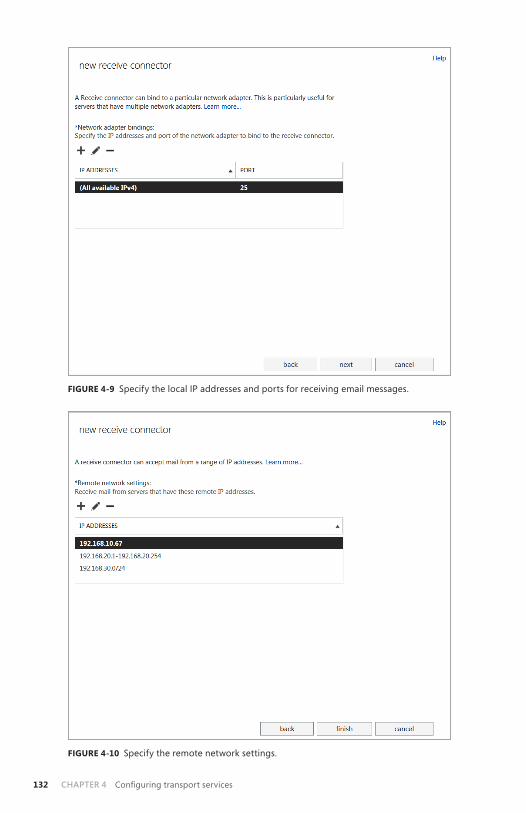
ChAptEr 4 Configuring transport services132
FIGURE 4-9 Specify the local IP addresses and ports for receiving email messages .
FIGURE 4-10 Specify the remote network settings .
Configuring transport services ChAptEr 4 133
7. When you’re finished, tap or click Finish to create the connector. You can verify that the connector is configured properly by confirming that messages arrive from a sending server to which the connector applies .
8. By default, the new Receive connector is enabled and configured to allow a maximum message size of 35 MB . To change the default maximum message size, open the related properties dialog box by double-tapping or double-clicking the connector’s entry in Exchange Admin Center . Next, enter the desired Maximum Receive Message Size in the combo box provided, and then tap or click Save . Valid maximum receive message sizes range from 1 to 2047 MB--and you can’t specify that there is no limit .
9. When you create a Receive connector, you can also specify the maximum hops that a message can take before it’s rejected by the Receive connector. By default, a message can have a maximum of 12 local hops and a maximum of 60 hops in total . If you want to change the default maximum hop counts, open the related properties dialog box by double-tapping or double-clicking the connector’s entry in Exchange Admin Center . After you set the maximum number of local hops and the maximum number of hops in total, tap or click Save . The valid range for local hops is 1 to 50 and the valid range for hops in total is 1 to 500. If you don’t want the connector to have a specific limit for local hops, set the maximum local hops to 0 . You can’t set the maximum hops in total to unlimited .
In the Exchange Management Shell, you can create Receive connectors by using the New-ReceiveConnector cmdlet . The –Usage parameter sets the Receive connec-tor type as Client, Custom, Internal, Internet, or Partner . The –Bindings parameter sets the internal IP addresses and ports on which to listen . The –FQDN parameter sets the FQDN to advertise in response to HELO or EHLO messages . The –RemoteIPRanges parameter provides a comma-separated list of acceptable IP address ranges . The –Server parameter specifies the server on which to create the Receive connector.
As Listing 4-9 shows, the required parameters for the New-ReceiveConnector cmdlet depend on the type of Receive connector you are creating . After you pro-vide the required parameters, the remaining parameters can be used in the same way regardless of which type of Receive connector you are creating . You use –Auth-Mechanism to specify the authentication type . With Basic Authentication or Basic Authentication Over TLS, you will be prompted to provide credentials . If a server hosts both the Mailbox Server role and Client Access Server role, use -TransportRole to specify the role with which the Receive connector should be associated .
LISTING 4-9 New-ReceiveConnector cmdlet syntax and usage
Syntax
New-ReceiveConnector -Name Name -Usage <Custom | Internet | Internal | Client | Partner> {AddtlParams} [-TransportRole <FrontEndTransport | HubTransport>] New-ReceiveConnector -Name Name -Bindings Bindings -RemoteIPRanges IPRange1, IPRange2, . . . {AddtlParams} [-TransportRole <FrontEndTransport | HubTransport>]

ChAptEr 4 Configuring transport services134
New-ReceiveConnector -Name Name -Bindings Bindings -Internet <$true | $false > {AddtlParams} [-TransportRole <FrontEndTransport | HubTransport>] New-ReceiveConnector -Name Name -Client <$true | $false > -RemoteIPRanges IPRange1, IPRange2, . . . {AddtlParams} [-TransportRole <FrontEndTransport | HubTransport>] New-ReceiveConnector -Name Name -Internal <$true | $false > -RemoteIPRanges IPRange1, IPRange2, . . . {AddtlParams} [-TransportRole <FrontEndTransport | HubTransport>] New-ReceiveConnector -Name <String> -Bindings Bindings -Partner <$true | $false > -RemoteIPRanges IPRange1, IPRange2, . . . [-TransportRole <FrontEndTransport | HubTransport>] {AddtlParams} {AddtlParams} [-AdvertiseClientSettings <$true | $false>] [-AuthMechanism <None | Tls | Integrated | BasicAuth | BasicAuthRequireTLS | ExchangeServer | ExternalAuthoritative>] [-Banner Banner] [-BinaryMimeEnabled <$true | $false>] [-Bindings Bindings] [-ChunkingEnabled <$true | $false >] [-Comment Comment] [-ConnectionInactivityTimeout TimeSpan] [-ConnectionTimeout TimeSpan] [-Custom <$true | $false >] [-DefaultDomain DefaultDomain] [-DeliveryStatusNotificationEnabled <$true | $false>] [-DomainController DCName] [-DomainSecureEnabled <$true | $false>] [-EightBitMimeEnabled <$true | $false>] [-EnableAuthGSSAPI <$true | $false>] [-Enabled <$true | $false>] [-EnhancedStatusCodesEnabled <$true | $false>] [-ExtendedProtectionPolicy <none | allow | require>] [-Fqdn FQDN] [-LiveCredentialEnabled <$true | $false>] [-LongAddressesEnabled <$true | $false>] [-MaxAcknowledgementDelay MaxDelay] [-MaxHeaderSize MaxHeaderBytes]

Configuring transport services ChAptEr 4 135
[-MaxHopCount MaxHops] [-MaxInboundConnection <MaxConn | Unlimited>] [-MaxInboundConnectionPercentagePerSource MaxPercentage] [-MaxInboundConnectionPerSource <MaxConnPerSource | Unlimited>] [-MaxLocalHopCount MaxHops] [-MaxLogonFailures MaxLogonFailures] [-MaxMessageSize MaxMessageSize] [-MaxProtocolErrors <MaxErrors | Unlimited>] [-MaxRecipientsPerMessage MaxRecipients] [-MessageRateLimit <RateLimit | Unlimited>] [-MessageRateSource <User | IPAddress | Both>] [-OrarEnabled <$true | $false>] [-PermissionGroups <None | AnonymousUsers | ExchangeUsers | ExchangeServers | ExchangeLegacyServers | Partners | Custom >] [-PipeliningEnabled < $true | $false>] [-ProtocolLoggingLevel <None | Verbose>] [-RemoteIPRanges IPRange1, IPRange2, . . .] [-RequireEHLODomain <$true | $false>] [-RequireTLS < $true | $false>] [-Server Server] [-ServiceDiscoveryFqdn ServiceFqdn] [-SizeEnabled <Disabled | Enabled | EnabledWithoutValue>] [-SuppressXAnonymousTls < $true | $false>] [-TarpitInterval TimeSpan] [-TlsCertificateName "X509:<I>Issuer<S>CommonName"] [-TlsDomainCapabilities DomainName:Capability]
Usage
New-ReceiveConnector -Name "Custom Receive Connector" -Usage "Custom" -Bindings "0.0.0.0:425" -Fqdn "mailserver85.cpandl.com" -RemoteIPRanges "0.0.0.0-255.255.255.255" -Server "CORPSVR127" -TransportRole HubTransport
Viewing and managing receive connectorsTo view all available Receive connectors for a server, select Mail Flow in the Feature pane, and then select Receive Connectors . Next, on the Receive Connectors page, select the server you want to work with . Receive connectors are listed by name, status, and role, as shown in Figure 4-11 .

ChAptEr 4 Configuring transport services136
FIGURE 4-11 Viewing connectors in Exchange Admin Center .
You can now:■■ Change a connector’s properties To change a connector’s properties,
double-tap or double-click the connector entry, and then use the Properties dialog box to manage the connector’s properties .
■■ Enable a connector To enable a connector, select it, and then select Enable in the details pane .
■■ Disable a connector To disable a connector, select it, and then select Disable in the details pane .
■■ Remove a connector To remove a connector, select it, and then select Remove .
When configuring Receive connector properties, you can specify the security mechanisms that can be used for incoming connections on the Security page . Use any combination of the following:
■■ Transport Layer Security Allows encrypted authentications with TLS for servers with smart cards or X.509 certificates.
■■ Enable Domain Security (Mutual Auth TLS) When TLS is enabled, you can also enable domain security to require mutual authentication .
■■ Basic Authentication Allows basic authentication . With basic authentica-tion, the user name and password specified are passed as base64-encoded text to the remote domain . Base64-encoding is cleartext and should not be confused with encryption .

Configuring transport services ChAptEr 4 137
■■ Offer Basic Authentication Only After Starting TLS Allows basic authen-tication only within an encrypted TLS session .
■■ Integrated Windows Authentication Allows secure authentication by using NT LAN Manager (NTLM) or Kerberos .
■■ Exchange Server Authentication Allows secure authentication for Exchange servers . With Exchange Server authentication, credentials are passed securely .
■■ Externally Secured Allows secure external authentication . With externally secured authentication, credentials are passed securely by using an external security protocol for which the server has been separately configured, such as IPsec .
Also when configuring Receive connector properties, you can specify the secu-rity group that is allowed to connect on the Permission Groups panel of the Security page . Use any combination of the following:
■■ Anonymous Users Allows unauthenticated, anonymous users to connect to the Receive connector .
■■ Exchange Users Allows connections by authenticated users who are valid recipients in the organization (Mailbox servers only) .
■■ Exchange Servers Allows connections by authenticated servers that are members of the Exchange Server Administrator group .
■■ Legacy Exchange Servers Allows connections by authenticated servers that are members of the ExchangeLegacyInterop group (Mailbox servers only) .
■■ Partners Allows connections by authenticated servers that are members of partner domains, as listed on the TLS Receive Domain Secure list .
In the Exchange Management Shell, you can view, update, or remove Receive connectors by using the Get-ReceiveConnector, Set-ReceiveConnector, or Remove-ReceiveConnector cmdlets, respectively . Listings 4-10 through 4-12 provide the syntax and usage . With Get-ReceiveConnector, you can return a list of all available Receive connectors if you don’t specify an identity or server . If you want to see only the Receive connectors configured on a particular server, use the –Server parameter.
LISTING 4-10 Get-ReceiveConnector cmdlet syntax and usage
Syntax
Get-ReceiveConnector [–Identity Server\ConnectorIdentity] [–Server Server] [-DomainController DCName]
Usage
Get-ReceiveConnector Get-ReceiveConnector -Identity "Corpsvr127\Adatum.com Receive Connector" Get-ReceiveConnector -Server "Corpsvr127"
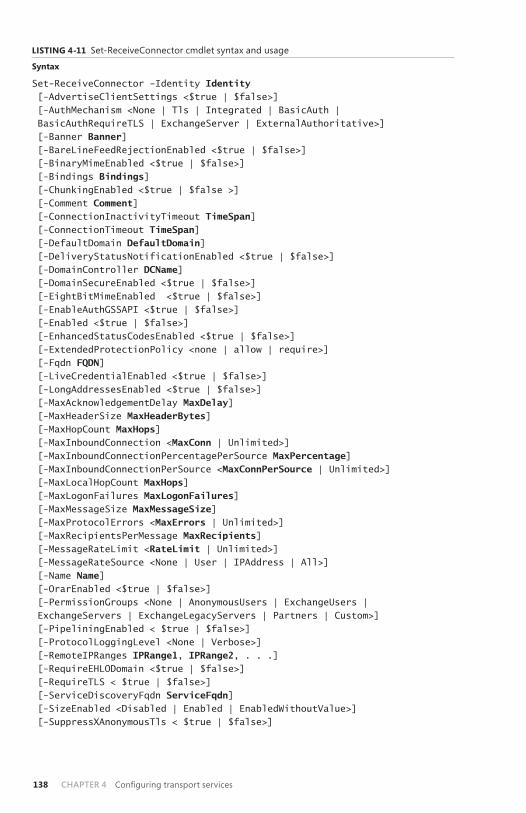
ChAptEr 4 Configuring transport services138
LISTING 4-11 Set-ReceiveConnector cmdlet syntax and usage
Syntax
Set-ReceiveConnector -Identity Identity [-AdvertiseClientSettings <$true | $false>] [-AuthMechanism <None | Tls | Integrated | BasicAuth | BasicAuthRequireTLS | ExchangeServer | ExternalAuthoritative>] [-Banner Banner] [-BareLineFeedRejectionEnabled <$true | $false>] [-BinaryMimeEnabled <$true | $false>] [-Bindings Bindings] [-ChunkingEnabled <$true | $false >] [-Comment Comment] [-ConnectionInactivityTimeout TimeSpan] [-ConnectionTimeout TimeSpan] [-DefaultDomain DefaultDomain] [-DeliveryStatusNotificationEnabled <$true | $false>] [-DomainController DCName] [-DomainSecureEnabled <$true | $false>] [-EightBitMimeEnabled <$true | $false>] [-EnableAuthGSSAPI <$true | $false>] [-Enabled <$true | $false>] [-EnhancedStatusCodesEnabled <$true | $false>] [-ExtendedProtectionPolicy <none | allow | require>] [-Fqdn FQDN] [-LiveCredentialEnabled <$true | $false>] [-LongAddressesEnabled <$true | $false>] [-MaxAcknowledgementDelay MaxDelay] [-MaxHeaderSize MaxHeaderBytes] [-MaxHopCount MaxHops] [-MaxInboundConnection <MaxConn | Unlimited>] [-MaxInboundConnectionPercentagePerSource MaxPercentage] [-MaxInboundConnectionPerSource <MaxConnPerSource | Unlimited>] [-MaxLocalHopCount MaxHops] [-MaxLogonFailures MaxLogonFailures] [-MaxMessageSize MaxMessageSize] [-MaxProtocolErrors <MaxErrors | Unlimited>] [-MaxRecipientsPerMessage MaxRecipients] [-MessageRateLimit <RateLimit | Unlimited>] [-MessageRateSource <None | User | IPAddress | All>] [-Name Name] [-OrarEnabled <$true | $false>] [-PermissionGroups <None | AnonymousUsers | ExchangeUsers | ExchangeServers | ExchangeLegacyServers | Partners | Custom>] [-PipeliningEnabled < $true | $false>] [-ProtocolLoggingLevel <None | Verbose>] [-RemoteIPRanges IPRange1, IPRange2, . . .] [-RequireEHLODomain <$true | $false>] [-RequireTLS < $true | $false>] [-ServiceDiscoveryFqdn ServiceFqdn] [-SizeEnabled <Disabled | Enabled | EnabledWithoutValue>] [-SuppressXAnonymousTls < $true | $false>]

Configuring transport services ChAptEr 4 139
[-TarpitInterval TimeSpan] [-TlsCertificateName "X509:<I>Issuer<S>CommonName"] [-TlsDomainCapabilities DomainName:Capability] [-TransportRole <None | Cafe | Mailbox | ClientAccess | UnifiedMessaging | HubTransport | Edge | All | Monitoring | CentralAdmin | CentralAdminDatabase | DomainController | WindowsDeploymentServer | ProvisionedServer | LanguagePacks | FrontendTransport | CafeArray | FfoWebService | OSP | ARR | ManagementFrontEnd | ManagementBackEnd | SCOM>]
Usage
Set-ReceiveConnector -Identity "Corpsvr127\Custom Receive Connector" -Bindings "0.0.0.0:425" -Fqdn "mailserver85.cpandl.com" -RemoteIPRanges "0.0.0.0-255.255.255.255"
LISTING 4-12 Remove-ReceiveConnector cmdlet syntax and usage
Syntax
Remove-ReceiveConnector –Identity ConnectorIdentity [-Confirm <$true | $false >] [-DomainController DCName]
Usage
Remove-ReceiveConnector -Identity "CorpSvr127\Adatum.com Receive Connector"
Creating Inbound and Outbound connectors with Exchange OnlineExchange Online uses Inbound and Outbound connectors, rather than Receive and Send connectors . Inbound connectors control mail flowing from the Internet, a part-ner, or a specific server. Outbound connectors control the flow of mail sent by recip-ients in the organization . When mailbox users in the online organization are sending mail, you can use Outbound connectors to direct messages to a server that applies additional processing before delivering the mail to its destination .
When you run the Hybrid Configuration Wizard to create a hybrid organization that combines an on-premises Exchange organization with an online Exchange organ-ization, a Send connector is created automatically in the on-premises Exchange organization to route mail to Exchange Online and a Receive connector is created automatically to receive mail from Exchange Online . Similarly, an Outbound con-nector is created automatically in the online Exchange organization to route mail to on-premises Exchange, and an Inbound connector is created automatically to receive mail from on-premises Exchange .
The automatically created Inbound and Outbound connectors have the connec-tor type set as On-Premises . To view and manage inbound or outbound connectors, access Exchange Admin Center for Exchange Online . Next, select Mail Flow in the Feature pane, and then select Connectors, as shown in Figure 4-12 .

ChAptEr 4 Configuring transport services140
FIGURE 4-12 Viewing connectors in Exchange Online .
You can create additional Inbound and Outbound connectors to control mail flow from and to trusted partners. These additional connectors have the connector type set as Partner, rather than On-Premises . By default, connectors use opportu-nistic TLS for connection security . This means connectors try to use TLS security for connections but if TLS cannot be used, they establish a standard SMTP connection instead .
To create Inbound or Outbound connectors, you have several options . If you are working with Exchange Admin Center, you can tap or click the Add option under Inbound Connectors to open the New Inbound Connector dialog box, or you can tap or click the Add option under Outbound Connectors to open the New Out-bound Connector dialog box. Next, use the options provided to configure the con-nectors much as you would configure Send and Receive connectors.
You also can connect to Exchange Online in Windows PowerShell and then use the New-InboundConnector or New-OutboundConnector cmdlet to create a con-nector . Each connector type has corresponding Set, Get, and Remove cmdlets as well . These are Set-InboundConnector, Get-InboundConnector, and Remove-InboundConnector in addition to Set-OutboundConnector, Get-OutboundConnec-tor, and Remove-OutboundConnector .

Configuring transport services ChAptEr 4 141
Configuring transport limits
Exchange Server 2013 automatically places receive size, send size, and other limits on messages being routed through an Exchange organization . The limits you can control include:
■■ Message header limits control the total size of all message header fields in a message . Header limits primarily apply to Receive connectors, although they also apply to messages in the pickup directory used by the Transport service . Header fields are plain text, and so the size of the header is determined by the total number of header fields and characters in each header field. Each character of text is 1 byte .
■■ Message receive size limits control the total size of messages that can be received, which includes the message header, message body, and any attachments . Exchange uses a custom message header (X-MS-Exchange-Organization-OriginalSize:) to record the original size of a message when it enters the Exchange organization . Although content conversion, encoding, and agent processing can change the size of the message, Exchange uses the lower value of the current or original message size to determine whether the limit applies .
■■ Message send size limits control the total size of messages that can be sent, which includes the message header, message body, and any attachments .
■■ Attachment size limits control the maximum size of each individual attach-ment within a message .
■■ Recipient limits control the total number of message recipients, with an unexpanded distribution group counted as a single recipient . When a mes-sage is composed, recipients are listed in the To:, Cc:, and Bcc: header fields. When a message is submitted for delivery, these recipients are converted into Rcpt To: entries in the message .
NOTE Unlike other limits, exceeding a recipient limit doesn’t automatically mean a message will be rejected. The message may be accepted for the first N recipients and then resent by the SMtp server in groups of N recipients until the message is delivered to all recipients.
A message that exceeds any applicable limit is rejected and a non-delivery report is issued to the sender with an error code, status, and description . Transport limits are configured for the organization as a whole, for individual send and receive connec-tors, for specific servers, for specific users, and for specific Active Directory site links.
As part of your planning for message size limits, you need to consider that base64 encoding will be applied to attachments and any binary data in messages . Base64 encoding increases the size of the attachments and the binary data by approximately 33 percent and in this way increases the total size of a message . Thus, attachments with a total original size of 27 MB could cause a message to exceed a send or receive limit of 35 MB .

ChAptEr 4 Configuring transport services142
Setting organizational transport limitsOrganizational transport limits apply to all transport servers in the organization, which includes Exchange 2013 Mailbox servers, Exchange 2010 Hub Transport serv-ers and Exchange 2007 Hub Transport servers . By default, the maximum message size that can be received or sent by recipients in the organization is 10,240 KB and messages can have no more than 500 recipients .
You can view or change the default limits for the Exchange organization by com-pleting the following steps:
1. In the Exchange Admin Center, select Mail Flow in the Feature pane, and then select either Receive Connectors or Send Connectors .
2. In the main pane, select the More button (which has 3 dots for an icon), and then tap or click Organization Transport Settings . In the Organization Trans-port Settings dialog box, the Limits page is selected by default, as shown in Figure 4-13 .
FIGURE 4-13 Set transport limits for the Exchange organization .
3. To set a maximum number of recipients limit, type the desired limit in the Maximum Number Of Recipients combo box . The valid input range is 0 to 2,147,483,647 . If you use a value of 0, no limit is imposed on the number of recipients in a message . Note that Exchange handles an unexpanded distri-bution group as one recipient .
4. To set a maximum receive size limit, type the desired receive limit in the related combo box . The valid input range is 0 to 2047 .999 MB . If you use a value of 0 or select Unlimited in the dropdown list, no limit is imposed on the message size that can be received by recipients in the organization .

Configuring transport services ChAptEr 4 143
5. To set a maximum send size limit, type the desired send limit in the related combo box . The valid input range is 0 to 2047 .999 MB . If you use a value of 0 or select Unlimited in the dropdown list, no limit is imposed on the message size that can be sent by senders in the organization .
6. Tap or click Save to apply your settings .In the Exchange Management Shell, you assign the desired transport limits by
using the Set-TransportConfig cmdlet, as shown in Listing 4-13. The –MaxReceive-Size and –MaxSendSize parameters set the maximum receive size and maximum send size, respectively . The -MaxRecipientEnvelopeLimit parameter sets the maxi-mum number of recipients in a message . When you use the –MaxReceiveSize and –MaxSendSize parameters, you must specify the units for values by using KB for kilobytes, MB for megabytes, or GB for gigabytes . Your changes are made at the organization level and apply to the entire Exchange Server 2013 organization .
LISTING 4-13 Setting transport limits
Syntax
Set-TransportConfig [-Identity OrgId] [-DomainController DCName] [-MaxReceiveSize <'MaxSize' | 'Unlimited'>] [-MaxSendSize <'MaxSize' | 'Unlimited'>] [-MaxRecipientEnvelopeLimit <'MaxRecipients' | 'Unlimited'>]
Usage
Set-TransportConfig -MaxReceiveSize '15MB' -MaxSendSize '15MB' -MaxRecipientEnvelopeLimit '1000'
You can control the maximum message size and maximum attachment size for all Mailbox servers in the organization by using transport rules . To do this, use the -MessageSizeOver and -AttachmentSizeOver parameters of New-TransportRule or Set-TransportRule .
Setting connector transport limitsThe transport limits of a connector apply to any message that uses a specified con-nector for message delivery . Exchange 2013 automatically sets transport limits on Send and Receive connectors . Most connectors have a maximum message size limit of 35 MB by default . The exceptions are the Default Frontend and Outbound Proxy Frontend Receive connectors, which have a 36 MB limit by default .
You can view the current maximum message size limits for all send connectors by entering the following command in Exchange Management Shell:
get-sendconnector | fl name, maxmessagesize
To view the current maximum size of all receive connectors, enter:
get-receiveconnector | fl name, maxmessagesize
You can modify the default maximum message size limit by using the -Max-MessageSize parameter of the New-ReceiveConnector, Set-ReceiveConnector, New-SendConnector, and Set-SendConnector cmdlets .

ChAptEr 4 Configuring transport services144
Receive connectors also have default limits on the maximum number of recipi-ents and the maximum header size . Most of the default Receive connectors have a limit of 200 recipients by default . The exception is the Default Receive connector which has a limit of 5,000 recipients by default .
The default Receive connectors and any other Receive connectors you create automatically have a 128 KB maximum header size limit . Although Exchange adds headers to messages during content conversion, encoding, and agent process-ing, the number of recipients in a message is the most common reason a message exceeds the maximum header size limit . Each character in a recipient’s name and email address counts against the limit. If a message is rejected because it exceeds the maximum header size limit, the sender should receive a non-delivery report . This non-delivery report may contain an error status code of 4 .4 .7, which can help you identify the problem as relating to the maximum header size limit .
In the shell, you can view the current recipient and header size limits for all receive connectors by entering:
get-receiveconnector |fl name, maxheadersize, maxrecipientspermessage
You can modify the recipient and header limits by using the -MaxRecipients-PerMessage and -MaxHeaderSize parameters of the New-ReceiveConnector and Set-ReceiveConnector cmdlets .
Setting server transport limitsThe transport limits of a server apply to any message processed by the server . If a user’s mailbox is on a particular Mailbox server, the maximum header size and maxi-mum number of recipient limits for the pickup directory apply. You can configure these limits on a per-server basis as discussed in Chapter 5, “Managing and main-taining mail flow” in the “Configuring messaging limits for the Pickup directory” section .
Per-server transport limits also apply to Client Access servers . The maximum message size for Outlook Web App is 33 MB . Exchange ActiveSync and Exchange Web Services have maximum message size limits of 10 MB and 64 MB respectively . To change these values, you must edit the appropriate web.config configuration file on each Client Access server. The configuration files are formatted with XML and can be edited in any standard text editor, including Notepad .exe .
IMPORTANT Before you make any changes, you might want to create a copy of each of the original configuration files. In Notepad, you can use the Find feature on the Edit menu to search. As the default search starts at the current position, make sure you start your searches at the top of the document. One way to ensure you are at the top of the document is to press Ctrl+home while working in Notepad.
Setting Exchange ActiveSync limitsThe %ExchangeInstallpath% variable is an environment variable set when you installed Exchange server. You’ll find the web.config file for Exchange ActiveSync in the %ExchangeInstallpath%\ClientAccess\Sync folder. In this web.config file, the

Configuring transport services ChAptEr 4 145
MaxDocumentDataSize key sets the maximum size of data that can be received by the ActiveSync protocol, and the MaxRequestLength value sets the maximum size of data that can be received from an ActiveSync client .
You can open the configuration file for editing in Notepad by entering the following command at a command prompt:
Notepad %ExchangeInstallpath%\ClientAccess\Sync\web.config
Or entering the following at the shell prompt:
Notepad $env:ExchangeInstallpath\ClientAccess\Sync\web.config
REAL WORLD If you’re using Exchange Management Shell rather than a standard powerShell prompt, keep in mind Exchange Management Shell does not run in elevated, administrator mode by default because your login credentials are used to create an implicit remoting session. Although you can run Exchange Management Shell in ad-ministrator mode, a new session for remoting won’t be implicitly established until you run the first Exchange command.
After you open the web.config file, search for MaxDocumentDataSize, and then set the related value to the desired maximum size in kilobytes (KB) . Next, search for MaxRequestLength to set the related value to the desired maximum size in bytes . The related entries are:
<add key="MaxDocumentDataSize" value="10240000"> ... </add> <httpRuntime maxRequestLength="10240" />
When you are finished making changes, save and close the configuration file. Keep in mind that when you save the changes to the configuration file, the related web application is restarted automatically .
Confirm that Exchange ActiveSync is working as expected by entering Test-ActiveSyncConnectivity at the shell prompt . If there’s a problem with Exchange ActiveSync, check your edits or restore the original configuration file.
Setting Exchange Web Services limitsYou’ll find the web.config file for Exchange Web Services in the %ExchangeInstall-path%\ClientAccess\exchweb\ews folder. In this web.config file, the MaxAllowed-ContentLength value sets the maximum size of HTTTP content requests and the MaxReceivedMessageSize value sets the maximum size of messages that can be accepted by Exchange Web Services .
You can open the configuration file for editing in Notepad by entering the fol-lowing command at a command prompt:
Notepad %ExchangeInstallpath%\ClientAccess\exchweb\ews\web.config
Or entering the following at the shell prompt:
Notepad $env:ExchangeInstallpath\ClientAccess\exchweb\ews\web.config

ChAptEr 4 Configuring transport services146
After you open the web.config file, search for each occurrence of MaxReceived-MessageSize to set the related value to the desired maximum size in bytes . You must set a MaxReceivedMessageSize value for each HTTP and HTTPS binding and authen-tication combination . Although there are 16 entries for MaxReceivedMessageSize in total, you don’t want to modify the two entries for UM bindings .
Next, search for MaxAllowedContentLength and then set the related value to the desired maximum size in bytes. When you’re finished making changes, save and close the configuration file. Keep in mind that when you save the changes to the configu-ration file, the related web application is restarted automatically.
Confirm that Exchange Web Services are working as expected by entering Test-WebServicesConnectivity at the shell prompt . If a problem occurs with Exchange Web Services, check your edits or restore the original configuration file.
Setting Outlook Web App limitsYou’ll find the web.config file for Outlook Web App in the %ExchangeInstallpath%\ClientAccess\Owa folder. In this web.config file, the MaxAllowedContentLength value key sets the maximum size of HTTTP content requests, MaxReceivedMessage-Size value sets the maximum size of messages that can be accepted by Outlook Web App and MaxRequestLength value sets the maximum size of data that can be received from an Outlook Web App client .
You can open the configuration file for editing in Notepad by entering the following command at a command prompt:
Notepad %ExchangeInstallpath%\ClientAccess\Owa\web.config
Or entering the following at the shell prompt:
Notepad $env:ExchangeInstallpath\ClientAccess\Owa\web.config
After you open the web.config file, search for MaxAllowedContentLength, and then set the related value to the desired maximum size in bytes . Next, search for MaxReceivedMessageSize, and then set the related value to the desired maximum size in bytes . There are two entries for MaxReceivedMessageSize: one for HTTP and one for HTTPS . Finally, search for MaxRequestLength to set the related value to the desired maximum size in kilobytes . The related entries are:
<requestLimits maxAllowedContentLength="35000000" /> ... <binding name="httpsBinding" maxReceivedMessageSize="35000000"> ... <binding name="httpBinding" maxReceivedMessageSize="35000000"> ... <httpRuntime maxUrlLength="500" maxRequestLength="35000" requestValidationMode="2.0" enableVersionHeader="false" />

Configuring transport services ChAptEr 4 147
When you are finished making changes, save and close the configuration file. Keep in mind that when you save the changes to the configuration file, the related web application is restarted automatically. Confirm that Outlook Web App is work-ing as expected by entering Test-OwaConnectivity at the shell prompt . If a prob- lem with Outlook Web App occurs, check your edits or restore the original configu-ration file.
REAL WORLD By default, IIS uses overlapping recycling of worker processes when restarting applications and application pools. With overlapping recycling, new worker processes are started to accept new requests from http.sys while current worker processes are marked for recycling but continue handling existing requests. When all existing requests are handled, the original worker processes shut down.
Completing Transport services setup
After you install Mailbox servers running Exchange Server 2013, you need to final-ize the configuration of Transport services by creating and configuring a postmaster mailbox and performing any other necessary tasks . For Exchange organizations with only Mailbox servers, you should optimize anti-spam features . For Exchange organi-zations with Edge Transport servers, you need to subscribe the Edge Transport serv-ers to your Exchange organization .
Configuring the postmaster address and mailboxEvery organization that sends and receives mail should have a postmaster address . This is the email address listed on nondelivery reports and other delivery status notification reports created by Exchange Server. The postmaster address is not set by default; therefore, you must manually set it .
To view your Exchange organization’s postmaster address, enter the following command at the Exchange Management Shell prompt:
Get-TransportConfig | Format-List Name,ExternalPostMasterAddress
This command lists the postmaster address for the organization, as shown in this sample output:
Name: Transport Settings ExternalPostmasterAddress : [email protected]
If you don’t set the postmaster address, the address typically is set to $null, except when you have an Edge Transport server that hasn’t been through the Edge Sync process . To change the postmaster address, you can use the –ExternalPostMaster -Address parameter of the Set-TransportServer cmdlet, as shown in this example:
Set-TransportConfig -ExternalPostMasterAddress "[email protected]"

ChAptEr 4 Configuring transport services148
If you want the postmaster address to be able to receive mail, you must either create a mailbox and associate it with the postmaster address or assign the post-master address as a secondary email address for an existing mailbox .
You also can view or change the organization’s postmaster address by completing the following steps:
1. In the Exchange Admin Center, select Mail Flow in the Feature pane, and then select either Receive Connectors or Send Connectors .
2. In the main pane, select the More button (which has 3 dots for an icon), and then tap or click Organization Transport Settings to display the Organization Transport Settings dialog box .
3. On the Delivery page, the current postmaster email address is listed (if any) . If you want to change the postmaster address, enter the address you want to use, and then tap or click Save .
REAL WORLD On the Delivery page, you also can specify the delivery status notifi-cation (DSN) codes that should be monitored. the postmaster receives a copy of any non-delivery reports delivered to internal senders with these codes. Codes you may want to have monitored include:
■■ 4.3.1 Issued when there are insufficient resources on the Mailbox server, usually as a result of a resource problem. Note that the report may state an out-of-memory error when the actual error that occurred was caused by a full disk.
■■ 4.3.2 Issued when the system is not accepting network messages often caused by a frozen queue. to resolve the problem, unfreeze the queue.
■■ 4.4.7 Issued when a message expires before it can be relayed or delivered, typically occurring as a result of a time-out during communication with a remote server. It also can indicate a message header limit has been reached, so the sender may need to reduce the number of recipients in the message.
■■ 5.3.5 Issued when a server is improperly configured, specifically when the server is configured to loop mail back to itself. To resolve the problem, check the server’s con-nectors for loops.
■■ 5.4.6 Issued when a routing loop is detected, specifically when the delivery of a message generates another message and that message then generates another mes-sage, and so forth. If the message generating loop continues more than 20 times, this error is issued. to resolve the error, check the mailbox rules associated with the recip-ients and senders to determine how automatic message forwarding is configured.
Configuring shadow redundancyShadow redundancy ensures that messages are protected from loss the entire time they are in transit by creating a copy of a message and retaining this copy while a message is in transit . If any transport server along the route fails to report a success-ful delivery, Exchange resubmits the message for delivery to ensure that the mes-sage continues through to its destination .

Configuring transport services ChAptEr 4 149
By default, shadow redundancy is enabled in the Transport service on all Mail-box servers . Unlike Exchange 2010, Exchange 2013 makes a redundant copy of any message it receives before acknowledging receipt . This important change ensures the message will be delivered even if the receiving server were to shut down imme-diately after acknowledging receipt of a message . Prior to this change, a message could possibly be lost if the receiving server were to shut down after acknowledging receipt of a message but before creating a copy of the message .
Thanks to shadow redundancy, as long as you have multiple transport servers (and multiple Edge Transports if you’ve deployed legacy Edge Transport servers), you can remove any transport server that fails and not have to worry about emp-tying its queues or losing messages . You also can upgrade or replace a Mailbox or Edge Transport server at any time without the risk of losing messages . If you have a single Mailbox server, you should drain all SMTP queues on the server before per-forming maintenance . The same is true if you have a single Edge Transport . This ensures that there is no risk of message loss, even without shadow redundancy . Keep in mind that if you have a single transport server, and it fails and must be replaced, you’ve likely lost data if you can’t restore the mail.que file.
IMPORTANT Shadow redundancy requires multiple servers. Your Mailbox servers can be stand-alone servers or they can be part of a database availability group. how-ever, with stand-alone servers, each Active Directory site with Mailbox servers must have two or more stand-alone servers. Although there must be multiple members of a database availability group for shadow redundancy to work, the members of that group can be in different Active Directory sites.
When you work with shadow redundancy, a key concept to understand is that the primary transport server has ownership of the messages in its shadow queue . The first primary owner is always the server on which the message originates. As the message travels through the transport pipeline, different transport servers may become the primary owner of a message . In addition, if a primary owner fails, another server can take over as the primary .
Shadow redundancy is implemented according to high availability transport (HAT) boundaries in the organization . Each Active Directory site with Mailbox servers in the organization is a HAT boundary, as is each Database Availability group in the organization . Within a HAT boundary, two copies of a message are always in transit: the original and the redundant copy .
It’s important to point out that the original copy and the redundant copy exist on different servers . When a Mailbox server receives a message, it makes a redun-dant copy of the message on another Mailbox server in the HAT boundary before acknowledging receipt of the message . With database availability groups, the Trans-port service prefers creating the redundant copy in a remote site to ensure site resilience .

ChAptEr 4 Configuring transport services150
The basic process works like this:
1. The primary server transmits a copy of the message to the Transport service on another Mailbox server, and the Transport service on the other Mailbox server acknowledges that the copy of the message was created successfully . The copy of the message is the shadow message, and the Mailbox server that holds it is the shadow server for the primary server . The message exists in a shadow queue on the shadow server .
2. After the primary server receives acknowledgement from the shadow server, the primary server acknowledges the receipt of the primary message to the original SMTP server in the original SMTP session, and the SMTP session is closed .
3. The primary server transmits the message . If the primary server transmits the message outside the HAT boundary and the receiving SMTP server acknowl-edges successful receipt of the message, the primary server moves the primary message into its Safety Net queue . Otherwise, if the ultimate destination for the message is within the HAT boundary, the primary message is moved into the Safety Net queue when the message is accepted by the Transport service on a Mailbox server that holds the ultimate destination for the message .
4. The shadow server moves the shadow message to its Safety Net queue .This process is complex and can be difficult to understand, so let’s take another
look at the process . Step-by-step, the process works like this:
1. An SMTP server transmits a message to the Transport service on a Mailbox server in the Exchange organization . The receiving Mailbox server becomes the primary server for the message, and the original message is the primary message .
2. While the original SMTP session with the SMTP server is still active, the Trans-port service on the primary server opens a new, simultaneous SMTP session with the Transport service on another Mailbox server in the HAT boundary .
3. The primary server transmits a copy of the message to the Transport service on the other Mailbox server . The copy of the message is the shadow mes-sage, and the Mailbox server that holds it is the shadow server for the pri-mary server . The message exists in a shadow queue on the shadow server .
4. After the primary server receives an acknowledgement from the shadow server that confirms the copy of the message was created, the primary server acknowledges the receipt of the primary message to the original SMTP server in the original SMTP session, and the SMTP session is closed .
5. The primary server transmits the message . The primary server and the shadow server stay in contact with each other to track the progress of the message .

Configuring transport services ChAptEr 4 151
6. When the primary server successfully transmits the message and the receiv-ing SMTP server acknowledges successful receipt of the message, the pri-mary server updates the discard status of the message to show delivery is complete and relays this to the shadow server .
7. The shadow server moves the shadow message from the shadow queue to its Safety Net queue .
In the Exchange Management Shell, you configure shadow redundancy for the on-premises Exchange organization by using the Set-TransportConfig cmdlet, as shown in Listing 4-14 . The related parameters are used as follows:
■■ MaxDumpsterTime Only used by Hub Transport servers in a coexistence scenario. Specifies the maximum amount of time that a delivered message will remain in the transport dumpster for possible resubmission . The default is seven days .
■■ MaxRetriesForLocalSiteShadow When member servers in a database availability group span multiple Active Directory sites and ShadowMessage-PreferenceSetting is configured to prefer remote sites, you can use this option to control how many times the primary server tries to create the shadow copy on a server in the local site after failing to create the copy in a remote site . By default, this option is set to 2 . If the preference is for Local-Only, this option controls the number of times the primary server tries to create the shadow copy on a server in the local site before failing and reject-ing the message with a transient error .
■■ MaxRetriesForRemoteSiteShadow When member servers in a data-base availability group span multiple Active Directory sites and Shadow-MessagePreferenceSetting is configured to prefer remote sites, you can use this option to control how many times the primary server tries to create the shadow copy on a server in a remote site before trying to create the shadow copy on a server in the local site . By default, this option is set to 4 . If the preference is for RemoteOnly, this option controls the number of times the primary server tries to create the shadow copy on a server in a remote site before failing and rejecting the message with a transient error.
■■ RejectMessageOnShadowFailure Determines whether a primary mes-sage can be accepted or acknowledged without a shadow copy being cre-ated first. This option is disabled by default. If you enable this option and a shadow copy cannot be created, the primary message will be rejected with a transient error . Enable this option only when you must ensure a shadow copy of a message is always created and multiple Mailbox servers exist in each HAT boundary .
■■ ShadowHeartbeatFrequency Sets the amount of time a transport server waits before establishing a connection to the primary server to check the discard status of shadow messages . The default value is two minutes . Set this value according to the size of your Exchange implementation, the level of messaging traffic, and the relative latency on the network. For example, in a

ChAptEr 4 Configuring transport services152
large global organization where transport servers handle an extremely high volume of messages, you might want to set a longer time interval, although the default may suffice for a smaller organization.
■■ ShadowMessageAutoDiscardInterval Sets the amount of time a server retains discard events for successfully delivered shadow messages . Primary servers queue discard events until they are checked by the shadow server or until the discard interval has elapsed, whichever comes first. The default value is two days . Set the value according to the size of your Exchange imple-mentation, the level of messaging traffic, and the relative reliability of your network . For example, in a large global organization where transport servers handle an extremely high volume of messages on a highly reliable network, you might want to set a shorter discard interval, whereas the default may suffice for a smaller organization.
■■ ShadowMessagePreferenceSetting When member servers in a data-base availability group span multiple Active Directory sites, you can use this option to control remote site preferences . By default, this option is set to PreferRemote . Here, the primary server attempts to create a shadow copy on a server in a remote site . If this fails, the primary server attempts to create a shadow copy on a server in the local site . Alternatively, you can specify that the copy should only be made in the local site or only in a remote site . To do this, set the value to LocalOnly or RemoteOnly respectively .
■■ ShadowRedundancyEnabled Enables or disables shadow redundancy . If you don’t use shadow redundancy, you can use this parameter to disable the feature . Ideally, you’d only disable the feature temporarily or in situations in which you have a single Exchange server implementation and are experiencing problems related to this feature . By default, shadow redundancy is enabled .
■■ ShadowResubmitTimeSpan Specifies how long a shadow server waits before deciding that the primary server has failed and assumes ownership of messages in the shadow queue for that server . The default value is three hours . Set this value according to the size of your Exchange implementa-tion and the relative amount of latency on the network . For example, a large global organization might want to set a longer time span, whereas the default may suffice for a smaller organization.
LISTING 4-14 Setting shadow queue options
Syntax
Set-TransportConfig [-Identity OrgId] [-DomainController DCName] [-MaxDumpsterTime <TimeSpan>] [-MaxRetriesForLocalSiteShadow RetryCount] [-MaxRetriesForRemoteSiteShadow RetryCount] [-RejectMessageOnShadowFailure <$true | $false>] [-SafetyNetHoldTime <TimeSpan>] [-ShadowHeartbeatFrequency <TimeSpan>] [-ShadowMessageAutoDiscardInterval <TimeSpan>] [-ShadowMessagePreferenceSetting <PreferRemote | LocalOnly | RemoteOnly>] [-ShadowRedundancyEnabled <$true | $false>] [-ShadowResubmitTimeSpan <TimeSpan>]
Configuring transport services ChAptEr 4 153
Usage
Set-TransportConfig -MaxRetriesForLocalSiteShadow 3 -MaxRetriesForRemoteSiteShadow 4 -RejectMessageOnShadowFailure $false -SafetyNetHoldTime "3.00:00:00" -ShadowHeartbeatFrequency "00:05:00" -ShadowResubmitTimeSpan "02:00:00" -ShadowMessageAutoDiscardInterval "3.00:00:00"
When working with shadow redundancy, Safety Net, and queues, you also want to consider:
■■ ConnectionInactivityTimeout Configured for each Send and Receive con-nector by using Set-SendConnector and Set-ReceiveConnector . Sets the max-imum time that an open SMTP connection between servers can remain idle before timing out . This value must be smaller than the ConnectionTimeout value . For Send connectors, the default is 10 minutes . For Receive connec-tors, the default is 5 minutes for the Transport service on Mailbox servers and the Front End Transport service on Client Access servers, but only one minute for Edge Transport servers .
■■ ConnectionTimeout Configured for each Receive connector using Set-ReceiveConnector . Sets the maximum time that an SMTP connection can be open between servers, even if the source server is transmitting data . The default is 10 minutes for the Transport service on Mailbox servers and the Front End Transport service on Client Access servers, but only 5 minutes for Edge Transport servers .
■■ MessageExpirationTimeout Configured for the Transport service on each Mailbox server using Set-TransportService. Specifies how long a message can remain in a queue before it expires . The default value is two days .
When configuring these settings, you’ll want to consider the relative latency and speed of the network as well as level of messaging traffic. If a slow or congested network has high latency, you may need to configure higher timeout values. Keep in mind, however, that each open connection uses resources and that each connector allows a finite number of open connections. By default, with Send connectors, the maximum number of connections is 1,000 and the maximum number of connec-tions per domain is 20 .
Configuring Safety NetAll Mailbox servers use Safety Net to maintain a queue of messages that were recently delivered to recipients . As discussed in “Working with Exchange Server message queues” in Chapter 1 and in the previous section of this chapter, this feature works in conjunction with shadow redundancy. The primary server that sends a message main-tains the primary Safety Net queue while a second server, called the shadow server, maintains the shadow Safety Net queue .

ChAptEr 4 Configuring transport services154
In the Exchange Management Shell, you configure Safety Net with these param-eters in mind:
■■ SafetyNetHoldTime An organization-wide option configured for Set-TransportConfig. Specifies how long a successfully processed message is retained in the Safety Net queue . The default value is two days . Unacknowl-edged shadow messages expire after the sum of the SafetyNetHoldTime and the MessageExpirationTimeout elapses . Set this value according to the size of your Exchange implementation and the relative amount of latency on the network . For example, a large global organization might want to set a longer time span, although the default may suffice for a smaller organization.
■■ ReplayLagTime Configured on individual mailbox database copies for Set-MailboxDatabaseCopy. Specifies how long the Exchange Replication service waits before replaying log files that have been copied to the passive data-base copy . By default, this option is not set . To ensure no data is lost and messages are available for resubmittal from the Safety Net queue, the replay lag time must be less than or equal to the safety net hold time .
■■ MessageExpirationTimeout Configured for the Transport service on each Mailbox server using Set-TransportService. Specifies how long a message can remain in a queue before it expires . The default value is two days .
■■ ShadowRedundancyEnabled Set using the Set-TransportConfig cmdlet. Enables or disables shadow redundancy for the Exchange organization . As Safety Net relies on shadow redundancy, you also disable Safety Net if you disable shadow redundancy .
You can use Exchange Admin Center to view or change the Safety Net hold time as well . Select Mail Flow in the Feature pane, and then select either Receive Connec-tors or Send Connectors . In the main pane, select the More button (which has 3 dots for an icon), and then tap or click Organization Transport Settings . This displays the Organization Transport Settings dialog box . Tap or click Safety Net . Finally, in the Safety Net Hold Time text box, enter the number of days that messages should be held in Safety Net queues and then tap or click Save .
Enabling anti-spam featuresBy default, Edge Transport servers have anti-spam features enabled and Mailbox servers do not . In an Exchange organization with Edge Transport servers, this is the desired configuration: you want your Edge Transport servers to run anti-spam filters on messages before they are routed into the Exchange organization . After Edge Transport servers have filtered messages, you don’t need to filter them again, which is why Mailbox servers have this feature disabled .
If your organization doesn’t use Edge Transport servers and has only Mailbox servers, you can enable the anti-spam features on Mailbox servers that receive mes-sages from the Internet so that you can filter incoming messages for spam. However, if incoming mail has any prior anti-spam filtering, you don’t need to filter messages again .
Configuring transport services ChAptEr 4 155
The following anti-spam agents are available for the Transport service on Mail-box servers to use:
■■ Content Filter agent■■ Protocol Analysis agent■■ Recipient Filter agent■■ Sender Filter agent■■ Sender ID agent
You can install and configure these agents by doing the following:
1. Log on to the Mailbox server you want to configure.2. In Exchange Management Shell, run the following command:
& $env:ExchangeInstallPath\Scripts\Install-AntiSpamAgents.ps1
3. After you install the anti-spam agents, you must restart the Exchange Trans-port service . In the shell, you can do this by running the following command:
Restart-service MSExchangeTransport
4. Repeat steps 1 – 3 for each Mailbox server that should filter messages.5. Configure organization-wide transport settings that identify any internal
SMTP servers that should be ignored by the Sender ID agent . Typically, this includes any Mailbox server in which you’ve enabled the anti-spam features . Use the -InternalSMTPServers parameter of Set-TransportConfig to identify each server by its IPv4 address . Here are examples:
Set-Transportconfig -InternalSMTPServers @{Add="192.168.10.52"}
Set-Transportconfig -InternalSMTPServers
@{Add="192.168.10.52","192.168.10.64"}
6. You can verify that the servers were added by running the following command:
Get-TransportConfig | fl InternalSMTPServers
Once you’ve installed the anti-spam agents, you can enable or disable the anti-spam features on Mailbox servers by using the Set-TransportService cmdlet . To enable these features, set the –AntispamAgentsEnabled parameter to $true . To dis-able these features, set the –AntispamAgentsEnabled parameter to $false .
The following example shows how you can enable anti-spam features on a Mail-box server named CorpSvr127:
Set-TransportService –Identity 'CorpSvr127' –AntispamAgentsEnabled $true
Next you need to restart the Microsoft Exchange Transport service on the server . In the shell, you can do this by running the following command:
Restart-service MSExchangeTransport

ChAptEr 4 Configuring transport services156
You can now configure the transport server’s anti-spam features as discussed in the “Configuring anti-spam and message filtering options” section in Chapter 5. When you turn on anti-spam features, a transport server can automatically get updates for spam signatures, IP reputation, and anti-spam definitions through auto-matic updates, as long as you’ve done the following:
■■ Conformed to Microsoft’s licensing requirements■■ Enabled Automatic Updates for use on the server■■ Specifically enabled and configured anti-spam updates
To obtain anti-spam updates through automatic updates, Microsoft requires an Exchange Enterprise Client Access License (CAL) for each mailbox user . You can con-figure automatic updates by using the Windows Update utility in Control Panel. Press Windows key + I, tap or click Control Panel\Security, and then tap or click Windows Update to start this utility. You can also configure Automatic Updates through Group Policy .
Subscribing Edge transport serversWhen your Exchange organization uses Legacy Edge Transport servers and you want to use the Edge Synchronization feature, you must subscribe the Edge Transport server to your Exchange organization prior to performing other configuration tasks on the Edge Transport server . Creating a subscription allows the Microsoft Exchange Edge Sync service running on designated Mailbox servers to establish one-way repli-cation of recipient and configuration information from your internal Active Directory database to the AD LDS database on an Edge Transport server . After you create an Edge subscription, synchronization is automatic . If problems occur, however, you can force synchronization or remove the Edge subscription .
Creating an Edge subscriptionA subscribed Edge Transport server receives the following from the EdgeSync service:
■■ Send connector configurations■■ Accepted domain configurations■■ Remote domain configurations■■ Safe Senders lists■■ Recipients
Any manually configured accepted domains, message classifications, remote domains, and Send connectors are deleted as part of the subscription process, and the related Exchange management interfaces are locked out as well . To manage these features after a subscription is created, you must do so within the Exchange organization and have the EdgeSync service update the Edge Transport server .
Also as part of the subscription process, you must select an Active Directory site for the subscription . The Mailbox server or servers in the site are the servers respon-sible for replicating Active Directory information to the Edge Transport server .
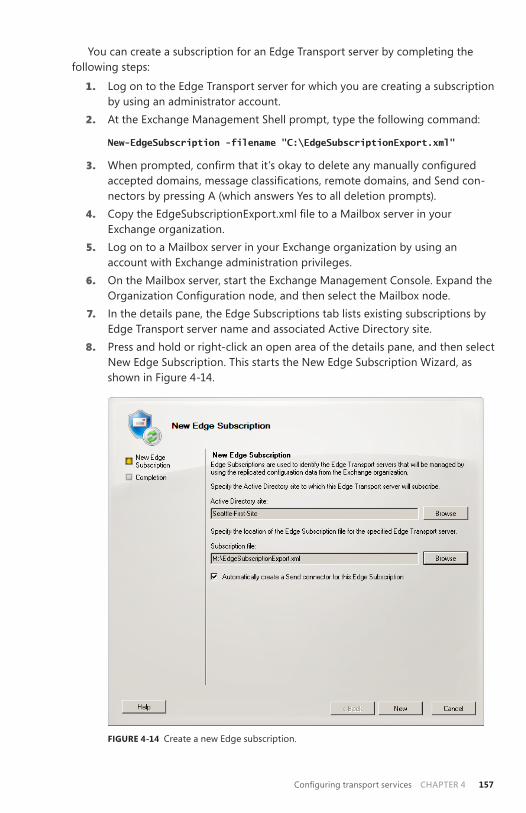
Configuring transport services ChAptEr 4 157
You can create a subscription for an Edge Transport server by completing the following steps:
1. Log on to the Edge Transport server for which you are creating a subscription by using an administrator account .
2. At the Exchange Management Shell prompt, type the following command:
New-EdgeSubscription -filename "C:\EdgeSubscriptionExport.xml"
3. When prompted, confirm that it’s okay to delete any manually configured accepted domains, message classifications, remote domains, and Send con-nectors by pressing A (which answers Yes to all deletion prompts) .
4. Copy the EdgeSubscriptionExport.xml file to a Mailbox server in your Exchange organization .
5. Log on to a Mailbox server in your Exchange organization by using an account with Exchange administration privileges .
6. On the Mailbox server, start the Exchange Management Console . Expand the Organization Configuration node, and then select the Mailbox node.
7. In the details pane, the Edge Subscriptions tab lists existing subscriptions by Edge Transport server name and associated Active Directory site .
8. Press and hold or right-click an open area of the details pane, and then select New Edge Subscription . This starts the New Edge Subscription Wizard, as shown in Figure 4-14 .
FIGURE 4-14 Create a new Edge subscription .

ChAptEr 4 Configuring transport services158
9. On the New Edge Subscription page, tap or click Browse to the right of the Active Directory Site text box . In the Select Active Directory Site dialog box, choose the Active Directory site for replication, and then tap or click OK .
REAL WORLD Mailbox servers in the Active Directory site you select must be able to resolve the Ip addresses for the Edge transport server. You need to ensure that subnets have been created in Active Directory Sites And Services and that DNS is configured to resolve the fully qualified domain name of the Edge Transport server. Mailbox servers in the site must also be able to connect to the Edge trans-port server over tCp port 50636.
10. Tap or click Browse to the right of the Subscription File text box . In the Open dialog box, locate and then select the Edge Subscription file to import. Tap or click Open .
11. On the New Edge Subscription page, if you don’t want to create the required Send connectors now, clear Automatically Create A Send Connector For This Edge Subscription, and then tap or click New to begin the subscription proc-ess. If you want to create Send connectors now, just tap or click New to begin the subscription process .
12. On the Completion page, tap or click Finish . Initial synchronization will begin, as discussed in “Synchronizing Edge Subscriptions .”
After you’ve completed steps 1–5, you can use the New-EdgeSubscription cmd-let to start a subscription . Listing 4-15 provides the syntax and usage . By default, the –CreateInboundSendConnector parameter is set to $true, which ensures that a Send connector from the Edge Transport server to Mailbox servers is created . By default, the –CreateInternetSendConnector parameter is set to true, which ensures that a Send connector to the Internet is created .
LISTING 4-15 New-EdgeSubscription cmdlet syntax and usage
Syntax
New-EdgeSubscription -FileName FilePath -Site SiteName [-AccountExpiryDuration <TimeSpan>] [-CreateInboundSendConnector <$true | $false>] [-CreateInternetSendConnector <$true | $false>] [-DomainController DCName] [-FileData ByteStr] [-Force <$true | $false>]
Usage
New-EdgeSubscription -FileName "Z:\EdgeSubscriptionExport.xml" -Site "Default-First-Site-Name" -CreateInboundSendConnector $true -CreateInternetSendConnector $true

Configuring transport services ChAptEr 4 159
Getting Edge subscription detailsIn the Exchange Management Console, you can view Edge subscriptions by expand-ing the Organization Configuration node, selecting the Mailbox node, and then tap-ping or clicking the Edge Subscriptions tab . Each Edge subscription is listed by Edge Transport server name and associated Active Directory site as shown in Figure 4-15 .
FIGURE 4-15 Review the Edge subscriptions .
As Listing 4-16 shows, you can use the Get-EdgeSubscription cmdlet to get infor-mation about Edge subscriptions as well . If you do not provide an identity with this cmdlet, configuration information for all Edge Subscriptions is returned.
LISTING 4-16 Get-EdgeSubscription cmdlet syntax and usage
Syntax
Get-EdgeSubscription -Identity EdgeTransportServerName [-DomainController DCName]
Usage
Get-EdgeSubscription -Identity "EdgeSvr04"
Synchronizing Edge subscriptionsDuring the configuration of an Edge subscription, you specified an Active Directory site to associate with the subscription . Mailbox servers in this site run the EdgeSync service and are responsible for synchronizing configuration data between Active Directory Domain Services and AD LDS on the Edge Transport server . By default, the EdgeSync service synchronizes configuration data hourly and recipient data every four hours .

ChAptEr 4 Configuring transport services160
If you’ve just created a new subscription and synchronization has occurred, you should verify that replication is taking place as expected by completing the follow-ing steps:
1. On the Edge Transport server, start the Exchange Management Shell .2. Verify that a Send connector was created to send Internet mail by typing
the command get-sendconnector. As shown in the following example and sample output, you should see an Inbound connector and an Internet con-nector for EdgeSync:
get-sendconnector
Identity AddressSpaces Enabled
-------- ------------- -------
Primary Send Connector {SMTP:*.cpandl.com;1} True
SD1 Send Connector {SMTP:*.adatum.com;1} True
EdgeSync - Seattle-First-Site to Int {smtp:*;100} True
EdgeSync - Inbound to Seattle-First- {smtp:--;100} True
3. Verify that there is at least one entry for accepted domains by typing get-accepteddomain as shown in the following example and sample output:
get-accepteddomain
Name DomainName DomainType Default
---- ---------- ---------- -------
cpandl.com cpandl.com Authoritative True
If you suspect there is a problem with synchronization and you want to start immediate synchronization of configuration data for all Edge subscriptions, com-plete the following steps:
1. Start the Exchange Management Shell .2. At the prompt, type the following command
start-edgesynchronization –Server ServerName
where ServerName is the name of the Mailbox server on which you want to run the command, such as:
start-edgesynchronization –Server mailserver25
If you are running the command on the Mailbox server, you can omit the –Server parameter .
Verifying Edge subscriptionsThe easiest way to verify the subscription status of Edge Transport servers is to run the Test-EdgeSynchronization cmdlet . This cmdlet provides a report of the synchro-nization status, and you also can use it to verify that a specific recipient has been synchronized to the Active Directory Lightweight Directory Service on an Edge Transport server .

Configuring transport services ChAptEr 4 161
Listing 4-17 provides the syntax and usage for the Test-EdgeSynchronization cmdlet. By default, the cmdlet verifies configuration objects and recipient objects. To have the cmdlet verify only configuration data, set –ExcludeRecipientTest to $true. Use the –VerifyRecipient parameter to specify the email address of a recipient to verify .
LISTING 4-17 Test-EdgeSynchronization cmdlet syntax and usage
Syntax
Test-EdgeSynchronization [-ExcludeRecipientTest <$true | $false>] [-DomainController DCName] [-FullCompareMode <$true | $false>] [-MaxReportSize <MaxNumberofObjectsToCheck | Unlimited>] [-MonitoringContext <$true | $false>] [-TargetServer EdgeServer] Test-EdgeSynchronization -VerifyRecipient RecipientEmailAddress [-DomainController DCName]
Usage
Test-EdgeSynchronization -ExcludeRecipientTest Test-EdgeSynchronization -MaxReportSize 500 Test-EdgeSynchronization -VerifyRecipient "[email protected]" Test-EdgeSynchronization –TargetServer CorpServer73.cpandl.com
Example and sample output
test-edgesynchronization
RunspaceId : 9654f021-e26d-4428-83ba-50cb75c645fe UtcNow : 6/15/2014 5:12:59 PM Name : CORPSERVER73 LeaseHolder : CN=MAILSERVER25,CN=Servers,CN=Exchange Administrative Group (FYDIBOHF23SPDLT),CN=Administrative Groups, CN=First Organization,CN=Microsoft Exchange,CN=Services,CN=Configuration, DC=cpandl,DC=com LeaseType : Option ConnectionResult : Succeeded FailureDetail : LeaseExpiryUtc : 6/15/2014 5:06:30 PM LastSynchronizedUtc : 6/15/2014 5:11:32 PM CredentialStatus : Synchronized TransportServerStatus : Synchronized TransportConfigStatus : Synchronized AcceptedDomainStatus : Synchronized RemoteDomainStatus : Synchronized SendConnectorStatus : Synchronized MessageClassificationStatus : Synchronized RecipientStatus : Synchronized CredentialRecords : Number of credentials 62 CookieRecords : Number of cookies 25

ChAptEr 4 Configuring transport services162
removing Edge subscriptionsIf you replace or decommission an Edge Transport server, you no longer need the related Edge subscription and can remove it . Removing an Edge subscription
■■ Stops synchronization of information from the Active Directory Domain Service to AD LDS .
■■ Removes all the accounts that are stored in AD LDS .■■ Removes the Edge Transport server from the source server list of any Send
connector .You can remove an Edge subscription by completing the following steps:
1. Log on to a Mailbox server by using an account with Exchange administrator privileges .
2. In the Exchange Management Console, expand the Organization Configura-tion node, and then select the Mailbox node .
3. In the details pane, on the Edge Subscriptions tab, press and hold or right-click the subscription that you no longer need, and then select Remove .
4. When prompted to confirm, tap or click Yes.In the Exchange Management Shell, you can remove an Edge Subscription by
passing the identity of the subscription to remove to the Remove-EdgeSubscription cmdlet . Listing 4-18 provides the syntax and usage .
LISTING 4-18 Remove-EdgeSubscription cmdlet syntax and usage
Syntax
Remove-EdgeSubscription -Identity EdgeTransportServerName [-DomainController DCName] [-Force <$true | $false>]
Usage
Remove-EdgeSubscription -Identity "EdgeSvr04"
163
CHAP TER 5
Managing and maintaining mail flow
■■ Managing message pickup, replay, throttling, and back pressure 163
■■ Creating and managing accepted domains 170
■■ Creating and managing email address policies 176
■■ Configuring journal rules 184
■■ Creating and managing remote domains 186
■■ Configuring anti-spam and message filtering options 189
■■ Configuring transport rules 205
In Microsoft Exchange 2013, mail flow occurs through a collection of services, connections, components, and queues that work together as part of the trans-
port pipeline . On Client Access servers, the Front End Transport service acts as a stateless proxy for all inbound and outbound external SMTP traffic. On Mailbox servers, the Transport service categorizes messages, inspects their content, and queues them for delivery or submission .
Message delivery is handled by the Mailbox Transport Delivery service . Mes-sage submission is handled by the Mailbox Transport Submission service . Both of these are components of the Mailbox Transport service . Although the trans-port pipeline is critical to mail flow, many other factors also affect mail flow in an Exchange organization, including the configuration of message processing speeds, message throttling, accepted domains, email address policies, journal rules, remote domains, filters, and transport rules.
Managing message pickup, replay, throttling, and back pressureTo support message routing and delivery, Mailbox and Edge Transport servers maintain a few special directories:
■■ Pickup A folder to which users and applications can manually create and submit new messages for delivery
■■ Replay A folder for messages bound for or received from non-SMTP mail connectors
ChAptEr 5 Managing and maintaining mail flow164
The sections that follow discuss how the Pickup and Replay directories are used and configured and also look at the related concepts of message throttling and back pressure .
Understanding message pickup and replayWhen a Mailbox or an Edge Transport server receives incoming mail from a server using a non-SMTP connector, it stores the message in the Replay directory and then resubmits it for delivery by using SMTP . When a Mailbox or an Edge Transport server has a message to deliver to a non-SMTP connector, it stores the message in the Replay directory and then resubmits it for delivery to the foreign connector . In this way, messages received from non-SMTP connectors are processed and routed, and messages to non-SMTP connectors are delivered .
Your Transport servers automatically process any correctly formatted .eml mes-sage file copied into the Pickup directory. Exchange considers a message file that is copied into the Pickup directory to be correctly formatted if it meets the following conditions:
■■ Is a text file that complies with the basic SMTP message format and can also use Multipurpose Internet Mail Extension (MIME) header fields and content
■■ Has an .eml file name extension, zero or one email address in the Sender field, and one or more email addresses in the From field
■■ Has at least one email address in the To, Cc, or Bcc fields and a blank line between the header fields and the message body
Transport servers check the Pickup directory for new message files every five seconds. Although you can’t modify this polling interval, you can adjust the rate of message file processing by using the –PickupDirectoryMaxMessagesPerMinute parameter on the Set-TransportService cmdlet . The default value is 100 messages per minute . When a transport server picks up a message, it checks the message against the maximum message size, the maximum header size, the maximum number of recipients, and other messaging limits .
For the Pickup directory, the maximum message size is 10 megabytes (MB), the maximum header size is 64 kilobytes (KB), and the maximum number of recipients is 100 by default . As may be necessary to meet the needs of your organization, you can change these limits by using the Set-TransportService cmdlet. If a message file doesn’t exceed any assigned limits, the Transport server renames the message file by using a .tmp extension, and then converts the .tmp file to an email message. After the message is successfully queued for delivery, the Transport server issues a “close” command and deletes the .tmp file from the Pickup directory.
REAL WORLD Header fields are plain text, and each character of text is 1 byte. The size of the header is determined by the total number of header fields and characters in each header field. Organization X-headers, forest X-headers, and routing head-ers are removed from messages in the pickup directory. On the other hand routing headers are preserved in the Replay directory, and organization X-headers and forest X-headers also are preserved if an X-CreatedBy header field indicates the headers were created by Exchange 2013 (meaning the field value is set to MSExchange15).

Managing and maintaining mail flow ChAptEr 5 165
Your Transport servers automatically process any correctly formatted .eml mes-sage file copied into the Replay directory. Exchange considers a message file that is copied into the Replay directory to be correctly formatted if it meets the following conditions:
■■ Is a text file that complies with the basic SMTP message format and can also use MIME header fields and content
■■ Has an .eml file name extension, and its X-header fields occur before all regular header fields
■■ Has a blank line between the header fields and the message bodyTransport servers check the Replay directory for new message files every five
seconds . Although you can’t modify this polling interval, you can adjust the rate of message file processing by using the –PickupDirectoryMaxMessagesPerMinute parameter of the Set-TransportService cmdlet . This parameter controls the rate of processing for both the Pickup directory and the Replay directory . The Transport server renames the message file by using a .tmp extension, and then converts the .tmp file to an email message. After the message is successfully queued for deliv-ery, the server issues a “close” command and deletes the .tmp file from the Replay directory .
Exchange considers any improperly formatted email messages received in the Pickup or Replay directory to be undeliverable and renames them from the standard message name (MessageName .eml) to a bad message name (MessageName .bad) . Because this is considered a type of message-processing failure, a related error is also generated in the event logs . In addition, if you restart the Microsoft Exchange Transport service when .tmp files are in the Pickup directory, Replay directory, or both directories, all .tmp files are renamed as .eml files and are reprocessed, which can lead to duplicate message transmissions .
Configuring and moving the Pickup and Replay directoriesBecause of the way message pickup and replay works, Transport servers do not per-form security checks on messages submitted through these directories . This means that if you’ve configured anti-spam, antivirus, sender filtering, or recipient filter-ing actions on a Send connector, those checks are not performed on the Pickup or Replay directory . To ensure that the Pickup and Replay directories are not compro-mised by malicious users, specific security permissions that must be tightly con-trolled are applied .
For the Pickup and Replay directories, you must configure the following permissions:
■■ Full Control for Administrator■■ Full Control for Local System■■ Read, Write, and Delete Subfolders and Files for Network Service
When you have a need to balance the load across a server’s disk drives or ensure ample free space for messages, you can move the Pickup and Replay directories to new locations . Move the location of the Pickup directory by using the –Pickup-Directory Path parameter on the Set-TransportServicer cmdlet . Move the location

ChAptEr 5 Managing and maintaining mail flow166
of the Replay directory by using the –ReplayDirectoryPath parameter on the Set-Transport Service cmdlet . With either parameter, successfully changing the directory location depends on the rights that are granted to the Network Service account on the new directory location and whether the new directory already exists . Keep the following in mind:
■■ If the new directory does not already exist and the Network Service account has the rights to create folders and apply permissions at the new location, the new directory is created and the correct permissions are applied to it .
■■ If the new directory already exists, the existing folder permissions are not checked or changed . Exchange assumes you’ve already set the appropriate permissions .
Listing 5-1 provides the syntax and usage for moving the Pickup and Replay directories . If you want to move both the Pickup and Replay directories, you should do so in two separate commands to ensure that both directories get moved as appropriate .
LISTING 5-1 Changing the Pickup directory
Syntax
Set-TransportService -Identity ServerIdentity [-PickupDirectoryPath LocalFolderPath] [-ReplayDirectoryPath LocalFolderPath]
Usage
Set-TransportService -Identity "CorpSvr127" -PickupDirectoryPath "g:\Pickup"
Changing the message processing speedBy default, Transport servers simultaneously and separately process the Pickup and Replay directories . Transport servers scan the Pickup and Replay directories for new message files once every five seconds (or 12 times per minute), and they process messages copied to either directory at a rate of 100 messages per minute, per direc-tory. Because the polling interval is not configurable, the maximum number of mes-sages that can be processed in either the Pickup or Replay directory during each polling interval, by default, is approximately 8 (100 messages per minute divided by 12 messages processed per minute) .
Although the polling interval is not configurable, the maximum number of mes-sages that can be processed during each polling interval is configurable. You assign the desired processing rate by using the –PickupDirectoryMaxMessagesPerMinute parameter, because this processing speed is used with both the Pickup and Replay directories .
Managing and maintaining mail flow ChAptEr 5 167
You might want to adjust the message processing rate in these situations:■■ If the server is unable to keep up with message processing, you might want
to decrease the number of messages processed per minute to reduce proc-essor and memory use .
■■ If the server is handling message transport for a large organization and you are seeing delays in message transport because of an abundance of mes-sages in the Pickup directory, Replay directory, or both directories, you might want to increase the number of messages processed per minute, as long as the server can handle the additional workload .
You assign the desired processing rate by using the –PickupDirectoryMax-Messages PerMinute parameter of the Set-TransportService cmdlet, as shown in Listing 5-2, and this processing speed is used with both the Pickup and Replay directories . Your Transport server then attempts to process messages in each directory independently at the rate specified. You can use a per-minute message processing value between 1 and 20,000 .
LISTING 5-2 Changing the message processing speed
Syntax
Set-TransportService -Identity ServerIdentity [-PickupDirectoryMaxMessagesPerMinute Speed]
Usage
Set-TransportService -Identity "CorpSvr127" -PickupDirectoryMaxMessagesPerMinute "500"
Configuring messaging limits for the Pickup directoryThe Pickup directory is used by administrators to test mail flow and by applications that create and submit their own messages . If applications are generating messages with expanded headers, such as when there are many recipients in To:, Cc:, and Bcc: header fields, you may need to modify the messaging limits for the Pickup directory .
You can set messaging limits for the Pickup directory for message header sizes and maximum recipients per message . The default message header size is 64 KB, which allows for 65,536 characters in the header . To change this setting, you can set the –PickupDirectoryMaxHeaderSize parameter of the Set-TransportService cmdlet to the desired size . The valid input range for this parameter is 32,768 to 2,147,483,647 bytes . When you specify a value, you should qualify the units for that value by ending with one of the following suffixes:
■■ B for bytes (Default)■■ KB for kilobytes■■ MB for megabytes■■ GB for gigabytes

ChAptEr 5 Managing and maintaining mail flow168
The following example sets the maximum header size to 256 KB:
Set-TransportService –Identity MailServer48 –PickupDirectoryMaxHeaderSize "256KB"
The default maximum recipients per message is 100 . To change this setting, you can set the –PickupDirectoryMaxRecipientsPerMessage parameter of the Set-Transport Service cmdlet to the desired size . The valid input range for this param-eter is 1 to 10,000 . The following example sets the maximum recipients to 500:
Set-TransportService –Identity MailServer48 –PickupDirectoryMaxRecipientsPerMessage "500"
Configuring message throttlingMessage throttling sets limits on the number of messages and connections that can be processed by a Mailbox or an Edge Transport server . These limits are designed to prevent the accidental or intentional inundation of transport servers and help ensure that transport servers can process messages and connections in an orderly and timely manner. Throttling works in conjunction with size limits on messages that apply to header sizes, attachment sizes, and number of recipients . Although the default throttling settings work in a typical messaging environment, you may need to modify these settings as your organization grows, especially if users or applica-tions create and send a lot of email messages .
On Mailbox and Edge Transport servers, you can set some message throttling options in the Exchange Admin Center by using the options on the Transport Limits page in the transport server’s Properties dialog box . In the Exchange Management Shell, you can configure all message throttling options by using Set-TransportService and related parameters .
■■ MaxConcurrentMailboxDeliveries Sets the maximum number of delivery threads that can be open at the same time to deliver messages to mailboxes . The default value is 20 .
■■ MaxConcurrentMailboxSubmissions Sets the maximum number of deliv-ery threads that can be open at the same time to accept messages from mailboxes . The default value is 20 .
■■ MaxConnectionRatePerMinute Sets the maximum rate at which new inbound connections can be opened to any Receive connectors that exist on the server . The default value is 1,200 connections per minute .
■■ MaxOutboundConnections Sets the maximum number of concurrent outbound connections that can be open at the same time for Send connec-tors . The default value is 1,000 .
■■ MaxPerDomainOutboundConnections Sets the maximum number of connections that can be open to any single remote domain for any available Send connectors . The default value is 20 .
With Set-SendConnector, you can configure throttling by using Connection- InactivityTimeOut . This parameter sets the maximum idle time before an open SMTP connection is closed . The default value is 10 minutes .
Managing and maintaining mail flow ChAptEr 5 169
With Set-ReceiveConnector, you can configure throttling by using the following parameters:
■■ ConnectionInactivityTimeout Sets the maximum idle time before an open SMTP connection is closed . The default value is 5 minutes for a Mailbox and 1 minute for an Edge Transport .
■■ ConnectionTimeOut Sets the maximum time that an SMTP connection can remain open, even if it is active . The default value is 10 minutes for a Mailbox and 5 minutes for an Edge Transport . ConnectionTimeout must be longer than ConnectionInactivityTimeout .
■■ MaxInboundConnection Sets the maximum number of simultaneous inbound SMTP connections . The default value is 5,000 .
■■ MaxInboundConnectionPercentagePerSource Sets the maximum num-ber of simultaneous inbound SMTP connections from a single source server . The value is expressed as the percentage of available remaining connections on a Receive connector (as defined by the –MaxInboundConnection param-eter) . With most Receive connectors the default value is 2 percent .
■■ MaxInboundConnectionPerSource Sets the maximum number of simul-taneous inbound SMTP connections from a single source messaging server . With most Receive connectors the default value is 20 .
■■ MaxProtocolErrors Sets the maximum number of SMTP protocol errors allowed before a Receive connector closes a connection with a source mes-saging server . The default value is 5 .
■■ TarpitInterval Sets artificial delay in SMTP responses in cases in which unwelcome messages are being received from anonymous connections . The default value is 5 seconds .
Understanding back pressureBack pressure limits overuse of system resources on a Mailbox or an Edge Transport server . Transport servers monitor key system resources to determine usage levels . If usage levels exceed a specified limit, the server stops accepting new connections and messages to prevent server resources from being completely overwhelmed and to enable the server to deliver the existing messages . When usage of system resources returns to a normal level, the server accepts new connections and mes-sages . Resources monitored as part of the back pressure feature include:
■■ Free space on hard disk drives that store the message queue database transaction logs .
■■ Free space on the hard disk drives that store the message queue database .■■ The amount of memory used by all processes .■■ The amount of memory used by the Edgetransport .exe process .■■ The number of uncommitted message queue database transactions that exist
in memory .Levels of usage are defined as normal, medium, or high. With the normal level,
the resource is not overused, and the server accepts new connections and messages . With the medium level, the resource is slightly overused, and limited back pressure

ChAptEr 5 Managing and maintaining mail flow170
is applied, allowing mail from senders in the authoritative domain to continue being sent while the server rejects new connections and messages from other sources. With the high level, the resource is severely overused and full back pressure is applied, meaning message flow stops and the server rejects all new connections and messages.
You have limited control over how back pressure is applied . Some related settings can be configured in the Edgetransport.exe.config file on Edge Transport servers; however, Microsoft recommends that you don’t change the default settings .
Creating and managing accepted domains
An accepted domain is any SMTP namespace for which an Exchange organization sends or receives email . Accepted domains include domains for which the Exchange organization is authoritative, in addition to domains for which the Exchange organi-zation relays mail .
Understanding accepted domains, authoritative domains, and relay domainsAn organization can have more than one SMTP domain, and the set of email domains your organization uses are its authoritative domains . An accepted domain is consid-ered authoritative when the Exchange organization hosts mailboxes for recipients in this SMTP domain . Transport servers should always accept email that is addressed to any of the organization’s authoritative domains . By default, when you install the first Mailbox server, one accepted domain is configured as authoritative for the Exchange organization, and this default accepted domain is based on the FQDN of your forest root domain .
In many cases, an organization’s internal domain name might differ from its external domain name . You must create an accepted domain to match your exter-nal domain name . You must also create an email address policy that assigns your external domain name to user email addresses . For example, your internal domain name might be cpandl .local, whereas your external domain name is cpandl .com . When you configure DNS, the DNS MX records for your organization will reference cpandl .com, and you will want to assign this SMTP namespace to users by creating an email address policy .
When email is received from the Internet by a Transport server and the recipi-ent of the message is not a part of your organization’s authoritative domains, the sending server is trying to relay messages through your Transport servers . To pre-vent abuse of your servers, Transport servers reject all email that is not addressed to a recipient in your organization’s authoritative domains . However, at times you might need to relay email messages from another domain, such as messages from a partner or subsidiary, in which case, you can configure accepted domains as relay domains. When your Transport servers receive the email messages for a configured relay domain, they will relay the messages to an email server in that domain .
You can configure a relay domain as an internal or an external relay domain. You configure an internal relay domain when there are contacts from the relay domain

Managing and maintaining mail flow ChAptEr 5 171
in the global address list . If your organization contains more than one forest and has configured global address list synchronization, the SMTP domain for one for-est can be configured as an internal relay domain in a second forest. Messages from the Internet that are addressed to recipients in internal relay domains are received and processed by your Edge Transport servers . These messages are then relayed to your Mailbox servers, which, in turn, route the messages to the Mailbox serv-ers in the recipient forest. Configuring an SMTP domain as an internal relay domain ensures that all email addressed to the relay domain are accepted by your Exchange organization .
You configure an external relay domain when you want to relay messages to an email server that is both outside your Exchange organization and outside the boundaries of your organization’s network perimeter. For this configuration to work, your DNS servers must have an MX record for the external relay domain that refer-ences a public IP address for the relaying Exchange organization . When your Edge Transport servers receive the messages for recipients in the external relay domain, they route the messages to the mail server for the external relay domain . You must also configure a Send connector from the Edge Transport server to the external relay domain . The external relay domain can also be using your organization’s Edge Transport server as a smart host for outgoing mail .
You also can configure accepted domains for Microsoft Exchange Online . In this case, accepted domains can either be authoritative or internal relay domains . Although you manage previously defined domains in Exchange Admin Center under Mail Flow > Accepted Domains, you must initially define domains in Office 365 Admin Center by using the Domains > Add A Domain option .
If you are working in a hybrid organization, you’ll find that the Hybrid Configu-ration Wizard adds an accepted domain to the on-premises organization to enable hybrid mail flow. This domain, called the coexistence domain, is added as a second-ary proxy domain to any email address policies that have primary SMTP address templates for domains selected in the wizard . By default, the coexistence domain is YourDomain .mail .onmicrosoft .com .
Viewing accepted domainsYou can view the accepted domains configured for your organization by completing the following steps:
1. In the Exchange Admin Center, select Mail Flow in the Feature pane, and then select Accepted Domains .
2. In the main pane, accepted domains are listed by name, SMTP domain name, and domain type . The domain type is listed as Authoritative, External Relay, or Internal Relay as shown in Figure 5-1 .
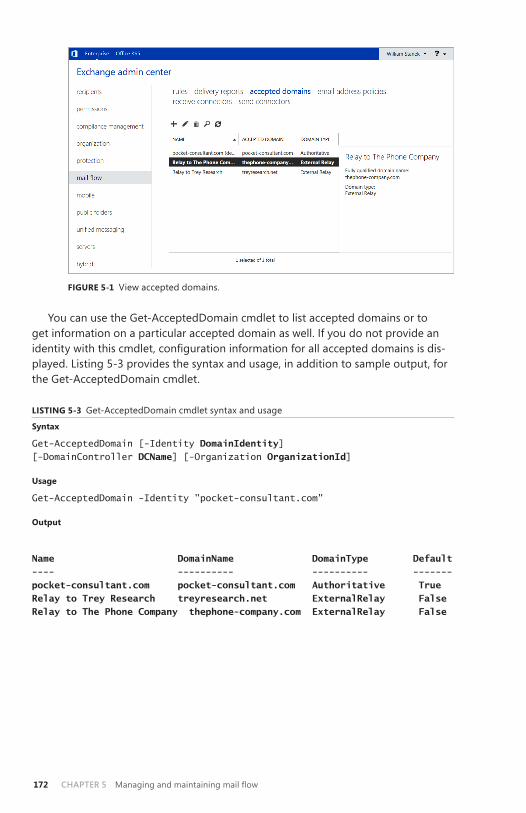
ChAptEr 5 Managing and maintaining mail flow172
FIGURE 5-1 View accepted domains .
You can use the Get-AcceptedDomain cmdlet to list accepted domains or to get information on a particular accepted domain as well . If you do not provide an identity with this cmdlet, configuration information for all accepted domains is dis-played . Listing 5-3 provides the syntax and usage, in addition to sample output, for the Get-AcceptedDomain cmdlet .
LISTING 5-3 Get-AcceptedDomain cmdlet syntax and usage
Syntax
Get-AcceptedDomain [-Identity DomainIdentity] [-DomainController DCName] [-Organization OrganizationId]
Usage
Get-AcceptedDomain -Identity "pocket-consultant.com"
Output
Name DomainName DomainType Default ---- ---------- ---------- ------- pocket-consultant.com pocket-consultant.com Authoritative True Relay to Trey Research treyresearch.net ExternalRelay False Relay to The Phone Company thephone-company.com ExternalRelay False

Managing and maintaining mail flow ChAptEr 5 173
Creating accepted domainsYou can create accepted domains for your organization by completing the following steps:
1. In the Exchange Admin Center, select Mail Flow in the Feature pane, and then select Accepted Domains .
2. In the main pane, tap or click Add to open the New Accepted Domain dialog box, as shown in Figure 5-2 .
3. Use the Name text box to identify the accepted domain . You can use a descriptive name that identifies the purpose of the accepted domain or simply enter the actual SMTP domain name .
4. In the Accepted Domain text box, type the SMTP domain name for which the Exchange organization will accept email messages . If you want to accept email for the specified domain only, enter the full domain name, such as adatum.com. If you want to accept email for the specified domain and child domains, type * (a wildcard character), then a period, and then the domain name, such as *.adatum.com .
NOTE Only domain names you specify can be used as part of an email address policy. Because of this, if you want to use a subdomain as part of an email address policy, you must either explicitly configure the subdomain as an accepted domain or use a wildcard character to include the parent domain and all related subdo-mains.
FIGURE 5-2 Create a new accepted domain .

ChAptEr 5 Managing and maintaining mail flow174
5. Select one of the following options to set the accepted domain type:• Authoritative Domain Email is delivered to a recipient in this exchange
organization .• Internal Relay Domain Email is relayed to an email server in another
Active Directory forest in the organization .• External Relay Domain Email is relayed to an email server outside the
organization by the Edge Transport server .6. Tap or click Save to create the accepted domain .In the Exchange Management Shell, you can use the New-AcceptedDomain
cmdlet to create accepted domains . Listing 5-4 provides the syntax and usage .
LISTING 5-4 New-AcceptedDomain cmdlet syntax and usage
Syntax
New-AcceptedDomain -Name Name -DomainName DomainName -DomainType <Authoritative|InternalRelay|ExternalRelay> [-Organization OrganizationId]
Usage;
New-AcceptedDomain -Name "Relay to Cohowinery.com" -DomainName "*.cohowinery.com" -DomainType "ExternalRelay"
Changing the accepted domain type and identifierYou can change an accepted domain’s type and identifier by completing the follow-ing steps:
1. In the Exchange Admin Center, select Mail Flow in the Feature pane, and then select Accepted Domains .
2. On the Accepted Domains tab, select the accepted domain you want to change, and then select Edit . Or simply double-tap or double-click the accepted domain .
3. In the Properties dialog box, shown in Figure 5-3, enter a new identifier, and use the options provided to change the accepted domain type as necessary .
4. Select the Make This The Default Domain check box to make the currently selected domain the default for the Exchange organization . The default accepted domain is used in the external postmaster email address and in encapsulated non-SMTP email addresses .
5. Tap or click Save .

Managing and maintaining mail flow ChAptEr 5 175
FIGURE 5-3 Modify an accepted domain .
In the Exchange Management Shell, you can use the Set-AcceptedDomain cmdlet to modify accepted domains . Listing 5-5 provides the syntax and usage . Use the –AddressBookEnabled parameter to enable recipient filtering for this accepted domain . You should set this parameter to $true only if all the recipients in this accepted domain are replicated to the AD LDS database on the Edge Trans-port servers . For authoritative domains and internal relay domains, the default value is $true . For external relay domains, the default value is $false .
LISTING 5-5 Set-AcceptedDomain cmdlet syntax and usage
Syntax
Set-AcceptedDomain -Identity AcceptedDomainIdentity [-AddressBookEnabled <$true | $false>] [-DomainController DCName] [-DomainType <Authoritative|InternalRelay|ExternalRelay>] [-MakeDefault <$true | $false>] [-Name Name] [-OutboundOnly <$true | $false>]
Usage
Set-AcceptedDomain -Identity "Relay to Cohowinery.com" -DomainType "ExternalRelay"

ChAptEr 5 Managing and maintaining mail flow176
removing accepted domainsYou can remove an accepted domain that’s no longer needed by completing the following steps:
1. In the Exchange Admin Center, select Mail Flow in the Feature pane, and then select Accepted Domains .
2. In the main pane, select the accepted domain you want to delete, and then select Delete .
3. When prompted to confirm, tap or click Yes.In the Exchange Management Shell, you can use the Remove-AcceptedDomain
cmdlet to remove accepted domains . Listing 5-6 provides the syntax and usage .
LISTING 5-6 Remove-AcceptedDomain cmdlet syntax and usage
Syntax
Remove-AcceptedDomain -Identity AcceptedDomainIdentity [-DomainController DCName]
Usage
Remove-AcceptedDomain -Identity "Relay to Cohowinery.com"
Creating and managing email address policies
Email address policies allow you to generate or rewrite email addresses automatically for each recipient in your organization based on specific criteria you set. Microsoft Exchange Server uses email address policies in two key ways:
■■ Whenever you create a new recipient, Exchange Server sets the recipient’s default email address based on the applicable email address policy .
■■ Whenever you apply an email address policy, Exchange Server automatically rewrites the email addresses for recipients to which the policy applies .
Every Exchange organization has a default email address policy, which is required to create email addresses for recipients . You can create additional email address policies as well . For example, if your organization’s internal domain name is differ-ent from its external domain name, you would need to create an accepted domain to match your external domain name and an email address policy that assigns your external domain name to user email addresses .
Viewing email address policiesYou can view the email address policies configured for your organization by completing the following steps:
1. In the Exchange Admin Center, select Mail Flow in the Feature pane, and then select Email Address Policies .
2. In the main pane, email address policies are listed by name, priority, and status as shown in Figure 5-4 . The status is listed as Applied for a policy that has been applied to recipients and Unapplied for a policy that has not been applied to recipients .

Managing and maintaining mail flow ChAptEr 5 177
FIGURE 5-4 View the email address policies .
You can use the Get-EmailAddressPolicy cmdlet to list email address policies or to get information on a particular email address policy . If you don’t provide an iden-tity with this cmdlet, configuration information for all email address policies is dis-played . Listing 5-7 provides the syntax and usage, in addition to sample output, for the Get-EmailAddressPolicy cmdlet .
LISTING 5-7 Get-EmailAddressPolicy cmdlet syntax and usage
Syntax
Get-EmailAddressPolicy [-Identity PolicyIdentity] [-DomainController DCName] [-Organization OrgId] [-IncludeMailboxSettingOnlyPolicy <$true | $false>]
Usage
Get-EmailAddressPolicy | ft name, priority, recipientfilter, recipientfilterapplied, includedrecipients Get-EmailAddressPolicy -Identity "Default Policy"
Output
Name Priority RecipientFilter ---- -------- --------------- Default Policy Lowest Alias -ne $null Rewrite Litware, Inc. Email Ad... 1 Alias -ne $null

ChAptEr 5 Managing and maintaining mail flow178
Creating email address policiesYou can create email address policies for your organization by completing the following steps:
1. In the Exchange Admin Center, select Mail Flow in the Feature pane, and then select Email Address Policies .
2. In the main pane, tap or click New to open the New Email Address Policy dialog box, as shown in Figure 5-5 .
FIGURE 5-5 Create a new email address policy .
3. Use the Name text box to identify the email address policy . You can use a descriptive name that identifies the purpose of the email address policy or simply enter the actual SMTP domain name to which it applies .
4. Under Email Address Format, tap or click the Add button . The Email Address Format dialog box appears, as shown in Figure 5-6 .
5. Use the Email Address Format options to specify how to generate or rewrite email addresses automatically for each recipient to which the policy applies . You can use the Exchange alias or parts of the user name in various orders .
6. Use the Select An Accepted Domain drop-down list to select the email address domain . Only authoritative accepted domains are available for selection .

Managing and maintaining mail flow ChAptEr 5 179
FIGURE 5-6 Select options to generate email addresses .
7. Although users can have multiple email addresses associated with their mail-box, only one email address, the default email address, is used for any sent messages . If you want the email address applied with this policy to be the default, select Make This Format The Reply Email Address .
8. Close the Email Address Format dialog box by tapping or clicking Save .9. Specify the types of recipients to include in the policy . Select All Recipient
Types, or select Only The Following Recipient Types, and then select the check boxes for the types of recipients to which you want to apply the policy .
10. If you’ve previously created other email address policies, set the relative pri-ority of this policy . Policies are run in priority order . A policy with a priority of one has the highest priority and runs before a policy with a priority of 2, and so on .
11. You can create rules that further filter recipients. Each rule acts as a condition that must be met . If you set more than one rule, each condition must be met for there to be a match. To define a rule, tap or click Add Rule. You can now set the filter conditions. The following types of conditions are available, in addition to conditions for custom attributes:• State Or Province Filters recipients based on the value of the State/
Province text box on the Contact Information page in the related Proper-ties dialog box . In the Specify Words Or Phrases dialog box, type a state or province identifier to use as a filter condition, and then press Enter or tap or click Add . Repeat as necessary, and then tap or click OK .

ChAptEr 5 Managing and maintaining mail flow180
• Department Filters recipients based on the value of the Department text box on the Organization page in the related Properties dialog box . In the Specify Words Or Phrases dialog box, type a department name to use as a filter condition, and then press Enter or tap or click Add. Repeat as necessary, and then tap or click OK .
• Company Filters recipients based on the value of the Company text box on the Organization page in the related Properties dialog box . In the Specify Words Or Phrases dialog box, type a company name to use as a filter condition. If you are entering multiple values, press Enter or tap or click Add, repeat as necessary, and then tap or click OK .
IMPORTANT Although each rule acts as an Or condition for matches on speci-fied values, the rules are aggregated as AND conditions. This means that a user that matches one of the values in a rule passes that filter but must be a match for all the rules to be included in the group. For example, if you were to define a state rule for Oregon, California, or Washington and a department rule for technology, only users who are in Oregon, California, or Washington and in the technology department match the filter.
12. Get a complete list of the recipients to which this policy will be applied by tapping or clicking Preview Recipients The Policy Applies To . If the pol-icy applies to the expected recipients, tap or click Save to create the email address policy. Otherwise, repeat steps 4 – 11 and ensure you configure options and rules to appropriately define the recipients to which the policy should apply .
13. The policy is not applied automatically . To apply the policy, select the pol-icy Exchange Admin Center’s main pane, and then tap or click Apply in the details pane .
If you tap or click More Options in the Email Address Format dialog box, you’ll be able to specify a custom SMTP email address . With custom addresses, you use the following variables to specify how the email address should be formatted in addi-tion to manually entered text:
■■ %d Inserts the recipient’s display name■■ %g Inserts the recipient’s given name (first name)■■ %i Inserts the recipient’s middle initial■■ %m Inserts the recipient’s Exchange alias■■ %s Inserts the recipient’s surname (last name)■■ %ng Inserts the first N letters of the given name■■ %ns Inserts the first N letters of the surname
For example, you could enter %g .%s@cpandl .com to specify that email addresses should be formatted with the given name first, followed by a period (.) and the surname .

Managing and maintaining mail flow ChAptEr 5 181
In the Exchange Management Shell, you create and apply email address policies by using separate tasks . You can create email address policies by using the New-EmailAddressPolicy cmdlet . After you create a policy, apply it using the Update-EmailAddressPolicy cmdlet . Listings 5-8 and 5-9 provide the syntax and usage for these cmdlets . Use the -EnabledPrimarySMTPAddressTemplate parameter to spec-ify the custom format for email addresses . Although the syntax for custom email addresses is the same as when you are working with Exchange Admin Center, you must use the SMTP: prefix before specifying the format, as shown in the example.
NOTE Any time you receive an error regarding missing aliases, you should run the Update-EmailAddresspolicy cmdlet with the –FixMissingAlias parameter set to $true. this tells Exchange to generate an alias for recipients who do not have an alias.
LISTING 5-8 New-EmailAddressPolicy cmdlet syntax and usage
Syntax
New-EmailAddressPolicy -Name PolicyName -EnabledPrimarySMTPAddressTemplate Template -IncludedRecipients RecipientTypes {AddtlParams} {ConditionalParams} New-EmailAddressPolicy -Name PolicyName -EnabledEmailAddressTemplates Templates -RecipientFilter Filter [-DisabledEmailAddressTemplates Templates] {AddtlParams} New-EmailAddressPolicy -Name PolicyName -EnabledPrimarySMTPAddressTemplate Template -RecipientFilter Filter {AddtlParams} New-EmailAddressPolicy -Name PolicyName -EnabledEmailAddressTemplates Templates -IncludedRecipients RecipientTypes [-DisabledEmailAddressTemplates Templates] {AddtlParams} {ConditionalParams} {AddtlParams} [-DomainController DCName] [-Organization OrgId] [-Priority Priority] [-RecipientContainer OUId] {ConditionalParams} [-ConditionalCompany CompanyNameFilter1, CompanyNameFilter2, ... ] [-ConditionalCustomAttributeN Value1, Value2, ...] [-ConditionalDepartment DeptNameFilter1, DeptNameFilter2, ... ] [-ConditionalStateOrProvince StateNameFilter1, StateNameFilter2, ... ]
Usage
New-EmailAddressPolicy -Name "Primary Email Address Policy" -IncludedRecipients "MailboxUsers, MailContacts, MailGroups" -ConditionalCompany "City Power & Light" -ConditionalDepartment "Sales","Marketing" -ConditionalStateOrProvince "Washington","Idaho","Oregon" -Priority "Lowest" -EnabledEmailAddressTemplates "SMTP:%g.%[email protected]"

ChAptEr 5 Managing and maintaining mail flow182
LISTING 5-9 Update-EmailAddressPolicy cmdlet syntax and usage
Syntax
Update-EmailAddressPolicy -Identity PolicyIdentity [-DomainController DCName] [-FixMissingAlias <$true | $false>]
Usage
Update-EmailAddressPolicy -Identity "Primary Email Address Policy" Update-EmailAddressPolicy -Identity "Primary Email Address Policy" -FixMissingAlias
Editing and applying email address policiesYou can manage email address policies in several different ways . You can edit their properties or apply them to rewrite email addresses automatically for each recipi-ent to which the policy applies . You can also change their priority to determine the precedence order for application in case there are conflicts between policies. When multiple policies apply to a recipient, the policy with the highest priority is the one that applies .
You can change the way email address policies work by completing the following steps:
1. In the Exchange Admin Center, select Mail Flow in the Feature pane, and then select Email Address Policies .
2. In the main window, select the email address policy you want to change, and then select Edit . This opens the properties dialog box for the policy .
3. Use the options on the General page to set the policy name and relative priority .
4. On the Email Address Format page, you can use the options provided to specify how to generate or rewrite email addresses automatically for each recipient to which the policy applies . You can use the Exchange alias or parts of the user name in various orders as described in steps 4 through 8 in the “Creating email address policies” section of this chapter .
5. On the Apply To page, you can use the options provided to specify the recip-ients to which the policy will apply. After you configure options, preview the recipients to which the policy applies to ensure you’ve configured the set-tings appropriately, as described in steps 9 through 12 in the “Creating email address policies” section of this chapter .
6. The modified policy is not applied automatically. To apply the policy, select the policy Exchange Admin Center’s main pane, and then tap or click Apply in the details pane .
You can change priority in the Exchange Admin Center by selecting the policy, and then using the Increase Priority and Decrease Priority buttons to change the priority of the policy . The valid range for priorities depends on the number of poli-cies you’ve configured. The Default Policy always has the lowest priority.
You can apply an email address policy by selecting the policy Exchange Admin Center’s main pane, and then tapping or clicking Apply in the details pane .

Managing and maintaining mail flow ChAptEr 5 183
In the Exchange Management Shell, you can use the Set-EmailAddressPolicy cmdlet to modify email address policies, as shown in Listing 5-10 . The Update-EmailAddressPolicy cmdlet, used to apply policies, was discussed previously .
LISTING 5-10 Set-EmailAddressPolicy cmdlet syntax and usage
Syntax
Set-EmailAddressPolicy -Identity PolicyIdentity [-ConditionalCompany CompanyNameFilter1, CompanyNameFilter2, ... ] [-ConditionalCustomAttributeN Value1, Value2, ...] [-ConditionalDepartment DeptNameFilter1, DeptNameFilter2, ... ] [-ConditionalStateOrProvince StateNameFilter1, StateNameFilter2, .... ] [-DisbledEmailAddressTemplates Templates] [-DomainController DCName] [-EnabledEmailAddressTemplates Templates] [-EnabledPrimarySMTPAddressTemplate Template] [-ForceUpgrade <$true | $false>] [-IncludedRecipients RecipientTypes] [-Name PolicyName] [-Priority Priority] [-RecipientContainer OUId] [-RecipientFilter Filter]
Usage
Set-EmailAddressPolicy -Identity "Primary Email Address Policy" -Name "Cpandl.com Email Address Policy" -IncludedRecipients "MailboxUsers" -ConditionalCompany "City Power & Light" -ConditionalDepartment "Sales" -ConditionalStateOrProvince "Washington" -Priority "2" -EnabledEmailAddressTemplates "SMTP:%g.%[email protected]"
removing email address policiesYou can remove an email address policy that is no longer needed by completing the following steps:
1. In the Exchange Admin Center, select Mail Flow in the Feature pane, and then select Email Address Policies .
2. In the main window, select the email address policy you want to delete, and then select Remove .
3. When prompted to confirm, tap or click Yes.In the Exchange Management Shell, you can use the Remove-EmailAddressPolicy
cmdlet to remove email address policies . Listing 5-11 provides the syntax and usage .
LISTING 5-11 Remove-EmailAddressPolicy cmdlet syntax and usage
Syntax
Remove-EmailAddressPolicy -Identity EmailAddressPolicyIdentity [-DomainController DCName]
Usage
Remove-EmailAddressPolicy -Identity "Cpandl.com Email Address Policy"

ChAptEr 5 Managing and maintaining mail flow184
Configuring journal rules
Journaling allows you to forward copies of messaging items and related reports automatically to an alternate location. You can use journaling to verify compliance with policies implemented in your organization and to help ensure that your organ-ization can meet its legal and regulatory requirements. Enable journaling for the entire organization by using journal rules.
Working with journal rulesExchange 2013 Setup creates a separate container in Active Directory Domain Ser-vices to store Exchange 2013 journal rules. If you are installing Exchange 2013 in an existing Microsoft Exchange 2010 or Exchange 2007 organization, Setup cop-ies any existing journal rules to this container so they will be applied to Exchange 2013. If you subsequently make changes to the journal rule configuration on your Exchange 2010 or Exchange 2007 servers, you must make the same changes on Exchange 2013 to ensure the journal rules are consistent across the organization (and vice versa). You can also export journal rules from Exchange 2010 or Exchange 2007 and import them to Exchange 2013 .
Both Exchange Online and on-premises Exchange support a full set of compli-ance options for in-place eDiscovery and hold, auditing, retention policies, retention tags, and journal rules. These compliance options are configured in much the same way whether you are working with Exchange Online or Exchange 2013 . If you are working in a hybrid configuration and have specific compliance requirements, you can ensure your on-premises compliance settings are applied to Exchange Online .
In a hybrid environment, inbound and outbound messages have separate rout-ing configurations. If you enable centralized mail transport for inbound, outbound, or both types of messages in the hybrid configuration, messages sent by or to recip-ients in the online organization are set through the on-premises organization to ensure that compliance rules and any other processes or messaging requirements configured in the on-premises organization are applied. However, there is a note-worthy exception: Outbound messages sent from Exchange Online to other recipi-ents in the same Exchange Online organization are delivered directly .
Setting the NDr journaling mailboxWhen you first configure journaling, you’ll need to specify an email address to receive any journal reports that are otherwise undeliverable. Typically, you’ll want to create a new, dedicated mailbox to receive these reports so that the mailbox will not be journaled and also won’t be subject to any transport rules or mailbox rule settings .
To specify the NDR journaling mailbox, complete the following steps:
1. In the Exchange Admin Center, select Compliance Management in the Feature pane, and then select Journal Rules .
2. If the journaling mailbox has already been specified, the email address is listed; otherwise, tap or click Select Address .

Managing and maintaining mail flow ChAptEr 5 185
3. In the NDRs For Undeliverable Journal Reports dialog box, tap or click Browse, select a destination mailbox, and then tap or click OK .
4. Tap or click Save .
Creating journal rulesYou create journal rules to record messages in your organization in support of email retention and compliance requirements. You can target journal rules for the following:
■■ Internal messaging items Tracks messaging items sent and received by recipients inside your Exchange organization .
■■ External messaging items Tracks messaging items sent to recipients or from senders outside your Exchange organization .
■■ All messaging items Tracks all messaging items, including those already processed by journal rules that track only internal or external messaging items .
When you enable journal rules for one or more of these scopes, the rules are executed on your organization’s Mailbox servers . Journal rules can be targeted to all recipients or to specific recipients. For example, you can create a rule to journal all messages sent to the AllEmployees distribution group .
You can create a journal rule by completing the following steps:
1. In the Exchange Admin Center, select Compliance Management in the Feature pane, and then select Journal Rules .
2. On the main pane, tap or click New to open the New Journal Rule dialog box (shown in Figure 5-7) .
FIGURE 5-7 Create a journal rule.
ChAptEr 5 Managing and maintaining mail flow186
3. In the Name text box, type a descriptive name for the rule .4. In the Send Journal Reports To, provide the journal email address. This is the
recipient to which Exchange should forward journal reports for this rule.5. Use the If The Message Is Send To Or Received From selection list to specify
whether the rule should be applied to messages sent to or received from a specific user or group, or to all messages. For a specific user or group, you’ll then need to select the user or group .
6. Use the Journal The Following Messages selection list to specify the scope of the rule as either All Messages, Internal Messages Only, or External Mes-sages Only .
7. Tap or click Save .
Managing journal rulesWhen you are working with the Compliance Management area and select Journal Rules, the currently defined journal rules are listed in the main pane by status, name, user journaled, and journal report recipient. You can easily enable or disable a rule by setting or clearing the corresponding check box in the On column . If you select a rule and then select Edit, you can modify the rule settings . If you select a rule and then select Remove, you can delete the rule .
In the Exchange Management Shell, you can manage journal rules by using the following cmdlets: New-JournalRule, Set-JournalRule, Get-JournalRule, and Remove-JournalRule .
Creating and managing remote domains
In on-premises Exchange organizations, remote domain settings help you manage mail flow for most types of automated messages, including out-of-office messages, automatic replies, automatic forwarding, delivery reports, and nondelivery reports . Remote domain settings also control some automated message-formatting options, such as whether to display a sender’s name on a message or only the sender’s email address . Your Exchange organization has a default remote domain policy that sets the global defaults . You can create additional policies to create managed connec-tions for specific remote domains as well.
Viewing remote domainsYou can use the Get-RemoteDomain cmdlet to list remote domains or to get infor-mation on a particular remote domain . Remote domains are listed by name and the domain to which they apply . The Default remote domain applies to all remote domains, unless you override it with specific settings.
If you do not provide an identity with the Get-RemoteDomain cmdlet, configura-tion information for all remote domains is displayed . Listing 5-12 provides the syn-tax and usage, in addition to sample output, for the Get-RemoteDomain cmdlet .

Managing and maintaining mail flow ChAptEr 5 187
LISTING 5-12 Get-RemoteDomain cmdlet syntax and usage
Syntax
Get-RemoteDomain [-Identity DomainIdentity] [-DomainController DCName] [-Organization OrgId]
Usage
Get-RemoteDomain -Identity "adatum.com"
Output
Name DomainName AllowedOOFType ---- ----------- -------------- Default * External Adatum *.adatum.com External
Creating remote domainsIn the Exchange Management Shell, you can use the New-RemoteDomain cmdlet to create remote domains . Use the -Name parameter to specify a descriptive name that identifies the purpose of the remote domain or simply enter the actual SMTP domain name .
Listing 5-13 provides the syntax and usage . The way you set the –DomainName parameter determines whether the remote domain includes subdomains . To man-age connections for a specific domain, you simply provide the fully qualified name of the domain . You insert an asterisk and a period before the domain name to include the domain and all child domains of the domain .
LISTING 5-13 New-RemoteDomain cmdlet syntax and usage
Syntax
New-RemoteDomain -Name Name -DomainName DomainName [-DomainController DCName] [-Organization OrgId]
Usage for parent domain only
New-RemoteDomain -Name "Cohowinery Managed Connection" -DomainName "cohowinery.com"
Usage for parent domain and child domains
New-RemoteDomain -Name "Cohowinery Managed Connection" -DomainName "*.cohowinery.com"
Configuring messaging options for remote domainsRemote domains are used to control how automated messages are used and to specify some types of messaging format options . In the Exchange Management Shell, you can use the Set-RemoteDomain cmdlet to configure remote domains. Listing 5-14 provides the syntax and usage .

ChAptEr 5 Managing and maintaining mail flow188
LISTING 5-14 Set-RemoteDomain cmdlet syntax and usage
Syntax
Set-RemoteDomain –Identity "RemoteDomainIdentity" [-AllowedOOFType <"External"|"InternalLegacy"|"ExternalLegacy"|"None">] [-AutoForwardEnabled <$true | $false>] [-AutoReplyEnabled <$true | $false>] [-CharacterSet "CharacterSet"] [-ContentType <"MimeHtmlText"|"MimeText"|"MimeHtml">] [-DeliveryReportEnabled <$true | $false>] [-DisplaySenderName <$true | $false>] [-DomainController DCName] [-IsInternal <$true | $false> [-LineWrapSize "Size"] [-MessageCountThreshold Count] [-MeetingForwardNotificationEnabled <$true | $false>] [-Name "Name"] [-NDREnabled <$true | $false>] [-NonMimeCharacterSet "CharacterSet"] [-TNEFEnabled <$true | $false>]
Usage
Set-RemoteDomain -Identity "Cohowinery" -DeliveryReportEnabled $false
Use the -AllowedOOFType parameter to specify whether and how out-of-office messages are sent to the remote domain . The options are as follows:
• None Blocks all out-of-office messages.• External Allows out-of-office messages to be received by the Exchange
organization, but does not allow the organization’s out-of-office mes-sages to be sent .
• ExternalLegacy Allows out-of-office messages to be received by the Exchange organization and receipt of out-of-office messages generated by Microsoft Outlook 2003, Exchange 2003, or earlier .
• InternalLegacy Allows out-of-office messages to be sent from the Exchange organization and the sending of out-of-office messages gener-ated by Outlook 2003, Exchange 2003, or earlier .
You also can specify how Exchange should format messages . Allow messaging options by setting the related parameters to $true, or disallow messaging options by setting the related parameters to $false . The options available are as follows:
• -AutoReplyEnabled Allows the sender to be notified that the message was received .
• -AutoForwardEnabled Allows Exchange Server to forward or deliver a duplicate message to a new recipient .
• -DeliveryReportEnabled Allows Exchange Server to return delivery confirmation reports to the sender.
• -MeetingForwardNotificationEnabled Allows Exchange Server to forward or deliver a meeting notification to a new recipient.

Managing and maintaining mail flow ChAptEr 5 189
• -NDREnabled Allows Exchange Server to return nondelivery confirma-tion reports to the sender .
• -DisplaySenderName Allows both the sender’s name and email address to appear on outbound email messages .
By default, text word-wrapping is disabled, which means that Exchange does not enforce a maximum line length. If you’d like message text to wrap at a specific line length, you can set the -LineWrapSize parameter to the specific column position at which text wrapping should start, such as at 72 characters .
Use the -ContentType parameter to set the outbound message content type and formatting . The options are as follows:
• MimeHtml Converts messages to MIME messages with HTML formatting .
• MimeText Converts messages to MIME messages with text formatting .• MimeHtmlText Converts messages to MIME messages with HTML
formatting, except when the original message is a text message . Text messages are converted to MIME messages with text formatting .
If you want to send Transport Neutral Encapsulation Format (TNEF) message data to the remote domain rather than Exchange Rich Text Format, set -TNEFEnabled to $true . TNEF is a Microsoft format for encapsulating MAPI message properties . Though this format is used by Outlook, it may not be recognized by other email cli-ents . When you enable TNEF for remote domains, all messages sent to that domain are normally converted to TNEF format, except when overridden by Outlook client or mailbox user settings .
removing remote domainsIn the Exchange Management Shell, you can use the Remove-RemoteDomain cmdlet to remove remote domains . Listing 5-15 provides the syntax and usage .
LISTING 5-15 Remove-RemoteDomain cmdlet syntax and usage
Syntax
Remove-RemoteDomain -Identity RemoteDomainIdentity [-DomainController DCName]
Usage
Remove-RemoteDomain -Identity "Cohowinery"
Configuring anti-spam and message filtering options
Every minute users spend dealing with unsolicited commercial email (spam) or other unwanted email is a minute they cannot do their work and address other issues . To try to deter spammers and other unwanted senders, you can use message filter-ing to block these senders from directing messages to your organization . Not only can you filter messages that claim to be from a particular sender or that are sent to a particular receiver, you can also establish connection filtering rules based on IP block lists . The sections that follow discuss these and other anti-spam options .

ChAptEr 5 Managing and maintaining mail flow190
As you configure message filtering, keep in mind that although Exchange Server is designed to combat most spammer techniques, no system can block all of them . Like the techniques of those who create viruses, the techniques of those who send spam frequently change, and you won’t be able to prevent all unwanted email from going through. You should, however, be able to substantially reduce the flow of spam into your organization .
If your organization is using legacy Edge Transports, you can configure message filtering through the use of Exchange Management Console. Because Exchange Server 2013 doesn’t have a graphical interface for configuring message filtering, you must use Exchange Management Shell .
Filtering spam and other unwanted mail by senderSometimes, when you are filtering spam or other unwanted email, you’ll know spe-cific email addresses or email domains from which you don’t want to accept mes-sages . In this case, you can block messages from these senders or email domains by configuring sender filtering. Another sender from which you probably don’t want to accept messages is a blank sender. If the sender is blank, it means the From field of the email message wasn’t filled in and the message is probably from a spammer.
Sender filtering is enabled by default and is designed to filter inbound messages from non-authenticated Internet sources. You can view the current configuration of sender filtering by using Get-SenderFilterConfig. Use the -Enabled parameter of Set-SenderFilterConfig to enable or disable sender filtering. The following example disables sender filtering:
Set-SenderFilterConfig -Enabled $false
To configure filtering according to the sender of a message on a legacy Edge Transport server running Exchange 2010, follow these steps:
1. In Exchange Management Console, select Edge Transport, tap or click the server you want to work with, and then tap or click the Anti-Spam tab in the details pane .
2. Press and hold or right-click Sender Filtering, and then select Properties . The Sender Filtering Properties dialog box appears .
3. On the Blocked Senders tab (shown in Figure 5-8), the Senders list box shows the current sender filters, if any.
4. You can add a sender filter by tapping or clicking Add. In the Add Blocked Senders dialog box, select Individual Email Address if the filter is for a specific email address, or select Domain if you want to filter all email sent from a par-ticular domain . Type the email address or domain name, as appropriate, and then tap or click OK .
5. You can remove a filter by selecting it, and then tapping or clicking Remove.6. To edit a filter, double-tap or double-click the filter entry, enter a new value,
and then tap or click OK .

Managing and maintaining mail flow ChAptEr 5 191
FIGURE 5-8 Use sender filtering to set restrictions on addresses and domains that can send mail to your organization .
7. On the Blocked Senders tab, you can also filter messages that don’t have an email address in the From field. To do this, select the Block Messages That Don’t Have Sender Information check box .
8. On the Action tab, specify how messages from blocked senders are to be handled . If you want to ensure that Exchange doesn’t waste processing power and other resources dealing with messages from filtered senders, select the Reject Message option. If you want to mark messages as being from a blocked sender and continue processing them, select Stamp Message With Blocked Sender And Continue Processing . Tap or click OK .
In the Exchange Management Shell, you can use the Set-SenderFilterConfig cmdlet to configure sender filtering. Listing 5-16 provides the syntax and usage. By default, sender filtering rejects messages from blocked domains and senders. If you set the -Action parameter to StampStatus instead, a message header stamp will be added to the message and the message will be processed by other anti-spam agents . This stamp and any other issues found will then be used to set the spam confidence level as part of content filtering. A message that exceeds a spam confi-dence level is rejected, quarantined, deleted, or marked as junk mail. Set the -Blank-SenderBlockingEnabled parameter to $true to block blank senders .
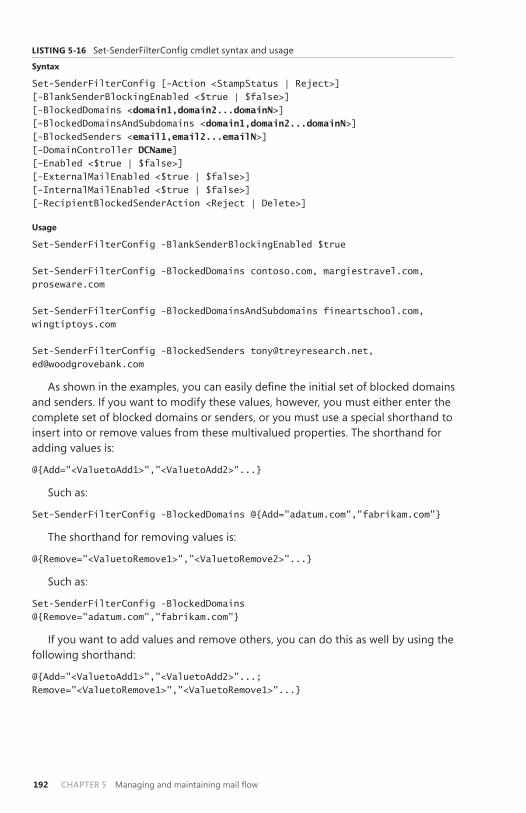
ChAptEr 5 Managing and maintaining mail flow192
LISTING 5-16 Set-SenderFilterConfig cmdlet syntax and usage
Syntax
Set-SenderFilterConfig [-Action <StampStatus | Reject>] [-BlankSenderBlockingEnabled <$true | $false>] [-BlockedDomains <domain1,domain2...domainN>] [-BlockedDomainsAndSubdomains <domain1,domain2...domainN>] [-BlockedSenders <email1,email2...emailN>] [-DomainController DCName] [-Enabled <$true | $false>] [-ExternalMailEnabled <$true | $false>] [-InternalMailEnabled <$true | $false>] [-RecipientBlockedSenderAction <Reject | Delete>]
Usage
Set-SenderFilterConfig -BlankSenderBlockingEnabled $true Set-SenderFilterConfig -BlockedDomains contoso.com, margiestravel.com, proseware.com Set-SenderFilterConfig -BlockedDomainsAndSubdomains fineartschool.com, wingtiptoys.com Set-SenderFilterConfig -BlockedSenders [email protected], [email protected]
As shown in the examples, you can easily define the initial set of blocked domains and senders . If you want to modify these values, however, you must either enter the complete set of blocked domains or senders, or you must use a special shorthand to insert into or remove values from these multivalued properties . The shorthand for adding values is:
@{Add="<ValuetoAdd1>","<ValuetoAdd2>"...}
Such as:
Set-SenderFilterConfig -BlockedDomains @{Add="adatum.com","fabrikam.com"}
The shorthand for removing values is:
@{Remove="<ValuetoRemove1>","<ValuetoRemove2>"...}
Such as:
Set-SenderFilterConfig -BlockedDomains @{Remove="adatum.com","fabrikam.com"}
If you want to add values and remove others, you can do this as well by using the following shorthand:
@{Add="<ValuetoAdd1>","<ValuetoAdd2>"...; Remove="<ValuetoRemove1>","<ValuetoRemove1>"...}
Managing and maintaining mail flow ChAptEr 5 193
You can confirm that values were added or removed as expected by using Get-SenderFilterConfig. In this example, you view the currently blocked domains:
Get-SenderFilterConfig | fl BlockedDomains
By default, -InternalMailEnabled is set to $false and -ExternalMailEnabled is set to true, which means authenticated internal email messages aren’t processed by the Sender Filter whereas unauthenticated external email messages are processed by the Sender filter. An unauthenticated external email messages is one from an untrusted or anonymous source rather than a trusted partner .
Finally, when users in your organization add senders to their blocked sender list, the SafeList aggregation feature in Exchange 2013 adds these senders to the Blocked Senders List in Exchange 2013. By default, messages from these users are rejected rather than deleted . To delete these messages, set -RecipientBlockedSender Action to Delete .
Filtering spam and other unwanted email by recipientIn any organization, you’ll have users whose email addresses change, perhaps because they request it, leave the company, or change office locations. Although you might be able to forward email to these users for a time, you probably won’t want to forward email indefinitely. At some point, you, or someone else in the organ-ization, will decide it’s time to delete the user’s account, mailbox, or both . If the user is subscribed to mailing lists or other services that deliver automated email, the auto-mated messages continue to come in, unless you manually unsubscribe the user or reply to each email that you don’t want to receive the messages . Unfortunately, some Exchange administrators find themselves going through this inefficient process. It’s much easier to add the old or invalid email address to a recipient filter list and specify that Exchange shouldn’t accept messages for users who aren’t in the Exchange direc-tory. After you do this, Exchange won’t attempt to deliver messages for filtered or invalid recipients, and you won’t see related nondelivery reports (NDRs) .
Recipient filtering is enabled by default. To configure filtering according to the message recipient on a legacy Edge Transport server running Exchange 2010, follow these steps:
1. In Exchange Management Console, select Edge Transport, tap or click the server you want to work with, and then tap or click the Anti-Spam tab in the details pane .
2. Press and hold or right-click Recipient Filtering, and then select Properties . The Recipient Filtering Properties dialog box appears .
3. On the Blocked Recipients tab (shown in Figure 5-9), the Recipients list box shows the current recipient filters, if any.

ChAptEr 5 Managing and maintaining mail flow194
FIGURE 5-9 Use recipient filtering to set restrictions for specific or invalid recipients .
4. You can filter messages that are sent to recipients who don’t have email addresses and aren’t listed as recipients in your Exchange organization . To do this, select the Block Messages Sent To Recipients That Do Not Exist In The Directory check box .
5. Before you can add other recipient filters, you must select the Block Messages Sent To The Following Recipients check box . You can then add a recipient filter by typing the address you’d like to filter, and then tapping or clicking Add. Addresses can refer to a specific email address, such as walter @blueyonderairlines.com, or a group of email addresses designated with the wildcard character (*), such as *@blueyonderairlines.com to filter all email addresses from blueyonderairlines.com, or *@*.blueyonderairlines.com, to filter all email addresses from child domains of blueyonderairlines.com .
6. You can remove a filter by selecting it, and then tapping or clicking Remove.7. To edit a filter, double-tap or double-click the filter entry, enter a new value,
and then press Enter . Tap or click OK .In the Exchange Management Shell, you can use the Set-RecipientFilterConfig
cmdlet to configure recipient filtering. Listing 5-17 provides the syntax and usage. By default, recipient filtering rejects messages from blocked recipients but doesn’t block users from sending messages to blocked recipients . If you set -BlockList-Enabled to $true, users won’t be able to send messages to blocked recipients . You also can specify whether Exchange 2013 validates recipients and then blocks mes-sages sent to recipients who don’t exist . Although it doesn’t validate recipients by default, you can have it validate recipients by setting -Recipient ValidationEnabled to $true .

Managing and maintaining mail flow ChAptEr 5 195
LISTING 5-17 Set-RecipientFilterConfig cmdlet syntax and usage
Syntax
Set-RecipientFilterConfig [-BlockedRecipients <email1,email2...emailN>] [-BlockListEnabled <$true | $false>] [-DomainController DCName] [-Enabled <$true | $false>] [-ExternalMailEnabled <$true | $false>] [-InternalMailEnabled <$true | $false>] [-RecipientValidationEnabled <$true | $false>]
Usage
Set-RecipientFilterConfig -RecipientValidationEnabled $true Set-RecipientFilterConfig -BlockedRecipients [email protected], [email protected]
If you want to modify the blocked recipients, you must either enter the complete set of blocked recipients, or you use a special shorthand to insert into or remove values from this multivalued property . The shorthand for adding values is:
@{Add="<ValuetoAdd1>","<ValuetoAdd2>"...}
Such as:
Set-RecipientFilterConfig –BlockedRecipients @{Add="[email protected]","[email protected]"}
The shorthand for removing values is:
@{Remove="<ValuetoRemove1>","<ValuetoRemove2>"...}
Such as:
Set-RecipientFilterConfig -BlockedRecipients @{Remove="[email protected]","[email protected]"}
If you want to add values and remove others, you can do this as well by using the following shorthand:
@{Add="<ValuetoAdd1>","<ValuetoAdd2>"...; Remove="<ValuetoRemove1>","<ValuetoRemove1>"...}
You can confirm that values were added or removed as expected by using Get-RecipientFilterConfig. In this example, you view the currently blocked domains:
Get-RecipientFilterConfig | fl BlockedRecipients
Filtering connections with Ip block listsIf you find that sender and recipient filtering isn’t enough to stem the flow of spam into your organization, you might want to consider subscribing to an IP block list service . Here’s how this service works:
■■ You subscribe to an IP block list service . Although there are free services available, you might have to pay a monthly service fee . In return, the service lets you query its servers for known sources of unsolicited email and known relay servers .
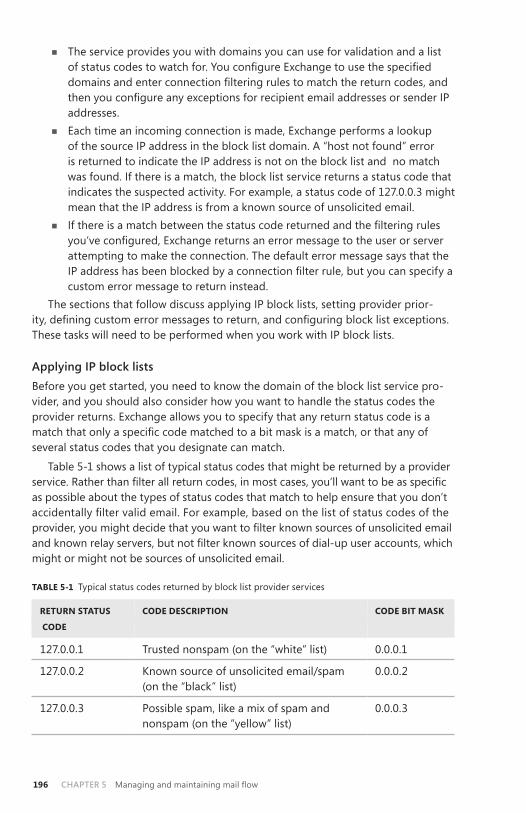
ChAptEr 5 Managing and maintaining mail flow196
■■ The service provides you with domains you can use for validation and a list of status codes to watch for. You configure Exchange to use the specified domains and enter connection filtering rules to match the return codes, and then you configure any exceptions for recipient email addresses or sender IP addresses .
■■ Each time an incoming connection is made, Exchange performs a lookup of the source IP address in the block list domain . A “host not found” error is returned to indicate the IP address is not on the block list and no match was found . If there is a match, the block list service returns a status code that indicates the suspected activity . For example, a status code of 127 .0 .0 .3 might mean that the IP address is from a known source of unsolicited email .
■■ If there is a match between the status code returned and the filtering rules you’ve configured, Exchange returns an error message to the user or server attempting to make the connection . The default error message says that the IP address has been blocked by a connection filter rule, but you can specify a custom error message to return instead .
The sections that follow discuss applying IP block lists, setting provider prior-ity, defining custom error messages to return, and configuring block list exceptions. These tasks will need to be performed when you work with IP block lists .
Applying Ip block listsBefore you get started, you need to know the domain of the block list service pro-vider, and you should also consider how you want to handle the status codes the provider returns . Exchange allows you to specify that any return status code is a match that only a specific code matched to a bit mask is a match, or that any of several status codes that you designate can match .
Table 5-1 shows a list of typical status codes that might be returned by a provider service. Rather than filter all return codes, in most cases, you’ll want to be as specific as possible about the types of status codes that match to help ensure that you don’t accidentally filter valid email. For example, based on the list of status codes of the provider, you might decide that you want to filter known sources of unsolicited email and known relay servers, but not filter known sources of dial-up user accounts, which might or might not be sources of unsolicited email .
TABLE 5-1 Typical status codes returned by block list provider services
RETURN STATUS
CODE
CODE DESCRIPTION
CODE BIT MASK
127 .0 .0 .1 Trusted nonspam (on the “white” list) 0 .0 .0 .1
127 .0 .0 .2 Known source of unsolicited email/spam (on the “black” list)
0 .0 .0 .2
127 .0 .0 .3 Possible spam, like a mix of spam and nonspam (on the “yellow” list)
0 .0 .0 .3
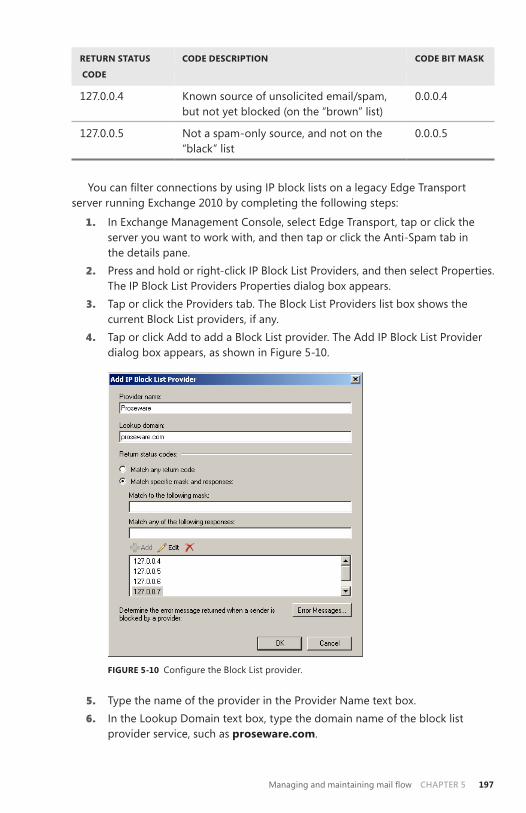
Managing and maintaining mail flow ChAptEr 5 197
RETURN STATUS
CODE
CODE DESCRIPTION
CODE BIT MASK
127 .0 .0 .4 Known source of unsolicited email/spam, but not yet blocked (on the “brown” list)
0 .0 .0 .4
127 .0 .0 .5 Not a spam-only source, and not on the “black” list
0 .0 .0 .5
You can filter connections by using IP block lists on a legacy Edge Transport server running Exchange 2010 by completing the following steps:
1. In Exchange Management Console, select Edge Transport, tap or click the server you want to work with, and then tap or click the Anti-Spam tab in the details pane .
2. Press and hold or right-click IP Block List Providers, and then select Properties . The IP Block List Providers Properties dialog box appears .
3. Tap or click the Providers tab . The Block List Providers list box shows the current Block List providers, if any .
4. Tap or click Add to add a Block List provider . The Add IP Block List Provider dialog box appears, as shown in Figure 5-10 .
FIGURE 5-10 Configure the Block List provider .
5. Type the name of the provider in the Provider Name text box .6. In the Lookup Domain text box, type the domain name of the block list
provider service, such as proseware.com .

ChAptEr 5 Managing and maintaining mail flow198
7. Under Return Status Codes, select Match Any Return Code to match any return code (other than an error) received from the provider service, or select one or more of the following options:• Match Specific Mask And Responses Select this option to match a
specific mask and return codes from the provider service.• Match To The Following Mask Select this option to match a specific
return code from the provider service . For example, if the return code for a known relay server is 127.0.0.4 and you want to match this specific code, you type the mask 0 .0 .0 .4 .
• Match Any Of The Following Responses Select this option to match specific values in the return status codes. Type a return status code to match, and then tap or click Add . Repeat as necessary for each return code that you want to add .
8. Tap or click OK to start using IP block lists from the block list provider .Exchange 2013 allows you to configure multiple IP block list providers, with a
relative priority assigned to a provider determining the order in which providers are checked . In the Exchange Management Shell, you manage IP block list providers and their settings by using the following:
■■ Add-IPBlockListProvider Adds an IP block list provider .
Add-IPBlockListProvider -LookupDomain SmtpDomain -Name ProviderName
[-AnyMatch <$true | $false>] [-BitmaskMatch IPAddressBitMask]
[-DomainController DCName] [-Enabled <$true | $false>]
[-IPAddressesMatch IpAddress1,IpAddress2...IpAddressN]
[-Priority Priority] [-RejectionResponse Response]
■■ Get-IPBlockListProvider Displays the settings of a specific or all IP block list providers .
Get-IPBlockListProvider [-Identity SmtpDomain]
[-DomainController DCName]
■■ Set-IPBlockListProvider Modifies the settings associated with the speci-fied IP block list provider.
Set-IPBlockListProvider -Identity SmtpDomain
[-AnyMatch <$true | $false>] [-BitmaskMatch IPAddressBitMask]
[-DomainController DCName] [-Enabled <$true | $false>]
[-IPAddressesMatch IpAddress1,IpAddress2...IpAddressN]
[-Priority Priority] [-RejectionResponse Response]
■■ Remove-IPBlockListProvider Removes an IP block list provider .
Remove-IPBlockListProvider -Identity SmtpDomain
[-DomainController DCName]
When you add a block list provider, you use the -Name parameter to set a descriptive name for the provider and the -LookupDomain to specify the domain name of the block list provider service, such as proseware.com . You can then specify
Managing and maintaining mail flow ChAptEr 5 199
whether to match any return code (other than an error) received from the provider service or to match a specific mask and return codes from the provider service. As shown in the following example, set -AnyMatch to $true to match any return code:
Add-IPBlockListProvider -Name Proseware -LookupDomain proseware.com -AnyMatch $true
If you want to match a specific mask, use -BitmaskMatch to specify the bitmask to match, such as:
Add-IPBlockListProvider -Name Proseware -LookupDomain proseware.com -BitmaskMatch 0.0.0.4
Alternatively, you can match specific values in the return status codes by using -IPAddressesMatch, such as:
Add-IPBlockListProvider -Name Proseware -LookupDomain proseware.com -IPAddressesMatch 127.0.0.4, 127.0.0.5, 127.0.0.6, 127.0.0.7
Other commands you can use to manage and work with block lists include:■■ Get-IPBlockListConfig Displays information about the configuration of
the Connection Filter agent .
Get-IPBlockListConfig [-DomainController DCName]
■■ Set-IPBlockListConfig Modifies the configuration of the Connection Filter agent .
Set-IPBlockListConfig [-DomainController DCName]
[-Enabled <$true | $false>] [-ExternalMailEnabled <$true | $false>]
[-InternalMailEnabled <$true | $false>]
[-MachineEntryRejectionResponse Response]
[-StaticEntryRejectionResponse Response]
■■ Set-IPBlockListProvidersConfig Modifies the block list provider configu-ration used by Connection Filter agent .
Set-IPBlockListProvidersConfig [-DomainController DCName]
[-BypassedRecipients <email1,email2...emailN>]
[-Enabled <$true | $false>]
[-ExternalMailEnabled <$true | $false>]
[-InternalMailEnabled <$true | $false>]
■■ Test-IPBlockListProvider Checks connectivity to the specified block list provider and then issues a lookup request for an IP address to verify .
Test-IPBlockListProvider -Identity SmtpName -IPAddress IPAddress
[-DomainController DCName] [-Server ServerID]

ChAptEr 5 Managing and maintaining mail flow200
Setting priority and enabling block list providersYou can configure multiple block list providers. Each provider is listed in priority order, and if Exchange makes a match by using a particular provider, the other pro-viders are not checked for possible matches . In addition to being prioritized, pro-viders can also be enabled or disabled . If you disable a provider, it’s ignored when looking for possible status code matches .
You can set block list provider priority and enable or disable providers on a legacy Edge Transport server running Exchange 2010 by completing the following steps:
1. In Exchange Management Console, select Edge Transport, tap or click the server with which you want to work, and then tap or click the Anti-Spam tab in the details pane .
2. Press and hold or right-click IP Block List Providers, and then select Properties . The IP Block List Providers Properties dialog box appears .
3. Tap or click the Providers tab . The Block List Providers list box shows the current block list providers in priority order .
4. To change the priority of a provider, select it and then tap or click the Move Up or Move Down button to change its order in the list .
5. To disable a provider, select it and then tap or click Disable .6. To enable a provider, select it and then tap or click Enable . Tap or click OK to
close the Properties dialog box .In Exchange Management Shell, you can use Add-IPBlockListProvider and Set-
IPBlockListProvider to manage provider priority and to enable or disable providers . If you don’t specify a priority when you add a provider using Add-IPBlockListProvider, the order providers are added sets the priority, with the first provider added having a priority of 1, the second a priority of 2, and so on . Use the -Priority parameter to set the relative priority of a provider and the -Enabled parameter to enable or disable a provider . In this example, you set the priority of Proseware .com to 2:
Add-IPBlockListProvider -LookupDomain Proseware.com -Priority 2
Specifying custom error messages to returnWhen a match is made between the status code returned and the filtering rules you’ve configured for block list providers, Exchange returns an error message to the user or server attempting to make the connection . The default error message says that the IP address has been blocked by a connection filter rule. If you want to over-ride the default error message, you can specify a custom error message to return on a per-rule basis . The error message can contain the following substitution values:
■■ %0 to insert the connecting IP address■■ %1 to insert the name of the connection filter rule■■ %2 to insert the domain name of the block list provider service
Some examples of custom error messages include the following:■■ The IP address (%0) was blocked and not allowed to connect .■■ %0 was rejected by %2 as a potential source of unsolicited email.
Managing and maintaining mail flow ChAptEr 5 201
The custom error message can’t be more than 240 characters .
Using the substitution values, you can create a custom error message for each block list provider on a legacy Edge Transport server running Exchange 2010 by fol-lowing these steps:
1. In Exchange Management Console, select Edge Transport, tap or click the server with which you want to work, and then tap or click the Anti-Spam tab in the details pane .
2. Press and hold or right-click IP Block List Providers, and then select Proper-ties . The IP Block List Providers Properties dialog box appears .
3. On the Providers tab, the Block List Providers list box shows the current Block List providers in priority order . Select the block list provider for which you want to create a custom error message, and then tap or click Edit .
4. In the Edit IP Block List Provider dialog box, tap or click Error Messages .5. In the IP Block List Provider Error Message dialog box, select Custom Error
Message, and then type the error message to return . Tap or click OK twice .In Exchange Management Shell, you use the -RejectionResponse parameter of
Add-IPBlockListProvider and Set-IPBlockListProvider to set a custom error message on a per-provider basis . The Set-ContentFilterConfig cmdlet also has a -Rejection-Response parameter that sets the default custom response .
Defining block list exceptions and global allow/block listsSometimes, you’ll find that an IP address, a network, or an email address shows up incorrectly on a block list . The easiest way to correct this problem is to create a block list exception that indicates that the specific IP address, network, or email address shouldn’t be filtered.
Creating or removing connection filter exceptions for email addressesYou can define connection filter exceptions for email addresses on a legacy Edge Transport server running Exchange 2010 by completing the following steps:
1. In Exchange Management Console, select Edge Transport, tap or click the server with which you want to work, and then tap or click the Anti-Spam tab in the details pane .
2. Press and hold or right-click IP Block List Providers, and then select Properties . The IP Block List Providers Properties dialog box appears .
3. On the Exceptions tab, any current exceptions are listed by email address . Type the email address to add as an exception, such as [email protected], and then tap or click Add .
4. To delete an exception, select an existing email address, and then tap or click Remove .
5. Tap or click OK to save your settings .

ChAptEr 5 Managing and maintaining mail flow202
In Exchange Management Shell, you can add exceptions by using the -Bypassed-Recipients parameter of the Set-IPBlockListProvidersConfig cmdlet. You can define the initial set of exceptions simply by entering the email addresses in a comma- separated list, such as:
Set-IPBlockListProvidersConfig -BypassedRecipients [email protected], [email protected]
If you want to modify the exceptions, however, you must either enter the complete set of exceptions, or use a special shorthand to insert into or remove values from this multivalued property . The shorthand for working with multivalued properties is:
@{Add="<ValuetoAdd1>","<ValuetoAdd2>"...} @{Remove="<ValuetoRemove1>","<ValuetoRemove2>"...} @{Add="<ValuetoAdd1>","<ValuetoAdd2>"...; Remove="<ValuetoRemove1>","<ValuetoRemove1>"...}
Such as:
Set-IPBlockListProvidersConfig -BypassedRecipients @{Add="[email protected]","[email protected]"; Remove="[email protected]"}
Creating or removing global allowed lists for Ip addresses and networksExchange will accept email from any IP address or network on the global allowed list. Before you can define allowed entries for IP addresses and networks you must be sure that the IP Allow List is enabled . To view or change the IP Allow List status on a legacy Edge Transport server running Exchange 2010, complete the following steps:
1. In Exchange Management Console, select Edge Transport, tap or click the server with which you want to work, and then tap or click the Anti-Spam tab in the details pane .
2. Check the status of IP Allow List . If the feature is not enabled, press and hold or right-click IP Allow List, and then select Enabled .
You use Add-IPAllowListEntry to add an IP address or IP address range to the IP Allow list . Listing 5-18 provides the syntax and usage .
LISTING 5-18 Add-IPAllowListEntry cmdlet syntax and usage
Syntax
Add-IPAllowListEntry -IPAddress IPAddress {AddtlParams} Add-IPAllowListEntry -IPRange IPRange {AddtlParams} {AddtlParams} [-Comment Comment] [-ExpirationTime DateTime] [-Server ServerId]

Managing and maintaining mail flow ChAptEr 5 203
Usage
Add-IPAllowListEntry –IPAddress 192.168.10.45 Add-IPAllowListEntry –IPRange 192.168.10.0/24 Add-IPAllowListEntry –IPRange 192.168.10.1-192.168.10.254
You use Get-IPAllowListEntry to list IP Allow List entries and Remove-IPAllowList-Entry to remove IP Allow List entries . Listings 5-19 and 5-20 provide the syntax and usage .
LISTING 5-19 Get-IPAllowListEntry cmdlet syntax and usage
Syntax
Get-IPAllowListEntry [-Identity IPListEntryId] {AddtlParams} Get-IPAllowListEntry -IPAddress IPAddress {AddtlParams} {AddtlParams} [-ResultSize Size] [-Server ServerId]
Usage
Get-IPAllowListEntry Get-IPAllowListEntry –IPAddress 192.168.10.45
LISTING 5-20 Remove-IPAllowListEntry cmdlet syntax and usage
Syntax
Remove-IPAllowListEntry -Identity IPListEntryId [-Server ServerId]
Usage
Get-IPAllowListEntry | Where {$_.IPRange -eq '192.168.10.45'} | Remove-IPAllowListEntry Get-IPAllowListEntry | Where {$_.IPRange -eq '192.168.10.0/24'} | Remove-IPAllowListEntry
Creating or removing global block lists for Ip addresses and networksExchange will reject email from any IP address or network on the block list. Before you can define blocked entries for IP addresses and networks, you must ensure that the IP block list is enabled . To view or change the IP block list status on a legacy Edge Transport server running Exchange 2010, complete the following steps:
1. In Exchange Management Console, select Edge Transport, tap or click the server with which you want to work, and then tap or click the Anti-Spam tab in the details pane .
2. Check the status of the IP block list . If the feature is not enabled, press and hold or right-click IP Block List, and then tap or click Enabled .
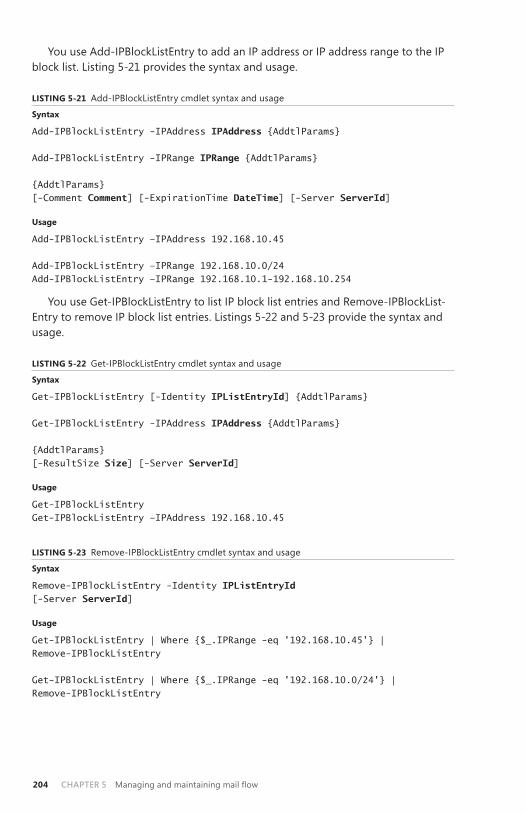
ChAptEr 5 Managing and maintaining mail flow204
You use Add-IPBlockListEntry to add an IP address or IP address range to the IP block list . Listing 5-21 provides the syntax and usage .
LISTING 5-21 Add-IPBlockListEntry cmdlet syntax and usage
Syntax
Add-IPBlockListEntry -IPAddress IPAddress {AddtlParams} Add-IPBlockListEntry -IPRange IPRange {AddtlParams} {AddtlParams} [-Comment Comment] [-ExpirationTime DateTime] [-Server ServerId]
Usage
Add-IPBlockListEntry –IPAddress 192.168.10.45 Add-IPBlockListEntry –IPRange 192.168.10.0/24 Add-IPBlockListEntry –IPRange 192.168.10.1-192.168.10.254
You use Get-IPBlockListEntry to list IP block list entries and Remove-IPBlockList-Entry to remove IP block list entries . Listings 5-22 and 5-23 provide the syntax and usage .
LISTING 5-22 Get-IPBlockListEntry cmdlet syntax and usage
Syntax
Get-IPBlockListEntry [-Identity IPListEntryId] {AddtlParams} Get-IPBlockListEntry -IPAddress IPAddress {AddtlParams} {AddtlParams} [-ResultSize Size] [-Server ServerId]
Usage
Get-IPBlockListEntry Get-IPBlockListEntry –IPAddress 192.168.10.45
LISTING 5-23 Remove-IPBlockListEntry cmdlet syntax and usage
Syntax
Remove-IPBlockListEntry -Identity IPListEntryId [-Server ServerId]
Usage
Get-IPBlockListEntry | Where {$_.IPRange -eq '192.168.10.45'} | Remove-IPBlockListEntry Get-IPBlockListEntry | Where {$_.IPRange -eq '192.168.10.0/24'} | Remove-IPBlockListEntry
Managing and maintaining mail flow ChAptEr 5 205
Preventing internal servers from being filteredTypically, you don’t want Exchange to apply Sender ID, content, or connection filters to servers on your organization’s network or to internal SMTP servers deployed in a perimeter zone. One way to ensure a filter is not applied is to configure message delivery options for your organization’s transport servers so that they don’t apply filters to IP addresses from internal servers and your perimeter network.
In Exchange Management Shell, you prevent internal servers from being filtered by the Sender ID, content or connection filters by using the -InternalMailEnabled parameter of Set-SenderIdConfig, Set-ContentFilterConfig, and Set-IPBlockList-Provider. By default, -InternalMailEnabled is set to $false for Set-SenderIdConfig and Set-ContentFilterConfig, which means authenticated internal email messages aren’t processed by the Send ID filter or the content filter.
Configuring transport rules
You can use transport rules in on-premises and online Exchange organizations . Trans-port rules allow you to screen messaging items and apply actions to those items that meet specific conditions. When you enable transport rules, all Mailbox servers in your Exchange organization screen messages according to the rules you’ve defined.
Understanding transport rulesTransport rules have conditions, actions, and exceptions that you can apply . Conditions you can screen for include the following:
■■ The sender is… Allows you to screen messages from specific senders according to their email address, group membership, account properties and more .
■■ The recipient is… Allows you to screen messages being sent to specific recipients according to their email address, group membership, account properties, and so forth .
■■ The subject or body… Allows you to screen messages that have specific words in their subject line or message body.
■■ Any attachment… Allows you to screen messages with attachments for specific content, file names, file extensions, and password protection, in addi-tion to when the attachment size is greater than or equal to the size limit that you set .
■■ The message… Allows you to screen messages sent to or copied to specific recipients or specific groups, in addition to when the message size is greater than or equal to a size limit that you set .
■■ The send and recipient… Allows you to screen messages sent between members of specific groups, messages sent by subordinates of a specific manager, and messages sent to a recipient who is a manager or direct report of the sender .

ChAptEr 5 Managing and maintaining mail flow206
■■ The message properties… Allows you to screen messages that have a spam confidence level (SCL) rating that is greater than or equal to a limit that you set. Also allows you to screen messages by classification, type, and importance level .
■■ A message header… Allows you to screen messages that have a header field that includes specific words or matches specific patterns.
When a message meets all of the conditions you specify in a transport rule, the message is handled according to the actions you’ve defined. Actions you can apply to messages that meet your transport rule conditions include the following:
■■ Forwarding the message for approval to specific people or to the sender’s manager
■■ Redirecting the message to specific recipients, host quarantine or a specific outbound connector
■■ Blocking the message by rejecting it with a specific return message and explanation or by deleting the message without notifying anyone
■■ Adding recipients to the Bcc, To, or Cc fields or simply adding the sender’s manager as a recipient
■■ Applying a disclaimer to the beginning or end of the message■■ Modifying the message by removing a message header, adding a message
header, adding a message classification, or setting the spam confidence level■■ Securing the message with rights protection or TLS encryption■■ Prepending the subject of the message with a specified text value■■ Generating an incident report and sending it to specific recipients
Transport rules can also have exceptions . Exception criteria are similar to condi-tion criteria . For example, you can exclude messages from certain people or from certain members of distribution lists . You can also exclude messages sent to certain people or to particular members of a distribution list .
Creating transport rulesYou can create a transport rule by completing the following steps:
1. In the Exchange Admin Center, select Mail Flow in the Feature area, and then select Rules .
2. In the main pane, tap or click New, and then select Create A New Rule to open the New Rule dialog box . Tap or click More Options to display all rule configuration options as shown in Figure 5-11.
3. In the Name text box, type a descriptive name for the rule and optionally enter a descriptive comment .
4. By default, transport rules are audited and enforced . If you don’t want the rule to be audited, clear the Audit This Rule check box . If you want to test the rule rather than enforce it, select Test With Policy Tips or Test Without Policy Tips instead of Enforce . It’s a good idea to test a rule before enforcing it so that you can ensure the rule works the way you think it will . If you test with Policy Tips, you will get more detailed information to help you fine-tune the rule .

Managing and maintaining mail flow ChAptEr 5 207
FIGURE 5-11 Create a transport rule .
5. Next you need to specify the conditions for the rule by using the options under Apply This Rule If .… Tap or click in the selection list . Next, choose what part of the message to examine and then choose how the condition should be matched . Finally, in the selection dialog box, set the condition parameters by selecting an option or typing a value or values to match . For example, choose “The sender” and then choose “is this person .” Finally, in the Select Members dialog box, select the sender to match in the rule and then tap or click OK .
6. If you want to add another condition, tap or click Add Condition and then tap or click in the new selection list provided . Next, choose what part of the message to examine, and then choose how the condition should be matched . Finally, in the selection dialog box, set the condition parameters by selecting an option or typing a value or values to match . Repeat this step to add other conditions .
7. Use the options under Do The Following… to define the actions to take when a message meets the condition or conditions you specified. Tap or click in the selection list . Next, choose the action, and then choose how the action should be performed . Finally, in the selection dialog box, set the action parameters by selecting an option or typing a value or values to match . For example, choose “Add recipients” and then choose “to the Bcc box .” Finally, in the Select Members dialog box, select the sender that should be added to the Bcc field of matching messages and then tap or click OK.
8. If you want to add another action, tap or click Add Action, and then tap or click in the new selection list provided . Next, choose the action, and then choose how the action should be performed . Finally, in the selection dialog box, set the action parameters by selecting an option or typing a value or values to match . Repeat this step to add other actions .

ChAptEr 5 Managing and maintaining mail flow208
9. You now need to specify any exceptions by using the options under Except If… . Tap or click Add Exception, and then tap or click in the new selection list provided . Next, choose the exception and then choose how the excep-tion should be matched . Finally, in the selection dialog box, set the exception parameters by selecting an option or typing a value or values to match . For example, choose “The sender” and then choose “is this person .” Finally, in the Select Members dialog box, select the sender to add as an exception to the rule, and then tap or click OK . Repeat this step to add other exceptions .
10. Tap or click Save to create the rule . If an error occurs during rule creation, note the error and then correct the issue before trying to create the rule again .
Managing transport rulesYou can manage transport rules in several different ways including editing their properties or disabling them . When you’ve created multiple rules, you can also change their priority to determine the precedence order for application in case there are conflicts between rules. When multiple rules apply to a message, the rule with the highest priority is the one that your Mailbox server applies .
When you select a transport rule in Exchange Admin Center, you can manage the rule in the following ways:
■■ Change Priority Use the Move Up or Move Down buttons to increase or decrease the relative priority of the rule . Rules are processed in priority order, with the rule listed first being the first one processed, the rule listed second being the second processed, and so on .
■■ Disable Rule Use the check box in the On column to enable or disable the rule .
■■ Remove Select Remove to remove the rule .■■ Edit Rule Select Edit to edit the properties of the transport rule .
In the Exchange Management Shell, you can manage transport rules by using the following cmdlets: New-TransportRule, Set-TransportRule, Get-TransportRule, and Remove-TransportRule .

209
CHAP TER 6
Managing client access■■ Mastering Outlook Web App essentials 210
■■ Managing web and mobile access 221
■■ Configuring POP3 and IMAP4 249
■■ Managing Outlook Anywhere 257
Microsoft Outlook Web App, Exchange ActiveSync, and Outlook Anywhere are essential technologies for enabling users to access Microsoft Exchange
anywhere at any time . As you know from previous chapters, Outlook Web App (OWA) lets users access Exchange by using a standard web browser . With Exchange ActiveSync, users can access Exchange by using mobile devices, such as smart-phones . Finally, Outlook Anywhere lets users access Exchange mailboxes by using Microsoft Outlook via remote procedure call (RPC) over HTTP . When users access Exchange mail and public folders over the Internet or a wireless network, virtual directories and web applications hosted by Client Access and Mailbox servers are working behind the scenes to grant access and transfer files.
As you’ll learn in this chapter, managing mobile access, virtual directories, and web applications is a bit different from other tasks you’ll perform as an Exchange administrator—and not only because you use the Microsoft Internet Information Services (IIS) Manager snap-in to perform many of the management tasks . In earlier releases of Exchange, all client access protocols were implemented and managed on Client Access servers . On each Client Access server, a single instance of IIS and a single virtual directory handled each client protocol .
In Exchange 2013, all client access protocols are split between Client Access servers and Mailbox servers . Client Access servers provide front-end authentica-tion and proxying, and Mailbox servers perform the actual processing . On each Client Access server, there is a single instance of IIS that handles front-end processes and a default website with a single virtual directory for each client protocol handled by the server . On each Mailbox server, there is an instance of IIS that handles back- end processes and an Exchange Back End website with a single virtual directory for each client protocol handled by the server . If the Client Access and Mailbox roles are both installed on a single server, there is a single instance of IIS . This single instance of IIS has a default website with a single virtual directory for each client protocol handled by the server and an Exchange Back End with a single virtual directory for each client protocol handled by the server .
ChAptEr 6 Managing client access210
Mastering Outlook Web App essentials
Outlook Web App is a standard Microsoft Exchange Server 2013 technology that allows users to access their mailboxes by using a web browser . If public folders are hosted by Exchange 2013, users will be able to access public folder data as well . The technology works with standard Internet protocols, including HTTP and Secure HTTP (HTTPS) .
When users access mailboxes and public folder data over the web, Client Access and Mailbox servers are working behind the scenes to grant access and transfer files to the browser. Because you don’t need to configure Outlook Web App on the client, it’s ideally suited for users who want to access email while away from the office and may also be a good choice for users on the internal network who don’t need the full version of Outlook. Outlook Web App is automatically configured for use when you install the Client Access and Mailbox server roles for Exchange Server 2013 . This makes Outlook Web App easy to manage . That said, there are some essential concepts you should know to manage Outlook Web App more effectively, and the following sections explain these concepts .
Getting started with Outlook Web AppOutlook Web App (OWA) is installed automatically when you install the Client Access and Mailbox server roles for Exchange Server 2013 . In your Exchange organization, you must install at least one Client Access server in each Active Directory site contain-ing an Exchange 2013 Mailbox server . If users will be accessing Outlook Web App over the Internet, then one of the Client Access servers you install must be Internet facing . This server accepts connections from external clients on an external URL .
In most cases, you need to open only TCP port 443 on your organization’s firewall to allow users to access mailboxes and public folder data over the web . After that, you simply tell users the URL path that they need to type into their browser’s Address text box in order to access Outlook Web App when they’re off-site .
Outlook Web App for Exchange 2013 has a streamlined interface that is optimized for PCs, tablets, and mobile devices . The browser used to access Outlook Web App determines the experience and supported features . The following two versions are available:
■■ Standard Provides a rich experience with performance that closely approxi-mates Microsoft Outlook, including a folder hierarchy that you can expand or collapse, drag-and-drop functionality, move and copy functionality, and shortcut menus that you can access by pressing and holding or right-clicking . In addition, you can use all of the following features: appearance color schemes, calendar views, file share integration, notifications, personal distribution lists, public folder access, recover deleted items, reminders, search, server-side rules, voice mail options, and WebReady Document Viewing .

Managing client access ChAptEr 6 211
■■ Light Provides a basic experience with a simplified user interface when the user’s browser cannot support the standard version . No Standard-only features are available . In addition, calendar options are limited and messages can be composed only as plain text . OWA shortcut menus are not displayed when you press and hold or right-click . The OWA toolbar has slightly different options, and the Options page itself is simplified as well.
IMPORTANT It’s important to point out that users can no longer specify whether they want to use the light or standard version of OWA, nor can administrators specify whether the light or standard version should be used as part of the Outlook Web App configuration. All users see the standard version when their browser supports it. Additionally, Outlook Web App for Exchange 2013 doesn’t include a spellchecker because this functionality is now being built into web browsers. Internet Explorer 10 and Internet Explorer 11, in addition to some other web browsers, have built-in spell checkers.
Outlook Web App uses HTML 4 .0 and JavaScript [European Computer Manufac-turers Association (ECMA) script] . With desktop and server operating systems that support these browsers, the standard version of Outlook Web App is available with Internet Explorer 9 .0, Internet Explorer 10 .0 or later, Firefox 17 or later, and Chrome 24 or later . With other browsers on desktop and server operating systems, the client functionality remains the same, but some features might not be supported .
The standard version of Outlook Web App also is available for tablets and smartphones running Windows 8 or Windows 8 .1 in addition to iOS 6 or later . With browsers on other tablets and smartphones, the client functionality remains the same, but the browsers likely will display the light version of Outlook Web App .
Outlook Web App for Exchange Server 2013 has many features, including:■■ Apps Users and administrators can add apps to the interface to add
functionality . Several apps are installed and made available to users by default, including the following apps created by Microsoft: Action Items, Bing Maps, Suggested Meetings, and Unsubscribe . Other apps can be added from the Office Store, from a URL, or from a file.
■■ Inbox rules Users can create Inbox rules to automatically sort incoming email into folders . Users create rules on the Inbox Rules tab or by pressing and holding or right-clicking a message on which they want to base a rule, and then selecting Create Rule .
■■ Text messaging notifications Users can set up text messaging notifica-tions to be sent to their mobile devices. Notifications are triggered by calendar events, such as meetings and Inbox rules .
■■ Message attachments Users can attach files, meeting requests, and other messages to messages by tapping or clicking the attach file icon on the toolbar .

ChAptEr 6 Managing client access212
■■ Delivery reports Users can generate delivery reports to search for delivery information about messages they’ve sent or received during the previous two weeks .
■■ Personal groups Users can create personal groups that will appear in their address book .
■■ Public groups Users can create distribution groups that will appear in the global address book for everyone to use .
At the time of this writing, Outlook Web App doesn’t support distribution list moderation options, reading pane, or the ability to reply to email messages sent as attachments . Additionally, Exchange 2013 doesn’t support S/MIME .
Connecting to mailboxes and public folder data over the webWith Outlook Web App, you can easily access mailboxes and public folder data over the web and a corporate intranet . To access a user’s mailbox, type the Exchange Outlook Web App URL into your browser’s Address text box, and then enter the user name and password for the mailbox you want to access . The complete step-by-step procedure is as follows:
1. In a web browser, enter the secure URL for Outlook Web App . If you are outside the corporate network, enter the external URL, such as https://servername .yourdomain.com/owa, where servername is a placeholder for the web server hosted by Exchange Server 2013 and yourdomain.com is a placeholder for your external domain name . For example, if your Client Access server is configured to use mail as the external DNS name and your external domain is cpandl .com, you type https://mail.cpandl.com/owa .The version of Outlook Web App displayed depends on the version of Exchange running on the Mailbox server hosting your personal mailbox . Exchange 2010 runs version 14 and you can specify this version explicitly by appending ?ExchClientVer=14 to the internal or external URL .Exchange 2013 runs version 15 and you can specify this version explicitly by appending ?ExchClientVer=15 to the internal or external URL . For example, if your external URL is https://mail .pocket-consultant .com, you could enter https://mail.pocket-consultant.com/owa?ExchClientVer=15 as the URL .
NOTE By default, you must use httpS to connect. If you don’t, you’ll see an error stating “Access is denied.” Using httpS ensures that data transmitted between the client browser and the server is encrypted and in this way secured.
2. By default, Client Access servers are configured to use Secure HTTP (HTTPS) for Outlook Web App . When you install Exchange Server 2013, a self-signed security certificate is issued for the Client Access server automatically. Because this default certificate is not issued by a trusted certificate authority, you might see a warning that there is a problem with the website’s security certificate. If your browser displays a security alert stating there’s a problem with the site’s security certificate or that the connection is untrusted, proceed anyway .
Managing client access ChAptEr 6 213
• With Internet Explorer, the error states “There’s a problem with this website’s security certificate.” You proceed by selecting the Continue To This Web Site (Not Recommended) link .
• With Google Chrome, the error states “The site’s security certificate is not trusted .” You continue by selecting the Proceed Anyway button .
• With Mozilla Firefox, the error states “This connection is untrusted .” You proceed by selecting I Understand The Risks, and then selecting Add Exception . Finally, in the Add Security Exception dialog box, you select Confirm Security Exception.
3. You’ll see the logon page for Outlook Web App . Enter your user name and password, and then tap or click Sign In . Be sure to specify your user name in DOMAIN\username format . The domain can either be the DNS domain, such as pocket-consultant .com, or the NetBIOS domain name, such as pocket-consulta . For example, the user MikeL could specify his logon name as pocket-consultant .com\mikel or pocket-consulta\mikel . Alternatively, you can enter your email address, which contains your Exchange alias and domain .
4. If you are logging in for the first time, select your preferred display language and time zone, and then tap or click Save .
After a user has accessed his mailbox in OWA, he can access public folders data that is available as well as long as the public folders are hosted on Exchange 2013 . To access public folders, follow these steps:
1. In the left pane of the OWA window, press and hold or right-click Favorites .2. Select Add Public Folder . In the Add Public Folder dialog box, you’ll see a list
of the available top levels to which you have access .3. Select a public folder to add, and then tap or click Add . 4. Repeat steps 1 through 3 to add other public folders .The public folders you’ve added are listed under the Favorites heading in the left
pane . To access a folder and display its contents in the main pane, simply select it in the left pane .
Working with Outlook Web AppAfter you enter the Outlook Web App URL into a browser’s Address text box and log in, you’ll see the view of Outlook Web App compatible with your browser . Figure 6-1 shows the full-featured view of Outlook Web App . Most users see this view of Outlook Web App automatically . If their browsers don’t support a necessary technology for the full-featured view, some features or options won’t be available, or they might see the Light view instead . If they can press and hold or right-click and see a shortcut menu, they have the full-featured view .

ChAptEr 6 Managing client access214
As shown in Figure 6-1, the latest version of Outlook Web App has a toolbar that provides quick access to the following key features:
■■ New Mail Notifications Displays notifications when new email messages are received .
■■ Mail Displays the contents of the user’s mailbox and provides access to public folders .
■■ Calendar Displays the user’s calendar, and allows users to create and share calendar events .
■■ People Provides quick access to address lists and contacts . Any tracked resources, such as conference rooms or projectors, are available as well.
■■ Tasks Displays the user’s to-do tasks and allows users to create new tasks .■■ User Options Displays the user’s name . Provides options for opening
another mailbox and signing out . Also allows you to set the picture for the mailbox .
■■ User Options, More Allows you to quickly view the Mail page or sign out . Available when you are working with the Options pages .
■■ Settings Provides quick access to settings for managing automatic replies, display settings, Outlook apps, offline settings, themes, and the user’s password. Also allows the user to access the Options page to configure Outlook Web App properties or view current configuration details.
■■ Help Shows the help page, which provides information on setting up email, using instant messaging in OWA, creating rules for managing incoming email, adding attachments and meeting requests to email, and more .
■■ Help, More Allows you to disable popup help notifications by tapping or clicking the options button to the right of the Help button while viewing the mailbox . You also can access privacy and copyright information .
FIGURE 6-1 Outlook Web App has nearly all of the features of Microsoft Outlook .

Managing client access ChAptEr 6 215
Outlook Web App can be configured to allow users to connect their OWA account to up to five other email accounts. This allows users to keep send, receive, and read email from other email services . Users also can forward email from their Outlook Web App to another account . If users want to add their contacts from Facebook and LinkedIn to Outlook Web App contacts, Outlook Web App can be configured to do this, too.
Outlook Web App can be configured to allow users to work offline. Users can continue to work when they are disconnected from the Internet when OWA is configured to cache mail items and other information on the users’ computers. When Offline mode is allowed in the OWA configuration, users can enable offline settings by completing the following steps:
1. In Outlook Web App, select Settings, Offline Settings, choose Turn On Offline Access, and then select OK. This starts the Offline Settings Wizard.
NOTE At the time of this writing, Offline Mode is supported by Internet Explorer 10 or later in addition to Chrome 24 or later.
2. Because the cached mail and other information stored on a user’s computer could be accessed by other users of a computer, the wizard prompts to ensure that the current user is the only person who uses the computer and you won’t be able to tap or click Next to continue unless the response is Yes .
3. Read the notification regarding browser storage. As a user’s browser caches the mail data, the size of the browser cache and other related settings might need to be changed . If so, when you tap or click Next to continue, you’ll see a notification regarding these changes and must tap or click Yes to continue with the setup .
4. Tap or click Next twice to complete the setup . Finally, tap or click OK .Currently, a quick and easy way to determine whether a mailbox has already been
configured to use offline mode is not available. That said, the primary offline data for Outlook Web App and the user’s mailbox is cached under %LocalAppData%\Microsoft\Windows\WebCache on the computer. After offline access is enabled, the browser reads data from this cache, allowing users to continue to work with Outlook Web App and access mail, contacts, and other mail data when their computers aren’t connected to the Internet .
If offline mode has been enabled, you can turn this feature off by selecting Settings, choosing Turn Off Offline Access, and then selecting OK. Disabling offline access doesn’t remove the cached data, nor does clearing the browser cache . Because the cached mail data is persistent across browser sessions and independent of the browser’s local cache, you must manually remove this data if you want to be certain the data can no longer be accessed .
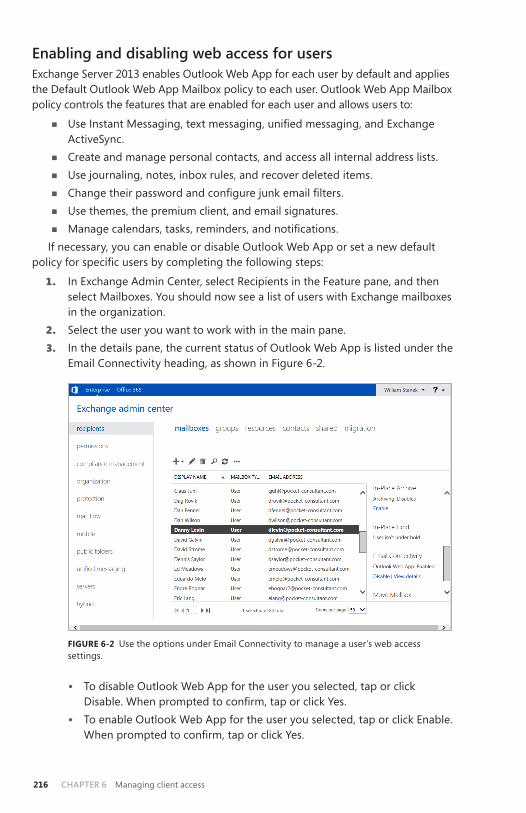
ChAptEr 6 Managing client access216
Enabling and disabling web access for usersExchange Server 2013 enables Outlook Web App for each user by default and applies the Default Outlook Web App Mailbox policy to each user . Outlook Web App Mailbox policy controls the features that are enabled for each user and allows users to:
■■ Use Instant Messaging, text messaging, unified messaging, and Exchange ActiveSync .
■■ Create and manage personal contacts, and access all internal address lists .■■ Use journaling, notes, inbox rules, and recover deleted items.■■ Change their password and configure junk email filters.■■ Use themes, the premium client, and email signatures .■■ Manage calendars, tasks, reminders, and notifications.
If necessary, you can enable or disable Outlook Web App or set a new default policy for specific users by completing the following steps:
1. In Exchange Admin Center, select Recipients in the Feature pane, and then select Mailboxes . You should now see a list of users with Exchange mailboxes in the organization .
2. Select the user you want to work with in the main pane .3. In the details pane, the current status of Outlook Web App is listed under the
Email Connectivity heading, as shown in Figure 6-2 .
FIGURE 6-2 Use the options under Email Connectivity to manage a user’s web access settings .
• To disable Outlook Web App for the user you selected, tap or click Disable. When prompted to confirm, tap or click Yes.
• To enable Outlook Web App for the user you selected, tap or click Enable . When prompted to confirm, tap or click Yes.

Managing client access ChAptEr 6 217
4. To view or change a user’s Outlook Web App mailbox policy, do the following:• Tap or click View Details . In the Outlook Web App Mailbox Policy dialog
box, the currently assigned policy is listed or the policy entry is blank, which means the default policy is currently applied .
• To assign a different policy, tap or click Browse . Select a policy to view its enabled features . When you’ve selected the policy you want to use, tap or click OK, and then tap or click Save .
troubleshooting Outlook Web AppAs discussed in Chapter 3 “Exchange administration essentials” of Exchange Server 2013 Pocket Consultant: Configuration and Clients (Microsoft Press, 2013), some-times users and administrators see a blank page or an error when they try to log on to Outlook Web App . This problem and other connection issues, such as those related to Exchange Control Panel (ECP), Offline Address Book (OAB), Autodiscover, and Windows PowerShell, can occur because of a wide variety of configuration issues, including:
■■ Invalid or missing TCP/IP settings .■■ Corrupted or improperly configured virtual directories.■■ Missing, expired, invalid, or improperly configured SSL certificates.
You resolve these issues by correcting the configuration problem as discussed in that chapter. Beyond configuration issues, Exchange servers can have connectivity, resource, and service issues . You can use Test-OwaConnectivity to test connectivity to Outlook Web Access as part of troubleshooting connectivity; however, this cmdlet is deprecated and will be removed in a future release of Exchange Server .
Exchange 2013 uses Active Monitoring to monitor essential services, connectivity, resources and the overall health of the messaging platform . Active Monitoring is performed by the Microsoft Exchange Health Manager service, which must be running on the Exchange server . As discussed in detail in Chapter 8, “Exchange Server 2013 maintenance, monitoring, and queuing,” Active Monitoring is itself part of the Managed Availability feature .
The overall health of Outlook Web App is tracked by the OWA health set . A health set includes a probe that takes measurements on the server and collects data, and a monitor that uses the collected data to determine whether a resource is healthy . OWA relies on the OwaCtpProbe to measure the health of Outlook Web App and the OwaCtpMonitor to determine the status of Outlook Web App . The OWA health is dependent on Active Directory Domain Services (AD DS) and the Microsoft Exchange Information Store service .
Alerts related to resources are logged in the event logs . You also can manually check the status of resources by using the Get-HealthReport and Get-ServerHealth . Whereas Get-ServerHealth provides the exact state and health of every Exchange resource, monitor, and service, Get-HealthReport returns the state of monitored resources .

ChAptEr 6 Managing client access218
You can quickly check for unhealthy resources by entering the following command:
Get-ServerHealth -Identity ServerID | where ($_.AlertValue -eq 'Unhealthy')
ServerID is the host name or fully-qualified name of the Exchange server to check, such as:
Get-ServerHealth -Identity MailServer21.pocketonconsultant.com | where ($_.AlertValue -eq 'Unhealthy')
Rather than check all resources and health sets, you can explicitly check the status of the OWA-related health sets by using the following command:
Get-ServerHealth ServerID | ?{$_.HealthSetName -match "OWA"}
ServerID is the host name or fully-qualified name of the Exchange server to check, such as:
Get-ServerHealth MailServer21.pocketonconsultant.com | ?{$_.HealthSetName -match "OWA"}
NOTE In the previous example, I’ve used a filter that looks for values that contain a match for OWA rather than a filter that looks for a value that equals OWA. In this way, you get the status of every OWA related health set rather than just the OWA health set.
As discussed in Chapter 1, “Microsoft Exchange organizations: the essentials,” Client Access servers use IIS for front-end services, such as authentication and proxying, whereas Mailbox servers use IIS for back-end processing . On Client Access servers, you’ll find front-end apps for OWA, ECP, Windows PowerShell, OAB, and Autodiscover apps are configured on the default website. On Mailbox servers, you’ll find back-end apps for OWA, ECP, Windows PowerShell, OAB, and Autodiscover are configured on an Exchange Back End website.
If the OWA health set reports an unhealthy status, an issue is present that might pre vent users from accessing their mailboxes in Outlook Web App . Such issues include:
■■ The OWA application pool is not responding on the Client Access server providing front-end proxy services .
■■ The OWA application pool is not responding on the Mailbox server providing back-end services .
■■ Network issues are preventing the Client Access server from connecting to the Mailbox server or a domain controller .
■■ A domain controller or the Microsoft Exchange Information Store service is not responding .
■■ The user’s mailbox database is dismounted or otherwise inaccessible .■■ The credentials for the monitoring account are incorrect .
Some of these problems can be resolved automatically by the responder engine, which is another Managed Availability component . When a problem exists with application pools or services on Exchange servers, the responder engine attempts to
Managing client access ChAptEr 6 219
recover the resource by restarting the application pool or service that is causing the problem. The problem identification and recovery process can take several minutes. If you notice a problem with Outlook Web App that you suspect is related to application pools or services, you can, of course, perform the restart procedures yourself to try to restore access more quickly to Outlook Web App .
OWA .Proxy and OWA .Protocol also are related health sets . OWA .Proxy relies on OwaProxyTestProbe, OWAAnonymousCalendarProblem, and OwaProxyTestMonitor to track the status of proxy services and calendaring features . OWA .Protocol relies on:
■■ OwaSelfTestProbe and the OwaSelfTestMonitor . OwaSelfTestProbe per- forms connectivity tests by sending an HTTP request to https://localhost: 444/owa/exhealth.check . If the probe gets back a status code of 200 OK, the MSExchangeOWAAppPool is responding . This probe doesn’t depend on any other Exchange component .
■■ OwaDeepTestProbe and OwaDeepTestMontor . OwaDeepTestProbe checks each Mailbox database on the server to ensure that mailbox users can log on to the server using Outlook Web Access . This probe depends on Active Directory Domain Services for authentication and the Microsoft Exchange Information Store for mailbox access .
As with the OWA health set, an unhealthy status for OWA .Proxy or OWA .Protocol means an issue exists that might prevent users from accessing their mailboxes in Outlook Web App . The common issues for the OWA .Protocol health set are the same as those for the OWA health set . With OWA .Proxy, common issues may be related to the OWA application pool not responding on the Client Access server providing front-end proxy services, a domain controller not responding, or the credentials for the monitoring account being incorrect .
You can diagnose a problem with OWA by using Get-HealthReport to check the status of an OWA-related health set . If the problem you are experiencing with Outlook Web App isn’t a configuration issue, use the following techniques to try to resolve the problem while verifying the issue still exists each time you take a corrective action:
1. Try to isolate the problem to a specific server by running a health check for each server . If OWA .Proxy or OWA .Protocol for a particular server has an Unhealthy status, you’ve likely isolated the problem and identified the server experiencing the problem and can skip steps 2 and 3 .
2. If you are unable to isolate the problem to a specific server or servers, try to access and log on to Outlook Web App by using the URL for a specific Client Access server . If this fails, try accessing and logging on to a different Client Access server to help you verify whether the problem is with a particular Client Access server or a particular Mailbox server . Remember that the Mail box server used in the one that contains the mailbox database where the mailbox for the user is stored .
3. Using the Services console, verify that all essential Exchange services are running on the Client Access and Mailbox servers . If an essential service isn’t running, select it, and then tap or click Start .
ChAptEr 6 Managing client access220
4. Verify network connectivity between the Client Access servers and the Mailbox servers . One way to do this is to log on to each server and try to ping the other servers . If you correct a connectivity issue, check to see if the OWA issue is resolved .
5. In IIS Manager, connect to the server that’s reporting the health issue or otherwise experiencing a problem with OWA . Expand the Sites node and verify that the default website or Exchange Back End website is running as appropriate . If a required website isn’t running, tap or click Start in the Actions pane to start it .
6. Under Application Pools, verify that the required application pools have been started . If a required application pool hasn’t been started, select it, and then tap or click Start in the Actions pane . The main application pool for OWA is MSExchangeOWAAppPool . This application pool exists on both the front-end Client Access server and the back-end Mailbox server . If the server has both roles, a single application pool with this name is used for both front-end and back-end services .For calendaring, OWA relies on MSExchangeOWACalendarAppPool . Again, this application pool exists on both the front-end Client Access server and the back-end Mailbox server . If the server has both roles, a single application pool with this name is used for both front-end and back-end services .
REAL WORLD As your messaging environment grows and usage of Outlook Web App increases, you may find that the basic application pool settings for MSExchange OWAAppPool are insufficient. Specifically, if users are getting an HTTP 503 “Service Unavailable” response when they try to connect to OWA, you may need to edit the application pool properties in IIS Manager and increase the queue length so that a greater number of requests can be queued in the application pool. Although slow response times likely can be attributed to connection speed and latency on the network, they might also be because the application pool has to service too many users. If so, you may want to consider configuring the Maximum Worker Processes setting so that multiple worker processes can be used. In both cases, doing so, however, requires that additional system resources (primary memory resources) must be allocated to the application pool.
7. If you suspect an issue with MSExchangeOWAAppPool on the front-end server, the back-end server, or both, select MSExchangeOWACalendarApp-Pool, and then tap or click Recycle in the Actions pane to recycle its work processes .
8. If you suspect an issue with MSExchangeOWACalendarAppPool on the front-end server, the back-end server, or both, select MSExchangeOWA-CalendarAppPool, and then tap or click Recycle in the Actions pane to recycle its worker processes .

Managing client access ChAptEr 6 221
9. If the problem isn’t resolved yet, restart the website where the problem is occurring or the IIS itself . To restart a website, select the website in IIS Manager and then select Restart in the Actions pane . To restart IIS, select the server node in IIS Manager, and then tap or click Restart in the Actions pane .
10. If the problem still isn’t resolved, restart the server . If restarting the server doesn’t resolve the problem, you likely have a configuration issue that can be resolved as discussed in Chapter 3 of Exchange Server 2013 Pocket Consultant: Configuration and Clients (Microsoft Press, 2013) .
After you complete the troubleshooting, you may want to examine the event logs and try to determine the cause of the problem . You may also want to check Exchange-specific logs, including the connectivity logs and the protocol logs. For more information, see Chapter 8 .
Managing web and mobile access
When you install the Client Access Server or Mailbox Server role on an Exchange server, Outlook Web App and Exchange ActiveSync are automatically configured for use . This makes them fairly easy to manage, but there are some essential concepts you need to know to manage these implementations more effectively . This section explains these concepts .
As you configure web and mobile access, don’t forget that the Client Access infrastructure has two layers:
■■ A front end that you can customize to control the way users access and work with related services and features
■■ A back end that handles the back-end processing but that you only modify to control the options that the front end uses for working with the back-end processes
Thus, although you typically modify front-end virtual directories to customize the environment for users, you rarely modify the back-end virtual directories . For example, when you first install Exchange services, Outlook Web App, Exchange Admin Center, and other essential services can only be accessed by clients on the internal network . To allow external clients to access these services, you must specify an external access URL for Outlook Web App, Exchange Admin Center, and other essential services .
Using Outlook Web App and Exchange ActiveSync with IISIIS handles incoming requests to a website within the context of a web application . A web application is a software program that delivers content to users over HTTP or HTTPS . Each website has a default web application and one or more additional web applications associated with it . The default web application handles incoming requests that you haven’t assigned to other web applications . Additional web applications handle incoming requests that specifically reference the application.
ChAptEr 6 Managing client access222
When you install an Exchange server, virtual directories and web applications are installed to support various Exchange services . Each web application must have a root virtual directory associated with it . The root virtual directory sets the applica-tion’s name and maps the application to the physical directory that contains the application’s content . Typically, the default web application is associated with the root virtual directory of the website and any additional virtual directories you’ve created but haven’t mapped to other applications .
In the default configuration, the default application handles an incoming request for the / directory of a website as well as other named virtual directories . IIS maps references to / and other virtual directories to the physical directory that contains the related content . For the / directory of the default website, the default physical directory is %SystemRoot%/inetpub/wwwroot .
In most cases, you only need to open port 443 on your organization’s firewall to allow users to access Exchange data hosted by IIS . Then you simply tell users the URL that they need to type into their browser’s Address field or in their smart-phone’s browser . Users can then access Outlook Web App or Exchange ActiveSync when they’re off-site . The URLs for Outlook Web App and Exchange ActiveSync are different . The Outlook Web App URL is https://yourserver.yourdomain.com/owa, and the Exchange ActiveSync URL is https://yourserver.yourdomain.com/Microsoft-Server-ActiveSync . Generally, however, the address users enter for both matches the OWA address .
You can configure Outlook Web App and Exchange ActiveSync for single-server and multiserver environments . In a single-server environment, you use one Client Access server for all your web and mobile access needs . In a multiple server environ-ment, you could instruct users to access different URLs to access different Client Access servers, or you could use a technique such as Round Robin Domain Name System (DNS) to load-balance between multiple servers automatically while giving all users the same access URLs . However, for optimal scalability and availability, you should configure a Client Access server (CAS) array and then use a software or hardware load balancer .
You can use Outlook Web App and Exchange ActiveSync with firewalls. You configure your network to use a perimeter network with firewalls in front of the designated Client Access servers and then open port 443 to your Client Access servers or to the URL for the CAS array .
Working with virtual directories and web applicationsWhen you install an Exchange server, Exchange Setup installs and configures virtual directories and Web applications for use . The virtual directories and web applica-tions allow authenticated users to access their messaging data from the web . On Client Access servers, you’ll find a default website that provides front-end services. On a Mailbox server, you’ll find an Exchange Back End website that provides back- end services . Apps on the front end have corresponding back-end apps, with connections being proxied from the front end to the back end for processing .
Managing client access ChAptEr 6 223
In the Exchange Management Shell, you can use the Get-OWAVirtualDirectory cmdlet to view information about OWA virtual directories, the New-OWAVirtual-Directory cmdlet to create an OWA directory if one does not exist, the Remove-OWAVirtualDirectory cmdlet to remove an OWA directory, and the Test-OWA-Connectivity cmdlet to test OWA connectivity . There are similar sets of commands for ActiveSync, Autodiscover, ECP, OAB, Windows PowerShell, and web services . Exchange Server automatically configures these directories as appropriate when a server has only the Client Access Server or Mailbox Server role installed .
On the other hand, you’ll typically want to specify whether you want to work with the front-end virtual directory or back-end virtual directory when a server has both roles installed as this will ensure the directory you expect to be configured is the one created or modified. Whether you are working with virtual directories for OWA, Exchange ActiveSync, Autodiscover, ECP, OAB, Windows PowerShell, or web services, the parameter you use to specify explicitly the virtual directory you want to work with is the -Role parameter. Set -Role to ClientAccess when you want to configure the front-end virtual directory on a server with both the Client Access and Mailbox server roles installed. Set -Role to Mailbox when you want to configure the back-end virtual directory on a server with both the Client Access and Mailbox server roles installed .
If you examine the virtual directory structure for the default website or the Exchange Back End website, you’ll find several important virtual directories and web applications, including:
■■ Autodiscover Autodiscover is used to provide the Autodiscover service for all clients. By default, this directory is configured for pass-through authenti-cation and the related app runs within the context of MSExchangeAuto-discoverAppPool. For troubleshooting non-configuration issues, use the Autodiscover, Autodiscover .Proxy, and Autodiscover .Protocol health sets . Check these health sets by using:
Get-ServerHealth ServerId | ?{$_.HealthSetName -match "Autodiscover"}
■■ ECP The Exchange Admin Center (ECP) is used for web-based administra-tion of Exchange. By default, this directory is configured for pass-through authentication and the related app runs within the context of MSExchange-ECPAppPool. For troubleshooting non-configuration issues, use the ECP and ECP .Proxy and OWA .Protocol health sets . Check the ECP health sets by using:
Get-ServerHealth ServerId | ?{$_.HealthSetName -match "ECP"}
■■ EWS Exchange Web Services (EWS) is used to enable applications to interact with Exchange mailboxes and messaging items using HTTPS . By default, this directory is configured for pass-through authentication and the related app runs within the context of MSExchangeServicesAppPool . For troubleshooting non-configuration issues, use the EWS, EWS.Proxy, and EWS.Protocol health sets . Check these health sets by using:
Get-ServerHealth ServerId | ?{$_.HealthSetName -match "EWS"}

ChAptEr 6 Managing client access224
■■ Microsoft-Server-ActiveSync Microsoft-Server-ActiveSync is the directory to which Exchange ActiveSync users connect to access their Exchange data . By default, this directory is configured for pass-through authentication and the related app runs within the context of MSExchangeSyncAppPool . For troubleshooting non-configuration issues, use the ActiveSync, ActiveSync.Proxy and ActiveSync .Protocol health sets . Check these health sets by using:
Get-ServerHealth ServerId | ?{$_.HealthSetName -match "ActiveSync"}
■■ OAB OAB is the directory that provides the offline address book (OAB) to clients. By default, this directory is configured for pass-through authentica-tion and the related app runs within the context of MSExchangeOABApp-Pool. For troubleshooting non-configuration issues, use the OAB and OAB.Proxy health sets . Check these health sets by using:
Get-ServerHealth ServerId | ?{$_.HealthSetName -match "OAB"}
■■ OWA OWA is the directory to which users connect with their web browsers to start an Outlook Web App session. By default, this directory is configured for pass-through authentication and the related app runs within the context of MSExchangeOWAAppPool. For troubleshooting non-configuration issues, use the OWA, OWA .Proxy, and OWA .Protocol health sets . Check these health sets by using:
Get-ServerHealth ServerId | ?{$_.HealthSetName -match "OWA"}
■■ Windows PowerShell Windows PowerShell is the directory to which the Exchange Management tools connect for remote administration . On Client Access servers, the related app runs within the context of MSExchange-PowerShellFrontEndAppPool . On Mailbox servers, the related apps run within the context of MSExchangePower ShellBackEndAppPool . For troubleshooting non-configuration issues, use the RPS and RPS.Proxy health sets. Check these health sets by using:
Get-ServerHealth ServerId | ?{$_.HealthSetName -match "RPS"}
■■ RPC RPC is the directory that provides Remote Procedure Call (RPC) services to clients. By default, this directory is configured for pass-through authentication and the related app runs within the context of MSExchange-RPCProxyAppPool . Whether the RPC virtual directory on the front end connects to the RPC virtual directory or the RPCWithCert virtual directory on the back end depends on whether an SSL certificate is used as part of authentication .
■■ Public Public is the directory to which mailbox users are connected to access the default Public Folders tree . This directory exists only on Mailbox servers and doesn’t have a specifically configured application pool. For troubleshooting non-configuration issues, use the PublicFolders and OWA health sets . Check the PublicFolders health set by using:
Get-ServerHealth ServerId | ?{$_.HealthSetName -eq "PublicFolders"}
Managing client access ChAptEr 6 225
For troubleshooting configuration issues with virtual directories, you might need to remove and recreate the front-end virtual directory first, and then check to see if this resolves the problem before removing and recreating the back-end virtual directory . As an example, if you’ve determined the OWA virtual directory is miscon-figured, you can remove it by using Remove-OwaVirtualDirectory, and then recreate it by using New-OwaVirtualDirectory . You could remove and then recreate the OWA virtual directory from the default website on MailServer21 by using the following commands:
remove-owavirtualdirectory -identity "mailserver21\owa (Exchange Back End)" new-owavirtualdirectory -server mailserver21 -websitename "Exchange Back End"
By default, the New-OwaVirtualDirectory and New-EcpVirtualDirectory com-mands enable basic authentication and forms authentication but do not enable Windows authentication . Because Windows authentication is required for OWA and ECP, you’ll want to use the Set-OwaVirtualDirectory and Set-EcpVirtualDirectory commands to modify the default authentication settings . In the following example, you enable Windows authentication and disable basic and forms authentication:
set-owavirtualdirectory -identity "mailserver21\owa (Exchange Back End)" -WindowsAuthentication $True -Basicauthentication $false -Formsauthentication $false
TIP You can set properties on some or all virtual directories by piping the output of Get-OwaVirtualDirectory to Set-OwaVirtualDirectory. For example, the following command allows users to change their passwords by default for all Outlook Web Access virtual directories:
Get-OwaVirtualDirectory | Set-OwaVirtualDirectory -ChangePassword $true
After you recreate a virtual directory you should restart IIS services . You can do this in IIS Manager or by entering the following command at an elevated command prompt or shell:
iisreset
You can diagnose non-configuration problems with a particular feature as well as any related proxy and protocol features by using Get-HealthReport to check the status of the related health sets . Try to resolve the problem by using the following techniques while verifying the issue still exists each time you take a corrective action:
1. Try to isolate the problem to a specific server by running a health check for the feature on each Exchange server. If you find an Unhealthy status for the feature on a particular server, you’ve likely isolated the problem and identified the server experiencing the problem and can skip steps 2 and 3 .
2. If you are unable to isolate the problem to a specific server or servers, try to log on to OWA or ECP, and then use the feature by using the URL for a specific Client Access server. If this fails, try accessing and log on to a different

ChAptEr 6 Managing client access226
Client Access server . This should help you verify whether the problem is with a particular Client Access server or a particular Mailbox server . Remem-ber that the Mailbox server used is the one that contains the mailbox database where the mailbox for the user is stored .
3. Using the Services console, verify that all essential Exchange services are running on the Client Access and Mailbox servers . If an essential service isn’t running, select it and then tap or click Start .
4. Verify network connectivity between the Client Access servers and the Mailbox servers . One way to do this is to log on to each server and try to ping the other servers . If you correct a connectivity issue, check to see if the issue is resolved . Most features require connectivity to domain controllers .
5. In IIS Manager, connect to the server that’s reporting the health issue or otherwise experiencing a problem with the feature you are troubleshooting . Expand the Sites node and verify that the default website or Exchange Back End website is running as appropriate . If a required website isn’t running, tap or click Start in the Actions pane to start it . This should resolve the problem .
6. Under Application Pools, verify that the required application pools have been started . If a required application pool hasn’t been started, select it and then tap or click Start in the Actions pane .
7. If you suspect an issue with a required application pool on the front-end server, the back-end server, or both, select the application pool and then tap or click Recycle in the Actions pane to recycle its work processes .
8. If the problem isn’t resolved yet, restart the website in which the problem is occurring or the IIS itself . To restart a website, select the website in IIS Man-ager, and then select Restart in the Actions pane . To restart IIS, select the server node in IIS Manager, and then Restart in the Actions pane .
9. If the problem still isn’t resolved, restart the server . If restarting the server doesn’t resolve the problem, you likely have a configuration problem that can be resolved by removing and recreating the related virtual directories .
After you complete the troubleshooting, you may want to examine the event logs and try to determine the cause of the problem . You may also want to check IIS-specific logs. For more information, see Chapter 8.
Enabling and disabling Outlook Web App featuresMicrosoft uses the term segmentation to refer to your ability to enable and disable the various features within Outlook Web App . Segmentation settings applied to the OWA virtual directory on Client Access servers control the features available to users . If a server has multiple OWA virtual directories or you have multiple Client Access servers, you must configure each directory and server separately. Table 6-1 provides a summary of the segmentation features that are enabled by default for use with Outlook Web App .

Managing client access ChAptEr 6 227
TABLE 6-1 An overview of segmentation features
FEATURE WHEN THIS FEATURE IS ENABLED, USERS CAN
All Address Lists View all the available address lists . When this feature is disabled, users can view only the default global address list .
Calendar Access their calendars in Outlook Web App .
Change Password Change their passwords in Outlook Web App .
Contacts Access their contacts in Outlook Web App .
Direct File Access Allow users to open attachments directly .
Email Signature Customize their signatures and include a signature in outgoing messages .
Exchange ActiveSync Remove mobile devices, initiate mobile wipe, view their device passwords, and review their mobile access logs .
Inbox Rules Customize rules in Outlook Web App .
Instant Messaging Access Instant Messaging in Outlook Web App .
Journaling Make the Journal folder visible on Outlook Web App .
Junk Email Filtering Filter junk email by using Outlook Web App.
Notes Access their notes in Outlook Web App .
Premium client Control whether the standard version or light version of Outlook Web App is displayed . (Applies only to Exchange 2010 and earlier .)
Public Folders Browse and read items in public folders by using Outlook Web App .
Recover Deleted Items View items that have been deleted from Deleted Items and choose whether to recover them .
Reminders And Notifications
Receive new email notifications, task reminders, calendar reminders, and automatic folder updates .
Tasks Access their tasks in Outlook Web App .
Text Messaging Send and receive text messages and create text message notifications in Outlook Web App.
Themes Change the color scheme in Outlook Web App .
Unified Messaging Access their voice mail and faxes in Outlook Web App . They can also configure voice mail options.
WebReady Document Viewing
View supported file types in their web browser.

ChAptEr 6 Managing client access228
You manage segmentation features in several ways:■■ In the Exchange Management Shell, you can enable or disable segmentation
features on a per server basis by running the Set-OWAVirtualDirectory cmdlet on Client Access servers .
■■ In Exchange Admin Center and Exchange Management Shell, you can define Outlook Web App policies that enable or disable segmentation features and then apply these policies to users . Settings in Outlook Web App policies override virtual directory settings .
■■ In the Exchange Management Shell, you can enable or disable segmentation features for individual users by using the Set-CASMailbox cmdlet . These settings override settings applied through policies and virtual directories .
To enable or disable segmentation features for a particular virtual directory, complete the following steps:
1. In the Exchange Admin Center, select Servers in the Feature pane, and then select Virtual Directories to view a list of the front-end virtual directories used by Client Access servers in the Exchange organization .
2. Select the OWA virtual directory you want to configure, and then select Edit.3. In the Virtual Directory dialog box, select the Features page as shown in
Figure 6-3 .4. To view all the features you can configure, tap or click More Options. 5. By default all features are enabled . To disable a feature, clear the related
checkbox .
FIGURE 6-3 Control access to Outlook Web App features by using the options provided .

Managing client access ChAptEr 6 229
6. By default, users can view web-ready documents in their browser and open attachments directly whether they are using a public or private computer . As necessary, use the options on the File Access page to change the file access options .
7. Tap or click Save to apply the settings .In the Exchange Admin Center, select Permissions in the Feature pane, and then select Outlook Web App Policies to view the currently defined policies. Select a policy to view its settings in the details pane .
To create an Outlook Web App policy, follow these steps:
1. When you select Outlook Web App Policies in Exchange Admin Center, you’ll see a list of current policies . To create a new policy, tap or click Add .
2. In the Policy Name text box, shown in in Figure 6-4, type a descriptive name for the policy, such as All Permanent Employees .
3. To view all the features you can configure, tap or click More Options. 4. By default all features are enabled . To disable a feature, clear the related
checkbox .5. Tap or click Save to create the policy .
FIGURE 6-4 Clear options that users shouldn’t have access to .
ChAptEr 6 Managing client access230
In Exchange Management Shell, you can create Outlook Web App policies by using New-OwaMailboxPolicy and then set the properties of the policy by using Set-OwaMailboxPolicy . The following example creates a policy called AllUsers and then configures its settings:
New-OwaMailboxPolicy -Name AllUsers Set-OwaMailboxPolicy -Identity AllUsers -AllAddressLists $false -ChangePasswordEnabled $false -AllowOfflineOn "NoComputers" -ContactsEnabled $false -LinkedInEnabled $false -CalendarEnabled $true
Use Get-OwaMailboxPolicy to confirm that the properties of the policy are set as expected . Afterward, you can apply the policy to users by using the -OwaMailbox-Policy property of Set-CASMailbox . Listing 6-1 shows various ways you can apply the policy .
LISTING 6-1 Techniques for applying OWA mailbox policies to mailbox users
Apply the policy to the mailbox user named HenryJ
Set-CASMailboxPolicy -Identity HenryJ -OwaMailboxPolicy "AllUsers"
Apply the policy to every mailbox in the Exchange organization
Get-Mailbox -ResultSize Unlimited | Set-CASMailbox -OwaMailboxPolicy "AllUsers"
Apply the policy to every mailbox in the Sales database
Get-MailboxDatabase "Sales" | Get-Mailbox -ResultSize Unlimited | Set-CASMailbox -OwaMailboxPolicy "AllUsers"
Apply the policy to all mailboxes in every mailbox database on MailboxServer18
Get-Mailbox -Server MailboxServer18 -ResultSize Unlimited | Set-CASMailbox -OwaMailboxPolicy "AllUsers"
Configuring ports, IP addresses, and host names used by websitesEach website hosted by IIS has one or more bindings . A binding is a unique combi-nation of ports, IP addresses, and host names that identifies a website. For unsecure connections, the default port is TCP port 80 . For secure connections, the default port is TCP port 443 . The default IP address setting is to use any available IP address . The default host name is the Client Access server’s DNS name .
Normally, you wouldn’t want to multihome a Client Access server; however, when the server is multihomed, or when you use it to provide Outlook Web App or Exchange ActiveSync services for multiple domains, the default configuration isn’t ideal . On a multihomed server, you’ll usually want messaging protocols to respond only on a specific IP address. To do this, you need to change the default settings. On a server that provides Outlook Web App and Exchange ActiveSync services for multiple domains, you’ll usually want to specify an additional host name for each domain

Managing client access ChAptEr 6 231
When you are working with IIS, you can change the identity of a website by completing the following steps:
1. If you want the website to use a new IP address, you must configure the IP address before trying to specify it on the website .
2. Start IIS Manager . In Server Manager, tap or click Tools, and then select Internet Information Services (IIS) Manager .
NOTE By default, IIS Manager connects to the services running on the local computer. If you want to connect to a different server, select the Start page node in the left pane, and then tap or click the Connect to a Server link to start the Connect to Server Wizard. Follow the prompts to connect to the remote server.
3. In IIS Manager, double-tap or double-click the entry for the server with which you want to work, and then double-tap or double-click Sites .
4. In the left pane, select the website that you want to manage, and then select Bindings on the Actions pane .
5. As Figure 6-5 shows, you can now use the Site Bindings dialog box to config-ure multiple bindings for the website .
FIGURE 6-5 Modify bindings for the website .
6. Use the Site Bindings dialog box to manage the site’s bindings by using the following settings:• Add Adds a new identity . To add a new identity, tap or click Add . In the
Add Site Bindings dialog box, select the binding type, IP address, and TCP port to use . Optionally, type a host header name or select a Secure Sockets Layer (SSL) certificate as appropriate for the binding type. Tap or click OK when you have finished.
• Edit Allows you to edit the currently selected identity . To edit an identity, tap or click the identity, and then tap or click Edit . In the Edit Site Binding dialog box, select an IP address and TCP port to use . Optionally, type a host header name or select an SSL certificate as appropriate for the binding type. Tap or click OK when you have finished.

ChAptEr 6 Managing client access232
• Remove Allows you to remove the currently selected identity . To remove an identity, tap or click the identity, and then tap or click Remove . When prompted to confirm, tap or click Yes.
• Browse Allows you to test an identity . To test an identity, tap or click the identity, and then tap or click Browse . IIS Manager then opens a browser window and connects to the selected binding .
7. Tap or click Close .
Enabling SSL on websitesSSL is a protocol for encrypting data that is transferred between a client and a server . Without SSL, servers pass data in readable, unencrypted text to clients, which could be a security risk in an enterprise environment . With SSL, servers pass data encoded using encryption .
Although websites are configured to use SSL on port 443 automatically, the server won’t use SSL unless you’ve created and installed a valid X.509 certificate. When you install an Exchange server, a default X.509 certificate is created for Exchange Server 2013 and registered with IIS . In IIS Manager, you can view the default X.509 certificate by completing the following steps:
1. Log on locally to the Client Access server . Start IIS Manager . In Server Manager, tap or click Tools, and then select Internet Information Services (IIS) Manager .
2. In IIS Manager, select the server node, and then double-tap or double-click the Server Certificates feature.
3. On the Server Certificates page, you’ll see a list of certificates the web server can use. The default X.509 certificate for Exchange Server has the name Microsoft Exchange. Tap or click the certificate entry, and then tap or click View in the Actions pane to view detailed information regarding the certificate. By default, this certificate is valid for one year from the date you install the server .
For a long-term solution, you need to create a permanent certificate for the server. This certificate can be a certificate assigned by your organization’s certificate authority (CA) or a third-party certificate. To create a certificate for use with Exchange and IIS, use the features provided by the Exchange management tools . In the Exchange Admin Center, you can view available certificates for Exchange servers by selecting Servers in the Feature pane, and then selecting Certificates. Next, on the Select Server list, choose the server you want to work with. You’ll then see a list of available certifi-cates for this server .
You can view the general settings for the certificate by selecting it and then selecting Edit. The subject alternative names associated with the certificate deter-mine the names that can be used when establishing SSL connections . Typically, the subject alternative names include the host name and the fully-qualified domain name of the server (see Figure 6-6) . On the Services page, each selected option represents a service assigned to the certificate. By assigning a service to a certificate, you are allowing the certificate to be used to secure the service. After you are done viewing a certificate’s properties, tap or click Cancel (you don’t want to inadvertently make any changes to a certificate).

Managing client access ChAptEr 6 233
FIGURE 6-6 View the properties of an SSL certificate in Exchange Admin Center .
CAUTION Don’t make any changes to certificates because this could invalidate them. When you are finished viewing a certificate, tap or click Cancel to exit the properties dialog box without saving any changes. The default certificates were created by using the Exchange Management Shell and should only be modified or renewed by using the Exchange Management Shell. the same is true for any other certificate created using the shell.
To request and create a certificate from a certification authority, complete the following steps:
1. In the Exchange Admin Center, select Servers in the Feature pane, and then select Certificates.
2. On the Select Server list, choose the server with which you want to work .3. Tap or click Add to start the New Exchange Certificate Wizard. 4. Select Create A Request to use the wizard to create a certificate request file,
and then tap or click Next .5. Type a descriptive name for the certificate, and then tap or click Next.6. If you want the certificate to be usable for all subdomains of your root
domain, select the Request A Wildcard Certificate checkbox, and then tap or click Next .
7. Tap or click Browse . Choose the server where you want to store the request . Typically, this is the server where you will install the certificate. Tap or click Next .

ChAptEr 6 Managing client access234
8. If you did not choose to create a wildcard certificate, you next need to:a. Review the services that will be authorized to use the certificate and
the associated domains . If you need to make changes to the domain associated with a service, select the entry, and tap or click Edit . In the Edit Domain dialog box, modify the domain entry as appropriate, and then tap or click OK . When you are ready to continue, tap or click Next .
b. Your previous selections set the subject names and subject alternative names for the certificate, which are the domains in which the certificate is authorized for use . Review the domains listed . To set an entry as the common name for the certificate, select the entry and then choose Common Name . If a required entry is missing, use the Add option to add the entry . If a domain should not be listed, select the entry and then choose Remove to delete the entry . To modify an entry, select it and then choose Edit . When you are ready to continue, tap or click Next .
9. Identify your organization by entering the organization name, department name, city, state, and country . These values are all required and must be entered before you can continue . Tap or click Next .
10. Specify the full file path for a network location where the certificate request file can be saved, such as \\MailServer92\Data\CertRequest.req. Tap or click Finish .
Send the certificate request file to a third-party certificate authority or your organization’s CA as appropriate. When you receive the certificate back from the CA, import the certificate. In the Certificates area, you’ll see an entry for the certificate with a status of Pending Request . Select this entry, and then select Complete in the details pane. Next, in the Complete Pending Request dialog box, specify the full file path for a network location where the certificate file is available to be imported, such as \\MailServer92\Data\MyCertificate.cer. Tap or click OK.
If you have a certificate to install but don’t have a pending request, you can import the certificate while working with the Certificates area in the Exchange Admin Center as well . To do this, complete the following steps:
1. Tap or click the More button (which shows three dots), and then select Import Exchange Certificate to start the Import Exchange Certificate Wizard. Use the wizard to import the certificate file.
2. In the Complete Pending Request dialog box, specify the full file path for a network location where the certificate file is available to be imported, such as \\MailServer92\Data\MyCertificate.cer. If the file is password-protected, enter the password . Tap or click Next . Tap or click Add .
3. In the Select A Server dialog box, select a server to which the certificate should be applied, and then tap or click Add . Repeat this process to add additional servers . Tap or click OK .
4. Tap or click Finish to import the certificate.After you’ve installed the certificate, you should test the certificate with an external
client by accessing OWA from a remote computer . Clients won’t automatically trust self-signed certificates or certificates issued by your CA; therefore, you might see an

Managing client access ChAptEr 6 235
error stating that there is a problem with the website’s security certificate. In Internet Explorer, follow these steps to have the client trust the certificate:
1. Tap or click the Continue To This Website link . When you continue to the site, a Certificate Error option appears to the right of the address field.
2. Tap or click the Certificate Error option to display a related error dialog box, and then tap or click View Certificates to display the Certificate dialog box.
3. On the General tab of the Certificate dialog box, you’ll see an error stating the CA Root Certificate isn’t trusted. Note the certificate details.
4. To enable trust, you must install this certificate in the Trusted Root Certification Authorities store on the computer. The browser will then trust the certificate, and you shouldn’t see the certificate error again for this client.
You also can test services supported by the certificate. Test web services by using Test-OutlookWebServices as shown in the following example:
test-outlookwebservices | fl
By default Test-OutlookWebServices, verifies the Availability service, Outlook Anywhere, Offline Address Book, and Unified Messaging. You can test OWA and ECP by using Test-OwaConnectivity and Test-EcpConnectivity respectively .
Another way to test connectivity is to use the Remote Connectivity Analyzer . In a web browser, enter the following URL: https://testexchangeconnectivity.com .
restricting incoming connections and setting time-out valuesYou can control incoming connections to a website in several ways including setting a maximum limit on the bandwidth used, setting a limit on the number of simulta-neous connections, and setting a connection time-out value . However, you typically wouldn’t want to perform any of these actions for an Exchange server or OWA . OWA has its own timers based on whether the end user is on a public/shared or a private computer. These values are fixed and not affected by any restrictions or settings discussed in this section .
Normally, websites do not have maximum bandwidth limits and accept an un - limited number of connections, which is an optimal setting in most environments . However, when you’re trying to prevent the underlying server hardware from becoming overloaded or you want to ensure other websites on the same computer have enough bandwidth, you might want to limit the bandwidth available to the site and the number of simultaneous connections . When either limit is reached, no other clients are permitted to access the server . The clients must wait until the connection load on the server decreases .
The connection time-out value determines when idle user sessions are discon-nected . With the default website, sessions time out after they’ve been idle for 120 seconds (2 minutes) . It’s a sound security practice to disconnect idle sessions and force users to log back on to the server . If you don’t disconnect idle sessions within a reasonable amount of time, unauthorized persons could gain access to your messaging system through a browser window left unattended on a remote terminal .
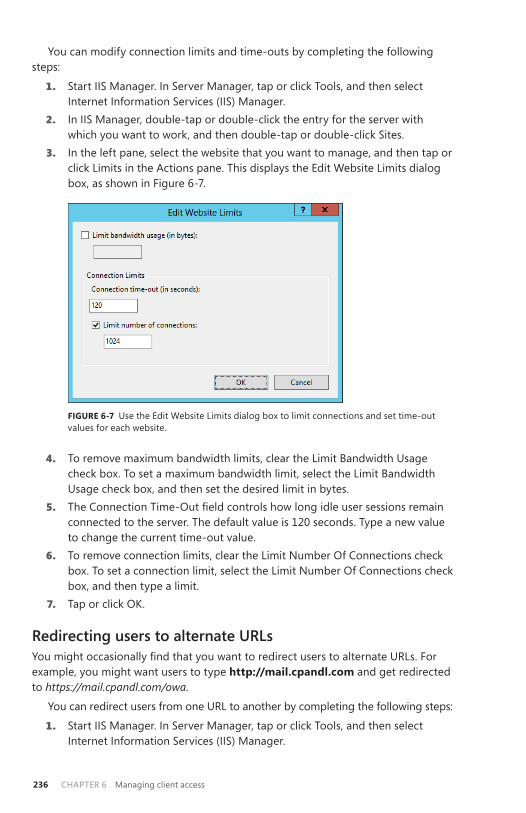
ChAptEr 6 Managing client access236
You can modify connection limits and time-outs by completing the following steps:
1. Start IIS Manager . In Server Manager, tap or click Tools, and then select Internet Information Services (IIS) Manager .
2. In IIS Manager, double-tap or double-click the entry for the server with which you want to work, and then double-tap or double-click Sites .
3. In the left pane, select the website that you want to manage, and then tap or click Limits in the Actions pane . This displays the Edit Website Limits dialog box, as shown in Figure 6-7 .
FIGURE 6-7 Use the Edit Website Limits dialog box to limit connections and set time-out values for each website .
4. To remove maximum bandwidth limits, clear the Limit Bandwidth Usage check box . To set a maximum bandwidth limit, select the Limit Bandwidth Usage check box, and then set the desired limit in bytes .
5. The Connection Time-Out field controls how long idle user sessions remain connected to the server . The default value is 120 seconds . Type a new value to change the current time-out value .
6. To remove connection limits, clear the Limit Number Of Connections check box . To set a connection limit, select the Limit Number Of Connections check box, and then type a limit .
7. Tap or click OK .
redirecting users to alternate UrLsYou might occasionally find that you want to redirect users to alternate URLs. For example, you might want users to type http://mail.cpandl.com and get redirected to https://mail.cpandl.com/owa .
You can redirect users from one URL to another by completing the following steps:
1. Start IIS Manager . In Server Manager, tap or click Tools, and then select Internet Information Services (IIS) Manager .
Managing client access ChAptEr 6 237
2. In IIS Manager, navigate to the level you want to manage . You manage redirec- tion for an entire site at the site level, and redirection for a directory at the directory level .
3. In the main pane, double-tap or double-click the HTTP Redirect feature . This displays the HTTP Redirect page .
NOTE With IIS, http redirection is an optional role service. therefore, if the http redirect feature is not available, you need to install the related role service by using Server Manager’s Add roles And Features Wizard.
4. On the HTTP Redirect page, select Redirect Requests To This Destination .5. In the Redirect Requests To This Destination text box, type the URL to which
the user should be redirected . To redirect the user to a different server, type the full path, starting with http:// or https://, such as https://mailer2.cpandl.com/owa. To redirect the user to a virtual directory on the same server, type a slash mark (/) followed by the directory name, such as /owa. Tap or click Apply to save your settings .
Controlling access to the http serverIIS supports several authentication methods, including the following:
■■ Anonymous authentication With anonymous authentication, IIS auto-matically logs users on with an anonymous or guest account . This allows users to access resources without being prompted for user name and password information .
■■ ASP.NET Impersonation With ASP .NET Impersonation, a managed code application can run either as the user authenticated by IIS or as a designated account that you specify when configuring this mode.
■■ Basic authentication With basic authentication, users are prompted for logon information . When entered, this information is transmitted unen-crypted (base64-encoded) across the network. If you’ve configured secure communications on the server, as described in the section of this chapter titled “Enabling SSL on websites,” you can require that clients use SSL . When you use SSL with basic authentication, the logon information is encrypted before transmission .
■■ Windows authentication With Windows authentication, IIS uses kernel-mode Windows security to validate the user’s identity . Instead of prompting for a user name and password, clients relay the logon credentials that users supply when they log on to Windows . These credentials are fully encrypted without the need for SSL, and they include the user name and password needed to log on to the network .
■■ Digest authentication With digest authentication, user credentials are transmitted securely between clients and servers . Digest authentication is a feature of HTTP 1 .1 and uses a technique that can’t be easily intercepted and decrypted .

ChAptEr 6 Managing client access238
■■ Forms authentication With Forms authentication, you manage client registration and authentication at the application level instead of relying on the authentication mechanisms in IIS . As the mode name implies, users register and provide their credentials using a logon form . By default, this information is passed as cleartext . To avoid this, you should use SSL encryp-tion for the logon page and other internal application pages .
When you install IIS on a Client Access server, you are required to enable basic authentication, digest authentication, and Windows authentication . These authenti-cation methods, along with anonymous authentication, are used to control access to the server’s virtual directories . A virtual directory is simply a folder path that is accessible by a URL . For example, you could create a virtual directory called Data that is physically located on C:\CorpData\Data and accessible by using the URL https://myserver.mydomain.com/Data .
Table 6-2 summarizes the default authentication settings for important virtual directories on a Client Access server . You should rarely change the default settings; however, if your organization has special needs, you can change the authentication settings at the virtual directory level .
TABLE 6-2 Default authentication settings for virtual directories on Client Access servers
VIRTUAL DIRECTORY
ANONYMOUS AUTHENTICATION
BASIC AUTHENTICATION
DIGEST AUTHENTICATION
WINDOWS AUTHENTICATION
Auto- discover
Yes Yes No Yes
ECP Yes Yes No No
EWS Yes No No Yes
MAPI No No No Yes
Microsoft-Server- ActiveSync
No Yes No No
OAB No No No Yes
OWA No Yes No No
PowerShell No No No No
RPC No Yes No Yes
Table 6-3 summarizes the default authentication settings for important virtual directories on a Mailbox server . Again, you should rarely change the default settings .
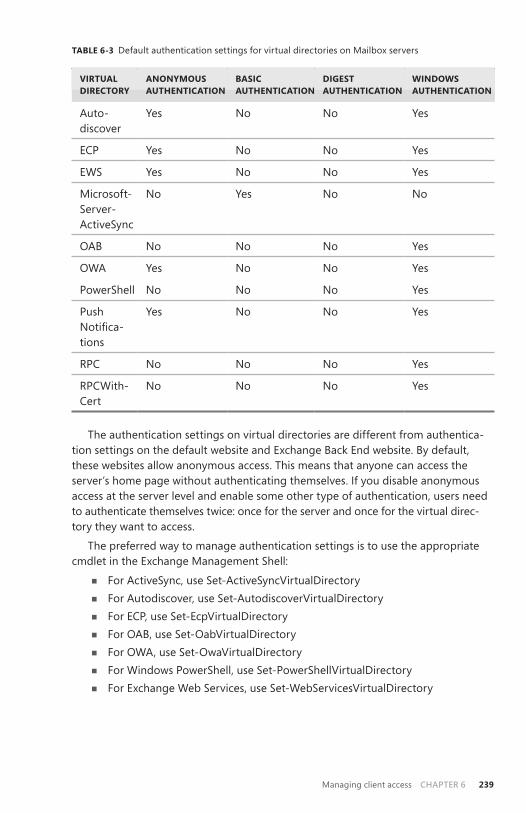
Managing client access ChAptEr 6 239
TABLE 6-3 Default authentication settings for virtual directories on Mailbox servers
VIRTUAL DIRECTORY
ANONYMOUS AUTHENTICATION
BASIC AUTHENTICATION
DIGEST AUTHENTICATION
WINDOWS AUTHENTICATION
Auto-discover
Yes No No Yes
ECP Yes No No Yes
EWS Yes No No Yes
Microsoft-Server- ActiveSync
No Yes No No
OAB No No No Yes
OWA Yes No No Yes
PowerShell No No No Yes
Push Notifica-tions
Yes No No Yes
RPC No No No Yes
RPCWith-Cert
No No No Yes
The authentication settings on virtual directories are different from authentica-tion settings on the default website and Exchange Back End website . By default, these websites allow anonymous access . This means that anyone can access the server’s home page without authenticating themselves . If you disable anonymous access at the server level and enable some other type of authentication, users need to authenticate themselves twice: once for the server and once for the virtual direc - tory they want to access .
The preferred way to manage authentication settings is to use the appropriate cmdlet in the Exchange Management Shell:
■■ For ActiveSync, use Set-ActiveSyncVirtualDirectory■■ For Autodiscover, use Set-AutodiscoverVirtualDirectory■■ For ECP, use Set-EcpVirtualDirectory■■ For OAB, use Set-OabVirtualDirectory■■ For OWA, use Set-OwaVirtualDirectory■■ For Windows PowerShell, use Set-PowerShellVirtualDirectory■■ For Exchange Web Services, use Set-WebServicesVirtualDirectory

ChAptEr 6 Managing client access240
As an example, to disable basic authentication on the default ActiveSync directory, you would enter:
Set-ActiveSyncVirtualDirectory –Identity "Default Web Site\microsoft-server- activesync" –BasicAuthEnabled $false
You can change the authentication settings for an entire site or for a particular virtual directory by completing the following steps:
1. Start IIS Manager . In Server Manager, tap or click Tools, and then select Internet Information Services (IIS) Manager .
2. In IIS Manager, navigate to the level you want to manage, and then double-tap or double-click the Authentication feature . On the Authentication page, shown in Figure 6-8, you should see the available authentication modes . If a mode you want to use is not available, you need to install and enable the related role service by using Server Manager’s Add Role Services Wizard .
FIGURE 6-8 Use the Authentication page to set access control on virtual directories . Virtual directories can have different authentication settings than the website .
3. To enable or disable anonymous access, select Anonymous Authentication, and then tap or click Enable or Disable as appropriate .
NOTE With anonymous access, IIS uses an anonymous user account for access to the server. the anonymous user account is named IUSr_ServerName, such as IUSr_Mailer1. If you use this account, you don’t need to set a password. Instead, let IIS manage the password. If you want to use a different account, tap or click Edit, and then tap or click Set to specify the user name and password for a different account to use for anonymous access.
4. To configure other authentication methods, select the authentication method, and then tap or click Enable or Disable as appropriate . Keep the following in mind:• Disabling basic authentication might prevent some clients from accessing
resources remotely . Clients can log on only when you enable an authenti-cation method that they support .

Managing client access ChAptEr 6 241
• A default domain isn’t set automatically . If you enable Basic authentica-tion, you can choose to set a default domain that should be used when no domain information is supplied during the logon process . Setting the default domain is useful when you want to ensure that clients authenti-cate properly .
• With Basic and Digest authentication, you can optionally specify the realm that can be accessed . Essentially, a realm is the DNS domain name or web address that will use the credentials that have been authenticated against the default domain . If the default domain and realm are set to the same value, the internal Windows domain name might be exposed to external users during the user name and password challenge/response .
• If you enable ASP .NET Impersonation, you can specify the identity to impersonate . By default, IIS uses pass-through authentication, and the identity of the authenticated user is impersonated . You can also specify a particular user if necessary .
• If you enable Forms authentication, you can set the logon URL and cookies settings used for authentication .
throttling Client AccessEvery Client Access server in your organization is subject to the default client throt-tling policy . Client throttling policies are designed to ensure that users aren’t inten-tionally or unintentionally overloading Exchange . Exchange tracks the resources that each user consumes and applies throttling policy to enforce connection bandwidth limits as necessary .
The default policy is set in place when you install your first Exchange 2013 Client Access server . In Exchange 2013, there is a single default throttling policy for the organization . You can customize the default policy or add additional policies as necessary .
To manage throttling policy, you use Exchange Management Shell and the Get-ThrottlingPolicy, Set-ThrottlingPolicy, New-ThrottlingPolicy, and Remove-ThrottlingPolicy cmdlets . Throttling policy applies to:
■■ Anonymous access■■ Exchange Web Services (EWS)■■ IMAP ■■ Microsoft Exchange ActiveSync (EAS)■■ Outlook Web App (OWA)■■ OWA Voicemail■■ POP■■ Windows PowerShell■■ Windows PowerShell Web Services■■ RPC Client Access

ChAptEr 6 Managing client access242
With all of these features except Windows PowerShell, you can specify separate settings for the following:
■■ Maximum concurrency controls the maximum number of connections a user can have at one time, with $null removing the limit . The parameters are AnonymousMaxConcurrency, EASMaxConcurrency, EWSMaxConcurrency, IMAPMaxConcurrency, OWAMaxConcurrency, POPMaxConcurrency, and PowerShellMaxConcurrency, in addition to OWAVoiceMaxConcurrency for OWA voicemail, PsWsMaxConcurrency for Windows PowerShell Web Services, and RcaMaxConcurrency for RPC Client Access .
■■ Maximum burst controls the amount of time in milliseconds that a user can use an elevated amount of resources before being throttled, with $null removing the limit . The parameters are AnonymousMaxBurst, EASMaxBurst, EWSMaxBurst, IMAPMaxBurst, OWAMaxBurst, POPMaxBurst, and PoweShell- MaxBurst, in addition to OWAVoiceMaxBurst for OWA voicemail, and RcaMaxBurst for RPC Client Access .
NOTE Each service also has a cutoff balance, such as AnonymousCutOffBalance, and a corresponding recharge rate, such as Anonymousrechargerate. Both values are set in milliseconds. Cutoff balance controls the resource consumption limits for a service before a user is completely blocked from performing operations on the related component. recharge rate controls the rate at which the cutoff balance is recharged. For example, with anonymous access the cut off is 720 seconds (720000 milliseconds) and the recharge rate is 420 seconds (420000 milliseconds). thus, the maximum amount of time a user can use an anonymous connection is 12 minutes, but after 7 minutes of idle time this cutoff value is fully recharged.
With Windows PowerShell you can specify:■■ Maximum number of concurrent Windows PowerShell sessions per user by
using PowerShellMaxRunspaces .■■ The time period for determining whether the maximum number of run
spaces has been exceeded by using PowerShellMaxRunspacesTimePeriod . ■■ Maximum number of cmdlets that a user can run in a given interval before
their execution is stopped by using PowerShellMaxCmdlets . ■■ The time period for determining whether the maximum number of cmdlets
has been exceeded by using PowerShellMaxCmdletsTimePeriod . ■■ The maximum number of operations allowed to be executed per user by
using the PowerShellMaxCmdletQueueDepth .■■ Maximum number of concurrent Remote PowerShell connections for an
Exchange tenant organization by using PowerShellMaxTenantConcurrency .
NOTE Maximum concurrency controls the number of user sessions. Maximum cmdlets controls the number of cmdlets in each user session. the two values together are affected by the maximum queue depth allowed. For example, if five user sessions are allowed, and each can run four cmdlets in a given interval, the maximum queue depth to allow this is 20 (5 user session x 4 cmdlets each = 20). Any value less than 20 restricts the number of operations that can be performed in this scenario.

Managing client access ChAptEr 6 243
You can get the default throttling policy by entering: Get-ThrottlingPolicy default* or Get-ThrottlingPolicy | where-object {$_.IsDefault -eq $true} . You can get the throttling policy applied to a particular user by entering (Get-Mailbox UserAlias).ThrottlingPolicy where UserAlias is the alias for a user, such as:
(Get-Mailbox jimj).ThrottlingPolicy | Get-ThrottlingPolicy
REAL WORLD You also can use this technique to list the retention policy, address book policy, role assignment policy, or sharing policy associated with a user mailbox (if any). here are examples:
(Get-Mailbox jimj).RetentionPolicy | Get-RetentionPolicy (Get-Mailbox jimj).SharingPolicy | Get-SharingPolicy (Get-Mailbox jimj).AddressBookPolicy | Get-AddressBookPolicy (Get-Mailbox jimj).RoleAssignmentPolicy | Get-RoleAssignmentPolicy
You can create a nondefault throttling policy by using the New-ThrottlingPolicy cmdlet . You can then assign the policy to a mailbox by using the -ThrottlingPolicy parameter of the Set-Mailbox and New-Mailbox cmdlets . In the following example, you apply TempUserThrottlingPolicy to AmyG:
Set-Mailbox –Identity amyg –ThrottlingPolicy (Get-ThrottlingPolicy TempUserThrottlingPolicy)
By using Set-ThrottlingPolicy, you can modify default and nondefault throttling policies . To have a user go back to the default policy, set the -ThrottlingPolicy parameter to $null as shown in this example:
Set-Mailbox –Identity amyg –ThrottlingPolicy $null
You can find all user mailboxes that currently have a particular policy applied by using Get-Mailbox with a where-object filter. In the following example, you look for all user mailboxes that have the TempUserThrottlingPolicy:
$p = Get-ThrottlingPolicy TempUserThrottlingPolicy Get-Mailbox | where-object {$_.ThrottlingPolicy -eq $p.Identity}
To switch multiple users from one policy to another, you can do the following:
$op = Get-ThrottlingPolicy TempUserThrottlingPolicy $ms = Get-Mailbox | where-object {$_.ThrottlingPolicy -eq $op.Identity} $np = Get-ThrottlingPolicy RestrictedUserThrottlingPolicy foreach ($m in $ms) {Set-Mailbox $m.Identity –ThrottlingPolicy $np;}
You can remove nondefault policies that aren’t currently being applied by using Remove-ThrottlingPolicy . Simply enter Remove-ThrottlingPolicy followed by the name of the policy as shown in this example:
Remove-ThrottlingPolicy TempUserThrottlingPolicy
ChAptEr 6 Managing client access244
Starting, stopping, and restarting websitesWebsites run under a server process that you can start, stop, and pause, much like other server processes. For example, if you’re changing the configuration of a website or performing other maintenance tasks, you might need to stop the website, make the changes, and then restart it . When a website is stopped, it doesn’t accept connections from users and can’t be used to deliver or retrieve mail .
The master process for all websites is the World Wide Web Publishing Service . Stopping this service stops all websites using the process, and all connections are disconnected immediately . Starting this service restarts all websites that were running when you stopped the World Wide Web Publishing Service .
You can start, stop, or restart a website by completing the following steps:
1. Start IIS Manager . In Server Manager, tap or click Tools, and then select Internet Information Services (IIS) Manager .
2. In IIS Manager, double-tap or double-click the entry for the server you want to work with, and then double-tap or double-click Sites .
3. Select the website you want to manage . Using the options in the Actions pane, you can now do the following:• Select Start to start the website .• Select Stop to stop the website .• Select Restart to stop and then start the website .
If you suspect there’s a problem with the World Wide Web Publishing Service or other related IIS services, you can use the following technique to restart all IIS services:
1. Start IIS Manager . In Server Manager, tap or click Tools, and then select Internet Information Services (IIS) Manager .
2. Select the entry for the server you want to work with, and then select Restart in the Actions pane .
Configuring URLs and authentication for the OABOutlook 2007 and later clients can retrieve the offline address book (OAB) from a web distribution point . The default distribution point is the OAB virtual directory on the default website . Each distribution point has the following three associated properties:
■■ PollInterval The time interval during which the Microsoft Exchange File Distribution service should poll the generation server for new updates (in minutes)
■■ ExternalUrl The URL from which Outlook clients outside the corporate network can access the OAB
■■ InternalUrl The URL from which Outlook clients inside the corporate network can access the OAB

Managing client access ChAptEr 6 245
You can configure web distribution points by completing the following steps:
1. In the Exchange Admin Center, select Servers in the Feature pane, and then select Virtual Directories to view a list of the front-end virtual directories used by Client Access servers in the Exchange organization .
2. You’ll see an entry for each OAB web distribution point . Select the distribution point you want to configure and then select Edit. This opens the Properties dialog box as shown in Figure 6-9 .
3. Set the desired polling interval using the Polling Interval text box . The default interval is 480 minutes .
4. The current internal and external URLs are listed . If you want to change the current settings, enter the desired internal and external URLs in the text boxes provided . Tap or click Save .
FIGURE 6-9 Configure OAB .
After you make changes to the OAB directory, you should verify that you can still access the OAB. If you can’t access OAB or suspect there is a configuration problem, you can reset the OAB virtual directory by selecting it in the list of virtual directories, selecting Reset, and then confirming the reset by selecting Reset in the warning dialog box . When you reset a virtual directory, Exchange deletes the virtual directory and then recreates it with its default settings . Resetting a directory means any custom settings will be lost .
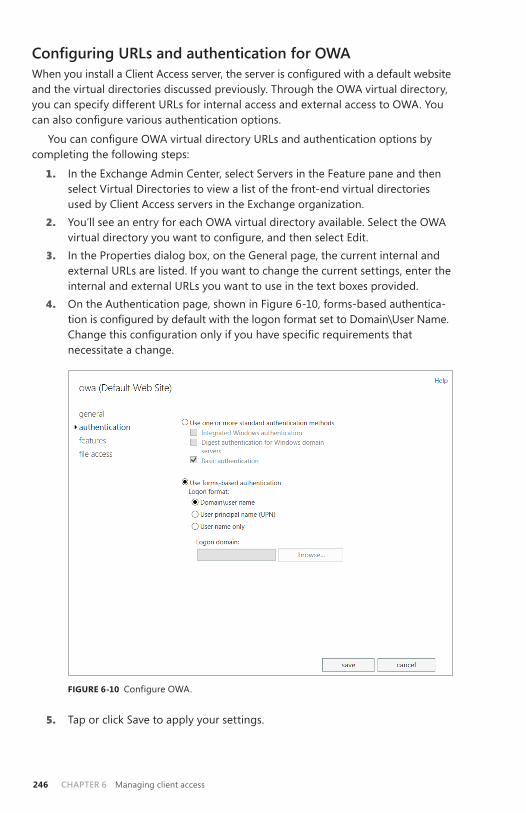
ChAptEr 6 Managing client access246
Configuring URLs and authentication for OWAWhen you install a Client Access server, the server is configured with a default website and the virtual directories discussed previously . Through the OWA virtual directory, you can specify different URLs for internal access and external access to OWA . You can also configure various authentication options.
You can configure OWA virtual directory URLs and authentication options by completing the following steps:
1. In the Exchange Admin Center, select Servers in the Feature pane and then select Virtual Directories to view a list of the front-end virtual directories used by Client Access servers in the Exchange organization .
2. You’ll see an entry for each OWA virtual directory available . Select the OWA virtual directory you want to configure, and then select Edit.
3. In the Properties dialog box, on the General page, the current internal and external URLs are listed . If you want to change the current settings, enter the internal and external URLs you want to use in the text boxes provided .
4. On the Authentication page, shown in Figure 6-10, forms-based authentica-tion is configured by default with the logon format set to Domain\User Name. Change this configuration only if you have specific requirements that necessitate a change .
FIGURE 6-10 Configure OWA .
5. Tap or click Save to apply your settings .
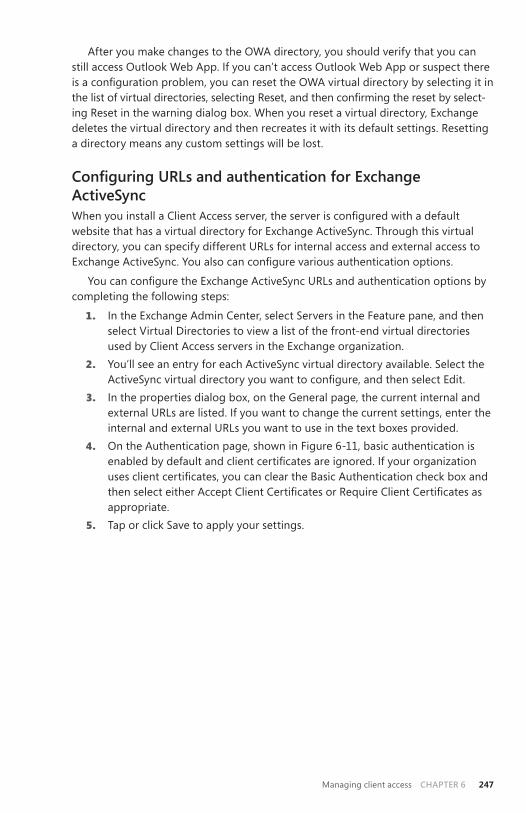
Managing client access ChAptEr 6 247
After you make changes to the OWA directory, you should verify that you can still access Outlook Web App . If you can’t access Outlook Web App or suspect there is a configuration problem, you can reset the OWA virtual directory by selecting it in the list of virtual directories, selecting Reset, and then confirming the reset by select- ing Reset in the warning dialog box . When you reset a virtual directory, Exchange deletes the virtual directory and then recreates it with its default settings . Resetting a directory means any custom settings will be lost .
Configuring URLs and authentication for Exchange ActiveSyncWhen you install a Client Access server, the server is configured with a default website that has a virtual directory for Exchange ActiveSync . Through this virtual directory, you can specify different URLs for internal access and external access to Exchange ActiveSync. You also can configure various authentication options.
You can configure the Exchange ActiveSync URLs and authentication options by completing the following steps:
1. In the Exchange Admin Center, select Servers in the Feature pane, and then select Virtual Directories to view a list of the front-end virtual directories used by Client Access servers in the Exchange organization .
2. You’ll see an entry for each ActiveSync virtual directory available . Select the ActiveSync virtual directory you want to configure, and then select Edit.
3. In the properties dialog box, on the General page, the current internal and external URLs are listed . If you want to change the current settings, enter the internal and external URLs you want to use in the text boxes provided .
4. On the Authentication page, shown in Figure 6-11, basic authentication is enabled by default and client certificates are ignored. If your organization uses client certificates, you can clear the Basic Authentication check box and then select either Accept Client Certificates or Require Client Certificates as appropriate .
5. Tap or click Save to apply your settings .
ChAptEr 6 Managing client access248
FIGURE 6-11 Configure Exchange ActiveSync .
After you make changes to the ActiveSync directory, you should verify that you can still access Exchange ActiveSync . If you can’t access Exchange ActiveSync or suspect there is a configuration problem, you can reset the ActiveSync virtual directory by selecting it in the list of virtual directories, selecting Reset, and then confirming the reset by selecting Reset in the warning dialog box. When you reset a virtual directory, Exchange deletes the virtual directory and then recreates it with its default settings . Resetting a directory means any custom settings will be lost .
Configuring URLs and authentication for ECPWhen you install a Client Access server, the server is configured with a default website and the virtual directories discussed previously . Through the ECP virtual directory, you can specify different URLs for internal and external access to Exchange Admin Center . You can also configure various authentication options.
You can configure ECP virtual directory URLs and authentication options by completing the following steps:
1. In the Exchange Admin Center, select Servers in the Feature pane, and then select Virtual Directories to view a list of the front-end virtual directories used by Client Access servers in the Exchange organization .
2. You’ll see an entry for each ECP virtual directory available . Select the ECP virtual directory you want to configure, and then select Edit.
3. On the General page, shown in Figure 6-12, the current internal and external URLs are listed . If you want to change the current settings, enter the internal and external URLs you want to use in the text boxes provided .

Managing client access ChAptEr 6 249
4. On the Authentication page, basic authentication and forms-based authenti- cation are configured by default. The logon format for forms-based authen-tication is the same as the format used for Outlook Web App . Change this configuration only if you have specific requirements that necessitate a change.
5. Tap or click Save to apply your changes .
FIGURE 6-12 Configure ECP .
After you make changes to the ECP directory, you should verify that you can still access the Exchange Admin Center . If you can’t access Exchange Admin Center or suspect there is a configuration problem, you can reset the ECP virtual directory by selecting it in the list of virtual directories, selecting Reset, and then confirming the reset by selecting Reset in the warning dialog box . When you reset a virtual directory, Exchange deletes the virtual directory and then recreates it with its default settings . Resetting a directory means any custom settings will be lost .
Configuring POP3 and IMAP4
Exchange Server 2013 supports Internet Message Access Protocol 4 (IMAP4) and Post Office Protocol 3 (POP3) . IMAP4 is a protocol for reading mail and accessing public and private folders on remote servers . Clients can log on to an Exchange server and use IMAP4 to download message headers and then read messages individually while online . POP3 is a protocol for retrieving mail on remote servers . Clients can log on to an Exchange server and then use POP3 to download their mail for offline use.

ChAptEr 6 Managing client access250
By default, POP3 (version 3) and IMAP4 (rev 1) are configured for manual startup. Because Outlook Web App, Exchange ActiveSync, and Outlook Anywhere offer so much more than POP and IMAP, they are the preferred way for users to access Exchange Server . If you still have users who want to use POP3 and IMAP4 to access Exchange Server, you can configure this, but you should try to move these users to Outlook Web App, Exchange ActiveSync, or Outlook Anywhere .
As you configure POP3 and IMAP4 access don’t forget that the Client Access infrastructure has two layers:
■■ A front end that you can customize to control the way users access and work with POP3 and IMAP4
■■ A back end that handles the back-end processing but that you only modify to control the options that the front end uses for working with the back-end processes
Thus, although you typically modify the front-end settings for POP3 and IMAP4 to customize the environment for users, you rarely modify the related back-end components .
Enabling the Exchange pOp3 and IMAp4 servicesClients that retrieve mail by using POP3 or IMAP4 send mail by using SMTP . SMTP is the default mail transport in Exchange Server 2013 . To enable POP3 and IMAP4, you must first start the POP3 and IMAP4 services on the Exchange servers that will provide these services. You must then configure these services to start automatically in the future . You should also review the related settings for each service and make changes as necessary to optimize the way these services are used in your Exchange organization .
Because the Client Access infrastructure has two-layers and Client Access servers proxy connections to Mailbox servers, there’s a front-end component and a back-end component for both POP3 and IMAP4 . On a Client Access server, you can enable and configure the POP3 service for automatic startup by completing these steps:
1. Start the Services utility . In Server Manager, tap or click Tools, and then select Services .
2. Press and hold or right-click Microsoft Exchange POP3, and then select Properties .
3. On the General tab, under Startup Type, select Automatic and then tap or click Apply .
4. Under Service Status, tap or click Start, and then tap or click OK .The corresponding service on Mailbox servers is the POP3 Backend service . On a
Mailbox server, you can enable and configure the POP3 Backend service for automatic startup by completing the following steps:
1. Start the Services utility . In Server Manager, tap or click Tools, and then select Services .
2. Press and hold or right-click Microsoft Exchange POP3 Backend, and then select Properties .

Managing client access ChAptEr 6 251
3. On the General tab, under Startup Type, select Automatic and then tap or click Apply .
4. Under Service Status, tap or click Start, and then tap or click OK .If you want to enable IMAP4, configure the Microsoft Exchange IMAP4 service on
your Client Access servers and the Microsoft Exchange IMAP4 Backend service on your Mailbox servers by selecting the respective services in the Service utility and configuring the services according to steps 3 and 4 in the previous procedure.
You can use Set-Service to enable and configure POP3 and IMAP4 as well. Use the –StartupType parameter to set the startup type as Automatic, Manual, or Disabled . Use the –Status parameter to set the status as Running, Paused, or Stopped . The following examples enable POP3 and IMAP4 for automatic startup and then start the services:
Set-Service –Name MSExchangePop3 –StartupType Automatic –Status Running Set-Service –Name MSExchangeImap4 –StartupType Automatic –Status Running
The following examples enable the POP3 and IMAP4 Backend services for automatic startup, and then start the services:
Set-Service –Name MSExchangePop3BE –StartupType Automatic –Status Running Set-Service –Name MSExchangeImap4BE –StartupType Automatic –Status Running
POP3 and IMAP4 have related IP address and TCP port configuration settings. The default IP address setting is to use any available IP address . On a multihomed server, however, you’ll usually want messaging protocols to respond on a specific IP address, in which case you need to change the default setting .
The default port setting depends on the messaging protocol being used and whether SSL is enabled or disabled . For users to be able to retrieve mail using POP3 and IMAP4, you must open the related messaging ports on your organization’s fire walls. Table 6-4 shows the default port settings for key protocols used by Exchange Server 2013 .
TABLE 6-4 Standard and secure port settings for messaging protocols
PROTOCOL DEFAULT PORT DEFAULT SECURE PORT
SMTP 25 587
HTTP 80 443
IMAP4 143 993
POP3 110 995
In the Exchange Management Shell, you can manage POP3 and IMAP4 by using the following cmdlets:
■■ Get-POPSettings Lists POP3 configuration settings■■ Set-POPSettings Configures POP3 settings

ChAptEr 6 Managing client access252
■■ Test-POPConnectivity Tests the POP3 configuration■■ Get-IMAPSettings Lists IMAP4 configuration settings■■ Set-IMAPSettings Configures IMAP4 settings■■ Test-IMAPConnectivity Tests the IMAP4 configuration
Configuring POP3 and IMAP4 bindingsThe bindings for POP3 and IMAP4 use a unique combination of an IP address and a TCP port . To change the IP address or port number for POP3 or IMAP4, complete the following steps:
1. In the Exchange Admin Center, select Servers in the Feature pane, and then select Servers to view a list of servers in the Exchange organization .
2. Select the server with which you want to work, and then select Edit .3. In the Properties dialog box, select the POP3 or IMAP4 page as appropriate
for the service you want to configure, as shown in Figure 6-13.
FIGURE 6-13 View settings and bindings .
4. If you scroll down, you’ll see the currently assigned IP addresses and ports used for TLS or unencrypted connections and SSL connections . The default configuration is as follows: POP3 and IMAP4 are configured to use all available IPv4 and IPv6 addresses, POP3 uses port 110 for TLS or unencrypted connec-tions and port 995 for SSL connections, and IMAP4 uses port 143 for TLS or unencrypted connections and port 993 for SSL connections .
Managing client access ChAptEr 6 253
5. To configure IP addresses and ports for TLS or unencrypted connections, use the following options on the TLS Or Unencrypted Connections panel:• Add Adds a TCP port on a per-IP address basis or all unassigned IP
address basis . Tap or click Add, and then specify the IP address and port you want to use .
• Edit Allows you to edit the IP address and port settings for the currently selected entry in the Address list box .
• Remove Allows you to remove the IP address and port settings for the currently selected entry in the Address list box .
NOTE The IP address/TCP port combination must be unique. You can assign the same port as long as the protocol is configured to use a different IP address. You can also assign the same Ip address and use a different port.
6. To configure IP addresses and ports for secure connections, use the following options on the Secure Sockets Layer (SSL) Connections panel:• Add Adds a TCP port on a per-IP address basis or an all-unassigned IP
address basis . Tap or click Add, and then specify the IP address and port you want to use .
• Edit Allows you to edit the IP address and port settings for the currently selected entry in the Address list box .
• Remove Allows you to remove the IP address and port settings for the currently selected entry in the Address list box .
7. Tap or click Save to apply your settings . When you add new ports, you must open the related messaging ports on your organization’s firewalls.
8. Use the Services utility to restart the Exchange POP3 or IMAP4 service . Restarting the service applies the new settings .
Configuring POP3 and IMAP4 authenticationBy default, POP3 and IMAP4 clients pass connection information and message data through a secure TLS connection . A secure TLS connection requires the Exchange servers to have properly configured SSL certificates with POP3, IMAP4, or both as assigned services .
Secure TLS connections are the best option to use when corporate security is a high priority and secure communication channels are required . That said, you have two other options for configuring communications: plain-text authentication and logon using integrated Windows authentication .
You configure communications by using plain-text authentication logon with or without integrated Windows authentication by completing the following steps:
1. In the Exchange Admin Center, select Servers in the Feature pane, and then select Servers to view a list of servers in the Exchange organization .
2. Select the server with which you want to work, and then select Edit .3. In the Properties dialog box, select the POP3 or IMAP4 page as appropriate
for the service you want to configure.

ChAptEr 6 Managing client access254
4. For Logon Method, do one of the following, and then tap or click Save:• Select Basic Authentication (Plain text) to use unsecure plain text for
communications .• Select Integrated Windows Authentication (Plain text) to use secure
communications with Windows authentication .• Select Secure TLS Connection to use a secure TSL connection for commu-
nications . 5. Use the Services utility to restart the Exchange POP3 or IMAP4 service .
Restarting the service applies the new settings .You can configure an Outlook client to use TLS by completing the following steps:
1. Do one of the following:• In Outlook 2007, select Account Settings on the Tools menu . • In Microsoft Office 2010, tap or click the Office button, tap or click
Account Settings, and then select the Account Settings option .• In Office 2013, tap or click the File tab. Next, select the Account Settings
option and then select Account Settings .2. In the Account Settings dialog box, select the POP3/IMAP4 account, and
then tap or click Change .3. In the Change E-Mail Account dialog box, tap or click More Settings .4. On the Advanced tab in the Internet E-Mail Settings dialog box, select TLS
or Auto as the type of encrypted connection .5. Tap or click OK . Tap or click Next, and then tap or click Finish . Tap or click
Close .
Configuring connection settings for POP3 and IMAP4You can control incoming connections to POP3 and IMAP4 in two ways . You can set a limit on the number of simultaneous connections, and you can set a connection time-out value .
POP3 and IMAP4 normally accept a maximum of 2,147,483,467 connections each and a maximum of 16 connections from a single user, and in most environments these are acceptable settings . However, when you’re trying to prevent the underly-ing server hardware from becoming overloaded or you want to ensure resources are available for other features, you might want to restrict the number of simultaneous connections to a much smaller value . When the limit is reached, no other clients are permitted to access the server . The clients must wait until the connection load on the server decreases .
The connection time-out value determines when idle connections are discon-nected . Normally, unauthenticated connections time out after they’ve been idle for 60 seconds and authenticated connections time out after they’ve been idle for 1,800
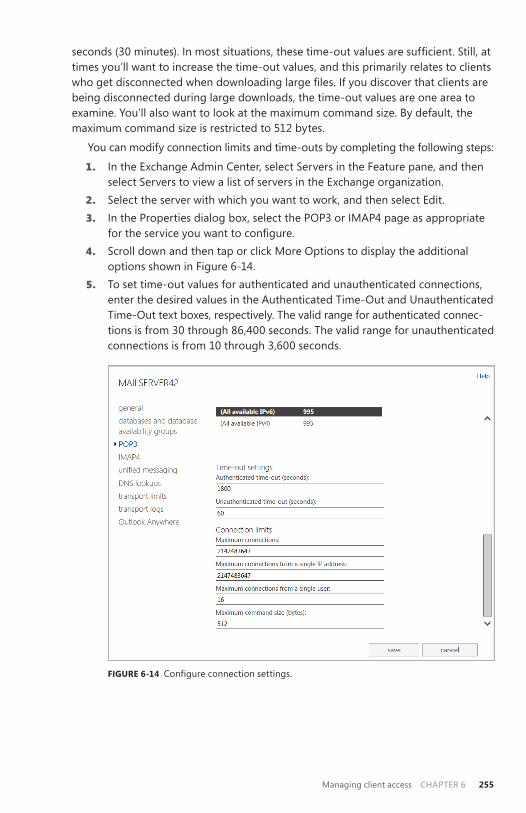
Managing client access ChAptEr 6 255
seconds (30 minutes). In most situations, these time-out values are sufficient. Still, at times you’ll want to increase the time-out values, and this primarily relates to clients who get disconnected when downloading large files. If you discover that clients are being disconnected during large downloads, the time-out values are one area to examine . You’ll also want to look at the maximum command size . By default, the maximum command size is restricted to 512 bytes .
You can modify connection limits and time-outs by completing the following steps:
1. In the Exchange Admin Center, select Servers in the Feature pane, and then select Servers to view a list of servers in the Exchange organization .
2. Select the server with which you want to work, and then select Edit .3. In the Properties dialog box, select the POP3 or IMAP4 page as appropriate
for the service you want to configure.4. Scroll down and then tap or click More Options to display the additional
options shown in Figure 6-14 .5. To set time-out values for authenticated and unauthenticated connections,
enter the desired values in the Authenticated Time-Out and Unauthenticated Time-Out text boxes, respectively . The valid range for authenticated connec-tions is from 30 through 86,400 seconds . The valid range for unauthenticated connections is from 10 through 3,600 seconds .
FIGURE 6-14 Configure connection settings .
ChAptEr 6 Managing client access256
6. To set connection limits, enter the desired limits in the text boxes on the Connection Limits panel . The valid input range for maximum connections is from 1 through 2,147,483,467 . The valid input range for maximum connec-tions from a single IP address is from 1 through 2,147,483,467 . The valid input range for maximum connections from a single user is from 1 through 2,147,483,467 . The valid input range for maximum command size is from 40 through 1,024 bytes .
7. Tap or click Save to apply your settings . Use the Services utility to restart the Exchange POP3 or IMAP4 service . Restarting the service applies the new settings .
Configuring message retrieval settings for POP3 and IMAP4Message retrieval settings for POP3 and IMAP4 control the following options:
■■ Message formatting Message format options allow you to set rules that POP3 and IMAP4 use to format messages before clients read them . By default, when POP3 or IMAP4 clients retrieve messages, the message body is converted to the best format for the client and message attachments are identified with a Multipurpose Internet Mail Extensions (MIME) content type based on the attachment’s file extension. You can change this behavior by applying new message MIME formatting rules . Message MIME formatting rules determine the formatting for elements in the body of a message . Message bodies can be formatted as plain text, HTML, HTML and alternative text, enriched text, enriched text and alternative text, or Outlook rich-text format (also known as TNEF) .
■■ Message sort order Message sort order options allow you to control the time sorting of messages during new message retrieval . By default, POP3 sorts messages in ascending order according to the time/date stamp . This ensures that the most recent messages are listed first. You can also sort messages by descending order, which places newer messages lower in the message list .
You can modify message retrieval settings by completing the following steps:
1. In the Exchange Admin Center, select Servers in the Feature pane, and then select Servers to view a list of servers in the Exchange organization .
2. Select the server with which you want to work, and then select Edit .3. In the Properties dialog box, select the POP3 or IMAP4 page as appropriate
for the service you want to configure.4. Use the Message MIME Format list to choose the desired body format for
messages . As discussed previously, the options are Text, HTML, HTML And Alternative Text, Enriched Text, Enriched Text And Alternative Text, Best Body Format, or TNEF .
Managing client access ChAptEr 6 257
5. If you are working with POP3, use the Message Sort Order list to specify the default sort order for message retrieval . Select Descending for descending sort order during message retrieval or Ascending for ascending sort order .
6. Tap or click Save to apply your settings . Use the Services utility to restart the Exchange POP3 or IMAP4 service . Restarting the service applies the new settings .
Managing Outlook Anywhere
With Outlook Anywhere, Outlook clients can use RPC over HTTP to connect to their Exchange mailboxes, eliminating the need for virtual private network (VPN) connec-tions. Because this feature is enabled and configured automatically when you install Exchange services, no additional configuration is required. Outlook Anywhere is secure by default, so unauthenticated requests from Outlook clients are blocked from accessing Exchange Server .
Working with Outlook AnywhereThe only requirement for Outlook Anywhere is that Exchange servers have properly configured SSL certificates. Because Outlook Anywhere requests use HTTPS, you must allow port 443 through your firewall. If you already use Outlook Web App with SSL or Exchange ActiveSync with SSL, port 443 should already be open and you do not have to open any additional ports .
As with other services, Outlook Anywhere has front-end components on Client Access servers and back-end components on Mailbox servers. Specifically, Outlook Anywhere uses the RPC virtual directory on Client Access servers and the RPC and RPCWithCert virtual directories on Mailbox servers . To customize the environment for users, you can configure the front-end settings on your Client Access servers.
You can use the Get-OutlookAnywhere cmdlet to list configuration details for Outlook Anywhere . If you use the –Server parameter, you can limit the results to a specific server. If you use the –Identity parameter, you can examine a particular virtual directory on a server . Listing 6-2 provides the syntax, usage, and sample output .
LISTING 6-2 Get-OutlookAnywhere cmdlet syntax and usage
Syntax
Get-OutlookAnywhere [-Server ServerName] [-DomainController DCName] Get-OutlookAnywhere [-Identity VirtualDirId] [-DomainController DCName]
Usage
Get-OutlookAnywhere Get-OutlookAnywhere -Server "MailServer42" Get-OutlookAnywhere -Identity "MailServer42\Rpc (Default Web Site)"

ChAptEr 6 Managing client access258
Output
ServerName : MAILSERVER42 SSLOffloading : True ExternalHostname : InternalHostname : mailserver42.pocket-consultant.com ExternalClientAuthenticationMethod : Negotiate InternalClientAuthenticationMethod : Ntlm IISAuthenticationMethods : {Basic, Ntlm, Negotiate} XropUrl : ExternalClientsRequireSsl : False InternalClientsRequireSsl : False MetabasePath : IIS://MAILSERVER42.pocket-consultant.com/W3SVC/1/ROOT/Rpc Path : C:\Program Files\Microsoft\Exchange Server\V15\FrontEnd\HttpProxy\rpc ExtendedProtectionTokenChecking : None ExtendedProtectionFlags : {} ExtendedProtectionSPNList : {} AdminDisplayVersion : Version 15.0 (Build 620.29) Server : MAILSERVER42 AdminDisplayName : ExchangeVersion : 0.20 (15.0.0.0) Name : Rpc (Default Web Site) DistinguishedName : CN=Rpc (Default Web Site),CN=HTTP,CN=Protocols,CN=MAILSERVER42,CN=Servers,CN=Exchange Administrative Group (FYDIBOHF23SPDLT),CN=Administrative Groups,CN=First Organization,CN=Microsoft Exchange,CN=Services,CN=Configuration, C=pocket-consultant,DC=com Identity : MAILSERVER42\Rpc (Default Web Site) Guid : ObjectCategory : pocket-consultant.com/Configuration/ Schema/ms-Exch-Rpc-Http-Virtual-Directory ObjectClass : {top, msExchVirtualDirectory, msExchRpcHttpVirtualDirectory} WhenChanged : 9/18/2013 7:15:43 PM WhenCreated : 9/18/2013 7:15:43 PM WhenChangedUTC : 9/19/2013 2:15:43 AM WhenCreatedUTC : 9/19/2013 2:15:43 AM OrganizationId : OriginatingServer : CorpServer27.pocket-consultant.com IsValid : True ObjectState : Changed
Configuring URLs and authentication for Outlook AnywhereWhen you install a Client Access server, the server is configured with a default website and the virtual directories discussed previously . Through the RPC virtual directory, you can specify different URLs for internal and external access to Outlook Anywhere. You can also configure various authentication options.

Managing client access ChAptEr 6 259
You can configure RPC virtual directory URLs and authentication options by completing the following steps:
1. In the Exchange Admin Center, select Servers in the Feature pane, and then select Servers to view a list of servers in the Exchange organization .
2. Select the server with which you want to work, and then select Edit .3. In the Properties dialog box, select the Outlook Anywhere page as shown in
Figure 6-15 .
FIGURE 6-15 Configure Outlook Anywhere .
4. The current internal and external URLs are listed . If you want to change the current settings, enter the internal and external URLs you want to use in the text boxes provided .
5. Select an available external authentication method . You can select Basic Authentication, NTLM Authentication, or Negotiate . Although NT LAN Manager (NTLM) authentication is more secure than basic authentication, the most secure option is Negotiate, which configures Outlook Anywhere to use Integrated Windows Authentication .
6. Select the Allow Secure Channel (SSL) Offloading check box only if you have configured an advanced firewall server to work with Exchange 2013 and handle your SSL processing .
7. Tap or click Save to apply your settings .

ChAptEr 6 Managing client access260
If you want to modify the Outlook Anywhere configuration, you can use the Set-OutlookAnywhere cmdlet to do this . Listing 6-3 provides the syntax and usage . The –IISAuthenticationMethods parameter sets the authentication method for the /rpc virtual directory as either Basic, NTLM, or Negotiate and disables all other methods .
LISTING 6-3 Set-OutlookAnywhere cmdlet syntax and usage
Syntax
Set-OutlookAnywhere -Identity VirtualDirId [-DefaultAuthenticationMethod {AuthMethod}] [-ExternalHostName ExternalHostName] [-IISAuthenticationMethods <Basic | NTLM | Negotiate>] [-InternalHostName InternalHostName] [-Name Name] [-SSLOffloading <$true | $false>] {AuthMethod} <Basic | Digest | NTLM | Fba | WindowsIntegrated | LiveIdFba | LiveIdBasic | WSSecurity | Certificate | NegoEx | OAuth | Adfs | Kerberos | Negotiate | LiveIdNegotiate | Misconfigured>
Usage
Set-OutlookAnywhere -Identity "CorpSvr127\Rpc (Default Web Site)" -ExternalHostName "mail.cpandl.com" -InternalHostName "mailserer21.cpandl.com" -ExternalClientAuthenticationMethod "Negotiate" -SSLOffloading $true

261
CHAP TER 7
Managing mobile messaging■■ Mastering mobile device and wireless access essentials 261
■■ Managing Exchange Server features for mobile devices 267
■■ Working with mobile devices and device policies 285
■■ Managing device access 295
In our increasingly connected world, users want to be able to access email, calen-dars, contacts, and scheduled tasks no matter the time or place . With Microsoft
Exchange 2013 and Microsoft Exchange Online, you can make anywhere, anytime access to Exchange data a real possibility . How? Start by using the built-in web and mobile access features that Exchange offers to allow users to connect to Exchange over the Internet and from cellular networks . With on-premises Exchange, web access, mobile access, and secure anywhere access are all implemented as sepa-rate features that are available when you install the Client Access server role for Exchange 2013 . These features include Exchange ActiveSync, Outlook Web App, Outlook Web App for Devices, and Outlook Anywhere . Outlook Anywhere is the default protocol for current versions of Microsoft Outlook . Exchange Active-Sync, Outlook Web App, and Outlook Web App for Devices are also available for Exchange Online .
Mastering mobile device and wireless access essentials
Exchange 2013 and Exchange Online support wireless access for users with many types of mobile devices via Exchange ActiveSync and Outlook Web App for Devices . Exchange ActiveSync allows users to link mobile devices to their Exchange accounts so that Exchange synchronizes mail data with the mobile device . Because mail and other data is stored on the device, users can access their email, calendar, contacts, and scheduled tasks whether they are online or offline.
Outlook Web App for Devices allows users to access Outlook Web App on a tablet or smartphone simply by accessing the app in the device’s browser and log-ging in . Unlike Exchange ActiveSync, Outlook Web App for Devices does not nor-mally store mail and related data in a file cache on a user’s mobile device.

ChAptEr 7 Managing mobile messaging262
Using Exchange ActiveSync and Outlook Web App for DevicesBecause sensitive data might be stored on a user’s mobile device with Exchange ActiveSync, several safeguards are in place to prevent unauthorized access to this data. The first safeguard is a device password, which can be reset remotely by the user or by an administrator . The second safeguard is a remote wipe feature that remotely instructs a mobile device to delete all its Exchange and corporate data . A third safeguard is a data encryption requirement, which can be enabled and enforced .
When you install Exchange 2013 or use Exchange Online, Exchange ActiveSync and Outlook Web App for Devices are automatically configured for use, which makes these features easy to manage . However, there are still some essential concepts you should know to manage them more effectively . This section explains these concepts .
NOTE All devices running Windows phone 8, Windows 8 rt, Windows 8.1 and later have encryption that is enabled by default. As an Exchange administrator, you can fine-tune the mobile access configuration for your organization in many ways, as dis-cussed later in this chapter. At a minimum, you’ll want to ensure that the appropriate level of authentication is applied. You’ll also want to create and apply mobile device mailbox policy and Outlook Web App policy.
Exchange ActiveSync allows users with smartphones and other mobile devices to initiate synchronization with Exchange to keep their data up to date and receive notices from Exchange that trigger synchronization through the Direct Push feature . Direct Push is a key feature about which you probably want to know a bit more . It works like this:
1. The user configures her mobile device to synchronize with Exchange, select-ing specific Exchange folders that she wants to keep up to date.
2. When a new message arrives in a designated sync folder, a control message is sent to the mobile device .
3. The control message initiates a data synchronization session, and the device performs background synchronization with Exchange .
After synchronization, users can then access their data while they are offline. In Exchange 2013, Direct Push is either enabled or disabled as is Exchange ActiveSync itself. Because Direct Push uses HTTPS, TCP port 443 must be open on your firewall between the Internet and the Client Access server to which the user is connecting .
Managing Exchange ActiveSync and Outlook Web App for DevicesWith Exchange Online, Exchange ActiveSync and Outlook Web App for Devices are enabled by default and you cannot change this setting . With Exchange 2013, Exchange ActiveSync is enabled for each user by default, but you can disable Exchange ActiveSync for specific users as necessary.
Managing mobile messaging ChAptEr 7 263
To disable Exchange ActiveSync for specific users, follow these steps:
1. In Exchange Admin Center, select Recipients in the Feature pane, and then select Mailboxes .
2. You should now see a list of users with Exchange mailboxes in the organi-zation . Double-tap or double-click the user’s name to open the Properties dialog box for the user account .
3. On the Mailbox Features page, the enabled mobile and web access features for the user are displayed .• To disable Exchange ActiveSync for this user, under Mobile Devices, select
Disable Exchange ActiveSync, and then tap or click Yes .• To enable Exchange ActiveSync for this user, under Mobile Devices, select
Enable Exchange ActiveSync, and then tap or click Yes .• To disable OWA For Devices for this user, under Mobile Devices, select
Disable OWA For Devices, and then tap or click Yes .• To enable OWA For Devices for this user, under Mobile Devices, select
Enable OWA For Devices, and then tap or click Yes .4. Tap or click Save .
REAL WORLD Exchange ActiveSync notifications are sent over the Internet. The actual process of receiving synchronization requests and sending synchronization notifications is handled by Exchange. Exchange ActiveSync is, in fact, configured as an ASp.NEt application on the web server. For Exchange ActiveSync to work properly, IIS server must be configured properly.
To define organization-wide security and authentication options, you can use mobile device mailbox policies . When you install Exchange 2013 or use Exchange Online, a default mobile device mailbox policy is created . Through mobile device mailbox policy settings, you can precisely control mobile browsing capabilities for all users in the enterprise, including the following:
■■ Whether Apple mobile devices can get push notifications■■ Whether passwords are required, and how passwords must be configured■■ Synchronization settings to include in addition to calendar and email items■■ Permitted devices and device options, such as whether a device can use
Wi-Fi, infrared, Bluetooth, storage cards, or its built-in camera■■ Whether the device, its storage cards, or both must be encrypted
Although you configure many mobile device settings in Exchange Admin Center, you will need to use Exchange Admin Shell to fully customize mobile device options .
Moving from remote mail to Outlook AnywhereTwo additional technologies you can use for mobile access are remote mail and Outlook Anywhere. These technologies require extra configuration for both Outlook clients and Exchange servers . This section discusses Outlook client con-figuration. See Chapter 6, “Managing client access,” for a discussion of Exchange server configuration.

ChAptEr 7 Managing mobile messaging264
Beginning with Outlook 2013 and Exchange Server 2013, Microsoft is moving away from remote mail. Previously, with remote mail you could configure Outlook to connect to Exchange Server using a dial-up connection to your organization’s modem bank . Remote mail was useful in the following scenarios:
■■ Users at a branch office must connect to Exchange Server by means of dial-up connections .
■■ Laptop users want to connect to Exchange Server through dial-up connec-tions when out of the office.
■■ Users working at home need to connect to Exchange Server by means of dial-up connections .
Remote mail is being replaced by Outlook Anywhere, which is a technology that allows users to access Exchange Server over the Internet using Outlook . In current Outlook clients, Outlook Anywhere is the default access technology . With Outlook Anywhere, you don’t need to use a virtual private network (VPN) to securely con-nect Outlook to Exchange Server . Instead of relying on VPN for security, Outlook Anywhere takes advantage of standard Internet security features to ensure that communications are secure .
Outlook Anywhere is a dynamic communication protocol for remotely access-ing Exchange Server using RPC over HTTP, with or without SSL encryption: With RPC over HTTP, remote procedure calls (RPCs) are nested within HTTP packets, which can either be encrypted or not encrypted with SSL, and then transmitted . By add-ing encryption to either technique, you help ensure that data transmitted between Outlook and Exchange Server is protected . Secure communication with SSL is the default configuration for Outlook Anywhere.
Outlook Anywhere is particularly useful in these scenarios:■■ Users at a branch office must connect to Exchange Server over a broadband
connection, such as a digital subscriber line (DSL) or a cable modem, and you don’t have a VPN, or you want to simplify the connection process by elimi-nating the need for a VPN .
■■ Laptop users want to connect to Exchange Server through broadband or T1 connections when out of the office without having to use VPNs.
■■ Users working at home need to connect to Exchange Server by means of broadband connections without having to use a VPN .
Dial-up users can also use Outlook Anywhere . In this case, the users connect to the Internet by using their dial-up connection and then connect to Exchange using Outlook Anywhere .
Enabling Outlook Anywhere requires separate client and server configurations. You work with Outlook Anywhere by following the procedures discussed in the “Managing Outlook Anywhere” section of Chapter 6 . Although Outlook 2013 or later should use Outlook Anywhere by default, Outlook 2007 and Outlook 2010 do not .

Managing mobile messaging ChAptEr 7 265
You can configure Outlook to use Outlook Anywhere by completing the following steps:
1. Exit Outlook . Start the Mail utility . (In Control Panel, tap or click User Accounts, and then tap or click Mail .)
2. In the Mail Setup–Outlook dialog box, tap or click Show Profiles. Then, in the Mail window, tap or click Add .
3. Type the name of the profile, such as Outlook Anywhere, and then tap or click OK . This starts the Add New E-mail Account Wizard .
4. If you’ve properly configured the Autodiscover service, Autodiscover will automatically configure the client for you, and you can skip the rest of this procedure. Otherwise, you need to manually configure settings. Select the Manually Configure Server Settings check box, and then tap or click Next.
5. Select Microsoft Exchange, and then tap or click Next .6. In the Server text box, type the host name of the mail server, such as
mailer1 . You can also enter the FQDN of the mail server, such as mailer1.cpandl.com. Using the fully qualified domain name can help ensure a suc-cessful connection when the mail server is in a different domain or forest .
7. In the User Name text box, enter the user’s domain logon name or domain user name, such as Williams or William Stanek . Tap or click Check Name to confirm that you’ve entered the correct user name for the mailbox. You’ll want to store a local copy of the user’s email on his computer, so make sure that the Use Cached Exchange Mode check box is selected .
8. Tap or click More Settings to display the Microsoft Exchange dialog box .9. With Outlook 2007 or Outlook 2010, you’ll usually want to manually control
the connection state and connect to Exchange only when there is an active connection (meaning when you are online as opposed to when you are offline). On the General tab, select both Manually Control Connection State and Connect With The Network options . If you want the user to be prompted for a connection type, select the Choose Connection Type When Starting check box .
10. By default, data sent between Outlook and Exchange is encrypted . If you don’t want to encrypt message traffic, on the Security tab, under Encryp-tion, clear the Encrypt Data Between Microsoft Office Outlook And Microsoft Exchange .
11. On the Connection tab, select the Connect To Microsoft Exchange Using HTTP check box .
12. Tap or click the Exchange Proxy Settings button to open the Exchange Proxy Settings dialog box, shown in Figure 7-1 .

ChAptEr 7 Managing mobile messaging266
FIGURE 7-1 Connect to the Internet-facing Client Access server .
13. In the Use This URL To Connect To My Proxy Server For Exchange text box, enter the Exchange Outlook Web App URL . Selecting the Connect Using SSL Only check box ensures that the connection to Exchange Server is secure and uses SSL. The Exchange Server must have a properly configured and trusted SSL certificate. If you configure Outlook 2013 while on your corporate net-work, you may find that this option is not selected. Thus, Outlook attempts to connect to Outlook Anywhere using HTTP without SSL .
14. The On Fast Networks and On Slow Networks check boxes allow you to con-figure the protocols used by Outlook Anywhere. When configuring these options, keep the following in mind:• If you select neither check box, Outlook tries to use TCP/IP . Outlook can
switch between TCP/IP and Outlook Anywhere . If you are not connected to the corporate LAN either directly or via a VPN, TPC/IP will fail . I recom-mend only selecting this option when a client will always be on the cor-porate network and when you always want the client to use TCP/IP and SMTP for communications .
• If you select both check boxes, Outlook Anywhere first tries to use RPC over HTTP . If it experiences problems connecting or transmitting, it then tries to use RPC over TCP/IP . Unless appropriate ports are open on the corp orate firewall, RPC over TCP/IP will fail if you are not connected to the corporate LAN either directly or via a VPN . Because you’ve optimized for usage on both fast and slow networks, Outlook initially assumes you’re on a fast network, which allows Outlook to quickly transition from one technology to the other . If Outlook later detects you’re on a slow network, Outlook allows for longer than usual timeouts and latency . Al though this
Managing mobile messaging ChAptEr 7 267
change can slow down the transition from one technology to the other, it does help to ensure that Outlook waits long enough for a response before transitioning . I recommend this setting when you prefer that Outlook connects to Exchange using HTTP over RPC .
• If you select only the Slow Network check box and Outlook Anywhere detects the user is on a slow network, it first tries to use RPC over HTTP and then tries to use RPC over TCP/IP . Because Outlook Anywhere allows for longer than usual timeouts and latency the transition from one to the other can be delayed. The definition of a slow network is configured in Group Policy . By default, a slow network is a network with a connection speed of 256 kilobits per second or less transmission speed . I don’t rec-ommend using only this option unless you know Outlook will always be on a slow network .
• If you select only the Fast Network check box and Outlook Anywhere detects the user is on a fast network, it first tries to use RPC over HTTP and then tries to use RPC over TCP/IP . Because Outlook Anywhere doesn’t allow for longer than usual timeouts and latency, the transition from one to the other is performed as quickly as possible . I don’t recommend using only this option unless you know Outlook will always be on a fast network .
15. NT LAN Manager (NTLM) authentication is the default authentication tech-nique . Using NTLM authentication ensures that the user’s credentials are protected and encrypted when transmitted over the network .
16. After you finish configuring remote mail, tap or click OK twice. In the Add New E-mail Account Wizard, tap or click Next, and then tap or click Finish .
17. In the Mail dialog box, select Prompt For A Profile To Be Used, and then tap or click OK .
Managing Exchange Server features for mobile devices
Mobile access to Exchange Server is supported on smartphones and other mobile devices . Most mobile devices include extensions that permit the use of additional features, including
■■ Autodiscover■■ Direct Push■■ Remote Device Wipe■■ Password Recovery■■ Direct File Access■■ Remote File Access
In Exchange Server, these features are all enabled by default . The sections that follow discuss how these features work and how related options are configured.

ChAptEr 7 Managing mobile messaging268
Using AutodiscoverThe Autodiscover service simplifies the provisioning process for mobile devices and for Outlook 2007 and later clients by returning the required Exchange settings after a user enters his or her email address and password . This provisioning eliminates the need to configure mobile carriers in Exchange Server, in addition to the need to download and install the carriers list on mobile devices .
Understanding AutodiscoverAutodiscover is enabled by default . The Default Web Site associated with a particu-lar Client Access server has an associated Autodiscover virtual directory that handles proxying and authentication for Autodiscover . The Exchange Back End website asso-ciated with the Mailbox server hosting the user’s mailbox has an Associated Auto-discover virtual directory through which devices can be provisioned . These virtual directories handle Autodiscover requests:
■■ Whenever an Outlook client queries for service details■■ Whenever a user account is configured or updated■■ Whenever the network connection changes
Each Client Access server is configured with a service connection point that contains an authoritative list of Autodiscover URLs for the associated Active Directory forest . The Autodiscover service URL for the service connection point is either https://SMTPdomain/autodiscover/autodiscover .xml or https://autodis-cover .SMTPdomain/autodiscover/autodiscover .xml, where SMTPdomain is the name of the SMTP domain to which the client wants to connect, such as Pocket-consultant .com .
CAServerName is the name of a Client Access server in the site to which the cli-ent is connecting . For example, if the user’s email address is tony@contoso .com, the primary SMTP domain address is contoso .com .
When the client connects to Active Directory, the client authenticates to Active Directory by using the user’s credentials and then queries for the available service connection point objects. One service connection point object is created for each Client Access server deployed in the Exchange organization. This object contains a ServiceBindingInfo attribute with the fully qualified domain name of the corre-sponding Client Access server in the form https://ServerFQDN/autodiscover/ autodiscover .xml, where ServerFQDN is the fully qualified name of the Client Access server . After the client obtains and enumerates the service connection point instances, the client connects to the first Client Access server in the enumer-ated list and obtains the profile information needed to connect to the user’s mail-box. This profile is formatted with XML and also includes a list of available Exchange features .

Managing mobile messaging ChAptEr 7 269
Configuring URLs and authentication for AutodiscoverWhen you install a Client Access server, the server is configured with a Default Web Site that has a virtual directory for Autodiscover . Through this virtual directory, you can specify different URLs for internal access and external access to Autodiscover . You also can configure various authentication options.
In the Exchange Admin Center, select Servers in the Feature pane and then select Virtual Directories to view a list of the front-end virtual directories used by Client Access servers in the Exchange organization, which includes an entry for each Auto-discover virtual directory available . If you’ve made any changes to an Autodiscover virtual directory, you should verify that you can still access Autodiscover . If you can’t access Autodiscover or suspect there is a configuration problem, you can reset the Autodiscover virtual directory by selecting it in the list of virtual directories, and then selecting Reset. In the Warning dialog box, enter the full file path to a network share in which a settings file can be created to store the current settings for the Autodiscover virtual directory, such as \\mailserver21\updates\Autodiscoverlog .txt . Finally, confirm that you want to reset the virtual directory by selecting Reset. When you reset a virtual directory, Exchange deletes the virtual directory and then recre-ates it with its default settings . Resetting a directory means any custom settings will be lost . To complete the process, you must run the iisreset /noforce command on the affected server .
IMPORTANT Only front-end virtual directories are listed in Exchange Admin Center and only the settings of front-end virtual directories are modified by the reset. If you also want to reset the corresponding back-end virtual directory after resetting a front-end virtual directory, you must do this in Exchange Management Shell.
In Exchange Management Shell, you have additional management options for the Autodiscover service . To get detailed information about the Autodiscover con-figuration, type the following command:
Get-AutodiscoverVirtualDirectory -Server MyServer | fl
MyServer is the name of the Client Access server you want to examine . Included in the detailed information is the identity of the Autodiscover virtual directory, which you can use with related cmdlets, and the authentication methods enabled for internal and external access. By default, Autodiscover is configured to use Basic authentication, NTLM authentication, integrated Windows authentication, Web Services security, and Outlook Authorization Authentication . By using the Set- AutodiscoverVirtualDirectory cmdlet, you can enable or disable these authentica-tion methods, in addition to digest authentication . You can also set the internal and external URLs for Autodiscover . Neither URL is set by default .

ChAptEr 7 Managing mobile messaging270
By default, only information about the related front-end virtual directories is included . To add information about the related back-end virtual directories, set -ShowMailboxVirtualDirectories to $true . Set -ADPropertiesOnly to $true if you want to only view the properties stored in Active Directory . The following example gets information for all Autodiscover virtual directories in the Exchange organization:
Get-AutodiscoverVirtualDirectory -ShowMailboxVirtualDirectories | fl
To disable Autodiscover, type the following command:
Remove-AutodiscoverVirtualDirectory -Identity ServerName\DirName (WebSiteName)
ServerName is the name of the Client Access server on which this feature should be disabled, DirName is the name of the virtual directory to remove, and WebSiteName is the name of the web site you are configuring, such as:
Remove-AutodiscoverVirtualDirectory –Identity "CorpMailSvr25\Autodiscover (Default Web Site)"
If you later want to enable Autodiscover, you can type the following command:
New-AutodiscoverVirtualDirectory -Identity -Identity "CorpMailSvr25\Autodiscover (Default Web Site)"
MyServer is the name of the Client Access server on which this feature should be enabled for the Default Web Site .
Listings 7-1 to 7-4 provide the full syntax and usage for the Get-Autodiscover-VirtualDirectory, New-AutodiscoverVirtualDirectory, Set-AutodiscoverVirtual-Directory and Remove-AutodiscoverVirtualDirectory cmdlets, respectively .
LISTING 7-1 Get-AutodiscoverVirtualDirectory cmdlet syntax and usage
Syntax
Get-AutodiscoverVirtualDirectory [-Server ServerName | -Identity VirtualDirID] [-ADPropertiesOnly <$true | $false>] [-DomainController DCName] [-ShowMailboxVirtualDirectories <$true | $false>]
Usage
Get-AutodiscoverVirtualDirectory -Identity "CorpMailSvr25\Autodiscover (Default Web Site)"
LISTING 7-2 New-AutodiscoverVirtualDirectory cmdlet syntax and usage
Syntax
New-AutodiscoverVirtualDirectory [-ApplicationRoot RootPath] [-AppPoolId AppPoolIdentity] [-BasicAuthentication <$true | $false>] [-DigestAuthentication <$true | $false>] [-DomainController DCName] [-ExternalURL ExternalURL] [-InternalURL InternalURL] [-OAuthAuthentication <$true | $false>] [-Path FileSystemPath] [-Role <ClientAccess | Mailbox>] [-Server ServerName] [-WebSiteName WebSiteName] [-WindowsAuthentication <$true | $false>] [-WSSecurityAuthentication <$true | $false>]
Managing mobile messaging ChAptEr 7 271
Usage
New-AutodiscoverVirtualDirectory -WebSiteName "Default Web Site" -BasicAuthentication $true –WindowsAuthentication $true -OAuthAuthentication $true –WSSecurityAuthentication $true New-AutodiscoverVirtualDirectory -WebSiteName "Exchange Back End" -BasicAuthentication $true –WindowsAuthentication $true -OAuthAuthentication $true –WSSecurityAuthentication $true -Role Mailbox
LISTING 7-3 Set-AutodiscoverVirtualDirectory cmdlet syntax and usage
Syntax
Set-AutodiscoverVirtualDirectory -Identity DirectoryIdentity [-BasicAuthentication <$true | $false>] [-DigestAuthentication <$true | $false>] [-DomainController DCName] [-ExternalURL ExternalURL] [-InternalURL InternalURL] [-LiveIdBasicAuthentication <$true | $false>] [-LiveIdNegotiateAuthentication <$true | $false>] [-OAuthAuthentication <$true | $false>] [-WindowsAuthentication <$true | $false>] [-WSSecurityAuthentication <$true | $false>]
Usage
Set-AutodiscoverVirtualDirectory -Identity "CorpMailSvr25\Autodiscover(Default Web Site)" -BasicAuthentication $false -DigestAuthentication $false –WindowsAuthentication $true
LISTING 7-4 Remove-AutodiscoverVirtualDirectory cmdlet syntax and usage
Syntax
Remove-AutodiscoverVirtualDirectory -Identity DirectoryIdentity [-DomainController DCName]
Usage
Remove-AutodiscoverVirtualDirectory -Identity "CorpMailSvr25\Autodiscover (Default Web Site)"
Using Direct pushDirect Push automates the synchronization process, enabling a mobile device to make requests to keep itself up to date . When the website used with Exchange ActiveSync has SSL enabled, Direct Push allows a mobile device to issue long-lived Hypertext Transfer Protocol Secure (HTTPS) monitoring requests to Exchange Server . Exchange Server monitors activity in the related user’s mailbox . If new mail arrives or other changes are made to the mailbox—such as modifications to cal-endar or contact items—Exchange sends a response to the mobile device, stating that changes have occurred and that the device should initiate synchronization with Exchange Server . The device then issues a synchronization request . When synchroni-zation is complete, the device issues another long-lived HTTPS monitoring request .

ChAptEr 7 Managing mobile messaging272
Port 443 is the default TCP port used with SSL . For Direct Push to work, port 443 must be opened between the Internet and the organization’s Internet-facing Client Access server or servers. You do not need to open port 443 on your external fire-walls to all of your Client Access servers—only those to which users can establish connections . The Client Access server receiving the request automatically proxies the request so that it can be handled appropriately . If necessary, this can also mean proxying requests between the mobile device and the Client Access server in the user’s home site . A user’s home site is the Active Directory site in which the mailbox server hosting his or her mailbox is located .
TIP On your firewall, Microsoft recommends increasing the maximum time-out for connections to 30 minutes to help optimize the efficiency of Direct Push.
Using remote device wipeAlthough passwords help to protect mobile devices, they don’t prevent access to the device . You can protect the data on mobile devices in several ways . One such way is to apply a mobile device mailbox policy that controls access to the device and encrypts its content . Another way is to have a strict policy that requires users and administrators to remotely wipe lost or stolen devices . A remote device wipe command instructs a mobile device to delete all Exchange and corporate data .
remotely wiping a deviceAn administrator or the owner of the device can prevent the compromising of sensi-tive data by initiating a remote device wipe . After you initiate a remote device wipe and the device receives the request, the device confirms the remote wipe request by sending a confirmation message and then removes all its sensitive data the next time it connects to Exchange Server . Wiping sensitive data should prevent it from being compromised .
REAL WORLD the way remote wipe is implemented depends on the way the related protocol is implemented on the device. Although Exchange 2013 only requires that Exchange and corporate data be removed, most device operating systems wipe all data on the device and then return the device to its factory default condition. A complete wipe can also remove any data stored on any storage card inserted into the device.
All devices running Windows phone 8, Windows 8 rt, Windows 8.1 and later support the remote wipe protocol as implemented for Exchange 2013. When you issue a remote wipe for one of these devices, the wipe only affects Exchange and corporate data. For these devices, client application settings also can determine whether the wipe actually deletes the sensitive data or simply makes it inaccessible. As data on these devices is encrypted by default, any data remaining would be protected by encryption.

Managing mobile messaging ChAptEr 7 273
The easiest way to wipe a device remotely is to have the device owner initiate the wipe using Outlook Web App . When the device acknowledges the request, the user will get a confirmation email. The device owner can wipe a device by following these steps:
1. Open your web browser. In the Address field, type the Outlook Web App URL, such as https://mail.cpandl.com/owa, and then press Enter to access this page .
2. When prompted, provide the logon credentials of the user whose device you want to wipe . Do not provide your administrator credentials .
3. On the Outlook Web App toolbar, tap or click the gear icon (Settings), and then tap or click Options .
4. The left pane of the Options view provides a list of options . Tap or click Phone .
5. The user’s mobile devices are listed in the details pane . Select the device you want to wipe, and then tap or click Wipe Device .
6. Confirm the action when prompted.7. Track the status of the device . When the status changes from Wipe Pending
to Wipe Successful, the device wipe is complete .
NOTE You can use Outlook Web App for remote device wiping only if the user has used the device previously to access Exchange Server and if you have enabled the Segmentation feature of Exchange Active Directory Integration (which is the default configuration).
CAUTION Because wiping a device causes complete data loss, you should do this only when you’ve contacted the user directly (preferably in person) and confirmed that the mobile device has been lost and that he or she understands the consequences of wiping the device. If your organization has a formal policy regarding the wiping of lost devices that might contain sensitive company data, be sure you follow this policy and get any necessary approvals. Keep in mind that although a remote wipe makes it very difficult to retrieve any data from the device, in theory retrieval is possible with sophisticated data recovery tools.
Alternatively, an administrator can log on to Exchange Admin Center and initiate a remote wipe by completing the following steps:
1. In Exchange Admin Center, select Recipients in the Feature pane, and then select Mailboxes .
2. Select the mailbox for the user whose device you want to wipe . Next, in the details pane, under Mobile Devices, tap or click View Details .
3. On the Mobile Device Details page, select the lost device, and then select Wipe Data .
4. Tap or click Save to initiate the remote wipe .5. Track the status of the device . When the status changes from Wipe Pending
to Wipe Successful, the device wipe is complete .

ChAptEr 7 Managing mobile messaging274
In the Exchange Management Shell, you can examine and filter through all of the mobile devices that have linked to Exchange by using Get-MobileDevice . You also can list the mobile devices registered as partners for a user’s mailbox by using the Get-MobileDeviceStatistics cmdlet . In either case, the device identity you want is the DeviceId string . If the user has multiple mobile devices, also be sure to consult the DeviceModel and DeviceOperatorNetwork values .
After you know the mobile device identity, you can issue a remote device wipe command by using the Clear-MobileDevice cmdlet . You then need to confirm that you want to wipe the device when prompted by pressing the Y key. Listings 7-5 through 7-7 provide the syntax and usage for Get-MobileDevice, Get-MobileDeviceStatistics, and Clear-MobileDevice cmdlets, respectively . With Get-MobileDeviceStatistics, you can specify either the unique identity of the remote device or the user mailbox with which you want to work . The –GetMailboxLog parameter retrieves mailbox logs and usage information . Use the –OutputPath parameter to direct the statistics to a specific folder path or the –Notification-EmailAddresses parameter to email the statistics to specified email addresses.
IMPORTANT If you determine that you’ve made a mistake in issuing a remote wipe, you should immediately issue a cancellation request by using the Clear-MobileDevice cmdlet. In this case, set the –Cancel parameter to $true. the remote device processes the cancellation request only if the remote wipe has not yet been initiated.
NOTE Exchange also supports the Get-ActiveSyncDevice, Get-ActiveSyncDevice-Statistics and Clear-ActiveSyncDevice cmdlets, which have similar syntax and options as Get-MobileDevice, Get-MobileDeviceStatistics, and Clear-MobileDevice respectivly. Because the ActiveSyncDevice cmdlets only work with ActiveSync devices and the Mobile Device cmdlets work with all supported devices, I prefer to use the Mobile-Device cmdlets and you probably will too.
LISTING 7-5 Get-MobileDevice cmdlet syntax and usage
Syntax
Get-MobileDevice [-Identity MobileDeviceId] {AddtlParams} Get-MobileDevice -Mailbox MailboxId {AddtlParams} {AddtlParams} [-ActiveSync <$true | $false>] [-DomainController FullyQualifiedName] [-Filter FilterValues] [-Monitoring <$true | $false>] [-Organization OrgId] [-OrganizationalUnit OUId] [-OWAforDevices <$true | $false>] [-ResultSize Size] [-SortBy AttributeName]
Usage
Get-MobileDevice -OrganizationalUnit Sales
Managing mobile messaging ChAptEr 7 275
LISTING 7-6 Get-MobileDeviceStatistics cmdlet syntax and usage
Syntax
Get-MobileDeviceStatistics -Identity MobileDeviceId {AddtlParams} Get-MobileDeviceStatistics -Mailbox MailboxId {AddtlParams} {AddtlParams} [-ActiveSync <$true | $false>] [-DomainController FullyQualifiedName] [-GetMailboxLog <$true | $false>] [-NotificationEmailAddresses email1,email2,...emailN] [-OWAMobileApp <$true | $false>] [-ShowRecoveryPassword <$true | $false>]
Usage
Get-MobileDeviceStatistics –Mailbox "David Pelton"
LISTING 7-7 Clear-MobileDevice cmdlet syntax and usage
Syntax
Clear-MobileDevice -Identity MobileDeviceId [-Cancel <$true | $false>] [-DomainController FullyQualifiedName] [-NotificationEmailAddresses email1,email2,...emailN]
Usage
Clear-MobileDevice –Identity "Mobile_DavidP" Clear-MobileDevice –Identity "Mobile_DavidP" –Cancel $true
reviewing the remote wipe statusWhen you initiate a remote wipe, the mobile device removes all its data the next time it connects to Exchange Server . You can review the remote wipe status by using an alternate syntax for the Get-MobileDeviceStatistics cmdlet . Instead of pass-ing the –Mailbox parameter to the cmdlet, use the Identity parameter to specify the DeviceId string of the device you wiped . The statistics returned will include these output parameters:
■■ DeviceWipeRequestTime The time you requested a remote wipe■■ DeviceWipeSentTime The time the server sent the remote wipe command
to the device ■■ DeviceWipeAckTime The time when the device acknowledged receipt of
the remote wipe commandIf there is a DeviceWipeSentTime time stamp, the device has connected to
Exchange Server and Exchange Server sent the device the remote wipe command . If there is a DeviceWipeAckTime time stamp, the device acknowledged receipt of the remote wipe and has started to wipe its data .
ChAptEr 7 Managing mobile messaging276
Using password recoveryUsers can create passwords for their mobile devices . If a user forgets his password, you can obtain a recovery password that unlocks the device and lets the user cre-ate a new password . The user can also recover his device password by using Outlook Web App .
To use Outlook Web App to recover a user’s device password, complete the fol-lowing steps:
1. Open a web browser. In the Address field, type the Outlook Web App URL, such as https://mail.cpandl.com/owa, and then press Enter to access this page .
2. When prompted, have the user enter her logon credentials or provide the user’s logon credentials . Do not provide your administrator credentials .
3. On the Outlook Web App toolbar, tap or click the gear icon (Settings), and then tap or click Options .
4. The left pane of the Options view provides a list of options . Tap or click Phone .
5. The user’s mobile devices are listed in the details pane . Select the device for which you are recovering the password .
6. Tap or click Display Recovery Password .You also can display the device recovery password by completing the following
steps:
1. In the Exchange Admin Center, select Recipients in the Feature pane, and then select Mailboxes .
2. Select the mailbox for the user whose device you want to wipe . Next, in the details pane, under Mobile Devices, tap or click View Details .
3. The device recovery password is listed .In the Exchange Management Shell, you can display the device recovery pass-
word by using the –ShowRecoveryPassword parameter of the Get-MobileDevice-Statistics cmdlet . Listing 7-8 provides the syntax and usage .

Managing mobile messaging ChAptEr 7 277
LISTING 7-8 Recovering a device password
Syntax
Get-MobileDeviceStatistics -Mailbox MailboxIdentity -ShowRecoveryPassword $true {AddtlParams} Get-MobileDeviceStatistics -Identity MobileDeviceIdentity -ShowRecoveryPassword $true {AddtlParams} {AddtlParams} [-ActiveSync <$true | $false>] [-DomainController FullyQualifiedName] [-GetMailboxLog <$true | $false>] [-NotificationEmailAddresses email1,email2,...emailN] [-OWAforDevices <$true | $false>]
Usage
Get-MobileDeviceStatistics -Mailbox "[email protected]" -ShowRecoveryPassword $true
Configuring direct file accessBy default, Exchange Server 2013 allows users to access files directly through Outlook, Outlook Web App, and related services . This means that users will be able to access files attached to email messages. You can configure how users interact with files by using one of three options in the Exchange Admin Center:
■■ Allow Allows users to access files of the specified types, and sends the users’ browser information that allows the files to be displayed or opened in the proper applications
■■ Block Prevents users from accessing files of the specified types■■ Force Save Forces users to save files of the specified types prior to open-
ing themTable 7-1 lists the file extensions and Multipurpose Internet Mail Extensions
(MIME) values that Exchange Server allows, blocks, or sets to force save by default . These settings are applied to the Outlook Web Access (OWA) virtual directory on Client Access servers . If a server has multiple OWA virtual directories or you have multiple Client Access servers, you must configure each directory and server separately .
NOTE If there are conflicts between the allow, block, and force save lists, the allow list takes precedence, which means that the allow list settings override the block list and the force save list. As updates are applied to Exchange Server, the default lists can change. Be sure to check the currently applied defaults.

ChAptEr 7 Managing mobile messaging278
TABLE 7-1 File extensions and MIME values for direct file access
OPTION FILE NAME EXTENSIONS MIME VALUES
Allow .avi, .bmp, .doc, .docm, .docx, .gif, .jpg, .mp3, .one, .pdf, .png, .ppsm, .ppsx, .ppt, .pptm, .pptx, .pub, .rpmsg, .rtf, .tif, .tiff, .txt, .vdx, .vsd, .vsdm, .vsdx, .vss, .vssm, .vssx, .vst, .vstm, .vstx, .vsx, .vtx, .wav, .wma, .wmv, .xls, .xlsb, .xlsm, .xlsx, .zip
image/bmp, image/gif, image/jpeg, image/png
Block .ade, .adp, .app, .asp, .aspx, .asx, .bas, .bat, .cer, .chm, .cmd, .cnt, .com, .cpl, .crt, .csh, .der, .exe, .fxp, .gadget, .hlp, .hpj, .hta, .htc, .inf, .ins, .isp, .its, .js, .jse, .ksh, .lnk, .mad, .maf, .mag, .mam, .maq, .mar, .mas, .mat, .mau, .mav, .maw, .mda, .mdb, .mde, .mdt, .mdw, .mdz, .mht, .mhtml, .msc, .msh, .msh1, .msh1xml, .msh2, .msh2xml, .mshxml, .msi, .msp, .mst, .ops, .osd, .pcd, .pif, .plg, .prf, .prg, .ps1, .ps1xml, .ps2, .ps2xml, .psc1, .psc2, .pst, .reg, .scf, .scr, .sct, .shb, .shs, .tmp, .url, .vb, .vbe, .vbp, .vbs, .vsmacros, .vsw, .ws, .wsc, .wsf, .wsh, .xml
application/hta, application/javascript, application/msaccess, application/prg, application/x-javascript, application/xml, text/javascript, text/scriplet, text/xml, x-internet-signup
Force Save .dcr, .dir, .spl, .swf Application/futuresplash, Application/octet-stream, Application/x-director, Application/x-shockwave-flash
Exchange Server considers all file extensions and MIME types not listed on the allow, block, or force save list to be unknown files and file types. The default setting for unknown file types is force save.
Based on the user’s selection, the configuration of her network settings, or both, Exchange divides all client connections into one of two classes:
■■ Public or shared computer A public computer is a computer being used on a public network or a computer shared by multiple people .
■■ Private computer A private computer is a computer on a private network that is used by one person .
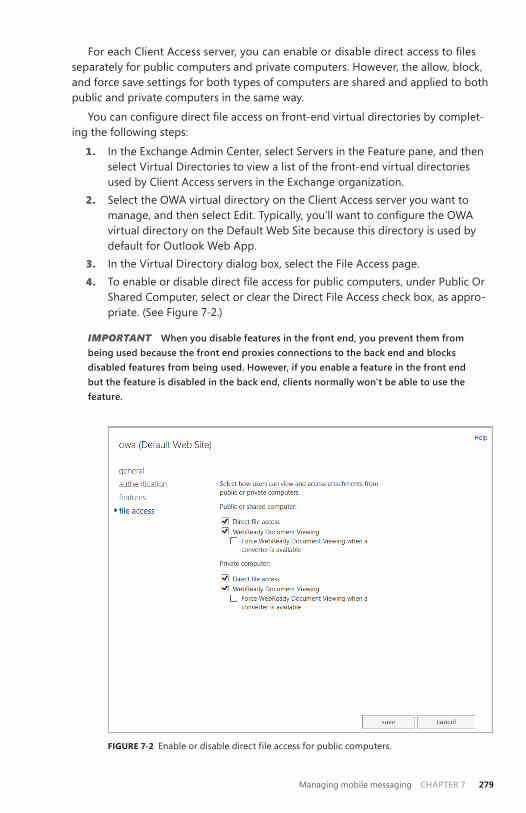
Managing mobile messaging ChAptEr 7 279
For each Client Access server, you can enable or disable direct access to files separately for public computers and private computers . However, the allow, block, and force save settings for both types of computers are shared and applied to both public and private computers in the same way .
You can configure direct file access on front-end virtual directories by complet-ing the following steps:
1. In the Exchange Admin Center, select Servers in the Feature pane, and then select Virtual Directories to view a list of the front-end virtual directories used by Client Access servers in the Exchange organization .
2. Select the OWA virtual directory on the Client Access server you want to manage, and then select Edit. Typically, you’ll want to configure the OWA virtual directory on the Default Web Site because this directory is used by default for Outlook Web App .
3. In the Virtual Directory dialog box, select the File Access page .4. To enable or disable direct file access for public computers, under Public Or
Shared Computer, select or clear the Direct File Access check box, as appro-priate . (See Figure 7-2 .)
IMPORTANT When you disable features in the front end, you prevent them from being used because the front end proxies connections to the back end and blocks disabled features from being used. however, if you enable a feature in the front end but the feature is disabled in the back end, clients normally won't be able to use the feature.
FIGURE 7-2 Enable or disable direct file access for public computers .

ChAptEr 7 Managing mobile messaging280
5. Under Private Computer, you can select or clear the Direct File Access check box to enable or disable direct file access for private computers.
6. Tap or click Save to apply your settings . As necessary, make corresponding changes in the related back-end virtual directory using Exchange Manage-ment Shell .
In the Exchange Management Shell, you can use the Set-OWAVirtualDirectory cmdlet to manage the direct file-access configuration. Use the –Identity parameter to identify the virtual directory with which you want to work, such as:
Set-OWAVirtualDirectory –Identity "Corpsvr127\owa (Default Web Site)"
Then specify how you want to configure direct file access on the front-end and back-end virtual directory, such as:
Set-OWAVirtualDirectory –Identity "Corpsvr127\owa (Default Web Site)" –DirectFileAccessOnPublicComputersEnabled $false –DirectFileAccessOnPrivateComputersEnabled $true Set-OWAVirtualDirectory –Identity "Corpsvr127\owa (Exchange Back End)" –DirectFileAccessOnPublicComputersEnabled $false –DirectFileAccessOnPrivateComputersEnabled $true
If you are unsure of the virtual directory identity value, use the Get-OWAVirtual-Directory cmdlet to retrieve a list of available virtual directories on a named server, as shown in the following example:
Get-OWAVirtualDirectory –Server "Corpsvr127" -ShowMailboxVirtualDirectories
Alternatively, you could get the OWAVirtualDirectory object for both the front end and back end and then set the desired options on both as shown in the follow-ing example:
Get-OWAVirtualDirectory –Server Corpsvr127 -ShowMailboxVirtualDirectories | Set-OWAVirtualDirectory –DirectFileAccessOnPublicComputersEnabled $false –DirectFileAccessOnPrivateComputersEnabled $true
Although the server in this example has both the Client Access Server role and the Mailbox Server role installed, you could just as easily apply the changes to front-end and back-end Exchange servers throughout the organization . If you want to make changes across all servers, however, I recommend adding the -Whatif param-eter to ensure the command is going to work exactly as expected before executing the command a second time without the -Whatif parameter . In the following exam-ple, you disable direct file access on public computers on all front-end and back-end OWA virtual directories:
Get-OWAVirtualDirectory -ShowMailboxVirtualDirectories | Set-OWAVirtualDirectory –DirectFileAccessOnPublicComputersEnabled $false -WhatIf
You configure allowed file types and allowed MIME types by using the -Allowed-FileTypes and -AllowedMIMETypes parameters respectively . As these are multival-ued properties, you must either enter the complete set of allowed values or use a

Managing mobile messaging ChAptEr 7 281
special shorthand to insert into or remove values from these multivalued properties . The shorthand for adding values is:
@{Add="<ValuetoAdd1>","<ValuetoAdd2>"...}
Because you’ll typically want to configure the front-end and back-end virtual directories in the same way, the following example sets the allowed file types on both the front-end and back-end OWA virtual directories:
Get-OWAVirtualDirectory –Server Corpsvr127 -ShowMailboxVirtualDirectories | Set-OWAVirtualDirectory –AllowedFileTypes @{Add=".log",".man"}
In this case, the server has both the Client Access Server role and the Mailbox Server role installed . The shorthand for removing values is:
@{Remove="<ValuetoRemove1>","<ValuetoRemove2>"...}
The following is an example:
Get-OWAVirtualDirectory –Server Corpsvr127 -ShowMailboxVirtualDirectories | Set-OWAVirtualDirectory –AllowedFileTypes @{Remove=".log",".man"}
If you want to add values and remove others, you can do this as well by using the following shorthand:
@{Add="<ValuetoAdd1>","<ValuetoAdd2>"...; Remove="<ValuetoRemove1>","<ValuetoRemove1>"...}
You can confirm that values were added or removed as expected by using Get-OWAVirtualDirectory. Because there are so many allowed file types, you won’t get a complete list of file types if you examine the -AllowedFileTypes property as shown in the following example:
Get-OWAVirtualDirectory –Identity "Corpsvr127\owa (Default Web Site)" | fl name, allowedfiletypes
A workaround to examine all the values of such a property follows:
$vdir = Get-OWAVirtualDirectory –Identity "Corpsvr127\owa (Default Web Site)" $data = $vdir.allowedfiletypes $data | fl *
In this case, you store the virtual directory object in the $vdir variable . Next, you store the values associated with this object’s AllowedFileTypes parameter in the $data variable. Finally, you list each allowed file type.
You can use similar techniques to work with■■ Blocked file types and blocked MIME types The corresponding param-
eters are -BlockedFileTypes and -BlockedMimeTypes respectively . ■■ Forced Save file types and forced save MIME types The correspond-
ing parameters are -ForcedSaveFileTypes and -ForcedSaveMimeTypes respectively .

ChAptEr 7 Managing mobile messaging282
Configuring remote file accessBy default, Exchange Server 2013 allows users to access files remotely through Out-look Web App (OWA) . This means users will be able to access Windows SharePoint Services and Universal Naming Convention (UNC) file shares on SharePoint sites. SharePoint sites consist of Web Parts and Windows ASP .NET–based components that allow users to share documents, tasks, contacts, events, and other information . When you configure UNC file shares on SharePoint sites, you enable users to share folders and files.
You configure remote file access by using configuration options for the Active-Sync virtual directory . The -RemoteDocumentsBlockedServers and -Remote-DocumentsAllowedServers parameters of the Set-ActiveSyncVirtualDirectory cmdlet specify the host names of servers from which clients are denied or allowed access respectively. If there is a conflict between the blocked servers list and the allowed servers list, the block list takes precedence .
Because the -RemoteDocumentsBlockedServers and -RemoteDocumentsAllowed-Servers parameters are multivalued properties, you must either enter the complete set of allowed values or use the special shorthand discussed earlier in this chapter in the “Configuring direct file access” section to insert into or remove values from these multivalued properties . To add a server to the blocked or allowed servers list, use the fully qualified domain name of the server, such as mailsvr83.cpandl.com .
The following example adds two servers to the allowed servers list throughout the Exchange organization:
Get-ActiveSyncVirtualDirectory -ShowMailboxVirtualDirectories | Set-OWAVirtualDirectory –RemoteDocumentsAllowedServers @{Add="mailsvr83.cpandl.com","corpserver18.treyresearch.net"}
Servers that are not listed on either the allow list or the block list are considered to be unknown servers . By default, access to unknown servers is allowed . You can use the -RemoteDocumentsActionForUnknownServers parameter to specify whether to allow or block unknown servers . Set the parameter value to Allow or Block as appro-priate . Here is an example:
Get-ActiveSyncVirtualDirectory -ShowMailboxVirtualDirectories | Set-OWAVirtualDirectory -RemoteDocumentsActionForUnknownServers Block
Users have access only to shares hosted on internal servers . For a server to be considered an internal server, you must tell Exchange about the domain suffixes that should be handled as internal by using the -RemoteDocumentsInternalDomain-Suffix List parameter. This is a multivalued parameter.
To add a domain suffix, specify the fully qualified domain name of the suffix. An example follows:
Get-ActiveSyncVirtualDirectory -ShowMailboxVirtualDirectories | Set-OWAVirtualDirectory -RemoteDocumentsInternalDomainSuffixList @{Add="cpandl.com","treyresearch.net"}

Managing mobile messaging ChAptEr 7 283
To remove a domain suffix, specify the suffix to remove, such as:
Get-ActiveSyncVirtualDirectory -ShowMailboxVirtualDirectories | Set-OWAVirtualDirectory -RemoteDocumentsInternalDomainSuffixList @{Remove="proseware.com","litwareinc.com"}
Using Webready Document ViewingWebReady Document Viewing allows users to view common file types in Outlook Web App without having the applications associated with those file types installed on their computer . WebReady Document Viewing allows users to view the following files:
■■ Adobe PDF documents with the .pdf extension■■ Microsoft Excel spreadsheets with the .xls and .xlsx extensions■■ Text and Microsoft Word documents with the .doc, .docx, .dot, .rtf, and .txt
extensions■■ Microsoft PowerPoint presentations with the .pps, .ppt, and .pptx extensions
For attachments, the following related MIME types are supported, in addition to related open XML formats for presentations, spreadsheets, and word processing documents:
■■ application/msword■■ application/pdf■■ application/vnd .ms-excel■■ application/vnd .ms-powerpoint■■ application/vnd.openxmlformats-officedocument.presentationml.
presentation■■ application/vnd.openxmlformats-officedocument.spreadsheetml.sheet■■ application/vnd.openxmlformats-officedocument.wordprocessingml.
document■■ application/x-msexcel■■ application/x-mspowerpoint
NOTE Webready Document Viewing works by converting documents in supported formats to htML so that they can be viewed as a webpage in Outlook Web App. thus, when an email message has an attachment in a supported format, Webready Docu-ment Viewing allows the document to be viewed without having to first download the document to the user’s computer or open a helper application.
When there are conflicting settings between the direct file, remote file, and WebReady Document Viewing settings, you can force clients to use WebReady Document Viewing first, if you want. This means that the documents will be opened within a client browser rather than in a related application, such as Word .

ChAptEr 7 Managing mobile messaging284
You can enable or disable WebReady Document Viewing separately for public computers and private computers . However, supported document settings for both types of computers are shared and applied to both public and private computers in the same way .
To configure WebReady Document Viewing and direct file access, complete the following steps:
1. In the Exchange Admin Center, select Servers in the Feature pane, and then select Virtual Directories to view a list of the front-end virtual directories used by Client Access servers in the Exchange organization .
2. Select the OWA virtual directory on the Client Access server you want to manage, and then select Edit. Typically, you’ll want to configure the OWA virtual directory on the Default Web Site because this directory is used by default for Outlook Web App .
3. In the Virtual Directory dialog box, select the File Access page .4. To enable or disable direct file access for public computers, under Public Or
Shared Computer, you can enable or disable WebReady Document View-ing for public computers by selecting or clearing the WebReady Document Viewing check box . Optionally, force Outlook Web App to use WebReady Document Viewing on public computers when a converter is available .
IMPORTANT When you disable features in the front end, you prevent them from being used because the front-end proxies connections to the back end and blocks disabled features from being used. however, if you enable a feature in the front end but the feature is disabled in the back end, clients normally won't be able to use the feature.
5. Under Private Computer, you can enable or disable WebReady Document Viewing for private computers by selecting or clearing the WebReady Docu-ment Viewing check box . Optionally, force Outlook Web App to use WebReady Document Viewing on private computers when a converter is available .
6. Tap or click Save to apply your settings . As necessary, make corresponding changes in the related back-end virtual directory using Exchange Manage-ment Shell .
In the Exchange Management Shell, you can use the Set-OWAVirtualDirectory cmdlet to manage the WebReady Document Viewing configuration. Use the –Identity parameter to identify the virtual directory you want to work, such as:
Set-OWAVirtualDirectory –Identity "Corpsvr127\owa (Default Web Site)"
Then specify how you want to configure WebReady Document Viewing on the front-end and back-end virtual directory, such as:
Set-OWAVirtualDirectory –Identity "Corpsvr127\owa (Default Web Site)" -WebReadyDocumentViewingOnPublicComputersEnabled $false -WebReadyDocumentViewingOnPrivateComputersEnabled $true -WebReadyDocumentViewingForAllSupportedTypes $true

Managing mobile messaging ChAptEr 7 285
Set-OWAVirtualDirectory –Identity "Corpsvr127\owa (Exchange Back End)" -WebReadyDocumentViewingOnPublicComputersEnabled $false -WebReadyDocumentViewingOnPrivateComputersEnabled $true -WebReadyDocumentViewingForAllSupportedTypes $true
If you are unsure of the virtual directory identity value, use the Get-OWAVirtual-Directory cmdlet to retrieve a list of available virtual directories on a named server, as shown in the following example:
Get-OWAVirtualDirectory –Server "Corpsvr127" -ShowMailboxVirtualDirectories
When working with Set-OWAVirtualDirectory, you configure WebReady file types and WebReady MIME types by using the -WebReadyFileTypes and -WebReadyMime- Types parameters respectively . Because these are multivalued properties, you must either enter the complete set of allowed values or use a special shorthand to insert into or remove values from these multivalued properties . Typically, you’ll want to configure the front-end and back-end virtual directories in the same way.
Working with mobile devices and device policies
Mobile device mailbox policy makes it possible to enhance the security of mobile devices used to access your Exchange servers . For example, you can use policy to require a password of a specific length and to configure devices to automatically prompt for a password after a period of inactivity .
Each mailbox policy you create has a name and a specific set of rules with which it is associated . Because you can apply policies separately to mailboxes when you create or modify them, you can create different policies for different groups of users . For example, you can have one policy for users and another policy for manag-ers . You can also create separate policies for departments within the organization . For example, you can have separate policies for Marketing, Customer Support, and Technology .
NOTE Exchange also supports ActiveSync mailbox policies. Because ActiveSync mail-box policies apply only to ActiveSync devices and the mobile device mailbox policies work with all supported devices, I prefer to use the mobile device mailbox policies, and you probably will too. Additionally, although ActiveSync mailbox policies are depre-cated and will be phased out in a future release of Exchange, you can still use them. If you do, the techniques are similar to those for mobile device mailbox policies, except that you use the following ActiveSync cmdlets instead of MobileDevice cmdlets: Get-ActiveSyncMailboxpolicy, New-ActiveSyncMailboxpolicy, Set-ActiveSyncMailboxpolicy, and remove-ActiveSyncMailboxpolicy.
Viewing existing mobile device mailbox policiesWhen the Client Access server role is installed on an Exchange server, the setup process creates a default mobile device mailbox policy, which allows ActiveSync to be used without restrictions or password requirements . All users with mailboxes have this policy applied by default . You can modify the settings of this policy to change the settings for all users or create new policies for specific groups of users.

ChAptEr 7 Managing mobile messaging286
In the Exchange Admin Center, you can view the currently configured mobile device mailbox policies by selecting Mobile in the Feature pane, and then select-ing Mobile Device Mailbox Policies . In the details pane, you’ll see a list of current policies .
In the Exchange Management Shell, you can list policies by using the Get-Mobile DeviceMailboxPolicy cmdlet . Listing 7-9 provides the syntax, usage, and sample output . If you do not provide an identity with this cmdlet, all available mobile device mailbox policies are listed . All devices running Windows Phone 8, Windows 8 RT, Windows 8 .1 and later have device encryption that is enabled by default .
LISTING 7-9 Get-MobileDeviceMailboxPolicy cmdlet syntax and usage
Syntax
Get-MobileDeviceMailboxPolicy [-Identity MailboxPolicyId] [-DomainController FullyQualifiedName] [-Organization OrgId]
Usage
Get-MobileDeviceMailboxPolicy Get-MobileDeviceMailboxPolicy -Identity "Primary Mobile Device Mailbox Policy"
Output
RunspaceId : AllowNonProvisionableDevices : True AlphanumericPasswordRequired : False AttachmentsEnabled : True DeviceEncryptionEnabled : False RequireStorageCardEncryption : False PasswordEnabled : False PasswordRecoveryEnabled : False DevicePolicyRefreshInterval : Unlimited AllowSimplePassword : True MaxAttachmentSize : Unlimited WSSAccessEnabled : True UNCAccessEnabled : True MinPasswordLength : MaxInactivityTimeLock : Unlimited MaxPasswordFailedAttempts : Unlimited PasswordExpiration : Unlimited PasswordHistory : 0 IsDefault : True AllowApplePushNotifications : True AllowMicrosoftPushNotification : True AllowStorageCard : True AllowCamera : True RequireDeviceEncryption : False AllowUnsignedApplications : True

Managing mobile messaging ChAptEr 7 287
AllowUnsignedInstallationPackages : True AllowWiFi : True AllowTextMessaging : True AllowPOPIMAPEmail : True AllowIrDA : True RequireManualSyncWhenRoaming : False AllowDesktopSync : True AllowHTMLEmail : True RequireSignedSMIMEMessages : False RequireEncryptedSMIMEMessages : False AllowSMIMESoftCerts : True AllowBrowser : True AllowConsumerEmail : True AllowRemoteDesktop : True AllowInternetSharing : True AllowBluetooth : Allow MaxCalendarAgeFilter : All MaxEmailAgeFilter : All RequireSignedSMIMEAlgorithm : SHA1 RequireEncryptionSMIMEAlgorithm : TripleDES AllowSMIMEEncryptionAlgorithmNegotiation : AllowAnyAlgorithmNegotiation MinPasswordComplexCharacters : 1 MaxEmailBodyTruncationSize : Unlimited MaxEmailHTMLBodyTruncationSize : Unlimited UnapprovedInROMApplicationList : {} ApprovedApplicationList : {} AllowExternalDeviceManagement : False MobileOTAUpdateMode : MinorVersionUpdates AllowMobileOTAUpdate : True IrmEnabled : True AdminDisplayName : ExchangeVersion : 0.1 (8.0.535.0) Name : Default DistinguishedName : CN=Default,CN=Mobile Mailbox Policies,CN=First Organization,CN=Microsoft Exchange,CN=Services,CN=Configuration,DC=pocket-consultant,DC=com Identity : Default Guid : ObjectCategory : pocket-consultant.com/Configuration/Schema/ms-Exch-Mobile-Mailbox-Policy ObjectClass : {top, msExchRecipientTemplate, msExchMobileMailboxPolicy} WhenChanged : 11/4/2014 10:02:34 PM WhenCreated : 11/4/2014 10:02:34 PM WhenChangedUTC : 11/5/2014 5:02:34 AM WhenCreatedUTC : 11/5/2014 5:02:34 AM OrganizationId : OriginatingServer : CorpServer27. pocket-consultant.com IsValid : True ObjectState : Unchanged

ChAptEr 7 Managing mobile messaging288
Creating mobile device mailbox policiesThe mobile device mailbox policies you create apply to your entire organization . You apply policies separately after you create them, as discussed later in this chapter in the “Assigning mobile device mailbox policies” section .
You can create a new policy by completing the following steps:
1. In Exchange Admin Center, select Mobile in the Feature pane, and then select Mobile Device Mailbox Policies to see a list of currently defined mobile device mailbox policies .
2. Tap or click New to open the New Mobile Device Mailbox Policy dialog box .3. As shown in Figure 7-3, type a descriptive name for the policy, and then use
the following options to configure the policy:• This Is The Default Policy Makes this the default policy . If you select
this option, the policy is assigned to all users who are currently using the previously assigned default policy .
• Allow Mobile Devices That Don't Fully Support… Allows older devices that do not support all policy settings to synchronize . If you select this option, these older devices can connect to Exchange 2013 .
FIGURE 7-3 Create the mobile device mailbox policy .

Managing mobile messaging ChAptEr 7 289
• Require A Password Requires mobile devices to use a password . If you do not select this option, you cannot specify password requirements .
• Allow Simple Passwords Allows the user to use a noncomplex password instead of a password that meets the minimum complexity requirements .
• Require An Alphanumeric Password Requires that a password contain numeric and alphanumeric characters . If you do not select this option, users can use simple passwords, which might not be as secure . If you select this option, you can also specify the number of character sets that are required to be used in passwords . The four character sets are low-ercase letters, uppercase letters, numbers, and symbols . You can require from one to four of these character sets to be used in passwords .
• Require Encryption On Device Requires mobile devices to use encryp-tion . Because encrypted data cannot be accessed without the appropri-ate password, this option helps to protect the data on the device . If you select this option, Exchange allows devices to download data only if they can use encryption (except when you allow mobile devices that don’t fully support mobile device mailbox policy) .
• Minimum Password Length Allows you to set a minimum password length . You must select the related check box to set the minimum pass-word length, such as eight characters . The longer the password, the more secure it is . A good minimum password length is between 8 and 12 char-acters, which is sufficient in most cases.
• Number Of Sign-In Failures Before Device Is Wiped Allows you to specify the number of login failures before the device is wiped . If you select this option, be sure to set a high enough value so that mobile devices aren’t accidentally wiped by users . For example, rather than set-ting a low value, such as 3, use a higher value, such as 9 .
• Require Sign-In After The Device Has Been Inactive For (Minutes) Allows you to specify the length of time that a device can go without user input before it locks . If you select this option, be sure to set an interval that allows for normal workflow and isn’t disruptive. For example, if high security isn’t a requirement, you may want to require users to sign-in after 5 to 7 minutes of inactivity rather than having the device lock itself after 2 to 3 minutes of inactivity .
• Enforce Password Lifetime (days) Allows you to specify the maximum length of time users can keep a password before they have to change it . You can use this option to require users to change their passwords peri-odically . A good password expiration value is between 30 and 90 days . This period is sufficient to allow use of the password without requiring overly frequent changes .

ChAptEr 7 Managing mobile messaging290
• Password Recycle Count Allows you to specify how frequently old passwords can be reused . You can use this option to discourage users from changing back and forth between a common set of passwords . To disable this option, set the size of the password history to zero . To enable this option, set the desired size of the password history . A good value is between 3 and 6 . This helps to deter users from switching between a small list of common passwords .
4. Tap or click Save to create the policy. Optimize the configuration, as dis-cussed in the following section of this chapter, “Optimizing mobile device mailbox policies .”
In the Exchange Management Shell, you can create new mobile device mailbox policies by using the New-MobileDeviceMailboxPolicy cmdlet . Listing 7-10 provides the syntax and usage . There are additional policy settings you can access in the shell that you cannot access in the Exchange Admin Center .
LISTING 7-10 New-MobileDeviceMailboxPolicy cmdlet syntax and usage
Syntax
New-MobileDeviceMailboxPolicy -Name PolicyName [-AllowBluetooth <Disable | HandsfreeOnly | Allow>] [-AllowSMIMEEncryptionAlgorithmNegotiation <BlockNegotiation | OnlyStrongAlgorithmNegotiation | AllowAnyAlgorithmNegotiation>] [-ApprovedApplicationList AppList] [-DevicePolicyRefreshInterval Interval] [-DomainController FullyQualifiedName] [-MaxAttachmentSize MaxSizeKB] [-MaxCalendarAgeFilter <All | TwoWeeks | OneMonth | ThreeMonths | SixMonths>] [-MaxEmailAgeFilter <All | OneDay | ThreeDays | OneWeek | TwoWeeks | OneMonth>] [-MaxEmailBodyTruncationSize MaxSizeKB] [-MaxEmailHTMLBodyTruncationSize MaxSizeKB] [-MaxInactivityTimeLock InactiveTime] [-MaxPasswordFailedAttempts NumAttempts] [-MinPasswordComplexCharacters MinComplexChars] [-MinPasswordLength MinLength] [-MobileOTAUpdateMode <MajorVersionUpdates | MinorVersionUpdates | BetaVersionUpdates>] [-Organization OrgId] [-PasswordExpiration PasswordExp] [-PasswordHistory HistLength] [-RequireEncryptionSMIMEAlgorithm <TripleDES | DES | RC2128bit | RC264bit | RC240bit>] [-RequireSignedSMIMEAlgorithm <SHA1 | MD5>] [-UnapprovedInROMApplicationList AppList] {OptionalTrueFalseParams} {OptionalTrueFalseParams} -AllowBrowser, -AllowCamera, -AllowConsumerEmail, -AllowDesktopSync, -AllowExternalDeviceManagement, -AllowHTMLEmail, -AllowInternetSharing, -AllowIrDA, -AllowMicrosoftPushNotifications, -AllowMobileOTAUpdate, -AllowNonProvisionableDevices, -AllowPOPIMAPEmail, -AllowRemoteDesktop, -AllowSimplePassword, -AllowSMIMESoftCerts, -AllowStorageCard, -AllowTextMessaging, -AllowUnsignedApplications, -AllowUnsignedInstallationPackages, -AllowWiFi, -AlphanumericPasswordRequired, -AttachmentsEnabled, -DeviceEncryptionEnabled, -IrmEnabled, -IsDefault, -PasswordEnabled, -PasswordRecoveryEnabled, -RequireDeviceEncryption, -RequireEncryptedSMIMEMessages, -RequireManualSyncWhenRoaming, -RequireSignedSMIMEMessages, -RequireStorageCardEncryption, -UNCAccessEnabled, -WSSAccessEnabled

Managing mobile messaging ChAptEr 7 291
Usage
New-MobileDeviceMailboxPolicy -Name "Primary Mobile Device Mailbox Policy" -AllowNonProvisionableDevices $true -PasswordEnabled $true -AlphanumericPasswordRequired $true -MaxInactivityTimeLock "00.15:00" -MinPasswordLength "8" -PasswordRecoveryEnabled $true -RequireDeviceEncryption $true -AttachmentsEnabled $true
Optimizing mobile device mailbox policiesWhen you create a mobile device mailbox policy, some additional settings are con-figured automatically. You can modify policy settings by using the Set-Mobile-DeviceMailboxPolicy cmdlet. By default, access to both Windows file shares and Microsoft Windows SharePoint Services is allowed. You can block access to file shares and SharePoint by setting the -UNCAccessEnabled and -WSSAccessEnabled parameters to $false .
If you specified that passwords are required, by default, simple passwords are not allowed . Additionally, by default, many device features are allowed . By using the TrueFalseParams shown in Listing 7-11, you can:
■■ Allow or disallow another device to share the device’s Internet connection .■■ Allow or disallow remote desktop connections .■■ Allow or disallow the device to access email accounts other than Exchange .■■ Allow or disallow the device to access removable storage, such as memory
cards .■■ Allow or disallow the device to connect to a wireless network .■■ Allow or disallow the device to connect to and synchronize with a desktop
computer .■■ Allow or disallow the device to connect to other devices using infrared .■■ Allow or disallow the device to execute unsigned applications .■■ Allow or disallow the device to install unsigned applications .■■ Allow or disallow the device to use the built-in browser .■■ Allow or disallow the device’s built-in camera .
You can specify the maximum allowed size for email messages by using -MaxEmail BodyTruncationSize and -MaxEmailHTMLBodyTruncationSize . Both parameter values are set in kilobytes . If a standard email message exceeds the MaxEmailBodyTruncationSize value, the message is truncated (clipped) . If an HTML-formatted email message exceeds the MaxEmailHTMLBodyTruncationSize, the message is truncated (clipped) .
If the policy allows devices to download attachments, the attachment has no default limit size . You can block attachment downloads by setting -Attachments-Enabled to $false . If you allow attachments and you want to limit the size of

ChAptEr 7 Managing mobile messaging292
attachments that users can download, you can specify the maximum allowed attachment size in kilobytes by using -MaxAttachmentSize .
For past calendar and email items, you can use the -MaxCalendarAgeFilter and -MaxEmailAgeFilter parameters respectively to specify whether all calendar and mail items should be synced or only items from a specific period of time, such as the last two weeks . If you allow Bluetooth, you also can specify how the device can use Bluetooth . To allow the device to use Bluetooth in any mode, set -AllowBlueTooth to Allow . To allow the device to use Bluetooth only in hands-free mode, set -AllowBlue-Tooth to HandsfreeOnly . To prevent the device from using Bluetooth, set -Allow-BlueTooth to Disable .
LISTING 7-11 Set-MobileDeviceMailboxPolicy cmdlet syntax and usage
Syntax
Set-MobileDeviceMailboxPolicy -Identity MailboxPolicyId [-AllowBluetooth <Disable | HandsfreeOnly | Allow>] [-AllowSMIMEEncryptionAlgorithmNegotiation <BlockNegotiation | OnlyStrongAlgorithmNegotiation | AllowAnyAlgorithmNegotiation>] [-ApprovedApplicationList AppList] [-DevicePolicyRefreshInterval Interval] [-DomainController FullyQualifiedName] [-MaxAttachmentSize MaxSizeKB] [-MaxCalendarAgeFilter <All | TwoWeeks | OneMonth | ThreeMonths | SixMonths>] [-MaxEmailAgeFilter <All | OneDay | ThreeDays | OneWeek | TwoWeeks | OneMonth>] [-MaxEmailBodyTruncationSize MaxSizeKB] [-MaxEmailHTMLBodyTruncationSize MaxSizeKB] [-MaxInactivityTimeLock InactiveTime] [-MaxPasswordFailedAttempts NumAttempts] [-MinPasswordComplexCharacters MinComplexChars] [-MinPasswordLength MinLength] [-MobileOTAUpdateMode <MajorVersionUpdates | MinorVersionUpdates | BetaVersionUpdates>] [-Organization OrgId] [-PasswordExpiration PasswordExp] [-PasswordHistory HistLength] [-RequireEncryptionSMIMEAlgorithm <TripleDES | DES | RC2128bit | RC264bit | RC240bit>] [-RequireSignedSMIMEAlgorithm <SHA1 | MD5>] [-UnapprovedInROMApplicationList AppList] {OptionalTrueFalseParams} {OptionalTrueFalseParams} -AllowBrowser, -AllowCamera, -AllowConsumerEmail, -AllowDesktopSync, -AllowExternalDeviceManagement, -AllowHTMLEmail, -AllowInternetSharing, -AllowIrDA, -AllowMicrosoftPushNotifications, -AllowMobileOTAUpdate, -AllowNonProvisionableDevices, -AllowPOPIMAPEmail, -AllowRemoteDesktop, -AllowSimplePassword, -AllowSMIMESoftCerts, -AllowStorageCard, -AllowTextMessaging, -AllowUnsignedApplications, -AllowUnsignedInstallationPackages, -AllowWiFi, -AlphanumericPasswordRequired, -AttachmentsEnabled, -DeviceEncryptionEnabled, -IrmEnabled, -IsDefault, -PasswordEnabled, -PasswordRecoveryEnabled, -RequireDeviceEncryption, -RequireEncryptedSMIMEMessages, -RequireManualSyncWhenRoaming, -RequireSignedSMIMEMessages, -RequireStorageCardEncryption, -UNCAccessEnabled, -WSSAccessEnabled
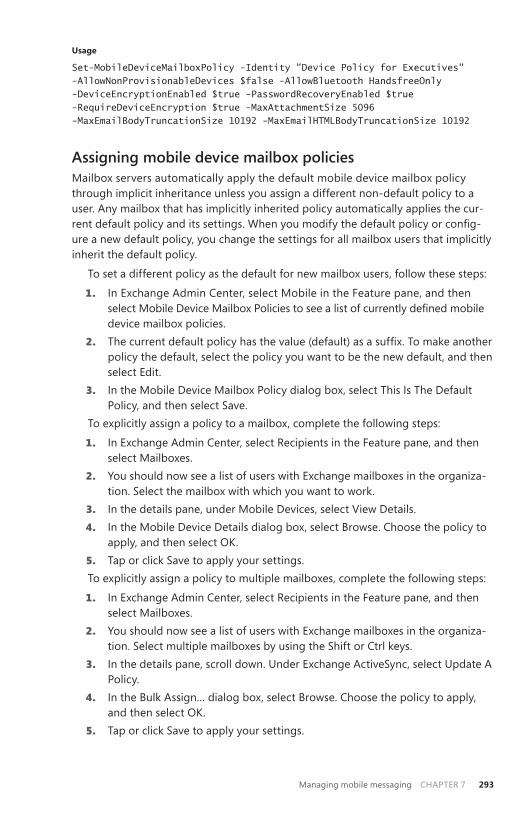
Managing mobile messaging ChAptEr 7 293
Usage
Set-MobileDeviceMailboxPolicy -Identity "Device Policy for Executives" -AllowNonProvisionableDevices $false -AllowBluetooth HandsfreeOnly -DeviceEncryptionEnabled $true -PasswordRecoveryEnabled $true -RequireDeviceEncryption $true -MaxAttachmentSize 5096 -MaxEmailBodyTruncationSize 10192 -MaxEmailHTMLBodyTruncationSize 10192
Assigning mobile device mailbox policiesMailbox servers automatically apply the default mobile device mailbox policy through implicit inheritance unless you assign a different non-default policy to a user . Any mailbox that has implicitly inherited policy automatically applies the cur-rent default policy and its settings. When you modify the default policy or config-ure a new default policy, you change the settings for all mailbox users that implicitly inherit the default policy .
To set a different policy as the default for new mailbox users, follow these steps:
1. In Exchange Admin Center, select Mobile in the Feature pane, and then select Mobile Device Mailbox Policies to see a list of currently defined mobile device mailbox policies .
2. The current default policy has the value (default) as a suffix. To make another policy the default, select the policy you want to be the new default, and then select Edit .
3. In the Mobile Device Mailbox Policy dialog box, select This Is The Default Policy, and then select Save .
To explicitly assign a policy to a mailbox, complete the following steps:
1. In Exchange Admin Center, select Recipients in the Feature pane, and then select Mailboxes .
2. You should now see a list of users with Exchange mailboxes in the organiza-tion . Select the mailbox with which you want to work .
3. In the details pane, under Mobile Devices, select View Details .4. In the Mobile Device Details dialog box, select Browse . Choose the policy to
apply, and then select OK .5. Tap or click Save to apply your settings .To explicitly assign a policy to multiple mailboxes, complete the following steps:
1. In Exchange Admin Center, select Recipients in the Feature pane, and then select Mailboxes .
2. You should now see a list of users with Exchange mailboxes in the organiza-tion . Select multiple mailboxes by using the Shift or Ctrl keys .
3. In the details pane, scroll down . Under Exchange ActiveSync, select Update A Policy .
4. In the Bulk Assign… dialog box, select Browse . Choose the policy to apply, and then select OK .
5. Tap or click Save to apply your settings .

ChAptEr 7 Managing mobile messaging294
If you want mailbox users to use a mobile device mailbox policy other than the default, you can assign a policy directly to mailboxes by using the –ActiveSyncMail-boxPolicy parameter of the Set-CASMailbox cmdlet . Listing 7-12 provides the syntax and usage .
LISTING 7-12 Assigning a Mobile Device Mailbox Policy to mailboxes
Syntax
Set-CASMailbox –Identity MailboxIdentity -ActiveSyncMailboxPolicy PolicyIdentity
Apply the policy to the mailbox user named MarkH
Set-CASMailbox –Identity "[email protected]" -ActiveSyncMailboxPolicy "Device Policy for Executives"
Apply the policy to every mailbox in the Exchange organization
Get-Mailbox -ResultSize Unlimited | Set-CASMailbox -ActiveSyncMailboxPolicy "Device Policy for Executives"
Apply the policy to every mailbox in the Sales database
Get-MailboxDatabase "Sales" | Get-Mailbox -ResultSize Unlimited | Set-CASMailbox -ActiveSyncMailboxPolicy "Device Policy for Executives"
Apply the policy to all mailboxes in every mailbox database on MailboxServer18
Get-Mailbox -Server MailboxServer18 -ResultSize Unlimited | Set-CASMailbox -ActiveSyncMailboxPolicy "Device Policy for Executives"
removing mobile device mailbox policiesWhen you no longer need a mobile device mailbox policy, you can remove it, pro-vided that it isn’t the current default policy . In the Exchange Admin Center, select the policy, and then select the Delete button. When prompted to confirm, tap or click Yes to delete the policy . If users are assigned to the policy, they will stop using the policy and implicitly inherit the current default policy .
In the Exchange Management Shell, you can remove a mobile device mailbox policy by using the Remove-MobileMailboxPolicy cmdlet . Listing 7-13 provides the syntax and usage .
LISTING 7-13 Remove-MobileMailboxPolicy cmdlet syntax and usage
Syntax
Remove-MobileMailboxPolicy –Identity Name [-DomainController DCName] [-Force <$true | $false>]
Usage
Remove-MobileMailboxPolicy -Identity "Primary ActiveSync Mailbox Policy"

Managing mobile messaging ChAptEr 7 295
Managing device access
You can manage device access to Exchange in several ways . One way to prevent a device from synchronizing with Exchange is to put the device on the blocked mobile device list for the user’s mailbox. The first step is to retrieve the ID of the device you want to prevent from syncing . Unfortunately, there’s no way to retrieve the device ID before the user synchronizes the device with Exchange (unless you already know the device ID) . If the user has synced the device already, you can get the device ID using:
Get-MobileDeviceStatistics -Mailbox ExchangeId -ActiveSync | fl DeviceID
ExchangeId is the email address or Exchange alias of the user, such as:
Get-MobileDeviceStatistics -Mailbox KaraH -ActiveSync | fl DeviceID
To prevent a device from synchronizing with Exchange, you must add the device to the -ActiveSyncBlockedDeviceIDs parameter list on the user’s mailbox . To do this, run the following command:
Set-CASMailbox -Identity ExchangeID -ActiveSyncBlockedDeviceIDs @{Add="DeviceID"}
ExchangeID is the email address or Exchange alias for the mailbox user you want to prevent from using certain mobile devices, and DeviceID is the ID of the device to prevent from synchronizing with Exchange . If the device was previously on the user’s allowed ActiveSync device list, you can remove the device from this list in addition to using the following syntax:
Set-CASMailbox -Identity ExchangeID -ActiveSyncAllowedDeviceIDs @{Remove="DeviceID"}
NOTE As the blocked list has precedence over the allowed list, you technically don't have to remove the device from the allowed list. however, if someone accidentally resets the blocked list and you haven't removed the device from the allowed list, the user will be explicitly permitted to use the device to sync with Exchange.
Although you may sometimes want to manage device access for individual users, you’ll probably prefer to define device access rules to control which device can and cannot sync with Exchange . To work with access rules, you’ll use the following cmdlets:
■■ Get-ActiveSyncDeviceAccessRule Lists an access group of Exchange mobile devices along with their access level
Get-ActiveSyncDeviceAccessRule [-Identity AccessRuleId]
[-DomainController FullyQualifiedName] [-Organization OrgId]

ChAptEr 7 Managing mobile messaging296
■■ Get-ActiveSyncDeviceClass Lists mobile devices that have connected to Exchange by their type and model
Get-ActiveSyncDeviceClass [-Identity DeviceGroupId]
[-DomainController FullyQualifiedName] [-Filter FilterValues]
[-Organization OrgId] [-SortBy AttributeName]
■■ New-ActiveSyncDeviceAccessRule Defines an access group of Exchange mobile devices along with their access level
New-ActiveSyncDeviceAccessRule -AccessLevel <Allow | Block |
Quarantine> -Characteristic <DeviceType | DeviceModel | DeviceOS |
UserAgent> -QueryString Devices [-DomainController
FullyQualifiedName]
[-Organization OrgId]
■■ Remove-ActiveSyncDeviceAccessRule Removes an existing device access rule
Remove-ActiveSyncDeviceAccessRule -Identity AccessRuleId
[-DomainController FullyQualifiedName]
■■ Remove-ActiveSyncDeviceClass Removes a device class from the list of mobile devices synchronizing with Exchange
Remove-ActiveSyncDeviceClass -Identity DeviceGroupId
[-DomainController FullyQualifiedName]
■■ Set-ActiveSyncDeviceAccessRule Sets the level of access for the ActiveSync Device Access rule
Set-ActiveSyncDeviceAccessRule -Identity AccessRuleId
[-AccessLevel <Allow | Block | Quarantine>]
[-DomainController FullyQualifiedName]
The following example creates access rules to block several different types of iOS 6 .1 devices:
New-ActiveSyncDeviceAccessRule -querystring "iOS 6.1 10B142" -characteristic DeviceOS -accesslevel block New-ActiveSyncDeviceAccessRule -querystring "iOS 6.1 10B143" -characteristic DeviceOS -accesslevel block New-ActiveSyncDeviceAccessRule -querystring "iOS 6.1 10B144" -characteristic DeviceOS -accesslevel block

Managing mobile messaging ChAptEr 7 297
Finally, by using the following commands you can set a default access level and blocking thresholds for ActiveSync devices:
■■ Get-ActiveSyncDeviceAutoblockThreshold Lists the Autoblock settings for Exchange ActiveSync mobile devices
Get-ActiveSyncDeviceAutoblockThreshold [-Identity RuleName]
[-DomainController FullyQualifiedName]
■■ Set-ActiveSyncDeviceAutoblockThreshold Modifies the autoblocking settings for mobile devices
Set-ActiveSyncDeviceAutoblockThreshold -Identity RuleName
[-AdminEmailInsert MessageText] [-BehaviorTypeIncidenceDuration
TimeSpan] [-BehaviorTypeIncidenceLimit Limit]
[-DeviceBlockDuration TimeSpan] [-DomainController
FullyQualifiedName]
■■ Get-ActiveSyncOrganizationSettings Lists the Exchange ActiveSync set-tings for the Exchange organization
Get-ActiveSyncOrganizationSettings [-Identity ExchangeOrgId]
[-DomainController FullyQualifiedName] [-Organization OrgId]
■■ Set-ActiveSyncOrganizationSettings Modifies the Exchange ActiveSync settings for the Exchange organization
Set-ActiveSyncOrganizationSettings [-Identity ExchangeOrgId]
[-AdminMailRecipients email1,email2,...emailN] [-DefaultAccessLevel
<Allow | Block | Quarantine>] [-DomainController FullyQualifiedName]
[-OtaNotificationMailInsert MessageText] [-UserMailInsert MessageText


299
CHAP TER 8
Exchange Server 2013 maintenance, monitoring, and queuing
■■ Performing tracking and logging activities in an organization 299
■■ Monitoring events, services, servers, and resource usage 317
■■ Working with queues 328
■■ Managing queues 331
Few administration tasks are more important than maintenance, monitoring, and queue tracking . You must maintain Microsoft Exchange Server 2013 to ensure
proper flow and recoverability of message data. You need to monitor Exchange Server to ensure that services and processes are functioning normally, and you need to track Exchange Server queues to ensure that messages are being processed .
Performing tracking and logging activities in an organization
This section examines message tracking, protocol logging, and diagnostic logging . You use these features to monitor Exchange Server and to troubleshoot messaging problems .
Using message trackingYou use message tracking to monitor the flow of messages into, out of, and within an organization . With message tracking enabled, Exchange Server maintains daily log files, with a running history of all messages transferred within an organization. You use the logs to determine the status of a message, such as whether a message has been sent, has been received, or is waiting in the queue to be delivered . Because Exchange Server handles postings to public folders in much the same way as email messages, you can also use message tracking to monitor public folder usage .

ChAptEr 8 Exchange Server 2013 maintenance, monitoring, and queuing300
TIP tracking logs can really save the day when you’re trying to troubleshoot delivery and routing problems. the logs are also useful in fending off problem users who blame email for their woes. Generally speaking, users can’t claim they didn’t receive emails if you can find the messages in the logs. That said, if you use third-party applications that integrate with Outlook, those applications could potentially delete messages before the user sees them.
Configuring message trackingBy default, all Edge Transport and Mailbox servers perform message tracking . You can enable or disable message tracking on a per-server basis by setting the –MessageTrackingLogEnabled parameter of the Set-TransportService cmdlet to $true or $false, as appropriate . The following example disables message tracking on MailServer34:
Set-TransportService -Identity "MailServer34" -MessageTrackingLogEnabled $false
TIP You can configure basic message tracking options in the Exchange Admin Center. to do this, select Servers in the Features pane, and then select Servers. In the main pane, double-tap or double-click the server you want to configure to display the related properties dialog box. On the transport Logs page, select or clear the Enable Message tracking Log check box. If you enable message tracking, you can enter the desired directory path for logging as well or accept the default setting.
Each Edge Transport and Mailbox server in your organization can have different message tracking settings that control the following:
■■ Where logs are stored■■ How logging is performed■■ The maximum log size and maximum log directory size■■ How long logs are retained
By default, message tracking logs are stored in the %ExchangeInstallPath%\TransportRoles\Logs\MessageTracking directory . Generally, message tracking does not have high enough input/output activity to warrant a dedicated disk . However, in some high usage situations, you might want to move the tracking logs to a sepa-rate disk . Before you do this, however, you should create the directory you want to use and set the following required permissions:
■■ Full Control for the server’s local Administrators group■■ Full Control for System■■ Full Control for Network Service
After you’ve created the directory and set the required permissions, you can change the location of the tracking logs to any local directory by setting the –MessageTrackingLogPath parameter of the Set-TransportService cmdlet to the desired local directory . The following example sets the message tracking directory as G:\Tracking on MailServer34:
Set-TransportService -Identity "MailServer34" -MessageTrackingLogPath "G:\Tracking"

Exchange Server 2013 maintenance, monitoring, and queuing ChAptEr 8 301
NOTE When you change the location of the message tracking directory, Exchange Server does not copy any existing tracking logs from the old directory to the new one. If you want all the logs to be in the same location, you should manually copy the old logs to the new location before you use Set-transportService to change the message tracking directory.
By default, all Edge Transport and Mailbox servers perform extended message tracking, which allows you to perform searches based on message subject lines, header information, sender, and recipient . If you don’t want to collect information on potentially sensitive subject lines, you can disable subject line tracking by setting the –MessageTrackingLogSubjectLoggingEnabled parameter of the Set-Transport-Service cmdlet to $false, as shown in the following example:
Set-TransportService -Identity "MailServer34" -MessageTrackingLogSubjectLoggingEnabled $false
Exchange Server continues to write to message tracking logs until a log grows to a specified maximum size, at which point Exchange Server creates a new log and then uses this log to track current messages. By default, the maximum log file size is 10 megabytes (MB) . You can change this behavior by setting the –MessageTracking-LogMaxFileSize parameter to the desired maximum file size. You must qualify the desired file size by using B for bytes, KB for kilobytes, MB for megabytes, or GB for gigabytes. The following example sets the message log file size to 50 MB:
Set-TransportService -Identity "MailServer34" -MessageTrackingLogMaxFileSize "50MB"
Exchange Server overwrites the oldest message tracking logs automatically when tracking logs reach a maximum age or when the maximum log directory size is reached . By default, the maximum age is 30 days and the maximum log directory size is 1,000 MB . You can use the –MessageTrackingLogMaxAge parameter to set the maximum allowed age in the following format:
DD.HH:MM:SS
DD is the number of days, HH is the number of hours, MM is the number of minutes, and SS is the number of seconds . The following example sets the maximum age for logs to 90 days:
Set-TransportService -Identity "MailServer34" -MessageTrackingLogMaxAge "90.00:00:00"
You can set the maximum log directory size by using the –MessageTrackingLog-MaxDirectorySize parameter. As with the maximum log file size, the qualifiers are B, KB, MB, and GB . The following example sets the maximum log directory size to 2 GB:
Set-TransportService -Identity "MailServer34" -MessageTrackingLogMaxDirectorySize "2GB"

ChAptEr 8 Exchange Server 2013 maintenance, monitoring, and queuing302
Searching through the tracking logsThe tracking logs are useful in troubleshooting problems with routing and delivery . In the Exchange Management Shell, you use Get-MessageTrackingLog to search through the message tracking logs . The related syntax is:
Get-MessageTrackingLog [-Start DateTime] [-Server ServerId] [-End DateTime] {AddtlParams} {AddtlParams} [-DomainController DCName] [-EventId {"BadMail" | "Defer" | "Deliver" | "DSN" | "Expand" | "Fail" | "PoisonMessage" | "Receive" | "Redirect" | "Resolve" | "Send" | "Submit" | "Transfer"} ] [-InternalMessageId MessageTrackingLogId] [-MessageId MessageId] [-MessageSubject Subject] [-Recipients SMTPEmailAddress1, SMTPEmailAddress2,...] [-Reference ReferenceField] [-ResultSize NumEntriesToReturn] [-Sender SMTPEmailAddress]
These parameters allow you to search the message tracking logs in the follow-ing ways:
■■ By date■■ By event ID■■ By message ID■■ By message subject■■ By recipients■■ By sender■■ By server that processed the messages
To begin a search, you must specify one or more of the previously listed identifi-ers as the search criteria . You must also identify a server in the organization that has processed the message in some way . This server can be the sender’s server, the recipient’s server, or a server that relayed the message .
You set the search criteria by using the following parameters:■■ –End Sets the end date and time for the search■■ –EventID Specifies the ID of the event for which you want to search, such
as a RECEIVE, SEND, or FAIL event■■ –InternalMessageID Specifies the ID of the message tracking log entries
for which you want to search■■ –MessageID Specifies the ID of the message for which you want to search■■ –MessageSubject Specifies the subject of the message for which you want
to search■■ –Recipients Sets recipient’s SMTP email address or addresses to return■■ –Reference Specifies the reference field value within the message for
which you want to search■■ –Sender Sets the sender’s SMTP email address (listed in the From field of
the message) to return
Exchange Server 2013 maintenance, monitoring, and queuing ChAptEr 8 303
■■ –Server Sets the name of the Transport or Mailbox server that contains the message tracking logs to be searched
■■ –Start Sets the start date and time for the search .Using the –Start and –End parameters, you can search for messages from a start-
ing date and time to an ending date and time . Using the –Server parameter, you specify the server to search . Consider the following example:
Get-MessageTrackingLog -Start "05/25/2014 5:30AM" –End "05/30/2014 7:30PM" -Server MailServer18 –Sender [email protected]
In this example, you search for a messages sent by [email protected] between 5:30 A .M . May 25, 2014 and 7:30 P .M . May 30, 2014 .
IMPORTANT Keep in mind that only messages that match all of the search crite-ria you’ve specified are displayed. If you want to perform a broader search, specify a limited number of parameters. If you want to focus the search precisely, specify multiple parameters.
reviewing message tracking logs manuallyExchange Server creates message tracking logs daily and stores them by default in the %ExchangeInstallPath%\TransportRoles\Logs\MessageTracking directory . For US-English, each log file is named by the date on which it was created, using one of the following formats:
■■ MSGTRKYYYYMMDD-N.log, such as MSGTRK20140325-1.log for the first log created on March 25, 2014 by the Transport service .
■■ MSGTRKMAYYYYMMDD-N .log, such as MSGTRKM20140325-1 .log for the first log created on March 25, 2014 and used with moderated messages for tracking approvals and rejections.
■■ MSGTRKMDYYYYMMDD-N .log, such as MSGTRKM20140325-1 .log for mes-sages delivered to mailboxes by the Mailbox Transport Delivery service .
■■ MSGTRKMSYYYYMMDD-N .log, such as MSGTRKM20140325-1 .log for mes-sages sent from mailboxes by the Mailbox Transport Submission service .
The message tracking logs store each message event on a single line . The infor-mation on a particular line is organized by comma-separated fields. Logs begin with a header that shows the following information:
■■ A statement that identifies the file as a message tracking log file■■ The version of the Exchange Server that created the file■■ The date on which the log file was created■■ A comma-delimited list of fields contained in the body of the log file
Table 8-1 summarizes message event fields and their meaning. Not all of the fields are tracked for all message events.

ChAptEr 8 Exchange Server 2013 maintenance, monitoring, and queuing304
TABLE 8-1 Message tracking log fields
LOG FIELD DESCRIPTION
Client-hostname The hostname of the client making the request
Client-ip The IP address of the client making the request
Connector-id The identity of the connector used
Custom-Data Optional custom data that was logged
Date-Time The connection date and time
Directionality An indication of the source of the message
Event-id The type of event being logged, such as Submit
Internal-message-id The internal identifier used by Exchange to track the message
Message-id The message identifier
Message-info Any related additional information on the message
Message-subject The subject of the message
Original-client-ip The IP address for the original client
Original-server-ip The IP address for the original server
Recipient-address The email addresses of the message recipients
Recipient-count The total number of recipients
Recipient-status The status of the recipient email address
Reference The references, if any
Related-recipient-address
The email addresses of any related recipients
Return-path The return path on the message
Sender-address The distinguished name of the sender’s email address
Server-hostname The server on which the log entry was generated
Server-ip The IP address of the server on which the log entry was generated
Source The messaging component for which the event is being logged, such as StoreDriver
Source-context The context of the event source
Tenant-id A tenant identifier
Total-bytes The total size of the message in bytes

Exchange Server 2013 maintenance, monitoring, and queuing ChAptEr 8 305
You can view the message tracking log files with any standard text editor, such as Microsoft Notepad. You can also import the message tracking log files into a spread-sheet or a database. Follow these steps to import a message tracking log file into Microsoft Excel:
1. With Excel 2007 or Excel 2010, click the Microsoft Office Button, and then tap or click Open . With Excel 2013, select File and then select Open . On the Open panel, select Computer and then select Browse .
2. Use the Open dialog box to select the message tracking log file you want to open. Set the file type as All Files (*.*), select the log file, and then tap or click Open .
3. The Text Import Wizard starts automatically . Tap or click Next . On the Delim-iters list, choose Comma . Tap or click Next, and then tap or click Finish .
4. The log file should now be imported. You can view, search, and print the message tracking log as you would any other spreadsheet .
NOTE You also can use Log parser Studio to work with Exchange logs. See “Using Log parser Studio” in Chapter 9, “troubleshooting Exchange Server 2013.”
Getting delivery reportsAs part of message tracking, you can create delivery reports in Exchange Admin Center . Delivery reports allow you to search for the delivery status of messages sent to or from user’s in your organization . In delivery reports, messages are listed by sender, recipients, and date and time sent. If subject line tracking is enabled, the subject line of messages is also included in reports.
You can track messages for up to 14 days after they were sent or received by completing the following steps:
1. In Exchange Admin Center, select Mail Flow in the Features pane, and then select Delivery Reports . As shown in Figure 8-1, the main pain provides options for tracking messages .
NOTE Only messages sent by using SMtp or Outlook Anywhere with Microsoft Outlook or Outlook Web App can be tracked. Mail sent by using pOp3 or IMAp mail clients cannot be tracked.

ChAptEr 8 Exchange Server 2013 maintenance, monitoring, and queuing306
FIGURE 8-1 Select the mailbox to search .
2. Each delivery report is for messages sent to or from a specific mailbox. Under Mailbox To Search, click Browse . Select the mailbox to search, and then tap or click OK .
3. Use the options provided to specify whether you want to search for messages sent from or to the mailbox you’re searching . Keep the following in mind:• To find messages sent to specific users or groups from the mailbox you’re
searching, select Search For Messages Sent To, and then tap or click Select Users . In the Select Users dialog box, select a user or group from the list, and then click Add . Repeat as necessary to add other users and groups . Tap or click OK when you’re finished.
• To find all messages sent from the mailbox you’re searching, select Search For Messages Sent To and then don’t select any specify users or groups . By leaving the field blank, you create delivery reports for messages sent from the mailbox to anyone .
• To find messages sent by a specific user to the mailbox you’re searching, select Search For Messages Received From, and then tap or click Select A User . In the Select Members dialog box, select a user from the list, and then click Add. Tap or click OK when you are finished. If you choose this option, you must select a user and cannot leave the field blank.
4. Optionally, if subject line tracking is enabled, you can restrict the search to messages with specific keywords in the subject line. In the Search For These Words… box, type one or more keywords to search for in the subject line of messages . To search for an exact phrase, enclose the phrase in quotation marks .

Exchange Server 2013 maintenance, monitoring, and queuing ChAptEr 8 307
5. When you’re ready to begin the search, tap or click Search . If any matching messages are found, they are listed in the Search Results pane with the fol-lowing fields:• From The display name, email address or alias of the person who sent
the message• To The display name, email address or alias of each message recipient• Sent The date and time the message was sent• Subject The subject line of the message
6. View the delivery status and detailed delivery information for a message by selecting the message in the Search Results pane, and then selecting Details . When messages are sent to distribution groups, the details tell you the spe-cific delivery status of each recipient in the group. When messages are mod-erated, the details tell you whether the moderator approved or rejected the message .
Using protocol loggingProtocol logging allows you to track Simple Mail Transfer Protocol (SMTP) communi-cations that occur between servers as part of message routing and delivery . These communications could include both Exchange servers and non-Exchange servers . When non-Exchange servers send messages to an Exchange server, Exchange does the protocol logging of the communications .
You use protocol logging to troubleshoot problems with the Send and Receive connectors that are configured on Mailbox and Edge Transport servers. However, you shouldn’t use protocol logging to monitor Exchange activity . This is primarily because protocol logging can be processor intensive and resource intensive, which means that an Exchange server may have to perform a lot of work to log protocol activity . The overhead required for protocol logging depends on the level of mes-saging activity on the Exchange server .
Configuring protocol loggingBy default, protocol logging isn’t enabled on custom connectors . As long as you know the identity of the custom connector with which you want to work, you can configure protocol logging for a specified connector. To retrieve a list of available Send and Receive connectors for a server, use the Get-SendConnector and Get-ReceiveConnector cmdlets, respectively . If you run either cmdlet without specifying additional parameters, a list of all available Send or Receive connectors is returned .
You enable or disable protocol logging on a per-connector basis . For Send con-nectors, you use the Set-SendConnector cmdlet to enable protocol logging . For Receive connectors, you use the Set-ReceiveConnector cmdlet to enable protocol logging . Both cmdlets have a –ProtocolLoggingLevel parameter that you can set to Verbose to enable protocol logging or to None to disable protocol logging . Here is an example:
Set-ReceiveConnector -Identity "Corpsvr127\Custom Receive Connector" -ProtocolLoggingLevel 'Verbose'

ChAptEr 8 Exchange Server 2013 maintenance, monitoring, and queuing308
In the Transport service on every Mailbox server and in the Front End Transport service on every Client Access server is an implicitly created Send connector, referred to as the intra-organization Send connector . The Transport service on Mailbox serv-ers uses the intra-organization Send connector to relay messages to other Transport servers in the Exchange organization . By default, the Transport service on Mailbox servers doesn’t perform protocol logging on the intra-organization Send connector . You enable or disable protocol logging for this Send connector on a Mailbox server by using the -MailboxDeliveryConnectorProtocolLoggingLevel parameter of the Set-MailboxTransportService cmdlet . Use Verbose to enable protocol logging or to None to disable protocol logging . Here is an example:
Set-MailboxTransportService -Identity MailServer18 -MailboxDeliveryConnectorProtocolLoggingLevel 'Verbose'
The Frontend Transport service uses the intra-organization Send connector to relay messages to the Transport service on Exchange 2013 Mailbox servers . By default, the Front End Transport service on Client Access servers performs protocol logging on the intra-organization Send connector . You enable or disable protocol logging for this Send connector on a Client Access server by using the -IntraOrg-ConnectorProtocolLoggingLevel parameter of the Set-FrontEndTransportService cmdlet . Use Verbose to enable protocol logging or set to None to disable protocol logging . Here is an example:
Set-FrontEndTransportService -Identity CAServer26 -IntraOrgConnectorProtocolLoggingLevel 'Verbose'
Although you enable protocol logging on a per-connector basis, you configure the other protocol logging parameters on a per-server basis for either all Send con-nectors or all Receive connectors by using the Set-TransportService cmdlet . As it does with message tracking logs, Exchange Server overwrites the oldest protocol logs automatically when tracking logs reach a maximum age or when the maximum log directory size is reached . If you decide to move the protocol log directories, you should create the directories you want to use and then set the following required permissions:
■■ Full Control for the server’s local Administrators group■■ Full Control for System■■ Full Control for Network Service
Because the parameters are similar to those for message tracking, I’ll summarize the available parameters . Table 8-2 shows the Send connector parameters for con-figuring protocol logging. Table 8-3 shows the Receive connector parameters for configuring protocol logging. In the default path for logs, the ServerType can be FrontEnd, Mailbox, or Hub. Under FrontEnd\ProtocolLogs, you’ll find logs for the Front End Transport service on Client Access servers . Under Hub\ProtocolLogs, you’ll find logs for the Transport service on Mailbox servers. Under Mailbox\ProtocolLogs, you’ll find logs for the Mailbox Transport service on Mailbox servers.

Exchange Server 2013 maintenance, monitoring, and queuing ChAptEr 8 309
TIP You can configure send and receive protocol log paths in the Exchange Admin Center. to do this, select Servers in the Features pane, and then select Servers. In the main pane, double-tap or double-click the server you want to configure to display the related properties dialog box. On the transport Logs page, the protocol log panel shows the current send and receive protocol log paths. You can specify the log file path by entering the desired directory path for logging or accept the default setting.
TABLE 8-2 Send connector parameters for protocol logging
PARAMETER DESCRIPTION DEFAULT
SendProtocolLog-MaxAge
Sets the maximum age for Send connector protocol logs
30 .00:00:00
SendProtocolLog-MaxDirectorySize
Sets the maximum size for the Send connector protocol log directory
250 MB
SendProtocolLog-MaxFileSize
Sets the maximum size for Send connector protocol logs
10 MB
SendProtocolLog-Path
Sets the local file path for proto-col logging of Send connectors
%ExchangeInstallPath% TransportRoles\Logs\ ServerType\ProtocolLogs\SmtpSend
TABLE 8-3 Receive connector parameters for protocol logging
PARAMETER DESCRIPTION DEFAULT
ReceiveProtocol-LogMaxAge
Sets the maximum age for Receive connector protocol logs
30 .00:00:00
ReceiveProtocol-LogMaxDirectory-Size
Sets the maximum size for the Receive connector protocol log directory
250 MB
ReceiveProtocol-LogMaxFileSize
Sets the maximum size for Receive connector protocol logs
10 MB
ReceiveProtocol-LogPath
Sets the local file path for protocol logging of Receive connectors
%ExchangeInstallPath% TransportRoles\Logs\ ServerType\ProtocolLogs\SmtpReceive
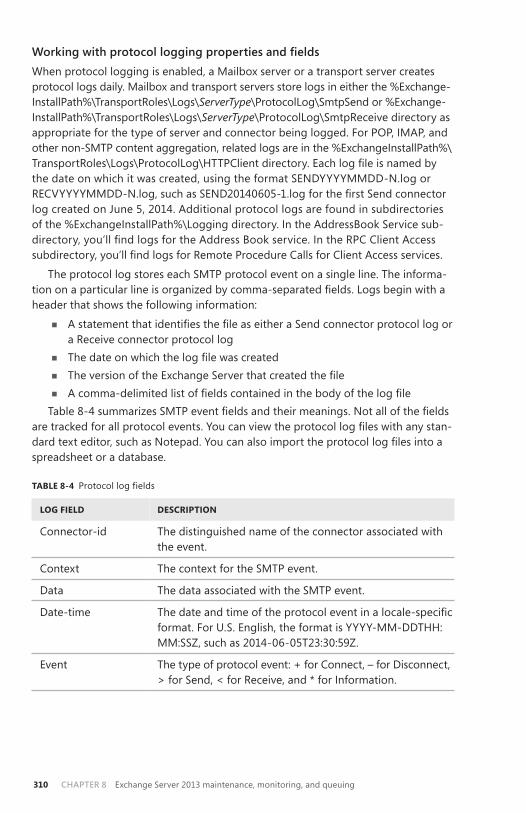
ChAptEr 8 Exchange Server 2013 maintenance, monitoring, and queuing310
Working with protocol logging properties and fieldsWhen protocol logging is enabled, a Mailbox server or a transport server creates protocol logs daily . Mailbox and transport servers store logs in either the %Exchange-InstallPath%\TransportRoles\Logs\ServerType\ProtocolLog\SmtpSend or %Exchange-InstallPath%\TransportRoles\Logs\ServerType\ProtocolLog\SmtpReceive directory as appropriate for the type of server and connector being logged . For POP, IMAP, and other non-SMTP content aggregation, related logs are in the %ExchangeInstallPath%\TransportRoles\Logs\ProtocolLog\HTTPClient directory. Each log file is named by the date on which it was created, using the format SENDYYYYMMDD-N .log or RECVYYYYMMDD-N.log, such as SEND20140605-1.log for the first Send connector log created on June 5, 2014 . Additional protocol logs are found in subdirectories of the %ExchangeInstallPath%\Logging directory . In the AddressBook Service sub-directory, you’ll find logs for the Address Book service. In the RPC Client Access subdirectory, you’ll find logs for Remote Procedure Calls for Client Access services.
The protocol log stores each SMTP protocol event on a single line . The informa-tion on a particular line is organized by comma-separated fields. Logs begin with a header that shows the following information:
■■ A statement that identifies the file as either a Send connector protocol log or a Receive connector protocol log
■■ The date on which the log file was created■■ The version of the Exchange Server that created the file■■ A comma-delimited list of fields contained in the body of the log file
Table 8-4 summarizes SMTP event fields and their meanings. Not all of the fields are tracked for all protocol events. You can view the protocol log files with any stan-dard text editor, such as Notepad. You can also import the protocol log files into a spreadsheet or a database .
TABLE 8-4 Protocol log fields
LOG FIELD DESCRIPTION
Connector-id The distinguished name of the connector associated with the event .
Context The context for the SMTP event .
Data The data associated with the SMTP event .
Date-time The date and time of the protocol event in a locale-specific format . For U .S . English, the format is YYYY-MM-DDTHH: MM:SSZ, such as 2014-06-05T23:30:59Z .
Event The type of protocol event: + for Connect, – for Disconnect, > for Send, < for Receive, and * for Information .

Exchange Server 2013 maintenance, monitoring, and queuing ChAptEr 8 311
LOG FIELD DESCRIPTION
Local-endpoint The local endpoint of the SMTP session, identified by the Internet Protocol (IP) address and Transmission Control Protocol (TCP) port .
Remote-endpoint The remote endpoint of the SMTP session, identified by the IP address and TCP port .
Sequence-number The number of the event within an SMTP session. The first event has a sequence number of 0 .
Session-id The globally unique identifier of the SMTP session. Each event for a particular session has the same identifier.
Optimizing protocol logging for httpClient Access servers have web-based applications and virtual directories that use Microsoft Internet Information Services (IIS) to provide the related services . In IIS 7 .0 and later, protocol logging for HTTP is a feature available when the HTTP Logging module is installed and logging is enabled . By default, this module is installed with IIS and enabled. The default configuration is to use one log file per website per day.
You can view and manage the logging settings by completing the following steps:
1. Start Internet Information Services (IIS) Manager . Start Server Manager, tap or click Tools, and select Internet Information Services (IIS) Manager .
NOTE By default, IIS Manager connects to the services running on the local computer. If you want to connect to a different server, select the Start page node in the left pane, and then tap or click the Connect to A Server link. this starts the Connect to Server Wizard. Follow the prompts to connect to the remote server. Keep in mind that with IIS 7.0 and later, the Windows remote Management Service must be configured and running on the remote server.
2. When you install the Client Access role, the default website is created (or updated) to include the virtual directories and web-based applications used to provide front-end services for Exchange Server . If a server has the Mailbox role, a website named Exchange Back End is created and has virtual directories and web-based applications used to provide back-end services for Exchange Server . In IIS Manager, double-tap or double-click the entry for the server with which you want to work, and then double-tap or double-click Sites .
3. In the left pane, select the website that you want to manage, and then double-tap or double-click Logging in the main pane to open the Logging feature as shown in Figure 8-2 .

ChAptEr 8 Exchange Server 2013 maintenance, monitoring, and queuing312
FIGURE 8-2 Customize logging by selecting the desired options .
4. If all logging options are dimmed and the server is configured for per-site logging, you can tap or click Enable in the Actions pane to enable logging for this site. Otherwise, if logging is configured per server, you need to con-figure logging at the server level rather than at the site level; the procedure is similar .
5. Use the Format selection list to choose one of the following log formats:• W3C Extended Log File Format Writes the log in ASCII text following
the World Wide Web Consortium (W3C) extended log file format. Fields are space-delimited, and each entry is written on a new line . This style is the default . Using this option allows you to include extensive information about clients, servers, and connections .
• Microsoft IIS Log File Format Writes the log in ASCII text following the IIS log file format. Fields are tab-delimited, and each entry is written on a new line . Using this option allows you to collect basic information about clients, servers, and connections .
• NCSA Common Log File Format Writes the log in ASCII text following the National Center for Supercomputing Applications (NCSA) common log file format. Fields are space-delimited, and each entry is written on a new line . When you use this option, log entries are small because only basic information is recorded .
TIP W3C Extended Log File Format is the preferred logging format because you can record detailed information. Unless you’re certain that another format meets your needs, you should use this format.
6. On the Log File panel, use the Directory text box to set the main folder for log files. By default, log files are written to a subdirectory of %SystemDrive% \inetpub\logs\LogFiles .
Exchange Server 2013 maintenance, monitoring, and queuing ChAptEr 8 313
7. On the Log File Rollover panel, select Schedule and then use the related selection list to choose a logging time period . In most cases, you’ll want to create daily or weekly logs, so select either Daily or Weekly .
8. If you selected W3C, tap or click Select Fields, and then choose the fields that should be recorded in the logs . Tap or click Apply .
Working with http protocol logsOn Client Access servers, HTTP protocol log files can help you detect and trace prob-lems with HTTP, Outlook Web App, Microsoft Exchange ActiveSync, and Outlook Anywhere. By default, Exchange Server writes protocol log files to a subdirectory of %SystemDrive%\inetpub\logs\LogFiles . You can use the logs to determine the following:
■■ Whether a client was able to connect to a specified server and, if not, what problem occurred
■■ Whether a client was able to send or receive protocol commands and, if not, what error occurred
■■ Whether a client was able to send or receive data■■ How long it took to establish a connection■■ How long it took to send or receive protocol commands■■ How long it took to send or receive data■■ Whether server errors are occurring and, if so, what types of errors are
occurring■■ Whether server errors are related to Windows or to the protocol itself■■ Whether a user is connecting to the server using the proper logon
informationMost protocol log files are written as ASCII text. This means you can view them
in Notepad or another text editor. You can import these protocol log files into Excel in much the same way as you import tracking logs .
Log files, written as space-delimited or tab-delimited text, begin with a header that shows the following information:
■■ A statement that identifies the protocol or service used to create the file■■ The protocol, service, or software version■■ A date and time stamp■■ A space-delimited or tab-delimited list of fields contained in the body of the
log fileThe name of the subdirectory used for logging depends on the number of web-
sites hosted on a server . Typically, when a server has either the Client Access role or the Mailbox role, the subdirectory name is W3SVC1, which identifies the website as the first created for IIS. When a server has the Client Access role and the Mailbox role, the W3SVC1 subdirectory typically is used for front-end logging and the W3SVC2 subdirectory is used for back-end logging . As discussed in Chapter 9, you also can use Log Parser Studio to work with HTTP protocol logs .

ChAptEr 8 Exchange Server 2013 maintenance, monitoring, and queuing314
Servers can have additional websites or may not have websites created in the expected order, such as when you deploy a Mailbox server and then later add the Client Access role to this server. In this case, you’ll want to confirm the identity of the logging subdirectory by using the following command:
Get-OwaVirtualDirectory -Server ServerID -ShowMailboxVirtualDirectories |fl identity, metabasepath
ServerID is the host name or fully-qualified domain name of the Exchange server to check, such as:
Get-OwaVirtualDirectory -Server MailServer21 -ShowMailboxVirtualDirectories |fl identity, metabasepath
The output will show the website identity and metabase path for the Outlook Web App (OWA) virtual directories created on the server . If the server has front-end and back-end virtual directories for OWA, the output will be similar to the following:
Identity : MAILSERVER21\owa (Exchange Back End) MetabasePath : IIS://MAILSERVER21.pocket-consultant.com/W3SVC/2/ROOT/owa Identity : MAILSERVER21\owa (Default Web Site) MetabasePath : IIS://MAILSERVER21.pocket-consultant.com/W3SVC/1/ROOT/owa
In the output, note that the name of the associated website is shown in parenthesis as part of the identity and the subdirectory path can be extrapolated from the meta-base path . Here, the back-end virtual directory is named Exchange Back End and has the associated subdirectory W3SVC2 (which is shown as W3SVC/2 in the metabase path) . The front-end virtual directory is named Default Web Site and has the associ-ated subdirectory W3SVC1 (which is shown as W3SVC/1 in the metabase path) .
Using connectivity loggingConnectivity logging allows you to track the connection activity of outgoing mes-sage delivery queues . You use connectivity logging to troubleshoot problems with messages reaching their designated destination Mailbox server or recipient .
Configuring connectivity loggingBy default, Exchange Server performs connectivity logging . Exchange Server creates connectivity logs when clients connect to the Front End Transport service on Client Access servers and when clients are proxied or redirected to the Transport service on Mailbox servers . Exchange Server also creates connectivity logs for communica-tions with the mailbox databases on a Mailbox server . Generally, Exchange Server creates connectivity logs to track:
■■ When the Mailbox Transport Delivery receives SMTP messages from the Transport service and connects to local mailbox databases .
■■ When the Mailbox Transport Submission service connects to local mailbox databases to retrieve messages and submit them to the Transport service for delivery .

Exchange Server 2013 maintenance, monitoring, and queuing ChAptEr 8 315
You manage connectivity logging for the Front End Transport service by using Set-FrontEndTransportService, the Transport service by using Set-TransportService, and the Mailbox Transport service by using Set-MailboxTransportService . With any of these cmdlets, you can enable or disable connectivity logging for the service by setting the –ConnectivityLogEnabled parameter to $true or $false, as appropriate . The following example disables connectivity logging for the Transport service on MailServer34:
Set-TransportService -Identity "MailServer34" -ConnectivityLogEnabled $false
TIP You can use the Exchange Admin Center to configure basic logging options for the transport service (but not for other services). to do this, select Servers in the Features pane, and then select Servers. In the main pane, double-tap or double-click the server you want to configure to display the related Properties dialog box. On the transport Logs page select or clear the Enable Connectivity Logging check box. If you enable connectivity logging, you can specify the log file path, and then tap or click OK.
The Front End Transport service, the Transport service, and the Mailbox Transport service can have different connectivity logging settings:
■■ Use the –ConnectivityLogMaxAge parameter to set the maximum log file age . The default maximum age is 30 .00:00:00 .
■■ Use the –ConnectivityLogMaxDirectorySize parameter to set the maximum log directory size . The default maximum log directory size is 250 MB .
■■ Use the –ConnectivityLogMaxFileSize parameter to set the maximum log file size. The default maximum log file size is 10 MB.
■■ Use the –ConnectivityLogPath parameter to move the log directory to a new location . The default logging directory depends on the service with which you are working .
As it does with other logs, Exchange Server overwrites the oldest connectivity logs automatically when tracking logs reach a maximum age or when the maximum log directory size is reached . If you decide to move the protocol log directories, you should create the directories you want to use and set the following required per- missions:
■■ Full Control for the server’s local Administrators group ■■ Full Control for System■■ Full Control for Network Service
Working with connectivity log properties and fieldsExchange Server creates connectivity logs daily and stores them in the %Exchange-InstallPath%\TransportRoles\Logs\ServerType\Connectivity directory . In the default path for logs, the ServerType can be FrontEnd, Mailbox, or Hub . Under FrontEnd \Connectivity, you’ll find logs for the Front End Transport service on Client Access

ChAptEr 8 Exchange Server 2013 maintenance, monitoring, and queuing316
servers. Under Hub\Connectivity, you’ll find logs for the Transport service on Mailbox servers. Under Mailbox\Connectivity, you’ll find a Submission subdirectory containing logs for the Mailbox Transport Submission service on Mailbox servers, and a Deliv-ery subdirectory containing logs for the Mailbox Transport Delivery service on Mail-box servers .
Each log file is named by the date on which it was created, using the format CONNECTLOGYYYYMMDD-N.log, such as CONNECTLOG20140521-1.log for the first connectivity log created on May 21, 2014 . The connectivity log stores outgoing queue connection events on a single line . The information on a particular line is organized by comma-separated fields. Logs begin with a header that shows the following information:
■■ A statement that identifies the file as a connectivity log■■ The date on which the log file was created■■ The version of Exchange Server that created the file■■ A comma-delimited list of fields contained in the body of the log file
Table 8-5 summarizes connectivity logging fields and their meanings. Not all of the fields are tracked for all outgoing queue connection events. You can view the connectivity log files with any standard text editor, such as Notepad. You can also import the connectivity log files into a spreadsheet or a database, as discussed previously .
TABLE 8-5 Connectivity log fields
LOG FIELD DESCRIPTION
Date-time The date and time of the outgoing queue connection event .
Session The globally unique identifier of the SMTP session. Each event for a particular session has the same identifier. For Messaging Application Programming Interface (MAPI) sessions, this field is blank.
Destination The name of the destination Mailbox server, smart host, or domain .
Direction The direction of the event: + for Connect, – for Disconnect, > for Send, and < for Receive .
Description The data associated with the event, including the number and size of messages transmitted, Domain Name Server (DNS) name resolution information, connection success messages, and connection failure messages .
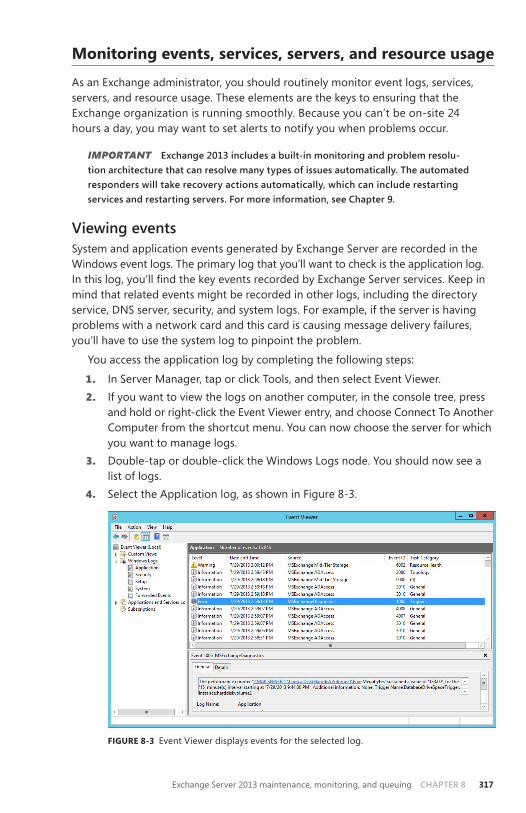
Exchange Server 2013 maintenance, monitoring, and queuing ChAptEr 8 317
Monitoring events, services, servers, and resource usage
As an Exchange administrator, you should routinely monitor event logs, services, servers, and resource usage . These elements are the keys to ensuring that the Exchange organization is running smoothly . Because you can’t be on-site 24 hours a day, you may want to set alerts to notify you when problems occur .
IMPORTANT Exchange 2013 includes a built-in monitoring and problem resolu-tion architecture that can resolve many types of issues automatically. the automated responders will take recovery actions automatically, which can include restarting services and restarting servers. For more information, see Chapter 9.
Viewing eventsSystem and application events generated by Exchange Server are recorded in the Windows event logs . The primary log that you’ll want to check is the application log . In this log, you’ll find the key events recorded by Exchange Server services. Keep in mind that related events might be recorded in other logs, including the directory service, DNS server, security, and system logs . For example, if the server is having problems with a network card and this card is causing message delivery failures, you’ll have to use the system log to pinpoint the problem .
You access the application log by completing the following steps:
1. In Server Manager, tap or click Tools, and then select Event Viewer .2. If you want to view the logs on another computer, in the console tree, press
and hold or right-click the Event Viewer entry, and choose Connect To Another Computer from the shortcut menu . You can now choose the server for which you want to manage logs .
3. Double-tap or double-click the Windows Logs node . You should now see a list of logs .
4. Select the Application log, as shown in Figure 8-3 .
FIGURE 8-3 Event Viewer displays events for the selected log .

ChAptEr 8 Exchange Server 2013 maintenance, monitoring, and queuing318
Entries in the main panel of Event Viewer provide an overview of when, where, and how an event occurred . To obtain detailed information on an event, select its entry . The event level precedes the date and time of the event . Event levels include the following:
■■ Information An informational event, generally related to a successful action
■■ Warning Details for warnings are often useful in preventing future system problems
■■ Error An error such as the failure of a service to startIn addition to level, date, and time, the summary and detailed event entries
provide the following information:■■ Source The application, service, or component that logged the event■■ Event ID An identifier for the specific event■■ Task category The category of the event, which is sometimes used to
further describe the related action■■ User The user account that was logged on when the event occurred■■ Computer The name of the computer on which the event occurred■■ Description In the detailed entries, this event entry provides a text
description of the event■■ Data In the detailed entries, this event entry provides any data or error
code output created by the eventUse the event entries to detect and diagnose Exchange performance problems .
Exchange-related event sources include the following: ■■ ESE Helps you track activities related to the Extensible Storage Engine (ESE)
used by the Information Store . Watch for logging and recovery errors, which might indicate a problem with a database or a recovery action . For example, Event ID 300 indicates the database engine initiated recovery steps; Event ID 301 indicates the database engine has begun replaying a log file for a mail-box database; and Event ID 302 indicates the database engine has success-fully completed recovery steps . If you want to track the status of online defragmentation, look for Event ID 703 . Additional related sources include ESENT and ESE Backup .
■■ MSExchange ActiveSync Helps you track activities related to the Exchange ActiveSync and connection requests from mobile devices . For example, Event ID 1021 indicates a non-compliant device is trying to connect with Exchange ActiveSync .
■■ MSExchange Antimalware, MSExchange Antispam, MSExchange Anti-spam Update Helps you track activities related to anti-malware and anti-spam agents. When you’ve configured Exchange to use Microsoft Update to retrieve anti-spam updates, watch for errors regarding update failure. You might need to change the Microsoft Update configuration or the way updates are retrieved .
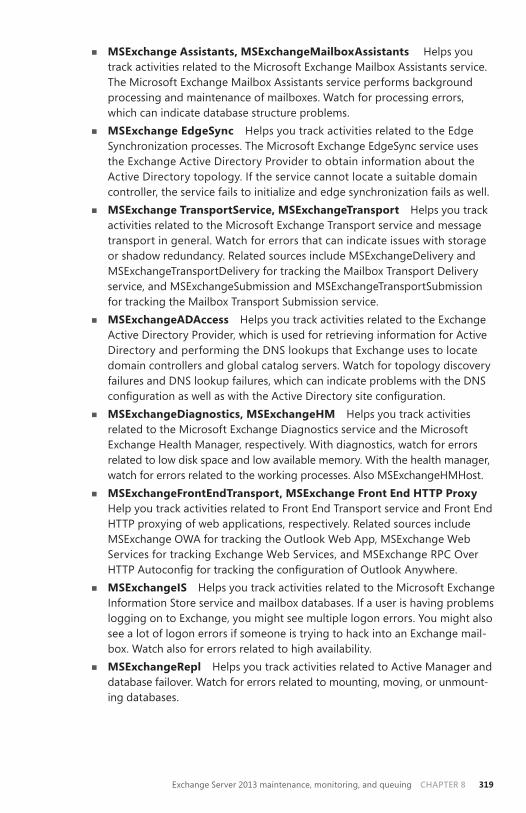
Exchange Server 2013 maintenance, monitoring, and queuing ChAptEr 8 319
■■ MSExchange Assistants, MSExchangeMailboxAssistants Helps you track activities related to the Microsoft Exchange Mailbox Assistants service . The Microsoft Exchange Mailbox Assistants service performs background processing and maintenance of mailboxes . Watch for processing errors, which can indicate database structure problems .
■■ MSExchange EdgeSync Helps you track activities related to the Edge Synchronization processes . The Microsoft Exchange EdgeSync service uses the Exchange Active Directory Provider to obtain information about the Active Directory topology . If the service cannot locate a suitable domain controller, the service fails to initialize and edge synchronization fails as well .
■■ MSExchange TransportService, MSExchangeTransport Helps you track activities related to the Microsoft Exchange Transport service and message transport in general . Watch for errors that can indicate issues with storage or shadow redundancy . Related sources include MSExchangeDelivery and MSExchangeTransportDelivery for tracking the Mailbox Transport Delivery service, and MSExchangeSubmission and MSExchangeTransportSubmission for tracking the Mailbox Transport Submission service .
■■ MSExchangeADAccess Helps you track activities related to the Exchange Active Directory Provider, which is used for retrieving information for Active Directory and performing the DNS lookups that Exchange uses to locate domain controllers and global catalog servers . Watch for topology discovery failures and DNS lookup failures, which can indicate problems with the DNS configuration as well as with the Active Directory site configuration.
■■ MSExchangeDiagnostics, MSExchangeHM Helps you track activities related to the Microsoft Exchange Diagnostics service and the Microsoft Exchange Health Manager, respectively . With diagnostics, watch for errors related to low disk space and low available memory . With the health manager, watch for errors related to the working processes . Also MSExchangeHMHost .
■■ MSExchangeFrontEndTransport, MSExchange Front End HTTP Proxy Help you track activities related to Front End Transport service and Front End HTTP proxying of web applications, respectively . Related sources include MSExchange OWA for tracking the Outlook Web App, MSExchange Web Services for tracking Exchange Web Services, and MSExchange RPC Over HTTP Autoconfig for tracking the configuration of Outlook Anywhere.
■■ MSExchangeIS Helps you track activities related to the Microsoft Exchange Information Store service and mailbox databases . If a user is having problems logging on to Exchange, you might see multiple logon errors . You might also see a lot of logon errors if someone is trying to hack into an Exchange mail-box . Watch also for errors related to high availability .
■■ MSExchangeRepl Helps you track activities related to Active Manager and database failover . Watch for errors related to mounting, moving, or unmount-ing databases .
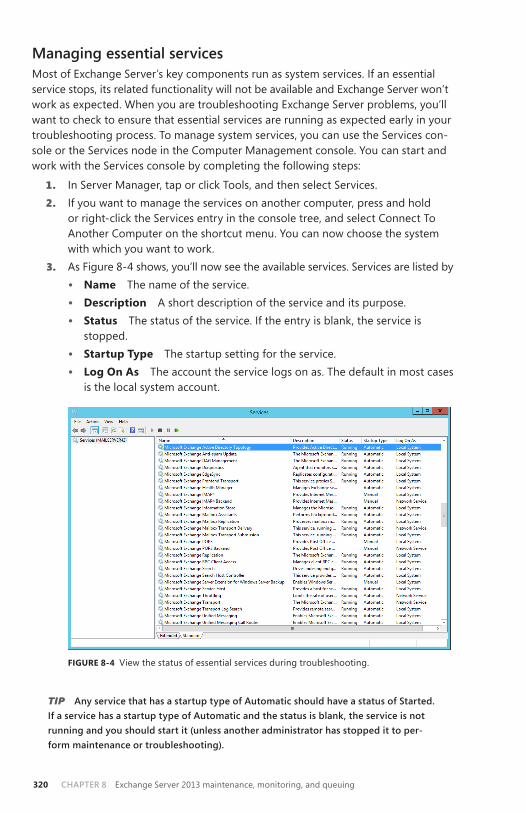
ChAptEr 8 Exchange Server 2013 maintenance, monitoring, and queuing320
Managing essential servicesMost of Exchange Server’s key components run as system services . If an essential service stops, its related functionality will not be available and Exchange Server won’t work as expected . When you are troubleshooting Exchange Server problems, you’ll want to check to ensure that essential services are running as expected early in your troubleshooting process . To manage system services, you can use the Services con-sole or the Services node in the Computer Management console . You can start and work with the Services console by completing the following steps:
1. In Server Manager, tap or click Tools, and then select Services .2. If you want to manage the services on another computer, press and hold
or right-click the Services entry in the console tree, and select Connect To Another Computer on the shortcut menu . You can now choose the system with which you want to work .
3. As Figure 8-4 shows, you’ll now see the available services . Services are listed by• Name The name of the service .• Description A short description of the service and its purpose .• Status The status of the service . If the entry is blank, the service is
stopped .• Startup Type The startup setting for the service .• Log On As The account the service logs on as . The default in most cases
is the local system account .
FIGURE 8-4 View the status of essential services during troubleshooting .
TIP Any service that has a startup type of Automatic should have a status of Started. If a service has a startup type of Automatic and the status is blank, the service is not running and you should start it (unless another administrator has stopped it to per-form maintenance or troubleshooting).

Exchange Server 2013 maintenance, monitoring, and queuing ChAptEr 8 321
If a service is stopped and it should be started, you need to restart it . If you sus-pect a problem with a service, you can try to diagnose the problem as discussed in Chapter 9, and you might also want to stop and then restart it . To start, stop, or restart a service, complete the following steps:
1. Access the Services console .2. Press and hold or right-click the service you want to manage, and then select
Start, Stop, or Restart, as appropriate .After you start or restart a service, you should check the event logs to see if there
are errors related to the service. Any related errors you find might help you identify why the service wasn’t running . Keep in mind that Exchange 2013 automatically restarts services that are found to not be responding or otherwise need restarting as part of the Managed Availability architecture . The automated processes can also reset IIS and restart servers . Although these automated processes work well, they won’t always resolve service issues as quickly as you could by manually intervening .
Monitoring Exchange messaging componentsWhen you are troubleshooting or optimizing a server for performance, you can use performance monitoring to track the activities of Exchange messaging components . Performance Monitor graphically displays statistics for the set of performance param-eters you’ve selected for display . These performance parameters are referred to as counters . Performance Monitor displays information only for the counters you’re tracking . Thousands of counters are available, and these counters are organized into groupings called performance objects .
When you install Exchange Server 2013 on a computer, Performance Monitor is updated with a set of objects and counters for tracking Exchange performance. These objects and counters are registered during setup in the Win32 performance subsystem and the Windows registry. You’ll find several hundred related perfor-mance objects for everything from the Microsoft Exchange Active Manager to the Microsoft Exchange Journaling Agent to Microsoft Exchange Outlook Web App .
You can select which counters you want to monitor by completing the following steps:
1. In Server Manager, select Tools, and then select Performance Monitor . Next, select the Performance Monitor entry in the left pane, as shown in Figure 8-5 .
2. The Performance Monitor tool has several views and view types . Ensure that you are viewing current activity by tapping or clicking View Current Activity on the toolbar or pressing Ctrl+T . You can switch between the view types (Line, Histogram Bar, and Report) by tapping or clicking the Change Graph Type button or pressing Ctrl+G .
3. To add counters, tap or click Add on the toolbar or press Ctrl+N . This displays the Add Counters dialog box shown in Figure 8-6 .
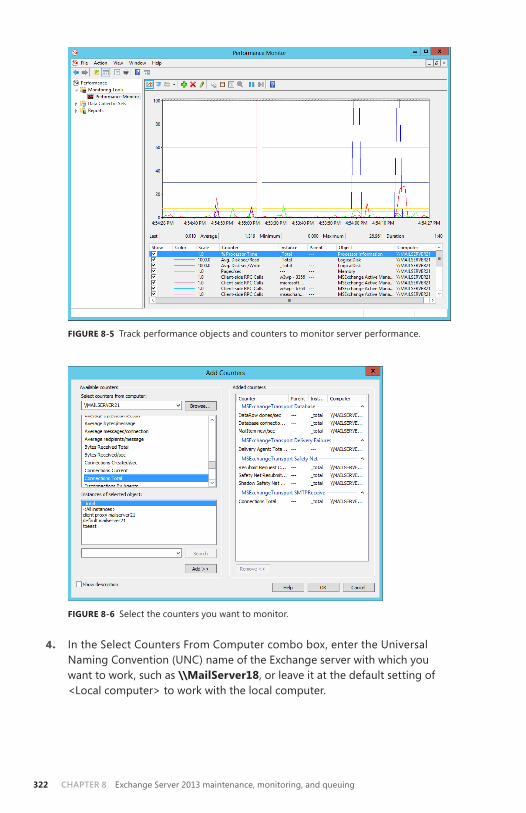
ChAptEr 8 Exchange Server 2013 maintenance, monitoring, and queuing322
FIGURE 8-5 Track performance objects and counters to monitor server performance.
FIGURE 8-6 Select the counters you want to monitor .
4. In the Select Counters From Computer combo box, enter the Universal Naming Convention (UNC) name of the Exchange server with which you want to work, such as \\MailServer18, or leave it at the default setting of <Local computer> to work with the local computer .
Exchange Server 2013 maintenance, monitoring, and queuing ChAptEr 8 323
NOTE You need to be at least a member of the performance Monitor Users group in the domain or the local computer to perform remote monitoring. When you use performance logging, you need to be at least a member of the performance Log Users group in the domain or the local computer to work with performance logs on remote computers.
5. In the Available Counters panel, performance objects are listed alphabeti-cally. If you select an object entry by tapping or clicking it, all related count-ers are selected. If you expand an object entry, you can see all the related counters and you can then select individual counters by tapping or clicking them . For example, you can expand the entry for the MSExchangeTransport Database object and then select the DataRow clones/sec, Database Connec-tions Current and MailItem new/sec counters .
6. When you select an object or any of its counters, you see the related instances, if any . Choose All Instances to select all counter instances for monitoring separately. Choose _total to view a single combined value reflecting data for all available instances . Or select one or more counter instances to monitor . For example, when you select MSExchangeIS Store, you’ll find separate instances for each database on the server and you could select an individual database to specifically track that database.
7. When you’ve selected an object or a group of counters for an object in addition to the object instances, tap or click Add to add the counters to the graph . Repeat steps 5 through 6 to add other performance parameters .
8. Tap or click OK when you’re finished adding counters. You can delete coun-ters later by tapping or clicking their entry in the lower portion of the Perfor-mance window, and then tapping or clicking Delete .
Using performance alertingData Collector Sets are used to collect performance data. When you configure Data Collector Sets to alert you when specific criteria are met, you are using performance alerting . Windows performance alerting provides a fully automated method for monitoring server performance and reporting when certain performance thresholds are reached . You can use performance alerting to track the following:
■■ Memory usage■■ CPU utilization■■ Disk usage■■ Messaging components
Using notifications, you can then provide automatic notification when a server exceeds a threshold value .
tracking memory usagePhysical and virtual memory is critical to normal system operation . When a server runs low on memory, system performance can suffer and message processing can grind to a halt. To counter this problem, you should configure performance alerting
ChAptEr 8 Exchange Server 2013 maintenance, monitoring, and queuing324
to watch memory usage . You could then increase the amount of virtual memory available on the server or add more random access memory (RAM) as needed . However, keep in mind that increasing virtual memory isn’t something you should do without careful planning . For detailed guidance on tuning virtual memory, see Chapter 10, “Performance Monitoring and Tuning,” in Windows Server 2012 Inside Out (Microsoft Press, 2012) .
You configure a memory alert by completing the following steps:
1. In Server Manager, select Tools, and then select Performance Monitor . Next, expand the Data Collector Sets node, and then select User Defined. You should see a list of current alerts (if any) in the right pane .
2. Press and hold or right-click the User-Defined node in the left pane, point to New, and then choose Data Collector Set .
3. In the Create New Data Collector Set Wizard, type a name for the Data Collector Set, such as Memory Usage Alert . Select the Create Manually option, and then tap or click Next .
4. On the What Type Of Data Do You Want To Include page, the Create Data Logs option is selected by default . Select the Performance Counter Alert option, and then tap or click Next .
5. On the Which Performance Counters Would You Like To Monitor page, tap or click Add . This displays the Add Counter dialog box . Because you are con-figuring memory alerts, expand the Memory object in the Performance Object list. Select Available MBytes by tapping or clicking it, and then tap or click Add .
6. Expand the Paging File object in the Performance Object list. Tap or click %Usage. In the Instances Of Selected Object panel, select _Total, and then tap or click Add . Tap or click OK .
7. On the Which Performance Counters Would You Like To Monitor page, you’ll see the counters you’ve added . In the Performance Counters panel, select Available MBytes (as shown in Figure 8-7), set the Alert When list to Below, and then enter a Limit value that is approximately 5 to 8 percent of the total physical memory (RAM) on the server for which you are configuring alerting. For example, if the server has 8 GB of RAM, you could set the value to 512 MB to alert you when the server is running low on available memory .
8. In the Performance Counters panel, select %Usage . Set the Alert When list to Above, and then type 98 as the Limit value . This ensures that you are alerted when more than 98 percent of the paging file is being used.
9. Tap or click Next, and then tap or click Finish . This saves the Data Collector Set and closes the wizard .
10. In the left pane, under User Defined, select the related Data Collector Set, and then double-tap or double-click the data collector for the alert in the main pane . This displays the data collector Properties dialog box .

Exchange Server 2013 maintenance, monitoring, and queuing ChAptEr 8 325
FIGURE 8-7 Configure the alert threshold .
11. On the Alerts tab, use the Sample Interval options to set a sample interval, as shown in Figure 8-8. The sample interval specifies when new data is collected . Don’t sample too frequently, however, because you’ll use system resources and might cause the server to seem unresponsive . By default, Performance Monitor checks the values of the configured counters every 15 seconds . A better value might be once every 10 to 30 minutes . Generally, you’ll want to track performance periodically over several hours at a minimum and during a variety of usage conditions .
FIGURE 8-8 Set the sample interval .
12. If you want to log an event rather than be alerted every time an alert limit is reached, on the Alert Action tab, select the Log An Entry In The Application Event Log check box . Selecting this option ensures that an event is logged when the alert occurs but does not alert you via the console .
13. Tap or click OK to close the Properties dialog box . By default, alerting is con-figured to start manually. To start alerting, select the User Defined node in the left pane, tap or click the alert in the main pane to select it, and then tap or click the Start button on the toolbar .
ChAptEr 8 Exchange Server 2013 maintenance, monitoring, and queuing326
To manage an alert, select the User Defined node in the left pane, press and hold or right-click the alert in the main pane, and then select one of the following options:
■■ Delete Deletes the alert■■ Properties Displays the alert’s Properties dialog box■■ Start Activates alerting■■ Stop Halts alerting
tracking CpU utilizationYou can use a CPU utilization alert to track the usage of a server’s CPUs . When CPU use is too high, Exchange Server can’t effectively process messages or manage other critical functions . As a result, performance can suffer greatly . For example, CPU utiliza-tion at 100 percent for an extended period of time can be an indicator of serious problems on a server . To recover, you might need to use Task Manager to end the process or processes with high CPU use, or you might need to take other corrective actions to resolve the problem, such as closing applications you are running while logged on to the server .
You’ll also want to closely track process threads that are waiting to execute . A relatively high number of waiting threads can be an indicator that a server’s proces-sors need to be upgraded .
You configure a CPU utilization alert by completing the following steps:
1. In Server Manager, select Tools, and then select Performance Monitor . Next, expand the Data Collector Sets node, and then select User Defined. You should see a list of current alerts (if any) in the right pane .
2. Press and hold or right-click the User-Defined node in the left pane, point to New, and then choose Data Collector Set .
3. In the Create New Data Collector Set Wizard, type a name for the Data Col-lector Set, such as CPU Utilization Alert . Select the Create Manually option, and then tap or click Next .
4. On the What Type Of Data Do You Want To Include page, the Create Data Logs option is selected by default . Select the Performance Counter Alert option, and then tap or click Next .
5. On the Which Performance Counters Would You Like To Monitor page, tap or click Add . This displays the Add Counter dialog box . Because you are con-figuring CPU alerts, expand the Processor object in the Performance Object list. Tap or click % Processor Time. In the Instances Of Selected Object panel, select _Total, and then tap or click Add .
6. Expand the System object in the Performance Object list. Tap or click Proces-sor Queue Length, and then tap or click Add . Tap or click OK .
7. On the Which Performance Counters Would You Like To Monitor page, you’ll see the counters you’ve added . Select % Processor Time . Then set the Alert When list to Above, and type 98 as the Limit value . This ensures that you are alerted when processor use is more than 98 percent .

Exchange Server 2013 maintenance, monitoring, and queuing ChAptEr 8 327
8. In the Performance Counters panel, select Processor Queue Length . Then set the Alert When list to Above, and type 3 as the Limit value . This ensures that you are alerted when more than three processes are waiting to execute, which can be an indicator that a server’s processors need to be upgraded .
9. Tap or click Next, and then tap or click Finish . This saves the Data Collector Set and closes the wizard .
10. Finish configuring the alert by following steps 10 through 13 under “Tracking memory usage” earlier in this chapter .
tracking disk usageExchange Server uses disk space for data storage, logging, tracking, and virtual memory . To ensure ample disk space is always available, Exchange Server monitors free disk space. If free disk space drops below specific thresholds, Exchange will gracefully shut itself down . When Exchange is in this state, it is likely that data could get lost . To prevent serious problems, you should monitor free disk space closely on all drives used by Exchange Server .
You’ll also want to track closely the number of system requests that are waiting for disk access . A relatively high value for a particular disk can affect server perfor-mance and is also a good indicator that a disk is being overutilized or that there may be some problem with the disk . To resolve this problem, you’ll want to try to shift part of the disk’s workload to other disks, such as by moving databases, logs, or both .
You configure disk usage alerting by completing the following steps:
1. In Server Manager, select Tools, and then select Performance Monitor . Next, expand the Data Collector Sets node, and then select User Defined. You should see a list of current alerts (if any) in the right pane .
2. Press and hold or right-click the User-Defined node in the left pane, point to New, and then choose Data Collector Set .
3. In the Create New Data Collector Set Wizard, type a name for the Data Col-lector Set, such as Disk Usage Alert . Select the Create Manually option and then tap or click Next .
4. On the What Type Of Data Do You Want To Include page, the Create Data Logs option is selected by default . Select the Performance Counter Alert option, and then tap or click Next .
5. On the Which Performance Counters Would You Like To Monitor page, tap or click Add . This displays the Add Counter dialog box . Because you are con-figuring disk alerts, expand the LogicalDisk object in the Performance Object list. Tap or click % Free Space. In the Instances Of Selected Object panel, select all individual logical disk instances that you want to track . Do not select _Total or <All Instances> . Tap or click Add .
6. Expand the PhysicalDisk object in the Performance Object list. Tap or click Current Disk Queue Length. In the Instances Of Selected Object panel, select all individual physical disk instances except _Total, and then tap or click Add . Tap or click OK .

ChAptEr 8 Exchange Server 2013 maintenance, monitoring, and queuing328
7. On the Which Performance Counters Would You Like To Monitor page, you’ll see the counters you’ve added. Select the first logical disk instance, set the Alert When list to Below, and then type 5 as the Limit value . This ensures that you are alerted when available free space is less than 5 percent . Repeat this procedure for each logical disk .
8. In the Performance Counters panel, select the first physical disk instance, set the Alert When list to Above, and then type 2 as the Limit value . This ensures that you are alerted when more than two system requests are waiting for disk access . Repeat this procedure for each physical disk .
9. Tap or click Next, and then tap or click Finish . This saves the Data Collector Set and closes the wizard .
10. Finish configuring the alert by following steps 10 through 13 under “Tracking memory usage” earlier in the chapter .
Working with queues
As an Exchange administrator, it’s your responsibility to monitor Exchange queues regularly . Mailbox and Edge Transport servers use queues to hold messages while they are processing them for routing and delivery . If messages remain in a queue for an extended period, problems could occur . For example, if an Exchange server is unable to connect to the network, you’ll find that messages aren’t being cleared out of queues .
Understanding Exchange queuesQueues are temporary holding locations for messages that are waiting to be proc-essed, and Exchange Server 2013 uses an Extensible Storage Engine (ESE) database for queue storage . Exchange Server 2013 uses the following types of queues:
■■ Submission queue The submission queue is a persistent queue that is used by the Exchange Categorizer (a transport component) to temporarily store all messages that have to be resolved, routed, and processed by transport agents . All messages that are received by a transport server enter processing in the submission queue . Messages are submitted through SMTP-receive, the Pickup directory, or the store driver . Each transport server has only one submission queue . Messages that are in the submission queue cannot be in other stan-dard queues at the same time .Edge Transport servers use the Categorizer to route messages to the appro-priate destinations . Mailbox servers use the Categorizer to expand distribu-tion lists, to identify alternative recipients, and to apply forwarding addresses . After the Categorizer retrieves the necessary information about recipients, it uses that information to apply policies, route the message, and perform content conversion . After categorization, the transport server moves the message to a delivery queue or to the Unreachable queue .
Exchange Server 2013 maintenance, monitoring, and queuing ChAptEr 8 329
■■ Mailbox delivery queue Mailbox delivery queues hold messages that are being delivered to a Mailbox server by using encrypted Exchange RPC . Only Mailbox servers have mailbox delivery queues, and they use the queue to temporarily store messages that are being delivered to mailbox recipients whose mailbox data is stored on a Mailbox server that is located in the same site as the Mailbox server . Mailbox servers have one mailbox delivery queue for each destination Mailbox server associated with messages currently being routed . After queuing the message, the Mailbox server delivers the messages to the distinguished name of the mailbox database .
■■ Relay queue Relay queues hold messages that are being relayed to another server . Only Mailbox servers have relay queues, and they use the queue to temporarily store messages that are being delivered to mailbox recipients whose mailbox data is being relayed through a connector, designated expan-sion server, or non-SMTP gateway . Mailbox servers have one relay queue for each connector, designated expansion server, or non-SMTP gateway . After queuing a message, the Mailbox server relays the message .
■■ Remote delivery queue Remote delivery queues hold messages that are being delivered to a remote server by using SMTP . Edge Transport servers can have remote delivery queues, and they use the queue to temporarily store messages that are being routed to remote destinations . On an Edge Transport server, these destinations are external SMTP domains or SMTP connectors . Edge Transport servers have one remote delivery queue for each remote destination associated with messages currently being routed . After queuing the message, the transport server delivers it to the appropriate server, smart host, IP address, or Active Directory site . Mailbox servers running Exchange 2013 do not have remote delivery queues .
■■ Poison message queue The poison message queue is used to hold mes-sages that are detected to be potentially harmful to Exchange Server 2013 after a server failure . Messages that contain errors that are potentially fatal to Exchange Server 2013 are delivered to the poison message queue . Each Mailbox server has one poison message queue, as does each Edge Transport server . Although this queue is persistent, it typically is empty and, as a result, is not displayed in queue viewing interfaces . By default, all messages in the poison message queue are suspended and can be manually deleted .
■■ Shadow redundancy queue The shadow redundancy queue is used to prevent the loss of messages that are in transit by storing queued messages until the next transport server along the route reports a successful delivery of the message . If the next transport server doesn’t report successful deliv-ery, the message is resubmitted for delivery . This queue is nonpersistent . Mailbox and Edge Transport servers have one for each hop to which the server delivered the primary message .
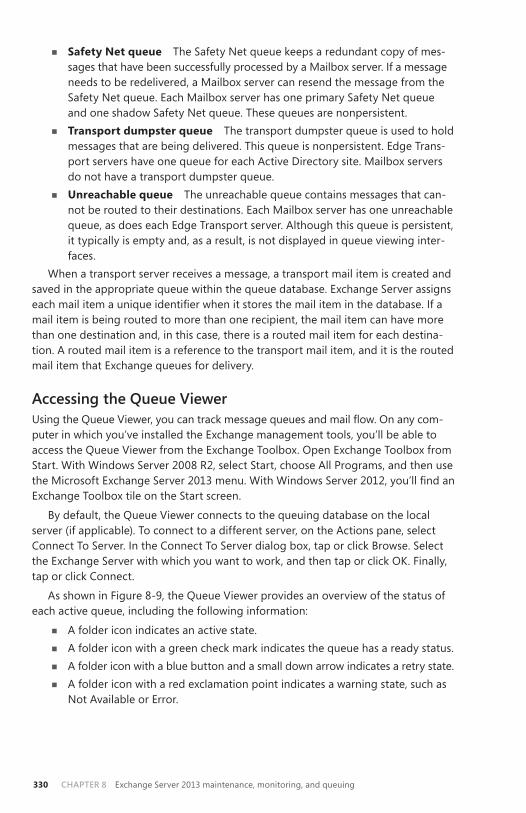
ChAptEr 8 Exchange Server 2013 maintenance, monitoring, and queuing330
■■ Safety Net queue The Safety Net queue keeps a redundant copy of mes-sages that have been successfully processed by a Mailbox server . If a message needs to be redelivered, a Mailbox server can resend the message from the Safety Net queue . Each Mailbox server has one primary Safety Net queue and one shadow Safety Net queue . These queues are nonpersistent .
■■ Transport dumpster queue The transport dumpster queue is used to hold messages that are being delivered . This queue is nonpersistent . Edge Trans-port servers have one queue for each Active Directory site . Mailbox servers do not have a transport dumpster queue .
■■ Unreachable queue The unreachable queue contains messages that can-not be routed to their destinations . Each Mailbox server has one unreachable queue, as does each Edge Transport server . Although this queue is persistent, it typically is empty and, as a result, is not displayed in queue viewing inter- faces .
When a transport server receives a message, a transport mail item is created and saved in the appropriate queue within the queue database . Exchange Server assigns each mail item a unique identifier when it stores the mail item in the database. If a mail item is being routed to more than one recipient, the mail item can have more than one destination and, in this case, there is a routed mail item for each destina-tion . A routed mail item is a reference to the transport mail item, and it is the routed mail item that Exchange queues for delivery .
Accessing the Queue ViewerUsing the Queue Viewer, you can track message queues and mail flow. On any com-puter in which you’ve installed the Exchange management tools, you’ll be able to access the Queue Viewer from the Exchange Toolbox . Open Exchange Toolbox from Start . With Windows Server 2008 R2, select Start, choose All Programs, and then use the Microsoft Exchange Server 2013 menu. With Windows Server 2012, you’ll find an Exchange Toolbox tile on the Start screen .
By default, the Queue Viewer connects to the queuing database on the local server (if applicable) . To connect to a different server, on the Actions pane, select Connect To Server . In the Connect To Server dialog box, tap or click Browse . Select the Exchange Server with which you want to work, and then tap or click OK . Finally, tap or click Connect .
As shown in Figure 8-9, the Queue Viewer provides an overview of the status of each active queue, including the following information:
■■ A folder icon indicates an active state .■■ A folder icon with a green check mark indicates the queue has a ready status .■■ A folder icon with a blue button and a small down arrow indicates a retry state .■■ A folder icon with a red exclamation point indicates a warning state, such as
Not Available or Error .
Exchange Server 2013 maintenance, monitoring, and queuing ChAptEr 8 331
FIGURE 8-9 The Queue Viewer provides an overview of the status of each active queue .
Managing queues
You usually won’t see messages in queues because they’re processed and routed quickly . Messages come into a queue, Exchange Server performs a lookup or estab-lishes a connection, and then Exchange Server either moves the message to a new queue or delivers it to its destination .
Understanding queue summaries and queue statesMessages remain in a queue when there’s a problem or if they have been suspended by an administrator . To check for problem messages, use the Queue Viewer to exam-ine the number of messages in the queues . If you see a queue with a consistent or growing number of messages, there might be a problem . Again, normally, messages should come into a queue and then be processed quickly . Because of this, the num-ber of messages in a queue should gradually decrease over time as the messages are processed, provided no new messages come into the queue .
Whenever you tap or click the Queues tab in the Queue Viewer, you get a sum-mary of the currently available queues for the selected server . Although queue summaries provide important details for troubleshooting message flow problems, you do have to know what to look for . The connection status is the key information to look at first. This value tells you the state of the queue. States you’ll see include the following:
■■ Active An active queue has messages that are being transported .■■ Ready A ready queue is needed to allow messages to be transported .
When queues are ready, they can have a connection allocated to them .■■ Retry A connection attempt has failed and the server is waiting to retry .■■ Suspended The queue is suspended, and none of its messages can be
processed for routing . Messages can enter the queue, but only if the Exchange Categorizer is running . You must resume the queue to resume normal queue operations .
ChAptEr 8 Exchange Server 2013 maintenance, monitoring, and queuing332
Administrators can choose to enable or disable connections to a queue by press-ing and holding or right-clicking the queue and selecting Suspend . If a queue is suspended, it’s unable to route and deliver messages .
You can change the queue state to Ready by pressing and holding or right-clicking the queue and selecting Resume . When you do this, Exchange Server should immedi-ately enable the queue, which allows messages to be routed and delivered . If a queue is in the retry state, you can force an immediate retry by using the Retry command .
Other summary information that you might find useful in troubleshooting include the following:
■■ Delivery Type Tells you what type of recipient messages are being queued for delivery .
■■ Next Hop Domain Tells you the next destination of a delivery queue . For mailbox delivery, relay, and remote delivery queues, this field tells you the next hop domain . Messages queued for delivery to an EdgeSync server list the associated site and destination, such as EdgeSync–Default-First-Site To Internet .
■■ Message Count Tells you the total number of messages waiting in the queue . If you see a large number, you might have a connectivity or routing problem .
■■ Next Retry Time When the connection state is Retry, this column tells you when another connection attempt will be made . You can tap or click the Retry command to attempt a connection immediately .
■■ Last Retry Time When the connection state is Retry, this column tells you when the last retry attempt was made .
■■ Last Error Tells you the error code and details of the last error to occur in a particular queue . This information can help you determine why a queue is having delivery problems .
You can add or remove columns by using the Add/Remove Columns dialog box . Display this dialog box by choosing View in the Actions pane and then selecting Add/Remove Columns .
REAL WORLD Queue Viewer uses Windows powerShell to perform all actions, includ-ing displaying and refreshing queue data. to display the commands Queue Viewer is using, choose View in the Actions pane, and then select View Exchange Management Shell Command Log.
refreshing the queue viewUse the queue summaries and queue state information to help you find queuing problems, as discussed in the “Understanding queue summaries and queue states” section earlier in this chapter . By default, the queue view is refreshed every 30 sec-onds, and the maximum number of message items that can be listed on each page is 1,000 .

Exchange Server 2013 maintenance, monitoring, and queuing ChAptEr 8 333
To change the viewing options, follow these steps:
1. In the Queue Viewer, on the View menu, tap or click Options .2. To turn off automatic refresh, clear the Auto-Refresh Screen check box . Other-
wise, enable automatic refresh by selecting the Auto-Refresh Screen check box .3. In the Refresh Interval text box, type a specific refresh rate in seconds.4. Type the desired maximum number of messaging items to be displayed per
page in the Number Of Items To Display text box . Tap or click OK .
Working with messages in queuesTo manage queues, you must enumerate messages . This process allows you to examine queue contents and perform management tasks on messages within a particular queue .
The easiest way to enumerate messages is to do so in sets of 1,000 . To display the first 1,000 messages in a queue, follow these steps:
1. On the Queues tab in the Queue Viewer, you should see a list of available queues. Double-tap or double-click a queue to enumerate the first 1,000 messages, as shown in Figure 8-10 .
FIGURE 8-10 The Queue Viewer provides a summary for each message in the selected queue .
2. After you enumerate messages in a queue, you can examine message details by double-tapping or double-clicking the entries for individual messages . This enumerates the first 1,000 messages in the selected queue by filtering the message queues based on the queue identifier of the selected queue.
You can also create a filter to search for specific types of messages. To do this, follow these steps:
1. Double-tap or double-click the queue with which you want to work . This enumerates the first 1,000 messages in the selected queue by filtering the message queues based on the queue identifier of the selected queue.
2. Tap or click Add Expression. Use the first selection list to specify the field you want to use for filtering messages. You can filter messages by the following criteria: Date Received, Expiration Time, From Address, Internet Message ID,

ChAptEr 8 Exchange Server 2013 maintenance, monitoring, and queuing334
Last Error, Message Source Name, Queue ID, SCL, Size (KB), Source IP, Status, and Subject.
3. Use the second selection list to specify the filter criteria. The available filter criteria depend on the filter field and include Equals, Does Not Equal, Con-tains, Does Not Contain, Greater Than, and Less Than .
4. Use the text box provided to specify the exact criteria to match . For example, if you are filtering messages using the Status field, you might want to see all messages in which the Status field equals Retry.
5. To apply the new filter criteria, tap or click Apply Filter.
Forcing connections to queuesIn many cases, you can change the queue state to Ready by forcing a connection . Simply press and hold or right-click the queue, and then select Retry . When you do this, Exchange Server should immediately enable connections to the queue, and this should allow messages to be routed to and delivered from the queue .
Suspending and resuming queuesWhen you suspend a queue, all new message transfer activity out of that queue stops and only messages being processed will be delivered . This means that mes-sages can continue to enter the queue, but no new messages will leave it . To restore normal operations, you must resume the queue .
You suspend and resume a queue by completing the following steps:
1. On the Queues tab in the Queue Viewer, you should see a list of available queues . Press and hold or right-click a queue, and then select Suspend .
2. When you’re done troubleshooting, press and hold or right-click the queue, and then select Resume .
Another way to suspend messages in a queue is to do so selectively . In this way, you can control the transport of a single message or several messages that might be causing problems on the server . For example, if a large message is delaying the delivery of other messages, you can suspend that message until other messages have left the queue . Afterward, you can resume the message to resume normal delivery .
To suspend and then resume individual messages, complete the following steps:
1. On the Messages tab in the Queue Viewer, you should see a list of queued messages .
2. Press and hold or right-click the message you want to suspend, and then select Suspend . You can select multiple messages by using Shift and Ctrl .
3. When you’re ready to resume delivery of the message, press and hold or right-click the suspended message, and then select Resume .

Exchange Server 2013 maintenance, monitoring, and queuing ChAptEr 8 335
Deleting messages from queuesYou can remove messages from queues if necessary . To do this, follow these steps:
1. On the Messages tab in the Queue Viewer, you should see a list of queued messages .
2. Press and hold or right-click the message you want to remove . You can select multiple messages by using Shift and Ctrl, and then press and hold or right-click . Select one of the following options from the shortcut menu:• Remove (With NDR) Deletes the selected messages from the queue,
and notifies the sender with a nondelivery report (NDR)• Remove (Without Sending NDR) Deletes the message or messages
from the queue without sending an NDR to the sender3. When prompted, tap or click Yes to confirm the deletion.Deleting messages from a queue removes them from the messaging system
permanently . You can’t recover the deleted messages .


337
CHAP TER 9
troubleshooting Exchange Server 2013
■■ Troubleshooting essentials 337
■■ Diagnosing and resolving problems 348
■■ Using Log Parser Studio 359
Microsoft Exchange Server 2013 is critically important to your organization, and to be a successful Exchange administrator, you need to know how to
diagnose and resolve problems as quickly as possible . Throughout this book, I’ve discussed techniques you can use to configure, maintain, and troubleshoot Exchange Server 2013 . In this chapter, I discuss additional techniques you can use to perform comprehensive troubleshooting .
Troubleshooting essentials
Client Access and Mailbox servers running Exchange 2013 can experience many types of issues that require troubleshooting to resolve . These issues can range from performance problems, to denied logins, to service outages . To help you resolve problems as they occur, you need a solid understanding of Exchange arch i-tecture, which I’ve covered throughout this book as part of the core discussion . Now let’s look at architecture components specific to maintaining, diagnosing, and resolving Exchange services .
tracking server healthIn Exchange Server 2013, the Managed Availability architecture is used to auto-matically detect and correct many types of system problems with a goal of helping to ensure the overall availability of Exchange services . Managed Availability is imple-mented as part of both the Client Access server role and the Mailbox server role . All servers running Exchange 2013 have this architecture .
As part of Managed Availability, hundreds of probes, monitors, and responders are running constantly on Exchange 2013 to analyze, monitor, and maintain services . If a problem is identified, it often can be fixed automatically. Figure 9-1 provides

ChAptEr 9 Troubleshooting Exchange Server 2013 338
an overview of how Managed Availability works . Managed Availability has three asynchronous components:
■■ Probe engine Takes measurements on the server and collects data samples . The collected data flows to the monitor engine.
■■ Monitor engine Uses the measurements and collected data to determine the status of Exchange services and components. The processed data flows to the responder engine .
■■ Responder engine Takes recovery actions based on unhealthy states reported by the monitor engine . If automated recovery is unsuccessful, escalates by issuing event log notifications.
FIGURE 9-1 Overview of Managed Availability in Exchange Server 2013 .
By delving deeper into the Managed Availability architecture, you can get a better understanding of how the automated monitoring and response processes work . As Figure 9-2 shows, the workflow has three phases:
■■ Sampling The probe engine checks the state of Exchange services and com-ponents according to specific probes. Each probe has a top-level identifier and one or more related probe definitions. Each probe definition identifies the name of the associated probe, the health set to which the probe belongs, the target resource being tracked, a recurrence interval, and a timeout value .
■■ Detection The monitor engine analyzes the sampled data and issues alerts related to changes in the state of Exchange services and components accord-ing to specific monitors. Each monitor has a top-level identifier and one or more related monitor definitions. Each monitor definition identifies the name of the associated monitor, the health set to which the monitor belongs, and a sample mask that specifies the top level identifier for related probes.

Troubleshooting Exchange Server 2013 ChAptEr 9 339
FIGURE 9-2 The probe, monitor, and recovery components of Managed Availability .
■■ Recovery The responder engine responds to unhealthy states identified in alerts. Each responder has an associated responder definition that identifies the recovery action to be taken, the name of the responder, the target resource that will be acted on, and an alert mask that specifies the top-level identifier for related monitors.
NOTE rather than list each associated monitor or probe, Managed Availability com-ponents use name masking. Here, a top-level identifier is provided and then used as a mask to identify the related monitors and probes.
Collections of monitors are grouped together in health sets . Exchange 2013 has health sets for everything from Microsoft ActiveSync to User Throttling . Each health set has a number of associated monitors . As part of automated recovery, responders use the alerts issued by monitors to take recovery actions . There are three levels of recovery:
■■ Tier 1 Provides the initial recovery response . As an initial response to an unhealthy state, responders typically will try to restart the service that uses the affected components .
■■ Tier 2 Provides more advanced and customized recovery response . If restart-ing the service doesn’t resolve the issue, the monitor state is escalated to the next level . The action or actions taken at this level to recover depend on the component but could include failover, bug checking, re-initialization of com-ponents to bring them back online, and more .
■■ Tier 3 Uses the escalate responder to issue event log notifications regard-ing the problem . If you’ve installed the Exchange Server 2013 Management Pack, escalated issues are sent to Microsoft System Center Operations Man-ager via the event logs as well .

ChAptEr 9 Troubleshooting Exchange Server 2013 340
Although designed to resolve many typical problems, Managed Availability can-not resolve every problem, and this escalation is built into the architecture . As part of diagnosing and resolving problems, you can check the status of monitors and health sets by using:
■■ Get-HealthReport Details the state and health of Exchange resources, monitors, and services
Get-HealthReport -Identity ServerID [-GroupSize SizeOfRollup] [-HaImpactingOnly <$true | $false>] [-HealthSet HealthSet] [-MinimumOnlinePercent MinToDegraded>] [-RollupGroup <$true | $false>]
■■ Get-ServerHealth Returns the state of monitored resources in addition to alert values
Get-ServerHealth -Identity ServerID [-HaImpactingOnly <$true |
$false>] [-HealthSet HealthSet]
To check the state of resources, enter the following command:
Get-ServerHealth -Identity ServerID
ServerID is the host name or fully qualified name of the Exchange server to check, such as:
Get-ServerHealth -Identity MailServer42
In the following sample, I’ve omitted the server name and server component columns from the default output:
State Name TargetResource HealthSetName AlertValue ----- ----- -------------- -------------- ---------- Online AutodiscoverProxy... MSExchangeAutoDis... Autodiscover... Healthy Online ActiveSyncProxyTe... MSExchangeSyncApp... ActiveSync.P... Healthy Repairing ECPProxyTestMonitor MSExchangeECPAppPool ECP.Proxy Unhealthy
REAL WORLD Often when you work with Exchange Management Shell, you’ll find that the output is too long for the default screen buffer size or that the output has too many columns for the default window size. Because of this, I prefer to use a screen buffer height of 2,999 and width of 120, along with a window width of 120 and height of 74. this makes Exchange Management Shell easier to work with. If you are using Windows 8 or Windows Server 2012, you’ll find that you can’t customize all of these settings from the Start screen. Instead, press and hold or right-click the tile for the shell on the Start screen, and then select Open File Location. this opens File Explorer to the folder in which the shortcut for Exchange Management Shell is located. press and hold or right-click this shortcut, and then select properties. In the properties dialog box, you’ll then be able to use the options on the Layout tab to customize the shell.

Troubleshooting Exchange Server 2013 ChAptEr 9 341
From the State value, you can determine the online status of a monitored resource that is used for transport, connections, or communications . State values you might see include:
■■ Online All the components of the monitored resource are online .■■ Partially Online Some of the components of the monitored resource are
not online .■■ Offline All the components of the monitored resource are offline.■■ Sidelined The monitored resource is sidelined and might not be in a fully
online state .■■ Functional The monitored resource is functional but might not be in a
fully online state .■■ NotApplicable An online or offline status is not applicable to this moni-
tored resource .■■ Unavailable The monitored resource is unavailable .
From the alert value, you can determine the general health status of a monitored resource . Alert values you might see include:
■■ Healthy All the components of the monitored resource are healthy .■■ Degraded Some of the components of the monitored resource are not
healthy .■■ Disabled The components of the monitored resource have been disabled .■■ Unhealthy All the components of the monitored resource are not healthy .■■ Sidelined The monitored resource is sidelined and might not be in a fully
healthy state .■■ Repairing The monitored resource is functional but is recovering from a
degraded or unhealthy state .■■ Unavailable The monitored resource is unavailable .■■ Uninitialized The monitored resource hasn’t been initialized .
If a health set has a status other than healthy or online, you can take a closer look at it by using the -HealthSet parameter . List the properties of the health set as shown in this example:
Get-ServerHealth -Identity MailServer42 -HealthSet ECP.Proxy | fl
You can get a formatted list of every monitor, target resource, and its related health set by entering the following command:
Get-ServerHealth localhost | ft name,targetresource,healthsetname
The output lists the name of the monitor, the target resource, and the name of the corresponding health set . You can store the output for later reference by redirect-ing the output to a file. In the following example, c:\data is the name of an existing folder, and Healthset-Reference.txt is the name of the file to create:
(get-serverhealth localhost|ft name,targetresource,healthsetname) > c:\data\healthset-reference.txt

ChAptEr 9 Troubleshooting Exchange Server 2013 342
The output will look similar to the following:
Name TargetResource HealthSetName ---- -------------- ------------- ActiveSyncV2CTPMonitor ActiveSync ActiveSync ActiveSyncCTPMonitor ActiveSync ActiveSync ActiveSyncV2DeepTestMonitor ActiveSync ActiveSync.Protocol ActiveSyncDeepTestMonitor ActiveSync ActiveSync.Protocol
tracking user and workload throttlingWhenever you are trying to diagnose and resolve problems with Exchange 2013, you need to keep in mind how user and workload throttling might be affecting performance. All users with mailboxes on servers running Exchange 2013 are subject to user throttling policy .
The default user throttling policy is named the Global Throttling Policy . As the name implies, this policy has global scope and applies throughout the organization . User throttling policies also can have organization and regular scope . If you want to configure user throttling, you should create policies with these scopes rather than modify the Global Throttling Policy .
You can list currently defined user throttling policies by entering Get-Throttling-Policy at the shell prompt . To create and manage user throttling policies, you can use New-ThrottlingPolicy, Set-ThrottlingPolicy, and Remove-ThrottlingPolicy . You can view throttling policies assigned to users by using Get-ThrottlingPolicyAssociation, and assign user throttling policies to users by using Set-ThrottlingPolicyAssociation .
In addition to user throttling, Exchange Server manages workloads for protocols, features, and services using workload throttling policy . Workloads are automatically throttled to prevent overuse of system resources and to try to ensure managed resources maintain a healthy state .
Each defined workload has an associated policy and classification. Workload poli-cies are used to enable and configure workloads. Workload classifications set the default priority of the workload. Classifications that can be assigned to workloads include:
■■ Urgent■■ Customer Expectation■■ Internal Maintenance■■ Discretionary
You can view the current workload policies and their associated workload classifi-cations by entering Get-WorkloadPolicy at the Shell prompt . To create and manage workload policies, you can use New-WorkloadPolicy, Set-WorkloadPolicy, and Remove-WorkloadPolicy .
Troubleshooting Exchange Server 2013 ChAptEr 9 343
Managed resources have health indicators and resource thresholds . Health indi-cators are used to measure the relative health of the workload in terms of the resources used . Health indicators tracked include:
■■ Percent CPU utilization■■ Mailbox database RPC latency■■ Mailbox database replication health■■ Content indexing age of last notification■■ Content indexing retry queue size
Resource thresholds are used to configure usage limits for a system resource. Within each workload classification, one of three thresholds can be assigned: under-loaded, overloaded, or critical . As an example:
■■ Discretionary workloads are considered underloaded at 70 percent utiliza-tion, overloaded at 80 percent utilization, and critical at 100 percent utilization .
■■ Internal Maintenance workloads are considered underloaded at 75 percent utilization, overloaded at 85 percent utilization, and critical at 100 percent utilization .
■■ Customer Expectation workloads are considered underloaded at 80 percent utilization, overloaded at 90 percent utilization, and critical at 100 percent utilization .
You can view the current resource threshold settings for each workload classifica-tion by entering the following command:
Get-ResourcePolicy | fl
To create and manage resource policies, you can use New-ResourcePolicy, Set-ResourcePolicy, and Remove-ResourcePolicy. After you’ve defined custom workload and resource policies, you can create a policy object based on a particular policy by using New-WorkloadManagementPolicy . You then assign the workload management policy to a server by using Set-ExchangeServer with the –WorkloadManagement-Policy and –Server parameters .
Tracking configuration changesAs part of your standard operating procedures, you should track changes in the con-figuration of your Exchange servers. The Exchange Management Shell provides the following cmdlets for obtaining detailed information on the current configuration of your Exchange servers:
■■ Get-ClientAccessServer Displays configuration details for servers with the Client Access server role
■■ Get-ExchangeServer Displays the general configuration details for Exchange servers
■■ Get-MailboxServer Displays configuration details for servers with the Mailbox server role

ChAptEr 9 Troubleshooting Exchange Server 2013 344
■■ Get-OrganizationConfig Displays summary information about your Exchange organization
■■ Get-TransportService Displays configuration details for servers with the Mailbox or Edge Transport server role
To get related details for a specific server, you pass the Get-TransportService cmdlet the identity of the server you want to work with, as shown in the following example:
Get-TransportService mailserver36 | fl
To get related details for all servers, omit the –Identity parameter, as shown in the following example:
Get-TransportService | fl
When you finalize the configuration of your Exchange servers, you should use these cmdlets to store the configuration details for each server role. To store the configuration details in a file, redirect the output to a file, as shown in the following example:
Get-TransportService mailserver36 | fl > c:\SavedConfigs\transport2014-0211.txt
If you then store the revised configuration, any time you make significant changes you can use this information during troubleshooting to help resolve problems that might be related to configuration changes. To compare two configuration files, you can use the file compare command, fc, at an elevated, administrator command prompt . When you use the following syntax with the fc command, the output is the difference between two files:
fc FilePath1 FilePath2
FilePath1 is the full file path to the first file and FilePath2 is the full file path to the second file. Here is an example:
fc c:\SavedConfigs\transport2014-0211.txt c:\SavedConfigs\ transport2014-0221.txt
Because the files contain configuration details for specific dates, the changes shown in the output represent the configuration changes that you’ve made to the server .
Testing service health, mail flow, replication, and moreAs part of troubleshooting, you’ll often want to determine the status of required services, which can be done by using Test-ServiceHealth . The basic syntax is:
Test-ServiceHealth [-Server ServerName]
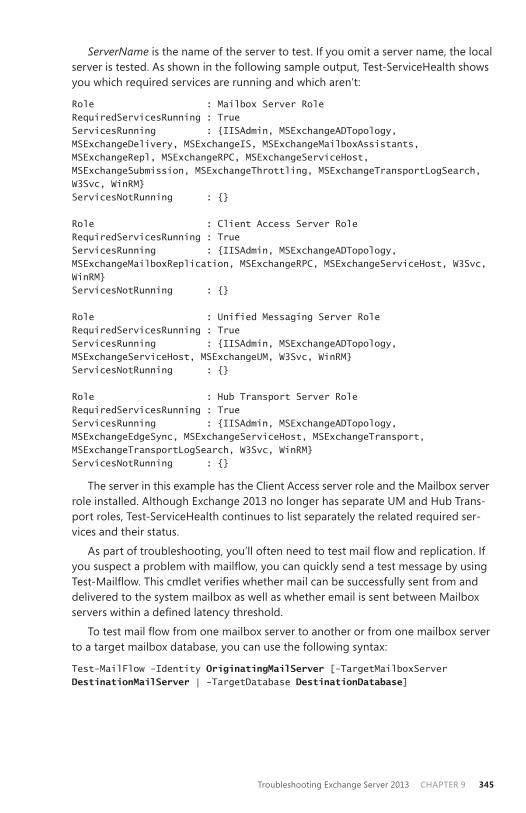
Troubleshooting Exchange Server 2013 ChAptEr 9 345
ServerName is the name of the server to test . If you omit a server name, the local server is tested . As shown in the following sample output, Test-ServiceHealth shows you which required services are running and which aren’t:
Role : Mailbox Server Role RequiredServicesRunning : True ServicesRunning : {IISAdmin, MSExchangeADTopology, MSExchangeDelivery, MSExchangeIS, MSExchangeMailboxAssistants, MSExchangeRepl, MSExchangeRPC, MSExchangeServiceHost, MSExchangeSubmission, MSExchangeThrottling, MSExchangeTransportLogSearch, W3Svc, WinRM} ServicesNotRunning : {} Role : Client Access Server Role RequiredServicesRunning : True ServicesRunning : {IISAdmin, MSExchangeADTopology, MSExchangeMailboxReplication, MSExchangeRPC, MSExchangeServiceHost, W3Svc, WinRM} ServicesNotRunning : {} Role : Unified Messaging Server Role RequiredServicesRunning : True ServicesRunning : {IISAdmin, MSExchangeADTopology, MSExchangeServiceHost, MSExchangeUM, W3Svc, WinRM} ServicesNotRunning : {} Role : Hub Transport Server Role RequiredServicesRunning : True ServicesRunning : {IISAdmin, MSExchangeADTopology, MSExchangeEdgeSync, MSExchangeServiceHost, MSExchangeTransport, MSExchangeTransportLogSearch, W3Svc, WinRM} ServicesNotRunning : {}
The server in this example has the Client Access server role and the Mailbox server role installed . Although Exchange 2013 no longer has separate UM and Hub Trans-port roles, Test-ServiceHealth continues to list separately the related required ser-vices and their status .
As part of troubleshooting, you’ll often need to test mail flow and replication. If you suspect a problem with mailflow, you can quickly send a test message by using Test-Mailflow. This cmdlet verifies whether mail can be successfully sent from and delivered to the system mailbox as well as whether email is sent between Mailbox servers within a defined latency threshold.
To test mail flow from one mailbox server to another or from one mailbox server to a target mailbox database, you can use the following syntax:
Test-MailFlow -Identity OriginatingMailServer [-TargetMailboxServer DestinationMailServer | -TargetDatabase DestinationDatabase]
ChAptEr 9 Troubleshooting Exchange Server 2013 346
In the following example, a test message is sent from MailboxServer18 to MailboxServer96:
Test-MailFlow -Identity MailboxServer18 -TargetMailboxServer MailboxServer96
As shown in this sample, the output of the command tells you whether the mes-sage was sent and received successfully:
TestMailflowResult : Success MessageLatencyTime : 00:00:04.0077377 IsRemoteTest : False Identity : IsValid : True ObjectState : New
If you suspect a problem with replication, you can quickly determine the status of replication components by using Test-ReplicationHealth . This cmdlet checks the status of all aspects of replication, replay, and availability on a Mailbox server in a Database Availability group . Use Test-ReplicationHealth to help you monitor the status of continuous replication, availability of Active Manager, and the general status of availability components .
The basic syntax is:
Test-MailFlow [-Identity MailboxServerId]
Such as:
Test-MailFlow MailServer42
As shown in this sample, the output of the command tells you the status of each replication component on the Mailbox server:
Server Check Result Error ------ ----- ------ ----- MAILSERVER42 ReplayService Passed MAILSERVER42 ActiveManager Passed MAILSERVER42 TasksRpcListener Passed MAILSERVER42 DatabaseRedundancy *FAILED* Failures:... MAILSERVER42 DatabaseAvailability *FAILED* Failures:...
If errors are found, you’ll want to get more details by formatting the output in a list, such as:
Test-MailFlow MailServer42 | fl server, check*, result, error
The error details should help you identify the problem . In this example, the Mail-box database doesn’t have enough copies to be fully redundant:
Server : MAILSERVER42 Check : DatabaseRedundancy CheckDescription : Verifies that databases have sufficient redundancy. If this check fails, it means that some databases are at risk of losing data. Result : *FAILED* Error : Failures:

Troubleshooting Exchange Server 2013 ChAptEr 9 347
There were database redundancy check failures for database 'Engineering Mailbox Database' that may be lowering its redundancy and putting the database at risk of data loss. Redundancy Count: 1. Expected Redundancy Count: 2.
In this example, the Engineering Mailbox Database does not have enough copies for full redundancy . This could be because an administrator forgot to make a passive copy of the database or because a Mailbox server hosting a copy of the database is offline or otherwise unavailable.
Other useful cmdlets for checking the Exchange organization include:■■ Test-ActiveSyncConnectivity Performs a full synchronization against a
specified mailbox to test the configuration of Exchange ActiveSync■■ Test-ArchiveConnectivity Verifies archive functionality for a mailbox user■■ Test-AssistantHealth Verifies that the Exchange Mailbox Assistant service
is running as expected■■ Test-CalendarConnectivity Verifies that calendar sharing as part of Outlook
Web App is working properly■■ Test-EcpConnectivity Verifies that the Exchange Admin Center is running
as expected■■ Test-EdgeSynchronization Verifies that the subscribed Edge Transport
servers have a current and accurate synchronization status■■ Test-ExchangeSearch Verifies that Exchange Search is currently enabled
and is indexing new email messages in a timely manner■■ Test-FederationTrust Verifies that the federation trust is properly config-
ured and functioning as expected■■ Test-FederationTrustCertificate Verifies the status of certificates used for
federation on all Mailbox and Client Access servers■■ Test-ImapConnectivity Verifies that the IMAP4 service is running as
expected■■ Test-IPAllowListProvider Verifies the configuration for a specific IP allow
list provider■■ Test-IPBlockListProvider Verifies the configuration for a specific IP block
list provider■■ Test-IRMConfiguration Verifies Information Rights Management (IRM)
configuration and functionality■■ Test-MapiConnectivity Verifies server functionality by logging on to the
mailbox that you specify■■ Test-MRSHealth Verifies the health of the Microsoft Exchange Mailbox
Replication Service■■ Test-OAuthConnectivity Verifies that OAuth authentication is working
properly■■ Test-OutlookConnectivity Verifies end-to-end Microsoft Outlook client
connectivity and also tests for Outlook Anywhere (RPC/HTTP) and TCP-based connections
ChAptEr 9 Troubleshooting Exchange Server 2013 348
■■ Test-OutlookWebServices Verifies the Autodiscover service settings for Outlook
■■ Test-OwaConnectivity Verifies that Outlook Web App is running as expected
■■ Test-PopConnectivity Verifies that the POP3 service is running as expected
■■ Test-PowerShellConnectivity Verifies whether Windows PowerShell remoting on the target Client Access server is functioning correctly
■■ Test-SenderId Verifies whether a specified IP address is the legitimate sending address for a specified SMTP address
■■ Test-SmtpConnectivity Verifies SMTP connectivity for a specified server■■ Test-UMConnectivity Verifies the operation of a computer that has the
Unified Messaging installed■■ Test-WebServicesConnectivity Verifies the functionality of Exchange
Web Services
Diagnosing and resolving problems
As discussed previously in this chapter in the “Troubleshooting essentials” section, you can use Get-ServerHealth to list monitors, target resources, and corresponding health sets . Knowing which monitor, target resource, and health set you want to work with is important for troubleshooting . To diagnose and resolve problems, you often need to work backward from the reported problem to the source of the prob-lem, as shown here:
1. Find recovery actions .2. Trace recovery actions to their responder .3. Use the responses logged by a responder to find the related monitor.4. Find the probes for a monitor .5. Locate the error messages being logged by probes .6. Verify probe errors still exist .The sections that follow examine the related procedures .
Identifying recovery actionsDuring recovery, the responder engine uses responders to take appropriate recovery actions, based on the type of alert and the affected target resource . Whenever a responder takes a recovery action, it logs related events in the Microsoft .Exchange .ManagedAvailability/RecoveryActionResults event log . An entry with an event ID of 500 indicates that a recovery action has started . An entry with an event ID of 501 indicates that the recovery action was completed .

Troubleshooting Exchange Server 2013 ChAptEr 9 349
Although you can view the events in Event Viewer, you can also view them at the Shell prompt . To collect the events in the RecoveryActionResults event log so you can process them, enter the following commands:
$Results = Get-WinEvent –ComputerName ServerName -LogName Microsoft-Exchange-ManagedAvailability/RecoveryActionResults $ResultsXML = ($Results | Foreach-object -Process {[xml]$_.toXml()}).event.userData.eventXml
ServerName is the name of the Client Access or Mailbox server that you want to work with. The first command collects the events. The second command formats the event entries so that they are easier to work with . These commands can be com-bined and shortened to:
$ResultsXML = (Get-WinEvent –ComputerName ServerName -LogName Microsoft-Exchange-ManagedAvailability/RecoveryActionResults | % {[xml]$_.toXml()}).event.userData.eventXml
Next, you need to identify a response that you want to look at more closely . If you want to review corrective actions taken by Managed Availability, you’d look for events that occurred today and completed successfully . The following example parses the previously collected event data and looks for events from 2013-07-01 that have a successful result:
$ResultsXML | Where-Object {$_.Result -eq "Succeeded" -and $_.EndTime -like "2013-07-01*"}| ft -AutoSize StartTime,RequestorName
As shown in this example, you also could look for events that occurred but where the responder failed to correct the issue:
$ResultsXML | Where-Object {$_.Result -eq "Failed" -and $_.EndTime -like "2013-07-01*"}| ft -AutoSize StartTime,RequestorName
With either approach, you’ll then get a list of issues by start time and requestor name, such as:
StartTime RequestorName --------- ------------- 2013-07-01t21:00:10.1008312Z SearchLocalCopyStatusRestartSearchService 2013-07-01t21:00:06.1162578Z RWSProxyTestRecycleAppPool 2013-07-01t21:00:00.4597184Z ClusterEndpointRestart 2013-07-01t20:59:36.1601996Z RWSProxyTestRecycleAppPool 2013-07-01t20:57:17.8657794Z OutlookSelfTestRestart 2013-07-01t20:58:03.7958299Z RWSProxyTestRecycleAppPool 2013-07-01t20:55:24.6591276Z ServiceHealthActiveManagerRestartService 2013-07-01t20:57:11.2223574Z ClusterEndpointRestart 2013-07-01t20:55:06.9326525Z OutlookSelfTestRestart 2013-07-01t20:57:02.6438007Z RWSProxyTestRecycleAppPool 2013-07-01t20:54:34.5391633Z OutlookMailboxDeepTestRestart 2013-07-01t20:56:32.4360908Z RWSProxyTestRecycleAppPool 2013-07-01t20:54:41.4926429Z ClusterEndpointRestart 2013-07-01t20:53:34.1596832Z ActiveDirectoryConnectivityRestart 2013-07-01t20:52:11.0579430Z ClusterEndpointRestart

ChAptEr 9 Troubleshooting Exchange Server 2013 350
In this example, the value in the RequestorName column is the responder that took the action . To examine the properties of a recovery action, run a query for a specific responder, such as:
$ResultsXML | Where-Object {$_.Result -eq "Failed" -and $_.EndTime -like "2013*" -and $_.RequestorName -eq "OutlookSelfTestRestart"}| fl
The output includes the details logged for events in which the recovery action initiated by the OutLookSelfTestRestart responder failed . Each entry will look similar to the following:
auto-ns2 : http://schemas.microsoft.com/win/2004/08/events xmlns : myNs Id : RestartService InstanceId : 130629.015717.86577.001 ResourceName : MSExchangeRPC StartTime : 2013-07-01T20:57:17.8657794Z EndTime : 2013-07-01T20:59:19.4994266Z State : Finished Result : Failed RequestorName : OutlookSelfTestRestart ExceptionName : TimeoutException ExceptionMessage : System error. Context : [null] CustomArg1 : [null] CustomArg2 : [null] CustomArg3 : [null] LamProcessStartTime : 7/01/2013 1:12:28 PM
Although the responder name and details will often help you identify the type of problem that occurred, you can keep working toward the exact problem that occurred by finding the monitor that triggered the responder.
Identifying respondersWhenever the Health Manager service starts, it logs related events in the Microsoft.Exchange.ActiveMonitoring/ResponderDefinition event log that you can use to get properties of responders . To collect the events in the Responder-Definition event log so that you can process them, enter the following command:
$Responders = (Get-WinEvent –ComputerName ServerName -LogName Microsoft-Exchange-ActiveMonitoring/ResponderDefinition | % {[xml]$_.toXml()}).event.userData.eventXml
ServerName is the name of the Client Access or Mailbox server with which you want to work. If you examine the definition of a responder, the AlertMask property will identify the monitor associated with the responder . Thus, one way to display the required information is to look for the responder and list the responder name and the associated alert mask in the output as shown in this example:
$Responders | ? {$_.Name –eq "OutlookSelfTestRestart"} | ft name, alertmask
Troubleshooting Exchange Server 2013 ChAptEr 9 351
The output will then be similar to the following:
Name AlertMask ---- --------- OutlookSelfTestRestart OutlookSelfTestMonitor OutlookSelfTestRestart OutlookSelfTestMonitor
You’ll know the related monitor is named OutlookSelfTestMonitor . Before exam-ining the related monitor, you might want to display the full details for the responder to help you understand exactly how the responder works . To display the full details for a responder, simply list its properties in a formatted list as shown in this example:
$Responders | ? {$_.Name –eq "OutlookSelfTestRestart"} | fl
During recovery, the responder engine uses responders to take appropriate recov-ery actions based on the alert type and the affected target resource . The wait inter-val specifies the minimum amount of time a responder must wait before running again. As shown in this partial output, the definition details can help you learn more about the responder:
Id : 452 AssemblyPath : C:\Program Files\Microsoft\Exchange Server\V15\Bin\Microsoft.Exchange.Monitoring.ActiveMonitoring .Local.Components.dll TypeName : Microsoft.Exchange.Monitoring .ActiveMonitoring.Responders.ResetIISAppPoolResponder Name : OutlookSelfTestRestart WorkItemVersion : [null] ServiceName : Outlook.Protocol DeploymentId : 0 ExecutionLocation : [null] CreatedTime : 2013-07-01T20:02:32.2527661Z Enabled : 1 TargetResource : MSExchangeRpcProxyAppPool RecurrenceIntervalSeconds : 0 TimeoutSeconds : 300 StartTime : 2013-07-01T20:02:32.2527661Z UpdateTime : 2013-07-01T17:55:07.9754209Z MaxRetryAttempts : 3 ExtensionAttributes : <ExtensionAttributes AppPoolName= "MSExchangeRpcProxyAppPool" MinimumSecondsBetweenRestarts="300" MaximumAllowedRestartsInAnHour="3" MaximumAllowedRestartsInADay="-1" DumpOnRestart="FullDump" DumpPath="C:\Program Files\Microsoft\Exchange Server\V15\Dumps" MinimumFreeDiskPercent="15" MaximumDumpsPerDay="9" MaximumDumpDurationInSeconds="180" /> AlertMask : OutlookSelfTestMonitor WaitIntervalSeconds : 30 MinimumSecondsBetweenEscalates : 0 NotificationServiceClass : 0 AlwaysEscalateOnMonitorChanges : 0
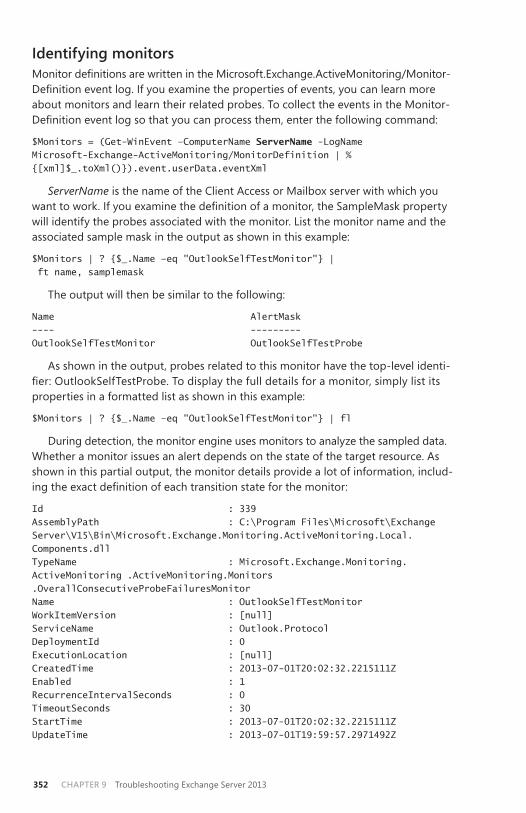
ChAptEr 9 Troubleshooting Exchange Server 2013 352
Identifying monitorsMonitor definitions are written in the Microsoft.Exchange.ActiveMonitoring/Monitor-Definition event log. If you examine the properties of events, you can learn more about monitors and learn their related probes . To collect the events in the Monitor-Definition event log so that you can process them, enter the following command:
$Monitors = (Get-WinEvent –ComputerName ServerName -LogName Microsoft-Exchange-ActiveMonitoring/MonitorDefinition | % {[xml]$_.toXml()}).event.userData.eventXml
ServerName is the name of the Client Access or Mailbox server with which you want to work. If you examine the definition of a monitor, the SampleMask property will identify the probes associated with the monitor . List the monitor name and the associated sample mask in the output as shown in this example:
$Monitors | ? {$_.Name –eq "OutlookSelfTestMonitor"} | ft name, samplemask
The output will then be similar to the following:
Name AlertMask ---- --------- OutlookSelfTestMonitor OutlookSelfTestProbe
As shown in the output, probes related to this monitor have the top-level identi-fier: OutlookSelfTestProbe. To display the full details for a monitor, simply list its properties in a formatted list as shown in this example:
$Monitors | ? {$_.Name –eq "OutlookSelfTestMonitor"} | fl
During detection, the monitor engine uses monitors to analyze the sampled data . Whether a monitor issues an alert depends on the state of the target resource . As shown in this partial output, the monitor details provide a lot of information, includ-ing the exact definition of each transition state for the monitor:
Id : 339 AssemblyPath : C:\Program Files\Microsoft\Exchange Server\V15\Bin\Microsoft.Exchange.Monitoring.ActiveMonitoring.Local. Components.dll TypeName : Microsoft.Exchange.Monitoring. ActiveMonitoring .ActiveMonitoring.Monitors .OverallConsecutiveProbeFailuresMonitor Name : OutlookSelfTestMonitor WorkItemVersion : [null] ServiceName : Outlook.Protocol DeploymentId : 0 ExecutionLocation : [null] CreatedTime : 2013-07-01T20:02:32.2215111Z Enabled : 1 RecurrenceIntervalSeconds : 0 TimeoutSeconds : 30 StartTime : 2013-07-01T20:02:32.2215111Z UpdateTime : 2013-07-01T19:59:57.2971492Z
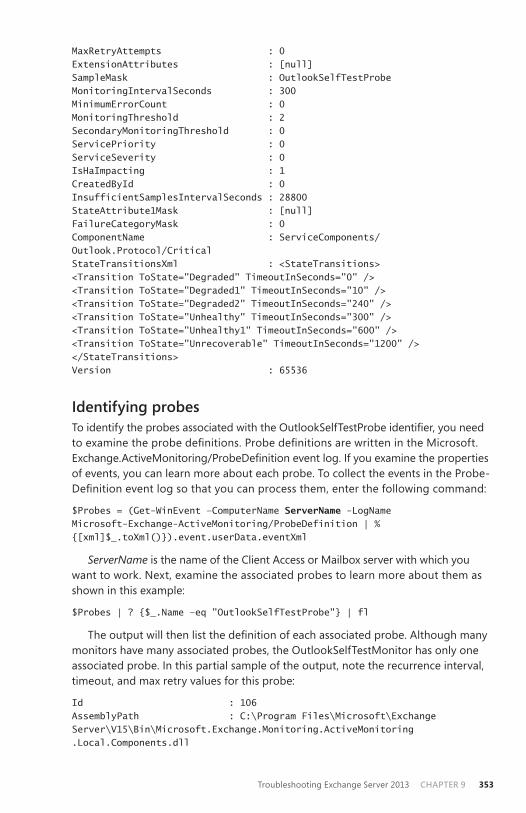
Troubleshooting Exchange Server 2013 ChAptEr 9 353
MaxRetryAttempts : 0 ExtensionAttributes : [null] SampleMask : OutlookSelfTestProbe MonitoringIntervalSeconds : 300 MinimumErrorCount : 0 MonitoringThreshold : 2 SecondaryMonitoringThreshold : 0 ServicePriority : 0 ServiceSeverity : 0 IsHaImpacting : 1 CreatedById : 0 InsufficientSamplesIntervalSeconds : 28800 StateAttribute1Mask : [null] FailureCategoryMask : 0 ComponentName : ServiceComponents/ Outlook.Protocol/Critical StateTransitionsXml : <StateTransitions> <Transition ToState="Degraded" TimeoutInSeconds="0" /> <Transition ToState="Degraded1" TimeoutInSeconds="10" /> <Transition ToState="Degraded2" TimeoutInSeconds="240" /> <Transition ToState="Unhealthy" TimeoutInSeconds="300" /> <Transition ToState="Unhealthy1" TimeoutInSeconds="600" /> <Transition ToState="Unrecoverable" TimeoutInSeconds="1200" /> </StateTransitions> Version : 65536
Identifying probesTo identify the probes associated with the OutlookSelfTestProbe identifier, you need to examine the probe definitions. Probe definitions are written in the Microsoft.Exchange.ActiveMonitoring/ProbeDefinition event log. If you examine the properties of events, you can learn more about each probe . To collect the events in the Probe-Definition event log so that you can process them, enter the following command:
$Probes = (Get-WinEvent –ComputerName ServerName -LogName Microsoft-Exchange-ActiveMonitoring/ProbeDefinition | % {[xml]$_.toXml()}).event.userData.eventXml
ServerName is the name of the Client Access or Mailbox server with which you want to work . Next, examine the associated probes to learn more about them as shown in this example:
$Probes | ? {$_.Name –eq "OutlookSelfTestProbe"} | fl
The output will then list the definition of each associated probe. Although many monitors have many associated probes, the OutlookSelfTestMonitor has only one associated probe . In this partial sample of the output, note the recurrence interval, timeout, and max retry values for this probe:
Id : 106 AssemblyPath : C:\Program Files\Microsoft\Exchange Server\V15\Bin\Microsoft.Exchange.Monitoring.ActiveMonitoring .Local.Components.dll

ChAptEr 9 Troubleshooting Exchange Server 2013 354
TypeName : Microsoft.Exchange.Monitoring.ActiveMonitoring .RpcClientAccess.LocalRpcProbe+SelfTest Name : OutlookSelfTestProbe WorkItemVersion : [null] ServiceName : Outlook.Protocol DeploymentId : 0 ExecutionLocation : [null] CreatedTime : 2013-07-01T20:02:32.2058880Z Enabled : 1 RecurrenceIntervalSeconds : 10 TimeoutSeconds : 8 StartTime : 2013-07-01T20:02:41.2215111Z UpdateTime : 2013-07-01T19:59:57.2190196Z MaxRetryAttempts : 0 ExtensionAttributes : <ExtensionAttributes AccountLegacyDN=" /o=First Organization/ou=Monitoring Mailboxes/cn=Recipients /cn=HealthMailbox3d899a319e1e4c019f5362ead47f0185" PersonalizedServerName="278c17fc-8adc-49d7-affa-90f0ea7679b6@ pocket-consultant.com" StartupNotificationId="MSExchangeRPC" StartupNotificationMaxStartWaitInSeconds="12 /> CreatedById : 0 Account : <r at="Kerberos" ln="POCKET-CONSULTA\SM_ fef8fb0aaba040c19"><s>S-1-5-21-1487214957-3235876329- 1606252878-1151</s><s a="7" t="1"> S-1-5-21-1487214957-3235876329-1606252878-513</s> <s a="7" t="1">S-1-1-0</s><s a="7" t="1">S-1-5-2</s> <s a="7" t="1">S-1-5-11</s><s a="7" t="1">S-1-5-15</s> <s a="3221225479" t="1">S-1-5-5-0-8194354</s><s a="7" t="1"> S-1-18-2</s></r> AccountDisplayName : HealthMailbox3d899a319e1e4c019f5362ead47f0185 Endpoint : MailServer21.pocket-consultant.com SecondaryAccount : [null] SecondaryAccountDisplayName : [null] SecondaryEndpoint : MailServer21.pocket-consultant.com ExtensionEndpoints : [null] Version : 65536 ExecutionType : 0
During sampling, the probe engine runs probes against target resources . How often a probe runs depends on its recurrence interval . How long a probe waits before reporting failure depends on its timeout value . Also listed in the output is the sys-tem account under which the probe runs and the authentication method used for that account .
Viewing error messages for probesAfter you know which probes are associated with the issue you are tracking, you can get the error messages for the probes . Probe results are written in the Microsoft .Exchange .ActiveMonitoring/ProbeResult event log . As this log is quite

Troubleshooting Exchange Server 2013 ChAptEr 9 355
extensive, you want to filter the logs for the exact information you are seeking. Properties for related events include:
■■ ServiceName Identifies the related health set.■■ ResultName Identifies the name of the probe. When there are multiple
probes for a monitor the name includes the monitor’s sample mask and the resource it verifies.
■■ Error Lists the error returned by this probe, if it failed .■■ Exception Lists the call stack of the error, if it failed .■■ ResultType Lists an integer value that indicates the result type: 1 for time-
out, 2 for poisoned, 3 for succeeded, 4 for failed, 5 for quarantined, and 6 for rejected.
■■ ExecutionStartTime Lists when the probe started .■■ ExecutionEndTime Lists when the probe completed .■■ ExecutionContext Provides additional information about the probe’s
execution context .■■ FailureContext Provides additional information about the probe’s failure .
Knowing this, you can collect the events in the ProbeResult event log and filter them . In this example, you look for failure results related to OutlookSelfTestProbe:
$Errors = (Get-WinEvent –ComputerName ServerName -LogName Microsoft-Exchange-ActiveMonitoring/ProbeResult -FilterXPath "*[UserData[EventXML[ResultName='OutlookSelfTestProbe'][ResultType='4']]]" | % {[XML]$_.toXml()}).event.userData.eventXml
ServerName is the name of the Client Access or Mailbox server with which you want to work. After you filter the log, you can display the results you want to see, such as:
$Errors | select -Property *Time,Result*,Error*,*Context
In this example, the output lists the time-, result-, error-, and context-related properties, which will help you identify the exact problem that occurred . Consider the following example:
ExecutionStartTime : 2013-07-01T21:24:26.9816420Z ExecutionEndTime : 2013-07-01T21:24:27.7508864Z ResultId : 644887342 ResultName : OutlookSelfTestProbe ResultType : 4 Error : The request was aborted: Could not create SSL/TLS secure channel. ExecutionContext : RpcProxy connectivity verification Task produced output: - TaskStarted = 7/01/2013 2:24:26 PM - TaskFinished = 7/01/2013 2:24:27 PM - Exception = System.Net.WebException: The request was aborted: Could not create SSL/TLS secure channel.

ChAptEr 9 Troubleshooting Exchange Server 2013 356
- ErrorDetails = Status: SecureChannelFailure HttpStatusCode: HttpStatusDescription: ProcessedBody: - Latency = 00:00:00.5617493 - RpcProxyUrl = https://mailserver21. pocket-consultant.com:444/rpc/rpcproxy.dll?MailServer21. pocket-consultant.com:6001 - ResponseStatusCode = <null> RpcProxy connectivity verification failed. FailureContext : Status: SecureChannelFailure HttpStatusCode: HttpStatusDescription: ProcessedBody:
As you can see from the output, the probe error details provide a lot of informa-tion regarding the exact problem that occurred . In this example, an RPC Proxy error occurred that prevented creation of a secure SSL/TLS channel . If this was a problem preventing access to the server or causing other issues, you would then know that you need to look at related components to continue your troubleshooting . You would look at the RPC, RPC Proxy, SSL and TLS configuration in Internet Information Services (IIS) in addition to the related settings in Exchange .
tracing probe errorsNow that you know how to trace a reported problem to its source, let’s take a look at additional ways in which you can put this knowledge to use . You view the overall health of a server by using Get-ServerHealth . As discussed earlier in this chapter, if a health set has a status other than healthy or online, you can take a closer look at it by using the -HealthSet parameter . List the properties of the health set as shown in this example:
Get-ServerHealth -Identity MailServer42 -HealthSet FrontEndTransport | fl
The Name property in the output of Get-ServerHealth lists the name of the moni -tor reporting the health status . Table 9-1 lists the health sets associated with key Exchange features and components .
TABLE 9-1 Health sets associated with key Exchange features and components
FEATURE/COMPONENT RELATED HEALTH SETS
ActiveSync ActiveSync, ActiveSync .Protocol, ActiveSync .Proxy
Active Directory AD
Anti-virus Antimalware, AntiSpam
Autodiscover Autodiscover, Autodiscover .Protocol, Autodiscover .Proxy
Mailbox databases Clustering, Database, DataProtection, Mailbox-Migration, MailboxSpace, MRS, Store

Troubleshooting Exchange Server 2013 ChAptEr 9 357
FEATURE/COMPONENT RELATED HEALTH SETS
Exchange Admin Center ECP .Proxy
Exchange Web Services EWS, EWS .Protocol, EWS .Proxy
Front End Transport Service FrontendTransport
Transport Service HubTransport, MailboxTransport, Transport, TransportSync
Offline Address Book OAB, OAB .Proxy
Outlook, Outlook Web Access
Outlook, Outlook .Proxy, OWA .Protocol, OWA .Protocol .Dep, OWA .Proxy
Unified Messaging UM .Callrouter, UM .Protocol
User Throttling UserThrottling
You can quickly identify all the related probes, monitors, and responders for a health set by using Get-MonitoringItemIdentity . The basic syntax is:
Get-MonitoringItemIdentity -Identity HealthSetName -Server ServerName
HealthSetName identifies the health set to examine and ServerName is the name of an Exchange server . In the following example, you list items by type, item name, and target resource:
Get-MonitoringItemIdentity -Identity FrontEndTransport -Server mailserver21 | ft itemtype, name, targetresource
As shown in the following partial output, each associated probe, monitor, and responder is listed by name:
ItemType Name TargetResource -------- ---- -------------- Probe FrontendTransportServiceRunning msexchangefrontendtransport Probe FrontendTransportRepeatedlyCrashing msexchangefrontendtransport Monitor FrontendTransportServiceRunningMonitor Monitor FrontendTransportRepeatedlyCrashingMonitor Responder FrontendTransportServiceRunningEscalateResponder Transport Responder FrontendTransportRepeatedlyCrashingResponder Transport
If the name of the monitor reporting a status other than online or healthy is FrontendTransportRepeatedlyCrashingMonitor, you can analyze the problem by looking at errors for the FrontendTransportRepeatedlyCrashing probe . Collect events for this probe from the ProbeResult event log and filter them as discussed earlier in “Viewing error messages for probes .” Here is an example:
$Errors = (Get-WinEvent –ComputerName ServerName -LogName Microsoft-Exchange-ActiveMonitoring/ProbeResult -FilterXPath "*[UserData[EventXML[ResultName='FrontendTransportRepeatedlyCrashing'] [ResultType='4']]]" | % {[XML]$_.toXml()}).event.userData.eventXml
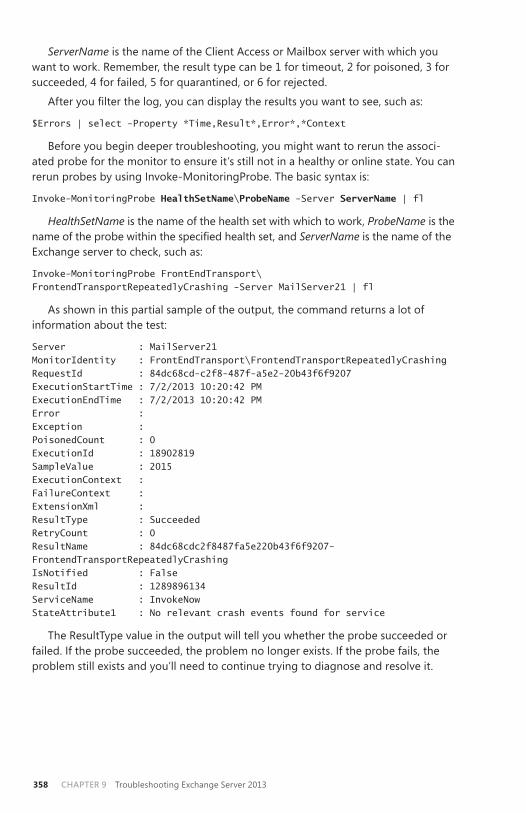
ChAptEr 9 Troubleshooting Exchange Server 2013 358
ServerName is the name of the Client Access or Mailbox server with which you want to work . Remember, the result type can be 1 for timeout, 2 for poisoned, 3 for succeeded, 4 for failed, 5 for quarantined, or 6 for rejected.
After you filter the log, you can display the results you want to see, such as:
$Errors | select -Property *Time,Result*,Error*,*Context
Before you begin deeper troubleshooting, you might want to rerun the associ-ated probe for the monitor to ensure it’s still not in a healthy or online state . You can rerun probes by using Invoke-MonitoringProbe . The basic syntax is:
Invoke-MonitoringProbe HealthSetName\ProbeName -Server ServerName | fl
HealthSetName is the name of the health set with which to work, ProbeName is the name of the probe within the specified health set, and ServerName is the name of the Exchange server to check, such as:
Invoke-MonitoringProbe FrontEndTransport\ FrontendTransportRepeatedlyCrashing -Server MailServer21 | fl
As shown in this partial sample of the output, the command returns a lot of information about the test:
Server : MailServer21 MonitorIdentity : FrontEndTransport\FrontendTransportRepeatedlyCrashing RequestId : 84dc68cd-c2f8-487f-a5e2-20b43f6f9207 ExecutionStartTime : 7/2/2013 10:20:42 PM ExecutionEndTime : 7/2/2013 10:20:42 PM Error : Exception : PoisonedCount : 0 ExecutionId : 18902819 SampleValue : 2015 ExecutionContext : FailureContext : ExtensionXml : ResultType : Succeeded RetryCount : 0 ResultName : 84dc68cdc2f8487fa5e220b43f6f9207- FrontendTransportRepeatedlyCrashing IsNotified : False ResultId : 1289896134 ServiceName : InvokeNow StateAttribute1 : No relevant crash events found for service
The ResultType value in the output will tell you whether the probe succeeded or failed . If the probe succeeded, the problem no longer exists . If the probe fails, the problem still exists and you’ll need to continue trying to diagnose and resolve it .
Troubleshooting Exchange Server 2013 ChAptEr 9 359
Step-by-step procedures for troubleshooting issues with Exchange services was provided in Chapter 6, “Managing client access”; specifically, see the “Troubleshoot-ing Outlook Web App” and “Working with virtual directories and web applications” sections .
Using Log Parser Studio
Log Parser Studio is a graphical interface for Log Parser . Both tools are excellent for processing log files and have been extended specifically to analyze the Exchange protocol logs .
Getting started with Log parser StudioBefore you can parse and analyze Exchange logs, you’ll need to install Log Parser and then add Log Parser Studio . At the time of this writing, the current version of Log Parser was available at http://www.microsoft.com/en-us/download/details.aspx?displaylang=en&id=24659 and the current version of Log Parser Studio was available at http://gallery.technet.microsoft.com/Log-Parser-Studio-cd458765 . After you install Log Parser, you can run Log Parser Studio .
Log Parser Studio runs from an executable named LPS .exe . Unless you copy logs to folders that you can access with standard user privileges, you’ll usually want to run Log Parser Studio with elevated, administrator privileges . To do this, press and hold or right-click the executable and then select Run As Administrator .
When you run Log Parser Studio, you’ll see dozens of preloaded queries that can be used to examine various Exchange protocols and other protocols . As shown in Figure 9-3, queries begin with a prefix that identifies the protocol they examine, including:
■■ ActiveSync and ActiveSync Proxy for analyzing Exchange ActiveSync and the Exchange ActiveSync Proxy .
■■ CAS and CAS-Proxy for analyzing requests related to Client Access server protocols and proxies .
■■ ECP for analyzing requests related to Exchange Admin Center .■■ EWS for analyzing requests related to Exchange Web Services .■■ ExRCA for tracking requests made by the Exchange Remote Connectivity
Analyzer .■■ OWA for analyzing requests related to Outlook Web Access .■■ Windows PowerShell for analyzing requests related to the remote Windows
PowerShell gateway .
ChAptEr 9 Troubleshooting Exchange Server 2013 360
FIGURE 9-3 Viewing the query library in Log Parser Studio .
performing queries in Log parser StudioLog Parser Studio is designed to run queries against several different types of logs, including Event Viewer logs, Exchange protocol logs, and IIS protocol logs . Queries in Log Parser Studio are listed by name, description, query, and log type .
Before you can run a query in Log Parser Studio, you must specify the folders and types of logs with which to work . Keep the following in mind:
■■ Logging for protocols and services that run on top of IIS are handled by IIS and these logs have the log type IISW3CLOG . By default, IIS logs are stored in the %SystemDrive%\inetpub\logs\LogFiles folder .
■■ Logging for Exchange services and components is performed by Exchange, and these logs have the type EELLOG or EELXLOG . By default, Exchange logs are stored within the Logging folder under the %ExchangeInstallPath% .
■■ Logging is also performed by the operating system and these logs have the type EVTLOG . By default, Windows logs are stored in the %SystemRoot%\System32\winevt\Logs folder .
In Log Parser Studio, you can specify the logs with which to work and their type by completing these steps:
1. Select the Choose Log… button on the toolbar .2. In the Log File Manager dialog box, select Add Folder . Adding folders
ensures any available log in the folder can be used .3. In the Add Folder dialog box, navigate to the folder with which you want to
work, such as %SystemDrive%\inetpub\logs\LogFiles .

Troubleshooting Exchange Server 2013 ChAptEr 9 361
4. Next, select a log with the log type you want to use, and then select Open . When you select a log, Log Parser Studio tries to automatically detect the log type . If Log Parser Studio can’t detect the log type, you’ll need to select the log type when prompted .
5. Select OK .You can run queries against all logs of the selected type in the selected folder . To
run a query, double-tap or double-click the query on the Library tab to open the query in a new tab . On the new query tab, select Execute Active Query to run the query . How long it takes to run a query depends on the size and number of logs in the specified folder or folders. When Log Parser Studio finishes analyzing the logs, you’ll see the results and can use this information for troubleshooting . Figure 9-4 shows the results of a sample query .
FIGURE 9-4 Viewing the results of a query in Log Parser Studio .


Index
363
AA records, 108accepted domains
defined, 170creating, 173, 174default, selecting, 174identifier, changing, 174modifying, 174, 175removing, 176types, 174viewing, 171, 172
actions, for transport rules, 206Active Directory
configuring site boundaries, 10data store, 14, 15database availability groups and, 30Edge subscription and, 158hub sites, configuring, 110site configuration details, viewing,
111site-based routing and, 8sites, renaming, 111
Active Directory Domain Services (AD DS)Edge Transport server role and, 108Exchange Server installations and, 2
Active Directory Lightweight Directory Services (AD LDS), 108
Active Manager, 16, 17, 30–34active monitoring
managed availability and, 32Outlook Web App and, 217
ActiveSync . See Exchange ActiveSyncActiveSyncDevice cmdlets vs .
MobileDevice cmdlets, 274Add cmdlets
Add-DatabaseAvailabilityGroup-Server, 29, 44, 61
Add-IPAllowListEntry, 202Add-IPBlockListEntry, 204Add-IPBlockListProvider, 198, 199,
200, 201
Add-MailboxDatabaseCopy, 29, 61, 81, 102
Address (A) record, 108address book policy, 243address lists, 5address policies . See email address
policiesaddress spaces, Send connectors and, 116,
119, 120alerting . See performance alertingaliases, missing, 181anonymous authentication, 237, 238,
239, 240anti-spam
described, 189agents, 155Edge Transport servers and, 154IP block lists, 195–201Mailbox servers, enabling on, 154recipient filtering, 193–195sender filtering, 190–193updates, configuring, 156
application log, 317application pools, Outlook Web App
and, 220arbitration mailboxes, 16architecture changes in Exchange Server
2013, 1, 2, 114archive mailboxes, 16ASP .NET Impersonation, 237, 241attachments
size limits, 141, 143storage location, 18
attempt copy last logs (ACLL), 32authentication
See also Forms authenticationAutodiscover and, 269IIS and, 237–241for mobile devices, 262NTLM, 267

364
authoritative domains
authentication (continued)Outlook Anywhere, 259, 260POP3 and IMAP4, 253, 254Receive connectors and, 109, 136, 137Send connectors and, 114, 119Windows, 237–239, 253, 254
authoritative domains, 170, 174autoblocking settings for mobile
devices, 297Autodiscover
described, 268connection points and, 1disabling and enabling, 270health sets, 223migrating mailboxes and, 13mobile devices and, 268–271
automated messages, managing mail flow for, 186
automatic distribution, 65automatic mounting, 97automatic reseed, 65, 66availability groups . See database avail-
ability groups (DAGs)
Bback end transport, 6, 8back pressure, 169–170backing up
data, 27database copies, 17
bandwidth limits, 235base64 encoding, affect on message
size, 141Basic authentication, 237, 238, 239,
241, 254bindings
IIS and, 230POP3 and IMAP4, 252, 253for Receive connectors, 129
blank senders, 191blocking messages . See message filtering;
IP block lists
CCategorizer, 8, 15certificates
creating, 233installing, 234requesting, 233, 234
trusting, 235viewing, 232
checkpoint filesmessage database, 18queue database, 22
circular logging, 17, 101, 102Clear-MobileDevice cmdlet
described, 274syntax and usage, 275
client accessdescribed, 209layers, 221throttling, 241–243
Client Access serversauthentication settings for virtual
directories, 238Exchange Server 2013 server roles
and, 1as front end, 2, 114proxying through, 121purpose in Exchange Server 2013, 2Receive connectors and, 128, 129transport limits, 144
Client front-end connector, 128Client Proxy connector, 128client-server architecture in Exchange
2013, 2client type Receive connectors, 131cloud service, Exchange Online as, 12Cluster Continuous Replication (CCR), 28cluster name objects, 37, 38clustering, 28, 30, 31Company filter condition, 180Compliance Management, journal rules
and, 186conditions, for transport rules, 205configuration changes, tracking, 343, 344configuration data type, 14Connect-Mailbox cmdlet, 77connection filters. See IP block listsconnection limits
domain, 127, 128simultaneous outbound, 127website, 235, 236
connection timeout values, 153, 235ConnectionInactivityTimeout value, 153connectivity logging
configuring, 314, 315log fields, list of, 316properties and fields, 315, 316

365
Department filter condition
connectors . See Receive connectors; Send connectors
contacts, Outlook Web App and, 215Content Filter agent, 155content indexing, 103–106continuous replication
changes since previous version, 28checking status, 58, 59circular logging, 17
cost of a routeIP site links and, 10setting for a Send connector, 116
counters, 321–323CPU utilization, 326, 327cross-premises routing, 13current log files
circular logging and, 17message database, 18, 19queue database, 22
custom address lists, 5Custom type Receive connectors, 109, 130Custom type Send connectors, 109, 117cutoff balance, throttling client access
and, 242
Ddata-center coordinator mode, 53Data Collector Sets, 323data pages, 19data storage
Active Directory data store, 14components, 16data pages and, 19data tables and, 19default location for files, 19Exchange store, 16file types, 18
data tables, 19data types, for replication, 14database availability groups (DAGs)
described, 28Active Manager and, 30–34cmdlets for, 29creating, 39–43limit on number of servers, 17manual network configuration,
enabling, 45membership, managing, 42–45network cards and, 42
network compression, 51network encryption, 51network settings, changing, 49–52networks, creating, 46, 47networks, managing, 45–49permissions, 34, 40pre-staging and preparing for, 34–39properties, configuring, 52–55removing, 54, 55replication and, 30, 79restoring operations after member
failure, 59–62routing messages, 8servers, removing from, 54witness servers, 34, 35
database copiesactivating lagged, 84–86constraints, 30creating, 79–81removing, 94replication status, monitoring, 90–93setting replay, truncation, and prefer-
ence values, 81status values, list of, 91–93
database management scopes, 65Database.edb file, 18databases . See mailbox databasesdecommissioning Edge Transport servers,
162Default front-end connector
described, 128default message size limit, 143
delay notification messages, 127delayed fan-out, 12, 110deleted items
recovering, 77, 78retention periods, 71–75
deleted mailboxesrecovering, 75–77retention periods, 71–75
delivery groupsboundaries, 8Exchange versions and, 9routing destinations and, 6, 110specifying expansion servers as, 15
Delivery/Relay queue, 20delivery reports, 305–307delivery status notification (DSN)
codes, 148Department filter condition, 180

366
destination delivery groups
destination delivery groups, 6device access, 295, 297dial-up connections, 264Digest authentication, 237, 238, 239, 241direct file access, 277–282Direct Push, 262, 271, 272discard status, 21disconnected mailboxes, 75, 76disk usage, performance alerts for,
327, 328Dismount-Database cmdlet, 29, 97dismounting mailbox databases, 95–98distribution points
configuring, 245properties, 244
DNS lookups, configuring Send connec-tors, 125, 126
domain data type, 14Domain Name System (DNS) suffix, Edge
Transport server role and, 108domains
accepted . See accepted domainsauthoritative, 170coexistence, 171relay, 170remote, 186, 187
dynamic distribution groupsdefined, 5expansion servers and, 15global catalogs and, 14
EE##00000001.log file, 19E##.chk file, 18ECP . See Exchange Admin Center (ECP)
directoryEdge subscriptions
Active Directory and, 11creating connectors during, 109, 158process, 157, 158purpose, 156removing, 162synchronizing, 159verifying, 160viewing, 159
Edge Transport serversanti-spam features, 154external relay domains and, 171
Mailbox servers and, 107queues, 20role, 2, 108subscribing . See Edge subscriptionsviewing Send connectors, 122
EdgeSync service, 156, 159EHLO start command, 129E##.log file, 18, 19email address format options, 178, 180email address policies
described, 176address book, 243creating, 178–180custom, variables for, 180editing and applying, 182priority order, setting, 179, 182purpose, 5removing, 183viewing, 176, 177
.eml message files, 164, 165encryption
disabling, 265SSL and, 232
enumerating messages, 333equipment mailboxes, 16E##Res00001.jrs file, 19error messages, for probes, 354–356error tracing, for probes, 356, 357E##tmp.log file, 18, 19event logging
application log, 317–319automatic reseed, 66Log Parser Studio and, 360mailbox database failures, 66managed availability and, 33monitors and, 352probes and, 353, 355recovery actions, identifying,
348, 349replication and, 30
event sources, list of, 318Event Viewer, 317–319EWS . See Exchange Web Services (EWS)Exchange ActiveSync
described, 261configuring URLs and authentication,
247disabling and enabling, 263IIS and, 263

367
externally secured authentication
load balancing, 222message size limits, 144resetting, 248safeguarding sensitive data, 262synchronization, 262transport limits, 144–145web.config file location, 144
Exchange Admin Center (ECP) directory, 223, 248, 249
Exchange Health Manager Service, 33Exchange Health Manager Worker
process, 33Exchange Management Shell, customizing
views, 340Exchange Online
accepted domains and, 171capabilities, 12cmdlets for creating connectors, 140compliance options, 184disadvantages of, 12hybrid deployments, role of Edge
Transport servers in, 107Inbound connectors, 139vs . on-premises, 12Outbound connectors, 139resolving mailbox conflicts with on-
premises, 13Exchange Replication service . See replica-
tionExchange Rich Text Format vs . Transport
Neutral Encapsulation Format (TNEF), 189
Exchange Search, 103–106Exchange Server 2007
Edge Transport servers and, 2Hub Transport Servers and, 6, 9, 15journal rules and, 184online vs. on-premises configura-
tions, 12Exchange Server 2010
Edge Transport servers and, 2filter exceptions, 201global allowed lists, 202Hub Transport servers and, 6, 9, 15IP block lists, 197, 200journal rules and, 184message filtering, 190, 193Outlook Web App and, 212transport dumpster, 21
Exchange Server 2013Client Access servers and, 1client-server architecture, 1, 2continuous replication, 28data storage, 13database limits for specific
editions, 69database types, 16expansion servers, 15hybrid deployments, 107installing, 2Mailbox servers and, 1mailbox types, 16managing from touch-capable com-
puters, xiiion-premises vs. online configuration,
12, 13organizations and, 2Outlook versions and, 1previous editions, changes from, 1,
21, 25, 114, 149routing and delivery, 9server roles, 1server types, 2upgrading from Standard to Enter-
prise edition, 69Exchange store, 16Exchange Toolbox, 20Exchange Trusted Subsystem group,
38, 39Exchange Web Services (EWS)
health sets, 223limits, 145message size limit, 144web.config file location, 145
%ExchangeInstallpath% variable, 144expansion servers, specifying as a delivery
group, 15expiration time-out
configuring, 127default, 126
Extended SMTP (ESMTP) sessions, 129Extensible Storage Engine (ESE), 17, 26, 28external DNS lookups, configuring, 125external relay domains, 171, 174externally secured authentication
Receive connectors and, 137Send connectors and, 119

368
failover
Ffailover
defined, 29clusters, 35, 36, 37vs . switchover, 55
Failover Cluster Manager, 30, 31fc (file compare) command, 344file types for Exchange data store, 18filtering. See message filtering; IP block
listsfirewalls, 39, 222Forms authentication, 238, 241forwarding mailboxes, 16Front End Transport service
Client Access servers and, 114incoming messages and, 6mail transport and, 4Receive connectors and, 130routing and, 6
front-end proxying, 121full-text indexes, 104, 105
GGet cmdlets
Get-AcceptedDomain, 172Get-AdSite, 111Get-AdSiteLink, 112, 113Get-AutodiscoverVirtualDirectory,
269, 270Get-ClientAccessServer, 343Get-DatabaseAvailabilityGroup,
29, 44Get-DatabaseAvailabilityGroup-
Network, 29, 48Get-EdgeSubscription, 159Get-EmailAddressPolicy, 177Get-ExchangeServer, 343Get-HealthReport, 217, 225, 340Get-IMAPSettings, 252Get-IPAllowListEntry, 203Get-IPBlockListConfig, 199Get-IPBlockListEntry, 204Get-IPBlockListProvider, 198Get-JournalRule, 186Get-Mailbox, 243
Get-MailboxDatabase, 29, 60, 96, 106Get-MailboxDatabaseCopyStatus, 29,
62, 93, 102, 106Get-MailboxServer, 343Get-MessageTrackingLog, 302, 303Get-MobileDevice, 274Get-MobileDeviceMailboxPolicy, 286Get-MobileDeviceStatistics, 275, 277Get-MonitoringItemIdentity, 357Get-OrganizationConfig, 344Get-OutlookAnywhere, 257, 258Get-OwaMailboxPolicy, 230Get-OWAVirtualDirectory, 281Get-OwaVirtualDirectory, 225Get-OWAVirtualDirectory, 223,
280, 285Get-POPSettings, 251Get-ReceiveConnector, 137Get-RecipientFilterConfig, 195Get-RemoteDomain, 186, 187Get-ResourcePolicy, 343Get-SendConnector, 124Get-SenderFilterConfig, 190, 193Get-ServerHealth, 217, 223, 224,
340, 341Get-ThrottlingPolicyAssociation, 342Get-ThrottlingPolicy, 241, 243, 342Get-TransportRule, 208Get-TransportService, 344Get-WorkloadPolicy, 342
global address list, 5global allowed lists, 202global block lists, 203global catalogs, 14Global Throttling Policy, 342
Hheader firewall feature, 109header size limits, 144headers, Pickup directory and, 164health indicators, 343health sets
ActiveSync, 224Autodiscover, 223ECP, 223Exchange Web Services (EWS), 223

369
Ipv6 addresses, specifying for receive connectors
list of, 356, 357monitors and, 339OAB, 224OWA, 218, 219, 224PublicFolders, 224RPC, 224Windows PowerShell, 224
HELO start command, 129high availability
database options, 28–30Information Store and, 25managed availability and, 32
high availability transport (HAT) boundar-ies, shadow redundancy and, 149
hops, specifying maximum for Receive connectors, 133
HTTPdefault port settings, 251optimizing protocol logging for,
311–313protocol log files, 313, 314redirection role service, 237server, controlling access to, 237–241
hub sites, 110, 111Hub Transport servers, 2, 6, 9hybrid deployments
Mailbox servers and Edge Transport servers, 107
message routing and delivery, 107on-premises and Exchange Online,
connectors for, 139hybrid organizations
accepted domains and, 171journal rules and, 184
Iidle user sessions, disconnecting, 235IIS
authentication, 237–241bindings, 230–232Exchange ActiveSync and, 263Log Parser Studio and, 360restarting, 225troubleshooting, 225, 226web applications and, 221, 222
IMAP4 (Internet Message Access Protocol 4)
authentication, 253, 254bindings, 252, 253configuring, 249–250default port settings, 251enabling, 250–251message retrieval settings, 256, 257
Inbound connectors, 139incoming messages, Mailbox Transport
Delivery service and, 6incremental resync, 87indexing, 103–106information store, 16, 17, 25–34, 63installing Exchange Server 2013, 2Integrated Windows Authentication,
Receive connectors and, 137internal DNS lookups, configuring, 125Internal Relay Domain accepted domain
type, 174internal relay domains, 171Internal type Receive connectors, 109, 130Internal type Send connectors, 109, 117Internet Message Access Protocol 4
(IMAP4) . See IMAP4 (Internet Message Access Protocol 4)
Internet type Receive connectors, 131Internet type Send connectors, 117interoperability with previous versions,
site-based routing and, 8Invoke-MonitoringProbe cmdlet, 358IP Allow List, enabling, 202IP block list services
enabling and disabling, 200priority order, 198, 200return status codes for, 196, 197, 198
IP block listsapplying, 196, 197, 198enabling, 203error messages, 200, 201exceptions, 201, 202
IP site links, 10, 112, 113IPv4 addresses, specifying for Receive
connectors, 131IPv6 addresses, specifying for Receive
connectors, 131

370
journal rules
Jjournal rules
configuring, 184creating, 185, 186managing, 186
Llagged database copies, activating, 84–86least-cost routing path
default behavior, changing, 113determining, 109message relay, 110
legacy Edge Transport servers . See Edge Transport servers
Lightweight Directory Access Protocol (LDAP) queries, 14
line length, setting maximum, 189linked mailboxes, 5, 16load balancing
Exchange ActiveSync, 222excluding a mailbox from provision-
ing, 66mailbox databases, 64, 65Outlook Web App, 222
local area networks (LANs), as sites, 10Local Continuous Replication (LCR), 28log files, 17–20
See also transaction logscurrent active, 22, 23location, 23, 26message tracking, 300–305reserve, 22, 23secondary, 22
Log Parser Studio, 359–361logging
See also event loggingcircular, 17, 101, 102connectivity, 314–316protocol, 307–314
Mmailbox databases
described, 16active vs . passive, 30, 63, 78associated default files, 26backing up data, 27copies, creating, 79–81
copies, removing passive, 94copy status values, 91–93creating, 66–67default, 64deleting, 103high availability options, 28limits on specific editions of Ex-
change, 69load balancing, 64, 65maintenance intervals, setting,
98–100mounting and dismounting, 95–98moving, 100–102naming, 26primary vs . secondary, 78recovering databases, 95, 96recovering items deleted from, 77, 78recovering mailboxes deleted from,
75–77renaming, 102, 103replication status, monitoring, 90–93replication, suspending and resum-
ing, 83, 84retention periods, setting, 71–75status, 96storage limits, 26, 72, 73system requirements, 17updating copies, 87–90viewing file and folder paths, 100
mailbox delivery queues, 329mailbox-enabled recipients, 5mailbox policies for mobile devices
assigning, 293creating, 288–292optimizing, 291options, 288–290purpose, 263removing, 294viewing, 285–287
mailbox policies for Outlook Web App, 216, 217, 229, 230
mailbox provisioning load balancer . See load balancing
Mailbox serversanti-spam features, enabling, 154authentication settings for virtual
directories, 239as back end, 2, 114connectors and, 109

371
MSExchangehMhost.exe
database limit and maximum size, 17Edge Transport servers and, 107, 114Exchange Server 2013 server roles
and, 1external DNS lookups, configuring,
125internal DNS lookups, configuring,
126queues, 20Receive connectors and, 128, 129routing and, 8, 9
Mailbox Transport Delivery service, incoming messages and, 6
Mailbox Transport service, 6, 8, 9Mailbox Transport Submission service,
outgoing messages and, 6mailbox types, 16mail-enabled recipients, 5mail flow, testing, 345, 346mail protocols, 108Mail.que file, 22maintenance intervals, setting, 98–100managed availability, 32–34, 337, 338Managed Store . See information storeMaxAllowedContentLength value, 145,
146MaxDocumentDataSize key, ActiveSync
limits and, 145MaxReceivedMessageSize value, 145, 146MaxRequestLength value, 145, 146memory usage, performance alerting and,
323–326MessageExpirationTimeout value, 153message filtering
described, 189blocking domains and senders, 192Edge Transport servers and, 154IP block lists . See IP block listspreventing on internal servers, 205by recipient, 193–195by sender, 190–193
message trackingconfiguring logs, 300, 301delivery reports, 305–307log fields, list of, 304purpose, 299reviewing logs manually, 303–305searching logs, 302, 303settings, 300
messagesheader limits, 141Pickup directory limits, 167processing speed, 166, 167queueing, 11, 20, 21, 22receive size limits, 141, 142routing, 4, 6, 8–13send size limits, 141, 143throttling, 168, 169
messaging networks, 45, 50Microsoft Exchange Online . See Exchange
OnlineMicrosoft Exchange Server 2013 .
See Exchange Server 2013Microsoft .Exchange .Store .Service .exe .
See Information StoreMicrosoft Exchange Transport service
(MSExchangeTransport .exe), 23Microsoft Exchange Writer, 17Microsoft Outlook . See Outlook 2013Microsoft-Server-ActiveSync directory,
224migrating mailboxes from online to
on-premises, 13MIME types, 277, 278, 280, 281mobile devices
Autodiscover and, 268–271direct file access, 277–282Direct Push and, 271, 272Exchange ActiveSync and, 262, 263mailbox policies, 285–295managing access, 295–297Outlook Anywhere and, 263–267password recovery, 276–277remote device wipe and, 272–275remote file access, 282WebReady Document Viewing,
283–284monitor engine, 338monitors, 352Mount-Database cmdlet, 97mounting mailbox databases, 57, 58, 68,
95–98Move cmdlets
Move-ActiveMailboxDatabase, 29, 57Move-DatabasePath, 29, 100
MSExchangeDagMgmt .exe . See database availability groups (DAGs)
MSExchangeHMHost .exe, 33

372
MSExchangehMWorker.exe
MSExchangeHMWorker .exe, 33MSExchangeRepl .exe . See replication
servicemsExchMDBAvailabilityGroup object, 35,
36multihomed servers, 230multimaster replication, 14Multipurpose Internet Mail Extensions
(MIME) values, 277, 278multivalued properties, shorthand for, 202MX records, 108, 118
Nnaming Exchange organizations, 2NDR journaling mailbox, 184, 185networks, database availability group,
45–52New cmdlets
New-AcceptedDomain, 174New-AutodiscoverVirtualDirectory,
270New-DatabaseAvailabilityGroup, 29,
41New-DatabaseAvailabilityGroupNet-
work, 29, 49New-EcpVirtualDirectory, 225New-EdgeSubscription, 158New-EmailAddressPolicy cmdlet, 181New-JournalRule, 186New-MailboxDatabase, 29, 70New-MobileDeviceMailboxPolicy,
290, 291New-OwaMailboxPolicy, 230New-OwaVirtualDirectory, 225New-OWAVirtualDirectory, 223New-ReceiveConnector cmdlet, 133,
134, 143, 144New-RemoteDomain cmdlet, 187New-ResourcePolicy, 343New-SendConnector cmdlet, 121, 143New-ThrottlingPolicy, 241, 243, 342New-TransportRule, 208New-WorkloadManagementPolicy,
343New-WorkloadPolicy, 342
New Mailbox Database Wizard, 66non-delivery of messages, Mail Transport
service and, 8
non-delivery reports, 127, 141, 144, 148nonpersistent queues, 20non-SMTP connectors, Replay directory
and, 164Ntds.dit file, 14
OOAB directory
health sets, 224resetting, 245web distribution points, 244
object-based storage, 19offline address book (OAB), 64, 70, 71Offline mode, Outlook Web App and, 215On-Premises connector type, 139organizations
Exchange environments and, 2hybrid deployments, 107recipients, managing, 5
Outbound Connection Failure Retry Inter-val (Seconds), 127
outbound connections, 127, 128Outbound connectors, 139Outbound Proxy front-end connector
default message size limit, 143purpose, 128
outgoing messages, Mailbox Transport Submission service and, 6
Outlook 2013Outlook Anywhere and, 264recovering deleted items, 77
Outlook Anywheredescribed, 264configuring, 257–260, 265–269connections and, 3RPC over HTTP and, 264, 266vs . remote mail, 264
Outlook Web Accessdisabling and enabling, 263mailboxes, accessing, 213public folders, accessing, 213
Outlook Web Appdescribed, 210, 261Active Monitoring and, 217application pools, configuring, 220configuration requirements, 210contacts, 215disabling, 216
373
protocol logging
features, 211, 212, 214health sets, 217, 218, 219limits, 146load balancing, 222mailboxes, accessing, 212mailbox policies, 216, 217, 229, 230message size limit, 144Offline mode, 215password recovery, 276remote device wipe and, 273segmentation features, 226–230troubleshooting, 217–221versions, 210, 211web.config file location, 146
overlapping recycling of worker pro-cesses, 147
OWA . See Outlook Web AppOWA directory
configuring URLs and authentication, 246
health sets, 224resetting, 247
Ppage headers, 19Partner connection type, 140Partner type Receive connectors, 131Partner type Send connectors
described, 117header firewall feature and, 109
password recovery for mobile devices, 276
performance alerting, 323–328performance monitoring, 321–323performance objects, 321–323persistent queues, 20Pickup directory
header fields and, 164message routing and delivery, 163messaging limits, 167moving, 165polling interval, 164Transport servers and, 164
poison message queue, 20, 329policies
address book, 243email address, 176–183Global Throttling, 342mailbox, for mobile devices, 285–294
mailbox, for Outlook Web Access, 216, 229, 230
mailbox, for Outlook Web App, 217remote domains, 186retention, 5, 243
polling intervalmaximum messages processed, 166Pickup directory, 164Replay directory, 165
POP3 (Post Office Protocol 3)authentication, 253, 254bindings, 252, 253configuring, 249connection settings, 254–256default port settings, 251enabling, 250, 251message retrieval settings, 256, 257
port settings for messaging protocols, 251postmaster address, 147, 148Post Office Protocol 3 (POP3). See POP3
(Post Office Protocol 3)PowerShell . See Windows PowerShellpreference values, 80, 81–83, 91preprovisioned log files
message database, 18queue database, 22
pre-staging cluster name objects, 37primary data files, 18, 19, 22primary role holders, 31, 32probe engine, 338, 339, 354probes
definitions, 353error messages, 354–356monitors and, 352tracing errors, 356–358
propertiesfor Receive connectors, 136for Send connectors, 123
Protocol Analysis agent, 155protocol logging
configuring, 307–309optimizing for HTTP, 311–313properties and fields, 310, 311purpose, 307receive connector parameters, list
of, 309send connector parameters, list of,
309working with log files, 313, 314
374
provisioning with Autodiscover
provisioning with Autodiscover, 268proxying through Client Access servers,
121proxy settings, 266Public directory, 224public folder mailboxes, 16public folders, Send As permission and, 5
Qqueueing messages . See messagesqueues
deleting, 335filtering messages, 333, 334forcing connections to, 334states, 331summaries, 331suspending and resuming, 334types, 328–330viewing, 330, 331, 333
Queue Viewer, 20, 330, 331, 332quorum, 35quorum resource, 31, 37quota notifications, 73, 74
RReceive connectors
described, 109bindings, 129creating, 128, 129, 130, 131, 133defaults created to enable mail flow,
128disabling and enabling, 136header size limits, 144managing, 135maximum hops, specifying, 133permissions, 137properties, changing, 136protocol logging, parameters for, 309recipient limits, 144removing, 136security, 136specifying IP addresses, 131transport limits, 143types of, 130viewing, 135
recharge rate, client access and, 242Recipient Filter agent, 155
recipient limits, 144recipients
defined, 5filtering, 179, 180, 193, 194limits, 141managing, 5resolution of, 8
recovering mailbox databases, 95, 96recovery actions, 348–350recovery response, levels, 339redirecting users to alternate URLs, 236,
237relay domains, 170relaying messages, 110relay queues, 329remote delivery queues, 20, 329remote device wipe, 272–275remote domains, 186–189
creating, 187message options for, 187, 188, 189policies, 186removing, 189settings, 186viewing, 186
remote file access, 282remote mail vs . Outlook Anywhere, 264remote network settings, specifying, 131Remove cmdlets
Remove-AcceptedDomain, 176Remove-AutodiscoverVirtual-
Directory, 270, 271Remove-DatabaseAvailabilityGroup,
29, 55Remove-DatabaseAvailability-
GroupNetwork, 29, 49Remove-DatabaseAvailability-
GroupServer, 29, 45, 61Remove-EdgeSubscription, 162Remove-EmailAddressPolicy, 183Remove-IPAllowListEntry, 203Remove-IPBlockList, 204Remove-IPBlockListProvider, 198Remove-JournalRule, 186Remove-MailboxDatabase, 29, 103Remove-MailboxDatabaseCopy, 29,
60, 61, 94Remove-OwaVirtualDirectory, 225Remove-OWAVirtualDirectory, 223

375
security
Remove-ReceiveConnector, 139Remove-RemoteDomain, 189Remove-ResourcePolicy, 343Remove-SendConnector, 125Remove-ThrottlingPolicy, 241,
243, 342Remove-TransportRule, 208Remove-WorkloadPolicy, 342
renaming Active Directory sites, 111Replay directory, 163–166
message routing and delivery, 163moving, 166non-SMTP connectors and, 164polling interval, 165
replay lag time, 81–83, 91replaying logs into lagged copies, 82, 83replication
automatic reseed and, 65database availability groups and, 79disabling, 46, 47event logging, 30monitoring status, 90–93multimaster, 14networks, 45, 50seeding and, 87service, 16, 17suspending, 81, 83, 84testing, 346, 347
reseeding databases, 65, 66, 87reserve log files
message database, 19queue database, 22
resource thresholds, 343responder engine, 338, 339responders, identifying, 350restarting websites, 244Restore-DatabaseAvailabilityGroup cmd-
let, 29, 54restoring databases, 17, 65, 66result types, 358Resume-MailboxDatabaseCopy cmdlet,
29, 84retention periods, 71–75retention policies, 5, 243retrying unsuccessful outbound connec-
tions, 127return status codes for IP block list
services, 196–198
role assignment policy, 243roles, primary vs . secondary Active
Managers, 31, 32room mailboxes, 16routing
cost of a route, 10cross-premises, 13delivery groups and, 6, 9distribution group expansion
servers, 15Front End Transport service and, 4, 6incoming messages, 6multi-recipient messages, 12site-based vs . group based, 8
routing destinations, delivery groups and, 110
routing headers, 109row offsets, 19RPC directory, 224, 258, 259RPC MAPI, Transport service and, 6RPC over HTTP . See Outlook AnywhereRPC over TCP/IP, Outlook Anywhere
and, 267RPC sessions, Mailbox servers and, 3
SSafeList aggregation feature, 193Safety Net
hold time, 154parameters, list of, 154queues, 20, 21, 22, 150, 153, 330
SAN (storage area network) implementa-tion, 27
schema data type, 14searching
content indexing and, 103–105tracking logs, 302, 303
secondary log filesmailbox database, 19queue database, 22
secondary role holders, 32security
Exchange ActiveSync safeguards, 262groups, specifying for Receive con-
nectors, 137header firewall feature, 109mobile device mailbox policies, 263

376
seeding databases
Set-CASMailbox, 230, 294Set-ContentFilterConfig, 201, 205Set-DatabaseAvailabilityGroup, 29,
35, 37, 51, 52, 53, 82Set-DatabaseAvailabilityGroup-
Network, 29, 51Set-EcpVirtualDirectory, 225, 239Set-EmailAddressPolicy, 183Set-ExchangeServer, 343Set-IMAPSettings, 252Set-IPBlockListConfig, 199Set-IPBlockListProvider, 198, 200,
201, 205Set-IPBlockListProvidersConfig, 199,
202Set-JournalRule, 186Set-MailboxDatabase, 29, 65, 71, 74,
75, 98, 99, 100, 102, 103Set-MailboxDatabaseCopy, 29, 82,
154Set-MailboxServer, 58Set-MailboxTransportService, 315Set-MobileDeviceMailboxPolicy, 291,
292, 293Set-OabVirtualDirectory, 239Set-OutlookAnywhere, 260Set-OwaMailboxPolicy, 230Set-OWAVirtualDirectory, 225, 239,
280, 281, 284, 285Set-POPSettings, 251Set-PowerShellVirtualDirectory, 239Set-ReceiveConnector, 138, 143, 144,
153, 169Set-RecipientFilterConfig, 195Set-RemoteDomai, 188Set-ResourcePolicy, 343Set-SendConnector, 124, 143, 153,
168Set-SenderFilterConfig, 190, 191, 192Set-SenderIdConfig, 205Set-Service, 251Set-ThrottlingPolicy, 241, 342Set-ThrottlingPolicyAssociation, 342Set-TransportConfig, 143, 151, 152,
154Set-TransportRule, 208Set-TransportServer, 147
security (continued)Outlook Anywhere and, 264, 267Pickup directory permissions, 165Receive connectors and, 136remote device wipe, 272–275Replay directory permissions, 165
seeding databases, 87–90segmentation, 226segmentation features
enabling and disabling, 228, 229listed, 227
Send As permission, 5Send connectors
described, 108address spaces and, 119, 120creating, 114, 115, 116, 117disabling, 123DNS lookups, 125, 126enabling, 123for internal mail flow, 114for Internet mail flow, 114, 115, 116limits, 126, 127linking to specific Receive connec-
tors, 115managing, 122, 123maximum size for messages, 116, 121properties, changing, 123protocol logging, parameters for, 309removing, 123setting cost of, 116transport limits, 143types, 117viewing, 122, 123
Sender Filter agent, 155sender filtering, 190, 192, 193Sender ID agent, 155server health
tracking, 337–342transition states, list of, 33, 34
service health, testing, 344Set cmdlets
Set-AcceptedDomain, 175Set-ActiveSyncVirtualDirectory, 239,
282Set-AdSite, 111, 112Set-AdSiteLink, 113Set-AutodiscoverVirtualDirectory,
239, 269, 271

377
test cmdlets
Set-TransportService, 153, 154, 155, 164, 166, 167, 168, 300, 315
Set-TransportService cmdlet, 165Set-WebServicesVirtualDirectory, 239Set-WorkloadPolicy, 342
shadow redundancyprocess, 149, 150purpose, 148queue, 20, 21, 329
shared mailboxes, 16sharing policy, 243Simple Mail Transfer Protocol (SMTP) .
See SMTPsite-based routing, 8site bindings, 230–232site links
described, 10configuration information, viewing,
112Exchange-specific costs, setting, 113maximum size for messaages, 113relaying messages across, 11
site membership, for Exchange servers, 9slow networks, defining, 267smart hosts
defined, 114adding to Send connectors, 118authentication and, 119
SMTPaddress spaces, 119, 120connectors, 108default port settings, 251delivering messages, 6primary address, 8routing messages, 4Send connectors, for Internet mail
flow, 115, 116standard vs . extended sessions, 129
soft-deleted mailboxes, 75source servers, 120source transport servers, 6spam confidence levels, 191spam filtering, 190, 191, 192, 193SSL
enabling on websites, 232–235Outlook Anywhere and, 266
Standby Continuous Replication (SCR), 28
Start-DatabaseAvailabilityGroup cmdlet, 29, 53
starting websites, 244State Or Province filter condition, 179State values, list of, 341Stop-DatabaseAvailabilityGroup cmdlet,
29, 54stopping websites, 244storage area network (SAN) implementa-
tion, 27storage limits for mailbox databases,
72, 73submission queue, 20, 328subscribing Edge Transport servers, 156,
158Suspend-MailboxDatabaseCopy cmdlet,
29, 84switching over servers and databases,
55–58switchover
defined, 29vs . failover, 55
synchronizingEdge subscriptions, 158mobile devices, 271preventing, 295
system services, 320, 321
Ttemporary data files
message database, 18queue databasee, 22
temporary log (E##tmp.log) file, 19Test cmdlets
Test-ActiveSyncConnectivity, 347Test-ArchiveConnectivity, 347Test-AssistantHealth, 347Test-CalendarConnectivity, 347Test-EcpConnectivity, 235, 347Test-EdgeSynchronization, 160, 161,
347Test-ExchangeSearch, 106, 347Test-FederationTrust, 347Test-FederationTrustCertificate, 347Test-IMAPConnectivity, 252, 347Test-IPAllowListProvider, 347

378
throttling
Test cmdlets (continued)Test-IPBlockListProvider, 199, 347Test-IRMConfiguration, 347Test-Mailflow, 345Test-MAPIConnectivity, 252, 347Test-MRSHealth, 347Test-OAuthConnectivity, 347Test-OutlookConnectivity, 347Test-OutlookWebServices, 235, 348Test-OWAConnectivity, 217, 223,
235, 348Test-POPConnectivity, 252, 348Test-PowerShellConnectivity, 348Test-ReplicationHealth, 58, 59, 102,
346, 347Test-SenderId, 348Test-ServiceHealth, 344Test-SmtpConnectivity, 348Test-UMConnectivity, 348Test-WebServicesConnectivity, 348
throttlingclient access, 241–243messages, 168, 169users, 342, 343workloads, 342, 343
time-out values, setting, 235, 236TLS connections, 253, 254Tmp.edb file, 18, 22TNEF (Transport Neutral Encapsulation
Format), remote domains and, 189touch-capable computers, managing
Exchange Server 2013 using, xiiitracking logs
event fields, 304importing, 305purpose, 300searching, 302, 303
tracking messages . See message trackingtransaction logs, 17, 18, 19, 22Transient Failure Retry Attempts, 127Transient Failure Retry Interval (Minutes),
127transition state, 33, 34transport dumpster queue, 330Transport Layer Security, 136transport limits
described, 141
connector, 143, 144organizational, 142, 143retrying unsuccessful connections,
127server, 144, 145, 146
Transport Neutral Encapsulation Format (TNEF) message data, remote domains and, 189
transport rulesactions, 206, 207conditions, 205, 207creating, 206, 207exceptions, 206, 208managing, 208
transport serversdestination delivery group and, 6DNS lookups, 125Pickup directory and, 164queues, 20Send connectors and, 114
Transport serviceback-end transport and, 6–8Mailbox servers and, 114Receive connectors and, 130
transporting messages . See Front End Transport service; Mailbox Transport services; routing
TRN00000001.log file, 22Trn.chk file, 22Trn.log file, 22TRNRes00001.jrs file, 22Trntmp.log file, 22troubleshooting steps, 348truncation lag time, 81–83
UUnified Messaging servers, 2unreachable queue, 20, 330Update-EmailAddressPolicy cmdlet, 181,
182Update-MailboxDatabaseCopy cmdlet,
29, 89, 90, 106upgrading to Exchange Server 2013
Enterprise edition, 69, 70user mailboxes, 16user throttling, 342, 343

379
X-headers
Vvirtual directories
authentication on Client Access servers, 238
authentication on Mailbox servers, 239
recreating, 225web applications and, 222–226
virtual directories for Autodiscover, reset-ting, 269
Wweb applications
IIS and, 221, 222root virtual directory, 222
web distribution pointsconfiguring, 245properties, 244
web.config file locationExchange ActiveSync, 144Exchange Web Services, 145Outlook Web App, 146
WebReady Document Viewing, 283–285website limits, 236websites, starting and stopping, 244wide area network (WAN) links, as site
boundaries, 10Windows authentication, 237, 238, 239,
253, 254Windows Failover Clustering, 28, 30, 36Windows Firewall, witness server and, 39Windows PowerShell
directory, 224throttling, 242
witness servers, 34, 35, 36, 40, 52, 53working files, 18, 19workload classifications, 342workload throttling, 342, 343wrapping text, 189
XX.509 certificates, 232X-headers, 109


About the author
WILLIAM STANEK (www.williamstanek.com) is the award-winning author and series editor of the bestselling Pocket Consultant series . William is one of the world’s leading technology experts and has more than 20 years of hands-on experience with advanced program-ming and development . Over the years, his practical advice has helped millions of programmers, developers, and network engineers
all over the world . Dubbed “A Face Behind the Future” in 1996 by The Olympian, William has been helping to shape the future of the written word for more than two decades . William’s 150th book was published in 2013 . William’s current books include Windows 8 Administration Pocket Consultant, Windows Server 2012 Pocket Consultant, and Windows Server 2012 Inside Out .
William has been involved in the commercial Internet community since 1991 . His core business and technology experience comes from more than 11 years of military service . He has substantial experience in developing server technology, encryption, and Internet solutions . He has written many technical white papers and training courses on a wide variety of topics. He frequently serves as a subject matter expert and consultant .
William has an MS with distinction in information systems and a BS in computer science, magna cum laude . He is proud to have served in the Persian Gulf War as a combat crew member on an electronic warfare aircraft. He flew on numerous combat missions into Iraq and was awarded nine medals for his wartime service, including one of the United States of America’s highest-flying honors, the Air Force Distinguished Flying Cross. Currently, he resides in the Pacific Northwest with his wife and children .
William recently rediscovered his love of the great outdoors . When he’s not writ-ing, he can be found hiking, biking, backpacking, traveling, or trekking in search of adventure with his family!
Find William on Twitter at WilliamStanek and on Facebook at www.facebook.com /William.Stanek.Author .

Now that you’ve read the book...
Was it useful?Did it teach you what you wanted to learn?Was there room for improvement?
Let us know at http://aka.ms/tellpress
Your feedback goes directly to the staff at Microsoft Press, and we read every one of your responses. Thanks in advance!
Tell us what you think!


![2 Exchange 2010 SP1 Protection native 08/02/2011 Teruin Laurent [Mvp] Consultant Communication unifiées](https://img.dokumen.tips/doc/110x75/551d9dc1497959293b8e0fc7/2-exchange-2010-sp1-protection-native-08022011-teruin-laurent-mvp-consultant-communication-unifiees-httpunifieditwordpresscom-httpunifieditwordpresscom.jpg)


