Embed Size (px)
Citation preview

T r a i n i n g G u i d e
Microsoft Excel 2010– Level 1
2 – Creating a new workbook
Microsoft Excel 2010 - Level 1
© Learning and Development Service Page 2 Creating a new workbook
CREATING A NEW WORKBOOK
The data you enter and use in Microsoft Excel will be stored in a file that is referred to as a workbook. It is into a workbook that you type data such as text, numbers, and even dates. You can then create formulas that perform calculations using this data. So, knowing how to create a new workbook of your own is a basic and essential skill to have in Excel.
INFOCUS
In this booklet you will:
gain an understanding of workbooks and their elements
learn how to create a new blank workbook based on the default template
learn how to type text into a worksheet
learn how to enter numbers into a worksheet
learn how to type dates and perform simple calculations with them
learn how to type a simple formula into a worksheet
learn how to save a new workbook file
learn how to enter formulas more quickly and easily
learn how to check spelling in a worksheet
learn how to make and save changes in a workbook
learn how print a worksheet
learn how to safely close a workbook
Microsoft Excel 2010 - Level 1
© Learning and Development Service Page 3 Creating a new workbook
UNDERSTANDING WORKBOOKS
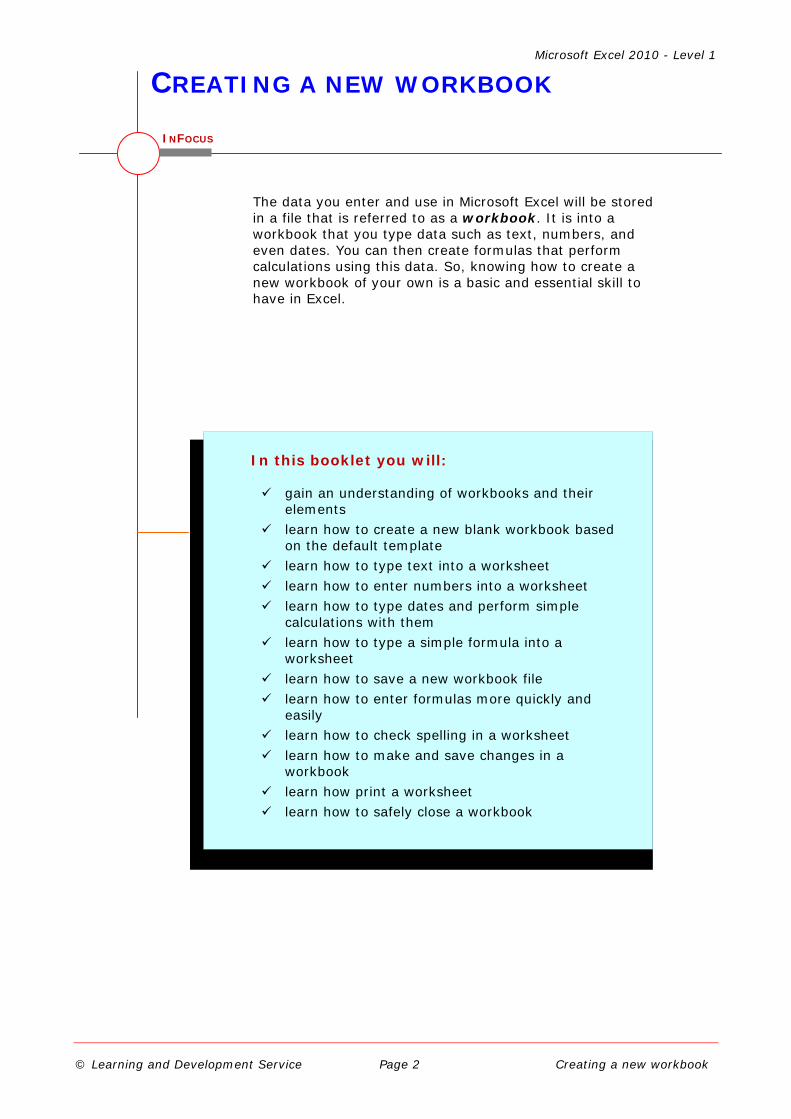
In Microsoft Excel the data you enter, whether it consists of numbers, text, or formulas, is stored in a file known as a workbook. Workbooks are just like super-huge electronic books with pages (or
sheets) that have been ruled into columns and rows. Before using Excel it is helpful to know what the various parts and elements that make up a workbook are.
1 A worksheet (or page) in a workbook contains 16,384 columns that are labelled using letters of the alphabet. The first column in a worksheet is labelled column A, while the last is labelled XFD.
2 A worksheet (or page) in a workbook contains 1,048,576 rows that are labelled using numbers from 1 to 1,048,576.
3 Where a column and row intersect we get what is known as a cell. You enter your data into these cells. Each cell in a worksheet can hold up to 32,767 characters – although you’d be nuts to ever push it this far. Cells are referred to by their column and row labels. For example, in the screen above, the cell we are pointing to is C11 – this reference is known as the cell address and is most important as it is frequently used in commands and formulas.
4 When you start typing something you want it to appear somewhere in the worksheet. As a consequence when the status bar shows Ready mode, at least one cell in the worksheet will be highlighted – this is known as the active cell. In the screen above the active cell is cell A1 – notice that the column label and the row label also appear coloured to indicate the active cell. You can have more than one active cell – when this occurs you have what is known as a range.
5 A workbook (as you would expect) is made up of pages known as worksheets. You can have as many sheets in a workbook as your computer resources can accommodate. As a default, a new blank workbook normally has 3 worksheets labelled Sheet1, Sheet2, and Sheet3. Of course these labels are pretty boring and meaningless and can be changed to something more relevant.
6 The Insert Worksheet button will insert another worksheet into the current workbook should you need it.
1
5 6
2
3
4

Microsoft Excel 2010 - Level 1
© Learning and Development Service Page 4 Creating a new workbook
CREATING A NEW WORKBOOK
Try This Yourself:
Before you begin you should ensure that Excel has started...
1 Click on the File tab to display the Backstage View
2 Select New to display the Available Templates
Here you can see the installed and online templates available to you...
3 Click on Blank workbook in Available Templates
4 Click on [Create] to create a new blank workbook
Notice that the workbook is automatically assigned a sequentially numbered name commencing with the word “Book”, which is displayed in the title bar
For Your Reference… To use the Blank workbook template:
1. Click on the File tab 2. Select New 3. Click on Blank workbook in
Available Templates 4. Click on [Create]
Handy to Know… • You can also use the keyboard shortcut
+ to instantly open a new blank
workbook based on the Blank workbook template, by-passing the Backstage view.
2
4
When you want to create a new spreadsheet project, you will normally first need to create a new workbook. All workbooks created in Excel are based on a template which defines the basic layout of
a workbook. Microsoft actually provides a number of task-specific templates for accounting, budgeting and the like. However the easiest to use is the Blank Workbook default template.

Microsoft Excel 2010 - Level 1
© Learning and Development Service Page 5 Creating a new workbook
TYPING TEXT
For Your Reference… To enter text:
1. Click the cell pointer on the desired cell and type the required information
2. Press , an arrow key or to confirm the data entry and to move the cell pointer to another cell
Handy to Know… • You don’t have to use or to
make adjacent cells active. You can simply use the mouse and click in the cells if you want or even press the arrow keys to move up, down, left, or right.
1 2
Generally when you start a new spreadsheet project the first task is to enter some headings into rows and columns. To type anything into a worksheet you need to make the cell into
which you wish to enter the data active. This can be done in a number of ways but the most common is to click in the cell first before typing.
3
4
5
Try This Yourself:
Before you begin ensure that you have a blank workbook open...
1 Click in cell A3 to make this the active cell, type Garden Settings and press
When you press the next cell down automatically becomes the active cell. By the way, even though the text looks like it is in cells A3 and B3 it really only is in cell A3 – since there is nothing in B3 Excel allows the spill over to be displayed, giving the illusion it is in 2 cells…
2 Type Pool Covers and press
3 Repeat the above steps and enter the remaining text in column A as shown
4 Click in cell B2 to make this the active cell, type AUS and press
When you press the cell to the right then becomes the active cell…
5 Enter the remaining text in row 2 as shown

Microsoft Excel 2010 - Level 1
© Learning and Development Service Page 6 Creating a new workbook
TYPING NUMBERS
Try This Yourself:
Sam
e
File Continue using the
previous file with this exercise...
1 Click in cell B3 to make this the active cell
2 Type 17200 and press or the down arrow
Notice how the text from the left cell has now been chopped off. This occurs because B3 has data in it and this takes precedence over the residual display from the left cell. The text in A3 is still all there – only the display has been chopped off not the data…
3 Enter the remaining values into the other cells as shown
For Your Reference… To enter values:
1. Click the cell pointer on the desired cell and type the required information
2. Press , an arrow key or to confirm the data entry and to move the cell pointer to another cell
Handy to Know… • If you are unsure exactly what is in a
cell, click on the cell to make it active and look in the formula bar at the top of the worksheet to see what is really there. For example, if you click on A3 in the worksheet above you’ll see the full text, Garden Settings, in the formula bar.
1
2
The method for entering numbers, letters, and formulas into a worksheet are exactly the same – you simply make a cell active by clicking in it and then type away.
However, numbers (or values as they are known) will align themselves to the right hand side of a cell as a default, rather than the left hand side, as is the case with letters.
3

Microsoft Excel 2010 - Level 1
© Learning and Development Service Page 7 Creating a new workbook
TYPING DATES
Try This Yourself:
Sam
e
File Continue using the
previous file with this exercise...
1 Click in cell A10 to make this the active cell
2 Type Sales at: and press to move to the
adjacent cell
3 Type 31/8 and press
Since 31/8 is recognised by Excel as a date it has been entered and formatted accordingly. You can change the formatted appearance of the date at a later time if you wish…
4 Click in cell A11, type Reviewed: and press to jump to B11
1 Type =B10+7 and press to enter a formula in
B11 that references the date you typed in cell B10
The formula here takes the value in B10 and adds 7 (i.e. 7 days) to the date
For Your Reference… To enter dates:
1. Click the cell pointer on the desired cell and type a date – as deemed valid to Excel
2. Press , an arrow key or to confirm the data entry and to move the cell pointer to another cell
Handy to Know… • You can type a date in a variety of
ways. If Excel accepts what you type as a date it will appear aligned to the right of a cell just like a number. If the date is invalid to Excel it will be left-aligned just like text – so, watch how your dates are entered to ensure that they are correct!
1
3
Dates are a special type of data that can be entered into a worksheet cell. When you type a date into a cell Excel converts that date to a number – you don’t see this
happen, but it does. From then on you can use that date to perform calculations just like you can with numbers.
5
Microsoft Excel 2010 - Level 1
© Learning and Development Service Page 8 Creating a new workbook
TYPING FORMULAS
For Your Reference… To enter a formula:
1. Click the cell pointer on the desired cell and type the formula commencing with =
2. Press , an arrow key or to confirm the data entry and to move the cell pointer to another cell
Handy to Know… • By using a cell address in a formula
(e.g. B3, B4, etc), each time the actual value in B3 or B4 changes, the formula will recalculate. This is the essence of what a spreadsheet is all about.
2
3
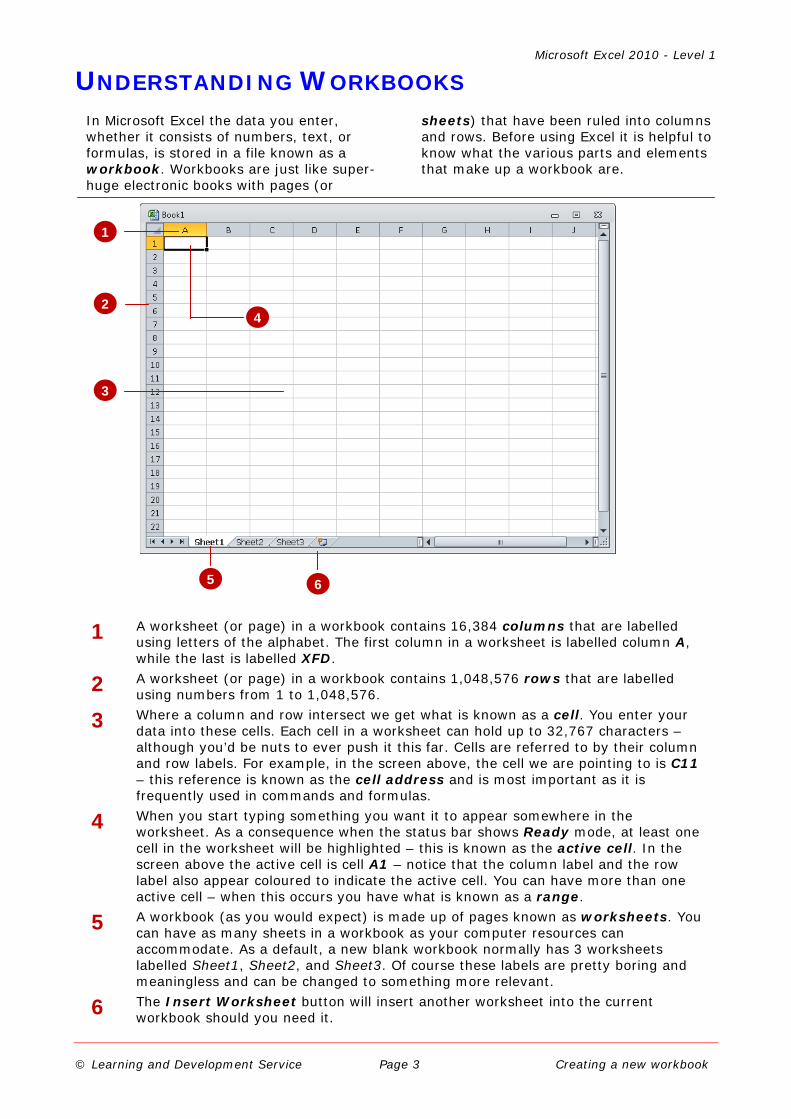
The whole idea behind Excel is to get it to perform calculations. In order for it to do this you need to type formulas in the worksheet. Usually these formulas reference existing numbers or even other
formulas already in the worksheet, using the cell addresses of these numbers rather than the actual value in them. Formulas must be typed beginning with an equal sign (=).
5
6
Try This Yourself:
Sam e
File Continue using the previous
file with this exercise...
1 Click in cell B8 to make this the active cell
2 Type =B3+B4+B5+B6+B7 and examine what is happening on the screen
3 Press to enter the formula and move to the next cell
Notice that a calculation has now been performed. We have entered a formula in B8 that says “add the values in B3, B4, B5, B6, and B7 and show them here”…
4 Ensure that C8 is the active cell, type =SUM(C3:C7) and press
This is an alternative type of formula known as a “function”. Again a calculation will appear in the cell…
5 Click in cell B8 and notice that the formula you typed appears in the formula bar, while the result of the calculation appears in the worksheet
6 Repeat step 5 with cell C8

Microsoft Excel 2010 - Level 1
© Learning and Development Service Page 9 Creating a new workbook
SAVING A NEW WORKBOOK
Try This Yourself:
Sam
e
File Continue using the
previous file with this exercise...
1 Click on the File tab and select Save (or Save As) to display the Save As dialog box – if it has not appeared as shown click on Browse Folders
Excel will propose the default book name as the new file name...
2 Type Garden Department Sales in File name
Now we need to choose the filing location…
3 Click on to the left of Documents to display a list of folders, then click on Local Disk (C:)
4 Click on to the right of Local Disk (C:) to see the available sub folders and click on Course Files for Excel 2010
5 Click on [Save] to save the document
Notice that the new name now appears in the title bar at the top of the screen
For Your Reference… To save a new document:
1. Click on the File tab and select Save 2. Locate the storage folder in the
Navigation pane 3. Type a File name and click on [Save]
Handy to Know… • In the exercise above we have named the
workbook Garden Department Sales and filed it in C:\Course Files for Excel 2010. Each time you start Excel it will most likely assume you want to file your workbooks in a folder called Documents which is associated with the user name you use on the computer.
2
3
Few things are more frustrating in the world of computers than doing an hour of work and then losing it all because the computer crashes. This is one reason why it is important to save your work regularly.
Saving your work moves the information from the computer’s short-term memory (known as RAM), to its long-term memory (the hard disk drive) so that you can access it again later.
4
5

Microsoft Excel 2010 - Level 1
© Learning and Development Service Page 10 Creating a new workbook
EASY FORMULAS
For Your Reference… To easily enter formulas into a worksheet:
1. Drag the small square (fill handle) of an existing formula to adjacent cells
OR 1. Click on AutoSum in the Editing
group to get Excel to type a formula for you
Handy to Know… • The small square at the bottom right of
the active cell is known as the fill handle because it is used to fill adjacent cells.
• Notice that a formula adjusts relative to its current position when it is dragged to adjacent cells – this is known as relative copying.
2
3
Excel provides a number of ways to enter formulas into worksheets and some of these are real time savers. Once a formula has been entered, it can be copied across other columns or rows in a worksheet
using an operation known as Filling. In addition, there are commands on the Ribbon that will automatically type a formula into the worksheet for you.
7
5
Try This Yourself:
Op
en
File Before starting this
exercise you MUST open the file Garden Department Sales.xlsx...
1 Click in cell C8 to make this the active cell
2 Move the mouse pointer to the small square at the bottom right of C8 until the mouse pointer changes to a thin cross
3 Hold down the left mouse button and drag the small square across to cell E8 – this will fill all of the intervening cells with a similar formula to the one in C8
4 Click in cell F3 to make this the active cell
5 Click on AutoSum in the Editing group to get Excel to type a formula for you
6 Press to complete the formula
7 Click in cell F3, then repeat steps 2 & 3 to fill down to cell F8 with a similar formula
8 Click on the File tab and select Save to save the additions that have been made

Microsoft Excel 2010 - Level 1
© Learning and Development Service Page 11 Creating a new workbook
CHECKING THE SPELLING
For Your Reference… To spell check a worksheet:
1. Click on the Review tab in the Ribbon, then click on Spelling in the Proofing group
2. Change words as required
Handy to Know… • Don’t stake your future career on a
computer spell checker – they are often tainted by the country in which they were developed and unless they have been specially configured, may also be culturally biased. Always proof read your workbooks before submitting them to the boss and/or the board of directors!
1
2
One of the most important tools you can use in Excel is the spell checking facility – after all, wouldn’t you have egg on your face if you gave your boss a worksheet with spelling mistakes! When the spell
checker is run it highlights instances of misspelt words and often makes a suggestion that you can choose to either accept or reject.
3
4
Try This Yourself:
Sam
e
File Continue using the previous
file with this exercise, or open the file Garden Department Sales.xlsx...
1 Click in cell E2, type Euroope and press just so we have an obvious error in the worksheet
2 Click on the Review tab in the Ribbon, then click on Spelling in the Proofing group
Excel will now ask if you wish to start from the beginning of the worksheet…
3 Click on [Yes] The checker will commence, stopping at the first word that causes it grief – which hopefully will be Euroope…
4 Click on [Change] to accept the suggestion from the checker
Unless there are any other errors the checker will now have finished…
5 Click on [OK] to acknowledge the message and close the checker
6 Click on the File tab and select Save to save the additions that have been made

Microsoft Excel 2010 - Level 1
© Learning and Development Service Page 12 Creating a new workbook
MAKING BASIC CHANGES
Try This Yourself:
Sam
e F
ile Continue using the
previous file with this exercise, or open the file Garden Department Sales.xlsx...
1 Click in cell B3 to make this the active cell, and make a mental note of the totals in B8, F3, and F8
2 Type 25700 and press
Notice that the totals that you are keeping a mental note of should have changed…
3 Click in cell B10 and make a mental note of the date shown currently in B11
4 Type 3/11 and press
Note the revised date now shown in B11…
5 Click on the File tab and select Save to save the additions that have been made
For Your Reference… To make changes to a cell:
1. Click on the cell to make it active 2. Type the new contents for the cell and
press , , or one of the arrow keys
Handy to Know… • If you want to keep the previous data in a
worksheet, simply enter the new data then use Save As rather than Save to save the workbook under a different name.
• If you begin typing in the wrong cell press to abort the editing and restore the
original content to the cell.
1
2
Changing the contents of a cell is just too easy in Excel – you simply click on the cell to make it active, type the new number, text, or date and press . The old cell contents will be immediately replaced by
the new data you have typed. In addition, and this is the really cool part of Excel, any formulas that reference the cell you’ve changed will also be updated.
3 4

Microsoft Excel 2010 - Level 1
© Learning and Development Service Page 13 Creating a new workbook
PRINTING A WORKSHEET
Try This Yourself:
Sam
e F
ile Continue using the
previous file with this exercise, or open the file Garden Department Sales.xlsx...
1 Click on the File tab then select Print to display the Print tab in the Backstage View
Your window may appear a little different to the one shown, but basically you will be presented with the printing options in the left pane and a preview of the document in the right pane...
2 Click on the drop arrow for Printer to see a list of devices
3 Select a printer from the list
4 Click on [Print] to print the pages or click on the Home tab in the ribbon if you wish to exit the print options and conserve paper
For Your Reference… To print a document:
1. Click on the File tab and select Print 2. Select a printer 3. Set any other options 4. Click on [Print]
Handy to Know… • Pressing the keyboard shortcut +
will also display the Print options in the File tab.
1
Traditionally, printing means producing your document on paper, but in today’s Web and online world it might mean printing to the Web or to another file. Excel gives you a lot of control over what and
how much to print as well as enabling you to select the printer to use. You can print one or multiple copies of a document, one or multiple pages and even collate copies.

Microsoft Excel 2010 - Level 1
© Learning and Development Service Page 14 Creating a new workbook
SAFELY CLOSING A WORKBOOK
For Your Reference… To close a workbook:
1. Click on the File tab and select Close
Handy to Know… • If you save your workbook and then select
Close, the workbook will be closed without the prompting message above.
• Excel allows you to have a number of workbooks open at the same time. When you close a workbook when others are still open one of the others will then appear.
1
2
When you have finished working with a workbook in Excel you should close it. Workbooks that are left open take up computer resources and your computer will work better and faster with fewer files
open. Workbooks are automatically closed when you exit Excel, but sometimes you may want to remain in Excel. You can do this by closing the current workbook before opening another.
3
Try This Yourself:
Sam
e
File Continue using the previous
file with this exercise, or open the file Garden Department Sales.xlsx...
1 Click in cell B3, type 30000 and press
As soon as you make a change in Excel it is deemed to be an “unsaved change” until you save the workbook. We have done this to see what will happen when you try and close a workbook with unsaved changes in it…
2 Click on the File tab and select Close to close the current document
If you have not saved your work, a message box appears providing you with an option to do so. If you want to keep the changes you’ve made you’d select [Save], otherwise you’d select [Don’t Save]. The [Cancel] option will cancel closing and leave the workbook open...
3 Click on [Save] to first save, then close the workbook
If this was the only workbook open, then the screen will now appear without a workbook.

Microsoft Excel 2010 - Level 1
© Learning and Development Service Page 15 Creating a new workbook
CONCLUDING REMARKS
Congratulations! You have now completed the Creating a new workbook booklet. This booklet was designed to get you to the point where you can competently perform a variety of operations as listed in the objectives on page 2.
We have tried to build up your skills and knowledge by having you work through specific tasks. The step by step approach will serve as a reference for you when you need to repeat a task.
Where To From Here… The following is a little advice about what to do next:
• Spend some time playing with what you have learnt. You should reinforce the skills that you have acquired and use some of the application's commands. This will test just how much of the concepts and features have stuck! Don't try a big task just yet if you can avoid it - small is a good way to start.
• Some aspects of the course may now be a little vague. Go over some of the points that you may be unclear about. Use the examples and exercises in these notes and have another go - these step-by-step notes were designed to help you in the classroom and in the work place!
Here are a few techniques and strategies that we've found handy for learning more about technology:
• visit CLD’s e-learning zone on the Intranet
• read computer magazines - there are often useful articles about specific techniques
• if you have the skills and facilities, browse the Internet, specifically the technical pages of the application that you have just learnt
• take an interest in what your work colleagues have done and how they did it - we don't suggest that you plagiarise but you can certainly learn from the techniques of others
• if your software came with a manual (which is rare nowadays) spend a bit of time each day reading a few pages. Then try the techniques out straight away - over a period of time you'll learn a lot this way
• and of course, there are also more courses and booklets for you to work through
• finally, don’t forget to contact CLD’s IT Training Helpdesk on 01243-752100