Embed Size (px)
Citation preview
Micrometer Caliper…..3/31/11 1 Don Rathjen....Exploratorium Teacher Institute....3601 Lyon St., San Francisco, CA 94123…[email protected] © 2011 Exploratorium, www.exploratorium.edu
Micrometer Caliper If you want to measure something very small, such as the the thickness of a sheet of paper, you may be out of luck unless you have an expensive measuring instrument—or the device you can build here. Based on a screw with a known number of threads per inch, this simple version of a micrometer caliper will allow you measure things that are not measurable by other means commonly available to you. The basic idea is to loosen the screw until there is some space between it and the metal washer, insert the object to be measured, retighten the screw, and read the dimension being measured on the dial. Details of assembly and use will be covered below. Although this micrometerʼs accuracy is less than perfect, its capability is somewhat amazing considering the cost of the materials. Figure 1 Materials • wood block , 2in x 2 in x 3/4 in • micrometer dial (see instructions below) • machine screw, #10-24, 4 inches long -- if you have trouble finding this screw in a 4-inch length, the screw from a 3/16 x 4" toggle bolt may work, if the whole length of the screw is threaded • 2 hex nuts, #10-24 • 2 wing nuts, #10-24 • 2 washers, SAE 10 • 1 fender washer, 3/16 x 1 ½ (hole size & outer diameter) • paper clip, jumbo • 2 sheet metal screws, 8 x 5/8, pan head, Phillips • 2 cable ties, ~ 7.5 or 8 in • binder clip, large • clothespin, wooden with spring • screw driver, Phillips • pliers (needle-nose are preferable, but regular will work) • drill • drill bit, 1/8 in • metal file, or grinding wheel for drill Assembly 1. Photocopy the micrometer dial in Figure 2 onto cardstock, and cut it out. (Alternatively, you can photocopy the micrometer dial on regular paper, cut it out, glue it onto an index card, and cut it out again. Or you can draw your own dial on an index card, and cut it out – just be sure it has 100 divisions.) Figure 2
Micrometer Caliper…..3/31/11 2 Don Rathjen....Exploratorium Teacher Institute....3601 Lyon St., San Francisco, CA 94123…[email protected] © 2011 Exploratorium, www.exploratorium.edu
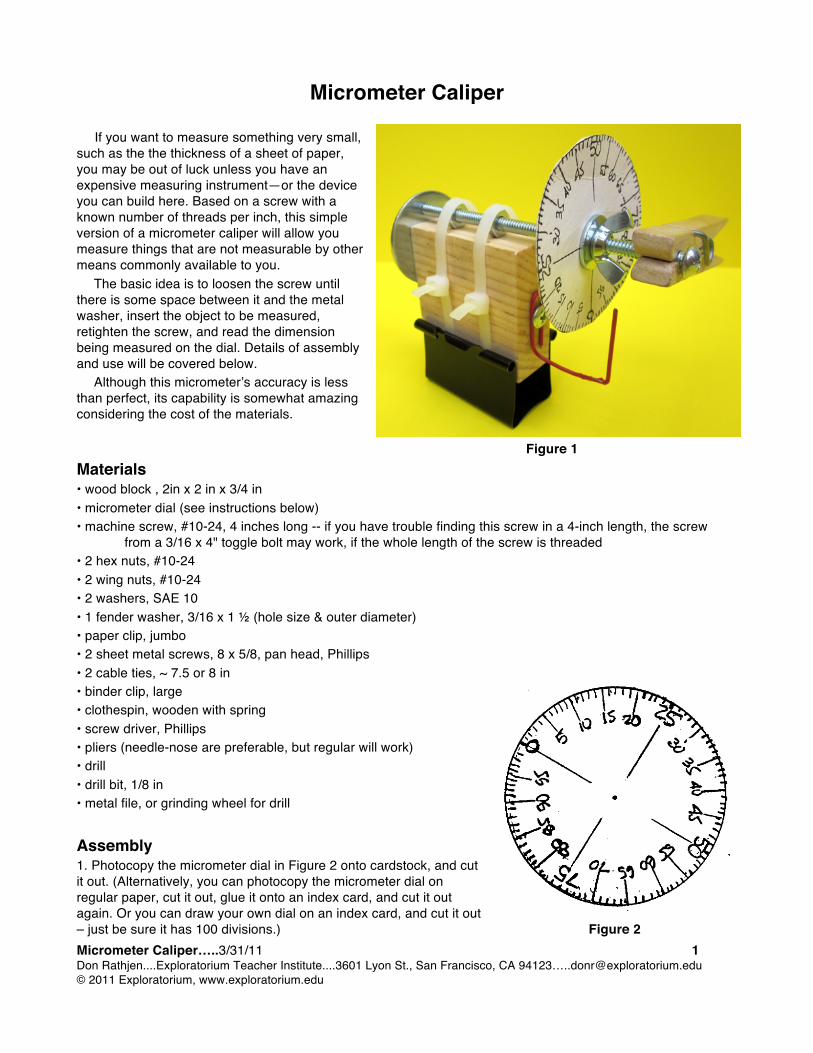
2. Use the metal file or the grinding wheel as necessary to make sure that the end of the machine screw is a flat surface that is perpendicular to the screw itself. (Often you will find a small raised ridge around the edge of the end, or possibly some irregular burrs. To work best in the micrometer, the end of the machine screw should be a flat surface that will contact the fender washer uniformly.) 3. Screw the 2 hex nuts onto the machine screw, approximately as shown in Figure 3. It doesn't really matter at this point exactly where the nuts are on the screw, but it is important that they be about an inch apart. Lay the machine screw and hex nut assembly on the top edge of the wood block, with the hex nut nearest the end of the screw about ½ - ¾ inch from the edge of the block. Then use two rubber bands to hold the hex nut and machine screw assembly in place, as shown in Figure 3. Figure 3 4. Loop the cable ties around the hex nuts and the wood block to fasten the assembly to the block. Use the pliers to tighten the cable ties so that the assembly is held very securely to the block, with the fastening heads of the cable ties located at least halfway up the side of the block. See Figure 1, or any of the Figures with the cable ties in place. When the cable ties are in place, the rubber bands can be removed and will no longer be needed. 5. Unscrew the machine screw and remove it. 6. Use one of the sheet metal screws to screw the fender washer to the face of the wood block where the end of the machine screw was located. See Figure 4. It's best to drill a pilot hole first. Leave approximately Figure 4 1 cm of the washer above the top of the block, so that the whole end of the screw will easily hit it when the screw is replaced.
7. Poke a small hole in the center of the dial, so that you will be able to slide it onto the machine screw. Use the two wing nuts and the two small washers to hold the dial in place on the machine screw, with the dial about 1 inch from the head of the screw. See Figures 1, 5 and 6 for reference. Figure 5
8. Screw the machine screw and dial assembly back through the two wing nuts until the end of the screw is fairly close to the fender washer (about ¼ inch), but is not in contact with it. 9. Attach the binder clip and remove the binder clip handles. The purpose of the binder clip is to give a flat base, so that the micrometer will stand up by itself. See Figures 1 and 6. Figure 6
Micrometer Caliper…..3/31/11 3 Don Rathjen....Exploratorium Teacher Institute....3601 Lyon St., San Francisco, CA 94123…[email protected] © 2011 Exploratorium, www.exploratorium.edu
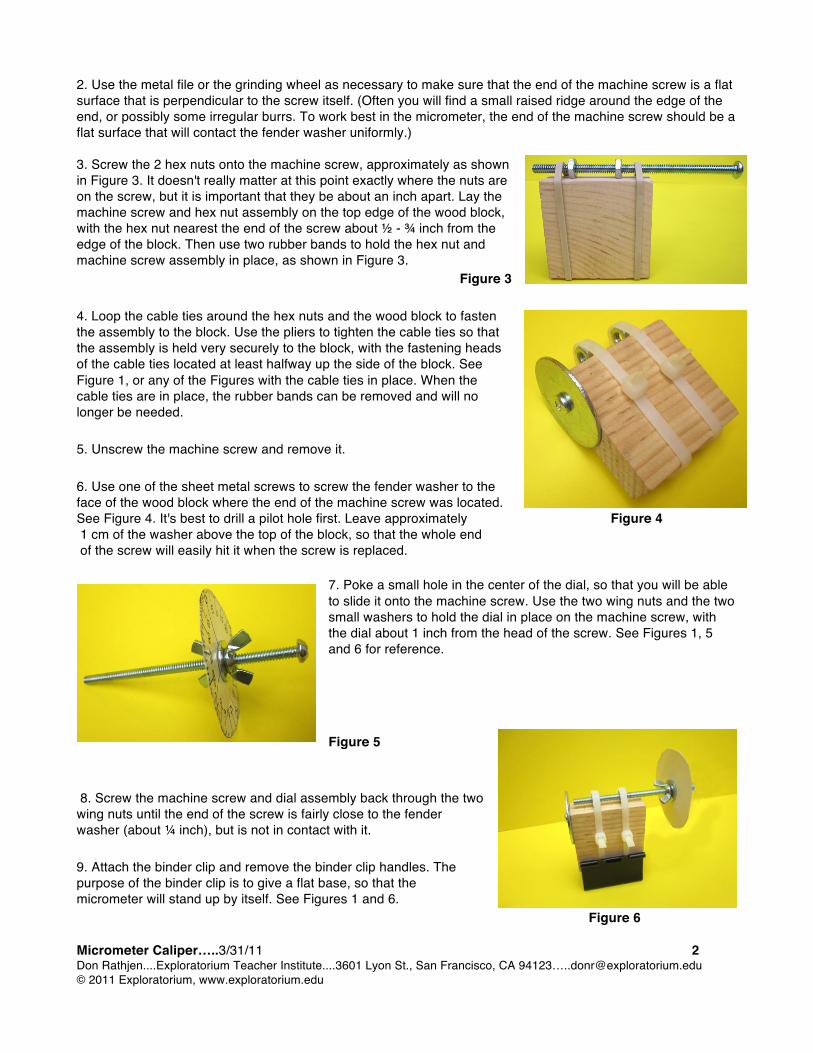
10. Bend the jumbo paper clip to make the reference indicator for the dial (use pliers if necessary). Attach with the remaining sheet metal screw. See Figures 1 and 7. Figure 7
11. Attach the clothespin to the machine screw right at the head of the screw. See Figures 1 and 8. Turn the screw so that it advances toward the washer by using your finger to push against the side of the clothespin.
Keep turning the screw until the clothespin starts to slip. At this point the end of the screw will be up against the fender washer. The purpose of using the clothespin is to standardize the force of the end of the screw against the washer and to prevent excessive force. With the screw remaining gently in contact with the washer, lightly loosen the wing nuts holding the dial in place, and rotate the dial until the zero on the dial is lined up with the reference indicator. Then tighten the wing nuts again to hold the dial in this position. Repeat this adjustment as necessary until tightening the screw with the clothespin until it slips leaves the reference indicator consistently reading zero on the dial.
Figure 8 NOTE ON ALTERNATIVE CALIBRATION PROCEDURE: As an alternative to calibrating by loosening the wing nuts to move the dial, you could also just initially make sure the zero on the dial is somewhere near the bottom, and then adjust the indicator by moving it or bending it until it lines up with the zero mark. NOTE ON CLOTHESPIN USE: As the clothespin is turned after it has begun to slip, the wood is soft enough that it may respond to the threads and travel along the screw toward the dial. If it hits the wing nut, then the slipping action will no longer be operative. So each time you use the clothespin, you may need to move it so that it starts next to the head of the screw.
Micrometer Caliper…..3/31/11 4 Don Rathjen....Exploratorium Teacher Institute....3601 Lyon St., San Francisco, CA 94123…[email protected] © 2011 Exploratorium, www.exploratorium.edu
To Do and Notice 1.Tighten the screw with the clothespin until the clothespin slips, the end of the screw is up against the fender washer, and the zero mark on the dial is lined up with the reference indicator. 2. Loosen the screw a little less than one whole turn (until the zero on the dial is almost to the reference mark again). 3. Insert a sheet of paper (or a smaller piece cut or torn from a sheet) between the end of the screw and the washer. 4 Tighten the screw again, again using the clothespin until it slips and the end of the screw is up against the paper. 5. Read the dial. Each mark on the dial represents about one one-hundredth of a millimeter, so the mark that lines up with the reference indicator indicates the thickness of the paper in hundredths of a millimeter. Ordinary copy paper will likely have a thickness of between ten to fifteen hundredths of a millimeter (10 to 15 on the dial). 6. Try measuring other things. Some things to consider are an index card, a paper clip, a piece of thin spaghetti, regular or heavy duty aluminum foil, nylon fishing line, a single strand of copper wire from a piece of lamp cord, wires of different gauges, regular and heavy duty plastic bag material, or a human hair. • Periodically check to make sure that the reference indicator still reads zero when there is no object in place. If it doesn't, then recalibrate the dial as described in Assembly Step 11, or in the NOTE below it. • If the object you are measuring is larger than one millimeter, then you will have to keep track of how many turns you have to loosen the screw (and therefore the dial) before measuring the object, and then add the appropriate amount to the dial reading. Each complete turn of the screw is one millimeter. • You can increase the reliability of a measurement by doing multiple trials and finding their average, instead of relying on a single trial.
Whatʼs Going On? The micrometer can measure the thickness of objects you couldnʼt easily measure any other way because it establishes a consistent relationship between tiny units of linear distance (in the gap between the washer and the end of the screw) and much larger units of spiral rotation (of the screw and dial). Using convenient approximations, this relationship is not difficult to determine: The 24 used to describe the screw (#10-24) indicates that there are 24 threads per inch, or that it takes 24 turns of the screw to tighten it one inch. Since one inch is equal to 2.54 centimeters, there are 24 threads in 2.54 centimeters, or 9.45 threads per centimeter, which is close to 10 threads per centimeter. Since 10 is such a convenient number to work with, we sacrifice accuracy for convenience in our micrometer, and just say that there are 10 threads per centimeter. (The percent error works out to about 4%, which is not bad considering the cost of the instrument.) Because there are 10 millimeters in a centimeter, we can say there are 10 threads for every 10 millimeters, or 1 thread per millimeter. In other words, one turn of the screw moves it one millimeter. The dial divides one rotation of the screw into 100 parts, each of which represents one one-hundredth of a turn. Since a whole turn is a whole millimeter, each division on the dial represents a hundredth of a millimeter, or 0.01 millimeter. Going Further Use references to learn something about simple error analysis. In particular, familiarize yourself with the following terms: precision, accuracy, and deviation. Credit The inspiration for this micrometer came from the original PSSC Physics materials of the late 1950s and early 1960s.


![Accaddeemmic c SSciieenncess International Journal of ... · suspended or dissolved, by saliva in the mouth [1]. Despite the drug ... using vernier caliper micrometer. The data are](https://img.dokumen.tips/doc/110x75/5e5db9c6de222c1b4d228128/accaddeemmic-c-ssciieenncess-international-journal-of-suspended-or-dissolved.jpg)