Embed Size (px)
Citation preview

Miami-Dade County Public Schools
Curriculum and Instruction (Science)
Required GRADE 5 ESSENTIAL SCIENCE
Laboratory Activities
QUARTER 2 LABORATORIES

THE SCHOOL BOARD OF MIAMI-DADE COUNTY, FLORIDA
Ms. Perla Tabares Hantman, Chair
Dr. Lawrence S. Feldman, Vice Chair
Dr. Dorothy Bendross-Mindingall
Mr. Carlos L. Curbelo
Mr. Renier Diaz de la Portilla
Dr. Wilbert “Tee” Holloway
Dr. Martin S. Karp
Dr. Marta Pérez
Ms. Raquel A. Regalado
Jude Bruno Student Advisor
Mr. Alberto M. Carvalho Superintendent of Schools
Dr. Nikolai P. Vitti Chief Academic Officer
Office of Academics and Transformation
Mr. Cristian Carranza
Executive Director Division of Science
Office of Academics and Transformation

1
Table of Contents
Introduction ………………………………………………………………………..Page 2 Next Generation Sunshine State Standards …………………………………Page 3 Second Quarter Grade 5 Essential Laboratories Lab # 5 ENERGY TRANSFORMATION: THE FORCE OF WATER Lab # 5 Teacher’s version ………………………………………Page 4 Lab # 5 Student’s version ………………………………………Page 9
Lab # 6 STATIC ELECTRICITY
Lab # 6 Teacher’s version ……………………………………… Page 13 Lab # 6 Student’s version ………………………………………..Page 19 Lab # 7 GET CONNECTED
Lab # 7 Teacher’s version ……………………………………….Page 22 Lab # 7 Student’s version ………………………………………..Page 27
Lab # 8 AROUND AND AROUND IT GOES! Lab # 8 Teacher’s version ……………………………………….Page 32 Lab # 8 Student’s version ………………………………………..Page 41
2
Introduction
The purpose of this packet is to provide Grade 5 science teachers with a list of basic laboratory and hands-on activities that students should experience in class. Each activity is aligned with the Pacing Guide and the Next Generation Sunshine State Standards (NGSSS). Emphasis should be placed on those activities that are aligned to the Annually Assessed benchmarks, which are consistently assessed in the Florida Comprehensive Assessment Test (FCAT). All hands-on activities were designed to cover most concepts found in Grade 5 Science. In some cases, more than one lab was included to cover a specific benchmark and in other cases a single lab may address more than one benchmark. In most cases, the activities were designed as simple as possible without the use of advanced technological equipment to make it possible for all teachers to use these activities. All activities can be modified, if necessary, to fit the needs of an individual class and/or student ability. This document is intended to be used by science leaders, coaches and teachers in M-DCPS so that all science teachers can work together, plan together, and rotate lab materials among classrooms. Through this practice, all students and teachers will have the same opportunities to participate in these experiences and promote discourse among learners, forming the building blocks of authentic learning communities. Acknowledgement: M-DCPS Curriculum and Instruction (Science) would like to acknowledge the efforts of the curriculum support specialists who worked arduously and diligently on the preparation of this document.

3
Next Generation Sunshine State Standards Annual Assessed Benchmarks addressed in Essential Laboratory
LAB # 5: ENERGY TRANSFORMATION: THE FORCE OF WATER Benchmarks: SC.5.P.10.2 Investigate and explain that energy has the ability to cause motion or create change. (Also assesses SC.3.P.10.2, SC.4.P.10.2, and SC.4.P.10.4.) SC.5.N.2.1 Recognize and explain that science is grounded in empirical observations that are testable; explanation must always be linked with evidence. (Also assesses SC.3.N.1.7, SC.4.N.1.3, SC.4.N.1.7, SC.5.N.1.5, and SC.5.N.1.6.)
LAB # 6: STATIC ELECTRICITY Benchmarks: SC.5.P.10.3 Investigate and explain that an electrically-charged object can attract an uncharged object and can either attract or repel another charged object without any contact between the objects. (Assessed as SC.5.P.10.4 Annually Assessed) SC.5.N.2.1 Recognize and explain that science is grounded in empirical observations that are testable; explanation must always be linked with evidence. (Also assesses SC.3.N.1.7, SC.4.N.1.3, SC.4.N.1.7, SC.5.N.1.5, and SC.5.N.1.6.)
LAB # 7 : GET CONNECTED Benchmarks: SC.5.P.10.1 Investigate and describe some basic forms of energy, including light, heat, electrical, chemical, and mechanical. SC.5.P.11.1 Investigate and illustrate the fact that the flow of electricity requires a closed circuit (a complete loop). SC.5.P.11.2 Identify and classify materials that conduct electricity and materials that do not.
LAB # 8: AROUND AND AROUND IT GOES! Benchmarks: SC.5.E.7.1 Create a model to explain the parts of the water cycle. Water can be a gas, a liquid, or a solid and can go back and forth from one state to another. SC.5.E.7.2 Recognize that the ocean is an integral part of the water cycle and is connected to all of Earth's water reservoirs via evaporation and precipitation processes. SC.5.N.1.5 Recognize and explain that authentic scientific investigation frequently does not parallel the steps of "the scientific method."

4
LAB # 5: ENERGY TRANSFORMATION: THE FORCE OF WATER Grade 5 Essential Lab (Teacher’s version)
Benchmarks: SC.5.P.10.2 Investigate and explain that energy has the ability to cause motion or create change. (Also assesses SC.3.P.10.2, SC.4.P.10.2, and SC.4.P.10.4.) SC.5.N.2.1 Recognize and explain that science is grounded in empirical observations that are testable; explanation must always be linked with evidence. (Also assesses SC.3.N.1.7, SC.4.N.1.3, SC.4.N.1.7, SC.5.N.1.5, and SC.5.N.1.6.) Objective/Purpose:
Students will explore moving water as an energy source.
Students will identify how water pressure is used in generating energy, and use a model to demonstrate the process.
Students will identify and explain that science is grounded in verifiable observations that are testable.
Background Information: Hydro means water. Hydropower uses the kinetic energy of moving water to make electricity. The principle behind hydroelectric energy is fairly simple. Dams are built to stop the flow of a river. Water behind the dam forms a reservoir. The water behind the dam is channeled through intakes at the base of the dam and into a pipe called a penstock. The water pushes against blades in a turbine, causing them to turn. The turbine spins a generator to produce electricity. Hydroelectric facilities are built at the base of dams to take advantage of the high pressure of the water at the bottom of a reservoir. Hydroelectric energy supplies about 10 percent of the electricity used in the United States. Teacher Notes: This activity is best completed outdoors where getting a surface wet is not an issue. If you decide to complete this experience indoors, select a container with a flat surface that is at least 50 cm long so that students will be able to accurately measure the water streams. Demonstrate how to loop a piece of the masking tape back so that it is easier to grasp and pull it off the holes. Engage: Place two 2 liter bottles of water on each group’s desk, one filled completely and the other half-way filled. Have students observe both bottles and determine which bottle is easier to squeeze. Allow students to explain their observations and draw representations of what the bottles look and feel like in their science journals.

5
Explore Problem statement: Does the height of a hole in a milk carton affect how far and how fast the stream of water will flow from a carton? Is there a difference between the lengths of the stream of water from the different holes? Hypothesis (If/then statement): If four holes are punched into a milk carton vertically from the base of a carton at 4cm, 8cm, 12cm, and 16cm, then the hole at the ____cm will stream further away and faster than the other holes in the carton. Materials:
Half gallon paper milk carton (empty and washed out)
Two liters of water
Two (2-liter bottles)
Awl or 10p nail
Masking tape
Ruler
Permanent marker
Pair of scissors Variables:
Test Variable (manipulated or independent variable):
Outcome Variable (dependent/responding variable):
Constant Variables (the variables that stays the same):
Teacher Procedures: 1. Cut off the top of the milk carton for each group.
2. Student using a ruler will mark a 25 cm line from the base of the carton using a permanent marker. This mark will represent the water line.
3. From the bottom of the milk carton, measure up 4cm and place a mark for a hole,
then repeat at 8 cm, again at 12cm and finally at 16 cm marking each so that the teacher can make the holes with the 10p nail or awl. NOTE: All holes should be the same size.
4. Cut 4 strips of masking tape 20 cm in length to cover all four holes.
5. Place the milk cartons in a plastic tub container.
6. Fill each milk carton with water to the 25 cm designated water line.
7. Quickly remove the tape that’s covering all four holes and observe what happens.

6
8. Record your observations on the data chart below.
9. Have students separately cover each hole with masking tape and refill the carton.
10. Tell students just to remove the tape from the top hole and record the longest distance the water streams out.
11. Direct students to refill the carton and test the remaining holes separately, recording the longest distance from each stream.
12. Students collect their group data in the group data table and then combine it in the class data table. Analyze the data.
Data: Observation: Students should describe what they notice when the tape is removed from all four holes. Note any changes to the flow of water as the water empties from the holes. Group _____ Data
Length of Water Stream
16 cm hole
12 cm hole
8 cm hole
4 cm hole
Class Data
Trials (Group Number)
Hole with the Shortest Distance
Hole with the Longest Distance
1
2
3
4
5
6
Evaluate /Explain Results:
1. Which hole had the longest stream from the class data? ________________________________________________________________
________________________________________________________________
________________________________________________________________

7
2. Which hole had the shortest stream from the class data? ________________________________________________________________
________________________________________________________________
________________________________________________________________
3. Why did we test each hole separately?
________________________________________________________________
________________________________________________________________
________________________________________________________________
4. What is the relationship between the size of the hole and the length of its
stream from the class data? ________________________________________________________________
________________________________________________________________
________________________________________________________________
Explain: Use these questions to bring the science concepts taught back into what happened and use them to analyze why.
How far away did the water stream from the carton? What force is acting on it?
Was there a difference between the streams of water from the different holes? Which hole had the slowest stream? Explain your reasoning?
Why did we test each hole separately?
What kind of energy did we just observe? Conclusion: Answer the following questions:
1. What was investigated? (State the purpose of the experiment by describing the problem statement.)
2. Was your hypothesis supported by the data? (Write a statement as to whether the data supports or does not support the hypothesis including a restatement of the hypothesis.)
3. What were the major findings? (Describe the data collected that provides the evidence as to why the hypothesis was supported or not supported.)
4. What possible explanations can you offer for your findings? (Think about everything that may have affected your results.)
What the Students’ Discovered! How far away did the streams of water fall from the carton? Was there a difference between the streams from the water from the hole at the bottom than at the top? Have students read pg. 310 (Moving Water)-Scott Foresman then discuss the reasons for the differences in the lengths of the streams. Here’s why? Water has weight. The closer to the bottom of the carton, the more water is above and the more weight is pressing down from above. The more weight, the more water pressure, and the more water pressure, the further away the stream will go and the faster it will go. How is moving water used today? Hydroelectric facilities are built at the base of dams to

8
take advantage of the high pressure of the water at the bottom of a reservoir. The water pressure is funneled through a tunnel through the dam called a penstock. The water then is focused on the blades of a turbine. Water pressure of the water turns the turbine, and the turbine turns a generator making electricity. Application: Answer the following questions:
1. How can the investigation be improved? 2. What are some possible applications of the experiment? (Describe how the
findings from this investigation can be used in day-to-day life.) 3. What questions has your experiment lead you to ask that could be tested in
a new investigation.
Extension: Have the students tape each hole separately and fill the cartons again. Tell them to remove the tape from the top hole and feel the water pressure with their hands. Ask them to refill the carton and to remove the tape from each of the other holes individually, feeling the force of the stream.
References
Adapted and modified from the following sources:
(Moving Water pg. 310) Scott Foresman
Adapted from: http://www.indiana.edu/~ensiweb/lessons/threehol.html

9
LAB # 5: ENERGY TRANSFORMATION: THE FORCE OF WATER Grade 5 Essential Lab (Student’s version)
Name______________________________________ Date________________ Problem statement: Does the height of a hole in a milk carton affect how far and how fast the stream of water will flow from a carton? Is there a difference between the lengths of the stream of water from the different holes? Hypothesis: (If/then statement) If four holes are punched into a milk carton horizontally from the base of a carton at 4cm, 8cm, 12cm, and 16cm, then the hole at the ____cm will stream further away and faster than the other holes in the milk carton. Materials:
Half gallon paper milk carton (empty and washed out)
Two liters of water
Two (2-liter bottles)
Awl or 10p nail
Masking tape
Rulers
Permanent marker
Pair of scissors Variables:
Test Variable (manipulated or independent variable):
Outcome Variable (dependent/responding variable):
Constant Variables (the variables that stays the same)

10
Procedures:
1. Gather materials.
2. Using a ruler, place a mark 25 cm up from the base of the milk carton to
represent the water line.
3. Mark four vertical holes on the side of the milk carton at 4cm, 8cm, 12cm and 16
cm. Label each measurement. (Your teacher will use an awl or a 10p nail to
puncture the holes).
4. Place a strip of masking tape on the ground to indicate where the milk carton will
be placed to release the start of the stream.
5. Place a 20 cm piece of masking tape to cover all four holes.
6. Fill the milk carton 25 cm up from the base.
7. Quickly remove the tape that’s covering all four holes. Observe what happens
and record the information in the data table below.
8. Next, cover each hole again with separate masking tape for each hole and refill
the cartons with water.
9. Remove the tape from the top hole (16 cm) and record the distance the water
streams out at its furthest point.
10. Refill the carton with water and test each hole separately, recording the distance
from each stream out at its furthest point.
Which hole had the longest stream? ______________________________________________________________________
______________________________________________________________________
______________________________________________________________________
Which hole had the shortest stream? __________________________________________________________________________________________________________________________________________________________________________________________________________________ What is the relationship between the size of the hole and the length of its stream? __________________________________________________________________________________________________________________________________________________________________________________________________________________

11
Conclusion: Answer the following questions: 1. What was investigated? (State the purpose of the experiment by describing the
problem statement.)
2. Was your hypothesis supported by the data? (Write a statement as to
whether the data supports or does not support the hypothesis including a
restatement of the hypothesis.)
3. What were the major findings? (Describe the data collected that provides the
evidence as to why the hypothesis was supported or not supported.)
4. What possible explanations can you offer for your findings? (Think about everything that may have affected your results.)
Application: Answer the following questions:
1. How can the investigation be improved?
2. What are some possible applications of the experiment? (Describe how the
findings from this investigation can be used in day-to-day life.)
3. What questions has your experiment lead you to ask that could be tested in a new investigation.

12
Data: Observation: Describe what you observe when the tape is removed from all four holes. Note any changes to the flow of water as the water empties from the holes. ______________________________________________________________________
______________________________________________________________________
______________________________________________________________________
______________________________________________________________________
______________________________________________________________________
Group _____ Data
Length of Water Stream
16 cm hole
12 cm hole
8 cm hole
4 cm hole
Class Data
Trials (Group Number)
Hole with the Shortest Distance
Hole with the Longest Distance
1
2
3
4
5
6
Extension: Have the students tape each hole separately and fill the cartons again. Tell them to remove the tape from the top hole and feel the water pressure with their hands. Ask them to refill the carton and to remove the tape from each of the other holes individually, feeling the force of the stream.

13
LAB # 6: STATIC ELECTRICITY Grade 5 Essential Lab (Teacher’s version)
Benchmarks: SC.5.P.10.3 Investigate and explain that an electrically-charged object can attract an uncharged object and can either attract or repel another charged object without any contact between the objects. (Assessed as SC.5.P.10.4 Annually Assessed) SC.5.N.2.1 Recognize and explain that science is grounded in empirical observations that are testable; explanation must always be linked with evidence. (Also assesses SC.3.N.1.7, SC.4.N.1.3, SC.4.N.1.7, SC.5.N.1.5, and SC.5.N.1.6.) Objective/Purpose:
Students will explore static electricity and observe the effects of positive and negative charges as they attract and repel through simple experiments.
Students will explain that an electrically-charged object can attract an uncharged object and can either attract or repel another charged object without any contact between the objects.
Students will interpret and analyze data observed and collected to generate appropriate explanations based on the data.
Background Information: All matter is made up of tiny particles called atoms. Each atom contains 3 basic parts:
Protons, which have a positive electric charge (+)
Electrons, which have a negative electric charge (-)
Neutrons, which have no electric charge Protons and neutrons are in the nucleus or core of an atom, while the electrons orbit around the nucleus (see drawing #1). Most objects, such as balloons, have about the same number of electrons and protons, making them electrically balanced (see drawing. #2) Drawing#1 Drawing#2
-+ -+ -+ -+
-+ -+ -+ -+
-+ -+ -+
-+ -+ -+

14
Friction (rubbing two objects together) causes objects to gain or lose electrons. When this occurs, the object becomes electrically charged. This is called static electricity. If an object gains electrons when it is rubbed, it becomes negatively charged, because it has more electrons (-) than protons (+). If an object loses electrons when it is rubbed, it becomes positively charged because it has more protons (+) than electrons (-). (Note: Atomic structure is very abstract for students. It is enough for them to understand that an electric charge is created. Since there is no way for them to tell whether the charge is negative or positive, simply recognizing that the object has a charge is enough.) A basic principle of electric charges is that like charges repel and unlike charges attract. When a balloon is rubbed on your hair, it gains electrons from your hair and becomes negatively charged. Your hair becomes positively charged and will stick up because like charges repel. When the negatively charged balloon is brought near your hair, it will be attracted because unlike charges attract. When a negatively charged balloon is brought near a wall, it induces a positive charge near the surface of the wall. (The electrons on the balloon repel electrons near the surface of the wall.) Since opposite charges attract, the balloon clings to the wall (see drawing #3).
Drawing# 3 Teacher Notes:
1. Prepare labels for 8 students: 2 neutrons, 2 electrons, 2 protons, 1 nucleus, and 1 atom.
2. Draw three concentric circles on the ground where you have room for students to move.
3. Set up each station by placing the materials in separate areas.
+ -
+ -
+ -
+ -
+ -
+ -
+ -
+ -
- - - -
- - - -
- - - -
- - - -
- -
- - -
-

15
4. Station 1 requires string to be strung between two chairs, about three meters in length. Tie a piece of string of the same length to each of two inflated balloons. Attach the balloons that you connected to the string using clothespins to secure them to the string that is connected between the two chairs, about 1 meter from each other and from the chairs. See illustration to the right.
5. This activity works best on cool, dry days or inside an air-conditioned classroom. If humidity is high, blow a hair dryer near the balloon and in the area where the experiments will be done.
Engage: Part 1:
1. Ask for 8 volunteers to model the structure of an atom. Assign the following roles: 1 Atom person, 2 protons, 2 neutrons, 1 nucleus, and 2 electrons. Each student will wear a sign that represents their role.
2. Take students outside or use a large area in the classroom where circles have
been drawn.
3. Ask the “Atom” person to hold up the sign and stand near the outside of the circles.
4. Ask the 2 “Protons” to go inside the center of the circle.
5. Ask the 2 “Neutrons” to go inside the circle.
6. Have the “Nucleus” stand inside the circle and hold his/her sign up.
7. Have one “Electron” stand on each of the outer circles.
8. Explain to students that the nucleus of atoms contains protons and neutrons.
Explain that this model is simplified because the nucleus is full of protons and neutrons.
9. Ask “Electrons” to run around their orbit.
10. Return to the classroom and ask students to use their science notebook and to
draw a diagram of the model they just made.
11. Review the model with students.
12. Ask students to write the key question in their science notebook and discuss their ideas with a partner.

16
13. Tell students most objects, such as balloons, have about the same number of electrons and protons, making them electrically balanced (see drawing #2).
14. Display a balloon and ask for a volunteer to rub the balloon on his/her hair. Then
asks students what they observed. Explain that when a balloon is rubbed on your hair, it gains electrons from your hair and becomes negatively charged. Your hair becomes positively charged and will stick up because like charges repel. When the negatively charged balloon is brought near your hair, it will be attracted because unlike charges attract?
15. Take the same balloon and bring it near the wall. Have students predict what will happen. Then ask students what they observed. Explain that when a negatively charged balloon is brought near a wall, it induces a positive charge near the surface of the wall. The electrons on the balloon repel electrons near the surface of the wall.) Since opposite charges attract, the balloon clings to the wall (see drawing #3).
Materials: Station cards Station 1: 2 inflated balloons, wool or felt cloth, 2 clothespins, 2 chairs, & string Station 2: small hole punched paper pieces, clear plastic container
(deli container or a short round plastic cup), wool or felt cloth Station 3: inflated balloon, wool or felt cloth, bucket or tub, towels, & container of water Station 4: inflated balloon, Styrofoam packing peanuts, & wool or felt cloth Explore: Key Question: How does static electricity cause objects to attract or repel?
1. Explain to students that they are going to investigate static electricity further in small group to answer the key question: How does static electricity cause objects to attract or repel?
2. Tell students that they are to rotate through the 4 stations, follow the directions, and collect data (they can use a data table similar to the one below).
3. When they are finished, they are to use evidence from their investigations to explain the key question in their notebook. (Each station should take a maximum of 5 minutes)

17
STATION # OBSERVATION
1
2
3
4
Explain:
1. Students share station findings a. How does what you observed at Station 1 provide evidence to answer
your key question? b. How does what you observed at Station 2 provide evidence to answer
your key question? c. How does what you observed at Station 3 provide evidence to answer
your key question? d. How does what you observed at Station 4 provide evidence to answer
your key question? Students should reflect on the key question and use their science notebook to write a conclusion using evidence from the investigation. How does static electricity cause objects to attract or repel?
STATION 1 INSTRUCTIONS
1. Rub one balloon with the wool or felt cloth.
2. Observe and note what happens.
3. Rub both balloons with the wool or felt cloth.
4. Observe and note what happens.
5. Place your hand in the area between the balloons.
6. Observe and note what happens.
STATION 2 INSTRUCTIONS
1. Make a small pile of hole punched paper circles.
2. Rub the bottom of the plastic container very fast with the wool or felt cloth.
3. Turn the plastic cup over, and place the bottom of the plastic cup over the pile of
paper circles.
3. Observe and note what happens.

18
STATION 3 INSTRUCTIONS
1. Rub the balloon with the wool or felt cloth.
2. Pour the water slowly into the bucket. As you are pouring, hold the balloon near the
stream of water.
3. Observe and note what happens.
STATION 4 INSTRUCTIONS
1. Rub the balloon with the wool or felt cloth.
2. Hold the balloon near the packing peanuts.
3. Observe and note what happens.
4. Rub the balloon on your clothing or hair.
5. Hold the balloon near the packing peanuts.
6. Observe and note what happens.
Explain and Apply: 1. Ask students to think of times when they observed the effects of statically
charged objects on other objects, especially in their homes. 2. Ask students to rub their feet on the carpet and touch the wall. Discuss what
happens. .
Evaluation: Review entries in science notebooks for completion and clear evidence to support conclusions. Source: Orange County Public Schools June 2009

19
LAB # 6: STATIC ELECTRICITY Grade 5 Essential Lab (Student’s version)
Name_______________________________________ Date_____________ All matter is made up of tiny particles called atoms. Each atom contains 3 basic parts: Protons, which have a positive electric charge (+) Electrons, which have a negative electric charge (-) Neutrons, which have no electric charge Drawing 1 Drawing 2 Drawing 3
+
+
+
+
-+ -+ -+ -+
-+ -+ -+ -+
-+ -+ -+
-+ -+ -+
+ -
+ -
+ -
+ -
+ -
+ -
+ -
+ -
- - - -
- - - -
- - - -
- - - -
- -
- - -
-

20
Station Card Materials and Procedures
Station 1 Materials : 2 inflated balloons, wool cloth, 2 clothespins, 2 chairs, & string
STATION 1 INSTRUCTIONS
1. Rub one balloon with the wool duster.
2. Observe and note what happens.
3. Rub both balloons with the wool duster
4. Observe and note what happens.
5. Place your hand in the area between the balloons.
6. Observe and note what happens.
Station 2 Materials: small paper hole punch pieces & clear plastic container
STATION 2 INSTRUCTIONS
1. Make a small pile of hole punched paper circles.
2. Rub the bottom of the plastic container very fast.
3. Turn the plastic cup over, and place the bottom of the plastic cup over the pile of
paper circles
Station 3 Materials: inflated balloon, wool cloth, bucket, towels, & water
STATION 3 INSTRUCTIONS
1. Rub the balloon with the wool cloth.
2. Pour the water slowly into the bucket.
3. As you are pouring, hold the balloon near the stream of water.
4. Observe and notes what happens.
Station 4 Materials: inflated balloon, Styrofoam packing peanuts, & wool cloth
STATION 4 INSTRUCTIONS
1. Rub the balloon with the wool cloth.
2. Hold the balloon near the packing peanuts.
3. Observe and note what happens.
4. Rub the balloon on your clothing or hair.
5. Hold the balloon near the packing peanuts.
6. Observe and note what happens.

21
Explore: Key Question: How does static electricity cause objects to attract or repel? Rotate through the 4 stations, follow the directions, and record your data in the chart below. Use evidence from your investigations to explain the key question in your notebook. (Each station should take a maximum of 5 minutes)
STATION # OBSERVATION
1
2
3
4
Explain:
a. How does what you observed at Station 1 provide evidence to answer your key question? ___________________________________________________________
_____________________________________________________
b. How does what you observed at Station 2 provide evidence to answer your key question? ________________________________________________________________________________________________________________
c. How does what you observed at Station 3 provide evidence to answer your key question? ________________________________________________________________________________________________________________
d. How does what you observed at Station 4 provide evidence to answer your key question?
_______________________________________________________________________________
________________________________________________________________________________

22
LAB # 7 : GET CONNECTED Grade 5 Essential Lab (Teacher’s version)
Benchmarks: SC.5.P.10.1 Investigate and describe some basic forms of energy, including light, heat,
electrical, chemical, and mechanical.
SC.5.P.11.1 Investigate and illustrate the fact that the flow of electricity requires a closed circuit (a complete loop).
SC.5.P.11.2 Identify and classify materials that conduct electricity and materials that do not.
SC.5.N.2.1 Recognize and explain that science is grounded in empirical observations that are testable; explanation must always be linked with evidence.
Objective/Purpose:
Students will investigate through experimentation.
Students will discover how to make a complete circuit that lights a bulb using only a D battery, a bulb, a wire and a piece of masking tape.
Students will determine that the flow of electricity requires a closed circuit.
Students will observe the transfer of chemical energy to electrical to light and heat energy.
Students will test a variety of materials to identify and/or classify materials that conduct electricity and those that do not.
Background Information: One rule about electricity is that it will only flow through a complete circuit. This means that electricity has to start form some source like one end of a battery and travel through some kind of connector like a wire or other material that electricity will flow through. The electricity then goes through a device like a bulb, and our through a wire or some other conductor. The electricity then ends up at the other end of the battery. The energy of the electricity is used to light the bulb. What happened? The battery is a source of “push” for the electrons. Connecting the bulb and the wires to the end of the battery gives the electrons a pathway to travel from one metal to another. What kind of change takes place? Chemical A circuit includes a source for electrical energy, a conducting path, and something that will use the electrical energy. The devices that use the electrical energy are placed on separate paths or connecting paths. How does a battery work? A battery contains 2 different metals. Metals like all matter
are made up of atoms. Atoms are made of protons, neutrons, and electrons. One of the
metals in the battery wants to give up its electrons and the other metal wants to accept
them. Connecting the wires, and the bulbs to a battery, gives the electrons a path to

23
travel from one metal to another. Those traveling electrons are electricity. One rule
about electricity is that it will only travel through a complete circuit.
Teacher Notes: Cut three pieces of wire about 15 centimeters (cm) long for each group of two (recommended) to four students ahead of time. Carefully strip off about 1 cm of insulation from both ends of each wire. The materials for this lab can be found in the Grade 5 Scott Foresman Physical Science bin. Part two is adapted from the Grade 5 Scott Foresman Pg. 476 “What Can Electricity Flow Through” Lab. Engage: Say the following to your students. Ask students to share what they know about how an electric circuit works. Let's look at the different parts of a flashlight bulb and a battery. (Pass out a flashlight bulb to each student group.) This will make it easier to understand how an electric circuit works and how to make your simple circuit to make a bulb light. If you look closely at the flashlight bulb, you should see that it has two wires sticking up that are connected by a very thin wire called a filament. The two wires go down inside the base of the bulb where you can't see them. One wire is connected to the very bottom of the base and the other is connected to the side of the base. (See drawing #1.) This is important to know if you want to make a circuit to light the bulb.
Drawing #1 Drawing #2
Show a 1 D battery, 1 wire, and 1 flashlight bulb to the class and say to make a complete circuit, you and your partner need to connect the battery, the wire, and the bulb so that electricity will have a path to flow from the bottom of the battery, through the wire, into the little wire on the side of the bulb, up that wire, through the filament, down the other bulb wire to the bottom of the bulb base and to the other end of the battery. (See drawing #2.) Pass out the materials to each group and say now you can make your own circuit out of a D battery, one wire, one flashlight bulb and some masking tape. Look over the procedures with your group. (Have a second wire ready for each group for step 5.)

24
Materials: flashlight battery (1.5 volts D cell) bulb insulated wire masking tape Explore Part One Procedures:
1. Get one D battery, a bulb, one wire, and two small pieces of masking tape. 2. Tape one end of your wire to the negative (flat end) end of the battery. Be sure
that the metal part of the wire is firmly attached to the battery. 3. Place the base of the bulb on the positive end (with the little bump) of the battery. 4. While holding the bulb in place, touch the unattached end of the wire to the side
of the bulb base. If your bulb lights, you have made a complete electric circuit. If the bulb does not light, check to be sure the wire is taped securely to the negative end of the battery. You could even hold it tightly to the battery to be sure it is making good contact.
5. Get a second piece of wire. 6. Make a complete circuit again this time using 2 wires instead of one, 1 battery,
and one flashlight bulb. (Hint: You do not need to touch the bulb directly to the battery.)
7. Connect the parts to test your ideas. Does the bulb light up? If not keep trying.
Explain/Evaluate: Think about this …
Write your responses in your journal/notebook.
1. Is electricity flowing through the systems you built? How do you know? 2. What do you think are necessary elements of all complete circuits? 3. How do you think a battery works? 4. What kind of energy makes a battery work? 5. Name the transfers of energy in the circuit you built. 6. How is either of the circuit models you built similar to a flashlight’s circuit?
This activity is adapted from http://acs.org (Science for Kids).

25
Part Two Engage: Does anyone know what the wires are made of that carried electricity through our circuit we just made? Why is aluminum a good choice? Now you’ll investigate to find out what other common materials are good conductors for electricity to flow. How should you connect the materials you have to light up the bulb? Materials Per Group: flashlight battery (1.5 volts D cell) flashlight bulb 3 pieces of insulated wire battery holder bulb holder nail penny spoon paper clip eraser pencil aluminum foil Explore: Essential Question: What other common materials are good conductors for the flow of electricity? Procedures:
1. Make a plan to create a circuit using 1 battery, 1 battery holder, 3 wire pieces, a bulb, and bulb holder to make a path to test the flow of electricity.
2. Connect the parts to test your plan. Does the bulb light up? If not keep trying.
3. Draw a picture of your working circuit. Show how the parts work.
4. What material allowed the electricity to pass through the circuit? _______________
5. Take an object out of the bag. Predict whether it will conduct enough electricity to light the bulb. Test the object by placing it between the bare ends of two wires so that it touches both wires and forms a closed circuit. Record observations on the data table.
6. Test the remainder of the items in the bag. Record observations on the data table.

26
Data (Table/Log and Observations):
Insulators and Conductors Data Sheet
Object
Prediction
Conductor or Insulator
penny
pencil
(wood part)
pencil
(metal part)
eraser
paper clip
nail
plastic spoon
Explain/Evaluate:
1. Were your predictions correct? How do you know? 2. How are the materials that conducted electricity allowing the bulb to light alike? 3. Which material created the brightest bulb?
Extend/Elaborate: Homelearning: Look for examples of conductors and insulators in your home. Then make a list of conductors and insulators found in your science journal/notebook.
CONDUCTORS INSULATORS
References: This lab was adapted and modified from: -What Can Electricity Flow Through Lab on Pg. 476 in the Grade 5 Scott Foresman textbook. - http://acs.org (Science for Kids)
27
LAB # 7: GET CONNECTED Grade 5 Essential Lab (Student’s version)
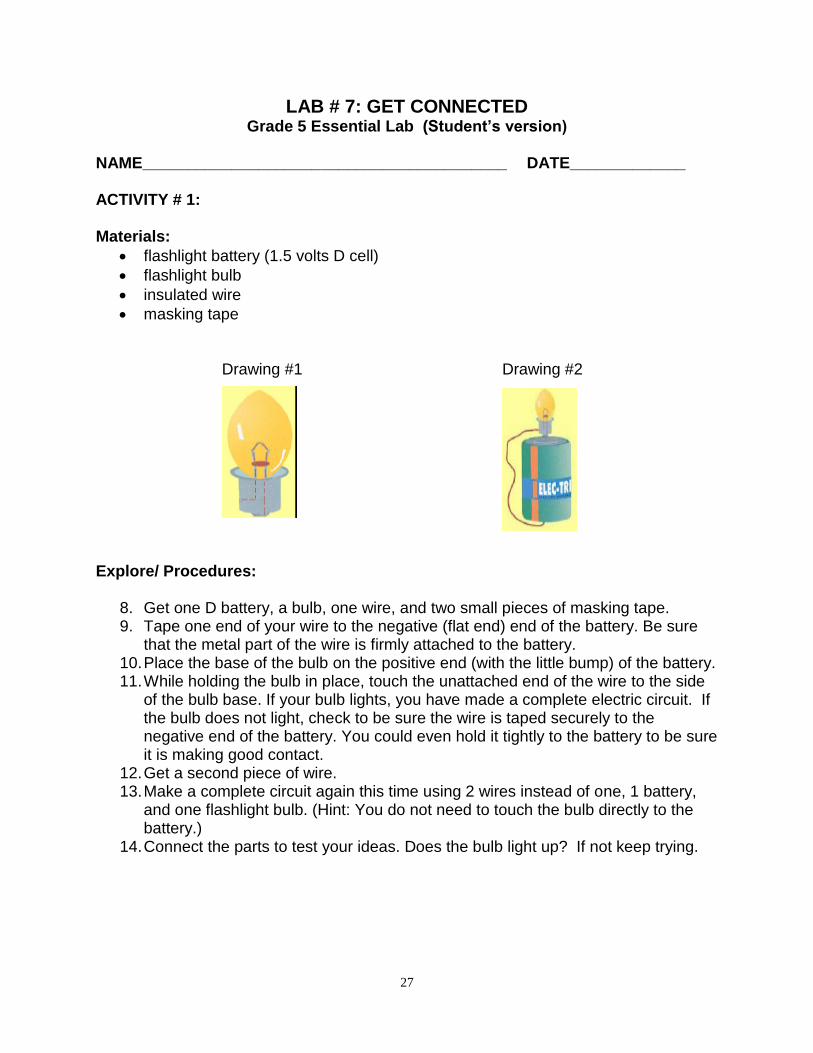
NAME_________________________________________ DATE_____________ ACTIVITY # 1: Materials:
flashlight battery (1.5 volts D cell)
flashlight bulb
insulated wire
masking tape
Drawing #1 Drawing #2
Explore/ Procedures:
8. Get one D battery, a bulb, one wire, and two small pieces of masking tape. 9. Tape one end of your wire to the negative (flat end) end of the battery. Be sure
that the metal part of the wire is firmly attached to the battery. 10. Place the base of the bulb on the positive end (with the little bump) of the battery. 11. While holding the bulb in place, touch the unattached end of the wire to the side
of the bulb base. If your bulb lights, you have made a complete electric circuit. If the bulb does not light, check to be sure the wire is taped securely to the negative end of the battery. You could even hold it tightly to the battery to be sure it is making good contact.
12. Get a second piece of wire. 13. Make a complete circuit again this time using 2 wires instead of one, 1 battery,
and one flashlight bulb. (Hint: You do not need to touch the bulb directly to the battery.)
14. Connect the parts to test your ideas. Does the bulb light up? If not keep trying.

28
Think about this … Write your responses in your journal/notebook:
7. Is electricity flowing through the systems you built? How do you know? 8. What do you think are necessary elements of all complete circuits? 9. How do you think a battery works? 10. What kind of energy makes a battery work? 11. Name the transfers of energy in the circuit you built. 12. How is either of the circuit models you built similar to a flashlight’s
circuit? This activity is adapted from http://acs.org (Science for Kids).

29
NAME__________________________________________ DATE___________ ACTIVITY #2 Materials per Group:
flashlight battery (1.5 volts D cell)
flashlight bulb
3 pieces of insulated wire
battery holder
bulb holder
nail
penny
spoon
paper clip
eraser
pencil
aluminum foil
Essential Question: What other common materials are good conductors for the flow of electricity? Procedures:
7. Make a plan to create a circuit using 1 battery, 1 battery holder, 3 wire pieces, a bulb, and bulb holder to make a path to test the flow of electricity.
8. Connect the parts to test your plan. Does the bulb light up? If not keep trying.
9. Draw a picture of your working circuit. Show how the parts work.

30
10. What material allowed the electricity to pass through the circuit? ______________
11. Take an object out of the bag. Predict whether it will conduct enough electricity to light the bulb. Test the object by placing it between the bare ends of two wires so that it touches both wires and forms a closed circuit. Record observations on the data table.
12. Test the remainder of the items in the bag. Record observations on the data table.
Data (Table/Log and Observations)
Object Prediction Conductor or Insulator
Penny
Pencil/ (wood part)
Pencil/ (metal part)
Eraser
paper clip
Nail
Plastic spoon
Explain/Evaluate:
1. Were your predictions correct? How do you know?
_____
2. Which material created the brightest bulb?
3. How are the materials that conducted electricity allowing the bulb to light alike?
__________
___________________________________________________________

31
Homelearning:
Look for examples of conductors and insulators in your home. Then make a list of in your science journal/notebook.
CONDUCTORS INSULATORS

32
LAB # 8: AROUND AND AROUND IT GOES! Grade 5 Essential Lab (Teacher’s version)
Adapted from http://myfwc.com/media/150529/CycleInABag.pdf
Benchmarks: SC.5.E.7.1 Create a model to explain the parts of the water cycle. Water can be a gas, a liquid, or a solid and can go back and forth from one state to another. SC.5.E.7.2 Recognize that the ocean is an integral part of the water cycle and is connected to all of Earth's water reservoirs via evaporation and precipitation processes. SC.5.N.1.5 Recognize and explain that authentic scientific investigation frequently does not parallel the steps of "the scientific method." Objective/Purpose:
The student will observe and explain the stages of the water cycle (evaporation, condensation, precipitation) and illustrate that when liquid water evaporates; it turns into a gas (vapor) in the air and condenses as a liquid when cooled, or as a solid if cooled below the freezing point of water.
The student will explain how sunlight and temperature affect the water cycle.
The student will explain why it is important to conserve and protect available drinking water sources.
Background Information: The water cycle is a never-ending cycle that includes evaporation, condensation, and precipitation. The sun is the energy that keeps the cycle moving. The heat energy from the sun changes water into vapor. This invisible vapor then condenses and forms billions of droplets that make up clouds. The moisture from the clouds returns to the earth as rain, snow, or other forms of precipitation. Temperature plays an integral role in this never-ending process by affecting the rate of evaporation and the type of precipitation (e.g., rain, snow, ice). Evaporation is the process in which matter changes from a liquid state to a gaseous state (vapor) Condensation is the process in which matter changes from a gaseous state (vapor) to a liquid state. Condensation occurs as air with water vapor in it cools; clouds are evidence of condensation. Precipitation forms when water droplets in clouds become too heavy to stay in the atmosphere. The water droplets fall in some form, such as snow, ice, or rain, to the earth’s surface. In order for students to understand how the water cycle works, it is important for them to review what they have already learned about water itself, and the different states it can

33
assume (solid, liquid, or gas) in our ever-changing environment. This can be done by showing the class three items—a half-filled glass of water, a dish with an ice cube, and a dish with a wet paper towel in the Engage activity in this lab. Teacher Notes: In preparation for this activity, scan your school grounds and locate a hot, sunny wall area where students can mount their mini-water cycle bags. Bags can be affixed to a window facing south inside the classroom if one is available. The bags will need to remain on the wall undisturbed for 3 days. Students will observe the bags over three days. The first phase of the activity in day 1 should begin as early as possible in the school day. The mini-water cycle baggies will need to be checked each morning and afternoon for three days. Add blue food coloring to water before distributing to the groups. Engage: Begin by drawing attention to the glass of water. Ask questions such as:
What is in this glass? What is water? What does it look or feel like? Is water a solid, a liquid, or a gas? Where can you find water? Where does it come from?
Guide the class in establishing that water is a liquid that both falls from the sky in the form of rain and can be found in abundance in oceans, lakes, streams, and underground. Next, pick up the dish with the ice cube and show it to the class.
Ask questions such as these:
What is in this dish? Describe ice. What does it look or feel like? Is ice a solid, a liquid, or a gas? What is ice made of? How is it made? If I left the ice in the room for a few hours, what would happen to it?
Help the class to see that ice is water that has been frozen into a solid because it has been exposed to very low temperatures. Make sure they understand that when ice is allowed to warm up, it returns to liquid water.

34
Next, present the dish with the wet paper towel, asking the following questions:
What is this? What would happen if I left it out for a few hours? Why would it dry out? Besides paper towels, what are some other examples of wet things that dry
out over time? (Examples could include wet clothes, watered plants, glasses of water, and puddles.)
What if I put this wet paper towel outside during the winter? What might happen to it? Why?
At this point, students should understand that when water is exposed to warm temperatures, it disappears or evaporates, becoming a gas, while under colder conditions it can freeze into ice, becoming a solid. It is important to emphasize that the three water samples they've seen represent the three states, or forms, that water takes on as temperature and other conditions change.
Explore: Next, divide the class into small groups. To better apply and reinforce what they have learned, have each group create a model of a water cycle. Essential Question: What will happen to water in a cup if the cup is placed inside a sealed bag and left in a warm area? Materials:
Cycle in a Bag” worksheet Quart size zip-lock baggie with writing label 7 oz. clear plastic cup Black permanent marker Measuring cup Water Blue food coloring Masking or duct tape Clipboard or other hard writing surface
Procedures: 1. Introduce and discuss the term “cycle.” Explain to students that in a cycle, a complete
set of events occurs in the same sequence over and over. Ask students to name examples of natural cycles. (Some examples include various plant and animal life cycles).

35
Reinforce the idea that both living and non-living things in our environment often undergo cycles. Next, ask students to recall the three major parts of the water cycle (evaporation, condensation, and precipitation). Explain that during this activity students will be working in groups to create their own mini water cycle in a plastic bag, but will keep an individual observation sheet.
3. Divide students into groups of four and distribute a
“Cycle in a Bag” lab sheet to each student in the group. Refer to the diagrams on the worksheet and review and demonstrate the procedure for creating a water cycle in a bag.
Procedures for students:
1. Instruct students to pour 50 mL of water into a small, clear plastic cup and mark the water line in a permanent marker.
2. Have students tape the cup to the inside of the baggie at the lower right corner. Remind students to tightly seal their baggies before beginning the experiment.
3. Remind students to tape their bags on the outside wall at an angle like a diamond and have them write their names at the top of the baggies.
4. If marker flags or flagging tape are available, mark off the wall as designated “study area.”
5. Distribute all materials and assist groups with the preparation of their miniature water cycle models.
Day 1: 1. Distribute a clipboard if available to each group and lead students to the outdoor
study wall site. Have each group securely tape its water cycle bag to the wall. Make sure students tape the bags at eye level so they are easy to observe.
2. Have each student predict what changes will take place inside the bag over the next
three days. Groups should record their predictions on the “Cycle in a Bag” worksheet.
Days 2 and 3 3. Have groups observe their bags daily for three days. Instruct group members to draw
and describe their observations on the “Cycle in a Bag” worksheet.

36
Explain/Evaluate: 1. After the third day of observations, ask students to share their observations and
discuss how accurate their predictions were. Conduct a whole-class discussion addressing the following questions:
During what phase of the water cycle is water invisible? (evaporation)
Why is the water invisible during this phase? (because it is a gas)
What causes water to evaporate in the water cycle? ( heat from the sun)
What causes water to condense in the water cycle? (cooler temperatures)
What stage of the water cycle do the water droplets inside the baggie represent? (condensation)
When many droplets of condensed water collect in the atmosphere, what do we see? (clouds)
Is the total amount of water in the baggie the same after 3 days? (yes, unless the bag was not tightly sealed)
When the water droplets collect at the bottom of the baggie, what stage of the water cycle does this represent? (precipitation)
If the baggie remained tightly sealed, how much water would be in the baggie after one month? (the same amount of water you started with 2 ounces
If the baggie were left on the wall with the seal opened, what would happen to water in the bag? (it would eventually all evaporate into the surrounding atmosphere)
How would your miniature water cycle be affected if the bag was placed in a cool, shady area instead of a hot, sunny area? (the rate of evaporation would be much lower)
How much water was left in the cup after three days? (answers will vary)
2. Have students complete the Explain/Evaluate section on the second page of the CYCLE IN A BAG lab sheet.
3. Remind students that although they can’t always see it happening, the water cycle is
constantly occurring all around them. Emphasize the idea that the Earth contains the same amount of water today that it contained millions of years ago. At different times in the Earth’s history, the water might be distributed differently, but the total amount of water never changes; it is constantly moving through a repeating cycle.

37
4. Ask students if they think we really need to worry about running out of useable water since the total amount of water on Earth remains constant.
5. Develop the idea that although water on Earth is abundant overall, the vast majority
of water on Earth is either trapped as frozen ice or found as salt water in the oceans. Explain that 97% of the Earth’s water is saltwater in the ocean and 2% of the Earth’s water is frozen. Of all the water available on Earth, only about one gallon out of every hundred gallons can be used for drinking. As a result, we must be careful to conserve our available fresh drinking water and protect it from contamination and pollution
Mini Water CYCLE IN A BAG Name_____________________________ Date_______________________ DIRECTIONS: Use the materials provided by your teacher to make a mini water cycle in a bag. Remember to mark the starting water level in your cup and write your names on the top bag label. Tape the baggie on the outdoor wall at an angle like a rhombus with the cup of water at the bottom. Record your predictions and daily observations in the spaces below. Essential Question: What will happen to water in a cup if the cup is placed inside a sealed bag and left in a warm area? Prediction: If a cup with water is placed inside a sealed bag and left in a warm area, then the water in the cup will ______________________________________________ _____________________________________________________________________ DAY 1 DAY 2 DAY 3
38
Predictions: Observations:
Predictions: Observations:
Predictions: Observations:
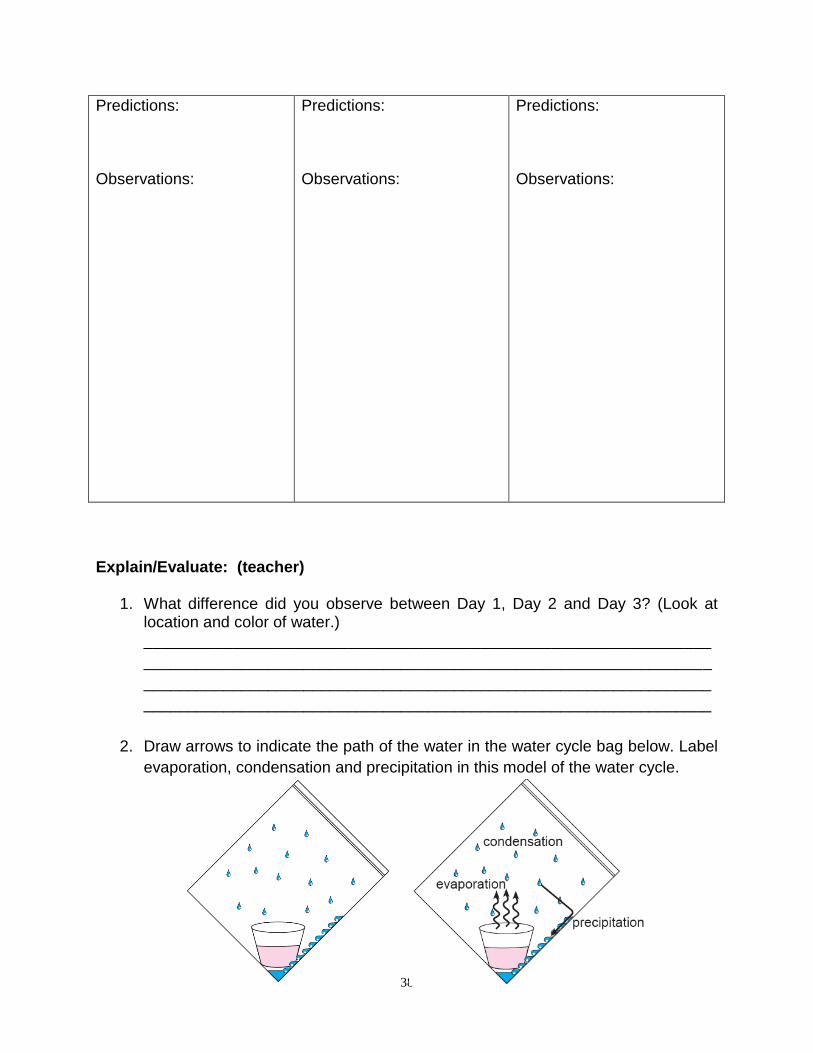
Explain/Evaluate: (teacher)
1. What difference did you observe between Day 1, Day 2 and Day 3? (Look at location and color of water.) ________________________________________________________________
________________________________________________________________
________________________________________________________________
________________________________________________________________
2. Draw arrows to indicate the path of the water in the water cycle bag below. Label
evaporation, condensation and precipitation in this model of the water cycle.
39
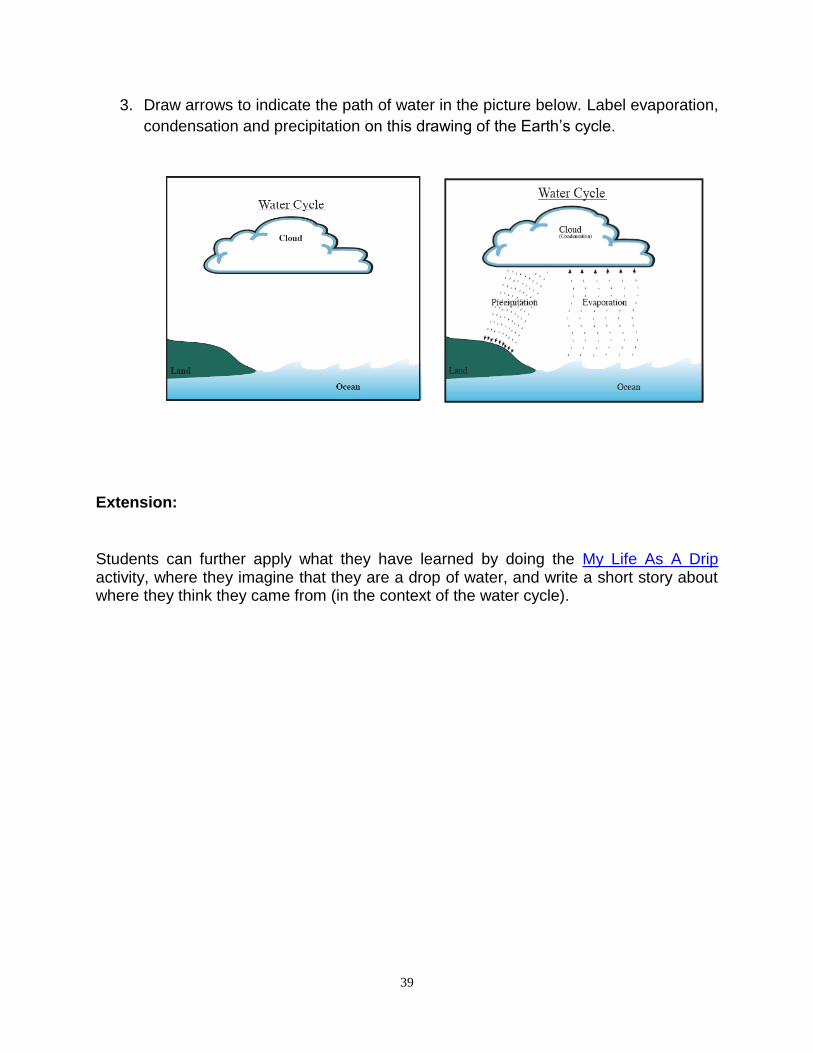
3. Draw arrows to indicate the path of water in the picture below. Label evaporation,
condensation and precipitation on this drawing of the Earth’s cycle.
Extension:
Students can further apply what they have learned by doing the My Life As A Drip activity, where they imagine that they are a drop of water, and write a short story about where they think they came from (in the context of the water cycle).

40

41
LAB # 8: AROUND AND AROUND IT GOES! Grade 5 Essential lab (Student’s version)
Name: ______________________________________ Date __________________ The water cycle is a never-ending cycle that includes evaporation, condensation, and precipitation. The sun is the energy that keeps the cycle moving. The heat energy from the sun changes water into vapor. This invisible vapor then condenses and forms billions of droplets that make up clouds. The moisture from the clouds returns to the earth as rain, snow, or other forms of precipitation. Temperature plays an integral role in this never-ending process by affecting the rate of evaporation and the type of precipitation (e.g., rain, snow, ice).
CYCLE IN A BAG
DIRECTIONS: Use the materials provided by your teacher to make a mini water cycle in a bag. Remember to mark the starting water level in your cup and write your names on the top bag label. Tape the bag on the outdoor wall at an angle like a diamond with the cup of water at the bottom. Record your predictions and daily observations in the spaces below.

42
Essential Question: What will happen to water in a cup if the cup is placed inside a sealed bag and left in a warm area? Prediction: If a cup with water is placed inside a sealed bag and left in a warm area, then the water in the cup will ______________________________________________ _____________________________________________________________________ DAY 1 DAY 2 DAY 3 Predictions:
Observations:
Predictions:
Observations:
Predictions:
Observations:
Explain/Evaluate:
1. What difference did you observe between Day 1, Day 2 and Day 3? (Look at
location and color of water.)
____________________________________________________________________________________________________________________________________________________________________________________________________________________________________________________________________________

43
2. Draw arrows to indicate the path of the water in the water cycle bag below. Label
evaporation, condensation and precipitation in this model of the water cycle.
3. Draw arrows to indicate the path of water in the picture below. Label evaporation,
condensation and precipitation on this drawing of the Earth’s cycle.


![[PPT]Atoms - Miami-Dade County Public Schoolsscience.dadeschools.net/documents/ETO Science Resources... · Web viewThey make up everything around us; Your desk, the board, your body,](https://img.dokumen.tips/doc/110x75/5ae074317f8b9a8f298e368a/pptatoms-miami-dade-county-public-science-resourcesweb-viewthey-make-up-everything.jpg)