Embed Size (px)
Citation preview
MGB 1967-1980 “Tube -Type” Rear Axle “clunk” reduction.
May 2010 Tom Hodgson
Since our cars in North America are now close to forty years old, it should not be surprisingto have occasional problems to solve. (MG’s were not shipped here after 1980 so we do notsee the later models that seem common in Britain.) In the case of my 1970 “B” tourer therewas a significant clunk heard at gear changes or other speed changes. My “navigator”seemed to notice this every time we went out as if to suggest it be fixed without delay.
In Ontario, we typically have our cars in storage for five or six months of the year. I do notdrive mine during the “salt” season. After all one major restoration is enough fun for quite awhile. This off-season is when we do any repairs that require significant time or effort. If ittakes a week or more in winter it does not matter.
The obvious items were checked first: wire wheel splines, possible loose suspension and axleparts, drive-shaft “u” joints and the nuts holding the brake drum to the hubs. When none ofthese produced any results a very expensive, new or more likely, a used axle was considered.The fact that any used axle would also be a similar age, its likely condition was cause forconcern.
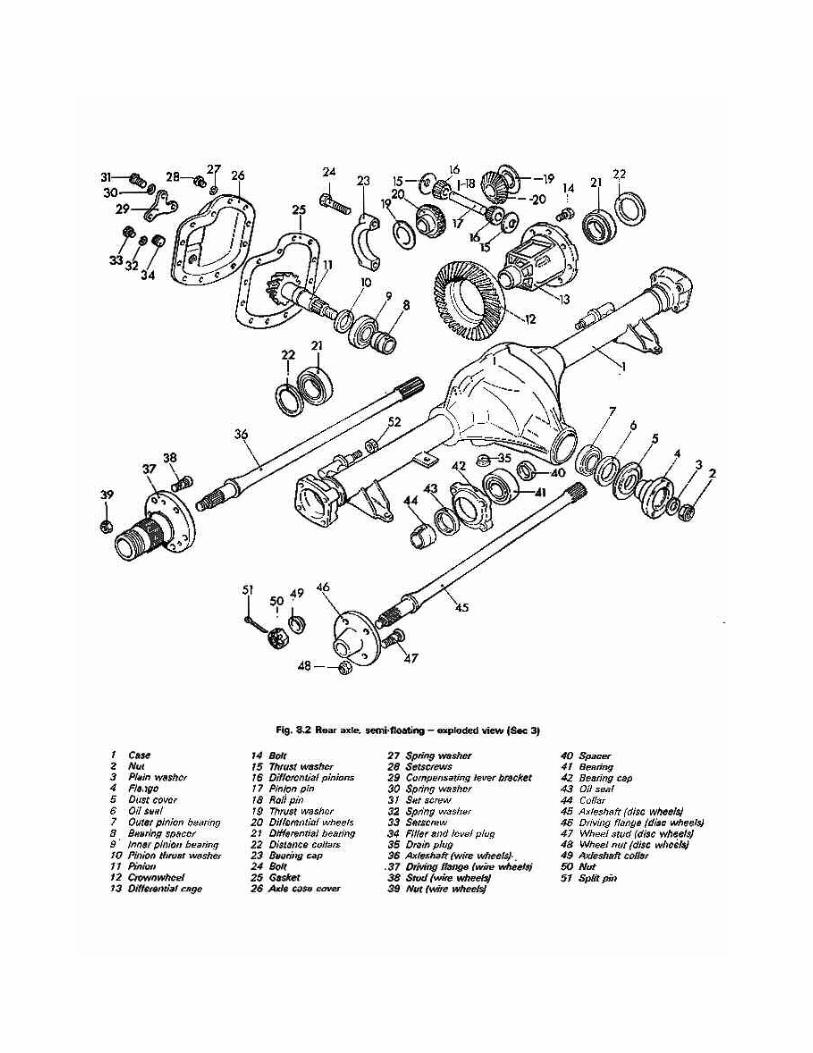
It was clear from consulting my various manuals that work could be done on the early Banjoaxles but not on the later ones like mine. The manuals I have are: Haynes MGB WorkshopManual, Lindsay Porters Guide to MGB Purchase and D.I.Y. Restoration (note to NorthAmericans D.I.Y., a common term in Britain it means “Do It Yourself”), Clymer-MGA andMGB Shop Manual. Clearly any work on the “tube-type” axle used after 1967 needed specialtools to even dismantle the differential at all.
The following diagram is typical of the ones from several manuals. This one is from HaynesMGB Workshop Manual.
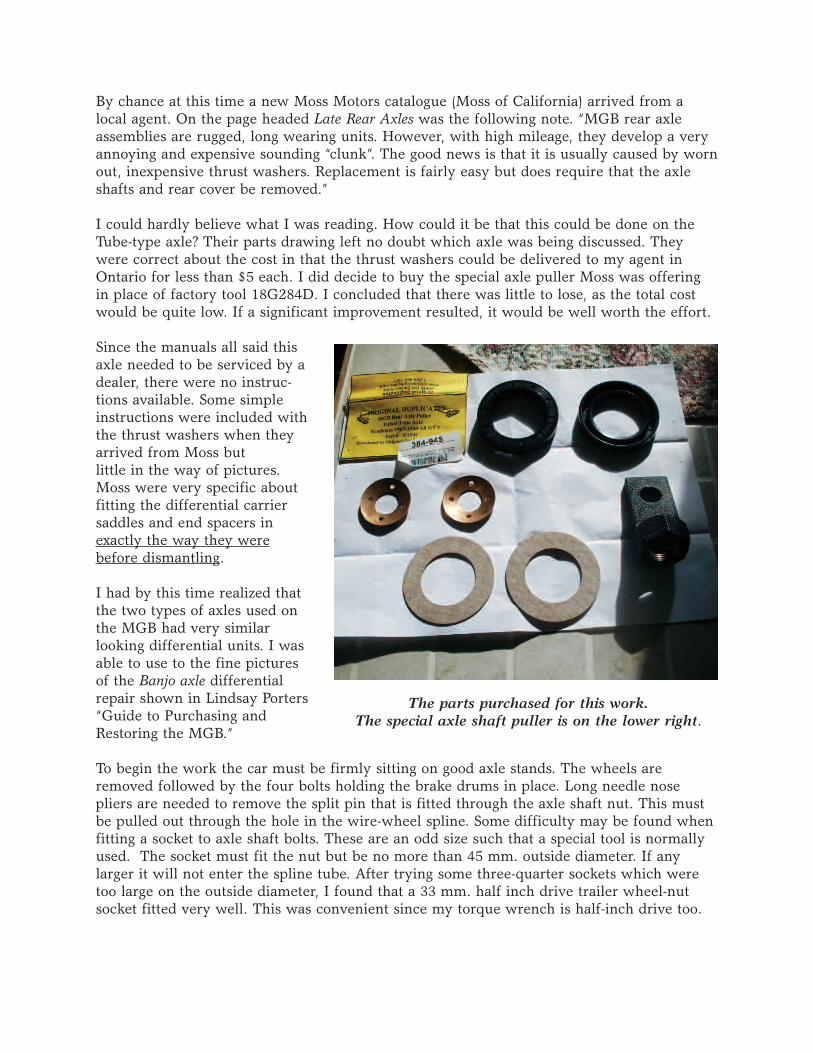
By chance at this time a new Moss Motors catalogue (Moss of California) arrived from alocal agent. On the page headed Late Rear Axles was the following note. “MGB rear axleassemblies are rugged, long wearing units. However, with high mileage, they develop a veryannoying and expensive sounding “clunk”. The good news is that it is usually caused by wornout, inexpensive thrust washers. Replacement is fairly easy but does require that the axleshafts and rear cover be removed.”
I could hardly believe what I was reading. How could it be that this could be done on theTube-type axle? Their parts drawing left no doubt which axle was being discussed. Theywere correct about the cost in that the thrust washers could be delivered to my agent inOntario for less than $5 each. I did decide to buy the special axle puller Moss was offeringin place of factory tool 18G284D. I concluded that there was little to lose, as the total costwould be quite low. If a significant improvement resulted, it would be well worth the effort.
Since the manuals all said thisaxle needed to be serviced by adealer, there were no instruc-tions available. Some simpleinstructions were included withthe thrust washers when theyarrived from Moss but little in the way of pictures.Moss were very specific aboutfitting the differential carriersaddles and end spacers inexactly the way they werebefore dismantling.
I had by this time realized thatthe two types of axles used onthe MGB had very similar looking differential units. I wasable to use to the fine picturesof the Banjo axle differentialrepair shown in Lindsay Porters“Guide to Purchasing andRestoring the MGB.”
To begin the work the car must be firmly sitting on good axle stands. The wheels areremoved followed by the four bolts holding the brake drums in place. Long needle nose pliers are needed to remove the split pin that is fitted through the axle shaft nut. This mustbe pulled out through the hole in the wire-wheel spline. Some difficulty may be found whenfitting a socket to axle shaft bolts. These are an odd size such that a special tool is normallyused. The socket must fit the nut but be no more than 45 mm. outside diameter. If anylarger it will not enter the spline tube. After trying some three-quarter sockets which weretoo large on the outside diameter, I found that a 33 mm. half inch drive trailer wheel-nutsocket fitted very well. This was convenient since my torque wrench is half-inch drive too.
The parts purchased for this work. The special axle shaft puller is on the lower right.
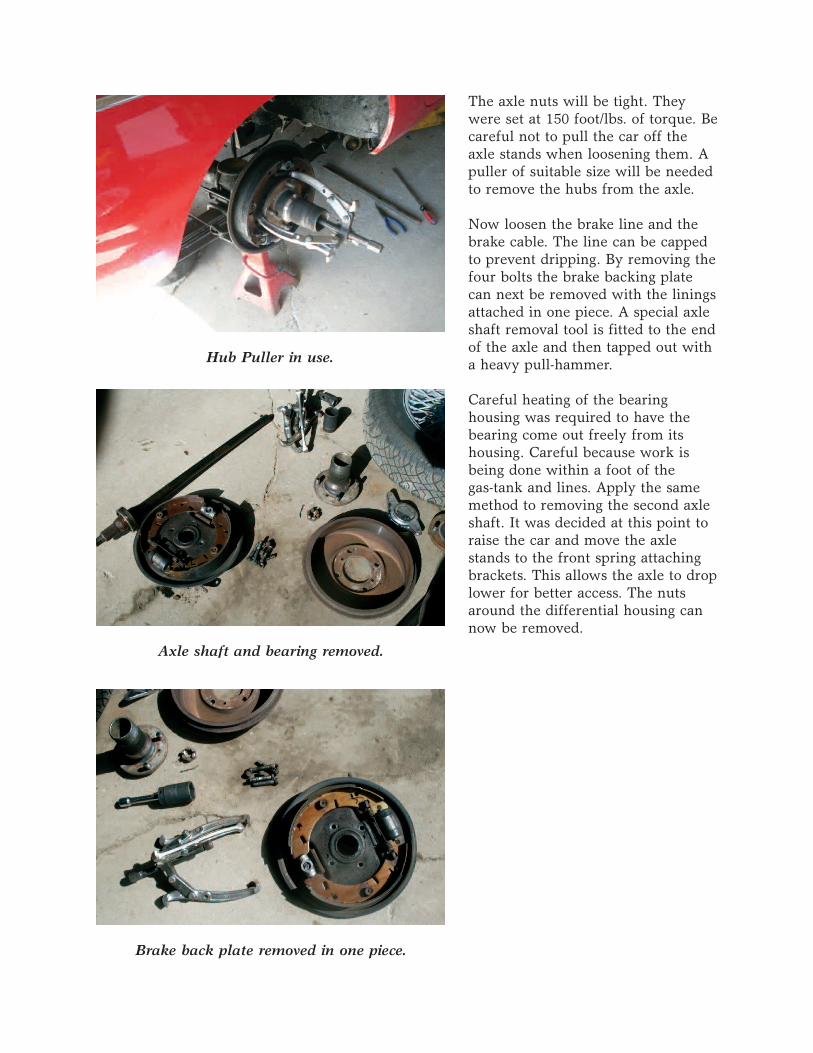
The axle nuts will be tight. Theywere set at 150 foot/lbs. of torque. Becareful not to pull the car off theaxle stands when loosening them. Apuller of suitable size will be neededto remove the hubs from the axle.
Now loosen the brake line and thebrake cable. The line can be cappedto prevent dripping. By removing thefour bolts the brake backing platecan next be removed with the liningsattached in one piece. A special axleshaft removal tool is fitted to the endof the axle and then tapped out witha heavy pull-hammer.
Careful heating of the bearing housing was required to have thebearing come out freely from itshousing. Careful because work isbeing done within a foot of the gas-tank and lines. Apply the samemethod to removing the second axleshaft. It was decided at this point toraise the car and move the axlestands to the front spring attachingbrackets. This allows the axle to droplower for better access. The nutsaround the differential housing cannow be removed.
Hub Puller in use.
Axle shaft and bearing removed.
Brake back plate removed in one piece.
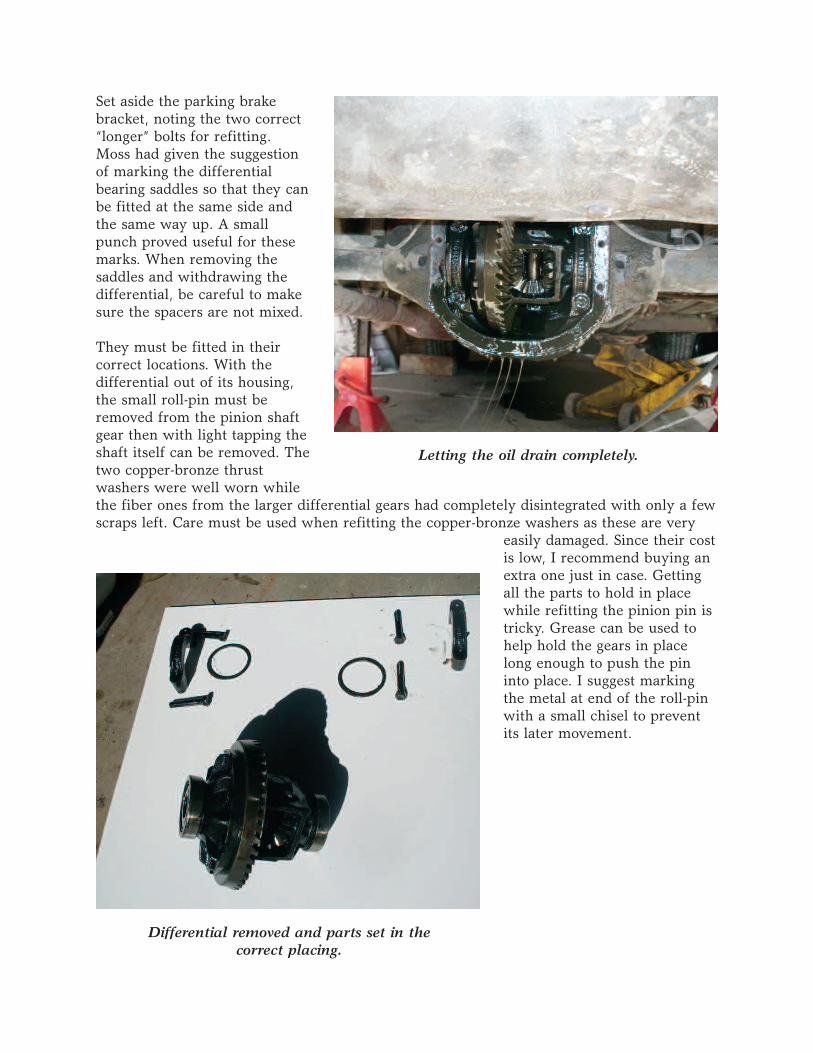
Set aside the parking brakebracket, noting the two correct“longer” bolts for refitting.Moss had given the suggestionof marking the differentialbearing saddles so that they canbe fitted at the same side andthe same way up. A smallpunch proved useful for thesemarks. When removing the saddles and withdrawing thedifferential, be careful to makesure the spacers are not mixed.
They must be fitted in their correct locations. With the differential out of its housing,the small roll-pin must beremoved from the pinion shaftgear then with light tapping theshaft itself can be removed. Thetwo copper-bronze thrust washers were well worn whilethe fiber ones from the larger differential gears had completely disintegrated with only a fewscraps left. Care must be used when refitting the copper-bronze washers as these are very
easily damaged. Since their costis low, I recommend buying anextra one just in case. Gettingall the parts to hold in placewhile refitting the pinion pin istricky. Grease can be used tohelp hold the gears in placelong enough to push the pininto place. I suggest markingthe metal at end of the roll-pinwith a small chisel to preventits later movement.
Letting the oil drain completely.
Differential removed and parts set in the correct placing.
A new gasket was used on the differential housing and new oil sealsfitted to the axle shafts. Otherwise,assembly is the reverse of disman-tling. New oil put into the axle.
When bringing the axle nuts up to the150foot/lbs of torque a little extramight be needed in order to fit thesplit pin through the nut. Fit thebrake drums. Reconnect the brakecable using new split pins. Reassemble the brake fluid lines andbleed the system. The axle stops arere-fitted then the wheels.There wasclearly much less free movement atthe wheels. Although at this age somefree-play between the Crown-wheeland pinion is likely.
Driving now is much more pleasantwithout the annoying “clunks”. In factthe result is quite remarkable. Thelast check after a run was an inspection to ensure there were no oilleaks from the axle or wheel area.
I am now waiting for someoneto tell me what I must havedone wrong without the“stretching” tool or whatever isrequired. Am I to expect somenew problem in the future as aresult?
Cover plate cleaned and ready.
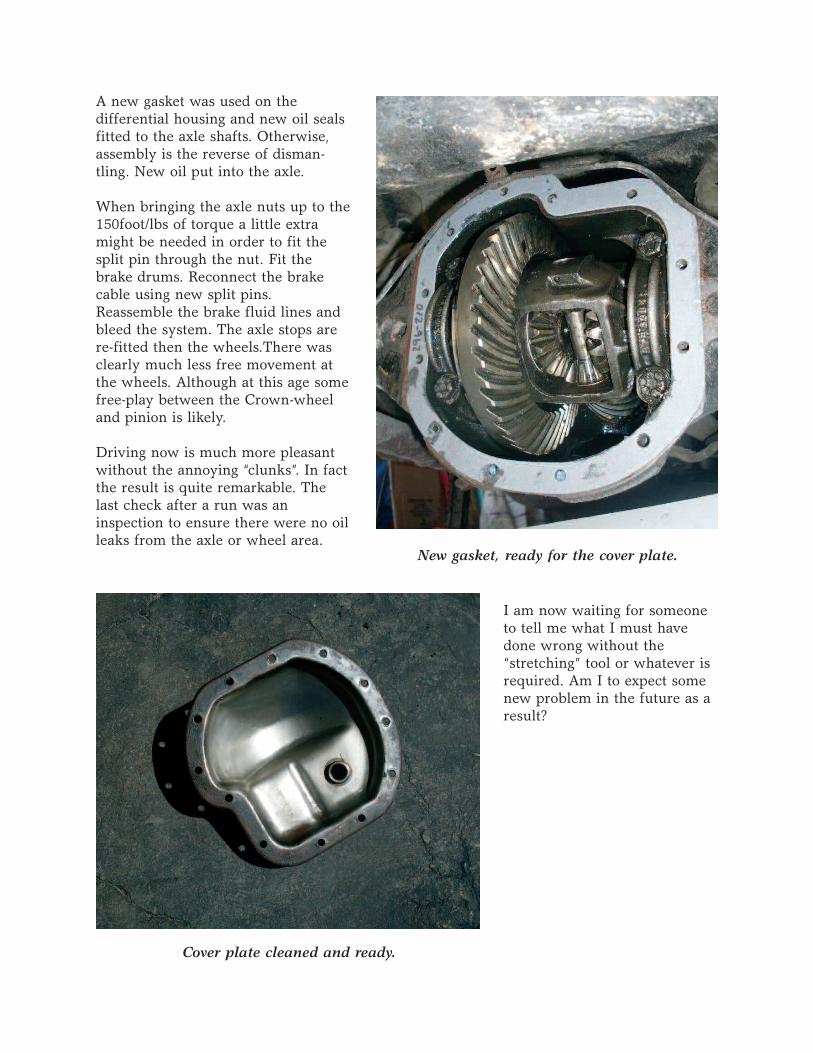
New gasket, ready for the cover plate.

![MGB MGB-75J MGB-100J PARTS AND OPTIONAL MGB-125J … Parts... · 2016. 11. 8. · P/N 240011116, Rev. C [05/31/2016] MGB Cast Iron Gas Fired Boilers For Forced Hot Water PARTS AND](https://img.dokumen.tips/doc/110x75/6056b1c1bec041070051b4b8/mgb-mgb-75j-mgb-100j-parts-and-optional-mgb-125j-parts-2016-11-8-pn-240011116.jpg)