Embed Size (px)
DESCRIPTION
Vol 2 Issue 2
Citation preview

1

2
Vol.2, Issue 2 2012
EDITOR’S NOTE In this issue, we encourage all of you to start planting at home, with some easy to grow vegetables. We will show you how simple it is to establish and maintain a garden in plot or a pot. There are also inherent advantages - one knows exactly what one is eating; produce is free from pesticides; there is satisfaction that the produce was the product of one’s own hands and from one’s own yard; and one can accumulate significant savings.
Included are some tasty local recipes to try. You will find that eating local is not only healthy, it is also delicious.
Recently, we uploaded twelve (12) ‘how to’ videos on www.youtube.com/agricultureNOW. Take a look at the topics, which include:
Requirements for Growth of a Plant• Places to Plant at Home• Selection and Preparation of Containers• How to Prepare the Growing Medium•
LandPreparation• How to Choose a Good Quality Seedling• Transplanting and Watering• Fertilizing• Weed Control• Pest Management• Planting and Maintenance of Fruit Trees• Harvesting•
Home gardening is an activity that can be enjoyed by all members of your family; and can serve as a time of relaxation to bond with one another. Let us sow the seeds for a bountiful tomorrow.
Yolande Agard-Simmons,Director, Corporate Communicationsand Editor, AgricultureNow.
HOME GARDENINGIntroductionEstablishing and maintaining a home garden is one way of ensuring that you have a variety of fresh fruits and vegetables to complement your diet. Gardening is good exercise for the body and mind as you enjoy seeing and reaping the fruits of your labour. For the budding home gardener we will provide you with tips for growing seasoning herbs, lettuce, bodi, tomato, melongene and corn. All these commodities will help to provide you with nutrients from the major food groups.
If you have enough space, you may plant a variety of crops at the same time. It is important that you do not plant crops of the same family on the same spot every time. Crop rotation is quite useful in helping to control the spread of pests and diseases, while at the same time allowing each crop family to add to or use nutrients in the soil.
As a home gardener, it would be useful to make your own compost. This can be used to enrich soil with natural fertilisers. There is also range of natural products such as kelp and seaweed which can be used to provide additional nutrients to your crop. However, you may keep two main granular fertilisers, if you wish; one for rooting and one for fruiting. When applying granular fertilisers, do not allow the fertiliser to touch the stem or leaves of the crop because the fertiliser can burn the plants. Granular fertilisers can be applied to the soil around the base of plants. To avoid wastage cover the fertilizer with a thin layer of soil. Fertilisers should be applied only if required.
The key to a successful home garden is observing your crops for signs of pest attack. If there are no signs pest attack such as leaves being eaten but plants appear unhealthy, your plants may be lacking nutrients. Happy Gardening!
Students of Sangre Grande SDA Primary engage in tree planting on the School’s compound.

3
Vol.2, Issue 2 2012
Name of Herb Propagation Materials Recommended SpacingCelery Seedling 20 cm x 20 cm (8 inches x 8 inches)
Chive Seedling 10 cm x 10 cm (4 inches x 4 inches)
Parsley Seedling 20 cm x 20 cm (8 inches x 8 inches)
French Thyme (Oregano) Propagated Cutting 50 cm–60 cm x 50 cm–60 cm (20-24 inches x 20-24 inches)
English Thyme (Fine Thyme) Seedlings 20 cm x 20 cm (8 inches x 8 inches)
Spanish Thyme (Podina) Cuttings 50-60 cm x 50–60 cm (20-24 inches x 20–24 inches)
Chadon Beni (Fitz weed or Bandhania) Seeds Young Plants Base of plants
15 cm x 15 cm (6 inches x 6 inches)
Parsley English Thyme, Chive, Chadon Beni Celery
Growing Seasoning HerbsIn designing your home garden, it is very useful to include some seasoning herbs which you love. These may be grown in
containers, on stands, between other crops or individually in the ground. The table below gives some information on spacing and plant parts used for growing a few herbs.
Growing Lettuce
Lettuce is a good source of dietary fibre, calcium, iron and vitamins. It can be planted in containers or can be intercropped with herbs and other vegetables.
PlantingMix well-rotted manure or compost in soil in each planting hole. This should provide sufficient nitrogen. Leafy crops require nitrogen for proper growth.Space plants 20-30 cm (8-12 inches) within rows and 38-45 cm (15-18 inches) between rows.
Crop Management• Water plants immediately after transplanting and
thereafter when needed. Lettuce is a delicate plant, susceptible to drying out
• At transplanting, you may apply a fertiliser high in potassium for root growth.
Harvesting After 4-6 weeks lettuce can be harvested by making sharp clean cut at base of plant.
PlantingTable 1 Recommended spacing for Seasoning Herbs
Crop Management Apply a mixture of well rooted manure or compost into the soil at transplanting. If plants need a boost, add manure into the soil.
HarvestingUse a knife to harvest/trim off leaves.
Continued on page 4

4
Vol.2, Issue 2 2012
Growing Bodi
Bodi is a legume crop which replenishes soil with nitrogen. It is useful in a crop rotation cycle before or after a crop which uses large amounts of nitrogen for their growth for example, cassava and corn. Bodi may be grown on the ground or in containers. Like most vegetables, it is best grown in open sunlight and in well-drained soil.
Planting• Prepare the planting area by mixing well rooted compost
in the soil• Some common varieties are either long or short. Bodi can
be grown either by seeds or healthy seedlings.• If using seeds, sow 2 to 3 seeds, 2 to 3 cm (0.8 – 1.2 in)
deep at a spacing of 0.5 m (1.5 ft.) within row and 1m (3 ft.) between rows.
• Water seeds or seedlings twice daily If a long variety is used, staking would be necessary to prevent beans from touching the ground. Home gardeners may also consider using a trellis or walls on which the bodi could grow.
Crop ManagementAt flowering plants may benefit from adding ashes (potassium). This assists in fruit flowering and fruit fruiting.
Harvesting Bodi can be harvested from 6 to 8 weeks after planting. Most
people prefer bodi at the ‘snap’ stage, but harvesting could be done at any stage you prefer. Harvest bodi by picking. Be careful not to break off flowers while harvesting. You may need to harvest every other day when the crop is in full production
Tomatoes
PlantingWhen purchasing tomato seedlings, ask the following questions:
1. Is this variety good for slicing or for sauces?2. Is this variety better suited for growing in the dry
season or in the rainy season?Select seedlings that are healthy and those that are not yet flowering.
Tomatoes can be planted in containers and can be intercropped with most other vegetables.
• Spacing: 45 cm (18 inches) within rows and 60 cm to 90 cm (24-36 inches). between rows.
• Transplant seedlings 3 - 4 weeks old and water twice daily.
• At the time of transplanting, mix agricultural lime in the planting hole at the time of transplanting (use as directed).
• Stake plants within three weeks after transplanting.
Crop ManagementApply wood ash which is high in potassium. Water plants regularly to prevent black spot at base of fruit (known as blossom end rot).
HarvestingHarvest tomatoes when they start to turn red and are no longer shiny. Avoid harvesting wet fruits unless you plan to use them on the same day.
Melongene
PlantingMany homeowners have had difficulty growing melongene which is commonly known as Eggplant or Baigan. Here are some tips to help you achieve greater success next time you plant.
It is important that you understand the characteristics of the plant. Melongene must be planted in an area with full sunlight for most of the day. It does not grow well in shade. Melongene plants -:
• Are deep-rooted so plough deep to 35-50 cm (1 to 2 ft.) or plant in very deep containers.
• need rich, organic soil • need lots of water but are sensitive to water logging.
Adequate drainage must be providedContinued on page 5

5
Vol.2, Issue 2 2012
Directions: Cut corn into bite sized pieces1. Boil split peas and corn in water until half cooked2. Add pumpkin to pot at this stage and continue 3. cooking until split pea breaks up Prepare dumplings by mixing flour, corn meal, 4. salt and water. Knead until firm Add chopped seasoning to pot5. Shape dumplings into size desired and add to 6. pot along with remaining ingredients. Continue cooking soup until dumplings are 7. cooked properly
Note: If desired pigtail can be added to soup when adding pumpkin. Ensure that pigtail is cut into small pieces, boiled and excess salt removed.Serves 12
Ingredients: 12 cups water 4 whole corn cobs ½ lb split peas 2 lbs potato (cubed) 1lb pumpkin (cubed) 1 carrot (diced) 1 spring chive (chopped)
1 blade celery (chopped) 3 cloves garlic (chopped) 1 onion (minced) Salt and pepper to taste ¾ lb cornmeal ¾ lb flour 1 pk Maggi “Flavor de Pot” 3 pimento peppers
RECIPECorn Soup
Plant melongene 90 cm (3 ft.) apart within rows and 1.5 m (5 ft.) between rows. Transplant healthy seedlings that are 3-4 weeks old. Apply agricultural lime in the planting hole at the time of transplanting.
Crop Management• Water plants daily.• At flowering, apply wood ash which is high in potassium
for proper fruit development.• Crops such as melongene and tomato require calcium
to encourage proper fruit development. A calcium fertiliser may be required throughout the lifetime of the crop. Use one handful of Calcium fertilizer per plant.
HarvestingMelongenes are ready for harvesting at 10-40 days from flowering. Mature fruit must be firm to touch and glossy. If properly managed, melongene bears fruits for between 6 to 9 months.
Corn
PlantingCorn is an important staple and has a good source of carbohydrates; Vitamins B1, B5, C and E; Iron and Zinc.
Spacing- Sow seeds 30 – 60 cm (1 to 2 ft.) between rows, 60 -90 cm (2 to 3 ft.) within rows. Plant them 1 to 2 cm deep (0.4-0.8 inches) using, 2 seeds per hole.
Crop ManagementIn planting hole, well-rotted manure or compost could be added around the base of the plant every two weeks. At flowering, add wood ash or a high potassium fertilizer to the soil.
HarvestingCorn may be harvested at any of the following stages of maturity-:
• Young Green Corn can be harvested when the “silk” turns brown (10-12 weeks after planting) used in soups, vegetable dishes and boiled
• Semi-Mature Green Corn (12-14 weeks after planting) may be roasted
• Mature Dried Corn (14-16 weeks after planting) ground into flour or used to make animal feed.
When harvesting, hold the corn firmly and bend downwards, Use sharp knife or cutlass and cut the part of the plant that attaches corn to tree. If a single cob is on the plant, cut down the plant. Store corn in a cool area.
Did You Know?• At the top of the mature corn plant there is a collection of
male flowers called ‘Tassel’.• When the female flowers develop into the corn it is called
an ‘Ear’.• The long soft threads at the top of the corn are called
‘Silk’.

Vol.2, Issue 2 2012
Directions:1. Put pumpkin in just enough water to cook
until soft. Drain.2. Add pumpkin to peppers, onion, garlic
and 1¼ cups vinegar in blender. Blend to desired consistency.
3. Place on heat and bring to boil.4. Mix saffron, curry powder, mustard and
cornstarch in ¼ cup vinegar and add to pepper mixture.
5. Add salt and simmer for approximately 5 minutes.
6. Allow to cool then bottle in sterilized jars.
Yields 4 bottles (375ml).Submitted: Siewdath Dupraj - A.A.II County St. George West
Ingredients:¾ lb pumpkin (peeled and chopped)12 hot peppers2 medium onions, chopped2 cloves garlic, chopped
1 tbs salt½ tsp saffron1 tsp curry powder4 tbs mustard4 tsp cornstarch12 fl. oz. white vinegar
RECIPEPepper Sauce
Some wonderful dishes made using our featured growing produce.
Tomatoes, lettuce and corn salad. Seasoned grilled melongene. Curried bodi and potatoes.
6
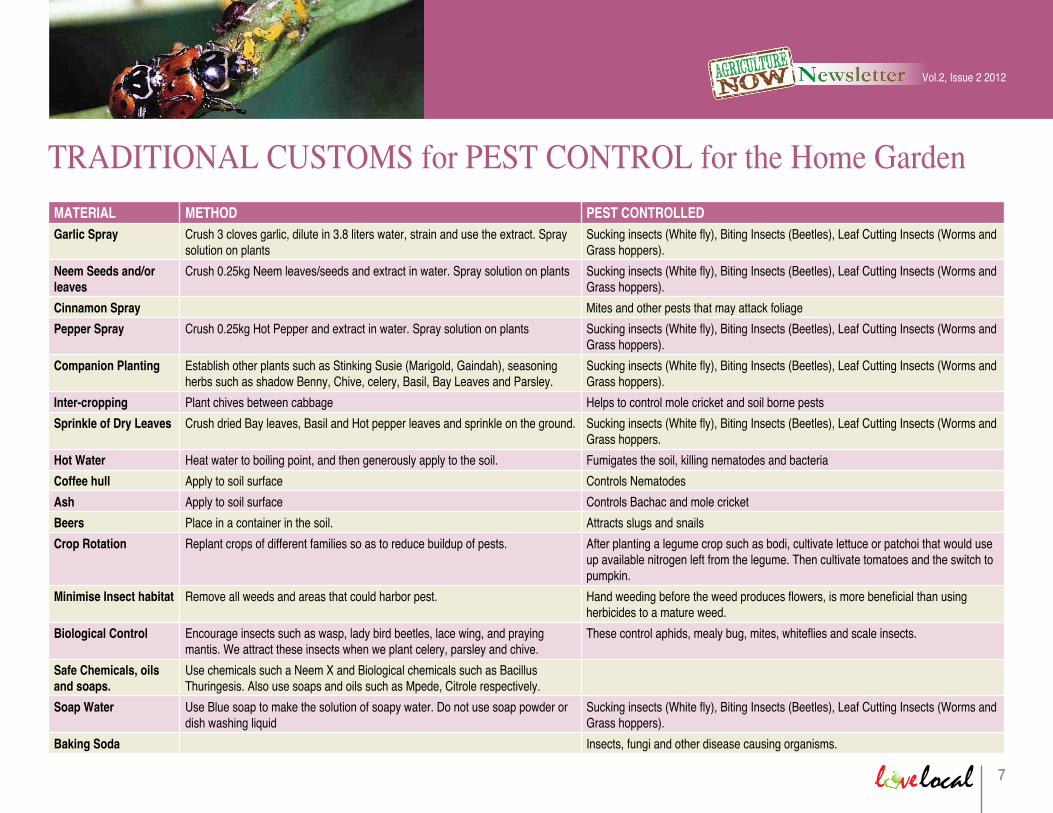
7
Vol.2, Issue 2 2012
MATERIAL METHOD PEST CONTROLLEDGarlic Spray Crush 3 cloves garlic, dilute in 3.8 liters water, strain and use the extract. Spray
solution on plantsSucking insects (White fly), Biting Insects (Beetles), Leaf Cutting Insects (Worms and Grass hoppers).
Neem Seeds and/or leaves
Crush 0.25kg Neem leaves/seeds and extract in water. Spray solution on plants Sucking insects (White fly), Biting Insects (Beetles), Leaf Cutting Insects (Worms and Grass hoppers).
Cinnamon Spray Mites and other pests that may attack foliage
Pepper Spray Crush 0.25kg Hot Pepper and extract in water. Spray solution on plants Sucking insects (White fly), Biting Insects (Beetles), Leaf Cutting Insects (Worms and Grass hoppers).
Companion Planting Establish other plants such as Stinking Susie (Marigold, Gaindah), seasoning herbs such as shadow Benny, Chive, celery, Basil, Bay Leaves and Parsley.
Sucking insects (White fly), Biting Insects (Beetles), Leaf Cutting Insects (Worms and Grass hoppers).
Inter-cropping Plant chives between cabbage Helps to control mole cricket and soil borne pests
Sprinkle of Dry Leaves Crush dried Bay leaves, Basil and Hot pepper leaves and sprinkle on the ground. Sucking insects (White fly), Biting Insects (Beetles), Leaf Cutting Insects (Worms and Grass hoppers.
Hot Water Heat water to boiling point, and then generously apply to the soil. Fumigates the soil, killing nematodes and bacteria
Coffee hull Apply to soil surface Controls Nematodes
Ash Apply to soil surface Controls Bachac and mole cricket
Beers Place in a container in the soil. Attracts slugs and snails
Crop Rotation Replant crops of different families so as to reduce buildup of pests. After planting a legume crop such as bodi, cultivate lettuce or patchoi that would use up available nitrogen left from the legume. Then cultivate tomatoes and the switch to pumpkin.
Minimise Insect habitat Remove all weeds and areas that could harbor pest. Hand weeding before the weed produces flowers, is more beneficial than using herbicides to a mature weed.
Biological Control Encourage insects such as wasp, lady bird beetles, lace wing, and praying mantis. We attract these insects when we plant celery, parsley and chive.
These control aphids, mealy bug, mites, whiteflies and scale insects.
Safe Chemicals, oils and soaps.
Use chemicals such a Neem X and Biological chemicals such as Bacillus Thuringesis. Also use soaps and oils such as Mpede, Citrole respectively.
Soap Water Use Blue soap to make the solution of soapy water. Do not use soap powder or dish washing liquid
Sucking insects (White fly), Biting Insects (Beetles), Leaf Cutting Insects (Worms and Grass hoppers).
Baking Soda Insects, fungi and other disease causing organisms.
TRADITIONAl CuSTOMS for PEST CONTROl for the Home Garden

8
Vol.2, Issue 2 2012
A GuIDE TO Planting & Aftercareof Fruit Plants PlantingSite Selection:Choose the site carefully bearing in mind soil type, slope, wind direction and shade.
Select and prepare site before planting.
Measure the height and dig the hole one and a half times as deep and two times as wide as the rootball.
Remove the growbag from around the rootball of the plant before
inserting into the hole.
Add organic manure if available and lift the plant by the rootballand gently place into the hole.
Balance the plant upright in the centre of the hole, refill the hole with soil to the rootball height and tamp soil to remove air pockets.
Stake the plant if needed. Use string or cloth when tying plantto stake leaving room for growth.
AftercareIrrigation/Drainage:
Water is critical to the survival of the fruit plants after planting. Planting in the rainy season is recommended and irrigation of plants in dry periods is required until plants become established. Avoid planting in areas prone to flooding. Ensure proper drainage.
Fertilisation:Essential nutrients boost plant growth, improve the health of the plants while helping the plants to resist the incidence of pests and diseases. Apply a complete fertiliser (e.g. 12:12: 17+2) at the drip edge of the crown of the plant at least twice per year at recommended rates. As the plant grows the crown area expands and the fertilizer should also be applied as per the crown of the fruit plant. Excessive high dosage of fertilizer would cause burning of the plant.
Weed Control:Weeds harbour pests and compete with the plant for soil nutrients and water. Regular weed control can be done manually (e.g. cutlass), mechanically (e.g. hand-held brush cutter) or chemically by the use of weedicides. Note well: keep hand held-brush cutter a safe distance away from the plant to avoid wounding the stem or cutting them out completely. Use a PVC sleeve around the base of the plant to avoid injury to the stem. Avoid weedicide contact with the stem and leaves of the plant. Manually remove weeds around the plant before applying chemical sprays and always use a spray shield.
Pest and Disease Control:Pest and Disease control is important in maintaining healthy plant growth and in sustaining high levels of fruit production. Monitor and observe plants for pest damage and disease symptoms. Use chemicals as required and always follow manufacturer’s recommendations.
Mulching:Mulching helps in maintaining soil moisture and in controlling weeds. Use inorganic mulch (e.g. black plastic) or organic mulch ( e.g. leaves, grass etc.). Be wary of bush fires.

9
Vol.2, Issue 2 2012
Mulch around plant stem and water to keep roots moist.
Pruning:Prune dead, diseased, injured or unwanted stems or branches immediately. Start pruning plants while young, usually around one year old to maintain the shape and size of the plant as it grows into a tree. Always use sharp tools and make clean cuts. Paint cut surfaces with an appropriate fungicide.
Deshooting:
Remove rootstock shoots inbudded or grafted fruit plants.
Shoots emerging from the rootstock of budded and grafted fruit plants can cause significant and costly losses. Determine the bud or graft union and remove all rootstock shoots to allow only the growth of the scion (desired plant variety). Failure to remove the rootstock shoots can result in the death of the desired plant variety or complete take over by the rootstock.
© 2011 St. Augustine Nurseries, 662-2692. Ministry of Food Production, Land and Marine Affairs. For further assistance contact your nearest Agricultural County Office. A Guide to Planting and Aftercare of Fruit Plants
HOW to care for TROPICAl PlANTSTropical plants are plants native to tropical climates, such as ours. According to the “American Horticultural Society Encyclopedia of Gardening,” a tropical climate is characterized by high temperatures and heavy rainfall. Rainfall may be year-round or seasonal.
Some examples of our Tropical Plants are:• ARECACEAE (Palmae), the palm family• BEGONIACEAE, the begonia family• EUPHORBIACEAE (Codiaeum), the croton family• BIGNONIACEAE (Tabebuia), the poui family• NYCTAGINACEAE, the Bougainvillea family
The following guidelines are for caring for your tropical plants:
• Plant tropical plants in containers filled with a quality potting soil that remains moist without compacting or becoming soggy. Use containers that have drainage holes in the bottom so excess moisture doesn’t collect in the soil.
• Locate plants in an area that receives the amount of light specified for the specific tropical variety. Place plants that require shade and part-shade in an area that receives no more than two to four hours of direct sunlight. Plants requiring full sun must receive more than four hours of direct light.
• Set pots of plants in a location away from heat and air vents indoors and out of the wind outside. These plants require high humidity and drying air can damage the plants. Group several pots together to help raise the humidity around the foliage.
• Feel the soil at least once a week and always feel the soil before watering. Water only when the top inch of soil begins to feel dry. Water at the top of the pot until moisture begins draining from the bottom drainage holes. Empty the collected water from the drip tray under the pot after watering. Outdoor pots may require more frequent irrigation.
• Fertilize tropical plants with a soluble houseplant fertilizer formulated for flowering or foliage plants, depending on the plant type. Apply the fertilizer when the plant is actively growing, at the rate recommended on the fertilizer package.
• Repot the plant when the pot is filled with roots, usually once every one to two years depending on the plant. Transplant the plant into a container one size larger than the old pot.
Happy Planting !!!!
Bougainvillea plant

Vol.2, Issue 2 2012
MAKING YOuR OWN COMPOSTYou can turn your kitchen and yard waste into a dark, rich, soil-like material (compost) which can be used in your home garden. This material is produced by a process called composting. Composting occurs in nature as organic matter rots, but you can speed up the process by providing the correct environment and the material for the process to occur. The organisms which break down the organic matter need air, food and water. You can produce compost in 2 to 3 months. Compost can be used as a soil conditioner, improves soil health and provides nutrients to plant. Compost may also be used as a mulch.
Materials for CompostingCarbon-rich material such as dried grass, leaves, bagasseNitrogen-rich material such as freshly-cut grass clippings, fruit and vegetable scraps
What Not to CompostDo not compost the following items. They can cause smells or create other problems with your compost.
- Diseased plants- Meats, bones and fatty foods- Pet waste- Weeds from fields that were flowering- Human waste- Chemically treated wood products
How to Make Your Own Compost The recommended size for a compost heap is 3 feet x 3 1. feet x 3 feet high. Select a level spot in your garden.2. Use under a tree to start your pile or cover the pile when 3. you are through to protect it from drying out and leaching the nutrients when rain falls.The pile can be made in an open area and covered or a 4. simple bin can be constructed using pallets or wood.The compost heap can be made by adding layers of 5. browns (carbon-rich material) and greens (nitrogen-rich) materials. All materials should be shred into small pieces to hasten the decomposition process. The material should be moistened before starting the compost as moisture is required for the process. The pile should be kept moist to the level of a damp sponge or the material should hold together when squeezed in the hand.
A general rule is to use the following steps:
• Place a layer of dry sticks at the bottom• Add a layer of browns: about 12 inches of dried grass and
leaves or bagasse.• Add a layer of nitrogen-rich material: about 4 inches of
freshly-cut grass clippings, fruit and vegetable scraps.• If you have old compost or animal manure, add a layer.
• You may add a high-nitrogen fertilizer and limestone.• Repeat the steps until the pile is 3 feet high.
Turn the compost every 3 to 5 days to speed up the process for the first two weeks. Use a garden fork or a pitch fork to take all the material out so that air passes through and then return material into bin. From the third week, turn every 10 days.
How Do You Know Your Compost is ready?
- The compost should be ready for use within two months.- The pile no longer heats up.- There is no odour.- The material is dark and soil-like.
10

Vol.2, Issue 2 2012
11
Directions to prepare pizza dough:Combine all the dry ingredients in a bowl with a wooden spoon with a little warm water to make a soft dough. The amount of water added depends on the variety of cassava used. Put the dough into a greased bowl and cover with a moist cloth. Keep in a warm area, undisturbed, until it rises to twice its original volume (about 30-60 minutes) or until done. Roll dough to fit baking sheet and pre-bake for 5 minutes.
Topping pizza:Lightly baste pre-cooked dough with • vegetable oil Sprinkle with fresh thyme and oregano• Spread cheese, chopped pimento and • tomatoAdd layer of chopped bodi with garlic• Finish topping with chopped patchoi, • pumpkin, onion, pineapple chunks, sweet pepper, chiveTop with cheese and sprinkle with oregano•
Put pizza into warmed oven. Bake for approximately 20-30 minutes at 300°F. Slice hot pizza and serve at once (8 slices).
Cassava Dough:3 cups Flour1 cup grated Cassava (packed) 1 tsp Salt
2 tsp Sugar ½ -3/4 pkt Dried Yeast4 ozs Margarine
Pizza topping:Vegetable oilOreganoRennet free cheese6 Pimentoes3 Ripe Tomatoes¼ lb Bodi¼ lb Patchoi¼ lb Corn or Squash
(pumpkin)1 large onion1 small pineapple cut into chunks3 cloves Garlic2 Sweet peppers (red/green)1 chive
RECIPECassava Dough Pizza
NEW BooksArea Wide Control of Insect Pests
Biodiversity IndicatorsCitrus Health Management
Collaborative and Participatory Approaches toCocoa Variety Improvement
Compendium of Ornamental Palm DiseasesEngaged Knowledge Management
International Guidelines for the Management of Deep Sea Fisheries in the High Seas
Plant Genetic Resources and Food SecurityStatistical Methods in Food and Consumer Research
Sweet Potato Technical ManualThe Evolving Structure of World Agricultural Trade
The Future Control of FoodThe New Caribbean Home Garden
NEW JournalsAgronomy Journal • March – April 2012
CSA News • March 2012Journal of Soil & Water Conservation • March/April 2012
SPORE • February – March 2012
NEW Multimedia Animal Health and Production Compendium
Commission on Genetic Resources for Food and AgricultureCrop Protection Compendium
Growing Vegetables Using the Grow Box SystemPesticide Residues in Food (Report and Evaluations)
Research Division Library • 646-1643
Caroni North Bank Road, Centeno
Cassava products by Trinidad and Tobago Agri-Business Association (TTABA).

12
Give us feedback on more of what you would like to see in this magazine: Corporate Communications, Tel: 622-1221 ext. 2205 Ministry of Food Production, Fax: 628-9608Land and Marine Affairs, Email: [email protected]. Clair Circle, St. Clair. www.agriculture.gov.tt
Yolande Agard-Simmons (Editor)Allys ForteChandrawti Kissun-AliCharmaine LewisCherryann DennisElvira Ali
Ian MohammedLiesl ThomasRebecca BainSarah MaharajSharda DurbalTheresa Gillian Mitchell
Next Issue: Youth and Agriculture
Editorial Committee
Vol.2, Issue 2 2012
ACROSS 2. Cultivation of soil & rearing of animals for food3. Creepy crawler on plants5. A freshwater delicacy7. A nourishing drink12. 43,560 square feet14. Removal of top soil15. Spray on plants for diseases16. A very talented and smart spider17. Somebody who plants crops18. Another word for dirt21. Its tiny when planted in the ground22. Who has long ears24. Fluid associated with nectar
DOWN1. Water lying down, water standing up4. A baby cow or bull6. Animals with four stomachs8. Available Information9. Used to make chili bibi10. Carries a plough11. A social get together13. Used to make chocolate15. Another word for chulha19. Mary had a little20. Worldwide ______23. Easter race held in Tobago
AGRI
CULT
URAL
Acr
oss
2. A
gric
ultu
re 3
. Lad
ybird
5. C
asca
dura
7. M
ilk 1
2. A
cre
14.
Ero
sion
15
. Fun
gici
de 1
6. A
nans
i 17
. Far
mer
18.
Soi
l 21
. See
d 2
2. R
abbi
t 24
. Hon
eyD
own
1. S
ugar
cane
4. C
alf
6. R
umin
ant
8. L
ibra
ry 9
. Cor
n 1
0. T
ract
or 1
1. L
ime
13
. Coc
oa 1
5. F
iresi
de 1
9. L
amb
20.
Web
23.
Goa
t
Correction - the food pyramid published in Issue I was used by the Editor for simplicity. However, please note that the Food Chart currently utilized by us in the Caribbean is the Caribbean Food Groups as represented above. This was the chart submitted to accompany the article credited to the National Schools Dietery Services Limited.