Embed Size (px)
Citation preview

SHOP-TESTED ADVICECustom-made jigs, time-savers, and smart solutions from fellow woodworkers.
methods of workF R O M T H E E D I T O R S O F F I N E W O O D W O R K I N G
T © 2013 The Taunton Press00ZZSB
w
w
page 17
page 30
page 6
page 26
page 28
page 21
page 29
page 22
page 5

Dear Subscriber,
Welcome to Fine Woodworking and thank you for subscribing
to our magazine.
Your first issue will arrive shortly, and you will find it packed with
all the woodworking information you need to help you improve your
skills every time you step into the woodshop.
This copy of “Methods of Work” is our thank-you gift for subscribing.
With more than thirty tips contributed by fellow woodworkers,
well-known experts, and our own editors, it’s a helpful resource
you’ll want to keep handy.
These nuggets of information, and all the shop-tested advice in
Fine Woodworking, are the result of years of following our passion
for woodcraft. Whether you’re just starting out or a seasoned
woodworker, Fine Woodworking provides detailed information and
visuals to help you build and refine your skills.
To discover how we can serve you, please visit FineWoodworking.com to
learn more about our robust website, books, videos, and free newsletters.
Thank you for becoming part of our Fine Woodworking community.
Asa Christiana
From the desk of the editor
Get our FREE Fine Woodworking eNewsletter: Improve your skills, find new project ideas, and enjoy free tips and advice from Fine Woodworking editors.
Sign up, it’s free: FineWoodworking.com/4Newsletter
Shop our Fine Woodworking Online Store: It’s your destination for premium resources from America’s best craftsmen: how-to books, DVDs, project plans, special interest publications, and more.
Sign up, it’s free:FineWoodworking.com/4More
Become a FineWoodworking.com member Join to enjoy unlimited access to premium content and exclusive benefits.
Discover more information online:FineWoodworking.com/4Join
There’s so much more to discover with Fine Woodworking.
methods of work

methods of workDovetail hold-down guides chisel ......................................................................................4
Tablesaw extension supports large pieces ........................................................................5
Bottle-cap clamp pads .....................................................................................................5
Quick way to set a plunge router to cut hinge mortises ...................................................6
Benchtop caddy is great for sandpaper sharpening .........................................................7
Micro-adjustable drawing bow dials in the curve .............................................................8
Variable-size dado fixture for a router ...............................................................................9
Chair-repair jacks .............................................................................................................10
Handy screwdriver for tight quarters ...............................................................................10
Locate shelf-pins with ease, accuracy ............................................................................11
Laminated mortise-and-tenon joint ................................................................................12
Krenovian clamp rack on wheels .....................................................................................13
No-fuss jig dials in caliper settings while turning ...........................................................14
Use dogs and a bench jack to support long boards .......................................................15
Jig holds burnisher at proper angle .................................................................................16
Blocks improve clamping area under cast-iron machine tops .......................................17
No-pinch vise handle .......................................................................................................17
Tool-stand drawer makes most of wasted space ............................................................18
Router jig for fluted posts and trim .................................................................................19
Slot a zero-clearance insert safely ..................................................................................20
Rack for storing parallel-jaw clamps ...............................................................................21
Magnetic parts keeper .....................................................................................................22
Keep your glue bottle, brush, and lid in one place .........................................................22
Story sticks speed setup for sharpening turning tools ...................................................23
Center finder for chair stretchers ....................................................................................24
Use a rigid-foam sled to straighten a board ...................................................................25
Knee paddle cuts power safely ........................................................................................26
Fit any power tool to your shop vac .................................................................................27
Straight-line guide for the router .....................................................................................28
Magnetic lid lifter keeps finish of your hands .................................................................29
Easy-to-remove paper templates ....................................................................................29
Magnetic catch holds bandsaw door open .....................................................................30

4
w
Dovetail hold-down guides chiselI’ve made several aids for hand-cutting dovetails, but the most useful is this hold-down fence. It not only clamps the workpiece but also guides the chisel while chopping out the pins.
The hold-down consists of two sturdy hardwood blocks, 1 in. thick or so, drilled to receive two carriage bolts. The holes in the blocks should match the spacing of the dog holes in your workbench. To use, push the top block down through the bench, and slide the bottom block over the bolts. Clamp the workpiece under the top block, carefully aligning the face of the fence with the scribed line on the workpiece. Tighten the knobs. You’re now ready to chop one side of the pins or tails. Don’t chop all the way through. Rather, flip the workpiece, realign it, and complete by chopping from the other side.
—ClaRk kellogg,
Houston, Texas
Carriage bolt
knob
Washers
Captured nut
Workpiece Workbench top
Dog holes
Use face as fence to guide chisel cuts.
Align front edge with scribed baseline.
lower block
Upper block

5
methods of work
SToReD position
IN-USe position
aluminum angle
Hardwood block sized to fit inside fence-rail tubing
lag bolts
Top of extension should be the same height as the saw table.
Tablesaw extension supports large workpiecesWhen crosscutting wide materials on the tablesaw, you need extra support at the front and side of the saw. My support extension slides right into the end of the fence tubing and can be used or stored in seconds. It is simply a length of aluminum angle lag-bolted to a length of hardwood that’s cut to fit snugly against the top and bottom of the tube. When the extension is in position, the aluminum angle should be the same height as the top of the table. When it’s not in use, I pull out the extension, rotate it 180°, and reinsert it. It is easily accessible yet out of the way at the same time.
—BoB HaRT Ig ,
Sheboygan, Wis.
Bottle-cap clamp pads Here is a simple, inexpensive solution for helping to protect your work from damage from clamp heads. Just fasten water-bottle caps onto the clamp heads with double-sided tape.
—RoN JoNeS,
Phoenix, ariz.
Attach caps with double-sided tape.
6
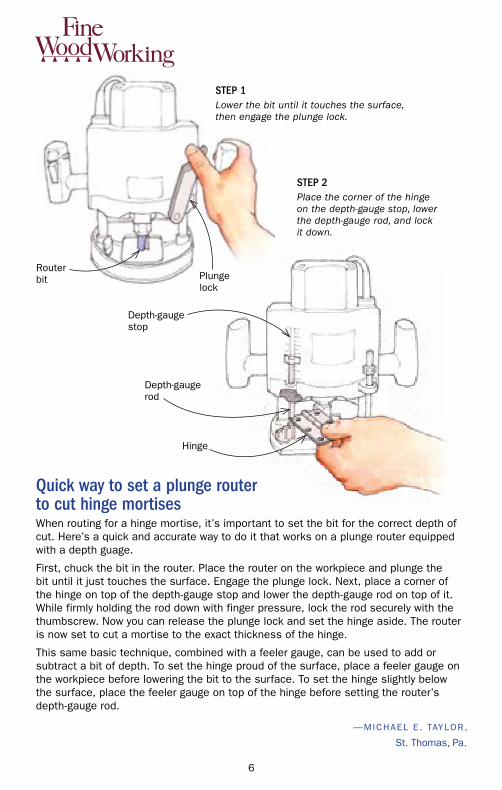
STEp 2Place the corner of the hinge on the depth-gauge stop, lower the depth-gauge rod, and lock it down.
Depth-gauge rod
STEp 1Lower the bit until it touches the surface, then engage the plunge lock.
Quick way to set a plunge router to cut hinge mortisesWhen routing for a hinge mortise, it’s important to set the bit for the correct depth of cut. Here’s a quick and accurate way to do it that works on a plunge router equipped with a depth guage.
First, chuck the bit in the router. Place the router on the workpiece and plunge the bit until it just touches the surface. engage the plunge lock. Next, place a corner of the hinge on top of the depth-gauge stop and lower the depth-gauge rod on top of it. While firmly holding the rod down with finger pressure, lock the rod securely with the thumbscrew. Now you can release the plunge lock and set the hinge aside. The router is now set to cut a mortise to the exact thickness of the hinge.
This same basic technique, combined with a feeler gauge, can be used to add or subtract a bit of depth. To set the hinge proud of the surface, place a feeler gauge on the workpiece before lowering the bit to the surface. To set the hinge slightly below the surface, place the feeler gauge on top of the hinge before setting the router’s depth-gauge rod.
—MICHael e . TaYloR,
St. Thomas, Pa.
Plunge lock
Router bit
Depth-gauge stop
Hinge
w

7
Hardboard strips keep glass in place.
latch
lid,
3⁄8-in. plywood
Wide cleat acts as bench hook.
Base, 3⁄4-in. MDF
methods of work
Benchtop caddy is great for sandpaper sharpeningI use wet-or-dry abrasive paper on glass for sharpening. But storing the different components separately was making the process inefficient. So I made this simple caddy that holds four pieces of glass and grades of abrasive. I can quickly take the caddy from storage, place it on the bench, open the lid, and begin sharpening.
The 3⁄4-in. MDF base holds the glass pieces, which fit snugly between thin strips of hardboard screwed and glued to the base. The strips are thin enough to give me a fingerhold on the 1⁄4-in.-thick glass, in case I need to remove any of the pieces. The hinged plywood lid locks in place with a clasp and twist latch. a piece of hardwood attached to the front of the base serves as a bench hook.
—CaRl JoHNSoN,
elmhurst, Ill.

8
w
Micro-adjustable drawing bow dials in the curveThis device is an invaluable aid to anyone who wants to draw fair curves but doesn’t have an extra pair of hands. It can be made from shop scraps and a few dollars’ worth of hardware.
The device consists of a plywood holder with a fixed block on one end and a sliding block on the other connected with a length of 1 ⁄4-in.-dia. all-thread. Wedged between the blocks is a bending blade that can be made from any springy, flexible material. Mine is a piece of Plexiglas.
By tightening or loosening the threaded rod, you can fine-tune the bending blade in tiny increments.
—DavID M. gRoSz,
Stamford, Conn.
Quick TipTo clean your hands after applying an oil finish, “wash” them in a waste can of sawdust. You will be amazed how quick and effective this is. When you wash with soap and water, it seems no amount of soap will do the job. But after washing your hands in sawdust, they will clean with soap and water quickly. even the smell of the oil finish is removed.
—DoUg SToWe,
eureka Springs, ark.
Handle and washer
Notch for sliding block
Sliding block
3⁄4-in.-thick plywood
1⁄4-in.-dia. threaded rod
Plexiglas blade, 1⁄4 in. thick by 2 in. wide by 24 in. long
Threaded insert
9
methods of work
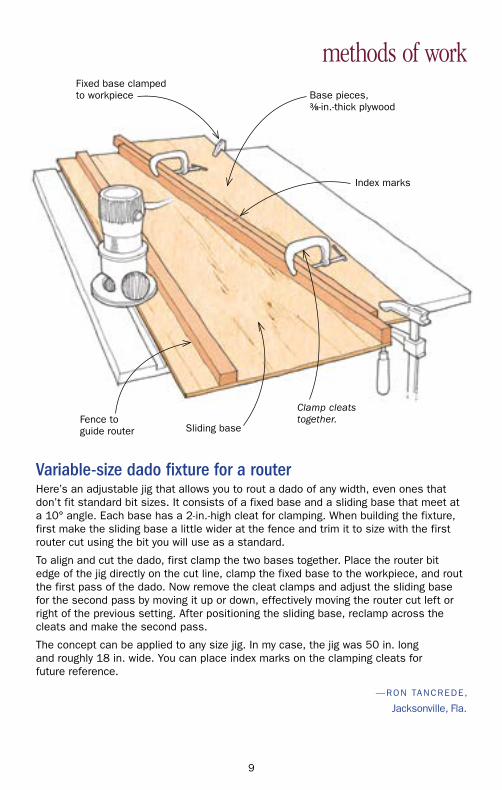
Variable-size dado fixture for a routerHere’s an adjustable jig that allows you to rout a dado of any width, even ones that don’t fit standard bit sizes. It consists of a fixed base and a sliding base that meet at a 10° angle. each base has a 2-in.-high cleat for clamping. When building the fixture, first make the sliding base a little wider at the fence and trim it to size with the first router cut using the bit you will use as a standard.
To align and cut the dado, first clamp the two bases together. Place the router bit edge of the jig directly on the cut line, clamp the fixed base to the workpiece, and rout the first pass of the dado. Now remove the cleat clamps and adjust the sliding base for the second pass by moving it up or down, effectively moving the router cut left or right of the previous setting. after positioning the sliding base, reclamp across the cleats and make the second pass.
The concept can be applied to any size jig. In my case, the jig was 50 in. long and roughly 18 in. wide. You can place index marks on the clamping cleats for future reference.
—RoN TaNCReDe,
Jacksonville, Fla.
Sliding base
Fixed base clamped to workpiece
Index marks
Clamp cleats together.Fence to
guide router
Base pieces, 3⁄8-in.-thick plywood

10
w
Phillips-head bit inserted in 1⁄4-in. socket
Spreader jack
F-style clamp
Chair-repair jacksIn the time needed to reverse the heads on your pipe clamps, you can make a pair of these simple spreader jacks from scrapwood. When used with two F-style clamps, the jacks will gently spread the joints on a chair for disassembly and repair.
—T. D. CUlveR,
Cleveland Heights, ohio
Handy screwdriver for tight quartersWhen my shortest conventional Phillips-head screwdriver was still too long to fit the space I had to work in, I used a different approach. I installed a 1⁄4-in. socket on a drive ratchet and then inserted a short Phillips-head bit into the socket. The arrangement not only fit the tight space, but it also gave me increased leverage to drive the screws.
—WIll IaM g. aDaMS,
Richmond, ky.

11
Plunge router
Engage flat of baseplate against straightedge clamped to workpiece.
Locate shelf pins with ease, accuracyMost shelf-pin jigs are simply long boards with lots of evenly spaced holes to align the plunge-router bit. But making one means a lot of drilling. My jig attaches to the router baseplate and uses a 1⁄4-in.-dia. bolt as an index pin; what’s best is that you have to drill only one hole to get the same accuracy as the other methods.
First attach an auxiliary baseplate to your router. To install the index pin, drill a 1⁄4-in. hole through the baseplate. locate the hole carefully because the spacing of the pin from the router bit will set the shelf-pin spacing. Next, use a 1⁄2 -in.-dia. Forstner bit to drill an extralarge hole in the bottom of the plate for the nut. Fasten the bolt using one nut on each side of the plate.
To create the shelf-pin holes, clamp a straightedge across the workpiece. Install a 1⁄4-in. straight bit in the router, and set the depth according to the requirement of the pins. Next, position the index pin against the edge of the workpiece and slide the router base against the straightedge. Plunge down to drill the first hole. Slide the router over and insert the index pin into the first hole. Drill subsequent holes using the same procedure. You can make a jig for different shelf-pin spacing or for different-size pins.
—BaS PlU IM,
Cary, N.C.
1⁄4-in. straight bit
1⁄4 in.
1⁄4-in.-dia. bolt
1⁄2-in.-dia. hole for nut
auxiliary baseplate, 1⁄2-in. MDF
methods of work

12
w
Laminated mortise-and-tenon jointI recently made a bed headboard using some exotic hardwood. My design called for the posts to be 2 in. thick but the wood was only available in 1-in. thickness. I also wanted to attach the rails using mortise-and-tenon joints, but I do not have a mortiser. To solve both problems, I laminated the posts using the 1-in. stock, cutting dadoes on the inside of both pieces so that, once glued up, the two dadoes would form the mortises.
But this created another problem: an obvious and visible glue joint on the outside edge of the post. So before glue-up, I mitered the outside edge of each post. Then I glued the post pieces together and filled the recess along the mitered edge with a triangular-shaped cap.
once everything was glued up, I had a perfect mortise-and-tenon joint in a post that looks like a piece of solid 2-in.-thick hardwood.
—DaN aDaMSoN,
Prince george, B.C., Canada
Miter outside edge of post.
laminated headboard post
“Dadoed” mortise
laminated headboard post
Cap conceals mortise.

13
methods of work
Doubled-up “krenovian” sawhorses
Wedged through-tenons
Top stretchers, 13⁄16 in. thick by 25⁄8 in. wide
lower stretchers, 13⁄16 in. thick by 2 7⁄8 in. wide
Feet, 13⁄16 in. thick by 27⁄8 in. wide, screwed to plywood base
Plywood base, 3⁄4 in. thick
Casters
Krenovian clamp rack on wheelsThis compact and effective rolling clamp rack is based on the elegant sawhorses designed by the late James krenov at College of the Redwoods. During my time at the school and in different furniture shops where I’ve worked, I realized a lot of time was spent walking heavy clamps back and forth. I vowed never to walk more than a few feet with a clamp ever again, and this rolling clamp rack was my answer. It’s easy. Make a double sawhorse, 30 in. square and 5 ft. tall, with extra cross- braces to hold the clamps as necessary. Fasten the rack to a plywood base and add casters on the bottom.
—JaSoN STRaW,
gainesville, Fla.
14
w
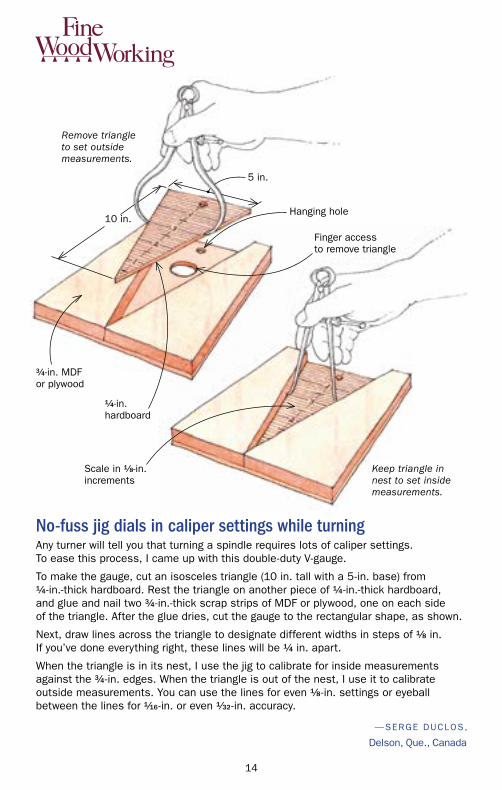
No-fuss jig dials in caliper settings while turningany turner will tell you that turning a spindle requires lots of caliper settings. To ease this process, I came up with this double-duty v-gauge.
To make the gauge, cut an isosceles triangle (10 in. tall with a 5-in. base) from 1⁄4-in.-thick hardboard. Rest the triangle on another piece of 1⁄4-in.-thick hardboard, and glue and nail two 3⁄4-in.-thick scrap strips of MDF or plywood, one on each side of the triangle. after the glue dries, cut the gauge to the rectangular shape, as shown.
Next, draw lines across the triangle to designate different widths in steps of 1⁄8 in. If you’ve done everything right, these lines will be 1⁄4 in. apart.
When the triangle is in its nest, I use the jig to calibrate for inside measurements against the 3⁄4-in. edges. When the triangle is out of the nest, I use it to calibrate outside measurements. You can use the lines for even 1⁄8-in. settings or eyeball between the lines for 1⁄16-in. or even 1⁄32 -in. accuracy.
—SeRge DUCloS,
Delson, Que., Canada
Keep triangle in nest to set inside measurements.
Scale in 1⁄8-in. increments
3⁄4-in. MDF or plywood
1⁄4-in. hardboard
Finger access to remove triangle
Hanging hole
Remove triangle to set outside measurements.
10 in.
5 in.
15
methods of work
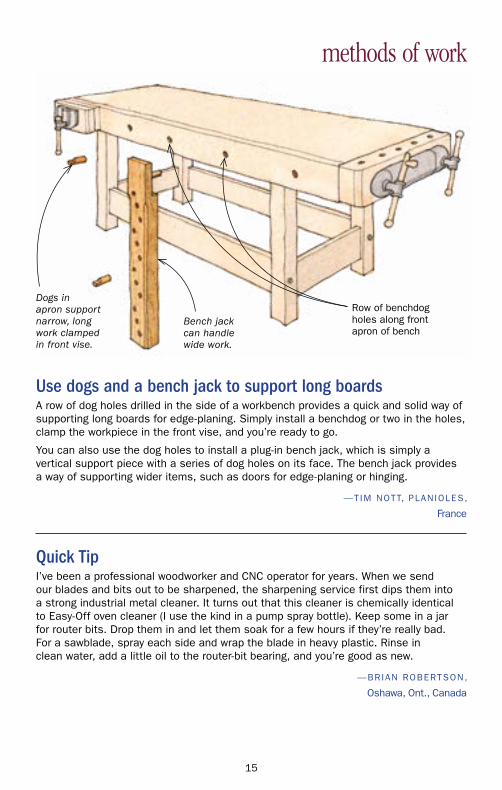
Use dogs and a bench jack to support long boardsa row of dog holes drilled in the side of a workbench provides a quick and solid way of supporting long boards for edge-planing. Simply install a benchdog or two in the holes, clamp the workpiece in the front vise, and you’re ready to go.
You can also use the dog holes to install a plug-in bench jack, which is simply a vertical support piece with a series of dog holes on its face. The bench jack provides a way of supporting wider items, such as doors for edge-planing or hinging.
—TIM NoTT, PlaNIoleS,
France
Bench jack can handle wide work.
Dogs in apron support narrow, long work clamped in front vise.
Row of benchdog holes along front apron of bench
Quick TipI’ve been a professional woodworker and CNC operator for years. When we send our blades and bits out to be sharpened, the sharpening service first dips them into a strong industrial metal cleaner. It turns out that this cleaner is chemically identical to easy-off oven cleaner (I use the kind in a pump spray bottle). keep some in a jar for router bits. Drop them in and let them soak for a few hours if they’re really bad. For a sawblade, spray each side and wrap the blade in heavy plastic. Rinse in clean water, add a little oil to the router-bit bearing, and you’re good as new.
—BRIaN RoBeRTSoN,
oshawa, ont., Canada
16
w
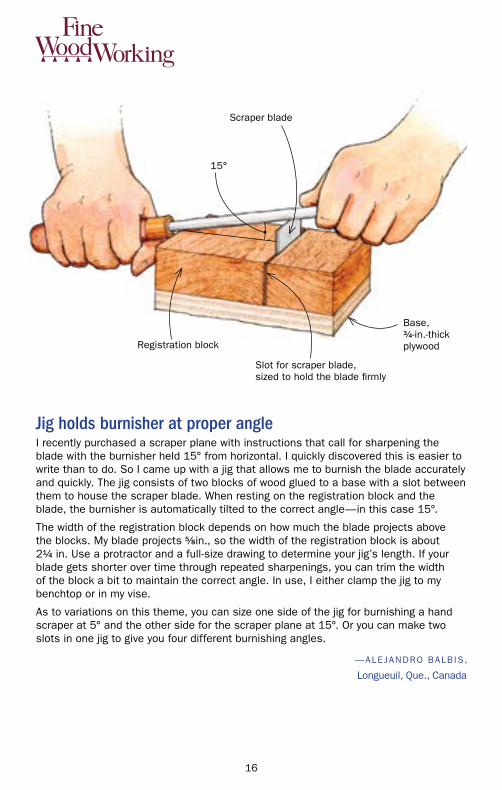
Jig holds burnisher at proper angle I recently purchased a scraper plane with instructions that call for sharpening the blade with the burnisher held 15° from horizontal. I quickly discovered this is easier to write than to do. So I came up with a jig that allows me to burnish the blade accurately and quickly. The jig consists of two blocks of wood glued to a base with a slot between them to house the scraper blade. When resting on the registration block and the blade, the burnisher is automatically tilted to the correct angle—in this case 15°.
The width of the registration block depends on how much the blade projects above the blocks. My blade projects 5⁄8in., so the width of the registration block is about 21⁄4 in. Use a protractor and a full-size drawing to determine your jig’s length. If your blade gets shorter over time through repeated sharpenings, you can trim the width of the block a bit to maintain the correct angle. In use, I either clamp the jig to my benchtop or in my vise.
as to variations on this theme, you can size one side of the jig for burnishing a hand scraper at 5° and the other side for the scraper plane at 15°. or you can make two slots in one jig to give you four different burnishing angles.
—aleJaNDRo BalB IS ,
longueuil, Que., Canada
15°
Slot for scraper blade, sized to hold the blade firmly
Base, 3⁄4-in.-thick plywoodRegistration block
Scraper blade

17
methods of work
Blocks improve clamping area under cast-iron machine topsFrom time to time, I need to clamp featherboards and other devices to the top of my tablesaw and shaper. Both tools have cast-iron tabletops with ribs on the underside, which makes it difficult to find the right place for a large clamp. The simple solution for both machines is to glue blocks of wood to the underside of the tops to provide a level clamping surface. I used construction adhesive as the glue.
—laRY SHaFFeR,
Scarborough, Maine
Blocks glued to ribs under tabletop
Cast-iron vise
Rubber bands around base of handle
No-pinch vise handleMy bench vise is a substantial cast-iron model with a beefy metal handle. When the handle drops vertically, it is not only noisy but also painful if your fingers are in the way. after pinching my fingers one time too many, I softened the impact by wrapping the ends of the bar with rubber bands. It works great.
—ozzIe TaToNe,
Dundas, ont., Canada
18
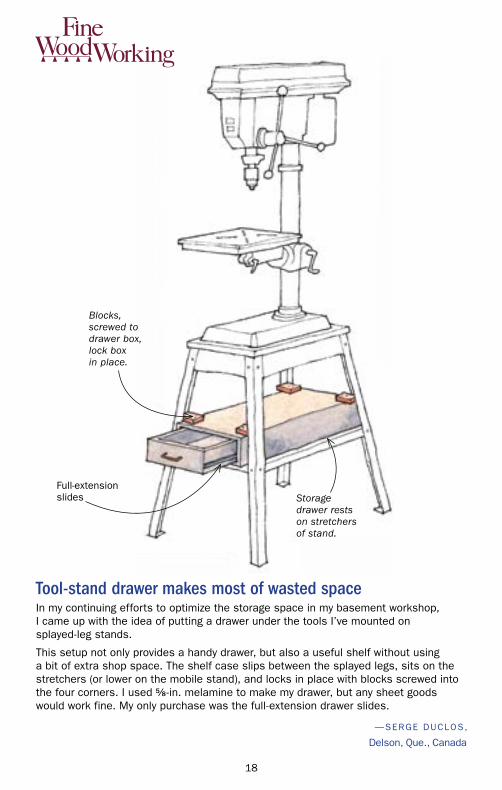
Tool-stand drawer makes most of wasted spaceIn my continuing efforts to optimize the storage space in my basement workshop, I came up with the idea of putting a drawer under the tools I’ve mounted on splayed-leg stands.
This setup not only provides a handy drawer, but also a useful shelf without using a bit of extra shop space. The shelf case slips between the splayed legs, sits on the stretchers (or lower on the mobile stand), and locks in place with blocks screwed into the four corners. I used 5⁄8-in. melamine to make my drawer, but any sheet goods would work fine. My only purchase was the full-extension drawer slides.
—SeRge DUCloS,
Delson, Que., Canada
Blocks, screwed to drawer box, lock box in place.
Full-extension slides Storage
drawer rests on stretchers of stand.
w

19
methods of work
Router jig for fluted posts and trimWith this simple jig, you can make a fluted post or pilaster door trim in any size or dimensions. Start with a piece of 1⁄2 -in.-thick Baltic-birch plywood as wide as the base of your router and at least 18 in. long, to handle a workpiece 6 in. wide or less. Remove the baseplate from your router and, using the mounting screw holes as a guide, drill mounting holes in the plywood base. Now use a bandsaw or router to cut two slots in each end of the base, right up to the edge of the router location. Finally, drill a center hole in the base for the router bit.
Make two adjustable side blocks. To rout flutes in a square post, these blocks should be at least 11⁄2 in. thick. If you are making pilaster trim, the blocks should be the same height as the workpiece thickness, probably 3⁄4 in. The blocks need to be wide enough to extend under the router base so you can cut flutes near the edge of the workpiece. Install two hanger bolts near the outside edge of each block, spaced the same width as the slots in the base. add a washer and wing nut to each bolt and the jig is complete.
To use the jig, simply position the router at the flute location, bring up the side blocks to the edges of the workpiece, and tighten the wing nuts to lock the side blocks. Make sure the jig slides freely but without any side-to-side play. Install a stop block at the beginning and end of each flute run for accuracy.
—FRaNk PRoF IT I ,
Toronto, ont., Canada
Base
Hanger bolt
Side block
Router base attachment screw
Stop block
Flute
Base
Workpiece
Side block

20
wRip fence clamped over one side of insert.
Hold-down clamped over other side.
Blade can be raised safely to cut slot.
zero-clearance insert
Quick TipI don’t have running water in my basement shop, but I often have a need for the wet stuff. So, for about $3, I bought an empty 32-oz. plastic spray bottle at my local hardware store and filled it with water. With the spray bottle within easy reach of my workbench, along with a roll of paper towels, I can easily give my hands a quick wash. Plus it’s handy for wiping up excess glue and keeping my safety glasses clean and dust-free.
—ToM BegNal,
kent, Conn.
Slot a zero-clearance insert safelyHere’s how to safely cut a blade slot in a new zero-clearance tablesaw insert. With the blade all the way down, lock the rip fence in place over the right edge of the insert. Clamp the fence at the back. Next, make a temporary long-reach clamp with a clamp, two scrap blocks, and a piece of long stock. The long stock should reach from the edge (or front or back) of the tablesaw to near the center of the left side of the insert. Now you can safely raise the blade through the secured insert with your hands well clear of the blade area.
—DeNNIS THe ISeN,
grand Rapids, Mich.
21
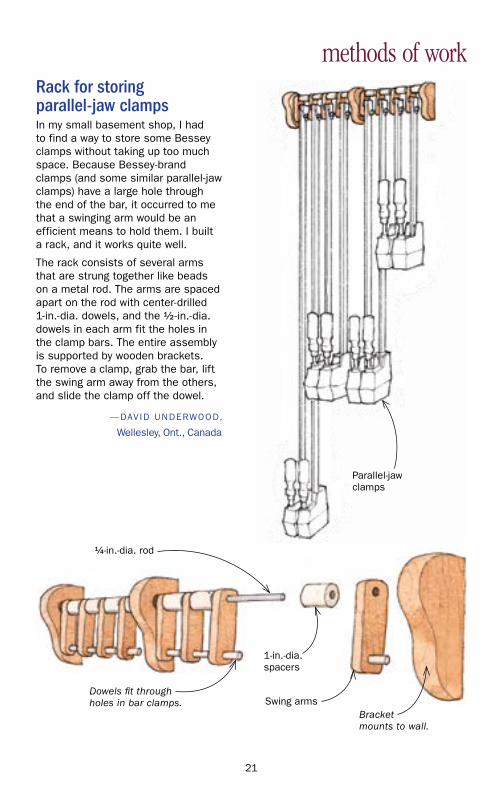
methods of workRack for storing parallel-jaw clampsIn my small basement shop, I had to find a way to store some Bessey clamps without taking up too much space. Because Bessey-brand clamps (and some similar parallel-jaw clamps) have a large hole through the end of the bar, it occurred to me that a swinging arm would be an efficient means to hold them. I built a rack, and it works quite well.
The rack consists of several arms that are strung together like beads on a metal rod. The arms are spaced apart on the rod with center-drilled 1-in.-dia. dowels, and the 1⁄2 -in.-dia. dowels in each arm fit the holes in the clamp bars. The entire assembly is supported by wooden brackets. To remove a clamp, grab the bar, lift the swing arm away from the others, and slide the clamp off the dowel.
—DavID UNDeRWooD,
Wellesley, ont., Canada
Swing arms
1-in.-dia. spacers
Dowels fit through holes in bar clamps.
Bracket mounts to wall.
1⁄4-in.-dia. rod
Parallel-jaw clamps
22
w
Cup for magnet (amazon.com), recessed into MDF
3⁄4-in.-thick MDF
Hole for hanging
1⁄2-in.-dia. rare-earth magnet
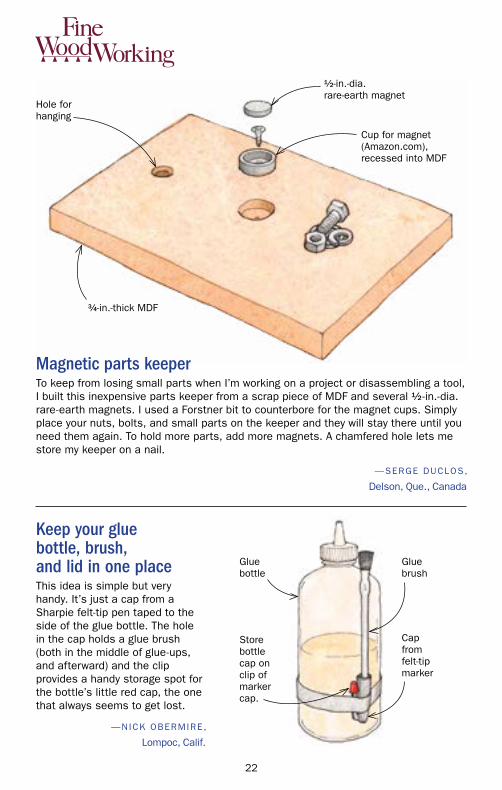
Magnetic parts keeperTo keep from losing small parts when I’m working on a project or disassembling a tool, I built this inexpensive parts keeper from a scrap piece of MDF and several 1⁄2 -in.-dia. rare-earth magnets. I used a Forstner bit to counterbore for the magnet cups. Simply place your nuts, bolts, and small parts on the keeper and they will stay there until you need them again. To hold more parts, add more magnets. a chamfered hole lets me store my keeper on a nail.
—SeRge DUCloS,
Delson, Que., Canada
Keep your glue bottle, brush, and lid in one place This idea is simple but very handy. It’s just a cap from a Sharpie felt-tip pen taped to the side of the glue bottle. The hole in the cap holds a glue brush (both in the middle of glue-ups, and afterward) and the clip provides a handy storage spot for the bottle’s little red cap, the one that always seems to get lost.
—NICk oBeRMIRe,
lompoc, Calif.
Store bottle cap on clip of marker cap.
glue bottle
glue brush
Cap from felt-tip marker

23
methods of work
Stick begins life extra long.
This end of stick must just touch nearest point of grinding wheel.
Story stick is used to set length of V-arm.
Story sticks are marked for each tool.
Mitered end of stick sits in V-arm pocket.
Adjust V-arm length until the grinding angle is correct.
v-arm of oneway sharpening system
Story sticks speed setup for sharpening turning toolsIf you are using the oneway Wolverine sharpening system to grind your detail/spindle/roughing gouges and skews, the v-arm setup can be a bit of a fussy process of trial, eyeballing, retrying, and readjusting multiple times to reproduce a given bevel angle. When I finally had wasted enough time adjusting the v-arm to a different length for each and every turning tool, I came up with some simple, accurate story sticks. They let me position the arm quickly to exactly the right setting.
Make a series of thin sticks mitered at one end. after adjusting the v-arm for a given tool, place a stick in the pocket and, with out altering the v-arm’s length, cut the other end to length so that it just touches the closest point on the wheel. Finally, label each stick to its companion tool and store it close to the grinder.
once in a while I have to shorten the end of the story stick as the tool is worn away over time.
—SeRge DUCloS,
Delson, Que., Canada

24
w
Center finder for chair stretchersFinding the perfect center to drill mortises for stretchers between two round chair legs can be quite a juggling act and a time consumer if you make a lot of chairs like I do. I came up with a simple solution using two center-finding heads and two grooved metal rules from combination squares. The rules are held together with a homemade clamp box, which allows the rules to slide between the legs and be locked precisely in place.
The top piece of the clamp box has a dado for the rules, a recessed T-nut, and a 1⁄4-in. brass screw for locking the rules. a piece of hardwood glued at the bottom holds the whole thing together.
as you tighten the knurled screw, it pushes on a copper penny, which acts as a pressure plate to lock the two rules in place.
I cut both rules short (about 9 in.) to give a measuring range of 12 in. to 16 in.— the distance between most chair legs. You can customize the length of the rules to suit your needs.
The device is easy to use. First I locate the height of the stretchers on the legs. Then I align the device with those marks and extend it until both legs of the center finders are rubbing the perimeter of each leg. Finally, I advance the rule tips to touch the legs, lock down the clamp, and mark the center point of the legs. The jig ensures that I drill aligning mortises, and it also helps me determine the length of the stretcher with precision.
—RICHaRD C IUPka,
Montreal, Que., Canada
Center-finding head
Clamp box
Rules from combination squares
DETaiL oF CLaMp Box
Penny
T-nut
1⁄4-in. knurled brass screw
Hardwood
Two rules

25
methods of work
Quick TipWhenever I need to set a router bit or a tablesaw blade to an exact height, I take a twist-drill bit with a diameter equal to the height I want and lay it down with the end of the shank against the blade as I adjust the height. When the top of the blade aligns with the shank of the bit, I’m there. I check the alignment by eye and then double check by running a finger across the blade to the drill shank.
—J. kaYe,
Phenix, va.
Use a rigid-foam sled to straighten a boardI was working with some nice teak paneling and needed one more small piece to finish the job. But the only piece left was from the scrap pile and both long edges were uneven. I wanted to trim the piece to size using my tablesaw and rip fence, but the bad edges made this unsafe.
looking around the shop for options, I spotted a sheet of rigid foam insulation board with straight edges. I taped the teak panel to the insulation board. Then I used the foam as a sled to rip a nice straight edge on the paneling. once I had one good edge, I removed the foam sled and ripped the other edge of the panel to bring it to final finished size. The tape and my hands worked well to hold the panel securely on the sled, but I wouldn’t recommend this for long workpieces, which may be hard to control.
—BIll WellS,
olympia, Wash.
Tape the panel to the rigid foam.
Rigid foam insulation

26
w
Knee paddle cuts power safelyone day after having a board bind up in my tablesaw and almost kick back, I looked into installing a paddle-style shut-off switch, sometimes called a panic switch. a commercial version I found would have required major alterations and rewiring. So I built this oversize maple paddle and attached it to the saw above the existing switch housing. This concept should work with almost any push-button switch as long as you can find a convenient place to attach the paddle.
It’s very easy to operate. at the end of a cut, a mere flick of my knee cuts off power with both hands still safely above the table and on the workpiece. a rubber bumper (available at most hardware stores) installed over the oFF switch ensures that the paddle hits the switch.
I installed similar switches on my jointer, router table, and bandsaw.
—aNDReW JoHNSoN,
Boise, Idaho
Rubber bumper engages OFF switch with a flick of the knee.
Maple, 1⁄4 in. thick
Piano hinge
Sheet-metal screws attach piano hinge to fence rail.
ON button is easily accessible.
Paddle-style shutoff switch at knee height
27
methods of work
Quick TipPopsicle sticks, and the wider tongue depressors, are available at any craft store and are handy around the shop. They make great glue spreaders. You can carve or sharpen them for a variety of uses. They also make good shim material.
—BRUCe D. SMITH,
Hanover, N.H.
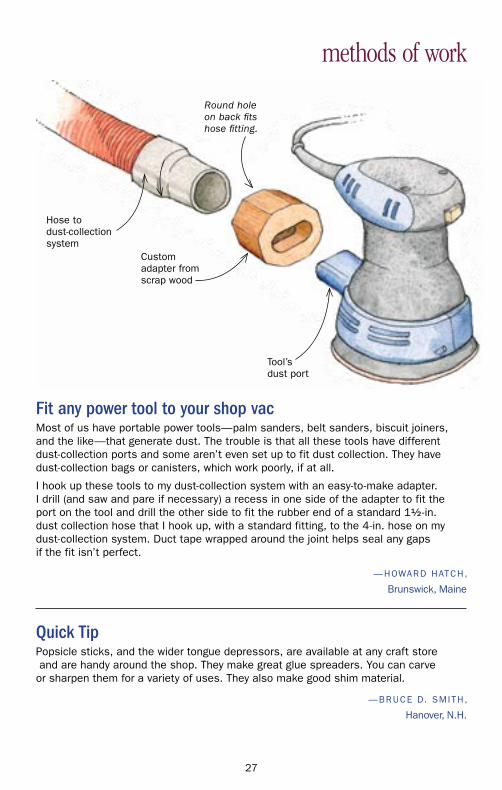
Fit any power tool to your shop vac Most of us have portable power tools—palm sanders, belt sanders, biscuit joiners, and the like—that generate dust. The trouble is that all these tools have different dust-collection ports and some aren’t even set up to fit dust collection. They have dust-collection bags or canisters, which work poorly, if at all.
I hook up these tools to my dust-collection system with an easy-to-make adapter. I drill (and saw and pare if necessary) a recess in one side of the adapter to fit the port on the tool and drill the other side to fit the rubber end of a standard 11⁄2 -in. dust collection hose that I hook up, with a standard fitting, to the 4-in. hose on my dust-collection system. Duct tape wrapped around the joint helps seal any gaps if the fit isn’t perfect.
—HoWaRD HaTCH,
Brunswick, Maine
Tool’s dust port
Hose to dust-collection system
Round hole on back fits hose fitting.
Custom adapter from scrap wood
28
w
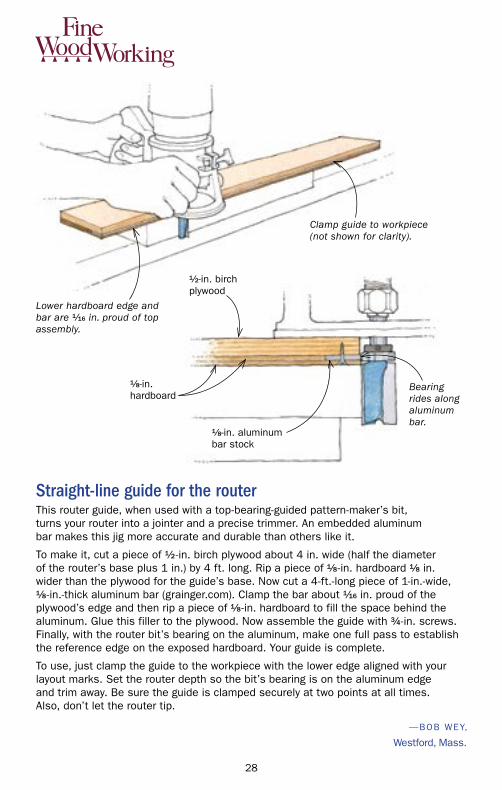
Straight-line guide for the routerThis router guide, when used with a top-bearing-guided pattern-maker’s bit, turns your router into a jointer and a precise trimmer. an embedded aluminum bar makes this jig more accurate and durable than others like it.
To make it, cut a piece of 1⁄2 -in. birch plywood about 4 in. wide (half the diameter of the router’s base plus 1 in.) by 4 ft. long. Rip a piece of 1⁄8-in. hardboard 1⁄8 in. wider than the plywood for the guide’s base. Now cut a 4-ft.-long piece of 1-in.-wide, 1⁄8-in.-thick aluminum bar (grainger.com). Clamp the bar about 1⁄16 in. proud of the plywood’s edge and then rip a piece of 1⁄8-in. hardboard to fill the space behind the aluminum. glue this filler to the plywood. Now assemble the guide with 3⁄4-in. screws. Finally, with the router bit’s bearing on the aluminum, make one full pass to establish the reference edge on the exposed hardboard. Your guide is complete.
To use, just clamp the guide to the workpiece with the lower edge aligned with your layout marks. Set the router depth so the bit’s bearing is on the aluminum edge and trim away. Be sure the guide is clamped securely at two points at all times. also, don’t let the router tip.
—BoB WeY,
Westford, Mass.
Lower hardboard edge and bar are 1⁄16 in. proud of top assembly.
Clamp guide to workpiece (not shown for clarity).
1⁄2-in. birch plywood
1⁄8-in. hardboard
1⁄8-in. aluminum bar stock
Bearing rides along aluminum bar.

29
methods of workMagnetic lid lifter keeps finish off your handsHere is a handy way to lift off and replace the lids of paint and varnish cans without getting the gooey stuff on your fingers. Just glue a small magnet to a stick. I used a small magnet from a speaker, but a rare-earth magnet would work well, too. after you loosen the lid with a screwdriver, simply place the magnet-stick on the lid, lift it off, and turn it over when you set it aside.
—CHaRl Ie gaRDNeR,
Mesa, ariz.
Magnet
lift-lid stick
Easy-to-remove paper templateslots of woodworkers use spray adhesive for attaching paper templates to wood. The stuff works, but I’ve always found it a pain to remove the template after the cut is complete, especially for small or intricate parts. and the adhesive leaves a nasty residue on the wood.
Here’s my solution: First, use packing tape to cover the area where the template will be placed. Now spray the template with adhesive and attach it to the workpiece on top of the tape.
When you are done with the cut, peel up the tape along with the paper template. Simple and clean.
—JaY SUll IvaN,
Washington, N.C.
Paper template attaches over tape with spray adhesive.
Packing tape

30
wloop of string
Rare-earth magnet
Magnetic catch holds bandsaw door openevery time I changed the blade on my bandsaw, I invariably got bonked on the noggin by a persistently self-closing upper door. Tired of bumps and readjusted glass-es, I concocted a simple remedy—a loop of string tied to a ring-type rare-earth magnet with a hole in the middle (amazon.com). Now I simply slap the magnet on a convenient spot on the saw frame, hook the loop over the door handle or latch, and it holds the door open. No more head bumps! I keep the magnet and string on the saw. The whole shebang costs about 50 cents.
—RolaND JoHNSoN,
Sauk Rapids, Minn.

Dear Subscriber,
Welcome to Fine Woodworking and thank you for subscribing
to our magazine.
Your first issue will arrive shortly, and you will find it packed with
all the woodworking information you need to help you improve your
skills every time you step into the woodshop.
This copy of “Methods of Work” is our thank-you gift for subscribing.
With more than thirty tips contributed by fellow woodworkers,
well-known experts, and our own editors, it’s a helpful resource
you’ll want to keep handy.
These nuggets of information, and all the shop-tested advice in
Fine Woodworking, are the result of years of following our passion
for woodcraft. Whether you’re just starting out or a seasoned
woodworker, Fine Woodworking provides detailed information and
visuals to help you build and refine your skills.
To discover how we can serve you, please visit FineWoodworking.com to
learn more about our robust website, books, videos, and free newsletters.
Thank you for becoming part of our Fine Woodworking community.
Asa Christiana
From the desk of the editor
Get our FREE Fine Woodworking eNewsletter: Improve your skills, find new project ideas, and enjoy free tips and advice from Fine Woodworking editors.
Sign up, it’s free: FineWoodworking.com/4Newsletter
Shop our Fine Woodworking Online Store: It’s your destination for premium resources from America’s best craftsmen: how-to books, DVDs, project plans, special interest publications, and more.
Sign up, it’s free:FineWoodworking.com/4More
Become a FineWoodworking.com member Join to enjoy unlimited access to premium content and exclusive benefits.
Discover more information online:FineWoodworking.com/4Join
There’s so much more to discover with Fine Woodworking.
methods of work

SHOP-TESTED ADVICECustom-made jigs, time-savers, and smart solutions from fellow woodworkers.
methods of workF R O M T H E E D I T O R S O F F I N E W O O D W O R K I N G
T © 2013 The Taunton Press00ZZSB
w
w
page 17
page 30
page 6
page 26
page 28
page 21
page 29
page 22
page 5