Embed Size (px)
Citation preview

Metasploit Remote API Guide
Applicable Products
Metasploit Pro 4.1.0 Metasploit Framework 4.1.0
Document Revision: 2.0 Last Modified: February 10, 2012

Copyright © 2011 Rapid7 LLC | Revision history 2
Metasploit Remote API
Contents Revision history ............................................................................................................................................. 4
Introduction .................................................................................................................................................. 5
Transport ....................................................................................................................................................... 5
Requests .................................................................................................................................................... 5
Responses ................................................................................................................................................. 5
Encoding ........................................................................................................................................................ 6
Requests .................................................................................................................................................... 7
Responses ................................................................................................................................................. 8
Versioning ................................................................................................................................................. 9
Programming .............................................................................................................................................. 10
Ruby ........................................................................................................................................................ 10
API Reference .............................................................................................................................................. 13
Authentication ........................................................................................................................................ 13
Standard API Methods ............................................................................................................................ 15
Authentication .................................................................................................................................... 15
Core ..................................................................................................................................................... 18
Console ................................................................................................................................................ 22
Jobs ..................................................................................................................................................... 25
Modules .............................................................................................................................................. 27
Plugins ................................................................................................................................................. 34
Sessions ............................................................................................................................................... 35
Metasploit Pro API Methods ................................................................................................................... 41
Pro General API ................................................................................................................................... 41
Pro License API .................................................................................................................................... 44
Pro Updates API .................................................................................................................................. 48
Pro Task API......................................................................................................................................... 51
Pro Feature API ................................................................................................................................... 54
Pro Import API ..................................................................................................................................... 89

Copyright © 2011 Rapid7 LLC | Revision history 3
Pro Loot API......................................................................................................................................... 90
Pro Module API ................................................................................................................................... 91
Pro Report API ..................................................................................................................................... 94
Pro Meterpreter API ........................................................................................................................... 94

Copyright © 2011 Rapid7 LLC | Revision history 4
Revision history The current document version is 1.0
Revision Date Version Description
August 1, 2011 1.0 Public release of the API and documentation
February 10, 2011 2.0 Updated with minor edits.

Copyright © 2011 Rapid7 LLC | Introduction 5
Introduction
This document describes transport, protocol, and individual methods available via the Metasploit Remote API. This API can be used to programmatically drive the Metasploit Framework and Metasploit Pro products.
Transport
The Metasploit API is accessed using the HTTP protocol over SSL. In a typical Metasploit Pro installation, this uses TCP port 3790, however the user can change this as needed. The SSL certificate is self-signed, however the user can exchange this for a root-signed certificate as necessary. Metasploit Framework users can elect to use SSL or plain HTTP and the port can be user specified as well. Callers of this API should allow these various transport-level options to be configured by the user.
Requests
Client requests are encapsulated in a standard HTTP POST to a specific URI, typically "/api" or "/api/1.0". This POST request must have the Content-Type header specified as "binary/message-pack", with the body of the request containing actual RPC message.
A sample request is shown below:
POST /api/1.0 HTTP/1.1 Host: RPC Server Content-Length: 128 Content-Type: binary/message-pack <128 bytes of encoded data>
Responses

Copyright © 2011 Rapid7 LLC | Encoding 6
Server responses are standard HTTP replies. The HTTP status code indicates the overall result of a particular request. The meaning of each status code is explained in the table below.
HTTP Code Meaning
200 The request was successfully processed
500 The request resulted in an error
401 The authentication credentials supplied were not valid
403 The authentication credentials supplied were not granted access to the resource
404 The request was sent to an invalid URI
In all circumstances except for a 404 result, the detailed response will be included in the message body.
The response content-type will always be "binary/message-pack" with the exception of the 404 response format, in which case the body may contain a HTML document.
A sample response is shown below
HTTP/1.1 200 OK Content-Length: 1024 Content-Type: binary/message-pack <1024 bytes of encoded data>
Encoding
All requests and responses use the MessagePack encoding (http://www.msgpack.org/). This encoding provides an efficient, binary-safe way to transfer nested data types. MessagePack provides implementations for many different languages, all under the Apache open source license.

Copyright © 2011 Rapid7 LLC | Encoding 7
The MessagePack specification is limited to a small set of data types. For this reason, non-native types, such as dates, are represented as integers or strings. Since MessagePack treats strings as binary character arrays, special care needs to be taken when using this encoding with Unicode-friendly languages. For example, in Java, strings used in requests and decoded from responses should always use the byte arrays type.
An example of a MessagePack encoded array is shown below:
["ABC", 1, 2, 3].to_msgpack() "\x94\xA3\x41\x42\x43\x01\x02\x03"
Requests
Requests are formatted as MessagePack encoded arrays. The specific form is
[ "MethodName", "Parameter1", "Parameter2", … ]
With the exception of the authentication API, all methods expect an authentication token as the second element of the request array, with the rest of the parameters defined by the specific method. Although most methods use strings and integers for parameters, nested arrays and hashes may be supplied as well. Methods that accept a list of items as input typically expect these as a single parameter consisting of an array of elements and not a separate parameter for each element. Some methods may accept a parameter consisting of a hash that contains specific options.
A call to an authentication method may take the following form:
["auth.login", "username", "password"]
A call to a version method may take the following form:
["core.version", "<token>"]
A call to a more complex method may take the following form:
["modules.search", "<token>", { "include" => ["exploits", "payloads"], "keywords" => ["windows"], "maximum" => 200
} ]

Copyright © 2011 Rapid7 LLC | Encoding 8
Responses
Responses use the same MessagePack encoding as requests and are always returned in the form of a hash, also known as a dictionary. If this hash contains an "error" element with the value of true, additional information about the error will be present in the hash fields, otherwise, the hash will contain the results of the API call.
A sample successful response is shown below:
{ "version" => "4.0.0-release", "ruby" => "1.9.1 x86_64-linux 2010-01-10" }
A sample error response is shown below:
{ "error" => true, "error_class" => "ArgumentError", "error_message" => "Unknown API Call" }
A sample successful response with nested data is shown below:
{ "name" => "Microsoft Server Service Stack Corruption", "description" => "This module exploits a parsing flaw…", "license" => "Metasploit Framework License (BSD)", "filepath" => "/modules/exploits/windows/smb/ms08_067_netapi.rb", "version" => "12540", "rank" => 500, "references" => [ ["CVE", "2008-4250"], ["OSVDB", "49243"], ["MSB", "MS08-067"] ], "authors" => [ "hdm <[email protected]>", "Brett Moore <[email protected]>", ], "targets" => { 0 => "Automatic Targeting", 1 => "Windows 2000 Universal", 2 => "Windows XP SP0/SP1 Universal",

Copyright © 2011 Rapid7 LLC | Encoding 9
3 => "Windows XP SP2 English (NX)", 4 => "Windows XP SP3 English (NX)" } "default_target" => 0 }
Versioning
The last parameter in the API URL is the requested version number. To prepare your code for future versions it is recommended that you append "/1.0" or whatever version of this API you have tested against. A request for the bare API URL without a version number will result in the latest version of the API being used to handle the request. For example, the request below will request that version 1.1 of the API should be used.
POST /api/1.1 HTTP/1.1 Host: RPC Server Content-Length: 128 Content-Type: binary/message-pack <128 bytes of encoded data>

Copyright © 2011 Rapid7 LLC | Programming 10
Programming
The Metasploit products are primarily written in the Ruby programming language; Ruby is by far the easiest way to use the remote API. In addition to Ruby, any language with support for MessagePack (Java, Python, C, etc) and HTTPS communication can take advantage of the remote API.
Ruby
To get started with the Ruby API, install the msfrpc-client GEM (www.rubygems.org). This GEM depends on librex, another GEM pulled from the Metasploit Framework source code, and MessagePack. Due to the size of the librex documentation, it is suggested that you install it first separately, without the builtin documentation, using the following commands:
# gem install librex --no-rdoc --no-ri # gem install msfrpc-client
After the GEM has been installed, the msfrpc-client library becomes available, and two example files are installed along with the GEM. The following command can be used view the examples:
# cd `gem env gemdir`/gems/msfrpc-client-*/examples # ls msfrpc_irb.rb msfrpc_pro_report.rb The msfrpc_irb.rb script is a good starting point for using the API. This script, along with the msfrpc_pro_report.rb example, both use a standard option parsing mechanism exposed by the Ruby GEM. This allows for the RPC destination to be configured in three different ways. The first way is through standard command-line arguments, running msfrpc_irb.rb with the --rpc-help option will display these. # ./msfrpc_irb.rb --rpc-help Usage: ./msfrpc_irb.rb [options] RPC Options: --rpc-host HOST --rpc-port PORT --rpc-ssl <true|false> --rpc-uri URI --rpc-user USERNAME --rpc-pass PASSWORD --rpc-token TOKEN

Copyright © 2011 Rapid7 LLC | Programming 11
--rpc-config CONFIG-FILE --rpc-help In order to connect to a remote instance of Metasploit, we need to supply the host and port. SSL is assumed to be on by default, but may be disabled through the relevant option above. The username and password options can either correspond to a manually configured set of the credentials in the Metasploit Framework or a Metasploit Pro user account. As an alternative to the username and password, an authentication token (Metasploit Pro API Key) may be used to authentication instead. If you wish to store these parameters in a configuration file instead of the command-line, the --rpc-config option can point to a YAML file with contents matching the syntax below: options: host: server port: 3790 user: username pass: password token: token ssl: true uri: /api/1.0 The YAML file options map directly to the command-line options. Finally, the process environment can be used to set these options. The environment is only considered if the command-line options are not specified. The corresponding environment variable names for the options above are: MSFRPC_HOST MSFRPC_PORT MSFRPC_USER MSFRPC_PASS MSFRPC_TOKEN MSFRPC_SSL MSFRPC_URI MSFRPC_CONFIG The MSFRPC_CONFIG variable can point to a YAML configuration file. For a typical Metasploit Pro installation, the only options we need to specify are the host and either a username and password, or an authentication token. The example below authenticates to the local Metasploit Pro instance using an existing user account: # ./msfrpc_irb.rb --rpc-user admin --rpc-pass s3cr3t [*] The RPC client is available in variable 'rpc' [*] Successfully authenticated to the server [*] Starting IRB shell... >> An important consideration with the msfrpc-client library is that the authentication token is automatically passed into each method call for you, so when calling a function such as "core.version",

Copyright © 2011 Rapid7 LLC | Programming 12
you do not need to specify the token as the first parameter. For example, the following code works as you would expect: >> rpc.call("core.version") => {"version"=>"4.0.0-release", "ruby"=>"1.9.2 x86_64-linux 2010-04-28", "api"=>"1.0"} For a slightly more complex example, the msfrpc_pro_report.rb script is a good reference. This script will generate and download an arbitrary report type from an arbitrary project, through the RPC protocol. The usage is slightly more complicated, as this script registers its own command-line options while still supporting the standard set. Usage: ./msfrpc_pro_report.rb [options] RPC Options: --rpc-host HOST --rpc-port PORT --rpc-ssl <true|false> --rpc-uri URI --rpc-user USERNAME --rpc-pass PASSWORD --rpc-token TOKEN --rpc-config CONFIG-FILE --rpc-help Report Options: --format FORMAT --project PROJECT --output OUTFILE --help Active Projects: default Sample usage would be as follows: # ./msfrpc_pro_report.rb --rpc-user admin --rpc-pass s3cr3t \ --format PDF --project default --output test.pdf [*] Report is generating with Task ID 4... [-] Report saved to test.pdf These two examples provide a base of functionality that be used to implement any form of wrapper or automation script you can think of. The msfrpc_irb.rb example is a great way to learn the calling syntax and behavior of the API, while the msfrpc_pro_report.rb example demonstrates the process of launching a new task and waiting for it to complete.

Copyright © 2011 Rapid7 LLC | API Reference 13
API Reference
All API functions use the naming convention "<group>.<method>". All product editions share the basic API groups defined in the Metasploit Framework. Metasploit Pro provides a number of additional APIs for accessing the Pro features.
Authentication
Access to the Metasploit API is controlled through authentication tokens. An authentication is typically a randomly generated 32-byte string, but may be created ad-hoc as well. These tokens come in two forms; temporary and permanent.
A temporary token is returned by the API call auth.login, which consults an internal list of valid usernames and passwords. If a correct username and password is supplied, a token is returned that is valid for 5 minutes. This token is automatically extended every time it is used to access an API method. If the token is not used for 5 minutes, another call to auth.login must be made to obtain a new token.
A permanent token acts as an API key that does not expire. Permanent tokens are stored in the database backend (api_keys table) when a database is available and in memory otherwise. There are two ways to create a new permanent token through the API. The first method is to authenticate using a valid login, then using the temporary token to call the auth.token_generate method. This will create a permanent token either in the database backend or in-memory, depending on the whether a database is present.
The Metasploit Framework RPC server requires a username and password to be specified. This username and password combination can be used with the auth.login API to obtain a temporary token that will grant access to the rest of the API.
Metasploit Pro, by contrast, generates a permanent authentication token on startup and store this token in a file named <install>/apps/pro/engine/tmp/service.key. The Metasploit Pro interface provides the ability to manage permanent authentication tokens through the web interface.
The sequence below demonstrates the use of the auth.login API to obtain a token and the subsequent use of this token to call the core.version API.
Client: ["auth.login", "username", "password"]
Server: { "result" => "success", "token" => "a1a1a1a1a1a1a1a1" }
Client: ["core.version", "a1a1a1a1a1a1a1a1"]
Server: {
"version" => "4.0.0-release",

Copyright © 2011 Rapid7 LLC | API Reference 14
"ruby" => "1.9.1 x86_64-linux 2010-01-10"
}

Copyright © 2011 Rapid7 LLC | API Reference 15
Standard API Methods
The API methods below are available across all editions of the Metasploit product. Keep in mind that the behavior of the Metasploit Framework can change depending on whether a database backend has been configured (it is by default, however).
Authentication
The authentication API provides methods for logging in and managing authentication tokens. The only API that can be accessed without a valid authentication token is auth.login, which in turn returns a token. All API users are treated as administrative users and can trivially gain access to the underlying operating system. For this reason, always protect API Keys as if they granted root access to the system on which Metasploit is running.
auth.login( String: Username, String: Password )
The auth.login method allows a username and password to be supplied which in turn grants the caller with a temporary authentication token. This authentication token expires 5 minutes after the last request made with it.
Successful request:
Client: [ "auth.login", "MyUserName", "MyPassword"]
Server: { "result" => "success", "token" => "a1a1a1a1a1a…" }
Unsuccessful request:
Client: [ "auth.login", "MyUserName", "BadPassword"]
Server: {
"error" => true,
"error_class" => "Msf::RPC::Exception",
"error_message" => "Invalid User ID or Password"
}

Copyright © 2011 Rapid7 LLC | API Reference 16
auth.logout( String: LogoutToken )
The auth.logout method will remove the specified token from the authentication token list. Note that this method can be used to disable any temporary token, not just the one used by the current user. This method will still return "success" when a permanent token is specified, but the permanent token will not be removed.
Successful request:
Client: [ "auth.logout", "<token>", "<LogoutToken>"]
Server: { "result" => "success" }
Unsuccessful request:
Client: [ "auth.logout", "<token>", "BadToken"]
Server: {
"error" => true,
"error_class" => "Msf::RPC::Exception",
"error_message" => "Invalid Authentication Token"
}
auth.token_add( String: NewToken )
The auth.token_add will add an arbitrary string as a valid permanent authentication token. This token can be used for all future authentication purposes. This method will never return an error, as collisions with an existing token of the same name will be ignored.
Client: [ "auth.token_add", "<token>", "<NewToken>"]
Server: { "result" => "success" }

Copyright © 2011 Rapid7 LLC | API Reference 17
auth.token_generate
The auth.token_generate method will create a random 32-byte authentication token, add this token to the authenticated list, and return this token to the caller. This method should never return an error if called with a valid authentication token.
Client: [ "auth.token_generate", "<token>"]
Server: { "result" => "success", "token" => "a1a1a1a1a1a…" }
auth.token_list
The auth.token_list method will return an array of all tokens, including both temporary tokens stored in memory and permanent tokens, stored either in memory or in the backend database. This method should never return an error if called with a valid authentication token.
Client: [ "auth.token_list", "<token>"]
Server: { "tokens" => [ "token1", "token2", "token3" ] }
auth.token_remove( String: TokenToBeRemoved )
The auth.token_remove method will delete a specified token. This will work for both temporary and permanent tokens, including those stored in the database backend. This method should never return an error if called with a valid authentication token.
Client: [ "auth.token_remove", "<token>", "<TokenToBeRemoved>"]
Server: { "result" => "success" }

Copyright © 2011 Rapid7 LLC | API Reference 18
Core
The core API provides methods for managing global variables in the framework object, saving the current configuration to disk, manipulating the module load paths, reloading all modules, managing background threads, and retrieving the server version.
core.add_module_path( String: Path )
This method provides a way to add a new local file system directory (local to the server) as a module path. This can be used to dynamically load a separate module tree through the API. The Path must be accessible to the user ID running the Metasploit service and contain a top-level directory for each module type (exploits, nop, encoder, payloads, auxiliary, post). Module paths will be immediately scanned for new modules and modules that loaded successfully will be immediately available. Note that this will NOT unload modules that were deleted from the file system since previously loaded (to remove all deleted modules, the core.reload_modules method should be used instead). This module may raise an error response if the specified path does not exist.
Client: [ "core.add_module_path", "<token>", "<Path>"]
Server: {
'exploits' => 800,
'auxiliary' => 300,
'post' => 200,
'encoders' => 30,
'nops' => 25,
'payloads' => 250
}
core.module_stats
This method returns the number of modules loaded, broken down by type.
Client: [ "core.module_stats", "<token>"]
Server: {
'exploits' => 800,
'auxiliary' => 300,
'post' => 200,
'encoders' => 30,

Copyright © 2011 Rapid7 LLC | API Reference 19
'nops' => 25,
'payloads' => 250
}
core.reload_modules
This method provides a way to dump and reload all modules from all configured module paths. This is the only way to purge a previously loaded module that the caller would like to remove. This method can take a long time to return, up to a minute on slow servers.
Client: [ "core.reload_modules", "<token>"]
Server: {
'exploits' => 800,
'auxiliary' => 300,
'post' => 200,
'encoders' => 30,
'nops' => 25,
'payloads' => 250
}
core.save
This method causes the current global datastore of the framework instance to be stored to the server's disk, typically in ~/.msf3/config. This configuration will be loaded by default the next time Metasploit is started by that user on that server.
Client: [ "core.save", "<token>" ]
Server: { "result" => "success" }
core.setg( String: OptionName, String: OptionValue )
This method provides a way to set a global datastore value in the framework instance of the server. Examples of things that can be set include normal globals like LogLevel, but also the fallback for any modules launched from this point on. For example, the Proxies global option can be set, which would

Copyright © 2011 Rapid7 LLC | API Reference 20
indicate that all modules launched from that point on should go through a specific chain of proxies, unless the Proxies option is specifically overridden for that module.
Client: [ "core.setg", "<token>", "<OptionName>", "<OptionValue>"]
Server: { "result" => "success" }
core.unsetg( String: OptionName )
This method is the counterpart to core.setg in that it provides a way to unset (delete) a previously configured global option.
Client: [ "core.unsetg", "<token>", "<OptionName>" ]
Server: { "result" => "success" }
core.thread_list
This method will return a list the status of all background threads along with an ID number that can be used to shut down the thread.
Client: [ "core.thread_list", "<token>"]
Server: {
0 =>
{
"status" => "sleep",
"critical" => true,
"name" => "SessionScheduler-1",
"started" => "2011-05-29 15:36:03 -0500"
},
1 =>
{
"status" => "sleep",
"critical" => true,
"name" => "SessionScheduler-2",
"started" => "2011-05-29 15:36:03 -0500"
}
}

Copyright © 2011 Rapid7 LLC | API Reference 21
core.thread_kill( Integer: ThreadID )
This method can be used to kill an errant background thread. The ThreadID should match what was returned by the core.thread_list method. This method will still return success even if the specified thread does not exist.
Client: [ "core.thread_kill", "<token>", "<ThreadID>"]
Server: { "result" => "success" }
core.version
This method returns basic version information about the running framework instance, the Ruby interpreter, and the RPC protocol version being used.
Client: [ "core.version", "<token>"]
Server: {
"version" => "4.0.0-release",
"ruby" => "1.9.1 x86_64-linux 2010-01-10",
"api" => "1.0"
}
core.stop
This method will result in the immediate shutdown of the Metasploit server. This should only be used in extreme cases where a better control mechanism is unavailable. Note that the caller may not even receive a response, depending on how fast the server is killed.
Client: [ "core.stop", "<token>"]
Server: { "result" => "success" }

Copyright © 2011 Rapid7 LLC | API Reference 22
Console
The Console API provides the ability to allocate and work with the Metasploit Framework Console. In addition to being able to send commands and read output, these methods expose the tab completion backend as well being able to detach from and kill interactive sessions. Note that consoles provide the ability to do anything a local Metasploit Framework Console user may do, including running system commands.
console.create
The console.create method is used to allocate a new console instance. The server will return a Console ID ("id") that is required to read, write, and otherwise interact with the new console. The "prompt" element in the return value indicates the current prompt for the console, which may include terminal sequences. Finally, the "busy" element of the return value determines whether the console is still processing the last command (in this case, it always be false). Note that while Console IDs are currently integers stored as strings, these may change to become alphanumeric strings in the future. Callers should treat Console IDs as unique strings, not integers, wherever possible.
Client: [ "console.create", "<token>"]
Server: {
"id" => "0",
"prompt" => "msf > ",
"busy" => false
}
console.destroy( String: ConsoleID )
The console.destroy method deletes a running console instance by Console ID. Consoles should always be destroyed after the caller is finished to prevent resource leaks on the server side. If an invalid Console ID is specified, the "result" element will be set to the string "failure" as opposed to "success".
Client: [ "console.destroy", "<token>", "ConsoleID"]
Server: { "result" => "success" }
console.list

Copyright © 2011 Rapid7 LLC | API Reference 23
The console.list method will return a hash of all existing Console IDs, their status, and their prompts.
Client: [ "console.list", "<token>"]
Server: {
"0" => {
"id" => "0",
"prompt" => "msf exploit(\x01\x02\x01\x02handler\x01\x02) > ",
"busy" => false
},
"1" => {
"id" => "1",
"prompt" => "msf > ",
"busy" => true
}
}
console.write( String: ConsoleID, String: Data )
The console.write method will send data to a specific console, just as if it had been typed by a normal user. This means that most commands will need a newline included at the end for the console to process them properly.
Client: [ "console.write", "<token>", "0", "version\n"]
Server: { "wrote" => 8 }
console.read( String: ConsoleID )
The console.read method will return any output currently buffered by the console that has not already been read. The data is returned in the raw form printed by the actual console. Note that a newly allocated console will have the initial banner available to read.
Client: [ "console.read", "<token>", "0"]
Server: {
"data" => "Framework: 4.0.0-release.14644[..]\n",
"prompt" => "msf > ",
"busy" => false
}

Copyright © 2011 Rapid7 LLC | API Reference 24
console.session_detach( String: ConsoleID )
The console.session_detach method simulates the user using the Control+Z shortcut to background an interactive session in the Metasploit Framework Console. This method can be used to return to the main Metasploit prompt after entering an interactive session through a "sessions –i" console command or through an exploit.
Client: [ "console.session_detach", "<token>", "ConsoleID"]
Server: { "result" => "success" }
console.session_kill( String: ConsoleID )
The console.session_kill method simulates the user using the Control+C shortcut to abort an interactive session in the Metasploit Framework Console. This method should only be used after a "sessions –i" command has been written or an exploit was called through the Console API. In most cases, the session API methods are a better way to session termination, while the console.session_detach method is a better way to drop back to the main Metasploit console.
Client: [ "console.session_kill", "<token>", "ConsoleID"]
Server: { "result" => "success" }
console.tabs( String: ConsoleID, String: InputLine )
The console.tabs command simulates the user hitting the tab key within the Metasploit Framework Console. This method will take a current line of input and return the tab completion options that would be available within the interactive console. This allows an API caller to emulate tab completion through this interface. For example, setting the InputLine to "hel" for a newly allocated console returns a single element array with the option "help".
Client: [ "console.tabs", "<token>", "ConsoleID", "InputLine"]
Server: { "tabs" => [ "option1", "option2", "option3" }
Copyright © 2011 Rapid7 LLC | API Reference 25
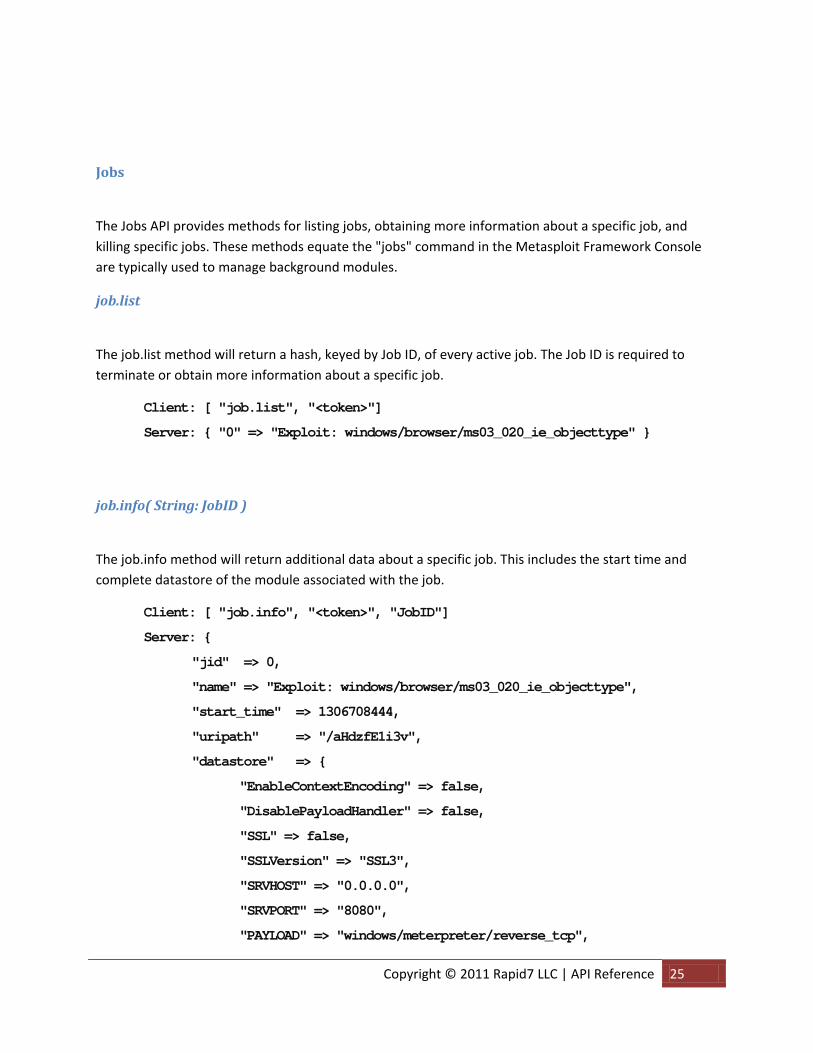
Jobs
The Jobs API provides methods for listing jobs, obtaining more information about a specific job, and killing specific jobs. These methods equate the "jobs" command in the Metasploit Framework Console are typically used to manage background modules.
job.list
The job.list method will return a hash, keyed by Job ID, of every active job. The Job ID is required to terminate or obtain more information about a specific job.
Client: [ "job.list", "<token>"]
Server: { "0" => "Exploit: windows/browser/ms03_020_ie_objecttype" }
job.info( String: JobID )
The job.info method will return additional data about a specific job. This includes the start time and complete datastore of the module associated with the job.
Client: [ "job.info", "<token>", "JobID"]
Server: {
"jid" => 0,
"name" => "Exploit: windows/browser/ms03_020_ie_objecttype",
"start_time" => 1306708444,
"uripath" => "/aHdzfE1i3v",
"datastore" => {
"EnableContextEncoding" => false,
"DisablePayloadHandler" => false,
"SSL" => false,
"SSLVersion" => "SSL3",
"SRVHOST" => "0.0.0.0",
"SRVPORT" => "8080",
"PAYLOAD" => "windows/meterpreter/reverse_tcp",

Copyright © 2011 Rapid7 LLC | API Reference 26
"LHOST" => "192.168.35.149",
"LPORT"=>"4444"
}
}
job.stop( String: JobID )
The job.stop method will terminate the job specified by the Job ID.
Client: [ "job.stop", "<token>", "JobID"]
Server: { "result" => "success" }

Copyright © 2011 Rapid7 LLC | API Reference 27
Modules
The Modules API provides the ability to list modules, enumerate their options, identify compatible payloads, and actually run them. All module types share the same API group and the module type is passed in as a parameter when the request would be ambiguous otherwise.
module.exploits
The module.exploits method returns a list of all loaded exploit modules in the framework instance. Note that the "exploit/" prefix is not included in the path name of the return module.
Client: [ "module.exploits", "<token>" ]
Server: { "modules" => [
"linux/pop3/cyrus_pop3d_popsubfolders",
"linux/ids/snortbopre",
[…]
]
}
module.auxiliary
The module.auxiliary method returns a list of all loaded auxiliary modules in the framework instance. Note that the "auxiliary/" prefix is not included in the path name of the return module.
Client: [ "module.auxiliary", "<token>" ]
Server: { "modules" => [
"pdf/foxit/authbypass",
"admin/motorola/wr850g_cred",
"admin/oracle/post_exploitation/win32exec"
[…]
]
}

Copyright © 2011 Rapid7 LLC | API Reference 28
module.post
The module.post method returns a list of all loaded post modules in the framework instance. Note that the "post/" prefix is not included in the path name of the return module.
Client: [ "module.post", "<token>" ]
Server: { "modules" => [
"multi/gather/env",
"windows/escalate/bypassuac",
[…]
]
}
module.payloads
The module.payloads method returns a list of all loaded payload modules in the framework instance. Note that the "payload/" prefix is not included in the path name of the return module.
Client: [ "module.payloads", "<token>" ]
Server: { "modules" => [
"linux/armle/exec",
"linux/armle/shell_reverse_tcp",
[…]
]
}
module.encoders
The module.encoders method returns a list of all loaded encoder modules in the framework instance. Note that the "encoder/" prefix is not included in the path name of the return module.
Client: [ "module.encoders", "<token>" ]
Server: { "modules" => [

Copyright © 2011 Rapid7 LLC | API Reference 29
"mipsbe/longxor",
"sparc/longxor_tag",
[…]
]
}
module.nops
The module.nops method returns a list of all loaded nop modules in the framework instance. Note that the "nop/" prefix is not included in the path name of the return module.
Client: [ "module.nops", "<token>" ]
Server: { "modules" => [
"armle/simple",
"sparc/random",
[…]
]
}
module.info( String: ModuleType, String: ModuleName )
The module.info method returns a hash of detailed information about the specified module. The ModuleType should be one "exploit", "auxiliary", "post", "payload", "encoder", and "nop". The ModuleName can either include module type prefix ("exploit/") or not.
Client: [ "module.info", "<token>", "ModuleType", "ModuleName" ]
Server: {
"name" => "SPARC NOP generator",
"description" => "SPARC NOP generator",
"license" => "Metasploit Framework License (BSD)",
"filepath" => "<msf>/modules/nops/sparc/random.rb",
"version" => "10394",
"rank" => 300,
"references" => [],

Copyright © 2011 Rapid7 LLC | API Reference 30
"authors" => [ "vlad902 <[email protected]>" ]
}
module.options( String: ModuleType, String: ModuleName )
The module.options method returns a hash of datastore options for the specified module. The ModuleType should be one "exploit", "auxiliary", "post", "payload", "encoder", and "nop". The ModuleName can either include module type prefix ("exploit/") or not.
Client: [ "module.options", "<token>", "ModuleType", "ModuleName" ]
Server: {
"SSL"=> {
"type" => "bool",
"required" => false,
"advanced" => true,
"evasion" => false,
"desc" => "Negotiate SSL for outgoing connections",
"default" => false
},
"SSLVersion" => {
"type" => "enum",
"required" => false,
"advanced" => true,
"evasion" => false,
"desc" => "Specify the version…",
"default" => "SSL3",
"enums" => [ "SSL2", "SSL3", "TLS1" ]
}
}
module.compatible_payloads( String: ModuleName )
The module.compatible_payloads method returns a list of payloads that are compatible with the exploit module name specified.
Client: [ "module.compatible_payloads", "<token>", "ModuleName" ]

Copyright © 2011 Rapid7 LLC | API Reference 31
Server: { "payloads" => [
"generic/debug_trap",
"generic/shell_bind_tcp",
"generic/shell_reverse_tcp"
]
}
module.target_compatible_payloads( String: ModuleName, Integer: TargetIndex )
The module.target_compatible_payloads method is similar to the module.compatible_payloads method in that it returns a list of matching payloads, however, it restricts those payloads to those that will work for a specific exploit target. For exploit modules that can attack multiple platforms and operating systems, this is the method used to obtain a list of available payloads after a target has been chosen.
Client: [ "module.target_compatible_payloads", "<token>", "ModuleName", 1 ]
Server: { "payloads" => [
"generic/debug_trap",
"generic/shell_bind_tcp",
"generic/shell_reverse_tcp"
]
}
module.compatible_sessions( String: ModuleName }
The module.compatible_sessions method returns a list of payloads that are compatible with the post module name specified.
Client: [ "module.compatible_sessions", "<token>", "ModuleName" ]
Server: { "sessions" => [
"1",
"2"
]
}
module.encode( String: Data, String: EncoderModule, Hash: Options )

Copyright © 2011 Rapid7 LLC | API Reference 32
The module.encode method provides a way to encode an arbitrary payload (specified as Data) with a specific encoder and set of options. The available options include:
- format – This option can be used to specify an output format, such as "exe" or "vbs" or "raw" - badchars – This option can be used to specify a list of raw bytes to avoid in the encoding - platform – This option can be used to set the operating system platform of the encoder - arch – This option can be used to set the architecture of the encoder - ecount – This option specifies the number of encoding passes to be done
For "exe" format, additional options are available:
- altexe – The name of a specific executable template file to use for the output file - exedir – The name of an alternate directory of templates to consult for the output file - inject – A boolean indicating whether to inject the payload as new thread
Client: [ "module.encode", "<token>", "Data", "EncoderModule", {
"Option1" => "Value1",
"Option2" => "Value2"
}
]
Server: { "encoded" => "<raw output data>" }
module.execute( String: ModuleType, String: ModuleName, Hash: Datastore )
The module.execute method provides a way to launch an exploit, run an auxiliary module, trigger a post module on a session, or generate a payload. The ModuleType should be one "exploit", "auxiliary", "post", and "payload. The ModuleName can either include module type prefix ("exploit/") or not. The Datastore is the full set of datastore options that should be applied to the module before executing it.
In the case of exploits, auxiliary, or post modules, the server response will return the Job ID of the running module:
Client: [ "module.execute", "<token>", "ModuleType", "ModuleName", {
"RHOST" => "1.2.3.4",
"RPORT" => "80"
}
]

Copyright © 2011 Rapid7 LLC | API Reference 33
Server: { "job_id" => 1 }
In the case of payload modules, a number of additional options are parsed, including the datastore for the payload itself. These options are:
- BadChars – The raw list of bytes that needed to be encoded out of the payload - Format – The output format that the payload should be converted to ("exe", "ruby", "c") - ForceEncoding – A boolean indicating whether encoding should be done even if bytes are OK - Template – The path to a template file for EXE output - Platform – The operating system platform for the encoder - KeepTemplateWorking – A boolean indicating whether to inject a new thread or not - NopSledSize – The size of the prefixed mandatory nop sled (default is 0) - Iterations – The number of encoding rounds to go through
The response consists of the raw payload data:
Client: [ "module.execute", "<token>", "ModuleType", "ModuleName", {
"LHOST" => "4.3.2.1",
"LPORT" => "4444"
}
]
Server: { "payload" => "<raw payload data>" }
Copyright © 2011 Rapid7 LLC | API Reference 34
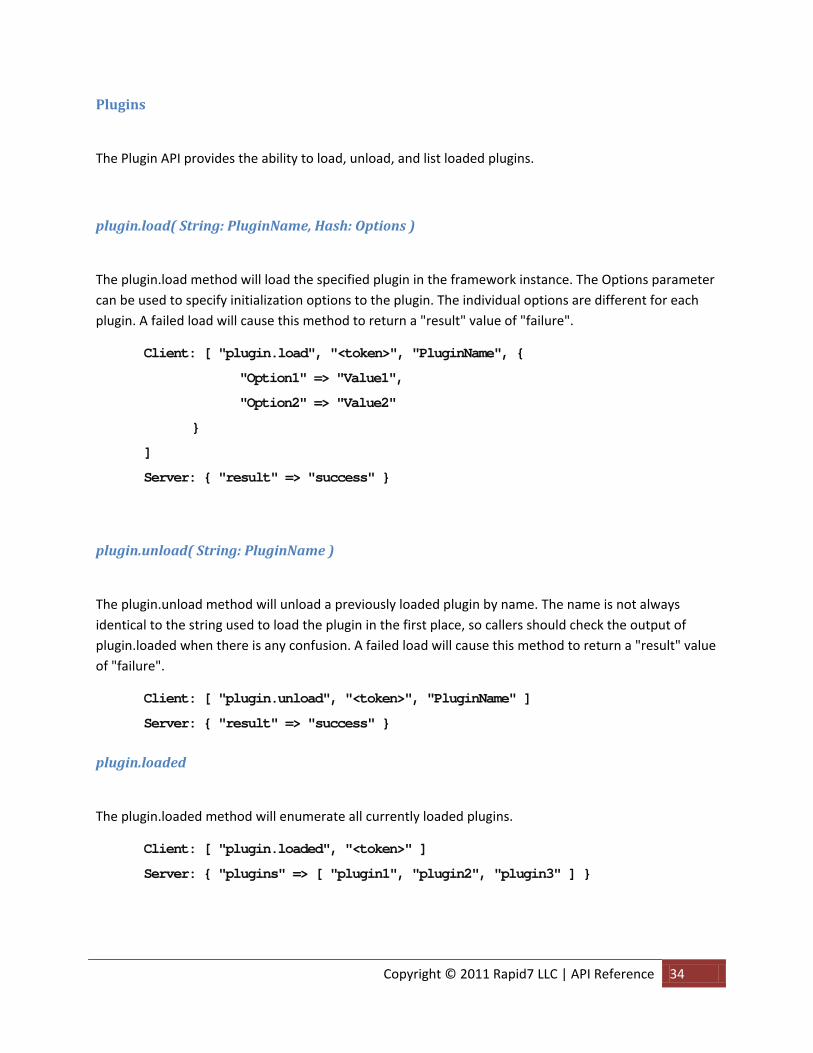
Plugins
The Plugin API provides the ability to load, unload, and list loaded plugins.
plugin.load( String: PluginName, Hash: Options )
The plugin.load method will load the specified plugin in the framework instance. The Options parameter can be used to specify initialization options to the plugin. The individual options are different for each plugin. A failed load will cause this method to return a "result" value of "failure".
Client: [ "plugin.load", "<token>", "PluginName", {
"Option1" => "Value1",
"Option2" => "Value2"
}
]
Server: { "result" => "success" }
plugin.unload( String: PluginName )
The plugin.unload method will unload a previously loaded plugin by name. The name is not always identical to the string used to load the plugin in the first place, so callers should check the output of plugin.loaded when there is any confusion. A failed load will cause this method to return a "result" value of "failure".
Client: [ "plugin.unload", "<token>", "PluginName" ]
Server: { "result" => "success" }
plugin.loaded
The plugin.loaded method will enumerate all currently loaded plugins.
Client: [ "plugin.loaded", "<token>" ]
Server: { "plugins" => [ "plugin1", "plugin2", "plugin3" ] }

Copyright © 2011 Rapid7 LLC | API Reference 35
Sessions
The Sessions API is used to list, interact with, and terminate open sessions to compromised systems. The Session ID returned by session.list is used to unique identify a given session. Note that the database IDs used to identify sessions in the Metasploit Pro user interface are translated to a framework instance-local Session ID for use by this API.
session.list
This method will list all active sessions in the framework instance.
Client: [ "session.list", "<token>" ]
Server: {
"1" => {
'type' => "shell",
"tunnel_local" => "192.168.35.149:44444",
"tunnel_peer" => "192.168.35.149:43886",
"via_exploit" => "exploit/multi/handler",
"via_payload" => "payload/windows/shell_reverse_tcp",
"desc" => "Command shell",
"info" => "",
"workspace" => "Project1",
"target_host" => "",
"username" => "root",
"uuid" => "hjahs9kw",
"exploit_uuid" => "gcprpj2a",
"routes" => [ ]
}
}

Copyright © 2011 Rapid7 LLC | API Reference 36
session.stop( String: SessionID )
The session.stop method will terminate the session specified in the SessionID parameter.
Client: [ "session.stop", "<token>", "SessionID" ]
Server: { "result" => "success" }
session.shell_read( String: SessionID, OPTIONAL: Integer:ReadPointer)
The shell.read method provides the ability to read output from a shell session. As of version 3.7.0, shell sessions also ring buffer their output, allowing multiple callers to read from one session without losing data. This is implemented through the optional ReadPointer parameter. If this parameter is not given (or set to 0), the server will reply with all buffered data and a new ReadPointer (as the "seq" element of the reply). If the caller passes this ReadPointer into subsequent calls to shell.read, only data since the previous read will be returned. By continuing to track the ReadPointer returned by the last call and pass it into the next call, multiple readers can all follow the output from a single session without conflict.
Client: [ "session.shell_read", "<token>", "SessionID", "ReadPointer ]
Server: {
"seq" => "32",
"data" => "uid=0(root) gid=0(root)…"
}
session.shell_write( String: SessionID, String: Data )
The shell.write method provides the ability to write data into an active shell session. Note that most sessions require a terminating newline before they will process a command.
Client: [ "session.shell_write", "<token>", "SessionID", "id\n" ]
Server: { "write_count" => "3" }
session.meterpreter_write( String: SessionID, String: Data )
The session.meterpeter_write method provides the ability write commands into the Meterpreter Console. This emulates how a user would interact with a Meterpreter session from the Metasploit Framework Console. Note that multiple concurrent callers writing and reading to the same Meterpreter session through this method can lead to a conflict, where one caller gets the others output and vice versa. Concurrent access to a Meterpreter session is best handled by running Post modules or Scripts. A

Copyright © 2011 Rapid7 LLC | API Reference 37
newline does not need to specified unless the console is current tied to an interactive channel, such as a sub-shell.
Client: [ "session.meterpreter_write", "<token>", "SessionID", "ps" ]
Server: { "result" => "success" }
session.meterpreter_read( String: SessionID )
The session.meterpreter_read method provides the ability to read pending output from a Meterpreter session console. As noted in the session.meterpreter_write documentation, this method is problematic when it comes to concurrent access by multiple callers and Post modules or Scripts should be used instead.
Client: [ "session.meterpreter_read", "<token>", "SessionID"]
Server: { "data" => "<raw console output>" }
session.meterpreter_run_single( String: SessionID, String: Command )
The session.meterpreter_run_single method provides the ability to run a single Meterpreter console command. This method does not need be terminated by a newline. The advantage to session.meterpreter_run_single over session.meterpreter_write is that this method will always run the Meterpreter command, even if the console tied to this sessions is interacting with a channel.
Client: [ "session.meterpreter_run_single", "<token>", "SessionID", "ps" ]
Server: { "result" => "success" }
session.meterpreter_script( String: SessionID, String: ScriptName )
The session.meterpreter_script method provides the ability to run a Meterpreter script on the specified session. This method does not provide a way to specify arguments for a script, but the session.metepreter_run_single method can handle this case.
Client: [ "session.meterpreter_run_single", "<token>", "SessionID", "ps" ]
Server: { "result" => "success" }

Copyright © 2011 Rapid7 LLC | API Reference 38
session.meterpreter_session_detach( String: SessionID )
The session.meterpreter_session_detach method stops any current channel or sub-shell interaction taking place by the console associated with the specified Meterpreter session. This simulates the console user pressing the Control+Z hotkey.
Client: [ "session.meterpreter_session_detach", "<token>", "SessionID" ]
Server: { "result" => "success" }
session.meterpreter_session_kill( String: SessionID )
The session.meterpreter_session_kill method terminates the current channel or sub-shell that the console associated with the specified Meterpreter session is interacting with. This simulates the console user pressing the Control+C hotkey.
Client: [ "session.meterpreter_session_detach", "<token>", "SessionID" ]
Server: { "result" => "success" }
session.meterpreter_tabs( String: SessionID, String: InputLine )
The session.meterpreter_tabs command simulates the user hitting the tab key within the Meterpreter Console. This method will take a current line of input and return the tab completion options that would be available within the interactive console. This allows an API caller to emulate tab completion through this interface. For example, setting the InputLine to "hel" for a newly allocated console returns a single element array with the option "help".
Client: [ "session.meterpreter_tabs", "<token>", "SessionID", "InputLine"]
Server: { "tabs" => [ "option1", "option2", "option3" }
session.compatible_modules( String: SessionID )
The session.compatible_modules method returns a list of Post modules that are compatible with the specified session. This includes matching Meterpreter Post modules to Meterpreter sessions and enforcing platform and architecture restrictions.
Client: [ "session.compatible_modules", "<token>", "SessionID" ]

Copyright © 2011 Rapid7 LLC | API Reference 39
Server: { "modules" => [ "multi/gather/env" ] }
session.shell_upgrade( String: SessionID, String: ConnectHost, String: ConnectPort )
The session.shell_upgrade method will attempt to spawn a new Meterpreter session through an existing Shell session. This requires that a multi/handler be running (windows/meterpreter/reverse_tcp) and that the host and port of this handler is provided to this method.
Client: [ "session.shell_upgrade", "<token>", "SessionID", "1.2.3.4", 4444 ]
Server: { "result" => "success" }
session.ring_clear( String: SessionID )
The session.ring_clear method will wipe out the ring buffer associated with a specific shell session. This may be useful to reclaim memory for idle background sessions.
Client: [ "session.ring_clear", "<token>", "SessionID" ]
Server: { "result" => "success" }
session.ring_last( String: Session ID )
The session.ring_last method will return the last issued ReadPointer (sequence number) for the specified Shell session.
Client: [ "session.ring_last", "<token>", "SessionID" ]
Server: { "seq" => 112 }
session.ring_put( String: SessionID, String: Data)
The session.ring_put method is identical to session.shell_write, please see that entry for more information.

Copyright © 2011 Rapid7 LLC | API Reference 40
session.ring_read( String: SessionID, OPTIONAL: Integer: ReadPointer)
The session.ring_read method is identical to session.shell_read, please see that entry for more information.

Copyright © 2011 Rapid7 LLC | API Reference 41
Metasploit Pro API Methods
In addition to the Standard API, Metasploit Pro provides access to the extensive commercial feature set. The API methods below can be used to manage a remote Metasploit Pro instance and include everything from product activation to automated mass exploitation and reporting. Note that while the Pro API includes a number of high-level APIs, the Standard API methods are still the best way to manage low-level primitives, such as Sessions. In some cases, there is overlap between what a Pro API method provides and what can be found in the Standard API and the comments listed for the Pro API will make it clear which use case a specific method is designed to solve.
Pro General API
The Pro General API methods provide access to product version information, active projects, and configured user accounts.
pro.about
The pro.about method returns a hash containing basic information about the running Metasploit Pro instance.
Client: [ "pro.about", "<token>" ]
Server: {"product" => "Metasploit Pro", "version" => "4.0.0" }
pro.workspaces
The pro.workspaces method returns a list of all active Metasploit Pro projects. Although these are called products in the user interface, the underlying object is referred to as a Workspace, and the terms workspace and project are used interchangeably throughout this guide.
Client: [ "pro.workspaces", "<token>" ]
Server: { "Project1" => {
"created_at" => 1303706869,
"updated_at" => 1303706869,
"name" => "Project1",
"boundary" => "192.168.0.0/24",
"description" => "This is the local office network",

Copyright © 2011 Rapid7 LLC | API Reference 42
"owner" => "admin",
"limit_to_network" => false
}
}
pro.projects
The pro.projects method is an alias for the pro.workspaces method listed above
pro.workspace_add( Hash:WorkspaceOptions )
The pro.workspace_add method adds a new workspace with the specified settings and returns a hash of that contains information on the newly created workspace.
Client: [ "pro.workspace_add", "<token>", { "name" => "Project1" ]
Server: { "Project1" => {
"created_at" => 1303706869,
"updated_at" => 1303706869,
"name" => "Project1",
"boundary" => "192.168.0.0/24",
"description" => "This is the local office network",
"owner" => "admin",
"limit_to_network" => false
}
}
Hash keys that be passed in to this method include:
name: The unique name of the newly created workspace boundary: The default network range for this project
description: A short amount of text describing this project limit_to_network: A Boolean indicating whether to restrict operations to the boundary

Copyright © 2011 Rapid7 LLC | API Reference 43
pro.project_add( Hash:WorkspaceOptions)
The pro.project_add method is an alias for the pro.workspace_add method listed above
pro.workspace_del( String:WorkspaceName )
The pro.workspace_del removes the workspace specified in the WorkspaceName parameter.
Client: [ "pro.workspace_del", "<token>", "Project1" ]
Server: { "result" => "success" }
pro.project_del( String:WorkspaceName )
The pro.project_del method is an alias for the pro.workspace_del method listed above
pro.users
The pro.users method returns a list of all configured user accounts in the Metasploit Pro instance.
Client: [ "pro.users", "<token>" ]
Server: { "users" => {
"admin" => {
"username" => "admin",
"admin" => true,
"fullname" => "Joe Admin",
"email" => "[email protected]",
"phone" => "1-555-555-1212",
"company" => "Giant Widgets, Inc."
}
}
}

Copyright © 2011 Rapid7 LLC | API Reference 44
Pro License API
The Pro License API provides methods for registering and activating the Metasploit Pro product.
pro.register( String: ProductKey )
The pro.register method accepts a product key as the only parameter, validates that the product key matches the correct format, and saves the product key internally. The pro.activate method must be used to fully activate the product. This method returns a hash indicating the result of the register call and the current state of the product.
Client: [ "pro.register", "<token>", "ProductKey" ]
Server: {
"result" => "success",
"product_key" => "XXXX-XXXX-XXXX-XXXX",
"product_serial" => "4dde9e80-c0b2cb0b-6d31b554",
"product_type" => "Metasploit Pro",
"product_version" => "4.0.0",
"product_revision" => "1",
"registered" => true,
"activated" => false,
"expiration" => 0,
"person" => "",
"organization" => "",
"email" => "",
"users" => 1,
"hardware" => true
}
pro.activate( Hash: ActivationOptions )
The pro.activate method causes the Metasploit Pro installation to attempt an online activation with the previously registered product key and the specified ActivationOptions. If a 'product_key' element is provided in the ActivationOptions hash, this key will be registered prior to the activation process. In most cases, an empty hash can be specified in place of the ActivationOptions. If the Metasploit Pro instance does not have direct access to the internet, the ActivationOptions can be used to specify an

Copyright © 2011 Rapid7 LLC | API Reference 45
internal HTTP proxy server. Proxy options can be specified in the 'proxy_host', 'proxy_port', 'proxy_user', and 'proxy_pass' elements of the ActivationOptions hash. Only standard HTTP proxies are supported. The response to the activate call will either contain a hash of license information, as the pro.register method does, or a hash containing a 'result' element with the value set to 'failure', and a second element, 'reason' indicating the reason for this failure. Note that every product key can only be activated a limited number of times, with the count determined by the license type. In the event that activation limit has been reached, Rapid7 Support must be contacted to reset the activation count.
Client: [ "pro.activate", "<token>",
{
"proxy_host" => "1.2.3.4",
"proxy_port" => 80
}]
Server: {
"result" => "success",
"product_key" => "XXXX-XXXX-XXXX-XXXX",
"product_serial" => "4dde9e80-c0b2cb0b-6d31b554",
"product_type" => "Metasploit Pro",
"product_version" => "4.0.0",
"product_revision" => "1",
"registered" => true,
"activated" => true,
"expiration" => 1325376000,
"person" => "Licensed Person",
"organization" => "Licensed Organization",
"email" => "[email protected]",
"users" => 2,
"hardware" => true
}
pro.activate_offline( String: ActivationFilePath )
The pro.activate_offline method causes the Metasploit Pro installation to load a pre-generated offline activation file from the specified local filesystem path. Offline activation files are reserved for customers with network isolation requirements and are available through Rapid7 Support.

Copyright © 2011 Rapid7 LLC | API Reference 46
Client: [ "pro.activate_offline", , "<token>",
"/tmp/metasploit_pro_activation.zip" ]
Server: {
"result" => "success",
"product_key" => "XXXX-XXXX-XXXX-XXXX",
"product_serial" => "4dde9e80-c0b2cb0b-6d31b554",
"product_type" => "Metasploit Pro",
"product_version" => "4.0.0",
"product_revision" => "1",
"registered" => true,
"activated" => true,
"expiration" => 1325376000,
"person" => "Licensed Person",
"organization" => "Licensed Organization",
"email" => "[email protected]",
"users" => 2,
"hardware" => true
}
pro.license
The pro.license method will return a hash indicating the current Metasploit Pro license.
Client: [ "pro.license", "<token>"]
Server: {
"result" => "success",
"product_key" => "XXXX-XXXX-XXXX-XXXX",
"product_serial" => "4dde9e80-c0b2cb0b-6d31b554",
"product_type" => "Metasploit Pro",
"product_version" => "4.0.0",
"product_revision" => "1",
"registered" => true,
"activated" => true,
"expiration" => 1325376000,
"person" => "Licensed Person",

Copyright © 2011 Rapid7 LLC | API Reference 47
"organization" => "Licensed Organization",
"email" => "[email protected]",
"users" => 2,
"hardware" => true
}
pro.revert_license
The pro.revert_license method attempts to switch to the last successfully activated product license before the current one. Only one backup license copy is kept and this method does nothing if there is no backup license available when it is called. The return value is identical to the pro.license call in that it provides the newly chosen license information as a hash. This method is used to temporarily use a license that may provide more users or other capabilities and then fallback to the original license when that temporary license expires.
Client: [ "pro.license", "<token>"]
Server: {
"result" => "success",
"product_key" => "XXXX-XXXX-XXXX-XXXX",
"product_serial" => "4dde9e80-c0b2cb0b-6d31b554",
"product_type" => "Metasploit Pro",
"product_version" => "4.0.0",
"product_revision" => "1",
"registered" => true,
"activated" => true,
"expiration" => 1325376000,
"person" => "Licensed Person",
"organization" => "Licensed Organization",
"email" => "[email protected]",
"users" => 5,
"hardware" => false
}

Copyright © 2011 Rapid7 LLC | API Reference 48
Pro Updates API
The Pro Updates API provides the ability to check for, download, and apply the latest Metasploit Pro updates. This API also includes a method for restarting the Metasploit Pro services.
pro.update_available( Hash: UpdateCheckOptions )
The pro.update_available method provides the ability to check for available updates to the Metasploit Pro instance. The UpdateCheckOptions hash can either be empty or include the 'proxy_host', 'proxy_port', 'proxy_user', and 'proxy_pass' elements to use a HTTP proxy for the check. The return value includes a hash that indicates whether an update is available, what the version number of this update is, and a description of what the update contains. Note that the description may contain HTML formatting.
Client: [ "pro.update_available", "<token>", { } ]
Server: {
"status" => "success",
"result" => "update",
"current" => "1",
"version" => "20120125000001",
"info" => "This updates adds new features and fixes…"
}
pro.update_install( Hash: InstallOptions )
The pro.update_install method provides the ability to install an update package by name, specified through the 'version' element of the InstallOptions hash. The 'proxy_host', 'proxy_port', 'proxy_user', and 'proxy_pass' elements can be supplied in this hash to indicate that a HTTP proxy should be used. This method returns a hash indicating whether the update was started successfully and what the current status of the installation is. The download and installation process is completed as a single step as the progress can be tracked through calls to the pro.update_status method. Note that the pro.restart_service method must be called to finalize the update.
Client: [ "pro.update_install", "<token>", { "version" => "20120125000001" }
]
Server: {

Copyright © 2011 Rapid7 LLC | API Reference 49
"status" => "success",
"result" => "Downloading",
"error" => ""
}
pro.update_install_offline( String: UpdatePath )
The pro.update_install_offline method provides the ability install an update package from a local filesystem. Customers that require offline updates should contact Rapid7 Support to be notified of the download location of each update package. The status of the offline package installation can be monitored by calling the pro.update_status method. Note that the pro.restart_service method must be called to finalize the update.
Client: [ "pro.update_install_offline", "<token>",
"/tmp/metasploit_pro_update.zip" ]
Server: {
"status" => "success",
"result" => "Installing",
"error" => ""
}
pro.update_status
The pro.update_status method returns a hash indicating the current status of the update installation process. If the update is still being retrieved from the server, the current progress of the download will be returned in the 'download_total', 'download_done', and 'download_pcnt' elements.
Client: [ "pro.update_status", "<token>" ]
Server: {
"status" => "success",
"result" => "Downloading",
"error" => "",
"download_total" => "1000000",
"download_done" => "100000",
"download_pcnt" => "10"
}

Copyright © 2011 Rapid7 LLC | API Reference 50
pro.update_stop
The pro.update_stop method forcibly stops any existing update process, whether it is downloading the update package or installing the contents.
Client: [ "pro.update_stop", "<token>" ]
Server: { "status" => "success" }
pro.restart_service
The pro.restart_service method causes the Metasploit Pro RPC Service (prosvc) and the Metasploit Pro Web Service to restart. This is necessary to complete the installation of an update package.
Client: [ "pro.restart_service", "<token>" ]
Server: { "status" => "success" }

Copyright © 2011 Rapid7 LLC | API Reference 51
Pro Task API
Metasploit Pro uses Tasks to manage background jobs initiated by the user through the web interface. Scanning, exploiting, bruteforcing, importing, and reporting are all handled through Tasks. The Pro Task API provides methods for enumerating active tasks, stopping tasks, and retrieving the raw log file for a given task.
pro.task_list
The pro.task_list method returns a hash of active tasks.
Client: [ "pro.task_list", "<token>" ]
Server: { "108" =>
{
"status" => "running",
"error" => "",
"created_at" => 1306792667,
"progress" => 25,
"description" => "Launching",
"info" => "#1 ICONICS WebHMI ActiveX Buffer Overflow",
"workspace" => "Branch Office",
"username" => "admin",
"result" => "",
"path" => "tasks/task_pro.single_108.txt",
"size" => 425
}
}
pro.task_status( String: TaskID )
The pro.task_status method returns the current status of a given task.
Client: [ "pro.task_status", "<token>", "108" ]
Server: { "108" =>

Copyright © 2011 Rapid7 LLC | API Reference 52
{
"status" => "running",
"error" => "",
"created_at" => 1306792667,
"progress" => 25,
"description" => "Launching",
"info" => "#1 ICONICS WebHMI ActiveX Buffer Overflow",
"workspace" => "Branch Office",
"username" => "admin",
"result" => "",
"path" => "tasks/task_pro.single_108.txt",
"size" => 425
}
}
pro.task_stop( String: TaskID )
The pro.task_stop method terminates the task specified in the TaskID parameter.
Client: [ "pro.task_status", "<token>", "108" ]
Server: { "task" => "108", "status" => "stopped" }
pro.task_log( String: TaskID )
The pro.task_log method returns the status and log data for the task specified in the TaskID parameter.
Client: [ "pro.task_log", "<token>", "108" ]
Server: {
"status" => "running",
"error" => "",
"created_at" => 1306792667,
"progress" => 25,
"description" => "Launching",
"info" => "#1 ICONICS WebHMI ActiveX Buffer Overflow",
"workspace" => "Branch Office",

Copyright © 2011 Rapid7 LLC | API Reference 53
"username" => "admin",
"result" => "",
"path" => "tasks/task_pro.single_108.txt",
"size" => 425,
"log" => "<425 bytes of output data>"
}
pro.task_delete_log( String: TaskID )
The pro.task_delete_log method deletes the associated log file for a specific task.
Client: [ "pro.task_delete_log", "<token>", "108" ]
Server: { "status" => "succcess" }

Copyright © 2011 Rapid7 LLC | API Reference 54
Pro Feature API
The Pro Feature API includes methods that provide access to many of the top-level features in the Metasploit Pro user interface. These methods include launching discovery scans, importing data from other tools, launching automated exploits, running brute force attacks, and generating reports. Since these methods are designed to expose all of the functionality available through the user interface, they take a large number of parameters.
pro.start_discover( Hash:Config )
The pro.start_discover method is the backend method that drives the Scan action within the Metasploit Pro user interface. This action launches a discovery scan against a range of IP addresses, identifying active hosts, open services, and extracting information from the discovered services. The resulting data is stored in the backend database. The pro.start_discover method takes a large number of options in the form of a single Hash parameter and returns a Task ID that can be monitored using the Pro Task API.
The individual options within the Config hash are defined in the table below.
Option Name Required Example Description
ips YES [ "192.168.0.0/24" ] This option determines what IP addresses and IP ranges to include in the scan. This option is an array of IP addresses and/or IP ranges.
workspace YES Project1 This option indicates the project name that this scan should be part of. This correlates to the full name of the project as listed in the user interface.
username NO admin This option specifies which Pro username this scan task should be attributed to. If not specified, the first user with administrative privileges is used.
DS_BLACKLIST_HOSTS NO 192.168.0.1 This option determines what addresses within the ips range should be excluded from the scan. Multiple entries should be separated by spaces.
DS_PORTSCAN_SPEED NO Insane This option should be one of

Copyright © 2011 Rapid7 LLC | API Reference 55
Paranoid, Sneaky, Polite, Normal, Aggressive or Insane. These correspond to the common options in the Nmap security scanner and progressively increase the speed of the scan. Insane is actually a reasonable setting for a local Ethernet network.
DS_PORTS_EXTRA NO 1-65535 This option allows additional TCP ports to be included in the scan. Ports are specified in Nmap format (ranges separated by –'s and commas between ranges).
DS_PORTS_BLACKLIST NO 9100, 1723 This option defines a list of ports that should always be excluded
DS_PORTS_CUSTOM NO 1-1024 This option overrides the built-in port list (derived from the loaded exploit modules) and only scans the ports listed.
DS_PORTSCAN_TIMEOUT NO 300 This option sets the maximum amount of time, in seconds, that the scanner should spend on a single host. If you increase the range of ports to scan with another option, this should also be increased. 300 seconds (5 minutes) is a reasonable setting even for heavily filtered networks.
DS_PORTSCAN_SOURCE_PORT NO 53 This option configures the source port for the scan. Setting this to 80, 53, or 20 can often bypass poorly configured firewalls and access lists.
DS_CustomNmap NO -sF -O This option can be used to completely override the Nmap command line normally used by Pro and replace it (excluding hosts and ports).
DS_UDP_PROBES NO false This option can be used to disable UDP service probes by setting it to false (it is enabled otherwise).
DS_FINGER_USERS NO false This option can be used to disable the finger service

Copyright © 2011 Rapid7 LLC | API Reference 56
(79/tcp) automated username harvesting that occurs by default when enabled.
DS_SNMP_SCAN NO false This option can be used to disable the SNMP scanner that is normally included in the scan by default. This scanner attempts to guess a small number of common SNMP communities for each targeted host.
DS_IDENTIFY_SERVICES NO false This option can be used to disable the service identification phase that is normally triggered when one or services are not identified in the first pass.
DS_SMBUser NO Administrator This option can be used to extract additional information from SMB services if a valid username and password is supplied.
DS_SMBPass NO S3cr3t This option defines the password that corresponds to the DS_SMBUser option.
DS_SMBDomain NO CORP This option defines the domain that corresponds to the DS_SMBUser option.
DS_DRY_RUN NO true This option, when set to true, will cause the task to show what it would do, but not actually send any network traffic.
DS_SINGLE_SCAN NO true This option, when set to true, will scan each host sequentially instead of multiple hosts at once. Useful for reducing packet loss on especially poor networks.
DS_FAST_DETECT NO true This option, when set to true, will limit the scan to a small set of TCP ports.

Copyright © 2011 Rapid7 LLC | API Reference 57
A sample request to use the default settings to scan 192.168.0.0/24 would look like:
Client: [ "pro.start_discover", "<token>",
{
"ips" => [ "192.168.0.0/24" ],
"workspace" => "Project1"
}
]
If we change the same request to scan all 65535 TCP ports, it would look like:
Client: [ "pro.start_discover", "<token>",
{
"ips" => [ "192.168.0.0/24" ],
"workspace" => "Project1",
"DS_PORTS_CUSTOM" => "1-65535"
}
]
In any case the reply from a successful request would look like:
Server: { "task_id" => "109" }

Copyright © 2011 Rapid7 LLC | API Reference 58
pro.start_import( Hash:Config )
The pro.start_import method is what drives the Import action within the Metasploit Pro user interface. This method assumes that a file is already on the local disk (relative to the Metasploit Pro system) or that a NeXpose Console has been configured with one or more active sites. To import arbitrary data without having to upload the file to the server first, please see the pro.import_data method instead. The pro.start_import method takes a large number of options in the form of a single Hash parameter and returns a Task ID that can be monitored using the Pro Task API.
The individual options within the Config hash are defined in the table below.
Option Name Required Example Description
workspace YES Project1 This option indicates the project name that this import should be part of. This correlates to the full name of the project as listed in the user interface.
username NO admin This option specifies which Pro username this task should be attributed to. If not specified, the first user with administrative privileges is used.
DS_PATH YES /tmp/nexpose.xml This option specifies the server-local file path to import. If you are calling this API from a remote system, it makes more sense to call the pro.import_data API instead.
DS_BLACKLIST_HOSTS NO 192.168.0.1 This option determines what addresses should be excluded from the import. Multiple entries should be separated by spaces.
DS_PRESERVE_HOSTS NO true This option can be used to prevent modifications to existing hosts during an import.
DS_REMOVE_FILE NO true This option tells the service to delete the file specified as DS_PATH after importing it.
DS_ImportTags NO false This option indicates whether to import tags as well as host data when processing a

Copyright © 2011 Rapid7 LLC | API Reference 59
Metasploit Pro export file. DS_NEXPOSE_CONSOLE NO EnterpriseScanner This option, when combined
with the DS_NEXPOSE_SITE parameter, can be used to import data directly from a per-configured NeXpose Console. Leave this blank to import from a file path
DS_NEXPOSE_SITE NO MainOffice This option, when combined with the DS_NEXPOSE_CONSOLE parameter, can be used to import data directly from an existing NeXpose site. Leave this blank to import from a file path.
A sample request to import a NeXpose Export XML would look like:
Client: [ "pro.start_import", "<token>",
{
"workspace" => "Project1",
"DS_PATH" => "/tmp/nexpose.xml"
}
]
The reply from a successful request contains the Task ID, as shown below:
Server: { "task_id" => "109" }

Copyright © 2011 Rapid7 LLC | API Reference 60
pro.start_import_creds( Hash:Config )
The pro.start_import_creds method is used to import credentials (users, passwords, hashes, and keys). This method assumes that a file is already on the local disk (relative to the Metasploit Pro system. The pro.start_import_creds method takes a large number of options in the form of a single Hash parameter and returns a Task ID that can be monitored using the Pro Task API.
The individual options within the Config hash are defined in the table below.
Option Name Required Example Description
workspace YES Project1 This option indicates the project name that this import should be part of. This correlates to the full name of the project as listed in the user interface.
username NO admin This option specifies which Pro username this task should be attributed to. If not specified, the first user with administrative privileges is used.
DS_IMPORT_PATH YES /tmp/wordlist.txt This option specifies the server-local file path to import.
DS_FTYPE YES pass This option determines tells the service that kind of import this is. It should be one of "userpass", "user", "pass", pwdump", or "ssh_keys".
DS_NAME YES common_passwords This option indicates a unique name of this imported data set.
DS_DESC YES Common passwords This option provides a user-visible description of this imported data
DS_ORIG_FILE_NAME NO my_passwords.txt This option indicates the original file name of the credential data
DS_REMOVE_FILE YES true This option indicates whether the service should delete the local file after importing it.

Copyright © 2011 Rapid7 LLC | API Reference 61
A sample request to import a pwdump file would look like:
Client: [ "pro.start_import_creds", "<token>",
{
"workspace" => "Project1",
"DS_IMPORT_PATH" => "/tmp/pwdump.txt",
"DS_FTYPE" => "pwdump",
"DS_NAME" => "domain_dump",
"DS_DESC" => "Password hashes from the DC",
"DS_REMOVE_FILE" => false
}
]
The reply from a successful request contains the Task ID, as shown below:
Server: { "task_id" => "109" }

Copyright © 2011 Rapid7 LLC | API Reference 62
pro.start_nexpose( Hash:Config )
The pro.start_nexpose method is used to launch NeXpose scans directly through the Metasploit Pro service. The pro.start_nexpose method takes a large number of options in the form of a single Hash parameter and returns a Task ID that can be monitored using the Pro Task API.
The individual options within the Config hash are defined in the table below.
Option Name Required Example Description
workspace YES Project1 This option indicates the project name that this import should be part of. This correlates to the full name of the project as listed in the user interface.
username NO admin This option specifies which Pro username this task should be attributed to. If not specified, the first user with administrative privileges is used.
DS_WHITELIST_HOSTS YES 192.168.0.0/24 This option specifies the list of addresses and network ranges to scan.
DS_BLACKLIST_HOSTS NO 192.168.0.3 This option specifies the list of addresses and network ranges to exclude from the whitelist range.
DS_NEXPOSE_HOST YES 127.0.0.1 This option specifies the address of the NeXpose Console
DS_NEXPOSE_PORT NO 3780 This option specifies the port of the NeXpose Console
DS_NEXPOSE_USER YES nxadmin This option specifies a valid username for the NeXpose Console
nexpose_pass YES S3cr3t! This option specifies the password for the user account. It uses a different syntax to prevent the password from being logged in the Event table.
DS_SCAN_TEMPLATE YES pentest-audit The option specifies the scan template to use. The common templates include: pentest-audit full-audit exhaustive-

Copyright © 2011 Rapid7 LLC | API Reference 63
audit discovery aggressive-discovery dos-audit
A sample request to start a new NeXpose scan:
Client: [ "pro.start_nexpose", "<token>",
{
"workspace" => "Project1",
"DS_WHITELIST_HOSTS" => "192.168.0.0/24",
"DS_NEXPOSE_HOST" => "127.0.0.1",
"DS_NEXPOSE_PORT" => 3780,
"DS_NEXPOSE_USER" => "nxadmin",
"nexpose_pass" => "s3cr3t",
"DS_SCAN_TEMPLATE" => "pentest-audit"
}
]
The reply from a successful request contains the Task ID, as shown below:
Server: { "task_id" => "109" }

Copyright © 2011 Rapid7 LLC | API Reference 64
pro.start_bruteforce( Hash:Config )
The pro.start_bruteforce method is used to launch a new Bruteforce task. The pro.start_bruteforce method takes a large number of options in the form of a single Hash parameter and returns a Task ID that can be monitored using the Pro Task API. Keep in mind that the Bruteforce task requires hosts and services to be present first (via Scan, Import, or NeXpose data sources).
The individual options within the Config hash are defined in the table below.
Option Name Required Example Description
workspace YES Project1 This option indicates the project name that this import should be part of. This correlates to the full name of the project as listed in the user interface.
username NO admin This option specifies which Pro username this task should be attributed to. If not specified, the first user with administrative privileges is used.
DS_WHITELIST_HOSTS YES 192.168.0.0/24 This option specifies the list of addresses and network ranges to test.
DS_BLACKLIST_HOSTS NO 192.168.0.3 This option specifies the list of addresses and network ranges to exclude from the target range.
DS_STOP_ON_SUCCESS YES true This option indicates whether the

Copyright © 2011 Rapid7 LLC | API Reference 65
bruteforce should continue testing a service after cracking the first account.
DS_VERBOSE NO true This option indicates how much diagnostic information is shown during the brute force.
DS_INCLUDE_KNOWN YES true This option indicates whether the bruteforce should use credentials that were previously found.
DS_DRY_RUN NO true This option indicates whether to skip the bruteforce and just show what usernames and passwords would have been tested.
DS_BRUTEFORCE_SCOPE YES normal This option indicates what brute force mode to operate in. This is one of the following settings: quick, defaults, normal, deep, known, imported, or 50k.
DS_BRUTEFORCE_SPEED YES Turbo This option specifies how fast to conduct the brute force. This is one of the following settings: Glacial, Slow, Stealthy, Normal, Fast, or

Copyright © 2011 Rapid7 LLC | API Reference 66
Turbo DS_BRUTEFORCE_SERVICES YES SSH This option
specifies what protocols to test. Multiple protocols should be separated by spaces. Available protocols include: SMB, Postgres, DB2, MySQL, MSSQL, Oracle, HTTP, HTTPS, SSH, Telnet, FTP, EXEC, LOGIN, SHELL, VNC, and SNMP
DS_BRUTEFORCE_GETSESSION YES true This option specifies whether to use cracked accounts to gain access to the tested systems.
DS_QUICKMODE_CREDS NO Username Password\n
This option specifies additional credentials to use as part of the brute force. The syntax is "username" followed by a space, following by the "password", and a new line "\n" for each credential.
DS_PAYLOAD_METHOD NO auto This option determines what connection method to use when opening sessions, it can be one of auto, reverse, or bind.

Copyright © 2011 Rapid7 LLC | API Reference 67
DS_PAYLOAD_TYPE NO meterpreter This option determines whether to prefer meterpreter or shell session types.
DS_PAYLOAD_PORTS NO 4000-5000 This option specifies the port range to use for bind and reverse connections.
DS_SMB_DOMAINS NO Domain1 This option specifies a list of domains, separated by spaces, to use when brute forcing protocols that speak NTLM.
DS_PRESERVE_DOMAINS NO true This option specifies whether to use the original domain name with each username and password previously identified.
DS_CRED_FILE_IDS NO 34 This option specifies what imported credential files to include in this brute force task. This requires knowledge of the imported credential file IDs.
DS_MAXGUESSESPERSERVICE NO 100 This option specifies the maximum number of authentication

Copyright © 2011 Rapid7 LLC | API Reference 68
attempts per service, it defaults to 0 which is unlimited.
DS_MAXMINUTESPERSERVICE NO 60 This option specifies the maximum amount of time in minutes to spend on each service, it defaults to 0 which is unlimited.
DS_MAXGUESSESPERUSER NO 3 This option specifies the maximum number of guesses to try for each unique user account, it defaults to 0 which is unlimited.
DS_MAXMINUTESOVERALL NO 30 This option specifies the maximum amount of time to run for the entire brute force task, it defaults to 0 which is unlimited.
DS_MAXGUESSESOVERALL NO 1000 This option specifies the maximum number of guesses to try overall, it defaults to 0 which is unlimited.
DS_BRUTEFORCE_SKIP_BLANK_PASSWORDS NO true This option specifies whether to skip blank passwords

Copyright © 2011 Rapid7 LLC | API Reference 69
entirely, it defaults to false.
DS_BRUTEFORCE_SKIP_MACHINE_NAMES NO true This option specifies whether to skip machine names as a password seed source for the wordlist, it defaults to false.
DS_BRUTEFORCE_SKIP_BUILTIN_WINDOWS_ACCOUNTS NO true This option specifies whether to skip builtin Windows accounts that typically do not have weak passwords (service accounts).
DS_BRUTEFORCE_SKIP_BLANK_BUILTIN_UNIX_ACCOUNTS NO true This options specifies whether to skip builtin Unix accounts that typically do have weak passwords (service accounts)
DS_BRUTEFORCE_RECOMBINE_CREDS NO true This option specifies whether to recombine known, imported, and additional credentials to create the wordlists.
DS_MSSQL_WINDOWS_AUTH NO true This option indicates that MSSQL Server authentication should use NTLM instead of Standard mode. This defaults to false.

Copyright © 2011 Rapid7 LLC | API Reference 70
A sample request to start a new Bruteforce task:
Client: [ "pro.start_bruteforce", "<token>",
{
"workspace" => "Project1",
"DS_WHITELIST_HOSTS" => "192.168.0.0/24",
"DS_BRUTEFORCE_SCOPE" => "defaults",
"DS_BRUTEFORCE_SERVICES" => "SSH HTTP",
"DS_BRUTEFORCE_SPEED" => "TURBO",
"DS_INCLUDE_KNOWN" => normal,
"DS_BRUTEFORCE_GETSESSION" => true
}
]
The reply from a successful request contains the Task ID, as shown below:
Server: { "task_id" => "109" }

Copyright © 2011 Rapid7 LLC | API Reference 71
pro.start_exploit( Hash:Config )
The pro.start_exploit method is what drives the Exploit action within the Metasploit Pro user interface. The pro.start_exploit method takes a large number of options in the form of a single Hash parameter and returns a Task ID that can be monitored using the Pro Task API. Keep in mind that the Exploit action requires hosts, services, and optionally vulnerabilities to be present before it can be used. This can be accomplished using the Scan, Import, and NeXpose actions first.
The individual options within the Config hash are defined in the table below.
Option Name Required Example Description
workspace YES Project1 This option indicates the project name that this import should be part of. This correlates to the full name of the project as listed in the user interface.
username NO admin This option specifies which Pro username this task should be attributed to. If not specified, the first user with administrative privileges is used.
DS_WHITELIST_HOSTS YES 192.168.0.0/24 This option specifies the target addresses and network ranges to test.
DS_BLACKLIST_HOSTS NO 192.168.0.1 This option determines what addresses should be excluded from the test. Multiple entries should be separated by spaces.
DS_WHITELIST_PORTS NO 1-1000 This option specifies what ports are allowed during the exploitation task. This defaults to 1-65535 (all ports).
DS_BLACKLIST_PORTS NO 80,443 This option specifies a list of ports to avoid during the exploitation task.
DS_MinimumRank YES great This option specifies the minimum reliability level of exploits to include the exploitation task. This is

Copyright © 2011 Rapid7 LLC | API Reference 72
one of the following settings, in order of increasing liability: low, average, normal, good, great, or excellent.
DS_EXPLOIT_SPEED YES 5 This option indicates how many exploits to run in parallel. The default is 5 and a reasonable maximum is 10 due to how resources are allocated.
DS_EXPLOIT_TIMEOUT NO 5 This option sets the maximum amount of time any individual exploit can run. Setting this below 2 minutes can prevent some exploits from working.
DS_LimitSessions NO false This option determines whether to attempt to avoid exploiting systems that already have an active session. The default is true.
DS_IgnoreFragileDevices NO false This option specifies whether to avoid running exploits against systems that are known to fall over during common testing. This is based on an internal blacklist and results in printers and many network devices being skipped automatically by the exploit engine. This setting defaults to true.
DS_FilterByOS NO false This option instructs the exploit engine to use OS information when matching exploits to hosts. Exploits will only be skipped when the confidence of the OS signature is high. The default for this option is true.

Copyright © 2011 Rapid7 LLC | API Reference 73
DS_OnlyMatch NO true This option, when set to true, instructions to exploit engine to match exploits but not actually run them. The default setting is false.
DS_MATCH_VULNS YES false This option instructs the exploit engine to match exploits based on vulnerability references. This setting defaults to true
DS_MATCH_PORTS YES false This option instructs the exploit engine to match exploits based on open services. This setting defaults to true.
DS_PAYLOAD_METHOD NO auto This option determines what connection method to use when opening sessions, it can be one of auto, reverse, or bind.
DS_PAYLOAD_TYPE NO meterpreter This option determines whether to prefer meterpreter or shell session types.
DS_PAYLOAD_PORTS NO 4000-5000 This option specifies the port range to use for bind and reverse connections.
DS_EVASION_LEVEL_TCP NO 1 This option specifies a transport-level evasion level between 0 and 3.
DS_EVASION_LEVEL_APP NO 1 This option specifies an application-level evasion level between 0 and 3.
DS_ModuleFilter NO exploit/windows/smb/psexec This option specifies a whitelist of module names that are allowed to be run, separated by commas. By default all modules are considered that meet the other criteria.

Copyright © 2011 Rapid7 LLC | API Reference 74
A sample request to run exploits across a network range:
Client: [ "pro.start_exploit", "<token>",
{
"workspace" => "Project1",
"DS_WHITELIST_HOSTS" => "192.168.0.0/24",
"DS_MinimumRank" => "great",
"DS_EXPLOIT_SPEED" => 5,
"DS_EXPLOIT_TIMEOUT" => 2,
"DS_LimitSessions" => true,
"DS_MATCH_VULNS" => true,
"DS_MATCH_PORTS" => true
}
]
The reply from a successful request contains the Task ID, as shown below:
Server: { "task_id" => "109" }

Copyright © 2011 Rapid7 LLC | API Reference 75
pro.start_webscan( Hash:Config )
The pro.start_webscan method is what drives the WebScan action within the Metasploit Pro user interface. The pro.start_webscan method takes a large number of options in the form of a single Hash parameter and returns a Task ID that can be monitored using the Pro Task API. The individual options within the Config hash are defined in the table below.
Option Name Required Example Description
workspace YES Project1 This option indicates the project name that this import should be part of. This correlates to the full name of the project as listed in the user interface.
username NO admin This option specifies which Pro username this task should be attributed to. If not specified, the first user with administrative privileges is used.
DS_URLS YES http://site/ This option specifies a list of URLs (space separated) to spider.
DS_MAX_PAGES YES 1000 This options indicates the maximum number of pages the spider should analyze per URL
DS_MAX_MINUTES YES 5 This option sets a maximum spider time per URL
DS_MAX_THREADS YES 1 This option specifies the number of concurrent threads to spider with per URL. Reasonable values are between 1 and 5.
DS_BasicAuthUser NO Admin This option indicates that HTTP Basic Authentication should be used and this username provided
DS_BasicAuthPass NO S3cr3t This option indicates that HTTP Basic Authentication should be

Copyright © 2011 Rapid7 LLC | API Reference 76
used and this password provided
DS_HTTPCookie NO SID=124324 This option can be used to specify a cookie value for form authentication
DS_UserAgent NO GoogleBot This option can be used to override the UserAgent of all requests sent by the spider
A sample request to run exploits across a network range:
Client: [ "pro.start_webscan", "<token>",
{
"workspace" => "Project1",
"DS_URLS" => "http://www.example.org/",
"DS_MAX_PAGES" => 1000,
"DS_MAX_MINUTES" => 5,
"DS_MAX_THREADS" => 2
}
]
The reply from a successful request contains the Task ID, as shown below:
Server: { "task_id" => "109" }

Copyright © 2011 Rapid7 LLC | API Reference 77
(pro.start_webaudit Hash:Config )
The pro.start_webaudit method is what drives the WebAudit action within the Metasploit Pro user interface. The pro.start_webaudit method takes a large number of options in the form of a single Hash parameter and returns a Task ID that can be monitored using the Pro Task API. Keep in mind that the WebAudit action requires one or more existing forms to have been identified by the WebScan action or an import from another data source.
The individual options within the Config hash are defined in the table below.
Option Name Required Example Description
workspace YES Project1 This option indicates the project name that this import should be part of. This correlates to the full name of the project as listed in the user interface.
username NO admin This option specifies which Pro username this task should be attributed to. If not specified, the first user with administrative privileges is used.
DS_URLS YES http://site/ This option specifies a list of URLs (space separated) to audit where at least form has been identified per URL.
DS_MAX_REQUESTS YES 1000 This options indicates the maximum number of requests that should be sent to each unique form
DS_MAX_MINUTES YES 5 This option sets a maximum audit time per form
DS_MAX_THREADS YES 1 This option specifies the number of concurrent threads to spider with per URL. Reasonable values are between 1 and 5.
DS_MAX_INSTANCES YES 5 This option specifies the maximum unique instances of a given form

Copyright © 2011 Rapid7 LLC | API Reference 78
that should be audited. DS_BasicAuthUser NO Admin This option indicates that
HTTP Basic Authentication should be used and this username provided
DS_BasicAuthPass NO S3cr3t This option indicates that HTTP Basic Authentication should be used and this password provided
DS_HTTPCookie NO SID=124324 This option can be used to specify a cookie value for form authentication
DS_UserAgent NO GoogleBot This option can be used to override the UserAgent of all requests sent
A sample request to run exploits across a network range:
Client: [ "pro.start_webaudit", "<token>",
{
"workspace" => "Project1",
"DS_URLS" => "http://www.example.org/login.aspx",
"DS_MAX_REQUESTS" => 1000,
"DS_MAX_MINUTES" => 2,
"DS_MAX_THREADS" => 1,
"DS_MAX_INSTANCES" => 10
}
]
The reply from a successful request contains the Task ID, as shown below:
Server: { "task_id" => "109" }

Copyright © 2011 Rapid7 LLC | API Reference 79
(pro.start_websploit Hash:Config )
The pro.start_websploit method is what drives the WebSploitt action within the Metasploit Pro user interface. The pro.start_websploit method takes a large number of options in the form of a single Hash parameter and returns a Task ID that can be monitored using the Pro Task API. Keep in mind that the WebSploit action requires one or more existing vulnerabilities to have been identified by WebAudit or imported from another data source.
The individual options within the Config hash are defined in the table below.
Option Name Required Example Description
workspace YES Project1 This option indicates the project name that this import should be part of. This correlates to the full name of the project as listed in the user interface.
username NO admin This option specifies which Pro username this task should be attributed to. If not specified, the first user with administrative privileges is used.
DS_VULNERABILITIES YES 100,101,102 This option specifies a list of vulnerability IDs to attempt to exploit. These IDs are created by WebAudit and by importing data. Each ID refers to a unique instance of a vulnerability.
DS_EXPLOIT_TIMEOUT NO 5 This option sets the maximum amount of time any individual exploit can run. Setting this below 2 minutes can prevent some exploits from working.
DS_LimitSessions NO false This option determines whether to attempt to avoid exploiting systems

Copyright © 2011 Rapid7 LLC | API Reference 80
that already have an active session. The default is true.
DS_PAYLOAD_METHOD NO auto This option determines what connection method to use when opening sessions, it can be one of auto, reverse, or bind.
DS_PAYLOAD_TYPE NO meterpreter This option determines whether to prefer meterpreter or shell session types.
DS_PAYLOAD_PORTS NO 4000-5000 This option specifies the port range to use for bind and reverse connections.
DS_BasicAuthUser NO Admin This option indicates that HTTP Basic Authentication should be used and this username provided
DS_BasicAuthPass NO S3cr3t This option indicates that HTTP Basic Authentication should be used and this password provided
DS_HTTPCookie NO SID=124324 This option can be used to specify a cookie value for form authentication
DS_UserAgent NO GoogleBot This option can be used to override the UserAgent of all requests sent
A sample request to run exploits across a network range:
Client: [ "pro.start_websploit", "<token>",
{
"workspace" => "Project1",
"DS_VULNERABILITIES" => "100 101 102",
}
]

Copyright © 2011 Rapid7 LLC | API Reference 81
The reply from a successful request contains the Task ID, as shown below:
Server: { "task_id" => "109" }

Copyright © 2011 Rapid7 LLC | API Reference 82
pro.start_cleanup( Hash:Config )
The pro.start_cleanup method is what drives the Cleanup action within the Metasploit Pro user interface. The pro.start_cleanup method takes a number of options in the form of a single Hash parameter and returns a Task ID that can be monitored using the Pro Task API.
The individual options within the Config hash are defined in the table below.
Option Name Required Example Description
workspace YES Project1 This option indicates the project name that this import should be part of. This correlates to the full name of the project as listed in the user interface.
username NO admin This option specifies which Pro username this task should be attributed to. If not specified, the first user with administrative privileges is used.
DS_SESSIONS YES 1 2 3 This option specifies a list of session IDs to close. These are RPC service session IDs.
DS_DBSESSIONS NO 1001 1002 This option specifies a list of session IDs by their database identifiers.
A sample request to run exploits across a network range:
Client: [ "pro.start_cleanup", "<token>",
{
"workspace" => "Project1",
"DS_SESSIONS" => "100 101 102",
}
]
The reply from a successful request contains the Task ID, as shown below:
Server: { "task_id" => "109" }

Copyright © 2011 Rapid7 LLC | API Reference 83
pro.start_collect( Hash:Config )
The pro.start_collect method is what drives the Collect action within the Metasploit Pro user interface. The pro.start_collect method takes a number of options in the form of a single Hash parameter and returns a Task ID that can be monitored using the Pro Task API.
The individual options within the Config hash are defined in the table below.
Option Name Required Example Description
workspace YES Project1 This option indicates the project name that this import should be part of. This correlates to the full name of the project as listed in the user interface.
username NO admin This option specifies which Pro username this task should be attributed to. If not specified, the first user with administrative privileges is used.
DS_SESSIONS YES 1 2 3 This option specifies a list of session IDs to close. These are RPC service session IDs.
DS_COLLECT_SYSINFO YES true This option indicates whether basic system information should be acquired
DS_COLLECT_PASSWD YES true This option indicates whether password and hashes should be acquired
DS_COLLECT_SCREENSHOTS YES true This option indicates whether screenshots should be taken
DS_COLLECT_SSH YES true This option indicates whether ssh key information should be acquired
DS_COLLECT_FILES YES false This option indicates whether specific files matching a pattern

Copyright © 2011 Rapid7 LLC | API Reference 84
should be acquired DS_COLLECT_FILES_PATTERN NO *.doc This option sets the file
pattern to automatically download
DS_COLLECT_FILES_COUNT NO 100 This option sets the maximum number of files to download per session
DS_COLLECT_FILES_SIZE NO 40 This option sets the maximum file size to download per file, in kilobytes
A sample request to run exploits across a network range:
Client: [ "pro.start_collect", "<token>",
{
"workspace" => "Project1",
"DS_SESSIONS" => "100 101 102",
"DS_COLLECT_SYSINFO" => true,
"DS_COLLECT_PASSWD" => true,
"DS_COLLECT_SCREENSHOTS" => true,
"DS_COLLECT_SSH" => true,
"DS_COLLECT_FILES" => false
}
]
The reply from a successful request contains the Task ID, as shown below:
Server: { "task_id" => "109" }

Copyright © 2011 Rapid7 LLC | API Reference 85
pro.start_report( Hash:Config )
The pro.start_report method is what drives the Report and Export actions within the Metasploit Pro user interface. The pro.start_report method takes a number of options in the form of a single Hash parameter and returns a Task ID that can be monitored using the Pro Task API.
The individual options within the Config hash are defined in the table below.
Option Name Required Example Description
workspace YES Project1 This option indicates the project name that this import should be part of. This correlates to the full name of the project as listed in the user interface.
username NO admin This option specifies which Pro username this task should be attributed to. If not specified, the first user with administrative privileges is used.
DS_WHITELIST_HOSTS YES 192.168.0.0/24 This option specifies what hosts from the specified project should be included. By default it includes all hosts
DS_BLACKLIST_HOSTS NO 192.168.0.1 This option specifies what hosts to exclude from the generated report
DS_MaskPasswords YES true This option indicates whether to hide passwords or not
DS_IncludeTaskLog YES true This option indicates whether to include the task logs in the ZIP report format
DS_JasperDisplaySession YES true This option indicates whether to include the session history in the report.
DS_DisplayCharts YES false This option indicates whether to show charts and graphs in the

Copyright © 2011 Rapid7 LLC | API Reference 86
generated report (if applicable)
DS_LootExcludeScreenshots YES true This option indicates whether to exclude screenshots from generated ZIP exports
DS_LootExcludePasswords YES true This option indicates whether to exclude passwords from generated ZIP exports
DS_JasperTemplate YES msfxv3.jrxml This option specifies the name of the report template to use on the server.
DS_REPORT_TYPE YES PDF This option is one of the following values (uppercase): XML, ZIP, REPLAY, PWDUMP, ACTIVITY-XML, ACTIVITY-PDF, ACTIVITY-RTF, PCI-PDF, PCI-RTF, PCI-XML, FISMA-PDF, FISMA-RTF, FISMA-XML
DS_UseJasper YES true This option indicates that the Jasper engine should be used (required for most formats)
DS_UseCustomReport YES true This option must be set to enable custom reporting (always true for RPC users)
DS_JasperProductName YES Metasploit Pro This option defines what banner is shown in the report cover page
DS_JasperDbEnv YES production This option specifies what database to use, for all RPC cases it should be "production"
DS_JasperLogo YES Logo.png This option can specify an image located in the Pro asset directory to use as the cover page logo. Leave blank to use the default logo.
DS_JasperDisplaySections YES 1,2,3,4,5,6,7,8 This option specifies a list of sections to include in the audit reports
DS_EnablePCIReport YES true This option must be set

Copyright © 2011 Rapid7 LLC | API Reference 87
to true in order to generate PCI reports
DS_EnableFISMAReport YES true This option must be set to true in order to generate FISMA reports
DS_JasperDisplayWeb YES true This option must be set to show web application vulnerabilities in the generated report
A sample request to run exploits across a network range:
Client: [ "pro.start_report", "<token>",
{
'DS_WHITELIST_HOSTS' => "",
'DS_BLACKLIST_HOSTS' => "",
'workspace' => "Project 1",
'DS_MaskPasswords' => false,
'DS_IncludeTaskLog' => false,
'DS_JasperDisplaySession' => true,
'DS_JasperDisplayCharts' => true,
'DS_LootExcludeScreenshots' => false,
'DS_LootExcludePasswords' => false,
'DS_JasperTemplate' => "msfxv3.jrxml",
'DS_REPORT_TYPE' => "PDF",
'DS_UseJasper' => true,
'DS_UseCustomReporting' => true,
'DS_JasperProductName' => "Metasploit Pro",
'DS_JasperDbEnv' => "production",
'DS_JasperLogo' => '',
'DS_JasperDisplaySections' => "1,2,3,4,5,6,7,8",
'DS_EnablePCIReport' => true,
'DS_EnableFISMAReport' => true,
'DS_JasperDisplayWeb' => true
}
]
The reply from a successful request contains the Task ID, as shown below:

Copyright © 2011 Rapid7 LLC | API Reference 88
Server: { "task_id" => "109" }

Copyright © 2011 Rapid7 LLC | API Reference 89
Pro Import API
pro.import_data( String:Workspace, BinaryString:Data, Hash:Options )
The pro.import_data method starts a new import task with the supplied data.
Client: [ "pro.import_data", "<token>", "Project1", "<DATA>",
{
'blacklist_hosts' => '',
'preserve_hosts' => false
}
Server: { "task_id" => "109" }
pro.import_file( String:Workspace, String:Path, Hash:Options )
The pro.import_file method starts a new import task with the supplied server-local path.
Client: [ "pro.import_file", "<token>", "Project1", "/home/data/report.xml",
{
'blacklist_hosts' => '',
'preserve_hosts' => false
}
Server: { "task_id" => "109" }
pro.validate_import_file( String:Path )
The pro.validate_import_file method validates a file on disk to verify that it is a support data format. This method is non-standard in that it only returns a true or false value.
Client: [ "pro.import_file", "<token>", "Project1", "/home/data/report.xml",
{
'blacklist_hosts' => '',
'preserve_hosts' => false
}
Server: true

Copyright © 2011 Rapid7 LLC | API Reference 90
Pro Loot API
pro.loot_download( Integer:LootID )
The pro.loot_download method downloads the file associated with loot record, by unique ID
Client: [ "pro.loot_download", "<token>", 99 ]
Server: { "data" => "<BinaryData>" }
pro.loot_list( String:WorkspaceName )
The pro.loot_download method returns a list of available loot records in a workspace
Client: [ "pro.loot_list", "<token>", "Project1" ]
Server: {
"900" => {
'workspace' => "Project1",
'host' => "1.2.3.4",
'service' => 80,
'proto' => 'tcp',
'ltype' => 'screenshot',
'ctype' => 'image/jpeg',
'created_at' => <Unix Timestamp Integer>,
'updated_at' => <Unix Timestamp Integer>,
'name' => 'desktop.jpg',
'info' => 'User desktop screenshot',
'path' => '/opt/metasploit/loot/wspace_1_xxxxx.jpg',
'size' => 40945
}
}

Copyright © 2011 Rapid7 LLC | API Reference 91
Pro Module API
pro.module_search( String:SearchQuery )
The pro.module_search method scans the module database and returns any entries matching the specified search query.
Client: [ "pro.module_search", "<token>", "dcom" ]
Server: { "matches"=>
{"exploit/windows/dcerpc/ms03_026_dcom"=>
{"type" => "exploit",
"name" => "Microsoft RPC DCOM Interface Overflow",
"rank" => 500,
"description" => "Long description…",
"license" => "Metasploit Framework License (BSD)",
"filepath" => "[..]/windows/dcerpc/ms03_026_dcom.rb",
"version" => "11545",
"arch" => [],
"platform" => [],
"references" =>
[["CVE", "2003-0352"],
["OSVDB", "2100"],
["MSB", "MS03-026"],
["BID", "8205"]],
"authors" =>
["hdm <hdm[at]metasploit.com>",
"spoonm <spoonm@no$email.com>",
"cazz <bmc[at]shmoo.com>"],
"privileged" => true,
"disclosure_date" => 1058313600,
"targets" => {0=>"Windows NT SP3-6a/2000/XP/2003 Universal"},
"default_target" =>"0",
"stance" => "aggressive"}, …
}

Copyright © 2011 Rapid7 LLC | API Reference 92
pro.module_validate( String:ModuleName, Hash:ModuleOptions )
The pro.module_validate method is used to determine whether a set of options satisfies the requirements of a given module.
Client: [ "pro.module_validate", "<token>",
"exploit/windows/smb/psexec", {
"RHOST" => "1.2.3.4"
}
]
Server: { "result" => "success" }
Invalid options would result in the following:
Server: {
"result" => "failure",
"error" => "The following options failed to validate: RHOST."
}
pro.modules( String:ModuleType )
The pro.modules method returns the full set of modules for a given type
Client: [ "pro.modules", "<token>", "post" ]
Server: {"modules" =>
{ "post/linux/gather/checkvm" =>
{"type" => "post",
"name" => "Linux Gather Virtual Environment Detection",
"rank" => 300,
"description" => "Long description…",
"license" => "Metasploit Framework License (BSD)",
"filepath" => "[…]post/linux/gather/checkvm.rb",
"version" => "13173",
"arch" => [],
"platform" => ["Msf::Module::Platform::Linux"],

Copyright © 2011 Rapid7 LLC | API Reference 93
"references" => [],
"authors" => ["Carlos Perez <carlos_perez[at]darkoperator.com>"],
"privileged" => false}, …
}

Copyright © 2011 Rapid7 LLC | API Reference 94
Pro Report API
pro.report_download(report_id)
pro.report_download_by_task(task_id)
pro.report_list( String:WorkspaceName )
Pro Meterpreter API
pro.meterpreter_chdir(sid, path)
pro.meterpreter_getcwd(sid)
pro.meterpreter_list(sid, path)
pro.meterpreter_rm(sid, path)
pro.meterpreter_root_paths(sid)
pro.meterpreter_search(sid, query)
pro.meterpreter_tunnel_interfaces(sid)