Embed Size (px)
Citation preview
4. Troubleshooting
4.6. Error Code and Troubleshooting
Messages appear on the control panel display to indicate the machine’s status or errors.
NOTE
Some messages may not appear on the display depending on the options or models.
4-72 Copyright© 1995-2016 SAMSUNG. All rights reserved.

4. Troubleshooting
4.6.1. 11–2Txx (Paper mismatch error)
Error Code Error Message Troubleshooting Page
11-2T01 Load tray with [Letter], [Plain] paper P.4–73
11-2T11 Load tray 1 with [Letter], [Plain] paper P.4–73
11-2T21 Load tray 2 with [Letter], [Plain] paper P.4–73
11-2T31 Load tray 3 with [Letter], [Plain] paper P.4–73
11-2T41 Load tray 4 with [Letter], [Plain] paper P.4–73
11-2T51 Load tray 5 with [Letter], [Plain] paper P.4–73
11-2T61 Load MP with [Letter], [Plain] paper P.4–73
► Error Code
11-2T01 / 11–2T11 / 11–2T21 / 11–2T31 / 11–2T41 / 11–2T51 / 11–2T61
► Error message
Load tray with [Letter], [Plain] paperLoad tray 1 with [Letter], [Plain] paperLoad tray 2 with [Letter], [Plain] paperLoad tray 3 with [Letter], [Plain] paperLoad tray 4 with [Letter], [Plain] paperLoad tray 5 with [Letter], [Plain] paperLoad MP with [Letter], [Plain] paper
► Symptom
Paper in tray is not matched to the machine paper setting.
► Troubleshooting method
NOTE
To see the troubleshooting video for this error, click through to the link below.
• 11-2T01 : http://tsp.samsung.com/tsp_file/spds/samsungprinter/K7/Webview/EN_K7_11-2T01.html
• 11–2T11 : http://tsp.samsung.com/tsp_file/spds/samsungprinter/K7/Webview/EN_K7_11-2T11.html
• 11-2T21 : http://tsp.samsung.com/tsp_file/spds/samsungprinter/K7/Webview/EN_K7_11-2T21.html
• 11-2T31 : http://tsp.samsung.com/tsp_file/spds/samsungprinter/K7/Webview/EN_K7_11-2T31.html
• 11-2T41 : http://tsp.samsung.com/tsp_file/spds/samsungprinter/K7/Webview/EN_K7_11-2T41.html
• 11-2T51 : http://tsp.samsung.com/tsp_file/spds/samsungprinter/K7/Webview/EN_K7_11-2T51.html
• 11-2T61 : http://tsp.samsung.com/tsp_file/spds/samsungprinter/K7/Webview/EN_K7_11-2T61.html
1) Check and change the paper setting of the corresponding tray properly.
Copyright© 1995-2016 SAMSUNG. All rights reserved. 4-73
4. Troubleshooting
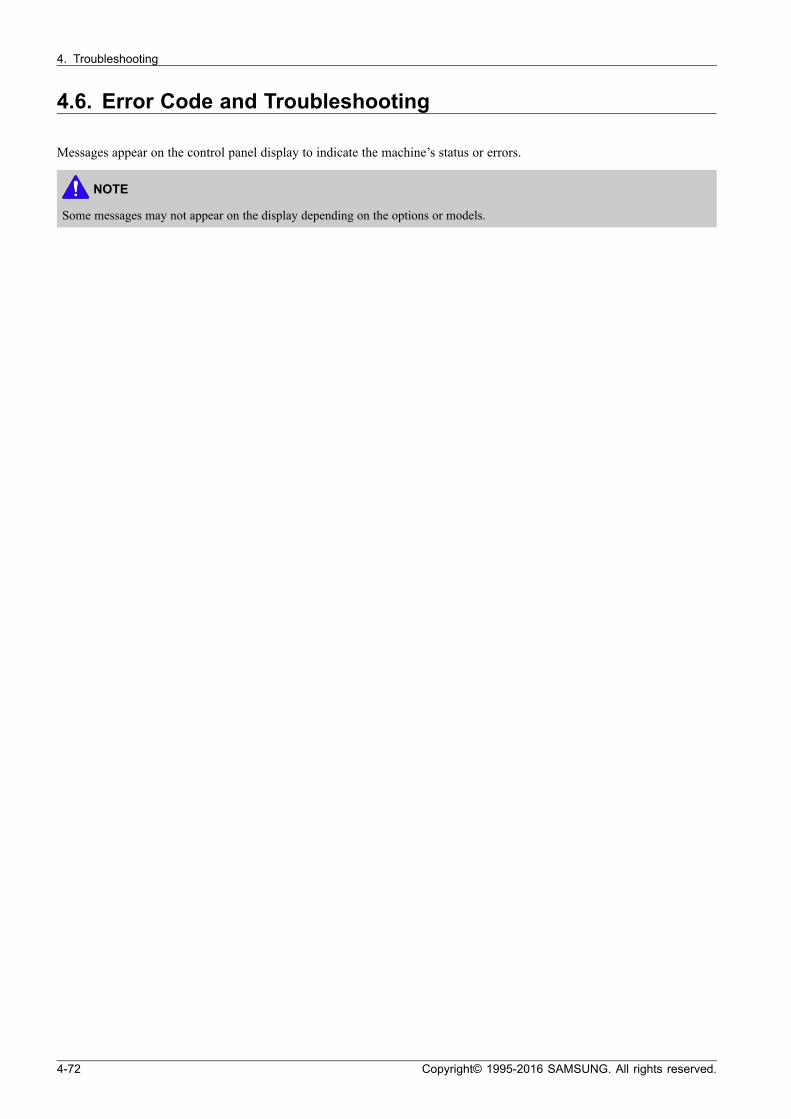
4.6.2. 61–1xxx (System Error)
Error Code Error Message Troubleshooting Page
61-1111 Booting Failure: #61-1111. Turn off then on. Call for service if the problempersists
P.4–74
61–1Y70 Scanner Failure: #61-1Y70. Turn off then on. Call for service if the problempersists
P.4–74
61-C401 Job is completed with error: DNS Error P.4–75
► Error Code
61–1111
► Error message
Booting Failure: #61-1111. Turn off then on. Call for service if the problem persists
► Symptom
Hibernation image creation is failed.
► Troubleshooting method
NOTE
To see the troubleshooting video for this error, click through to the link below.
(http://tsp.samsung.com/tsp_file/spds/samsungprinter/K7/Webview/EN_K7_61-1111.html)
1) Turn the machine on with a normal booting.
2) Enter the SVC mode. Select “Hibernation On” again.
► Error Code
61–1Y70
► Error message
Scanner Failure: #61-1Y70. Turn off then on. Call for service if the problem persists
► Symptom
Shading data is broken due to HDD/SD replacement or system format.
► Troubleshooting method
NOTE
To see the troubleshooting video for this error, click through to the link below.
(http://tsp.samsung.com/tsp_file/spds/samsungprinter/K7/Webview/EN_K7_61-1Y70.html)
1) Turn the machine off then on.
2) If the error persists, enter the SVC mode.
3) Execute the shading test.
4-74 Copyright© 1995-2016 SAMSUNG. All rights reserved.

4. Troubleshooting
► Error Code
61-C401
► Error message
Job is completed with error: DNS Error
► Symptom
Scan to Email Job or Scan to Server Job is failed because of DNS server error.
► Troubleshooting method
1) Connect to the SyncThru Web Service as administrator.
2) Check domain name. (Network > Interface > Ethernet > TCP/IP > Domain name)
3) Check DNS server address.
4) Retry the job.
Copyright© 1995-2016 SAMSUNG. All rights reserved. 4-75

4. Troubleshooting
4.6.3. A1–xxxx (Motor error)
Error Code Error Message Troubleshooting Page
A1-1111 Motor Failure: #A1-1111. Turn off then on. Call for service if the problempersists
P.4–78
A1-1113 Motor Failure: #A1-1113. Turn off then on. Call for service if the problempersists
P.4–78
A1-1211 Motor Failure: #A1-1211. Turn off then on. Call for service if the problempersists
P.4–79
A1-1213 Motor Failure: #A1-1213. Turn off then on. Call for service if the problempersists
P.4–79
A1-1611 Motor Failure: #A1-1611. Turn off then on. Call for service if the problempersists
P.4–80
A1-1612 Motor Failure: #A1-1612. Turn off then on. Call for service if the problempersists
P.4–80
A1-1613 Motor Failure: #A1-1613. Turn off then on. Call for service if the problempersists
P.4–80
A1-2211 Motor Failure: #A1-2211. Turn off then on. Call for service if the problempersists
P.4–81
A1-2212 Motor Failure: #A1-2212. Turn off then on. Call for service if the problempersists
P.4–81
A1-2213 Motor Failure: #A1-2213. Turn off then on. Call for service if the problempersists
P.4–81
A1-2311 Motor Failure: #A1-2311. Turn off then on. Call for service if the problempersists
P.4–82
A1-2312 Motor Failure: #A1-2312. Turn off then on. Call for service if the problempersists
P.4–82
A1-2313 Motor Failure: #A1-2313. Turn off then on. Call for service if the problempersists
P.4–82
A1-2411 Motor Failure: #A1-2411. Turn off then on. Call for service if the problempersists
P.4–83
A1-2412 Motor Failure: #A1-2412. Turn off then on. Call for service if the problempersists
P.4–83
A1-2413 Motor Failure: #A1-2413. Turn off then on. Call for service if the problempersists
P.4–83
A1-2511 Motor Failure: #A1-2511. Turn off then on. Call for service if the problempersists
P.4–84
A1-2512 Motor Failure: #A1-2512. Turn off then on. Call for service if the problempersists
P.4–84
A1-2513 Motor Failure: #A1-2513. Turn off then on. Call for service if the problempersists
P.4–84
A1-4310 Motor Failure: #A1-4310. Turn off then on. Call for service if the problempersists
P.4–85
A1-5212 Motor Failure: #A1-5212. Turn off then on. Call for service if the problempersists
P.4–86
A1-5213 Motor Failure: #A1-5213. Turn off then on. Call for service if the problempersists
P.4–86
4-76 Copyright© 1995-2016 SAMSUNG. All rights reserved.

4. Troubleshooting
Error Code Error Message Troubleshooting Page
A1-5312 Motor Failure: #A1-5312. Turn off then on. Call for service if the problempersists
P.4–87
A1-5313 Motor Failure: #A1-5313. Turn off then on. Call for service if the problempersists
P.4–87
A1-5412 Motor Failure: #A1-5412. Turn off then on. Call for service if the problempersists
P.4–88
A1-5413 Motor Failure: #A1-5413. Turn off then on. Call for service if the problempersists
P.4–88
A1-5512 Motor Failure: #A1-5512. Turn off then on. Call for service if the problempersists
P.4–89
A1-5513 Motor Failure: #A1-5513. Turn off then on. Call for service if the problempersists
P.4–89
Copyright© 1995-2016 SAMSUNG. All rights reserved. 4-77

4. Troubleshooting
► Error Code
A1–1111A1–1113
► Error message
Motor Failure: #A1-1111. Turn off then on. Call for service if the problem persists.Motor Failure: #A1-1113. Turn off then on. Call for service if the problem persists.
► Symptom
Feed/MP motor operation is abnormal.
► Troubleshooting method
NOTE
To see the troubleshooting video for this error, click through to the link below.
• A1–1111 : http://tsp.samsung.com/tsp_file/spds/samsungprinter/X7/Webview/EN_X7_A1-1111.html
• A1-1113 : http://tsp.samsung.com/tsp_file/spds/samsungprinter/X7/Webview/EN_X7_A1-1113.html
• A1–1111 : Feed/MP motor is stopped but machine recognizes it as operational.
• A1–1113 : Feed/MP motor is operating but machine recognizes status as "Stopped".
1) Turn the machine off then on. If the error persists, check the following.
2) Open the side cover. Check if there are any foreign substances or paper around Feed/MP unit.
3) Remove the rear cover.
4) Check the connection between the motor and main board.
5) If the connection is OK, enter SVC mode. Execute the motor test.(Diagnostics > Engine Diagnostics > Engine Test Routines)
a) If the motor is not operational,i) Check the motor signal(3.3V). If the signal is abnormal, replace the main board.
(Refer to 3.3.7 Main board)
ii) Check the power(24V). If the power is abnormal, check the SMPS board. If the SMPS board is defective,replace it.(Refer to 3.3.9 SMPS board 1 and 2)
iii) If the motor signal and power is normal, replace the Feed/MP motor.(Refer to 3.3.18 Feed_MP Drive Unit)
b) If the motor is operational, replace the main board.
4-78 Copyright© 1995-2016 SAMSUNG. All rights reserved.

4. Troubleshooting
► Error Code
A1–1211A1–1213
► Error message
Motor Failure: #A1-1211. Turn off then on. Call for service if the problem persistsMotor Failure: #A1-1213. Turn off then on. Call for service if the problem persists
► Symptom
Fuser/Exit motor operation is abnormal.
► Troubleshooting method
NOTE
To see the troubleshooting video for this error, click through to the link below.
• A1-1211 : http://tsp.samsung.com/tsp_file/spds/samsungprinter/X7/Webview/EN_X7_A1-1211.html
• A1-1213 : http://tsp.samsung.com/tsp_file/spds/samsungprinter/X7/Webview/EN_X7_A1-1213.html
• A1–1211 : Fuser/Exit motor is stopped but machine recognizes it as operational.
• A1–1213 : Fuser/Exit motor is operating but recognizes status as "Stopped".
1) Turn the machine off then on. If the error persists, check the following.
2) Open the side cover. Check if there are any foreign substances or paper around fuser unit.
3) Remove the rear cover.
4) Check the connection between the motor and main board.
5) If the connection is OK, enter SVC mode. Execute the motor test.(Diagnostics > Engine Diagnostics > Engine Test Routines)
a) If the motor is not operational,i) Check the motor signal(3.3V). If the signal is abnormal, replace the main board.
(Refer to 3.3.7 Main board)
ii) Check the power(24V). If the power is abnormal, check the SMPS board. If the SMPS board is defective,replace it.(Refer to 3.3.9 SMPS board 1 and 2)
iii) If the motor signal and power is normal, replace the Fuser/Exit motor.(Refer to 3.3.20 Fuser_Exit Drive unit)
b) If the motor is operational, replace the main board.
Copyright© 1995-2016 SAMSUNG. All rights reserved. 4-79
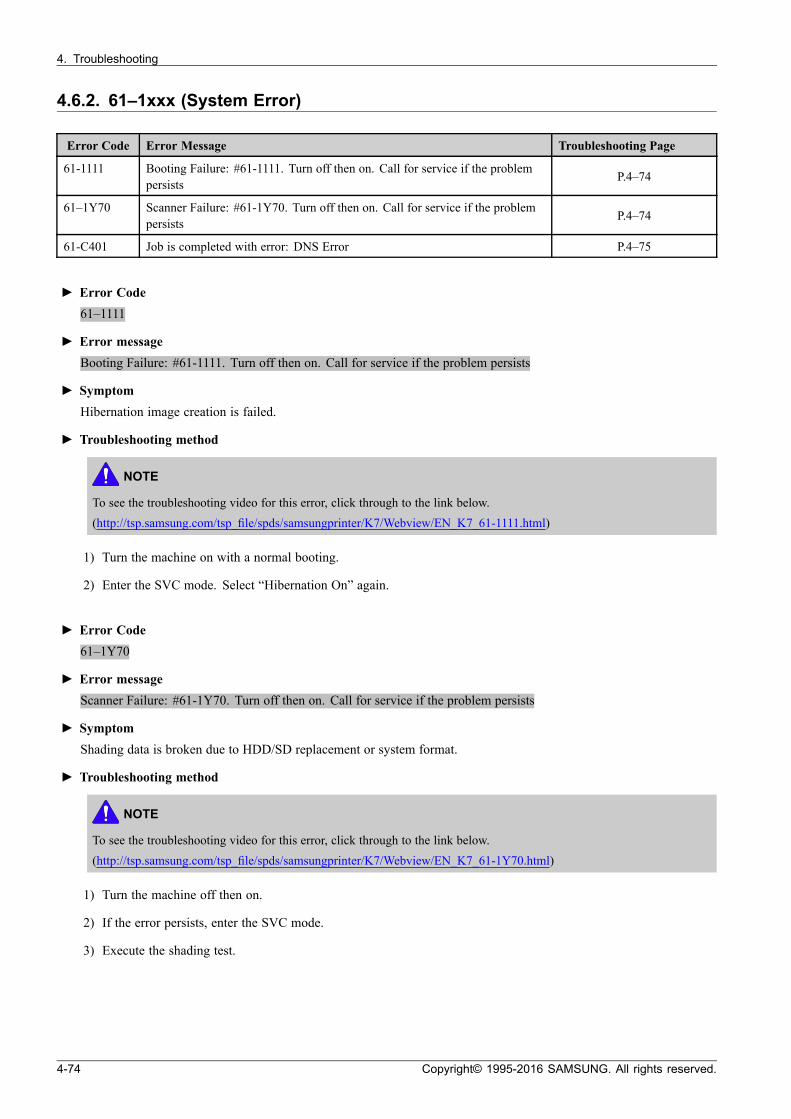
4. Troubleshooting
► Error Code
A1–1611A1–1612A1–1613
► Error message
Motor Failure: #A1-1611. Turn off then on. Call for service if the problem persists.Motor Failure: #A1-1612. Turn off then on. Call for service if the problem persists.Motor Failure: #A1-1613. Turn off then on. Call for service if the problem persists.
► Symptom
ITB motor operation is abnormal.
► Troubleshooting method
NOTE
To see the troubleshooting video for this error, click through to the link below.
• A1-1611 : http://tsp.samsung.com/tsp_file/spds/samsungprinter/X7/Webview/EN_X7_A1-1611.html
• A1-1612 : http://tsp.samsung.com/tsp_file/spds/samsungprinter/X7/Webview/EN_X7_A1-1612.html
• A1-1613 : http://tsp.samsung.com/tsp_file/spds/samsungprinter/X7/Webview/EN_X7_A1-1613.html
• A1–1611 : ITB motor is stopped but machine recognizes it as operational.
• A1–1612 : ITB motor is not operated for print-job.
• A1–1613 : ITB motor is operating but machine recognizes status as "Stopped".
1) Turn the machine off then on. If the error persists, check the following.
2) Remove the ITB cleaner and ITB Unit. Check if there are any foreign substances in ITB unit.
3) Remove the rear cover.
4) Check the connection between the motor and main board.
5) If the connection is OK, enter SVC mode. Execute the motor test.(Diagnostics > Engine Diagnostics > Engine Test Routines)
a) If the motor is not operational,i) Check the motor signal(3.3V). If the signal is abnormal, replace the main board.
(Refer to 3.3.7 Main board)
ii) Check the power(24V). If the power is abnormal, check the SMPS board. If the SMPS board is defective,replace it.(Refer to 3.3.9 SMPS board 1 and 2)
iii) If the motor signal and power is normal, replace the ITB motor.b) If the motor is operational, replace the main board.
4-80 Copyright© 1995-2016 SAMSUNG. All rights reserved.

4. Troubleshooting
► Error Code
A1–2211A1–2212A1–2213
► Error message
Motor Failure: #A1-2211. Turn off then on. Call for service if the problem persistsMotor Failure: #A1-2212. Turn off then on. Call for service if the problem persistsMotor Failure: #A1-2213. Turn off then on. Call for service if the problem persists
► Symptom
Yellow OPC motor operation is abnormal.
► Troubleshooting method
NOTE
To see the troubleshooting video for this error, click through to the link below.
• A1-2211 : http://tsp.samsung.com/tsp_file/spds/samsungprinter/X7/Webview/EN_X7_A1-2211.html
• A1-2212 : http://tsp.samsung.com/tsp_file/spds/samsungprinter/X7/Webview/EN_X7_A1-2212.html
• A1-2213 : http://tsp.samsung.com/tsp_file/spds/samsungprinter/X7/Webview/EN_X7_A1-2213.html
• A1–2211 : Yellow OPC motor is stopped but machine recognizes it as operational.
• A1–2212 : Yellow OPC motor is not operated for print-job.
• A1–2213 : Yellow OPC motor is operating but machine recognizes status as "Stopped".
1) Turn the machine off then on. If the error persists, check the following.
2) Remove the yellow drum unit. Check if there are any foreign substances in yellow drum unit.
3) Remove the rear cover.
4) Check the connection between the yellow OPC motor and main board.
5) If the connection is OK, enter SVC mode. Execute the motor test.(Diagnostics > Engine Diagnostics > Engine Test Routines)
a) If the motor is not operational,i) Check the motor signal(3.3V). If the signal is abnormal, replace the main board.
(Refer to 3.3.7 Main board)
ii) Check the power(24V). If the power is abnormal, check the SMPS board. If the SMPS board is defective,replace it.(Refer to 3.3.9 SMPS board 1 and 2)
iii) If the motor signal and power is normal, replace the yellow OPC motor.b) If the motor is operational, replace the main board.
Copyright© 1995-2016 SAMSUNG. All rights reserved. 4-81

4. Troubleshooting
► Error Code
A1–2311A1–2312A1–2313
► Error message
Motor Failure: #A1-2311. Turn off then on. Call for service if the problem persistsMotor Failure: #A1-2312. Turn off then on. Call for service if the problem persistsMotor Failure: #A1-2313. Turn off then on. Call for service if the problem persists
► Symptom
Magenta OPC motor operation is abnormal.
► Troubleshooting method
NOTE
To see the troubleshooting video for this error, click through to the link below.
• A1-2311 : http://tsp.samsung.com/tsp_file/spds/samsungprinter/X7/Webview/EN_X7_A1-2311.html
• A1-2312 : http://tsp.samsung.com/tsp_file/spds/samsungprinter/X7/Webview/EN_X7_A1-2312.html
• A1-2313 : http://tsp.samsung.com/tsp_file/spds/samsungprinter/X7/Webview/EN_X7_A1-2313.html
• A1–2311 : Magenta OPC motor is stopped but machine recognizes it as operational.
• A1–2312 : Magenta OPC motor is not operated for print-job.
• A1–2313 : Magenta OPC motor is operating but machine recognizes status as "Stopped".
1) Turn the machine off then on. If the error persists, check the following.
2) Remove the magenta drum unit. Check if there are any foreign substances in magenta drum unit.
3) Remove the rear cover.
4) Check the connection between the magenta OPC motor and main board.
5) If the connection is OK, enter SVC mode. Execute the motor test.(Diagnostics > Engine Diagnostics > Engine Test Routines)
a) If the motor is not operational,i) Check the motor signal(3.3V). If the signal is abnormal, replace the main board.
(Refer to 3.3.7 Main board)
ii) Check the power(24V). If the power is abnormal, check the SMPS board. If the SMPS board is defective,replace it.(Refer to 3.3.9 SMPS board 1 and 2)
iii) If the motor signal and power is normal, replace the magenta OPC motor.b) If the motor is operational, replace the main board.
4-82 Copyright© 1995-2016 SAMSUNG. All rights reserved.
4. Troubleshooting
► Error Code
A1–2411A1–2412A1–2413
► Error message
Motor Failure: #A1-2411. Turn off then on. Call for service if the problem persistsMotor Failure: #A1-2412. Turn off then on. Call for service if the problem persistsMotor Failure: #A1-2413. Turn off then on. Call for service if the problem persists
► Symptom
Cyan OPC motor operation is abnormal.
► Troubleshooting method
NOTE
To see the troubleshooting video for this error, click through to the link below.
• A1-2411 : http://tsp.samsung.com/tsp_file/spds/samsungprinter/X7/Webview/EN_X7_A1-2411.html
• A1-2412 : http://tsp.samsung.com/tsp_file/spds/samsungprinter/X7/Webview/EN_X7_A1-2412.html
• A1-2413 : http://tsp.samsung.com/tsp_file/spds/samsungprinter/X7/Webview/EN_X7_A1-2413.html
• A1–2411 : Cyan OPC motor is stopped but machine recognizes it as operational.
• A1–2412 : Cyan OPC motor is not operated for print-job.
• A1–2413 : Cyan OPC motor is operating but machine recognizes status as "Stopped".
1) Turn the machine off then on. If the error persists, check the following.
2) Remove the cyan drum unit. Check if there are any foreign substances in cyan drum unit.
3) Remove the rear cover.
4) Check the connection between the cyan OPC motor and main board.
5) If the connection is OK, enter SVC mode. Execute the motor test.(Diagnostics > Engine Diagnostics > Engine Test Routines)
a) If the motor is not operational,i) Check the motor signal(3.3V). If the signal is abnormal, replace the main board.
(Refer to 3.3.7 Main board)
ii) Check the power(24V). If the power is abnormal, check the SMPS board. If the SMPS board is defective,replace it.(Refer to 3.3.9 SMPS board 1 and 2)
iii) If the motor signal and power is normal, replace the cyan OPC motor.b) If the motor is operational, replace the main board.
Copyright© 1995-2016 SAMSUNG. All rights reserved. 4-83

4. Troubleshooting
► Error Code
A1–2511A1–2512A1–2513
► Error message
Motor Failure: #A1-2511. Turn off then on. Call for service if the problem persistsMotor Failure: #A1-2512. Turn off then on. Call for service if the problem persistsMotor Failure: #A1-2513. Turn off then on. Call for service if the problem persists
► Symptom
Black OPC motor operation is abnormal.
► Troubleshooting method
NOTE
To see the troubleshooting video for this error, click through to the link below.
• A1-2511 : http://tsp.samsung.com/tsp_file/spds/samsungprinter/X7/Webview/EN_X7_A1-2511.html
• A1-2512 : http://tsp.samsung.com/tsp_file/spds/samsungprinter/X7/Webview/EN_X7_A1-2512.html
• A1-2513 : http://tsp.samsung.com/tsp_file/spds/samsungprinter/X7/Webview/EN_X7_A1-2513.html
• A1–2511 : Black OPC motor is stopped but machine recognizes it as operational.
• A1–2512 : Black OPC motor is not operated for print-job.
• A1–2513 : Black OPC motor is operating but machine recognizes status as "Stopped".
1) Turn the machine off then on. If the error persists, check the following.
2) Remove the black drum unit. Check if there are any foreign substances in black drum unit.
3) Remove the rear cover.
4) Check the connection between the black OPC motor and main board.
5) If the connection is OK, enter SVC mode. Execute the motor test.(Diagnostics > Engine Diagnostics > Engine Test Routines)
a) If the motor is not operational,i) Check the motor signal(3.3V). If the signal is abnormal, replace the main board.
(Refer to 3.3.7 Main board)
ii) Check the power(24V). If the power is abnormal, check the SMPS board. If the SMPS board is defective,replace it.(Refer to 3.3.9 SMPS board 1 and 2)
iii) If the motor signal and power is normal, replace the black OPC motor.b) If the motor is operational, replace the main board.
4-84 Copyright© 1995-2016 SAMSUNG. All rights reserved.
4. Troubleshooting
► Error Code
A1–4310
► Error message
Motor Failure: #A1-4310. Turn off then on. Call for service if the problem persists
► Symptom
T1 engage motor operation is abnormal.
► Troubleshooting method
NOTE
To see the troubleshooting video for this error, click through to the link below.
(http://tsp.samsung.com/tsp_file/spds/samsungprinter/X7/Webview/EN_X7_A1-4310.html)
1) Turn the machine off then on. If the problem persists, check the followings.
2) Enter SVC mode. Execute the T1 engage motor test.(Diagnostics > Engine Diagnostics > Engine Test Routines)a) If the motor is not operational,
i) Check the T1 engage motor connection.ii) Check the motor resistance. If the measured value is out of the standard area (7~10 ohm), replace the
T1 engage motor.iii) If the motor is normal, replace the main board.
b) If the motor is operational,i) Open the side cover. Check if the ITB connector is connected correctly or is deformed.ii) Remove the ITB cleaner and ITB unit. Check the photo sensor in ITB unit.iii) Check the engage gear. If it is not operational, replace the main drive unit.
Copyright© 1995-2016 SAMSUNG. All rights reserved. 4-85
4. Troubleshooting
► Error Code
A1–5212A1–5213
► Error message
Motor Failure: #A1-5212. Turn off then on. Call for service if the problem persistsMotor Failure: #A1-5213. Turn off then on. Call for service if the problem persists
► Symptom
Yellow toner is not supplied normally.
► Troubleshooting method
NOTE
To see the troubleshooting video for this error, click through to the link below.
• A1-5212 : http://tsp.samsung.com/tsp_file/spds/samsungprinter/X7/Webview/EN_X7_A1-5212.html
• A1-5213 : http://tsp.samsung.com/tsp_file/spds/samsungprinter/X7/Webview/EN_X7_A1-5213.html
• A1–5212 : Toner supply is stopped during operation.
• A1–5213 : Toner is not supplied.
1) Turn the machine off then on. If the problem persists, check the followings
2) Open the front cover. If the yellow toner pipe is blocked, open it.
3) Enter SVC mode. Execute the yellow toner supply motor test.(Diagnostics > Engine Diagnostics > Engine Test Routines)
a) If the motor is not operational,i) Check the power(24V). If the power is abnormal, check the SMPS board. If the SMPS board is defective,
replace it.(Refer to 3.3.9 SMPS board 1 and 2)
ii) If the SMPS board is normal, replace the main board.(Refer to 3.3.7 Main board)
iii) If the error persists after replacing the main board, replace the yellow toner supply motor.(Refer to 3.3.8 Toner Supply Drive Unit)
b) If the motor is operational,i) Check the toner cartridge remains. If necessary, replace the yellow toner cartridge.ii) If the toner cartridge remains is enough, replace the yellow drum unit.
4-86 Copyright© 1995-2016 SAMSUNG. All rights reserved.
4. Troubleshooting
► Error Code
A1–5312A1–5313
► Error message
Motor Failure: #A1-5312. Turn off then on. Call for service if the problem persistsMotor Failure: #A1-5313. Turn off then on. Call for service if the problem persists
► Symptom
Magenta toner is not supplied normally.
► Troubleshooting method
NOTE
To see the troubleshooting video for this error, click through to the link below.
• A1-5312 : http://tsp.samsung.com/tsp_file/spds/samsungprinter/X7/Webview/EN_X7_A1-5312.html
• A1-5313 : http://tsp.samsung.com/tsp_file/spds/samsungprinter/X7/Webview/EN_X7_A1-5313.html
• A1–5312 : Toner supply is stopped during operation.
• A1–5313 : Toner is not supplied.
1) Turn the machine off then on. If the problem persists, check the followings
2) Open the front cover. If the magenta toner pipe is blocked, open it.
3) Enter SVC mode. Execute the magenta toner supply motor test.(Diagnostics > Engine Diagnostics > Engine Test Routines)
a) If the motor is not operational,i) Check the power(24V). If the power is abnormal, check the SMPS board. If the SMPS board is defective,
replace it.(Refer to 3.3.9 SMPS board 1 and 2)
ii) If the SMPS board is normal, replace the main board.(Refer to 3.3.7 Main board)
iii) If the error persists after replacing the main board, replace the magenta toner supply motor.(Refer to 3.3.8 Toner Supply Drive Unit)
b) If the motor is operational,i) Check the toner cartridge remains. If necessary, replace the magenta toner cartridge.ii) If the toner cartridge remains is enough, replace the magenta drum unit.
Copyright© 1995-2016 SAMSUNG. All rights reserved. 4-87

4. Troubleshooting
► Error Code
A1–5412A1–5413
► Error message
Motor Failure: #A1-5412. Turn off then on. Call for service if the problem persistsMotor Failure: #A1-5413. Turn off then on. Call for service if the problem persists
► Symptom
Cyan toner is not supplied normally.
► Troubleshooting method
NOTE
To see the troubleshooting video for this error, click through to the link below.
• A1-5412 : http://tsp.samsung.com/tsp_file/spds/samsungprinter/X7/Webview/EN_X7_A1-5412.html
• A1-5413 : http://tsp.samsung.com/tsp_file/spds/samsungprinter/X7/Webview/EN_X7_A1-5413.html
• A1–5412 : Toner supply is stopped during operation.
• A1–5413 : Toner is not supplied.
1) Turn the machine off then on. If the problem persists, check the followings
2) Open the front cover. If the cyan toner pipe is blocked, open it.
3) Enter SVC mode. Execute the cyan toner supply motor test.(Diagnostics > Engine Diagnostics > Engine Test Routines)
a) If the motor is not operational,i) Check the power(24V). If the power is abnormal, check the SMPS board. If the SMPS board is defective,
replace it.(Refer to 3.3.9 SMPS board 1 and 2)
ii) If the SMPS board is normal, replace the main board.(Refer to 3.3.7 Main board)
iii) If the error persists after replacing the main board, replace the cyan toner supply motor.(Refer to 3.3.8 Toner Supply Drive Unit)
b) If the motor is operational,i) Check the toner cartridge remains. If necessary, replace the cyan toner cartridge.ii) If the toner cartridge remains is enough, replace the cyan drum unit.
4-88 Copyright© 1995-2016 SAMSUNG. All rights reserved.

4. Troubleshooting
► Error Code
A1–5512A1–5513
► Error message
Motor Failure: #A1-5512. Turn off then on. Call for service if the problem persistsMotor Failure: #A1-5513. Turn off then on. Call for service if the problem persists
► Symptom
Black toner is not supplied normally.
► Troubleshooting method
NOTE
To see the troubleshooting video for this error, click through to the link below.
• A1-5512 : http://tsp.samsung.com/tsp_file/spds/samsungprinter/X7/Webview/EN_X7_A1-5512.html
• A1-5513 : http://tsp.samsung.com/tsp_file/spds/samsungprinter/X7/Webview/EN_X7_A1-5513.html
• A1–5512 : Toner supply is stopped during operation.
• A1–5513 : Toner is not supplied.
1) Turn the machine off then on. If the problem persists, check the followings
2) Open the front cover. If the black toner pipe is blocked, open it.
3) Enter SVC mode. Execute the black toner supply motor test.(Diagnostics > Engine Diagnostics > Engine Test Routines)
a) If the motor is not operational,i) Check the power(24V). If the power is abnormal, check the SMPS board. If the SMPS board is defective,
replace it.(Refer to 3.3.9 SMPS board 1 and 2)
ii) If the SMPS board is normal, replace the main board.(Refer to 3.3.7 Main board)
iii) If the error persists after replacing the main board, replace the black toner supply motor.(Refer to 3.3.8 Toner Supply Drive Unit)
b) If the motor is operational,i) Check the toner cartridge remains. If necessary, replace the black toner cartridge.ii) If the toner cartridge remains is enough, replace the black drum unit.
Copyright© 1995-2016 SAMSUNG. All rights reserved. 4-89
4. Troubleshooting
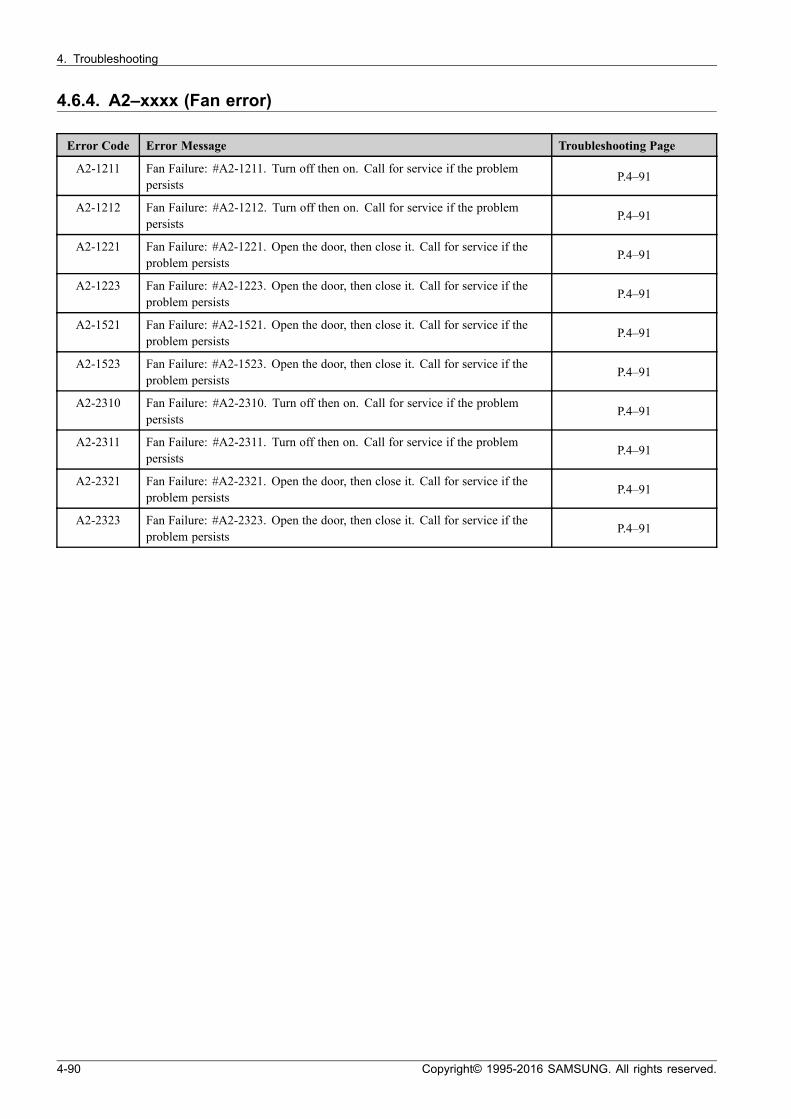
4.6.4. A2–xxxx (Fan error)
Error Code Error Message Troubleshooting Page
A2-1211 Fan Failure: #A2-1211. Turn off then on. Call for service if the problempersists
P.4–91
A2-1212 Fan Failure: #A2-1212. Turn off then on. Call for service if the problempersists
P.4–91
A2-1221 Fan Failure: #A2-1221. Open the door, then close it. Call for service if theproblem persists
P.4–91
A2-1223 Fan Failure: #A2-1223. Open the door, then close it. Call for service if theproblem persists
P.4–91
A2-1521 Fan Failure: #A2-1521. Open the door, then close it. Call for service if theproblem persists
P.4–91
A2-1523 Fan Failure: #A2-1523. Open the door, then close it. Call for service if theproblem persists
P.4–91
A2-2310 Fan Failure: #A2-2310. Turn off then on. Call for service if the problempersists
P.4–91
A2-2311 Fan Failure: #A2-2311. Turn off then on. Call for service if the problempersists
P.4–91
A2-2321 Fan Failure: #A2-2321. Open the door, then close it. Call for service if theproblem persists
P.4–91
A2-2323 Fan Failure: #A2-2323. Open the door, then close it. Call for service if theproblem persists
P.4–91
4-90 Copyright© 1995-2016 SAMSUNG. All rights reserved.
4. Troubleshooting
► Error Code
A2–1211 / A2–1212 / A2–1221 / A2–1223A2–1521 / A2–1523A2–2310 / A2–2311 / A2–2321 / A2–2323
► Error message
Fan Failure: #A2–1211 / A2–1212 / A2–1221 / A2–1223. Turn off then on. Call for service if the problem persistsFan Failure: #A2–1521 / A2–1523. Turn off then on. Call for service if the problem persistsFan Failure: #A2–2310 / A2–2311 / A2–2321 / A2–2323. Turn off then on. Call for service if the problem persists
► Symptom
SMPS or Fuser or Duplex fan operation is abnormal..
► Troubleshooting method
NOTE
• SMPS fan error : A2–1211 / A2–1212 / A2–1221 / A2–1223
• Duplex fan error : A2–1521 / A2–1523
• Fuser fan error : A2–2310 / A2–2311 / A2–2321 / A2–2323
1) Turn the machine off then on. If the problem persists, check the followings.
2) Check the connection of the corresponding fan and main board.
3) If the connection is OK, enter SVC mode. Execute the fan test.(Diagnostics > Engine Diagnostics > Engine Test Routines)
a) If the fan is not operational,i) Check the power(24V).
• If the power is abnormal, check the SMPS board. If the SMPS board is defective, replace it.
• If the SMPS board is normal, replace the corresponding fan.
• If the error persists after replacing the fan, replace the main board.
b) If the fan is operational,i) Check the fan signal (3.3V) as connected or disconnected.
• If the fan signal as disconnected is abnormal, replace the main board.
• If the fan signal as connected is abnormal, replace the corresponding fan.
Copyright© 1995-2016 SAMSUNG. All rights reserved. 4-91
4. Troubleshooting
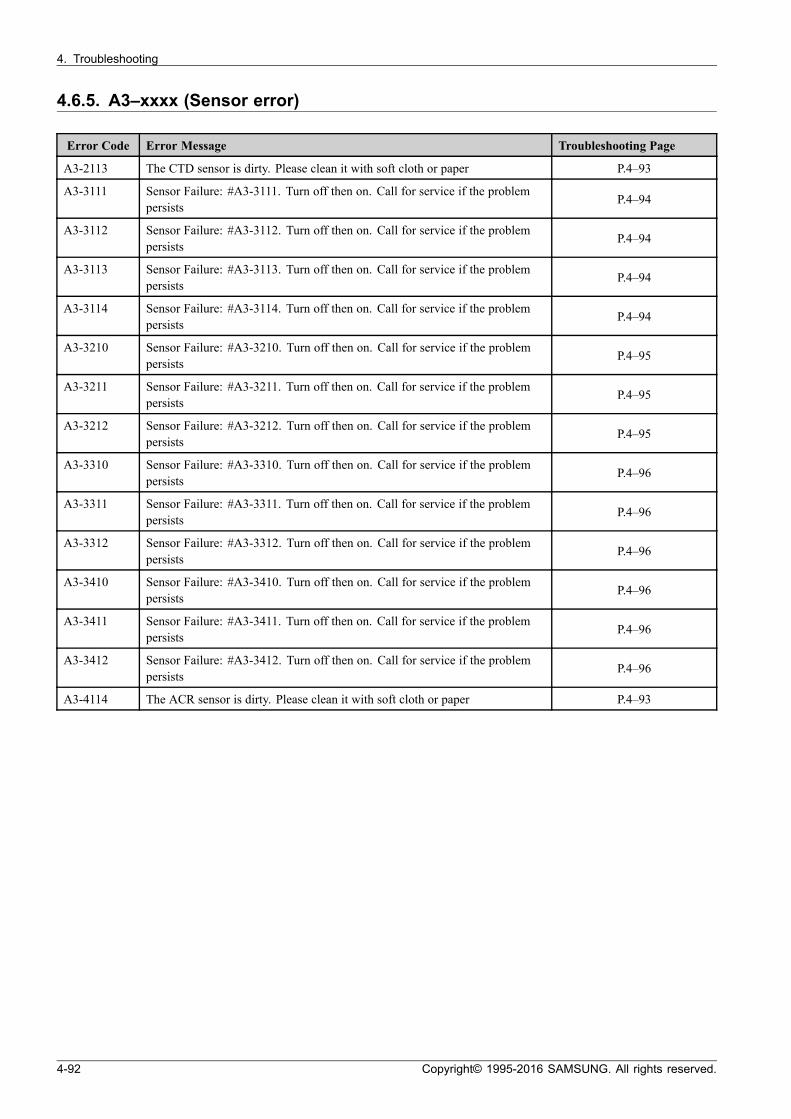
4.6.5. A3–xxxx (Sensor error)
Error Code Error Message Troubleshooting Page
A3-2113 The CTD sensor is dirty. Please clean it with soft cloth or paper P.4–93
A3-3111 Sensor Failure: #A3-3111. Turn off then on. Call for service if the problempersists
P.4–94
A3-3112 Sensor Failure: #A3-3112. Turn off then on. Call for service if the problempersists
P.4–94
A3-3113 Sensor Failure: #A3-3113. Turn off then on. Call for service if the problempersists
P.4–94
A3-3114 Sensor Failure: #A3-3114. Turn off then on. Call for service if the problempersists
P.4–94
A3-3210 Sensor Failure: #A3-3210. Turn off then on. Call for service if the problempersists
P.4–95
A3-3211 Sensor Failure: #A3-3211. Turn off then on. Call for service if the problempersists
P.4–95
A3-3212 Sensor Failure: #A3-3212. Turn off then on. Call for service if the problempersists
P.4–95
A3-3310 Sensor Failure: #A3-3310. Turn off then on. Call for service if the problempersists
P.4–96
A3-3311 Sensor Failure: #A3-3311. Turn off then on. Call for service if the problempersists
P.4–96
A3-3312 Sensor Failure: #A3-3312. Turn off then on. Call for service if the problempersists
P.4–96
A3-3410 Sensor Failure: #A3-3410. Turn off then on. Call for service if the problempersists
P.4–96
A3-3411 Sensor Failure: #A3-3411. Turn off then on. Call for service if the problempersists
P.4–96
A3-3412 Sensor Failure: #A3-3412. Turn off then on. Call for service if the problempersists
P.4–96
A3-4114 The ACR sensor is dirty. Please clean it with soft cloth or paper P.4–93
4-92 Copyright© 1995-2016 SAMSUNG. All rights reserved.
4. Troubleshooting
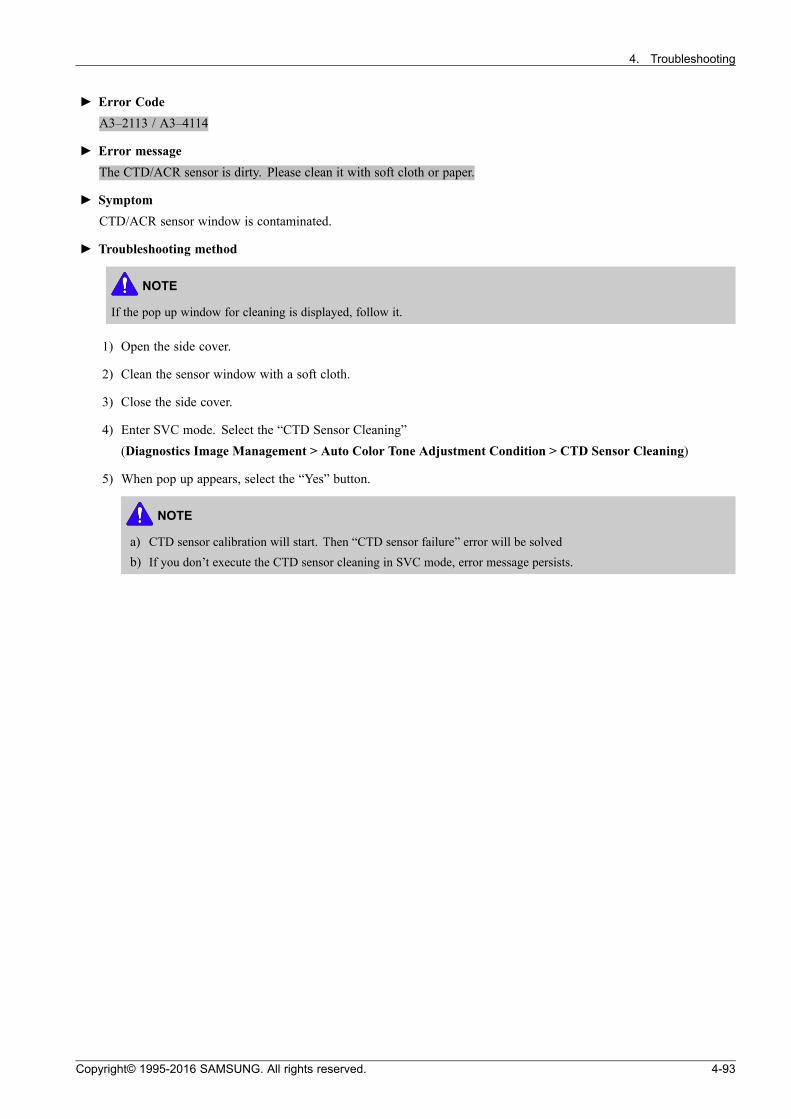
► Error Code
A3–2113 / A3–4114
► Error message
The CTD/ACR sensor is dirty. Please clean it with soft cloth or paper.
► Symptom
CTD/ACR sensor window is contaminated.
► Troubleshooting method
NOTE
If the pop up window for cleaning is displayed, follow it.
1) Open the side cover.
2) Clean the sensor window with a soft cloth.
3) Close the side cover.
4) Enter SVC mode. Select the “CTD Sensor Cleaning”(Diagnostics Image Management > Auto Color Tone Adjustment Condition > CTD Sensor Cleaning)
5) When pop up appears, select the “Yes” button.
NOTE
a) CTD sensor calibration will start. Then “CTD sensor failure” error will be solved
b) If you don’t execute the CTD sensor cleaning in SVC mode, error message persists.
Copyright© 1995-2016 SAMSUNG. All rights reserved. 4-93
4. Troubleshooting
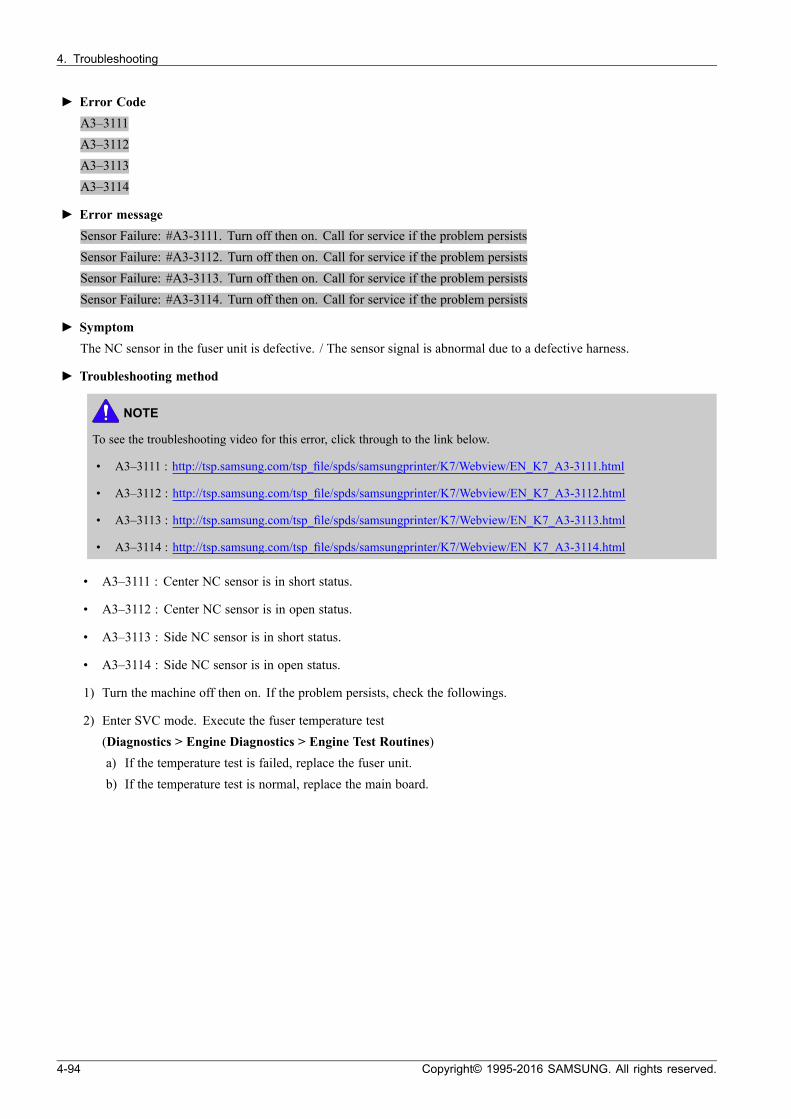
► Error Code
A3–3111A3–3112A3–3113A3–3114
► Error message
Sensor Failure: #A3-3111. Turn off then on. Call for service if the problem persistsSensor Failure: #A3-3112. Turn off then on. Call for service if the problem persistsSensor Failure: #A3-3113. Turn off then on. Call for service if the problem persistsSensor Failure: #A3-3114. Turn off then on. Call for service if the problem persists
► Symptom
The NC sensor in the fuser unit is defective. / The sensor signal is abnormal due to a defective harness.
► Troubleshooting method
NOTE
To see the troubleshooting video for this error, click through to the link below.
• A3–3111 : http://tsp.samsung.com/tsp_file/spds/samsungprinter/K7/Webview/EN_K7_A3-3111.html
• A3–3112 : http://tsp.samsung.com/tsp_file/spds/samsungprinter/K7/Webview/EN_K7_A3-3112.html
• A3–3113 : http://tsp.samsung.com/tsp_file/spds/samsungprinter/K7/Webview/EN_K7_A3-3113.html
• A3–3114 : http://tsp.samsung.com/tsp_file/spds/samsungprinter/K7/Webview/EN_K7_A3-3114.html
• A3–3111 : Center NC sensor is in short status.
• A3–3112 : Center NC sensor is in open status.
• A3–3113 : Side NC sensor is in short status.
• A3–3114 : Side NC sensor is in open status.
1) Turn the machine off then on. If the problem persists, check the followings.
2) Enter SVC mode. Execute the fuser temperature test(Diagnostics > Engine Diagnostics > Engine Test Routines)a) If the temperature test is failed, replace the fuser unit.b) If the temperature test is normal, replace the main board.
4-94 Copyright© 1995-2016 SAMSUNG. All rights reserved.
4. Troubleshooting
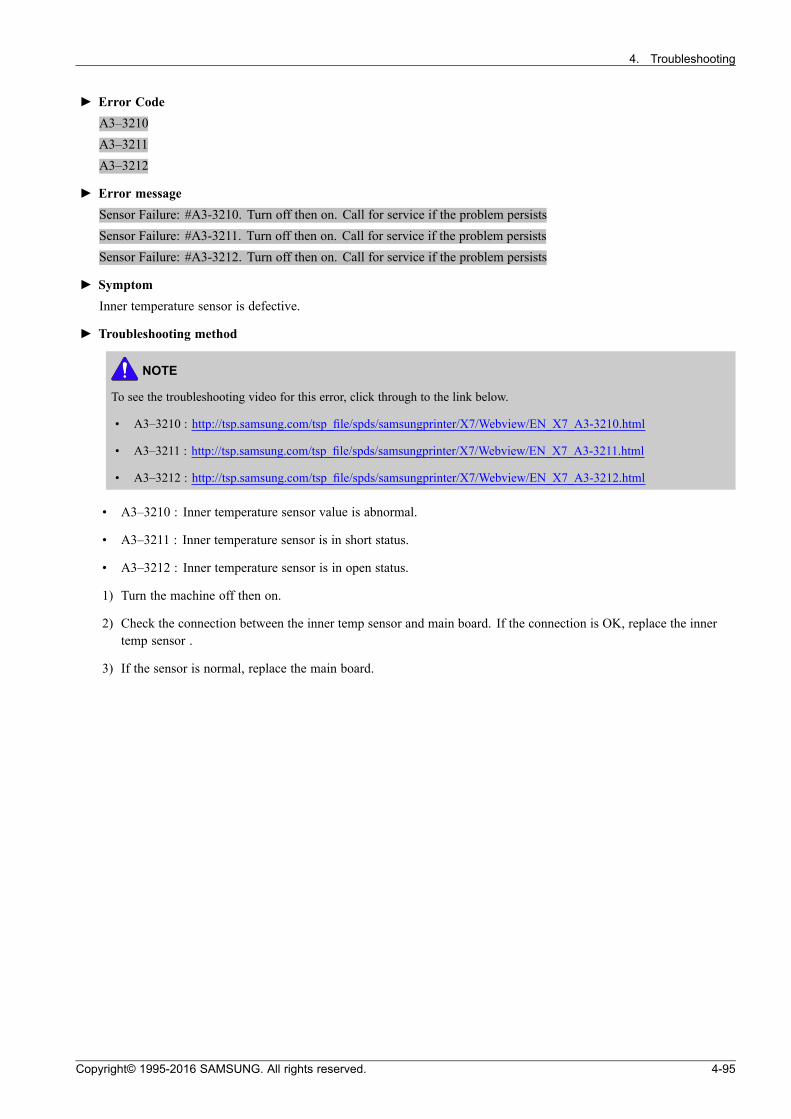
► Error Code
A3–3210A3–3211A3–3212
► Error message
Sensor Failure: #A3-3210. Turn off then on. Call for service if the problem persistsSensor Failure: #A3-3211. Turn off then on. Call for service if the problem persistsSensor Failure: #A3-3212. Turn off then on. Call for service if the problem persists
► Symptom
Inner temperature sensor is defective.
► Troubleshooting method
NOTE
To see the troubleshooting video for this error, click through to the link below.
• A3–3210 : http://tsp.samsung.com/tsp_file/spds/samsungprinter/X7/Webview/EN_X7_A3-3210.html
• A3–3211 : http://tsp.samsung.com/tsp_file/spds/samsungprinter/X7/Webview/EN_X7_A3-3211.html
• A3–3212 : http://tsp.samsung.com/tsp_file/spds/samsungprinter/X7/Webview/EN_X7_A3-3212.html
• A3–3210 : Inner temperature sensor value is abnormal.
• A3–3211 : Inner temperature sensor is in short status.
• A3–3212 : Inner temperature sensor is in open status.
1) Turn the machine off then on.
2) Check the connection between the inner temp sensor and main board. If the connection is OK, replace the innertemp sensor .
3) If the sensor is normal, replace the main board.
Copyright© 1995-2016 SAMSUNG. All rights reserved. 4-95

4. Troubleshooting
► Error Code
A3–3310A3–3311A3–3312A3–3410A3–3411A3–3412
► Error message
Sensor Failure: #A3-3310. Turn off then on. Call for service if the problem persistsSensor Failure: #A3-3311. Turn off then on. Call for service if the problem persistsSensor Failure: #A3-3312. Turn off then on. Call for service if the problem persistsSensor Failure: #A3-3410. Turn off then on. Call for service if the problem persistsSensor Failure: #A3-3411. Turn off then on. Call for service if the problem persistsSensor Failure: #A3-3412. Turn off then on. Call for service if the problem persists
► Symptom
Outer temperature/humidity sensor is defective.
► Troubleshooting method
NOTE
To see the troubleshooting video for this error, click through to the link below.
• A3-3310 : http://tsp.samsung.com/tsp_file/spds/samsungprinter/K7/Webview/EN_K7_A3-3310.html
• A3-3311 : http://tsp.samsung.com/tsp_file/spds/samsungprinter/K7/Webview/EN_K7_A3-3311.html
• A3-3312 : http://tsp.samsung.com/tsp_file/spds/samsungprinter/K7/Webview/EN_K7_A3-3312.html
• A3–3410 : http://tsp.samsung.com/tsp_file/spds/samsungprinter/K7/Webview/EN_K7_A3-3410.html
• A3–3411 : http://tsp.samsung.com/tsp_file/spds/samsungprinter/K7/Webview/EN_K7_A3-3411.html
• A3–3412 : http://tsp.samsung.com/tsp_file/spds/samsungprinter/K7/Webview/EN_K7_A3-3412.html
• A3–3310 / A3–3311 / A3–3312 : Temperature function is abnormal.
• A3–3410 / A3–3411 / A3–3412 : Humidity function is abnormal.
1) Turn the machine off then on.
2) Check the connection between the outer temp sensor and main board. If the connection is OK, replace the outertemp sensor .
3) If the sensor is normal, replace the main board.
4-96 Copyright© 1995-2016 SAMSUNG. All rights reserved.
4. Troubleshooting
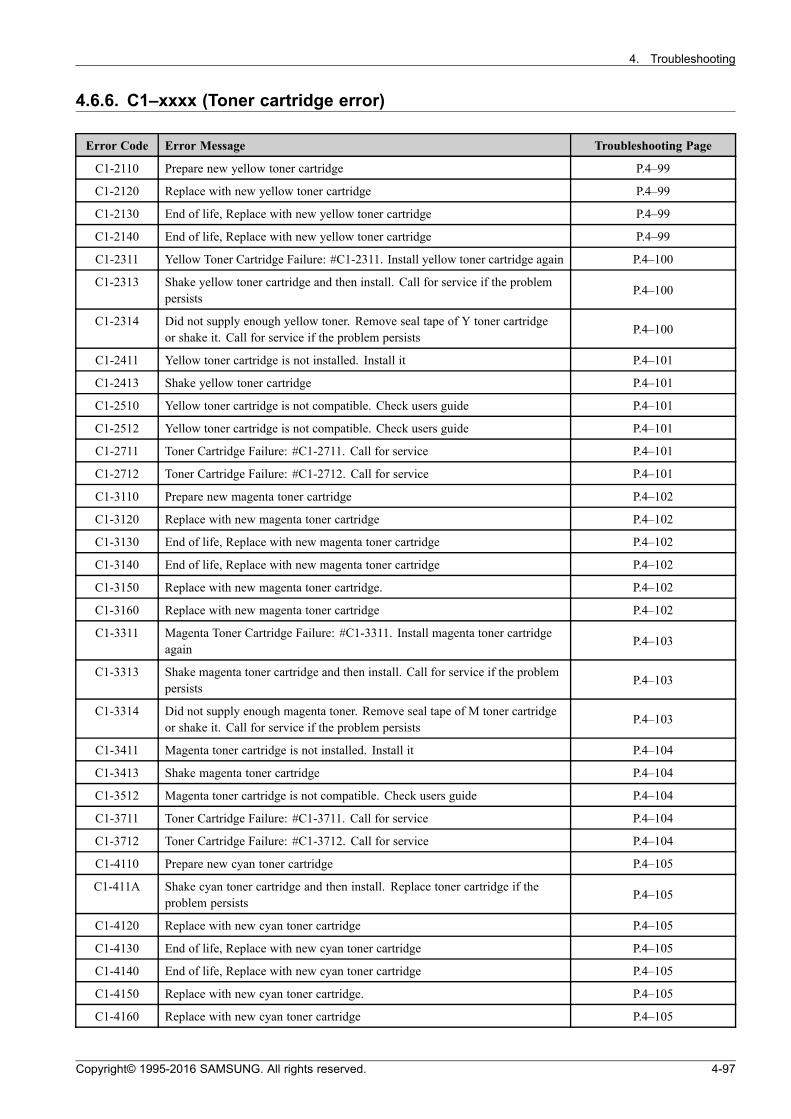
4.6.6. C1–xxxx (Toner cartridge error)
Error Code Error Message Troubleshooting Page
C1-2110 Prepare new yellow toner cartridge P.4–99
C1-2120 Replace with new yellow toner cartridge P.4–99
C1-2130 End of life, Replace with new yellow toner cartridge P.4–99
C1-2140 End of life, Replace with new yellow toner cartridge P.4–99
C1-2311 Yellow Toner Cartridge Failure: #C1-2311. Install yellow toner cartridge again P.4–100
C1-2313 Shake yellow toner cartridge and then install. Call for service if the problempersists
P.4–100
C1-2314 Did not supply enough yellow toner. Remove seal tape of Y toner cartridgeor shake it. Call for service if the problem persists
P.4–100
C1-2411 Yellow toner cartridge is not installed. Install it P.4–101
C1-2413 Shake yellow toner cartridge P.4–101
C1-2510 Yellow toner cartridge is not compatible. Check users guide P.4–101
C1-2512 Yellow toner cartridge is not compatible. Check users guide P.4–101
C1-2711 Toner Cartridge Failure: #C1-2711. Call for service P.4–101
C1-2712 Toner Cartridge Failure: #C1-2712. Call for service P.4–101
C1-3110 Prepare new magenta toner cartridge P.4–102
C1-3120 Replace with new magenta toner cartridge P.4–102
C1-3130 End of life, Replace with new magenta toner cartridge P.4–102
C1-3140 End of life, Replace with new magenta toner cartridge P.4–102
C1-3150 Replace with new magenta toner cartridge. P.4–102
C1-3160 Replace with new magenta toner cartridge P.4–102
C1-3311 Magenta Toner Cartridge Failure: #C1-3311. Install magenta toner cartridgeagain
P.4–103
C1-3313 Shake magenta toner cartridge and then install. Call for service if the problempersists
P.4–103
C1-3314 Did not supply enough magenta toner. Remove seal tape of M toner cartridgeor shake it. Call for service if the problem persists
P.4–103
C1-3411 Magenta toner cartridge is not installed. Install it P.4–104
C1-3413 Shake magenta toner cartridge P.4–104
C1-3512 Magenta toner cartridge is not compatible. Check users guide P.4–104
C1-3711 Toner Cartridge Failure: #C1-3711. Call for service P.4–104
C1-3712 Toner Cartridge Failure: #C1-3712. Call for service P.4–104
C1-4110 Prepare new cyan toner cartridge P.4–105
C1-411A Shake cyan toner cartridge and then install. Replace toner cartridge if theproblem persists
P.4–105
C1-4120 Replace with new cyan toner cartridge P.4–105
C1-4130 End of life, Replace with new cyan toner cartridge P.4–105
C1-4140 End of life, Replace with new cyan toner cartridge P.4–105
C1-4150 Replace with new cyan toner cartridge. P.4–105
C1-4160 Replace with new cyan toner cartridge P.4–105
Copyright© 1995-2016 SAMSUNG. All rights reserved. 4-97
4. Troubleshooting
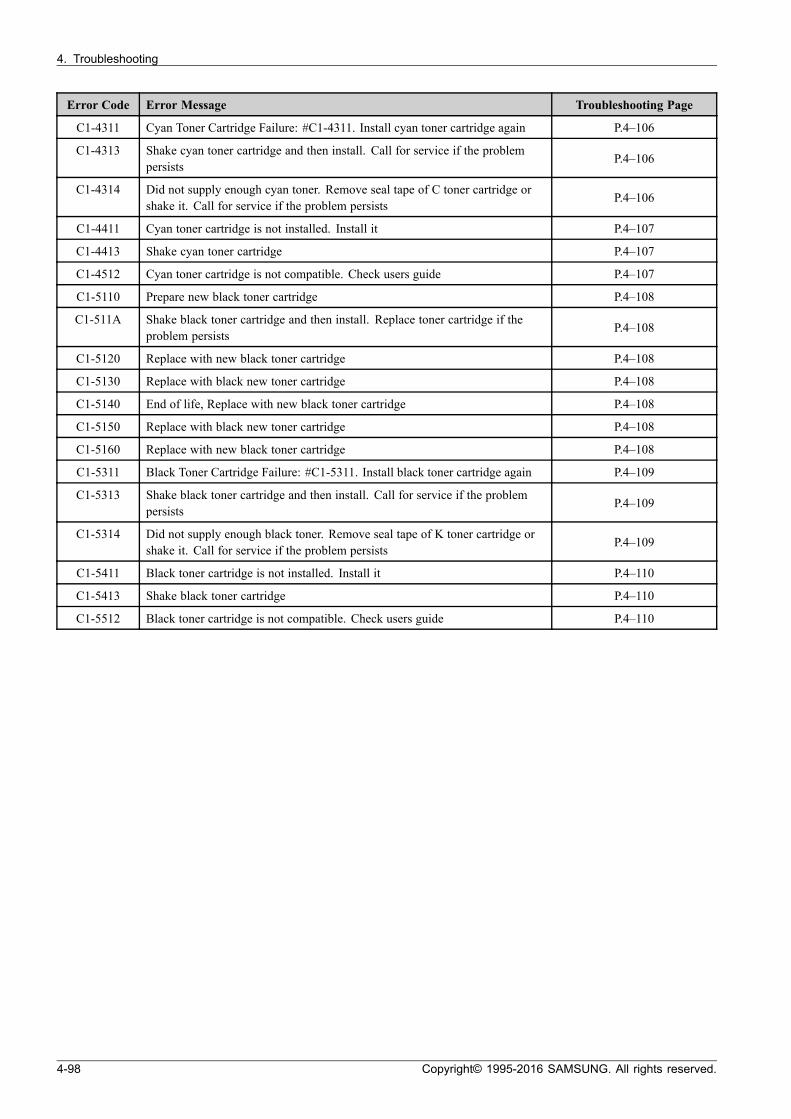
Error Code Error Message Troubleshooting Page
C1-4311 Cyan Toner Cartridge Failure: #C1-4311. Install cyan toner cartridge again P.4–106
C1-4313 Shake cyan toner cartridge and then install. Call for service if the problempersists
P.4–106
C1-4314 Did not supply enough cyan toner. Remove seal tape of C toner cartridge orshake it. Call for service if the problem persists
P.4–106
C1-4411 Cyan toner cartridge is not installed. Install it P.4–107
C1-4413 Shake cyan toner cartridge P.4–107
C1-4512 Cyan toner cartridge is not compatible. Check users guide P.4–107
C1-5110 Prepare new black toner cartridge P.4–108
C1-511A Shake black toner cartridge and then install. Replace toner cartridge if theproblem persists
P.4–108
C1-5120 Replace with new black toner cartridge P.4–108
C1-5130 Replace with black new toner cartridge P.4–108
C1-5140 End of life, Replace with new black toner cartridge P.4–108
C1-5150 Replace with black new toner cartridge P.4–108
C1-5160 Replace with new black toner cartridge P.4–108
C1-5311 Black Toner Cartridge Failure: #C1-5311. Install black toner cartridge again P.4–109
C1-5313 Shake black toner cartridge and then install. Call for service if the problempersists
P.4–109
C1-5314 Did not supply enough black toner. Remove seal tape of K toner cartridge orshake it. Call for service if the problem persists
P.4–109
C1-5411 Black toner cartridge is not installed. Install it P.4–110
C1-5413 Shake black toner cartridge P.4–110
C1-5512 Black toner cartridge is not compatible. Check users guide P.4–110
4-98 Copyright© 1995-2016 SAMSUNG. All rights reserved.
4. Troubleshooting
► Error Code
C1–2110 / C1–211A
► Error message
Prepare new yellow toner cartridge.
► Symptom
Yellow toner is almost empty.
► Troubleshooting method
1) Order new yellow toner cartridge because toner cartridge with level of “Low” will be exhausted soon.
► Error Code
C1–2120 / C1–2130 / C1–2140
► Error message
Replace with new yellow toner cartridgeEnd of life, Replace with new yellow toner cartridge
► Symptom
The yellow toner cartridge is at the end of its life.
► Troubleshooting method
1) Open the front cover.
2) Remove the yellow toner cartridge.
3) Install the new yellow toner cartridge.
4) Close the front cover.
Copyright© 1995-2016 SAMSUNG. All rights reserved. 4-99
4. Troubleshooting
► Error Code
C1–2311 / C1–2313 / C1–2314
► Error message
Yellow Toner Cartridge Failure: #C1-231x. Install yellow toner cartridge again
► Symptom
Yellow toner supply is inefficient or abnormal.
► Troubleshooting method
NOTE
To see the troubleshooting video for this error, click through to the link below.
(http://tsp.samsung.com/tsp_file/spds/samsungprinter/X7/Webview/EN_X7_C1-2311.html
1) Open the front cover.
2) Remove the yellow toner cartridge. Stand the toner cartridge vertically and tap its top section to distribute the tonerevenly inside the cartridge. And turn over the toner cartridge and tap the top in the same way.
3) Shake the toner cartridge horizontally to distribute the toner evenly inside the cartridge.
4) Close the front cover.
5) Check if the toner supply pipe is blocked. Replace the reservoir Unit.
6) Check the toner supply motor operation. Reconnect the harness. If the motor is broken, replace it.
4-100 Copyright© 1995-2016 SAMSUNG. All rights reserved.
4. Troubleshooting
► Error Code
C1–2411 / C1–2413 / C1–2711 / C1–2712
► Error message
Yellow toner cartridge is not installed. Install it.Shake yellow toner cartridge.
► Symptom
The yellow toner cartridge is not installed. / The CRUM data is not detected.
► Troubleshooting method
NOTE
To see the troubleshooting video for this error, click through to the link below.
• C1–2411 : http://tsp.samsung.com/tsp_file/spds/samsungprinter/X7/Webview/EN_X7_C1-2411.html
• C1–2413 : http://tsp.samsung.com/tsp_file/spds/samsungprinter/X7/Webview/EN_X7_C1-2413.html
1) Open the front cover. Check if the yellow toner cartridge is installed.
2) Remove and reinstall the yellow toner cartridge.
3) If the problem persists, check if the toner cartridge modular jack is contaminated or deformed.
4) Replace the yellow toner cartridge with a new one.
► Error Code
C1–2510 / C1–2512
► Error message
Yellow toner cartridge is not compatible. Check users guide.
► Symptom
Yellow toner cartridge is not compatible.
► Troubleshooting method
NOTE
To see the troubleshooting video for this error, click through to the link below.
• C1–2510 : http://tsp.samsung.com/tsp_file/spds/samsungprinter/X7/Webview/EN_X7_C1-2510.html
• C1–2512 : http://tsp.samsung.com/tsp_file/spds/samsungprinter/X7/Webview/EN_X7_C1-2512.html
1) Replace the yellow toner cartridge with a new one.
Copyright© 1995-2016 SAMSUNG. All rights reserved. 4-101

4. Troubleshooting
► Error Code
C1–3110
► Error message
Prepare new magenta toner cartridge.
► Symptom
Magenta toner is almost empty.
► Troubleshooting method
1) Order new magenta toner cartridge because toner cartridge with level of “Low” will be exhausted soon.
► Error Code
C1–3120 / C1–3130 / C1–3140 / C1–3150 / C1–3160
► Error message
Replace with new magenta toner cartridgeEnd of life, Replace with new magenta toner cartridge
► Symptom
The magenta toner cartridge is at the end of its life.
► Troubleshooting method
1) Open the front cover.
2) Remove the magenta toner cartridge.
3) Install the new magenta toner cartridge.
4) Close the front cover.
5) Check if the toner pipe is blocked. Replace it, if necessary.
4-102 Copyright© 1995-2016 SAMSUNG. All rights reserved.

4. Troubleshooting
► Error Code
C1–3311 / C1–3313 / C1–3314
► Error message
Magenta Toner Cartridge Failure: #C1-3311. Install magenta toner cartridge again
► Symptom
Magenta toner supply is inefficient or abnormal.
► Troubleshooting method
NOTE
To see the troubleshooting video for this error, click through to the link below.
(http://tsp.samsung.com/tsp_file/spds/samsungprinter/X7/Webview/EN_X7_C1-3311.html)
1) Open the front cover.
2) Remove the magenta toner cartridge. Stand the toner cartridge vertically and tap its top section to distribute thetoner evenly inside the cartridge. And turn over the toner cartridge and tap the top in the same way.
3) Shake the toner cartridge horizontally to distribute the toner evenly inside the cartridge.
4) Close the front cover.
5) Check if the toner supply pipe is blocked. Replace the reservoir Unit.
6) Check the toner supply motor operation. Reconnect the harness. If the motor is broken, replace it.
Copyright© 1995-2016 SAMSUNG. All rights reserved. 4-103

4. Troubleshooting
► Error Code
C1–3411 / C1–3413 / C1–3711 / C1–3712
► Error message
Magenta toner cartridge is not installed. Install it.Shake magenta toner cartridge.
► Symptom
The magenta toner cartridge is not installed. / The CRUM data is not detected.
► Troubleshooting method
NOTE
To see the troubleshooting video for this error, click through to the link below.
• C1–3411 : http://tsp.samsung.com/tsp_file/spds/samsungprinter/X7/Webview/EN_X7_C1-3411.html
• C1–3413 : http://tsp.samsung.com/tsp_file/spds/samsungprinter/X7/Webview/EN_X7_C1-3413.html
1) Open the front cover. Check if the magenta toner cartridge is installed.
2) Remove and reinstall the magenta toner cartridge.
3) If the problem persists, check if the toner cartridge modular jack is contaminated or deformed.
4) Replace the magenta toner cartridge with a new one.
► Error Code
C1–3512
► Error message
Magenta toner cartridge is not compatible. Check users guide.
► Symptom
Magenta toner cartridge is not compatible.
► Troubleshooting method
NOTE
To see the troubleshooting video for this error, click through to the link below.
(http://tsp.samsung.com/tsp_file/spds/samsungprinter/X7/Webview/EN_X7_C1-3512.html)
1) Replace the magenta toner cartridge with a new one.
4-104 Copyright© 1995-2016 SAMSUNG. All rights reserved.
4. Troubleshooting
► Error Code
C1–4110 / C1–411A
► Error message
Prepare new cyan toner cartridge.
► Symptom
Cyan toner is almost empty.
► Troubleshooting method
1) Order new cyan toner cartridge because toner cartridge with level of “Low” will be exhausted soon.
► Error Code
C1–4120 / C1–4130 / C1–4140 / C1–4150 / C1–4160
► Error message
Replace with new cyan toner cartridgeEnd of life, Replace with new cyan toner cartridge
► Symptom
The cyan toner cartridge is at the end of its life.
► Troubleshooting method
1) Open the front cover.
2) Remove the cyan toner cartridge.
3) Install the new cyan toner cartridge.
4) Close the front cover.
Copyright© 1995-2016 SAMSUNG. All rights reserved. 4-105

4. Troubleshooting
► Error Code
C1–4311 / C1–4313 / C1–4314
► Error message
Cyan Toner Cartridge Failure: #C1-431x. Install yellow toner cartridge again
► Symptom
Cyan toner supply is inefficient or abnormal.
► Troubleshooting method
NOTE
To see the troubleshooting video for this error, click through to the link below.
(http://tsp.samsung.com/tsp_file/spds/samsungprinter/X7/Webview/EN_X7_C1-4311.html
1) Open the front cover.
2) Remove the cyan toner cartridge. Stand the toner cartridge vertically and tap its top section to distribute the tonerevenly inside the cartridge. And turn over the toner cartridge and tap the top in the same way.
3) Shake the toner cartridge horizontally to distribute the toner evenly inside the cartridge.
4) Close the front cover.
5) Check if the toner supply pipe is blocked. Replace the reservoir Unit.
6) Check the toner supply motor operation. Reconnect the harness. If the motor is broken, replace it.
4-106 Copyright© 1995-2016 SAMSUNG. All rights reserved.
4. Troubleshooting
► Error Code
C1–4411 / C1–4413
► Error message
Cyan toner cartridge is not installed. Install it.Shake cyan toner cartridge.
► Symptom
The cyan toner cartridge is not installed. / The CRUM data is not detected.
► Troubleshooting method
NOTE
To see the troubleshooting video for this error, click through to the link below.
• C1–4411 : http://tsp.samsung.com/tsp_file/spds/samsungprinter/X7/Webview/EN_X7_C1-4411.html
• C1–4413 : http://tsp.samsung.com/tsp_file/spds/samsungprinter/X7/Webview/EN_X7_C1-4413.html
1) Open the front cover. Check if the cyan toner cartridge is installed.
2) Remove and reinstall the cyan toner cartridge.
3) If the problem persists, check if the toner cartridge modular jack is contaminated or deformed.
4) Replace the cyan toner cartridge with a new one.
► Error Code
C1–4512
► Error message
Cyan toner cartridge is not compatible. Check users guide.
► Symptom
Cyan toner cartridge is not compatible.
► Troubleshooting method
NOTE
To see the troubleshooting video for this error, click through to the link below.
(http://tsp.samsung.com/tsp_file/spds/samsungprinter/X7/Webview/EN_X7_C1-4512.html)
1) Replace the cyan toner cartridge with a new one.
Copyright© 1995-2016 SAMSUNG. All rights reserved. 4-107

4. Troubleshooting
► Error Code
C1–5110 / C1–511A
► Error message
Prepare new black toner cartridge.
► Symptom
Black toner is almost empty.
► Troubleshooting method
1) Order new black toner cartridge because toner cartridge with level of “Low” will be exhausted soon.
► Error Code
C1–5120 / C1–5130 / C1–5140 / C1–5150 / C1–5160
► Error message
Replace with new black toner cartridgeEnd of life, Replace with new black toner cartridge
► Symptom
The black toner cartridge is at the end of its life.
► Troubleshooting method
1) Open the front cover.
2) Remove the black toner cartridge.
3) Install the new black toner cartridge.
4) Close the front cover.
4-108 Copyright© 1995-2016 SAMSUNG. All rights reserved.

4. Troubleshooting
► Error Code
C1–5311 / C1–5313 / C1–5314
► Error message
Black Toner Cartridge Failure: #C1-5311. Install black toner cartridge again
► Symptom
Black toner supply is inefficient or abnormal.
► Troubleshooting method
NOTE
To see the troubleshooting video for this error, click through to the link below.
(http://tsp.samsung.com/tsp_file/spds/samsungprinter/X7/Webview/EN_X7_C1-5311.html)
1) Open the front cover.
2) Remove the black toner cartridge. Stand the toner cartridge vertically and tap its top section to distribute the tonerevenly inside the cartridge. And turn over the toner cartridge and tap the top in the same way.
3) Shake the toner cartridge horizontally to distribute the toner evenly inside the cartridge.
4) Close the front cover.
5) Check if the toner supply pipe is blocked. Replace the reservoir Unit.
6) Check the toner supply motor operation. Reconnect the harness. If the motor is broken, replace it.
Copyright© 1995-2016 SAMSUNG. All rights reserved. 4-109
4. Troubleshooting
► Error Code
C1–5411 / C1–5413
► Error message
Black toner cartridge is not installed. Install it.Shake black toner cartridge.
► Symptom
The black toner cartridge is not installed. / The CRUM data is not detected.
► Troubleshooting method
NOTE
To see the troubleshooting video for this error, click through to the link below.
• C1–5411 : http://tsp.samsung.com/tsp_file/spds/samsungprinter/X7/Webview/EN_X7_C1-5411.html
• C1–5413 : http://tsp.samsung.com/tsp_file/spds/samsungprinter/X7/Webview/EN_X7_C1-5413.html
1) Open the front cover. Check if the black toner cartridge is installed.
2) Remove and reinstall the black toner cartridge.
3) If the problem persists, check if the toner cartridge modular jack is contaminated or deformed.
4) Replace the black toner cartridge with a new one.
► Error Code
C1–5512
► Error message
Black toner cartridge is not compatible. Check users guide.
► Symptom
Black toner cartridge is not compatible.
► Troubleshooting method
NOTE
To see the troubleshooting video for this error, click through to the link below.
(http://tsp.samsung.com/tsp_file/spds/samsungprinter/X7/Webview/EN_X7_C1-5512.html)
1) Replace the black toner cartridge with a new one.
4-110 Copyright© 1995-2016 SAMSUNG. All rights reserved.

4. Troubleshooting
4.6.7. C3–xxxx (Drum unit error)
Error Code Error Message Troubleshooting Page
C3-2110 Prepare new yellow imaging unit P.4–112
C3-2130 End of life, Replace with new yellow imaging unit P.4–112
C3-2140 End of life, Replace with new yellow imaging unit P.4–112
C3-2411 Yellow imaging unit is not installed. Install it P.4–113
C3-2511 Yellow imaging unit is not compatible. Check users guide P.4–113
C3-2512 Yellow imaging unit is not compatible. Check users guide P.4–113
C3-3110 Prepare new magenta imaging unit P.4–114
C3-3130 End of life, Replace with new magenta imaging unit P.4–114
C3-3140 End of life, Replace with new magenta imaging unit P.4–114
C3-3411 Magenta imaging unit is not installed. Install it P.4–115
C3-3512 Magenta imaging unit is not compatible. Check users guide P.4–115
C3-4110 Prepare new cyan imaging unit P.4–116
C3-4130 Replace with new cyan imaging unit P.4–116
C3-4140 End of life, Replace with new cyan imaging unit P.4–116
C3-4411 Cyan imaging unit is not installed. Install it P.4–117
C3-4512 Cyan imaging unit is not compatible. Check users guide P.4–117
C3-5110 Prepare new black imaging unit P.4–118
C3-5130 Replace with new black imaging unit P.4–118
C3-5140 Replace with new black imaging unit P.4–118
C3-5411 Black Imaging unit is not installed. Install it P.4–119
C3-5512 Black imaging unit is not compatible. Check users guide P.4–119
Copyright© 1995-2016 SAMSUNG. All rights reserved. 4-111

4. Troubleshooting
► Error Code
C3–2110
► Error message
Prepare new yellow imaging unit
► Symptom
Yellow drum unit has almost reached the end of its life.
► Troubleshooting method
1) Order new yellow drum unit because drum unit with level of “Low” will be exhausted soon.
► Error Code
C3–2130C3–2140
► Error message
End of life, Replace with new yellow imaging unit
► Symptom
Yellow drum unit is at the end of its life.
► Troubleshooting method
1) Open the front cover.
2) Remove the waste toner container.
3) Remove the yellow drum unit.
4) Install the new yellow drum unit.
5) Clean the LSU window.
6) Install the waste toner container.
7) Close the front cover.
4-112 Copyright© 1995-2016 SAMSUNG. All rights reserved.
4. Troubleshooting
► Error Code
C3–2411
► Error message
Yellow imaging unit is not installed. Install it.
► Symptom
The yellow drum unit is not installed.
► Troubleshooting method
NOTE
To see the troubleshooting video for this error, click through to the link below.
(http://tsp.samsung.com/tsp_file/spds/samsungprinter/X7/Webview/EN_X7_C3-2411.html
1) Open the front cover.
2) Remove the waste toner container.
3) Remove and reinstall the yellow drum unit
4) Install the waste toner container.
5) Close the front cover.
► Error Code
C3–2511 / C3–2512
► Error message
Yellow imaging unit is not compatible. Check user's guide
► Symptom
Yellow drum unit is not compatible.
► Troubleshooting method
NOTE
To see the troubleshooting video for this error, click through to the link below.
• C3–2511 : http://tsp.samsung.com/tsp_file/spds/samsungprinter/X7/Webview/EN_X7_C3-2511.html
• C3–2512 : http://tsp.samsung.com/tsp_file/spds/samsungprinter/X7/Webview/EN_X7_C3-2512.html
1) Open the front cover.
2) Remove the waste toner container.
3) Remove the yellow drum unit. Check if the drum unit is compatible with the machine.
4) If the drum unit is not a samsung genuine, replace it with a new one.
Copyright© 1995-2016 SAMSUNG. All rights reserved. 4-113
4. Troubleshooting
► Error Code
C3–3110
► Error message
Prepare new magenta imaging unit
► Symptom
Magenta drum unit has almost reached the end of its life.
► Troubleshooting method
1) Order new magenta drum unit because drum unit with level of “Low” will be exhausted soon.
► Error Code
C3–3130C3–3140
► Error message
End of life, Replace with new magenta imaging unit
► Symptom
Magenta drum unit is at the end of its life.
► Troubleshooting method
1) Open the front cover.
2) Remove the waste toner container.
3) Remove the magenta drum unit.
4) Install the new magenta drum unit.
5) Clean the LSU window.
6) Install the waste toner container.
7) Close the front cover.
4-114 Copyright© 1995-2016 SAMSUNG. All rights reserved.

4. Troubleshooting
► Error Code
C3–3411
► Error message
Magenta imaging unit is not installed. Install it.
► Symptom
The magenta drum unit is not installed.
► Troubleshooting method
NOTE
To see the troubleshooting video for this error, click through to the link below.
(http://tsp.samsung.com/tsp_file/spds/samsungprinter/X7/Webview/EN_X7_C3-3411.html)
1) Open the front cover.
2) Remove the waste toner container.
3) Remove and reinstall the magenta drum unit.
4) Install the waste toner container.
5) Close the front cover.
► Error Code
C3–3512
► Error message
Magenta imaging unit is not compatible. Check user's guide
► Symptom
Magenta drum unit is not compatible.
► Troubleshooting method
NOTE
To see the troubleshooting video for this error, click through to the link below.
(http://tsp.samsung.com/tsp_file/spds/samsungprinter/X7/Webview/EN_X7_C3-3512.html)
1) Open the front cover.
2) Remove the waste toner container.
3) Remove the magenta drum unit. Check if the drum unit is compatible with the machine.
4) If the drum unit is not a samsung genuine, replace it with a new one.
Copyright© 1995-2016 SAMSUNG. All rights reserved. 4-115

4. Troubleshooting
► Error Code
C3–4110
► Error message
Prepare new cyan imaging unit
► Symptom
Cyan drum unit has almost reached the end of its life.
► Troubleshooting method
1) Order new cyan drum unit because drum unit with level of “Low” will be exhausted soon.
► Error Code
C3–4130C3–4140
► Error message
End of life, Replace with new magenta imaging unit
► Symptom
Cyan drum unit is at the end of its life.
► Troubleshooting method
1) Open the front cover.
2) Remove the waste toner container.
3) Remove the cyan drum unit.
4) Install the new cyan drum unit.
5) Clean the LSU window.
6) Install the waste toner container.
7) Close the front cover.
4-116 Copyright© 1995-2016 SAMSUNG. All rights reserved.

4. Troubleshooting
► Error Code
C3–4411
► Error message
Cyan imaging unit is not installed. Install it.Cyan Imaging Unit Failure: #C3-4414. Install imaging unit again.
► Symptom
The cyan drum unit is not installed.
► Troubleshooting method
NOTE
To see the troubleshooting video for this error, click through to the link below.
(http://tsp.samsung.com/tsp_file/spds/samsungprinter/X7/Webview/EN_X7_C3-4411.html
1) Open the front cover.
2) Remove the waste toner container.
3) Remove and reinstall the cyan drum unit
4) Install the waste toner container.
5) Close the front cover.
► Error Code
C3–4512
► Error message
Cyan imaging unit is not compatible. Check user's guide
► Symptom
Cyan drum unit is not compatible.
► Troubleshooting method
NOTE
To see the troubleshooting video for this error, click through to the link below.
(http://tsp.samsung.com/tsp_file/spds/samsungprinter/X7/Webview/EN_X7_C3-4512.html)
1) Open the front cover.
2) Remove the waste toner container.
3) Remove the cyan drum unit. Check if the drum unit is compatible with the machine.
4) If the drum unit is not a samsung genuine, replace it with a new one.
Copyright© 1995-2016 SAMSUNG. All rights reserved. 4-117

4. Troubleshooting
► Error Code
C3–5110
► Error message
Prepare new cyan imaging unit
► Symptom
Black drum unit has almost reached the end of its life.
► Troubleshooting method
1) Order new black drum unit because drum unit with level of “Low” will be exhausted soon.
► Error Code
C3–5130C3–5140
► Error message
End of life, Replace with new magenta imaging unit
► Symptom
Black drum unit is at the end of its life.
► Troubleshooting method
1) Open the front cover.
2) Remove the waste toner container.
3) Remove the black drum unit.
4) Install the new black drum unit.
5) Clean the LSU window.
6) Install the waste toner container.
7) Close the front cover.
4-118 Copyright© 1995-2016 SAMSUNG. All rights reserved.
4. Troubleshooting
► Error Code
C3–5411
► Error message
Black imaging unit is not installed. Install it.
► Symptom
The black drum unit is not installed.
► Troubleshooting method
NOTE
To see the troubleshooting video for this error, click through to the link below.
(http://tsp.samsung.com/tsp_file/spds/samsungprinter/X7/Webview/EN_X7_C3-5411.html
1) Open the front cover.
2) Remove the waste toner container.
3) Remove and reinstall the black drum unit
4) Install the waste toner container.
5) Close the front cover.
► Error Code
C3–5512
► Error message
Black imaging unit is not compatible. Check user's guide
► Symptom
Black drum unit is not compatible.
► Troubleshooting method
NOTE
To see the troubleshooting video for this error, click through to the link below.
(http://tsp.samsung.com/tsp_file/spds/samsungprinter/X7/Webview/EN_X7_C3-5512.html
1) Open the front cover.
2) Remove the waste toner container.
3) Remove the black drum unit. Check if the drum unit is compatible with the machine.
4) If the drum unit is not a samsung genuine, replace it with a new one.
Copyright© 1995-2016 SAMSUNG. All rights reserved. 4-119
4. Troubleshooting
4.6.8. C5–xxxx (ITB unit error)
Error Code Error Message Troubleshooting Page
C5-1110 Prepare new transfer belt unit P.4–120
C5-1120 Replace new transfer belt unit P.4–121
C5-2120 Transfer belt cleaning unit is worn. Replace with new one P.4–121
► Error Code
C5–1110
► Error message
Prepare new transfer belt unit.
► Symptom
The life of the ITB Unit expires soon
► Troubleshooting method
NOTE
To see the troubleshooting video for this error, click through to the link below.
(http://tsp.samsung.com/tsp_file/spds/samsungprinter/X7/Webview/EN_X7_C5-1110.html
1) Order new ITB unit.
4-120 Copyright© 1995-2016 SAMSUNG. All rights reserved.

4. Troubleshooting
► Error Code
C5–1120
► Error message
Replace new transfer belt unit.
► Symptom
The life of the ITB Unit has expired.
► Troubleshooting method
NOTE
To see the troubleshooting video for this error, click through to the link below.
(http://tsp.samsung.com/tsp_file/spds/samsungprinter/X7/Webview/EN_X7_C5-1120.html
1) Turn the machine off.
2) Remove the ITB cleaner.
3) Remove the ITB Unit.
4) Install new ITB Unit and ITB cleaner.
5) Turn the machine on.
6) Enter SVC mode.
7) Select “TRANSFER”(INFORMATION > Supply Status > Field Replacement Unit > TRANSFER)
8) Select “ITB”. The “RESET” button will be activated. Click “RESET” to clear the ITB count.
9) Exit SVC mode by pushing the home button.
► Error Code
C5–2120
► Error message
Prepare new transfer belt unit.
► Symptom
The life of the ITB cleaner has expired.
► Troubleshooting method
NOTE
To see the troubleshooting video for this error, click through to the link below.
(http://tsp.samsung.com/tsp_file/spds/samsungprinter/X7/Webview/EN_X7_C5-2120.html
1) Turn the machine off.
2) Replace the ITB cleaner.
3) Turn the machine on.
Copyright© 1995-2016 SAMSUNG. All rights reserved. 4-121
4. Troubleshooting
4.6.9. C6–xxxx (Fuser unit error)
Error Code Error Message Troubleshooting Page
C6-1120 Replace with new fuser unit P.4–122
C6-1310 Fuser unit is not installed. Install it P.4–123
► Error Code
C6–1120
► Error message
Replace with new fuser unit
► Symptom
The life of the fuser unit has expired.
► Troubleshooting method
NOTE
To see the troubleshooting video for this error, click through to the link below.
(http://tsp.samsung.com/tsp_file/spds/samsungprinter/K7/Webview/EN_K7_C6-1120.html)
1) Turn the machine off.
2) Replace the fuser unit.
3) Turn the machine on.
4-122 Copyright© 1995-2016 SAMSUNG. All rights reserved.
4. Troubleshooting
► Error Code
C6–1310
► Error message
Fuser unit is not installed. Install it.
► Symptom
The fuser unit is not installed or fuser unit connector is not connected properly.
► Troubleshooting method
NOTE
To see the troubleshooting video for this error, click through to the link below.
(http://tsp.samsung.com/tsp_file/spds/samsungprinter/X7/Webview/EN_X7_C6-1310.html)
1) Turn the machine off then on.
2) If the problem persists, turn the machine off again.
3) Open the side cover.
4) Remove and reinstall the fuser unit.
5) Turn the machine on.
6) If the problem persists, replace the fuser unit.
CAUTION
The temperature gets high in the vicinity of the fuser unit. When replacing it, you may get burned. Before replacingit, make sure that fuser unit has cooled.
Copyright© 1995-2016 SAMSUNG. All rights reserved. 4-123

4. Troubleshooting
4.6.10. C7–xxxx (Waste toner container error)
Error Code Error Message Troubleshooting Page
C7-1110 Waste toner container is almost full. Order new one P.4–124
C7-1130 Waste toner container is full. Replace it P.4–124
C7-1311 Waste toner container is not installed. Install it P.4–125
► Error Code
C7–1110
► Error message
Waste toner container is almost full. Order new one.
► Symptom
The life of the waste toner container expires soon.
► Troubleshooting method
1) Order new waste toner container.
► Error Code
C7–1130
► Error message
Waste toner container is full. Replace it.
► Symptom
The life of the waste toner container has expired.
► Troubleshooting method
1) Open the front cover.
2) Remove the waste toner container. Install a new waste toner container.
3) Close the front cover.
4-124 Copyright© 1995-2016 SAMSUNG. All rights reserved.

4. Troubleshooting
► Error Code
C7–1311
► Error message
Waste toner container is not installed. Install it.
► Symptom
The waste toner container is not installed.
► Troubleshooting method
NOTE
To see the troubleshooting video for this error, click through to the link below.
(http://tsp.samsung.com/tsp_file/spds/samsungprinter/X7/Webview/EN_X7_C7-1311.html)
1) Open the front cover.
2) Remove and reinstall the waste toner container.
3) Close the front cover.
Copyright© 1995-2016 SAMSUNG. All rights reserved. 4-125
4. Troubleshooting
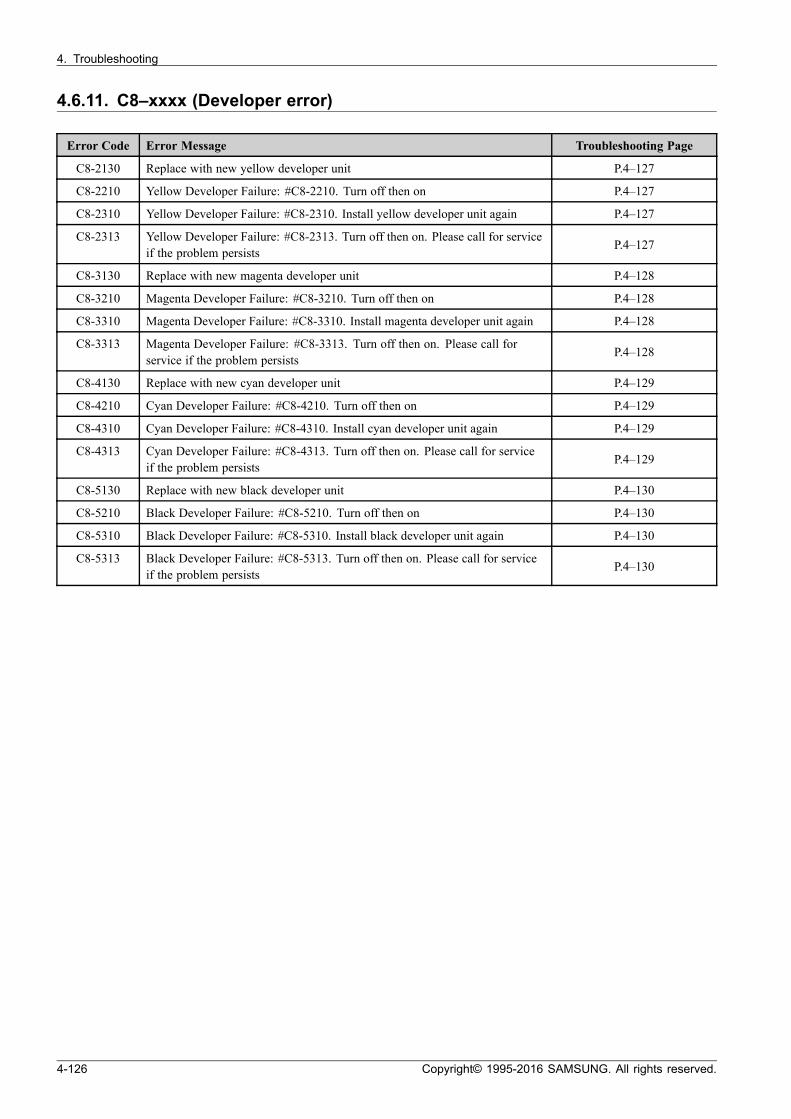
4.6.11. C8–xxxx (Developer error)
Error Code Error Message Troubleshooting Page
C8-2130 Replace with new yellow developer unit P.4–127
C8-2210 Yellow Developer Failure: #C8-2210. Turn off then on P.4–127
C8-2310 Yellow Developer Failure: #C8-2310. Install yellow developer unit again P.4–127
C8-2313 Yellow Developer Failure: #C8-2313. Turn off then on. Please call for serviceif the problem persists
P.4–127
C8-3130 Replace with new magenta developer unit P.4–128
C8-3210 Magenta Developer Failure: #C8-3210. Turn off then on P.4–128
C8-3310 Magenta Developer Failure: #C8-3310. Install magenta developer unit again P.4–128
C8-3313 Magenta Developer Failure: #C8-3313. Turn off then on. Please call forservice if the problem persists
P.4–128
C8-4130 Replace with new cyan developer unit P.4–129
C8-4210 Cyan Developer Failure: #C8-4210. Turn off then on P.4–129
C8-4310 Cyan Developer Failure: #C8-4310. Install cyan developer unit again P.4–129
C8-4313 Cyan Developer Failure: #C8-4313. Turn off then on. Please call for serviceif the problem persists
P.4–129
C8-5130 Replace with new black developer unit P.4–130
C8-5210 Black Developer Failure: #C8-5210. Turn off then on P.4–130
C8-5310 Black Developer Failure: #C8-5310. Install black developer unit again P.4–130
C8-5313 Black Developer Failure: #C8-5313. Turn off then on. Please call for serviceif the problem persists
P.4–130
4-126 Copyright© 1995-2016 SAMSUNG. All rights reserved.

4. Troubleshooting
► Error Code
C8–2130
► Error message
Replace with new yellow developer unit
► Symptom
The life of the yellow developer unit expires has expired.
► Troubleshooting method
NOTE
To see the troubleshooting video for this error, click through to the link below.
(http://tsp.samsung.com/tsp_file/spds/samsungprinter/X7/Webview/EN_X7_C8-2130.html)
1) Turn the machine off.
2) Replace the yellow developer unit.
3) Turn the machine on then print the test page.
► Error Code
C8–2210 / C8–2310 / C8–2313
► Error message
Yellow Developer Failure: #C8-2210. Turn off then onYellow Developer Failure: #C8-2310. Install yellow developer unit againYellow Developer Failure: #C8-2313. Turn off then on. Please call for service if the problem persists
► Symptom
The yellow developer unit has a problem with toner supply or sensor calibration.
► Troubleshooting method
NOTE
To see the troubleshooting video for this error, click through to the link below.
• C8–2210 : http://tsp.samsung.com/tsp_file/spds/samsungprinter/X7/Webview/EN_X7_C8-2210.html
• C8–2310 : http://tsp.samsung.com/tsp_file/spds/samsungprinter/X7/Webview/EN_X7_C8-2310.html
• C8–2313 : http://tsp.samsung.com/tsp_file/spds/samsungprinter/X7/Webview/EN_X7_C8-2313.html
1) Open the front cover. Then, remove the waste toner container.
2) Check if the toner supply pipe is blocked. If it is closed, open it. (Lever is in horizontal position.)
3) Check if deve unit connector(4 pin) is connected correctly. Check if the pin is deformed.
4) Install the waste toner container. Close the front cover.
5) Turn the machine off then on.
6) If the problem persists, remove and reinstall the yellow developer unit.
7) If the problem persists, replace the yellow developer unit.
Copyright© 1995-2016 SAMSUNG. All rights reserved. 4-127
4. Troubleshooting
► Error Code
C8–3130
► Error message
Replace with new magenta developer unit
► Symptom
The life of the magenta developer unit expires has expired.
► Troubleshooting method
NOTE
To see the troubleshooting video for this error, click through to the link below.
(http://tsp.samsung.com/tsp_file/spds/samsungprinter/X7/Webview/EN_X7_C8-3130.html)
1) Turn the machine off.
2) Replace the magenta developer unit.
3) Turn the machine on then print the test page.
► Error Code
C8–3210 / C8–3310 / C8–3313
► Error message
Magenta Developer Failure: #C8-3210. Turn off then onMagenta Developer Failure: #C8-3310. Install magenta developer unit againMagenta Developer Failure: #C8-3313. Turn off then on. Please call for service if the problem persists
► Symptom
The magenta developer unit has a problem with toner supply or sensor calibration.
► Troubleshooting method
NOTE
To see the troubleshooting video for this error, click through to the link below.
• C8–3210 : http://tsp.samsung.com/tsp_file/spds/samsungprinter/X7/Webview/EN_X7_C8-3210.html
• C8–3310 : http://tsp.samsung.com/tsp_file/spds/samsungprinter/X7/Webview/EN_X7_C8-3310.html
• C8–3313 : http://tsp.samsung.com/tsp_file/spds/samsungprinter/X7/Webview/EN_X7_C8-3313.html
1) Open the front cover. Then, remove the waste toner container.
2) Check if the toner supply pipe is blocked. If it is closed, open it. (Lever is in horizontal position.)
3) Check if deve unit connector(4 pin) is connected correctly. Check if the pin is deformed.
4) Install the waste toner container. Close the front cover.
5) Turn the machine off then on.
6) If the problem persists, remove and reinstall the magenta developer unit.
7) If the problem persists, replace the magenta developer unit.
4-128 Copyright© 1995-2016 SAMSUNG. All rights reserved.
4. Troubleshooting
► Error Code
C8–4130
► Error message
Replace with new cyan developer unit
► Symptom
The life of the cyan developer unit expires has expired.
► Troubleshooting method
NOTE
To see the troubleshooting video for this error, click through to the link below.
(http://tsp.samsung.com/tsp_file/spds/samsungprinter/X7/Webview/EN_X7_C8-4130.html)
1) Turn the machine off.
2) Replace the cyan developer unit.
3) Turn the machine on then print the test page.
► Error Code
C8–4210 / C8–4310 / C8–4313
► Error message
Cyan Developer Failure: #C8-4210. Turn off then onCyan Developer Failure: #C8-4310. Install cyan developer unit againCyan Developer Failure: #C8-4313. Turn off then on. Please call for service if the problem persists
► Symptom
The cyan developer unit has a problem with toner supply or sensor calibration.
► Troubleshooting method
NOTE
To see the troubleshooting video for this error, click through to the link below.
• C8–4210 : http://tsp.samsung.com/tsp_file/spds/samsungprinter/X7/Webview/EN_X7_C8-4210.html
• C8–4310 : http://tsp.samsung.com/tsp_file/spds/samsungprinter/X7/Webview/EN_X7_C8-4310.html
• C8–4313 : http://tsp.samsung.com/tsp_file/spds/samsungprinter/X7/Webview/EN_X7_C8-4313.html
1) Open the front cover. Then, remove the waste toner container.
2) Check if the toner supply pipe is blocked. If it is closed, open it. (Lever is in horizontal position.)
3) Check if deve unit connector(4 pin) is connected correctly. Check if the pin is deformed.
4) Install the waste toner container. Close the front cover.
5) Turn the machine off then on.
6) If the problem persists, remove and reinstall the cyan developer unit.
7) If the problem persists, replace the cyan developer unit.
Copyright© 1995-2016 SAMSUNG. All rights reserved. 4-129

4. Troubleshooting
► Error Code
C8–5130
► Error message
Replace with new black developer unit
► Symptom
The life of the black developer unit expires has expired.
► Troubleshooting method
NOTE
To see the troubleshooting video for this error, click through to the link below.
(http://tsp.samsung.com/tsp_file/spds/samsungprinter/X7/Webview/EN_X7_C8-5130.html)
1) Turn the machine off.
2) Replace the black developer unit.
3) Turn the machine on then print the test page.
► Error Code
C8–5210 / C8–5310 / C8–5313
► Error message
Black Developer Failure: #C8-5210. Turn off then onBlack Developer Failure: #C8-5310. Install black developer unit againBlack Developer Failure: #C8-5313. Turn off then on. Please call for service if the problem persists
► Symptom
The black developer unit has a problem with toner supply or sensor calibration.
► Troubleshooting method
NOTE
To see the troubleshooting video for this error, click through to the link below.
• C8–5210 : http://tsp.samsung.com/tsp_file/spds/samsungprinter/X7/Webview/EN_X7_C8-5210.html
• C8–5310 : http://tsp.samsung.com/tsp_file/spds/samsungprinter/X7/Webview/EN_X7_C8-5310.html
• C8–5313 : http://tsp.samsung.com/tsp_file/spds/samsungprinter/X7/Webview/EN_X7_C8-5313.html
1) Open the front cover. Then, remove the waste toner container.
2) Check if the toner supply pipe is blocked. If it is closed, open it. (Lever is in horizontal position.)
3) Check if deve unit connector(4 pin) is connected correctly. Check if the pin is deformed.
4) Install the waste toner container. Close the front cover.
5) Turn the machine off then on.
6) If the problem persists, remove and reinstall the black developer unit.
7) If the problem persists, replace the black developer unit.
4-130 Copyright© 1995-2016 SAMSUNG. All rights reserved.
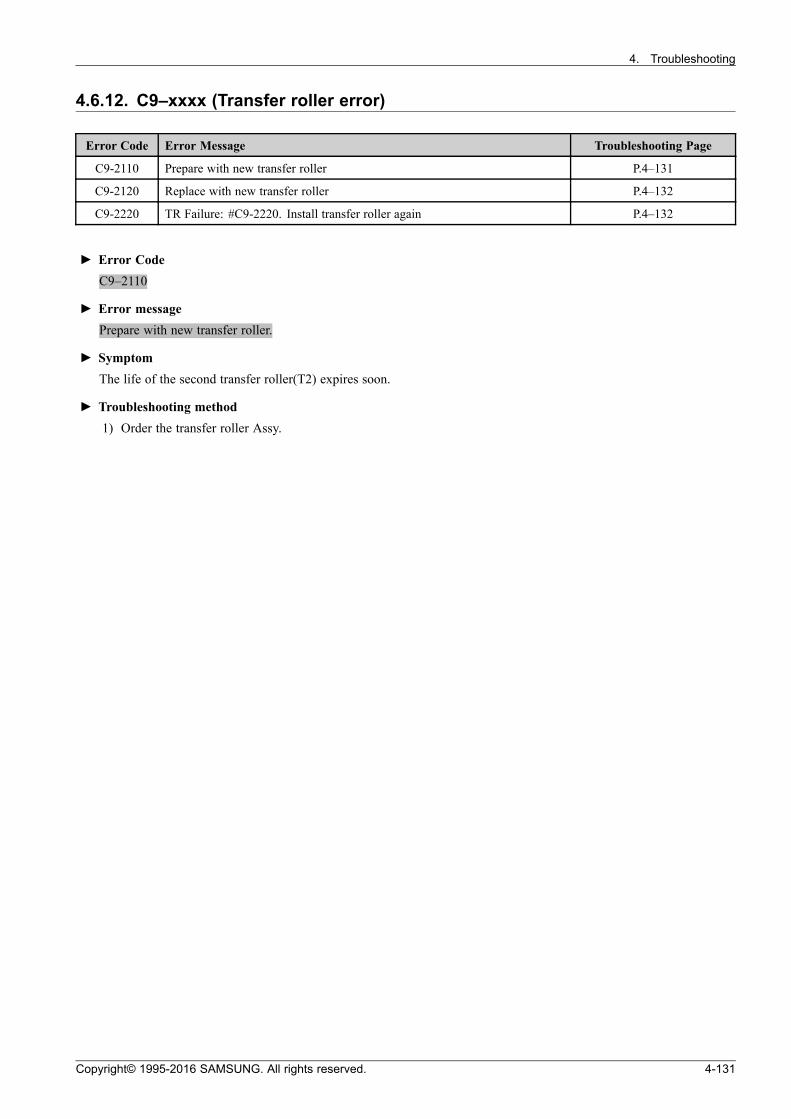
4. Troubleshooting
4.6.12. C9–xxxx (Transfer roller error)
Error Code Error Message Troubleshooting Page
C9-2110 Prepare with new transfer roller P.4–131
C9-2120 Replace with new transfer roller P.4–132
C9-2220 TR Failure: #C9-2220. Install transfer roller again P.4–132
► Error Code
C9–2110
► Error message
Prepare with new transfer roller.
► Symptom
The life of the second transfer roller(T2) expires soon.
► Troubleshooting method
1) Order the transfer roller Assy.
Copyright© 1995-2016 SAMSUNG. All rights reserved. 4-131
4. Troubleshooting
► Error Code
C9–2110C9–2120
► Error message
Replace with new Transfer roller.
► Symptom
The life of the second transfer roller(T2) expires soon or has expired.
► Troubleshooting method
NOTE
To see the troubleshooting video for this error, click through to the link below.
(http://tsp.samsung.com/tsp_file/spds/samsungprinter/X7/Webview/EN_X7_C9-2120.html)
1) Open the side cover.
2) Replace the 2nd transfer roller with a new one.
3) Close the side cover.
4) Enter SVC mode.
5) Select “TRANSFER”(INFORMATION > Supply Status > Field Replacement Unit > TRANSFER)
6) Select “T2 Roller”. The “RESET” button will be activated. Click “RESET” to clear the T2 Roller count.
7) Exit the SVC mode by pushing the home button.
► Error Code
C9–2220
► Error message
TR Failure: #C9-2220. Install transfer roller again
► Symptom
The life of the second transfer roller(T2) is not installed.
► Troubleshooting method
NOTE
To see the troubleshooting video for this error, click through to the link below.
(http://tsp.samsung.com/tsp_file/spds/samsungprinter/X7/Webview/EN_X7_C9-2220.html)
1) Open the side cover.
2) Remove and reinstall the second transfer roller.
3) Close the side cover.
4) If the problem persists, replace the HVPS board.
4-132 Copyright© 1995-2016 SAMSUNG. All rights reserved.
4. Troubleshooting
4.6.13. H1–xxxx (Double Cassette Feeder Unit Error)
Error Code Error Message Troubleshooting Page
H1-1311 Paper jam in Tray 3 P.4–134
H1-1312 Paper jam in Tray 3 P.4–134
H1-1313 Paper jam in Tray 3 P.4–134
H1-1314 Paper jam inside of machine P.4–134
H1-1315 Paper jam in Tray 3 P.4–134
H1-1317 Paper jam in Tray 3 P.4–134
H1-1318 Paper jam in Tray 3 P.4–134
H1-1322 Tray 3 cassette is pulled out. Insert it properly P.4–136
H1-1351 Paper is low in Tray 3. Load paper P.4–137
H1-1352 Paper is empty in Tray 3. Load paper P.4–137
H1-1353 Input System Failure: #H1-1353. Pull Tray 3 out and insert it P.4–138
H1-1354 Paper is empty in tray 3. Load paper P.4–137
H1-1411 Paper jam in Tray 4 P.4–139
H1-1412 Paper jam in Tray 4 P.4–139
H1-1417 Paper jam in Tray 4 P.4–139
H1-1418 Paper jam in Tray 4 P.4–139
H1-1422 Tray 4 cassette is pulled out. Insert it properly P.4–141
H1-1451 Paper is low in Tray 4. Load paper P.4–142
H1-1452 Paper is empty in Tray 4. Load paper P.4–142
H1-1453 Input System Failure: #H1-1453. Pull Tray 4 out and insert it P.4–143
H1-1454 Paper is empty in tray 4. Load paper P.4–142
H1-5323 Tray door is open. Close the door P.4–144
H1-5330 DCF Failure: #H1-5330. Check internal DCF connection P.4–145
Copyright© 1995-2016 SAMSUNG. All rights reserved. 4-133

4. Troubleshooting
► Error Code
H1-1311 / H1–1312 / H1–1313 / H1–1314 / H1–1315 / H1–1317 / H1–1318
► Error message
Paper jam in Tray 3.
► Symptom
Paper jam has occurred in tray3. (Pick up unit connection is defective. / Pickup rollers are defective. / pre Feedsensor is defective.)
► Troubleshooting method
1) Open the DCF Take Away-Cover. Remove the jammed paper.
2) Remove tray3. Remove the jammed paper. Close the DCF Take Away-Cover and insert tray3.
3) If this jam error occurs frequently, check the rollers below.a) Remove the tray3 and tray4.b) Check if the pick up/ reverse/ forward rollers are assembled correctly.
c) If the pick up/ reverse/ forward rollers are worn out or contaminated, replace the defective roller.
4) If pick up/ reverse/ forward rollers have no problem, check the following.a) Remove the DCF pick up unit1. Check if the pre feed sensor cable is connected correctly.b) Check if the sensor cable on DCF PBA is connected correctly.c) If the connection is OK, replace the pre feed sensor(0604-001490).d) Install the DCF pick up unit1.
5) If the problem persists after checking step 3~4, check the following :a) Remove the DCF pick up unit1. Check if the sensor and actuator are assembled correctly.b) When pushing the pickup lever, check if the pick up rollers are down.c) Replace the DCF pick up unit1(JC93-01087A) or defective part.
6) Check the DCF feed motor.a) Check if the DCF feed motor cable is connected correctly.b) If the connection is OK, replace the DCF feed drive unit(JC93-01135A).
7) Check the DCF pick up motor.
4-134 Copyright© 1995-2016 SAMSUNG. All rights reserved.
4. Troubleshooting
a) Check if the DCF pick up motor cable is connected correctly.b) If the connection is OK, replace the DCF pick up drive unit(JC93-01063A).
Copyright© 1995-2016 SAMSUNG. All rights reserved. 4-135
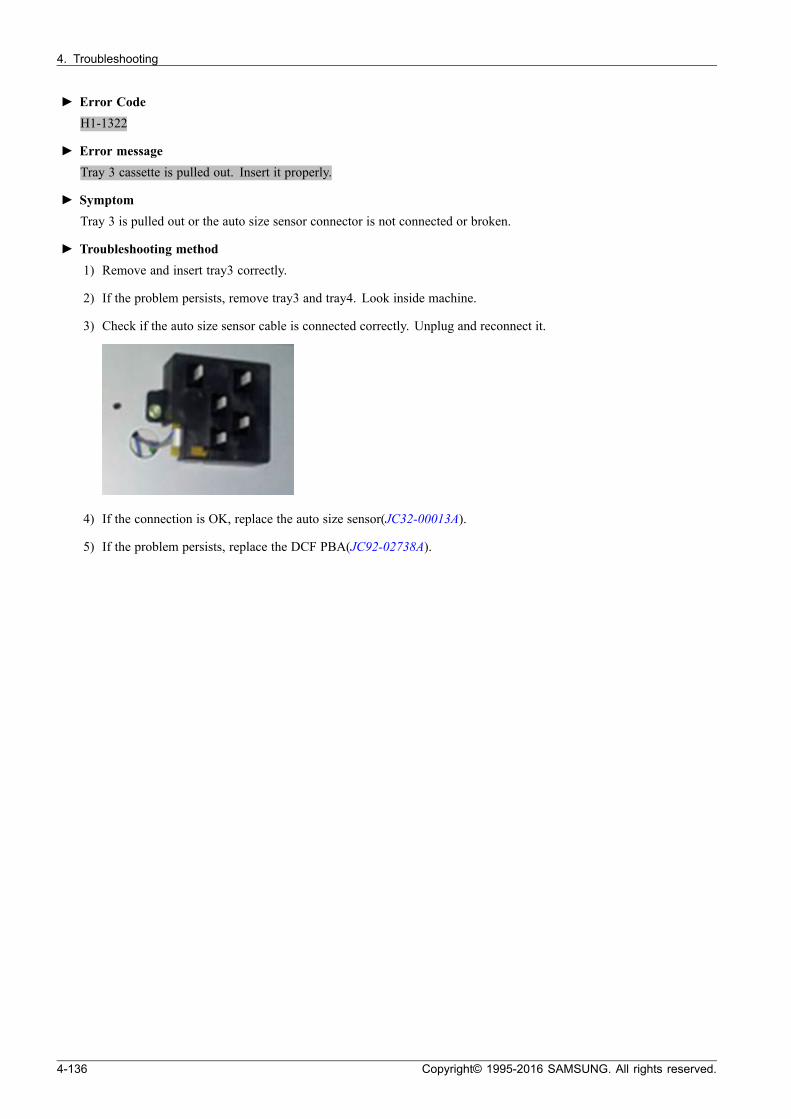
4. Troubleshooting
► Error Code
H1-1322
► Error message
Tray 3 cassette is pulled out. Insert it properly.
► Symptom
Tray 3 is pulled out or the auto size sensor connector is not connected or broken.
► Troubleshooting method
1) Remove and insert tray3 correctly.
2) If the problem persists, remove tray3 and tray4. Look inside machine.
3) Check if the auto size sensor cable is connected correctly. Unplug and reconnect it.
4) If the connection is OK, replace the auto size sensor(JC32-00013A).
5) If the problem persists, replace the DCF PBA(JC92-02738A).
4-136 Copyright© 1995-2016 SAMSUNG. All rights reserved.

4. Troubleshooting
► Error Code
H1-1351 / H1–1352 / H1–1354
► Error message
Paper is low in Tray 3. Load paper.Paper is empty in Tray 3. Load paper.
► Symptom
Paper in the tray is less than 10% of specification. / The photo sensor is defective.
► Troubleshooting method
1) Remove tray3. Load the paper in tray3.
2) If paper is loaded but error message has not disappeared, check the following.a) Remove the DCF pick up unit1.b) Check if the photo sensor in the DCF pick up unit1 is contaminated. If so, clean it.c) If the photo sensor(0604-001393) is defective, replace it.d) If the actuator(JC66-04399A) is defective, replace it.
Copyright© 1995-2016 SAMSUNG. All rights reserved. 4-137
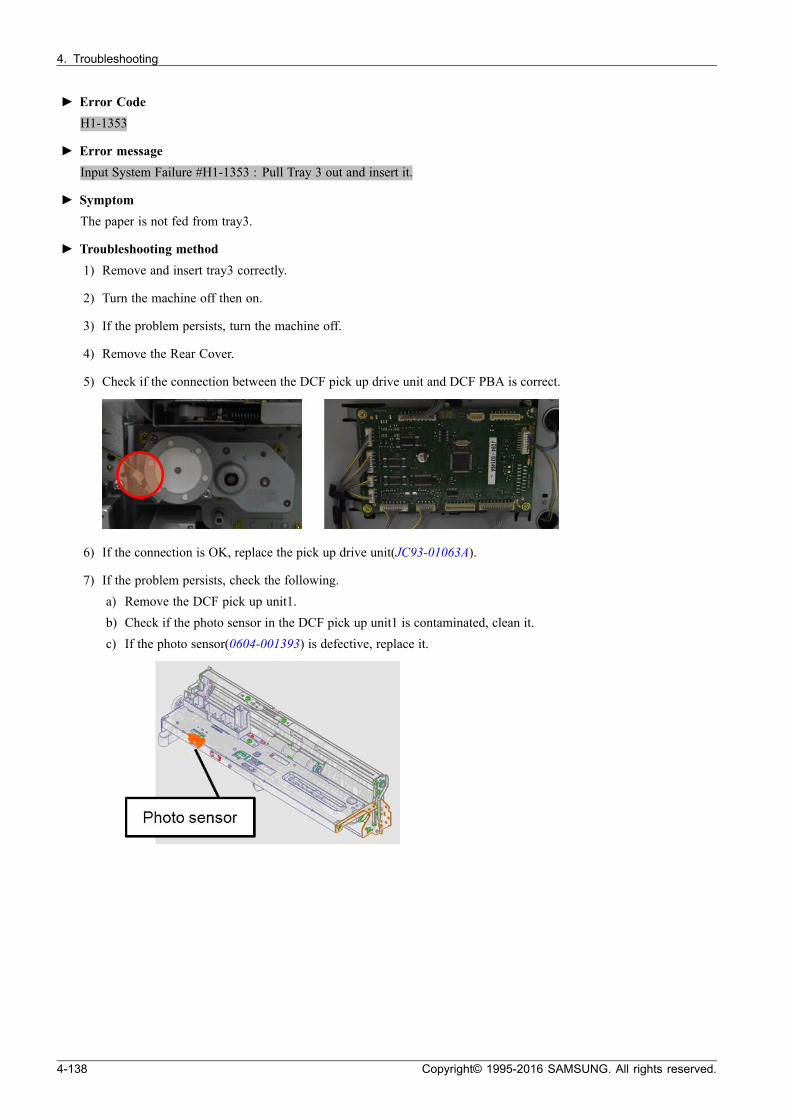
4. Troubleshooting
► Error Code
H1-1353
► Error message
Input System Failure #H1-1353 : Pull Tray 3 out and insert it.
► Symptom
The paper is not fed from tray3.
► Troubleshooting method
1) Remove and insert tray3 correctly.
2) Turn the machine off then on.
3) If the problem persists, turn the machine off.
4) Remove the Rear Cover.
5) Check if the connection between the DCF pick up drive unit and DCF PBA is correct.
6) If the connection is OK, replace the pick up drive unit(JC93-01063A).
7) If the problem persists, check the following.a) Remove the DCF pick up unit1.b) Check if the photo sensor in the DCF pick up unit1 is contaminated, clean it.c) If the photo sensor(0604-001393) is defective, replace it.
4-138 Copyright© 1995-2016 SAMSUNG. All rights reserved.

4. Troubleshooting
► Error Code
H1-1411 / H1–1412 / H1–1417 / H1–1418
► Error message
Paper jam in Tray 4.
► Symptom
Paper jam has occurred in tray4. (Pick up unit connection is defective. / Pickup rollers are defective. / Pre Feedsensor is defective.)
► Troubleshooting method
1) Open the DCF Take Away-Cover. Remove the jammed paper.
2) Remove tray4. Remove the jammed paper. Close the DCF Take Away-Cover and insert tray4.
3) If this jam error occurs frequently, check the rollers below.a) Remove tray3 and tray4.b) Check if the pick up/ reverse/ forward rollers are assembled correctly.
c) If the pick up/ reverse/ forward rollers are worn out or contaminated, replace the defective roller.
4) If pick up/ reverse/ forward rollers have no problem, check the following.a) Remove the DCF pick up unit2. Check if the feed sensor cable is connected correctly.b) Check if the sensor cable on DCF PBA is connected correctly.c) If the connection is OK, replace the pre feed sensor(0604-001490).d) Install the DCF pick up unit2.
5) If the problem persists after checking step 3~4, check the following :a) Remove the DCF pick up unit2. Check if the sensor and actuator are assembled correctly.b) When pushing the pickup lever, check if the pick up rollers are down.c) Replace the DCF pick up unit2(JC93-00513A) or defective part.
6) Check the DCF feed motor.a) Check if the DCF feed motor cable is connected correctly.b) If the connection is OK, replace the DCF feed drive unit(JC93-01135A).
7) Check the DCF pick up motor.
Copyright© 1995-2016 SAMSUNG. All rights reserved. 4-139

4. Troubleshooting
a) Check if the DCF pick up motor cable is connected correctly.b) If the connection is OK, replace the DCF pick up drive unit(JC93-01063A).
4-140 Copyright© 1995-2016 SAMSUNG. All rights reserved.

4. Troubleshooting
► Error Code
H1-1422
► Error message
Tray 4 cassette is pulled out. Insert it properly.
► Symptom
Tray 4 is pulled out or the auto size sensor connector is not connected or is broken.
► Troubleshooting method
1) Remove and insert tray4 correctly.
2) If the problem persists, remove tray3 and tray4. Look inside machine.
3) Check if the auto size sensor cable is connected correctly. Unplug and reconnect it.
4) If the connection is OK, replace the auto size sensor(JC32-00013A).
5) If the problem persists, replace the DCF PBA(JC92-02738A).
Copyright© 1995-2016 SAMSUNG. All rights reserved. 4-141
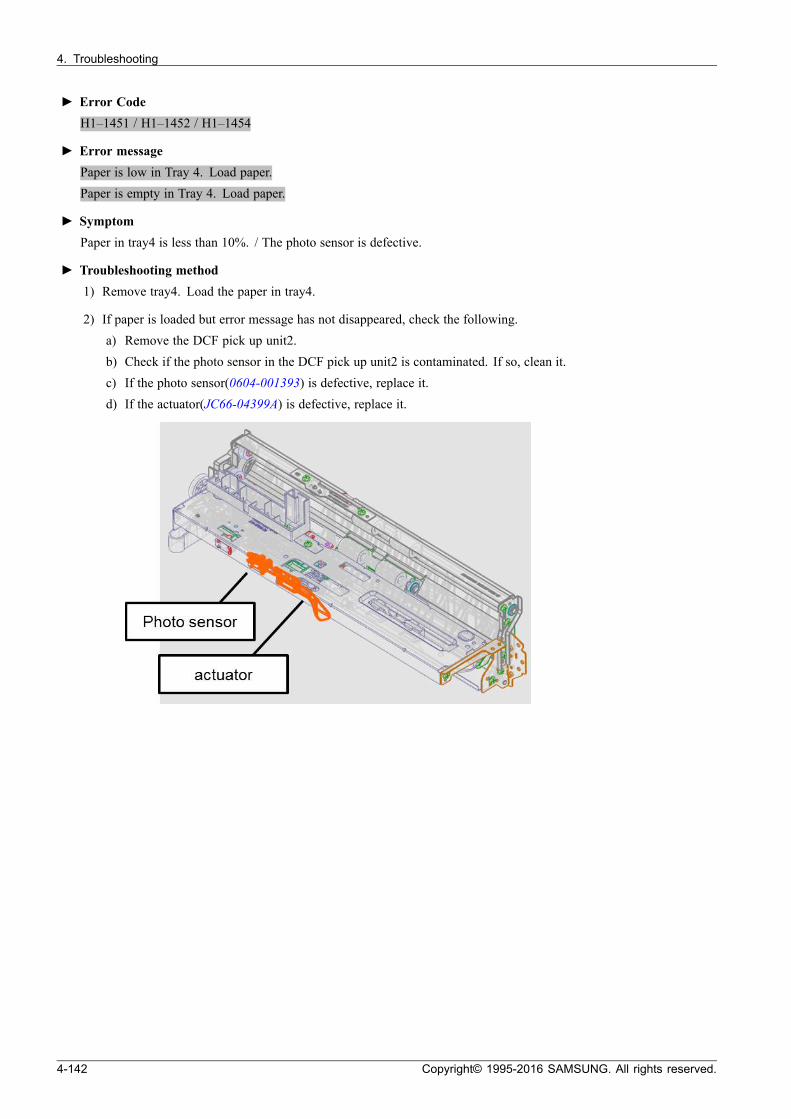
4. Troubleshooting
► Error Code
H1–1451 / H1–1452 / H1–1454
► Error message
Paper is low in Tray 4. Load paper.Paper is empty in Tray 4. Load paper.
► Symptom
Paper in tray4 is less than 10%. / The photo sensor is defective.
► Troubleshooting method
1) Remove tray4. Load the paper in tray4.
2) If paper is loaded but error message has not disappeared, check the following.a) Remove the DCF pick up unit2.b) Check if the photo sensor in the DCF pick up unit2 is contaminated. If so, clean it.c) If the photo sensor(0604-001393) is defective, replace it.d) If the actuator(JC66-04399A) is defective, replace it.
4-142 Copyright© 1995-2016 SAMSUNG. All rights reserved.
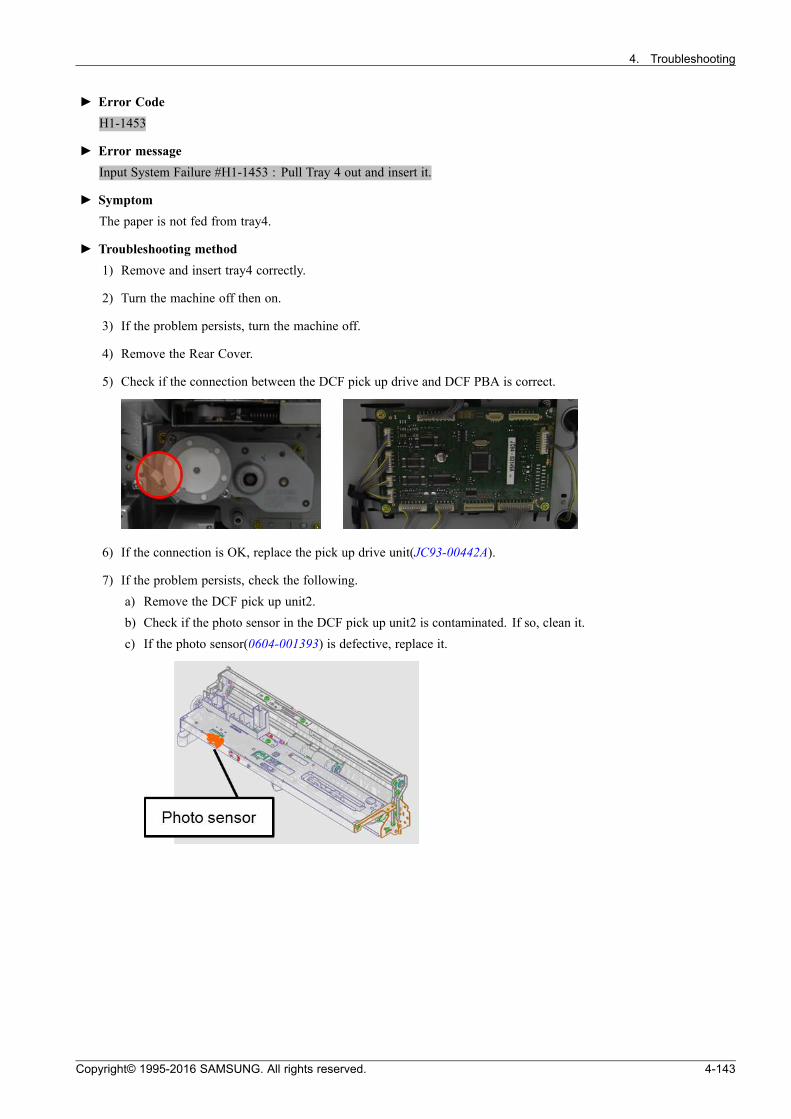
4. Troubleshooting
► Error Code
H1-1453
► Error message
Input System Failure #H1-1453 : Pull Tray 4 out and insert it.
► Symptom
The paper is not fed from tray4.
► Troubleshooting method
1) Remove and insert tray4 correctly.
2) Turn the machine off then on.
3) If the problem persists, turn the machine off.
4) Remove the Rear Cover.
5) Check if the connection between the DCF pick up drive and DCF PBA is correct.
6) If the connection is OK, replace the pick up drive unit(JC93-00442A).
7) If the problem persists, check the following.a) Remove the DCF pick up unit2.b) Check if the photo sensor in the DCF pick up unit2 is contaminated. If so, clean it.c) If the photo sensor(0604-001393) is defective, replace it.
Copyright© 1995-2016 SAMSUNG. All rights reserved. 4-143

4. Troubleshooting
► Error Code
H1-5323
► Error message
Tray door is open. Close the door
► Symptom
DCF Takeaway-Cover is open. / I/L-Switch harness or connector is defective.
► Troubleshooting method
1) Open and close the DCF Take away-Cover correctly.
2) If the problem persists, check the following.a) Check if I/L-Switch(HARNESS-DCF COVER OPEN)(JC39–02268A) is not operating normally. If it is
defective, replace it.
b) If the I/L Switch is OK, replace the DCF PBA(JC92–02738A).
4-144 Copyright© 1995-2016 SAMSUNG. All rights reserved.

4. Troubleshooting
► Error Code
H1-5330
► Error message
DCF Failure #H1-5330. Check internal DCF connection.
► Symptom
A communication error between the optional tray and the main machine has occurred.
► Troubleshooting method
1) Lift up and release the DCF unit from the machine.
2) Remove the Rear Cover.
3) Check if the interface connector is connected to the DCF PBA. If the interface connector(JC39–02276A) isdefective, replace it.
4) If the problem persists, replace the DCF PBA.
Copyright© 1995-2016 SAMSUNG. All rights reserved. 4-145

4. Troubleshooting
4.6.14. H1–xxxx (High Capacity Feeder Unit Error)
Error Code Error Message Troubleshooting Page
H1-2311 Paper Jam in tray 3. After open the door & remove paper, Close the door P.4–147
H1-2312 Paper Jam in tray 3. After open the door & remove paper, Close the door P.4–147
H1-2313 Paper Jam in tray 3. After open the door & remove paper, Close the door P.4–147
H1-2317 Paper Jam in tray 3. After open the door & remove paper, Close the door P.4–147
H1-2318 Paper Jam in tray 3. After open the door & remove paper, Close the door P.4–147
H1-2320 HCF 3 door is open. Close it P.4–149
H1-2322 HCF 3 cassette is pulled out. Insert it properly P.4–149
H1-2330 Input System Failure: #H1-2330. Check HCF 3 connection P.4–149
H1-2351 Paper is low in HCF 3. Load paper P.4–150
H1-2352 Paper is empty in HCF 3. Load paper P.4–150
H1-2353 Input System Failure #H1-2353 : Pull HCF 3 out and insert it P.4–151
4-146 Copyright© 1995-2016 SAMSUNG. All rights reserved.
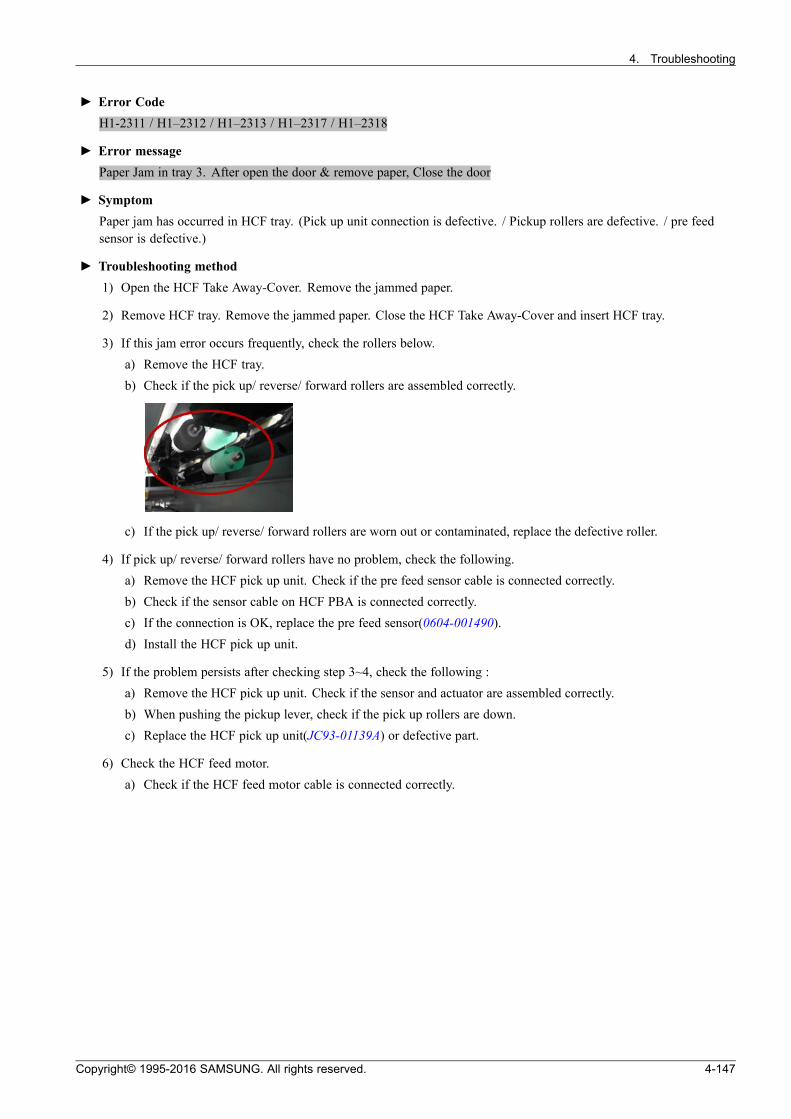
4. Troubleshooting
► Error Code
H1-2311 / H1–2312 / H1–2313 / H1–2317 / H1–2318
► Error message
Paper Jam in tray 3. After open the door & remove paper, Close the door
► Symptom
Paper jam has occurred in HCF tray. (Pick up unit connection is defective. / Pickup rollers are defective. / pre feedsensor is defective.)
► Troubleshooting method
1) Open the HCF Take Away-Cover. Remove the jammed paper.
2) Remove HCF tray. Remove the jammed paper. Close the HCF Take Away-Cover and insert HCF tray.
3) If this jam error occurs frequently, check the rollers below.a) Remove the HCF tray.b) Check if the pick up/ reverse/ forward rollers are assembled correctly.
c) If the pick up/ reverse/ forward rollers are worn out or contaminated, replace the defective roller.
4) If pick up/ reverse/ forward rollers have no problem, check the following.a) Remove the HCF pick up unit. Check if the pre feed sensor cable is connected correctly.b) Check if the sensor cable on HCF PBA is connected correctly.c) If the connection is OK, replace the pre feed sensor(0604-001490).d) Install the HCF pick up unit.
5) If the problem persists after checking step 3~4, check the following :a) Remove the HCF pick up unit. Check if the sensor and actuator are assembled correctly.b) When pushing the pickup lever, check if the pick up rollers are down.c) Replace the HCF pick up unit(JC93-01139A) or defective part.
6) Check the HCF feed motor.a) Check if the HCF feed motor cable is connected correctly.
Copyright© 1995-2016 SAMSUNG. All rights reserved. 4-147
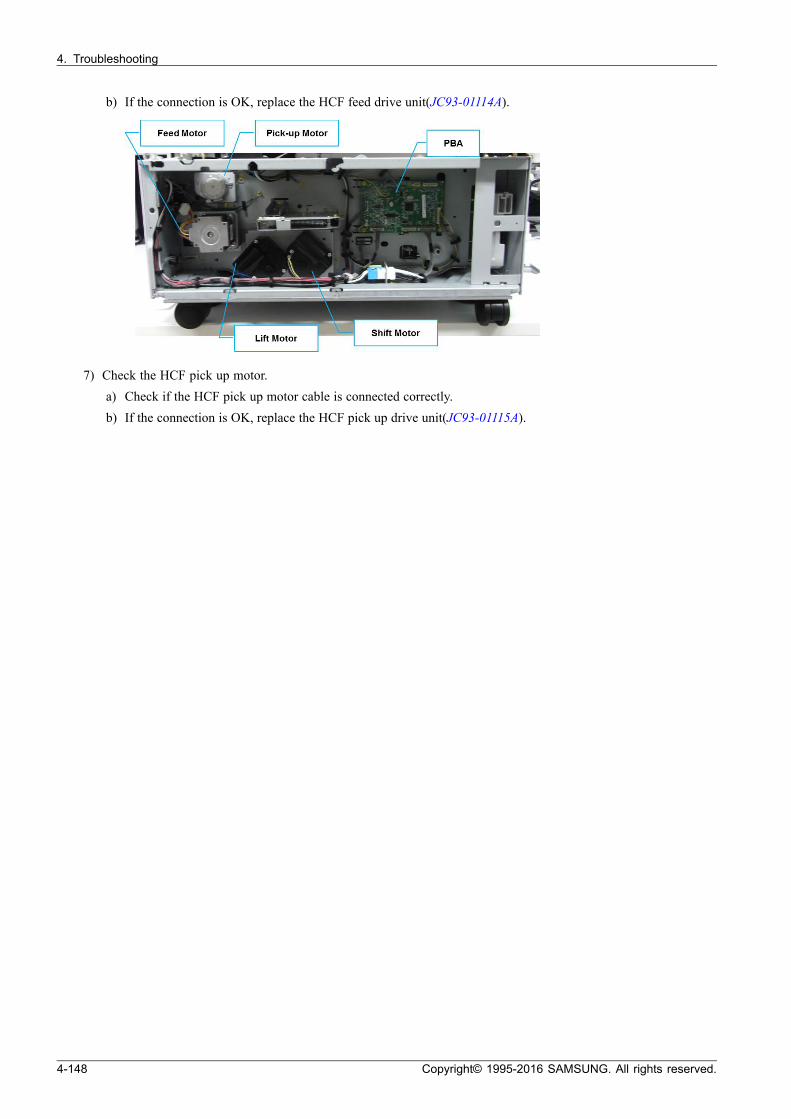
4. Troubleshooting
b) If the connection is OK, replace the HCF feed drive unit(JC93-01114A).
7) Check the HCF pick up motor.a) Check if the HCF pick up motor cable is connected correctly.b) If the connection is OK, replace the HCF pick up drive unit(JC93-01115A).
4-148 Copyright© 1995-2016 SAMSUNG. All rights reserved.

4. Troubleshooting
► Error Code
H1-2320
► Error message
Tray 3 door is open. Close it.
► Symptom
HCF Takeaway-Cover is open. / Side door open switch harness or connector is defective.
► Troubleshooting method
1) Open and close the HCF Take away-Cover correctly.
2) Check if the side door open switch is connected correctly. Unplug and reconnect it.
3) If the connection is OK, replace the side door open switch(JC39-02279A).
4) If the problem persists, replace the HCF PBA(JC92-02738B).
► Error Code
H1-2322
► Error message
Tray 3 cassette is pulled out. Insert it properly.
► Symptom
HCF Tray is pulled out or the Tray insertion sensor connector is not connected or broken.
► Troubleshooting method
1) Remove and insert HCF tray correctly.
2) If the problem persists, remove HCF tray. Look inside machine.
3) Check if the tray insertion sensor is connected correctly. Unplug and reconnect it.
4) If the connection is OK, replace the tray insertion sensor(0604–001393).
5) If the problem persists, replace the HCF PBA(JC92-02738B).
► Error Code
H1-2330
► Error message
Tray Failure: #H1-2330. Check tray 3 connection & turn off then on. Call for service if the problem persists
► Symptom
A communication error between the optional tray and the main machine has occurred.
► Troubleshooting method
1) Turn the machine off.
2) Remove the Rear Cover.
3) Check the connection of HCF PBA. If the interface connector is defective, replace it.
4) If the problem persists, replace the HCF PBA.
Copyright© 1995-2016 SAMSUNG. All rights reserved. 4-149
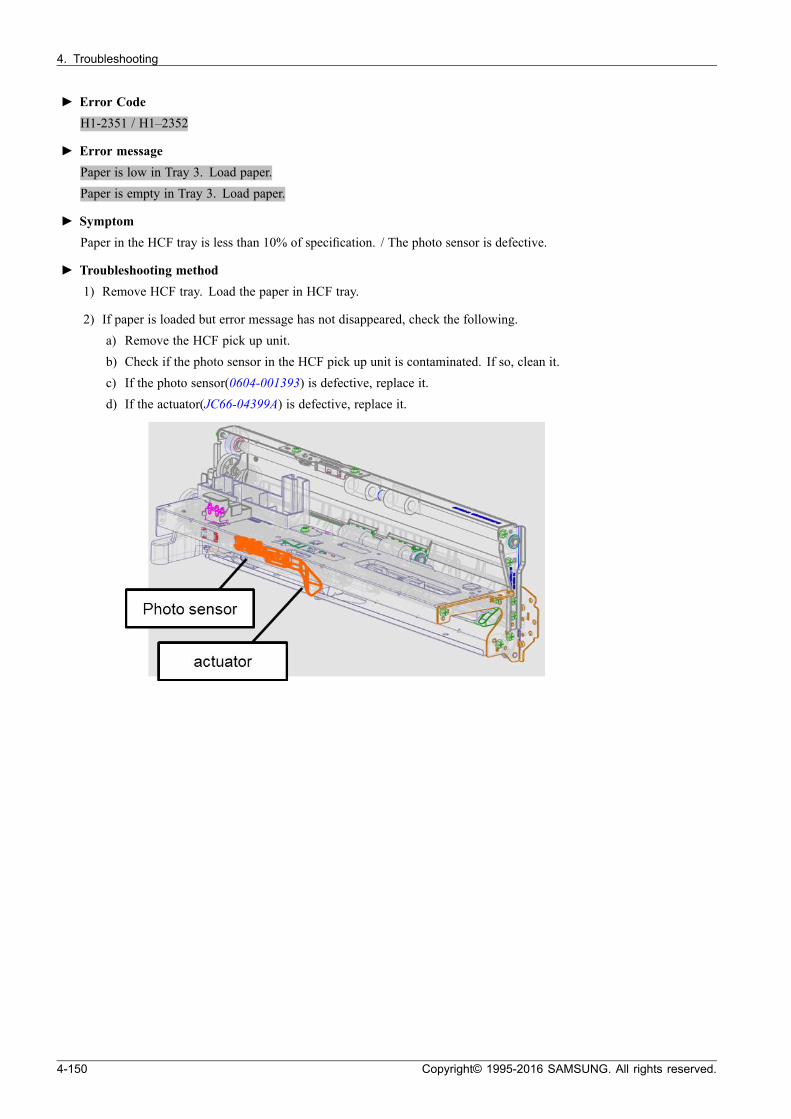
4. Troubleshooting
► Error Code
H1-2351 / H1–2352
► Error message
Paper is low in Tray 3. Load paper.Paper is empty in Tray 3. Load paper.
► Symptom
Paper in the HCF tray is less than 10% of specification. / The photo sensor is defective.
► Troubleshooting method
1) Remove HCF tray. Load the paper in HCF tray.
2) If paper is loaded but error message has not disappeared, check the following.a) Remove the HCF pick up unit.b) Check if the photo sensor in the HCF pick up unit is contaminated. If so, clean it.c) If the photo sensor(0604-001393) is defective, replace it.d) If the actuator(JC66-04399A) is defective, replace it.
4-150 Copyright© 1995-2016 SAMSUNG. All rights reserved.
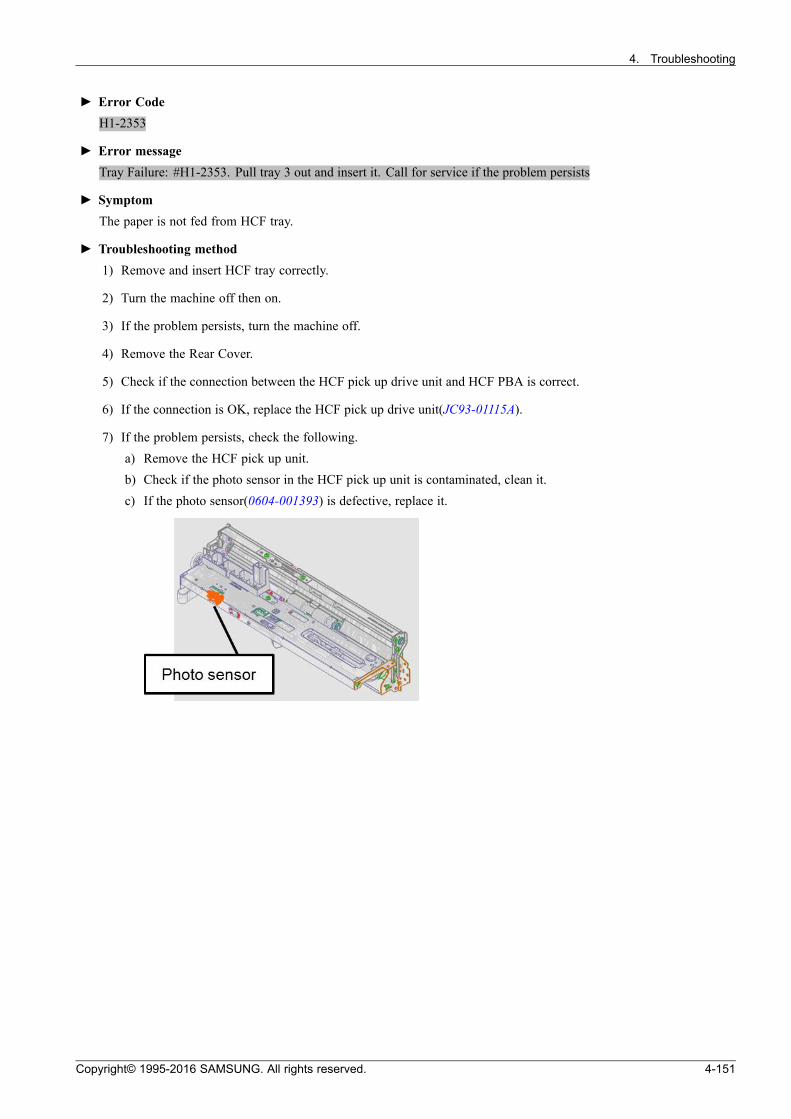
4. Troubleshooting
► Error Code
H1-2353
► Error message
Tray Failure: #H1-2353. Pull tray 3 out and insert it. Call for service if the problem persists
► Symptom
The paper is not fed from HCF tray.
► Troubleshooting method
1) Remove and insert HCF tray correctly.
2) Turn the machine off then on.
3) If the problem persists, turn the machine off.
4) Remove the Rear Cover.
5) Check if the connection between the HCF pick up drive unit and HCF PBA is correct.
6) If the connection is OK, replace the HCF pick up drive unit(JC93-01115A).
7) If the problem persists, check the following.a) Remove the HCF pick up unit.b) Check if the photo sensor in the HCF pick up unit is contaminated, clean it.c) If the photo sensor(0604-001393) is defective, replace it.
Copyright© 1995-2016 SAMSUNG. All rights reserved. 4-151

4. Troubleshooting
4.6.15. H1–xxxx (High Capacity Feeder Side Unit(LCT Unit) Error)
Error Code Error Message Troubleshooting Page
H1-4411 Paper jam in Tray 4 P.4–153
H1-4412 Paper jam in Tray 4 P.4–153
H1-4413 Paper jam in Tray 4 P.4–153
H1-4417 Paper jam in Tray 4 P.4–153
H1-4418 Paper jam in Tray 4 P.4–153
H1-4420 Tray 4 door is open. Close it P.4–155
H1-4422 Tray 4 cassette is pulled out. Insert it properly. P.4–156
H1-4430 Tray Failure: #H1-4430. Check tray 4 connection P.4–157
H1-4451 Paper is low in Tray 4. Load paper. P.4–158
H1-4452 Paper is empty in Tray 4. Load paper. P.4–158
H1-4453 Input System Failure #H1-4453 : Pull Tray 4 out and insert it. P.4–159
H1-4511 Paper jam in Tray 5 P.4–153
H1-4512 Paper jam in Tray 5 P.4–153
H1-4513 Paper jam in Tray 5. P.4–153
H1-4517 Paper jam in Tray 5. P.4–153
H1-4518 Paper jam in Tray 5 P.4–153
H1-4520 Tray 5 door is open. Close it P.4–155
H1-4522 Tray 5 cassette is pulled out. Insert it properly. P.4–156
H1-4530 Tray Failure: #H1-4530. Check tray 5 connection P.4–156
H1-4551 Paper is low in Tray 5. Load paper. P.4–158
H1-4552 Paper is empty in Tray 5. Load paper. P.4–158
H1-4553 Input System Failure #H1-4553 : Pull Tray 5 out and insert it. P.4–159
4-152 Copyright© 1995-2016 SAMSUNG. All rights reserved.

4. Troubleshooting
► Error Code
H1-4411 / H1–4412 / H1–4413 / H1–4417 / H1–4418 (HCF+LCT)H1-4511 / H1–4512 / H1–4513 / H1–4517 / H1–4518 (DCF+LCT)
► Error message
Paper jam in Tray 4.Paper jam in Tray 5.
► Symptom
Paper jam has occurred in LCT. (Pick up unit connection is defective. / Pickup rollers are defective. / Feed sensoris defective.)
► Troubleshooting method
1) Open the LCT Top Cover. Remove the jammed paper. And, close the LCT Top Cover.
2) If this jam error occurs frequently, check the rollers below.a) Open the LCT Top Cover.b) Check if the pick up/ reverse/ forward rollers are assembled correctly.
c) If the pick up/ reverse/ forward rollers are worn out or contaminated, replace the defective roller(JC93–01091A).
3) If pick up/ reverse/ forward rollers have no problem, check the following.a) Remove the LCT pick up unit. Check if the feed sensor cable is connected correctly.b) Check if the sensor cable on LCT board is connected correctly.c) If the connection is OK, replace the feed sensor(0604-001490).d) Check if the sensor and actuator are assembled correctly.e) Install the LCT pick up unit.
Copyright© 1995-2016 SAMSUNG. All rights reserved. 4-153

4. Troubleshooting
4) Check the LCT feed motor and pick-up motor.a) Check if the LCT feed motor and pick-up motor cables are connected correctly.b) If the connection is OK, replace the LCT feed drive unit(JC93-01112A).
4-154 Copyright© 1995-2016 SAMSUNG. All rights reserved.

4. Troubleshooting
► Error Code
H1-4420H1-4520
► Error message
Tray 4 door is open. Close itTray 5 door is open. Close it
► Symptom
LCT Top Cover is open. / I/L-Switch harness or connector is defective.
► Troubleshooting method
1) Open and close the LCT Top Cover correctly.
2) If the problem persists, check the following.a) Check if I/L-Switch(Top Door Open Switch)(JC39-02346A) is not operating normally. If it is defective,
replace it.
b) If the Top Door Open Switch is OK, replace the LCT PBA(JC92-02738C).
Copyright© 1995-2016 SAMSUNG. All rights reserved. 4-155
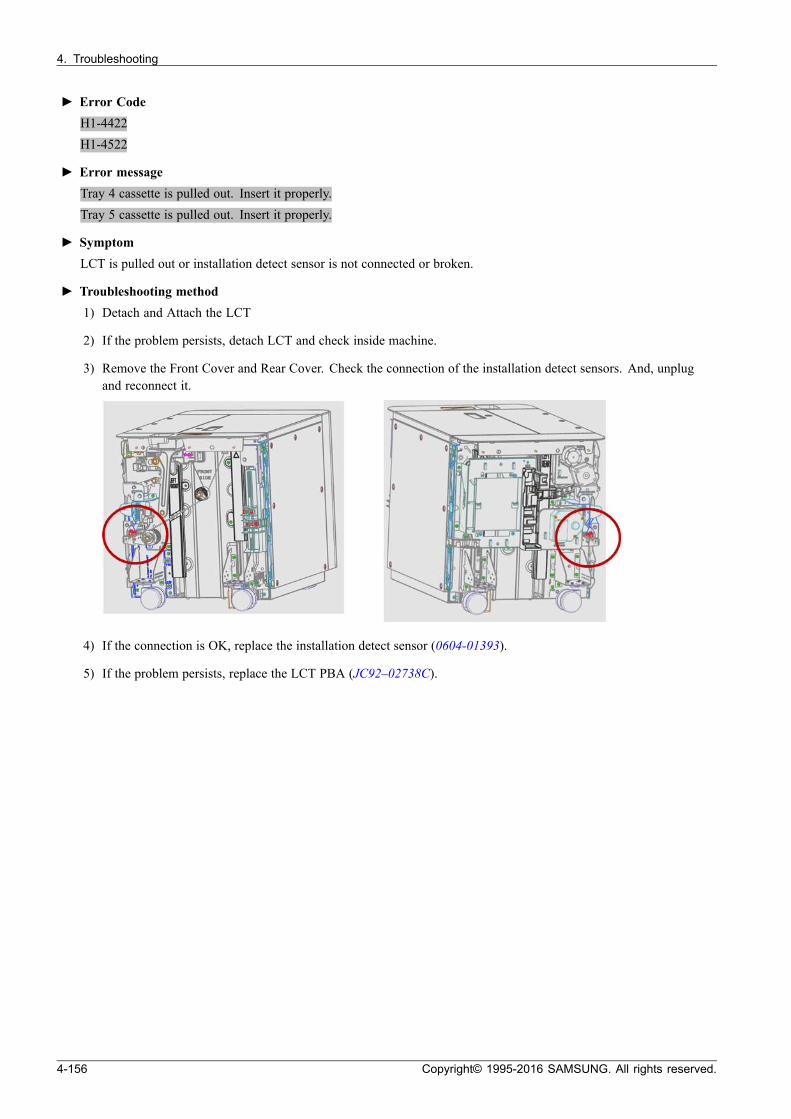
4. Troubleshooting
► Error Code
H1-4422H1-4522
► Error message
Tray 4 cassette is pulled out. Insert it properly.Tray 5 cassette is pulled out. Insert it properly.
► Symptom
LCT is pulled out or installation detect sensor is not connected or broken.
► Troubleshooting method
1) Detach and Attach the LCT
2) If the problem persists, detach LCT and check inside machine.
3) Remove the Front Cover and Rear Cover. Check the connection of the installation detect sensors. And, unplugand reconnect it.
4) If the connection is OK, replace the installation detect sensor (0604-01393).
5) If the problem persists, replace the LCT PBA (JC92–02738C).
4-156 Copyright© 1995-2016 SAMSUNG. All rights reserved.
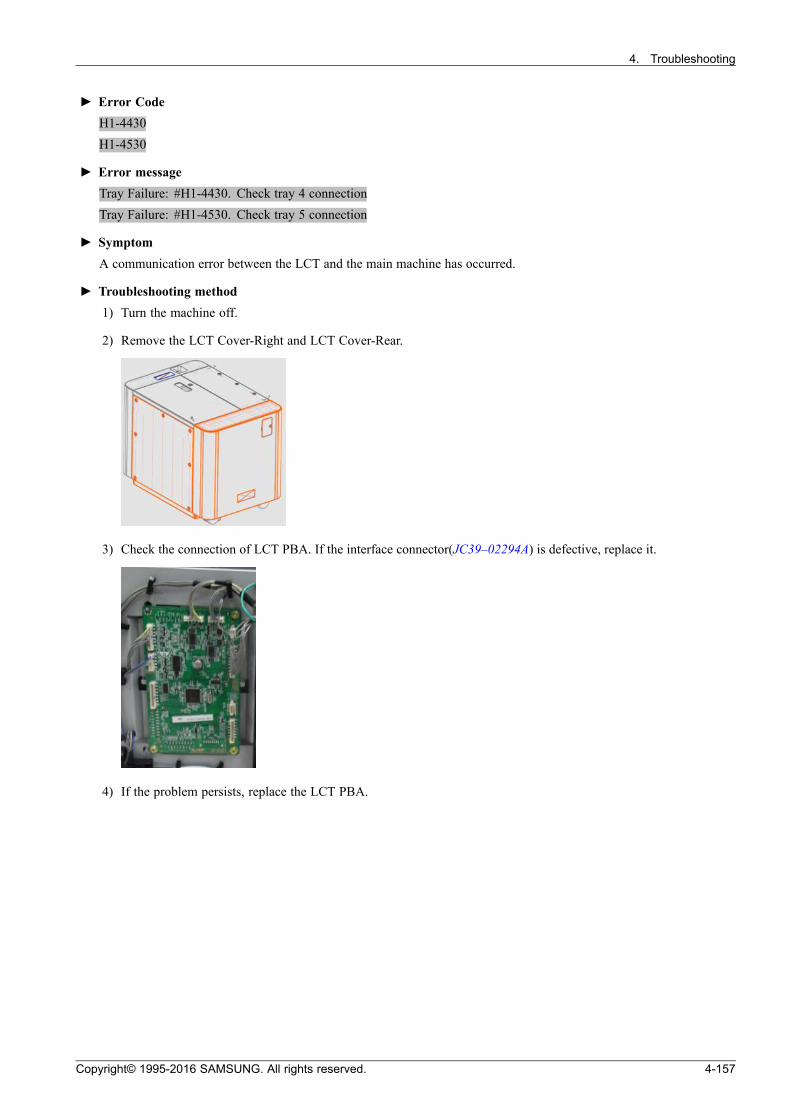
4. Troubleshooting
► Error Code
H1-4430H1-4530
► Error message
Tray Failure: #H1-4430. Check tray 4 connectionTray Failure: #H1-4530. Check tray 5 connection
► Symptom
A communication error between the LCT and the main machine has occurred.
► Troubleshooting method
1) Turn the machine off.
2) Remove the LCT Cover-Right and LCT Cover-Rear.
3) Check the connection of LCT PBA. If the interface connector(JC39–02294A) is defective, replace it.
4) If the problem persists, replace the LCT PBA.
Copyright© 1995-2016 SAMSUNG. All rights reserved. 4-157

4. Troubleshooting
► Error Code
H1-4451 / H1–4452H1-4551 / H1–4552
► Error message
Paper is low in Tray 4. Load paper. / Paper is empty in Tray 4. Load paper.Paper is low in Tray 4. Load paper. / Paper is empty in Tray 4. Load paper.
► Symptom
Paper in the LCT is less than 20% of specification. / The photo sensor is defective.
► Troubleshooting method
1) Open the LCT Top Cover. Load the paper in LCT.
2) If paper is loaded but error message has not disappeared, check the following.a) Remove the LCT pick up unit.b) Check if the photo sensor in the LCT pick up unit1 is contaminated. If so, clean it.c) If the photo sensor(0604-001393) is defective, replace it.d) If the actuator(JC66-04276A) is defective, replace it.
4-158 Copyright© 1995-2016 SAMSUNG. All rights reserved.

4. Troubleshooting
► Error Code
H1-4453H1-4553
► Error message
Input System Failure #H1-4453 : Pull Tray 4 out and insert it.Input System Failure #H1-4553 : Pull Tray 5 out and insert it.
► Symptom
The paper is not fed from the LCT.
► Troubleshooting method
1) Turn the machine off then on.
2) If the problem persists, turn the machine off.
3) Remove the Cover-Right and Cover-Rear after removing 16 screws.
4) Check if the connection between the LCT pick up drive and LCT PBA is correct.
5) If the connection is OK, replace the drive unit(JC93–01112A).
6) If the problem persists, check the following.a) Remove the LCT pick up unit.b) Check if the photo sensor in the LCT pick up unit is contaminated, clean it.c) If the photo sensor(0604-001393) is defective, replace it.
Copyright© 1995-2016 SAMSUNG. All rights reserved. 4-159

4. Troubleshooting
4.6.16. H2–xxxx (Finisher error)
NOTE
For H2–xxxx type error, refer to the Finisher Service Manual.
NOTE
• H2-6xxx : Inner Finisher (Refer to SL-FIN501L Service Manual.)
• H2-7xxx : 3K Finisher (Refer to SL-FIN701B/H Service Manual.)
• H2-8xxx : Booklet (Refer to SL-FIN701B/H Service Manual.)
4-160 Copyright© 1995-2016 SAMSUNG. All rights reserved.
4. Troubleshooting
4.6.17. Mx–xxxx (Jam error)
Error Code Error Message Troubleshooting Page
M1-1113 Paper jam in tray 1 P.4–162
M1–1121 Paper jam in tray 2 P.4–163
M1-1213 Paper jam in tray 2 P.4–163
M1-1610 Paper jam in MP tray P.4–164
M1-1613 Paper jam in MP tray P.4–164
M2–1114 Paper jam inside of machine P.4–165
M2–1117 Paper jam at the bottom of duplex path P.4–165
M2-1121 Paper jam in tray 1 P.4–166
M2-1124 Paper jam in tray 1 P.4–166
M2-1125 Paper jam inside of machine P.4–166
M2-1131 Paper jam in tray 2 P.4–167
M2-1134 Paper jam in tray 2 P.4–167
M2-1135 Paper jam in tray 2 P.4–167
M2-1211 Paper jam inside of machine P.4–168
M2-1213 Paper Mismatch at tray. Load tray with setting paper, and remove the jammedpaper
P.4–168
M2-1214 Paper jam inside of machine P.4–168
M2-1331 Paper jam inside of machine P.4–169
M2-1332 Paper jam inside of machine P.4–169
M2-1333 Check whether the pieces of paper remain in the paper path P.4–169
M2-1334 Paper jam inside of machine P.4–169
M2-2111 Paper jam at the top of duplex path P.4–170
M2–2112 Paper jam at the top of duplex path P.4–170
M2-2113 Check whether the pieces of paper remain in the paper path P.4–170
M2-2114 Paper jam at the top of duplex path P.4–170
M2–2311 Paper jam at the bottom of duplex path P.4–170
M2–2312 Paper jam at the bottom of duplex path P.4–170
M2–2314 Paper jam at the bottom of duplex path P.4–170
M3-1411 Paper jam in exit area P.4–171
M3–1412 Paper jam inside of machine P.4–171
M3-1413 Check whether the pieces of paper remain in the paper path P.4–171
M3-1414 Paper jam in exit area P.4–171
Copyright© 1995-2016 SAMSUNG. All rights reserved. 4-161
4. Troubleshooting
► Error Code
M1–1113
► Error message
Paper jam in Tray 1.
► Symptom
Paper jam has occurred in tray1.
► Troubleshooting method
NOTE
To see the troubleshooting video for this error, click through to the link below.
(http://tsp.samsung.com/tsp_file/spds/samsungprinter/K7/Webview/EN_K7_M1-1113.html)
1) Open the side cover and check if a foreign substance or paper is jammed inside the machine.
2) Remove tray1 and remove the jammed paper.
3) If this jam error occurs frequently, check the rollers of the pick up unit1.a) Remove tray1 and tray2.b) Check if the pick up/ reverse/ forward rollers are assembled correctly.c) If the pick up/ reverse/ forward rollers are worn out or contaminated, replace the defective roller.
4) If the problem persists, check the pick-up unit1.a) Check if the pre-feed sensor is connected correctly. If the sensor is defective, replace it.b) If there is any defective part in pick-up unit 1, replace it or pick up unit 1.
5) If the problem persists, replace the pickup drive unit 1.
4-162 Copyright© 1995-2016 SAMSUNG. All rights reserved.

4. Troubleshooting
► Error Code
M1–1211 / M1–1213
► Error message
Paper jam in Tray 2.
► Symptom
Paper jam has occurred in tray2.
► Troubleshooting method
NOTE
To see the troubleshooting video for this error, click through to the link below.
(http://tsp.samsung.com/tsp_file/spds/samsungprinter/K7/Webview/EN_K7_M1-1211.html)
1) Open the side cover and check if a foreign substance or paper is jammed inside the machine.
2) Remove tray2 and remove the jammed paper.
3) If this jam error occurs frequently, check the rollers of the pick up unit2.a) Remove tray1 and tray2.b) Check if the pick up/ reverse/ forward rollers are assembled correctly.c) If the pick up/ reverse/ forward rollers are worn out or contaminated, replace the defective roller.
4) If the problem persists, check the pick-up unit2.a) Check if the pre-feed sensor is connected correctly. If the sensor is defective, replace it.b) If there is any defective part in pick-up unit 2, replace it or pick up unit 2.
5) If the problem persists, replace the pickup drive unit 2.
Copyright© 1995-2016 SAMSUNG. All rights reserved. 4-163

4. Troubleshooting
► Error Code
M1–1610 / M1–1613
► Error message
Paper jam in MP Tray.
► Symptom
Paper jam has occurred in MP tray.
► Troubleshooting method
NOTE
To see the troubleshooting video for this error, click through to the link below.
• M1–1610 : http://tsp.samsung.com/tsp_file/spds/samsungprinter/K7/Webview/EN_K7_M1-1610.html
• M1–1613 : http://tsp.samsung.com/tsp_file/spds/samsungprinter/K7/Webview/EN_K7_M1-1613.html
1) Open the side cover. Remove the jammed paper from the MP tray.
2) If this jam error occurs frequently, check the rollers of the MP unit.a) Check if MP pick up/ reverse/ forward rollers are assembled correctly.b) If the MP pick up/ reverse/ forward rollers are worn out or contaminated, replace the defective roller.
3) If the problem persists, check if the MP solenoid operates correctly.a) Enter SVC mode. Execute MP solenoid test.b) If the MP solenoid operation is abnormal, check the harness connection of MP unit.c) If the harness has no defects, replace the MP solenoid.
4) If the problem persists, check the Feed/MPdrive unit.a) Enter SVC mode. Execute Feed/MP motor test.b) Remove the rear cover.c) Check if the motor harness is connected correctly.d) If the problem occurs, replace the Feed/MP Drive Unit.
4-164 Copyright© 1995-2016 SAMSUNG. All rights reserved.
4. Troubleshooting
► Error Code
M2–1114 / M2–1117
► Error message
Paper jam inside of machinePaper jam at the bottom of duplex path
► Symptom
Paper jam has occurred inside the machine.
► Troubleshooting method
NOTE
To see the troubleshooting video for this error, click through to the link below.
• M2–1114 : http://tsp.samsung.com/tsp_file/spds/samsungprinter/X7/Webview/EN_X7_M2-1114.html
• M2–1117 : http://tsp.samsung.com/tsp_file/spds/samsungprinter/K7/Webview/EN_K7_M2-1117.html
• M2–1114 : The paper has not left from the feed sensor within the specified time.
• M2-1117 : The paper passed duplex path has not reached the feed sensor within the specified time.
1) Open the side cover. Remove the jammed paper.
2) If jammed paper occurs continually, check the following.a) Enter SVC mode. Execute the feed 1 sensor test.b) Check connection between the feed 1 sensor and main board.c) If the connection is OK, replace the feed 1 sensor.d) If the feed 1 sensor is normal, check the feed motor.e) Execute feed motor test.f) Check if the feed motor cable is connected correctly.g) If the connection is OK, replace the feed/MP drive unit.
Copyright© 1995-2016 SAMSUNG. All rights reserved. 4-165

4. Troubleshooting
► Error Code
M2–1121 / M2–1124 / M2–1125
► Error message
Paper jam in tray 1Paper jam inside of machine.
► Symptom
Paper jam has occurred inside the machine.
► Troubleshooting method
NOTE
To see the troubleshooting video for this error, click through to the link below.
• M2–1121 : http://tsp.samsung.com/tsp_file/spds/samsungprinter/X7/Webview/EN_X7_M2-1121.html
• M2–1124 : http://tsp.samsung.com/tsp_file/spds/samsungprinter/X7/Webview/EN_X7_M2-1124.html
• M2–1125 : http://tsp.samsung.com/tsp_file/spds/samsungprinter/X7/Webview/EN_X7_M2-1125.html
• M2–1121 : The paper is detected by feed 1 sensor.
• M2–1124 : The leading edge of the paper has not reached the feed 1 sensor within the specified time.
• M2-1125 : The paper has not left from the feed 1 sensor within the specified time.
1) Open the side cover. Remove the jammed paper.
2) If jammed paper occurs continually, check the following.a) Enter SVC mode. Execute the feed 1 sensor test.b) Check connection between the feed 1 sensor and main board.c) If the connection is OK, replace the feed 1 sensor.d) If the feed 1 sensor is normal, check the feed motor.e) Execute feed motor test.f) Check if the feed motor cable is connected correctly.g) If the connection is OK, replace the feed/MP drive unit.
4-166 Copyright© 1995-2016 SAMSUNG. All rights reserved.
4. Troubleshooting
► Error Code
M2–1131 / M2–1134 / M2–1135
► Error message
Paper jam in tray 2
► Symptom
Paper jam has occurred inside the machine.
► Troubleshooting method
NOTE
To see the troubleshooting video for this error, click through to the link below.
• M2–1131 : http://tsp.samsung.com/tsp_file/spds/samsungprinter/K7/Webview/EN_K7_M2-1131.html
• M2–1134 : http://tsp.samsung.com/tsp_file/spds/samsungprinter/K7/Webview/EN_K7_M2-1134.html
• M2–1135 : http://tsp.samsung.com/tsp_file/spds/samsungprinter/K7/Webview/EN_K7_M2-1135.html
• M2–1131 : The paper is detected by feed 2 sensor.
• M2–1134 : The leading edge of the paper has not reached the feed 2 sensor within the specified time.
• M2-1135 : The paper has not left from the feed 2 sensor within the specified time.
1) Open the side cover. Remove the jammed paper.
2) If jammed paper occurs continually, check the following.a) Enter SVC mode. Execute the feed 2 sensor test.b) Check connection between the feed 2 sensor and main board.c) If the connection is OK, replace the feed 2 sensor.d) If the feed 2 sensor is normal, check the feed motor.e) Execute feed motor test.f) Check if the feed motor cable is connected correctly.g) If the connection is OK, replace the feed/MP drive unit.
Copyright© 1995-2016 SAMSUNG. All rights reserved. 4-167

4. Troubleshooting
► Error Code
M2–1211 / M2–1213 / M2–1214
► Error message
Paper jam inside of machine.
► Symptom
Paper jam has occurred inside the machine.
► Troubleshooting method
NOTE
To see the troubleshooting video for this error, click through to the link below.
• M2–1211 : http://tsp.samsung.com/tsp_file/spds/samsungprinter/X7/Webview/EN_X7_M2-1211.html
• M2–1213 : http://tsp.samsung.com/tsp_file/spds/samsungprinter/X7/Webview/EN_X7_M2-1213.html
• M2–1214 : http://tsp.samsung.com/tsp_file/spds/samsungprinter/X7/Webview/EN_X7_M2-1214.html
• M2–1211 : When the machine is warming-up, jammed paper inside machine is detected.
• M2–1213 : The leading edge of the paper has not reached the regi. sensor within the specified time.
• M2-1214 : The paper has not left from the regi. sensor within the specified time.
1) Open the side cover. Remove the jammed paper.
2) If jammed paper occurs continually, check the following.a) Enter SVC mode. Execute the regi sensor test.b) Check connection between the regi sensor and main board.c) If the connection is OK, replace the regi sensor.d) If the regi sensor is normal, check the regi motor.e) Execute regi motor test.f) Check if the regi motor cable is connected correctly.g) If the connection is OK, replace the regi drive unit.
4-168 Copyright© 1995-2016 SAMSUNG. All rights reserved.

4. Troubleshooting
► Error Code
M2–1331 / M2–1332 / M2–1333 / M2–1334
► Error message
Paper jam inside of machinePaper jam at the top of duplex path
► Symptom
Paper jam has occurred inside the machine.
► Troubleshooting method
NOTE
To see the troubleshooting video for this error, click through to the link below.
• M2–1331 : http://tsp.samsung.com/tsp_file/spds/samsungprinter/X7/Webview/EN_X7_M2-1331.html
• M2–1332 : http://tsp.samsung.com/tsp_file/spds/samsungprinter/X7/Webview/EN_X7_M2-1332.html
• M2–1333 : http://tsp.samsung.com/tsp_file/spds/samsungprinter/X7/Webview/EN_X7_M2-1333.html
• M2–1334 : http://tsp.samsung.com/tsp_file/spds/samsungprinter/X7/Webview/EN_X7_M2-1334.html
• M2-1331 : Paper is detected by the fuser out JAM sensor.
• M2-1332 : Paper has not reached the fuser out JAM sensor within the specified time.
• M2-1333 : Paper escaped from feed sensor has reached to the fuser out JAM sensor faster than the specified time.
• M2–1334 : The paper has not left from the fuser out JAM sensor within the specified time.
1) Open the side cover. Remove jammed paper.
2) If the problem persists, check the following:a) Enter SVC mode. Execute the fuser out sensor test.b) Check connection between the fuser out sensor and main board.c) If the connection is OK, replace the fuser out sensor.d) If the fuser out sensor is normal, check the fuser/exit motor.e) Execute fuser/exit motor test.f) Check if the fuser/exit motor cable is connected correctly.g) If the connection is OK, replace the fuser/exit drive unit.
Copyright© 1995-2016 SAMSUNG. All rights reserved. 4-169

4. Troubleshooting
► Error Code
M2–2111 / M2–2112 / M2–2113 / M2–2114 / M2–2311 / M2–2312 / M2–2314
► Error message
Paper jam inside of machinePaper jam at the top of duplex path
► Symptom
Paper jam has occurred in duplex path.
► Troubleshooting method
NOTE
To see the troubleshooting video for this error, click through to the link below.
• M2–2111 : http://tsp.samsung.com/tsp_file/spds/samsungprinter/K7/Webview/EN_K7_M2-2111.html
• M2–2112 : http://tsp.samsung.com/tsp_file/spds/samsungprinter/K7/Webview/EN_K7_M2-2112.html
• M2–2113 : http://tsp.samsung.com/tsp_file/spds/samsungprinter/K7/Webview/EN_K7_M2-2113.html
• M2–2114 : http://tsp.samsung.com/tsp_file/spds/samsungprinter/K7/Webview/EN_K7_M2-2114.html
• M2–2311 : http://tsp.samsung.com/tsp_file/spds/samsungprinter/K7/Webview/EN_K7_M2-2311.html
• M2–2312 : http://tsp.samsung.com/tsp_file/spds/samsungprinter/K7/Webview/EN_K7_M2-2312.html
• M2–2314 : http://tsp.samsung.com/tsp_file/spds/samsungprinter/K7/Webview/EN_K7_M2-2314.html
1) Open the side cover. Remove jammed paper.
2) If the problem persists, check the following:a) Enter SVC mode. Execute the fuser out sensor test.b) Check connection between the fuser out sensor and main board.c) If the connection is OK, replace the fuser out sensor.d) If the fuser out sensor is normal, check the fuser/exit motor.e) Execute fuser/exit motor test.f) Check if the fuser/exit motor cable is connected correctly.g) If the connection is OK, replace the fuser/exit drive unit.
4-170 Copyright© 1995-2016 SAMSUNG. All rights reserved.

4. Troubleshooting
► Error Code
M3–1411 / M3–1412 / M3–1413 / M3–1414
► Error message
Paper jam in exit area.Check whether the pieces of paper remain in the paper path
► Symptom
Paper jam has occurred around the fuser unit.(Job separator connection is defective. / Actuator-Exit is defective.)
► Troubleshooting method
NOTE
To see the troubleshooting video for this error, click through to the link below.
• M3–1411 : http://tsp.samsung.com/tsp_file/spds/samsungprinter/K7/Webview/EN_K7_M3-1411.html
• M3–1412 : http://tsp.samsung.com/tsp_file/spds/samsungprinter/K7/Webview/EN_K7_M3-1412.html
• M3–1413 : http://tsp.samsung.com/tsp_file/spds/samsungprinter/K7/Webview/EN_K7_M3-1413.html
• M3–1414 : http://tsp.samsung.com/tsp_file/spds/samsungprinter/K7/Webview/EN_K7_M3-1414.html
1) Open the side cover. Remove the jammed paper.
2) If the problem persists, check the following:a) Remove the exit unit.b) Check if the return sensor is connected correctly. If the connection is OK, replace the sensor.c) Check if the return sensor actuator is broken or deformed. If necessary, reassemble or replace it.d) Check if the exit gate solenoid connected correctly. If the connection is OK, replace the solenoid.e) If the problem persists, replace the fuser unit.
Copyright© 1995-2016 SAMSUNG. All rights reserved. 4-171
4. Troubleshooting
4.6.18. Mx–xxxx (Tray not install_Paper empty_Outbin full)
Error Code Error Message Troubleshooting Page
M1-3122 Tray 1 cassette is pulled out. Insert it properly P.4–173
M1-3222 Tray 2 cassette is pulled out. Insert it properly P.4–174
M1-4111 Tray Failure: #M1-4111. Pull tray 1 out and insert it. Call for service if theproblem persists
P.4–175
M1-4211 Tray Failure: #M1-4211. Pull tray 2 out and insert it. Call for service if theproblem persists
P.4–176
M1-5111 Paper is low in tray 1. Load paper P.4–177
M1-5112 Paper is empty in tray 1. Load paper P.4–177
M1-5113 Paper is empty in tray 1. Load paper P.4–177
M1-5120 Paper is empty in all tray. Load paper P.4–177
M1-5211 Paper is low in tray 2. Load paper P.4–178
M1-5212 Paper is empty in tray 2. Load paper P.4–178
M1-5612 Paper is empty in MP tray. Load paper P.4–179
M3-2230 Paper in output bin is full. Remove printed paper P.4–180
M3-2430 Paper in output bin is full. Remove printed paper P.4–180
4-172 Copyright© 1995-2016 SAMSUNG. All rights reserved.

4. Troubleshooting
► Error Code
M1-3122
► Error message
Tray 1 cassette is pulled out. Insert it properly.
► Symptom
Tray 1 is pulled out or the auto size sensor connector is not connected or broken.
► Troubleshooting method
NOTE
To see the troubleshooting video for this error, click through to the link below.
(http://tsp.samsung.com/tsp_file/spds/samsungprinter/K7/Webview/EN_K7_M1-3122.html)
1) Remove and insert Tray1 correctly.
2) If Tray1 is not locked or pulled out without holding the locking lever, remove Tray1.
3) Check if foreign substance or paper is inside the space between Tray1,2. If so, please remove it.
4) If the problem persists, check that the auto size sensor is connected properly.
5) If the problem persists, replace the main board.
Copyright© 1995-2016 SAMSUNG. All rights reserved. 4-173
4. Troubleshooting
► Error Code
M1-3222
► Error message
Tray 2 cassette is pulled out. Insert it properly.
► Symptom
Tray 2 is pulled out or the auto size sensor connector is not connected or broken.
► Troubleshooting method
NOTE
To see the troubleshooting video for this error, click through to the link below.
(http://tsp.samsung.com/tsp_file/spds/samsungprinter/K7/Webview/EN_K7_M1-3222.html)
1) Remove and insert Tray2 correctly.
2) If Tray2 is not locked or pulled out without holding the locking lever, remove Tray2.
3) Check if foreign substance or paper is inside the space between Tray1,2. If so, please remove it.
4) If the problem persists, check that the auto size sensor is connected properly.
5) If the problem persists, replace the main board.
4-174 Copyright© 1995-2016 SAMSUNG. All rights reserved.

4. Troubleshooting
► Error Code
M1-4111
► Error message
Input System Failure #M1–4111 : Pull Tray 1 out and insert it.
► Symptom
The paper is not fed from tray1.
► Troubleshooting method
NOTE
To see the troubleshooting video for this error, click through to the link below.
(http://tsp.samsung.com/tsp_file/spds/samsungprinter/K7/Webview/EN_K7_M1-4111.html)
1) Remove tray1 and re-install it.
2) If the problem persists, turn the machine off then on.
3) Enter SVC mode. Execute pickup motor test.(Diagnostics > Engine Diagnostics > Engine Test Routines)
4) If the pick up motor operation is abnormal, turn the machine off.
5) Remove the rear cover.
6) Check if the connection between pickup drive unit1 and main board is secure.
7) If the connection is OK, replace the pickup drive unit.
8) If the problem persists, check the pickup unit1.a) Check if the photo sensor in the pickup unit1 is defective.b) If the sensor is defective, replace it.
Copyright© 1995-2016 SAMSUNG. All rights reserved. 4-175
4. Troubleshooting
► Error Code
M1-4211
► Error message
Input System Failure #M1-4211 : Pull Tray 2 out and insert it.
► Symptom
The paper is not fed from tray2.
► Troubleshooting method
NOTE
To see the troubleshooting video for this error, click through to the link below.
(http://tsp.samsung.com/tsp_file/spds/samsungprinter/K7/Webview/EN_K7_M1-4211.html)
1) Remove tray2 and re-install it.
2) If the problem persists, turn the machine off then on.
3) Enter SVC mode. Execute pickup motor test.(Diagnostics > Engine Diagnostics > Engine Test Routines)
4) If the pick up motor operation is abnormal, turn the machine off.
5) Remove the rear cover.
6) Check if the connection between pickup drive unit2 and main board is secure.
7) If the connection is OK, replace the pickup drive unit.
8) If the problem persists, check the pickup unit2.a) Check if the photo sensor in the pickup unit2 is defective.b) If the sensor is defective, replace it.
4-176 Copyright© 1995-2016 SAMSUNG. All rights reserved.
4. Troubleshooting
► Error Code
M1–5111 / M1–5112 / M1–5113 / M1–5120
► Error message
Paper is low in Tray 1. Load paper.Paper is empty in Tray 1. Load paper.
► Symptom
Paper in the tray1 is less than 10%. / The photo sensor is defective.
► Troubleshooting method
NOTE
To see the troubleshooting video for this error, click through to the link below.
• M1–5111 : http://tsp.samsung.com/tsp_file/spds/samsungprinter/K7/Webview/EN_K7_M1-5111.html
• M1–5112 : http://tsp.samsung.com/tsp_file/spds/samsungprinter/K7/Webview/EN_K7_M1-5112.html
• M1–5113 : http://tsp.samsung.com/tsp_file/spds/samsungprinter/K7/Webview/EN_K7_M1-5113.html
• M1–5120 : http://tsp.samsung.com/tsp_file/spds/samsungprinter/K7/Webview/EN_K7_M1-5120.html
1) Remove tray 1. Load paper in the tray. And insert tray 1.
2) If paper is loaded but error message has not disappeared, check the following:a) Turn the machine off. Open the Side Cover.b) Remove Pick-Up Unit1.c) If the photo sensor is contaminated, clean it.d) If the photo sensor is defective, replace it.e) If the actuator is defective, replace it.
Copyright© 1995-2016 SAMSUNG. All rights reserved. 4-177

4. Troubleshooting
► Error Code
M1–5211M1–5212
► Error message
Paper is low in Tray 2. Load paper.Paper is empty in Tray 2. Load paper.
► Symptom
Paper in the tray is less than 10% of specification. / The photo sensor is defective.
► Troubleshooting method
NOTE
To see the troubleshooting video for this error, click through to the link below.
• M1–5211 : http://tsp.samsung.com/tsp_file/spds/samsungprinter/K7/Webview/EN_K7_M1-5211.html
• M1–5212 : http://tsp.samsung.com/tsp_file/spds/samsungprinter/K7/Webview/EN_K7_M1-5212.html
1) Remove tray 2. Load paper in the tray, and insert the tray 2.
2) If paper is loaded but error message has not disappeared, check the following :a) Turn the machine off. Open the Side Cover.b) Remove Pick-Up Unit2.c) If the photo sensor is contaminated, clean it.d) If the photo sensor is defective, replace it.e) If the actuator is defective, replace it.
4-178 Copyright© 1995-2016 SAMSUNG. All rights reserved.

4. Troubleshooting
► Error Code
M1–5612
► Error message
Paper is empty in MP Tray. Load paper.
► Symptom
Paper in the MP tray is less than 10%. / The photo sensor is defective.
► Troubleshooting method
NOTE
To see the troubleshooting video for this error, click through to the link below.
(http://tsp.samsung.com/tsp_file/spds/samsungprinter/K7/Webview/EN_K7_M1-5612.html)
1) Load the paper in the MP tray.
2) If paper is loaded but error message has not disappeared, check the following :a) If the photo sensor is contaminated, clean it.b) If the photo sensor is defective, replace it.c) If the actuator is defective, replace it.
Copyright© 1995-2016 SAMSUNG. All rights reserved. 4-179
4. Troubleshooting
► Error Code
M3–2230M3–2430
► Error message
Output tray is full. Remove printed media.
► Symptom
There is too much paper in output bin tray or inner tray.
► Troubleshooting method
NOTE
To see the troubleshooting video for this error, click through to the link below.
• M3–2230 : http://tsp.samsung.com/tsp_file/spds/samsungprinter/K7/Webview/EN_K7_M3-2230.html
• M3–2430 : http://tsp.samsung.com/tsp_file/spds/samsungprinter/K7/Webview/EN_K7_M3-2430.html
• M3-2230 : There is too much paper in output bin tray.
• M3-2430 : There is too much paper in inner tray.
1) Remove the paper from output bin tray or inner tray.
2) If this error occurs continually, check the following.a) Check if the bin-full sensor and actuator is assembled correctly.b) Check if the bin-full sensor is defective.
4-180 Copyright© 1995-2016 SAMSUNG. All rights reserved.
4. Troubleshooting
4.6.19. Sx–xxxx (System error)
Error Code Error Message Troubleshooting Page
S1-1113 Video System Failure: #S1-1113. Turn off then on P.4–183
S1-1313 The clock became initial time. Set a time again P.4–184
S1-1411 Video System Failure: #S1-1411. Turn off then on P.4–184
S1-1413 Video System Failure: #S1-1413. Turn off then on P.4–184
S1-2111 Video System Failure: #S1-2111. Turn off then on P.4–185
S1-2433 System Failure: #S1-2433 . Call for service P.4–186
S1-2434 HDD Error #S1-2434. Check users guide P.4–187
S1-2435 HDD Error #S1-2435. Check users guide P.4–187
S1-2436 HDD Error #S1-2436. Check users guide P.4–187
S1-2437 HDD Error #S1-2437. Check users guide P.4–187
S1-2438 HDD Error #S1-2438. Check users guide P.4–187
S1-2439 HDD Error #S1-2439. Check users guide P.4–187
S1-2443 HDD System Failure #S1-2443 : Call for service P.4–186
S1-2444 HDD System Failure #S1-2444 : Call for service P.4–186
S1-2445 HDD System Failure #S1-2445 : Call for service P.4–186
S1-2446 HDD System Failure #S1-2446 : Call for service P.4–186
S1-2447 HDD System Failure #S1-2447 : Call for service P.4–186
S1-2448 HDD System Failure #S1-2448 : Call for service P.4–186
S1-2449 HDD System Failure #S1-2449 : Call for service P.4–186
S1-2510 MSOK Failure: #S1-2510. Call for service and change MSOK P.4–188
S1-2521 MSOK Failure: #S1-2521. Call for service P.4–188
S1-3110 Video System Failure: #S1-3110. Turn off then on P.4–189
S1-4111 Video System Failure: #S1-4111. Turn off then on P.4–189
S1-4311 Video System Failure: #S1-4311. Turn off then on P.4–190
S1-5521 FDI device is not installed. Install the device P.4–190
S2-1211 Engine System Failure: #S2-1211. Turn off then on P.4–191
S2-2311 Engine System Failure: #S2-2311. Turn off then on P.4–191
S2-3110 Engine System Failure: #S2-3110. Turn off then on P.4–191
S2-3114 Engine System Failure: #S2-3114. Turn off then on P.4–191
S2-331D Wait delay time for lower fixing temperature… P.4–192
S2-3322 Supplying and mixing toner to yellow developer unit. Please wait… P.4–192
S2-3323 Supplying and mixing toner to magenta developer unit. Please wait... P.4–192
S2-3324 Supplying and mixing toner to cyan developer unit. Please wait... P.4–192
S2-3325 Supplying and mixing toner to black developer unit. Please wait... P.4–192
S2-3422 Calibrating yellow image density. Please wait... P.4–192
S2-3423 Calibrating magenta image density. Please wait... P.4–192
S2-3424 Calibrating cyan image density. Please wait... P.4–192
S2-3425 Calibrating black image density. Please wait... P.4–192
S2-4210 Front door is open. Close it P.4–192
Copyright© 1995-2016 SAMSUNG. All rights reserved. 4-181
4. Troubleshooting
Error Code Error Message Troubleshooting Page
S2-4410 Right door is open. Close it P.4–193
S2-5111 Failed to adjust the color registration P.4–193
S2-5112 Failed to adjust the color registration P.4–193
S2-5120 Failed to adjust the color registration P.4–193
S2-5131 Failed to adjust the color registration P.4–193
S2-5132 Failed to adjust the color registration P.4–193
S2-5133 Failed to adjust the color registration P.4–193
S2-5135 Failed to adjust the color registration P.4–193
S2-5136 Failed to adjust the color registration P.4–193
S2-5161 Failed to adjust the color registration P.4–193
S2-5164 Failed to adjust the color registration P.4–193
S2-5210 Failed to adjust the OPC Feedforward control P.4–193
S2-5240 Failed to adjust the OPC Feedforward control P.4–193
S3-3121 Scanner is locked P.4–194
S3-3211 Scan System Failure: #S3-3211. Turn off then on P.4–195
S4-3131 There has been a problem with fax modem card(Line 1). Install again. Call forservice if the problem persists
P.4–196
S4-3132 There has been a problem with fax modem card(Line 2). Install again. Call forservice if the problem persists
P.4–196
S5-3111 UI System Failure: #S5-3111. Call for service P.4–197
S6-3113 Network Failure: #S6-3113. Turn off then on. Call for service if the problempersists
P.4–198
S6-3114 Network Failure: #S6-3114. Turn off then on. Call for service if the problempersists
P.4–198
S6-3122 Network cable is disconnected. Check it P.4–198
S6-3123 This IP address conflicts with that of other system. Check it P.4–199
S6-3128 802.1x authentication failed. Please contact the system administrator P.4–199
S7-2110 Fuser Failure: #S7-2110. Turn off then on P.4–200
4-182 Copyright© 1995-2016 SAMSUNG. All rights reserved.
4. Troubleshooting
► Error Code
S1–1113
► Error message
Video System Failure #S1-1113: Turn off then on.
► Symptom
The system has some problems due to CPU overheating.
► Troubleshooting method
NOTE
To see the troubleshooting video for this error, click through to the link below.
(http://tsp.samsung.com/tsp_file/spds/samsungprinter/K7/Webview/EN_K7_S1-1113.html)
1) Turn the machine off.
2) Wait until the machine is cool, and then turn the machine on.
3) If the problem persists, turn the machine off again.
4) Remove the rear cover.
5) Replace the main board.
NOTE
Insert the MSOK to the new main board.
6) Assemble the rear cover. Turn the machine on.
Copyright© 1995-2016 SAMSUNG. All rights reserved. 4-183
4. Troubleshooting
► Error Code
S1–1313
► Error message
The clock became initial time. Set a time again.
► Symptom
Saved time is invalid
► Troubleshooting method
1) Set up the time and reboot the machine.a) Select “Machine Setup” on touch screen.b) Select “General Setting”.c) Select “Date and Time” and set the time.
2) If the problem persists, check the following.a) Remove the rear cover.b) Remove the fax holder from the main board.c) Measure the voltage of the battery. If the battery is normal, the measured value is over 3V.
3) If the battery is normal, replace the main board.
► Error Code
S1–1411 / S1–1413
► Error message
Video System Failure: #S1-1411. Turn off then onVideo System Failure: #S1-1413. Turn off then on
► Symptom
Video chip in main board is defective.
► Troubleshooting method
1) Turn the machine off then on.
2) If the problem persists, replace the main board.
NOTE
Insert the MSOK to the new main board.
4-184 Copyright© 1995-2016 SAMSUNG. All rights reserved.
4. Troubleshooting
► Error Code
S1–2111
► Error message
Video System Failure #S1-2111: Turn off then on.
► Symptom
The machine can’t detect memory during booting.
► Troubleshooting method
NOTE
To see the troubleshooting video for this error, click through to the link below.
(http://tsp.samsung.com/tsp_file/spds/samsungprinter/K7/Webview/EN_K7_S1-2111.html)
1) Turn the machine off then on.
2) If the problem persists, turn the machine off again.
3) Remove the rear cover.
4) Replace the main board.
NOTE
Insert the MSOK to the new main board.
5) Assemble the rear cover. Turn the machine on.
Copyright© 1995-2016 SAMSUNG. All rights reserved. 4-185

4. Troubleshooting
► Error Code
S1–2433 / S1–2443 / S1–2444 / S1–2445 / S1–2446 / S1–2447 / S1–2448 / S1–2449
► Error message
HDD System Failure #S1-24xx: Turn off then on.
► Symptom
HDD partition is full or corrupted.
► Troubleshooting method
NOTE
To see the troubleshooting video for this error, click through to the link below.
• S1–2433 : http://tsp.samsung.com/tsp_file/spds/samsungprinter/K7/Webview/EN_K7_S1-2433.html
• S1–2443 : http://tsp.samsung.com/tsp_file/spds/samsungprinter/K7/Webview/EN_K7_S1-2443.html
• S1–2444 : http://tsp.samsung.com/tsp_file/spds/samsungprinter/K7/Webview/EN_K7_S1-2444.html
• S1–2445 : http://tsp.samsung.com/tsp_file/spds/samsungprinter/K7/Webview/EN_K7_S1-2445.html
• S1–2446 : http://tsp.samsung.com/tsp_file/spds/samsungprinter/K7/Webview/EN_K7_S1-2446.html
• S1–2447 : http://tsp.samsung.com/tsp_file/spds/samsungprinter/K7/Webview/EN_K7_S1-2447.html
• S1–2448 : http://tsp.samsung.com/tsp_file/spds/samsungprinter/K7/Webview/EN_K7_S1-2448.html
• S1–2449 : http://tsp.samsung.com/tsp_file/spds/samsungprinter/K7/Webview/EN_K7_S1-2449.html
1) Enter SVC mode. Select “System Recovery” in Service Function menu.
2) Execute hard disk format and firmware re-installation.
3) If the problem persists, replace the HDD.
4-186 Copyright© 1995-2016 SAMSUNG. All rights reserved.
4. Troubleshooting
► Error Code
S1–2434 / S1–2435 / S1–2436 / S1–2437 / S1–2438 / S1–2439
► Error message
HDD Error #S1-243x. Check users guide.
► Symptom
HDD partition or memory is full.
► Troubleshooting method
NOTE
To see the troubleshooting video for this error, click through to the link below.
• S1–2434 : http://tsp.samsung.com/tsp_file/spds/samsungprinter/K7/Webview/EN_K7_S1-2434.html
• S1–2435 : http://tsp.samsung.com/tsp_file/spds/samsungprinter/K7/Webview/EN_K7_S1-2435.html
• S1–2436 : http://tsp.samsung.com/tsp_file/spds/samsungprinter/K7/Webview/EN_K7_S1-2436.html
• S1–2437 : http://tsp.samsung.com/tsp_file/spds/samsungprinter/K7/Webview/EN_K7_S1-2437.html
• S1–2438 : http://tsp.samsung.com/tsp_file/spds/samsungprinter/K7/Webview/EN_K7_S1-2438.html
• S1–2439 : http://tsp.samsung.com/tsp_file/spds/samsungprinter/K7/Webview/EN_K7_S1-2439.html
NOTE
• S1-2434 : Addresses in Address book / User data in User profile
• S1-2435 : Documents in Document box / Jobs in Secure job list / Fonts / Forms
• S1-2436 : System Logs
• S1-2437/3438/3439 : Printing Error / No Paper in Tray
1) Enter SVC mode. Select “Hard Disk Maintenance” in Service Function menu.
2) Execute hard disk format.
3) If the problem persists, replace the HDD.
Copyright© 1995-2016 SAMSUNG. All rights reserved. 4-187
4. Troubleshooting
► Error Code
S1–2510S1–2521
► Error message
MSOK System Failure #S1-2510: Turn off then on.MSOK Failure: #S1-2521. Call for service
► Symptom
MSOK is not installed properly. / MSOK is defective.
► Troubleshooting method
NOTE
To see the troubleshooting video for this error, click through to the link below.
• S1-2510 : http://tsp.samsung.com/tsp_file/spds/samsungprinter/K7/Webview/EN_K7_S1-2510.html
• S1-2521 : http://tsp.samsung.com/tsp_file/spds/samsungprinter/K7/Webview/EN_K7_S1-2521.html
1) Remove the rear cover.
2) Check if the MSOK is inserted correctly. Remove and reinstall it.
3) If the problem persists, replace the main board.
4-188 Copyright© 1995-2016 SAMSUNG. All rights reserved.

4. Troubleshooting
► Error Code
S1–3110
► Error message
Video System Failure #S1-3110: Turn off then on.
► Symptom
The main board is defective.
► Troubleshooting method
NOTE
To see the troubleshooting video for this error, click through to the link below.
(http://tsp.samsung.com/tsp_file/spds/samsungprinter/K7/Webview/EN_K7_S1-3110.html)
1) Turn the machine off then on.
2) If the problem persists, turn the machine off again.
3) Replace the main board.
4) Turn the machine on.
► Error Code
S1–4111
► Error message
Video System Failure #S1-4111: Turn off then on.
► Symptom
The main board can’t send the data through the network channel.
► Troubleshooting method
1) Check if the green LED of the network port is on.
2) If not, unplug and reconnect the network cable.
3) If the problem persists, replace the main board.
Copyright© 1995-2016 SAMSUNG. All rights reserved. 4-189

4. Troubleshooting
► Error Code
S1–4311
► Error message
Video System Failure #S1-4311: Turn off then on.
► Symptom
The USB device chip is defective.
► Troubleshooting method
NOTE
To see the troubleshooting video for this error, click through to the link below.
(http://tsp.samsung.com/tsp_file/spds/samsungprinter/K7/Webview/EN_K7_S1-4311.html)
1) Turn the machine off then on.
2) If the problem persists, turn the machine off again.
3) Replace the OPE hub board.
4) Turn the machine on.
► Error Code
S1–5521
► Error message
FDI device is not installed. Install the device
► Symptom
FDI device was removed.
► Troubleshooting method
1) Check if the FDI is installed correctly. If necessary, re-install or replace it with new one.
4-190 Copyright© 1995-2016 SAMSUNG. All rights reserved.

4. Troubleshooting
► Error Code
S2–1211 / S2–2311 / S2–3110
► Error message
Engine System Failure: #S2-1211. Turn off then onEngine System Failure: #S2-2311. Turn off then onEngine System Failure: #S2-3110. Turn off then on
► Symptom
The main board is defective.
► Troubleshooting method
NOTE
To see the troubleshooting video for this error, click through to the link below.
• S2–1211 : http://tsp.samsung.com/tsp_file/spds/samsungprinter/K7/Webview/EN_K7_S2-1211.html
• S2–2311 : http://tsp.samsung.com/tsp_file/spds/samsungprinter/K7/Webview/EN_K7_S2-2311.html
• S2–3110 : http://tsp.samsung.com/tsp_file/spds/samsungprinter/K7/Webview/EN_K7_S2-3110.html
• Power chip error
• EEPROM detection error
• Communication error
1) Turn the machine off then on.
2) If the problem persists, turn the machine off again.
3) Replace the main board(JC92-02737A).
4) Turn the machine on.
► Error Code
S2–3114
► Error message
Engine System Failure #S2-3114: Turn off then on.
► Symptom
ACR error has occurred.
► Troubleshooting method
NOTE
To see the troubleshooting video for this error, click through to the link below.
(http://tsp.samsung.com/tsp_file/spds/samsungprinter/X7/Webview/EN_X7_S2-3114.html)
1) Execute “ACR calibration” manually.(Machine Setup > General Settings > Image Management > Auto Color Registration)
2) Clean the ACR sensor.
3) If the problem persists, replace the main board(JC92-02737A).
Copyright© 1995-2016 SAMSUNG. All rights reserved. 4-191

4. Troubleshooting
► Error Code
S2–33xxS2–34xx
► Error message
Wait delay time for lower fixing temperature…Supplying and mixing toner to xxxx developer unit. Please wait…Calibrating xxxx image density. Please wait...
► Symptom
These error show the engine status.
► Troubleshooting method
1) Wait until error will be disappeared.
► Error Code
S2–4210
► Error message
Front door is open. Close it.
► Symptom
Front cover is opened.
► Troubleshooting method
NOTE
To see the troubleshooting video for this error, click through to the link below.
(http://tsp.samsung.com/tsp_file/spds/samsungprinter/K7/Webview/EN_K7_S2-4210.html)
1) Close the front cover correctly.
2) Check if the cover open sensor connector is connected properly. Reconnect it.
3) If the sensor is defective, replace it.
4-192 Copyright© 1995-2016 SAMSUNG. All rights reserved.
4. Troubleshooting
► Error Code
S2–4410
► Error message
Right door is open. Close it.
► Symptom
Side cover is opened.
► Troubleshooting method
NOTE
To see the troubleshooting video for this error, click through to the link below.
(http://tsp.samsung.com/tsp_file/spds/samsungprinter/K7/Webview/EN_K7_S2-4410.html)
1) Close the side cover correctly.
2) Check if the cover open sensor connector is connected properly. Reconnect it.
3) If the sensor is defective, replace it.
► Error Code
S2–5111 / S2–5112 / S2–5120 / S2–5131 / S2–5132 / S2–5133 / S2–5135 / S2–5136 / S2–5161 / S2–5164 / S2–5210 /S2–5240
► Error message
Failed to adjust the color registration
► Symptom
ACR execution is failed.
► Troubleshooting method
NOTE
To see the troubleshooting video for this error, click through to the link below.
• S2–5111 : http://tsp.samsung.com/tsp_file/spds/samsungprinter/X7/Webview/EN_X7_S2-5111.html
• S2–5112 : http://tsp.samsung.com/tsp_file/spds/samsungprinter/X7/Webview/EN_X7_S2-5112.html
• S2–5120 : http://tsp.samsung.com/tsp_file/spds/samsungprinter/X7/Webview/EN_X7_S2-5120.html
• S2–5131 : http://tsp.samsung.com/tsp_file/spds/samsungprinter/X7/Webview/EN_X7_S2-5131.html
• S2–5132 : http://tsp.samsung.com/tsp_file/spds/samsungprinter/X7/Webview/EN_X7_S2-5132.html
• S2–5133 : http://tsp.samsung.com/tsp_file/spds/samsungprinter/X7/Webview/EN_X7_S2-5133.html
• S2–5135 : http://tsp.samsung.com/tsp_file/spds/samsungprinter/X7/Webview/EN_X7_S2-5135.html
• S2–5136 : http://tsp.samsung.com/tsp_file/spds/samsungprinter/X7/Webview/EN_X7_S2-5136.html
• S2–5161 : http://tsp.samsung.com/tsp_file/spds/samsungprinter/X7/Webview/EN_X7_S2-5161.html
• S2–5164 : http://tsp.samsung.com/tsp_file/spds/samsungprinter/X7/Webview/EN_X7_S2-5164.html
• S2–5210 : http://tsp.samsung.com/tsp_file/spds/samsungprinter/X7/Webview/EN_X7_S2-5210.html
• S2–5240 : http://tsp.samsung.com/tsp_file/spds/samsungprinter/X7/Webview/EN_X7_S2-5240.html
Copyright© 1995-2016 SAMSUNG. All rights reserved. 4-193
4. Troubleshooting
1) Turn the machine off then on.
2) If the problem persists, check the followings.
• Check if the ACR sensor is contaminated or defective. Clean the ACR sensor or replace it.
• Remove and reinstall the ITB unit. If the problem persists, replace the ITB unit.
► Error Code
S3–3121
► Error message
Scanner is locked.
► Symptom
Scanner module does not move.
► Troubleshooting method
NOTE
To see the troubleshooting video for this error, click through to the link below.
(http://tsp.samsung.com/tsp_file/spds/samsungprinter/K7/Webview/EN_K7_S3-3121.html)
1) Turn off the machine then on. Check if the scanner module works normally.
2) If the initial operation does not occurred normally, turn the machine off.
3) Remove the scan glass.
4) Check if the home position sensor cable is connected correctly.
5) Remove the scan rear cover. Check if all cables on scan joint board are connected correctly.
6) If the connection is OK, replace the scan joint board.
4-194 Copyright© 1995-2016 SAMSUNG. All rights reserved.

4. Troubleshooting
► Error Code
S3–3211
► Error message
Scan System Failure #S3-3211: Turn off then on.
► Symptom
ADF is not connected or communication error occurs with CIP6 board.
► Troubleshooting method
NOTE
To see the troubleshooting video for this error, click through to the link below.
(http://tsp.samsung.com/tsp_file/spds/samsungprinter/K7/Webview/EN_K7_S3-3211.html)
1) Turn the machine off then on. If the problem persists, check the following:
2) Turn the machine off again.
3) Remove the scan rear cover. Check if the connector on scan joint board is connected correctly.
4) Remove the ADF rear cover. Check if the connector on ADF board is connected correctly.
5) If the connection is OK, replace the ADF board.
Copyright© 1995-2016 SAMSUNG. All rights reserved. 4-195
4. Troubleshooting
► Error Code
S4–3131
► Error message
There has been a problem with fax modem card(Line 1). Install again. Call for service if the problem persists
► Symptom
1st Fax card is not installed properly. / Fax card is defective.
► Troubleshooting method
1) Remove and reinstall the 1st fax card.
2) If the 1st fax card is defective, replace it.
► Error Code
S4–3132
► Error message
There has been a problem with fax modem card(Line 1). Install again. Call for service if the problem persists
► Symptom
2nd Fax card is not installed properly. / Fax card is defective.
► Troubleshooting method
1) Remove and reinstall the 2nd fax card.
2) If the 2nd fax card is defective, replace it.
4-196 Copyright© 1995-2016 SAMSUNG. All rights reserved.
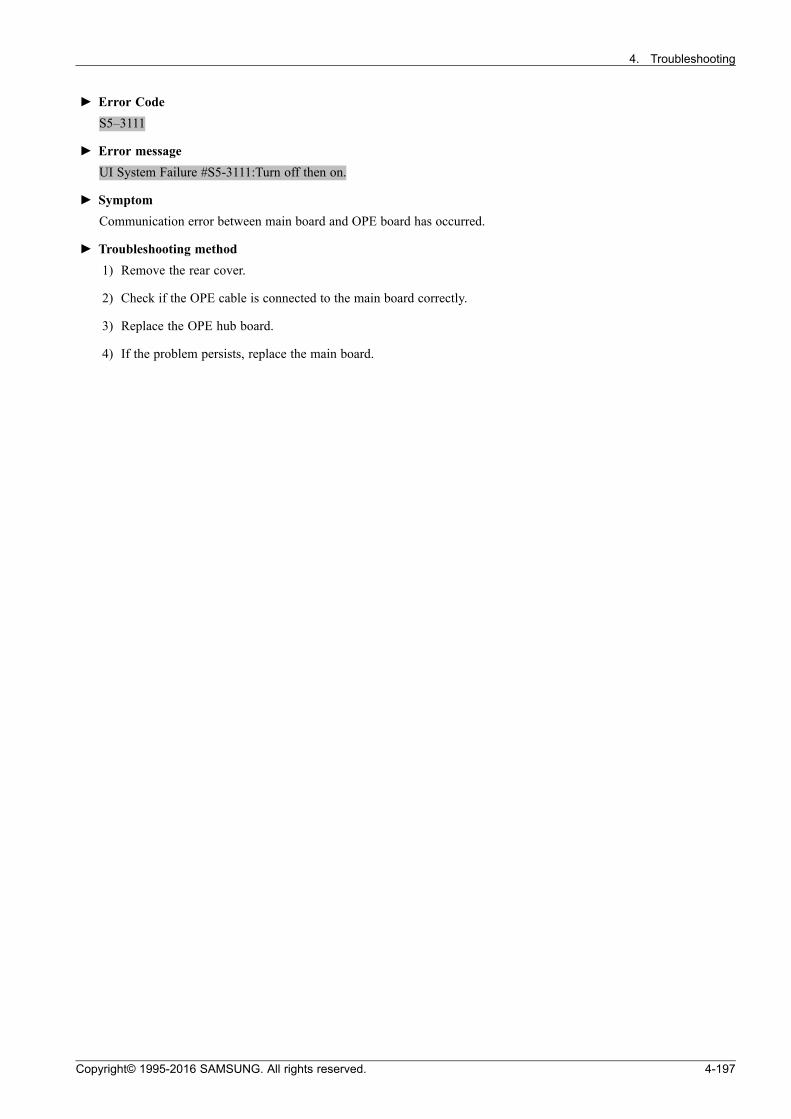
4. Troubleshooting
► Error Code
S5–3111
► Error message
UI System Failure #S5-3111:Turn off then on.
► Symptom
Communication error between main board and OPE board has occurred.
► Troubleshooting method
1) Remove the rear cover.
2) Check if the OPE cable is connected to the main board correctly.
3) Replace the OPE hub board.
4) If the problem persists, replace the main board.
Copyright© 1995-2016 SAMSUNG. All rights reserved. 4-197

4. Troubleshooting
► Error Code
S6–3113 / S6–3122
► Error message
Network Failure: #S6-3113. Turn off then on. Call for service if the problem persistsNetwork cable is disconnected. Check it.
► Symptom
Network cable is disconnected.
► Troubleshooting method
1) Check if the green LED of the network port is on.
2) If not, unplug and reconnect the network cable.
3) If the problem persists, replace the main board.
► Error Code
S6–3114
► Error message
Network Failure: #S6-3114. Turn off then on. Call for service if the problem persists
► Symptom
Network chip in option network kit is defective.
► Troubleshooting method
1) Check if the green LED of the network port is on.
2) If not, unplug and reconnect the network cable.
3) Re-install the optional network kit.
4) If the problem persists, replace the optional network kit.
5) If the problem persists, replace the main board.
4-198 Copyright© 1995-2016 SAMSUNG. All rights reserved.

4. Troubleshooting
► Error Code
S6–3123S6–3128
► Error message
This IP address conflicts with that of other system. Check it.802.1x authentication failed. Please Contact the System Administrator.
► Symptom
Network error. (IP address conflicts with that of another system. / Communication error / There is no response whenchecking the ping test.)
► Troubleshooting method
• Change the machine’s IP address.
1) Select “Machine Setup” on the touch screen.
2) Select “Networking Setting”.
3) “Log-In”.
4) Select “TCP/IP”.
5) Select the proper item for your machine.
6) Select “IP Setting”.
7) Select the proper item for your machine.
8) Change the IP address.
Copyright© 1995-2016 SAMSUNG. All rights reserved. 4-199

4. Troubleshooting
► Error Code
S7–2110
► Error message
Fuser Failure: #S7-2110. Turn off then on
► Symptom
Heater control relay is abnormal.
► Troubleshooting method
NOTE
To see the troubleshooting video for this error, click through to the link below.
(http://tsp.samsung.com/tsp_file/spds/samsungprinter/K7/Webview/EN_K7_S7-2110.html)
1) Turn the machine off. Re-install the fuser unit, then turn the machine on.
2) If the problem persists, replace the fuser unit.
4-200 Copyright© 1995-2016 SAMSUNG. All rights reserved.

4. Troubleshooting
4.6.20. U1–xxxx (Fuser error)
Error Code Error Message Troubleshooting Page
U1-2113 Fuser Unit Failure: #U1-2113. Turn off then on P.4–202
U1-2115 Fuser Unit Failure: #U1-2115. Turn off then on. Call for service if the problempersists
P.4–203
U1-2119 Fuser Unit Failure: #U1-2119. Turn off then on P.4–202
U1-2132 Fuser Unit Failure: #U1-2132. Turn off then on. Call for service if the problempersists
P.4–202
U1-2135 Fuser Unit Failure: #U1-2135. Turn off then on. Call for service if the problempersists
P.4–202
U1-2141 Fuser Unit Failure: #U1-2141. Turn off then on P.4–202
U1-2142 Fuser Unit Failure: #U1-2142. Turn off then on P.4–202
U1-2315 Fuser Unit Failure: #U1-2315. Turn off then on. Call for service if the problempersists
P.4–202
U1-2316 Fuser Failure: #U1-2316. Turn off then on. Call for service if the problempersists
P.4–202
U1-2317 Fuser Failure: #U1-2317. Turn off then on. Call for service if the problempersists
P.4–202
U1-2320 Fuser Unit Failure: #U1-2320. Turn off then on. Call for service if the problempersists
P.4–202
U1-2330 Fuser Unit Failure: #U1-2330. Turn off then on. Call for service if the problempersists
P.4–202
U1-2334 Fuser Unit Failure: #U1-2334. Turn off then on. Call for service if the problempersists
P.4–202
U1-2335 Fuser Failure: #U1-2335. Turn off then on P.4–202
U1-2337 Fuser Failure: #U1-2337. Turn off then on P.4–202
U1-233A Fuser Failure: #U1-233A. Turn off then on P.4–202
U1-233D Fuser Failure: #U1-233D. Turn off then on P.4–202
U1-2340 Fuser Unit Failure: #U1-2340. Turn off then on. Call for service if the problempersists
P.4–202
U1-234H Fuser Unit Failure: #U1-234H. Turn off then on. Call for service if the problempersists
P.4–202
Copyright© 1995-2016 SAMSUNG. All rights reserved. 4-201
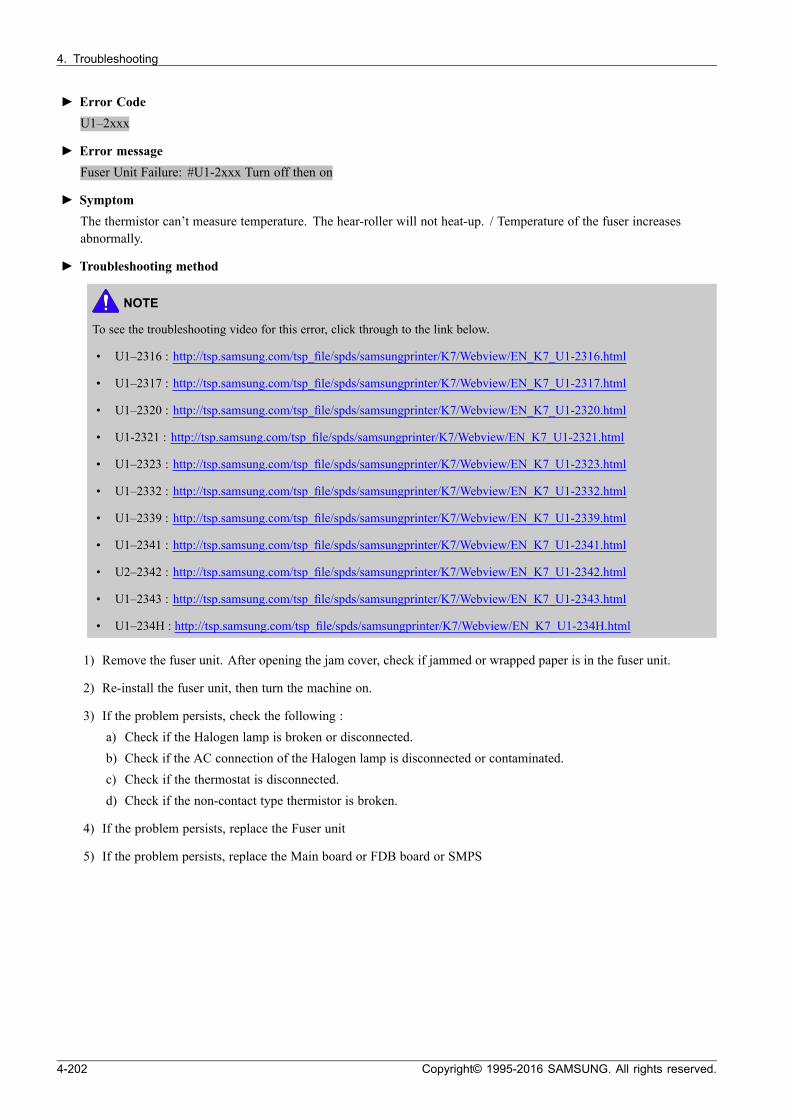
4. Troubleshooting
► Error Code
U1–2xxx
► Error message
Fuser Unit Failure: #U1-2xxx Turn off then on
► Symptom
The thermistor can’t measure temperature. The hear-roller will not heat-up. / Temperature of the fuser increasesabnormally.
► Troubleshooting method
NOTE
To see the troubleshooting video for this error, click through to the link below.
• U1–2316 : http://tsp.samsung.com/tsp_file/spds/samsungprinter/K7/Webview/EN_K7_U1-2316.html
• U1–2317 : http://tsp.samsung.com/tsp_file/spds/samsungprinter/K7/Webview/EN_K7_U1-2317.html
• U1–2320 : http://tsp.samsung.com/tsp_file/spds/samsungprinter/K7/Webview/EN_K7_U1-2320.html
• U1-2321 : http://tsp.samsung.com/tsp_file/spds/samsungprinter/K7/Webview/EN_K7_U1-2321.html
• U1–2323 : http://tsp.samsung.com/tsp_file/spds/samsungprinter/K7/Webview/EN_K7_U1-2323.html
• U1–2332 : http://tsp.samsung.com/tsp_file/spds/samsungprinter/K7/Webview/EN_K7_U1-2332.html
• U1–2339 : http://tsp.samsung.com/tsp_file/spds/samsungprinter/K7/Webview/EN_K7_U1-2339.html
• U1–2341 : http://tsp.samsung.com/tsp_file/spds/samsungprinter/K7/Webview/EN_K7_U1-2341.html
• U2–2342 : http://tsp.samsung.com/tsp_file/spds/samsungprinter/K7/Webview/EN_K7_U1-2342.html
• U1–2343 : http://tsp.samsung.com/tsp_file/spds/samsungprinter/K7/Webview/EN_K7_U1-2343.html
• U1–234H : http://tsp.samsung.com/tsp_file/spds/samsungprinter/K7/Webview/EN_K7_U1-234H.html
1) Remove the fuser unit. After opening the jam cover, check if jammed or wrapped paper is in the fuser unit.
2) Re-install the fuser unit, then turn the machine on.
3) If the problem persists, check the following :a) Check if the Halogen lamp is broken or disconnected.b) Check if the AC connection of the Halogen lamp is disconnected or contaminated.c) Check if the thermostat is disconnected.d) Check if the non-contact type thermistor is broken.
4) If the problem persists, replace the Fuser unit
5) If the problem persists, replace the Main board or FDB board or SMPS
4-202 Copyright© 1995-2016 SAMSUNG. All rights reserved.
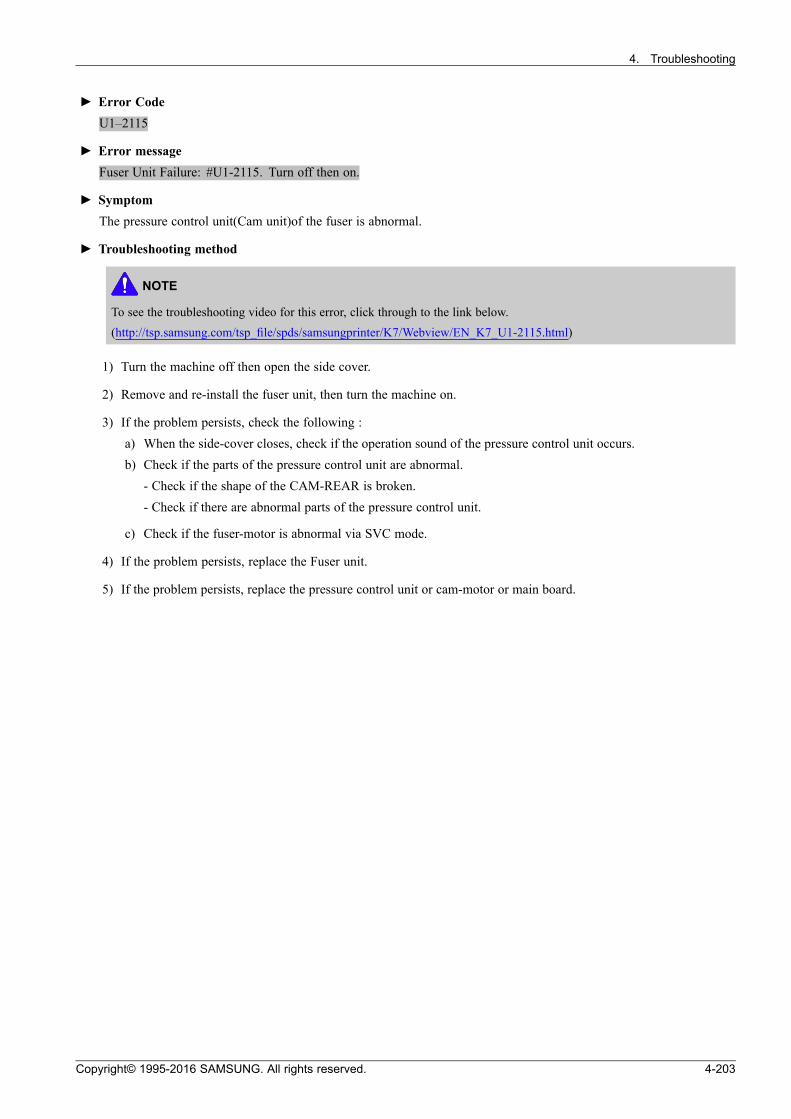
4. Troubleshooting
► Error Code
U1–2115
► Error message
Fuser Unit Failure: #U1-2115. Turn off then on.
► Symptom
The pressure control unit(Cam unit)of the fuser is abnormal.
► Troubleshooting method
NOTE
To see the troubleshooting video for this error, click through to the link below.
(http://tsp.samsung.com/tsp_file/spds/samsungprinter/K7/Webview/EN_K7_U1-2115.html)
1) Turn the machine off then open the side cover.
2) Remove and re-install the fuser unit, then turn the machine on.
3) If the problem persists, check the following :a) When the side-cover closes, check if the operation sound of the pressure control unit occurs.b) Check if the parts of the pressure control unit are abnormal.
- Check if the shape of the CAM-REAR is broken.- Check if there are abnormal parts of the pressure control unit.
c) Check if the fuser-motor is abnormal via SVC mode.
4) If the problem persists, replace the Fuser unit.
5) If the problem persists, replace the pressure control unit or cam-motor or main board.
Copyright© 1995-2016 SAMSUNG. All rights reserved. 4-203
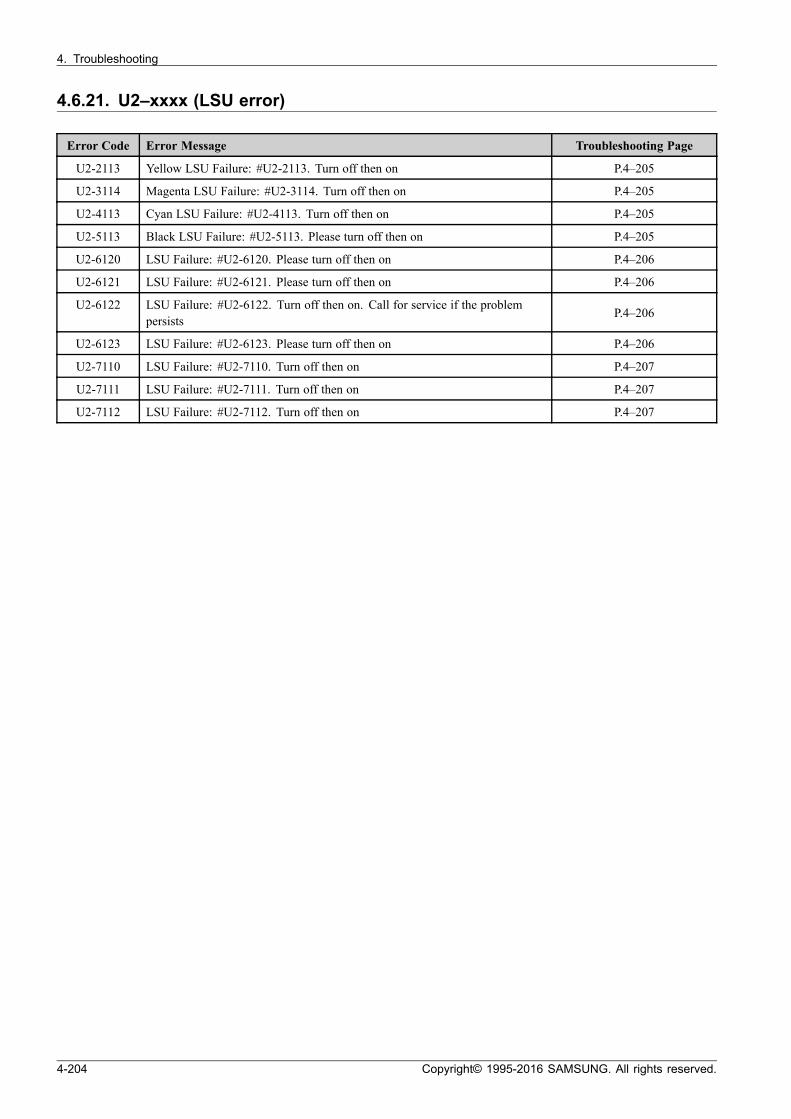
4. Troubleshooting
4.6.21. U2–xxxx (LSU error)
Error Code Error Message Troubleshooting Page
U2-2113 Yellow LSU Failure: #U2-2113. Turn off then on P.4–205
U2-3114 Magenta LSU Failure: #U2-3114. Turn off then on P.4–205
U2-4113 Cyan LSU Failure: #U2-4113. Turn off then on P.4–205
U2-5113 Black LSU Failure: #U2-5113. Please turn off then on P.4–205
U2-6120 LSU Failure: #U2-6120. Please turn off then on P.4–206
U2-6121 LSU Failure: #U2-6121. Please turn off then on P.4–206
U2-6122 LSU Failure: #U2-6122. Turn off then on. Call for service if the problempersists
P.4–206
U2-6123 LSU Failure: #U2-6123. Please turn off then on P.4–206
U2-7110 LSU Failure: #U2-7110. Turn off then on P.4–207
U2-7111 LSU Failure: #U2-7111. Turn off then on P.4–207
U2-7112 LSU Failure: #U2-7112. Turn off then on P.4–207
4-204 Copyright© 1995-2016 SAMSUNG. All rights reserved.

4. Troubleshooting
► Error Code
U2–2113 / U2–3114 / U2–4113 / U2–5113
► Error message
Yellow LSU Failure: #U2-2113. Turn off then onMagenta LSU Failure: #U2-3114. Turn off then onCyan LSU Failure: #U2-4113. Turn off then onBlack LSU Failure: #U2-5113. Please turn off then on
► Symptom
Hsync signal of the LSU is abnormal.
► Troubleshooting method
NOTE
To see the troubleshooting video for this error, click through to the link below.
• U2–2113 : http://tsp.samsung.com/tsp_file/spds/samsungprinter/K7/Webview/EN_K7_U2-2113.html
• U2–3114 : http://tsp.samsung.com/tsp_file/spds/samsungprinter/K7/Webview/EN_K7_U2-3114.html
• U2–4113 : http://tsp.samsung.com/tsp_file/spds/samsungprinter/K7/Webview/EN_K7_U2-4113.html
• U2–5113 : http://tsp.samsung.com/tsp_file/spds/samsungprinter/K7/Webview/EN_K7_U2-5113.html
CAUTION
Before unplugging the LSU harness, the machine must be turned off and power cord must be removed.
1) Turn the machine off then on. Check for the LSU motor operation sound during warm-up.
2) Print a demo page to check that the machine operates normally.
3) If the problem persists, check the following :a) Turn the machine off and open the side cover. Unplug and reconnect the LSU cable. Print a demo page to
check that the machine operates normally.b) Turn the machine off and open the side cover. Unplug and reconnect the LSU cable on main board. Print a
demo page to check that the machine operates normally.c) If the LSU cable is defective, replace it. Check that the LSU motor makes a sound after turning the machine on.d) If the problem persists, replace the LSU.
Copyright© 1995-2016 SAMSUNG. All rights reserved. 4-205
4. Troubleshooting
► Error Code
U2–6120 / U2–6121 / U2–6122 / U2–6123
► Error message
LSU Failure: #U2-612x. Please turn off then on
► Symptom
LSU motor does not operate or it operates abnormally. Motor ready signal is abnormal.
► Troubleshooting method
NOTE
To see the troubleshooting video for this error, click through to the link below.
• U2–6120 : http://tsp.samsung.com/tsp_file/spds/samsungprinter/K7/Webview/EN_K7_U2-6120.html
• U2–6121 : http://tsp.samsung.com/tsp_file/spds/samsungprinter/K7/Webview/EN_K7_U2-6121.html
• U2–6122 : http://tsp.samsung.com/tsp_file/spds/samsungprinter/K7/Webview/EN_K7_U2-6122.html
• U2–6123 : http://tsp.samsung.com/tsp_file/spds/samsungprinter/K7/Webview/EN_K7_U2-6123.html
CAUTION
Before unplugging the LSU harness, the machine must be turned off and power cord must be removed.
1) Turn the machine off then on. Check for the LSU motor operation sound during warm-up.
2) Print a demo page to check that the machine operates normally.
3) If the problem persists, check the following :a) If the LSU motor makes a sound,
i) Enter SVC mode to check the LSU motor ready signal.( Diagnostics > Engine Diagnostics > Engine Test Routines)
ii) Select “LSU Motor1 Run Ready”. ( Diagnostics > Engine Diagnostics > Engine Test Routines >110-0000)
iii) Press ‘Start’ button. Check that the status has changed to ‘Executing -> Low -> High’.iv) If the status has not changed, the motor ready signal is abnormal. Replace the LSU.
b) If the LSU motor does not makes a sound,i) Turn the machine off and open the side cover. Unplug and reconnect the LSU cable. Check that the LSU
motor make a sound after turning the machine on.ii) Turn the machine off and remove the rear cover. Unplug and reconnect the LSU cable on main board.
Check that the LSU motor make a sound after turning the machine on.iii) If the LSU cable is defective, replace it. Check that the LSU motor make a sound after turning the
machine on.iv) If the problem persists, replace the LSU.
4-206 Copyright© 1995-2016 SAMSUNG. All rights reserved.

4. Troubleshooting
► Error Code
U2–7110 / U2–7111 / U2–7112
► Error message
LSU Failure: #U2-711x. Turn off then on
► Symptom
Temperature sensor of the LSU is abnormal.
► Troubleshooting method
NOTE
To see the troubleshooting video for this error, click through to the link below.
• U2–7110 : http://tsp.samsung.com/tsp_file/spds/samsungprinter/K7/Webview/EN_K7_U2-7110.html
• U2–7111 : http://tsp.samsung.com/tsp_file/spds/samsungprinter/K7/Webview/EN_K7_U2-7111.html
• U2–7112 : http://tsp.samsung.com/tsp_file/spds/samsungprinter/K7/Webview/EN_K7_U2-7112.html
CAUTION
Before unplugging the LSU harness, the machine must be turned off and power cord must be removed.
1) Turn the machine off then on. Check for the LSU motor operation sound during warm-up.
2) Print a demo page to check that the machine operates normally.
3) If the problem persists, check the following :a) Turn the machine off and open the side cover. Unplug and reconnect the LSU cable. Print a demo page to
check that the machine operates normally.b) Turn the machine off and open the side cover. Unplug and reconnect the LSU cable on main board. Print a
demo page to check that the machine operates normally.c) If the LSU cable is defective, replace it. Check that the LSU motor makes a sound after turning the machine on.d) If the problem persists, replace the LSU.
Copyright© 1995-2016 SAMSUNG. All rights reserved. 4-207

4. Troubleshooting
4.6.22. U3–xxxx (Document Feeder error_DSDF for LX model)
Error Code Error Message Troubleshooting Page
U3-3111 Original paper jam in front of the scanner P.4–209
U3-3113 Original paper jam in front of the scanner P.4–209
U3-3114 Original paper jam in front of the scanner P.4–209
U3-3122 Documents are inserted incorrectly. After open the scanner`s door, put it again.Call for service if the problem persists
P.4–210
U3-3211 Original paper jam inside of scanner P.4–209
U3-3213 Original paper jam inside the scanner P.4–209
U3-3214 Original paper jam inside the scanner P.4–209
U3-3311 Original paper jam inside the scanner P.4–209
U3-3313 Original paper jam inside the scanner P.4–209
U3-3314 Original paper jam inside the scanner P.4–209
U3-3511 Original paper jam inside the scanner P.4–211
U3-3513 Original paper jam inside the scanner P.4–211
U3-3514 Original paper jam inside the scanner P.4–211
U3-3611 Original paper jam in the exit area of scanner P.4–212
U3-3613 Original paper jam in the exit area of scanner P.4–212
U3-3614 Original paper jam in the exit area of scanner P.4–212
U3-4210 Top door of scanner is open P.4–213
4-208 Copyright© 1995-2016 SAMSUNG. All rights reserved.
4. Troubleshooting
► Error Code
U3–3111 / U3–3113 / U3–3114 / U3–3211 / U3–3213 / U3–3214 / U3–3311 / U3–3313 / U3–3314
► Error message
Original paper jam in front of the scannerOriginal paper jam inside of scanner
► Symptom
Jam has occurred inside the DSDF unit.
► Troubleshooting method
1) Open the DSDF cover. If there is jammed paper, remove it.
2) If this error occurs continually, check the Regi. sensor and Regi actuator.Push and release the regi actuator. Check if the pick up module returns the original position.If the sensor is defective, replace it.
3) If the regi sensor is OK, check the scan 1 sensor and reflect film.
• If the scan 1 sensor is defective, replace it.
• If the reflect film is contaminated, clean it.
Copyright© 1995-2016 SAMSUNG. All rights reserved. 4-209

4. Troubleshooting
► Error Code
U3–3122
► Error message
Documents are inserted incorrectly. After open the scanner`s door, put it again. Call for service if the problem persists
► Symptom
DSDF pick up module has the problem.
► Troubleshooting method
1) Open and close the DSDF cover. Check if the error message is disappeared.
2) Open the DSDF cover. Push and release the pick up module. Check if the pick up module returns the originalposition.
• Check if the spring is deformed. If the spring is defective, replace it.
3) Check If the regi sensor is OK, check the scan sensor and scan actuator. If their operation is abnormal, replacethe defective part.
4-210 Copyright© 1995-2016 SAMSUNG. All rights reserved.

4. Troubleshooting
► Error Code
U3–3511 / U3–3513 / U3–3514
► Error message
Original paper jam inside of scanner.
► Symptom
Jam has occurred inside the DSDF unit.
► Troubleshooting method
1) Open the DSDF cover. If there is jammed paper, remove it.
2) If this error occurs continually, check the Regi. sensor and Regi actuator.Push and release the regi actuator. Check if the pick up module returns the original position.If the sensor is defective, replace it.
3) If the regi sensor is OK, check the scan 2 sensor and exit sensor.
• If the scan 2 sensor is defective, replace it.
• If the exit sensor is defective, replace it.
Copyright© 1995-2016 SAMSUNG. All rights reserved. 4-211
4. Troubleshooting
► Error Code
U3–3611 / U3–3613 / U3–3614
► Error message
Original paper jam in the exit area of scanner
► Symptom
Jam has occurred in exit area of the DSDF unit.
► Troubleshooting method
1) Open the DSDF cover. If there is jammed paper, remove it.
2) If the regi sensor is OK, check the scan 2 sensor and exit sensor.
• If the scan 2 sensor is defective, replace it.
• If the exit sensor is defective, replace it.
4-212 Copyright© 1995-2016 SAMSUNG. All rights reserved.
4. Troubleshooting
► Error Code
U3–4210
► Error message
Top door of scanner is open.
► Symptom
DSDF cover is open.
► Troubleshooting method
1) Open and close the DSDF cover. Check if the error message is disappeared.
2) If the problem persists, check the cover open sensor.a) Open the DSDF cover. Remove the spring.b) Check if the sensor connector is connected correctly.
If the sensor is defective, replace it.
Copyright© 1995-2016 SAMSUNG. All rights reserved. 4-213
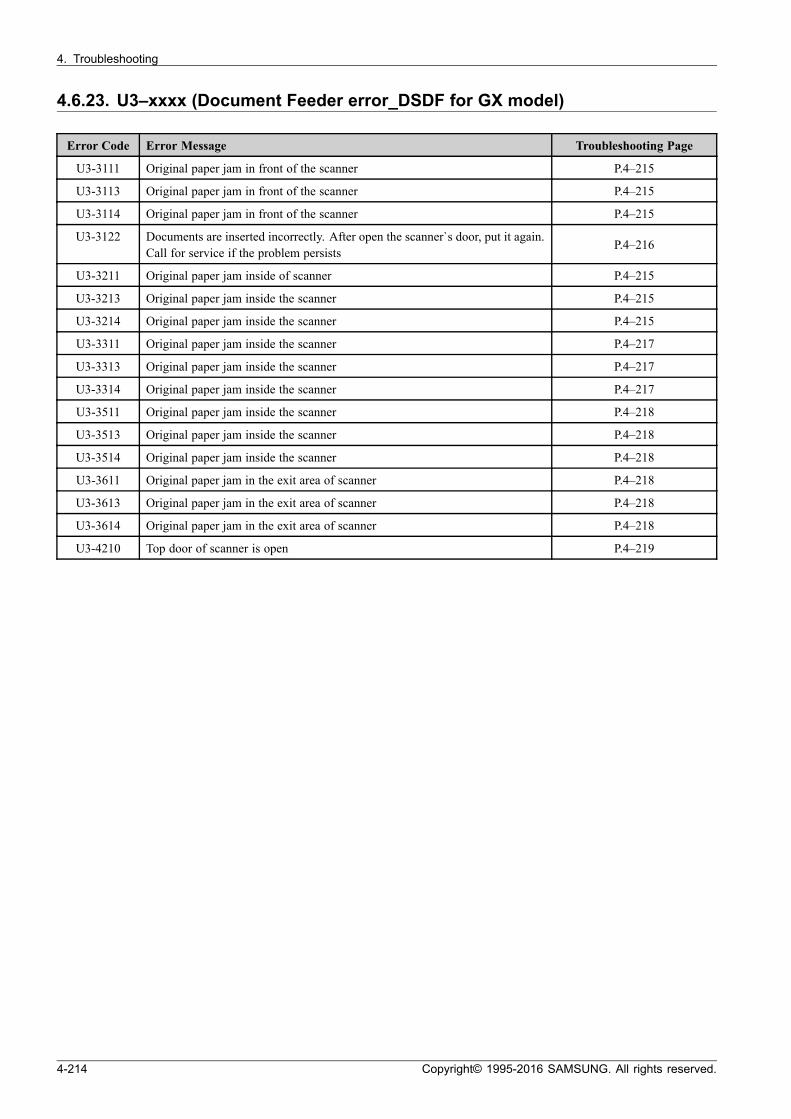
4. Troubleshooting
4.6.23. U3–xxxx (Document Feeder error_DSDF for GX model)
Error Code Error Message Troubleshooting Page
U3-3111 Original paper jam in front of the scanner P.4–215
U3-3113 Original paper jam in front of the scanner P.4–215
U3-3114 Original paper jam in front of the scanner P.4–215
U3-3122 Documents are inserted incorrectly. After open the scanner`s door, put it again.Call for service if the problem persists
P.4–216
U3-3211 Original paper jam inside of scanner P.4–215
U3-3213 Original paper jam inside the scanner P.4–215
U3-3214 Original paper jam inside the scanner P.4–215
U3-3311 Original paper jam inside the scanner P.4–217
U3-3313 Original paper jam inside the scanner P.4–217
U3-3314 Original paper jam inside the scanner P.4–217
U3-3511 Original paper jam inside the scanner P.4–218
U3-3513 Original paper jam inside the scanner P.4–218
U3-3514 Original paper jam inside the scanner P.4–218
U3-3611 Original paper jam in the exit area of scanner P.4–218
U3-3613 Original paper jam in the exit area of scanner P.4–218
U3-3614 Original paper jam in the exit area of scanner P.4–218
U3-4210 Top door of scanner is open P.4–219
4-214 Copyright© 1995-2016 SAMSUNG. All rights reserved.

4. Troubleshooting
► Error Code
U3–3111 / U3–3113 / U3–3114 / U3–3211 / U3–3213 / U3–3214
► Error message
Original paper jam inside of scanner
► Symptom
Jam has occurred inside the DSDF unit.
► Troubleshooting method
NOTE
To see the troubleshooting video for this error, click through to the link below.
• U3–3211 : http://tsp.samsung.com/tsp_file/spds/samsungprinter/K7/Webview/EN_K7_U3-3211.html
• U3–3213 : http://tsp.samsung.com/tsp_file/spds/samsungprinter/K7/Webview/EN_K7_U3-3213.html
• U3–3214 : http://tsp.samsung.com/tsp_file/spds/samsungprinter/K7/Webview/EN_K7_U3-3214.html
1) Find and remove the jammed paper.
2) If this error occurs continually, remove 4 screws and the upper cover.
3) Check the Pick-up Position Sensor(0604–001393) and Pick-up Feed Sensor(0604–001381) connection.
4) Check if the black sheet from the bottom of the pick up feed sensor is attached properly. If it is contaminated, clean it.
5) If the sensor is defective, replace it.
Copyright© 1995-2016 SAMSUNG. All rights reserved. 4-215
4. Troubleshooting
► Error Code
U3–3122
► Error message
Documents are inserted incorrectly. After open the scanner`s door, put it again. Call for service if the problem persists
► Symptom
DSDF pick up module has the problem.
► Troubleshooting method
NOTE
To see the troubleshooting video for this error, click through to the link below.
(http://tsp.samsung.com/tsp_file/spds/samsungprinter/K7/Webview/EN_K7_U3-3122.html)
1) Open and close the DSDF cover. Check if the error message is disappeared.
2) Open the DSDF cover. Push and release the pick up module. Check if the pick up module returns the originalposition.
• Check if the spring is deformed. If the spring is defective, replace it.
3) Check If the regi sensor is OK, check the scan sensor and scan actuator. If their operation is abnormal, replacethe defective part.
4-216 Copyright© 1995-2016 SAMSUNG. All rights reserved.
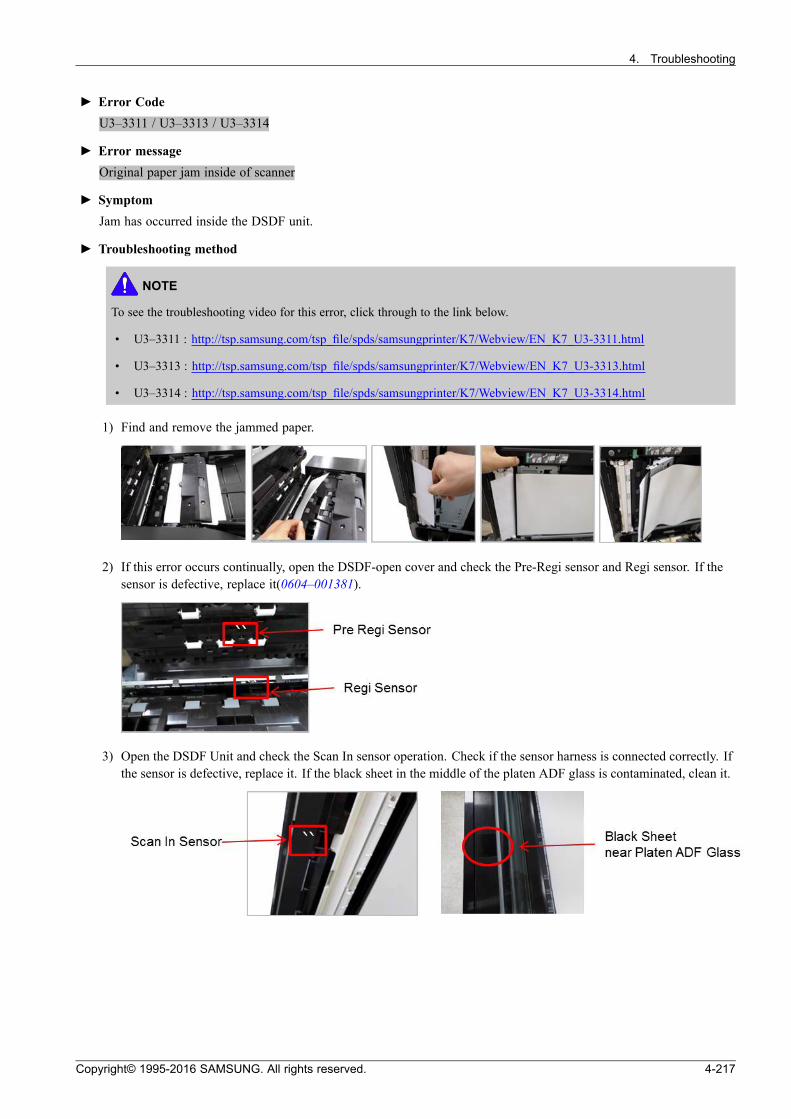
4. Troubleshooting
► Error Code
U3–3311 / U3–3313 / U3–3314
► Error message
Original paper jam inside of scanner
► Symptom
Jam has occurred inside the DSDF unit.
► Troubleshooting method
NOTE
To see the troubleshooting video for this error, click through to the link below.
• U3–3311 : http://tsp.samsung.com/tsp_file/spds/samsungprinter/K7/Webview/EN_K7_U3-3311.html
• U3–3313 : http://tsp.samsung.com/tsp_file/spds/samsungprinter/K7/Webview/EN_K7_U3-3313.html
• U3–3314 : http://tsp.samsung.com/tsp_file/spds/samsungprinter/K7/Webview/EN_K7_U3-3314.html
1) Find and remove the jammed paper.
2) If this error occurs continually, open the DSDF-open cover and check the Pre-Regi sensor and Regi sensor. If thesensor is defective, replace it(0604–001381).
3) Open the DSDF Unit and check the Scan In sensor operation. Check if the sensor harness is connected correctly. Ifthe sensor is defective, replace it. If the black sheet in the middle of the platen ADF glass is contaminated, clean it.
Copyright© 1995-2016 SAMSUNG. All rights reserved. 4-217

4. Troubleshooting
► Error Code
U3–3511 / U3–3613 / U3–3614U3–3611 / U3–3613 / U3–3614
► Error message
Original paper jam in the exit area of scanner
► Symptom
Jam has occurred in exit area of the DSDF unit.
► Troubleshooting method
NOTE
To see the troubleshooting video for this error, click through to the link below.
• U3–3511 : http://tsp.samsung.com/tsp_file/spds/samsungprinter/K7/Webview/EN_K7_U3-3511.html
• U3–3611 : http://tsp.samsung.com/tsp_file/spds/samsungprinter/K7/Webview/EN_K7_U3-3611.html
• U3–3613 : http://tsp.samsung.com/tsp_file/spds/samsungprinter/K7/Webview/EN_K7_U3-3613.html
• U3–3614 : http://tsp.samsung.com/tsp_file/spds/samsungprinter/K7/Webview/EN_K7_U3-3614.html
1) Find and remove the jammed paper.
2) If this error occurs continually, push the locking lever and pull down the Scan Out.
3) Check the Scan Out sensor and Exit sensor. If the sensor is defective, replace it(0604–001381).
4-218 Copyright© 1995-2016 SAMSUNG. All rights reserved.
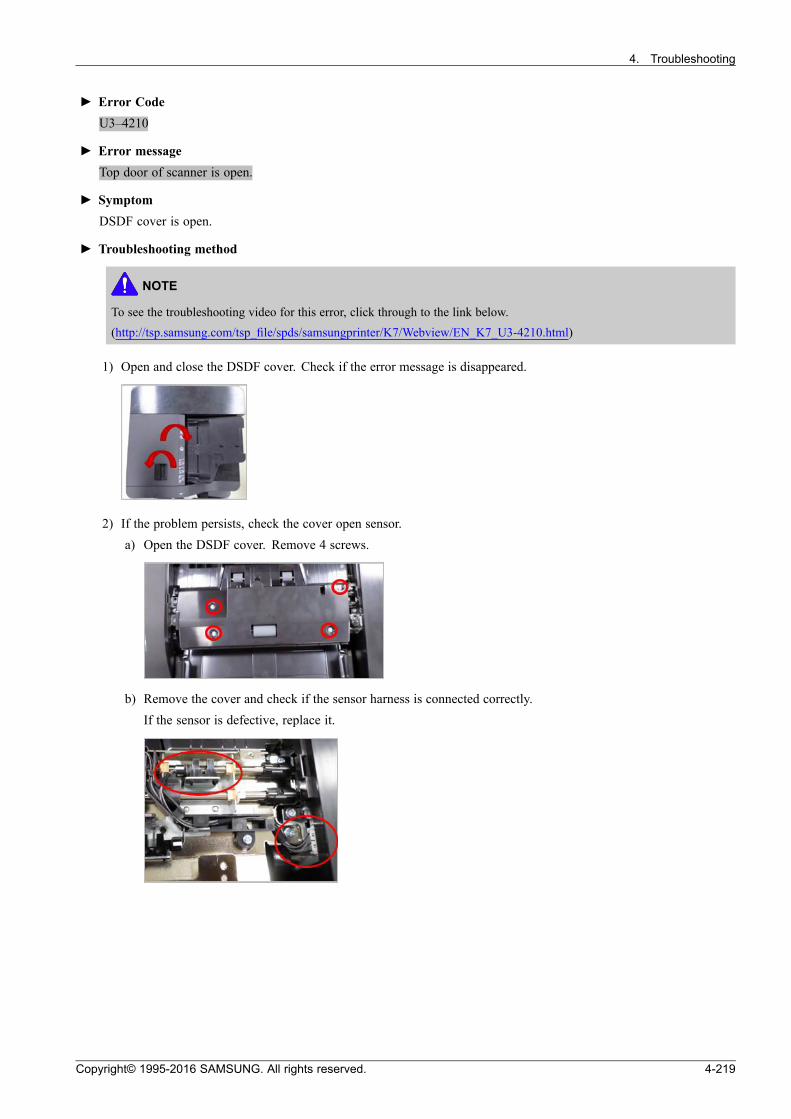
4. Troubleshooting
► Error Code
U3–4210
► Error message
Top door of scanner is open.
► Symptom
DSDF cover is open.
► Troubleshooting method
NOTE
To see the troubleshooting video for this error, click through to the link below.
(http://tsp.samsung.com/tsp_file/spds/samsungprinter/K7/Webview/EN_K7_U3-4210.html)
1) Open and close the DSDF cover. Check if the error message is disappeared.
2) If the problem persists, check the cover open sensor.a) Open the DSDF cover. Remove 4 screws.
b) Remove the cover and check if the sensor harness is connected correctly.If the sensor is defective, replace it.
Copyright© 1995-2016 SAMSUNG. All rights reserved. 4-219


![[Brochure] SMART MultiXpress X7600 Series H … · WORK SMARTER WITH AN INTUITIVE USER EXPERIENCE Work SMART, just like on a tablet Touch & Slide UI on 10.1 Color Touchscreen 6DPVXQJ](https://img.dokumen.tips/doc/110x75/5a9e29ca7f8b9a75458b7c54/brochure-smart-multixpress-x7600-series-h-work-smarter-with-an-intuitive-user.jpg)


![Samsung Multifunction MultiXpress X7400, X7500, …ST] Samsung...This document describes Security Target of Samsung Multifunction MultiXpress X7400, X7500, X7600, X703 Series. 1.1](https://img.dokumen.tips/doc/110x75/5edaa4b517d1191fc20fe30a/samsung-multifunction-multixpress-x7400-x7500-st-samsung-this-document-describes.jpg)

![[Brochure] SMART MultiXpress X7600 Series H - …...Samsung X7600 MFPs provide complete support for quality mobile printing. Using Samsung’s private cloud, users can work in a secured](https://img.dokumen.tips/doc/110x75/5f9c39d00f784872b317040c/brochure-smart-multixpress-x7600-series-h-samsung-x7600-mfps-provide-complete.jpg)