Embed Size (px)
Citation preview

Mercury System
Table of Contents 1.0 System Purpose ........................................................................................................................................2
2.0 System Overview......................................................................................................................................2
3.0 Applicable Documents .............................................................................................................................2
4.0 System Procedures...................................................................................................................................3
4.1 Laboratory Qualifications .....................................................................................................................3
4.1.1 Laboratory Safety Test .................................................................................................................3
4.1.2 Laboratory Equipment Qualification ............................................................................................4
4.2 Access to the Laboratory .....................................................................................................................6
4.3 Laboratory Resource Usage .................................................................................................................8
4.3.1 Equipment Reservation ................................................................................................................8
4.3.2 Find Equipment Manuals .......................................................................................................... 11
4.3.3 Review Resource Status ............................................................................................................ 13
4.3.4 Enable Equipment ..................................................................................................................... 14
4.3.5 Disable Equipment .................................................................................................................... 15
4.3.6 Report Problems ....................................................................................................................... 16
4.3.7 Review Problem History ............................................................................................................ 17
4.3.8 Find Process and Equipment Engineers .................................................................................... 19
4.3.9 Find Laboratory Supplies ........................................................................................................... 19
4.4 Laboratory Fees and Charges ............................................................................................................ 20
4.4.1 Review Laboratory Fees ............................................................................................................ 20
4.4.2 Review Laboratory Charges ...................................................................................................... 22
4.5 Sending E-mails ................................................................................................................................. 23
4.5.1 E-mail Forward .......................................................................................................................... 23
4.5.2 Contact with Members ............................................................................................................. 23
4.5.3 Buddies ...................................................................................................................................... 24
4.6 Equipment Override .......................................................................................................................... 25
5.0 Appendices ............................................................................................................................................ 26
6.0 List of Figures ........................................................................................................................................ 27
Mercury System Procedures
2
1.0 System Purpose
Mercury is the NanoLab management system that provides an efficient way to operate and monitor the
laboratory resources, and support safety and stability of the cleanroom.
NanoLab staff use Mercury System mainly to control and manage the laboratory resources, to monitor
equipment status and its usage, to monitor equipment utilities status (i.e. water, gases and power), and
to prepare charges for NanoLab members in accordance with their usage of the laboratory resources.
Students and associated researches use Mercury System mostly to have access to the laboratory and
its resources, to take qualifications tests, to interact with other NanoLab members and staff, and to file
job requests or suggestions to the laboratory staff.
2.0 System Overview
Mercury System is a complex of control systems, software applications, and Windows®, UNIX™
terminals. Its applications designed for NanoLab members are Mercury Client and MercuryWeb.
Mercury Client starts the laboratory session and gives members an ability to enable/disable equipment.
It shows who is in the cleanroom at the current moment and warns if there is nobody or less than three
people in the lab when a member tries to log in/out the laboratory. Also in Mercury Client, members
may view the laboratory equipment and its status, view equipment reservations, find manuals and
members who are qualified to work on the equipment, find the appropriate equipment engineers, track
or file equipment problems, view the laboratory fees on materials, chemicals and equipment usage,
view general laboratory fees, and review the current laboratory charges. Members have access to
Mercury Client only from the cleanroom and only from the cleanroom Windows® terminals.
MercuryWeb provides online access to the laboratory resources via Internet browser from any place. It
provides members with abilities to make equipment reservations, to view the current reservation
schedule, to find and communicate with other NanoLab members, to file Mask job requests, Machine
Shop job requests or ASML job requests, and to file suggestions to the laboratory staff. Like Mercury
Client, MercuryWeb also allows one to view the current laboratory charges, to view equipment status
and the laboratory supplies (i.e. materials and chemicals), to find equipment manuals, qualified
members or appropriate equipment engineers, and to track problem reports for laboratory resources.
Members may find the link to MercuryWeb at the NanoLab web site or at Mercury Client.
After a new member submits their NanoLab Membership form, their NanoLab member account will be
created. This account provides members with an e-mail address <[email protected]>
and with access to Windows®, UNIX™ terminals, and to Mercury Client and MercuryWeb.
Common and Personal Environment (CAPE) is a NanoLab member’s Windows® terminal from where
they can login to the Mercury Client application. Access to CAPE terminals is possible only from the
cleanroom computers. UNIX™ accounts are created for access to servers: silicon2.eecs.berkeley.edu
and mercury4.banatao.berkeley.edu. NanoLab members may access UNIX™ terminals from any place
via Secure-Shell connection protocol.
3.0 Applicable Documents
Mercury System Report: http://www.eecs.berkeley.edu/Pubs/TechRpts/2014/EECS-2014-149.pdf
Equipment Qualification: https://nanolab.berkeley.edu/member/qualification/eqqual.shtml
Equipment Reservation Policy: https://nanolab.berkeley.edu/member/reservation/policies.shtml
Mercury System Procedures
3
Tanner L-Edit: https://nanolab.berkeley.edu/member/computers/computeruse/apphelp/tanner.shtml
CAD Conversion: https://nanolab.berkeley.edu/member/computers/computeruse/apphelp/cad.shtml
4.0 System Procedures
4.1 Laboratory Qualifications
NanoLab members must pass the safety test to gain access to the cleanroom and must qualify for each
piece of equipment they use. To take a test online, members have to come in the NanoLab office, 520
Sutardja Dai Hall, and login to MercuryWeb. Usage of any external resources during a test is
prohibited.
4.1.1 Laboratory Safety Test
Before a member passes the NanoLab safety test, their account stays in pending status and they will
be unable to use Mercury Client or MercuryWeb.
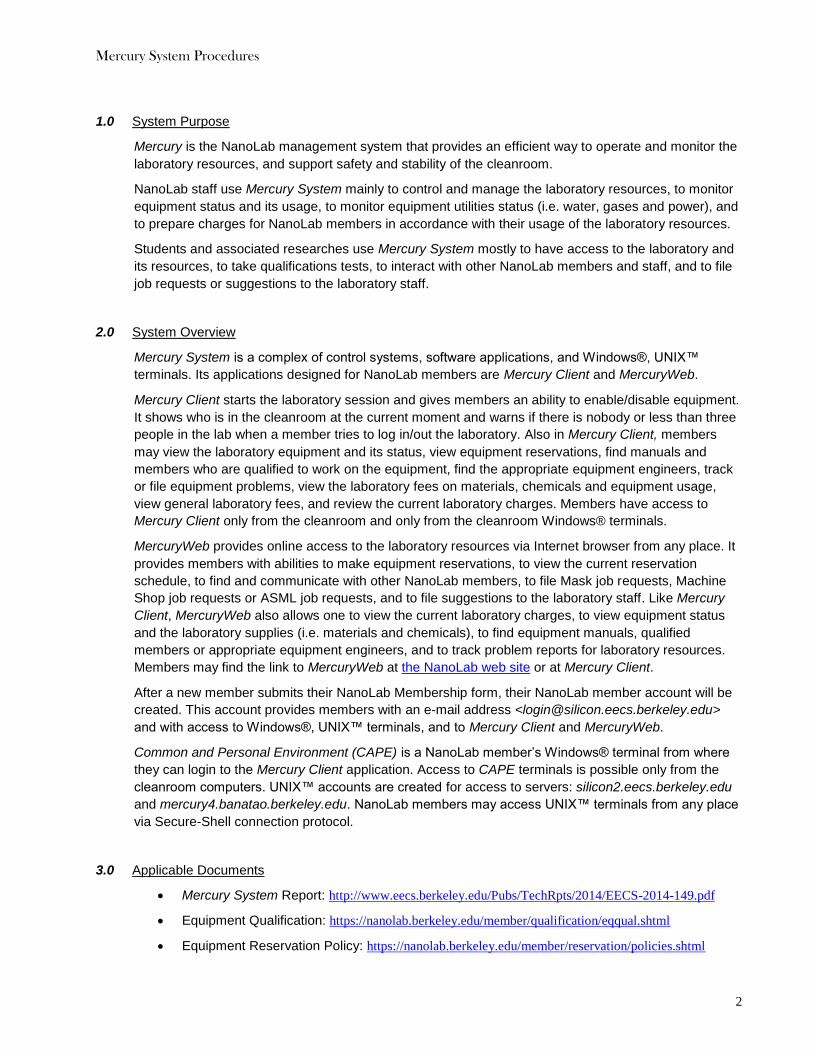
To take the NanoLab safety test, a member needs to login to MercuryWeb using their login and
password pair (chosen by the member on their New Member Form), and choose a facility.
Figure 1. The laboratory safety test page
If a member tries to take a test from any other location except the NanoLab office, they will see the
following error message:
If a member fails the safety test, they may retake it in 2 hours. If the member fails the safety test a
second time, they must review the test with the NanoLab Director or a super user.
Mercury System Procedures
4
After a member passes the safety test, their account will be activated. This qualification lasts 1 year,
and after it expires a member will be required to pass the safety quiz. Members will be notified about
the qualification expiration in 30 days prior to expiration by a message from MercuryWeb.
Active members may use Mercury Client and MercuryWeb resources, but to be able to use and
enable/disable equipment, members will need to take and pass the equipment qualification test.
4.1.2 Laboratory Equipment Qualification
Before use the laboratory equipment, members need to pass the equipment qualification.
To find a person who will provide a training, a member may send a Training Request to all qualified
members, to members with current reservations, or to super users. This option is available at
MercuryWeb.
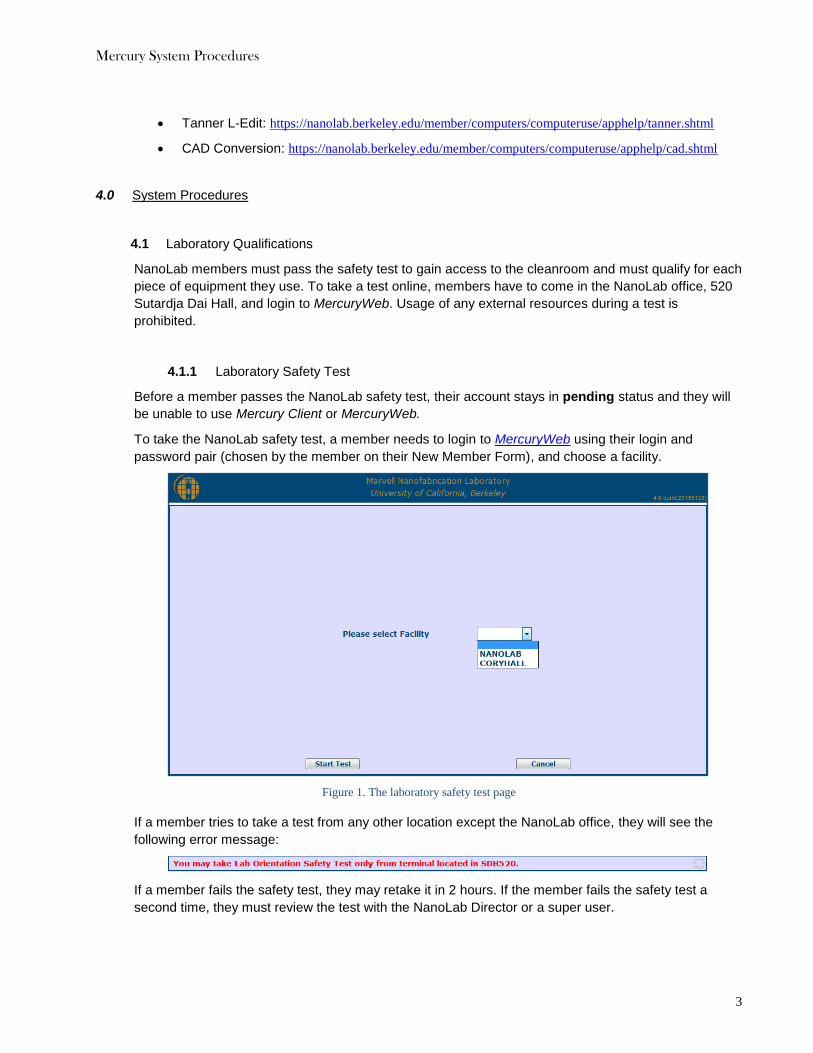
To send a Training Request, a member needs to enter an equipment name in <Request Qualify> field
at the Equipment section on the Member page.
Figure 2. Request Qualify option
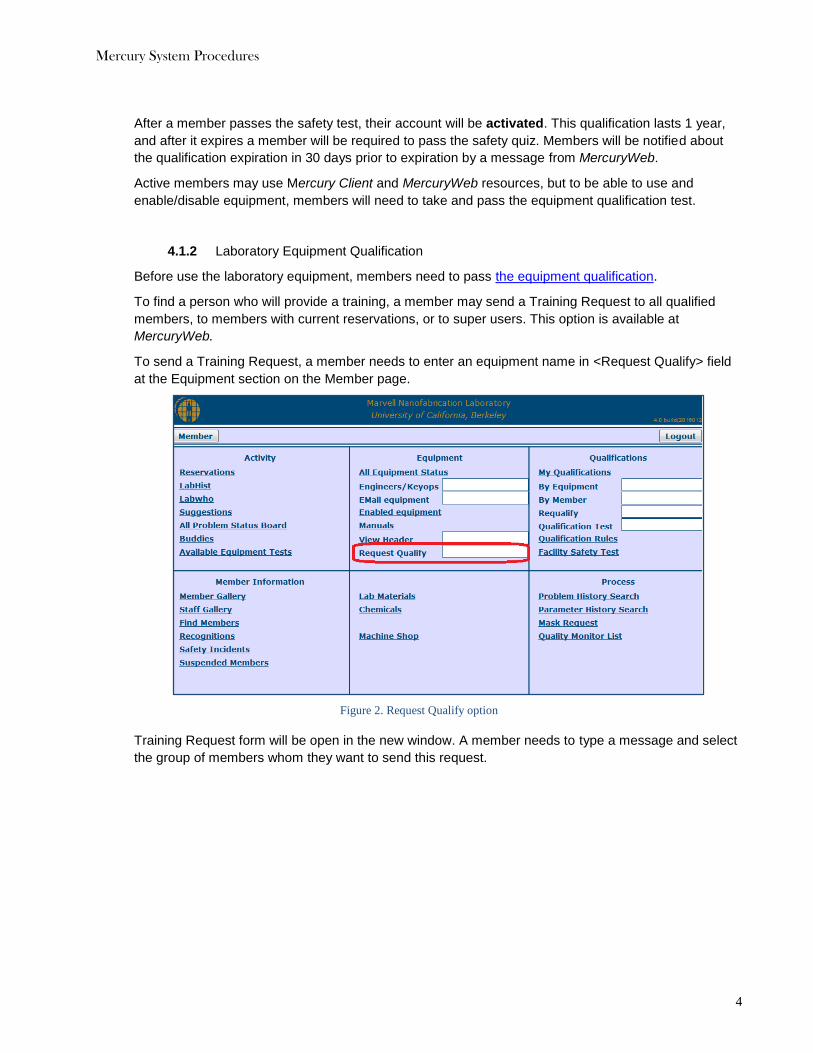
Training Request form will be open in the new window. A member needs to type a message and select
the group of members whom they want to send this request.
Mercury System Procedures
5
Figure 3. Training Request
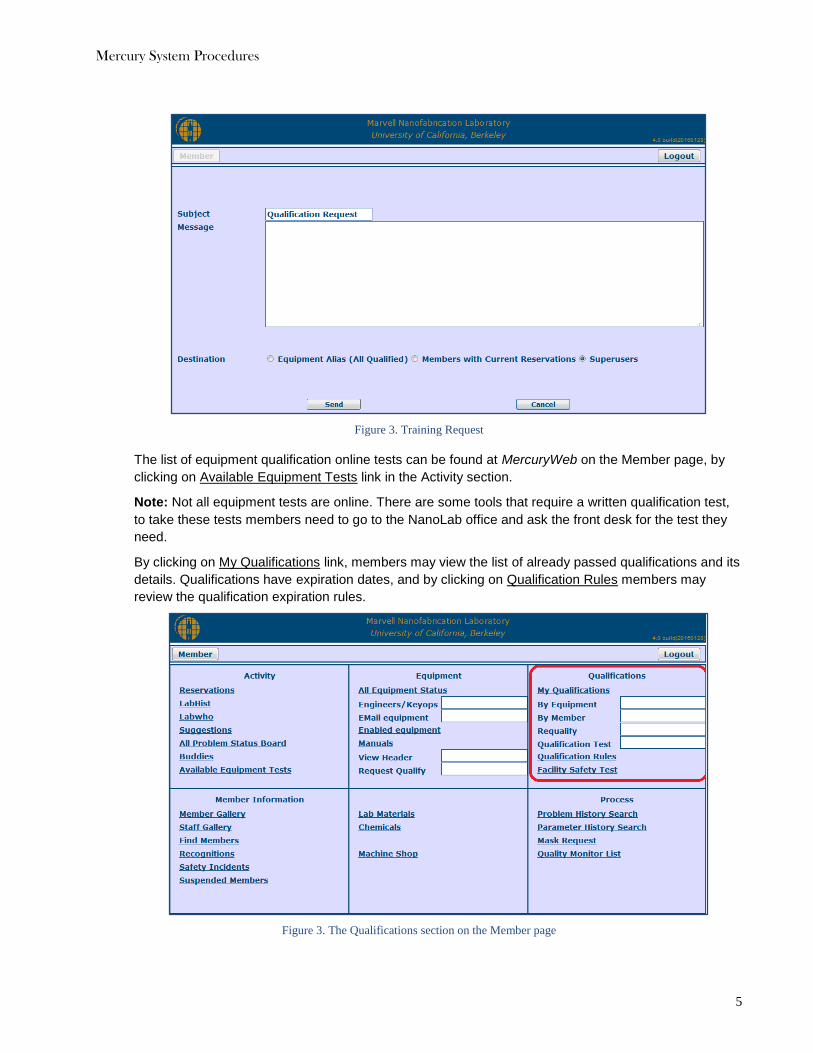
The list of equipment qualification online tests can be found at MercuryWeb on the Member page, by
clicking on Available Equipment Tests link in the Activity section.
Note: Not all equipment tests are online. There are some tools that require a written qualification test,
to take these tests members need to go to the NanoLab office and ask the front desk for the test they
need.
By clicking on My Qualifications link, members may view the list of already passed qualifications and its
details. Qualifications have expiration dates, and by clicking on Qualification Rules members may
review the qualification expiration rules.
Figure 3. The Qualifications section on the Member page
Mercury System Procedures
6
To find the laboratory members who are already qualified to work on a piece of equipment, a member
may enter the equipment name in <By Equipment> field.
To find what qualifications a laboratory member has, a member may enter the login name of that
person in the <By Member> field. Members and staff login names can be found at Member Gallery and
Staff Gallery links at the Member Information section on the Member page.
To find and take equipment qualification test, a member needs to enter the name of that equipment in
<Qualification Test> field. As with all qualification tests, a test can be taken only from the NanoLab
office computers, otherwise a member will see the following error message:
If a member fails a test, they may retake it. The time that the member must wait to retake a test
depends on the test, and can be 1, 2, 4, 12 or 24 hours. This information is shown when a member
tries to take the test again. If the member fails the equipment qualification test second time, they must
review the test with the test grader.
If the equipment qualification expires, a member will need to take the qualification test again. For some
equipment, there are equipment re-qualification quizzes. To find and take a requalification quiz, a
member may enter the equipment name in <Requalify> field. If a quiz for this equipment is present, it
will show up in the pop up window.
4.2 Access to the Laboratory
Every NanoLab member must login to Mercury Client before entering the NanoLab.
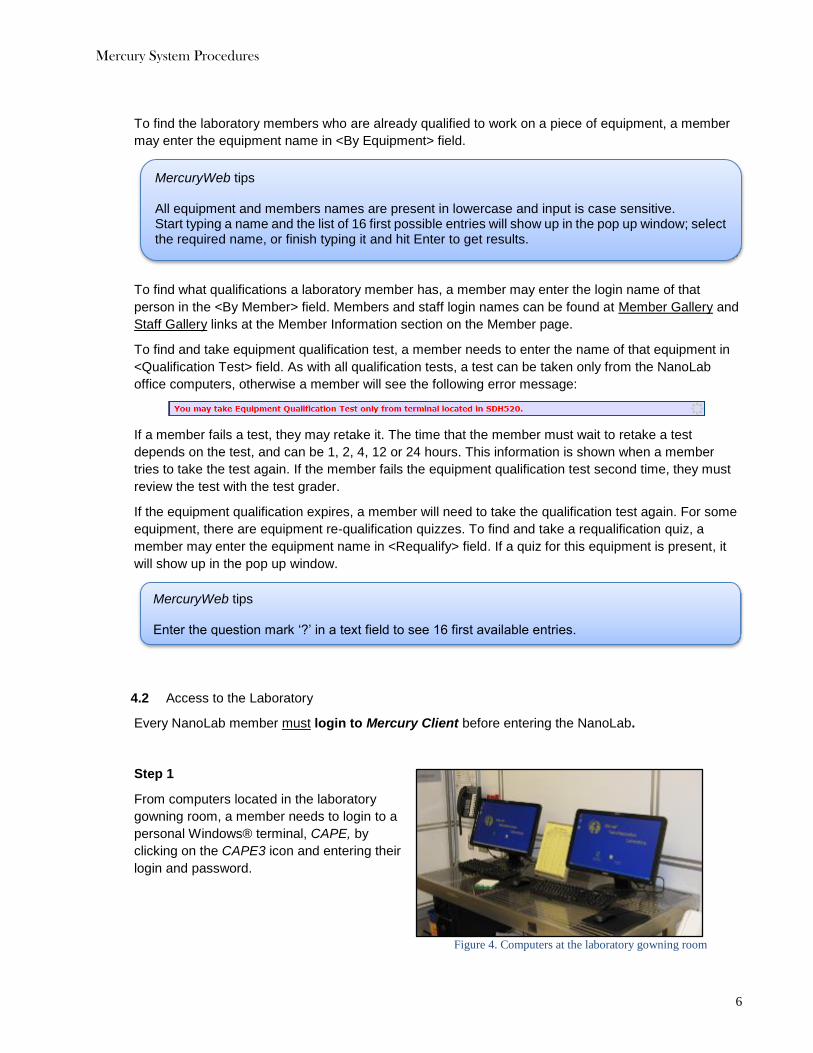
Step 1
From computers located in the laboratory
gowning room, a member needs to login to a
personal Windows® terminal, CAPE, by
clicking on the CAPE3 icon and entering their
login and password.
Figure 4. Computers at the laboratory gowning room
MercuryWeb tips All equipment and members names are present in lowercase and input is case sensitive. Start typing a name and the list of 16 first possible entries will show up in the pop up window; select the required name, or finish typing it and hit Enter to get results.
MercuryWeb tips Enter the question mark ‘?’ in a text field to see 16 first available entries.
Mercury System Procedures
7
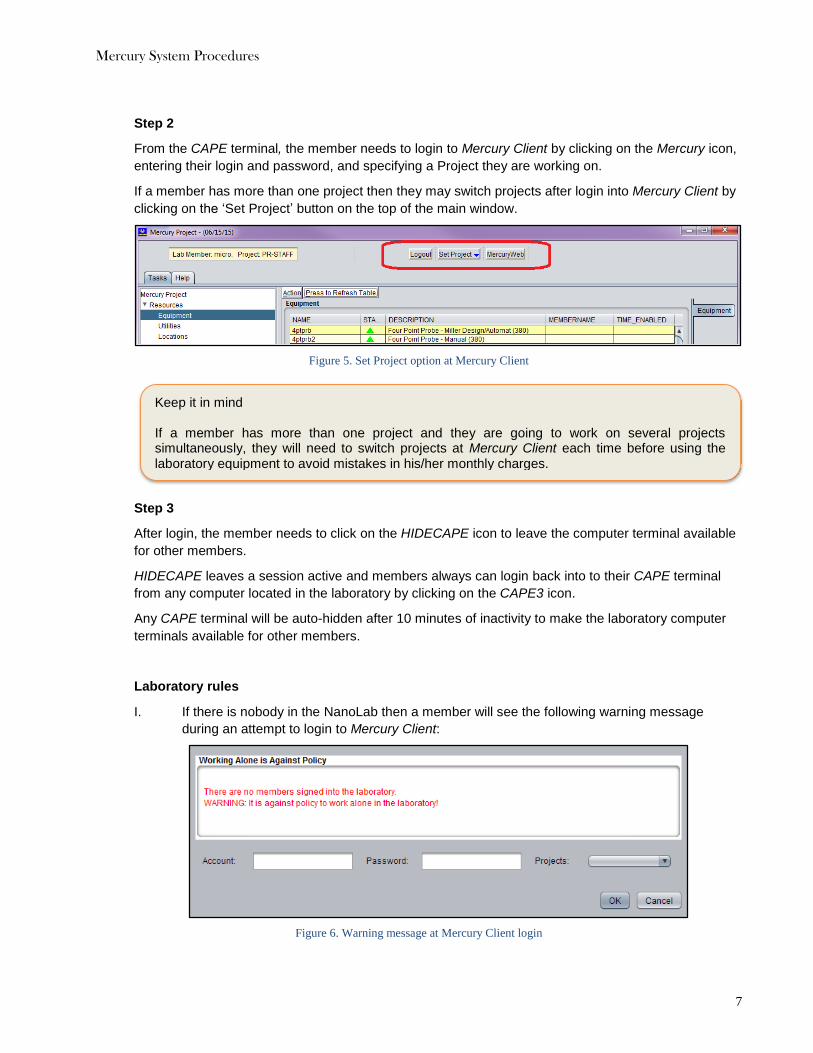
Step 2
From the CAPE terminal, the member needs to login to Mercury Client by clicking on the Mercury icon,
entering their login and password, and specifying a Project they are working on.
If a member has more than one project then they may switch projects after login into Mercury Client by
clicking on the ‘Set Project’ button on the top of the main window.
Figure 5. Set Project option at Mercury Client
Step 3
After login, the member needs to click on the HIDECAPE icon to leave the computer terminal available
for other members.
HIDECAPE leaves a session active and members always can login back into to their CAPE terminal
from any computer located in the laboratory by clicking on the CAPE3 icon.
Any CAPE terminal will be auto-hidden after 10 minutes of inactivity to make the laboratory computer
terminals available for other members.
Laboratory rules
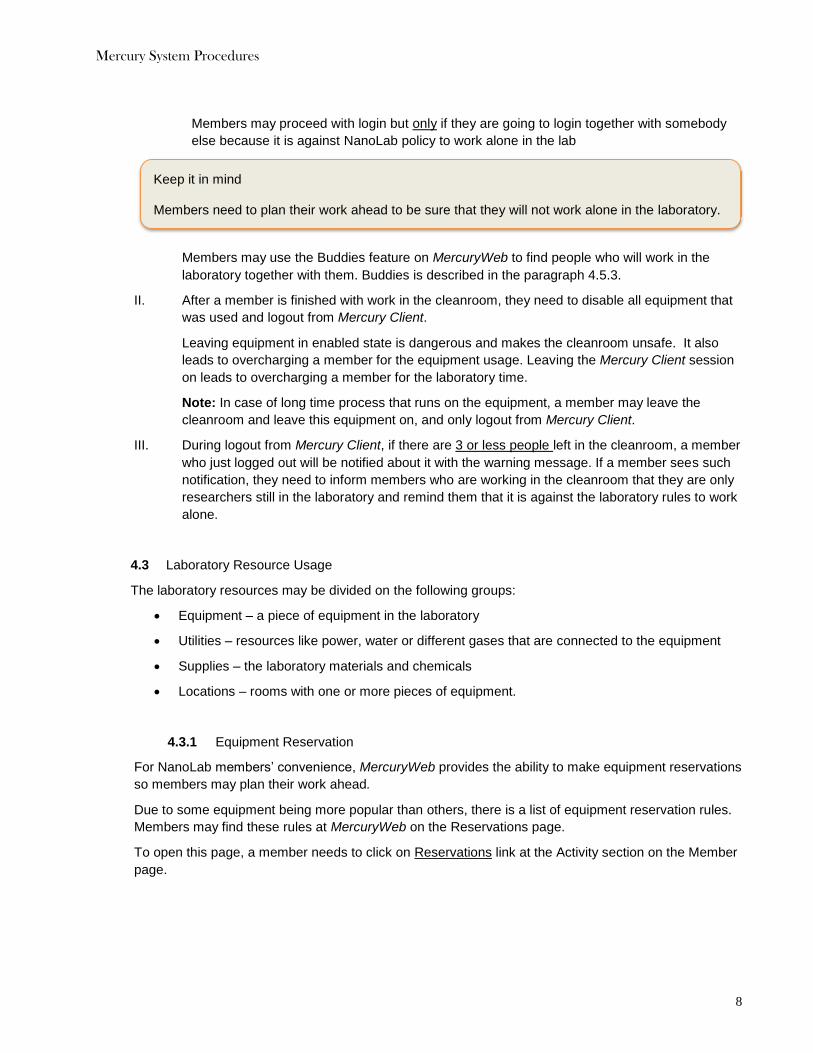
I. If there is nobody in the NanoLab then a member will see the following warning message
during an attempt to login to Mercury Client:
Figure 6. Warning message at Mercury Client login
Keep it in mind If a member has more than one project and they are going to work on several projects simultaneously, they will need to switch projects at Mercury Client each time before using the laboratory equipment to avoid mistakes in his/her monthly charges.
Mercury System Procedures
8
Members may proceed with login but only if they are going to login together with somebody
else because it is against NanoLab policy to work alone in the lab
Members may use the Buddies feature on MercuryWeb to find people who will work in the
laboratory together with them. Buddies is described in the paragraph 4.5.3.
II. After a member is finished with work in the cleanroom, they need to disable all equipment that
was used and logout from Mercury Client.
Leaving equipment in enabled state is dangerous and makes the cleanroom unsafe. It also
leads to overcharging a member for the equipment usage. Leaving the Mercury Client session
on leads to overcharging a member for the laboratory time.
Note: In case of long time process that runs on the equipment, a member may leave the
cleanroom and leave this equipment on, and only logout from Mercury Client.
III. During logout from Mercury Client, if there are 3 or less people left in the cleanroom, a member
who just logged out will be notified about it with the warning message. If a member sees such
notification, they need to inform members who are working in the cleanroom that they are only
researchers still in the laboratory and remind them that it is against the laboratory rules to work
alone.
4.3 Laboratory Resource Usage
The laboratory resources may be divided on the following groups:
Equipment – a piece of equipment in the laboratory
Utilities – resources like power, water or different gases that are connected to the equipment
Supplies – the laboratory materials and chemicals
Locations – rooms with one or more pieces of equipment.
4.3.1 Equipment Reservation
For NanoLab members’ convenience, MercuryWeb provides the ability to make equipment reservations
so members may plan their work ahead.
Due to some equipment being more popular than others, there is a list of equipment reservation rules.
Members may find these rules at MercuryWeb on the Reservations page.
To open this page, a member needs to click on Reservations link at the Activity section on the Member
page.
Keep it in mind Members need to plan their work ahead to be sure that they will not work alone in the laboratory.
Mercury System Procedures
9
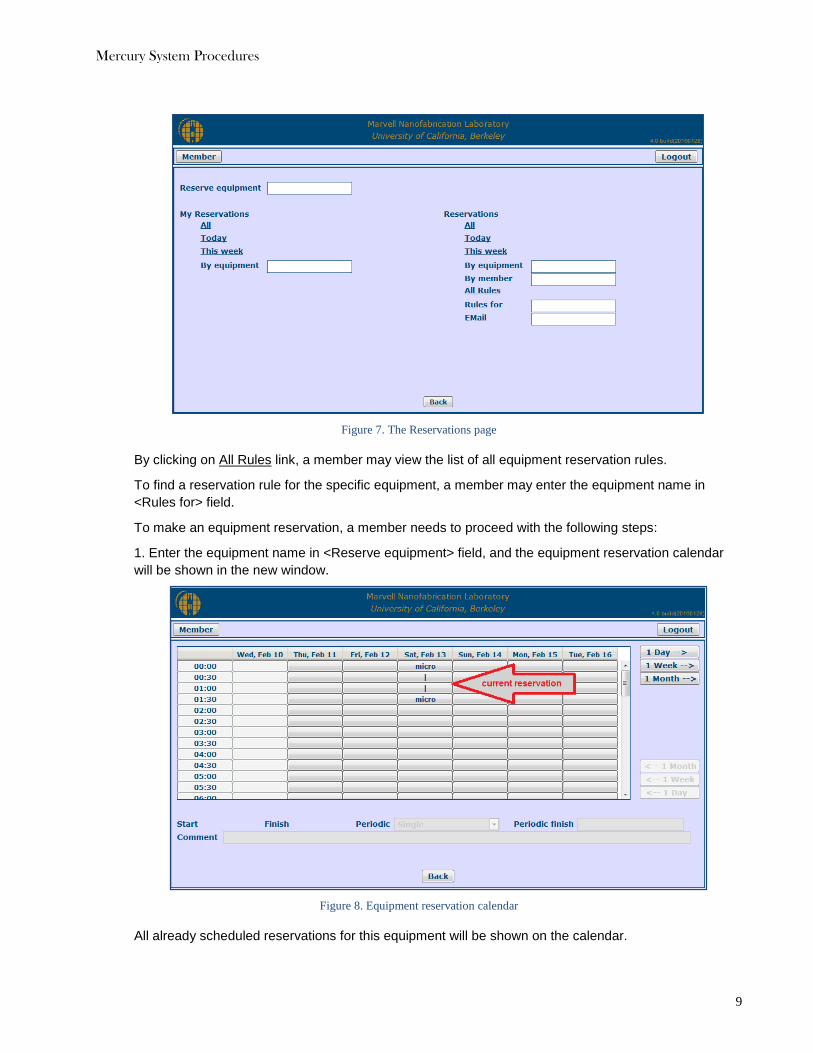
Figure 7. The Reservations page
By clicking on All Rules link, a member may view the list of all equipment reservation rules.
To find a reservation rule for the specific equipment, a member may enter the equipment name in
<Rules for> field.
To make an equipment reservation, a member needs to proceed with the following steps:
1. Enter the equipment name in <Reserve equipment> field, and the equipment reservation calendar
will be shown in the new window.
Figure 8. Equipment reservation calendar
All already scheduled reservations for this equipment will be shown on the calendar.
Mercury System Procedures
10
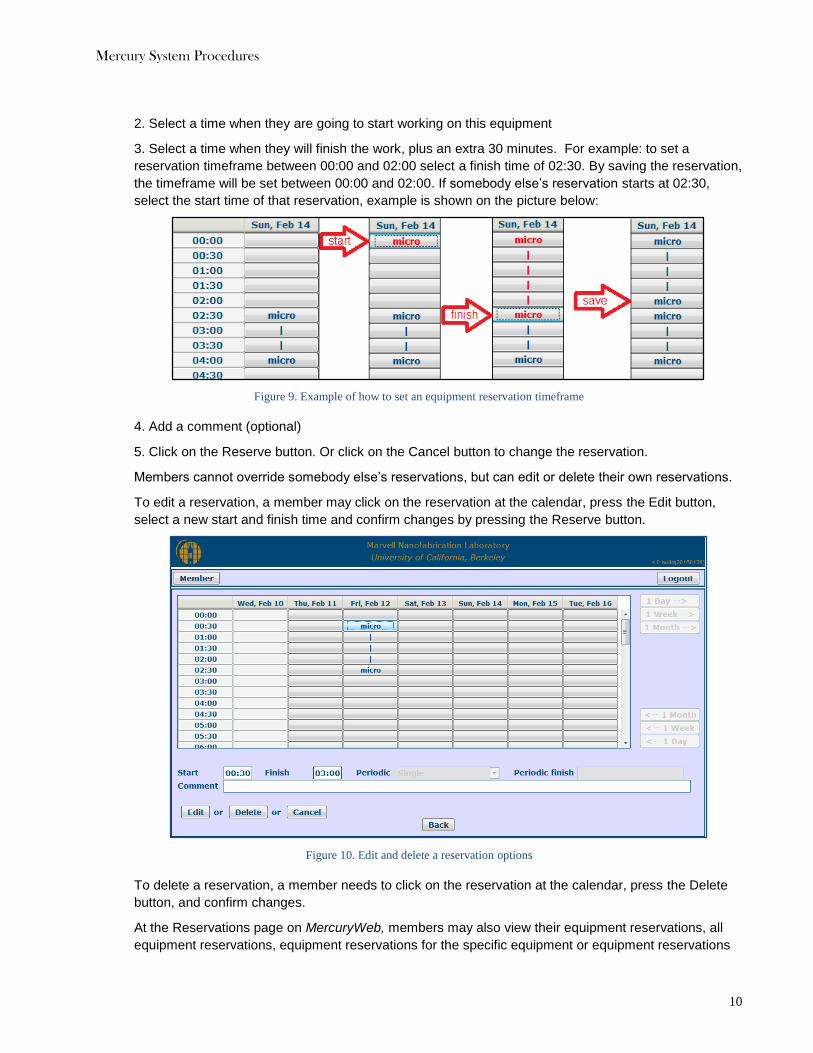
2. Select a time when they are going to start working on this equipment
3. Select a time when they will finish the work, plus an extra 30 minutes. For example: to set a
reservation timeframe between 00:00 and 02:00 select a finish time of 02:30. By saving the reservation,
the timeframe will be set between 00:00 and 02:00. If somebody else’s reservation starts at 02:30,
select the start time of that reservation, example is shown on the picture below:
Figure 9. Example of how to set an equipment reservation timeframe
4. Add a comment (optional)
5. Click on the Reserve button. Or click on the Cancel button to change the reservation.
Members cannot override somebody else’s reservations, but can edit or delete their own reservations.
To edit a reservation, a member may click on the reservation at the calendar, press the Edit button,
select a new start and finish time and confirm changes by pressing the Reserve button.
Figure 10. Edit and delete a reservation options
To delete a reservation, a member needs to click on the reservation at the calendar, press the Delete
button, and confirm changes.
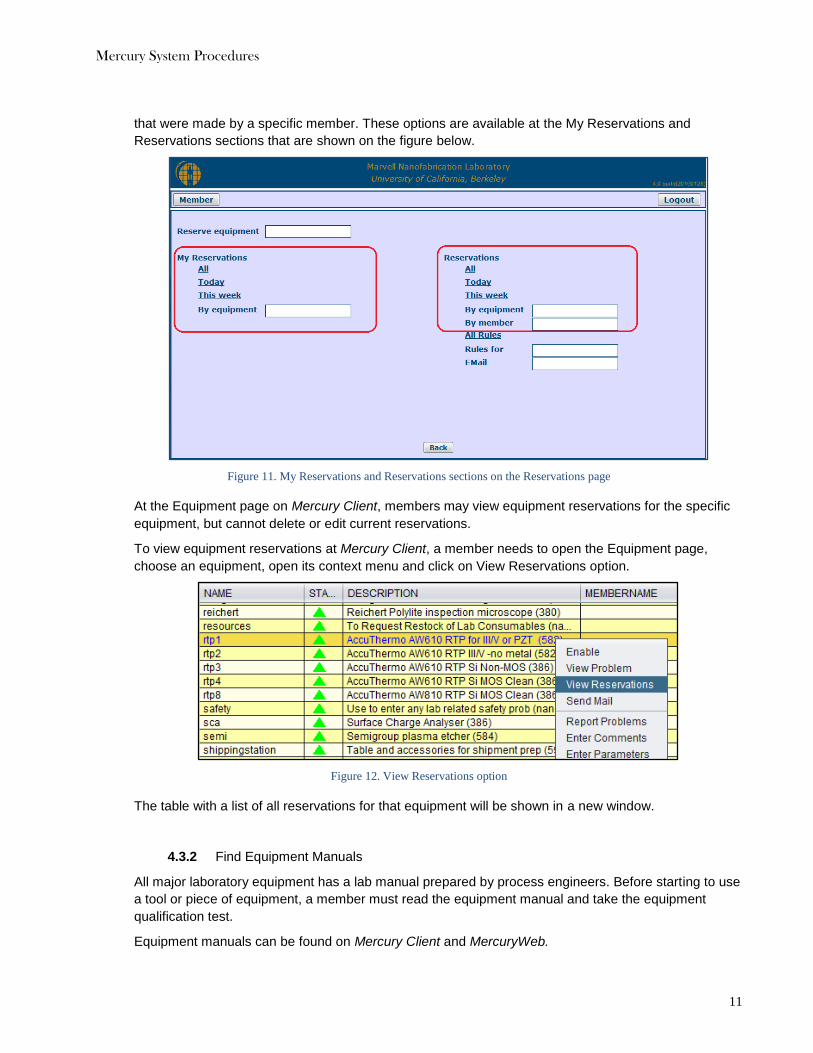
At the Reservations page on MercuryWeb, members may also view their equipment reservations, all
equipment reservations, equipment reservations for the specific equipment or equipment reservations
Mercury System Procedures
11
that were made by a specific member. These options are available at the My Reservations and
Reservations sections that are shown on the figure below.
Figure 11. My Reservations and Reservations sections on the Reservations page
At the Equipment page on Mercury Client, members may view equipment reservations for the specific
equipment, but cannot delete or edit current reservations.
To view equipment reservations at Mercury Client, a member needs to open the Equipment page,
choose an equipment, open its context menu and click on View Reservations option.
Figure 12. View Reservations option
The table with a list of all reservations for that equipment will be shown in a new window.
4.3.2 Find Equipment Manuals
All major laboratory equipment has a lab manual prepared by process engineers. Before starting to use
a tool or piece of equipment, a member must read the equipment manual and take the equipment
qualification test.
Equipment manuals can be found on Mercury Client and MercuryWeb.

Mercury System Procedures
12
At Mercury Client:
To find an equipment manual, a member needs to open the Equipment page, select the equipment,
open its context menu and click on Manual option.
Figure 13. Equipment manual option
The Manual will be open in a new Internet browser window.
At MercuryWeb:
To find an equipment manual, a member needs to click on Manuals link at the Equipment section and
select their needed manual from the list of all equipment manuals.
Figure 14. The Equipment section on the Member page
Mercury System Procedures
13
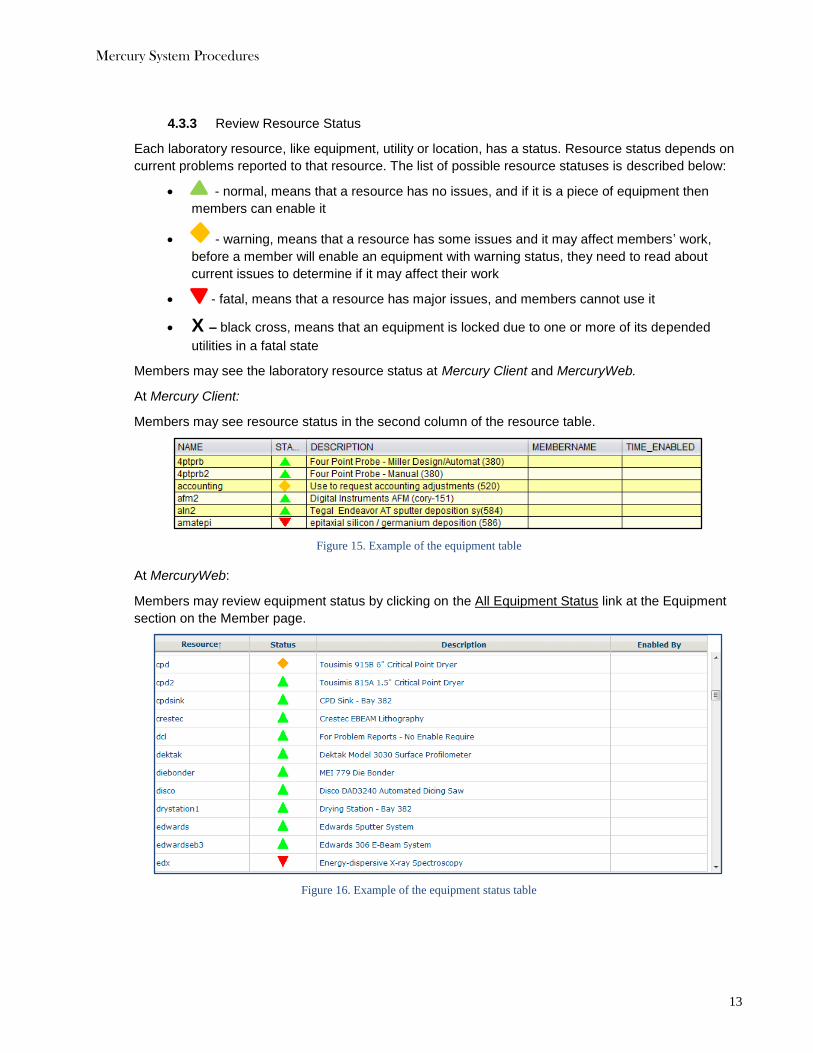
4.3.3 Review Resource Status
Each laboratory resource, like equipment, utility or location, has a status. Resource status depends on
current problems reported to that resource. The list of possible resource statuses is described below:
- normal, means that a resource has no issues, and if it is a piece of equipment then
members can enable it
- warning, means that a resource has some issues and it may affect members’ work,
before a member will enable an equipment with warning status, they need to read about
current issues to determine if it may affect their work
- fatal, means that a resource has major issues, and members cannot use it
X – black cross, means that an equipment is locked due to one or more of its depended
utilities in a fatal state
Members may see the laboratory resource status at Mercury Client and MercuryWeb.
At Mercury Client:
Members may see resource status in the second column of the resource table.
Figure 15. Example of the equipment table
At MercuryWeb:
Members may review equipment status by clicking on the All Equipment Status link at the Equipment
section on the Member page.
Figure 16. Example of the equipment status table
Mercury System Procedures
14
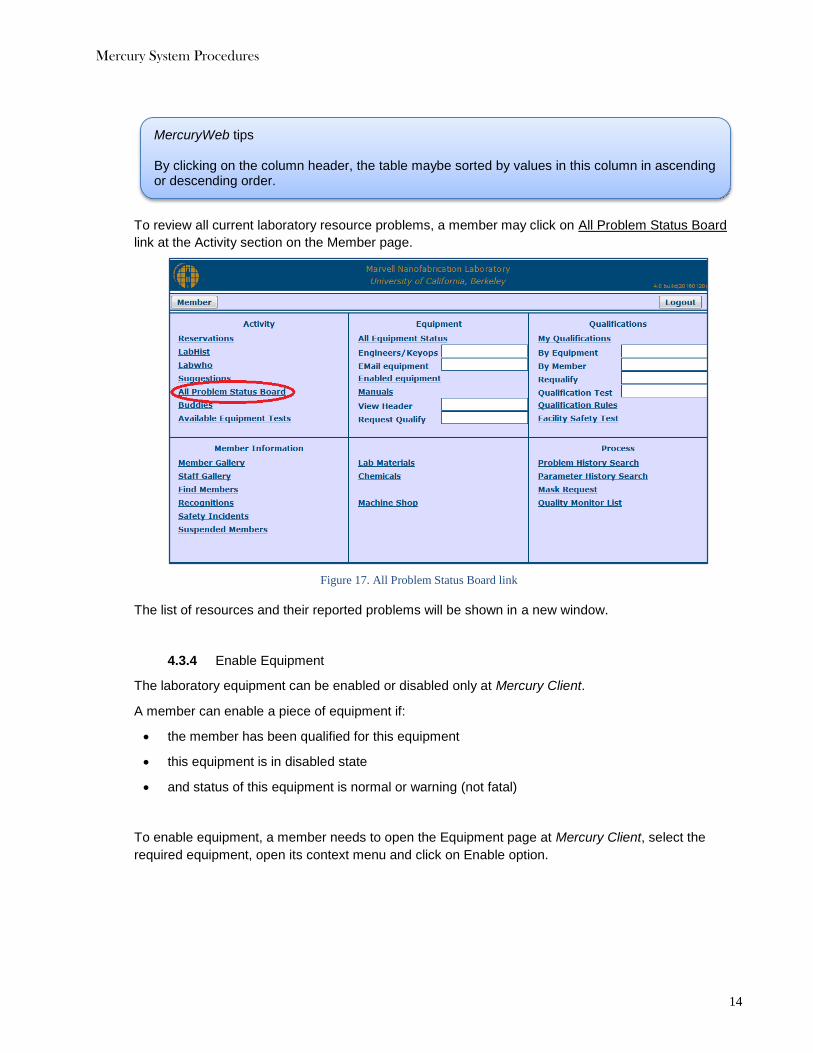
To review all current laboratory resource problems, a member may click on All Problem Status Board
link at the Activity section on the Member page.
Figure 17. All Problem Status Board link
The list of resources and their reported problems will be shown in a new window.
4.3.4 Enable Equipment
The laboratory equipment can be enabled or disabled only at Mercury Client.
A member can enable a piece of equipment if:
the member has been qualified for this equipment
this equipment is in disabled state
and status of this equipment is normal or warning (not fatal)
To enable equipment, a member needs to open the Equipment page at Mercury Client, select the
required equipment, open its context menu and click on Enable option.
MercuryWeb tips By clicking on the column header, the table maybe sorted by values in this column in ascending or descending order.

Mercury System Procedures
15
Figure 18. Enable equipment option
If an equipment is in the warning state before it is enabled, members will see the pop up window with
Reported Problems. If there are upcoming reservations then a member will be notified about it in the
same popup window.
Figure 19. Example of a notification window at the enable equipment procedure
To continue with the enable equipment procedure, a member needs to press Continue button.
4.3.5 Disable Equipment
To disable equipment, a member needs to open the Equipment page at Mercury Client, select the
required equipment, open its context menu and click on Disable option.
After the disable equipment procedure, a member will see the following pop up window where he/she
will be asked if there are any equipment problems to report.
Figure 20. Pop up window at the disable equipment procedure
By answering “Yes”, a member will be asked to file an equipment Problem Report, shown on the
picture below.

Mercury System Procedures
16
Figure 21. Problem Report form
To file a problem report, a member needs to:
1. Select a Symptom
2. Add CC recipients (optionally)
3. Choose an appropriate severity
4. Describe the problem. Problem description should be detailed and include an explanation of the
problem, actions performed before the problem occurred, and what steps were done to correct it.
5. Press the Save button to send the Problem Report, or press the Cancel button to discard it.
The problem report will send an e-mail to the process engineers and equipment engineers assigned to
this equipment, and to all members with current reservations. The problem report will also be stored in
the equipment problem reports history.
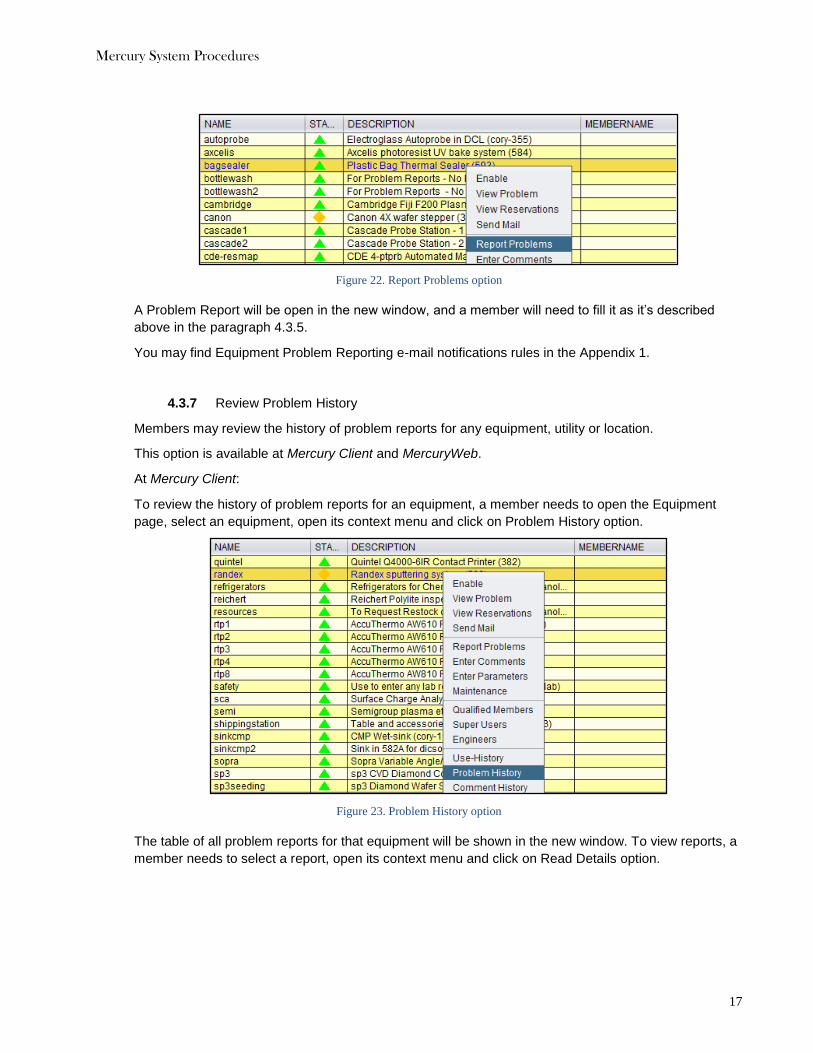
4.3.6 Report Problems
Members may file a problem report at any time. To do that, a member needs to login Mercury Client,
open the appropriate resource page like Equipment, Utilities or Locations, select an equipment, utility
or location that has a problem, open its context menu and click on Report Problems option.
Mercury System Procedures
17
Figure 22. Report Problems option
A Problem Report will be open in the new window, and a member will need to fill it as it’s described
above in the paragraph 4.3.5.
You may find Equipment Problem Reporting e-mail notifications rules in the Appendix 1.
4.3.7 Review Problem History
Members may review the history of problem reports for any equipment, utility or location.
This option is available at Mercury Client and MercuryWeb.
At Mercury Client:
To review the history of problem reports for an equipment, a member needs to open the Equipment
page, select an equipment, open its context menu and click on Problem History option.
Figure 23. Problem History option
The table of all problem reports for that equipment will be shown in the new window. To view reports, a
member needs to select a report, open its context menu and click on Read Details option.
Mercury System Procedures
18
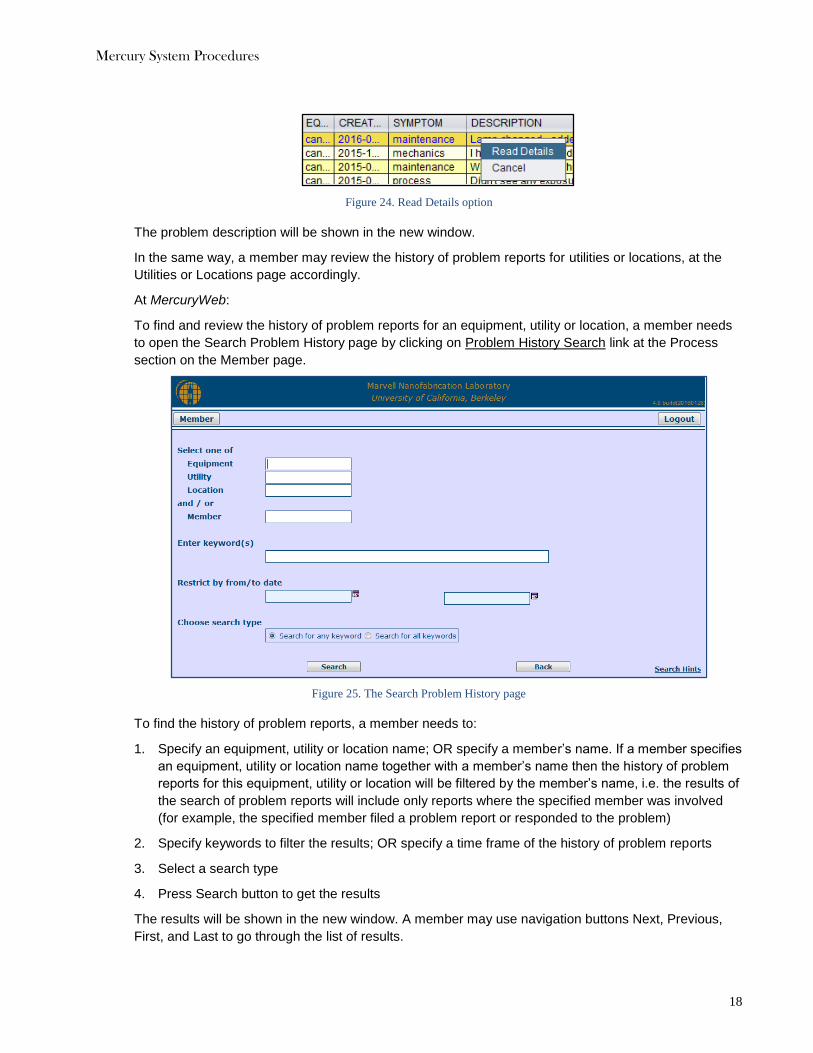
Figure 24. Read Details option
The problem description will be shown in the new window.
In the same way, a member may review the history of problem reports for utilities or locations, at the
Utilities or Locations page accordingly.
At MercuryWeb:
To find and review the history of problem reports for an equipment, utility or location, a member needs
to open the Search Problem History page by clicking on Problem History Search link at the Process
section on the Member page.
Figure 25. The Search Problem History page
To find the history of problem reports, a member needs to:
1. Specify an equipment, utility or location name; OR specify a member’s name. If a member specifies
an equipment, utility or location name together with a member’s name then the history of problem
reports for this equipment, utility or location will be filtered by the member’s name, i.e. the results of
the search of problem reports will include only reports where the specified member was involved
(for example, the specified member filed a problem report or responded to the problem)
2. Specify keywords to filter the results; OR specify a time frame of the history of problem reports
3. Select a search type
4. Press Search button to get the results
The results will be shown in the new window. A member may use navigation buttons Next, Previous,
First, and Last to go through the list of results.
Mercury System Procedures
19
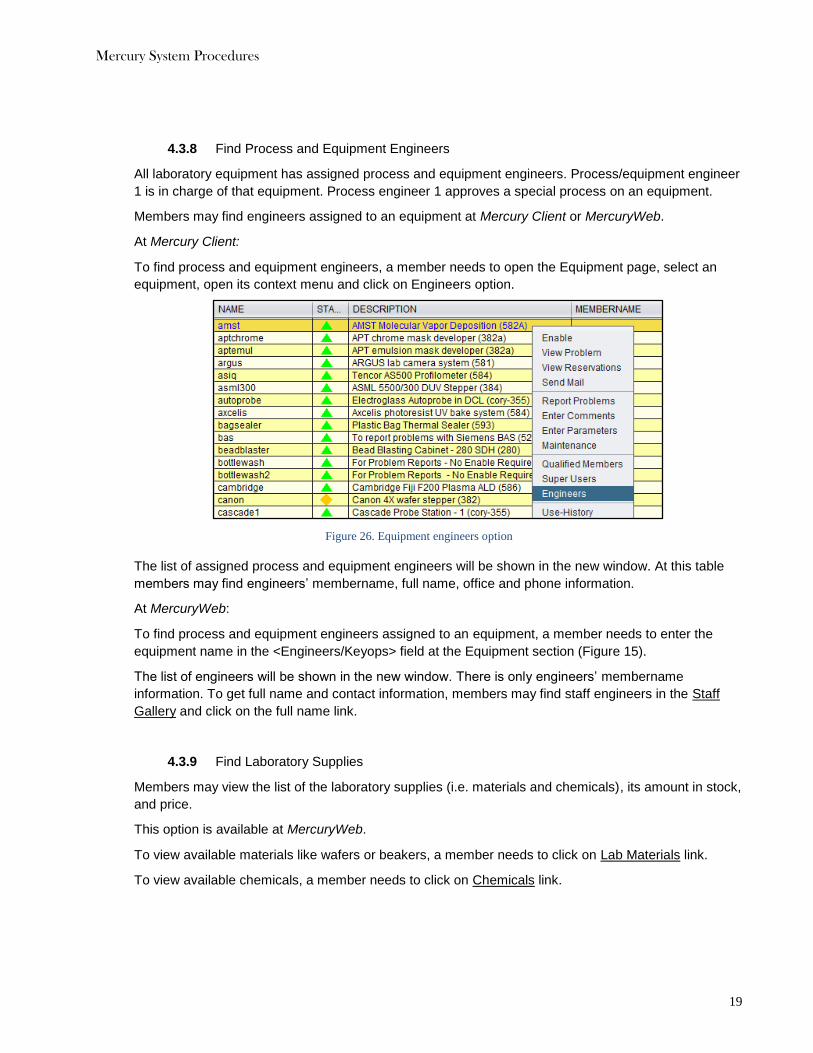
4.3.8 Find Process and Equipment Engineers
All laboratory equipment has assigned process and equipment engineers. Process/equipment engineer
1 is in charge of that equipment. Process engineer 1 approves a special process on an equipment.
Members may find engineers assigned to an equipment at Mercury Client or MercuryWeb.
At Mercury Client:
To find process and equipment engineers, a member needs to open the Equipment page, select an
equipment, open its context menu and click on Engineers option.
Figure 26. Equipment engineers option
The list of assigned process and equipment engineers will be shown in the new window. At this table
members may find engineers’ membername, full name, office and phone information.
At MercuryWeb:
To find process and equipment engineers assigned to an equipment, a member needs to enter the
equipment name in the <Engineers/Keyops> field at the Equipment section (Figure 15).
The list of engineers will be shown in the new window. There is only engineers’ membername
information. To get full name and contact information, members may find staff engineers in the Staff
Gallery and click on the full name link.
4.3.9 Find Laboratory Supplies
Members may view the list of the laboratory supplies (i.e. materials and chemicals), its amount in stock,
and price.
This option is available at MercuryWeb.
To view available materials like wafers or beakers, a member needs to click on Lab Materials link.
To view available chemicals, a member needs to click on Chemicals link.
Mercury System Procedures
20
Figure 27. Lab Materials and Chemicals links
Both links will be open a new window with a table of available supplies. At this table members may find
information about supplies’ SKU (stock keeping unit) number, location, its current amount in the stock
and fee for using it.
4.4 Laboratory Fees and Charges
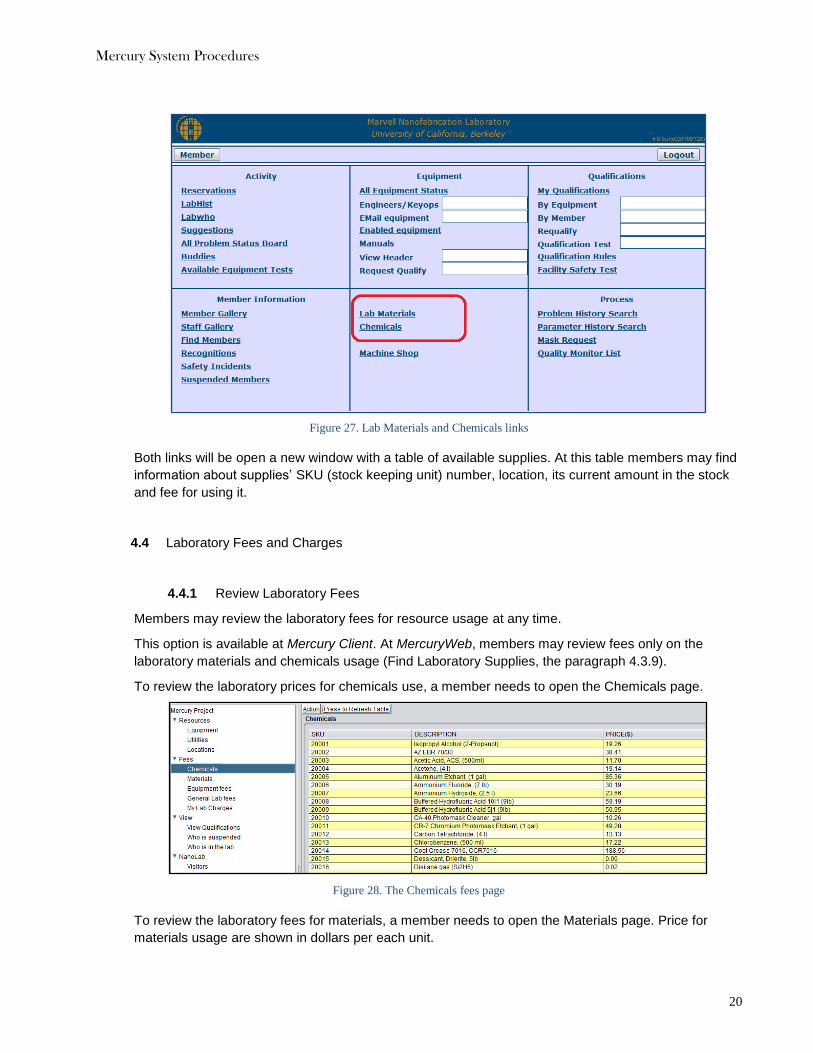
4.4.1 Review Laboratory Fees
Members may review the laboratory fees for resource usage at any time.
This option is available at Mercury Client. At MercuryWeb, members may review fees only on the
laboratory materials and chemicals usage (Find Laboratory Supplies, the paragraph 4.3.9).
To review the laboratory prices for chemicals use, a member needs to open the Chemicals page.
Figure 28. The Chemicals fees page
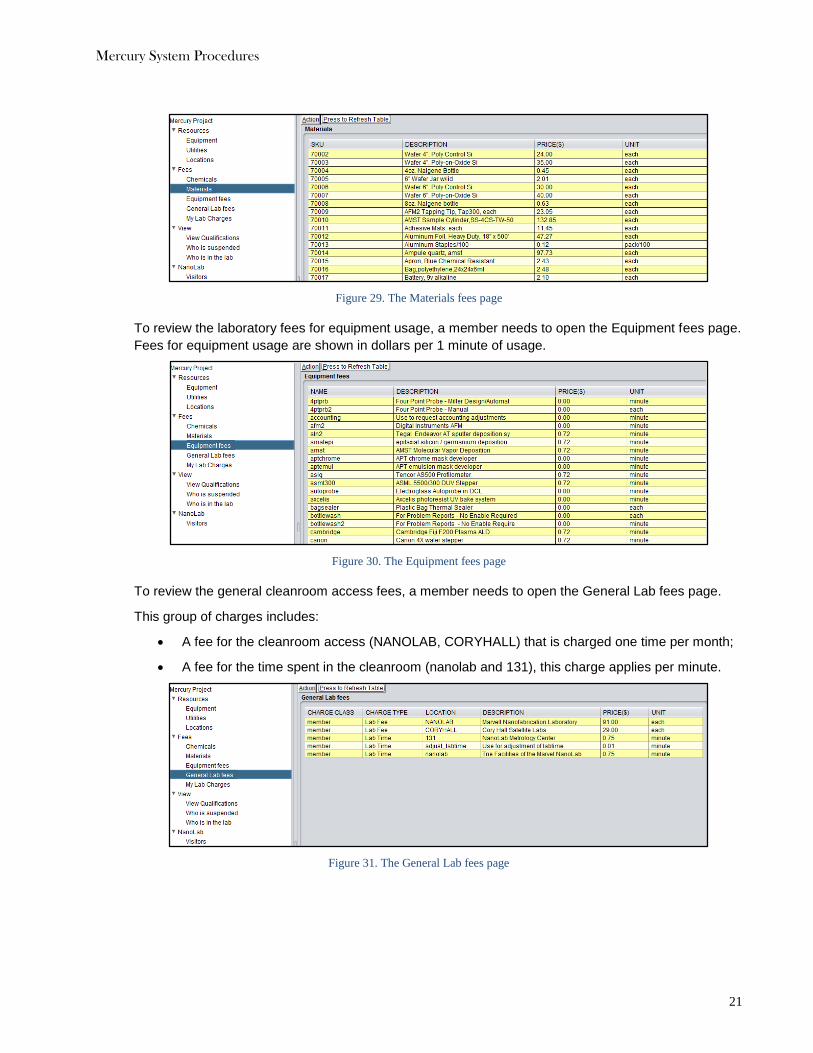
To review the laboratory fees for materials, a member needs to open the Materials page. Price for
materials usage are shown in dollars per each unit.
Mercury System Procedures
21
Figure 29. The Materials fees page
To review the laboratory fees for equipment usage, a member needs to open the Equipment fees page.
Fees for equipment usage are shown in dollars per 1 minute of usage.
Figure 30. The Equipment fees page
To review the general cleanroom access fees, a member needs to open the General Lab fees page.
This group of charges includes:
A fee for the cleanroom access (NANOLAB, CORYHALL) that is charged one time per month;
A fee for the time spent in the cleanroom (nanolab and 131), this charge applies per minute.
Figure 31. The General Lab fees page
Mercury System Procedures
22
4.4.2 Review Laboratory Charges
Members may review their current laboratory charges at any time.
This option is available at Mercury Client and MercuryWeb.
At Mercury Client:
To review the current laboratory charges, a member needs to open the My Lab Charges pages. The
table with all charges for the current month will be shown in the new window.
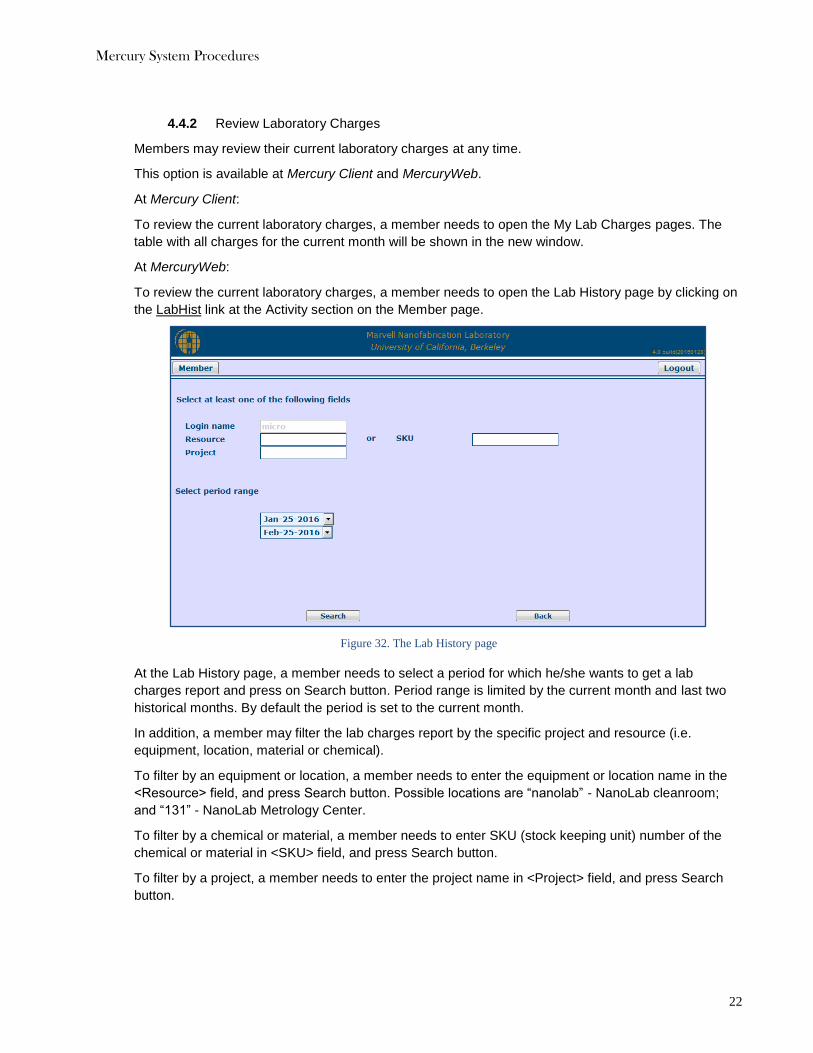
At MercuryWeb:
To review the current laboratory charges, a member needs to open the Lab History page by clicking on
the LabHist link at the Activity section on the Member page.
Figure 32. The Lab History page
At the Lab History page, a member needs to select a period for which he/she wants to get a lab
charges report and press on Search button. Period range is limited by the current month and last two
historical months. By default the period is set to the current month.
In addition, a member may filter the lab charges report by the specific project and resource (i.e.
equipment, location, material or chemical).
To filter by an equipment or location, a member needs to enter the equipment or location name in the
<Resource> field, and press Search button. Possible locations are “nanolab” - NanoLab cleanroom;
and “131” - NanoLab Metrology Center.
To filter by a chemical or material, a member needs to enter SKU (stock keeping unit) number of the
chemical or material in <SKU> field, and press Search button.
To filter by a project, a member needs to enter the project name in <Project> field, and press Search
button.

Mercury System Procedures
23
4.5 Sending E-mails
4.5.1 E-mail Forward
Every NanoLab member has an e-mail address like <membername>@silicon.eecs.berkeley.edu.
Every e-mail that are sent to a member’s NanoLab e-mail address will be forwarded to e-mail that they
provided during the registration at the New Member form.
4.5.2 Contact with Members
Members may e-mail any member by using <membername>@silicon.eecs.berkeley.edu e-mail
address.
Members may send e-mails from the system to the group of members. Possible groups are listed
below:
Equipment - all engineers assigned to the equipment and all members who qualified to work
on the equipment
Superusers - all equipment super users
Members with Current Reservations - all members who has reservations for the equipment.
This option is available at MercuryWeb. At Mercury Client, members may send e-mails only to
Equipment group.
At Mercury Client:
To send an e-mail, a member needs to open the Equipment page, select an equipment, open its
context menu and click on Send Mail option.
Figure 33. Send Mail option
The equipment e-mail form will be open in the new window. A member needs to write a subject and a
message, add CC recipients (optional), and press the Send button. This message will be sent to
Equipment group.
Send Mail option is also available for utilities and locations. In this case, an e-mail will be sent to all
engineers and keyops assigned to this utility or location.
At MercuryWeb:
To send an e-mail, a member needs to enter an equipment name in <EMail equipment> field at the
Equipment section (Figure 15) or in <EMail> field on the Reservations page (Figure 8).

Mercury System Procedures
24
Figure 34. Equipment e-mail form
The equipment e-mail form will be open in the new window. A member needs to write a subject and a
message, choose the group of members whom this message will be addressed, and press Send
button.
4.5.3 Buddies
To find a buddy to work together in the laboratory, a member may send a broadcast message to other
members using the Buddies option.
This option is available at MercuryWeb.
To send a broadcast message, a member needs to click on Buddies link at the Activity section on the
Member page.
Figure 35. Buddies link
Mercury System Procedures
25
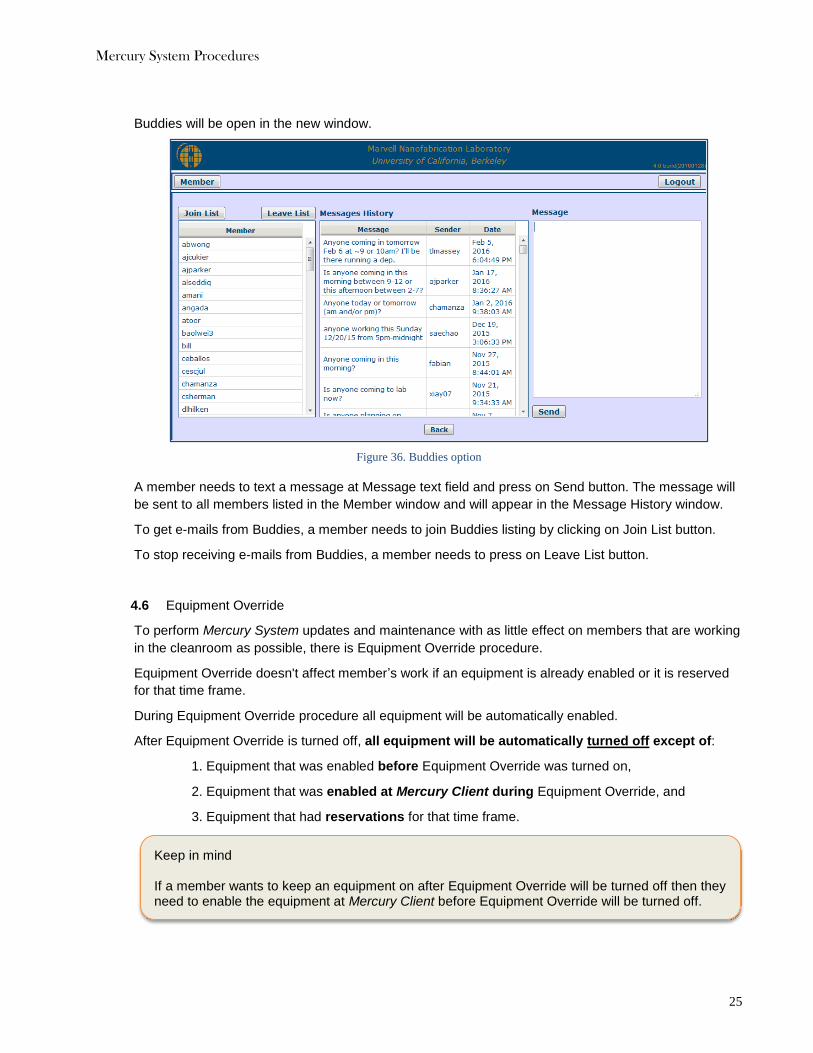
Buddies will be open in the new window.
Figure 36. Buddies option
A member needs to text a message at Message text field and press on Send button. The message will
be sent to all members listed in the Member window and will appear in the Message History window.
To get e-mails from Buddies, a member needs to join Buddies listing by clicking on Join List button.
To stop receiving e-mails from Buddies, a member needs to press on Leave List button.
4.6 Equipment Override
To perform Mercury System updates and maintenance with as little effect on members that are working
in the cleanroom as possible, there is Equipment Override procedure.
Equipment Override doesn't affect member’s work if an equipment is already enabled or it is reserved
for that time frame.
During Equipment Override procedure all equipment will be automatically enabled.
After Equipment Override is turned off, all equipment will be automatically turned off except of:
1. Equipment that was enabled before Equipment Override was turned on,
2. Equipment that was enabled at Mercury Client during Equipment Override, and
3. Equipment that had reservations for that time frame.
Keep in mind If a member wants to keep an equipment on after Equipment Override will be turned off then they need to enable the equipment at Mercury Client before Equipment Override will be turned off.
Mercury System Procedures
26
When the laboratory staff members plan to turn on/off Equipment Override they send a broadcast
notification about it to everybody who is in the cleanroom. This notification is displayed on the TV
screens located in the cleanroom and in the NanoLab office. Also all members will be notified about it
by e-mail and by phone via broadcast pager system, so members will hear this message from all
NanoLab phones and speaker in the cleanroom.
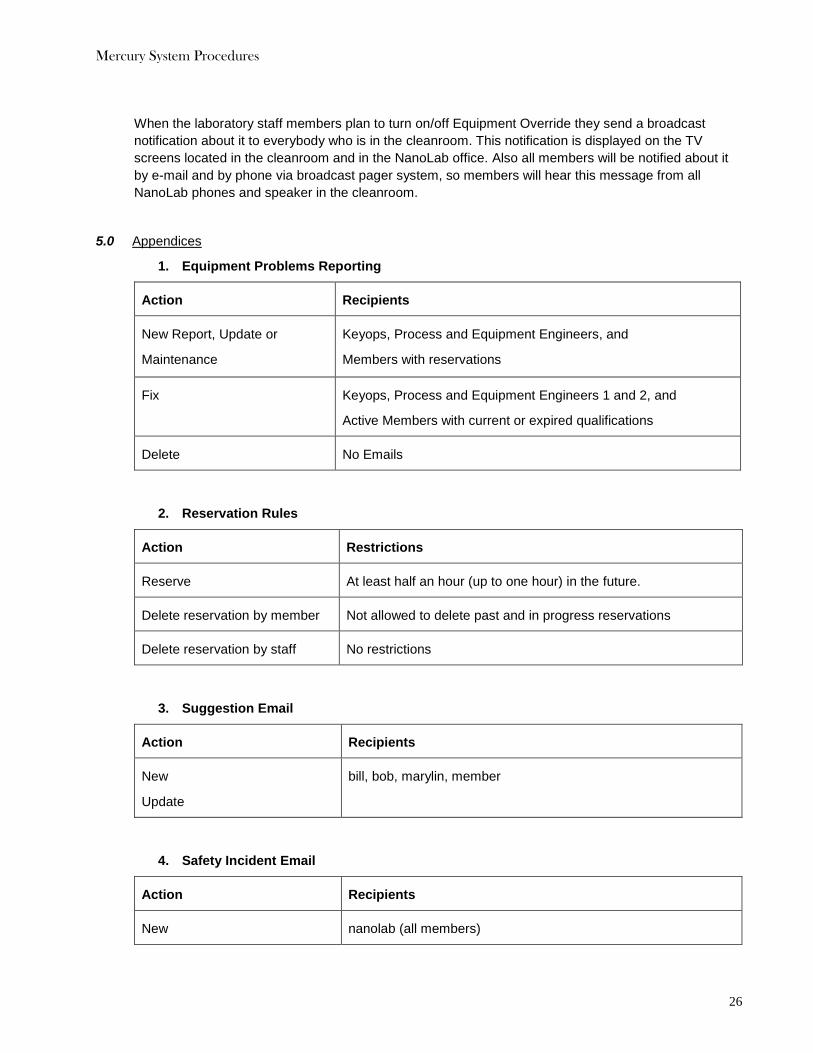
5.0 Appendices
1. Equipment Problems Reporting
Action Recipients
New Report, Update or
Maintenance
Keyops, Process and Equipment Engineers, and
Members with reservations
Fix Keyops, Process and Equipment Engineers 1 and 2, and
Active Members with current or expired qualifications
Delete No Emails
2. Reservation Rules
Action Restrictions
Reserve At least half an hour (up to one hour) in the future.
Delete reservation by member Not allowed to delete past and in progress reservations
Delete reservation by staff No restrictions
3. Suggestion Email
Action Recipients
New
Update
bill, bob, marylin, member
4. Safety Incident Email
Action Recipients
New nanolab (all members)

Mercury System Procedures
27
5. Recognition Email
Action Recipients
New bill, bob, marilyn, member, nominee
Update member
6. Equipment Enable/Disable Rules
Action Equipment Status Restrictions
Enable Green
Yellow
Red
Cross
No restrictions
No restrictions
Staff only
Staff only
Disable Green
Yellow
Red (enabled by member)
Red (enabled by staff)
Cross (enabled by member)
Cross (enabled by staff)
No restrictions
No restrictions
No restrictions
Staff only
No restrictions
Staff only
6.0 List of Figures
Figure 1. The laboratory safety test page ............................................................................................................3 Figure 2. Request Qualify option .........................................................................................................................4 Figure 3. The Qualifications section on the Member page ..................................................................................5 Figure 4. Computers at the laboratory gowning room .........................................................................................6 Figure 5. Set Project option at Mercury Client .....................................................................................................7 Figure 6. Warning message at Mercury Client login ............................................................................................7 Figure 7. The Reservations page .........................................................................................................................9 Figure 8. Equipment reservation calendar ...........................................................................................................9 Figure 9. Example of how to set an equipment reservation timeframe ............................................................ 10 Figure 10. Edit and delete a reservation options .............................................................................................. 10 Figure 11. My Reservations and Reservations sections on the Reservations page ........................................ 11 Figure 12. View Reservations option ................................................................................................................ 11 Figure 13. Equipment manual option ................................................................................................................ 12 Figure 14. The Equipment section on the Member page .................................................................................. 12 Figure 15. Example of the equipment table ...................................................................................................... 13 Figure 16. Example of the equipment status table ........................................................................................... 13 Figure 17. All Problem Status Board link .......................................................................................................... 14
Mercury System Procedures
28
Figure 18. Enable equipment option ................................................................................................................. 15 Figure 19. Example of a notification window at the enable equipment procedure ........................................... 15 Figure 20. Pop up window at the disable equipment procedure ....................................................................... 15 Figure 21. Problem Report form ....................................................................................................................... 16 Figure 22. Report Problems option ................................................................................................................... 17 Figure 23. Problem History option .................................................................................................................... 17 Figure 24. Read Details option ......................................................................................................................... 18 Figure 25. The Search Problem History page................................................................................................... 18 Figure 26. Equipment engineers option ............................................................................................................ 19 Figure 27. Lab Materials and Chemicals links .................................................................................................. 20 Figure 28. The Chemicals fees page ................................................................................................................ 20 Figure 29. The Materials fees page .................................................................................................................. 21 Figure 30. The Equipment fees page ................................................................................................................ 21 Figure 31. The General Lab fees page ............................................................................................................. 21 Figure 32. The Lab History page ...................................................................................................................... 22 Figure 33. Send Mail option .............................................................................................................................. 23 Figure 34. Equipment e-mail form ..................................................................................................................... 24 Figure 35. Buddies link ...................................................................................................................................... 24 Figure 36. Buddies option ................................................................................................................................. 25


