Embed Size (px)
Citation preview

Medium Voltage SMC OEM Components, 10…15 kVBulletin Number 7703E
Installation InstructionsOriginal Instructions

Important User Information
Read this document and the documents listed in the additional resources section about installation, configuration, and operation of this equipment before you install, configure, operate, or maintain this product. Users are required to familiarize themselves with installation and wiring instructions in addition to requirements of all applicable codes, laws, and standards.
Activities including installation, adjustments, putting into service, use, assembly, disassembly, and maintenance are required to be carried out by suitably trained personnel in accordance with applicable code of practice.
If this equipment is used in a manner not specified by the manufacturer, the protection provided by the equipment may be impaired.
In no event will Rockwell Automation, Inc. be responsible or liable for indirect or consequential damages resulting from the use or application of this equipment.
The examples and diagrams in this manual are included solely for illustrative purposes. Because of the many variables and requirements associated with any particular installation, Rockwell Automation, Inc. cannot assume responsibility or liability for actual use based on the examples and diagrams.
No patent liability is assumed by Rockwell Automation, Inc. with respect to use of information, circuits, equipment, or software described in this manual.
Reproduction of the contents of this manual, in whole or in part, without written permission of Rockwell Automation, Inc., is prohibited.
Throughout this manual, when necessary, we use notes to make you aware of safety considerations.
Labels may also be on or inside the equipment to provide specific precautions.
WARNING: Identifies information about practices or circumstances that can cause an explosion in a hazardous environment, which may lead to personal injury or death, property damage, or economic loss.
ATTENTION: Identifies information about practices or circumstances that can lead to personal injury or death, property damage, or economic loss. Attentions help you identify a hazard, avoid a hazard, and recognize the consequence.
IMPORTANT Identifies information that is critical for successful application and understanding of the product.
SHOCK HAZARD: Labels may be on or inside the equipment, for example, a drive or motor, to alert people that dangerous voltage may be present.
BURN HAZARD: Labels may be on or inside the equipment, for example, a drive or motor, to alert people that surfaces may reach dangerous temperatures.
ARC FLASH HAZARD: Labels may be on or inside the equipment, for example, a motor control center, to alert people to potential Arc Flash. Arc Flash will cause severe injury or death. Wear proper Personal Protective Equipment (PPE). Follow ALL Regulatory requirements for safe work practices and for Personal Protective Equipment (PPE).

Table of Contents
PrefaceSummary of Changes . . . . . . . . . . . . . . . . . . . . . . . . . . . . . . . . . . . . . . . . . . . 5Scope . . . . . . . . . . . . . . . . . . . . . . . . . . . . . . . . . . . . . . . . . . . . . . . . . . . . . . . . . 5Additional Resources . . . . . . . . . . . . . . . . . . . . . . . . . . . . . . . . . . . . . . . . . . . 6
Chapter 1Receiving and General Information
Receiving . . . . . . . . . . . . . . . . . . . . . . . . . . . . . . . . . . . . . . . . . . . . . . . . . . . . . . 7Handling Procedures for Electrostatic Sensitive Devices . . . . . . . . . . . 7Standards and Codes . . . . . . . . . . . . . . . . . . . . . . . . . . . . . . . . . . . . . . . . . . . 7
Chapter 2PowerBrick Installation Identification . . . . . . . . . . . . . . . . . . . . . . . . . . . . . . . . . . . . . . . . . . . . . . . . . . 9
Sizing the Enclosure . . . . . . . . . . . . . . . . . . . . . . . . . . . . . . . . . . . . . . . . . . . 10Dimensions. . . . . . . . . . . . . . . . . . . . . . . . . . . . . . . . . . . . . . . . . . . . . . . . . . . 10Torque Requirements . . . . . . . . . . . . . . . . . . . . . . . . . . . . . . . . . . . . . . . . . 11PowerBrick Mounting . . . . . . . . . . . . . . . . . . . . . . . . . . . . . . . . . . . . . . . . . 11Typical Mounting, 10…12 kV PowerBrick System . . . . . . . . . . . . . . . 13Typical Mounting, 12.1…14.4 kV PowerBrick System . . . . . . . . . . . . 14Power Connections . . . . . . . . . . . . . . . . . . . . . . . . . . . . . . . . . . . . . . . . . . . 15Grounding . . . . . . . . . . . . . . . . . . . . . . . . . . . . . . . . . . . . . . . . . . . . . . . . . . . 16PowerBrick Operating Restrictions . . . . . . . . . . . . . . . . . . . . . . . . . . . . . 16Voltage Sensing Board Dimensions . . . . . . . . . . . . . . . . . . . . . . . . . . . . . 17Mounting and Connecting the Voltage Sensing Board. . . . . . . . . . . . 17Current Loop Gate Drive Power Assembly (CLGD) . . . . . . . . . . . . . 19
Chapter 3Control Component Installation Interface Board Installation . . . . . . . . . . . . . . . . . . . . . . . . . . . . . . . . . . . . 23
Interface Board Connections. . . . . . . . . . . . . . . . . . . . . . . . . . . . . . . . . . . 25SMC-50 Control Module. . . . . . . . . . . . . . . . . . . . . . . . . . . . . . . . . . . . . . 25EMC Compliance. . . . . . . . . . . . . . . . . . . . . . . . . . . . . . . . . . . . . . . . . . . . . 26
Enclosure . . . . . . . . . . . . . . . . . . . . . . . . . . . . . . . . . . . . . . . . . . . . . . . . . 26Wiring . . . . . . . . . . . . . . . . . . . . . . . . . . . . . . . . . . . . . . . . . . . . . . . . . . . 26
Control Power . . . . . . . . . . . . . . . . . . . . . . . . . . . . . . . . . . . . . . . . . . . . . . . . 27Control Voltage . . . . . . . . . . . . . . . . . . . . . . . . . . . . . . . . . . . . . . . . . . . 27Control Wiring . . . . . . . . . . . . . . . . . . . . . . . . . . . . . . . . . . . . . . . . . . . 27
Control Terminal Designations . . . . . . . . . . . . . . . . . . . . . . . . . . . . . . . . 27Connecting Interface Board to Voltage Sensing Board. . . . . . . . . . . . 28Connecting Fiber Optic Multiplexer Board to Gate Driver Board . 29Additional Control Components. . . . . . . . . . . . . . . . . . . . . . . . . . . . . . . 30
Chapter 4Main and Bypass Switching Device Installation
Introduction. . . . . . . . . . . . . . . . . . . . . . . . . . . . . . . . . . . . . . . . . . . . . . . . . . 31Main Contactor or Circuit Breaker . . . . . . . . . . . . . . . . . . . . . . . . . . . . . 31Bypass Contactor or Circuit Breaker . . . . . . . . . . . . . . . . . . . . . . . . . . . . 31
Rockwell Automation Publication 7703E-IN001F-EN-P - July 2019 3

Table of Contents
Chapter 5Typical Wiring Diagrams Wiring Diagrams. . . . . . . . . . . . . . . . . . . . . . . . . . . . . . . . . . . . . . . . . . . . . . 33
Chapter 6Final Test Procedures Final Test Procedures. . . . . . . . . . . . . . . . . . . . . . . . . . . . . . . . . . . . . . . . . . 35
Dielectric Test . . . . . . . . . . . . . . . . . . . . . . . . . . . . . . . . . . . . . . . . . . . . . . . . 36Additional Tests . . . . . . . . . . . . . . . . . . . . . . . . . . . . . . . . . . . . . . . . . . . . . . 37Programming . . . . . . . . . . . . . . . . . . . . . . . . . . . . . . . . . . . . . . . . . . . . . . . . . 37
Medium Voltage SMC-50 Module . . . . . . . . . . . . . . . . . . . . . . . . . . 37Voltage Sensing Module . . . . . . . . . . . . . . . . . . . . . . . . . . . . . . . . . . . . . . . 37Power Supply Test . . . . . . . . . . . . . . . . . . . . . . . . . . . . . . . . . . . . . . . . . . . . 37Start-Up. . . . . . . . . . . . . . . . . . . . . . . . . . . . . . . . . . . . . . . . . . . . . . . . . . . . . . 41
Appendix AComponent Deratings Deratings Specifications . . . . . . . . . . . . . . . . . . . . . . . . . . . . . . . . . . . . . . . 43
Appendix BTypical Schematic Diagrams Introduction. . . . . . . . . . . . . . . . . . . . . . . . . . . . . . . . . . . . . . . . . . . . . . . . . . 45
Appendix CSpare Parts PowerBricks . . . . . . . . . . . . . . . . . . . . . . . . . . . . . . . . . . . . . . . . . . . . . . . . . . 49
Index . . . . . . . . . . . . . . . . . . . . . . . . . . . . . . . . . . . . . . . . . . . . . . . . . . . . . . . . 51
4 Rockwell Automation Publication 7703E-IN001F-EN-P - July 2019

Preface
Summary of Changes
Scope This document pertains to the Bulletin 7703E SMC OEM components for 10…15 kV. These components allow an OEM to fabricate a medium voltage soft starting solution.
Most of the components described herein are provided in various 7703E kits; however, some of the devices described are not provided. These must be acquired separately.
A key part of the Bulletin 7703E components is the power stack assembly which uses PowerBrick™ technology. PowerBricks are a superior means of packaging SCRs, heatsinks, passive devices (for circuit protection) and gate drive circuit boards. Each PowerBrick is a self-contained assembly with inherent insulation and flexible mounting features. PowerBricks are easily connected in series to service the required system voltage level.
PowerBricks are provided as a set of components used to create a three-phase assembly (refer to Figure 1 on page 9). Each form of PowerBrick assembly is applied with other Bulletin 7703E control components and power devices, in forming a complete solution.
Topic Page
Replaced all references from SMC Flex to SMC-50 Throughout
Changed MV Ratio parameter number to 169 18, 37
Replaced dimensions graphic to show updated SMC-50 board 23
Replaced SMC Flex interface board graphic with SMC-50 24
Updated control terminal designations and descriptions 27
Replaced multiplexer board graphic 29
Replaced typical power circuit wiring diagram to reflect SMC-50 interface board 34
Replaced typical power system diagram to reflect SMC-50 interface board 46
replaced typical control circuit graphic to reflect SMC-50 interface board 47
Rockwell Automation Publication 7703E-IN001F-EN-P - July 2019 5

Preface
Additional Resources These documents contain additional information concerning related products from Rockwell Automation.
You can view or download publications athttp://www.rockwellautomation.com/global/literature-library/overview.page.
Resource Description
CENTERLINE Medium Voltage SMC-50 Motor Controller user manual, publication 1560F-UM001
Provides information on installing, commissioning, operation, programming, troubleshooting, and parameter information for MV SMC-50 controllers
Industrial Automation Wiring and Grounding Guidelines, publication 1770-4.1
Provides general guidelines for installing a Rockwell Automation industrial system.
Product Certifications website: rok.auto/certifications Provides declarations of conformity, certificates, and other certification details.
6 Rockwell Automation Publication 7703E-IN001F-EN-P - July 2019

Chapter 1
Receiving and General Information
Receiving See Getting Started, General Handling Procedures for Medium Voltage Controllers, publication MV-QS050. This document is included with your shipment and contains information regarding receiving, unpacking, initial inspection, handling, storage, and site preparation.
Handling Procedures for Electrostatic Sensitive Devices
To guard against electrostatic damage (ESD) to equipment, the following precautions should be observed when handling electrostatic sensitive devices.
1. Use a grounding wrist strap to minimize the build up of static charges on personnel.
2. Handle the module by the edges and avoid touching components or printed circuit paths.
3. Store devices with sensitive components in the conductive packaging that the module is shipped in.
These precautions are the minimum requirements for guarding against ESD. For more information, see Guarding Against Electrostatic Damage, publication 8000-4.5.2.
Standards and Codes
• CEC (Canadian Electrical Code)• CSA 22.2 No. 253 (Canadian Standards Association) – Medium Voltage
AC Contactors, Controllers and Control Centers • NEC (National Electrical Code)• NEMA ICS Standards (National Electrical Manufacturers’ Association)
ATTENTION: Printed circuit boards contain components that can be damaged by electrostatic charges that build up on personnel during normal activities. Exercise the following precautions when handling electrostatic sensitive devices. Failure to do so may damage the device and render it inoperable.
IMPORTANT It is recommended that the user be familiar with the following safety and design standards and codes, and any additional local codes that a medium voltage controller must comply with:
Rockwell Automation Publication 7703E-IN001F-EN-P - July 2019 7

Chapter 1 Receiving and General Information
• OSHA (Occupational Safety and Health Administration)• UL 50 (Underwriters Laboratories) – Enclosures for Electrical Equipment• UL 347B (Underwriters Laboratories) – Medium Voltage Motor
Controllers• UL 508 (Underwriters Laboratories) – Industrial Control Equipment• IEC 60204-1 – Safety of Machinery – Electrical Equipment of Machines,
Part 1: General Requirements• IEC 62271-200 – AC Metal Enclosed Switchgear and Control Gear for
Rated Voltages Above 1kV and up to 52 kV (formerly IEC 60298)• IEC 62271-106 – High Voltage Alternating Current Contactors (formerly
IEC 604701• IEC 60529 – Degrees of Protection Provided by Enclosures (IP Code)• IEC 62271-1 – Common Clauses for High Voltage Switchgear and
Control Gear Standards• ICS1– Industrial Control and Systems General Requirements• ICS3 Part 2 – Industrial Control and Systems - Medium Voltage
Controllers Rated 2001-7200V AC
8 Rockwell Automation Publication 7703E-IN001F-EN-P - July 2019

Chapter 2
PowerBrick Installation
Identification A PowerBrick™ is shown in Figure 1.
Figure 1 - Single-phase PowerBrick
Several PowerBricks are supplied as a loose set of components to service a particular voltage and current. Verify the voltage and current rating of the OEM power stacks by examining the shipping label and referencing it to the information in Table 1.
Table 1 - PowerBrick Options and Catalog Numbers
Catalog Number(1)
(1) The OEM is responsible for ordering and installing the correct format for the current loop gate drive conductor conduit/CT assembly (refer to the Installation Instructions, publication 7703E-IN008 for additional details.)
Voltage(2)
(2) Voltage ranges : 12000 = 10000…12000V (5 PowerBricks in series per phase)13800 = 12001…14400V (6 PowerBricks in series per phase)
Current (A)
7703E-PPMT 12,000V 3 PH, 50/60 Hz 160
7703E-PPMA 340
7703E-PPMC 580
7703E-PPNT 13,800V 160
7703E-PPNA 340
7703E-PPNC 580
Rockwell Automation Publication 7703E-IN001F-EN-P - July 2019 9
Chapter 2 PowerBrick Installation
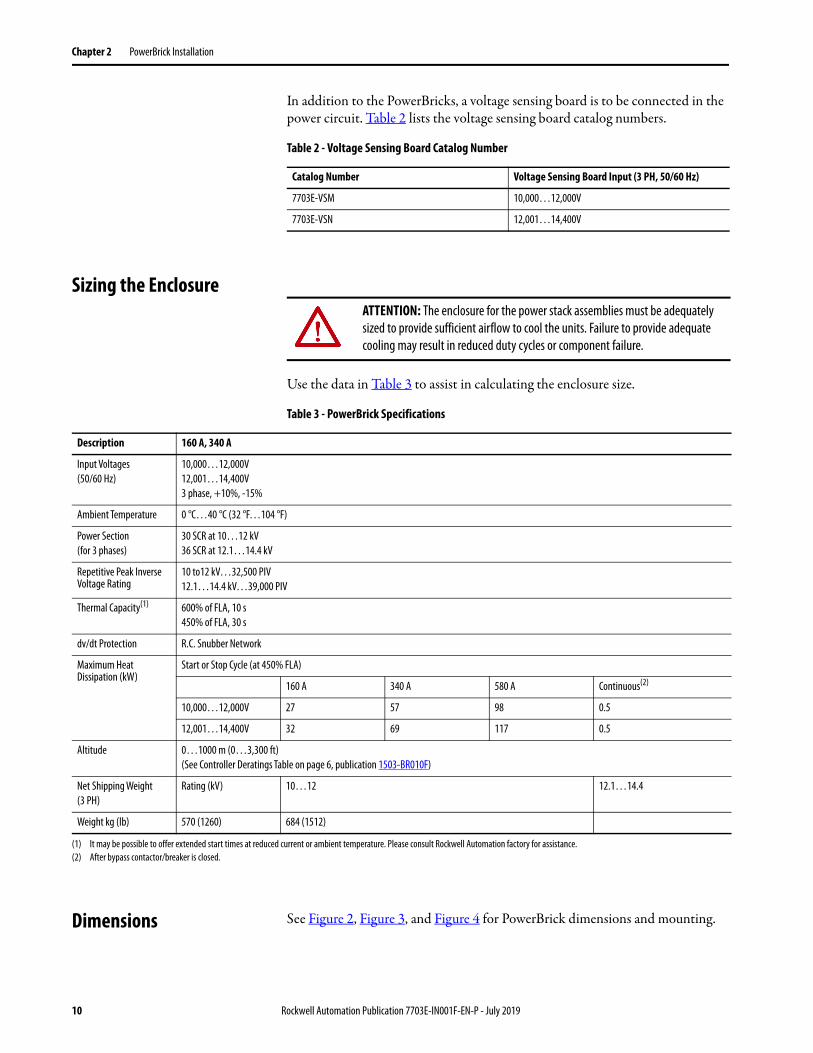
In addition to the PowerBricks, a voltage sensing board is to be connected in the power circuit. Table 2 lists the voltage sensing board catalog numbers.
Table 2 - Voltage Sensing Board Catalog Number
Sizing the Enclosure
Use the data in Table 3 to assist in calculating the enclosure size.
Table 3 - PowerBrick Specifications
Dimensions See Figure 2, Figure 3, and Figure 4 for PowerBrick dimensions and mounting.
Catalog Number Voltage Sensing Board Input (3 PH, 50/60 Hz)
7703E-VSM 10,000…12,000V
7703E-VSN 12,001…14,400V
ATTENTION: The enclosure for the power stack assemblies must be adequately sized to provide sufficient airflow to cool the units. Failure to provide adequate cooling may result in reduced duty cycles or component failure.
Description 160 A, 340 A
Input Voltages(50/60 Hz)
10,000…12,000V12,001…14,400V3 phase, +10%, -15%
Ambient Temperature 0 °C…40 °C (32 °F…104 °F)
Power Section(for 3 phases)
30 SCR at 10…12 kV36 SCR at 12.1…14.4 kV
Repetitive Peak Inverse Voltage Rating
10 to12 kV…32,500 PIV12.1…14.4 kV…39,000 PIV
Thermal Capacity(1) 600% of FLA, 10 s450% of FLA, 30 s
dv/dt Protection R.C. Snubber Network
Maximum Heat Dissipation (kW)
Start or Stop Cycle (at 450% FLA)
160 A 340 A 580 A Continuous(2)
10,000…12,000V 27 57 98 0.5
12,001…14,400V 32 69 117 0.5
Altitude 0…1000 m (0…3,300 ft)(See Controller Deratings Table on page 6, publication 1503-BR010F)
Net Shipping Weight (3 PH)
Rating (kV) 10…12 12.1…14.4
Weight kg (lb) 570 (1260) 684 (1512)
(1) It may be possible to offer extended start times at reduced current or ambient temperature. Please consult Rockwell Automation factory for assistance.(2) After bypass contactor/breaker is closed.
10 Rockwell Automation Publication 7703E-IN001F-EN-P - July 2019

PowerBrick Installation Chapter 2
Torque Requirements All electrical connections must be torqued to the specifications shown in Table 4.
Table 4 - Torque Requirements
PowerBrick Mounting PowerBricks are to be mounted in a vertical orientation in order to provide adequate component cooling. Mount the PowerBricks in a suitable location using the mounting holes provided in the assembly (see Figure 2). Use M8 (5/16 in.) or similar hardware for the mounting hole dimensions of 10.7 x 15.9 mm (0.421 x 0.625 in.).
PowerBricks are provided with two methods for mounting (as shown in Figure 2). The PowerBricks can be mounted to a vertical surface using the four mounting locations on the rear face, or they can be mounted to a horizontal surface using the four mounting locations on the base.
Note: Using either mounting option requires space above and below each phase assembly (see Figure 3 and Figure 4).
ATTENTION: Ensure that all electrical connections are torqued to the correct specification. Failure to do so may result in damage to the equipment and/or injury to personnel.
Hardware Recommended Torque
¼-20 thread cutting housing assembly screws 7 N•m [62 lb•in]
M5 3.4 N•m [30 lb•in]
Control Wire Terminals 0.2…0.4 N•m [2.0…3.3 lb•in]
CLGD Power Assembly Terminals 5.6 N•m [50 lb•in]
SMC-50 Control Module Terminals 0.6 N•m [5in•lb]
M8, Capacitor LugsM8, All others
7.5 N•m [66 lb•in]14 N•m [120 lb•in]
M10 29 N•m [250 lb•in]
ATTENTION: Maintain sufficient clearance between the power phases and between phases and grounded surfaces. Refer to local electrical codes to determine the required clearance. Failure to do so may result in injury to personnel or damage to the equipment.
Rockwell Automation Publication 7703E-IN001F-EN-P - July 2019 11

Chapter 2 PowerBrick Installation
Figure 2 - Single PowerBrick Dimensions (1000/2400V)
Top View
Front View Side View
Mounting holes for M8 [5/16] hardware (4) places
12 Rockwell Automation Publication 7703E-IN001F-EN-P - July 2019

PowerBrick Installation Chapter 2
Typical Mounting, 10…12 kV PowerBrick System
Figure 3 - Typical PowerBrick arrangement for 10…12 kV
Front View
Typical spacing to ground metallic enclosure components. Spacing may be reduced through the full use of suitable insulation systems.
Side View
Rockwell Automation Publication 7703E-IN001F-EN-P - July 2019 13

Chapter 2 PowerBrick Installation
Typical Mounting, 12.1…14.4 kV PowerBrick System
Figure 4 - Typical PowerBrick Arrangement for 12.1…14.4 kV
Front View
Typical spacing to ground metallic enclosure components. Spacing may be reduced through the full use of suitable insulation systems.
Side View
14 Rockwell Automation Publication 7703E-IN001F-EN-P - July 2019

PowerBrick Installation Chapter 2
Power Connections
1. The PowerBrick units are connected to each other in order to create a complete phase assembly. The flexible connector on the top of each PowerBrick is attached to the fixed connector on the bottom of the PowerBrick above.
2. The top PowerBrick should be connected to a suitable fixed terminal location. Use appropriate cable lugs to attach suitable line cables to the line cable terminal. Each PowerBrick can use M10 (3/8 in.) hardware. See Figure 5 for the terminal location. Torque the fastening hardware to the specifications shown in Table 4.
3. Use cable lugs to attach suitable load cables to the load cable terminal (lower). Refer to Figure 5 for the terminal location. Torque the fastening hardware to the specifications shown in Table 4.
4. Refer to Chapter 5 for a typical wiring diagram to determine the required connections. Appendix B includes a typical schematic for a complete soft starter unit.
Figure 5 - Typical Single Phase 15 kV PowerBrick Assembly (side view)
ATTENTION: To avoid shock hazard, lock out incoming power to power cables when completing connections. Failure to do so may result in severe burns, injury or death.
IMPORTANT It is the responsibility of the OEM to ensure that suitable line and load cables are used to satisfy the requirements of the equipment and meet local electrical codes.
Non-conductive mounting plate (supplied by OEM)
Insulator (supplied by OEM)
Flexible bus link11 mm clearance hole
for M10 hardware(supplied)
Terminal
Rockwell Automation Publication 7703E-IN001F-EN-P - July 2019 15

Chapter 2 PowerBrick Installation
Figure 6 - Photo of Typical Single Phase PowerBrick Assembly (Front View)
Grounding
PowerBrick Operating Restrictions
The SCRs in the power stacks are not intended for continuous operation. Observe the following operating restrictions for the SMC when operating at the thermal capacity limit and maximum ambient temperature (see Table 3.)
• Power stacks must be bypassed using a separate contactor or circuit breaker when the motor is up to speed.
• Do not operate the power stacks for more than 60 seconds in one hour. • Do not exceed 30 seconds for any individual duty cycle of the power
stacks.
ATTENTION: It is the responsibility of the OEM to ensure that the final enclosure is suitably bonded to ground, and that provisions for grounding are made according to local electrical codes and standards.
16 Rockwell Automation Publication 7703E-IN001F-EN-P - July 2019

PowerBrick Installation Chapter 2
• Do not operate the power stacks for at least five minutes between a start or a stop cycle.
• For repeated hourly operation, forced ventilation is required.
Note: It may be possible to exceed some of the above restrictions if all maximum ratings are not attained. For example, higher ambient conditions can be supported when the % FLC and/or start time are reduced. Please consult factory for details.
Voltage Sensing Board Dimensions
Figure 7 - Voltage Sensing Board Dimension Diagram
Mounting and Connecting the Voltage Sensing Board
The voltage sensing board (VSB) for the relevant voltage range (see table below) should be mounted adjacent to the PowerBrick (see Figure 7 for dimensions). All connection points are to be made accessible.
ATTENTION: The operating restrictions for the SMC must be adhered to. Failure to observe the recommended precautions may result in injury to personnel or damage to the equipment.
8.9 [0.35]4 holes
Includes features to secure HV wire for maintained spacings.
Approximate dimensions in mm [inches]
Description Line Voltage(3 phase, 50/60 Hz)
MV Ratio Catalog Number
Voltage Sensing Board 10,000…12,000V 126 7703E-VSM
12,001…14,400V 97 7703E-VSN
Rockwell Automation Publication 7703E-IN001F-EN-P - July 2019 17

Chapter 2 PowerBrick Installation
Connect the voltage sensing board to the L1 to L3 (Line) and T1 to T3 (Load) terminals of the power stack (see Figure 8).
Recommended specifications for wire used on medium voltage connections: UL style 3239, #18 AWG, 40 KVDC silicone rubber insulated wire, covered with PCV tubing or other suitable material.
The MV ratios shown above are nominal values and may be fine tuned to achieve better accuracy on the display of the SMC-50 control module. While running the motor in bypass mode, compare the voltage displayed on the control module to a known accurate meter connected to the same source voltage as the motor the MV SMC-50 is controlling. Parameter 169, MV Ratio, may be changed up or down to match the HIM display to the external meter. A small change in ratio can make a large change in the display, so 5 units at a time are recommended. Increasing the ratio will decrease the displayed voltage, and visa versa.
Figure 8 - Voltage Sensing Board
IMPORTANT The wires must be prevented from touching live or grounded metals, and low voltage wiring, or have supplemental insulation suitable for the application. Use the tapered features below the Lx and Tx terminals to maintain wire spacings in this area.
To Interface Board Ground Connections
18 Rockwell Automation Publication 7703E-IN001F-EN-P - July 2019

PowerBrick Installation Chapter 2
Current Loop Gate Drive Power Assembly (CLGD)
The CLGD power assembly is provided as a loose component with the PowerBricks. It should be mounted adjacent to the PowerBrick in a manner that allows the secondary cable assembly to be correctly installed.
The CLGD power assembly consists of three parts:
1. Power supply (transformer with secondary terminal blocks and sensing CT)
2. Current Transformer (CT) assembly (plastic tubing with two current transformers per PowerBrick)
3. Loop Cable (white, silicone insulated, 50 kV DC, #6 AWG)
The CT assembly is mounted with hardware to the left side of the PowerBrick stack, and can be pivoted to the left by loosening the mounting hardware to allow removal of individual PowerBricks without removing the CT assembly. The current transformer secondary leads plug into the gate driver board directly behind each CT, and must all be unplugged to pivot the assembly.
Figure 9 - PowerBrick Current Loop Gate Drive Cable Assembly and Power Supply
ATTENTION: Check that all CT leads are plugged into each gate driver board before putting the SMC into service. Failure to do so may result in erratic operation and/or equipment damage during option stop maneuvers.
Rockwell Automation Publication 7703E-IN001F-EN-P - July 2019 19
Chapter 2 PowerBrick Installation
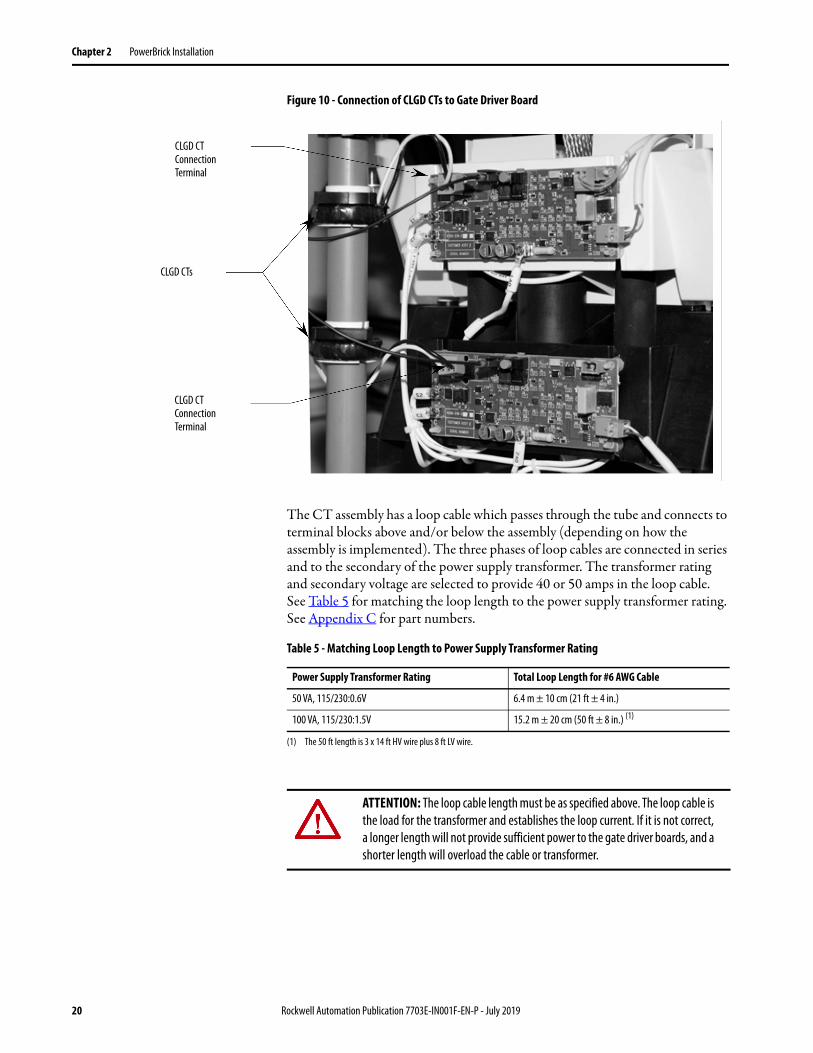
Figure 10 - Connection of CLGD CTs to Gate Driver Board
The CT assembly has a loop cable which passes through the tube and connects to terminal blocks above and/or below the assembly (depending on how the assembly is implemented). The three phases of loop cables are connected in series and to the secondary of the power supply transformer. The transformer rating and secondary voltage are selected to provide 40 or 50 amps in the loop cable. See Table 5 for matching the loop length to the power supply transformer rating. See Appendix C for part numbers.
Table 5 - Matching Loop Length to Power Supply Transformer Rating
CLGD CT Connection Terminal
CLGD CTs
CLGD CT Connection Terminal
Power Supply Transformer Rating Total Loop Length for #6 AWG Cable
50 VA, 115/230:0.6V 6.4 m ± 10 cm (21 ft ± 4 in.)
100 VA, 115/230:1.5V 15.2 m ± 20 cm (50 ft ± 8 in.) (1)
(1) The 50 ft length is 3 x 14 ft HV wire plus 8 ft LV wire.
ATTENTION: The loop cable length must be as specified above. The loop cable is the load for the transformer and establishes the loop current. If it is not correct, a longer length will not provide sufficient power to the gate driver boards, and a shorter length will overload the cable or transformer.
20 Rockwell Automation Publication 7703E-IN001F-EN-P - July 2019

PowerBrick Installation Chapter 2
A sensing CT is supplied to monitor the current in the loop. It provides a signal to the Interface Board to inform the SMC-50 control module that the power supply is operating. If the current loop is not operating, option stop maneuvers will be inhibited. An Alarm will be generated in the SMC-50 control module if the signal is lost after control power has been applied. If control power is applied without the signal, the controller will not provide option stop maneuvers until the module is powered up with the signal present.
Figure 11 - Typical 12 kV Implementation for Current Loop
Figure 12 - Typical 15 kV Implementation for Current Loop
To control power
1. Power Supply2. Current Transformer Assembly3. Loop Cable4. Terminal5. Return Cable #6 AWG (13 mm2)
The total length of the three loop cables and the return cable must be 152. m ± 20 cm (50 feet ± 8 in.).
PowerBrick assemblies
NOTE:
1. Power Supply2. Current Transformer Assembly3. Loop Cable4. Terminal5. Return Cable #6 AWG (13 mm2)
The total length of the three loop cables and the return cable must be 152. m ± 20 cm (50 feet ± 8 in.).
PowerBrick assemblies
NOTE:
Rockwell Automation Publication 7703E-IN001F-EN-P - July 2019 21

Chapter 2 PowerBrick Installation
Notes:
22 Rockwell Automation Publication 7703E-IN001F-EN-P - July 2019

Chapter 3
Control Component Installation
Interface Board Installation
Mount the 7703E-INTB interface board in a suitable location within a low voltage compartment, using the appropriate hardware. Use the interface board mounting bracket (refer to Figure 13).
Figure 13 - Interface Board (SMC-50 Module installed)
ATTENTION: Do not touch or bend the connectors on the Interface Board when handling it. Damage to the connectors may result in loss of communication signals from the MV SMC™-50 to other components.
ATTENTION: Do not mount the interface board in the same compartment as high voltage components. Ensure that barriers are provided in the final application to prevent access to any live high-voltage parts, including insulated conductors located in enclosures with low voltage parts and wiring. Failure to do so may result in severe burns, injury or death.
Rockwell Automation Publication 7703E-IN001F-EN-P - July 2019 23

Chapter 3 Control Component Installation
Figure 14 - Connection and Test Information for Interface Board
231
81
81
81
1
O
1
41
61
242
61
56
12
61
61
61
+
21
13
N
2ON
TP32
DS15
TP10
R100
TP33
TP34
DS16
DS14
DS17
DS2
TP19
TB21
TB10
SW4
TB6
R13
R102
C31
TP5
C28
TP2
TP9
TB8
TP42
TP43
T1
TP35
MV2
MV1
MV3
HS1
D25
C50
R87
C53
L4
C52
C46
MOV1
TP18
DS3
TP20
TB1
DS12
DS5
DS11
TP4
TP11
TP13
DS6
TP38
DS7
TP37
TP30
DS9
DS10
R86
TP41
TP8
TP40
TP15
TP39
TP22
TP25
TP31
TP27
TP28
DS8
TP29
TP36
TP16
TP17
TP21
DS4
R84
R85
SW3
SW2
83U73U
U5
TB5
DS1
TP50
TP48
TP3
R229
C27C115
R101
TP49
TP26
C10C103
TP1
TP7
TB3
TB2
TB4
TP44
U21U19
C48
TB7
C49
F1
DS13
C47
C45
C51
TX14
TX15
TX5
TX12
RX1
TX2
TX7
TX8
TX13
TX3
TX10
TX16
TX6
TX11
TX17
RX2
RX3
TX1
TX4
TX9
TX18
1 32SW1
3 4
TP6
A+
A-
A+
A -
A+
A-
B+
B-
B+
B-
B+
B-
C+
C-
C+
C-
C+
C-
SW2: When ON (right) provides test pulses to gate driver circuits.NOTE: Must be OFF (left) for normal operation.
LED (Red): ON when test pulses on
SMC-50 Control Module
Ribbon connectors to connect to SMC-50
control module (underneath control
module)
LED (Green) is ON when OptionStop Input Circuitry is Functioning
TB6: Option Stop Current Input and Relay Status Output
SW1: Selects CTCurrent Input. NOTE:
Must be on (up) forNormal Operation.
VoltageFeedback
Test Points
TB5: Current Transformer Connections
Module Common:DO NOT CONNECT
to this terminal
LED (Green): ON when signal present at temperature feedback fibre optic receivers
LED (Yellow): ON when Phase A+ gate signal active
Phas
e A
Fiber
Opt
ic Tra
nsm
itter
s sen
d gat
e sign
als to
drive
r boa
rds
Phas
e BFib
re O
ptic
Trans
mitt
ers
Phas
e CFib
re O
ptic
Trans
mitt
ers
TemperatureFeedback
Fibre OpticReceivers
L N GControl Power
110…240V AC
L NPower out to
SMC-50
SW3: detectstemperature
feedbackchannels
Phase A+ gate signal
Common for Gate/Pulse Test Points
LED (Yellow): ON when Phase A- gate signal active
Phase A- gate signal
Common for Gate/Pulse Test Points
LED (Yellow): ON when Phase B+ gate signal active
Phase B+ gate signal
Common for Gate/Pulse Test Points
LED (Yellow): ON when Phase B- gate signal active
Phase B- gate signal
Common for Gate/Pulse Test Points
LED (Yellow): ON when Phase C+ gate signal active
Phase C+ gate signal
Common for Gate/Pulse Test Points
LED (Yellow): ON when Phase C+ gate signal active
Phase C+ gate signal
Common for Gate/Pulse Test Points
LED (Green): ON when +15V rail is present
LED (Green): ON when +5V rail is present
Power Supply Test Points
ProgrammingInterface
SW4 Firmware Programming
Switch
Ribbon Connector to Voltage Sensing BoardLED (Red) is ON when in program mode
CurrentFeedbackTestPoints
LED (Green) is ON when+12V Rail is present
LED (Green) is ON when-12V Rail is present
LED (Green) is ON when15V_IN Rail is present
PowerSupplyTestPoints
ReplacementPart Number
SerialNumber
24 Rockwell Automation Publication 7703E-IN001F-EN-P - July 2019
Control Component Installation Chapter 3
Interface Board Connections
Connect control power to the interface board. Use a grounded supply source from 110…240 +10, -15% VAC, 50/60 Hz, 15 VA.
Connect 5A current transformer (CT) secondary signals to the interface board, noting the required CT polarity. Three-phase CTs are required.
SMC-50 Control Module 1. Connect the ribbon cables (5) to the back of the SMC-50 control module.
2. Align the ribbon cables (5) from the SMC-50 control module with the connectors on the Interface Board. Push the ribbon connectors into the mating connectors on the interface board.
3. Use the supplied screws to securely fasten the module to the board mounting bracket.
4. Supply power to the SMC-50 control module and make the required control connections.
Please refer to CENTERLINE Medium Voltage SMC-50 Motor Controller user manual, publication 1560F-UM001 for detailed instructions on wiring and programming the unit.
IMPORTANT 10…12 kV and 12.1…15 kVTwo fiber optic devices per phase are used. One connects to the temperature feedback in the upper PowerBrick™, and the other connects to the fiber optic multiplexer board (see below).
WARNING: Do not connect to Interface Board Vcom terminal.
Rockwell Automation Publication 7703E-IN001F-EN-P - July 2019 25

Chapter 3 Control Component Installation
EMC Compliance
The following guidelines are provided for EMC installation compliance.
Enclosure
Install the product in a grounded metal enclosure.
Wiring
Wire in an industrial control application can be divided into three groups: power, control, and signal. The following recommendations for physical separation between these groups are provided to reduce the coupling effect.
• Different wire groups should cross at 90° inside an enclosure.• Minimum spacing between different wire groups in the same tray should
be 16 cm (6 in.).• Wire runs outside an enclosure should be run in conduit or have shielding/
armor with equivalent attenuation.• Different wire groups should be run in separate conduits.• Minimum spacing between conduits containing different wire groups
should be 8 cm (3 in.).• For additional guidelines, please refer to Wiring and Ground guidelines,
publication DRIVES-IN001.• Wire earth ground to control terminal 14 of the SMC-50 control module.• Use shielded wire for:
• PTC Input• Ground Fault Input
• Terminate shield wires to terminal 14.• Ground fault CT must be inside or within 3 m of metal enclosure.• To meet product susceptibility requirements, ferrite cores need to be
added to the communication lines. All cores specified below are split core type, so they can be added to existing connections.• When using an external HIM (or DPI interface), a core should be
added to the HIM cable near the SMC-50 control module. The recommended core is Fair-Rite no. 0431167281 or equivalent.
• When using DeviceNet, two cores need to be added to the DeviceNet cable near the SMC-50 control module. The recommended cores are TDK ZCAT2033 0930H and TDK ZCAT2035 0930 or equivalent.
ATTENTION: This product has been designed for Class A equipment. Use of the product in domestic environments may cause radio interference, in which case, the installer may need to employ additional mitigation methods.
26 Rockwell Automation Publication 7703E-IN001F-EN-P - July 2019
Control Component Installation Chapter 3
Control Power Control Voltage
The SMC-50 controller will accept a control power input of 100…240V AC, (-15 / +10%), 1 phase, 50/60 Hz. Refer to the product nameplate to verify the control power input voltage.
Connect control power to the controller at terminals 11 and 12. The control power requirement for the control module is 75 VA. Depending on the specific application, additional control circuit transformer VA capacity may be required.
Control Wiring
Table 6 provides the control terminal wire capacity and the tightening torque requirements. Each control terminal will accept a maximum of two wires.
Table 6 - Control Wiring and Tightening Torque
Control Terminal Designations
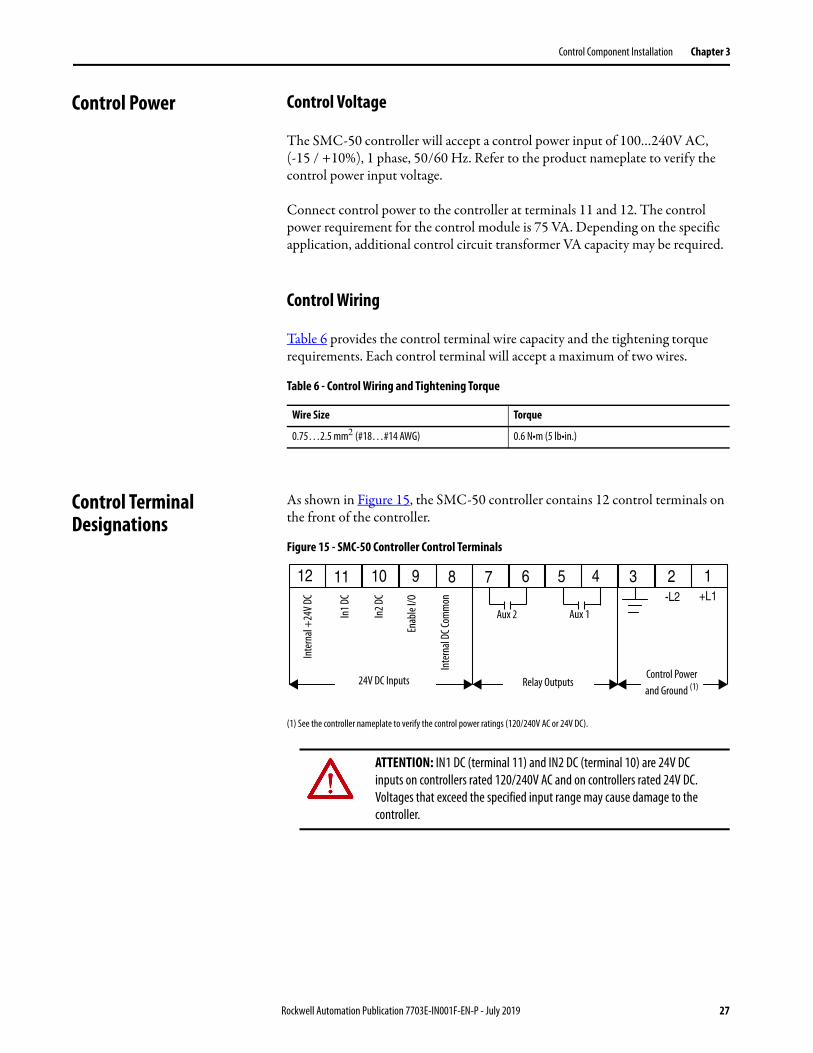
As shown in Figure 15, the SMC-50 controller contains 12 control terminals on the front of the controller.
Figure 15 - SMC-50 Controller Control Terminals
(1) See the controller nameplate to verify the control power ratings (120/240V AC or 24V DC).
Wire Size Torque
0.75…2.5 mm (#18…#14 AWG) 0.6 N•m (5 lb•in.)
ATTENTION: IN1 DC (terminal 11) and IN2 DC (terminal 10) are 24V DC inputs on controllers rated 120/240V AC and on controllers rated 24V DC. Voltages that exceed the specified input range may cause damage to the controller.
-L2 +L1
12 11 10 9 8 7 6 5 4 3 2 1
24V DC Inputs Relay OutputsControl Power and Ground (1)
Inte
rnal
+24
V DC
In1 D
C
In2 D
C
Enab
le I/O
Inte
rnal
DC Co
mm
on
Aux 2 Aux 1
Rockwell Automation Publication 7703E-IN001F-EN-P - July 2019 27

Chapter 3 Control Component Installation
Table 7 - Terminal Descriptions
Note: The OFF state leakage current for a solid-state device connected to an SMC-50 input must be less than 6 mA.
Connecting Interface Board to Voltage Sensing Board
Use the wire harness provided to connect the Voltage Sensing Board and the Interface Board. See Figure 14 for the location of the connector on the interface board, and Figure 8 on page 18 for the connector on the voltage sensing board.
Terminal Number Description
1 (1) (2)
(1) RC snubbers are required when inductive loads are connected to terminal.(2) See the controller nameplate to verify the control power ratings (120/240V AC or 24V DC)
Control Power +L1
2(1)(2) Control Power Common -L2
3 Ground — To connect to the system/control ground point.
4 (1)(3)
(3) When set to external bypass mode, the auxiliary contact is used to control a properly sized external contactor and overload once the motor is at full speed.
Auxiliary Relay Contact #1—rated 3 A @ 120V AC, 1.5 A @ 240V AC
5 (1)(3) Auxiliary Relay Contact #1—rated 3 A @ 120V AC, 1.5 A @ 240V AC
6 (1)(3) Auxiliary Relay Contact #2—rated 3 A @ 120V AC, 1.5 A @ 240V AC
7 (1)(3) Auxiliary Relay Contact #2—rated 3 A @ 120V AC, 1.5 A @ 240V AC
8 DC Internal I/O Power, DC Common
9 Enable I/O
10 (1)(4)
(4) Do not connect any additional loads to this terminal. Parasitic loads may cause problems with operation.
Input #2 (24V DC) (range 15…30V DC)
11 (1)(4) Input #1 (24V DC) (range 15…30V DC)
12 +24V DC Internal I/O Power
28 Rockwell Automation Publication 7703E-IN001F-EN-P - July 2019

Control Component Installation Chapter 3
Connecting Fiber Optic Multiplexer Board to Gate Driver Board
The 7703E-FMUXB Fiber Optic Multiplexer board accepts fiber gate drive signals from the interface board (7703E-INTB) and splits them into the required fiber optic gate drive signals for 10…15 kV.
Figure 16 - Fiber Optic Multiplexer Board Dimensions and Connections
Table 8 - Fiber Optic Multiplexer Board Specifications
1. Use the fiber optic cables (Cat. No. 7703E-XXFOXX) to connect each fiber optic receiver from the gate driver boards to the fiber optic multiplexer board (see Figure 16). Ensure that the gate driver boards of each power phase are connected to the correct terminals on the fiber optic multiplexer board. Observe the minimum bend radius of at least 45 mm (1.75 in.) for the fiber optic cables.
Refer to the appropriate wiring diagram in Chapter 5.
++
++
++
+
++
1
+
+
2
21
3
1
2
+
C11
C23
C30
R63
R40
R67
R10
R35
C15
R64
FO30
FO31
FO36
FO37
U2
FO27
FO21
C21
FO26
FO20
FO24
DS3
DS6
FO18
C9
FO25
R30
FO19
R26
C19
R27
R22
R21
FO15
FO14R19
DS5
FO9
FO8
R20
DS2
FO12
FO13
R53
R51
C14
C1
TP2
FO39
FO38
FO33
FO32
HS2
VR1
D7
C13
DS7
C24
C27
R49
DS4
R50
R38
R59
R33
C25
D5
C29
R47
R46
R45
R34
D6
R58
C28
C26
R62
tp3
R36
C20
R31
C22
R37
C32
R32
FO35
FO34
FO28
FO29
J2
FO3
C12
FO42
D4
R66
R9
HS1
R5
R24
R56
R54
R43
R25
R44
R28
R29
R23
R55
R61
C18
U4
C16
FO23
FO17
FO16
R3
FO22
R1
R2
FO41
FO2
R65
R8
R18
R41
R15
L1
R13
R14
R52
FO6
FO7
R60C17
FO11
FO10
FO4
FO5
RV1
FO40
FO1
F1
J1
L2
L3
R7
DS1
R48
R39
C10
R57
tp1
U5
R6
C33
T1R4D2
C8
D3
U1C7
D1C5
C6
C4
R42
C3
U3
C2
C31
R12
R11
R17
R16
TB1
127.0[5.00]
28.6[1.13]
4.0 [0.16](5) MTG HOLES
118.4[4.66]
52.8[2.08]
210.0 [8.27]
201.4 [7.93]
100.7 [3.96]
Phase A Phase B Phase C
Control Voltage 110/120V…220/240V at 50/60 Hz, 30 VA
Gate Drive (In/Out) Via Fiber Optics
ATTENTION: Do not sharply bend or strike the fiber optic cables when handling them. A minimum bend radius of at least 45 mm (1.75 in.) should be maintained throughout the system. Damaging the cables may result in signal loss to the components and improper functioning of the unit.
IMPORTANT Fiber optic components are color coded for easier connections. Receiver terminals are dark blue, and transmitter terminals are grey or black. The cables have a grey connector at one end and a blue one at the other. When connecting to the gate driver boards, the dark blue connector must plug into the dark blue receiver and the grey connector must plug into the grey or black transmitter.
Rockwell Automation Publication 7703E-IN001F-EN-P - July 2019 29

Chapter 3 Control Component Installation
2. Connect a single fiber optic cable between the interface board transmitter (one per phase) to the corresponding receiver on the fiber optic multiplexer board.
3. Connect the temperature feedback fiber optic receivers for each phase from the interface board to the appropriate gate driver board transmitter. Refer to Chapter 5 for the appropriate diagram for the temperature feedback fiber optic connections.
Additional Control Components
Additional control components are required to complete the circuit, depending on the application. Some of these control components are outlined in Chapter 4 and Appendix B.
It is the responsibility of the OEM to ensure that all required power and control components are supplied and functional.
IMPORTANT It is acceptable to connect the fiber optic transmitter cables to any port within a particular power phase. Note that the cables for the temperature feedback ports should be connected to the correct phase. See Figure 14 for the Interface Board layout.
30 Rockwell Automation Publication 7703E-IN001F-EN-P - July 2019
Chapter 4
Main and Bypass Switching Device Installation
Introduction The MV SMC components are designed for intermittent starting duty. A bypass contactor or circuit breaker must be used to bypass the PowerBrick™ assemblies once the motor is at full speed.
Main Contactor or Circuit Breaker
A line switch is required in order to isolate the power stacks from line voltage. • If a line contactor is used, suitable short-circuit protection must be
provided in compliance with relevant standards and/or local codes (see Standards and Codes on page 7).
• If a circuit breaker is used for the line switch, it must be rated to handle normal load and short-circuit conditions.
Bypass Contactor or Circuit Breaker
A bypass contactor or circuit breaker must be used in the SMC configuration to bypass the SCRs once the motor is up to speed. The bypass must have an opening time of 100 ms or less.
ATTENTION: A bypass contactor or circuit breaker must be installed to complete the SMC configuration. SCRs are not rated for continuous duty. The duty cycle is limited to 60 seconds per hour. This can be a combination of starting and stopping cycles that does not exceed 30 seconds per cycle. Failure to install a bypass contactor or circuit breaker may result in damage to components from overheating.
Rockwell Automation Publication 7703E-IN001F-EN-P - July 2019 31

Chapter 4 Main and Bypass Switching Device Installation
Notes:
32 Rockwell Automation Publication 7703E-IN001F-EN-P - July 2019

Chapter 5
Typical Wiring Diagrams
Wiring Diagrams The following wiring diagrams illustrate the connections between the main components of the MV SMC OEM components.
Additional components are typically required to complete the MV SMC. See Appendix B for examples of how these additional components can be implemented to form a complete solution.
ATTENTION: Wires used for connecting the components must be sufficiently insulated to withstand system voltage. Refer to the appropriate wiring diagram for the wire insulation requirements. Failure to use adequately insulated wiring may cause injury to personnel and/or damage to the equipment.
Rockwell Automation Publication 7703E-IN001F-EN-P - July 2019 33

Chapter 5 Typical Wiring Diagrams
Figure 17 - Typical Power Circuit Wiring Diagram (10-15 kV)
PHASE A PHASE B PHASE C
FO4-15 FO16-27 FO28-39
GATE TRANSMITTERS
115/230V AC
11
5/2
30
V A
C
G
L2/N
L1
TB1
TB6
RX1
TX17
TX18
RX2
RX3
TX10
TX16
TX15
TX5
TX6
TX11
TX12
TX14
TX13
TX9
TX4
TX3
TX8
GDPS
TX2
TX1
TX7
VSBTB21
PHASE A
PHASE C
TEMP. C-
A+
A-
B-
B+
TB5
C+
CT INPU
TS
GATE TRAN
SMITTERS
PHASE B
POW
ERIN
4
3
2
1
TB7
POW
ERO
UT
1
2
G
L2/N
L1
TB1
POW
ERIN
SMC-
50 IN
TERF
ACE
BOAR
D
C-
A+
A-
B-
B+
C+SMC-50 FIBER OPTICMULTIPLEXER BOARD
TO J1 ON VSB
NOTE: Only devices supplied by Rockwell Automation are shown. Additional devices are required to form a complete solution (refer to Appendix B for a typical schematic showing other devices).
See F
igure
23.
34 Rockwell Automation Publication 7703E-IN001F-EN-P - July 2019

Chapter 6
Final Test Procedures
Final Test Procedures • Verify that the enclosure is properly grounded.• Verify that phase-to-phase and phase-to-ground clearances meet the
requirements of the local electrical code. • Visually check for sufficient electrical clearances, creepage allowances and
bend radii. Refer to the applicable local electrical codes. • Check the tightness of all power and control connections. See Table 6 on
page 27 for recommended torque values. Gently tug on all wires to ensure that they are properly connected.
• Check for cross-threaded hardware. In addition to the regular power connections, check the connections and wiring to the voltage sensing board.
• The high voltage silicone-insulated wires must be identified with tube markers. Avoid routing the wires over any components. If the wires are routed near live parts or ground, there must be enough slack in the wire to allow at least 15 cm (6 in.) of creep or clearance between the wire and other parts. Tie wraps must not tightly squeeze the high voltage wires, and must not be put on with a tie-wrap gun.
• Do not remove the plastic plugs from unused fiber optic transmitters on the circuit boards.
• Verify that the fiber optic cables between the interface board, fiber optic multiplexer board, and the gate driver boards are connected to the correct power phase.
• Check the routing of the twisted pair of red and white cathode and gate wires from the SCRs. They can safely touch the heatsink on the side of the SCR that they are exiting; however, they must not touch the heatsink on the other side of the SCR. The wires must be properly supported to ensure this condition is met. See wiring diagrams in Appendix B for the sequences.
• Wiring to the voltage sensing board from the power stacks must be rated for the line voltage. Rockwell Automation recommends UL style 3239, #18 AWG, 40 kV DC silicone rubber insulated wire covered with PVC tubing or other suitable material for this application. These wires must not touch live parts, grounded metal or low voltage wiring.
ATTENTION: All hardware for electrical connections must be torqued to the above specifications. Failure to do so may result in electrical faults causing personal injury or damage to the equipment.
Rockwell Automation Publication 7703E-IN001F-EN-P - July 2019 35

Chapter 6 Final Test Procedures
• The bypass vacuum contactor or breaker (and capacitor contactor if applicable) must have a fast drop-out time (typically 100 milliseconds or less).
Dielectric Test 1. Remove the ribbon cable and ground wires from the voltage sensing board, and isolate the ends to prepare for the Hi-Pot test.
2. Jumper the line and load terminals together within each phase (Figure 18).
Figure 18 - Example of Jumper Positioning for Hi-pot Test
3. Measure the resistance between the line and load sides of each PowerBrick™ phase assembly to make sure there is zero resistance. This indicates that the jumpers are properly set.
4. Perform a Hi-Pot test as required by the applicable local codes and standards. Typical levels for field testing are two times the rated voltage of the equipment.
5. After the Hi-Pot remove the heatsink jumpers. Re-connect the feedback board wires.
6. Perform a resistance check for each SCR. The SCR resistance can be checked directly at the device or at the leads on the gate driver board. a. The gate-to-cathode resistance should range from 10…40 Ω for all
styles.b. The cathode-to-cathode resistance can also be checked and should be
between 20…32 ks per brick.
7. Check all line and load resistances to ground at the interface board voltage feedback test points. The measurement for all voltages should be within 11…13 kΩ.
Jumper
36 Rockwell Automation Publication 7703E-IN001F-EN-P - July 2019

Final Test Procedures Chapter 6
Additional Tests Perform additional tests as outlined in the CENTERLINE Medium Voltage SMC-50 Motor Controller user manual, publication 1560F-UM001.
Programming Medium Voltage SMC-50 Module
See publication 1560F-UM001 for programming procedures and default (factory) parameter settings.
If the factory settings are not suitable for the application, program the module to meet the application requirements.
Voltage Sensing Module The MV ratios shown above are nominal values and may be fine tuned to achieve better accuracy on the display of the SMC-50 control module. While running the motor in bypass mode, compare the voltage displayed on the control module to a known accurate meter connected to the same source voltage as the motor the MV SMC-50 is controlling. Parameter 169, MV Ratio, may be changed up or down to match the HIM display to the external meter. A small change in ratio can make a large change in the display, so 5 units at a time are recommended. Increasing the ratio will decrease the displayed voltage, and visa versa.
Table 9 - MV Ratio
Power Supply Test
1. Isolate incoming power
IMPORTANT The module should be programmed with an understanding of how the SMC functions, and the characteristics of the motor and driven load. Inappropriate settings may elicit unexpected results such as lack of acceleration torque or full-voltage starting. For Pump Control applications, refer to Application Considerations in publication 1560F-UM001.
Voltage MV Ratio
12000V 126
14400V 97
ATTENTION: Servicing energized industrial control equipment can be hazardous. Severe injury or death can result from electrical shock, burn, or unintended actuation of controlled equipment. Before proceeding, ensure that all sources of power are isolated and locked out. Verify that all circuits are voltage free using a hot stick or appropriate voltage measuring device. Any covers or barriers removed during this procedure must be replaced and securely fastened before energizing equipment. Where appropriate, the case of test equipment should be connected to ground.
Rockwell Automation Publication 7703E-IN001F-EN-P - July 2019 37

Chapter 6 Final Test Procedures
2. Open the door(s) providing access to the SCR/heatsink assemblies. You will be touching components which are connected to the high voltage power circuit, so be sure to isolate power as stated above.
3. Apply rated control voltage to the control circuits from a separate control source, or by plugging into the test source connector, and selecting the TEST position of the control switch.
4. Check voltage on each gate-driver board by connecting a DC voltmeter at TP4(+) and TP3(-). (See Figure 20.) The voltage should be 18…22V DC.
5. Locate the SMC-50 interface board in the control section (See Figure 19). This circuit board has the control module mounted on it. Locate the switch labeled SW2 at the upper left corner of the board. Close the switch by sliding the toggle up. This starts a pulse generator to supply simulated gate-pulse signals via fiber optic cables to the gate driver boards. A red LED beside the switch, and the three yellow LEDs on the left side of the Interface board should be lit.
Note: They may appear dim, depending on ambient light conditions.
Figure 19 - Interface PCB
6. With the gate pulses on, check the voltage again on each gate-driver board as described in step 4 above. The voltage should be 4…5V DC.
7. Locate the Portable Test Power Supply that was included with the equipment, and verify that the rating corresponds to the available power system (i.e., 110/120V AC or 220/240V AC). Plug the unit into the power source, and plug the green connector into J1 on each of the gate driver boards (see Figure 20).
SW2 – Close (slide up) to initiate test pulse Red LED – ON when test pulses active
38 Rockwell Automation Publication 7703E-IN001F-EN-P - July 2019

Final Test Procedures Chapter 6
ur
Figure 20 - Test Power Application on Gate Driver Board
8. The yellow LED on the upper right-hand side of the energized gate driver circuit should be lit (it may appear dim, depending on ambient light conditions). While the gate pulses are still on, check the voltage on each gate driver board as described in step 4 above. The voltage should be 10…12V DC. If the voltage is less than 5V, then you have a bad gate drive board. Do not leave the Portable Test Power Supply connected to a bad gate driver board. The power supply adapter will burn up if the gate driver board is shorted.
9. A more detailed check is performed by verifying the actual gate pulses by connecting an oscilloscope between TP1 and TP3 (-) (see Figure 4 on page 14). To check gate pulses, the pulse generator must be enabled (i.e. SW2 toggled up) and the Portable Test Power Supply should be connected to J1. The pulse should appear as shown in Figure 21 and Figure 22.
Temperature signal fiber optic Yellow LED
Thermistorconnector
Gate signal test point
Gate/cathode connector
Overvoltage +20V test point
+5V test point
Gate signal fiber optic
Plug-in test power supply
Current loop CT connector
bber minal
Cathode terminal
Common test point
Rockwell Automation Publication 7703E-IN001F-EN-P - July 2019 39

Chapter 6 Final Test Procedures
Figure 21 - Gate Pulse Detail – Typical SCR (ABB)
Figure 22 - Gate Pulse Test Waveform
10. If no pulse is observed, and the yellow LED is lit, check for a shorted gate on the SCR by removing the green plug and connecting an ohmmeter to the gate leads. If the LED is not lit, and the circuit voltage is as specified in step 8 (above), pinch the tab on the blue fiber-optic connector and carefully pull it straight out of the receiver. The end of the connector should glow red to indicate the presence of a gate signal.
If it does not, remove the other end of the cable from the interface board and check that the grey transmitter is emitting red light. If it is, the fiber-optic cable must be replaced. If it isn’t, the interface board should be replaced.
ATTENTION: Do not look directly into the end of the fiber optic cable.
Microseconds
Volts
Microseconds
40 Rockwell Automation Publication 7703E-IN001F-EN-P - July 2019

Final Test Procedures Chapter 6
11. When each gate driver circuit has been checked, disconnect the power supply and remove it from the cabinet.
12. Open the switch SW2 on the interface board (see Figure 20) before returning the unit to service. Ensure the red LED is off.
13. Check that all plugs and connectors are secure. Retrieve all hardware and tools from the equipment. Replace and secure any barriers removed during servicing and close all doors before applying power.
14. Apply rated control voltage to the control circuit.
15. Using the control schematic, apply control signals to cause relays and contactors to energize, to verify operation.
16. Remove any jumpers used in the test and restore all circuits to normal when finished.
Start-Up 1. Remove any temporary jumpers or grounding devices used during commissioning.
2. Check that all tools are removed from the equipment. Any tools or hardware used or dropped during installation and commissioning must be retrieved and accounted for.
3. Check that all barriers or covers removed during installation or commissioning have been securely mounted.
4. Close and secure all doors, and verify function of all interlocks that prevent access to medium voltage compartments when the unit is energized.
5. The controller is ready to power the motor.
ATTENTION: The gate-drive circuits operate at high voltage when the SMC is energized. Failure to remove the portable test power supply will result in equipment damage and may cause severe injury or death.
ATTENTION: If the SW2 switch is not in the open position when the SMC is energized, the motor will start in an uncontrolled manner and may cause severe damage.
ATTENTION: Servicing energized industrial control equipment can be hazardous. Severe injury or death can result from electrical shock, burn, or unintended actuation of controlled equipment. Recommended practice is to disconnect and lock out control equipment from power sources, and allow any stored energy in capacitors to dissipate. The safety related work practices of NFPA 70E, Electrical Safety Requirements for Employee Workplaces, must be followed if it is necessary to work in the vicinity of energized equipment.
Rockwell Automation Publication 7703E-IN001F-EN-P - July 2019 41

Chapter 6 Final Test Procedures
Notes:
42 Rockwell Automation Publication 7703E-IN001F-EN-P - July 2019

Appendix A
Component Deratings
Deratings Specifications The components described in this publication may be applied in a wide variety of situations. Some applications may require component derating. For example, at altitudes above 1000 m (3300 ft), the maximum current and basic impulse level (BIL) are reduced as shown in Table 10.
Table 10 - Component Derating Table
Altitude Rating Reduce Max. Continuous Current Rating by: B.I.L. Withstand Rating
160 A 340 A 580 A 12 kV 15 kV
0…1000 m(0…3300 ft)
— — 75 kv 95 kV
1001…2000 m(3301…6600 ft)
5 A 10 A 15 A 66 kV 84 kV
2001…3000 m(6601…9900 ft)
10 A 20 A 30 A 59 kV 74 kV
3001…4000 m(9901…13,200 ft)
15 A 30 A 45 A 52 kV 66 kV
4001…5000 m(13,201…16,500 ft)
20 A 40 A 60 A 46 kV 58 kV
Rockwell Automation Publication 7703E-IN001F-EN-P - July 2019 43

Appendix A Component Deratings
Notes:
44 Rockwell Automation Publication 7703E-IN001F-EN-P - July 2019

Appendix B
Typical Schematic Diagrams
Introduction This Appendix contains a typical schematic for a complete MV SMC-50 controller (refer to Figure 23).
Refer to publication 1560F-UM001 for additional samples of control wiring configurations. The examples shown are not a recommendation for the correct wiring configurations, nor is the OEM required to follow this design exactly.
The OEM must ensure that all wiring for the unit meets all performance and safety requirements, including any applicable laws, regulations, codes and standards.
Rockwell Automation does not assume any responsibility or liability for loss or damages caused by failures in the unit manufactured by the OEM.
A configuration similar to Figure 23 requires input disconnection (optional), as well as main and bypass vacuum contactors.
Rockwell Automation Publication 7703E-IN001F-EN-P - July 2019 45

Appendix B Typical Schematic Diagrams
Figure 23 - Typical Power System Diagram (10…15 kV)L1
L2
GRD
L3
24C
PHAS
E A
PHAS
E B
PHAS
E C
FO4-
15FO
16-2
7FO
28-3
9
GND2
GND1
J1
1 2 3 4 5 6
GATE
TRA
NSMI
TTER
S
-RS
1-R
S n
TO S
MC-5
0 CT
INPU
TS
-QB
-QB
-QE
SMC-
50
CONT
ROL
MODU
LELOOP
CT
FROM
CUR
RENT
MTR
2
1
OV1
C1S1
OV2
RR1/2
RS1/2
/3
C2S2
CS
RX1
GTX
1C
T
-GP1
TEST
-BC
-+
OVS
C
RX1
TX1
TC
GOV
-BC
TEST
+-
-GP2S
C
G1G2
TT
G2
2
1
C1S1
RS1/2
/3
C2S2
CS
G1
TT
RX1
GTX
1C
T
-GP2
TEST
-BC
-+
OVS
C
RX1
TX1
TC
GOV
-BC
TEST
+-
-GP1S
C
OV2
OV1
RR1/2 TO
FROM
STA
RTCO
NTRO
LLER
PHAS
E CT
S
STAR
T CO
NTRO
LLER
BYPA
SS C
ONTR
OLLE
R
POW
ER C
ONVE
RTER
- CUR
RENT
LOOP
GAT
E DR
IVER
BOA
RD-G
P
- SMC
-50 I
NTER
FACE
BOA
RD-K
F2-BC
- SMC
-50 F
IBRE
OPT
IC B
OARD
-KF1
- CUR
RENT
TRA
NSFO
RMER
- CIR
CUIT
BRE
AKER
-QB
- EAR
THIN
G SW
ITCH
(OPT
IONA
L EQU
IPME
NT)
-QE
- SMC
-50
POW
ERBR
ICK
ASSE
MBLY
-RS
- VOL
TAGE
SEN
SING
BOA
RD-B
V
WIR
E CO
NNEC
TION
S FO
R PH
ASE
A
CONN
ECTI
ONS
SHOW
N FO
R PH
ASE
C
LEGE
ND
WIR
E CO
NNEC
TION
S FO
R PH
ASE
B
ON T
HE C
URRE
NT LO
OP A
SSEM
BLY
CURR
ENT
LOOP
CON
DUCT
ORS
PASS
THR
OUGH
THE
C.T
.'S
REMO
TE E
QUIP
MENT
VOLT
AGE
NUMB
ER O
F
10-1
2kV
512
.1-14
.4kV
6
INCO
MING
LINE
UNIT
INCO
MING
LINE
CUST
OMER
'S
L3L2L1
1
-BC2
-BC1
-BC3
-BC2
-BC1
-BC3
-BV
T3T2T1
115/230V AC
115/230V AC
GL2/NL1TB1
TB6
RX1
TX17
TX18
RX2
RX3
TX10
TX16
TX15
TX5
TX6
TX11
TX12
TX14
TX13
TX9
TX4
TX3
TX8
GD
PS
TX2
TX1
TX7
VSB
TB21
PHASE A PHASE C TEMP.
C-A+
A-
B-B+TB5
C+
CT INPUTS
GATE TRANSMITTERSPHASE B
POWERIN
4 3 2 1 TB7
POWEROUT
1 2
GL2/NL1
TB1
POWERIN
SMC-50 INTERFACE BOARD
C-A+
A-
B-B+ C+SM
C-50
FIB
ER O
PTIC
MU
LTIP
LEXE
R BO
ARD
46 Rockwell Automation Publication 7703E-IN001F-EN-P - July 2019

Typical Schematic Diagrams Appendix B
Figure 24 - Typical Control Circuit, Standard Module (10-15 kV)
Note: Requires optional Main and Bypass control panels, as well as control relays and pilot devices.
123456789101112
+L1
-L2
GN
D
Aux1Aux2COM
Enab
le
Inpu
t 1 D
C
Inpu
t 2 D
C
+24V
DC
A1A2A3A4A5A6A7A8A9A10A11A12
Aux A1
Inpu
t A1
Inpu
t A2
Inpu
t A3
Inpu
t A4
COM
Aux A2Aux A3
NC
SLOT 7 150-SM4
SLOT 8 SLOT 9
DPI COMMSMC 50
EXT. BYPASSNORMAL
STAR
T
STO
P O
PTIO
N
COAS
T
Emer
. By
p.
FAULT
3 4
SMC 50IB_TB6
CL_FLT
MC
SS
BC
SS
From SMC 50IB TB7
CR
CL_FLT
CR
CR
CR
CL_FLT
ESTOP
STOP
MC CR
CONTROL RELAY (CR)
FAULT RELAY
Rockwell Automation Publication 7703E-IN001F-EN-P - July 2019 47

Appendix B Typical Schematic Diagrams
Notes:
48 Rockwell Automation Publication 7703E-IN001F-EN-P - July 2019

Appendix C
Spare Parts
PowerBricks Table 11 - PowerBrick Replacements
Table 12 - Snubber Capacitor / Snubber Resistor
Part Number Description Match Designator PowerBrick Current Rating
81020-232-51-R Heatsink Assembly only W 160 A
81020-753-51-R IJ
81020-230-51-R Complete PowerBrick W
81020-752-51-R IJ
81020-232-57-R Heatsink Assembly only Y 340 A
81020-232-58-R Z
81020-230-57-R Complete PowerBrick Y
81020-230-58-R Z
81020-753-85-R Heatsink Assembly only DM 580 A
81020-753-86-R DN
81020-752-85-R Complete PowerBrick DM
81020-752-86-R DN
Snubber Capacitor Part Number
200/400 Amp
All voltages 80026-508-02 (0.68 μF)
Snubber Resistor(1)
(1) All parts are ceramic, wirewound, non-inductive winding.
Part Number(2)
(2) Resistors are series connected for a total of 60 Ω per snubber for 180/360A assemblies and 30 Ω per snubber for 600A assemblies. A PowerBrick has one snubber per pair of SCRs.
200/400 Amp
3 per PowerBrick 80026-561-02-R (20 Ω, 120 W)
Rockwell Automation Publication 7703E-IN001F-EN-P - July 2019 49

Appendix C Spare Parts
Table 13 - Common Parts
Table 14 - Accessories
Part Number Description Quantity
80026-562-01-R Sharing resistor 16.25 kS, 112W, 2.5 k, tap 2 per SCR pair(1)
(1) See Table 11 for an explanation of the number of SCRs per controller, which is voltage dependent.
80190-519-02-R Current loop self-powered gate driver board (CLGD) 1 per SCR(1)
81020-237-52-R Voltage Sensing Board (VSB)
10-12 kV 1 per controller
81020-237-53-R 12.1-15 kV
PN-545832 160 A, Interface Board, 10…15 kV 1 per controller
PN-545833 340 A, Interface Board, 10…15 kV 1 per controller
PN-545835 580 A, Interface Board, 10…15 kV 1 per controller
80190-679-01-R Fiber optic multiplexer Board 1 per controller
80025-549-03-R Fiber Optic Cable 2.5 m (8.2 ft) (1 per SCR) + 6(1)
80025-549-01 5 m (16.4 ft)
80187-051-51-R Test Power Supply 120V AC for North America 1 per controller
80187-245-51-R Universal
80022-133-01 Current loop transformer 50 VA, 115/230 : 0.6V 1 per controller
80022-133-02 100 VA, 115/230:1.5V
80018-246-56 Current loop cable (4.3 m) 14 ft (2)
(2) Different lengths may be used for various configurations. The current loop total length must conform to the requirements outlined in Current Loop Gate Drive Power Assembly (CLGD) on page 19.
80018-246-57 (6.4 m) 21 ft
80022-163-01 Current loop sense CT 1 per controller
80026-146-56 Ribbon cable from VSB to Interface Board 1 per controller
80174-201-01 Ribbon cable from control module to Interface board
6-pin 2 per controller
80174-201-02 8-pin 3 per controller
Part Number Description Quantity
PN-281287 Control Module (Standard) 1
350325-A06 HIM (Bezel Mounted) 1
PN-71481 SMC-50 Digital I/O Module 1
PN-71480 SMC-50 Ground Fault, PTC Module 1
80144-491-02 Fuse Extractor
50 Rockwell Automation Publication 7703E-IN001F-EN-P - July 2019

Index
Aadditional test procedures 37
Bbypass switching device
installation 31
Ccatalog numbers
PowerBricks 9voltage sensing boards 10
CLGD (current loop gate drive power assembly) 19
codesCEC 7CSA 7ICS1 7ICS3 7IEC 7NEC 7OSHA 7UL 7
control componentscontrol power 27
voltage 27wiring 27wiring, torque requirements 27
derating 43EMC compliance 26installation 23interface board
connections 25installation 23layout 24mounting 23
SMC-50 control modulecontrol terminal designations 27installation 25
control powercontrol components 27
voltage 27wiring 27
control terminal designations 27current loop gate drive power assembly
(CLGD) 19
Dderating
control components 43diagrams
schematic 4510...15 kV control circuit 4710...15 kV power system 46
wiring 33dielectric test procedure 36
jumper positioning 36
dimensionsPowerBricks 10, 12, 13, 14voltage sensing board 17
Eelectrostatic sensitive devices
handling procedures 7EMC compliance
control components 26ESD (Electrostatic Sensitive Devices)
handling procedures 7
Ffiber optic multiplexer board
connec to gate driver board 29
Ggate driver board
connect to fiber optic multiplexer board 29
Hhandling procedures
ESD (electrostatic sensitive devices) 7
Iidentification, PowerBricks 9installation
bypass switching device 31control bomponents
interface boards 23control components 23
SMC-50 control module 25main switching device 31PowerBricks 9
interface boardconnect to voltage sensing board 28connections 25layout 24mounting 23
Llayout
interface board 24loop length
power supply transformer rating 20
Mmain switching device
installation 31
Rockwell Automation Publication 7703E-IN001F-EN-P - July 2019 51

Index
mountinginterface boards 23PowerBricks 11, 13, 14voltage sensing boards 17
Ooperating restrictions
PowerBricks 16options
PowerBricks 9voltage sensing boards 10
Ppower connections
PowerBricks 15grounding 16
voltage sensing boards 17power supply test procedure 37power supply transformer rating
loop length 20PowerBrick
catalog numbers 9current loop gate drive power assembly
(CLGD) 19dimensions 10, 12, 13, 14identification 9installation 9mounting 11, 13, 14operating restrictions 16options 9power connections 15
grounding 16spare parts 49specifications 10torque requirements 11
programming 37SMC-50 control module 37
Rreceving
overview 7
Sschematic diagrams 45
10...15 kV control circuit 4710...15 kV power system 46
SMC-50 control modulecontrol terminal designations 27installation 25programming 37
spare parts 49PowerBricks 49
specificationsPowerBricks 10
standards and codes 7start-up test procedure 41
Ttest procedures 35
additional 37dielectric 36
jumper positioning 36power supply 37start-up 41
torque requirementscontrol components
wiring 27PowerBricks 11
Vvoltage ratios
voltage sensing module 37voltage sensing board
catalog numbers 10connect to interface board 28dimensions 17mounting 17options 10power connections 17
voltage sensing modulevoltage ratios 37
Wwiring diagrams 33
52 Rockwell Automation Publication 7703E-IN001F-EN-P - July 2019


Publication 7703E-IN001F-EN-P - July 2019Supersedes Publication 7703E-IN001E-EN-P - August 2014 Copyright © 2019 Rockwell Automation, Inc. All rights reserved. Printed in Canada.
Rockwell Automation Support
Use the following resources to access support information.
Documentation Feedback
Your comments will help us serve your documentation needs better. If you have any suggestions on how to improve this document, complete the How Are We Doing? form at http://literature.rockwellautomation.com/idc/groups/literature/documents/du/ra-du002_-en-e.pdf.
Technical Support Center Knowledgebase Articles, How-to Videos, FAQs, Chat, User Forums, and Product Notification Updates.
https://rockwellautomation.custhelp.com/
Local Technical Support Phone Numbers
Locate the phone number for your country. http://www.rockwellautomation.com/global/support/get-support-now.page
Direct Dial Codes Find the Direct Dial Code for your product. Use the code to route your call directly to a technical support engineer.
http://www.rockwellautomation.com/global/support/direct-dial.page
Literature Library Installation Instructions, Manuals, Brochures, and Technical Data.
http://www.rockwellautomation.com/global/literature-library/overview.page
Product Compatibility and Download Center (PCDC)
Get help determining how products interact, check features and capabilities, and find associated firmware.
http://www.rockwellautomation.com/global/support/pcdc.page
.
Rockwell Otomasyon Ticaret A.Ş., Kar Plaza İş Merkezi E Blok Kat:6 34752 İçerenköy, İstanbul, Tel: +90 (216) 5698400
Rockwell Automation maintains current product environmental information on its website at http://www.rockwellautomation.com/rockwellautomation/about-us/sustainability-ethics/product-environmental-compliance.page.
Allen-Bradley, CENTERLINE, PowerBrick, Rockwell Automation, Rockwell Software, and SMC-50 are trademarks of Rockwell Automation, Inc.
Trademarks not belonging to Rockwell Automation are property of their respective companies.