Embed Size (px)
Citation preview

MEAT & EGG QUALITY AND PROCESSING: LABORATORY EXERCISESFor Afghanistan
AUTHORSPAUL EBNER, PhD
Associate Professor, Purdue University, College of Agriculture, Animal Sciences
MOHAMMAD ALAM GHORYAR, PhD Associate Professor, Herat University, Faculty of Agriculture
SHOAIB AHMAD SHAKHES, DVM, MVSc. Associate Professor, Herat University, Faculty of Veterinary Science

2
AUTHORS
Paul Ebner, PhD Associate Professor, Purdue University, College of Agriculture, Animal Sciences
Mohammad Alam Ghoryar, PhD Associate Professor, Herat University, Faculty of Agriculture
Shoaib Ahmad Shakhes, DVM, MVSc., Associate Professor, Herat University, Faculty of Veterinary Science
Prepared for the USWDP Food Technology Bridge Program at Herat University
Front cover photo credit: ThinkStock
It is the policy of the Purdue University Cooperative Extension Service that all persons have equal opportunity and access to its educational programs, services, activities, and facilities without regard to race, religion, color, sex, age, national origin or ancestry, marital status, parental status, sexual orientation, disability or status as a veteran.
Purdue University is an Affirmative Action institution. This material may be available in alternative formats.
March 2018
Order or download materials from Purdue Extension • The Education Store
www.edustore.purdue.edu1-888-EXT-INFO • www.extension.purdue.edu
AS-637

3
TABLE OF CONTENTS
PHYSICAL TESTS OF MEAT 3Color 4
Meat Color Experiments 6
Physical Signs of Spoilage 8
CHEMICAL TESTS OF MEAT 9Water in Meat 9
Measuring Water Percentage 10
Measuring Drip Loss 11
pH of Meat 12
Measuring pH of Meat 13
MICROBIAL TESTS 14Microbial Tests — Coliform Test 15
Salmonella Test 17
MEAT PROCESSING LABORATORY EXERCISES 18Poultry 19
Meat Preservation 19
EGG QUALITY TESTS 22Candling 22
Haugh Measurement 24
NOTES 26-27
TABLE OF CONTENTS

4
PHYSICAL TESTS OF MEATA great deal of information can be learned from basic physical tests of meat. Meats should have specific odors (or lack thereof ), colors, and textures. Improper processing, contamination, and spoilage can each have significant effects on these characteristics, and those effects can be easily seen, smelled, or felt. Some preliminary tests of meat quality can be done very rapidly with minimum equipment or tools.
1. COLOR
Color in meat is probably the characteristic most often used by consumers when determining the quality of a meat product. Meat color, however, is sometimes misunderstood. The red color in red meats, such as beef and lamb, is not due to blood. It is due to the amount of myoglobin in the muscle. Muscles in animals such as cows contain much more myoglobin than muscles from poultry. Therefore, poultry is generally a pale, whitish color.
Myoglobin is used to transport oxygen in muscle, similar to how hemoglobin transports oxygen in blood. Like hemoglobin, myoglobin contains hemes. When exposed to UV light, the iron component of heme fluoresces red.
The amount of myoglobin is also affected by how the muscle is used. Heavy use muscles that require more oxygen generally have higher amounts of myoglobin. Fresh cuts of heavy use muscles usually will appear bright red on their surfaces.
It is sometimes difficult, however, to judge the quality of a high myoglobin meat based only on its color. Just as in the live animal, the iron component of myoglobin continually undergoes oxidation and reduction. Myoglobin in natural meat is usually in one of three states: myoglobin, oxymyoglobin, and metmyoglobin. Each of these different states is associated with a different color.
Myoglobin: When freshly cut meat has not been exposed to oxygen, the iron is in the myoglobin state. The color of this meat is usually purple/red. This color is usually seen in the center of the muscle when the carcass is first cut, before it is exposed to outside oxygen.
Oxymyoglobin: Once exposed to oxygen, the myoglobin becomes oxygenated, becoming oxymyoglobin. The color of this meat is usually red/bright pink. This is the traditional “fresh meat” color.
GENERAL MILK QUALITY TESTS
PHYSICAL TESTS OF MEAT
ColorMeat Color ExperimentsPhysical Signs of Spoilage
PHYSICAL TESTS OF MEAT

5
Metmyoglobin: Once fresh meat is exposed to oxygen and becomes red, it can then turn different shades of brown/gray if oxygen levels are depleted. This is due to the oxymyoglobin undergoing oxidation (losing an electron). This is often seen on the underside of the packaged meat, where the top surface of the meat is bright pink due to exposure to oxygen (if the packaging is oxygen permeable), while the bottom surface, which is exposed to much less oxygen, is brown. Once meat becomes brown due to metmyoglobin, it is very difficult to become red/pink again. Incidentally, meat becomes brown during cooking as all forms of myoglobin are broken down.
Other Forms of Myoglobin and Impact on Color. Myoglobin can bind to other compounds besides oxygen, and this can significantly impact color. Carbon monoxide binds to myoglobin to form carboxymyoglobin. Such meat can remain pink for extended periods if refrigerated or frozen (months, in some cases). Nitric oxide also binds to myoglobin to form nitrosomyoglobin, which can also keep the meat pink for very long periods. Both carbon monoxide and nitric oxide are found in smoke. As such, smoked meats often appear bright red or pink although they are thoroughly cooked. Nitrites are sometimes added to cured meats, and in doing so, create nitrosomyoglobin. After cooking, those meats can remain pink.
It is important to note that brown meat is not always safe to eat. Spoilage can often change the color of meat to brown as well. This is done by microbial breakdown of myoglobin similar to what is seen when meat is cooked.
PHYSICAL TESTS OF MEAT
MyoglobinPurple / Red
OxymyoglobinPurple / Red
MetmyoglobinBrown
Oxygenadded
Oxygenremoved
Reduction(electron gain)
Oxidation(electron loss)
1
1. Alternating Forms of Myoglobin in Meat and the Corresponding colors.

6
2. MEAT COLOR EXPERIMENTS
The experiments below are designed to show the changes in meat color due to changes in myoglobin. They are used to illustrate natural changes in color due to the level of oxygen exposure.
MATERIALS:
• ~2Kg of ground red (beef, lamb, mutton) meat. If ground meat is not available, the same demonstration can be done with whole cuts of red meats.
• Stomacher bags or similar container• Oxygen-impermeable wrapping• Refrigerator• Sodium nitrite
PROCEDURE:
STEP 1
1. Remove meat from package.2. Examine the underside to see if the color on the bottom matches the
color on the top.3. Slice through the meat along its length.4. Examine the color throughout the meat.
PHYSICAL TESTS OF MEAT
1. The picture above shows fresh ground beef. The myoglobin in the pink portions is in the oxymyoglobin state. The myglobin in the brown portions is in the metmyoglobin state.
Oxymyoglobin
Metmyoglobin

7PHYSICAL TESTS OF MEAT
STEP 2.
1. Form two patties from the same meat package (whole meat cuts will also work).
2. Wrap one patty in oxygen-impermeable wrap and one in oxygen-permeable wrap.
3. Place both in the refrigerator, incubate for 1–2 hr and observe color changes.
NOTES ON MEAT COLOR EXPERIMENTS
1. Form meat into two flat patties 2. Wrap one patty in oxygen- impermeable plastic wrap (or similar container that is impervious to oxygen). Wrap the second patty in plastic wrap that allows oxygen. Incubate both patties in the refrigerator for 1-2 hours and compare color changes.

8 PHYSICAL TESTS OF MEAT
3. PHYSICAL SIGNS OF SPOILAGE
The clearest indication of spoiled meat is usually the smell. Spoilage organisms can change the physical appearance of the meat as well. Some common physical signs of spoilage include:
SLIME
Slimes often appear on the surfaces of meats. If so, they are generally created by aerobic bacteria.
DISCOLORATION
Often microbial growth results in discoloration of the meat. This discoloration can appear to be the harmless result of metmyoglobin formation, but discoloration due to microbial growth and spoilage is often accompanied by an off odor.
STICKY SURFACES
Molds can produce sticky films on meat surfaces.
ODOR
One of clearest indications of spoiled meat is odor. An odorless meat sample is not necessarily safe to eat, but in almost every case, meat that has clear off odors has spoiled. Meat should never be considered a sterile product and will always contain bacteria or fungi at different levels. If meat is improperly prepared or stored, these microbes can proliferate. A clear rancid odor is an indication of putrefaction. In short, this is the breakdown of proteins by different microbes. Often these microbes produce gases. Some of these gases are noxious. Bacteria can produce other odorous compounds during putrefaction, such as the amines putrescine and cadaverine.

9
CHEMICAL TESTS OF MEAT
WaterMeasuring Water PercentagePurge TestpH Measuring pH
CHEMICAL TESTS OF MEAT
CHEMICAL TESTS OF MEAT
1. WATER
Muscle is approximately 75% water. How much water is retained by meat and how well and long it is retained will affect the quality of the meat. How water is actually retained depends on several factors, including pH, temperature, and time. Here are some basic definitions of types of water in meat:
Bound water. This is water that is very tightly bound to proteins. The amount of bound water in meat is very low, approximately 0.5% of the total water. Bound water is not easily lost from meat, neither by cooking nor freezing. Free water. This is water that truly is unbound and easily lost. The water that you may see on a meat surface or left behind on a cooking plate is free water. Free water makes up about 20% of the total water.
Immobilized water. Most water in meat (~80%) is immobilized water. This is water trapped in the muscle fibers or within muscle cells.

10
NOTES ON THE WATER PERCENTAGE TEST:
CHEMICAL TESTS OF MEAT
2. MEASURING WATER PERCENTAGE
The percentage water of a meat sample can be estimated using a microwave.
MATERIALS:
• Meat samples• Filter paper• Rubber band• Beaker• Scale
PROCEDURE:
1. Weigh together the beaker, two pieces of filter paper, and the rubber band.
2. Measure approximately 10g of meat.3. Chop meat into small pieces.4. Layer the bottom of a beaker with one sheet of filter
paper.5. Place chopped meat on top of filter paper.6. Cover the top of the beaker with a second sheet of
filter paper.7. Secure the top filter paper with a rubber band.8. Weigh together the beaker, two pieces of filter
paper, the rubber band, and the meat sample.9. Microwave for 30s intervals, checking to make sure
that meat does not burn.10. Once meat is thoroughly dried, place beaker,
filter papers, rubber band and meat sample in a dessicator. Alternatively, remove the filter and meat sample and wipe down any condensation from sides of the beaker.
11. Weigh all components together once more.
RECORDING RESULTS:
A = weight of beaker, two filter papers, and rubber bandB = weight of all components before dryingC = weight of all components after drying
From the sample in the pictures below:
% water =52.2g - 45.17g
52.20g - 40.99gX 100 = 63%
% water =B - C
B - AX 100

11CHEMICAL TESTS OF MEAT
3. PURGE TEST
Meat quality is significantly impacted by its water holding capacity. Meat that does not retain water is difficult to process into many preserved meat products. Water that is easily lost by meat is referred to as purge or drip. The amount of water that is lost in this manner is referred to purge-loss or drip-loss. Purge contains many proteins as well as vitamins. Purge loss also results in significant loss in weight. Therefore, meats with high purge-loss are generally lower quality, but can also result in economic losses for the producer or seller by losing weight over time. Testing water holding capacity is straightforward. The meat sample is weighed, suspended uncovered in a refrigerated environment to allow water loss, and weighed once again after 24 hours.
1. Suspend meat so it is not touching anything and there is good airflow.
2. After approximately 24 hours, the dried meat should be rigid, but not too hard.
MATERIALS:
• Meat sample• Refrigerator
PROCEDURE:
1. Weigh meat sample.2. Suspend meat sample in a refrigerated
environment. Place something under the meat sample to catch any liquids.
3. Weigh sample after 24 hr.
RECORDING RESULTS
Purge loss is recorded as a percentage. It is calculated by dividing the change in weight by pre-drying weight of the sample. In the example to the left, the sample weighed 73g prior to drying and 63g after drying. The purge loss = (73g – 63g)/ 73g = 13.6 %. This is a high purge loss and would represent a significant economic loss to a producer who sells meat by weight.
NOTES ON THE PURGE TEST:
12 CHEMICAL TESTS OF MEAT
4. PH OF MEAT
The pH of a meat product can reveal a great deal about the product. To understand how, it is important to understand how muscle becomes meat.
When an animal dies, the muscles will continue to contract and relax. This is often seen immediately after exsanguination as “twitching” muscles. The carcass at this point is dying muscles. This process of contracting and relaxing requires energy (glycogen) that is stored in the muscle. In living muscle, the muscle glycogen stores are continually replenished as they are used. As blood is no longer circulating in the exsanguinated animal, the muscle glycogen stores become depleted with time. As they become depleted, the muscles stay in a contracted state, as there is no longer energy available to relax. This is rigor and is commonly seen in recently killed animals. With time, the muscle fibers begin to break down and the muscle tenderizes, becoming meat.
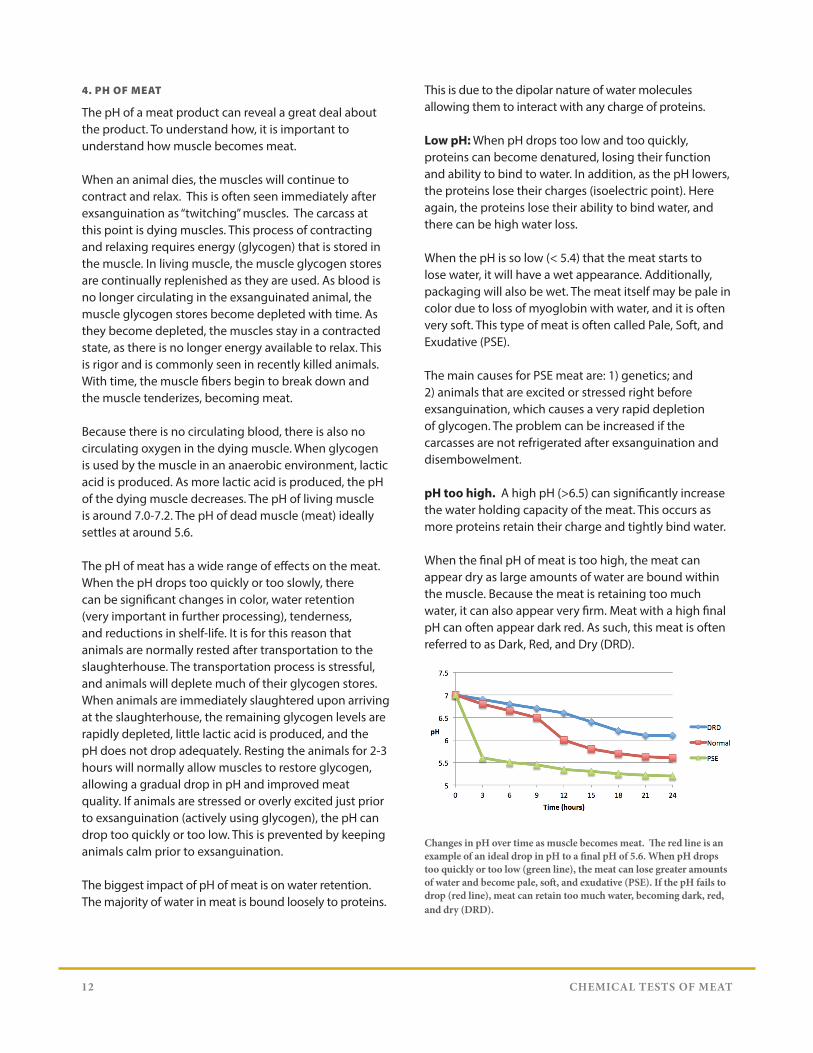
Because there is no circulating blood, there is also no circulating oxygen in the dying muscle. When glycogen is used by the muscle in an anaerobic environment, lactic acid is produced. As more lactic acid is produced, the pH of the dying muscle decreases. The pH of living muscle is around 7.0-7.2. The pH of dead muscle (meat) ideally settles at around 5.6.
The pH of meat has a wide range of effects on the meat. When the pH drops too quickly or too slowly, there can be significant changes in color, water retention (very important in further processing), tenderness, and reductions in shelf-life. It is for this reason that animals are normally rested after transportation to the slaughterhouse. The transportation process is stressful, and animals will deplete much of their glycogen stores. When animals are immediately slaughtered upon arriving at the slaughterhouse, the remaining glycogen levels are rapidly depleted, little lactic acid is produced, and the pH does not drop adequately. Resting the animals for 2-3 hours will normally allow muscles to restore glycogen, allowing a gradual drop in pH and improved meat quality. If animals are stressed or overly excited just prior to exsanguination (actively using glycogen), the pH can drop too quickly or too low. This is prevented by keeping animals calm prior to exsanguination.
The biggest impact of pH of meat is on water retention. The majority of water in meat is bound loosely to proteins.
This is due to the dipolar nature of water molecules allowing them to interact with any charge of proteins.
Low pH: When pH drops too low and too quickly, proteins can become denatured, losing their function and ability to bind to water. In addition, as the pH lowers, the proteins lose their charges (isoelectric point). Here again, the proteins lose their ability to bind water, and there can be high water loss.
When the pH is so low (< 5.4) that the meat starts to lose water, it will have a wet appearance. Additionally, packaging will also be wet. The meat itself may be pale in color due to loss of myoglobin with water, and it is often very soft. This type of meat is often called Pale, Soft, and Exudative (PSE).
The main causes for PSE meat are: 1) genetics; and 2) animals that are excited or stressed right before exsanguination, which causes a very rapid depletion of glycogen. The problem can be increased if the carcasses are not refrigerated after exsanguination and disembowelment.
pH too high. A high pH (>6.5) can significantly increase the water holding capacity of the meat. This occurs as more proteins retain their charge and tightly bind water.
When the final pH of meat is too high, the meat can appear dry as large amounts of water are bound within the muscle. Because the meat is retaining too much water, it can also appear very firm. Meat with a high final pH can often appear dark red. As such, this meat is often referred to as Dark, Red, and Dry (DRD).
Changes in pH over time as muscle becomes meat. The red line is an example of an ideal drop in pH to a final pH of 5.6. When pH drops too quickly or too low (green line), the meat can lose greater amounts of water and become pale, soft, and exudative (PSE). If the pH fails to drop (red line), meat can retain too much water, becoming dark, red, and dry (DRD).

13CHEMICAL TESTS OF MEAT
5. MEASURING PH
Measuring the pH of meat is standard practice. A designated pH meter for meat can be used. This is a pH meter where the electrode can be inserted directly into the meat tissue. pH can also easily be measured using a standard pH meter using the protocol below.
MATERIALS:
• Meat sample• pH meter• Blender• Distilled water
PROCEDURE:
CALIBRATING THE PH METER
pH meters need to be calibrated routinely. A proper calibration prior to starting any experiments can save a lot of time and produce much more accurate results. Different pH meters have different protocols for calibration; calibration should follow the manufacturer’s instructions. To the right is a standard protocol typical of most pH meters.
MEASURING PH OF MEAT:
1. Cut meat sample into small pieces and measure out 10g.
2. Combine meat sample with 100mL of distilled water.
3. Blend meat/water sample at high speed for 30 seconds to form a slurry.
4. Transfer meat slurry to a beaker and add a magnetic stir bar.
5. Measure pH while sample is mixing. Avoid hitting the pH electrode with stirring magnet.
1. Start by cleaning the probe. This is done by rinsing the probe with clean, distilled water.
2. Dry the probe gently with soft, clean tissue paper or a towel.
3. Be especially careful with the electrode end of the probe. It is easily damaged. Dry it simply by blotting the end with the paper.
4. Press the “CAL” button and insert the probe into the pH 7.0 solution.
5. Once the screen stops blinking, remove the probe. The meter will adjust to pH 7.0.
6. After washing the probe, press the “CAL” button and insert the probe into the pH 4.0 solution.
6. Once the screen stops blinking, remove the probe. The meter will adjust to pH 4.0.
7. Repeat the procedure one last time with the pH 10.0 solution.

14 MICROBIAL TESTS OF MEAT
MICROBIAL TESTS OF MEATRaw meat is not a sterile product. Meat regularly contains different types of bacteria. Most of these bacteria are harmless, but many meat products are associated with harmful or pathogenic bacteria, such as Salmonella, pathogenic E. coli, Campylobacter, Listeria, and others. Detecting the different pathogens usually relies on using different types of “selective media”. These are media that allow only certain types of bacteria to grow. This may be due to the addition of different sugars or other substrates, or chemicals that inhibit or kill different types of bacteria. An effective selective media will “select” for the bacteria of interest by allowing the target bacteria to proliferate while inhibiting the growth of all or most other bacteria.
The two protocols described here are just two examples of how selective media can be used to detect the presence of undesirable bacteria. There are countless types of selective media for all different types of bacteria, but the principles described below apply to almost all of them. Note: the protocols here use meat samples, but the same protocols can be used for eggs.
MICROBIAL TESTS OF MEAT
Coliform TestSalmonella Test
14

15MICROBIAL TESTS OF MEAT
1. COLIFORM TEST
Coliforms are bacteria that are generally found in the intestinal systems of animals and, in turn, animal feces. So, the presence of coliforms in a meat sample is an indication of fecal contamination. The coliform test described here uses Violet Red Bile Agar (VRBA) as the selective medium, which allows coliforms to grow while inhibiting other types of bacteria. The medium contains crystal violet and bile salts, which inhibit the growth of most gram-positive bacteria. Neutral Red is a dye and is included as a pH indicator. Lactose fermenting colonies (likely coliforms) appear pink/red and may be surrounded by pink/red zones indicating precipitation of bile salts. Note that VRBA does not get autoclaved. It is only boiled prior to pouring plates.
1. E. coli grown on VRBA agar. Typical colonies are pink.
2. Closer detail of E. coli on VRBA agar. Lighter pink zones can be seen surrounding the bacterial colonies indicating precipitation of bile salts.
MATERIALS
• Petri dishes• Stomacher bags• Test tubes• Pipettes• Cell spreader• Ethanol• Incubator (37C)• VRBA• Peptone water• PBS
PROCEDURE:
SAMPLE PREPARATION
1. Measure 10g of meat sample.2. Add meat sample to 90mL
peptone water in a stomacher bag or similar container
3. Thoroughly mix meat and peptone water.
DILUTION PREPARATION
**if possible, it’s best to do these tests in duplicate. Taking an average of your results will give you a more accurate estimation of the bacterial concentration.
1. Add 900uL PBS to 7 individual microcentrifuge tubes. Label the tubes starting with “-2”, and continue
2. Add 100uL of meat/peptone water sample to the tube labeled “-2” and mix thoroughly.
3. Take 100uL of the “-2” mix sample and add it to the tube labeled “-3”.
4. Repeat for the remaining tubes.
PLATING
1. Add 100uL from the undiluted meat/peptone water sample to the first plate and spread sample with a sterile spreader. Label this plate “-1”.
2. Repeat for samples from each test tube labeling each plate with the corresponding test tube number (-2, -3, -4, etc.).
3. Once plates have dried, turn them upside down before placing them in the incubator. This is to prevent condensation from dripping onto the agar.
4. Incubate at 37C for 24hr.

16 MICROBIAL TESTS OF MEAT
Plate -1 -2 -3 -4 -5 -6 -7 -8
Colonies TNTC TNTC 185 19 2 0 0 0
TNTC TNTC 196 18 1 0 0 0
NOTES ON THE COLIFORM TEST:
RECORDING RESULTS:
Plates with 25-250 colonies, like the example below, should be used to most accurately count colonies. When there are >250 colonies on a plate, don’t try and count them. Just record that plate as TNTC (too numerous to count) and go to the next readable plate.
Bacterial concentrations are reported in colony forming units (CFU) per mL. As such, some calculations have to be done to determine the true concentration.
Directly plating 100 uL of the meat sample is already diluted 1/10, so that is the “-1” plate. If 25 colonies were to grow on this plate, the concentration (taking into consideration the 1/10 dilution) would be 25 X 10 CFU/mL. Because you are measuring the concentration of bacteria in the meat/peptone water mixture, it is accurate to report this as “CFU/mL rinsate”. The scenario below shows results from a highly contaminated sample.
As in the scenario above, you would choose the -3 plates as they have 25-250 colonies. The estimated bacterial concentration would be:
((185 X 103) + (196 X 103)) / 2 = 190.5 X 10³ or 1.90 X 10⁵ CFU/mL. In log10 it would be 5.27 log10 CFU/mL rinsate.
It normally takes some practice and experience to produce accurate plate counts. Going slowly, thoroughly mixing samples, changing pipette tips whenever possible, and always plating the highest dilutions first can help in reducing error.
1. Dip the spreader in ethanol.
2. Carefully hold spreader over flame to burn ethanol and sterilize spreader.
3. Apply 100ul of the sample to the center of the plate.
4. Spin the plate and uniformly spread bacteria from the inside of the plate to the outside, being careful not to touch the edges of the plate.
1. Example of the type of plate (not VRBA) that is ideal for counting colonies. There are between 25 and 250 colonies that are well isolated from each other.

17MICROBIAL TESTS OF MEAT
2. SALMONELLA TEST
Oftentimes, a harmful bacterium may be present on a meat sample, but in concentrations too low to detect by simply plating the rinsate, as shown in the coliform test. These bacteria can be detected by first doing an enrichment step. The enrichment step uses a selective media and is designed to allow the growth of the targeted bacteria, while inhibiting all or most others. This allows the targeted bacteria to grow to higher and detectable levels. The example below is for Salmonella, but the principle can be applied to numerous types of bacteria simply by using different types of media. The protocol below is based on the FDA protocol for Salmonella detection in food.
MATERIALS:
• Petri dishes• Plastic (or similar) sample bags• Test tubes• Pipettes• Cell spreader• Ethanol• Incubator (37C)• Tetrathionate (TT) broth (selective enrichment
medium)• Rappaport Vassiliadis (RV) broth (selective
enrichment medium)• XLT4 Agar (Xylose, Lysine, Tergitol)
PROCEDURES:
ENRICHMENT
1. Fill one stomacher bag with 90mL of TT broth and one stomacher bag with 90mL of RV broth.
2. Add 10g of meat sample to each bag and mix thoroughly and loosely seal bags.
3. Incubate TT samples overnight at 37C. Incubate RV samples overnight at 42C.
PLATING
1. After the overnight incubation, streak 10uL samples from each bag on individual XLT4 plates.
2. Incubate overnight at 37C.
RECORDING RESULTS:
Salmonella positive samples will grow black colonies on XLT4. This is due to the fermentation of iron. Due to the enrichment step, the protocol described here is a qualitative test and only indicates whether a sample is positive or not. Additional methods such as Most Probable Number (MPN) can be used to estimate the quantity in the original sample prior to enrichment.
1. Typical Salmonella colonies will produce black colonies on XLT4. Some types of E. coli or other coliforms may also grow on XLT4, but not black, and usually produce high amounts of acid, turning the medium yellow.
NOTES ON THE SALMONELLA TEST:

18
MEAT PROCESSING AND PRESERVATION LABORATORY EXERCISES
While there are countless ways to process and preserve meat, the following exercises can be used to illustrate several principles. Breaking down and deboning chicken carcasses is an economical way to illustrate basic processing. Fresh sausage production can be used to show how ingredients and composition (e.g., fat%, protein%) impact value-added products. The other exercises show two common types of meat preservation. The cured sausage exercise illustrates curing, which employs both nitrites and bacteria to prevent spoilage. As previously mentioned in the section on myoglobin, curing also impacts meat color. In most cases, cured meat remains red or pink even after cooking. Finally, students can produce different types of landhi with varying preparations to see changes in meat over time in different environments.
Please wash hands thoroughly before each exercise and during each exercise if you are handling any raw materials and intend to later sample products.
MEAT PROCESSING & PRESERVATION LABORATORY EXERCISES
Poultry Inspection & Breakdown
Meat Preservation
MEAT PROCESSING & PRESERVATION18

19
1. POULTRY INSPECTION AND BREAKDOWN
Whole, bone-in birds can be used to demonstrate physical inspection of a carcass. In the same laboratory, the same chickens can be used to show how carcasses are broken down into parts.
MATERIALS:
• Whole, bone-in chickens (raw, thawed)• Knives• Trays• Flashlights
PROCEDURES:
Inspection/Examination
1. Using a flashlight, inspect the entirety of the outside of the carcass.
2. Using a flashlight, inspect the body cavity of the carcass.
3. For both external and internal inspection, note any defects, using the lecture materials as a reference.
4. Determine whether any defects are “Public Health Defects” or “Consumer Protection Defects”.
5. Summarize your findings.
BREAKDOWN/DEBONING
The instructor will demonstrate the proper breakdown/deboning, and each group will repeat it with their chickens.
NOTES ON POULTY BREAKDOWN:
MEAT PROCESSING & PRESERVATION
2. MEAT PRESERVATION
MATERIALS:
• Meat grinder (with sausage nozzle)• Meat• Casings• Spices (optional)• Bowls• Salt• Curing salt• Aluminum foil (optional)• Oven
FRESH SAUSAGE GENERAL DIRECTIONS (WITHOUT CASINGS)
*recipe with volumes, ingredients will be provided by the instructors
1. Debone lamb and/or beef cuts.2. Cut meat samples into approximately 6cm3 cubes.3. If adding fat, cut fat into cubes slightly smaller than
the meat.4. Try and keep everything as cold as possible (meat
should be refrigerated; fat can go in a freezer).5. Combine meat and fat (if appropriate) with any
sugar, spices, vinegar, etc., mix and place in freezer for 30 min.
6. Grind meat/fat/spice combination. Try to do this quickly so that meat remains cool.
7. In a bowl, add the remaining sugar, spices, vinegar, etc. to the ground meat. Mix thoroughly.
8. Form sausage into patties and refrigerate immediately. Cook within 5 days.

20 MEAT PROCESSING & PRESERVATION
FRESH SAUSAGE GENERAL RECIPE/DIRECTIONS (WITH CASINGS)
*recipe with volumes, ingredients will be provided by the instructors
1. Follow the recipe for fresh sausage up to step 7. Place ground meat in the freezer.
2. Prepare the casings by soaking in room temperature water for 30 min.3. Fit the casing onto the stuffing nozzle. Leave a tail of approximately 10
cm. Don’t tie the tail yet. You will want air to escape the casing when you start stuffing.
4. Guide the casing with one hand while stuffing with the other hand.5. When the casing is stuffed (leave another 10 cm on the head end), tie
double knots at both ends. 6. Pinch every 15cm and twist the casing. This separates the sausage into
links. 7. Hang the sausages so the links do not touch.8. Inspect each link and try to remove any visible air pockets with a sterile pin.9. Refrigerate sausages for 24 hr. Cook within 5 days.
CURED SAUSAGE (HARD SAUSAGE) GENERAL RECIPE/DIRECTIONS
1. Combine ground meat, spices, flavors, and cure into bowl.
2. Mix thoroughly by hand (PICTURE 1).3. Roll ground meat into cylinders or logs (PICTURE 2)4. Wrap the cylinders into aluminum foil and refrigerate for 24 hr.5. Poke small holes in the cylinders to let air, gas, and some fat to escape
during cooking. (PICTURE 3)6. Cook (bake) samples at 165C for 90 min. 7. Remove sausage and refrigerate for 24 hrs. (PICTURE 4). The meat will
remain pink/red in color even though it is fully cooked. This is the effect of the curing salts.

21MEAT PROCESSING & PRESERVATION
LANDHI
1. Cut meat into strips approximately 5 to 10 cm wide, 15 to 25 cm long (PICTURE 1)
2. For thick cuts, slice into side of cut (not all the way through) every 1 to 2 cm. You will add salt to these openings (PICTURE 2).
3. Add copious amounts of salt onto surfaces (PICTURE 3).
4. The salt will pull the water out of the meat. Place salted meat on top of strainers for 1 to 2 hours to allow any water to drain.
NOTES ON MEAT PRESERVATION:
5. Put holes at the end of each salted meat sample.6. Guide landhi through holes in each salted meat
sample and hang to dry (PICTURE 4). 7. Protect the drying meat by covering with
cheesecloth or other porous material (not plastic; PICTURE 5).
8. Drying time will depend on: temperature, climate, location, thickness of meat sample.
9. After drying, keep in a cool, dry, dark room. 10. Optional: Soak or wash before cooking.

22 EGG QUALITY
EGG QUALITYJudging egg quality is a relatively easy task with just a little bit of training. Both internal and external egg quality can be assessed using only a couple of basic tools.
1. CANDLING
Candling is used around the world to measure egg quality. It is used in poultry breeding to determine the viability of fertilized eggs, but it’s also used in table egg production to give a quick assessment of egg quality. Candlers can be purchased, but they can also easily be constructed with just a flashlight and some cardboard. When candling an egg, the following should be inspected:
Egg Shell Defects. Large cracks are easily seen with the naked eye, but eggs often have micro-cracks, which are often only visible with a candler. The egg shell can have a variety of defects, though. The light of the candler can be used like a high-power flashlight to thoroughly examine the shell for deposits, dirt, wrinkles, etc. The Alltech Egg Shell Defect Chart provides examples of different defects. Internal Defects. The first thing to locate is the air cell. This is located on the fat end of the egg. The size of the air cell can give you an idea of the age of the egg. As the egg gets older, water evaporates from the inside of the egg through its pores. Thus, the older the egg, the larger the air cell. Sometimes an air cell detaches from the shell. This is a low quality egg. When this happens, you might see air bubbles circulating throughout the inside of the egg.
EGG QUALITY TESTS
Candling
Haugh Measurement
The eggs above can be graded based on how their yolks appear while candling. The eggs get older from left to right. The left egg is freshest and the yolk is diffuse and light in color. The right egg is oldest and its yolk is very defined and dark. This occurs as the egg ages and the yolk takes up water from the albumin and becomes denser. From: missouri.edu.
CANDLING
22

23EGG QUALITY
You can also tell the age of the egg by locating the yolk. The yolk in fresh eggs is diffuse, and it will be difficult to find the edges of the egg. As the egg gets older, the yolk becomes more defined. The yolk of an old egg is usually darker, smaller, with visible edges.
Finally, you will want to look for blood or meat spots. These result from reproductive tissue or blood being deposited in the egg when the egg is produced. While meat and blood spots are not a problem in terms of food safety, they are an issue for many consumers.
MATERIALS:
• Candler (or flashlight)• Eggs
EXTERNAL INSPECTION/CANDLING
1. Place egg in the candler (fat side down) and record size of air cell (small, medium, large) (PICTURE 1) AA = < 3 mm A = 4 -5 mm B = > 5 mm
2. Rotate the egg on the candler to inspect the inside of the egg and record any defects (e.g., meat spots, blood spots, etc.) (PICTURE 2)
3. Using the light of the candler like a flashlight, thoroughly inspect the outside of the shell for any dirt, deposits, wrinkles, etc. (use the Alltech Egg Shell Quality Chart below as a reference).
1. This is an example of a low quality egg that would be condemned. The air cell is very large and the candler identifies profuse cracking.
2. Use the light of the candler to thoroughly inspect the surface of the egg shell to identify any defects.
EXAMPLES OF EGG SHELL DEFECTS
From
: http
s://w
ww
.allt
ech.
com
/site
s/de
faul
t/file
s/al
ltech
-egg
-she
ll-qu
ality
-pos
ter.p
df

24 EGG QUALITY
2. HAUGH MEASURE (GRADING)
The internal quality of an egg can be much more comprehensively assessed once it is opened. Once the egg is open, you will want to examine three components: the yolk, the large albumin, and the small albumin. Again, examine the egg for any defects like blood spots, meat spots, etc. The age and quality of the egg is best measured, however, by taking a Haugh measurement. A Haugh tool is simply a micrometer that is used to measure the large albumin. Then, using a simple formula, the egg is graded based on: 1) its weight; and 2) large albumin height.
PROCEDURE:
Visuals accompanying these instructions are on the following page.
1. Place egg on clean weigh boat, tare the scale, and record weight (w) of egg in grams (PICTURE 1).2. Carefully open egg onto flat surface.3. Record yolk color and characteristics.4. Calibrate the Haugh Micrometer by first making sure that all four legs are touching the flat surface (PICTURE 2).5. Loosen the screw on the top right. This will allow the face of the micrometer to turn (PICTURE 2).6. Rotate face of micrometer so that the arrow points to “O” (PICTURE 3)7. Tighten the screw on the top right (PICTURE 4). The Haugh Micrometer is ready for use.8. Raise the middle leg of the Haugh Micrometer about 1.5 cm.9. Place Haugh Micrometer on top of egg so that the middle leg is approximately 1cm from the outside of the yolk
(PICTURE 5). 10. Lower the middle leg until it just touches the albumen. Measure and record height (h) of THICK albumen (mm)
(PICTURE 5). 11. The Haugh Unit is calculated using the following formula:
HU = 100 * log10 (h - 1.7w0.37 + 7.6)
12. Grade the eggs based on their Haugh Unit:
AA: ≥ 72A: 60 – 71B: 31 – 59C: ≤ 30
MATERIALS:
• Haugh micrometer (Note: While a Haugh micrometer will make this task easier, it can also be done with a good ruler (mm).
• Flat surface• Eggs

25EGG QUALITY
1. Note the placement of the micrometer. Start with the center leg well above the albumin. Position the micrometer so that the center leg, when lowered, will touch the large albumin < 1 cm from the edge of the yolk. Lower the center leg until it touches the large albumin. Record the large albumin height.
HAUGH MEASURE (GRADING)

26

27