Embed Size (px)
Citation preview

User Manual
MDT 860
GPS Tracking and Fleet Management Solutions

�MDT 860 || User Manual
Contents 1 Introduction 5 1.1 Safety Notice 5
2 MDT 860 Hardware 6 2.1 Box Contents 6 2.2 Front Components 6 2.� Back and Underside Components 7
� Positioning the MDT 860 in a Vehicle 8 �.1 MDT 860 Suction-Mount 8 �.2 MDT 860 M� Mounting Holes 8
4 Getting Started 9 4.1 Screens 9 4.2 Function Keys 1�
5 Messaging 14 5.1 Receiving Messages 16 5.2 Reading Messages 16 5.� Sending a Message 17 5.4 Deleting a Message 18 5.5 Reading and Managing Sent Messages 18
6 Driver Options 19 6.1 Introduction 19 6.2 Driver Options 19
7 Miscellaneous 2�
8 Configuration 24 8.1 General 25 8.2 Display 25 8.� Keypad 25 8.4 Buzzer 25 8.5 Font 25 8.6 Language 25 8.7 Status Bar 26 8.8 Notification 26 8.9 Main Menu 26 8.10 Inbox 27 8.11 Outbox 27
9 Diagnostics 28
10 Communication Test 29
11 Pop Ups �0
12 Specifications �1
Appendix �2 External Keyboard �2 Memory Usage �2 Using Multi-Tap Text Entry �2 The Editor Screen ��
Conditions of Sale and Warranty �4
Contacts �5
Contents


5MDT 860 || User Manual
1 IntroductionThank you for purchasing this Navman MDT 860. We hope you enjoy your new OnlineAVL messaging terminal.
Whether your fleet operates in a city, across a country or a continent, the MDT 860 will provide efficient, cost effective and timely two-way text messages from the dashboard to the OnlineAVL application loaded on a PC at your office. The MDT 860 can send pre-programmed replies or outbound messages.
Navman welcomes your feedback. To contact us, please find our details in the Contacts section at the back of this user manual.
1.1 Safety NoticeWARNING: In a vehicle, it is your sole responsibility to place, secure and use the MDT 860 in a manner that will not cause accidents, personal injury or property damage. The user of this product is solely responsible for observing safe driving practices and for all use of this device. It is your responsibility to read and follow the vehicle mount installation instructions and to use the product in consistent with your government’s laws and regulations. Consult the vehicle manual to ensure the mounting location is safe. It is your sole responsibility to adhere to the following safety instructions at all times:
Do not operate the MDT 860 while driving or place the MDT 860 in a position that obstructs the driver’s view.Do not mount the MDT 860 in a way that may be distracting or interfere with the safe operation of the vehicle, the deployment of airbags or other safety equipment.Do not leave the MDT 860 in view while your vehicle is unattended, especially in strong or direct sunlight.Do not use or handle the MDT 860 when it is hot; leave it to cool, out of direct sunlight.
Failure to adhere to these instructions may lead to serious personal injury, including death, or property damage. Navman disclaims all liability for use of the MDT 860 that contributes to injuries, death, property damage or violates law.
•
•
•
•
1. Introduction
6
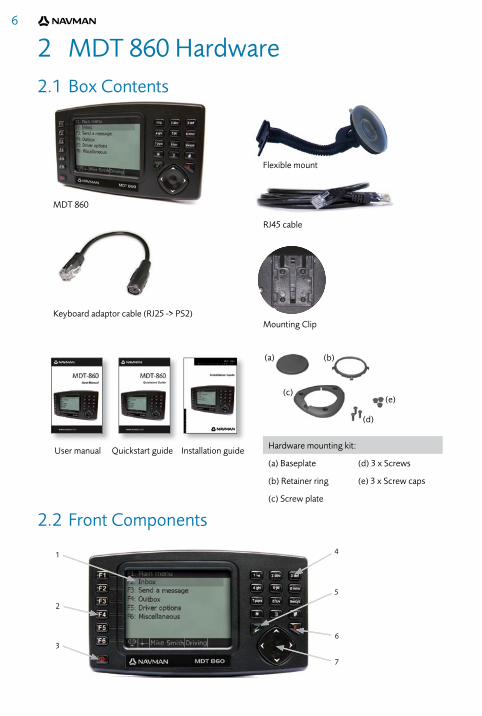
2 MDT 860 Hardware2.1 Box Contents
4
7
6
5
1
�
2
2.2 Front Components
Hardware mounting kit:
(a) Baseplate (d) � x Screws
(b) Retainer ring (e) � x Screw caps
(c) Screw plate
MDT 860
Flexible mount
RJ45 cable
(a) (b)
(c)
(d)
(e)
Keyboard adaptor cable (RJ25 -> PS2)Mounting Clip
User manual Quickstart guide Installation guide
Quickstart Guide
7MDT 860 || User Manual2. M
DT 860 H
ardware
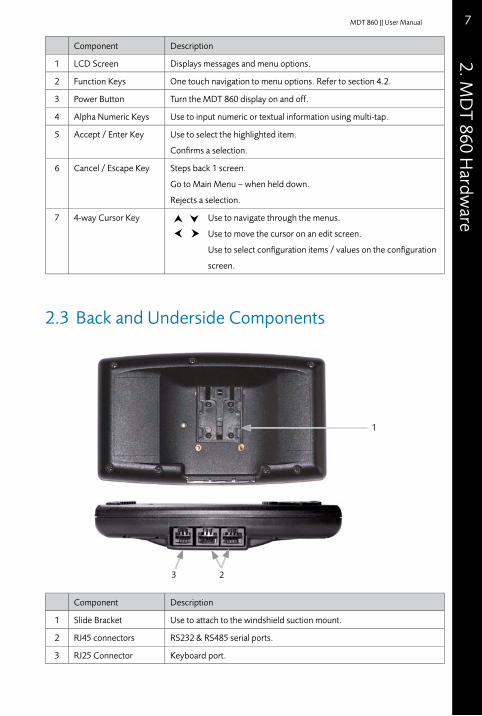
Component Description
1 LCD Screen Displays messages and menu options.
2 Function Keys One touch navigation to menu options. Refer to section 4.2.
� Power Button Turn the MDT 860 display on and off.
4 Alpha Numeric Keys Use to input numeric or textual information using multi-tap.
5 Accept / Enter Key Use to select the highlighted item.
Confi rms a selection.
6 Cancel / Escape Key Steps back 1 screen.
Go to Main Menu – when held down.
Rejects a selection.
7 4-way Cursor Key Use to navigate through the menus.
Use to move the cursor on an edit screen.
Use to select confi guration items / values on the confi guration
screen.
2.� Back and Underside Components
Component Description
1 Slide Bracket Use to attach to the windshield suction mount.
2 RJ45 connectors RS2�2 & RS485 serial ports.
� RJ25 Connector Keyboard port.
1
2�

8
� Positioning the MDT 860 in a VehicleThere are three options provided for mounting the MDT 860:
Use the suction mounted, flexible, snap-lock bracket provided.Panel mount the MDT 860 with the hardware mounting kit provided.Attach to a Panavise bracket (Navman part number BK000025-G) or an alternative bracket using the M� mounting holes in the backcase.
�.1 MDT 860 Suction-MountFollow these steps:
Attach the MDT 860 to the vehicle mount by matching the two slides on the stand to the corresponding slots on the back of the MDT 860 unit and slide to gether until they firmly latch into place.Choose a position on the windshield that is clearly visible to the driver without obstructing the view of the road or any safety equipment ie airbags. Clean the surface thoroughly.Press the suction cup firmly to the surface. Pull the lever down to seal the suction cup. The suction cup firmly anchors the vehicle mount.Hold the vehicle mount base firmly and bend the stalk to adjust to a safe and easy viewing position.
�.2 MDT 860 M� Mounting Holes The holes (illustrated in the diagram below) can be used to attach the MDT 860 to a Panavise bracket or an alternative bracket.
Use the diagram below as a guide to insert M� x 6 mm machine screws. Do not over tighten, as driving the M� machine screws in too far may cause damage.
38.5mm (1.52")
30.0mm (1.18")
1.2.�.
1.
2.
�.
4.
9MDT 860 || User Manual
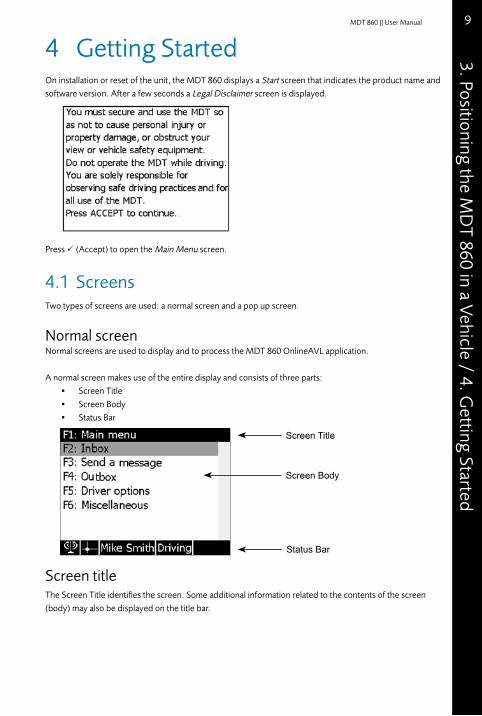
4 Getting StartedOn installation or reset of the unit, the MDT 860 displays a Start screen that indicates the product name and software version. After a few seconds a Legal Disclaimer screen is displayed.
Press P (Accept) to open the Main Menu screen.
4.1 ScreensTwo types of screens are used: a normal screen and a pop up screen.
Normal screenNormal screens are used to display and to process the MDT 860 OnlineAVL application.
A normal screen makes use of the entire display and consists of three parts:Screen TitleScreen BodyStatus Bar
Screen Title
Screen Body
Status Bar
•••
�. Positioning the MD
T 860 in a Vehicle / 4. Getting Started
Screen titleThe Screen Title identifies the screen. Some additional information related to the contents of the screen (body) may also be displayed on the title bar.
10
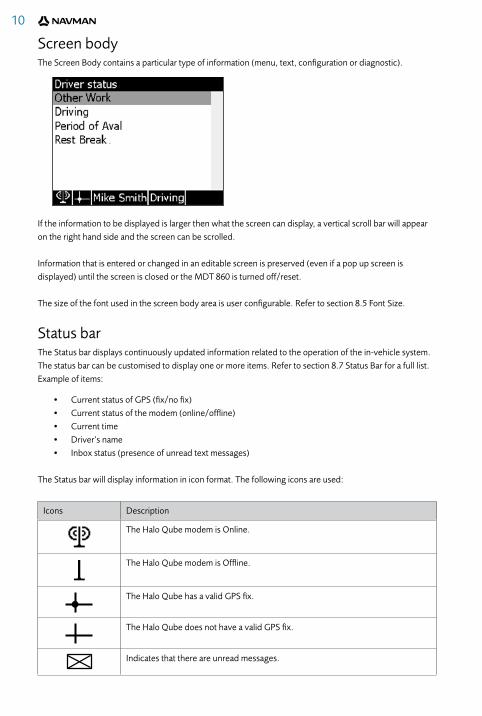
Screen bodyThe Screen Body contains a particular type of information (menu, text, configuration or diagnostic).
If the information to be displayed is larger then what the screen can display, a vertical scroll bar will appear on the right hand side and the screen can be scrolled.
Information that is entered or changed in an editable screen is preserved (even if a pop up screen is displayed) until the screen is closed or the MDT 860 is turned off/reset.
The size of the font used in the screen body area is user configurable. Refer to section 8.5 Font Size.
Status barThe Status bar displays continuously updated information related to the operation of the in-vehicle system. The status bar can be customised to display one or more items. Refer to section 8.7 Status Bar for a full list. Example of items:
Current status of GPS (fix/no fix)Current status of the modem (online/offline)Current timeDriver’s nameInbox status (presence of unread text messages)
The Status bar will display information in icon format. The following icons are used:
Icons Description
The Halo Qube modem is Online.
The Halo Qube modem is Offline.
The Halo Qube has a valid GPS fix.
The Halo Qube does not have a valid GPS fix.
Indicates that there are unread messages.
•••••

11MDT 860 || User Manual
Indicates the status of the Inbox memory, from empty to full.
Indicates the status of the Outbox memory, from empty to full.
Indicates the status of the outgoing messages memory, from empty to full.
Indicates that a Halo Qube is connected to the MDT 860.
Indicates that an external keyboard is connected to the MDT 860.
Pop up screenPop up screens are used to display out of order notifications about important events or warnings generated as a result of actions taken. Pop up screens require immediate attention and/or action. In most cases, a beep will sound when a pop up is displayed.
Most pop ups are blocking, i.e. pop ups must be actioned in order to be able to return to the previously opened screens. Non-blocking pop ups, such as notifications regarding restoration of cellular connection or GPS fix are shown for a few seconds only.
A pop up screen is displayed over a normal screen and usually occupies only a part of the display.
Note: Pop up screens are not stacked. However, in some cases if an event requiring generation of a pop up arises while another pop up is shown on the screen, a beep will sound and the later pop up will be displayed after the previous one has been processed.
•
4. Getting Started

12
Screen navigationMDT 860 screens are accessed through menus.
Initially, when the device is powered up, a Start screen showing technical information about the hardware and firmware is displayed for five seconds. A legal disclaimer is displayed after this Start screen. The disclaimer remains displayed until P is pressed, after which the main menu is displayed.
From the Main Menu screen, any single piece of information or control can be accessed via a series of menus. All successive screens opened by selecting items in the submenus are stacked. As a result, when traveling back up the menu structure (by closing the opened screens) all previously opened screens can be retrieved in the same state they were left.
Alternatively, to return directly to the Main Menu screen (where all opened screens will be automatically closed), press and hold the O key.
At all times, one item from the menu will be highlighted. To navigate through the menu, use the ‘4-way cursor key’ to highlight the required item.
A highlighted item can be selected by pressing the P key. Selecting an item will result in either another screen opening, or one or more opened screens closing.
Main menuThe Main Menu screen is the starting screen in the series of menus. The following items are available:
InboxSend A MessageOutboxDriver OptionsMiscellaneous
The availability of items on the Main Menu are access controlled. It is possible to configure the MDT 860 to display any of the items above. This configuration will be possible over the air from the OnlineAVL application or locally via the Configuration menu. Refer to section 8.9 Main Menu.
•••••
1�MDT 860 || User Manual4. G
etting Started
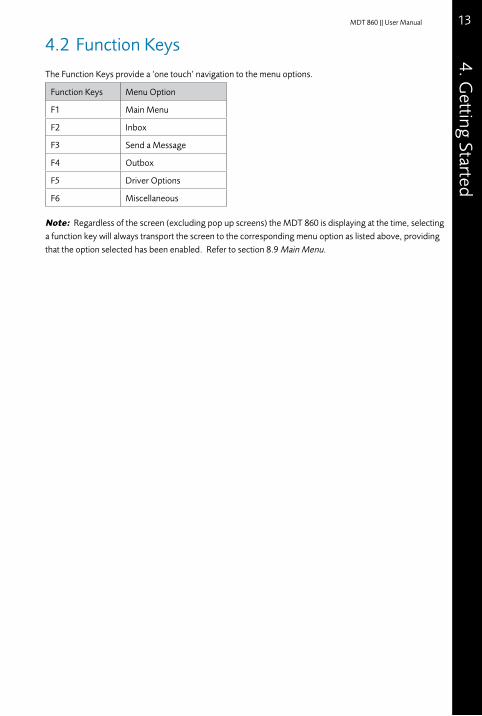
4.2 Function KeysThe Function Keys provide a ‘one touch’ navigation to the menu options.
Function Keys Menu Option
F1 Main Menu
F2 Inbox
F� Send a Message
F4 Outbox
F5 Driver Options
F6 Miscellaneous
Note: Regardless of the screen (excluding pop up screens) the MDT 860 is displaying at the time, selecting a function key will always transport the screen to the corresponding menu option as listed above, providing that the option selected has been enabled. Refer to section 8.9 Main Menu.

14
5 MessagingText messages are categorised into three distinct groups:
Group Description
Received Incoming messages received by the MDT 860.
Responses Messages sent from the MDT 860 as responses to received message(s).
Originated Messages created from the MDT 860, other than responses.
There are three separate entries in the Main Menu that give access to the text messaging functionality:
InboxThe Inbox shows a list of all messages received from the OnlineAVL application and stored in the MDT 860. Messages are shown in the order of their receipt, with the most recent message at the top.
The following information in the Inbox is shown for each message, on a single line:
First words of the messageTime or date of reception (time only is given if the message has been received on the current day, otherwise date only is given).
Message’s current status.
New (unread)
Read
Replied
Note: When the Inbox is initially opened the highlighted message is dependant upon the Inbox settings. Refer to section 8.10 Inbox. The options available are:
Top: The newest messageBottom: The oldest messageCurrent: The message accessed most recently
••
•
•
•
•
•••

15MDT 860 || User Manual5. M
essaging
Send a messageDisplays a complete list of options for sending a message from the MDT 860. The content of the screen is configurable and may contain a list of canned (pre-programmed) messages as well as a free form text message.
OutboxThe Outbox shows a list of all messages sent from the MDT 860. Messages are shown in order of their sending, with the most recent message sent at the top.
The following information in the Outbox is shown for each message, on a single line:
First words of the messageTime or date of sending (time only is given if message has been sent on the current day, otherwise date only is given)Current status of the message
Sent Delivered
Additional notes on messagesThe MDT 860 can store hundreds of messages. A pop up screen is displayed to warn when the storage for a particular type of message is about to become full. If the message memory becomes full, the MDT 860 will not be able to receive an incoming message. The message will be rejected and an appropriate warning will be displayed.
••
•••
•
•
16
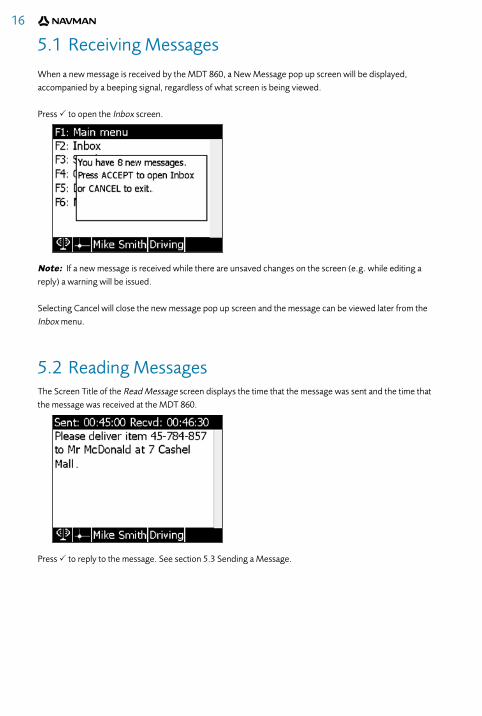
5.1 Receiving MessagesWhen a new message is received by the MDT 860, a New Message pop up screen will be displayed, accompanied by a beeping signal, regardless of what screen is being viewed.
Press P to open the Inbox screen.
Note: If a new message is received while there are unsaved changes on the screen (e.g. while editing a reply) a warning will be issued.
Selecting Cancel will close the new message pop up screen and the message can be viewed later from the Inbox menu.
5.2 Reading MessagesThe Screen Title of the Read Message screen displays the time that the message was sent and the time that the message was received at the MDT 860.
Press P to reply to the message. See section 5.� Sending a Message.
17MDT 860 || User Manual5. M
essaging
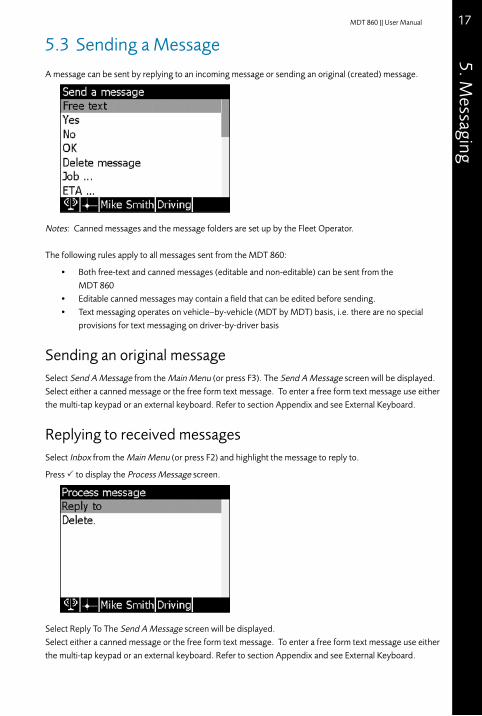
5.� Sending a MessageA message can be sent by replying to an incoming message or sending an original (created) message.
Notes: Canned messages and the message folders are set up by the Fleet Operator.
The following rules apply to all messages sent from the MDT 860:
Both free-text and canned messages (editable and non-editable) can be sent from the MDT 860 Editable canned messages may contain a field that can be edited before sending.Text messaging operates on vehicle–by-vehicle (MDT by MDT) basis, i.e. there are no special provisions for text messaging on driver-by-driver basis
Sending an original message Select Send A Message from the Main Menu (or press F�). The Send A Message screen will be displayed. Select either a canned message or the free form text message. To enter a free form text message use either the multi-tap keypad or an external keyboard. Refer to section Appendix and see External Keyboard.
Replying to received messagesSelect Inbox from the Main Menu (or press F2) and highlight the message to reply to.
Press P to display the Process Message screen.
Select Reply To The Send A Message screen will be displayed. Select either a canned message or the free form text message. To enter a free form text message use either the multi-tap keypad or an external keyboard. Refer to section Appendix and see External Keyboard.
•
••
18
5.4 Deleting a MessageSelect Inbox from the Main Menu (or press F2) and highlight the message to delete.
Press P to display the Process Message screen. Select Delete from the menu to delete the message from the Inbox. To delete all the messages in the Inbox, refer to section 8.10 Inbox.
A notification is sent to the OnlineAVL application to notify users the message has been deleted.
Note: When deleting a message, a pop up screen confirming this action will be displayed to ensure messages are not deleted in error.
5.5 Reading and Managing Sent MessagesTo read replies that have been sent in response to received messages, select Inbox (or press F2). Use the and on the 4-way cursor key to select the message. Press P to display the Previous Replies screen. Select either Delete or Resend.
To read sent messages, select Outbox (or press F4). Use the and on the 4-way cursor key to select the message. Press P again to display the Process Previous Message screen to either Delete or Resend the message.

19MDT 860 || User Manual
6 Driver Options6.1 IntroductionDriver Options contains the functionality to support the Driver ID and Driver Hours features.
Note: These features are enabled over the air from the OnlineAVL application.
When either the Driver ID or Driver Hours features are enabled, in order to use the MDT 860 the driver needs to be logged on.
Logging on consists of entering a Personal Identification Number (PIN) into the MDT 860, which is then checked over the air by the OnlineAVL server. A successful PIN results in the driver’s name being sent by the server to the MDT 860. If no match is found for the entered PIN, the log on fails and the MDT 860 continues to beep until a correct log on is recorded.
The requirement for the driver to be logged on in order to access all services of the system is configurable from the OnlineAVL applicationWhen a vehicle with no-one logged on is detected to be in use (ignition has been turned on), the MDT 860 will beep until a logon is confirmed
The Driver Hours feature makes it possible to monitor drivers’ activities and to record their working time as well as the duration of breaks taken. This, in turn, makes it possible to monitor and to report driver’s compliance with relevant industry and health and safety regulations.
6.2 Driver OptionsSelect Driver Options from the Main Menu (or press F5) to display a menu with the following options:
•
•
Option Description
Log on or Log off Depending upon the current state, either log on or log off.
Driver Status Select to view a list of available driver statuses.
Working time Select Working time to display the total time the driver has spent in “working” state since log on. Working time is cleared when log off occurs.
6. Driver O
ptions

20
How to log onThe Driver ID Log On screen will appear on the MDT 860 immediately after the ignition is turned on.
Using the numeric keypad enter the complete Driver PIN.
Press P to confirm the Driver PIN. The MDT 860 will then send the PIN number back to the OnlineAVL application for checking. Confirmation may take a few minutes depending on cellular network coverage.
If the vehicle is out of coverageIf the vehicle is out of cellular coverage when inserting the Driver PIN, the Halo Qube tracking device will store the information and will send it when the vehicle is back in cellular coverage.
If a CORRECT DRIVER PIN has been enteredThe Driver ID Status pop up screen will appear with details of the driver’s name.
Press any key on the MDT 860 to exit the screen.
If an INCORRECT DRIVER PIN has been enteredThe Driver ID Status pop up screen will appear with ‘Log on Failed’.
Press the O key to exit the screen.
The Driver ID Log on screen will reappear to request a valid log on.
21MDT 860 || User Manual
If a PIN number that is ALREADY IN USE by another driver has been enteredThe Driver ID Status pop up screen will appear with ‘Log on Failed! You are already logged on’.
Press any key on the MDT 860 to exit the screen.
The Driver ID Log On screen will reappear to request a valid log on. Contact your office immediately to ask the Fleet Operator to re-confirm the Driver PIN and/or check why the Driver PIN is in use.
How to log offSelect Driver Options from the Main Menu (or press F5).
Select Log off from the menu.
The Driver ID Log Off screen will appear.
Press P to confirm log off OR press the O key to cancel the action.
If Driver Status* is activated, the driver must select a status before log off can occur.
*The Driver Status feature is only visible on the MDT 860 if it has been activated. This feature is not available in all the regions.
Note: If the Driver ID is logged off, but the vehicle’s ignition has not been turned off, the Driver ID Log On screen will reappear requesting a valid log on.
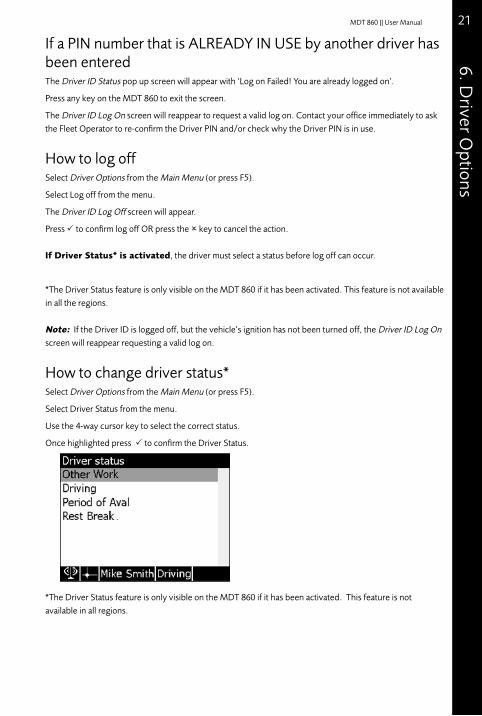
How to change driver status* Select Driver Options from the Main Menu (or press F5).
Select Driver Status from the menu.
Use the 4-way cursor key to select the correct status.
Once highlighted press P to confirm the Driver Status.
*The Driver Status feature is only visible on the MDT 860 if it has been activated. This feature is not available in all regions.
6. Driver O
ptions

22
If the MDT 860 is beepingThe MDT 860 will beep to remind that a log on with a Driver PIN is required. The beeping can be stopped by entering a correct Driver PIN. If a Driver PIN has not been assigned and the MDT 860 is beeping, contact your office immediately.

2�MDT 860 || User Manual
7 MiscellaneousSelect Miscellaneous from the Main Menu screen (or press F6) to access the Miscellaneous screen.
The Miscellaneous menu provides access to three sub-menus:
ConfigurationDiagnostics Communication Test
•••
7. Miscellaneous

24
8 ConfigurationThe Configuration Menu screen provides access to menu options that allow users to configure various MDT 860 settings.
The following MDT 860 setting are available:
GeneralDisplayKeypadBuzzerFont SizeLanguageStatus BarNotificationsMain MenuInboxOutbox
Use the 4-way cursor key to select an MDT 860 setting. Press the P key to confirm selection.
Settings for individual MDT 860 settings can be modified by using the and on the 4-way cursor key. As a general rule, a short press on the or key will make the value increase or decrease by a unit. A continuous press on the or key will make the value increase or decrease by several units. All exceptions to this rule are given in the paragraphs detailing the individual settings (refer to section 8.1 General to 8.11 Outbox).
Note: All changes to settings take effect in real time.
To ACCEPT configuration settings, press the P key to:
Options:
SaveRestore defaultsRestore defaults and saveCancel
Press the O key to return the screen to the Configuration Menu and restore the previous values.
•••••••••••
••••

25MDT 860 || User Manual
8.1 GeneralThe MDT 860 turn-off time (time the MDT 860 turns off after ignition has been switched off). Range: 1 – 255 minutes or infinite.
8.2 DisplayContrast. Range: 0 – 100%Backlight intensity. Range: 0 – 100%Backlight timeout (time the backlight is turned off after ignition has been switched off) Range: 1 – 255 minutes or infinite
8.� KeypadMulti-tap timeout (length of time before a multi-tap character is automatically accepted. Refer to the Appendix and see Using Multi-Tap Text Entry). Range: 0.1 – 5 secondsBacklight intensity. Range: 0 – 100%
8.4 BuzzerThree settings are available for the keypad key-press tone (beep):
Pitch. Range: 100 – 8000 Hz. (Note: A continuous press on the or key will result in a large increase or decrease of the pitch)Duration. Range: 1 – 255 millisecondsVolume. Range: 0 – 100%
8.5 Font sizeThe following font sizes are available for the screen body:
Tiny (8 lines of text per screen body)Small (7 lines of text per screen body)Medium (6 lines of text per screen body)Large(5 lines of text per screen body)
Font sizes can be selected by using the and cursor keys. Press the P key to accept the selection.
8.6 LanguageThe following languages are available:
EnglishFrench
Use the and cursor keys to select a language. Press the P key to accept the selection.
•••
•
•
•
••
••••
••
8. Configuration
26Note: The Language settings apply to:
Fixed elements of the screens (titles, menus, pop ups, etc.)Keypad multi-tap character subsets
Language setting does not apply to messages received at or sent from the MDT 860.
8.7 Status BarThe status bar can be customised to display the following information:
Current status of GPS (fix/no fix)Current status of the modem (online/offline)Current timeCurrent dateDriver’s nameDriver’s statusInbox status (presence of unread text messages)Qube status (Halo Qube present)Keyboard status (external keyboard present)Inbox memory usageOutbox memory usageIncoming/Outgoing messages memory usage
Use the and cursor key to select or deselect (Yes or No) the required information, respectively.
Note: The Status bar configuration screen settings are applied in real-time, so the selection can be viewed at the time of changing before accepting or canceling the action.
8.8 NotificationsUse to set up a subset of active real-time notifications. The following notifications can be enabled or disabled:
Change of GPS statusModem change of stateMemory overflow warnings
Use the and cursor keys to select or deselect (Yes or No) the required information.
8.9 Main MenuThe Main menu can be customised to enable or disable the following options:
InboxSend A MessageOutboxDriver Options
Use the and cursor keys to select or deselect (Yes or No) the required options.
••
••••••••••••
•••
••••
27MDT 860 || User Manual
8.10 InboxThe following settings are available:
Message focus (bottom, current, top). Use the and cursor key to select the required optionAutomatic saving of responses. Use the and cursor key to enable or disable (Yes or No) the required optionThreshold (percentage of the full capacity = 100%) above which warnings need to be issued regarding the usage of Inbox memory. Range: 0 – 100%
Delete all messages. Press P to delete all the messages in the Inbox
Delete all stored responses. Press Pto delete
Note: When deleting messages, a pop up screen confirming this action will be displayed to ensure the messages are not deleted in error.
8.11 OutboxThe following settings are available:
Automatic saving of originated messages. Use the and cursor keys to enable or disable (Yes or No) the required optionAction to perform on originated messages memory overflow: stop storing new messages or overwrite the oldest message. Use the and cursor keys to select the required optionThreshold (percentage of the full capacity = 100%) above which warnings need to be issued regarding the usage of Outbox memory. Range: 0 – 100%
Delete all stored originated messages. Press P to delete
Note: When deleting messages, a pop up screen confirming this action will be displayed to ensure the messages are not deleted in error.
••
•
•
•
•
•
•
•
8. Configuration
28
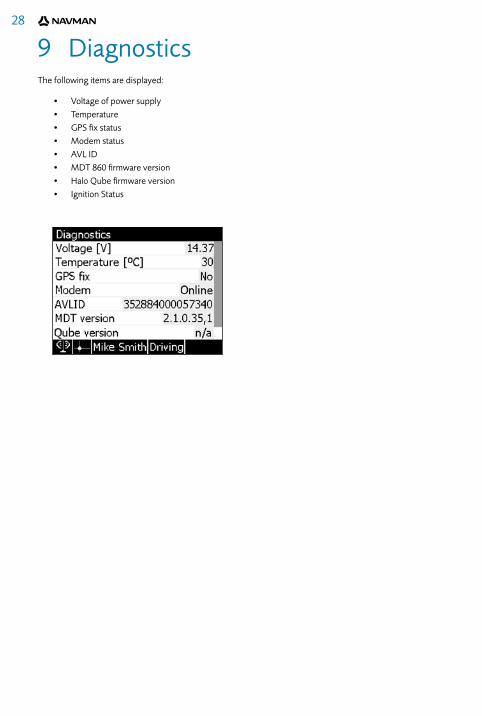
9 DiagnosticsThe following items are displayed:
Voltage of power supplyTemperatureGPS fix statusModem statusAVL IDMDT 860 firmware versionHalo Qube firmware versionIgnition Status
••••••••
29MDT 860 || User Manual9. D
iagnostics / 10. Com
munication Test
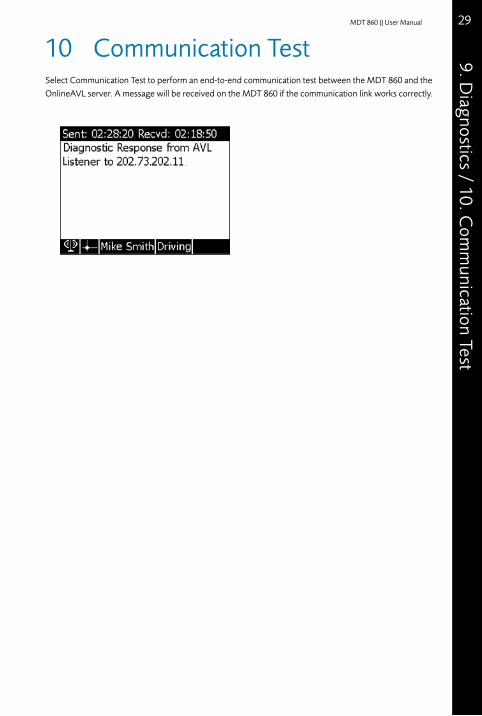
10 Communication TestSelect Communication Test to perform an end-to-end communication test between the MDT 860 and the OnlineAVL server. A message will be received on the MDT 860 if the communication link works correctly.
�0
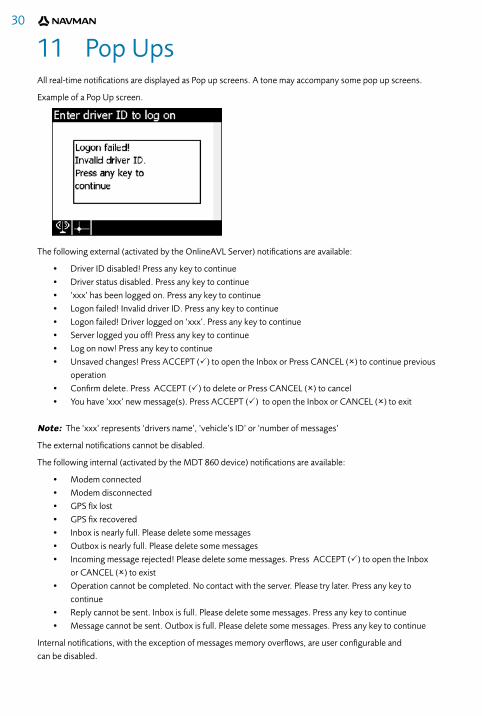
11 Pop Ups All real-time notifications are displayed as Pop up screens. A tone may accompany some pop up screens.
Example of a Pop Up screen.
The following external (activated by the OnlineAVL Server) notifications are available:
Driver ID disabled! Press any key to continueDriver status disabled. Press any key to continue‘xxx’ has been logged on. Press any key to continueLogon failed! Invalid driver ID. Press any key to continueLogon failed! Driver logged on ‘xxx’. Press any key to continueServer logged you off! Press any key to continueLog on now! Press any key to continueUnsaved changes! Press ACCEPT (P) to open the Inbox or Press CANCEL (O) to continue previous operationConfirm delete. Press ACCEPT (P) to delete or Press CANCEL (O) to cancelYou have ‘xxx’ new message(s). Press ACCEPT (P) to open the Inbox or CANCEL (O) to exit
Note: The ‘xxx’ represents ‘drivers name’, ‘vehicle’s ID’ or ‘number of messages’
The external notifications cannot be disabled.
The following internal (activated by the MDT 860 device) notifications are available:
Modem connectedModem disconnectedGPS fix lostGPS fix recoveredInbox is nearly full. Please delete some messagesOutbox is nearly full. Please delete some messagesIncoming message rejected! Please delete some messages. Press ACCEPT (P) to open the Inbox or CANCEL (O) to existOperation cannot be completed. No contact with the server. Please try later. Press any key to continueReply cannot be sent. Inbox is full. Please delete some messages. Press any key to continueMessage cannot be sent. Outbox is full. Please delete some messages. Press any key to continue
Internal notifications, with the exception of messages memory overflows, are user configurable and can be disabled.
••••••••
••
•••••••
•
••
8. Diagnostics / 9. Pop U
ps

�1MDT 860 || User Manual
12 SpecificationsPhysical:
Size: 165mm x 95mm x �0mmWeight: 2��g
Display:
58mm x 77mmWhite LED backlight, user selectable level�20 x 240 pixels, 4 grey levels
Memory:
10KB RAM�2KB EEPROM1664KB Flash as 2 banks256KB battery-backed SRAM, as 2 banks
Keypad:
21 keys with backlighting4 way cursor key with backlighting
External Interface:
Two RJ45 connectors (Power and RS2�2) International PC AT keyboard interface via RJ25 connector. Keyboard adaptor cable RJ25 to PS/2 supplied
Electrical
+8 to +42VDCOperating: 1�0mA@12V, DC 70mA@24V DC (backlight on)Standby: 25mA@12V DC, 15mA@24V DC (LCD and backlight off)
••
•••
••••
••
••
•••
11. Pop Ups / 12. Specifications

�2
AppendixExternal KeyboardThe external keyboard is an optional device. When connected, it complements the in-built keypad.
Note:
Some of the keys are not supported (e.g. Tab, Insert)There is no equivalent to the Power (•) keyThe soft keys (1-6) are mapped onto the function keys (F1 – F6, respectively)The Accept key (insert symbol of the tick in brackets) is mapped onto the Enter key, except in the editor screenThe Cancel key (insert symbol of the cross) is mapped onto the Esc key
Memory UsageThe following should be noted with regards to memory storage of OnlineAVL messages:
Messages awaiting transmission are stored in a buffer which, in certain situations (vehicle out of cellular coverage for prolonged time), may overflow. If this happens, an appropriate notification is issued. However, no newly generated messages will be stored for sending (they will be lost).When the storage for the Inbox becomes full, no new messages are accepted and a warning displays every time a new message arrives.
Using Multi-Tap Text Entry Multi-tap is only available for the alpha numeric keys (0 – 9).Two subsets of special characters have been implemented for keys 0 and 1. These include punctuation, currency and other symbols.Multi-tap characters are language-dependent, i.e. any language-specific (accented, special) characters are only available for the language in question.In multi-tap mode, the subset of characters available for the currently used key is displayed over the status bar with the current character highlighted.Multi-tap timeout (length of time before a multi-tap character is automatically accepted) is user- configurable. Refer to section 8.� Keypad.
How to enter multi-tap text:
Press a key one or more times until the required character appears on the screen (e.g. to select the character ‘M’, press the key 4 times. To accept the selected character, use one of the following options:
Pause for a short while ORPress the key on the 4-way cursor key ORContinue to enter the next character using a different key
To select and accept a numeric character, press the key once with a continuous pause.
••••
•
•
•
••
•
•
•
•
•••
•
10. Specifications / Appendix

��MDT 860 || User Manual
To delete one or more characters before the cursor, press with a short pause the O button one or more times. Note: Do not use a continuous pause on the O button, as this will return the screen to the Main Menu.
The Editor screenThe Editor screen is used for editing free form text messages.
Use the 4-way cursor key to move the cursor around the screen.Press P to send the message (or F12 if using an external keyboard).To delete all the text in the message, place the cursor at the beginning of the text and press O () Backspace if using an external keyboard).
•
•••
Appendix
�4
Conditions of Sale and WarrantyA. Conditions of Sale
Important NoticeSome of the following terms and conditions vary from country to country. Please check with your Navman dealer from whom you purchased your product.
Except to the extent otherwise required by the laws of the country in which the accompanying product (“the product”) is sold the manufacturer of the product Navman NZ (“Navman”) - has no liability in respect of the product beyond the warranty hereunder provided. Where liability may not be excluded but may be limited to repair or replacement or the supply of equivalent goods or for the payment of the cost of replacing the goods or of acquiring equivalent goods, liability is so limited.
B. Manufacturers warrantyWarranty Period - 1 year from the date of purchase.
Extent of warranty - Subject to the following conditions Navman will rectify any defect occurring in the product of which notice in writing is received by Navman or its approved distributor within the Warranty Period.
Conditions:
Repairs may only be carried out by a Service Centre approved by Navman.Repairs as above will be carried out at no cost to the owner subject to these conditions.The cost of returning the goods to an approved dealer shall be met by the owner.Warranty does not extend to accessories or defects or injuries caused or resulting from causes not attributable to faulty parts or the manufacturer of the product including, but not limited to, defect or injuries caused by or resulting from misuse, abuse, neglect, accidental damage, incorrect installation, water damage, use of consumables other than those approved by Navman or any alterations to the product not approved by Navman.No warranty claim accepted without sales documentation. Navman may, at its discretion, replace the product instead of repairing it.
C. Acceptance of Conditions of SaleIn consideration of this warranty the purchaser accepts the limitations of liability as set out in the conditions of sale.
1.2.�.4.
5.6.
�5MDT 860 || User Manual
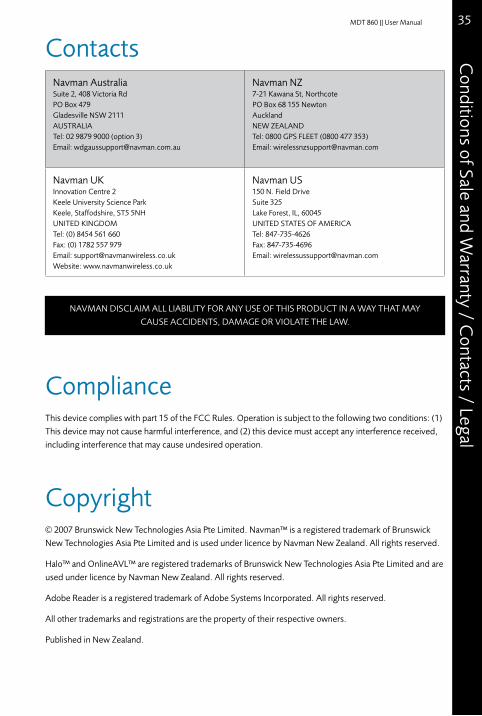
Contacts
ComplianceThis device complies with part 15 of the FCC Rules. Operation is subject to the following two conditions: (1) This device may not cause harmful interference, and (2) this device must accept any interference received, including interference that may cause undesired operation.
Copyright© 2007 Brunswick New Technologies Asia Pte Limited. Navman™ is a registered trademark of Brunswick New Technologies Asia Pte Limited and is used under licence by Navman New Zealand. All rights reserved.
Halo™ and OnlineAVL™ are registered trademarks of Brunswick New Technologies Asia Pte Limited and are used under licence by Navman New Zealand. All rights reserved.
Adobe Reader is a registered trademark of Adobe Systems Incorporated. All rights reserved.
All other trademarks and registrations are the property of their respective owners.
Published in New Zealand.
Navman AustraliaSuite 2, 408 Victoria RdPO Box 479Gladesville NSW 2111AUSTRALIATel: 02 9879 9000 (option �)Email: [email protected]
Navman NZ7-21 Kawana St, NorthcotePO Box 68 155 NewtonAucklandNEW ZEALANDTel: 0800 GPS FLEET (0800 477 �5�)Email: [email protected]
Navman UKInnovation Centre 2Keele University Science ParkKeele, Staffodshire, ST5 5NHUNITED KINGDOMTel: (0) 8454 561 660Fax: (0) 1782 557 979Email: [email protected]: www.navmanwireless.co.uk
Navman US150 N. Field DriveSuite �25Lake Forest, IL, 60045UNITED STATES OF AMERICATel: 847-7�5-4626Fax: 847-7�5-4696Email: [email protected]
NAVMAN DISCLAIM ALL LIABILITY FOR ANY USE OF THIS PRODUCT IN A WAY THAT MAYCAUSE ACCIDENTS, DAMAGE OR VIOLATE THE LAW.
Conditions of Sale and W
arranty / Contacts / Legal
MN000498A
Lat �6° 48.422`S
Lon
174°
44.
480`
E