Embed Size (px)
Citation preview

MC40USER GUIDE

CopyrightsThe Motorola products described in this document may include copyrighted Motorola computer programs. Lawsin the United States and other countries preserve for Motorola certain exclusive rights for copyrighted computerprograms. Accordingly, any copyrighted Motorola computer programs contained in the Motorola productsdescribed in this document may not be copied or reproduced in any manner without the express written permissionof Motorola.
© 2013 Motorola Solutions, Inc. All Rights Reserved
No part of this document may be reproduced, transmitted, stored in a retrieval system, or translated into anylanguage or computer language, in any form or by any means, without the prior written permission of MotorolaSolutions, Inc.
Furthermore, the purchase of Motorola products shall not be deemed to grant either directly or by implication,estoppel or otherwise, any license under the copyrights, patents or patent applications of Motorola, except for thenormal non-exclusive, royalty-free license to use that arises by operation of law in the sale of a product.
Disclaimer
Please note that certain features, facilities, and capabilities described in this document may not be applicable toor licensed for use on a particular system, or may be dependent upon the characteristics of a particular mobilesubscriber unit or configuration of certain parameters. Please refer to your Motorola contact for further information.
Trademarks
MOTOROLA, MOTO, MOTOROLA SOLUTIONS, and the Stylized M Logo are trademarks or registeredtrademarks of Motorola Trademark Holdings, LLC and are used under license. All other trademarks are theproperty of their respective owners.
European Union (EU) Waste of Electrical and Electronic Equipment(WEEE) directive
The European Union's WEEE directive requires that products sold into EU countries must have the crossed outtrash bin label on the product (or the package in some cases).
As defined by the WEEE directive, this cross-out trash bin label means that customers and end-users in EUcountries should not dispose of electronic and electrical equipment or accessories in household waste.
Customers or end-users in EU countries should contact their local equipment supplier representative or servicecentre for information about the waste collection system in their country.
i


Revision HistoryChanges to the original guide are listed below:
Change Date Description
-01 Rev A 08/30/2013 Initial release.
iii


Contents1 Getting Started ..........................................................................................................................................1-1
1.1 Features ..........................................................................................................................................1-11.2 Unpacking.......................................................................................................................................1-31.3 Setup..............................................................................................................................................1-4
1.3.1 Installing the Battery ................................................................................................................1-41.3.2 Charging the Battery ................................................................................................................1-51.3.3 Powering On the MC40 ............................................................................................................1-61.3.4 Replacing the Battery ...............................................................................................................1-71.3.5 Battery Management ................................................................................................................1-8
1.4 Setting the Date and Time ................................................................................................................ 1-101.5 Display Setting............................................................................................................................... 1-11
1.5.1 Setting the Screen Brightness................................................................................................... 1-121.5.2 Setting Screen Rotation .......................................................................................................... 1-121.5.3 Changing the Screen Timeout Setting ........................................................................................ 1-13
1.6 General Sounds Setting .................................................................................................................... 1-132 Using the MC40 ........................................................................................................................................2-1
2.1 Home Screen ...................................................................................................................................2-12.2 Status Bar........................................................................................................................................2-2
2.2.1 Status Icons ............................................................................................................................2-22.2.2 Notification Icons ....................................................................................................................2-4
2.3 Managing Notifications......................................................................................................................2-52.4 Application Shortcuts and Widgets.......................................................................................................2-6
2.4.1 Adding an Application or Widget to the Home Screen ....................................................................2-72.4.2 Moving Items on the Home Screen .............................................................................................2-72.4.3 Removing an App or Widget from the Home Screen ......................................................................2-7
2.5 Folders ...........................................................................................................................................2-72.5.1 Creating Folders ......................................................................................................................2-82.5.2 Naming Folders.......................................................................................................................2-82.5.3 Removing a Folder ..................................................................................................................2-9
2.6 Home Screen Wallpaper .....................................................................................................................2-92.6.1 Change the Home Screen Wallpaper.......................................................................................... 2-10
2.7 Using the Touchscreen..................................................................................................................... 2-102.8 Using the On-screen Keyboard .......................................................................................................... 2-112.9 Applications .................................................................................................................................. 2-11
2.9.1 Accessing Applications........................................................................................................... 2-142.9.2 Switching Between Recent Applications .................................................................................... 2-15
2.10 Un-Locking the Screen................................................................................................................... 2-152.10.1 Single User Mode ................................................................................................................ 2-162.10.2 MultiUser Mode .................................................................................................................. 2-18
2.10.2.1 MultiUser Login ........................................................................................................... 2-182.10.2.2 MultiUser Logout.......................................................................................................... 2-19
2.11 Resetting the Device ...................................................................................................................... 2-192.11.1 Performing a Soft Reset ........................................................................................................ 2-202.11.2 Performing a Hard Reset ....................................................................................................... 2-20
2.12 Suspend Mode.............................................................................................................................. 2-202.13 File Browser ................................................................................................................................ 2-212.14 PTT Express Voice Client ............................................................................................................... 2-23
2.14.1 Enabling PTT Communication ............................................................................................... 2-242.14.2 Selecting a Talk Group.......................................................................................................... 2-242.14.3 PTT Communication ............................................................................................................ 2-25
2.14.3.1 Creating a Group Broadcast (One to Many) ........................................................................ 2-272.14.3.2 Responding to a Group Broadcast..................................................................................... 2-27
v

MC40 User Guide
2.14.3.3 Responding with a Private Response ................................................................................. 2-272.14.3.4 Responding with a Private Response with the Wired Headset................................................. 2-28
2.14.4 Disabling PTT Express Voice Client Communication.................................................................. 2-292.15 VoIP Telephony Ready................................................................................................................... 2-29
3 Data Capture.............................................................................................................................................3-13.1 Imager ............................................................................................................................................3-13.2 Digital Camera .................................................................................................................................3-13.3 Scanning Considerations ....................................................................................................................3-23.4 Bar Code Capture with Imager ............................................................................................................3-23.5 Bar Code Capture with Integrated Camera .............................................................................................3-43.6 Reading Magnetic Stripe Cards ...........................................................................................................3-5
3.6.1 Improper Swiping....................................................................................................................3-63.7 DataWedge......................................................................................................................................3-9
3.7.1 Enabling DataWedge.............................................................................................................. 3-103.7.2 Disabling DataWedge ............................................................................................................. 3-10
4 WLAN.....................................................................................................................................................4-14.1 Scan and Connect to a Wi-Fi Network ..................................................................................................4-1
5 Bluetooth .................................................................................................................................................5-15.1 Adaptive Frequency Hopping..............................................................................................................5-15.2 Security ..........................................................................................................................................5-15.3 Bluetooth Profiles .............................................................................................................................5-25.4 Bluetooth Power States ......................................................................................................................5-25.5 Bluetooth Radio Power ......................................................................................................................5-2
5.5.1 Enabling Bluetooth ..................................................................................................................5-35.5.2 Disabling Bluetooth .................................................................................................................5-3
5.6 Discovering Bluetooth Device(s) .........................................................................................................5-35.7 Changing the Bluetooth Name.............................................................................................................5-55.8 Connecting to a Bluetooth Device ........................................................................................................5-55.9 Selecting Profiles on the Bluetooth Device.............................................................................................5-65.10 Disconnecting from a Bluetooth Device...............................................................................................5-65.11 Unpairing a Bluetooth Device............................................................................................................5-7
6 Photos and Videos......................................................................................................................................6-16.1 Taking Photos ..................................................................................................................................6-16.2 Taking a Panoramic Photo ..................................................................................................................6-26.3 Recording Videos .............................................................................................................................6-36.4 Camera Settings ...............................................................................................................................6-46.5 Video Settings..................................................................................................................................6-56.6 Viewing Photos and Videos ................................................................................................................6-6
6.6.1 Working with Albums ..............................................................................................................6-76.6.1.1 Share an Album................................................................................................................6-96.6.1.2 Get Album Information......................................................................................................6-96.6.1.3 Deleting an Album ............................................................................................................6-9
6.6.2 Working with Photos .............................................................................................................. 6-106.6.2.1 Viewing and Browsing Photos ........................................................................................... 6-106.6.2.2 Rotating a Photo ............................................................................................................. 6-116.6.2.3 Cropping a Photo ............................................................................................................ 6-126.6.2.4 Get Photo Information ..................................................................................................... 6-126.6.2.5 Share a Photo ................................................................................................................. 6-136.6.2.6 Deleting a Photo ............................................................................................................. 6-13
6.6.3 Working with Videos.............................................................................................................. 6-146.6.3.1 Watching Videos............................................................................................................. 6-146.6.3.2 Sharing a Video .............................................................................................................. 6-156.6.3.3 Deleting a Video ............................................................................................................. 6-15
7 Accessories...............................................................................................................................................7-17.1 MC40 Accessories ............................................................................................................................7-1
vi
Revision History
7.2 Micro USB Cable .............................................................................................................................7-27.3 Single Slot Charge Cradle ..................................................................................................................7-47.4 Five Slot Charge Only Cradle..............................................................................................................7-57.5 Four Slot Battery Charger...................................................................................................................7-7
8 Maintenance and Troubleshooting .................................................................................................................8-18.1 Maintaining the MC40.......................................................................................................................8-18.2 Battery Safety Guidelines ...................................................................................................................8-18.3 Cleaning Instructions.........................................................................................................................8-28.4 Cleaning the MC40 ...........................................................................................................................8-3
8.4.1 Connector Cleaning .................................................................................................................8-38.5 Cleaning Cradle Connectors................................................................................................................8-48.6 Troubleshooting the MC40 .................................................................................................................8-58.7 Single-Slot Charge Cradle Troubleshooting ...........................................................................................8-88.8 Five-Slot Charge Only Cradle CRDUNIV-40–5000R Troubleshooting........................................................8-88.9 Four-Slot Battery Charger SACMC40XX-4000R Troubleshooting .............................................................8-9
9 Technical Specifications ..............................................................................................................................9-19.1 MC40 Technical Specifications............................................................................................................9-19.2 Single-Slot Charge Cradle CRDMC40XX-1000R Technical Specifications ..................................................9-39.3 Five-Slot Charge Only Cradle CRDUNIV-40-5000R Technical Specifications ..............................................9-49.4 Four-Slot Battery Charger SACMC40XX-4000R Technical Specifications...................................................9-5
vii


List of FiguresManufacturing Label Location ..................................................................................................... xvi
Figure 1-1 Front View...............................................................................................................................1-1Figure 1-2 Back View ...............................................................................................................................1-3Figure 1-3 Inserting the Battery ..................................................................................................................1-5Figure 1-4 Lift Battery Latch......................................................................................................................1-7Figure 1-5 Remove Battery ........................................................................................................................1-8Figure 1-6 Battery Use Screen ....................................................................................................................1-9Figure 1-7 Low Battery Notification Screen ..................................................................................................1-9Figure 1-8 Brightness Dialog Box ............................................................................................................. 1-12Figure 1-9 Sounds Screen ........................................................................................................................ 1-14Figure 1-10 Volumes Dialog Box ................................................................................................................ 1-14Figure 2-1 Home Screen............................................................................................................................2-1Figure 2-2 Notification and Status Icons .......................................................................................................2-2Figure 2-3 Notification Panel......................................................................................................................2-5Figure 2-4 Stacked Shortcut Icons ...............................................................................................................2-8Figure 2-5 Unnamed Folder .......................................................................................................................2-8Figure 2-6 Open Folder .............................................................................................................................2-8Figure 2-7 Renamed Folder........................................................................................................................2-9Figure 2-8 APPS Window........................................................................................................................ 2-14Figure 2-9 Recently Used Applications ...................................................................................................... 2-15Figure 2-10 Lock Screen ........................................................................................................................... 2-16Figure 2-11 PIN Screen............................................................................................................................. 2-17Figure 2-12 Pattern Screen ........................................................................................................................ 2-17Figure 2-13 Password Screen ..................................................................................................................... 2-18Figure 2-14 Multiple User Log In Screen ..................................................................................................... 2-19Figure 2-15 Lock Screen ........................................................................................................................... 2-21Figure 2-16 File Browser Screen................................................................................................................. 2-22Figure 2-17 PTT Express Window .............................................................................................................. 2-24Figure 2-18 MC40 PTT Buttons ................................................................................................................. 2-25Figure 2-19 Wired Headset ........................................................................................................................ 2-26Figure 3-1 Bar Code Scanning ....................................................................................................................3-3Figure 3-2 Aiming Pattern .........................................................................................................................3-3Figure 3-3 Pick List Mode with Multiple Bar Codes in Aiming Pattern...............................................................3-3Figure 3-4 Application with Preview Window ...............................................................................................3-4Figure 3-5 Swiping a Magnetic Stripe Card ...................................................................................................3-5Figure 3-6 Do Not Start Swipe in Middle of Card...........................................................................................3-6Figure 3-7 Avoid Thumb Hitting Device.......................................................................................................3-7Figure 3-8 Do Not Hold End of Card While Swiping ......................................................................................3-8Figure 3-9 Do Not Swipe Card on Angle ......................................................................................................3-9Figure 4-1 Wi-Fi Screen ............................................................................................................................4-2Figure 5-1 Bluetooth Pairing - Enter PIN ......................................................................................................5-4Figure 5-2 Bluetooth Pairing — Simple Pairing .............................................................................................5-4Figure 6-1 Camera Mode...........................................................................................................................6-1Figure 6-2 Panoramic Mode .......................................................................................................................6-3Figure 6-3 Video Mode .............................................................................................................................6-4Figure 6-4 Gallery — Albums ....................................................................................................................6-7Figure 6-5 Photos Inside an Album..............................................................................................................6-8Figure 6-6 Photo Example ....................................................................................................................... 6-11Figure 6-7 Cropping Tool ........................................................................................................................ 6-12Figure 6-8 Video Example ....................................................................................................................... 6-14Figure 7-1 Charging Using the Micro USB Cable ...........................................................................................7-3Figure 7-2 Communication Using the Micro USB Cable..................................................................................7-3
ix

MC40 User Guide
Figure 7-3 MC40 Battery Charging .............................................................................................................7-4Figure 7-4 Charging MC40s and Spare Batteries ............................................................................................7-6Figure 7-5 Four Slot Battery Charger ...........................................................................................................7-7
x

List of TablesTable 1-1 Features - Front View ................................................................................................................1-1Table 1-2 Features - Back View ................................................................................................................1-3Table 1-3 Battery Charge LED Status .........................................................................................................1-6Table 2-1 Home Screen Items....................................................................................................................2-1Table 2-2 Status Icons..............................................................................................................................2-2Table 2-3 Notification Icons......................................................................................................................2-4Table 2-4 Applications........................................................................................................................... 2-11Table 7-1 MC40 Accessories.....................................................................................................................7-1Table 7-2 Spare Battery Charge LED Status .................................................................................................7-8Table 8-1 Troubleshooting the MC40..........................................................................................................8-5Table 8-2 Troubleshooting the Single-slot Charge Cradle................................................................................8-8Table 8-3 Troubleshooting the Five-Slot Charge Only Cradle ..........................................................................8-8Table 8-4 Troubleshooting the Four-slot Battery Charger ................................................................................8-9Table 9-1 MC40 Technical Specifications ....................................................................................................9-1Table 9-2 Single-slot Charge Cradle Technical Specifications ..........................................................................9-3Table 9-3 Five-Slot Charge Only Cradle Technical Specifications.....................................................................9-4Table 9-4 Four-slot Battery Charger Technical Specifications ..........................................................................9-5
xi


About This GuideThis guide provides information on using the MC40 and accessories.
Screens and windows pictured in this guide are samples and can differ from actual screens.
Documentation SetThe documentation set for the MC40 provides information for specific user needs, and includes:
• MC40 Quick Start Guide - describes how to get the device up and running.• MC40 Regulatory Guide - provides required regulatory information.• MC40 User Guide - describes how to use the device.• MC40 Integrator Guide - describes how to set up the device and accessories.
ConfigurationsThis guide covers the following configurations:
Configuration Radios Display Memory Data CaptureOptions
OperatingSystem
MC40 WLAN:802.11a/b/g/n
WPAN:Bluetooth v2.1with EDR
4.3” colorWVGA
1 GB RAM / 8GB Flash
camera andimager orcamera, imagerand MSR
Android-based,AndroidOpen-SourceProject 4.1.1
Software Versions
To determine the current software versions touch > About device.
• Serial number – Displays the serial number.• Model number – Displays the model number.• Android version – Displays the operating system version.• Kernel version – Displays the kernel version number.• Build number – Displays the software build number.
The build number contains the software revision number and whether the MC40 is VoIP telephony ready.
Example Build Number: 0z-4AJ11–J-xxxx–xxxx–y0–M1–mmddyy
• z = software version number• y = VoIP telephone ready
xiii
MC40 User Guide
where:
• 0 = not VoIP telephony ready
• V = VoIP telephony ready.
Chapter DescriptionsTopics covered in this guide are as follows:
• 1 Getting Started, page 1-1 provides information on getting the MC40 up and running for the first time.
• 2 Using the MC40, page 2-1 provides basic instructions for using the MC40, including powering on and resettingthe MC40.
• 3 Data Capture, page 3-1 provides information for capturing bar code data using the internal camera and optionalscan modules and Bluetooth scanner.
• 4 WLAN, page 4-1 provides information for configuring Wi-Fi.
• 5 Bluetooth, page 5-1 provides information for configuring Bluetooth.
• 6 Photos and Videos, page 6-1 explains how to take photos, capture videos and video images in the Galleryapplication.
• 7 Accessories, page 7-1 describes the available accessories and how to use them with the MC40.
• 8 Maintenance and Troubleshooting, page 8-1 includes instructions on cleaning and storing the MC40, andprovides troubleshooting solutions for potential problems during MC40 operation.
• 9 Technical Specifications, page 9-1 provides the technical specifications for the MC40.
Notational ConventionsThe following conventions are used in this document:
• Italics are used to highlight the following:
– Chapters and sections in this and related documents
– Icons on a screen.
• Bold text is used to highlight the following:
– Dialog box, window, and screen names
– Drop-down list and list box names
– Check box and radio button names
– Button names on a screen.
• Bullets (•) indicate:
– Action items
– Lists of alternatives
– Lists of required steps that are not necessarily sequential
• Sequential lists (for example, lists that describe step-by-step procedures) appear as numbered lists.
xiv

Icon Conventions
Icon Conventions
The documentation set is designed to give the reader more visual clues. The following graphic icons are usedthroughout the documentation set. These icons and their associated meanings are described below.
The word WARNING with the associated safety icon implies information that, if disregarded, couldresult in death or serious injury, or serious product damage.
The word CAUTION with the associated safety icon implies information that, if disregarded, mayresult in minor or moderate injury, or serious product damage.
NOTE contains information more important than the surrounding text, such as exceptions or preconditions.They also refer the reader elsewhere for additional information, remind the reader how to complete anaction (when it is not part of the current procedure, for instance), or tell the reader where something islocated on the screen. There is no warning level associated with a note.
Related Documents
• MC40 Quick Start Guide, p/n 72-166941-xx
• MC40 Regulatory Guide, p/n 72-166942-xx
• MC40 Integrator Guide, p/n 72E-166943-xx
• MSP Client Software Guide, p/n 72E-128805-xx
• MSP Release Notes, p/n 72E-100160-xx.
For the latest version of this guide and all guides, go to: http://supportcentral.motorolasolutions.com
Service Information
If you have a problem with your equipment, contact Motorola Solutions Global Customer Support Center for yourregion. Contact information is available at: http://www.motorolasolutions.com/support.
When contacting Motorola Solutions Global Customer Support Center, please have the following informationavailable:
• Serial number of the unit (found on manufacturing label)
• Model number or product name (found on manufacturing label)
• Software type and version number
xv

MC40 User Guide
Manufacturing Label Location
Motorola responds to calls by email or telephone within the time limits set forth in support agreements.
If your problem cannot be solved by Motorola Solutions Global Customer Support Center, you may need toreturn your equipment for servicing and will be given specific directions. Motorola is not responsible for anydamages incurred during shipment if the approved shipping container is not used. Shipping the units improperlycan possibly void the warranty.
If you purchased your product from a Motorola business partner, contact that business partner for support.
xvi

1 Getting StartedThis chapter provides the features of the MC40 and explains how to set it up for the first time.
1.1 FeaturesFigure 1-1 Front View
23
41
17
16 5
6
7
8
9
10
111
12
13
14
15
Table 1-1 Features - Front View
Number Item Function1 Microphone Use for making voice recordings.
2 Receiver Provide audio in handset mode.
3 Light/ProximitySensor
Determines ambient light for controlling display backlight intensity andfor turning off display when in handset mode.
4 Right LED Indicates battery charge state when MC40 is in a charger.
Indicates decode functionality. Lights red when scanning in process.Lights green indicating a successful decode.
MN000111A01 - August 2013 1-1
MC40 User Guide
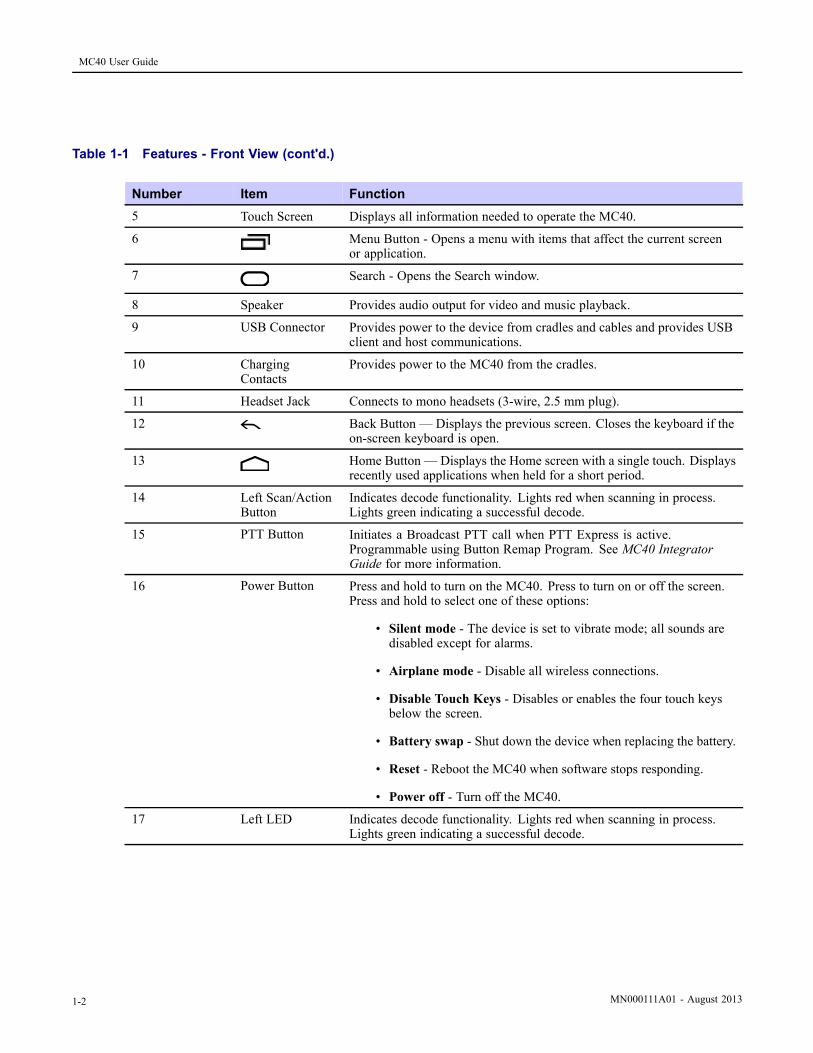
Table 1-1 Features - Front View (cont'd.)
Number Item Function5 Touch Screen Displays all information needed to operate the MC40.
6 Menu Button - Opens a menu with items that affect the current screenor application.
7 Search - Opens the Search window.
8 Speaker Provides audio output for video and music playback.
9 USB Connector Provides power to the device from cradles and cables and provides USBclient and host communications.
10 ChargingContacts
Provides power to the MC40 from the cradles.
11 Headset Jack Connects to mono headsets (3-wire, 2.5 mm plug).
12 Back Button — Displays the previous screen. Closes the keyboard if theon-screen keyboard is open.
13 Home Button — Displays the Home screen with a single touch. Displaysrecently used applications when held for a short period.
14 Left Scan/ActionButton
Indicates decode functionality. Lights red when scanning in process.Lights green indicating a successful decode.
15 PTT Button Initiates a Broadcast PTT call when PTT Express is active.Programmable using Button Remap Program. See MC40 IntegratorGuide for more information.
16 Power Button Press and hold to turn on the MC40. Press to turn on or off the screen.Press and hold to select one of these options:
• Silent mode - The device is set to vibrate mode; all sounds aredisabled except for alarms.
• Airplane mode - Disable all wireless connections.
• Disable Touch Keys - Disables or enables the four touch keysbelow the screen.
• Battery swap - Shut down the device when replacing the battery.
• Reset - Reboot the MC40 when software stops responding.
• Power off - Turn off the MC40.
17 Left LED Indicates decode functionality. Lights red when scanning in process.Lights green indicating a successful decode.
1-2 MN000111A01 - August 2013

1.2 Unpacking
Figure 1-2 Back View
18
19
20
21
2223
24
25
Table 1-2 Features - Back View
Number Item Function18 Battery Provides the MC40 with operating power.
19 Battery Latch Secures the battery in position.
20 Camera Takes photos, videos, and captures bar code data.
21 RightScan/ActionButton
Initiates scanning when a scan application is enabled (default).Programmable using Button Remap Program. See MC40 IntegratorGuide for more information.
22 Volume Control Increases and decrease audio volume. Programmable using ButtonRemap Program. See MC40 Integrator Guide for more information.
23 Imager Captures bar code data.
24 MSR Slot(Optional)
Use to swipe magnetic stripe cards during credit or debit transactions.
25 Finger Strap Plug Covers mounting area for optional Finger Strap.
1.2 UnpackingCarefully remove all protective material from the MC40 and save the shipping container for later storage andshipping.
Verify the following items are in the box:
• MC40
MN000111A01 - August 2013 1-3

MC40 User Guide
• Lithium-ion battery
• Quick Start Guide
• Regulatory Guide.
Inspect the equipment for damage. If any equipment is missing or damaged, contact the Motorola Solutions GlobalCustomer Support Center immediately. See Service Information, page xv for contact information.
1.3 SetupTo start using the MC40 for the first time:
• Install the battery
• Charge the MC40
• Power on the MC40.
1.3.1 Installing the BatteryTo install the battery:
1-4 MN000111A01 - August 2013

1.3.2 Charging the Battery
Procedure Steps
1 Align the battery with the slots in the battery compartment.
Figure 1-3 Inserting the Battery
2 Lower the battery and press down until it snaps into place.
3 Press down on the battery latch.
4 Press the Power button to turn on the MC40.
1.3.2 Charging the Battery
Ensure that you follow the guidelines for battery safety described in 8.2 Battery Safety Guidelines,page 8-1.
Before using the MC40 for the first time, charge the main battery until the Right light emitting diode (LED)turns solid green (see Table 1-3 Battery Charge LED Status for charge status indications). To charge the MC40,use a cable or a cradle with the appropriate power supply. For information about the accessories available forthe MC40, see 7 Accessories, page 7-1.
The MC40 is equipped with a memory backup battery that automatically charges from the fully-charged mainbattery. When using the MC40 for the first time, the backup battery requires approximately 36 hours to fully charge.This is also true any time the backup battery is discharged, which occurs when the main battery is removed forseveral hours. The backup battery retains random access memory (RAM) data in memory for at least 10 minutes(at room temperature) when the MC40’s main battery is removed, when Battery Swap feature is used. When theMC40 reaches a very low battery state, the combination of main battery and backup battery retains RAM data inmemory for at least 48 hours.
MN000111A01 - August 2013 1-5

MC40 User Guide
For cable and cradle setup and charging procedures refer to the MC40 Integrator Guide.
• Micro USB Cable• Single Slot Charging Cradle• Five Slot Charge Only Cradle.
Table 1-3 Battery Charge LED Status
Status Indications
Off MC40 is not charging.
MC40 is not inserted correctly in the cradle.
MC40 is not connected to a power source.
Charger or cradle is not powered.
Slow Blinking Amber (3 blinksevery 2 seconds)
MC40 is charging.
Solid Green Charging complete.
Fast Blinking Amber (3blinks/second)
Charging error, e.g.:
• Temperature is too low or too high.
• Charging has gone on too long without completion (typically eighthours).
Flashes Amber once (when Powerbutton pressed)
Critical battery state. Battery too low to boot device.
Fast Blinking Amber (when Powerbutton pressed)
Battery over-temperature condition. Device shuts down. Battery will notcharge until temperature returns to normal operating value.
Charging TemperatureCharge batteries in ambient temperatures from 0 °C to 40 °C (32 °F to 104 °F) or up to 45 °C (113 °F) as reported
by the battery. To view the battery temperature, touch > About device > Battery Information.
Note that charging is intelligently controlled by the MC40. To accomplish this, for small periods of time, the MC40or accessory alternately enables and disables battery charging to keep the battery at acceptable temperatures. TheMC40 or accessory indicates when charging is disabled due to abnormal temperatures via its LED.
Charging Spare BatteriesSee 7 Accessories, page 7-1 for information on using accessories to charge spare batteries.
1.3.3 Powering On the MC40If the MC40 did not turn on when the battery was installed, press the Power button until the Right and Left LEDsflash once. The splash screen displays for about a minute as the MC40 initializes its flash file system. Notethat these windows also appear upon reset.
1-6 MN000111A01 - August 2013
1.3.4 Replacing the Battery
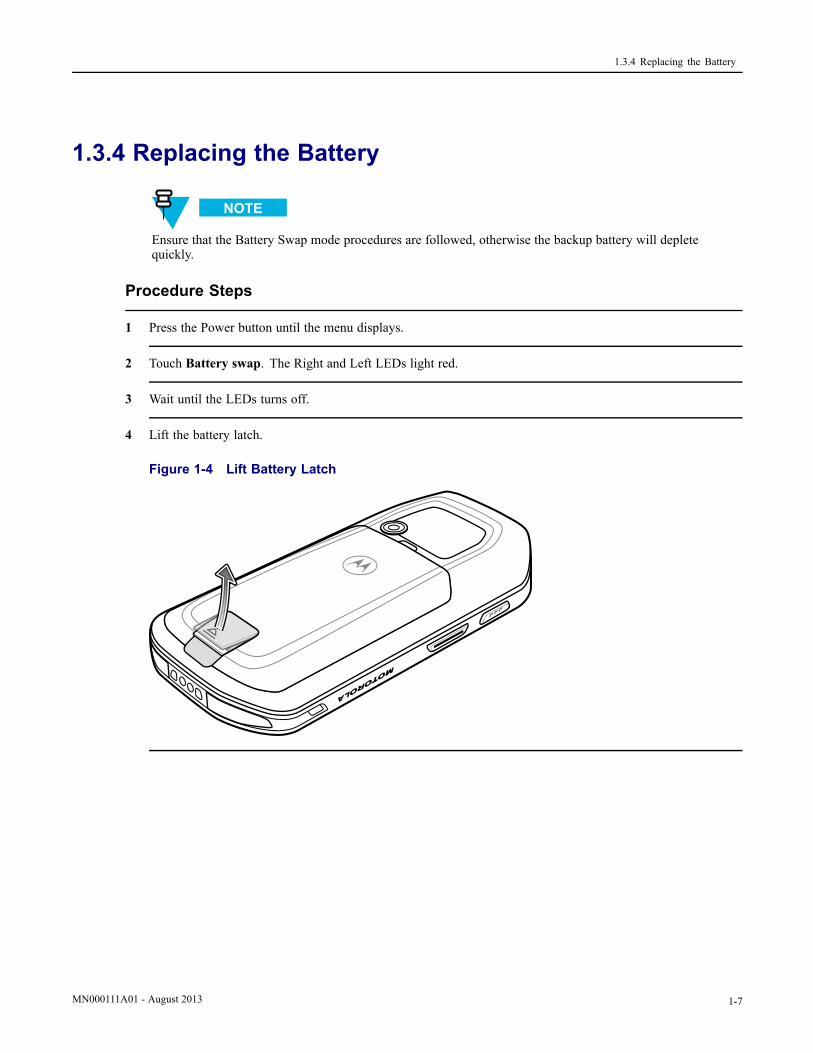
1.3.4 Replacing the Battery
Ensure that the Battery Swap mode procedures are followed, otherwise the backup battery will depletequickly.
Procedure Steps
1 Press the Power button until the menu displays.
2 Touch Battery swap. The Right and Left LEDs light red.
3 Wait until the LEDs turns off.
4 Lift the battery latch.
Figure 1-4 Lift Battery Latch
MN000111A01 - August 2013 1-7

MC40 User Guide
5 Remove the battery out of the battery compartment.
Figure 1-5 Remove Battery
6 Align the replacement battery in the battery compartment.
7 Lower the battery and press down until it snaps into place.
8 Press down on the battery latch.
9 Press the Power button to turn on the MC40.
1.3.5 Battery Management
Prior to checking the battery charge level, remove the MC40 from any AC power source (cradle or cable).
To check the charge status of the main battery, touch > About device > Status.
Battery status indicates that the battery is discharging and Battery level lists the battery charge (as a percentageof fully charged).
Monitor Battery UsageThe Battery Use screen lists which applications consume the most battery power. Also use it to turn off applicationsthat were downloaded if they are consuming too much power.
Touch > Battery.
1-8 MN000111A01 - August 2013

1.3.5 Battery Management
Figure 1-6 Battery Use Screen
The Battery Use screen lists the applications using the battery. The discharge graph at the top of the screen showsthe rate of battery discharge since last charged (short periods of time when connected to a charger are shown as thingreen lines at the bottom of the chart), and how long it has been running on battery power.
Touch an application in the Battery Use screen to display details about its power consumption. Different applicationsdisplay different information. Some applications include buttons that open screens with settings to adjust power use.
Low Battery Notification
When the battery charge drops below 15%, the MC40 displays a notice to connect the MC40 to power.
Figure 1-7 Low Battery Notification Screen
The user should replace the battery or charge the MC40 using one of the charging accessories.
When the battery charge drops below 10%, the MC40 goes into critical suspend mode to save data. The screenturns off. If the Power button is pressed, the Right LED flashes amber.
MN000111A01 - August 2013 1-9

MC40 User Guide
The user must replace the battery or charge the MC40 using one of the charging accessories to retain data.
Battery Optimization
Observe the following battery saving tips:
• Leave the MC40 connected to AC power at all times when not in use.
• Set the screen to turn off after a short period of non-use.
• Reduce the screen brightness.
• Turn off all wireless radios when not in use.
• Turn off automatic syncing for Email, Calendar, Contacts, and other applications.
• Use the Power Control widget to check and control the status of radios, the screen brightness, and syncing.
• Minimize use of applications that keep the MC40 from suspending, for example, music and video applications.
1.4 Setting the Date and TimeThe date and time is automatically synchronized using an NTP server when the MC40 is connected to a wirelessnetwork. The user is only required to set the time zone or set the date and time when not connected to a wirelessnetwork.
1-10 MN000111A01 - August 2013

1.5 Display Setting
Procedure Steps
1 Touch .
2 Touch Date & time.
3 Touch Automatic date & time to disable automatic date and time synchronization.
4 Touch Automatic time zone to disable automatic time zone synchronization.
5 Touch Set date.
6 Move the sliders up and down to select the month, date and year.
7 Touch Done.
8 Touch Set time.
9 Move the sliders up and down to select the hour, minutes and part of the day.
10 Touch Done.
11 Touch Select time zone.
12 Select the current time zone from the list.
13 Touch .
1.5 Display SettingUse Display settings to change the screen brightness, change the background image, enable screen rotation, setsleep time and change font size.
MN000111A01 - August 2013 1-11

MC40 User Guide
1.5.1 Setting the Screen Brightness
Procedure Steps
1 Touch .
2 Touch Display.
3 Touch Brightness.
Figure 1-8 Brightness Dialog Box
4 In the Brightness dialog box, check the Automatic brightness checkbox to set the device to automaticallyadjust the brightness using the built-in light sensor. Uncheck the checkbox to set the brightness manually.Use the slider to set a brightness level.
5 Touch OK.
6 Touch .
1.5.2 Setting Screen RotationThe user can set the MC40 screen to rotate 90 degrees left or right.
1-12 MN000111A01 - August 2013

1.5.3 Changing the Screen Timeout Setting
Procedure Steps
1 Touch .
2 Touch Display.
3 In the Display settings screen, check Auto-rotate screen to set the MC40 to automatically switch orientationwhen the MC40 is rotated.
4 Touch .
1.5.3 Changing the Screen Timeout SettingTo set the MC40 to turn off after a short period of non-use:
Procedure Steps
1 Touch .
2 Touch Display
3 Touch Sleep
4 Select a value from the Sleep window. Options:• 15 seconds
• 30 seconds
• 1 minute (default)• 2 minutes
• 5 minutes
• 10 minutes
• 30 minutes
5 Touch .
1.6 General Sounds Setting
Use the Sounds settings to configure media and alarm volumes. Touch > Sounds.
MN000111A01 - August 2013 1-13

MC40 User Guide
Figure 1-9 Sounds Screen
• Volumes - Use to change the volume of media, ringtones and notifications and alarms.
Figure 1-10 Volumes Dialog Box
• Call Ringtone and Vibrate
– Phone ringtone - Opens a dialog box to select the ringtone to sound when a VoIP call is received(VoIP telephony ready only).
– Vibrate when ringing - Check to make the device vibrate when a call is received (VoIP telephonyready only).
• System
– Default notification - Touch to select a sound to play for all system notifications.– Touch sounds - Check to play a sound when making screen selection.– Touch sounds - Check to play a sound when making screen selections.
1-14 MN000111A01 - August 2013

1.6 General Sounds Setting
– Screen lock sounds - Check to play a sound when locking and unlocking the screen.
– Vibrate on touch - Check to have the device vibrate when touching soft keys and on certain screeninteractions.
MN000111A01 - August 2013 1-15


2 Using the MC40This chapter describes the screens, status and notification icons, and controls on the MC40, and provides basicinstructions for using the MC40.
2.1 Home ScreenThe Home screen displays when the MC40 turns on. Depending upon the configuration, the Home screen mightappear different. Contact your system administrator for more information.
After a suspend or screen time-out, the Home screen displays with the lock sliders. Slide to the right toward
to unlock the screen. For screen locking information see 2.10 Un-Locking the Screen, page 2-15.
Figure 2-1 Home Screen
The Home screen consists of the following:
Table 2-1 Home Screen Items
Item Description1 — Status Bar Displays the time, status icons (right side), and notification icons (left side). For more
information see 2.2.1 Status Icons, page 2-2 and 2.3 Managing Notifications, page 2-5.
2 — Browser Icon Opens the Browser application.
MN000111A01 - August 2013 2-1

MC40 User Guide
Table 2-1 Home Screen Items (cont'd.)
Item Description3 — All AppsIcon
Opens the APPS window.
4 — Settings Icon Opens the Settings window.
5 — ShortcutIcons
Opens applications installed on the MC40. See 2.4 Application Shortcuts and Widgets, page2-6 for more information.
6 — Widgets Launches stand-alone applications that run on the Home screen. See 2.4 ApplicationShortcuts and Widgets, page 2-6 for more information.
The Home screen provides four additional screens for placement of widgets and shortcuts. Swipe the screenleft or right to view the additional screens.
2.2 Status BarThe Status bar displays the time, notification icons (left side) and status icons (right side).
Figure 2-2 Notification and Status Icons
1 Notifications icons
2 Status icons
If there are more notifications than can fit in the Status bar, displays indicating that more notifications exist.Open the Notifications panel to view all notifications and status.
2.2.1 Status IconsTable 2-2 Status Icons
Icon DescriptionIndicates that Bluetooth is on.
Indicates that the device is connected to another Bluetooth device.
2-2 MN000111A01 - August 2013

2.2.1 Status Icons
Table 2-2 Status Icons (cont'd.)
Icon DescriptionIndicates that the Alarm is active.
Indicates that all sounds except media and alarms are silenced and vibrate mode is active.
Indicates that the audio is silenced.
Connected to a Wi-Fi network.
No Wi-Fi signal.
Indicates that the battery charge is very low.
Indicates that the battery charge is low.
Indicates that the battery is partially drained.
Indicates that the battery is fully charged.
Indicates that the battery is charging.
Indicates that the MC40 is calculating the battery capacity level.
Indicates an unknown charging error.
Indicates that the battery temperature is nearing the high for charging to occur.
Indicates that the battery temperature is nearing the low for charging to occur.
Indicates that the Airplane Mode is active. All radios are turned off.
Indicates that a wired headset is connected to the MC40.
MN000111A01 - August 2013 2-3

MC40 User Guide
2.2.2 Notification IconsTable 2-3 Notification Icons
Icon DescriptionIndicates that more notifications are available for viewing.
Indicates that data is syncing.
Indicates an upcoming event.
Indicates that an open Wi-Fi network is available.
Indicates that a song is playing.
Indicates that a problem with sign-in or sync has occurred.
Indicates that the device is uploading data.
Indicates that the Internal Storage is almost full.
Indicates that the device is downloading data when animated and download is complete whenstatic.
Indicates that the device is connected via USB cable.
Indicates that the device is connected to a virtual private network (VPN).
Preparing Internal Storage.
Indicates that USB debugging is enabled on the device.
Screenshot captured.
Error capturing screenshot.
2-4 MN000111A01 - August 2013

2.3 Managing Notifications
Table 2-3 Notification Icons (cont'd.)
Icon DescriptionIndicates that the MultiUser feature is enabled.
Indicates that a new user is logging in.
2.3 Managing NotificationsNotification icons report the arrival of new messages, calendar events, and alarms, as well as ongoing events. Whena notification occurs, an icon appears in the Status bar with a brief description. See 2.2.2 Notification Icons, page2-4 for a list of possible notification icons and their description. Open the Notifications panel to view a listof all the notifications.
To open the Notification panel, drag the Status bar down from the top of the screen.
Figure 2-3 Notification Panel
To respond to a notification, open the Notifications Panel and then touch a notification. The Notifications Panelcloses and the subsequent activity is dependent on the notification.
To clear all notifications, open the Notifications Panel and then touch . All event-based notifications areremoved. Ongoing notifications remain in the list.
To close the Notification Panel, drag the bottom of the Notifications Panel to the top of the screen or touch .
MN000111A01 - August 2013 2-5

MC40 User Guide
2.4 Application Shortcuts and WidgetsApplication shortcuts placed on the Home screen allow quick and easy access to applications. Widgets areself-contained applications placed on the Home screen to access frequently used features.
2-6 MN000111A01 - August 2013

2.4.1 Adding an Application or Widget to the Home Screen
2.4.1 Adding an Application or Widget to the Home ScreenProcedure Steps
1 Go to the desired Home screen.
2 Touch .
3 Swipe right, if necessary, to find the application icon or widget.
4 Touch and hold the icon or widget until the Home screen appears.
5 Position the icon on the screen and then release.
2.4.2 Moving Items on the Home ScreenProcedure Steps
1 Touch and hold the item until it floats on the screen.
2 Drag the item to a new location. Pause at the edge of the screen to drag the item onto an adjacent Home screen.
3 Lift finger to place the item on the Home screen.
2.4.3 Removing an App or Widget from the Home ScreenProcedure Steps
1 Go to the desired Home screen.
2 Touch and hold the application shortcut or widget icon until it floats on the screen.
3 Drag the icon to on the top of the screen and then release.
2.5 FoldersUse Folders to organize similar applications together. Touch the folder to open and display items in the folder.
MN000111A01 - August 2013 2-7
MC40 User Guide
2.5.1 Creating Folders
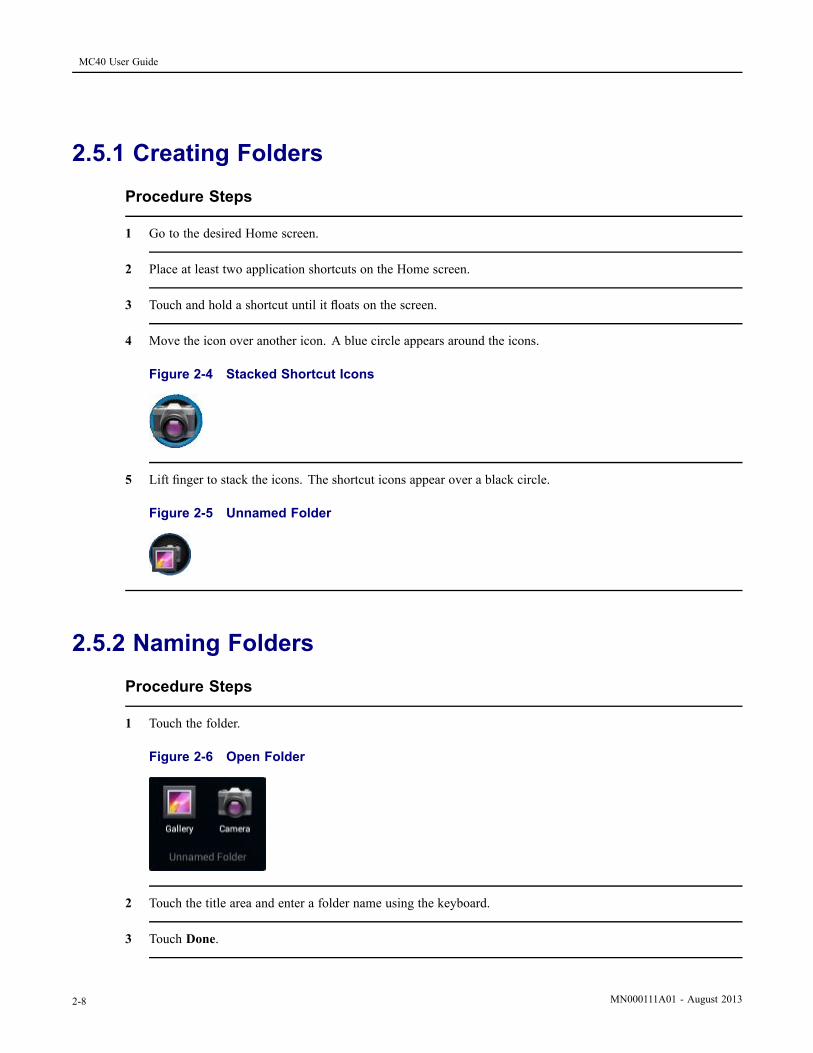
Procedure Steps
1 Go to the desired Home screen.
2 Place at least two application shortcuts on the Home screen.
3 Touch and hold a shortcut until it floats on the screen.
4 Move the icon over another icon. A blue circle appears around the icons.
Figure 2-4 Stacked Shortcut Icons
5 Lift finger to stack the icons. The shortcut icons appear over a black circle.
Figure 2-5 Unnamed Folder
2.5.2 Naming Folders
Procedure Steps
1 Touch the folder.
Figure 2-6 Open Folder
2 Touch the title area and enter a folder name using the keyboard.
3 Touch Done.
2-8 MN000111A01 - August 2013

2.5.3 Removing a Folder
4 Touch anywhere on the Home screen to close the folder. The folder name appears under the folder.
Figure 2-7 Renamed Folder
2.5.3 Removing a Folder
Procedure Steps
1 Touch and hold the folder icon until it enlarges and the device vibrates.
2 Drag the icon to and release.
2.6 Home Screen Wallpaper
Use of Live Wallpaper may reduce battery life.
MN000111A01 - August 2013 2-9

MC40 User Guide
2.6.1 Change the Home Screen Wallpaper
Procedure Steps
1 Touch and hold on the Home screen until the Choose Wallpaper from menu appears.
2 Touch Gallery, Live wallpapers orWallpapers.• Gallery - Select to use an image stored on the device.• Live wallpapers - Select to use an animated wallpaper image.• Wallpapers - Select to use a wallpaper image.
3 Touch Save or Set wallpaper.
2.7 Using the TouchscreenUse the dual-touch sensitive screen to operate the device.
• Touch - Touch to:
– select items on the screen
– type letters and symbols using the on-screen keyboard
– press on-screen buttons.
• Touch and Hold - Touch and hold:
– an item on the Home screen to move it to a new location or to the trash.
– an item in the All Apps screen to create a shortcut on the Home screen.
– the Home screen to change the Home screen wallpaper.
• Drag - Touch and hold an item for a moment and then move finger on the screen until reaching the newposition.
• Swipe - Move finger up and down or left and right on the screen to:
– unlock the screen
– view additional Home screens
– view additional application icons in the All Apps screen
– view more information on an application’s screen.
• Double-tap - Tap twice on a web page, map, or other screen to zoom in and out.
• Pinch - In some applications, zoom in and out by placing two fingers on the screen and pinching themtogether (to zoom out) or spreading them apart (to zoom in).
2-10 MN000111A01 - August 2013

2.8 Using the On-screen Keyboard
2.8 Using the On-screen Keyboard
Use the on-screen keyboard to enter text in a text field. To configure the keyboard settings, touch > andthen select Android keyboard settings.
Editing TextEdit entered text and use menu commands to cut, copy, and paste text within or across applications. Someapplications do not support editing some or all of the text they display; others may offer their own way to select text.
Entering Numbers, Symbols and Special CharactersTo enter numbers and symbols:
• Touch and hold one of the top-row keys until a menu appears then select a number. Keys with alternate charactersdisplay an ellipsis ( ... ) below the character.
• Touch and hold the Shift key with one finger, touch one or more capital letters or symbols to enter them, and thenlift both fingers to return to the lowercase keyboard.
• Touch to switch to the numbers and symbols keyboard.
• Touch the key on the numbers and symbols keyboard to view additional symbols.
To enter special characters, touch and hold a number or symbol key to open a menu of additional symbols.
• A larger version of the key displays briefly over the keyboard.• Keys with alternate characters display an ellipsis ( ... ) below the character.
2.9 ApplicationsThe All Apps screen displays icons for all installed applications. Table 2-4 Applications lists the applicationsavailable on the MC40. Refer to the MC40 Integrator Guide for information on installing and uninstallingapplication.
Table 2-4 Applications
Icon DescriptionBrowser - Use to access the Internet or intranet.
Calculator - Provides the basic and scientific arithmetic functions.
Calendar - Use to manage events and appointments.
MN000111A01 - August 2013 2-11
MC40 User Guide
Table 2-4 Applications (cont'd.)
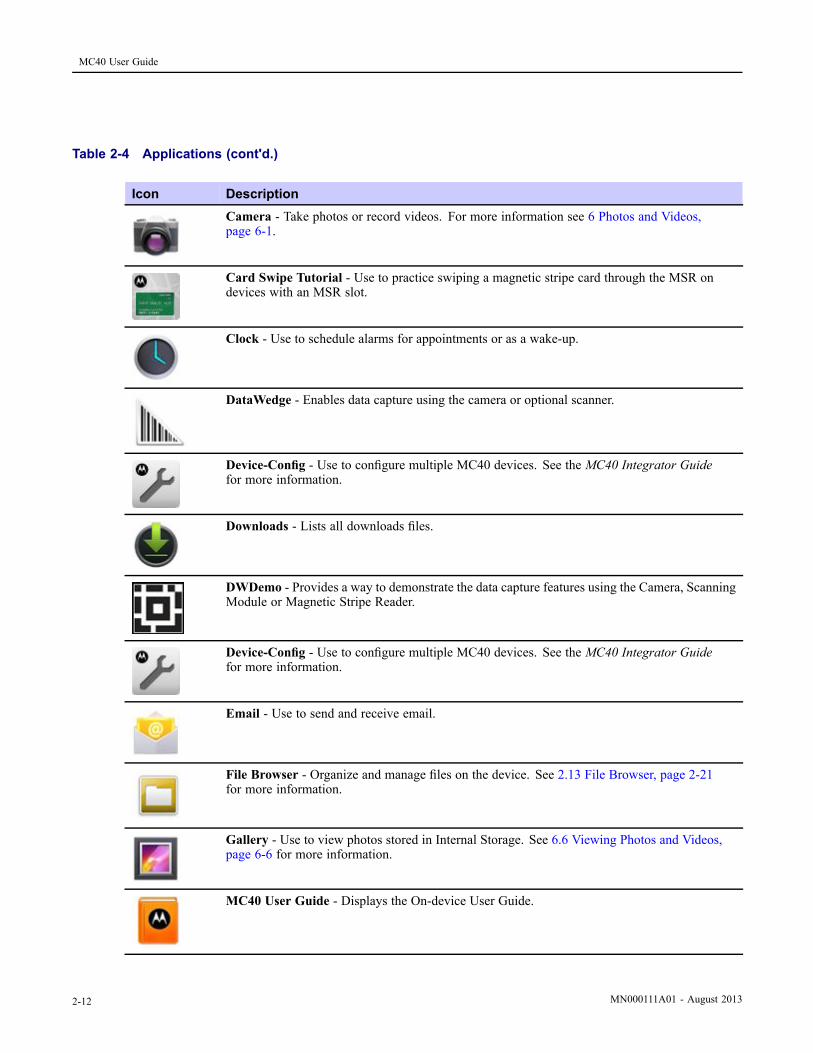
Icon DescriptionCamera - Take photos or record videos. For more information see 6 Photos and Videos,page 6-1.
Card Swipe Tutorial - Use to practice swiping a magnetic stripe card through the MSR ondevices with an MSR slot.
Clock - Use to schedule alarms for appointments or as a wake-up.
DataWedge - Enables data capture using the camera or optional scanner.
Device-Config - Use to configure multiple MC40 devices. See the MC40 Integrator Guidefor more information.
Downloads - Lists all downloads files.
DWDemo - Provides a way to demonstrate the data capture features using the Camera, ScanningModule or Magnetic Stripe Reader.
Device-Config - Use to configure multiple MC40 devices. See the MC40 Integrator Guidefor more information.
Email - Use to send and receive email.
File Browser - Organize and manage files on the device. See 2.13 File Browser, page 2-21for more information.
Gallery - Use to view photos stored in Internal Storage. See 6.6 Viewing Photos and Videos,page 6-6 for more information.
MC40 User Guide - Displays the On-device User Guide.
2-12 MN000111A01 - August 2013

2.9 Applications
Table 2-4 Applications (cont'd.)
Icon DescriptionMSP Agent - Enables management of the device from an MSP server. Requires the purchaseof an appropriate MSP client license per device to suit the level of management functionalityrequired.
Music - Play music stored in Internal Storage.
People - Use to manage contact information.
Phone - use to dial a phone number when used with some VoIP clients (VoIP telephony readyonly).
PTT Express - Use to launch the PTT Express client for Voice over IP (VoIP) communication.
Rapid Deployment - Allows the device to stage a device for initial use by initiating thedeployment of settings, firmware and software. Requires the purchase of an MSP client licenseper device.
Search - Use the Google search engine to search the Internet and the device.
Settings - Use to configure the device. For more information, refer to the MC40 EnterpriseTablet Integrator Guide.
Sound Recorder - Use to record audio.
AppLock Administrator - Use to configure the Application Lock feature. This icon appearsafter the optional application is installed.
MN000111A01 - August 2013 2-13

MC40 User Guide
Table 2-4 Applications (cont'd.)
Icon DescriptionMultiUser Administrator - Use to configure the MultiUser feature. This icon appears afterthe optional application is installed.
Secure Storage Administrator - Use to configure the Secure Storage feature. This icon appearsafter the optional application is installed.
2.9.1 Accessing ApplicationsAll applications installed on the device are accessed using the APPS window.
Procedure Steps
1 On the Home screen touch . The APPS window displays.
Figure 2-8 APPS Window
2 Slide the APPS window left or right to view more application icons. Touch an icon to open the application.
2-14 MN000111A01 - August 2013

2.9.2 Switching Between Recent Applications
See 2.4 Application Shortcuts and Widgets, page 2-6 for information on creating a shortcut on the Homescreen.
2.9.2 Switching Between Recent Applications
Procedure Steps
1 Touch and hold . A window appears on the screen with icons of recently used applications.
Figure 2-9 Recently Used Applications
2 Slide the window up and down to view all recently used applications.
3 Swipe left or right to remove application from the list and force close the application.
4 Touch an icon to open it or press to return to the current screen.
2.10 Un-Locking the ScreenUse the Lock screen to protect access to data on the MC40. Some email account require locking the screen. Referto the MC40 Integrator Guide for information on setting up the locking feature. The Locking feature functionsdifferently in Single User mode or Multiple User mode.
MN000111A01 - August 2013 2-15

MC40 User Guide
2.10.1 Single User ModeWhen locked, a pattern, PIN or password is required to unlock the device. Press the Power button to lock thescreen. The device also locks after a pre-defined time-out.
Press and release the Power button to wake the device.
The Lock screen displays. Slide up to unlock the screen. If the Pattern screen unlock feature is enabled,the Pattern screen appears instead of the Lock screen.
If the PIN or Password screen unlock feature is enabled, enter the PIN or password after unlocking the screen.
Figure 2-10 Lock Screen
2-16 MN000111A01 - August 2013

2.10.1 Single User Mode
Figure 2-11 PIN Screen
Figure 2-12 Pattern Screen
MN000111A01 - August 2013 2-17
MC40 User Guide
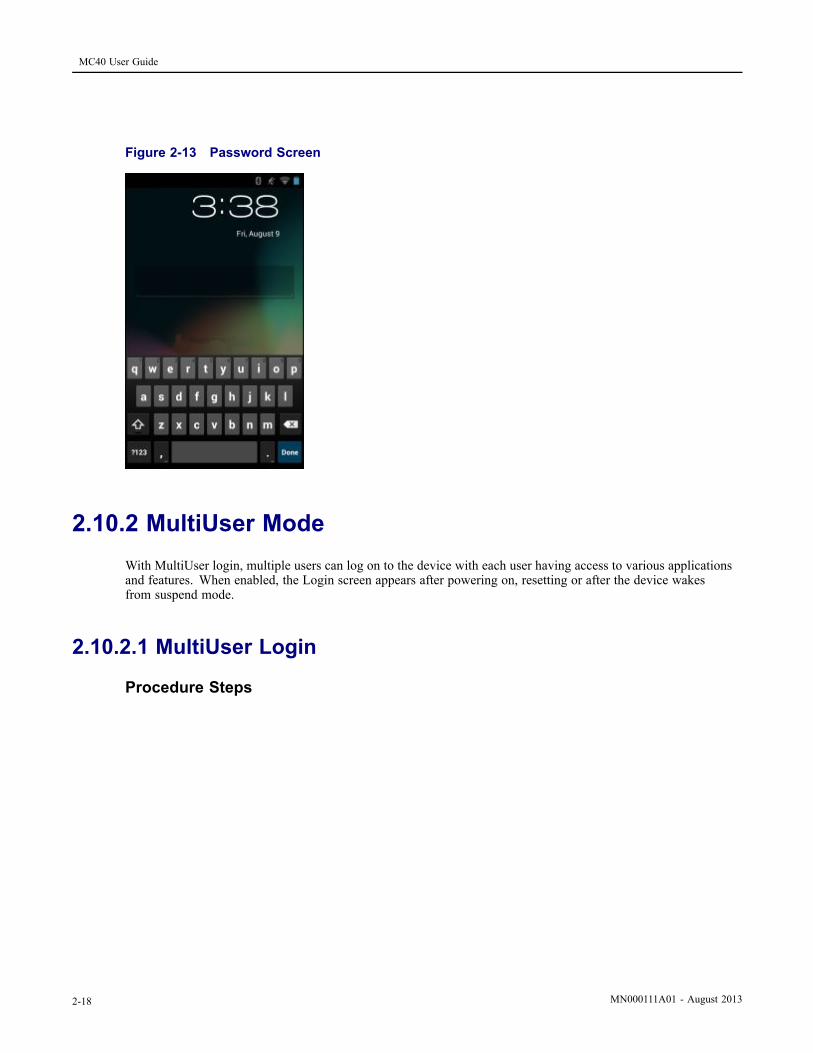
Figure 2-13 Password Screen
2.10.2 MultiUser ModeWith MultiUser login, multiple users can log on to the device with each user having access to various applicationsand features. When enabled, the Login screen appears after powering on, resetting or after the device wakesfrom suspend mode.
2.10.2.1 MultiUser Login
Procedure Steps
2-18 MN000111A01 - August 2013

2.10.2.2 MultiUser Logout
1 In the Login text field, enter the username.
Figure 2-14 Multiple User Log In Screen
2 In the Password text field, enter the password.
3 Touch OK. After a resume from suspend, the user must enter the password.
2.10.2.2 MultiUser Logout
Procedure Steps
1 Drag the Status Bar down from the top of the screen.
2 Touch MultiUser is active.
3 Touch Logout.
4 The Login screen appears.
2.11 Resetting the DeviceThere are two reset functions, soft reset and hard reset.
MN000111A01 - August 2013 2-19

MC40 User Guide
2.11.1 Performing a Soft ResetPerform a soft reset if applications stop responding.
Procedure Steps
1 Press and hold the Power button until the menu appears.
2 Touch Reset.
3 The device shuts down and then reboots.
2.11.2 Performing a Hard ResetPerform a Hard Reset if the device stops responding. To perform a Hard Reset:
Procedure Steps
1 Simultaneously press the Power, Left Scan/Action and Up Volume buttons.
2 The device shuts down and then reboots.
2.12 Suspend ModeThe MC40 goes into suspend mode when the user presses the Power button or after a period of inactivity (set inthe Display settings window).
To wake the MC40 from Suspend mode, press the Power button.
The Lock screen displays. Slide to the right toward to unlock the screen. If the Pattern screen unlockfeature is enabled, the Pattern screen appears instead of the Lock screen. See 2.10 Un-Locking the Screen,page 2-15.
If the user enters the PIN, password or pattern incorrectly five times, they must wait 30 seconds beforetrying again.
If the user forgets the PIN, password or pattern contact the system administrator.
2-20 MN000111A01 - August 2013

2.13 File Browser
Figure 2-15 Lock Screen
2.13 File BrowserUse the File Browser application to view and mange files on the device.
To open File Browser, touch > .
MN000111A01 - August 2013 2-21

MC40 User Guide
Figure 2-16 File Browser Screen
The address bar (1) indicates the current folder path. Touch the current folder path to manually enter a path andfolder name.
Use (2) to select multiple files/folder.
Use (3) to view the internal storage root folder.
Use (4) to view the microSD card root folder.
Use (5) to view the previous folder or to exit the application.
Touch and hold an item to perform an operation on that item. Select one of the options from the File Operationsmenu:
• Information - View detailed information about the file or folder.• Move - Move the file or folder to a new location.• Copy - Copy the select file.• Delete - Delete the selected file.• Rename - Rename the select file.• Open as - Open the selected file as a specific file type.• Share - Share the file with other devices.
Touch to open additional functionality:
• Touch > New Folder to create a new folder in the current folder.
• Touch > Search to search for a file or folder.
• Touch > Sort to sort the list by name, by type, by size or by date.
• Touch > Refresh to re-display the contents of the current folder.
2-22 MN000111A01 - August 2013

2.14 PTT Express Voice Client
• Touch > List View to change the folder view from tile to list format.
• Touch > Change Size to change the size of the icons: Large, Normal or Small.
• Touch > About File Browser to view the application version information.
2.14 PTT Express Voice Client
PTT Express Voice Client creates Push-To-Talk (PTT) communication capability between disparateenterprise devices. Leveraging existing Wireless Local Area Network (WLAN) infrastructure, PTTExpress delivers simple PTT communication without the need of a voice communication server.
• Group Broadcast: Press and hold the PTT (Talk) button to start communicating with other voice client users.
• Private Response: Press and hold the Left Scan/Action (Private) button to respond to the originator of the lastbroadcast or to make a Private Response.
PTT Audible Indicators
The following tones provide helpful cues when using the voice client.
• Talk Tone: Double chirp. Plays when the Talk (or Private) button is depressed. This is a prompt for the user tostart talking.
• Access Tone: Single beep. Plays when another user just finished a broadcast or response. The user is now ableto initiate a Group Broadcast or Private Response.
• Busy Tone: Continuous tone. Plays when the Talk (or Private) button is depressed and another user is alreadycommunicating on the same talkgroup.
• Network Tone:
– Three increasing beeps. Plays when PTT Express is acquiring the WLAN connection and ready for voicecommunication.
– Three decreasing beeps. Plays when PTT Express has lost the WLAN connection and is not ready for voicecommunication.
MN000111A01 - August 2013 2-23

MC40 User Guide
2.14.1 Enabling PTT Communication
Procedure Steps
1 Touch .
2 Touch .
Figure 2-17 PTT Express Window
3 Touch the OFF button to turn on PTT Express. The button changes to a blue ON button.
2.14.2 Selecting a Talk GroupOne of 32 talk groups can be selected by PTT Express users. However, only one talk group may be enabledat a time on the MC40.
2-24 MN000111A01 - August 2013
2.14.3 PTT Communication
Procedure Steps
1 Touch one of the 32 Talk Group buttons. A confirmation dialog appears.
2 Touch OK to return to the Home screen
2.14.3 PTT Communication
Messages may appear on the screen indicating that the PTT service is not active or if the MC40 is notconnected to a WLAN.
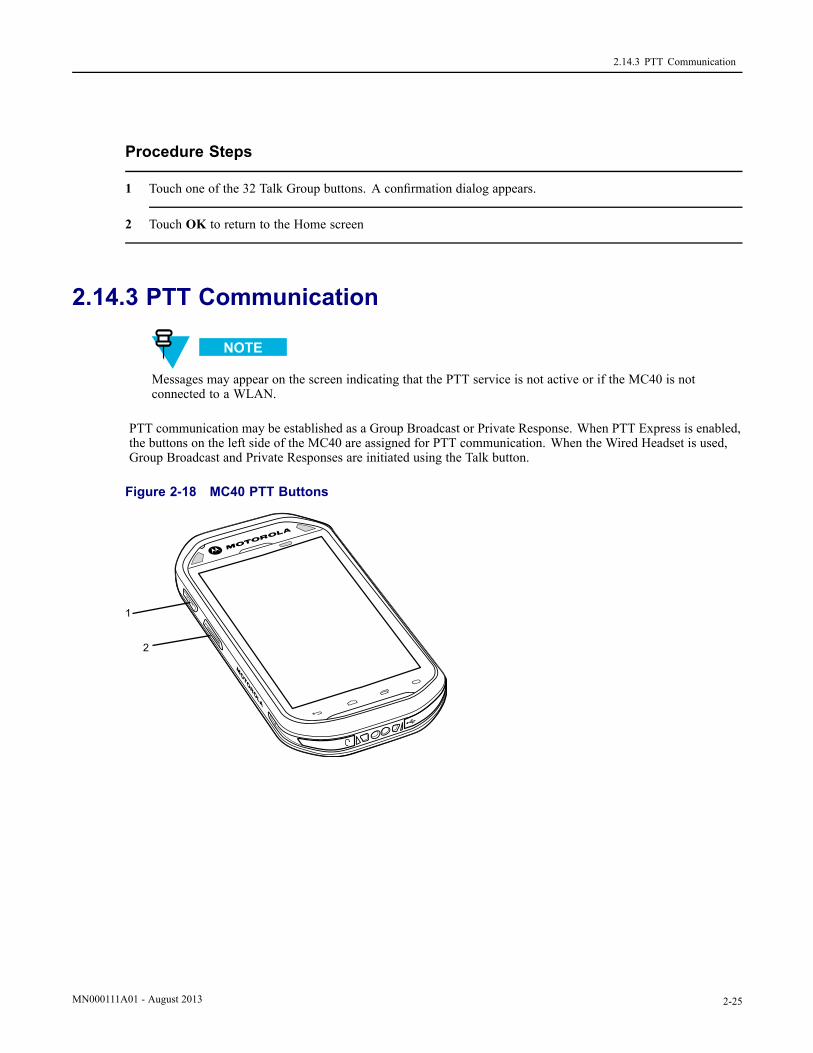
PTT communication may be established as a Group Broadcast or Private Response. When PTT Express is enabled,the buttons on the left side of the MC40 are assigned for PTT communication. When the Wired Headset is used,Group Broadcast and Private Responses are initiated using the Talk button.
Figure 2-18 MC40 PTT Buttons
1
2
MN000111A01 - August 2013 2-25

MC40 User Guide
Figure 2-19 Wired Headset
1
1 Talk Button
2 Private Button
2-26 MN000111A01 - August 2013

2.14.3.1 Creating a Group Broadcast (One to Many)
2.14.3.1 Creating a Group Broadcast (One to Many)
Procedure Steps
1 Press and hold the Talk button and listen for the talk tone to play.If a busy tone is heard, release the Talk button and wait a moment before making another attempt. Ensure thatPTT Express and the WLAN are enabled.
2 Start talking after the talk tone is heard.
If the user holds the Talk button for more than 60 seconds (default), the call is dropped allowing othersto make Group Broadcast calls. The user should release the Talk button when finished talking to allowothers to make calls.
3 Release the Talk button when finished talking.
2.14.3.2 Responding to a Group Broadcast
Procedure Steps
1 Wait until an access tone is heard.
2 Press and hold the Talk button, and listen for the talk tone to play.If a busy tone is heard, release the Talk button and wait a moment before making another attempt. Ensure thatPTT Express and the WLAN are enabled.
3 Start talking after the talk tone plays.
4 Release the Talk button when finished talking.
2.14.3.3 Responding with a Private ResponseThe Private Response can only be initiated once a Group Broadcast has been established. The initial PrivateResponse is made to the last talker on the Group Broadcast.
MN000111A01 - August 2013 2-27

MC40 User Guide
Procedure Steps
1 Wait until an access tone is heard.
2 Within 10 seconds, press and hold the Private button, and listen for the talk tone to play.If a busy tone is heard, release the Talk button and wait a moment before making another attempt. Ensure thatPTT Express and the WLAN are enabled.
3 Start talking after the talk tone plays.
4 Release the Private button when finished talking.
2.14.3.4 Responding with a Private Response with the WiredHeadset
The Private Response can only be initiated once a Group Broadcast has been established. The initial PrivateResponse is made to the last talker on the Group Broadcast.
2-28 MN000111A01 - August 2013

2.14.4 Disabling PTT Express Voice Client Communication
Procedure Steps
1 Wait until an access tone is heard.
2 Within 10 seconds, press and release and then press and hold the Talk button, and listen for the talk tone to play.If a busy tone is heard, release the Talk button and wait a moment before making another attempt. Ensure thatPTT Express and the WLAN are enabled.
3 Start talking after the talk tone plays.
4 Release the Talk button when finished talking.
2.14.4 Disabling PTT Express Voice Client Communication
Procedure Steps
1 Touch .
2 Touch .
3 Touch the ON button to turn off PTT Express. The button changes to a gray OFF button.
4 Touch .
2.15 VoIP Telephony ReadyThe MC40 VoIP telephony-ready models are optimized to support telephony VoIP functionality.
Use the Motorola Solutions Mobile Extensions Client or other 3rd party clients are required. Refer to thedocumentation provided with the client software for installation and usage information.
MN000111A01 - August 2013 2-29


3 Data CaptureThe MC40 offers the following data capture options:
• integrated imager• integrated digital camera• Magnetic stripe reader (MSR).
DataWedge is installed and enabled on the MC40 by default.
3.1 ImagerThe device with an integrated imager has the following features:
• Omnidirectional reading of a variety of bar code symbologies, including the most popular linear, postal, PDF417,and 2D matrix code types.
• Advanced intuitive laser aiming cross-hair for easy point-and-shoot operation.
The modules uses digital camera technology to take a digital picture of a bar code, stores the resulting image in itsmemory, and executes state-of-the-art software decoding algorithms to extract the data from the image.
Operational ModesThe device with an integrated imager supports two modes of operation, listed below. Activate each mode bypressing a scan button.
• Decode Mode: In this mode, the device attempts to locate and decode enabled bar codes within its field of view.The imager remains in this mode as long as the user holds the scan button, or until it decodes a bar code.
To enable Pick List Mode, configure in DataWedge.
• Pick List Mode: This mode allows the user to selectively decode a bar code when more than one bar code is inthe device’s field of view. To accomplish this, move the aiming crosshair over the required bar code to decodeonly this bar code. This feature is ideal for pick lists containing multiple bar codes and manufacturing or transportlabels containing more than one bar code type (either 1D or 2D).
3.2 Digital CameraThe device with an integrated camera based bar code scanning solution has the following features:
• Omnidirectional reading of a variety of bar code symbologies, including the most popular linear, postal, QR,PDF417, and 2D matrix code types.
MN000111A01 - August 2013 3-1

MC40 User Guide
• Cross-hair reticle for easy point-and-shoot operation.
• Picklist mode to decode a particular bar code from many in the field of view.
The solution uses the advanced camera technology to take a digital picture of a bar code, and executesstate-of-the-art software decoding algorithms to extract the data from the image.
3.3 Scanning ConsiderationsTypically, scanning is a simple matter of aim, scan, and decode where a few quick trial efforts master it. However,consider the following to optimize scanning performance:
• Range
– Any scanning device decodes well over a particular working range — minimum and maximum distances fromthe bar code. This range varies according to bar code density and scanning device optics.
– Scanning within range brings quick and constant decodes; scanning too close or too far away prevents decodes.Move the scanner closer and farther away to find the right working range for the bar codes being scanned.
• Angle
– Scan angle is important for promoting quick decodes. When laser beams reflect directly back into the scannerfrom the bar code, this specular reflection can “blind” the scanner.
– To avoid this, scan the bar code so that the beam does not bounce directly back. But do not scan at toosharp an angle; the scanner needs to collect scattered reflections from the scan to make a successful decode.Practice quickly shows what tolerances to work within.
• Hold the device farther away for larger symbols.
• Move the device closer for symbols with bars that are close together.
Scanning procedures depend on the application and device configuration. An application may use differentscanning procedures from those described.
3.4 Bar Code Capture with ImagerTo capture bar code data:
Procedure Steps
1 Ensure that an application is open on the device and a text field is in focus (text cursor in text field).
3-2 MN000111A01 - August 2013

3.4 Bar Code Capture with Imager
2 Point the top of the device at a bar code.
Figure 3-1 Bar Code Scanning
3 Press and hold the Scan button.
The red laser aiming pattern turns on to assist in aiming. Ensure the bar code is within the area formed by thecross-hairs in the aiming pattern. The aiming dot is used for increased visibility in bright lighting conditions.
The Left and Right LEDs light red to indicate that scanning is in process, then light green, a beep sounds and theMC40 vibrates, by default, to indicate the bar code was decoded successfully. Note that when the MC40 is inPick List Mode, the MC40 does not decode the bar code until the center of the crosshair touches the bar code.
Figure 3-2 Aiming Pattern
Figure 3-3 Pick List Mode with Multiple Bar Codes in Aiming Pattern
4 Release the scan button.
5 The captured data appears in the text field.
MN000111A01 - August 2013 3-3

MC40 User Guide
3.5 Bar Code Capture with Integrated CameraTo capture bar code data:
Procedure Steps
1 Ensure that an application is open on the device and a text field is in focus (text cursor in text field).
2 Aim the camera at a bar code.
3 Press and hold the Scan button. By default, a preview window appears on the screen. The Decode light emittingdiode (LED) lights red to indicate that data capture is in process.
Figure 3-4 Application with Preview Window
4 Move the device until the bar code is centered.
5 The Decode LED lights green, a beep sounds and the device vibrates, by default, to indicate the bar codewas decoded successfully.
6 The captured data appears in the text field.
3-4 MN000111A01 - August 2013

3.6 Reading Magnetic Stripe Cards
3.6 Reading Magnetic Stripe CardsUse the integrated MSR to read magnetic stripe card.
Use the Card Swipe Tutorial application to practice swiping magnetic stripe cards through the MSR.
Procedure Steps
1 Ensure thatMSR input is enabled in DataWedge and the cursor is in a text field.
2 Grip MC40 firmly in one hand.
3 Hold magnetic stripe card firmly in the other hand.
4 Align the magnetic stripe on the card toward the display and swipe the card smoothly in either direction.
Figure 3-5 Swiping a Magnetic Stripe Card
MN000111A01 - August 2013 3-5

MC40 User Guide
5 The captured data appears in the text field.
3.6.1 Improper SwipingFigure 3-6 Do Not Start Swipe in Middle of Card
3-6 MN000111A01 - August 2013

3.6.1 Improper Swiping
Figure 3-7 Avoid Thumb Hitting Device
MN000111A01 - August 2013 3-7

MC40 User Guide
Figure 3-8 Do Not Hold End of Card While Swiping
3-8 MN000111A01 - August 2013

3.7 DataWedge
Figure 3-9 Do Not Swipe Card on Angle
3.7 DataWedgeDataWedge is a utility that adds advanced bar code scanning capability to any application without writing code.It runs in the background and handles the interface to built-in bar code scanners. The captured bar code data isconverted to keystrokes and sent to the target application as if it was typed on the keypad.
To configure DataWedge refer to the MC40 Integrator Guide.
MN000111A01 - August 2013 3-9

MC40 User Guide
3.7.1 Enabling DataWedge
Procedure Steps
1 Touch .
2 Touch .
3 Touch .
4 Touch Settings.
5 Touch the DataWedge enabled checkbox. A blue checkmark appears in the checkbox indicating thatDataWedge is enabled.
6 Touch .
3.7.2 Disabling DataWedge
Procedure Steps
1 Touch .
2 Touch .
3 Touch .
4 Touch Settings.
5 Touch the DataWedge enabled checkbox. The blue checkmark disappears from the checkbox indicating thatDataWedge is disabled.
6 Touch .
3-10 MN000111A01 - August 2013

4 WLANWireless local area networks (WLANs) allow the MC40 to communicate wirelessly inside a building. Before usingthe MC40 on a WLAN, the facility must be set up with the required hardware to run the WLAN (sometimes knownas infrastructure). The infrastructure and the MC40 must both be properly configured to enable this communication.
Refer to the documentation provided with the infrastructure (access points (APs), access ports, switches, Radiusservers, etc.) for instructions on how to set up the infrastructure.
Once the infrastructure is set up to enforce the chosen WLAN security scheme, use theWireless & networkssettings to configure the MC40 to match the security scheme.
Turn off Wi-Fi when not using it, to extend the life of the battery.
The Status bar displays icons that indicate Wi-Fi network availability and Wi-Fi status. See 2.2 Status Bar,page 2-2 for more information.
4.1 Scan and Connect to a Wi-Fi NetworkTo set up WLAN on the device:
MN000111A01 - August 2013 4-1

MC40 User Guide
Procedure Steps
1 Touch .
2 Slide the Wi-Fi switch to the On position.
3 TouchWi-Fi. The MC40 searches for WLANs in the area and lists them.
Figure 4-1 Wi-Fi Screen
4 Scroll through the list and select the desired WLAN network.
5 For open networks, touch Connect or for secure networks enter the required password or other credentialsthen touch Connect. See the system administrator for more information.
The MC40 obtains a network address and other required information from the network using the dynamic hostconfiguration protocol (DHCP) protocol. To configure the MC40 with a fixed internet protocol (IP) address,Refer to the MC40 Integrator Guide for more information.
6 In the Wi-Fi setting field, Connected appears indicating that the MC40 is connected to the WLAN.
4-2 MN000111A01 - August 2013

5 BluetoothBluetooth-equipped devices can communicate without wires, using frequency-hopping spread spectrum (FHSS)radio frequency (RF) to transmit and receive data in the 2.4 GHz Industry Scientific and Medical (ISM) band(802.15.1). Bluetooth wireless technology is specifically designed for short-range (10 meters (32.8 feet) )communication and low power consumption.
Devices with Bluetooth capabilities can exchange information (e.g., files, appointments, and tasks) with otherBluetooth enabled devices such as printers, access points, and other mobile devices.
5.1 Adaptive Frequency HoppingAdaptive Frequency Hopping (AFH) is a method of avoiding fixed frequency interferers, and can be used withBluetooth voice. All devices in the piconet (Bluetooth network) must be AFH-capable in order for AFH to work.There is no AFH when connecting and discovering devices. Avoid making Bluetooth connections and discoveriesduring critical 802.11b communications. AFH for Bluetooth consists of four main sections:
• Channel Classification - A method of detecting an interference on a channel-by-channel basis, or pre-definedchannel mask.
• Link Management - Coordinates and distributes the AFH information to the rest of the Bluetooth network.• Hop Sequence Modification - Avoids interference by selectively reducing the number of hopping channels.• Channel Maintenance - A method for periodically re-evaluating the channels.
When AFH is enabled, the Bluetooth radio “hops around” (instead of through) the 802.11b high-rate channels.AFH coexistence allows Motorola Enterprise Tablets to operate in any infrastructure.
The Bluetooth radio in this device operates as a Class 2 device power class. The maximum output power is 2.5 mWand the expected range is 10 meters (32.8 ft.). A definition of ranges based on power class is difficult to obtain dueto power and device differences, and whether one measures open space or closed office space.
It is not recommended to perform Bluetooth wireless technology inquiry when high rate 802.11b operationis required.
5.2 SecurityThe current Bluetooth specification defines security at the link level. Application-level security is not specified.This allows application developers to define security mechanisms tailored to their specific need. Link-level securityoccurs between devices, not users, while application-level security can be implemented on a per-user basis. TheBluetooth specification defines security algorithms and procedures required to authenticate devices, and if needed,encrypt the data flowing on the link between the devices. Device authentication is a mandatory feature of Bluetoothwhile link encryption is optional.
Pairing of Bluetooth devices is accomplished by creating an initialization key used to authenticate the devices andcreate a link key for them. Entering a common personal identification number (PIN) in the devices being pairedgenerates the initialization key. The PIN is never sent over the air. By default, the Bluetooth stack responds withno key when a key is requested (it is up to user to respond to the key request event). Authentication of Bluetooth
MN000111A01 - August 2013 5-1

MC40 User Guide
devices is based-upon a challenge-response transaction. Bluetooth allows for a PIN or passkey used to create other128-bit keys used for security and encryption. The encryption key is derived from the link key used to authenticatethe pairing devices. Also worthy of note is the limited range and fast frequency hopping of the Bluetooth radios thatmakes long-distance eavesdropping difficult.
Recommendations are:
• Perform pairing in a secure environment• Keep PIN codes private and do not store the PIN codes in the device• Implement application-level security.
5.3 Bluetooth ProfilesThe MC40 supports the following Bluetooth services:
• Generic Access Profile (GAP) - Use for device discovery and authentication.• Service Discovery Protocol (SDP) - Handles the search for known and specific services as well as general services.• Serial Port Profile (SPP) - Sets up a virtual serial port and connects two Bluetooth enabled devices. For example,connecting the MC40 to a printer.
• Human Interface Device Profile (HID) - Allows Bluetooth keyboards, pointing devices, gaming devices andremote monitoring devices to connect to the MC40.
• Object Push Profile (OPP) - Allows the MC40 to push and pull objects to and from a push server.• Dial-up Networking (DUN) - Allows the MC40 to access the Internet and other dial-up services using a Bluetoothenabled mobile phone.
• Headset Profile (HSP) - Allows a Bluetooth headset to communicate with the MC40.• Advanced Audio Distribution Profile (A2DP) - Allows the MC40 to stream stereo-quality audio to a wirelessheadset or wireless stereo speakers.
• Audio/Video Remote Control Profile (AVRCP) - Allows the MC40 to control televisions, hi-fi equipment, etc.
5.4 Bluetooth Power StatesThe Bluetooth radio is off by default.
• Suspend—When the MC40 goes into suspend mode, the Bluetooth radio turns off.• Resume—When the MC40 resumes, Bluetooth turns on if it was on prior to suspend.• Airplane Mode—When the MC40 is placed in Airplane Mode, the Bluetooth radio turns off. When in AirplaneMode, the Bluetooth radio can be turned back on if desired.
5.5 Bluetooth Radio PowerTurn off the Bluetooth radio to save power or if entering an area with radio restrictions (e.g., an airplane). Whenthe radio is off, other Bluetooth devices cannot see or connect to the device. Turn on the Bluetooth radio toexchange information with other Bluetooth devices (within range). Communicate only with Bluetooth radiosin close proximity.
5-2 MN000111A01 - August 2013

5.5.1 Enabling Bluetooth
To achieve the best battery life turn off radios when not in use.
5.5.1 Enabling BluetoothProcedure Steps
1 Touch .
2 Slide the Bluetooth switch to the ON position. The Bluetooth icon also appears in the Status bar.
3 Touch .
5.5.2 Disabling BluetoothProcedure Steps
1 Touch .
2 Slide the Bluetooth switch to the OFF position.
3 Touch .
5.6 Discovering Bluetooth Device(s)The MC40 can receive information from discovered devices without pairing. However, once paired, the MC40 andthe paired device will exchange information automatically when the Bluetooth radio is on.
Procedure Steps
1 Ensure that Bluetooth is enabled on the device to discover.
2 Ensure that the Bluetooth device to discover is in discoverable mode.
3 Ensure that the two devices are within 10 meters (32.8 feet) of one another.
4 Touch .
MN000111A01 - August 2013 5-3

MC40 User Guide
5 If Bluetooth is off, slide the switch to the ON position.
6 Touch Bluetooth.
7 The MC40 begins searching for discoverable Bluetooth devices in the area and displays them under AvailableDevices.
8 Scroll through the list and select a device. The Bluetooth pairing request dialog box appears.
Figure 5-1 Bluetooth Pairing - Enter PIN
Figure 5-2 Bluetooth Pairing — Simple Pairing
9 Enter a PIN in the text box and touch OK.
10 Enter the same PIN on the other device. Touch Pair.
5-4 MN000111A01 - August 2013

5.7 Changing the Bluetooth Name
11 The Bluetooth device is added to the Paired Devices list and a trusted (“paired”) connection is established.
5.7 Changing the Bluetooth NameBy default, the MC40 has a generic Bluetooth name that is visible to other devices when connected.
Procedure Steps
1 Touch .
2 Touch Bluetooth.
3 If Bluetooth is not on, slide the switch to the ON position.
4 Touch .
5 Touch Rename device.
6 In the Rename device dialog box, enter a name and touch Done.
7 Touch .
5.8 Connecting to a Bluetooth DeviceOnce paired, connect to a Bluetooth device:
MN000111A01 - August 2013 5-5

MC40 User Guide
Procedure Steps
1 Touch .
2 Touch Bluetooth.
3 If Bluetooth is not on, slide the switch to the ON position.
4 In the PAIRED DEVICES list, touch and hold on an unconnected Bluetooth device until a menu appears.
5 Touch Connect. When connected, the device is displayed as connected in the list.
5.9 Selecting Profiles on the Bluetooth DeviceSome Bluetooth devices have multiple profiles. To select a profile:
Procedure Steps
1 Touch .
2 Touch Bluetooth.
3 If Bluetooth is not turned on, slide the blue switch to the ON position.
4 In the PAIRED DEVICES list, touch next to the device name.
5 Under PROFILES, check or uncheck a profile to allow the device to use that profile.
6 Touch .
5.10 Disconnecting from a Bluetooth DeviceProcedure Steps
1 Touch .
2 Touch Bluetooth.
5-6 MN000111A01 - August 2013
5.11 Unpairing a Bluetooth Device
3 In the Bluetooth devices list, touch and hold on a device until a menu appears.
4 Touch Disconnect.
5 Touch .
5.11 Unpairing a Bluetooth DeviceProcedure Steps
1 Touch .
2 Touch Bluetooth.
3 In the Paired Devices list, touch next to the device name.
4 Touch Unpair.
5 Touch .
MN000111A01 - August 2013 5-7


6 Photos and VideosThis chapter provides information for taking photos and recording videos using the integrated digital cameras.
Photos and videos are stored in Internal Storage.
6.1 Taking Photos
Camera settings are described in 6.4 Camera Settings, page 6-4.
To take a photo:
Procedure Steps
1 Touch > .
Figure 6-1 Camera Mode
2 If necessary, touch the options bar and touch .
MN000111A01 - August 2013 6-1

MC40 User Guide
3 Touch to adjust exposure, flash, and other settings using the camera settings. See 6.4 Camera Settings,page 6-4 for more information.
4 Touch and to adjust the zoom level.
5 Frame the subject on screen.
6 Touch .
The camera brings the image into focus. When the image is in focus, the focus indicators in each corner turngreen, the camera takes a photo and a shutter sound plays.
To disable the shutter sound, turn notification sounds off. Touch > Sounds > Volumes andslide the Notifications slider all the way to the left.
Alternately, touch and hold to focus first, before taking a photo; then release to take a focused photo.
The photo appears momentarily then displays as a thumbnail in the upper right corner.
7 Touch the thumbnail to view the photo in Gallery. See 6.6 Viewing Photos and Videos, page 6-6 for moreinformation.
6.2 Taking a Panoramic PhotoPanorama mode lets the user create a single wide image by panning slowly across a scene. To take a panoramicphoto:
Procedure Steps
1 Touch .
2 Touch .
6-2 MN000111A01 - August 2013

6.3 Recording Videos
3 Touch the options bar and touch .
Figure 6-2 Panoramic Mode
4 Frame one side of the scene to capture.
5 Touch and slowly start panning across the area to capture. A small white square appears inside thebutton indicating that the shot is in progress.
If panning too quickly, the message Too fast appears.
6 Touch to end the shot. The panorama appears immediately and a progress indicator displays while itsaves the image.
7 Touch the thumbnail to view the photo in Gallery. See 6.6 Viewing Photos and Videos, page 6-6.
6.3 Recording VideosTo record a video:
Procedure Steps
1 Touch > .
MN000111A01 - August 2013 6-3

MC40 User Guide
2 Touch the options bar and touch .
Figure 6-3 Video Mode
3 Touch to adjust exposure, flash, and other settings using the video settings. See 6.5 Video Settings, page6-5 for more information.
4 Touch and to adjust the zoom level.
5 Point the camera and frame the scene.
6 Touch to start recording.
The device starts recording the video. The video time remaining appears in the top left of the screen.
7 Touch to end recording.
Previously recorded video displays in the thumbnail at the top right.
8 Touch the thumbnail to access the Gallery application. See 6.6 Viewing Photos and Videos, page 6-6.
6.4 Camera SettingsWhen in Camera mode, Camera settings are displayed on screen.
6-4 MN000111A01 - August 2013

6.5 Video Settings
Touch to display the camera setting options.
• Settings - Touch to open a scrolling list of settings:
– Focus Mode - Touch to select the camera focus setting. Options: Macro, Infinity, Continuous or Auto(default).
– Capture Mode - Touch to select the capture mode. Options: High Quality (default) or Zero Shutter Lag.– Picture size - Touch to set the size (in pixels) of the photo. Options: 8M pixels (default), 5M pixels, 3Mpixels, 2M pixels, 1M pixels, VGA or QVGA.
– ISO - Options: Auto (default), 100, 200, 400 or 800.– Picture quality - Touch to select picture quality setting. Options: Super fine (default), Fine or Normal.– Restore defaults - Touch Restore defaults to restore all camera settings to the default values.
• Scene mode - Touch to select a preset combination of camera settings designed for specific scenes.Options: Auto (default), Portrait, Landscape, Night, Steady Photo or Sports.
• Exposure - Touch to adjust the exposure settings. Options: +3, +2, +1, 0 (default), -1, -2, or -3.
• White balance - Touch to select how Camera adjusts colors in different kinds of light, to achieve the mostnatural-looking colors.
– Auto - Adjust the white balance automatically (default).
– Incandescent - Adjust the white balance for incandescent lighting.
– Daylight - Adjust the white balance for daylight.
– Fluorescent - Adjust the white balance for florescent lighting.
– Cloudy - Adjust the white balance for a cloudy environment.
6.5 Video SettingsWhen in Video mode, Video settings are displayed on screen.
Touch to display the video setting options.
• Settings - Touch to open a scrolling list of settings:
– Restore defaults - Touch Restore defaults to restore all video settings to the default values.
• Video quality - Touch to select video quality:
– HD 1080p - High definition 1080p.– HD 720p - High definition 720p.– SD 480p - Standard definition 480p.
• Time lapse interval - Touch to select a time interval to set the frame rate for time lapse photography. Options:Off (default), 1s, 1.5s, 2s, 2.5s, 3s, 5s or 10s.
MN000111A01 - August 2013 6-5

MC40 User Guide
• White balance - Touch to select how Camera adjusts colors in different kinds of light, to achieve the mostnatural-looking colors.
– Auto - Adjust the white balance automatically (default).
– Incandescent - Adjust the white balance for incandescent lighting.
– Daylight - Adjust the white balance for daylight.
– Fluorescent - Adjust the white balance for florescent lighting.
– Cloudy - Adjust the white balance for a cloudy environment.
6.6 Viewing Photos and Videos
The device supports the following image formats: jpeg, gif, png and bmp.
The device supports the following video formats: H.263, H.264 and MPEG4 Simple Profile.
Use Gallery to:
• view photos
• play videos
• perform basic editing of photos
• set photos as wallpaper
• set photos as a contact photo
• share photos and videos.
To open the Gallery application, touch > or in the camera application touch the thumbnail image atthe top right.
Gallery presents all photos and videos stored in the Internal Storage.
6-6 MN000111A01 - August 2013

6.6.1 Working with Albums
Figure 6-4 Gallery — Albums
• Touch an album to open it and view its contents. The photos and videos in the album are displayed inchronological order.
• Touch a photo or video in an album to view it.
• Touch icon (top left corner) to return to the main Gallery screen.
6.6.1 Working with AlbumsAlbums are groups of images and videos in folders. Touch an album to open it. The photos and videos are listed ina chronologically ordered grid. The name of the album displays at the top of the screen.
MN000111A01 - August 2013 6-7

MC40 User Guide
Figure 6-5 Photos Inside an Album
Swipe left or right to scroll images across the screen.
6-8 MN000111A01 - August 2013

6.6.1.1 Share an Album
6.6.1.1 Share an Album
Procedure Steps
1 Touch .
2 Touch .
3 Touch and hold an album until it highlights.
4 Touch other albums as required.
5 Touch . The Share menu opens. Touch the application to use to share the selected albums.
6 Follow the instructions within the selected application.
6.6.1.2 Get Album Information
Procedure Steps
1 Touch .
2 Touch .
3 Touch and hold an album until it highlights.
4 Touch .
5 Touch Details.
6.6.1.3 Deleting an AlbumTo delete an album and its contents from the microSD card:
MN000111A01 - August 2013 6-9

MC40 User Guide
Procedure Steps
1 Touch .
2 Touch .
3 Touch and hold an album until it highlights.
4 Check other albums to delete. Ensure that other albums are selected.
5 Touch .
6 In the Delete selected item? menu, touch OK to delete the album.
6.6.2 Working with PhotosUse Gallery to view photos on the microSD card and edit and share photos.
6.6.2.1 Viewing and Browsing PhotosTo view a photo:
Procedure Steps
1 Touch .
2 Touch .
3 Touch an album to open it.
6-10 MN000111A01 - August 2013

6.6.2.2 Rotating a Photo
4 Touch a photo.
Figure 6-6 Photo Example
5 Swipe left or right to view the next or previous photo in the album.
6 Turn the device to view the photo in upright (portrait) or sideways (landscape) orientation. The photo isdisplayed (but not saved) in the new orientation.
7 Touch the photo to view the controls.
8 Double-tap the screen to zoom in or pinch two fingers together or spread them apart to zoom in or out.
9 Drag the photo to view parts that are not in view.
6.6.2.2 Rotating a Photo
Procedure Steps
1 Touch a photo to view the controls.
2 Touch .
3 Touch Rotate Left or Rotate Right.Step result: The photo is automatically saved with the new orientation.
MN000111A01 - August 2013 6-11

MC40 User Guide
6.6.2.3 Cropping a Photo
Procedure Steps
1 In Gallery, touch a photo to view the controls.
2 Touch .
3 Touch Crop. The blue cropping tool appears.
4 Use the cropping tool to select the portion of the photo to crop.• Drag from the inside of the cropping tool to move it.• Drag an edge of the cropping tool to resize it to any proportion.• Drag a corner of the cropping tool to resize it with fixed proportions.
Figure 6-7 Cropping Tool
5 Touch OK to save a copy of the cropped photo. The original version is retained.
6.6.2.4 Get Photo Information
Procedure Steps
1 Touch .
6-12 MN000111A01 - August 2013

6.6.2.5 Share a Photo
2 Touch .
3 Touch an album to open it.
4 Touch the photo to open it.
5 Touch .
6 Touch Details.
7 Touch Close.
6.6.2.5 Share a Photo
Procedure Steps
1 Touch .
2 Touch .
3 Touch an album to open it.
4 Touch a photo to open it.
5 Touch .
6 Touch the application to use to share the selected photo. The application selected opens with the photo attachedto a new message.
6.6.2.6 Deleting a Photo
Procedure Steps
1 Touch .
2 Touch .
3 Touch an album to open it.
MN000111A01 - August 2013 6-13
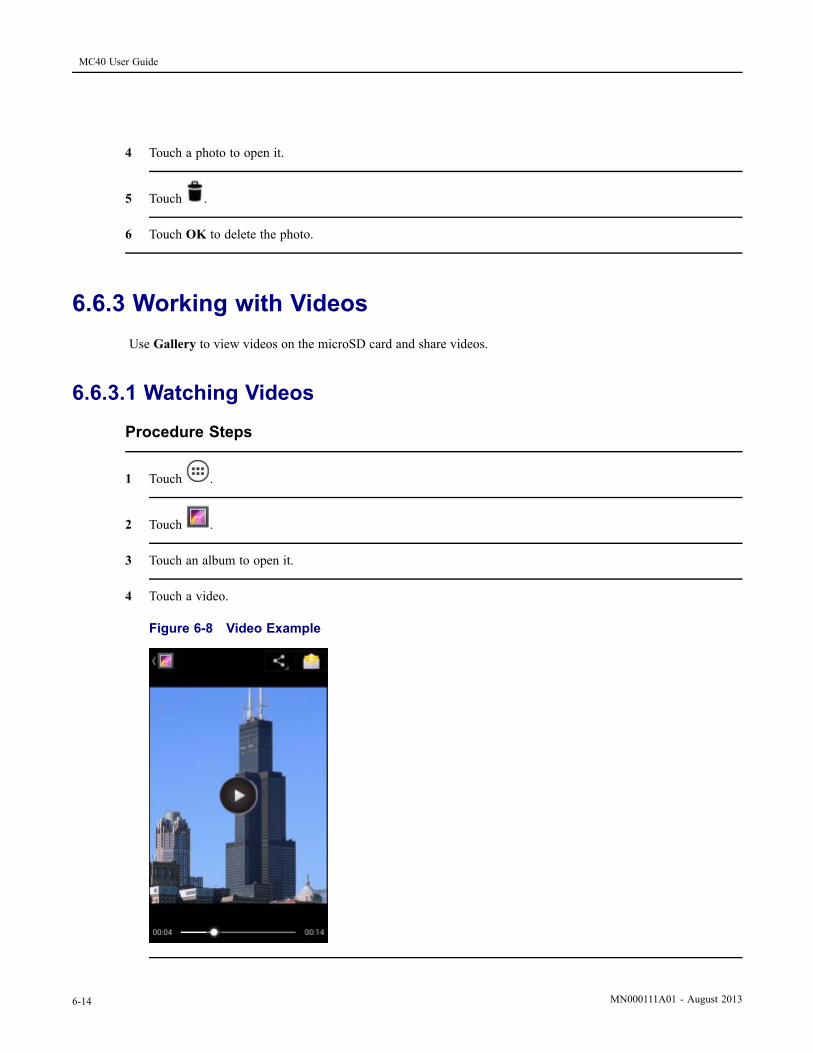
MC40 User Guide
4 Touch a photo to open it.
5 Touch .
6 Touch OK to delete the photo.
6.6.3 Working with VideosUse Gallery to view videos on the microSD card and share videos.
6.6.3.1 Watching Videos
Procedure Steps
1 Touch .
2 Touch .
3 Touch an album to open it.
4 Touch a video.
Figure 6-8 Video Example
6-14 MN000111A01 - August 2013

6.6.3.2 Sharing a Video
5 Touch . The video begins to play.
6 Touch the screen to view the playback controls.
6.6.3.2 Sharing a Video
Procedure Steps
1 Touch .
2 Touch .
3 Touch an album to open it.
4 Touch a video to open it.
5 Touch . The Share menu appears.
6 Touch the application to use to share the selected video. The application selected opens with the video attachedto a new message.
6.6.3.3 Deleting a Video
Procedure Steps
1 Touch .
2 Touch .
3 Touch an album to open it.
4 Touch a video to open it.
5 Touch .
6 Touch OK.
MN000111A01 - August 2013 6-15


7 AccessoriesThis chapter provides information for using the accessories for the device.
7.1 MC40 AccessoriesTable 7-1 lists the accessories available for the MC40.
Table 7-1 MC40 Accessories
Accessory Part Number DescriptionCradles
Single SlotCharge OnlyCradle
CRDMC40XX-1000R Charges the MC40.
Five Slot ChargeOnly CradleBase
CRDUNIV-XX-5000R Provides charging for up to five MC40 devices or four MC40devices and one Four Slot Battery Charger using optionalCharging Cups. Requires additional power supplies.
Five Slot ChargeOnly Cradle
CRDUNIV-40-5000R Provides charging for up to five MC40 devices.
Chargers
Four SlotBattery Charger
SACMC40XX-4000R Charges up to four MC40 batteries.
Power Supply PWRS-124306-01R Provides power to the MC40 and Single Slot Charge Cradle.
Power Supply(12 VDC, 4.16A)
PWRS-14000-148C Provides power to the Five Slot Charge Only Cradle and theFour Slot Battery Charger.
Cables
Micro USBCable
25-MCXUSB-01R Provides power to the MC40 and USB communication witha host computer.
US AC LineCord (3-wire)
23844-00-00R Provides power to the power supplies.
2-way DC Cable 25-122026-02R Connects one power supply (PWRS-14000-148C) to two FourSlot Battery Chargers.
4-way DC Cable 25-85992-01R Connects one power supply (PWRS-14000-241R) to four FourSlot Battery Chargers.
Miscellaneous
Spare 2680mAhlithium-ionbattery
BTRY-MC40EAB0E
BTRY-MC40EAB0E-10R
Replacement 2680 mAh battery.
Replacement 2680 mAh battery (10-pack)
MN000111A01 - August 2013 7-1

MC40 User Guide
Table 7-1 MC40 Accessories (cont'd.)
Accessory Part Number DescriptionCharging Cup CUPMC40XX-1000R Mounts onto the Five Slot Charge Only Cradle Base and
provides MC40 charging slot (Single pack).
Battery ChargerCup
CUPUNIBTRY-1000R Mounts on the Five Slot Charge Only Cradle Base and providesmounting for the Four Slot Battery Charger.
Universal BlankSlot Cover
CUPUNICVR-5000R Mounts on the Five Slot Charge Only Cradle and covers a slotwhen a cup is not required (5-pack).
SG-MC40-RBOOT-01R
SG-MC40-RBOOT-10R
Provides additional protection for the MC40.
Provides additional protection for the MC40 (10–pack).
ProtectiveRubber Boot
SG-MC40-MBOOT-01R
SG-MC40-MBOOT-10R
Provides additional protection for the MC40 with MSR.
Provides additional protection for the MC40 with MSR(10–pack).
Soft Hip Holster SG-MC40HLSTR-02R Mounts on belt and provides storage for the MC40.
Finger Strap SG-MC40STRAP-01R
SG-MC40STRAP-10R
Mounts on the back of the MC40 and provides secure optionfor holding the device (Single pack or 10-pack).
Rack/WallMount Bracket
KT-UNIVLBRKT-01R Provides for mounting the Five Slot Charge Only Cradle onto astandard rack or wall.
Mono CordedHeadset
21-UNIV-HDSET1-01R
21-UNIV-HDSET1-10R
Use for PTT and VoIP telephony communications.
Use for PTT and VoIP telephony communications (10–pack).
7.2 Micro USB CableUse the Micro USB cable to connect the MC40 to the power supply for charging or to a host computer forcommunication.
7-2 MN000111A01 - August 2013

7.2 Micro USB Cable
Figure 7-1 Charging Using the Micro USB Cable
Communication
When the MC40 is connected to a host computer using the Micro USB cable, the MC40 appears as a RemovableDisk on the host computer. Refer to the MC40 Integrator Guide for more information.
Figure 7-2 Communication Using the Micro USB Cable
MN000111A01 - August 2013 7-3

MC40 User Guide
7.3 Single Slot Charge CradleThe Single Slot Charge Cradle provides 5 VDC power for operating the MC40 and charging the battery.
Charging the MC40 Battery
Connect the cradle to power. Insert the MC40 into the slot to begin charging.
Figure 7-3 MC40 Battery Charging
The MC40’s Right light emitting diode (LED) indicates the status of the battery charging in the MC40. See Table1-3 Battery Charge LED Status for charging status indications. The 2680 mAh battery charges in approximatelyfour hours.
Charge batteries in ambient temperatures from 0 °C to 40 °C (32 °F to 104 °F) or up to 45 °C (113 °F) as reported
by the battery. To view the battery temperature, touch > About device > Battery Information.
7-4 MN000111A01 - August 2013

7.4 Five Slot Charge Only Cradle
Note that charging is intelligently controlled by the MC40. To accomplish this, for small periods of time, the MC40or accessory alternately enables and disables battery charging to keep the battery at acceptable temperatures. TheMC40 or accessory indicates when charging is disabled due to abnormal temperatures via its Right LED. See Table1-3 Battery Charge LED Status.
7.4 Five Slot Charge Only CradleThe Five Slot Charge Only Cradle:
• Provides 5 VDC power for operating the MC40.
• Simultaneously charges up to five MC40s.
• Consists of a cradle base and optional cups that can be configured for various charging requirements.
• Provides mounting for a Four Slot Battery Charger (requires separate power supply).
See the MC40 Integrator Guide for setup and configuration instructions. To charge the MC40, insert the MC40into an open slot.
MN000111A01 - August 2013 7-5
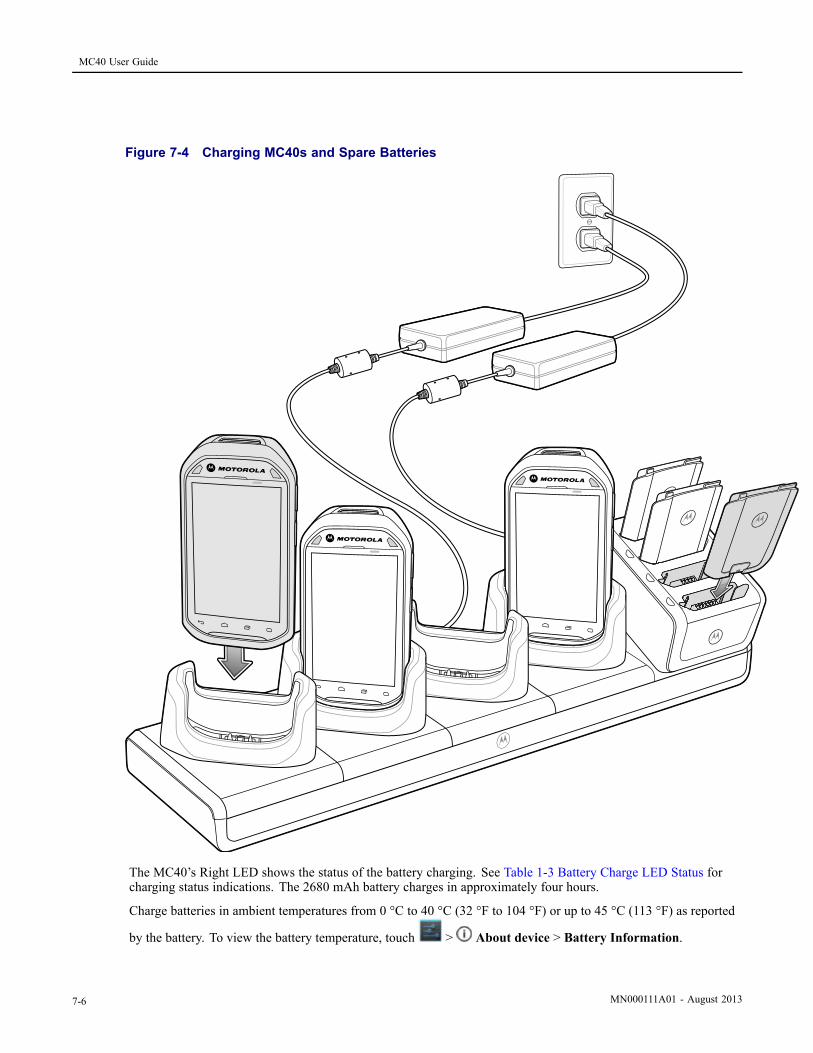
MC40 User Guide
Figure 7-4 Charging MC40s and Spare Batteries
The MC40’s Right LED shows the status of the battery charging. See Table 1-3 Battery Charge LED Status forcharging status indications. The 2680 mAh battery charges in approximately four hours.
Charge batteries in ambient temperatures from 0 °C to 40 °C (32 °F to 104 °F) or up to 45 °C (113 °F) as reported
by the battery. To view the battery temperature, touch > About device > Battery Information.
7-6 MN000111A01 - August 2013

7.5 Four Slot Battery Charger
Note that charging is intelligently controlled by the MC40. To accomplish this, for small periods of time, the MC40or accessory alternately enables and disables battery charging to keep the battery at acceptable temperatures. TheMC40 or accessory indicates when charging is disabled due to abnormal temperatures via its Right LED. See Table1-3 Battery Charge LED Status.
7.5 Four Slot Battery ChargerThe Four Slot Battery Charger:
• Provides 12 VDC power for charging the batteries.
• Simultaneously charges up to four MC40 batteries.
To charge a spare battery:
Figure 7-5 Four Slot Battery Charger
The Four Slot Battery Charger has four amber Battery Charging LEDs, one for each battery charging well. The2680 mAh battery charges in approximately four hours.
Charge batteries in ambient temperatures from 0 °C to 40 °C (32 °F to 104 °F) or up to 45 °C (113 °F) as reported
by the battery. To view the battery temperature, touch > About device > Battery Information. Charging isintelligently controlled by the MC40. To accomplish this, for small periods of time, the charger alternately enablesand disables battery charging to keep the battery at acceptable temperatures. The charger indicates when charging isdisabled due to abnormal temperatures via its LED.
MN000111A01 - August 2013 7-7

MC40 User Guide
Table 7-2 Spare Battery Charge LED Status
Status Indications
Off No battery in a slot.
Battery is not charging.
Battery is not inserted correctly in the charger.
Charger is not powered.
Slow Blinking Amber Battery is charging.
Solid Green Charging complete.
Fast Blinking Amber Charging error, e.g.:
• Temperature is too low or too high.
• Charging has gone on too long without completion.
7-8 MN000111A01 - August 2013

8 Maintenance and TroubleshootingThis chapter includes instructions on cleaning and storing the device, and provides troubleshooting solutionsfor potential problems during operation.
8.1 Maintaining the MC40For trouble-free service, observe the following tips when using the MC40:
• Do not scratch the screen of the MC40. When working with the MC40, use only a finger. Never use an actualpen or pencil or other sharp object on the surface of the MC40 screen.
• The touch-sensitive screen of the MC40 is glass. Do not to drop the MC40 or subject it to strong impact.• Protect the MC40 from temperature extremes. Do not leave it on the dashboard of a car on a hot day, andkeep it away from heat sources.
• Do not store or use the MC40 in any location that is dusty, damp, or wet.• Use a soft lens cloth to clean the MC40. If the surface of the MC40 screen becomes soiled, clean it with a softcloth moistened with a diluted window-cleaning solution.
• Periodically replace the rechargeable battery to ensure maximum battery life and product performance. Batterylife depends on individual usage patterns.
8.2 Battery Safety Guidelines• The area in which the units are charged should be clear of debris and combustible materials or chemicals.Particular care should be taken where the device is charged in a non commercial environment.
• Follow battery usage, storage, and charging guidelines found in this guide.• Improper battery use may result in a fire, explosion, or other hazard.• To charge the mobile device battery, the battery and charger temperatures must be between +32 ºF and +104 ºF(0 ºC and +40 ºC)
• Do not use incompatible batteries and chargers. Use of an incompatible battery or charger may present a riskof fire, explosion, leakage, or other hazard. If you have any questions about the compatibility of a battery or acharger, contact Motorola Solutions Global Customer Support Center.
• For devices that utilize a USB port as a charging source, the device shall only be connected to products that bearthe USB-IF logo or have completed the USB-IF compliance program.
• Do not disassemble or open, crush, bend or deform, puncture, or shred.• Do not short circuit a battery or allow metallic or conductive objects to contact the battery terminals.• Do not modify or remanufacture, attempt to insert foreign objects into the battery, immerse or expose to water orother liquids, or expose to fire, explosion, or other hazard.
• Do not leave or store the equipment in or near areas that might get very hot, such as in a parked vehicle or near aradiator or other heat source. Do not place battery into a microwave oven or dryer.
• Battery usage by children should be supervised.• Please follow local regulations to properly dispose of used re-chargeable batteries.
MN000111A01 - August 2013 8-1

MC40 User Guide
• Do not dispose of batteries in fire.• In the event of a battery leak, do not allow the liquid to come in contact with the skin or eyes. If contact has beenmade, wash the affected area with large amounts of water and seek medical advice.
• If you suspect damage to your equipment or battery, contact Motorola Solutions Global Customer SupportCenter to arrange for inspection.
8.3 Cleaning Instructions
Always wear eye protection.
Read warning label on compressed air and alcohol product before using.
If you have to use any other solution for medical reasons please contact Motorola for moreinformation.
Avoid exposing this product to contact with hot oil or other flammable liquids. If such exposureoccurs, unplug the device and clean the product immediately in accordance with these guidelines.
Approved Cleanser Active Ingredients100% of the active ingredients in any cleaner must consist of one or some combination of the following: isopropylalcohol, bleach/sodium hypochlorite, hydrogen peroxide or mild dish soap.
Harmful IngredientsThe following chemicals are known to damage the plastics on the device and should not come in contact with thedevice: ammonia solutions, compounds of amines or ammonia; acetone; ketones; ethers; aromatic and chlorinatedhydrocarbons; acqueous or alcoholic alkaline solutions; ethanolamine; toluene; trichloroethylene; benzene; carbolicacid and TB-lysoform.
Cleaning InstructionsDo not apply liquid directly to the device. Dampen a soft cloth or use pre-moistened wipes. Do not wrap thedevice in the cloth or wipe, but gently wipe the unit. Be careful not to let liquid pool around the display windowor other places. Allow the unit to air dry before use.
Special Cleaning NotesMany vinyl gloves contain phthalate additives, which are often not recommended for medical use and are knownto be harmful to the housing of the device. The device should not be handled while wearing vinyl glovescontaining phthalates, or before hands are washed to remove contaminant residue after gloves are removed. Ifproducts containing any of the harmful ingredients listed above are used prior to handling the device, such ashand sanitizer that contain ethanolamine, hands must be completely dry before handling the device to preventdamage to the plastics.
8-2 MN000111A01 - August 2013
8.4 Cleaning the MC40
Cleaning Materials Required
• Alcohol wipes
• Lens tissue
• Cotton-tipped applicators
• Isopropyl alcohol
• Can of compressed air with a tube.
Cleaning Frequency
The cleaning frequency is up to the customer’s discretion due to the varied environments in which the mobiledevices are used. They may be cleaned as frequently as required, but it is advisable to clean the camera windowperiodically when used in dirty environments to ensure optimum performance.
8.4 Cleaning the MC40
Housing
Using the alcohol wipes, wipe the housing including keys and in-between keys.
Display
The display can be wiped down with the alcohol wipes, but care should be taken not to allow any pooling of liquidaround the edges of the display. Immediately dry the display with a soft, non-abrasive cloth to prevent streaking.
Exit and Camera Window
Wipe the camera window periodically with a lens tissue or other material suitable for cleaning optical materialsuch as eyeglasses.
8.4.1 Connector CleaningTo clean the connectors:
MN000111A01 - August 2013 8-3

MC40 User Guide
Procedure Steps
1 Remove the main battery from mobile computer.
2 Dip the cotton portion of the cotton-tipped applicator in isopropyl alcohol.
3 Rub the cotton portion of the cotton-tipped applicator back-and-forth across the connector. Do not leave anycotton residue on the connector.
4 Repeat at least three times.
5 Use the cotton-tipped applicator dipped in alcohol to remove any grease and dirt near the connector area.
6 Use a dry cotton-tipped applicator and repeat steps 4 through 6.
Do not point nozzle at yourself and others, ensure the nozzle or tube is away from your face.
7 Spray compressed air on the connector area by pointing the tube/nozzle about ½ inch away from the surface.
8 Inspect the area for any grease or dirt, repeat if required.
8.5 Cleaning Cradle ConnectorsTo clean the connectors on a cradle:
8-4 MN000111A01 - August 2013

8.6 Troubleshooting the MC40
Procedure Steps
1 Remove the DC power cable from the cradle.
2 Dip the cotton portion of the cotton-tipped applicator in isopropyl alcohol.
3 Rub the cotton portion of the cotton-tipped applicator along the pins of the connector. Slowly move theapplicator back-and-forth from one side of the connector to the other. Do not leave any cotton residue on theconnector.
4 All sides of the connector should also be rubbed with the cotton-tipped applicator.
Do not point nozzle at yourself and others, ensure the nozzle or tube is pointed away from your face.
5 Spray compressed air in the connector area by pointing the tube/nozzle about ½ inch away from the surface.
6 Remove any lint left by the cotton-tipped applicator.
7 If grease and other dirt can be found on other areas of the cradle, use a lint-free cloth and alcohol to remove.
8 Allow at least 10 to 30 minutes (depending on ambient temperature and humidity) for the alcohol to air drybefore applying power to cradle.If the temperature is low and humidity is high, longer drying time is required. Warm temperature and dryhumidity requires less drying time.
8.6 Troubleshooting the MC40Table 8-1 Troubleshooting the MC40
Problem Cause SolutionBattery iscompletelydischarged.
Re-charge or replace the battery.
Battery notinstalledproperly.
Install the battery properly. See 1.3.1 Installing the Battery, page 1-4.
Power buttonnot held downlong enough.
Press the Power button until the Right LED flashes once.
When the user pressesthe Power button, theMC40 does not turn on.
MC40 notresponding.
Perform a hard reset. See 2.11 Resetting the Device, page 2-19.
MN000111A01 - August 2013 8-5

MC40 User Guide
Table 8-1 Troubleshooting the MC40 (cont'd.)
Problem Cause SolutionWhen the user pressesthe Power button theMC40 does not turn onbut the Decode LEDblinks amber.
Battery chargelevel is very low.
Re-charge or replace the battery.
Battery failed. Replace battery. If the MC40 still does not operate, perform ahardware reset. See 2.11 Resetting the Device, page 2-19.
MC40 wasremoved frompower whilebattery wascharging.
Insert MC40 in cradle. The 2680 mAh battery fully charges in lessthan four hours.
Battery did not charge.
Extreme batterytemperature.
Battery does not charge if ambient temperature is below 0 °C (32°F) or above 40 °C (104 °F).
MC40disconnectedfrom hostcomputer duringcommunication.
Reattach the communication cable and re-transmit.During datacommunication, nodata transmitted, ortransmitted data wasincomplete.
Incorrect cableconfiguration.
See the system administrator.
No sound. Volume settingis low or turnedoff.
Adjust the volume.
MC40 isinactive.
The display turns off after a period of inactivity. Set this period to15 seconds, 30 seconds, 1, 2, 10, or 30 minutes.
MC40 turns off.
Battery isdepleted.
Recharge or replace the battery.
A message appearsstating not enoughstorage memory.
Too manyapplicationsinstalled on theMC40.
Remove user-installed applications on the MC40 to recover memory.
Select > Apps > Downloaded. Select the unused programsand touch Uninstall.
8-6 MN000111A01 - August 2013
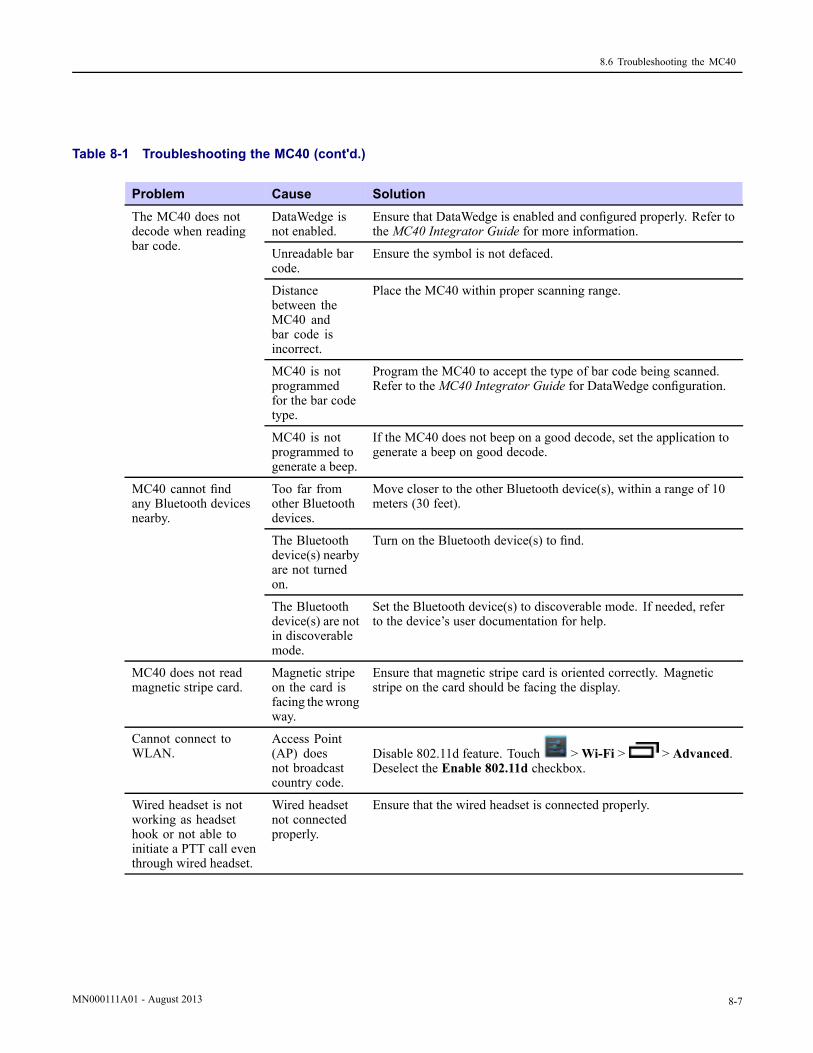
8.6 Troubleshooting the MC40
Table 8-1 Troubleshooting the MC40 (cont'd.)
Problem Cause SolutionDataWedge isnot enabled.
Ensure that DataWedge is enabled and configured properly. Refer tothe MC40 Integrator Guide for more information.
Unreadable barcode.
Ensure the symbol is not defaced.
Distancebetween theMC40 andbar code isincorrect.
Place the MC40 within proper scanning range.
MC40 is notprogrammedfor the bar codetype.
Program the MC40 to accept the type of bar code being scanned.Refer to the MC40 Integrator Guide for DataWedge configuration.
The MC40 does notdecode when readingbar code.
MC40 is notprogrammed togenerate a beep.
If the MC40 does not beep on a good decode, set the application togenerate a beep on good decode.
Too far fromother Bluetoothdevices.
Move closer to the other Bluetooth device(s), within a range of 10meters (30 feet).
The Bluetoothdevice(s) nearbyare not turnedon.
Turn on the Bluetooth device(s) to find.
MC40 cannot findany Bluetooth devicesnearby.
The Bluetoothdevice(s) are notin discoverablemode.
Set the Bluetooth device(s) to discoverable mode. If needed, referto the device’s user documentation for help.
MC40 does not readmagnetic stripe card.
Magnetic stripeon the card isfacing thewrongway.
Ensure that magnetic stripe card is oriented correctly. Magneticstripe on the card should be facing the display.
Cannot connect toWLAN.
Access Point(AP) doesnot broadcastcountry code.
Disable 802.11d feature. Touch >Wi-Fi > > Advanced.Deselect the Enable 802.11d checkbox.
Wired headset is notworking as headsethook or not able toinitiate a PTT call eventhrough wired headset.
Wired headsetnot connectedproperly.
Ensure that the wired headset is connected properly.
MN000111A01 - August 2013 8-7

MC40 User Guide
8.7 Single-Slot Charge Cradle TroubleshootingTable 8-2 Troubleshooting the Single-slot Charge Cradle
Problem Cause SolutionMC40 wasremoved fromcradle or cradlewas unpluggedfrom AC powertoo soon.
Ensure cradle is receiving power. Ensure MC40 is seated correctly.Confirm the battery is charging. The 2680 mAh battery charges inapproximately four hours.
Battery is faulty. Verify that other batteries charge properly. If so, replace the faultybattery.
The MC40 is notfully seated inthe cradle.
Remove and re-insert the MC40 into the cradle, ensuring it is firmlyseated.
MC40 battery is notcharging.
Extreme batterytemperature.
Battery does not charge if ambient temperature is below 0 °C (32°F) or above 40 °C (104 °F).
8.8 Five-Slot Charge Only Cradle CRDUNIV-40–5000RTroubleshooting
Table 8-3 Troubleshooting the Five-Slot Charge Only Cradle
Problem Cause SolutionMC40 removedfrom the cradletoo soon.
Replace the MC40 in the cradle. The 2680 mAh battery charges
in approximately four hours. Touch > About device >Status to view battery status.
Battery is faulty. Verify that other batteries charge properly. If so, replace the faultybattery.
MC40 isnot insertedcorrectly in thecradle.
Remove the MC40 and reinsert it correctly. Verify charging is
active. Touch > About device > Status to view batterystatus.
Battery is not charging.
Ambienttemperature ofthe cradle is toowarm.
Move the cradle to an area where the ambient temperature isbetween 0 °C (32 °F) and 35 °C (95 °F).
Spare batteries are notcharging in Four SlotBattery Charger.
Missing FourSlot BatteryCharger powersupply.
The Four Slot Battery Charger requires a separate power supply.Obtain the correct power supply and connect to the charger.
8-8 MN000111A01 - August 2013

8.9 Four-Slot Battery Charger SACMC40XX-4000R Troubleshooting
8.9 Four-Slot Battery Charger SACMC40XX-4000RTroubleshooting
Table 8-4 Troubleshooting the Four-slot Battery Charger
Problem Cause SolutionBattery wasremoved fromthe charger orcharger wasunplugged fromAC power toosoon.
Re-insert the battery in the charger or re-connect the charger’s powersupply. The 2680 mAh battery charges in approximately four hours.
Battery is faulty. Verify that other batteries charge properly. If so, replace the faultybattery.
Battery not charging.
Battery contactsnot connected tocharger.
Verify that the battery is seated in the battery well correctly withthe contacts facing down.
MN000111A01 - August 2013 8-9


9 Technical SpecificationsThe following sections provide technical specification for the device.
9.1 MC40 Technical SpecificationsThe following table summarizes the MC40’s intended operating environment and technical hardware specifications.
Table 9-1 MC40 Technical Specifications
Item DescriptionPhysical Characteristics
Dimensions Height: 143.9 mm (5.66 in.)
Width: 72.8 mm (2.87 in.)
Non-MSR: Depth: 20.1 mm (0.79 in.)
MSR: Depth: 31.8 mm (1.25 in.)
Weight Non-MSR: 257.7 g (9.09 oz.)
MSR: 266.1 g (9.38 oz.)
Display 4.3 in. capacitive; 480 x 800; 300 nit
Touch Panel Capacitive dual-touch
Backlight LED backlight
Battery Rechargeable Lithium Ion 3.7V, 2680 mAh Smart battery.
Backup Battery NiMH battery (rechargeable) 15 mAh 3.6 V (not user accessible).
Connectivity One USB 2.0 OTG connector.
Notification LED, audio and vibration.
Keypad Options On-screen keyboard.
Audio Speakers, microphone and headset connector (mono, 2.5 mm jack withmicrophone). Stereo audio through Bluetooth stereo headsets.
Communications All models: Push-to-Talk. PTT Express Client pre-loaded. VoIP TelephonyReady models: Optimized for VoIP telephony. VoIP client not included.
Performance Characteristics
CPU Texas Instruments OMAP 4430 @ 800 MHz, dual-core.
Operating System Android-based ASOP 4.1.1.
Memory 1 GB RAM, 8 GB Flash.
Output Power (USB) Docking Connector: 5 VDC @ 500 mA max.
User Environment
MN000111A01 - August 2013 9-1

MC40 User Guide
Table 9-1 MC40 Technical Specifications (cont'd.)
Item DescriptionOperating Temperature 0°C to 50°C (32°F to 122°F)
Storage Temperature -40°C to 70°C (-40°F to 158°F)
Charging Temperature 0° C to 40° C (32°F to 104°F)
Humidity 5% to 95% RH non-condensing
Drop Specification Multiple 1.2 m (4 ft.) drops to plywood per MIL-STD 810G specifications.Multiple 0.9 m (3 ft.) drops to tile.
Electrostatic Discharge (ESD) +/-15kVdc air discharge, +/-8kVdc direct discharge, +/-2kVdc indirect discharge
Sealing IP54
Wireless LAN Data Communications
Wireless Local Area Network(WLAN) radio
IEEE® 802.11a/b/g/n with internal antenna
Data Rates Supported 802.11b: 1, 2, 5.5, 11 Mbps
802.11a/g: 6, 9, 12, 18, 24, 36, 48, 54 Mbps
802.11n: 6.5, 13, 19.5, 26, 39, 52, 58.5, 65 Mbps
Note that 802.11n data rates may be higher.
Operating Channels Chan 36 - 165 (5180 – 5825 MHz), Chan 1 - 13 (2412 - 2472 MHz); actualoperating channels/frequencies depend on regulatory rules and certificationagency.
Security Security Modes: Legacy, WPA and WPA2
Encryption: WEP (40 and 128 bit), TKIP and AES
Authentication: TLS, TTLS (MSCHAP), TTLS (MSCHAPV2), TTLS (PAP),PEAP (MSCHAPV2), PEAP (GTC), FAST (MSCHAPV2), FAST (GTC), LEAP.
CCXv4 certified.
Spreading Technique Direct Sequence Spread Spectrum (DSSS) and Orthogonal Frequency DivisionMultiplexing (OFDM)
Wireless PAN Data and Voice Communications
Bluetooth Class II, v 2.1 with EDR; integrated antenna.
Data Capture
Imager Captures 1D and 2D bar codes.
Rear-facing Camera For bar code scanning and image capture: 8 MP auto-focus camera with aiming;captures 1D and 2D bar codes, photographs, video, signatures and documents.
Magnetic Stripe Reader Reads data on magnetic stripe cards.
Sensors
Motion Sensor 3-axis accelerometer that enables motion sensing applications for dynamic screenorientation and power management.
9-2 MN000111A01 - August 2013

9.2 Single-Slot Charge Cradle CRDMC40XX-1000R Technical Specifications
Table 9-1 MC40 Technical Specifications (cont'd.)
Item DescriptionAmbient Light/ProximitySensor
Automatically adjusts display brightness and turns off the display during PTTcalls.
Imager (SE4500-DL) Specifications
Field of View Horizontal - 39.2°
Vertical - 25.4°
Optical Resolution WVGA 752 H x 480 V pixels (gray scale)
Roll 360°
Pitch Angle +/- 60° from normal
Skew Tolerance +/- 60° from normal
Ambient Light Indoor: 450 ft. candles (4845 lux)
Outdoor: 9000 ft. candles (96,900 lux)
Sunlight: 8000 ft. candles
Fluorescent: 450 ft. candles
Focal Distance From center of exit window: 18.5 cm (7.3 in.)
Aiming Element (VLD) 655 nm +/- 10 nm
Illumination Element (LED) 625 nm +/- 5 nm
Supported Symbologies
1D Chinese 2 of 5, Codabar, Code 11, Code 128, Code 39, Code 93, Discrete 2 of 5,EAN-8, EAN-13, GS1 DataBar, GS1 DataBar Expanded, GS1 DataBar Limited,Interleaved 2 of 5, Korean 2 of 5, MSI, TLC 39, Matrix 2 of 5, Trioptic, UPCA,UPCE, UPCE1, Web Code.
2D Australian Postal, Aztec, Canadian Postal, Composite AB, Composite C, DataMatrix, Dutch Postal, Japan Postal, Maxicode, Micro PDF, Micro QR, PDF, QRCode, UK Postal, US Planet, US Postnet, US4State, US4State FICS.
9.2 Single-Slot Charge Cradle CRDMC40XX-1000RTechnical Specifications
Table 9-2 Single-slot Charge Cradle Technical Specifications
Item DescriptionDimensions Height: 69.4 mm (2.73 in.)
Width: 102.5 mm (4.04 in.)
Depth: 88.9 mm (3.50 in.)
Weight 274 g (9.67 oz)
MN000111A01 - August 2013 9-3

MC40 User Guide
Table 9-2 Single-slot Charge Cradle Technical Specifications (cont'd.)
Item DescriptionInput Voltage 5 VDC
Power Consumption (withMC40)
6 watts
Operating Temperature 0 °C to 40 °C (32 °F to 104 °F)
Storage Temperature -40 °C to 70 °C (-40 °F to 158 °F)
Charging Temperature 0 °C to 40 °C (32 °F to 104 °F)
Humidity 0% to 95% non-condensing
Drop 76.2 cm (30.0 in.) drops to vinyl tiled concrete at room temperature.
Electrostatic Discharge (ESD) +/- 15 kV air
+/- 8 kV contact
9.3 Five-Slot Charge Only Cradle CRDUNIV-40-5000RTechnical Specifications
Table 9-3 Five-Slot Charge Only Cradle Technical Specifications
Item DescriptionDimensions (Base only) Height: 40.2 mm (1.6 in.)
Width: 449.6 mm (17.7 in.)
Depth: 120.3 mm (4.7 in.)
Dimensions (Base with fiveCharging Cups)
Height: 90.1 mm (3.5 in.)
Width: 449.6 mm (17.7 in.)
Depth: 120.3 mm (4.7 in.)
Dimensions (Base with fourCharging Cups and oneBattery Charger Cup
Height: 77.0 mm (3.0 in.)
Width: 449.6 mm (17.7 in.)
Depth: 120.3 mm (4.7 in.)
Weight (Base only) 0.93 kg (20.5 lbs.)
Weight (Base with fiveCharging Cups))
1.31 kg (2.89 lbs.)
Weight (Base with fourCharging Cups and oneBattery Charger Cup)
1.30 kg (2.86 lbs.)
Input Voltage 12 VDC
Power Consumption (withMC40)
37.5 watts
9-4 MN000111A01 - August 2013

9.4 Four-Slot Battery Charger SACMC40XX-4000R Technical Specifications
Table 9-3 Five-Slot Charge Only Cradle Technical Specifications (cont'd.)
Item DescriptionOperating Temperature 0 °C to 50 °C (32 °F to 122 °F)
Storage Temperature -40 °C to 70 °C (-40 °F to 158 °F)
Charging Temperature 0 °C to 40 °C (32 °F to 104 °F)
Humidity 0% to 95% non-condensing
Drop 76.2 cm (30.0 in.) drops to vinyl tiled concrete at room temperature.
Electrostatic Discharge (ESD) +/- 15 kV air
+/- 8 kV contact
9.4 Four-Slot Battery Charger SACMC40XX-4000RTechnical Specifications
Table 9-4 Four-slot Battery Charger Technical Specifications
Item DescriptionDimensions (with USB HostExpansion Module)
Height: 59.9 mm (2.36 in.)
Width: 84.0 mm (3.31 in.)
Depth: 116.3 mm (4.58 in.)
Weight 257 g (9.07 in.)
Input Voltage 12 VDC
Power Consumption (withMC40)
25 watts
Operating Temperature 0 °C to 40 °C (32 °F to 104 °F)
Storage Temperature -40 °C to 70 °C (-40 °F to 158 °F)
Charging Temperature 0 °C to 40 °C (32 °F to 104 °F)
Humidity 0% to 95% non-condensing
Drop 76.2 cm (30.0 in.) drops to vinyl tiled concrete at room temperature.
Electrostatic Discharge (ESD) +/- 15 kV air
+/- 8 kV contact
MN000111A01 - August 2013 9-5


IndexAadaptive frequency hopping ...................................... 5-1albums.................................................................. 6-7android version....................................................... xiiiapplication shortcuts ................................................ 2-6approved cleanser ................................................... 8-2
Bback button............................................................ 1-2batterycharging............................................................. 1-5management ....................................................... 1-8replacement ........................................................ 1-7
bluetooth ............................................................... 5-1connecting to a device .......................................... 5-5profiles .............................................................. 5-6
BluetoothPIN................................................................... 5-1security.............................................................. 5-1
build number.......................................................... xiii
Ccamera .................................................................. xiiirear-facing.......................................................... 1-3
camera settings ....................................................... 6-4cleaning ................................................................ 8-2cleaning instructions................................................ 8-2configuration.......................................................... xiiicradleconnector cleaning ............................................... 8-4
creating folders....................................................... 2-8
Ddatawedge ............................................................. 3-9decode mode.......................................................... 3-1default notifications ................................................ 1-14digital camera......................................................... 3-1display .................................................................. xiiicleaning ............................................................. 8-3
Ffive-slot charge only cradle base ................................ 7-1four slot battery charger ........................................... 7-1
Hharmful ingredients ................................................. 8-2
home button........................................................... 1-2
Kkeyboard .............................................................. 2-11
Llight sensor ............................................................ 1-1
Mmemory ................................................................ xiiimenu button........................................................... 1-2micro USB cable..................................................... 7-1microphone............................................................ 1-1
Nnaming folders ....................................................... 2-8
Ooperating system..................................................... xiii
Ppanoramic ............................................................. 6-2photos................................................................... 6-1picklist mode ......................................................... 3-1power button.......................................................... 1-2power on ............................................................... 1-6
Rradios ................................................................... xiiirecording videos ..................................................... 6-3replacing the battery ................................................ 1-7resetting ............................................................... 2-19right LED.............................................................. 1-1rotate screen.......................................................... 1-12
Sscan angle.............................................................. 3-2scanning range ....................................................... 3-2screen lock sounds ................................................. 1-15screen rotation....................................................... 1-12screen timeout ....................................................... 1-13
MN000111A01 - August 2013 I

9.4 Four-Slot Battery Charger SACMC40XX-4000R Technical Specifications
serial number ......................................................... xiiiservice information ...................................................xvset date ................................................................ 1-10set time ................................................................ 1-10set time zone ......................................................... 1-10settingcamera............................................................... 6-4video................................................................. 6-5
single-slot charge only cradle .................................... 7-1soft reset .............................................................. 2-20spare battery .......................................................... 7-1status bar............................................................... 2-2system sounds ....................................................... 1-14
Ttaking a panoramic photo.......................................... 6-2taking photos ......................................................... 6-1touch screen........................................................... 1-2
Vvibrate on touch..................................................... 1-15video settings ......................................................... 6-5videos............................................................. 6-1, 6-3volume ................................................................ 1-14
II MN000111A01 - August 2013