Embed Size (px)
Citation preview

Timbercrete ®
BUILDING WITHTIMBERCRETE
In recognition of our commitment to continuous improvement this document is subject to change without notice. Please check our website for the latest version.
© 2010 Timbercrete Pty. Ltd.
- V01.09.11

Building with Timbercrete - V01.09.11 | © 2010 Timbercrete Pty. Ltd.
Building With Timbercrete
“Clean” bricklaying can make a difference to your dream home.
Incorrect laying of Timbercrete Bricks Correct laying of Timbercrete Bricks
Your bricklayer’s and builder’s performance is vital to the final quality and aesthetics of your timbercrete home. It is essential that they are fully acquainted with all aspects of the enclosed document prior to commencement. In particular, please ensure the block layer is following the simple “On-Site Audit & Checklist” that is attached to this document.
The four fundamentals in achieving the best possible results are:
1. Observe incremental block laying procedure
2. Cleaning off excess mortar during block laying every day
3. Use correct timbercrete mortar mix; not you’re favorite mortar
4. Only lay blocks after the “use after” date on each pallet
Ignoring these issues will result in a second rate effect.
All tradesmen should fully acquaint themselves with BCA building procedures. The accompanying recommendations are in no way meant to supplant BCA procedures or good engineering recommendations, but are given as a guide after years of practical experience in the installation of this product.
If ever in doubt ~ please ask us!
SAFETY - the same care, precautions & professional conduct should be exercised when building with Timbercrete as when building with any other brick or masonry product. In particular, always wear hearing and eye protection when cutting, nailing, and fixing or otherwise working with Timbercrete blocks.

Building with Timbercrete - V01.09.11 | © 2010 Timbercrete Pty. Ltd.
Index
Introduction ........................................................................................................... 1
Brick & Block Types, and their Incremental Benchmarks ........................................ 2
Tips for Laying Cobblestone Block .......................................................................... 3 Laying Irregular Cobblestone Blocks ........................................................... 3 Cobblestone Series ..................................................................................... 4 Positioning Blocks....................................................................................... 5 Block Variations ......................................................................................... 5 Batch Colour Variations .............................................................................. 5
Door and Window Lintel Block Pattern .................................................................. 6 Calculating Window Sizes .......................................................................... 7
Mortar Mortar Thickness Strengths ......................................................................... 8 Mortar Mixes ............................................................................................. 8 Mortar Additives ........................................................................................ 9 Selecting and Testing Sand Suitability ........................................................ 10 Problem Solving ....................................................................................... 11
Types of Joints ...................................................................................................... 12 Cleaning and Pointing .............................................................................. 12
Cutting, Splitting and Drilling Timbercrete ............................................................ 13
Nailing and Screwing Timbercrete ........................................................................ 14
Stain Removal ...................................................................................................... 14 Calcium (Lime) and Efflorescence Stains ................................................... 14 Hardwood Stains
Curing Block & Moisture Content ........................................................................ 15
Wall Movement ................................................................................................... 15 Accommodating Wall Shrinkage ............................................................... 15 Control Joints ........................................................................................... 16 Vertical Shrinkage ..................................................................................... 17
Wall Reinforcement ............................................................................................. 18 Tensioning the Strapping .......................................................................... 18 Intersecting Wall Junctions ........................................................................ 19
Wetting Down Prelayed Blocks - WARNING ........................................................ 19
Installing Windows and Doors .............................................................................. 20 Installing Sill Blocks and Windows ............................................................ 20
Installing Skirting Boards and Cornices ................................................................. 21
Lintel Types .......................................................................................................... 21 Installing Lintels ........................................................................................ 21
Installing Services in Blocks .................................................................................. 22 Installing Electrical Services ....................................................................... 22
Joinst Hangers ...................................................................................................... 23
Sub-Floor Breathing Holes ................................................................................... 23
Wet Areas ............................................................................................................ 23
Architectural Features .......................................................................................... 24
Building with Timbercrete - V01.09.11 | © 2010 Timbercrete Pty. Ltd.
Wall Treatments ................................................................................................... 25
Sealing Timbercrete Single Skin Walls ................................................................... 26 Enternal Sealers ........................................................................................ 26 Internal Sealers ......................................................................................... 26 Applying Shalex on Internal Walls ............................................................. 26 Building Code Requirements for Weatherproofing .................................... 27 Generous Eaves Recommended for Single Skin Walls ............................... 27 Water Tightness ........................................................................................ 27
Termite Prevention ............................................................................................... 28
Footing Details ..................................................................................................... 29
Top Plate Details - Single Leaf .............................................................................. 30
Top Plate and Tie Down Details - Double Brick ................................................... 31
Finishing Touches ................................................................................................. 32
Site Audit on Timbercrete Installation ................................................................... 33
On-Site Audit Checklist (Appendix 1) ................................................................... 34
Notes (Appendix 2) .............................................................................................. 35

Building with Timbercrete - V01.09.11 | © 2010 Timbercrete Pty. Ltd. 1
IntroductionContextThe “Building with Timbercrete” manual should be considered in the context of the recommendation that Timbercrete houses be designed in accordance with AS 3700.
TolerancesTimbercrete Bricks and Blocks can be manufactured in accurately fabricated steel, plastic and ply moulds. As such we can achieve a tolerance of AS/NZS 4455 tolerance DW1.
However, because some of our products require a rustic visual effect (as in the Cobblestone Series), there are no specific tolerances on this range of product, such units are manufactured to AS/NZS 4455 tolerance DW0 (no requirement).
Brick & Block TypesTimbercrete manufactures several different types/styles of brick and blocks. All are made from the same raw material. Most bricks and blocks are available in veneer, double brick (cavity brick wall) or single skin (single leaf) type construction.
These types/styles include:
• Cobblestone Series The Cobblestone series is our most popular style featuring a smooth curved face with a river stone/cobble stone appearance. These bricks and blocks vary slightly in size; this variation is intentional and the mortar joints accommodate this variation by ranging 10mm to 20mm thick.
• Smooth Faced Sandstone Series features a smooth flat face like a diamond cut sandstone. This series comes in a vast range of sizes. The mortar is 10mm to 15mm thick, more formal in their thickness.
• Ancient Stone Series features a textured face like rough cut limestone or weathered sandstone. The mortar is 10mm to 12mm thick.
• Super Insulating Series is the latest invention from Timbercrete with patent protection granted around the world. This large block comes in single skin only, with an exceptionally high insulation. Total R value, as a result of the 110mm thick styrene centre and Timbercrete outer layers, equals R3.7+. The mortar is 10mm to 15mm thick.
The Super Insulating Series has the same finish as the Smooth Faced Sandstone Series. This block comes with cavities for all types of services as well as cavities for structural reinforcement. It is also available in a narrow veneer or internal brick counterpart.
• Tri-Modular Series is a veneer brick that comes in three different lengths (300mm, 600mm and 900mm) with three different textured finishes (smooth, lightly textured and rough textured). The unique size and design of the tri-modular series means that the brick having three different facial textures can be laid with either face facing out. This is simply achieved because the bricks are equal in height and width. The mortar is 10mm to 12mm thick.
For Information regarding specific sizes and specifications, please refer to the chart on the following page.
The key to successfully building Timbercrete walls is to work to incremental benchmarks. That is, both the horizontal and vertical courses need to be laid out in increments of “one block plus one mortar joint”, as per the chart on the following page.
By strict observance of these increments, the finished wall aesthetics will be maximized, waste eliminated and cost minimised.

Building with Timbercrete - V01.09.11 | © 2010 Timbercrete Pty. Ltd. 2
Brick & Block Types and their Incremental Benchmarks
Product Availability Actual Actual Actual Module Module Weight Coverage Length Height Width Length Height (kg) (Bricks/m2)
Cobblestone Series (Single Skin) SS 405 160 200 420 175 12.75 13.60
Cobblestone Series (Veneer) V or FB 405 160 125 420 175 8.00 13.60
Cobblestone Ryan Series V or FB 290 118 100 300 130 3.42 25.60
Cobblestone Hunter Series V or FB 350 160 100 360 172 5.50 16.10
Ancient Stone Series (Large) V or FB 440 240 110 450 250 11.62 8.90
Ancient Stone Series (Small) V or FB 348 160 100 360 172 5.57 16.10
Super Insulating Series SS 590 165 290 600 175 16.00 9.50
Smooth Faced Sandstone (Large) V or FB 590 163 90 600 175 8.66 9.50
Smooth Faced Sandstone SS 400 165 200 410 175 12.75 13.90 (Small - Single Skin)
Smooth Faced Sandstone V or FB 400 165 120 410 175 8.00 13.90 (Small - Veneer Block)
Textured Faced Sandstone (Large) V or FB 590 163 90 600 175 8.66 9.50
Ancient Stone Cladding CL 440 240 35 450 250 3.70 8.90
Tri-Modular Brick Series (Small) V or FB 290 90 90 300 100 2.35 33.30
Tri-Modular Brick Series (Medium) V or FB 590 90 90 600 100 4.78 16.70
Tri-Modular Brick Series (Large) V or FB 890 90 90 900 100 7.21 11.10
Fixing Panel Wall System VP or FP 900 300 60 900 300 16.20 3.70
Key: SS - Single Skin, FB - Full Brick, V - Veneer, VP - Venner Panel, FP - Fixing Panel

Building with Timbercrete - V01.09.11 | © 2010 Timbercrete Pty. Ltd. 3
Tips for Laying Cobblestone BlocksThe Bricklayers string line will ensure the correct thickness of horizontal mortar joints. By selecting shorter or longer blocks he will also be able to maintain straight and centre located perpendicular lines (see illustration below).
Bricklayers’ professional training will prompt them to reject a proportion of Timbercrete Cobblestone blocks due to the size, surface or colour irregularities. It is therefore vital that they be made aware of these significant differences from conventional concrete blocks (which are all identical in size).
The mortar bed should NOT be a Perimeter Shell as with traditional hollow core concrete blocks. Instead, all Timbercrete bricks and blocks must have a solid, full bed of mortar (in both horizontal & vertical joints), as per BCA requirements for solid single-skin structures.
This is important for 2 reasons.
1. To ensure maximum bond and load bearing strength.
2. To prevent cavities in which water can pool and ultimately leak through the mortar joint.
Also remember that the longer the block, the greater the cobblestone slump (lower height) and more mortar will be needed. The same incremental benchmarks should also be followed between doors and windows when setting out the job.
Laying Irregular Cobblestone Blocks
TIP 1 - By running a string line on the inside of the wall rather than the outside, the inside wall will be more accommodating for the cornice, skirting or rendering (if applicable). Also the outside wall will have a little more “character”.
TIP 2 - Flatter faced blocks (that is, without cobblestone curves) can be used on the top and bottom courses, as well as around window and door openings, to ensure flat internal surfaces to abut cornices, door & window frames, and skirting (if installed). Note: With regard to the Cobblestone series, Timbercrete automatically supplies a proportion of flatter blocks in every order.
TIP 3 - “Specialty” blocks (those with grooves, slots or cut-outs) should only be used in positions where they are required to perform their specific function. As a general rule they should not be used in general block laying otherwise they may run short when needed.
Below is a sheet detailing the range of specialty blocks provided for the Large Single Skin Cobblestone Series.
The depth of the mortar bed is varied 10mm to 20mm to account for the slight variation in the height and length from one cobblestone block to the next.

Building with Timbercrete - V01.09.11 | © 2010 Timbercrete Pty. Ltd. 4

Building with Timbercrete - V01.09.11 | © 2010 Timbercrete Pty. Ltd. 5
Positioning Blocks
TIP 4 - All Cobblestone Blocks have a “rough” bottom and a smooth flat “top” resulting from the method of manufacture. Ensure that blocks are always laid with the smooth flat “top” facing upwards, which provides a straight flat surface for the string line and spirit level.
Block Variations
TIP 5 - Cobblestone series blocks, being hand-crafted, vary slightly in height, length and width. All sizes are an average. This is intentional.
The purpose for this variation is to create the unique Timbercrete “cobblestone” appearance. The bricklayer needs to appreciate that the variation in block dimensions and shapes is intentional, and is compensated by the varying thickness of mortar joints. Also, some Timbercrete blocks will feature “split faces”, air bubble “pock marks”, and various other surface and colour “irregularities”. These are all standard Timbercrete features which are purposely created during the hand-crafted production process.
Batch Colour Variations
TIP 6 - There is a possibility that Timbercrete bricks and blocks may change slightly in colour from batch to batch, especially if several months separate consecutive orders. To eliminate this possibility ordered the entire batch at one time.
If this is not possible then remember to keep a few pallets of bricks or blocks aside and blend them in with the newly ordered batch.

Building with Timbercrete - V01.09.11 | © 2010 Timbercrete Pty. Ltd. 6
Door and Window Lintel Block Patterns
Soldier Course
Many Timbercrete blocks such as the large Cobblestone series (as seen in the illustrations) are designed so that the vertical increments work door heights without the need for a packer block. The vertical increment height is 175 mm. 12 large Cobblestone blocks equals (2.1m) a standard door height.
Stretcher Bond
If the brick or block you have selected does not correspond to a vertical increment of 2.1m, build a step down into the slab at a depth that corresponds to the adjustment needed for the door height.

Building with Timbercrete - V01.09.11 | © 2010 Timbercrete Pty. Ltd. 7
Calculating Window SizesHaving your Windows custom-built to work the module of the brick should save you time and money. Remember every time you cut a brick or a block, you lose the cost of the area that is discarded as well as adding the cutting costs. Therefore keep cutting to a minimum.
Window Width - to calculate the window width, simply multiply any of the module lengths (see chart below) and add the thickness of one mortar joint. The chart below demonstrates this in relation to the Large Cobblestone series.
Window Height - to calculate height of windows, multiply any of the module heights (see chart below) and deduct the various amounts for a lintel gap, sill brick and mortar joint. The chart below demonstrates this in relation to the Large Cobblestone series.
Deduct a 5mm to 7mm gap between the top of the window and the bottom of the lintel beam. This 5mm to 7mm gap accommodates vertical masonry shrinkage, or the sagging of the lintel beam. (Some builders prefer a gap of 10mm.)
Deduct the thickness of the windowsill brick or tile.
Deduct the thickness of the mortar joint (between the sill brick and the block below).
g|ÅuxÜvÜxàx ® LARGE COBBLESTONE SERIES (.420 Long x .175 High ~ Joint included)
Approximate Block size : .400 Long x .160 High x.200 Wide. Note; The Cobblestone Series varies slightly in size.
joint has been deducted at the end of each wall length)
Block Vertical No of Horizontal No of HorizontalCourse Increments Blocks Increments Blocks Increments
1 0.175 0.5 0.190 No Mortar Joint 9.0 3.7602 0.350 1.0 0.400 No Mortar Joint 9.5 3.9703 0.525 1.5 0.610 10.0 4.1804 0.700 2.0 0.820 10.5 4.3905 0.875 Bench Height 2.5 1.030 11.0 4.6006 1.050 3.0 1.240 11.5 4.8107 1.225 3.5 1.450 12.0 5.0208 1.400 4.0 1.660 12.5 5.2309 1.575 4.5 1.870 13.0 5.44010 1.750 5.0 2.080 13.5 5.65011 1.925 5.5 2.290 14.0 5.860
Lintel 12 2.100 Door Height 6.0 2.500 14.5 6.07013 2.275 6.5 2.710 15.0 6.28014 2.450 7.0 2.920 15.5 6.49015 2.625 7.5 3.130 16.0 6.70016 2.800 8.0 3.340 16.5 6.91017 0.350 8.5 3.550 17.0 7.120
Using these incremental measurements you will avoid having to cut any blocks.
Window Heights
For window heights select any of the above Multiply any of the 420mm "Horizontal Increments" andmeasurements and deduct the sill hight, mortar add 20mm, representing the mortar jointthickness and a 5mm between the top of the window and the bottom of the lintel. This 5mm Example : A ~2 Full Block Incrementsgap will accommodate any possible vertical wall 2 blocks 0.840shrinkage, or sagging in the lintel beam. add 0.020 (mortar joint)
0.860 Door or window widthExample:Courses 8 1.400 Vert Increment Example: B ~ 2.5 Block Increments.Deduct 0.005 Gap 2 blocks 0.840Deduct 0.100 Sill Brick add 0.020 (mortar joint)Deduct 0.015 Mortar Joint 1/2 Block 0.200
1.280 Window Height 1.060 Door or window width
*** Control joints in walls are placed every 6 metres, depending the proximity of the nearest window or door.
Window or Door Widths
of block + 1 mortar joint.)
Window or Door Sizes
Vertical Increments 175mm Horizontal Increments 420mm
(Increments include length of block 400 + 1 mortar joint 20 .A 20mm mortar(Increments include height

Building with Timbercrete - V01.09.11 | © 2010 Timbercrete Pty. Ltd. 8
MortarThe recommended mortars are both M3 mortars. This is based on AS 3700.
We also acknowledge that construction in some locations (e.g. severe marine environments within 1km of a surf coast or 100m of a non-surf coast) will require M4 mortar.
* Note when changing the cement/lime proportions to reflect a M4 grade, be sure to use the same sand selection and testing procedure. (See below)
Mortar Thickness and Compressive Strength• AS 3700 Clause 4.9.1
• Independent tests demonstrate that the Characteristic Compressive Strength of Timbercrete Masonry = 3.8 Mpa for joint thickness in the range of 10 mm to 25 mm. (see specification sheet “Physical Properties of Timbercrete”).
• For your engineer: The Characteristic Compressive Strength of Masonry, f’m, determined from AS 3700 Clause 3.3.2 and Table 3.1 should be modified by appropriate adjustment to km.
Mortar Flexural Strength or Bond Wrench StrengthMortar Mixes A & B (below) are a “M3 Grade” and have a Flexural Strength or Bond Wrench Strength of 0.36 MPa. Even though test strength of 0.36 MPa has been previously determined, it is recommended that design be based on a Characteristic Flexural Tensile Strength, f’mt of 0.2 MPa. This is because design based on 0.2 MPa does not require any further site control, but design based on 0.36 MPa would need to be treated as “special masonry”, with increased site control in accordance with AS 3700 Clause 11.7.
Mortar MixesImportant - Use the same mortar mix for all Timbercrete bricks and blocks regardless of the size or type.
Warning! Fine particle sands and Fatty stands are the main cause for shrinkage cracks in mortar joints. This can be simply eliminated by observing the following:
There are two mortar mixes listed below. If Aalborg White cement/lime mix is available, use Mix A. If not, use Mix B. Both these mixes are M3 grade.
Mortar Mix A• One 20kg bag of Aalborg White* mortar mix (cement & lime combo).
• Four 20 litre buckets of mixed sand. (The sand should be a 50/50 mix of pre-washed coarse sand and local yellow fatty brickies sand. Most sand suppliers will deliver this sand pre-mixed if requested.)
Waterproof Mortar Additives
• For a waterproofing agent add 500ml of “Timbercrete Mortar Shield” to 20kg of “Bricklayers White Cement”.
Mortar Retardants
• During hot/windy conditions add Dynex or Pozz 400 RI, to prevent the mortar from going off too quickly. (Use the cup that comes with Dynex).
Colour Additives
• 1½ to 2 cups (500ml total) of yellow oxide to each batch, alternatively other colour as per colour taste.
* Aalborg “Bricklayers White” is a mixture of white cement and lime and is normally available from your local Timbercrete supplier.
Building with Timbercrete - V01.09.11 | © 2010 Timbercrete Pty. Ltd. 9
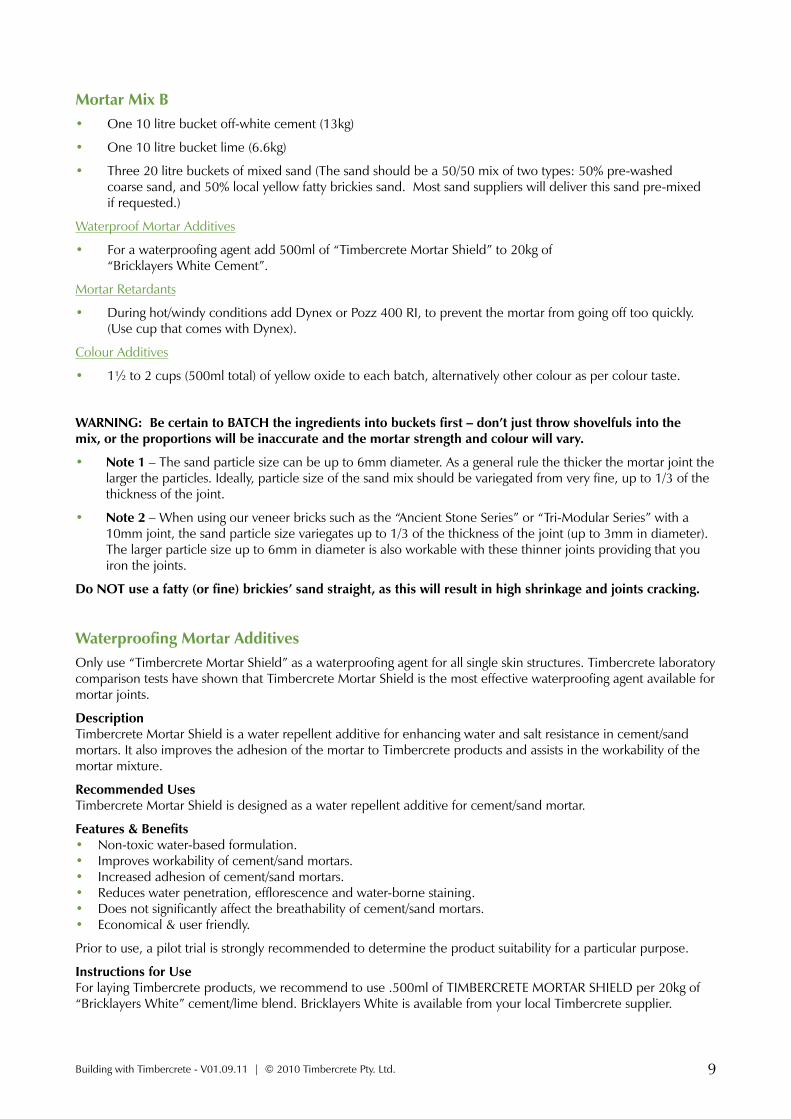
Mortar Mix B• One 10 litre bucket off-white cement (13kg)
• One 10 litre bucket lime (6.6kg)
• Three 20 litre buckets of mixed sand (The sand should be a 50/50 mix of two types: 50% pre-washed coarse sand, and 50% local yellow fatty brickies sand. Most sand suppliers will deliver this sand pre-mixed if requested.)
Waterproof Mortar Additives
• For a waterproofing agent add 500ml of “Timbercrete Mortar Shield” to 20kg of “Bricklayers White Cement”.
Mortar Retardants
• During hot/windy conditions add Dynex or Pozz 400 RI, to prevent the mortar from going off too quickly. (Use cup that comes with Dynex).
Colour Additives
• 1½ to 2 cups (500ml total) of yellow oxide to each batch, alternatively other colour as per colour taste.
WARNING: Be certain to BATCH the ingredients into buckets first – don’t just throw shovelfuls into the mix, or the proportions will be inaccurate and the mortar strength and colour will vary.
• Note 1 – The sand particle size can be up to 6mm diameter. As a general rule the thicker the mortar joint the larger the particles. Ideally, particle size of the sand mix should be variegated from very fine, up to 1/3 of the thickness of the joint.
• Note 2 – When using our veneer bricks such as the “Ancient Stone Series” or “Tri-Modular Series” with a 10mm joint, the sand particle size variegates up to 1/3 of the thickness of the joint (up to 3mm in diameter). The larger particle size up to 6mm in diameter is also workable with these thinner joints providing that you iron the joints.
Do NOT use a fatty (or fine) brickies’ sand straight, as this will result in high shrinkage and joints cracking.
Waterproofing Mortar AdditivesOnly use “Timbercrete Mortar Shield” as a waterproofing agent for all single skin structures. Timbercrete laboratory comparison tests have shown that Timbercrete Mortar Shield is the most effective waterproofing agent available for mortar joints.
Description Timbercrete Mortar Shield is a water repellent additive for enhancing water and salt resistance in cement/sand mortars. It also improves the adhesion of the mortar to Timbercrete products and assists in the workability of the mortar mixture.
Recommended Uses Timbercrete Mortar Shield is designed as a water repellent additive for cement/sand mortar.
Features & Benefits • Non-toxic water-based formulation. • Improves workability of cement/sand mortars. • Increased adhesion of cement/sand mortars. • Reduces water penetration, efflorescence and water-borne staining. • Does not significantly affect the breathability of cement/sand mortars. • Economical & user friendly.
Prior to use, a pilot trial is strongly recommended to determine the product suitability for a particular purpose.
Instructions for Use For laying Timbercrete products, we recommend to use .500ml of TIMBERCRETE MORTAR SHIELD per 20kg of “Bricklayers White” cement/lime blend. Bricklayers White is available from your local Timbercrete supplier.

Building with Timbercrete - V01.09.11 | © 2010 Timbercrete Pty. Ltd. 10
Hot Weather Mortar AdditivesTo maintain the “workability” of the mortar, especially in hot or windy weather, DYNEX (Mortar flex) or Pozz 400Ri may be added to the mortar mix. These additives will not compromise the structural integrity or bond wrench-ability, and are normally available from your local Timbercrete manufacturer.
WARNING: DO NOT USE FATTY BRICKIES SAND STRAIGHT with Timbercrete
WARNING: DO NOT USE BICOL or any other detergents in mix with Timbercrete
WARNING: DO NOT USE any MORTAR ADDITIVES unless approved by Timbercrete
Selecting and Testing Sand Suitability for Timbercrete Mortar• Test the sand/mortar mix for excess shrinkage BEFORE you lay a block.
Procedure
1. Select a very coarse washed (river) sand 2.1 litres by volume. Note - the ideal large particle size is up to 1/3 the size of the mortar joint. Therefore if the mortar joints are approximately 20mm (as per the cobblestone series) the large particle sizes need to range from 6mm or 7mm down. This is typically a washed River Sand.
2. Select a typical brickies Loam (sand), 2.1 litres by volume.
Note - this sand will be smaller in particle size and contain some clay, approximately 10% is standard. (See photo)
3. Cut out a piece of ply board (not laminated) 15mm thick by .500mm by .500mm. Nail four strips of timber around the outside of the ply to a height of 15mm. Do note seal or coat the board. (See photo)
This is a simple tried and proven method that has been used throughout Europe.
4. Knock up a small batch of mud with the selected sands intended to be used.
5. The mix being; Mortar mixes A. (4.1.) or B. (6.1.1.) both are a M3 grade.
Mortar Mix A
• 2.1 litres of Coarse washed sand • 2.1 litres of brickies sand • 1.05 litre of Aalborg White mortar mix (1 litre + 50ml) (cement/lime mix) • enough water to make a workable mix
Mortar Mix B
• 2.1 litres of Coarse washed sand • 2.1 litres of brickies sand • 700 ml of off/white cement • 700 ml of Builders lime • enough water to make a workable mix
Building with Timbercrete - V01.09.11 | © 2010 Timbercrete Pty. Ltd. 11
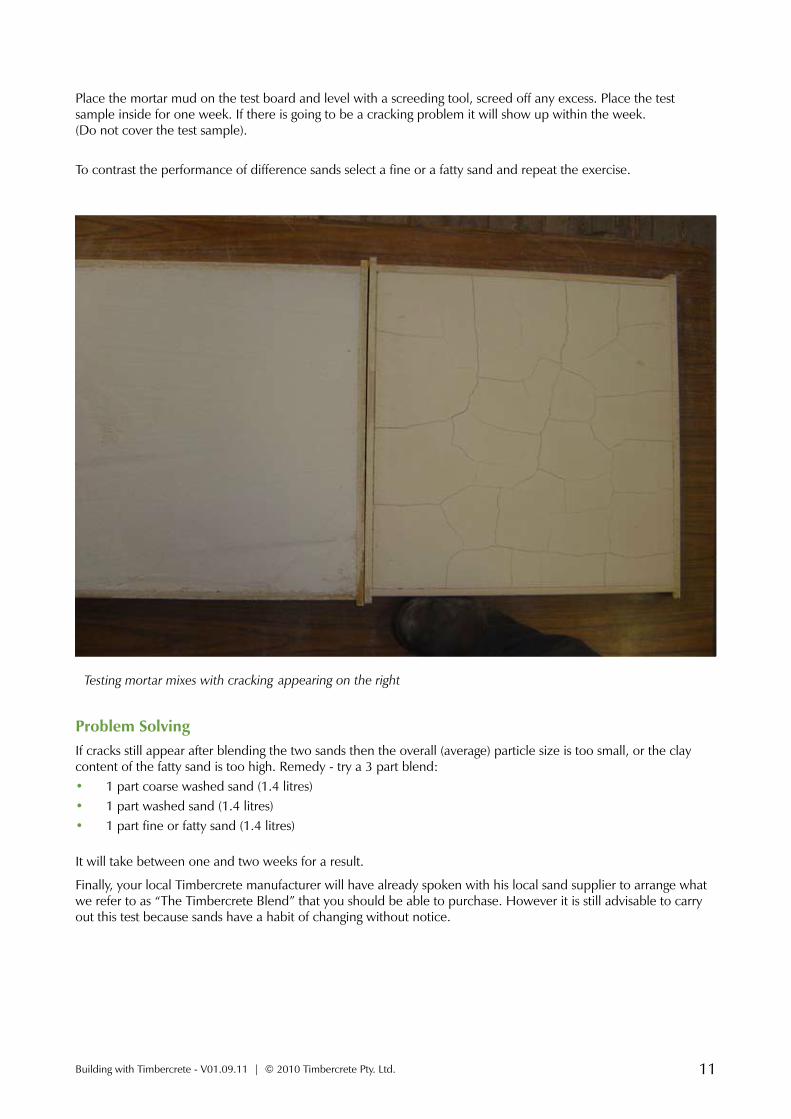
Place the mortar mud on the test board and level with a screeding tool, screed off any excess. Place the test sample inside for one week. If there is going to be a cracking problem it will show up within the week. (Do not cover the test sample).
To contrast the performance of difference sands select a fine or a fatty sand and repeat the exercise.
Problem SolvingIf cracks still appear after blending the two sands then the overall (average) particle size is too small, or the clay content of the fatty sand is too high. Remedy - try a 3 part blend:• 1 part coarse washed sand (1.4 litres)• 1 part washed sand (1.4 litres)• 1 part fine or fatty sand (1.4 litres)
It will take between one and two weeks for a result.
Finally, your local Timbercrete manufacturer will have already spoken with his local sand supplier to arrange what we refer to as “The Timbercrete Blend” that you should be able to purchase. However it is still advisable to carry out this test because sands have a habit of changing without notice.
Building with Timbercrete - V01.09.11 | © 2010 Timbercrete Pty. Ltd. 12
Types of JointsSeveral different visual effects can be achieved by varying the technique for “raking or ironing” joints (or a combination of both) after blocks have been laid.
• Flush Joint - only to be used if the wall is to be rendered or bagged.
• Struck Joint - a good alternative for external or internal walls, because it sheds water dust and dirt well.
• Raked Joint - looks great externally and makes the blocks appear more defined and rustic, but is does tend to collect more dust and dirt therefore it is not recommended internally.
Note -If using raked joints externally we recommend ALWAYS ironing the joints after raking. This will make the joint more water proof, heal over any separation cracks and smooth out the rough appearance. The mortar can be raked out of the joints between blocks to a depth of (say) 8mm, allowing the blocks to “stand out” as a feature. A standard Bricklayer’s raking tool can be used for this purpose.
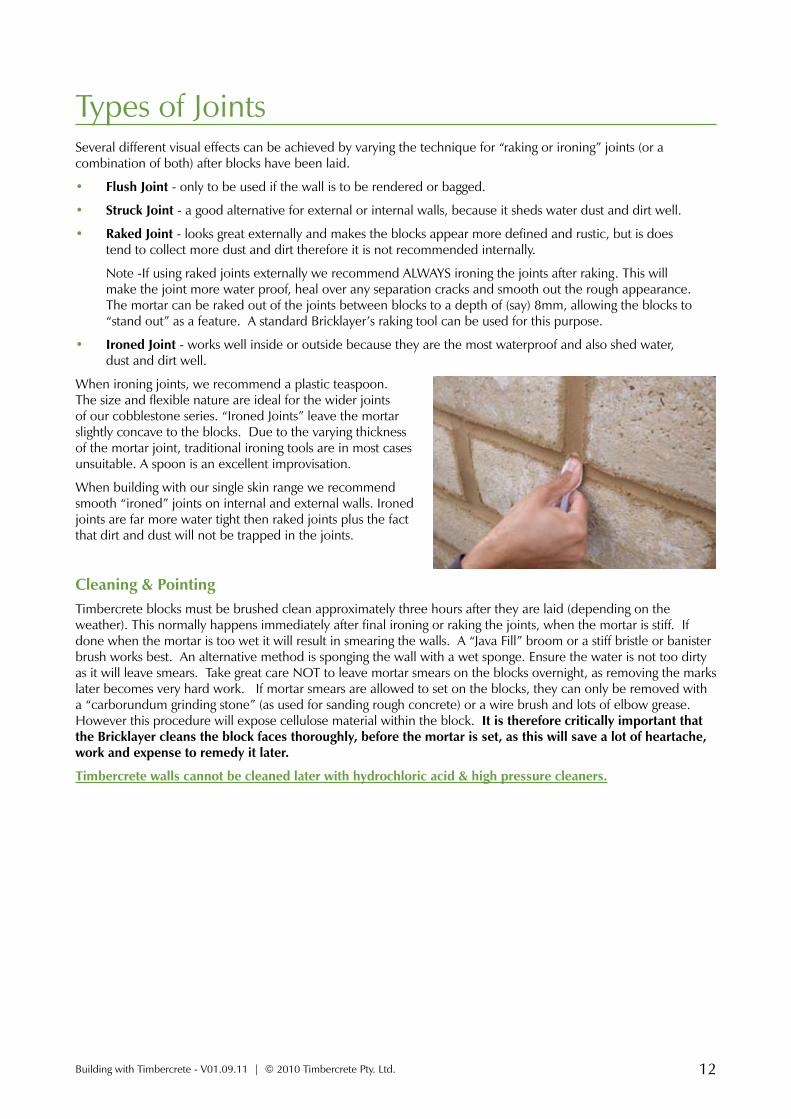
• Ironed Joint - works well inside or outside because they are the most waterproof and also shed water, dust and dirt well.
When ironing joints, we recommend a plastic teaspoon. The size and flexible nature are ideal for the wider joints of our cobblestone series. “Ironed Joints” leave the mortar slightly concave to the blocks. Due to the varying thickness of the mortar joint, traditional ironing tools are in most cases unsuitable. A spoon is an excellent improvisation.
When building with our single skin range we recommend smooth “ironed” joints on internal and external walls. Ironed joints are far more water tight then raked joints plus the fact that dirt and dust will not be trapped in the joints.
Cleaning & PointingTimbercrete blocks must be brushed clean approximately three hours after they are laid (depending on the weather). This normally happens immediately after final ironing or raking the joints, when the mortar is stiff. If done when the mortar is too wet it will result in smearing the walls. A “Java Fill” broom or a stiff bristle or banister brush works best. An alternative method is sponging the wall with a wet sponge. Ensure the water is not too dirty as it will leave smears. Take great care NOT to leave mortar smears on the blocks overnight, as removing the marks later becomes very hard work. If mortar smears are allowed to set on the blocks, they can only be removed with a “carborundum grinding stone” (as used for sanding rough concrete) or a wire brush and lots of elbow grease. However this procedure will expose cellulose material within the block. It is therefore critically important that the Bricklayer cleans the block faces thoroughly, before the mortar is set, as this will save a lot of heartache, work and expense to remedy it later.
Timbercrete walls cannot be cleaned later with hydrochloric acid & high pressure cleaners.

Building with Timbercrete - V01.09.11 | © 2010 Timbercrete Pty. Ltd. 13
Cutting, Splitting and Drilling TimbercreteOne of the advantages of choosing Timbercrete is its trade friendly attributes. Timbercrete can be cut and drilled just like timber; however you will need to use masonry blades and masonry drills.
To prevent excess dust use a standard watercooled masonry block saw. Alternatively Timbercrete blocks can easily be cut with a:
• masonry blade on an angle grinder (dusty but effective)
• handheld hebal saw
• reciprocating saw (with a masonry blade)
• jigsaw (with a masonry blade)
• or shaped and split with a chisel (splitting is not so easy because Timbercrete is not as fragile or brittle as standard concrete and clay masonry)
If a home has been designed around the dimensions of Timbercrete blocks, virtually no block cutting will be required. However, some cutting may be required for special features such as portholes or arches. (Check with your local Timbercrete Licensee for availability or pre-made arch blocks).
Timbercrete blocks cut and split and rarely run off line by using the following procedure:
1. First score around the entire surface with an angle grinder with a masonry blade, leaving a score approximately 10mm to 20mm deep.
2. Separate the scored areas by hitting with a lump hammer and bolster chisel. If there are any protruding pieces then the blade of a scutcham hammer will easily remove these.
Alternatively special “arch” & “key stone” blocks can be made to order. This will eliminate the need for cutting (see photo below).

Building with Timbercrete - V01.09.11 | © 2010 Timbercrete Pty. Ltd. 14
Nailing and Screwing TimbercreteOne of the unique features of Timbercrete is that it can be nailed and screwed directly into without the need for pre-drilling or wall plugs. The blocks feels just like pine timber, and nails and screws go in and come out with the similar amount of resistance.
Stain RemovalCalcium (Lime) and Efflorescence StainsIt is extremely rare that Timbercrete bricks and blocks suffer from any efflorescence, however if freshly laid walls receive a heavy rainstorm, occasionally a white powdery substance may appear on the surface, emanating from the fresh mortar joints running down the face of the blocks. This is calcium oxide (efflorescence) and can usually be brushed off. If staining is persistent, a liquid efflorescence remover can be brushed or sprayed on and then gently pressure washed off. Try this first on a small area of the affected wall.
Efflorescence Remover can be purchased from;
• your local hardware
• your local licensed Timbercrete manufacture, or
• Enviro Pacific “Efflorescence Remover” Helpline: 1800 04 1144
Hardwood StainsIf blocks get stained by leaching of tannins or vanadium from hardwood materials, apply Oxalic Acid followed by a light pressure wash (as per directions on the pack). If stains are particularly deep and the above fails to remove all the marks, then rub with a carborundum stone followed by a very light pressure wash.
Blocks and Bricks will be stained with leaching tannins during wet weather, if they are placed under gum trees, under hardwood pallets, under hardwood roof trusses, timbers rafter or floor joists. (As shown below).
Where hardwood roof timber has to be installed on top of Timbercrete walls, it is advisable to either seal the walls prior to the timber installation, or to lay sheets of plastic temporarily along the top of walls during construction.

Building with Timbercrete - V01.09.11 | © 2010 Timbercrete Pty. Ltd. 15
Curing Blocks & Moisture ContentAs soon as Timbercrete blocks arrive at your building site, they should be unwrapped (plastic removed) so as to allow free flow of air around each block. WARNING: If blocks are built into walls prior to the “USE AFTER” date as detailed on every pallet label, or not unwrapped from the plastic so as to continue drying, walls may develop cracks as block shrinkage takes place. If you are in a period or area of high rainfall, it would be wise to cover the top of each pallet with a sheet of corrugated iron or similar. The intention is to prevent the blocks from becoming soaked, but still allow free air flow to the sides of all pallets so that the curing process may continue uninterrupted. This is particularly important in wet or freeze/thaw conditions. (See photos below)
Wall MovementAccommodating Wall ShrinkageIt’s common knowledge that all concrete masonry products, including Timbercrete, are subject to shrinkage.
The reason for this is that all cement products are manufactured “wet”. As moisture is lost over time shrinkage occurs. Clay fired products such as bricks expand over time because they are manufactured and then fired. Coming out of the kiln they are completely dry. In time they take up moisture from rain and humidity, and expand. As a result walls made with clay fired bricks grow in size; that is, expand. This problem is addressed by the installation of expansion joints.
Because shrinkage in cement based products is three dimensional, provision needs to be made to accommodate these phenomena. Most movement will be seen on the horizontal plane (length) and some on the vertical (height) and a fraction on the width (depth). Walls tend to be longer than they are in height, and higher than they are wide, which means that shrinkage is most noticed in the horizontal, and then the vertical, planes.
Providing all Timbercrete blocks used in construction are completely cured (as indicated by the “Use After” date clearly indicated on every pallet of blocks), and providing the correct mortar mix and other procedures in accordance with this document are followed to the letter, there is no reason to anticipate wall movement other than that caused by potential movement of slab or foundations.
Confidence in wall stability is based on the following:
• The AS/NZS 4455.12 shrinkage tests and previous NATA Laboratory tests;
• In-house shrinkage monitoring;
• The use of hoop iron strapping to control shrinkage;
• The ductile nature of timber aggregate, when compared to stone aggregate.
However, according to the Australian Building Code (BCA), no masonry product can span more than six metres without an expansion or control joint. All masonry products, including Timbercrete, may be subject to movement, and therefore require “expansion” or “control” joints.

Building with Timbercrete - V01.09.11 | © 2010 Timbercrete Pty. Ltd. 16
Control JointsControl joints must be installed in every wall every 6 metres, or as per your Engineer’s specifications.
Windows and doors can be a handy and unobtrusive position and represent a natural joint location. For example, a control joint could be installed from the top of a door to the top of the wall, allowing the door space to form part of the control joint. The same principle applies for above and below windows. Remember, when using timber lintels, run the control joint to the outside edge of the lintel.
Control joints are installed as follows:
• Where ever a Control Joint is required, a break needs to occur in the wall. This is achieved by utilizing the natural break at the perpendicular end of one full Block, and then cutting the block above it in half so that the break continues up the wall. The gap will tend to open rather than close because typically the wall will not expand; only contract.
• Blocks are laid in the normal manner, except that Masonry Expansion Ties (M.E.T.s) MUST be installed to rejoin all the blocks that have been cut in half. This retains the lateral stability of the wall.
• The M.E.T.s (type 3-3) should be screwed into position using 50mm Tec screws. Timbercrete can be easily screwed into (just like timber), without the need to pre-drill. Mortar is then laid across the top of the M.E.T. as the next course of blocks is laid. Ensure the hoop iron strap is secured to the M.E.T. with a Tec screw.
• Fill the breaks with colour matched Flexible Joint Filler to hide them. To save using large amounts of Flexible Joint Filler, a compressible 10mm diameter foam strip can be jammed into wide control joint cavities prior to adding the flexible joint filler.
• MET contact details are: 21 Garema Circuit, Kingsgrove, NSW. Telephone (02) 9740 4444.
(See over page for the diagram depicting installation)

Building with Timbercrete - V01.09.11 | © 2010 Timbercrete Pty. Ltd. 17
Every good Builder and Block Layer will place a vertical control joint strategically placed above a window or door in the wall to accommodate shrinking on the horizontal plane. Control joints need to be built into the wall at approx 6m intervals, or closer where there are several windows or doors closely spaced.
This is commonly achieved by cutting through blocks on every second course and rejoining using M.E.T. expansion ties (Type 3-3). Squirt a colour matching flexible control joint filler into the joint such as Sikafex or Mortar Flex.
Ensure your Engineer is satisfied with the above information relating to Control Joints, and incorporates the appropriate standards in your particular plans and specifications.
Vertical ShrinkageDue to the fact that vertical shrinkage often goes unnoticed (due to the relatively short heights of most walls) allowance for shrinkage is often overlooked. Allowance for vertical shrinkage can be accommodated as follows:
• Allow a gap of at least 7mm between the top of all windows and doors and the bottom of the corresponding lintels.
Note - Do not under any circumstances place the lintel on top of the window or the door without allowing for this gap.
Failure to follow the above procedure may result in the walls “shrinking down” onto the window and door frames, which causes them to become load bearing. (See diagram below)
Leave a 5 to 7mm gap with builders foam sandwich between lintel & top of sill.
Building with Timbercrete - V01.09.11 | © 2010 Timbercrete Pty. Ltd. 18
Wall ReinforcementThe system described below must be used with all types of single skin Timbercrete blocks. A lighter variation of this system can also be used in our veneer range instead of brick mesh, as it offers a superior structural outcome that will manifest itself in three areas.
• It reduces the accumulative effect of shrinkage (creep) which can be one of the main causes of cracking in all types of brick and block walls
• It increases bracing strength (racking strength)
• It increases lateral strength (face loading)
Longer, un-interrupted walls benefit most from this strapping, whereas shorter runs benefit little. Therefore strapping is unnecessary for any length of wall that is less than 1.8m, (unless your engineer specifies to the contrary).
When building with our single skin (single leaf) blocks use hoop iron strapping (30mm wide x .8mm thick). This is the same strapping commonly used to brace roofs and timber frames, and is to be used instead of traditional brickies mesh. The hoop iron strapping should be screwed directly into the Timbercrete blocks on every 2nd or 3rd course. A 50mm long roofing Tec screw should be screwed through the SMALL hole at each end of the block (two per block) to affix the strapping. A continuous piece of strapping is to be used between Control Joints. It is particularly important to use a continuous strip of strapping above all doors and below all windows (except those windows and doors extending all the way to the floor, and/or ceiling).
When building with our veneer series bricks, the strapping is not necessary unless the wall needs to be horizontally reinforced. If this is the case, use “hoop iron strapping” (25mm wide x .6mm thick). It is to be used instead of traditional brickies mesh. The hoop iron strapping can be used in Timbercrete veneer bricks at courses corresponding to a 350mm to 500mm vertical increment.
When laying a thinner mortar bed (approximately 10mm thick), use a 50mm long stainless steel (or galvanised) decking screw (countersunk square drive). Use one screw through the strapping hole into each brick. A continuous piece of strapping is to be used between Control Joints. It is particularly important to use a continuous strip of strapping directly above all doors and below all windows. The addition of strapping here in these problem areas will minimise the chance of cracking (with an exception to those windows and doors extending all the way to the floor, and/or ceiling).
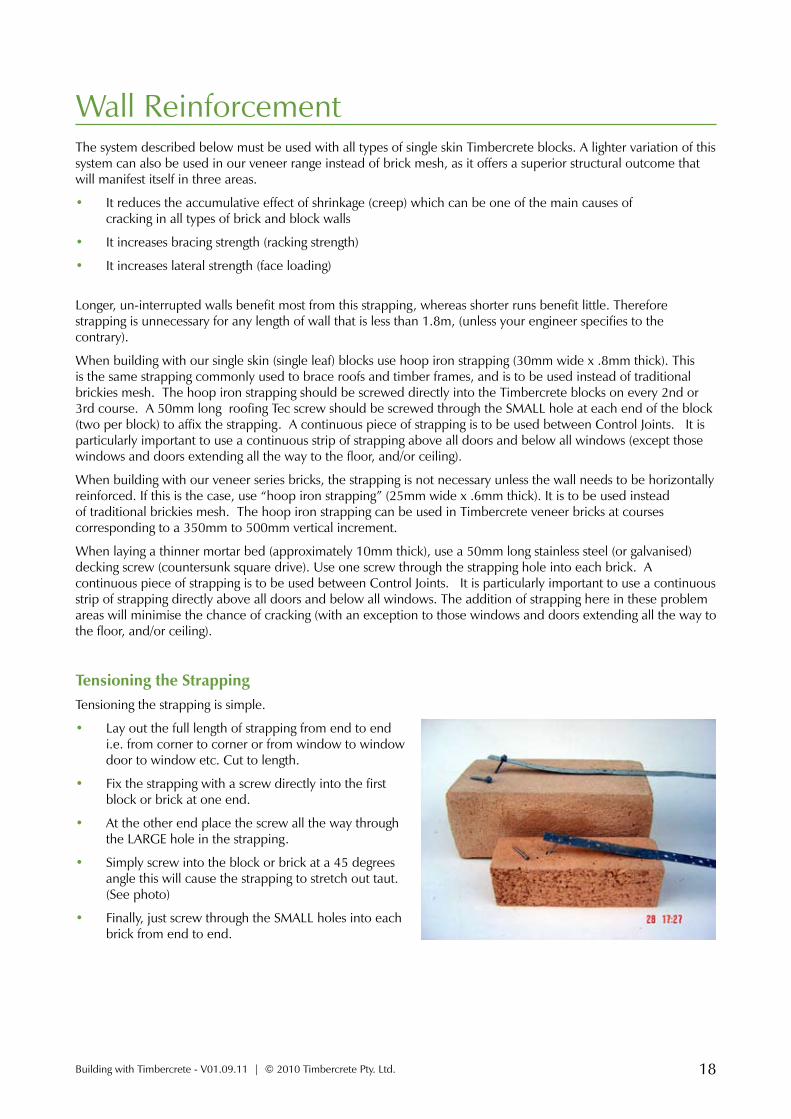
Tensioning the Strapping
Tensioning the strapping is simple.
• Lay out the full length of strapping from end to end i.e. from corner to corner or from window to window door to window etc. Cut to length.
• Fix the strapping with a screw directly into the first block or brick at one end.
• At the other end place the screw all the way through the LARGE hole in the strapping.
• Simply screw into the block or brick at a 45 degrees angle this will cause the strapping to stretch out taut. (See photo)
• Finally, just screw through the SMALL holes into each brick from end to end.

Building with Timbercrete - V01.09.11 | © 2010 Timbercrete Pty. Ltd. 19
Intersecting Wall Junction (Block/Brick Walls)Where two walls intersect; for example where an internal wall meets an external wall, hoop iron strapping needs to be installed. This is the method used to tie the two walls together.
If the two walls are being laid at the same time, then the hoop iron should overlap from one wall into the other. This means that the hoop iron in the two walls will come to meet at a “T” intersection at the corner of the walls, and a Tec screw should be placed to ensure that both strips of hoop iron are secured to one another. (See diagram over page) This needs to be done on every second course.
If the two walls are NOT being laid at the same time, ensure that a length of hoop iron at least 500mm long, is secured with a Tec screw to one of the walls at the point of intersection (in the mortar joint), so that the loose length can be incorporated (and affixed) into the other wall when constructed. This needs to be done on every second course.
Intersection Wall Junction (Gyprock Walls)When using Gyprock sheeting with Timbercrete, the following 2-step technique is effective:
• Cut a groove into the block wall where the gyprock needs to abut. The groove needs to be about 10mm deep and 10mm wide. Remember to paint along the outside edge of the gyprock this will eliminate the need to have to carefully cut in with painting later.
• Run a small timber cornice or beading, and then grout some Timbercrete Final Filler into the nooks and crannies. This product is excellent and ideal as a gap filler.
Wetting Down Pre-Layed Blocks WARNING! The wetting down of blocks is something that Timbercrete STRONGLY advises NOT to do for the following reasons:
• IfblocksaremoistorwetthentheywillhaveINFERIORbondstrength
• Thewallmayexhibitproblemswithwateringressoncethehouseiscomplete
• Smallseparationcracksoftenappearbetweenblocksandmortariftheblocksarepre-moistened
If weather conditions are hot and windy then the wall may be moistened AFTER the blocks are laid, NOT before. If the mortar is setting too fast then ask your Timbercrete supplier for one of 2 mortar additives - “Dynex” or “Pozz400 RI”. We do not approve any other mortar additive.

Building with Timbercrete - V01.09.11 | © 2010 Timbercrete Pty. Ltd. 20
Installing Windows & DoorsWith our single skin series our recommendation is to install windows and door jams as the blocks are being laid. This is the best way to insure a perfect fit. If using aluminium windows then the fin will need to be left ON.
If it is not possible to install windows and door jams as the blocks are being laid, then build and install (as you lay) timber frames that are the same size as your planned windows and doors. However, if using aluminium windows then the fin will need to be removed and an alternative fixing method will need to be implemented.
Installing Sill Blocks & WindowsSpecial “grooved vertical service blocks”, “grooved solid blocks” and “grooved half blocks” are straight sided to facilitate abutting straight surfaces such as window frames. They also feature a small groove to accommodate the window fin (see Block Range Sheet).
Special “large bevel sill blocks” and “bull nose sill blocks” are available for positioning under windows as sills. To ensure a waterproof seal on the base of windows, a groove can be cut on the top of the sill blocks to accommodate the window fin. This groove needs to be filled with fresh silicon sealer a minute or two before the window with its fin is inserted.
Large custom made single piece window sills are available upon request. Talk to your helpful Timbercrete manufacturer.
Large Bevelled Sill Block
Bullnose Sill Block
Building with Timbercrete - V01.09.11 | © 2010 Timbercrete Pty. Ltd. 21
Installing Skirting Boards and Cornices (Fix Out)
When considering the Skirting Boards and Cornices remember to run a course of straight sided blocks behind the skirting or cornice. If you don’t like the look of a flatter or different shaped course of blocks, simply use the standard blocks and apply “Timbercrete Final Filler” to fill in the gaps. If you run the string line on the inside of the blocks rather than the outside, this will minimize the size of the gaps needing to be filled.
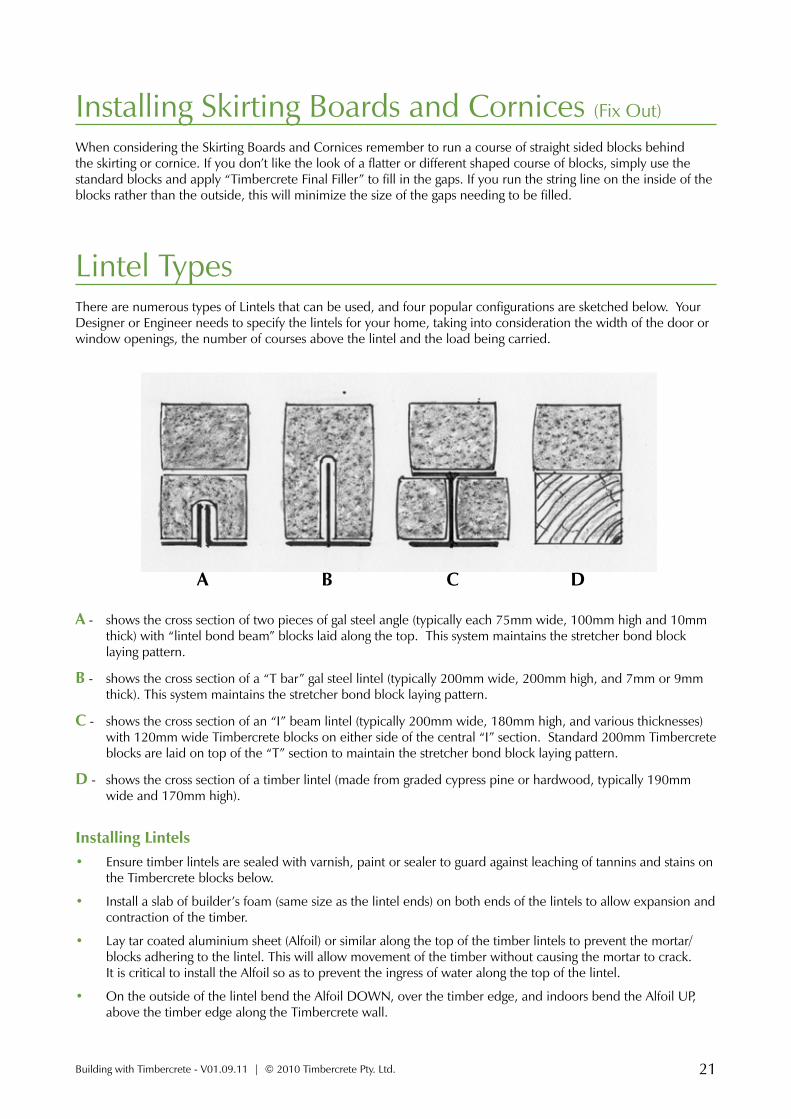
Lintel TypesThere are numerous types of Lintels that can be used, and four popular configurations are sketched below. Your Designer or Engineer needs to specify the lintels for your home, taking into consideration the width of the door or window openings, the number of courses above the lintel and the load being carried.
A - shows the cross section of two pieces of gal steel angle (typically each 75mm wide, 100mm high and 10mm thick) with “lintel bond beam” blocks laid along the top. This system maintains the stretcher bond block laying pattern.
B - shows the cross section of a “T bar” gal steel lintel (typically 200mm wide, 200mm high, and 7mm or 9mm thick). This system maintains the stretcher bond block laying pattern.
C - shows the cross section of an “I” beam lintel (typically 200mm wide, 180mm high, and various thicknesses) with 120mm wide Timbercrete blocks on either side of the central “I” section. Standard 200mm Timbercrete blocks are laid on top of the “T” section to maintain the stretcher bond block laying pattern.
D - shows the cross section of a timber lintel (made from graded cypress pine or hardwood, typically 190mm wide and 170mm high).
Installing Lintels• Ensure timber lintels are sealed with varnish, paint or sealer to guard against leaching of tannins and stains on
the Timbercrete blocks below.
• Install a slab of builder’s foam (same size as the lintel ends) on both ends of the lintels to allow expansion and contraction of the timber.
• Lay tar coated aluminium sheet (Alfoil) or similar along the top of the timber lintels to prevent the mortar/blocks adhering to the lintel. This will allow movement of the timber without causing the mortar to crack. It is critical to install the Alfoil so as to prevent the ingress of water along the top of the lintel.
• On the outside of the lintel bend the Alfoil DOWN, over the timber edge, and indoors bend the Alfoil UP, above the timber edge along the Timbercrete wall.
A B C D
Building with Timbercrete - V01.09.11 | © 2010 Timbercrete Pty. Ltd. 22
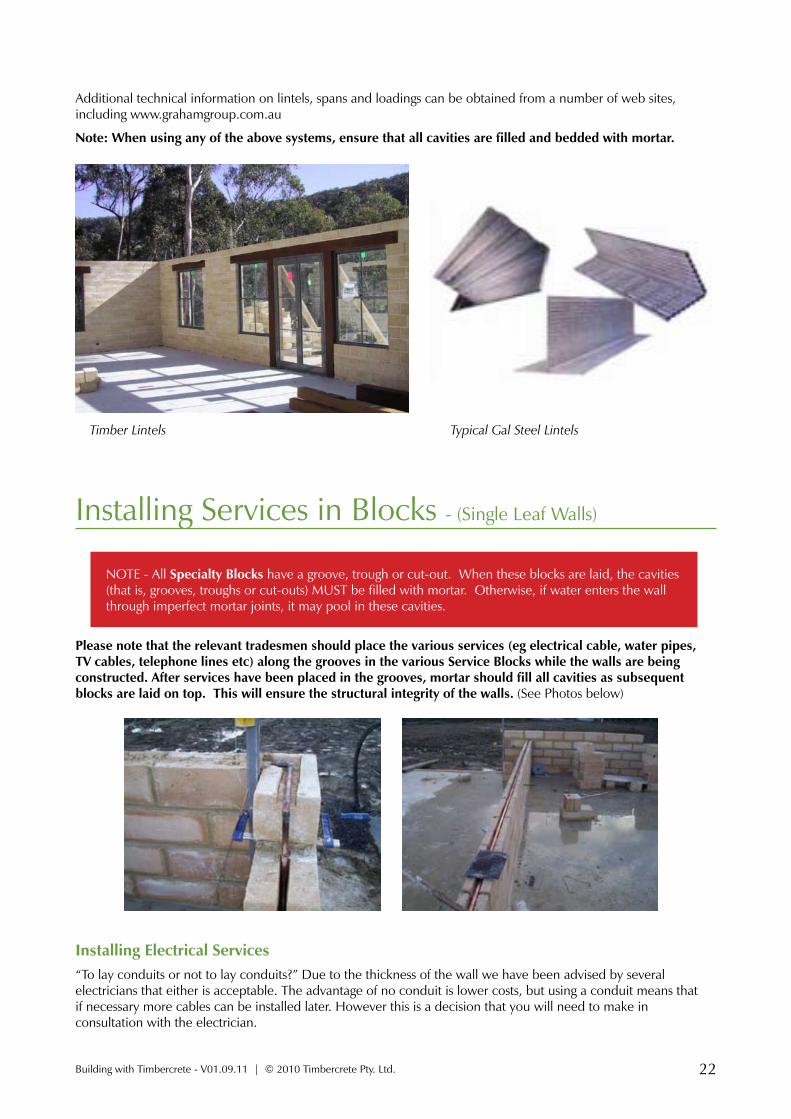
Additional technical information on lintels, spans and loadings can be obtained from a number of web sites, including www.grahamgroup.com.au
Note: When using any of the above systems, ensure that all cavities are filled and bedded with mortar.
Timber Lintels Typical Gal Steel Lintels
Installing Services in Blocks - (Single Leaf Walls)
NOTE - All Specialty Blocks have a groove, trough or cut-out. When these blocks are laid, the cavities (that is, grooves, troughs or cut-outs) MUST be filled with mortar. Otherwise, if water enters the wall through imperfect mortar joints, it may pool in these cavities.
Please note that the relevant tradesmen should place the various services (eg electrical cable, water pipes, TV cables, telephone lines etc) along the grooves in the various Service Blocks while the walls are being constructed. After services have been placed in the grooves, mortar should fill all cavities as subsequent blocks are laid on top. This will ensure the structural integrity of the walls. (See Photos below)
Installing Electrical Services“To lay conduits or not to lay conduits?” Due to the thickness of the wall we have been advised by several electricians that either is acceptable. The advantage of no conduit is lower costs, but using a conduit means that if necessary more cables can be installed later. However this is a decision that you will need to make in consultation with the electrician.
Building with Timbercrete - V01.09.11 | © 2010 Timbercrete Pty. Ltd. 23
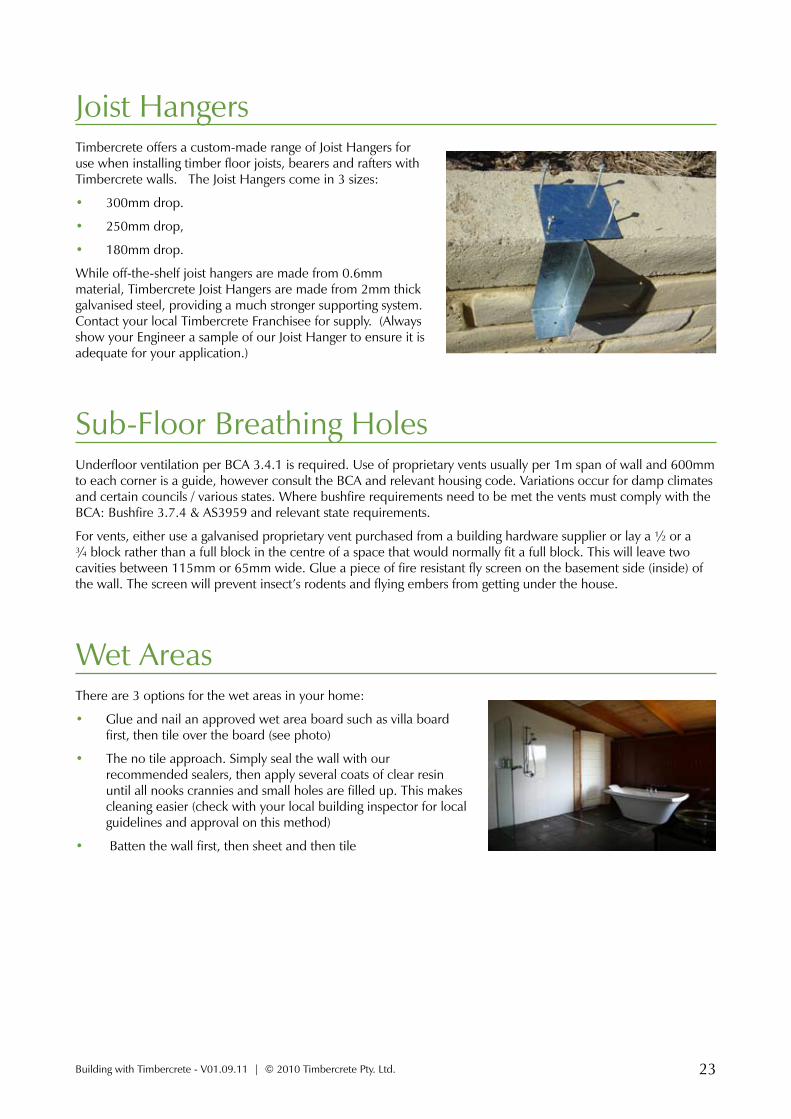
Joist HangersTimbercrete offers a custom-made range of Joist Hangers for use when installing timber floor joists, bearers and rafters with Timbercrete walls. The Joist Hangers come in 3 sizes:
• 300mm drop.
• 250mm drop,
• 180mm drop.
While off-the-shelf joist hangers are made from 0.6mm material, Timbercrete Joist Hangers are made from 2mm thick galvanised steel, providing a much stronger supporting system. Contact your local Timbercrete Franchisee for supply. (Always show your Engineer a sample of our Joist Hanger to ensure it is adequate for your application.)
Sub-Floor Breathing HolesUnderfloor ventilation per BCA 3.4.1 is required. Use of proprietary vents usually per 1m span of wall and 600mm to each corner is a guide, however consult the BCA and relevant housing code. Variations occur for damp climates and certain councils / various states. Where bushfire requirements need to be met the vents must comply with the BCA: Bushfire 3.7.4 & AS3959 and relevant state requirements.
For vents, either use a galvanised proprietary vent purchased from a building hardware supplier or lay a ½ or a ¾ block rather than a full block in the centre of a space that would normally fit a full block. This will leave two cavities between 115mm or 65mm wide. Glue a piece of fire resistant fly screen on the basement side (inside) of the wall. The screen will prevent insect’s rodents and flying embers from getting under the house.
Wet AreasThere are 3 options for the wet areas in your home:
• Glue and nail an approved wet area board such as villa board first, then tile over the board (see photo)
• The no tile approach. Simply seal the wall with our recommended sealers, then apply several coats of clear resin until all nooks crannies and small holes are filled up. This makes cleaning easier (check with your local building inspector for local guidelines and approval on this method)
• Batten the wall first, then sheet and then tile

Building with Timbercrete - V01.09.11 | © 2010 Timbercrete Pty. Ltd. 24
Architectural Features - Build Something Beautiful
Bullseye Window
Curved Walls
Split Faced Corner Block Arched Window
Keyhole Entry Way

Building with Timbercrete - V01.09.11 | © 2010 Timbercrete Pty. Ltd. 25
Wall Treatments
Untouched - showing their natural beauty
Lightly Bagged
Combination, showing a Gyprocked wall with a Natural wall
Painted
Heavily Bagged

Building with Timbercrete - V01.09.11 | © 2010 Timbercrete Pty. Ltd. 26
Sealing Timbercrete Single Skin WallsSingle Skin or Single Leaf Timbercrete walls use three lines of defence against water ingress :
1. Despite the fact that under normal wet or dry conditions water does not penetrate through Timbercrete blocks, standard mortar is significantly more porous than Timbercrete hence the need for a waterproofing addmixture in the mortar.
2. The second line of defence is to generously apply an external walls sealer. Timbercrete recommends Grimes & Sons Water Repellent Sealer. We recommend that an external sealer be applied after the walls are clean and dry.
3. The third line of defence is generous eves or better still wraparound verandas.
External SealersFor the past 5 years, Timbercrete has researched and tested many different brands of sealers, with a view to being confident that you have the best possible outcome, at the least possible expense. As a result we can offer a range of tested sealers to suit your needs and budget. These sealers range in performance, cost and appearance.
For sealing external walls, they are:
• Dry-Treat 40 SK This is a dry (non glossy) look sealer. Our tests to date demonstrate that when it comes to a totally water proof dry look sealer, there is none better. However its exceptional performance comes at a higher price. For application read the instructions supplied on the container.
• Grimes & Sons Silicon Water Repellent 1L covers approximately 10m² depending on the porosity of the surface. One coat should be sufficient; however a second coat can be applied in problem areas if needed. Comparison tests in the Timbercrete laboratory sampling over a dozen sealers have shown that the Grimes & Sons Silicon Water Repellent sealer has proven to be one of the most effective and value for money waterproof barriers on the market.
Internal Sealers• Shalex Glaze This sealer is a semi gloss membrane type sealer. It is the best membrane type sealer in its class. While it may not be as water proof for external applications as the above mentioned sealers, it has inherited some other great qualities for sealing internal walls.
This coating will render the wall washable, stain and dust resistant, and also hold any loose particles in the mortar.
The down side of membrane type sealers and the reason why we no longer use them on an external application is; that during very extreme weather conditions, they sometimes allow some water penetration. Once there has been some water penetration it takes a lot longer for the wall to dry out, because the moisture can get trapped inside the wall. This is the main problem with membrane sealers.
On the other hand the dry look non-membrane type sealers such as Grimes and Sons Water Repellent allow the wall to breathe better, so if any water does penetrate into the wall during extreme conditions, it will be able to escape and dry out much faster.
Applying Shalex on Internal Walls
For Shalex sealer apply only one coat. This Coat should be applied diluted 50/50 with water.
Note - The recommended method of application is to “flood coat” the walls, starting at the top and working down. This involves using a high volume spray (such as typical garden variety 15 litre back pack pump spray). The sealer should be applied so that it runs down the walls.
WARNING: to prevent over spray, mask and cover all windows and doors before spraying.
* Sealer Test results are available upon request. Ask your local Timbercrete supplier. **Timbercrete HQ testing facility is constantly Testing and re examining products and sealers, to ensure the highest quality in performance and installation for the best possible outcome.

Building with Timbercrete - V01.09.11 | © 2010 Timbercrete Pty. Ltd. 27
Building Code Requirements for Weatherproofing All Single Skin WallsTimbercrete single skin masonry walls are typically treated in accordance with the BCA section 3.3.4.12 (C).
“Acceptable external waterproof finishes are - …(C) “clear water repellent” provided the wall is protected by a roof overhang.”
Generous Eves Recommended for Single Skin WallsFrom Timbercrete’s perspective, an acceptable overhang is at least 450mm on a single-storey building (walls of less than 3 m high). However, if walls are greater than 3 m high we recommend that the overhanging eaves extend to 900mm.
Ideally single skin masonry walls should have a verandah surrounding the entire structure.
We strongly recommend our approved waterproof admixture in the mortar joint called “Timbercrete Mortar Shield” in all single leaf or single skin structures.
Water TightnessTimbercrete product is inherently more waterproof (has a lower absorption rate) than other masonry products made from concrete. This is due to the fact that unlike other concrete masonry products Timbercrete has a closed structure. This closed structure is a result of removing air pockets during the manufacturing process, as well as introducing micro-fines to the mix.
Approximately 10 years of history, with thousands of houses being constructed in Australia as well as the USA and New Zealand, has clearly demonstrated that to date, water has never penetrated through a single skin 200 mm wide solid Timbercrete block.
The same cannot be said of typical bricklaying mortar, and it is for this reason that we have introduced a threefold waterproof process:
• The introduction of a waterproofing addmixture to the mortar
• Adequate overhangs on all external walls (wraparound verandas are our recommendation)
• A high-quality water repellent sealer that has been tested in the Timbercrete laboratory. This waterproof sealer covers all blocks and mortar joints.

Building with Timbercrete - V01.09.11 | © 2010 Timbercrete Pty. Ltd. 28
Termite PreventionThe termite resistance of Timbercrete is scientifically unknown. However 10 years of anecdotal evidence has demonstrated that to this day no termite has ever penetrated a Timbercrete block. Samples have been placed in, on and near various types of termite nests. Timbercrete has even been used for Retaining walls and pavers for many years without any sign of Termite ingress.
Details of Australian practice are set out in AS 3660.1.
Various commercially available termite barriers are included on the following web sites.
• www.electronicblueprint.com.au
• www.electronicblueprint.com.au/suppliers/TERMseal.html
• www.electronicblueprint.com.au/suppliers/ensystex.html
Termites generally enter the walls close to the footings and access the timber superstructure via paths hidden from view, e.g. at control joints, tie-down anchorages and door jabs. The aim of most termite barriers is to force the termites to the surface of the structure where they are visible and can be easily eradicated. Some termite barriers also include chemicals that deter the termites from passing.
Other systems, involving chemical dosing and graded stone barriers, have not been reported herein, because of possible problems associated with their application and maintenance.
The most effective solution is to place a termite barrier in the masonry, at least 75 mm above finished ground. Such a barrier would need to extend from the outside of the masonry (and up the inside to beyond the level of the floor slab, in the case of a drop-edge beam). Such a barrier need only be physical, but could also include chemical impregnation if this is available. Options are:
• Sheet metal barrier, similar to a metal flashing.
• Stainless steel mesh barrier, joined and fixed by resistant adhesive Proprietary system - Termimesh
• Non-toxic waterproof compound impregnated into a geotextile Proprietary system - Term Seal
• Internal non-woven fibre blanket impregnated with deltametherin crystals (low toxicity to warm blooded animals) which both strongly repels and (where necessary) kills termites, bonded within casing layers, top plastic layer (200 microns), which doubles as a moisture vapour layer, and bottom plastic layer (50 microns) prevents termicide leaching into soil. Proprietary system - Trithor Termite Protection
Manufacturers Details
Phone: (02) 6583 6699 Fax: (02) 6583 5699 Email: [email protected] Mail: P.O.Box 5649, Port Macquarie, NSW 2444
Term Seal and dampcourse coating being applied prior to laying Timbercrete bricks
Building with Timbercrete - V01.09.11 | © 2010 Timbercrete Pty. Ltd. 29
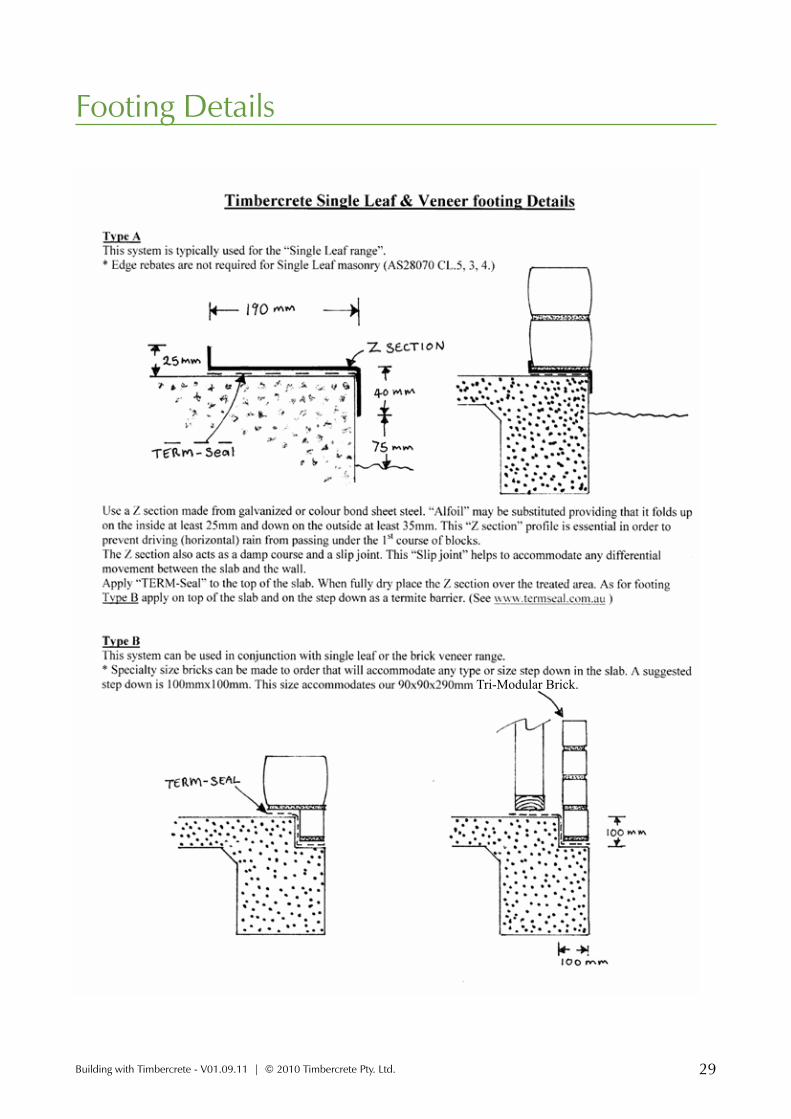
Footing Details
Tri-Modular Brick.

Building with Timbercrete - V01.09.11 | © 2010 Timbercrete Pty. Ltd. 30
Top Plate Details - Single Leaf

Building with Timbercrete - V01.09.11 | © 2010 Timbercrete Pty. Ltd. 31
Top Plate Details - Double Brick
Tie Down Details for Double Brick Homes(Diagram above supplied by ABCB, from BCA Volume 2: section 3.3.3.3)
In addition to the relevant BCA guidelines, we at Timbercrete recommend that when placing the tie down strap in the mortar course, it is screwed to the Timbercrete brick using a 50mm stainless steel decking screw (square head). This recommendation is made because you will provide a superior anchor point for the strapping. It is not possible to affix tie down straps to normal clay or concrete brickwork in this fashion.
Note - For all structural details as to the length or the strap refer to your Structural Engineer.

Building with Timbercrete - V01.09.11 | © 2010 Timbercrete Pty. Ltd. 32
Finishing TouchesTimbercrete is constantly searching and researching ways to improve product installation with a view to ensure our customers achieve the best possible outcome.
As a result of this commitment we have made available a product we call: “Timbercrete Final Filler”. This product that can be colour matched to brick, block or mortar and is a permanent non shrinking water proof filler that has a sandy texture and sets hard like the mortar or the bricks. Timbercrete final filler is non-flexible.
Other more flexible off-the-shelf caulking compounds such as “Mortar Flex” can be used with Timbercrete as per standard practices for brick and masonry walls.
Uses for flexible and/or non-flexible gap filler:
• to finish gaps around doors and windows (use a flexible or a non-flexible gap filler).
• in control joints or expansion joints use (Sikaflex or Mortar Flex flexible gap filler).
• to fill any large gaps or holes in damaged bricks or blocks (use the non-flexible gap filler, Timbercrete Final Filler).
• to fill any tiny shrinkage (micro) cracks in the mortar (use the non-flexible gap filler, Timbercrete Final Filler).
To fill micro cracks caused by high shrinkage in the mortar, simply rub on Timbercrete Final Filler with a sponge and wipe off with a clean wet sponge, as though you were grouting tiles.
Note: Always test first. Then wait until the product dries to ensure that you are happy with the colour match before proceeding to touch up your wall.
The top cracks in the photo are the result of using an incorrect non-flexible filler in a control joint. Control joints and expansion joints need to expand and contract to accommodate wall movement. The bottom section of the wall has been applied with the flexible Timbercrete Final Filler. All gaps and cracks are totally filled.

Building with Timbercrete - V01.09.11 | © 2010 Timbercrete Pty. Ltd. 33
Site Audit on Timbercrete installationNow that you have decided to build a Timbercrete home, we want to provide you with the QUALITY you deserve!
A top quality home requires not only top quality products, but also top quality installation. While other brick suppliers sell you their products then say good bye, we don’t.
We provide documentation for an ON SITE AUDIT (see appendix 1) which is aimed at detecting any deficiencies in installation at the early stages of construction. The Audit Check List should be given, carried out and signed by the Owner, the Builder and the Bricklayer. The Audit is designed to identify and eliminate problems that may occur during the construction.
If your audit is showing problems please contact your local Timbercrete manufacturer for advise or assistance with the audit.
It should be noted however Timbercrete bears no responsibility for the quality of construction before, during or after the Audit.
A Quality Product + a Quality Installtion + Outstanding Customer Service= A Quality Home
Thank You for Choosing Timbercrete...If you are unclear about any of the teaching in this manual, please contact your nearest Timbercrete representative. We are dedicated to providing you with support and service when needed.
www.timbercrete.com.au

Building with Timbercrete - V01.09.11 | © 2010 Timbercrete Pty. Ltd. 34
On-Site Audit ChecklistThis audit checklist is intended to highlight building practices that do not conform to the Building with Timbercrete manual. Any items bearing a “NO” tick require immediate and urgent attention and rectification.
(Tick the Appropriate Box)
YES / NO
1. The builder has a copy of the Building with Timbercrete manual.
2. The bricklayer has a copy of the Building with Timbercrete manual.
3. All pallets have been unwrapped and space to maximise drying.
4. Blocks being used have passed the “use after date” (as per the pallet label).
5. All the directions on the pallet label are being followed.
6. The bricklayer has completed a mortar test on the sand (mortar test board sighted).
7. Cracks have not appeared in the mortar on the mortar test board.
8. The sand mix and particle size are as per the teaching in the BWTC manual.
9. There is no unapproved mortar additive being used, or on the building site.
10. The bricklayer is batching the mortar into buckets first.
11. The sand and cement and lime volumes and portions is correct.
12. A full bed of mortar is applied to all Timbercrete brick and block surfaces.
13. All service block cavities are filled with mortar or concrete grout.
14. A damp course barrier is used between the slab and the first course of blocks (as per BWTC).
15. Bracing strap is being installed to single skin blocks. (As per BWTC).
16. Type and size of the bracing strap is as per the BWTC manual.
17. Control joints are installed above all articulation joints in the slab.
18. Control joints are being installed at the appropriate intervals.
19. A 5-7 mm gap has been left between the top of windows and doors and the bottom of lintels or, the building has not reached this stage but the matter has been discussed with the bricklayer.
APPENDIX 1 - On-Site Audit Checklist
The on-ste audit was conducted, and all agree with the results.
Bricklayer
Builder
Owner
Timbercrete
Building Site Address
Extra Comments
(NAME)
(NAME)
(NAME)
(NAME)
(SIGNATURE)
(SIGNATURE)
(SIGNATURE)
(SIGNATURE)
(DATE)
(DATE)
(DATE)
(DATE)

Building with Timbercrete - V01.09.11 | © 2010 Timbercrete Pty. Ltd. 35
Notes
APPENDIX 2 - Notes