Embed Size (px)
DESCRIPTION
http://www.marygrove.edu/images/docs/resources/blackboard9/mastering_the_grade_center.pdf
Citation preview

Extend learning online
Content Delivery Release 1.0 © 2008 Blackboard Inc.

© 2008 Blackboard Inc. Page 2 Mastering the Grade Center
© 2008 Blackboard Inc. All rights reserved. The content of this manual may not be reproduced or distributed without the express written consent of Blackboard Inc. Users acknowledge that the manual, and all copyright and other intellectual and proprietary rights therein, are and at all times shall remain the valuable property of Blackboard and its licensors, or their respective successors or assignees. Users agree to respect and not to alter, remove, or conceal any copyright, trademark, trade name, or other proprietary marking that may appear in the manual. Blackboard, the Blackboard logo, Blackboard Learn, and Content Delivery are either registered trademarks or trademarks of Blackboard Inc. in the United States and/or other countries.

© 2008 Blackboard Inc. Page 3 Mastering the Grade Center
TABLE OF CONTENTS
Workshop Overview .................................................................................................. 5
ROADMAP ............................................................................................................. 6
Student Experience ................................................................................................... 7
Accessing My Grades ........................................................................................... 8
Viewing Grades ..................................................................................................... 9
Viewing Feedback .............................................................................................. 11
Exploring the Grade Center.................................................................................... 12
The Grade Center Interface ............................................................................... 13
Grade Center Accessibility ................................................................................. 17
Hands-on Activity ................................................................................................ 18
Hiding Rows and Columns................................................................................... 19
Showing Rows ...................................................................................................... 21
Sorting Rows and Columns .................................................................................. 22
Organizing the Grade Center ............................................................................. 24
Understanding Column Types ............................................................................. 26
Understanding Categories .................................................................................. 28
Hands-on Activity ................................................................................................ 29
Working with Columns ............................................................................................. 30
Creating Grade Columns .................................................................................... 31
Creating Calculated Columns ............................................................................ 34
Default Calculated Columns .............................................................................. 37
Ask Dr. C .............................................................................................................. 38
Hands-on Activity ................................................................................................ 39
Customizing the Letter Grade Schema .............................................................. 40
Creating Categories............................................................................................ 42
Changing Column Categories............................................................................ 44
Hands-on Activity ................................................................................................ 45
Working with Grades ............................................................................................... 46

© 2008 Blackboard Inc. Page 4 Mastering the Grade Center
Grading an Assignment ...................................................................................... 47
Viewing Grade Details ........................................................................................ 51
Hands-on Activity ................................................................................................ 52
Viewing and Grading Tests ................................................................................. 53
Clearing Test Attempts ........................................................................................ 56
Overriding Grades ............................................................................................... 58
Exempting a Grade ............................................................................................. 61
Hands-on Activity ................................................................................................ 62
Creating Smart Views .......................................................................................... 63
Hands-on Activity ................................................................................................ 66
Workshop Wrap Up ................................................................................................. 67
Spotlight on YOUR Course ................................................................................... 68
Resources ............................................................................................................ 70

workshop overview
© 2008 Blackboard Inc. Page 5 Mastering the Grade Center
Workshop Overview The Blackboard Learn™ Grade Center is more than just a way to record students’ grades; it is a dynamic and interactive tool. The Grade Center can record data, monitor student progress, communicate information to students, parents, administrators, and other stakeholders. Use this valuable tool to help understand student progress and make informed decisions on how to improve educational performance. This workshop provides a comprehensive, hands-on introduction to the Grade Center tool. You will first experience the student perspective by exploring the My Grades tool and becoming familiar with how grades will appear to your students. Then, turning to the instructor perspective, you will learn how to navigate the Grade Center and customize it to suit your needs. Next, you will learn how to create columns to manage and calculate grades. Finally, you will learn how to enter and manage grades, including grading test and assignment submissions.

© 2008 Blackboard Inc. Page 6 Mastering the Grade Center
Workshop Overview
ROADMAP 1. Student Experience: Access My Grades: View assigned grades and related information, such as grade, due date, and total points possible. View feedback: View instructor comments on student work.
2. Exploring the Grade Center Explore the Grade Center interface: Learn about key terminology and features, such as the Action Bar, the Action Link, default columns, and Grade Center views. Hiding and sorting: Learn how to hide and sort columns and rows to focus on specific students or data. Organize the Grade Center: Use the drag-and-drop function to quickly rearrange columns and learn how to freeze columns to aid scrolling. Understanding column types: Learn about grade and calculated columns. Understanding categories: Learn about the default categories and how they can be used to organize Grade Center.
3. Working with Columns Creating columns: Learn how to create columns for entering and calculating grades. Default calculated columns: Learn about the Total and Weighted Total columns. Creating Grade Schemas: Convert scores to letter grades and customize the default schema to match your institution’s grading schema. Creating categories: Learn how to create categories and assign columns to categories.
4. Working with Grades Enter grades: Learn how to grade student submissions and view grade details. View and grade tests: Learn how to view and grade tests and clear test attempts. Override and exempt grades: Use Grade Center functions to override and exempt grades. Create Smart Views: Create a custom display of student performance.

student experience
© 2008 Blackboard Inc. Page 7 Mastering the Grade Center
Student Experience First, we will explore My Grades, the tool students use to access their grades. You will learn how grades are presented to students and how they can access feedback. Learning Outcomes After completing this section, you will be able to: • Access My Grades
• View grades
• Understand how to read the symbols used in My Grades to follow the progress of submissions
• View feedback from the instructor

© 2008 Blackboard Inc. Page 8 Mastering the Grade Center
Student Experience Accessing My Grades Students view their course grades from the My Grades tool. Grades are available by default; however, instructors may choose to make a grade unavailable. Students access My Grades from the Course Menu.
Figure 1

© 2008 Blackboard Inc. Page 9 Mastering the Grade Center
Student Experience Viewing Grades My Grades displays the following information by default. The instructor can customize the information students see.
• Item Name – each item is a column in the Grade Center, such as a grade column.
• Details – contains the description the instructor entered when creating the column, or the default description if the column was automatically created.
• Due Date – information appears only if the instructor entered a due date when creating the column.
• Last Submitted, Edited, or Graded – displays the date a student submitted the item or the instructor graded or returned the item.
• Grade – if the item has been graded, the grade is a link to the submission and instructor feedback; if it has not yet been graded, a symbol shows the item’s status.
• Points Possible – value entered by the instructor when creating the test or assignment, or when creating the column.
• Comments – if the original grade is overridden, the instructor can provide feedback to the user.
Figure 2

© 2008 Blackboard Inc. Page 10 Mastering the Grade Center
Student Experience Viewing Grades In the Item Name column, you may see rows displaying a Total and Weighted Total. We will discuss those in more detail later. In the Grade column, a symbol represents the item’s status. The table below describes the symbols displayed on the My Grades page.
SYMBOL DESCRIPTION
Submitted; waiting to be reviewed by the instructor.
OR
Submitted; reviewed by the instructor and returned ungraded, with comments.
– (dash) No information.
Not submitted; attempt in progress because the student has saved it as a draft.
Item has been completed.
For example, for a survey, the check mark icon indicates the student has completed the survey.
Error.
Grade exempted for this user.

© 2008 Blackboard Inc. Page 11 Mastering the Grade Center
Student Experience Viewing Feedback The content of the Submission History page varies depending on the item type. For assignments, the submission is displayed with the instructor’s feedback, if given. For assessments, only the grade is displayed.
Figure 3 Take Note
A The student attached a file to fulfill the assignment, which the instructor downloaded to view and grade. In the example above, the student added his last name to the file name before uploading.
B The instructor added a grade, feedback, and attached a file with comments for the student.

exploring the grade center
© 2008 Blackboard Inc. Page 12 Mastering the Grade Center
Exploring the Grade Center From the Grade Center, you can enter and manage your students’ grades for assignments, tests, discussions posts, and projects. In this section, you will become familiar with the Grade Center interface and features. You will learn how to navigate and customize the Grade Center so you can quickly focus on the student or data of interest. Learning Outcomes After completing this section, you will be able to: • Navigate the Grade Center
• Change your view of the Grade Center to make it more accessible
• Hide and sort rows and columns to focus on specific data
• Use the Column Organization page in Grade Center to quickly rearrange columns, freeze columns to aid scrolling, and hide or show multiple columns simultaneously
• Explain the difference between grade columns and calculated columns
• Explain the purpose and features of categories

© 2008 Blackboard Inc. Page 13 Mastering the Grade Center
Exploring the Grade Center The Grade Center Interface You access the Grade Center from the Control Panel under Evaluation.
Figure 1.1 The Grade Center is made up of rows and columns of student information and gradable items. Cells in the grid contain data specific to corresponding students. Use the scroll bars to see additional rows and columns.
Figure 1.2

© 2008 Blackboard Inc. Page 14 Mastering the Grade Center
Exploring the Grade Center The Grade Center Interface Take Note
The Grade Center page contains the following areas:
A Action Bar – rows containing functions specific to the current page
B Grade Information Bar – to access column details quickly, click a Grade Center column title, and information will display in this grayed area
C Grade Center – columns, rows, and cells that make up the current view of the Grade Center data
D Icon Legend – explains the symbols used in columns and cells The Action Link You can use the Action Link to access the contextual menus with options for most columns, rows, and cells. The options on the contextual menu will vary depending on the location. For example, a menu for a grade column will include a Column Statistics option; for a non-grade column, such as First Name, you may only have the option of hiding the column.
Figure 1.3 – Click the Action Link to access the contextual menu

© 2008 Blackboard Inc. Page 15 Mastering the Grade Center
Exploring the Grade Center The Grade Center Interface Default Columns The table below lists the default columns in the Grade Center.
Column Description
Last Name
First Name
Username
Student ID
The data in these four columns is automatically populated when students enroll in the course.
Last Access The data is automatically populated.
Availability The administrator determines the availability status. If a student’s status is set to unavailable, the student cannot access the course.
Weighted Total The Weighted Total column is provided as a placeholder for instructors who want to create a calculated column that weighs the data in grade or category columns. We will look at this default column in more detail later.
Total By default, the Total column displays a running total of the items in all grade columns. You can edit the criteria for the Total column.
Any of the above columns may be hidden from view, except the Last Name column.

© 2008 Blackboard Inc. Page 16 Mastering the Grade Center
Exploring the Grade Center The Grade Center Interface Automatically Generated Grade Center Columns When the following gradable items are created in Blackboard Learn™, corresponding columns are created automatically in the Grade Center: • Assessments, including Self and Peer Assessments • Surveys
• Assignments, including SafeAssignments
• Gradable discussion forums and threads Once these columns are created, they can be edited by the instructor. For example, a column may be renamed or hidden from view. Grade Center Views
Figure 1.4 – Current View drop-down list on the Action Bar
• Full Grade Center – displays all columns and rows. This is the default view of the Grade Center.
• Smart Views – heading title only. A Smart View is a custom view of student performance. The default Smart Views, and any you create, are listed under this heading. Smart Views will be discussed in detail later.
• Final Grade View – displays all columns, including the default Total and Weighted Total column. This is a default Smart View.
• Preview of My Grades – displays the columns visible to students. This is a default Smart View.
Use the Set as Default function on the Action Bar to select a view as the default view for the Grade Center.

© 2008 Blackboard Inc. Page 17 Mastering the Grade Center
Exploring the Grade Center Grade Center Accessibility In order to make the Grade Center accessible to as many people as possible, the Grade Center has two different modes, Interactive View and Screen Reader View. • Interactive View – the default setting. Columns may be frozen, and grades may be
typed directly in the cells, called inline editing. • Screen Reader View – displays the Grade Center data in a simplified grid. The
table is static and grades may be entered on the Grade Details page accessed by selecting the table cell for the grade. You cannot freeze columns or edit inline, making it easier to navigate by keystroke and to accommodate screen readers.
In both views, you can do the following: • Move the cursor from column to column using the tab key • Navigate cells within the Grade Center by using the up, down, left, and right
arrows on a standard keyboard
QUICK STEPS: manually changing to screen reader view
1 Click the Action Link for the main Grade Center heading at the top of the page to access the contextual menu.
2 Select Turn screen reader mode on.
Figure 2 NOTE: This setting is not saved across sessions (persistent). It will last only as long as the current session. Once the browser is closed, the view will default back to Interactive.

© 2008 Blackboard Inc. Page 18 Mastering the Grade Center
Exploring the Grade Center Hands-on Activity * For this activity, use your Practice Course. Explore the Grade Center • In the Grade Center, click the Action Link to access the contextual menus for
several cells and column headings. Note the options available for different types of columns.
• Use the Icon Legend to assist with answering the following questions:
• Which column is currently set as the External Grade column?
• Which student’s grade for the Unit 2 Quiz has been exempted? • For the Pluto Opinion assignment, which student’s grade has been manually
edited? Grade Center Views • Switch back and forth between the different views of the Grade Center. Note the
differences between views. Make Preview My Grades the default view.

© 2008 Blackboard Inc. Page 19 Mastering the Grade Center
Exploring the Grade Center Hiding Rows and Columns You can hide columns and rows to focus on specific data. When you hide information, the data is retained. Hiding Rows Users can be hidden from the Grade Center view to reduce the number of rows in the grid. Hidden users are not removed from the Grade Center, and can be shown at any time.
QUICK STEPS: hiding a row 1 Move your mouse pointer over a student’s name cell to see the Action Link and click
it to access the contextual menu. 2 Select Hide User. 3 A message appears stating that the user has been successfully hidden.
Figure 3.1

© 2008 Blackboard Inc. Page 20 Mastering the Grade Center
Exploring the Grade Center Hiding Rows and Columns Hiding Columns You can hide columns to reduce scrolling. To hide a single column, click the Action Link for the column and select Hide Column. You will learn how to hide multiple columns on the next page.
Figure 3.2 To show hidden columns, you will navigate to the Column Organization page, which will be explained in detail later in the manual.

© 2008 Blackboard Inc. Page 21 Mastering the Grade Center
Exploring the Grade Center Showing Rows You can use this feature to display a hidden row, or to show or hide multiple users simultaneously.
QUICK STEPS: showing a row 1 On the Action Bar, click Manage to access the drop-down list.
2 Select Student Visibility.
3 On the User Visibility page, select the check boxes for the users to be shown or hidden.
4 On the Action Bar, click Hide Users or Show Users.
5 Click Submit.
Figure 4 – On the User Visibility page, hidden users appear grayed out

© 2008 Blackboard Inc. Page 22 Mastering the Grade Center
Exploring the Grade Center Sorting Rows and Columns You can sort the information in rows and columns. The sorting remains in effect only as long as your current session. Once you close your browser, the view returns to the default. Sorting Rows You can sort rows by ordering grades from highest to lowest or lowest to highest. You can also sort rows by first or last name. To sort rows, click the column title or the carat beside the title.
Figure 5.1
© 2008 Blackboard Inc. Page 23 Mastering the Grade Center
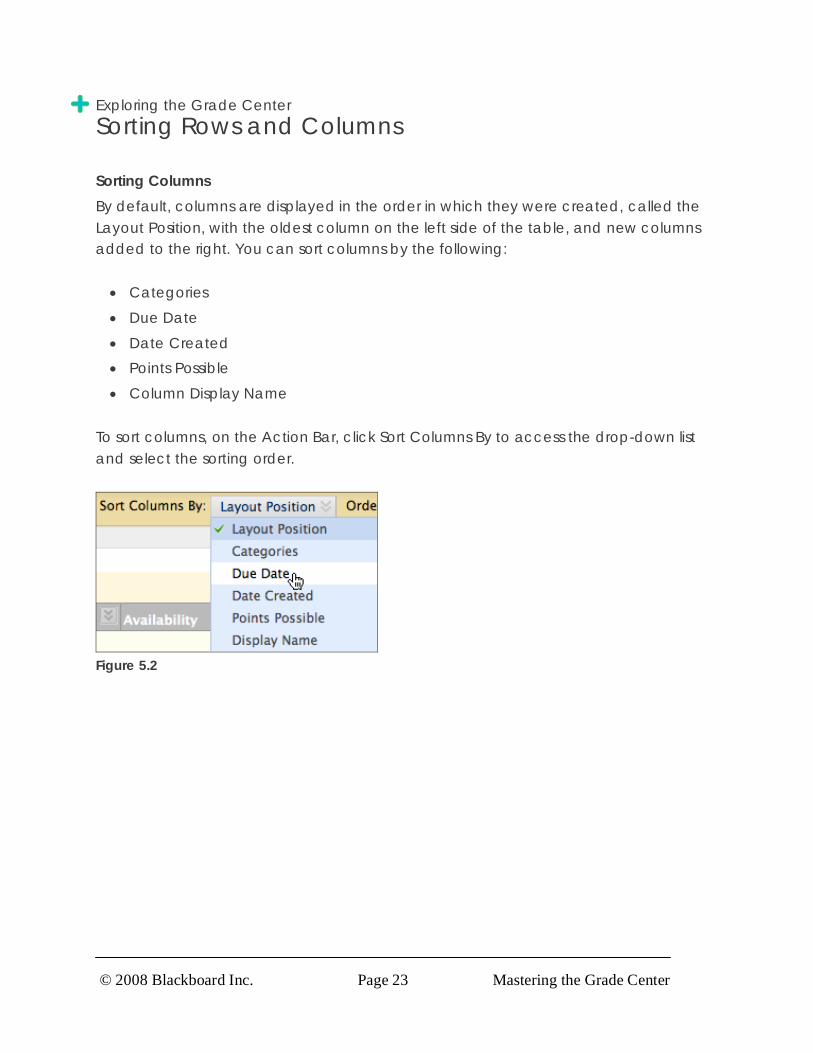
Exploring the Grade Center Sorting Rows and Columns Sorting Columns By default, columns are displayed in the order in which they were created, called the Layout Position, with the oldest column on the left side of the table, and new columns added to the right. You can sort columns by the following: • Categories
• Due Date
• Date Created • Points Possible
• Column Display Name To sort columns, on the Action Bar, click Sort Columns By to access the drop-down list and select the sorting order.
Figure 5.2

© 2008 Blackboard Inc. Page 24 Mastering the Grade Center
Exploring the Grade Center Organizing the Grade Center The Column Organization page provides an at-a-glance view of the columns in the Grade Center. Each column is represented by a row, with the top row representing the left-most column in the Grade Center. You can organize columns in the following ways: • Rearrange the order of columns quickly using the drag-and-drop function
• Freeze or unfreeze columns. If a column is frozen, it remains stationary when scrolling through the Grade Center view.
• Quickly hide or show multiple columns
• Change a grade column’s category Access the Column Organization page by clicking Manage on the Action Bar to access the drop-down list.
Figure 6.1

© 2008 Blackboard Inc. Page 25 Mastering the Grade Center
Exploring the Grade Center Organizing the Grade Center
Figure 6.2 Take Note
A Select the check boxes, click Show/Hide on the Action Bar, and select your option from the drop-down list. Multiple columns can be shown or hidden. Hiding columns reduces the length of the grid and reduces the need for continuous scrolling. Existing information is retained.
B Use the move icon to drag the item to the desired location.
C Columns in gray are frozen in place on the left side of the Grade Center, so they do not move while scrolling through other columns.
D Drag the bar to change which columns are frozen. Click Submit to save changes.

© 2008 Blackboard Inc. Page 26 Mastering the Grade Center
Exploring the Grade Center Understanding Column Types Grade Columns Grade columns are automatically created in the Grade Center when you create a gradable discussion, assignment, or assessment. You can also create columns manually or through uploading. Uploading items to the Grade Center will not be discussed in this workshop. You can manually create grade columns for other items you want to grade. For example, you can create a column to record participation grades, or for an activity that took place outside of Blackboard Learn.
Figure 7.1 In the image above, there are two grade columns: • Participation column – manually created by the instructor to record participation
grades
• Chapter 1 Test column – automatically created when the instructor created the test
The data in the Participation column is populated when the instructor assigns the grades.

© 2008 Blackboard Inc. Page 27 Mastering the Grade Center
Exploring the Grade Center Understanding Column Types Calculated Columns The Grade Center also contains calculated columns. As with grade columns, some calculated columns are created by default, such as the Total and Weighted Total columns, which will be discussed later. Others are created by the instructor. A calculated column uses the data from two or more grade columns to make a calculation. For example, in the image below, the Testing Total column is a calculated column that shows the combined points scored on two tests, the Chapter Test 1 and the Chapter Test 2.
Figure 7.2

© 2008 Blackboard Inc. Page 28 Mastering the Grade Center
Exploring the Grade Center Understanding Categories Categories are used to group related items together. By default, the following categories are created:
• Assignment
• Discussion • Survey
• Test When you create a gradable item, a column is automatically created for the item in the Grade Center and the column is automatically added to the appropriate category. For example, if you create a gradable discussion forum called Week 1 Discussion, a column with that name is added to the Grade Center and the column is automatically added to the Discussion category. You cannot edit or delete the default categories themselves, but you can move a column from one category to another category. You can also create an unlimited number of categories to organize grades. We will learn to create new categories later in the workshop. You can use categories to:
• Sort the Grade Center. For example, you can sort using the Assignment category to see all assignment columns at a glance.
• Calculate grades. For example, you can assign a weight to a category when calculating final grades. We will learn more about calculating grades later in the workshop.
• Create a Smart View. Smart Views are views of the Grade Center based on a variety of student criteria. For example, you can generate a Smart View that only displays columns associated with the Test category. We will learn more about Smart Views later in the workshop.

© 2008 Blackboard Inc. Page 29 Mastering the Grade Center
Exploring the Grade Center Hands-on Activity * For this activity, use your Practice Course. Hide and Show columns and rows • Hide the rows for Alyssa Dubois and Andy Farrell.
• Show the row for Laura Jackson.
• Hide the Availability and Last Access columns. Use the Column Organization page • From the Column Organization page:
• Identify the category for the Moon Viewing column. • Hide the Username column. Use the drag-and-drop function to rearrange the
columns.
• Make the Last Access column visible. • Return to the Grade Center to see the changes.

working with columns
© 2008 Blackboard Inc. Page 30 Mastering the Grade Center
Working with Columns In this section, you will learn how to create grade columns for any items you want to grade. You will also learn how to create calculated columns that combine the data in multiple columns. Next, you will learn how to organize and manage columns by using categories. Finally, we will look at grading schemas and learn how to edit the letter grade schema to reflect your institution’s grading policy. Learning Outcomes After completing this section, you will be able to: • Create grade columns to enter and manage grades
• Create calculated columns to calculate grades • Explain the purpose of the default calculated columns, Total and Weighted Total
• Create grading schemas
• Create categories, and add and move columns into categories

© 2008 Blackboard Inc. Page 31 Mastering the Grade Center
Working with Columns Creating Grade Columns We learned earlier that you can create grade columns for activities students complete outside of Blackboard Learn, or for activities that do not automatically have grade columns created for them. When creating Grade Center columns, you can do the following: • Choose how the grade will be displayed, such as score, letter, text, percentage, or
complete/incomplete. See the table on the next page for more information.
• Add it to category.
• Select whether to make the grade available for potential inclusion in any Grade Center calculations, such as when creating a calculated column.
• Select whether students can see the grade.
QUICK STEPS: creating grade columns
1 In the Grade Center, click Create Column on the Action Bar.
2 On the Create Grade Column page, enter the Column Name and optional Description.
3 Select the Primary Display from the drop-down list.
4 Optionally, select a Category in which to include the column.
5 In the Points Possible text box, enter the total points.
6 Optionally, select the radio node next to Due Date and enter a date. 7 Select the radio nodes next to the desired Options.
8 Click Submit.
Figure 1.1

© 2008 Blackboard Inc. Page 32 Mastering the Grade Center
Working with Columns Creating Grade Columns
Figure 1.2 Enter a brief, descriptive name. This becomes the column name in Grade Center, unless a shorter name or abbreviation is entered in the Grade Center Display Name text box. The optional description appears when the column information is viewed and when students view the column details in My Grades. If you select a due date, this date can be used with the Early Warning System to generate an alert if a test or assignment is not submitted on time.

© 2008 Blackboard Inc. Page 33 Mastering the Grade Center
Working with Columns Creating Grade Columns The table below describes the options on the Create Grade Column page.
Options Description
Primary Display: Score Select to display the achieved score. This is the default.
Primary Display: Letter Select to display a letter grade based on a percentage range defined in the Grade Center. For example, a score of 21/30 equals 70% and may appear as a C.
Primary Display: Text Select to display a text comment you enter manually. For example, Satisfactory/Unsatisfactory.
Primary Display: Percentage Select to display a percentage calculated from the achieved score. For example, a score of 21/30 is displayed as 70%.
Primary Display: Complete/Incomplete
Select to display a check mark when the item is submitted, regardless of the score achieved.
Include this Column in Grade Center Calculations
Select the Yes radio node to make the column available for potential inclusion when creating calculated columns.
Show this Column to Students
Select the Yes radio node to display the column to students in My Grades, the View Attempts page, and the Report Card module (if available).
Show Statistics (average and median) for this Column to Students in My Grades
Select the Yes radio node to show statistics for this column in My Grades.
Once you have created the grade column, you can enter grades and include the column when creating calculated columns.

© 2008 Blackboard Inc. Page 34 Mastering the Grade Center
Working with Columns Creating Calculated Columns In addition to using the Grade Center to record grades, you can use it to calculate grades. You do this by creating a calculated column. When you create a calculated column, you select two or more grade columns from which the data is used to make the calculation. You can use calculated columns to do the following: • Calculate the average grade
• Calculate a minimum or maximum grade • Calculate the total grade
• Weight grades by column, category, or both Each type of column is created in a slightly different way. New or restored courses automatically have two calculated columns, a Total and a Weighted Total. A Weighted Total column contains the weighted sum of all grades for a user based on item or category weighting. In our example, we will create a calculated column that weighs grades for one assignment and three tests, as follows:
Column Weight
Chapter 1 Worksheet 10%
Chapter 1 Test 20%
Chapter 2 Test 30%
Chapter 3 Test 40%

© 2008 Blackboard Inc. Page 35 Mastering the Grade Center
Working with Columns Creating Calculated Columns
QUICK STEPS: creating calculated columns 1 In Grade Center, on the Action Bar, click Create Calculated Column to access the
drop-down list. 2 Select Weighted Column.
3 On the Add Weighted Column page, complete the Column Information.
4 In the Columns to Select box, click a column title to select it. To select multiple columns in a row, hold down Shift and click. To select multiple columns out of sequence, hold down the Control Key and click.
5 Click the right-pointing arrow to move columns into the Selected Columns box. 6 In the Selected Columns box, enter the weight percentage for each item in the text
boxes.
7 Select the radio next to Calculate as Running Total, if desired. Running totals will exempt any cells that do not contain data.
8 Select the radio nodes next to the desired Options.
9 Click Submit.
Figure 2.1

© 2008 Blackboard Inc. Page 36 Mastering the Grade Center
Working with Columns Creating Calculated Columns
Figure 2.2
Figure 2.3 You can include a calculated column when creating another calculated column. For example, if you have created a calculated column that weighs quiz grades, you can include this column when creating a final grade column. As with other columns, you can choose whether calculated columns are displayed to students.

© 2008 Blackboard Inc. Page 37 Mastering the Grade Center
Working with Columns Default Calculated Columns By default, you will see two calculated columns in the Grade Center: • Total
• Weighted Total You can edit the default columns to calculate and display the data most useful to you. You can delete the default columns, if desired. The table below describes the default columns, their default settings, and suggested use.
Column Default Settings Suggested Use
Total • Sum of all items in grade columns
• Calculated columns or categories NOT included
• Ungraded items NOT included. Change by editing the column and toggling the setting to: do not Calculate as Running Total.
• Included in Smart Views > Final Grade View
• Set as the External Grade column. This is the column used for the final grade. It is shared with the institution as the student's grade for the course. Select any column as the External Grade column by clicking the column’s Action Link and selecting Set as External Grade.
For a quick indicator of student performance, change the display of the Total column to show the percentage.
Weighted Total
• No default settings. You must edit the column to select the columns to include in the weight calculation.
• Included in Smart Views > Final Grade View
If the final grade for your course will be based on weighting items, edit the column to include the desired items and their weights and use it to calculate final grades.

© 2008 Blackboard Inc. Page 38 Mastering the Grade Center
Working with Columns Ask Dr. C In the table below, our Blackboard Learn expert, Dr. C, discusses working with columns.
Your Question Dr. C’s Reply
I want to change the name of an assessment column. Will it change the name of the assessment?
No, if you change the name of an auto-created Grade Center column, such as an assignment, assessment, or gradable discussion forum, the new name applies only within Grade Center.
If you want to change the column name so students can see it, you must edit the item where it was created. For example, to change an assignment name, you must go to the Content Area containing the assignment and edit the name there. The reverse is also true—if you change an item name in a Content Area, the change is not automatically applied in the Grade Center.
How can I delete columns for assignments?
You cannot delete default columns (First Name, Last Name, Username) or automatically generated columns for tests and assignments. The only way to delete a column for a test or assignment is to delete the test or assignment itself.
I do not want to use the Total column, but there is no option to delete it.
Check to see if the Total column has been selected as the External Grade column. You will see a check mark next to the column name. If this is the case, simply click the Action Link for the column you wish to be the External Grade column and select Set as External Grade. You will now see the check mark by the column name you chose, and no check mark by the Total column.

© 2008 Blackboard Inc. Page 39 Mastering the Grade Center
Working with Columns Hands-on Activity * For this activity, use your Practice Course. Create columns in the Grade Center based on the specific criteria outlined below. Create an Essay Column • Create a grade column called Essay. • Assign the column to the Assignments category.
• Set the Primary Display as a Percentage. • You want to use this grade in the final grade calculations, so select Yes, Include
this Column in Grade Center Calculations. • Make the grade available to students.
• Manually enter grades for the column. Enter at least one grade that is under 60%. Create a Final Grade Column • Create a calculated column called Final Grade that assigns the following weights:
• Essay = 30% • Group Project = 20%
• Unit Quiz 1 = 25%
• Unit Quiz 2 = 25%
• Set the Primary Display as a Percentage, and the Secondary Display as a Score. • Make the grade available to students.
• Set the Final Grade column as the External Grade column.
• Delete the Weighted Total column.

© 2008 Blackboard Inc. Page 40 Mastering the Grade Center
Working with Columns Customizing the Letter Grade Schema Grading Schemas are mappings of a student's raw score to a grade display, such as a letter grade or a pass/fail evaluation. There is a default schema for letter grades that consists of letter grades from A+ to F and their corresponding percentage ranges. If you choose to display students' scores as letter grades, the default letter schema is used to convert the scores to letter grades. You can customize the default letter schema to match your institution's grading scheme. You can also create your own grading schemas.
QUICK STEPS: customizing the letter grade schema 1 In Grade Center, on the Action Bar, click Manage to access the drop-down list.
2 Select Grading Schemas.
3 On the Grading Schemas page, click the Letter Action Link to access the contextual menu.
4 Select Edit. 5 On the Edit Grading Schema page, edit the Name, if desired, and add an optional
Description.
6 In the Grades Scored Between text box, enter the percentage range for the letter grade.
7 In the Will Equal text box, enter the letter grade.
8 In the Will Calculate as text box, enter the percentage value to be used if a letter grade is entered manually.
9 Repeat steps for all letter grade values you want to edit.
10 Click Submit.
Figure 3.1

© 2008 Blackboard Inc. Page 41 Mastering the Grade Center
Working with Columns Customizing the Letter Grade Schema
Figure 3.2 The name you enter for the letter grade schema appears in the drop-down lists for Primary Display and Secondary Display when creating columns. The description is optional, but can help differentiate grading schemas.
Figure 3.3 TIP: Start from the top and complete the values for the first letter grade and then move to the next row. Then, delete any letter grades not needed and insert additional rows as needed.

© 2008 Blackboard Inc. Page 42 Mastering the Grade Center
Working with Columns Creating Categories We learned earlier that there are four default categories: • Assignment
• Discussion
• Survey
• Test You can create an unlimited number of additional categories to organize your columns. Once you have created a category, you can do the following: • Assign new columns to the category when you are creating a column
• Move existing columns to the new category
QUICK STEPS: creating categories
1 In Grade Center, on the Action Bar, click Manage to access the drop-down list. 2 Select Categories.
3 On the Categories page, click Create Category on the Action Bar.
4 On the Add Category page, enter the category Name and an optional Description.
5 Click Submit.
Figure 4.1

© 2008 Blackboard Inc. Page 43 Mastering the Grade Center
Working with Columns Creating Categories
Figure 4.2

© 2008 Blackboard Inc. Page 44 Mastering the Grade Center
Working with Columns Changing Column Categories You can move columns from one category to another. You can also move a column from a category to no category. You can move any column, except calculated columns, to a different category. For example, you can move a column from the Discussions category to a category named Extra Credit.
QUICK STEPS: changing a column category 1 In Grade Center, on the Action Bar, click Manage to access the drop-down list.
2 Select Column Organization.
3 On the Column Organization page, select the check box for the column to move. 4 On the Action Bar, click Change Category to… to access the drop-down list.
5 Select the category to which to move the column.
6 Click Submit to save changes.
Figure 5

© 2008 Blackboard Inc. Page 45 Mastering the Grade Center
Working with Columns Hands-on Activity * For this activity, use your Practice Course. Edit the letter grade schema Edit the letter grade schema to reflect the following letter grades and values as shown in the table below:
Percentage Range Letter Grade Will Calculate As
90 to 100% A 95%
80 to 89% B 85%
70 to 79% C 75%
61 to 69% D 65%
0 to 60% F 55%
Work with categories • Create a category named Group Work.
• Move the Group Project column into the Group Work category.

working with grades
© 2008 Blackboard Inc. Page 46 Mastering the Grade Center
Working with Grades In this section, you will learn how to enter and override grades in the Grade Center. You will learn how to view and grade assessments and assignments, as well as learn how to enter grades for projects created outside of Blackboard Learn. Next, you will learn how to override and exempt grades from grade calculations. Finally, you will create a Smart View, which allows you to see a customized display of student performance. Learning Objectives After completing this section, you will be able to: • Enter grades for items that must be manually graded, such as assignments
• View and grade tests • Clear test attempts to allow students to retake the test
• Override grades
• Exempt a grade
• Create a Smart View to see a customized display of student performance

© 2008 Blackboard Inc. Page 47 Mastering the Grade Center
Working with Grades Grading an Assignment You can enter grades for any items you manually grade, such as essays, group projects, or assignments and assessments not automatically graded by Blackboard Learn. We will go through the steps to review and grade an assignment submission in the Grade Center. When an assignment is created, a grade column is automatically created. Assignments that have been submitted, but not graded, are indicated with an exclamation mark in the Grade Center. When reviewing assignment submissions, you can provide a grade and feedback. You also have the option of returning the submission to the student with comments only, so the assignment can be refined further and then resubmitted for a grade.
QUICK STEPS: grading an assignment
1 In Grade Center, locate the cell for the student’s assignment containing an exclamation mark.
2 Move the mouse pointer over the cell to see the Action Link.
3 Click the Action Link to access the contextual menu. 4 Select View Grade Details.
5 On the Grade Details page, under Attempts, click the Action Link next to the exclamation mark to access the contextual menu.
6 Select Open Attempt. 7 On the Grade Assignment page:
• Click the file name under Submission materials to view or download attachments.
• Enter a numerical value in the Grade box.
• Optionally, enter feedback in the Comments area and attach files for the student to review.
• Optionally, enter Instructor Notes and attach files that only you will be able to access.
8 Click Submit to return to the Grade Details page. Next, click OK to return to the Grade Center.

© 2008 Blackboard Inc. Page 48 Mastering the Grade Center
Working with Grades Grading an Assignment
Figure 1.1

© 2008 Blackboard Inc. Page 49 Mastering the Grade Center
Working with Grades Grading an Assignment
Figure 1.2

© 2008 Blackboard Inc. Page 50 Mastering the Grade Center
Working with Grades Grading an Assignment
Figure 1.3 To return an assignment attempt without a grade:
• To return an attempt to a student with comments only, follow the steps for grading an assignment, but at step 8, click Save as Draft. The attempt remains ungraded and student can access your feedback.

© 2008 Blackboard Inc. Page 51 Mastering the Grade Center
Working with Grades Viewing Grade Details When you finish grading an item, the Attempts and Grade History are updated on the Grade Details page. The Attempts information display includes: • Value – the grade you entered
• Feedback to User – available to the student when submission is viewed • Grading Notes – any instructor notes you entered
Figure 2.1 The Grade History displays the history in reverse chronological order. It includes:
• Date and time the item was last edited (submitted or graded) and by whom
• Grade and comments entered when the item was edited
Figure 2.2 TIP: To view grade details from the Grade Center table, locate the cell that contains the grade, then click the Action Link and select Grade Details.

© 2008 Blackboard Inc. Page 52 Mastering the Grade Center
Working with Grades Hands-on Activity * For this activity, use your Practice Course. Review and grade submission For the Moon Viewing assignment, review Martha Allen’s submission and then: • Enter a grade. • Enter feedback for the student.
Enter grades directly into Grade Center Cell You have reviewed a group’s project and want to enter their grades. For the Group Project, enter a grade of 88 for the following students: • Ryan Johnson, Porter Durand, Ann Rousseau, Henry Wagner
HINT: You can enter the grades directly into the appropriate cell because this column was created manually and is not associated with an assignment or test. Be aware that grades entered this way are overrides. For tests and assignments, this would result in the override grade superseding all other attempts, including those not yet submitted.

© 2008 Blackboard Inc. Page 53 Mastering the Grade Center
Working with Grades Viewing and Grading Tests View and grade tests from the Grade Center, where there is a column automatically created for every assessment. Some types of questions, such as true/false and multiple choice, are graded automatically, while others, such as essay questions, must be graded manually. You also have the option of adjusting a grade for an automatically graded question. For example, if a student successfully defends an answer selection, the grade for the question can be edited.
QUICK STEPS: viewing and grading a test 1 In Grade Center, locate the cell for the student’s test containing an exclamation
mark. The exclamation mark appears when a test requires grading. 2 Move the mouse pointer over the cell to see the Action Link.
3 Click the Action Link to access the contextual menu.
4 Select View Grade Details.
5 On the Grade Details page, under Attempts, click the Action Link next to the exclamation mark to access the contextual menu.
6 Select Open Attempt. 7 On the Grade Test page, review the student’s answers, grade any questions that
require manual grading, and enter Feedback, if desired.
8 Click Submit. You are returned to the Grade Details page.
Figure 3.1

© 2008 Blackboard Inc. Page 54 Mastering the Grade Center
Working with Grades Viewing and Grading Tests
Figure 3.2
Figure 3.3

© 2008 Blackboard Inc. Page 55 Mastering the Grade Center
Working with Grades Viewing and Grading Tests
Figure 3.4 NOTE: No score is entered at the top of the page because the test includes an essay question which requires manual grading.

© 2008 Blackboard Inc. Page 56 Mastering the Grade Center
Working with Grades Clearing Test Attempts You can clear a test attempt, allowing a student to retake a test. For example, if a student encountered technical problems and only partially completed a test, clear the grade to allow a retake. If you clear a grade that has a previous attempt, the previous attempt will now be the grade.
QUICK STEPS: clearing a test attempt 1 In Grade Center, locate the cell containing the student’s test grade to clear.
2 Move the mouse pointer over the cell to see the Action Link.
3 Click the Action Link to access the contextual menu. 4 Select View Grade Details.
5 On the Grade Details page, under Attempts, click the Action Link next to the current grade to access the contextual menu.
6 Select Clear Attempt. A warning message appears.
7 Click OK.
8 To return to the Grade Center, click OK at the bottom of the page, or use the breadcrumbs.
Figure 4.1

© 2008 Blackboard Inc. Page 57 Mastering the Grade Center
Working with Grades Clearing Test Attempts The grade is cleared under Attempts and the action is recorded under Grade History. The grade is also cleared in the Grade Center column.
Figure 4.2

© 2008 Blackboard Inc. Page 58 Mastering the Grade Center
Working with Grades Overriding Grades You can override grades that were either manually or automatically recorded in the Grade Center. A grade Override supersedes all attempts, including attempts students have not yet submitted. When a grade is overridden, future attempts do not display with exclamation marks (needs grading) in the Grade Center. The grade is updated in the student’s My Grades tool.
QUICK STEPS: overriding grades 1 In Grade Center, locate the cell containing the student’s grade to override.
2 Move the mouse pointer over the cell to see the Action Link.
3 Click the Action Link to access the contextual menu. 4 Select View Grade Details.
5 On the Grade Details page, next to Current Grade Value, click Override.
6 The Override field opens. Edit the Current Grade Value.
7 Optionally, enter Feedback to User which explains the grade change.
8 Optionally, enter Grading Notes for yourself. 9 Click Save. The updated Grade Details page appears.
Figure 5.1

© 2008 Blackboard Inc. Page 59 Mastering the Grade Center
Working with Grades Overriding Grades
Figure 5.2 The Override field collapses and the new grade is now the Current Grade Value.
Figure 5.3 In the Grade Center column, the new grade is shown with a Cell Modified Icon in the cell’s corner, indicating the grade has been modified. The icon can be deleted using the contextual menu and selecting Clear Cell Modified Icon.

© 2008 Blackboard Inc. Page 60 Mastering the Grade Center
Working with Grades Overriding Grades Grades can be entered directly in the Grade Center cells. The grade entered is designated as an Override. Since Override grades supersede all other grades, only use this method if students will not be submitting any other attempts. Click the assignment’s exclamation mark and enter the grade in the field. Click Enter to save the grade.
Figure 5.4

© 2008 Blackboard Inc. Page 61 Mastering the Grade Center
Working with Grades Exempting a Grade You can exempt a grade from a student’s record. When you exempt a grade, the grade is ignored in all Grade Center calculations. The grade cell displays a blue square. The grade remains available on the Grade Details page, and you can clear the exemption at any time. In the Grade Center, click the item’s Action Link and select Exempt Grade.
Figure 6

© 2008 Blackboard Inc. Page 62 Mastering the Grade Center
Working with Grades Hands-on Activity
* For this activity, use your Practice Course. Grade tests For the Unit 1 Quiz: • Grade question 4 for Porter Durand.
Reset test attempts For the Unit 4 Quiz: • Clear attempt for Henry Wagner.
Override a grade Through Group Project peer review, it has come to your attention that one member of the group missed many meetings.
• Since you had five points set aside for participation, override Porter Durand’s grade to 83.

© 2008 Blackboard Inc. Page 63 Mastering the Grade Center
Working with Grades Creating Smart Views As you enter and view grades, you are automatically obtaining information on how students are performing in the course. You can tailor your view of student progress by creating Smart Views. A Smart View shows only the data that matches a set of criteria. With Smart Views, you can view the progress of the following: • An existing group • Student performance for a particular item
• Individual students You may also perform a query to select students using a combination of attributes. In our example, we will create a Smart View that allows us to see which students scored below a designated value on an important assignment.
QUICK STEPS: creating a smart view
1 In Grade Center, on the Action Bar, click Manage to access the drop-down list.
2 Select Smart Views.
3 On the Smart Views page, click Create Smart View.
4 On the Add Smart View page, enter the Name of the Smart View. This will appear in the Current View drop-down list under Smart Views. Optionally, enter a Description.
5 Select the radio node next to the Type of View.
6 Complete the Select Criteria section: • Under User Criteria, select the grade column to search.
• Under Condition, select the criteria, such as Equal to.
• In the Value text box, enter the score or percentage against which the criteria and condition will be assessed.
7 Select the Filter Results from the drop-down list by selecting the columns to display in the Smart View.
8 Click Submit. The list of Smart Views appears.

© 2008 Blackboard Inc. Page 64 Mastering the Grade Center
Working with Grades Creating Smart Views
Figure 7.1

© 2008 Blackboard Inc. Page 65 Mastering the Grade Center
Working with Grades Creating Smart Views You can view the Smart View in two locations. On the Smart Views page, click its hyperlinked title.
Figure 7.2 – The Smart Views page displays the new Smart View In the Grade Center, select it from the Current View drop-down list on the Action Bar.
Figure 7.3 Two default Smart Views are available: Final Grade View and Preview of My Grades.

© 2008 Blackboard Inc. Page 66 Mastering the Grade Center
Working with Grades Hands-on Activity * For this activity, use your Practice Course. Create a Smart View
• Create a Smart View that displays all students who scored less than 60% on the Essay.

workshop wrap up
© 2008 Blackboard Inc. Page 67 Mastering the Grade Center
Workshop Wrap Up The Workshop Wrap Up provides the opportunity to reflect on what has been learned by focusing your attention on the key concepts presented in the workshop. Also, the next page includes a worksheet for listing some considerations about determining the grading criteria for your course. In this workshop, you learned how to do the following: • Access My Grades, and view grades and feedback from the instructor • Understand how to read the symbols used in My Grades to follow the progress of
submissions
• Navigate the Grade Center and change your view of the Grade Center to make it more accessible
• Hide and sort rows and columns to focus on specific data
• Use the Column Organization page in the Grade Center to quickly rearrange columns, freeze columns to aid scrolling, and hide or show multiple columns simultaneously
• Explain the difference between grade columns and calculated columns
• Explain the purpose and features of categories
• Create grade columns to enter and manage grades
• Create calculated columns to calculate grades • Explain the purpose of the default calculated columns, Total and Weighted Total
• Create grading schemas
• Create categories and add and move columns into categories
• Enter grades for items that must be manually graded • View and grade tests, and clear test attempts
• Override and exempt grades
• Create a Smart View to see a customized display of student performance

© 2008 Blackboard Inc. Page 68 Mastering the Grade Center
Workshop Wrap Up Spotlight on YOUR Course Now that you have experienced the online Grade Center, it is time to think about determining the grading criteria for your course. The table below lists some areas to consider.
Ideas to consider Notes
Review your institution’s policies about grading, exam procedures, submitting final grades, and student attendance. For example, do you know your institution’s:
• Deadline for submitting final grades?
• Policy on students who miss classes or exams?
• Procedure for students who want to challenge their grades?
Determine your course objectives and what you want your students to learn. Then, tailor your grading standards to your objectives so students will focus on what is most important for them to learn.
Decide which course activities (assignments, projects, exams, group work, participation, and attendance) will be graded and how they will be weighted.
Find out if your department has a specific grading schema (raw scores, percentages, or letter grades) you must use.

© 2008 Blackboard Inc. Page 69 Mastering the Grade Center
Workshop Wrap Up Spotlight on YOUR Course After you have determined your grading criteria and set up the Grade Center, make sure you communicate grading criteria clearly to your students. • Do you give explanations of each assignment, project, and activity, and include
clearly defined grading criteria for each? • Are you clear about which activities are weighted more than others?
• Which assignments and projects count toward the final grade?
• How are you grading attendance and participation?
• If students are graded as a group, do they know how you will determine the
grade? Will each student in the group receive the same grade? • Are you prepared to give students detailed feedback after they submit
assignments and projects so they know how they can improve?

© 2008 Blackboard Inc. Page 70 Mastering the Grade Center
Workshop Wrap Up Resources
Faculty Support Page: http://behind.blackboard.com/s/faculty/
Training Page: http://www.blackboard.com/Services/Training/index.Bb
User Group Page: http://www.blackboard.com/communities/usergroups.aspx


