Embed Size (px)
Citation preview

Center for Science, Mathematics, & Computer Education | University of Nebraska-Lincoln
MAPLE TA 10.0 USER GUIDE CENTER FOR SCIENCE, MATHEMATICS, & COMPUTER EDUCATION
UNIVERSITY OF NEBRASKA-LINCOLN
TABLE OF CONTENTS
What’s New in Maple T.A. 10.0 ......................................................................................... 3
The Good ....................................................................................................................... 3
The Bad .......................................................................................................................... 5
Basic Walkthrough ............................................................................................................. 6
Create a Maple TA Class (Blackboard) ........................................................................... 6
Create a Maple TA Class (Canvas) .................................................................................. 8
Create a Question Group ............................................................................................. 11
Create a Multiple Choice Question .............................................................................. 12
Preview a New Question ............................................................................................. 15
Create a Question Using the Question Designer ......................................................... 18
Create a Homework/Quiz Assignment......................................................................... 22
Try Out a New Assignment .......................................................................................... 25
Add Assignment Link to LMS (Blackboard) .................................................................. 26
Add Assignment Link to LMS (Canvas) ......................................................................... 28
Question Repository ........................................................................................................ 31
Create a Multiple Choice Question with Graphics ....................................................... 31
Assigning Groupless Questions to a Question Group .................................................. 34
Where can I find questions that haven’t been assigned to a question group? ........ 34
How do I assign a “Groupless” Question to a question group? ............................... 34
Assignments .................................................................................................................... 36
Create a Proctored Exam ............................................................................................. 36
Center for Science, Mathematics, & Computer Education | University of Nebraska-Lincoln
Copy an Assignment .................................................................................................... 37
Provide Extra Time to a Student Served by SSD ........................................................... 40
Give a Student an Additional Attempt at an Assignment ............................................ 40
Extend the Deadline for All Students ........................................................................... 40
Extend the Deadline for Some Students ...................................................................... 40
Gradebook ....................................................................................................................... 41
Force-Grading .............................................................................................................. 41
Manual Grading (By Question) .................................................................................... 43
Manually Exporting Scores to LMS (Canvas) ................................................................ 48
Course Modules ............................................................................................................... 50
Create and Export a Course Module ............................................................................ 50
Import a Course Module into a New Class ................................................................... 53

Maple T.A. 10.0 User Guide What’s New in Maple T.A. 10.0 |3
Center for Science, Mathematics, & Computer Education | University of Nebraska-Lincoln
WHAT’S NEW IN MAPLE T.A. 10.0
THE GOOD
The Equation Editor no longer uses Java, so you and your students will no longer
have to deal with annoying security prompts. Unfortunately, Clickable Image Map
questions still use Java, but it seems likely that Maple TA will eventually do away
with Java altogether.
Updated interface:
Collapsible page sections. This button will collapse/hide its associated
section, and this button will expand/show its associated section. The value of
this is dubious. If an errant mouse click causes part of your page to disappear,
look for a button and click it.
Fewer mouse clicks. Question creation in particular is no longer split between
multiple pages. This should make question creation easier, as you will spend less
time waiting for pages to load.
Multiple Choice and Multiple Selection questions now provide a basic text editor
for each answer option, making it easier to format answer text, use graphics as
answers, and use mathematical expressions in answers.
Maple T.A. 10.0 User Guide What’s New in Maple T.A. 10.0 |4
Center for Science, Mathematics, & Computer Education | University of Nebraska-Lincoln
Easier assignment navigation.
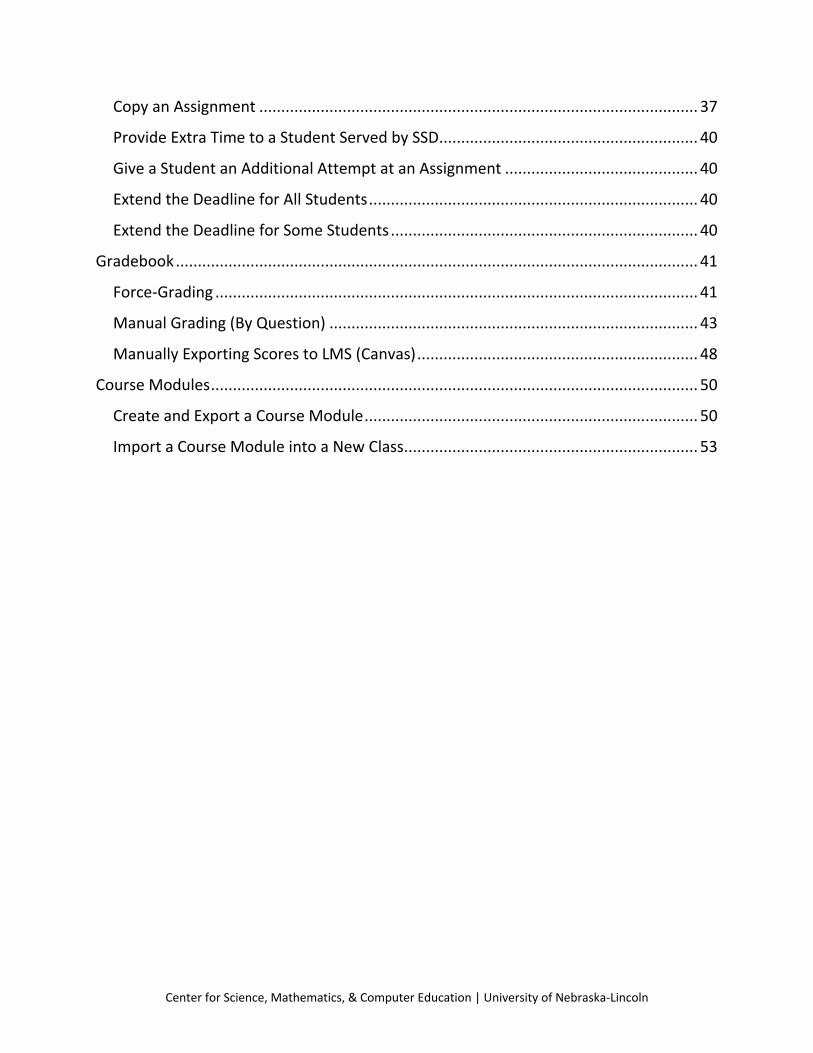
Rubrics:
Question Designer now offers Sketch and Free Body Diagram question types
Maple T.A. 10.0 User Guide What’s New in Maple T.A. 10.0 |5
Center for Science, Mathematics, & Computer Education | University of Nebraska-Lincoln
THE BAD
Maple TA 10’s move away from Java is the primary reason we chose to upgrade at this
time. Some browsers either have discontinued or will be discontinuing support for the
cross platform plugin architecture upon which the Java plugin relies. And even apart
from this, Java applets have become a big pain to use, what with all the security
warnings Java makes users click through.
Fortunately, Maple TA only uses Java for a couple things: the Equation Editor and
Clickable Image Maps. If you don’t use either of these—and most of you don’t—then
you haven’t had to deal with any Java-related frustrations. But for those of you who use
the Equation Editor (or create questions that students can answer using the Equation
Editor), the switch to Maple TA 10 should be welcome. (The Clickable Image Map,
unfortunately, has not yet ditched Java, so Maple TA 10 is not yet completely Java-free.)
The problem is that we had wanted to delay the upgrade to version 10 because there
are a couple of things about it we don’t like. Here they are…
In previous versions of Maple TA, the question creation process would conclude
with a page that would instruct users to select a question group for the new
question. Maple TA 10 does conclude the question creation progress with a page
on which users can assign the new question to a question group, but users are
not prompted to do this. Therefore, users are bound to at least occasionally
forget to assign new questions to question groups. This will cause some
frustration, but it’s not a fatal mistake. In this guide, I provide instructions for
locating “groupless” questions and assigning them to a question group.
The bigger problem with Maple TA 10 is that it does not provide feedback during
manual grading. In version 9.5, when you enter a new score for a question and
then click the save button, a progress bar shows you that the new score is being
saved, and then you see the recorded score update to the new score. In version
10, nothing happens when you click the save button. Or rather, the score is
saved, but nothing happens to let you know that it’s been saved. Therefore, later
in this guide you can find instructions for an approach to manual grading that will
make it less of a nightmare.

Maple T.A. 10.0 User Guide Basic Walkthrough |6
Center for Science, Mathematics, & Computer Education | University of Nebraska-Lincoln
BASIC WALKTHROUGH
CREATE A MAPLE TA CLASS (BLACKBOARD)
1. Log into Blackboard (my.unl.edu)
2. Select your class
3. In the course menu on the left, under Control Management, click Course Tools
4. Click Maple T.A. Instructor Menu
You do not need to enroll
students in your Maple T.A. class
Maple T.A. 10.0 User Guide Basic Walkthrough |7
Center for Science, Mathematics, & Computer Education | University of Nebraska-Lincoln
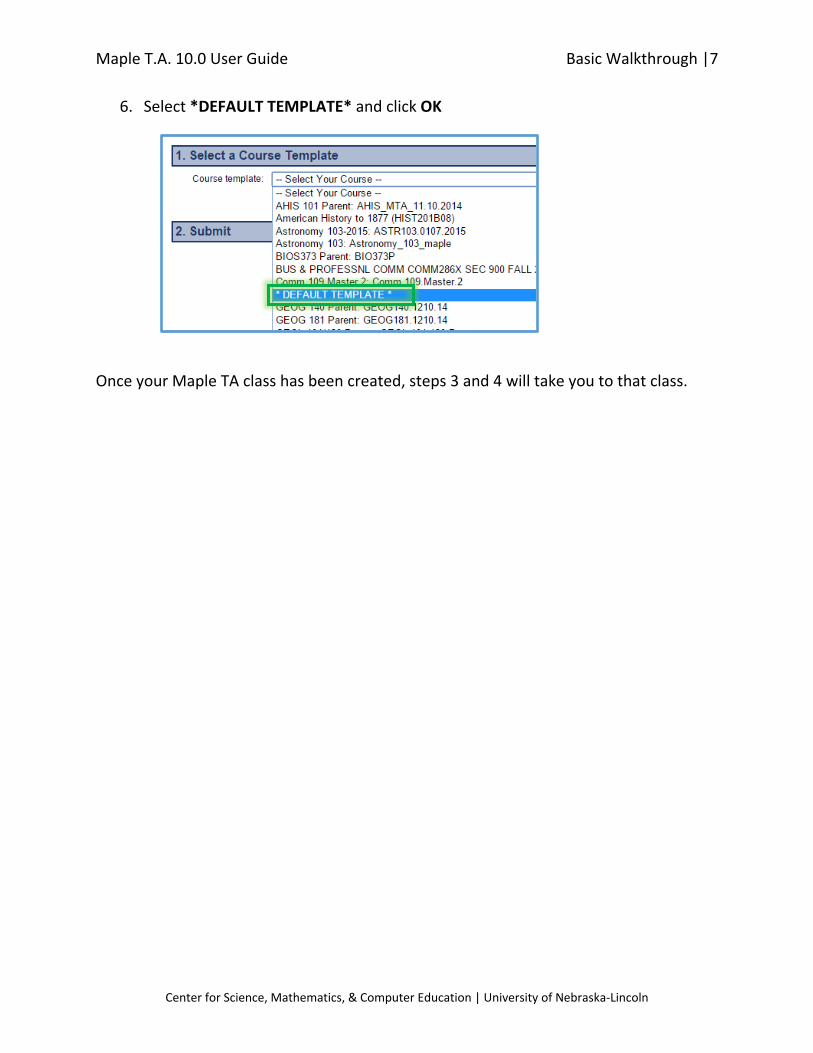
6. Select *DEFAULT TEMPLATE* and click OK
Once your Maple TA class has been created, steps 3 and 4 will take you to that class.

Maple T.A. 10.0 User Guide Basic Walkthrough |8
Center for Science, Mathematics, & Computer Education | University of Nebraska-Lincoln
CREATE A MAPLE TA CLASS (CANVAS)
1. Log into Canvas
2. Select your class
3. In the course menu, click Assignments; if the menu isn’t visible, click the Menu
button
4. Click the red +Assignment button
5. For the Assignment Name, type “Maple TA Instructor Menu”
6. For Submission Type, select external tool

Maple T.A. 10.0 User Guide Basic Walkthrough |9
Center for Science, Mathematics, & Computer Education | University of Nebraska-Lincoln
7. Click in the box underneath External Tool URL
8. Click Maple TA and then click the Select button
9. Select Load This Tool In A New Tab
10. Click the Save button
Maple T.A. 10.0 User Guide Basic Walkthrough |10
Center for Science, Mathematics, & Computer Education | University of Nebraska-Lincoln
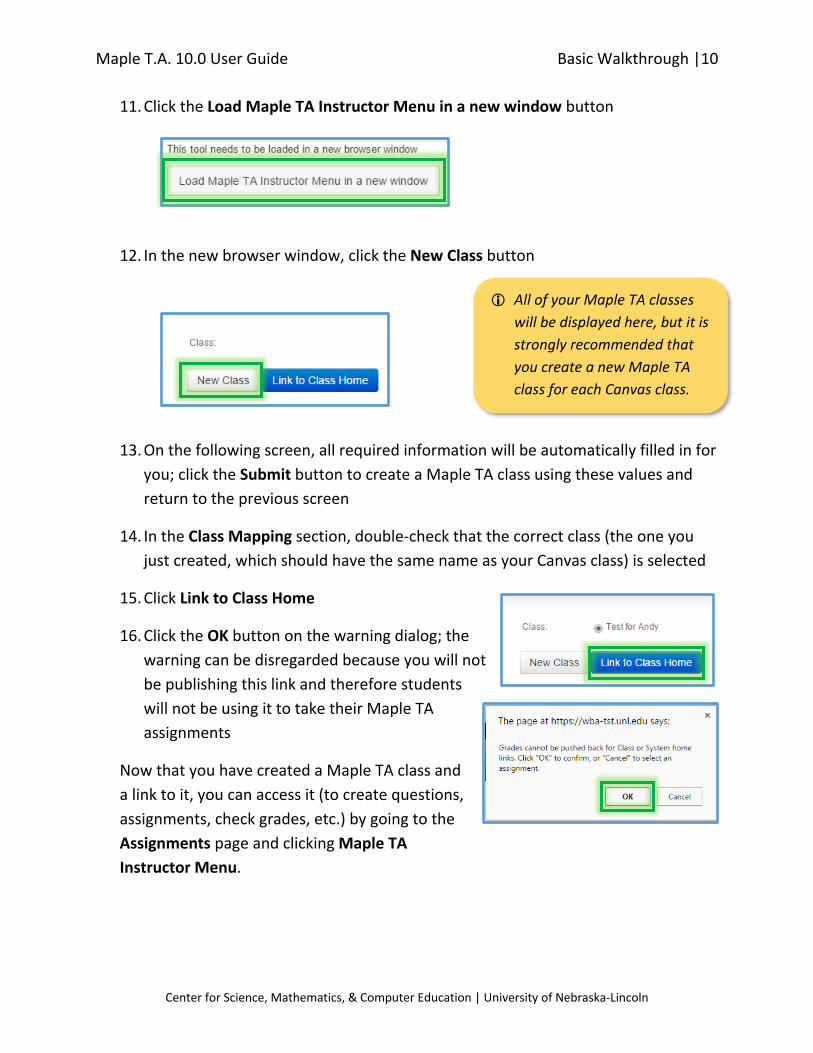
11. Click the Load Maple TA Instructor Menu in a new window button
12. In the new browser window, click the New Class button
13. On the following screen, all required information will be automatically filled in for
you; click the Submit button to create a Maple TA class using these values and
return to the previous screen
14. In the Class Mapping section, double-check that the correct class (the one you
just created, which should have the same name as your Canvas class) is selected
15. Click Link to Class Home
16. Click the OK button on the warning dialog; the
warning can be disregarded because you will not
be publishing this link and therefore students
will not be using it to take their Maple TA
assignments
Now that you have created a Maple TA class and
a link to it, you can access it (to create questions,
assignments, check grades, etc.) by going to the
Assignments page and clicking Maple TA
Instructor Menu.
All of your Maple TA classes
will be displayed here, but it is
strongly recommended that
you create a new Maple TA
class for each Canvas class.

Maple T.A. 10.0 User Guide Basic Walkthrough |11
Center for Science, Mathematics, & Computer Education | University of Nebraska-Lincoln
CREATE A QUESTION GROUP
In previous versions of Maple TA, at the end of the question creation process users were
prompted to assign the new question to a question group (and could create the
question group if it hadn’t already been created). In Maple TA 10, although users will
certainly have the opportunity to assign each new question to a question group on the
View Question page (which is displayed at the end of the question creation process),
they are not expressly prompted to do so, and they will not be able to create new
question groups on this page.
Therefore, in Maple TA 10 it’s important to first create some question groups before
creating any new questions.
1. In the main menu, click Questions
2. Click the New Group button
3. Type a name for the new group
4. Click Save
5. To create a subgroup within a group, click the desired group’s menu button and then click Add Child Group
Course modules can now
accommodate unlimited
nesting of question groups.
Therefore, you are free to
organize your questions any
way you see fit.

Maple T.A. 10.0 User Guide Basic Walkthrough |12
Center for Science, Mathematics, & Computer Education | University of Nebraska-Lincoln
CREATE A MULTIPLE CHOICE QUESTION
1. Click Questions
2. Click New Question
3. Click Multiple choice
4. In the Question Name field, type a short but descriptive name for this question; alternatively you could copy and paste the question text into this field
Generic question names (e.g.
“Question 15”) will make it
difficult to find a specific question

Maple T.A. 10.0 User Guide Basic Walkthrough |13
Center for Science, Mathematics, & Computer Education | University of Nebraska-Lincoln
5. In the Question Text field, type the text of the question (e.g., “What is 2 + 2?”)
6. In the Choices for the answers section, enter the text of your answers (e.g., “3”, “4”, “5”)
7. Select the correct answer by clicking its radio button (e.g., “4”)
8. In the Change the order of the choices? section, choose Yes if you want the answers displayed in random order, and choose No if you want your answers to be displayed in the order that they appear on this screen
The Maple T.A. Question Editor offers basic formatting options for the
question text. The editor also allows you to insert graphics, create tables, and
format mathematical expression.
If an answer needs to refer to other answers (e.g., “Both A and B are true”),
you will need to type the answer labels as part of the answer text (e.g., “A)
red”, “B) blue”, etc.) since Maple TA does not label the answers
Maple T.A. 10.0 User Guide Basic Walkthrough |14
Center for Science, Mathematics, & Computer Education | University of Nebraska-Lincoln
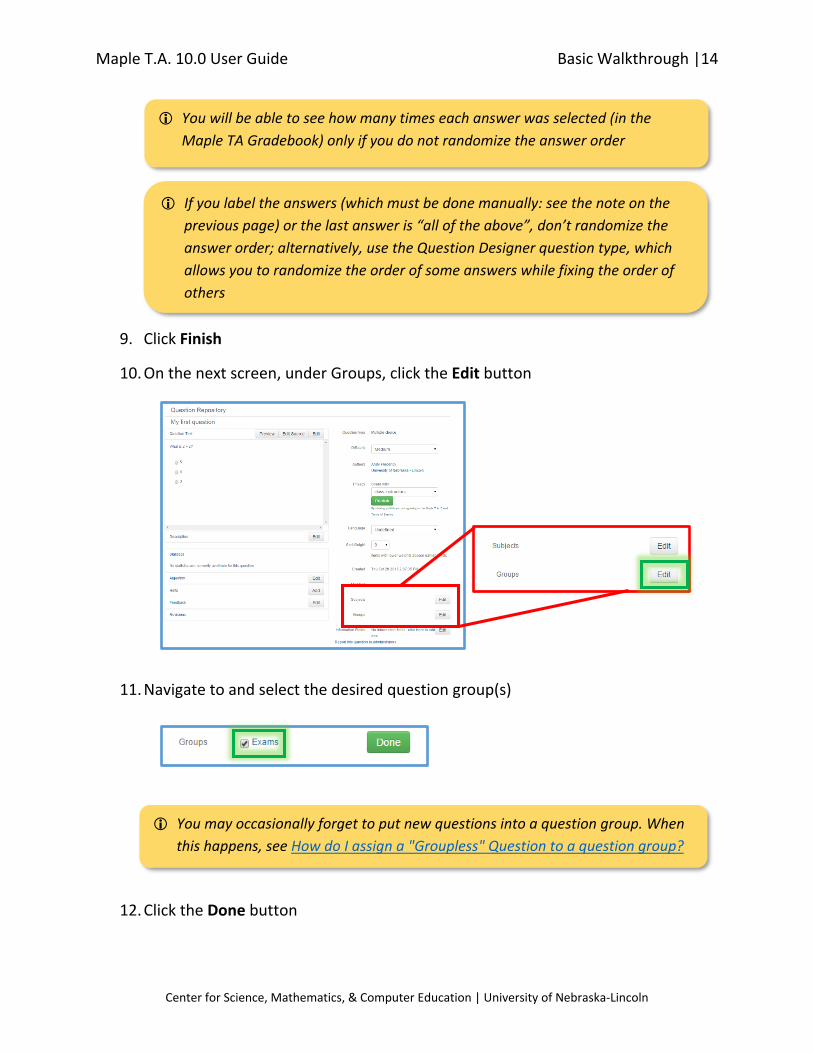
9. Click Finish
10. On the next screen, under Groups, click the Edit button
11. Navigate to and select the desired question group(s)
12. Click the Done button
You will be able to see how many times each answer was selected (in the
Maple TA Gradebook) only if you do not randomize the answer order
If you label the answers (which must be done manually: see the note on the
previous page) or the last answer is “all of the above”, don’t randomize the
answer order; alternatively, use the Question Designer question type, which
allows you to randomize the order of some answers while fixing the order of
others
You may occasionally forget to put new questions into a question group. When
this happens, see How do I assign a "Groupless" Question to a question group?

Maple T.A. 10.0 User Guide Basic Walkthrough |15
Center for Science, Mathematics, & Computer Education | University of Nebraska-Lincoln
PREVIEW A NEW QUESTION
Upon creating a new question, you will be shown that question’s View Question page. This page, which you can see an example of below, provides many details and settings for the question.
One of the most important parts of the View Question page is that it displays the question and gives you the opportunity to try it out.
Maple T.A. 10.0 User Guide Basic Walkthrough |16
Center for Science, Mathematics, & Computer Education | University of Nebraska-Lincoln
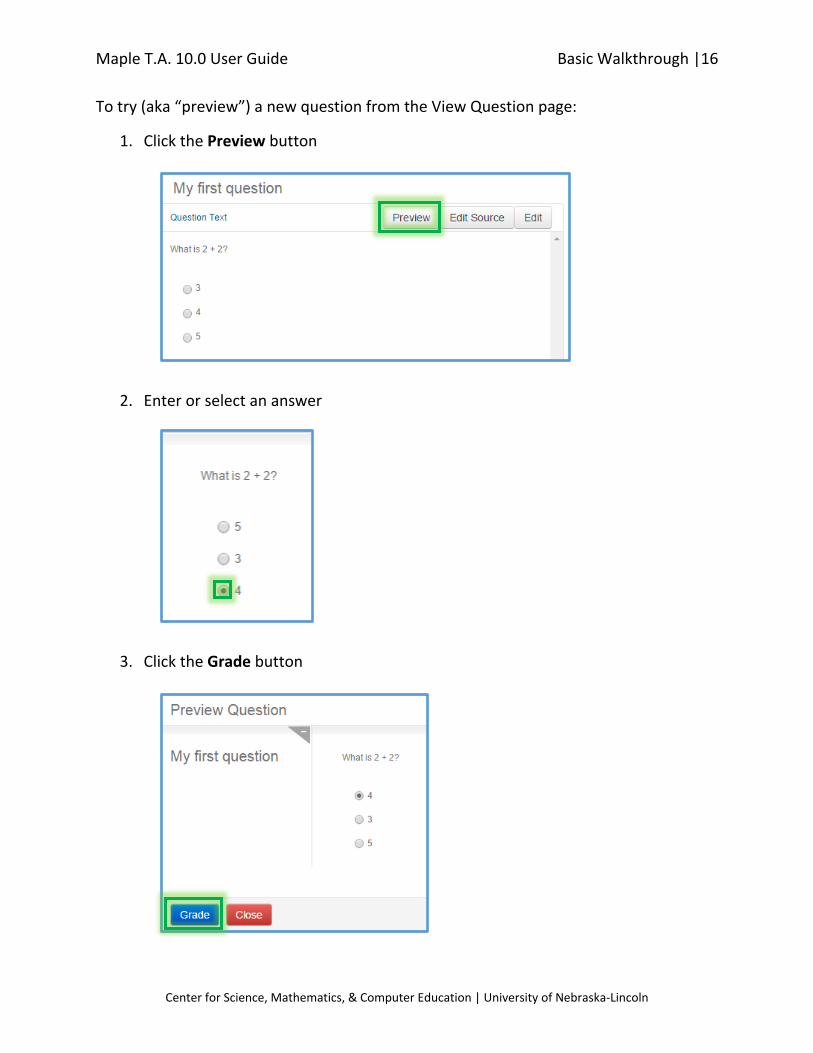
To try (aka “preview”) a new question from the View Question page:
1. Click the Preview button
2. Enter or select an answer
3. Click the Grade button

Maple T.A. 10.0 User Guide Basic Walkthrough |17
Center for Science, Mathematics, & Computer Education | University of Nebraska-Lincoln
4. Click the Back button to try the question again
5. Click the Close button to close the question preview window
6. If your question uses algorithms, you can generate a different version of the question by clicking the Refresh button
7. Take note of whether your answer was evaluated correctly; edit the question to fix any problems that you discover
Maple T.A. 10.0 User Guide Basic Walkthrough |18
Center for Science, Mathematics, & Computer Education | University of Nebraska-Lincoln
CREATE A QUESTION USING THE QUESTION DESIGNER
The Question Designer question type is the preferred question type. Question Designer
questions are a more flexible and extensible form of free response questions, which can
include multiple question types and response areas. They are especially useful when you
want to ask multiple questions based on a common set of information: for example, a
photo, a graph, or a table of data.
In the example below, we will create a Question Designer question that asks multiple
questions about George Washington.
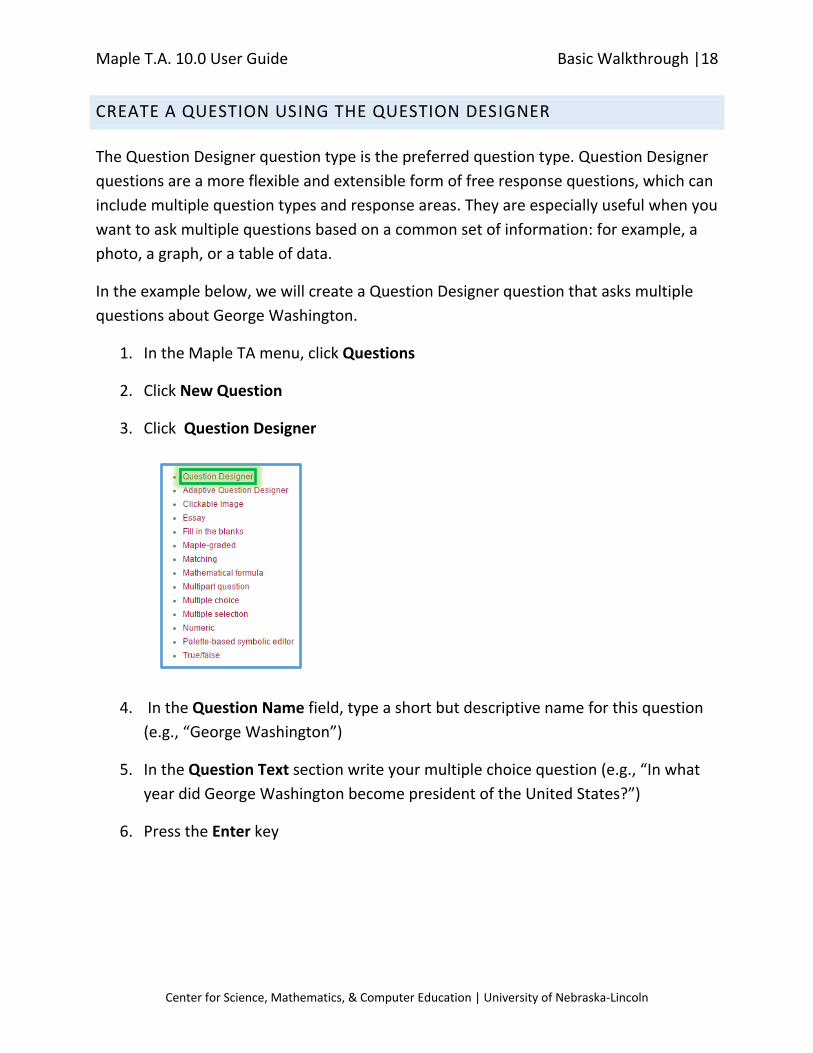
1. In the Maple TA menu, click Questions
2. Click New Question
3. Click Question Designer
4. In the Question Name field, type a short but descriptive name for this question
(e.g., “George Washington”)
5. In the Question Text section write your multiple choice question (e.g., “In what
year did George Washington become president of the United States?”)
6. Press the Enter key
Maple T.A. 10.0 User Guide Basic Walkthrough |19
Center for Science, Mathematics, & Computer Education | University of Nebraska-Lincoln
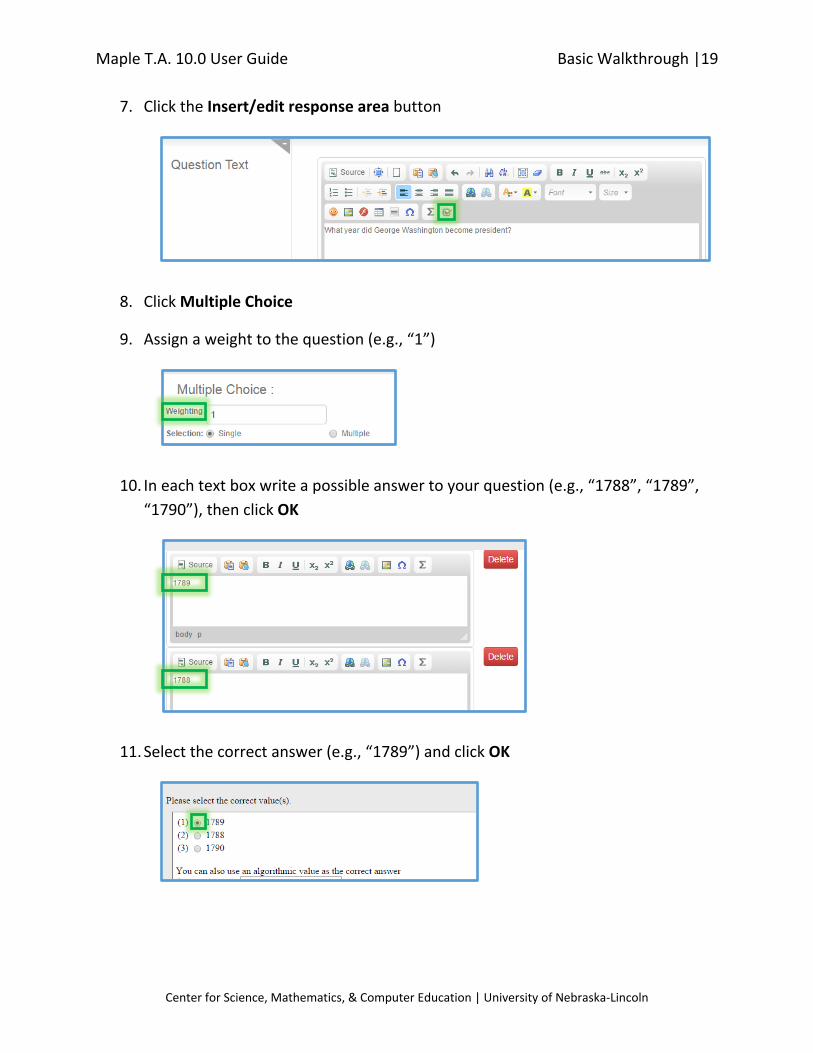
7. Click the Insert/edit response area button
8. Click Multiple Choice
9. Assign a weight to the question (e.g., “1”)
10. In each text box write a possible answer to your question (e.g., “1788”, “1789”,
“1790”), then click OK
11. Select the correct answer (e.g., “1789”) and click OK
Maple T.A. 10.0 User Guide Basic Walkthrough |20
Center for Science, Mathematics, & Computer Education | University of Nebraska-Lincoln
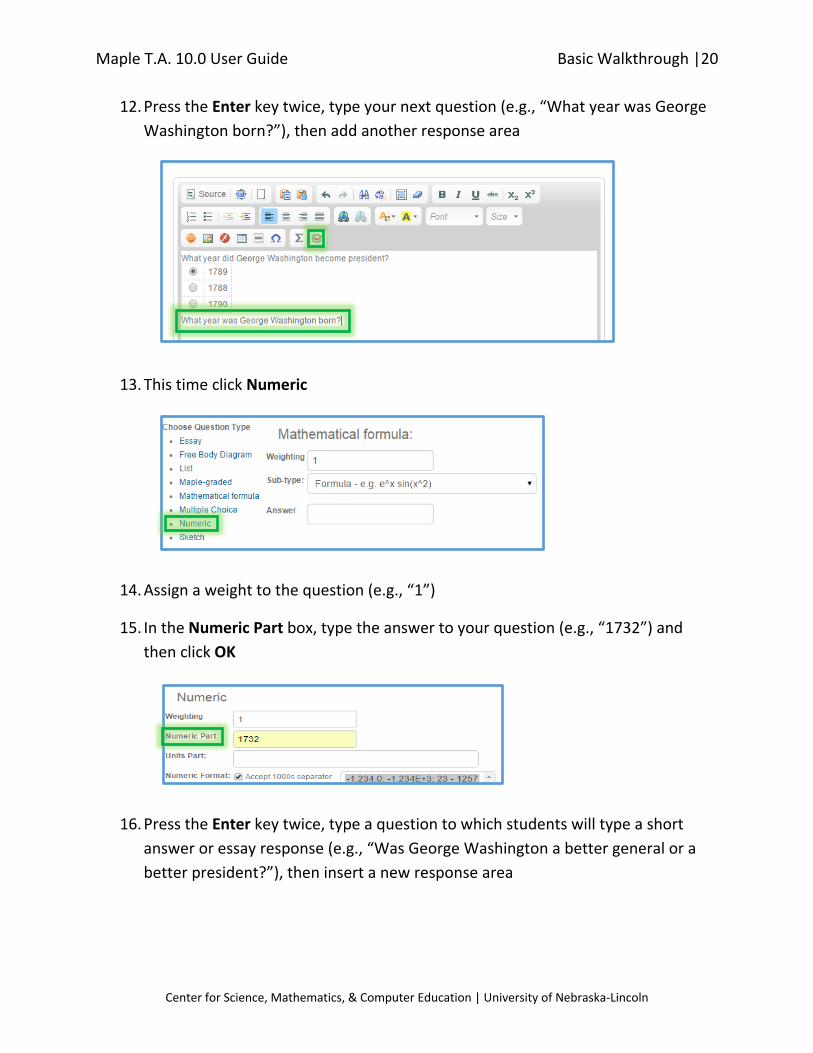
12. Press the Enter key twice, type your next question (e.g., “What year was George
Washington born?”), then add another response area
13. This time click Numeric
14. Assign a weight to the question (e.g., “1”)
15. In the Numeric Part box, type the answer to your question (e.g., “1732”) and
then click OK
16. Press the Enter key twice, type a question to which students will type a short
answer or essay response (e.g., “Was George Washington a better general or a
better president?”), then insert a new response area

Maple T.A. 10.0 User Guide Basic Walkthrough |21
Center for Science, Mathematics, & Computer Education | University of Nebraska-Lincoln
17. Click Essay
18. Assign a weight to your question (e.g., “5) and click OK
19. Click Finish
Response weighting can be tricky. Be sure you consider whether some response areas
should be weighted more heavily than others. In the above example, the essay response
has been given a weighting of 5 because typing a paragraph is harder than selecting an
answer from a list. Also, you will need to consider response weightings when you create
your assignments, because if a question’s response weightings add up to, say, 7, you will
probably want it to assign the question a point value that’s a multiple of 7. And because
Maple TA won’t remind you of your response areas’ weightings when you are assembling
your assignments in the Assignment Editor, a good strategy is to type a question’s total
weighting as a part of its name. In the above example, after creating the question we could
change its name from “George Washington” to “George Washington (7)”.

Maple T.A. 10.0 User Guide Basic Walkthrough |22
Center for Science, Mathematics, & Computer Education | University of Nebraska-Lincoln
CREATE A HOMEWORK/QUIZ ASSIGNMENT
1. In the Maple TA menu, click Assignments, then click Assignments in the drop-
down menu
2. Click New assignment
3. Type the assignment name
4. Click the Select Questions tab
Maple T.A. 10.0 User Guide Basic Walkthrough |23
Center for Science, Mathematics, & Computer Education | University of Nebraska-Lincoln
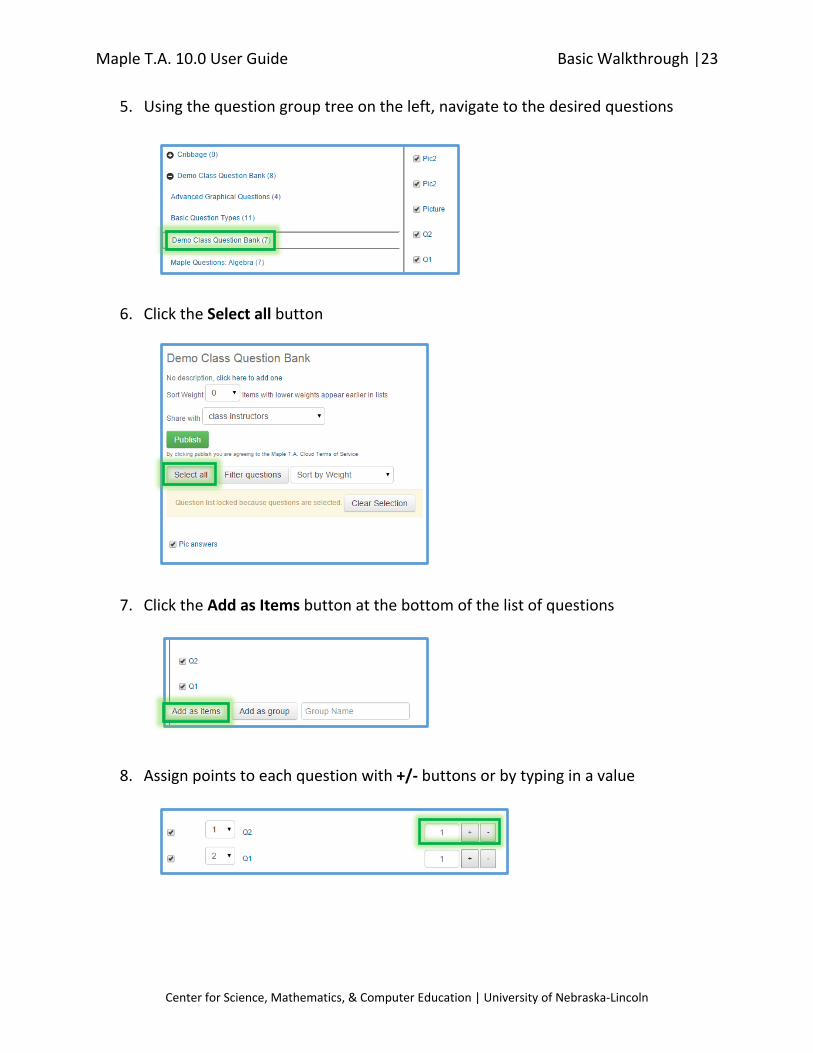
5. Using the question group tree on the left, navigate to the desired questions
6. Click the Select all button
7. Click the Add as Items button at the bottom of the list of questions
8. Assign points to each question with +/- buttons or by typing in a value
Maple T.A. 10.0 User Guide Basic Walkthrough |24
Center for Science, Mathematics, & Computer Education | University of Nebraska-Lincoln
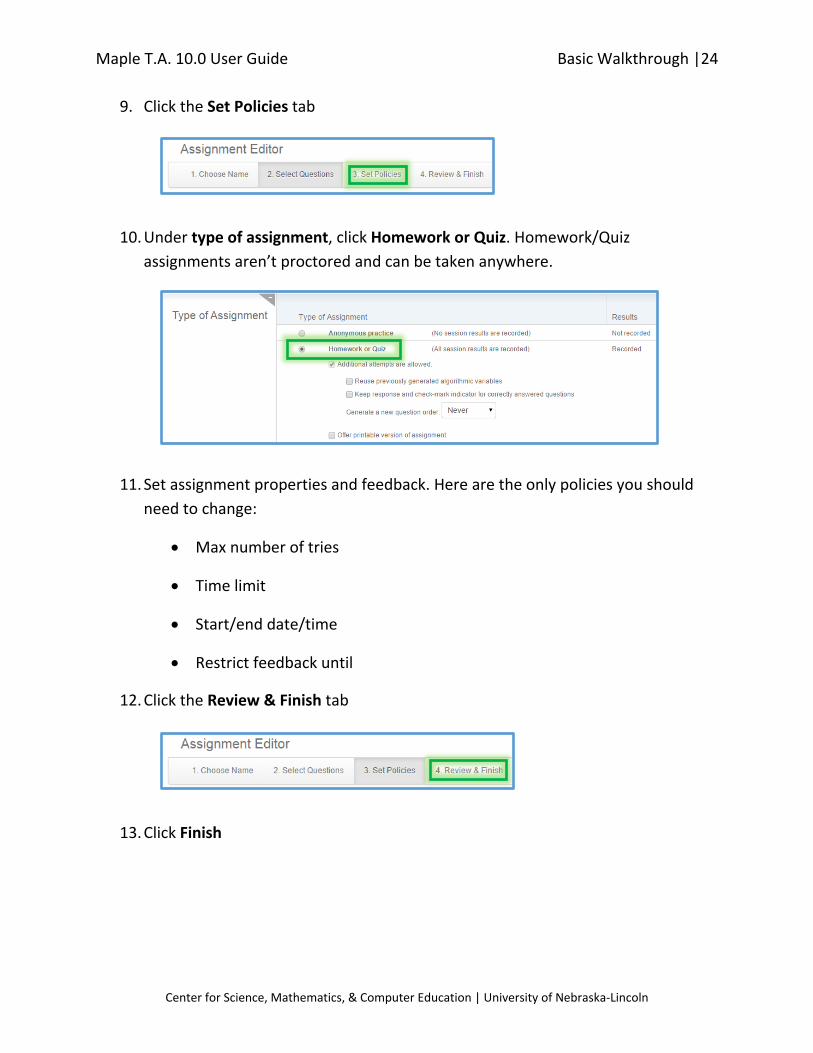
9. Click the Set Policies tab
10. Under type of assignment, click Homework or Quiz. Homework/Quiz
assignments aren’t proctored and can be taken anywhere.
11. Set assignment properties and feedback. Here are the only policies you should
need to change:
Max number of tries
Time limit
Start/end date/time
Restrict feedback until
12. Click the Review & Finish tab
13. Click Finish

Maple T.A. 10.0 User Guide Basic Walkthrough |25
Center for Science, Mathematics, & Computer Education | University of Nebraska-Lincoln
TRY OUT A NEW ASSIGNMENT
1. In the Maple TA menu, click the name of your class to go to the class homepage
2. Click the name of the new assignment
3. Answer the first question, click Next to proceed
4. When all questions have been answered, click the Submit Assignment button
Maple T.A. 10.0 User Guide Basic Walkthrough |26
Center for Science, Mathematics, & Computer Education | University of Nebraska-Lincoln
ADD ASSIGNMENT LINK TO LMS (BLACKBOARD)
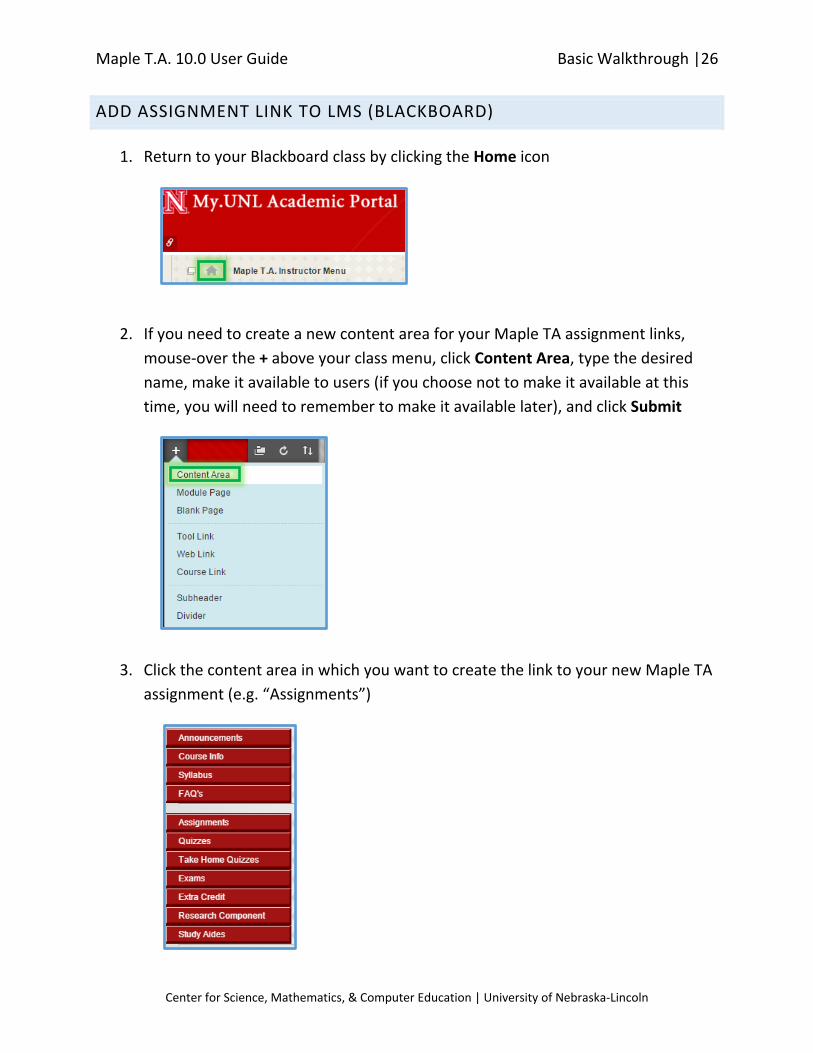
1. Return to your Blackboard class by clicking the Home icon
2. If you need to create a new content area for your Maple TA assignment links,
mouse-over the + above your class menu, click Content Area, type the desired
name, make it available to users (if you choose not to make it available at this
time, you will need to remember to make it available later), and click Submit
3. Click the content area in which you want to create the link to your new Maple TA
assignment (e.g. “Assignments”)

Maple T.A. 10.0 User Guide Basic Walkthrough |27
Center for Science, Mathematics, & Computer Education | University of Nebraska-Lincoln
4. Turn EDIT MODE on
5. Mouse-over Tools and click Add Maple T.A. Assignment
6. Select the desired assignment and click Submit
7. Click OK

Maple T.A. 10.0 User Guide Basic Walkthrough |28
Center for Science, Mathematics, & Computer Education | University of Nebraska-Lincoln
ADD ASSIGNMENT LINK TO LMS (CANVAS)
1. Return to your Canvas class
2. In the class menu, click Assignments
3. Click the red +Assignment button
4. Type the assignment name into the box
5. Set Points to the number of points the assignment is worth
6. Under Submission Type, select External Tool

Maple T.A. 10.0 User Guide Basic Walkthrough |29
Center for Science, Mathematics, & Computer Education | University of Nebraska-Lincoln
7. Under External Tool Options, click the Find button
8. Select Maple TA and then click the Select button
9. Click the checkbox for Load This Tool In A New Tab
10. Click the Save button
11. Click the Load [your assignment name] in a New Window button
Maple T.A. 10.0 User Guide Basic Walkthrough |30
Center for Science, Mathematics, & Computer Education | University of Nebraska-Lincoln
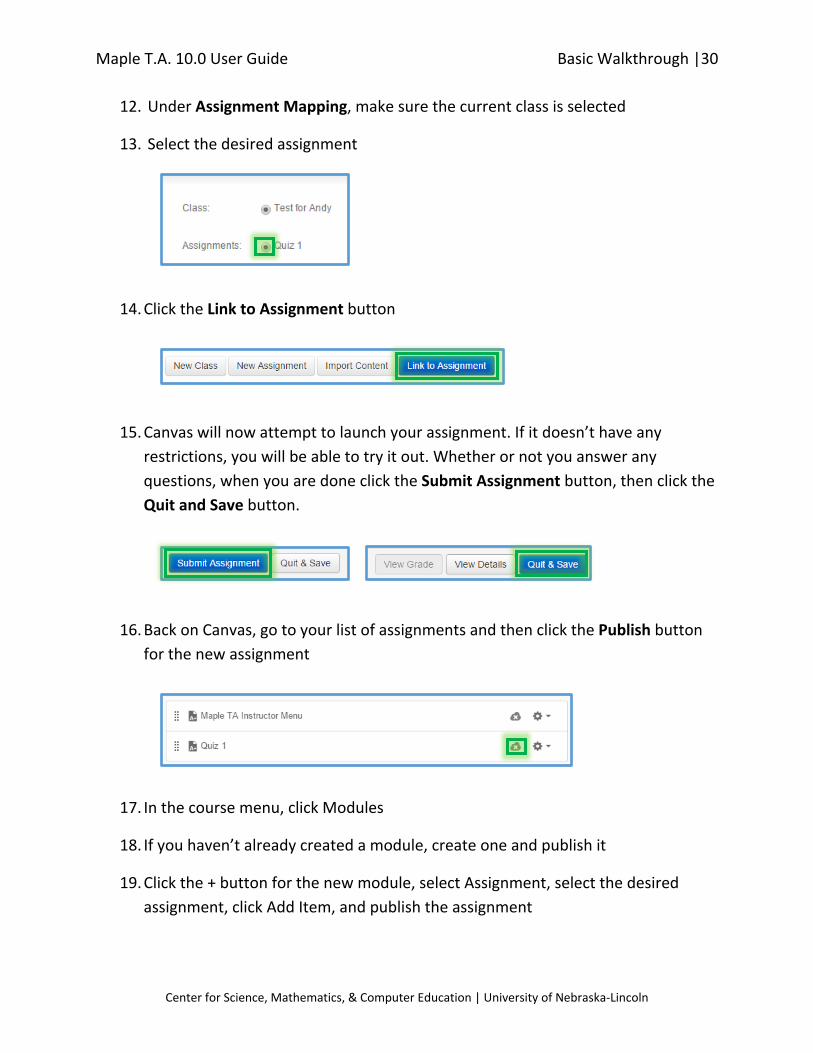
12. Under Assignment Mapping, make sure the current class is selected
13. Select the desired assignment
14. Click the Link to Assignment button
15. Canvas will now attempt to launch your assignment. If it doesn’t have any
restrictions, you will be able to try it out. Whether or not you answer any
questions, when you are done click the Submit Assignment button, then click the
Quit and Save button.
16. Back on Canvas, go to your list of assignments and then click the Publish button
for the new assignment
17. In the course menu, click Modules
18. If you haven’t already created a module, create one and publish it
19. Click the + button for the new module, select Assignment, select the desired
assignment, click Add Item, and publish the assignment
Maple T.A. 10.0 User Guide Question Repository |31
Center for Science, Mathematics, & Computer Education | University of Nebraska-Lincoln
QUESTION REPOSITORY
CREATE A MULTIPLE CHOICE QUESTION WITH GRAPHICS
Although you can embed graphics from any source, this is not recommended. If the graphics are on someone else’s website, those graphics could be removed or changed without your knowledge. Even if the graphics are on a site that is under your control, the more spread out your content the harder it will be to manage, and the more technology that can fail.
Therefore, it is strongly recommended that you upload all of your Maple TA assignment resources (images, PDFs, etc.) to your Maple TA class.
Any graphics that you wish to upload to your Maple TA class will first need to exist on your computer.
1. In the Maple TA menu, click Questions
2. In the Question Repository menu, click New Question
3. Click Multiple Choice
4. Type the Question Name
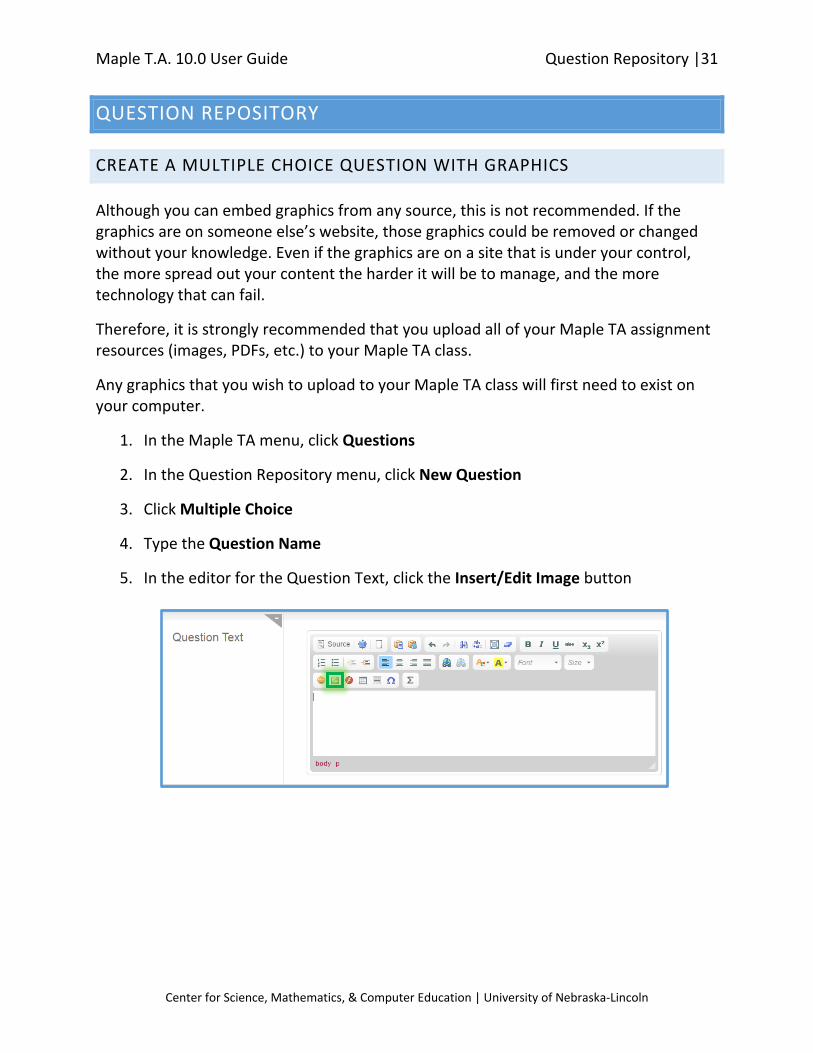
5. In the editor for the Question Text, click the Insert/Edit Image button
Maple T.A. 10.0 User Guide Question Repository |32
Center for Science, Mathematics, & Computer Education | University of Nebraska-Lincoln
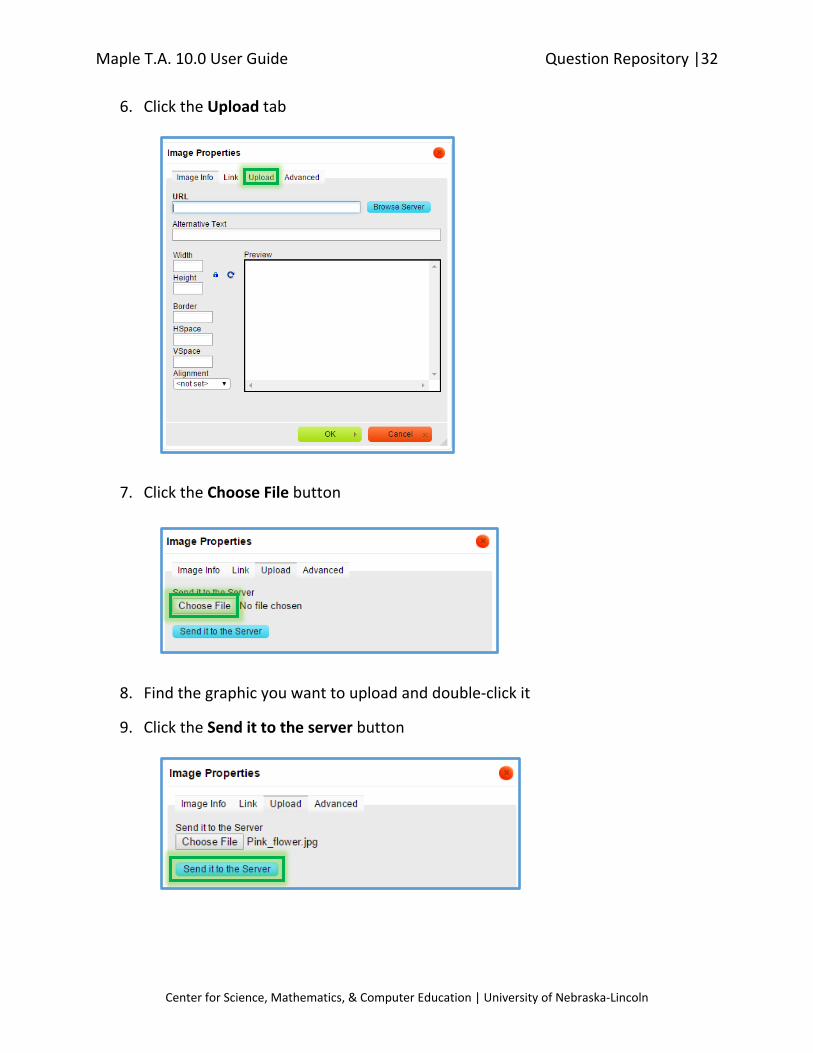
6. Click the Upload tab
7. Click the Choose File button
8. Find the graphic you want to upload and double-click it
9. Click the Send it to the server button
Maple T.A. 10.0 User Guide Question Repository |33
Center for Science, Mathematics, & Computer Education | University of Nebraska-Lincoln
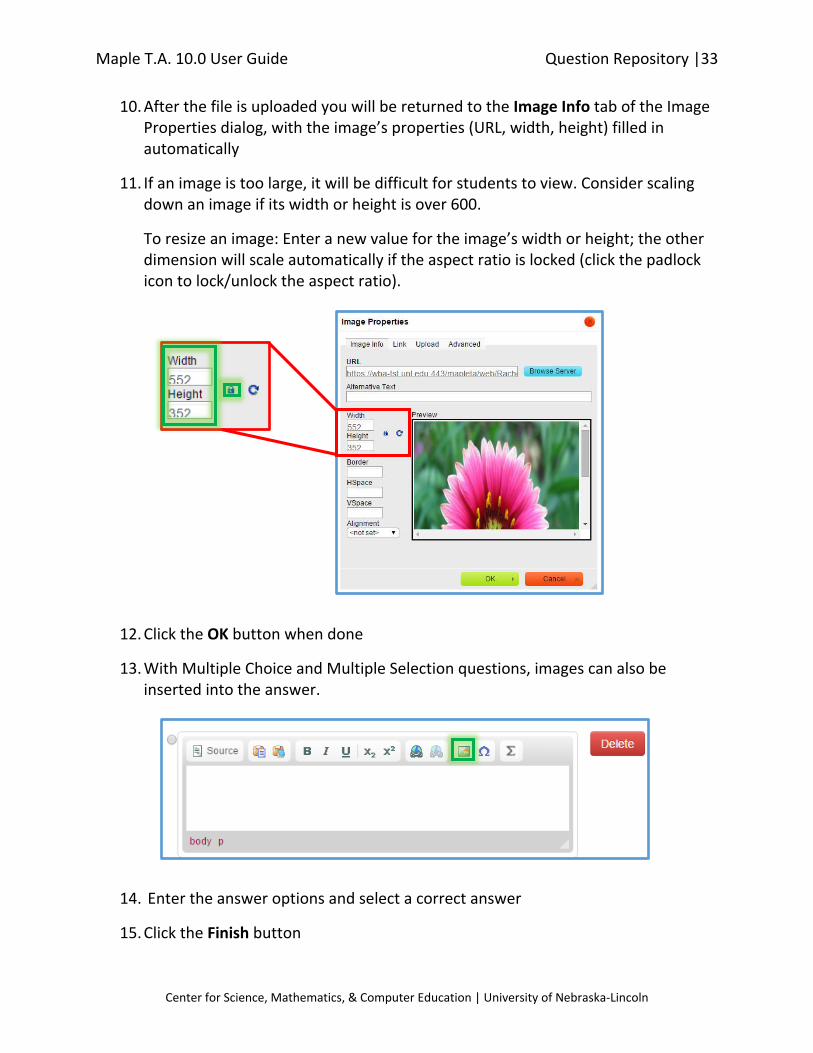
10. After the file is uploaded you will be returned to the Image Info tab of the Image Properties dialog, with the image’s properties (URL, width, height) filled in automatically
11. If an image is too large, it will be difficult for students to view. Consider scaling down an image if its width or height is over 600.
To resize an image: Enter a new value for the image’s width or height; the other dimension will scale automatically if the aspect ratio is locked (click the padlock icon to lock/unlock the aspect ratio).
12. Click the OK button when done
13. With Multiple Choice and Multiple Selection questions, images can also be inserted into the answer.
14. Enter the answer options and select a correct answer
15. Click the Finish button

Maple T.A. 10.0 User Guide Question Repository |34
Center for Science, Mathematics, & Computer Education | University of Nebraska-Lincoln
ASSIGNING GROUPLESS QUESTIONS TO A QUESTION GROUP
Because users are no longer prompted to assign new questions to a question group, it’s inevitable that you will occasionally forget to assign a new question to a question group. When this happens, you may panic when you look in a question group and discover that it doesn’t contain all the questions it should. But these “orphaned” questions are not lost for good.
WHERE CAN I FIND QUESTIONS THAT HAVEN’T BEEN ASSIGNED TO A
QUESTION GROUP?
In the Question Repository, your question groups are shown in the left hand column. At
the bottom of the list of question groups are two links. One link is for Questions not in
groups, and the other is for Deleted questions. By clicking the Questions not in groups
link, you can view all questions that have not been assigned to a question group.
HOW DO I ASSIGN A “GROUPLESS” QUESTION TO A QUESTION GROUP?
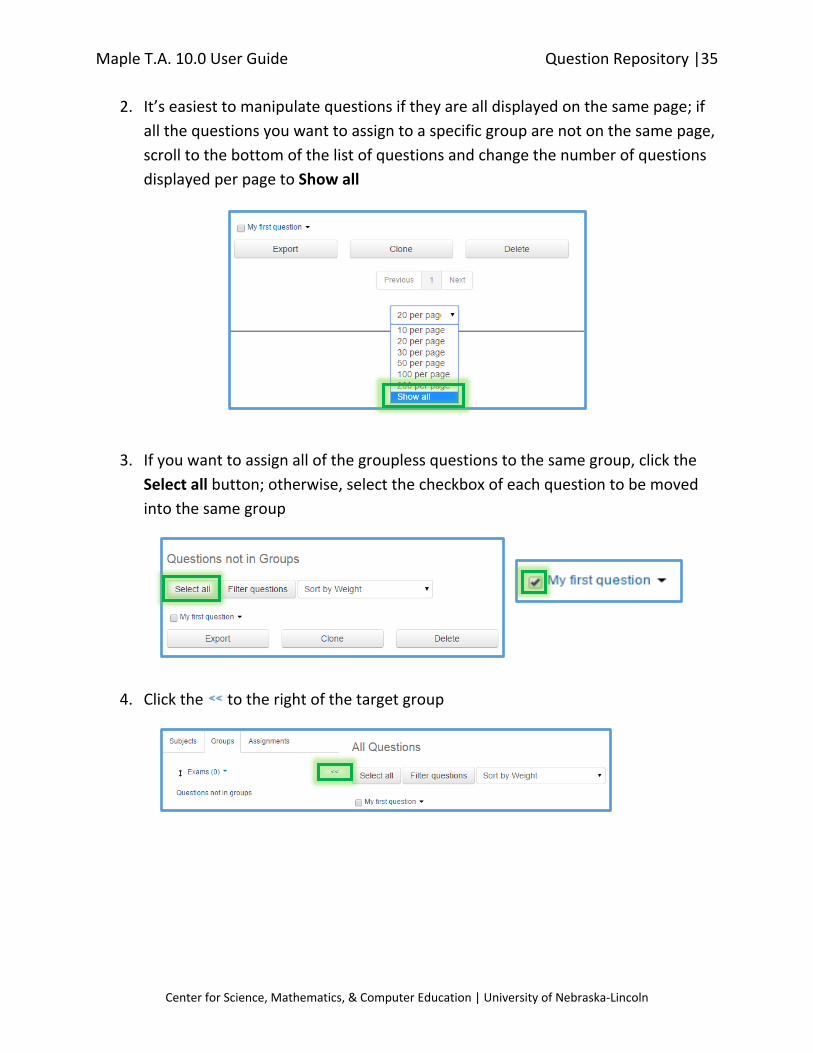
1. In the Question Repository, click Questions not in groups
Maple T.A. 10.0 User Guide Question Repository |35
Center for Science, Mathematics, & Computer Education | University of Nebraska-Lincoln
2. It’s easiest to manipulate questions if they are all displayed on the same page; if
all the questions you want to assign to a specific group are not on the same page,
scroll to the bottom of the list of questions and change the number of questions
displayed per page to Show all
3. If you want to assign all of the groupless questions to the same group, click the
Select all button; otherwise, select the checkbox of each question to be moved
into the same group
4. Click the to the right of the target group
Maple T.A. 10.0 User Guide Assignments |36
Center for Science, Mathematics, & Computer Education | University of Nebraska-Lincoln
ASSIGNMENTS
CREATE A PROCTORED EXAM
Coming soon.
Maple T.A. 10.0 User Guide Assignments |37
Center for Science, Mathematics, & Computer Education | University of Nebraska-Lincoln
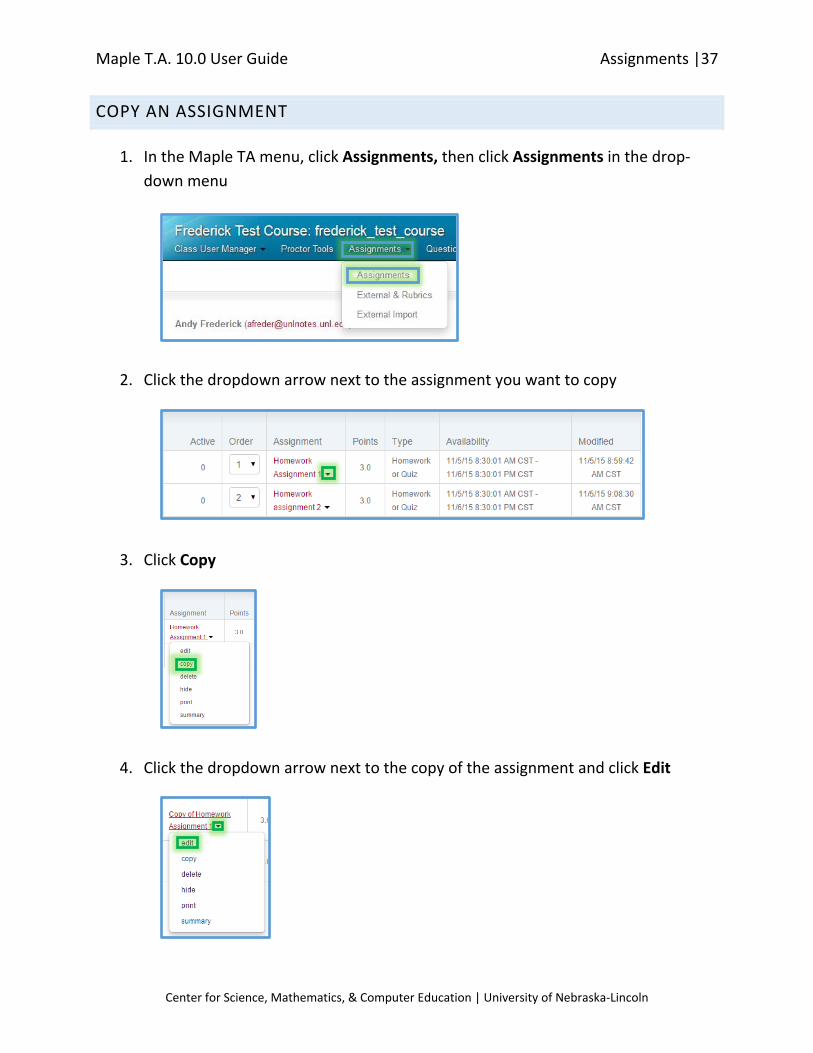
COPY AN ASSIGNMENT
1. In the Maple TA menu, click Assignments, then click Assignments in the drop-
down menu
2. Click the dropdown arrow next to the assignment you want to copy
3. Click Copy
4. Click the dropdown arrow next to the copy of the assignment and click Edit

Maple T.A. 10.0 User Guide Assignments |38
Center for Science, Mathematics, & Computer Education | University of Nebraska-Lincoln
5. Type a new name for the assignment
6. Click Set Policies
7. Change any setting(s) that you want to be changed for this copy of the
assignment
8. If maximum number of attempts had been set in the original assignment, notice
that in the copy this setting can’t be changed. This is due to a bug in Maple TA.
Even if you do not wish to change the maximum number of attempts for this
copy of the assignment, this problem needs to be fixed or students will not be
able to take the assignment.
a. To fix the problem, click the Advanced button (right under the tabs)
b. Click the Remove criterion button
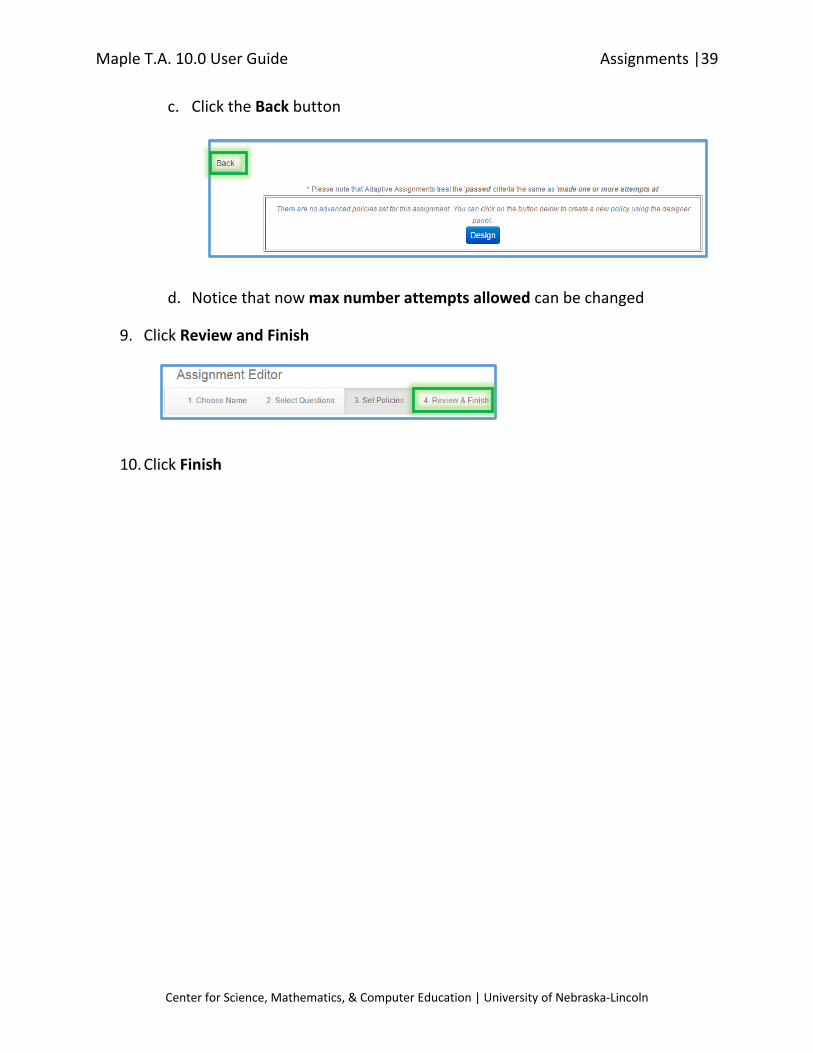
Maple T.A. 10.0 User Guide Assignments |39
Center for Science, Mathematics, & Computer Education | University of Nebraska-Lincoln
c. Click the Back button
d. Notice that now max number attempts allowed can be changed
9. Click Review and Finish
10. Click Finish

Maple T.A. 10.0 User Guide Assignments |40
Center for Science, Mathematics, & Computer Education | University of Nebraska-Lincoln
PROVIDE EXTRA TIME TO A STUDENT SERVED BY SSD
You don’t need to do anything, as SSD staff and the A&S testing center are able to add
extra time.
GIVE A STUDENT AN ADDITIONAL ATTEMPT AT AN ASSIGNMENT
Coming soon.
EXTEND THE DEADLINE FOR ALL STUDENTS
Coming soon.
EXTEND THE DEADLINE FOR SOME STUDENTS
Coming soon.

Maple T.A. 10.0 User Guide Gradebook |41
Center for Science, Mathematics, & Computer Education | University of Nebraska-Lincoln
GRADEBOOK
FORCE-GRADING
Sometimes students don’t submit their Maple TA assignments when they’re done. They
might click the Quit & Save button instead of the Submit Assignment button, or they
might close the assignment window without clicking any button. When this happens,
you will need to force-grade these assignment.
While most students do submit their assignments, there will usually be a few who don’t,
and so it’s highly recommended that you check for and force-grade any active
assignment attempts following each assignment deadline.
To check for and force-grade any active assignment:
1. In the Maple TA menu, click Assignments, then click Assignments in the drop-
down menu
2. In the table of assignments, look for the name of the assignment that just ended
3. If the number in the assignment’s Active column is greater than zero, click it
Maple T.A. 10.0 User Guide Gradebook |42
Center for Science, Mathematics, & Computer Education | University of Nebraska-Lincoln
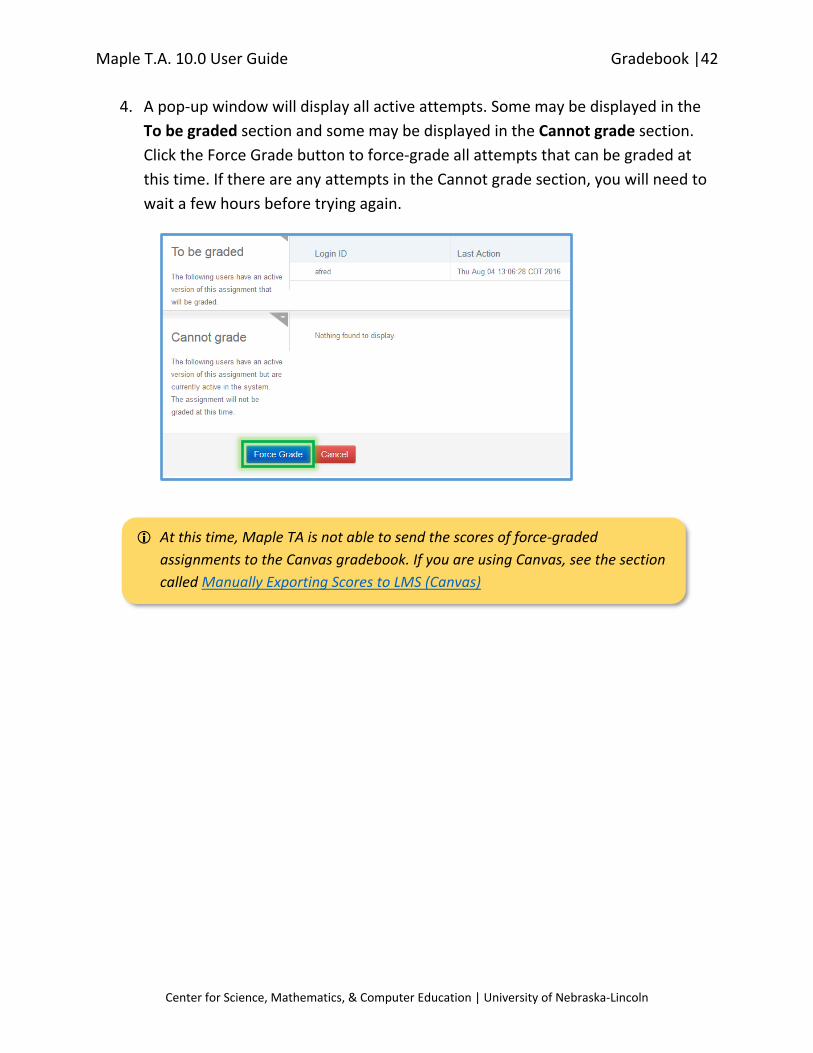
4. A pop-up window will display all active attempts. Some may be displayed in the
To be graded section and some may be displayed in the Cannot grade section.
Click the Force Grade button to force-grade all attempts that can be graded at
this time. If there are any attempts in the Cannot grade section, you will need to
wait a few hours before trying again.
At this time, Maple TA is not able to send the scores of force-graded
assignments to the Canvas gradebook. If you are using Canvas, see the section
called Manually Exporting Scores to LMS (Canvas)
Maple T.A. 10.0 User Guide Gradebook |43
Center for Science, Mathematics, & Computer Education | University of Nebraska-Lincoln
MANUAL GRADING (BY QUESTION)
Because Maple TA 10 doesn’t provide any feedback when a new grade is entered and
saved, saving each new grade as you go (which is what I used to recommend) would be
too confusing and frustrating. So now my recommendation is to grade all answers and
then save, because this method requires you to select each student whose score should
be updated, which provides a visual reminder of your progress.
Note: Often it’s more convenient/efficient to do manual grading by question rather than
by student. But the by-student method is fairly straightforward, while the by-question
method isn’t. Therefore, these instructions describe how to grade by question.
1. You will need to navigate through the structure of the assignment to find the
questions that require manual grading. Therefore, before going to the Maple TA
Gradebook, it is often best to go to Assignments and edit the assignment and
review its structure.
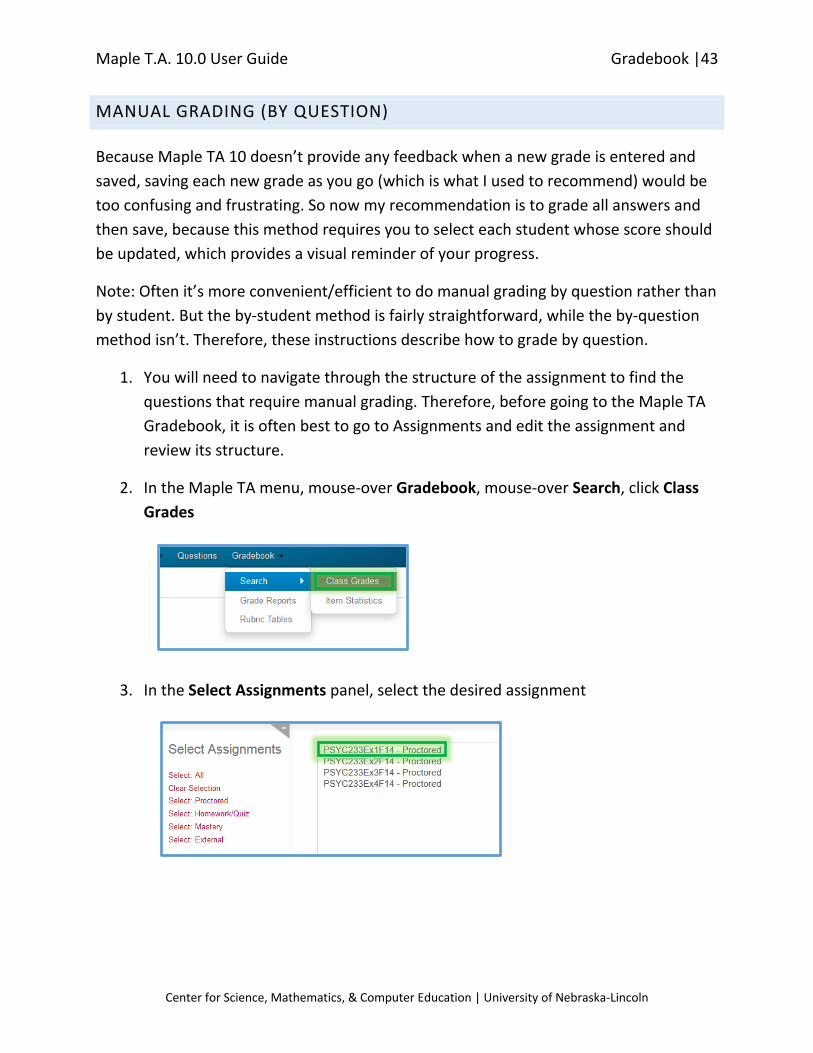
2. In the Maple TA menu, mouse-over Gradebook, mouse-over Search, click Class
Grades
3. In the Select Assignments panel, select the desired assignment

Maple T.A. 10.0 User Guide Gradebook |44
Center for Science, Mathematics, & Computer Education | University of Nebraska-Lincoln
4. In the Filter Results panel…
a. For Classes (if you are working in a parent class – if you don’t know what
that means, you can skip this step), select the desired class(es); hold down
the Ctrl key to select multiple classes, or click/shift-click to select a range
of classes
b. For List, select Students with grades
c. For Progress, selected To Be Reviewed
5. At the very bottom of the browser page, set Rows to 999 (the goal is to display all
students on one page)
6. Click the Search button
7. Scroll down to see a table of student scores for the selected assignment

Maple T.A. 10.0 User Guide Gradebook |45
Center for Science, Mathematics, & Computer Education | University of Nebraska-Lincoln
8. Click the name of the assignment at the top of the Grade column
9. You will now see a table that shows student scores broken down by the question
groups and/or questions at the root level of the assignment.
a. Question Groups: The column labels for question groups end with a plus
sign (e.g., Q1+ in the screen capture above represents a question group)
b. Questions: The column labels for questions do not end with a plus sign
(e.g., Q2 in the screen capture above represents a question), and they are
accompanied by a preview button:
10. Locate the desired question. If the question is in a question group, click the
column label of its suspected question group to navigate into it.
If you click the wrong question group, just click your browser’s Back button to
back out of it.
Maple T.A. 10.0 User Guide Gradebook |46
Center for Science, Mathematics, & Computer Education | University of Nebraska-Lincoln
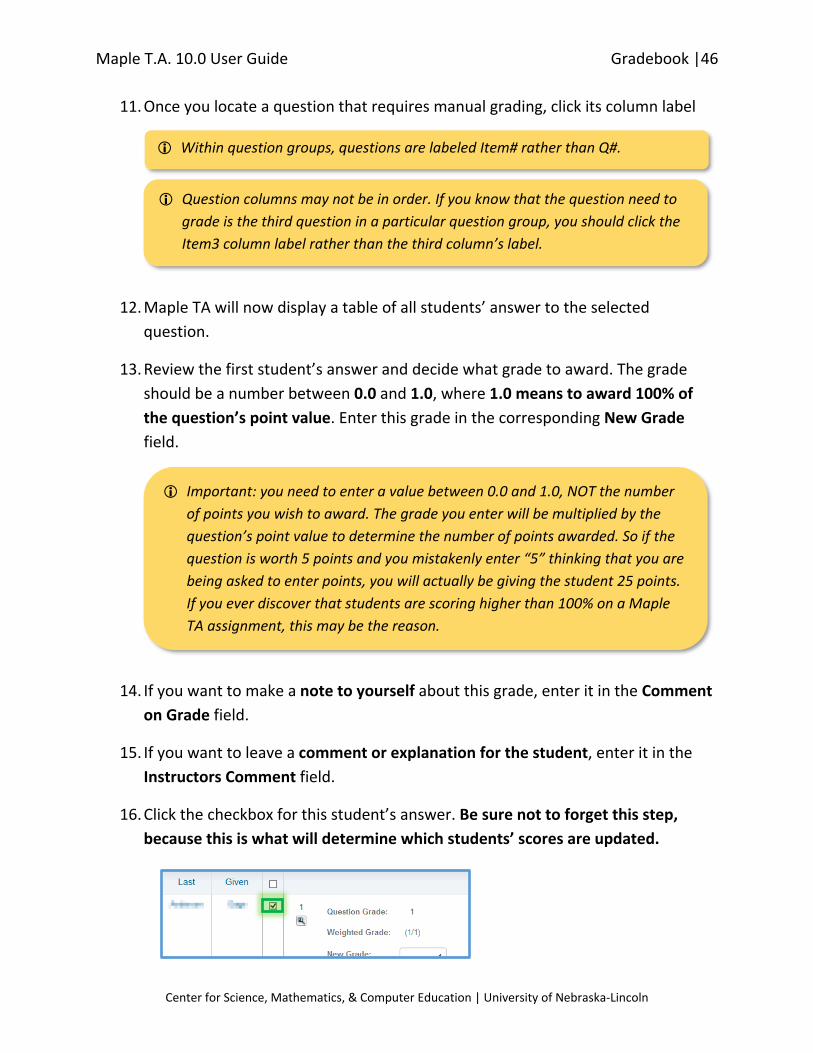
11. Once you locate a question that requires manual grading, click its column label
12. Maple TA will now display a table of all students’ answer to the selected
question.
13. Review the first student’s answer and decide what grade to award. The grade
should be a number between 0.0 and 1.0, where 1.0 means to award 100% of
the question’s point value. Enter this grade in the corresponding New Grade
field.
14. If you want to make a note to yourself about this grade, enter it in the Comment
on Grade field.
15. If you want to leave a comment or explanation for the student, enter it in the
Instructors Comment field.
16. Click the checkbox for this student’s answer. Be sure not to forget this step,
because this is what will determine which students’ scores are updated.
Question columns may not be in order. If you know that the question need to
grade is the third question in a particular question group, you should click the
Item3 column label rather than the third column’s label.
Important: you need to enter a value between 0.0 and 1.0, NOT the number
of points you wish to award. The grade you enter will be multiplied by the
question’s point value to determine the number of points awarded. So if the
question is worth 5 points and you mistakenly enter “5” thinking that you are
being asked to enter points, you will actually be giving the student 25 points.
If you ever discover that students are scoring higher than 100% on a Maple
TA assignment, this may be the reason.
Within question groups, questions are labeled Item# rather than Q#.
Maple T.A. 10.0 User Guide Gradebook |47
Center for Science, Mathematics, & Computer Education | University of Nebraska-Lincoln
17. Continue scoring students’ answers in this way, repeating steps 13 through 16 for
each grade to be updated
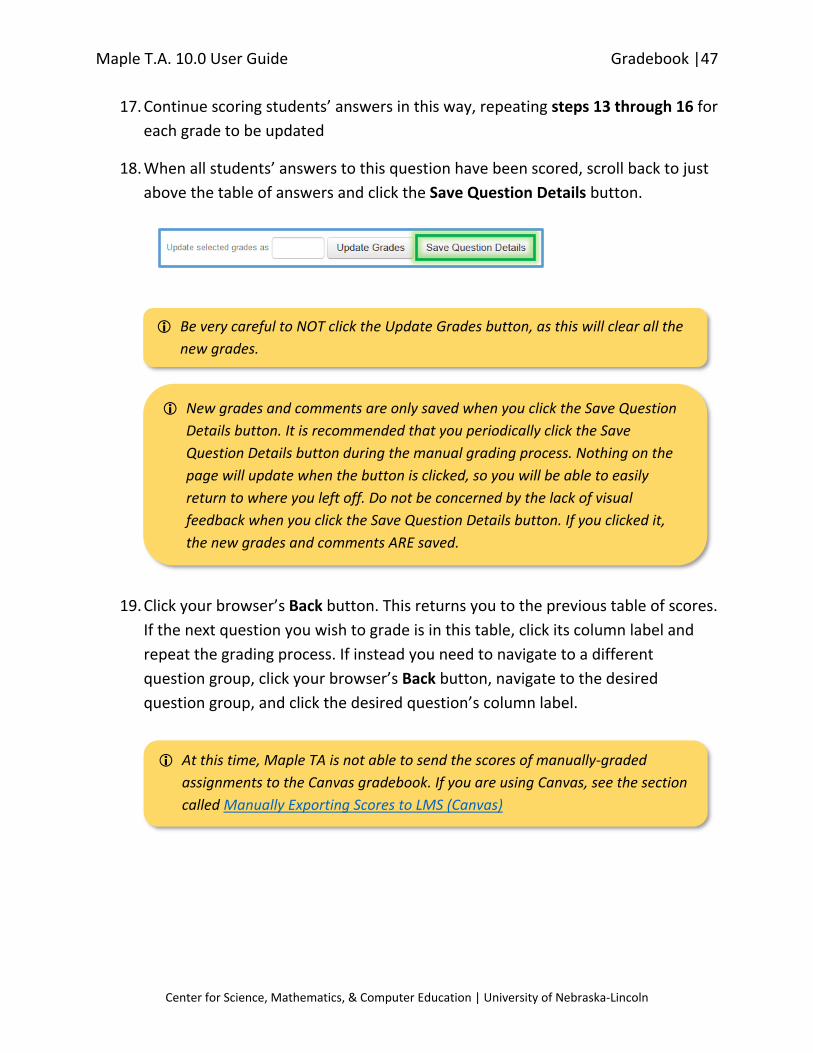
18. When all students’ answers to this question have been scored, scroll back to just
above the table of answers and click the Save Question Details button.
19. Click your browser’s Back button. This returns you to the previous table of scores.
If the next question you wish to grade is in this table, click its column label and
repeat the grading process. If instead you need to navigate to a different
question group, click your browser’s Back button, navigate to the desired
question group, and click the desired question’s column label.
Be very careful to NOT click the Update Grades button, as this will clear all the
new grades.
New grades and comments are only saved when you click the Save Question
Details button. It is recommended that you periodically click the Save
Question Details button during the manual grading process. Nothing on the
page will update when the button is clicked, so you will be able to easily
return to where you left off. Do not be concerned by the lack of visual
feedback when you click the Save Question Details button. If you clicked it,
the new grades and comments ARE saved.
At this time, Maple TA is not able to send the scores of manually-graded
assignments to the Canvas gradebook. If you are using Canvas, see the section
called Manually Exporting Scores to LMS (Canvas)

Maple T.A. 10.0 User Guide Gradebook |48
Center for Science, Mathematics, & Computer Education | University of Nebraska-Lincoln
MANUALLY EXPORTING SCORES TO LMS (CANVAS)
At this time, Maple TA is not able to send the scores of force-graded or manually-graded
assignments to the Canvas gradebook. (Scores ARE sent to Canvas when a student
submits their assignment.) Maplesoft says this capability will be provided in the next
Maple TA update, which we expect to upgrade to during the 2016 winter break.
For now, whenever you force-grade or manually-grade any attempts for an assignment,
you will need to export the assignment’s scores from Maple TA and import them into
Canvas. Normally this would be a difficult process, but I’ve created an Excel spreadsheet
that should make it fairly simple.
1. To begin, download the Maple TA Gradebook Tool for Canvas (if you haven’t
already) and open it in Excel.
2. Follow the sub-steps below to export your Canvas grade data and put it in the
Maple TA Gradebook Tool for Canvas spreadsheet; you can skip this step if you’ve
already done it, and your Canvas grade data is current (by current, I mean that no
new students have joined the class, and the assignment for which you need to
export scores already has a column in your Canvas grade data)
a. In your Canvas class, click Grades
b. At the top right, click Export then click Current
c. Save the exported CSV file to the same location as the Maple TA
Gradebook Tool for Canvas
d. Open the CSV file
e. Press Ctrl-A and Ctrl-C to copy the exported Canvas data
f. Go to the Canvas Export worksheet in the Maple TA Gradebook Tool for
Canvas spreadsheet
g. Click cell A1
h. Press Ctrl-V to paste the Canvas data

Maple T.A. 10.0 User Guide Gradebook |49
Center for Science, Mathematics, & Computer Education | University of Nebraska-Lincoln
3.

Maple T.A. 10.0 User Guide Course Modules |50
Center for Science, Mathematics, & Computer Education | University of Nebraska-Lincoln
COURSE MODULES
CREATE AND EXPORT A COURSE MODULE
1. In Maple TA menu, click Questions
2. Click Course Modules
3. Click New
4. For each type of content (Groups, Assignments, and Web Folders), click Select All
and then click > to add the selected content to the course module

Maple T.A. 10.0 User Guide Course Modules |51
Center for Science, Mathematics, & Computer Education | University of Nebraska-Lincoln
5. Click OK
6. Type a name for the course module; there is no need to fill in any other fields
7. Click the OK button
8. Click the checkbox for the course module you would like to export
Maple T.A. 10.0 User Guide Course Modules |52
Center for Science, Mathematics, & Computer Education | University of Nebraska-Lincoln
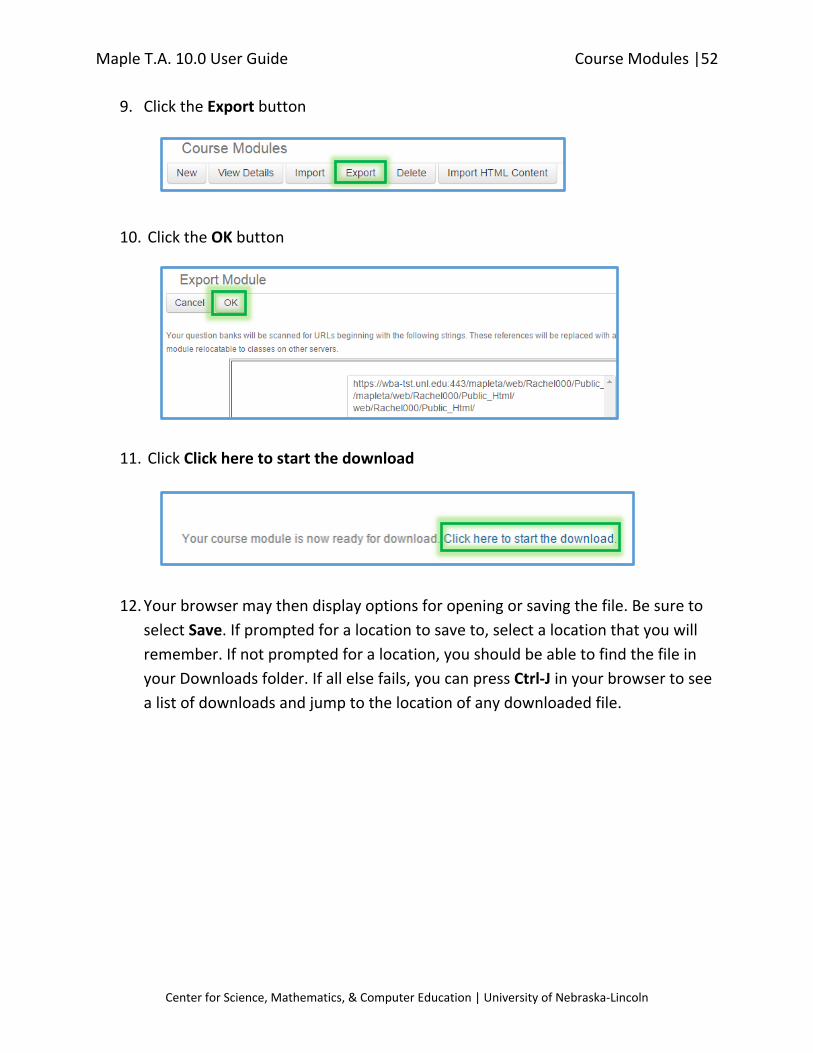
9. Click the Export button
10. Click the OK button
11. Click Click here to start the download
12. Your browser may then display options for opening or saving the file. Be sure to
select Save. If prompted for a location to save to, select a location that you will
remember. If not prompted for a location, you should be able to find the file in
your Downloads folder. If all else fails, you can press Ctrl-J in your browser to see
a list of downloads and jump to the location of any downloaded file.
Maple T.A. 10.0 User Guide Course Modules |53
Center for Science, Mathematics, & Computer Education | University of Nebraska-Lincoln
IMPORT A COURSE MODULE INTO A NEW CLASS
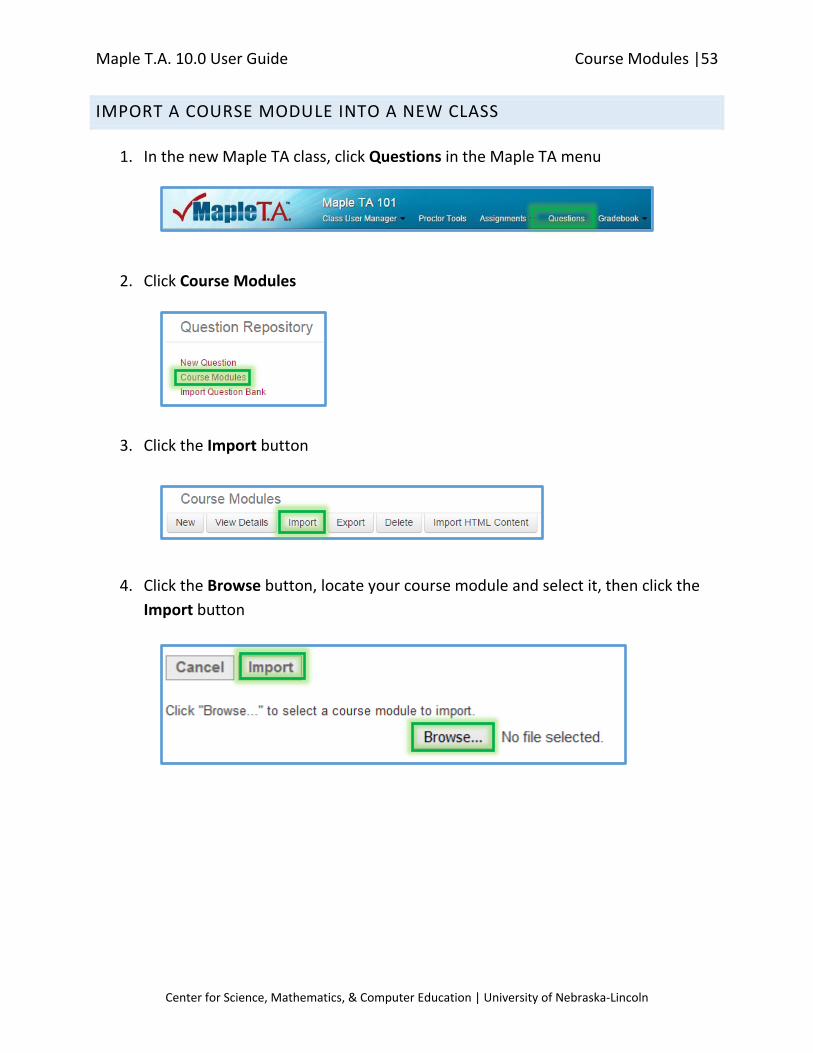
1. In the new Maple TA class, click Questions in the Maple TA menu
2. Click Course Modules
3. Click the Import button
4. Click the Browse button, locate your course module and select it, then click the
Import button
Maple T.A. 10.0 User Guide Course Modules |54
Center for Science, Mathematics, & Computer Education | University of Nebraska-Lincoln
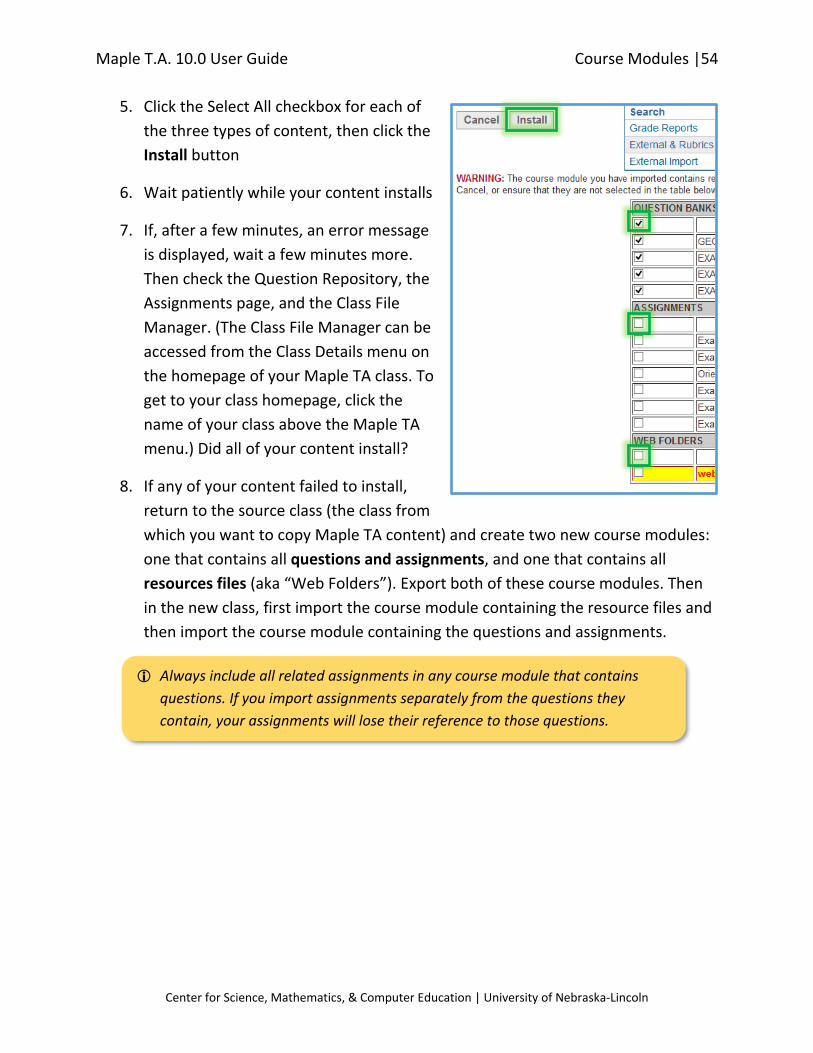
5. Click the Select All checkbox for each of
the three types of content, then click the
Install button
6. Wait patiently while your content installs
7. If, after a few minutes, an error message
is displayed, wait a few minutes more.
Then check the Question Repository, the
Assignments page, and the Class File
Manager. (The Class File Manager can be
accessed from the Class Details menu on
the homepage of your Maple TA class. To
get to your class homepage, click the
name of your class above the Maple TA
menu.) Did all of your content install?
8. If any of your content failed to install,
return to the source class (the class from
which you want to copy Maple TA content) and create two new course modules:
one that contains all questions and assignments, and one that contains all
resources files (aka “Web Folders”). Export both of these course modules. Then
in the new class, first import the course module containing the resource files and
then import the course module containing the questions and assignments.
Always include all related assignments in any course module that contains
questions. If you import assignments separately from the questions they
contain, your assignments will lose their reference to those questions.