Embed Size (px)
Citation preview

Attention: This is draft version and
errors are possible
MOSA 4600 Plus
Operation Manual
Edition 7.0
Update:2008/07/16
DOC No.: 9171005107
MOSA 4600 Plus Operation Manual

Operation Manual
1
Table of Contents
Table of Contents .......................................................................................1
1. Safety Instructions ..........................................................................14
2. Preface..............................................................................................15
3. Introduction of Features.................................................................16
3.1 Trunk Feature ............................................................................................................... 16
3.2 Line Feature.................................................................................................................. 17
3.3 Phone Feature ............................................................................................................... 17
3.4 Extension Feature ......................................................................................................... 18
3.5 System Feature ............................................................................................................. 19
4. Appearance......................................................................................20
4.1 Panel ............................................................................................................................. 20
4.2 Module Appearance...................................................................................................... 21
4.3 LED indicators ............................................................................................................. 22
4.4 Connection Ports .......................................................................................................... 23
5. Dialing Plan for Access Code .........................................................24
5.1 Rules for PBX Access Code......................................................................................... 24
5.2 Default Example of PBX Access Code ........................................................................ 25
5.3 Rule for Extension Number.......................................................................................... 25
6. Planning of Extension.....................................................................27
6.1 Extension Number ........................................................................................................ 27 6.1.1 How to Know Default Extension No. from Web .......................................................27 6.1.2 How to Know Default Extension No. from Box.........................................................27
6.2 Configuration of Pickup Group.................................................................................... 28 6.2.1 Pick up Extension of This Machine ..........................................................................28 6.2.2 Call Pickup over the Other Machine ........................................................................29
6.3 Configuration of Extension Permission ....................................................................... 30 6.3.1 Permission of Outbound Transit Calls......................................................................31 6.3.2 Permission to make outgoing call (Outbound Transit Control).................................34 6.3.3 Barring Class ...........................................................................................................36
Operation Manual
2
6.4 Configuration to Join Operator Group ......................................................................... 42 6.4.1 Operator on This Machine .......................................................................................42 6.4.2 Network Operator.....................................................................................................44
6.5 Change Extension Number........................................................................................... 46 6.5.1 Change Prefix of Extension .....................................................................................46 6.5.2 Configure Dedicate Extension Number....................................................................46
6.6 Limit the Duration of Trunk Call from Extension........................................................ 47
7. Configuration of Trunk ..................................................................48
7.1 Disable Useless Trunk Port .......................................................................................... 48
7.2 Permission of Incoming Call Route to Trunk............................................................... 49
7.3 Allow Incoming Call Only (Incoming Only Trunk) .................................................... 50
7.4 Call Forward to Backup Line for Incoming Trunk call................................................ 51
7.5 Call Forward for Day/Night incoming Trunk call........................................................ 53
8. Configuration of Speedy Dial.........................................................55
8.1 Abbreviated Dial .......................................................................................................... 55
8.2 Digit Map ..................................................................................................................... 56
9. Connect Tradition Analog PBX .....................................................57
9.1 Connect FXS to PBX Analog Trunk ............................................................................ 57 9.1.1 Configuration on MOSA 4600 Plus ..........................................................................57 9.1.2 Configuration on Analog PBX ..................................................................................58
9.2 Connect FXO to PBX Analog Line.............................................................................. 60 9.2.1 Configuration on MOSA 4600 Plus ..........................................................................61 9.2.2 Busy Tone Detection of PBX....................................................................................63
10. Work with Other MOSA Products ................................................64
10.1 Configuration of Stacking/Networking ........................................................................ 64 10.1.1 Configure Different Port Number When Stacking ....................................................64 10.1.2 Add Prefix / Extension Number................................................................................65 10.1.3 Input Information of Other Machine into Phonebook ...............................................66 10.1.4 Add Permission of Outbound Transit to PSTN.........................................................68
10.2 Configuration of Group Dialing ................................................................................... 72 10.2.1 Method of Configuration...........................................................................................72 10.2.2 Dialing Method.........................................................................................................73

Operation Manual
3
11. Connect FAX Machine ...................................................................74
12. Configuration of DISA (Auto Attendant) System ........................75
12.1 System Greeting of DISA System................................................................................ 75 12.1.1 Record System Greeting..........................................................................................76 12.1.2 Listen the Recorded Greeting..................................................................................78
12.2 Configuration the Time of Day/Night DISA Mode...................................................... 78
12.3 Configure Greeting Mode for Special Holiday ............................................................ 81
12.4 The Configuration to Cascade IP DISA ....................................................................... 83
13. Work with Voice Mail Product ......................................................83
13.1 Basic Configuration of VM and MOSA 4600 Plus ...................................................... 84 13.1.1 Configuration on MOSA 4600 Plus ..........................................................................84 13.1.2 Configuration on VM ................................................................................................85
13.2 Message Configuration of VM and MOSA 4600 Plus................................................. 87 13.2.1 Use Call Forward Function of MOSA 4600 Plus to Connect VM .............................87 13.2.2 Use VM Function of MOSA 4600 Plus and Busy Tone / Ring Back Detection
Function of VM.........................................................................................................90
13.3 Retrieve (listen) Message / New Message Notification Related Configuration .......... 91 13.3.1 Backup on VM System.............................................................................................93
13.4 Use Built-In Voice Mail Function ................................................................................ 93 13.4.1 Use RAM or Flash as VM storage ...........................................................................95 13.4.2 Reset or Re-create Voice Mail Box..........................................................................99 13.4.3 Use pre-recorded prompt greeting from other MOSA............................................100
14. Create the Connection of SIP Device...........................................101
14.1 Concept:...................................................................................................................... 101
14.2 SIP Line (SIP Proxy Server)....................................................................................... 101 14.2.1 Open a New Account .............................................................................................101 14.2.2 Specify a Channel to the New Created Account ....................................................103 14.2.3 Registration of SIP Device (Client) ........................................................................104 14.2.4 Check Registration Status .....................................................................................106
14.3 SIP Trunk Server ........................................................................................................ 107 14.3.1 Register to SIP Telephony Server Provider ...........................................................107 14.3.2 Configuration of SIP Trunk Dialing Behavior..........................................................108 14.3.3 Configure incoming/outgoing CID and forward rule for IP trunk call ...................... 116
15. Configuration of Conference Call ...............................................117
15.1 Configuration of a Single FONEMOSA 4496 ............................................................117

Operation Manual
4
15.1.1 Chairman is Unspecified Member.......................................................................... 118 15.1.2 Specify Dedicated Member as Chairman .............................................................. 119
15.2 Configuration of Cascaded FONEMOSA 4496 ......................................................... 120
16. Configuration of Other Application ............................................121
16.1 Call Forward............................................................................................................... 121 16.1.1 General Call Forward.............................................................................................122 16.1.2 Secretarial Intercept Feature .................................................................................124 16.1.3 Offnet Forward to PSTN ........................................................................................125 16.1.4 Call Forward after Called Side Is Answered ..........................................................127 16.1.5 Call Forward of Trunk Port .....................................................................................129 16.1.6 Application of Private Line .....................................................................................130 16.1.7 Default Call Forward ..............................................................................................131
16.2 Hotline Extension ....................................................................................................... 131
16.3 Abbr. Dial Combined with Softkey............................................................................ 132
16.4 Line Group ................................................................................................................. 134
16.5 Call Park ..................................................................................................................... 135 16.5.1 Operation Procedure..............................................................................................135 16.5.2 Analysis of Example...............................................................................................135 16.5.3 Configuration Method.............................................................................................137 16.5.4 Practice..................................................................................................................138 16.5.5 Summary of Parking Server Configuration ............................................................139
16.6 Call Hold .................................................................................................................... 140 16.6.1 Analysis of Example...............................................................................................140 16.6.2 Configuration Method.............................................................................................140 16.6.3 Practice..................................................................................................................141
16.7 Ring Group ................................................................................................................. 142
17. Connect to Special Device (Seize Specific Trunk) ......................143
17.1 Connect Door Phone and Voice Broadcast System.................................................... 143
17.2 Connect Voice Broadcast System (for MOSA 4603 Plus Only) ................................ 145
18. Value Added Function by Extra Charge.....................................145
18.1 Concept....................................................................................................................... 145
18.2 Purchasing Extra License to Do Upgrade .................................................................. 146
18.3 Purchase Extra MOSA Hardware Product ................................................................. 147
18.4 Lease Service.............................................................................................................. 148

Operation Manual
5
19. Firmware Update/Backup and License Upgrade.......................149
19.1 License Upgrade to Increase Users or functions ........................................................ 149
19.2 File Types of Firmware Update .................................................................................. 151 19.2.1 Attention to Upgrade MOSA 4600 Plus from V1.xx to V2.xx .................................153
19.3 Update and Backup Firmware via Web...................................................................... 158 19.3.1 Firmware Update ...................................................................................................158 19.3.2 Backup Firmware ...................................................................................................159 19.3.3 Application of MEM file ..........................................................................................160 19.3.4 Create MEM file by MEM Software Tool ................................................................163 19.3.5 The Application of CFG file ....................................................................................164
19.4 Update and Backup Firmware via FTP ...................................................................... 166 19.4.1 Firmware Update by FTP Software........................................................................167
19.5 Check Updated Firmware Version.............................................................................. 168
20. Appendix........................................................................................169
20.1 Management by System Console, and Telnet............................................................. 169 20.1.1 List of all commands ..............................................................................................169
20.2 Management by Phone set.......................................................................................... 170 20.2.1 User of Extension Line...........................................................................................170 20.2.2 System Administrator.............................................................................................172
20.3 Change Settings of Mass Quantity of Channels ......................................................... 175
20.4 How to Install Linux NFS for the VM of MOSA 4600 Plus...................................... 178
20.5 Full Time Busy Tone Detection-Special Purpose....................................................... 178
20.6 Work with MOSA4491/4600A for Redundant Purpose............................................. 179
20.7 Usable SIP Device and SIP ITSP ............................................................................... 180 20.7.1 SIP Device That Can Register to This Machine.....................................................180 20.7.2 ITSP That This machine Can Register To..............................................................180

Operation Manual
6
Change History: Software Version 3.04
Add new items in MEM file
More MEM items are added and it can be edited by text file. For the function of MEM file, please refer to 19.3.3 Application of MEM file. For the items that can be edited in MEM file, please get it from distributor.
Add IP entries that can manage this machine.
When this function is activated, max 5 sets of source IP are allowed to manage this machine. It prevents hacker to get account and password accidently and try to control the box at remote place. Please refer to MOSA 4600 Plus Technical Manual, Chapter 2 – 6. IP Settings
Add mechanism of redundant extension number.
When this machine works with MOSA 4491 or MOSA 4600A, it has great elasticity of extension number and easy to manage for changes. This machine can specify 2 MOSA 4491 or MOSA 4600A for redundant service to prevent extension number loss when anyone of them is offline. Please refer to 20.6 Work with MOSA4491/4600A for Redundant Purpose, and MOSA 4600 Plus Technical Manual, Chapter 2 – 7. Phone Book
Add mechanism to reply Ping in different way
The behavior that this machine replies Ping can be different. It prevents hacker to know if this box is online, or tries to deter the box from service with heavy ping package. Please refer to MOSA 4600 Plus Technical Manual, Chapter 2 – 6. IP Settings
Add function that SIP ext. users can change their password
SIP Users can login to this machine with default password, then change it by themselves. By the aid of Administrator is not required. Please refer to MOSA 4600 Plus Technical Manual, Chapter 2 – 4.4 Telephony Tuning
Configure Softkey for all channels of the same type at a time.
When Softkey configuration of channels with the same type (FXS, FXO, SIP Trunk, SIP Line) are the same, user can configure one channel only and then apply to all channels. Please refer to MOSA 4600 Plus Technical Manual, Chapter 2 – 2.1 Summary, the status of each types of channels.
Add number control rule of incoming and outgoing call for IP trunk
System can add extra prefix number of original Caller ID and then send for outgoing call. System can remove prefix number what user dialed and then forward to extension directly. Please refer to 14.3.3 Configure incoming/outgoing CID and forward rule for IP trunk call, and MOSA 4600 Plus Technical Manual, Chapter 2 – 3.4.SIP Trunk Numbering,
Add encrypted CFG file
For this version, it creates configuration .CFG file with good encrypted formate that can prevent security problem. For the function of CFG file, please refer to 19.3.5 The Application of CFG file.
Add Digit Map mechanism
When user dial auto-routing trunk outgoing call or VODNET call, add # to end dialing or wait for the dial ending time is required. Use Digit Map function, administrator can define common dialing behavior. Once what user dials matches the rule, number is sent immediately without # and the end of dial ending time. Please refer to 8.2 Digit Map, and MOSA 4600 Plus Technical Manual, Chapter 2 –4.8.Digit Map,
Add function that the DTMF tone volume to FXS channel is
When FXS is connected to PBX, if there is problem of DTMF tone (too loud or too quite), administrator can adjust it. Please refer to MOSA 4600 Plus Technical Manual, Chapter 2 – 4.4. Telephony Tuning

Operation Manual
7
adjustable.
Select the sequence of outgoing trunk call
For outgoing trunk call, administrator can configure different outbound sequence. From this version, default sequence is changed to PhoneBook-Outbound-VODNET. Please refer to MOSA 4600 Plus Technical Manual, Chapter 2 – 1.2. PBX Access Code, IP Call Priority
Modify the input format of VODNET server serial No.
For VODNET server serial No. there is default value for public service. If there is VODNET No. server in your own company, administrator can also input IP address & port of their own VODNET Server. Please refer to MOSA 4600 Plus Technical Manual, Chapter 2 – 6. IP Setting, VODNET Setting
The Account and Password length of Web and Console is extended
The length is extended to 30 characters. Note: This configuration has to be done by VODTEL remotely. If administrator does not has this requirement of extra long Account and Password, apply this service is not required.
Change History: Software Version 2.02.1 & 3.03.0
The difference between 2.02.1 & 3.03.0
The main difference is the hardware which 2.02.1 and 3.03.0 supports are different.
2.02.1: Support original hardware and it upgrade box from 2.02.0 and add some new function. ※The software for this hardware is terminated, unless there are bug problems.
3.03.0: Support new CPU hardware and it upgrade box from 2.02.0 and add some new function. It contains 2.02.1 + Voice Mail function by built-in flash + expansion of available SIP Trunk license + expansion of ext. table + supports Default.mem + blue LED panel
Add new item in MEM file
More MEM items are added and it can be edited by text file. For the function of MEM file, please refer to 19.3.3 Application of MEM file. For the items that can be edited in MEM file, please refer to xxx.
Add new phone set programming command
Add phone set programming command 64, 65, 66. Please refer to 20.2.2 System Administrator
Add Default.mem setting text file ((Only for new hardware with V3.03.0 or above)
The format and function of this file is the same as original XP44XX.MEM. The necessary settings can be edited and upload it to the machine in advance. These settings will not be lost even if factory reset is executed. (Upload and download by FTP only.) Please refer to 19.3.3 Application of MEM file
Add built-in flash memory for voice mail. (Only for new hardware with V3.03.0 or above)
Built-in Voice Mail function is available by new hardware MOSA 4604/4616 Plus with 3.03.0 firmware, plus purchasing VM upgrade license, Original hardware can be done by external NFS device only. Please refer to 13.4 Use Built-In Voice Mail Function
Add license upgrade web for voice mail
Please provide info from box to distributor for upgrade. For extra charge function, please refer to 18.2 Purchasing Extra License to Do Upgrade. For the upgrade procedure of extra charge function, please refer to 19.1 License Upgrade to Increase Users or function
Add analog trunk For machine with analog trunk (FXO) ports, system detects loop current status of wired
Operation Manual
8
(FXO) loop current detect
ports. If no loop current is detected, system skips these ports when trunk seizure happens. Disable ports via management web is suggested if these trunk ports are not required. Please refer to 7.1 Disable Useless Trunk Port
Extension number table is expanded (Only for new hardware with V3.03.0 or above)
For MOSA 4616/4604, it expands from 600 to 800 entries. Please refer to MOSA 4600 Plus Technical Manual, Chapter 2 – 1.3.Extension Number
SIP trunk channels is expanded (Only for new hardware with V3.03.0 or above)
The maximum available SIP Trunk channels are expanded to 30. Please refer to MOSA 4600 Plus Technical Manual, Chapter 2 – 2.1.Summary
Change History: Software Version 2.02.0
Analog and SIP extension can generate CDR for extension calls.
CDR of calling side can be generated between extension calls. Please refer to MOSA 4600 Plus Technical Manual, Chapter 2 - 6.IP Settings
Send RTCP packet for certain cases.
For some SIP devices, it needs to send RTCP packet for the conversation at 2 sides, enable it if required. Please refer to MOSA 4600 Plus Technical Manual, Chapter 2 - 3.5.Common
Configure password after Smart Pad had login to MOSA
When Smart Pad login to channels of this machine without password, this machine can either deny the connection or request a password for configuration. Please refer to MOSA 4600 Plus Technical Manual, Chapter 2 - 4.4.Telephony Tuning and Smart Pad & Smart Console user manual
When region ID is changed, factory reset is not required.
When system configuration is done and it is running, change Region ID without doing factory reset is available. Original setting can be kept. Please refer to MOSA 4600 Plus Technical Manual, Chapter 2 - 1.1.Basic Information
Access to Time Server for different purpose
In VPN environment, some MOSA can connect to Internet, some are not, then Public IP of all of them is not consistent and failed call is happened. Sync time without interpret Public IP is required. Please refer to MOSA 4600 Plus Technical Manual, Chapter 2 - 1.1.Basic Information
Simplify dialing behavior of call transfer and call park
# or * suffix to end dialing for Call transfer / Call park can be eliminated. Please refer to MOSA 4600 Plus Technical Manual, Chapter 2 - 1.2.PBX Access Code
Call transfer of FXS and IP Line can be disabled.
It can apply to Hotel extension or some environment that call transfer is not allowed. Please refer to MOSA 4600 Plus Technical Manual, Chapter 2 - 2.1.Summary and configure it at individual Line Channel
Upgrade Smart Console license via management web.
There is a new feature that support Smart Console client software. Purchase license from us and upgrade it via management web is required. For Smart Console software, please refer to Smart Pad $ Smart Console user manual. For License upgrade, please refer to 19.1 License Upgrade to Increase Users

Operation Manual
9
Trunk Caller ID length under N digits can be excluded from add/eliminate control.
When MOSA is integrated with traditional PBX. This feature let called user is able to see caller ID that shows extension No. only. Please refer to MOSA 4600 Plus Technical Manual, Chapter 2 - 4.4.Telephony Tuning
Add new item in MEM file
New item Offnet / Specified Route / Ring Group is added to MEM file. For the format of MEM file, please contact with distributor. Please refer to 19.3.3 Application of MEM file
Add new Call Forward feature
All incoming extension call can be forwarded to a certain device (extension) if they are busy/no answer. Please refer to 16.1.7 Default Call Forward and also MOSA 4600 Plus Technical Manual, Chapter 2 - 4.4.Telephony Tuning
Caller ID source is selectable for outgoing (SIP) IP trunk call
Original source caller ID or trunk number that register to SIP proxy are selectable. Please refer to MOSA 4600 Plus Technical Manual, Chapter 2 - 3.3.Proxy/Trunk Mapping
Caller ID for extension can be replaced by Alias
When MOSA is integrated with traditional PBX, this feature let traditional PBX see the real extension caller ID. Under the one extension with 3 devices structure, no matter what device is used, called side gets the same caller ID. Please refer to MOSA 4600 Plus Technical Manual, Chapter 2 - 2.1.Summary and configure it at individual Line Channel
Default Ring Group Number is changed.
4 default Ring Group Number is changed to 100000001 ~ 100000004 to prevent conflict with existing extension number. For ring group function, please refer to 16.7 Ring Group
Errata Correct: Ring Group function can apply to extension only
Error: Ring Group can apply to both line and trunk When incoming call is Offnet To trunk, the system goes to Answer Mode, so other extension in this ring group stop ringing, and only the trunk keep to connect the destination. That's the reason why you can not apply it to trunk. For ring group function, please refer to 16.7 Ring Group
Add description: Configure complete barring for outbound call.
Trunk call is not allowed includes barring of auto-routing and trunk seizure is not allowed. For earlier version, administrator has to configure a Barring Class: 6, Lock Phone, then user can lock their phone by phone-keypad to restrict outbound call. Please refer to 6.3.3.2 Steps to create the Barring Classes:
Change History: Software Version 2.01.0
Add volume control of Softphone / IP Phone
When user use Softphone / IP phone with different brands to communicate with called side at MOSA's FXS port or PSTN via MOSA's FXO port, this function can adjust the volume (gain) to those destination. Web Path: 2.Channel Config.\ 2.1.Summary, the status of SIP Line: Voice Gain Tuning
※ The volume of listening and speaking of Softphone / IP Phone itself can be adjusted by the IP Phone and Softphone itself.
Add busy tone detection gain control
When the busy tone detection of MOSA's analog FXO is enabled, if the busy tone from PSTN or PBX is too loud or quite that is unable to be detected, then the detection sensitivity is adjustable. Web Path: 4.PBX Advanced\4.4.Telephony Tuning, Busy Tone Detection Threshold
Add control items in To work with new developed software tool, lots of configurable items is added into MEM
Operation Manual
10
MEM file
file. By the software tool, it can create many different types of mem file. Upload mem file into the machine and restart to take effect. Please refer to 19.3.4 Create MEM file by MEM Software Tool
Add default value of Barring Table
In previous version, configure it by yourself is required. Please refer to 6.3.3 Barring Class
Pick up specified extension in PBX group structure
Operator in different PBX group can pick up extension number in other PBX Group by Smart Pad software. For Pickup of specified extension, please refer to User Dialing Guide. For PBX Group, please refer to 10.2 Configuration of Group Dialing
Duraing for extension to trunk call can be limited
Configure trunk call duration for this machine, all trunk call will be terminated when time is up. This function prevent long trunk call that has excessive PSTN charge. For control on individual extension, please refer to 6.6 Limit the Duration of Trunk Call from Extension
Incoming Caller ID value is replaceable
If there is no caller ID value for incoming call, or you don't want to use the value received, you can replace the value that is transmitted to phone. Web Path: 2.Channel Config.\ 2.1.Summary, the status of Analog trunk (FXO) and SIP Trunk: Default Caller ID
Modification of IP Search function
If the number inquired is the extension number existed in extension table, It shows related Phone Number. IP Search is shown on the left bottom corner of web page.
New control code in text mode channel settings
If the first character is minus "-", its channel settings keep intact without any change. Please refer to 20.3 Change Settings of Mass Quantity of Channels
Behavior of failed Consult transfer
In previous version, call is back automatically. In this version, call is not back automatically. System play busy tone, user has to press # or Flash to get the call back.
Add service with extra charge
Add Smart Console and Web Call functions. Please refer to 18.2 Purchasing Extra License toDo Upgrade and 18.4 Lease Service
Change History: Software Version 2.00.1
Add built-in voice mail feature
This feature has to work with NFS file server (can be PC+Lunux+NFS software). If there is no NFS server, only Demo Only function is available. Please refer to 13.4 Use Built-In VoiceMail Function. For Lunux NFS, it will have more detail on next version of manual.
Add built-in ring group function
Incoming call can ring many extensions and/or trunk number in ring group. Please refer to 16.7 Ring Group
Add group-numbering system.
When location is expanded, several IP-PBX at the same location can be grouped with group number. The extension number at different location keeps the same and only new prefix has to be added. Dial new number with the rule Group Number + original extension number. Please refer to 10.2 Configuration of Group Dialing
The available suffix of extension is changeable
The suffix number of each channel can be 00~99. Use default suffix number is suggested.
Add Tie Line option When this machine works with FONEMOSA 4491. The Redirect Map of 4491 can provide more extension numbers and it is not limited to FONEMOSA 4491's 100 channels. It also

Operation Manual
11
can make one step dialing to the PBX extension this is connected behind MOSA 4600 Plus. In this situation, the type of FXS has to be Tie Line. Please contact with us if you have this kind of operation.
Add new consult transfer feature
Incoming call can be consult transferred to IP DISA, then calling side can dial other extension.
Add cascaded IP DISA IP DISA can be cascaded. Calling side can follow the greeting of IP DISA and dial to the next IP DISA, until reach called side by dialing extension. Please refer to 12.4 The Configuration to Cascade IP DISA
Add caller ID gain control
When caller ID volume (gain) is too loud or too quite and it is unable to be detected. The gain is adjustable. Web Path: 4.PBX Advanced\ 4.4.Telephony Tuning
Add configuration table of mass channels
Configuration of mass quantity of channels can be updated and backup by text file. Please refer to 20.3 Change Settings of Mass Quantity of Channels
Add Secondary Service Agent of Direct Line feature
Trunk incoming call at day mode. If ♦ DISA is disabled and manual operator is busy ♦ DISA is at day mode and the Forward To number is busy It forward to secondary backup destination. Please refer to 7.4 Call Forward to Backup Line for Incoming Trunk call
Add Night Service Agent of Direct Line feature
Incoming trunk call at night mode can be forward to specified number. Please refer to 7.5 Call Forward for Day/Night incoming Trunk call
Full time busy tone detection-Special Purpose
For special application, full time busy tone detection can be activated. Please refer to 20.5 Full Time Busy Tone Detection-Special Purpose
Restore CFG backup file still can keep IP
Please refer to 19.3.5 The Application of CFG file
Add Forward To feature after call is answered.
Add Forward To feature that dial extra number after call is answered by PBX. Please refer to 16.1.4 Call Forward after Called Side Is Answered
Add greeting control on special holiday
Please refer to 12.3 Configure Greeting Mode for Special Holiday
Add new feature that user can make trunk call by PIN code at extension with less permission
Hint for application: Administrators of company can make (international) trunk call at the extension of general employee. Please refer to 6.3.2 Permission to make outgoing call (Outbound Transit Control)
Add available remove control code in MEM file
Please refer to 19.3.3 Application of MEM file
Add voice mail light control of phone-set
Limit to TENTEL phone-set, model: 320. Please refer to 13.3 Retrieve (listen) Message / New Message Notification Related Configuration
Forward To number is saved in Ext. type or full number type
Change Prefix/Ext. table without changing Forward To number. Please refer to 16.1.1 General Call Forward

Operation Manual
12
Terminate the connection of certain channel by Console
Please refer to 20.1.1 List of all commands
Compare the first N digits for Outbound Forward Number
For Outbound Forward Number (1.System Config.\1.7.Offnet Forward), full number is not required. System can compare the first N digits. For example, input 0982, then all numbers with prefix 0982 is able to do outbound call. 16.1.3 Offnet Forward to PSTN
Summary of parking server settings in different environment
Configure parking server for different environment (VPN, fixed public IP, dynamic public IP), change some configuration is required. Please refer to 16.5.5 Summary of Parking Server Configuration
Change History: Software Version 1.02.0 Add new Web page: License Upgrade
Purchase extra SIP ports and get Key from distributor, then upgrade users license from Web page. Please refer to 19.1 License Upgrade to Increase Users
Add feature that can use ring group function
Working with Ring Group Server, incoming call can ring several phones (including extension and phone at PSTN trunk) at the same time. For Ring Group Server, please contact with distributor
Add Pickup specified extension function
Extension user can pickup incoming call of specified extension. Please refer to 5.2 Default Example of PBX Access Code or MOSA 4600 Plus User Dialing Guide
Add Trunk Booking and Auto Call Back function
When trunk (PSTN) is busy, do trunk booking to get free trunk automatically when trunk is idle. When extension call is busy, do Auto Call Back to create call route automatically when called side is idle. Please refer to User Dialing Guide
Add summary table of Barring Class
System can show the summary table of Barring Class and it is convenience to view the configuration. Please refer to 6.3.3.4 View the result of configuration
Add private line 2 Each trunk port can specify 2 sets of private line that only them can seize this trunk port. Please refer to 16.1.6 Application of Private Line
Add control parameter Add: 3.3.Proxy/Trunk Mapping: Soft switch type, 4.4.Telephony Tuning: Remote Hang Up Signal, 4.4.Telephony Tuning: Analog Trunk Incoming Delay Time / Busy Tone Delay Time and SIP RFC2833 Pay Load Type Value...and so on parameter. Please refer to MOSA 4600 Plus Technical Manual.
Modify description of phone set programming mode code
Modify original error description of user phone set programming mode code 11, please to 20.2.1 User of Extension Line
Change History: Software Version 1.01.1
Add day/night DISA mode in the days of week
Configure start and end time of Day/Night (on duty/off duty) mode in a week. Please refer to 12.2 Configuration the Time of Day/Night DISA Mode
Change recording of system greeting section 5
Please refer to 12.1 System Greeting of DISA System
Day and night manual operator port can be specified.
For day/night shift personnel, the extension port of manual operator can be different. Please refer to 6.4.1.1 Specify Channel of Operator and Operator Access Code
Add new phone set programming mode code
Add user phone set programming mode code 14, 21. Please refer to 20.2.1 User of ExtensionLine. Add administrator phone set programming mode code 8. Please refer to 20.2.2 System Administrator
Add Private Line It uses the Call Forward function of FXO and SIP Trunk. Please refer to 16.1.5 Call Forward

Operation Manual
13
function of Trunk Port and 16.1.6 Application of Private Line
Add description: The permission of extension to make outgoing call.
Make Outbound Transit call by the extension of this machine. Please refer to 6.3.2 Permission to make outgoing call (Outbound Transit Control)
Other change notes Some new or changed functions are not used in normal condition, or default value is OK for most cases. Please refer to MOSA 4600 Plus technical manual or Firmware 1.01.1 Change Notes.
Change History: Software Version 1.00.X
Add description: Abbr. Dial Combined with Softkey
Please refer to 16.3 Abbr. Dial Combined with Softkey
Add description: Specified Route
Please refer to 6.3.1.1 Specified Route
Add description: Configuration to Penetrate PBX DISA
Please refer to 9.1.1.2 Configuration to Penetrate PBX DISA

Operation Manual
14
1. Safety Instructions
1. Do not attempt to service the product yourself. Any servicing of this product should be
referred to qualified service personal. 2. To avoid electric shock, do not put your finger, pin, wire, or any other metal objects into vents
and gaps. 3. To avoid accidental fire or electric shock, do not twist power cord or place it under heavy
objects. 4. The product should be connected to a power supply of the type described in the operating
instructions or as marked on the product. 5. To avoid hazard to children, dispose of the product’s plastic packaging carefully. 6. The phone line from Telecom Company or traditional PBX should always be connected to the
LINE or FXO connector. It should not be connected to the PHONE/FAX or FXS connector as it may cause damage to the product.
Please read all the instructions before using this product, otherwise, it may damage this product. You should read Quick Installation Guide for installation first. Adjust setting according to this manual if you have advanced request. If the document you read is digital format, it is better to print out the whole manual for easy installation.
Warning

Operation Manual
15
2. Preface MOSA 4600 Plus series is the products that design with the latest Voice Over IP (VoIP) technology. It acts as a traditional telecom PBX, IP-PBX, SIP Server and Auto Attendant that 4 functions are integrated together. It achieves high quality communication of voice and FAX service with low cost Internet connection that can save lots of money and also provides more value added service. This product features with easy installation, mobility and versatile application.
There are 4 MOSA 4600 Plus models:
SIP Channel Model Name Analog Channel
SIP Line SIP Trunk MOSA 4603 Plus 3 1 FXO + 2 FXS 2 0 MOSA 4604A Plus 4 2 FXO + 2 FXS 2 0 MOSA 4604B Plus 4 4 FXS 2 0 MOSA 4604C Plus 4 4 FXO 2 0 MOSA 4604D Plus 4 1 FXO + 3 FXS 2 0 MOSA 4608 Plus 8 Ports Base Unit 4 0 MOSA 4616 Plus 16 Ports Base Unit 4 0
Note: Volume of SIP Channel can be expanded with charge. Please contact with distributor.
Option accessory: (purchase for your own demand. Only for 4608/4616 Plus Base Unit)。
Modules Description MP3208+ 4FXS + 4FXO MP3008+ 8FXS MP3108+ 8FXO
MOSA 4600 Plus is equipped with commercial PBX, IP-PBX, SIP Server and SIP Client function
SIP device (Gateway, IP Phone, Softphone or Wi-Fi phone) that comply with RFC3261 standard can register to MOSA 4600 Plus and become a extension of the whole IP-PBX system. Make SIP call is the same as dialing between extension.
MOSA 4600 Plus also acts as SIP Client that can register to ITSP (Internet Telephony Service Provider). Then, user can use the services from ITSP, such as free call inside network, cost saving call to PSTN...

Operation Manual
16
3. Introduction of Features MOSA 4600 Plus is designed with the most advanced fully distributed, stackable and networking structure. It not only provides function of traditional PBX, also use latest IP switching technology the user around the world share voice resource from the IP-PBX. Its Line (extension) can connect analog phone set; FAX or SIP device that comply with RFC3261 and its Trunk can connect to traditional CO line (PSTN) and new generation Soft Switch. Here is the brief feature description as below.
3.1 Trunk Feature Trunk Grouping
This function divides trunk into 2 group, local trunk and SIP IP Trunk. User can make call by suitable trunk group according to what call type they want.
Auto. Trunk Selection When user of extension want to make trunk (PSTN or SIP) call, user can just dial Trunk Group access code such as "9", then the system select a free trunk port in selected trunk group automatically for what use needs. It function apply to the machine itself and all other machine that is cascaded together.
Automatic Route Selection / Least Cost Route (ARS/LCR) When Automatic Route Selection is applied to extension, system select the least cost route according to pre-configuration automatically for you to make the cheapest call.
Specific Trunk Seizure When user of extension want to make trunk (PSTN) call of remote site, user can seize specific remote trunk in advanced. When dial tone of remote trunk is heard, then dial PSTN number later. When this function is applied, the barring of extension is still under effetely control.
Trunk Class Trunk can be group by detail for different trunk connection type, special number or device such as door phone or paging (speaker). User can select specific trunk according to different purpose.
Call Barring There are 6 barring class for each extension. Each barring class can apply to each extension to limit calls.
Transit Call PSTN incoming call can transit out to other PSTN via this machine under password control. User that is not at office can save PSTN call expense via VoIP network.
Speed Dial

Operation Manual
17
This machine provides 100 sets of Abbr. Dial number. Number that is too long can be defined as speed dial number. User dial speed dial number without remembering lousy long number.
Direct Outward Dial When the extension is seldom to make call to other extension, MOSA 4600 Plus can make this extension to seize trunk automatically when phone set is pickup. User can make trunk call directly without selecting or seizing different trunk.
3.2 Line Feature Call Pickup Group
Users can be grouped for Call Pickup purpose, such as Sales, R.D. for max 10 groups. Users in the same group can pickup others' extension and they won't be able to pickup extension in other group.
Group Hunting A series of extension can be grouped together and assign them an access code. Make incoming call with that access code will be directed to the extension in that group that is idle.
Hot Line Extension can hotline to specified extension or PSTN number. When this hot lined extension is picked up, the call route to specified extension or PSTN number is built.
Zone Paging The trunk (FXO) port of MOSA 4600 Plus can connect with paging (speaker) system. User can make remote speaker broadcast.
Automatic Call Distributor To work with FONEMOSA 4493, the system can distribute incoming call evenly and automatically to extensions in pre-configured group. It is the basic needs for call center.
Group Paging To work with FONEMOSA 4483, the system can do voice broadcast to extensions of different area via IP broadcast technology. General manager deliver a speech to national wide branch is an example.
3.3 Phone Feature Call Transfer
MOSA 4600 Plus provide consult transfer feature that extension can transfer incoming call to any extension in the system, either at local or remote site.
Call Park When incoming call is not answered by the right person, or answer man don't want to talk by that extension, answer man can activate Call Park for this incoming call. The incoming call is held and calling side is listening the music. Answer man can tell the call park message to the

Operation Manual
18
right person by broadcast system. The right person can retrieve the incoming call with the phone set right beside him with park ID.
Call Hold This is the exception of pervious Call Park. When answer man activate Call Park by certain call park ID defined in the system, the system allows the incoming called is retrieved by the original extension that activates call park only and other extension can not retrieve it.
Music on Hold When incoming call is held or transferring, system play system music to user of incoming call that make him know the waiting status.
Automatic Call Release MOSA 4600 plus provides busy tone detection function. It activate this function to insure call release will be successful when (1) incoming trunk (PSTN) call is answered by auto attendant (2) incoming trunk (PSTN) call make PSTN-IP-PSTN call. Busy tone detection can decide the state of trunk (PSTN) call to activate Call Release.
Conference Call To work with FONEMOSA 4496, conference call is available. Each FONEMOSA 4496 provides one meeting room for max 4 lines or trunk to join conference. Many meeting room is available for your demand and the volume of meeting room is unlimited.
3.4 Extension Feature Call Forward
Extension can be forwarded to any extension (local or remote site). The rule of call forward includes All Calls, Busy, No Answer, Busy or No Answer.
Offnet Call Forward This is the unique design of MOSA IP-PBX. When user of extension is unable to answer the extension call on desktop, Call Forward function can be configured for incoming call to PSTN, such as mobile phone. The incoming calls never miss. The rule of call forward also includes All Calls, Busy, No Answer, Busy or No Answer.
Secretarial Intercept When there are manager and sectary and all incoming call to manager is filtered by sectary. Sectary can decide whether to forward calls to manager.
Timed Alarm User of extension can input alarm time by dialing keypad on phone set. Phone set is ringing to notify you when time is up, such as Morning Call.
Do Not Disturb (DND) Extension is able to make outgoing call only when it is configured. Incoming call is not allowed.

Operation Manual
19
3.5 System Feature Flexible Numbering Plan
Extension number and function access code can be flexible configured according to origination of enterprise or location of installation to reach the max user friendly and easy memorize purpose.
Selectable Tone/Ring Specification MOSA IP-PBX can select suitable Ring Back Tone, Dial Tone, and Busy Tone... that fit local telecom specification.
Call Detail Recording System provides detail recording of trunk (PSTN) call that can be used on billing system.
Emergency Telephone For models that have symmetric module, 4603、4604A、4604D and 4608/4616, they connect PSTN and extension directly for emergency call when power breakdown happens
Build-in DISA DISA is built in this product for each incoming trunk and IP call. The greeting section can be recorded by phone set.
Build-in Dialer ITSP dialer is built in this product. System administrator can specify suitable ITSP (Internet Telephony Service Provider) anytime for international or long distance call. End user (extension) in this system needs not to change any dialing behavior.
Behind PBX Operation This machine is also able to connect traditional analog PBX. It makes the Trunk ports and Line ports of traditional PBX to integrate with the MOSA IP-PBX system to fulfill the complete VoIP switch system that can share voice resource at different place.
Integrate Voice Mail This product can connect to other brand commercial Voice Machine with extension ports, than it is able to support function like voice guidance, voice messages.
Networking & Stacking Service This product is designed with distributed architecture. The reliability is much higher than normal Client-Server structure IP-PBX and the expansion of the network ability can fit requirement anytime. Multiple single machines can build a single IP-PBX in a single location in LAN and multiple single machine in different location can also work together as a single PBX system in WAN.
Private IP Supporting This machine can work with Private IP under NAT, and also work with Router that use dynamic IP in WAN. This is very important in some countries that do not have much IP address available.

Operation Manual
20
4. Appearance This machine can work together for stacking/networking. Here is the figure and LED indicator of a single unit.
4.1 Panel Front Panel MOSA 4616 Plus
MOSA 4608 Plus
MOSA 4604 A/B/C/D Plus
MOSA 4603 Plus
Rear Panel MOSA 4616 Plus

Operation Manual
21
MOSA 4608 Plus
MOSA 4604A Plus (The combination of FXS/FXO model is different for A/B/C/D model)
MOSA 4603 Plus
4.2 Module Appearance There are 3 modules, MP3008+、MP3108+ and MP3208+ for 8 and 16 ports models. For the installation of Modules, please refer to quick installation guide.
MP3008+ (8FXS)
MP3108+ (8FXO)
MP3208+ (4FXS + 4FXO)
Operation Manual
22
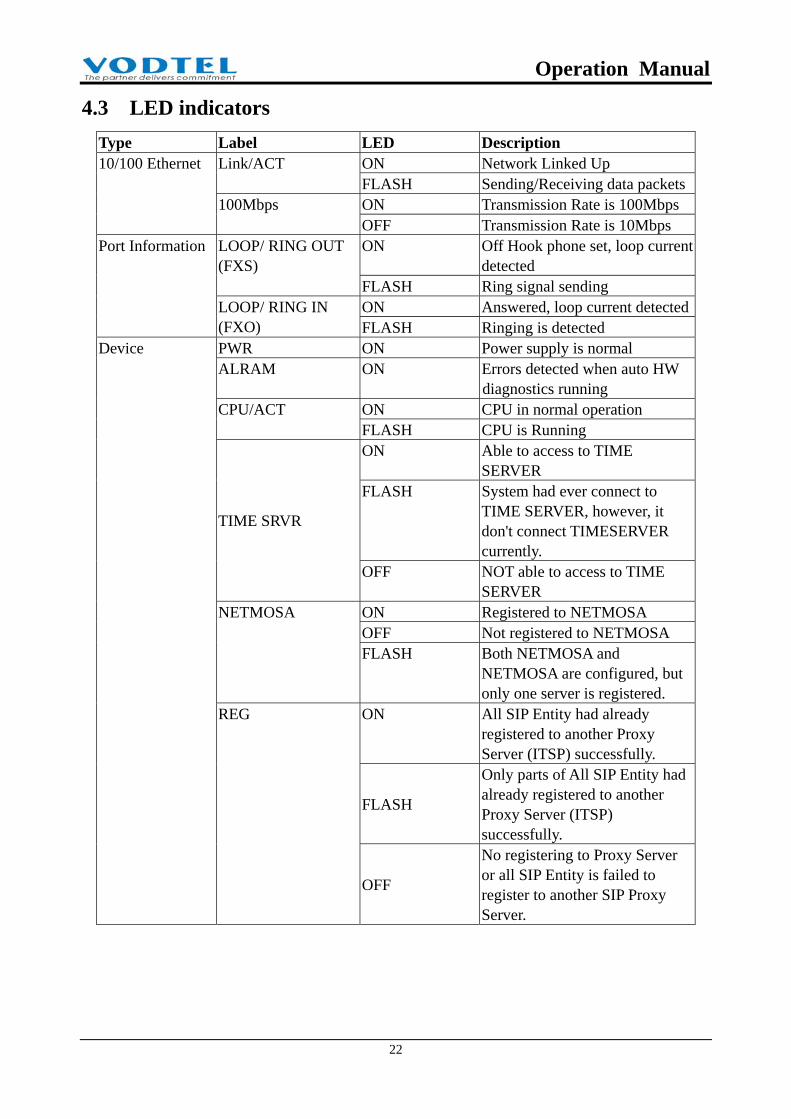
4.3 LED indicators Type Label LED Description
ON Network Linked Up Link/ACT FLASH Sending/Receiving data packetsON Transmission Rate is 100Mbps
10/100 Ethernet
100Mbps OFF Transmission Rate is 10Mbps ON Off Hook phone set, loop current
detected LOOP/ RING OUT (FXS)
FLASH Ring signal sending ON Answered, loop current detected
Port Information
LOOP/ RING IN (FXO) FLASH Ringing is detected PWR ON Power supply is normal ALRAM ON Errors detected when auto HW
diagnostics running ON CPU in normal operation CPU/ACT FLASH CPU is Running ON Able to access to TIME
SERVER FLASH System had ever connect to
TIME SERVER, however, it don't connect TIMESERVER currently.
TIME SRVR
OFF NOT able to access to TIME SERVER
ON Registered to NETMOSA OFF Not registered to NETMOSA
NETMOSA
FLASH Both NETMOSA and NETMOSA are configured, but only one server is registered.
ON All SIP Entity had already registered to another Proxy Server (ITSP) successfully.
FLASH
Only parts of All SIP Entity had already registered to another Proxy Server (ITSP) successfully.
Device
REG
OFF
No registering to Proxy Server or all SIP Entity is failed to register to another SIP Proxy Server.

Operation Manual
23
4.4 Connection Ports
Terminal Label Description
FXS For analog phone set or FAX machine
FXO For PSTN or trunk connection
Voice
BROADCAST (Only available on MOSA 4603 Plus)
For amplifier or speaker (earphone)
To WAN (MDI-X) RJ-45 MDI-X terminal, for WAN Network
To LAN (MDI) RJ-45 MDI terminal, for LAN
CDR For CDR RS-232
CONSOLE For system console

Operation Manual
24
5. Dialing Plan for Access Code Purpose: For the demand of different brand traditional PBX and the dialing behavior of different origination, you can tune the dialing plan to this machine for different request. All examples in this manual use default access code. Please install this machine with default value if you don't have special request. By this way, it speed up the installation procedure and it prevent conflict between different dialing plan that is defined by users themselves.
5.1 Rules for PBX Access Code
The numbering plan for this machine is to define the access code for each kind of services and the manner of dialing. These codes will be applied often, therefore the code should be simple, easy to remember, and unique. The prefix No. of equipment should be put into consideration to prevent the conflict. For the prefix of equipment, please refer to 5.3 Rule for Extension Number.
The access code consists any combination of 0 ~ 9, * , and # ; and Total length must be less than 6 characters. The first character can not be 0 , 1 If an access code is defined, you can define another access code by this code followed
by one extra character, only one character is allowed. For example, "9" is defined as Trunk Group Access Code, then "91" or "92" may be defined as another access code, but "921" or "9112" may not be defined as an access code.
Code can not be used if that has been defined as a Prefix in Extension Number Table. (For the description of Extension Number Table, please refer to 5.3 Rule for Extension Number..
The example before is for your reference. Assume that no Prefix in Extension Number Table is configured Correct *1 / *2 / *3, *1 / *21 / *38, *61 / *62 / *63, *61 / *72 / *83, 5 / 7 / 8, 81 / 82 /83 False *1 / *12 / *13, *61 / *612 / *613, 81 / 812 /813

Operation Manual
25
5.2 Default Example of PBX Access Code The default PBX Access Code can be found and modified in 1.System Config.\1.2.PBX Access Code
Note: For the integration of different condition, the shipping configuration value may not completely the same as the table below.
Items Access Code
OnNet Calls & Auto Route Calls: **
Seize Analog Trunk Access: 9
Seize SIP Trunk Access: 8
Phoneset Programming: *0
Abbr. Dial: *2
Call Pick UP: *7
Call Pick Up with Extension: *4
Operator: 0
VODNET Call: *3
Seize Remote Trunk: *9
Seize Specific Trunk (Class): *8
Call Retrieve: *1
Message Waiting On:
Message Waiting Off:
5.3 Rule for Extension Number The Extension Number web page of this machine is to configure customized extension number, prefix of extension or prefix of other machine. This machine already has default extension number when it is shipped. If there is no special requirement, please don't change it. Extension Number and Prefix Number should be configured carefully to prevent conflict with PBX Access Code. To configure customized extension number, please refer to 6.5 Change Extension Number

Operation Manual
26
Web Path:1.System Config.\1.3.Extension Number
There are three fields in the Extension Number Table. Click Apply if it changes. 1. Prefix/Ext. No.:
Customized extension number, Prefix of extension (There is one set of value, 10, means all extension number is 10xx) and Prefix of other machine, maximum length is 6 characters.
2. Phone Number
The phone number of this machine (itself or others). The VODNET Number may also be entered in this field. It is the mapping of Prefix Number to the equipment. When you input digit "0" here and click Apply button, system replaces "0" with the full Phone Number of this machine. There is a default value "0" here, means the full Phone Number of this machine
3. Type: There are two choices: iPBX / Phone. It presents that this (Prefix/Ext. No.) points to the machine itself or to the port of the machine. If the extension number is specified by the machine itself, selects iPBX. If it points to certain port of the machine directly, selects Phone.
Operation Manual
27
6. Planning of Extension There are two kinds of extension for this machine. One is a general phone set that connects to this machine physically, and the other is SIP extension. It uses SIP terminal device (SIP Phone or Softphone that runs on PC) to connect this machine via IP network. The extensions here in this chapter are the physical extension of PBX. For SIP extension, it will be described in chapter 14 Create the Connection of SIP Device
6.1 Extension Number The default physical extension number is 1011~1026 (the real ports available depends on what model you use)
6.1.1 How to Know Default Extension No. from Web
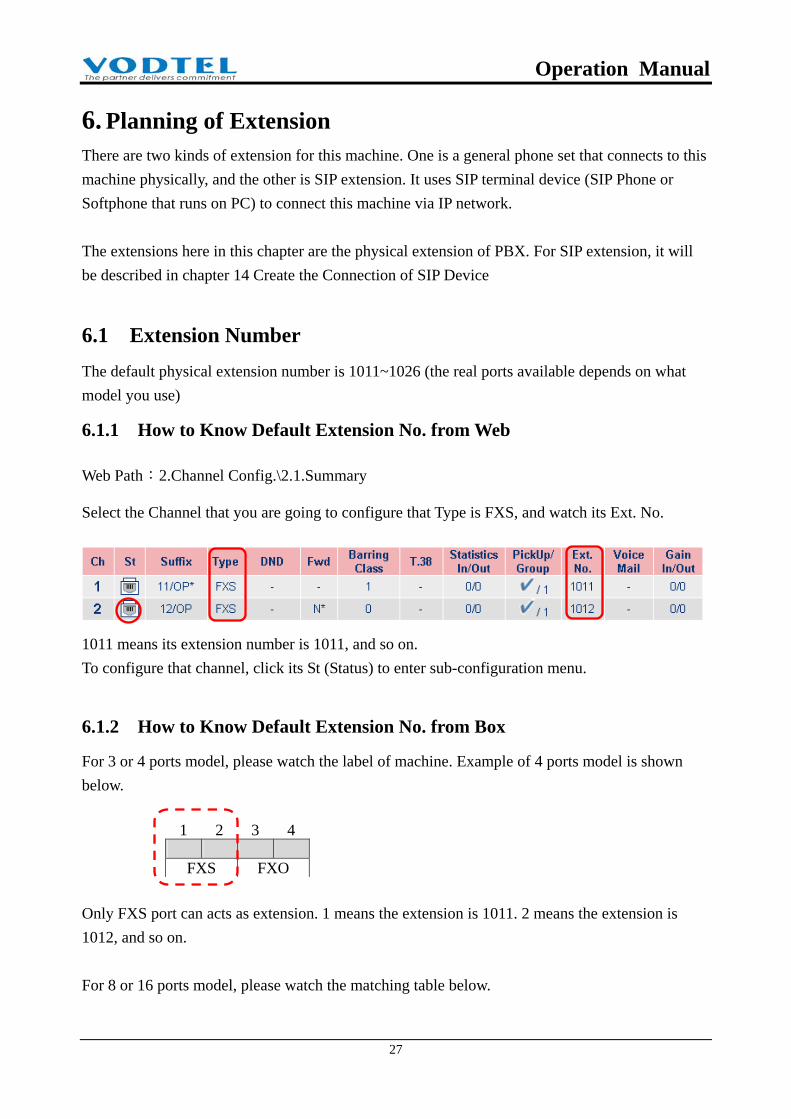
Web Path:2.Channel Config.\2.1.Summary
Select the Channel that you are going to configure that Type is FXS, and watch its Ext. No.
1011 means its extension number is 1011, and so on. To configure that channel, click its St (Status) to enter sub-configuration menu.
6.1.2 How to Know Default Extension No. from Box
For 3 or 4 ports model, please watch the label of machine. Example of 4 ports model is shown below.
1 2 3 4
FXS FXO Only FXS port can acts as extension. 1 means the extension is 1011. 2 means the extension is 1012, and so on. For 8 or 16 ports model, please watch the matching table below.
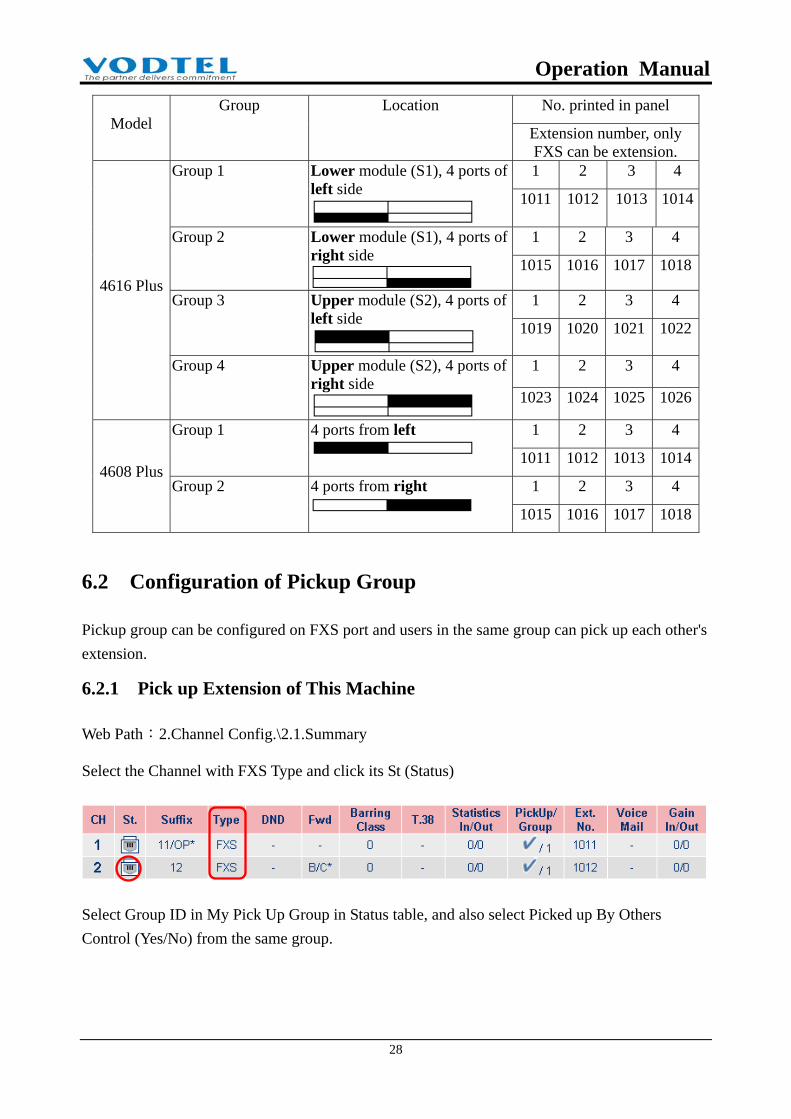
Operation Manual
28
No. printed in panel Model
Group Location
Extension number, only FXS can be extension. 1 2 3 4 Group 1 Lower module (S1), 4 ports of
left side
1011 1012 1013 1014
1 2 3 4 Group 2 Lower module (S1), 4 ports of right side
1015 1016 1017 1018
1 2 3 4 Group 3 Upper module (S2), 4 ports of left side
1019 1020 1021 1022
1 2 3 4
4616 Plus
Group 4 Upper module (S2), 4 ports of right side
1023 1024 1025 1026
1 2 3 4 Group 1 4 ports from left 1011 1012 1013 1014
1 2 3 4 4608 Plus
Group 2 4 ports from right 1015 1016 1017 1018
6.2 Configuration of Pickup Group
Pickup group can be configured on FXS port and users in the same group can pick up each other's extension.
6.2.1 Pick up Extension of This Machine
Web Path:2.Channel Config.\2.1.Summary
Select the Channel with FXS Type and click its St (Status)
Select Group ID in My Pick Up Group in Status table, and also select Picked up By Others Control (Yes/No) from the same group.

Operation Manual
29
Shown in Summary table
6.2.2 Call Pickup over the Other Machine
Call Pickup is not only to the extension line of the same machine, but also to the extension line of different machine defined in the same pickup group. Please consider the following issues:
The extension lines defined in the same Call Pickup Group must be in the range that the ringing can be heard. That can reduce the problem that you accidentally pickup others call that you don't means to.
The extension lines defined in the same Call Pickup Group must be under the same Subnet. Extensions that are configured the same pick up group ID can not pick up each other if they are not under the same Subnet.
Maximum 9 groups can be defined for Call Pickup Group. If the number of group is over 9, Section can be defined previously. The extension lines in same group number but different section can not pick up each other.
Under VPN Structure, it is possible to have the same Subnet for two branch offices in different locations. Therefore pick-up sections have to be separated to avoid from picking up the call of another office accidentally.
VPNor LAN
Area A
Pickup
Group A
Area B Pickup
Group B
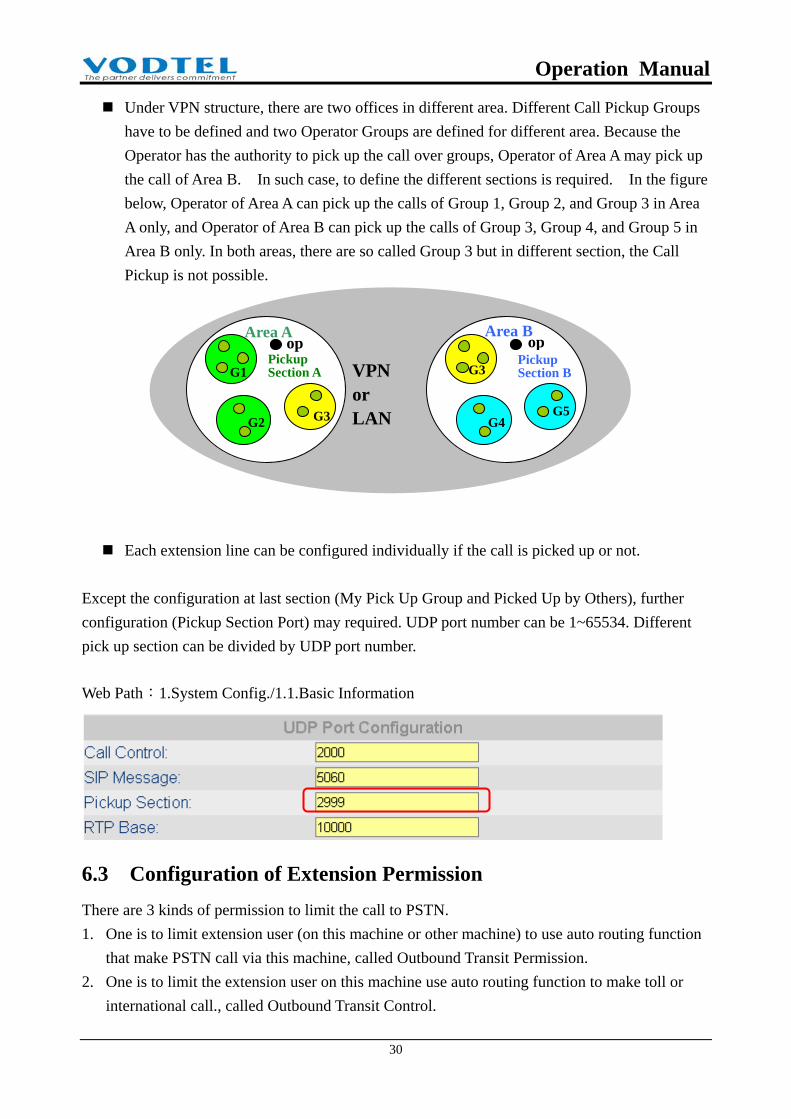
Operation Manual
30
Under VPN structure, there are two offices in different area. Different Call Pickup Groups have to be defined and two Operator Groups are defined for different area. Because the Operator has the authority to pick up the call over groups, Operator of Area A may pick up the call of Area B. In such case, to define the different sections is required. In the figure below, Operator of Area A can pick up the calls of Group 1, Group 2, and Group 3 in Area A only, and Operator of Area B can pick up the calls of Group 3, Group 4, and Group 5 in Area B only. In both areas, there are so called Group 3 but in different section, the Call Pickup is not possible.
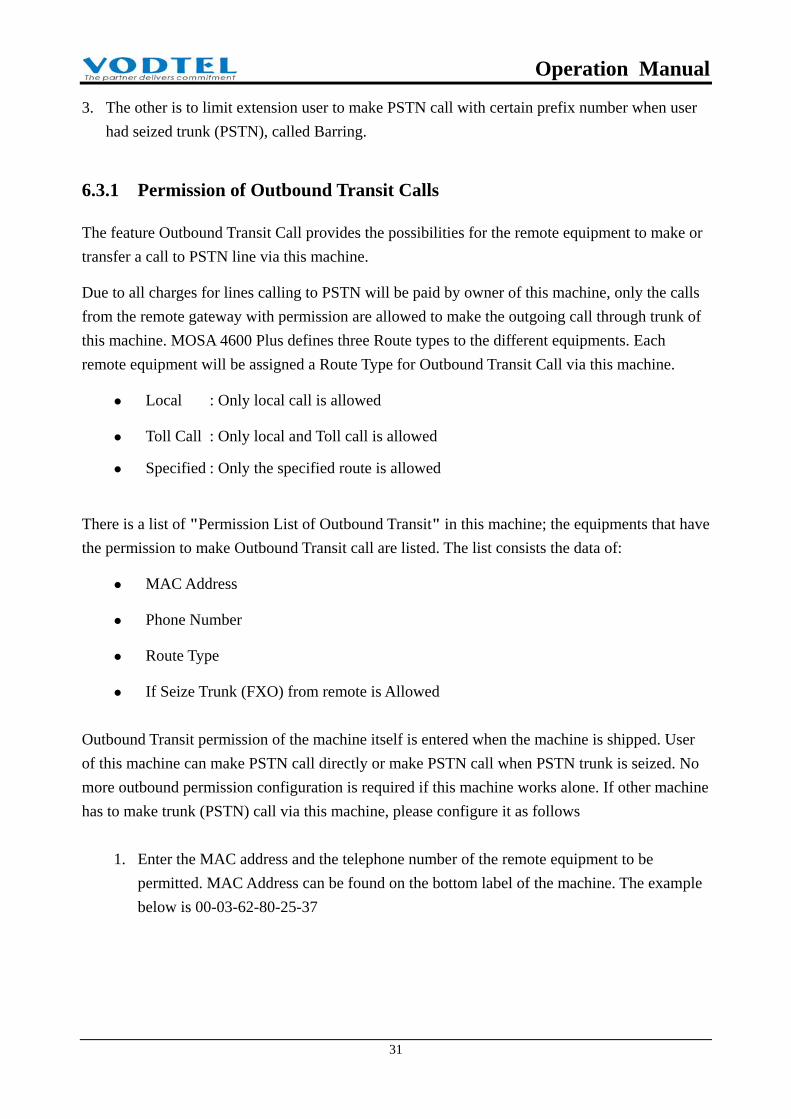
Each extension line can be configured individually if the call is picked up or not. Except the configuration at last section (My Pick Up Group and Picked Up by Others), further configuration (Pickup Section Port) may required. UDP port number can be 1~65534. Different pick up section can be divided by UDP port number. Web Path:1.System Config./1.1.Basic Information
6.3 Configuration of Extension Permission There are 3 kinds of permission to limit the call to PSTN. 1. One is to limit extension user (on this machine or other machine) to use auto routing function
that make PSTN call via this machine, called Outbound Transit Permission. 2. One is to limit the extension user on this machine use auto routing function to make toll or
international call., called Outbound Transit Control.
Area A Pickup Section A
Area B
Pickup Section B
op op
G1
G2 G3
G3
G4G5
VPN or LAN
Operation Manual
31
3. The other is to limit extension user to make PSTN call with certain prefix number when user had seized trunk (PSTN), called Barring.
6.3.1 Permission of Outbound Transit Calls
The feature Outbound Transit Call provides the possibilities for the remote equipment to make or transfer a call to PSTN line via this machine.
Due to all charges for lines calling to PSTN will be paid by owner of this machine, only the calls from the remote gateway with permission are allowed to make the outgoing call through trunk of this machine. MOSA 4600 Plus defines three Route types to the different equipments. Each remote equipment will be assigned a Route Type for Outbound Transit Call via this machine.
Local : Only local call is allowed
Toll Call : Only local and Toll call is allowed
Specified : Only the specified route is allowed
There is a list of "Permission List of Outbound Transit" in this machine; the equipments that have the permission to make Outbound Transit call are listed. The list consists the data of:
MAC Address
Phone Number
Route Type
If Seize Trunk (FXO) from remote is Allowed Outbound Transit permission of the machine itself is entered when the machine is shipped. User of this machine can make PSTN call directly or make PSTN call when PSTN trunk is seized. No more outbound permission configuration is required if this machine works alone. If other machine has to make trunk (PSTN) call via this machine, please configure it as follows
1. Enter the MAC address and the telephone number of the remote equipment to be permitted. MAC Address can be found on the bottom label of the machine. The example below is 00-03-62-80-25-37

Operation Manual
32
2. Choose the Route Type from Local, Toll, or Specified. 3. Choose if the trunk can be seized from remote in the field "Trunk Call Allowed".
Web Path:1.System Config.\1.5.Outbound Permission
If the field of "Trunk Call Allowed" is set to TRUE, a " + " sign will be followed by MAC Address in the Permission List of Outbound Transit. No " + " sign means seize trunk to make call is allowed
For "Trunk Call Allowed", not only the Outbound Transit call is allowed, the seize remote trunk from the remote IP-PBX to FXO port of this machine is also allowed
MAC Address of this machine
Outbound permission had applied to itself
Add info of other machine

Operation Manual
33
6.3.1.1 Specified Route
Specified Route for Outbound Transit Call
Specified route is to define some specified area as the destination of Outbound Transit Call. If “Specified Route” is selected when Outbound Transit is configured (please refer to 6.3.1 Permission of Outbound Transit Calls), that means only the call to the specified area can be transferred via this machine.
Specified Route is defined by the starting digits of the telephone number, including country code or/and area code, to specify a certain range. For example
Route Range Covered 86 Whole China (Country Code=86) is covered
8621 The area with Area Code 21 in China (Country Code=86), i.e. Shanghai area
8869 The area with Area Code 9 in Taiwan (Country Code=886), i.e. the mobile phone of Taiwan
1 Whole United State (Country Code=1) is covered
813 The area with area code 3 in Japan (country code=81), i.e. Tokyo area
Cost for Route (Priority)
The concept of the cost for route is applied as the factor to select the route for Outbound Transit. The cost of range from 1 to 95 is assigned to the route of different equipment, The more the route with lower cost, the more higher priority the machine will select. There is a default cost, i.e. 0, is assigned to the route specified the same Country Code and Area Code in the machine.
Example 1 Machine Web Setting:
Route Web Setting: Cost
Company of Trunk connection
MOSA 4600 Plus (1), in Taipei
8862 0 Cheaper rate
MOSA 4600 Plus (2), in Taipei
8862 1 More Expensive rate (better quality)
Both machine provides outbound call from remote site. Outbound call from MOSA 4600 Plus (1)
has higher priority.

Operation Manual
34
Example2 Machine Web Setting:
Route Web Setting: Cost
Company of Trunk connection
MOSA 4600 Plus (1), in Taipei
8862 0 A company
MOSA 4600 Plus (2), in Kaohsiung
8867 0 A company
Both machine provides outbound call from remote site. Outbound call to Taipei goes from MOSA
4600 Plus (1). Outbound call to Kaohsiung goes from MOSA 4600 Plus (2)
Can be configured from
Web Path:1.System Config.\1.6.Specified Route
6.3.2 Permission to make outgoing call (Outbound Transit Control)
The permission to make trunk-outgoing call for each extension can be configured individually. Default value is International, means all outgoing number can be dialed. If change is required, Web Folder:2.Channel Config.\2.1.Summary Select Channel with FXS type and click its St (Status)

Operation Manual
35
Select Outbound Transit Control inside table
Available selections are 1. Disable: Can not make trunk (PSTN, ITSP) call 2. Local: Local trunk call only 3. Toll: Can make local and long distance trunk call 4. International: Can make local, long distance and international trunk call Hint for Application 1: Each extension can be configured individually. So if extension user doesn't want others to make trunk call via his/her extension when he/she is not at his/her seat, he/she can disable the extension In addition to configure it by Web, by phone-set is also OK ♦ Pick up that extension and dial *0(Du Du Du)140# (Du Du Du), that extension is unable to
make trunk call ♦ Pick up that extension and dial *0(Du Du Du)141# (Du Du Du), that extension resume to
original status (the ability to make trunk call (Local, Toll, International) keeps intact) ♦ If password is pre-configured at that extension, please dial *0+ Password (Du Du Du)+ 140#
(Du Du Du) and *0+ Password (Du Du Du)+ 141# (Du Du Du) individually. Attention: For the machines that were shipped after Firmware 2.01(included) or above, user can dial function code to limit complete outbound call (including auto-routing and trunk seizure). For the machines that were shipped before Firmware 2.01(not included), administrator has to manually configure barring class 6: Lock Phone (this feature limits trunk seizure) to limit outbound call completely. For barring class 6: Lock Phone, please refer to 6.3.3.2 Steps to create the Barring Classes: Example 5 Hint for Application 2: High rank administrators may have meeting at different meeting rooms. Administrators may need to make call in meeting rooms or by employee's extension sometimes. For security purpose, it is unable to make international/toll call by employee's extension. In this case, administrator can dial his/her PIN code for authentication. If PIN code is correct, user can make call with the permission allowed originally. Configure PIN code (Inbound Password) and its available permission. PIN code can be the same for several people, and they also can be different for each individual person, however, there are maximum 200 sets for each MOSA 4600 Plus box. Click Apply to take effect when the configuration of PIN code and its permission is done.

Operation Manual
36
Web Folder: 1.System Config.\1.8.Inbound Password (PIN code)
Dialing Method You can dial to the IP DISA of your own extension, by using the extension with lower permission. Do it by this way. 1. Dial "Prefix Number of this machine+*", such as: 10* 2. Dial "Box number+#" or “VODNET ID+#” of this machine Then, dial * + PIN code + # and then second dial tone is heard. Dial the call according to the permission above (Disable/Local/Toll/International. Disable means that only calls between extensions are allowed). PIN code with higher permission covers the permission lower.
6.3.3 Barring Class
The main purpose of Barring is to allow or disallow extensions to make PSTN trunk call that start from certain digits (prefix)
For MOSA 4600 Plus, there are maximum six Barring Classes of any pre-defined barring rule that can apply to each individual extension. For example, the destination phone number is allowed or disallowed to be dialed can be defined in the Barring Class table. For each extension line, only one Barring Class can be selected.
Note: For box that is shipped after Firmware V2.01 or later version, it has default value according to different Region ID. User still can modify it by themselves.
Default barring class value are 1. Local / 2.Toll / 3. International / 4. Blank / 5. Blank / 6. All
Attention: Barring class only control phone calls that seize trunk first, then dial outgoing number later. For phone calls that use auto routing function, barring class can not control it.
6.3.3.1 Create Barring Class
The web page to configure Barring Classes is entered from Web Path: 4.PBX Advanced \4.3.Barring Class.. The parameter for Barring Classes defines "Accept" or "Deny" attributes. Each attribute can be defined in Barring Table and Exception Table. Only one Attribute can be

Operation Manual
37
defined for each Barring Class. The default values for the six classes are 0 and no data are defined.
Web Path of Barring Classes: 4.PBX Advanced \4.3.Barring Class. There are two attributes, "Deny" and "Accept" for each barring class. No matter what attribute is applied to the barring class, it uses two table, Barring Table and Exception Table. Only one Attribute can be defined for each Barring Class and it can be "Deny" or "Accept"
There are maximum six Barring Classes can be pre-defined in this machine. When extension is specified with barring class "0", means there is no barring control.
Web Path:4.PBX Advanced \4.3.Barring Class
Group Field Description Default Value
Class Selection of Barring Classes, Choice from 1 to 6 Name Display the name of barring class (Display Only) Blank
Class Information
Attribute Display the attribute of Barring Class (Display Only) N/A

Operation Manual
38
Class Attribute The attribute of the class, Deny or Accept. There are Barring Table and Except Table may be defined for each attribute. Only one attribute can apply to one barring class, can be Deny or Accept DENY: (Positive list, configure prefix number for phone call allowed only) All numbers are denied except the numbers listed in the Exception List. When DENY is selected, it is not necessary to define Barring List, because DENY is to reject all numbers. ACCEPT: (Negative list, configure prefix number that is not allowed for phone call) Accept all numbers except number in the Barring List. The number in the Exception List are exceptions. New: When Attribute has not yet to apply to barring class (shown N/A), click New to add the Attribute to selected Barring Class Delete: Delete the Attribute to selected Barring Class. Delete the attribute of certain barring class will deactivate that barring class.
Class Name Define a name for the selected Barring Class; any name less than 15 characters can be defined by the system Manager. Add: Add class name for Barring Class.
Barring The phone number (less than 18 characters) that is limited to be dialed Add: Add phone number to Baring List for selected Barring Class Delete: Delete phone number from Barring List for selected Barring Class
Exception The phone number (less than 18 characters) for exception Add: Add phone number to Exception List for selected Barring Class Delete: Delete phone number from Exception List for selected Barring Class
Barring List Display all numbers to be barred that is related to the attribute
(Display Only)
Class Control
Exception List Display all exception in Except Table that is related to the attribute
(Display Only)
Operation Manual
39
6.3.3.2 Steps to create the Barring Classes:
1. Select a Barring Class (1~6) from the field of "Class" under Barring Class Configuration, then click button Select.
2. Select an Attribute for the selected Barring Class, ACCEPT or DENY, and click button New. 3. Enter a name for Barring Class in the field of "Class Name" and click button Add. 4. Now you may define the details based on the attribute selected. Create the Baring List by
clicking the button Add Barring, and create the Exception List by clicking button Add Exception.
After the Barring Classes are created, you may select a Barring Class for the IP-PBX extension.
(1) Example-1
If this machine is located at Shanghai, and only the calls to Beijing (Area Code = 010) and the calls to mobile phone (Area Code = 013) in China is allowed. The configuration for Barring of the equipment is to define the Area Code 010 and 013 in Exception List, the rest all number are denied.
Attribute DENY Barring Table (No configuration is
required when attribute is "Deny")
Exception Table 010 013
(2) Example-2
If this machine is located at Shanghai, only local calls to Shanghai are allowed, all numbers starting with 0 (including toll call and international call) is not allowed except Beijing (Area Code = 010) and Shenzhen (Area Code = 0755).
Attribute ACCEPT Barring Table 0 Exception Table 010 0755
(3) Example-3
If this machine is located at St. Jose, United State of America, only the local calls in St. Jose are allowed. Toll calls (starting with 1) and the international calls (starting with 011) are not allowed except calls to Beijing (011-86-10).
Operation Manual
40
Attribute ACCEPT Barring Table 011 1 Exception Table 0118610
(4) Example-4
If this machine is located at Tokyo, Japan, only local calls to Tokyo are allowed. The toll call (starting with 0) and international call (starting with 001) are not allowed except the call to Shanghai (001-86-21).
Attribute ACCEPT Barring Table 001 0 Exception Table 0018621
(5) Example-5
For the machine that shipped after Firmware V2.01 (included) or above, this system configure default barring class for different Region ID. Default barring classes includes: 1. Local / 2. Toll / 3. International / 4. (none) / 5. (none) 6. Lock Phone
Earlier firmware does not have barring class 6: Lock Phone. Administrator has to configure it manually. This call is to limit trunk seizure call (Note: Auto-routing control for Outbound permission call is located at 1.System\1.5.Outbound Permission)
For extension users that want to lock phone set by dial pad, please refer to 6.3.2 Permission to make outgoing call (Outbound Transit Control)
Barring Class 6 Attribute: DENY
Name Lock Phone Barring Table:
(None)
Exception Table: (None)
6.3.3.3 Modify the Attribute of Baring Classes
If the attribute of the Barring Class is defined, it is not allowed to define a new attribute (New) to the same Barring Class. Any modification to the attribute of Barring Class has to delete the attribute (Delete), and then define a new one.
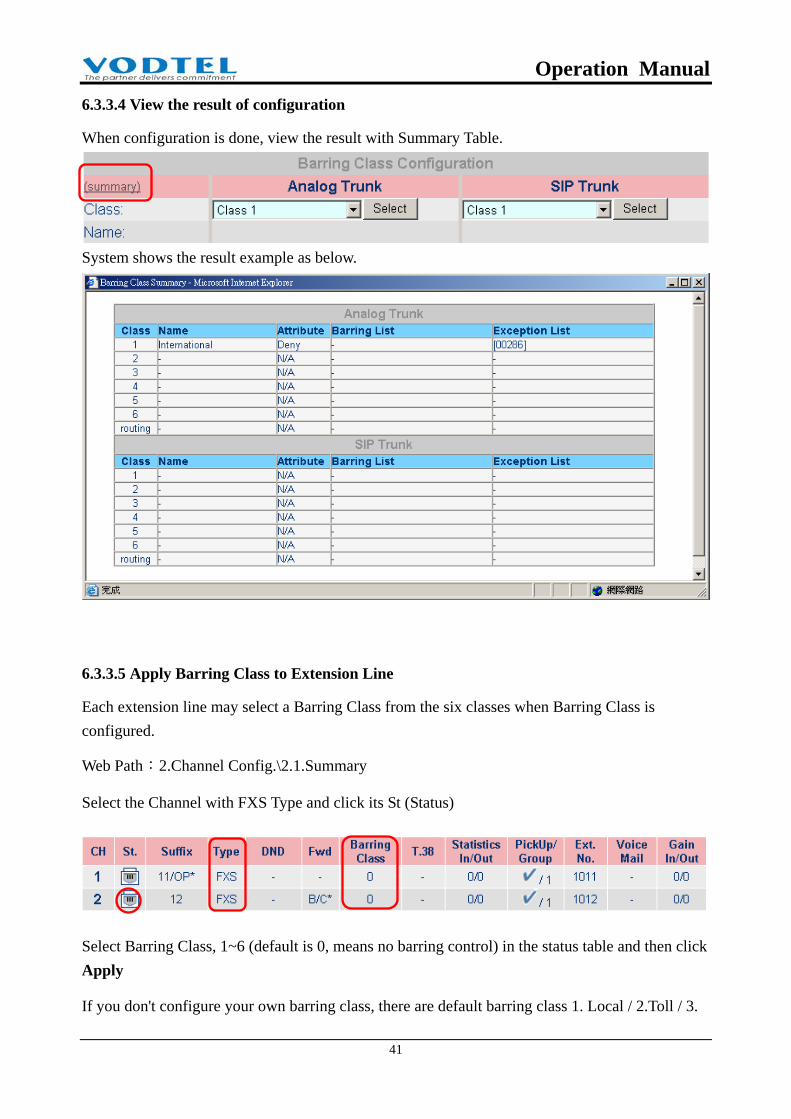
Operation Manual
41
6.3.3.4 View the result of configuration
When configuration is done, view the result with Summary Table.
System shows the result example as below.
6.3.3.5 Apply Barring Class to Extension Line
Each extension line may select a Barring Class from the six classes when Barring Class is configured.
Web Path:2.Channel Config.\2.1.Summary
Select the Channel with FXS Type and click its St (Status)
Select Barring Class, 1~6 (default is 0, means no barring control) in the status table and then click Apply
If you don't configure your own barring class, there are default barring class 1. Local / 2.Toll / 3.

Operation Manual
42
International / 4. Blank / 5. Blank / 6. All for your reference.
6.4 Configuration to Join Operator Group
MOSA 4600 series IP-PBX supports several types of Operator:
DISA: It is an Auto attendant that system can answer incoming call and play the instruction greeting. It can be disabled.
Operator for this machine: Operator (personnel) takes incoming call manually.
Network Operator: Operator (personnel) at network site takes incoming call manually.
When a call is coming from trunk (i.e. FXO port) or from IP, DISA answer the call by default. If incoming call user presses 0, it will be pickup by Operator (personnel, by the operator of this machine or at network site). If company selects to use Operator, at least one extension had to join operator group (default value)
6.4.1 Operator on This Machine
Many extensions of this machine can join to operator. If the specified operator is busy, the system will ring the idle extension at Operator Group from the first port (Channel 1) upward. Pay attention to the relation ports location when you wire the extension line.
6.4.1.1 Specify Channel of Operator and Operator Access Code
Configuration: 1. Enter Web Path 1.System Config. \1.2.PBX Access Code 2. Configure Operator Access Code. Default value is 0. Please don't change it if there is no
special requirement 3. Select a channel for operator in "Assign Operator to" field in "Other Setting" function.
The operator of Day and Night can be different. If yours is different, specify them to different ports.
4. Click "Apply" button.

Operation Manual
43
6.4.1.2 Configure Operator Group
When the default operator is busy, system rings the next idle extension in operator group (from next extension upward to the end). For the default setting, all physical extension had already join Operator. To configure extension to join Operator Group, see below.
Web Path:2.Channel Config.\2.1.Summary
Select the Channel with FXS Type and click its St (Status)
In Status table, select to join group (Join Operator Group) or not. Default value is Yes, and then click Apply button

Operation Manual
44
Note: If the extension with T.38 (for FAX only) enabled had already join to Operator Group, the system don't ring this extension when extension of operator is busy.
6.4.2 Network Operator
Network operator means the operator (personnel) is not configured at this machine and it is configured at other MOSA 4600 Plus. It allows operator to be located at other MOSA 4600 Plus via IP network. When user of incoming call dials the Operator Code, system will search the Operator in this machine. If the Operator of this machine is set to N/A, system will assume that Operator is defined on another machine. The system rings the Prefix/extension number at another machine that is defined in the Network Operator Extension Number. (Of course, the Prefix/extension number of other machine had already configured in Extension Table in advance.)
In the following example, the Operator is configured on equipment with Prefix/Ext. No.: 81, which is a MOSA 4600 Plus with phone No. 886-2-8226-8881, as a Network Operator.
Steps of configuration: 1. Web Path of this machine:1.System Config.\1.2.PBX Access Code. In the field, Other
Setting / Assign Operator to. Set it to "N/A"
2. Input the Prefix/Ext. No. of network operator into the Extension Number table of this machine. In Web Path 1.System Config.\1.3.Extension Number, input Prefix/Ext. No.=81, Phone_No=886282268881, Type=iPBX, and then click Apply.
3. Configure the Prefix/Ext. No. of network operator to Network Operator Extension Number field. Web Path:1.System Config.\1.3.Extension Number

Operation Manual
45
No matter what type (Phone/iPBX) of Prefix/Ext. No. is assigned to the Prefix/Ext. No. device of the network operator, it connect network operator without dialing extra 0 or extension number of that device. (DISA won't query user again)
6.4.2.1 Backup Network Operator (Cascade Device)
Although operator in this machine is configured, it seizes the network operator at other machine automatically when all operators at original machine are busy.
When a call is coming and the Operator Code is dialed, this machine will find the Operators of this machine for answering the call first. If the extension in Operator Group of this machine is busy, and another machine is assigned as backup Operator, then system will find an available Operator from the second machine. If the second machine has also assigned the third machine as the backup Operator, and all Operators of the first and the second machine are all busy; then system will find an available Operator from the third IP-PBX. Backup network operator can be cascaded for 16 times and maximum 17 machines can be cascaded together
IP MOSA 4600 Plus
FXSFXS
FXO
MOSA 4600 Plus
PSTN
… …All Busy
FXS
MOSA 4600 Plus
…
IP
All Busy Operator Group OperatorOperator Group

Operation Manual
46
Configuration: In Web path 4.PBX Advanced \ Telephony Tuning, Input Phone Number (Web Path:1.System Config.\1.1.Basic Information,My Phone Number) of other machine in Cascade Device field. It has to be full number, Country Code + Area Code + Phone Number, also can be VODNET number.
Attention: Make call between the operator extensions in different machine in advance.
6.5 Change Extension Number The default extension number of physical extension (FXS port) is 1011~1026 (available extension is depends on the models with different ports). In 6.1 Extension Number, we know the rule of extension. By these rule, you can specify your own extension number.
6.5.1 Change Prefix of Extension
The default physical extension number is 1011~1026, because the system configure a default prefix of extension: "10" in Web Path: 1.System Config.\1.3.Extension Number, shown below
For your special requirement, you can change it, such as adding a new Prefix/Ext. No.: 8. Then the extension number is changed to 811~826. Here is the way to input and click Apply when it is done.
(It is better not to delete Prefix/Ext. No.: 10, unless it is conflict with existing extension number) Hint: Set Phone_Number as 0 means it is the phone number of the machine itself. It can sync with My Phone Number in Web Path 1.System Config.\1.1.Basic Information
6.5.2 Configure Dedicate Extension Number
Example 1 If the full number of This Machine is 886-2-82263397. You can configure two extensions as below. In Web Path 1.System Config.\1.3.Extension Number Prefix/Ext. No.: 8888,Phone Number: 886-2-82263397-11,Type: Phone

Operation Manual
47
Prefix/Ext. No.: 6666,Phone Number: 886-2-82263397-12,Type: Phone When it is done, Dial 8888, the original default extension 1011 is ringing. Dial 6666, the original default extension 1012 is ringing.
Example 2 If the full number of Other Machine is 886-2-82263380. You can configure two extensions as below. In Web Path 1.System Config.\1.3.Extension Number 中 Prefix/Ext. No.: 8801,Phone Number: 886-2-82263380-11,Type: Phone Prefix/Ext. No.: 6601,Phone Number: 886-2-82263380-12,Type: Phone When it is done, Dial 8801, the original default extension 1011 at other machine is ringing. Dial 6601, the original default extension 1012 at other machine is ringing. Create data of Prefix/Ext. No will write a .MEM file in system. You can backup this file (can be modified by Windows Notepad if required), and then upload to other MOSA 4600 Plus. Restart machine when it is done. By this way, you don't have to Create data of Prefix/Ext. for each machine and it also keep all dialing behavior inside the system the same.
6.6 Limit the Duration of Trunk Call from Extension To prevent too much trunk call (including PSTN and IP trunk) cause excessive billing charge (from telecom company), the extension of this machine can be configured individually for this function
Web Path:2.Channel Config.\2.1.Summary
Select the Channel with FXS Type and click its St (Status)

Operation Manual
48
Web Folder: 4.PBX Advanced\4.4.Telephony Tuning
Attention: ♦ All extensions that use this function have consistent limitation duration for each extension
and different duration for each extension is not available. (For example, Extension 1 is 3 minutes, Extension 2 is 5 minutes)
♦ When this function is activated, the duration of all trunk call from that extension is limited, however, duration of Offnet Forward call is not under this control.
♦ If you want all extensions are under the control of duration of trunk call, then configure individual extension one by one is required.
♦ If the extension user of this machine make trunk call via other machine, then the duration is under the control of the machine itself, not the duration control of the other machine.
7. Configuration of Trunk
7.1 Disable Useless Trunk Port If users seize the truck ports of this machine from extension or remote site, this machine will assign idle port from the last port upward. If the port is idle, the port is seized. If the port is busy, system seize next idle port upward. All trunk port is enabled when this machine is produced. It might be possible that users seize an empty port without wired or current that is totally silent at phone set if not all trunk ports are installed. To prevent this kind of problem, disable useless port is required. Web Path:2.Channel Config.\2.1.Summary Select FXO channel that is for incoming call only and click its St (Status)
Disable Channel

Operation Manual
49
--> (Note: For V2.02.1 (included) or later version, analog trunk (FXO) loop current detection is provided. System detects loop current status of wired ports. If no loop current is detected, system skips these ports when trunk seizure happens. Disable ports via management web are suggested if these trunk ports are not required.)
7.2 Permission of Incoming Call Route to Trunk
MOSA 4600 Plus provides the feature that can make transit call to the trunk (FXO or SIP) port, then route to FXS port of other machine; or to PSTN via other machine (PSTN-IP-PSTN call), so called transit call. This chapter tell you how to configure the permission of incoming PSTN call to transit to PSTN call.
If the transit phone number is VODNET No. or the FXS extension number of another machine, there is no limitation of permission and area, because it is VoIP call and there is no extra charge. If the transit call is transit to PSTN (PSTN – IP –PSTN), then the password will limit the transit calls. Different passwords have different permission. Permission is shown below.
Disable : Call can not be transit to the line outside the IP network Local : Call can be transit to a local call of PSTN line Toll : Call can be transit to a local or toll call of PSTN line International : Call can be transit to a local, toll, or international call
The definition is relative to the "Region ID" of the equipment that caller dials into. Please refer to the following example.
Example: User at Taipei makes call to MOSA 4600 Plus at Taipei, phone number is 82268888. This call is transit to PSTN at Shanghai via remote MOSA 4600 Plus at Shanghai. This user must apply the password for Transit Call with privilege for international call, e.g. 2222. Web Path:1.System Config.\1.8.Inbound Password

Operation Manual
50
And then click Apply button. This password is required for MOSA 4600 Plus to provide this function.
The steps to place the call are:
(1) Make a call to Taipei 82268888, which is MOSA 4600 Plus in Taipei from any public phone line (PSTN)
(2) After hearing the greetings, dial **2222#002862164452222#
Attention 1. Note that the user is trying to make a transit call from Taipei’s MOSA 4600 Plus to a public
line in Shanghai; therefore this user needs the password for Transit Call with privilege for international permission.
2. The remote machine that provide route to PSTN needs to have configuration on Outbound Permission Table. Please enter Web Path:1.System Config.\1.5.Outbound Permission to check Outbound Permission. Please refer to 10.1.4 Add Permission of Outbound Transit to PSTN
7.3 Allow Incoming Call Only (Incoming Only Trunk) For the construction of office telephone, some trunk has to be reserve for incoming call only and user in office can not seize these trunk to make call. If prevent that all trunk are all seized by office user and all incoming call is busy. Trunk Class of each Analog Trunk has default setting "0" and all extension can seize all Analog Trunk. To enable this function, change Trunk Class ID of FXO port that is for incoming call only. For example, change Trunk Class ID to 2. 1. Web Path:2.Channel Config.\2.1.Summary Select FXO channel that is for incoming call only and click its St (Status)
2. Configure Trunk Class to 2, for example, and then
Click Apply button, Summary table changed
3. If there is more then one trunk need to join incoming only FXO port, please select different

Operation Manual
51
FXO port and repeat steps 1 and 2. 4. Web Path:1.System Config.\1.4.Trunk Group/Class Tick Incoming Only on Trunk Class 2 and then click Apply
7.4 Call Forward to Backup Line for Incoming Trunk call Each incoming trunk call can be forward to specified phone number directly (without conditionally that caller needs not to dial any extension number), however, it is possible that the specified number is busy. In this section, you can configure the results. When ♦ DISA is disabled, and manual operator is busy ♦ DISA is on day mode, and the specified forward number is busy The incoming call can be forwarded to specified number (can be ring group). If the specified number is also busy, system will try these two numer alternately until it is connected or caller side hang up the call. For incoming IP trunk call, system will try 20 times alternately and disconnect the call if it is busy. The incoming trunk call number that will forward to (use 886282263456 as example) 1. Web folder: 2.Channel Config\2.1.Summary Select the FXO Channel for incoming call only and click its status
2. Configure Call Forward Control to Day/Night, and then configure Forward To as 886282263456

Operation Manual
52
Click Apply, then Summary Table is updated
When incoming call that forward to 886282263456 is busy, then incoming call is forward to 886282263333 (use 886282263333 as example) Web Folder: 4:PBX Advanced\4.4 Telephony Tuning
Note: For this feature of call forward, each box can has one Secondary Service Agent of Direct Line No. for incoming trunk call only, so specify it to the DISA of other box, manual operator or ring group. This feature applys to Day Mode only. As the definition of Day Mode, it is based on the Day Mode of DISA. Please refer to the configuration of 12.2 Configuration the Time of Day/Night DISA Mode and 12.3 Configure Greeting Mode for Special Holiday Web Folder: 1.System Config.\1.1.Basic Information
1. If Offnet To (such as mobile phone number 0968223356) is configured to incoming trunk port, the Offnet To number will be dialed from the device of Secondary Service Agent of Direct Line
As the example figure above, the mobile number: 0968223356 that will dial from 886282263456 originally, is dialed from device 886282263333 finally.

Operation Manual
53
2. If the field in Secondary Service Agent of Direct Line is blank, Offnet To number is dialed from original Forward To (such as 886282263456) device.
3. If the device of the number (can be extension or full number) that is configured at the field above is set to execute Offnet To to PSTN. The call will do Offnet To call to remote PSTN.
7.5 Call Forward for Day/Night incoming Trunk call Analog and IP incoming trunk call can be configured to forward to different destination numbers (can be ring group) between day and night. As the definition of Day/Night Mode, it is based on the Day/Night Mode of DISA. Please refer to the configuration of 12.2 Configuration the Time of Day/Night DISA Mode and 12.3 Configure Greeting Mode for Special Holiday Web Folder: 1.System Config.\1.1.Basic Information
♦ Select Day/Night for the trunk ports that have different destinations between day and night. Web Folder: 2.Channel Config.\2.1.Summary Select the FXO Channel that has different forward to destination between day and night, and click its status
Select Call Forward Control to Day/Night

Operation Manual
54
♦ Configure the Forward To number at night in the field of Night Service Agent of Direct Line,
such as 886282267890 Web Folder: 4:PBX Advanced\4.4 Telephony Tuning
When Night Mode is activated for Day/Night mode of DISA, and Call Forward Control is configured to Day/Night. The incoming call to this trunk channel is forwarded to 886282267890 Rule for this feature: ♦ For this field, Night Service Agent of Direct Line, each box can has one Night Service
Agent of Direct Line No. for incoming trunk call only, so specify it to the DISA of other box, manual operator or ring group.
♦ If Call Forward Control of trunk channel is disabled, Call Forward is disabled, even though there is any number in that field.
♦ If Offnet To (PSTN or mobile number) number is configured, this function is disabled when system is in Nighrt Mode.
♦ If incoming call is forwarded to 886282267890, and this number is configured to do Offnet

Operation Manual
55
Forward (PSTN, Mobile number), then the incoming call is Offnet Forwared to PSTN, Mobile phone.
♦ If Call Forward Control is configured to Day/Night, however, there is no number in the field of Night Service Agent of Direct Line, no mater what mode (day/night) does the box has now, all incoming call can be Forwarded To specified number (each channel can has different Forward To number, such as the example below, 886282265678)
8. Configuration of Speedy Dial
8.1 Abbreviated Dial
The feature of Abbreviated Dial is to provide a simple and short dialing behavior to send out the complex and long telephone number instead of dialing the full telephone number. There are 100 entries for Abbreviated Dial. The Abbreviated Dial Index is for every extension line to make a call by just hook off the phone set and dial
< "*2" > + <Abbr. Dial Index (00 ~ 99) > (*2 is default value, can be configured at Web Path:
1.System Config.\1.2.PBX Access Code) When you make a call by Abbreviated Dial, the call will override the restriction defined in the Barring Table if the Index is from 00 to 69, and the call will be restricted by the definition in the Barring Table if the Index is from 70 to 99.
0 ~ 9 , * , and # may be used to define the Abbr. Dial Index in Abbr. Dial Table. The number defined in the table is the actual digits to be dialed out for making a phone call. For example, if you would like to dial "9" then the call of telephone number " 0921888666 " will be made, and then you should configure the telephone number in the Abbr. Dial Table as " 90921888666 ". Another example, if you would like to make an IP call **82263368#, then you can configure the telephone number as "**82263368#" in Abbr. Dial. Web Path: enter 4.PBX Advanced\4.2.Abbr. Dial and input Abbr. Dial number that is shown below:

Operation Manual
56
And then click Apply button
8.2 Digit Map (Note: Only for Firmware V3.04 or later version) When users dial auto-routing call to trunk or VODNET call, users have to dial # to end each call, otherwise, wait for dial ending time (3 seconds) to send to call is required. By using【Digit Map】
function, call is sent immediately if common dialing type is pre-configured and it also match what
users dial. Dial extra # or wait for dial ending time is not required. To active this function Web Path:4.PBX Advanced\4.8.Digit Map
Input digit map type Refer to example before input the digit map type. Please click (Description)
Here is the example and its description
[Character Set] Symbol: Description: Formal DTMF Signals 0~9、A~D、*、# Wildcard digit 'x', it means any digit between 0~9 Repeat previous digit '.', it repeats the previous digit
Range & Sub-range Use [xxx..] to mark usable symbol and digits. Use [x-x] to mark usable range of digits (0~9 only)
[Example] Sample Format Explain
1[016]X Total 3 digits. The first one is 1, the second digits may be 0 or 1 or 6, and the third digits can be any of 0~9
[*#]XX.[*#] Total 5 digits. The first is * or #, the second and the third digits are any of 0~9, the forth digit is the same as the third and the 5th is * or #

Operation Manual
57
[X*#ABCD]. or [0-9*#ABCD]
Total 2 digits. The first digit is one of formal DTMF signals, and the second digit is the same as the first one.
From previous example, here we add some extra example Example Description *[389*]X.[#8] Number that match *+ 3 or 8 or 9 or * + any digit +
repeat previous digit + # or 8 are send without waiting dial ending time
*2XX Number that match * +2 + any digit + any digit are send without waiting dial ending time
9. Connect Tradition Analog PBX
9.1 Connect FXS to PBX Analog Trunk There are 2 and 4 wires phone cable available. Use 2 wires cable is OK and it use RJ-11 jack. For your attention ♦ FXS or Phone port of this machine can connect to phone set or Trunk card/FXO port of
tradition Analog PBX only Example Structure
9.1.1 Configuration on MOSA 4600 Plus
9.1.1.1 Configuration of DISA (Auto Attendant)
With default setting, the machine answer trunk (PSTN) call automatically and play instruction greeting. If the DISA of traditional analog PBX should be used, the DISA of MOSA 4600 Plus needs to disable. The incoming call will bypass this machine to the first FXS (Channel 1) to traditional analog PBX Web Path:1.System Config.\1.1.Basic Information
4600 Plus PBX
FXS/Phone
FXO/Trunk
PSTN FXS/Phone

Operation Manual
58
9.1.1.2 Configuration to Penetrate PBX DISA
This section of configuration is not absoultly necessary. It depends on the structure of wiring. In previous section 9.1.1.1 Configuration of DISA (Auto Attendant), the DISA of MOSA 4600 Plus is disabled and incoming code is answered by traditional voice PBX. In some case, you may want that the incoming call can Penetrate PBX DISA, however, the DISA of PBX still works. After the configuration of this section, MOSA send the PBX extension number to PBX after the PBX DISA answer the incoming call for 2 seconds, when user dial incoming call "Extension (FXS) Number of MOSA 4600 Plus + PBX extension number" Web Path: 4.PBX Advanced\4.1.Trunk Access Code
Extension Digits is the length of PBX extension number.
9.1.2 Configuration on Analog PBX
9.1.2.1 Test DTMF sending on PBX trunk
Before the construction above, test to see if trunk of PBX is able to send correct DTMF tone, so connect PBX and phone set below to do the test.
PBX PSTN
Seize turnk, then dial

Operation Manual
59
Seize PBX Trunk to Send DTMF Test to see if PBX extension able to send */# DTMF when it had seize trunk. If it does not work, please contact PBX service personnel to change PBX setting. Testing Method Seize PBX Trunk to PSTN by extension first. If you seize Trunk to PSTN correctly, you can hear dial tone. Dial * or # to hear the tone reaction from phone-set. If dial tone stops immediately (silent), it means that PBX is able to send DTMF signal correctly.
9.1.2.2 Configuration of PBX Trunk Group and Tuning of Wire
Configure trunk group on the line connection from MOSA 4600 Plus and also assign the access code of that PBX Trunk group
Connection of PBX trunk port Group PBX FXO port that connects to two lines (or more lines, depends on ports available) of MOSA 4600 Plus. Specify trunk group access code, such as "8" to this trunk group. When "8" of phone set is dialed, dial tone form MOSA 4600 Plus is heard. User then can make IP call or seize trunk (PSTN) to make call.
9.1.2.3 Busy Tone Detection
Busy tone detection is for line termination when conversation is finished and it only apply to FXO Trunk only. For FXS port, it use loop current detection and there is no Busy Tone Detection issue.
4600 Plus PBX
FXS/Phone
FXO/Trunk
PSTN FXS/Phone
Busy Tone Detection
4600 Plus PBX
FXS/Phone
FXO/Trunk
PSTN FXS/Phone
Group Trunk and set access code such as 8

Operation Manual
60
Busy Tone Detection of MOSA 4600 Plus MOSA 4600 Plus had built-in busy tone detection system of PSTN for many countries. If correct Region ID is configured, the system can detect busy tone correctly. To know the current Region ID setting, please refer to Web Path:1.System Config.\1.1.Basic Information
To change Region ID, it has to use Console or Telnet, and also do Factory Reset when it is done. Please refer to Quick Installation Guide, section 5.2 Configuration of Telecom Region ID and also refer to its Region ID table. If the location of this machine is not listed in the table, you can refer to http://www.itu.int/ITU-T/inr/forms/files/tones-0203.pdf List of various tones used in national networks" to find busy tone specification of the location (country) and configure the Region ID of this machine to use the location with similar busy tone specification. For example, for Macao, configure Region ID to French or German, which their busy tone is similar to Macao.
Busy Tone Detection of PBX The busy tone that MOSA 4600 Plus sends is the same as the specification that it detects the busy tone of selected Region ID, so configure the busy tone detection of PBX to the same country as MOSA 4600 Plus.
9.2 Connect FXO to PBX Analog Line There are 2 and 4 wires phone cable available. Use 2 wires cable is OK and it use RJ-11 jack. For your attention ♦ FXO or Line port of this machine can connect to PSTN from telecom company or Line
card/FXS port of tradition Analog PBX only Example Structure Note: By default condition, trunk (FXO) port with top number will be seized by extension first, so please connect the FXO/Line ports of MOSA 4600 Plus from the top number downward. For the example of 16 ports model, connect it by the sequence 16→15→14→13

Operation Manual
61
Attention: Mis-connect the FXS/Phone port of this machine to PSTN trunk from Telecom Company or Line Card of analog PBX will cause circuit breakdown on the machine, Telecom Company, and analog PBX.
9.2.1 Configuration on MOSA 4600 Plus
9.2.1.1 Configuration of PBX Trunk Access Code
By default configuration, incoming trunk (PSTN) call is answered by DISA and the system play instruction greeting. If FXO port of MOSA 4600 Plus is connected to an extension line of a PBX, PBX Co Line Access Code must be defined. When MOSA 4600 Plus makes an outbound transit call, user needs not to know that MOSA 4600 Plus is connected behind PBX and he can dial PSTN phone number directly. This MOSA 4600 Plus use the access code configured here to seize real PSTN Trunk then make PSTN call.
Web Path:4.PBX Advanced \4.1.Trunk Access Code
For the example above, "9" means PSTN trunk access code of analog PBX and "P" means pause 1 seconds. If the speed that PBX seize trunk is a little slower, "P" can be used repeat, such as 9PP Note: If the FXO is seized by remote extension, the dial tone heard in the extension is sent from PBX. This procedure won't penetrate PBX and get the dial tone from Telecom Company.
9.2.1.2 Gain Control
When you make a call to PSTN or extension of other MOSA 4600 Plus, it needs to penetrate PBX and MOSA 4600 Plus. So adjust Line/Trunk volume (Gain) of PBX and MOSA 4600 Plus is required if it necessary. The tuning of volume (Gain) is quite import for DTMF sending.
Large port number first
4600 Plus PBX
FXO/Line
Line/FXSPSTN FXS/
Phone
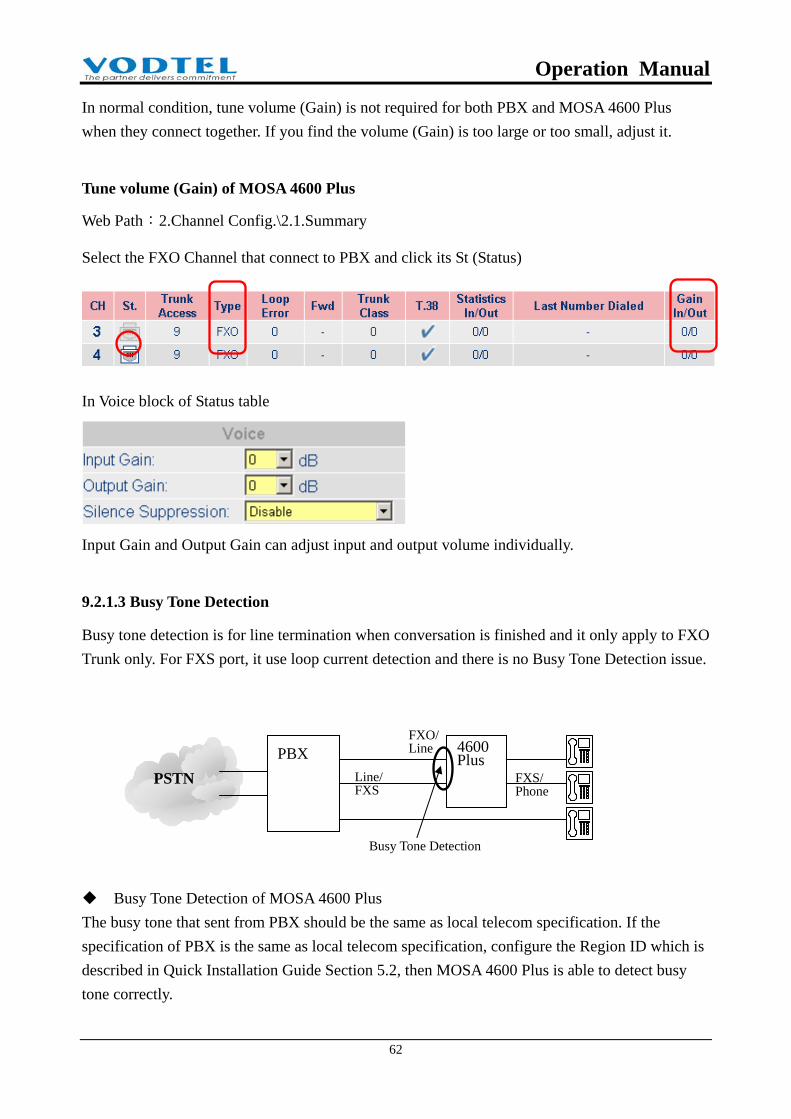
Operation Manual
62
In normal condition, tune volume (Gain) is not required for both PBX and MOSA 4600 Plus when they connect together. If you find the volume (Gain) is too large or too small, adjust it.
Tune volume (Gain) of MOSA 4600 Plus
Web Path:2.Channel Config.\2.1.Summary
Select the FXO Channel that connect to PBX and click its St (Status)
In Voice block of Status table
Input Gain and Output Gain can adjust input and output volume individually.
9.2.1.3 Busy Tone Detection
Busy tone detection is for line termination when conversation is finished and it only apply to FXO Trunk only. For FXS port, it use loop current detection and there is no Busy Tone Detection issue.
Busy Tone Detection of MOSA 4600 Plus The busy tone that sent from PBX should be the same as local telecom specification. If the specification of PBX is the same as local telecom specification, configure the Region ID which is described in Quick Installation Guide Section 5.2, then MOSA 4600 Plus is able to detect busy tone correctly.
Busy Tone Detection
4600 Plus PBX
FXO/Line
Line/FXS
FXS/Phone
PSTN
Operation Manual
63
However, the busy tone specification of PBX may be defined by the PBX manufacture individually, not busy tone specification of certain country. The special busy tone specification can be configured by yourself. Web Path:4.PBX Advanced\4.4.Telephony Tuning
Tune it to the same busy tone specification of the PBX
9.2.2 Busy Tone Detection of PBX
9.2.2.1 Test DTMF Sending Between PBX Extension
Before the construction of the example above, check DTMF sending (including */#) between PBX extensions is required. Connect PBX and phone set shown as below first.
Testing Method A that under PBX makes call to B and B answers the call. Then A dial */# from phone set. If B can hear the DTMF Du tone which A dial, then it means PBX can send DTMF correctly. If DTMF can not be sent correctly, then some function may not workable
9.2.2.2 Configuration of PBX Line Group and Wiring
Group PBX FXS port that connects to MOSA 4600 Plus and specify line group access code, such as "6" to this group. When digit "6" from extension or PSTN is dialed, user hear DISA greeting from MOSA 4600 Plus or second dial tone is heard. IP Call can be dialed now.
PBX
A B
Group Line and set access code such as 6
4600Plus PBX
FXO/Line
Line/FXSPSTN FXS/
Phone

Operation Manual
64
10. Work with Other MOSA Products
10.1 Configuration of Stacking/Networking Here is the definition of Stacking/Networking: ♦ Stacking: Means more than one machines stack together in one single location. Stacking can
increase available port (Channel) ♦ Networking: Means many machines are used at different place and they are connected with
Internet. Networking can expand useable location MOSA 4600 Plus use fully distributed architecture and many machines (including 2/4/8/16 models) can stacking/networking together without worrying about expansion Even though the machine is planned to use in stacking/network environment at the beginning, it still need to finish the installation and configuration of a single working machine. Please refer to Quick Installation Guide. When those steps are finished, then follows the Section below to finish the configuration of stacking/networking.
10.1.1 Configure Different Port Number When Stacking
For different machines the use public IP (Internet), they can use 2000,5060,10000 at the same time and it is not necessary to adjust them. However, the MOSA 4600 Plus that stacks together under NAT (Router, Firewall) needs to use different Port Number. In NAT (Router,Firewall) side, open Server Port to penetrate NAT is required. Please refer to Quick Installation Guide section 6.2 Open Server Port to Penetrate NAT At MOSA 4600 Plus side: Default port number is 2000. If other machine had already use 2000, then this machine has to change The configuration below is example: Call Control SIP Message RTP Base MOSA 1 2000 5060 10000 MOSA 2 2010 5070 11000 MOSA 3 2020 5080 12000 And so on... Web Path:1.System Config.\1.1.Basic Information

Operation Manual
65
1. Click Web Path on left side【1.System Config.\1.1.Basic Information 】 2. Input 2010 (or other value) in Call Control field of UDP Port Configuration 3. Click【Apply】。 4. Repeat the steps above if there are more machines needs to do stacking/networking 5. Warm Restart is required to take effect.
10.1.2 Add Prefix / Extension Number
When machines is stacking/networking, information of other MOSA 4600 Plus has to be input into Extension Number. Not only extension number of this machine or other machine can be enter into Extension Number table, it also define the Prefix Extension Number of this machine or other machine. There is a set of default data when this machine is shipped. Web Path:1.System Config. \1.3.Extension Number Prefix/Ext. No.【10】、Phone Number【My Phone No. Full No.】、Type【iPBX】
Means the extension number of this machine is 10xx, the physical extension number that connect to phone set are 1011~1026 (real available number depends on models and modules) For machines that used in stacking/networking, their Prefix/Ext. No. can not use 10 for all machine. It has to be different and all entries save in each machine is the same
The example of stacking: Prefix/Ext. No.【10】、Phone Number【886282263368】、Type【iPBX】(Ext. 10xx) Prefix/Ext. No.【20】、Phone Number【886282263369】、Type【iPBX】(Ext. 20xx) Prefix/Ext. No.【30】、Phone Number【886282263370】、Type【iPBX】(Ext. 30xx) ...and so on
The configuration below is example of networking: Input Data Description
Prefix/Ext. No.【10】、Phone Number【886282263368】、Type【iPBX】
MOSA 4616 PLUS at Taipei, Extensions are 10xx
Prefix/Ext. No.【20】、Phone Number【862177453276】、Type【iPBX】
MOSA 4616 PLUS at Shanghai, Extensions are 20xx
Prefix/Ext. No.【30】、Phone Number【85299673356】、Type【iPBX】
MOSA 4616 PLUS at Hong Kong, Extensions are 30xx

Operation Manual
66
...and so on ...and so on Web Path:1.System Config. \1.3.Extension Number
1. Click Web Path on left side【1.System Config. \1.3.Extension Number】。 2. Input Prefix of extension of other machine into【Prefix/Ext. No.】field, such as 20. Then
extensions of other machine are 20xx 3. Input phone number that come from【My Phone Number】(Web Path:1.System
Config.\1.1.Basic Information) of other machine, into the【Phone Number】field. This phone number has to be full number (Country Code+ Area Code + Phone Number)
4. Select iPBX in【Type】field 5. Click【Apply】。 6. Repeat the steps above if there are more machines have to be stacking/networking
10.1.3 Input Information of Other Machine into Phonebook
The machines for stacking/networking have to input others' information into the Phonebook of own machine. Assumes there is 3 sets of MOSA 4600 Plus,
Machine ID Info of other machine that should add into Phonebook of this machine
1st set 2nd set, 3rd set 2nd set 1st set, 3rd set 3rd set 1st set, 2nd set
...and so on
The example of stacking: Below are the information 3 sets of machine. In most of case, they use fixed Private IP of LAN when they are stacking together. 1st set : Phone Number【886282263368】、IP/Port【10.13.6.107/2000】 2nd set : Phone Number【886282263369】、IP/Port【10.13.6.15/2001】 3rd set : Phone Number【886282263370】、IP/Port【10.13.6.34/2002】 ...and so on Input the other 2's information into each machine according to the table above.
The example of networking: Below are the information 3 sets of machine. In most of case, they use fixed Public IP of Internet when they are networking together. 1st set : Phone Number【886282263368】、IP/Port【61.222.217.39/2000】(at Taipei) 2nd set : Phone Number【862177453276】、IP/Port【61.220.219.84/2000】(at Shanghai) 3rd set : Phone Number【85299673356】、IP/Port【203.204.89.38/2000】(at Hong Kong) ...and so on Input the other 2's information into each machine according to the table above.

Operation Manual
67
According to the service of different ISP, PPPoE can be used on Router. If the Router that connect to this machine use dynamic IP (PPPoE), then input IP/Port information 0.0.0.0/0 of other machine into the Phonebook of this machine and do auto-learning of Phone Book procedure. Please refer to next section 10.1.3.1 Sync of Phonebook IP or contact with distributor to join NETMOSA group. Example: 1st set : Phone Number【886282263368】、use dynamic IP (PPPoE) (at Taipei) 2nd set : Phone Number【862177453276】、use dynamic IP (PPPoE) (at Shanghai) 3rd set : Phone Number【85299673356】、IP/Port【203.204.89.38/2000】(at Hong Kong)
Machine ID
Phone Book info that need to learn from
Information of other machine that need to add into Phonebook
2nd set Input Phone Number【862177453276】、IP/Port【0.0.0.0/0】in PHONEBOOK field, and do auto-learning: 1st set dial to 2nd set, then 2nd set dial to 1st set
1st set
3rd set Input Phone Number【85299673356】、IP/Port【203.204.89.38/2000】in PHONEBOOK field, and do auto-learning: 1st set dial to 3rd set
1st set Input Phone Number【886282263368】、IP/Port【0.0.0.0/0】in PHONEBOOK field, and do auto-learning: 2nd set dial to 1st set, then 1st set dial to 2nd set
2nd set
3rd set Input Phone Number【85299673356】、IP/Port【203.204.89.38/2000】in PHONEBOOK field, and do auto-learning: 2nd set dial to 3rd set
1st set Input Phone Number【886282263369】、IP/Port【0.0.0.0/0】in PHONEBOOK field, and do auto-learning: 3rd set dial to 1st set, then 1st set dial to 3rd set
3rd set
2nd set Input Phone Number【862177453276】、IP/Port【0.0.0.0/0】in PHONEBOOK field, and do auto-learning: 3rd set dial to 2nd set
Web Path:7.Phonebook\
1. Click Web Path on left side【7.Phonebook\】。 2. Input phone number that come from【My Phone Number】(Web Path:1.System
Config.\1.1.Basic Information) of other machine, into the【Phone Number】field. This phone number has to be full number (Country Code+ Area Code + Phone Number)
3. Input IP and Port Number of other machine to【IP/Control Port】field 4. Click【Apply】。 5. Repeat the steps above if there are more machines have to be stacking/networking
10.1.3.1 Sync of Phonebook IP
The IP address of Phonebook can be learned by making VODNET call. (If fix IP is not used, do learning again every time when IP address is changed). The number of VODNET can be found on the bottom label of the machine. Be sure that the status is OK before making call. (The LED of

Operation Manual
68
TIME SRVR and NETMOSA is ON)
Dialing Method: The number structure and dialing method of VODNET are the same as traditional telecom. You need to kown the VODNET number you want to dial and then compare it with your own number:
If the country code and area code is the same, you only need to dial **+office code+ subscriber number+#
If the country code is the same, but area code is different, you need to dial **+long distance access code+area code +office code+ subscriber number+#
If the country code is different, you need to dial **+International access code+country code+area code +office code+ subscriber number+#
Here lists some example: Assume Long Distance access code is "0" and International Access code is 002.
Calling side VODNET number Called side VODNET number Dialing Method
28-6-201-1000 28-6-201-7799 **201 7799# 28-6-201-1000 28-7-200-6600 **07 200 6600# 28-6-201-1000 18-7-8226-3368 **002 187 8226 3368#
If the number you dial is not busy (hear second dial tone or instruction greeting), and then auto-learning of phone book is done.
10.1.4 Add Permission of Outbound Transit to PSTN
The same as traditional analog PBX, extension can seize trunk to make PSTN call if this machine or other MOSA 4600 Plus had connected to PSTN trunk. By default setting, the extension of this machine can seize the PSTN trunk of this machine to make PSTN call. If you input the information of other machine into this machine, then other machine can make PSTN call via this machine. PSTN call is not free, so configure permission is required to avoid extra charge. It needs not to input the information of other machine into this machine if you don't want others to make
VODNET No. of this machine

Operation Manual
69
call via this machine. In previous section, when other machine input the information of this machine into its Phone Book. This machine can list info of other machine in Outbound Waiting List. Then this machine can tick the machine that can make PSTN call via this machine. Web Path:1.System Config.\1.5.Outbound Permission
Outbound Waiting List
MAC Address, Phone Number and Route Type of the machine itself (default)
Select other machine that will make trunk call via this machine

Operation Manual
70
Example of Configuration
The example of stacking: MAC Address【00-03-62-80-25-37】、Phone Number【886282263368】、Route Type【Toll】 MAC Address【00-03-62-80-25-48】、Phone Number【886282263369】、Route Type【Toll】 MAC Address【00-03-62-80-25-56】、Phone Number【886282263370】、Route Type【Toll】
The example of networking: MOSA 4616 PLUS at Taipei and Shanghai: MAC Address【00-03-62-80-25-37】、Phone Number【886282263368】、Route Type【Toll】 MAC Address【00-03-62-80-25-48】、Phone Number【862177453276】、Route Type【Toll】 MAC Address【00-03-62-80-25-56】、Phone Number【85299673356】、Route Type【Toll】 MOSA 4616 PLUS at Hong Kong: MAC Address【00-03-62-80-25-37】、Phone Number【886282263368】、Route Type【Local】 MAC Address【00-03-62-80-25-48】、Phone Number【862177453276】、Route Type【Local】 MAC Address【00-03-62-80-25-56】、Phone Number【85299673356】、Route Type【Local】 If you don't want to use Outbound Waiting List, you can also input it manually Web Path:1.System Config.\1.5.Outbound Permission
List the machine available for outbound call, tick
Click Add when seletion is done

Operation Manual
71
1. Input MAC address of other machine, MAC can be found on the bottom label of machine. It is
00-03-62-80-25-37 for the example figure below
2. Input phone number that come from【My Phone Number】(Web Path:1.System
Config.\1.1.Basic Information) of other machine, into the【Phone Number】field. This phone number has to be full number (Country Code+ Area Code + Phone Number), such as 886282263368
3. Select Route Type as Toll (suitable for Taiwan and PRC. Hong Kong should be Local, because no long distance call in HK). Select Toll means local and long distance call is usable. Select Local means local call is usable.
4. Select TRUE in Trunk Call Allowed field 5. Click【Apply】 6. Repeat the steps above if there are more machines have to be stacking/networking
MAC Address of this machine
Input MAC Address, Phone Number
and Route Type manually.

Operation Manual
72
10.2 Configuration of Group Dialing When new location is added, you can add group number for all IP-PBX of the original locations. All extension numbers at original different location need not to be changed. Just dial new extension number with the format: Group Number + Original extension number. When new location is added and original users don't want to change original extension number. Administrator can use PBX Group Number that works with Extension Table (1.3.Extension Number) to plan a networking dialing plan. Select an IP-PBX as a portal for all IP-PBX boxes in the same location and configure them with the same PBX Group number. All users at other MOSA IP-PBX that dial to this location should follow the rule that dial Group Number + original extension number. Extension Tables at each IP-PBX box of the same location are all the same. Here is the configuration.
10.2.1 Method of Configuration
Configuration: 1. PBX Group Number: Area A: 10, Area B: 20 Web Folder: 1.System Config.\1.3.Extension Number All IP-PBXs in area A
All IP-PBXs in area B
2. Extension Table Web Folder: 1.System Config.\1.3.Extension Number
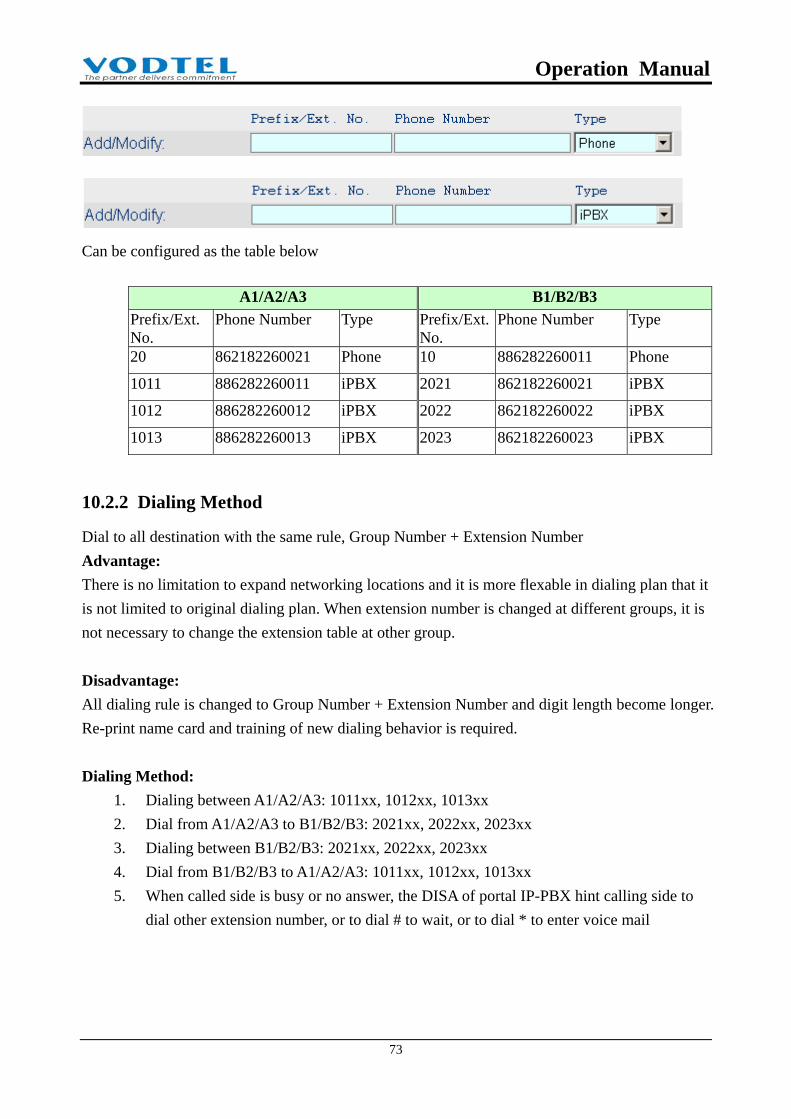
Operation Manual
73
Can be configured as the table below
A1/A2/A3 B1/B2/B3 Prefix/Ext. No.
Phone Number Type Prefix/Ext. No.
Phone Number Type
20 862182260021 Phone 10 886282260011 Phone
1011 886282260011 iPBX 2021 862182260021 iPBX
1012 886282260012 iPBX 2022 862182260022 iPBX
1013 886282260013 iPBX 2023 862182260023 iPBX
10.2.2 Dialing Method
Dial to all destination with the same rule, Group Number + Extension Number Advantage: There is no limitation to expand networking locations and it is more flexable in dialing plan that it is not limited to original dialing plan. When extension number is changed at different groups, it is not necessary to change the extension table at other group. Disadvantage: All dialing rule is changed to Group Number + Extension Number and digit length become longer. Re-print name card and training of new dialing behavior is required. Dialing Method:
1. Dialing between A1/A2/A3: 1011xx, 1012xx, 1013xx 2. Dial from A1/A2/A3 to B1/B2/B3: 2021xx, 2022xx, 2023xx 3. Dialing between B1/B2/B3: 2021xx, 2022xx, 2023xx 4. Dial from B1/B2/B3 to A1/A2/A3: 1011xx, 1012xx, 1013xx 5. When called side is busy or no answer, the DISA of portal IP-PBX hint calling side to
dial other extension number, or to dial # to wait, or to dial * to enter voice mail

Operation Manual
74
11. Connect FAX Machine There is no special connection for Fax machine. Connect physical extension (FXS) port for phone set originally, to FAX machine directly. Each physical FXO port has the ability to receive FAX and no configuration is required. Each physical FXS port can be configured to have T.38 FAX function. Ports that its FAX function is not activated, can not receive or send FAX. Note: If the FAX function is activated for certain FXS extension, that extension can not be pick up by other extension.
Web Path:2.Channel Config.\2.1.Summary
Select channel in Analog Channel, and select the FXS port that connect to FXS
Click icon of St (Status). In Status table, select FAX in Connect Device Type and then click Apply. MOSA 4600 Plus uses T.38 protocol to send FAX in IP network.
T.38 FAX status of each port can be knew in Summary table of all ports.
4600 Plus
PSTN
FAX
FXO
FXS

Operation Manual
75
Web Path:2.Channel Config.\2.1.Summary
12. Configuration of DISA (Auto Attendant) System Configure most of the setting of DISA is not required. Default value is OK and some configuration need to be done by yourself is listed below.
12.1 System Greeting of DISA System The default greeting of MOSA 4600 Plus is Chinese. If you have the request of other language, you have to record the instruction greeting by yourself. No special tools are required and any extension line can record the message of greetings. There are totally 8 sections of greetings and one minute maximum for each section. For Example:
Type of Greetings Description of Greetings Example of Messages
Greeting (1) The Greetings for office hour Good day, this is XX XXX, please dial extension number or 0 for Operator
Greeting (2) The message when line is busy Line is busy, please dial other extension number or 0 for operator
Greeting (3) The message when the number is wrong or can not be recognized
The number you dialed can not be recognized, please dial again
Greeting (4) The message for waiting, the call is transferring
Thank you, please wait a moment
Greeting (5) The greetings for company off duty or holiday
This is off duty time, please dial extension number directly or call in office hour again
Greeting (6) The message for no answer Call is no answer, please dial other extension number or 0 for Operator
Greeting (7) The message for unable to answer the call, may be network problem or line problem
The line is unable to answer, please dial other extension number or 0 for operator

Operation Manual
76
Type of Greetings Description of Greetings Example of Messages
Greeting (8) When other IP-PBX activates Consult Transfer. The call side of this machine will hear this greeting section
Default greeting is a section of music and change is not required. You can record it as: "Wait a moment please, the people you want to talk is consulting transfer with other currently" if you want.
If the extension line is assigned as Operator, this line can activate the greetings for office hour and the greetings for off duty time
(1) Activate the greetings for office hour, hook off the phone set, dial *0, then 071#
(2) Activate the greetings for off duty time, hook off the phone set, dial *0, then 070#
If the extension line is not assigned as Operator, this line should enter to management mode, then activate the greetings for office hour and greetings for off duty time
(1) Activate the greetings for office hour, hook off the phone set,
dial *0 , dial 09 9999# to enter the management mode, then dial 071#
(2) Activate the greetings for off duty hour, hook off the phone set,
dial *0 , dial 09 9999# to enter the management mode, then dial 070#
12.1.1 Record System Greeting
(1) Entering the Management Mode
Hook off the phone set, when hear the dial tone, dial *0, then 09 9999# to enter the management mode, hear the tone of “DuDu…..”
(2) Recording the 1st section
Dial 99 1 * start to record # (end the record)
(3) Storing the 1st section
Dial 9# hear the tone of “DuDu…” #
(4) Recording the 2nd section
Dial 99 2 * start to record # (end the record)
(5) Storing the 2nd section

Operation Manual
77
Dial 9# hear the tone of “DuDu…” #
(6) Recording the 3rd section
Dial 99 3 * start to record # (end the record)
(7) Storing the 3rd section
Dial 9# hear the tone of “DuDu…” #
(8) Recording the 4th section
Dial 99 4 * start to record # (end the record)
(9) 9 Storing the 4th section
Dial 9# hear the tone of “DuDu…” #
(10) Recording the 5th section
Dial 99 5 * start to record # (end the record)
(11) Storing the 5th section
Dial 9# hear the tone of “DuDu…” #
(12) Recording the 6th section
Dial 99 6 * start to record # (end the record)
(13) Storing the 6th section
Dial 9# hear the tone of “DuDu…” #
(14) Recording the 7th section
Dial 99 7 * start to record # (end the record)
(15) Storing the 7th section
Dial 9# hear the tone of “DuDu…” #
(16) Recording the 8th section
Dial 99 8 * start to record # (end the record)
(17) Storing the 8th section
Dial 9# hear the tone of “DuDu…” #

Operation Manual
78
Attention : Don’t forget to dial additional “#” to end the last record, then start the next section.
12.1.2 Listen the Recorded Greeting
(1) Entering the management mode
Hook off the phone set, when hear the dial tone, dial *0, then 09 9999# to enter the management mode, hear the tone of “DuDu…..”
(2) Listening the 1st message : Dial 961 If you like to stop, just dial #
(3) Listening the 2nd message : Dial 962 If you like to stop, just dial #
(4) Listening the 3rd message : Dial 963 If you like to stop, just dial #
(5) Listening the 4th message : Dial 964 If you like to stop, just dial #
(6) Listening the 5th message : Dial 965 If you like to stop, just dial #
(7) Listening the 6th message : Dial 966 If you like to stop, just dial #
(8) Listening the 7th message : Dial 967 If you like to stop, just dial #
(9) Listening the 8th message : Dial 968 If you like to stop, just dial # If you have more MOSA 4600 Plus, or related product that use system greeting, or products that don't have FXS port, you can download the recorded greeting file, extension name .GT1~GT8 by WEB or FTP and upload it to other products, then repeat recording is not required. To download file to PC or upload file to this machine, please refer to chapter 19 Firmware Update/Backup
12.2 Configuration the Time of Day/Night DISA Mode If this machine is used in company, the DISA can be configured according to the On-duty and Off-duty time in a week. By the configuration, you can: ♦ DISA play greeting section 1: "Good day, this is XX XXX, please dial extension number or 0
for Operator" at On-duty time. ♦ DISA play greeting section 5: "This is off duty time, please dial extension number directly or
call in office hour again" at Off-duty time. Web Folder:1.System Config.\1.1.Basic Information

Operation Manual
79
Click Week set, system shows
♦ Configure all day 24 hrs as On-duty time: Tick Day of that day, such as Wed. and click Apply
+
♦ Configure 7 days a week and 24 hrs a day as On-duty time: Tick Day of Mon., click All week as Mon. and then click Apply
+
+
♦ Configure all day 24 hrs as Off-duty time: Tick Night of that day, such as Wed. and click Apply
+
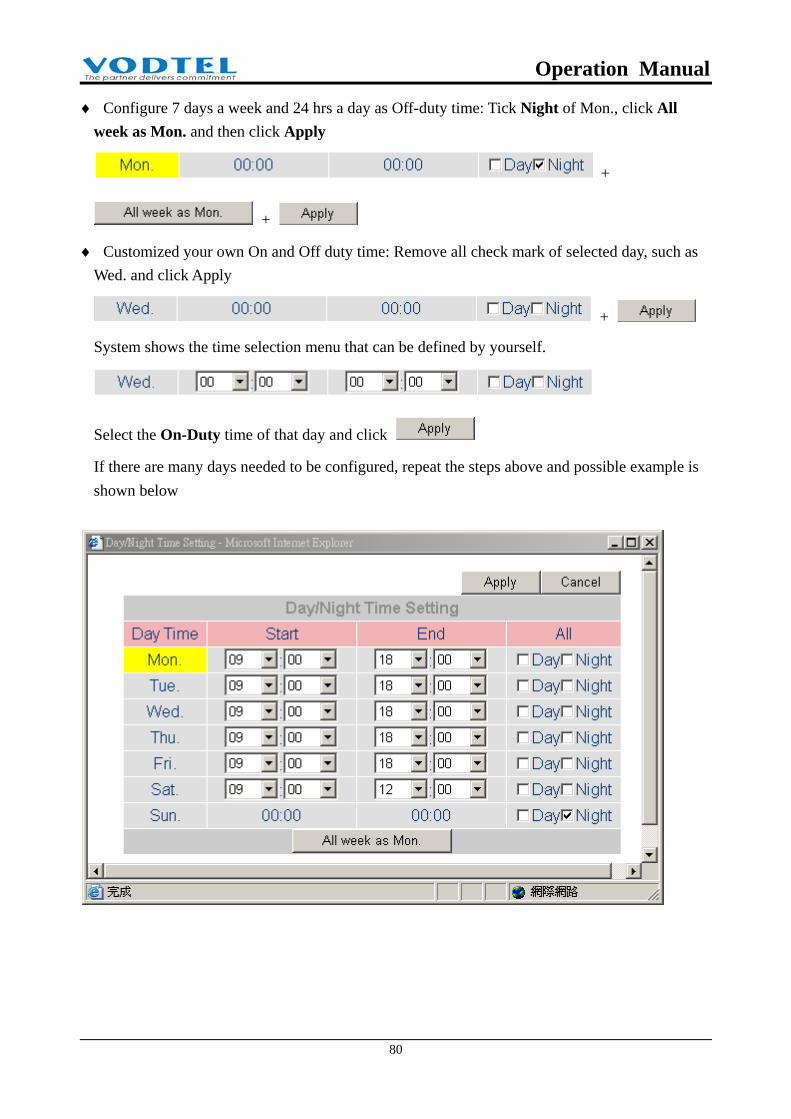
Operation Manual
80
♦ Configure 7 days a week and 24 hrs a day as Off-duty time: Tick Night of Mon., click All week as Mon. and then click Apply
+
+
♦ Customized your own On and Off duty time: Remove all check mark of selected day, such as Wed. and click Apply
+
System shows the time selection menu that can be defined by yourself.
Select the On-Duty time of that day and click
If there are many days needed to be configured, repeat the steps above and possible example is shown below

Operation Manual
81
12.3 Configure Greeting Mode for Special Holiday If this machine is used in company, you can configure the date/period of time of special holiday of company to this machine. When it is done, it can
♦ Play greeting section 5: "It is off-duty time. Please dial extension number directly or call again in office hour." at the date/period of time of special holiday.
♦ If there is incoming trunk call at the time of non special holiday, system play greeting according to Day/Night mode of DISA that is based on weekdays. If it is Day (office hour) Mode, system plays greeting section 1: Please dial extension number, or 0 for operator. If it is Night (off-duty) mode, system plays greeting section 5: It is off-duty time. Please dial extension number directly or call again in office hour.
Web folder: 1.System Config.\1.1.Basic Information
Click Week/Holiday, system shows the window below.
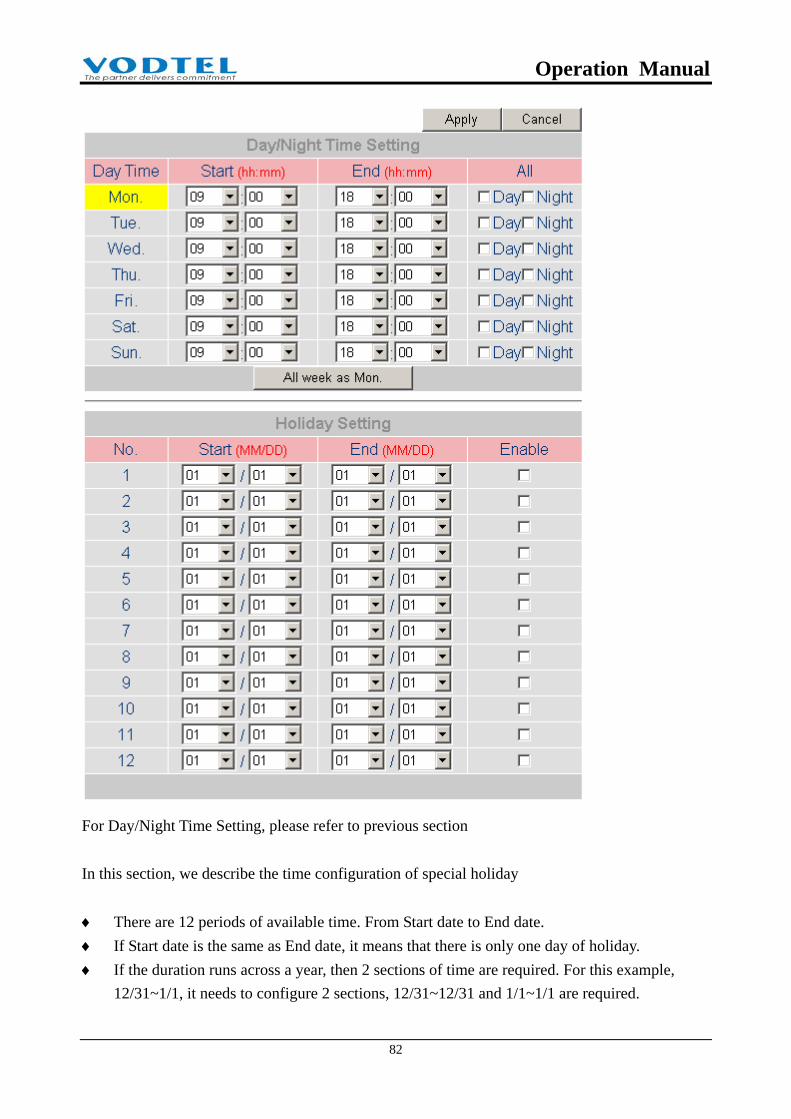
Operation Manual
82
For Day/Night Time Setting, please refer to previous section In this section, we describe the time configuration of special holiday ♦ There are 12 periods of available time. From Start date to End date. ♦ If Start date is the same as End date, it means that there is only one day of holiday. ♦ If the duration runs across a year, then 2 sections of time are required. For this example,
12/31~1/1, it needs to configure 2 sections, 12/31~12/31 and 1/1~1/1 are required.

Operation Manual
83
♦ If these settings conflict with Day/Night Time Setting (based on weekdays), the settings here have higher priority
♦ Configure Start day and End day and click Apply to take effect.
12.4 The Configuration to Cascade IP DISA This feature can be applied to large enterprise. Announce to everyone to dial to the same IP DISA. Follow the instruction of IP DISA, calling side can dial to IP DISA of different MOSA 4600 Plus that are belonged to different areas or departments, then dial extension number to reach called side. Attention: for V1.02.2 or previous version of firmware, cascaded IP DISA is not workable. The IP DISA at the second level won't answer the call and it is redirected to the channel of manual operator. If you have the application to cascade IP DISA, please upgrade to V2.00 or later version. Web Folder: 1.System Config.\1.1.Basic Configuration
The default value of DISA for IP Call is "Enable". Unless there is other requirement, please keep default value.
13. Work with Voice Mail Product MOSA 4600 Plus can work with other brand analog Voice Mail Product (the paragraph below use "VM" instead). The function of VM includes Voice Mail Box, Retrieve (Listen) Voice Mail. After proper configuration, MOSA 4600 Plus not only has complete original features, but also has VM functions. (The function of VM depends on what brand and model MOSA 4600 Plus connect to).
Suitable Hardware and Software
One set of (or more sets for cascade) MOSA 4600 Plus
Voice Mail product that is able to work with commercial PBX

Operation Manual
84
Hardware Connection
Reserve the FXS port of MOSA 4600 Plus to connect with the line of VM, and then the hardware connection is ready to work.
13.1 Basic Configuration of VM and MOSA 4600 Plus
13.1.1 Configuration on MOSA 4600 Plus
Enable VM connection on FXS port of 4604 Plus (2) that is connected to VM
Web Path:2.Channel Config.\2.1.Summary
Select the Channel with FXS Type and click its St (Status)
Enable connection to Voice Mail in Status table
Configure the FXS port 4604 Plus (2) that is connected to VM to join the operator group
Join that channel to Operator Group in Status table.
IP Network
4604 Plus (2)
FXS
Voice Mail Line
4604 Plus (3) 4604 Plus (4)
4604 Plus (1)
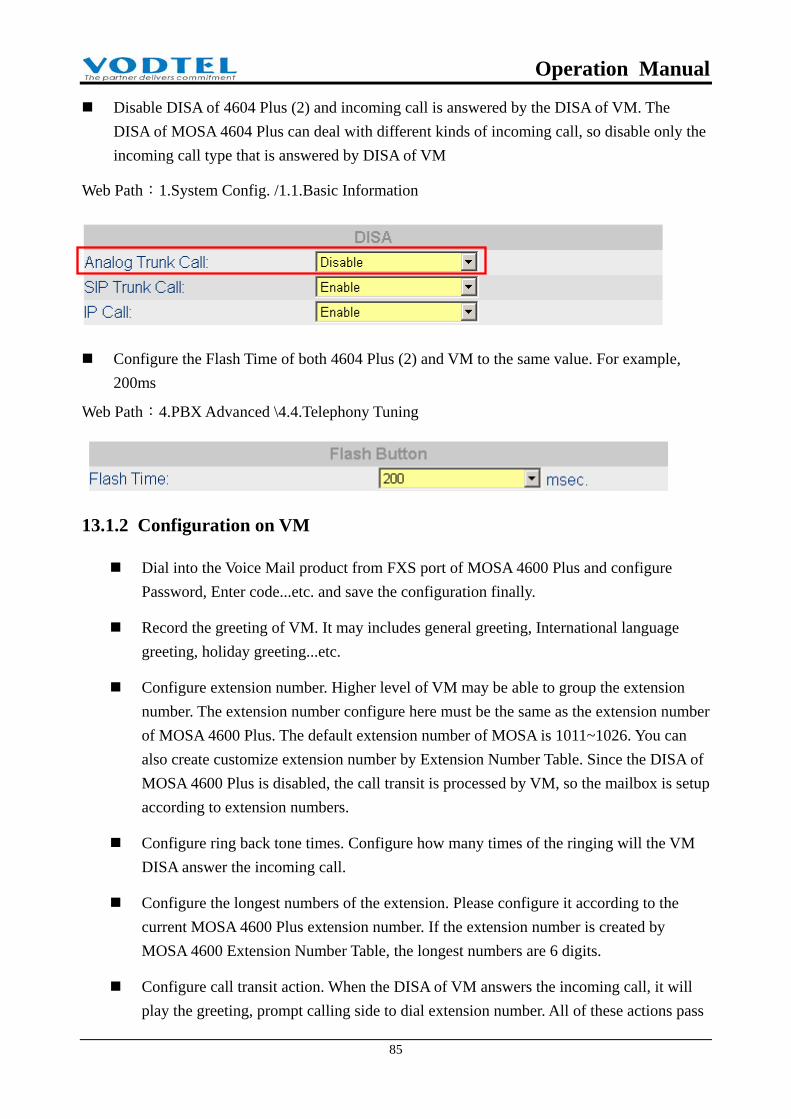
Operation Manual
85
Disable DISA of 4604 Plus (2) and incoming call is answered by the DISA of VM. The DISA of MOSA 4604 Plus can deal with different kinds of incoming call, so disable only the incoming call type that is answered by DISA of VM
Web Path:1.System Config. /1.1.Basic Information
Configure the Flash Time of both 4604 Plus (2) and VM to the same value. For example, 200ms
Web Path:4.PBX Advanced \4.4.Telephony Tuning
13.1.2 Configuration on VM
Dial into the Voice Mail product from FXS port of MOSA 4600 Plus and configure Password, Enter code...etc. and save the configuration finally.
Record the greeting of VM. It may includes general greeting, International language greeting, holiday greeting...etc.
Configure extension number. Higher level of VM may be able to group the extension number. The extension number configure here must be the same as the extension number of MOSA 4600 Plus. The default extension number of MOSA is 1011~1026. You can also create customize extension number by Extension Number Table. Since the DISA of MOSA 4600 Plus is disabled, the call transit is processed by VM, so the mailbox is setup according to extension numbers.
Configure ring back tone times. Configure how many times of the ringing will the VM DISA answer the incoming call.
Configure the longest numbers of the extension. Please configure it according to the current MOSA 4600 Plus extension number. If the extension number is created by MOSA 4600 Extension Number Table, the longest numbers are 6 digits.
Configure call transit action. When the DISA of VM answers the incoming call, it will play the greeting, prompt calling side to dial extension number. All of these actions pass

Operation Manual
86
through MOSA 4600 Plus. So it needs to setup the call transit action to work with MOSA 4600 Plus. For call transit, please setup it as below. "Flash + Pause + Extension No. + 4 times of Pause" VM comes in different brands and models, please configure it according to real condition. For configuration of Dial Ending Time, please refer to Web Path 4.PBX Advanced\4.4.Telephony Tuning
Configure the extensions of main operator. Configure the main operator of VM to the operator's extension line of MOSA 4600 Plus
Configure the assistant operator. When the extension line of main operator is busy, the call is transited to assistant operator
Configure Operator Access Code. Calling side press this access code to reach operator.
Configure transit greeting as "system transit greeting" or "personal transit greeting"
Operation Work Flow
1. MOSA (2) accept the incoming call from MOSA (1) or PSTN. Since the DISA of MOSA (2) is disable, so the call is answered by the DISA of VM
2. VM prompts calling side to dial extension number.
3. Calling side dial 3113 extension.
4. VM play greeting "Wait a moment please. We will transfer the call to 3113 for you" and then send "Flash + Pause + Extension No. + 4 times of Pause" to MOSA (2)
5. MOSA (2) transit the call to 3113. Extension 13 of MOSA (3) is ringing.
6. Called side, extension 13 of MOSA (3) answer the phone. VM release the line, MOSA (1) and MOSA (3) built route directly.

Operation Manual
87
13.2 Message Configuration of VM and MOSA 4600 Plus
13.2.1 Use Call Forward Function of MOSA 4600 Plus to Connect VM
13.2.1.1 Configuration on MOSA 4600 Plus
Configure the Prefix, Suffix of VM in MOSA(2)
The design of Prefix and Suffix is for numbers receiving of VM. Generally speaking, it needs to dial certain numbers as below to VM to activate voice mailbox.
Prefix + Extension Number (that use mailbox function) + Suffix
For example: *3122# Different VM have different Prefix, Suffix. It may not have Prefix or Suffix code. If there is no such code, please leave it blank. Configure it as real condition.
Web Path:1.System Config./1.2.PBX Access Code
FXS
1. Dial 8226-3368 MOSA (2)
8226-3368
IP/Trunk DISA
disable
VM
MOSA (1)
8226-1100
or PSTN
MOSA (3),Prefix: 31
2 Please dial ext.
4 Wait a moment please. We will...
5 Transit to 3113
3. Dial 3113
6 Answer
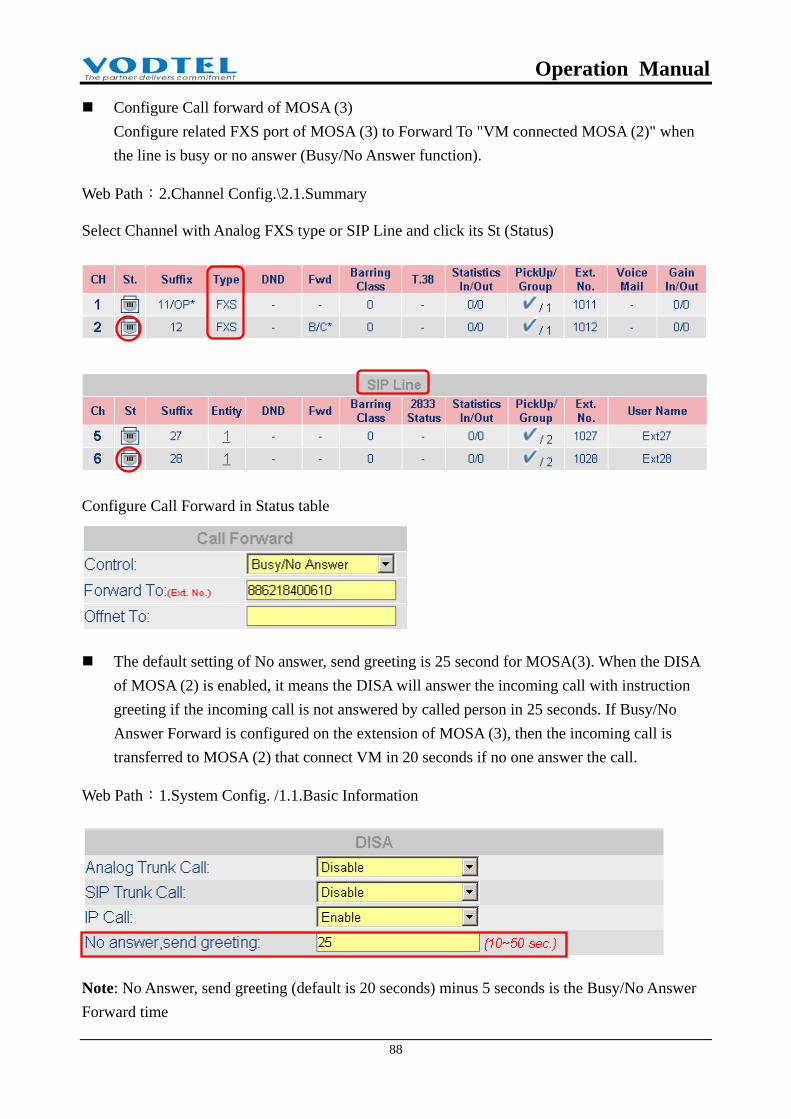
Operation Manual
88
Configure Call forward of MOSA (3) Configure related FXS port of MOSA (3) to Forward To "VM connected MOSA (2)" when the line is busy or no answer (Busy/No Answer function).
Web Path:2.Channel Config.\2.1.Summary
Select Channel with Analog FXS type or SIP Line and click its St (Status)
Configure Call Forward in Status table
The default setting of No answer, send greeting is 25 second for MOSA(3). When the DISA of MOSA (2) is enabled, it means the DISA will answer the incoming call with instruction greeting if the incoming call is not answered by called person in 25 seconds. If Busy/No Answer Forward is configured on the extension of MOSA (3), then the incoming call is transferred to MOSA (2) that connect VM in 20 seconds if no one answer the call.
Web Path:1.System Config. /1.1.Basic Information
Note: No Answer, send greeting (default is 20 seconds) minus 5 seconds is the Busy/No Answer Forward time

Operation Manual
89
13.2.1.2 Configuration on VM
Configure the extension number according to the section above 13.1 Basic Configuration of VM and MOSA 4600 Plus
Configure the password for extension line to retrieve Voice Mailbox.
Configure the Voice Mail access code for incoming call. (For example: *)
Configure Delete Mailbox, Maximum No. of Messages, Delete Message, Maximum Message Time, Min. Message Time...and other setting.
Operation Work Flow
1. MOSA (2) accept the incoming call from MOSA (1) or PSTN. Since the DISA of MOSA (2) is disable, so the call is answered by the DISA of VM
2. VM prompts calling side to dial extension number.
3. Calling side dial 3113 extension. VM get extension number 3113 via MOSA (2)
4. VM play greeting "Wait a moment please. We will transfer the call to 3113 for you" and then send "Flash + Pause + Extension No. + 4 times of Pause" to MOSA (2)
5. MOSA (2) transit the call to 3113. Extension 3113 of MOSA (3) is ringing.
6. Called side, extension 3113 of MOSA (3) is busy or no answer, so the call is forwarded to MOSA (2) and then enter the VM.
7. VM play the mailbox system greeting "Here is extension 3113, please leave your message". Calling side start to leave the voice message.
MOSA (1)
8226-1100
or PSTN
MOSA (3),Prefix: 31
FXS
MOSA (2)
1840-0610
IP/Trunk DISA
disable
VM
1. Dial 8226-3368
2 Please dial ext.
4 Wait a moment please. We will...
5 Transit to 3113
3. Dial 3113
3113 no answer/busy forward to 82263368 FXS port
6 no answer forward timeout
7 Here is extension 3113, please...

Operation Manual
90
13.2.2 Use VM Function of MOSA 4600 Plus and Busy Tone / Ring Back Detection Function of VM
Configuration on MOSA 4600 Plus
Setting is the same as the configuration of MOSA 4600 Plus on last section 13.2.1 Use Call Forward Function of MOSA 4600 Plus to Connect VM
Configuration on VM
Setting is the same as the configuration of VM on last section 13.2.1 Use Call Forward Function of MOSA 4600 Plus to Connect VM
Enable detective mode of VM. The tone types for VM to monitor includes items below:
- Ring back tone detective times - Ring back tone cadence - Monitor action (Enable, Disable ring back tone detective mode) - Busy tone detective times - Busy tone cadence - Monitor action (Enable, Disable busy tone detective mode)
Use system greeting to prompt calling side to leave message
- Disable mailbox personal greeting and enable mailbox system greeting
- Configure monitor action or cadence/times of tone that VM is going to monitor. In this example, we configure No Answer Forward time of MOSA (3) to larger than VM ring back/busy tone detective time. In this situation, VM ring back/busy tone detective times is timeout before No Answer Forward time, so VM retrieve the incoming call and play system greeting to promote calling side to leave message.
Use mailbox personal greeting to prompt calling side to leave message
- Enable mailbox personal greeting and disable mailbox system greeting
- Configure No Answer Forward time of MOSA (3) is smaller than VM ring back/busy tone detective times. In this situation, No Answer Forward time of MOSA (3) is timeout before VM ring back/busy tone detective time; so incoming call is forward to FXS port of MOSA (2) and then enters VM. VM is able to identify the called side and play the mailbox personal greeting to prompt calling side to leave message.

Operation Manual
91
13.3 Retrieve (listen) Message / New Message Notification Related Configuration
When there is new message for an extension, MOSA 4600 Plus can prompt the user of that extension by changing the dial tone.
Most of VM provides new message prompt (light) function, however, most of phone-set does not have message prompt light. In order to overcome this problem, MOSA 4600 Plus send short Du, Du, Du tone and then normal dial tone to prompt the user when hook off phone-set if MOSA 4600 Plus receive the new message prompt (light) code from VM
Note: If TENTEL phone set, model: 320 is used, it supports prompt light for new message. When there is a new voice mail, the prompt light is ON and there is no change on dial tone.
General VM product sends the codes below to commercial PBX when a new message comes.
New message prompt code + Extension number
General VM product sends the codes below to commercial PBX when all new messages are retrieved.
All new messages are retrieved code + Extension number
MOSA (1)
8226-1100
Or PSTN
MOSA (3),Prefix: 31
FXS
MOSA (2)
8226-3368
IP/Trunk DISA
disable
VM
1. Dial 8226-3368
2 Please dial ext.
4 Wait a moment please. We will...
5 Transit to 3113
3. Dial 3113
3113 no answer/busy forward to 82263368 FXS port
6 Ring back/busy tone
7 No ans. for that ext. Pls. press * to
leave msg. or dial other ext.
No answer forward time > VM ring back/busy tone detective time

Operation Manual
92
Configuration on MOSA (2) Please check the "new message prompt code" and "All new messages are retrieved code" of the VM you have. Input it in MOSA 4600 Plus. Here is the configuration
Input "Message Waiting On code". This code must be the same as VM's new message prompt code.
When MOSA 4600 receive "New Message Prompt code + Extension number", it will send Du, Du, Du tone and then normal dial tone to prompt the user new voice message when user hook off phone-set.
Web Path:1.System Config. /1.2.PBX Access Code
Input "Message Waiting Off code", this code must be the same as VM's "All new messages are retrieved code".
When MOSA had got " All new messages are retrieved code + Extension number", the dial tone of that extension will return to normal status.
Web Path:1.System Config. /1.2.PBX Access Code
Configuration on VM
Enable message notification (light) function
Enable new message prompt function
Enable extension line message notification (light) function
Enable oral notification function (Extra VM function)
Operation Work Flow
1. According to previous example, VM prompt calling side to leave message
2. Calling side leave message. Voice message pass through MOSA (2), enter VM and leave message successfully.

Operation Manual
93
3. VM send code "New message prompt code + Extension number" to the FXS port of MOSA (3)
4. MOSA (3) receives the code and then change the dial tone. When user of that extension hook off phone-set, he/she hear Du, Du, Du before normal dialing tone. He/she knows that new message is waiting for retrieve.
5. When the extension of MOSA (3) needs to retrieve (listen) the voice message, dial a call to MOSA (2) and it is answered by the DISA of VM. Retrieve the message by the instruction of VM.
13.3.1 Backup on VM System
Most of VM product can connect with PC for online or offline editing, and also for system backup. Please backup these data to PC for system update or restore.
13.4 Use Built-In Voice Mail Function Built-in RAM or Flash memory can be used for the storage of voice mail. External NFS storage media is also can be used. For the configuration and connection to NFS, please refer to 20.4 How to Install Linux NFS for the VM of MOSA 4600 Plus This section tell you how to use built-in memory (RAM or Flash)
The original MOSA 4600 Plus hardware has built-in voice mail function (provided after V 2.00). The memory size of this machine is limited and only demo only feature with two messages is available. For practical purpose with complete function, add an extra NFS server
MOSA (2)
8226-3368
VM MOSA (1)
8226-1100
1. Here is ext. 3111. Please leave your message.
FXS
2. Leave message FXS
4. Different dial tone when
hook off
3. Notification code
5. Retrieve msg
MOSA (3)

Operation Manual
94
for storage of voice file and also pay extra charge to us for system upgrade is required. The machine may have status below, according to factory default or license added.
RAMDisk: Use built-in RAM. For demo only and maximum two voice messages can be recorded. It disappears when power is off.
NFS and RAMDisk: It can use built-in RAM for demo only purpose, or use add-on NFS storage.
New MOSA 4600 Plus hardware has built-in Flash memory, and extra NFS for voice file
storage is not required. (Note: the function to use add-on NFS still available) The machine may have status below, according to factory default or license added.
Disable: No built-in voice mail function NFS and RAMDisk: It can use built-in RAM for demo only purpose, or use add-on NFS
storage. FlashDisk: Use built-in Flash memory for voice mail storage. NFS and FlashDisk: Can be selected with the two options, built-in Flash memory or
add-on NFS. The current license status of VM can be found at the location below Web Folder:2.Channel Config.\2.1.Summary Click Channel Upgrade at top-right corner
It shows the windows below. Marked place is the license status of VM

Operation Manual
95
13.4.1 Use RAM or Flash as VM storage
Original MOSA 4600 Plus hardware does not has built-in Flash memory, so it can save voice file on built-in RAM for demo only purpose that there are max 2 voice files and it will be lost if power is off
Configure VM setting in MOSA 4600 Plus Web Folder: 8.Voice Mail Before system upgrade, this machine is for demo only (Demo Only state) purpose and it use RAM as storage. If system is upgraded, it uses Flash memory automatically.
Warm restart
At the left bottom corner
1. Select Internal Disk first
2.Click

Operation Manual
96
VM function of this machine is initialized OK. Web Folder: 8.Voice Mail System shows related message
If built-in RAM is used, It shows RAMSERV If built-in FLASH is used, It shows FLASHSERV

Operation Manual
97
View the path of voice mail files by FTP client software When the system had built the connection with the voice mail component of this machine, an extra disk0 folder is shown. If there are messages left, list of files are shown in the folder. Use FTP software to show the demo as below.
Configure Call Forward for MOSA 4600 Plus
Only incoming call to Analog Line (extension) or IP Line (extension) is able to use voice mail. The condition to activate voice mail is the same as Forward To settings. It can be configured to forward to voice mail in such conditions that include All Call, Busy, No Answer, Busy/No Answer. If the number that voice mail uses is 1099, then configure it to the Forward To: number.
Select the Forward To control (behavior) type and the Forward To number, 1099
If the duration of waiting time to enter voice mail is not suitable, configure No answer, send greeting of DISA is required. When voice mail function is activated, system redirect incoming call to voice mail before No answer, send greeting time is expired

Operation Manual
98
Operation of Voice Mail Incoming Call to Voice Mail
If an extension (such as 1012) is configured to Forward To voice mail (line no. 1099) when the extension is Busy/No answer, an incoming call to this extension will hears the greeting from voice mail if the extension rings a while (before DISA answer the call, setting of No answer, send greeting). Press * to leave message instantly or wait the Du hint tone to leave the message. Hang up phone set when recording is finished.
Extension owner listen messages Extension (such as 1012) owner dials line no. 1099 and hears the greeting of voice mail. The owner dials the extension number (such as 1012#) according to the voice instruction, then dials the extension password 1234 (default value and it is changeable). Later, extension owner can listen the message, manage the message, change password…according to the voice instruction. View message records from management page Web Folder: 8.Voice Mail
Click extension number to view records in detail

Operation Manual
99
13.4.2 Reset or Re-create Voice Mail Box
To re-create the connection information (i.e. when extension no. is changed), please follow the step below
System will prompt you that all VM setting and voice message will be clear and system restarts automatically.
After machine is restarted, click again on Web Folder: Voice Mail Connection information is cleared. Please follow the section above to recreate connection

Operation Manual
100
If even the instruction voice has to be clear and rebuild (such as changing instruction voice to English), then use Del FVPN and Initialize button is required.
The sequence are Click --> Click --> Restart automatically --> Select Internal or
External disk (NFS) --> Click --> Restart manually --> Click -->
Record your own prompt greeting according to recording procedure by analog phone set or IP
phone --> Click --> Check to see if prompt greeting is updated. Actually leave
voice message to verify if prompt greeting is updated. --> Finished
13.4.3 Use pre-recorded prompt greeting from other MOSA
(1) Download the pre-recorded prompt greeting file (FVPN.VMM) to computer (File Folder: 9.File Transfer)
(2) Upload the FVPN.VMM file to other MOSA 4600 Plus
(3) Restart other MOSA 4600 Plus
Click
Operation Manual
101
(4) Check to see if the FVPN.VMM is updated. Check the file time to see if it is the upload system time, or actually leave voice message to verify if prompt greeting is updated.
14. Create the Connection of SIP Device
14.1 Concept:
SIP telephony network is a kind of Public VoIP specification. All SIP devices (SIP Phone,
Softphone (run in PC),SIP Wi-Fi Phone (use Wireless LAN) or SIP Gateway (connect analog phone or PBX)) that comply with SIP standard can work with this machine.
SIP device can register to MOSA 4600 Plus and become an extension of the whole IP-PBX. SIP device can work together with analog phone set to make call with each other like extension.
MOSA 4600 Plus also acts as SIP Client that can register to ITSP (Internet Telephony Service Provider). Then, user can use the services from ITSP, such as free call inside network, cost saving call to PSTN...
VODNET network provides better telephony service than SIP VoIP network. VODNET network means that all VoIP products that VODTEL makes have a VODNET Number that all product can communicate with each other with that number. It includes the VoIP network and extra value service built from MOSA 4600 Plus.
SIP Phone can also use the ASD value added service in VODNET via MOSA 4600 Plus. For the value added service of ASD, pleaser refer to Chapter 18 Value Added Function by Extra Charge
14.2 SIP Line (SIP Proxy Server) MOSA 4600 Plus is also a SIP Proxy Server. SIP device can register to this machine and become an extension of IP-PBX
14.2.1 Open a New Account
When a new SIP device intend to register to this machine as an extension, the device can use default pre-configured accounts and extension number, or administrator can create a new account for this device.

Operation Manual
102
14.2.1.1 Default Pre-configured Account and Extension Number
All SIP channels have default User Name (account) from Ext27 upward when this machine is shipped. You can purchase extra available accounts and accounts can go upward to Ext** (** means 2 or 3 digits)
All SIP channels have default Extension Number from 1027 upward when this machine is shipped. The number can go upward to ExtXX (XX means 2 or 3 digits) depends on account available.
Web Path:2.Channel Config.\2.1.Summary, SIP Line Table
14.2.1.2 Create a New Account
Create it from web page. Click SIP Entity from Channel directly. Web Path:2.Channel Config.\2.1.Summary, SIP Line Table
Or enter from Web Path:3.SIP Environment\3.1.SIP Line Mapping
Create a new account that is the same as the account that is default pre-configured for extension number, such as Ext27, and also input password. Finally, click Apply. By this way, it can simplify the configuration procedure later You can also configure customized account, such as

Operation Manual
103
And then click Apply
14.2.2 Specify a Channel to the New Created Account
When configuration of account is done, specify this account to a certain SIP Channel. SIP device that register to this machine can use the specify account to register the certain SIP Channel. Later, it can make call or answer call with this channel. Web Path:2.Channel Config.\2.1.Summary, SIP Line Table
Click channel St (status) that marked with X (means that channel is not registered from
other SIP device. Note: Channel that is specified with account also marks X if the SIP device does not register to this machine) Confirm the Status Table that Channel State is Enable and User Name is the account configured at last section.
User Name is selectable to avoid input error. Double Click User Name ant it shows the sub-menu. Select the User Name that is configured at last section.

Operation Manual
104
Click Apply when it is done.
14.2.3 Registration of SIP Device (Client)
To register this machine, configure the parameter of SIP device (client) is required. The parameter of this machine is shown below. (Please configure it according to your real environment; the example below is for reference) Please click left top corner of Web of this machine to find the information
System shows the information of this machine below.

Operation Manual
105
Outbound Proxy: If SIP device and MOSA 4600 Plus is under the same Subnet, please use IP address in LAN. For the example above, use 192.168.1.11, otherwise, use Public IP 211.21.45.252
Registrar: If SIP device and MOSA 4600 Plus is under the same Subnet, please use IP address in LAN. For the example above, use 192.168.1.11, otherwise, use Public IP 211.21.45.252
Port No: Default is 5060, as the graph above. If it is changed, change it according to your own setting.
Public Address (Account): Account@Proxy Server Account name can be checked in Web Path:Channel Config\2.1.Summary, SIP Line Table It depends on the Channel that the SIP device uses.
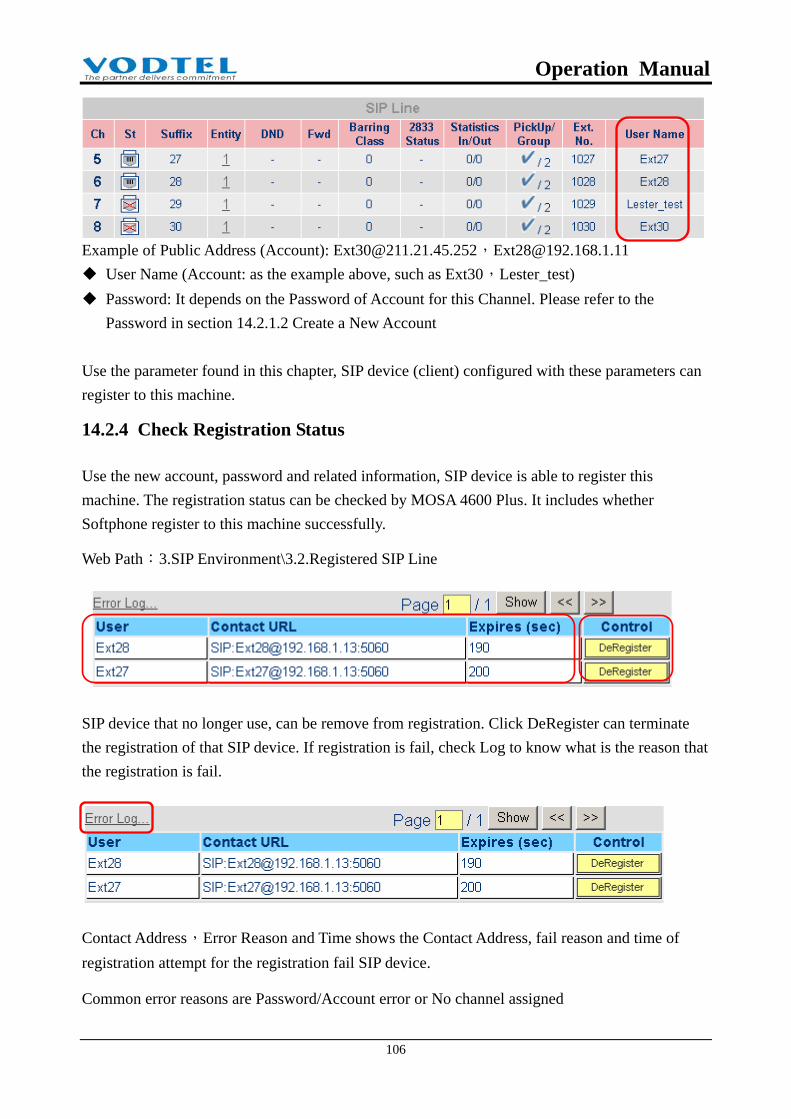
Operation Manual
106
Example of Public Address (Account): [email protected],[email protected]
User Name (Account: as the example above, such as Ext30,Lester_test) Password: It depends on the Password of Account for this Channel. Please refer to the
Password in section 14.2.1.2 Create a New Account Use the parameter found in this chapter, SIP device (client) configured with these parameters can register to this machine.
14.2.4 Check Registration Status
Use the new account, password and related information, SIP device is able to register this machine. The registration status can be checked by MOSA 4600 Plus. It includes whether Softphone register to this machine successfully.
Web Path:3.SIP Environment\3.2.Registered SIP Line
SIP device that no longer use, can be remove from registration. Click DeRegister can terminate the registration of that SIP device. If registration is fail, check Log to know what is the reason that the registration is fail.
Contact Address,Error Reason and Time shows the Contact Address, fail reason and time of registration attempt for the registration fail SIP device.
Common error reasons are Password/Account error or No channel assigned

Operation Manual
107
14.3 SIP Trunk Server In addition to FXO (analog trunk) port, this machine also has SIP Trunk that can register to SIP Service Provider (ITSP). The extension of this machine can seize trunk to enter ITSP. The SIP connection of ITSP may have free call inside the network or cost saving call to PSTN.
14.3.1 Register to SIP Telephony Server Provider
Assume that the registration information of ITSP are SIP Outbound Proxy: fwd.pulver.com Port Number: 5060 Registrar: fwd.pulver.com Port Number: 5060 The number you get is 211. So the Public Address of SIP Phone Number is "[email protected]" Password is 1234 Input the information above to Web Path:3.SIP Environment \ 3.3.Proxy/Trunk Mapping

Operation Manual
108
Click Apply to confirm configuration Later, check the registration status.
14.3.2 Configuration of SIP Trunk Dialing Behavior
Dialing from SIP Trunk is route to the (ITSP, Internet Telephony Service Provider) and connect to other SIP phone by ITSP. You can dial 8 to seize SIP Trunk and hear the dial tone from ITSP, then make SIP Phone call. (This method is suggested) If auto-routing function is used, dialing behavior here need to configure to make dialing number correct for different ITSP, because the installation location of this machine may be different from the ITSP that this machine register to.
Check registration status

Operation Manual
109
The real dialing number of SIP Trunk is composed according to the rule here (add or subtract Country Code, Area Code, Access Code) Web Path: 3.SIP Environment\3.4.SIP Trunk Numbering
Group Item Description Default Value
Country Code Country Code of ITSP Blank Setting
Area Code Area code of SIP Telecom service of the ITSP
country above
Blank
Call Type The prefix type that add or subtract
International Call
Long Distance Call
Local Call
Remove Leading N
Digit(s)
Remove the first N digits of access code (prefix)
of the types below. It can be 0 (default) to 10
International Call
Long Distance Call
Local Call
0
Add Leading Digit
String
After N digits is removed (described at paragraph
above), add access code (prefix) digits of the types
below. It can be the digits string from 1~9.
International Call
Long Distance Call
Local Call
Blank
Add/Remove
Digits
Simulator Test the real number dial that is simulated from the
add/subtract rule of this system. It has to use full
number to simulate, including Country Code +
Area Code + Local phone number.
Note: If no rules are applied on SIP Trunk Web page, the system follows the standard telecom rule
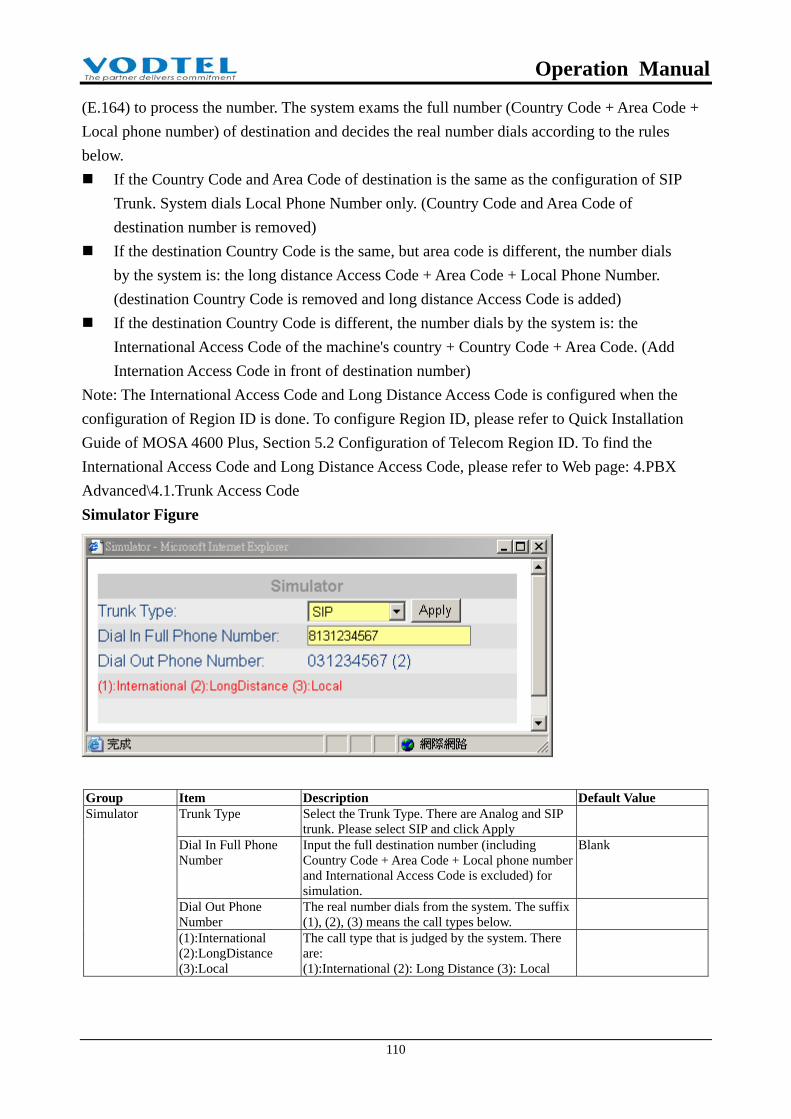
Operation Manual
110
(E.164) to process the number. The system exams the full number (Country Code + Area Code + Local phone number) of destination and decides the real number dials according to the rules below.
If the Country Code and Area Code of destination is the same as the configuration of SIP Trunk. System dials Local Phone Number only. (Country Code and Area Code of destination number is removed)
If the destination Country Code is the same, but area code is different, the number dials by the system is: the long distance Access Code + Area Code + Local Phone Number. (destination Country Code is removed and long distance Access Code is added)
If the destination Country Code is different, the number dials by the system is: the International Access Code of the machine's country + Country Code + Area Code. (Add Internation Access Code in front of destination number)
Note: The International Access Code and Long Distance Access Code is configured when the configuration of Region ID is done. To configure Region ID, please refer to Quick Installation Guide of MOSA 4600 Plus, Section 5.2 Configuration of Telecom Region ID. To find the International Access Code and Long Distance Access Code, please refer to Web page: 4.PBX Advanced\4.1.Trunk Access Code Simulator Figure
Group Item Description Default Value
Trunk Type Select the Trunk Type. There are Analog and SIP trunk. Please select SIP and click Apply
Dial In Full Phone Number
Input the full destination number (including Country Code + Area Code + Local phone number and International Access Code is excluded) for simulation.
Blank
Dial Out Phone Number
The real number dials from the system. The suffix (1), (2), (3) means the call types below.
Simulator
(1):International (2):LongDistance (3):Local
The call type that is judged by the system. There are: (1):International (2): Long Distance (3): Local

Operation Manual
111
14.3.2.1 Dialing Example
Standard dialing method: General SIP ITSP use the same network phone number rule as traditional PSTN and the dialing behavior is the same as PSTN. You should knows the network phone number of destination and compare it with the location of your SIP ITSP (calling side).:
If the country code and area code is the same, you only need to dial Local Phone Number of called side.
If the country code is the same, but area code is different, you need to dial Long Distance Access Code + Area Code + Local Phone Number (For Long Distance Access Code, it needs to comply with the telecom rule of the location of SIP ITSP)
If the country code is different, you need to dial International Access Code + Country Code + Area Code + Local Phone Number (For Internation Access Code, it needs to comply with the telecom rule of the location of SIP ITSP)
If dialing behavior (standard) of SIP ITSP is the same as traditional PSTN, and ITSP use the same Country Code, Area Code as the configuration of this machine, then no configuration of Add/Subtract rule is required.
Example (1) of Add/Subtract rule When the location of this machine and the registration of ITSP and the destination place that user make call are different, then Add/Subtract rule should be applied to make real number (Access Code, Country Code, Area Code, Local Phone Number) correct For example: (the SIP access code may not the same as real condition, please adjust it according to real condition) Role Location International
Access Code Country Code Long
Distance Access Code
Area Code
Location of this machine (calling side)
Taiwan 002 886 (3 digits) 0 2 (1 digit)
Registration of ITSP Japan 010 81 (2 digits) 0 50 (2 digits) Called side U.S. 011 1 (1 digit) 1 408 (digits)
Assumes the Local Phone Number of U.S. called side is 2345678, Owing to the location of calling side is Taiwan, so the number dials is 002 1 408 2345678 (Don't add International Access Code 002 when you do simulation)
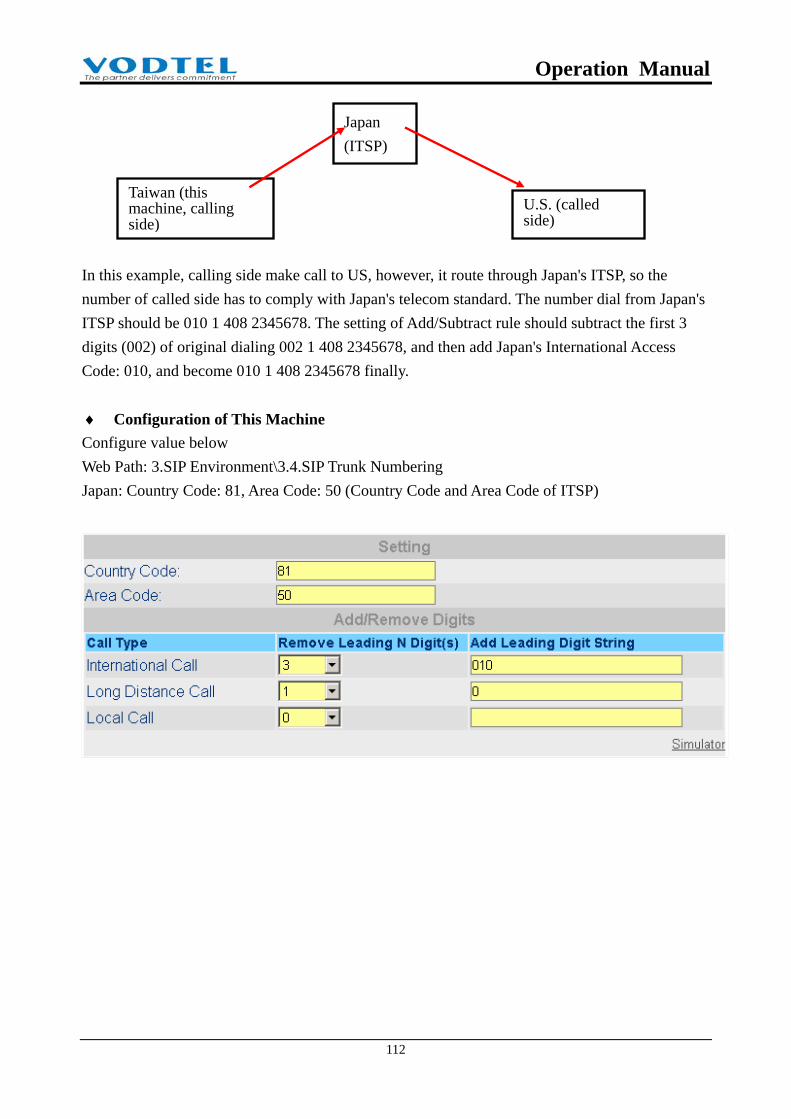
Operation Manual
112
In this example, calling side make call to US, however, it route through Japan's ITSP, so the number of called side has to comply with Japan's telecom standard. The number dial from Japan's ITSP should be 010 1 408 2345678. The setting of Add/Subtract rule should subtract the first 3 digits (002) of original dialing 002 1 408 2345678, and then add Japan's International Access Code: 010, and become 010 1 408 2345678 finally. ♦ Configuration of This Machine Configure value below Web Path: 3.SIP Environment\3.4.SIP Trunk Numbering Japan: Country Code: 81, Area Code: 50 (Country Code and Area Code of ITSP)
Taiwan (this machine, calling side)
Japan (ITSP)
U.S. (called side)

Operation Manual
113
Group Item Description Default Value
Country Code Country Code of Japan 81 Setting
Area Code Area Code of the location of Japan 50
Remove Leading N
Digit(s)
International Call: 3, in this example, the digits
actually removed are 002 and it is the
International Access Code of Taiwan, 3 digits.
Long Distance Call: 1, the Long Distance Access
Code of Taiwan is 0, 1 digit. (In this example,
Distance Access Code is not required for making
international call, so it doesn't affect the result).
Since the Long Distance Access Code of Japan is
the same as Taiwan's 0, so configure the field to 0
is also OK. If 0 is configured, the Add Leading
Digit String at Long Distance Call field below is
not required.
Local Call: 0, number is not changed, set 0
3
1 Set 0 at below field
0 Keep blank at below
filed
0
Add Leading Digit
String
International Call: 010, International Access
Code of Japan
Long Distance Call: 0, Long Distance Access Call
of Japan
Local Call: Blank. Needs not to add and don't
change
010
0 When 1 at field above
is configured
Blank When 0 at field
above is configured
Blank
Add/Remove
Digits
Simulator Input 14082345678 to simulator (International
Access Code of Taiwan, 002 is excluded), then
output 01014082345678 (1)

Operation Manual
114
Other Example 1. The same as the Country Code and Area Code of Japan (Example 2)
The destination Local Phone Number is 22345678 and Area Code is 50 Calling side (Taiwan) dials: 002 81 50 22345678, (002 is excluded when you do simulation), then system simulator dials 22345678 (3), because the ITSP use the same Country Code and Area Code and it is regarded as Local call.
2. Country Code is the same, but Area Code is different (Example 3) The destination Local Phone Number is 22345678 and Area Code is 3 Calling side (Taiwan) dials: 002 81 3 22345678, (002 is excluded when you do simulation), then system simulator dials 0 322345678 (2), because the ITSP use the same Country Code, but Area Code is different and it is regarded as Long Distance call.
3. The same as the Country Code and Area Code of Japan, however, add digits are required (VoIP telecom standard that define 050 Access Code even it is in the same area). Here is the add/subtract rule: (Example 4)
The destination Local Phone Number is 22345678 and Area Code is 50 Calling side (Taiwan) dials: 002 81 50 22345678, (002 is excluded when you do simulation), then system simulator dials 05022345678 (3), because the ITSP use the same Country Code and Area Code and it is regarded as Local call.
14.3.2.2 Use Simulator to Simplify Configuration
After the instruction above, you can use Simulator first to achieve the result you want, without thinking adding/subtracting digits in which field first. Input the Country Code, Area Code of ITSP field in Country Code, Area Code field, such as Japan, and then click Apply button.

Operation Manual
115
Simulate the number you want to dial with default value (no add/subtract digits). Get the result to decide which fields needs to be added/subtracted For the example (1), input number and get number below.
To remove 002 (3 digits) and add the International Access Code of Japan, 010, Change setting:
You can also apply these rules to tune the number on other example. This method is more complicated. VODTEL will provide better way for dialing behavior control on next version.

Operation Manual
116
14.3.3 Configure incoming/outgoing CID and forward rule for IP trunk call
(Note: Only for Firmware V3.04 or later version) Add caller leading digit(s) for direct outgoing call
When ITSP hope the outgoing call to PSTN from this machine can has certain extra Leading Digit(s) in front of original Caller ID for identification, then this function can be applied. For example, when ITSP use E1/T1 to connect to PSTN and the number of E1/T1 is assigned as 8226-xxxx, then administrator can configure Add DOD Call Caller Leading Digit(s) as 8226. When extension 2327 user make outgoing call, extra leading digits change Caller ID to 8226-2327 and it become standard PSTN phone number. It takes effect on all SIP outbound call and offnet forward call. Here is configuration Create Extension Table Web Folder: 1.System Config.\1.3.Extension Number
Configure the originate Caller ID if this trunk outgoing call is come from SIP Line Web Folder: 3.SIP Environment\ 3.3.Proxy/Trunk Mapping
Configure extra Caller Leading Digit(s) of DOD Call Web Folder: 3.SIP Environment\ 3.4.SIP Trunk Numbering
Remove DID Call Callee Leading Digit(s) for call forward
When DID (direct inward dialing) mode is applied, system can remove specified prefix digits and then compare the other left digits to extension table. When the number is matched, system forwards the call to destination extension directly. For example, input an entry 8226 to Remove DID Call Callee Leading Digit(s) field, and an extension number 1357 is pre-configured in extension table. When ITSP users dial 8226-1357 to enter trunk of this machine, then call is forwarded to 1357 directly without the support of DISA. 8226 can be the prefix that the ITSP assign to this company (box). Web Folder: 3.SIP Environment\ 3.4.SIP Trunk Numbering

Operation Manual
117
15. Configuration of Conference Call To use this function, works with FONEMOSA 4496 PBX Conference Bridge is required. This machine is not included in MOSA 4600 Plus and you have to purchase it additionally. Work with FONEMOSA 4496 (PBX Conference Bridge), user (chairman) is able to call the other parties to invites them to join conference. FONEMOSA 4496 can be cascaded. You may access many FONEMOSA 4496 with only one conference ID assigned. The system will search for free conference when user requests. For the detail information of FONEMOSA 4496, please refer to FONEMOSA 4496 User Manual
15.1 Configuration of a Single FONEMOSA 4496
Please connect the devices as the example below.
Configure an Prefix/Ext. No. to connect to FONEMOSA 4496 is required.
Input Prefix or VODNET ID of FONEMOSA 4496 to Phone_Number field.
Web Path:1.System Config. \1.3.Extension Number
IP Network
4496 PBX Conference Bridge
FXS
MOSA 4600 Plus
PSTN
FXO
FXS
MOSA 4600 Plus
PSTN
FXO

Operation Manual
118
As the example above, 3200 is the Prefix/Ext. No. of FONEMOSA 4496 (Phone Number: 889944964496)
If this machine or FONEMOSA 4496 does not join VODNET, input the information of FONEMOSA 4496 to Phone Book
Web Path: 7.Phone Book\
As the example above, phone number of FONEMOSA 4496 is 889944964496, IP is 10.13.6.130, and Port Number is 2000. Input all of them to web page Phone Book of this machine.
15.1.1 Chairman is Unspecified Member Configurations of one or more FONEMOSA 4496 have to sync with the Parking Server setting of this machine (MOSA 4600 Plus) Authority Key of each FONEMOSA 4496 has to be the same as the Security Key of this machine.
MOSA 4600 Plus Web Path: 4.PBX Advanced \4.5.Parking Server
As the example above, configure Security Setting to 2300 and then click Apply.
Configure the Authority Key of FONEMOSA 4496 to the same as Security Setting of Parking Server of this machine.
FONEMOSA 4496 Web Path: AUTHORITY\
As the example above, configure Authority Key of FONEMOSA 4496 to the same as 2300
Follow the configuration above; each port of MOSA 4600 Plus is able to use FONEMOSA 4496.

Operation Manual
119
When conversation starts, party who activates Consult Transfer to FONEMOSA 4496 will become chairman. (For example: Flash+3200+#, 3200 is the prefix number of FONEMOSA 4496 (phone number: 889944964496))
15.1.2 Specify Dedicated Member as Chairman
The chairmen of FONEMOSA 4496 PBX conference bridge can be specify to dedicated person. Specified MOSA 4600 Plus ports can be configured in FONEMOSA 4496. Only the party at these specified ports can become chairman. User at other ports of MOSA 4600 Plus can be invited by chairman to join the conference only. Here is the configuration
MOSA 4600 Plus Web Path: 4.PBX Advanced \4.5.Parking Server
Configure Security Key of Parking Server
As the example above, configure Security Setting to 2300, and click Apply
Authority Key of FONEMOSA 4496 has to be different from Parking Server
FONEMOSA 4496 Web Path: AUTHORITY
As the example above, configure it to 0
Specify certain ports or all ports of MOSA 4600 Plus to be the chairman.
FONEMOSA 4496 Web Path: AUTHORITY
As the example graph above, 886272235511 is the phone number of a MOSA 4600 Plus, then all parties of that machine can be a chairman.
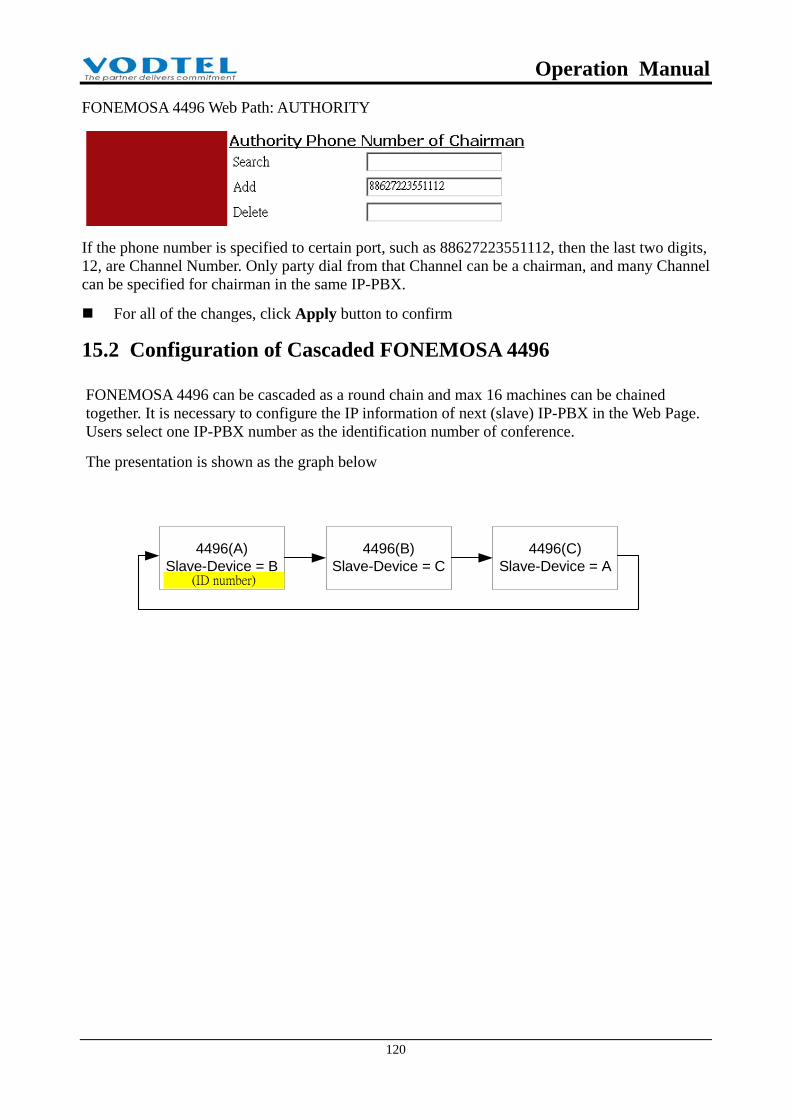
Operation Manual
120
FONEMOSA 4496 Web Path: AUTHORITY
If the phone number is specified to certain port, such as 88627223551112, then the last two digits, 12, are Channel Number. Only party dial from that Channel can be a chairman, and many Channel can be specified for chairman in the same IP-PBX.
For all of the changes, click Apply button to confirm
15.2 Configuration of Cascaded FONEMOSA 4496
FONEMOSA 4496 can be cascaded as a round chain and max 16 machines can be chained together. It is necessary to configure the IP information of next (slave) IP-PBX in the Web Page. Users select one IP-PBX number as the identification number of conference.
The presentation is shown as the graph below
4496(A)Slave-Device = B
4496(B)Slave-Device = C
4496(C)Slave-Device = A
(ID number)

Operation Manual
121
For FONEMOSA 4496(A), Input IP address and Port Number of next (slave) FONEMOSA 4496(B) in A's Slave Conference Bridge Chain Address field via web page. When FONEMOSA 4496 (A) is busy, the IP-PBX redirect the request to the next IP-PBX configured here, FONEMOSA 4496(B). FONEMOSA 4496(B) also can configure its next IP-PBX. When the last IP-PBX is configured its Slave Conference Bridge Chain Address to the first FONEMOSA 4496 (A), the round chain structure is created. Max 16 IP-PBXs can be chained together. The chain information can be viewed in Conference Bridge Chain Info field.
FONEMOSA 4496 Web Path:BASIC \ CONFERENCE
As the example graph above, configure IP / Port field of next (slave) FONEMOSA 4496
16. Configuration of Other Application
16.1 Call Forward
The feature of Call Forward is to predefine a destination on the extension line, and then all calls to this extension line will be forwarded to the destination automatically. The destination can be defined in MOSA 4600 Plus are:
The extension line in the same IP-PBX
The extension line of another MOSA 4600 Plus at remote side
The extension line of another MOSA 4600, FONEMOSA 4400 at remote side
SIP device (SIP Phone,Softphone,SIP Wi-Fi phone)
The public line (PSTN) through the machine at remote side (Off-net Forward)
For the feature of Call Forward, there are 3 parameters to be configured:
Parameter Description

Operation Manual
122
Control Disable: Disable Forward Feature
All Calls: Forward all calls
Busy: Forward only if this line is busy
Busy (Cascade): Forward only if this line is busy. And if the forwarded line is also busy and Busy (Cascade) is defined, this call will be forwarded to next destination as configured. 16 times max can be forwarded.
No Answer: When there is no answer for this line, the call forward to the specified destination
Busy/No Answer: When there is no answer or line busy for this channel, the call forward to the specified destination
Forward To Phone number, extension number, or VODNET Number of the remote equipment that will be forwarded to.
If the call needs to forward to Voice Mail Product, configure this number as the phone number or VODNET Number of MOSA 4600 Plus that connect to Voice Mail Product.
The phone number must be a full number including country code and area code. If Offnet To number below is also configured. The call is offnet to PSTN via the machine of the phone number configured here.
Offnet to The telephone number of PSTN or mobile phone that the call will be forwarded to. The telephone number is entered from the viewpoint of transfer IP-PBX (the remote equipment that the phone number had entered in the field of “Forward To”).
For general Call Forward, only parameter of Control and Forward To needs to be configured. There are two kinds of configuration tools, via Web or Phone set.
16.1.1 General Call Forward
Each extension can have its own call forward. Here is the configuration. Configured Call Forward by Phone set
(1) Off-hook the phone set and dial ; *0 0000 (Du, Du, Du)
(2) Dial 011 (Du,Du Du) ; Activate Forward 0 : Disable 1 : All Calls 2 : Busy 3 : No Answer 4 : Busy or No Answer

Operation Manual
123
5 : Busy (Cascade)
(3) Dial 0286216666111 ; Define field of “Forward To”
(4) Hang up the phone set
Disable Call Forward by Phone set
(1) Off-hook the phone set and dial ; *0 0000 (Du, Du, Du)
(2) Dial 010 (Du, Du, Du) ; Disable Call Forward
(3) Hang up the phone set
Configure General Call Forward by Web
Web Path:2.Channel Config.\2.1.Summary
Select Channel with FXS type and click its St (Status)
Configure Call Forward in Status Table
It shows icon after configuration
Icon of other status is shown below A: All Calls B: Busy B/C: Busy(cascade) N: No Answer B/N: Busy or No Answer

Operation Manual
124
Activate Call Forward Disable Call Forward
Control All Calls Disable
Forward To The phone number (full number, can plus
extension number) of the destination or
VODNET Number
Offnet To Blank
Note: If the value in Forward To field can be found in Extension Number Table (Web Folder:
1.System Config.\1.3.Extension Number), system saves data in Extension Number form and
"Ext. No." words in shown on the web. Later, even the phone number (field) that maps to this
Prefix/Ext. No. is changed, the incoming call can still forward to new phone number. If the
Forward To number is not found in Extension Number Table, system saves data in Phone
Number form (full number or VODNET ID). No matter what extension number that will map to
this Phone Number in the future, it won't influence the forward to destination.
For example, an entry, Prefix/Ext. No. 2013 that maps to Phone Number: 886282261319 is
created in Extension Table.
If 886282261319 is inputted into Forward To field, system save data in 2013 form. If extension
2013 no more maps to 886282261319 in extension table in the future. For example, it is changed
to 886282265555, then change value in Forward To field is not required. Incoming call is
forwarded to 886282265555 automatically.
For example, if 886282261320 is inputted into Forward To field, and there is no such number in
Extension Number Table. System saves data in 886282261320 form. If there is any extension
number that map to this 886282261320 in Extension Number Table in the future. It does not
affect the Forward To number 886282261320 at all.
16.1.2 Secretarial Intercept Feature
In a company, phone call of General Manager is pickup by secretary. Phone calls are filtered by secretary and it is transferred to GM if necessary.
1. Configure all calls dial to GM are forwarded to the extension line of secretary, then any calls that dial to GM will be forwarded to secretary.
Configure Call Forward in Status Table

Operation Manual
125
Activate Call Forward
Control All Calls
Forward To: The extension line of secretary
2. Secretary press phone-set Flash (or #) + extension of GM Then the incoming calls is transfer to GM.
3. Only the extension of secretary is allowed to Call Transfer or dial to the extension of GM.
16.1.3 Offnet Forward to PSTN
16.1.3.1 Offnet Forward to Remote PSTN Line From Local Machine
User may forward a call from the extension line of this machine to a PSTN line in remote site via
a transfer machine. Here is the configuration:
(1) Configuration for the parameters of “Call Forward” of This Machine (A)
Field : Description
Control : All Calls
Forward To : The telephone number of the remote machine (B) that will forward to. If
the transfer machine is the machine (A) itself, keep this field in blank
Offnet To : The telephone number of Trunk (FXO (PSTN) or SIP) that the call will be
forwarded to. Because this call will be dialed from the remote machine
(B), the phone number must be entered from the point of view of the
remote machine (B). The phone number of remote "Forward To" machine
(B) needs to be entered for Offnet To function to PSTN
(2) Configuration for the equipment of Remote Transfer Machine (B)
For remote transfer machine, the telephone number, same as the telephone number configured in “Offnet to” of machine (A), need to be defined in the field of “Permitted Phone Number for Offnet Forward”
Example
Own machine (A) MOSA 4600 is located at Taipei and remote machine (B) as the transfer machine is located at Shanghai. If an extension line at Taipei will forward a call and offnet to a mobile phone 1360567888 in Beijing. The configuration for both parties is:

Operation Manual
126
Parameters Configuration of Machine (A) at Taipei
Configuration of Remote Machine (B) at Shanghai
(8621-6445-1111)
Control All Calls -
Forward to 862164451111 -
Offnet to 1360567888 -
Permitted Phone Number for Offnet forward -
1360567888, can be selected via Offnet Forward Tracking List
In order to forward the call to remote PSTN line, the “Offnet to” of machine (A) needs be configured; in addition, the parameters of remote FONEMOSA also need to be configured. The example is shown below:
Configuration of remote machine (B), Web Path:1.System Config.\1.7.Offnet Forward)
Note: For Outbound Forward Number (1.System Config.\1.7.Offnet Forward), full number is not required. System can compare the first N digits. For example, input 0982, then all numbers with prefix 0982 is able to do outbound call. Offnet Forward Tracking List is useful for machine (B) to select the phone number that can offnet forward to PSTN. Machine (A)'s MAC Address, Channel, Phone Number and Offnet Number input in machine (A)'s channel are shown in the List.

Operation Manual
127
Attention:
1、 Attention: The telephone number defined in the field of “Offnet To” is the number actually
dialed from the remote transfer machine. In this example, the call is forwarded to offnet
mobile phone, therefore configure it to mobile number and full number is not required.
2、 Machine (A) has to be the MOSA 4600 Plus model, then it will be shown in Offnet Forward
Tracking List
16.1.4 Call Forward after Called Side Is Answered
If the Forward To number is connected to PBX and the application is that the extension number should be sent after PBX answers the call. Call Forward with two steps dialing feature can be used. Here is the example.
Web Folder: 2.Channel Config.\2.1.Summary
Select the channel with FXS type and click its Status
Tick, and select Trunk
Trunk can be FXO or SIP
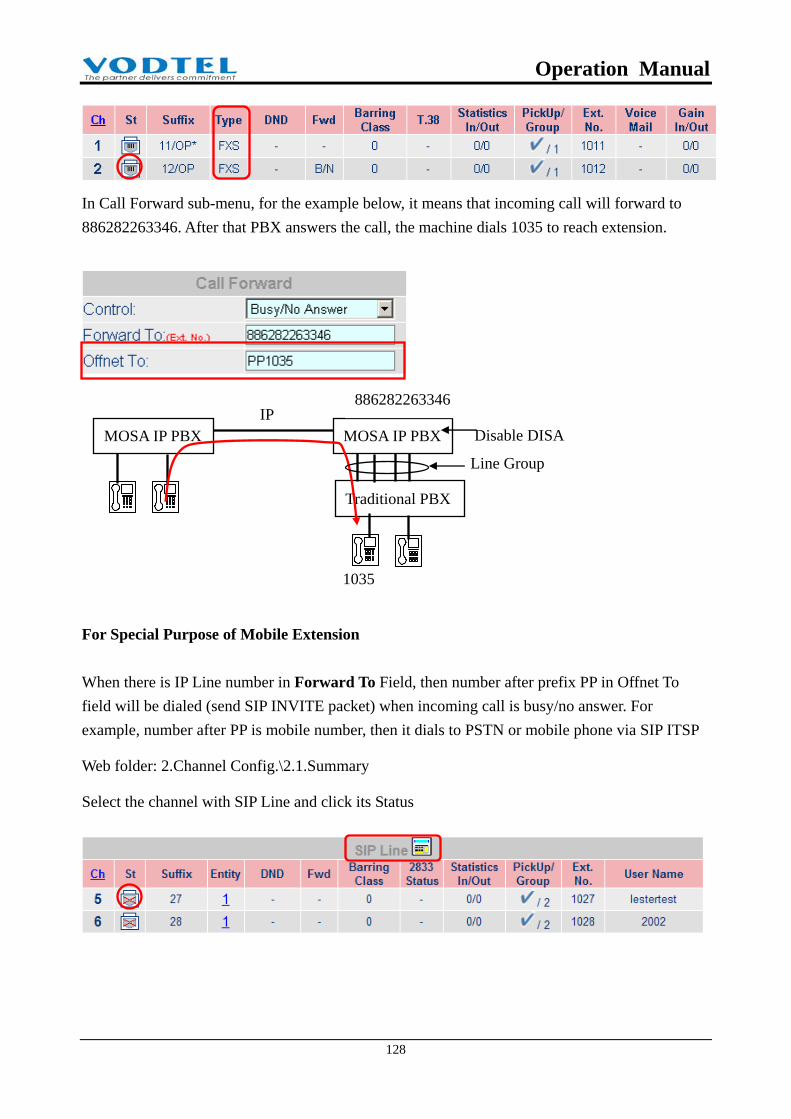
Operation Manual
128
In Call Forward sub-menu, for the example below, it means that incoming call will forward to 886282263346. After that PBX answers the call, the machine dials 1035 to reach extension.
For Special Purpose of Mobile Extension When there is IP Line number in Forward To Field, then number after prefix PP in Offnet To field will be dialed (send SIP INVITE packet) when incoming call is busy/no answer. For example, number after PP is mobile number, then it dials to PSTN or mobile phone via SIP ITSP
Web folder: 2.Channel Config.\2.1.Summary
Select the channel with SIP Line and click its Status
MOSA IP PBX MOSA IP PBX
Traditional PBX
886282263346
1035
IP Disable DISA
Line Group

Operation Manual
129
Dialing incoming call to SIP line 3400. When 3400 is busy / no answer, extension 3400 send 0968223380 to MOSA 4600B. Incoming call is re-directed to PSTN or mobile phone via MOSA 4600C and SIP ITSP. This feature can apply to mobile extension. Mobile number can be added or modified at MOSA 4600 Plus and modification at MOSA 4600B is not required.
16.1.5 Call Forward of Trunk Port
By this configuration, incoming call to FXO Trunk (PSTN) or SIP Trunk (ITSP) can be forward to specified number (FXS extension, SIP Line extension or Offnet to No.). The incoming call is forward to specified extension and call side need not and can not dial other extension number, and the DISA of that trunk port is not activated.
Web Folder:2.Channel Config.\2.1.Summary
Select the Channel with FXO or SIP Trunk type that will be forwarded. Click its St (Status)
Configure Control as All Calls and Forward number in Status table
MOSA IP PBX MOSA SIP Line
MOSA 4600B
3400
0968223380 MOSA 4600C
SIP E1/T1 Gateway
PSTN
Mobile Package
Line Group

Operation Manual
130
Shows icon in summary table
16.1.6 Application of Private Line
In addition to the function of All Calls forward described in last section, Private Line also have function below In default condition, all Trunk (FXO for PSTN or SIP Trunk for ITSP) can be seized by extension to make outgoing call. It is possible that high level administrator or emergency phone of rescue organization can not make outgoing call, owing to the entire trunk ports are seized (full) by other extension. Configure certain trunks as Private Line and it can be seized by certain extension only. It insures that trunk busy will not happen for those extensions.
Configure Control as Private Line and Forward number in Status table
Shows icon in summary table
That configured trunk has become the private line of the extension (full number) 88628226449114 Note: Although that trunk has been specified as the private line of this extension, it does not mean that this extension can seize that trunk only. This extension still seize free trunk from last trunk port upward when it do seize trunk action.
Application of Private Line 2 When Private Line is used, only a specified desktop extension can seize that trunk port. However, if extension user has both desktop extension and SIP extension, system administrator can configure 2 extension numbers to seize that trunk (FXO or SIP Trunk) port
Shows icon in summary table

Operation Manual
131
Then the desktop extension (10)14 and SIP extension (10)29 of the machine 886282264491 can seize that trunk as private line.
16.1.7 Default Call Forward
All incoming extension calls can be forwarded to a certain device (extension) and answer by certain person if they are busy/no answer. When there is VODNET or MOSA IP PBX full number in Default Call Forward field and there is no Forward To configuration on individual extension, then incoming call is forwarded to this device (extension) that is defined at this field.
16.2 Hotline Extension When an extension is configured hotline function, the hotline call route is built when hook off. For example: Extension of 1012 make a call to **88628226336814# immediately and automatically when user pick up phone set of ext. 1012. (** is access code of IP Call, # is the ending code of IP Call) Configuration of Example Web Path:2.Channel Config.\2.1.Summary
Select Channel with FXS type and click its St (Status)
Configure Softkey in Status Table

Operation Manual
132
Parameter Value Description Soft key String **88628226336814# Contents of hotline
number. Trigger Mode Auto When the system detect a
loop on the extension, it triggers the call
Trigger Digits (Blank) The digit to trigger the call. When Trigger Mode is Auto, it is blank here.
Append Trigger Digits Not Append IP Call **88628226336814# is made automatically when user of extension 1012 pick up phone set.
16.3 Abbr. Dial Combined with Softkey Combine Abbr. Dial and Softkey can have varied and convenient application.
Example: Seize the trunk of remote side by Abbr. Dial
There are four MOSA 4600 Plus installed in Taiwan, Shanghai, Hong Kong, and Tokyo. Each MOSA 4600 Plus is equipped the trunks to the local Telecom.
Activities of Taiwan User’s expectation
User off-hooks the phone and dial “ 1 “ . System will seize the trunk of Shanghai’s machine and the dial tone from the FXO of Shanghai’s MOSA 4600 Plus is heard.
User off-hooks the phone and dial “ 2 “ , System will seize the trunk of Hong Kong’s machine and the dial tone from the FXO of Hong Kong’s MOSA 4600 Plus is heard
User off-hooks the phone and dial “ 3 “ , System will seize the trunk of Tokyo’s machine and the dial tone from the FXO of Tokyo’s MOSA 4600 Plus is heard
Configuration
Abbr. Dial & Seize Remote Trunk Access Code : Web Path: 1.System Config.\1.2.PBX Access Code
Field Value Entered Abbr. Dial Access Code *2 Seize Remote Trunk *9
Abbr. Dial Index Configuration : Web Path: 4.PBX Advanced\4.2.Abbr. Dial

Operation Manual
133
Field (Index) Value Entered 61 *9 8621# 62 *9 852# 63 *9 813#
Softkey : Web Path: 2.Channel Config.\2.1.Summary
Select channel with FXS type and click its St (Status)
Configure Soft key in Status Table
Field Value Entered Description
Soft key String *26 Contents of Softkey Trigger Mode Key Press Any key dialed below in Trigger
Digits triggers Soft key String above Trigger Digits 123 Digits to Trigger Softkey String Append Trigger Digits
Append "Append" means system dial Soft key String + Trigger Digits. Not Append means system dial Soft key String only.
Explanation of how system works
User dials “ 1 “ , Softkey is triggered and “ *261 “ is sent out. This number meets the definition of Abbr. Dial Access Code “ *2 “ , followed by Abbr. Dial Index “ 61 “, therefore the actual number dialed out is *9 8621# . The number is the code to seize the remote trunk of 8621, that is the Country Code and Area Code of Shanghai.
User dials “ 2 “ , Softkey is triggered and “ *262 “ is sent out. This number meets the definition of Abbr. Dial Access Code “ *2 “ , followed by Abbr. Dial Index “ 62 “, therefore the actual number dialed out is *9 852# . The number is the code to seize the remote trunk of 852, that is the Country Code and Area Code of Hong Kong.
User dials “ 3 “ , Softkey is triggered and “ *263 “ is sent out. This number meets the definition of Abbr. Dial Access Code “ *2 “ , followed by Abbr. Dial Index “ 63 “, therefore the actual number dialed out is *9 813# . The number is the code to seize the remote trunk of 813, that is the Country Code and Area Code of Tokyo.

Operation Manual
134
16.4 Line Group Several extensions can be grouped as an Line Group. When one of the FXS (extension) in the group is busy, incoming call to this FXS can be forward to pre-configured destination. If the destination FXS port is also busy and it is also configured as Forward (cascade), then this call will be forwarded to the pre-configured destination again. The maximum cascade is up to 16 extensions. When the final extension is configured to forward back to the first extension, Line Group loop is created. Web Path:2.Channel Config.\2.1.Summary
Select Channel with FXS type and click its St (Status)
Configure Call Forward in Status Table. Configure Forward To number to the next extension.
Example figure:
Attention: Confirm calls between these extensions in Line Group in advanced are required.
IPFXS
4600 Plus IP 4600 Plus 4600 Plus
FXO
PSTN
Busy(cascade) Busy(cascade) Busy(cascade)

Operation Manual
135
16.5 Call Park Called side can park the incoming call and anyone use this system can pick up the call anywhere.
16.5.1 Operation Procedure
A party is the one who triggers Call Park B party is the one who has conversation with A party. A will park B on parking server. C is the third party who retrieves the phone call.
Operation method A and B is under conversation (A calls B, or B calls A) A parks B to Parking Server, and then any other C party can retrieve the phone call
16.5.2 Analysis of Example
Example 1:
A, B, C three parties all use the extension line of MOSA 4600 Plus.
Example 2: A, B use the same box of MOSA 4600 Plus, A uses extension line (FXS), B is connected via PSTN. C uses extension line (FXS) of other box of MOSA 4600 Plus
IP Network
4604 Plus (1)
A
FXS
4604 Plus (3)
CFXS
4604 Plus (2)
B
FXS

Operation Manual
136
Example 3:
A, B, C all use different box of MOSA 4600 Plus. A, C uses extension line. B is connected via PSTN (also can be Mobile Phone).
IP Network
4604 Plus (3)
CFXS
A FXS
4604 Plus (1)
B
PSTN
FXO
IP Network FXS
4604 Plus (1)
A
4604 Plus (3)
C
FXS
FXS
4604 Plus (2)
B
PSTN
FXO

Operation Manual
137
16.5.3 Configuration Method
Configuration of A party's MOSA 4604 (1):
♦ Configure Call Hold ID, such as: 9999
Web Path:4.PBX Advanced \4.5.Parking Server
♦ Configure a Prefix/Ext. No: 5555 in A party's MOSA 4604 (1). It must be different from the Call Hold ID of Parking Server of this machine. Phone Number can be configured as the phone number (My Phone Number, full number in Web Path: 1.System Config.\ Basic Information) of MOSA 4604 (1) and Type as Phone. This Prefix/Ext. No. is identified as Park ID of MOSA 4604 (1)'s Parking Server
Web Path:1.System Config. \1.3.Extension Number
Talking about Park ID, it can be divided into few types below
The Prefix/Ext. No. of machine: MOSA 4600 Plus series of product can configure Prefix/Ext. No as the device number. This number is identified as Park ID. Prefix/Ext. No + Ext. suffix can also be Park ID and its type is iPBX
The Prefix Number + Extension number: If park function is used across different IP-PBX, the combination of two kinds of number are used as Call Park ID
When Park function is used, it is shown below.
Web Path:4.PBX Advanced \4.5.Parking Server
♦ Configure related configuration that make A and B are able to communicate.
Configuration of B party's MOSA 4604 (2):
♦ Configure related configuration that make A and B are able to communicate.
Configuration of C party's MOSA 4604 (3):
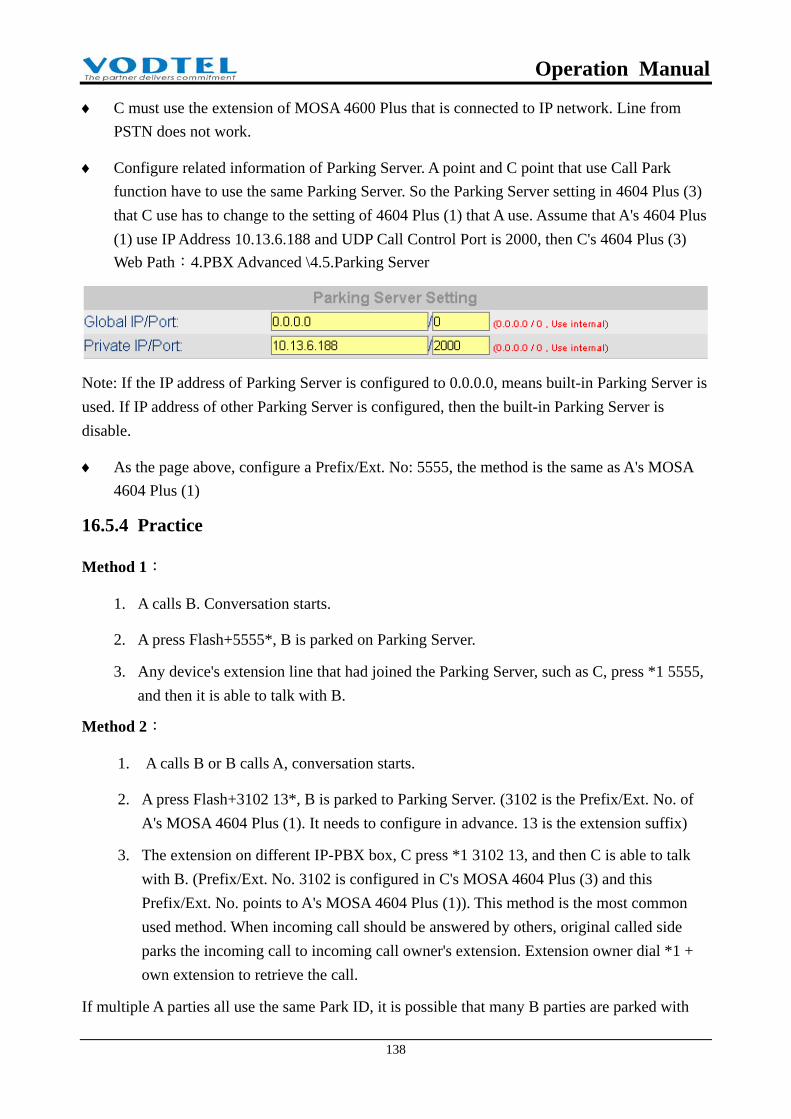
Operation Manual
138
♦ C must use the extension of MOSA 4600 Plus that is connected to IP network. Line from PSTN does not work.
♦ Configure related information of Parking Server. A point and C point that use Call Park function have to use the same Parking Server. So the Parking Server setting in 4604 Plus (3) that C use has to change to the setting of 4604 Plus (1) that A use. Assume that A's 4604 Plus (1) use IP Address 10.13.6.188 and UDP Call Control Port is 2000, then C's 4604 Plus (3) Web Path:4.PBX Advanced \4.5.Parking Server
Note: If the IP address of Parking Server is configured to 0.0.0.0, means built-in Parking Server is used. If IP address of other Parking Server is configured, then the built-in Parking Server is disable.
♦ As the page above, configure a Prefix/Ext. No: 5555, the method is the same as A's MOSA 4604 Plus (1)
16.5.4 Practice
Method 1:
1. A calls B. Conversation starts.
2. A press Flash+5555*, B is parked on Parking Server.
3. Any device's extension line that had joined the Parking Server, such as C, press *1 5555, and then it is able to talk with B.
Method 2:
1. A calls B or B calls A, conversation starts.
2. A press Flash+3102 13*, B is parked to Parking Server. (3102 is the Prefix/Ext. No. of A's MOSA 4604 Plus (1). It needs to configure in advance. 13 is the extension suffix)
3. The extension on different IP-PBX box, C press *1 3102 13, and then C is able to talk with B. (Prefix/Ext. No. 3102 is configured in C's MOSA 4604 Plus (3) and this Prefix/Ext. No. points to A's MOSA 4604 Plus (1)). This method is the most common used method. When incoming call should be answered by others, original called side parks the incoming call to incoming call owner's extension. Extension owner dial *1 + own extension to retrieve the call.
If multiple A parties all use the same Park ID, it is possible that many B parties are parked with

Operation Manual
139
the same Park ID. The retrieve sequence is the same as the parking sequence, no matter how many C parties they have.
16.5.5 Summary of Parking Server Configuration
In stacking, networking or VPN environment, parking server may have different configuration. Here, we summarize the correct information for Parking Server in different environment.
Parking Server: Non-VPN, Fixed Public IP Parking Server Which Parking
Server is used Global IP Global Port Private IP Private Port Machine itself 0.0.0.0 0 0.0.0.0 0 Machine itself 255.255.255.255 Control Port itself 0.0.0.0 0 Machine itself IP address itself Control Port itself 0.0.0.0 0
Others IP address of Parking Server
Control Port of Parking Server 0.0.0.0 0
Parking Server: Non-VPN, Private with Fixed Public IP Parking Server Which Parking
Server is used Global IP Global Port Private IP Private Port Machine itself 0.0.0.0 0 0.0.0.0 0 Machine itself 255.255.255.255 Control Port itself Private IP itself Control Port itself Machine itself Public IP itself Control Port itself Private IP itself Control Port itself
Others Public IP of Parking Server
Control Port of Parking Server
Private IP of Parking Server
Control Port of Parking Server
Parking Server: Non-VPN, Private IP with dynamic Public IP Parking Server Which Parking
Server is used Global IP Global Port Private IP Private Port Machine itself 0.0.0.0 0 0.0.0.0 0 Machine itself 255.255.255.255 Control Port itself Private IP itself Control Port itself
Others (Same LAN) 255.255.255.255 Control Port of
Parking Server Private IP of Parking
Server Control Port of Parking Server
Parking Server: VPN, Fixed Private IP Parking Server Which Parking
Server is used Global IP Global Port Private IP Private Port Machine itself 0.0.0.0 0 0.0.0.0 0 Machine itself IP address itself Control Port itself 0.0.0.0 0
Others IP address of Parking Server
Control Port of Parking Server 0.0.0.0 0
Note: (1) Use the parking server of the machine itself, input both global IP/Port and Private
IP/Port to 0. (2) For non-VPN environment, if consult transfer is required in networking for different locations,
then MOSA 4600 Plus that provides parking server function should not use dynamic Global IP.

Operation Manual
140
16.6 Call Hold This is the advanced feature of Call Retrieve. When incoming call is parked on parking server, only the original extension that activate the call park can retrieve the call.
16.6.1 Analysis of Example
A party uses the extension line of MOSA 4604 Plus (1), B(2)~B(n) are any PSTN or extension lines of MOSA 4604 Plus
A and B start conversation (includes A calls B(1), or B(1) calls A), B(1) is hold to Parking Server by A party.
Only A is able to retrieve the phone call. When B(1) is parked to Parking Server by A party, A party can make new call, such as B(2). A party can parks more than one call (i.e. Party B(1), B(2)..) to Parking Server. First hold call will be retrieved first, i.e., B(1) is retrieved first, then B(2),...etc.
16.6.2 Configuration Method
Configuration of A's MOSA 4604 Plus (1):
♦ Configure Call Hold ID, such as: 9999
Web Path:4.PBX Advanced \4.5.Parking Server
♦ Configure related configuration that make A and B are able to communicate.
IP Network
B(4) FXS
4604 (2) Plus
B(3)
PSTN
FXO
B(1) FXS
A FXS
4604 Plus (1)
B(2)
PSTN
FXO

Operation Manual
141
Configuration of B's MOSA 4604 Plus (2):
♦ Configure related configuration that make A and B are able to communicate.
16.6.3 Practice
Note: *1 is the default access code of Call Retrieve
Method 1:
1. A calls B(1) or B(1) calls A, conversation start
2. A press Flash+9999*, B(1) is parked to Parking Server
3. A press *1 9999 to resume conversation with B(1).
Method 2:
1. A calls B(1) or B(1) calls A, conversation starts.
2. A press Flash+9999*, B(1) is parked on Parking Server.
3. A calls B(2), conversation starts.
4. A press Flash+9999*, B(2) is parked on Parking Server.
5. A press *1 9999 to resume conversation with B(1).
6. A ends the conversation with B(1).
7. A press *1 9999 to resume conversation with B(2).
Method 3:
Step 1~5, the same as Method 2.
6. A press Flash+9999*, then B(1) is parked to Parking Server again.
7. A press *1 9999 to resume conversation with (B2).
8. A ends the conversation with B(2)
9. A press *1 9999 to resume conversation with (B1).
Other operation method can follow the rule above. Such as: Hold many phone calls, retrieve and park again...and so on.

Operation Manual
142
16.7 Ring Group This machine can group variety of Line connections into ring groups and you can assign them with one extension number. When there is incoming call that dials to this extension, all extensions of this group will be ringed at the same time. If there is one destination is answered, ringing at all other destinations stop. This application can be used on several persons that can answer customer service call, or a person that has many personal phone numbers. Note: This feature is not suitable for customer service center. For customer service center, ACD (Automatic Call Distribution) function is required. Use FONEMOSA 4493 ACD server for this application. For detail, please contact with distributor. The numbers of ring group can be default extension number 10xx, or extension numbers that are defined by customer, such as 8801 Web Folder: 1.System Config.\1.3.Extension Number
Configure Ring Group Web Folder: 4.PBX Advanced\4.7.Ring Group
1. Specify
Group Number
2. Add Extension
Number
3. Clieck Apply

Operation Manual
143
1. Four Groups at most are available and there are maximum 40 members in one group, however,
there are maximum 40 members available for one single box only. 2. Default ring group numbers are 100000001 ~ 100000004 and it is changeable in this web page.
It must be the extension number of this machine (if default value is used, such as 10xx), and it can not be the same as other existing extension numbers. If numbers are duplicated or there are any errors, system does not work and system also won't check it.
3. The members of ring group have to be the extension numbers that is defined in Extension Table (not necessary has to be the extension of this box)
4. The member can not be the number of another ring group or an extension number that Forward To an ring group extension
5. Members go normal forward if normal Forward To function is configured on members. Make a Ring Group Call For the example of default value, if incoming call from user dials extension 100000001, then all members of 100000001 ring group will ring. People of any member in the group can answer this call.
17. Connect to Special Device (Seize Specific Trunk)
17.1 Connect Door Phone and Voice Broadcast System You probably can connect this machine to some non-telecom analog device. These devices supply analog current and it is similar to the trunk line of PSTN. Open or close the circuit can open or close the device at remote place, such as
Door Phone AL2100 (a kind of voice broadcast system)
For these device, it has to specify a FXO port to connect to door phone or AL2100. User of MOSA 4600 Plus can do Seize Specific Trunk, then door lock is open or voice broadcast system is seize for voice broadcast. Description:
Trunk Class ID (0~11) may be assigned to every FXO port; default value is 0.
By defining Trunk Class, the specific FXO port can be accessed by the remote machine.
Dial Method: <Seize-specific-Trunk-Access-Code> + <Prefix/Ext. No.> +< Class(0~11)> +<*/#>

Operation Manual
144
Note: If there are several FXO ports have the same Trunk Class ID, the access sequence is from the last port upward.
Configuration:
Web Path:2.Channel Config.\2.1.Summary
Select Channel with FXO Type and click its St (Status)
Configure Trunk Class in Status Table, such as "1", and then click Apply.
Example Figure:
Note: The default Prefix of Extension is 10 and access code of Seize Specific Trunk is *8

Operation Manual
145
17.2 Connect Voice Broadcast System (for MOSA 4603 Plus Only)
In addition to general channel, MOSA 4603 Plus has an extra Broadcast port.
This port can connect to voice amplifier for broadcasting to company
To use this function, seize specific trunk method is used. When specific trunk is seized, personnel talk to phone set directly for broadcasting.
Method: Pick up phone set and dial *8 10 11 (#). Start to broadcast when hint tone is heard. (*8: access code of Seize Specific Trunk, 10: Extension Prefix of this machine, 11: Trunk Class ID, #: dial ending code)
This function uses a fixed Channel and can not be changed.
Web Path:2.Channel Config.\2.1.Summary
And Trunk Class ID: 11 is also fixed for this function and can not be used for other purpose
Web Path:1.System Config.\1.4.Trunk Group/Class
Trunk Class ID 11 can not be selected
18. Value Added Function by Extra Charge
18.1 Concept To achieve the best utilization, we research new features consistently. Extra charge to customer is required, such as by customer's request to do upgrade, or customer can purchase extra hardware to do value added function, or rent some service.

Operation Manual
146
18.2 Purchasing Extra License to Do Upgrade Currently, (Firmware V2.01), you can purchase extra license to do upgrade for these features below. For the upgrade procedure, please refer to 19 Firmware Update/Backup and License Upgrade
1. IP Line (SIP Line):Several SIP channels are activated for the registration of IP Phone and SoftPhone in advanced. If these channels are not enough, customer can purchase license to activate SIP channels until they reach the max available channels of specification. For this function, please refer 14.2 SIP Line (SIP Proxy Server)
2. IP Trunk (SIP Trunk): There is no IP Trunk channel is activated in advanced. For these channels, you can register it to ITSP (Internet Telephony Service Provider), such as 070 IP telephony service (Taiwan area)。Customer can purchase license to activate SIP channels until they reach the max available channels of specification. For this function, please refer 14.3 SIP Trunk Server
3. 4. Built-in Voice Mail: Add a NFS Server (by yourself) in your LAN for storage of voice file
or use built-in Flash memory for voice file storage (for new hardware and firmware 3.03 or above only) and purchase upgrade license from us, then you can have full functional voice mailbox. For this function, please refer to 13.3.1 Backup on VM System
5. Smart Pad supported: Smart Pad is the dialer software for MOSA 4600 Plus of our company. By this software, personnel with PC needs not to pick up phone set for any dialing behavior and common dialing behavior and dialing number can be added to Phone Book, hotkey. It makes operator, customer service and general personnel to manage and use MOSA 4600 Plus easily. Software itself is free, however, purchase license to activate channels for Smart Pad until they reach the max available channels of specification is required. Please refer to user manual of Smart Pad.
6. Smart Console supported: In addition to all functions that Smart Pad have, Smart Console also can collect and manage channels of single box, boxes or groups of MOSA 4600 Plus. In this software, you can see the real-time status of each channel and you can operate the task the same as traditional operator console at desktop without purchasing desktop operator console, and only PC and monitor is required. Please refer to user manual of Smart Console (to be released later)
Note: For the demand of distributor, not all of the Licenses above are applied after the machine had been purchased. The Licenses of some functions are available when this machine is manufactured.

Operation Manual
147
18.3 Purchase Extra MOSA Hardware Product ASD (Application Service Device) series products provide extra value added service for VODTEL IP-PBX products. For different kind of value added service, VODTEL IP-PBX product can have specific added service if it works with specific ASD products. ASD series products include the model and function below.
Introduction of ASD series product
♦ FONEMOSA 4491: Redirect Server It provides many Virtual Ports for Forward control. The incoming call can be forwarded to another IP Gateway/Extension of IP-PBX or PSTN
♦ FONEMOSA 4492: CDR (Call Detail Record) Receiver Machine at remote place can send CDR to this machine via RS-232 or IP network, and then this machine converts CDR to TEXT format file for billing system.
♦ FONEMOSA 4493: ACD (Automatic Call Distribution) Server FONEMOSA 4493 is an automatic telephone attendant system that dispatches incoming call to specified extension. The extensions need to be the extension of MOSA IP PBX series. This machine is used in Call Center.
♦ FONEMOSA 4495: Parking Server,MOSA 4600 Plus has built-in Parking Server. MOSA 4600 Plus can use external Parking Server for specific requirement Call Park is a function for a group of users to use phone call easier. Parking Server provides the function that park calls on server. When any call party wants to talk to third party, he can park the call on the server and the call can be retrieved by any party. Also, the called party can discuss with the person who the incoming call really wants to talk with in advance and decides who should take the phone call.
♦ FONEMOSA 4496: PBX Conference Bridge By using the FONEMOSA 4496 PBX Conference Bridge, user (chairman) is able to call the other parties to invites them to join conference.
♦ FONEMOSA 4483: Broadcast Server FONEMOSA 4483 Broadcast Server uses the ability that IP Packet can be broadcasted, so that voice packet can be broadcast to many specified IP-PBX/gateway. Users that use extension can listen the voice broadcasting at the same time.
♦ FONEMOSA 4484: Conference Bridge FONEMOSA 4484 is a conference bridge that many people via different lines can make call to the center to discuss by phone together. Max 17 line can join together for

Operation Manual
148
discussion.
FONEMOSA 4484 includes 3 models:
Module Main Feature FONEMOSA 4484
None Maximum 4 parties can join the
conference via IP call.
FONEMOSA 4484B 4 FXS Stackable only, standalone is not workable
FONEMOSA 4484C 4 FXO Maximum 5 parties can join the conference via PSTN or IP.
♦ FONEMOSA 4489: Group Ring Server Provides function that one extension number with many physical extensions (desktop and SIP extension) can ring together.
♦ FONEMOSA 4490: MOSA-Proxy To create route for MOSA IP-PBX that is installed under IP network that is unable to open Server Port or under closed IP network with firewall.
♦ FONEMOSA 4498: Route Manager Can centerize manage the call route of MOSA/FONEMOSA series IP-PBX, such as choosing route of better voice quality or lower cost.
18.4 Lease Service Web Call
For customer that had already uses our MOSA 4600 Plus or IP-PBX product, apply Web Call service to us or to MOSANET dealer is available. The purpose of Web Call is to build an online customer call service on Web Page that normal company has. People who visit the Web Page can make charged free call to customer service hotline immediately, just by clicking the Web Call link at Web Page. By different configurations, it can be 1. Make charged free call to the extension of customer service agent 2. Make charged free call to original DISA (operator). Colleague who stay outside (especially at
other country) can make charged free call to company for business.
MobiWeb Package If customer does not have our MOSA 4600 Plus or IP-PBX, customer can purchase MobiWeb package. It includes a MOSA 46xx Plus, Router and IP Phone...and so on. One year free Web Call service is also included. If one year is expired, customer can apply extended license with charge to MOSANET dealer or us. (Machine and hardware belong to customer after they are purchased). For detail, please contact with MOSANET dealer or us.

Operation Manual
149
19. Firmware Update/Backup and License Upgrade There are two types of Update/Upgrade ♦ License Upgrade to increase ports: The available ports of SIP Line and SIP Trunk of this
machine, built-in Voice Mail, Smart Pad and Smart Console supported function can be increased by purchasing extra license and do upgrade, till the max ports is used. By the Key numbers that you purchase, upgrade to more ports can be done at management Web.
♦ Firmware Upgrade: The firmware of this machine will have new version when new function is added or program bug is removed. Please contact with distributor to get the latest firmware for free update.
19.1 License Upgrade to Increase Users or functions 1. The steps to do license upgrade is shown below 2. View the Box Info of this machine
Web Folder: 2.Channel Config.\2.1.Summary Click Channel Upgrade on the right top corner of Web page
3. Copy the Box Info of this machine
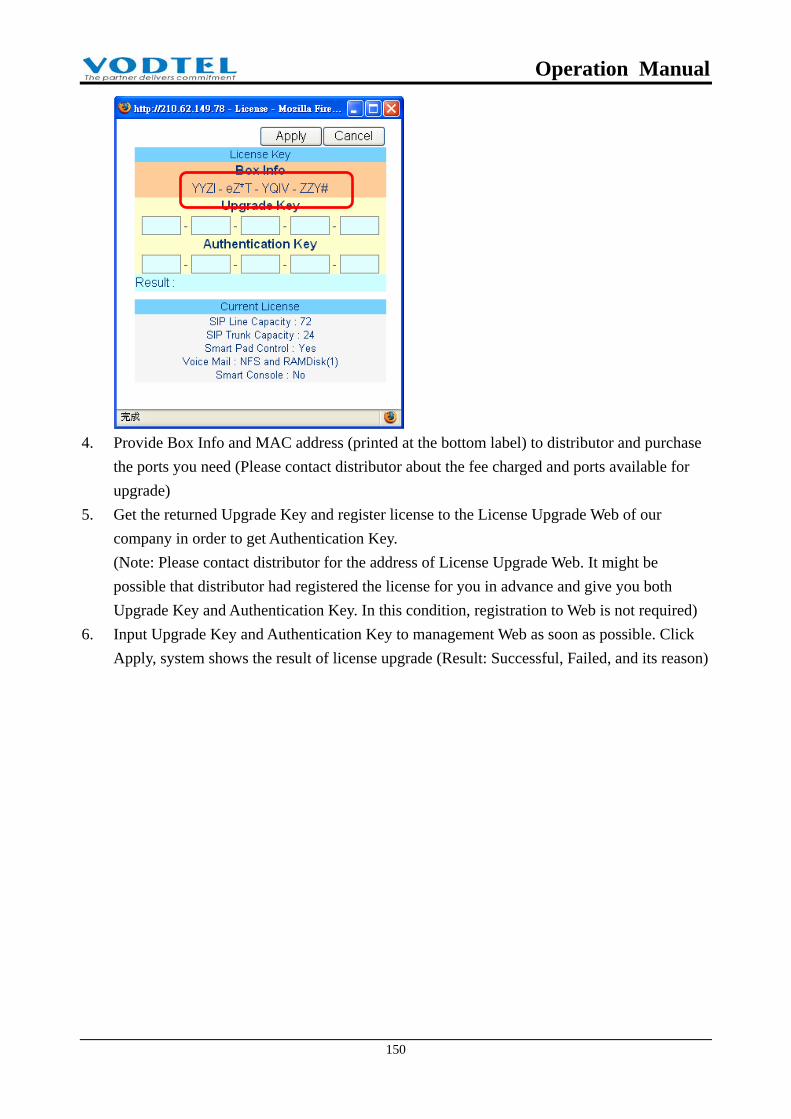
Operation Manual
150
4. Provide Box Info and MAC address (printed at the bottom label) to distributor and purchase
the ports you need (Please contact distributor about the fee charged and ports available for upgrade)
5. Get the returned Upgrade Key and register license to the License Upgrade Web of our company in order to get Authentication Key. (Note: Please contact distributor for the address of License Upgrade Web. It might be possible that distributor had registered the license for you in advance and give you both Upgrade Key and Authentication Key. In this condition, registration to Web is not required)
6. Input Upgrade Key and Authentication Key to management Web as soon as possible. Click Apply, system shows the result of license upgrade (Result: Successful, Failed, and its reason)

Operation Manual
151
Attention: ♦ In order to manage and record the License Upgraded machine more effective, each
Upgrade Key has its valid date. Upgrade will not be successful if expired Key is used. For this reason, do License Upgrade ASAP when you get the Key. If Key is expired, contact distributor for dealing the problem.
♦ License Upgrade can be done on the same machine several times with different ports until max ports available is reached. (Note: reduce ports and request money withdraw is not possible)
♦ Attention: If you did not purchase License Upgrade Key from VODTEL, don't input any key and try to upgrade, otherwise, machine will be locked with several times of failed upgrade. In this case, return to us for maintenance with your own shipping charge is required.
♦ For the demand of distributor, not all of the Licenses above are applied after the machine had been purchased. The Licenses of some functions are available when this machine is manufactured.
19.2 File Types of Firmware Update
For the files of MOSA 4600 Plus, each file has its own meaning. Here lists its meaning:

Operation Manual
152
File Name File Type Description
XP4421.CFG XP4423.CFG XP44XX.CFG
System configuration file
File of system configuration
XP44XX.GT1 1st greeting file File of voice greeting record
XP44XX.GT2 2nd greeting file File of voice greeting record
XP44XX.GT3 3rd greeting file File of voice greeting record
XP44XX.GT4 4th greeting file File of voice greeting record
XP44XX.GT5 5th greeting file File of voice greeting record
XP44XX.GT6 6th greeting file File of voice greeting record
XP44XX.GT7 7th greeting file File of voice greeting record
XP44XX.GT8 8th greeting file File of voice greeting record
XP44XX.VON System voice file Voice file for announcement XP4421.RUN XP4423.RUN XP44XX.RUN
Executing file System Software
XP4421.WEB XP4423.WEB XP44XX.WEB
Web page Page for web browser
XP44XX.MEM Text file
MEM setting file can be downloaded by FTP to PC; open file and modify the contents using NOTEPAD or other word processing tool; then uploaded the file to system.
COLDSTART Cold start
It is a pseudo file. MOSA 4600 Plus will execute the cold start if this file is deleted via FTP. It is a convenient function if cold start is required after software updated via FTP
WARMSTART Warm start
It is a pseudo file. MOSA 4600 will execute the warm start if this file is deleted via FTP. It is a convenient function to execute warm start via FTP.
CP_TONE.BIN CP binary tone file CP binary tone file
DSP_CORE.RUN Run DSP file DSP execution file

Operation Manual
153
19.2.1 Attention to Upgrade MOSA 4600 Plus from V1.xx to V2.xx
When MOSA 4600 Plus is upgraded from V1.xx to V2.xx, an extra .vmm file is required for built-in voice mail function. It shares the same memory with greeting file of DISA. Follow the upgrade procedure below is required. Attention: If the machine you got from VODTEL is V2.00 or above, or had upgraded to V2.00 or above, then please upgrade it according to the normal procedure at 19.3 Update and Backup Firmware via Web. No more upgrade procedures from V1.xx to V2.xx at this section are required 1. Backup original XP44xx.gt1~8 files Web Folder: 9. File Transfer
1. Click the icon of .GT1 that is going to download
2. Click "Save File"

Operation Manual
154
3. Select the directory of PC and save file. 4. Repeat the steps above and save .GT1~.GT8 to PC. If you are able to use FTP client software,
download .GT1~.GT8 by FTP once a time. For the operation of FTP client software, please refer to 19.4 Update and Backup Firmware via FTP.
2. Upload XP44XX.RUN and XP44XX.WEB file Web Folder: 9. File Transfer
1. Click "Browse"
2. Select "XP4423.RUN" file from your PC
Save File

Operation Manual
155
3. Click "Open"
4. Click Send, when result shows successful message, upgrade is OK. Please repeat the steps above and upgrade the second file "XP4423.WEB"
3. Restart the machine (cold restart) Cold restart this machine Web Folder: At the left bottom side of web, click -Restart-, then select Cold Restart, and then click Apply.
4. Upload original XP4421.GT1~8 to this machine Web Folder: 9. File Transfer
Open
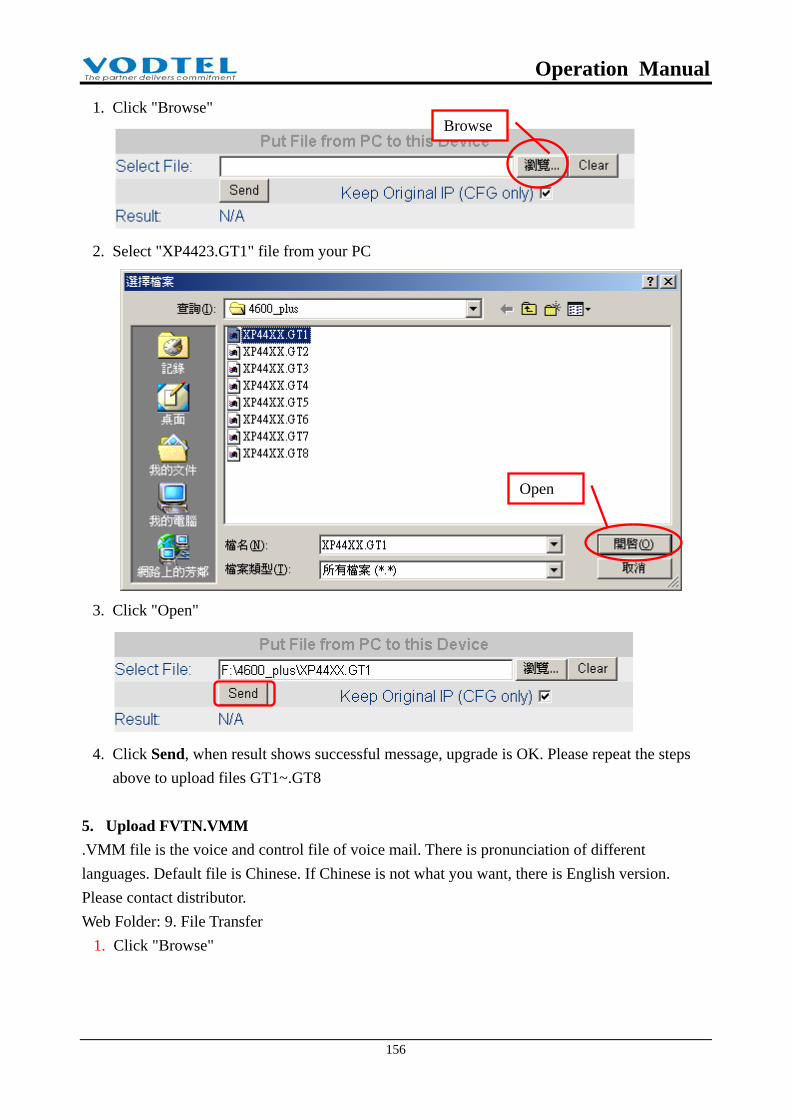
Operation Manual
156
1. Click "Browse"
2. Select "XP4423.GT1" file from your PC
3. Click "Open"
4. Click Send, when result shows successful message, upgrade is OK. Please repeat the steps above to upload files GT1~.GT8
5. Upload FVTN.VMM .VMM file is the voice and control file of voice mail. There is pronunciation of different languages. Default file is Chinese. If Chinese is not what you want, there is English version. Please contact distributor. Web Folder: 9. File Transfer
1. Click "Browse"
Open
Browse

Operation Manual
157
2. Select "FVTN.VMM" file from your PC
3. Click "Open"
4. Click Send, when result shows successful message, upgrade is OK.
6. Restart the machine (Warm restart) Warm restart this machine Web Folder: At the left bottom side of web, click -Restart-, then select Warm Restart, and then click Apply
Browse

Operation Manual
158
19.3 Update and Backup Firmware via Web MOSA 4600 Plus can update or backup firmware via management Web page.
19.3.1 Firmware Update
Web Path:8.File Transfer 1. Click "Browse"
2. Select "XP4423.RUN" in your PC.
Browse
Open

Operation Manual
159
3. Click Open
4. Click Send. Wait for the Result to show successful message. Please repeat the steps above to finish the upload of the second file "XP4423.WEB".
5. Do restart to this machine Web Path: Click Restart at left side of the Web page.
19.3.2 Backup Firmware
Web Path:8.File Transfer 5. Click the icon that is going to download
6. Click "Save File"

Operation Manual
160
7. Select the path of PC and save file
19.3.3 Application of MEM file
MEM file records lots of customized data which user creates from Web. MEM file can be downloaded from this machine. Open the file either by Notepad or other word process software, and modify the data; then upload the file back to this machine. If there are lots of data need to create or modify, use this way can save lots of time. If administrator doesn't want to use management web for configuration, you can use this way instead and it also achieves backup purpose.
For different purpose, there are 2 MEM files. Here is the description Default.MEM: Only for V3.03.0 (included) or later version. A new added Default.MEM file
that has the same format as XP44XX.MEM. The necessary settings can be edited in advance and upload it to the machine. These settings will not be lost even if factory reset is executed. File can be uploaded and download via FTP client software and it is for new hardware only.
XP44XX.MEM:It can work with Default.MEM together. Common settings for each machine can be saved at Default.MEM file. Different settings for individual machine can be saved at XP44XX.MEM file. For machine that is not (or can not) upgraded to V3.03.0 (included) or later version, only XP44XX.MEM workable and Default.MEM is not useful. File can be uploaded and download via management web.
Web Path:8.File Transfer
Save File

Operation Manual
161
Download the .MEM file to PC and open it by Notepad. It shows as below.
Then you can create the data by yourself. To know the format of data entries, please refer to Web Path:8.File Transfer, at bottom line
Click Sample MEM File, you can see the table below. Create the data entries according to this table to speed up installation.

Operation Manual
162
Note: There are several parameters added for Firmware 2.02. These parameters are helpful for the operation via MEM software tool. New parameters include Box-Info, Channel-Setting, Barring-Table, Offnet / Specified Route / Ring Group and Inbound-Password. For the format of these parameters, they are suitable for you to create MEM file by MEM software tool. Errors are possible if it is input manually, so please contact with dealer for sample MEM file. For MEM software tool, please refer to 19.3.4 Create MEM file by MEM Software Tool After modification is done, upload it backs to this machine, then the data on this machine is updated.
Delete of MEM data
Note: The IP-PBX had already kept all of the data before you download the .MEM file. So the data is not removed if you remove entries (all or partial) of the .MEM file and upload to machine again.
If you need to remove any entries, you should.

Operation Manual
163
Remove entry from Web page Add special mark to MEM file. Follow the way below:
Example 1: Delete a Prefix Number record Original MEM data 3000 882994546 0 Add delete mark and remove its number as below 3000! Save the file and upload it to IP-PBX again, then the record is removed. Example 2: Delete the whole Phone Book Original MEM data [PHONE-BOOK] 88994326 203.204.89.31 2000 88994381 10.13.6.185 2000 88956381 61.220.13.25 2000 Add delete mark and remove all entries of Phone Book as below [PHONE-BOOK]~ Save the file and upload it to IP-PBX again, then all records of Phone Book are removed.
Notice of MEM File Update
After the configuration is finished, please make a backup file for CFG file. It is in case that if the data is lost, you may upload the backup file of CFG file to this machine. If you upload the previous backup file of CFG file to machine after the MEM file is uploaded, the MEM file will be ineffective because the backup file overwrites the MEM file. You have to re-upload the updated MEM file to this machine to get the correct data.
19.3.4 Create MEM file by MEM Software Tool
When many MOSA 4600 Plus are used in networking and stacking environment, use MEM software tool can create MEM file for each individual MOSA 4600 Plus. Upload these individual files to individual MOSA and restart to take effect. By this way, administrator can save lots of time to do configuration and it also prevent mistakes. This MEM software tool assume the configuration that includes 1. Group: generally speaking, it is country, such as the field of A company include Taiwan and
PRC 2. Location: generally speaking, it is city; such as the location of A company include Taiwan
Operation Manual
164
Taipei and PRC Shanghai. We assume that the MOSA boxes are all under the same NAT at one location. If MOSA boxes are under different NAT, then it is regarded as different location.
3. Stacking: The configuration of extensions. When the volume of extension ports is not available for all users at office, administrator can configure stacking with many MOSA 4600 Plus boxes.
When the configuration from software tool to MOSA is done, no matter how many MOSA 4600 Plus boxes works together in different country, all of its individual MEM file can be created once. Then administrator uploads these individual files to individual boxes in different location. Later, modify some settings on Management Web if required. For the operation of MEM software tool, please refer to the user manual of MEM software tool (to be released later).
19.3.5 The Application of CFG file
CFG file is the configuration file that the system reads and records MEM file and the settings on Web interface. It records all current settings of this machine. If user backups this file as a copy, user can restore this machine to original status by uploading this file to machine when these settings has been changed. This file can not be edited by Windows Notepad and it is used for backup and restore purpose only. Attention: For security reason, the CFG file created after Firmware 3.04 has more safety encription, so its CFG file can not be uploaded to machine with Firmware 3.04 or below. However, machine with Firmware 3.04 or above is able to use the CFG file created below Firmware 3.04 You can see a file that has the extension file name .CFG in Web ♦ Backup CFG file Web Folder: 9. File Transfer

Operation Manual
165
You can download CFG file to PC and save it according to the description at previous section
♦ Restore CFG file to return original status before backup Web Folder: 9. File Transfer Click "Browse"
Select .CFG file and open
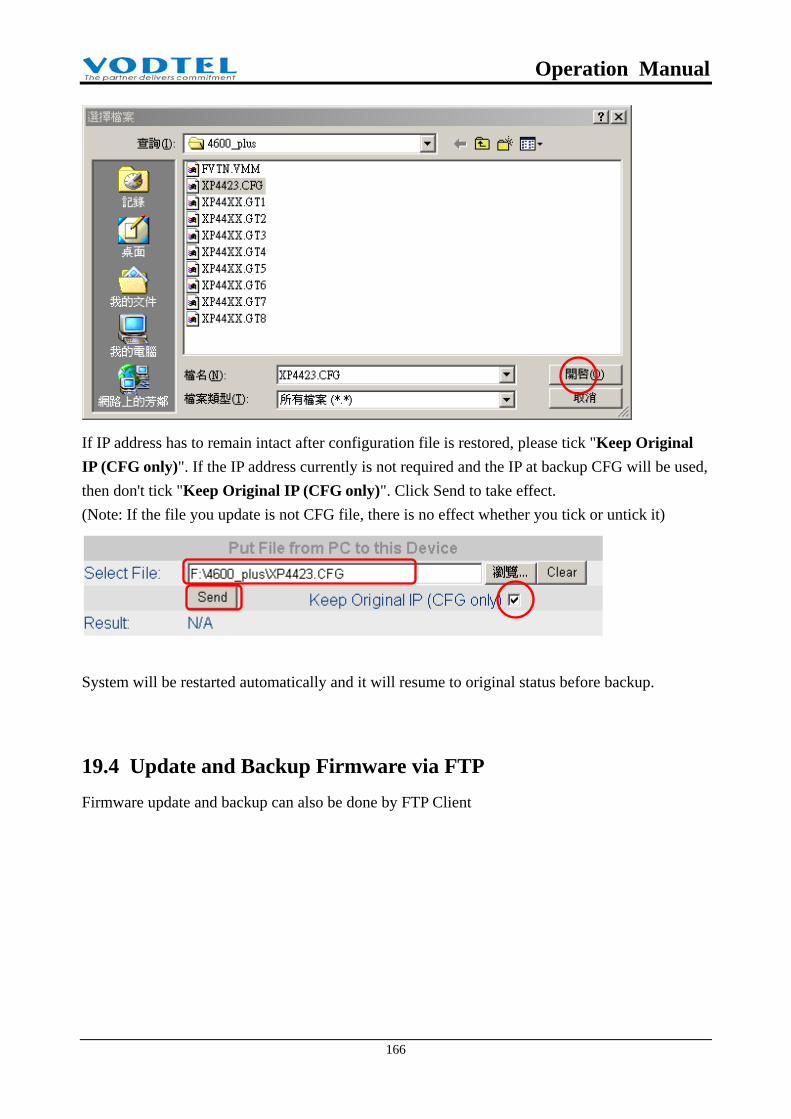
Operation Manual
166
If IP address has to remain intact after configuration file is restored, please tick "Keep Original IP (CFG only)". If the IP address currently is not required and the IP at backup CFG will be used, then don't tick "Keep Original IP (CFG only)". Click Send to take effect. (Note: If the file you update is not CFG file, there is no effect whether you tick or untick it)
System will be restarted automatically and it will resume to original status before backup.
19.4 Update and Backup Firmware via FTP Firmware update and backup can also be done by FTP Client

Operation Manual
167
19.4.1 Firmware Update by FTP Software
19.4.1.1 Update RUN and WEB by FTP Software
1. Execute FTP Client Software, such as CuteFTP, WS FTP. Enter IP Address, User Name (default is FTP), Password (the password of FTP and Console is same, and the default is blank), and the Fire Wall Port Number to 21
2. Click button Connect to get connection between this machine and FTP Client. The files of this machine will be displayed if the connection is successful.
3. Be sure that the files to be uploaded are stored on the hard disk. Select the file with extension of .RUN and click . (Please notice that the file name must be same as the file name in the IP-PBX, e.g. XP4423.RUN).

Operation Manual
168
4. Click Overwrite. After the file is overwritten (you may check if the time of the file is updated), Select the file with extension of .WEB and click (Please notice that the file name must be same as the file name in the Gateway, e.g. XP4423.WEB). The step is the same as 3 and 4
5. Do Cold Restart to finish the Update procedure (this procedure save and process all setting).
19.5 Check Updated Firmware Version
Check if the update is successful or not: Enter Web page to verify
Web Path:1.System Config.\1.1.Basic Information
Check if the version
correct. This manual
is for Version: 2.02.2
or 3.04.0
Operation Manual
169
20. Appendix
20.1 Management by System Console, and Telnet
20.1.1 List of all commands
It may have sub-command when the command below is executed. Input "?" anytime and press Enter to get further help
User Exec commands:
Enable Turn on privileged commands Exit Exit from the EXEC Help Description of the interactive help system Show Show running system information
show:
dns Show the IP address of domain name server ethernet FastEthernet port status and configuration history Display the session command history ip Display IP configuration log Show log filter control manager Show status of management functions outbound-auto-sync Show outbound auto sync route Show route running-config Show current operating configuration service_port Show service port configuration version System hardware and software status
Privileged Mode:
Configure Enter configuration mode Delete Reset configuration Disable Turn off privileged commands Exit Exit from the EXEC Help Description of the interactive help system Ping Send echo request to destination Probe-hook Probe busy tone cadence Probe-remove Stop probe busy tone cadence Reload Halt and perform cold start Restart Halt and perform warm start Show Show running system information
Global Mode:
Dbflush DataBase flush Dns Set the IP address of domain name server
Operation Manual
170
End Exit from configure mode to privileged mode
Exit Exit from configure mode Help Description of the interactive help system Ip Global IP configuration subcommands Log Control log output Manager Enable/Disable the specific management
function,including Enable/Disable management of FTP,Telnet and Web.
No Negate a command or set its defaults Outbound-auto-sync Automatic sync remote outbound entries Password Modify password of enable command region_id Set regional id service_port Set service port number terminate Force channel clear down Specified channel can
be terminated by console command IP PBX(config)#terminate 99 means to terminate call at channel 99. The value can be 00~99
20.2 Management by Phone set
There are two levels of managements, the user of extension line and the system administrator.
20.2.1 User of Extension Line
Every extension line has a password. Off-hook the phone and hear the dial tone. Dial *0, or press the button on the rear panel of machine and then make call to FXO port of this machine (no *0 or password is required) and hear the tone of “Du..Du….”. At this moment you may configure the parameters by following instructions, and end with #.
Attention: button on the rear panel of the machine is for maintain purpose and don't push it under normal condition.
Operation Manual
171
Item Description Parameter Remarks
01 Call Forward
0 / 1 / 2 / 3 / 4 / 5 0 : Disable 1 : All Calls 2 : Busy 3 : No Answer 4 : Busy or No Answer 5 : Busy (Cascade, Administrator Only)
Configure “Call Forward” type. Only Forward All Calls take effect if make call from FXO
02 Telephone number for Call Forward
1~19 Digits Define the telephone number of Call Forward
03 Telephone number for Offnet To
1 ~ 22 Digits Define the telephone number for Offnet To
04 Clock Alarm hh*mm*c : hh : 00~23 Hours mm : 00~59 Minutesc : 1 : one time 2 : periodic Blank : clear the setting of periodic alarm
Phone will ring 3 times when the time is up. You can set alarm start once or periodically
05 Voice Gain 0 : Default 1 : +2 db 2/22/222 : -2/ -4/ -6 db
The Input Gain and Output Gain will be changed
06 Change Password 4 Digits Default is no password. You may set or change password
08 Pick up is allowed 0 / 1
0 : Disable 1 : Enable
The other line can not pick up calls for you unless this function is enable
09 Enter to system management mode
4 Digits Please refer to the section 10.4.2 System Management
10 Play current time 2 Digits Play the current time
11 Display System Info by Phone set
0 / 1 0 : Disable 1 : Enable
Display IP, Port info of this machine via Phone set. (Note: This function needs to work with phone set that is able to show info under conversation. When it is enabled, vocal info report via phone set is disabled. Configure this value to Disable is suggested
12 Do not disturb (DND) 0/1 0:Disable 1:Enable
Configure DND function. Enable it allows to dial call from that extension, but block all call dial to that extension
13 Clear voice mail waiting Clear waiting tone of voice mail
Operation Manual
172
Item Description Parameter Remarks
tone that had not yet retrieve (This machine send DuDuDu dial tone when voice mail that had not yet retrieve)
14 Outbound Transit Call Control
0/1 0:Disable (outbound call is
disabled) 1:Enable (by permission)
Permission to make PSTN call can be enabled/disabled by extension user to prevent unwanted call made by others. When it is Enabled, system use original permission configured by administrator. For machine that is shipped after Firmware 2.01 or above, there is built-in barring class 6: Lock Phone, and it can reject trunk seizure call. For earlier version, administrator has to configure this barring class manually. Please refer to 6.3.2 Permission to make outgoing call (Outbound Transit Control) and 6.3.3.2 Steps to create the Barring Classes:
21 Read Phone Number (full number: country code + area code + phone number) of this machine
Press * or # to leave
22 Read VODNET number of this machine
Press * or # to leave
23 Read Prefix Number of this machine
Press * or # to leave
20.2.2 System Administrator
The system Administrator has a special password (the default password is 9999). You can off-hook any phone and dial *0 after dial tone or press the button on the rear panel of machine and then make call to FXO port of this machine (no *0 or password is required), you will hear the tone of “Du ..Du….” then dial 09 9999#, then hear the tone of “Du ..Du….” again. At this moment, the system management can dial the following item number for management, and end with #.
Attention: button on the rear panel of the machine is for maintain purpose and don't push it under normal condition.
Item Description Parameter Remarks
Operation Manual
173
Item Description Parameter Remarks
40 Read internal IP Address If under NAT, access to the current internal IP address
41 Read Subnet Mask If under NAT, access to the current Subnet Mask
42 Read Default Gateway If under NAT, access to the current Default Gateway
43 Read Signaling Port If under NAT, access to the current UDP Port
44 Read the Global IP Address Access to the current Global IP Address
45 Read Global Signaling Port Access to the current Global UDP Port
50 Define Area Code
1~3 Digits ; from 1 to 999 Define the Area Code that the system is allocated
51 Define Phone Number 1~19 Digits of 0~9 Define the telephone number of the equipment
52 Define PSTN Call DISA Control
0 / 1 0 : Disable 1 : Enable
If DISA answers the PSTN call
53 Define IP Call DISA Control 0 / 1 0 : Disable 1 : Enable
If DISA answers the IP call
54 Set IP Status 0 / 1 / 2 0 : Manual 1 : DHCP
Configure the method to get the IP Address
55 Define IP Address x : 1 ~ 3 Digits ; 0~255 xxx*xxx*xxx*xxx
Define IP Address of own equipment
56 Define Subnet Mask x : 1 ~ 3 Digits ; 0~255 xxx*xxx*xxx*xxx
Define Subnet Mask of own equipment
57 Define Default Gateway x : 1 ~ 3 Digits ; 0~255 xxx*xxx*xxx*xxx
Define default Gateway of own equipment
58 Define Primary DNS Server IP
x : 1 ~ 3 Digits ; 0~255 xxx*xxx*xxx*xxx
Define Primary DNS Server IP of own equipment

Operation Manual
174
Item Description Parameter Remarks
59 Define Secondary DNS Server IP
x : 1 ~ 3 Digits ; 0~255 xxx*xxx*xxx*xxx
Define Secondary DNS Server IP of own equipment
60 Define Dial Ending Time 1 Digit ; from 0 to 9 It is dial ending if no digits are dialed before dial ending time out. Default is 0 second and the dial must be ended by #. If the dial ending time is defined and the dial is not ended by #, system will wait until dial ending time out.
61 Change Service Port 1:FTP,2:HTTP, 3:Telnet 0~65535
Can configure the port number of three kind services.
62 Remote Management Control (TCP)
0/1
0:Disable 1:Enable
Enable or Disable Remote Management Control (FTP, Telnet and HTTP (Web)
63 VAD control 0/1
0:Disable
1:Enable
Default value of VAD is Enable. When it is enabled, the machine uses G.729AB codec. This Codec use less bandwidth. If this machine connects to other machine that use G.729A codec only, please Disable it. Then this machine use G.729A codec to communicate with others (use more bandwidth)
64 Select Time Source 0/1/3
0:Auto
1:Manual
3:ITSP
Select the method to synchronize the system date and time Auto Sync:Synchronize automatically Manual:Entered manually ITSP Sync: Synchronize from the ITSP (Internet Telephony Service Provider) that this box registers to.
65 Input Date Manually yyyy/mm/dd Year/Month/Date
"/" is replaced with * at dial pad of phone set
Enter the date manually, valid only if “Manual” is selected in Time Source
Operation Manual
175
Item Description Parameter Remarks
66 Input Time Manually hh:mm:ss Hour:Minutes:Seconds
":" is replaced with * at dial pad of phone set
Enter the time manually, valid only if “Manual” is selected in Time Source
83 Define an extension line as night Operator 2 Digits; from 00 to 99
Enter the extension suffix that will be night manual operator
91 Not restricted by Barring Table
You will hear the dial tone again after dialing “91”. Any numbers dial after above process is not restricted by barring table. System manager uses this function for checking and maintenance.
92 Reset the password of individual extension line
2 Digits ; from 00 to 99 When the user forgot the password, user can ask the system manager to reset the password to default value (blank)
93 Define an extension line as day Operator
2 Digits; from 00 to 99 Enter the extension suffix that will be day manual Operator
94 Configure password of phone set programming mode
4 Digits;0~9 Configure password of phone set programming mode for this machine
95 Configure Region ID 2 Digits;00~99 Configure different Region ID
96 Play the greetings recode 1 Digit ; from 1 to 7 # stop
Enter the number of greeting to be played
97 Reset to recover all parameters to default value
1 / 2 1 : recovered by default value2 : recovered by default value except IP
Recover all parameters to default value
98 Warm Restart 1 / 2 1: Warn restart 2: Cold restart
Execute Restart
99 Record Greeting records 1 Digit, from 1 to 8 Record the voice record of greetings, total 8 voice records
20.3 Change Settings of Mass Quantity of Channels When technician installs the machine at the first time, or this machine is installed to different environment again, it might be possible that change individual settings for each channel

Operation Manual
176
(especially the IP Line) is required. It may take lots of time to configure settings by entering each web page for individual port, especially when Softkey and/or SIP account is different for each channel. This feature provides text-based configuration. ♦ User can edits a text file by Windows Notepad software. Copy this text content and paste it
into this window. Click Apply to take effect the settings of certain channel or all channels. ♦ User also can copy the current data on this window and paste & save to a text file. If there
are any changes in the future, edit the text file and paste into the window again, and then click Apply.
Web Folder: 2.Channel Config.\2.1.Summary
Select the channels with FXS, FXO, or IP Line, IP Trunk type that you want to configure. Click Ch (Channel)
The tables are different for FXS, FXO or IP Line, IP Trunk type of channel. It depends the setting items of different type of channel. We use IP line as the example below.

Operation Manual
177
Upper part of window shows all Channel settings of the IP Line. Lower part of window shows the meanings and string length of each field. Each field has to be separated by ",". Heading and ending of each entry has to be included by { }. Add new entry at the end of last line when new data has to be added. If a "-" is added before "{" , such as "–{" , it means that the data of this line will not be processed and it won't take effect. The information of each field

Operation Manual
178
Items Description Field Abbreviation of field Name Full name of this field Length String field Description Description of this field and value
available Default values are set when this machine is shipped from our company. User can refer to the default value and the information of this table to input the correct type of text file. Click Apply to take effect.
20.4 How to Install Linux NFS for the VM of MOSA 4600 Plus We are sorry that this parts of contents has not been finished yet, owing to different kinds and versions of Linux NFS may has different results. Some of them may not work well. NFS is the abbreviation of Network File System and it is developed by Sun Corporation first. Its purpose is to share individual file for different machine and/or different operating system. For Unix and Linux OS, it is used as file sharing server. You can purchase packed NFS server, or install Linux OS and NFS software to PC by yourself. Linux Operating System and NFS software package are sharewares and they can be downloaded from Internet freely. You can also purchase Installation/configuration manual of Linux that bounds with Linux Operating System DVD. Windows system is much more popular than Linux. There are other solutions that some software simulate Linux NFS at Windows 2000 or above Windows operating system that runs on PC. It might be possible that extra charge for these software are required.
20.5 Full Time Busy Tone Detection-Special Purpose Default busy tone detection of this machine has covered most normal busy tone detection For the application of some special purpose, such as the application below 1. Connect external Voice Mail box 2. Trunk port configuration that has one extension number with 3 extension devices (Mobicomm
mobile package) For these applications, there is no mechanism for Line ports (FXS) to disconnect the Trunk port and it has to rely on the Full Time Busy Tone Detection to disconnect trunk connection when lines are busy.
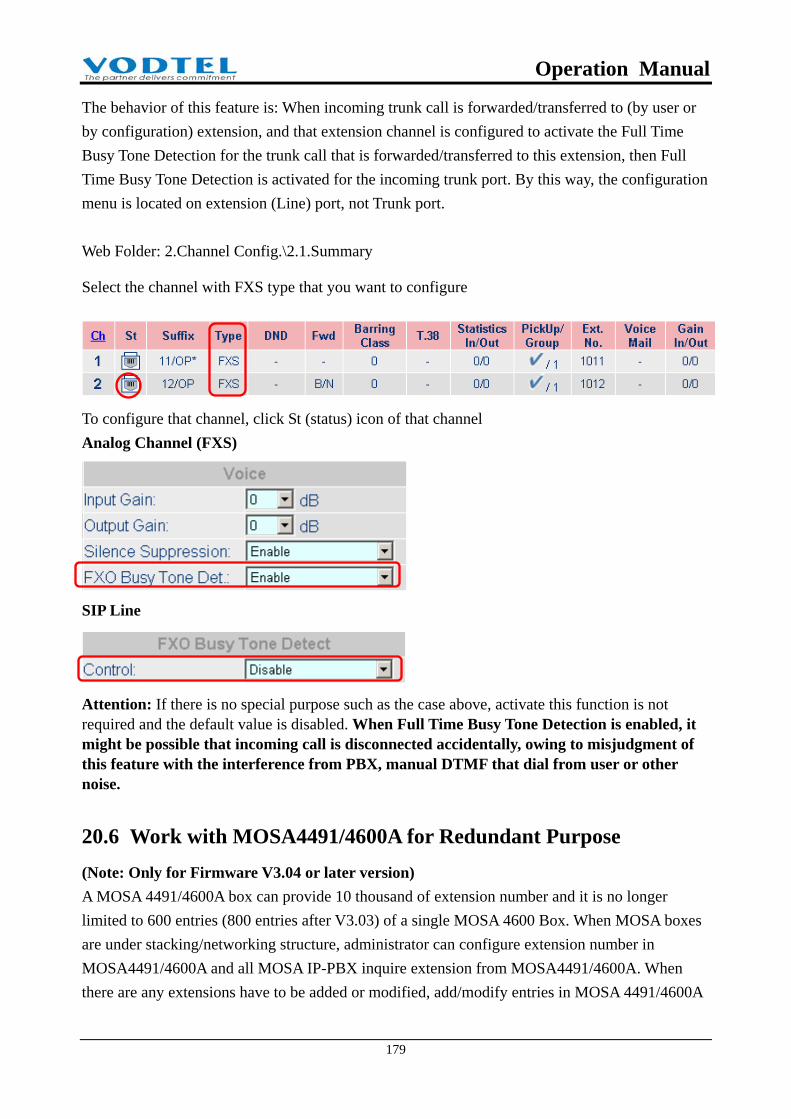
Operation Manual
179
The behavior of this feature is: When incoming trunk call is forwarded/transferred to (by user or by configuration) extension, and that extension channel is configured to activate the Full Time Busy Tone Detection for the trunk call that is forwarded/transferred to this extension, then Full Time Busy Tone Detection is activated for the incoming trunk port. By this way, the configuration menu is located on extension (Line) port, not Trunk port. Web Folder: 2.Channel Config.\2.1.Summary
Select the channel with FXS type that you want to configure
To configure that channel, click St (status) icon of that channel Analog Channel (FXS)
SIP Line
Attention: If there is no special purpose such as the case above, activate this function is not required and the default value is disabled. When Full Time Busy Tone Detection is enabled, it might be possible that incoming call is disconnected accidentally, owing to misjudgment of this feature with the interference from PBX, manual DTMF that dial from user or other noise.
20.6 Work with MOSA4491/4600A for Redundant Purpose (Note: Only for Firmware V3.04 or later version) A MOSA 4491/4600A box can provide 10 thousand of extension number and it is no longer limited to 600 entries (800 entries after V3.03) of a single MOSA 4600 Box. When MOSA boxes are under stacking/networking structure, administrator can configure extension number in MOSA4491/4600A and all MOSA IP-PBX inquire extension from MOSA4491/4600A. When there are any extensions have to be added or modified, add/modify entries in MOSA 4491/4600A

Operation Manual
180
is enough. Add/Modify extension table of each MOSA 4600 Plus box is not required. When all MOSA 4600 Plus inquire extension number from MOSA 4491/4600A, stability of MOSA4491/4600A is very important. This mechanism provides 2 MOSA4491/4600A for redundant purpose. When one of them is offline or removed for replace/repair pupose, system inquire the other one to insure system stability. For how to configure MOSA4491/4600A, please refer its own user manual For how to configure MOSA 4600 Plus to use redundant mechanism of MOSA4491/4600A, please refer to MOSA 4600 Plus Technical Manual, Chapter 2, Section 7. Phone Book.
20.7 Usable SIP Device and SIP ITSP
20.7.1 SIP Device That Can Register to This Machine
VODTEL Technology Inc. had test lots of SIP device that is sold in the market, including SIP Phone, SIP Softphone, SIP Gateway and SIP Wi-Fi phone. We recommend the model and brand below. These devices can register to our machine and use most of the function. VODTEL also provides the detail configuration of these devices. Please contact with distributor. For those model that is not recommend here (has to use standard SIP protocol), user can configure it according to the recommend model. (Not all recommend model is fully test. When it is done, the manual will be updated, or the data is uploaded to Web, or store it in CD)
20.7.2 ITSP That This machine Can Register To
MOSA 4600 Plus also acts as SIP Client that can register to ITSP (Internet Telephony Service Provider). Then, user can use the services from ITSP, such as free call inside network, cost saving call to PSTN... VODTEL Technology Inc. had test several ITSP that this machine can register to. We recommend these ITSP below. For ITSP that is not recommend here (has to use standard SIP protocol), user can configure it according to the information from ITSP and test by yourself. (Not all recommend ITSP is fully test. When it is done, the manual will be updated, or the data is uploaded to Web, or store it in CD)
DOC No.: 9171005107


