Embed Size (px)
Citation preview

\
Blackboard Version 8.0.375.9

Faculty User Guide
1

Table of ContentsG E T T I N G T O B L A C K B O A R D
What is Blackboard 2
System Requirements 3
How to Log in to Blackboard 5
MyMtech 6
Blackboard Courses & Announcments 6
C O N T R O L P A N E L
Control Panel 9
Content Areas (adding content) 10
Course Tools 19
Announcements 19
Course Calendar 19
Staff Information 20
Task 20
Send Email 21
Discussion Boards 22
Collaboration Tools (Wimba) 23
Digital Dropbox 27
Glossary Manager 27
Messages 27
Web Assign 28
Self and Peer Assessment 29
Course Options 31
Manage Course Menu 31
Course Design 32
Manage Tools 32
Settings 32
Recycle Course 33
Course Copy 33
Import Course Cartridge 34
Export Course 34
Archive Course 34
User Management 35
List/Modify Users 35
Manage Groups 35
Assessment 37
Test Manager 37
Survey Manager 42
Pool Manager 42
Course Statistics 42
Grade Center 43
-Add Grade Column 44
-Manage Items 44
-Add Calculated Column 46
-Manage (Grade Center) 47
-Smart Views 48
-Grading Schemas 49
-Organize Grade Center 49
-Email 50
-Reports 51
-Grade History 52
Performance Dashboard 53
Early Warning System 53
Help 55

What is Blackboard? lackboard is a web-based course management tool designed to enhance teaching and learning. This system can be used to supplement the face-to-face curriculum or can be used for
classes that are taught strictly online. How much or how little Blackboard is used is left to the instructor’s discretion.
BThe course management tool has many features. The Grade Center, a special assignment feature for students to upload files, assessment tools as well as seamless integration with Wimba (virtual classroom), are just a few. In the following pages, we will explain how to use these features and more.
When an instructor first enters the course, they are seeing it from the student’s perspective, with the exception of the Control Panel.
2

System RequirementsThe minimum requirements for running Blackboard are as follows…
Computer/Processor
Computer with Intel/AMD 500 Mhz Processor or greater, Macintosh G3 or greater
Operating System
Windows XP, Windows Vista Desktop, Mac OS 10.3
Computer Programs
A basic word processor and internet browser are required.
If a word processor is not available, Microsoft offers a free MS Viewer to view office documents
Suggestion: Ask Network Services to download a basic Windows package on your computer for free (if you are a local Tech student)
Internet Platform
Internet Explorer 6+
Internet Explorer 8 is compatible but has not been fully tested.If you experience problems using Explorer 8, changing to “Compatibility View” should solve the problem.
Netscape Navigator 7.1+ Firefox 2.0 +
Note: Blackboard does not support the AOL, Juno, NetZero, or PeoplePC browsers. After using one of these to connect to the internet, open one of the browsers listed above.
Make sure your internet provider does not have pop-up blocking software and that your browser pop-up blockers are off.
3

Internet Connection
A minimum of 56k dial up. Blackboard recommends DSL or Cable internet connections for best performance.
Display
Super VGA (800 x 600) or higher-resolution monitor with 256 colors. 1024 x 768 or higher is recommended when applicable.
Peripherals
Microsoft compatible mouse and keyboard.
4

How to Log in to Blackboard
Before you can login to Blackboard, you need a Montana Tech campus account. This is generally created when your contract is signed and Network Services is notified. The password you will use to log into Blackboard is the same password that you set when originally given your account.
You may change your password at anytime by using CTRL-ALT-DEL -> change password on any campus computer that has Microsoft Windows installed. The change takes approx. 15 minutes to take effect. If a campus computer is not available to you, you may have your password changed by contacting our help desk (496-4244).
Open your web browser to http://mymtech.mtech.edu. This will take you to Montana Tech’s Online Portal System, MyMTech.
Once you have your username and password, you are ready to log in. Click “Sign In with CAS”
The next screen you will see is for our Central Authentication Service (CAS) screen. CAS is our single sign on solution that allows you to seamlessly access MyMtech and Blackboard without re-entering your username and password.
5

Your login credentials remain active throughout your browser session so it is imperative that when you wish to log out that you close your browser completely.
MyMTechOnce you are inside MyMTech you will see several smaller windows called portlets within each tab. For more information on MyMTech please review the User’s Guide to MyMTECH.
For our purposes in this manual, we will only look at the Blackboard Courses and Announcements portlet.
Blackboard Courses & AnnouncementsThis portlet is used to access Blackboard. Clicking on the course or the announcement for that course will bring you into Blackboard, our Course Management System.
6

EDIT the courses and announcements you wouldlike to see
Number of courses you have chosen to hide using the EDIT button
By clicking the icon in the upper right hand toolbar of the portlet you can choose which courses and announcements you would like to see.
EDIT View
7

BlackboardOnce inside Blackboard the first screen you typically see is the Announcements for that particular course.
All course administration is done through the Control Panel. You may only access this area if your role in the course is an instructor, teaching assistant, grader or a system administrator.
The control panel is used for adding
content and checking grades
8

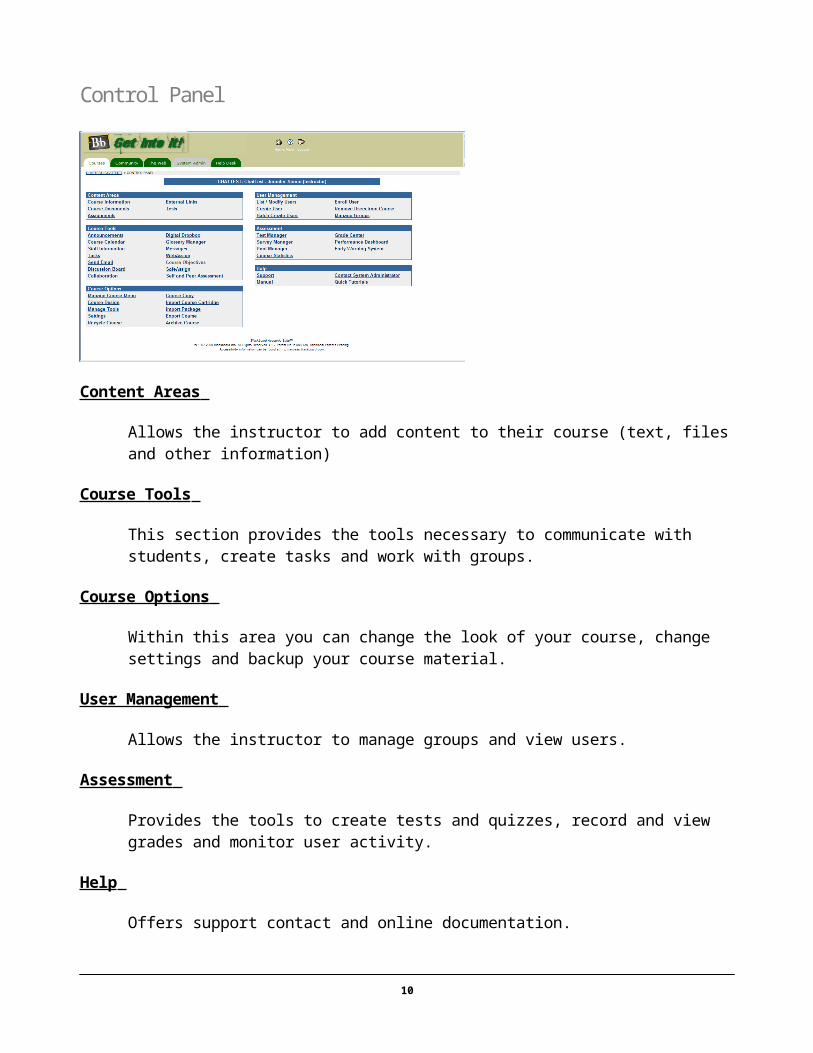
Control Panel
Content Areas
Allows the instructor to add content to their course (text, files and other information)
Course Tools
This section provides the tools necessary to communicate with students, create tasks and work with groups.
Course Options
Within this area you can change the look of your course, change settings and backup your course material.
User Management
Allows the instructor to manage groups and view users.
Assessment
Provides the tools to create tests and quizzes, record and view grades and monitor user activity.
Help
Offers support contact and online documentation.
9
Each section (listed below) can have content added to it via these methods.
Course InformationCourse DocumentsAssignmentsExternal LinksQuizzesExams
Content Areas
Content for your course is kept within this area.
When adding course content you will always be given the options to…
Make the content available Track Number of Views Choose date and time restrictions for that item.
10

I T E M
Files or text can be added by selecting “Item”.
Once the Item is created, you can choose the manage button and modify other options.
Adaptive Release options go into greater detail regarding who can access the content and when. Using these options can get quite confusing when there is more than one rule, so we advise caution for this feature.
Review Status will record whether a user has looked at an assignment.
Statistics Tracking can tell you how much a user was in blackboard. Because this is resource intensive, we purge this information on the first of every month.
Meta Data Allows you to indicate where the content came from, who contributed to it’s creation, and whether or not there are copyright restrictions.
11

F O L D E R
Selecting “Folder” will allow you to enter a folder to organize your course materials.
12

E X T E R N A L L I N K
External Link provides the ability to display a hyper link. You can also attach a file to the URL and choose if you would like to have it open into a new window.
13

C O U R S E L I N K
Course Link allows you to create a link to another folder or location within your course, for example, Assignments.
14

TEST
Choosing the “Add Test” icon will allow you to create a test or add a test that has already been created to your course.
CREATING A TEST
There are two ways to create a test.
Choosing Create from within the “Add Test” screen.
Or, In the Control Panel, go to the Assessment block and click, Test Manager,
15

Add Test
Detailed instructions on how to create the test are found in the Assessment Section.
ASSIGNMENT
The Assignment feature is the recommended method to use when it is necessary for your students to upload a document for you to receive.
After choosing “Assignment” as indicated above, fill out the following form.
16

1. The name you wish to give the assignment, due date, points possible and instructions.
2. Add any files that you need to (i.e., examples, documents, images)
3. Specify when the assignment should be available to the students and if you want to track the number of times your students view it.
4. Submit
5. Press O.K. to confirm submission.
17

You may also add many other types of content by choosing the drop down box.
6. OTHER
For More Information Concerning Other Types of Content
See the ‘Manual’ for Instructors, located online under the Help Section within the Control Panel.
.
18

Course Tools
Announcements
By clicking ‘Add Announcement’ you can enter information for everyone enrolled in your course to see.
Clicking the option “Email This Announcement to All Course Users” will send an email with the Announcement information to the email address they have specified within Blackboard.
Course Calendar
19

Course Calendar will allow you to Add Events to be seen by all those that are enrolled in your course.
Staff Information
By selecting ‘Profile’ you can enter all of your information, so your students will be able to contact you easily.
Tasks
20

The Task area will display the tasks that you have assigned. By selecting ‘Add Task’ you can enter a new one.
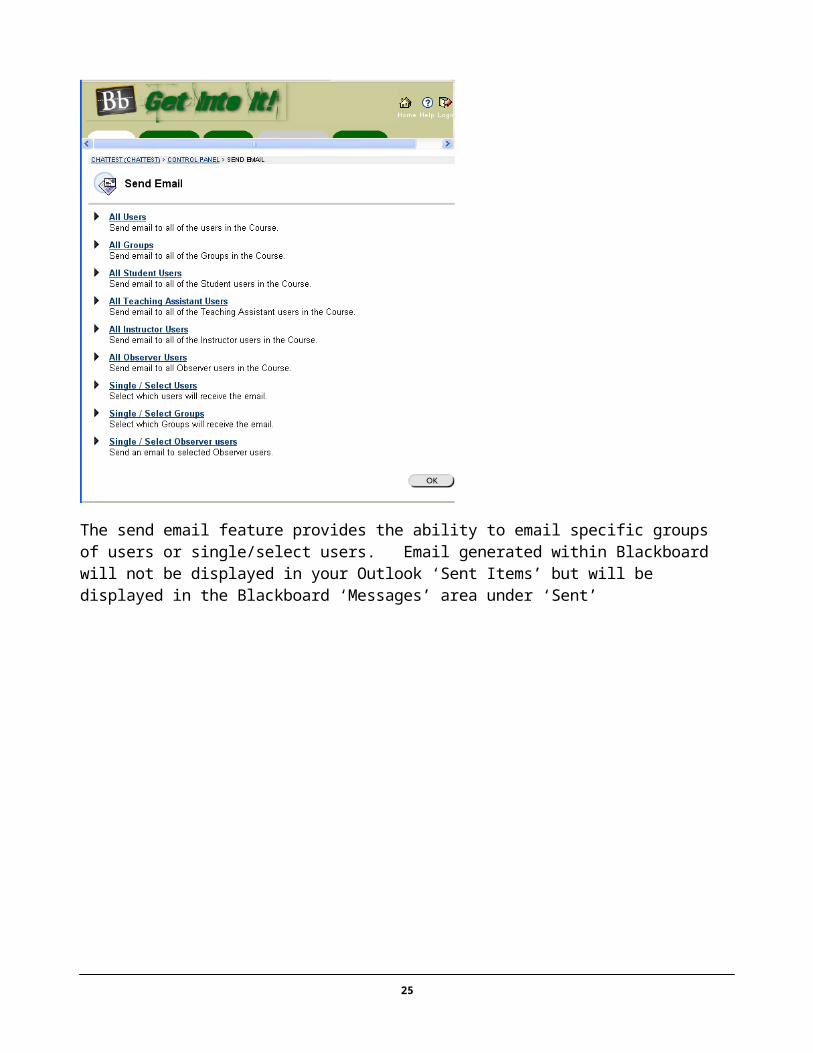
Send Email
21

The send email feature provides the ability to email specific groups of users or single/select users. Email generated within Blackboard will not be displayed in your Outlook ‘Sent Items’ but will be displayed in the Blackboard ‘Messages’ area under ‘Sent’
22

Discussion Boards
The Discussion Board allows instructors to add, modify or remove forums. Users can then post topics and threads (or add new threads) related to your course. These comments can be viewed by anyone enrolled in your course at anytime.
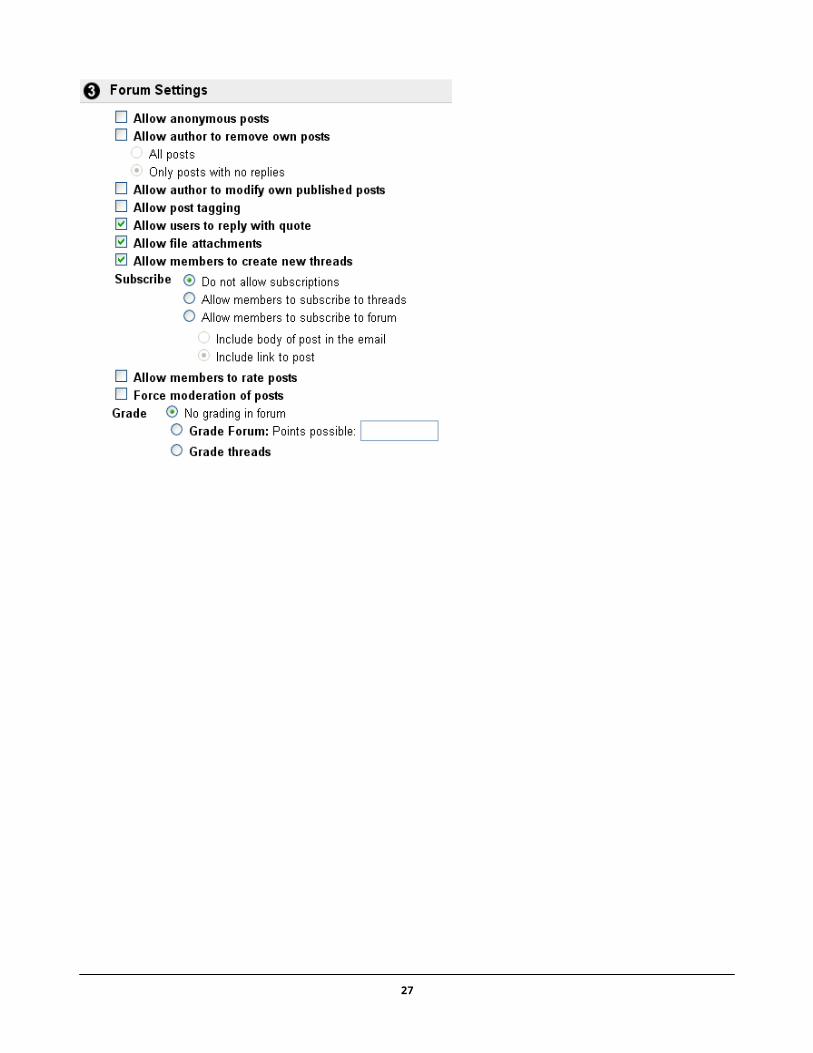
When you add a forum, you will be prompted for the name and description along with when it will be available. You will also have the opportunity to choose among the following settings.
If you wish to grade the discussion board, select “Grade Forum” or “Grade Threads” from the Forum Settings shown below. DO NOT add a column in the Grade Center. Choosing to grade the forum here will create the column for you.
23

Collaboration Tools
Blackboard offers limited Collaboration Tools. We recommend using Wimba for any classroom collaboration.
Wimba offers a larger virtual whiteboard, better response time, video with “follow the speaker” technology and chat as well as the ability to share a desktop or a desktop application.
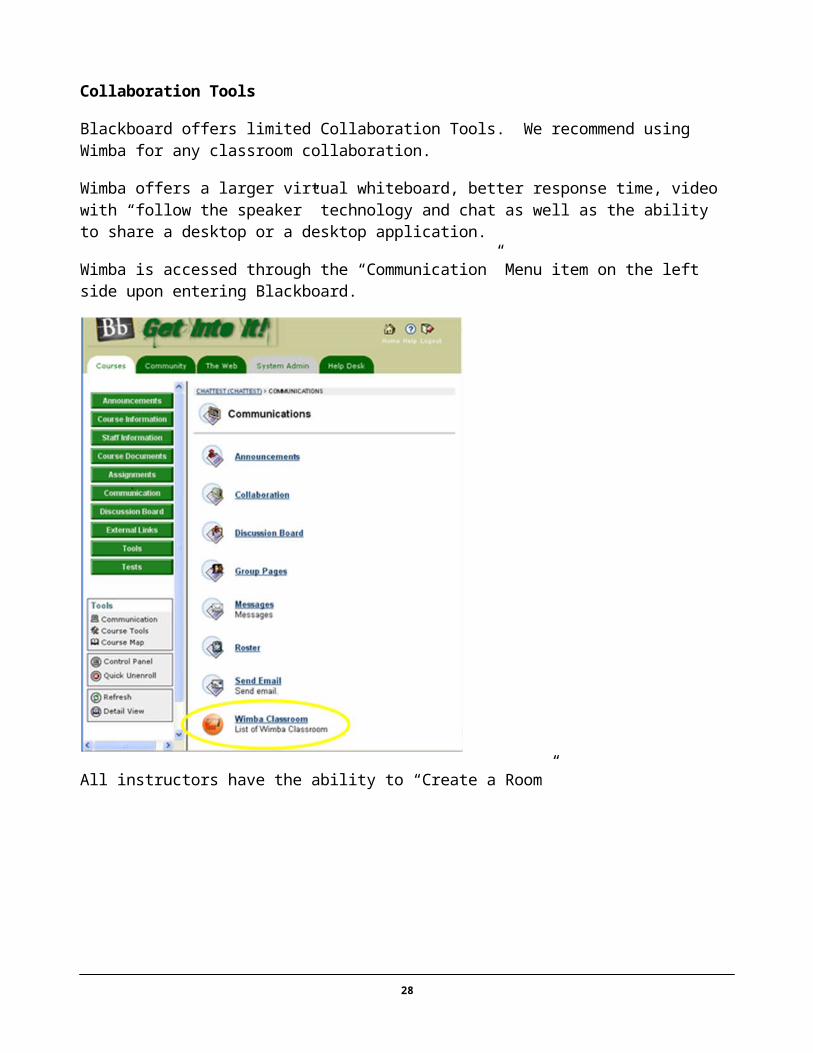
Wimba is accessed through the “Communication” Menu item on the left side upon entering Blackboard.
All instructors have the ability to “Create a Room”
24
Enter the Name and Description. By clicking the small arrow under each section, more options for your room will be displayed.
25

After the room is created, click on the room name.
After choosing the room, click the Setup Wizard. This only needs to be done the first time you use Wimba on your computer.
To successfully complete the wizard you will need…
Java installed on your computer. You can download this from http://www.java.com/en/download/index.jsp at no cost.
Pop up Blocker must be disabled. Instructions for the two most common browsers are as follows:
Internet Explorer
26
In Internet Explorer, go to the “Tools” menu followed by “Internet Options,” then click on the “Privacy” tab and uncheck the box marked “Turn on pop-up blocker.”
Mozilla Firefox
Firefox users will need to click on “Tools”, then “Options” and uncheck “Block pop-up windows” under the “Content” tab.
Simply follow the directions as the setup wizard runs. After the first couple of check marks, you will be given directions on how to complete the wizard and be required to click “Next” in order to continue.
Once the setup is successful you are ready to “Enter the Room”
For detailed information on how to use Wimba for your class, please refer to http://www.wimba.com/assets/resources/WC_53_Presenter_Guide.pdf
If you would like to add a Wimba feature to a content area…
1. Go To the Control Panel, select the Content Area where you wish to add a feature. 2. On the Content Area page, a small drop-down menu may be available in the upper right-hand corner. If
it is not, click the Edit View link that appears in this location. 3. Click the Select drop-down menu. Your available Wimba features appear in the list. .
27
4. Select the feature you wish to add to the Content Area. 5. Click the Go button to the right of the pull-down menu.
If you would like to have a link to Wimba from your course menu, follow these steps.
1. Access the Control Panel. 2. From the Course Options menu, click Manage Course Menu. 3. Click the Tool link in the Add bar. The Set Area Properties page appears. 4. Select Wimba Classroom List from the Type drop-down menu. 5. Enter an appropriate title in the Name box. 6. Click Submit.
28

Digital Dropbox
While the Digital Dropbox is available, it is not recommended for use. There have been past issues with students submitting an assignment and it not showing up on the instructor’s side. Please use the assignment feature when it is necessary for your students to upload a document/assignment.
Glossary Manager
This tool allows the instructor to add terms that are specific to their course. You may also upload a glossary that has been previously developed or download the current glossary for another use.
Messages
Along with being able to view messages that are sent to you via your Outlook mailbox, you can also view messages that originate in Blackboard here. The “Sent” folder is where the message you send to other users will be recorded.
29

WebAssign
WebAssign provides problems, questions and automated grading capabilities associated with popular textbooks pertaining to
Accounting Astronomy Biology Chemistry Engineering Geoscience Mathematics Physics Social Studies Statistics
For more information on WebAssign please go to http://www.webassign.net
30

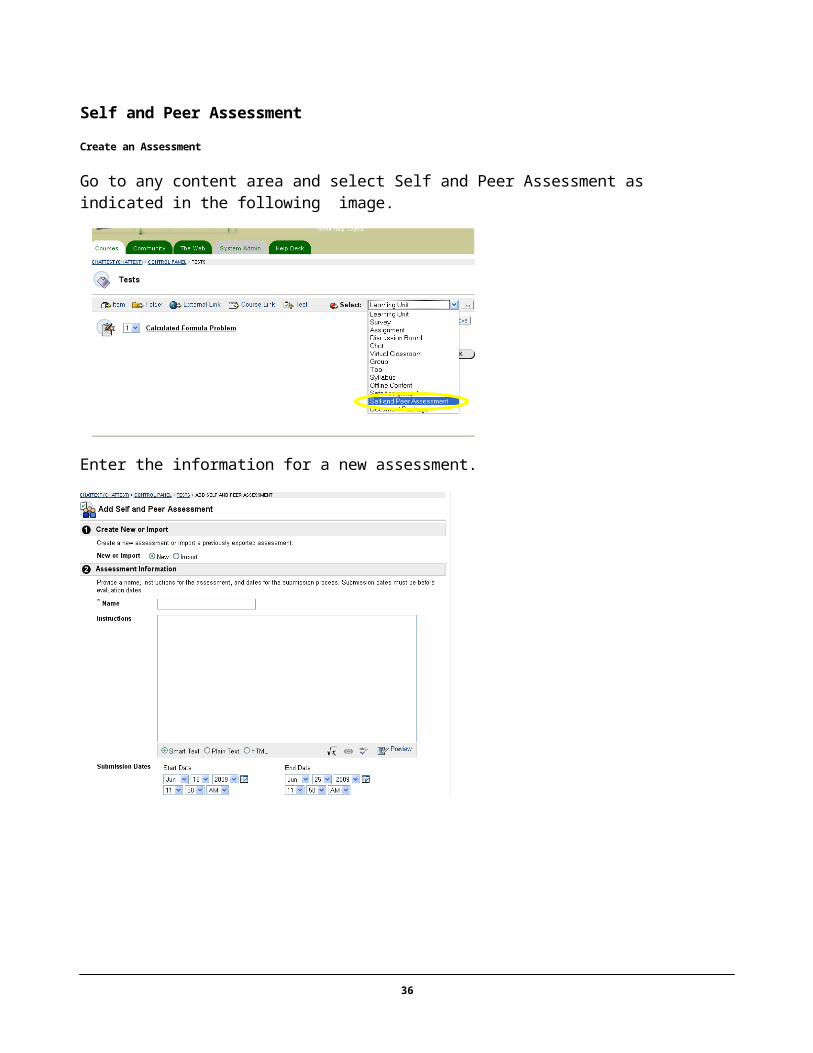
Self and Peer AssessmentCreate an Assessment
Go to any content area and select Self and Peer Assessment as indicated in the following image.
Enter the information for a new assessment.
31

Number of Submissions to Evaluate describes how many of their peer’s assessments each student is expected to evaluate, not including the creator of the assessment. Enter zero(0) in this field if Self Evaluations are the only kind desired.
After Submitting, add questions as follows.
Click “Modify” next to the assessment you wish to work with.
Click the “Assessment Canvas” and then “Add Question”
Enter the Question and a Model Response if desired, clicking yes to make the Model response available.
Once the question is added, you can add criteria by choosing “criteria” next to the question.
32

Choosing “Word Count Criteria” allows you to set criteria based on how many words are used in the response.
Course Options
Manage Course Menu
This area designates which buttons will be seen in the left navigation area of your course. You can rearrange them by modifying the numbers to the left, remove them or modify the titles.
33

Course Design
The Course Design area allows you to customize the look of your course. Course cartridges usually change the settings in this area upon import.
Manage Tools
Tool Availability – Allows you to determine which tools you would like to be available in your course, for example the Discussion Board or Email.
Content Type Availability – Allows you to enable/disable specific types of content, for example, chat, virtual classroom and Wimba.
Settings
The most important part of the Settings area is the Course Availability function. Many instructors choose to keep their course listed as unavailable until they are completely finished adding content to it. If you choose to do this please be sure and make the course available effective the first day of the semester. This is
34

particularly important for those instructors teaching an online course without any face-to-face interaction.
Starting in Fall of 2009, new fall students will have access to MyMTech 24 hours after registering, which can be as early as April. To prevent confusion for them, we have made all Fall Courses “Unavailable” until August 1. At this time, we will make them all “Available”. Even though a course is “Unavailable”, instructors can still access them, students cannot.
Course Duration – Continuous is the recommended setting. If you do not choose continuous, please only use the start date. Having the course duration information entered often hampers the students access in future semesters
Recycle Course
When recycling a course all information is deleted and cannot be recovered unless an archive exists. For this reason we highly recommend archiving your course using the ‘Archive Course’ choice before recycling your course. You can recycle specific parts of your course or the entire course (by selecting all check boxes) at one time.
Course Copy
35
Allows the instructor to copy course content available within this course into another course they are instructing.
36

Import Course Cartridge
Many books have a component that can be downloaded into Blackboard. This is done by importing the course cartridge. Once the download key is obtained the user enters it here and submits. Before a course cartridge is obtained it is strongly suggested that the instructor visit with the publishing company to ask the following questions…
Does the cartridge have a copy protection on it or can it be copied to multiple sections and/or semesters?
How often does the cartridge need to be adopted?- Just once for each edition of a book- Once every semester
Does the cartridge require students buy an access key; and if so is it received when the text is purchased? - If so make sure the bookstore knows when ordering the books.
Export Course
Exporting a course is the equivalent of backing up your course content. This process does not backup users (students) or grades. If you have exported a course, you can then use the Import tool to restore it.
Archive Course
The Archive option is a complete backup of your course including all of the content as well as users and student grades.
Archiving is done nightly with our system backups throughout the semester, but in some circumstances you may feel more comfortable archiving your course and keeping your own copy. It is recommended that you archive your course at the end of every semester and immediately prior to recycling it. Be sure to download the file (right-click and save as) after your archive is complete.
37

User Management
List/Modify Users
By selecting List/Modify Users, You can view who is currently enrolled in your course and modify the personal properties for specified users. Although you have the option to change the users password within Blackboard, this function will not accomplish anything as we use CAS (Central Authentication System) for authentication instead of the Blackboard authentication.
These selections should not be used. There are automated processes in place to ensure that the list of students enrolled in your course is correct. If there is a problem, please contact help desk so we can research the issue.
Create UserBatch Create UserEnroll UserRemove Users from Course
Manage Groups
38

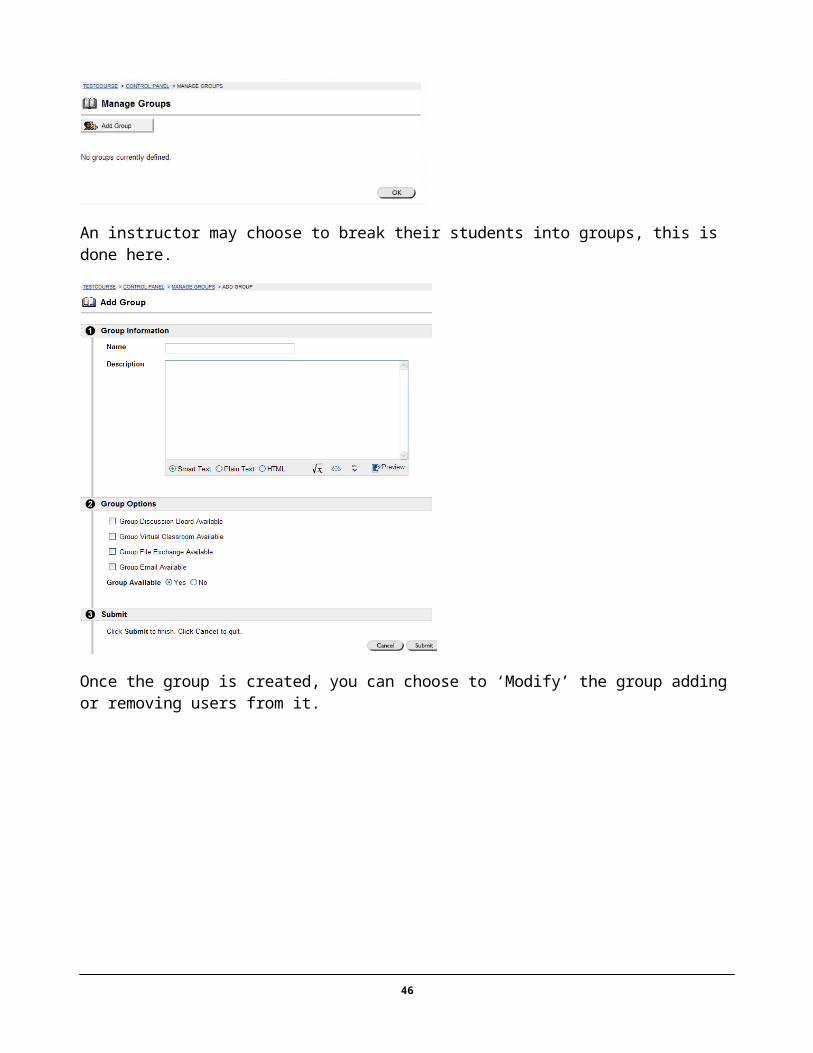
An instructor may choose to break their students into groups, this is done here.
Once the group is created, you can choose to ‘Modify’ the group adding or removing users from it.
39

Assessment
Test Manager
The Test Manager is where all test and quizzes are created.
Attempts
The instructor can indicate how many times a student can attempt an assessment, besides having the previous options of once or unlimited.
Extra Credit
When creating a test, questions may now be marked as extra credit only. This means that the extra credit question points will only be added to the final score if the questions was answered correctly. There is no penalty if the questions is answered incorrectly.
You may choose to add a test, or import an existing test from another course.
40
A D D T E S T
Once the title information is completed for a test you may begin to build your questions.
After the test is built, it is not accessible by the students until it is added to a Content Area.
If you would like to review the test you just finished building, the easiest way is through the student view exiting the control panel and locating it just as your students would).
41

As you can see, there are several different types of questions that you can use. These descriptions are as described in the Blackboard Instructor’s Manual. For specific directions on how to create these questions, please see the ‘Manual’ under the Help Section.
Short Answer
Short Answer questions are similar to essay questions. The length of the answer can be limited to a specified number of rows in the text box. Like Essay questions, Short Answer questions must be graded manually.
The number of rows is meant as a guideline when entering an answer, it does not impose an absolute limit on answer length.
True/False
True/False questions allow the user to choose either true or false. True and False answer options are limited to the words True and False.
Essay
Essay questions require the Instructor to provide Students with a question or statement. Students are given the opportunity to type an answer into a text field. Sample answers can be added for users or graders to use as a reference. These types of questions must be graded manually on the Grade Assessment page. Essay questions may use the Math and Science Notation Tool.
Fill in the Blank
Fill in the Blank answers are evaluated based on an exact text match. Accordingly, it is important to keep the answers simple and limited to as few words as possible. Answers are not case sensitive, but are evaluated based on spelling. Consider the following tips when creating Fill in the Blank questions and answers:
Provide answers that allow for common spelling errors.
Provide answers that allow for abbreviations or partial answers.
Create the question that indicates to Students the best way to answer the question.
Phrase the question so there is only one answer
Try to keep answers limited to one word to avoid mismatched answers due to extra spaces or order of answer terms. If the answer may be more then one word, list all possibilities as answers. For example, if Benjamin Franklin is the answer, include Benjamin Franklin, Franklin, and Ben Franklin as correct answers.
Matching
Matching questions allow Students to pair items in one column to items in another column. Instructors may include a different numbers of questions and answers in a Matching question. For example, the question may include a list of animals and a list of food they eat (herbivore, carnivore, omnivore). The users would match each animal with their diet.
Students will be granted partial credit for matching questions if they answer part of the question correctly. For example, if the question is worth eight points and the student gives the correct answers for half of the matches, they will receive four points.
42

Multiple Answer
Multiple answer questions allow users to choose more than one answer. The number of answer choices is limited to 20. This type of question may be used when more then one answer is correct; users can select the incorrect answers. For example, in the medical field, this type of question may be used to select symptoms associated with a medical condition.
Multiple Choice
Multiple-choice questions allow the users a multitude of choices with only one correct answer. In multiple-choice questions, users indicate the correct answer by selecting a radio button. The number of answer choices is limited to 20.
Calculated Formula
A Calculated Formula question contains a formula, the variables of which can be set to change for each user. The variable range is created by specifying a minimum value and a maximum value for each variable. Answer sets are randomly generated. The correct answer can be a specific value or a range of values. Partial credit may be granted for answers falling in a range.
Since this question allows the Instructor to randomize the value of variables in an equation it may be useful when creating math drills to when giving a test when Students are seated close together.
Calculated Numeric
This question resembles a fill-in-the-blank question. The user enters a number to complete a statement. The correct answer can be a specific number or within a range of numbers. Please note that the answer must be numeric, not alphanumeric. For example, in a Geography class the Instructor may ask for the estimated population of a specific city.
Either/Or
Users are presented with a statement and asked to respond using a selection of pre-defined two-choice answers, such as:
Yes/No
Agree/Disagree
Right/Wrong
This question type is very useful in Surveys to gage user's opinions. It is a slight variation on the True/False question type, except more descriptive and meaningful answers may be used.
File Response
Users upload a file from the local drive or from the Content Collection as the answer to the question. This type of question is graded manually. This question type is a good option if the Instructor would like Students to work on something before a test and submit it with a test, or if the response to the questions is expected to take a long time to read. Submitting the answer this way allows the Instructor to read and grade the question without worrying that the browser will time out.
43

Fill in Multiple Blanks
This question type builds on fill-in-the-blank questions with multiple fill in the blank responses that can be inserted into a sentence or paragraph. Separate sets of answers are defined for each blank. This question type may be used if there are multiple variables, such as "What color is the Italian flag?" This question type is also useful in foreign language classes. In this case the identifier and adjective may be left blank in a sentence, so as not to give away the gender of an object.
Hot Spot
Users indicate the answer by marking a specific point on an image. A range of pixel coordinates is used to define the correct answer. Hot Spot refers to the area of an image that, when selected, yields a correct answer. The following are some examples of uses for this type of question:
Anatomy - to locate different parts of the body
Geography - to locate areas on a map
Foreign Language - to select different articles of clothing
Jumbled Sentence
Users are shown a sentence with a few parts of the sentence as variables. The user selects the proper answer for each variable from drop-down lists to assemble the sentence. Only one set of answers is used for all of the drop-down lists. This type of question may be useful when teaching about proper grammatical order in a sentence, such as the location of a noun, verb, or adjective,
Opinion Scale/Likert
Question type based on a rating scale designed to measure attitudes or reactions. This type of question is popular to use in surveys in order to get a comparable scale of opinion. Users indicate the multiple choice answer that represents their attitude or reaction. When the instructor creates an opinion scale question, six answer fields are pre-populated with the following answers:
Strongly Agree
Agree
Neither Agree nor Disagree
Disagree
Strongly Disagree
Not Applicable
Ordering
Ordering questions require users to provide an answer by selecting the correct order of a series of items. For example, an Instructor may give users a list of historical events and ask them to place these events in chronological order.
Users will be granted partial credit for ordering questions if they answer part of the question correctly. For example, if the question is worth eight points and the student gives the correct order for half of the items, they will receive four points.
44

Quiz Bowl
Quiz Bowl questions are a way to add fun and creativity to tests, such as self assessments or in-class contests. The user is shown the answer and responds by entering the correct question into a text box. An answer must include a phrase and a question word, such as who, what, or where, to be marked as correct. For example, the question may be "The person who invented the cotton gin", with the answer being "Who is Eli Whitney?" Partial credit may be given if the question word is not included in the answer.
Random Block
Random Blocks enable the Instructor to use a random selection of questions from a Pool. Be aware that it is not possible to add a Random Block of questions from another Test or Survey.
Upload Question
Instructors may import files containing questions into an Assessment.
The questions in the uploaded file must match the file structure explained below. The file may include Essay, Ordering, Matching, Fill in the Blank, Multiple Choice, Multiple Answer, and True/False questions.
NOTE: Files with questions may be imported into Pools and Surveys. When uploaded to a Survey, the correct/incorrect answer assignment is ignored, but the file must follow the same format as described for Tests and Pools.
The following information is important to note when importing Assessment questions:
Once uploaded, questions can be manipulated like other questions created within the Assessment.
If there is an error in a question within a file, only the question with an error will fail to upload. Questions without errors will upload successfully.
The system does not check for duplicate questions. It is up to the Instructor to manage this aspect of the Assessment questions.
Survey Manager
Surveys can be added in the same manner that a test can, however for our semester course evaluations we use different software that prevents the instructor for seeing the evaluation results until grades are submitted to the Office of Enrollment Processing.
Pool Manager
The Pool Manager consists of a group of questions for use in assessments. Typically this area is populated by a course cartridge, but can be created by the instructor as well.
Course Statistics
45
Is a tool that allows you to see where students spend their time in your course. You can view the results taking the entire class into consideration or selected students. You may also export this report.
46

Grade Center
Version 8 of Blackboard has undergone significant changes to the Gradebook – which is now called the Grade Center.
All grades for students are kept here. Only currently enrolled students are displayed. This icon will display when the user is in the process of working on their assessment.
If a student clicks the browser navigation buttons ‘Back’, ‘Refresh’ or any others, they will be locked out of their assessment. When this happens, the instructor can unlock it by clicking Grade Details -> Clear Attempt.
The CTS Help Desk can also reset an exam, however before Help Desk will clear an attempt the instructor must confirm that this is what they want done via email.
47

A D D G R A D E C O L U M N
You can also add other items into the grade center, such as homework assignments that are external to Blackboard.
M A N A G E I T E M S
Primary Display Allows you to select how the grade should be displayed. Score, Text, Percentage, Letter, Complete/Incomplete. This selection will be reflected in both the Grade Center( instructor view) and in the My Grades area (student view).
● Secondary DisplayAllows you to select another option to be shown in the Grade Center only.
● CategoryIndicates the type of category this assignment should be put into.
48

No Category Assignment Attendance EssayExamExtra CreditFinal ExamGroup ProjectHomeworkJournalLabMidterm ExamOtherPaperPresentationProblem SetQuizSurveyTestDiscussionSelf and Peer
2) DatesAutomatically indicates the creation date and allows you to optionally set the date that the assignment is due.
3)OptionsSelect the appropriate radio buttons to specify if you would like this column to be calculated in the Grade Center calculations, if you would like to have this column displayed to the student (My Grades) and/or if you would like the average and media for this column displayed to the students.
Once this column has been created, you can modify any of the above by choosing “next” to your new column name and selecting “Modify Column”.
The double down arrow will always indicate another set of menu choices for you. The other choices available at the column level are...
● Column Information
● Modify Column – (previously discussed)
● Hide Column – will hide the column from your view in the grade center
49

● Column Statistics – displays how your class did on this assignment as a whole.
● Set as External Grade – Indicates your preferred final grade column. This is also identified with a green check mark next to the column name. The “Total” column is the external grade default.Note: If you choose to indicate another column as the final grade, you may want to hide the original total column from the student view as well as giving the preferred final grade column an appropriate name. If the original total column is displayed to the students in their “My Grades” page and the external grade column you have choses has a generic name (i.e. Homework 1) – the student will be led to believe the original total column contains their final grade.
● Remove Column – This option is only available when the column is not set as the External Grade.
A D D C A L C U L A T E D C O L U M N
Clicking “Add Calculated Column” will give you a choice of four different options.
● Weighted – will allow you to select the columns/and or categories.
Selecting a Category will also give you the ability to
● drop the lowest, highest grade(s) in the category
● Use only the lowest, highest values to calculate the value
50

● Total
This selection provides the opportunity for a total column to be based on a specific grading period. Choosing selected grade columns will allow the same options to be available that currently exist when creating a weighted column.
● Average
This selection creates the average based on all columns or selected categories/columns using the same options as both the weighted and total column.
● Minimum/Maximum
This option will determine the Minimum or Maximum grade for a user among all columns or the selected columns/categories.
M A N A G E
● Upload
This selection provides the ability to upload a file with the student’s grades. In order to ensure that the data is formatted correctly, you should always download the grades first and modify the downloaded file.
● Download
Provides the opportunity to download the
● Full Grade Center
● Selected Columns (with or without comments)
● User Information Only
You can also choose the delimiter type and whether or not to include users that have been hidden from view.
● Categories
51

Several categories are already available within Blackboard, but if you need to build a new one, this is where and how it is done.
● Select Categories
● Choose Add Category, enter the name and description. Submit.
52

● Smart Views
Smart views can be extremely helpful for classes that have several sections enrolled in the same course to prevent duplicating content.
With a Smart View you can choose which students should be displayed together.
To Add A Smart View – click Add Smart View.
As you can see, you can select students individually, using a custom query, or based on their Group, Grading Period, or performance.
● Add Grading Period
By adding a grading period, you can easily calculate grades for any length of time and/or choose which columns should be included in this grade.
53

● Grading Schemas
Blackboard has a default schema available, it is Letter. This is where the instructor can indicate what letter grade will correspond to each percentage point.
For example, if you do not use + and – in your grades you can simply modify this Schema and remove the + and - from the “will equal” side.
If this schema is very different from what you require, you can also add a new schema by clicking Add Grading Schema.
● Organize Grade Center
The menu item allows the instructor to modify their view of the Grade Center. The instructor can click and drag and columns into the order in which they would like to see them.
Gray rows are “frozen” so they will always be viewable, even when the instructor scrolls to the right side of the screen. You can drag and drop any fields to this area.
54

After selecting specific columns, you can choose to hide or show them, modify the category for those columns, or even the grading period.
● Show/Hide Users
This option allows you to select specific users and choose to Hide or Show them.
E M A I L
● Email Selected Users
After selecting users by clicking the box at the far left of their row, you can email them using this menu item.
● Email Selected Users and Their Observers
After selecting users by clicking the box at the far left of their row, you can email them and their Observers using this menu item.
● Email Observers for Selected Users
After selecting users by clicking the box at the far left of their row, you can email their observers using this menu item.
● Email Other
This option allows you to type in any email address and send a message.
55

R E P O R T S
This menu item allows you to create custom reports by choosing any of the below selections.
56

G R A D E H I S T O R Y
With Version 8 you can now see a complete history of grades, including any changes, who made them and when they occurred. An example follows…
57

G R A D E B O O K L A Y O U T
For more detailed information regarding the context sensitive menus, please see the Blackboard Instructor’s Manual.
Performance Dashboard
This tool is very useful in viewing how much each user has to access your course. While this tool contains nice information it is also very resource intense. For this reason we purge this information on the first of every month.
Early Warning System
The Early Warning System can be extremely helpful when trying to manage a large class. By defining rules you can easily see who is meeting certain criteria within your grade book.
58

In the below example; a rule called “Grade Rule” has been created. This rule is set to select all students that have received below a 90 on Homework 2.
Because this rule was created after Homework 2 was completed, selecting “Refresh” was required to check the current grades. Once the process is completed an email indicating so is sent to the instructor.
59

After receiving the email, click on Grade Rule to review the results.
At this point you can select all users, or just selected users, then click Go. You will then see an email form that is partially prepared. Modify any of the desired fields and submit.
HelpSupport - Hyperlink to Blackboard help site.
Manual – The Blackboard Academic Suite Instructor Manual
Contact System Administrator – A direct email link to Jennifer Simon ([email protected])
Quick Tutorials – Blackboard has provided several quick tutorials here.
For further assistance please contact our Help Desk.
Help Desk ph. 496-4244 [email protected]. MG 107.
60

Index
AIndex 1, 1Index 1, 1Index 1, 1
Index 2, 2Index 3, 3
Index 1, 1Index 1, 1
BIndex 1, 1Index 1, 1Index 1, 1
Index 2, 2
CIndex 1, 1Index 1, 1Index 1, 1
Index 2, 2Index 1, 1Index 1, 1Index 1, 1
DIndex 1, 1Index 1, 1Index 1, 1Index 1, 1
EIndex 1, 1Index 1, 1Index 1, 1
Index 2, 2Index 1, 1Index 1, 1Index 1, 1
GIndex 1, 1Index 1, 1Index 1, 1Index 1, 1Index 1, 1Index 1, 1
HIndex 1, 1Index 1, 1Index 1, 1
Index 1, 1Index 2, 2
Index 1, 1Index 1, 1Index 1, 1Index 1, 1Index 1, 1Index 1, 1
KIndex 1, 1
LIndex 1, 1
Index 2, 2Index 1, 1Index 1, 1
Index 2, 2Index 1, 1Index 1, 1Index 1, 1Index 1, 1Index 1, 1
MIndex 1, 1Index 1, 1Index 1, 1
Index 2, 2
NIndex 1, 1Index 1, 1Index 1, 1
Index 2, 2Index 1, 1Index 1, 1Index 1, 1
RIndex 1, 1Index 1, 1
SIndex 1, 1Index 1, 1Index 1, 1
Index 2, 2Index 1, 1Index 1, 1Index 1, 1
TIndex 1, 1Index 1, 1Index 1, 1Index 1, 1
Index 2, 2
WIndex 1, 1Index 1, 1Index 1, 1
Index 2, 2Index 1, 1Index 1, 1Index 1, 1Index ,
61

62