Embed Size (px)
Citation preview
MediaCentral 2Version 2.8
© 2006-2008 equinux AG and equinux USA, Inc.
Under the copyright laws, this manual may not be copied, in whole or in part, without the written consent of equinux AG or equinux USA, Inc. Your rights to the software are governed by the accompanying software license agreement.
The equinux logo is a trademark of equinux AG and equinux USA, Inc., registered in the U.S. and other countries.
Every effort has been made to ensure that the information in this manual is accurate. equinux is not responsible for printing or clerical errors.
Manual Revision 2.8
Created using Apple Pages.
www.equinux.com
Apple, the Apple logo, AppleWorks, iBook, iTunes, .Mac, Mac, Mac OS, MacBook, PowerBook, and QuickTime are trademarks of Apple Computer, Inc., registered in the U.S. and other countries.
Finder, iTunes, iWork, Pages, and Safari are trademarks of Apple Computer, Inc. AppleCare is a service mark of Apple Computer, Inc., registered in the U.S. and other countries.
All other trademarks, registered trademarks, product names and company names or logos mentioned herein are the property of their respective owners, and may not be copied, imitated or used, in whole or in part without the prior written permission of such respective owners.
equinux assumes no responsibility with regard to the performance or use of these products.
2
Content
Welcome to MediaCentral 6.....................................................................Slick and Streamlined Interface 6
...............................................................................................................................TV 6..........................................................................................................................IP TV 6
.............................................................................Browse Your Movie Archive 6.......................................................................................DVDs in Your Network 6
................................................................................Take a Break, Play a Game 6......................................................................................................Not Just iTunes 6
....................................................................................Tune In and Get Rockin' 7..............................................................................Pictures on the Big Screen 7
................................................................................................Skype Integration 7...........MediaCentral Online Content – Be Informed With One Click 7
...............................................................................................New in Version 2.8 7
Install MediaCentral 8.....................................................................................................Getting Started 8
............................................................................................Install MediaCentral 8.......................................................................................Register MediaCentral 9....................................................................................Uninstall MediaCentral 11
Application Overview 12......................................................Explore the Interface of MediaCentral 12
............................................................................................“My MediaCentral” 13.....................................................................Auto-sorting of Optical Media 13
......“MediaCentral Online Content” – Be Informed With One Click 13.............................Full Screen or Window Mode – Whatever You Like 14
............................................................................................................Sound Sets 15
IP TV 16..............................................Take Part in the Next Internet Revolution 16
..........................................Create Your Own IP TV Library in “My IP TV” 16.......................................................................................IP TV Online Content 16
...................................................................................Define “My Languages” 17
............................................................................................All Key Commands 17...........................................Contribute to MediaCentral’s IP TV Section 17
TV 18......................................................................................................Requirements 18
...........................................................................Initial Setup of a DV Device 18....................................................................Initial Setup of a DVB-T Device 18
..............................................................................Managing DVB-T Regions 19..................................................................................Managing Your Sources 19
.............................................................................Watch TV in MediaCentral 20.........................................................................Watch The Tube Recordings 24
............................................................................................All Key Commands 24
Movies 25...................................Create Your Own Movie Library in “My Movies” 25
......................................See the Movies You Downloaded With iTunes 26.........................................................................................Watch Movie Trailers 26
................................................................................Show Status Information 26.......................................................................................Change Aspect Ratio 26
............................................................................................All Key Commands 27
Music 28........................................................Activate MediaCentral for Music CDs 28
.....................................................................Listen to Music CDs and iPods 28...........................................................................Listen to Your iTunes Music 28
......................................................Watch Music Videos (Online Content) 28.....................................................Build Your Own Library Based on Files 29
...........................................................................................Supported Formats 29............................................................................................All Key Commands 29
Radio 30...................................................................................................It‘s Your Choice 30
........................................................................Add Your Own Radio Station 30...................................................................................Playing a Radio Station 30
..................................Contribute to MediaCentral’s Radio Station List 31
3
DVD 32..................................................................Activate MediaCentral for DVDs 32
................................................Play DVDs Inserted in Your Optical Drive 32............................................................................................Browsing Chapters 32
........................................................................................................Stop and Go 33..........................................................................................DVD Options Menu 33
.............................................................................................................Eject DVD 34.....................................................................Create Your Own DVD Library 34
............................................................................................All Key Commands 35
Skype 36..............................................................Authorize MediaCentral for Skype 36
..............................................................................................Call Your Contacts 36......................................................................................................Receive a Call 37
.................................................................................................Troubleshooting 37
Games 38..Get Interactive With MediaCentral's Arcade and Action Classics 38
.........................................................................................................Play a Game 38..............................................................................................Control the Game 38
..........................................................................................Highscore Function 39......................................................Add Your Own Games in “My Games” 39
......................Advanced Users: Adapt Flash Games to MediaCentral 39................................................Contribute to MediaCentral’s Games List 39
Pictures 40......................................................Activate MediaCentral for Picture CDs 40
....................................................................................Viewing Photo Albums 40.........................................................................Viewing Your iPhoto Library 41
..............................................................................Setting Up Local Galleries 41..................................................................................Adding Online Galleries 41
............................................................Using Picture CDs in MediaCentral 44
............................................................How to Submit New Picture Feeds 44............................................................................................All Key Commands 44
Appendix: Key Commands 45.....................................................................................................................Global 45
...............................................................................................Navigation Mode 45......................................................................................................................IP TV† 46
.............................................................................................................................TV 46.................................................................................................................Movies† 47
.........................................................................................................................DVD 47.......................................................................................................................Radio 49
...................................................................................................................Pictures 49
Appendix: MediaCentral Preferences 50..............................................................................................Tab “Registration” 51
.......................................................................................................Tab “General” 53.......................................................................................Tab “Online Content” 54
.......................................................................................................Tab “Themes” 55........................................................................................................Tab “Sounds” 56
.....................................................................................................Tab “Modules” 57.................................................................Tab “Modules”: Configure “IP TV” 58
.....................................................................Tab “Modules”: Configure “TV” 59...........................................................Tab “Modules“: Configure “Pictures“ 60
Appendix: Remote Controls 61.....................................................................................................Apple Remote 61
.................................................................................ATI Remote Wonder I / II 61....................................................................................DVB-T Device Remotes 61
.................................................................................................Troubleshooting 62
Appendix: Including Custom Streams 63.......................................................................................QuickTime (SDP files) 63
..............................................................................................Real Player (RAM) 63.....................................................................................Windows Media (ASX) 63
4

Appendix: Make Flash Games Ready for MediaCentral 66
Appendix: How to Create Your Own Sound Sets 67....................................................................................Sound Sets Made Easy 67
Appendix: How to Submit Additional Content 68.....................................The MediaCentral “Submit Content” Webpage 68
5
Welcome to MediaCentralMediaCentral is the ultimate entertainment center for your Mac. With an all-in-one interface and support for numerous audio and video formats, IP and standard TV, radio channels, slide show functions and an integrated Games module, MediaCentral turns your Mac into the ultimate home theater system. Be entertained.
Slick and Streamlined InterfaceKeep control wired or wireless: MediaCentral's streamlined interface lets you forget about mouse and keyboard. Your Apple Remote or any of the other supported remotes offer you the ability to smoothly navigate and control your MediaCentral experience. You can even customize MediaCentral by disabling/reordering modules or choosing your own color theme!
TVUsing a supported DVB-T device, you can tune into digital TV channels (depending on local availability). Or connect any DV device supported by QuickTime to stream any media to your Mac via USB or FireWire.
IP TVMediaCentral incorporates state-of-the-art IP TV technology. Select IP TV and enjoy the variety of TV channels offered by stations around the world. MediaCentral redefines your TV experience on the Internet.
Browse Your Movie ArchiveDVDs are great - but what about all your movie files? MediaCentral takes care of these files and makes them easily accessible. Supported formats include AVI, DivX, Xvid, MPEG1, MPEG2, MPEG4 and DV files.
DVDs in Your NetworkWhether you have physical DVDs or extracted DVD content (VIDEO_TS) stored on your local hard-drive or anywhere else in your network - MediaCentral pulls it all together for you quickly and efficiently.
Take a Break, Play a GameAre you ready for some interactive stress relief? MediaCentral brings you the best in arcade and action classics.
Not Just iTunesMediaCentral tunes into your iTunes library without even launching iTunes. What's more, you can also build a second library by copying your favorite music and other audio content
6
to MediaCentral's music folder. MediaCentral supports MP3, AAC, ALC, M4A, M4P, AIFF, WAV, ASF and much more.
Tune In and Get Rockin'From Jazz to Rock, Funk to Hip-Hop or whatever your favorite music genre may be, MediaCentral will tune you in to some of
the best radio streams on the Internet. For additional enjoyment, you can add any of your favorite audio into the “My Radio” folder to customize your experience.
Pictures on the Big ScreenYour iPhoto galleries have never looked better. Start slideshows by simply selecting an image, then tapping the return key. MediaCentral enriches your digital gallery with music preselected in iPhoto. And if you‘re favorite gallery is available online at flickr or .Mac – let MediaCentral fetch it from the web!
Skype IntegrationHave you just seen a great new movie that you know a friend would truly enjoy? Give them a call and let them know - all that from within MediaCentral. The seamlessly integrated Skype feature makes it possible: You can easily view all of your buddies and even place and accept calls.
MediaCentral Online Content – Be Informed With One ClickMediaCentral automatically integrates many sources of online content. With the most up-to-date Movie Trailers, IP TV, Photo Streams and more, you will always find a way to be entertained.
New in Version 2.8
See You LaterThe last quarter just started, and your mom calls to discuss your birthday present. What to do? Never fear! Help is just a click away. Hit the space bar or choose pause, and MediaCentral will automatically record the current program so you can resume the game where you left off.
Fully Integrated with The TubeMediaCentral not only uses the locations and channel lists created by The Tube, it also plays recordings from The Tube directly. Instead of exporting all of your recordings manually, simply use MediaCentral to playback them in full resolution.
7

Install MediaCentralGetting StartedBefore you turn your Mac into a media center, MediaCentral must be installed on your hard drive. Additional third party software, like Real Player and Windows Media Support (both available for free) will also need to be installed in order to take full advantage of what MediaCentral has to offer.
Install MediaCentralIf you bought the retail version of MediaCentral:‣ Insert the MediaCentral CD into your computer
‣ Double click the MediaCentral CD icon that appears on your desktop.
‣ Double click “Install MediaCentral” and follow the onscreen instructions.
If you downloaded MediaCentral from equinux.com:‣ Double click the downloaded dmg file.
‣ Double click “Install MediaCentral” and follow the onscreen instructions.
Install Real Player (Needed for IP TV Feature)MediaCentral‘s own video core supports a lot of digital video formats. For support of Real Streams, you will need to install Real Player, a free application that can be downloaded from the Internet.
To install the Real Player, complete the following steps:‣ Go to: http://www.equinux.com/Go to/mediacentral/
getrealplayer
‣ After downloading , drag the Application “Real Player” to your Applications folder
8
‣ Start Real Player by double clicking. This first start will install all the necessary components on your system.
Install Windows Media Plug-in (Needed for IP TV Feature)To enable streams that use Windows Media Player technology, you need to install a Windows Media Plug-in for QuickTime, called Flip4Mac.
To install the Windows Media Plug-In, complete the following steps:‣ Go to: http://www.equinux.com/Go to/mediacentral/
getwindowsmedia
‣ After downloading, install the components by double-clicking the installer
‣ Choose ““ > “System Preferences“
‣ Choose “Flip4Mac WMV“
‣ Choose the “Movie“ tab
‣ Enable the option “Create streaming movies“
Check If All Components Are Installed CorrectlyYou can easily verify if all the components needed for IP TV have been installed. See “Appendix: MediaCentral Preferences”: Tab “Extensions”: “IP TV Extension” for more information.
Register MediaCentralRegistering MediaCentral is a simple and straightforward process. Described below are three different scenarios: Buy a new license online, register a retail version and transfer a license.
Note Your equinux ID will be used to store and manage all your licenses. Whenever you purchase additional licenses or other products, please specify your equinux ID.
Buy a LicenseObtaining a license for MediaCentral and activating it on your Mac is a simple process.
To buy a license, please complete the following steps:‣ Choose “MediaCentral“ > “Buy MediaCentral...“
‣ Click “Buy MediaCentral“
‣ If you are a new customer, choose your country and click “Next“.
or
‣ If you already registered with equinux, login with your equinux ID
‣ Choose the desired license
9
‣ Click “Check Out“
‣ Continue shopping for other equinux products
or
‣ Click “Continue Check Out“
‣ If you are a new customer, register a new equinux ID
‣ Select either “Bank Transfer“ or “Credit Card“ as your preferred payment option
‣ Enter your credit card data, if necessary
‣ Review your order and click “Complete Order“
If you paid by credit card, MediaCentral will automatically be activated as soon as the order process is completed. Your license will be stored on your Mac.
Otherwise, we will send you an “Activation Code“ as soon as we receive your payment. Please refer to the section below for instructions on how to use the “Activation Code“.
Register a Retail VersionIf you bought a retail version of MediaCentral at your local software store or paid a license via bank transfer, you received an “Activation Code“. This code can be used to create a license.
To register a retail version, please complete the following steps:‣ Choose “MediaCentral“ > “Activate MediaCentral...“
‣ Click “Activate MediaCentral“
‣ Register a new equinux ID (if this is your first equinux product)
or
‣ Login with your equinux ID
‣ Enter your Activation Code
Your license will be created and stored on your Mac automatically.
Transfer a LicenseAll licenses for equinux products are hardware bound. When registering our software on your computer, the license is created for this machine. This means that a license can only be used on a single computer.
However, transferring a license to a different computer is easy.
To transfer a license, please complete the following steps:‣ On your old Mac, choose “MediaCentral“ > “Deactivate
MediaCentral...“
The license will now be available for registering the software on your new Mac.
‣ Install MediaCentral on your new Mac
‣ On your new Mac, choose “MediaCentral“ > “Activate MediaCentral“
MediaCentral will automatically fetch the free license.
10
Note From now on, the software cannot be used on the old machine. To transfer the license again, just repeat the process described above.
Uninstall MediaCentralMediaCentral consists of 3 components: The MediaCentral main application, the system preferences pane and the MediaCentral Launcher that handles updates and hot key activation.
To uninstall the software completely, please complete the following steps:
‣ Move the main application into the trash
‣ Move the MediaCentral system preference pane located in ~/Library/PreferencePanes into the trash
‣ Move the "MediaCentral2" application support directory located in ~Library/Application Support into the trash
‣ If you are familiar with the terminal, you can enter the command killall "MediaCentral Launcher". If you are not familiar with the terminal, you will need to restart your Mac
‣ Empty the trash
‣ Open the "Accounts" system preference pane and select the tab "Login Items". Delete the "MediaCentral Launcher" login item
11
Application Overviewequinux has developed MediaCentral with a simple idea in mind. We wanted to create one central user interface that integrates all types of media: IP TV, Broadcast TV, Digital Movies, DVDs, Games, Music, Radio and Pictures. MediaCentral does all this and more with Mac-styled focus on simplicity. You are going to love it.
Explore the Interface of MediaCentralOnce started, MediaCentral will present a list of categories from which to start your experience.
To navigate through MediaCentral:‣ Use the Up and Down arrow keys on your keyboard or
remote control to select a category.
‣ Use the Right arrow or “Return” key on your keyboard or remote control to dive into the selected category and explore its contents.
‣ Use the left arrow or “Escape” key to return to the top-level menu.
Navigation in sub-categories works just like the top-level navigation.
Note The navigation in the TV category works differently, please see “TV“ for details.
Choose Your ColorsYou can choose between various pre-defined color themes or even define your own. Please refer to “Appendix: Preferences“ for details.
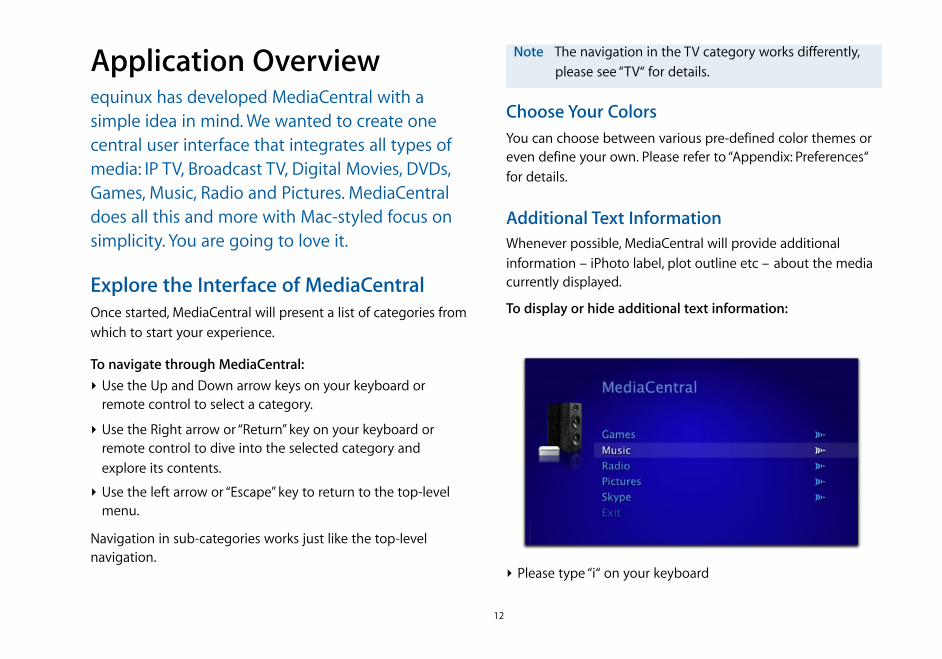
Additional Text InformationWhenever possible, MediaCentral will provide additional information – iPhoto label, plot outline etc – about the media currently displayed.
To display or hide additional text information:
‣ Please type “i“ on your keyboard
12
While the information is displayed, all other keyoard controls are disabled.
“My MediaCentral”MediaCentral creates a folder called “My MediaCentral” within your home directory. You can easily store your personal media data in this location. You will also be able to store your own links to IP TV stations, movies, pictures, DVDs, games, music and radio stations to personalize your experience.
Customize MediaCentralIt's not just your media – it's your application. You can customize MediaCentral's main menu using the system preferences. Please see “Appendix: MediaCentral Preferences“ for more information.
Auto-sorting of Optical MediaThis is a great feature if someone brings over media on a CD/DVD. Just insert the disc into you drive, and MediaCentral takes care of the rest. All the media on the disc – be it movies, music files or picture files – will get sorted automatically and displayed in the appropriate categories.
“MediaCentral Online Content” – Be Informed With One ClickMediaCentral features Online Content that is periodically updated over the Internet. You can check out the latest IP TV channels, movie files, flash games, music videos, radio streams and picture slide shows simply by browsing through the integrated content feeds in each category.
You can even submit content and content feeds (like IP TV channels in your home town) you are missing using the equinux Content feedback form. After your submitted content has been reviewed and approved, it will be made available to all MediaCentral users. See “Appendix: How to submit additional content” for further information.
If the is no Online Content available, please do the following:‣ Check if your Internet connection is up and running
‣ Open ““ > “System Preferences“ > “MediaCentral“ > “Online Content“ and make sure that the Online Content checkbox is activated
‣ Quit MediaCentral
‣ Open a Finder window and navigate to “~/Library/Application Support/MediaCentral2“
‣ Delete the folder “Caches“
13

Full Screen or Window Mode – Whatever You LikeIf you are using a Mac Mini with MediaCentral as the core of your home theater, you will love the clear and crisp full screen mode. If you are looking to use MediaCentral with your MacBook on the road, “MediaCentral-in-a-window” is probably the right mode for you. You can toggle between full screen and “MediaCentral-in-a-window” at any time.
To toggle between the full screen and “MediaCentral-in-a-window” modes:‣ Use the MediaCentral “Window” menu or the following
keystrokes:
✦ Small Size (⌘ 1)✦ Medium Size (⌘ 2)✦ Large Size (⌘ 3)✦ Full Screen (⌘ 0)
The menu bar can be displayed even in full screen mode.
To display the menu bar in full screen mode:‣ Move the mouse cursor to the top of the screen
MediaCentral on Multiple DisplaysMediaCentral is perfectly suited for systems with multiple displays. You can even use the full screen mode on any of the attached displays.
MediaCentral 2 does not require a dialog box for switching displays anymore. Changing the display works now the same way as in the QuickTime Player.
To switch between different displays, complete the following steps:
‣ If in full screen mode, switch to one of the window modes
‣ Move the MediaCentral main window to a different display
‣ Switch back to full screen, if desired
Choose Your Aspect Ratio - 4:3 or 16:9MediaCentral‘s main window can easily switch between a 4:3 or 16:9 aspect ratio.
Complete the following steps to set the aspect ratio:‣ Use the MediaCentral “Window” menu or the following
keystrokes
✦ 4:3 Ratio (⌥⌘ 1)✦ 16:9 Ratio (⌥⌘ 2)
14
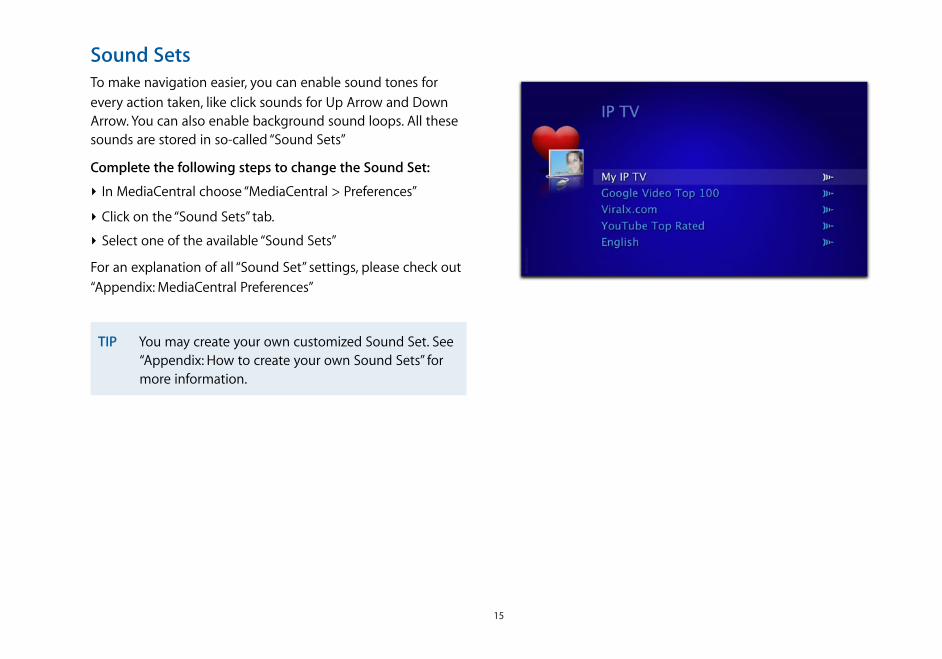
Sound SetsTo make navigation easier, you can enable sound tones for every action taken, like click sounds for Up Arrow and Down Arrow. You can also enable background sound loops. All these sounds are stored in so-called “Sound Sets”
Complete the following steps to change the Sound Set:
‣ In MediaCentral choose “MediaCentral > Preferences”
‣ Click on the “Sound Sets” tab.
‣ Select one of the available “Sound Sets”
For an explanation of all “Sound Set” settings, please check out “Appendix: MediaCentral Preferences”
TIP You may create your own customized Sound Set. See “Appendix: How to create your own Sound Sets” for more information.
15
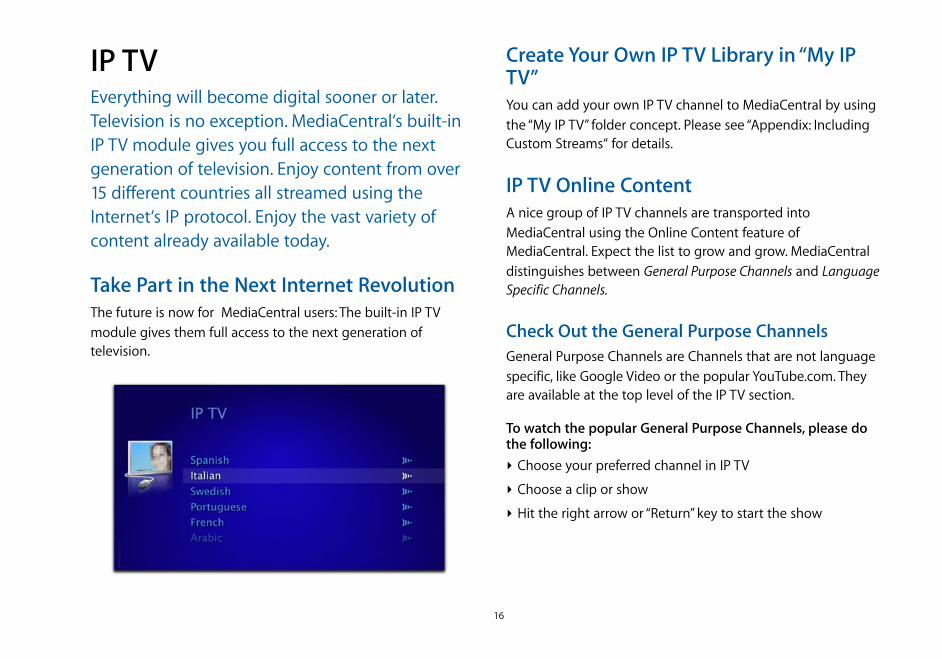
IP TVEverything will become digital sooner or later. Television is no exception. MediaCentral‘s built-in IP TV module gives you full access to the next generation of television. Enjoy content from over 15 different countries all streamed using the Internet‘s IP protocol. Enjoy the vast variety of content already available today.
Take Part in the Next Internet RevolutionThe future is now for MediaCentral users: The built-in IP TV module gives them full access to the next generation of television.
Create Your Own IP TV Library in “My IP TV”You can add your own IP TV channel to MediaCentral by using the “My IP TV” folder concept. Please see “Appendix: Including Custom Streams“ for details.
IP TV Online ContentA nice group of IP TV channels are transported into MediaCentral using the Online Content feature of MediaCentral. Expect the list to grow and grow. MediaCentral distinguishes between General Purpose Channels and Language Specific Channels.
Check Out the General Purpose ChannelsGeneral Purpose Channels are Channels that are not language specific, like Google Video or the popular YouTube.com. They are available at the top level of the IP TV section.
To watch the popular General Purpose Channels, please do the following:‣ Choose your preferred channel in IP TV
‣ Choose a clip or show
‣ Hit the right arrow or “Return” key to start the show
16

Check Out the Language Specific ChannelsLanguage specific channels contain a huge number of IP TV stations in their respective languages.
To enjoy one of the predefined channels, please do the following:‣ Choose your preferred language in IP TV
‣ Choose a channel from the list
‣ Hit the right arrow or “Return” key to start the show
Define “My Languages”You may define the languages you would like to be presented in the IP TV channel and hide unknown languages.
Complete the following steps to define your languages:‣ Choose Menu “MediaCentral > Preferences”
‣ Select the tab named “Online Content”
‣ Select all the languages you want to see in the IP TV section.
For more information about the preference settings, see “Appendix: MediaCentral Preferences”
All Key CommandsSee “Appendix: Key Commands” for a complete list of key options available in the IP TV menu.
Contribute to MediaCentral’s IP TV SectionIf you want to contribute an IP TV station to MediaCentral’s IP TV channel, see “ Appendix: How to submit additional content” for more information.
17
TVMediaCentral features a built-in TV tuner for DVB-T, a next-generation digital broadcasting technology. But there‘s hope for all your legacy DV devices – if they‘re supported by QuickTime, MediaCentral will play nice with them, too!
RequirementsMediaCentral now offers a DV interface for all devices supported by Apple‘s QuickTime. There is a wide range of such devices, from local cameras like the iSight to DV converters allowing you to stream analog TV signals to your Mac.
To watch Digital Broadcasting TV (DVB-T), you need to plug in one DVB-T devices supported by MediaCentral before you can use the TV feature. Please see “Appendix: Compatible USB TV Devices“ for a list of supported devices.
Initial Setup of a DV DeviceSetting up a DV device is quite simple.
To setup a DV device:‣ Make sure that your device is supported by QuickTime
‣ Plug the device directly into a free USB or FireWire port on your Mac
Initial Setup of a DVB-T DeviceBefore you can enjoy Digital Broadcasting TV functionality, you need to setup the channel list for your region. This only has to be done once (as long as you don‘t take your Mac to a different DVB-T region).
Note MediaCentral is fully integrated with The Tube, so your locations and channel lists from The Tube are available right away.
Complete the following steps to setup the channel list:‣ Quit MediaCentral if it is running
‣ Plug in one of the supported DVB-T devices directly into a free USB port on your Mac. Do not use USB extension cables or USB hubs
MediaCentral opens a dialog offering to configure your device.
‣ Click “Configure Now“
‣ Select your country from the list
‣ Click “Auto Tune...”
MediaCentral automatically scan all the available channels. This procedure may take some time. The available channels are displayed in a list. You may now rename the channels or change their order.
18
To rename the channels, complete the following steps:‣ Click on the name of the channel
‣ Rename the channel to fit your needs
To change the order of the channels, complete the following step:‣ Click and drag any channel in the list to the position you
wish
Managing DVB-T RegionsMediaCentral uses the “Location“ concept for managing different DVB-T regions. In each region, different DVB-T channels might be available under different frequencies. If you commute, for example, between London and Edinburgh, you might want to create two locations and store the DVB-T channels for the respective city in them.
To create a new location:‣ Be sure, that MediaCentral is not running. Otherwise simply
quit MediaCentral
‣ Choose “ > System Preferences”
‣ Click on MediaCentral's preference pane in the “Other” section of the window
‣ Select the “Modules” tab.
‣ Choose “TV” and click “Configure”
‣ Open the menu next to “Select your Location:“
‣ Choose “New Location...“
‣ Name your new location
Now you can setup the DVB-T channels for the new location.
‣ Make sure that your Mac is located in the appropriate DVB-T region
‣ Repeat the initial setup process for DVB-T devices (s. above)
MediaCentral will store the DVB-T channels for each location separately, so you can move to different locations without repeating the tuning process.
Managing Your SourcesAll the TV devices connected to your Mac are displayed in MediaCentral‘s preferences. You can choose to hide any device in MediaCentral itself.
To toggle the display of any TV device:‣ Be sure, that MediaCentral is not running. Otherwise simply
quit MediaCentral
‣ Choose “ > System Preferences”
‣ Click on MediaCentral's preference pane in the “Other” section of the window
‣ Select the “Modules” tab
‣ Choose “TV” and click “Configure”
‣ Open the menu next to “Select a source:“
19
Depending on the type of device currently selected, the window will show the DVB-T setup screen (s. above) or a preview of the device‘s signal.
‣ Choose “Edit sources...“
‣ Check/uncheck the box next to a device to activate/deactivate it
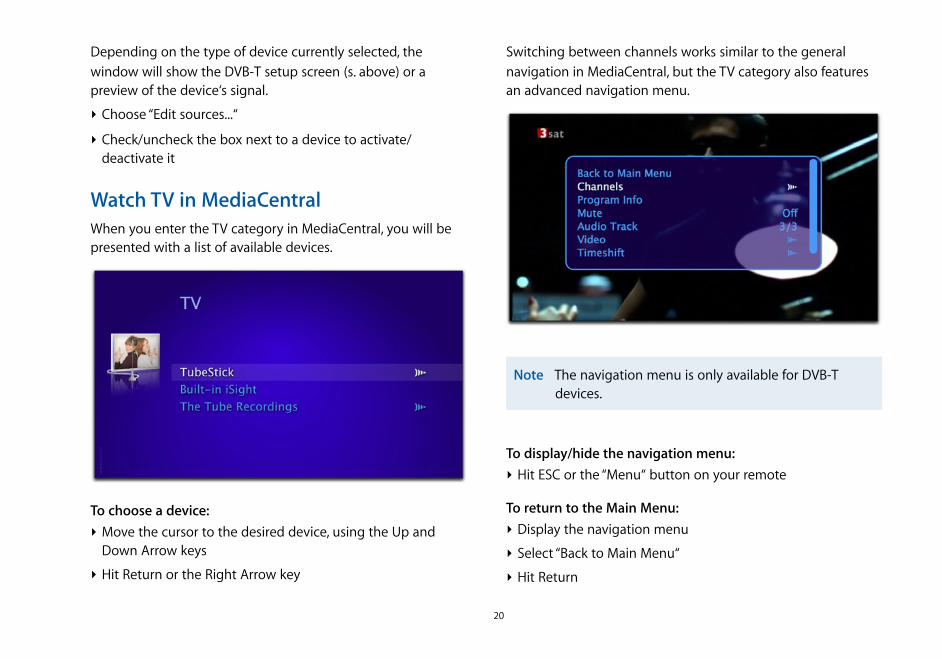
Watch TV in MediaCentralWhen you enter the TV category in MediaCentral, you will be presented with a list of available devices.
To choose a device:‣ Move the cursor to the desired device, using the Up and
Down Arrow keys
‣ Hit Return or the Right Arrow key
Switching between channels works similar to the general navigation in MediaCentral, but the TV category also features an advanced navigation menu.
Note The navigation menu is only available for DVB-T devices.
To display/hide the navigation menu:‣ Hit ESC or the “Menu“ button on your remote
To return to the Main Menu:‣ Display the navigation menu
‣ Select “Back to Main Menu“
‣ Hit Return
20

Switching ChannelsInstead of switching channels one by one, you can also access channels directly using the navigation menu.
To access channels directly:‣ Display the navigation menu
‣ Select ”Channels“
‣ Hit Return or the right arrow key to open the channel list
‣ Use the arrow keys to select the desired channel
‣ Hit Return to switch to the channel
MuteYou might want to mute the TV program temporarily.
To mute/unmute the TV program:‣ Display the navigation menu
‣ Select “Mute“
‣ Hit Return to toggle the setting
Audio TracksSome channels distribute more than a single audio track (e.g. English and Spanish). If there is more than a single audio tracks available, you can choose your preferred language.
To switch between audio tracks:‣ Display the navigation menu
‣ Select “Audio Track“
‣ Hit Return to switch to another audio track
Video settingsVideo settings can be controlled with the video submenu within the navigation menu.
Some TV broadcasts need to be enlarged to crop disturbing pixels along the borders of the picture. This process is called overscan.
To toggle overscan:‣ Display the navigation menu
‣ Select “Video“
‣ Hit Return to enter the submenu
‣ Choose “Overscan“
‣ Hit Return
You can choose between the following aspect ratios:
✦ “Source”: Original ratio✦ “4:3”✦ “16:9”✦ “2,35:1”✦ “Zoom”: A function to zoom into 16:9 content that is
being sent in a 4:3 format.
To change the aspect ratio:‣ Display the navigation menu
21
‣ Select “Video“
‣ Hit Return to enter the submenu
‣ Select “Aspect Ratio“
‣ Hit Return to cycle through the available ratios
Deinterlacing improves picture quality of the TV broadcast. But it also consumes more processing power. You may want to switch it off if you are using MediaCentral on a slower Mac.
To toggle deinterlacing:‣ Display the navigation menu
‣ Select “Video“
‣ Hit Return to enter the submenu
‣ Choose “Deinterlace“
‣ Hit Return
TimeshiftMediaCentral now incorporates Timeshift, a technology to pause the current program, or scroll back and forth.
To enable or disable Timeshift:‣ Display the navigation menu
‣ Select “Timeshift“
‣ Hit Return to toggle the Timeshift status
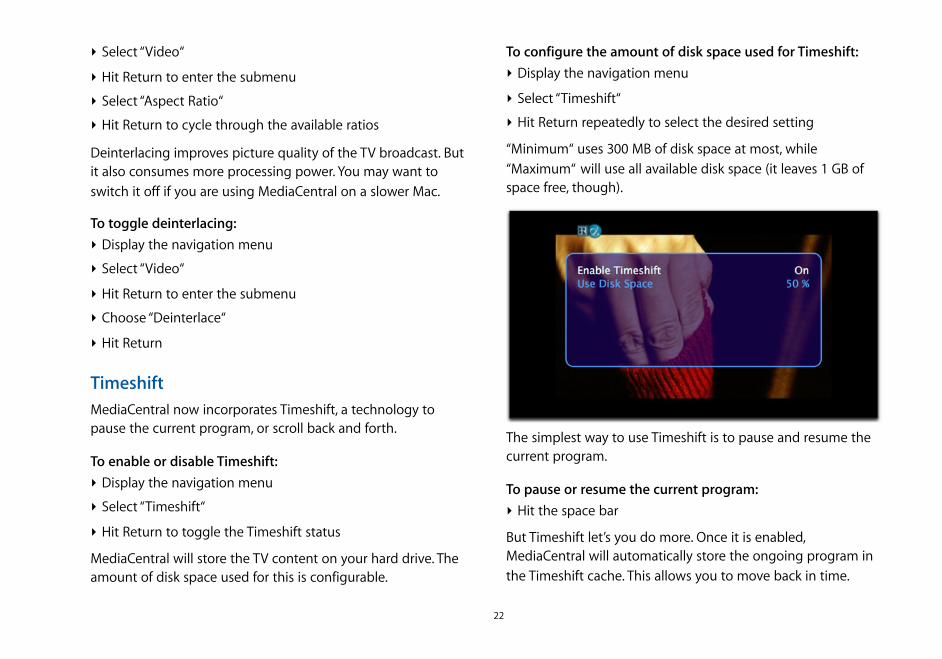
MediaCentral will store the TV content on your hard drive. The amount of disk space used for this is configurable.
To configure the amount of disk space used for Timeshift:‣ Display the navigation menu
‣ Select “Timeshift“
‣ Hit Return repeatedly to select the desired setting
“Minimum“ uses 300 MB of disk space at most, while “Maximum“ will use all available disk space (it leaves 1 GB of space free, though).
The simplest way to use Timeshift is to pause and resume the current program.
To pause or resume the current program:‣ Hit the space bar
But Timeshift let’s you do more. Once it is enabled, MediaCentral will automatically store the ongoing program in the Timeshift cache. This allows you to move back in time.
22
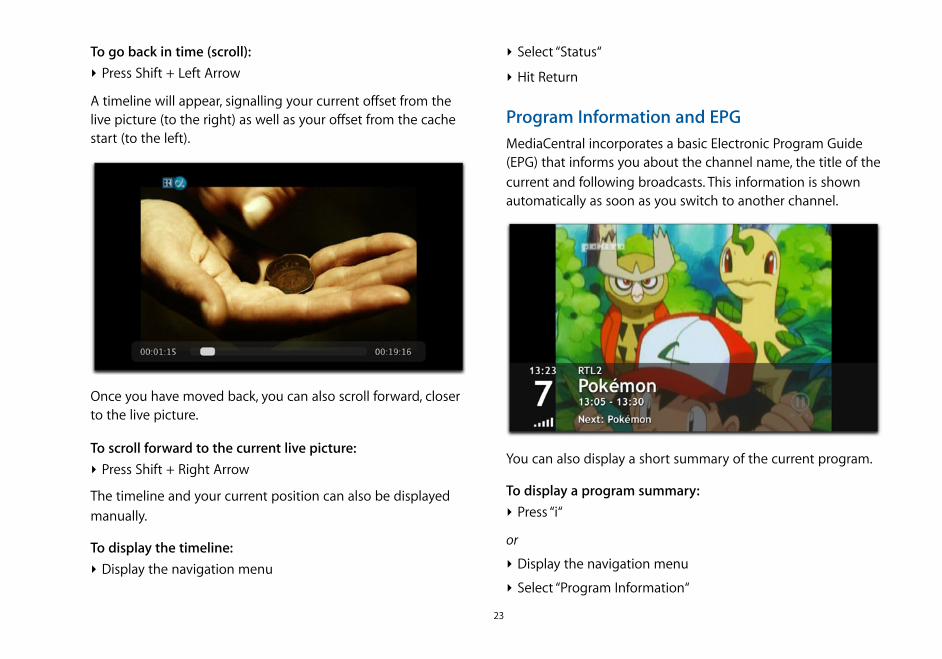
To go back in time (scroll):‣ Press Shift + Left Arrow
A timeline will appear, signalling your current offset from the live picture (to the right) as well as your offset from the cache start (to the left).
Once you have moved back, you can also scroll forward, closer to the live picture.
To scroll forward to the current live picture:‣ Press Shift + Right Arrow
The timeline and your current position can also be displayed manually.
To display the timeline:‣ Display the navigation menu
‣ Select “Status“
‣ Hit Return
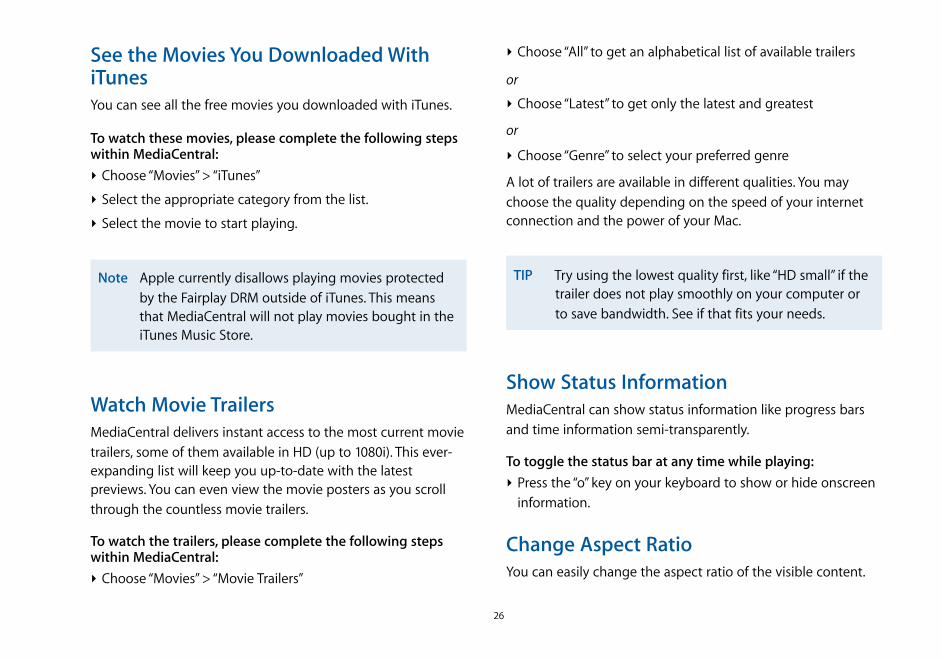
Program Information and EPGMediaCentral incorporates a basic Electronic Program Guide (EPG) that informs you about the channel name, the title of the current and following broadcasts. This information is shown automatically as soon as you switch to another channel.
You can also display a short summary of the current program.
To display a program summary:‣ Press “i“
or
‣ Display the navigation menu
‣ Select “Program Information“
23

‣ Hit Return to display the program summary
Watch The Tube RecordingsYour recording library from The Tube is available in MediaCentral.
To access your recordings:‣ Display the TV module’s main menu
‣ Select “The Tube Recordings“
‣ Hit Return to display a list of your recordings
‣ Select the desired recording
‣ Hit Return to start playback
Note If there is only a single recording in your library, it will be played automatically.
To return to the main menu while playing a recording:‣ Display the navigation menu
‣ Select “Back to the Main Menu“
‣ Hit Return
All Key CommandsPlease see “Appendix: Key Commands” for a complete list of key options available in the TV menu.
24
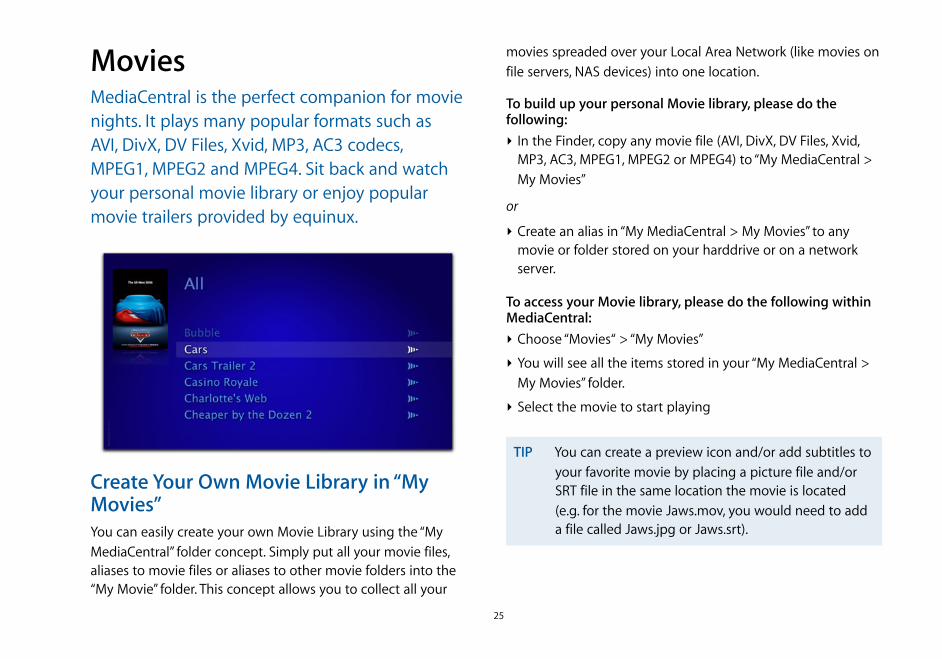
MoviesMediaCentral is the perfect companion for movie nights. It plays many popular formats such as AVI, DivX, DV Files, Xvid, MP3, AC3 codecs, MPEG1, MPEG2 and MPEG4. Sit back and watch your personal movie library or enjoy popular movie trailers provided by equinux.
Create Your Own Movie Library in “My Movies”You can easily create your own Movie Library using the “My MediaCentral” folder concept. Simply put all your movie files, aliases to movie files or aliases to other movie folders into the “My Movie” folder. This concept allows you to collect all your
movies spreaded over your Local Area Network (like movies on file servers, NAS devices) into one location.
To build up your personal Movie library, please do the following:‣ In the Finder, copy any movie file (AVI, DivX, DV Files, Xvid,
MP3, AC3, MPEG1, MPEG2 or MPEG4) to “My MediaCentral > My Movies”
or
‣ Create an alias in “My MediaCentral > My Movies” to any movie or folder stored on your harddrive or on a network server.
To access your Movie library, please do the following within MediaCentral:‣ Choose “Movies“ > “My Movies”
‣ You will see all the items stored in your “My MediaCentral > My Movies” folder.
‣ Select the movie to start playing
TIP You can create a preview icon and/or add subtitles to your favorite movie by placing a picture file and/or SRT file in the same location the movie is located (e.g. for the movie Jaws.mov, you would need to add a file called Jaws.jpg or Jaws.srt).
25
See the Movies You Downloaded With iTunesYou can see all the free movies you downloaded with iTunes.
To watch these movies, please complete the following steps within MediaCentral:‣ Choose “Movies” > “iTunes”
‣ Select the appropriate category from the list.
‣ Select the movie to start playing.
Note Apple currently disallows playing movies protected by the Fairplay DRM outside of iTunes. This means that MediaCentral will not play movies bought in the iTunes Music Store.
Watch Movie TrailersMediaCentral delivers instant access to the most current movie trailers, some of them available in HD (up to 1080i). This ever-expanding list will keep you up-to-date with the latest previews. You can even view the movie posters as you scroll through the countless movie trailers.
To watch the trailers, please complete the following steps within MediaCentral:‣ Choose “Movies” > “Movie Trailers”
‣ Choose “All” to get an alphabetical list of available trailers
or
‣ Choose “Latest” to get only the latest and greatest
or
‣ Choose “Genre” to select your preferred genre
A lot of trailers are available in different qualities. You may choose the quality depending on the speed of your internet connection and the power of your Mac.
TIP Try using the lowest quality first, like “HD small” if the trailer does not play smoothly on your computer or to save bandwidth. See if that fits your needs.
Show Status InformationMediaCentral can show status information like progress bars and time information semi-transparently.
To toggle the status bar at any time while playing:‣ Press the “o” key on your keyboard to show or hide onscreen
information.
Change Aspect RatioYou can easily change the aspect ratio of the visible content.
26
To cycle through different aspect ratios:‣ Press the “c” key when watching a movie. By each click
MediaCentral cycles through
✦ “Source”: Original ratio✦ “4:3”✦ “16:9”✦ “2.35:1”✦ “Zoom”: Good to zoom into 16:9 content that is being
sent in a 4:3 format.
All Key CommandsPlease see “Appendix: Key Commands” for a complete list of key options available in the Movie menu.
27
MusicMusic belongs to the Mac like butter belongs to popcorn. It goes beyond iTunes, in making managing music with a Mac even easier. Get access to your Music library, iPods, music CDs, to Online Music Content and music videos.
Activate MediaCentral for Music CDsBy default, iTunes is the primary application for playing music CDs in Mac OS X which will be started each time you insert a CD in your optical drive. This setting can be changed via the System Preferences.
To activate MediaCentral as the primary application for music CDs:
‣ Open “ > System Preferences...“
‣ Open “CDs & DVDs“
‣ Choose MediaCentral for “When you insert a music CD“
Listen to Music CDs and iPodsWhenever you insert a music CD in your optical drive or attach an iPod to your Mac, MediaCentral will display a new item in its “Music“ category.
To listen to music CDs or iPods:
‣ Choose “Music“
‣ Choose the CD or iPod item
‣ Start playing by hitting the Right Arrow or “Return” key.
Listen to Your iTunes MusicMediaCentral automatically loads your iTunes library upon startup and adds it to its Music category.
To listen to your music:‣ Choose “Music > iTunes”
‣ Navigate through your library using one of the available browser options:
✦ Playlists✦ Songs✦ Artists✦ Albums✦ Compilations✦ Genre
‣ Start playing by hitting the Right Arrow or “Return” key
Watch Music Videos (Online Content)MediaCentral’s Online Content feature shows you music video feeds. As soon as you choose one of the content feeds, the content will be streamed from the Internet.
28
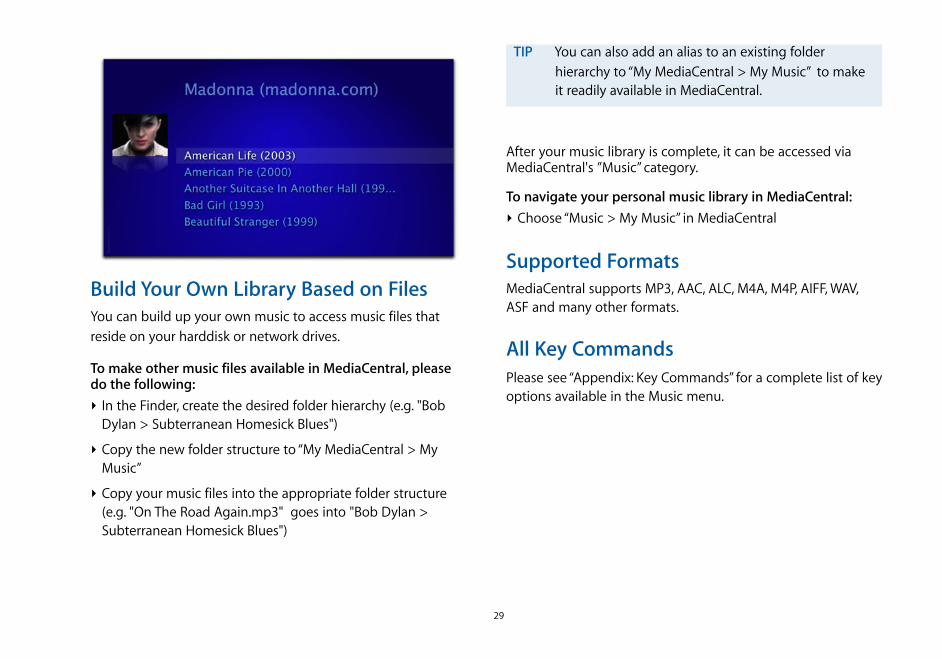
Build Your Own Library Based on FilesYou can build up your own music to access music files that reside on your harddisk or network drives.
To make other music files available in MediaCentral, please do the following:‣ In the Finder, create the desired folder hierarchy (e.g. "Bob
Dylan > Subterranean Homesick Blues")
‣ Copy the new folder structure to “My MediaCentral > My Music”
‣ Copy your music files into the appropriate folder structure (e.g. "On The Road Again.mp3" goes into "Bob Dylan > Subterranean Homesick Blues")
TIP You can also add an alias to an existing folder hierarchy to “My MediaCentral > My Music” to make it readily available in MediaCentral.
After your music library is complete, it can be accessed via MediaCentral's ”Music” category.
To navigate your personal music library in MediaCentral:‣ Choose “Music > My Music” in MediaCentral
Supported FormatsMediaCentral supports MP3, AAC, ALC, M4A, M4P, AIFF, WAV, ASF and many other formats.
All Key CommandsPlease see “Appendix: Key Commands” for a complete list of key options available in the Music menu.
29
RadioListen to your favorite tunes with Radio streams from the Internet. MediaCentral comes with a bunch of preset online radio stations. Browse them by category or simply add your own stations. And that’s all in your one stop entertainment center: MediaCentral.
It‘s Your ChoiceSeveral genres are available in MediaCentral (availability of individual stations may vary):
✦ Alternative✦ Ambient✦ Classical✦ Country✦ Dance/House✦ Jazz✦ Mixed✦ Pop✦ Rap✦ Reggae✦ Techno✦ The 70's✦ The 80's
Add Your Own Radio StationYou can easily add your own favorite radio streams to MediaCentral by using the “My Radio” folder concept.
MediaCentral supports different playlist formats. Please see “Appendix: Including Custom Streams“ for details.
Playing a Radio StationTo play a radion station, please do the following:‣ Select the “Radio“ category in MediaCentral
‣ Choose the desired genre (s. above)
‣ If more than one channel is available, choose your preferred channel
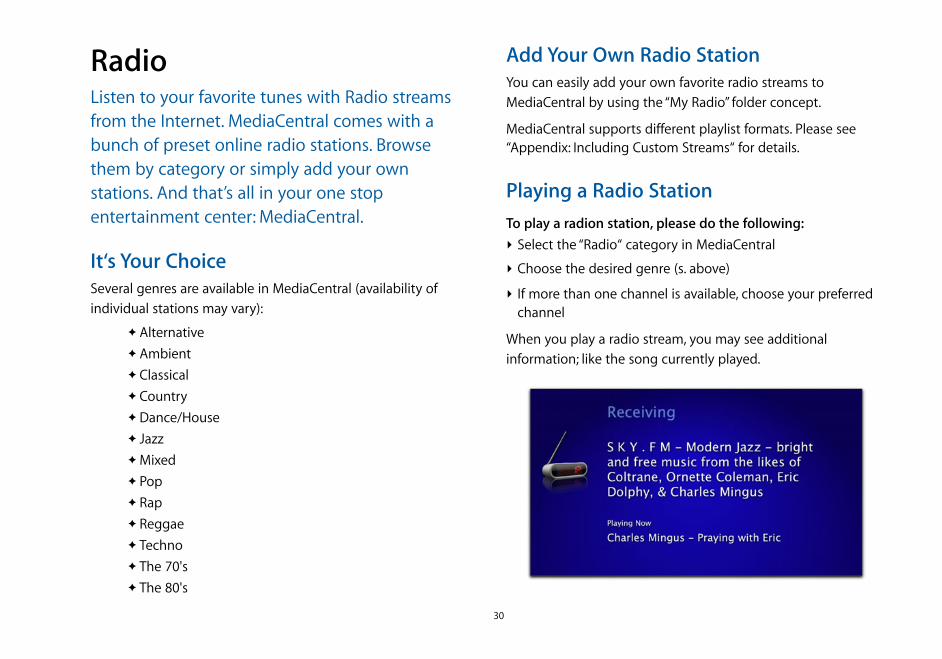
When you play a radio stream, you may see additional information; like the song currently played.
30
Contribute to MediaCentral’s Radio Station ListIf you want to contribute a station to the growing list of radio channels, see “ Appendix: How to submit additional content” for more information.
31

DVDWatching your DVD in MediaCentral can really be fun. You can do it the “classical” way by inserting a DVD into your disk drive or you can access DVD content stored on your harddrive or a network server (in so-called VIDEO_TS folders). Store your whole DVD library on your Mac and let your DVD player catch dust! Simply stay seated and enjoy.
Activate MediaCentral for DVDsBy default, the Apple DVD Player is the primary application for playing DVDs in Mac OS X which will be started each time you
insert a DVD in your optical drive. This setting can be changed via the System Preferences.
To activate MediaCentral as the primary application for DVDs:
‣ Open “ > System Preferences...“
‣ Open “CDs & DVDs“
‣ Choose MediaCentral for “When you insert a video DVD“
Play DVDs Inserted in Your Optical DriveMediaCentral will automatically detect if your optical drive's region code matches with the inserted DVD and display an error message if necessary.
To view DVD movies with MediaCentral:‣ Insert a DVD in your computer's optical drive.
‣ Select the “DVD” category and you will be able to select your inserted DVD here.
Browsing ChaptersComplete the following step to browse chapters:‣ Press the Right (Forward) or Left (Backward) Arrow on your
keyboard
32

Stop and GoEven if you quit MediaCentral and turn off your Mac, MediaCentral will remember where you left off that exciting DVD. So if it's time to go to work, school or just a short bathroom break - MediaCentral has you covered.
Whenever you return to a DVD movie, you will be asked whether you would like to resume playback where you left off or start from the beginning.
DVD Options MenuSeveral features – switching audio tracks and output devices, toggling subtitles etc – are accessible via the DVD options menu.
To display/hide the DVD options menu:‣ Press the ESC key while a DVD movie is running
Switch Audio TracksSome DVDs include multiple audio tracks for different languages or director’s comments.
To cycle through different audio tracks:‣ Display the DVD options menu
‣ Use the arrow keys to select “Audio Track“
‣ Press Return to cycle
View SubtitlesSome DVDs include subtitles that can be displayed in MediaCentral.
Complete the following step to cycle through subtitles available on the DVD:‣ Display the DVD options menu
‣ Use the arrow keys to select “Subtitle“
‣ Press Return to cycle
AnglesSome DVDs have film material stored that shows the movie from different angles. MediaCentral supports this advanced feature as well.
To cycle through the different angles while watching the DVD:‣ Display the DVD options menu
33
‣ Use the arrow keys to select “Angle“
‣ Press Return to cycle
Audio Output DevicesIf there is more than one digital audio output device connected to your Mac, you can cycle through all devices here.
To cycle through all digital audio output devices:‣ Display the DVD options menu
‣ Use the arrow keys to select “Audio Output Device“
‣ Press Return to cycle
Internal DVD MenuMost DVDs provide an internal menu to choose the main feature or additional interviews, background info etc.
To access the internal DVD menu directly:‣ Display the DVD options menu
‣ Use the arrow keys to select “Go to DVD menu“
‣ Press Return
Note Not all DVDs allow direct access to the internal DVD menu.
Exit DVD moduleThe DVD module cannot be left using the ESC key (similar to the TV module).
To leave the DVD module:
‣ Display the DVD options menu
‣ Use the arrow keys to select “Back to Main Menu“
‣ Press Return
Eject DVDComplete the following steps to eject your DVD:‣ Press the ⌥ESC key combination
or
‣ Display the DVD options menu
‣ Select “Eject“
‣ Press Return
Create Your Own DVD LibraryYou can easily create your personal DVD library by adding VIDEO_TS folders to your “My DVDs” folder. To create VIDEO_TS folders from DVDs, you need to own the DVD you intend to copy to your harddrive. Please do not steal movies.
34
Please complete the following steps to create your own DVD library:‣ Create a new folder in “My MediaCentral > My DVDs”
‣ Name the folder based on the title of the film you wish to add
‣ Copy a VIDEO_TS folder or create an alias to a local or networked VIDEO_TS folder in the new folder you have just created
The DVD content will be available in MediaCentral's DVD menu under the section “My DVDs”.
TIP You can create a preview icon for your VIDEO_TS movie by placing a picture file in the folder containing your VIDEO_TS folder.The picture file may have any name.
All Key CommandsPlease see “Appendix: Key Commands” for a complete list of key options available in the DVD menu.
35
SkypeVoice over IP is one of the hottest Internet applications today, and Skype is the most popular VoIP services. To use Skype, you don't even have to leave MediaCentral – it features full Skype integration. Talk to you soon!
Authorize MediaCentral for SkypeBefore you can use Skype, you will need to authorize MediaCentral to use the Skype API.
To authorize MediaCentral for Skype:
‣ Open “ > System Preferences...“
‣ Choose the “Modules“ tab
‣ Select the “Skype“ module
‣ Click “Configure...“
‣ Click “Authorize MediaCentral for Skype Access“.
Skype will open and display a dialog asking to confirm access for MediaCentral.
‣ Confirm access
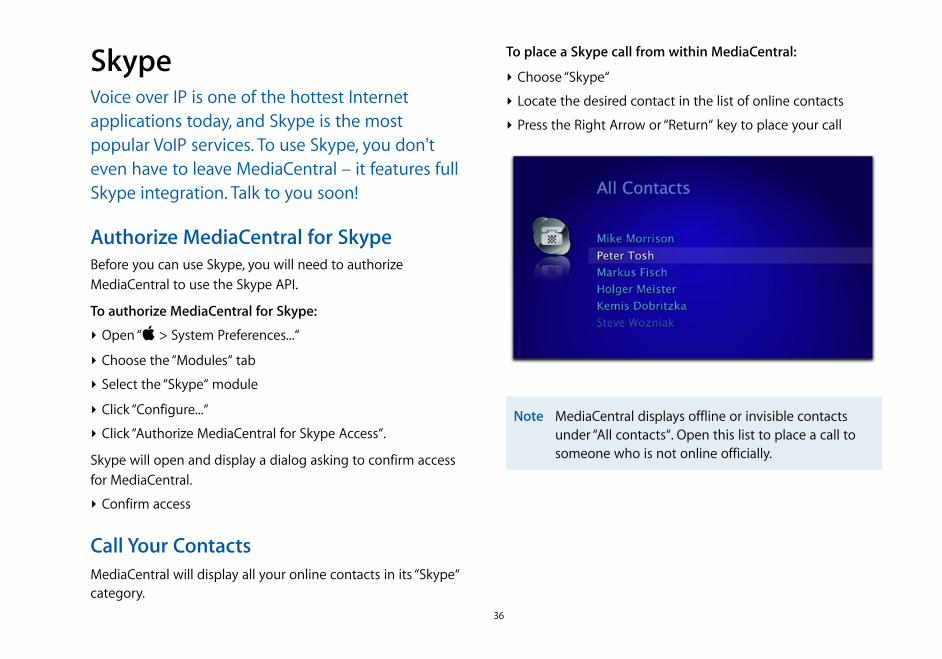
Call Your ContactsMediaCentral will display all your online contacts in its “Skype“ category.
To place a Skype call from within MediaCentral:
‣ Choose “Skype“
‣ Locate the desired contact in the list of online contacts
‣ Press the Right Arrow or “Return“ key to place your call
Note MediaCentral displays offline or invisible contacts under “All contacts“. Open this list to place a call to someone who is not online officially.
36

Receive a CallIncoming calls will be signaled in every category, whether you are watching a movie, listen to your music or enjoy a picture gallery.
To accept an incoming call:
‣ Choose “Accept“ from the incoming call dialog (using the Left/Right Arrow keys)
‣ Hit the “Return“ key
To reject an incoming call:
‣ Choose “Reject“ from the incoming call dialog (using the Left/Right Arrow keys)
‣ Hit the “Return“ key
TroubleshootingMediaCentral was tested thoroughly with Skype 1.4.0.49 for Mac OS X. Older versions might exhibit incorrect behavior due to an older API implementation.
If you do experience problems, please complete the following steps:‣ Quit Skype and MediaCentral
‣ Open http://www.skype.com/download/skype/macosx/ in your web browser and download the latest Skype client
‣ Install the downloaded version on your Mac
‣ Restart MediaCentral
37
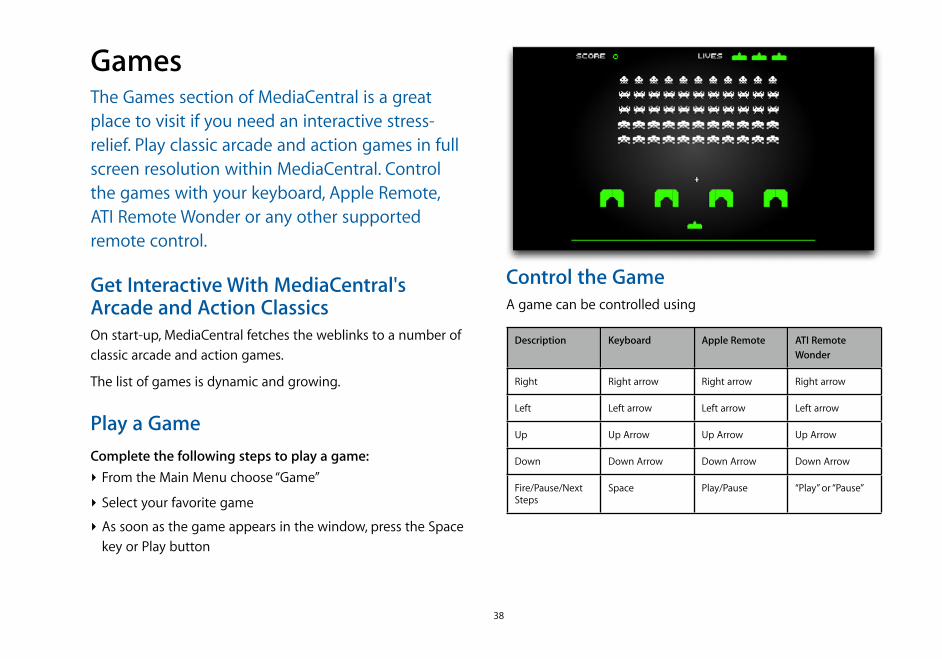
GamesThe Games section of MediaCentral is a great place to visit if you need an interactive stress-relief. Play classic arcade and action games in full screen resolution within MediaCentral. Control the games with your keyboard, Apple Remote, ATI Remote Wonder or any other supported remote control.
Get Interactive With MediaCentral's Arcade and Action ClassicsOn start-up, MediaCentral fetches the weblinks to a number of classic arcade and action games.
The list of games is dynamic and growing.
Play a GameComplete the following steps to play a game:‣ From the Main Menu choose “Game”
‣ Select your favorite game
‣ As soon as the game appears in the window, press the Space key or Play button
Control the GameA game can be controlled using
Description Keyboard Apple Remote ATI Remote Wonder
Right Right arrow Right arrow Right arrow
Left Left arrow Left arrow Left arrow
Up Up Arrow Up Arrow Up Arrow
Down Down Arrow Down Arrow Down Arrow
Fire/Pause/Next Steps
Space Play/Pause “Play” or “Pause”
38
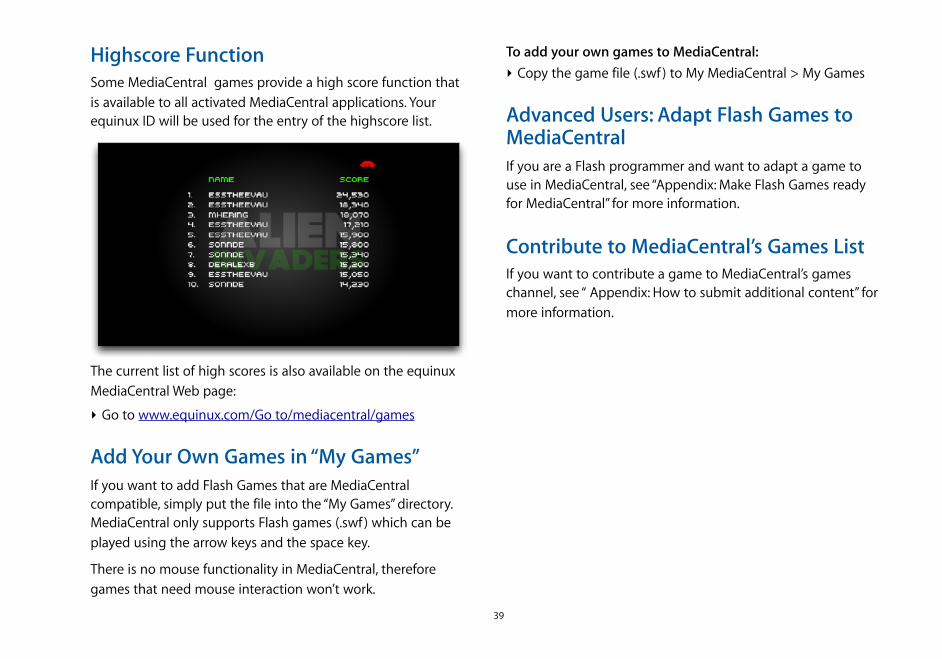
Highscore FunctionSome MediaCentral games provide a high score function that is available to all activated MediaCentral applications. Your equinux ID will be used for the entry of the highscore list.
The current list of high scores is also available on the equinux MediaCentral Web page:
‣ Go to www.equinux.com/Go to/mediacentral/games
Add Your Own Games in “My Games”If you want to add Flash Games that are MediaCentral compatible, simply put the file into the “My Games” directory. MediaCentral only supports Flash games (.swf ) which can be played using the arrow keys and the space key.
There is no mouse functionality in MediaCentral, therefore games that need mouse interaction won’t work.
To add your own games to MediaCentral:‣ Copy the game file (.swf ) to My MediaCentral > My Games
Advanced Users: Adapt Flash Games to MediaCentralIf you are a Flash programmer and want to adapt a game to use in MediaCentral, see “Appendix: Make Flash Games ready for MediaCentral” for more information.
Contribute to MediaCentral’s Games ListIf you want to contribute a game to MediaCentral’s games channel, see “ Appendix: How to submit additional content” for more information.
39
PicturesThe Picture category in MediaCentral provides slide show features for your iPhoto library or predefined folders on your harddrive. You can add your favorite flickr feeds or enjoy MediaCentral’s “Online Content”.
Activate MediaCentral for Picture CDsBy default, iPhoto is the primary application for playing picture CDs in Mac OS X which will be started each time you insert a CD in your optical drive. This setting can be changed via the System Preferences.
To activate MediaCentral as the primary application for picture CDs:
‣ Open “ > System Preferences...“
‣ Open “CDs & DVDs“
‣ Choose MediaCentral for “When you insert a picture CD“
Viewing Photo AlbumsPhoto albums are available via your picture library or picture CDs (see below).
To open an album, please complete the following steps:‣ Choose the “Pictures“ category
‣ Choose one of the online albums available
or
‣ Choose either iPhoto or “My Pictures“
‣ Choose one of the albums available
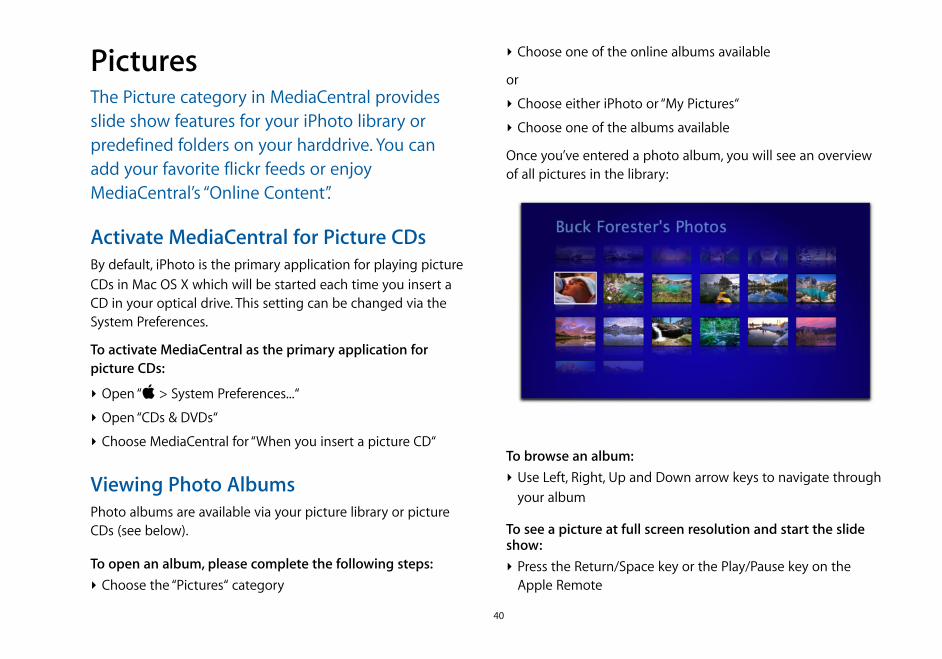
Once you’ve entered a photo album, you will see an overview of all pictures in the library:
To browse an album:‣ Use Left, Right, Up and Down arrow keys to navigate through
your album
To see a picture at full screen resolution and start the slide show:‣ Press the Return/Space key or the Play/Pause key on the
Apple Remote
40
‣ Pressing ESC ends the slide show and lets you return to the browse view
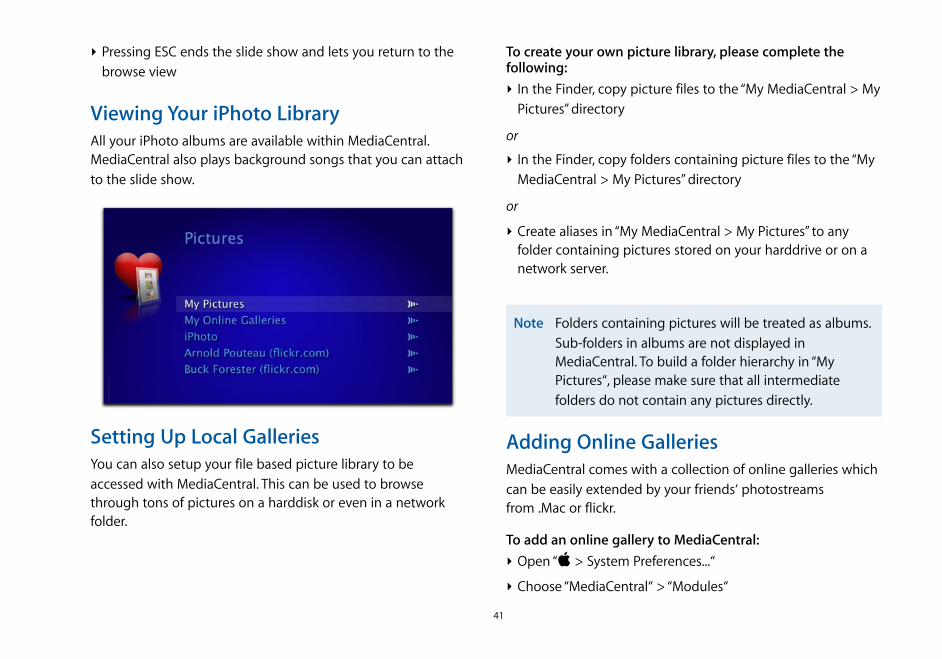
Viewing Your iPhoto LibraryAll your iPhoto albums are available within MediaCentral. MediaCentral also plays background songs that you can attach to the slide show.
Setting Up Local GalleriesYou can also setup your file based picture library to be accessed with MediaCentral. This can be used to browse through tons of pictures on a harddisk or even in a network folder.
To create your own picture library, please complete the following:‣ In the Finder, copy picture files to the “My MediaCentral > My
Pictures” directory
or
‣ In the Finder, copy folders containing picture files to the “My MediaCentral > My Pictures” directory
or
‣ Create aliases in “My MediaCentral > My Pictures” to any folder containing pictures stored on your harddrive or on a network server.
Note Folders containing pictures will be treated as albums. Sub-folders in albums are not displayed in MediaCentral. To build a folder hierarchy in “My Pictures“, please make sure that all intermediate folders do not contain any pictures directly.
Adding Online GalleriesMediaCentral comes with a collection of online galleries which can be easily extended by your friends‘ photostreams from .Mac or flickr.
To add an online gallery to MediaCentral:‣ Open “ > System Preferences...“
‣ Choose “MediaCentral“ > “Modules“
41
‣ Select “Pictures“ and click “Configure...“
‣ Doubleclick the name field to specify a name
‣ Doubleclick the URL field and paste a feed URL (s. below)
A screenshot of the configuration dialog can be found in “Appendix: Preferences“.
Note Please make sure to specify a valid feed URL. The configuration dialog will provide two examples.
To embed your own online galleries, you need to obtain a valid feed URL from either .Mac or flickr.
.Mac
.Mac is an online service from Apple. Among other features, it can be used to publish photostreams on the web. These streams are accessible under a certain URL.
You can create your own .Mac photostream and distribute the feed URL to your friends or family. Or someone else wants to share their pictures with you and sends a .Mac feed URL to you. In any case, you can watch the stream with MediaCentral.
To publish a .Mac Photocast:‣ Register for .Mac
‣ Open iPhoto on your Mac
‣ Follow the instructions for ”Publishing Photocast photo albums for subscribers“ provided by the iPhoto help
iPhoto will display the feed URL for the new .Mac Photocast.
‣ Copy this URL
.Mac feed URLs need to be adapted for MediaCentral.
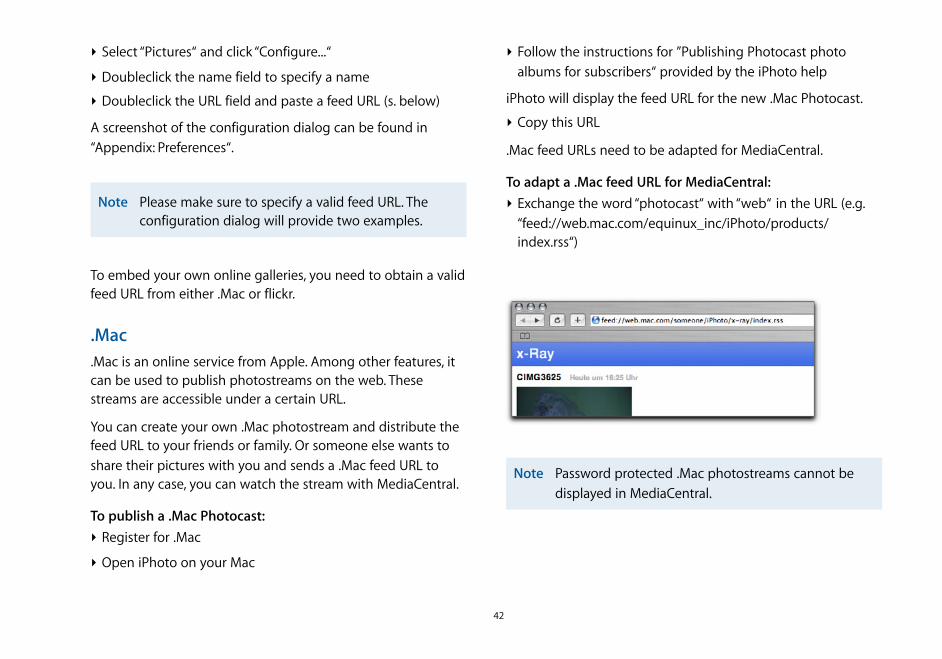
To adapt a .Mac feed URL for MediaCentral:‣ Exchange the word “photocast“ with “web“ in the URL (e.g.
“feed://web.mac.com/equinux_inc/iPhoto/products/index.rss“)
Note Password protected .Mac photostreams cannot be displayed in MediaCentral.
42
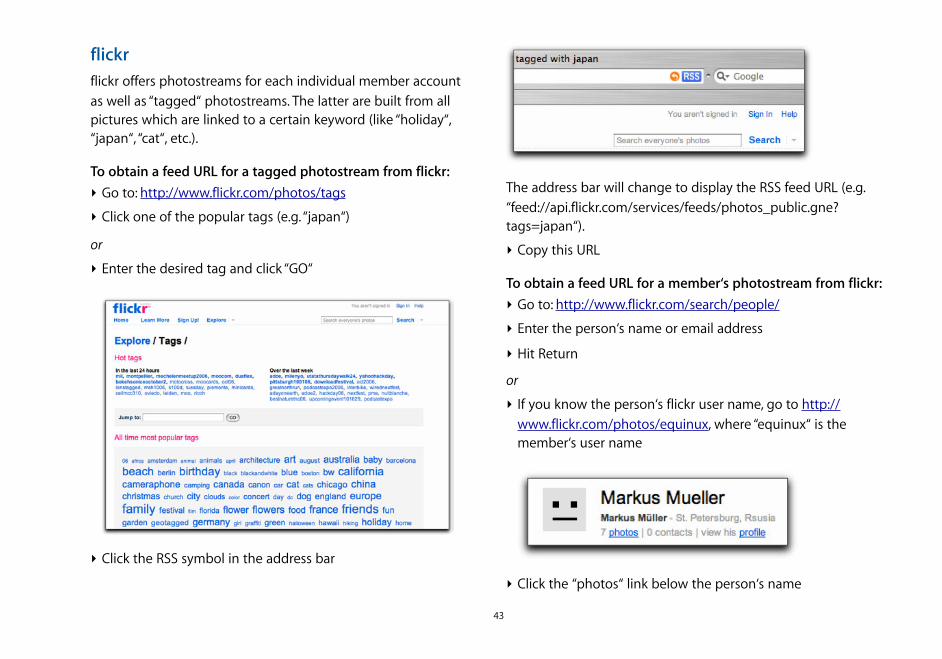
flickrflickr offers photostreams for each individual member account as well as “tagged“ photostreams. The latter are built from all pictures which are linked to a certain keyword (like “holiday“, “japan“, “cat“, etc.).
To obtain a feed URL for a tagged photostream from flickr:‣ Go to: http://www.flickr.com/photos/tags
‣ Click one of the popular tags (e.g. “japan“)
or
‣ Enter the desired tag and click “GO“
‣ Click the RSS symbol in the address bar
The address bar will change to display the RSS feed URL (e.g. “feed://api.flickr.com/services/feeds/photos_public.gne?tags=japan“).
‣ Copy this URL
To obtain a feed URL for a member‘s photostream from flickr:‣ Go to: http://www.flickr.com/search/people/
‣ Enter the person‘s name or email address
‣ Hit Return
or
‣ If you know the person‘s flickr user name, go to http://www.flickr.com/photos/equinux, where “equinux“ is the member‘s user name
‣ Click the “photos“ link below the person‘s name
43
‣ Click the RSS symbol in the address bar (s. above)
The address bar will change to display the RSS feed URL (e.g. “feed://api.flickr.com/services/feeds/photos_public.gne?id=123456789@N00&format=atom“
‣ Copy this URL
Using Picture CDs in MediaCentralWhenever you insert a picture CD in your optical drive, MediaCentral will add the CD as a new album in its “Picture“ category.
How to Submit New Picture FeedsIf you want to contribute a new picture feed to the growing list of online picture feeds, see “ Appendix: How to submit additional content” for more information.
All Key CommandsPlease see “Appendix: Key Commands” for a complete list of key options available in the Pictures menu.
44
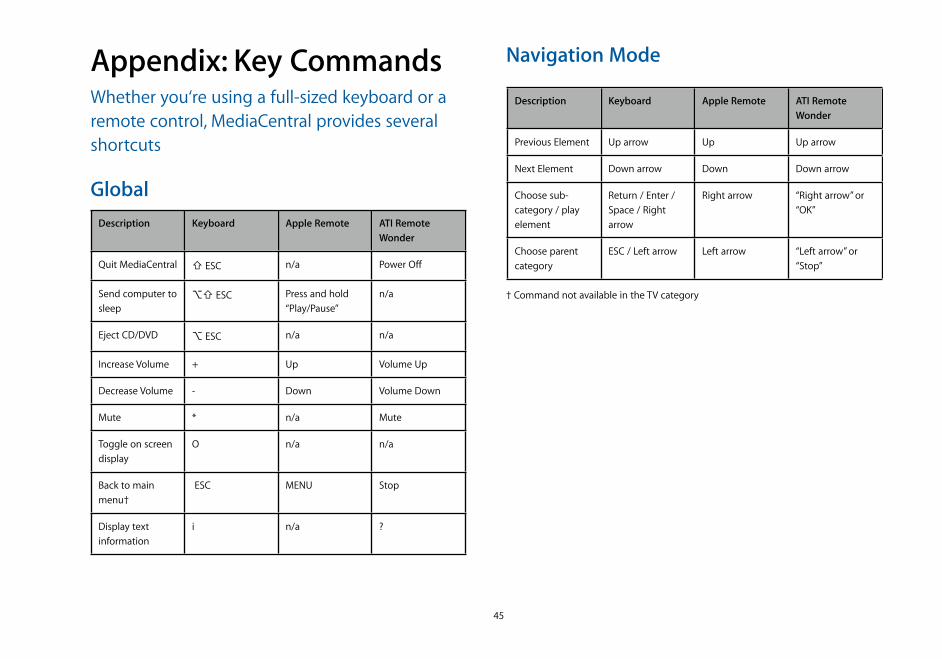
Appendix: Key CommandsWhether you‘re using a full-sized keyboard or a remote control, MediaCentral provides several shortcuts
GlobalDescription Keyboard Apple Remote ATI Remote
Wonder
Quit MediaCentral
Send computer to sleep
Eject CD/DVD
Increase Volume
Decrease Volume
Mute
Toggle on screen display
Back to main menu†
Display text information
⇧ ESC n/a Power Off
⌥⇧ ESC Press and hold “Play/Pause”
n/a
⌥ ESC n/a n/a
+ Up Volume Up
- Down Volume Down
* n/a Mute
O n/a n/a
ESC MENU Stop
i n/a ?
Navigation Mode
Description Keyboard Apple Remote ATI Remote Wonder
Previous Element
Next Element
Choose sub-category / play element
Choose parent category
Up arrow Up Up arrow
Down arrow Down Down arrow
Return / Enter / Space / Right arrow
Right arrow “Right arrow” or “OK”
ESC / Left arrow Left arrow “Left arrow” or “Stop”
† Command not available in the TV category
45

IP TV†
Description Keyboard Apple Remote ATI Remote Wonder
Scroll forward Shift + Right arrow
Press and hold “Right arrow”
Fast forward
Scroll backward Shift + Left arrow Press and hold “Left arrow”
Fast backward
Toggle Play/Pause Space Play/Pause “Play” or “Pause”
Cycles through audio channels
A n/a A
Toggle subtitles B n/a B
Cycles through aspect ratios
C n/a C
† Availability of functions depending on selected IP TV channel
TV
Description Keyboard Apple Remote ATI Remote Wonder
Next channel Right arrow Right arrow Right arrow
Previous channel Left arrow Left arrow Left arrow
Toggle Navigation Menu
ESC MENU Stop
46
Movies†
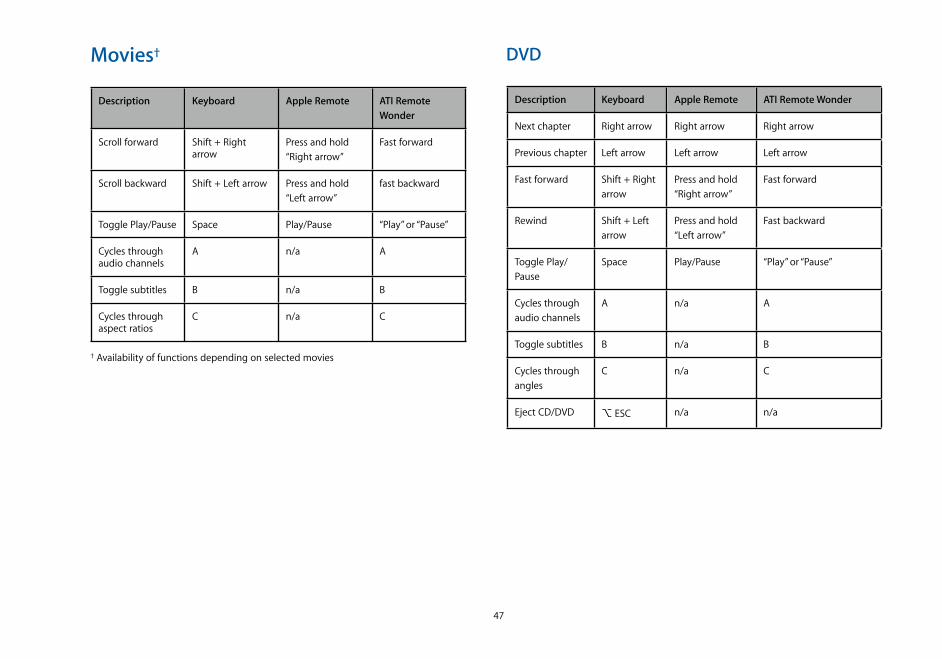
Description Keyboard Apple Remote ATI Remote Wonder
Scroll forward Shift + Right arrow
Press and hold “Right arrow”
Fast forward
Scroll backward Shift + Left arrow Press and hold “Left arrow”
fast backward
Toggle Play/Pause Space Play/Pause “Play” or “Pause”
Cycles through audio channels
A n/a A
Toggle subtitles B n/a B
Cycles through aspect ratios
C n/a C
† Availability of functions depending on selected movies
DVD
Description Keyboard Apple Remote ATI Remote Wonder
Next chapter Right arrow Right arrow Right arrow
Previous chapter Left arrow Left arrow Left arrow
Fast forward Shift + Right arrow
Press and hold “Right arrow”
Fast forward
Rewind Shift + Left arrow
Press and hold “Left arrow”
Fast backward
Toggle Play/Pause
Space Play/Pause “Play” or “Pause”
Cycles through audio channels
A n/a A
Toggle subtitles B n/a B
Cycles through angles
C n/a C
Eject CD/DVD ⌥ ESC n/a n/a
47
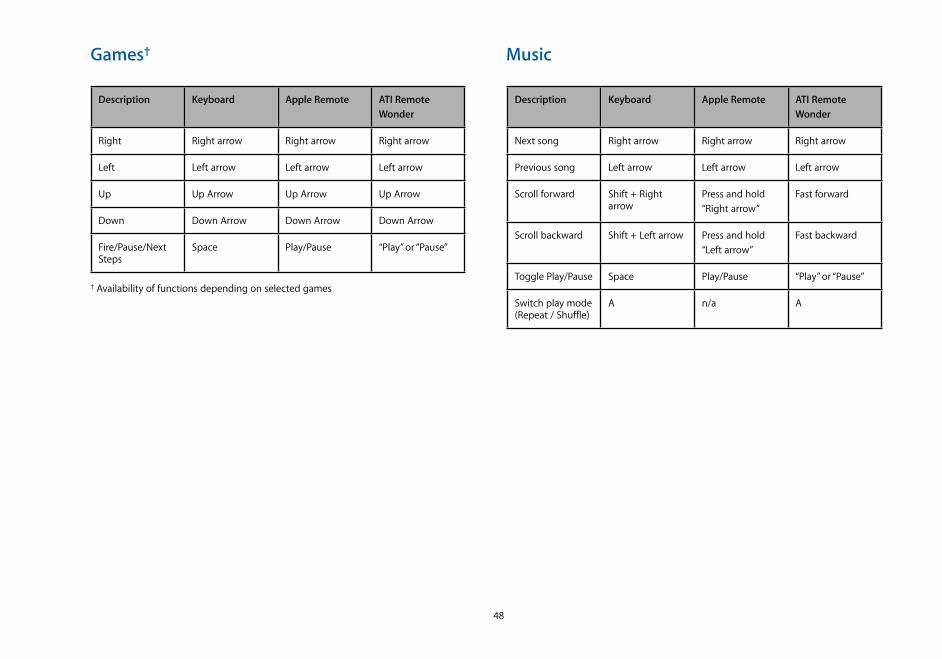
Games†
Description Keyboard Apple Remote ATI Remote Wonder
Right Right arrow Right arrow Right arrow
Left Left arrow Left arrow Left arrow
Up Up Arrow Up Arrow Up Arrow
Down Down Arrow Down Arrow Down Arrow
Fire/Pause/Next Steps
Space Play/Pause “Play” or “Pause”
† Availability of functions depending on selected games
Music
Description Keyboard Apple Remote ATI Remote Wonder
Next song Right arrow Right arrow Right arrow
Previous song Left arrow Left arrow Left arrow
Scroll forward Shift + Right arrow
Press and hold “Right arrow”
Fast forward
Scroll backward Shift + Left arrow Press and hold “Left arrow”
Fast backward
Toggle Play/Pause Space Play/Pause “Play” or “Pause”
Switch play mode (Repeat / Shuffle)
A n/a A
48

Radio
Description Keyboard Apple Remote ATI Remote Wonder
Exit Radio ESC MENU Menu
Pictures
Description Keyboard Apple Remote ATI Remote Wonder
Next picture Right arrow Right arrow Right arrow
Previous picture Left arrow Left arrow Left arrow
Toggle Play/Pause Space Play/Pause OK
Exit slide show ESC MENU Menu
49
Appendix: MediaCentral PreferencesComplete the following to access MediaCentral’s preferences:‣ Choose > System Preferences...
‣ Click on the MediaCentral Icon under the section “Other”
or
‣ In MediaCentral, choose menu “MediaCentral > Preferences...”
50

Tab “Registration”
Buy and Activate
It’s easy to purchase a copy of MediaCentral
Activate your MediaCentral license manually
51
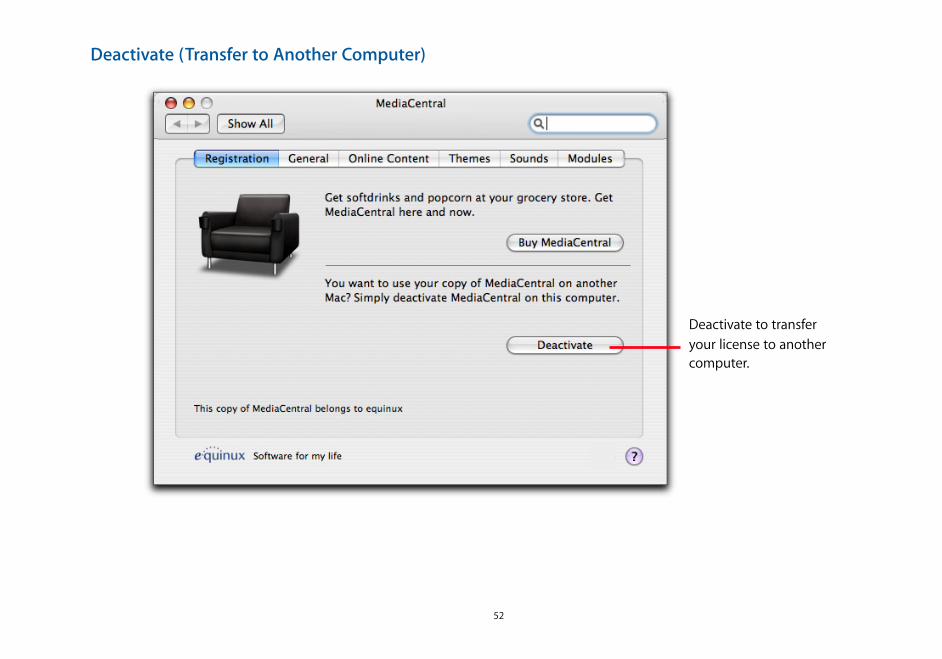
Deactivate (Transfer to Another Computer)
Deactivate to transfer your license to another computer.
52
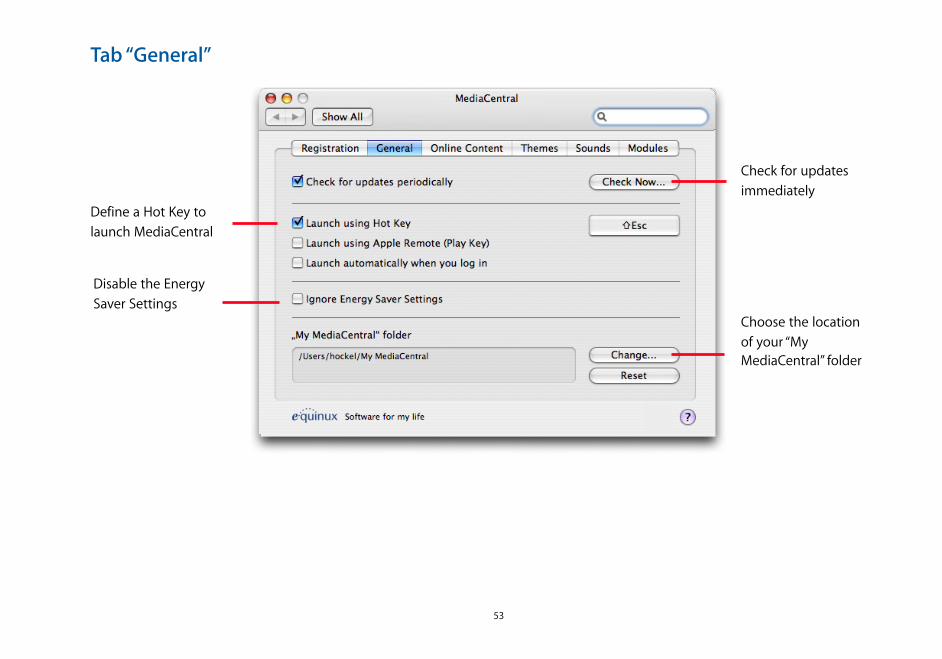
Tab “General”
Choose the location of your “My MediaCentral” folder
Check for updates immediately
Define a Hot Key to launch MediaCentral
Disable the Energy Saver Settings
53
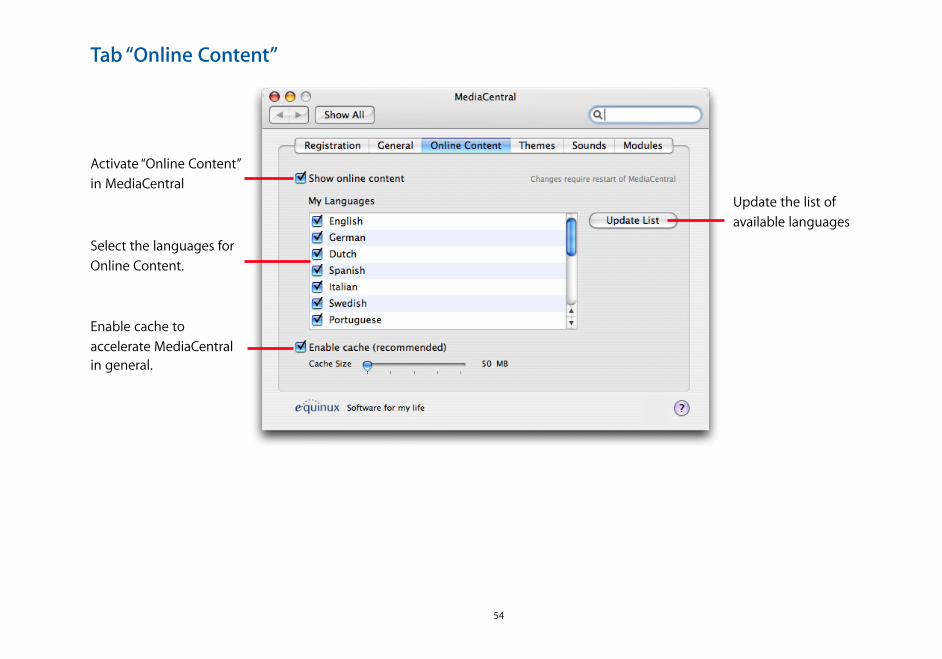
Tab “Online Content”
Update the list of available languages
Activate “Online Content” in MediaCentral
Select the languages for Online Content.
Enable cache to accelerate MediaCentral in general.
54

Tab “Themes”
55
Choose yourfavorite theme
Compose yourown theme
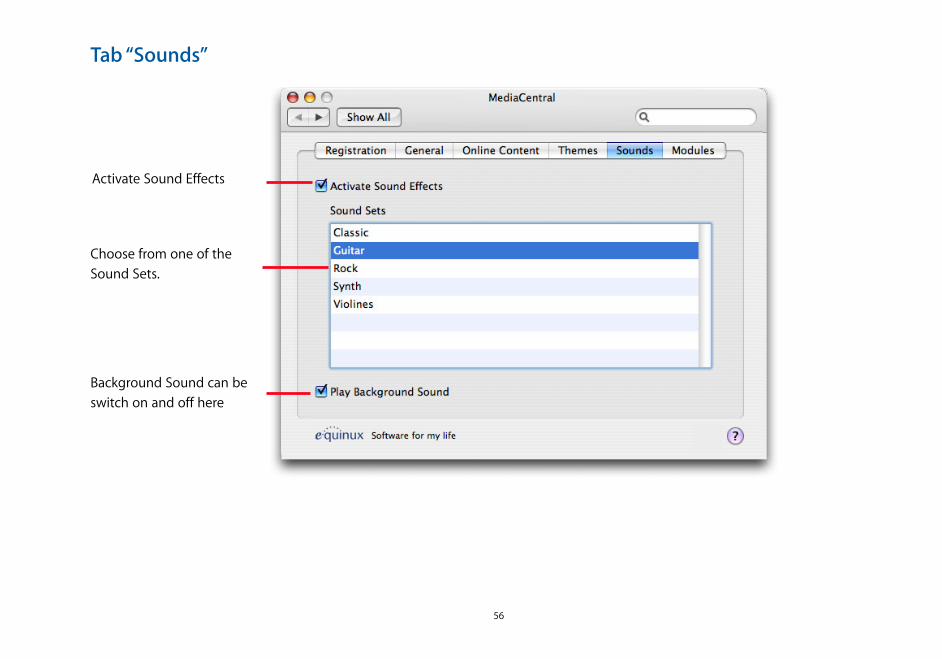
Tab “Sounds”
Activate Sound Effects
Choose from one of the Sound Sets.
Background Sound can be switch on and off here
56
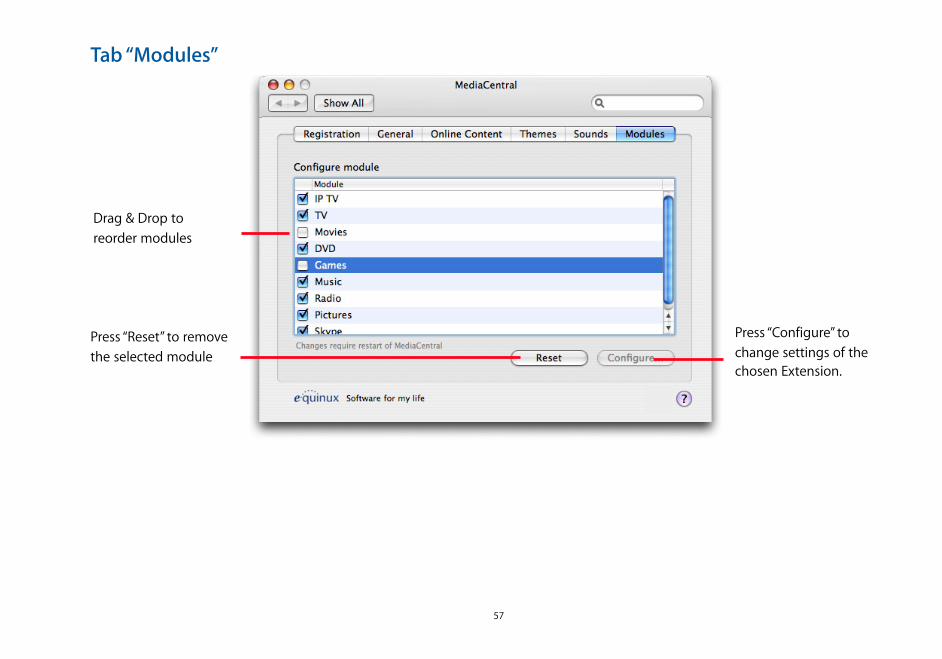
Tab “Modules”
Drag & Drop to reorder modules
Press “Configure” to change settings of the chosen Extension.
Press “Reset” to remove the selected module
57
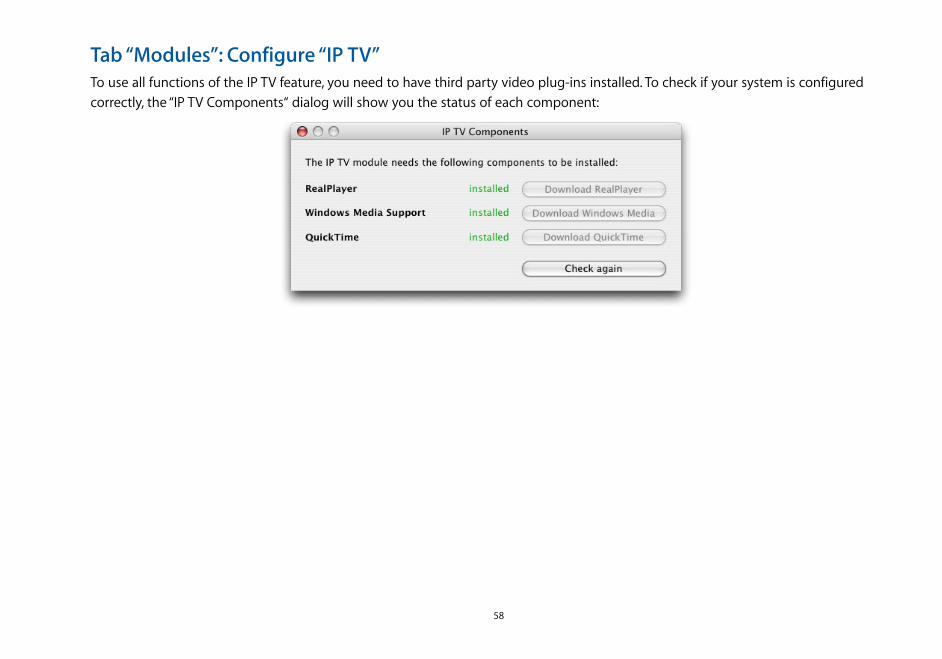
Tab “Modules”: Configure “IP TV”To use all functions of the IP TV feature, you need to have third party video plug-ins installed. To check if your system is configured correctly, the “IP TV Components“ dialog will show you the status of each component:
58
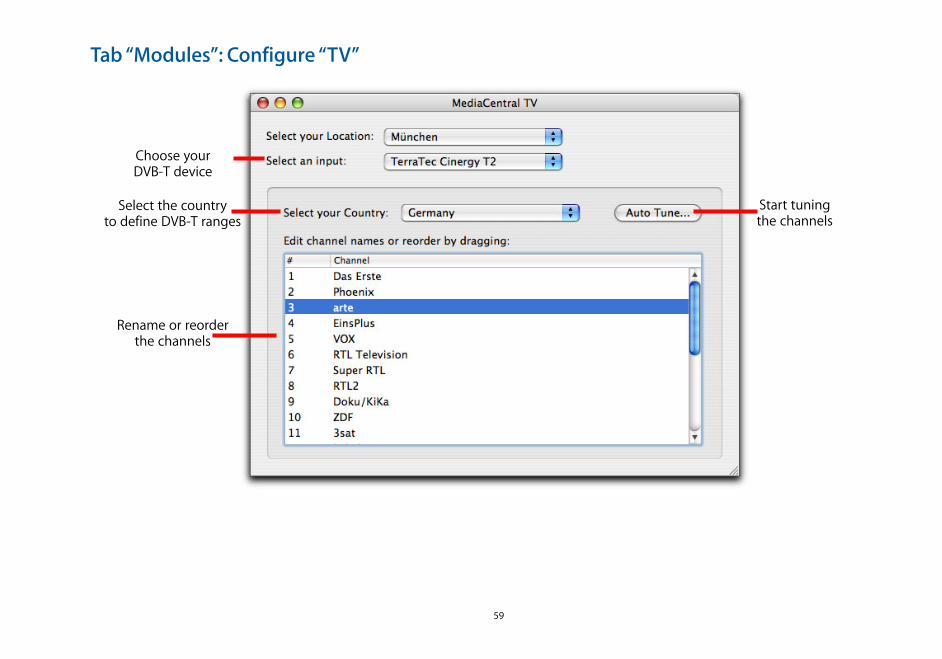
Tab “Modules”: Configure “TV”
Select the countryto define DVB-T ranges
Choose yourDVB-T device
Start tuningthe channels
Rename or reorderthe channels
59
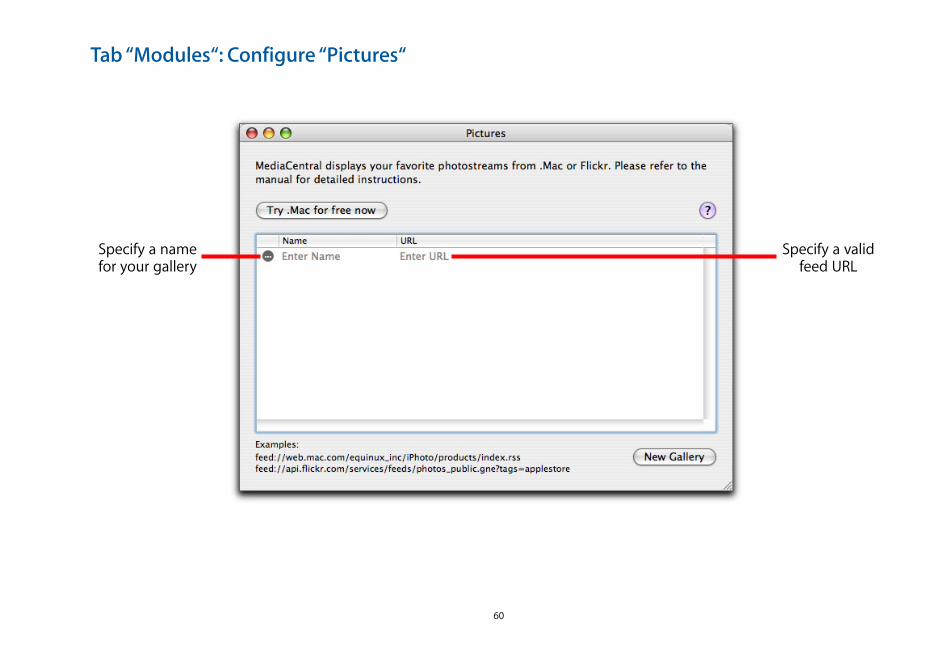
Tab “Modules“: Configure “Pictures“
Specify a namefor your gallery
Specify a validfeed URL
60

Appendix: Remote ControlsMediaCentral is compatible with most remote controls that can send regular key strokes to your Mac. It is also compatible with the Apple Remote and the ATI Remote Wonder and the remotes that come with the supported DVB-T devices.Every programmable remote should be fully compatible with MediaCentral. You'll have to map at least the cursor keys, the enter key and the escape key on your remote control. If your control has more keys available, you can look up possible mappings in “Appendix: Key Commands“.
Apple RemoteYou may use the Apple Remote to navigate through MediaCentral.
ATI Remote Wonder I / IIBoth ATI Remotes, the Remote Wonder I and II, are natively supported by MediaCentral.
DVB-T Device RemotesAny remote included with a compatible DVB-T device can be used to operate MediaCentral. (See “ Appendix: Compatible USB TV devices” for more information).
61
TroubleshootingOn some Macs, the Apple Remote comes with a configuration that is quite similar to the remote of the Twinhan DTV Alpha. This can cause problems using the Apple Remote with MediaCentral properly.
To fix these problems:
Go to: http://docs.info.apple.com/article.html?artnum=302545
62

Appendix: Including Custom StreamsOnce you obtained an IP TV or Radio stream URL, you will need to create a container file for your stream. Depending on the stream format, different container files are available.
QuickTime (SDP files)SDP (MOV) files are references to streams in the popular QuickTime format. These files are created by the QuickTime Broadcaster and are provided by the respective IP TV provider.
To add SDP files to MediaCentral, please complete the following steps:‣ In the Finder, copy the file into “My MediaCentral“ > “My IP
TV” or “My Radio“
‣ In MediaCentral, start the stream by accessing it via “My IP TV“ or “My Radio“
Real Player (RAM)RAM files are used to embed the stream URL of channels broadcasting in the Real Player format. They contain nothing but the Real stream URL:
rtsp://www.somerver.gxc/real.rm
To create a RAM file:‣ Open your preferred text editor
‣ Copy your stream URL into a new file
‣ Store the file as plain text and make sure that the file extension is “.ram“
‣ In the Finder, copy the RAM file to “My MediaCentral“ > “My Radio” or “My IP TV“
Note Real Audio streams have the extension .ra, whereas Real Video streams end in .rm.
Windows Media (ASX)The ASX format was invented by Microsoft to allow for embedding ASF streams in local files. ASX files contain the stream URL in an HTML-like format:
<ASX version = "3.0"><TITLE>Simple ASX File</TITLE> <ENTRY> <TITLE>This is a great IP TV Channel</TITLE> <REF HREF = "mms://someserver.gxc/yourchannel.asf" />
63

</ENTRY></ASX>
To create an ASX file:‣ Open your preferred text editor
‣ Copy your stream URL into a new file like the above example
‣ Store the file as plain text and make sure that the file extension is “.asx“
‣ In the Finder, copy the RAM file to “My MediaCentral“ > “My Radio” or “My IP TV“
PLSPLS playlists are usually used for audio streams in MP3 format. They take the following form:
[Playlist]NumberOfEntries=1File1=http://www.someserver.gxc/sample.mp3Title1=Bird SongLength1=-1Version=2
If you include a single radio station, your PLS playlist will always have a single entry. The negative length is used to specify a stream (instead of a static audio file).
To create a PLS file:‣ Open your preferred text editor
‣ Copy your stream URL into a new file like the above example
‣ Store the file as plain text and make sure that the file extension is “.pls“
‣ In the Finder, copy the PLS file to “My MediaCentral“ > “My Radio”
Note PLS is not suitable for including Real Audio streams.
M3UM3U playlists are also suitable for MP3 streams. They have a simpler structure than PLS files. In fact, they look just like RAM files:
http://www.someserver.gxc/speedfm.mp3
To create a M3U file:‣ Open your preferred text editor
‣ Copy your stream URL into a new file
‣ Store the file as plain text and make sure that the file extension is “.m3u“
‣ In the Finder, copy the M3U file to “My MediaCentral“ > “My Radio”
64

Note M3U is not suitable for including Real Audio streams.
65
Appendix: Make Flash Games Ready for MediaCentralFlash games can be adapted to work with MediaCentral. Advanced users with programming skills can learn how to do this.
Understanding Flash Games in MediaCentralMost Flash games need the interaction of a mouse to start gaming. In many cases, you are presented with a “Start” Button that needs to be clicked. MediaCentral does not provide mouse interaction. Any code in the Flash game that relies on mouse interaction need to be replaced by keystroke interaction.
Flash games run in a “sandbox” mode within MediaCentral.
Please follow these guidelines to adapt existing Flash games to MediaCentral:‣ Replace any mouse interaction by keystroke commands
‣ Do not use the ESC key as a function as it will be trapped by MediaCentral‘s GUI
‣ Check the available key commands that will be passed to the Flash Game by MediaCentral
‣ Only use keystrokes that are available (arrow keys, Space) and be sure to remap any keys that are not available
How to Publish a Game for Other MediaCentral UsersOnce you’ve adapted a Flash game to MediaCentral, put the Flash file (.swf ) to a webserver. Submit the link using the equinux MediaCentral Submit Form. See Appendix “How to submit content” for more information.
66

Appendix: How to Create Your Own Sound SetsWant to change the sounds for up and down navigation, background sound loops and more? Go ahead and create your own Sound Set.
Sound Sets Made EasyA Sound Set in MediaCentral is basically a folder that has the special file suffix ".mcsnds" and contains sound files. MediaCentral opens this folder and reads the sound files that have the correct naming.
To create a new Sound Set:‣ Create a folder and add 7 sound files with the following
names to it:
✦ "Background"Is played in the background in a loop
✦ "Back"Will be played if you go back to the parent menu
✦ "Confirm"Will be played if you open a submenu
✦ "Denied"Will be played if there is the action is currently not allowed
✦ "Navigation"Will be played if you select another menu item
✦ "Quit"Will be played if you quit MediaCentral
✦ "Volume"Will be played if you change the playback volume
MediaCentral does not care about file suffixes of sound files. You can use any sound format that can be opened with the Quicktime Player. It is advised to use a compressed format like MP3 or AAC when you make your Sound Set available for download.
‣ After your Sound Set is complete, rename the folder you created by adding the file suffix ".mcsnds" to the folder name
The folder icon now changes to a black document symbol with a note in it
‣ To install your new Sound Set, double-click on the icon
67

Appendix: How to Submit Additional ContentMediaCentral retrieves Online Content automatically when it starts and reloads new content during specific time intervals. If you would like to see more content channels in MediaCentral, please let us know.
The MediaCentral “Submit Content” Webpageequinux provides a special webpage to propose additional content for MediaCentral’s Online Content sections in each category, like IP TV, Movies, Games, Music, Radio and Pictures.
Please complete the following to propose additional Online Content:‣ Go to: www.equinux.com/Go to/mediacentral/submitcontent
‣ Choose what type of Online Content you would like to submit. Please fill out all of the required fields
equinux will review the suggested content and decide whether your content will be published in MediaCentral.
68