Embed Size (px)
Citation preview

Manual
The present documentation is protected by law. All rights, especially the right of duplication,circulation and translation is reserved.
No part of this publication may be reproduced in form of copies, microfilms or other proces-ses, or transmitted into a language used for machines, especially data processing machines,without the express written consent of the publisher.
All copyrights reserved.
MAGIX is a registered trademark of MAGIX Entertainment Corp. All other product namesare trademarks of their respective owners.
Errors and changes to the contents as well as program modifications are reserved.
© 1994 —2000 Copyright by MAGIX Entertainment Products GmbH
VST™ is a Registered Trademark of Steinberg® Soft- und Hardware GmbH.
All other trademarks are property of their respective owners. Technical specifications subjectto change without notice. Correct as of July 2000.
Table of Contents
3
Table of Contents
Preface 9Contents of packaging 10System Requirements 12Installation 13Our copy protection for your safety 15Notes on the electronic manual 15Introduction 16What is MAGIX music studio generation 6? 16Sound Cards 17Testing the Sound Card 18The MIDI Interface 18Reading the Manual 19Digital Audio Basics 19CD Sound 20Direct-to-disk Recording 20Setting up Your Equipment 20Setting up Your Audio Devices 21
PART 1 - MIDI STUDIO: TUTORIAL 25Audio Cabling 26Just Like a Multitrack 26Mixing Desk without Sub Groups 26Mixing Desk with Sub Groups 27MIDI Installation 28Interface Connection 28MIDI Cable Connections 28Tape Synchronization 30Audio: Recording and Playback 31Concept: Tracks, Audio Files, and Regions 31Audio Recording 35Sample Editor and Digital Factory 38The Sample Editor Window 38Digital Factory 39The Waveplayer 40The Waveplayer Window 40Mixdown with MAGIX midi studio generation 6 44The Mixer and HyperDraw 44The Track Mixer 44Audio Channel Strips 45MIDI Channel Strips 46

Table of Contents
4
Automated Mixing 48Graphical Mixdown with HyperDraw 49Audio Instruments 51MIDI: Recording and Playback 53Flow of MIDI Signals 53Recording Notes and Playing Them Back with Sound Generators 55… if there still is no sound … 56Recording, Playing Back, and Deleting Sequences 57Fine or Rough Copying and Shifting of Sequences 58Sequence Play-Back Parameters 58The Autoload Song 60Event Editor 61The Event Float Window 63Transport Functions 64Score Editing and Printout 67Interactive Score Editor 67Editing Sequences in the Score Editor 67Matrix Editor 69Preparing files for CD burning 71File Format 71Mixdown by Track Bouncing 71Post-Production 72Troubleshooting 74PCI Faults 75SCSI and IDE Faults 76Faulty Cables 76Hardware Conflicts 77Sound Cards 78Viruses 79Graphic Cards 79Re-installing the Operating System 79Updating the Operating System 80Formatting the Hard Disk 80
PART 2 - MIDI STUDIO: REFERENCE 81Using MAGIX midi studio generation 6 82Conventions of this Manual 82The Mouse 82Window Functions 86Selection Techniques 93Edit Operations 95General Functions of the Editors 96Key Commands 100Global Functions 103

Table of Contents
5
Song Administration 103Transport Functions 106The Transport Window 106Bar Ruler 111Cycle Mode 112Recording 114Chase Events 117Arrange Window 119Overview 119Tracks 120The Patch Name Editor 122The Track Parameters 124Sequences 126Sequence Playback Parameters 131Quantization 135Groove 137Hyper Draw in the Arrange window 137Altering the Display 140Reset Functions 141Using Audio in the Arrange Window 142Regions in the Arrange Window 142Audio Recording 149Functions 153Mixers and Audio Objects 155The basics 155The Track Mixer 156EQ’s, Effects and Plug-Ins 157Audio Instruments 165The Synthesizers—Audio Instruments 166Faders and Level Adjustment 175Routing 176Automation 178The Audio Window 180Layout 182Display 183Operation 185File Administration 189Other Functions 195Audio Driver 196EASI/ASIO 196The Sample Edit Window 197Layout 198Display 198The Sample Edit Window In Use 201

Table of Contents
6
Functions 205The WavePlayer 211The WavePlayer window 211The Event List 216Display 217Operation 217Event List Structure 220Event Type Structure 222Event Float Window 225The Drum Editor 227Event Definitions 228Event Definition Parameter Box 229Operation 232The Matrix Editor 236Display 236Editing Notes 237Functions 240Score Edit Window 241Opening the Score Editor 241Layout and Printing 244Tempo 260Tempo List Editor 260The Graphic Tempo Editor 262Tempo Functions 262Synchronization 263Synchronization Window 263Special Functions 267Synchronizing Video Files 269The Basics 270Song Settings and Preferences 278Song Settings 278Preferences 283Standard MIDI Files 288Basics 288Glossary 290

Table of Contents
7
PART 3 - AUDIO STUDIO: TUTORIAL 299New features in the generation 6 version 300Quickstart 301The first recording 301The first arrangement 304Terminology 307Overview 307Clip 307Handle 308Marker 308Objects 308Range 309Section 309Virtual Projects (VIPs) 310Wave projects 311Virtual Editing Concepts 313Working with Objects 313Working with Ranges 316Volume 319Output modus 320Tips & Tricks 321Working in Projects 321Mixer 323Performance 323Recording/Playback 324The Effects 325Effects in the VIP 325Mixer-Effects 326Effect Calculations and Signal Manipulations 326Internet-Functions 328Web Publishing (Upload) 328FTP Download 329Burning of CDs (deluxe version only) 330RedBook 330Data Transfer 330Burning CDs in MAGIX Audio Studio 330DSP Display 332The Individual Mouse Modes 334Universal Mode 334Range Mode (Secure Mode) 335Draw Volume Mode 335Draw Panorama Mode 335Curve Mode 336

Table of Contents
8
Context Help mode 336Cut mode 336Zoom mode 336Object separator mode 337Pitch-shift/Time stretch mode 337Draw wave mode (only wave projects) 337Shortcuts 338General 338Range 339Function keys 339Mouse 340Button overview 341Upper Toolkit bar 341Lower toolbars 342Range bar 343Problems & Solutions 344
PART 4 - AUDIO STUDIO: REFERENCE 349Menu File 350Menu Edit 363Menu View 371Menu Object 378Menu Effects 387Menu Range 404Menu CD (deLuxe-Version) 410Menu Tools 416Menu Playback 420Menu Options 431Menu Window 447Menu Help 455
INDEX - MIDI STUDIO 457INDEX - AUDIO STUDIO 479

Preface
9
Preface
Congratulations on your purchase of MAGIX music stu-dio generation 6!Creating your own music or video soundtracks in a homestudio has become more and more popular. But the widevariety of available equipment and software often con-fuses beginner and professional musicians alike. MAGIXmusic studio generation 6 offers the perfect solution by al-lowing you to create high quality productions in a quickand easy manner.MAGIX music studio generation 6 transforms your PCinto a complete, virtual sound studio. It allows you to ar-range and produce on the highest level—with any 16bitsound card. Of course, you can also integrate other studioequipment without any problems. This program ensuresprofessional production results which can be integratedwith existing and future musical studio equipment. Thefollowing pages will introduce you in detail to the variousfunctions and possibilities of MAGIX music studio gener-ation 6. Experience music like never before—turn yourPC into your own home studio.
Enjoy!
Your MAGIX Entertainment Team

Contents of packaging
10
Contents of packaging
Please make sure that the objects indicated here are included in your packaging.
Program-CD
This CD contains the MAGIX Music World with the in-stallation program of MAGIX music studio generation 6.
Manual
For a quick intro with MAGIX music studio generation 6or to learn in-depth about the program, we recommendthat you take a look at the manual.
Registration card
Please send us your registration card today! MAGIX pro-vides e-mail and phone support to its registered users. Wewill also keep you up-dated on new products, up-grades,etc.
MAGIX music network
Become a MAGIX networker! Your avantages:– the Mega-NetWork items on offer on the MAGIX
Homepage– The latest info and demos will be sent to you free of
charge.– There is a Sound and Song Exchange for all
NetWorkers on the MAGIX Homepage. Here you canswap sounds, songs and experiences and chat withother NetWorkers.

Contents of packaging
11
– You can participate in MAGIX soundpool raffles.Simply fill in the enclosed Winnings Card and send itback to us as quickly as possible! Or join in online:
http://www.magix.com/network/
– Charts to join in on: MAGIX music studio generation 6is not only multimedia software, but also the key toparticipating in the MAGIX music network charts onthe Internet. Send in your masterpieces! You canupload them directly from the program via the new webpublishing wizard!
Support
If you are unable to correct your problem with MAGIXmidi studio generation 6 contact MAGIX support:
Please supply the following information:– Configuration of your system (Processor, RAM, hard
disk, etc.)– Sound card configuration (Type, Driver)– Information on whether other audio components are
operating properly
Legal Notice
Most chart hits and whole CDs can be downloaded fromthe Internet as MP3 files. However, many of these down-loads are illegal. Works protected by copyright may not bedownloaded or presented on your own homepage withoutthe express knowledge and consent of the copyrightowner. Free transfer and trade with such music files ispunishable by law. There are, however, many sites offering free MP3 fordownloading. A selection of them can be accessed directlyvia the MAGIX homepage (http://www.magix.com/).Your own compositions can be presented as you wish onhomepages and in the network.
U.S.A. Europe
Info [email protected] [email protected]
Webpage http://www.magix.com/
Fax (310) 656-0234 ++49 - (0)89-7691041
Telephone — 0181 968 1554
System Requirements
12
System Requirements
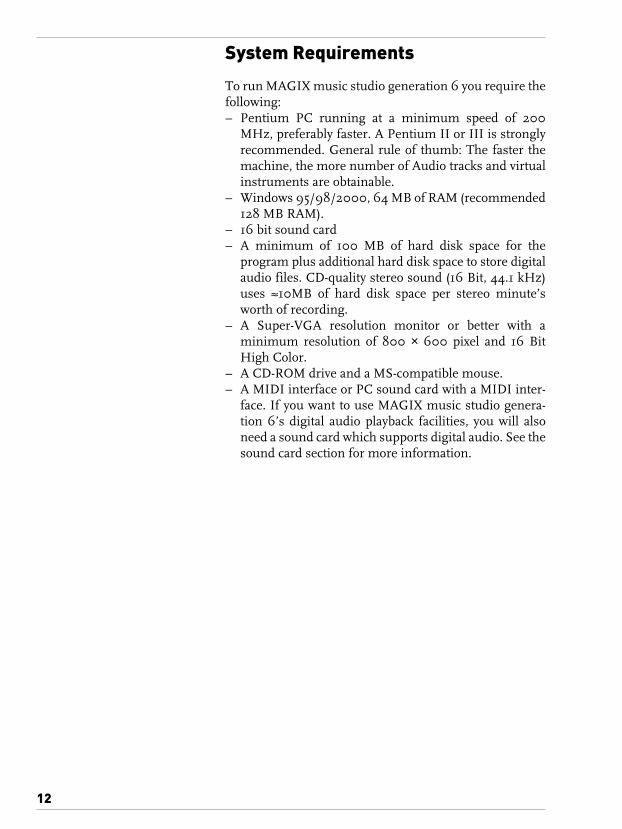
To run MAGIX music studio generation 6 you require thefollowing:– Pentium PC running at a minimum speed of 200
MHz, preferably faster. A Pentium II or III is stronglyrecommended. General rule of thumb: The faster themachine, the more number of Audio tracks and virtualinstruments are obtainable.
– Windows 95/98/2000, 64 MB of RAM (recommended128 MB RAM).
– 16 bit sound card– A minimum of 100 MB of hard disk space for the
program plus additional hard disk space to store digitalaudio files. CD-quality stereo sound (16 Bit, 44.1 kHz)uses ≈10MB of hard disk space per stereo minute’sworth of recording.
– A Super-VGA resolution monitor or better with aminimum resolution of 800 × 600 pixel and 16 BitHigh Color.
– A CD-ROM drive and a MS-compatible mouse.– A MIDI interface or PC sound card with a MIDI inter-
face. If you want to use MAGIX music studio genera-tion 6’s digital audio playback facilities, you will alsoneed a sound card which supports digital audio. See thesound card section for more information.

Installation
13
Installation
1Put the Installation CD in your CD-ROM drive.
2With Windows 95/98/2000 the installation managerstarts automatically. If it doesn’t, open the Explorer andclick on the letter corresponding to your CD ROM driveand double click on Mworld.exe.
3To start the installation process, click on Install MAGIXmusic studio generation 6.
4The Installation Wizard appears. Simply follow the in-structions and click on “NEXT” to continue. When all filesare copied on the hard disk, a program group will be estab-lished and the installation is completed. Confirm with“Finish”. The program automatically starts with a DemoProject. Later you can start the program with the icon inthe Windows start menu.
Autostart of the installation orActivation of the CD-ROManddouble click on Mworld.exe
Put the Installation CD in your CD ROM drive

Installation
14
The MAGIX Music World is the starting point for every-thing that you’ll find on the Installation CD such as infor-mation about other MAGIX products and our website.You will always find the latest & greatest about MAGIXmusic studio generation 6.
INSTALLClick here to installMAGIX music studio gen-eration 6
DEMOSGet demo versions and infor-mation about other MAGIXprograms.
BROWSE CDBrowse through the filestructure of the CD ROM.
WWWVisit our website at www.magix.net to getupdated information about MAGIX and toorder additional products and sound orvideopools on-line.
EXITClick here to exitthe MAGIX MusicWorld.
playR jukeboxTo install the MAGIXplayR jukebox, clickon this button.
Installation
15
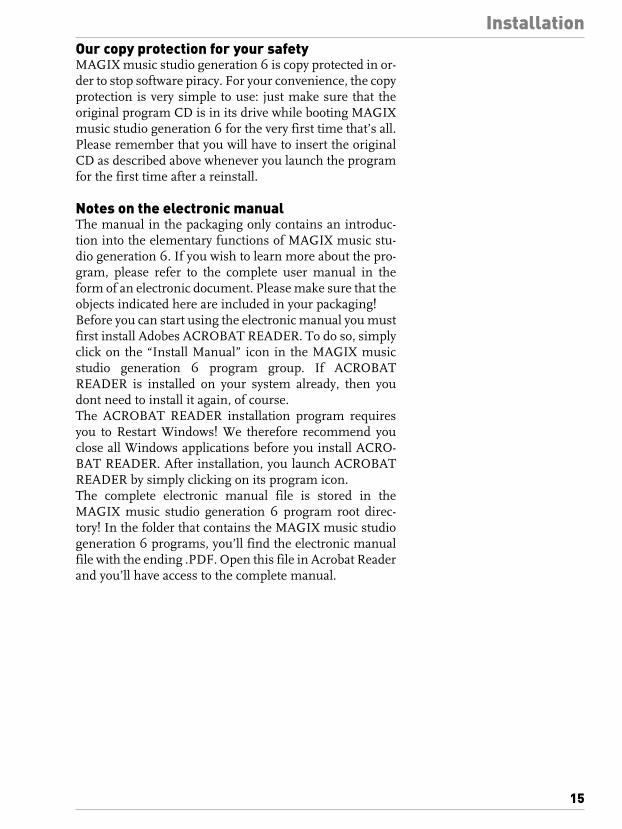
Our copy protection for your safetyMAGIX music studio generation 6 is copy protected in or-der to stop software piracy. For your convenience, the copyprotection is very simple to use: just make sure that theoriginal program CD is in its drive while booting MAGIXmusic studio generation 6 for the very first time that’s all.Please remember that you will have to insert the originalCD as described above whenever you launch the programfor the first time after a reinstall.
Notes on the electronic manualThe manual in the packaging only contains an introduc-tion into the elementary functions of MAGIX music stu-dio generation 6. If you wish to learn more about the pro-gram, please refer to the complete user manual in theform of an electronic document. Please make sure that theobjects indicated here are included in your packaging!Before you can start using the electronic manual you mustfirst install Adobes ACROBAT READER. To do so, simplyclick on the “Install Manual” icon in the MAGIX musicstudio generation 6 program group. If ACROBATREADER is installed on your system already, then youdont need to install it again, of course.The ACROBAT READER installation program requiresyou to Restart Windows! We therefore recommend youclose all Windows applications before you install ACRO-BAT READER. After installation, you launch ACROBATREADER by simply clicking on its program icon.The complete electronic manual file is stored in theMAGIX music studio generation 6 program root direc-tory! In the folder that contains the MAGIX music studiogeneration 6 programs, you’ll find the electronic manualfile with the ending .PDF. Open this file in Acrobat Readerand you’ll have access to the complete manual.

Introduction
16
Introduction
What is MAGIX music studio generation 6?MAGIX music studio generation 6 uses your PC as a com-plete, virtual sound studio. Your hard drive becomes ahighly sensitive recording tool. The sound chip of yoursound card, a microphone, your instruments or thesoundtrack of your video become the sound sources. Youhave access to two highly optimized programs that arecompatible with each other: MAGIX music studio genera-tion 6 combines a hard disk recording program with aMIDI Sequencer.Harddisk-Recording means digital recording of audio sig-nals directly to the hard drive. Through the analog/digitaltransformer, analog audio signals are transformed intodigital information that are saved to the hard drive asWAV files.MIDI means “Musical Instruments Digital Interface” andcontrols the sound sources such as synthesizers or soundcards. A MIDI file only contains information which note isplayed when and how whereas WAV files are digital repre-sentation of real audio signals. That’s why MIDI files aremuch smaller than WAV files.MAGIX audio studio generation 6 allows the perfect re-cording and editing of sounds in WAV format. On 24 au-dio tracks (48 with MAGIX audio studio generation 6 de-luxe), you can work with professional effects and editingtools—even for real-time editing of video sound tracks.Per FTP connection you can use the internet as a bound-less image and sample pool and load the multimediabuilding blocks from the World Wide Web directly intoyour arrangement. The MAGIX web publishing area isthere for the publishing of your work—one mouse clicktakes you into the charts. Every surfer is entitled to vote,the best songs and videos will receive attractive prices…MAGIX midi studio generation 6 controls the synthe-sizer-chip on your sound card (or of external MIDI instru-ments). In addition you get a polyphonic Waveplayer withfilter and envelope capabilities, allowing you to play yourWAV files as if you were using them in an external sam-pler. Furthermore the MAGIX midi studio generation 6features 256 MIDI tracks (1.000 with MAGIX midi studiogeneration 6 deLuxe) on which you can simultaneouslyrecord and playback. And finally you get 4 (6 with MAGIXmidi studio generation 6 deLuxe) audio instrumenttracks, on which you can play and record the built-in two(three with MAGIX midi studio generation 6 deLuxe) syn-

Introduction
17
thesizers. As an alternative to the MAGIX synthesizers,you can also use VST™2.0-instruments.You can record WAV files both in MAGIX audio studiogeneration 6 and MAGIX midi studio generation 6, andsoon you’ll appreciate both possibilities. You can, for in-stance, draft a song in MAGIX midi studio generation 6,play it back and simultaneously record sounds with a mi-crophone. You can transform the MIDI files into WAVfiles by using the recording function.Both studios are only a mouse click apart! Take your audiotracks from MAGIX midi studio generation 6 to MAGIXaudio studio generation 6 and vice versa. MAGIX musicstudio generation 6 lets you do all this and more with avery user-friendly interface. Right after the first steps,you’ll be able to use the programs intuitively.
Sound CardsThere are dozens different PC sound cards on the market.MAGIX music studio generation 6 works with all Win-dows compatible sound cards, i. e. with all that have adriver for Windows 32 Bit Operating Systems. These driv-ers are listed in “Multimedia” of the Windows ControlPanel. It’s safe to assume that all modern sound cards areWindows compatible.Most sound cards have a synthesizer-chip for the playbackof MIDI. Additionally, most sound cards support the playback of digital audio data. If you work with MAGIX musicstudio generation 6, your sound card must have separatedrivers for MIDI and Audio playback (which most modernsound cards do).MAGIX music studio generation 6 supports all soundcards that can be addressed via an ASIO or EASI driver.The available options depend on the specific ASIO orEASI driver you will be using. Please refer to the instruc-tions that came with your driver. MME and DirectSounddrivers are supported via so-called MME-to-EASI respec-tively DirectSound-to-EASI wrapper.Please note: If you want to use the Waveplayer, you mustuse a DirectSound driver. And only DirectSound driversallow the simultaneous use of the Waveplayer and digitalaudio tracks.MAGIX music studio generation 6 supports sound cardswith a stereo output. Digital interfaces such as S/PDIF orAES-EBU are also supported. MAGIX music studio gener-ation 6 deluxe supports sound cards with up to four audiooutputs.
Introduction
18
But please note: Some older sound cards cannot play backdigital audio data. As long as you have Windows drivers,you can use such sound cards with MAGIX music studiogeneration 6; however not for playing back audio data.Some other older sound cards use only one driver for bothAudio and MIDI. In that case, you can you MAGIX musicstudio generation 6 only for MIDI or Audio but not forMIDI and Audio simultaneously.
Testing the Sound CardMake sure your sound card is installed correctly and thedrivers are set up properly before using MAGIX midi stu-dio generation 6. The software which comes with thesound card should include routines to test the card. Youmust make sure it is running correctly under Windows,not just DOS. An easy way to test the card is with the Me-dia Player which you will find in Windows’ AccessoriesProgram Group. Look in the Device menu and you shouldsee MIDI Sequencer… and, if your card supports digitalaudio, Sound…Try playing the CANYON.MID file which Windows in-stalls automatically in the Windows directory. Then tryplaying a .WAV file. Again, there should be some in theWindows directory. If either of these items is missingfrom the Device menu it means the drivers have not beenloaded. Go back to the Drivers Control Panel and installthe correct drivers. Refer to your sound card’s manual andthe Windows Users’ Guide for more information.
The MIDI InterfaceMany sound cards have a built-in MIDI interface which isaccessed from a joystick connector on the back of the card.To use it you need a MIDI adapter. One end plugs into thejoystick socket and the other terminates in MIDI plugs orsockets which you connect to your MIDI equipment.Some sound card packs include the adapter but many ofthe cheaper ones do not. There are also several dedicatedMIDI interfaces available. Many are on plug-in cardswhich are fitted and installed into the PC just like a soundcard. There are also external MIDI interfaces which con-nect to the PC’s printer port or serial port. You can installthem without opening up your PC and they are ideal foruse on portable PCs. You still have to install driver soft-ware for them. Some have a Thru socket which enablesyou to plug in your printer and use it without removingthe interface. Other’s don’t.

Introduction
19
Reading the ManualFew people like reading manuals. Many software usersprefer to point and click their way around a program todiscover what it does and how it works. MAGIX midi stu-dio generation 6 has an intuitive interface so if you knowa little about sequencers you will probably be able to learnhow most of the program works by this approach. You candip into the manual to look up any features you requiremore information about. If you are a newcomer to se-quencing we strongly recommend working through theTutorial. It uses a practical, hands-on approach to explainall of MAGIX midi studio generation 6’s main functionsand by the end you should be well on the way to becominga sequencing expert. We recommended even the more ex-perienced user read the Tutorial in order to become famil-iar with how the various parts of the program work. Fi-nally, do at least flip through the Reference section. It notonly contains detailed information about every menu,window and function in MAGIX midi studio generation 6but it also includes examples of how many functions canbe used in a practical way.
Digital Audio BasicsIf you’re familiar with the principles of digital audio youcan skip this section. This is a brief introduction to thesubject to help you get the most out of MAGIX midi studiogeneration 6’s digital audio playback facilities. Digital au-dio recording is the process of converting audio data—sound—into digital data which can be stored on a com-puter. The device which does this is built into most soundcards and is known, quite helpfully, as an Audio-to-Digitalconverter. This is often abbreviated as A-to-D, ATD or justAD.To convert the digital data back into sound, the card uses aDA (Digital to Audio) converter. To capture sound, the ADconverter takes a sample of a sound source a specific num-ber of times per second. This is known as the sample rateand is measured in kHz or so-many thousand samples persecond. The higher the rate, the more samples the ADconverter takes and the more accurate the digital represen-tation of the sound will be. The sampling resolution is theaccuracy or fineness of the measuring scale used to storethe numbers and is measured in bits. Currently there aretwo resolutions commonly in use: 8 bits and 16 bits. Togive you an idea of the relevance of the sampling resolu-tion, imagine two people are building a house. One is us-ing a measuring stick marked to the nearest foot. The
Introduction
20
other has a stick marked to the nearest inch. Although thehouse built with the stick measuring to the nearest footmay not fall down, the one using the finer scale will builda more accurate house.
New Audio Engine: MAGIX music studio generation 6now works with a new, significantly improved audio en-gine. It offers shorter latency times, faster fader response,improved VST™ support and overall better performance.Monitoring, that is, listening to the input signal at the au-dio output, is now available. You will find these new driversettings on the pages “Audio Drivers” and “Audio Drivers2” in the Audio menu.
CD SoundCD quality audio is recorded at a sample rate of 44.1 kHzwith 16 bit resolution. Many Multimedia programs use alower rate such as 22.05 kHz or 11.025 kHz, and many use8 bits. This is often quite adequate if the sound is playedthrough inexpensive PC speakers but you would certainlybe able to tell the difference if it played through a good hi-fi system.
Direct-to-disk RecordingOne minute of CD-quality sound requires 10 MB of stor-age space. Clearly it’s impractical to store this in RAM. It ismore practical to store your samples on disk. During play-back this data has to be read on the fly so you need a rea-sonably fast hard disk if the data is to be played back accu-rately. Most modern disks are capable of this but someolder ones may have problems, especially if they are run-ning in a slow PC. With MAGIX midi studio generation 6you can playback digital audio which has previously beensaved to disk.
Setting up Your EquipmentMake sure the MIDI interface or sound card and MAGIXmidi studio generation 6 are correctly installed. If you areusing an external MIDI keyboard connect its MIDI Out tothe interface’s MIDI In. If you are also using the soundson the keyboard, connect its MIDI In to the interface’sMIDI Out. If you are using the sounds on a sound cardthis is not necessary. If you want to use a keyboard for re-cording but a MIDI sound module for playback, connectthe module’s MIDI In to the interface’s MIDI Out. If youwant to use MAGIX midi studio generation 6’s digital au-
Introduction
21
dio playback facility, make sure the sound card’s audiooutput is connected to a pair of speakers.
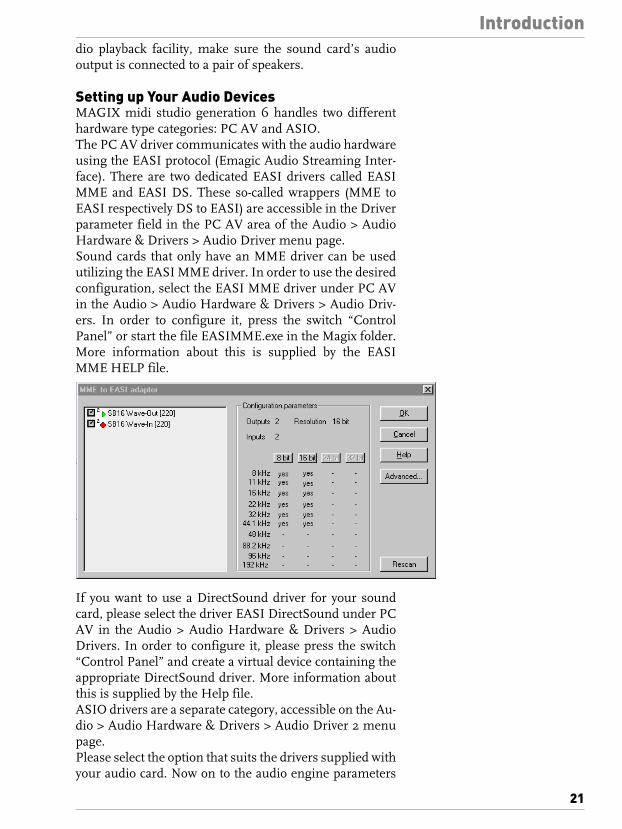
Setting up Your Audio DevicesMAGIX midi studio generation 6 handles two differenthardware type categories: PC AV and ASIO. The PC AV driver communicates with the audio hardwareusing the EASI protocol (Emagic Audio Streaming Inter-face). There are two dedicated EASI drivers called EASIMME and EASI DS. These so-called wrappers (MME toEASI respectively DS to EASI) are accessible in the Driverparameter field in the PC AV area of the Audio > AudioHardware & Drivers > Audio Driver menu page. Sound cards that only have an MME driver can be usedutilizing the EASI MME driver. In order to use the desiredconfiguration, select the EASI MME driver under PC AVin the Audio > Audio Hardware & Drivers > Audio Driv-ers. In order to configure it, press the switch “ControlPanel” or start the file EASIMME.exe in the Magix folder.More information about this is supplied by the EASIMME HELP file.
If you want to use a DirectSound driver for your soundcard, please select the driver EASI DirectSound under PCAV in the Audio > Audio Hardware & Drivers > AudioDrivers. In order to configure it, please press the switch“Control Panel” and create a virtual device containing theappropriate DirectSound driver. More information aboutthis is supplied by the Help file.ASIO drivers are a separate category, accessible on the Au-dio > Audio Hardware & Drivers > Audio Driver 2 menupage.Please select the option that suits the drivers supplied withyour audio card. Now on to the audio engine parameters

Introduction
22
as displayed in the Audio Driver/Audio Driver 2 menupages.
MonitoringThis option allows you to switch monitoring (i.e. listeningto the actual input signal) on or off. Please note that mon-itoring is processed only via software—a certain delay isinevitable. If you are listening to the recorded signalthrough your mixing desk, you should switch this optionoff.
Volume Smoothing [ms]This parameter defines the length of the fade between twoconsecutive volume values for an audio track. When set-ting this value to 0 you might hear zipper noise whenmoving a volume fader during playback. Higher valuessoften the volume changes and eliminate the zipper noise.
Max. Number of AudiotracksThe Audio Engine requires free system memory. Theamount of memory needed depends on the maximumnumber of tracks to be played, and on the number of I/Ochannels supplied by the driver. This setting allows you toreduce the amount of memory used by the driver, by re-ducing the number of tracks. This may be sensible whenyou want to run other applications or audio hardwaretypes simultaneously.
Larger Disk BufferThis option influences the amount of audio data that isread from the disk in advance. This option is switched offby default, matching the demands of fast hard drives andpowerful computers. If you get frequent error messageswhile running your MAGIX midi studio generation 6 inthis mode, you should switch this setting on, so that youcan play back more tracks, achieving higher reliability.However, more RAM is needed in this case.
Larger Process BufferThis parameter determines the size of the native bufferused to compute mixers and effects. Do not activate thisoption if you own a fast computer. This shortens responsetimes to operations such as volume changes or Solo. Ex-periment to find the setting that coaxes the best perfor-mance from your system.Only available for ASIO are the following parameters.
Clock SourceThis let’s you choose between the internal synchroniza-tion via MAGIX midi studio generation 6’s internal clockand external synchronization received via the digital inputof the sound card.
Introduction
23
ASIO Buffer DelaySome drivers do not communicate their input/output de-lay settings correctly to MAGIX midi studio generation 6.If you experience irregularities, try correcting them withthese settings. Refer to the manual of your ASIO audiocard.
Max. I/O streamsHere you set the number of input signal streams comingfrom your ASIO-compliant card and the number of outputstreams going to your ASIO-compliant card. These arelimited to 2 input streams and 2 output streams (MAGIXmidi studio generation 6) respectively 4 output streams(MAGIX midi studio generation 6 deLuxe).

Introduction
24

25
Part1
Tutorial
midistudio
Audio Cabling
26
Audio Cabling
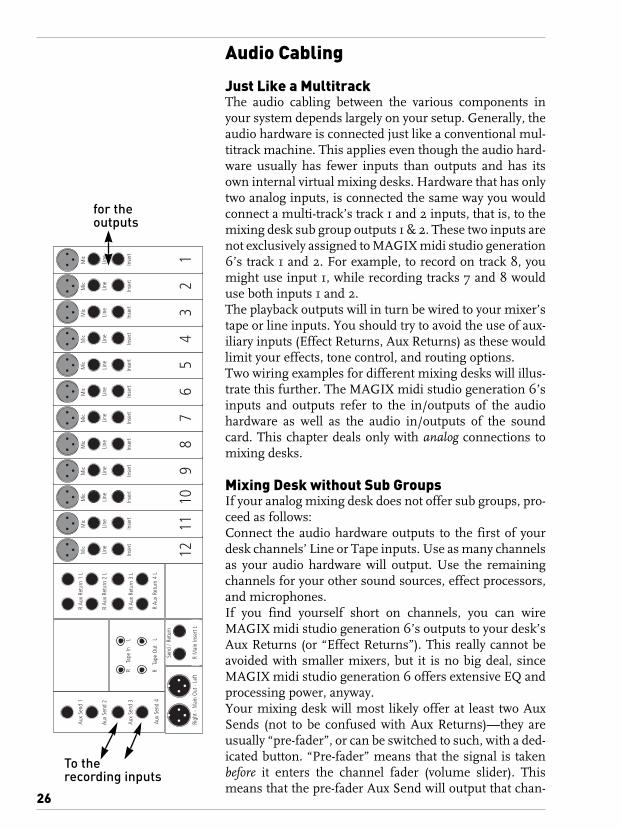
Just Like a MultitrackThe audio cabling between the various components inyour system depends largely on your setup. Generally, theaudio hardware is connected just like a conventional mul-titrack machine. This applies even though the audio hard-ware usually has fewer inputs than outputs and has itsown internal virtual mixing desks. Hardware that has onlytwo analog inputs, is connected the same way you wouldconnect a multi-track’s track 1 and 2 inputs, that is, to themixing desk sub group outputs 1 & 2. These two inputs arenot exclusively assigned to MAGIX midi studio generation6’s track 1 and 2. For example, to record on track 8, youmight use input 1, while recording tracks 7 and 8 woulduse both inputs 1 and 2.The playback outputs will in turn be wired to your mixer’stape or line inputs. You should try to avoid the use of aux-iliary inputs (Effect Returns, Aux Returns) as these wouldlimit your effects, tone control, and routing options.Two wiring examples for different mixing desks will illus-trate this further. The MAGIX midi studio generation 6’sinputs and outputs refer to the in/outputs of the audiohardware as well as the audio in/outputs of the soundcard. This chapter deals only with analog connections tomixing desks.
Mixing Desk without Sub GroupsIf your analog mixing desk does not offer sub groups, pro-ceed as follows:Connect the audio hardware outputs to the first of yourdesk channels’ Line or Tape inputs. Use as many channelsas your audio hardware will output. Use the remainingchannels for your other sound sources, effect processors,and microphones.If you find yourself short on channels, you can wireMAGIX midi studio generation 6’s outputs to your desk’sAux Returns (or “Effect Returns”). This really cannot beavoided with smaller mixers, but it is no big deal, sinceMAGIX midi studio generation 6 offers extensive EQ andprocessing power, anyway.Your mixing desk will most likely offer at least two AuxSends (not to be confused with Aux Returns)—they areusually “pre-fader”, or can be switched to such, with a ded-icated button. “Pre-fader” means that the signal is takenbefore it enters the channel fader (volume slider). Thismeans that the pre-fader Aux Send will output that chan-
Aux
Send
1
Aux
Send
2
Aux
Send
3
Aux
Send
4
Righ
t - M
ain
Out
- Le
ftR
Mai
n In
sert
L
R
Tape
In
L
R T
ape
Out
L
R Au
x Re
turn
3 L
R Au
x Re
turn
4 L
Mic
Line
Inse
rt
Send
/ Re
turn
R Au
x Re
turn
1 L
R Au
x Re
turn
2 L
12
Mic
Line
Inse
rt
11
Mic
Line
Inse
rt
10
Mic
Line
Inse
rt 9
Mic
Line
Inse
rt 8
Mic
Line
Inse
rt 7
Mic
Line
Inse
rt 6
Mic
Line
Inse
rt 5
Mic
Line
Inse
rt 4
Mic
Line
Inse
rt 3
Mic
Line
Inse
rt 2
Mic
Line
Inse
rt 1
To the
for theoutputs
recording inputs

Audio Cabling
27
nel’s signal, even if its fader is all the way down. This kindof output is usually referred to as a monitor output, andmay actually be labelled as such. So, each channel has twoknobs that are used to create a mix which is sent to thedesk’s corresponding auxiliary (or monitor) output. Con-nect these two outputs to the audio hardware’s two inputs.For example, if the two pre-fader Aux Sends are labelled“Aux 3” and “Aux 4”, you would connect a cable from thedesk’s “Aux 3 Output” to the first audio hardware inputand another from Aux4 to the second. You can now control MAGIX midi studio generation 6’sinputs with the Aux Send controls (and their mastersends).
Mixing Desk with Sub GroupsIf your mixing desks has sub groups, use them for record-ing. Connect the first sub group output to MAGIX midistudio generation 6 input 1, and the second to MAGIXmidi studio generation 6 input 2. The recording level isnow controlled with the sub group faders.Connect the outputs to the first few channels’ Line or Tapeinputs. Connect the rest of your sound sources (effect pro-cessors, microphones etc.) to the remaining channel in-puts.During recording, route the channels that are to be re-corded, or the sub groups to your desk’s stereo (master)outputs. If your audio hardware supports more audio in-puts, connect more sub group outputs to them as needed.Avoid connecting the MAGIX midi studio generation 6 re-cording inputs to your desk’s main output (Main Out)—these, as well as the Control Room output that usually car-ries the same signal, are meant for your monitoring equip-ment and your stereo or two track tape machine. This out-put includes a mix of MAGIX midi studio generation 6’soutput signal, which you do not want to re-record.A DAT mastering machine is not required, as MAGIXmidi studio generation 6 can master CD-Rs, in conjunc-tion with a CD burner. If you choose to use a conventionalmastering machine, a DAT or MiniDisc recorder or an an-alog tape deck, connect it directly to the mixing desk’smain output.
Tape
Inpu
t
Aux
Send
1
Aux
Send
2
Aux
Send
3
Aux
Send
4
Righ
t - M
ain
Out
- Le
ftR
Mai
n In
sert
LR
Cont
rol R
oom
L
R
Tape
In
L
R T
ape
Out
L
R Au
x Re
turn
1 L
R Au
x Re
turn
2 L
Bus
Out
puts
(Sub
Gro
ups)
1 5
2 6
3 784
Mic
Line
Inse
rt
Dire
ctO
ut
Mic
Line
Inse
rt
Dire
ctO
ut
Mic
Line
Inse
rt
Dire
ctO
ut
Mic
Line
Inse
rt
Dire
ctO
ut
Mic
Line
Inse
rt
Dire
ctO
ut
Mic
Line
Inse
rt
Dire
ctO
ut
Mic
Line
Inse
rt
Dire
ctO
ut
Mic
Line
Inse
rt
Dire
ctO
ut
Mic
Line
Inse
rt
Dire
ctO
ut
Mic
Line
Inse
rt
Dire
ctO
ut
Mic
Line
Inse
rt
Dire
ctO
ut
Mic
Line
Inse
rt
Dire
ctO
ut
Send
/ Re
turn
Stud
io M
onito
r Out
12
Tape
Inpu
t
11
Tape
Inpu
t
10
Tape
Inpu
t
9
Tape
Inpu
t
8
Tape
Inpu
t
7
Tape
Inpu
t
6
Tape
Inpu
t
5
Tape
Inpu
t
4
Tape
Inpu
t
3
Tape
Inpu
t
2
Tape
Inpu
t
1
to the
from theoutputs
recording inputs

MIDI Installation
28
MIDI Installation
Interface ConnectionPlease consult your sound card or MIDI interface manualfor the correct connection of a MIDI interface. The mostcommon ways to add MIDI functionality to computersare:– Multiport MIDI interfaces, including separate devices
like Emagic’s Unitor8 MkII.– Sound card with MIDI interface – via a General MIDI module or keyboards’ integrated
interface, usually labeled “To Host” interface.
Connecting Emagic Unitor8 MkIIThese short instructions may suffice for the Unitor8 MkIImultiport interface: connect the Unitor8 MkII suppliedcable from your PC’s COM2 port to the RS-232 connectoron the Unitor8 MkII. Then install the driver under Win-dows.If you wish to use a modem or other device on the COM2port however, you will need to use an RS-232 switch box,which can be purchased from most computer shops.Any MIDI interface that supports the Windows MMEstandard will work with MAGIX midi studio generation 6.See the manufacturer’s instructions for information onthe proper installation of any needed drivers.
MIDI Cable ConnectionsMIDI Local OffIf your keyboard has an internal sound source, it is impor-tant that you stop the keyboard from generating sounds di-rectly from its own keyboard. If you buy a new keyboardthat is to be used without a sequencer, and connect itstraight to an amplifier, you would expect the device tomake a sound when you press its keys—in other words thekeyboard is connected to the sound generator. However,this is exactly what you do not want when using the key-board with a sequencer. In this scenario, the keyboard isused as the computer’s input device, while the computerwill play the various connected tone generators, be theythe keyboard’s own sound generator, or any other con-nected sound modules. If you wanted to control andrecord another sound module with your keyboard, its ownsounds would get in the way—that is why the keyboardmust be separated from its own internal sound generator.This function is known as “Local Off”, and can be set di-rectly at your keyboard. The sequencer will speak to your

MIDI Installation
29
keyboard’s tone generator just like any other connected,keyboardless sound module.If you cannot find the “Local” function under your key-board’s MIDI menu, consult its manual as how best toproceed for sequencer use. Some keyboards allow you toselect from among “Local”, “MIDI” or “Both” for each oftheir so-called “Parts”—in this case, the “MIDI” setting isequivalent to “Local Off”.
MIDI Inputs/outputsIf your computer has an internal or external MIDI port, orhas a MIDI capable sound card connected, hook the key-board “MIDI Out” to the computer’s “MIDI In” (on the in-terface, sound card etc.). If the keyboard can generate itsown sounds, connect the computer’s “MIDI Out” to thekeyboard’s “MIDI In”. If your computer (or the MIDI de-vice) offers more than one MIDI output, connect anyother tone generators to these. If the computer only hasone MIDI output, you need to connect the second tonegenerator’s MIDI In to the keyboard’s MIDI Thru port. Athird device can be connected to the second’s MIDI Thru,and so on. The MIDI Thru port always delivers a copy ofthe signals coming into the device’s MIDI In. It is prefer-able, however, to use a direct connection from a com-puter’s MIDI Out to a device, rather than chaining toomany devices, one after another. This is because timingproblems may occur in the chain, if many MIDI com-mands are sent in a short time, due to the slight delays in-troduced by each MIDI In to MIDI Thru transaction. Ifyour computer also has several MIDI inputs, you can con-nect the MIDI outputs of other MIDI expanders there.
Keyboards and Expanders with “To Host” InterfaceThe “To Host” interface, which allows a direct connectionto the computer, can be found on many of the more cost-effective MIDI sound modules, as well as on many entry-level keyboards. This in effect is a simple integrated MIDIinterface, with one MIDI In, and one MIDI Out for thecomputer. An instrument with a “To Host” interface iscontrolled directly; the MIDI In and Out serve as MIDIconnections for the computer, to allow further instruments,such as another keyboard to be connected. This provesvery cost-effective for entry level setups, which may in-clude only one keyboard and another sound module. Theexpense of a dedicated computer MIDI interface, or card isnot initially required.If you are working with such a module, first install thedriver software supplied by the manufacturer.

MIDI Installation
30
Connect the keyboard MIDI Out to the sound module’sMIDI In, and the module’s MIDI Out to the keyboard’sMIDI In (assuming it can generate sounds). Connect the“To Host” interface to the computer, usually to a serialport.
Tape SynchronizationDetails on how to synchronize MAGIX midi studio gener-ation 6 with digital or analog tape machines, multitrack-ers, or video editing systems and their wiring require-ments can be found in the reference manual.

Audio: Recording and Playback
31
Audio: Recording and Playback
Concept: Tracks, Audio Files, and RegionsMAGIX midi studio generation 6 combines a MIDI Se-quencer with a Hard Disk Recorder. A Hard Disk Re-corder is similar to a DAT Recorder or a Sampler: it allowsdigital recording and playback of audio signals. The harddisk recording medium provides many advantages overthe magnetic tape medium; no rewinding is required, andthe data is read from and written to various sectors of thehard disk almost simultaneously. The recordings to beplayed back simultaneously may be located at any positionon the hard disk. The Hard Disk Recorder perceives soundrecording edits as play instructions—i. e., an actual edit orcut does not occur. Subsequently, any edits of the materialcan be revoked and the original condition restored. This isgenerally referred to as non-destructive editing. CD play-ers with programmable title sequences are based on acomparable principle: if you choose to listen to the titleson the CD in reverse order, the CD player will not changethe data (the actual sequence) on the CD—which would bedestructive. The program merely plays the titles in thechanged sequence—which is non-destructive.
Number of Audio TracksOn a multi-track tape recorder, the number of tracks thatcan be recorded simultaneously, the total number oftracks on the tape, the number of tracks that can be playedback simultaneously, and the number of outputs for theplayback of the tracks are the same. So, for example, withan 8-track device, you may simultaneously record 8 tracks,store 8 tracks on the tape, and play back these 8 tracksthrough 8 outputs.A Hard Disk Recorder like MAGIX midi studio generation6 operates differently. In its case, the number of tracksand outputs depend on the audio and computer hardwarebeing used. The following applies, for example, to theMAGIX midi studio generation 6 with a sound card withtwo in- and outputs:– You may simultaneously record two mono signals (or
one stereo).– There is an almost unlimited number of virtual tracks,
i. e., recordings that may be located on the hard diskunder MAGIX midi studio generation 6. The numberof tracks is only limited by the hard disk capacity.
– The number of tracks that MAGIX midi studio genera-tion 6 can play back simultaneously—the so-calledphysical tracks—depends mostly on the hard disk and
Audio: Recording and Playback
32
on the computer. But 24 (respectively 48 tracks withMAGIX midi studio generation 6 deLuxe) tracks arethe maximum with MAGIX midi studio generation 6.
– The sound card has two outputs for simultaneous play-back of the physical tracks. Since MAGIX midi studiogeneration 6 provides a digital mixer with soundcontrols and sound effects, the fact that there are feweroutputs than simultaneously played-back tracks doesnot present the same limitation it would with a tapebased system.
Depending on the available hardware, MAGIX midi stu-dio generation 6 acts virtually like a polyphonic samplerwith at least one stereo input and one stereo output, withhundreds of different samples loaded on the hard disk. Thenumber of tracks that can be recorded simultaneously, thenumber of tracks that can be played back simultaneously,and the number of audio outputs depend on the hardware.The hardware play-back tracks are represented in the au-dio mixer by channels, which are similar to the channelsof a conventional mixer. The MAGIX midi studio genera-tion 6’s mixer mixes all tracks, including effects, togetheron one or more stereo outputs.The channels of the mixer also represent the hardware onthe software display level. The number of tracks displayedby MAGIX midi studio generation 6 upon start-up is hard-ware-dependent, i. e. it depends on the computer and theavailable audio hardware.
Audio Files and Regions in the Audio WindowSelect Audio > Audio Window to open the Audio window.In the Audio window, you can display and manage all Au-dio Files. Audio Files are the actual samples, i. e., the actualsound recordings. To load an Audio File select the localcommand > Add Audio File in the Audio Window.A dialog box appears, in which you can select the file froma hard disk or from a folder. To record a new audio file, seeinstructions below.MAGIX midi studio generation 6 can be used to continu-ously play back sound tracks just like a tape recorder.However, this is not necessary.The Arrange window displays audio tracks horizontally.Rectangular bars visually represent the location andlength of the audio phrases within the song. These sections are called Regions and may include a smallportion of the audio file or the entire audio file.

Audio: Recording and Playback
33
In the Arrange window the regions on the audio tracksand the sequences on the MIDI tracks look the same. Op-eration and editing are identical, for the most part (top).
The audio window shown above displays all logged audiofiles and their regions—however, without the timing ref-erence in the song.The Arrange window shows the audio track regions on atime axis, whereas the Audio window shows the availableaudio files in a non-chronological sequence. On the leftside, the audio file names are listed in bold. The region

Audio: Recording and Playback
34
names are indented, in regular type, and displayed with apadlock. The regions are only visible if the arrow to the leftof the audio file name is pointing downward (click on thearrow to toggle). The audio file regions are shown in adark shade inside the rectangles. The areas outside the re-gions are shown in a light shade. You may move the re-gion boundaries by dragging them with the mousepointer. To prevent accidental adjustments, click on thepadlock to secure the region settings.Moving the beginnings and ends of regions provides aneasy, non-destructive editing method for the audio mate-rial. Nothing will be deleted. You may, for example, cut offthe last syllable of a song line—and then restore this sylla-ble by defining it in another region of the audio file, or byextending the region!It is often very useful to open one Audio window and oneArrange window at the same time. You then can grab re-gions with the mouse pointer in the Audio window anddrag them onto the desired track in the Arrange window.If you are using the Windows version, you must first se-lect the respective track in the Arrange window and set thesong position line to the position at which you want the re-gion to be triggered.In this context you should note that MAGIX midi studiogeneration 6 automatically remembers the various win-dow configurations as Screen Sets. Just press the respectivekey, from 1 to 9, to recall the windows that were openwhen you last selected this screen set. The screen set num-ber is shown on the main menu display (on top) at theright side of the Window entry. Summary: Within Audio Files you define Regions. Theseregions are displayed in the Arrange window, where theyare arranged on a Track. This track is then played backthrough a channel of the integrated Track mixer.In the Audio window, you can play back a region, by point-ing at it and holding the mouse button depressed. Play-back will start at the position of your cursor. Alternatively,you can click the loudspeaker icon at the left and the se-lected region will be played back from its beginning. If theCycle symbol is enabled, the region will loop continu-ously, which is very useful, for example, when adjustingthe length of a drum loop. The lower button defines theplay-back channel. If you are using multiple audio hard-ware systems, a similar button for the selection of audiohardware will be available.The small, black arrowbelow the waveform display of theregions is the anchor. It serves as the region’s timing ref-
Audio: Recording and Playback
35
erence point, i. e., if a region is assigned to the beat posi-tion 14 1 1 1, this anchor will be positioned on the 14 1 1 1beat. Although this point will always be at the beginning ofnewly recorded regions, it does not necessarily have to beplaced there. An up-beat syllable, or the breathing-in of thesinger prior to the first syllable can sound before the an-chor, which is quantized on a time grid. Caution: movingthe anchor will also change the arrangement’s timing ref-erence.
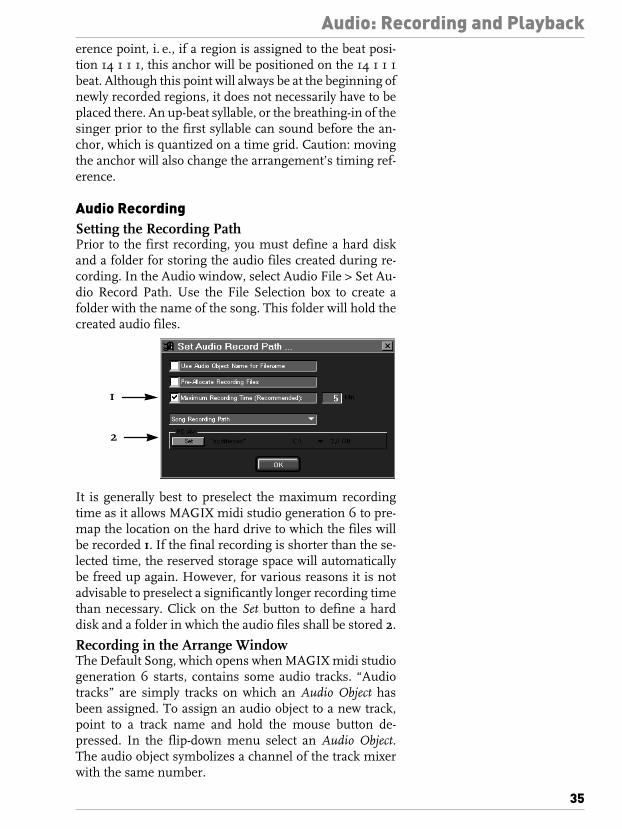
Audio RecordingSetting the Recording PathPrior to the first recording, you must define a hard diskand a folder for storing the audio files created during re-cording. In the Audio window, select Audio File > Set Au-dio Record Path. Use the File Selection box to create afolder with the name of the song. This folder will hold thecreated audio files.
It is generally best to preselect the maximum recordingtime as it allows MAGIX midi studio generation 6 to pre-map the location on the hard drive to which the files willbe recorded 1. If the final recording is shorter than the se-lected time, the reserved storage space will automaticallybe freed up again. However, for various reasons it is notadvisable to preselect a significantly longer recording timethan necessary. Click on the Set button to define a harddisk and a folder in which the audio files shall be stored 2.
Recording in the Arrange WindowThe Default Song, which opens when MAGIX midi studiogeneration 6 starts, contains some audio tracks. “Audiotracks” are simply tracks on which an Audio Object hasbeen assigned. To assign an audio object to a new track,point to a track name and hold the mouse button de-pressed. In the flip-down menu select an Audio Object.The audio object symbolizes a channel of the track mixerwith the same number.
1
2

Audio: Recording and Playback
36
Whenever an audio track is activated for recording(record-ready), an audio file will be created during record-ing with a region spanning the entire audio file length.Just as on a multi-track device, several tracks can be acti-vated at once. The region will appear in the Arrange win-dow exactly at the location that you recorded; i. e., you canrecord just as you would with a conventional tape re-corder. The only difference compared to a MIDI recordingis that the audio track must be activated (record ready);however, it does not have to be selected.In the Arrange window, there are two buttons between thenumbers and names of the tracks. The left button (M)mutes the track (Mute), the right button (R) activates thetrack for recording (REC). Similar buttons can be found inthe audio objects underneath the fader: these buttons arealso used to mute a track or to enable or disable recordingof a track (M and REC).While both record-ready buttons for a track (in the Ar-range window or in the Audio Object) are always coupled,the effect of the mute button may be different under cer-tain circumstances: in the Arrange window, muting al-ways affects the respective track. The mute button at theaudio object, however, is used to mute the respective play-back channel of the audio hardware—this way, all tracksplayed back through this channel are muted. Please notethat in the Arrange window several tracks can be playedback through the same audio object (play-back channel),however, with the limitation that only one of these trackscan be heard at a time (the track with the region startedlast).The recorded regions in the Arrange window look thesame as the MIDI tracks. Using View > Object Coloursyou can, however, select different colors. During the re-cording of an audio track, a waveform will be displayed.With a larger, vertical display, the waveform display willappear under the regions, whereas the MIDI sequenceswill show small notes. The largest display can be selectednext to the scroll bars at the lower right edge of the win-dow.This display cannot be enabled, if HyperDraw is activated.HyperDraw is a function allowing the graphical input oflevel and panning processes, which will be displayed in-stead of the notes and waveforms. HyperDraw is de-scribed in the chapter section titled Graphical Mixdownwith HyperDraw on page 49.
Audio: Recording and Playback
37
Copying and Moving RegionsIn the Arrange window, regions (and MIDI sequences)can be shifted by dragging them with the mouse. If youhold ctrl while dragging, a copy is created. To select severalregions or sequences hold shift while clicking or selectthem by collecting them in a rubber band. During shift-ing, the selected regions or sequences will always jump toa grid position. The grid corresponds to the divisions visi-ble on the bar ruler. It can be changed all the way down tothe nominator of the beat type using the horizontal tele-scope.If you want to use the format value as grid, hold alt whileshifting. The format value is displayed in the Transportbar, in a field just under where the Time Signature is dis-played. If you don’t want to use any grid, hold alt-shiftwhile shifting. This way, the regions and sequences areshifted by single ticks, which is useful to correct rhythmicirregularities in single song syllables.
Recording the InputJust as with professional multi-track devices, MAGIX midistudio generation 6 does not provide a Record Level. Theanalog recording must be adjusted using the source de-vice. Typically, this would be the sub-group fader of an an-alog mixer. However, the channel of the on-screen mixerprovides a record level display which you can use to mon-itor the recording level. To display this record level, dou-ble-click on the audio track name. Digital inputs cannot beadjusted during recording—which is not necessary underthat circumstance anyway.

Sample Editor and Digital Factory
38
Sample Editor and Digital Factory
The Sample Editor WindowOpen the Sample Editor by double-clicking on a region—in the Arrange window or in the Audio window or bychoosing Audio > Sample Editor.
In addition to non-destructive editing, MAGIX midi stu-dio generation 6 audio files can also be edited destruc-tively in many different ways. The Sample Editor providesa detailed display of the audio file and all of the tools re-quired for editing. It selects the exact region within the au-dio file—this is very practical, since all functions forchanging data always affect the selection.With MAGIX midi studio generation 6 deLuxe you canavoid major errors, i. e., accidental deletions, by first creat-ing a backup copy of the entire audio file (Audio File >Create Backup). If needed, you can restore your originalcopy at any time by selecting Audio File > Revert toBackup. This backup functionality is not provided byMAGIX midi studio generation 6, so you have to be care-ful.The Functions allow modification of the level or the ampli-tude (of the level control). For example, Normalize willraise the overall level of an audio file until the loudestpeaks are at full amplitude. Fade in and fade out, the in-sertion of digital silence or the playback in reverse aremore, but not all, functions available in the Functionsmenu. See for yourself what they can do for you—experi-ment and have fun!With MAGIX midi studio generation 6 deLuxe you canensure that the selection boundaries are always positionedat zero crossings, by selecting Edit > Search Zero Cross-
Sample Editor and Digital Factory
39
ings. This is desirable because non-zero cross points willcause small ‘snaps’ or ‘pops’ to occur. The ruler along the top of the waveform display defaults tousing Samples as the unit of measurement. If you wish tosee the waveform in relation to bars and beats simply se-lect View > Show Length as... > Bars&Beats (MAGIX midistudio generation 6 deLuxe only). Please note that themeasurement will not relate to the regions actual positionin the song unless you enter the Sample Editor by doubleclicking on the region in the Arrange Window. The reasonfor this should be somewhat self-evident—regions in theAudio window have no musical beat reference.
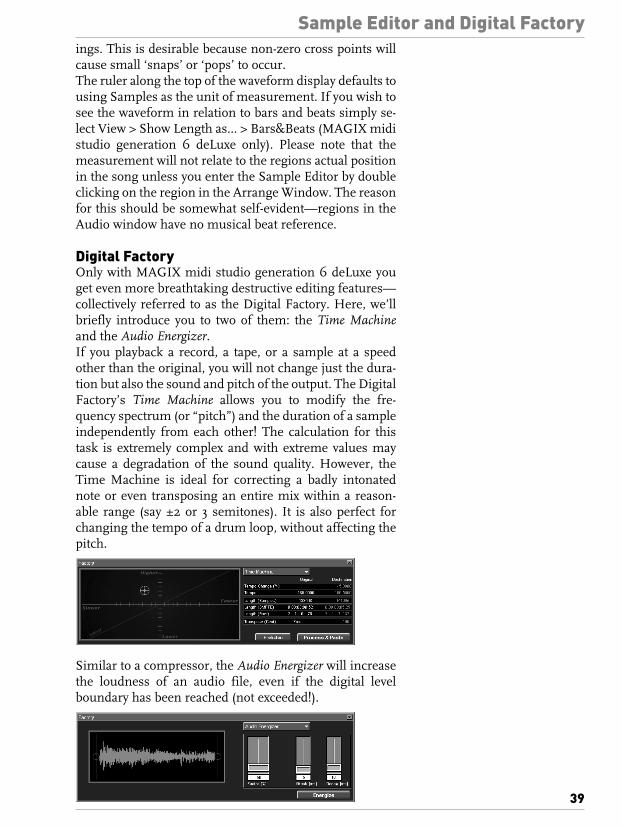
Digital FactoryOnly with MAGIX midi studio generation 6 deLuxe youget even more breathtaking destructive editing features—collectively referred to as the Digital Factory. Here, we’llbriefly introduce you to two of them: the Time Machineand the Audio Energizer. If you playback a record, a tape, or a sample at a speedother than the original, you will not change just the dura-tion but also the sound and pitch of the output. The DigitalFactory’s Time Machine allows you to modify the fre-quency spectrum (or “pitch”) and the duration of a sampleindependently from each other! The calculation for thistask is extremely complex and with extreme values maycause a degradation of the sound quality. However, theTime Machine is ideal for correcting a badly intonatednote or even transposing an entire mix within a reason-able range (say ±2 or 3 semitones). It is also perfect forchanging the tempo of a drum loop, without affecting thepitch.
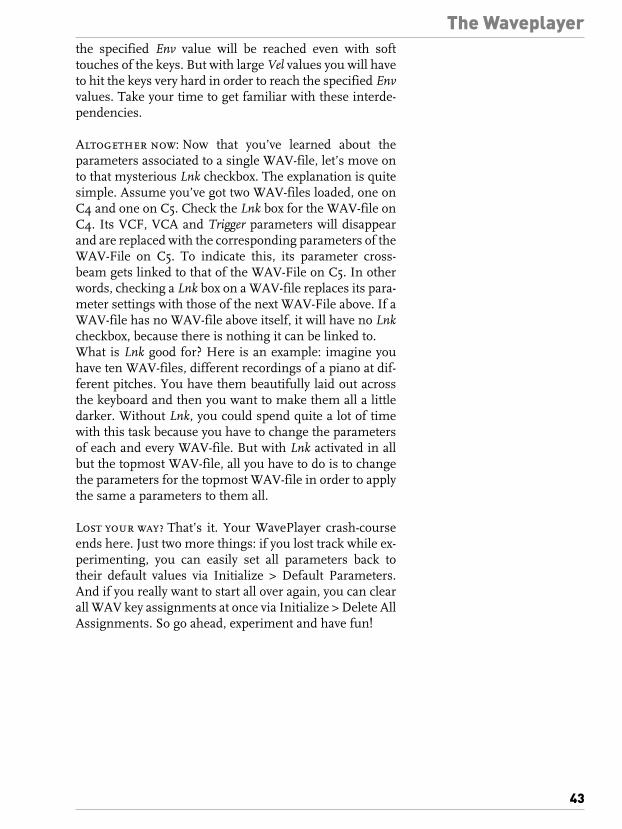
Similar to a compressor, the Audio Energizer will increasethe loudness of an audio file, even if the digital levelboundary has been reached (not exceeded!).

The Waveplayer
40
The Waveplayer
The Waveplayer WindowMAGIX midi studio generation 6’s built-in WavePlayerlets you play back any WAV-files you like—polyphonically,with filter and envelope treatments. If that sounds likeowning a real sampler, you’re right, but you don’t have tobuy an expensive piece of hardware. So how do you use theWavePlayer? Easy—just follow our small tour, andchances are that you’ll never have to read the WavePlayersection in the reference manual. The only real precondi-tion is that after you fasten your seatbelt and load MAGIXmidi studio generation 6, you must select a DirectSounddriver for the WavePlayer under Audio > Audio-Hardware& Drivers. This is because the WavePlayer works only witha DirectSound driver and only DirectSound drivers allowyou to use the WavePlayer and the audio features ofMAGIX midi studio generation 6 simultaneously. Got afew WAV-files at hand? Fine, let’s start.
What you really got to knowClick on the Wave track in the Arrange window. Open theWavePlayer window via Options > WavePlayer. On the leftside of the WavePlayer window you can see a horizontalkeyboard. To the right of each key you can see the name ofeach note. To the right of each note name you can see theFile Name box. Left-clicking on such a box opens the stan-dard Windows File Selector. Select and open a WAV-file.You have now assigned this WAV-file to the key associatedto the File Name box. Don’t like the WAV you assigned?No problem: simply right-click on the File Name box toerase the key/WAV-assignment, then repeat the aboveprocedure to assign a new WAV-file.Now that you have assigned a WAV to a key, it will onlyplay when you press this specific key. So let’s define a key-board zone in which you can play this WAV-file. Right be-side the File Name box you see the controls for each WAV-file, arranged on a kind of grey crossbeam. Grab the upperor lower edge of the crossbeam without touching anyother controls, and a double-arrow will appear, allowingyou to stretch the crossbeam into a vertical rectangle. Thisrectangle defines the keyboard zone in which you can playthe WAV-file.There is only one limitation in doing this: you can extendthe keyboard zone down all the way you like, but you canonly extend it one octave (twelve semitones) upwards. Thismeans that playing on your keyboard allows you to trans-pose down as far as you like, but an upward transposition

The Waveplayer
41
is limited to twelve semitones. It is important to be awareof the interdependence between the upper keyboard zoneand the Tune parameter at this point. If Tune is set to+1200, you won’t be able to transpose the WAV-file anyfurther upwards because it is already transposed an octaveup via Tune because Tune is measured in cents, and onecent equals 1/100 of a semitone.Now that we have introduced Tune, we can also get rightinto the other parameters of the crossbar. You can deter-mine which parameters you would like to see via View.The active default settings are: Parameters, Keyboard, FilterParameter and Filter Parameters as Knobs. To start with, wesuggest that you just leave them on.Let’s have a look at the parameters from left to right. Tuneis already familiar to you. Next come Start and Length: hereyou can adjust from which point (in samples) the WAV-file is played back when you start it, and how long (in sam-ples) the part played back will be.Trigger defines the playback mode: set Trigger to Gate andthe WAV-file will only play back as long as you hold thekey. When set to Freerun, the WAV-file will play back forits whole length, regardless of whether you release or holdthe key. Hint: Freerun is especially suitable for drumsounds.
Soundshaping via the VCA: We’ll leave out the Lnkcheckbox for the moment and move to the On checkbox.Check it to activate the sound shaping section of the Wave-Player. Uncheck it to save computing power that couldotherwise increase the polyphony of the WavePlayer, butthen you won’t be able to tweak those nice parameterswe’ll now describe.The sound shaping parameters are divided into twogroups: VCF and VCA. We will start with the VCA. TheVCA group lets you alter the volume of your WAV-file overtime. Attack (Atk) allows you to automatically fade in yourWAV-file from zero level to full level. The smaller the At-tack value, the faster you will hear the WAV-file at fulllevel. Increase the Attack value and it will take more timefor the WAV-file to gradually fade in. Decay (Dcy) allowsyou to fade out your WAV-file from full level to zero level.Small Decay values will give you rapid fade-outs, large val-ues will correspondingly lengthen the fade out time. Atmaximum Decay value there will be no fade out at all; youwill hear the WAV-file for its full length (or not, if Triggeris set to Gate and you release the key before the WAV-filehas reached its end).

The Waveplayer
42
It is important to know that the Decay phase follows theAttack phase: first you can fade in a WAV-file, then youcan fade it out. It is not possible to first fade it out and thenfade it in.The last parameter in the VCA group is Vel. With Vel youset how much the level of the WAV-file depends on the ve-locity (how fast you hit a key on your velocity-sensitive key-board). The higher the Vel value, the faster you have to hityour keys to reach full level. Experiment with these threeparameters to get to know them.
Soundshaping via the VCF: Let’s now go to the VCFgroup. Here you can give your WAV-file a new tone colourand a new tone colour curve. This is accomplished via twobasic parameters: Frq and Res. With Frq, you can makeyour WAV-file sound “darker”: the smaller the value forFrq, the darker your sound. With Res, you can make yourWAV-file sound “sharper”: the higher the value for Res,the sharper your sound. Experiment with these two para-meters and you will very quickly get the idea of how to usethem.The VCF group also features the parameters Atk, Dcy andVel, expanded with the parameter Env. With these para-meters you can control Frq automatically. Try this exam-ple: turn Frq all the way down, Env all the way up and setVel to 0. Now play with the Atk parameter: with small Atkvalues the sound becomes bright almost immediately.With large Atk values the sound starts very dull and ittakes quite a long time before it becomes bright. Dcyworks as you’d expect the other way around: with smallvalues the bright-dark progression will take almost notime, while large Dcy values increase the amount of timerequired for the bright-dark progression. With Dcy at max-imum, there will be no bright-dark progression at all. Toput it briefly: Atk determines how long it takes for thedark-bright progression and afterwards Dcy determineshow long it takes for the bright-dark progression.With Env you determine how big the difference is betweendark and bright of the dark-bright-dark-progression pro-duced with Atk and Dcy. With small Env values you will bealmost unable to hear the dark-bright-dark progressionproduced with Atk and Dcy, while large Env values will letyour hear this progression very clearly. Don’t be afraid toexperiment in order to become familiar with the possibil-ities. Lastly, Vel controls how hard you have to hit the keys toreach the value specified with Env. With small Vel values
The Waveplayer
43
the specified Env value will be reached even with softtouches of the keys. But with large Vel values you will haveto hit the keys very hard in order to reach the specified Envvalues. Take your time to get familiar with these interde-pendencies.
Altogether now: Now that you’ve learned about theparameters associated to a single WAV-file, let’s move onto that mysterious Lnk checkbox. The explanation is quitesimple. Assume you’ve got two WAV-files loaded, one onC4 and one on C5. Check the Lnk box for the WAV-file onC4. Its VCF, VCA and Trigger parameters will disappearand are replaced with the corresponding parameters of theWAV-File on C5. To indicate this, its parameter cross-beam gets linked to that of the WAV-File on C5. In otherwords, checking a Lnk box on a WAV-file replaces its para-meter settings with those of the next WAV-File above. If aWAV-file has no WAV-file above itself, it will have no Lnkcheckbox, because there is nothing it can be linked to.What is Lnk good for? Here is an example: imagine youhave ten WAV-files, different recordings of a piano at dif-ferent pitches. You have them beautifully laid out acrossthe keyboard and then you want to make them all a littledarker. Without Lnk, you could spend quite a lot of timewith this task because you have to change the parametersof each and every WAV-file. But with Lnk activated in allbut the topmost WAV-file, all you have to do is to changethe parameters for the topmost WAV-file in order to applythe same a parameters to them all.
Lost your way? That’s it. Your WavePlayer crash-courseends here. Just two more things: if you lost track while ex-perimenting, you can easily set all parameters back totheir default values via Initialize > Default Parameters.And if you really want to start all over again, you can clearall WAV key assignments at once via Initialize > Delete AllAssignments. So go ahead, experiment and have fun!
Mixdown with MAGIX midi studio generation 6
44
Mixdown with MAGIX midi studio gen-eration 6
The Mixer and HyperDrawThe music you produce with MAGIX midi studio genera-tion 6 can be mixed down within the program. For this, afully automated mixer and a graphical editing view areavailable:– The Track mixer– HyperDraw.The Track mixer allows you to mix both audio tracks andMIDI tracks at the same time. It always displays all of thetracks you are working with. The mixer can be fully auto-mated. Data that you input from other editors will directlyaffect the mixer’s display and vice versa.Hyper Draw provides another option for mixing and edit-ing . This view provides an easy way to view your mix inthe Arrange window.
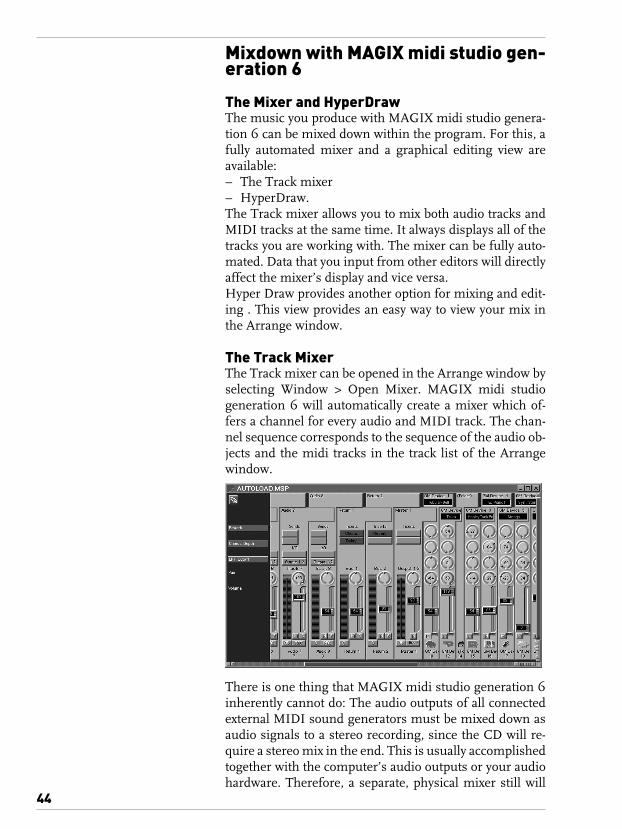
The Track MixerThe Track mixer can be opened in the Arrange window byselecting Window > Open Mixer. MAGIX midi studiogeneration 6 will automatically create a mixer which of-fers a channel for every audio and MIDI track. The chan-nel sequence corresponds to the sequence of the audio ob-jects and the midi tracks in the track list of the Arrangewindow.
There is one thing that MAGIX midi studio generation 6inherently cannot do: The audio outputs of all connectedexternal MIDI sound generators must be mixed down asaudio signals to a stereo recording, since the CD will re-quire a stereo mix in the end. This is usually accomplishedtogether with the computer’s audio outputs or your audiohardware. Therefore, a separate, physical mixer still will
Mixdown with MAGIX midi studio generation 6
45
be required in order to merge the signals, to control thelevel during recording, and also to accommodate the mi-crophone amplifiers. This mixer, however, can be consid-erably smaller than a mixer used in a comparable studiowith a multi-track tape recorder. Additionally, you can mixtogether all audio signals with a uniform level, whileMAGIX midi studio generation 6 will control the volume, pan, and any other effects that your MIDI device(s) mayhave.
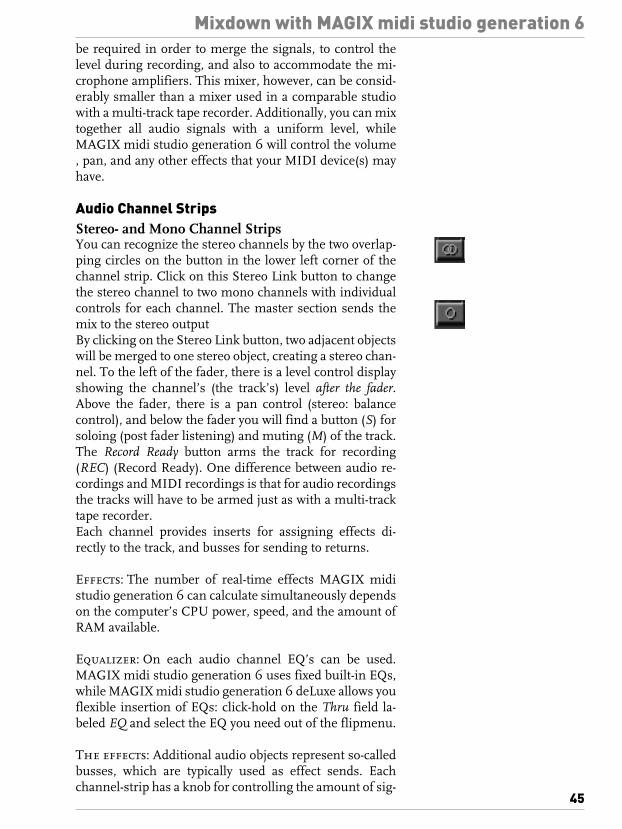
Audio Channel StripsStereo- and Mono Channel StripsYou can recognize the stereo channels by the two overlap-ping circles on the button in the lower left corner of thechannel strip. Click on this Stereo Link button to changethe stereo channel to two mono channels with individualcontrols for each channel. The master section sends themix to the stereo outputBy clicking on the Stereo Link button, two adjacent objectswill be merged to one stereo object, creating a stereo chan-nel. To the left of the fader, there is a level control displayshowing the channel’s (the track’s) level after the fader.Above the fader, there is a pan control (stereo: balancecontrol), and below the fader you will find a button (S) forsoloing (post fader listening) and muting (M) of the track.The Record Ready button arms the track for recording(REC) (Record Ready). One difference between audio re-cordings and MIDI recordings is that for audio recordingsthe tracks will have to be armed just as with a multi-tracktape recorder.Each channel provides inserts for assigning effects di-rectly to the track, and busses for sending to returns.
Effects: The number of real-time effects MAGIX midistudio generation 6 can calculate simultaneously dependson the computer’s CPU power, speed, and the amount ofRAM available.
Equalizer: On each audio channel EQ’s can be used.MAGIX midi studio generation 6 uses fixed built-in EQs,while MAGIX midi studio generation 6 deLuxe allows youflexible insertion of EQs: click-hold on the Thru field la-beled EQ and select the EQ you need out of the flipmenu.
The effects: Additional audio objects represent so-calledbusses, which are typically used as effect sends. Eachchannel-strip has a knob for controlling the amount of sig-

Mixdown with MAGIX midi studio generation 6
46
nal sent to the assigned effect. In the return channelsclick-hold one of the fields labeled Insert assign effects,like Reverb, Chorus or Delay for the effect. If you turn Eff1up on a channel, then signal from that track will be sent towhatever effects you have inserted on the Effect 1 returnobject. If you assign Effect 2 to a track, then turning up thesend knob will send signal from that track to the effect(s)assigned to the Effect 2 return object.The effects are assigned as post Fader; i. e., the relation be-tween original signal and effect signal remains constant,even if the fader is moved. To access edit parameters for the assigned effects, double-click the effect name in the green insert field.The number of realtime-effects that MAGIX midi studiogeneration 6 can compute simultaneously depends on thecomputing power of your computer. The maximum isfour effect busses with three effect-inserts each (withMAGIX midi studio generation 6 deLuxe) or two effectbusses with three effect-inserts each (with MAGIX midistudio generation 6).
MIDI Channel StripsGeneral MIDIGeneral MIDI is not a deviation from the MIDI standard.If an instrument bears the GM logo, this merely meansthat the following minimum features are included:– 16x Multi Mode (16 different sound on 16 different
MIDI channels, the so-called parts); all of them can beplayed polyphonically with dynamic part assignment (itis not necessary to set the number of parts for eachsound);
– at least 24 voices (parts) (24 notes can sound simulta-neously);
– 128 standardized sound programs (program number 1is always the piano…);
– 26 Drum and percussion sounds with standardizedkeyboard layout on channel 10;
– Chorus and Hall Effects;– Certain MIDI commands can be recognized (velocity,
pitch bender, modulation wheel, and others).Most General MIDI instruments provide more minimumfeatures. The above list is by no means complete. GeneralMIDI instruments offer two advantages: 1) song files caneasily be exchanged between different systems with differ-ent instruments, since sounds and keyboard layout aresomewhat standardized. Solo entertainers, for example,can purchase song files from third parties and use them
Mixdown with MAGIX midi studio generation 6
47
without any problems, regardless of the sound generatorbrand used. 2) The low-cost General MIDI sound modulescan be used to design complete arrangements, allowingyou to create a good pre-production at a very low cost. Pro-fessional productions, however, will require the transferof many sounds to instruments, which sound better andmore distinct.Roland has developed a General MIDI standard calledGeneral Standard (GS), which is fully forward compatiblewith General MIDI. If you are working with a Roland GSsound generator, you can adapt the GM/GS/XG Mixer toits configuration. Yamaha has developed a General MIDIstandard called Extended General MIDI (XG), which isfully backwards compatible not only with General MIDI,but also with GS. If you are working with a Yamaha XGsound generator, you adapt the GM/GS/XG Mixer to itsconfiguration. Some Yamaha instruments bear the XGlogo, although they are not compatible with GeneralMIDI. These are merely designed for interplay with otherXG instruments (Yamaha P-50m, Yamaha VL 70m). Toadapt your system touch the button shown on the rightand select the appropriate setting.
The MIDI Channel Strips are merely a remote control. A mixer is used to mix audio signals. This is not the casewith this part of the Mixer. It is rather a remote control fora sound generator in the shape of an on-screen mixer.Why? Here is an example:On your sound module (or on the sound generator of yourkeyboard) you can adjust how loud the sound coming inon MIDI channel 3 should be. This volume parameter canalso be set through MIDI without ever touching the soundmodule. To set the volume of the sound on channel 3 to avalue of 65 “MIDI units” (value range 0—127) you willsend a MIDI volume command with the channel ID 3 andthe value 65. MIDI Volume is a controller command, to beexact: a controller 7 command. In the Event Editor, thiscommand would look like this:
MAGIX midi studio generation 6 will send exactly thiscommand, if you set the fader (volume slider control) ofchannel 3 in the GM/GS/XG Mixer to a value of 65. Thefaders will send controller 7, the pan control will send con-troller 10, the reverb control will send controller 91—andso on. It is not necessary to remember all of these control-ler numbers. Just use the GM/GS/XG Mixer as remote

Mixdown with MAGIX midi studio generation 6
48
control for the sound generator. Watch the display to seehow the settings change while operating the GM/GS/XGMixer. Please note that the sound generator will actually work inMulti Mode (“General MIDI“), not in Performance Mode.Also make sure that the GM sound generator is connectedto the proper port (MIDI output).All volume adjustments and the selection of sound pro-grams must always be carried out in MAGIX midi studiogeneration 6—never adjust the sound generator! Other-wise your mixdown will not be saved with the song. It isnot necessary to separately save mix parameters at thesound generator. You only have to open the MAGIX midistudio generation 6 song with the settings made underMAGIX midi studio generation 6. Rule of Thumb: Nevertouch your sound module, except to turn it on or off, or tosave new sound programs. Comparable situation: Anycorrections you make on a printout using White-Out haveno effect on the text file saved on your hard disk.
Effect Paths of the GM/GS/XG MixerThe GM/GS/XG Mixer provides knobs to control two ef-fects on each channel. With these controls you can definefor each part, how much Hall effect (Reverb) and howmuch Chorus effect should be applied to the respectivesound. Not all General MIDI sound modules support thisfeature—however, most of them do. With GM and XG in-struments you can also recall various effect typesand editthem. The cutoff frequency of the low-pass filter is the ma-jor deciding factor for the harmonic content of the sound.This parameter could have been called “Brilliance“. Tech-nically, this effect is not comparable to an equalizer inform of a “Treble“ control. But in real-life applications, itusually serves as an effective sound control. This featuremay not be supported by some of the older General MIDIsound generators. The effects settings and the cutoff con-trols work for all GS and XG instruments.
Automated MixingThe mixer in MAGIX midi studio generation 6 is fully au-tomated. Full automation means: Every control move-ment can be recorded, edited and played-back. For exam-ple, if the trumpet on track 12 initially is supposed to beloud, then become a little softer, and finally pan more tothe right, you will operate the channel (channel 12 on theTrack mixer) only once—during the recording! For everysubsequent play-back, the trumpet will automatically re-peat your mixdown.

Mixdown with MAGIX midi studio generation 6
49
Any time you save a song, all of the adjustments made onthe mixer will be saved also.
Mixing Automation with the Track mixerThe mixing automation of the Track mixer is easy to ex-plain: Record, operate the Track mixer, finish.The automation data of the Track mixer will be recordedas MIDI sequences on the track for which you moved thefader or knob. The same applies to audio tracks, which willalso be mixed down as MIDI commands.The audio channel controls send MIDI controller com-mands just like MIDI channels; the Volume Fader (vol-ume slider control) sends Controller No. 7 (MIDI Vol-ume). The meaning of the controller numbers is definedin the MIDI Standard. The sound generator will respondwith a volume adjustment for the sound on the respectiveMIDI channel. If you open the Event Editor for the se-quence created due to your mixing movements during re-cording, you can view the MIDI Controller data—and alsoedit them just like any other MIDI data.In the NUM column you will find Controller Number 7.The Info column shows “Volume”. Controller 10 is Pan.You can edit the mixing process by deleting command orchanging values (VAL).The same data is visible in HyperDraw and can also be ed-ited. The next sections describes Hyper Draw (bottomgraphic).
Graphical Mixdown with HyperDrawVolume and Pan can be graphically input, edited, andviewed using HyperDraw. Following is an example of amix displayed in the Arrange window with HyperDraw en-abled:
Volume events (MIDI Volume, Controller 7) appear as yel-low lines, pan events (Controller 10) as orange lines on ablue background. To enable HyperDraw in the Arrange window:– Select the desired sequence(s).

Mixdown with MAGIX midi studio generation 6
50
– Using the Zoom Tool, select a large, vertical view(important!)
– Select View > HyperDraw > Volume.Click in the left half of the blue field in the lower range ofa sequence. At that location, a yellow, horizontal line willstart. It represents a volume command (Controller 7).Click to the right at another height. Now you have createda series of volume commands, which are spaced betweenthe two volume commands you have entered. You cangrab the points and move them anyway you want: chang-ing the time or the value. To delete a point, grab it anddrag it beyond the right border of the sequence, i. e., out-side the region. You can view your data in the Event Edi-tor. Or you may open the Track mixer and watch how themixer’s fader will move during play-back like it is beingmoved by an invisible hand (in the main menu select:Window > Open Mixer). Using View > Hyper Draw > Panyou can enter Pan events in the same way. The applicablecontroller number (7 for Volume) is very small and shownat the left side. When working with HyperDraw, you will frequently needan enlarged display of a sequence. For this purpose, themagnifying glass function is readily available: Press andhold the alt key and draw a frame around the respective se-quence (group). Make sure to always start the frame in thebackground of the Arrange window. The selected sectionwill be enlarged immediately. Now you can continue yourHyperDraw edits comfortably. To restore the original size,click alt in the background. Please note that in MIDI is a serial protocol meaning thatall events are sent to each port sequentially, which maynegatively affect the timing. If you are working with only afew MIDI ports, where each of the ports includes manychannels, complex mixes, with a lot of controller data, maycause timing problems.

Audio Instruments
51
Audio Instruments
MAGIX midi studio generation 6 supports the new, in-cluded Magix synthesizers M-TB 6 (MAGIX midi studiogeneration 6 deLuxe only), Carpet Sweeper and Percusor.Outfitted with an innovative user interface, the units pro-vide subtractive synthesis that meets the classic analogideals. They offer everything that made the analog synthe-sizer so famous: rich basic sound, punchy filters, flexiblemodulation possibilities and extremely fast envelopes.The synthesizer instruments integrate seamlessly withinMAGIX midi studio generation 6’s internal digital mixer;all plug-ins effects can be used and all parameters can beautomated. The direct connection with the sequencing en-gine of MAGIX midi studio generation 6 guarantees un-surpassed precision through sample-accurate timing thatis superior to any external MIDI synthesizer. Beside thesebuilt-in synthesizers MAGIX midi studio generation 6supports VST™2.0 instruments as well.To use the new instruments, MAGIX midi studio genera-tion 6 features a new category of audio objects in MAGIXmidi studio generation 6, called “audio instruments”.These can have the synthesizers or VST™2.0 plug-in intheir top insert slot. The default song—the song thatopens if you move your Autoload away from the Magixmusic studio folder—has readily configured audio instru-ments. An audio instrument is an audio track with the track para-meter “Cha” switched to one of the “Instruments (1-4)”(with MAGIX midi studio generation 6) or “Instruments(1-6)” (with MAGIX midi studio generation 6 deLuxe). Soeach audio track can be made an audio instrument by set-ting its “Cha” parameter in its object parameter box to aninstrument channel. But it is more convenient to create anew audio instrument by simply selecting Functions >Track > Create Audio Instrument Track.Please make sure that you have inserted the desired syn-thesizer in the Audio Instrument mixer channel in theMixer window, and that you have selected the track of thisAudio Instrument mixer channel in the Arrange window.Now double-click on the inserted synthesizer plug-in tosee and access all those lovely knobs. As synthesizers areall about creating and playing new sounds, we will just tellyou how to set up these instruments for usage, and en-courage you to experiment with them. They come withplenty of pre-programmed settings that serve as startingpoints for your own, unique sound creations. You can load

Audio Instruments
52
these presets by clicking on the small triangle in the headof the plug-in window. What more can we say—go aheadand have fun!

MIDI: Recording and Playback
53
MIDI: Recording and Playback
Flow of MIDI SignalsTypically, a keyboard is used to play in MIDI data; howeverGuitar-to-MIDI and Drum-to-MIDI controllers are alsoavailable. Your keyboard probably has an integrated soundgenerator, or perhaps you are using a master keyboardcontroller without an internal sound generator in connec-tion with one or more MIDI sound generators. The MIDIsequencer will record the notes you are playing on the key-board. During recording and playback, the sequencer willtrigger the connected MIDI sound generators. Unlike au-dio recordings, MIDI tracks do not record any sounds.They record information, such as the time at which keyson the keyboard were hit, the strike speed and the releasespeed. Using the sequencer, this information can be ed-ited in any way desired, or played back as is. Even thoughMIDI tracks can only be played back on MIDI instru-ments, the MIDI sequencer offers a multitude of advan-tages over an audio recorder. There is one thing aboutMIDI recording that should always be kept in mind:The sequencer always plays the instruments live, so the in-struments always need to be present. For example, if asynthesizer voice is required by the bass, it cannot playanything else. By contrast, audio recorders use multipletracks to record entire choirs, or to record multiple partswith one synthesizer voice. Consequently, MIDI record-ing requires many voices. It is quite typical to have 64voices in one sound module. If you are working with sev-eral MIDI sound generators, the significance of the num-ber of voices will become apparent very quickly. An exception are the new “audio instruments”, accessedvia the new, correspondingly named track objects. Seenfrom the “input aspect”, these are MIDI instruments, asthey are “played” via MIDI commands from the se-quencer. Seen from the “output aspect”, they are audio in-struments, as their output signal is directly generated andplayed back by the computer, just as the audio tracks.
Advantages of MIDI Recordings over Audio Record-ings: – You may change the sound, either of the sound gener-
ator’s sound program or the sound generator itself,anytime after recording.
– You may insert, delete, or change notes, even if thenotes are sounding on the same track. From asustained C-major seventh chord you can create a C

MIDI: Recording and Playback
54
minor chord by deleting the B Natural, and changingthe E to an Es. Re-recording is not required.
– The timing of the notes can be changed or quantized(optimized on a time grid) any way you like.
– The tempo and pitch of the notes can be handled totallyindependently of each other—without complex calcula-tions or loss of sound quality.
– During recording, you could select a slow tempo andthen choose an unplayable high tempo during play-back without affecting the pitch.
– 1.000 tracks (MAGIX midi studio generation 6 deLuxe)respectively 256 (MAGIX midi studio generation 6) areavailable.
– Only a small storage space is required. Data handling isextremely fast, even with less powerful computers.
– Well arranged note displays (note print-out, noteeditor), Matrix Editor and Event Editor (listing) allowfor very organized editing. Sound sequences can beinput at the computer “virtually“ without playing aninstrument.
Advantages of Audio Recordings over MIDI Record-ings: – You can record any instruments without MIDI connec-
tion—such as vocals or acoustic guitar.– No instruments are required for play-back. Individual
voices can be used several times (e. g., choir recordingsusing only one voice).
– The time resolution is very precise and always consis-tent. There is no deviation of phase relations betweenindividual notes. The play-back level for mixdowns isalways exactly the same.
The above points indicate the following: all MIDI instru-ments should be recorded on MIDI tracks. The MIDI levelproduction should be carried as far as possible, beforestarting the first audio recording. Prior to the first audiorecording, the tempo of the song should be clearly de-fined. Subsequent tempo changes are possible, however,they involve time and a loss in quality. Naturally, all non MIDI instruments have to be recordedon audio tracks. MIDI instruments have to be recorded onaudio tracks only if the number of voices in MIDI is insuf-ficient, if the instruments will not be available for play-back, or if a mixdown is required.
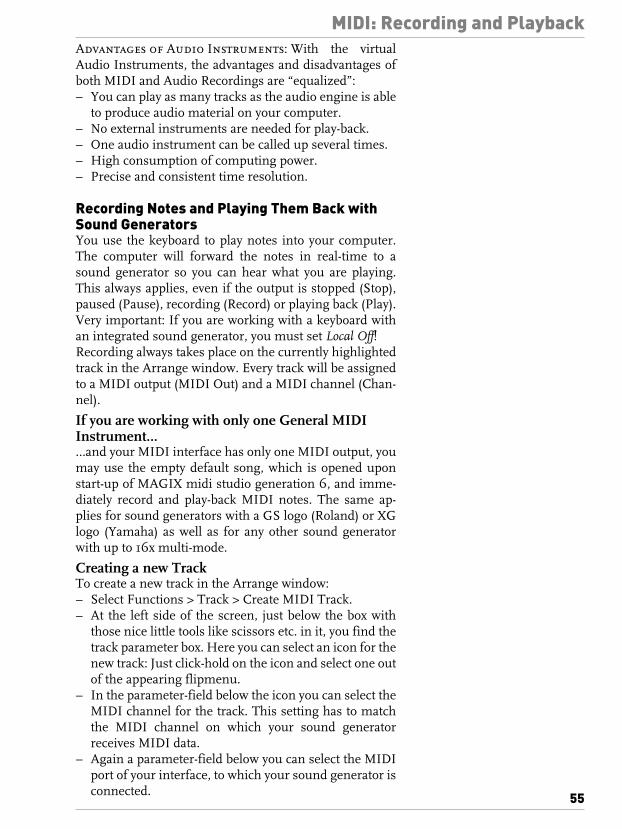
MIDI: Recording and Playback
55
Advantages of Audio Instruments: With the virtualAudio Instruments, the advantages and disadvantages ofboth MIDI and Audio Recordings are “equalized”:– You can play as many tracks as the audio engine is able
to produce audio material on your computer.– No external instruments are needed for play-back.– One audio instrument can be called up several times.– High consumption of computing power.– Precise and consistent time resolution.
Recording Notes and Playing Them Back with Sound GeneratorsYou use the keyboard to play notes into your computer.The computer will forward the notes in real-time to asound generator so you can hear what you are playing.This always applies, even if the output is stopped (Stop),paused (Pause), recording (Record) or playing back (Play).Very important: If you are working with a keyboard withan integrated sound generator, you must set Local Off!Recording always takes place on the currently highlightedtrack in the Arrange window. Every track will be assignedto a MIDI output (MIDI Out) and a MIDI channel (Chan-nel).
If you are working with only one General MIDI Instrument……and your MIDI interface has only one MIDI output, youmay use the empty default song, which is opened uponstart-up of MAGIX midi studio generation 6, and imme-diately record and play-back MIDI notes. The same ap-plies for sound generators with a GS logo (Roland) or XGlogo (Yamaha) as well as for any other sound generatorwith up to 16x multi-mode.
Creating a new TrackTo create a new track in the Arrange window: – Select Functions > Track > Create MIDI Track.– At the left side of the screen, just below the box with
those nice little tools like scissors etc. in it, you find thetrack parameter box. Here you can select an icon for thenew track: Just click-hold on the icon and select one outof the appearing flipmenu.
– In the parameter-field below the icon you can select theMIDI channel for the track. This setting has to matchthe MIDI channel on which your sound generatorreceives MIDI data.
– Again a parameter-field below you can select the MIDIport of your interface, to which your sound generator isconnected.
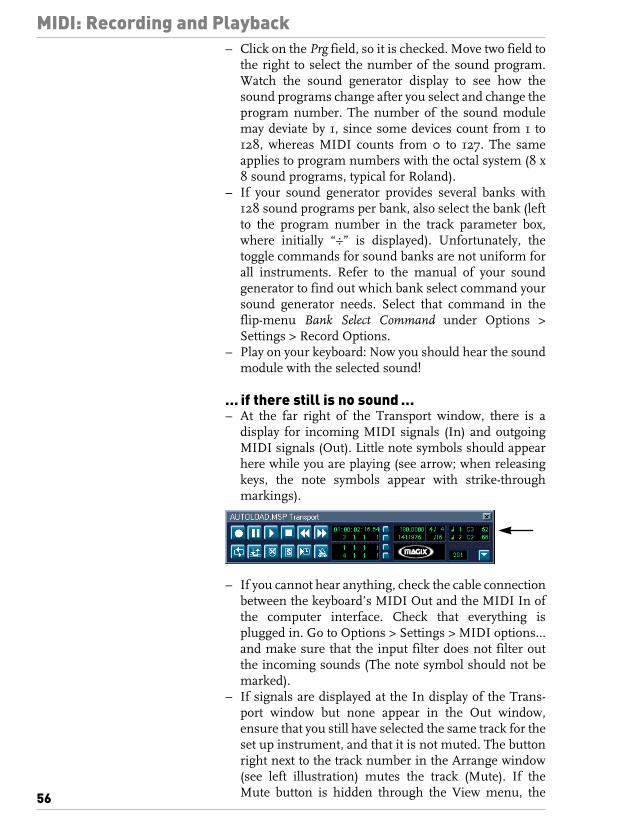
MIDI: Recording and Playback
56
– Click on the Prg field, so it is checked. Move two field tothe right to select the number of the sound program.Watch the sound generator display to see how thesound programs change after you select and change theprogram number. The number of the sound modulemay deviate by 1, since some devices count from 1 to128, whereas MIDI counts from 0 to 127. The sameapplies to program numbers with the octal system (8 x8 sound programs, typical for Roland).
– If your sound generator provides several banks with128 sound programs per bank, also select the bank (leftto the program number in the track parameter box,where initially “÷” is displayed). Unfortunately, thetoggle commands for sound banks are not uniform forall instruments. Refer to the manual of your soundgenerator to find out which bank select command yoursound generator needs. Select that command in theflip-menu Bank Select Command under Options >Settings > Record Options.
– Play on your keyboard: Now you should hear the soundmodule with the selected sound!
… if there still is no sound …– At the far right of the Transport window, there is a
display for incoming MIDI signals (In) and outgoingMIDI signals (Out). Little note symbols should appearhere while you are playing (see arrow; when releasingkeys, the note symbols appear with strike-throughmarkings).
– If you cannot hear anything, check the cable connectionbetween the keyboard’s MIDI Out and the MIDI In ofthe computer interface. Check that everything isplugged in. Go to Options > Settings > MIDI options…and make sure that the input filter does not filter outthe incoming sounds (The note symbol should not bemarked).
– If signals are displayed at the In display of the Trans-port window but none appear in the Out window,ensure that you still have selected the same track for theset up instrument, and that it is not muted. The buttonright next to the track number in the Arrange window(see left illustration) mutes the track (Mute). If theMute button is hidden through the View menu, the

MIDI: Recording and Playback
57
muted track will have a period to the left of its number(see right illustration).
– Does the MIDI instrument provide a MIDI In display?If yes, it must light up while playing. Is there a directcable connection between the MIDI Out of your inter-face, and MIDI In of the sound generator? Are theaudio connections correct? Does the sound generatorhave several stereo outputs? Perhaps Part 1 of the soundgenerator is routed to an unamplified stereo output.Double-check by connecting a headphone directly tothe sound generator.
– Is the sound generator really set to Multi Mode, or didyou select “Performance” or “Single Sound” instead of“Multi”, receiving on only one (different) MIDIchannel? It is recommended that you always work inmulti mode, even if layered sounds will initially beunavailable. Such sound layers can be organized morelogically and clearly on the MAGIX midi studio genera-tion 6 level with its various tracks than in the soundmodule.
– If sound generation is integrated into the keyboard,each part must be set individually for receivingincoming MIDI notes (Local Off, just called “MIDI” bysome manufacturers). All parts must be set to “LocalOff”!
Recording, Playing Back, and Deleting SequencesIn the Arrange window, set the song position line (the ver-tical line which shows the beat position during play-back)to the desired position. You may grab and drag the line, oryou can click on the bottom half of the beat ruler to directlyposition the line. – Start the recording by pressing * (RECORD) and play a
few sounds. To repeat the recording, press * againwhile the recording is still running.
– Stop the recording by pressing enter (STOP). Pressenter again to return to Beat 1 (or, in the Cycle mode, tothe left Locator).
– Play back your recording by pressing 0 (PLAY). Press 0again during the play-back to start over at the sameposition.
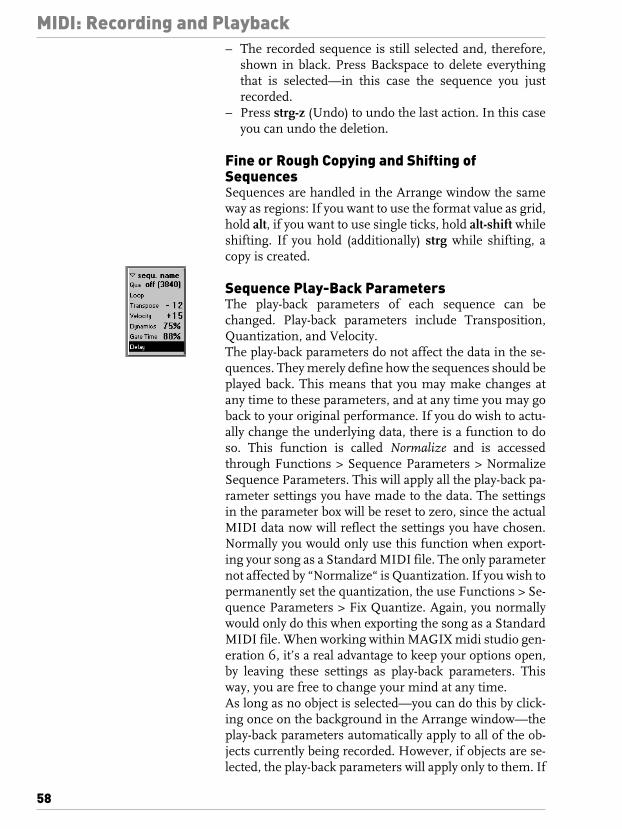
MIDI: Recording and Playback
58
– The recorded sequence is still selected and, therefore,shown in black. Press Backspace to delete everythingthat is selected—in this case the sequence you justrecorded.
– Press strg-z (Undo) to undo the last action. In this caseyou can undo the deletion.
Fine or Rough Copying and Shifting of SequencesSequences are handled in the Arrange window the sameway as regions: If you want to use the format value as grid,hold alt, if you want to use single ticks, hold alt-shift whileshifting. If you hold (additionally) strg while shifting, acopy is created.
Sequence Play-Back ParametersThe play-back parameters of each sequence can bechanged. Play-back parameters include Transposition,Quantization, and Velocity.The play-back parameters do not affect the data in the se-quences. They merely define how the sequences should beplayed back. This means that you may make changes atany time to these parameters, and at any time you may goback to your original performance. If you do wish to actu-ally change the underlying data, there is a function to doso. This function is called Normalize and is accessedthrough Functions > Sequence Parameters > NormalizeSequence Parameters. This will apply all the play-back pa-rameter settings you have made to the data. The settingsin the parameter box will be reset to zero, since the actualMIDI data now will reflect the settings you have chosen.Normally you would only use this function when export-ing your song as a Standard MIDI file. The only parameternot affected by “Normalize“ is Quantization. If you wish topermanently set the quantization, the use Functions > Se-quence Parameters > Fix Quantize. Again, you normallywould only do this when exporting the song as a StandardMIDI file. When working within MAGIX midi studio gen-eration 6, it’s a real advantage to keep your options open,by leaving these settings as play-back parameters. Thisway, you are free to change your mind at any time.As long as no object is selected—you can do this by click-ing once on the background in the Arrange window—theplay-back parameters automatically apply to all of the ob-jects currently being recorded. However, if objects are se-lected, the play-back parameters will apply only to them. If

MIDI: Recording and Playback
59
nothing is selected, then “MIDI Thru“will be shown in thesequence parameter box instead of the sequence name.
NameDouble-click to enter a name for the sequence in the topline.
QuantizationQuantization allows you to correct the timing of a se-quence with extreme precision. Quantization corrects thetiming of the note-ons, while maintaining the originallength of each note. If you wish to retain the original tim-ing of your performance, set the Quantization to “Off(3840)“. There are many quantization options, includingseveral odd tuplet and swing settings.
LoopIf you enable “Loop”, the selected object will be repeateduntil it encounters another object in the same track, or un-til the end of the song is reached. Loops can be very usefulfor providing the correct beat with a played Hihat track in-stead of with a metronome. For this, just record one, two,or four beats of Hihat and quantize to a sixteenth or aneighth. Loop the sequence (Loop: On), and a perfectlytimed Hihat will accompany you. Later the loops can beconverted to real copies for further editing by selectingFunctions > Sequence Parameters > Turn Loops to RealCopies.
TransposeThis function allows you to transpose sequences in half-tone steps. An octave has 12 half-tone steps. You can,therefore, transpose a sound by one octave upward ordownward with +12 or −12!
VelocityMIDI differentiates 127 speeds with which a note can bestruck—from the softest pianissimo (1) up to the hardestfortissimo (127). If you enter the value +18, the original ve-locity will increased by 18 points, i. e., it will be movedto-wards “forte”.
DynamicsA form of “MIDI compression“ can be achieved with Dy-namics, i. e., the differences between piano and forte, canbe compressed (levelled). For this you select a value below100%. Values over 100% emphasize the differences be-tween the strike velocity of individual notes (Expansion). Ifyou want a constantly stronger and more uniform strikevelocity for your keyboard play, try the following setting:Velocity = +20 and Dynamics = 50%!
MIDI: Recording and Playback
60
Gate TimeThis parameter allows you to shorten or lengthen the du-ration of the notes in a selected sequence by a percentage.This can be useful to create staccato or legato effects veryquickly. It can also be used to compensate for the differingattack/release characteristics that you may encounterwhen assigning a sequence to ply with different sounds.Percentages lower than 100 will shorten the notes, above100 will lengthen them.
DelayThis function allows you to move up the play-back of atrack (negative values) or to delay it (positive values). TheDelay function is not only used for rhythmic effects, butalso to compensate for sounds with slow attack times. Byadvancing the track a few milliseconds, even slowly fadingin string sounds will sync with other sounds with faster at-tack times.
The Autoload SongA Song named “Autoload”After you have become familiar with the basics of MAGIXmidi studio generation 6, you should create a default songwhich includes all settings so you can start a recording atany time. You can also record a drum track with kick,snare, and eights from Hihat, which will then accompanyyou like a sophisticated metronome. You can also preparea standard arrangement including a track for piano, bassand strings. Further, you can prepare Screen Sets for thewindow combinations which suit your work method andyour monitor size. Put the Autoload Song on your desk-top, and start it by double-clicking it. You should alwayssave your songs with a different name: File > Save As…).With the autoload file, the basic setup of tracks and othermajor settings needs to be done only once. It can be mod-ified occasionally, if you add a new instrument to your col-lection, for example, or if you get rid of one.

Event Editor
61
Event Editor
Open the Event Editor by selecting Window> Open EventList. NOTE: If you wish for the Event Editor to be the editor thatis opened when you double-click on a sequence in the Ar-range window, open the Options > Settings > Global Pref-erences menu and select Double-click to open Event Edit inArrange from the flip menu at the bottom of the window.The Event Editor displays all data chronologically in a textformat within a table. The Event Editor has no graphicalfeatures, and its arrangement and display of notes is notcomparable to the easy overview provided by the Score andMatrix Editors. However, it is by nature the most efficienteditor, showing you every MIDI event, with its type and itsvalues (data bytes) in plain text. All of these parameters areaccessible for editing. In fact, you could do a complete pro-duction without ever leaving the Event Editor. The MIDIevent type is shown in one of the middle columns of thedisplay. This makes it easy to quickly discern betweenNote, Volume (controller 7), Modulation wheel or anyother type of data. Below is an Event window with a collec-tion of MIDI events of all types. (thought not necessarily areal life collection of events, it is useful for this demonstra-tion.
With the buttons on the left side you can determine whichdata types should be visible. You can also use the buttons

Event Editor
62
to add events directly from the Event Editor. You do this bysimply clicking on the desired button with the pen tool.You may select events by rubberbanding them within theStatus column. (the column under the word Status at thetop portion of the window.) Be careful not to grab the tim-ing positions or the data lines, as you may change their val-ues without wanting to.Identity of buttons, starting at top left and moving down incriss-cross fashion: Notes, Program Commands, PitchBender, Any Type of Controllers, Channel Pressure (Af-tertouch, Pressure Dynamics), Poly Pressure (polyphonicpressure dynamics), System Exclusive Data, Contents ofSystem Exclusive Data.Note-Off Events, i. e., commands to end notes, are not dis-played separately. Instead the length of the notes is shownon the information line for Note-On Commands.
Application Example: Deleting unwanted Controller dataLet’s assume that an otherwise perfect keyboard perfor-mance is flawed because of too much modulation wheeldata. The Event Editor makes it very easy to delete only thisunwanted data. You could then re-record just the modula-tion wheel performance and merge it back into the se-quence containing the note data. Here is how you mightproceed with such a task. Open the Event Editor and selecta modulation wheel command (controller 1). Select Edit >Select > Select Similar Objects.All modulation wheel commands are now selected.Delete them by pressing Backspace. Close the Event Edi-tor. In the Arrange window, select Functions > Track >Create MIDI Track to create a new, identical track onwhich you will re-record the modulation wheel commandsonly. Using the Merge Tool you can then merge thesecommands anytime with the currently edited note se-quence. You should also take note that the same value can bechanged simultaneously for all selected events in theEvent Editor. For example, once all the modulation wheelevents were selected above, you could have reduced theamount of modulation wheel effect for one of the eventsand the values for all the other events would have changedsimultaneously by the same amount. You could also use asimilar procedure to alter the time position of any selec-tion of events.

Event Editor
63
The Event Float Window
The Event window may not be as intuitively designed asthe Score Editor or Matrix Editor. However, its detailed in-formation and direct access to all Events parameters areinvaluable. The Event Float window, a relative of the EventEditor, allows you to access this same information easilyand compactly from within any other edit window. TheEvent Float is like a single ‘slice’ of the Event editor andwill always display the currently selected event (if morethan one event is selected, the first event is shown). Just aswith the Transportation window, the float window alwaysfloats, i. e., is never covered by another window. To openan Event Float window select Options > Event Float in themain menu.
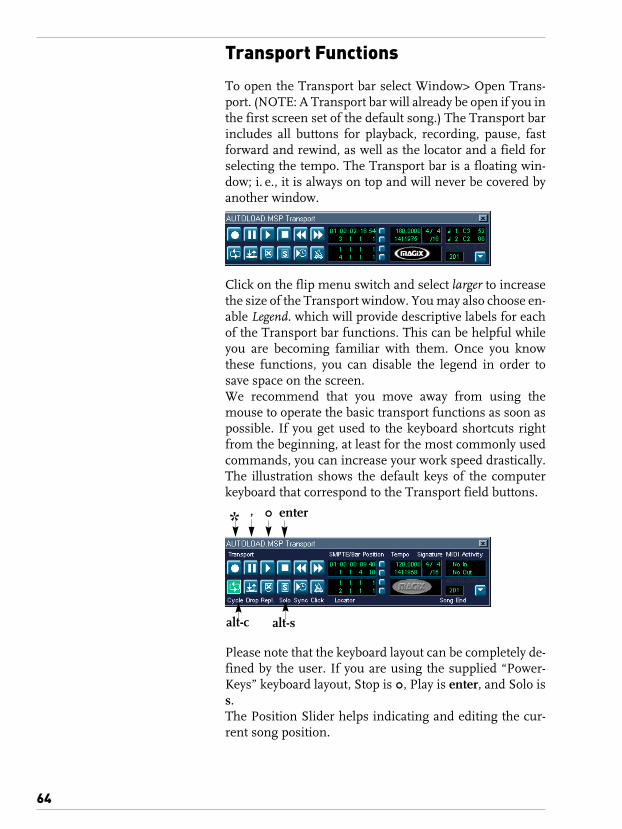
Transport Functions
64
Transport Functions
To open the Transport bar select Window> Open Trans-port. (NOTE: A Transport bar will already be open if you inthe first screen set of the default song.) The Transport barincludes all buttons for playback, recording, pause, fastforward and rewind, as well as the locator and a field forselecting the tempo. The Transport bar is a floating win-dow; i. e., it is always on top and will never be covered byanother window.
Click on the flip menu switch and select larger to increasethe size of the Transport window. You may also choose en-able Legend. which will provide descriptive labels for eachof the Transport bar functions. This can be helpful whileyou are becoming familiar with them. Once you knowthese functions, you can disable the legend in order tosave space on the screen.We recommend that you move away from using themouse to operate the basic transport functions as soon aspossible. If you get used to the keyboard shortcuts rightfrom the beginning, at least for the most commonly usedcommands, you can increase your work speed drastically.The illustration shows the default keys of the computerkeyboard that correspond to the Transport field buttons.
Please note that the keyboard layout can be completely de-fined by the user. If you are using the supplied “Power-Keys” keyboard layout, Stop is 0, Play is enter, and Solo iss.The Position Slider helps indicating and editing the cur-rent song position.
alt-salt-c
* , 0 enter

Transport Functions
65
Punch, Cycle, Skip CyclePress “Stop” twice to set the song position line back to thebeginning of the song (or, if Cycle is enabled, to the next lo-cator to the left). This double-hit of the Stop key is veryuseful, if you want to start playing back or recording fromthe beginning of the song. With this function no rewind-ing is required. Record Toggle (preset to space bar) allowsyou to manually drop (or: punch); i. e., enter or exit a re-cording while the sequence is already playing. (drop in /drop out).Cycle will continuously repeat the playback or recordingbetween the left and right locator. You can directly clickand drag on the beat position of each locator to changetheir value. If you double-click them, a text field opens inwhich you can type in an exact value. Type in a “space” or“.” to separate between the data positions of location, i. e.,type “5.3.1.1” to set the locator to bar 5, beat 3. (NOTE:MAGIX midi studio generation 6 will also “round off” thevalues of positions not entered so typing “5.3” would ren-der the same result as typing “5.3.1.1”) The illustration onthe left shows the input of 14 in the left locator (seengraphically it actually is on top), by double-clicking Back-space, 1, 4, and enter. The “right“ (lower) locator is set to abeat of 20.For intensive editing of a song section, you can repeat itcontinuously using the Cycle function. To enable thisfunction, press and hold your mouse button and moveover the respective area in the upper half of the bar ruler.In the Cycle mode, playback and recording will be re-peated only between the two locator positions.This Cycle range is highlighted with a thick, orange bar onthe bar ruler. As an alternative to the previous describedmethod, you can change the locator positions by grabbingthe lower corners of this bar and dragging them with themouse.To skip a section, press and hold the mouse button andmove over the section from right to left. The Skip Cyclerange is shown as a very thin bar at the top of the bar ruler.Under Skip Cycle, the left locator will have a later positionthan the right locator.
Count-In and MetronomeThe count-in and metronome settings are set as follows:

Transport Functions
66
– Select Options > Settings > Recording Options. In thebottom flip-down menu you can choose None, One,Two, Three, or Four beat count-in. You can also selectthe option Wait for Note, which will repeat a quarternote count-in, until you play the first note and therecording starts.
– In the Recording Options you can choose if thecomputer loudspeaker should click during recordingand/or playback.
– Select Options > Settings > Metronome Settings todefine a MIDI channel and MIDI notes to be used asmetronome. You might, for example, use the Rim Shotof your sound module as metronome click.
Auto DropThe Auto Drop function is used to automate the process ofdropping in and out of record. When it is enabled, MAGIXmidi studio generation 6 will drop in and out of record atthe designated left and right locator points, i. e., at the leftlocator recording will start, at the right locator MAGIXmidi studio generation 6 will switch back to playback. Youcan also use Drop mode in conjunction with Cycle, inwhich case a total of four locator points are displayed.
In the example below playback will start at beat 2. At beat4, MAGIX midi studio generation 6 enters the recording(drop in). At beat 8, playback is re-activated (drop out). Atbeat 9, playback starts over beginning with beat 2.If you want MAGIX midi studio generation 6 to act andfeel like a real tape player for MIDI recordings; i. e., thatthe range within the drop locators will actually be erasedand replaced instead of just recording an additional se-quence, select Replace.If Solo is selected, you can listen only to the selected track.All other tracks will be muted.
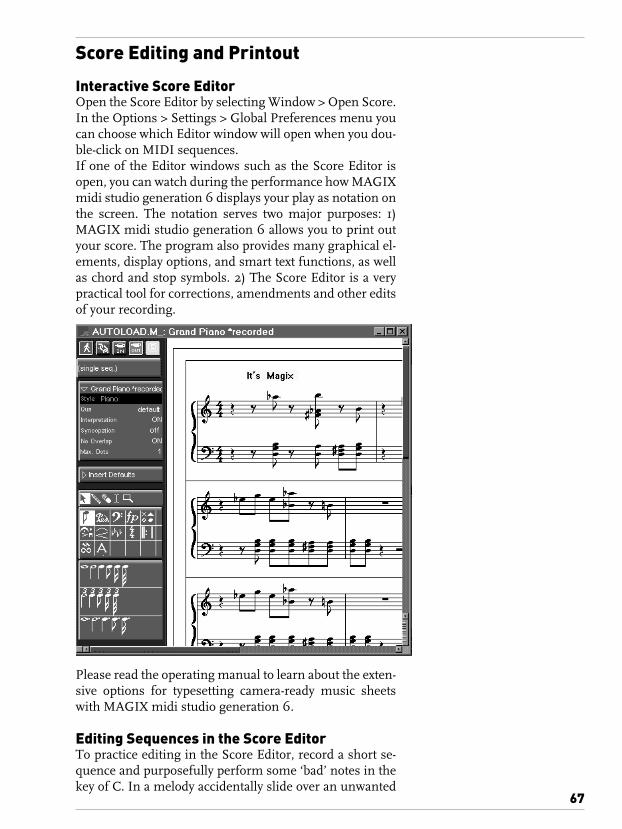
Score Editing and Printout
67
Score Editing and Printout
Interactive Score EditorOpen the Score Editor by selecting Window > Open Score.In the Options > Settings > Global Preferences menu youcan choose which Editor window will open when you dou-ble-click on MIDI sequences.If one of the Editor windows such as the Score Editor isopen, you can watch during the performance how MAGIXmidi studio generation 6 displays your play as notation onthe screen. The notation serves two major purposes: 1)MAGIX midi studio generation 6 allows you to print outyour score. The program also provides many graphical el-ements, display options, and smart text functions, as wellas chord and stop symbols. 2) The Score Editor is a verypractical tool for corrections, amendments and other editsof your recording.
Please read the operating manual to learn about the exten-sive options for typesetting camera-ready music sheetswith MAGIX midi studio generation 6.
Editing Sequences in the Score EditorTo practice editing in the Score Editor, record a short se-quence and purposefully perform some ‘bad’ notes in thekey of C. In a melody accidentally slide over an unwanted

Score Editing and Printout
68
f sharp down to the actually intended g, and play a C-Minorchord where a C-Major chord should be played. Then cor-rect these errors as follows:– Double-click the recorded track. The Note Editor will
open with a display of the Score.– Grab the f sharp with your mouse. The f sharp will
sound and be selected: it will blink. Press Backspace todelete. The f sharp is deleted.
– Grab the e flat of the incorrect C-Minor chord and dragit one half-tone step upwards. The e flat changes to an e,and the C-Minor changes to a C-Major chord.
– Try using the pen tool to add notes. Please notice the Score Tutorial on the separate TutorialCD. It consists of a .pdf file and a few example songs.
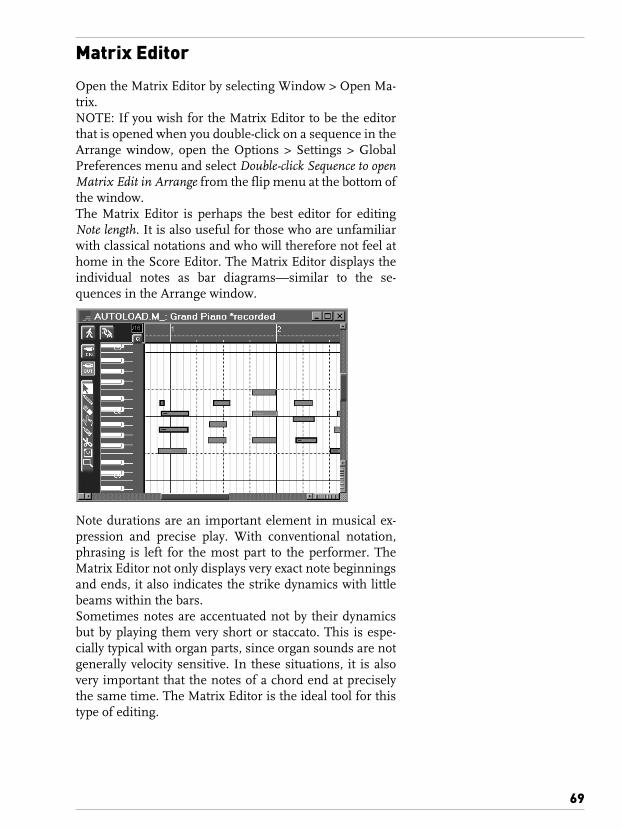
Matrix Editor
69
Matrix Editor
Open the Matrix Editor by selecting Window > Open Ma-trix. NOTE: If you wish for the Matrix Editor to be the editorthat is opened when you double-click on a sequence in theArrange window, open the Options > Settings > GlobalPreferences menu and select Double-click Sequence to openMatrix Edit in Arrange from the flip menu at the bottom ofthe window.The Matrix Editor is perhaps the best editor for editingNote length. It is also useful for those who are unfamiliarwith classical notations and who will therefore not feel athome in the Score Editor. The Matrix Editor displays theindividual notes as bar diagrams—similar to the se-quences in the Arrange window.
Note durations are an important element in musical ex-pression and precise play. With conventional notation,phrasing is left for the most part to the performer. TheMatrix Editor not only displays very exact note beginningsand ends, it also indicates the strike dynamics with littlebeams within the bars.Sometimes notes are accentuated not by their dynamicsbut by playing them very short or staccato. This is espe-cially typical with organ parts, since organ sounds are notgenerally velocity sensitive. In these situations, it is alsovery important that the notes of a chord end at preciselythe same time. The Matrix Editor is the ideal tool for thistype of editing.

Matrix Editor
70
Now the note beginnings are aligned exactly on the grid.You can shorten the notes by grabbing them at their rightlower corner. If you simultaneously hold ctrl-shift, all ofthe selected notes will receive the same length.
In some editors, the Q buttoncan be used to quantize theselected notes.
If you touch the Q button, a selection box appears. In thisbox you define the grid on which the notes should bequantized. The selection of a quantizing grid activates thequantization. Subsequent quantizations can be activatedby clicking on the Q button.Above the quantize button there is a field which shows thecurrent resolution of the grid lines to which the notes willsnap when moved. To move the notes without any gridlines, hold down shift-alt while moving the notes.You may use the Velocity tool to change the dynamics of aselection of notes. With the tool selected, just click anddrag up or down on a note or selection of notes. The lengthof the “velocity bar(s)” will change to reflect the change.

Preparing files for CD burning
71
Preparing files for CD burning
File FormatSpecial software like MAGIX audio studio is required forthe burning of CDs. This software accepts single songs inthe form of single stereo files. The sequence and number-ing of the titles will be organized by the CD software. TheCD burner software requires the file format WAV. WAVfiles with the following characteristics:– stereo,– 16 bit– 44.1 kHz sampling rateThese type of files can be created with MAGIX midi studiogeneration 6. This chapter describes the procedure usedto create these files.
Mixdown by Track Bouncing
Recording MIDI Instruments as Intermediate Audio Mixdowns: MAGIX midi studio generation 6 allows youto digitally merge various audio tracks without playingback the song (digital mixdown). But only MAGIX midistudio generation 6 deLuxe allows you to record the finalmixdown in real-time, for using internal plug-in effectsand external real-time effects processors (like reverb andmulti-effect devices) during the final mixdown and man-ual intervention. This technique is called Track Bouncingand is described in the following. To accomplish this, youmight first record the signals of all MIDI instruments tobe played back by MAGIX midi studio generation 6 de-Luxe in their entirety on to a single stereo audio track andthen mute all MIDI tracks.Only mix the signals that you will actually need on the re-cording input of MAGIX midi studio generation 6 de-Luxe. Do not turn them louder than necessary, to avoidunwanted noise.For automatic mixing, see chapter “Mixdown withMAGIX midi studio generation 6“.
Track Bouncing: It is not necessary to re-record the totalof all audio tracks through the analog inputs, or to use an-other master device. MAGIX midi studio generation 6 de-Luxe provides a Track Bounce function, which allows youto master the mixdown in real-time on the hard disk—us-ing a file format that the CD burner will recognize. Openthe Audio Mixer or the Track Mixer (open the Track Mixerin the Arrange window by selecting: Window > Open

Preparing files for CD burning
72
Mixer…). Press the Bounce button on the track objectwhich plays back all tracks, i. e., the Master fader. TheBounce dialog box appears. In this dialog box you can setthe beat range across which the mixdown should span.This dialog also displays the required storage space.
Click on the Bounce button, or confirm by pressing re-turn. In the displayed dialog box enter the hard drive andthe folder to which you want to write the mixdown of yoursong as an WAVE file.
Post-ProductionFinal editing of the stereo recording will take place in theAudio window and in the Sample Editor. At first you mayhave to cutany remaining unwanted material at the begin-ning and/or end of the mixdowns.
Grab the regions in the Audio window next to their lowercorners, and shorten them.
Open the Sample Editor by double-clicking the region,and check the region’s starting and ending point (Any-thing important cut off? Any unnecessary pauses?). Onceyou’ve made the desired selection, choose Functions >Trim. With MAGIX midi studio generation 6 deLuxe you canperform a composite compression for that powerful hitsound—select Factory > Audio Energizer.
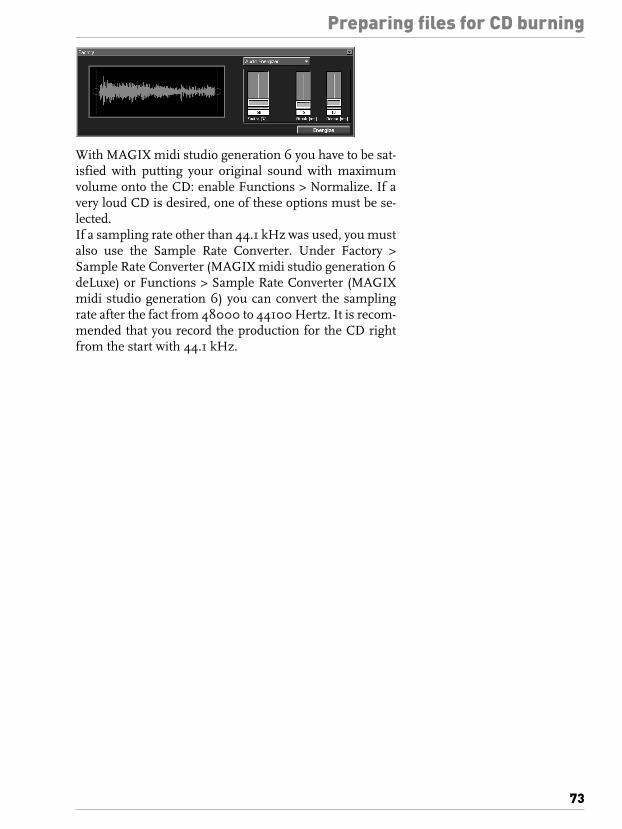
Preparing files for CD burning
73
With MAGIX midi studio generation 6 you have to be sat-isfied with putting your original sound with maximumvolume onto the CD: enable Functions > Normalize. If avery loud CD is desired, one of these options must be se-lected.If a sampling rate other than 44.1 kHz was used, you mustalso use the Sample Rate Converter. Under Factory >Sample Rate Converter (MAGIX midi studio generation 6deLuxe) or Functions > Sample Rate Converter (MAGIXmidi studio generation 6) you can convert the samplingrate after the fact from 48000 to 44100 Hertz. It is recom-mended that you record the production for the CD rightfrom the start with 44.1 kHz.
Troubleshooting
74
Troubleshooting
Possible SymptomsThey may be rare, but every computer user inevitably ex-periences seemingly severe computer problems at somepoint, whether they be crashes where the mouse freezes,the screen locks up, or the display becomes plastered witherror messages. Even mature, well written operating sys-tems cannot protect you completely from hardware con-flicts, bugs , or other problems.Experience has shown that such system problems arerarely caused by a defect in our programs or hardwareproducts, since they are rigorously tested by a diverserange of musicians and studio users in a variety of appli-cations, looking for any faults or problems.This does not mean that the possibility of errors can becompletely ruled out; problems can crop up especially asthe various applications, operating systems and driversare all developed and improved in parallel by unrelatedteams, leading to occasional compatibility problems. Wedo, however provide fixes in the form of software updates,as soon as we become aware of such problems, and aregrateful to any users who make us aware of them.If you suffer from system crashes or errors, you may wellfind the tips in this chapter helpful, even if the problemsare ultimately unrelated to our products. In most cases,these problems, once identified, can be rectified with aminimum of effort, although tracing the cause of suchproblems can be time consuming. You will be able to over-come most of these problems without needing to consultan expert—this chapter will guide you on how to proceed.It is best to eliminate the classic causes of problems beforeyou suspect a hardware defect, or another fault, especiallybefore you send your machine for repair, or your softwarefor a refund! Take care, though: some of these suggestionsmay only cure the symptoms, and could therefore compli-cate the identification of the actual cause of the problem.Persistent problems will require the advice of an expert.If you have bought the computer together with the soundcard and other hardware, it is a good idea to test that thecomputer is functioning as expected, with just a mouse,keyboard, and display attached, before installing the cardand additional hardware (hard disks, printers etc.). Mostnew computers come with pre-installed software, whichshould allow you to test to see that everything is workingcorrectly. Once you have switched off everything, you canproceed to install any hard disks, modems, scanners etc.
Troubleshooting
75
Now check that everything is still working as it should. Ifso, you can unplug all cables from the back of the com-puter and begin to install the sound card.
If disaster strikes…… your first priority should be to make a backup of yourmost important documents. Attempt to copy your files(lyrics, songs, tax declarations) to diskettes, hard, or re-movable drives, without launching their associated appli-cations. While you are at it, you should also make timelybackup copies of your software’s installation diskettes.You can skip this step for CD-ROMs, but even CDs re-quire extra care: neither of its two sides should bescratched. Once you have made backups of your privatefiles, and programs, the chances of a true disaster are allbut eliminated. Never skip making regular backups, evenif everything is working perfectly—eventually, any harddisk may crash. A system crash can be caused by:– operator error,– a software conflict (e. g. incompatibility between two
programs),– overloading of the system’s resources,– faulty cable connections (or missing termination), or– a hardware defect.Eliminate the first two causes before deciding to have yourhardware repaired.If the problem persists, make precise note of the follow-ing:– what you were doing at the time of the error (which
program, which function, which applications wereopen);
– the exact text of any error messages and/or errornumbers (if applicable);
– the version of the operating system, as well as of theprogram where the error occurred;
– your system configuration.– After each crash: Check the files and file structure of
your system hard disk with a suitable program likeScandisk. If necessary, repair the files and file structureof your system hard disk. We highly recommendchecking your hard disks with the Scandisk programregularly, so as to rule out any hard disk related prob-lems in the first place.
PCI FaultsPCI technology relies on highly accurate timing synchro-nization in your computer’s data stream. Unfortunately,there are certain PCI card combinations that will cause

Troubleshooting
76
conflicts with each other, despite the fact that each on itsown is working perfectly, and within the PCI specifica-tions. PCI problems like this can cause seemingly randomsystem crashes.– Check whether the same problem persists after you
have removed the PCI card. Of course, you need thiscard to work, but try to work on the machine for severalhours without the card—if the problems have goneaway, you have found the culprit. If the problemspersists however, you can safely rule out PCI problemsas being the cause.
– Try to use the PCI card in another slot. It is quitepossible to solve conflicts by simply swapping slots.
SCSI and IDE FaultsFaults in the SCSI or IDE chain can have a variety of con-sequences. SCSI, SCSI2 and IDE are parallel interfaces,and can be used to connect hard and removable drives, CDburners, and other drives, as well as scanners to your com-puter. Always take care with the following:– The total length of all cables must be as short as
humanly possible, and the cables should be of the bestquality.
– The connectors must sit securely in their sockets, i. e.securely screwed or clipped into place.
– Each SCSI ID (a number from 0—7) must be allocatedonly once per SCSI bus.
– The last device in a SCSI chain must usually be termi-nated with a resistor block. Some devices have internaltermination, that can be switched in/out. If no termina-tion is available, you will need an external terminator(which looks like a single connector). This will beconnected to the last device’s output. Although thismay seem to contradict with the previous statements, ithas been known for a SCSI chain to work better withouttermination. If you suffer from seemingly randomsystem failures, without an obvious cause, you may wellexperiment with different device order combinations.Also experiment with, and without termination for thelast device in the chain.
Faulty CablesCable faults are a common problem, which can cause allmanner of problems.The use of the right monitor cable is important—simplyhaving the correct connector at either end is not sufficient.Before you assume an unrelated hardware fault, please

Troubleshooting
77
test whether the cable may be at fault by swapping it for anew one. Another common problem is loose internalcomputer connections, which especially can occur aftercomputer transport. With awareness of the warranty re-quirements, as well as all safety precautions, our moretechnically minded readers may wish to fasten the internalconnectors, with all due care. Be careful though: discon-nect the power cable first, and wait for the high voltage todrop. Ground yourself with the computer. This can pre-vent many visits to the repair man (or the hospital). How-ever, we cannot be held responsible for any computer ma-nipulation of this kind.
Hardware ConflictsThe installation of various PCI cards and the use of exter-nal devices (like MIDI interfaces) can cause hardwareproblems—these sound more intimidating than they ac-tually are. If Windows does not respond the way it used toafter having installed new hardware, it will be useful to be-gin to localize the problem. Start Windows in Safe Mode.– Restart the computer.– During startup (while still in DOS mode) the message
“Windows is starting” will appear—press F8 as soon asit does.
– Choose Safe Mode by selecting 3 and confirm yourchoice with return. Windows will now launch in SafeMode. Your video and audio card features will not beavailable—for example, the screen resolution will belower than usual.
You can, at this point call up the Windows Help file, whichcan help you in many cases. Choose Start > Help. The“Contents” section has an entry for “Troubleshooting”.Now, right-click the “My Computer” icon on your desktop,and choose “Properties”, then select “Device Manager”.

Troubleshooting
78
– If you see any small yellow exclamation mark warningsymbols (click on any plus signs to check all theentries), you have found the root of your problem.
– Select the hardware entry that is causing the hardwareconflict, and click the “Properties” button.
– Pay close attention to the notes Windows gives aboutthe hardware, for example about resource conflicts.Hardware resources such as IRQ numbers cannot bechanged in Safe Mode. Instead remove the device fromthe Device Manager and restart your machine. You cannow re-install the hardware. On a related topic, pleasenote that IRQ conflicts can be avoided by setting yourBIOS parameters correctly. However, BIOS settingsshould only be changed by experienced users. Consultyour computer or music dealer for advice in this area.
Sound CardsIf MAGIX midi studio generation 6 complains with theerror “PCAV Error xx : padUnprimeFailed (xx is a num-ber) on start up, one of three causes could be the culprit:1. There is no sound card installed in your computer;2. The sound card or its drivers are not stereo or 16bit ca-pable (this applies to older sound cards);3. The sound card is currently in use by another pro-gram—the Windows CD Player, a wave editor, or the like;If the first instance, uncheck the ‘PC AV’ checkbox in Au-dio > Audio Hardware & Drivers. Exit MAGIX midi studio
Troubleshooting
79
generation 6, and start it again—everything should nowwork.If the second case applies, you will need to install more re-cent drivers, or change the sound card altogether. Pleaseask your sound card’s manufacturer.In the third instance you simply need to close down theother programs and start MAGIX midi studio generation6 again.Advanced users can use the settings accessible via the“Control Panel” switches in Audio > Audio Hardware &Drivers > Audio Drivers to manually control MAGIX midistudio generation 6’s sound card use.
VirusesRegrettably, there are some malicious people, who pro-gram and distribute virus solely to cause damage. Checkyour drives regularly for viruses, especially if you are inregular contact with other people’s data carriers, or down-load from the Internet. Not all virus programs are able todetect the tricky macro viruses, and others which are as yetunknown to virus protection software developers.
Graphic CardsGraphic cards and graphic drivers can cause many prob-lems. Always ensure that you have the latest drivers foryour graphic card installed.If you are confronted with inexplicable problems, installthe Standard VGA graphics driver. This is sensible even ifthe actual symptom appears unrelated to graphics use. Ifthe graphic card or its driver is responsible for the prob-lem, the use of the Standard VGA driver should cure it.
Re-installing the Operating SystemSometimes parts of your computer’s Operating Systemget corrupted. There are dozens of reasons for this. Thenre-installing the operating system (Windows 95/98/2000) from your installation CD-ROM is a good idea. To prevent such time-consuming actions, you shouldmake sure that you only install software that you reallyneed and use. Do not mess too much with installing eachand every piece of software that comes across your way.And stay away from cracked software, not only for legalreasons, but also for cracks are likely to play havoc withyour computer’s operating system in order to avoid thecracked software’s copy protection. Please remember: Re-altime audio processing as carried out by Magix music stu-dio generation 6 is a “Formula One” race for your com-
Troubleshooting
80
puter, so make sure your system is in VERY good shape.Learn about this in internet news groups or computer mu-sic magazines.
Updating the Operating SystemSometimes the faults simply come down to the operatingsystem. You can usually find updates to your operatingsystem, free of charge. Operating system upgrades can beconveniently download from the Internet. The Internet isa gold mine for solutions to problems, and a great meetingplace for solution seekers. Many computer magazine web-sites have links from their home pages, to pages that offersolutions to many common problems.If all else fails, there is only one thing left to do:
Formatting the Hard DiskFormatting the hard disk is the last resort you should at-tempt before sending the computer for repair. This willerase all files on your hard disk, and most probably alsoany garbage data that may be causing your problems. Theformatting process will erase all files, so make backups ofall your files and programs first, and make sure to verifythose backups to ensure that they have been successful.Note that all invisible authorization files will also be lost,so uninstall your authorizations of other software first. Ona related note, consider the importance of sending us yourregistration card so that you can get help when a hard diskdisaster strikes.In order to allow formatting of the internal hard drive youneed to start your computer from another, either from theCD-ROM or an external hard disk. To rule out a Virusproblem however, it is advised that your reformat all yourhard drives in the same session—after all, a CD-ROM can-not be infected with a virus (unless it was infected to beginwith.). Install MAGIX midi studio generation 6 again. Ifthe problem still persists, a hardware conflict or conflictbetween the program and the operating system is mostlikely. If the problem only occurs with a specific program,you will need to get in touch with the software manufac-turer. If the problem occurs with several applications, youwill need to get in touch with your computer dealer.

81
Part2
Reference
midistudio

Using MAGIX midi studio generation 6
82
Using MAGIX midi studio generation 6
This chapter summarizes MAGIX midi studio generation6’s general operating functions.But first, a quick word about this manual.
Conventions of this ManualMenu Functions: If the text is dealing with functions whichcan be reached via hierarchical menus, the different menulevels are described as follows: Menu > Menu entry >Function.Key Commands: When a function can be operated by a keycommand of the same name, you will see this symbol atthe side of the text. If names differ, or if a function is onlyavailable as a key command, its name will be printed likethis: Key Command.Options and Parameters: The options you can set from thePreferences or Song Settings, and the parameters in dia-log boxes are printed like this: Parameters.Different parameter values are printed like this: Parametervalue.Graphics: Sometimes this manual uses graphics fromother MAGIX programs. This is due to technical reasonsand does not influence the usability of this manual. How-ever we apologize for this inconvenience.
The MouseBasic functionsUnless stated otherwise, the left mouse button is the oneyou should use whenever “the mouse button” is men-tioned.Clicking: Place the mouse pointer on the object (button, in-put field, etc.) and press the mouse button once.Double-clicking: The same as clicking on an object, but youpress the mouse button twice, in quick succession. Youcan set the appropriate time-span for this in the SystemControls.Grabbing or Clicking and Holding: The same as clicking onan object, but you keep the mouse button held down.Moving or Dragging: Grab the object and move the mouse(keeping the mouse button held down) to the desired po-sition.
Mouse Input
Checkboxes: Checkboxes are square boxes which be-come “checked” when you click them to activate an option
Using MAGIX midi studio generation 6
83
(or function). Click them again to remove the “check” anddeactivate the option.
Pull-down Menus: Pull-down menus open when yougrab certain input fields or buttons. You choose a com-mand by moving the mouse onto the desired item. If youwant to choose an item which is outside the visible sec-tion,– move the mouse over the top or bottom edge of the
menu; the further you move it, the faster you will scrollthrough the menu.
– now click using the right mouse button. You can thenlet go of both mouse buttons.
Mouse as Slider: You can set practically all the numeri-cal parameters, (even note values or names) by grabbingthe parameter value and moving the mouse up or down. Ifthe parameter is made up of several separate numbers(e.g. song position), you can adjust each number individ-ually.
Using the Mouse for In/Decrementing: All the para-meter values which can be set using the mouse as a slidermay also be increased or decreased in single units byclicking on the top or bottom half of the value with the leftor right mouse buttons while holding down the alt.
Numerical Input: Double-clicking on a numerical para-meter value opens an input field. The previous value ap-pears pre-selected, (i.e. highlighted) to allow it to be over-written by a new entry. You can also use the mouse tomake a partial selection in an input field so that only thehighlighted part is overwritten (for more on this, see thesection Numerical Value Input from page 220 onwards).As long as the input field is open, all the keys may be usedfor inputting data only, and may not be used for key com-mands (the exceptions are the main menu functions).… by arithmetic: At any time, you can enter numbers bytyping in an arithmetical operation, e.g. “+2” or “−5”,which then simply changes the current value by thatamount.… as ASCII-symbols: You can also input numbers asASCII symbols: just put a ` or " in front of it, and theASCII code will be input as a number. For example:"! gives 33"a gives 97

Using MAGIX midi studio generation 6
84
This function is particularly useful for entering text in Sy-sEx strings.
Text Input: You input text names in the same way asnumbers, but you only have to click the name fields onceto allow input.Numbered Names: As you might expect, you can give anynumber of selected objects the same name. If the nameends in a number, the number will automatically be incre-mented by 1 for each object. This allows you to name allthe sequences on one track quickly.
Disabling automatic numbering: To turn off the automaticnumbering, place a space after the number at the end ofthe name. All the selected objects will then end in thesame number.
Tools and the ToolboxMAGIX midi studio generation 6 allows recorded data tobe handled graphically. This means that you don’t have tocarry out operations by inputting commands via numbertables, but rather by manipulating graphic “objects”.When editing objects graphically, you always have twotools available at the mouse pointer position: one is al-ready active, the other is activated by the right mouse but-ton.You change the currently active tool by clicking on thetoolbox. The mouse pointer then adopts the shape of thetool you click on, so that you can tell what its function is bylooking at the symbol: the Eraser is used for deleting, thescissors for cutting and the glue tool for merging objects.To assign a tool to the right mouse button, click on the de-sired tool in the Toolbox, with the right mouse button.
Effective Range of the Tools: – Tools are effective only in the working area of the
window they were selected from (you can define indi-vidual tools for each opened window).

Using MAGIX midi studio generation 6
85
– A tool basically affects the objects you click on. If theclicked object is already selected, the tool operates on allother selected objects, as well.
Selecting Tools: You select the tool you want to use byclicking on it in the toolbox (or clicking while holdingdown the right mouse button for the alternate tool).If a toolbox is opened at the mouse position you can alsouse one of the number keys to choose a tool at the corre-sponding position. The tools are always numbered fromleft to right and top to bottom. Press the Show Tools keyagain to switch to the pointer, and close the box.Opening the Toolbox at the Mouse Position: Use Show Tools(default: esc) to open a toolbox at the mouse position. Thiswindow will disappear as soon as– you choose a tool by mouse click,– you choose a tool bypressing a number key,– you click anywhere outside the tool window or– press any key.
Info Line: When operating many of the tools an info lineappears at the edge of the window for as long as the mousebutton is held down. The info line replaces the localmenus in the window. This info line provides useful feed-back about the type of operation you are performing.
The Tools: Pointer: The pointer is the default tool. Themouse also takes on this shape outside the working areawhen you are choosing from a menu or inputting a value.Within the working area the pointer is used for selecting(by clicking on objects), moving (by grabbing and drag-ging), copying (by holding down ctrl and dragging) and ed-iting lengths (by grabbing the bottom right corner anddragging). Grabbing and dragging anywhere in the back-ground opens a rubber band (see page 94).Pencil: The pencil is used to add new objects. You can alsoselect, drag, and alter the length of objects.Eraser: The Eraser deletes clicked objects. When you clickon a selected object all of the currently selected objects aredeleted (as if you had used delete). Text Tool: The text tool is used to name arrange objects oradd text to a musical score.Scissors: The scissors are used to split arrange objects, e.g.before copying or moving individual sections (see page129).Glue Tool: The glue tool is the opposite of the scissors: allselected objects are merged into a single object, which is

Using MAGIX midi studio generation 6
86
given the name and track position of the first of the objectson the time axis (more on this on page 129).Solo Tool: Grabbing with the solo tool allows you to listento only selected objects during playback. Moving themouse vertically also outputs any events the cursortouches, even when the sequencer is stopped (please referalso to section Soloing sequences from page 130 onwards).Mute Tool: Clicking on an object with the mute tool stopsit from playing and places a dot in front of its name, to in-dicate that it is muted. You can unmute it by clicking itagain with the tool. If multiple objects are selected, the set-ting of the object you’ve clicked on applies to all selectedobjects (see also section Muting sequences from page 130onwards).Magnifying Glass: The magnifying glass allows you tozoom in on a “rubber-banded” section, right up to fullwindow size. You revert to normal size by clicking on thebackground with the tool(for more on this, see the sectionZooming Selectively from page 88 onwards). You can alsoaccess this function via other tools by holding down alt.Finger: The finger is used in the Matrix Editor to alter notelengths.Crosshair: The Crosshair is used in the Drum Editor to in-put a linear series of parameter values.Layout tool: The layout tool is used for graphically movingobjects in the Score Editor to optimize the display (e.g.bars to lines: “Local Formatting”) without altering the tim-ing of actual MIDI events.Size Tool: The size tool is used to adjust the size of graphicelements in the score.Velocity Tool: In the note (i.e. Matrix and Score) editors),you can use the V tool to change the velocity of notes.
Window FunctionsThe basic functions of the MAGIX midi studio generation6 windows are the same as those in other Windows appli-cation programs. However, the display options in MAGIXmidi studio generation 6’s windows are far more exten-sive.In MAGIX midi studio generation 6, you can open differ-ent combinations of windows (even several of the sametype) and adjust each one individually. All open windowsin a song are constantly updated. This means that the win-dows update to follow the song position, and any alter-ations that you make in one window immediately updatethe display of all the other windows you are working with.It is also easy to save different window arrangements

Using MAGIX midi studio generation 6
87
(called “screen sets”), and recall them at the push of a but-ton.
Working with windows
Opening windows: All MAGIX midi studio generation 6windows can be opened via the Window main menu. Youcan open as many of the same type of window as you like.
Closing windows: You close windows (alt f4) by clickingon the close symbol in the top right of the windows.
Setting window size: As is usual for Windows, you canchange window size by positioning the mouse over a Win-dow edge, or corner and pulling.Maximizing window size: The windows maximize button,in the upper right corner of the window, toggles the win-dow between its maximum size, and the size it was beforeyou clicked on the button .Minimizing window size: Clicking on the minimize buttonreduces the window to its minimum size. Double-clickingon a minimized window restores it to its original size.
Selecting the Working Area: Scroll Bars: The scrollbars are situated at the right and bottom edges of a win-dow, if you can only see one section of the working area ineither the vertical or horizontal dimension.You can move the visible section by clicking the arrows orgrabbing and dragging the scroll slider. There are twopoints of note: – The size of the scroll slider in relation to the size of the
entire scroll bar corresponds to the size of the visiblesection in relation to the overall size of the window,
– the visible section changes as you move the scrollslider.
X/Y Element: The X/Y element is situated in the bottomleft corner of the window. By grabbing and dragging it youcan move the horizontal and vertical window section, as ifyou were dragging both scroll bars simultaneously.
Page Scrolling: Use the key commands Page Up, -Down,-Left and -Right to scroll one page up, down, left or right, asif you had clicked in the grey region above / below the ver-tical scroll bar, or to the left / right of the horizontal scrollbar. The key commands Page Top, -Bottom, -Left most and -Right most take the visible section of the working area tothe top, bottom, left or right, just as if you had grabbed one
X
X

Using MAGIX midi studio generation 6
88
of the scroll sliders, and moved it to one of its extreme po-sitions.
Zooming: Below the vertical scrollbar and right besidethe horizontal scrollbar you find two hatched fields. Thesefields are used for vertical respectively horizontal zoomingand are therefore referred to as telescopes. Clicking theleft, smaller side of the telescope symbol reduces the sizeof the objects in the display, allowing you to see more ob-jects in the same space (zoom out) and clicking the right,larger side enlarges the objects in the display (zoom in).The vertical telescope is for vertical zooming (Zoom Verti-cal In/Out, default assignment: ctrl page up/ctrl pagedown), while the one with the horizontal arrow handleshorizontal enlargement (Zoom Horizontal In/Out, defaultassignment page up/page down). In some windows, onlyone telescope is available, and this then handles both hor-izontal and vertical zooming at once.Whike “zooming”, the top left selected object is kept in thevisible region, whenever possible.
Zooming Selectively: Zooming In On One Section of the Screen: To enlarge a section of the screen to the size of thewhole window use the magnifying glass tool to drag a“rubber band” over the section you want. You can do thismore than once.Reverting to the Previous Zoom Setting: Click on the back-ground with the magnifying glass. This will return thezoom to the original setting, by backtracking through theprevious steps.You can call up the magnifying glass functions with anyother tool (apart from the pencil) by holding down alt. Thepointer will still look like the previous tool, but if you “rub-berband” with it, it will behave like the magnifying glass.
Window Elements: Adjusting the Size of the Window Ele-ments: If you move the mouse over the top left corner ofthe arrange area the mouse pointer turns into a crosshair.By dragging it, you can now adjust the size of the bar ruler,arrange area, track list, and transport buttons. You canalso adjust the window elements in the Score, Drum andMatrix Editors using the same method.Concealing/Revealing the Transport Functions: Use View >Transport to display or remove the transport panel but-tons from the top left corner of the Drum, Matrix or Ar-range windows. The number of buttons and indicators de-pends on the amount of space available (see the section
X
X

Using MAGIX midi studio generation 6
89
Adjusting the Size of the Window Elements from page 88 on-wards).Concealing/Revealing the Parameters: The function View >Parameters (Hide/Show Parameters) allows you to displayor remove the entire area to the left of the Arrange and Ed-itor windows, which contains the sequence parameters,track parameters, and the toolbox. Hiding these para-meters gives you more space for the editor window itself.In many windows, you can hide and/or reveal furtherscreen elements, such as the toolbox. These display op-tions are always available from the View menu.
MenusBecause of MAGIX midi studio generation 6’s great rangeof functions, most of them are not found in the mainmenus, but appear as local menus. These are always in themenu bars of the MAGIX midi studio generation 6 win-dows where they are required.
Hierarchical Menus: You use the menus (whethermain or local) in the same way as in other application pro-grams: grab the menu title, move the mouse over the de-sired item , and release the mouse button. In hierarchicalmenus, there is a right-pointing arrow after the item. Ifyou highlight this item, a sub-menu drops down to theright. To choose an item from this sub-menu, move themouse to the right, into the sub-menu, and then verticallyover the desired item. Releasing the mouse button will ac-tivate the selected function.Using a keyboard: You can also select the active window’smenu using alt, and step through the menus in the usualway using cursor left and cursor right (or by hitting thetypewriter keys for the underlined letters) to select the oneyou want. You then use cursor down and cursor up to se-lect the menu entry you want (or carry out the menu func-tion immediately by hitting the key for the letter under-lined in the menu function’s name).If you encounter a hierarchical entry (which has a triangleat the end of the entry line), you can use cursor right to ac-cess the sub-entries (cursor left closes the sub-menuagain) and, again, use cursor down/up to make your selec-tion.When you have chosen your function, hit return to acti-vate it.
Fixed key commands: Some menu functions can be ac-cessed via fixed keystrokes or combinations of keystrokes.The keys (or combinations thereof) are shown on-screen
X

Using MAGIX midi studio generation 6
90
next to the menu entries and operate globally. For exam-ple, you can open a song with ctrl o, or copydata to theClipboard (=Copy) via ctrl c.Please note that you may assign practically any other func-tion to any key you like using the Key Commands window.
Menu options with “…” in their title: Three periods,like this: …, next to the menu function title indicate thatthe entry does not activate a function immediately, but in-stead opens a dialog box.
Dialog BoxesIn Dialog boxes, you can hit the thick-bordered button bypressing return, or by clicking with the mouse.As per usual for Windows, you can toggle the thick borderfrom button to button with cursor left/right.
Window TypesThere are two different types of window in MAGIX midistudio generation 6: normal windows and float windows.The contents of all the windows belonging to the currentsong are always updated, no matter what the type of win-dow.
Normal Windows: You can open as many normal win-dows as you want, including several of the same type. Eventhough the contents of all the windows is constantly up-dated, only one of the windows ever has the status of beingthe “top”, or “active” window. This is the window which isin the foreground when several normal windows are over-lapping.Top or Active Window: This window can be recognized byits fully-shaded title list. The main distinguishing charac-teristic of this window is that key commands only affectthis window, and not any of the others. Windows > NextWindow (ctrl+tab) brings the next window forward if it isfully covered up by others.Background Windows: Background windows are identifiedby the color of their title bar. This color is determined byyour “Appearance settings in Windows. You bring thewindow to the foreground by clicking on it, clicking on thetitle bar, or calling up one of the local menu functions.
Float Windows: MAGIX midi studio generation 6knows two float windows: the Transport window and theEvent Float window. Float windows are so called becausethey always “float” in the foreground, even above the topnormal window (if there are too many open float windows,they will inevitably cover each other up—just click on

Using MAGIX midi studio generation 6
91
them to bring them to the front). Float windows are recog-nizable by their narrower title bar, which contains noname. Mouse operations can be carried out in the sameway as in normal windows.
Main Menu Window: MAGIX midi studio generation 6Main Menu window is the main window of the program.You will find all menu items here. There are:– Global Menus, which are always visible (e.g. File);– Window related menus: they belong to a certain
window type (e.g. Score Window) and are only visiblewhen this window type is the active window. It onlycontains functions relevant for the correspondingwindow type.
As is common on Windows computers, you can address amenu using using the alt key. Keep this window at its pre-set maximized size, there isn’t much point in making itsmaller.The “Minimize Window” button can be used to switch be-tween MAGIX midi studio generation 6 and other appli-cations. You can get back to MAGIX midi studio genera-tion 6 at any time by clicking the MAGIX midi studiogeneration 6 symbol in the Task Bar.Press alt tab to toggle directly between MAGIX midi stu-dio generation 6 and any other application.
Relationships between WindowsThe two buttons at the top left of a window (shown here),determine its relationship to the song position (Catch), orto other windows (Link, Show Contents, or ContentsCatch).
Catch: The Catch function means that the visible sectionof a window follows the song position as the song plays. If the button with the walking man on it is lit (i.e. if it isgreen), the window’s display follows the song position asthe song plays. If the button is not lit, the display does notupdate, even when the song position line moves past theright edge of the visible portion of the window(Catch ClockPosition).Automatic Catch Disabling: If you move the visible sectionmanually, Catch is automatically switched off, so that thenew section you have chosen doesn’t then disappear, asthe display is updated to the song position line.Autocatch: The function Enable Catch when Sequencer starts(Options > Settings > Global Preferences…) always en-ables Catch mode whenever you press play or pause.
X

Using MAGIX midi studio generation 6
92
Link, Show Contents, and Contents Catch: You candefine these display options to control how information isdisplayed when working with related editor windows.Link: When the button with the chain link icon is activated(i.e. when it is this window always displays the same con-tents as the top window. The display is adjusted wheneverthe selection in the top window is altered.Here’s an example: imagine the top window is an editor.In Link mode, the other editor windows can display thesame data in another form (though please remember: youcannot have any event display as the background windowof an Arrange window while in Link mode).
Contents Link: Double-clicking on the link button (darkblue) activates Contents Catch mode. This means that thewindow always shows the contents of the object selectedin the top window. The display is therefore always onelevel below that of the top window.Here’s an example: if the top window is an Arrange win-dow, in Contents Link mode the editor windows can showthe events of a selected sequence. Selecting a different se-quence in the Arrange window will cause the display ofthe linked editor to switch to that sequence, as well.
Contents Catch: By simultaneously switching on Catchand Contents Link, you activate Contents Catch mode. Ini-tially, this is equivalent to Contents Link mode, but whenthe song position reaches the next object on the sametrack, the contents of this object are then displayed.You could use this mode in an Arrange window, much asyou would in Contents Link mode. The editor windowswould then show the events of the sequence which is cur-rently being played on a track.
ScreensetsNormally you will lay out your windows on the screen in away that suits your way of working. This layout with vari-ous windows, with all their different parameters (display,zoom, position of each window) is called a screenset, andcan be stored. You can then swap between differentscreensets, much as you might swap between differentcomputer monitors.
Storing Screensets: Screensets are numbered from 1—99 using only the numbers 1—9. You can see the numberof the current screenset in the main menu next to theword Window.
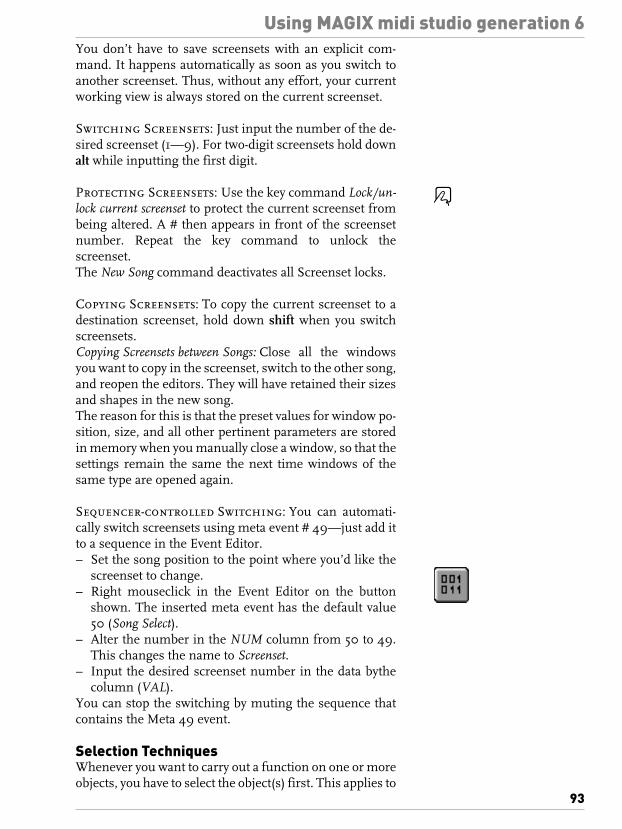
Using MAGIX midi studio generation 6
93
You don’t have to save screensets with an explicit com-mand. It happens automatically as soon as you switch toanother screenset. Thus, without any effort, your currentworking view is always stored on the current screenset.
Switching Screensets: Just input the number of the de-sired screenset (1—9). For two-digit screensets hold downalt while inputting the first digit.
Protecting Screensets: Use the key command Lock/un-lock current screenset to protect the current screenset frombeing altered. A # then appears in front of the screensetnumber. Repeat the key command to unlock thescreenset.The New Song command deactivates all Screenset locks.
Copying Screensets: To copy the current screenset to adestination screenset, hold down shift when you switchscreensets.Copying Screensets between Songs: Close all the windowsyou want to copy in the screenset, switch to the other song,and reopen the editors. They will have retained their sizesand shapes in the new song.The reason for this is that the preset values for window po-sition, size, and all other pertinent parameters are storedin memory when you manually close a window, so that thesettings remain the same the next time windows of thesame type are opened again.
Sequencer-controlled Switching: You can automati-cally switch screensets using meta event # 49—just add itto a sequence in the Event Editor.– Set the song position to the point where you’d like the
screenset to change.– Right mouseclick in the Event Editor on the button
shown. The inserted meta event has the default value50 (Song Select).
– Alter the number in the NUM column from 50 to 49.This changes the name to Screenset.
– Input the desired screenset number in the data bythecolumn (VAL).
You can stop the switching by muting the sequence thatcontains the Meta 49 event.
Selection TechniquesWhenever you want to carry out a function on one or moreobjects, you have to select the object(s) first. This applies to
X

Using MAGIX midi studio generation 6
94
arrange objects and individual events alike. Selected ob-jects are either displayed in inverse color, or will flash (thelatter in the Score editor).The selection status of an object applies to all windows. Anobject selected in one window will also be selected in allother windows that display that object. Changing the topwindow doesn’t affect the selection (as long as you don’tclick on the background, which deselects everything. Besure to click on the window’s title bar).
Selecting Individual Objects: Individual objects maybe selected by clicking on them, and deselected by clickingin the background, or by selecting another object.You can also use the key commands Select next/previousObject (default: K/ J, in the Event List: M/ I).Selecting Alphabetically: tab selects the next alphabeticalobject. In the Arrange window pressing any letter key se-lects the first object whose name begins with this letterproviding there is no key command assigned to this key.
Selecting Several Objects: To select several non-con-tiguous objects , hold down S as you click them. As subse-quent objects are selected this way, the previous selectionsare retained. This also works with horizontal or rubberband selection.Horizontal Selection: To select all objects on a track, clickon the track name in the track list. In the same way, youcan select all events with a certain event definition in theDrum Editor, by clicking on the event definition name, orall notes of a certain pitch in the Matrix Editor by clickingthe relevant key on the screen keyboard.In Cycle mode, the above selects only the events within theCycle zone.“Rubber-Banding”: To select objects which are close to-gether, click on the background and drag a “rubber band”over them.All objects touched, or enclosed by the rubber band will beselected.Toggling the Selection Status: When you make any selec-tion (including by rubber band or horizontal selection),holding down shift at the same time will reverse the selec-tion status of the objects.You can reverse the selection status of all objects usingEdit > Select > Toggle Selection. For example: if you wantto select all objects except for a few, first select these fewand then choose Toggle Selection.
X
X
X
Using MAGIX midi studio generation 6
95
Selecting Following Objects: To select all objects after thecurrent one (or, if no object is currently selected, to selectall objects after the song position), choose Edit > Select >Select All Following.Selecting Objects within the Locators (Vertical selection): Edit > Select > Select inside Locators selects all objects ly-ing wholly or partly within the locators.
Selecting all Objects: To select all objects, select Edit >Select All or press ctrl a.Deselecting All Objects: You can deselect all objects by click-ing on the background or using the key command DeselectAll.
Edit OperationsThe local edit menus in MAGIX midi studio generation6’s various windows all take the same form. The first itemis Undo. Below Undo are the typical clipboard functionsand at the bottom of each are the main selection com-mands.
Undo: Undo allows you to reverse the previous edit. Un-der Options > Settings > Global Preferences…, you candisable the warning message that normally appears whenyou activate Undo, by checking the Disable safety alert forUndo box.The key command for Undo is always ctrl z.
The ClipboardThe clipboard is an invisible area of memory into whichyou cut or copy selected objects so that you can paste theminto a different position.The clipboard spans all songs, which means you can use itto exchange objects between songs.
Cut: All selected objects are removed from their currentposition and placed on the clipboard. The previous con-tents of the clipboard are overwritten in the process (keycommand ctrl x).
Copy: A copy of all selected objects is placed on the clip-board. The selected objects are also left in place. Here too,the previous contents of the clipboard are overwritten (keycommand ctrl c).
Paste: All objects from the clipboard are copied into thetop window. The clipboard is not erased in the process(key command ctrl v).
X
X
X
X
X
X
X
X

Using MAGIX midi studio generation 6
96
The contents of the clipboard are added at the currentsong position (if they are events or arrange objects). Thesong position is incremented by the length of the pastedobjects.In the Arrange window, the contents of the clipboard arepasted to the selected track. If events are pasted in the Ar-range window, either a new sequence is created for them,or the events are added to a selected sequence.Any objects that existed previously are unchanged.
Delete: Any selected objects are erased. Delete has no ef-fect on the clipboard and is the same as pressing back-space or delete.
General Functions of the Editors
Control output via MIDI: Switching on the MIDI Outbutton causes MIDI events to be output when they areadded, selected, or edited. This allows you to audibly mon-itor every editing stage, whether you are scrolling throughthe Event List (automatic selection) or transposing a note.
Automatic Scroll Functions: … scrolling to the Song po-sition: The button with the walking man on it activates theCatch function, which means that the window view will al-ways show the current song position.
Contents Link: Clicking on the button with the chainsymbol on it activates the link function, and double-click-ing it activates the “show contents” function. In “showcontents” mode, the window always displays the contentsof an object selected in the top window; in link mode thewindow shows the same objects as the window where youare making the selections.For a full description of the catch and link functions seepage 91.In Editor windows, contents link is usually active. You canthen, for example, select some sequences in an arrangewindow, and when you switch to a screenset with an openeditor window, you will see the contents of the selected se-quence(s).
Selection Commands and Editing Functions
Setting Locators by Objects: The Functions > Objects> Set Locators by Objects command allows you to set thelocators in all the Editors (just as in the Arrange window)so that they just encompass the currently-selected events.
X
X

Using MAGIX midi studio generation 6
97
Edit Functions: For a description of the undo and clip-board functions (particularly adding events at the Arrangelevel), refer to page 95.
Altering Note Lengths: While changing the lengths ofmultiple objects you can make all lengths equal by holdingshift ctrl.
Repeating or Copying Events: To repeat selected eventsonce or several times (with adjustable rounding of the po-sition of the first repeated event), you can use the functionFunctions > Object > Repeat Objects.
Deleting Events: The basic techniques are the same asfor deleting sequences:– delete deletes all selected events,– the Eraser also deletes all selected events, and any
events that you click with it (whether previouslyselected or not).
Step-time RecordingStep-time recording allows you to enter notes via the key-board, but not at any defined tempo as in real-time record-ing. After each note is inserted, the sequencer “steps”ahead by an increment which is determined by the divi-sion setting in the Transport window. Every note or chordyou enter automatically receives the note value of the dis-play format, or a multiple of it. MIDI Step-time input is ac-tivated in the Score, Event List and Matrix Editors bypressing the MIDI In button.Here’s how to do it. Select an existing sequence, or createone in the Arrange with the Pencil tool. Open one of thenote editors (Score, Event List or Matrix).– Switch on MIDI In.– Play and hold a note or chord. You may even hit the
notes for the chord one after another, if you like. Theimportant thing is that at least one note remain pressedfrom the beginning.
– Release the last note. This moves the song position byone step (the format value on the transport), and youmay enter a new note.
– Rests are entered with the sustain pedal. Each time youpress this, you step through the song by the formatvalue, without entering a new note.
– You may enter longer notes or chords by pressing thesustain pedal while holding down the note(s).
You may change the format value on the Transport at anytime, even while you are holding down notes.
X
X

Using MAGIX midi studio generation 6
98
Step-time input is also possible from the score display.However, the quantize value Default should be avoided, asthe note display will then change every time the step sizeis altered.If you are step-time recording in the Score Editor you canalso define the note value by clicking notes in the part box(but only if step-time recording is switched on.)
Keyboard Control: When employing step-time input,there are a few special, non-editable key commands thatcan only be used if the keys in question have not been re-defined for another purpose (see the section Key Com-mands Window from page 101 onwards).tab or space bar: as the sustain pedal. (please note thatspace bar is the default key for Record Toggle. If you wish touse space bar to move along in steps, you will first have todelete this key assignment; see the section Deleting Assign-ments from page 102 onwards).n jumps to the next bar division position; so in 4⁄4 time,to the next quarter note.m jumps to the next bar.b moves back a step and erases the event there.a sets the division value to 1⁄4.s sets the division value to 1⁄8.d sets the division value to 1⁄16.q sets the division value to 1⁄32.w sets the division value to 1⁄64.e the current division value is set to the next highest trip-let value: for example from 1⁄16 to 1⁄24.e the current division value is set to the next lowest trip-let value: for example from 1⁄16 to 1⁄12.The key commands will continue adding these values, aslong as the MIDI controller key is held down.
Editing via MIDI input: By double-clicking on theMIDI In button, you switch on “Edit by MIDI In Mode”.The values of the MIDI data being input are then used toedit the “Pitch” and “Velocity” of the currently-selectednote. The note length remains unchanged. In contrast toMIDI step-time input, no new data is created; what existsalready is merely changed. The key commands Next / Pre-vious Event allow you to move one note further forward orback.
Event QuantizationThe Event Editor has a separate quantization functionwhich can be applied to all selected events. Unlike quanti-zation for arrange objects the event quantization applies to
X

Using MAGIX midi studio generation 6
99
all events, not just notes. It irreversibly alters their posi-tions ( only notes can be returned to their original re-corded positions).
Quantizing Events: Select the events that you want toquantize.You open the pull-down Quantization menu by grabbingthe “Q” button shown here.This is identical to the matching pull-down menu for theplayback parameters, and contains its own quantizationgrid (for details see the section Quantization from page 135onwards). As soon as you choose an item from the menu,all the selected events are quantized.Please remember that you can only reverse note quantiza-tion. All other events are permanently shifted.To apply the same quantization grid to another series ofselected events (even in other Editor windows), selectFunctions > Quantize again, or click quickly on the “Q”button again.
Note QuantizationNormally, all notes in a sequence are quantized accordingto the Quantization parameter in the sequence parameterbox and the extended sequence parameter box (explainedin greater detail in the section Quantization from page 135onwards).To quantize single notes in either of the Note Editors (theMatrix or Score Editors) you can use the Q tool, as well asevent quantize.If you click on a single note (or a selected group ) with theQuantize tool, and hold down the mouse button, the quan-tize menu should open and you can choose the quantiza-tion you want.If you click quickly on notes, the last quantize value will beused again, just as with the Quantize Again command.If you click on the background with the Q tool you get theusual rubber band for selection of several objects at once.Special note for working in the Score window: the displayquantize setting will have an effect on how this works.Unquantizing Notes: Note events can be returned to theiroriginal record positions, or moved by hand, by selectingthe setting Qua off (3840),or by clicking on the Q buttonwhile holding down ctrl.You can also unquantize all the currentlyselected notes byclicking on them with the Q tool while holding down ctrl.You achieve the same result by selecting Functions > De-Quantize.
X
X

Using MAGIX midi studio generation 6
100
Display FunctionsThe section Window Functions from page 86 onwards de-scribes the basic window functions, including how to layout the window elements to make more space for theevent display in the graphic editors, and how to operatethe zoom functions.Many of the display options in the editor windows corre-spond to those in the Arrange window:By choosing View > Parameters you can hide or show theparameter fields to enlarge the window’s working area.The key command is Hide/Show Parameters.In the Matrix and Drum Editors you can conceal or revealthe transport panel in the top left corner by choosing View> Transport.
Key CommandsYou can activate many MAGIX midi studio generation 6’sfunctions via key commands. The Key Commands win-dow is where you assign key commands to the keys.Whenever this manual mentions a key command, this re-fers to a command which can be called up by a keystroke.This allows you to completely customize MAGIX midi stu-dio generation 6 to suit your own working style.If any function described in this manual is also availablevia a key command with the same name you will see thissymbol.Your personal key assignments are stored (together withthe settings of the Preferences pages) in a file called“MAGIX midi studio g6.prf” in your PC’s Windowsfolder. You should:– make a backup of this file at another location on your
hard disk;– make a floppy disk backup of it in case you need to use
a MAGIX midi studio generation 6 system on anothercomputer.
When you install updates to your version of MAGIX midistudio generation 6, your personal key commands will re-main unaltered.
Special Keys: Some keys have special functions:– The modifier keys shift, ctrl, and alt can only be used in
conjunction with other keys.– The backspace key has the fixed function “delete
selected objects”. It can only be assigned a function inconjunction with the modifier keys shift, ctrl, and alt .
– The ctrl+f4 key (close window) and ctrl+alt+f4 keycombination (close application) cannot be reassigned.
X

Using MAGIX midi studio generation 6
101
– The key combinations assigned to the options in themain menu bar cannot be reassigned. The relevant keysare displayed after the main menu items.
– The + and – keys increase or decrease any selected para-meter value in single units. However, they can beassigned different functions which overwrite this func-tion.
– The keys tab, n, m, b, a, s, d, q, w, e, r have invisiblepredefined functions for step recording, which can alsobe overwritten if you choose to redefine them.
Key Commands WindowThe Key Commands window can be opened by selectingOptions > Settings > Key Commands….
All the available key commands are listed on the right side.They are grouped according to the following categories:– Global commands– Functions affecting all windows (various windows)– Functions affecting all Editor windows (various
sequence Editors)– Functions for the Arrange window– Functions for the Score Editor (Score window)– Functions for the Event List Editor (Event window)– Functions of the Audio window– Functions of the Waveform editorsA “*” in front of the description of the function indicatesthat the function is only available as a key command. Tothe left you can see the currently-assigned key.
Assigning a Function to a Key: – Click the Learn Key button.– Select the desired function with the mouse.
X
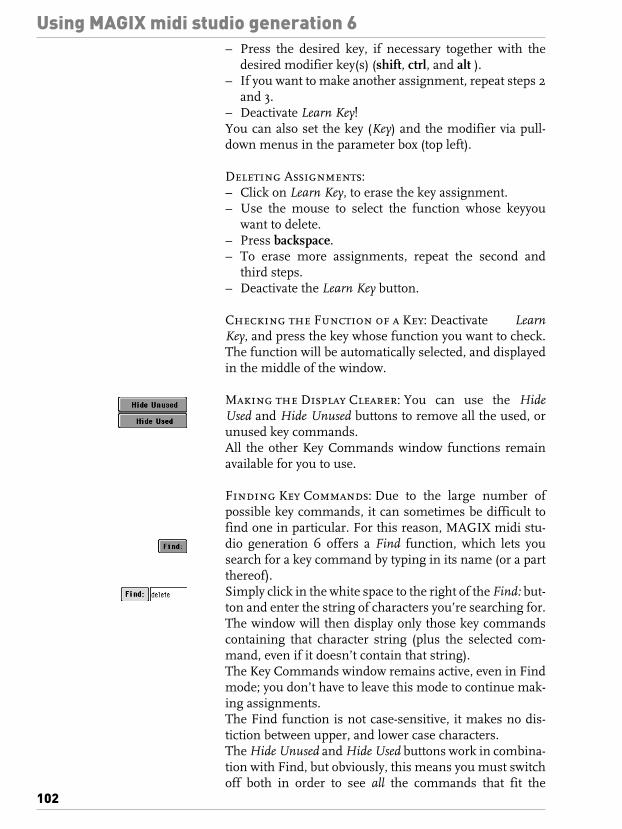
Using MAGIX midi studio generation 6
102
– Press the desired key, if necessary together with thedesired modifier key(s) (shift, ctrl, and alt ).
– If you want to make another assignment, repeat steps 2and 3.
– Deactivate Learn Key!You can also set the key (Key) and the modifier via pull-down menus in the parameter box (top left).
Deleting Assignments: – Click on Learn Key, to erase the key assignment.– Use the mouse to select the function whose keyyou
want to delete.– Press backspace.– To erase more assignments, repeat the second and
third steps.– Deactivate the Learn Key button.
Checking the Function of a Key: Deactivate LearnKey, and press the key whose function you want to check.The function will be automatically selected, and displayedin the middle of the window.
Making the Display Clearer: You can use the HideUsed and Hide Unused buttons to remove all the used, orunused key commands.All the other Key Commands window functions remainavailable for you to use.
Finding Key Commands: Due to the large number ofpossible key commands, it can sometimes be difficult tofind one in particular. For this reason, MAGIX midi stu-dio generation 6 offers a Find function, which lets yousearch for a key command by typing in its name (or a partthereof).Simply click in the white space to the right of the Find: but-ton and enter the string of characters you’re searching for.The window will then display only those key commandscontaining that character string (plus the selected com-mand, even if it doesn’t contain that string).The Key Commands window remains active, even in Findmode; you don’t have to leave this mode to continue mak-ing assignments.The Find function is not case-sensitive, it makes no dis-tiction between upper, and lower case characters.The Hide Unused and Hide Used buttons work in combina-tion with Find, but obviously, this means you must switchoff both in order to see all the commands that fit the

Using MAGIX midi studio generation 6
103
search criteria, regardless of the commands’ current as-signment.The Find: button switches Find mode off and on. The but-ton is automatically activated if a string of characters is en-tered.By choosing Options > Scroll To Selection the key com-mands window will scroll to the currently selected keycommand. The same function will automatically be per-formed when the FIND button will be disabled.You will find other helpful functions under the Optionsmenu. Options > Import Key Commands… allows you toimport the key commands from another .prf file. This im-ports only the key commands, not the rest of the settingsstored in a .prf file. Just in case: Please make a backupcopy of your existing .prf before importing other key com-mands.If you want to printout your key commands, use Options >Copy Key Commands to Clipboard, paste the key com-mands into a text editor—and print them.
Global FunctionsObject ColorsIn the Arrange window you can define a color for selectedobjects. View > Object Colors… (Open Object Colors) opensa color palette. Selecting the key command a second timecloses the palette.Click on the color you want to fill in all the selected objectsin that color. Newly-recorded sequences acquire their tracks’ colors.
Online HelpMAGIX midi studio generation 6 has an online help facil-ity: the .HLP file is automatically installed, and needs to bein the MAGIX midi studio generation 6 folder. You cancall up the online help via Help > Help.
Song AdministrationAll events, other objects and settings (apart from the Pref-erences and key commands) are components of a song.Songs are handled in the main File menu.
New SongWhen you first launch MAGIX midi studio generation 6,it opens a preset standard song. After just a short time,you will have learned how to make your own adjustmentsto screensets and to song settings, and will no doubt wantto keep these settings for use in future songs, as they aresuited to the way you personally work with MAGIX midistudio generation 6. The best way to do this is to set up
X

Using MAGIX midi studio generation 6
104
your own “default song”, and save it in the same folder asthe MAGIX midi studio generation 6 program, calling it“Autoload”.
Autoload Song: If you want MAGIX midi studio gener-ation 6 to automatically load a specific song when you bootup the program, just name this song “Autoload” and saveit in the same folder as the MAGIX midi studio generation6 program.Now, every time you boot up MAGIX midi studio genera-tion 6, the Autoload.MSP song will be opened automati-cally (provided you don’t start MAGIX midi studio gener-ation 6 by double-clicking on a different song altogether).
Creating a new Song: If you select File > New (ctrl n), anew default song is created.
Loading a SongYou use File > Open (ctrl o) to bring up a typical file selec-tion box.
Special Functions
Checking/repairing Songs: If you double-click on thedisplay on the Transport which shows the remainingnumber of free events (see page 108), the memory will bereconfigured. At the same time, the current song will bechecked for any signs of damage, structural problems andunused blocks.If any unused blocks are found—which normallyshouldn’t happen—you will be able to remove these, andrepair the song.
Saving SongsWhen you select File > Save (or ctrl s) the current song willbe saved with its current name intact.If you don’t wish to overwrite the last version of this songsaved under this name (which is what will happen if youjust use File > Save or ctrl s), try using File > Save As…Here, you can enter a new name for the song (and select anew directory or even create a new folder). The next timeyou save using straight Save (ctrl s), the new name and filepath will be used.
Reverting to the Saved Version: Anytime you make amistake, you can undo it by selecting Edit > Undo (ctrl z).If you have made some really serious blunders (unlikely asthat may be), or you decide that since the time you lastsaved, your creative outpourings have gone in the totallywrong direction, you may find the function File > Revert
X
X
X
X
X

Using MAGIX midi studio generation 6
105
to Saved very helpful. This replaces the current song withthe previously saved version.
Closing a SongFile > Close (ctrl w) closes the currently active song. If youhave made any changes since the last time you saved,MAGIX midi studio generation 6 will ask you if the songshould be re-saved before closing, to preserve the changesyou have made.
Quick Start of the last four SongsThe last items in the File menu, just above the Quit com-mand, are the last four songs you used—allowing youquick restarts of your recent works.
Quitting the Program…Choose File > Quit (ctrl q) to leave the program. If youhave not yet saved your last changes, you will be asked ifyou want to do so before quitting (press return to save).
X

Transport Functions
106
Transport Functions
The Transport WindowThe Transport window is used to control and display re-cording and playback functions.Being a float window, it is always in the foreground, andcan never be covered by other windows.
Opening the Transport WindowTo open the Transport window, select Open Transportfrom the Window main menu.Closing the Transport Window: Click on the close symbolon the top right of the window.
The Transport Bar in Other WindowsYou can also configure a fixed Transport window in theArrange, Score, Drum and Matrix windows. When youchoose View > Transport, the transport bar functions ap-pear in the top left corner. The number of visible buttonsand displays depends on the size of this area. Move themouse cursor to the lower right corner of this area tochange the cursor into a cross. With this you can grab thelower right corner and thus change the size of the area.
Altering the DisplayTo move the Transport window around the screen grab itby its title bar.The Transport window pull-down menu opens when youclick on the triangle symbol in the lower left corner. This iswhere you change the way the Transport window looks.Smaller/Larger: You can adjust the size of the Transportbar to several different size settings.Legend: This display option conceals/reveals a descriptionof all the window elements, and is very helpful if you arestill getting to know the program.
Position Slider: This hides/shows a stripe at the bottomedge of the window whose size represents the currentamount of the song shown on screen relative to the entiresong length (read the section Song End from page 109 on-
X

Transport Functions
107
wards). You can also grab the stripe and move it quickly, totake you to a different song position.
Parameter Fields and DisplaysAll the displays in the Transport panel (apart from thesong name), can be used for inputting data. You can eitherinput the numbers via the keyboard, after double-clickingon the display field, or adjust the individual numbers us-ing the mouse as a slider.
Position Display: The current song position is shown intwo formats:
Above: SMPTE time.Hours: Minutes: Seconds: Frames / Subframes.
For more on setting the song Start time when using exter-nal SMPTE sync, please read the section SMPTE Offsetfrom page 264 onwards. Below: bar positionBar—Beat—Division—Ticks.
A beat corresponds to the denominator in the time signa-ture, a division is a freely-definable part of a beat (see sec-tion Time Signature and Divisions from page 108 onwards).A tick is the smallest possible bar subdivision or systemquantization—just 1/3840 note.Buttons: There is a column of four small gray buttons, be-tween the locator display area, and the tempo display area.The bottom two of these are aligned just to the right of thetwo locator points. The upper of these will take the SPL tothe left locator, when pressed. The lower button will takethe SPL to the right locator.
Locators: You define two sets of locator points, one forthe Cycle zone, and the other for the Autodrop zone.The locators on the left define the cycle region, which is apassage that can be constantly repeated (take a look at thesection Cycle Mode from page 112 onwards).The locators on the right define the autodrop range (take alook at the section Autodrop from page 110 onwards). Theyare only displayed when the cycle and autodrop functionsare both switched on.Any mention of the left or right locators is a reference tothe left-hand cycle locators. The top one is the left locatorand the bottom one is the right locator.
Transport Functions
108
Switches: On the right of the cycle locators are two place-ment buttons. When you click on either of the buttons, thesong position jumps to the relevant locator.
Tempo: The tempo is given in quarter notes per minute orbeats per minute (bpm). In MAGIX midi studio genera-tion 6 it ranges from 0.5 to 9999 bpm and is given to aprecision of 4 decimal places.Programming Tempo Changes: Please refer to the sectionTempo from page 260 onwards.
Time Signature and Divisions: Bar numerator/ Bar de-nominator/ Division: The division defines the third formatvalue in all position displays (i.e. in the Event Window),and forms the grid for various length and placement oper-ations. The division is normally set to 1/16 notes, but hasa value range of 1/4 to 1/96 note. If the note value of the di-vision is equal to or greater than the bar denominator, thethird value of the position display is automatically re-moved.Programming Time Signature Changes: If you alter the barnumerator or denominator in the Transport window, atime-signature change is created at the start of the barwhere the current song position is. This is shown in thebar ruler, to the left of the bar number. Of course, a timechange does not affect the absolute positions of the eventsthat are already there.You can also add time signature changes directly in theScore Editor. For more about this, see the section Time sig-natures from page 253 onwards.Editing Time Signature Changes: Move the Song PositionLine to the first bar with the particular time signature youwant to change. Set the new time signature from the trans-port bar.You can also edit the time signature in the Score Editor, bydouble-clicking on it.Erasing Time Signatures: Simply change the time signa-ture back to the value of the previous time signature.You can also erase time signatures in the Score Editor byselecting them. and hitting delete. To erase all time signa-tures, select Edit > Select > Select Similar Objects beforedoing this.
MIDI Monitor and Panic Function: The top line at thefar right shows the last MIDI message received, and thebottom line the last MIDI message transmitted. The mon-itor is mainly used to check the MIDI connections.
X
X

Transport Functions
109
Click on the MIDI monitor to silence any hanging notes.If this doesn’t work, double-clicking on it should do thetrick (Full Panic; take a look at the section For hangingnotes—Panic Function from page 141 onwards).
Song Title: The title of the active song is shown belowthe MIDI monitor.
Song End: Below the song title, on the right, you aregiven the position of the song end. As soon as the se-quencer reaches this position, it stops automatically, ex-cept when recording. In this case the song end is automat-ically moved to the end of the recording.For internal system reasons, the maximum length of aMAGIX midi studio generation 6 song is 8550 quarternotes, or about 2138 bars in 4/4 time.A song can therefore last a maximum of around 70 min-utes at a tempo of 120bpm. At 95bpm, the maximumlength is over an hour and a half.If you need to increase this length, e.g. for video synchro-nization, just halve the tempo. You can achieve the sameresult by using 4/8 time instead of 4/4 time, and treatingquarter notes as eighth notes.A 4/8 song at a tempo of 60bpm (equivalent to 4/4 at atempo of 120) has a maximum length of more than 4273bars, or over 2 hours and 22 minutes.
Keys and ButtonsAll the functions of the Transport panel are also availableas keyboard commands, even if the Transport window isnot open.
Transport: The basic functions of these keys are thesame as on tape machines, or cassette recorders, andshould be familiar to everyone. Here are a few special fea-tures.Record: Recording normally starts after the count-in, at thestart of the current bar. In cycle mode, it starts at the leftlocator. You can also choose to have one beat constantly re-peated, until a MIDI message is received, at which pointrecording begins (more on this on page 114).Pause: Pauses recording or playback until you press pauseor play again. During paused recording, you can add indi-vidual events which will still be recorded.Play: Starts playback at the current position, or in cyclemode from the left locator.Stop: Ends recording or playback—the sequencer stops. Ifthe sequencer is already stopped, pressing stop moves the
X
X
X
X
X
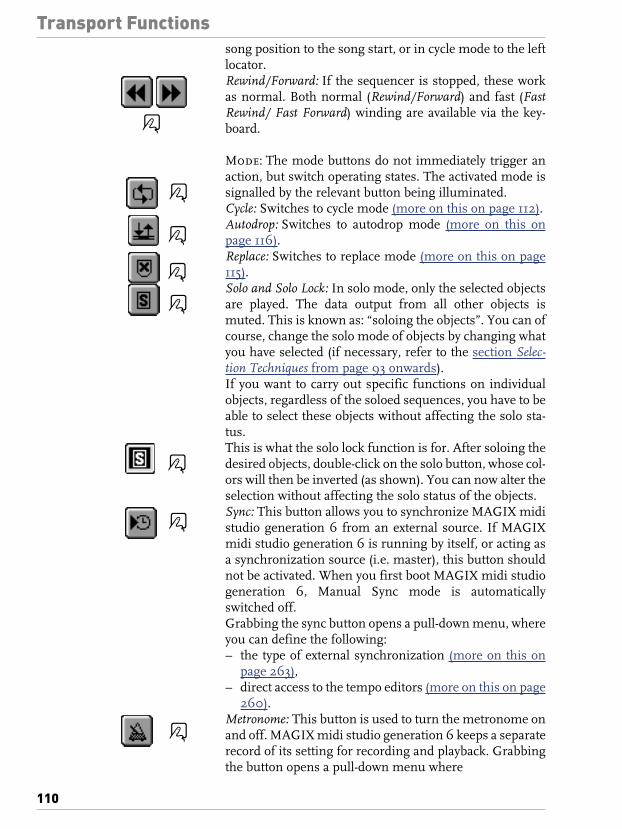
Transport Functions
110
song position to the song start, or in cycle mode to the leftlocator.Rewind/Forward: If the sequencer is stopped, these workas normal. Both normal (Rewind/Forward) and fast (FastRewind/ Fast Forward) winding are available via the key-board.
Mode: The mode buttons do not immediately trigger anaction, but switch operating states. The activated mode issignalled by the relevant button being illuminated.Cycle: Switches to cycle mode (more on this on page 112).Autodrop: Switches to autodrop mode (more on this onpage 116).Replace: Switches to replace mode (more on this on page115).Solo and Solo Lock: In solo mode, only the selected objectsare played. The data output from all other objects ismuted. This is known as: “soloing the objects”. You can ofcourse, change the solo mode of objects by changing whatyou have selected (if necessary, refer to the section Selec-tion Techniques from page 93 onwards).If you want to carry out specific functions on individualobjects, regardless of the soloed sequences, you have to beable to select these objects without affecting the solo sta-tus.This is what the solo lock function is for. After soloing thedesired objects, double-click on the solo button, whose col-ors will then be inverted (as shown). You can now alter theselection without affecting the solo status of the objects.Sync: This button allows you to synchronize MAGIX midistudio generation 6 from an external source. If MAGIXmidi studio generation 6 is running by itself, or acting asa synchronization source (i.e. master), this button shouldnot be activated. When you first boot MAGIX midi studiogeneration 6, Manual Sync mode is automaticallyswitched off.Grabbing the sync button opens a pull-down menu, whereyou can define the following:– the type of external synchronization (more on this on
page 263), – direct access to the tempo editors (more on this on page
260).Metronome: This button is used to turn the metronome onand off. MAGIX midi studio generation 6 keeps a separaterecord of its setting for recording and playback. Grabbingthe button opens a pull-down menu where
X
X
X
X
X
X
X
X

Transport Functions
111
– you have direct access to the Recording Options(described on page 278),
– you have direct access to the MIDI Metronome Clicksettings.
Bar RulerThere is a bar ruler at the top of all the horizontal time-based windows (i.e. the Arrange, Matrix, Drum andScore).
This ruler is used to display and set the;– song position,– start/end of the song and– cycle and autodrop locators.
Display
Depending on the zoom settings (page 88) the bars areshown at the top edge in units of 1, 4, 8 or 16. Changes intime signature are also shown here.In the bottom third, there is a vertical line for each bar.The shorter lines represent one beat, but are not alwaysvisible (depending on the zoom setting).
Start and End Markers:
The song start is normally at position 1 1 1 1. You can movethe song start to an earlier position for playing upbeats orprogram change commands, by grabbing and dragging itwith the mouse. The position display in the top left of thewindow will tell you where it is. The song end (default: bar201) can be set using the same method, or via the numer-ical display (see page 109).
Song Position LineThe song position line (SPL) is a vertical line which indi-cates the current song position in all horizontal, time-based windows. You can grab the line with the mouse, anddrag it to the desired position (but only if there is no objectat the mouse position when you drag it). Choosing WideSong Position Line under Options > Settings > DisplayPreferences… switches to a thicker SPL.
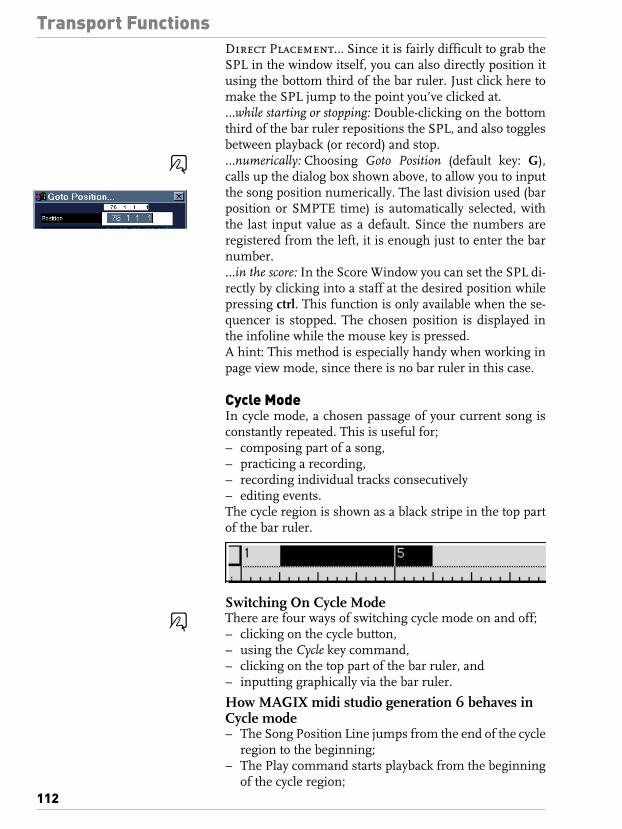
Transport Functions
112
Direct Placement… Since it is fairly difficult to grab theSPL in the window itself, you can also directly position itusing the bottom third of the bar ruler. Just click here tomake the SPL jump to the point you’ve clicked at.…while starting or stopping: Double-clicking on the bottomthird of the bar ruler repositions the SPL, and also togglesbetween playback (or record) and stop.…numerically: Choosing Goto Position (default key: G),calls up the dialog box shown above, to allow you to inputthe song position numerically. The last division used (barposition or SMPTE time) is automatically selected, withthe last input value as a default. Since the numbers areregistered from the left, it is enough just to enter the barnumber.…in the score: In the Score Window you can set the SPL di-rectly by clicking into a staff at the desired position whilepressing ctrl. This function is only available when the se-quencer is stopped. The chosen position is displayed inthe infoline while the mouse key is pressed.A hint: This method is especially handy when working inpage view mode, since there is no bar ruler in this case.
Cycle ModeIn cycle mode, a chosen passage of your current song isconstantly repeated. This is useful for;– composing part of a song,– practicing a recording,– recording individual tracks consecutively– editing events.The cycle region is shown as a black stripe in the top partof the bar ruler.
Switching On Cycle ModeThere are four ways of switching cycle mode on and off;– clicking on the cycle button,– using the Cycle key command,– clicking on the top part of the bar ruler, and– inputting graphically via the bar ruler.
How MAGIX midi studio generation 6 behaves in Cycle mode– The Song Position Line jumps from the end of the cycle
region to the beginning;– The Play command starts playback from the beginning
of the cycle region;
X
X

Transport Functions
113
– To start playback from another position, hit Pausetwice, or Pause and then Play;
– At the cycle jump point, you can use the Chase Eventsfunction ( more on this later)—Options > Settings >Chase Events… > Chase on Cycle Jump)
– You can determine the way recording works in cyclemode, by using the various options on the Options >Settings > Recording Options… page (for more on this,take a look at the section Recording in Cycle Mode frompage 115 onwards).
Defining the Cycle Region
Graphically using the Bar Ruler: – Click-hold in the top third of the bar ruler, and define
the desired region, by dragging the mouse (draggingfrom right to left generates a Skip Cycle; see above).
– Grab the bar in the middle to reposition it.– Grab the bottom corner to move the start or end points
of the cycle (you can even do this while the sequencer isstill running.). If you set the start and end points to thesame position, cycle mode is switched off.
– You can reset the nearest edge of the beam by clickingon it while holding down shift, even if the beam isoutside the visible range, or if cycle mode is switchedoff.
When you set the size of a cycle graphically in the barruler, your sizes are quantized to the nearest bar. The lo-cator positions can only be changed division by division athigh zoom resolutions, or if you hold down alt as you drag.If you hold down shift and alt, at a really high zoom reso-lution, you can drag and change the size of the region inticks.To set locator positions that do not lie on whole bar linesregardless of the zoom resolution, enter your locator posi-tions numerically in the Transport window.
Numerical Entry: The positions of the left and right lo-cators (start and end points of the cycle) are shown in theTransport window, where they can also be altered.
Skip CycleWhen you are playing the song you can skip a passage,which is useful for trying out the musical effect of varioustransitions.
Setting up Skip Cycle: Drag out the skip cycle regionfrom right to left in the bar ruler.

Transport Functions
114
If there is already a (normal) cycle region just move the leftlocator after the right locator.The skip region is shown as a very thin strip at the topedge of the bar ruler.
Features of Skip Cycle Mode: When the SPL reachesthe right locator it skips to the left locator (i.e. the “right”and “left” locators swap positions).Skip cycle is a quick way of leaving out a passage in an Ar-rangement, without having to physically delete it from allthe tracks, make a backup, etc.You can also use it when editing, to leave out those parts ofthe song which you don’t want to be affected by the edit.
Recording
Choosing a Track: First you have to select the track youwant to record on, for example by clicking on it (more onthis on page 120). Remember, just one track can be se-lected. During the recording, the incoming events arestored in a sequence, on the selected track.Note: If you want to record fader, knob or button move-ments of normal audio tracks, just open the mixer and dowhat you have to do. All your changes will be recorded (asMIDI events) on the corresponding audio track.Changing Tracks: You can change the record track, with-out having to stop recording —just select a new track, forexample via the Select previous / next track command (de-fault keys: cursor up or down).
Count-inAfter you press the record button, the recording beginswith a count-in. This is defined under Options > Settings> Recording Options…. The choices are:No count-in The recording begins without a count-in.
Wait for note MAGIX midi studio generation 6 repeatsthe first 1/4 note (or note value of the bar denominator)until a MIDI note is received. The recording then begins.
1-6 Bar count-inThere is a 1—6 bar count-in (default: 1bar).
2/4 - 9/4 count-in2—9 quarternotes count-in.
…Click only during count-in: If the Options > Settings > Re-cording Options… > Click only during Count In option is ac-tive, the click will be switched off after the count-in—so-called “Drummer mode”.
X
X

Transport Functions
115
This is often useful if the section of the song just beforethe part you’re recording lacks the sort of rhythmic infor-mation necessary to play new parts in time, but whenthere’s plenty of rhythmic reference, once the sectionyou’re recording to gets going.
Record OptionsRecord Toggle (default: space bar) switches between play-back and record mode.Record into selected sequences: Normally a new sequence iscreated during every recording. Under Options > Settings> Recording Options… you can activate Merge New Record-ing With Selected Sequences, so that any new data is incor-porated into an existing sequence, when this sequence isselected.
Replace Mode: To activate replace mode, press the re-place button. In replace mode, any newly recorded data isalways stored in a new sequence. In addition, any existingsequences on the destination track are cut at the punch in/out points of the recording, and any data between thesepoints is deleted.
Destructive MIDI Recording: If you select Merge NewRecording With Selected Sequences (r) and switch on replacemode (the recording head symbol in the Transport win-dow), the new events you record will replace the ones inexisting sequences.The Merge/Replace combination can itself be coupledwith the Autodrop and/or Cycle functions.
Recording in Cycle ModeAll settings for recording in cycle mode can be made in theRecording Options of the Song Settings (see page 278).You can either use several cycles to record a single se-quence (Merge only New Sequences in Cycle Recordchecked), or you can create a new sequence for every cycle(…unchecked). A new track can be automatically createdfor each of these sequences (Auto Create Tracks in CycleRecord). The sequences you create can also be automati-cally muted (Auto Mute in Cycle Record). This mode is verywell suited to recording several consecutive versions of asolo, and then picking the best one.
Cycle and Replace: During a cycle recording in replacemode, existing sequences are deleted during the first cy-cle, from the punch-in point to either a punch-out point orup to the end of the cycle. When the second cycle begins,recording continues, but no more sequences are deleted.
X
X
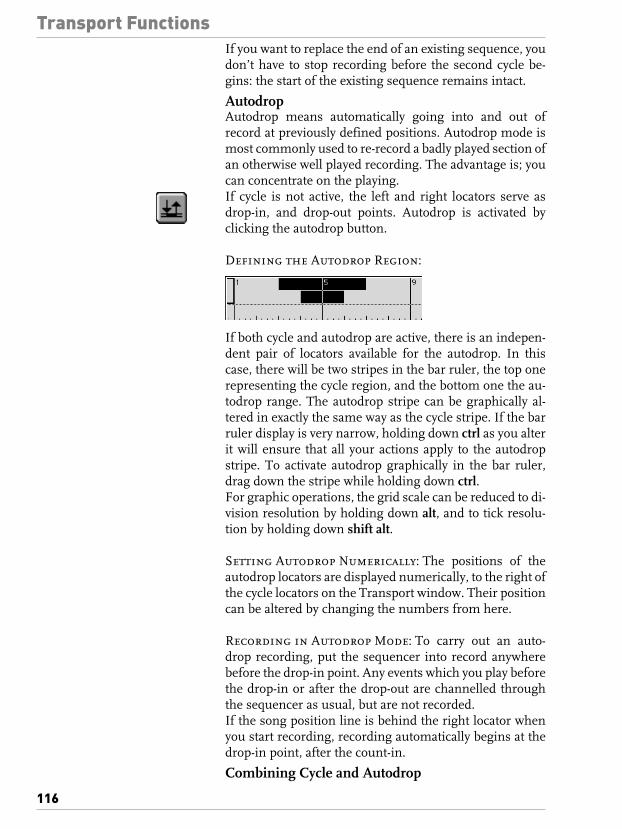
Transport Functions
116
If you want to replace the end of an existing sequence, youdon’t have to stop recording before the second cycle be-gins: the start of the existing sequence remains intact.
AutodropAutodrop means automatically going into and out ofrecord at previously defined positions. Autodrop mode ismost commonly used to re-record a badly played section ofan otherwise well played recording. The advantage is; youcan concentrate on the playing.If cycle is not active, the left and right locators serve asdrop-in, and drop-out points. Autodrop is activated byclicking the autodrop button.
Defining the Autodrop Region:
If both cycle and autodrop are active, there is an indepen-dent pair of locators available for the autodrop. In thiscase, there will be two stripes in the bar ruler, the top onerepresenting the cycle region, and the bottom one the au-todrop range. The autodrop stripe can be graphically al-tered in exactly the same way as the cycle stripe. If the barruler display is very narrow, holding down ctrl as you alterit will ensure that all your actions apply to the autodropstripe. To activate autodrop graphically in the bar ruler,drag down the stripe while holding down ctrl.For graphic operations, the grid scale can be reduced to di-vision resolution by holding down alt, and to tick resolu-tion by holding down shift alt.
Setting Autodrop Numerically: The positions of theautodrop locators are displayed numerically, to the right ofthe cycle locators on the Transport window. Their positioncan be altered by changing the numbers from here.
Recording in Autodrop Mode: To carry out an auto-drop recording, put the sequencer into record anywherebefore the drop-in point. Any events which you play beforethe drop-in or after the drop-out are channelled throughthe sequencer as usual, but are not recorded.If the song position line is behind the right locator whenyou start recording, recording automatically begins at thedrop-in point, after the count-in.
Combining Cycle and Autodrop

Transport Functions
117
If you want to improve a difficult part of a certain passage,you can use a combination of cycle and autodrop. Cyclemode lets you practice as many times as you like beforethe “final take”. Each time, only the autodrop range is re-corded. You can use the previous section to “get into thegroove”.
Recording with Skip Cycle: If skip cycle is switched onthe cycle region is left out during the recording.
Chase EventsChase Events is a function which searches all the se-quences playing at a jump-in point. The function exam-ines what all these sequences are doing before the jump-inpoint, to find out which events would be affecting playbackat the jump-in point, if it had been reached by playingthrough the song, rather than by just jumping there.This is a complex point to grasp, so here’s another expla-nation:If you start playback of a song in the middle, by jumpingstraight to that point (via Cycle mode looping or by directplacement), you might expect there to be problems withnote playback. If an important note started playing just be-fore the play-start point, you would expect MAGIX midistudio generation 6 to miss it, and the note would notsound. Notes, however, are not the only potential prob-lem. If there were a maximum pitch-bend message justbefore the play-start point, playback would leave this outtoo. Fortunately, MAGIX midi studio generation 6 issmarter than your average MIDI sequencer, to misquoteYogi Bear…Open the Options > Settings > Chase Events… to set upthe chase events function.The function searches all the sequences playing at theplay-start point, looking before the play-start for a selec-tion of the following:– any notes still due to be playing at the play-start point;– any notes still due to be playing at play-start, because of
a held-down sustain pedal (Chase sustained Notes);– program changes;– pitch-bend information;– continuous controllers 0—15;– continuous “switch” controllers 64—71;– all other controllers (all other Controls);– monophonic (channel) aftertouch;

Transport Functions
118
– polyphonic aftertouch;– SysEx data (the last SysEx message before the play-start
point is transmitted)Special Note: There is a potential problem with chasing notes that arebeing used to trigger a drum loop in the WavePlayer ofMAGIX midi studio generation 6. Unless you are luckyenough to start the sequence precisely at the beginning ofthe sample loop, the sample will be triggered at the wrongtime and therefore, they will be played out of sync with therest of the sequence, (at least until the next trigger note).The problem is that the WavePlayer, as almost every othersampler, can only play its samples from the beginning,and cannot synchronize them to the beat by starting in themiddle.Well, here’s how you solve that one:Activate the No Seq Trp parameter in the Track parameterbox of the WavePlayer, and switch off Chase Notes in NoSeq Trp Instruments unter Options > Settings > ChaseEvents…. The result is that whenever the song jumps to anew position, your drum loops will not play until theyreach the next “trigger note”.Note: The No Seq Trp parameter actually prevents transpo-sition by the sequence playback parameters, which is alsonot desirable for drum sounds.

Arrange Window
119
Arrange Window
OverviewThe Arrange window is the heart of MAGIX midi studiogeneration 6. Study it closely because it is the view of theprogram that you will see most often when you’re workingwith the program.
It appears in the first screenset whenever you startMAGIX midi studio generation 6. The arrange area 1 iswhere all MIDI information is recorded on horizontal“tracks”. Individual MIDI or audio recordings are called“sequences”, and are displayed as beams. Above the ar-range area is the bar ruler which displays position infor-mation 2.To the left of the arrange area is the track list 3. This iswhere you name each track and determine which soundprogram should play the MIDI information or which au-dio object plays back the audio data of each track. You canmake various settings for the track parameters in theTrack parameter box 4 in the lower left corner.Because the sequences are arranged graphically, you canalso use specialized mouse tools from the tool box 5 tohelp you perform different operations.The sequence parameter box 6 is where you set the play-back parameters for the individual sequences such astransposition and “quantization”.In the upper left corner is the transport panel 7 which isfunctionally almost identical to the Transport window.
23
7
4
5
6
1

Arrange Window
120
Opening the Arrange window: The Arrange Window can beopened by selecting Windows > Open Arrange in themain menu.
TracksEach individual track is stretched horizontally across thearrange area and the tracks are stacked vertically. A track iswhere the notes and other MIDI events are recorded.In the track list each track is numbered from top to bot-tom. During playback a small “level indicator” appearsover the track number. This indicates the velocity of the re-corded notes and shines red for a maximum velocityvalue. The little “c” stands for Controller command.Adjust the MIDI channel, MIDI port and the icon of eachtrack in the Track parameter box.Generally, only one track can be selected at any one time.The exception is with combining MIDI and audio record-ing, where it is possible to select one audio and one MIDItrack simultaneously.) During recording, a sequence iscreated on this track containing the recorded MIDI events,audio or mixing data.
Selecting a TrackYou select a track by clicking its name or icon in the tracklist. This also selects all objects on the track (if the Cyclefunction is switched on, it only selects the objects withinthe defined cycle region ).Use the Select Next/Previous Track function to select thetrack above/below it in the track list (key command: cursorup/down).
Changing tracks while keeping selection: If youclick on a new track while holding down ctrl, the track willbe selected without changing the existing selection of se-quences.
Sorting Tracks: To change the position of a track in thetrack list, grab the track near the track number and drag itup or down.
Copying a Track: Drag a track, as described above, whileholding down ctrl and you will get a copy of this track atthe desired target location. The settings of the new trackare the same as the ones of the old track.
Creating tracksTo create a track, use the Functions > Track > Create MIDITrack command to create a new track for MIDI data, usethe Functions > Track > Create Audio Track command to
X
X
Arrange Window
121
create a new track for audio data, or use the Functions >Track > Create Audio Instrument Track command to cre-ate a track for the new MAGIX synthesizers or VST™2.0-Instruments. The new track is created at the same positionas the track currently selected, and all the tracks below itare moved down accordingly.To create a track at the bottom of the track list, double-clickin the track list below the lowest track .The new track always has the same settings as the selectedtrack.
Moving Objects onto a Track: The function Functions> Object > Move Selected Objects to current track movesall selected sequences from different tracks onto the se-lected track. The time position of all the sequences is re-tained.This is useful for displaying sequences in a stave or gath-ering together regions of different vocal takes.
Deleting TracksTo delete the selected track, use the Functions > Track >Delete Track function. If there are any objects on the tracka warning message appears first.If there is no object selected in the arrange area you canperform the same function by pressing delete.A third method is to grab the track as if to reposition it (seeabove) and remove it from the track list by dragging it tothe left.
Naming tracksTo name a track use the right mouse key to double-click onthe track name in the list. Now you can edit the name ofthe currently selected track. The edited track name will beshown in the Arrange window. If you use a ∗ symbol infront of a track name the corresponding, selected PatchName will be shown instead. This is also true when youleave the track name blank.
X
X
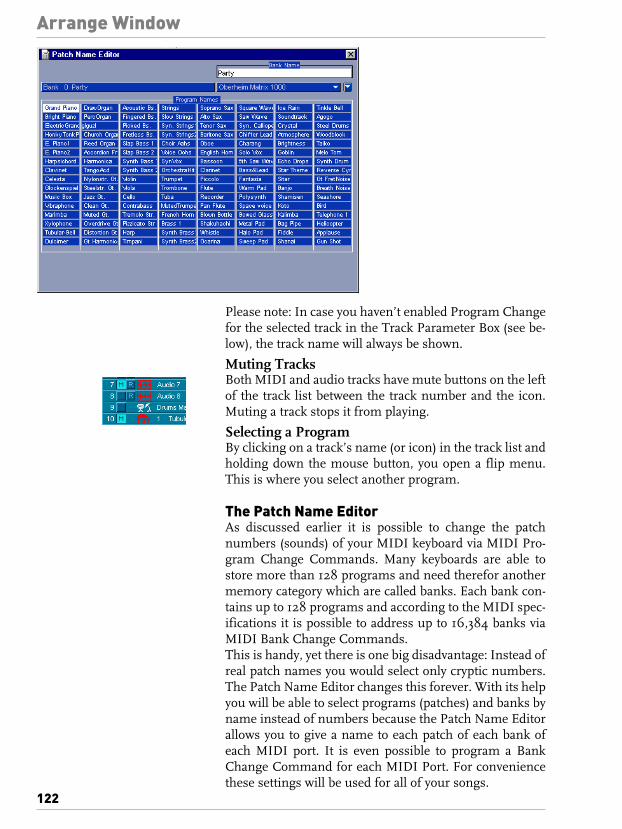
Arrange Window
122
Please note: In case you haven’t enabled Program Changefor the selected track in the Track Parameter Box (see be-low), the track name will always be shown.
Muting TracksBoth MIDI and audio tracks have mute buttons on the leftof the track list between the track number and the icon.Muting a track stops it from playing.
Selecting a ProgramBy clicking on a track’s name (or icon) in the track list andholding down the mouse button, you open a flip menu.This is where you select another program.
The Patch Name EditorAs discussed earlier it is possible to change the patchnumbers (sounds) of your MIDI keyboard via MIDI Pro-gram Change Commands. Many keyboards are able tostore more than 128 programs and need therefor anothermemory category which are called banks. Each bank con-tains up to 128 programs and according to the MIDI spec-ifications it is possible to address up to 16,384 banks viaMIDI Bank Change Commands.This is handy, yet there is one big disadvantage: Instead ofreal patch names you would select only cryptic numbers.The Patch Name Editor changes this forever. With its helpyou will be able to select programs (patches) and banks byname instead of numbers because the Patch Name Editorallows you to give a name to each patch of each bank ofeach MIDI port. It is even possible to program a BankChange Command for each MIDI Port. For conveniencethese settings will be used for all of your songs.
Arrange Window
123
How do you work with the Patch Name Editor ?Simply select a MIDI Track. Clicking and holding themouse pointer on the track name will open a menu fromwhich you can select a patch by name. Similar, select aMIDI Track, and go to the Track Parameter Box on the leftside of your computer screen. Click and hold on the pro-gram number until a menu opens from which you canchoose a patch for this track by selecting a name. In thesame way, by clicking and holding on the bank numberwithin the track parameter field it is possible to select abank by name. For this to function the banks need to benamed first.
Where do the names come from?Program and Bank Names are entered with the PatchName Editor. You will get to the Patch Name Editor by ei-ther double clicking on the track name or with the menuFunction > Track > Edit Patch Names. The Patch NameEditor is divided in several areas: the bank name, a bankselect pop-up menu, a Bank Change Command pop-up in-cluding several Bank Change Command formats, a littletriangular symbol and finally the patch names.Please note: all edits you perform in this window will beused for the port of your currently selected track. To editthe Patch Names of a different MIDI port select anothertrack and then double click its track name. This will openthe Patch Names of the corresponding MIDI port as-signed to this track.
Patch namesA simple click will select a patch within the current bank.To edit the patch name just double click the name you liketo change. By default the General MIDI Patch Names areused in this window.
The triangleHere you will reset the Patch Names of the current bankas either patch numbers or as standard General MIDIPatch Names. Furthermore the names can be edited viathe clipboard using Cut, Copy and Paste commands. Toedit the names of whole banks comfortably copy and pastthe names of the bank to an empty word processing docu-ment. Edit the names in the word processing documentand copy all of them back into the bank. Make sure youdon’t alter the tabs and returns in the word processingdocument.
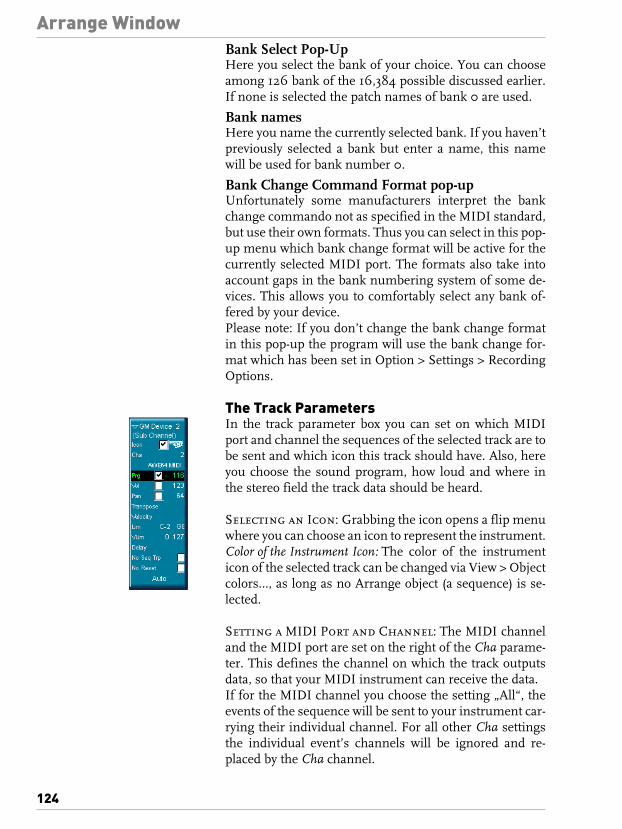
Arrange Window
124
Bank Select Pop-UpHere you select the bank of your choice. You can chooseamong 126 bank of the 16,384 possible discussed earlier.If none is selected the patch names of bank 0 are used.
Bank namesHere you name the currently selected bank. If you haven’tpreviously selected a bank but enter a name, this namewill be used for bank number 0.
Bank Change Command Format pop-upUnfortunately some manufacturers interpret the bankchange commando not as specified in the MIDI standard,but use their own formats. Thus you can select in this pop-up menu which bank change format will be active for thecurrently selected MIDI port. The formats also take intoaccount gaps in the bank numbering system of some de-vices. This allows you to comfortably select any bank of-fered by your device.Please note: If you don’t change the bank change formatin this pop-up the program will use the bank change for-mat which has been set in Option > Settings > RecordingOptions.
The Track ParametersIn the track parameter box you can set on which MIDIport and channel the sequences of the selected track are tobe sent and which icon this track should have. Also, hereyou choose the sound program, how loud and where inthe stereo field the track data should be heard.
Selecting an Icon: Grabbing the icon opens a flip menuwhere you can choose an icon to represent the instrument.Color of the Instrument Icon: The color of the instrumenticon of the selected track can be changed via View > Objectcolors…, as long as no Arrange object (a sequence) is se-lected.
Setting a MIDI Port and Channel: The MIDI channeland the MIDI port are set on the right of the Cha parame-ter. This defines the channel on which the track outputsdata, so that your MIDI instrument can receive the data.If for the MIDI channel you choose the setting „All“, theevents of the sequence will be sent to your instrument car-rying their individual channel. For all other Cha settingsthe individual event’s channels will be ignored and re-placed by the Cha channel.

Arrange Window
125
The MIDI port is set in the flip menu directly below thechannel setting. This menu lists the available MIDI driv-ers.
Adjusting the sound of a Track: The Prg, Vol and Panparameters transmit program changes, volume control-lers (#7) and pan controllers (#10) respectively.If there is no check in the respective box the default valueis used. The corresponding value is only transmitted if youplace a check in the box (by clicking it) . If there is alreadya check in the box, any value alterations you make aretransmitted immediately.A program change may be selected on the right via a flipmenu; volume and panning are set using the mouse as aslider. If you hold down alt, any value can be increased ordecreased by clicking on it and tapping the left or rightmouse button.To the left of the program number, there is an extra para-meter which is used for Bank Select. If your sound sourcecan receive Bank Select messages (check in your synthmanual for format details), you can switch between differ-ent banks, each containing a maximum of 128 sounds. Forthis to work you must tell MAGIX midi studio generation6 via the Patch Name Editor or via Options > Settings >Recording Options…, which Bank Select message your in-strument is expecting.As many devices cannot receive these messages, you candeactivate this parameter by making the adjustmentshown to the right.As many devices cannot receive these messages, you candeactivate this parameter by making the adjustmentshown to the right.Recording Program Changes, Volume or Pan controllers: Any of the types of events that can be transmitted bychecking the right square in the track parameter box canalso be stored when in record mode. For example, inrecord-pause mode, you can store program changes atspecific positions in the following way:– Remove the “x” in the box next to Prg (or Vol, or Pan);– Click on Pause, then Record;– Move the Song Position line to the place you want;– Choose the sound (program) you want (or the volume/
pan setting you want);– Click on the box next to Prg (or Vol, or Pan). Each
selected event will be sent and recorded.– Click on Stop to exit Record mode.

Arrange Window
126
In this context, please remember MAGIX midi studio gen-eration 6’s sophisticated Mixer Automation features as de-scribed in the mixer chapter. The values of the Parameters Prg, Vol and Pan in the trackparameter box will not be updated every time such controlchange events will be played back.
SequencesSequences are containers for the MIDI events withinthem. Their purpose is to make things clearer and easierto deal with. They also correspond to the musical conven-tion of treating a phrase or a riff as a single unit. It is oftenbetter to apply many operations (e.g. quantization) tothese units rather than to individual notes.Sequences within a track can be partly or wholly over-lapped, but for clarity’s sake this should generally beavoided.Remember that all the following operations with a pluralin the heading (sequences) apply just to selected se-quences.
Creating a SequenceNormally a sequence is created automatically when yourecord on the selected track. It begins at the start of the barin which the first events were recorded and stops at theend of the bar in which the last event was recorded.Sequences can also be created by directly inserting eventsfrom the clipboard into the Arrange window (see the sec-tion Inserting events from page 131 onwards).
Creating an Empty Sequence: Click with the pencil atthe position in the Arrange area where you want the emptysequence to begin. You can now enter the events manuallyin one of the Editors.
Deleting SequencesYou can delete all the selected sequences by clicking themwith the eraser or by pressing delete. You can also deleteany non-selected sequence by clicking it with the eraser.Of course if you accidentally delete a sequence you can re-store it by choosing Edit > Undo (ctrl z) immediately after-wards.
Moving SequencesSequences may be moved by grabbing them and draggingthem with the mouse pointer. You can move sequencesboth along the timeline and from one track to another.
Arrange Window
127
Copying SequencesTo copy sequences to another point in the song or to othertracks, hold down ctrl while moving the sequence.
Making multiple copies of sequences: The functionFunctions > Object > Repeat Objects menu allows you torepeat one or more selected sequences. The repetition al-ways starts at the end of the sequence itself or at the end ofthe latest (timewise) sequence.Number of Copies: This is where you enter the number ofcopies (excluding the original).Adjustment: This is where you determine whether youwant a copy to begin exactly at the end of the original (orthe previous copy) (setting: None) or whether you want thestart-point to be “quantized”. In most cases the Auto set-ting will do what you want.Please also note that there is a sequence parameter called“Loop”, which repeats a sequence over and over up to thenext object on the same track (see the section Loop frompage 132 onwards). This may be preferable to copying se-quences in many cases.
Altering the Length of Sequences…Grab the sequence at the bottom right corner with thepointer or pencil. You can now move the end of the se-quence wherever you want. Even when you shorten se-quences the data in them is never deleted; playback juststops at the end of the sequence.
… of multiple selection … You can change the length ofmultiple objects in the same way. The length will bechanged by the same absolute value.… to the same absolute length: If you want to make all se-lected sequences the same absolute length—even if theyhad different original lengths—simply hold ctrl shiftwhile changing the length (just as in the Matrix Editor orthe Event List).… to the same end position: If you want to end all selectedsequences to the same time hold shift while changing thelength.
… Adjusting the start: You can also adjust the length ofthe sequence by grabbing it at the bottom left corner.However, you can never move the left corner beyond thefirst event in the sequence, i.e. you can never “hide” eventsfrom the front. If you want to remove the start of a se-quence you have to cut it and mute or delete the start.
X
Arrange Window
128
…rounded to whole bars: The function Functions >Object > Snap Objects rounds the start to the nearestwhole bar.When you lengthen or shorten sequences this never altersthe position of the events contained within it. If you wishto do so, please do the following:
…by time-compressing or -expanding: Hold down ctrlwhile you are altering the length. The timing of the eventsin the sequence will be stretched or compressed in propor-tion to the amount by which you’ve altered the length.Using this method you can make a rhythm sequence play“half-time” by stretching it to twice the original length, or“double-time” by shortening the length to half the origi-nal.
…to adjust it to fit its contents: The function Func-tions > Object > Set Optimal Object Sizes reduces or in-creases the length of an object so that it is just largeenough to contain the events (or other objects) within it.The object borders are rounded to the nearest bar.If you hold down alt when you call up this function theborders are rounded to the nearest beat instead.
…to adjust it to fit other sequences: When youchoose Functions > Object > Remove Overlaps all selectedsequences in a track are searched for overlaps. If an over-lap is found the sequence that begins first is shortened byenough to remove the overlap.Choosing Functions > Objects > Tie Objects by LengthChange all selected sequences will be lengthened until thebeginning of the next sequence on the same track.
…using a Finer GridAll these operations (moving/copying, lengthening/short-ening) snap to the bar or beat grid (depending on the cur-rent resolution of the bar ruler and the setting of the zoomfunction). However, there are two ways of reducing thegrid:Display Format values as grid scale: alt + operation.
No grid (ticks as grid scale): alt shift + operation.
All you need to do is hold these keys during the particularoperation.Let’s say you want to shorten a sequence in a 4/4 bar sothat the “4” is played but not the “4 and” of the last bar. En-large the screen display until you can see quarter notes inthe bar ruler. Now grab the bottom right corner of the ob-
X

Arrange Window
129
ject and move the mouse to the left until the sequence isshortened by one quarter note. Then press (and hold) altand move the mouse carefully to the right until the se-quence has become one division longer. While you are do-ing this the right side of the Arrange window’s title barshows the track number followed by the current length ofthe object in bars, beats, divisions and ticks. The threeright-hand numbers should be “3 1 0”.
Dividing Sequences…Choose the scissors. Now click the desired sequence(s)and keep the mouse button held down. The left side of thetitle bar of the Arrange window shows the current positionof the mouse. When you release the mouse button, all se-lected objects are cut at the relevant position. The grid isbased on the Display Format value. This value is displayedand editable on the Transport window, just below theTime Signature indicator.If any notes overlap other notes by more than a 1/16 note,the following dialog will appear on-screen:Overlapping Notes found! Do you want to keep, to shortenor to split those? [KEEP|SHORTEN|SPLIT]KEEP (default) leaves all notes unaltered. The sequence iscut as usual, but when you do this, you can end up withnotes in the left-hand half that are much longer than thesequence now is. Such notes are played normally, unless“Clip Length” is set to cut off all sounding notes at the endof a sequence.SHORTEN truncates all overlapping notes, so that theyend at the point where the sequence was divided.SPLIT divides overlapping notes across the two sequencescreated when a cut is made; two subsequent notes are cre-ated, with the same pitch and velocity, and the same totallength as the original note.
…multiple division with the scissors: If you holddown ctrl while cutting an object with the scissor tool, theselected sequence will be cut into several pieces, whoselengths are determined by the length of the first segment.For example: To divide a 16-bar sequence into 8 2-bar se-quences, cut the sequence at the start of bar 3 while hold-ing down ctrl.
Merging SequencesYou can merge two or more selected sequences in a trackinto a single sequence by clicking on one of them with theglue tool.This merges all selected sequences, even those on differ-ent tracks, into a single sequence in which all the events
X

Arrange Window
130
from the individual objects retain their original time posi-tion. Be aware that the individual MIDI channels are re-placed by the MIDI channel of the current track. The newobject adopts the name and track of the first (timewise) ofthe merged objects.See the section Merge/Normalize and MIDI Channels frompage 134 onwards for more on this.
Demixing SequencesThe function Functions > Demix > Demix by Event Chan-nel searches the selected sequence for events with differ-ent MIDI channels. A separate sequence containing allthe relevant events is created for every MIDI channelfound. Each of these sequences is created on a track withthe same MIDI channel. If no such tracks exist the tracksare created on a track with the original channel.
Muting sequencesOften when you are arranging, you will want to test musi-cal ideas out by muting certain objects. This is what themute tool is for.You can mute individual or selected objects by clicking onthem with the tool. They are then displayed with a dot be-fore the object name. Clicking a muted object reverses thisstate (unmuting).You can perform the same function using the Mute Fold-ers/Sequences key command.
Soloing sequencesYou can solo any selected sequences using the Solo buttonin the Transport window or the key command of the samename. Double-clicking on the Solo button “locks” the so-loed status, so that changing the selection doesn’t affectwhat is being soloed. This is especially useful when youwant to make changes to the Playback parameters of a se-quence while listening to a specific solo group. A furtherclick (or using the key command again) quits solo mode.For more on this, read the section Solo and Solo Lock frompage 110 onwards.The solo tool enables you to solo individual or selected ob-jects by clicking them and holding down the mouse but-ton. Release the mouse button to end solo listening.
Naming a SequenceOne sequence: click the sequence with the text marker tooland a text input box appears. Enter the name and press re-turn, or click another object, or the background.The same applies if you are entering the name in the se-quence parameter box.
X
X

Arrange Window
131
Special Functions
Inserting events: MIDI events can be added directly tothe selected track on the Arrange window, at the currentsong position, from one of the edit windows (or even fromanother song) via the clipboard.This function allows you to insert MIDI events—e. g.from the Matrix Editor—directly into the Arrange win-dow. MAGIX midi studio generation 6 checks as it doesthis that you have selected a sequence, and then adds thedata to that sequence. If you have not selected any se-quences, MAGIX midi studio generation 6 will create anew sequence on the selected track.
Sequence Playback Parameters The sequence parameter box is located to the left of thetrack list above the tool box. Displaying Sequence Parameters: When you select a se-quence object, its parameters are automatically displayedin the sequence parameter box. If the sequence parameterbox isn’t visible, select View > Parameters).None of these parameters alter the original data of the se-quence, they only affect the playback.
Default Sequence parameters: If no sequence is se-lected, the upper line of the sequence parameter box willread “MIDI Thru”. When you record a new sequence, thesettings in the >MIDI Thru< parameter box are carriedover into the new sequence’s parameter box. The MIDIThru parameter box can therefore be viewed as an adjust-able “default” parameter box. Realtime processing: By now you should understand thatincoming MIDI data is always relayed “through” the trackthat is currently selected. What you may not know is thatthis data is processed through the previously describedMIDI Thru parameter box. The MIDI Thru parametersare always displayed and editable when there are no se-quences selected. (click on the window background to de-select all sequences).
Editing Several Sequences Simultaneously: If sev-eral sequences are selected, the number of selected se-quences is displayed, instead of the name. If you now alterany sequence parameter this alteration affects all the se-lected sequences. If a parameter was set differently in theindividual sequences, a >*< appears. You can still alterthis parameter for all the selected sequences and the value
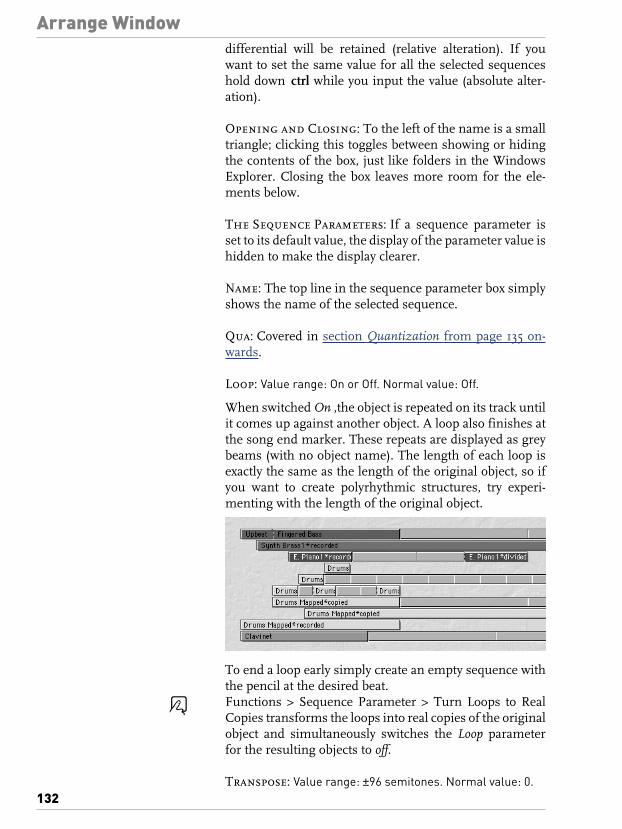
Arrange Window
132
differential will be retained (relative alteration). If youwant to set the same value for all the selected sequenceshold down ctrl while you input the value (absolute alter-ation).
Opening and Closing: To the left of the name is a smalltriangle; clicking this toggles between showing or hidingthe contents of the box, just like folders in the WindowsExplorer. Closing the box leaves more room for the ele-ments below.
The Sequence Parameters: If a sequence parameter isset to its default value, the display of the parameter value ishidden to make the display clearer.
Name: The top line in the sequence parameter box simplyshows the name of the selected sequence.
Qua: Covered in section Quantization from page 135 on-wards.
Loop: Value range: On or Off. Normal value: Off.
When switched On ,the object is repeated on its track untilit comes up against another object. A loop also finishes atthe song end marker. These repeats are displayed as greybeams (with no object name). The length of each loop isexactly the same as the length of the original object, so ifyou want to create polyrhythmic structures, try experi-menting with the length of the original object.
To end a loop early simply create an empty sequence withthe pencil at the desired beat.Functions > Sequence Parameter > Turn Loops to RealCopies transforms the loops into real copies of the originalobject and simultaneously switches the Loop parameterfor the resulting objects to off.
Transpose: Value range: ±96 semitones. Normal value: 0.
X

Arrange Window
133
All note events contained in the sequence are transposedup or down by the selected amount during playback.If you want to transpose by octaves, grab to the left of theparameter field between the word “Transpose” and the ac-tual value. This opens a flip menu to allow direct input ofoctave transpositions.
Velocity: Value range: ±99. Normal value: 0.
All notes in the relevant object are offset by the selectedvalue. Positive values are added and negative ones sub-tracted, although naturally it is impossible to go outsidethe limits prescribed by the MIDI Standard (0—127). Ifyou select a velocity offset that exceeds the maximum orminimum possible value for a particular note, that notewill play at the extreme possible range. For example, a set-ting of >+20< will cause a note with a velocity of 120 toplay at 127.
Dynamics: Normal value: 100%.
This parameter also affects the velocity values of the notes,but instead of adding or subtracting a fixed amount, thedifferences between “soft” and “loud” notes (the dynam-ics) are increased or decreased. This works in a similarway to a compressor or expander. Values above 100% ex-pand the dynamics and so increase the difference between“loud” and “soft”, while values below 100% compress thedynamics, i.e., reduces the differences in velocity.The FIX setting means that all notes are transmitted witha velocity of 64. When used in conjunction with the veloc-ity parameter (see above) it is therefore possible to set anyfixed velocity value.
Gate Time: Value range: see diagram. Normal value: 100%.
The term “gate time” stems from the technology used inanalog synthesizers and refers to the time between press-ing and releasing a key. This parameter therefore affectsthe absolute note duration or length. This should not beconfused with the musical note value, which normally re-fers to the amount of time until the next note. The techni-cal term “gate-on time” or “note length” is described mu-sically as extreme staccato and legato. The parameterrange is referenced to this scale. “Fix” means extremestaccato; likewise the other values below 100% shorten thenote lengths. Values above 100% lengthen the notes. The“leg.” setting produces a completely legato effect for all the
Arrange Window
134
notes, no matter what their original lengths, eliminatingall space between notes in the affected sequence.
Delay: Normal value: 0.
This parameter alters the time position of the selected ob-jects. Positive values correspond to a delay (laid-back play-ing style or dragging), negative values cause a pre-delay(driving or rushing).The units are ticks. A tick is the smallest time resolution ina sequencer, which in the case of MAGIX midi studio gen-eration 6 is 1/3840th note. On the right side of the delayvalue field you can use the mouse as slider to input thevalue.If you click to the left, between the word “Delay” and thedelay value, the flip menu shown here appears for you toset the delay in terms of note value.The delay parameter is mainly used for musical purposes.It is also a way of fixing timing problems that may occurfor a variety of reasons. Some examples of these are:– The attack phase of the sound is too slow. A good musi-
cian will automatically compensate for this by playingthe notes slightly early. With very slow sounds you mayneed a pre-delay of over 100 ms to even them out.
– The sound generator is reacting too slowly to theincoming note-on messages. Older multitimbral soundgenerators often take tens of milliseconds before begin-ning to output a voice. This effect may be bettercompensated for by using the delay parameter in thetrack parameter box, since this will affect all sequenceson all tracks sending to the slowly reacting device.
– The delay in outputting the voice is not constantbecause it depends where it comes in the order of notesarriving serially at the sound generator. You shouldtherefore try pre-delaying rhythmically importanttracks by as little as one tick—it can work wonders!
Fixing/Neutralizing Sequence Parameters: You cannormalize the sequence parameter settings of all selectedobjects using the command Functions > Sequence Param-eter > Normalize Sequence Parameters (Normalize). Thismeans that all settings are actually written to the data andthe playback parameters resume their normal values. Theaudible result remains the same. The loop is not affected.Merge/Normalize and MIDI Channels: Just like the Gluetool, the Normalize function is intelligent with respect tostored MIDI channel numbers. If all stored events havethe same MIDI channel number, the channel will be
X
X

Arrange Window
135
changed into that of the current track. If the events are ondifferent channels, MAGIX midi studio generation 6 willask whether you would like to convert the channels or not.
QuantizationQuantization is the rhythmic correction of notes to a spe-cific time grid. Any inaccurately played notes are moved tothe nearest position on this grid. For example, if the smallest notes in a passage are 1/16thnotes, you should use 1/16th quantization to move all re-corded notes to their ideal rhythmic value. This will onlywork if no note has been played more than 1/32nd fromthe ideal position, otherwise the note will be moved 1/16thlater or earlier than the proper position.
How It WorksQuantization settings are made in the sequence parame-ter box. They are non-destructive playback parameters, sothey can be replaced by another setting at any time. Thisalso means that by setting the Qua parameter to off (3840)you can always revert to the unquantized original record-ing. Unlike other playback parameters, quantization af-fects the way notes are displayed in the editor windows,thus allowing you to see from the position of the noteswhat effect the quantization parameters are having. Thequantization affects only notes, not other types of events(e.g. controllers).For every note event, two positions are stored internally:the original position that was played in, and the playback po-sition (also shown in the Editor windows). For unquan-tized sequences, both positions are the same. Each timeyou quantize, a new playback position is calculated fromthe original position.The Fix Quantize command (see the section Fixing theQuantization from page 136 onwards) overwrites the orig-inal position with the playback position. The same thinghappens if you change a note in one of the Editors manu-ally—although then you can’t return to the original value.
What events can be quantized: Quantization onlyworks on notes, not on other types of events like control-lers. Apart from notes, all events have just one position pa-rameter, which you can leave or change permanently byusing Event Quantize or dragging with the mouse.To quantize events other than notes, read the sectionQuantizing Events from page 99 onwards.Essentially, quantization works on the whole sequence. Toquantize single notes only, use the note quantization in

Arrange Window
136
one of the Editor windows (see the section Note Quantiza-tion from page 99 onwards). Keep in mind that this over-writes the original record position of the quantized note.If you wanted to quantize various parts of a sequence dif-ferently, you could divide the sequence up, and use differ-ent quantization settings on each part of the sequence.You can then recombine the parts of the original se-quences without this affecting the way the parts areplayed. The quantization grid always begins at the start of a se-quence. If the sequence does not start at the beginning ofthe bar, neither does the quantization grid.Qua: The quantization grid is accessed from a flip menuunder the Qua parameter in the sequence parameter box.Quantization off: The setting off(3840) plays the notes withthe finest possible time resolution: 1/3840 note, which ispractically unquantized playback.Normal quantization: The settings 1/1, 1/2, 1/4, 1/8, 1/16, 1/32 and 1/64 note quantize the sequence to the equivalentnote value.Triplet quantization: The settings 1/3, 1/6, 1/12, 1/24, 1/48and 1/96 note quantize the sequence to triplet note values.A 1/6 note is equivalent to a quarter triplet, 1/12 note to aneighth triplet, 1/24 note to a sixteenth triplet and 1/48 noteto a thirty-second triplet, etc.…Mixed quantization: The setting 8 & 12 corresponds toeighths and eighth triplets, 16 & 12 to sixteenths and eighthtriplets and 16 & 24 to sixteenths and sixteenth triplets.Mixed quantization always applies both note values andthus naturally requires greater precision when playing.Odd quantization: The setting 9-Tuplet means novetuplets(1 bar = 9 beats), 7-Tuplet is septuplets (1 bar = 7 beats), 5-Tuplet/4 is quarterquintuplets (1 bar = 5 beats), and 5-Tu-plet/8 is eighthquintuplets (1 bar = 10 beats).
Fixing the Quantization: In the same way that theother sequence parameters can be normalized, the quan-tization settings can also be adopted permanently by thestored data. To do this, use the menu command Functions > SequenceParameter > Fix Quantize.Of course once this is done it is impossible to revert to theoriginal recording.Pre-quantization: The Fix Quantize function is especiallysuited to pre-quantization. For example, if a recorded se-quence cannot be immediately quantized to a 1/16 swingwithout producing a few incorrect notes, start by quantiz-
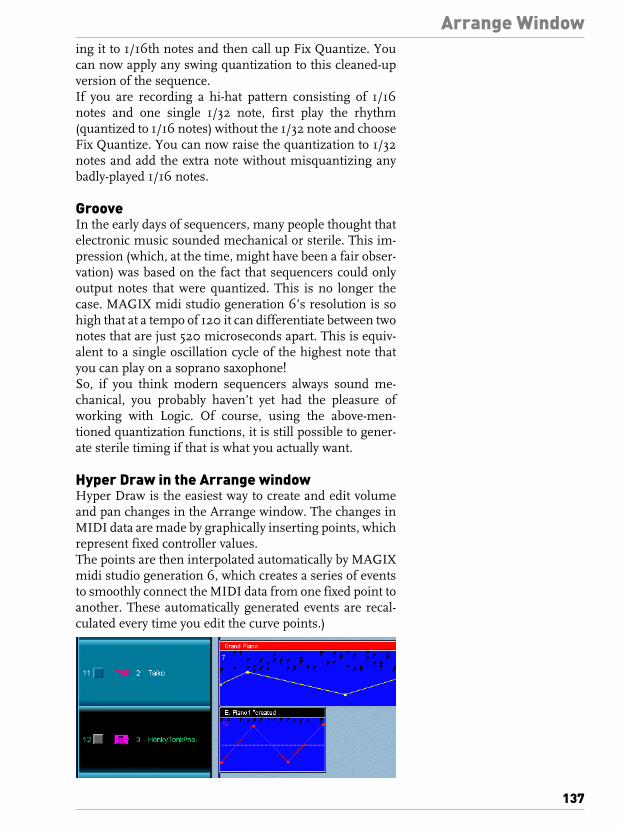
Arrange Window
137
ing it to 1/16th notes and then call up Fix Quantize. Youcan now apply any swing quantization to this cleaned-upversion of the sequence.If you are recording a hi-hat pattern consisting of 1/16notes and one single 1/32 note, first play the rhythm(quantized to 1/16 notes) without the 1/32 note and chooseFix Quantize. You can now raise the quantization to 1/32notes and add the extra note without misquantizing anybadly-played 1/16 notes.
GrooveIn the early days of sequencers, many people thought thatelectronic music sounded mechanical or sterile. This im-pression (which, at the time, might have been a fair obser-vation) was based on the fact that sequencers could onlyoutput notes that were quantized. This is no longer thecase. MAGIX midi studio generation 6’s resolution is sohigh that at a tempo of 120 it can differentiate between twonotes that are just 520 microseconds apart. This is equiv-alent to a single oscillation cycle of the highest note thatyou can play on a soprano saxophone!So, if you think modern sequencers always sound me-chanical, you probably haven’t yet had the pleasure ofworking with Logic. Of course, using the above-men-tioned quantization functions, it is still possible to gener-ate sterile timing if that is what you actually want.
Hyper Draw in the Arrange windowHyper Draw is the easiest way to create and edit volumeand pan changes in the Arrange window. The changes inMIDI data are made by graphically inserting points, whichrepresent fixed controller values.The points are then interpolated automatically by MAGIXmidi studio generation 6, which creates a series of eventsto smoothly connect the MIDI data from one fixed point toanother. These automatically generated events are recal-culated every time you edit the curve points.)

Arrange Window
138
Hyper Draw is activated on a per sequence basis. For ex-ample, you could open Hyper Draw windows to controlvolume in one sequence, and pan in another.In sections where the MIDI data being edited does notchange in value, the data curve appears as a thin, horizon-tal line.You must choose a large enough vertical zoom resolutionin order to see the Hyper Draw curves.
Activating Hyper Draw: To activate Hyper Draw for thecurrently-selected sequence(s), select View > Hyper Draw> Volume (example). You can select different Hyper Drawmodes for different sequencesEvent type: You can choose the following types of eventsdirectly from the Hyper Draw menu– Volume– PanningMIDI Channel: By calling up View > Hyper Draw > Chan-nel… you can choose the MIDI channel on which eventswill be displayed and edited. If you select any here, eventswill be shown regardless of their MIDI channel. When in-serting events, the most recently selected MIDI channelwill be used.
Display: When sequences are displayed in Hyper Drawmode, both the MIDI channel and the Controller beingedited are displayed on the left, divided by a comma.
If the channel is set to any (default) the first number(MIDI channel) will not be displayed. Then the controllerevents of all channels will be displayed. Inserted events getthe channel of the track.
Deactivating Hyper Draw: To switch off Hyper Drawfor selected sequence(s) choose View > Hyper Draw > off.
Hyper Draw—Functions: Making Hyper Draw visible: If you can’t see the blue Hyper Draw window, increase thevertical resolution (zoom) of the Arrange window, eitherwith a key command, the telescope icons, or by holdingdown A and using the magnifying glass tool.
controller # (7; Volume)MIDI channel (1),

Arrange Window
139
Quick Delete: You can delete all events displayed in HyperDraw for a sequence by shift ctrl-double-clicking in theblue Hyper Draw area. Adding new points: Just click on the blue background ofthe Hyper Draw display—you can use either the pointer orthe pencil, and a point will appear. As long as you holddown the mouse, you can move any of these points. Theposition and value are displayed in the Info line on the up-per edge of the Arrange window.No events will be inserted into the sequence until you re-lease the mouse button.Deleting points: Click briefly on any point to delete it.Moving an existing point: Just grab a point with the mouseand move it. If you hold down the mouse button while youdo this, you can restore erased curve points by draggingthe mouse over where they used to be.Fine-tuning curve points: While you move a point, holddown alt. You will then be limited to moving the point ver-tically, but be able to select all 127 possible steps.
.Using Colors with Hyper Draw: You can globally as-sign colors for different controller numbers and MIDIchannels, which are then used as presets to display theHyper Draw lines. However the background color for Hy-per Draw (blue) is fixed.Select a Hyper Draw sequence, open the color selectionwindow by choosing View > Object Colors... and choose acolor. This will globally assign the color to this controllerand channel. Now whenever you select this controller onthis channel in any song, the color assignment will beused.If you want to change the color of a sequence, you mustfirst deactivate the Hyper Draw function.Making practical use of Hyper Draw: Hyper Draw is verysimple to use. For example, choose View > Hyper Draw >Volume. A blue area appears beneath the sequence nameand by clicking here with the mouse you can insert or de-lete the points. You can also move the points by holdingdown the mouse button. While you are editing an Info lineappears at the top of the Arrange window indicating thebar position and controller value.If you want to edit pan values choose View > Hyper Draw> Pan. This means that only pan events will be generatedand displayed. This rule applies to all types of events, i.e.only one type can be displayed at any one time.If you’ve selected Cha: All in the current track parameterbox, so that all MIDI channels 1—16 will play back, you

Arrange Window
140
will have to choose the MIDI channel you want to edit viaView > Hyper Draw > Channel….Editing Edges, Move and Copy with HyperDraw engaged: You can still move and copy sequences that have HyperDraw active, by grabbing them by their top edges in the ti-tle list.When Hyper Draw is active, you can still change the startand length of a sequence, but you have to grab it in the topname zone instead of the blue Hyper Draw area in order tomove the left or right edge, or (for moving and copying), inthe middle of the name area. Just delete the points byclicking on them and vreate them anew at the desired po-sition. If possible, lengthen the sequence before and afterthe area in which you want to create controller changes.If Hyper Draw starts behaving oddly…Hyper Draw supports Program Change events. These arenot interpolated like Controller events to give smoothcurves; instead, one program number remains set untilthe next point.Controller events will only be displayed if their MIDIchannel matches the one set for Hyper Draw (set by call-ing up View > Hyper Draw > Channel…).If you make alterations to a group of events (e.g. volumes)in another editor (e.g. the Event or Hyper Editor), the Hy-per Draw display will not update until you have selected ordeselected the relevant sequence.
Altering the DisplayFor information on the basic window functions, please re-fer to the section Window Functions from page 86 on-wards.
Display MenuIn order to maximize the usable space within the Arrangewindow, in the Display menu of the Arrange window youcan switch off the display of both the Transport and the Pa-rameters.
Object Display
Making Sequence Parameters Visible: Enlarge the dis-play using the vertical zoom button. If the zoom setting islarge enough, you will be able to see the sequence para-meters displayed in the bottom half of all the objects. Hereyou can directly edit the sequence parameters with themouse (by means of sliders and/or flip menus).

Arrange Window
141
Contents Visible in the Object: If you vertically zoomthe display further, you will be able to see the actual eventscontained within the objects.
Sequences show notes and controller events.
Altering the Background of the Arrange: Use thefunction View > Grid to switch on/off a track/bar numbergrid in the arrange area’s background. View > White Background toggles the background be-tween grey/high resolution and white.
Reset FunctionsTo switch off stuck notes, click on the MIDI monitor inthe Transport window, or hit “STOP” twice in rapid suc-cession. In both cases, reset messages are sent, as definedin Options > Settings > Reset Preferences….
For hanging notes—Panic Function: If the notescontinue to sound, then your sound sources may not beable to respond to “All Notes Off” messages. If this hap-pens, try the following:Double-click on the MIDI Monitor in the Transport win-dow (or use the key command Send discrete Note Offs). Sep-arate Note Off messages will now be sent for every note onall channels of every MIDI port. That should do the trick.
Unwanted modulation—Controller Reset: Options> Send to MIDI > Reset Controllers transmits a controlchange message #121 with the value 0 (reset all control-lers) on all MIDI channels and outputs used by existingtracks. This neutralizes all sound alteration caused byMIDI controllers like modulation or pitch wheels.
If some sounds are suddenly too quiet—Volume Reset: The function Options > Send to MIDI >Maximum Volume transmits a control change message#7 (main volume) with a value of 127 on all MIDI channelsand outputs used by existing tracks. This sets all channelsto their maximum volume, giving your sound sources theoptimum signal/noise ratio.
X
X
X

Using Audio in the Arrange Window
142
Using Audio in the Arrange Window
Regions in the Arrange WindowCreating RegionsWhen you record audio, MAGIX midi studio generation 6automatically creates regions which represent your re-cording both in the Arrange window and Audio window.To import an existing audio file recorded in another appli-cation or from another MAGIX midi studio generation 6song, it is necessary to manually place the region into theArrange window.Immediately after importing audio files from other songs,we recommend physically copying the files to the currentsong folder using the Audio window function “CopyFiles”. Answer “Change References?” with “Yes”, other-wise destructive editing of these audio files will also affectthe original song.To play back a region at a specified point in a song, youhave to place the region in the Arrange window first (sec-tion Adding a Region to the Arrangement from page 189 on-wards).A quick reminder: when you place regions onto tracks,don’t forget to allocate each track its own audio object. Formore information about this, take a look at the section Au-dio Tracks: Basics from page 149 onwards.
Inserting Audio Files using the Pencil tool: Audiofiles can be inserted by shift-clicking on audio tracks withthe Pencil tool at the desired position. A file selector ap-pears that lets you choose the file you wish to insert. Thelength of new regions inserted in this way defaults to thecomplete file length, which can be freely edited later.
Dividing Regions: When you divide a region using thescissors tool, you create two new regions. The newly cre-ated segments of the region take the same name and ap-pend it with a sequential number.Resolution: When you are selecting a cutting point with thescissor tool, you can move it backwards and forwards insteps of one division. If you need a finer resolution, pressalt after you have selected the sequence with the scissorpoint. To obtain the maximum resolution (ticks) pressshift, as well.
Erasing RegionsRegions can be erased either by selecting them and press-ing backspace, or by clicking on them with the Eraser tool.
Using Audio in the Arrange Window
143
Erasing recordings: When you erase a region that you havejust recorded (since opening the song), MAGIX midi stu-dio generation 6 will ask if you also want to erase the cor-responding Audio File. This is a good way to avoid usingup unnecessary space on the hard drive by storing badtakes and unwanted recordings.If the recording was made before the song was loaded forthe current session, this question does not appear. Thisprevents you accidentally deleting valuable recordings.Pressing backspace will only remove the region from theArrange area. If you want to delete the corresponding Au-dio Files from the hard disk, you can do so by choosingAudio File > Delete File(s) in the Audio window.
Copying Regions
Creating New Regions: Copies of regions are made ex-actly the same way as MIDI sequences—by dragging themwhile holding down ctrl. This automatically creates a newregion in the Audio window. The new region will retainthe same name as the old one, but will be numbered se-quentially.This allows you to alter the start and end-points of the cop-ied region independently of the original. It is comparableto a genuine copy of a MIDI sequence, which is created inthe same way.
Making Multiple Copies of Regions: By choosingFunctions > Edit > Repeat Objects… you can make multi-ple copies of both audio regions and MIDI sequences.Further details of this function are described in sectionMaking Multiple copies of Sequences.Another way to make regions repeat is to use the Loop pa-rameter in the Region parameter box (see section Loopfrom page 145 onwards). The command Functions > Sequence Parameter > TurnLoops to Real Copies changes the loops into audio regions.The arrange objects which are created, however, representthe same region. Thus any alterations in the length of theregion or audio material affect all objects.
Moving RegionsYou can grab regions in the Arrange window with themouse and move them around just like MIDI sequences.Movements are made in steps of one beat (e.g. quarternotes—see below).If you hold down alt while moving sequences, you canmove them in steps of one division (in sixteenths, for ex-ample).
X

Using Audio in the Arrange Window
144
If you hold down alt and shift while moving sequences,you can move them by single ticks (maximum resolution).You can also use the Delay parameter in the Region para-meter box to shift the placement of the regions (see sec-tion Delay from page 146 onwards).Fine-tuning: In practice, a resolution of “1 tick” will usuallybe fine enough.To move a region by a finer resolution than ticks, i.e. by aresolution of 1 sample word, please use the Anchor in theAudio window or Sample Edit window.Don’t forget that all cloned regions in the Arrange windowwill be affected as well.
Moving sequences in the Event List: You can alsomove sequences by inputting data in the Event List. Selectthe region you wish to edit and choose Windows > OpenEvent List. You can then move sequences by units of a sin-gle tick if you wish, by changing the value in the Positioncolumn.
Audio files in the Arrange window 2 can also be displayedalphanumerically in the Event List 1. Highly accurate po-sition or length changes can be carried out easily using theEvent List.Inserting at the record position: You can copy (ctrl c) or cut(ctrl x) a region into the Clipboard, and then use Edit >Paste at Original Position to insert it into the selected trackat the original record position.
1
X
Using Audio in the Arrange Window
145
Changing Start and End PointsYou can shorten or lengthen any region by grabbing it byits lower right hand corner with the mouse and draggingit. You cannot make a region longer than its original audiofile. This means that all the other regions derived from thatregion will be lengthened by the same amount.Of course, the same goes for any changes you make to thestart point of a region. Such a change can be made by grab-bing the lower left edge of the region with the mouse anddragging.You can edit start and end points much more accuratelywith the Sample Editor, which can be opened by double-clicking on the region. Simply slide the “S”and “E” mark-ers to change the Start and End points of the region. Whilemoving the start point, use the ctrl-key to make sure thatthe Anchor, and therefore the timing relative to the rest ofthe arrangement, remains unchanged. Keep in mind thatthe Anchor must be inside the region. If you wish to movethe start point to the right, first move it to the approximatedesired position while in the Arrange window. Then openthe sample editor and use the ctrl-key to move the startpoint to the exact position.
Region Parameter Box
Name: Just as with MIDI sequences, the top line of the se-quence parameter box is for giving a name to the region.You can name several selected regions at once; the regionsare then given the same name and distinguished only bydifferent numbers at the end of the name. MAGIX midistudio generation 6 inserts these numbers automaticallyunless you deliberately leave a space at the end of thename.When you change the title of a region, the correspondingregion is also renamed in the Audio window.
Loop: As with MIDI sequences, you can use the loop para-meter to set a region to loop automatically. The loop re-peats until it reaches the next region on that track or theend of the song. Don’t forget that these loops are based onthe sample grid of the region. This means that even if thesong tempo matches precisely, after a while the loop re-peats may start to go out of sync. You can avoid this by set-ting the end point of the region to an exact measureboundary. In these cases, it may be better to use the RepeatObjects function (section Edit Functions from page 97 on-wards).

Using Audio in the Arrange Window
146
Delay: Just as with MIDI sequences, you can advance ordelay the playback of regions, the smallest available unitsbeing ticks.
The Region AnchorThe Anchor is a region’s temporal reference point. Whenyou move a region, it’s not the start point that is displayedin the Info column, as with MIDI sequences—it’s the An-chor point.To guarantee perfect sync between (for example) a one-bardrum loop and your sequencer, the Anchor must be as-signed to a well-defined musical point. If the loop beginswith a significant level peak (say a kick drum beat), set theAnchor to the point where the volume of that beat is at itsprecise peak.
The following procedure can be useful in determiningwhether the Anchor is set to its optimum position or not:play a drum sequence in via MIDI that duplicates themain rhythmic stresses of the drum loop. You should thenbe able to correct the Anchor position by ear.
1
2
3
45

Using Audio in the Arrange Window
147
The changes made to the position of the Anchor in the Au-dio window (2 and 4) directly affect the region in the Ar-range window (1 and 3). The position of the audio shiftsrelative to the sequencer’s time axis, while the Anchor re-mains tied to the same bar value, and is marked by a dot-ted line 5.

Using Audio in the Arrange Window
148
MIDI Sequences and Regions comparedThe following table sums up the main differences be-tween audio regions and MIDI sequences. There are somenotes at the bottom of the table to clarify the most impor-tant points.
Characteristic MIDI sequences
Regions
Composed of dis-crete data
Yes No, because regions are just refer-ences to parts of audio files
Can be given names Yes Yes
Sequence parame-ter “Loop” available
Yes Yes
Sequence parame-ter “Quantize” avail-able
Yes No, but the position of regions them-selves can be quantized, using the Event List display on the Arrange level
Sequence parame-ter “Transpose” available
Yes No
Sequence parame-ter “Velocity” avail-able
Yes No
Sequence parame-ter “Dynamics” available
Yes No
Sequence parame-ter “Gate Time” available
Yes No
Sequence parame-ter “Delay” available
Yes Yes
Freely positionable Yes Yes
Left or Right Cor-ner Edit
Yes Yes, and this affects the audio region, but not the position of the audio sig-nals relative to the time axis of the sequencer
Can be cut with the scissor tool
Yes Yes, creates new regions
Concealable intro No Yes
Have a variable musical reference point
No Yes, a variable Anchor. This affects all the regions derived from one region and can change the position of the audio signals relative to the time axis of the sequencer
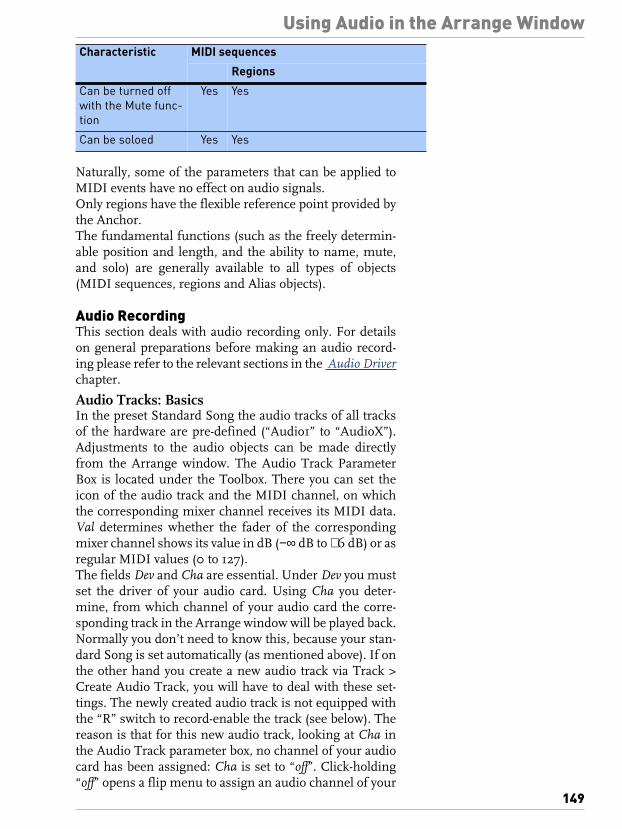
Using Audio in the Arrange Window
149
Naturally, some of the parameters that can be applied toMIDI events have no effect on audio signals.Only regions have the flexible reference point provided bythe Anchor.The fundamental functions (such as the freely determin-able position and length, and the ability to name, mute,and solo) are generally available to all types of objects(MIDI sequences, regions and Alias objects).
Audio RecordingThis section deals with audio recording only. For detailson general preparations before making an audio record-ing please refer to the relevant sections in the Audio Driverchapter.
Audio Tracks: BasicsIn the preset Standard Song the audio tracks of all tracksof the hardware are pre-defined (“Audio1” to “AudioX”).Adjustments to the audio objects can be made directlyfrom the Arrange window. The Audio Track ParameterBox is located under the Toolbox. There you can set theicon of the audio track and the MIDI channel, on whichthe corresponding mixer channel receives its MIDI data.Val determines whether the fader of the correspondingmixer channel shows its value in dB (−∞ dB to +6 dB) or asregular MIDI values (0 to 127).The fields Dev and Cha are essential. Under Dev you mustset the driver of your audio card. Using Cha you deter-mine, from which channel of your audio card the corre-sponding track in the Arrange window will be played back.Normally you don’t need to know this, because your stan-dard Song is set automatically (as mentioned above). If onthe other hand you create a new audio track via Track >Create Audio Track, you will have to deal with these set-tings. The newly created audio track is not equipped withthe “R” switch to record-enable the track (see below). Thereason is that for this new audio track, looking at Cha inthe Audio Track parameter box, no channel of your audiocard has been assigned: Cha is set to “off”. Click-holding“off” opens a flip menu to assign an audio channel of your
Can be turned off with the Mute func-tion
Yes Yes
Can be soloed Yes Yes
Characteristic MIDI sequences
Regions

Using Audio in the Arrange Window
150
card. Having done this, the “R” switch of this track ap-pears. We will describe the function of this switch in thenext chapter.
“Arming” Tracks1. Method: – Click the switch with the red “R” in the track list. If the
switch is still not visible, you should switch on thedriver for the relevant audio hardware in Audio > AudioPreferences… Audio Driver and then restart MAGIXmidi studio generation 6.
2. Method: – Open the Track Mixer per key command or from the
Audio window by selecting Windows > Open Mixer).– Click on the REC button of all the audio objects whose
tracks you wish to record to.Click the audio object once more (as shown above) to dis-arm the track again.You can only make audio recordings on tracks that havebeen armed, no matter what track is highlighted in the Ar-range window.– If you choose a MIDI track, you’ll record MIDI events.– If you choose an audio track, you’ll record on all the
tracks that have been armed (record enabled).– Space is reserved on the hard disk for armed tracks, and
is no longer available for Undo files. For this reasonMAGIX midi studio generation 6 will automaticallydisarm audio tracks if editing in the Sample Editorwhen the hard disk is nearly full.
– You can record simultaneously on one MIDI track andseveral audio tracks together by clicking the MIDI trackand the audio tracks you’re going to record to, whileholding down shift.
If several Arrange window tracks are assigned to the sameaudio track (e.g. “Audio 1”), then the new audio file (or re-gion) will be recorded to the selected track.“Disarming” all tracks: If several tracks are record-enabled,you can instantly disable them all at once by clicking oneof the flashing REC buttons while holding down ctrl.
Recording ModesMAGIX midi studio generation 6 gives you many optionsfor starting audio recordings at various points in yoursong.
Standard Recording with Count-In: You can start re-cording at any point you like in a song by setting the SongPosition Line to the desired place. If the audio tracks youwant to record to are correctly set, and the necessary input

Using Audio in the Arrange Window
151
signals are connected and properly adjusted, just hit therecord switch on the Transport bar, or press *.A “count-in” will sound. Signals will be recorded duringthis time. Depending on the number of tracks required,MAGIX midi studio generation 6 will pause for a shorttime between the record button being pressed and the re-cording actually starting.During recording, the Recording float window opens.This displays the remaining recording time.MAGIX midi studio generation 6 will automatically createa region in the Arrange window after recording. You canlisten back to the new recording in the Arrange window asthe overview is created.
Pre-programmed Drop-Record: MAGIX midi studiogeneration 6’s autodrop function can be used on audiotracks just as it can with MIDI sequences. You enable au-todrop by clicking on the autodrop switch on the Trans-port bar. Here is a step by step breakdown of the proce-dure:207 AudioDrop
1 The autodrop switch must be turned on.2 You can set the autodrop locators numerically in the
Transport window.3 The autodrop recording zone is marked out by a thick
orange bar in the middle third of the bar ruler.4 Recording only takes place within the autodrop zone
you have set up, with the exception of a short “lead-in”just before recording is due to start (see below).
The autodrop zone start and end points can be set eitherfrom the bar ruler or by using the locators in the Transportbar. Please note that if the Cycle function is switched on,you can set the Autodrop Locators in the window to theright of the Cycle Locators (under tempo).Start the recording. MAGIX midi studio generation 6 willbegin recording about one bar before the drop-in locator;afterwards a region will be created that exactly corre-sponds to the length of the autodrop zone. This method al-lows the start of the region to be lengthened later if de-sired, so that the lead-in becomes audible. However, doing
X
3
1 2
4

Using Audio in the Arrange Window
152
this does not change the position of the recording relativeto the time axis.A small tip: if you wish, you can even define a small auto-drop zone within a larger Cycle Zone (see below). This canbe handy if a player needs to re-record a difficult passagein the middle of a song, and requires many attempts to getit right.
Record and Pause Mode: If MAGIX midi studio genera-tion 6 is in pause mode you can start audio recording byclicking “Record Toggle”,“Pause” or ”Play”. Recordingthen begins at the current song position.
Audio Cycle Recording: You can make audio record-ings even when “Cycle” is switched on. A new track is cre-ated for every cycle. All the tracks created are still playedvia the same audio object. This prevents the tracks frombeing played simultaneously.If you stop recording just after the end of a full cycle, no re-gion is created for the cycle which has just begun. How-ever, the audio material is not lost, but is recorded after thelast region in the audio file.The whole recording (during all cycles) is stored in a sin-gle audio file. This audio file is split into regions which areas long as the length of the cycle. The region for the previ-ous cycle is automatically muted at the beginning of thenext cycle.Audio Cycle Recording also works when you are simulta-neously recording two channels (e.g. stereo tracks).After recording, please take note… After you’ve made yourfirst audio recording in a song, you should not make anyfurther adjustments to the tempo of that song. Decide ona tempo and all the changes in tempo well before the firstaudio recording, and stick to it! Audio recordings have afixed playback rate and can only be matched to new tem-pos if you’re prepared to go through a great deal of hassle.The time compression/expansion algorithms currentlyavailable only permit you to match audio to new temposwhen the tempo differences involved are relatively small;if you try and use them to significantly change the tempoof your audio recording, its quality may be significantlycompromised.If you’ve made your audio recordings in real time, playingthem in over the top of, say, an existing MIDI arrange-ment, we don’t particularly recommend that you move theAnchor of any of your regions very often. You can make

Using Audio in the Arrange Window
153
slight adjustments to the timing of your regions using the“Delay” object parameter.
FunctionsDigital MixdownUsing MAGIX midi studio generation 6, you can mixdown audio data in the digital domain from within the Ar-range window. This is done with the glue tool. This func-tion is non-destructive, as MAGIX midi studio generation6 always creates a new file for the mixed-down material.This new audio file is stored on your hard drive, so youshould keep an eye on available space.To carry out a mixdown, you choose the glue tool from thetoolbox and use it to select the required regions for mix-down (if necessary using shift as well).No Mixdown Situation: – If there are several regions (mono or stereo) in a row on
the same track, which have been cut out of one regionusing the scissors tool, i.e. which originate in this orderfrom the same audio file, no mixdown is carried out.Instead, a single region is simply created over the entirearea. This gives the desired result, without using up anyadditional disk space.
MAGIX midi studio generation 6 can recognize associ-ated regions even if there are gaps between the regions.The determining factor is that the relative position of theregions in the Arrangement corresponds to the relativeposition of the regions in the audio file.– In the Arrange window if you want to mix two regions
whose tracks are panned to opposite sides, no mixdownis carried out.
The two resulting mixdown files would be identical to theoriginal audio files in the used areas of the regions. If youdon’t need the unused areas of the audio files choose “Op-timize Files”.“Mixdown” of Regions in a Track: If several regions thatrun concurrently (i.e. not after one another) are selectedfrom one track, the program does not mix them down. In-stead, you are asked to create a new audio file, which isnamed after the first region. The selected regions are thenmixed together without any changes to volume, and with-out clip scanning.If there are empty sections between two regions, these areadded into the new audio file as silent passages.Genuine Mixdown with Clipscan: If you combine audiodata from two or more tracks, the current values for panand volume found in the Mixer for the individual tracks
X
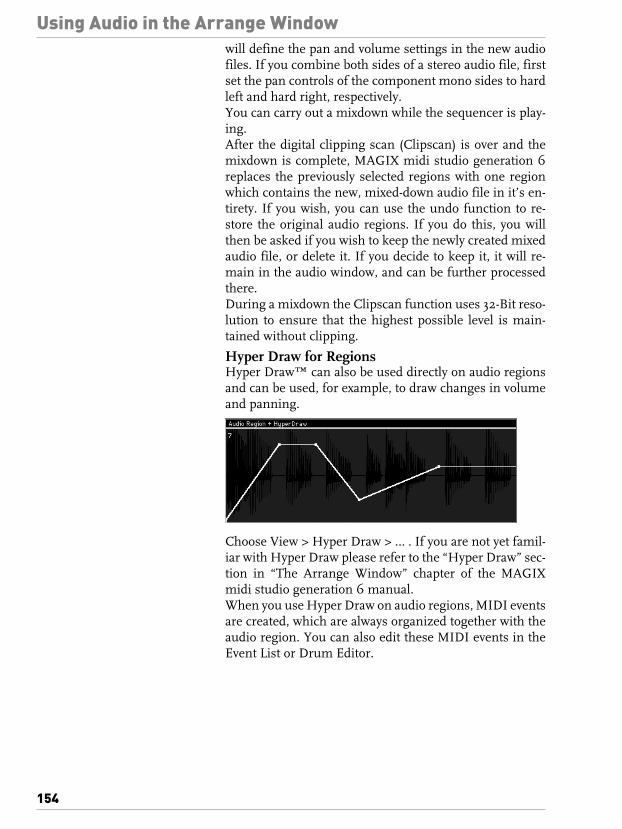
Using Audio in the Arrange Window
154
will define the pan and volume settings in the new audiofiles. If you combine both sides of a stereo audio file, firstset the pan controls of the component mono sides to hardleft and hard right, respectively.You can carry out a mixdown while the sequencer is play-ing.After the digital clipping scan (Clipscan) is over and themixdown is complete, MAGIX midi studio generation 6replaces the previously selected regions with one regionwhich contains the new, mixed-down audio file in it’s en-tirety. If you wish, you can use the undo function to re-store the original audio regions. If you do this, you willthen be asked if you wish to keep the newly created mixedaudio file, or delete it. If you decide to keep it, it will re-main in the audio window, and can be further processedthere.During a mixdown the Clipscan function uses 32-Bit reso-lution to ensure that the highest possible level is main-tained without clipping.
Hyper Draw for RegionsHyper Draw™ can also be used directly on audio regionsand can be used, for example, to draw changes in volumeand panning.
Choose View > Hyper Draw > … . If you are not yet famil-iar with Hyper Draw please refer to the “Hyper Draw” sec-tion in “The Arrange Window” chapter of the MAGIXmidi studio generation 6 manual.When you use Hyper Draw on audio regions, MIDI eventsare created, which are always organized together with theaudio region. You can also edit these MIDI events in theEvent List or Drum Editor.

Mixers and Audio Objects
155
Mixers and Audio Objects
The basicsYour Studio Equipment probably consists of one or moreMulti Timbral Sound Module(s) with stereo analogue out-puts, Microphone(s) and Guitar Pre-Amps or similar ana-logue signal sources, as well as a solid (hardware) Mixingdesk (analogue or digital, at any rate a separate device). Achapter in the Installation Handbook describes how toconnect these instruments to the audio in- and outputs,or, as the case may be, the respective Sound Card forMAGIX midi studio generation 6. With your HardwareMixing desk you route the various signals that you want torecord, using Subgroups when possible, to MAGIX midistudio generation 6’s Recording Inputs (i.e. the SoundCard). The Hardware Mixing desk also contains the re-quired separate Microphone Pre-Amplifier. In the sim-plest case these tasks could also be done by separate Mi-crophone Pre-Amps (Voice Processor, for instance) or bySound Modules with integrated Mixing functions. TheHardware Mixing desk, however, performs a further func-tion, mixing the analog signals from your MIDI multi tim-bral sound module with the MAGIX midi studio genera-tion 6 Audio output signals from the soundcard.– MAGIX midi studio generation 6 mixes the Audio
Signals that are fed to the Sound Card with its owneffects.
– The instrumental part levels and the effect levels, thatis, the entire mix of the signal output by your soundmodule, is remotely controlled by MAGIX midi studiogeneration 6.
– The Track Mixer performs both of the following func-tions simultaneously: The control of the MIDI multitimbral sound machine (that is Level, Pan, Effects ofthe different Parts) as well as mixing the audio trackswithin MAGIX midi studio generation 6 (Levelcontrols, Panning and so on). The actual electricalmixing together, resulting in the stereo signal that youwill hear from the speakers, is once again the job of theMixing Desk.
– Any mixing action in Logics mixers, that is: every move-ment of a fader or knob can be recorded simply bypressing the record button. Afterwards, the passagewith the recorded movements of the controls can beplayed back, and you will see how the knobs move justas you have recorded them. Since the data controllingthese knobs are MIDI controller events, you can edit
Mixers and Audio Objects
156
them like all the other events—for instance with theDrum Editor.
The Track MixerThe Track Mixer is the simplest and most convenient wayto mix audio and MIDI tracks. MAGIX midi studio gener-ation 6 creates a mixer based on all tracks which are as-signed to the track list of the Arrange window. It containsas many channels as there are tracks. The mixer deals withboth audio and MIDI tracks. These are laid out in thesame order as in the Arrange window. Each channel rep-resents a track in the Arrange window: the audio channelscorrespond to the audio tracks, the MIDI channels corre-spond to the MIDI tracks. The parameters which you ad-just on the Track Mixer are also available in the Arrangewindow. You open the Track Mixer via the key commandor, from the Arrange window, via Windows > Open Mixer.On the left is the parameter display which tells you(among other things) which effects are assigned to the auxsends. Selected tracks are framed in red.
Display: The Track menu is where you define what typesof track are displayed in the track mixer. You can switchoff MIDI tracks if necessary. Although the effect and mas-ter (output) objects are not track objects, they can also bedisplayed in the track mixer.The View menu is where you customize the display to suityour requirements. You can hide the labels for the user-defined pots on the MIDI mixer channels, which saves agreat deal of space. You can individually switch off the dis-play of the program numbers, bank numbers, the user-de-fined pots on the MIDI mixer channels (Assign), the panpots (Pan), the faders (Volume), and the track names andnumbers, to make more space. You can also switch off dis-play of the equalizer, the aux sends, and Plug-Ins for theaudio channels.Like the other editors, the track mixer is always stored inthe Screensets. You can switch between these using thenumber keys 1—9, or you may call up two digit screensetsby holding down shift while entering the first digit.
Setting Knobs to their defaults: Clicking a fader orknob in MIDI tracks while holding alt resets the value to aneutral value. The neutral value is zero for all controls ex-cept Volume = 100, and Pan, Balance, Cutoff = 64 (centerposition).
X
Mixers and Audio Objects
157
Send all Mixer Data: By choosing Options > Send AllMixer Data you can transmit all currently visible mixerknobs and faders to MIDI.Track Selection when Playing or Recording: You can preventthe track selection from changing whenever you make anadjustment to a channel, while MAGIX midi studio gen-eration 6 is in recording- or non-recording mode. For bothsituations there is an independent parameter. You can ac-cess these parameters by choosing Options > ChangeTrack in Record Mode and Options > Change Track inPlay Mode. GM, GS, XG: To adapt the Track Mixer to the MIDI stan-dard supported by the sound module you are using, to theright of the mixer channels you will find a flip menuwhere you can choose between the standards GM, GS, andXG.
EQ’s, Effects and Plug-InsWith the mixer you get CPU-based real-time effects withany audio hardware that can be addressed with MAGIXmidi studio generation 6’s own audio drivers. There areEQs, Reverb, Delay and others, which are included in thisproduct. In addition, MAGIX midi studio generation 6 al-lows for real-time effects made by different software man-ufacturers to be integrated into MAGIX midi studio gen-eration 6’s audio signal-flow. These are managed exactlylike the internal effects of MAGIX midi studio generation6.Memory : A propriety Plug-In requires between 10 and400 KB. A single DirectX Plug-In, with its own graphic in-terface (editing window), can require up to 2 MB. Pleaseensure that you have enough free memory.Refer to the section on memory in the Installation man-ual.
Effect ReturnsIn MAGIX midi studio generation 6 all effects except theEQs are sent to effect objects (Return). This makes theseeffect objects effect returns. If you insert a reverb effect inan Insert of a Return, you are applying reverb to your mixby– setting up a Send to the Return in all desired audio chan-
nels of the mixer, by selecting the corresponding effectobject from one of the send inserts on the audio fader(and adjusting its level) and
– adjusting the output level (fader) of that effect objectTo choose an effect, grab one of the Inserts boxes on the ef-fect object, with the mouse. Once the desired effect has
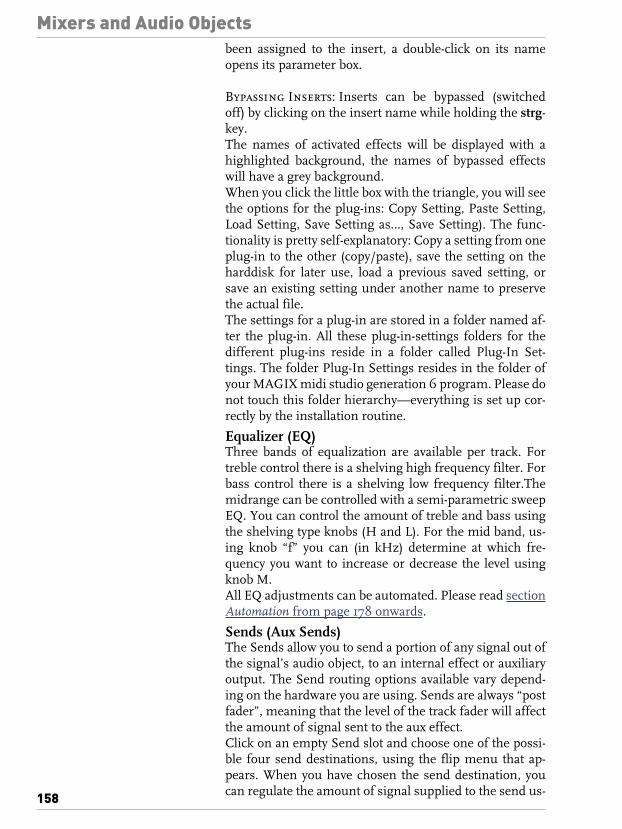
Mixers and Audio Objects
158
been assigned to the insert, a double-click on its nameopens its parameter box.
Bypassing Inserts: Inserts can be bypassed (switchedoff) by clicking on the insert name while holding the strg-key.The names of activated effects will be displayed with ahighlighted background, the names of bypassed effectswill have a grey background.When you click the little box with the triangle, you will seethe options for the plug-ins: Copy Setting, Paste Setting,Load Setting, Save Setting as…, Save Setting). The func-tionality is pretty self-explanatory: Copy a setting from oneplug-in to the other (copy/paste), save the setting on theharddisk for later use, load a previous saved setting, orsave an existing setting under another name to preservethe actual file. The settings for a plug-in are stored in a folder named af-ter the plug-in. All these plug-in-settings folders for thedifferent plug-ins reside in a folder called Plug-In Set-tings. The folder Plug-In Settings resides in the folder ofyour MAGIX midi studio generation 6 program. Please donot touch this folder hierarchy—everything is set up cor-rectly by the installation routine.
Equalizer (EQ)Three bands of equalization are available per track. Fortreble control there is a shelving high frequency filter. Forbass control there is a shelving low frequency filter.Themidrange can be controlled with a semi-parametric sweepEQ. You can control the amount of treble and bass usingthe shelving type knobs (H and L). For the mid band, us-ing knob “f” you can (in kHz) determine at which fre-quency you want to increase or decrease the level usingknob M.All EQ adjustments can be automated. Please read sectionAutomation from page 178 onwards.
Sends (Aux Sends)The Sends allow you to send a portion of any signal out ofthe signal’s audio object, to an internal effect or auxiliaryoutput. The Send routing options available vary depend-ing on the hardware you are using. Sends are always “postfader”, meaning that the level of the track fader will affectthe amount of signal sent to the aux effect.Click on an empty Send slot and choose one of the possi-ble four send destinations, using the flip menu that ap-pears. When you have chosen the send destination, youcan regulate the amount of signal supplied to the send us-
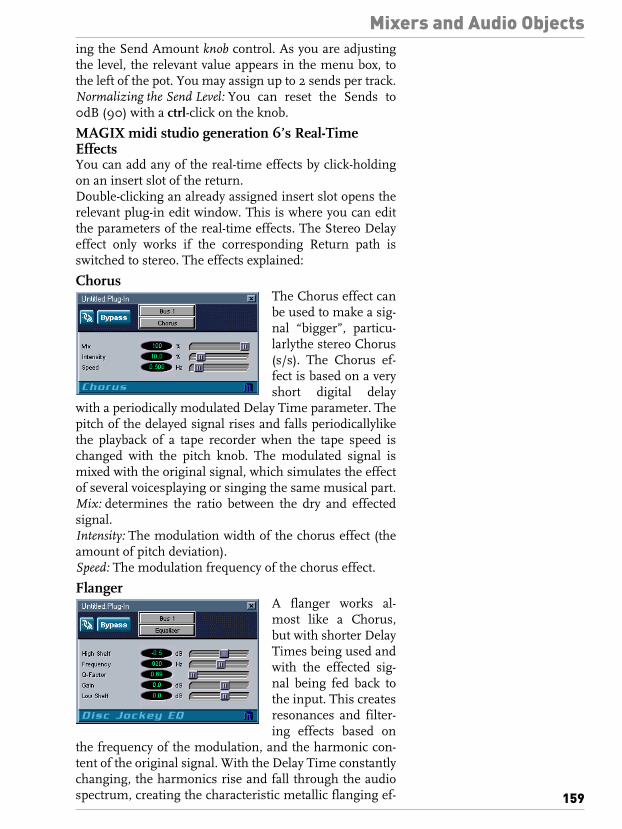
Mixers and Audio Objects
159
ing the Send Amount knob control. As you are adjustingthe level, the relevant value appears in the menu box, tothe left of the pot. You may assign up to 2 sends per track.Normalizing the Send Level: You can reset the Sends to0dB (90) with a ctrl-click on the knob.
MAGIX midi studio generation 6’s Real-Time EffectsYou can add any of the real-time effects by click-holdingon an insert slot of the return.Double-clicking an already assigned insert slot opens therelevant plug-in edit window. This is where you can editthe parameters of the real-time effects. The Stereo Delayeffect only works if the corresponding Return path isswitched to stereo. The effects explained:
ChorusThe Chorus effect canbe used to make a sig-nal “bigger”, particu-larlythe stereo Chorus(s/s). The Chorus ef-fect is based on a veryshort digital delay
with a periodically modulated Delay Time parameter. Thepitch of the delayed signal rises and falls periodicallylikethe playback of a tape recorder when the tape speed ischanged with the pitch knob. The modulated signal ismixed with the original signal, which simulates the effectof several voicesplaying or singing the same musical part.Mix: determines the ratio between the dry and effectedsignal. Intensity: The modulation width of the chorus effect (theamount of pitch deviation).Speed: The modulation frequency of the chorus effect.
FlangerA flanger works al-most like a Chorus,but with shorter DelayTimes being used andwith the effected sig-nal being fed back tothe input. This createsresonances and filter-ing effects based on
the frequency of the modulation, and the harmonic con-tent of the original signal. With the Delay Time constantlychanging, the harmonics rise and fall through the audiospectrum, creating the characteristic metallic flanging ef-

Mixers and Audio Objects
160
fect. The first parameters are the same as with the Choruseffect described above.Feedback: “Feedback” controls how much of the delayedsignal is routed back into the input. Negative values meanthat the phase of the routed signal is inverted. This will re-sult in a resonance that will be one octave lower, and onlyits odd-numbered harmonics will remain. You can use“Feedback” to increase the intensity of the flanger whichcan produce very dramatic effects.
Stereo DelayThe stereo delay, asthe name suggests,delays the audio sig-nal, or simply createsechoes of the originalsignal.Left/Right Delay: The“Time” parameter de-fines the delay time inmilliseconds. Very small values (up to 10 ms) produce res-onances, larger values (10 to 100ms) produce doubling-ef-fects, and even greater values produce echoes.Feedback: “Feedback” controls how much delayed signal isrouted back to the input, which allows you to control thenumber of repeats .Cross Feed: This parameter determines how much of theleft channel is routed to the right and vice versa. Highervalues result in more complex reflection clusters.
Fast ReverbReverbs require farmore processing thanother real-time effects,especially with highquality values. TheFast Reverb is a goodsounding reverb thatputs less strain on thesystem than other re-
verbs.Pre Delay: Pre delay determines the amount of time be-tween the original signal and the initial reflection. Withthe right level of pre delay, the reverb gains space. Theideal values are normally between 5 and 50 ms. Very smallvalues may sound better in solo mode, but in the mix canlead to “mushing” of the signal with its reverb. Larger val-ues can be interesting for combined delay/reverb effects,
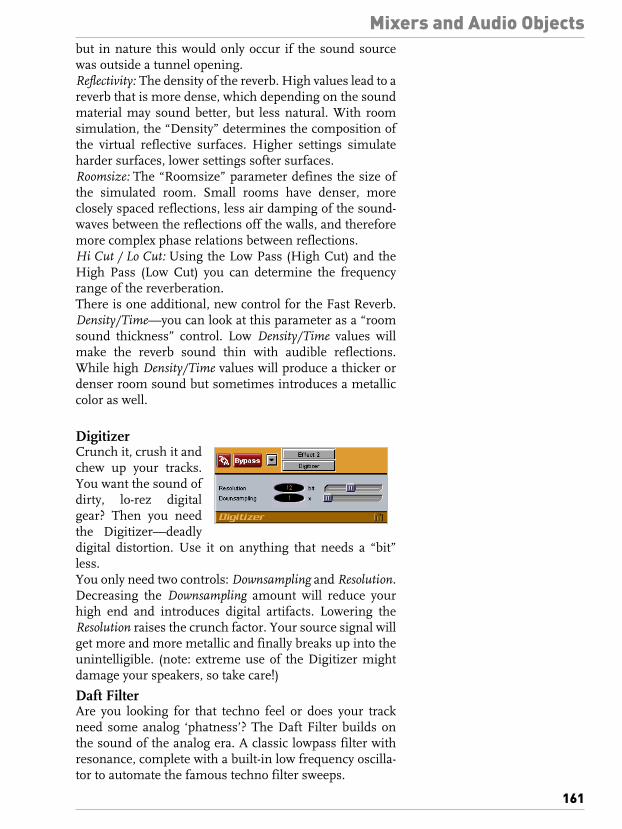
Mixers and Audio Objects
161
but in nature this would only occur if the sound sourcewas outside a tunnel opening.Reflectivity: The density of the reverb. High values lead to areverb that is more dense, which depending on the soundmaterial may sound better, but less natural. With roomsimulation, the “Density” determines the composition ofthe virtual reflective surfaces. Higher settings simulateharder surfaces, lower settings softer surfaces.Roomsize: The “Roomsize” parameter defines the size ofthe simulated room. Small rooms have denser, moreclosely spaced reflections, less air damping of the sound-waves between the reflections off the walls, and thereforemore complex phase relations between reflections.Hi Cut / Lo Cut: Using the Low Pass (High Cut) and theHigh Pass (Low Cut) you can determine the frequencyrange of the reverberation.There is one additional, new control for the Fast Reverb.Density/Time—you can look at this parameter as a “roomsound thickness” control. Low Density/Time values willmake the reverb sound thin with audible reflections.While high Density/Time values will produce a thicker ordenser room sound but sometimes introduces a metalliccolor as well.
DigitizerCrunch it, crush it andchew up your tracks.You want the sound ofdirty, lo-rez digitalgear? Then you needthe Digitizer—deadlydigital distortion. Use it on anything that needs a “bit”less.You only need two controls: Downsampling and Resolution.Decreasing the Downsampling amount will reduce yourhigh end and introduces digital artifacts. Lowering theResolution raises the crunch factor. Your source signal willget more and more metallic and finally breaks up into theunintelligible. (note: extreme use of the Digitizer mightdamage your speakers, so take care!)
Daft FilterAre you looking for that techno feel or does your trackneed some analog ‘phatness’? The Daft Filter builds onthe sound of the analog era. A classic lowpass filter withresonance, complete with a built-in low frequency oscilla-tor to automate the famous techno filter sweeps.

Mixers and Audio Objects
162
The Cutoff control re-moves the bright high-end content of yoursource audio to thepoint where it becomesdull (not “dull” as inboring, but rather “less
bright”) and eventually disappears completely.Resonance adds emphasis to the sound. High Resonancevalues will produce the characteristic whistle and screamyou are probably familiar with from your favorite technosongs.Intensity introduces an up and down motion to the filter.The higher the Intensity values, the more pronounced themotion will become.The speed of the filter’s up and down motion can be ad-justed with the Speed control.
Mono DelayThis is the mono ver-sion of the Stereo Delayplug-in and should beused on mono audiochannels. With the de-lay you can produce re-peating echoes and me-tallic, resonating effects.The controls are similar to the controls of the Stereo De-lay.With Mix you control how much of the delay effect isheard in relation to the original. Higher values mean moreof the effect is mixed to your original signal. At Mix 100%,you will only hear the delay.With Delay Coarse, you dial-in the delay time. This is thetime after which your original signal starts repeating.High values create what you know as echo or repetitions.Small values create metallic, resonating effects. DeleayCoarse works together with Delay Fine. Delay Fine can dial-in the delay time in much smaller steps. Add Delay Fine toDelay Coarse to get the total delay time.The Feedback control. This is where you adjust how manytimes your original signal repeats. At 0% you hear onlyone repetition. Raise the Feedback control and more andmore repetitions occur until at 99% the sound seems tocontinue endlessly.High Cut and Low Cut are tone controls for each delay rep-etition. Raise High Cut and the repeating sound will getduller over time. Raise the Low Cut control to reduce the
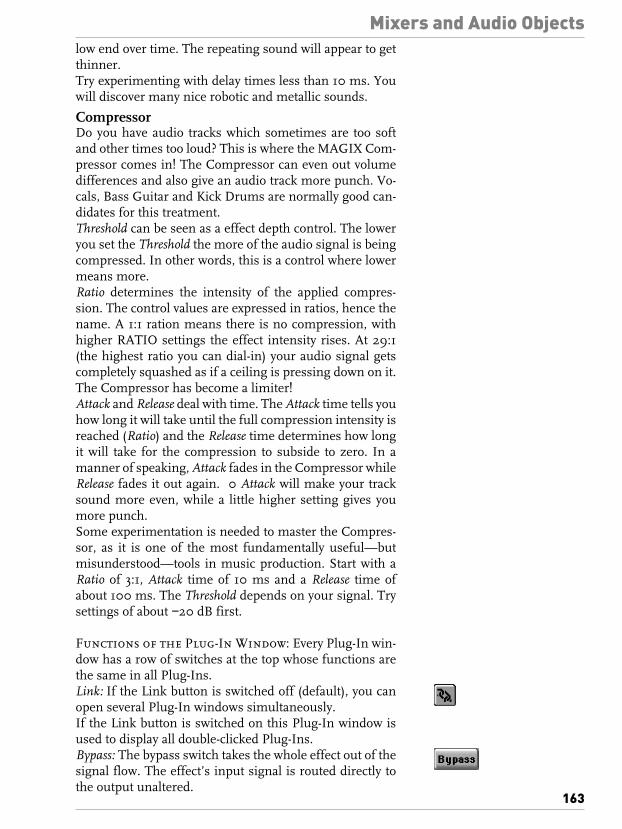
Mixers and Audio Objects
163
low end over time. The repeating sound will appear to getthinner.Try experimenting with delay times less than 10 ms. Youwill discover many nice robotic and metallic sounds.
CompressorDo you have audio tracks which sometimes are too softand other times too loud? This is where the MAGIX Com-pressor comes in! The Compressor can even out volumedifferences and also give an audio track more punch. Vo-cals, Bass Guitar and Kick Drums are normally good can-didates for this treatment.Threshold can be seen as a effect depth control. The loweryou set the Threshold the more of the audio signal is beingcompressed. In other words, this is a control where lowermeans more. Ratio determines the intensity of the applied compres-sion. The control values are expressed in ratios, hence thename. A 1:1 ration means there is no compression, withhigher RATIO settings the effect intensity rises. At 29:1(the highest ratio you can dial-in) your audio signal getscompletely squashed as if a ceiling is pressing down on it.The Compressor has become a limiter! Attack and Release deal with time. The Attack time tells youhow long it will take until the full compression intensity isreached (Ratio) and the Release time determines how longit will take for the compression to subside to zero. In amanner of speaking, Attack fades in the Compressor whileRelease fades it out again. 0 Attack will make your tracksound more even, while a little higher setting gives youmore punch.Some experimentation is needed to master the Compres-sor, as it is one of the most fundamentally useful—butmisunderstood—tools in music production. Start with aRatio of 3:1, Attack time of 10 ms and a Release time ofabout 100 ms. The Threshold depends on your signal. Trysettings of about −20 dB first.
Functions of the Plug-In Window: Every Plug-In win-dow has a row of switches at the top whose functions arethe same in all Plug-Ins.Link: If the Link button is switched off (default), you canopen several Plug-In windows simultaneously.If the Link button is switched on this Plug-In window isused to display all double-clicked Plug-Ins.Bypass: The bypass switch takes the whole effect out of thesignal flow. The effect’s input signal is routed directly tothe output unaltered.

Mixers and Audio Objects
164
Choosing an Audio Object: If you have used the displayedeffect algorithm in another effect object, you can simplyswap between the objects. You can quickly compare set-tings.Insert Slot Selection: If you have installed more Plug-Ins inother insert slots of the same effect object, you can quicklychange to the other Plug-Ins. This allows you to quicklybalance the settings of all the Plug-Ins within an object.
Plug Ins from Other Manufacturers
DirectX: MAGIX midi studio generation 6 supports theDirectX standard, which allows real-time effects made bydifferent software manufacturers to be integrated intoMAGIX midi studio generation 6’s audio signal-flow.Please follow the installation instructions from the Plug-In manufacturers to ensure their correct installation.There is an application on the MAGIX midi studio gener-ation 6 program CD that allows you to exclude certainPlug-Ins—the Plug-In-Enabler. Due to some technicalchanges with the new audio engine, some Direct Showplug-ins which appeared in generation 5 may not appearMAGIX midi studio generation 6. If so, exit MAGIX midistudio generation 6, and start the latest version of theplug-in enabler in order to re-activate the deactivated plug-ins, assuming that these had been working correctly be-fore.The Plug-Ins are automatically available in the Plug-Inmenu, along with MAGIX midi studio generation 6’s owneffects. This is the menu which opens when you open anaudio object’s Insert button ( in an effect object).Double click an inserted Plug-In to open its editor. If theselected Plug-In does not have its own editor, MAGIXmidi studio generation 6’s standard surface will be used toaccess the Plug-In’s parameters.
VST™2.0 Support: MAGIX midi studio generation 6supports the use of VST™2.0 plug-ins. Of course, thismeans that VST™1.x plug-ins are now also supported.Please note the difference: VST™1.x plug-ins work as au-dio-in/audio-out plug-ins, as do your built MAGIX plug-ins, and are thus to be inserted in the effect objects (seeabove). However, VST™ 2.0 plug-ins work as MIDI-in/audio-out plug-ins, as do your built-in MAGIX synthesizerplug-ins, and are thus to be inserted in audio-instrumentobjects (see below). These support the stereo outputs ofthe relevant plug-ins.

Mixers and Audio Objects
165
To work with VST™ plug-ins in MAGIX midi studio gen-eration 6, copy the plug-in files to the folder called “VST-PlugIns” in the corresponding directory. Simply create afolder with this name if one does not already exist—butthe installation routine will have it done for you. In orderto prevent particular plug-ins from being shown in theplug-in list, move the plug-in file to another folder, whichcould be named “Vst_unused”. MAGIX midi studio generation 6 now supports programsfor VST™/VST™2.0 plug-ins, if a plug-in provides pro-gram memory. You will find a new menu in the title bar ofthe plug-in window that displays the currently chosen pro-gram (“PROG 01” etc.). Double click on a program nameto rename it. Version 6 also allows the Plug-In enabler to activate anddeactivate VST™ plug-ins. Click on the flip menu in themiddle of the Enabler window to switch between both for-mats. It is possible to apply DirectX and VST™ plug-ins si-multaneously; you do not deactivate one format when youswitch to another. Like MAGIX midi studio generation 6’s own plug-ins,VST™ plug-ins can also be automated. This type of auto-mation is not possible with DirectShow plug-ins due totechnical reasons based on the principle of the Direct-Show interface.
Audio InstrumentsMAGIX midi studio generation 6 supports the new, in-cluded MAGIX synthesizers Carpet Sweeper and Percu-sor. Outfitted with an innovative user interface, the unitsprovide subtractive synthesis that meets the classic analogideals. They offer everything that made the analog synthe-sizer so famous: rich basic sound, punchy filters, flexiblemodulation possibilities and extremely fast envelopes.The synthesizer instruments integrate seamlessly withinMAGIX midi studio generation 6’s internal digital mixer;all plug-ins effects can be used and all parameters can beautomated. The direct connection with the sequencing en-gine of MAGIX midi studio generation 6 guarantees un-surpassed precision through sample-accurate timing thatis superior to any external MIDI synthesizer.To use the new instruments, version 6 features a new cat-egory of audio objects in MAGIX midi studio generation6, called “audio instruments”. These can have the synthe-sizer plug-in in their top insert slot. The default song—thesong that opens if you move your Autoload away from the

Mixers and Audio Objects
166
MAGIX midi studio generation 6 folder—has readily con-figured audio instruments.An audio instrument is an audio track with the track para-meter “Cha” switched to one of the “Instruments (1-4)”.So each audio track can be made an audio instrument bysetting its “Cha” parameter in its object parameter box toan instrument channel. But it is more convenient to createa new audio instrument by simply selecting “Functions >Track > Create Audio Instrument Track”.
Remarks on the Use of Audio InstrumentsThe instruments offer an opportunity to reduce systemload. Please only assign as many voices that you expect toneed for a particular task; for example, one voice is usuallyenough for a bass or snare drum. Please note that muting an audio instrument track in Ar-range does not reduce system load. When an audio instrument track is selected, it is ready tobe played in real-time and consequently produces somesystem load. Normally MAGIX midi studio generation 6releases system resources used by the Audio Engine whenthe sequencer is stopped. But this is not true if an audioinstrument track is selected in Arrange and is thereforeavailable for real-time playing. Selecting a MIDI track or anormal audio track exits this “stand by” mode and releasesreserved system resources again when the sequencer isstopped. Audio instruments can only be addressed through corre-sponding audio instrument tracks in Arrange. Audio in-strument tracks process the sequence parameters Quan-tize, Transpose or Delay in real-time. All other sequenceparameters become effective after they are normalized.Loops and aliases must be converted to “real” copies. Ifyou want to shorten sequences, please divide them withthe scissors tool and erase the part you do not need anymore. The reason for this is the totally different internalhandling of an audio instrument as compared to externalMIDI instruments. The good thing is: the MIDI timing ofaudio instruments is sample accurate. To hear instrument plug-ins along with plug-in effects in-serted afterwards, MAGIX midi studio generation 6 mustbe in play mode.
The Synthesizers—Audio InstrumentsIntroductionWith Generation 6 you now have access to everything acomplete professional music production studio offers—thanks to the built-in synthesizers. To make it as easy as

Mixers and Audio Objects
167
possible to work with these synthesizers, each of them istailored to a special task; for example, the “CarpetSweeper” is built to deliver warm and full pad soundswhich give your tracks that soft and spacious feeling. Bytailoring each new synthesizer to a special purpose wewere able to reduce the number of parameters, resultingin an ease and speed of use unparalleled by conventionalsynthesizers.To make the new synthesizers still easier to use, each evencomes with its own preset selection. By all means usethese as a starting point for your own sound creations butdon’t be afraid to experiment with all the parameters aswell. This is the most enjoyable way to learn about the syn-thesizers—and it is the best way to create your ownsounds that will set your tracks apart from those of yourcompetitors.We know that you do not want to be bothered with the jar-gon normally associated with synthesizers so, rather thantalking in confusing technical terms, we will use a musicaland understandable language to help you get the most outof our synthesizers as soon as possible. There are, how-ever, some terms and principles that have to be under-stood before getting to each synth in detail. Here we go—
PrinciplesSynthesizers produce their sounds by providing controlover the pitch, the timbre and the volume of a sound.To do this, each synthesizer has a sound source, called os-cillator. An oscillator produces a sound that goes on for-ever. The pitch of this sound can be adjusted and playedvia your keyboard. Typically you can select between wave-forms that provide different sound characteristics, withthe proviso that they all sound very bright.This bright sound from the oscillator is then passed to thefilter, which controls the timbre of the sound. A filter canmake the bright sound darker or duller (not dull as in“boring”, but rather “less bright”), with the amount of“darkness” being adjustable with the Cutoff control. Fur-thermore a filter can also add some sharpness or pronun-ciation to a sound. The amount of sharpness is controlledwith the Resonance control. When Resonance is turned up,the sharpness gets so pronounced that the filter itselfmight start outputting an additional sound. This can bepitched with Cutoff.The interaction of the oscillator and the filter gives us lotsof sonic variety—control the pitch of the entire sound atthe oscillator, select different bright sound characteristicsat the oscillator, give the sound a timbre anything between

Mixers and Audio Objects
168
bright and dark or sharp and soft with the filter. Remem-ber though, that the sound output by the filter still goes onendlessly. This is where the amplifier comes in. It gives abeginning and an end to the endless sound by simplyturning its volume up from zero and down to zero.Okay, now you have learned how and where in a synthe-sizer the three basic sonic parameters—pitch, timbre andvolume—are controlled. But there is one final step waitingto be taken in order to fully understand how a synthesizerdoes what it does. And that is that each of the parameterspitch, timbre and volume can not only be controlled man-ually—like twisting a control named “volume” or“pitch”—but can be controlled automatically by the syn-thesizer itself.To do this, a synthesizer offers not only the above-men-tioned oscillator, filter and amplifier modules, but alsosome additional modules that produce adjustable curves.These curves can be one-shot or repeat periodically, andare used to alter pitch, timbre or volume automatically. Here are two examples: first, imagine an additional mod-ule that produces a periodically repeating curve that goesup and down and up and down and so on. Now imaginethis curve controls pitch. The result? Pitch goes up anddown and up and down and so on, according to the curve.In this case, we say that pitch is “modulated” by the curvethat goes up and down and up and down and so on.Second example: imagine an additional module that pro-duces a one-shot curve that goes up, when you press a keyon your keyboard, and that goes down, when you releasethe key. Now imagine that this curve controls volume. Theresult? The sound starts when you press a key, and it endswhen you release it. In this case, we say that volume ismodulated by the curve that goes up when you press a keyon your keyboard, and that goes down when you releasethe key.To sum everything up, a synthesizer gives you manualcontrol of the three basic parameters of sound: pitch, tim-bre and volume. Furthermore, a synthesizer can controlthese parameters automatically by itself, which is calledmodulation. And now let’s get straight to the astoundingcapabilities of your new synthesizers. Enjoy!Please note:The following explanations of the synthesizers are de-signed to be read when you like. It is not necessary to readthe explanations in a specific order; you can start with thesynthesizer you first wish to get acquainted with. Thismeans of course that some explanations will be repeated
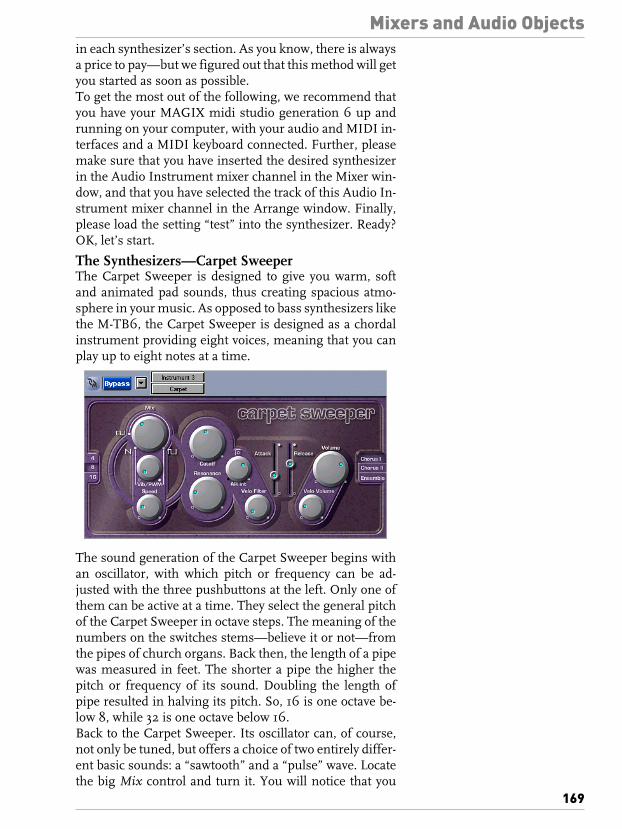
Mixers and Audio Objects
169
in each synthesizer’s section. As you know, there is alwaysa price to pay—but we figured out that this method will getyou started as soon as possible. To get the most out of the following, we recommend thatyou have your MAGIX midi studio generation 6 up andrunning on your computer, with your audio and MIDI in-terfaces and a MIDI keyboard connected. Further, pleasemake sure that you have inserted the desired synthesizerin the Audio Instrument mixer channel in the Mixer win-dow, and that you have selected the track of this Audio In-strument mixer channel in the Arrange window. Finally,please load the setting “test” into the synthesizer. Ready?OK, let’s start.
The Synthesizers—Carpet SweeperThe Carpet Sweeper is designed to give you warm, softand animated pad sounds, thus creating spacious atmo-sphere in your music. As opposed to bass synthesizers likethe M-TB6, the Carpet Sweeper is designed as a chordalinstrument providing eight voices, meaning that you canplay up to eight notes at a time.
The sound generation of the Carpet Sweeper begins withan oscillator, with which pitch or frequency can be ad-justed with the three pushbuttons at the left. Only one ofthem can be active at a time. They select the general pitchof the Carpet Sweeper in octave steps. The meaning of thenumbers on the switches stems—believe it or not—fromthe pipes of church organs. Back then, the length of a pipewas measured in feet. The shorter a pipe the higher thepitch or frequency of its sound. Doubling the length ofpipe resulted in halving its pitch. So, 16 is one octave be-low 8, while 32 is one octave below 16.Back to the Carpet Sweeper. Its oscillator can, of course,not only be tuned, but offers a choice of two entirely differ-ent basic sounds: a “sawtooth” and a “pulse” wave. Locatethe big Mix control and turn it. You will notice that you

Mixers and Audio Objects
170
can switch between the sawtooth wave at the very left ofthe dial, and the pulse wave, which continuously coversthe rest of the dial’s turn. Listen closely to sonic differ-ences of the waves—the sawtooth wave gives you a bright,string-like sound, while the pulse wave covers a continu-ous range from bright, hollow, clarinet-like sounds at theleft of the Mix control, and bright, nasal, clavinet-likesounds at the right end of the Mix control. And, of course,everything between, depending on the setting of Mix. Asthe icons indicate, turning Mix clockwise narrows thewidth of the pulse wave. Try it and listen to the results.There is another difference between these two waves. Se-lect the sawtooth wave, locate the Vib/PWM control andturn it up. You will hear the pitch of the sound going upand down and up and down and so on. This cyclic pitchchange is called a “vibrato”, thus the abbreviation in Vib/PWM. The vibrato intensity is set with Vib/PWM. The vi-brato speed is set with the Speed control below Vib/PWM.Now switch Mix to pulse wave and turn on Vib/PWM. Youwill not hear a vibrato, but a cyclic change in the soundcolor itself. This sound change is achieved by modulatingthe width of the pulse wave, as if you would manually turnthe Mix control. This is called “pulse width modulation”,abbreviated to PWM. The speed of this cyclic soundchange is again controlled with the Speed control belowVib/PWM. Both principles, vibrato and PWM, are the keyfeatures to bring life and animation to your pad sounds. So much about the oscillator of the Carpet Sweeper, on tothe filter. It features the main controls already familiar toyou from the introduction: Cutoff for darkening the sound,Resonance for sharpening it. Please try these controls in-tensively, as they are the most effective and thus impor-tant tools for your sound creations.Let us jump to the Attack and Release sliders. They controlthe volume course of the sound. The higher Attack, thelonger it takes the sound’s level to raise from zero to fulllevel when you press a key. As long as you hold the key, thesound’s level will be full. As soon as you release a key, thesound’s level will fall from full to zero in the time specifiedwith Release. The higher Release, the longer it takes thesound’s level to fall from full level to zero when you re-lease a key.But Attack and Release are not only used to control the levelcourse of the sound, they can also be used to move Cutoffautomatically up or down from the position you set. Pleasenote that you will not see the Cutoff control itself moving,but you will hear the appropriate effect. To hear it, turn

Mixers and Audio Objects
171
Cutoff half way up, locate AR Int just left of the middle be-tween Cutoff and Resonance and turn it up. As you press akey, you will hear a change in timbre as you would moveCutoff manually. Leave AR Int turned up and try out differ-ent Attack and Release positions. You will find that AR Intcontrols the amount of the automated Cutoff movement,while Attack and Release control the times with which thistimbre shift takes place.AR Int can be set to positive or negative values. PositiveAR Int values makes Cutoff raise from its original positionwith the time specified by Attack as you press a key, andfall down to its original value in the time specified by Re-lease as soon as you release a key. Negative AR Int valuesmakes Cutoff fall down from its original position with thetime specified by Attack as you press a key, and rise up toits original value in the time specified by Release as soon asyou release a key. You can make AR Int sensitive to your playing. Try turn-ing up Velo Filter below AR Int. This will make AR Int re-act to how hard you hit a key. If Velo Filter is turned fulldown, it does not matter how hard you hit a key. Turningit up clockwise increases the sensitivity, meaning that youhave to hit a key harder to reach the AR Int value you haveset. And if you do not want any Cutoff movement at all,simply press the little “zero” symbol right above AR Int.This will reset AR Int.The final output level of the Carpet Sweeper is controlledwith the big Volume control. Sideways below Volume sitsVelo Volume: Turn it up to make the sound’s level react tohow hard you hit a key.That leaves us with three mysterious buttons in the upperright of the Carpet Sweeper. Besides Vib/PWM, thesethree switches are the final key for animated, swirlingsounds. Try them and hear for yourself how they breathelife and motion into your sounds. You can deactivate theseeffects by clicking on an already activated effect.
The Synthesizers—PercusorThe Percusor is the most elaborate and universal synthe-sizer of your music studio. Together with the the CarpetSweeper, the Percusor puts all the synthesizer magic atyour disposal, and its sonic capabilities start where CarpetSweeper reach their borders. Its full-featured ADSR sec-tion is especially suited for fine-crafted percussive sounds.The Percusor is, as is the Carpet Sweeper, designed as apolyphonic instrument providing eight voices, so that youcan play up to eight notes at a time.

Mixers and Audio Objects
172
For enormous sonic wealth, the sound generation of thePercusor offers a special oscillator, the pitch or frequencyof which can be adjusted with the three pushbuttons at theleft of the Percusor. They select the general pitch of thePercusor in octave steps. Only one of them can be active ata time. The meaning of the numbers on the switchesstems from the length of pipe organs, as the length of apipe was measured in feet. The shorter a pipe the higherthe pitch, or frequency, of its sound. Doubling the lengthof pipe resulted in halving its pitch. So, 8 is one octave be-low 4, and 16 is one octave below 8.There is another similarity between those big pipe organsand the Percusor—both are able to produce new timbresby mixing existing ones. But instead of routing airthrough a pipe system, the Percusor’s oscillator offers sixsliders for convenient mixing of six different sounds. Lo-cate the six sliders and move them up and down, one byone. We will start from the left, with the slider from the tri-angle wave. In the synthesizer world waves are named af-ter their shape; when viewed through an oscilloscope—which is kind of a TV set for watching the shapes of elec-trical waves—the triangle wave does indeed look like a tri-angle. The triangle wave does not sound as bright as the otherwaveforms you will encounter on the next sliders. It re-sembles a softly blown flute with quite a lot of low-end en-ergy. Use it as an addition to give your sound creations anice bottom end, or use it stand-alone for pleasant, mellowsounds. Next comes the sawtooth slider. The sawtooth isone of the two the most popular synthesizer waveforms. Itsounds very bright and rich, resembles stringed instru-ments and is a good starting point for almost any soundexperiment. The other one of the most popular synthe-sizer waveforms is the square wave, right beside the saw-tooth slider. Compared to the sawtooth, the square wave

Mixers and Audio Objects
173
sounds bright as well, but with a hollow, clarinet-like char-acter. The next two sliders do also give you square waves,but their pitch is one or two octaves lower, respectively,than the pitch of the other waves. Use them to give yoursounds a really huge, wide character and the deepestbasses. Or try this for unusual bright timbres: set the oc-tave switch to 4 feet, pull down the sliders of all waves butthe square wave two octaves below the original pitch. Nowcarefully pull up the sawtooth slider and note how brightyour square wave gets…The remaining slider is for the noise waveform. Thissounds exactly as it reads: noisy. It is non-pitched, mean-ing it has no audible pitch and is thus independent fromthe note you play or from the setting of the octaveswitches. When used alone, this is the waveform of choicefor all kinds of non-pitched percussion instruments, ex-plosions, and sound effects like wind or waves. If you mixit to the other waves, you can emulate things like breathnoise in a flute, or, when added at a very, very low volume,it can give your sound that animated high-end sparkle.That’s almost all about the oscillator of the Percusor, solet’s move on to the filter. It features the main controls al-ready familiar to you from the introduction: Cutoff fordarkening the sound, Resonance for sharpening it. Youwill find them in the middle of the Percusor’s surface.Please try these controls intensively, as they are, togetherwith the almost endless mix combinations of the wave-form sliders, the most effective and thus important toolsfor your sound creations.In between the filter controls and the six waveform slidersyou will find the Vib/Wah control. Turn it to the left. Youwill hear the pitch of the sound going up and down and upand down and so on. This cyclic pitch change is called a“vibrato”, thus the abreviation in Vib/Wah. The vibrato in-tensity is set with the left range of Vib/Wah. The vibratospeed is set with the Speed control below Vib/PWM.Now turn Vib/Wah to the right: You will not hear a vibrato,but a cyclic change in the sound color itself, as if youmoved the Cutoff control manually up and down and upand down and so on. And this is exactly what is happen-ing, but it is now done automatically for you by the Percu-sor. The speed of this so-called “Cutoff modulation” iscontrolled with the Speed control below Vib/Wah. If youdo not want to hear neither vibrato nor cutoff modulation,just click the little “zero” symbol above the Vib/Wah con-trol.

Mixers and Audio Objects
174
Just in the middle between Cutoff and Resonance you willfind three switches named 1/3, 2/3 and 3/3. An engagedswitch can be deactivated by clicking on it again. To learnwhat they do, deactivate these switches, pull down allwaveform sliders but noise, turn Cutoff quite down andraise Resonance slowly till the noise gets a distinct whis-tling character. When you now play different keys on yourMIDI keyboard you will notice that the pitch of this whis-tling is not affected by the notes you play. Now activate 3/3 and play some notes again. You will hear that you cannow almost play the whistling like any other waveform.This is done by controlling the Cutoff by the note you play.It will not exactly track the notes you play, but don’t worry.These are the inaccuracies that make a digital synthesizerthat is calculated inside a computer sound like an analogsynthesizer made out of resistors, transistors and di-odes—parts that react to temperature and thus alwayshave some kind of uncontrollable “life”. With the othersettings 2/3 and 1/3 the Cutoff will not track the notesplayed as closely as with 3/3.Let’s jump to the sliders on the right side of the Percusor:A (stands for “Attack”), D (stands for “Decay”), S (standsfor “Sustain”) and R (stands for “Release”). They controlthe volume curve of the sound: the higher the attack time(A), the longer it takes the sound’s level to raise from zeroto full level when you press a key. Continue to hold the keyand the sound’s level will fall down to the sustain level setwith the sustain slider S in the decay time set with the Dslider. The higher the decay time, the longer it takes thesound’s level to fall from full level to sustain level. As longas you hold the key, the sound’s level will then stay at thesustain level. As soon as you release a key, the sound’slevel will fall from sustain level to zero in the release timespecified with R slider. The higher the release time, thelonger it takes the sound’s level to fall from sustain level tozero when you release a key. So, while A, D and R adjusttimes, S adjusts a level. Please note that your sound willdie to zero in the decay time even when you hold a key ifsustain level is set to zero.But ADSR sliders are not only used to control the levelcurve of the sound, they can also be used to move Cutoffautomatically up or down from the position you set. Pleasenote that you will not see the Cutoff control itself moving,but you will hear the appropriate effect. To hear it, turnCutoff half way up, locate ADSR Int below the right side ofCutoff and turn it up. As you press a key, you will hear achange in timbre as you would move Cutoff manually.

Mixers and Audio Objects
175
Leave ADSR Int turned up and try out different ADSRslider positions. You will find that ADSR Int controls theamount of the automated Cutoff movement, while ADSRsliders control the curve form with which this timbre shifttakes place.ADSR Int can be set to positive or negative values. PositiveADSR Int values make Cutoff raise from its original posi-tion with the curve specified by the ADSR sliders as youpress a key, and fall down to its original value when you re-lease a key. Negative ADSR Int values makes Cutoff falldown from its original position with the curve specified byADSR as you press a key, and rise up to its original valuewhen you release a key. You can make ADSR Int sensitive to your playing style.Try turning up Velo Filter above ADSR Int. This will makeADSR Int react to how hard you hit a key. If Velo Filter isturned full down, it does not matter how hard you hit akey. Turning it up clockwise increases the sensivity,meaning that you have to hit a key harder to reach theADSR Int value you have set. And if you do not want anyCutoff movement at all, simply press the little “zero” sym-bol right above ADSR Int. This will reset ADSR Int.The final output level of the Percusor is controlled withthe Volume control. Sideway below Volume sits Velo Vol-ume: turn it up to make the sound’s level react to how hardyou hit a key.To give your carefully crafted Percusor sounds that cuttingedge, make sure you give the Chorus and Overdrive con-trols to the right of the Percusor’s surface a try. Chorus willbroaden your sounds with a swirling effect, and Overdrivewill give them the aggressive bite to cut through even thedensest arrangements.
Faders and Level Adjustment
Level Meter: The channel strips have a level meter fordisplaying playback or monitor level. When you arm a track in preparation for recording, themeter will display the input level.Peak Hold: As with conventional mixing desk meters,peak values are “held” on the display for a few seconds, sothat they can be read more easily. Even if your CPU pro-cessing capacity is not sufficient for a smooth display, itreliably shows the last maximum level.Clip Detector: If the signal overloads, and goes into clip-ping, the Clip detector (the red “virtual LED” at the top of

Mixers and Audio Objects
176
the meter) will light and remain lit. You can reset the de-tector by clicking anywhere on the meter.
Adjusting the level: The fader on each track object setsits playback level. The recording level is not set in MAGIXmidi studio generation 6, but at the source supplying thesignal. You cannot adjust the level on the digital input.MAGIX midi studio generation 6’s fader shown here isused to control the monitor level.The level reading of the audio objects and the aux sendscan be shown in decibels (dB) or MIDI controller values.To change the scale, select the appropriate object and alterthe “Val as” parameter. A MIDI volume of 90 is equiva-lent to 0 dB.The maximum boost is +6 dB. You can reset the volumefader to 0dB (90) by ctrl-clicking.During Recording: An independent monitoring level isavailable if a Track object is record enabled. When the ob-ject is again disarmed, the original level will be restored.
Routing
Mute control: You can mute any audio object by press-ing the button marked “M”. Pressing the button again re-stores the previous level.
Pan/Balance: Mono objects feature a Pan control whichdetermines the position of a signal in the stereo image.Stereo objects, on the other hand, possess Balance con-trols. The balance control differs from the pan control inthat the former controls the relative levels of two signals(L/R) at their outputs. The latter merely shares one signalproportionally between two outputs.You can reset the pan control to center (64) with a ctrl-click.
Track arming: The Rec control (see right) “arms” a track,making it ready for recording. Once the track has beenarmed, the control flashes red. During actual recording, itremains lit red all the time.If the control is flashing but gray-red in color, no audiotrack has been selected in the Arrange window. No record-ing can take place.Rec controls only exist for Track objects. Please note thatthe number of Track objects which can be armed at thesame time, is limited to the number of tracks which youraudio hardware can record simultaneously.

Mixers and Audio Objects
177
You can select which available input the Track object willrecord from, by using the input selector switch, found inthe I/O section of the Track object. Click-holding on theswitch will reveal a flip-menu, showing all available inputsfor your hardware. If the record track is stereo, the inputswill be displayed in pairs (Input 1-2, Input 3-4, etc.). Formono tracks, they will be displayed individually.If you are using different audio hardware systems, you canrecord on all hardware simultaneously.
Solo: All audio objects have a solo button. This mutes allother audio objects. The muted objects are marked with aflashing “M” in the mute button. Please note that this doesnot mute MIDI tracks.You can solo several objects at once.ctrl-clicking releases other active solo buttons, so that youonly hear one channel (“Interlocking Solo” or “Solo Tog-gle”).ctrl-clicking any activated solo button removes the solo sta-tus from all audio objects.Solo Safe: When you solo a channel, if you want to hear thesignal together with its effects, the effect return channelsshould not be muted. Unlike conventional mixing desks,MAGIX midi studio generation 6 can scan the entire sig-nal flow and leave the effect return channels open.The same applies when you solo an effect return signal.The channels feeding the effect are muted (“taken out ofthe routing”) but their effect sends remain open so thatthe effect still receives a signal.Of course the automatic mute-suppression only applies tothe internal effect returns. If you are using external effectunits via effect objects, the scan will keep the effect mastersends open. However, MAGIX midi studio generation 6cannot know which of the input objects you are using aseffect returns for the external effect units. You need tomanually switch these input objects to “solo safe”—justlike in a conventional mixing desk.alt-clicking an inactive solo button makes this audio object“solo safe”. This stops it being muted when you solo an-other channel. “Solo safe” status is marked by a cross inthe solo button.alt-clicking again removes the solo safe status.
Mute Remote Control: Mutes used to be recorded asVolume Controller events. Now Controller #9 is used in-stead. This allows you to control muting e.g. via hardwarecontrollers.
Mixers and Audio Objects
178
Value 127 Mute (actually any value except 0 or 64)Value 0 Switch off mute Value 64 Toggle mute
Stereo ObjectsAll the types of audio objects (Track, Input, and Output)may be used configured as stereo.Audio sequences on the tracks of stereo objects are alwaysdealt with together, no matter what the operation beingperformed. If you open the Sample Edit window, bothsides of the stereo pair are shown there, and processed to-gether.
Creating Stereo Objects: To do this, select the objectnamed “Audio 1” (click on its name, at the bottom). Clickon the Mono symbol, at the bottom left of the object, nextto the REC button.The button will now show two interlinked circles, indicat-ing that it is now a stereo object. If you click-hold on this button, you will see a flip-menu, giving you four choices: Mono Sets the track to play mono files.Stereo Sets the track to play stereo files.The Effects: Whatever parameters you adjust for stereo ob-jects, the changes affect both sides equally. The pan con-trol becomes a balance control.Stereo objects have their own set of parameters for settinglevel, balance, aux send and EQ. As a result, you can togglebetween stereo and mono object types without losing theparameters for each type.Any combination of stereo and mono recordings is per-mitted. you can set tracks 1 and 2 each to stereo, and usetracks 3 and 4 for mono recording s, if you wish.
AutomationOn a mixing desk, Automation is the ability to record thechanges to the levels of the various audio channels overtime, and then recall and reproduce these changes auto-matically when mixing.“Full” automation allows you to recall the adjustments toall of the parameters on a desk, such as the pan and EQsettings, as well as all the channel levels.Naturally, the “virtual” mixing desk of MAGIX midi stu-dio generation 6 is fully automated. This includes all but-tons, fader and knob movements.Fader movements—just as with MIDI events—are re-corded on a track. This track will consist of a sequencewith corresponding MIDI events from the respective fader
Mixers and Audio Objects
179
or knob. After being recorded, these events can be edited,just like any other MIDI sequence.The different channel tracks in the mixer create eventswith different MIDI channels. When automation data isrecorded—from the adaptive mixer, the automation datais recorded to the corresponding track in the Arrange win-dow.
Example: Let’s say you have three tracks: a bass track, a pi-ano track (both MIDI tracks), and an audio drum loop onan audio track in the Arrange window. Click on the Recordbutton in the Transport window, and then move any faderor knob on the mixer, and automation data will be re-corded. If the fader for the piano channel on the mixer ismoved, MAGIX midi studio generation 6 automaticallycreates a new sequence on the piano track in the Arrangewindow. Move the volume fader for the drum loop, and anew sequence is written to the corresponding track in theArrange window. During the recording process, it is pos-sible to jump back and forth between the mixer channels.The mixer assigns automation data to the correct track au-tomatically.
Operation: Select Windows > Open Mixer in the mainmenu bar.Click on “Record” in the Transport window.Move the the faders, knobs, or buttons on the mixer.
The Audio Window
180
The Audio Window
MAGIX midi studio generation 6 allows you to access alldigitally stored audio recordings (audio files) are availablein the Wave format (.WAV) or AIFF. All recordings madeusing MAGIX midi studio generation 6 are stored asWave files.The Audio window of a MAGIX midi studio generation 6song is where you organize all the audio files used in thesong on the hard disk. It doesn’t matter whether these au-dio files have just been recorded or whether they were cop-ied weeks ago from a CD-ROM onto the hard disk. TheAudio window gives a MAGIX midi studio generation 6song access to any compatible data on the hard disk.There is no timing assignment of the recordings in theAudio window. An audio file contains no information onits time position in relation to the musical sequencer’stime axis. This assignment is made by arranging sectionsof the audio files, known as “regions”, in the Arrange win-dow in the same way as MIDI sequences.The Audio window is really like a catalog for audio files. Italso gives you an overview of what regions have been de-fined for each audio file.Here you can define new regions and edit, delete, or re-name existing ones. When you edit them here, the accu-racy is limited to units of 256 sample words. To makemore precise edits use the Sample Edit window.These regions can then be dragged directly into the Ar-range window, where they now may be arranged as audiosequences.The menus in the Audio window contain all the opera-tions relating to the administration of audio files and re-gions, plus the System parameters of the hard disk record-ing hardware (HDR hardware).
Opening the Audio WindowTo open the Audio window choose Windows > Open Au-dio. You can open several Audio windows at once (evenwithin one Screenset) for example, if you want to use dif-ferent zoom factors.

The Audio Window
181
1 Link button2 Region cycle button3 Monitor button4 Selection field for the output channel for monitoring5 Tool box for the Audio window6 Click this small triangle to show or hide the regions in
the relevant audio file7 Click the lock symbol to protect the parameters of the
region8 The name of the audio file (large print)9 The name of a region (small print)10 Grab and drag this point to adjust the horizontal win-
dow division11 Region box with waveform display12 Display of the audio passages outside the current re-
gion13 The Anchor—musical reference point in the regionIf you add an audio file to the Audio window, MAGIXmidi studio generation 6 automatically creates a regionencompassing the entire length of the file.You can create as many regions as you want from thesame audio file and there are also no limits in terms oflength, as long as the region is no longer than the sourceaudio file.Regions can be moved with the mouse into the Arrangewindow. The audio file is then played at the desired songposition.
1
234
5
6
8
9
1011
1214
7
The Audio Window
182
LayoutOn the left side of the window is a thin column. At the topthis are the mode buttons, and at the bottom are the tools.This is what is described in the following sections.The column to the right lists the audio files, and their re-gions by name.Further to the right, the region waveform s are displayedgraphically in the large white area of the window. A regionis shown as a boxed, black or colored area, while the rest ofthe audio file is shown in light gray indicating that thispart of the audio file is not used for the region.
Zoom FunctionsThe two telescope symbols at the top right, just below thetitle bar can be used to enlarge or reduce the display (zoomfunction).You can use the telescope symbol on the left to enlarge orreduce the vertical display area altering the height of theregion waveform display. The telescope symbol on the right is for enlarging or re-ducing the horizontal display size, i.e., altering the timedisplay of the regions .
The Mode ButtonsThe mode buttons allow you to select different operatingmodes. These affect both the display and the playback ofregions in the Audio window.
Link: Link mode in the Audio window means that when-ever you select an audio region in the Arrange window thesame region is automatically selected and displayed in theAudio window. You can switch link mode on or off by clicking the buttonwith the chain link icon.“Hidden regions” cannot be displayed in link mode. If youwant to display them you have to “Show” the regions (seesection Hiding and Showing Regions from page 183 on-wards).
Monitoring: You can play regions directly in the Audiowindow. This monitoring is not related to the time axis ofthe sequencer. There are several ways of playing a region:Playing from a specific position: Click-hold the desired re-gion in the waveform display with the mouse. Playbackstarts at the point where you clicked. This allows you toplay specific sections.Playback stops as soon as you release the button.Playing the whole region: If you want to play an entire re-gion, select it by clicking the name of the region in the au-

The Audio Window
183
dio list. Now click the button with the speaker symbol tostart playback. Click the button again to stop playback.As well as using the mouse, you can also start or stop thistype of playback using the “Play/Stop Region” key com-mand.Stereo playback: If a region from a stereo file is selected,clicking the speaker icon plays both sides of the stereo file.However, if you click the icon while holding down ctrl orshift only the selected region (mono) is played. If you sub-sequently select a region from another stereo file, MAGIXmidi studio generation 6 goes back to playing in stereo.
Region Cycle: Regions may be looped continuously dur-ing monitoring. To switch “region cycle” on or off, clickthe button with the circular arrow symbols. This mode ap-plies to all regions in the Audio window.This cycling only affects the monitoring in the Audio win-dow and has no effect on song playback. It should not beconfused with the cycle function in the Arrange window.You can adjust the start and end points of the region inreal time while the region is being cycled. This is usefulfor setting precise region lengths, for example when “pol-ishing” drum loops.
Choosing the Audio Output for Monitoring: Theactual routing of the audio signals to the different outputsis done in the Arrange window (using the audio object inthe track list).However, you can choose a specific channel of the audiohardware for monitoring in the Audio window. Set the de-sired output in the Cha button below the speaker icon.
DisplayThe Audio ListThe list display of the audio files and regions, (known asthe audio list) gives an overview of all the audio files usedin the current song and the regions contained withinthem. This is where audio files can be added, removed, de-leted, or renamed. Regions can also be created, deletedand renamed.
Hiding and Showing Regions: After you add an audiofile, you can see the file name in the Audio window inlarge print. This takes up minimal screen space, andshows you as many currently used files as your zoom set-ting and monitor size will allow. There is a small triangu-lar arrow directly next to the file name 1.
X

The Audio Window
184
Click the small triangle 2 next to an audio file to reveal itsregions. Like the list display of folders in the Explorer, thisshows you the “contents” of the audio files—i.e. the rele-vant regions. The arrow is now pointing downward towardthe regions, which are shown in small print. Click the tri-angle again to hide the regions.You can also press ctrl while clicking on this triangle toquickly Hide/Show ALL regions.
The Waveform Display outside the RegionMAGIX midi studio generation 6 defaults to showing thewaveforms outside the defined region area in light gray.You can alter the display yourself by clicking inside the re-gion while holding down ctrl and keeping the mouse but-ton held down. A flip menu appears containing the follow-ing options:None : No waveform dis-play outside the regions.Bright : Waveform displayoutside the regions coloredlight gray.Middle : Waveform displayoutside the regions coloredmedium gray.Dark : Waveform displayoutside the regions coloreddark gray.
Overview CalculationIn addition to the pure audio data, an audio file also con-tains data which is required for graphic display of thewaveform in the Audio window and Sample Editor (“Over-view” data).Automatic Overview Calculation: If the option Create Over-views after recording is switched on in Audio > Audio Pref-erences…, graphic overviews are automatically calculatedright after audio recording.If you switch off this option, overviews are not calculatedautomatically. However, you can start them manually.Starting Overview Calculation manually : Sometimes whenyou load/import audio files, you have to carry out the cal-
1 2
1
2
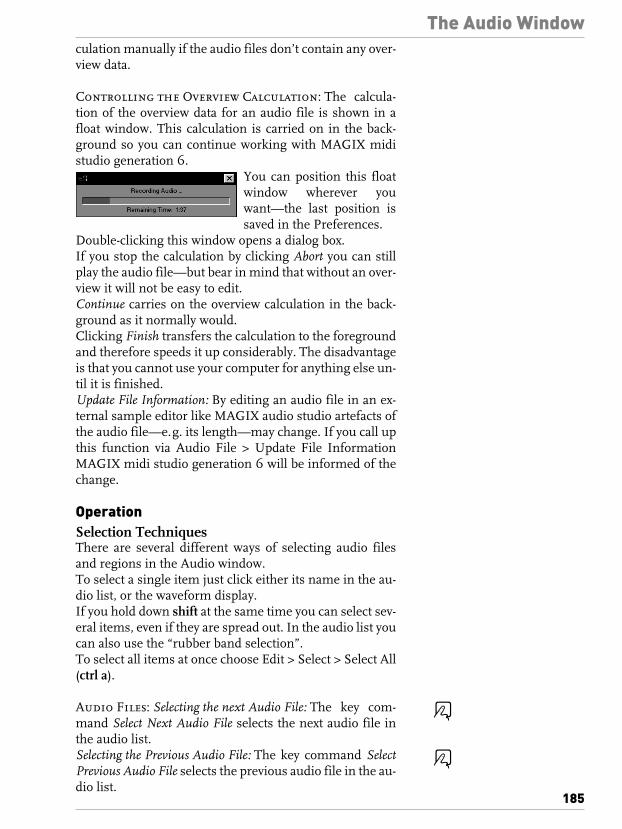
The Audio Window
185
culation manually if the audio files don’t contain any over-view data.
Controlling the Overview Calculation: The calcula-tion of the overview data for an audio file is shown in afloat window. This calculation is carried on in the back-ground so you can continue working with MAGIX midistudio generation 6.
You can position this floatwindow wherever youwant—the last position issaved in the Preferences.
Double-clicking this window opens a dialog box.If you stop the calculation by clicking Abort you can stillplay the audio file—but bear in mind that without an over-view it will not be easy to edit.Continue carries on the overview calculation in the back-ground as it normally would.Clicking Finish transfers the calculation to the foregroundand therefore speeds it up considerably. The disadvantageis that you cannot use your computer for anything else un-til it is finished.Update File Information: By editing an audio file in an ex-ternal sample editor like MAGIX audio studio artefacts ofthe audio file—e.g. its length—may change. If you call upthis function via Audio File > Update File InformationMAGIX midi studio generation 6 will be informed of thechange.
OperationSelection TechniquesThere are several different ways of selecting audio filesand regions in the Audio window.To select a single item just click either its name in the au-dio list, or the waveform display.If you hold down shift at the same time you can select sev-eral items, even if they are spread out. In the audio list youcan also use the “rubber band selection”.To select all items at once choose Edit > Select > Select All(ctrl a).
Audio Files: Selecting the next Audio File: The key com-mand Select Next Audio File selects the next audio file inthe audio list.Selecting the Previous Audio File: The key command SelectPrevious Audio File selects the previous audio file in the au-dio list.
X
X
The Audio Window
186
Audio Files and Regions: Selecting used Regions: Whenyou choose Edit > Select Used all audio files and regionsused in the arrangement of the song are selected.Selecting unused Regions: Choosing Edit > Select Unusedselects all those audio files and regions which are not usedin the arrangement of the current song.For example, you can call up this function at the end of aproduction to delete any items that are not required (back-space).
Edit CommandsAll the standard edit commands are available in the Audiowindow. As usual, they apply to the currently selected en-tries (whether audio files or regions). The Cut, Copy and Paste commands only apply to exchang-ing items between two different songs. An audio file canonly appear once in a song’s audio list, and so cannot becopied within a song. For instructions on how to physi-cally copy an audio file to the hard disk, please see the sec-tion Copying Audio Files from page 192 onwards.Cut: The selected audio files or regions are cut out, i.e.moved to the clipboard. They are removed from the Audiowindow. Shortcut: ctrl x.Copy: The selected audio files and their regions are copiedto the clipboard. They remain in the Audio window. Short-cut: ctrl c.Paste: The contents of the clipboard are added (providingthey contain audio files and their regions from anothersong). Shortcut: ctrl v.Clear: Any selected audio files or regions are deleted. Youcan achieve the same effect by pressing backspace.Don’t forget; the functions Cut or Clear do not delete au-dio files from the hard disk, they just remove them fromthe Audio window of the current song.If regions from the audio files in the Arrange window arebeing used as audio sequences these sequences will be de-leted from the Arrange window as well.If you want to delete the selected audio files from the harddisk, select Audio File > Delete File(s).Undo: Reverses the Previous Command (Shortcut: ctrl z).You should call up this function if you want to reverse anaction.Not all actions can be reversed using Undo. If you select afunction which you cannot Undo, you will be warned ofthis before you can execute the function.
X
X
The Audio Window
187
Regions
Creating a Region: Select the desired audio file andchoose Audio File > Add Region. The new region will ap-pear in the list, after the existing regions.Copying a Region: If you select an existing region and thencarry out the Add Region function, another region is cre-ated whose definition (start, end, Anchor) is exactly thesame as the selected region.
Deleting a Region: You can use the Eraser tool to deleteone or more regions. If any of these regions exist in the Ar-range window, they will be removed from there, as well.You should therefore be careful when using this tool.However, the Undo function is always available, if you in-advertently remove a needed region.You can also delete any selected regions with delete.
Altering the Limits of a Region: You can directly alterthe limits of a region in the graphic display using the re-gion edit (finger) tool.You can also use the normal mouse pointer. Just makesure you grab the region by the lower third when carryingout the following actions:Moving the Start Point: To adjust the start point of a re-gion, grab the left border. You can now adjust the startpoint.Moving the End point of a Region: To adjust the end pointof a region grab, the right border. You can now adjust theend point.Moving the whole Region: You can also move an entire re-gion within an audio file, by grabbing it in the middle. Thetool turns into two arrows pointing left and right. If the re-gion is very small, use the zoom function to enlarge thesection. Make sure you can see the two arrows before mak-ing any alterations.If you want to adjust the limits of the region without mov-ing the Anchor, hold down ctrl during the operation. Thisapplies to moving the start or end points, as well as mov-ing the whole region.
Moving the Anchor: To move the Anchor, grab thesmall Anchor triangle below the region. The tool turnsinto the region edit tool. A guide line appears above theAnchor triangle. With audio sequences in the Arrange window, the Anchoris marked by a vertical, dashed line.
X
X
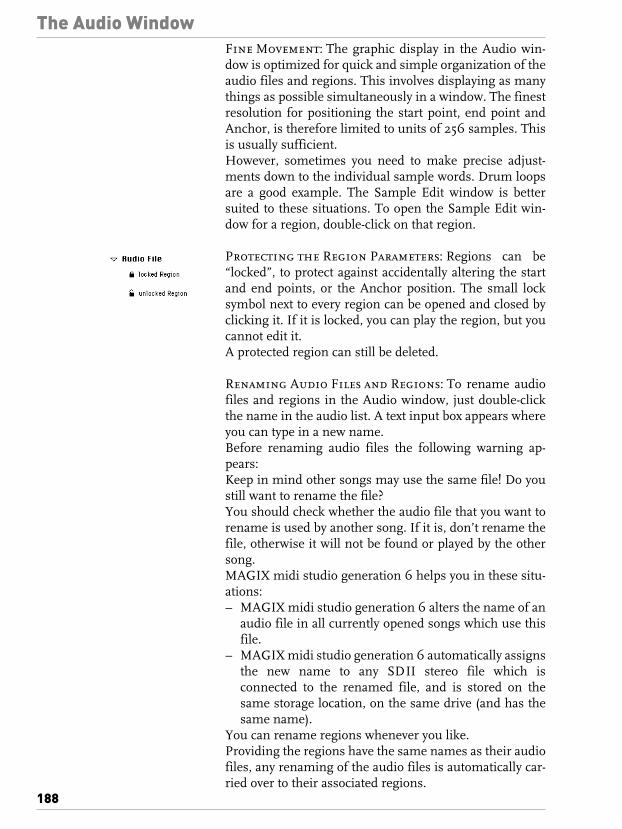
The Audio Window
188
Fine Movement: The graphic display in the Audio win-dow is optimized for quick and simple organization of theaudio files and regions. This involves displaying as manythings as possible simultaneously in a window. The finestresolution for positioning the start point, end point andAnchor, is therefore limited to units of 256 samples. Thisis usually sufficient.However, sometimes you need to make precise adjust-ments down to the individual sample words. Drum loopsare a good example. The Sample Edit window is bettersuited to these situations. To open the Sample Edit win-dow for a region, double-click on that region.
Protecting the Region Parameters: Regions can be“locked”, to protect against accidentally altering the startand end points, or the Anchor position. The small locksymbol next to every region can be opened and closed byclicking it. If it is locked, you can play the region, but youcannot edit it.A protected region can still be deleted.
Renaming Audio Files and Regions: To rename audiofiles and regions in the Audio window, just double-clickthe name in the audio list. A text input box appears whereyou can type in a new name.Before renaming audio files the following warning ap-pears: Keep in mind other songs may use the same file! Do youstill want to rename the file?You should check whether the audio file that you want torename is used by another song. If it is, don’t rename thefile, otherwise it will not be found or played by the othersong.MAGIX midi studio generation 6 helps you in these situ-ations:– MAGIX midi studio generation 6 alters the name of an
audio file in all currently opened songs which use thisfile.
– MAGIX midi studio generation 6 automatically assignsthe new name to any SDII stereo file which isconnected to the renamed file, and is stored on thesame storage location, on the same drive (and has thesame name).
You can rename regions whenever you like.Providing the regions have the same names as their audiofiles, any renaming of the audio files is automatically car-ried over to their associated regions.

The Audio Window
189
Adding a Region to the Arrangement: To add a re-gion to the song arrangement, drag its graphic display intoan open Arrange window to create an audio sequence. First select the desired track in the Arrange window andmove the song position line to the position where youwant to create the audio sequence.Grab the middle of the graphic display of the region in theAudio window and drag it into the Arrange window.Don’t worry if the region starts to play. It will stop playingas soon as you move the mouse pointer outside the Audiowindow. You can prevent this by using the region dragtool (the small hand with the outstretched fingers), or bygrabbing the name of the region in the Audio List anddragging it into the Arrangement.
File AdministrationRecord File
Defining the Record Path: Every recording in the Ar-range window creates a new audio file. To keep track ofyour recordings, you should tell MAGIX midi studio gen-eration 6 where the data is to be written before you startrecording.You can also define a file name for the audio files that arerecorded—a kind of working title—which MAGIX midistudio generation 6 will automatically keep using, by ap-pending a series of numbers to the file name for everysubsequent recording.The path (folder) for audio recordings can be set individu-ally for each song. You can also have different paths fordifferent audio hardware systems running simulta-neously.To call up the dialog window for these settings, open theAudio window and choose Audio File > Set Audio RecordPath… or open the Record menu (click-hold the Recordbutton). The menu entries are:Pre-Allocate Recording Files: If this option is selected,MAGIX midi studio generation 6 creates the audio file forthe next recording after you record-enable the track. In ad-dition, at the end of every recording, the audio file for thenext recording is immediately created. This allows you tostart audio recordings quickly.Unused recording files are deleted when you quit MAGIXmidi studio generation 6.

The Audio Window
190
Maximum Recording Time (Recommended): xxx Minutes: This parameter defines the maximum recording time fornew audio files in minutes; this determines the size of thetemporary recording file.You can switch this option off, in which case a record fileas big as the whole free memory from within the currentlyselected hard disk will be created.Disadvantage:– the audio file can be heavily fragmented, if the actual
recording time is much less than the maximum avail-able value.
It is strongly recommended that you switch on this option,and set a top limit for the recording time.If there is not enough storage space available, the maxi-mum length of the recording is temporarily reduced. Dur-ing the recording you can see how much time is availablein the Record Float window (with the red bar).
When you enter the Recording Time remember… Important: the display of the remaining memory and themaximum recording time depends on the following fac-tors:– the number of tracks which are to be recorded simulta-
neously.– the sample rate.It is always advisable to choose a much smaller value thanthe maximum possible recording time. Otherwise afterthe first recording there will not be enough space for fur-ther recordings unless you reduce the value.Global Record Path / Song Record Path: The Global RecordPath was available in earlier versions. It is stored in Pref-erences and applies to all songs. The advantage is that youdon’t have to define a record path in every new song beforeyou can record, providing you don’t mind recording filesfor every song into the same folder.The Song Record Path allows you to organize the audio re-cordings for each song into its own folder. The advantagehere, is that when you change between different songs,any new recordings are automatically stored in that song’sfolder, without having to switch the path manually.Set: These buttons can be used to define the recordingpath. You can create a new folder (if required) in the dialogbox.To the right, you will see the current driveand the remain-ing capacity (only if the drive is registered).

The Audio Window
191
If you click-hold the drive the entire path is displayed. Thisway you can see exactly which folder you are recordinginto.Here is an example illustrating the individual steps:It is usually advisable to store all the audio files from onerecording session or song in its own folder. Let’s supposethe song you are working on is called “Morning Light”.– Choose Audio File > Set Audio Record Path.– Create a new folder by clicking the “folder”symbol in
the file selection box.– Call the folder something like “Morning Light Audio”
and click Open.– Now enter a working name for the audio files. It is a
good idea to enter a name which mentions the song andthe type of recording. If you are recording vocals for thesong “Morning Light” you could use something like“Morning LeadVoc” as a working name.
– Then click Store.For every new recording a successive number is added tothe name. For example:Morning LeadVoc.#01Morning LeadVoc.#02Morning LeadVoc.#03 …You can change the path and name whenever you want, bycalling up the Set Record Path function again.Let’s assume you want to record the lead guitar for our ex-ample song “Morning Light”. Enter a new name such as“Morning LeadGuit”.
When you choose the Path remember… – If the hard disk to which the path leads is not connected
or is switched off, the path is deleted.– If you rename the drive, MAGIX midi studio genera-
tion 6 will not be able to find it.
Adding Audio FilesIf you want to use an audio file stored on the hard disk inthe current song choose Audio File > Add Audio File…, orsimply drag them from Windows to the desired positionin the arrange window.Click Cancel in the file selection box when you have fin-ished choosing the files.The file names will then be listed in the Audio window.
Add Audio Files from CD: If files have been addedfrom CD, or some other protected volume MAGIX midistudio generation 6 asks you for a path, so it can copythese files onto the hard disk.
X

The Audio Window
192
Removing Audio Files: To remove an audio file fromthe current song, select its name in the Audio window andpress backspace. This does not delete the file from thehard disk.
Creating Audio FilesAudio files are normally created by making a recording.After a digital mixdown of regions in the Arrange windowa new audio file is also created (see section Digital Mix-down from page 153 onwards).
Deleting Audio Files: In theory audio files are dis-played and organized by theWindows operating system inexactly the same way as all the other Windows files. Youcan therefore delete or copy them in Windows Explorer.However, this has the following disadvantages:– If you delete an audio file you may not know if it is
needed in a song.– If you accidentally delete audio files MAGIX midi
studio generation 6 warns you of this when you loadthe song. In addition, there will still be items in theAudio window and Audio sequences in the Arrangewindow which originally referred to the missing audiofile and have therefore been “orphaned”. This detractsfrom a clear overview of the song.
For this reason, it is safer to delete redundant audio filesin the Audio window. First, select the audio files whichyou want to delete. Be careful, because once files havebeen deleted they are gone for good. You cannot use theUndo function to recover deleted audio files.Choose Audio File > Delete File(s). You will see an alertmessage informing you of the number of audio files aboutto be deleted.
Click Cancel to abandon the deletion process, or click De-lete to permanently delete the files.Here too, you should make sure that the files about to bedeleted are not being used in any other songs.
Copying Audio FilesThe Audio File > Copy File(s) function copies files to a dif-ferent location on your hard disk (or other storage me-dium). When you copy a file you can enter a new name inthe file selection box.MAGIX midi studio generation 6 checks whether there isenough space to copy the selected file(s) at the target loca-tion. If there is already a file with the same name there,MAGIX midi studio generation 6 asks whether you wantto replace it. MAGIX midi studio generation 6 also gives
X

The Audio Window
193
you the opportunity of replacing the audio file in the songwith the file that you have just copied.Data format: MAGIX midi studio generation 6 allows sav-ing audio files in the formats Wave (.wav) or AIFF (AudioInterchange File Format).
Moving Audio FilesThe Audio File > Move File(s) function enables you tomove audio files on your hard disk. Unlike the copy func-tion, the source file disappears afterwards.If the source drive/partition is the same as the targetdrive/partition the files are simply moved to the otherfolder. This is a very quick and convenient way of organiz-ing the drive and the song.Choose “Select Used” from the Edit menu of the Audiowindow (this refers to the files which are being used in theArrange window), and move them to a new folder. Thisfolder will then contain just the audio files from this song.Be very careful when using this function. A different songmay use the same audio files. The next time you start theother song, you will then have to locate the files that youhave moved.MAGIX midi studio generation 6 updates the informationon the new path for all open songs which use this audiofile. Thus, you can open every song which uses the audiofile(s) you are moving. Then move the files to the new lo-cation, and save the songs to transfer the storage refer-ence(s).
Other Functions involving Audio Files
Reassigning Audio Files: If MAGIX midi studio gener-ation 6 cannot find one or more audio files—for examplewhen it opens a song—the regions are shown as gray ar-eas in the Audio window.
If the files are available under a different name or if youwant to assign a “replacement” file, you can do this as fol-lows:

The Audio Window
194
Double-click the relevant region, or select Audio File >Update File Information.
Choose Locate in the dialog box and a file selection boxopens, where you can load the desired audio file.
What to do if MAGIX midi studio generation 6 cannot find an Audio File: Sometimes MAGIX midistudio generation 6 cannot find a file which was previ-ously used in the song. This could be due to one of the fol-lowing :– You have not connected the relevant hard disk or you
have renamed the drive.– You have stored the files in a different drive, or moved
them to another drive.– You have renamed the files in Windows Explorer, or
renamed them in the Audio window of another song.– You have deleted the files.In this case MAGIX midi studio generation 6 producesthis dialog box:
You can respond in any of the following ways:Locate: The current drive is searched for this name. If thesearch is unsuccessful, MAGIX midi studio generation 6asks you if you want to search other drives for these files.This enables you to assemble songs even if you have cop-ied or moved the relevant files onto other media.Skip: (Don’t search for this file). Use this function if youknow that this audio file no longer exists or has been re-named. This button changes to “Skip All” if after the firstskip, yet another audio file could not be found.Skip All (for Several Files): (Don’t search for any morefiles). Use this function if you know that all audio files inthis song no longer exist, or have been renamed.

The Audio Window
195
Other Functions
Choosing the Sample Rate: In the Options menu of theAudio window you can choose one of the available samplerates, for example 44.1kHz or 48kHz. (If you are not surewhich one you need please refer to the Introduction man-ual).The sample rate setting is global and applies to the play-back of all audio files in the current song. It is not possibleto play different audio files simultaneously using differentsample rates.If you have loaded several songs, eachwith different sam-ple rates, MAGIX midi studio generation 6 can automati-cally take account of this when you switch songs. Eachsong can only contain files of one sample rate.Converting the Sample Rate: MAGIX midi studio genera-tion 6 can digitally convert sample rates:– Double-click a region in the Audio window to open the
Sample Editor.– Press ctrl a to select the whole file.– Choose Functions > Sample Rate Convert….– Enter the desired sample rate in Hertz next to Destina-
tion (Hz) (e.g. 44100), and– Press return.For more detailed instructions see section Sample RateConverter from page 209 onwards.

Audio Driver
196
Audio Driver
EASI/ASIOThe driver settings for the sound card are covered in theInstallation manual. Please refer to it for the relevant set-tings.

The Sample Edit Window
197
The Sample Edit Window
The Sample Edit window offers an enormous number ofdata-editing functions which are used to process individ-ual audio files. You can edit mono as well as stereo files. You can set the lengths of audio regions with extreme pre-cision (down to single-sample resolution) by making useof the window’s adjustable zoom resolution. The anchorpoints can also be positioned here with the same degree ofaccuracy.
Opening the Sample Edit WindowThere are various ways of opening a Sample Edit window:– Select Audio > Sample Editor.– Double-click on any audio region in the Arrange
window; this opens that region in the Sample Editor.– Double-click on any region in the Audio window; this
takes that region into the Sample Editor.If no region is selected, MAGIX midi studio generation 6will ask if you’d like to load a new file into the Sample Editwindow.If you’re dealing with a stereo region or audio sequence,both channels/audio files will be displayed in the SampleEdit window, with the left side on top, and the right sidebelow.If you open the Sample Edit window from the Arrangewindow, as opposed to the Audio window, the bar ruler isable to reference the regions position in the song.A dotted line indicates no time connection (Audio win-dow), while a broken one indicates a time connection forthe region, which is being used as an audio region in theArrange window.

The Sample Edit Window
198
Layout
1 This is the overview; the entire audio file is depictedhere.
2 This is the parameter box for the current selection,and shows the start point and length of the selected ar-ea.
3 When the Catch (“walking man” symbol) button is ac-tivated it insures that the playback position is alwaysvisible in the window. The other controls operate as inthe Audio window.
4 Amplitude Scale (readings as percentage). 5 The dotted frame shows the extent of the section visi-
ble in the display area.6 Detailed waveform display.7 The horizontal time ruler displays the name of the ed-
ited region at the top left. Beneath that is the time po-sition in the audio file, in various formats.
8 The Start point, Anchor and End point of the currentlyselected region can be changed by simply grabbing,and dragging them.
DisplayOverviewBetween the Sample Edit window’s title strip and bar ruleris the so-called “Overview”. This display always shows thefull length of the currently selected audio file, regardlessof the zoom resolution set by the telescope symbols.Please note that no idea of scale is given in the overview; akick drum sample lasting 0.3 seconds could take up thesame space here as a choral passage lasting 15 minutes.
21
3
4
5
6
7
8

The Sample Edit Window
199
During playback, the current position is indicated by a ver-tical line, moving in real time. This is visible in both theoverview and the detailed waveform display.The current selection is also displayed in the overview.The section visible in the detailed waveform display isshown in the overview as a dotted rectangle.
The overview: the dotted box 1 shows the section of win-dow currently displayed in the detailed waveform display.Part of the selection 2 is also visible.
Functions in the overview: A short mouse click on theoverview brings the area clicked on into the detailed wave-form display.A long click on the mouse resumes playback from this po-sition. Releasing the mouse button halts playback oncemore.Double-clicking lets you listen to the sample from the po-sition clicked.
Window functionsThe Catch and Link functions work in pretty much thesame way as in the other edit windows.
Catch Mode: Catch mode insures that the Sample Editwindow always displays the area around the current play-back position (whether you are playing the song, or moni-toring the sample). Catch is turned on and off either byclicking the switch with the “walking man” symbol on it orvia the key command.
Link Mode: Link mode insures that any audio sequencesselected in the Arrange window are displayed in the Sam-ple Edit window. Link mode is turned off and on by click-
1 2

The Sample Edit Window
200
ing the switch marked with the “linked chain” symbol orvia the key command.If you often work in Link mode, give this a try: open aSample Edit window and switch on Link mode. Now closethe window. MAGIX midi studio generation 6 now leavesLink mode permanently on.Double-click on the audio region you wish to view. Youcan see straight away that the display in both windows islinked.
The Detailed Waveform DisplayThe Zoom Tool: Just as in the other windows, there is azoom tool in the Sample Edit window toolbox (the magni-fying glass). If you use this tool to draw a rectangle, the se-lected area of the window will be magnified so that it fillsthe whole screen. You can also repeat the action. Clickingthe mouse once (with the tool) returns you to the previouszoom resolution.You can access the zoom function even more convenientlyby pressing alt, if the pointer tool is selected. Before youcan draw a magnification box, you have to click on anempty space in the window.
X- and Y-Axes Scales: The Y-axis has a vertical scaleshowing the waveform amplitude in percentage units.The X-axis (the time ruler) shows the course of the audiofile over time. This corresponds to the display in the othertime-based windows. The “Zero point” is represented by“1 1 1 1”, but lengths are measured from “0 0 0 0”.Don’t forget that this display format also affects the fig-ures shown in the Info line and the selection parameterfield:
Absolute and Relative Time: The different axis scalesin the Sample Edit window can be displayed on the basisof one of two different reference values:– by reference to the time axis of the song (absolute posi-
tion)– by reference to the beginning of the audio file (relative
position)Relative Position: The units in the time axis (between theOverview and the waveform display) will be displayed withdotted lines when it is displaying the Relative Posi-tion.You will be in this mode if you open the Sample Edi-tor from the Audio window, or if the Sample Editor is inLink mode, and you select a region in the Audio window.The beginning the section is automatically assigned thevalue zero, or in Bar/Beat terms, “1 1 1 1”. Please note that

The Sample Edit Window
201
this does not necessarily match the actual song position.The calculation of all remaining musical sections is thendone using the current song tempo.Absolute Position: You can recognize this format by thebroken line below the units in the time axis.There will bea broken line below the units in the time axis when it isdisplaying the Absolute Position. You will be in this modeif you open the Sample Editor from the Arrange window,or if the Sample Editor is in Link mode, and you select a re-gion in the Arrange window.Time is measured from the start of the Song, which isgiven the value zero (or 1 1 1 1 in Bar/Beat terms). In thisinstance the time axis shows the absolute (song) time andthe figures do not refer to the audio file.
The Sample Edit Window In UseMonitoring Sample PlaybackThere are various ways of playing back the sections of au-dio visible in the Sample Edit window, making it possibleto hear audio as you edit it. Playback occurs independentlyof the position of the sequencer in a Song. If, on the otherhand, you’d like to hear the selected audio passage in thecontext of the whole song, you’ll have to use the transportcontrols as usual.
Playback from the overview: Monitoring playbackfrom the overview display is carried out in exactly thesame way as with regions in the Audio window. Simplyclick-hold the mouse at the point at which you wish to be-gin playback. Releasing the mouse causes playback tostop. You can also start monitoring from any position bydouble-clicking there.
Playing the current selection: To play back the cur-rent selection, click on the switch depicting a small loud-speaker.You can also perform this function with the key commandPlay/Stop Selection.
Playback from a certain position: If you double-clickat any point on the time axis, the audio file will play backfrom this point, to the end of the current selection. If youdouble-click on a point beyond the selected area, the audiofile will play right to its end.
Cycle Playback Mode: On the left-hand side of the Sam-ple Edit window, just above the Loudspeaker symbol, is
X

The Sample Edit Window
202
the Cycle button. If you turn this on, the currently selectedsection of audio will cycle continually when sample editwindow playback is engaged.Please note that you can change the start and end points ofthe selected area, while monitoring it in cycle playbackmode. In this way, you could edit the start and end pointsof (say) a drum loop until it loops perfectly.
Choosing the Audio Output: The small box under theloudspeaker symbol allows you to choose the output chan-nel to be used for monitoring. If you’re editing a stereofile, the right channel will be sent to the next-highest avail-able output channel.Set the number of the output you want to use in the Chabox under the loudspeaker symbol. Make sure that the pan positions of both channels are setas widely as possible.
Automatic ScrollingYou use the scroll strip on the bottom and right edges ofthe Sample Edit window to scroll through the detailedwaveform display in the usual way.
Making Selections
Selecting the Whole Audio File: You can select theentire audio file with the function Edit > Select > Select All(ctrl a).
Manual Selection: To select a particular section of anaudio file, click on the start or end of the area you want toselect, hold down the mouse button, and move the mouseto the right or left.
To change the boundaries of a selection: By click-ing on a selection while holding down shift, you canchange its existing start and end points at any time.Whether you change the start point or end point by doingthis, is determined entirely by whether the point youclicked on was nearer to the start or end of the selection.The closest one wins…Changing the Further Selection Limit: If you hold down ctrlshift the further selection boundary is changed (ratherthan the nearer).
Moving a Selection: If you hold down ctrl, you can shiftthe whole selection without changing its length.

The Sample Edit Window
203
The Selection Parameter Box: Please note that thestart point and length of the current selection are shown inthe selection parameter box at all times.
Editing Regions in the Sample Editor: If accuracy iswhat you need, you should edit the start and end points ofregions in the Sample Edit window, not the Audio win-dow.The same goes for any adjustments you make to the an-chor, which in many cases should really be placed on theamplitude peaks, rather than at the start of the attackphase of the sound. A good example would be recordingsof brass instruments, which may take some time to buildto a peak. By moving the anchor to these peaks, the regionwill snap to the grid in your arrangement using the anchoras the pivot point. The flexible zoom settings allow you tobe as precise as you like, going right down to the level ofsingle bits, at the highest magnification.Be Careful! Any changes to the position of the Anchorpoint will change the relative position of that audio regionin the song. Since the region start is the default positionfor the anchor you must also take care when changing aregion’s start point.The small markers on the lower edge of the waveform dis-play allow you direct access to the boundaries of the regionand the anchor. As usual, you can just grab them, andpull!
1
2
3

The Sample Edit Window
204
Protecting the Anchor point: If you move the start or endpoints of a region past the anchor point, the anchor pointwill also move. This is quite often not what you want tohappen.Holding down ctrl while you move the start or end mark-ers of a piece of audio prevents the anchor from moving.
Editing commandsLike the other windows, the Sample Edit window featuresthe usual edit commands Cut, Copy, Paste, Clear andUndo under its Edit menu (or via the keyboard).Please note: in the Sample Edit window all these com-mands (except Copy) change the data on the audio files it-self; in other words, they behave destructively. Conse-quently, they cannot be reversed using the “Undo”command.Cut: cuts a selected passage out of an audio file and copiesit to the Clipboard. All the following sections of audiomove forward to fill the gap.Copy: copies a selected passage to the Clipboard, leavingthe selected area in its original location.Paste: Inserts the contents of the Clipboard at the cursorposition, or start point of the selection. If there is no selec-tion available, the cursor acts as the paste point (it isshown as a thin dotted line). If audio data is present be-hind the paste point, it is moved back to make room forthe Clipboard contents. If anything is selected at the timeof the paste, it is deleted and replaced by the Clipboardcontents.Clear: Erases the selection without placing it in the clip-board. All data beyond the deleted passage is pulled for-ward to fill the gap.
Undo: Cancels the last edit command used, and reversesits effect. This also works with the destructive editing com-
1 3 2
The Sample Edit Window
205
mands described in the section Functions from page 205onwards.Remember that the Undo function in the Sample Editor isorganized separately from the rest of the program. This al-lows you to try out the edit in the Arrangement. If youdon’t like it you can go back to the Sample Editor and re-verse the edit using the Undo function.• Space is reserved on the hard disk for armed trackswhich is not available for undo files. MAGIX midi studiogeneration 6 therefore automatically switches off record-ready status for audio tracks, if the disk is nearly full, andthis would make an edit possible in the Sample Editor.
FunctionsThe following section describes various useful functionsavailable in the Sample Edit window, for perfecting audiorecordings. You can use these to add the finishing touchesto your work.Each of the commands affects only the currently selectedaudio. If you want to use them to alter the whole audio file,you have to use the Select All function beforehand.All of the following functions are destructive, so theychange files stored on your hard drive. You can use theUndo function—but only until you make another destruc-tive edit. So you could, for example, change the start andend points of the selected audio in between destructive ed-its, without losing your undo facility.Since the Undo function in the Sample Editor works inde-pendently of the rest of the program, you can try out anedit in the Arrangement and make changes there. As soonas you open the Sample Editor again (or bring it into thefore ground), the Undo function is available for the last de-structive sample edit.Before these functions are executed, you are asked to con-firm them as a safety measure. This confirmation dialogbox can be turned off by choosing Audio > Audio Prefer-ences > Warning before process Function in Sample Edit(Menu) or … (Key).
Normalize: Normalization is the process by which a digi-tal signal is bought up to its highest possible level, withoutintroducing distortion. Normalizing is possible in MAGIXmidi studio generation 6 by selecting Functions > Nor-malize.This is done in the following way; MAGIX midi studiogeneration 6 finds the point with the highest volume (−xdB) in the currently selected audio, and determines how
X

The Sample Edit Window
206
far this is from the maximum possible level. The level ofthe whole selection is then raised by this amount. The dy-namic balance of the audio passage remains unaltered—itmerely gets louder.513 Normalize
Example showing the “Normalize” function. 1 Before 2AfterPlease note that the start and end points for the section be-ing normalized should generally not fall within a continu-ous section of audio, as this will result in abrupt increasesin volume after normalization. The start and end pointsshould therefore be located in sections that also containpauses. Occasionally, you should remove any unwanted,audible noises that fall in gaps in the music with the aid ofthe “Silence” function.
Change Gain: You can use Functions > Change Gain toraise or lower the level of a passage of audio by a specificamount.A dialog box appears in which you can set the requiredlevel change in percent (Change relative:).If you click on Search Maximum, the highest peak level isdetermined and the value is then calculated that would beused to normalize the audio file.The value results in absolute: displays the maximum levelthat would be achieved by changing the gain by theamount shown in the Change relative: box.You should never make a gain change that results in avalue over 100%, as this would create digital clipping.The gain change is effected by hitting Change (or return).
1
2
X

The Sample Edit Window
207
Fade In: You use Functions > Fade In to create a fade in.You set up the period of time over which the fade-in willoccur with the help of the currently selected audio (asshown in 1 and 2). Volume is set to zero at the left startpoint of the selection, and the fade-in occurs over thelength of the selection.
Example showing the “Fade In” function. 1 Before 2 Af-ter
Fade Out: Functions > Fade Out works in the same wayas Fade In, except that the fade works in the opposite di-rection. This lets you fade passages out automatically.
Example showing the “Fade-Out” function. 1 Before 2 Af-terFading Tips: 1: Common fades (like the typical fade-out at
the end of a track) can also be achieved with the helpof the mixer faders or using Hyper Draw. The advan-tage of using MIDI volume to achieve the fade is thatyour audio doesn’t need to be edited in any way.
2: If you use the Silence function (see below) to removeunwanted background noise from silent passages,small jumps in volume can sometimes appear at thestart and end points of selections, as well as on theflanks of the audio signal. In this case, select only asmall area (e.g. within and just in front of the flank ofthe signal) and then use the “Fade-in” function.
Silence: You use Functions > Silence to remove all datafrom a selected area. The waveform material contained inthe selected audio passage and the corresponding ampli-tude values are all set to zero. You can use this function tosilence the unwanted background noise in quiet passages.
X
1 2
X
1 2
X

The Sample Edit Window
208
Example showing the “Silence” function. 1 Before 2 After
Invert: Functions > Invert completely reverses the phaseof all the currently-selected audio material. All negativeamplitude values become positive, and vice versa. Whilethis doesn’t change the file audibly, if it is heard in isola-tion, you can use Invert to correct phase cancellation er-rors, particularly if you’re mixing down to mono. This isparticularly valuable when several out of tune signals (orseveral signals processed with chorus pedals) are to bemixed down to mono together. The effect depends on theaudio material.518 Invertieren
Example showing the “Invert” function. 1 Before 2 After
Reverse: You reverse the selected audio passage by select-ing Functions > Reverse.
Example showing the “Reverse” function. 1 Before 2 After
Trim: By selecting Functions > Trim you can erase all theregions that aren’t selected. Use “Trim” to remove unim-portant passages from the start and end of your AudioFiles.
1 2
X
1
2
X
1 2
X

The Sample Edit Window
209
Example showing the “Trim” function. 1 Before 2 AfterMake sure that the areas you are about to delete do notcontain any regions which you may need. Regions outsidethe selection will be lost, and regions which are partly out-side will be shortened. If any such regions are being usedin the Arrange an alert box appears, giving you the optionof cancelling the trim function.
Remove DC Offset: When using poorly constructed au-dio hardware, direct current (DC) can be undesirably lay-ered over the audio signal. This results in a vertical shift inthe waveform position, which can be clearly seen in theSample Editor. During playback, this can cause cracklingsounds at the start and end of the audio region.
Waveform with 1 and without 2 DC OffsetWith Functions > Remove DC Offset it is possible to cen-ter the waveform around the zero amplitude line, to avoidcrackling at cut points.
Sample Rate ConverterThe Sample Rate Converter is used for converting thesample frequency. For example, audio files which have a48kHz sample rate (recorded on a Hi-Fi DAT recorder anddigitally transferred into the computer), can be convertedto 44.1kHz.Normally you will want to convert the sample rate of awhole audio file. To do this, select the whole audio file inthe Sample Editor (ctrl a). Select Functions > Sample RateConvert… in the Sample Edit window. To execute thefunction click the Convert button.
1
2
1 2
X

The Sample Edit Window
210
Parameters: Source (Hz)This shows the previous sample rate of the audio file.However, to enable you to change incorrectly stored sam-ple rate formats (for example after editing in other pro-grams)—or for effects—you can enter any value you likehere. You should only use this function if you know whatyou are doing.
Destination (Hz)Here you can enter the desired sample rate to which theselected area is to be converted.In most professional audio circles only the 44.1 kHz sam-ple rate is used. There is little audible advantage in using48kHz. This format is mostly used with older DAT ma-chines.

The WavePlayer
211
The WavePlayer
The WavePlayer windowThe WavePlayer of MAGIX midi studio generation 6 pro-vides polyphonic playback—including filter and envelopetreatment—of any WAV-files you like. This is just likehaving a dedicated sampler without buying expensive ex-ternal hardware.As with the MAGIX midi studio generation 6 in general,the CPU of your computer also computes the WavePlayer.Therefore, in order to get a lot of voices and fast computa-tion of all processes simultaneously, the following simplerule-of-thumb applies: the faster the CPU and the largerthe RAM, the better. Don’t try to save money on theseitems, especially if you are planning a new purchase. Falseeconomy at the beginning could very possibly lead to frus-tration later on.
WavePlayer driver: In order to use the WavePlayer,please bear in mind that you have to select a DirectSounddriver for the WavePlayer under Audio > Audio Hardware& Drivers > Audio Driver, because the WavePlayer worksonly with a DirectSound driver. If you want to use the WavePlayer and the audio featuresof MAGIX midi studio generation 6 simultaneously, youhave to use a DirectSound driver for PC AV also.
Controlling the WavePlayer: The Waveplayer is con-trolled via its special track in the Arrange. This track can-not be erased.
The Track parameter box of the WavePlayer: TheTrack parameter box of the WavePlayer differs onlyslightly from those of MIDI tracks (see section The TrackParameters from page 124 onwards). You will notice thatthere are no settings for the MIDI port and channel asthese are not necessary for the WavePlayer.You will, however, find a new checkbox: No seq trp. Trans-positions of sequences on the WavePlayer track will be ig-nored if this is checked. This is very useful if the Wave-Player plays back drumloops or drumkits, becausetransposing such elements would result in unwanted tim-ing shifts and timbral mutations (see also section ChaseNotes in ‘No Seq Trp’ Instruments from page 281 onwards).
Opening the WavePlayer window: You can call up theWavePlayer window via Options > WavePlayer…, the re-

The WavePlayer
212
leated key command or a double-click on the WavePlayertrack.
The Structure of the WavePlayerIn the WavePlayer window you see the note range fromA0 to C6. You can assign a separate WAV-file to each ofthese 64 notes. Each WAV-file sound can be shaped via anindependent synthesizer-like sound shaping section con-sisting of a VCF with an envelope and a VCA with an en-velope.In addition, each WAV-file can span a note range thangreater than one note and thus be played polyphonicallyjust like on a real sampler. Furthermore you can adjust thesynthesizer-parameters for multiple WAV-files simulta-neously.Finally, the output of the WavePlayer can be adjusted inlevel and balance. Unlike the previously mentioned set-tings, level and balance are not set in the WavePlayer win-dow, but in the Mixer and/or the Track parameter box.
Assigning WAV-filesA click on the File Name field opens a file selector box inwhich you can select and load a WAV-file. This WAV-filegets assigned to the key belonging to the File Name fieldyou clicked on.A right-click on an already assigned File Name field erasesthat WAV-file from the WavePlayer keyboard assignment.
Adjusting the keyboard range: Right beside the FileName field you find the settings of the assigned WAV-file,arranged on a grey crossbeam. The upper and lower edgesof this crossbeam can be grabbed and moved with themouse to define the keyboard range of a WAV-file. Pleasenote that while a WAV-file can be transposed down as faras you wish, its upward transposition is limited to an oc-tave. This applies if the upward transposition is achievedby playing the keyboard, using the Tune parameter or acombination of both of them.
The parameters of a WAV-file in the WavePlayerEach WAV-file in the WavePlayer has its own parameterset. The View menu allows you to decide which para-meters you wish to see.
Tune: The pitch of a WAV-file is adjusted in cent (1 cent =1/100 semitone). The adjustable range is ±1.200 cents (thatequals ± 1 octave).
Start and Length: Adjusts the point in the WAV-filefrom which it gets played back when pressing a key (Start)

The WavePlayer
213
and how much of the WAV-file will be played back fromthe Start point (Length). Both parameters are displayed insamples. If View > Wave Display is active, these para-meters can be changed graphically with the mouse in thewave display.
Trigger: Determines how a WAV-file is played back. IfGated is selected, the WAV-file will only be played back aslong as you hold the corresponding key. If Freerun is se-lected, the WAV-file will be played back to its full length,regardless how long you hold the key. Freerun is especiallysuited for drum or percussive sounds.
Link: This checkbox is only visible if you have loadedmore than one WAV-file into the WavePlayer . Checkingthis box for a specific WAV-file means that its VCA, VCFand envelope settings will be determined by those of theWAV-file immediately above.
On: This checkbox is only visible if you have not activatedLink for this specific WAV-file. If you check On, you’ll ac-tivate the sound shaping section consisting of VCA, VCFand envelopes for that specific WAV-file, and any WAV-files linked to it.Please note that you can save computing power by deacti-vating the sound shaping section, therefore possibly gain-ing more voices for the WavePlayer.
Soundshaping via VCA and envelope: These para-meters let you change the volume curve of a WAV-file. Inhonour of good old analogue synthesizers, this section iscalled VCA, which stands for Voltage Controlled Ampli-fier. While the VCA is responsible for the volume change,it is itself controlled by an envelope which determines howthe volume changes over time.The envelopes of the WavePlayer have two time sections:Attack (Atk) and Decay (Dcy). Attack determines the timethe envelope needs to change gradually from zero level tofull level. Decay starts immediately after Attack has fin-ished and determines how much time the envelope needsto change gradually back from full level to zero level. Inother words, if you press a key, the envelope starts at zerolevel, changes gradually over the Attack time to full leveland then falls gradually back from full level to zero level inthe Decay time.The WavePlayer uses the curve of such an envelope to con-trol the VCA. It then takes a WAV-file and puts it through

The WavePlayer
214
the VCA. You then hear the WAV-file with a new volumecurve, determined to your taste via the envelope parametersettings. Fade in the WAV-file automatically in the Attacktime and then fade it out automatically in the Decay time;the smaller the values for Attack or Decay, the shorter thefade-times. There is only one exception: if Decay is set tomaximum, there won’t be any fade-out at all and theWAV-file will sound till it is finished.Vel in the VCA section stands for Velocity and determineshow dependent the volume of a WAV-file is on the velocitywith which you hit a key. The larger value Vel has, theharder you have to hit a key to gain the maximum volume.
Soundshaping via VCF and envelope: This sectionchanges the tone colour of a WAV-file. The section re-sponsible for tone colour changes in an analogue synthe-sizer was called VCF, which stands for Voltage ControlledFilter, so we used this abbreviation here.The WavePlayer uses lowpass-filters. Broadly speaking,these filters let the deep parts of a sound passed, but notthe high parts, thus changing the brightness of a sound.The Frequency (Frq) of such a filter determines the borderbetween the deep and the high parts of a sound. Techni-cians call this the cutoff-frequency. To put it briefly, thelower the Frq value, the duller the sound will be .With Res (Resonance) you can emphasize the parts of thesound that are in the immediate neighbourhood of thecutoff-frequency (or the deep-high border). The higher Resis, the sharper the overall sound.As is the case with the VCA, the VCF (more precisely, thecutoff-frequency) is also controlled via its own envelope.Env determines the influence of the envelope. The inter-play between Frq, Atk, Dcy and Env is as follows: press akey, and the cutoff-frequency starts at the value adjustedvia Frq, rises in the Atk-time to a value equalling the sumof Frq and Env, and falls back from that to Frq in the Dcy-time. As in the VCA-envelope, if you set Dcy to maximum,Dcy will be disabled and the cutoff-frequency will stay onthe sum of Frq and Env for the duration of the sample.Finally, Vel controls how hard you have to hit the keys inorder to reach the value specified by Env. If you go forsmall Vel values, you will reach Env even with soft keystrokes.If you choose large Vel values, you’ll have to hit thekeys quite hard in order to reach the value specified byEnv.

The WavePlayer
215
Global WavePlayer parametersWith Initialize > Default Parameters, all WavePlayer para-meters are set back to default values.Initialize > Delete All Assignments clears all key-WAV-file-assignments immediately, so you can start fromscratch at once.View allows you to exclude certain parameter groups fromdisplay to save space or protect them against unwanted ad-justment.View > Wave Display means that, in addition to the nu-meric information, each WAV-file will be graphically dis-played as a waveform. The WavePlayer plays only the blackmarked section of the graphic. You can adjust the bordersof that region and its position with the mouse.View > Parameters: If this item is checked, you have ac-cess to the parameters Tune, Start and Length of all WAV-files.View > File Info provides you with the following valuableinformation about each WAV-file: Format, Sample Rateand Size. These values are read-only.View > Keyboard displays a keyboard at the left windowedge to make the note-WAV-file-assignment easier.View > Filter Parameters activates the display of the VCFand VCF section.View > Filter Parameters as Knobs: Displays the VCA andVCF parameters as knobs instead of numbers.
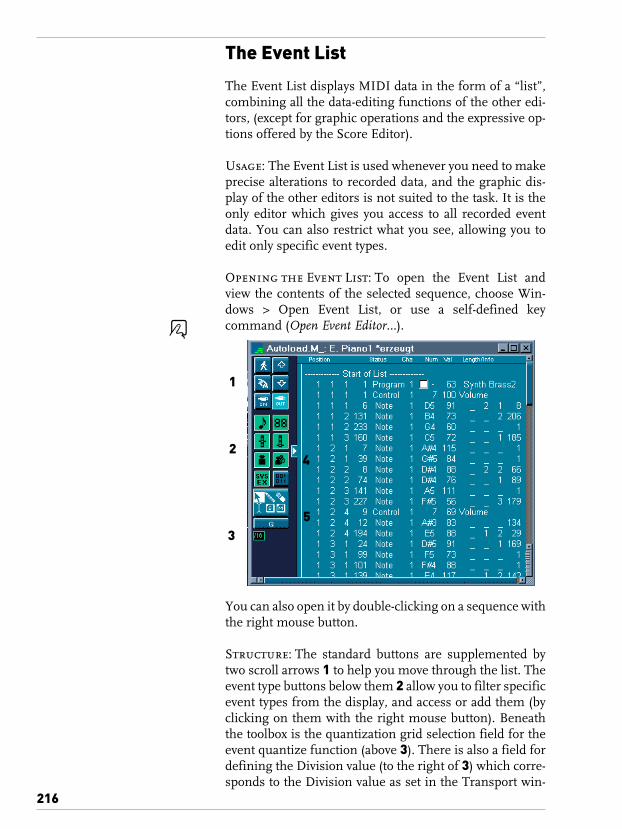
The Event List
216
The Event List
The Event List displays MIDI data in the form of a “list”,combining all the data-editing functions of the other edi-tors, (except for graphic operations and the expressive op-tions offered by the Score Editor).
Usage: The Event List is used whenever you need to makeprecise alterations to recorded data, and the graphic dis-play of the other editors is not suited to the task. It is theonly editor which gives you access to all recorded eventdata. You can also restrict what you see, allowing you toedit only specific event types.
Opening the Event List: To open the Event List andview the contents of the selected sequence, choose Win-dows > Open Event List, or use a self-defined keycommand (Open Event Editor…).
You can also open it by double-clicking on a sequence withthe right mouse button.
Structure: The standard buttons are supplemented bytwo scroll arrows 1 to help you move through the list. Theevent type buttons below them 2 allow you to filter specificevent types from the display, and access or add them (byclicking on them with the right mouse button). Beneaththe toolbox is the quantization grid selection field for theevent quantize function (above 3). There is also a field fordefining the Division value (to the right of 3) which corre-sponds to the Division value as set in the Transport win-
X
1
2
3
4
5

The Event List
217
dow. If the Catch function is switched on, the arrow-shaped position marker 4 will always point to the currentevent. The structure of the actual list display 5 is describedon page 220.
DisplayThe event type buttons allow you to “filter” the display toremove individual event types from the Event List, so thatyou can view only the specific types of events you are inter-ested in. Click the desired button with any tool (except thepencil).If a button is grayed out, that event type will not be dis-played.All the functions affect only the events displayed, so non-displayed events are protected from any alterations youmake.Here is a short overview. For more detailed informationon the individual event types see page 222.The note symbol stands for note events.The symbol with the dual-digit, seven-segment displaystands for program change events.The hand wheel symbol with a marker in the middle(pitch bend wheel) stands for pitch bend events.The hand wheel symbol with a marker at the bottom(modulation wheel) stands for all control change events.The single weight symbol stands for aftertouch events(channel pressure).The multiple weights symbol stands for polyphonic keypressure events (polyphonic aftertouch).This symbol stands for SysEx events.The symbol with a row of zeros and ones is called the fullmessage button. This does not filter out any type of eventbut affects the display of all event types.Normally the display in the Event List is restricted to oneline per event. When the full message display is active, allinformation stored along with the event is shown too. Thisis particularly important for editing SysEx messages.When examining note events in the Event List, you willalso notice MAGIX midi studio generation 6’s internalscore layout information included in the list. You can editthis in the Event List if you want, but it serves little pur-pose.
Operation
Scrolling: Clicking either of the scroll arrows moves thedisplay up or down by one event. The event at the position

The Event List
218
marker is always selected (so the existing selectionchanges as you scroll). The scrolling speed can be varied asyou scroll, by vertically moving the mouse. The key com-mand Scroll to Next/Previous Event is also available fromthe Event window, and has the same end result.Remember that if the MIDI Out button is switched on ev-ery newly selected event will be played. This means youcan scroll through the list and audibly monitor the eventsas you go.If you want to keep the selected event where it is, use theusual scroll bar functions.
Selection Techniques: When selecting events with themouse, you should click near the status column to avoidany unintentional parameter alterations.You can use any of the standard selection techniques here:individual selection by clicking on objects, multiple selec-tion using the rubber band, or both of these (without alter-ing the previous selection), in conjunction with shift.Don’t forget you can also make selections according tospecific criteria via the Edit menu (read the section Selec-tion Techniques from page 93 onwards).Any events which you remove from the display by clickingon the event type buttons are immediately deselected. Thisensures that all the functions affect only the displayed (se-lected) events.
Special Selection Functions: Some selection com-mands (which can be accessed from within all the Editorwindows via their Edit menus), can also be utilized in theEvent List by selecting an item with the mouse while hold-ing down additional modifier keys.1. If you click on an event while holding down ctrl, you
select all events between the last event that was select-ed and the current one.
2. If you hold down alt and select an event, all similarevents will also be selected.
3. If you select an event while holding down the alt andctrl keys, all identical events will be selected.
Event Editing
Adding Events: To add an event, click on the desiredevent type button with the pencil (or with any other toolwhile holding down the right mouse button). The event isthen added at the current song position, and is automati-cally selected.
X
The Event List
219
Duplicating Events: To duplicate an existing event (forexample, so you can alter the parameter value of the copy)click on the original event with the pencil. An input boxappears—this is where you enter the position for thenewly-duplicated event. If you just hit return, the dupli-cate will appear at the same place as the original.Pasting from the Clipboard: When adding events using theclipboard’s Paste function, a position input box will ap-pear, allowing you to type in the position of the first event.Once again, if you confirm by just pressing return, theoriginal position of the event is retained. The relative posi-tions are also always maintained.This means that the events are not added at the song posi-tion, as in the graphical editors. For more details on theway the clipboard works, please refer to page 95.
Moving Events: To move an event in time, alter its posi-tion indicator. As soon as you alter its position, the list isautomatically sorted, even though the currently selectedevent remains the same.
Altering ValuesEvent positions or parameter values can be altered in theusual way by using the mouse like a slider (grabbing anddragging), or via text input (just double-click on the para-meter value).You cannot alter the type of events using this method,however. To alter the event type, you must add an event ofthe desired type, and then delete the original event.
Altering the Values of Several Events: If a parameterof a selected event is altered, it will affect the same para-meter in all selected events.Relative Value Alteration: When you alter parameter valuesin a multiple selection, the relative differences betweenthe parameter values remain unchanged. The parametervalues that you grab or double-click on can therefore onlybe altered until the value of one of the selected events hasreached its maximum or minimum value.Flexible Relative Value Alteration: If you want to continuealtering a parameter value in a multiple selection (even ifone of the values in the selection has reached its maxi-mum or minimum), hold down ctrl while you move themouse, or press return to confirm a numerical input.Absolute Value Alteration: If you want to set a parameter tothe same value for all selected events, hold down the shiftand ctrl keys while you use the mouse as a slider.
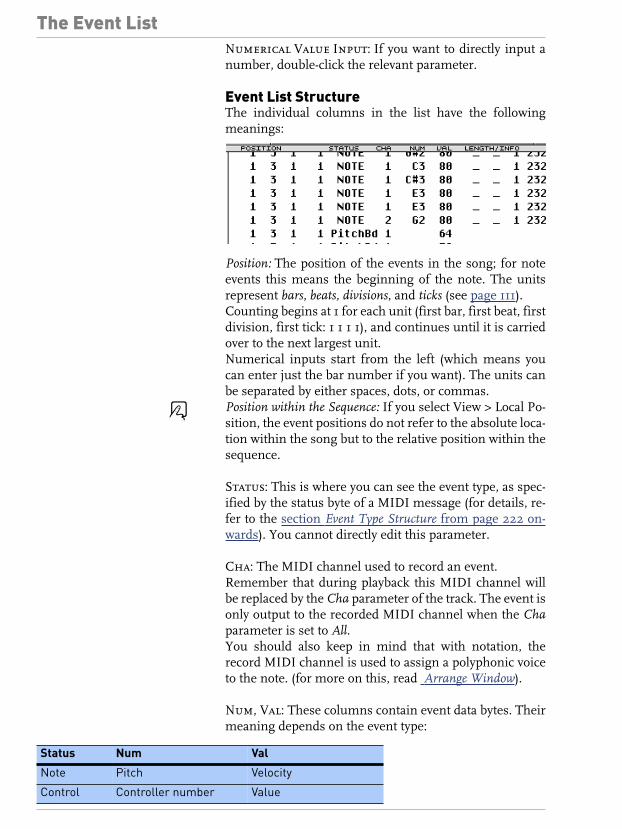
The Event List
220
Numerical Value Input: If you want to directly input anumber, double-click the relevant parameter.
Event List StructureThe individual columns in the list have the followingmeanings:
Position: The position of the events in the song; for noteevents this means the beginning of the note. The unitsrepresent bars, beats, divisions, and ticks (see page 111).Counting begins at 1 for each unit (first bar, first beat, firstdivision, first tick: 1 1 1 1), and continues until it is carriedover to the next largest unit.Numerical inputs start from the left (which means youcan enter just the bar number if you want). The units canbe separated by either spaces, dots, or commas.Position within the Sequence: If you select View > Local Po-sition, the event positions do not refer to the absolute loca-tion within the song but to the relative position within thesequence.
Status: This is where you can see the event type, as spec-ified by the status byte of a MIDI message (for details, re-fer to the section Event Type Structure from page 222 on-wards). You cannot directly edit this parameter.
Cha: The MIDI channel used to record an event.Remember that during playback this MIDI channel willbe replaced by the Cha parameter of the track. The event isonly output to the recorded MIDI channel when the Chaparameter is set to All.You should also keep in mind that with notation, therecord MIDI channel is used to assign a polyphonic voiceto the note. (for more on this, read Arrange Window).
Num, Val: These columns contain event data bytes. Theirmeaning depends on the event type:
X
Status Num Val
Note Pitch Velocity
Control Controller number Value

The Event List
221
Length/Info: With controller events, this column showsthe controller name, and with SysEx events, the manufac-turer’s name.With pitch bend events, a 14-bit value is displayed here,which is composed of the first (Num) and second (Val)Data bytes combined. This value can be edited directlyfrom here.With notes or sequences, the length is displayed here.Here too, the units are bars, beats, divisions, and ticks. Forthe sake of clarity, when the length begins with one ormore zeros, the “_” symbol is used instead. The minimumlength is 1tick (_ _ _ 1) not 0 ticks, because it makes nosense to simultaneously switch a note on and off.Numerical input starts on the right, working to the left—and you can enter just ticks if you want. The units can beseparated by either spaces, dots, or commas.End instead of Length: If you choose View > Length as ab-solute Position you can make the length display show theabsolute position of the note off event, instead of its lengthfrom the note on.
List Structure on the Arrange LevelWhen you double-click on any entry, you move up onelevel in the folder/sequence hierarchy. You may also moveup a level by double-clicking the white area above or belowthe list entries (if visible).
This allows you to see all the arrange objects in the currentsong. On the arrange level, the list has the following col-umns:
Pitch LSB MSB
C-Press (not used) Value
P-Press Pitch Value
Program Bank Select Program number
Status Num Val
X

The Event List
222
Position: The start of the arrange object (see page 220).
Name: Name of the sequence. You can alter the name withthe text tool.
Track: Displays the track number. You cannot edit thisvalue from here (you might totally destroy your arrange-ment if you could). If you want to move arrange objects toother tracks, it is better to do it graphically from the Ar-range window.
Length: The length of the arrange object (see page 221).
Event Type Structure
Note Events:
NumMIDI note number (note #). The range is from C-2 (note#: 0) to G8 (note #: 127). Middle C is note # 60 and inMIDI terminology is called C3.On some keyboards/synth modules (notably those madeby Korg and Roland), the note range is C-1 (#0) to G9(#127). In these cases middle C is called C4.In the Preferences (Display page) you can reference thedisplay to the description used most frequently on yourdevices (Display middle C as…).
ValVelocity of a note from 1 to 127. The value 0 carries the noteoff message, and thus is not available.
Length/InfoLength of the note. Although MIDI can only transfer noteon or note off messages, MAGIX midi studio generation 6actually stores the position and length of all the noteswhich makes them easier to access musically. The note offmessage is generated automatically during playback.
Program Change Events:
Program change events can be transmitted to connectedMIDI devices to call up different patches. These may besounds in a synthesizer, programs in an effect unit, orsnapshots in an automated mixing desk.

The Event List
223
ValA program number between 0 and 127.Some manufacturers (e.g. Yamaha) number the programsin their devices from 1 to 128, not 0 to 127. In this case, youhave to subtract 1 from the program number given in thedevice itself.Other manufacturers use various methods of dividing intogroups (or banks) and sounds. The most common is divid-ing into 8 groups of 8 sounds, each numbered 1 to 8.These devices respond to program numbers 0—63 by call-ing up storage locations 11—88. The instruction manualsfor these devices should contain conversion tables to assistyou.
NumBank select. Normally you will see this symbol, whichmeans no bank select will be sent. If you assign a numberbetween 0 and 62, a bank select event is sent before theprogram change event. This allows you to address differ-ent sound banks (e.g. preset, internal, card) inside yoursynthesizer. The synthesizer must be able to recognizecontroller 32 as bank select, but unfortunately this stan-dard is not yet widely used. If you have any problems withbank select, check your synthesizer’s manual to seewhether, and how it responds to bank select commands.
Pitch Bend Events:
Pitch bend events are used to continuously vary the pitch.They are usually generated by a centered pitchbend wheelor a joystick on your keyboard.
NumFine pitch bend division (LSB). Many keyboards justtransmit the value 0. If the pitch bend wheel has an 8-bitresolution, you will see the value 0 or 64 here.
ValThe effective pitch value (MSB) of 0—127. The value 64corresponds to the mid-way setting of the wheel.
Length/InfoThe 14-bit value is displayed in this column as a decimalfigure ranging from −8192 to 8191. This value may be ed-ited in this column in the usual way.
Control Change Events:

The Event List
224
These event types are used to transfer MIDI controllers(e.g. modulation, sustain, volume and pan).
NumThe number of the controller. All the various MIDI con-trollers (such as the modulation wheel or sustain pedal)have their own numbers (#1 or #64 respectively). Someother effects are also defined, such as volume (#7) or pan(#10).Controllers that are defined in the MIDI Standard are de-scribed in the Length/Info field.
ValValue of the controller. Continuous controllers have arange of 0—127. Switch controllers (#64—#90), transferonly two states; off (val=0) and on (val anything between 1and 127).
Aftertouch Events:
Aftertouch (or channel pressure) events are generated by amechanical pressure sensor beneath the keyboard. The re-sulting sound modulation affects all the notes on that par-ticular MIDI channel.
NumThis column is empty with aftertouch events, since theyhave only one data byte.
ValStrength of the pressure on the keyboard (0—127).
Poly Pressure Events:
Poly pressure events are generated by mechanical pres-sure sensors beneath each individual key. The resultingsound modulation affects only that particular note.Only a few keyboards currently support this capability.
NumMIDI note.
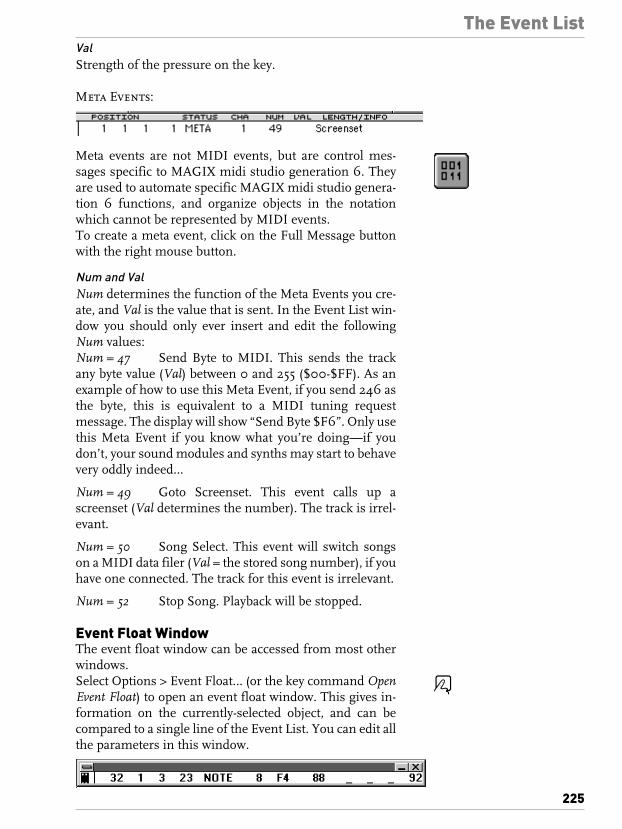
The Event List
225
ValStrength of the pressure on the key.
Meta Events:
Meta events are not MIDI events, but are control mes-sages specific to MAGIX midi studio generation 6. Theyare used to automate specific MAGIX midi studio genera-tion 6 functions, and organize objects in the notationwhich cannot be represented by MIDI events.To create a meta event, click on the Full Message buttonwith the right mouse button.
Num and ValNum determines the function of the Meta Events you cre-ate, and Val is the value that is sent. In the Event List win-dow you should only ever insert and edit the followingNum values: Num = 47 Send Byte to MIDI. This sends the trackany byte value (Val) between 0 and 255 ($00-$FF). As anexample of how to use this Meta Event, if you send 246 asthe byte, this is equivalent to a MIDI tuning requestmessage. The display will show “Send Byte $F6”. Only usethis Meta Event if you know what you’re doing—if youdon’t, your sound modules and synths may start to behavevery oddly indeed…
Num = 49 Goto Screenset. This event calls up ascreenset (Val determines the number). The track is irrel-evant.
Num = 50 Song Select. This event will switch songson a MIDI data filer (Val = the stored song number), if youhave one connected. The track for this event is irrelevant.
Num = 52 Stop Song. Playback will be stopped.
Event Float WindowThe event float window can be accessed from most otherwindows.Select Options > Event Float… (or the key command OpenEvent Float) to open an event float window. This gives in-formation on the currently-selected object, and can becompared to a single line of the Event List. You can edit allthe parameters in this window.
X

The Event List
226
The following parameters are displayed:– the start point of the selected object in bars, beats, divi-
sions, and ticks,– the type or name of the selected object,– the recorded MIDI channel and first data byte (if the
selected object is an event)—for notes, the name—and,if there is one, the second data byte;
– length of the selected object in bars, beats, divisions,and ticks.
Clicking on the video symbol (on the extreme left) togglesthe position and length display between SMPTE time andthe normal display.Clicking on the SMPTE symbol with the right mouse but-ton turns the “MIDI Out” button on or off, and with it themonitor that gives MIDI playback in the Event float win-dow).

The Drum Editor
227
The Drum Editor
UsageThe Drum Editor has many uses. The main ones are cre-ating and editing drum sequences, and graphically editingcontroller data.
Opening the Drum EditorTo open a Drum Editor window, select Windows > OpenDrum Edit (ctrl right mouse button double-click, or a self-defined key command). You will then be able to see thecontents of the sequence selected in the Arrange window.
StructureThe structure of the Drum Editor window resembles thatof the Arrange window: there is the horizontal bar ruler atthe top (1) and the optional transport panel (2, currentlydisabled) in the top left corner. On the left is the optionalparameter area (3), next to it the event name column (4)and to the right of that the editing area (5) which can belikened to the area containing the tracks in the Arrangewindow.The individual lines in the Drum Editor are functionallysimilar to the tracks in the Arrange window, in that eachline has an event definition which determines the eventtype displayed in this line. When you select a line in thename column, its event definition is shown in the parame-ter box.The display of the events takes the form of a horizontalrow of vertical beams whose height indicates the value ofthe relevant event. You can directly alter the value by grab-bing the beam slider.
12
3
4
5

The Drum Editor
228
Event DefinitionsThe event definition of a drum edit line determines whichevents it displays. This selection usually affects the statusbyte and the first data byte of the event. The second databyte then contains the adjustable value, which is repre-sented by the height of the beam. For example, in an eventdefinition line, the value of a controller or the velocityvalue of a note is shown as a beam. Don’t worry if thisseems a bit confusing at first: when setting up these para-meters, MAGIX midi studio generation 6 helps you byproviding pull-down menus containing written defini-tions of the status byte and (to the furthest extent possible)the first data byte. There is an even simpler way: you canautomatically create event definitions for selected events.Example: In a given drum edit line the Velocity values of anote are displayed as bars.There are many ways of altering the way the beams are dis-played, and adjusting them to the particular event types.You can also use a grid to align the display of existingevents, and add new events. This grid can be set separatelyfor each event definition. The height of the lines is ad-justed using the Drum Edit window’s vertical zoom func-tion.Selecting the Event Definition: As with tracks in the Ar-range window, you can select an event definition by click-ing on the name column. This allows you to view its para-meters in the event definition parameter box. Unlike witharrange tracks, however, it is possible to make a multipleselection.Creating an Event Definition: When you choose Drum >Create Event Definition a new event definition is added, atthe position of the currently selected event definition. Ini-tially, it has the same parameters. The event definitionsbeneath it are moved downwards.Automatically Creating Event Definitions: If you select anevent in another opened editor window you can automati-cally create an equivalent event definition by checking theAuto Define checkbox.If an event definition exists whichcorresponds to the type of the selected event, MAGIX midistudio generation 6 does not create a superfluous doubledefinition. Instead this event definition is moved to thevisible area.Don’t forget to switch off Auto Define immediately aftercompleting the input.
Deleting an Event Definition: Choose Drum > DeleteEvent Definition to remove the selected event definition.

The Drum Editor
229
Drum Sets: Copying Event Definitions: Select theevent definition that you want to copy and choose Drum >Copy Event Definition. Switch to the destination DrumSet and choose Drum > Paste Event Definition. You canpaste the event definition as often as you like. These func-tions are especially helpful to copy event definitions be-tween Songs: If for example you disfigured your “GMDrum Kit” so badly that you just want to restore your goodold version of it, you simply create an empty Song, call upthe Drum Editor, select all Event Definitions and, viaDrum > Copy/Paste Event Definition, copy them back intoyour Song.
Sorting Event Definitions: To change the vertical or-der of the various event definitions, just grab the eventdefinition you want to move by its name column, and dragit to the desired position.
Event Definition Parameter BoxThe event definition parameter box is where you make thesettings for the currently selected event definition line.The most important parameters are Status and -1- (page231).Opening the event definition parameter box. You can show(or hide) the entire left parameter area by checking (or un-checking) View > Parameters. You can close or open theparameter box by clicking the triangle in the top left cor-ner.Name of the Event Definition: By clicking the name next tothe triangle you can determine what appears in the namecolumn. If you define a named MIDI controller via theStatus and -1- parameters the relevant name will be offeredas a preset.Display and Editing Grid: The Grid parameter is set via thetypical pull-down quantization menu. New events canthen be added at the set grid positions. The positions of ex-isting events are not affected.If you want to quantize the positions you can do so usingevent quantization (see page 99).The same quantization templates are available as for theplayback parameters.When editing complex drum rhythms, it can be useful tocreate several definitions for one drum note, each with adifferent quantization grid. For example, if there are twolines for a snare drum, one with a 1/16 and the other witha 1/96 grid, you can use the pencil to add individual hits inthe coarser grid and rolls in the finer grid.
X

The Drum Editor
230
Beam Width: You can set the width of the event beamsfrom 1—16 using the Pen-width parameter. Regardless ofthe beam width, the exact event position is always markedby the left edge of the beam.
When set to the maximum value (Penwidth = 16) noteevents are displayed with their actual length.Beam Display: The Style parameter allows you to choosefrom four different color display variations for the beams.Styles 5 to 8 are the same as 1 to 4, but the selected eventsflash to highlight them.
Delay: The Delay parameter can be used to delay (with pos-itive values) or advance (negative values) all the events inan event definition line by an adjustable number of ticks.The change in position is visible immediately. Even newevents are offset from the grid positions by the Delayvalue. If you click between the word Delay and the parame-ter value you can use a pull-down menu to enter note val-ues (e.g. 1/16 etc.) directly.Unlike the sequence playback parameters’ Delay option,this affects only individual event types or note numbers,which is very useful for drum programming.In general, it is useful to transmit controller data slightlybefore or after the exact grid positions to improve the tim-ing of the notes lying on the grid positions.Length of Notes to be Added: You can use the Length para-meter to set the length of notes to be added, measured indivisions (the left number) and ticks (the right number).To guarantee optimum timing when drum programming,you should ensure that note off events are never transmit-ted at the same time as note on events. Use note lengths

The Drum Editor
231
which are not close to straight note values, e.g. 100 ticks(1/48 note = 80 ticks, 1/32 note = 120 ticks). Very smalltick values are also unsuitable, because the note off eventsmay sometimes be transmitted at the same time as noteon events at the same position.Event Status: If you grab the right side of the Status line apull-down menu opens where you can determine theevent status for this event definition line.MIDI Channel: Next to Cha there is a checkbox and to theright of this you can set a MIDI channel number. If youcheck this box, the display is restricted to events on the setchannel. If the box is unchecked, the channel parameter isignored, and matching events on all channels are dis-played.First Data Byte: In the bottom line is the -1- parameterwhere you can determine the first data byte of the dis-played event.For example, if Note is set as the event status you can de-termine here which pitch (note #) should be displayed inthis event definition line.As with the MIDI channel, the checkbox determineswhether (if checked) only events with the defined first databyte should be displayed, or whether (if unchecked) thesetting should be ignored. In the case of note events thevelocity values of all notes (regardless of pitch) would bedisplayed in the relevant event definition line.If Control is set as the event status you can use a pull-downmenu to determine the controller type (controller #).With channel aftertouch (status C-Press) or programchange events (status Program) the setting of the -1- para-meter is always ignored, since the first data byte is dis-played as a beam height. With pitch bend data (statusPitchBd) the setting is also ignored, because both databytes are used to display the beam height.
Making Different Definitions Simultaneously: Likethe parameters in several sequences you can set the para-meters of several event definitions simultaneously. Selectseveral event definitions in the name column by holdingdown shift and clicking on them. You can also use Drum> Select All Event Definitions to select all event definitionsand then deselect some of them by holding down shift andclicking on them.Any alterations which you make in the event definition pa-rameter box affect all selected event definitions absolutely.
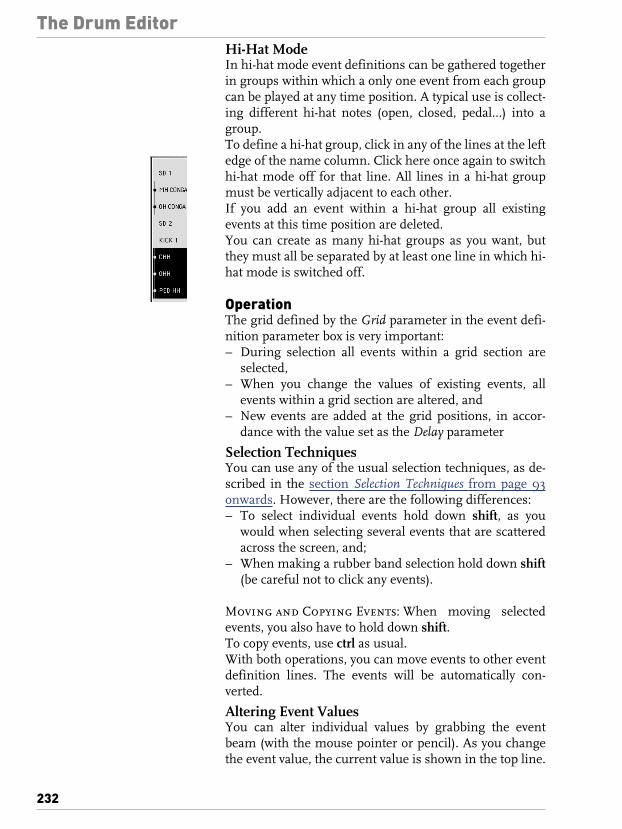
The Drum Editor
232
Hi-Hat ModeIn hi-hat mode event definitions can be gathered togetherin groups within which a only one event from each groupcan be played at any time position. A typical use is collect-ing different hi-hat notes (open, closed, pedal…) into agroup.To define a hi-hat group, click in any of the lines at the leftedge of the name column. Click here once again to switchhi-hat mode off for that line. All lines in a hi-hat groupmust be vertically adjacent to each other.If you add an event within a hi-hat group all existingevents at this time position are deleted. You can create as many hi-hat groups as you want, butthey must all be separated by at least one line in which hi-hat mode is switched off.
OperationThe grid defined by the Grid parameter in the event defi-nition parameter box is very important:– During selection all events within a grid section are
selected,– When you change the values of existing events, all
events within a grid section are altered, and– New events are added at the grid positions, in accor-
dance with the value set as the Delay parameter
Selection TechniquesYou can use any of the usual selection techniques, as de-scribed in the section Selection Techniques from page 93onwards. However, there are the following differences:– To select individual events hold down shift, as you
would when selecting several events that are scatteredacross the screen, and;
– When making a rubber band selection hold down shift(be careful not to click any events).
Moving and Copying Events: When moving selectedevents, you also have to hold down shift.To copy events, use ctrl as usual.With both operations, you can move events to other eventdefinition lines. The events will be automatically con-verted.
Altering Event ValuesYou can alter individual values by grabbing the eventbeam (with the mouse pointer or pencil). As you changethe event value, the current value is shown in the top line.

The Drum Editor
233
Altering Several Events:
If several events are selected, you can alter all the valuesrelatively, by grabbing just one of these event beams. Theabsolute differences between the event values remain thesame. If one of the beams reaches the top or bottom, youwill not be able to go any further in that direction.However, if you hold down ctrl as well, you can keep rais-ing or lowering the values of the selected event group, un-til the event beam which you have grabbed reaches the topor bottom.
Setting up a manual series:
Existing Events: Draw the events with the mouse pointerwhile holding down the mouse button.

The Drum Editor
234
Creating New Events: Draw the events with the pencilwhile holding down the mouse button. The pencil is pre-set as the second tool (right mouse button).
Setting up a linear series:
– Select the crosshair tool.– Click anywhere in the beam display area and hold down
the mouse button.– Keep an eye on the display showing the exact position
and event value in the top line. Move the mouse to thestart point of the line you want.
– Release the mouse button.– Move the mouse to the desired end point of the line (to
the right or left). You can also keep an eye on the posi-tion and event value in the top line.
– Click to align the event beams along the line.If there were already events in the area between the startand end points, they are aligned along the line.If there were no events in the region new events are cre-ated at the grid positions (in accordance with the Grid pa-rameter).If you definitely want to create new events, hold down ctrlwhen you click for the last time.This creates one event at every grid value. With very flatslopes, or very fine grids, the individual grid positions al-ways remain unoccupied if the value to be added there isthe same as the value of the previous event. This reducesthe data-flow along the MIDI bus without reducing theresolution of the controller.When defining the Grid parameter to add successions ofcontrollers use the motto, “as coarse as possible and asfine as necessary” to keep down the data output. MAGIXmidi studio generation 6 can deal with very large amountsof data but unfortunately the same cannot be said ofMIDI.
Linear Series in Sections: The last time you click (re-gardless of whether or not you hold down ctrl to add newevents) if you also hold down shift you can immediatelydraw another line from the end point of this line.

The Drum Editor
235
Adding Individual EventsUse the pencil to add individual events. You can alter theadded value even before you release the mouse button.The pencil is preset as the second tool (right mouse but-ton).
Fix Value: If you place a check in the Fix Value checkbox,you can prevent the height of any event beam being al-tered with the mouse pointer or pencil.When adding events with the pencil, all the added eventsare given the value of the previously-selected event. Thisallows you to draw a succession of events with the samevalue.By selecting an event with the pencil, you can adopt thisvalue as a preset, because in fix value mode it is impossibleto alter the value by clicking on it.When adding events with the crosshair tool, the presetvalue is always used as the start point of the line.
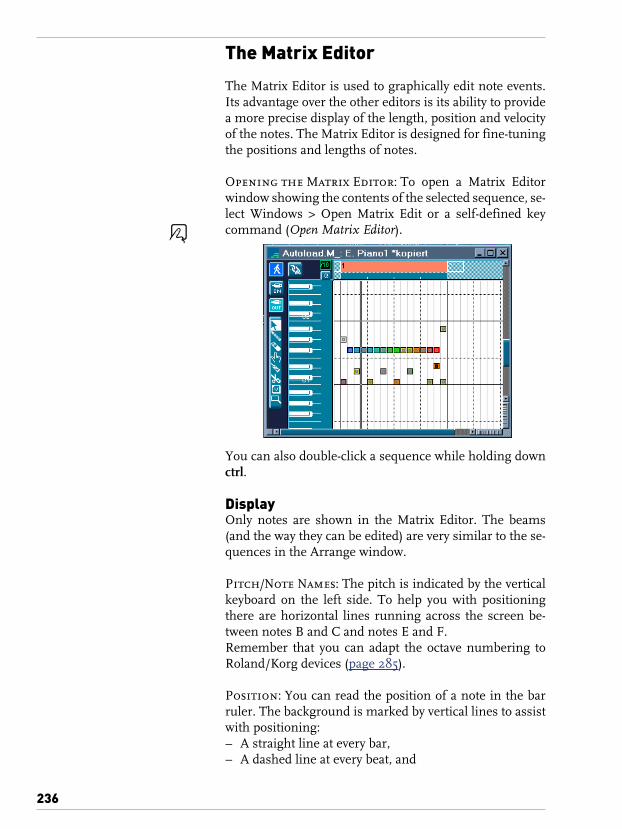
The Matrix Editor
236
The Matrix Editor
The Matrix Editor is used to graphically edit note events.Its advantage over the other editors is its ability to providea more precise display of the length, position and velocityof the notes. The Matrix Editor is designed for fine-tuningthe positions and lengths of notes.
Opening the Matrix Editor: To open a Matrix Editorwindow showing the contents of the selected sequence, se-lect Windows > Open Matrix Edit or a self-defined keycommand (Open Matrix Editor).
You can also double-click a sequence while holding downctrl.
DisplayOnly notes are shown in the Matrix Editor. The beams(and the way they can be edited) are very similar to the se-quences in the Arrange window.
Pitch/Note Names: The pitch is indicated by the verticalkeyboard on the left side. To help you with positioningthere are horizontal lines running across the screen be-tween notes B and C and notes E and F.Remember that you can adapt the octave numbering toRoland/Korg devices (page 285).
Position: You can read the position of a note in the barruler. The background is marked by vertical lines to assistwith positioning:– A straight line at every bar,– A dashed line at every beat, and
X

The Matrix Editor
237
– A dotted line at every division (you can alter the divisionvalue in the Transport window or up on the left in theparameter area).
Other Display Options: All other display options arecovered in the section Display Functions from page 100 on-wards. In the Matrix Editor, you will often want to movethe visible section (using the scroll bars), and alter the dis-play zoom (with the telescope buttons and magnifyingglass).
Editing NotesYou can use the same intuitive editing functions as for thesequences in the Arrange window.There are also some editing options which are available inall editor windows. These are covered in the section EditFunctions from page 97 onwards.
Creating NotesTo create a note, click with the pencil at the desired pointin the background.
Duplicating Notes: To copy an existing note to anotherposition or pitch, first click the original note with the pen-cil (near the middle).Now, any notes which you create by clicking the back-ground will have exactly the same length and velocity asthe original note.
Moving NotesYou can move selected notes by grabbing them (near themiddle) and dragging them. If you move notes verticallythey will be transposed, and if you move them horizontallythey will be moved in time. While you keep the mouse but-ton held down, the target position and pitch are shown inthe info line at the top.

The Matrix Editor
238
When you move notes horizontally, they snap onto the di-vision positions (you can alter the division setting when-ever you want).Remember that you can limit movement to one directionto avoid accidentally transposing notes when movingthem vertically (and vice versa). (Options > Settings > Glo-bal Preferences…: Limit Dragging to one direction in Matrixand Score).
Setting a finer Grid: When moving notes in the Matrixwindow you can make fine adjustments at a high resolu-tion by holding down alt as you drag. The exact resolutionyou use depends on the current Zoom setting of the win-dow.If you hold down alt shift, you can move the notes in ticksteps, completely independently of the Zoom setting andthe time grid.
Copying NotesHold down ctrl as you move the notes..Of course you can also copy (Edit > Copy or ctrl c) or move(Edit > Cut or ctrl x) the notes onto the clipboard, and thenadd them at the current song position with the originalpitch (choose Edit > Paste or ctrl v; see page 95).
Altering LengthsTo alter the length of a note, grab it by its bottom right-hand corner and drag it to the required length. While youare altering the length, the info line will keep you in-formed of the precise length of the note.
Altering the Lengths of Several Notes Simulta-neously: You can adjust the lengths of several selectednotes at once (e.g. a chord) simply by altering the length of

The Matrix Editor
239
one of them. This will alter the lengths relatively amongthe selected notes.
Making Notes the Same Length: If you want to makeseveral selected notes the same length hold down ctrl shift(as in the Event List, when making several parameters thesame value).
What Tools to UseWhen altering note lengths, you can use either the mousepointer or the pencil. However, it is better to use thepointer, because you might accidentally draw new noteswith the pencil.With very short or small notes it can sometimes be diffi-cult to grab the bottom right corner. In this case, youshould use the index finger tool which allows you to grabnotes anywhere, and alter their length.
Altering the VelocityTo alter the velocity value, click on the note with the V tool.The info line will then indicate the velocity value of thenote you have clicked on.
If you hold down the mouse button, you can alter the ve-locity by vertically moving the mouse. If the MIDI Outfunction is switched on, the note will be output every timeyou alter the velocity.Altering the Velocity of Several Notes: All selected notes canbe altered simultaneously; the differences in the velocityvalues will be retained. If the velocity value of one of theselected notes reaches an extreme value (0 or 127) youcan’t go any further. However, by simultaneously pressingalt you can carry on altering the velocity values until theclicked note reaches an extreme value.To give all the notes the same velocity value, hold down altshift as you alter the value.
DeletingYou can delete selected notes by pressing delete, or click-ing on them with the eraser.
Selection TechniquesIn addition to the usual selection options you can select allnotes of the same pitch throughout the whole sequence byclicking one of the keys on the screen keyboard.

The Matrix Editor
240
If you hold down the mouse button, you can also draw(rubber- band) a pitch range over the screen keyboard andselect all the notes within it. Don’t forget the specialized selection options available viathe Edit menu (or key commands). These are covered onpage 95.
FunctionsFor a description of all the other functions of the MatrixEditor, such as automatic length correction, and selectivedeleting /copying, please refer to the section General Func-tions of the Editors from page 96 onwards.

Score Edit Window
241
Score Edit Window
This chapter is all about editing your sequences using con-ventional notation. Although the Event and Matrix Editorshave features that are designed for specific tasks (such asvelocity and note length editing), if you read music, there’snothing like being able to work directly on the stave.
Opening the Score EditorThe Score Editor is opened choosing Windows > OpenScore.
The standard elements in the Score EditorAs a reminder of what’s available, here are the elementslisted:– The buttons Catch, Link, MIDI Out, Zoom– A toolbox– The bar rulerThe operation of these elements should be familiar to youby now.
The parameter box: The Options menu is where you canhide the parameter box from view. This is useful if you usea small monitor as it gives more room to the staves.When you first open the Score Editor it defaults to themiddle zoom level.
Justifying the displayThe default display quality is generally quite sufficientwhen just editing notes, as one is more concerned with ef-ficiency and speed than with wanting to perfect a score forprinting. However, it can become necessary to adjustsome of the display parameters to better accomodate themusical material being edited. You’ll find the display para-meters in the display parameter box that’s described in de-tail in the section Layout and Printing from page 244 on-wards.Click the little box next to the sequence name to open thedisplay parameter box for that sequence.
“Style”: The Score Styles in MAGIX midi studio genera-tion 6 are pre-programmed standard settings for specificinstruments. Whether it’s piano or bass or transposing in-struments such as saxophone—the Style contains,amongst other things, the right clef, octave range andtransposition. Selecting a Style automatically adjusts thedisplay of the notes in the sequence.

Score Edit Window
242
Display Quantization: The display quantization is forchoosing the correct rhythmic format for the musical ma-terial in hand. You should set the “Qua” value to the small-est note value that appears in the music.If a sequence’s smallest notes are sixteenths, set it to “1⁄16”and nothing smaller, as too fine a display quantize settingcan make the music unreadable:Graphik
The “Qua” value is too small
Display quantization affects the display only, not the MIDIevents represented by the display. Do not confuse this“Qua” parameter with the one in the Arrange window orthe one in the Event Editor.The other display parameter functions are discussed inthe section Layout and Printing from page 244 onwards.
Editing notes
Selecting: Individual notes are selected by clicking asusual. To select a group of notes, such as the notes in achord, drag a lasso around them. To select notes incongru-ously, press shift while clicking.
The Info Line: The Score Editor’s Info Line is displayedjust under the window’s title bar whenever you are copy-ing or moving an object. The Info Line provides accurateup-to-date information about the events positionand,when applicable, length. It is therefore very useful tomonitor it during an edit operation.
The Event Parameter BoxThis box is located below the display parameter box andprovides data on the selected object(s). The actual para-meters displayed vary depending on the object. When anote or notes are selected, the parameters are Pitch, Veloc-ity and Length. These parameters can be edited and ap-plied to more then one event at a time.The parameters function similarly to the way they do inthe Event Editor. If the selected notes’ values are differentfrom one another, the relevant parameter shows an aster-isk. In this case, changing one of the values changes themall by the same amount, relatively.

Score Edit Window
243
EXAMPLE: if you select a chord the Pitch parameter willshow an asterisk. If you click-hold this and move themouse, all the chords’ notes will move.If you hold ctrls while changing the values, the parameteris set to the same value for all selected objects. This can beuseful for example when you want to change the lengthsof all the notes in a chord to the same value.You can also transpose the whole sequence or track—de-pending on the level—by using “Select All” from the localEdit menu.
Moving and transposing: To move or transpose notes,select them and drag them to the desired position; the InfoLine will appear under the window’s title bar and show thecurrent position of the mouse pointer, both in terms ofpitch and time. Time-wise, the resolution of the steps isdefined by the Transport window’s display format.
Copying: To copy notes, select and drag them to the de-sired position while keeping ctrl pressed. You can also usethe local Edit menu’s Copy and Paste functions.
Inserting: Notes can be created using the pen tool. Sim-ply click-hold the pen tool at the desired position. Once theInfo Line is showing the desired pitch and location, re-lease the mouse button and MAGIX midi studio genera-tion 6 will create a new note whose length is equivalent tothe note value of the note selected in the partbox.
“Insert Defaults”If you click in an empty part of the Score area, the eventparameter box switches to showing the caption “Insert De-faults”. The values set when it is in this mode will deter-mine the default values for newly inserted events as fol-lows.Channel This is the MIDI channel the note isassigned to. In the Score Editor the channel is relevantonly when you have double staves or polyphonic notation,where MAGIX midi studio generation 6 allocates notes tostaves according to their channels. It’s important to haveselected the correct Score Style, such as “Piano 1/3” or“Organ”.
Velocity Inserted notes acquire this velocity value.This affects only how they sound, not how they appear inthe notation.
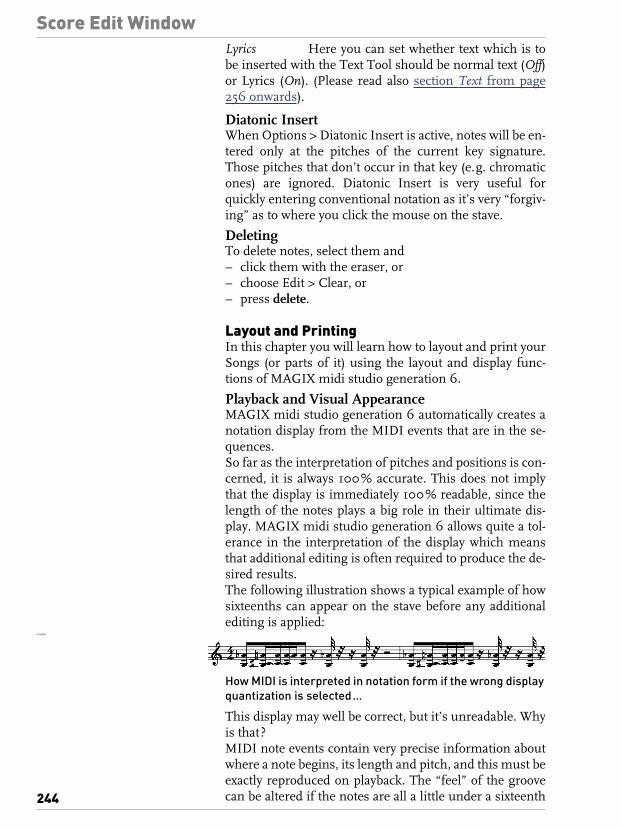
Score Edit Window
244
Lyrics Here you can set whether text which is tobe inserted with the Text Tool should be normal text (Off)or Lyrics (On). (Please read also section Text from page256 onwards).
Diatonic InsertWhen Options > Diatonic Insert is active, notes will be en-tered only at the pitches of the current key signature.Those pitches that don’t occur in that key (e.g. chromaticones) are ignored. Diatonic Insert is very useful forquickly entering conventional notation as it’s very “forgiv-ing” as to where you click the mouse on the stave.
DeletingTo delete notes, select them and – click them with the eraser, or– choose Edit > Clear, or– press delete.
Layout and PrintingIn this chapter you will learn how to layout and print yourSongs (or parts of it) using the layout and display func-tions of MAGIX midi studio generation 6.
Playback and Visual AppearanceMAGIX midi studio generation 6 automatically creates anotation display from the MIDI events that are in the se-quences.So far as the interpretation of pitches and positions is con-cerned, it is always 100% accurate. This does not implythat the display is immediately 100% readable, since thelength of the notes plays a big role in their ultimate dis-play. MAGIX midi studio generation 6 allows quite a tol-erance in the interpretation of the display which meansthat additional editing is often required to produce the de-sired results. The following illustration shows a typical example of howsixteenths can appear on the stave before any additionalediting is applied:
Graphik
How MIDI is interpreted in notation form if the wrong display quantization is selected…
This display may well be correct, but it’s unreadable. Whyis that?MIDI note events contain very precise information aboutwhere a note begins, its length and pitch, and this must beexactly reproduced on playback. The “feel” of the groovecan be altered if the notes are all a little under a sixteenth
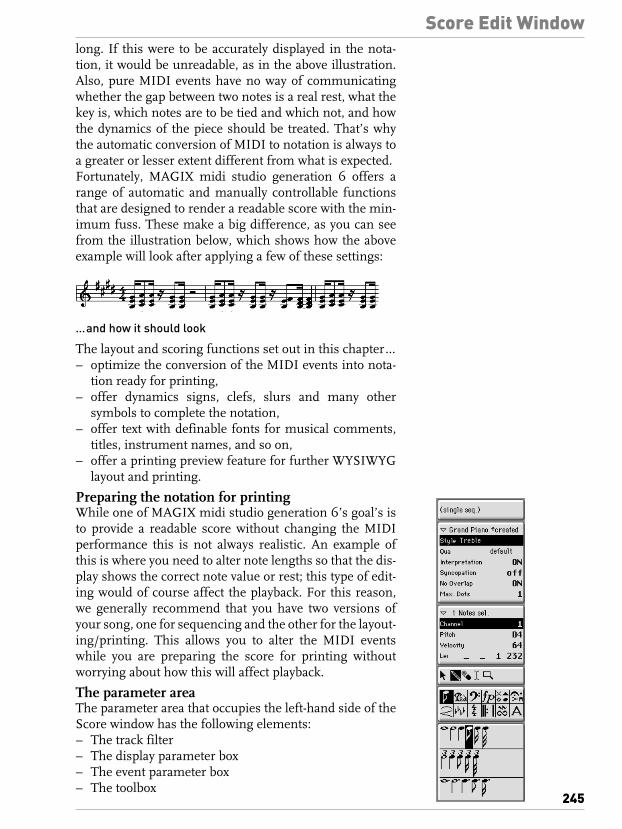
Score Edit Window
245
long. If this were to be accurately displayed in the nota-tion, it would be unreadable, as in the above illustration.Also, pure MIDI events have no way of communicatingwhether the gap between two notes is a real rest, what thekey is, which notes are to be tied and which not, and howthe dynamics of the piece should be treated. That’s whythe automatic conversion of MIDI to notation is always toa greater or lesser extent different from what is expected.Fortunately, MAGIX midi studio generation 6 offers arange of automatic and manually controllable functionsthat are designed to render a readable score with the min-imum fuss. These make a big difference, as you can seefrom the illustration below, which shows how the aboveexample will look after applying a few of these settings:Graphik
…and how it should look
The layout and scoring functions set out in this chapter…– optimize the conversion of the MIDI events into nota-
tion ready for printing,– offer dynamics signs, clefs, slurs and many other
symbols to complete the notation,– offer text with definable fonts for musical comments,
titles, instrument names, and so on,– offer a printing preview feature for further WYSIWYG
layout and printing.
Preparing the notation for printingWhile one of MAGIX midi studio generation 6’s goal’s isto provide a readable score without changing the MIDIperformance this is not always realistic. An example ofthis is where you need to alter note lengths so that the dis-play shows the correct note value or rest; this type of edit-ing would of course affect the playback. For this reason,we generally recommend that you have two versions ofyour song, one for sequencing and the other for the layout-ing/printing. This allows you to alter the MIDI eventswhile you are preparing the score for printing withoutworrying about how this will affect playback.
The parameter areaThe parameter area that occupies the left-hand side of theScore window has the following elements:– The track filter– The display parameter box– The event parameter box– The toolbox
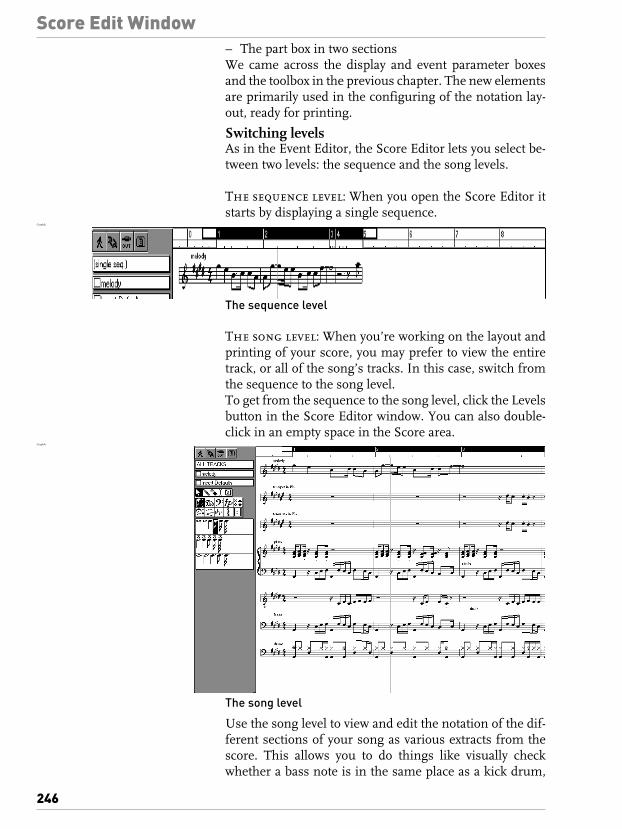
Score Edit Window
246
– The part box in two sectionsWe came across the display and event parameter boxesand the toolbox in the previous chapter. The new elementsare primarily used in the configuring of the notation lay-out, ready for printing.
Switching levelsAs in the Event Editor, the Score Editor lets you select be-tween two levels: the sequence and the song levels.
The sequence level: When you open the Score Editor itstarts by displaying a single sequence.
Graphik
The sequence level
The song level: When you’re working on the layout andprinting of your score, you may prefer to view the entiretrack, or all of the song’s tracks. In this case, switch fromthe sequence to the song level.To get from the sequence to the song level, click the Levelsbutton in the Score Editor window. You can also double-click in an empty space in the Score area.
Graphik
The song level
Use the song level to view and edit the notation of the dif-ferent sections of your song as various extracts from thescore. This allows you to do things like visually checkwhether a bass note is in the same place as a kick drum,
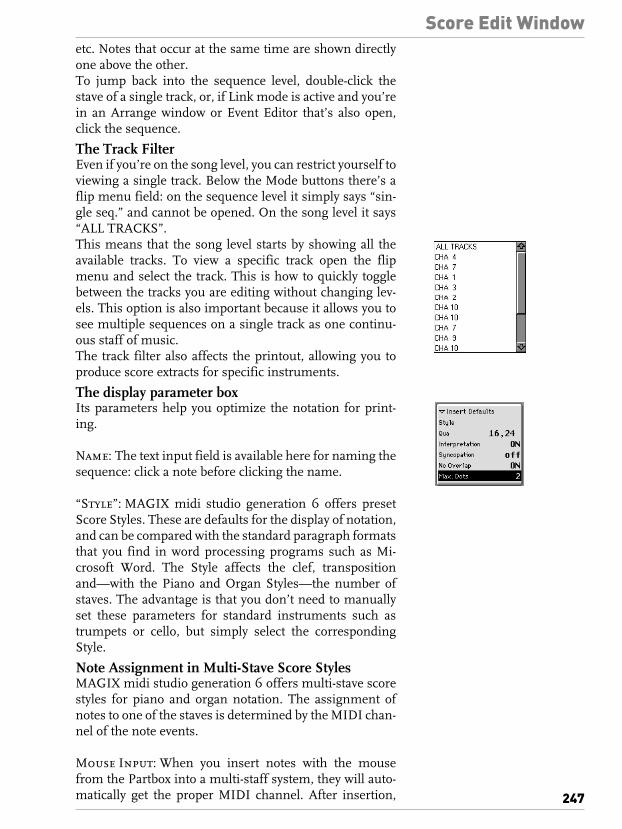
Score Edit Window
247
etc. Notes that occur at the same time are shown directlyone above the other.To jump back into the sequence level, double-click thestave of a single track, or, if Link mode is active and you’rein an Arrange window or Event Editor that’s also open,click the sequence.
The Track FilterEven if you’re on the song level, you can restrict yourself toviewing a single track. Below the Mode buttons there’s aflip menu field: on the sequence level it simply says “sin-gle seq.” and cannot be opened. On the song level it says“ALL TRACKS”.This means that the song level starts by showing all theavailable tracks. To view a specific track open the flipmenu and select the track. This is how to quickly togglebetween the tracks you are editing without changing lev-els. This option is also important because it allows you tosee multiple sequences on a single track as one continu-ous staff of music. The track filter also affects the printout, allowing you toproduce score extracts for specific instruments.
The display parameter boxIts parameters help you optimize the notation for print-ing.
Name: The text input field is available here for naming thesequence: click a note before clicking the name.
“Style”: MAGIX midi studio generation 6 offers presetScore Styles. These are defaults for the display of notation,and can be compared with the standard paragraph formatsthat you find in word processing programs such as Mi-crosoft Word. The Style affects the clef, transpositionand—with the Piano and Organ Styles—the number ofstaves. The advantage is that you don’t need to manuallyset these parameters for standard instruments such astrumpets or cello, but simply select the correspondingStyle.
Note Assignment in Multi-Stave Score StylesMAGIX midi studio generation 6 offers multi-stave scorestyles for piano and organ notation. The assignment ofnotes to one of the staves is determined by the MIDI chan-nel of the note events.
Mouse Input: When you insert notes with the mousefrom the Partbox into a multi-staff system, they will auto-matically get the proper MIDI channel. After insertion,

Score Edit Window
248
also the channel for these notes can be edited. Please becareful only to use channels 1 or 3. Notes with other chan-nels will not be displayed when using the Piano 1/3 style. Ifyou do accidentally assign a note to a channel other than 1or 3, you can change the channel back for the note in theEvent List.
Display: In these multi-stave systems, MAGIX midi stu-dio generation 6 only shows the notes carrying the MIDIchannel of the Style or the stave, respectively. As an exam-ple, in Style Piano 1/3 you would only see an empty stave ifall contained notes had MIDI channel 4.
Score Style Piano 1/3: In this style the MIDI channel ofeach note determine s which staff that note will belong to:All notes with channel 1 will be written in the upper staff,all notes with channel 3 in the lower staff/bass clef. How-ever, this does not mean that you have to adjust the MIDIchannel of every individual note: When you record a se-quence, the notes will initially get channels 1 or 3 accord-ing to their pitch. Notes equal to or above middle C will getchannel 1, notes below middle C will get channel 3. Afterthe sequence is recorded, the MIDI channel of each notecan be edited in order to assign that note to the other staff.To change the MIDI channel of a note, select it andchange the channel setting in the Event Parameter Box.This also works for several notes at once (use the rubberband method for selecting more than one note). Here is anexample:
Graphik
Here you see the same sequence twice, displayed with dif-ferent Score Styles. On the left side the regular PianoScore Style is used: Notes with pitch B2 (= B below middleC) are displayed in the bass clef staff. However, sincethose notes clearly belong to the chords played with theright hand, they should be displayed in the upper staff. Toachieve this, the Piano 1/3 style has been used in the rightexample, the MIDI channel of the three notes with pitchB2 has been changed to channel 1.
Score Style Organ 1/1/5: This Score Style combines theregular Piano style with an additional pedal staff for organmusic. Channel 1 notes go to the upper two staves and are
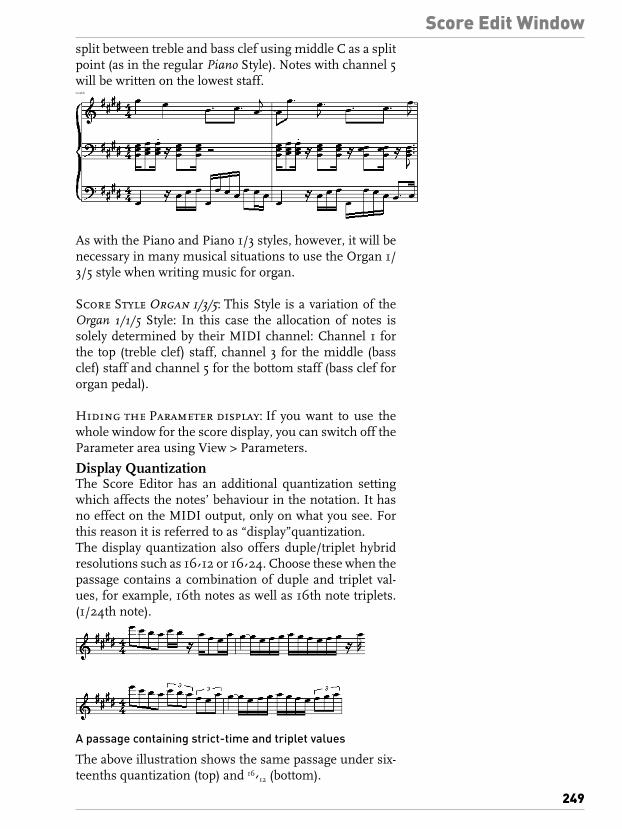
Score Edit Window
249
split between treble and bass clef using middle C as a splitpoint (as in the regular Piano Style). Notes with channel 5will be written on the lowest staff.Graphik
As with the Piano and Piano 1/3 styles, however, it will benecessary in many musical situations to use the Organ 1/3/5 style when writing music for organ.
Score Style Organ 1/3/5: This Style is a variation of theOrgan 1/1/5 Style: In this case the allocation of notes issolely determined by their MIDI channel: Channel 1 forthe top (treble clef) staff, channel 3 for the middle (bassclef) staff and channel 5 for the bottom staff (bass clef fororgan pedal).
Hiding the Parameter display: If you want to use thewhole window for the score display, you can switch off theParameter area using View > Parameters.
Display QuantizationThe Score Editor has an additional quantization settingwhich affects the notes’ behaviour in the notation. It hasno effect on the MIDI output, only on what you see. Forthis reason it is referred to as “display”quantization.The display quantization also offers duple/triplet hybridresolutions such as 16⁄12 or 16⁄24. Choose these when thepassage contains a combination of duple and triplet val-ues, for example, 16th notes as well as 16th note triplets.(1/24th note).GraphikPassage mit binären und triolischen Werten
A passage containing strict-time and triplet values
The above illustration shows the same passage under six-teenths quantization (top) and 16⁄12 (bottom).

Score Edit Window
250
“Interpretation”: This controls the automatic rests andtie-correction algorithm. In a way, it functions like a dis-play only length quantize. When it’s on, MAGIX midi stu-dio generation 6 displays rests and ties in such a way as tomake the best possible musical sense; it does not affect theplayback. You’ll find more details in the section Layoutand Printing from page 244 onwards.Graphik
The same passage without (top) and with Interpretation
Interpretation also applies to notes that are created fromthe part box with the mouse (see below).
“Syncopation”: This option affects the way syncopatednotes are displayed. When it is on, it will generally displaysyncopations as independent notes instead of as small-value tied notes. This can help improve the readability ofthe score.Graphik
The same passage without (top) and with Syncopation
Syncopation often only makes sense when used in combi-nation with “Interpretation ON”.
“No Overlap”:
The same passage without (left) and with No Overlap
This function suppresses the display of ties where notesoverlap their neighbours. This often happens when a pas-sage was played legato.

Score Edit Window
251
“Max. Dots”: This setting determines the maximumnumber of dots in the display of dotted notes. When it’s at“0”, MAGIX midi studio generation 6 shows no dots at all.
Max. Dots = 3 (top) and 1
In normal use you can leave the value at “1”. The numberof dots that are shown are also affected by the displayquantization and the Interpretation and Syncopationmodes.
Inserting symbols from the partboxA complete score needs more symbols (slurs, dynamicsigns, fermata and so on) and other notation signs thanthe program is able to automatically create from its inter-pretation of the MIDI events you record. These symbolscan all be inserted from the partbox using the mouse.Clefs, time signatures and key signatures can also bedragged in from this partbox.The majority of these symbols have no effect on the MIDIplayback, only on the display.The symbols are all in the partbox and can be draggedfrom there onto the staves.If you cannot see the partbox, check that “Hide/Show Pa-rameters” in the local Options menu is active. Otherwise,make the window taller and/or minimize the Display andEvent Parameter boxes. The width of the partbox can bevaried by horizontally dragging the vertical dividing linebetween the parameter area and the Score area.As you can see from the diagram (left), the partbox widthadapts itself to the width of the parameter area. This is soyou can adjust it to the size of your screen.The partbox comprises two sections:The top section contains buttons that select the overallsymbol “families”. Click a button and the correspondingfamily moves to the top of the partbox section below. Thebottom section contains the symbol fields. The displayedsymbols depend on which family of symbols you selected.
Inserting symbols: Symbols are inserted the same wayas notes: click the pen tool (right mouse button) in thestave. Use the eraser tool to delete them, and the normalarrow tool for moving or copying them (pressing ctrl). You
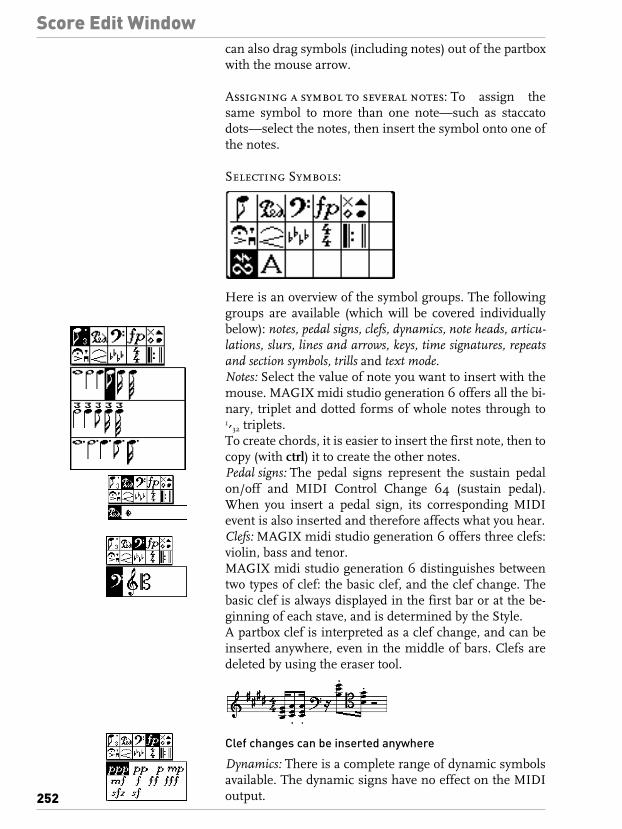
Score Edit Window
252
can also drag symbols (including notes) out of the partboxwith the mouse arrow.
Assigning a symbol to several notes: To assign thesame symbol to more than one note—such as staccatodots—select the notes, then insert the symbol onto one ofthe notes.
Selecting Symbols:
Here is an overview of the symbol groups. The followinggroups are available (which will be covered individuallybelow): notes, pedal signs, clefs, dynamics, note heads, articu-lations, slurs, lines and arrows, keys, time signatures, repeatsand section symbols, trills and text mode.Notes: Select the value of note you want to insert with themouse. MAGIX midi studio generation 6 offers all the bi-nary, triplet and dotted forms of whole notes through to1⁄32 triplets.To create chords, it is easier to insert the first note, then tocopy (with ctrl) it to create the other notes.Pedal signs: The pedal signs represent the sustain pedalon/off and MIDI Control Change 64 (sustain pedal).When you insert a pedal sign, its corresponding MIDIevent is also inserted and therefore affects what you hear.Clefs: MAGIX midi studio generation 6 offers three clefs:violin, bass and tenor.MAGIX midi studio generation 6 distinguishes betweentwo types of clef: the basic clef, and the clef change. Thebasic clef is always displayed in the first bar or at the be-ginning of each stave, and is determined by the Style.A partbox clef is interpreted as a clef change, and can beinserted anywhere, even in the middle of bars. Clefs aredeleted by using the eraser tool.
Clef changes can be inserted anywhere
Dynamics: There is a complete range of dynamic symbolsavailable. The dynamic signs have no effect on the MIDIoutput.

Score Edit Window
253
Note-heads: MAGIX midi studio generation 6 defaults togiving each note the note-head that corresponds to itsvalue. The partbox note-heads relate to percussion and canbe manually assigned to existing notes: select one or morenotes and insert the desired note-head onto anyone ofthem.Articulation signs: These signs are assigned to individualnotes. Any change to a note (e.g. transposition) affects itssign as well. MAGIX midi studio generation 6 automati-cally positions the sign relative to the note: select one ormore notes and insert the desired note-head onto any oneof them.Dim/Cresc, slurs, lines and arrows: These symbols can beplaced anywhere in the notation and are freely editable. If you insert a slur or select it on the stave, little“grab boxes” appear which allow you to change its shape.To move the symbol as a whole, drag it using the spacesbetween the “grab boxes”.Key signatures: Keys can be entered where you like in astave: they then apply to all the song’s staves from thatpoint. If you have defined a Style for a transposing instru-ment, its transposition relative to the new key is assured.To enter a new key, choose the corresponding letter, andthe program will automatically convert that into the neces-sary flats and sharps.The one at the earliest time position is taken as the basickey signature.Existing key changes can be edited as follows: double-clickthe signature to open the dialog box in which you canchoose a new key signature. You can select between majoror minor key signatures. Alternatively you can insert thenew key from the partbox by placing it on top of the oldone.To delete a key signature, click it with the eraser tool.Time signatures: MAGIX midi studio generation 6 distin-guishes between the basic time signature and time signa-ture changes. The basic signature is the one that comesfirst. Time signature changes can be placed where you likein a stave and have no effect on the playback. They apply toall the staves in the song from that point and are automat-ically shown in all the staves.The time signature affects the following parts of MAGIXmidi studio generation 6:– The display format in the Transport window– Any position or length display– The bar ruler– The metronome click and count-in.
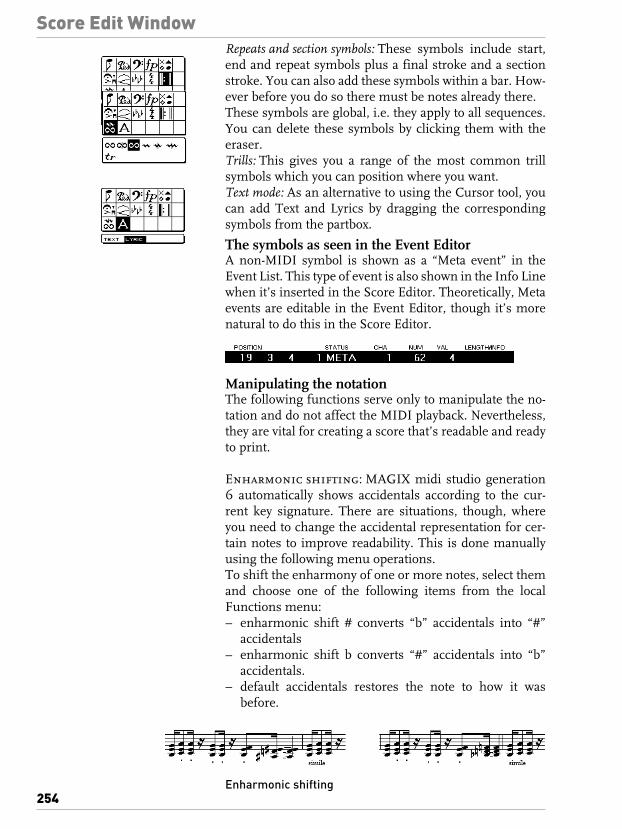
Score Edit Window
254
Repeats and section symbols: These symbols include start,end and repeat symbols plus a final stroke and a sectionstroke. You can also add these symbols within a bar. How-ever before you do so there must be notes already there.These symbols are global, i.e. they apply to all sequences.You can delete these symbols by clicking them with theeraser.Trills: This gives you a range of the most common trillsymbols which you can position where you want.Text mode: As an alternative to using the Cursor tool, youcan add Text and Lyrics by dragging the correspondingsymbols from the partbox.
The symbols as seen in the Event EditorA non-MIDI symbol is shown as a “Meta event” in theEvent List. This type of event is also shown in the Info Linewhen it’s inserted in the Score Editor. Theoretically, Metaevents are editable in the Event Editor, though it’s morenatural to do this in the Score Editor.
Manipulating the notationThe following functions serve only to manipulate the no-tation and do not affect the MIDI playback. Nevertheless,they are vital for creating a score that’s readable and readyto print.
Enharmonic shifting: MAGIX midi studio generation6 automatically shows accidentals according to the cur-rent key signature. There are situations, though, whereyou need to change the accidental representation for cer-tain notes to improve readability. This is done manuallyusing the following menu operations.To shift the enharmony of one or more notes, select themand choose one of the following items from the localFunctions menu:– enharmonic shift # converts “b” accidentals into “#”
accidentals– enharmonic shift b converts “#” accidentals into “b”
accidentals.– default accidentals restores the note to how it was
before.Graphik
Enharmonic shifting

Score Edit Window
255
You can apply these functions more than once to createdouble flats or sharps.
Note stems:
You are able to determine the stem direction of selectednotes, thereby overriding MAGIX midi studio generation6’s automatic display. Select the notes and choose one ofthe following items from the menu Attributes > Stems > …(their operation is self-explanatory):– Default– Up– Down
Manual beaming: You are able to determine the beamedgrouping of selected notes, thereby overriding MAGIXmidi studio generation 6’s automatic display. The follow-ing illustration shows automatic beaming (top) after it hasbeen manually edited (bottom).Graphik
Beaming
To beam a group of notes, select them and choose Func-tions>Beam selected.To remove the beam from a group of notes, select themand choose Functions>Unbeam selected.To restore the beaming to how it was originally, chooseFuncitons>Default beams.These functions apply to selected notes only. To restore awhole sequence’s worth of alterations to their former situ-ation, select the whole sequence.
Moving staves vertically: Each stave can be moved ver-tically: click-hold in the area of the basic clef in the emptyspace between two leger lines. The leger lines dim and theInfo Line says “Move Stave”.Now simply drag the stave to where you want it.

Score Edit Window
256
Multi-staves: When you are using a piano or organ multi-stave Score Style, you can move it as a whole as well aschange the distance between the individual staves.– To move the entire multi-stave, drag it by the top stave.– To alter the distance between the individual staves, drag
the lower ones. This will not affect the multi-stave’soverall position.
Graphik
Expanding a double-stave
TextMAGIX midi studio generation 6 allows you to introducetext into the score for naming staves, giving your song a ti-tle, or naming the composer and so on. Text is shown asMeta events in the Event List.
Selecting a font: MAGIX midi studio generation 6 letsyou choose any of the fonts you have installed in yourcomputer for displaying and pringint text in your score.MAGIX midi studio generation 6 prefers to work withTruetype fonts; these are able to be shown on-screen inany size. You can recognize Truetype fonts by the TT sym-bol that comes before the font name in the fonts window.To select the font in MAGIX midi studio generation 6choose Font>Score Font and a window opens in whichyou can choose the font, its style and size.The font applies to all the text within a song. If you changethe score text font after entering text, this reformats theentire song’s text, often with undesirable consequences. Ittherefore makes sense to choose the final font before youstart work.
Inserting text: Choose the text-cursor tool from the tool-box. Click it at the location you want to enter text. Thisopens a text input field and the Info Line.Type the text and finish by pressing return. The text re-mains selected and blinks. You can now use the mouse ar-row to fine-tune its position. Once you click in an emptyspace the text is fixed in position. To edit existing text, ei-ther click it with the text-cursor tool or left-click it.
Positioning text: Text can be dragged in the same wayas other events, using the mouse arrow. It’s also possible

Score Edit Window
257
to move the text numerically using the event parameterbox’s parameters. This method can also be used to assigntext to a different stave as follows:Stave This value is relevant only with Piano andOrgan Styles and defines the stave number the textbelongs to. You can instantly shift text from one stave tothe other by simply changing the stave number. If youenter a stave number that exceeds the number of availablestaves, the text disappears.
vert. pos The vertical position of the bottom of thetext relative to the top leger line, in pixels.
hor. pos The horizontal position of the left-handend of the text relative to the earliest position at which anote can be entered on the stave, in pixels.
Lyrics: You can enter note-referenced lyrics in the NoteEditor. Lyrics have special features compared to normaltext (e.g. title or composer):– The words are directly assigned to the notes and can be
moved together (to do this, you have to select both thenote and the corresponding text), and
– The note spacing adapts to fit the word lengths.To enter lyrics:1. First choose the letter “A” in the Part box.2. Click “Lyrics” and with the mouse button held down
drag the mouse pointer below the first note where you want to assign lyrics.
Lyrics.bmp
A flashing text cursor appears along with the Info Line.3. Enter the text for the first note,4. Press tab to jump to the next note,5. To complete the entry press return.Lyrics can be edited, copied or moved just like normal text.

Score Edit Window
258
Page Edit
You may have come across the “Page Edit” concept inword processing or DTP programs. MAGIX midi studiogeneration 6 calculates the contents of a whole side of pa-per and shows these on the screen as they will appear inprint using the WYSIWYG principle.
Page Edit and the normal display: You can swap be-tween the two by clicking the “Page Edit” button that’snext to the MIDI Out button.Page Edit is not just for manipulating the score prior toprinting (e.g. titles, text), but can be used for editing a longpassage of music. Indeed, all the editing commands we’vecovered so far apply in Page Edit mode, too. The “word-wrapping” (or more correctly “stave-wrapping”) meansyou can see appreciably more bars on the screen at thesame time.
Scrolling the Page Edit display: The vertical scroll baris used to “turn the pages” of the Page Edit display. Thepage number is shown at the top left of the score.
Page Edit and printers: You must install your printerand have it correctly set up before you start manipulatingthe layout of your final score. What you see in the PageEdit display depends on the printer installed and its paperformat and resolution settings. The advantage is that PageEdit is then exactly able to show how the printout will look.For more information on setting up the printer, see thesection below.
Score Edit Window
259
Printing the scoreThe print parameters are relatively simple to prepare asMAGIX midi studio generation 6 mainly uses the stan-dard Windows settings for printers. This means thatMAGIX midi studio generation 6 is able to function withany printer that you’ve installed in the Windows ControlPanel under “Printer”.Before you start to print, you must activate your printerand select the correct paper format under File > PageSetup…. The Score Editor window showing the Page Editdisplay must be the active window, i. e. must be on top ofall others. You start the printout via File > Print. Followingthis command a print dialogue appears, Depending on theprinter or printer driver, there are several different op-tions, e. g. number of pages, number of copies, etc. The result of the printout always matches exactly what yousee in the Page Edit display. However, the followingscreen elements will not be printed:– The green lines marking the top/bottom and left/right
page margins– The mouse pointer and the Song Position Line (SPL)– The coloration of the currently selected sequence and of
the margins.Printers use to have a resolution much higher than themonitor you are working on. Therefore, when fine posi-tioning the symbols and the text, you should work in ahighly detailed zoom display. Hint: Using the Zoom Toolyou can easily switch between normal size and extrememagnification of the corresponding detail.

Tempo
260
Tempo
Tempo DisplayIf your song has a tempo that stays the same throughout,you can set this constant tempo in the Transport window.
The current tempo will always be displayed here, even ifyou are using programmed tempo changes or externalsynchronization.
Tempo TrackTempo changes are controlled by tempo events, which arestored in a special tempo track. This track is not visible inthe Arrange window.The tempo track applies to the whole song.The tempo track also determines the relationship betweenincoming time code, and the current song position (seepage 270).
Overview
Information on changing song tempo: The easiestway to set individual tempo changes is from the Tempo List(see page 260). The Tempo List is a specialized Event Listeditor for tempo events. Another way is to record tempo changes with the mouse,from the Transport window, or you can do this more accu-rately using the Graphic Tempo editor (see page 262). TheGraphic Tempo editor is a Drum Editor, with a fixed eventdefinition for tempo events, and is really useful for editingexisting tempo changes by hand (see page 262).To find out how to lock a particular bar of a song to a partic-ular SMPTE time frame (for all of you out there who are us-ing MAGIX midi studio generation 6 to synchronize mu-sic to picture), read the section Positioning Bars to Framesfrom page 269 onwards.
Tempo List EditorYou can open the Tempo List by clicking and holding onthe Transport’s Sync button with the mouse. A pull-downmenu will appear, from which you select Open TempoList… or, you can simply select Options > Tempo > TempoList Editor….X

Tempo
261
The layout, and way you use the Tempo List are very sim-ilar to those of the Event List (see page 216).
Creating Tempo Changes– Set the song position to the required point.– Click Create.A tempo event appears showing the current tempo. Youcan alter the tempo in the tempo column.Or, with the pencil tool selected, click on the word“Tempo” on an existing tempo event. A new tempo eventappears, with an input box for the position. Enter the re-quired bar position and press return.
Deleting Tempo Changes: You can delete tempo eventsby clicking them with the eraser, or pressing delete.
Copying The Tempo Changes from a Passage– Set the locators to the passage containing the correct
tempo change.– Choose Edit > Select > Select Inside Locators.– Copy the tempo events onto the clipboard (ctrl c).– Deselect all tempo events (by clicking Start of Eventlist/
End of Eventlist or the background).– Paste the tempo events from the clipboard (ctrl v).– A position input box appears at the first tempo event,
where you can alter the bar position. If the first tempochange is not at the start of the bar in the passage, besure to alter the number of the bar and leave the “frac-tional values” unaltered.
– Press return. The copied tempo changes are selected,and you can undo the operation if necessary.
Other FunctionsThe entries in the tempo list interact with, and affect eachother. For details, please refer to the section PositioningBars to Frames from page 269 onwards. You can alsomake several synchronization settings here. All other

Tempo
262
functions are identical to those in the Event List (see page216).
The Graphic Tempo EditorThe Graphic Tempo editor is a specialized Drum Editor,that only allows you to draw and edit tempo events.To open the Graphic Tempo editor, grab the Sync buttonin the transport panel and choose Open Graphic Tempo…from the pull-down menu. Or, select Options > Tempo >Tempo Graphic Editor….
Creating Continuous Tempo Changes – Choose the Crosshair tool.– Click on the required section in the working area, and
hold down the mouse button.– Keep an eye on the info line at the top of the window
which tells you the exact position and tempo. Set thestart (or end) of the tempo change.
– Release the mouse button.– Now set the end (or start) of the tempo change. If you
want to create new tempo events (instead of alteringexisting ones) hold down ctrl.
– Click the mouse button.Remember that the time width of the added tempo eventsdepends on the setting of the Grid parameter.In most cases, the 1/16 note setting is enough to create theimpression of a continuous tempo change.
Other Functions: The operation of other functions areidentical to those of the Drum Editor (see page 228).
Tempo FunctionsRecording Tempo ChangesGo to Options > Settings > Recording Options, and acti-vate the Allow Tempo Change Recording checkbox. All tempoalterations which you make during the recording will nowbe recorded as tempo events on the tempo track. You canthen edit them in one of the tempo editors.

Synchronization
263
Synchronization
Synchronization Window You can open this window from the Arrange window viaOptions > Settings > Synchronisation Settings… or via along click on the Sync button in the Transport window.At the top edge you can switch pages: General, Audio,MIDI.
GeneralThis page of the synchronization window contains the ma-jor synchronization parameters for running MAGIX midistudio generation 6 as a slave.
Sync Mode: This parameter defines the master to whichMAGIX midi studio generation 6 is to be synchronized:Internal: MAGIX midi studio generation 6’s internaltimer. MAGIX midi studio generation 6 is the master. Ex-ternal devices can be synchronized via MIDI Clock orMTC (the relevant settings are made on the “MIDI” page).MTC: “MIDI Time Code”. MAGIX midi studio generation6 runs as a slave. The MIDI Time Code can either arrive ata MIDI In port, or be generated by a MIDI interface from“translated” incoming SMPTE code.MIDI Clock: MIDI Clock and Song Position Pointer.MAGIX midi studio generation 6 runs as a slave. Clockand SPP can be received at any MIDI input.
Auto Enable external Sync: When this option is acti-vated, MAGIX midi studio generation 6 runs as the mas-ter (Sync Mode Internal), until it receives a synchroniza-tion signal—either in the form of MTC, or Clock/SPP, orfrom the tempo interpreter.MAGIX midi studio generation 6 automatically locks tothe first received synchronization signal. Please be surethat different synchronization signals don’t arrive simul-taneously—because there can be only one time code master.
External Stop ends Record Mode: This option meansthat during external synchronization, recording stopswhenever the time code ceases.If the option is switched off, MAGIX midi studio genera-tion 6 stops, but remains in record mode (Record +Pause).Frame Rate: This is where you set the frame rate (in “fps”,frames per second). This frame rate applies to both trans-mitted and received timecode.
X

Synchronization
264
“d” stands for “drop frame”. In “drop frame” formats, cer-tain frames are left out according to a regular pattern. Todistinguish between them, formats without drop frameare sometimes referred to as “nd” or “non drop”.
Auto Detect Format of MTC: With this option the in-coming timecode is analyzed and the correct frame rate isset automatically. In general you should leave this optionswitched on.Please note that it is not possible to automatically distin-guish between MTC frame rates 29.97 and 30, because;1. the MTC standard does not allow a distinction, and2. a measured rate of 30 fps could also be 29.97 fps
timecode running too fast, and vice versa.MAGIX midi studio generation 6 automatically interpretsframe rates with “approx. 30 fps” as either 29.97 df or 30nd, depending on whether or not the drop frame format isused. This interpretation will usually be correct, becauseonly these two formats are actually used as a standard.“Auto Detect…” only switches to 29.97 df or 30 nd if, pre-viously one of the other conventional formats was set. Ifyou want to synchronize MAGIX midi studio generation 6to one of the unconventional frame rates, you have to de-fine the format manually. This setting will not be alteredby “Auto Detect…”.
SMPTE Offset: This is where you set the SMPTE offsetfor the song. Because songs do not always have to startprecisely at bar 1 you can select any bar position to beplayed at the set SMPTE time.The preset is 1/1/1/1 at 1:00:00:00. The SMPTE offset1:00:00:00 is normally used, because it allows you to pre-run some timecode.
AudioThis page of the synchronization dialog window containsall the relevant parameters for synchronizing Audio andMIDI.
Frame rate Typical applications
24 Video
25 Audio (Europe) and PAL Video
(30 d) Unusable (not real-time)
30 Audio (USA) and NTSC Video (s/w)
29.97 d Audio (USA) and NTSC Video (color)
29.97 Extremely rare (not real-time)

Synchronization
265
Nominal Sample Rate: This is where the selected nomi-nal sample rate is shown.You can change the sample rate via Audio > Sample Rate,if your hardware supports several different sample rates.
MTC [Hz]: This display shows the deviation between theincoming MTC, and its nominal frame rate.If the deviation is too large, please check that you have setthe right frame rate (on the “General” page of the synchro-nization window). If in doubt, set the frame rate to 24 fpsand switch on “Auto Detect format of MTC”.If the frame rate is correct, you can use this display to ad-just the tape speed of the master machine to the nominalvalue (i.e. the same speed as used when the time code wasrecorded). Adjust the varipitch control on the master ma-chine, until the vertical yellow line is exactly in the middle.
Sample Rate: This display shows the deviation of thesample rate from its nominal value.Bear in mind that some audio hardware will not allow anyvariation in the sample rate.
Deviation: This display shows the current phase devia-tion of the word clock from the timecode master, in otherwords, the deviation between audio and MIDI.With varying timecode you can see in this display howMAGIX midi studio generation 6 Audio regulates thesample rate of the hardware in “MTC continuous” syncmode. Even with large timecode variations, there is no de-viation between audio and MIDI. Your audio hardwaremust be capable of continuously variable sample rate, forthis to function.Small deviations between audio and MIDI are unavoid-able, because MIDI can (and should) follow the timecodemaster directly.
Sync Mode: This is where you define how the audio hard-ware should be synchronised to an external timecode mas-ter.Depending on its design, not all audio hardware can workin every sync mode described below. This depends partic-ularly on whether or not the hardware’s sample rate can becontrolled.MTC Trigger: Audio regions are started in sync, but arethen played with a constant sample rate, regardless of anyvariations in the timecode master. MAGIX midi studio

Synchronization
266
generation 6 Audio always uses the set nominal samplerate (44.1 or 48 kHz).This mode is suitable when it is vital to retain the absolutepitch of a recording. If the speed of the timecode masterdeviates from the nominal value, you have to split long re-gions into shorter sections.In MAGIX midi studio generation 6, this mode is avail-able with any audio hardware. It allows far better synchro-nization than with software not capable to synchronize thestart points of regions to the external Time Code Master inreal time.External/Free: MAGIX midi studio generation 6 has no in-fluence on the sample rate. The audio hardware has to en-sure that the position and sample rate of the audio regionsmatch.
MIDIThis page is where you monitor all the settings sent byMAGIX midi studio generation 6 via MIDI when the se-quencer is running. This enables you to synchronize ex-ternal devices as slaves to MAGIX midi studio generation6, which acts as the master.
Transmit MIDI Clock: The switch on the right activatestransmission of MIDI Clock. In the display next to it youcan choose the port (MIDI Out Driver) from which MIDIClock is sent.Every time you start, “Song Position Pointer” (SPP) is alsosent.Because not all devices can process SPP the real-time mes-sage “Continue” is also sent. The exception to this is whenyou start at position 1/1/1/1. In this case, the real-timemessage “Start” is sent, instead of “Continue”.MIDI Clock to all Ports (All Ports): Both MIDI Clock andMTC can be sent to all ports simultaneously: select “AllPorts”.MIDI Clock can easily be sent via a bus along with othernormal MIDI events (notes, controllers). With multiportMIDI interfaces like Unitor8 MkII, it is better for timingreasons to send MIDI Clock via all ports rather than viaseveral individual ports.If MIDI Clock is transmitted via all ports, the events aresent only once from the computer to the interface. If youaddress individual ports, one event has to be sent for eachindividual port, which worsens the timing for all ports.
Allow Song Position Pointer while playing: Accord-ing to the MIDI Standard, Song Position Pointer is nor-

Synchronization
267
mally only sent when you start. This option means thatSPP can also be sent while the sequencer is running. Theadvantage is that external devices can also follow MAGIXmidi studio generation 6 in Cycle mode.If the external devices cannot process SPP, you shouldswitch off this option. This improves the timing when cy-cling.
Transmit MTC (MIDI Time Code): The switch to theright activates transmission of MIDI Time Code. In thedisplay next to it, you can define the port (MIDI OutDriver) to which MTC is transmitted.It is not advisable to send MTC to all ports. Unlike MIDIClock, if you want to send MTC (which is very data-inten-sive), use a MIDI port which is not being used for any-thing else.
Transmit MTC Delay: This parameter allows you to de-lay the transmitted MIDI Time Code. Negative valuesmean that the MTC is transmitted earlier. This enablesyou to compensate for any reaction delays in the externalMTC slaves.
Special FunctionsSwitching on external syncSwitching on the sync button on the Transport causesMAGIX midi studio generation 6 to synchronize to thesync source you’ve chosen.You can use the Sync button to turn off the external sync atany time, without changing your selected sync source.This allows you to remove MAGIX midi studio generation6 temporarily from the sync master’s time axis. This couldprove useful if, for example, you need to quickly edit a se-quence while the external sync source (tape machine, VTRetc.) is still running.
Recording with external synchronization: When“Record” is pressed during external sync, MAGIX midistudio generation 6 goes into MIDI Record mode, butdoes not start until it encounters external time code.
Incoming MIDI Time Code Display: The flashing doton the transport window’s sync button indicates thatMAGIX midi studio generation 6 is receiving error-freeMIDI time code.If the dot “sticks”, an error has occurred. AlthoughMAGIX midi studio generation 6 is capable of dealing

Synchronization
268
with many MTC errors itself, you should neverthelesscheck the quality of your SMPTE signal, as well as otherpotential sources of error.
MTC Interpretation: Because the MIDI standard onlysupports four of the possible six time code formats (the 30fps and 29.97 fps formats cannot be differentiated),MAGIX midi studio generation 6 has to decide which for-mat is “intended”, when it encounters incoming timecode:
In other words, the much more commonly used 29.97 fpsand 30 drop fps formats are used in preference to the un-common 30 fps and the virtually-unheard-of 29.97 dropfps formats.However, you can manually set the format from theTempo List editor to whatever you like: for example to con-vert material to 30 fps for black and white TV transmis-sion in the NTSC format.
Receiving MIDI Clock/SPP: Sync via MIDI Clock/SPPis the most accurate method, if MAGIX midi studio gen-eration 6 is being synchronized to a bar-referenced mas-ter.MIDI Clock has a resolution of 24 PPQN (pulses per quar-ter note), while MAGIX midi studio generation 6 has aninternal resolution of 960 PPQN (some 40 times more ac-curate!). For this reason, MAGIX midi studio generation 6has to interpolate the 39 steps between two incomingclock impulses itself.If you are bothered by small variations in timing betweenmaster and slave, you can improve the relationship whenin external sync, by entering the expected tempo changesfrom the master into MAGIX midi studio generation 6’sinternal tempo list as well.Even if you don’t take this step, the sync should hold upfairly well, as long as you avoid large deviations, such as aninternal setting of 200 bpm , with an external tempo of 40bpm.Continue Event: When a MIDI Continue Event is received,MAGIX midi studio generation 6 doesn’t leap to the last
incoming MTC format is interpreted as
24 fps 24 fps
25 fps 25 fps
30 drop fps 29.97 drop fps
30 fps 30 fps
Synchronization
269
valid position received via MIDI Clock. Instead, playbackrecommences from the current song position. This allowsyou to change the song position manually while the se-quencer is halted, and restart from the new position, witha MIDI Continue command.
Positioning Bars to Frames: If you want to arrive at aposition in the song at a specific SMPTE time, you have toalter the tempo of the preceding passage. You don’t wantto do this by trial and error.– Open the Tempo List (page 260).– Create a tempo event at the relevant bar position (page
261).– Set the desired time position for this tempo event in the
SMPTE-Position column. The preceding tempo event isautomatically adjusted to generate the correct bar andtime position for the “auxiliary tempo event”.
– You can then delete the “auxiliary tempo event” if youwant to keep the same tempo for the following passage.
Synchronizing Video FilesAVIMAGIX midi studio generation 6 lets you open videos inthe Video for Windows (*.AVI) format.You can run these videos in a MAGIX midi studio gener-ation 6 window synchronized to the song. Wherever youmove the song position, the video follows. You can writevideo music, or attach sound effects to individual frames.To ensure smooth playback, you should try to play the Au-dio files, and the video material from different hard disks,if possible.
Opening a Movie: If you select Options > Video Player…,the file selector opens, and you can select an *.AVI videofrom your hard disk.
Setting an Offset: Following the path Options > VideoSettings… a small window opens. There, just above the en-try SMPTE Start, you can set the video start-point.
Enable Audio of Video: In the window you open via Op-tions > Video Settings… you can choose whether you wantto hear the audio track of the video.
X

Synchronization
270
The BasicsSummaryIf you want to synchronize MAGIX midi studio genera-tion 6 to a second sequencer system (workstation, drummachine) please use MIDI Clock/SPP.For all other situations where you use external synchroni-zation (tape machine, stand-alone hard disk recorder,video recorder) use MTC. To synchronize MAGIX midistudio generation 6 to a SMPTE signal you need a “syn-chronizer”, which converts SMPTE into MTC. This can bedone by nearly all interfaces with multiple MIDI ports.
Timecode and Clock synchronizationsynchronization involves ensuring that several devicesrun absolutely in time with each other. This doesn’t justmean that the devices start at the same point, and run atthe same speed. To set exactly the same speed would re-quire infinite precision (even with digital devices). In-stead, synchronization means that while the devices arerunning, every point along the time axis of all the devicesmust be linked.This requires that the devices to be constantly “connected”to each other. This is only possible if one of the devicesacts as the “master”, defining the current position, whilethe all other devices act as “slaves” and constantly try tofollow this position as closely as possible.There are two different ways of doing this, depending onthe type of devices being used:1. With devices like sequencers or drum machines, the
positional information shared is expressed in bar po-sitions—in other words, they use “bar-referenced syn-chronization”.
2. Devices like tape machines or hard disk recordersusually use “time-referenced synchronization”—thepositional information shared by these devices is timeinformation, in the form of so-called time code. Devic-es that use time-referenced sync include tape ma-chines for video signals, like VTRs (video taperecorders) and VCRs (video cassette recorders). Withtime-referenced sync, the tape speed or sampling rateis not dependent on the musical tempo of the record-ed song.
Bar-referenced synchronization is only appropriate if youare using devices from the first category. As far as devicesfrom the second category are concerned, time-referencedsync really ought to be used. A single tape machine couldtheoretically control several devices from the first cate-gory, by playing recorded bar-referenced time code. How-

Synchronization
271
ever, for various reasons, most professionals would workusing time-referenced code. For one thing, this is the onlyway to sync additional machines up to the tape later. A sequencer synchronized to tape has to calculate the barposition from the time position, using its tempo track.
Bar-Referenced synchronization: First, a quick tripdown memory lane…Pulse Clock and FSK (historical)
The original method of synchronizing analog sequencers,or drum machines to each other was by transferring elec-trical impulses (clock signals) at specific intervals. Thenorm was 24 ppqn (pulses per quarter note), which isequivalent to a resolution of 1/96 note. However, somecompanies used 48 (Korg, Linn), 64 (PPG), 96 (Ober-heim) or 384 ppqn (Fairlight). By way of comparison,MAGIX midi studio generation 6 has a resolution of 960ppqn).By encoding these impulses as the “shift between twopitches” (FSK code, frequency shift keying), it was possi-ble to record this kind of code onto tape. It was mainlyused to synchronize drum machines to tape machines.There were plenty of disadvantages to it, however– FSK code laid down a fixed tempo.– It was impossible to program intros/outros later.Both Pulse Clock and FSK had two further disadvantages:– If any impulses were lost through signal dropouts, the
synchronized devices would run constantly out of syncfrom that point onwards.
– Because there was no position indicator, you alwayshad to start the song from the beginning (FSK 2 orSmart FSK overcame this by encoding the song posi-tion as well).
These disadvantages eventually killed off clock and FSK,neither is now used professionally.MIDI Clock / SPP: With the advent of the MIDI Standard,an equivalent to clock impulses was incorporated into thecommand protocol: MIDI Clock. MIDI Clock events aretransmitted by the master 24 times per quarter note. Toavoid having to start songs from the beginning every time,a further MIDI command is also transferred: song positionpointer. This transmits 1/16 notes from the beginning ofthe song. Because two data bytes are available for encod-ing (14 bit), it is possible to distinguish a maximum of16384 different 1/16 notes or 1024 bars. The slave recog-
Synchronization
272
nizes the current song position within this region, andsynchronizes to it.Modern devices always use a combination of MIDI Clockand song position pointer.If a sequencing program has a higher timing resolutionthan 1/96 note, the positions between must be interpo-lated. The resolution of MAGIX midi studio generation 6is 1/3840 notes.
Time-Referenced synchronization: Time-referencedsynchronization originates from the field of video syn-chronization, but nowadays it is also used for audio work.This is why it divides a second not into tenths and hun-dredths, but into frames. One frame was originally thetime it took for a single frame of video (i.e. one image) topass through a video camera, or projector.Unfortunately, the number of frames used per second var-ies according to country, norm and usage. For video, theinternational norm is 24 frames per second (fps). Ameri-can black and white television uses 30 fps. With the intro-duction of color television, the frame rate of the NTSCnorm, used in America and Canada had to be reduced to29.97 fps for technical reasons. In Europe, a lower framerate of 25 fps was used from the start, and with the intro-duction of color television this was adopted by the Euro-pean PAL TV standard, as used in Europe today.The original reason for the differing video rates, inciden-tally, derives from the different rates of alternating currentused on the different continents (USA: 60Hz, Europe: 50Hz), which corresponds to the number of half-frames ofvideo passing through a camera/projector per second.SMPTE/EBU: It was the American Society of Motion Pic-ture and Television Engineers (SMPTE) which first laiddown a norm for encoding the individual frames. Thisdesignates exactly 80 bits per frame for encoding the hour(0—23), minute, second, and frame (frame numberwithin the second). Some of the surplus bits are used to in-dicate the frame rate, i.e. the number of frames per sec-ond. This encoded data stream of 80 bits per frame isknown as SMPTE time code. Because the individual bitsthemselves have a definite time spacing, they are also usedas a further subdivision of a frame, called a “subframe”.This code was adopted without alteration by the EuropeanBroadcasting Union (EBU), for use with the Europeanframe rates, and renamed “EBU Time Code”. In practicethis time code is usually referred to as SMPTE time code,or just SMPTE (pronounced: “simptee”).

Synchronization
273
Drop Frame (df): One technical problem was the framerate of 29.97 fps. Only whole frames can be counted, butcounting up to the 30th frame in every second wouldcause a deviation between the time code time, and the ac-tual time (a difference of about 5.4 seconds for a typicalfeature video). So, the following trick was employed: in ev-ery minute 2 frames are left out (“dropped”), except inminutes that can be divided by 10.This may sound complicated, but is actually simpler than“one leap-year every 4 years except in years divisible by100, apart from those also divisible by 400”!To describe this method, “drop” or “df” is added after theframe rate. Because it is used so often with 30 fps, it ismore common to indicate non-usage by adding “nondrop”, “nd” or “ndf” to avoid confusion.The 29.97 nd format is seldom used (just like the point-less 30 df), because the timecode time “drifts” from “real”time.Frame Rates: The SMPTE frame rate must be set the samefor all connected devices; you can’t have different framerates in one system. The diagram below shows the variousframe rates with the respective duration of a frame, or sub-frame:
In Europe 25 fps is used both in the audio field and for syn-chronizing television or video productions.American audio productions use mainly 30 fps, but withvideo the frame rate is nearly always 29.97 df.International audio productions are recorded with 25 fps,and 30 fps on different tracks.LTC / VITC: The 80 bits per frame of the SMPTE timecode can be stored in two different forms:– As a sound signal on a sound track. This is called longi-
tudinal time code (LTC).– As a signal in the scanning gap of the video picture.
(The complete picture information is transferredslightly quicker than the duration of a frame. There is ashort gap, while the electronic beam of the cathode ray
Frame Rate [fps] Frame [ms] Bit [µs] Source
24 41.67 520.8 Video
25 40 500 PAL
29.97 drop 33.37 417.1 —
29.97 33.37 417.1 NTSC color
30 drop 33.33 416.7 —
30 33.33 416.7 NTSC S/W
Synchronization
274
tube travels from the end of the bottom line, back to thebeginning of the top line. Because the beam is tempo-rarily switched off, time code transferred during thisgap does not interfere with the picture.) This is calledvertical interval time code (VITC).
LTC is used for all audio productions, and often for videosynchronization as well. Tape duplication plants canrecord LTC onto one of the audio tracks, usually track 2.The SMPTE time can also be written onto the picture. Be-cause of the almost universal use of LTC for audio work,the term “SMPTE” is used synonymously with it.With video synchronization LTC can only be output dur-ing playback at normal speed. VITC (pronounced “vitzi”)has the advantage that it can be output while fast-forward-ing, or rewinding. This is very useful when creatingframe-synchronized sound effects, or musical phrases.Emagic’s networkable 8x8 MIDI interface “Unitor8 MkII”has a synchronizer that can read and write both LTC andVITC.MIDI Time Code (MTC): MTC is a “translation” of theSMPTE bits into the MIDI Standard, and contains thetime and frame rate information. This requires one statusbyte and eight data bytes. MTC defines only 24, 25, 30 dfand 30 ndf.
Synchronizers: A professional synchronizer is a devicewhich can write and read SMPTE signals. It is connectedto a master, and one or more slave tape machines, and canalso control their transport functions.In computer MIDI interfaces, built-in synchronizers gen-erally have just a SMPTE input and output. SMPTE sig-nals arriving at the input are automatically passed on tothe computer by the interface, in the form of MTC.Which device should be the Master, and which the Slave? Asa general rule, the slowest machine should be used as themaster, to reduce waiting times for the slaves when re-winding or forwarding. Since a sequencer naturally“winds” much faster than even the quickest tape machine,it always acts as the slave.
Synchronization Procedure: The following steps ap-ply to external equipment, rather than MAGIX midi stu-dio generation 6.Recording SMPTE: If you want to synchronize a computer-based sequencer to a tape machine, the first thing to do isrecord a SMPTE signal onto one of the outside tracks (theoutside tracks on analog tape machines are of a marginally

Synchronization
275
lower quality, because of the (very slight) “fluttering” ofthe tape, but they are perfectly adequate for time code).Connect the SMPTE out of the interface with the input ofthe tape machine (or the input of the mixing desk, if youwant to route the time code, and set a level). It is custom-ary to use the track with the highest number. Set the levelof the time code to −10 VU. Avoid recording stationarytime code by starting the time code generator before therecording. For several reasons—for example to avoiddrop-outs which can lead to gaps or jumps in the timecode, and to give you the option of extending a songlater,—it is a good idea to record the time code throughoutthe whole tape (this is known as “striping” the tape). It isalso customary to set a SMPTE code start time of just un-der one hour (01:00:00:00). The first song on a tape thenalways begins at exactly one hour. Other tapes of the sameproject can be given SMPTE times with consecutivehours, which means the SMPTE time can be used toclearly identify a tape, if the tape boxes get mixed up.Synchronizing Sequencers to Tape: Connect the output ofthe time code track to the SMPTE input of the computer.To minimize crosstalk, it is better to make a direct connec-tion rather than routing the signal via the mixing desk.The computer does not have to begin bar 1 at a SMPTEtime of 0 hours, 0 minutes, 0 seconds and 0 frames(00:00:00:00), you can set an “offset”, to make the se-quencer wait for the correct SMPTE position, before itstarts the song. If the second song on tape begins at (say)01:04:50:00, you need to set the SMPTE offset to match.Make a note of the SMPTE offset on the track sheet for thesong, or next to the song title on the tape box.The bar position which is reached at a specific SMPTEtime position depends on the tempo of the sequencer. Ifyou have begun to record onto tape, you won’t be able to al-ter the tempo without disrupting the synchronization.You should, therefore, also make a note of the precisetempo on the track sheet.The SMPTE offset and tempo settings are saved with thesong, but it is not unheard of for the song file and the tapeto be separated.Synchronizing Several Sequencers: If you want to synchro-nize several sequencer programs with a tape machine act-ing as the master, you should try at all costs to synchronizejust one sequencer via SMPTE or MTC. You can then syn-chronize the other sequencers to this one, via MIDIClock/SPP. When synchronizing several sequencers (withno tape machine) you should only use MIDI clock/SPP.

Synchronization
276
This avoids deviations in the bar position, since otherwise,each sequencer has to calculate this independently, fromthe time information using its own tempo track.Click Track: It is common practice to record a click track,i.e. a metronome sound, to run throughout any song at thecorrect tempo, in addition to the time code. This is partlydue to possible deviations in the positional calculation ofdifferent sequencers from the recorded SMPTE code. Italso allows overdubs in studios without MIDI equipment,although nowadays, such studios are few and far between.When recording a click track or other signal onto the tracknext to the SMPTE code, it is better to set a fairly lowrecord level. Crosstalk from a high-level signal onto theSMPTE track can corrupt the SMPTE track, and interferewith smooth synchronization.
If you have Sync Problems… you may find some useful advice here …Faulty Digital synchronization: If MAGIX midi studio gen-eration 6 is synchronized to an external wordclock (AudioSync Mode: External /free), you must ensure that a validdigital signal is always available. If you are getting errormessages like “Sample Rate 13,x kHz recognized” it maybe that the DAT recorder (or whatever clock source youhave connected to your audio hardware’s digital input)does not transmit wordclock in stop or pause mode (or hasswitched itself off).Faulty synchronization to an External Tape Machine: Cre-ate a new song, make a new recording and see if that doesthe trick. Why? If an old recording on tape was not prop-erly synchronized to timecode you will not be able to useit. One basic rule: the playback situation must be identicalto the recording situation.If everything is working fine with the new recording, thismeans the present setup is o.k. Next, check whether any-thing has changed in your global setup. Has the frame ratechanged? Has the tape speed changed? If you havechanged a 30 fps setting, try variations such as 30 drop or29.97.If MIDI and Audio are not synchronized: Go to the Audiopage of the synchronization dialog window and under Au-dio Sync Mode, select MTC Trigger. If your audio hardwaredoes not support this operating mode, you should cut ex-tremely long regions into shorter sections.If MIDI and SMPTE are not synchronized: Check all theframe rate settings. The frame rate of all connected de-vices must be identical, including the timecode on thetape machine, the synchronizer, and in MAGIX midi stu-
Synchronization
277
dio generation 6 itself. Some synchronizers encode thewrong frame rate in MTC. In this case open the TempoEditor, switch off the Detect option, and set the correctframe rate manually.Note for America: try out the different kinds of 30 fps (30drop, 29.97 fps).In Europe, a frame rate of 25 fps is almost always used.
Song Settings and Preferences
278
Song Settings and Preferences
Both the Song Settings and the Preferences… can bereached via Options > Settings > …. Both consist of a dia-log box which allows you to access various different sub-pages. Some of these pages can also be reached directlyfrom MAGIX midi studio generation 6’s local menus (forexample in the Score window), or from the transport but-tons, via pop-up menus.The Song Settings and Preferences are where you can de-fine some of MAGIX midi studio generation 6’s basic op-erating parameters. This section explains each of thesewindows’ menu items individually. Unless indicated oth-erwise, the descriptions of the various options are the onesthat apply when the checkbox next to the option is crossed(in other words, when it’s active).
Song SettingsSong settings are saved independently with each song,which means that different songs can have different songsettings. You can save all of your standard settings in atemplate song. This way, you can start each MAGIX midistudio generation 6 session with your preferred workingsetup.
Recording OptionsThis page can be reached via Options > Settings > Record-ing Options…, or via Recording Options… in the metro-nome switch pull-down menu on the Transport bar.The settings here determine how MAGIX midi studiogeneration 6 responds in record mode. If this page isopen, you can enable/disable some of the checkboxes viathe computer keyboard using the keys indicated in brack-ets after the function. While this page is open, any keycommands normally assigned to these keys will be tempo-rarily deactivated.Merge New Recording With Selected Sequences: After eachrecording, all newly-recorded data is merged with all theselected sequences on the recorded track, to form one se-quence. At the same time, the following function is auto-matically activated (see below).Merge only New Sequences in Cycle Record (n): When re-cording with Cycle Mode enabled, this function merges alldata recorded during later cycles to the sequence recordedduring the first cycle. It can be used independently ofMerge New Recording With Selected Sequences.Auto Mute in Cycle Record (m): If recording with CycleMode enabled, this function creates a new sequence for
X
Song Settings and Preferences
279
every cycle during which there is any data input. All se-quences made during previous cycles are automaticallymuted. If the Auto Create Tracks in Cycle Record function(described next) is not active, all the sequences are layeredonto one track. This function deactivates both the mergefunctions.Auto Create Tracks in Cycle Record: While recording withCycle Mode enabled, this option creates a new track witheach new cycle, when there is data input. The recorded se-quences from earlier cycles are pushed down to the tracksbelow, so the “oldest” tracks end up at the bottom. Thisfunction deactivates both the merge functions. This func-tion is useful when, for example, you are doing multipletakes of a solo, while cycling a section of music. Record-ings made during each repetition of the cycle will appearon their own track, making it easy to sort through themwhen you have finished recording.Allow Tempo Change Recording: All tempo changes madein record mode are recorded. For details on how to editthese “tempo recordings”, please see the section Tempofrom page 260 onwards.MIDI Data Reduction: Controller events are thinned outduring the recording, to lessen the data load on the MIDIbus during playback. This improves the timing of densearrangements on interfaces with fewer MIDI ports. Thefunction actually reduces the duration of controller events,using an intelligent algorithm which retains the value atthe end of a succession of controller data.Click while recording: The metronome click is automati-cally switched on for recording. This is the same as activat-ing the metronome switch in the transport panel duringthe recording.Click while playing (p): The metronome click is automati-cally switched on for playback. This is the same as activat-ing the metronome button in the transport panel duringplayback.Polyphonic Clicks: The MIDI metronome sends all notesdefined and activated for bars, beats and divisions. For ex-ample, at the beginning of each measure, two or threenotes may be sent simultaneously. If the option box is notchecked, then the metronome only ever transmits onenote at a time.Speaker Click: This sends the metronome click to the com-puter loudspeaker.MIDI Click: The metronome click is sent out as a MIDInote.
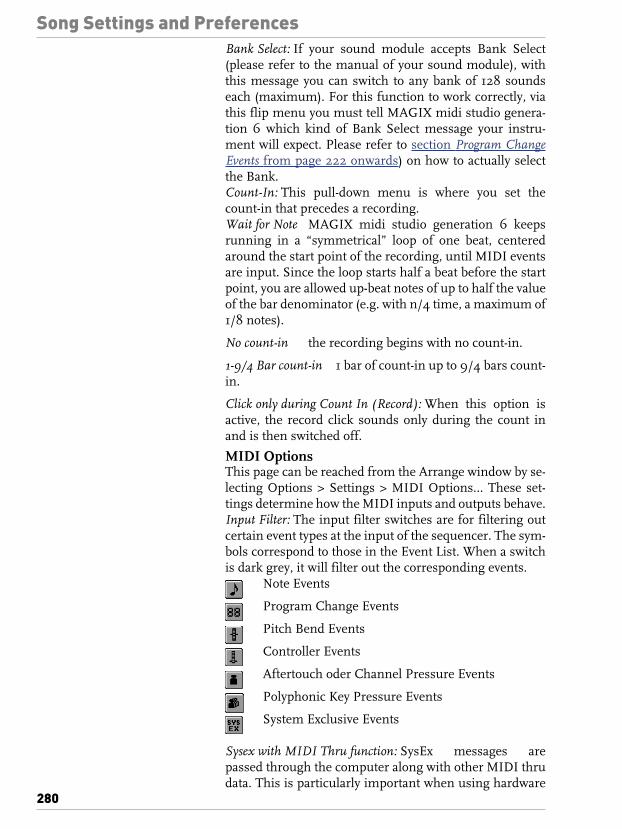
Song Settings and Preferences
280
Bank Select: If your sound module accepts Bank Select(please refer to the manual of your sound module), withthis message you can switch to any bank of 128 soundseach (maximum). For this function to work correctly, viathis flip menu you must tell MAGIX midi studio genera-tion 6 which kind of Bank Select message your instru-ment will expect. Please refer to section Program ChangeEvents from page 222 onwards) on how to actually selectthe Bank.Count-In: This pull-down menu is where you set thecount-in that precedes a recording.Wait for Note MAGIX midi studio generation 6 keepsrunning in a “symmetrical” loop of one beat, centeredaround the start point of the recording, until MIDI eventsare input. Since the loop starts half a beat before the startpoint, you are allowed up-beat notes of up to half the valueof the bar denominator (e.g. with n/4 time, a maximum of1/8 notes).
No count-in the recording begins with no count-in.
1-9/4 Bar count-in 1 bar of count-in up to 9/4 bars count-in.
Click only during Count In (Record): When this option isactive, the record click sounds only during the count inand is then switched off.
MIDI OptionsThis page can be reached from the Arrange window by se-lecting Options > Settings > MIDI Options… These set-tings determine how the MIDI inputs and outputs behave.Input Filter: The input filter switches are for filtering outcertain event types at the input of the sequencer. The sym-bols correspond to those in the Event List. When a switchis dark grey, it will filter out the corresponding events.
Note Events
Program Change Events
Pitch Bend Events
Controller Events
Aftertouch oder Channel Pressure Events
Polyphonic Key Pressure Events
System Exclusive Events
Sysex with MIDI Thru function: SysEx messages arepassed through the computer along with other MIDI thrudata. This is particularly important when using hardware

Song Settings and Preferences
281
programmers as only then will you be able monitor thechanges to the sound immediately. If you just want torecord SysEx dumps don’t select the checkbox. It hardlyever makes sense to divert dumps through the computer,unless you want to record a dump, and simultaneouslytransmit it to a second device of the same make.Transmit MIDI Clock: MAGIX midi studio generation 6transmits MIDI Clock with Song Position Pointer. Formore about these terms, please see the section ReceivingMIDI Clock/SPP from page 268 onwards. The MIDI out-put is selected to the right of this option (see the next para-graph).Transmit MTC (MIDI Time Code): MIDI Time Code istransmitted when this is enabled.You may set the MIDIoutput port in the input area at the right of this option. Se-lect the port by click-holding on the box.
Auto Sync In: When this option is activated, MAGIXmidi studio generation 6 runs as Master (sync mode Inter-nal), until any synchronization signal will be received—ei-ther MTC or Clock/SPP.MAGIX midi studio generation 6 synchronizes automati-cally to the sync signal that will be received first. Please besure that you are either; a) only using one external syn-chronization source or; b) certain that MAGIX midi studiogeneration 6 will not receive sync data from more thanone source at a given time.
Chase EventsThis page is for making settings relating to the “ChaseEvents” function described on page 117. You can reach thispage following the path Options > Settings > ChaseEvents…
Message Type Switches: These switches are used to se-lect the event types for which event chasing applies. Thesymbols are the same as the ones in the Event List Editor.If a button is gray, it means chase events is deactivated forthat event type.
Notes: When this button is switched off, the followingthree options are not available.Chase sustained Notes: This checkbox is used to searcharound the current play-start point for any notes whichshould still be playing, because of a held-down sustainpedal.Chase Notes in ‘No Seq Trp’ Instruments: This means thateven notes are searched, that are played by drum tracks

Song Settings and Preferences
282
(whose check box No Seq Trp in the track parameter box ofthe Waveplayer window is checked).
Chase Notes on Cycle Jump: When activated, the chasefunction will also chase notes, if a cycle jump occurs. Thisparameter is only available when ‘Chase on Cycle Jump’ isactive.
Program Change: The last program change commandbefore the current play-start point is sent. Keep in mindthat a sound module will usually take a short while to re-spond.
Pitch Bend Events: Pitch bend data are searched for.
Controller Events: If this switch is active, you canswitch three controller groups on and off individually:Chase Control 0—15: Controller numbers 0—15 aresearched. These include the following controllers: modu-lation wheel, breath, foot, volume, pan, portamento time,balance and expression, plus the MSB for data entry andbank select.Chase Control 64—71: Switch controllers 64—71 aresearched. These include sustain, sostenuto, hold 2, softpedal and portamento.Chase all other Controls: All other controller numbers aresearched.
Aftertouch or Channel Pressure Events: Aftertouchdata generated by the pressure sensor under the wholekeyboard is searched for. Aftertouch is also called „Chan-nel Pressure“.
Polyphonic Key Pressure Events: Polyphonic After-touch data, generated by pressure sensors under the indi-vidual keys of is searched for.
System Exclusive Events: The last SysEx messages inthe sequences before the current play-start point are trans-mitted. If the sequence contains the recorded data of a Sy-sEx fader, the fader will be set to its correct state at the startpoint.Please keep in mind that chase events cannot always fullyrestore the correct state of SysEx data at the start-playpoint. To do so would involve not just searching for, butalso analyzing all SysEx messages in the whole song, bothbefore and after the play-start point. Because of the non-

Song Settings and Preferences
283
standardized data structure of SysEx messages, this iscompletely impossible.If even a couple of sound parameters have been recorded,each with separate SysEx faders, at differing settings be-fore the play-start point, there will be deviations in thesound. To get around this, try recording controller data toremote-control the SysEx faders during playback instead.Since chase events searches all the different controllernumbers separately, the SysEx settings for the sound para-meters will all be correct at the play-start point. Anotheradvantage to this method is that controller events can beedited graphically in the Drum Editor, or using HyperDraw.Chase sep. channels in ‘All Cha’ instruments: This optionaffects tracks whose Cha parameter is set to All (i.e. whichplay events with their recorded MIDI channel). All definedevent types in sequences started part-way through are thensearched separately for each MIDI channel.Chase on Cycle Jump: Switches on the Chase Events func-tion for cycle jumps. When this function is activated, inthe check box below you may exclude notes fromthe ChaseEvents function.Send full MIDI Reset before Chasing: Before chasingevents, corresponding to the settings in the Preferences aMIDI Reset will be sent (see section Reset Messages frompage 285 onwards).
PreferencesThe Preferences are saved together with the key commandassignments as a separate file called “MAGIX midi studiog6.prf” in the Windows directory. These settings are validfor the whole Song.
Opening The Preferences: This Preferences windowcan be reached from the main menu by selecting Options> Settings > Global [resp. Display, Score, Reset] Prefer-ences…Although the settings you make in the Preferences affectthe way MAGIX midi studio generation 6 deals with allthe songs it opens, you still have to open a song before youcan alter the Preferences. You can’t open the “MAGIXmidi studio g6.prf” file directly.
Initializing The Preferences… If you erase the “Magixmidi studio g6.prf” file in your PC’s Windows folder ,MAGIX midi studio generation 6 will create a new Prefer-

Song Settings and Preferences
284
ences file next time you launch. All parameters will thenbe reset to their default values.When you erase the Preferences file, you also lose all yourcustom key commands.
GlobalThis page contains the global presets.When Opening a song, ask to ‘Close current Song(s)?’: Whenever you load a new song before closing the old one,MAGIX midi studio generation 6 will ask whether the cur-rent song should be closed.Add ‘Last Edit Function’ to sequence name: After perform-ing any edit operation (e.g. cutting), the description of theedit operation is added to the name of the arrange object(or resulting objects).Disable safety alert for ‘Undo’: This means that no safetyalert appears when you call up the undo function.Enable Catch when sequencer starts: Every time you startthe sequencer (start or pause), the catch function is auto-matically switched on, in all windows (see page 91). Enable Catch when moving song position: The “EnableCatch when moving SPL” option means that wheneveryou move the SPL, the Catch function (screen view followsSPL) is switched on.Allow Content Catch by Position if Catch and Link enabled: If the catch and content catch functions are active, the con-tents of the sequence at the current song position are whatis shown. If there is no check in the box, the window viewstill follows the song position within the displayed se-quence, but does not update to show the contents of sub-sequent sequences when they become the current se-quence (see page 92).Limit Dragging to one direction in Matrix and Score: In theMatrix or Score Editors, you can only move notes in onedirection, per operation. This means that a note may be ei-ther transposed or moved in time, but not both at once.This prevents accidental alteration of the other parameter.Limit dragging to one direction in Arrange: This restrictsthe direction you can move sequences in the Arrange win-dow, in a similar way to, and for the same reasons, as theoption above.Hide Windows of inactive Songs: If this check box ischecked, the display looks much better when severalSongs are open at the same time.‘Export MIDI File…’ saves single sequences as Format 0: Ifonly one sequence is selected when you choose File > Ex-port Selection as MIDI File… the contents of the sequenceare saved in MIDI file format 0.This file format is guaran-
Song Settings and Preferences
285
teed to be compatible with every MIDI file player (more onthis on page 288).Double Click Sequence to open… In this flip menu you candetermine, which Editor opens when double-clicking a se-quence in the Arrange window.
DisplayThis page contains two display options and your preferredlanguage setting.Wide Song Position Line: A thicker Song Position Line isused.Display Middle C as C3 (Yamaha): This option affects thedescription of notes in the editors.Bottom C on a five-oc-tave keyboard (note # 36) is labeled C1 and middle C (#60or c’) is labeled C3. According to this standard, the lowestMIDI note (# 0) is called C-2. This is the official standardand is used by most manufacturers.If there is no check in the checkbox, bottom C on a five-oc-tave keyboard is labeled C2 and middle C is labeled C4.Using this standard, the lowest MIDI note is C-1.Language selection: In this flip menu you may set your pre-ferred language. This setting will be active after the nextprogram launch.
ScoreThis page of the Preferences can also be reached via theScore window’s local menu by selecting Options > ScorePreferences….Dashed Song Position Line: The song position line in theScore Editor is dashed. If the box is not checked, the line issolid.Show sequence selection colored: If you switch on this op-tion, in the Score window on Song level the selected se-quence will be displayed in blue color.Fast (Lower Resolution) Curves on Screen: The screen re-draw rate is accelerated by using a slightly coarser displayof braces and slurs.
Reset MessagesThis is where you define which controllers are sent as a re-set message.A MIDI Reset is transmitted when:– the sequencer is halted by pressing Stop twice, in quick
succession;– you click on the MIDI Out display in the Transport
window;– you make use of the Full Panickey command;– or automatically when a new Song is opened or acti-
vated (regardless of the chase settings—see the sectionChase Events from page 281 onwards).
Song Settings and Preferences
286
Smart Reset: The reset has been optimized for use with thefollowing controllers, to minimize data congestion at cyclejumps, or when the sequencer is stopped:1. Pitch Bend2. Channel Pressure3. Modulation wheel (Control 1)4. Sustain Pedal (Control 64)MAGIX midi studio generation 6 handles these messagesseparately for each track. As soon as MAGIX midi studiogeneration 6 is halted, or its position altered, the aboveMIDI messages will be transmitted to the relevant tracks,and no others.Send Used Instrument Settings On Reset: When this optionis switched on, all currently used instrument parameterswill be transmitted, whenever a MIDI Reset occurs.
AudioWarning before closing Sample Edit: If you have executed adestructive edit command in the Sample Editor, e.g. Nor-malize or Fade Out etc., when you close the window youwill be asked if you want to Undo this edit. Of course, onceyou are used to editing audio data in the Sample Edit win-dow, you may begin to find this alert box irritating, so thisis where you can get rid of the warning.Warning before process Function in Sample Edit (Key): Be-fore you carry out a destructive edit in the Sample Editorusing a key command, a warning appears giving you theopportunity to cancel it, before altering the data.You can define key commands for all the destructive editcommands in MAGIX midi studio generation 6, whichwill then be valid only if the Sample Edit window is active(active title bar). Depending on what key commands andwindow combinations you are using, there is a danger ofexecuting edit commands accidentally. Thus, MAGIXmidi studio generation 6 is preset so that an alert box ap-pears first. If you feel confident that you won’t accidentallyprocess a file, you can switch of the alert here.Warning before process Function in Sample Edit (Menu): This option is functionally almost identical to the previousone, the only difference being that the warning appearswhenever you use a menu to execute a destructive com-mand in the Sample Edit window.Once you are more experienced, you may not need thisalert box when you call up an edit command via a menu,so you can switch it off here.Create Undo file for “Normalize”: Storing the “Undo” filesfor destructive edits of audio data can take up a lot of timeand memory, depending on the length of the audio data.

Song Settings and Preferences
287
Normalize is generally a safe, and usually beneficial typeof data edit. Switch this option off, if you want to removethe Undo option for the normalize function.Display Color in Audio Window: If audio regions in the Ar-range window are very brightly colored, it can sometimesbe difficult to make out the waveform display in the Audiowindow. You can, therefore revert to a black and white dis-play here.Release Audio in Background if Stopped: When you switchon this option, MAGIX midi studio generation 6 releasesthe audio hardware whenever playback stops. This allowsyou to switch to another program , like a Sample Editor,which also needs to use the audio hardware, without hav-ing to quit MAGIX midi studio generation 6 first.Prepare Audio Playback when Stopped: Normally at thestart of a recording—or playback—all audio files at thesong position are prepared for playback. Depending onthe number of tracks, and type of system, this can takeanywhere from a fraction of a second, to over a second. Insome situations, you might prefer to bypass this prepara-tion of all the playback tracks, to allow you to start record-ing immediately. In such a case, you should switch on thisoption. Recording (and MIDI playback) can then beginstraight away, although the audio tracks will not start play-ing until a few seconds later. Create overview after recording: Creating the overviews istime-consuming. If you don’t want to waste time directlyafter recording, you can deactivate this check box.Global Instrument Tune: With this parameter you can tuneall audio instruments plug-ins at once. Unit is cent, whichis 1/100 of a semitone, and the range is ± 50 cents.
Audio Drivers On the pages Audio Driver and Audio Driver 2 you can ac-tivate and deactivate the audio engine of MAGIX midi stu-dio generation 6. Uncheck the boxes left of each driver toeffectively turn MAGIX music studio generation 6 into aMIDI only application which can run on computers withless RAM. Remember that any alterations made will notbecome valid until the next program startup.

Standard MIDI Files
288
Standard MIDI Files
BasicsStandard MIDI Files are not specific to a particular se-quencer program or type of computer. They contain thefollowing information:– MIDI events with their time positions and channel
assignments,– Names of the individual tracks,– Tempo changes.MAGIX midi studio generation 6 supports the importingand exporting of Standard MIDI File formats 0 and 1:– Format 0 can contain one track,– Format 1 can contain multiple tracks.Neither format recognizes any division of a track (e.g. intoseveral sequences).
Loading Standard MIDI FilesTo load a Standard MIDI File, select File > Open. In thefile selector, select MIDI File in the “Files of Type” box.Bank Select: When you open Standard MIDI Files, pro-gram change and controller events occurring at the sameposition are moved by one tick, so that they will remain intheir intended order. This prevents MAGIX midi studiogeneration 6 from reversing the transmission order of theevents. The reason for this is that certain MIDI deviceswill not respond properly to program change and bank se-lect events that do not occur in the correct order.This guarantees that there will be no timing problems, be-cause the transmission of a MIDI event always lasts longerthan 1 tick.Via Drag and Drop: MIDI files may also be opened viaDrag and Drop. Being in a window of the Windows Ex-plorer or the desktop, just drag the MIDI file onto an openArrange windows of MAGIX midi studio generation 6.
Saving Standard MIDI FilesIf you want to play a MAGIX midi studio generation 6song on another sequencer, you can do so by saving the se-lection as a Standard MIDI File. Consult the other se-quencer’s instruction manual to see which StandardMIDI File formats it can read. All sequencers should beable to interpret at least the type 0 file format.
Preparing the Song: Because of the limitations of theStandard MIDI File format, you should make the follow-ing preparations to your MAGIX midi studio generation 6song:

Standard MIDI Files
289
– Neutralize all playback parameters with the normalizefunction (select them all by pressing ctrl a, then chooseFunctions > Sequence Parameter > NormalizeSequence Parameters),
– Convert all playback quantization with the fix quantizefunction (ctrl a, Functions > Sequence Parameter > FixQuantize,
– Convert all loops into real copies (ctrl a, Functions >Sequence Parameter > Turn Loops to Real Copies),
– Convert all sequences on each track into a continuoussequence: Click on a track, so that all objects of thistrack are selected. Select the glue tool from the tool boxand click on one of the tracks’s objects. Now allsequences of the track have been merged into a singlesequence. Repeat this procedure for all of your Song’sMIDI tracks containing sequences.
Additional preparations for file format 0: Since StandardMIDI File type 0 format files can only save one sequence,you must also merge all sequences into one (press ctrl a,take the glue tool and click a sequence).
Saving a Song as a Standard MIDI File: Select all ofthe required sequences and choose File > Save Selectionas MIDI File… You can now enter the destination direc-tory.In File Format 0: See whether under Options > Settings >Global Preferences… the parameter “Export MIDI File…”save single Sequences as File Format 0 is checked. If it is,choosing File > Export MIDI File… when only one se-quence is selected means that file format 0 will be auto-matically used.
Glossary
290
Glossary
ADAT: Abbreviation for Alesis Digital Audio Tape. TheADAT (supported by Alesis, Studer, and Fostex) is a digitalmultitrack cassette recorder with eight audio tracks usingan S-VHS video tape, with 16 or 20 Bit quantization. Theoptical port allows the parallel transmission of all eight au-dio channels.Aftertouch: Also known as pressure. MIDI data-type gener-ated by pressure on keys after they have been played.There are two types; channel aftertouch, whose value ismeasured by a sensor stretching along the whole keyboardand whose data apply to the whole MIDI channel, andpolyphonic aftertouch (rare) which is individually mea-sured and transmitted for every key.AIFF: Abbreviation for Audio Interchange File Format.Data format for audio files in the Macintosh operating sys-tem.Autodrop, Auto Punch: Automatic drop-in recording withadjustable drop-in/out positions.Bar ruler: Ruler at the top edge of the screen, divided intobar units.BBS: Abbreviation for Bulletin Board System. An elec-tronic mailbox.Catch: Function for making the section of the song cur-rently displayed in the window reflect the current song po-sition.Cha: Abbreviation for channel or MIDI channelCheck box: A small box. Placing a check in it (by clickingon it) activates an option.Click: Metronome, or metronome sound.Clock: Electrical synchronization impulse, transmitted ev-ery 1/96 note. Was used in older drum machines beforethe advent of MIDI. (i.e. MIDI Clock).Controller, control change: MIDI data type, e.g. for sliders,pedals, switches or standard parameters like volume andpanning. The type of command is encoded in the firstdatabyte, the value in the second databyte.Count-in: Beats which sound prior to the start of a record-ing.C-Press: Channel pressure or aftertouch.Cueing: Monitoring while fast-forwarding or rewinding.Cycle: Function which constantly repeats the passage be-tween the locator positions.Data bytes: These define the content of a MIDI message.The first data byte represents the note, or controller num-ber; and the second the velocity, or controller value.
Glossary
291
Default, default value: The preset parameter value.Delay: An object that can create a series of repeats. In theArrange window, a playback parameter which can delay oradvance a selected Track by a given number of millisec-onds.Dialog, Dialog box: A window containing a query or mes-sage. It must be cancelled or replied to before it will disap-pear and allow you to continue.DIMM: Abbreviation for Double Inline Memory Module.Type of RAM chip.Display Format Value: Adjustable note value for the gridused in displays and operations. Third number in the po-sition indicator.Drag & Drop: Grabbing objects with the mouse, movingthem, and releasing them.Driver: In MAGIX midi studio generation 6: specializedsupport for audio hardware. The part of MAGIX midi stu-dio generation 6 which allows you to address and use thishardware.Drop, drop-in, drop-out (Punch in/out): Going into and outof record to record over a section of an existing recording.Edit: Local menu with clipboard functions.Editor: Window for editing MIDI Events.Envelope, Envelope Generator: This term comes from theanalogue synthesizer technique. Produces a change ofvoltage over time after triggering (e. g. by hitting a key onthe keyboard).EQ, Equalizer: Used to boost or cut frequencies within asound spectrum.Erase: DeleteEvent definition: Parameter for defining the display of aline in the Drum Editor.File: In MAGIX midi studio generation 6 the two most im-portant types of file are: 1. Song files containing all theMIDI events and parameter settings in a song (includingmixer automation data) plus information about which au-dio files are to be played; 2. Audio files containing the ac-tual recordings of guitar, vocals, etc. (not actually stored inthe song files).Flip menu: See Pull-down menu.Float window: Window with special status which always“floats” on the surface above all the other windows, butcan only be operated with the mouse.Font: Character printing style.Frame: Unit of time. A second in the SMPTE standard isdivided into frames, corresponding to the frames in amovie or video.

Glossary
292
GM (General MIDI): Standard for MIDI sound modules,including standardized instrument sounds on the 128program numbers, a standardized key assignment fordrum and percussion sounds on MIDI channel 10, 16-partmulti-timbral and at least 24-voice polyphony.Grab (an object): Placing the mouse pointer on the object,pressing the mouse button and keeping it held down.GS: Extended GM standard developed by Roland Inc.Hierarchical menus: Structured menus where highlightingan individual entry opens yet another menu.Icon: Small graphic symbol. In MAGIX midi studio gener-ation 6 an icon may be assigned to the tracks in the Ar-range window.Info Line: Display at the top of the window which tells youthe position of objects when using the mouse tools.Insert: Point on a mixer where you can patch in an effect(Plug In). The effect objects on MAGIX midi studio gen-eration 6’s track and audio mixers have inserts for effects.Key command: Function which can be executed by press-ing a specific key.Legato: Method of musical performance that smoothlyconnects one note to the next. Local menu: Menu in a window containing functionswhich are relevant to only that particular window.Local Off: Operating mode on a MIDI synthesizer with akeyboard where the keyboard (local) does not directly playits own integrated sound generator. This is useful whenusing it as a master keyboard in a MIDI setup with a se-quencer. Locators (left and right): Two programmable song posi-tions which set the cycle limits in the Transport window.The Locators also can be used to define the area to be ed-ited for certain functions.Loop: Constant repetition of an object, up to the next ob-ject in the same track, or to the end of the song (whichevercomes first).Merge: Mix, combine together.Meta event: Type of event in the Event List. Contains non-MIDI events that can control special MAGIX midi studiogeneration 6 features, like text or screenset configura-tions.MIDI (Musical Instrument Digital Interface): Standard-ized, asynchronized, serial and event-oriented interfacefor electronic musical instruments.MIDI Clock: Short MIDI message for clock signals. Seealso: SPP.

Glossary
293
MIDI Event: Individual MIDI command, such as a noteon command. Continuous controller movements (e.g.modulation wheel) produce a quick succession of individ-ual events with absolute values.MIDI Message: A message transmitted via MIDI consist-ing of 1 status byte and none, one, two or (with system ex-clusive commands) many data bytes. See MIDI Event.MIDI Multi Mode: Multi-timbral operating mode on aMIDI sound module in which different sounds can becontrolled polyphonically on different MIDI channels. Amulti mode sound module behaves like several poly-phonic sound modules. General MIDI prescribes a 16-part multimode, (i.e. the ability to control 16 differentparts individually). Most modern sound generators sup-port multi mode. In MAGIX midi studio generation 6,multi mode sound modules are addressed via multi in-struments.MIDI System Exclusive Message: Also SysEx. System exclu-sive data forms the top tier in the hierarchy of MIDI com-mands. These messages are tagged with an identificationnumber for each manufacturer (the Sys Ex Manufac-turer’s ID number). The actual contents of these MIDIcommands is up to the manufacturer. They are used fortransferring whole sound programs and/or system set-tings, and for addressing individual parameters used insound generation or signal processing. Editor softwaretransmits and receives MIDI system exclusive messagesfrom MIDI devices, allowing you to program these MIDIdevices on your computer.Modifier (Special keys): Computer keyboard keys used to-gether with “normal” keys to change their function: shiftctrl alt.Modulation: Generally, a slight, continuously varyingpitch change. The MIDI standard is controller no. 1, trans-mitted on keyboards by the non-centered control wheel (orby moving the joystick vertically).Moving: Grabbing an object, moving it with the mouse but-ton held down and releasing it at the target position.MTC (MIDI Time Code): “Translation” of a SMPTE sig-nal into the MIDI Standard.Mute: Switch off (a sound or track).Normalize: 1) This function applies the settings of the cur-rent playback parameters to the selected events (by alteringthe actual events themselves), and clears the playback pa-rameter settings.

Glossary
294
2) (Audio): This function raises the volume of a recordedaudio file to the maximum digital level without alteringthe dynamic content.Note number (Note #): Pitch of a MIDI note, controlled bythe first data byte of a MIDI note event.Object: General term for sequences, Events or a Mixer’schannel.Option: Alternative function, often in the form of a check-box, sometimes also as a menu entry to be ticked.Parameter box: Field on the left side of the screen whereyou can adjust the parameters of the selected object.Paste: Add. The command ctrl v adds the contents of theclipboard—i.e. whatever you copied with ctrl c or cut withctrl x—to the position of the cursor, or song position line.Pitch Bend Message: MIDI message transmitted by a key-board’s pitch bend wheel.Pitch Bend Wheel: Hand wheel for generating pitch bendmessages.Pixel: One matrix dot on the computer screen. Short for“picture element.”Play parameters: The parameters for quantization, trans-position, velocity, compression and delay which do not al-ter the stored data but merely affect how the events areplayed back.Position indicator: Units: bars, beats, sub-divisions (oftenwritten simply as divisions in this manual) and ticks.Post Fader: Positioned after the fader in the signal flow, i.e.the level of a signal routed post fader to an auxiliarychanges when the fader is moved. Post fader aux sends arenormally used for effects (such as reverb) so that the re-verb level changes with the channel level, and the ratio oforiginal and effect signal remains constantP-Press: Polyphonic key pressure, also known as poly-phonic aftertouch. Rare and very data-intensive type ofcommand, measuring the pressure exerted on each indi-vidual key. Very few keyboards have sensors for poly pres-sure.Pre Fader: Positioned before the fader in the signal flow,i.e. the level of a signal routed pre fader to an auxiliarydoes not change when the fader is moved. Pre fader auxsends are normally used for monitor mixes, so that themix on stage or in the studio headphones does not changewhen the levels are altered in the control room. Preferences: Storable settings for a program.Pull-down menu: Selection menu which opens when yougrab the parameter input box. Occasionally referred to inthis manual as a flip menu.

Glossary
295
Punch, punch-in, punch-out (Drop in/out): Going into andout of record to record over a section of an existing record-ing.Quantization: Time-correction of note positions by mov-ing them to the nearest point on a selectable grid.Region: Chosen area of an audio file which is registered inthe Audio window for use in the song and, can be placedin the Arrange window on the audio tracks, just like a se-quence can be placed on the MIDI tracks. The regioncould be the whole length of the audio file, or any portionthereof. A region is created automatically after every audiorecording.Replace: Operating mode where a new recording deletesthe previous one (like a tape machine).Rubber band: Technique for selecting items by click-hold-ing the mouse, and lassoing it over a group of adjacentitems.Scroll bars and scroll box: Gray beam at the edge of a win-dow with a movable box inside it for adjusting the sectionof a song displayed in the window.Screenset: Storage location for the layout of the variousMAGIX midi studio generation 6 windows. Each MAGIXmidi studio generation 6 song may store up to 90Screensets.Scrubbing: On tape machines: manually moving the tapeacross the tape head. In a sequencer: manually moving thesong position line through the song, triggering playback ofthe MIDI events.Selecting: Choosing. Selected objects are displayed in in-verted colors.Sends: Abbreviation for auxiliary sends (used for effect ormonitor sends).Sequence: A collection of MIDI events which is shown inthe Arrange window as a horizontal beam with a name onit.SMPTE: Standard for time coding in a specialized soundsignal used for synchronizing different devices. There aresix formats. Acronym for the Society of Motion Pictureand Television Engineers. Specifies the “counter position”of a “SMPTE clock”. Composed of hours, minutes, sec-onds and frames. The MIDI variation of SMPTE is MIDITime Code (MTC).Song Position Line: Vertical line in the Arrange, Matrix andScore windows which indicates the current song position.It can be grabbed with the mouse and moved (see scrub-bing).

Glossary
296
Sound source: General term for MIDI-controllable synthe-sizer, sampler, drum machine, digital piano, etc.SPP, song position pointer: A specific type of MIDI mes-sage which gives the distance from the song start in 1/16notes, and is transmitted along with MIDI clock.SMF (Standard MIDI File): Standard file format for ex-changing songs between different sequencers or MIDIfile players.Status byte: First byte in a MIDI message, which deter-mines the type of message.Subframe: A sub-division of a SMPTE frame, correspond-ing to the individual bits of a SMPTE frame. One frameconsists of 80 bits.Swing: Parameter which alters the rigid timing of a quan-tization grid by delaying every other note of a specifiedsub-division by a definable amount.Synchronization: Method for keeping several recording/playback devices locked together timing-wise.Synchronizer: Unit for centrally controlling the synchroni-zation of several devices.Tick, plural = ticks: The smallest unit of timing resolutionin a sequencer. In MAGIX midi studio generation 6 this is1/3840 note.Timing: Measure of the ability to play notes at the righttime.Toggle: Switches backwards and forwards between twostates (windows, parameter values, etc.)Track column: Situated to the left of the working area ofthe Arrange window. Displays the instruments assignedto various tracks.Undo: Function which reverses the previous operation.Update: 1. New revised and improved version of a pro-gram. 2. Mixer automation mode in MAGIX midi studiogeneration 6, where the old automation data is replaced bynew recordings of existing controllers.VCA: This term has its roots in the analogue synthesizertechnique. The abbreviation stands for Voltage ControlledAmplifier. The level of a signal passing through a VCAwill be controlled by a voltage. Usually, this voltage is beentaken from an envelope generator.VCF: This term has its roots in the analogue synthesizertechnique. The abbreviation stands for Voltage ControlledFilter. The frequency content of a signal passing through aVCF will be controlled by a voltage. Usually, this voltage isbeen taken from a filter envelope generator.Velocity: Force with which a MIDI note is struck; con-trolled by the second data byte of a note event.
Glossary
297
View: Local menu with display options.Virtual memory: Area of the hard disk which can be usedby the PC as an extension of the RAM memory. The disad-vantage in using it is its very slow access time.WAV File: Audio file format in the Windows operatingsystem. Uses the file extension, “.WAV”. Window class: Status of the window as a float window or anormal window. Float windows are not hidden by normalwindows in the same program.Work area: The area of a window in which you edit objects(sequences or events).WYSIWYG: “What You See Is What You Get”. The abilityof a program to accurately display the forthcoming print-out on the screen, e.g. Page View mode in MAGIX midistudio generation 6’s Score window.XG: Extended General MIDI standard from Yamaha,compatible with Roland GS.Zoom function: Shrinking or enlarging the display inMAGIX midi studio generation 6 windows.

Glossary
298

Part 3
audiostudio
Tutorial

300
New features in the generation 6version
– The maximum number of tracks is now 24 for MAGIXaudio studio and 48 for MAGIX audio studio deLuxe.
– Direct Internet connection: Via FTP connection you canuse the internet as a boundless image and sample pooland load audio samples or songs from the World WideWeb directly into your arrangement. The MAGIX webpublishing area is for the publishing of your work – onemouse click takes you into the charts. Every surfer isentitled to vote, the best songs and videos will receiveattractive prices...
– The menu structure of the program has been completelyoverhauled. The numerous menu commands anddialogues have been regrouped and are now easier tolocate.
– MP3 files – like wave files – can be downloadeddirectly, processed, arranged and enhanced with real timeeffects. For MP3 export, the audio studio has a QDesign®
limited encoder for MP3 files valid for 20 applications.After that an upgrade can be bought.
– All supported media formats can be downloaded directlyand processed; no separate conversion is required.
– There are two new mouse modes: time stretching cannow be processed via the object tabs directly in the VIP.For hard disk projects (HDPs), a freehand mode isavailable with which crackling etc. can easily and quicklybe eliminated from the audio material.
– The equaliser, echo/reverb and compressor effects havebeen improved.
– The transport control contains a Jog & Shuttle Wheel,which can be ‘scrubbed’ across the files.

301
Quickstart
When you have installed MAGIX audio studio generation6, a soundcard and a Windows driver, make use of the fol-lowing example to get to know the MAGIX audio studioprocess.Start the audio studio by double clicking the icon in thestart menu in the MAGIX directory.
The first recordingWe will record two stereo tracks for our initial test.Let’s assume that you are using an audio source like a mi-crophone or a musical instrument. Connect this with thehelp of the appropriate cable to the soundcard input.
Preliminary settingsFirst create a 4-track multi-track project. After the programstart you will see a dialogue in which you can select thecreation of a multi-track project. (If not, select the option‘New multi-track project’ (VIP) in the file menu.)This will open the dialogue window “Setup for a new VIP”.– Now please enter the following settings:– 4 tracks (you can use the menu “Edit at any time to ex-
tend the number of tracks in your arrangement)– Sample rate: 44.1 kHz (for a CD quality recording).MAGIX audio studio opens a new, empty project with fourstereo tracks.The Project window can be enlarged to screen size by press-ing the enter key.
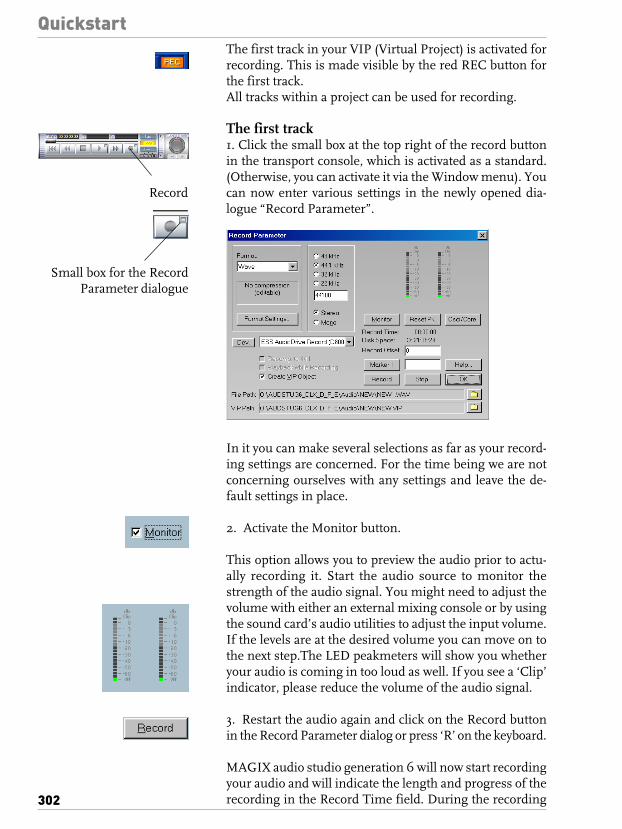
302
QuickstartThe first track in your VIP (Virtual Project) is activated forrecording. This is made visible by the red REC button forthe first track.All tracks within a project can be used for recording.
The first track1. Click the small box at the top right of the record buttonin the transport console, which is activated as a standard.(Otherwise, you can activate it via the Window menu). Youcan now enter various settings in the newly opened dia-logue “Record Parameter”.
In it you can make several selections as far as your record-ing settings are concerned. For the time being we are notconcerning ourselves with any settings and leave the de-fault settings in place.
2. Activate the Monitor button.
This option allows you to preview the audio prior to actu-ally recording it. Start the audio source to monitor thestrength of the audio signal. You might need to adjust thevolume with either an external mixing console or by usingthe sound card’s audio utilities to adjust the input volume.If the levels are at the desired volume you can move on tothe next step.The LED peakmeters will show you whetheryour audio is coming in too loud as well. If you see a ‘Clip’indicator, please reduce the volume of the audio signal.
3. Restart the audio again and click on the Record buttonin the Record Parameter dialog or press ‘R’ on the keyboard.
MAGIX audio studio generation 6 will now start recordingyour audio and will indicate the length and progress of therecording in the Record Time field. During the recording
Small box for the RecordParameter dialogue
Record
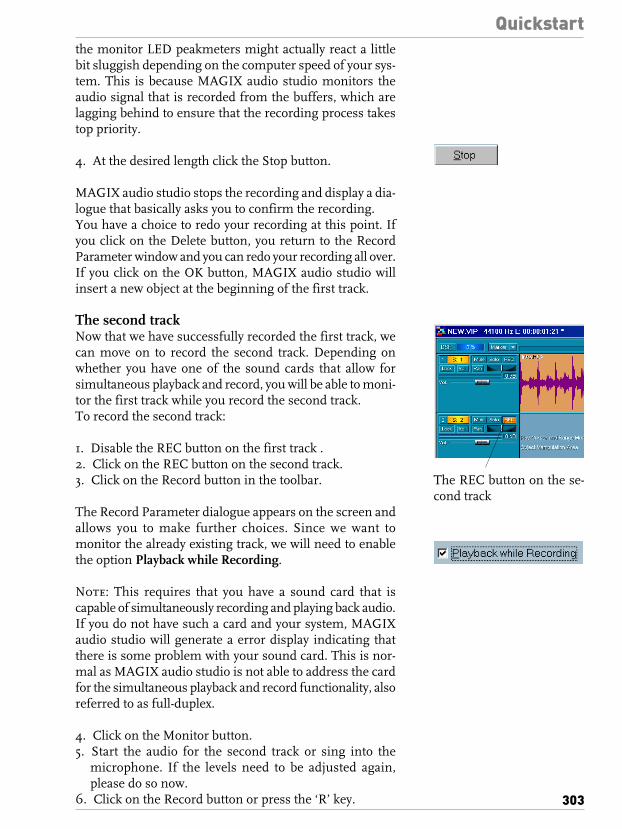
303
Quickstartthe monitor LED peakmeters might actually react a littlebit sluggish depending on the computer speed of your sys-tem. This is because MAGIX audio studio monitors theaudio signal that is recorded from the buffers, which arelagging behind to ensure that the recording process takestop priority.
4. At the desired length click the Stop button.
MAGIX audio studio stops the recording and display a dia-logue that basically asks you to confirm the recording.You have a choice to redo your recording at this point. Ifyou click on the Delete button, you return to the RecordParameter window and you can redo your recording all over.If you click on the OK button, MAGIX audio studio willinsert a new object at the beginning of the first track.
The second trackNow that we have successfully recorded the first track, wecan move on to record the second track. Depending onwhether you have one of the sound cards that allow forsimultaneous playback and record, you will be able to moni-tor the first track while you record the second track.To record the second track:
1. Disable the REC button on the first track .2. Click on the REC button on the second track.3. Click on the Record button in the toolbar.
The Record Parameter dialogue appears on the screen andallows you to make further choices. Since we want tomonitor the already existing track, we will need to enablethe option Playback while Recording.
Note: This requires that you have a sound card that iscapable of simultaneously recording and playing back audio.If you do not have such a card and your system, MAGIXaudio studio will generate a error display indicating thatthere is some problem with your sound card. This is nor-mal as MAGIX audio studio is not able to address the cardfor the simultaneous playback and record functionality, alsoreferred to as full-duplex.
4. Click on the Monitor button.5. Start the audio for the second track or sing into the
microphone. If the levels need to be adjusted again,please do so now.
6. Click on the Record button or press the ‘R’ key.
The REC button on the se-cond track
304
QuickstartMAGIX audio studio generation 6 now starts recording thesecond audio track and at the same time will playback thecontents of the first track.
7. Click the Stop button at the desired location.
The confirmation dialogue appears on the screen. If youclick on OK. MAGIX audio studio inserts another objectinto the second track. If you decide to delete the audio, youhave another chance to record the audio over again.
Note: You can add additional tracks at this point byrepeating the above steps. Depending on the systemconfiguration and power of your computer system, you maybe able to record a number of additional tracks. However,if MAGIX audio studio starts to skip the audio playbackduring the recording process, it is time to reduce thenumber of playback tracks. The skipping of the audio is anindication that either your buffer settings are too low oryour computer system cannot carry all the load. If you runinto problems while recording additional tracks, please seethe chapter on Problems and Solutions.
The first arrangementEvery recording produces an object that can be processedand arranged on the tracks in various ways. In order to moveor delete objects on the track, click the lower half of theobject with the mouse button. By keeping the mouse buttondepressed you can now move the object to any position andtrack you select. The Del button deletes the object from thetrack.
VIPs and WavesA so-called wave project is set up for every object that youcan see in the arranger. You can work essentially with twodifferent project types: arrangements (VIPs) – i.e. multi-track projects with different objects – or wave projects – i.e.the audio material used in the VIPs.When you delete an object in an arrangement, the audiomaterial and corresponding wave project remain in tact.You can access the wave project used in the currentarrangement (VIP) via the window menu. Move across tothe wave project of your recording! As your recording issaved directly onto the hard disk, the corresponding waveproject is allocated the suffix HDP (hard disk project). Whenyou open the HDP you will see a wave presentation of theaudio materials in large format.
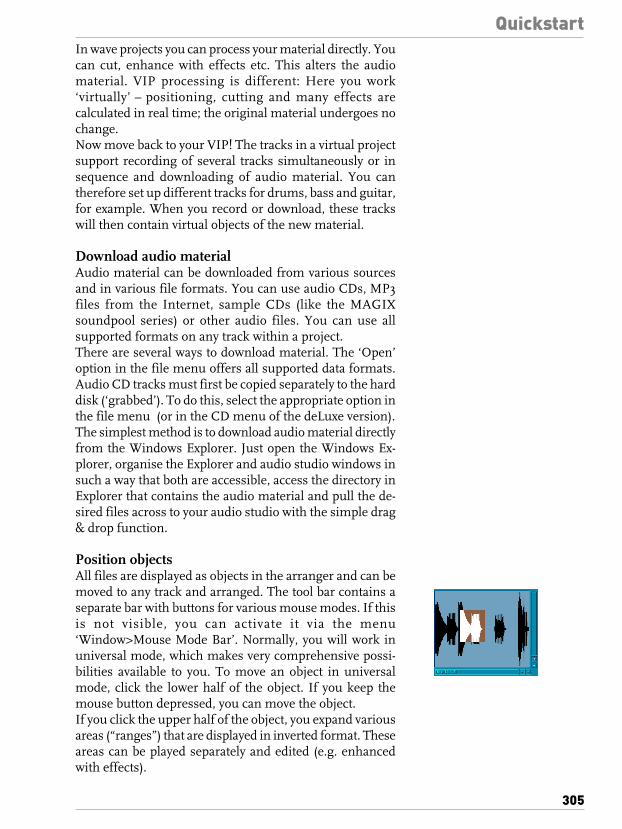
305
QuickstartIn wave projects you can process your material directly. Youcan cut, enhance with effects etc. This alters the audiomaterial. VIP processing is different: Here you work‘virtually’ – positioning, cutting and many effects arecalculated in real time; the original material undergoes nochange.Now move back to your VIP! The tracks in a virtual projectsupport recording of several tracks simultaneously or insequence and downloading of audio material. You cantherefore set up different tracks for drums, bass and guitar,for example. When you record or download, these trackswill then contain virtual objects of the new material.
Download audio materialAudio material can be downloaded from various sourcesand in various file formats. You can use audio CDs, MP3files from the Internet, sample CDs (like the MAGIXsoundpool series) or other audio files. You can use allsupported formats on any track within a project.There are several ways to download material. The ‘Open’option in the file menu offers all supported data formats.Audio CD tracks must first be copied separately to the harddisk (‘grabbed’). To do this, select the appropriate option inthe file menu (or in the CD menu of the deLuxe version).The simplest method is to download audio material directlyfrom the Windows Explorer. Just open the Windows Ex-plorer, organise the Explorer and audio studio windows insuch a way that both are accessible, access the directory inExplorer that contains the audio material and pull the de-sired files across to your audio studio with the simple drag& drop function.
Position objectsAll files are displayed as objects in the arranger and can bemoved to any track and arranged. The tool bar contains aseparate bar with buttons for various mouse modes. If thisis not visible, you can activate it via the menu‘Window>Mouse Mode Bar’. Normally, you will work inuniversal mode, which makes very comprehensive possi-bilities available to you. To move an object in universalmode, click the lower half of the object. If you keep themouse button depressed, you can move the object.If you click the upper half of the object, you expand variousareas (“ranges”) that are displayed in inverted format. Theseareas can be played separately and edited (e.g. enhancedwith effects).

306
Quickstart
Handles (Tabs)All objects in VIP can be shortened or looped, simply leadthe mouse to one of the lower corners of the object untilthe mouse pointer becomes a stretch symbol. Now the ob-ject can be compressed. If the option ‘Create looped object’is activated in the ‘Object’ menu, the object can be stretchedvia the lower right tab. This allows you to create entirerhythm tracks from short drum samples simply by stretch-ing!At the two upper corners there are two fade tabs, which arepulled towards the inside in order to fade the object in orout. The upper middle tab adjusts the volume of the object.
ProcessingAll objects can be cut into several objects. To do this, selectthe option ‘Cut object’ in the ‘Process’ menu or ‘Separateobjects’ in the mouse mode. The mouse pointer becomes ascissors and you can cut the objects into as many smallerobjects as you like.Multiple objects can be consolidated as a group, e.g. to pre-vent inadvertent movement within the group. The first stephere is to mark individual objects.Single objects can be marked simply by clicking the lowerhalf with the mouse button in standard mouse mode. Thethree upper object tabs of a marked object become grey toindicate their selection. Multiple objects can be marked bykeeping the Shift key depressed. If you click with the mousenext to an object on the lower half of track, you can draw arectangle with the depressed mouse button. All objectswithin the rectangle are then marked (‘rubber band selec-tion’).
ExportThe destination for all arrangements and processes is nor-mally an audio file. There are a number of different exportformats, which can be selected via the File menu. In thedeLuxe version, the arrangement can be burned directlyonto an audio CD. All export calculations are independentof the play performance . If the computer experiences re-play difficulties due to an excessive number of objects andeffects, the export file will nevertheless calculate correctly.In the event of computer overload, it is recommendablehere to move already completed passages of complex ar-rangements by export or mix-down function into a singlefile.
Length
FadeVolume

307
Terminology
The following lists some specific terms that where definedto describe components of MAGIX audio studio generation6 that are mentioned frequently throughout thedocumentation. Even if you were somewhat familiar withsome of the particulars, we would like to encourage you toread the definitions for the individual terms. The terms arespecific context related and are not further covered in therest of the documentation. PC typical terms such as button,window, and file requester are not explained here. Pleaserefer to a PC or Windows™ manual for further details onthose terms.
Overview1. Your recordings will be saved as individual Wave projects.
You can edit those projects as a unit or only parts of it(ranges).
2. Multiple Wave projects or different ranges of Waveprojects can be arranged as Virtual projects (VIPs).
3. In virtual multi-track projects, audio tracks will bepositioned and displayed as objects. Within those objectsyou can select ranges, edit them and switch between thedifferent views.
4. Important working functions for audio are the Clip andthe VirtClip that function as a temporary saving spacefor Wave projects and Virtual projects.
5. Important graphical tools are the handles, marker,section and the play cursor. With the use of the handlesand markers you can change and position the objects.In the section you can edit different ranges of the project.The play cursor shows and marks the play-back position.
Terms in alphabetic order:
ClipClip for Audio Data (Wave Projects)The Clip is a storage place for samples from Wave projects,which are copied from a Wave project window and can beinserted in the same Wave project or a different one. Inaddition, the content of the Clip can also be mixed withthat of another Wave project window. The Clip always takeson the attributes of the originating project (Bit Rate, SampleRate, Mono, L&R, or Stereo Mode). The Clip is representedon the screen with a window that contains the word ‘Clip’in its title bar. Otherwise, the Clip is like any other projectthat can be played back, edited and saved with a differentname.

308
Terminology
VirtClip for Virtual ProjectsWhile the Clip is responsible for transferring material fromand to Wave project windows, the VirtClip does this withdata from Virtual projects. Likewise, the window is notinitially opened and displayed.
HandleHandles are the five little rectangles that appear on theoutline of a selected object.
Length Handle: Lower right and left-hand handles. The-se can be used to change the object length.
Fade Handle: Upper right and left-hand handles. Thesehandles change the fade in and fade out of an object.
Volume Handle: Upper middle handle. This handle setsthe volume for the selected object or object group. The levelis displayed in the upper left-hand corner of the VIPwindow.
MarkerMarkers are used to store specific time locations. They areindicated on the upper edge of the sample display by smalltriangles and show any assigned name or number. Thesemarkers can be moved with the left mouse button.Any project can have an unlimited number of markers. Upto 10 of these markers can be accessed through the numberkeys. A marker that has been assigned to one of the numberkeys carries the name ‘1’ through ‘10’. The menu optionRange>Store Marker>Other can be used to store markerswith specific names. These names are displayed next to themarker in the project window.If you click the right mouse button in the area where themarkers are displayed, a context sensitive pop-up menu isdisplayed, which contains additional commands tomanipulate markers.Use the Marker Manager (Menu ‘Tools’ or Marker Contextmenu) to manage and rename markers.To select a range between two markers, click on the triangleof the first marker to activate it, followed by holding theShift key and clicking on the second marker.
ObjectsAudio data is displayed in Virtual projects via rectangles,which are located in multiple tracks. These are the so-calledObjects. An object is a representation of sample material
Length
FadeVolume
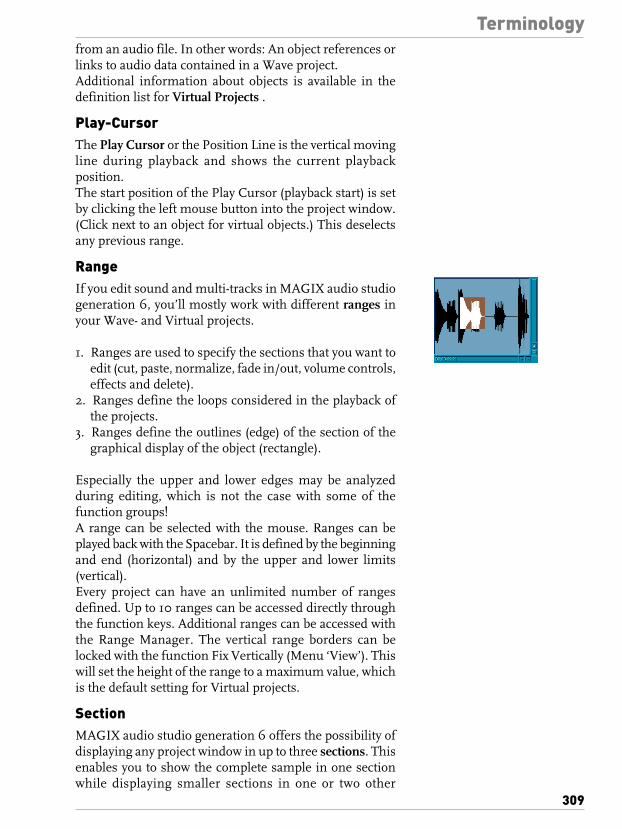
309
Terminologyfrom an audio file. In other words: An object references orlinks to audio data contained in a Wave project.Additional information about objects is available in thedefinition list for Virtual Projects .
Play-CursorThe Play Cursor or the Position Line is the vertical movingline during playback and shows the current playbackposition.The start position of the Play Cursor (playback start) is setby clicking the left mouse button into the project window.(Click next to an object for virtual objects.) This deselectsany previous range.
RangeIf you edit sound and multi-tracks in MAGIX audio studiogeneration 6, you’ll mostly work with different ranges inyour Wave- and Virtual projects.
1. Ranges are used to specify the sections that you want toedit (cut, paste, normalize, fade in/out, volume controls,effects and delete).
2. Ranges define the loops considered in the playback ofthe projects.
3. Ranges define the outlines (edge) of the section of thegraphical display of the object (rectangle).
Especially the upper and lower edges may be analyzedduring editing, which is not the case with some of thefunction groups!A range can be selected with the mouse. Ranges can beplayed back with the Spacebar. It is defined by the beginningand end (horizontal) and by the upper and lower limits(vertical).Every project can have an unlimited number of rangesdefined. Up to 10 ranges can be accessed directly throughthe function keys. Additional ranges can be accessed withthe Range Manager. The vertical range borders can belocked with the function Fix Vertically (Menu ‘View’). Thiswill set the height of the range to a maximum value, whichis the default setting for Virtual projects.
SectionMAGIX audio studio generation 6 offers the possibility ofdisplaying any project window in up to three sections. Thisenables you to show the complete sample in one sectionwhile displaying smaller sections in one or two other

310
Terminologysections. Each section can be accessed and edited inseparately.
Active Section when using Zoom LevelsIf Zoom commands are used on one of the display sections,such as the buttons on the Positionbar, it is important todesignate the section that is to be zoomed. Click on the leftor right scrollbar of a section to activate it.
Virtual Projects (VIPs)Virtual projects are the centerpiece of MAGIX audio stu-dio generation 6! In Virtual projects you can arrange ob-jects taken from multiple Wave projects and arrange com-plex audio projects. All cut operations, volume level changes,fades, and more are completely virtual, meaning that theaudio material is not destroyed! This allows you to selectthe proper cut position, cut length, volume level, effect set-ting, etc. by experimenting without loosing audio materialor alter it.Detailed information about working with Virtual projectscan be found in the electronic Reference Manual.Even if the present audio hardware can only play back upto 2 channels of audio (Stereo), multiple tracks beyond astereo pair can be played back in a Virtual project.The display of the Virtual project can be switched betweentwo definitions. The Tab key allows you to switch betweenthe two modes. The key combination Shift + Tab displaysthe Editor dialog for the Virtual project display preferences.Attributes such as displaying only a single graphic formfor Stereo tracks can be chosen next to whether you wanttext displayed in the objects.
Buttons on the left side of each track in VIPsMute: Mute: Mutes the corresponding track.
Solo: Only this track is played back when this button isactive (independent from any Mute button assignments).
Lock: Objects on this track can no longer be moved.
Vol: Activates the volume automation curve for the track.
Pan: Activates the panorama automation curve for the track.
Rec: Arms the track for recording.
S-Button: activates the track info dialogue where you canactivate the surround mode for each track.
VIP with two objects

311
TerminologySnapshot Buttons in VIPsThe four buttons in the lower left-hand section of the Virtualproject window allow you to save four setups incl. Zoom-Level, Display-Position, and Display Mode. To store a setup,hold the Shift key and click on one of the buttons. A singleclick on the button without holding the Shift key recallsthe stored setup or zoom level. Any changes applied to thewindows will return to the state saved to the button.
Wave projectsA Wave project contains audio data. Access to the Waveproject is obtained by selecting the corresponding Waveproject window. The title bar of the window displays thename of the Wave project, the bit resolution, the length ofthe sample, and the resulting storage requirement. To acti-vate the window, simply click into the project window.MAGIX audio studio generation 6 can work with an un-limited number of Wave project window displayed on thescreen.Working in a Wave project window works much the sameas with conventional sample editing programs and you mayalready be used to those conventions.To perform destructive editing, it is necessary to select arange with the left mouse button.Clicking the right mouse button opens a context sensitivepop-up menu. The menu displays the most importantfunctions for working with destructive processing.Wave projects feature five mouse modes, which can be se-lected in Options>Program Preferences>Wave ProjectMouse Mode or via the mouse mode toolbar.For additional information see Effects. Please keep in mindthat destructive editing is also possible in most cases in anobject oriented fashion in Virtual projects.
RAM and HD Wave ProjectsThe RAM Wave project load their complete content intothe RAM memory of the computer.When working with RAM Wave projects, you can decide atthe end, whether you want to keep the changes or whetheryou want to discard them by simply not saving the changesto the file stored on the hard disk. Since the material iscompletely loaded into the RAM memory of the computer,any changes will be lost unless they are saved to the filestored to the hard disk (Shortcut: ‘s’).This method of editing and processing is equivalent to thecomputer’s native behavior. However, with large datacontent as is the case with audio files, the computer suffersfrom extreme speed loss since the operating system starts

312
Terminologyto transfer the memory contents to the virtual memory fileon the hard disk.Any editing or processing applied to HD Wave projects areimmediately written back to the hard disk file, as is thecase with conventional tape recorders. Prudence is sug-gested when using the editing options in the menu Effectsand any commands in the Edit menu to prevent any acci-dental loss of audio material.For test or preview purposes, please follow the outlinedbelow:First, work on a copy of the audio material. To accomplishthis, copy the selected range into the Clip (Shortcut: ‘c’).Open or activate the Clip window and select the completecontents of the window (Shortcut: ‘a’). Any processing cannow be applied to the Clip contents.
Mono, L&R, and Stereo Wave ProjectsMono: Contains mono audio data.
Stereo: Stereo audio with a standard one-channel graphicaldisplay (combined display of both stereo channels).Contains stereo audio data. The sample values for the rightand left channels are contained in the same file in successiveorder.It is also possible to display both stereo channels. To switchthe display select View > VIP Display Mode > Definition >Stereo in 2.
L&R: Stereo audio with two-channel graphical display (se-parate display of both tracks). Contains two mono samples(mono audio data) for both stereo tracks.Using L&R projects in MAGIX audio studio is onlynecessary as a transitional step to convert a stereo Waveproject into two mono projects and vice versa.All types of Wave projects (Mono, L&R, Stereo) can be usedin the same VIP. To play back L&R Wave projects in stereo,the parameters for the two (mono) tracks need to be set to‘left’ and ‘right’ respectively.

313
Virtual Editing Concepts
Working with ObjectsIntegrating an audio file as a VIP ObjectMethod 1: Loading a File into a VIP
Mark a range in the VIP and load the WAV file withFile>Open Project>Audio File. The file is inserted at thebeginning of the selected range as an object. The rangealso denotes the track into which the WAV file is inserted.
Method 2: Drag & Drop from the Explorer
You may use the Windows Explorer to drag & drop audiofiles into the VIP. The program automatically creates objectsand their associated HD Wave projects.
Integrating a WAV File Range as a VIP ObjectOpen a Wave Project. Mark a range, which is to be incorpo-rated into a Virtual project (Complete Range: key ‘a’). Cre-ate a new Virtual project with File>New Multi Track Project(Shortcut: ‘e’) or with the corresponding button in thetoolbar. Tile the open windows by pressing the ‘Enter’ key.Drag the selected range in the Wave project into the Vir-tual project by clicking the left mouse button into the rangeand dragging the range into a VIP track. A new object iscreated in the VIP at the position the mouse button wasreleased.

314
Virtual Editing ConceptsAccessing Audio Material in an ObjectSelect any object. In the menu Object, select ”DestructiveEditing”. (The same menu option is available from the con-text sensitive menu when clicking the right mouse buttonon the object.) This opens the corresponding Wave projectwindow. The marked range represents the audio materialthat is used in the VIP object.
Selecting an Object with the MouseClicking the left mouse button selects the desired object.Prerequisite for this is the selection of the correct MouseMode: Object Mode, Object & Curve Mode, and UniversalTool Mode all offer this functionality. In the Universal ToolMode, the object is selected by clicking on the lower half ofthe object.The five handles on the outline of the objects identify anyselection of objects. While the mouse button is held clicked,the outline of the object is also displayed.Clicking the mouse button outside of the object confinesdeselects any object selection.Also, see the information in Details about the IndividualMouse Modes .
Selecting Multiple Objects with the MouseIf the Shift or Ctrl key is pressed in addition to a mouseclick, additional objects are selected without undoing anyprevious object selection.Prerequisite for this is the selection of the correct MouseMode: Object Mode, Object & Curve Mode, and UniversalTool Mode all offer this functionality. In the Universal ToolMode, the object is selected by clicking on the lower half ofthe object.Another method of selecting multiple objects is the use ofthe Object Lasso. Simply click the left mouse button at anempty VIP track pane location to the left of the desiredobjects and drag a marquee (Object Lasso) around the objectyou would like to select. Once the mouse button is released,the object covered by the Object Lasso will be selected.Also, see the information in Details about the IndividualMouse Modes .
Moving and Duplicating ObjectsAny object selection can be moved (dragged) along the ho-rizontal time line or vertically into different tracks by clickingand holding the left mouse button on one of the selectedobjects. After releasing the mouse button, the objects appearat the new location.
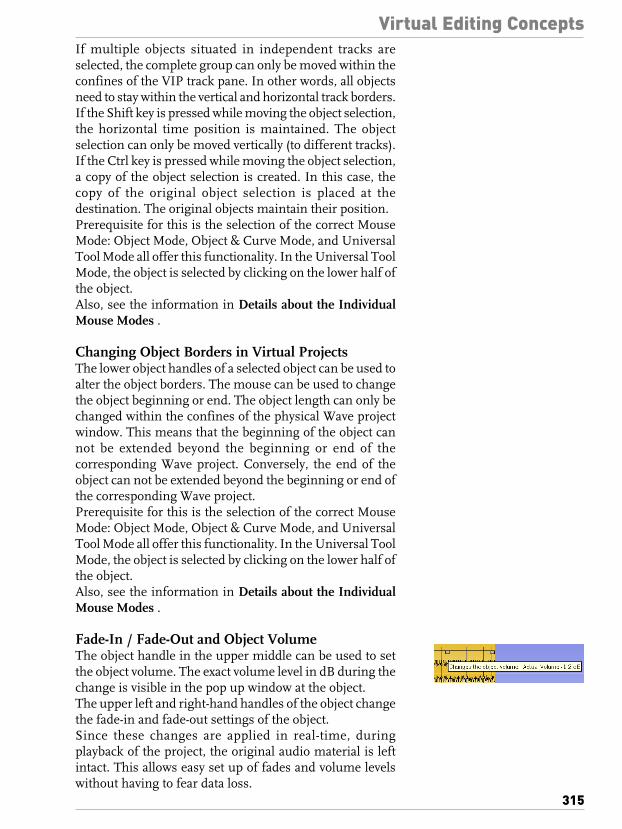
315
Virtual Editing ConceptsIf multiple objects situated in independent tracks areselected, the complete group can only be moved within theconfines of the VIP track pane. In other words, all objectsneed to stay within the vertical and horizontal track borders.If the Shift key is pressed while moving the object selection,the horizontal time position is maintained. The objectselection can only be moved vertically (to different tracks).If the Ctrl key is pressed while moving the object selection,a copy of the object selection is created. In this case, thecopy of the original object selection is placed at thedestination. The original objects maintain their position.Prerequisite for this is the selection of the correct MouseMode: Object Mode, Object & Curve Mode, and UniversalTool Mode all offer this functionality. In the Universal ToolMode, the object is selected by clicking on the lower half ofthe object.Also, see the information in Details about the IndividualMouse Modes .
Changing Object Borders in Virtual ProjectsThe lower object handles of a selected object can be used toalter the object borders. The mouse can be used to changethe object beginning or end. The object length can only bechanged within the confines of the physical Wave projectwindow. This means that the beginning of the object cannot be extended beyond the beginning or end of thecorresponding Wave project. Conversely, the end of theobject can not be extended beyond the beginning or end ofthe corresponding Wave project.Prerequisite for this is the selection of the correct MouseMode: Object Mode, Object & Curve Mode, and UniversalTool Mode all offer this functionality. In the Universal ToolMode, the object is selected by clicking on the lower half ofthe object.Also, see the information in Details about the IndividualMouse Modes .
Fade-In / Fade-Out and Object VolumeThe object handle in the upper middle can be used to setthe object volume. The exact volume level in dB during thechange is visible in the pop up window at the object.The upper left and right-hand handles of the object changethe fade-in and fade-out settings of the object.Since these changes are applied in real-time, duringplayback of the project, the original audio material is leftintact. This allows easy set up of fades and volume levelswithout having to fear data loss.

316
Virtual Editing ConceptsPrerequisite for this is the selection of the correct MouseMode: Object Mode, Object & Curve Mode, and UniversalTool Mode all offer this functionality. In the Universal ToolMode, the object is selected by clicking on the lower half ofthe object.Also, see the information in Details about the IndividualMouse Modes .
Overlapping ObjectsA track (channel) can only play back one object at a time. Ifone object is moved over another object, the previous objectis partially or completely taken out of the playback list muchlike one sheet of paper covers another partially orcompletely. The invisible part of a covered object will notbe audible. By moving the covering object out of the way,the covered section or the complete object can be madeaudible again. To create a crossfade between two objectsthat are intersecting each other, the Crossfade Editor in themenu Edit can be used.
Working with RangesSelecting the Correct Mouse ModeInitially, the correct mouse mode needs to be selected, sincethe mouse is the center point of any range manipulation.In Virtual projects, the Range mode and the Universal Toolmode (upper track pane) are available. In Wave projects,the Range mode can be used to select and manipulateranges.
Selecting a RangeA range can be selected from any position to the next byclicking with the left mouse button into the waveform.Hold the mouse key and move the cursor within the range/waveform.The selected range will appear as an inverse rectangle. Re-lease now the mouse button. In the Textile right under theheader of the project window you will see the horizontaledges of the selected range.If you want to select a different range, just click into thearea next to the inverse rectangle, but still within thewaveform. The previous range will disappear and you areable to select a new range.
Adjusting a RangeClick into the inverse rectangle if you want to extend orshorten the size of the selected range. Move the cursor (holdthe mouse key down) into the direction in which you wantto extend to. As soon as you slide over the edge of the
317
Virtual Editing Conceptsrectangle, the selected range will follow your mousemovements. When you are done with the adjustments,release the left mouse button. In this way you can moveone edge only to the desired position while maintainingthe correct limits.If the entire waveform is already selected and you still wantto adjust only one edge of the rectangle then you have twopossibilities:Either you have another area that is not within the selectedrange and you can click in there. The previously selectedrange disappears and a very small range will appear. Nowyou can define a new area within the previously selectedrange.Another way is to press the key 7 (Home) or 1 (End) on thenumeric key block on your keyboard. Those are the shortcutcommands to place the marker to the start and end of arange. The previously selected reange disappears and youcan select a new one.You can also find those functions in the menu Range. Inaddition to that you can use key 4 (cursor left) and key 6(cursor right) to scroll the range to the left or right.
De-Selecting a RangeIf you want to select a different range or want to deactivatethe current range selection, click the mouse button onceinto the project window. The previous range disappears andthe window can be used to select a new range.
Changing a RangeIf you want to change an already selected range outline(beginning, end, upper, and lower border), simply click theleft mouse button into the range and while holding thebutton, move the mouse in the direction you want to extendor shorten the range. As soon as the mouse pointer crossesover the current range border, the program picks up theborder and snaps it to the mouse pointer. You now canmove the range border to the new point and release themouse button.
Moving a Range HorizontallyHold the Ctrl or Shift key while clicking inside a range.Next, hold the left mouse button clicked and move the rangeto the new position. Release the mouse button to place therange at the new location.
Saving Ranges and Special Range CommandsRanges and markers can be saved with the help of menufunctions or keyboard shortcuts.

318
Virtual Editing ConceptsMAGIX audio studio generation 6 can store an unlimitednumber of ranges and markers. These and other specialfunctions to define, change, and use ranges can be foundin the menu Ranges.To manage saved ranges, use the Range Manager (Menu‘Tools’).
Moving of Ranges in Small Increments (KeyboardShortcuts)By holding the Shift key and using the cursor keys, rangescan be moved in small increments. An overview of allkeyboard shortcuts can be found in the Shortcuts section.
Changing Range Ends in Increments Using theMouseThis is most often needed when searching for optimizedloop borders in Wave projects. The sections can be splitwith a keyboard shortcut (Shortcut: ‘b’) or with Range>SplitRange. All range borders are displayed with a high-resolution zoom level.Using Shift + b returns the display to a single section.
Playback of a rangeSimply press the space key to playback selected samples.There are 3 different types of playback. You can controlwith the 3 buttons in the top tool bar.The first one plays the sample or range once,the second plays the sample or range looped,the third plays the sample from the beginning and playsinto a loop which is very handy for testing of instrumentalloops. If a certain range is selected, that selection will beplayed back again and again.When you adjust the range (while playback) it will play thenew range immediately. If only a marker is set but not arange, it will only play from the start of the marker to theend of the sample. When you set a marker within a range,it will play a loop from the marker to the end of the range.You can stop the playback with the space key. The All bitresolutions can be reflected immediately. Conversion of thedata works in real-time meaning while playback. Thatmeans also a high CPU activity, and sometimes the CPU isoverloaded or not able to process the request at once andthe system stops and/or doesn’t react to any regular stopand play commands. In this case, you can press ESC tointerrupt the conversion process.

319
Virtual Editing Concepts
Shortcuts for range editing– Cursor left, right: The active range scrolls to the left or
right– Cursor left + shift: The edge or the active range will be
moved smoothly to the left.– Cursor right + shift: The edge or the active range will be
moved smoothly to the right.– Cursor left + Ctrl: Zoom into the active range– Cursor right + Crtl: Zoom out of the active range– Cursor left + shift + Ctrl: The selected range will be
doubled to the left. This function is very handy whenyou search for Drumloops: When you have selected abar in a Rhythm sample, you can use this function toselect the previous bar. This will also easier the use ofthe Virtual projects.
– Page Up: The beginning of the range will be adjusted tothe next smaller volume leve (to avoid glitch/disturbingnoises).
– Page Up + shift
VolumeThe volume levels of objects and tracks/channels can bechanged at various stages. Here is an overview of the diffe-rent possibilities:
Wave Project LevelThe volume level changes are applied to the audio materialwith Effects>Normalize>Normalize File or with Fade In/Out.The audio data is changed. The computer usage is notaffected during playback.
Object LevelEvery object can have an independent setting for its volumelevel. This can be performed by changing the upper handlesof the object or with Effects>Amplitude/Normalize>Normalize Object.The audio data is not changed. The calculations areperformed in real-time during playback.
Track LevelThe volume of every track can be changed dynamically withthe volume automation curve and the volume fader in theMixer or the VIP.The audio data is not changed. The calculations areperformed in real-time during playback.

320
Virtual Editing ConceptsAlso, see Effect Calculations and Signal Manipulations inEffects.
Output modusYou can setup the output modus in the Playback parameterdialog (key P).With the sample rate option you can choose a differentsample rate as playback. With Device you can select thedesired playback device (if you have more then one activesoundcard).Please note that some soundcards are not be able to playbackall sample rates.

321
Tips & Tricks
A few tricks that help make working with MAGIX audiostudio generation 6 easy:
Working in Projects– The a key will select the complete sample as a range.– With the keys Home and End you can set the play cursor
to the beginning or end; all selected ranges will disappear.– A range can be selected from one exact marker position
to the next by clicking on the marker above the waveform.Next, hold the Shift key and click on the second marker.
– Using the Shift + mouse click a range can be movedhorizontally.
– Shift + Ctrl + Cursor keys will flip a range to the right orleft. This is a great way of testing a loop at a differentposition.
– Objects in Virtual projects can be displayed in two diffe-rent modes. By pressing the Tab key you alternatebetween the modes. Pressing Shift + Tab will open adialog window in which you can set the parameters ofthe display modes.
– Using Ctrl + mouse click on an object copies the object.– Double-clicking the mouse button on the volume curve
you can create and delete volume handles. Activate thevolume automation curve with the V-button in each trackof the VIP!
– Change the function of the mouse buttons in VIPs withthe menu Preferences>Mouse Mode or use one of theMouse Mode buttons in the Mouse Mode toolbar!
– The function Lock Objects allows you to lock objects toprevent for example accidental movement. This isespecially useful for multi track recording when theindividual tracks need to stay in sync with each other.
– To determine the tempo of a selected range (BPM), openthe Snap Definition dialog (Shift + ‘r’) and select thenumber of beats the selected range represents (forexample: 4) in the Section Free Bar Snap. Next, click onthe button Get Range in the section Free Bar Snap toretrieve the length of the selected range. The BPM displayin the Fixed Bar Snap section now displays the BPM ofthe audio section.
– Try the right mouse button on various components ofthe VIP window! A context sensitive pop-up menu isdisplayed, which features useful functions depending onthe window component you clicked on. Among themare objects, Record and Mute buttons, and the scrollbars.

Tips & Tricks
322
– The Delete key deletes markers when the Play Cursor(real-time cursor) is located exactly on the marker. Thesame key deletes any selected objects and deletes rangesthat are selected.
– The key t separates a selected object at the position ofthe Play Cursor. If a range is selected within the object,the object is separated on the range borders, which resultsin three objects. If the Auto Crossfade mode is activewhile the separation takes place, MAGIX audio studioadds smooth crossfades at the separation points. Thesecrossfades can later be edited for further refinement. Usethe Crossfade Editor to change the crossfade aspects.
– Multiple zoom levels can be saved to the four Z buttonsin the lower left-hand corner of the Virtual projectwindow. Use the Shift + left mouse click to store a zoomlevel to a specific preset button. When clicking on apreviously assigned preset button, the zoom level isrecalled. The S preset buttons can be used with the Shift+ left mouse click to store a complete windowconfiguration set. This includes the scroll position of thewindow and the Mute/Solo assignments for the tracks.This offers four Mute/Solo groups that can be quicklyrecalled.
– Multiple objects can be selected by holding the Ctrl keyand individually clicking on the desired object.
– Objects between two points can be selected by holdingthe Shift key and clicking the mouse button behind thelast object you want to select.
– WAV, HDP, and RAP Projects, as well as stored objectscan be opened with the Windows Explorer by draggingthem from the Explorer window to the MAGIX audiostudio window. A special menu option is available to openthe Explorer from within MAGIX audio studio withTools> Explore the HDP Directory. The default folderopened in Explorer is the same as the HD-Project settingin the System dialog (Shortcut:‘y’).
– Shift + Tab can be used to display the VIP Display Modedialog. This dialog allows you to change the VIP Displayaspects such as the VIP window behavior when an objector range is moved toward the confines of the currentlydisplayed window borders (VIP Border Scroll).
– When pressing the Return key, all open windows aretiled on the MAGIX audio studio screen. This is a goodstarting point when using drag & drop functionality tomove ranges and objects between individual projectwindows.

Tips & Tricks
323
– Use the menu option Edit>Edit Tracks to manipulatecomplete tracks. This includes adding new tracks,inserting tracks and rearranging tracks.
Mixer– Clicking the right mouse button on a Mixer effect control
knob or element opens the associated effect dialog.– A double click on the middle of a control knob or element
returns it to the passive default setting. Another doubleclick resets the element to the previous position.
– Clicking on the left or right outer limits of a control knobchanges the setting in individual increments.
– In the Mixer window, multiple channels can be soloedsimultaneously. When holding the Shift key and clickingon a Solo button, all previously soloed channels are un-soloed and the single channel is soloed.
– The Master Normalization function in the Mixer windowcan be used to instantaneously adjust the output level to0 dB, no matter how loud or soft the master output signalis.
Performance– It often helps to run two copies of MAGIX audio studio
at the same time (simply start it twice from the Desktop).This allows you to work on an extensive effect processing,a longer recording, the creation of a CD, or any otherunattended procedure, while working on another aspectof a second VIP or project. When working on dualprocessor systems in Windows NT, both instances usethe full capacity of one of the processors. Even underWindows 95 this technique can be used to work moreeffectively. Make sure you disable the option Check SpaceBar for Play Back… in the System dialog (Shortcut: ‘y’) toprevent the program in the background to stop anyprocess.
– After installation, the VIP Buffer size is set to 16,000Stereo samples (System Dialog – Shortcut: ‘y’). Thissetting enables all effects in the Master section of theMixer window with an optimum hard disk performance.If you only work with a small number of VIP tracks anddo not use the FFT Filter in the Master section of theMixer, you may reduce the buffer size up to theminimum of 2,000 Stereo samples. The Start/Stopresponds much faster and the Scrubbing (using thekeypad ‘0’ key) works much smoother.
Tips & Tricks
324
Recording/Playback– The Recording window can be displayed by pressing the
shortcut key r. The recording can be started with the keyr and stopped with the key s when the Recording windowis displayed and active.
– The playback can be started and stopped with theSpacebar. When stopping, the Play Cursor returns to theoriginal position. If the playback is stopped with the 0key on the numeric keypad, the cursor will stop at thecurrent playback position. Continuing to hold the 0 key,while moving the mouse (Scrubbing) can alter the exactposition.
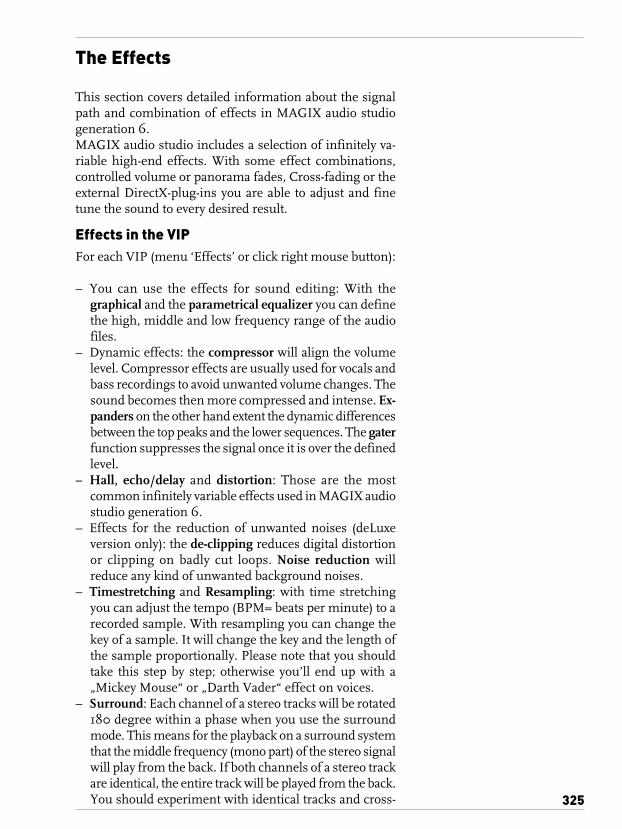
325
The Effects
This section covers detailed information about the signalpath and combination of effects in MAGIX audio studiogeneration 6.MAGIX audio studio includes a selection of infinitely va-riable high-end effects. With some effect combinations,controlled volume or panorama fades, Cross-fading or theexternal DirectX-plug-ins you are able to adjust and finetune the sound to every desired result.
Effects in the VIPFor each VIP (menu ‘Effects’ or click right mouse button):
– You can use the effects for sound editing: With thegraphical and the parametrical equalizer you can definethe high, middle and low frequency range of the audiofiles.
– Dynamic effects: the compressor will align the volumelevel. Compressor effects are usually used for vocals andbass recordings to avoid unwanted volume changes. Thesound becomes then more compressed and intense. Ex-panders on the other hand extent the dynamic differencesbetween the top peaks and the lower sequences. The gaterfunction suppresses the signal once it is over the definedlevel.
– Hall, echo/delay and distortion: Those are the mostcommon infinitely variable effects used in MAGIX audiostudio generation 6.
– Effects for the reduction of unwanted noises (deLuxeversion only): the de-clipping reduces digital distortionor clipping on badly cut loops. Noise reduction willreduce any kind of unwanted background noises.
– Timestretching and Resampling: with time stretchingyou can adjust the tempo (BPM= beats per minute) to arecorded sample. With resampling you can change thekey of a sample. It will change the key and the length ofthe sample proportionally. Please note that you shouldtake this step by step; otherwise you’ll end up with a„Mickey Mouse“ or „Darth Vader“ effect on voices.
– Surround: Each channel of a stereo tracks will be rotated180 degree within a phase when you use the surroundmode. This means for the playback on a surround systemthat the middle frequency (mono part) of the stereo signalwill play from the back. If both channels of a stereo trackare identical, the entire track will be played from the back.You should experiment with identical tracks and cross-

The Effects
326
fadings. When you cross-fade two identical stereo tracksand one track will be played in surround mode you canfade the middle tone part slowly from the front to theback speakers. You can activate the surround mode viathe track info dialogue at the left end of each track.
Mixer-EffectsIm mixer window you will find more real-time effects foryour mastering:– a graphical three-band equalizer for each track– a stereo enhancer for editing the stereo pans, echo– a FFT-filter to filter selected frequencies in order to edit
the sound fields.
Effect Calculations and Signal ManipulationsWhen working with MAGIX audio studio generation 6,audio material manipulation can be performed on fivelevels. The signal flows through these five levels insequence:
1. Wave Editing (Destructive Editing),2. Manipulations on the object level in Virtual projects
(Real-time Processing),3. Volume and panorama automation, including track
volume fader in the Mixer or VIP (Real-time Processing),4. Real-time effects in the Mixer tracks (Real-time
Processing),5. Real-time effects in the Mix Master section (Real-time
Processing).
Significance fo the Effect Processing and Signal Ma-nipulation OrderThe sequence of the effect processing and othermanipulations (volume and panorama automation) oftenaffects the result. Some effects depend on the input signallevel.When working with volume, panorama, and filtermanipulations, the sequence is not important. For example,it is of no significance whether you first apply a filterfunction and then change the volume or vice versa. Evenwhen working with a multiple of effects, the input signallevel is unimportant. Among them are the Reverb, the Delay(Echo), Resampling and Timestretching, or Pitch Shifting.However, all Dynamics functions and those that remove orreduce noise (Dehisser and Noise Reduction) are dependenton the input signal level and in some cases on the frequencyresponse of the input signal. If you have found an optimal
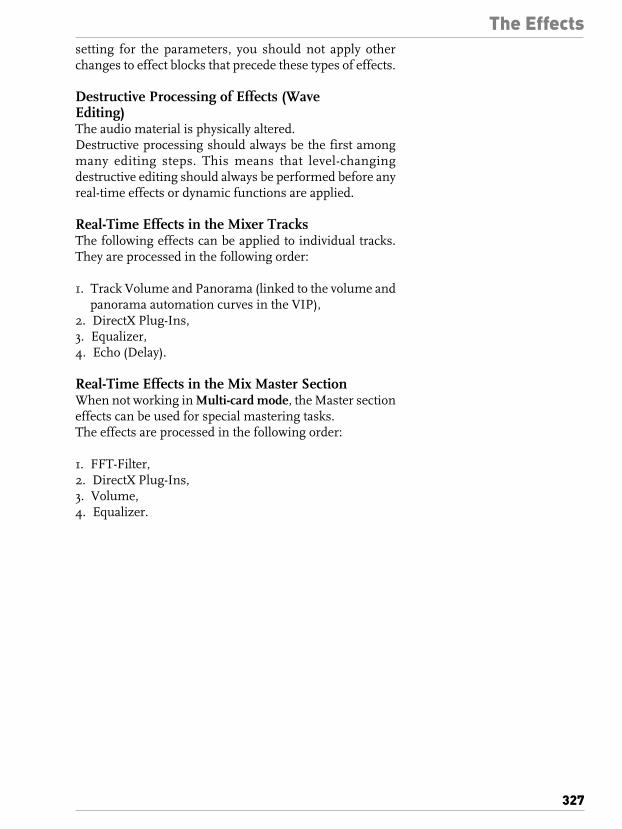
The Effects
327
setting for the parameters, you should not apply otherchanges to effect blocks that precede these types of effects.
Destructive Processing of Effects (WaveEditing)The audio material is physically altered.Destructive processing should always be the first amongmany editing steps. This means that level-changingdestructive editing should always be performed before anyreal-time effects or dynamic functions are applied.
Real-Time Effects in the Mixer TracksThe following effects can be applied to individual tracks.They are processed in the following order:
1. Track Volume and Panorama (linked to the volume andpanorama automation curves in the VIP),
2. DirectX Plug-Ins,3. Equalizer,4. Echo (Delay).
Real-Time Effects in the Mix Master SectionWhen not working in Multi-card mode, the Master sectioneffects can be used for special mastering tasks.The effects are processed in the following order:
1. FFT-Filter,2. DirectX Plug-Ins,3. Volume,4. Equalizer.

328
Internet-Functions
MAGIX audio studio generation 6 is equipped with a di-rect Internet connection for down- and uploads of songsand audio files.
Web Publishing (Upload)You can very easily publish your own songs in the Internet,so that they can be heard by all Internet users around theworld. The only prerequisite is perfectly normal Internetaccess – modem, ISDN or DSL.As soon as you have created a good personal song withMAGIX music studio, you can ‘upload’ it with Web Pub-lishing Wizard and tell all your friends that they can listenin via the MAGIX Web Publishing Area! Everyone can vote;the votes submitted are used to generate a chart list, andthe most successful titles stand to win prizes and maybeeven contracts...If you exclusively use material from the MAGIX soundpoolCDs for your song, the song will be available immediatelyin the Internet in the MAGIX Web Publishing Area. If othermaterial is contained, e.g. own recordings, a check mustfirst be run to ensure that publication is legally permissible– then it can take a few hours before your song is online. Itis expressly prohibited to upload copyright protected mate-rial, specifically music from commercial CDs, for example!If you have completed a good arrangement, save it beforeyou do anything else. Then select the option ‘Publish toweb’ in the file menu.The first window of the ‘Publishing Wizard’ will open andaccompany you through the process. You must agree tothe licence stipulations displayed prior to continuation ofthe process.On the second page, enter your name and a song title –these will be used later for the online search process. It isalso useful to add a style type (genre), so that one can selecta favourite style when listening to songs. Then enter you e-mail address, in case there are any questions or commentsabout your song.Your name, the song title, the genre and your e-mail ad-dress are important details for the inclusion of your songin the Web Publishing Area, so thy must be correctly andcarefully entered. You can decide whether you e-mail ad-dress should be published in the Internet or not.On the next page, you enter the optimum Internet downloadspeed for the song. The pre-set is 56 kbit/seconds, whichrepresents the right rate for most modems and ISDN cards.
MAGIX web publishing area
Online radio
Online monitor
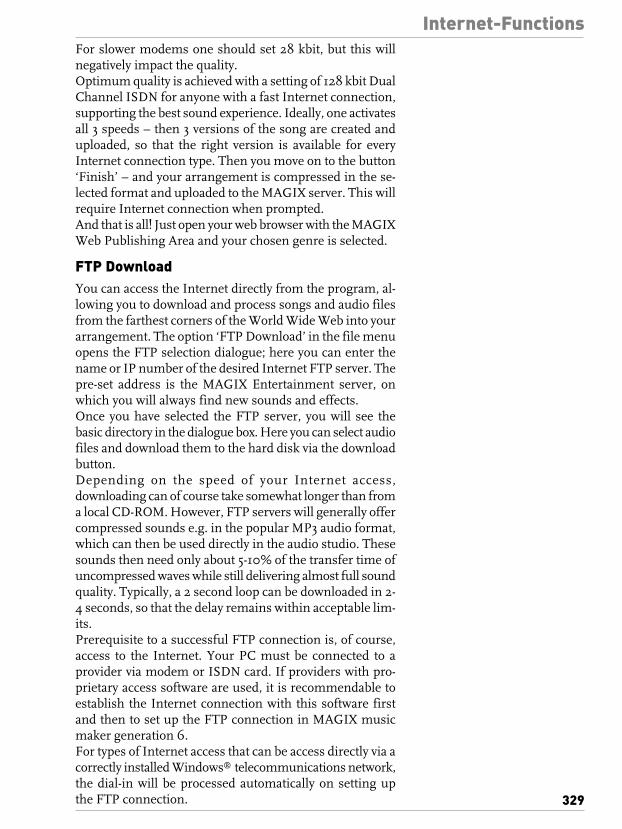
Internet-Functions
329
For slower modems one should set 28 kbit, but this willnegatively impact the quality.Optimum quality is achieved with a setting of 128 kbit DualChannel ISDN for anyone with a fast Internet connection,supporting the best sound experience. Ideally, one activatesall 3 speeds – then 3 versions of the song are created anduploaded, so that the right version is available for everyInternet connection type. Then you move on to the button‘Finish’ – and your arrangement is compressed in the se-lected format and uploaded to the MAGIX server. This willrequire Internet connection when prompted.And that is all! Just open your web browser with the MAGIXWeb Publishing Area and your chosen genre is selected.
FTP DownloadYou can access the Internet directly from the program, al-lowing you to download and process songs and audio filesfrom the farthest corners of the World Wide Web into yourarrangement. The option ‘FTP Download’ in the file menuopens the FTP selection dialogue; here you can enter thename or IP number of the desired Internet FTP server. Thepre-set address is the MAGIX Entertainment server, onwhich you will always find new sounds and effects.Once you have selected the FTP server, you will see thebasic directory in the dialogue box. Here you can select audiofiles and download them to the hard disk via the downloadbutton.Depending on the speed of your Internet access,downloading can of course take somewhat longer than froma local CD-ROM. However, FTP servers will generally offercompressed sounds e.g. in the popular MP3 audio format,which can then be used directly in the audio studio. Thesesounds then need only about 5-10% of the transfer time ofuncompressed waves while still delivering almost full soundquality. Typically, a 2 second loop can be downloaded in 2-4 seconds, so that the delay remains within acceptable lim-its.Prerequisite to a successful FTP connection is, of course,access to the Internet. Your PC must be connected to aprovider via modem or ISDN card. If providers with pro-prietary access software are used, it is recommendable toestablish the Internet connection with this software firstand then to set up the FTP connection in MAGIX musicmaker generation 6.For types of Internet access that can be access directly via acorrectly installed Windows® telecommunications network,the dial-in will be processed automatically on setting upthe FTP connection.
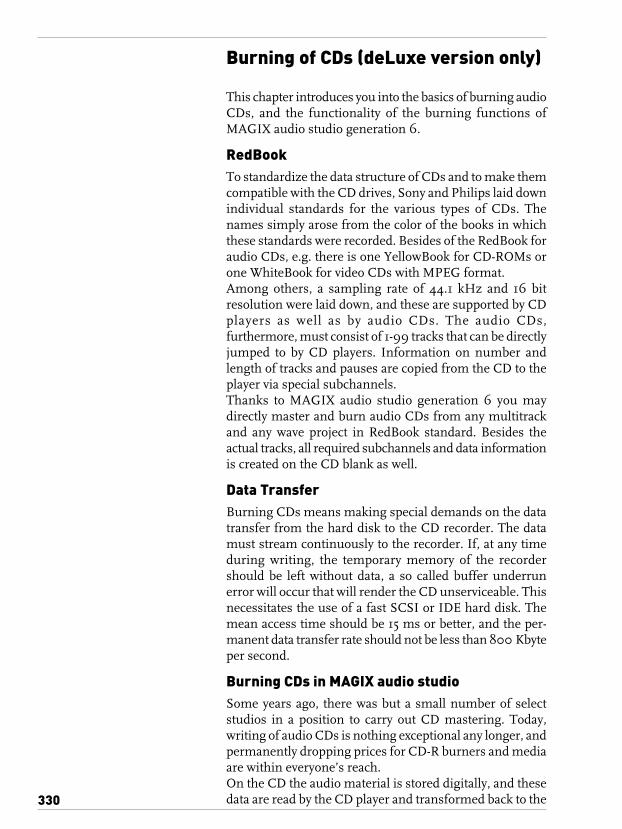
330
Burning of CDs (deLuxe version only)
This chapter introduces you into the basics of burning audioCDs, and the functionality of the burning functions ofMAGIX audio studio generation 6.
RedBookTo standardize the data structure of CDs and to make themcompatible with the CD drives, Sony and Philips laid downindividual standards for the various types of CDs. Thenames simply arose from the color of the books in whichthese standards were recorded. Besides of the RedBook foraudio CDs, e.g. there is one YellowBook for CD-ROMs orone WhiteBook for video CDs with MPEG format.Among others, a sampling rate of 44.1 kHz and 16 bitresolution were laid down, and these are supported by CDplayers as well as by audio CDs. The audio CDs,furthermore, must consist of 1-99 tracks that can be directlyjumped to by CD players. Information on number andlength of tracks and pauses are copied from the CD to theplayer via special subchannels.Thanks to MAGIX audio studio generation 6 you maydirectly master and burn audio CDs from any multitrackand any wave project in RedBook standard. Besides theactual tracks, all required subchannels and data informationis created on the CD blank as well.
Data TransferBurning CDs means making special demands on the datatransfer from the hard disk to the CD recorder. The datamust stream continuously to the recorder. If, at any timeduring writing, the temporary memory of the recordershould be left without data, a so called buffer underrunerror will occur that will render the CD unserviceable. Thisnecessitates the use of a fast SCSI or IDE hard disk. Themean access time should be 15 ms or better, and the per-manent data transfer rate should not be less than 800 Kbyteper second.
Burning CDs in MAGIX audio studioSome years ago, there was but a small number of selectstudios in a position to carry out CD mastering. Today,writing of audio CDs is nothing exceptional any longer, andpermanently dropping prices for CD-R burners and mediaare within everyone’s reach.On the CD the audio material is stored digitally, and thesedata are read by the CD player and transformed back to the

331
Burning of CDs (deLuxe version only)analog plane. While in action, track indexes show the CDplayer which song starts at what position.MAGIX audio studio can write an audio CD directly outfrom the program too. Before the write process starts, thetrack indexes are directly set in the VIP window. ThenMAGIX audio studio converts stereo sum and indexes intoa data stream that is fed to the CD burner.The CD-R drive modifies an assigned layer of the mediumby means of a laser such that an audio CD player can readthis information as digital audio data later on.
1. In order to write an audio CD the VIP window must atfirst contain audio material. You may either record it newor import existing wave files into the virtual project.
In theory, multiple-track projects might be written in anynumber of tracks onto the CD in realtime. Reality sets alimit that is determined by the capacity of the computer. Ifthe computer produces intermittent faults this may be anindication that the writing process onto the CD won’tfunction in realtime any longer too. In this case create asingle stereo file by trackbouncing first, import it into anew VIP window, and there you set the track indexes now.
2. Mix your recordings by means of the realtime functionsof the VIP window and the mixer window. The CD willlater sound exactly like you will hear the playback via astereo sound card. All settings for the playback will beaudible on the CD too.
You may arrange the individual tracks or objects by theequalizer, compressor or delay, and upgrade the stereo sumwith master effects such as the stereo enhancer. You may,furthermore, adjust sound conditions by means of theautomation curves.
3. Set the track indexes to mark the starting position ofeach song. The track indexes show the CD player whichsing starts at what position. Since the track indexes are aspecial kind of markers they can be edited like them. Asan example, they may be moved afterwards.
If the VIP window contains but one stereo track in whicheach song is created as separate object, you may causeMAGIX audio studio to create indexes by means of thebutton ”automatic indexes”. This will cause an index to bepositioned at the beginning of each object. Tracks andindexes may be arranged in MAGIX audio studio at
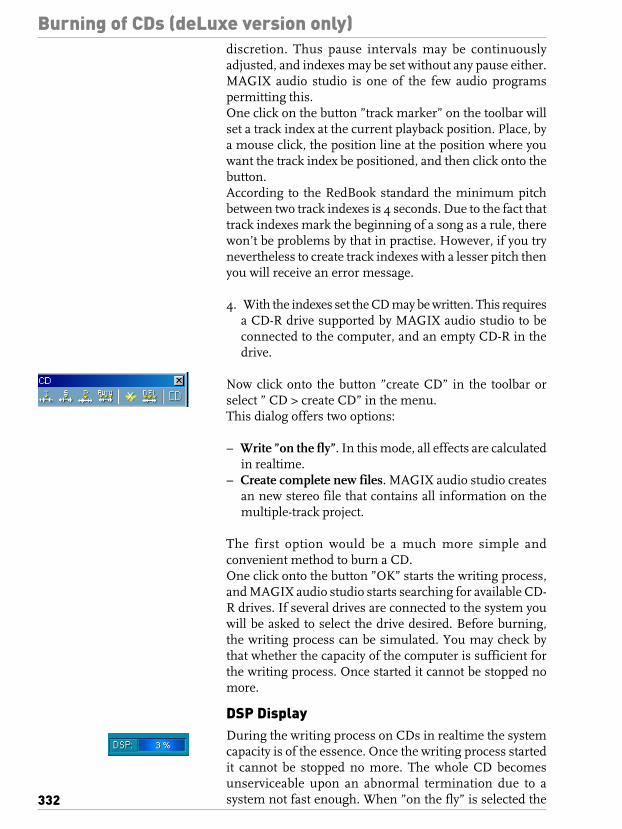
332
Burning of CDs (deLuxe version only)discretion. Thus pause intervals may be continuouslyadjusted, and indexes may be set without any pause either.MAGIX audio studio is one of the few audio programspermitting this.One click on the button ”track marker” on the toolbar willset a track index at the current playback position. Place, bya mouse click, the position line at the position where youwant the track index be positioned, and then click onto thebutton.According to the RedBook standard the minimum pitchbetween two track indexes is 4 seconds. Due to the fact thattrack indexes mark the beginning of a song as a rule, therewon’t be problems by that in practise. However, if you trynevertheless to create track indexes with a lesser pitch thenyou will receive an error message.
4. With the indexes set the CD may be written. This requiresa CD-R drive supported by MAGIX audio studio to beconnected to the computer, and an empty CD-R in thedrive.
Now click onto the button ”create CD” in the toolbar orselect ” CD > create CD” in the menu.This dialog offers two options:
– Write ”on the fly”. In this mode, all effects are calculatedin realtime.
– Create complete new files. MAGIX audio studio createsan new stereo file that contains all information on themultiple-track project.
The first option would be a much more simple andconvenient method to burn a CD.One click onto the button ”OK” starts the writing process,and MAGIX audio studio starts searching for available CD-R drives. If several drives are connected to the system youwill be asked to select the drive desired. Before burning,the writing process can be simulated. You may check bythat whether the capacity of the computer is sufficient forthe writing process. Once started it cannot be stopped nomore.
DSP DisplayDuring the writing process on CDs in realtime the systemcapacity is of the essence. Once the writing process startedit cannot be stopped no more. The whole CD becomesunserviceable upon an abnormal termination due to asystem not fast enough. When ”on the fly” is selected the

333
Burning of CDs (deLuxe version only)computer must calculate the playback with all realtimefunctions and simultaneously write the data onto the CD.The DSP display is a fine expedient to assess possibleproblems when writing onto the CD. The below table givesyou a clue for the maximum possible writing speed.Individual deviations may result due to the configurationof your system and the speed of its components.
DSP Display and Writing Speed
nearly 100 percent single speedup to 50 percent double speedup to 25 percent fourfold speed
Particularly when first using a new and unknown computersystem it is recommended to simulate the writing processat first to check the limit performance of the system. Shouldthe system become overloaded, a reduction of the numberof tracks or realtime effects will help by combining parts ofthe VIP window by trackbouncing.
The offline variation of the writing process offers anotherpossibility. At first, it creates a new stereo file that will bethe basis for the writing process.

334
The Individual Mouse Modes
Universal ModeRight Mouse Button: Displays context sensitive pop-up menu.Left Mouse Button:Upper Track Pane:
Range: Selecting ranges and moving ranges (with Shiftkey).Play Cursor: Single click sets the real-time cursoranywhere in the track.Zoom: Double click outside of a selected range (or norange) zooms out. Double click inside a selected rangezooms in.
Lower Track Pane:Selecting Objects: Single click selects objects (or groupof objects.) Single click + Shift selects multiple objects,including all objects between the two clicks. Single click+ Ctrl selects multiple single objects.Moving Objects: Dragging moves objects or objectgroups. Dragging + Shift moves objects or objectgroups up or down the track list without changing thetime position. Dragging + key ‘k’ move the object underthe mouse pointer, plus all objects behind on the sametrack.Duplicating Objects: Dragging + Ctrl duplicates one ormore objects. Dragging + Shift + Ctrl duplicates one ormore objects, while allowing the objects to be movedup or down the track list without changing the timeposition.Lasso Function: Clicking next to an object while rightdragging the marquee (lasso) across multiple objectsselects the objects within the marquee. Clicking nextto an object while left dragging the marquee (lasso)selects multiple volume or panorama curve events.
Complete Track:Object Handles: The upper handle changes the objectvolume. The changed level is shown in dB in the upperleft-hand corner of the VIP. The upper left and righthandles change the fade-in and fade-out of the object.Fade curve parameters can be set in the Crossfade Edi-tor. The lower handles resize the object.Volume and Panorama Automation Curves: Doubleclick on the automation curve creates a new curve event.Another double click on the same curve event deletes
335
The Individual Mouse Modesthe event. Single click on an event selects theautomation curve event.Selecting Events: Single click + Ctrl allows selection ofmultiple events.Dragging of a curve event moves the selected event.Dragging + Ctrl moves several events.To delete events, select the events and use Edit->Delete… Handle.
Range Mode (Secure Mode)Right Mouse Button: Displays context sensitive pop-up menu.Left Mouse Button:
Range: Selecting ranges and moving ranges (with Shiftkey). Objects or automation curves can not be changedby accident (therefore called ‘Secure Mode’).Play Cursor: Single click sets the play cursor anywherein the track.Zoom: Double click outside of a selected range (or norange) zooms out.Double click inside a selected range zooms in.Select Object Mode temporarily: Using the ‘.’ (Periodkey) temporarily switches to the object mode, whichallows moving of objects.Select Curve Mode temporarily: Using the ‘-‘ (Minuskey) temporarily switches to the curve mode, whichallows moving and manipulating of automation curveevents.
Draw Volume ModeRight Mouse Button: Displays context sensitive pop-up menu.Left Mouse Button:
Draws volume automation curves into VIP tracks. The‘V’ button for a respective track needs to be active priorto drawing the volume curve.
Draw Panorama ModeRight Mouse Button: Displays context sensitive pop-up menu.Left Mouse Button:
Draws volume automation curves into VIP tracks. The‘P’ button for a respective track needs to be active priorto drawing the panorama curve.

336
The Individual Mouse Modes
Curve ModeRight Mouse Button: Context menuLeft Mouse Button: The left mouse key offersfollowing functions:Volume and Panorama rubber band
When you click into the track near by an object, youcan, by pulling the mouse to the left or right, spread arectangle with the mouse key kept depressed. This willselect all volume and panorama points containedwithin.
Volume and Panorama graduations for the whole
track
By means of the panorama and volume curves, volumeand stereo panorama graduations can be graphicallyrecorded. For this purpose sizing handles which aremoved are created on the curve.A double click on the volume or panorama curve createsa new handle, and a further double click will clear it.Selected handles may also be cleared by selecting theoption ”clear handles” in menu ”edit”.You may select a volume or panorama handle by a sin-gle click. You will select further handles by holding theCtrl key while clicking.When you click into the track on the right besides anobject, you can spread a rectangle with the mouse keykept depressed. This will select all volume andpanorama points contained within (rubber bandfunction).You may move selected volume and panorama handleswith the mouse. To move several handles the Ctrl keymust be kept depressed while pulling.
Context Help modeRight Mouse Button: Context menuLeft Mouse Button: Click onto the object or subjectfor which you request further information.
Cut modeRightMmouse Button: Context menuLeft Mouse Button: You can use the mouse cursorlike a pair of scissors to crop objects.
Zoom modeRight Mouse Button: Zooms out of the projectLeft Mouse Button: Zooms into the project

337
The Individual Mouse Modes
Object separator modeRight Mouse Button: Context menuLeft Mouse Button: You can use the mouse pointer like ascissors in order to cut objects.
Pitch-shift/Time stretch modeRight Mouse Button: Context menuLeft Mouse Button: The lower right tab allows compres-sion or stretching of an object. A time stretching effect iscreated: The object is not played as a loop or shorter ver-sion, but simply in a different play tempo.Using the centre tab, the pitch can be altered using pitchshifting.
Draw wave mode (only wave projects)Right Mouse Button: Context menuLeft Mouse Button: Free-hand drawing function for thewave format.
338
Shortcuts
Below are the default MAGIX audio studio generation 6shortcuts for the program. You may change the shortcutsat any time with Options>Program Preferences>Edit Key-board Shortcuts.
GeneralA Range allCtrl-A RedoB Split range into 3 viewsShift-B Display gets 1 viewC or Ctrl-C Copy rangeShift-C Copy AsAlt-C Copy and Clear (VIP)E New VIPF Fade In/OutG SynchronizationH Close all WindowsI Project InformationCtrl-I Import SampleL Load RAM-projectShift-l Load HD-projectM Open MixerN Normalize (virtual)Shift-N Normalize (destructive)O Load Virtual projectP Play parameterR Record DialogCtrl-R Grid on/offShift-R Grid definitionQ switch Grid offS Save projectShift-S Save project with new nameT Split objectsCtrl-T Trim objectsCtrl-V or V Insert ClipboardAlt-V Overwrite with Clip (VIP)W Load waveX or Ctrl-X Cut rangeY System preferencesCtrl-Z UndoTab Toggle object draw modeTab + Shift Define object draw modeSpace Playback on/offEnter Arrange windows

339
ShortcutsEsc Abort playback, recording & physical
sample manipulationsDel Delete rangeDel + Ctrl Delete selected objectsBackspace Restart PlaybackInsert Overwrite with Clip+ Ctrl Copy into Clip+ Shift Insert ClipNumeric 0 ScrubbingNumeric ‘,’ 2 Views# Switch Grid on/off
RangeCursor left or 4on numeric pad: Scrolling left
+ Ctrl Zoom In+ Alt Play Cursor to beginning of the range+ Shift + Ctrl Flip range left
Cursor right or 6on numeric pad: Scrolling right
+ Ctrl Zoom Out+ Alt Play Cursor to end of range+ Shift + Ctrl Flip range right
Home Play Cursor to beginning of project+ Shift range to beginning of project
End Play Cursor to end of project+ Shift Range to end of project
PgUp Range start to next zero crossing+ Shift Range start to previous zero crossing
PgDn Range end to next zero crossing+ Shift Range end to previous zero crossing
Cursor up Scroll up+ Ctrl Zoom in vertically in VIPs
Cursor down Scroll down+ Ctrl Zoom out vertically in VIPs/ * - + Keys onnumeric pad: Move range borders dependent on
zoom level
Function keys1-10 Get range 1-10
+ Shift Store range 1-10+ Shift + Ctrl Get range length
F11 Store range with new nameKeypad 0-9(not numeric block!): Get Marker 1...10
+ Shift Store Marker 1 bis 10
340
Shortcuts+ Alt Store Marker while playback
? Store Marker with new name
MouseFor a full description of the mouse shortcuts, please seethe section on Details about the Individual Mouse Modes
Microsoft® IntellimouseMiddle mouse click: Playback Start/StopWheel: Scroll horizontally
+ Ctrl Zoom In/Out horizontally+ Shift Zoom In/Out vertically+ Ctrl + Shift Scroll vertically in VIPs

341
Button overview
Upper Toolkit barWhen the program is first started, only the tools and mousemode bars are opened in the upper right corner of themonitor. All further ones may be added via menu”windows”.All toolbars may be placed on the screen at discretion, andthey are automatically arranged in the upper part of thescreen by a double click onto the header line.
Tools bar
1 – New multi-track project2 – Open VIP3 – Open WAV file/HD-Wave project4 – Store project5 – Crop6 – Copy7 – Insert8 – Screen active9 – Auto crossfade mode10 – Crossfade editor11 – Form group12 – Cancel group13 – Mixer14 – Transport console
Mouse Mode bar
1 2 3 4 5 6 7 8 9 10 11
1 – Universal mode2 – Range mode3 – Cut mode4 – Pitchshift/Timestrech mode5 – Curve mode6 – Draw Volume mode7 – Draw panorama mode8 – Draw wave mode9 – Zoom mode10 – Scrubbing mouse mode11 – Context Help mode
1 2 3 4 5 6 7 8 9 10 11 12 13 14

342
Button OverviewCD bar (deLuxe version)
1 2 3 4 5 6 7
1 – Set track marker2 – Set Sub index3 – Set pause index4 – Set auto marker5 – Clear index6 – Clear all indexes7 – Write CD
Lower toolbarsPositioning bar (left)
1 2 3 4 5 6 7 8 9 10 11 12 131 – Cropping at start2 – Cropping to left3 – Half cropping to left4 – Half cropping to right5 – Half cropping to right6 – Cropping at end7 – Object edge left8 – Object edge right9 – Range to last marker10 – Range to next marker11 – Zoom in12 – Zoom out13 – Zoom all14 – Range as clipping15 – 1:1 presentation
Positioning Bar (right)
16 17 18 19 20 21
16 – Zooming range 1 sec, 10 sec, 60 sec or 10 min17 – Zoom in vertically18 – Zoom out vertically19 – Zoom all vertically20 – Range as vertical clipping21 – Waveform zoom in/out
14 15
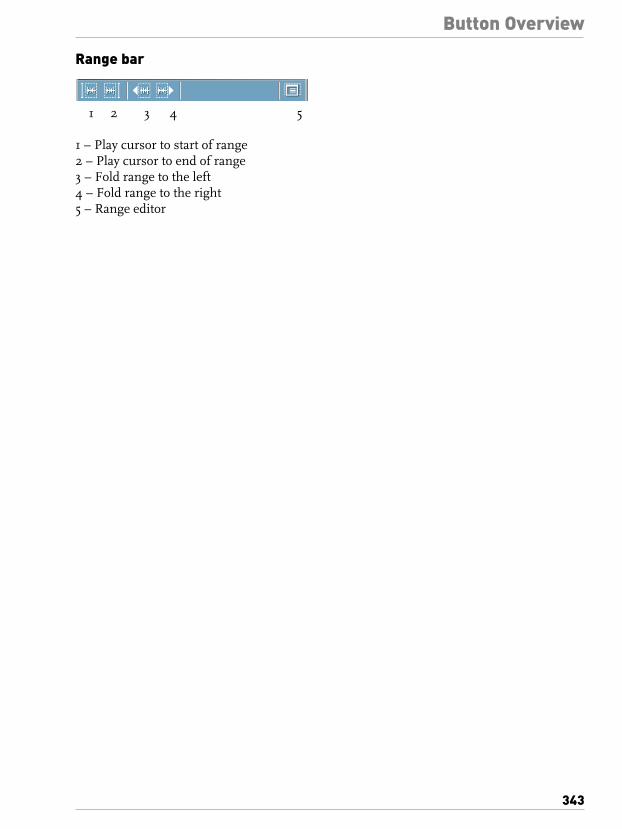
343
Button Overview
Range bar
1 2 3 4 5
1 – Play cursor to start of range2 – Play cursor to end of range3 – Fold range to the left4 – Fold range to the right5 – Range editor
344
Problems & SolutionsThe following are solutions to some common problems.
I see markers with the letter ‘E’ in my physicalaudio file and interruptions occur at thosespots. What are they?MAGIX audio studio generation 6 creates these markersautomatically if during the recording the program runs outof resources and recording interruptions take place. Thiscan happen if the computer is overloaded or not fast enoughto do the processing of multiple tracks. Look at the ‘popsand clicks’ section for some solutions to the problem.
I want to back up all my project files. Whatneeds to be included?When backing up project files all files need to be includedthat are associated with the VIP project! These files mayinclude any of the following: *.hdp, *.h0°, *.h1°, *.vip, *.wav,*.s0°, *.s1°.To keep files organized we suggest that for each project orsong you are working on, you create a sub-directory beforeyou start working with the project and save/record all filesinto that directory. This can be done from the Record Para-meter dialog.
I have pops and clicks in my material when Iplay back any audio.Pops and clicks can sometimes occur with certain soundcards and system configurations. If it happens, it is mostoften during the recording of audio tracks.Especially when using MAGIX audio studio generation 6in Windows 95 there are several things that can be done toremedy the problem:Make sure you use the latest driver for the sound card. Youmight need to contact the manufacturer of your sound cardfor an updated driver.Check to see that there are no IRQ or DMA conflicts withother devices in your system. The Device Manager in theControl Panel in Windows 95 might help you diagnoseproblems.The audio caching setting in Windows 95 might need to beadjusted. To do this bring up the Control Panel and selectMultimedia from the options. Next, click the Advanced taband select the Media Control Devices option. In the MediaControl Devices look for Audio Control Device and call upthe Properties. The following setting can be adjusted to solvesome pops and clicks problems.
345
Problems & SolutionsSome problems with pops and clicks can be solved byediting the SYSTEM.INI file in the Windows directory. Lookfor a [Vcache] section and add the following lines:maxfilecache=4096This should effectively solve the problem. The values forthe parameters are Kbytes of file cache and can be adjusteddepending on your RAM size.By disabling virtual memory a problem with pops and clicksor other playback or recording problems can sometimes besolved. Please refer to your Windows manual forinstructions on how to disable the virtual memory.As a rule of thumb: If the status bar in MAGIX audio studiodoes not indicate any errors during playback or recording,the problem most likely has to do with the sound card driveror settings for the sound card.
I get no audio during recording or playback.If you hear no audio during either recording or playback,check on the following items:Make sure that all cable connections are made properly andthat none of the cables is defective.If the sound card has a mixer program, make sure that noneof the mute options are turned on and that the volume fadersare sufficiently turned up.Check to see whether you have the proper driver installedfor your sound card. You can do this in the Windows ControlPanel.If you don’t hear any audio in MAGIX audio studiogeneration 6 and would like to check your sound card, usethe sound card’s own sound utilities to diagnose the card.Also, many sound cards come with their own set of playbacksoftware for digital audio. Follow the instructions in thesound card’s manual for testing digital audio with the card’sutilities.Make sure that your external mixer/amplifier is turned onand has a sufficient volume setting.These are the most common problems you would be dealingwith when having audio problems.Note: The Digital Audio Labs CardD+ approachesmonitoring the recorded signal during the recording a littlebit different than other sound cards. It is perfectly normalto have the incoming audio signal missing on the outputsof the card as you are recording the audio.The CardD+ will not ‘feed’ the audio signal on the inputsof the card to the outputs during the recording. You willneed to monitor the recorded signal externally during therecording phase. All other tracks in MAGIX audio studiogeneration 6 will play back just fine.

346
Problems & Solutions
My VIP volume appears to be too low. How can Ifix that?MAGIX audio studio generation 6 has a sophisticate wayto deal with digital audio clipping which can occur whenyou add audio tracks in the VIP. Depending on how strongthe audio signals are in each of the tracks, by the time youadd audio in tracks 5 or 6, you actually might encounterdigital clipping.Since digital audio volume processing deals withmathematical addition of volume values it can easily happenthat the resulting volume for combined tracks is beyond asound card’s capabilities to deal with the audio volume.This is when digital clipping would be introduced.In MAGIX audio studio you can set a ‘master volume’ foreach VIP. This setting can be different depending on theaudio material in the VIP.This setting can be found in File>Properties>Project Info.You will need to have a VIP open to get to the Project Infodialog. You can adjust the overall volume setting for theVIP in the Volume section of the dialog. By default, MAGIXaudio studio will assign a setting of -12dB which can be toolow for some projects. You can easily increase the volumesetting to 0 dB for example. When you encounter digitalclipping, you may want to reduce the volume setting at thatpoint.You may also change the overall volume setting in the Mi-xer window in the Master Volume + Image section.
MAGIX audio studio display some sort of‘SYSTEM’ error when I try to do simultaneousrecord and playback with my sound card. Whatcould be the problem?Unfortunately, you may be dealing with a sound card thatis not capable of working in the ‘full-duplex’ mode neededfor simultaneous record and playback. Some sound cardare only ‘half-duplex’ sound cards, meaning that you caneither play back your audio or record audio, but not both atthe same time.You will either need to install a second sound card andrecord with one card while you play back audio tracks withthe other. Or you will need to replace your sound card witha full-duplex sound card. Check with the manufacturer ofyour card to verify the capabilities.

347
Problems & Solutions
Whenever I start playback or recording mysystem hangs or displays an error message.This many times is an indication that an IRQ or DMA andpossibly an address conflict is present. You will need tomake sure that no other component in your computersystem uses the same hardware settings as your sound card.If it does, the system may hang or even crash.Under Windows 95 and NT 4.0 you may use the DeviceManager to find free IRQ, DMA and address settings. Referto your Window manual for instructions on using the DeviceManager to diagnose your system. There are also a numberof commercial diagnostics tools available that may assistyou with finding free settings. In some casesreconfiguration of already existing components is necessaryand sometimes even replacing components with ones thatallow you more configuration choices.
When I try to do something with my mouse itdoesn’t respond or does something erroneous.Make sure that the correct mouse mode is selected. Youmay need to set the mode back to it’s default setting byselecting the Universal Mouse Mode from the mouse modetoolbar. You may also change the mouse mode inFile>Preferences>VIP Mouse Mode.
Why can’t I close a Wave project even thoughall references (objects), using the Wave projectcontents, in the VIP are gone?Trying to close a Wave project usually only works if thereare no objects in a VIP that may use ranges from the Waveproject (HDP or RAP). This is due to the fact that the VIPneeds the Wave project for playback of material in theobject(s). If all VIP objects in the VIP window are deletedthat make use of the Wave project, the Undo list still mayhave references to the Wave project open in case you needto undo any editing step associated with the VIP window.If you are really convinced that the material in the Waveproject is not needed anymore, simply delete the UndoLevels with Edit, Delete Undo Levels. After this you will beable to close the Wave project since all references in theUndo list are gone.Note: MAGIX audio studio generation 6 will only allowyou to delete the Undo Levels when a VIP window is active(click on the title bar of the VIP window).

348
Problems & Solutions
SynchronizationThere are various aspects to synchronizing MAGIX audiostudio generation 6 with the outside world.Synchronization is used when you need to synchronizeMAGIX audio studio with a tape based recorder, videomachine, external sequencer or other equipment which willsend sync signals to MAGIX audio studio. Most of thesesituations will work best by setting up MAGIX audio studioas the slave and the external sync source as the master.Once the setup has been made for MAGIX audio studio toexpect the synchronization signals at a particular interfaceport, you do not need to do anything else in MAGIX audiostudio to start the playback or the recording. Once MAGIXaudio studio detects the incoming signal, it will attempt tolocate the song position pointer and jump to that location.Playback is started automatically.The same holds true if you need to record in MAGIX audiostudio while synching up to an external device. Simply openup the Record Parameter window and make all necessaryadjustments. Now, press the Record button. Once you havemade the needed changes in the window, simply start theexternal device. MAGIX audio studio will lock up to theincoming signal and will start the recording process. It’sthat simple!There are several things to consider when working with anexternal sync source:Make sure that the synchronization interface can convert aSMPTE signal into MTC code. A software utility should letyou do this easily, or the card’s device driver might do it foryou automatically.When striping analog or digital tape with a SMPTE track,make sure that the signal is strong enough to feed acontinuous, uninterrupted sync signal. MAGIX audiostudio will stop the playback or recording as soon as a dropout occurs.You might need to work with the offset settings in MAGIXaudio studio when working with a sync source that startsin the middle of a tape for example.Make sure you are using the proper sync protocol.

Part 4
audiostudio
Reference

350
Menu File
The project menu contains wide-range functions for gen-erating, managing, loading and saving projects.
New Multitrack ProjectA new virtual project is opened, you can choose the trackand select a name for the new VIP.
Track Number: Sets the number of tracks for the virtualproject. The maximum number of tracks in MAGIX audiostudio generation 6 is 24 (deLuxe: 48).
Sample Rate: Sets the sample rate of the virtual project.
Name: Each new VIP can be named here.
Grid: Activates the grid display.
Units of Measurement: Select from six different displaytypes for the grid.
Snap to Objects: Activates the Object grid. Objects will besnapped together sample exact when this option is active.
Lock Recorded Objects: Recorded objects are immediatelylocked once they are placed into a VIP track. This preventsaccidental moving and is especially helpful for multi-trackprojects.
Project-patterns: Projects (arrangements) can also besaved as patterns in the File-Menu. The patterns are empty
Menu File
351
arrangements that contain all of the settings (f. ex. of theVIP-display) of another project.
Auto-Crossfade-Mode: see Edit-Menu
Keys: e
Open > Virtual ProjectMulti-track project in MAGIX audio studio, which makesuse of Wave projects.When loading a virtual project, all associated Wave projects(RAM and HD Wave projects) are opened if they were notopen prior to loading the VIP. The windows of the indi-vidual Wave projects remain minimized to prevent clutter-ing of the screen. They are initially only visible as icons.Once the Wave projects are loaded, the VIP project win-dow is displayed.
Keys: o for virtual projects
Open > Audio fileWhen opening an audio file, MAGIX audio studio auto-matically creates an associated HD Wave project. The HDWave project file contains additional information about theaudio file, such as marker positions. Once the audio filefile has been opened once in MAGIX audio studio, it canbe loaded as a HDP from that point on.Please note that direct editing of audio files from a CD-ROM is not possible. Please use “Import Sample” instead.
Note: If a VIP is the active window, all loaded HD projectsare immediately turned into objects in the VIP. Any se-lected range (range beginning) determines the position andtrack where the object is created.
Keys: w for WAV files
Open > RAM Wave (RAP)RAM Wave projects contain audio data in MAGIX audiostudio’s proprietary format. These files are loaded into theRAM memory of your computer, including their associ-ated graphic files, marker position information, etc.
Keys l for RAM projects
Open > HD Wave (HDP)HD Wave projects contain audio data, which is directlyloaded from the hard disk, together with the graphical in-

Menu File
352
formation, marker position information, etc. The audioformat used for these files is the WAV format.
Keys: SHIFT+l for HD Wave projects
Open > ObjectContains playback instructions (link to a Wave project, track,time position, parameters, etc.) for audio data. Objects areused in virtual projects.
Open > SessionA previously saved MAGIX audio studio session can beloaded with this command. All projects and their relatedwindows are arranged on the screen the way they were savedto the session.
Keys: ALT+sfor Sessions
Load Audio CD Track(s)...This option is located in the menu “CD” in the deLuxe-version.This function allows you to import audio data from mostCD ROM drives and CD-Writers in the digital domain, with-out any loss in quality. Please contact our technical sup-port for the latest list of supported drives.The HD Wave projects are recorded as WAV files and cantherefore be edited with other audio editing programs with-out having to convert them first.To do this, please follow these steps:
1. Open the drive list dialog and select your desired CD-ROM drive, if you have more than 1 drive
2. Click the “Track List” Button3. In the CD track list dialog select one or more tracks in
the list box4. Click on “Copy Selected Track(s)..”5. Select a filename for the new WAV file or HD Wave
project and click O.K.6. Now the audio data is copied from the CD-ROM to your
hard disk as a new WAV file.7. Close the tracklist dialog and the drive list dialog, in your
VIP appear one or more new objects, containing theaudio data from your CD.

Menu File
353
Features of the Drive List Dialog
Track List: This button opens the track list dialog for se-lecting several audio tracks of your CD.
Configuration: This button opens the drive configurationdialog, where you can select special copy modes and SCSIIDs...
Reset: Restores the standard drive settings.
Add Drive: Creates a new drive entry in the list for editingthe configuration data.
Delete: Deletes the selected drive entry from the drive list.
Save Setup: Saves the drive list and all configuration datain a *.cfg file.
Load Setup: Loads the drive list and all configuration datafrom a *.cfg file.
Features of the Track List Dialog

Menu File
354
Copy selected Track(s): This button starts the audio datacopy process, all selected tracks from the list are copiedinto one WAV file.
Play: Starts audio playback of the first selected track in thelist.
Stop: Stops audio playback.
Pause: Stops audio playback for later resuming.
Resume: Resumes playback if previously paused.
Select all tracks: Selects all tracks of the CD for copyingthe complete volume. You can select multiple tracks withCtrl + mouse click or with Shift/Alt + Cursor keys!
Deselect tracks: Closes the drive door of the CD ROMdrive.
Features of the CD ROM Drive Configuration Dialog
Drive Name: Lets you edit the name of the drive in the list.This is useful if you create more than one entry accessingthe same physical drive.
Host Adapter Number: Lets you specify the number ofyour SCSI adapter – normally 0.

Menu File
355
SCSI-ID: Lets you set the ID of your CD ROM drive. Besure to set the correct ID, there is no error checking!
SCSI-LUN: Select the SCSI LUN parameter, normally 0.
Alias: Lets you select a manufacturers type of your CD ROMdrive.
Copy Mode Normal: Copies the audio data without anysoftware correction.
Copy Mode Sector Synchronization: Copies the audiodata using a software correction algorithm. This is useful,because some CD ROM drives cannot seek exactly to thesame position between two read accesses but MAGIX audiostudio can correct these differences using this algorithm.
Copy Mode Burst: Optimizes the speed of the copy process,no software correction is done.
Sectors per Read: Defines the number of audio sectorsper read cycle, the higher the number the faster the copyprocess will be. Not all SCSI adapters support more than27 sectors!
Sync Sectors: Defines the number of audio sectors usedfor the Sector Synchronization. A higher number resultsin a better synchronization but also in a slower copy process.
Save ProjectThe current project is saved with the name displayed in theproject window. If you previously have not specified a namefor your project, MAGIX audio studio will ask you to do so.
Keys: s
Save Project asYou can define the path and name of the new project youwant to save your work under. RAM projects and virtualprojects will be saved with the new names (the source fileremains untouched). HD Wave projects are renamed onthe hard disk. MAGIX audio studio will not generate a copyof it for reasons of conserving space on your hard drive.
Keys: SHIFT + s

Menu File
356
Save complete VIP toThis function in menu “Project” allows saving a VIP withall needed Wave projects (*.RAP., *.HDP) into a specifieddirectory. This makes it easy to copy all files of a VIP to abackup disk etc.
Save Project as “Base Project”This option allows you to create project-patterns, where allproject settings such as the number of tracks or the type ofgrate are maintained and saved without the objects andHDPs. These patterns can be loaded when you are creatinga new multi-track project (Menu File > New MultitrackProject).
Save in FormatWith this function, you have the possibility to convertprojects between the different MAGIX audio studio Waveproject formats. This is useful if, for example, a RAM Waveproject is to be converted into a HD Wave project or a L&RWave project (two linked mono files). Another option isthe conversion to and from stereo Wave projects to monoWave projects.
Save ObjectThis function allows you to save a single object. This isespecially helpful if you want to transfer material betweenVIP projects or want to preserve certain parts of a VIP bysaving them to single objects. Another use is the creationof a sound effects library. Please keep in mind that you canuse the Windows Explorer to drag & drop multiple objetfiles into a VIP for easy access.The default file extension for object files is *.obj.To save an object, select any object in the VIP and click onFile->Save Object.
Save SessionThis will let you save a complete session in MAGIX audiostudio. This includes information about all just openedprojects and their respective window positions etc.. This isuseful to be able to continue later at the same place withouthaving to load the individual projects first.If a session is stored with the name “startup.sam”, thissession is automatically loaded at the next start of MAGIXaudio studio.

Menu File
357
Import SampleImport Sample as DumpMAGIX audio studio gives you the option of importingWave, AIFFor Sample Dump files into a MAGIX audiostudio project. You will need to specify which type theproject is going to be, a RAM Wave Project, or a HD Waveproject.
Difference between Open->WAV and ImportSample->WAV:The command Open->WAV opens an already existing WAVfile and edits the file as a HD Wave project. MAGIX audiostudio automatically creates a HDP file and the correspon-ding graphic file in the source folder.When importing a WAV file, the complete file is copied.Additional hard disk space is needed and the process takesmuch more time, since the audio file has to be copied withOpen Project->WAV. Import Sample->WAV has to be usedwhen intending to use the WAV file as a RAM Wave project.
Convert > Unlink ProjectSometimes it is necessary to split a 2 channel stereo project(two joined mono projects (L&R Wave project) into two in-dependent mono projects. With this menu option, you canterminate the static connection between the projects.If you would like to join the projects again, simply select“Link Projects” from the “Special” menu (see below).
Convert > Link ProjectsTwo mono projects are linked to one L&R Wave project.This is a convenient way of editing joined mono sampleswith the same operations.Make sure that the windows of the two projects to be linkedare open. Select one of the objects as the current object(click on the lower half with the left mouse button) and callup the “Link Projects” menu option. Next, click on the pro-ject you want to join. MAGIX audio studio will link the twoprojects.MAGIX audio studio will automatically match the samplelength of the two projects but not the bit resolution.
Convert > Append ProjectsWith this function a project can be appended with anotherproject, i.e. the material of one project is copied directlybehind the material of the first.

Menu File
358
You need to first select the object you want to append. Thenyou activate the menu and click on the project you want toadd to the first.A particular use of this option is the “cleaning up” of VIP’sthat contain numerous physical samples.
Convert > Change Bit ResolutionWhen using this function, MAGIX audio studio lets youselect the bit resolution of a Wave project.
Notes for Working with 8-bit Wave ProjectsLower resolution audio files are often used for multimediaapplications. A reduction of the resolution to 8-bit is useful,since the storage requirements are also reduced.A drawback of lower bit resolutions is the decline of thesignal to noise ratio (SNR). The quantization noise increaseswith the lower resolution. The quantization noise is not ofa steady type. In fact, it is modulated by the signal andappears especially annoying.By the way, the bit resolution of a project file is always dis-played in the title bar of the project window. Bit resolu-tions between 1 and 8 bits use 1 Byte (8 Bit) per samplevalue. Resolutions between 9 and 16 bits use 2 Bytes (16Bit).If you need to perform multiple processing steps on an 8-bit Wave project, convert the audio file into a 16-bit projectbefore starting the processing. Any calculation inaccuraciesoccur in the 16-bit realm and are therefore minimized. Also,some functions in the Effects menu only work with 16-bitsamples. After your are done processing the audio, convertit back to an 8-bit audio file.
Convert > MonoThe current L&R Wave project is converted into a monomode. If it was a stereo project before, both channels willbe mixed. The previous samples are first added with 100%of their image and then divided by two to prevent overmodulation (distortion). This is an equivalent of reducingthe volume by 6 dB.
Convert > StereoThe original mono Wave project is duplicated and convertedinto a single L&R Wave project with the same sample inboth channels.

Menu File
359
Export audio> WaveThe audio material is exported as a standard Wave file. Thisis the standard format for further use on PCs running in aWindows environment. These files are not compressed andcontain the full quality of your arrangement.If you want a lower resolution or a lower sample rate youcan select that via the “Format Settings” button.
Export audio> MP3Exports the arrangement in MP3 format. This is the exten-sion for MPEG Layer 3 coded audio files, used for high qual-ity audio material off the internet (Off-line Playback).20 free encodings are available.
Encoder upgrade: For the upgrade of the QDesign® en-coder you just select the option “Upgrade QDesign MP3Coder” in the menu “Options”.
Export audio> MPEGExports the arrangement in MPEG format. This is the ex-tension for MPEG-Layer 2 coded audio files, used for highquality audio material off the internet (Off-line Playback).
Export audio> MS Audio File (deLuxe version)This is the internet format from Microsoft. It makes thecontinuous playback of audio files through the internetpossible. However, for this format you will need to use asuitable codec that prevents file rates from getting to highfor an on-line playback (“Format Settings”).
Export audio> Real Audio (deLuxe version)This is a format specifically optimized for internet purposes.It reaches a very high compression rate, and the soundquality is noticeably lower. However, this format is veryuseful if e.g. audio on-line has to be played through the

Menu File
360
internet (Streaming Audio). After selecting the file nameyou can choose the bit range of the transferring speed (Mo-dem, ISDN etc.). This should still play audio files withoutinterruption.
Format SettingsHere you can select presettings for the quality of the audiomaterial.
Target groups: Here you select at which band width thevideo is to be created, i.e. on which data line it can be played(‘streamed’) in real time. The setting you select here maypossibly restrict the other selection possibilities, as a filefor a 28k-modem cannot be generated in high-quality.
Multirate file (real server): The streaming of videosrequires a server application which must have been installedon the server from which the video is to be played(‘streamed’) in real time. If this application does not exist,only a download is possible. ‘Real server’ is a server appli-cation which makes it possible to stream videos in real videoformat.
If you activate this option, you can create a multirate filewhich basically contains several videos of different bandwidths. It is thus possible to select several ‘target groups’.
Export audio> AIFF file with Quicktime(deLuxe version)Exports the arrangement in AIF format, compressed withthe Quicktime coder. This is a format specifically optimizedfor internet purposes.

Menu File
361
Export audio> 16 Bit AIFF (deLuxe version)Exports the arrangement in AIF format. This is the audioformat used with Apple Macintosh. These files are not com-pressed and contain the full quality of your arrangement.
Export audio> Export as DumpExports the arrangement as a dump file e.g. for externalsamplers connected to the computer via MIDI.
Rename ProjectThe “Rename Project” command will let you rename aproject file rather than save it to a different file. For RAMWave projects, only the internal names are changed (withoutbeing saved). But all corresponding files are renamedimmediately in the case of HD Wave projects.RAM Wave projects need to be saved after renaming theproject.
Export as PlayR-FileThe arrangements can be exported in the MAGIX playR-tables format (MKS-format), a special format for the live-remix-program MAGIX playR. All you need is an arrange-ment with 8 audio-tracks, that can then be exported to theplayR-format and directly opened and played back usingthe playR.The MAGIX playR includes a CD and a MP3 player, a fullyequipped DJ-control desk and multimedia remix-software.You can start up to 16 samples simultaneously on your 2turntables, using a mouse, the keyboard or a joystick; Acrossfader and a mixer provide you with the live-mix facili-ties. The MAGIX music maker can be used for creatingand editing the playR-songs. A smaller version of theplayR – the MAGIX playR jukebox – is included in thispackage!
Connect to the Internetopens the dialup connection to the Internet.
Publish to WebIt‘s really easy to publish your own songs and videos on theweb so that all internet-users worldwide can listen to themand enjoy them immediately.All you need is a normal internet-connection for your com-puter – using a Modem, ISDN or ADSL.However, it is forbidden to upload material that is protectedby copyright laws, for example songs from commercial CDs.This will be checked every time you upload material, so it

Menu File
362
may actually take a few hours for your song to appear online.If you‘ve just created a nice arrangement, save it first usingthe ”File > Save as”-option. Then click on ”Publish to Web”and follow the instructions of the Publishing Wizard.See chapter “Web Publishing” for further details!
FTP-DownloadThis option allows you to build up a direct connection toany FTP-server on the internet in order to download audiomaterial directly into your music studio so that you canedit it there. The pre-set server is the MAGIX Server, whereyou will always find new sound-material. Once again, theonly thing you need is a working internet connection.
Delete Wave Project(s) (HDP)HD Wave projects are deleted from the hard disk. Use thiscommand with caution, as all corresponding files are lost.(If you wanted to delete a HD Wave project (HDP) from afile manager such as Windows Explorer, it would also benecessary to delete the graphic files related to the projectfiles.)
Close Projectcloses the arrangement.
Exitcloses MAGIX audio studio.

363
Menu Edit
This menu contains all functions, which are similar to cut-ting on a tape machine.In virtual projects, you can select track sensitive ranges, soonly the selected tracks are manipulated.Activate cutting and copy also makes a project named Clipactivated. The window for this project will appear if double-click on the icon.Some of the functions are only available for Wave projects.Others only for virtual projects (VIP), while some of the func-tions will work in all types of projects.When working with a virtual project (VIP) a selected rangeis always required for the cut functions. The beginning andend of the selected range determine the start and ends of acut. The vertical position indicates which tracks are affectedby the edit.It is recommended to use the Auto-crossfade function toachieve smooth transitions between the edit points. This willautomatically create fades at the object edges.Please note that these functions are processed for both chan-nels when working with stereo and L&R Wave projects. (Ifonly one channel is to be edited, you will need to convert theWave project into two mono Wave projects. After editing thetwo mono Wave projects can be merged again.)
UndoMAGIX audio studio offers you a comfortable way of trackingyour changes in virtual projects. Up to 100 changes can bekept in memory and traced backwards.That means, virtual processes can be reversed (undone).Range and marker manipulations can also be undone usingthe “Undo” feature.Thanks to this extremely efficient feature, critical operationscan simply be tried and then reversed to return to the origi-nal status if the results are not satisfactory.MAGIX audio studio offers a convenient undo option forVIP objects. A maximum of 100 undo steps can be retraced.This number can be configured in File/Preferences/UndoDefinition.No undo is available for physical Wave projects.
Keys: CTR+z
RedoRedo revokes the latest undo command.

Menu Edit
364
Keys: CTRL+a
CutWave Projects:
The audio data in the selected range are copied from thecurrent Wave project into the Clip. The material behindthe removed range is merged with the material in front ofthe removed range to close the gap. The complete Waveproject becomes shorter.Please keep in mind that the Clip always contains the sameattributes as the Wave project the material was copied orremoved from.If you cut material from a mono Wave project, the Clipbecomes a mono Wave project. If material from a stereoWave project is cut or copied to the Clip, the Clip becomesa stereo Wave project. Another attribute adopted is the bitresolution and the sample rate of the originating Waveproject.The previous contents of the Clip are deleted.After a successful removal of the selected material, MAGIXaudio studio drops a marker at the position the removedrange previously started. This allows you to insert the con-tents of the Clip into the Wave project at the exact samespot if you accidentally removed the material. Use the func-tion Edit->Paste/Insert Clip to insert the Clip contents.
Virtual Projects (VIP):
In virtual projects the selected range is copied to the VirtClipand is removed from the current VIP project. The VirtClipdoes not contain actual audio information, only the linksto the audio files. The VirtClip also contains as many tracksas the removed range.The material behind the removed range is appended to thematerial in front of the removed range. The VIP projectbecomes shorter if the selected range did cover all tracks.This way you can shorten Vips which contain empty spacebehind the last object.As with the Wave projects, a successful removal of the se-lected range drops a marker at the position the removedrange previously started. This allows you to insert the re-moved material with Edit->Paste/Insert Clip.
Keys: CTRL + x or x
DeleteThe data of the current range is deleted. The sample dataafter the deleted range is added at the position the deletedrange started. The sample length becomes shorter.
Menu Edit
365
Please note that this command will not save the deleteddata to the Clip. If you want to preserve the deleted sampledata, use the “Cut” command. Using this the “Delete”command will delete the data from the current sample andpreserve the contents of the Clip.
Keys: Del
ClearThe data of the current range is replaced with silence.Please note that this command will not save the deleteddata to the Clip. If you want to preserve the deleted data,use the Cut or Copy command. Using the Delete commandwill delete the data from the current project and preservethe contents of the Clip.
Keys: Alt + Del
CopyThe current range is copied into the Clip but not deleted inthe project. The sample length is not varied. Please notethat the former Clip contents are deleted. The Clip againhas the same attributes as the project.
Keys: CTRL + c oder c
Copy and ClearThe current range is copied into the Clip and cleared in theproject. The project length is not changed. Please note thatthe previous Clip contents are deleted.
Keys: Alt + c
Copy asThe current range of a Wave project (HDP or RAP) is copiedinto a new file. A file requester appears to select the nameof the new project.
Paste/Insert ClipThe contents of the Clip are inserted into the current projectbehind the position of the play cursor or the beginning ofthe currently selected range. The data or objects that arelocated behind the insert position are moved out of the wayto make room for the Clip contents. The samples or audiotracks become longer. The Clip remains unchanged duringthe procedure. If the Clip was empty, an error message isdisplayed.

Menu Edit
366
After inserting the contents, the program selects a rangeover the inserted area. If you select Edit->Delete , the in-serted contents are removed and the project is returned tothe original state.In virtual projects using selected ranges, the programutilizes the beginning position and relative track positionas the insert point for the VirtClip or Clip contents.The following table shows how MAGIX audio studioresponds in the case the clip and the project have differentchannel numbers:
Clip Project > Clip Channel >Project ChannelMono > Mono > Channel 1 Channel 1Stereo > Stereo > Channel 1 Channel 1
> Channel 2 Channel 2Mono > Stereo > Channel 1 Channel 1
> Channel 1 Channel 2Stereo > Mono > Channel 1 Channel 1
Keys: CTRL +v oder v
Overwrite with ClipThe current range is replaced with the Clip contents. Theoverall sample length remains unchanged. The data thatoccupied this position before cannot be recalled. The Clipcontents are not changed. The assignment of the Clipchannels follows the table mentioned above.In virtual projects, the selected range determines theposition and track in which the Clip is inserted.
Shortcut:Keys: Alt +v or Insert Key
ExtractThis function is the counter part of the ‘Cut’ function.
Wave Projects:The current range remains unchanged only the sectionsbefore and after the selected range are permanently
deleted. The audio file becomes shorter. The contents ofthe Clip are unchanged.
Virtual Projects (VIP):The selected range determines the material from all VIPtracks that remains in the project after using the functionno matter whether the selected range spans all tracks ornot. This means that this function does not operate track
Menu Edit
367
selectively. The objects before and after the selected rangeare deleted from the project. The contents of the VirtClipremain unchanged.The virtual project is expanded by one empty track.
Mix with ClipThe range contents and the Clip contents are mixed.Channel assignment between project and Clip follows thetable above (See “Insert” function). The contents of the Clipare not altered.Since either component is combined with their full samplevalues, make sure that no over-modulation takes place. Thisfunction is performed by way of addition. This assures onone hand, that the project sample remains free of a suddenvolume decrease. On the other hand, modification of theamplitude might need to be performed before the mix tokeep the resulting sample from clipping and distorting. Forinformation on amplitude modification, see “Editing Menu”.
Insert WorkspaceThe “Insert Workspace” option will insert “blank” data atthe current play cursor position or the position of thecurrently selected range. Size and position of the insertedblank space will depend on the length of the range selectedbefore.The blank space will actually contain data with zero value.The data following the insertion point will be added to theend of the blank space. The defined range is maintained,the length of the inserted space extends the overall sample.If you do not have sufficient memory to insert the workspace(i.e. with RAM projects), MAGIX audio studio will displayan error message.
Add one TrackThis option adds a new empty track. The maximum numberof tracks is 24 (deLuxe: 48).
Crossfade EditorWave Projects (RAM or HD):The section before the current play cursor position or theselected range is merged with the contents of the Clip in away to create a crossfade section. Two separate cuts areneeded:
1) Copy a range into the Clip.2) Set the play cursor on the desired position and then callup the crossfading function.

Menu Edit
368
Virtual Projects (VIP):This option offers a convenient way of adding a real-timecrossfade to two objects in a VIP track. Both objects needto be selected. The best way to select the two objects is withthe Object Lasso. The Object Lasso is used when startingthe selection in an empty area and dragging a marquee overthe two objects. The next step is to display the CrossfadeEditor with Edit->Crossfade Editor.The length of the crossfade can be specified in differentlength units or can be transferred from the selected range.Make sure that enough material is available before and afterthe object borders to create the desired crossfade length.Available fade-in and fade-out curve types are Linear,Logarithmic, Exponential, and Sine/Cosine.If a range is selected over the crossfade section, the cross-fade can be previewed with the Play/Stop button. This alsoworks while making adjustments in the editor dialog andallows you to audition the crossfade parameters in real-time.Please keep in mind that long crossfades employ twice theprocessing power compared to playback of single tracks.Two samples are played at the same time in real-time andincrease the processing requirements. In critical casesincrease the VIP Buffer size in File->Preferences->System.Linear crossfades do not take as much processing power asnon-linear crossfade curves.
The buttons “+”, “/” and “-” change the length of the cross-fade section in default increments.
The Crossfade Position: can also be moved with the +and – buttons.
The button Crossfade Off: deactivates the crossfade forthe selected Object.

Menu Edit
369
Global Set: The currently selected settings for the cross-fade can be used as default setting for newly created cross-fades.
Global Get: Restores the global crossfade settings asparameters for the Editor configuration.The special functions and shortcuts in the menu Object->Object/Crossfade Editing are very helpful when editingcrossfades in VIP projects.
Get Range: The length of the currently selected range isused for the length of the crossfade.
Auto Crossfade activeIf this option is turned on, all newly recorded or cut materialin a VIP or material that is copied from a Wave project intoa VIP track has an automatic crossfade applied to it.Global settings for fade-in and fade-out parameters areassigned to the object. These settings can be changed withthe crossfade editor in the Edit->Crossfade Editor.If two objects are overlapped that had an automatic cross-fade applied to them a real-time crossfade is the result.The auto crossfade mode is an excellent tool to easily per-form a linear cut of a spoken voice track, jingle track etc.,which requires a soft passage without the unwanted “pops”.If needed, each crossfade can be edited in the editor or bymanually manipulating the handles.
Delete Volume HandleThis function deletes volume curve events, which have beenpreviously selected. Individual volume events can be deletedby selecting the Object and Curve Mode mouse modeand double clicking the left mouse button on a volume curveevent. However, when deleting several curve events, the“Delete Volume Handle” function is the best tool. Use theCurve Mode and Grab Tool to select multiple curveevents.
Delete Panorama HandleThis function deletes panorama curve events, which havebeen previously selected. Individual events can be deletedby selecting the Object and Curve Mode mouse mode anddouble clicking the left mouse button on a volume curveevent. However, when deleting several curve events, the“Delete Panorama Handle” function is the best tool. Usethe Curve Mode and Grab Tool to select multiple curveevents.

Menu Edit
370
Delete Undo LevelsThis feature will delete the Undo levels of a virtual project.This is useful, if for example certain Wave projects are leftin the Undo chain, but do not exist in the VIP anymore.You won’t be able to process or delete the Wave project ifthe Undo chain still contains a reference. After deletingthe Undo levels, these projects are available again.

371
Menu View
This menu contains tools for manipulating the display ofMAGIX audio studio.
Rebuild Graphic DataDisplay inaccuracies after complicated sample processingcan be fixed by using this menu option. The screen (win-dow) will be cleared and redrawn to display the project prop-erly.
SectionsMAGIX audio studio allows the optional display of one,two or three sections of the samples belonging to one Waveproject or the VIP itself. Other audio editing applicationsusually show only one window of a sample.If you select “2”, MAGIX audio studio will display the samesample in two window sections. Each section can be handledseparately. It is possible, for example, to represent the com-plete sample in one section and a zoomed in version of acertain range in the other.The mode “3 sections” is especially useful for searching forloop points in Wave projects.The whole sample can be shown in the upper section, whilethe section on the lower left displays the beginning of theloop range and the section on the lower right the end of therange. Use the split range function for this purpose (keyb).Go back to 1 view with Shift b!This is only an example of the mode “3” view. All sectionscan be handled independently.You can also drag ranges over the section bounds. Estab-lish the starting point of a range by clicking, then keep themouse button pressed, and change over to another section.MAGIX audio studio will show you the size of the rangeand at the desired location release the left mouse button todetermine the end of this range.
Fix verticallyRanges can be dragged (pulled) in MAGIX audio studiohorizontally and vertically as well. If this option seems toostrange to you, you can fix the upper edge of a range(s) tothe maximum value and the lower end to the minimumvalue. Thus, you get the usual representation in range drag-ging. However, a trade-off is, that you will not be able todefine the vertical extension of a section by choosing thevertical range button.

372
Menu View
Show GridThis menu function will display the grid on the projectwindow. The units of measurement defined in “Units ofMeasurement” will appear in the upper sections of the grid.
Keys: #
Grid SetupWith this option, you can define the type of grid that isused for the Show Grid option. Select between several linestyles.
Units of MeasurementWith this function you can define the unit of measurementfor the grid, for the display of start and length of the se-lected range and for the position of the play cursor.
Snap to GridThis function switches the Grid on and off.When working with virtual objects the Virtual Grid becomesavailable. Objects can only be shifted to the beginning, theend, or the hot spot of another object. The reference pointis usually the beginning of the object to be shifted to. A hotspot when defined will be used as a reference point as well.If several objects have been selected, the move is performedin lining up the beginning of the last selected object in thesequence with the reference object or Grid point. All selectedobjects remain their position to each other.This option can be used to easily rearrange objects withtheir audio patterns and gain sample-exact connections.
Keys: r
Snap Setup
Object: Activates the object grid.
Range: Activates the range grid and enables the use of thecurrent selected range as grid base (by clicking on the but-
373
Menu Viewton “Get Range”). This option is very useful if you havefound the perfect location defining a particular music barin the sample. To transfer the range into the grid, use thecommand “Get Range”.
Bar Snap: Activates a grid, this is based on bars and beats.You can specify the speed of the measure by entering theBPM (Beats Per Measure) value in the dialog box. Byclicking on the “Bar Definitions” button you have moreoptions to specify the parameters for this option such asthe time signature.If a complete 4/4 measure is selected the number of beatsin the measure would be 4. The length of the range woulddetermine the speed in BPM that is needed to play thesample in the selected time frame.
Bar Definitions: This dialog lets you specify the barsettings, e.g. Numerator / Denominator, the speed in beatsper minute and the timer resolution in peaks per quarternote.
Keys: SHIFT + rKey for switching the two modes: Tab
VIP Display ModeThe Display Preferences were designed to help you definethe two alternative display modes possible in MAGIX audiostudio when working with virtual projects.Usually you choose mode 1 for detailed drawing of sampleswith all information displayed and mode 2 for a quickdrawing without graphics. Switching between the twomodes is possible by pressing the Tab-key.The menu option will provide you with another window inwhich you can specify the details of the two different displaymodes.
DefinitionThis will allow you to set the following configuration optionsfor the VIP display. Settings can be made for the to displaymodes.

374
Menu View
Sample / Halve: The graphical representation of the audiomaterial can be displayed as a whole waveform or half theform for higher definition. Checking this box will displaythe waveform with half its information.This mode is recommended, because the grid function (key#) and the vertical zoom functions (Ctrl + cursor up/down)are perfectly adapted to this draw mode.
Background: Each object in the VIP track can be assignedwith a color. The color is displayed if this option is checked.Otherwise, the same background color is used as for thetrack background.
Object Name: Objects in VIP windows can have their ownname. If this option is checked, the object name is displayed.
Project Name: MAGIX audio studio also allows you todisplay the audio file name in each object. This is especiallyuseful if you quickly want to identify the Wave project usedin an object. Checking this option will display the file namein the object.
Object Properties: This shows you which object releatedeffects are applied the the object, e.g. EQ for equalizers,DYN for dynamics etc...
Group Number: Objects in VIP windows can be groupedtogether. When grouping objects it is helpful if the groupnumber is displayed in the object. This option allows youto display that information in the object.
375
Menu ViewButtons/Slider: By default, MAGIX audio studio displaysthe buttons and sliders for each track. However, on smallerdisplays it may be desirable to turn the display for the buttonsand sliders off. By unchecking this option, they are notdisplayed.
Peak Meters: Every track in a virtual project has its ownLED meter to allow exact volume level display. However,they are only visible up to a certain vertical zoom level.The LED meters also work during recording and contain apeak hold function that remembers the maximum inputlevel. This allows you to adjust the input levels.When working with a large number of tracks, the peakmeters can slightly increase the processing load.
Change Mouse: This option causes the mouse pointer tochange when moving it over certain areas. For example,moving the mouse pointer over an object handle, the mousepointer is changed into a directional pointer. This option isonly useful for mouse modes that combine several func-tions.
New Object Mode: This mode allows moving of objectson the second click, rather than the first click. The firstclick selects the object, but disables simultaneous acciden-tal replacement.
Show Border: Decides if a border is drawn between tracksin a VIP. Switch it off to save space for VIPs with lots oftracks on small displays!
Separate Stereo: If this option is active, stereo tracks inVIP projects are displayed with a two-channel display. Thisallows you to expand the display to both channels ratherthan displaying just one composite channel display. Pleasekeep in mind that this will also affect the Wave project dis-play for stereo Wave projects.
Active: Allows you to determine which mode is to be used.This can also be done with the TAB key from the VIP win-dow without having to call up the VIP Display Definitionsdialog.
Keys: SHIFT + Tab

376
Menu View
HorizontallyThis menu contains all the functions of the horizontal (red)position bar.
Store / Get position and zoom levelThis function does the same as the snapshot-buttons at thebottom left of the VIP. The four buttons in the lower left-hand section of the Virtual project window allow you tosave four setups (S1…S4, incl. Zoom-Level, Display-Posi-tion, and Display Mode). To store a setup, hold the Shiftkey and click on one of the buttons. A single click on thebutton without holding the Shift key recalls the stored setupor zoom level. Any changes applied to the windows willreturn to the state saved to the button.
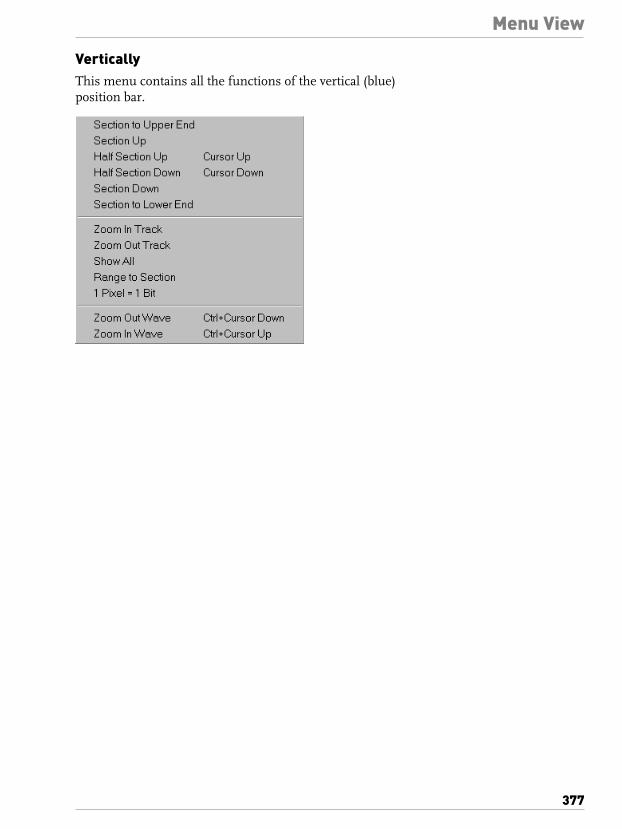
377
Menu View
VerticallyThis menu contains all the functions of the vertical (blue)position bar.

378
Menu Object
Contrary to the menu Edit all functions in this menu exclu-sively manipulate selected objects in virtual projects. Se-lected ranges have no effect with these functions. Rangesare used to determine insertion points or cut positions ofobjects. When inserting material into a virtual project, therange beginning has the same function as the play cursor– the material is inserted at the range beginning.
New ObjectUse this function to create a virtual object. The current rangein the Wave project will be inserted into the virtual projectat the play cursor position. It will also be the currently se-lected object. This is the same procedure as the drag&dropmethod explained earlier in this chapter.The object is inserted at the actual range position in theVIP.
Mute objectsThe selected objects will be muted.
Cutting Objects > Cut ObjectsThe currently selected object is replaced with empty spaceand copied to the VirtClip. The length of the current projectremains and all other non-selected objects remain in theirpositions. The previous contents of the VirtClip are replacedwith the cut object.If a range is selected, all active objects are separated on therange edges.
Cutting Objects > Copy ObjectsTo place a copy of the currently selected object into theVirtClip select this option. The contents of the VirtClip canthen be inserted into the project using the “Insert Objects”option (see below). The previous contents of the VirtClipare replaced.
Cutting Objects > Insert ObjectsObjects in the VirtClip can be inserted in the project at thecurrent play cursor position. The other objects in the projectmaintain their positions. Please note that the newly insertedobject might cover portions of the already existing objects.Simply drag the new object to a different set of tracks orreposition the object on the same tracks.
379
Menu Object
Cutting Objects > Delete ObjectsThe selected objects are deleted from the current project.The length of the current project however remains the same.Previously unselected objects keep their positions. The con-tents of the VirtClip remain unchanged.
Keys: CTRL + Del
Cutting Objects > Extract ObjectsAll objects not currently selected are deleted. Please notethat the function Edit->Extract works similar. However, theEdit menu function requires a previously selected range!
Cutting Objects > Duplicate ObjectsAll selected objects are duplicated and pasted to the sameposition as the original objects. The original object is over-laid with the copied object. The duplicate object can easilybe shifted to a desired position by using the mouse. If severalobjects have been selected before the duplication, press theshift key before shifting to ensure that all objects remain inselected status and are shifted together.This option does not make use of the VirtClip, so all contentsof the VirtClip remain unchanged.This function is also available using your mouse. Press andhold the Ctrl-key, click on the object you want to duplicateand drag the copy to a new position in the project.Another option is to use the Drag&Drop functionality forthe Object or Universal Mouse Mode:If multiple objects are selected, press the Ctrl key and dragthe selected objects to the new position. This allows you toduplicate the selected objects easily and without using theVirtClip.
Cutting Objects > Duplicate Objects multipleThis function duplicates multiple objects and places themin sequence. Another dialog is displayed, which allows youto determine how many copies of the selected objects areto be duplicated, the separating distance and the overalllength of the duplication.This is also another way of building Loop-Objects!The following parameters are available:
Number of Objects: Determines the number of objectsthat are created.
Group created Objects: When checked, all created objectsare grouped together.

380
Menu ObjectDelta Time: This determines the relative position of eachcreated object to the next (from the beginning of one objectto the beginning of the next). The default setting is thelength of the selected object. At the default setting theduplicated objects line up without a gap between them, thiscreates a seamless loop.
Duration: As an alternative, the duration can be specified,which are the combination of time difference and thenumber of duplicated objects.
Cutting Objects > Split Objects on MarkerpositionThis function splits or separates selected objects so thatindividual object sections can be further manipulated. Allselected objects are separated at the current marker position,which results in two independent objects.
Split ObjectsThis function splits or separates selected objects so thatindividual object sections can be further manipulated. Allselected objects are separated at the current play cursorposition, which results in two independent objects.If a range is selected, the cut occurs on both range borders.It is not necessary to select objects prior to choosing therange and calling the Split Objects function. If an underlyingobject is separated, the newly created object covers the ori-ginal underlying object.
Keys: t
Trim ObjectsThis function trims the object borders to the currently selectedrange borders. The selected range needs to be located withinthe confinements of the object you want to trim.
Keys: Ctrl+t
Lock Objects > Lock ObjectsTo protect objects from unintended shifting use this option.First, select the objects you want to “lock” in place andactivate the lock function. A diagonal line is placed acrossthe locked object.
Lock Objects > Unlock ObjectsLocked objects are unlocked and made available for shifting.Make sure you have selected the object(s) you want to unlockprior to activating the unlock function.

381
Menu Object
Lock Objects > Lock Definitions
Here you can select, which options should be disabled:
Disable Moving: Disables moving of objects (default). Thisis useful in multi-track projects to avoid delays betweenseveral tracks.
Disable Volume changes: The volume handles aredisabled.
Disable Fade In/Out: The fade handles are disabled.
Disable Length changes: The length handles are disabled.
Object to Playcursor PositionThis moves the selected object to the acutal playcursorposition.
Object to Original PositionThis moves the selected object to the original position wherethe material was originally recorded. This is often helpfulif an object was accidentally moved.
Set New Original PositionThe current object position is used to reset the OriginalPosition attribute for the object. This is also used in theTake Manager.
Build Loop ObjectWith this function, a loop can be defined within an object.An area, which indicates the loop length, must be selectedin the object first.The object then becomes the loop object. That means thatthe number of loops can simply be “raised” with the “lengthhandlers” at the bottom of the object.Such generated loop objects are ideal for generating longdrum sequences from only one drum loop! Loop objects

382
Menu Objectalso help to save memory, since in the VIP only one objectis handled rather than multiple objects or copies of the samematerial or very long samples!
Set HotspotThe current play cursor position is turned into a referencepoint for the snap function. Instead of the object’s be-ginning, the hot spot is now used when the object is snappedto the grid.Stroked vertical lines illustrate hot spots. Hot spots maystand outside an object (in front of or behind the object).This function is very useful for a case where the portion ofan object to be synchronized does not line up with it’sbeginning.
Select ObjectsTo select all objects located partially or entirely in theselected range, or at the current play cursor position.
Switch SelectionTo select all objects located partially or entirely in theselected range, or at the current play cursor position.
Group ObjectsAll selected objects are grouped together. All operationsare applied to the whole group.
Ungroup ObjectsSelected objects are ungrouped. Individual objects areavailable for processing after that.
Object Background ColorSometimes it is necessary to distinguish certain objectsfrom others. MAGIX audio studio will let you specify diffe-rent colors for selected objects. Once you have selected oneor more objects, choose “Object Background Color” fromthe “Object” menu and specify a different background colorfor the objects. After clicking on OK, all selected objectswill have the specified background color.
Object Foreground ColorThe foreground color (such as sample data displayed) canbe changed as well. After selecting the desired color, allselected objects in the project will have the same foregroundcolor.
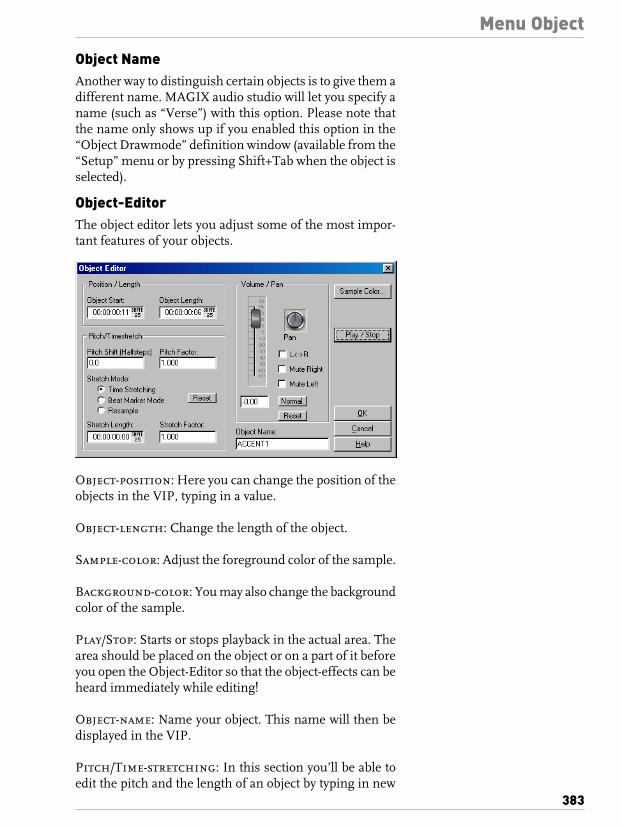
383
Menu Object
Object NameAnother way to distinguish certain objects is to give them adifferent name. MAGIX audio studio will let you specify aname (such as “Verse”) with this option. Please note thatthe name only shows up if you enabled this option in the“Object Drawmode” definition window (available from the“Setup” menu or by pressing Shift+Tab when the object isselected).
Object-EditorThe object editor lets you adjust some of the most impor-tant features of your objects.
Object-position: Here you can change the position of theobjects in the VIP, typing in a value.
Object-length: Change the length of the object.
Sample-color: Adjust the foreground color of the sample.
Background-color: You may also change the backgroundcolor of the sample.
Play/Stop: Starts or stops playback in the actual area. Thearea should be placed on the object or on a part of it beforeyou open the Object-Editor so that the object-effects can beheard immediately while editing!
Object-name: Name your object. This name will then bedisplayed in the VIP.
Pitch/Time-stretching: In this section you’ll be able toedit the pitch and the length of an object by typing in new

384
Menu Objectvalues. We recommend the time/pitch-mouse-mode formore intuitive editing.
Volume/Pan: You can also assign your object a certain vol-ume level and an exact position in the stereo-pan.
Keys: right + left mouse button or left double-click on theobject
Take ManagerThe Take Manager is another powerful feature of MAGIXaudio studio. It is especially for those who work with manydifferent recording takes and need to manage them.MAGIX audio studio registers the VIP position of therecorded audio material. This time stamp is stored to theHD or RAM Wave project and offers the option to alwaysreturn the recorded object to its original position.
Application Examples:
– Selection of the best take after five loop-punch recordingpasses.
– Locating the best material between bars 32 and 34 of 12takes from a classical production.
– A clear overview of all available takes during a SMPTEtime of 30:00 to 35:00.
Basis for working with the Take Manager is a selected ob-ject. This could be the last created object after using punch-in recording. This object is referenced in the take list with acolored “O”.
385
Menu ObjectAttention: The Take Manager does not work if objectsare used in a VIP, which are not created by recording ma-terial into MAGIX audio studio. This would be the case forany material imported through the WAV Import or CDTrack features!When objects are present that where not created throughrecording, a manual time stamp can be assigned to theobjects by using the function Object->Set New OriginalPosition. Once completed, the Take Manager will list theobjects in the take list.
Display FilterSame File Only: Only those takes are displayed that belongto the same audio file as the selected object.
Same Track Only: Only those takes are displayed that apositioned in the same track as the selected object.
Match Time: Only those takes are listed that match theoriginal time position of the selected object.
Play: Starts the playback. Before opening the Take Mana-ger set the play cursor to the desired playback position.
Replace!: This replaces the selected object with the currentlychosen takes from the Take List.
Statistic (Verbose): Creates a new VIP with the currentlyshown takes from the Take List. Every take is listed in anew track. The VIP can be used to audition the individualtakes with the Solo and Mute functions of each track.
Statistic (Brief): Creates a new VIP with the currentlychosen takes from the Take List. All takes are lined up onthe same track.
Destructive EditingThe corresponding Wave project window for a VIP objectis opened. This Wave project contains the audio materialthat is referenced in the VIP object. The selected range inthe displayed Wave project is the material used in the VIPobject. The Wave project allows you to conduct any des-tructive editing (Wave editing).When using destructive editing, simple editing proceduressuch as cut and copy functions can be used, as well as veryelaborate effect processing.

386
Menu ObjectUsing destructive editing may not necessarily be the bestmethod of editing. For example, if you have duplicated anobject several times, all of the objects would contain thesame destructive editing effect after changes are applieddirectly to the Wave project window.Please keep in mind that editing functions such as cut, copy,fades, crossfades, and others, can all be applied to the audiomaterial in a non-destructive way in the virtual project.Also, remember that if you work extensively with WAV files,MAGIX audio studio has the perfect solution for Waveoriented editing. By using a 1-track virtual project, you cancomplete all editing steps faster and more convenient thanany other Wave editing application! For example, any typeof cutting and rearranging of audio segments can beperformed in a non-linear, non-destructive, and extremelyfast way in the virtual project. The Track Bouncing optionin the Special menu allows you to take any material in aVIP and turn it into a WAV file.
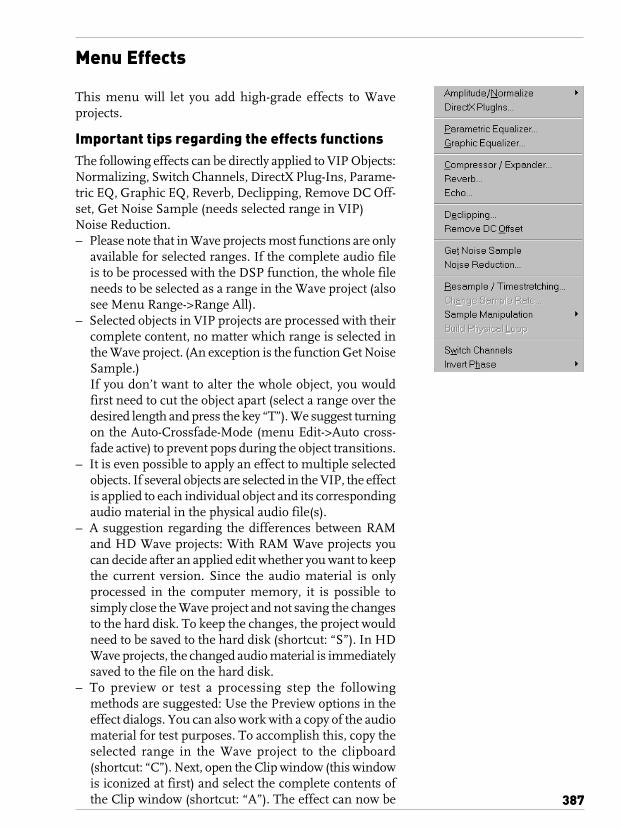
387
Menu Effects
This menu will let you add high-grade effects to Waveprojects.
Important tips regarding the effects functionsThe following effects can be directly applied to VIP Objects:Normalizing, Switch Channels, DirectX Plug-Ins, Parame-tric EQ, Graphic EQ, Reverb, Declipping, Remove DC Off-set, Get Noise Sample (needs selected range in VIP)Noise Reduction.– Please note that in Wave projects most functions are only
available for selected ranges. If the complete audio fileis to be processed with the DSP function, the whole fileneeds to be selected as a range in the Wave project (alsosee Menu Range->Range All).
– Selected objects in VIP projects are processed with theircomplete content, no matter which range is selected inthe Wave project. (An exception is the function Get NoiseSample.)If you don’t want to alter the whole object, you wouldfirst need to cut the object apart (select a range over thedesired length and press the key “T”). We suggest turningon the Auto-Crossfade-Mode (menu Edit->Auto cross-fade active) to prevent pops during the object transitions.
– It is even possible to apply an effect to multiple selectedobjects. If several objects are selected in the VIP, the effectis applied to each individual object and its correspondingaudio material in the physical audio file(s).
– A suggestion regarding the differences between RAMand HD Wave projects: With RAM Wave projects youcan decide after an applied edit whether you want to keepthe current version. Since the audio material is onlyprocessed in the computer memory, it is possible tosimply close the Wave project and not saving the changesto the hard disk. To keep the changes, the project wouldneed to be saved to the hard disk (shortcut: “S”). In HDWave projects, the changed audio material is immediatelysaved to the file on the hard disk.
– To preview or test a processing step the followingmethods are suggested: Use the Preview options in theeffect dialogs. You can also work with a copy of the audiomaterial for test purposes. To accomplish this, copy theselected range in the Wave project to the clipboard(shortcut: “C”). Next, open the Clip window (this windowis iconized at first) and select the complete contents ofthe Clip window (shortcut: “A”). The effect can now be

Menu Effects
388
experimented with on the temporary copy of the audiomaterial.
– A tip: To edit ranges in a VIP, the object first needs to beseparated (selecting a range over the desired length andpressing “T”). We suggest to turn on the Auto-Cross-fade mode (Menu Edit->Auto Crossfade active) to smooththe transitions and prevent pops. If the complete HDPneeds to be saved, the separated object will need to bemerged into a new audio file (HDP). This can be accom-plished by selecting a range over the three object partsresulting from the separation (Suggestion: Use the Gridto assist with the creation of the range.) Next, use theTrack Bouncing function (Menu Tools->Track Bouncing,Setting: Only Selected Range) to merge the objects inthe range to create a new HD Wave Project.
– The real time effects dialogs in the Mixer window canalso be accessed by clicking the right mouse button onthe respective effects knob of a channel. The correspon-ding effects dialog will appear, which can be used to makedetailed adjustments to the settings.
Amplitude/Normalize > Normalize File (phys.)This function modifies the sample’s overall amplitude. Thedata is altered so that the maximum amplitude occurringin a specified range is set to 100% (or any other value bet-ween 1-400%). MAGIX audio studio will first attempt todetect the maximum and relate it to the percentage chosen.Then all other values are weighted with the new factor.The Normalize function is designed to fully modulate orover-modulate samples. A particular application is pro-cessing that is done before a conversion from a highersample resolution to a lower resolution takes place. Sincethe dynamic range of the low resolution is smaller, it stillcan be fully utilized by applying the Normalize function.If working with sounds from one single instrument, youshould set the factor to 100%.If, however, your audio material has background percussionfor example, you will be able to over-modulate the sampleto 120% to 200%. This will only cut off the new percussionpeaks. The same method allows you to alter the sound ofnatural instruments by over-modulating them.As preparation for further physical processing, such asfilters, reverb, dynamic compression etc., a level reductionof 50-70% is suggested. This should avoid clipping duringpost processing.
An important reselect: If the volume level during therecording is relatively low and the material is later norma-

Menu Effects
389
lized, the result will not be of the same quality if the re-cording level is maximized to its fullest range. If for examplethe volume level was only set to 50% of the possible range,the audio material will be in 15-bit quality. Even normalizingthe material to 100% will not change this aspect.
Keys: Shift + n
Amplitude/Normalize > Normalize Object(virt.)This function will perform real-time normalizing on theselected objects. This is different than the physical norma-lizing, which will restructure the audio file.The real-time normalizing will look for the peaks in youraudio material and adjust the volume so that the peaksrepresent 0 dB. The rest of the audio material is scaledaccordingly.
Keys: n
Amplitude/Normalize > Amplitude / 2This function divides the amplitude of all sample values bya factor of 2. The same could be achieved by a fade-in/fade-out with parameters ranging from 50% to 50%. However,this function is much faster since computing time is greatlyreduced.
Amplitude/Normalize > Amplitude * 2The same holds true for the “Amplitude * 2” function.However, sample amplitude values are multiplied by a factorof 2, thus corresponding with a fade-in/fade-out processwith parameters ranging from 200% to 200%.
Amplitude/Normalize > Set ZeroSample data values in a selected range are set to zero (nodata). Noise and imperfections in a sample can thus beeliminated.
Amplitude/Normalize > Fade in/outThis function allows sample ranges to be faded in or out.The amplitude is varied in its time characteristic from thestart value of the beginning to the final value at the end ofthe range. When the function has been called, a windowappears in which you can specific parameters for this op-eration.A simple fade-in operation would be performed with theparameters from 0% to 100%, whereas normal fade-outrequires the specification from 100% to 0%.
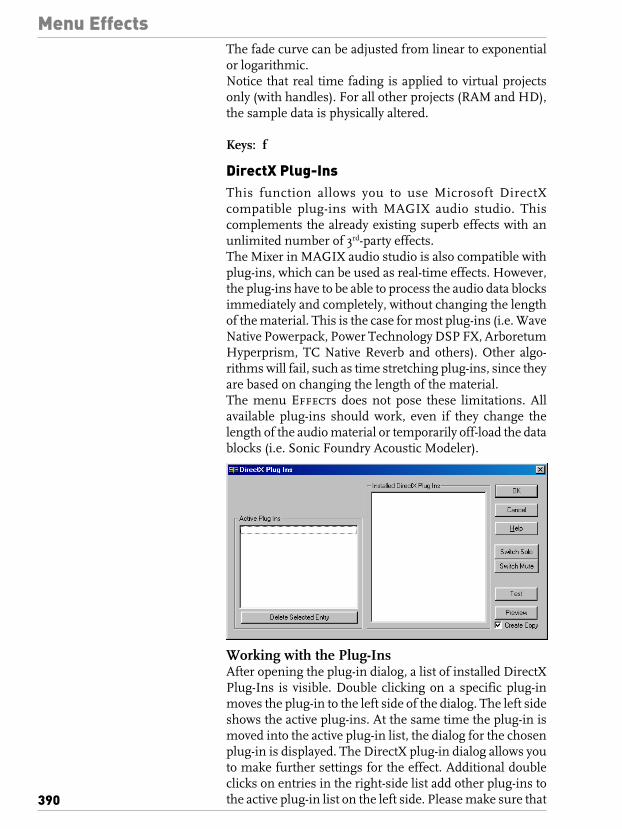
Menu Effects
390
The fade curve can be adjusted from linear to exponentialor logarithmic.Notice that real time fading is applied to virtual projectsonly (with handles). For all other projects (RAM and HD),the sample data is physically altered.
Keys: f
DirectX Plug-InsThis function allows you to use Microsoft DirectXcompatible plug-ins with MAGIX audio studio. Thiscomplements the already existing superb effects with anunlimited number of 3rd-party effects.The Mixer in MAGIX audio studio is also compatible withplug-ins, which can be used as real-time effects. However,the plug-ins have to be able to process the audio data blocksimmediately and completely, without changing the lengthof the material. This is the case for most plug-ins (i.e. WaveNative Powerpack, Power Technology DSP FX, ArboretumHyperprism, TC Native Reverb and others). Other algo-rithms will fail, such as time stretching plug-ins, since theyare based on changing the length of the material.The menu Effects does not pose these limitations. Allavailable plug-ins should work, even if they change thelength of the audio material or temporarily off-load the datablocks (i.e. Sonic Foundry Acoustic Modeler).
Working with the Plug-InsAfter opening the plug-in dialog, a list of installed DirectXPlug-Ins is visible. Double clicking on a specific plug-inmoves the plug-in to the left side of the dialog. The left sideshows the active plug-ins. At the same time the plug-in ismoved into the active plug-in list, the dialog for the chosenplug-in is displayed. The DirectX plug-in dialog allows youto make further settings for the effect. Additional doubleclicks on entries in the right-side list add other plug-ins tothe active plug-in list on the left side. Please make sure that

Menu Effects
391
the chosen plug-ins are compatible with each other. Forexample, mono and stereo plug-ins can not be used simul-taneously – an error message is displayed.The last plug-in loaded into the active plug-in list can bedeleted with the button “Delete last Entry”.
Test: This button activates the real-time preview of the activeplug-in listed on the left side of the display. This functionis ideal for testing of the chosen plug-in settings if the real-time calculation operates sufficiently.
Preview: This function calculates a short segment of theaudio material with the active plug-in settings and playsback the audio segment. Use this option if your systemdoes not seem to be able to sustain the real-time preview(button “Test”). The length of the off-line preview can bedetermined with the setting System (shortcut: y).
Parametric EqualizerThis dialogue contains a 3-Band parametric equalizer. Youcan adjust the sound of your sample activating filters onthree independent frequency bands. This allows you to raisethe bass and treble in a broad spectrum as well as makingvery specific corrections in the dynamic frequency spec-trum.However, you will first have to highlight an area of the cur-rent project or the entire project with the a-key (wave-projects).Don‘t forget that the mixer (m-key) also includes one equal-izer per channel that works in real time and does not modifythe saved audio-material! (non-destructive manipulationprocess).

Menu Effects
392
Frequency: Adjust the middle frequencies of the differentfilters between 10 Hz and 24 kHz using these switches. Asyour choice is completely unrestricted, you can also set vari-ous filters to the same frequencies in order to obtain morepronounced effects.
Spectrum: Here you can set the frequency-spectrum ofeach filter between 10 Hz and 10 kHz.
Decibel: These switches control the activity and intensityof each filter. If the switch is set to 0, the filter we be inac-tivated, saving system resources.
Volume: This button controls the general volume shouldthe filters produce an extreme increase or decrease of theindividual levels.
Test: This button activates the real time demo-function. Ifthe demo-function can‘t be stopped using this button (dueto work-overload) you can stop playback using the space-bar. Maybe you should then choose a bigger real time buffer-size in the “Setup > System”-menu!
The effect of the equalizers can be enhanced by using itrepeatedly on the same sample. This enables you to makeany manipulation you want on the dynamic frequency spec-trum!
Graphic EqualizerThis editor contains a 5-band graphic equalizer. You canactivate filters on five pre-set frequency bands in order toadjust the sound of your sample.
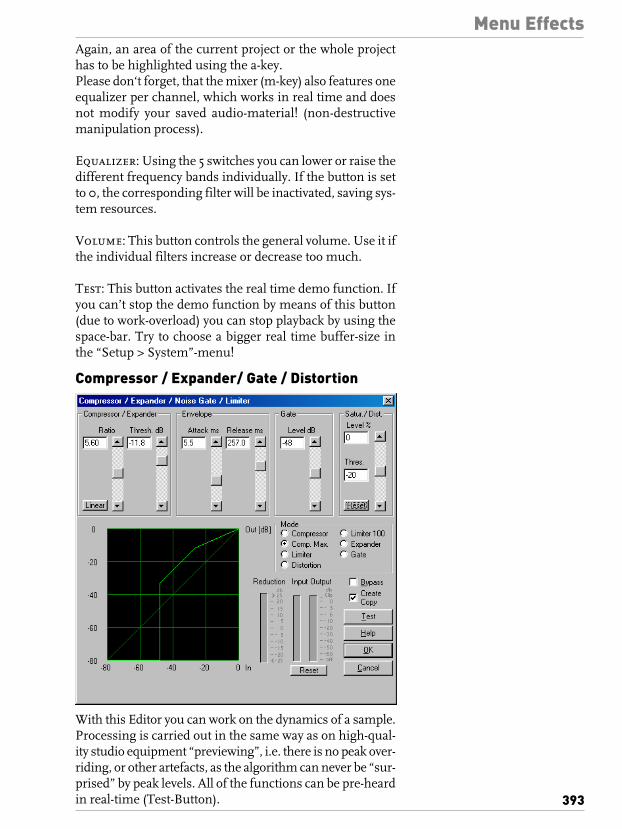
Menu Effects
393
Again, an area of the current project or the whole projecthas to be highlighted using the a-key.Please don‘t forget, that the mixer (m-key) also features oneequalizer per channel, which works in real time and doesnot modify your saved audio-material! (non-destructivemanipulation process).
Equalizer: Using the 5 switches you can lower or raise thedifferent frequency bands individually. If the button is setto 0, the corresponding filter will be inactivated, saving sys-tem resources.
Volume: This button controls the general volume. Use it ifthe individual filters increase or decrease too much.
Test: This button activates the real time demo function. Ifyou can’t stop the demo function by means of this button(due to work-overload) you can stop playback by using thespace-bar. Try to choose a bigger real time buffer-size inthe “Setup > System”-menu!
Compressor / Expander/ Gate / Distortion
With this Editor you can work on the dynamics of a sample.Processing is carried out in the same way as on high-qual-ity studio equipment “previewing”, i.e. there is no peak over-riding, or other artefacts, as the algorithm can never be “sur-prised” by peak levels. All of the functions can be pre-heardin real-time (Test-Button).

Menu Effects
394
The following functions are available:
Compressor/ExpanderThe dynamics of a work are restricted, loud passages stayloud, quiet passages become louder. Compression is oftenused to give material more power and assertiveness. Thecompression level is set with the Ratio Control, the appli-cation level is determined by the Threshold. Build-up andfade-out times can be influenced by Attack and Release.An Expander is the functional opposite to the compressor:the differences between the peak levels and quiet passagesbecome greater.
GateVery quiet passages (under the Threshold Level) are sup-pressed or drawn down to zero. This effectively enables thenoise level even in the pauses between individual takes tobe suppressed, but even at high compressions levels (Ratio> 5) the Gate function is useful, to avoid over-raising of thequietest passages and thereby the background noise.
DistortionWith this set-up audio material can be distorted by meansof a non-linear transfer identification line; the signal be-come louder and additional harmony waves are created. Byinfluencing the application point of the distortion (Thresh-old) a soft, analogue sounding distortion (Overdrive) canbe generated (Threshold e.g. on -40 dB), or a hard, digitalsounding distortion (Threshold on 0 dB). With Ratio thestrength of the distortion can be set precisely.
Parameters for the Compressor/Gate/Distortion Edi-tor:Ratio: This parameter controls the strength of the giveneffects, 1.0 means no effect.
Threshold: Here the application threshold can be set,above or below that of the given effect.
Attack: Here the time can be set in which the algorithmreacts to increasing levels.
Release: Here the time can be set in which the algorithmreacts to decreasing levels.
Gate Level: This parameter determines under whichamounts the level should be set to 0.

Menu Effects
395
ReverbThis function generates high quality reverb in 3 differenttypes.
Type: Here you can switch between short, medium and longreverb.
Mix: This slider lets you adjust the level of the dry signaland the reverb sound.
Volume: Here you can adjust the output level of the audiomaterial.
Test: This button calculates a short buffer of audio materialwith reverb and starts playback for previewing the results.
EchoThis editor allows you to include echo-effects in your sam-ples. In order to avoid overriding, leave a certain marginfor adjustments, in other words, the sample data shouldnot reach the maximum or minimum values. That can beachieved (if necessary) by using the Normalising-function(around 70%).Again, you should keep in mind that the mixer (m-key) fea-tures one echo effect per channel, which is generated inreal time so that your saved audio material will remainunharmed!
Delay ms: This button indicates the delay in ms betweenthe single echoes or the original sound and the first echo.The preset value is 500 ms, or half a second if you prefer.Note that the delay depends on the sampling rate, there-

Menu Effects
396
fore any changes in the sampling rate after introducing theechoes will produce changes in the echo delays.
Decay %: This button adjusts the dumping values (per-centage) between the individual echoes. A value close to100 % produces slowly decaying echoes, whereas a valuebelow 40% produces echoes that disappear rapidly.
1 Delay: This just adds a delay to the original.
Feedback: This option produces an echo with feedback.Multi-Tap: The Multi-Tap produces a series of echoes ofdifferent intensities and delays.
Wet-/ Dry Balance %: Adjust the damping between theindividual echoes. A percentage close to 100 % producesslowly decaying echoes, whereas a percentage below 40%produces rapidly disappearing echoes.
Resonance: In this option you can adjust the size of thevirtual resonance room and the color of the resonance bytyping in values or using the scroll bars.
Declipping
MAGIX audio studio contains a function to remove digitalor analog clipping. Anybody who records audio hasencountered this one before. The perfect live recordingcontains clipping at the most important moment. This alonemay render the recording unusable!MAGIX audio studio uses high-grade algorithms to inter-polate the passages containing the clipping. The algorithmuses the material before and behind the clipping as areference point.The declipping algorithm is especially useful for materialthat contains obvious clipping, such as a piano or voice re-cording. Distorted drumbeats are normally not salvageable.
Minimal Level of Clipped Samples: This setting deter-mines the volume level the algorithm considers offendingmaterial. There are sound cards that exhibit different
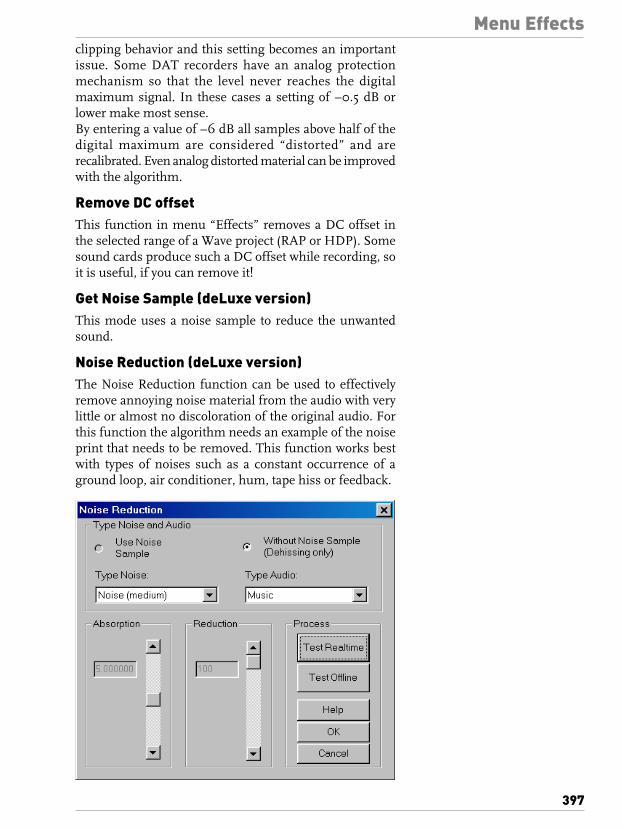
Menu Effects
397
clipping behavior and this setting becomes an importantissue. Some DAT recorders have an analog protectionmechanism so that the level never reaches the digitalmaximum signal. In these cases a setting of –0.5 dB orlower make most sense.By entering a value of –6 dB all samples above half of thedigital maximum are considered “distorted” and arerecalibrated. Even analog distorted material can be improvedwith the algorithm.
Remove DC offsetThis function in menu “Effects” removes a DC offset inthe selected range of a Wave project (RAP or HDP). Somesound cards produce such a DC offset while recording, soit is useful, if you can remove it!
Get Noise Sample (deLuxe version)This mode uses a noise sample to reduce the unwantedsound.
Noise Reduction (deLuxe version)The Noise Reduction function can be used to effectivelyremove annoying noise material from the audio with verylittle or almost no discoloration of the original audio. Forthis function the algorithm needs an example of the noiseprint that needs to be removed. This function works bestwith types of noises such as a constant occurrence of aground loop, air conditioner, hum, tape hiss or feedback.

Menu Effects
398
Please note that this algorithm was not necessarily deve-loped to remove pops and clicks from audio material.However, a typical click noise floor such as vinyl recordingscan still be successfully treaded with this function.The algorithm can also work without a noise sample – thenonly white noise is reduced, such as tape hiss or microphoneamplifier hiss.Mark a range over the audio material you want to be reducedin the recording! Then create the noise sample beforeopening the Noise Reduction dialog using the menu “Effects> get Noise Sample”!
Without Noise Sample: Use this mode if you do not havea noise sample and you only want to reduce white noise(dehissing).
Type Noise: Here you can select between different noisetypes.
Type Audio: Here you can select between Music and Voicesto control the denoising algorithm.
Absorption: This parameter lets you adjust the level ofnoise to be reduced. Please adjust this level carefully – itcontrols the quality of the complete noise reductionalgorithm! If the level is too low you still hear noise andartificial high tones. If the level is set too high you mayloose high frequencies of your audio material.
Reduction: Here you can adjust the balance between ori-ginal signal and denoised signal. In most cases is is usefulto keep a certain amount of original (non denoised) material– e.g. with a setting of -12 dB. This keeps as much of thenatural color of the audio material as possible.
Test Realtime: This button starts the realtime previewfunction of the actual settings on fast PCs.
Test Offline: This buttons starts the preview funtion forslower PCs – small parts of audio material are calculatedand played back.
Remove DC offsetThis function in menu ‘Effects’ removes a DC offset in theselected range of a Wave project (RAP or HDP). Some soundcards produce such a DC offset while recording, so it isuseful, if you can remove it!

Menu Effects
399
Resample / Timestretching / PitchshiftingImportant: If you want to change the sample rate of a wholeaudio file (e.g. from 48 kHz to 44.1 kHz) please use theseparate function “Change Sample Rate” in the Effectsmenu!All algorithms in this dialog only use the parameter factor(upper left edit control) to set the amount of effect. All theother input fields in the parameter group simply controlthis factor. This makes it easy to specify the factor by typingin the new length, pitch or tempo in bpm. Press “RefreshDisplay” to calculate the actual factor if needed!The following algorithms can be used:
Resampling:When using a factor lower than 1.0 the material becomesfaster and higher. This is very similar to an analog tapedeck, which runs at a higher or lower speed. Also samplersand pcm-synthesizers use this type of algorithm for trans-posing the samples or waveforms. Use this mode to correctthe pitch and speed of any audio material, which maychange its length.If the factor is lower than 1.0, the re-sampling process isperformed without a quality loss.Otherwise, the re-sampling process will result in a loss ofhigh frequencies. If for example the length of a 44.1 kHzsample is doubled, the resulting frequency response of theprocessed sample is limited to 11.025 kHz.
Pitch Shifting:The pitch of the sample is changed, maintaining the length.Use this mode to transpose an audio object without chang-ing the length.
Time Stretching:The length of the sample is changed, maintaining the pitch.Use this mode for example to change the tempo of a drumloop without changing the pitch.
Menu Effects
400
Time Stretching and Pitch Shifting are no loss-less proce-dures - depending on the factor there can occur short de-lays or other artifacts in the sample. To minimize theseartifacts you have the choice between 3 internal algorithms:
Loops/Songs: Use this mode for factors in the range of0.9...1.1. This algorithm keeps the original phase even ofstereo material, but it produces more artifacts when usingwith large factors.
Loops/Songs/Speech: This mode uses a much more com-plex algorithm, which needs more time that is calculating.But it gives in most cases better results when using largefactors. The phase of the material is changed to get a“smoother” sound. If you were for example dealing withspeech, vocals, or orchestral instruments this would be noproblem. More complex spectrums, such as a mix of differ-ent instruments or completed mix problems, may developproblems.
Solo Instruments: This mode uses the same algorithmsas the last one, but uses more of the smoothing compo-nent. This makes it ideal for solo instrumental sounds likepiano samples or vocals.
Beat Marker-Mode: This is a additional Timestretch Mode.It is made for pure Drumloops. Basically it works like this:Through activating the option “Find Beat Marker” the al-gorithm tries to find and mark Beats in the Audio material.Only these points will be used for timestretching by mov-ing the autio material at the markers ahead or back.Increasing the tempo will superimpose some beats, slow-ing down generates short pauses between the beats. Thatmostly sounds better than the older algorithms.A threshold value for beat detection can be set by using thesensitivity control.Furthermore you are able to set the beat markers manualbefore you open the Timestretching dialog.Just set the markers short of the beats (key: shift + 1 ... 0 )If a Wave Project is open and visible, you can follow theprocess of setting beat markers on the screen.
Test Realtime: This is a new function for the beat markermode. Herewith it is easy to test the effect before you letMusic Editor calculate the whole sample.Irrespective of the tempo, the pitch of the loop can be ad-justed using the pitch control in the upper left region ofthe dialog.
Menu Effects
401
Change Sample RateUse this function to change the sample rate of a whole audiofile. This may be needed to convert a DAT recording at 48kHz to 44.1 kHz for use on an audio CD.After choosing the new sample rate you can select afilename for the new project.If the resolution is increased the sample rate change willtake place without any quality loss – the sample materialwill not experience fidelity reductions. (The needed harddisk space will increase though.)If the resolution is reduced, the overtones or high frequen-cies may be lost during the sample rate change. For exam-ple, if the resolution of a 44.1 kHz sample is reduced to22.05 kHz, the frequency response of the resulting sampleis reduced to 11.025 kHz. The frequency response is alwayshalf of the resolution specified. For a conversion from a 48kHz sample to 44.1 kHz, this loss in quality is not signifi-cant, since the human ear only recognizes frequencies upto 20 kHz. (A resolution of 48 kHz is often only used be-cause the digital to analog conversion can take place withmuch higher precision without expensing a lot of effort.)Please note that resampling to 44.1 kHz can also be donewhile recording in real-time.The Playback Parameter window (Shortcut: p) contains aVarispeed option for real-time resampling during playback.The Record window (Shortcut: r) lets you resample to 44.1kHz in real-time from any of the selected sampling rates.
Sample manipulation > Sampledata / 2Every second sampling value is removed and the completesample is reduced to half its length. The audible pitch isdoubled, i.e. raised by one octave. When halving the sam-pling rate you will notice that the corresponding upper har-monics are missing.The frequency range is divided (i.e. 0-22.05 kHz @ 44.1kHz Sample Rate -> 0-11.025 kHz @ 22.05 kHz).
Sample manipulation > Sampledata * 2This function inserts a new value between two neighboringsampling values. It is the average of the two sampling val-ues.The complete sample changes to twice it’s length and theresulting pitch of the sample is cut in half. You must thendouble the playing rate to achieve the former pitch.You should note that the higher sample rate does not leadto new upper harmonics – the frequency range of the audiomaterial stays the same.
Menu Effects
402
Sample manipulation > ReverseThe sample data in the selected range is reversed along thetime axis. The playback of the sample data happens fromthe end to the beginning. This allows for very interestingeffects, not to mention the “hidden messages” frequentlyreferred to in various songs.This function is reversible: if you do not select a new range,calling this function once more leads to the originalmaterial.
Build Physical LoopThis function utilizes a complex algorithm for optimizingloops in Wave projects. It is useful when samples are to beused for instrumental sounds as well as wave table synthe-sizer.Before you can process a sample you need to select a rangein your sample that already defines the rough edges of thesample loop. Remember that you can shift and vary a rangeduring playback to find the best loop position. A comfortableway to look at the loop positions is by activating the splitrange mode by pressing “b”. The sample will be displayedin 3 sections.To gain an interruption-free loop the outer limits of therange will be set to zero. By applying a crossfade to thematerial at the loop end containing the sample data in frontof the loop beginning, MAGIX audio studio will create a‘smooth’ transition between loop end and loop beginning.When a marker is set in front of the selected range, therange between the marker and the beginning of the loopwill be used for the crossfade. This offers you a feature foundin professional hardware samplers. To achieve a short cross-fade set the marker close to the loop beginning. To receivea long crossfade position the marker further away from theloop beginning.Notice that the distance between marker and beginning ofthe loop range needs to be smaller than the loop range itselfto make a crossfade possible.
Switch ChannelsWith this function you can switch left and right stereochannel. This is useful to correct recordings with switchedchannels.

Menu Effects
403
Invert PhaseThe sample data within the selected range is inverted alongthe amplitude axis. This phase inversion means that nega-tive values become positive and vice versa. This function,too, is reversible.The “Invert” function permits samples with different phasesto be matched.Along with the available mixing functions (which are, froma mathematical viewpoint, adding functions) you canactually subtract samples by applying this function to theselected sample.

404
Menu Range
MAGIX audio studio offers a convenient way of working withranges. The “Range” menu will let you use these options.
Range allThe range will cover the complete sample. This commandcomes in handy if you want to apply changes to the entiresample with functions that normally only address certainranges.
Keys: a
Move Play Cursor > to beginningSets the start position of the play cursor to the beginning ofthe project.
Keys: Home
Move Play Cursor > to endSets the start position of the play cursor to the end of the project.
Keys: End
Move Play Cursor > to range startSets the start position of the play cursor to the beginning ofthe currently selected range.
Keys: Alt + cursor right
Move Play Cursor > to range endSets the start position of the play cursor to the end of thecurrently selected range.
Keys: Alt + cursor left
Edit Range > Range to beginningThe beginning of the range will be extended toward to thebeginning of the project.
Keys: SHIFT + Home
Edit Range > Range to endThe end of the range will be extended toward the end of theproject.
Keys: SHIFT + End

Menu Range
405
Edit Range > Flip Range leftThe current range is shifted left by the length of the range.Its end will be its former beginning. If there is not enoughroom to place the range, the command will not be executed.
Keys: CTRL + SHIFT + left
Edit Range > Flip Range rightThe current range is shifted right by the length of the range.Its beginning will be its former end. Keep in mind that ifthere is not enough room to place the range, the commandwill not be executed.
Keys: CTRL + SHIFT +right
Edit Range > Beginning of Range > 0This function shifts the beginning of range to the right ofthe next zero position. The function can be called from thekeyboard by pressing the left Shift + Alt keys and “6” onthe numeric keypad at the same time. You can also pressthe PgUp key.
Keys: Page Up
Edit Range > End of Range > 0This function shifts the end of the range to the right of thenext zero position (change in polarity). “Zero position” isthe next sample value with zero value or the boundarybetween a positive and a negative sample value (or viceversa). This is particular useful for searching for loop points.The function can be called from the keyboard by pressingthe right Shift + Alt keys and “6” on the numeric keypad orthe PgDn keys.
Keys: Page Down
Edit Range > Beginning of Range < 0This function shifts the beginning of the range to the leftof the next zero position. The function can be called fromthe keyboard by pressing of the left Shift + Alt keys and “4”on the numeric keypad. You can also press the PgDn key.
Keys: SHIFT + Page Up
Edit Range > End of Range < 0This function shifts the end of the range to the left of thenext zero position.

Menu Range
406
The function can be called from the keyboard by simul-taneously pressing the right Shift + Alt keys and “4” on thenumeric keypad or by pressing the Shift + PgDn keys.
Keys: SHIFT + Page Down
Edit Range > 0> Range < 0This function shifts the beginning of the range to the leftand the end of the range to the right of the next zero position.
Keys: Clear
Range length toThis command lets you set the range length to 1, 2, 4, 8,and 16 bars. You can set the tempo in BPM with menuView->Snap Setup.
Split RangeThis function is in particular useful for working with loops.If not already displaying in Split Range Mode the project isfirst switched to this mode displaying three sections on thescreen.The upper section displays the whole sample. The sectionlocated at the bottom left displays the data near thebeginning of the range. The section at the bottom rightdisplays the data near the end of the range.The boundaries of the range can be exactly positioned inthe lower sections, while the upper section will display thelocation of the entire range. You can also define rangesacross several sections.
Keys: b
Split Range for VideoThis function is in particular useful for working with AVIVideos.The upper section displays the whole sample. The sectionlocated at the bottom left displays the data near thebeginning of the range. The section at the bottom rightdisplays the data near the end of the range.Both lower sections are zoomed down to single frameaccuracy.The boundaries of the range can be exactly positioned inthe lower sections, while the upper section will display thelocation of the entire range. You can also define rangesacross several sections.To undo the split, the display has to be returned to a 1 sectiondisplay with Shift + b or View->Sections->1.
Menu Range
407
Store RangeAnother powerful feature of MAGIX audio studio is theoption of defining and saving different ranges for futureretrieval. An unlimited number of ranges can be defined.You can for example specify different loops and comparethem while you recall their ranges.All ranges of a project can be seen in menu Tools->RangeManager. There all ranges can be renamed or played.When selecting this menu option, the selected range needsto be stored by entering a numerical value the range isassociated with.
Keys: SHIFT + F2 ... F10
You can define more ranges by using the submenu “Other”.You will need to specify a name for the range selected.
Keys: SHIFT + F11
Get RangeBy selecting this option, you can choose one of the definedranges as the current range.MAGIX audio studio even lets you choose a range whileplaying. The specified range becomes the current one andis audible. Using this method, you can change between tworanges comparing them with each other. Ranges can alsobe named and recalled with the Range Manager (Toolsmenu).
Keys: F2 ... F10
Get Range LengthBy selecting this option you can choose the length of one ofthe defined ranges as the current range.MAGIX audio studio even lets you choose a range lengthwhile playing. The specified range becomes the current oneand is audible. Using this method you can change betweentwo range length comparing them with each other.
Keys: Ctrl + Shift + F2 ... F10
Store MarkerYou can store an unlimited number of markers whereverthe play cursor is placed at.
Keys: SHIFT + 1 ... 0

Menu Range
408
Using the submenu “Other”, you can define more markerswith a desired name. Defined markers can be seen abovethe sample data section of the project window and can bemoved with the mouse.
Keys: SHIFT + [
Get MarkerBy selecting this menu option, you can easily locate markerpoints. Simply specify the desired marker location andMAGIX audio studio will position the play cursor at thatlocation.You can even select a new play cursor location duringplayback of the project.You should keep in mind that, whenever a marker has beendefined, the range between the marker and the end of thesample is played.
Keys: 1 ... 0
Markers on Range BordersThis function sets two markers to the beginning (S) andthe end (E) of a selected range.
Set Markers on SilenceThis function sets markers on silent regions in the sample(only in Wave projects - HDP or RAP). You can choose theminimal length of the pause, a threshold level, the startnumber and a prefix for the marker name.This is very useful to select the regions of sample CDs etc...
Min. Time (ms): This is the minimum length in ms of a”silent” area.

Menu Range
409
Threshold (dB): This is the maximum volume of a ”si-lent” area. The level of the area in the project will be set onthe level of the threshold in the graphic display!
Starting number: The markers will start to count fromthe number you type in this dialogue box.
Prefix: This allows you to insert additional symbols (let-ters would be appropriate), which will be placed in front ofthe marker-numbers. By doing this, you will able to distin-guish between new and older markers.
Delete markerThe selected marker will be deleted.
Delete all markersAll markers of the project will be deleted.
Recall last rangeGet the last selected range. This is useful if you have clicked
Range EditorThe beginning, the end and length of a selected range canbe numerically changed in different units of measurement.This function will let you specify minute details of aparticular range you need to set.If you change any of the values in the “Range Start”, “Ran-ge Length” or “Range End” sections, all other values willautomatically be updated with the exceptions below:Change values in the Range Start section:The end will be maintained.Change values in the Range End section:The start will be maintained.Change values in the Range Length section:The start will be maintained.Please note the format of the “Bar” dialog box. The formatis displayed as a 4/4 beat with 96 clicks per quarter.Displayed are the bar, beat, and clicks.The number of beats per minute (BPM) can be set in theBPM dialog box in View->Snap Setup.

410
Menu CD (deLuxe-version)
MAGIX audio studio deLuxe allows you to create audio CDsdirectly from virtual projects and any Stereo Wave project,regardless how many tracks are in the VIP. The requirementis a sample rate of 44.1 kHz for the project. 24-bit objectsare converted to 16-bit during the burning of the CD or theCD Track Bouncing function.Single-track virtual projects (so-called CD VIPs) areespecially useful, if WAV files or Wave projects are readyto be turned into a CD. The VIP treats the loading of theWave project different than for multi-track VIPs. Regardlessof any selected range, the Wave projects are loaded byautomatically inserting a pre-determined space between thesongs or objects. The distance can be set with CD->Set Pau-se Time.If a completed VIP represents a single track on the CD, usethe Track Bouncing function to turn the multiple tracksinto a single Wave project. This Wave project can then beloaded as a “Track Object” in a new CD VIP to properlyplace it among other track objects.
Load audio CD track(s)See menu „File“!
Set TrackUse this function to set a track marker (Index Marker) onthe current play cursor position. All markers behind theinsertion point will be renumbered.Each track on your CD needs a track marker, typically setafter a short pause at the beginning of the next title.Use the function “Track markers on object edges” to createthe markers automatically on the borders of the sampleobjects!To manage the markers or to rename them use the Marker/ CD Track Manager in the menu “Tools”.
Set Sub-indexUse this function to set a sub-index marker on the currentplay cursor position. All sub-index markers behind theinsertion point will be renumbered.Sub indices are not necessary for your CD but useful forselecting several regions in one track.
Set PauseUse this function to set a pause marker on the current playcursor position. This lets the CD player switch the output

Menu CD (deLuxe-version)
411
to absolute silence while continuing playback until to thenext track index/marker is encountered.
Set Track Indices on SilenceIf you are inserting a longer audio-file containing varioustitles (for example a live-take or recordings on DAT), youcan automatically insert track-markers between the titlesusing this function.
Min Time: Time interval detected as silence
Threshold db: Maximum volume detected as silence
Starting number: The number of the marker that will bethe starting point for the automatic indexing procedure.
Prefix: You can add additional symbols (letters) to themarker numbers which will be displayed in front of them.This allows you to distinguish new markers from alreadyexisting markers.
Delete prefixed Markers: All markers that are labeledwith the same prefix will be deleted.
Delete all Markers: Deletes all markers
Set Track Indices on Object EdgesThis function sets track markers (Index Markers) auto-matically to the beginning of each VIP object in the firstVIP track.Prior to using the function, execute Remove All Indices
to delete any possible track markers.If there are multiple objects that make up a single track ortitle, you may want to use the Bouncing function tocombine the objects to ensure proper track assignments.
Remove IndexUse this function to remove a previously set track or sub-index marker. First, click on the marker (the small rectanglebelow the number), then activate this function to delete it!

Menu CD (deLuxe-version)
412
Keys: Delete
Remove all IndicesUse this function to remove all previously set track or sub-index markers. This can be helpful before calling thefunction “Set track markers on object edges”!
Make CDThis dialog starts the CD writing process. MAGIX audiostudio contains high-grade CD creation routines that areconstantly updated. The software code is licensed fromPoint Software & Systems.MAGIX audio studio creates a TOC (Table of Contents)file prior to starting the CD creation. The name of thecurrent VIP is used and the extension *.tcx is added to thefile. The TOC file is located in the same folder as the currentVIP. It is therefore important to save the VIP to the harddisk prior to starting the burning process.
Burn “On the Fly”Use this extremely powerful mode if you want to create theCD directly from within the VIP. All necessary calculationsare performed in real-time during the burning process. Thefollowing real-time tasks are calculated during the process:– volume and panorama settings– Fades and crossfades– Mixing of tracks– Mixer track effects– Mixer Master section effects
To get a good idea whether your system is able to sustainthe real-time processing needed for this functionality, trythis:

Menu CD (deLuxe-version)
413
Play back the VIP sections that contain the largest numberof tracks and/or where the most real-time effects are used.Watch the DSP meter (bottom left-hand). Below are theexpected performances at the different DSP values:
– Below 25%: CD creation with up to 4x mode– Below 50%: CD creation with up to 2x mode– Below 90%: CD creation with up to 1x mode– Above 90%: Real-time creation is not possible, use the
second mode (Bouncing)
Generate a complete new fileUse this option if your system is not fast enough to sustainthe real-time creation of the CD (see above). This modecalculates all WAV files, including fades, crossfades, andvolume automation into a new audio file. Any other real-time processing is also part of the newly created audio file.Make sure that you have sufficient hard disk space prior tostarting the process (approx. 700 MB for a complete CD).The original WAV files used in the VIP remain unchanged.This makes this procedure non-destructive!
Use Uni Code for TOCThis is the default setting and is used for the internal CDcreation process as well as the 32-bit version of PointCDAudio.
Use ASCII Code for TOCThis format should only be chosen when using the 16-bitversion of Point CDAudio.
Print TOCThis starts the external TOC Printer application. Thisconvenient tool allows you to print the contents informationof the current CD. You may choose between a text styleformat to print the production documentation and aformatted printout for the CD jewel case. Please refer tothe on-line help for the TOC Printer for more specificinformation!
Show TOCThis button opens a text window, which shows the contentsof the current TOC. The “Copy” function can be used tocopy the contents to the Windows Clipboard for use withother text editing applications.

Menu CD (deLuxe-version)
414
Show CD-R Drive InformationThis dialog shows you information about the active CD-Rdrive(s).Among the information displayed is the manufacturer, drivename, hardware revision, cache size, and the featuressupported by the drive mechanism.The feature “Disc At Once” is extremely important, since itis needed to produce Red Book compatible Audio CDs thatare accepted as masters by pressing plants
Show CD-R Disc InformationThis dialog shows information about the currently insertedCD-R media.The most important information is the maximum lengththat can not be exceeded during the production (i.e. 74minutes and 5 seconds).
CD Track OptionsThe CD Track dialog shows all CD tracks and sub-indexesused in the current VIP.Every track can be assigned with a name, which is alsodisplayed in the VIP.Other settings such as Preemphasis, Copy Protection, andSecond Generation Protection Flags can be set for each ofthe tracks.The button Set All allows you to use the current flags to setall tracks to the chosen settings.Other settings are the ISRC Codes for every CD track.
CD Disc OptionsThis dialog configures settings for the current CD. Amongthem are:
CD TitleThe title is written to the CD and is used in the TOC Printerapplication to print the CD information.
UPC/Ean CodeThis code is also written to the CD and can be requested byspecial CD players that work with this format.
Number of first CD TrackUnder certain circumstances, such as writing with Track-At-Once, the number of the first track can be determinedwith this setting. When using the Disk-At-Once mode thissetting does not have any significance. The CD will alwaysstart with track 1 in this mode.

Menu CD (deLuxe-version)
415
Set Pause TimeUse this function to set the length of the default pausebetween two tracks. These pause length is needed for thegrid function, which lets the sample objects snap to theedges of other objects + this pause time. Normally a pausetime of 2 seconds is used.
Set Start Pause TimeUse this function to set the length of the default pausebefore the first track.Normally a start pause time of 2 seconds is used.
Special CD Arrange-ModeIf you activate this menu feature, MAGIX audio studio willarrange the next objects introducing a Red Book-Standard-Pause between them.The following procedure highly recommended:– Open a new VIP, with 4 tracks for example, so that you
may reedit it later on– Activate the Special CD Arrange Mode in the CD Menu– Open a new VIP– Load wave files, audio tracks or make a recording using
the microphone– You will notice gaps in the VIP between the individual
objects which represent the inserted breaks. You canadjust the length of the included pauses in the dialogue”Adjust Pause Length” if you want.
Bouncing (Internal Mixdown)Use this function to convert the objects within a selectedrange to a new WAV file. The selected objects in the VIPare replaced with the track-bounced version. This is veryuseful to combine multiple objects into a single object sothat the function to create track markers automatically canbe used.
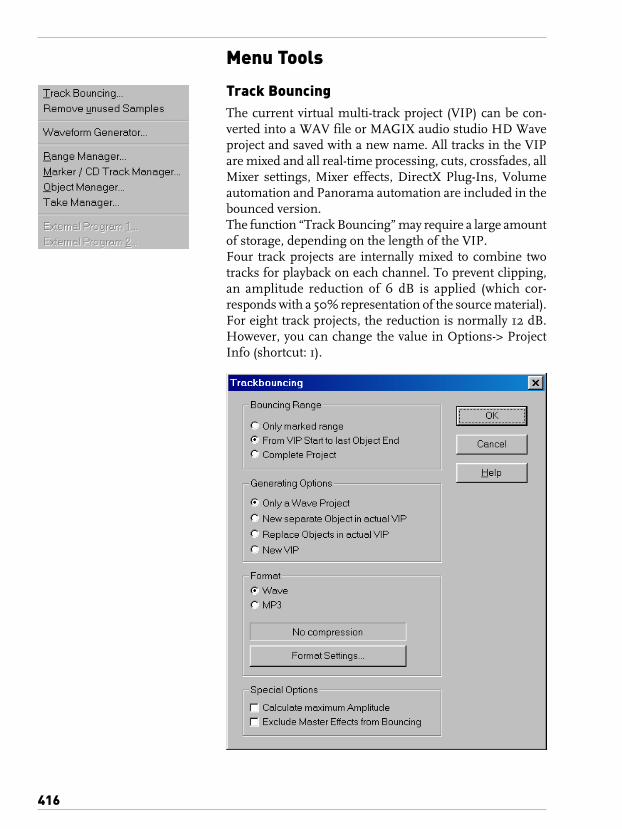
416
Menu Tools
Track BouncingThe current virtual multi-track project (VIP) can be con-verted into a WAV file or MAGIX audio studio HD Waveproject and saved with a new name. All tracks in the VIPare mixed and all real-time processing, cuts, crossfades, allMixer settings, Mixer effects, DirectX Plug-Ins, Volumeautomation and Panorama automation are included in thebounced version.The function “Track Bouncing” may require a large amountof storage, depending on the length of the VIP.Four track projects are internally mixed to combine twotracks for playback on each channel. To prevent clipping,an amplitude reduction of 6 dB is applied (which cor-responds with a 50% representation of the source material).For eight track projects, the reduction is normally 12 dB.However, you can change the value in Options-> ProjectInfo (shortcut: i).

Menu Tools
417
There are two variations for the track bouncing implemen-tation:
Only selected Range: MAGIX audio studio uses any se-lected range in a VIP for the track bouncing. This commanddoes not work track selected, meaning that the number oftracks that are spanned by the selected range does not mat-ter. The track bouncing will always use all tracks for theperiod of the selected range.
Complete Project: The complete contents of the VIP pro-ject are used.
Calculate Maximum Amplitude: When check, this optiondisplays the peak level of the mixed WAV file in dB. Furt-her processing of the bounced audio file can use the specsto make precise adjustments. After the track bouncingprocess, MAGIX audio studio displays a dialog with themaximum amplitude value.
Remove unused SamplesThis function removes all material from Wave projectsbelonging to the current VIP that is not used by any of theVIP objects. The objects in the VIP will point to the properaudio ranges in the linked audio files. This leaves the VIPitself unchanged.Using this function can conserve a lot of storage space.However, the downside of using this option is that objectlength changes are possible only in a limited form. Objectcan be made short, but they cannot be extended.Tip: If you need the complete contents of the audio files forother production projects, it is recommended to archive thefinished project in the following way. Save the completeproject to a new folder (File->Save Complete Project to).The VIP is now located with the complete contents, inother words all the audio files, in an unaltered form (WAV,RAP, etc.) in the same folder that the VIP was saved to.Next, use the command Remove Unused Samples. Thesame folder will now only contain the audio data or samplesthat are actually used by the archived VIP. The contentscan be easily back up to any backup medium such as CD-ROM, Data DAT, and others.
Waveform GeneratorThis dialog contains a powerful generator of several testtones. Please be sure to have activated a Wave project (HDPor RAP) before opening this dialog!The generated waveform is stored in the Clipboard with

Menu Tools
418
the same properties as the opened wave project. Pleaserename the Clip after generating the wavefom, so it can beeasily included into other projects without naming conflicts.You can adjust type, frequency, and length in samples ofthe created waveform.
The generated samples are always fully amplified. Thevolume level can be easily reduced with the normalizingfunction (Normalizing).The following types can be selected:Square, pulse, triangle, sine, saw up, saw down and whitenoise.
Range ManagerThe Range manager is a window illustrating all ranges ofthe current project. The current range is selected by acolored bar. The range bounds are selected by clicking onthe range name. The range name can be changed in thelower line. Ranges can be deleted and new ranges can besaved.With the Play Once button you can playback the actualrange once, with Play Loop it is played as a loop. This wayyou can use the range manager as a simple jingle player!
Marker / CD Track ManagerAll currently saved markers of the active project are shownwith their name and position in this dialog.The play cursor is moved to the respective marker positionby clicking on the dialog entry of the desired marker.You can also change the marker names and create newmarkers. In addition, the dialog lets you delete individualor all markers of a project.
Object ManagerIn the object manager all objects used in a VIP are indicatedin sequence of their temporal appearance. With this optionthe object manager features a function which is oftenoffered in other programs with “Play Lists”.
Menu Tools
419
In the object manager objects can be selected, which arealso activated in the VIP. Small objects can be identifiedand manipulated easily.Ctrl + a mouse click will select several objects; Shift + amouse click will select all objects between two selects (likein the Windows Explorer).Especially productive is the search function in the objectmanager:With it you can look for certain objects in full text moderather than just the graphical representation of the objects.An example would be to look for all HD Wave projects withthe name “XYZ.HDP” or all objects that contain the name“Intro”. You simply enter the search criteria in the text fieldand click on “Search”. All found objects will be selectedand are available for further processing.
Take Managersee Menu “Object”!
External Program 1, 2This menu item in menu “Special” runs an external pro-gram with the actual project as parameter. This makes iteasy to export a MAGIX audio studio project to anotheraudio software for special edits.Use the ?-button to select the external program you want torun. After editing and saving the file in the external pro-gram you can load it back to MAGIX audio studio usingthe recent file list in menu “Project”.This function works only with HDPs in Mono or StereoWave format!
420
Menu Playback
Play onceThe project or the range is played once.
Keys: Space
Play loopThe project or the range is played in a loop.
Keys: Space
Play in RangeIf you have specified a range selecting this menu option(or button) will start the playback of the sample from thebeginning, enter the range and continue to loop throughthe range until you press the stop key (button). This modeis very useful when testing loops for instrument samples.
Keys: Space
Play with PreloadAll buffers are loaded and the playback is ready to be started.Another window will appear with which playback can bestarted at your convenience. No delays will occur. This func-tion is useful on slower systems and if a synchronizationmust be started in manual mode and an exact start has tobe performed.
Keys: Shift + Space
StopThe playback is stopped for all projects types.
Keys: Space
Stop and go to current positionThe playback is stopped; the play cursor goes to the currentposition.
Change Play DirectionThe playback direction can be changed even during theactual playback.

421
Menu Playback
Restart PlayPlayback will start at the beginning even during the actualplayback.
Keys: Backspace
Playback OptionsThe Play Parameter window which appears after selectingthis menu option is designed to quickly enter playback para-meters. Below is an explanation of the options available inthis window.
Sample Rate: The sample rate can be changed here as longas the soundcard supports the new rate (some soundcardseven support changing the rate while playing the sample!).This is especially useful to hear notes in a sample rangeplayed in a different octave. When selecting half the samplerate the pitch should be the same. It would be played oneoctave lower.
Device: To specify the driver of the sound card use thisdialog box. This is necessary if playback takes place througha single sound card device. This is especially important ifmultiple output devices are located in the computer.
AutoscrollThe “Autoscroll” section will let you activate the autoscrollfeature. It is especially useful when working with long diskfiles. The HD Wave project window will follow the playcursor during playback.When working in “2” or “3” section display mode, theautoscroll feature will cause the individual sections to followthe play cursor as well. If you have zoomed into one of thesections, the play cursor will move through the section fasterresulting in more screen redraws.
422
Menu PlaybackThere are two alternatives in auto scrolling:
1. The “Soft” option performs a smooth scrolling of thewhole waveform, the play cursor stays in the center of thedisplay. This mode needs a fast graphics board, becausethe complete screen is scrolled between the marker steps.
2. The “Page” option performs a page by page scrolling.Please note, that the auto scrolling requires certain pro-cessing power based on your processor, graphic card andthe resolution of the display. For this reason you might en-counter small interruptions in playing the audio files.Should this occur simply disable the auto scroll feature orraise the buffer size (select “Setup” menu and click on “Sy-stem”).
ScrubbingWhile pressing the 0 key on the numeric block (Numlockactive) and moving the mouse you can perform scrubbing.MAGIX audio studio starts playback at a very low speed,the mouse position relative to the start play cursor controlsthe speed.There are two scrubbing modes (in playback parameter win-dow - key p):
Note: When working with smaller buffer sizes (4000, 2000samples) the scrolling becomes “softer”. Please verify theperformance of your computer system and smaller buffersizes to not produce playback interruption.
Relative: The distance between the play cursor and themouse sets the playback speed.
Absolute: The position of the mouse in the window setsthe playback speed - at the left border playback speed is200% backward, at the right border speed is 200 % forward,in the middle of the window the speed is 0.There is a real time resampling performed for changingthe playback rate without changing the sample rate of thesound card. For best performance, use small play buffersizes and a fast processor (Pentium recommended)!
A Tip Using Scrubbing: The scrolling becomes “softer“when using small buffer sizes (2000, 4000 samples). Youmay need to test your system for error free playback withthese small settings. Combined with the Soft Scroll mode,editing becomes very convenient on faster computers.

423
Menu PlaybackVaripitchMAGIX audio studio supports smooth changes of the pitchwhile playback, even in multi track projects (vertical sliderin playback parameter window - key p). Activate the Va-rispeed mode with the “active” button, then you can changethe playback speed in various kinds:
Vertical slider: Changes the playback speed from -200%to +200%
Pitch Factor: Lets you specify a certain pitch factor ma-nually
Halftones: Lets you specify a value of halftones. The play-back will be transposed the number of halftones.
Internal Rate: Here you can set a sample rate for thevaripitch calculation. If you want to play a WAV file with asample rate of 48 KHz but your sound card can only playrates up to 44.1 KHz simply set the internal rate to 48 andactivate varispeed. You hear the same result as playing backwith real 48 KHz! This function is also very useful for digi-tal playback to DAT with 44.1 KHz samples and and viceversa!
BPM: Here you can type in the original bpm value of yourmaterial and a destination bpm value, which is reachedusing the varipitch.
Important: Varipitch works also while recording! So youcan set the pitch to -2 halftones, sing a song into thecomputer, then switch off the varipitch – your track istransposed two halftones higher!There is a real time resampling performed for changingthe playback rate without changing the sample rate of thesound card. For best performance use small play buffersizes and a fast processor (Pentium recommended) !
Keys: p
Punch In > Punch In Mode activeThis option activates the Punch mode. Punch-In and Punch-Out are a process automating the recording start and endof an audio segment. Once the Punch mode is active, thePunch-In Record can be used to record audio segmentswithout stopping the playback.Requirements for this mode is an armed Record track. Usethe “REC” button on each track to select it for punch recording!
424
Menu PlaybackPunch Recording can be done in two ways:
1. Punch-In/Out “On-The-Fly”
This allows you to start the recording (punch in) at anytime during the playback. Once the recording commences,it can be stopped at any time (punch out), while the play-back continues.This is very similar to tape based multi-track recorders,which allow you to correct mistakes during previousrecording takes by overwriting segments of the tape.Simply start the playback with the Spacebar. The Punch-Inrecording can be started by clicking on the Punch Recordbutton in the toolbar. The same button punches out of therecording mode, while the playback continues. To stop theplayback, press the Spacebar.
2. Punch-In/Out with Markers
The second method is the punching in and out of recordingusing special markers. This is a more automated way ofdealing with punch-in/out recording. This is useful whenspecific punch-in and punch-out points are determined andyou don’t want to take any risks in possible punching in orout of the recording. Don’t panic though! The punching inand out with markers lets you specify the exact points therecording is to start and stop. Since you are working in anon-linear, non-destructive environment, any mistake orunwanted take can be removed or undone without anyproblems. The previous material in the track would still bethere!This is simply a very convenient way when it’s midnightand your fingers are getting tired!To operate in this mode, a range has to be selected, whichdefines the beginning and end of the recording. Thefunctions Set Punch-In Marker and Set Punch-Out
Marker are used to tell MAGIX audio studio where topunch in and where to punch out. Next, set the play cursorto an appropriate position prior to the punch-in point andstart the playback/recording with the Punch Record
button in the Punch Toolbar.
Important: When working with the punch in/outfunctionality, make sure that the Auto Crossfade mode isactivated, by clicking on the corresponding button in theMAGIX audio studio toolbar. The auto crossfade will createsmooth transitions between the takes. This helps to preventlittle pops and clicks!There is also a way to perform looped punch-in reco-
rding! Simply select a range over the desired punch region.

425
Menu PlaybackThe range is played back until you stop the playback withthe Spacebar. Each time the program loops through therange, new takes are recorded at the punch markers. Tofind the best take after the recording is completed, use theTake Manager!
Punch In Record: This function/button starts and stopsthe punch-in recording.
Set Punch In Marker: This function/button sets thepunch-in marker.
Set Punch Out Marker: This function/button sets thepunch-out marker.
Remove Punch Markers: This function/button deletes thepunch-in and punch-out markers.
Punch In > Punch In RecordThis function/button starts and stops the punch-in record-ing.
Punch In > Set Start MarkerThis function/button sets the punch-in marker.
Punch In > Set End MarkerThis function/button sets the punch-out marker.
Punch In > Remove Punch In / Punch OutMarkersThis function/button deletes the punch-in and punch-outmarkers.
Live Input ModeThis is another very powerful feature of MAGIX audiostudio – the Live Input Mode! When working with thismode, MAGIX audio studio lets you use the real-time Mi-xer to mix live inputs from the sound card with recordedaudio material.This turns MAGIX audio studio into a full-scale digital real-time effects device, including DirectX Plug-Ins!
The Basics:
The Live Input Mode basically functions similar to recordingaudio material – without writing it to disk! A channel thatis to be used for live mixing has to be armed for recording.Once the playback of the VIP is started with the Spacebar,the live signals on the input of the audio device(s) are routed
426
Menu Playbackthrough the Mixer. Use the controls in the Mixer windowto create a mix. In addition, any VIP object is also playedback while the live inputs are processed.
Latency
The audio processing in MAGIX audio studio obviouslytakes time. This may lead to small delays at the outputsversus the incoming signal. This delay is very much de-pendent on the VIP Buffer size. The latency can be reducedby using smaller VIP buffer settings. Use settings thatenable the program to process the real-time audio withoutintroducing any errors. A setting of 4 buffers at a buffersize of 8000 stereo samples creates a delay of 0.7 seconds.A buffer size reduction to 2000 samples results in a delayof only 0.2 seconds. Experiment with the buffer settings tofind the optimal settings for your system!The latency may not make it possible to use the Live InputMode to replace an analog effects device. However, it leavesroom for some very interesting application aspects.
MAGIX audio studio as Live Effect Processor
If you are looking for fancy effects that are not offered byeffect units in your rack, try to use some of the integratedeffects in MAGIX audio studio. A live signal can be pro-cessed with the FFT Filter, the Eqs and the Stereo Enhancer.You may also use the many DirectX Plug-Ins available.There is no limit to your creativity!
RecordStrarts recording.
Record ParameterThis menu option opens the Record window. All necessarysettings for the recording can be performed here.
Record mode: Select between Stereo and Mono, whetheryou want to record the audio into a RAM Wave project or tothe hard disk as a HD Wave project.
Preload: The Preload option allows you to load all thebuffers before the recording actually begins. This enablesyou to an immediate recording once you click the recordingbutton. Otherwise MAGIX audio studio will load the buffersand depending on the size of the buffers and the overallcomputer speed this may take a little bit of time.
Sample Rate: Select the sample rate of the audio file. Makesure that your sound card supports the chosen sample rate.

427
Menu PlaybackResampling to 44.1 kHz: Some MAGIX audio studio ver-sions can perform a real-time sample rate conversion to44.1 kHz if you are recording with a different sample rate.For example, many times a DAT tape is recorded at 48 kHzbut the tape needs to mastered and prepared for Red Bookaudio CD processing, which needs to be in 44.1 kHz.MAGIX audio studio allows you to automatically convertthe audio during the recording, eliminating the additionalsample rate conversion step after the recording.
Device: This selects the desired device driver you want touse for the recording. If you have more than one soundcard installed in your system, this window will let you specifywhich card to use. Make sure the sound card is properlyinstalled in Windows and is operational. If you do not seean entry in this window, check whether a device driver hasbeen installed for your sound card. This usually is doneduring the software installation for your sound card.
? (Device): By clicking on the “?” button you can check onthe record capabilities of the selected sound card. It showsyou information on the sound card driver and it’s capa-bilities.
Playback while Recording: Simultaneous record andplayback is especially important when wanting to monitorexisting tracks while recording a new track. This optionallows you to turn the feature on. To conserve system re-sources and keep the recording error free on slower systems,you may need to turn this feature off.

428
Menu PlaybackNote: If you only have one sound card in your system andwant to use this feature, you will need a full-duplex capablesound card. Check the capabilities of your sound card forthis functionality. MAGIX audio studio will generate anerror message if your sound card is not capable of workingin this mode.Also, this option is grayed out until the first track is recorded.
Virtual Working: MAGIX audio studio allows you tochoose whether you want to automatically create objects ina VIP once you are done with the recording. If you checkthis box a new object is created for every recording takeand inserted at the play cursor location and in the track(s)you enabled for the recording.If the box is unchecked MAGIX audio studio will not createan object but rather open the Wave project with the contentsof the recorded audio material.
Monitor: This checkbox activates the VU meters. Mostsound cards also allow you to preview the audio signal youare about to record and depending on the features of thesound card, you will be able to monitor the recorded signalduring the recording.To keep the system requirements down, you may wish todisable the monitor function if it is not crucial to the re-cording you are doing. This will lower demand on thecomputer system, which may be required if you are workingon a slower system.During the recording, the meters will react more slowlydue to the priority level change. The most important task isto keep the recording error free. For this reason, MAGIXaudio studio will switch the updating of the VU meters to alower priority to not overload the computer system.This results in a slower reaction time of the meters. Thelevels are still shown with the correct values. Also, if youuse lower buffer settings, the meters are updated in fasterintervals.
Corel/Osci: A oscilloscope view can be opened to displaythe wave form in a scaleable window. When activating thePhase check the phase correlation of a stereo signal can bedisplayed.A vertical line represents a mono signal, a horizontal linerepresents a signal with a phase inversion, which is notwanted in most cases.

429
Menu PlaybackRecord Time: This counter indicates the length of the actualrecording in minutes, seconds, and milliseconds.
Disk Space: This counter shows you the available disk spacein total track minutes for the selected sample rate and recordmode. This counter does not decrease during the recording.It is updated after the recording takes place.
Record Offset: This option allows you to specify an offset,which is calculated in samples. Sometimes it is necessaryto compensate for any delays due to processing speed andother factors, such as your sound card’s ability to switchbetween playback and recording mode. Delays can occurbetween the recording and the playback of audio when thePlayback while Recording feature is turned on. This optionallows adjustments if this occurs. Good values to start withare in the 20-2000 sample range.
Help: This brings up the context sensitive help system withinformation on the features in the Record Parameter dialog.
New (Button 1): The path to the left of the button indicatesthe location of the audio file that is to be recorded. If youclick on the New button you may enter a new name for theaudio file or a new location. This is an easy way to targetspecify directories or hard disks as destinations for the newaudio files. If you select a new name, the Wave project isrenamed as well.
New (Button 2): The path to the left of the button indicatesthe location of the VIP file you are working with. You mayreassign the VIP to a new location on a hard disk or inanother directory. If you specify a new VIP name, a newVIP is generated with only one track of the same type asthe mode that is specified in the Record Mode section inthe Record Parameter dialog.
Set Marker 1: You can drop markers into the project. Thecurrent position of the play cursor is used to drop a markerat positions you want to select for later clean-up or similartasks.
Media: This option allows you to link a media file with therecording. Files that can be linked include MIDI, AVI andWAV files. Please refer to MIDI/Video Link in the Pro-perties section for a detailed description of available features.

430
Menu PlaybackLinking media files is often needed for editing of audio forAVI films or when needing to synchronize a MIDI file toadd digital audio tracks to it.
Record: Starts recording by activating this button.
Stop: Stops the recording process. MAGIX audio studiowill ask you whether you wish to keep the recording or deleteit.Should the computer become overloaded due to swappingdata or hard disk access for example, simply interrupt therecording with a click of the right mouse button or the spacekey.
OK: Closes the Record Parameter dialog.
Key: r (second r starts recording)

431
Menu Options
Project Properties > Playback OptionsSee menu “Playback“!
Project Properties > Media linkThis is one of the most powerful features of MAGIX audiostudio. With this option you have the opportunity tosynchronize media files such as MIDI files or AVI files.These can be complete MIDI songs or sequences (*.MIDfiles), Video clips (*.AVI files) or other files for which aMCI driver is installed in Windows.
Synchronizing MAGIX audio studio projects with
MIDI songs
Since MAGIX audio studio offers synchronization withmedia files, you can set audio tracks to a already existingMIDI song. Certain audio effects in VIP’s can be perfectlypositioned on MIDI material (e.g. drum loops, scratchesetc.). Otherwise, a project recording can be synchronizedwith the MIDI file, so that MIDI and audio material willplay simultaneously. Please note that the MIDI file is alwaysplayed through the selected MIDI device in the WindowsControl Panel.
Synchronizing of MAGIX audio studio projects with
Video-for-Windows movies (AVI)
With this capability MAGIX audio studio is an excellenttool for film music arrangements. Film and video clips arerecorded as AVI files. A MAGIX audio studio virtual project

Menu Options
432
can then be synchronized with it. The music, original sound,voice tracks, effects and much more can be adjusted on thetime line and played with the AVI video simultaneously.As the final step, the audio signal can be recorded back tothe video tapes original audio tracks or mixed for broad-casting.
File Name: Here you can specify the file name and directorywhere the media file is located. By clicking on the “?” buttonyou will receive a file requester dialog that allows you notonly to look for the location on your hard disk(s), but alsolet’s you specify which media file type you are looking for.Once you have found the media file, simply click on OKand MAGIX audio studio will make the link.
SMPTE Offset: The Offset allows you to specify a diffe-rent start time for the media file. The default is a zeroposition, which means that the media file would be startedat exactly 0 position, which is the beginning of the file. Ifthe offset is different than the 0 position the playback ofthe media file starts at the position you entered. Here is anexample:Let’s assume that we are working on the audio for an AVIfile and the audio section does not appear until 15 minutesinto the AVI file. It would be unnecessary to create 15minutes of empty space at the beginning of the VIP in orderto line up the AVI frames and the audio. Instead we canspecify an offset of 15 minutes and the AVI file would startplayback at 15 minutes into the video file. However, all theaudio in MAGIX audio studio would start at position 0.It makes good sense to write down the offsets you are spe-cifying for the individual projects you are working with.This way you can easily identify offset references for yourwork.
Play Always: This checkbox allows you to specify whetherMAGIX audio studio is to play the media file every timeyou start playback or recording in MAGIX audio studio. Ifyou uncheck the option MAGIX audio studio will not playback the media file. This is a quick way to turn off the play-back of the media file.
Load Always New: If this option is checked, MAGIX audiostudio will always load the media file for every playback orrecording of your VIP or Wave project. If the box is notchecked the playback of the media file is performed with thecontents of the memory. If the media file is too large for thebuffers, the playback is performed from the hard disk.

Menu Options
433
On faster computers, the real-time preview can be used.Using the preview, a specific setting can be easily examinedbefore it is written back to the sample. On a Pentium with90 MHz or higher, all 3 bands can be calculated in real-time and played back simultaneously!
Extract audio from AVI: If the file type is an AVI filewith video and audio data, audio streams are extracted fromall other information and the audio information itself isput into a Wave project. This allows you to extract and editthe audio apart from the rest of the contents in the importedfile.
Replace Audio in existing AVI: This option performs atrack bouncing of the current VIP into 1 WAV file. This fileis merged into the selected AVI file, so the AVI gets a newaudio track.
Create AVI / Audio Copy: This option performs a trackbouncing of the current VIP into 1 WAV file. The AVI fileis copied to a new file, which contains the new audio track.This option keeps the original AVI.
Play Video without sound: This option applies for AVIfiles only. If the AVI file contains audio the playback of theAVI file and it’s audio could interfere with the audio play-back in MAGIX audio studio. For this reason, it is suggestedthat you turn the audio playback for the AVI file off.
Video in MAGIX audio studio window: This option alsoapplies to the AVI file playback only. Normally, the AVIfile is played back in a completely independent window.This means, that if you run the MAGIX audio studiowindow enlarged you will not see the playback of the AVIwindow. You would need to minimize the MAGIX audiostudio window or scale the window in order to display bothwindows on the screen. However, by checking this optionyou can display the AVI window as another MAGIX audiostudio related window, which always stays on top duringplayback. This allows you to display the AVI movie at anytime the playback or recording in MAGIX audio studio takesplace.
Show Video Track: This is a new feature in MAGIX audiostudio! With this option, you can display a video track inthe VIP window, which shows individual frames of the AVIfile. In the upper left-hand corner of the VIP window, thecurrent frame is displayed when clicking the play cursor at
Menu Options
434
a particular location in the VIP tracks. This allows you toposition audio events and material at exact frame positions.If you zoom into the window, the video track is alsoenlarged, showing the video frames at a lower zoom levelas well. If you select to display the window at its lowestzoom level, each frame is shown in the video track.
FX: The FX option allows the adjusting of small delays thatcan occur on slower computer systems for example. Thelinking of media files with VIP or Wave projects is basedon two playback processes, one for the MAGIX audio studiowindow and one for the media file window. No synchro-nizing of material takes place during the playback process.This means that on computers that have timing problemsdue to insufficient system resources or speed the digitalaudio tracks and the media file may run “out of sync”. Withthe FX option you can specify a factor that is used to dointernal sample rate conversion. How does that work?Since we can not influence the playback speed of the mediafile, we need to adjust the playback speed of the digital audiotracks. Imagine that a normal playback speed is representedwith a factor of 100. If the digital tracks play ahead of themedia file, the playback needs to be slowed down. Thiswould be accomplished by multiplying the regular playbackspeed of 100 with a FX factor just a little below 1, for example0.998. This would result in a playback speed of 99.8, whichis a little bit slower than the regular speed. This way wewould align the digital tracks with the media file.On the other hand, if the digital audio tracks lag behind themedia file playback, a factor higher and 1 would need to theentered. A value of 1.002 would be an example.Rule of thumb for this factor is to use small value in-crements. The values should stay around 1. You will needto experiment with this setting, since there is no hard ruleabout the system performance of an individual computersystem.If you do not have any problems with the digital audio tracksand the media file playback staying in sync, you should notenter any values in this field!
Remove Link: This button will unlink the media file fromthe MAGIX audio studio window. This effectively stops allassociation with the media file. If you do not need any furt-her referenced to the media file, you may use this option.
Preview: The Test button allows testing of the current link.By clicking the button the playback of the media file shouldcommence. If no playback is visible in a MAGIX audio stu-
Menu Options
435
dio window, you may need to check the Video in MAGIXaudio studio window option for AVI files. Other media filesshould be playing back through the Windows multimediaextension, such as the MIDI file player.
Project Properties > CD arrange mode(deLuxe version)See “Menu CD (deLuxe version)”!
Project Properties > Text CommentsYou can enter text comments to the current project via asimple text editor. This text can be displayed at each newopening of the project. This will preserve importantinformation about the project together with the audiomaterial.
Project Properties > Units of MeasurementProject Properties > Snap SetupSee “Menu View”!
Project InformationThis will show you information on the current project. Thisincludes creation date, memory size, path and file names.For virtual projects, a list of all included physical files isdisplayed.Virtual projects also display a list of linked Wave projects.Volume Reduction in Virtual Projects:The Project Information dialog features a setting for thevolume attenuation in 6 dB steps. This setting allows youto adjust the main volume output of virtual projects.Theoretically, each track of a 4 track stereo project must bereduced by 2 bit’s (12 dB). In the real world application,tracks are often not recorded or played back at the maximumlevel so that the reduction can be adjusted accordingly.However, raising the volume reduction setting may resultin clipping.Please keep in mind that MAGIX audio studio reduces thevolume of Wave projects to the setting in the virtual projectthat uses the Wave project. This allows you to switch bet-ween the VIP and the Wave project without the usualencounter of volume differences between the project types.If a Wave project is opened by itself (without using the Waveproject in a VIP), MAGIX audio studio automatically usesthe maximum volume playback.
Key: i
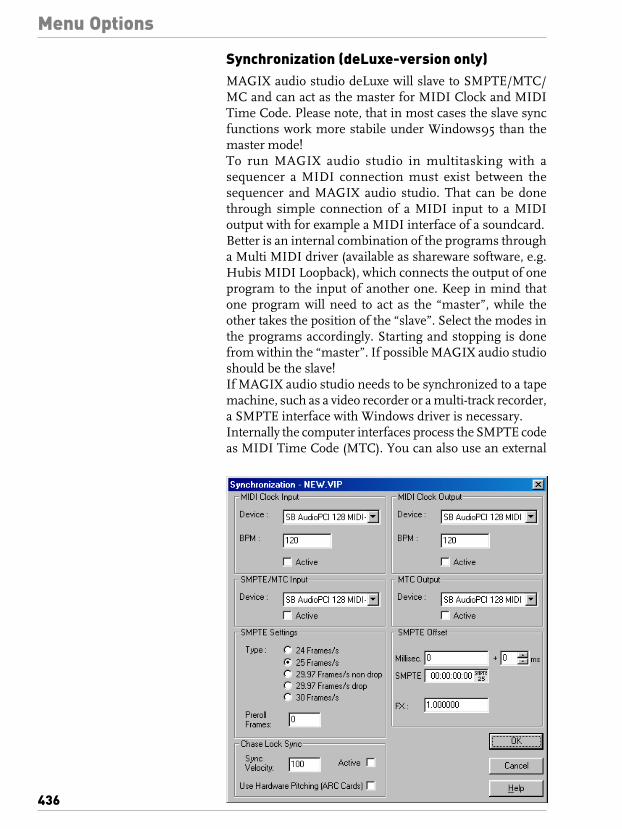
Menu Options
436
Synchronization (deLuxe-version only)MAGIX audio studio deLuxe will slave to SMPTE/MTC/MC and can act as the master for MIDI Clock and MIDITime Code. Please note, that in most cases the slave syncfunctions work more stabile under Windows95 than themaster mode!To run MAGIX audio studio in multitasking with asequencer a MIDI connection must exist between thesequencer and MAGIX audio studio. That can be donethrough simple connection of a MIDI input to a MIDIoutput with for example a MIDI interface of a soundcard.Better is an internal combination of the programs througha Multi MIDI driver (available as shareware software, e.g.Hubis MIDI Loopback), which connects the output of oneprogram to the input of another one. Keep in mind thatone program will need to act as the “master”, while theother takes the position of the “slave”. Select the modes inthe programs accordingly. Starting and stopping is donefrom within the “master”. If possible MAGIX audio studioshould be the slave!If MAGIX audio studio needs to be synchronized to a tapemachine, such as a video recorder or a multi-track recorder,a SMPTE interface with Windows driver is necessary.Internally the computer interfaces process the SMPTE codeas MIDI Time Code (MTC). You can also use an external

Menu Options
437
SMPTE to MTC converter and feed the MTC signal to aMIDI input port on a MIDI interface in the computer.MAGIX audio studio supports real chase lock sync (MIDIClock and MIDI Time Code/SMPTE). This means, that theinternal sample rate of MAGIX audio studio’s playback orrecording is varied in small steps, so that MAGIX audiostudio can follow little timing changes of the sync master.This is very useful when using sync between a tape or videorecorder (master) and MAGIX audio studio (slave), becausemost tape machines always produce small pitch changes,which results in delays between the tape and MAGIX audiostudio, when not using chase lock sync. If the timingchanges are too big, MAGIX audio studio produces heavypitch changes, which may be reduced by entering smallervalues for the Sync Velocity in the sync dialog. Try valuesof 200 or more, when you need fast pitch changes in syncmode! In the lower right status bar you can read the actual/maximal pitch change in cents ( 1 cent = 1/100 halftone).Please know, that the chase lock sync performs a real timeresampling (if not using ARC44/88 sound cards), whichneeds a certain processing power, so be carefully on slowmachines!When receiving SMPTE/MTC you can start and stopplayback with the space key – MAGIX audio studio willalways be in sync!
MIDI Clock Input Device: Here the driver must be se-lected from which MAGIX audio studio will receive MIDIClocks for the synchronization.
BPM: Here the tempo must be entered, with which theMIDI Clocks should be received.
SMPTE/MTC Input Device: Select the device driverthrough which MAGIX audio studio will receive theSMPTE/MTC signal.
MTC Output Device: Select the device driver throughwhich MAGIX audio studio will send the MIDI Time Codemaster signal.
Type: Select the proper frame rate. Use 24 frames forcinematic synchronization, 25 frames for PAL video, andaudio synchronization, 30 frames for NTSC video.
Preroll-Frames: You can specify, how many framesMAGIX audio studio is to ignore before the synchronizationstarts. Here you can account for the fact, that certain ana-

Menu Options
438
log instruments need time to reach the correct speed. Inorder to have MAGIX audio studio link up to the propertime values, a certain pre-roll frame count can be specified.
Sync Velocity: You can specify how fast MAGIX audiostudio follows a pitch change of the sync master. A value of100 is good for normal purposes. If you need faster pitchchanges, try 200 or 300. If you want to reduce the pitchchanges in MAGIX audio studio try a setting of 50 or 30!
SMPTE-Offset: The SMPTE offset is indicated inmilliseconds and in SMPTE frames. The offset is removedfrom the incoming SMPTE time code signal to line updifferences between tape material and recorded samples inMAGIX audio studio. With an offset of “60:00:00”milliseconds (1 hour) a tape that was previously strippedcan be synchronized, if the start point for the recording/playback starts at 1 hour. MAGIX audio studio will, however,start at the correct beginning position.
FX: With this parameter, possible inaccuracies during thepositioning of long samples can be equalized. Requirementis a flawless synchronization at the sample beginning.Follow the instructions in the chapter “Problem Solutions”.
Shortcut: key g
Program Preferences > Undo DefinitionsThe depth of undo can be specified when working withVIP’s. A value of “20” means that the last 20 changes canbe undone.

Menu Options
439
Program Preferences > VIP Mouse ModeThis submenu makes the following selections available.(These are also accessible via the Mouse Modes Toolbar.):
Universal Mode: This is the default mode in MAGIX audiostudio. All necessary functions can be executed with theleft mouse button. The right mouse button accesses a con-text sensitive pop-up menu.The vertical position within each VIP track determinesbetween Object handling or marker and range manipulation.The upper half of a track lets you select ranges and set theposition of the play cursor. The lower half of the track makesobject selection and manipulation possible. Object handles,and volume and panorama curve events take precedence andcan be modified at any position within the track.
Range Mode (Secure Mode): This mode lets you onlymodify the ranges and the play cursor position. Using twospecial keys, additional functionality is available:If the period key is pressed, MAGIX audio studio changestemporarily into the Object Mode. Once in the Object Modeyou can easily select and manipulate objects.Pressing the Minus Key “-” key, MAGIX audio studiotemporarily changes into the Curve Mode. In the CurveMode, you can change the volume and panorama auto-mation curves.These special functions provide a way to quickly reach allof the important functions, while protecting an object fromaccidental moving. This is why this mode is also called“Secure Mode”!
Cut Mode: You can use the mouse cursor like a pair ofscissors to crop objects.
Pitchshift-/Timestrech mode: The lower right tab allowscompression or stretching of an object. A time stretchingeffect is created: The object is not played as a loop or shorterversion, but simply in a different play tempo.Using the centre tab, the pitch can be altered using pitchshifting.
Curve Mode: The Curve mode allows you to manipulateexisting volume and panorama automation curves.
Draw Volume Mode: The left mouse button draws volumeautomation curves. Before using this mode, make sure the“V” button for the desired track is active.

Menu Options
440
Draw Panorama Mode: The left mouse button drawspanorama automation curves. Before using this mode,make sure the “P” button for the desired track is active.
Scrubbing mode: You can listen to the spot in an arrange-ment at which the mouse is currently located in this mousemode by pressing the mouse button. The replay cursortherefore follows the mouse movements.
Zoom mode:
Right mouse key: Zooms out of the projectLeft mouse key: Zooms into the project
Context Help mode: Click onto the object or subject forwhich you request further information.
Program Preferences > Wave Mouse ModeYou can select between two draw modes for Wave projects(HD and RAM Wave projects):
Ranges Mode: The left mouse button is used to set thereal-time cursor, select ranges, and markers (default).
Draw Wave: In this mode you can use “freehand drawing”to manipulate the waveform. This is useful to correct sin-gle samples, small distortion peaks, clicks etc... Please usea zoom level of 1:1 or larger for exact handling!
Draw Volume: In this mode you can draw the volume ofthe sample, e.g. to create a special fade curve.The middle of the display is volume 100%, the lower bord-er is volume 0%, and the upper corner is volume 200%.
Program Preferences > Object LockDefinitionsSee “Menu Object > Lock objects > Lock Definitions”!
Program Preferences > Edit KeyboardShortcutsThis dialog allows you to customize the keyboard shortcutsfor all menu functions in MAGIX audio studio. This makesit possible to assign your popular commands to specifickeys and key combinations for a quick recall.The shortcut settings are saved to the file “MusStu40.ini”in the Windows directory when exiting the program. Thenext time the program is loaded, the customized shortcutswill be retained.

Menu Options
441
The most important aspect of the dialog is the display ofthe MAGIX audio studio menu tree. You can select whichmenu option is to be reassigned a new key. To accomplishthis, simply click on the desired menu option in the treeand then on the “New Shortcut” box. Next, press the newkey or key combination and press or click on the “Assignnew Shortcut” button. Any possible combination of Shift,Alt, and Ctrl with other keys is possible. Please do not usethe space bar, ESC, or the Insert key. These functions arehardcoded into MAGIX audio studio and can not bechanged!
Restore default: This will return the shortcut assignmentsto the default settings of MAGIX audio studio.
Show Shortcut list: This opens another dialog that willshow a complete list of current shortcut assignments. Thislist can be copied to the Windows Clipboard with the Copybutton for further processing with a text editor to print ahardcopy of the list.
Load Shortcuts: Previously loaded shortcut assignmentscan be loaded with this button.
Save Shortcuts: The current shortcut assignments aresaved to a new file name with the extension “*.ssc”.
Menu Options
442
Delete: Deletes the selected shortcut.
Assign new Shortcut: This will assign the value in the“New Shortcut” box as the new shortcut for the respectivemenu function.
Program Preferences > Change Toolbar styleYou can change the style of the toolbars into 3-D or a flatlook. You have to restart MAGIX audio studio if you changedthe toolbar style.
Program Preferences > Enable VIP TooltipsToolTips are small information windows that open up au-tomatically if the mouse pointer stops briefly on a buttonor some other area. They provide information about thebutton’s function. These information boxes can be switchedoff or on with this option.
Program Preferences > ColorsMAGIX audio studio lets you specify the color for variousareas of the screen. Use this menu option if you want tochange the default color to another one.
Program Preferences > Grid SetupSee “Menu View>Snap setup”!
Program Preferences > Video HeightMAGIX audio studio allows you to link to an AVI file. TheAVI movie is played back whenever the VIP or Wave projectis played back or recorded into. If the option to display theAVI frames in the VIP window, the height of the AVIpictures is determined with this setting.
Program Preferences > Font SelectionMAGIX audio studio will also let you specify the font usedfor text display in the various objects.
Program Preferences > Font for Time DisplayThis option lets you select the display font for the TimeDisplay (Window->Time Display).
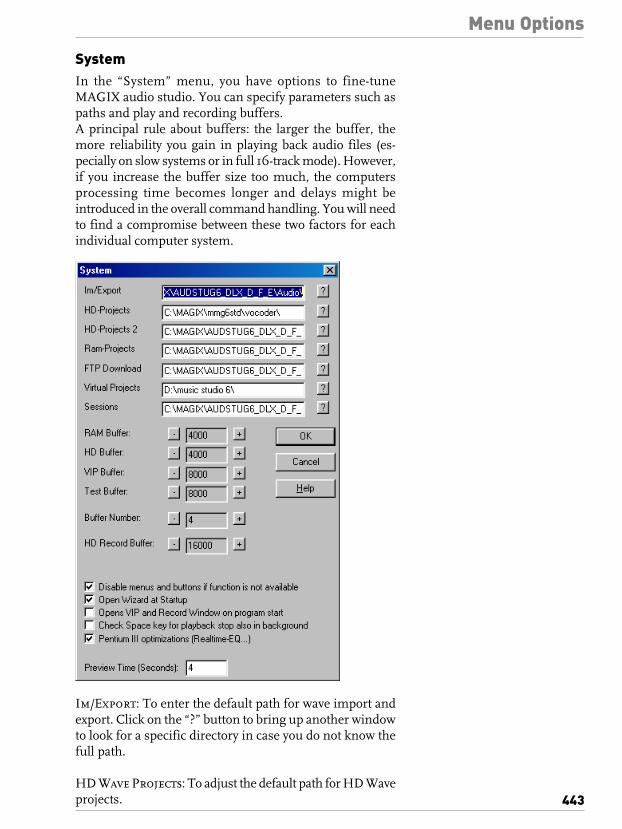
Menu Options
443
SystemIn the “System” menu, you have options to fine-tuneMAGIX audio studio. You can specify parameters such aspaths and play and recording buffers.A principal rule about buffers: the larger the buffer, themore reliability you gain in playing back audio files (es-pecially on slow systems or in full 16-track mode). However,if you increase the buffer size too much, the computersprocessing time becomes longer and delays might beintroduced in the overall command handling. You will needto find a compromise between these two factors for eachindividual computer system.
Im/Export: To enter the default path for wave import andexport. Click on the “?” button to bring up another windowto look for a specific directory in case you do not know thefull path.
HD Wave Projects: To adjust the default path for HD Waveprojects.

Menu Options
444
RAM Wave Projects: To adjust the default path for RAMWave projects.
Virtual projects: To adjust the default path for virtualprojects.
Sessions: The path for sessions is set.Play/Record Buffer: This setting determines the buffersize for the playback and recording of audio files. Largerbuffer settings may lead to a more stable playback on slowersystems or at full CPU load. The number of simultaneousplayback tracks increases. However, the response of thecomputer slows down, which may have an adverse effecton real-time effect editing. We therefore suggest findingan optimal compromise for your individual system.For simultaneous playback and record (Record while Play)the buffer settings for the HD Record and HD Buffer needsto be the same.
RAM Buffer: The default setting is 4000 Samples. Thisbuffer is used for playback of RAM Wave projects. If youwant a faster response time when playing back RAM Waveprojects, experiment with smaller settings!
HD Buffer: The default setting is 8000 Samples. Thisbuffer is used for the playback of HD Wave projects. Togain faster response times, try smaller settings.
VIP Buffer: Default setting is 16000 Samples. The bufferis used for the playback of virtual projects. Since an errorfree playback is more important than fast response times,we suggest using a setting between 16000 and 32000 whenworking with a large number of tracks. This setting is themost important setting when working with virtual projectsand the real-time Mixer. Any of the other buffer types andsettings are not utilized in VIPs and the Mixer window!
Real Time Buffer: The default setting is 8000 Samples.This buffer is only used for the real-time preview in theEffect menu dialogs. (The real-time effects in the Mixerwindow do not use this buffer. The VIP Buffer is used forthose functions.)
Buffer Number: This setting determines how many of theabove buffers are to be utilized (values between 2 and 9). Ahigher setting for Buffer Number secures a more stableoperation. However, the memory requirement increases

Menu Options
445
and the response time decreases. The actual bufferutilization can be monitored with the status bar in the lowerright-hand of the MAGIX audio studio screen.
HD Record Buffer: The default setting is 16000 Samples.This buffer is used during the recording of audio materialand determines the length of the data block that is writtento the hard disk.
Disable menus and buttons if function is not avai-
lable: When checking this option, only those menu optionsappear in the menu selection, which are actually availablewith the type of project window.
Open VIP and Record window on program start: A newdefault VIP and the Record window are displayed whenfirst starting MAGIX audio studio.
Check the Spacebar for Playback Stop in the Back-
ground: The spacebar is used for playback start and stop.If MAGIX audio studio is playing in the background,(another Windows application takes the focus), this optiondetermines whether the spacebar is monitored to stopplayback in MAGIX audio studio.
Preview Time: This determines the length of preview forthe non real-time preview in the Effects menu dialogs. Thenon real-time preview is used for very processing intensiveeffects in the destructive Wave editing portion of MAGIXaudio studio (Menu “Effects”).
Keys: y
Draw SetupSee “Menu View > VIP Display Mode > Defintition”!
Upgrade QDesign MP3 CoderThe included MP3-Encoder from QDesign allows you touse the program 20 times for free. After that, you may wantto use the Upgrade-Option of the program.In the upgrade-dialogue your personal ID-code will be dis-played. If you indicate this code to MAGIX® you will re-ceive the code for unlocking your MP3-Encoder for only19,90 DM (149 ÖS / 19,90 CHF / 9 EUR). You just haveto type in the code in the corresponding dialogue-box, con-firm and then you can encode, encode, encode...

Menu Options
446
Just inform us about your wish to upgrade via internet linkof the upgrade dialogue, by phone, fax or mail:
Europe (UK):Phone: +49 (0)5741 3455 0Fax: +49 (0)5741 310 768Mail: MAGIX Entertainment Products GmbH,Borsigstrasse 24, 32312 Lübbecke, GERMANY
US:Phone: 1.888.866.2449Fax: 310 656 0234Mail: MAGIX Entertainment Corp., 429 Santa Monica Blvd.#120, Santa Monica, CA 90401
Please don’t forget to name the information as follows:– Key word: QDesign-Upgrade– ID code– Address– In case of payment by credit card: Credit card number
and date of validity– In case of payment in advance: Stamped transfer bill– In case payment by check: Signed nonnegotiable check
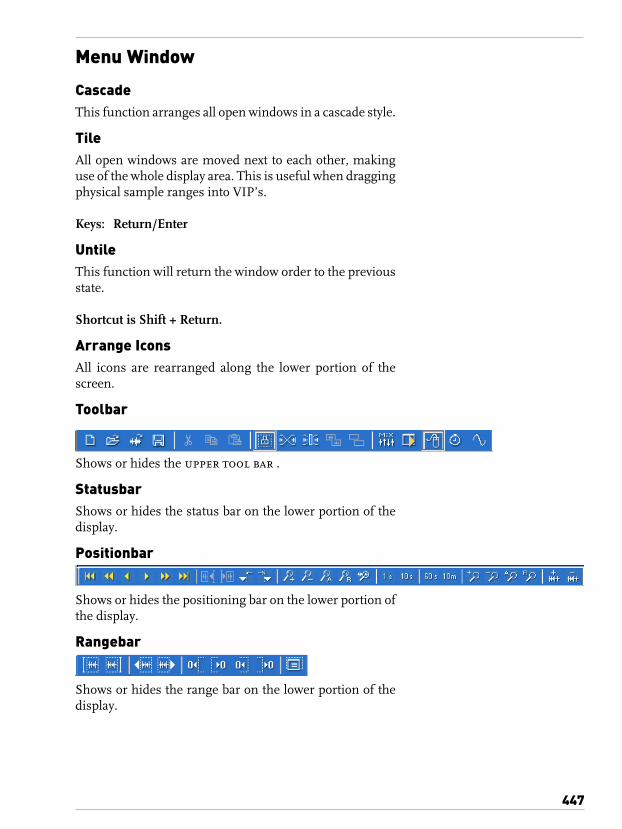
447
Menu Window
CascadeThis function arranges all open windows in a cascade style.
TileAll open windows are moved next to each other, makinguse of the whole display area. This is useful when draggingphysical sample ranges into VIP’s.
Keys: Return/Enter
UntileThis function will return the window order to the previousstate.
Shortcut is Shift + Return.
Arrange IconsAll icons are rearranged along the lower portion of thescreen.
Toolbar
Shows or hides the upper tool bar .
StatusbarShows or hides the status bar on the lower portion of thedisplay.
Positionbar
Shows or hides the positioning bar on the lower portion ofthe display.
Rangebar
Shows or hides the range bar on the lower portion of thedisplay.

Menu Windows
448
CD bar (deLuxe version)
Shows or hides the CD bar on the display of the deLuxe-version.
MixerThis option opens the very powerful real-time Mixer.Note: Depending on the number of tracks, certain pro-cessing power is needed for the real-time effects. Pleaseuse the Preferences Profiling tool to check the DSP powerof your machine during playback! Well-configured PentiumPro starting at 166 MHz or faster systems normally haveno problems to perform all the effects.For the new mastering effects in MAGIX audio studio (FFTFilter...), we recommend a Pentium II system. Using mul-tiple processing intensive DirectX Plug-Ins may alsonecessitate a Pentium II configuration.
Channel Settings (Mixer)AUX1: Adjusts the send level to AUX1 bus
AUX2: Adjusts the send level to AUX2 bus
Echo: Adjusts echo decay, right mouse button opens echodialog
Menu Windows
449
Hi: Adjusts high EQ band, right mouse button opens EQdialog
Mid: Adjusts medium EQ band, right mouse button opensEQ dialog
Low: Adjusts low EQ band, right mouse button opens EQdialog
Pan: Adjusts the panorama position. When using stereofiles only one panorama knob of both tracks can be used.
Mute: Mute the selected track. Note: This button is inde-pendent from the Mute button in VIPs!
Solo: Solo the selected track. Note: This button is indepen-dent from the Solo button in VIPs!
DirX: This button lets you insert DirectX Plug-Ins intothe signal path for the channel. (More about it below.)
Link: Links two mono tracks. All controllers are editedacross the linked channels. (If you activate this feature fortwo stereo tracks, the parameters of both stereo channelsare altered simultaneously. This may not necessarily bedesired.)
Volume Fader: Adjusts the volume of the selected track.
Master AUX Sends (Mixer)AUX1: Adjusts the master level on the AUX1 bus
AUX2: Adjusts the master level on the AUX2 bus
DirX: This inserts DirectX Plug-Ins into the signal chainof the AUX Sends. (More about it below.) To use you willneed to click on the DirX button. It is necessary to activatethe Intern mode when using Plug Ins.
Extern: The auxiliary send signal is routed to the selectedplayback device (button “?” selects the device).
?: If you are using the AUX Sends with external playbackdevices, you will need to select the appropriate output device.Make sure that a different device than that of the Masteroutput is used (check with keyboard shortcut “p” to displaythe Playback Parameter dialog).

Menu Windows
450
If only a single stereo device is installed in the system, theAUX Sends will not be available.
Master Effects (Mixer)Master Equalizer
Low: Adjusts low EQ band, right mouse button opens EQdialog
Mid: Adjusts medium EQ band, right mouse button opensEQ dialog
Hi: Adjusts high EQ band, right mouse button opens EQdialog
Master FFT Filter
The control knob adjusts the damping of the filtered signal.The FFT Filter section enables you to make precise MasterEQ adjustments. Simply draw the required frequency res-ponse into the graphic window of the FFT filter dialog. Thecomplete FFT Filter section can be bypassed with the buttonnext to the control knob in the Master section.
Stereo Enhancer
The base width can be changed with the control knob. Thesettings range from “0” (Mono) to “200” (variance signal,the mid-section is removed).The complete effect can be bypassed with the button nextto the control knob in the Master section.
Master Volume (Mixer)Volume Faders: Adjusts the master volume.
Norm: This is the Master Normalization. When the buttonis clicked, the volume faders are adjusted in a way, so thatthe loudest sections in the signal represent 0 dB.Requirement for this function is the locating of the loudestsection in the VIP and playing it back. The maximum levelis displayed during the playback. While clicking on theNorm button, the program adjusts the master level in away to reference the signal at that exact location to 0 dB. Todisplay the maximum values after other changes in theeffects are made, use the Peak Reset button to clear thepeak meters.
DirX: This allows you to insert DirectX Plug-Ins into thesignal chain. (More about it below).
Link: Links the master section faders to a stereo fader.
Menu Windows
451
?: The Playback Parameter window is opened. This is wheresettings for the playback device for the Master mode aremade.
Global Control Elements (Mixer)Play/Stop: Start/Stop playback.
Mute AUX: Mutes all AUX sends.
Mute FX: Mutes all EQ, Compressors and Delays.
Reset AUX: Resets all AUX send levels to standard settings.
Reset FX: Reset all EQ, Compressors, and Delays tostandard settings.
Reset (Mono): Resets complete mixer to standard settingsfor use with mono or L&R Wave projects.
Reset (Stereo): Resets complete mixer to standard settingsfor use with stereo Wave projects.
Osci/Corel.: Opens the Oscilloscope/Phase Correlationdisplay
Peak Reset: Resets the peak meters.
Input Att.: Dampens the input signals by 6, 12, or 18 dB.This may help prevent internal distortion, which can occurwhen working with the 16-bit precision. This setting canalso be changed with the Project Information for the virtualprojects.
Tips and Tricks (Mixer)– Clicking the right mouse button on any of the effect
control knobs opens the corresponding effect dialog.– Double clicking on the middle position of a Mixer control
knob returns the knob to the default setting. Anotherdouble click resets the knob to the original active posi-tion.
– Control knob values can be changed in small incrementsby clicking on the left and right outer limits of the knobwithout the fear of invoking a double click.
– The Mixer window allows you to solo multiple channelssimultaneously. When multiple channels are soloed,holding the Shift key while clicking on a Solo button of a

Menu Windows
452
channel deselects the previous solo assignments andsolos the single channel.
– The Master Section in the Mixer window contains a con-venient feature, the Normalizing function. The masteroutput level can be quickly set to 0 dB by clicking on the“Norm.” button. If the Limiter in the Master section isactive, the signal is also monitored to prevent any excee-ding signal level.
Using DirectX Plug-Ins in the Mixer (deLuxe-version)Right clicking on the DirX button opens the DirectX
Plug-In menu for the DirectX section.Simply select the needed Plug In from the list and select it.The Plug In properties dialog is opened - you can adjust allneeded parameters.Close the dialog when all adjustments are done.To re-open the Plug IN dialog choose again the markedPlug Ins from the menu.To select another Plug in simply click on ist name in themenu.To clear the Plug In choose the first entry “No Effect” fromthe menu!
Transport Control
With the new transport control you can easily start and stopplayback, start record and punch recording.Also the cursor position and range langth can be seen inthe transport control.An output peakmeter is shown in the lower line.
Control ElementsPlay: Here you can read the play or range start position
L: This shows the langth of the actual range.
E: This shows the end position of the marked range
Scroll bar: This lets you move the play cursor throughthe project.
Sync (deLuxe version only): Opens the Synchronization-Dialog in the deLuxe version.

Menu Windows
453
Loop: switches the Loop Playback Mode
Punch: Activates the Puhch Record Mode, starting recordnow begins the punch recording process.
In: Sets the Punch IN Marker
Out: Sets the Punch OUT Marker
Jog & Shuttle Wheel: The transport controls features ajog & shuttle-wheel, which allows you to ”scrub” over thefiles. The scrubbing-function is similar to the edit mode ofa tape recording machine. In this mode, both motors areswitched off but the tape stays in contact with the head.Moving the tape slowly by hand allows you to locate exactlycertain sequences.Scrubbing is more difficult in a digital system, as there areno moving mechanical devices. The controls of the scrub-bing-function in the audio studio is similar to the tape re-cording machine, as playback follows the movements ofyour mouse. Quick mouse moves produce a higher play-back speed, whereas slow moves produce slower playbackspeeds.
Mouse Mode Toolbar
Shows or hides the mouse mode toolbar with buttons toselect different mouse modes in VIPs.
Time DisplayShows or hides the time display window.This window always shows the actual time position in theactual format.You can change this format with the menu“Units of Measurement”. We recommend the SMPTE for-mat:hours:minutes:seconds:frames. The colors and the fontfor the display can be changed in the File->Preferences. Youcan zoom the window to any size and position it anywhereon the screen!

Menu Windows
454
VisualizerA visualizer can be opened to display the wave form in ascaleable window.
Setup: You can select several views and options for thewaveform display.
Close all WindowsCloses all opened projects. Before closing a window/project,MAGIX audio studio will ask you whether you would liketo save the project.
Hide all physical projectsThis function will hide all Wave projects to make room forthe display of the virtual projects.
Iconise all physical projectsThis function will reduce all Wave projects to their icons tomake room for the display of the virtual projects.
Half HeightThe MAGIX audio studio screen is shown in the upper halfof the display.This is useful, when using a sequencer program in multi-tasking. So you can switch between MAGIX audio studioand the sequencer without the need of complete screenredraws.
1, 2, ...Choose active window from the list.
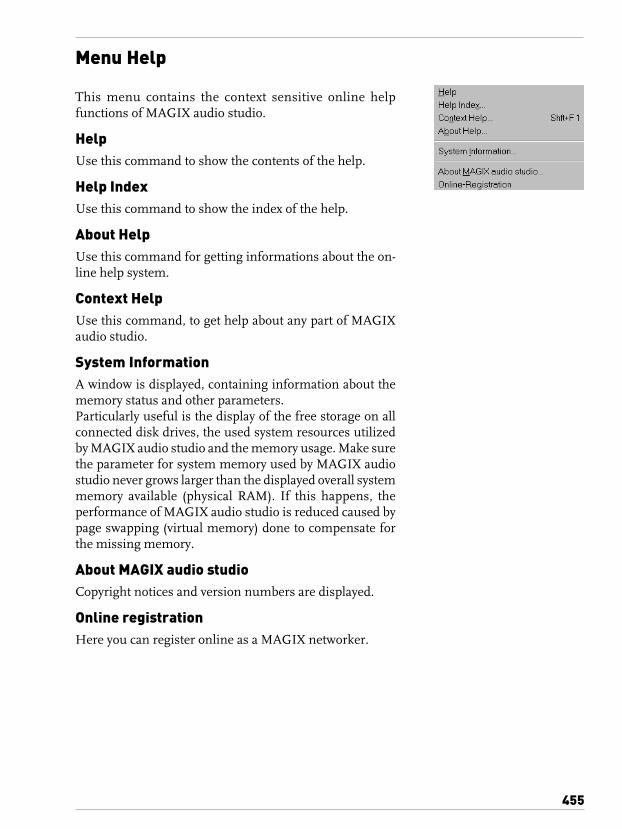
455
Menu Help
This menu contains the context sensitive online helpfunctions of MAGIX audio studio.
HelpUse this command to show the contents of the help.
Help IndexUse this command to show the index of the help.
About HelpUse this command for getting informations about the on-line help system.
Context HelpUse this command, to get help about any part of MAGIXaudio studio.
System InformationA window is displayed, containing information about thememory status and other parameters.Particularly useful is the display of the free storage on allconnected disk drives, the used system resources utilizedby MAGIX audio studio and the memory usage. Make surethe parameter for system memory used by MAGIX audiostudio never grows larger than the displayed overall systemmemory available (physical RAM). If this happens, theperformance of MAGIX audio studio is reduced caused bypage swapping (virtual memory) done to compensate forthe missing memory.
About MAGIX audio studioCopyright notices and version numbers are displayed.
Online registrationHere you can register online as a MAGIX networker.

456

457
INDEX–MIDI STUDIO
AAccelerando 262Add
Audio File 191Region 187
Aftertouch Event 224Altering Values
absolutely 219numerically 220of events 219relatively 219
Anchor 146moving 187protecting 204
Arrange WindowInserting Events 131tracks 120
ASCII Input 83Attack Phase Compensation 134Audio
arming ~ Track 150Autodrop recording 151Digital Mixdown 153List 183recording 149recording with count-in 150Release in Background 287Stereo Object 178
Audio File 189adding 191copying 192Destructive Editing 205exchanging ~s & Regions between Songs 186finding 194Formats 180locating 194moving 193Overview 184reassigning 193removing 192selecting 185
Audio Region 142Anchor 146changing start and end points 145
458
copying 143creating 142cutting 142Delay 146erasing 142fine-tuning 144Loop 145moving 143moving numerically 144Name 145Parameter box 145
Audio window 180Edit commands 186Link mode 182opening 180Selection techniques 185Undo 186
Auto Create Tracks in Cycle Record 115Auto Define 228Auto Mute in Cycle Record 115Autodrop 116, 151, 290
Button 110Cycle 116defining ~ region 116
Autoload 104Automatic Scrolling 91AVI 269
BBackground Windows 90Balance 176Bank Select 125Bar
Position Display 107positioning ~ to Frame 269
Bar Ruler 111, 290display 111Positioning directly 112Song Position Line 111
Beam Width 230Beaming 255Bypass 163
CCatch 91, 96
Enable when SPL is moved 284switching off automatically 91switching on automatically 91

459
Change Background 141Chase Events 117, 281
SysEx 282Checkbox 82, 290Chorus 159Clefs 252Click 110, 279
only during count-in 114Clip Detector 175Clipboard 95Clipscan 153Concealing the Parameters 89Contents
Catch 92Link 92
Copy 95File(s) 192Notes in Score Editor 243
Count-In 114Crosshair Tool 86Cut 95Cycle 112
button 110Chase Events 283defining the region 113Numeric Display 107switching on 112
DDamaged Song 104Default 291Delay 134, 160, 291
for single event types 230of Audio Regions 146
Delete 96File(s) 186, 192Note in Score Editor 244
Deselect all 95Dialog Boxes 90Diatonic Insert 244Digital Mixdown 153Disable safety alert for Undo 95Disarming all tracks 150Display
bar numerator 108bar/SMPTE 107denominator 108

460
division value 108Format 128, 129Locators 107MIDI Events 108parameter box 247quantization 242Song End 109Song Position 107song title 109tempo 108
Division value 108Dots 251Double-clicking 82Double-time 128Drag and Drop of MIDI Files 288Drop 291Drum Editor 227
Beam Display 230Beam Width 230Beams 228Changing Event Values 232Changing several Event Values 233Creating new Events 234Event Definition 227, 228Grid 228, 229Length of Notes 230Linear Series 234Open 227Selection Techniques 232Setting Events with fixed Values 235Style 230
Dynamics 133Dynamics signs 252
EEBU 272Edit
Control via MIDI Output 96Repeat Objects 127via MIDI Input 98
Edit Operations 95Copy 95Cut 95Delete 96Paste 95Undo 95
Editor

461
Contents Catch 92Contents Link 92Drum Editor 227Event List 216Matrix Editor 236Score Editor 241
Enable Catch when Sequencer starts 91Enharmonic Shift 254Enlarging 88Entering Numbers 83Equalizer (EQ) 158Eraser 85Event
~ Types 222Add 218, 235Aftertouch ~ 224Alter ~ Value 219Chase ~s 281Control Change ~ 223Convert 232Copy 232Data Byte 220Delete 97Display 108Duplicate 219Float Window 225Input Filter 280Insert 131Meta ~ 225, 254MIDI Channel 220Move 219, 232Note ~ 222Paste 219Pitch Bend ~ 223Poly Pressure ~ 224Position 220Program Change ~ 222Quantization 98Relative Position 220
Event Definition 228, 230Beam Width 230Create 228Create ~ automatically for selected Events 228Editing different ~s simultaneously 231Erase 228Event Status 231First Data Byte 231
462
Grid 229, 232Hi-Hat Mode 232MIDI Channel 231Note Name 229Parameter Box 229Select 228Sorting 229
Event ListArrange Level 221Display Filter 217Length/Info 221Meta Event 254Monitoring Events 218Open 216Scroll 217Selecting Events 218
Event Parameter Box 242External Sync
Enable 267
FFader 176Feedback 159Filtering Events 280Finding Key Commands 102Fix
Quantize 135Value 235
Fixed Key Commands 89Flanger 159Float Windows 90Font 256Forward 110Frame 291
Rate 263, 273Frequency Range 158
GGate Time 133Glue Tool 85Goto
Position 112Selection 98
Grid 229
HHalf-time 128Hand Tool 86

463
Hanging Notes 108Hardware Programmers 280Help 103Hide
Unused Key Commands 102Used Key Commands 102
Hierarchical Menus 89Hi-Hat Mode 232Horizontal Selection 94Hyper Draw 137
Colour 139Deactivating 138Defining MIDI Channel 138Fine-tuning Values 139Inserting a new Curve Point 139Making ~ visible 138Moving a Curve Point 139Quick Delete 138Tips 140
IInput Filter 280Insert
Defaults 243Notes in Score Editor 243
Interpretation mode 250
JJump 112
KKey Commands 100
~ Window 101Assign 101Check 102Delete 102Find 102Hide 102Learn Key 101Special Keys 100
LLayout 244
Tool 86Legato 133Level
adjusting 176Meter 175

464
Link 92, 163Locators
Numeric Display 107Setting by Objects 96
Loop 132, 292of Audio Regions 145Turning ~s into real Copies 132
LTC 273Lyrics 257
MMagnifying Glass 86Matrix Editor 236
Change Note Length 238Change Velocity 239Copy Note 238Create Note 237Delete Note 239Duplicating Note 237Functions 240Move Note 237Note Display 236Open 236Selection Techniques 239
Max Dots 251Menus 89Merge
New recording with selected sequences 115Only new Sequences in Cycle Record 115
Meta Event 225, 254, 292~ switches Screenset 93
Metronome 110, 279MIDI
Control Change Event 223Control Output via ~ 96Event Display 108In switch 97Monitor 108Options 280Out Switch 96Step Edit 98
MIDI Clock 271Interpolation 268Transmit 266
MIDI File 288Bank Select 288Format 284, 288

465
Load 288Open via Drag and Drop 288Save 288Save in Format 0 289
MIDI Monitor 108MIDI Thru
Parameter Box 131SysEx 280
MIDI Time Code 274Delay 267Format Interpretation 268Send 267Transmit 281Trigger 265
Mode Buttons 110Modify Object Borders 128Monitoring 182, 201
~ from a Position 182~ Output 183, 202Cycle 183Stereo ~ 183Whole Region 182
Mouse 82as slider 83Pointer 85
Move 82File(s) 193Note in Score Editor 243Selected Objects to Track 121
MTC 274Multi ~ 256Multi Stave 247, 256Mute 130, 176
Tool 86Track 122
NNames 247
Input ~ 84With Numbers 84
New Song 103Next/Previous Object 94No Overlap 250Normalize 293
Sequence Parameters 134Notation 241Note

466
~ End as absolute Position 221~ Event 222~ Head 253~ Name for Event Definition 229~ Names in Matrix Editor 236~ Symbol Families 252Beaming 255Change ~ Length 97, 238Change ~ Length with Sequence Parameters 133Change Velocity 239Copy 237, 238Copy ~ in Score Editor 243Create 237Delete 239Delete ~ in Score Editor 244Editing via MIDI In 98Insert ~ in Score Editor 243Move 237Move ~ in Score Editor 243Quantize ~ individually 99Stem Direction 255transposing in Score Editor 243
NotenSymbolgruppe 252
Num 220Numerical
Input 83Value Input 220
OObject 294
Colors 103Snap ~ 128Solo listening 110
Online Help 103Open 104Original Event Position 135Overview Calculation 184
Aborting 185Accelerating 185Automatic 184Start manually 184
Overview Display 198
PPage
Edit 258Scroll 258
467
Up/Down/Left/Right 87Page Edit 258Pan 125, 176
Insert ~ Event 125Panic Function 108, 141Parameter Box 294Partbox 251Paste 95
At original Position 96Paste at Original Position 144Pause 109Peak Hold 175Pedal
~ in Step-Time Recording 97Sign 252
Pen Width 230Pencil 85Pitch Bend Event 223Play 109Play parameters 294Plug-In Window 163Pointer 85Poly Pressure Event 224Preferences
Audio 286Audio Extensions 287Display 285Global 284Initializing 283Reset 285Score 285
Print 259Program Change 125, 222
Insert ~ Event 125Pull-down menus 83
QQ Tool 99Qua 136Quantization 135
Display ~ 249Event ~ 98Fix 136How it works 135in Sequence 136Mixed ~ 136Odd ~ 136

468
Triplet ~ 136Quantize again 99Quick Record 287
RRecord 114
Arm ~ 176Autodrop 116Button 109Change a Track 114Choose a track 114Count-In 114Cycle & Autodrop 116Cycle & Replace 115Erase ~ 143in Cycle Mode 115in Replace Mode 115in Step Time 97Merge & Replace 115Options 115Pause 109Predefining ~ Length 190Setting a ~ Path 189Time 190Toggle 115
Recording Options 278Rec-Ready Switch 176Region
Add to Arrangement 189Altering Limits 187Copy 187Create 143, 187Cycle 183Delete 187Drag Tool 189Fine Adjustments 203Protect 188Rename 188Select 186Show/Hide 183Waveform Display 184
RegionsIndividualize ~ in Arrange 143
Relative Value Alteration 219Remove Overlaps 128Repeat Objects 127Replace 110

469
Reset 141Controller 141Panic 141Volume 141
Rest Correction 250Reverb 160, 163Revert to Saved 104Rewind 110Ritardando 262Rubber-Banding 94
SSample Editor
Absolute Position 201Catch Mode 199Change Gain 206Cut, Copy, Paste, Clear 204Fade In 207Fade Out 207Invert 208Layout 198Link mode 199Normalize 205Open 197Overview functions 199Relative Position 200Remove DC Offset 209Reverse 208Silence 207Trim 208Warning before Closing 286
Sample Ratechoosing 195convert 209
Save 104Save as… 104Scissors 85Score Editor 241
Arrows 253Articulation signs 253Crescendo 253Decrescendo 253Diminuendo 253Info Line 242Key Signature 253Lines 253Lyrics 257
470
Multi Stave 247Open 241Overlap Correction 250Partbox 251Print 244, 259Slurs 253Speed up Screen Redraw Rate 285Text Font 256
Screenset 92, 295Copy 93Number 92Protect 93Sequencer-controlled Switching 93Store 92Switch 93
Scroll 87to SPL 96
SelectAll Objects 95Alphabetically 94Following Objects 95Horizontally 94In Score Editor 242Next Audio File 185Previous Audio File 185Rubber-Banding 94Several Objects at once 94Single Objects 94Unselected Items 94Unused 186Used 186within the locators 95
Selection 93Toggling 94
Send Fader Values after loading 281Sequence 126, 295
~ Playback Parameters 131Adjust Length to fit 128Automatic Naming 284Change Length 127Change Tempo 128Copy 127Create 126Create empty ~ 126Create with Clipboard Events 131Cut 129Cut several Times 129
471
Delete 126Demix by Event Channel 130Finer Grid 128Fix Playback Parameters 134Hyper Draw 137Inserting Events 131Join and Mix 129Loop 132Make Contents visible 141Move 126Moving the Start 127Mute 130Name 130Quantization 136Repeat 127Soloing 130
Sequence Parameter 132Change several ~s at once 131Default 131Delay 134Dynamics 133Gate Time 133Loop 132Normalize 134Open ~ Box 132Qua 136
Sequencer Positions as List 221Sequences
Round Length to Bars 128Set Locators
by Objects 96Set Optimal Object Sizes 128Show
Contents 92Silence 207Size
of Display 88of Window Elements 88Tool 86
Slider Input 83SMPTE 272
Drop Frame 273Frame Rate 273LTC/VITC 273Offset 264Position Display 107Recording Time Code 274
472
Snap Objects 128Solo 130
Button 110Lock 110Tool 130
Solo Tool 86Song
Autoload ~ 104Check/Repair 104End 109Load 104New 103Revert to saved Version 104Store 104Switch between ~ 104
Song PositionCatch 91Display 107Jump graphically 112Jump numerically 112
Song Position Line 111, 295Catch 91Wide ~ 285
Song Position Pointer 266, 271Song Settings 278
Chase Events 281MIDI options 280Recording Options 278recording options 278
Song Title Display 109SPL 111, 295SPP 271Staccato 133Standard MIDI File 288Start/Stop with Bar Ruler 112Stave 256
Move ~ vertically 255Step-Time Recording 97, 98
Keyboard Controls 98Stereo Objects 178Stop 109Style 241, 247Swing 296Symbol groups 252Sync
Button 110Mode 265

473
Synchronization~ of Sequencers to Tape 275~ of several Sequencers at once 275Bar-Referenced 271Basics of ~ 270Click Track 276MIDI 266MIDI Clock 271Problem solving 276Procedure 274Pulse Clock/FSK 271SMPTE/EBU 272Song Position Pointer 271Status Display 260Time-Referenced 272
Synchronizers 274Syncopation 250SysEx
MIDI Thru 280
TTelescopes 88Tempo 260
display 108events 260Graphic Tempo Editor 262List Editor 260Overview 260recording tempo changes 262Spur 260
Tempo Changescontinuous - creating 262copying from a musical passage 261creating 261deleting 261
Text~ in Score Editor 256lyrics 257positioning ~ 256
Text Input 84Text Mark 85Text mode 254Tie Correction 250Tie Objects 128Time Code (TC) 272Time Signature and Divisions 108Time Signature Changes 253

474
creating 108editing 108erasing 108
Toggle Selection 94Toolbox
at the mouse position 85Toolbox (see Tools) 84Tools 85
crosshair 86effective range 84eraser 85glue tool 85hand 86Layout ~ 86magnifying glass 86Mute ~ 86pencil 85Pointer 85Q tool 99scissors 85selecting 85Size Tool 86solo tool 86text mark 85two at once 84voice splitter 86
Top Window 90Track 124
Filter in Score Editor 247Icon 124Mute 122Pan 125Program Change Event 125Selecting Banks 125Selecting Programs 122Setting MIDI Channels 124Setting MIDI Port 124sorting 120Volume 125
Track Column 296Tracks 120
changing 120creating 120deleting 121selecting 120
TransferMIDI File 288

475
Transportin window 88
Transport Bar 106buttons (lower) 108buttons (upper) 107time signature and divisions 108
Transport Function Keys 109Transport Window 106
Autodrop 110changing the display 106cycle 110Forward 110large SMPTE or bar display 107legend 106Locators 107metronome 110MIDI monitor 108moving 106opening 106panic function 108part display 107Pause 109Play 109position display 107position slider 106pull-down menu 106Record 109Replace 110Rewind 110smaller/larger 106solo 110Solo Lock 110Stop 109sync 110tempo 108
Transposingnotes in Score Editor 243
Trill symbols 254TrueType Fonts 256Turn Loops to Real Copies 132
UUndo 95
Audio window 186im Sample Editor 204Safety Alert 284
Unused Blocks 104
476
Update File Information 194
VV Tool 239Val 220VCA 212, 213VCF 212, 214Velocity
Compressing 133tool 239
Vertical Selection 95Video for Windows 269View
parameters 100transport 100
VITC 273Voltage Controlled Amplifier 213Voltage Controlled Filter 214Volume 125
Insert ~ Event 125
WWaveform
Absolute Time Axis 201Change Gain 206changing selection 202Detailed display 200Editing commands 204fading in 207fading out 207moving selection 202normalizing 205Phase inversion 208Relative Time Axis 200selecting 202Selection Parameter Box 203To digital Zero 207X and Y axis 200
WavePlayer 211Wide Song Position Line 111Window
Drum Editor 227Event List 216hiding those of inactive songs 284Matrix Editor Window 236
WindowsArrange 119autocatch 91
477
Background ~ 90Catch 91changing the elements present 88close box 87concealing the parameters 89concealing the Transport 88contents catch 92Event Float Windows 225Float Windows 90functions 86Graphic Tempo Editor 262Hierarchical Menus 89Key Commands 101Link 92main menu 91maximizing 87menus 89minimizing 87opening 87relationships between 91screensets 92scrolling 87selecting the working area 87selective zoom 88Show Contents Mode 92size 87Tempo List Editor 260top window 90Transport window 106types 90zooming 88
WYSIWYG 258
XX/Y Element 87
ZZoom 88
selective 88Zoom Function 297

478

479
INDEX - AUDIO STUDIOAAbout MAGIX audio studio 455Absorption 398Accessing Audio Material 314Active Section when using Zoom Levels 310Add one Track 367Adjusting a Range 316Amplitude 388, 389, 417Amplitude * 2 389Amplitude / 2 389Append Projects 357Apple Macintosh 361Application Examples 384Arrange Icons 447Assign new Shortcut 442Attack 394Audio data 308, 311Audio file 351Auto Crossfade active 369Auto-Crossfade-Mode 351Autoscroll 421AUX1 448, 449AUX2 448, 449
BBackground 374Background-color 383Bar Definitions 373Basics 425Beat Marker-Mode 400Beginning of Range < 0 405Beginning of Range > 0 405Bouncing 415, 416BPM 423, 437Buffer 444Buffer Number 444Buffer size 323Build Loop Object 381Build Physical Loop 402Burn “On the Fly” 412Burning of CDs (deLuxe version) 330Button Crossfade Off 368Button overview 341Buttons/Slider 375

Index - audio studioCCalculate Maximum Amplitude 417Cascade 447CD arrange mode 435CD bar 342, 448CD Disc Options 414CD ROM Drive Configuration Dialog 354CD Title 414CD Track Manager 418CD Track Options 414Change Bit Resolution 358Change Mouse 375Change Play Direction 420Change Sample Rate 401Change Toolbar style 442Changing a Range 317Changing Object Borders 315Channel Settings 448Clear 365Clip 307Close all Windows 454Close Project 362Colors 442Complete Project 417Compressor 325, 393, 394Connect to the Internet 361Context Help 455Context Help mode 336, 440Convert > Mono 358Convert > Stereo 358Copy 365Copy and Clear 365Copy as 365Copy Mode Burst 355Copy Mode Normal 355Copy Mode Sector Synchronization 355Copy Objects 378Corel 428, 451Create Audio Copy 433Create AVI 433Create complete new file 332Crossfade Editor 322, 367Crossfade Position 368Curve Mode 336, 439Cut 364Cut mode 336, 440Cutting Objects 378, 379, 380

Index - audio studioDData Transfer 330De-Selecting a Range 317Decay % 396Decibel 392Declipping 325, 396Delay 325Delay ms 395Delete 364Delete all Markers 409, 411Delete Marker 409Delete Objects 379Delete Panorama Handle 369Delete prefixed Markers 411Delete Undo Levels 370Delete Volume Handle 369Delete Wave Project(s) (HDP) 362Delta Time 380Destructive Editing 314, 326, 385Destructive Processing 327Device 421, 427DirectX Plug-Ins 390, 452DirectX plug-ins 327DirectX-plug-ins 325DirX 449, 450Disable Fade In/Out 381Disable Length changes 381Disable Moving 381Disable Volume changes 381Disk Space 429Display Filter 385Distortion 325, 393, 394Download audio material 305Drag & Drop 313Draw Panorama Mode 335Draw Volume 440Draw Volume Mode 335, 439Draw Wave 440Draw wave mode (only wave projects) 337Drive List Dialog 353DSP display 332Duplicate Objects 379Duplicate Objects multiple 379Duplicating Objects 314Duration 380
Index - audio studioEEan Code 414Echo 325, 395, 448Edit Keyboard Shortcuts 440Edit Range 404, 405, 406Effect Calculations and Signal Manipulations 326Effects 325Effects in the VIP 325Enable VIP Tooltips 442End of Range < 0 405End of Range > 0 405Enhancer 326, 450Equalizer 325, 393Expander 325, 393, 394Export 306Export as PlayR-File 361Export audio> 16 Bit AIFF 361Export audio> AIFF file with Quicktime 360Export audio> Export as Dump 361Export audio> MP3 359Export audio> MPEG 359Export audio> MS Audio File 359Export audio> Real Audio 359Export audio> Wave 359Extern 449External Program 1, 2 419Extract 366Extract audio from AVI 433Extract Objects 379
F
Fade Handle 308Fade in/out 381, 389Fade-In / Fade-Out 315Feedback 396FFT Filter 323, 326, 327, 450Fix vertically 371Fixed Bar Snap 373Flip Range left 405Flip Range right 405Font for Time Display 442Font Selection 442Frequency 392FTP Download 329, 362Full-duplex 303FX 434, 438

Index - audio studioGGate 393, 394Gater 325Generate a complete new file 413Get Marker 408Get Noise Sample 397Get position 376Get Range 369, 407Get Range Length 407Global Control Elements 451Global Get 369Global Set 369Graphic Equalizer 392Graphic Refresh 371Grid 350Grid Setup 372, 442Group created Objects 379Group Number 374Group Objects 382
H
Half Height 454Halftones 423Hall 325Handle 306, 308HD Buffer 444HD Record Buffer 445HD Wave (HDP) 351HD Wave Project 351HD Wave project 312HD Wave Projects 443HDP 322Help Index 455Hide all physical projects 454High EQ 449, 450Horizontally 376Host Adapter Number 354
I
Iconise all physical projects 454Import Sample 357Import Sample as Dump 357Individual Mouse Modes 334Insert Objects 378Insert Workspace 367Integrating a range 313Integrating a WAV File 313
Index - audio studioInternal Mixdown 415Internet-Functions 328Invert Phase 403
L
L&R Wave Project 312Lasso Function 334Latency 426LED peakmeters 302, 303Length changing 381Length Handle 308Link 449, 450Link Projects 357Live Effect Processor 426Live Input Mode 425Load Always New 432Load Audio CD 352, 410Load Shortcuts 441Lock Definitions 381Lock Objects 321, 380, 381Lock Recorded Objects 350Loops / Songs / Speech 400Low 450Low EQ 449Lower toolbars 342
M
Make CD 412Marker 308Marker Manager 308, 418Markers on Range Borders 408Master AUX Sends 449Master Effects (Mixer) 450Master Equalizer 450Master FFT Filter 450Master Normalization 323Master Volume 450Match Time 385Maximale Spurenanzahl 300Media 429Media link 431Medium EQ 449, 450Menu CD (deLuxe version) 410Menu Edit 363Menu Effects 387Menu File 350Menu Help 455Menu Object 378

Index - audio studioMenu Options 431Menu Playback 420Menu Range 404Menu Tools 416Menu View 371Menu Window 447Microsoft® Intellimouse 340MIDI Clock 437MIDI Clock Input Device 437MIDI Time 437MIDI Time Code 436Mix Master Section 327Mix with Clip 367Mixer 323, 327, 448Mixer-Effects 326MKS-format 361Monitor 302, 303, 428Mono 358Mono Wave Project 312Mouse 340Mouse Mode 439, 440Mouse Mode bar 341Mouse Mode Toolbar 453Move Play to beginning 404Move Play to end 404Move Play to range end 404Move Play to range start 404Moving 381Moving a Range Horizontally 317Moving Objects 314MTC Output Device 437Multirate file 360Mute 449Mute AUX 451Mute FX 451Mute objects 378
NNew features in the generation 6 version 300New Multitrack Project 350New Object 378New Object Mode 375Noise Reduction 397Noise reduction 325Noise Sample 398Normalize 388, 389Normalize File (phys.) 388Normalize Object (virt.) 389
Index - audio studioNumber of first CD Track 414Number of Objects 379
O
Object 352Object and Curve Mode 314Object Background Color 382Object Foreground Color 382Object Lasso 314Object Lock Definitions 440Object Manager 418Object Mode 314Object Name 374, 383Object Properties 374Object to Original Position 381Object to Playcursor Position 381Object Volume 315Object-Editor 383Object-length 383Object-position 383Objects 334Offset 432On-The-Fly 412, 424Online registration 455Open Project 351, 352Osci 451Oscilloscope 428Output modus 320Overlapping Objects 316Overwrite with Clip 366
P
Panorama 449Panorama Draw Mode 440Parameters for the Compressor 394Parameters for the Distortion Editor 394Parameters for the Gate 394Parametric Equalizer 391Paste/Invert Clip 365Peak Meters 375Peak Reset 451Performance 323Pitch Factor 423Pitch Shifting 399Pitch-shift/Time stretch mode 337Pitch/Time-stretching 383Play 385, 451Play Always 432
Index - audio studioPlay Buffer 444Play Cursor 335Play in Range 420Play loop 420Play once 420Play Video without sound 433Play with Preload 420Play-Cursor 309Play/Stop 383Playback 324Playback of a range 318Playback Options 421, 431Playback while Recordin 427Position objects 305Positionbar 447Positioning bar 342Prefix 411Preload 426Preview 434Print TOC 413Problems & Solutions 344Program Preferences 438, 439, 440, 442Project Information 435Project Name 374Project Properties 431, 435Project window 301Project-patterns 350Publish to Web 361Punch In 423, 425Punch In Mode active 423Punch In Record 425Punch Out Markers 425Punch-In/Out 424Punch-In/Out with Markers 424
QQDesign 359, 445Quickstart 301
R
RAM Buffer 444RAM Wave (RAP) 351RAM Wave project 311RAM Wave Projects 444Range 309, 335Range, <0, 0> 406Range all 404Range bar 343

Index - audio studioRange Commands 317Range Editor 409Range length to 406Range Manager 418Range Mode (Secure Mode) 335, 439Range to beginning 404Range to end 404Rangebar 447Ranges Mode 440RAP 322Ratio 394Real Time Buffer 444Real-Time Effects 327Real-time Processing 326REC-Button 302Recall last range 409Record 426, 430Record Buffer 444Record button 302Record mode 426Record Offset 429Record Parameter 426Record Time 429Recording 324Recording/Playback 324RedBook 330Redo 363Reduction 398Release 394Remove all Indices 412Remove DC offset 397, 398Remove Index 411Remove Link 434Remove Punch In 425Remove Punch Markers 425Remove unused Samples 417Rename Project 361Replace 385Replace Audio in existing AVI 433Resampling 325, 399Resampling to 44.1 kHz 427Reset (Mono) 451Reset (Stereo) 451Reset AUX 451Reset FX 451Resonance 396Restart Play 421Reverb 395
Index - audio studioReverse 402
S
Same File Only 385Same Track Only 385Sample / Halve 374Sample manipulation 401, 402Sample Rate 350, 421, 426Sample-color 383Sampledata * 2 401Sampledata / 2 401Samplerate 301Save complete VIP to 356Save in Format 356Save Object 356Save Project 355Save Project as 355Save Session 356Save Shortcuts 441Saving Ranges 317Scrubbing 324, 422Scrubbing mode 440SCSI-ID 355SCSI-LUN 355Section 309Sections 371Secure Mode 335Select Objects 382Selected Range 417Selecting a Range 316Selecting an Object 314Selecting Multiple Objects 314Selecting the Correct Mouse Mode 316Separate Stereo 375Session 352, 444Set End Marker 425Set Hotspot 382Set Markers on Silence 408Set New Original Position 381Set Pause 410Set Pause Time 415Set Punch In Marker 425Set Punch Out Marker 425Set Start Marker 425Set Start Pause Time 415Set Sub-index 410Set Track 410Set Track Indices on Object Edges 411

Index - audio studioSet Track Indices on Silence 411Set Zero 389Shortcuts 338Shortcuts for range 319Show Border 375Show CD-R Disc Information 414Show CD-R Drive Information 414Show Grid 372Show Shortcut list 441Show TOC 413Show Video Track 433Signal Manipulations 326SMPTE code 436SMPTE Offset 432, 438SMPTE/MTC Input Device 437Snap Setup 372, 435Snap to Grid 372Snap to Objects 350Snapshot Buttons in VIPs 311Solo 449Solo Instruments 400Special CD Arrange-Mode 415Spectrum 392Split Objects 380Split Objects on Marker position 380Split Range 406Split Range for Video 406Starting number 411Statistic 385Statusbar 447Stereo 358Stereo Enhancer 450Stereo Wave Project 312Stop 420, 451Stop and go to current position 420Store Marker 407Store Range 407Surround 325Switch Channels 402Switch Selection 382Sync Velocity 438Synchronization 348Synchronization (deluxe-version only) 436Synchronizing MAGIX Audio Studio projects 431System 443System Information 455

Index - audio studioTTake Manager 384, 419Target groups 360Terminology 307Test Offline 398Test Realtime 398, 400Text Comments 435Threshold 394Threshold db 411Tile 447Time Display 453Time Stretching 399Time stretching 325Timestretching 399Tips & Tricks 321Tips and Tricks (Mixer) 451Toolbar 447TOOLS bar 341Track Bouncing 416Track Delay 396Track List Dialog 353Track Number 350Transport Control 452Trim Objects 380Type Audio 398Type Noise 398
U
Undo 363Undo Definitions 438Ungroup Objects 382Units of Measurement 350, 372, 435Universal Mode 334, 439Universal Tool Mode 314Unlink Project 357Unlock Objects 380Untile 447UPC 414Upper Toolkit bar 341Use ASCII Code for TOC 413Use Uni Code for TOC 413
V
Varipitch 423Vertical slider 423Vertically 377Video Height 442

Index - audio studioVIP Buffer 444VIP Display Mode 373VIP Mouse Mode 439VirtClip 308Virtual Editing Concepts 313Virtual Projects 310, 351, 364, 366, 368, 444Virtual Projects (VIPs) 310Virtual Working 428Visualizer 454Volume 319, 392, 393Volume changing 381Volume Fader 449, 450Volume Handle 308Volume/Pan 384
W
Wave Mouse Mode 440Wave Projects 351, 364, 366, 367Wave projects 311Wave-Projects 311Waveform Generator 417Web Publishing (Upload) 328Wet-/ Dry Balance % 396Working in Projects 321Working with Objects 313Working with Ranges 316Working with the Plug-Ins 390Write ”on the fly” 332Writing Speed 333
Z
Zoom 335Zoom levels 310, 322, 376Zoom mode 336, 337, 440