Embed Size (px)
Citation preview
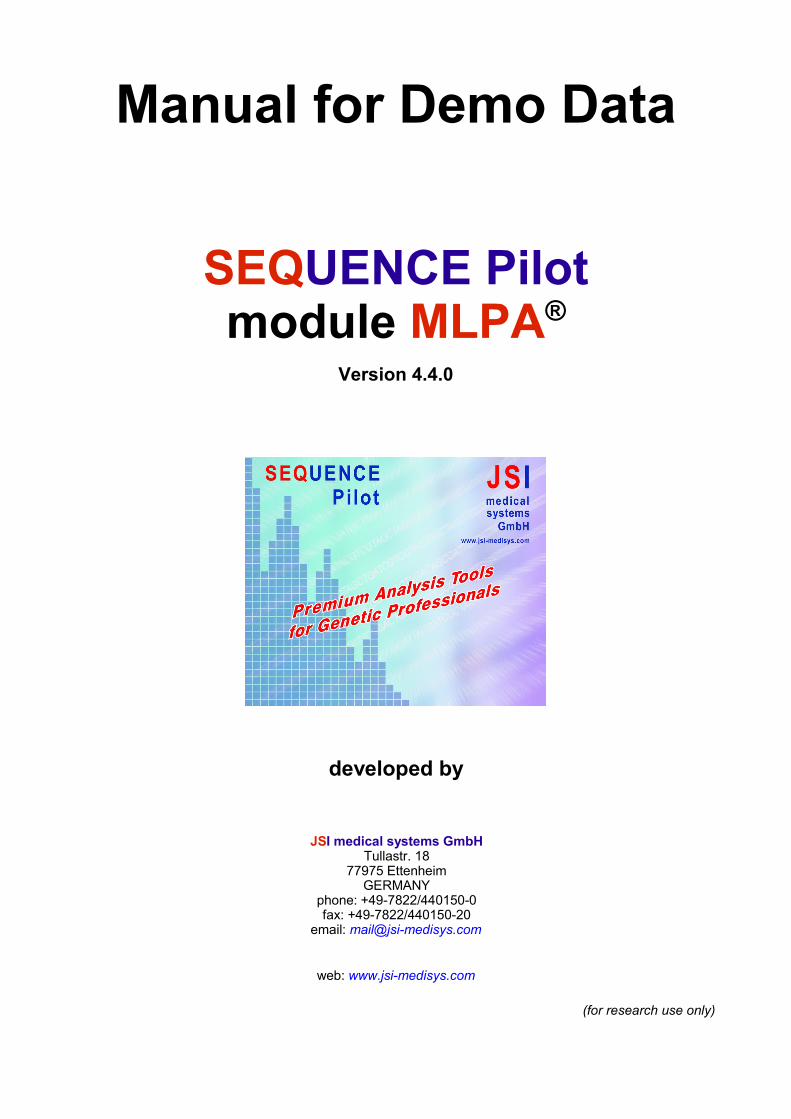
Manual for Demo Data
SEQUENCE Pilotmodule MLPA®
Version 4.4.0
developed by
JSI medical systems GmbHTullastr. 18
77975 EttenheimGERMANY
phone: +49-7822/440150-0fax: +49-7822/440150-20
email: [email protected]
web: www.jsi-medisys.com
(for research use only)
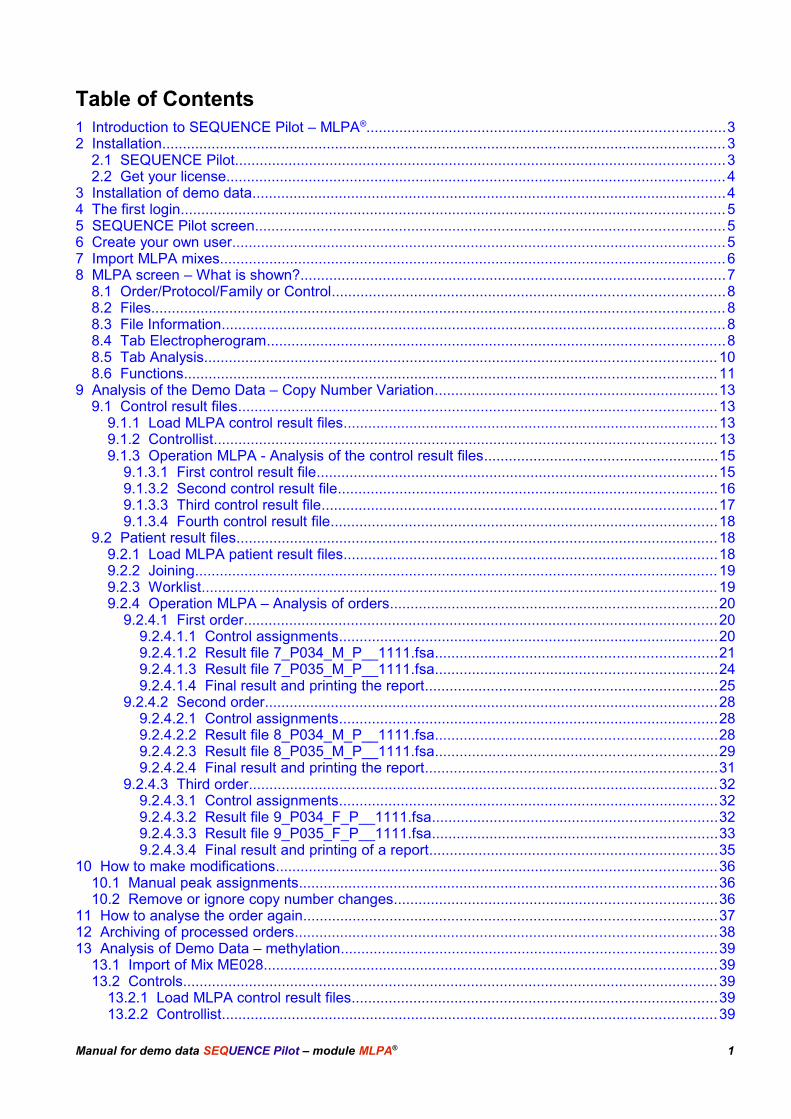
Table of Contents1 Introduction to SEQUENCE Pilot – MLPA®.......................................................................................32 Installation.........................................................................................................................................3
2.1 SEQUENCE Pilot.......................................................................................................................32.2 Get your license.........................................................................................................................4
3 Installation of demo data...................................................................................................................44 The first login....................................................................................................................................55 SEQUENCE Pilot screen..................................................................................................................56 Create your own user........................................................................................................................57 Import MLPA mixes...........................................................................................................................68 MLPA screen – What is shown?.......................................................................................................7
8.1 Order/Protocol/Family or Control...............................................................................................88.2 Files...........................................................................................................................................88.3 File Information..........................................................................................................................88.4 Tab Electropherogram...............................................................................................................88.5 Tab Analysis............................................................................................................................108.6 Functions.................................................................................................................................11
9 Analysis of the Demo Data – Copy Number Variation.....................................................................139.1 Control result files....................................................................................................................13
9.1.1 Load MLPA control result files...........................................................................................139.1.2 Controllist..........................................................................................................................139.1.3 Operation MLPA - Analysis of the control result files.........................................................15
9.1.3.1 First control result file.................................................................................................159.1.3.2 Second control result file............................................................................................169.1.3.3 Third control result file................................................................................................179.1.3.4 Fourth control result file..............................................................................................18
9.2 Patient result files.....................................................................................................................189.2.1 Load MLPA patient result files...........................................................................................189.2.2 Joining...............................................................................................................................199.2.3 Worklist.............................................................................................................................199.2.4 Operation MLPA – Analysis of orders...............................................................................20
9.2.4.1 First order...................................................................................................................209.2.4.1.1 Control assignments............................................................................................209.2.4.1.2 Result file 7_P034_M_P__1111.fsa....................................................................219.2.4.1.3 Result file 7_P035_M_P__1111.fsa....................................................................249.2.4.1.4 Final result and printing the report.......................................................................25
9.2.4.2 Second order..............................................................................................................289.2.4.2.1 Control assignments............................................................................................289.2.4.2.2 Result file 8_P034_M_P__1111.fsa....................................................................289.2.4.2.3 Result file 8_P035_M_P__1111.fsa....................................................................299.2.4.2.4 Final result and printing the report.......................................................................31
9.2.4.3 Third order..................................................................................................................329.2.4.3.1 Control assignments............................................................................................329.2.4.3.2 Result file 9_P034_F_P__1111.fsa.....................................................................329.2.4.3.3 Result file 9_P035_F_P__1111.fsa.....................................................................339.2.4.3.4 Final result and printing of a report......................................................................35
10 How to make modifications...........................................................................................................3610.1 Manual peak assignments.....................................................................................................3610.2 Remove or ignore copy number changes..............................................................................36
11 How to analyse the order again....................................................................................................3712 Archiving of processed orders......................................................................................................3813 Analysis of Demo Data – methylation...........................................................................................39
13.1 Import of Mix ME028..............................................................................................................3913.2 Controls..................................................................................................................................39
13.2.1 Load MLPA control result files.........................................................................................3913.2.2 Controllist........................................................................................................................39
Manual for demo data SEQUENCE Pilot – module MLPA® 1
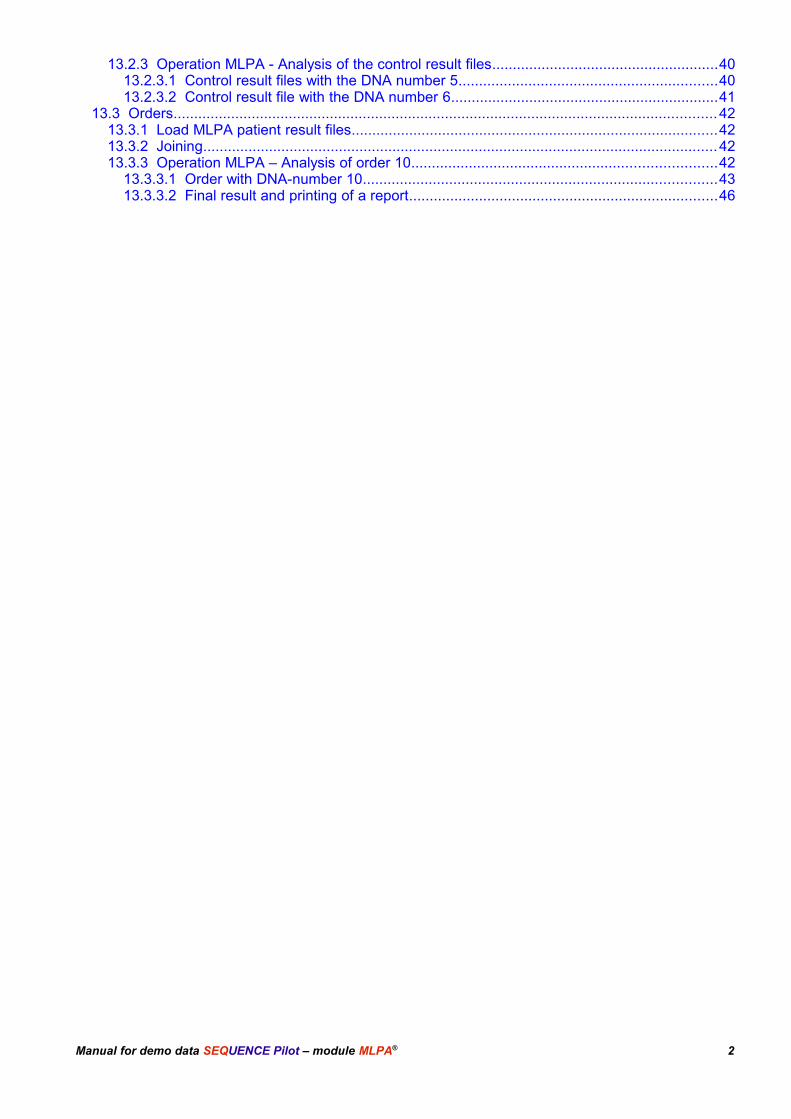
13.2.3 Operation MLPA - Analysis of the control result files.......................................................4013.2.3.1 Control result files with the DNA number 5...............................................................4013.2.3.2 Control result file with the DNA number 6.................................................................41
13.3 Orders....................................................................................................................................4213.3.1 Load MLPA patient result files.........................................................................................4213.3.2 Joining.............................................................................................................................4213.3.3 Operation MLPA – Analysis of order 10..........................................................................42
13.3.3.1 Order with DNA-number 10......................................................................................4313.3.3.2 Final result and printing of a report...........................................................................46
Manual for demo data SEQUENCE Pilot – module MLPA® 2
1 Introduction to SEQUENCE Pilot – MLPA®
The module MLPA® is made for bioinformatical analysis of your MLPA® data and is compatible withall sequencers. On our homepage pre-configured SALSA MLPA® kit descriptions are available whichcan be easily imported. For your analysis you can select different analysis modes for each MLPA® kit.Moreover MLPA® offers configurable control settings and relative peak area limits. For calculation ituses automated peak assignment and a data correction for probes with “tailing-off-effect”. If desiredmanual peak assignments are easy to do afterwards. Moreover warnings are displayed for undersized and oversized peak areas and heights, too little DNAquantity, incomplete denaturation and hybridisation and in case the wrong gender is set. After theanalysis, a diagnostic report for each sample is received. MLPA® is a simple, easy to use desktop application including a variety of functionalities to fit theprogram to many different specific needs.
2 Installation
In case you have done the Installation of SeqPilot already, please proceed with chapter 3.
2.1 SEQUENCE Pilot
For the installation of SEQUENCE Pilot, please do the following:
Go to our website http://www.jsi-medisys.com/free-trial-license to obtain a free trial license.
Please use the link you will receive via e-mail to download our latest version of SeqPilot.
Execute the downloaded file.
Press [Execute] in case of an security warning.
Press [Next] in the dialogue Setup – Sequence Pilot.
Press [Next] after reading the Sequence Pilot module information.
Check the box I accept the agreement after reading the Software License Agreement andpress [Next].
Press [Next] after reading the Installation Instructions.
Select a destination folder, where SEQUENCE Pilot should be installed. By default this isc:\SeqPilot. Then press [Next].
Note: Please make sure, that SeqPilot is not installed under C:\program files,C:\program files (x86) or in another directory with limited rights; for executing andusing SeqPilot full reading and writing rights are required.
Warning: Use another folder in case you already have an existing SEQUENCE Pilotinstallation on C:\SeqPilot. Otherwise your existing installation will be overwritten!
A warning appears, that updates are only free for customers with maintenance contract. Thisdoes not apply to trial licenses. Ignore this warning by pressing [OK].
Select the components, which should be installed. By default all SEQUENCE Pilot modulesare selected. Then press [Next].
Select the start menu folder, where the setup should place the program's shortcuts. By defaultthis is c:\SeqPilot. Then press [Next].
Check the box Create a desktop icon, if a SEQUENCE Pilot icon should be placed on yourdesktop. Then press [Next].
Press [Install].
Press [Finish] when the SEQUENCE Pilot installation is completed.
Manual for demo data SEQUENCE Pilot – module MLPA® 3
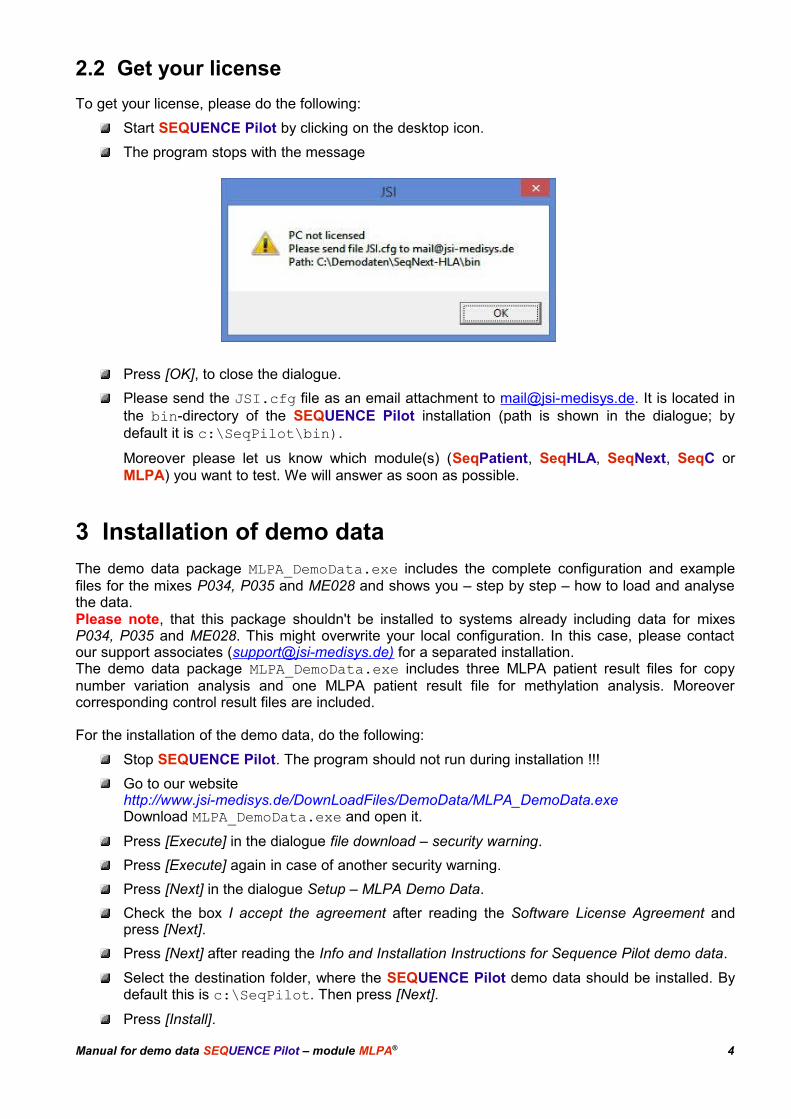
2.2 Get your license
To get your license, please do the following:
Start SEQUENCE Pilot by clicking on the desktop icon.
The program stops with the message
Press [OK], to close the dialogue.
Please send the JSI.cfg file as an email attachment to [email protected]. It is located inthe bin-directory of the SEQUENCE Pilot installation (path is shown in the dialogue; bydefault it is c:\SeqPilot\bin).
Moreover please let us know which module(s) (SeqPatient, SeqHLA, SeqNext, SeqC orMLPA) you want to test. We will answer as soon as possible.
3 Installation of demo data
The demo data package MLPA_DemoData.exe includes the complete configuration and examplefiles for the mixes P034, P035 and ME028 and shows you – step by step – how to load and analysethe data. Please note, that this package shouldn't be installed to systems already including data for mixesP034, P035 and ME028. This might overwrite your local configuration. In this case, please contactour support associates ([email protected]) for a separated installation.The demo data package MLPA_DemoData.exe includes three MLPA patient result files for copynumber variation analysis and one MLPA patient result file for methylation analysis. Moreovercorresponding control result files are included.
For the installation of the demo data, do the following:
Stop SEQUENCE Pilot. The program should not run during installation !!!
Go to our websitehttp://www.jsi-medisys.de/DownLoadFiles/DemoData/MLPA_DemoData.exeDownload MLPA_DemoData.exe and open it.
Press [Execute] in the dialogue file download – security warning.
Press [Execute] again in case of another security warning.
Press [Next] in the dialogue Setup – MLPA Demo Data.
Check the box I accept the agreement after reading the Software License Agreement andpress [Next].
Press [Next] after reading the Info and Installation Instructions for Sequence Pilot demo data.
Select the destination folder, where the SEQUENCE Pilot demo data should be installed. Bydefault this is c:\SeqPilot. Then press [Next].
Press [Install].
Manual for demo data SEQUENCE Pilot – module MLPA® 4
Press [Finish] when the SEQUENCE Pilot installation is completed.
4 The first login
Once SEQUENCE Pilot is installed and licensed, you can login with the Name jsi (leave thePassword field empty).
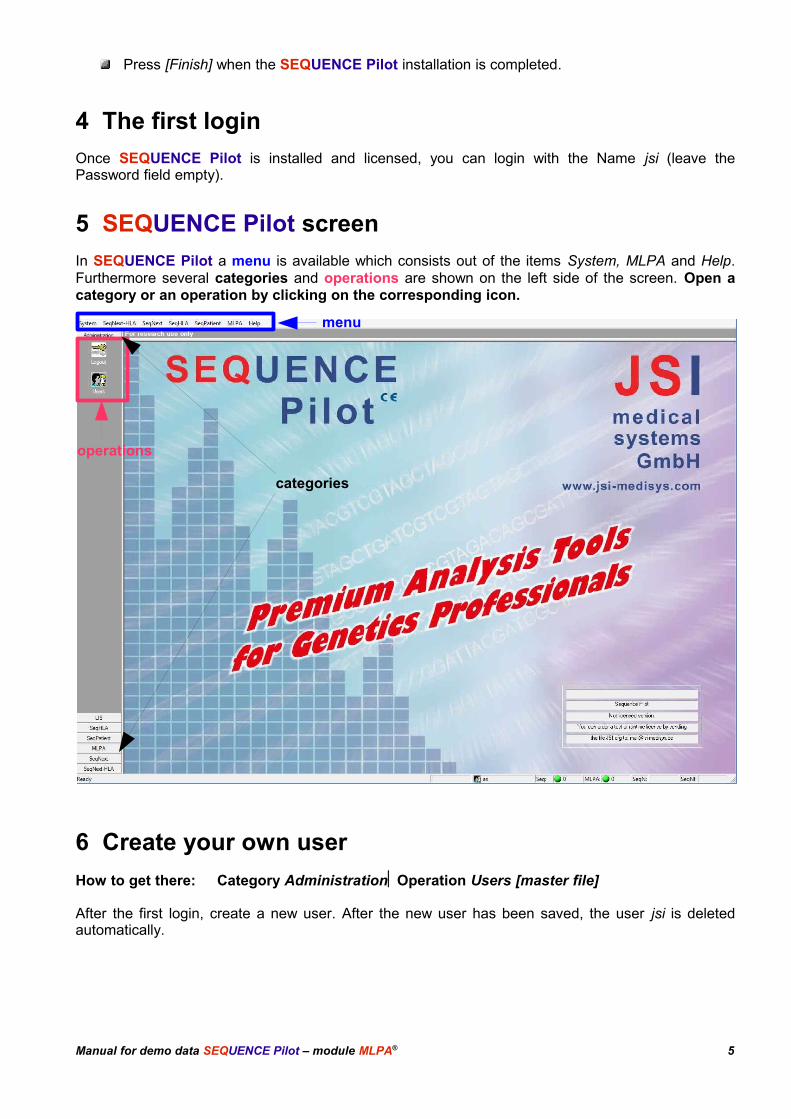
5 SEQUENCE Pilot screen
In SEQUENCE Pilot a menu is available which consists out of the items System, MLPA and Help.Furthermore several categories and operations are shown on the left side of the screen. Open acategory or an operation by clicking on the corresponding icon.
6 Create your own user
How to get there: Category AdministrationOperation Users [master file]
After the first login, create a new user. After the new user has been saved, the user jsi is deletedautomatically.
Manual for demo data SEQUENCE Pilot – module MLPA® 5
menu
categories
operations
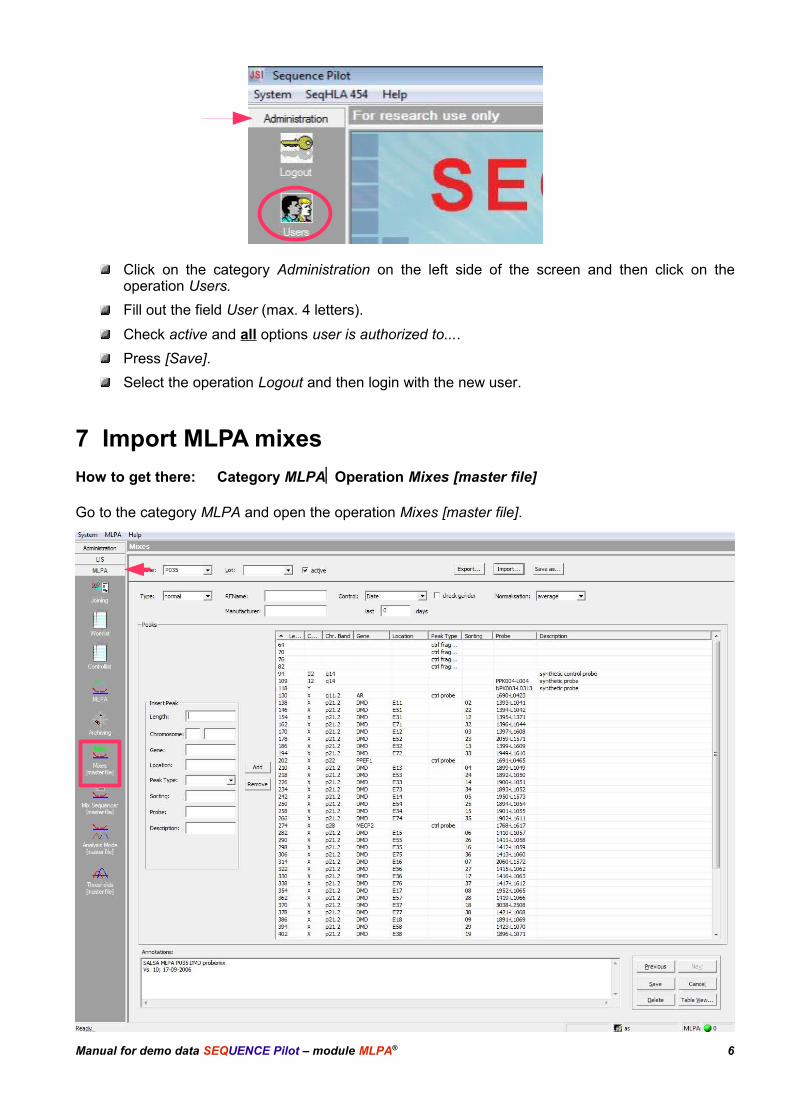
Click on the category Administration on the left side of the screen and then click on theoperation Users.
Fill out the field User (max. 4 letters).
Check active and all options user is authorized to....
Press [Save].
Select the operation Logout and then login with the new user.
7 Import MLPA mixes
How to get there: Category MLPAOperation Mixes [master file]
Go to the category MLPA and open the operation Mixes [master file].
Manual for demo data SEQUENCE Pilot – module MLPA® 6

To import the master files for the MLPA mixes P034 and P035, do the following:
Press [Import] and the dialogue Import file... is opened.
Open the folder MLPA-Mixes, which is located in the Demo folder of your installation (bydefault C:\SeqPilot\Demo\MLPA-Mixes).
Select the files P034.mme and P035.mme and press [Open]. All data belonging to thesemixes (data for the operation Mixes [master file] and the corresponding data for the operationsMix Sequencer [master file] and Analysis Mode [master file]) are imported.
If the import was successful, you will get a corresponding message. In case a mix with thesame name already exists, you will be asked, if you want to overwrite it.
8 MLPA screen – What is shown?
How to get there: Category MLPAOperation MLPA
Before we start analysing our demo data we first explain the most important features of the operationMLPA. The operation MLPA is the main operation for your analysis.
If you switch to this operation you won't see any entries because we have no result files loaded yet!
Manual for demo data SEQUENCE Pilot – module MLPA® 7
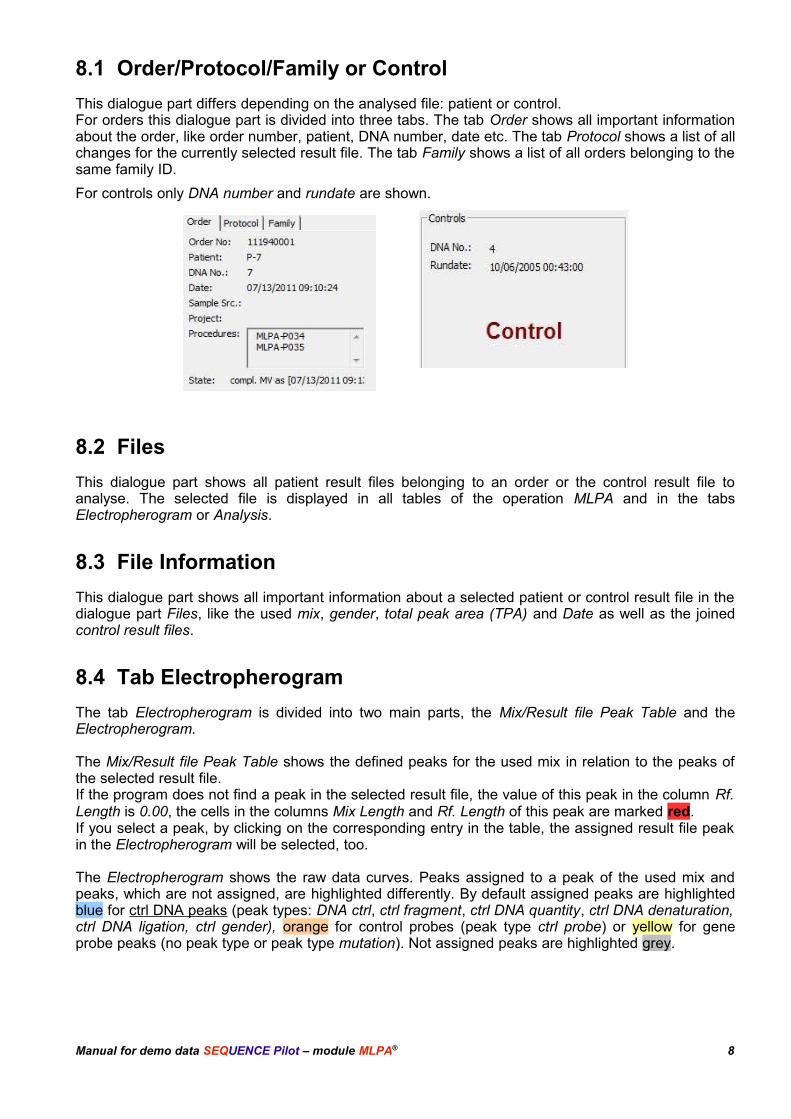
8.1 Order/Protocol/Family or Control
This dialogue part differs depending on the analysed file: patient or control.For orders this dialogue part is divided into three tabs. The tab Order shows all important informationabout the order, like order number, patient, DNA number, date etc. The tab Protocol shows a list of allchanges for the currently selected result file. The tab Family shows a list of all orders belonging to thesame family ID.
For controls only DNA number and rundate are shown.
8.2 Files
This dialogue part shows all patient result files belonging to an order or the control result file toanalyse. The selected file is displayed in all tables of the operation MLPA and in the tabsElectropherogram or Analysis.
8.3 File Information
This dialogue part shows all important information about a selected patient or control result file in thedialogue part Files, like the used mix, gender, total peak area (TPA) and Date as well as the joinedcontrol result files.
8.4 Tab Electropherogram
The tab Electropherogram is divided into two main parts, the Mix/Result file Peak Table and theElectropherogram.
The Mix/Result file Peak Table shows the defined peaks for the used mix in relation to the peaks ofthe selected result file.If the program does not find a peak in the selected result file, the value of this peak in the column Rf.Length is 0.00, the cells in the columns Mix Length and Rf. Length of this peak are marked red.If you select a peak, by clicking on the corresponding entry in the table, the assigned result file peakin the Electropherogram will be selected, too.
The Electropherogram shows the raw data curves. Peaks assigned to a peak of the used mix andpeaks, which are not assigned, are highlighted differently. By default assigned peaks are highlightedblue for ctrl DNA peaks (peak types: DNA ctrl, ctrl fragment, ctrl DNA quantity, ctrl DNA denaturation,ctrl DNA ligation, ctrl gender), orange for control probes (peak type ctrl probe) or yellow for geneprobe peaks (no peak type or peak type mutation). Not assigned peaks are highlighted grey.
Manual for demo data SEQUENCE Pilot – module MLPA® 8
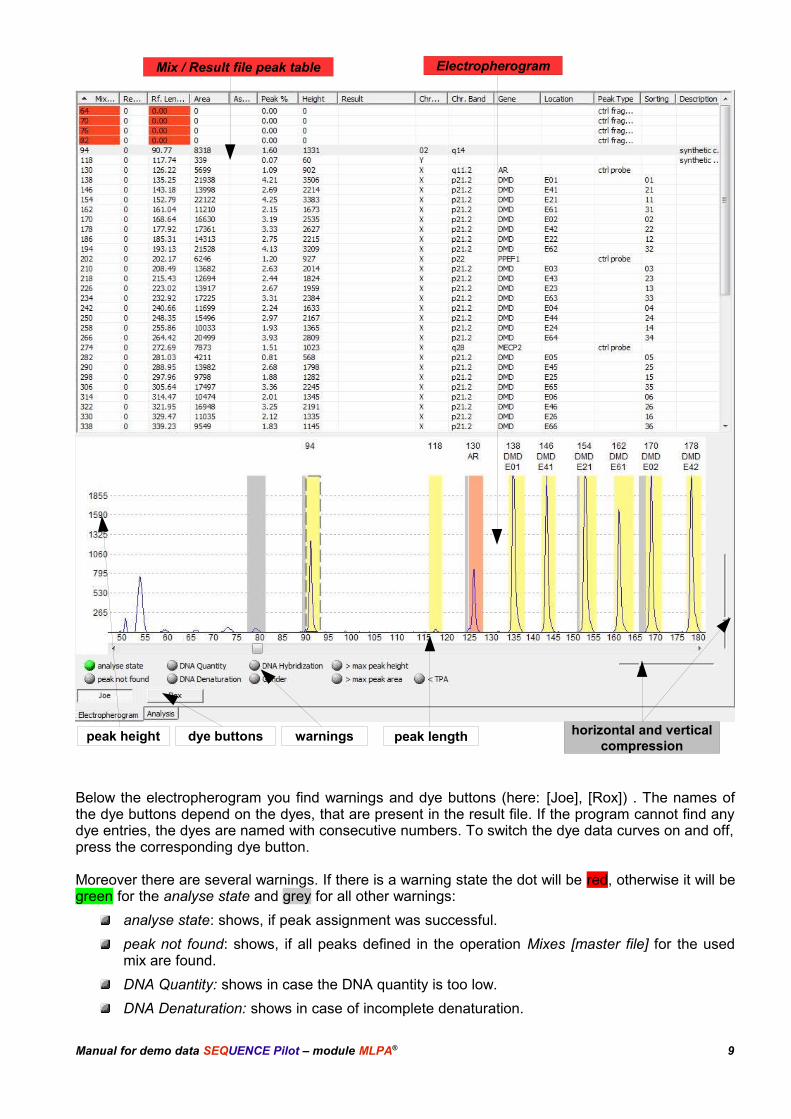
Below the electropherogram you find warnings and dye buttons (here: [Joe], [Rox]) . The names ofthe dye buttons depend on the dyes, that are present in the result file. If the program cannot find anydye entries, the dyes are named with consecutive numbers. To switch the dye data curves on and off,press the corresponding dye button.
Moreover there are several warnings. If there is a warning state the dot will be red, otherwise it will begreen for the analyse state and grey for all other warnings:
analyse state: shows, if peak assignment was successful.
peak not found: shows, if all peaks defined in the operation Mixes [master file] for the usedmix are found.
DNA Quantity: shows in case the DNA quantity is too low.
DNA Denaturation: shows in case of incomplete denaturation.
Manual for demo data SEQUENCE Pilot – module MLPA® 9
Mix / Result file peak table
dye buttons
Electropherogram
horizontal and vertical compression
peak lengthpeak height warnings

DNA Hybridisation: shows in case of incomplete hybridisation.
Gender: shows if the wrong gender is set. Calculations based on the peak types ctrl gender.
> max peak height: shows, if there are peaks that exceed the max. peak height defined in theoperation Mix Sequencer [master file].
> max peak area: shows, if there are peak areas of the assigned peaks which exceed themax peak area defined in the operation Mix Sequencer [master file].
< TPA (total peak area): shows, if the total peak area of all assigned peaks of a result file ishigher than the min total peak area defined in the operation Mix Sequencer [master file].
8.5 Tab Analysis
The tab Analysis is divided into two main parts, the Result table and the Analyse.
The Result table shows all peaks, defined in the selected analysis mode of the used mix. You will geta corresponding entry in the column Result if there is a deletion, duplication or multiple copies at a
Manual for demo data SEQUENCE Pilot – module MLPA® 10
Result table
warningsanalyse modes ratio RPA (relative peak area)
relative peak area of the patient result file
relative peak area of the control result fileswith standard deviation
regression
Analyse
limits horizontal and vertical compression
peak length
peak position. Moreover the result is mutation present or mutation absent if a MLPA kit that includesmutation analysis was used (peak type mutation defined in Mixes [master file]).
Result calculation:The ratio relative peak area is the relative peak area of the patient result file divided by the relativepeak area of the control result files. If this value is around 100 % the relative peak area of the patientis about the relative peak area of the control and there is probably no copy number change.Depending on your settings there will be a copy number change shown if the ratio relative peak areaexceeds or falls below a certain limit. The default settings for this limit are 75 % (indicates a deletion)and 125 % (indicates an insertion). A value above 175 % indicates multiple copies. Moreover there isthe result mutation present or mutation absent possible in the column Result if the peak typemutation was defined in Mixes [master file]. For the peak type mutation no copy number variationanalysis is performed. If the peak is present (peak must exceed the upper limit) the mutation ispresent, otherwise it is absent.
If you select an entry of the table, the corresponding position in the Analyse is selected, too.
The Analyse shows the results in the form of a histogram:
The upper histogram shows the relative control peak area as blue bars and the relativepatient peak area as green bars.
The lower histogram shows the ratio relative peak area as blue bars if it is within the limits andas dark blue bars if it exceeds or falls below the limits. The limits are indicated as red lines.
Below the Analyse warnings are shown.
If there is a warning state the dot will be red, otherwise it will be green for analyse state and grey for<> std. deviation:
analyse state: shows, if peak assignment was successful.
<> std. Deviation: shows, if the relative peak area (RPA) of the patient result files is betweenthe standard deviation of the corresponding control result files multiplied by the Std. deviationFactor defined in the operation Analysis Mode [master file].
Moreover the buttons [Regression On/Off] and [show Regression] are available. The regression isused to compensate the tailing off effect (decreasing peak height with an increasing time ( = fragmentlength)). By default the regression is activated, but it is switched off automatically in case:
no or only one ctrl probe peak(s) is/are present.
it was not successful (red warning dot).
The warning dot for the regression can be differently colored:
grey: The regression is switched off.
green: The regression was successful.
Red: The regression was not successful.
Below buttons are shown for all activated analysis modes which are defined in the for the used mix.You can switch to another analysis mode by pressing on the corresponding button.
8.6 Functions
This dialogue part comprises different functions to edit the orders or control result files.
Manual for demo data SEQUENCE Pilot – module MLPA® 11

[Previous] and [Next]: to jump to the previous or next file in your Worklist or Controllist.
[T.V.] and [M.V.]: to technical and medical validate your order or control result file.
[print...]: to print a report.
[Extras ->]: you can enter a comment or change the order state to repeat or cancelled.
[Protocol]: to open the protocol that shows all edits done in the current order.
Manual for demo data SEQUENCE Pilot – module MLPA® 12
9 Analysis of the Demo Data – Copy Number Variation
For the analysis it is best to use the following instructions:
First load all control result files. Check the control result files and technically validate them.This way all technically validated controls of the same run date are joined to patient ordersautomatically during loading of patient result files.
Then load all patient result files. Check if all control result files are joined to the orders. As wewill see you can join other control result files manually (Files / editing / control settings...).
9.1 Control result files
Before analysing our demo data, we first load, analyse and validate our controls.
9.1.1 Load MLPA control result files
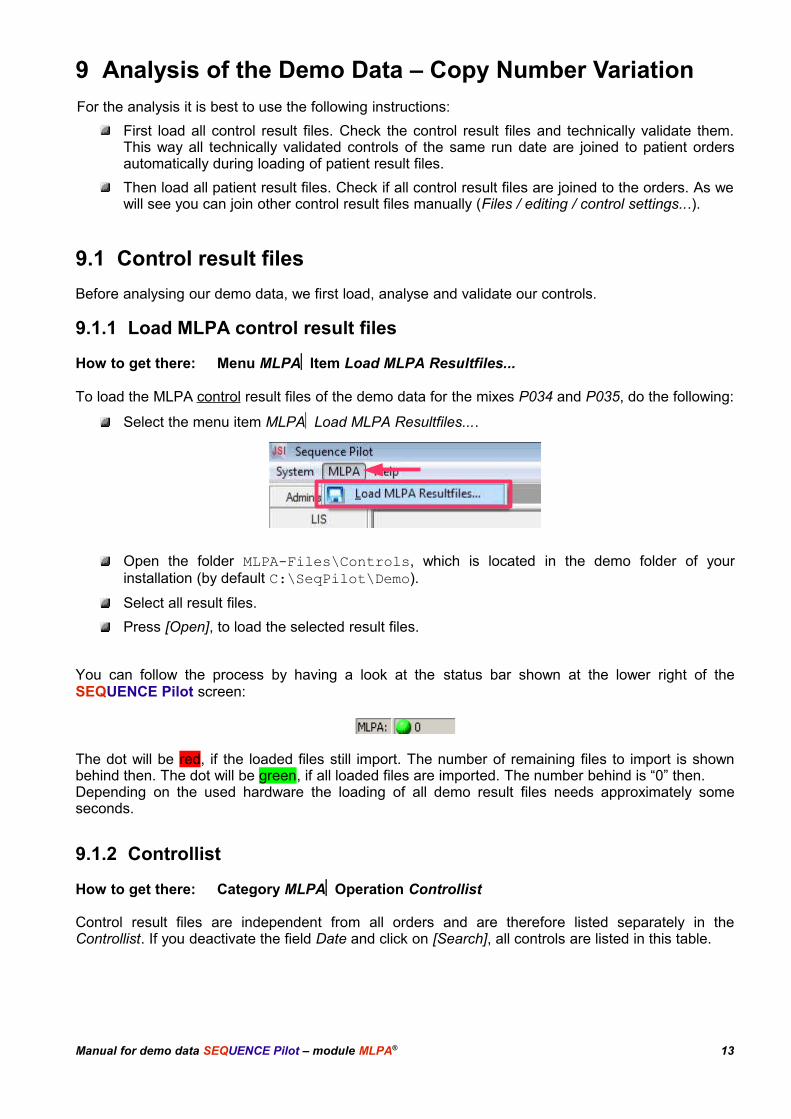
How to get there: Menu MLPAItem Load MLPA Resultfiles...
To load the MLPA control result files of the demo data for the mixes P034 and P035, do the following:
Select the menu item MLPALoad MLPA Resultfiles....
Open the folder MLPA-Files\Controls, which is located in the demo folder of yourinstallation (by default C:\SeqPilot\Demo).
Select all result files.
Press [Open], to load the selected result files.
You can follow the process by having a look at the status bar shown at the lower right of theSEQUENCE Pilot screen:
The dot will be red, if the loaded files still import. The number of remaining files to import is shownbehind then. The dot will be green, if all loaded files are imported. The number behind is “0” then.Depending on the used hardware the loading of all demo result files needs approximately someseconds.
9.1.2 Controllist
How to get there: Category MLPAOperation Controllist
Control result files are independent from all orders and are therefore listed separately in theControllist. If you deactivate the field Date and click on [Search], all controls are listed in this table.
Manual for demo data SEQUENCE Pilot – module MLPA® 13
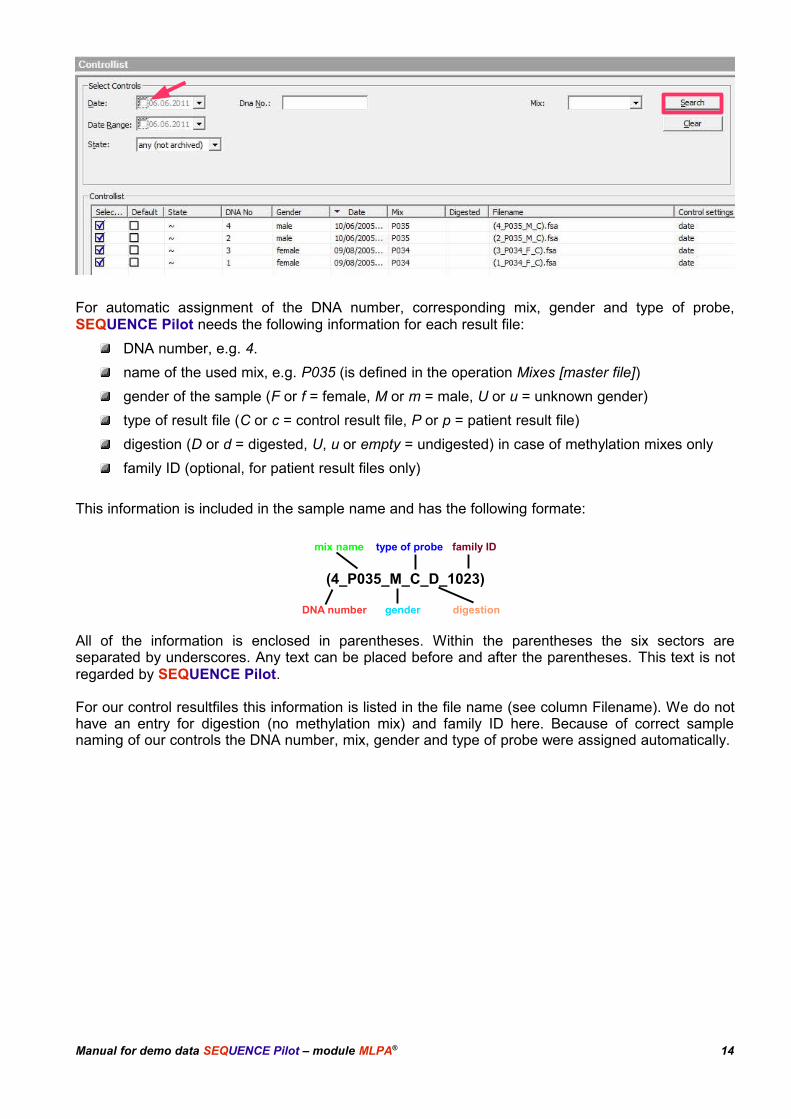
For automatic assignment of the DNA number, corresponding mix, gender and type of probe,SEQUENCE Pilot needs the following information for each result file:
DNA number, e.g. 4.
name of the used mix, e.g. P035 (is defined in the operation Mixes [master file])
gender of the sample (F or f = female, M or m = male, U or u = unknown gender)
type of result file (C or c = control result file, P or p = patient result file)
digestion (D or d = digested, U, u or empty = undigested) in case of methylation mixes only
family ID (optional, for patient result files only)
This information is included in the sample name and has the following formate:
mix name type of probe family ID
(4_P035_M_C_D_1023)
DNA number gender digestion
All of the information is enclosed in parentheses. Within the parentheses the six sectors areseparated by underscores. Any text can be placed before and after the parentheses. This text is notregarded by SEQUENCE Pilot.
For our control resultfiles this information is listed in the file name (see column Filename). We do nothave an entry for digestion (no methylation mix) and family ID here. Because of correct samplenaming of our controls the DNA number, mix, gender and type of probe were assigned automatically.
Manual for demo data SEQUENCE Pilot – module MLPA® 14
9.1.3 Operation MLPA - Analysis of the control result files
How to get there: Category MLPAOperation MLPA
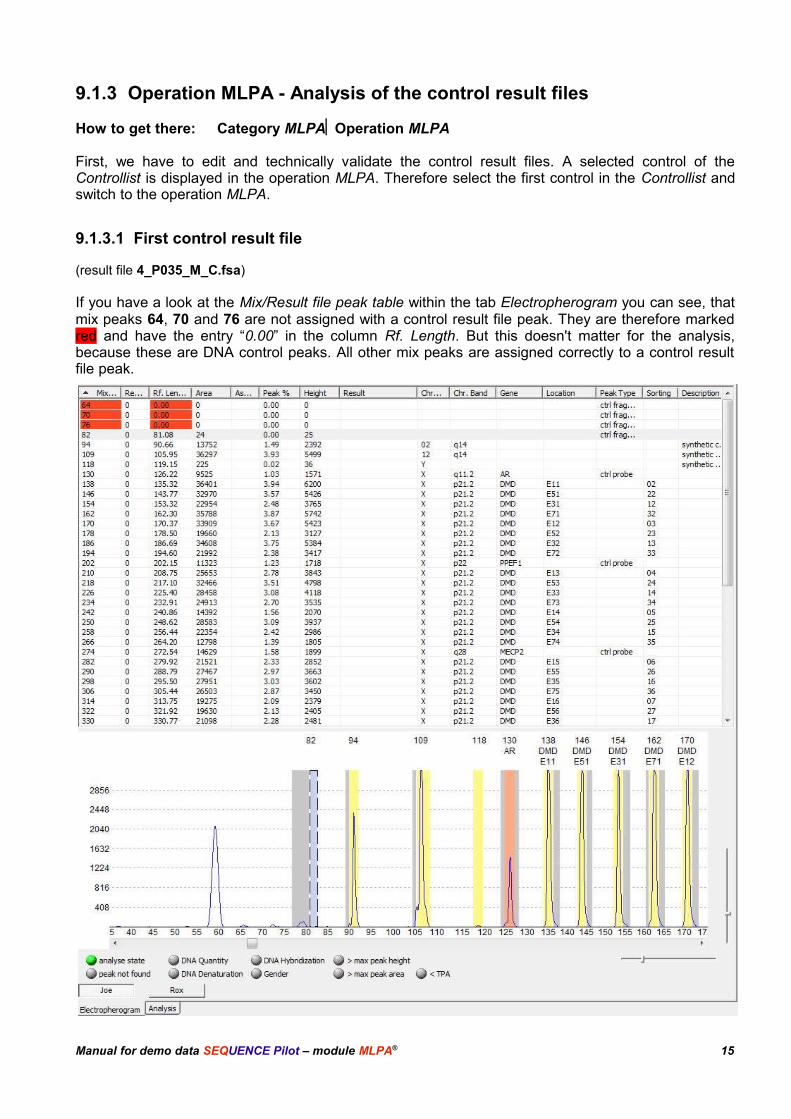
First, we have to edit and technically validate the control result files. A selected control of theControllist is displayed in the operation MLPA. Therefore select the first control in the Controllist andswitch to the operation MLPA.
9.1.3.1 First control result file
(result file 4_P035_M_C.fsa)
If you have a look at the Mix/Result file peak table within the tab Electropherogram you can see, thatmix peaks 64, 70 and 76 are not assigned with a control result file peak. They are therefore markedred and have the entry “0.00” in the column Rf. Length. But this doesn't matter for the analysis,because these are DNA control peaks. All other mix peaks are assigned correctly to a control resultfile peak.
Manual for demo data SEQUENCE Pilot – module MLPA® 15
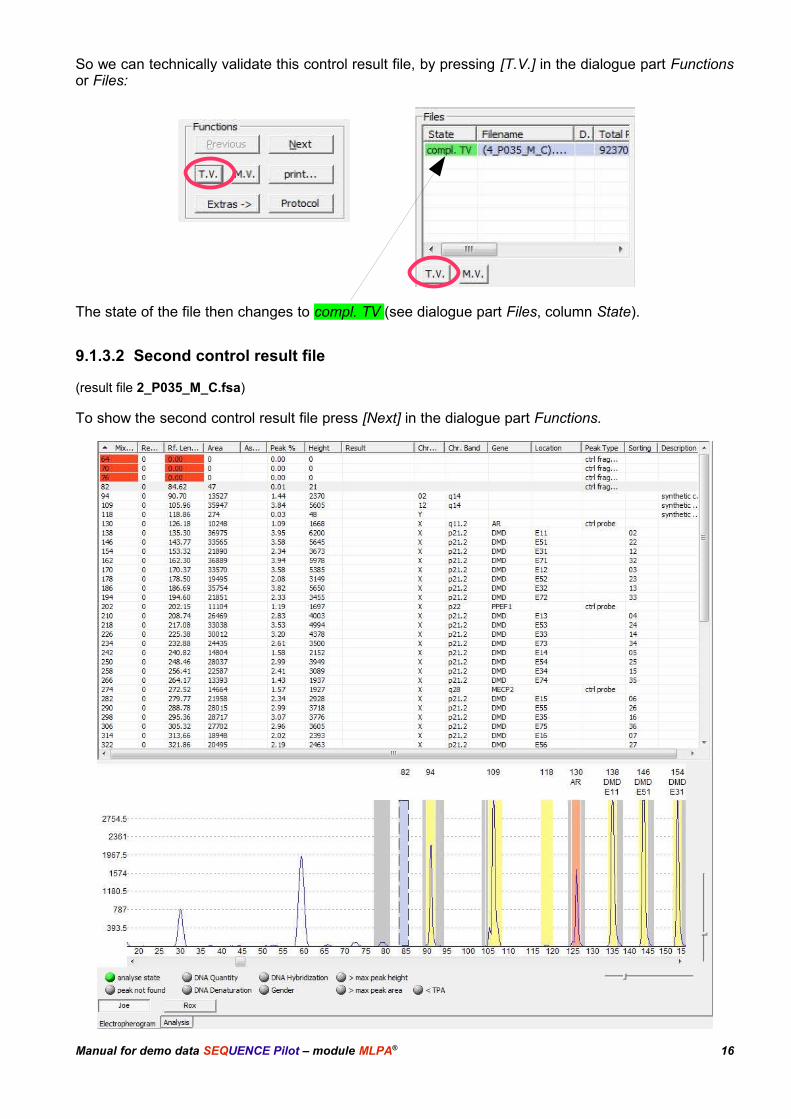
So we can technically validate this control result file, by pressing [T.V.] in the dialogue part Functionsor Files:
The state of the file then changes to compl. TV (see dialogue part Files, column State).
9.1.3.2 Second control result file
(result file 2_P035_M_C.fsa)
To show the second control result file press [Next] in the dialogue part Functions.
Manual for demo data SEQUENCE Pilot – module MLPA® 16
The Mix/Result file peak table shows, that mix peaks 64, 70 and 76 are not assigned with a controlresult file peak. But those are DNA control peaks again. All other mix peaks are assigned. So we cantechnically validate this control result file, by pressing [T.V.] as done for the first control.
9.1.3.3 Third control result file
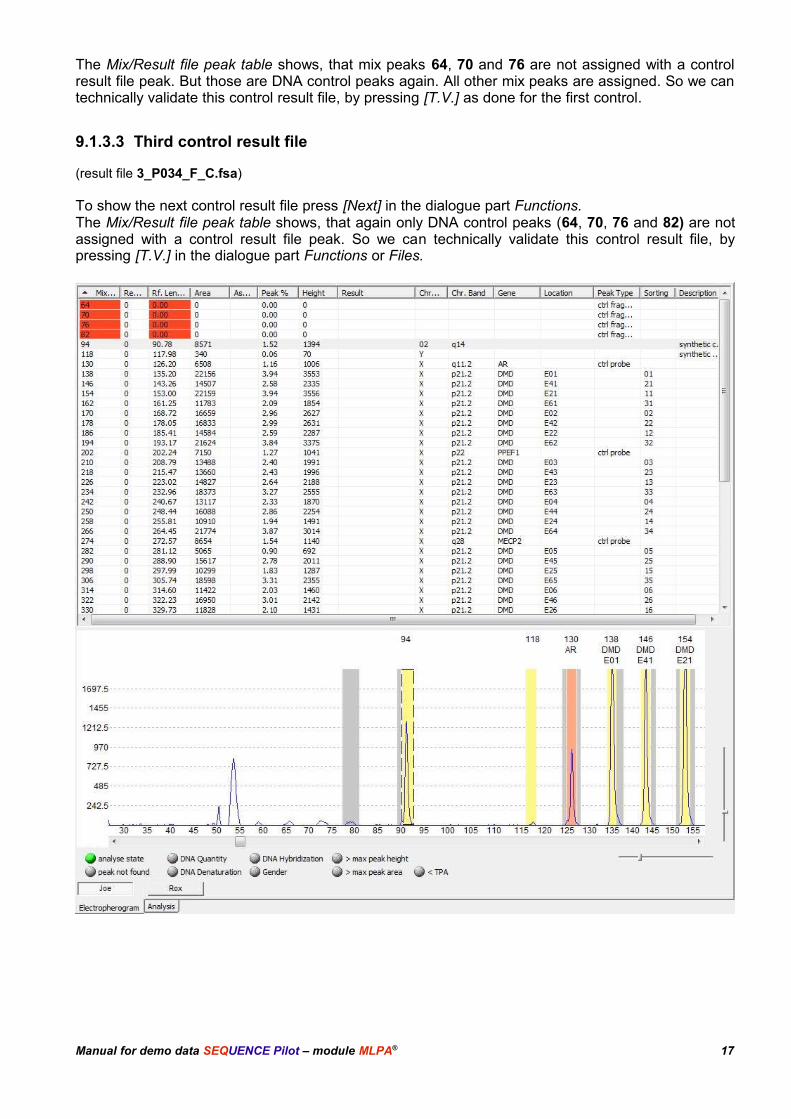
(result file 3_P034_F_C.fsa)
To show the next control result file press [Next] in the dialogue part Functions.The Mix/Result file peak table shows, that again only DNA control peaks (64, 70, 76 and 82) are notassigned with a control result file peak. So we can technically validate this control result file, bypressing [T.V.] in the dialogue part Functions or Files.
Manual for demo data SEQUENCE Pilot – module MLPA® 17
9.1.3.4 Fourth control result file
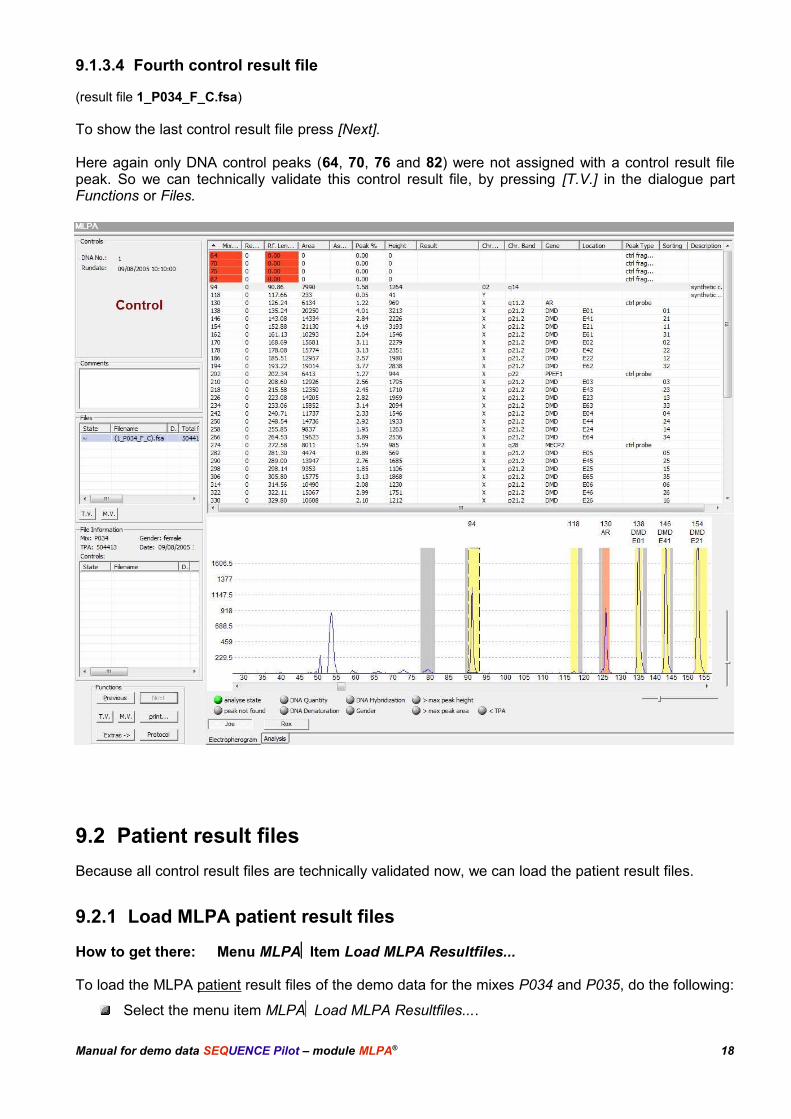
(result file 1_P034_F_C.fsa)
To show the last control result file press [Next].
Here again only DNA control peaks (64, 70, 76 and 82) were not assigned with a control result filepeak. So we can technically validate this control result file, by pressing [T.V.] in the dialogue partFunctions or Files.
9.2 Patient result files
Because all control result files are technically validated now, we can load the patient result files.
9.2.1 Load MLPA patient result files
How to get there: Menu MLPAItem Load MLPA Resultfiles...
To load the MLPA patient result files of the demo data for the mixes P034 and P035, do the following:
Select the menu item MLPALoad MLPA Resultfiles....
Manual for demo data SEQUENCE Pilot – module MLPA® 18
Open the folder MLPA-Files/Patients, which is located in the Demo-folder of yourSEQUENCE Pilot installation (by default this is C:\SeqPilot\Demo).
Select all result files.
Press [Open], to load the selected result files.
9.2.2 Joining
How to get there: Category MLPAOperation Joining
All loaded patient result files are joined to an order. An order therefore includes all result files havingthe same DNA number. By default the operation Joining lists all result files or orders loaded at the current date. (To showorders from other dates, deactivate Date/Select Orders and press [Search]).
Patient result files that could not be joined to an order or control result files that were not detected ascontrol are shown in the Upper Table. Patient result files that could be joined to orders and are readyfor analysis are shown in the Lower Table.
Upper Table Select Orders Lower Table
For automatic generation of orders the sample naming conventions have to be used, to ensure thatthe program gets all necessary data (see chapter 9.1.2). Only the DNA number is obligatory forautomatic joining of result files to an order. All files with the same DNA-number are automaticallyjoined to the same order. This is what happened to our patient result files of mixes the P034 andP035. They are ready for analysis.
The file name of our patient resultfiles is shown in the column Filename (e.g. 7_P034_F_P__1111).This file name is conform to the needed sample naming conventions and gives information aboutDNA number (7), the used mix (P034), the gender (F=female), the type of probe (P=patient) and thefamily ID (1111). The entry for digestion is empty (no methylation mix).
9.2.3 Worklist
How to get there: Category MLPAOperation Worklist
This operation lists all existing orders and their joined result files. The dialogue part Select Ordersand the Worklist Table are the same than Select Orders and the Lower Table in Joining.
Manual for demo data SEQUENCE Pilot – module MLPA® 19

9.2.4 Operation MLPA – Analysis of orders
How to get there: Category MLPAOperation MLPA
A selected order in the Lower Table of the operation Joining or in the Worklist is displayed in theoperation MLPA. Therefore select the first order in the Worklist and switch to the operation MLPA.
9.2.4.1 First order
(DNA number 7; result files 7_P034_M_P__1111.fsa and 7_P035_M_P__1111.fsa)
9.2.4.1.1 Control assignments
First of all we have to check, if we have to assign the control result files of the same mix to the patientresult files. Technically validated control result files of the same date (and mix) are joined to ordersautomatically during loading of patient result files. That is why we loaded and validated our controlsbefore loading our patient result files. In our demo data, some controls of the same mix are not of thesame date as the patient result files. We have to assign those manually.
Therefore select the first patient result file in the dialogue part Files. The dialogue part FileInformation shows that two control result files are assigned.
Now we check if there are more control result files which can be assigned (of the same mix but not ofthe same date). Therefore right-click the first patient result file in the dialogue part Files and selectthe item editing>control settings... from the context menu.
Manual for demo data SEQUENCE Pilot – module MLPA® 20
Control Settings
File information
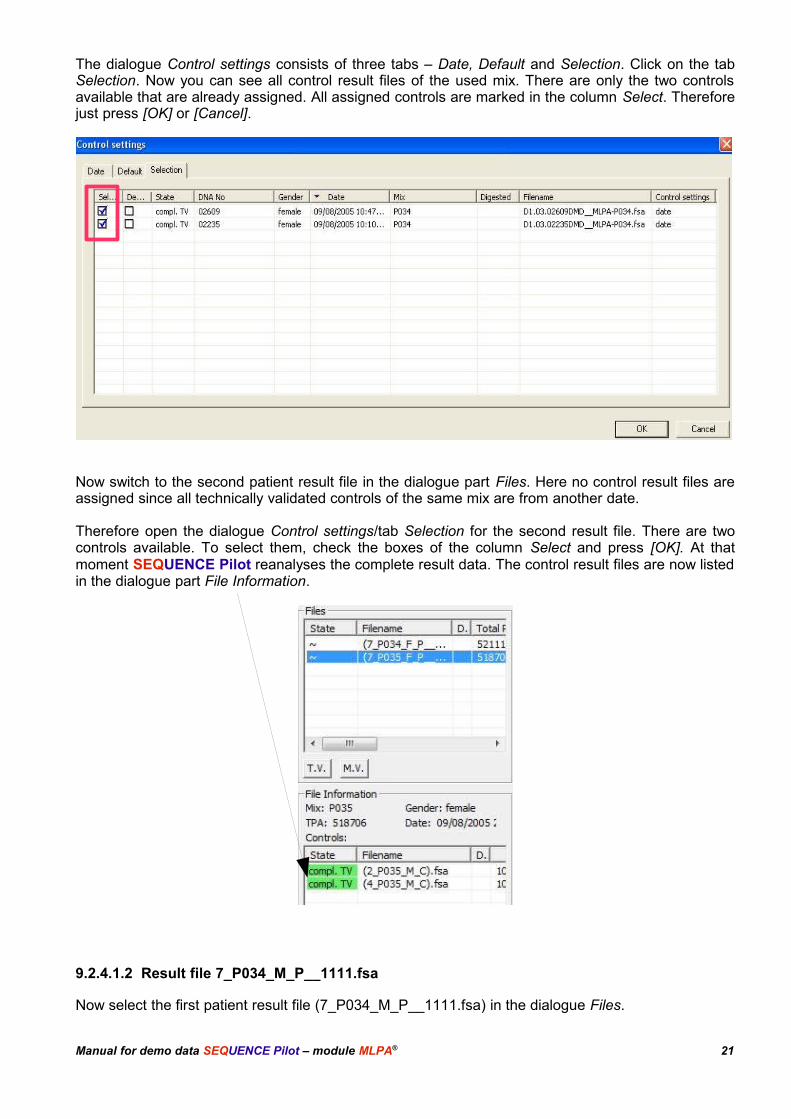
The dialogue Control settings consists of three tabs – Date, Default and Selection. Click on the tabSelection. Now you can see all control result files of the used mix. There are only the two controlsavailable that are already assigned. All assigned controls are marked in the column Select. Thereforejust press [OK] or [Cancel].
Now switch to the second patient result file in the dialogue part Files. Here no control result files areassigned since all technically validated controls of the same mix are from another date.
Therefore open the dialogue Control settings/tab Selection for the second result file. There are twocontrols available. To select them, check the boxes of the column Select and press [OK]. At thatmoment SEQUENCE Pilot reanalyses the complete result data. The control result files are now listedin the dialogue part File Information.
9.2.4.1.2 Result file 7_P034_M_P__1111.fsa
Now select the first patient result file (7_P034_M_P__1111.fsa) in the dialogue Files.
Manual for demo data SEQUENCE Pilot – module MLPA® 21
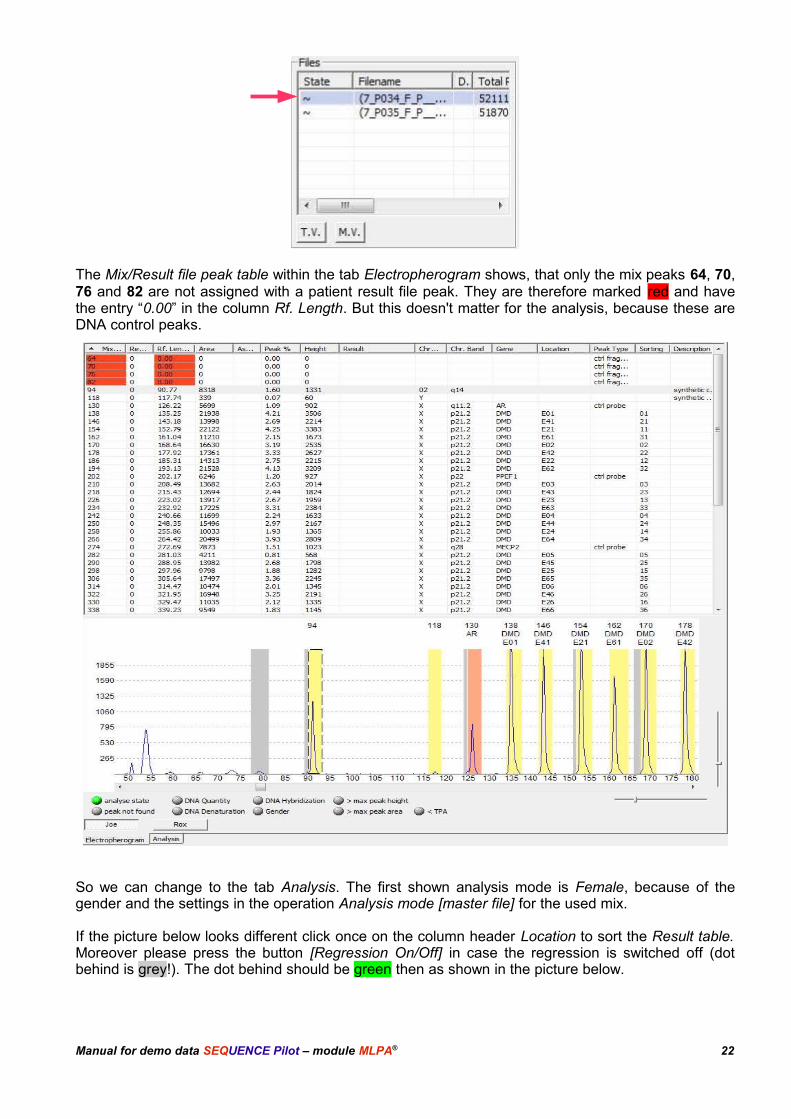
The Mix/Result file peak table within the tab Electropherogram shows, that only the mix peaks 64, 70,76 and 82 are not assigned with a patient result file peak. They are therefore marked red and havethe entry “0.00” in the column Rf. Length. But this doesn't matter for the analysis, because these areDNA control peaks.
So we can change to the tab Analysis. The first shown analysis mode is Female, because of thegender and the settings in the operation Analysis mode [master file] for the used mix.
If the picture below looks different click once on the column header Location to sort the Result table.Moreover please press the button [Regression On/Off] in case the regression is switched off (dotbehind is grey!). The dot behind should be green then as shown in the picture below.
Manual for demo data SEQUENCE Pilot – module MLPA® 22
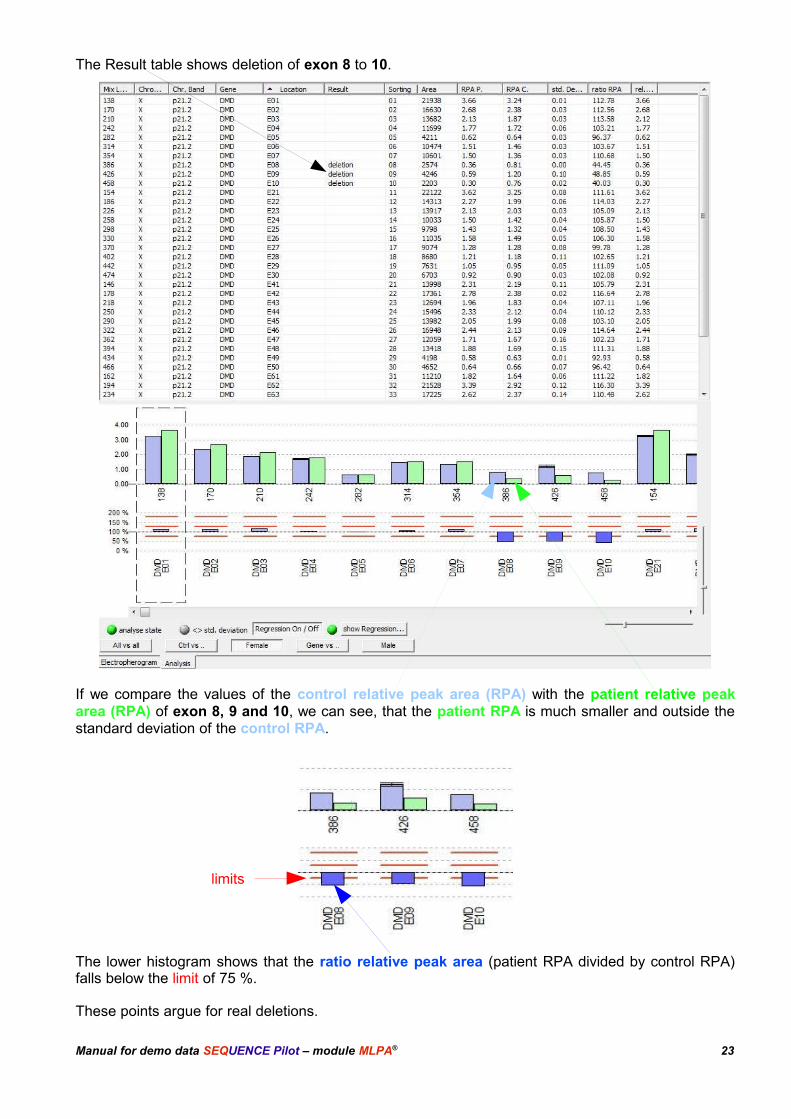
The Result table shows deletion of exon 8 to 10.
If we compare the values of the control relative peak area (RPA) with the patient relative peakarea (RPA) of exon 8, 9 and 10, we can see, that the patient RPA is much smaller and outside thestandard deviation of the control RPA.
The lower histogram shows that the ratio relative peak area (patient RPA divided by control RPA)falls below the limit of 75 %.
These points argue for real deletions.
Manual for demo data SEQUENCE Pilot – module MLPA® 23
limits
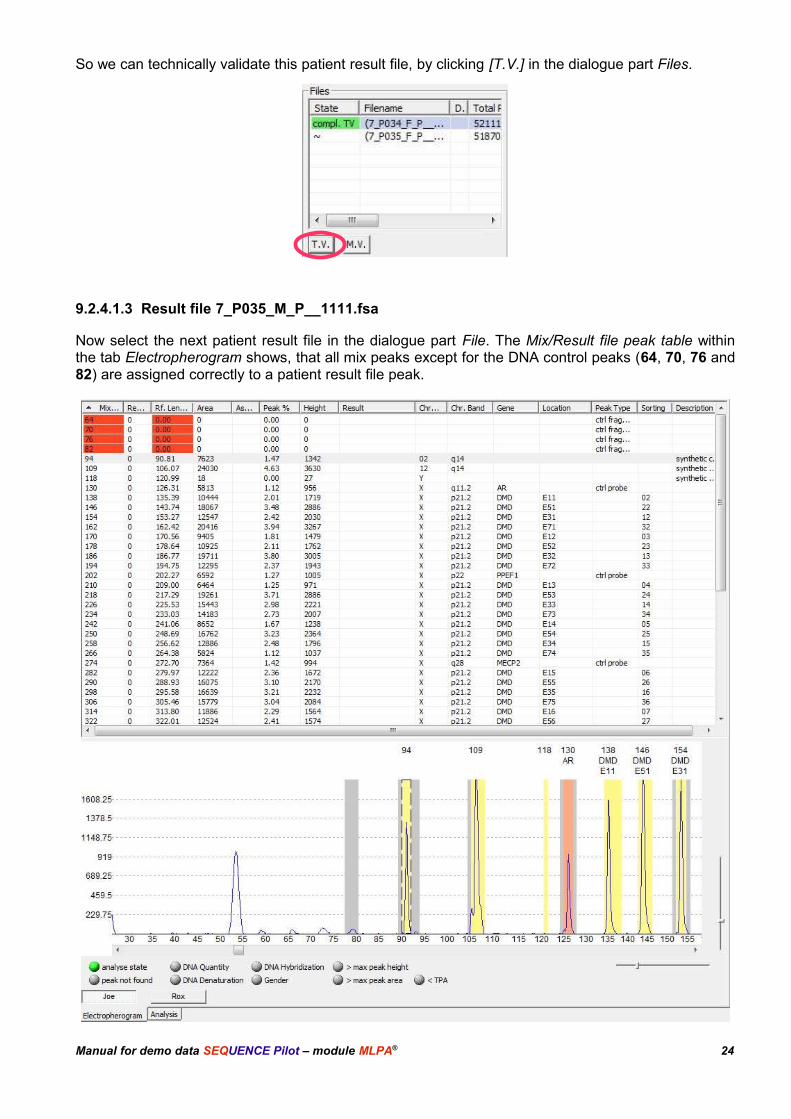
So we can technically validate this patient result file, by clicking [T.V.] in the dialogue part Files.
9.2.4.1.3 Result file 7_P035_M_P__1111.fsa
Now select the next patient result file in the dialogue part File. The Mix/Result file peak table withinthe tab Electropherogram shows, that all mix peaks except for the DNA control peaks (64, 70, 76 and82) are assigned correctly to a patient result file peak.
Manual for demo data SEQUENCE Pilot – module MLPA® 24
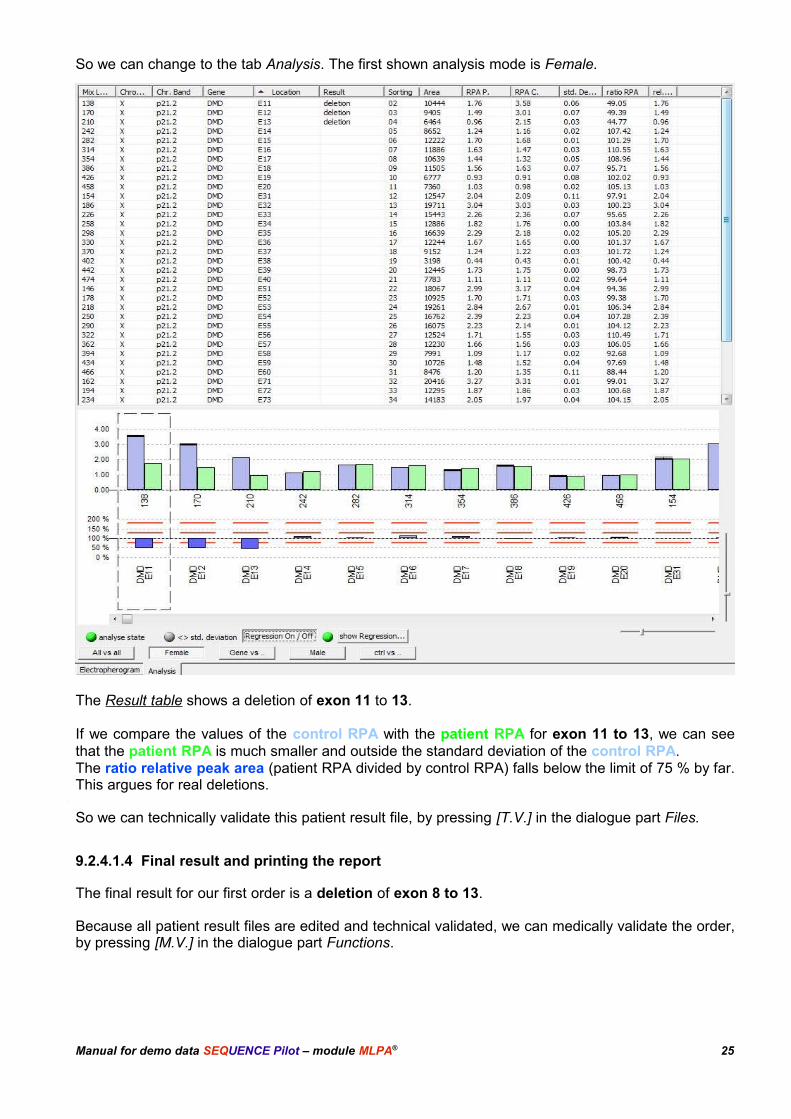
So we can change to the tab Analysis. The first shown analysis mode is Female.
The Result table shows a deletion of exon 11 to 13.
If we compare the values of the control RPA with the patient RPA for exon 11 to 13, we can seethat the patient RPA is much smaller and outside the standard deviation of the control RPA.The ratio relative peak area (patient RPA divided by control RPA) falls below the limit of 75 % by far.This argues for real deletions.
So we can technically validate this patient result file, by pressing [T.V.] in the dialogue part Files.
9.2.4.1.4 Final result and printing the report
The final result for our first order is a deletion of exon 8 to 13.
Because all patient result files are edited and technical validated, we can medically validate the order,by pressing [M.V.] in the dialogue part Functions.
Manual for demo data SEQUENCE Pilot – module MLPA® 25
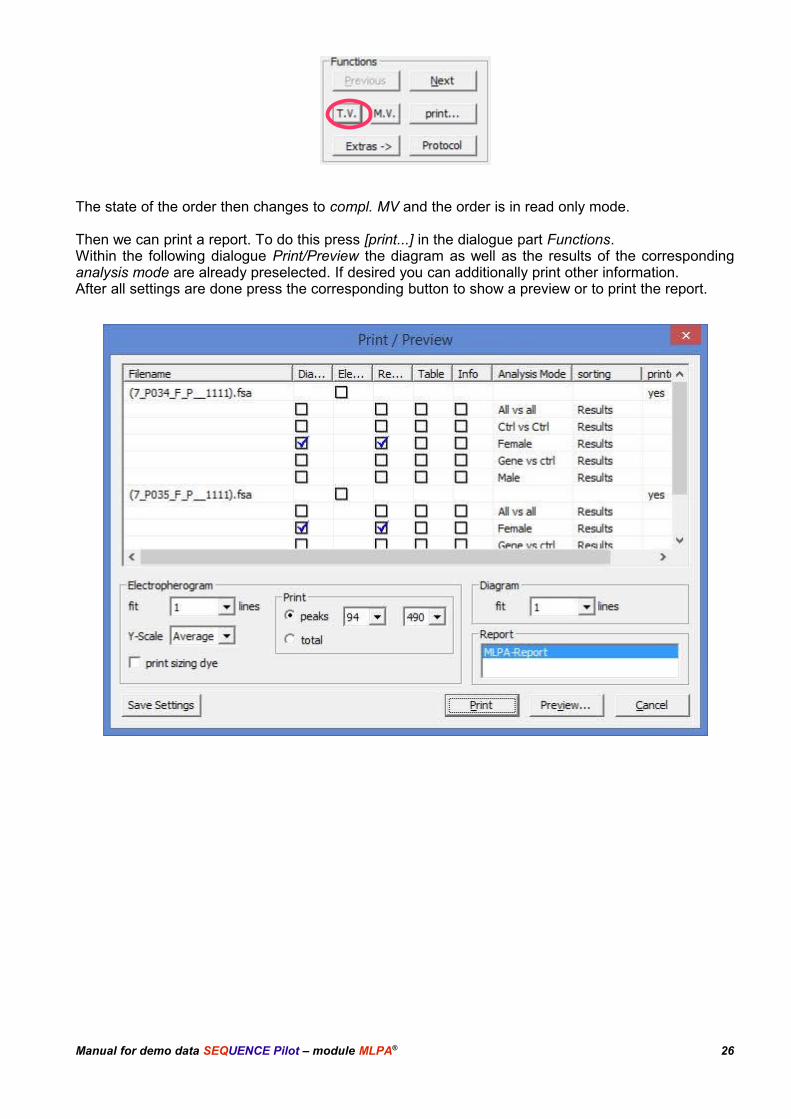
The state of the order then changes to compl. MV and the order is in read only mode.
Then we can print a report. To do this press [print...] in the dialogue part Functions. Within the following dialogue Print/Preview the diagram as well as the results of the correspondinganalysis mode are already preselected. If desired you can additionally print other information.After all settings are done press the corresponding button to show a preview or to print the report.
Manual for demo data SEQUENCE Pilot – module MLPA® 26
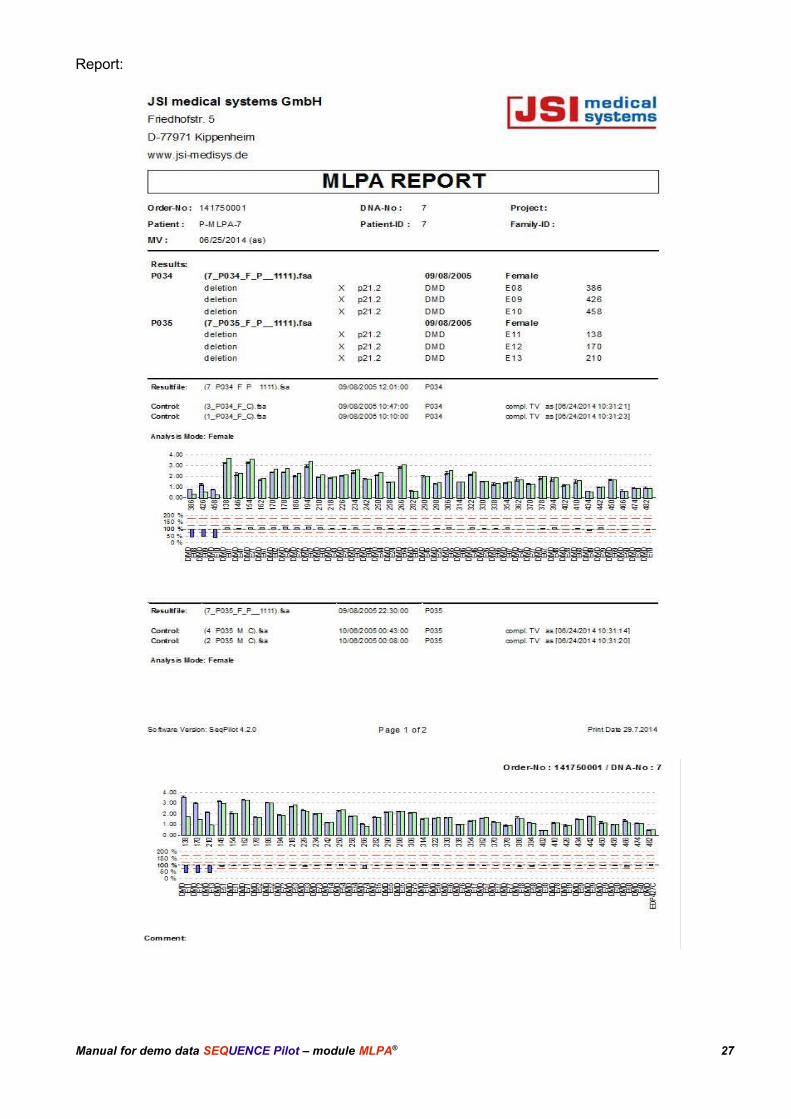
Report:
Manual for demo data SEQUENCE Pilot – module MLPA® 27
9.2.4.2 Second order
(DNA number 8; result files 8_P034_M_P__1111.fsa and 8_P035_M_P__1111.fsa )
To show the second order press [Next] in the dialogue part Functions.
9.2.4.2.1 Control assignments
First of all we have to check, if the corresponding control result files are assigned. For the first patientresult file no controls are assigned. Therefore right-click the file in the dialogue part Files and selectediting>control settings.... Now click on the tab Selection to see all technical validated control resultfiles of the used mix. Select these control result files, by checking the column Select and press [OK].
For the second patient result file the controls are assigned already.
9.2.4.2.2 Result file 8_P034_M_P__1111.fsa
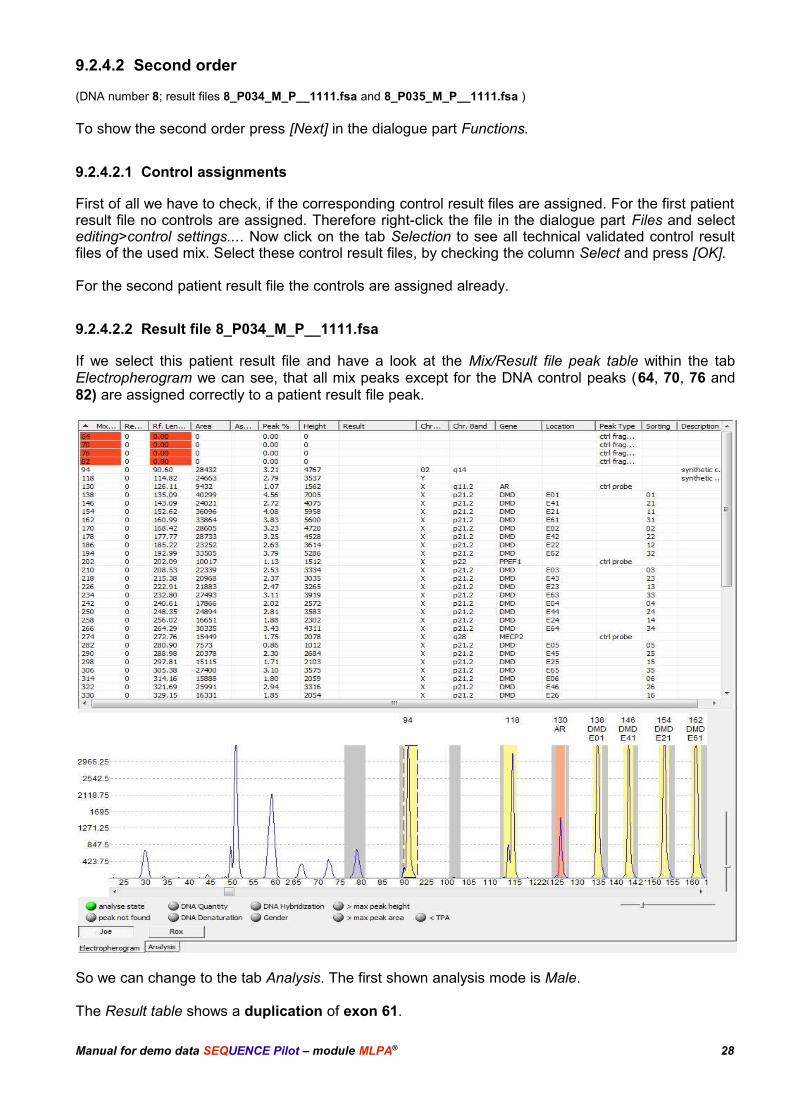
If we select this patient result file and have a look at the Mix/Result file peak table within the tabElectropherogram we can see, that all mix peaks except for the DNA control peaks (64, 70, 76 and82) are assigned correctly to a patient result file peak.
So we can change to the tab Analysis. The first shown analysis mode is Male.
The Result table shows a duplication of exon 61.
Manual for demo data SEQUENCE Pilot – module MLPA® 28
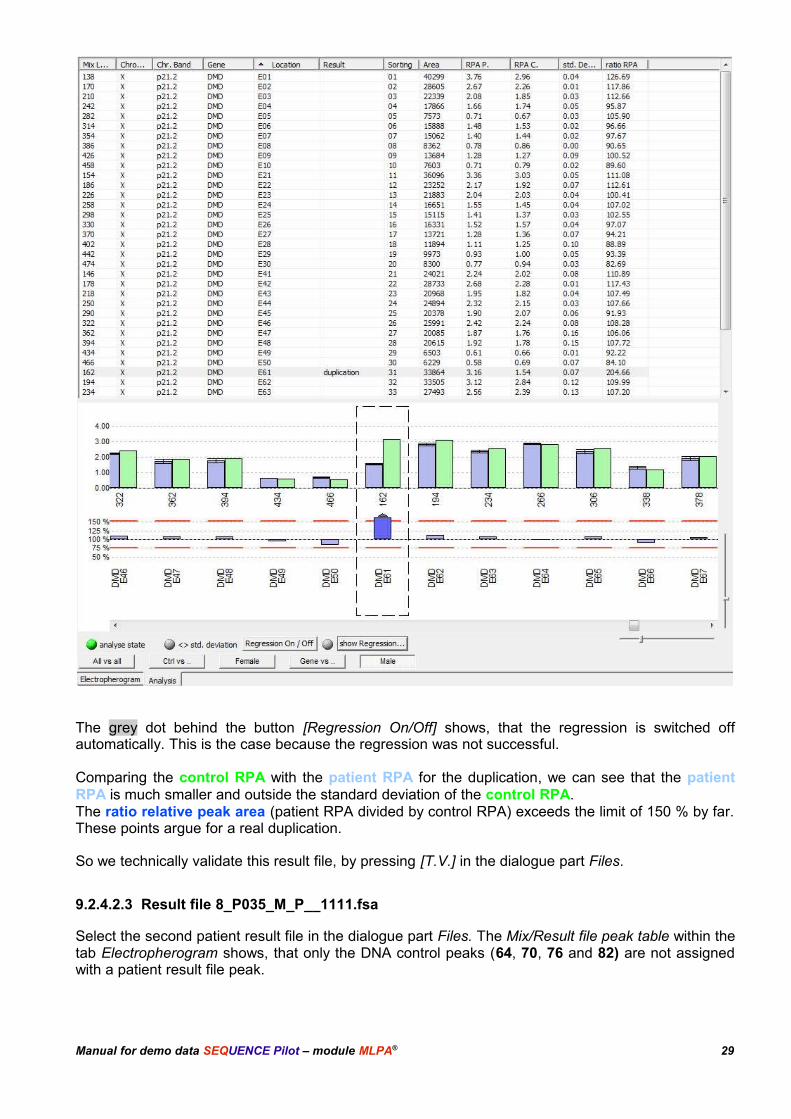
The grey dot behind the button [Regression On/Off] shows, that the regression is switched offautomatically. This is the case because the regression was not successful.
Comparing the control RPA with the patient RPA for the duplication, we can see that the patientRPA is much smaller and outside the standard deviation of the control RPA.The ratio relative peak area (patient RPA divided by control RPA) exceeds the limit of 150 % by far.These points argue for a real duplication.
So we technically validate this result file, by pressing [T.V.] in the dialogue part Files.
9.2.4.2.3 Result file 8_P035_M_P__1111.fsa
Select the second patient result file in the dialogue part Files. The Mix/Result file peak table within thetab Electropherogram shows, that only the DNA control peaks (64, 70, 76 and 82) are not assignedwith a patient result file peak.
Manual for demo data SEQUENCE Pilot – module MLPA® 29
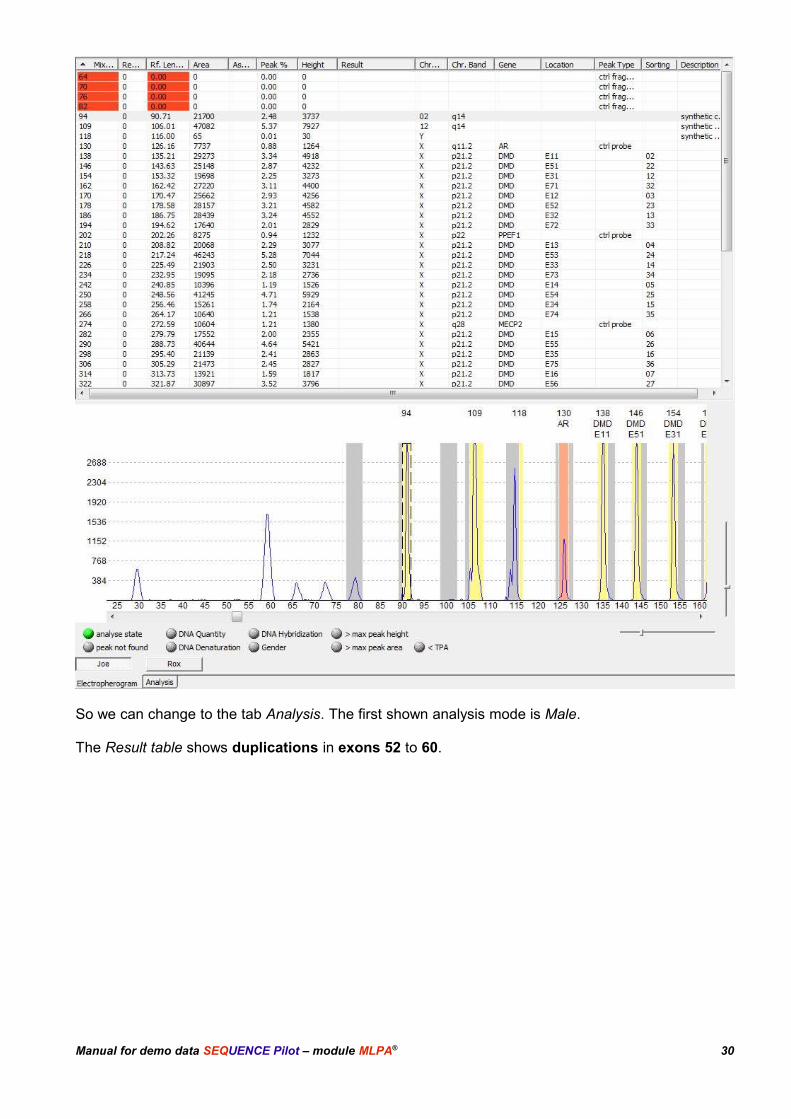
So we can change to the tab Analysis. The first shown analysis mode is Male.
The Result table shows duplications in exons 52 to 60.
Manual for demo data SEQUENCE Pilot – module MLPA® 30
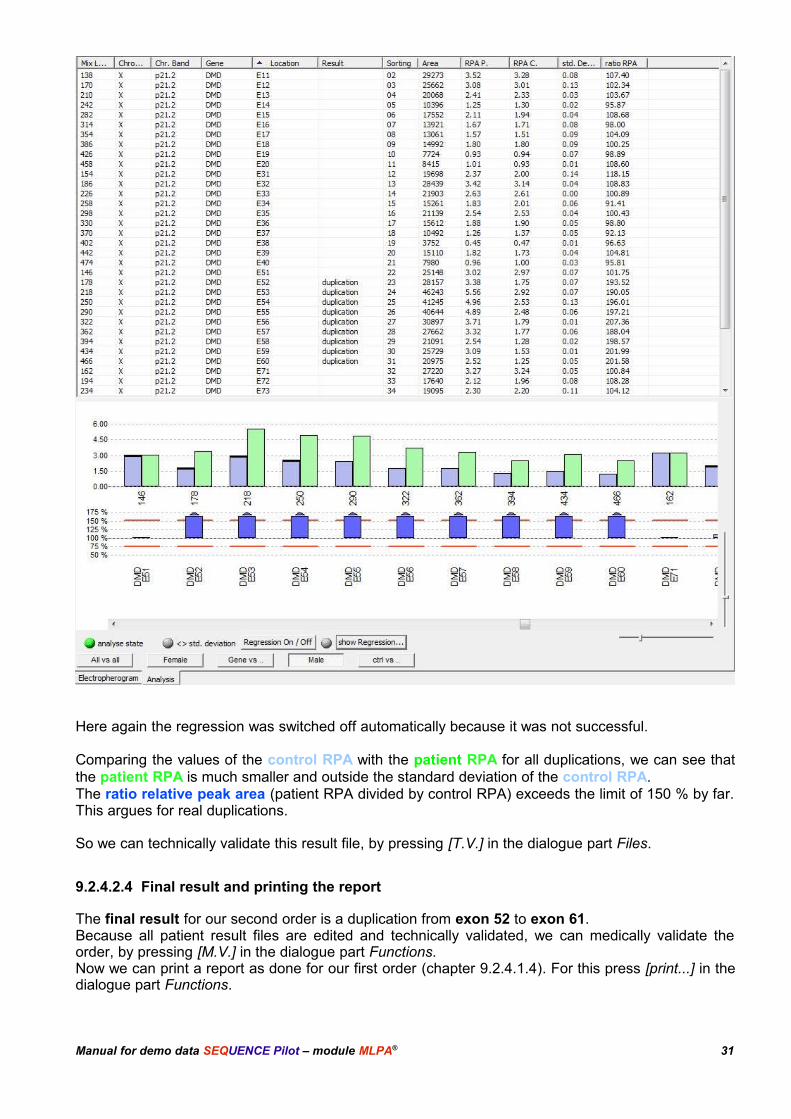
Here again the regression was switched off automatically because it was not successful.
Comparing the values of the control RPA with the patient RPA for all duplications, we can see thatthe patient RPA is much smaller and outside the standard deviation of the control RPA.The ratio relative peak area (patient RPA divided by control RPA) exceeds the limit of 150 % by far.This argues for real duplications.
So we can technically validate this result file, by pressing [T.V.] in the dialogue part Files.
9.2.4.2.4 Final result and printing the report
The final result for our second order is a duplication from exon 52 to exon 61.Because all patient result files are edited and technically validated, we can medically validate theorder, by pressing [M.V.] in the dialogue part Functions.Now we can print a report as done for our first order (chapter 9.2.4.1.4). For this press [print...] in thedialogue part Functions.
Manual for demo data SEQUENCE Pilot – module MLPA® 31
9.2.4.3 Third order
(DNA number 01743; result files 9_P034_F_P__1111.fsa and 9_P035_F_P__1111.fsa)
To show the third order press [Next] in the dialogue part Functions.
9.2.4.3.1 Control assignments
First of all we have to check if the corresponding control result files are assigned as done before. Thecontrols for the first result file are already assigned. The controls for the second patient result file have to be assigned manually. Therefore right-click thepatient result file in the dialogue part Files and select editing>control settings.... Then switch to thetab Selection and select both control result files, by checking the column Select. Press [OK].
9.2.4.3.2 Result file 9_P034_F_P__1111.fsa
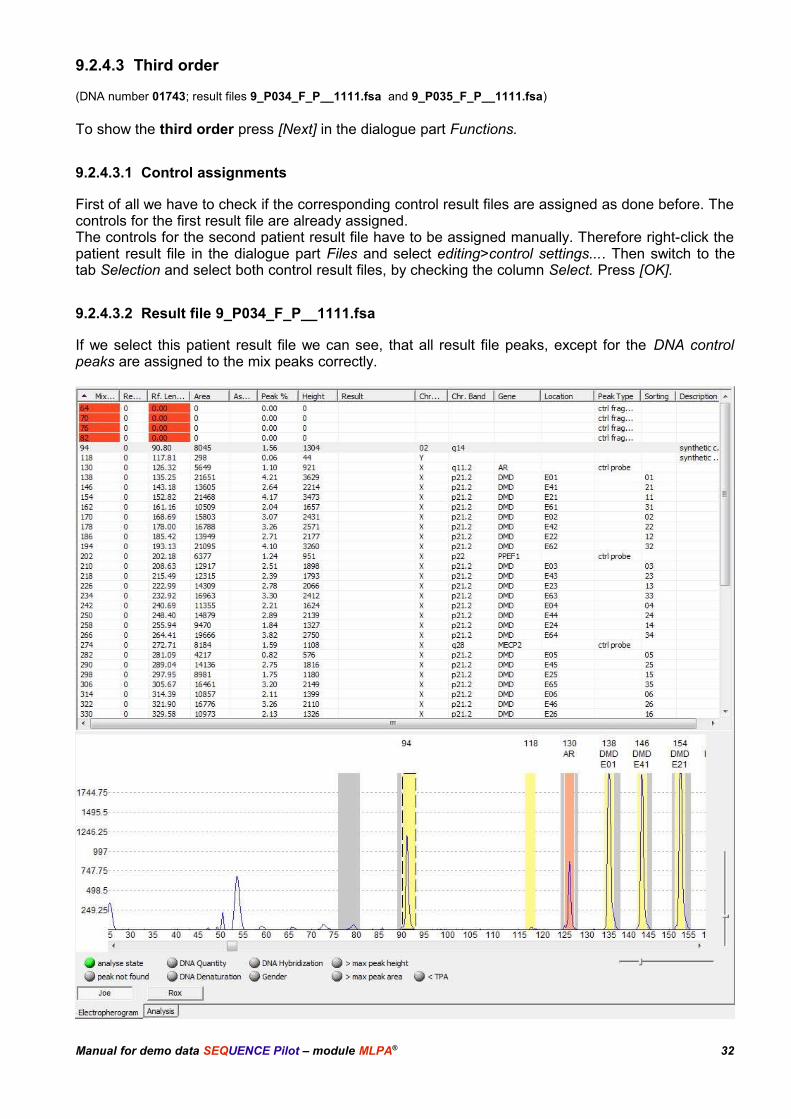
If we select this patient result file we can see, that all result file peaks, except for the DNA controlpeaks are assigned to the mix peaks correctly.
Manual for demo data SEQUENCE Pilot – module MLPA® 32
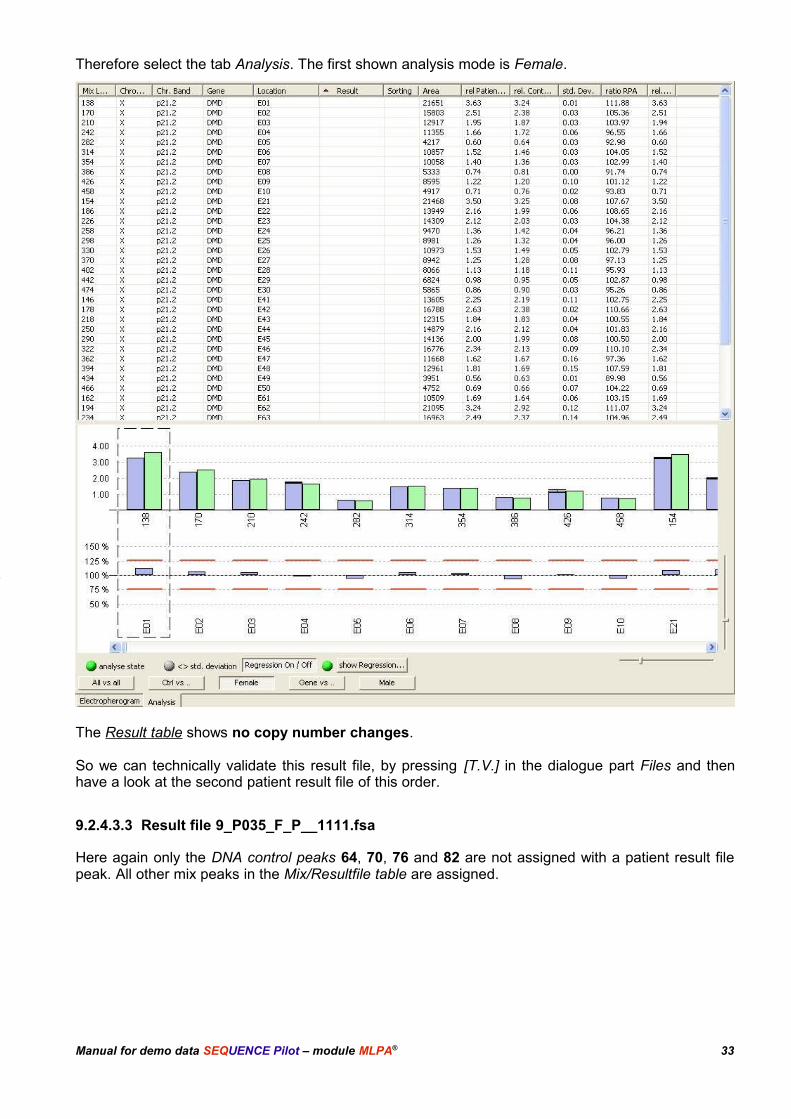
Therefore select the tab Analysis. The first shown analysis mode is Female.
The Result table shows no copy number changes.
So we can technically validate this result file, by pressing [T.V.] in the dialogue part Files and thenhave a look at the second patient result file of this order.
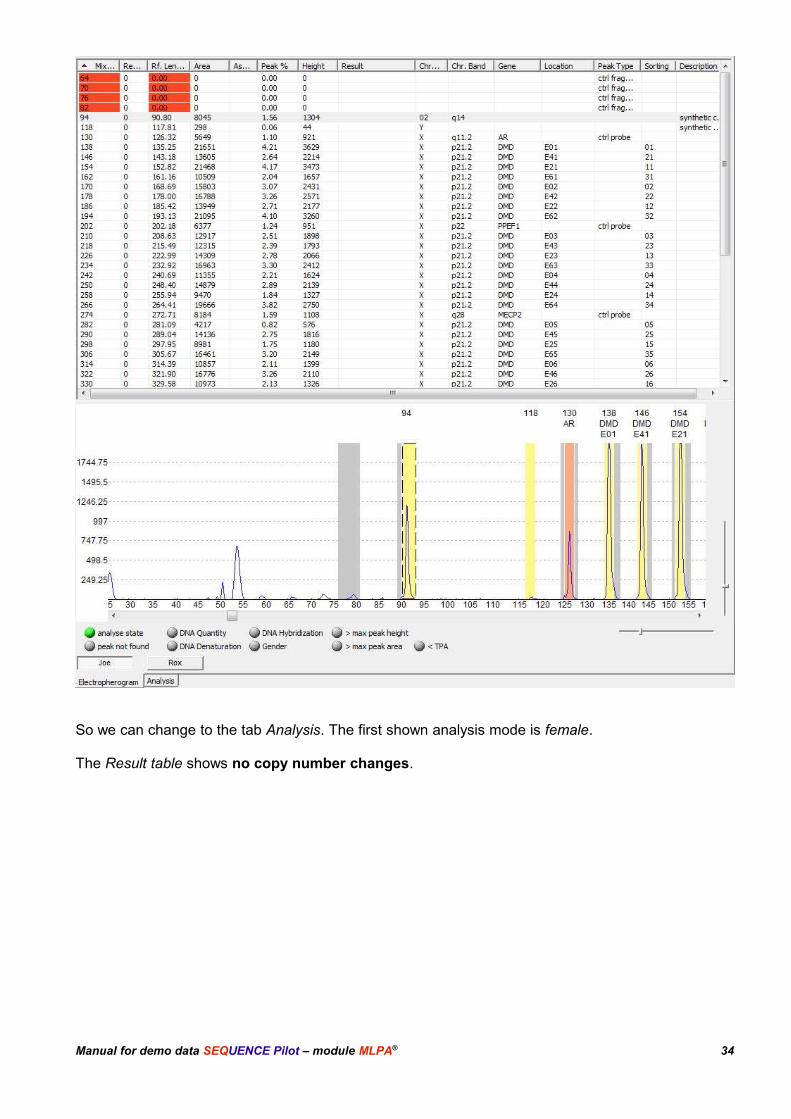
9.2.4.3.3 Result file 9_P035_F_P__1111.fsa
Here again only the DNA control peaks 64, 70, 76 and 82 are not assigned with a patient result filepeak. All other mix peaks in the Mix/Resultfile table are assigned.
Manual for demo data SEQUENCE Pilot – module MLPA® 33
So we can change to the tab Analysis. The first shown analysis mode is female.
The Result table shows no copy number changes.
Manual for demo data SEQUENCE Pilot – module MLPA® 34
So we can technically validate this result file, by pressing [T.V.] in the dialogue part Files.
9.2.4.3.4 Final result and printing of a report
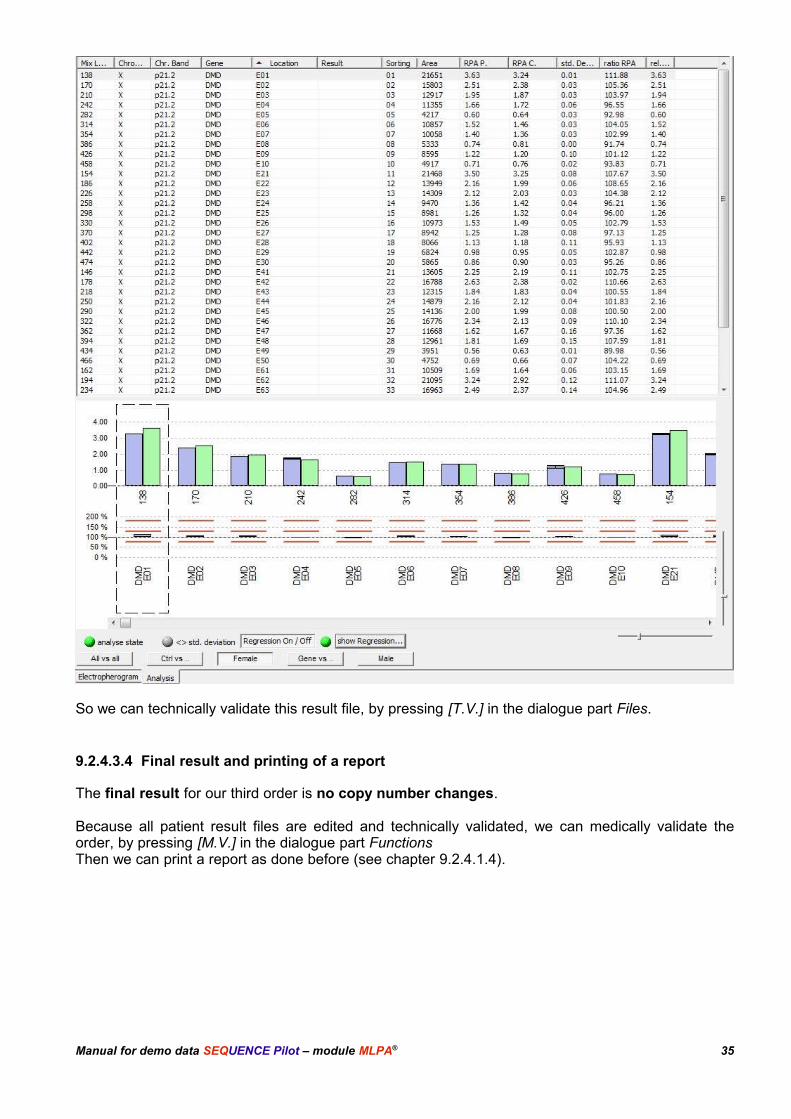
The final result for our third order is no copy number changes.
Because all patient result files are edited and technically validated, we can medically validate theorder, by pressing [M.V.] in the dialogue part FunctionsThen we can print a report as done before (see chapter 9.2.4.1.4).
Manual for demo data SEQUENCE Pilot – module MLPA® 35
10 How to make modifications
To make modifications in our demo data you have to remove the state compl MV by clicking [MV] inthe dialogue part Functions again.
10.1 Manual peak assignments
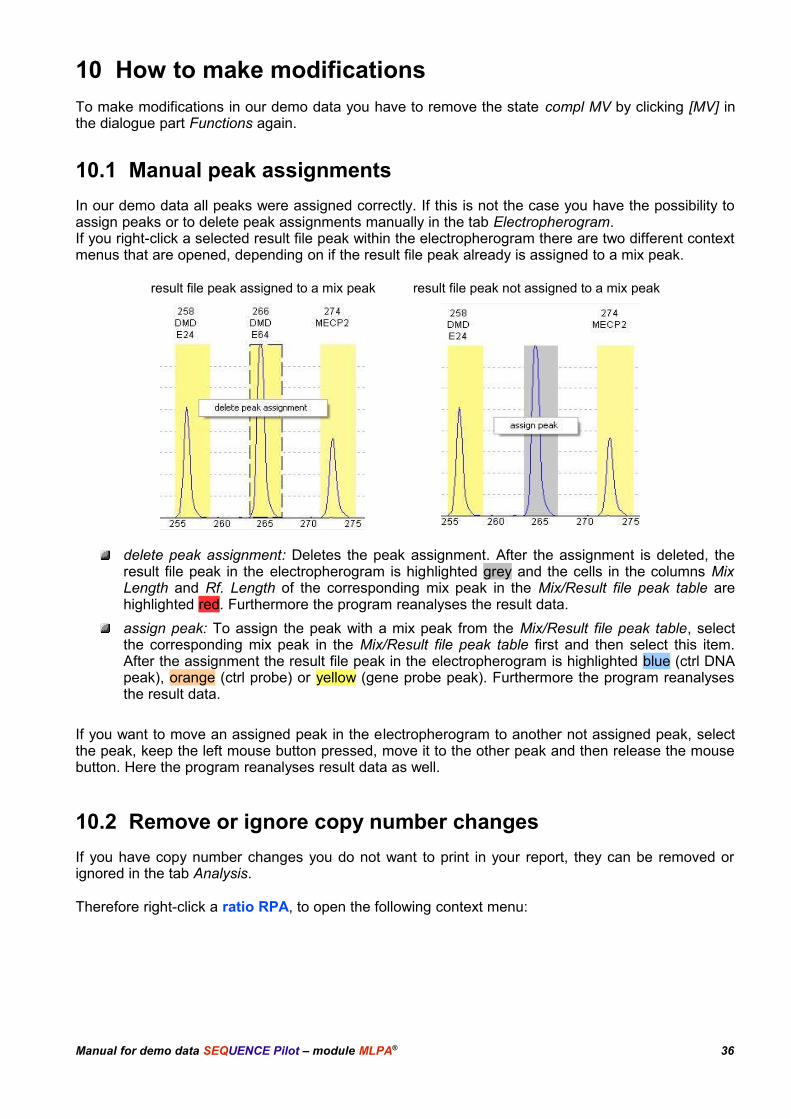
In our demo data all peaks were assigned correctly. If this is not the case you have the possibility toassign peaks or to delete peak assignments manually in the tab Electropherogram.If you right-click a selected result file peak within the electropherogram there are two different contextmenus that are opened, depending on if the result file peak already is assigned to a mix peak.
result file peak assigned to a mix peak result file peak not assigned to a mix peak
delete peak assignment: Deletes the peak assignment. After the assignment is deleted, theresult file peak in the electropherogram is highlighted grey and the cells in the columns MixLength and Rf. Length of the corresponding mix peak in the Mix/Result file peak table arehighlighted red. Furthermore the program reanalyses the result data.
assign peak: To assign the peak with a mix peak from the Mix/Result file peak table, selectthe corresponding mix peak in the Mix/Result file peak table first and then select this item.After the assignment the result file peak in the electropherogram is highlighted blue (ctrl DNApeak), orange (ctrl probe) or yellow (gene probe peak). Furthermore the program reanalysesthe result data.
If you want to move an assigned peak in the electropherogram to another not assigned peak, selectthe peak, keep the left mouse button pressed, move it to the other peak and then release the mousebutton. Here the program reanalyses result data as well.
10.2 Remove or ignore copy number changes
If you have copy number changes you do not want to print in your report, they can be removed orignored in the tab Analysis.
Therefore right-click a ratio RPA, to open the following context menu:
Manual for demo data SEQUENCE Pilot – module MLPA® 36

set limit value selected peak: Changes the limits of a selected peak. If you change this settingand a peak does not exceed the limit any more the result will be removed in the result table.
set limit value all peaks: Changes the limits of all peaks.
ignore peak (toggle) (peaks with a result only): Ignores a peak. The corresponding entry in thecolumn Result of the Result Table is written in parenthesis with the remark ignore in frontthen. To remove the state ignore, select this item again. Ignored results are not printed in thereport.
11 How to analyse the order again
The same result files can not be loaded twice. To load patient result files again, the order has to bedeleted. Therefore select the category LIS and the operation Orderlist. Then right-click on the firstorder (DNA No 7) and select the context menu item delete order. Now you can load the patient resultfiles again as described in chapter 9.2.
Manual for demo data SEQUENCE Pilot – module MLPA® 37
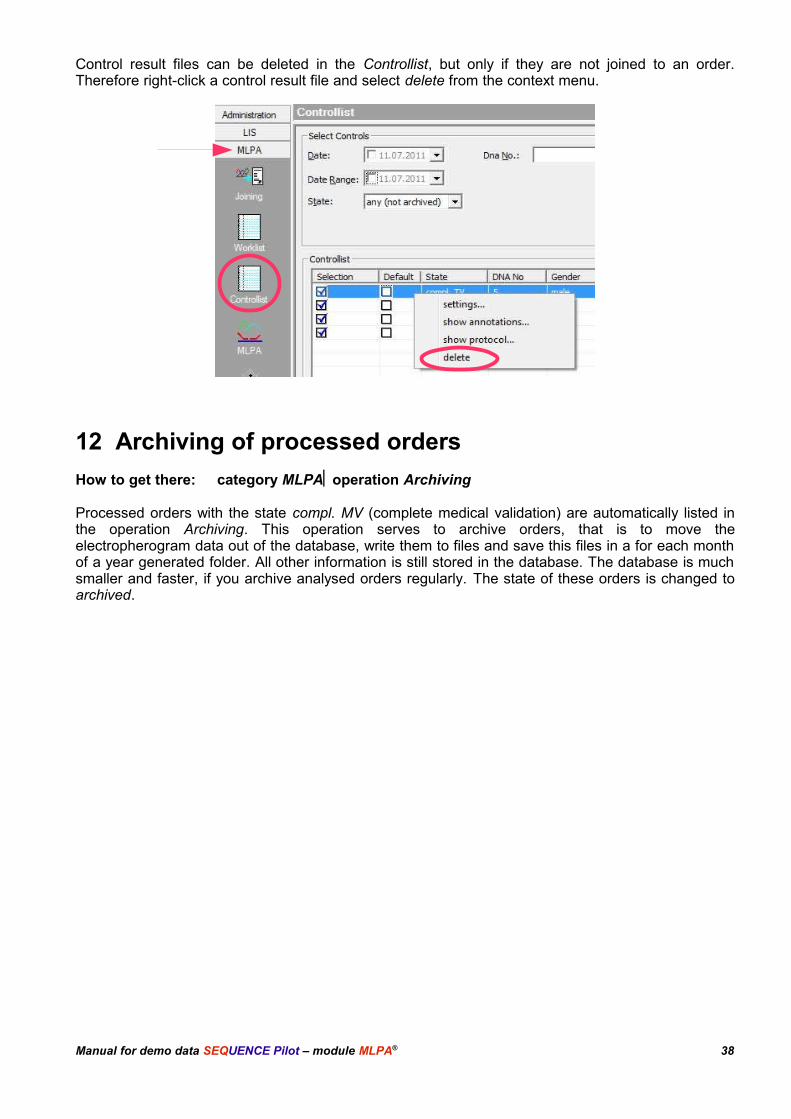
Control result files can be deleted in the Controllist, but only if they are not joined to an order.Therefore right-click a control result file and select delete from the context menu.
12 Archiving of processed orders
How to get there: category MLPAoperation Archiving
Processed orders with the state compl. MV (complete medical validation) are automatically listed inthe operation Archiving. This operation serves to archive orders, that is to move theelectropherogram data out of the database, write them to files and save this files in a for each monthof a year generated folder. All other information is still stored in the database. The database is muchsmaller and faster, if you archive analysed orders regularly. The state of these orders is changed toarchived.
Manual for demo data SEQUENCE Pilot – module MLPA® 38

13 Analysis of Demo Data – methylation
For the analysis later on it is best if you load the result files as explained in the following:
First load all control result files. Check the control result files and technically validate them.This way all technically validated controls of the same run date are joined to ordersautomatically during loading of patient result files.
Then load all undigested patient result files. Check if all control result files are joined to theorders. Only technically validated controls of the same date are joined automatically. You canjoin other control result files manually (Files / editing / control settings...)
Then load all digested patient result files. Check if all control result files are joined to theorders. If you did not load the undigested result files first, you have to reanalyse all digestedresult files after loading the undigested ones! (Files / editing / reanalyse).
13.1 Import of Mix ME028
Open the operation Mixes [master file]. To import the master files for the MLPA mix ME028, do thefollowing:
Press [Import] and the dialogue Import file... is opened.
Open the folder MLPA-Mixes, which is located in the folder C:\SeqPilot\Demo\MLPA-Mixes.
Select the file ME028.mme and press [Open]. All data belonging to this mix (including thecorresponding data from the operations Mix Sequencer [master file] and Analysis Mode[master file] are imported.
If the import was successful, you get a corresponding message.
13.2 Controls
13.2.1 Load MLPA control result files
How to get there: Menu MLPAItem Load MLPA Resultfiles...
To load the MLPA control result files of the demo data for the mix ME028, do the following:
Select the menu item MLPALoad MLPA Resultfiles....
Open the folder MLPA-Methylation\Controls, which is located in the folderC:\SeqPilot\Demo.
Select all result files.
Press [Open], to load the selected result files.
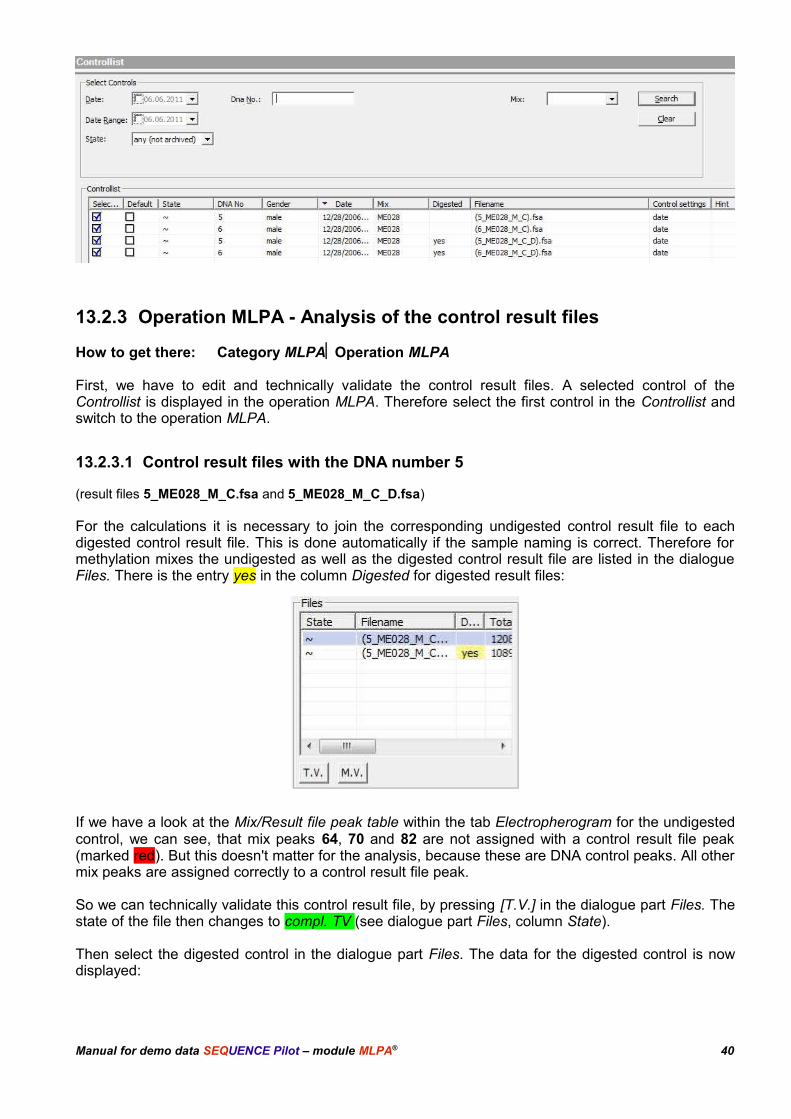
13.2.2 Controllist
How to get there: Category MLPAOperation Controllist
If you deactivate the field Date and click on [Search], the following controls for methylation mixME028 are listed in the table:
Manual for demo data SEQUENCE Pilot – module MLPA® 39
13.2.3 Operation MLPA - Analysis of the control result files
How to get there: Category MLPAOperation MLPA
First, we have to edit and technically validate the control result files. A selected control of theControllist is displayed in the operation MLPA. Therefore select the first control in the Controllist andswitch to the operation MLPA.
13.2.3.1 Control result files with the DNA number 5
(result files 5_ME028_M_C.fsa and 5_ME028_M_C_D.fsa)
For the calculations it is necessary to join the corresponding undigested control result file to eachdigested control result file. This is done automatically if the sample naming is correct. Therefore formethylation mixes the undigested as well as the digested control result file are listed in the dialogueFiles. There is the entry yes in the column Digested for digested result files:
If we have a look at the Mix/Result file peak table within the tab Electropherogram for the undigestedcontrol, we can see, that mix peaks 64, 70 and 82 are not assigned with a control result file peak(marked red). But this doesn't matter for the analysis, because these are DNA control peaks. All othermix peaks are assigned correctly to a control result file peak.
So we can technically validate this control result file, by pressing [T.V.] in the dialogue part Files. Thestate of the file then changes to compl. TV (see dialogue part Files, column State).
Then select the digested control in the dialogue part Files. The data for the digested control is nowdisplayed:
Manual for demo data SEQUENCE Pilot – module MLPA® 40
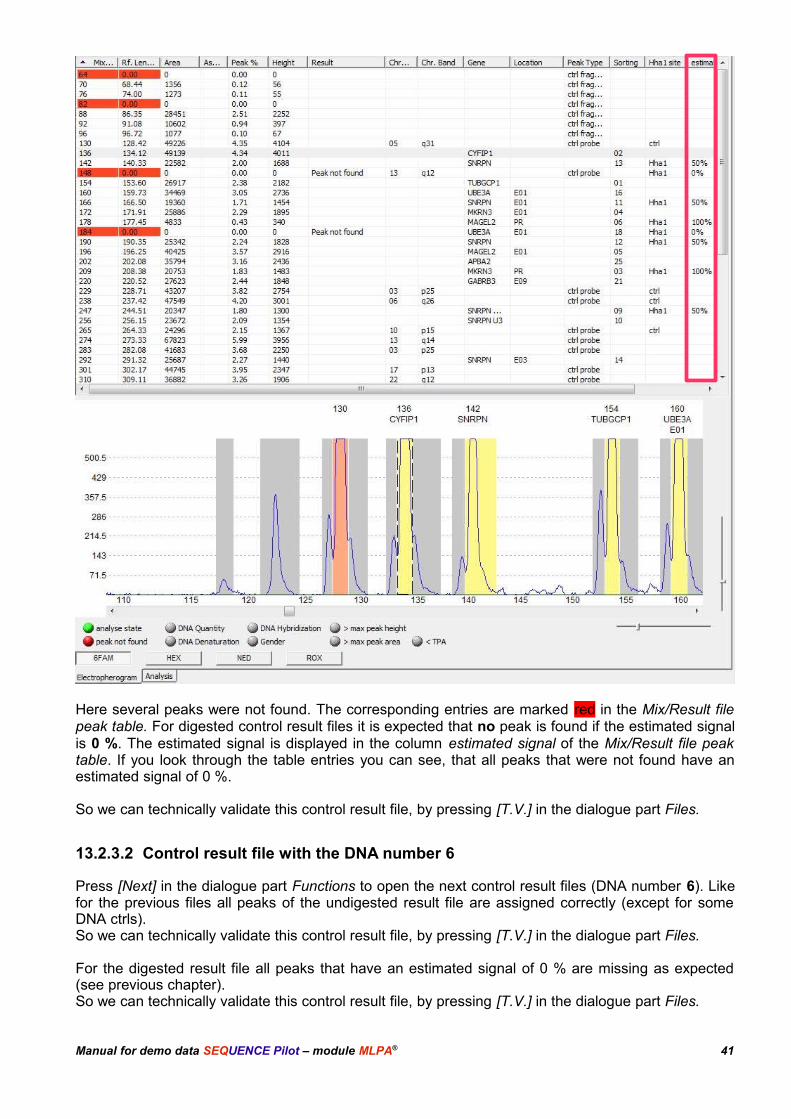
Here several peaks were not found. The corresponding entries are marked red in the Mix/Result filepeak table. For digested control result files it is expected that no peak is found if the estimated signalis 0 %. The estimated signal is displayed in the column estimated signal of the Mix/Result file peaktable. If you look through the table entries you can see, that all peaks that were not found have anestimated signal of 0 %.
So we can technically validate this control result file, by pressing [T.V.] in the dialogue part Files.
13.2.3.2 Control result file with the DNA number 6
Press [Next] in the dialogue part Functions to open the next control result files (DNA number 6). Likefor the previous files all peaks of the undigested result file are assigned correctly (except for someDNA ctrls). So we can technically validate this control result file, by pressing [T.V.] in the dialogue part Files.
For the digested result file all peaks that have an estimated signal of 0 % are missing as expected(see previous chapter).So we can technically validate this control result file, by pressing [T.V.] in the dialogue part Files.
Manual for demo data SEQUENCE Pilot – module MLPA® 41
13.3 Orders
13.3.1 Load MLPA patient result files
How to get there: Menu MLPAItem Load MLPA Resultfiles...
It is important to load undigested MLPA patient result files first, before loading the digested patientresult files. Therefore do the following:
Select the menu item MLPALoad MLPA Resultfiles....
Open the folder MLPA-Methylation\Patients\Undigested, which is located in thefolder C:\SeqPilot\Demo.
Select the result file.
Press [Open], to load the selected result file.
Then select the menu item MLPALoad MLPA Resultfiles.... again.
Open the folder MLPA-Methylation\Patients\Digested, which is located in the folderC:\SeqPilot\Demo.
Select the result file.
Press [Open], to load the selected result file.
13.3.2 Joining
How to get there: Category MLPAOperation Joining
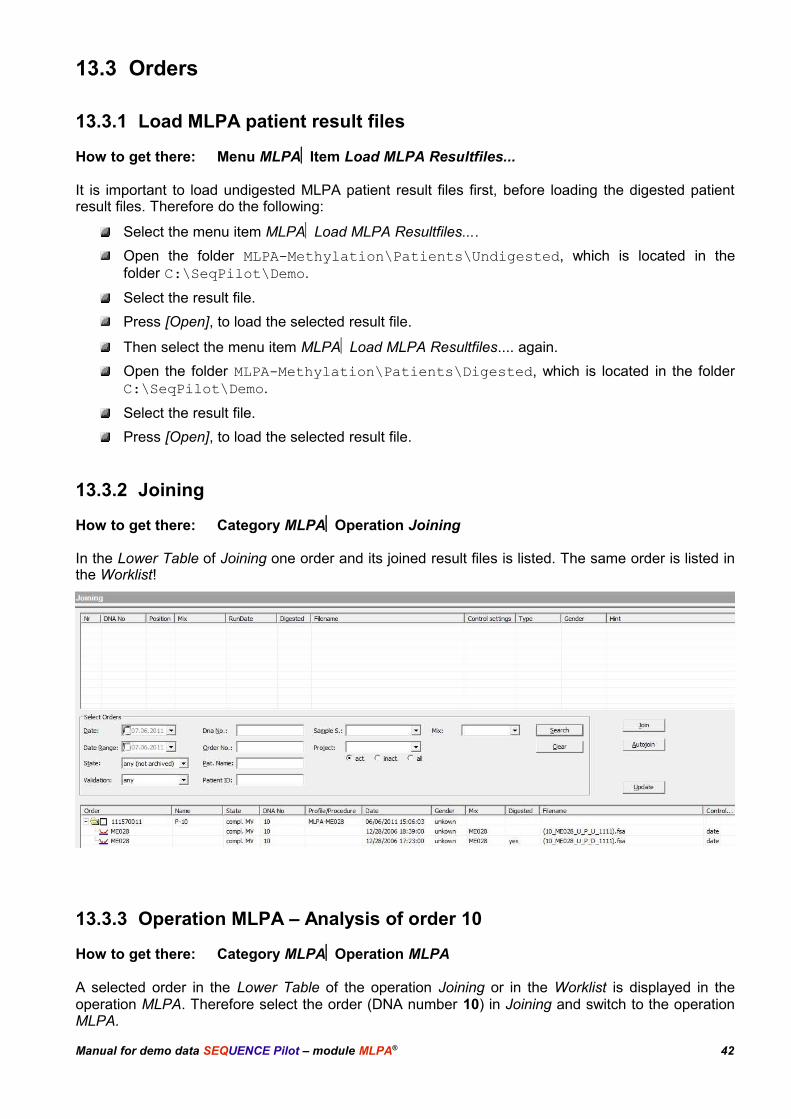
In the Lower Table of Joining one order and its joined result files is listed. The same order is listed inthe Worklist!
13.3.3 Operation MLPA – Analysis of order 10
How to get there: Category MLPAOperation MLPA
A selected order in the Lower Table of the operation Joining or in the Worklist is displayed in theoperation MLPA. Therefore select the order (DNA number 10) in Joining and switch to the operationMLPA.
Manual for demo data SEQUENCE Pilot – module MLPA® 42

13.3.3.1 Order with DNA-number 10
(DNA number 10; result files 10_ME28_U_P_U_1111.fsa and 10_ME28_U_P_D_1111.fsa)
The analysis of the undigested result files (first result file listed in Files) is the same as the normalcopy number analysis, which was shown in the previous chapters.
As you can see in the dialogue File Information both undigested control result files (DNA number 5and 6) are joined to the undigested patient result file already, so the control settings do not have to bechanged.
Moreover as you can see in the electropherogram and the Mix/Result file peak table, all peaks wereassigned expect for the DNA ctrl peak 74. But this does not matter since it is a DNA ctrl.
Change to the tab Analysis:
Manual for demo data SEQUENCE Pilot – module MLPA® 43
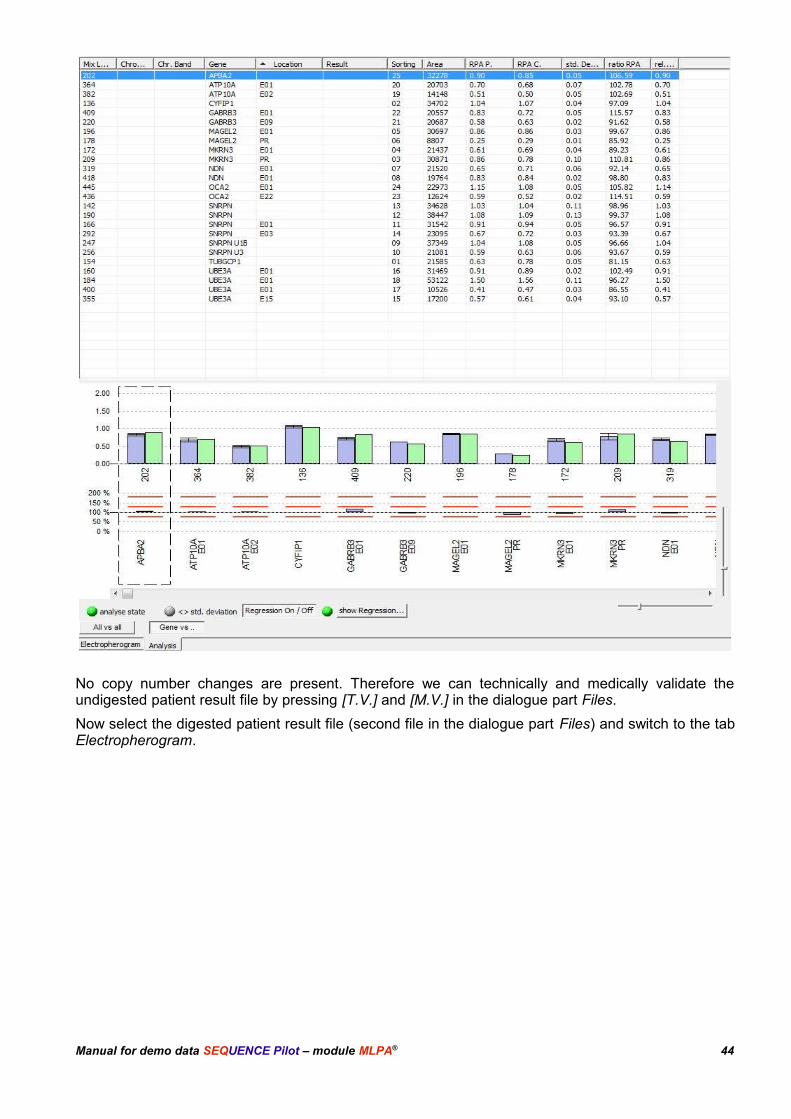
No copy number changes are present. Therefore we can technically and medically validate theundigested patient result file by pressing [T.V.] and [M.V.] in the dialogue part Files.
Now select the digested patient result file (second file in the dialogue part Files) and switch to the tabElectropherogram.
Manual for demo data SEQUENCE Pilot – module MLPA® 44
As you can see in the dialogue part File Information the digested as well as the undigested controlresultfiles were joined to this file automatically.
The Mix/Resultfile Peak Table shows that some peaks were not found, but this is expected fordigested result files.
Switch to the tab Analysis now.
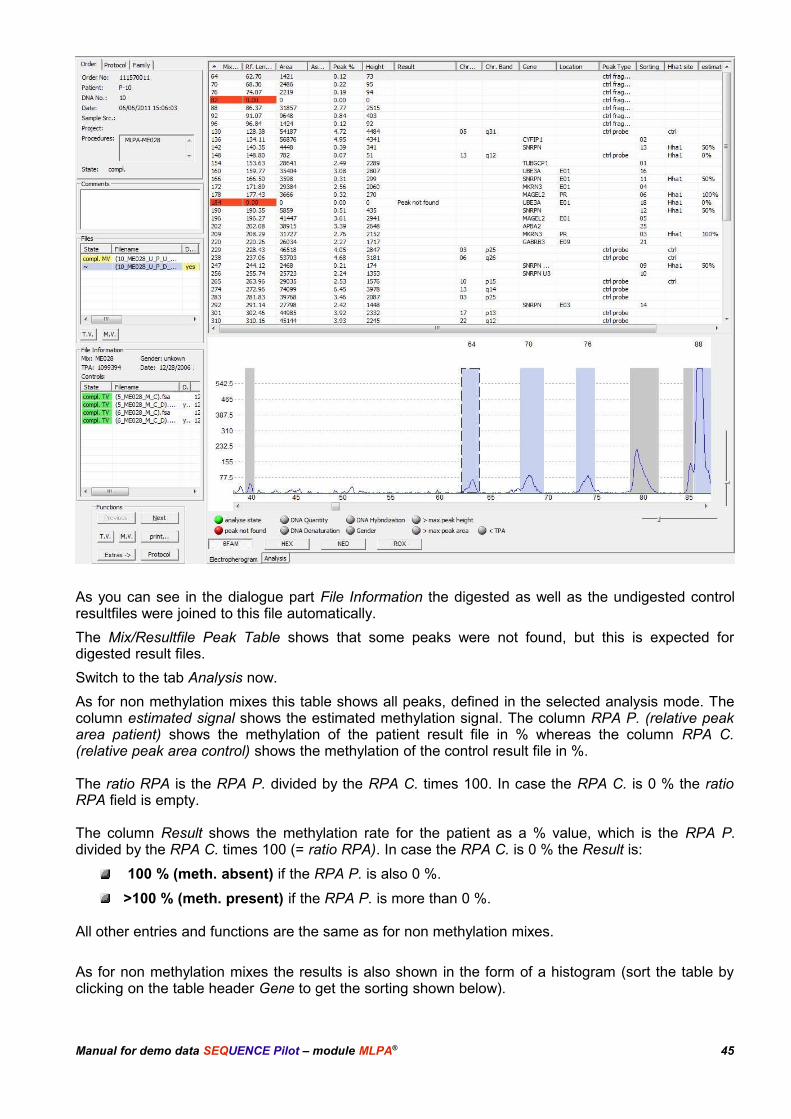
As for non methylation mixes this table shows all peaks, defined in the selected analysis mode. Thecolumn estimated signal shows the estimated methylation signal. The column RPA P. (relative peakarea patient) shows the methylation of the patient result file in % whereas the column RPA C.(relative peak area control) shows the methylation of the control result file in %.
The ratio RPA is the RPA P. divided by the RPA C. times 100. In case the RPA C. is 0 % the ratioRPA field is empty.
The column Result shows the methylation rate for the patient as a % value, which is the RPA P.divided by the RPA C. times 100 (= ratio RPA). In case the RPA C. is 0 % the Result is:
100 % (meth. absent) if the RPA P. is also 0 %.
>100 % (meth. present) if the RPA P. is more than 0 %.
All other entries and functions are the same as for non methylation mixes.
As for non methylation mixes the results is also shown in the form of a histogram (sort the table byclicking on the table header Gene to get the sorting shown below).
Manual for demo data SEQUENCE Pilot – module MLPA® 45
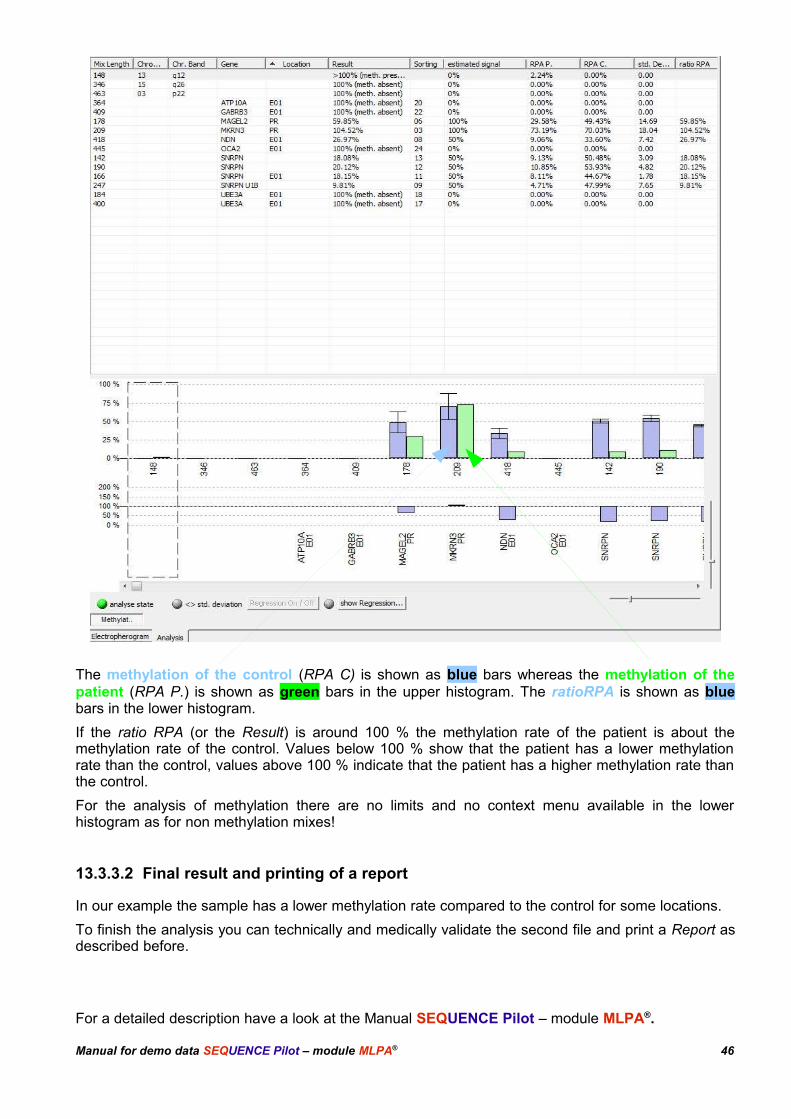
The methylation of the control (RPA C) is shown as blue bars whereas the methylation of thepatient (RPA P.) is shown as green bars in the upper histogram. The ratioRPA is shown as bluebars in the lower histogram.
If the ratio RPA (or the Result) is around 100 % the methylation rate of the patient is about themethylation rate of the control. Values below 100 % show that the patient has a lower methylationrate than the control, values above 100 % indicate that the patient has a higher methylation rate thanthe control.
For the analysis of methylation there are no limits and no context menu available in the lowerhistogram as for non methylation mixes!
13.3.3.2 Final result and printing of a report
In our example the sample has a lower methylation rate compared to the control for some locations.
To finish the analysis you can technically and medically validate the second file and print a Report asdescribed before.
For a detailed description have a look at the Manual SEQUENCE Pilot – module MLPA®.
Manual for demo data SEQUENCE Pilot – module MLPA® 46