Embed Size (px)
Citation preview
Name of the Document Manual for Configuring VPN Client
Classification General Audience NIC VPN
Version Date of last change
NIC VPN Services Page 1
Manual for configuring NIC VPN in Windows OS
NIC is introducing a new web based VPN interface to allow s to connect to NICNET through
VPN. Apart from existing Client based VPN service, this new interface automatically identified
the OS of the clients system, downloads and installs the compatible VPN client software
accordingly.
NIC VPN can be accessed by Digital Certificate in hardware token(e-token/smart card) issued by
NICCA as well as client certificate issued by VPNCA.
The new Web VPN software is provided by the VPN appliance manufacturer ‘Cisco
AnyConnect Secure mobility client’ and is loaded on the security appliance and automatically
deployed to remote s when they log in to the security appliance.
System Requirements Windows Versions • Windows 7 SP1 x86 (32-bit) and x64 (64-bit) • Windows Vista SP2 x86 (32-bit) and x64 (64-bit) • Windows XP SP3 x86 (32-bit) and x64 (64-bit)
Configuration and installation of VPN client
Note: Prior to installing VPN client software, the user has to get the VPN account and Digital
certificate from NICCA / VPN Division.
1. Download the CA root certificate from http://vpn.nic.in
2. Install the Digital certificate issued by VPNCA. Refer ‘Procedure to Import Digital
Certificate’ enclosed.
Or
USB token/Smart Card received from NICCA then insert it into the Machine.
as per the issuer of the Digital
certificate provided.
2.6 22 January 2013

Name of the Document Manual for Configuring VPN Client
Classification General Audience NIC VPN
Version Date of last change
NIC VPN Services Page 2
3. From the Tools menu item select on Internet Options, as shown below
4. In the Internet Options select on Security tab, then on Trusted Sites and then on Sites button as shown below to add vpn server address as trusted site.
2.6 22 January 2013
Name of the Document Manual for Configuring VPN Client
Classification General Audience NIC VPN
Version Date of last change
NIC VPN Services Page 3
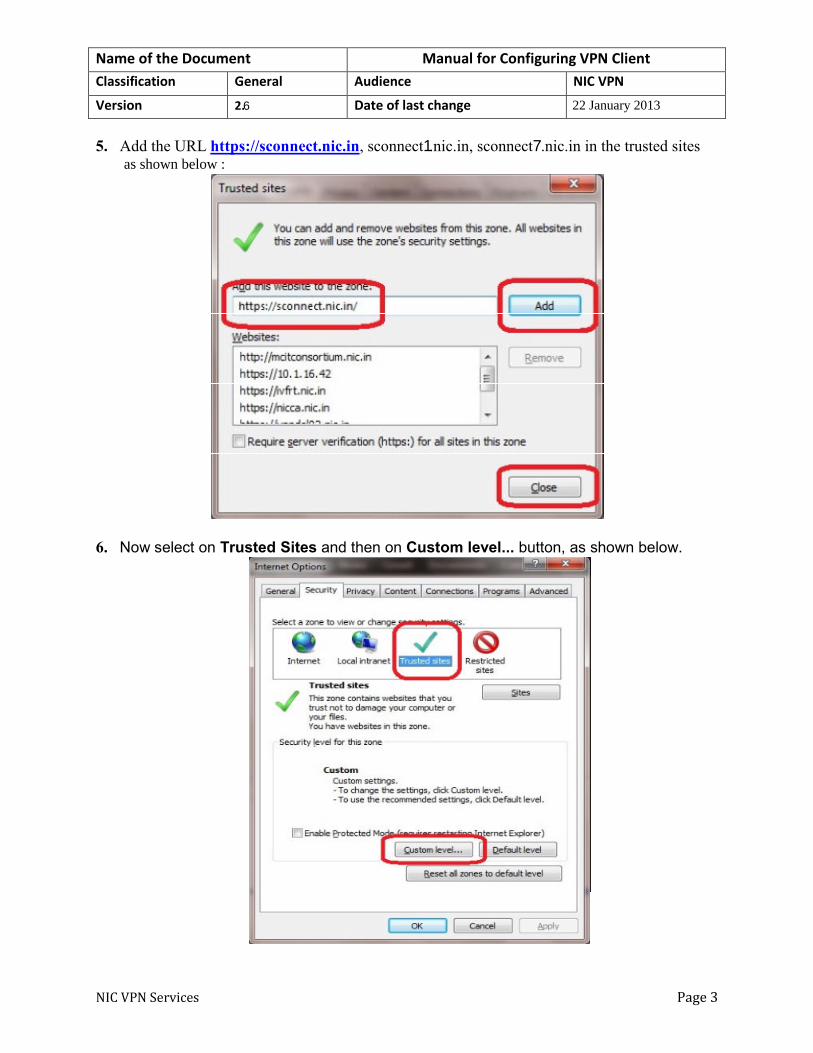
5. Add the URL https://sconnect.nic.in
6. Now select on Trusted Sites and then on Custom level... button, as shown below.
2.6 22 January 2013
, sconnect1.nic.in, sconnect7.nic.in in the trusted sitesas shown below :

Name of the Document Manual for Configuring VPN Client
Classification General Audience NIC VPN
Version Date of last change
NIC VPN Services Page 4
7. In the window that pops-up, enable all ActiveX controls and plug-ins and select OK, as shown below.
8. Close the Internet Options window and then the browser. 9. Open the Internet Explorer and type the URL https://sconnect.nic.in in the address
bar, as shown below.
2.6 22 January 2013

Name of the Document Manual for Configuring VPN Client
Classification General Audience NIC VPN
Version Date of last change
NIC VPN Services Page 5
10. Select ‘continue to the website’ as shown below.
11. User will be prompted to select a certificate from the list of client certificates currently
available on User machine. Select the one which is issued by NIC VPN services and select OK as shown below:
Issued By NICCA
Issued By VPNCA
2.6 22 January 2013

Name of the Document Manual for Configuring VPN Client
Classification General Audience NIC VPN
Version Date of last change
NIC VPN Services Page 6
12. User will be prompted to enter the PIN/Private Key , as shown below.
For E-TOKEN
Or
For VPNCA Certificate
2.6 22 January 2013
Name of the Document Manual for Configuring VPN Client
Classification General Audience NIC VPN
Version Date of last change
NIC VPN Services Page 7
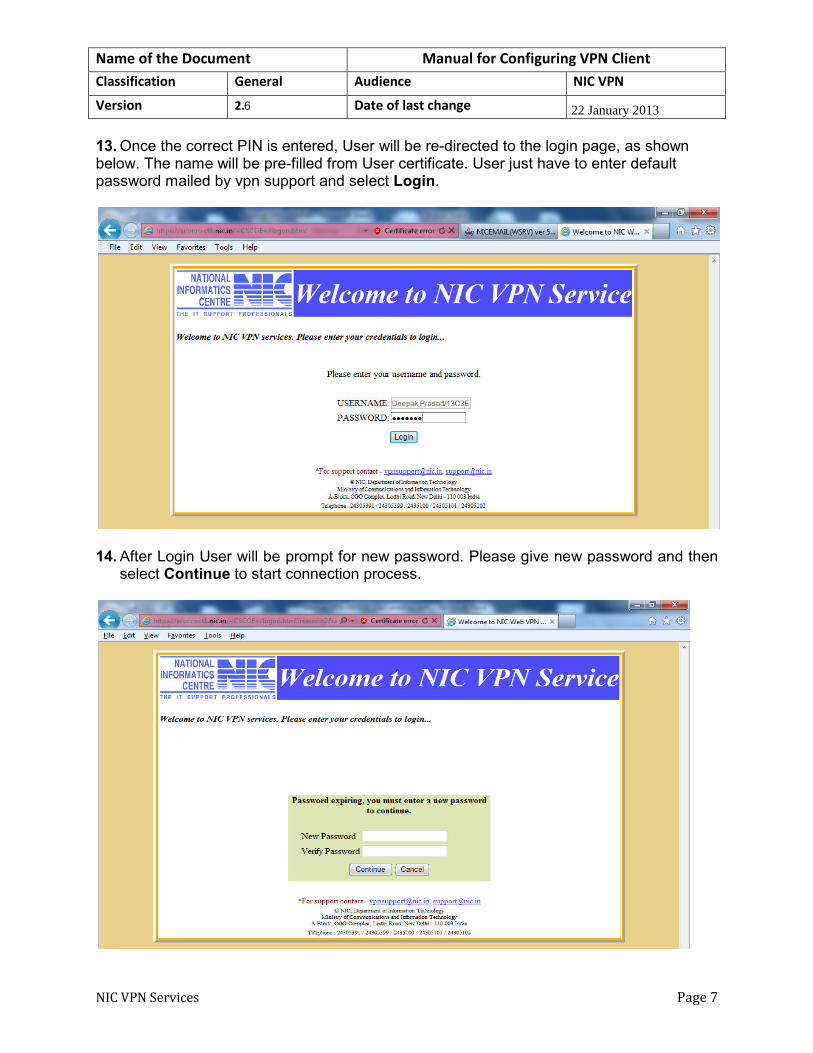
13. Once the correct PIN is entered, User will be re-directed to the login page, as shown below. The name will be pre-filled from User certificate. User just have to enter default password mailed by vpn support and select Login.
14. After Login User will be prompt for new password. Please give new password and then
select Continue to start connection process.
2.6 22 January 2013

Name of the Document Manual for Configuring VPN Client
Classification General Audience NIC VPN
Version Date of last change
NIC VPN Services Page 8
15. The Cisco AnyConnect Secure Mobility Client will be downloaded automatically, as
shown below.
16. If a Security Alert prompts up, select Yes to accept the connection, as shown below
17. Accept any other prompts that come up during the process as this is a trusted site and
User need not worry about it.
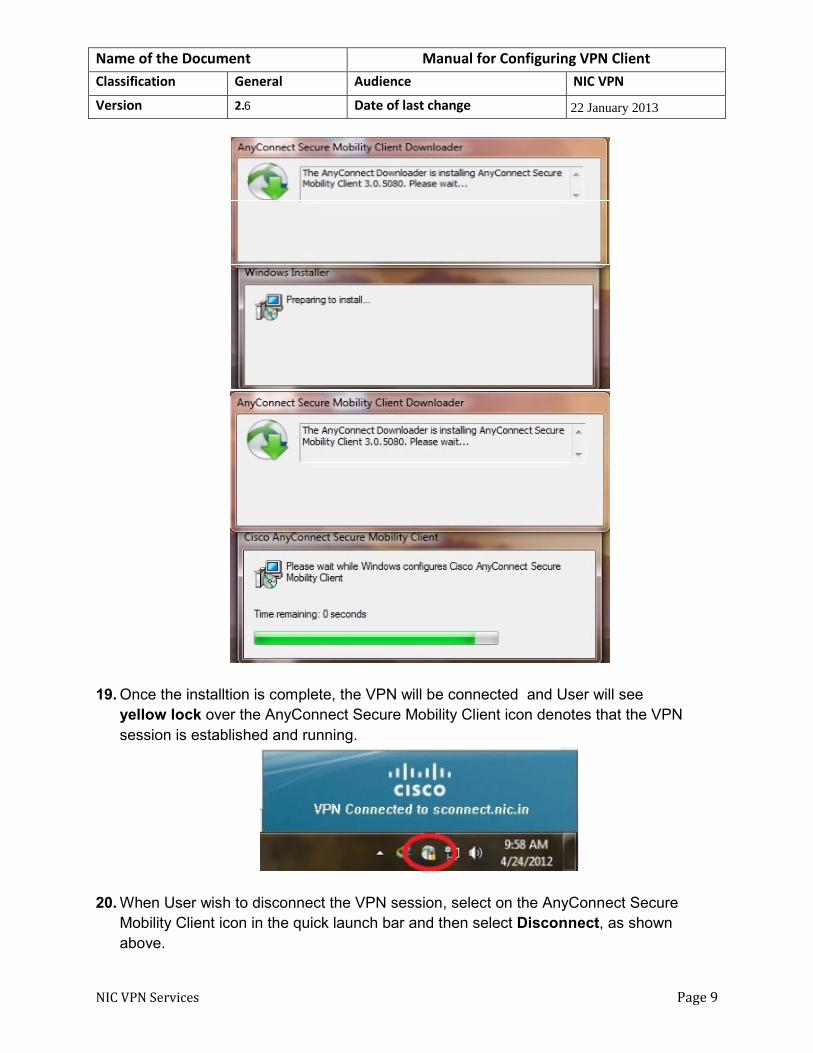
18. A set of screens relating to the installation of the VPN Client would come as shown
below.
2.6 22 January 2013
Name of the Document Manual for Configuring VPN Client
Classification General Audience NIC VPN
Version Date of last change
NIC VPN Services Page 9
19. Once the installtion is complete, the VPN will be connected and User will see
yellow lock over the AnyConnect Secure Mobility Client icon denotes that the VPN
session is established and running.
20. When User wish to disconnect the VPN session, select on the AnyConnect Secure
Mobility Client icon in the quick launch bar and then select Disconnect, as shown
above.
2.6 22 January 2013

Name of the Document Manual for Configuring VPN Client
Classification General Audience NIC VPN
Version Date of last change
NIC VPN Services Page 10
21. Once the VPN connection is established , the Cisco Anyconnect application will be
added in the list of the program . And will appear in the program list/ startup. And quick
launch bar.
2.6 22 January 2013
Name of the Document Manual for Configuring VPN Client
Classification General Audience NIC VPN
Version Date of last change
NIC VPN Services Page 11
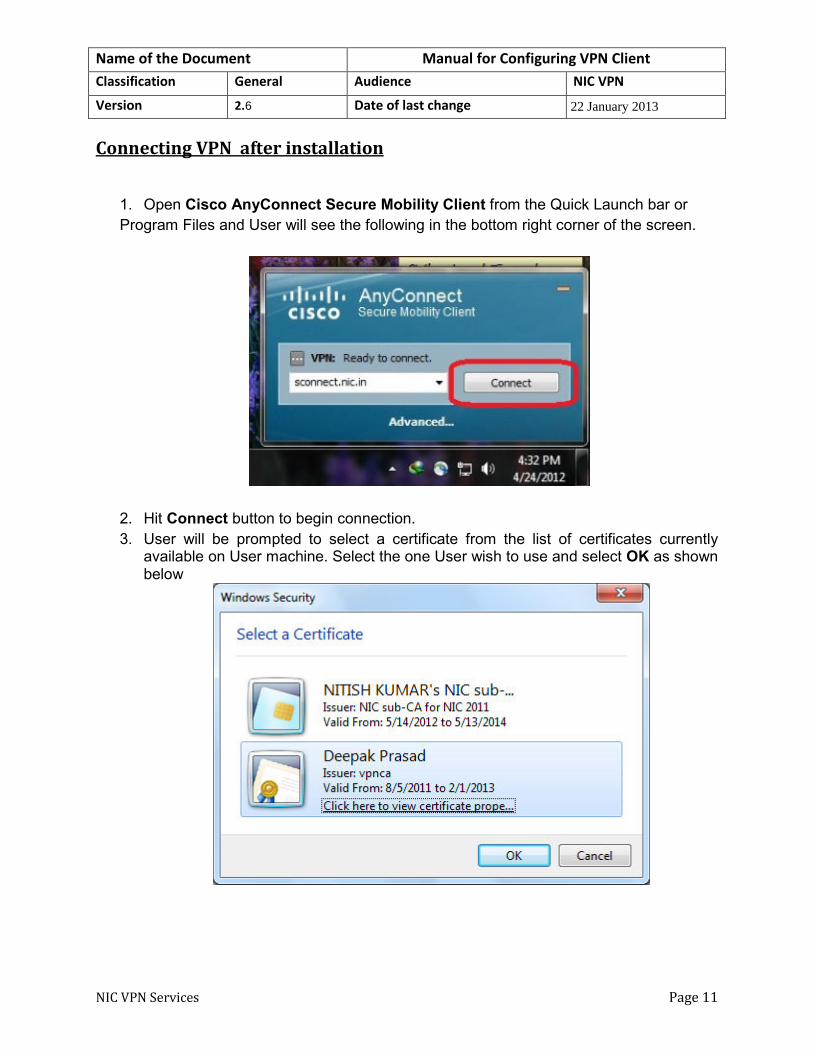
Connecting VPN after installation
1. Open Cisco AnyConnect Secure Mobility Client from the Quick Launch bar or
Program Files and User will see the following in the bottom right corner of the screen.
2. Hit Connect button to begin connection.
3. User will be prompted to select a certificate from the list of certificates currently available on User machine. Select the one User wish to use and select OK as shown below
2.6 22 January 2013

Name of the Document Manual for Configuring VPN Client
Classification General Audience NIC VPN
Version Date of last change
NIC VPN Services Page 12
4. User will be prompted to enter the PIN/Private Key for User certificate, as shown
below.
For USB TOKEN
For VPNCA Certificate
5. Once the correct PIN is entered, User will be re-directed to the login page, as shown
below. The name will be pre-filled from User certificate. User just have to enter
password and select OK.
2.6 22 January 2013

Name of the Document Manual for Configuring VPN Client
Classification General Audience NIC VPN
Version Date of last change
NIC VPN Services Page 13
6. User will be re-directed to the following page on entering the correct password. Select Accept to begin the connection process.
7. If a Security Alert prompts up, select Yes to accept the connection, as shown
below.
. 8. Accept any other prompts that come up during the process as this is a trusted site
and User need not worry about it.
9. VPN will be connected in a minute and User will see the following in the bottom right
corner of the screen. The yellow lock over the AnyConnect Secure Mobility Client
icon denotes that the VPN session is established.
10. When User wish to disconnect the VPN session, select on the AnyConnect Secure
Mobility Client icon in the quick launch bar and then select Disconnect, as shown above.
2.6 22 January 2013

Name of the Document Manual for Configuring VPN Client
Classification General Audience NIC VPN
Version Date of last change
NIC VPN Services Page 14
Checking VPN connection After VPN connection is eshtablished you will be able to access nic internal application as http://inoc.nic.in . and other server as per your requirement.
For Any VPN Query Please Contact
VPN SUPPORT
Email : [email protected] Contact No : +91-11-24305391 / 99 IP Phone : 6001
2.6 22 January 2013