Embed Size (px)
Citation preview

Manual de funciones básicas de teléfonos Grandstream Networks, Inc.
GXP2120/GXP2110/GXP2100/GXP14xx
SIP Enterprise Phones
USING THE GXP2120/GXP2110/GXP2100/GXP14xx ............................. 19
GETTING FAMILAR WITH THE LCD .................................................................................................. 19
GETTING FAMILAR WITH THE KEYPAD ........................................................................................... 25
MAKING PHONE CALLS..................................................................................................................... 26
HANDSET, SPEAKER AND HEADSET MODE ........................................................................... 26
MULTIPLE SIP ACCOUNTS AND LINES ..................................................................................... 26
COMPLETING CALLS.................................................................................................................. 27
MAKING CALLS USING IP ADDRESSES ................................................................................... 29
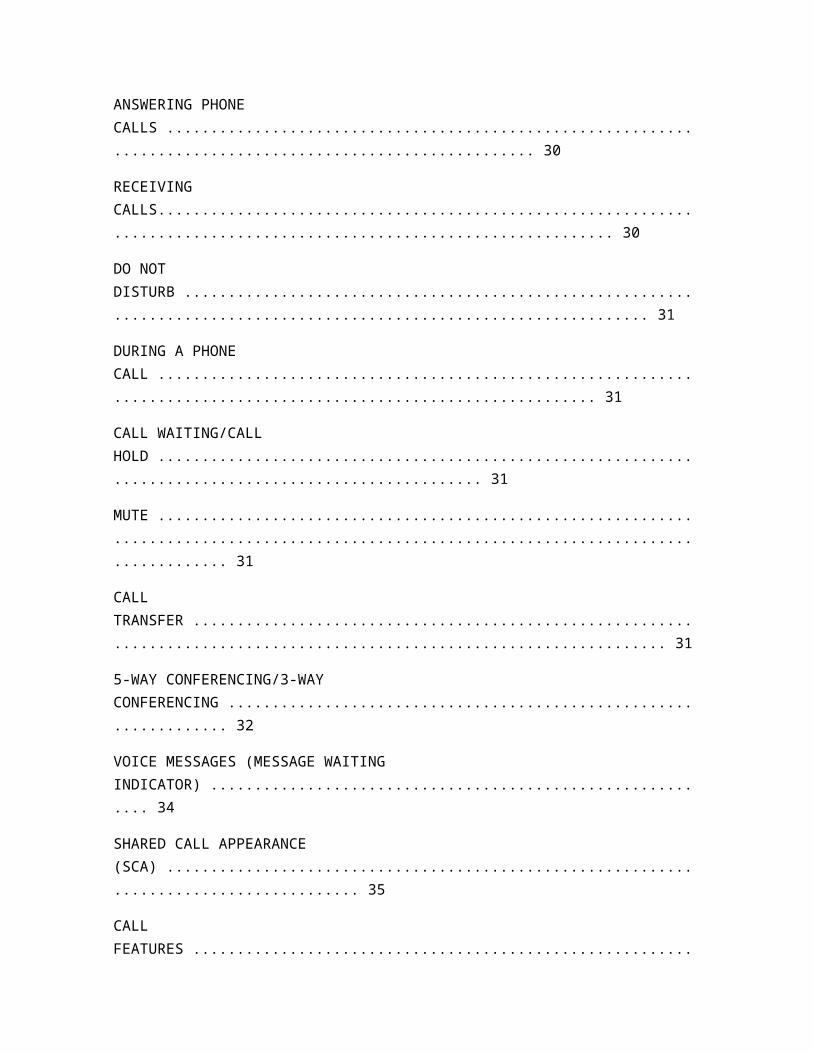
ANSWERING PHONE CALLS ............................................................................................................ 30
RECEIVING CALLS...................................................................................................................... 30
DO NOT DISTURB ....................................................................................................................... 31
DURING A PHONE CALL .................................................................................................................... 31
CALL WAITING/CALL HOLD ....................................................................................................... 31
MUTE ............................................................................................................................................ 31
CALL TRANSFER ........................................................................................................................ 31
5-WAY CONFERENCING/3-WAY CONFERENCING .................................................................. 32
VOICE MESSAGES (MESSAGE WAITING INDICATOR) ........................................................... 34
SHARED CALL APPEARANCE (SCA) ........................................................................................ 35
CALL FEATURES ................................................................................................................................ 35
CUSTOMIZED LCD SCREEN & XML ................................................................................................. 37
CONFIGURATION GUIDE ........................................................................ 38
CONFIGURATION VIA KEYPAD ......................................................................................................... 38
CONFIGURATION VIA WEB BROWSER ........................................................................................... 42
DEFINITIONS ...................................................................................................................................... 43
STATUS PAGE DEFINITIONS ..................................................................................................... 43
ACCOUNTS PAGE DEFINITIONS ............................................................................................... 44
SETTINGS PAGE DEFINITIONS ................................................................................................. 52
NETWORK PAGE DEFINITIONS ................................................................................................. 61
MAINTENANCE PAGE DEFINITIONS ......................................................................................... 62
PHONEBOOK PAGE DEFINITIONS ............................................................................................ 65
NAT SETTINGS ................................................................................................................................... 68
WEATHER UPDATE ............................................................................................................................ 68
PUBLIC MODE .................................................................................................................................... 69
EDITING CONTACTS AND CLICK-TO-DIAL ...................................................................................... 70

USING THE GXP2120/GXP2110/GXP2100/GXP14xx
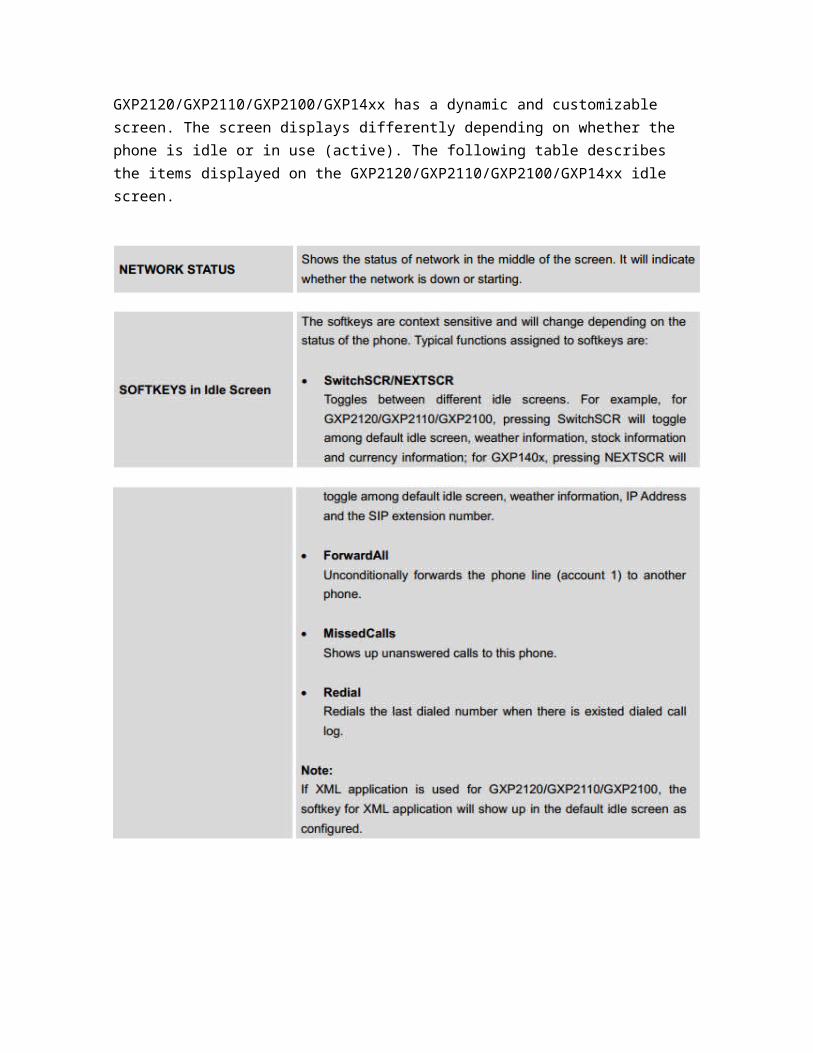
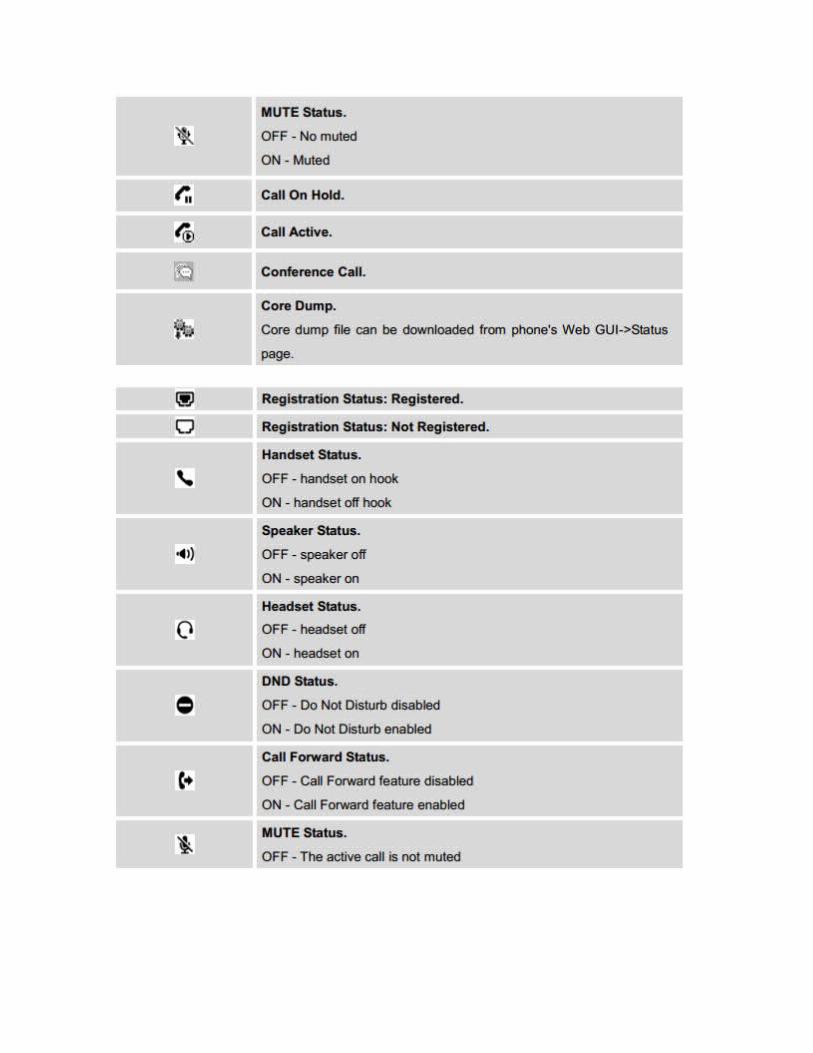
GETTING FAMILAR WITH THE LCD
GXP2120/GXP2110/GXP2100/GXP14xx has a dynamic and customizable screen. The screen displays differently depending on whether the phone is idle or in use (active). The following table describes the items displayed on the GXP2120/GXP2110/GXP2100/GXP14xx idle screen.


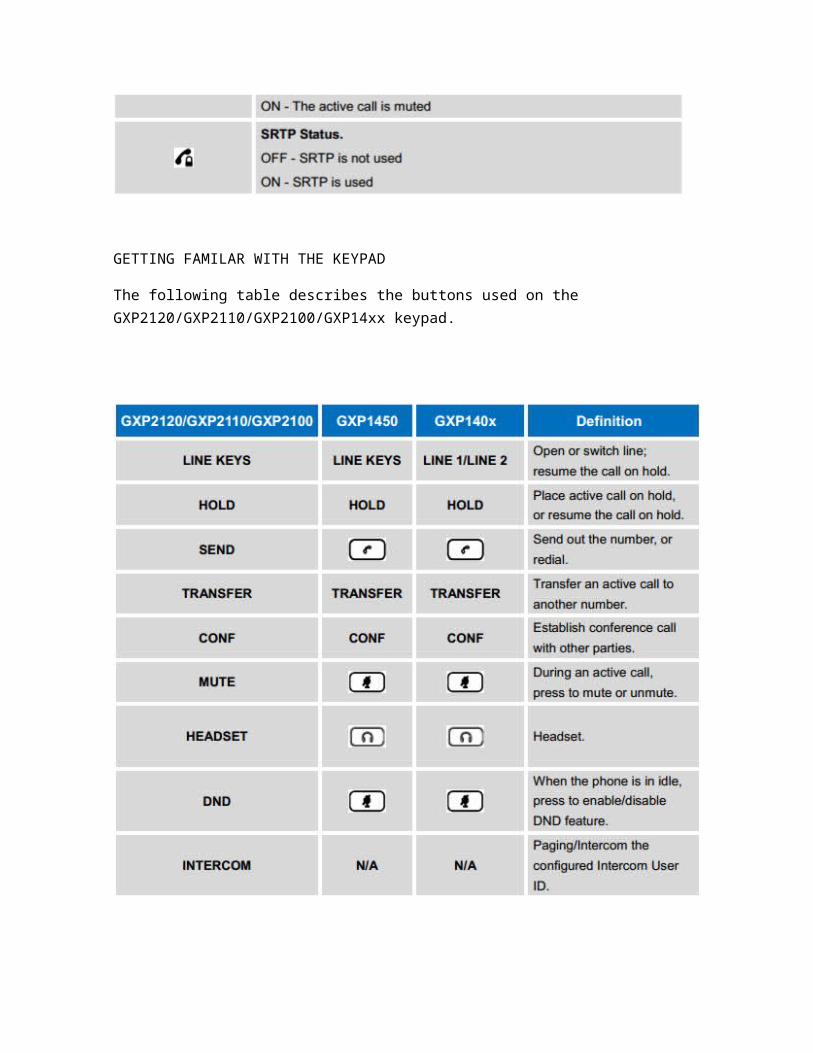
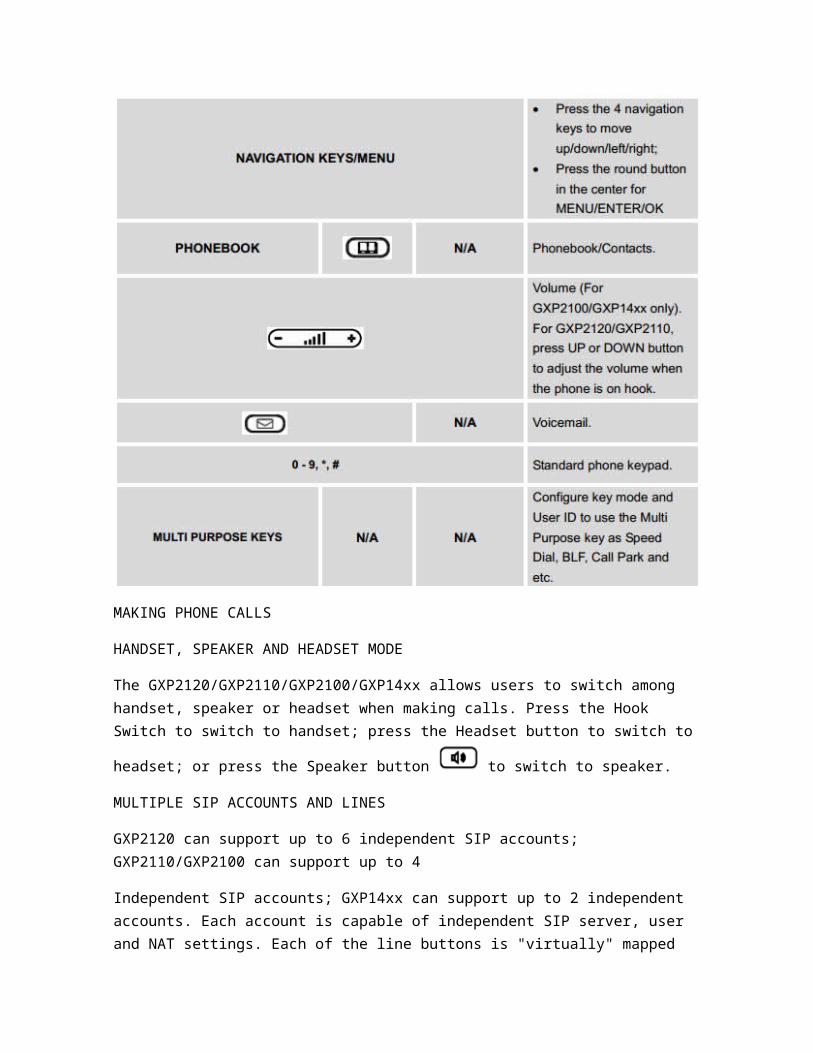
GETTING FAMILAR WITH THE KEYPAD
The following table describes the buttons used on the GXP2120/GXP2110/GXP2100/GXP14xx keypad.
MAKING PHONE CALLS
HANDSET, SPEAKER AND HEADSET MODE
The GXP2120/GXP2110/GXP2100/GXP14xx allows users to switch among handset, speaker or headset when making calls. Press the Hook Switch to switch to handset; press the Headset button
to switch to headset; or press the Speaker button to switch to speaker.
MULTIPLE SIP ACCOUNTS AND LINES
GXP2120 can support up to 6 independent SIP accounts; GXP2110/GXP2100 can support up to 4
Independent SIP accounts; GXP14xx can support up to 2 independent accounts. Each account is capable of independent SIP server, user and NAT settings. Each of the line buttons is "virtually" mapped to an individual SIP account. In off hook state, select an idle line and the dial tone will be heard.
To make a call, select the line you wish to use. The corresponding LINE LED will light up in green. The user can switch lines before dialing any number by pressing the LINE buttons.
There are several ways to complete a call.
On hook dialing. Enter the number when the phone is on hook and then send out.
When the phone is in idle, enter the number to be dialed out;
Take handset off hook; or
Press Speaker button; or
Press Headset button with headset plugged in; or
Select an available LINE key;
The call will be dialed out.
Off hook and dial. Off hook the phone, enter the number and send out.
Take handset off hook; or
Press Speaker button; or
Press Headset button with headset plugged in; or
Press an available LINE key to activate speaker;
You shall hear dial tone after off hook;
Enter the number;
Press SEND key or # to dial out.
Redial. Redial the last dialed number.
Take handset off hook; or
Press Speaker button; or
Press Headset button with headset plugged in; or
Press an available LINE key to activate speaker; or
When the phone is in idle;
Press SEND key, or the REDIAL softkey.
Via Call History. Dial the number logged in phone's call history.
Press MENU button to bring up the main menu;
Enter Call History and select "Answered Calls", "Missed Calls", "Transferred Calls" or "Forwarded
Calls";
Select the entry you would like to call using the navigation arrow keys;
Press SEND button to dial out.
Via Phonebook. Dial the number from the phonebook.
Press MENU button to bring up the main menu;
Select and enter Phonebook;
Select the phonebook entry you would like to call using the navigation arrow key;
Press SEND button to dial the selected contact.
Speed Dial. Dial the number configured as Speed Dial on Line Key.
Go to phone's Web GUI->Settings->Programmable Keys, configure the Line Key's Key Mode as
Speed Dial. Select the account to dial from, enter the Name and User ID (the number to be dialed
out) for the Line Key. Click on "Update" at the bottom of the Web GUI page;
Off hook the phone, or directly press the Speed Dial key to dial out.

Call Return. Dial the last answered call.
Go to phone's Web GUI->Settings->Programmable Keys, configure the Line Key's Key Mode as
Call Return. Select the account to dial from, no Name or User ID has to be set on for Call Return;
Off hook the phone, or directly press the Call Return key to dial out.
Via Paging/Intercom.
Take handset off hook; or
Press Speaker button; or
Press Headset button with headset plugged in; or
Press an available LINE key to activate speaker;
You shall hear dial tone after off hook;
Press MENU button to switch the call screen from "Dialing" to "Paging";
Enter the number;
Press SEND key or # to dial out.
Note:
After entering the number, the phone waits for the No Key Entry Timeout (Default timeout is 4 seconds,
configurable via Web GUI) before dialing out. Press SEND or # key to override the No Key Entry
Timeout;
If digits have been entered after handset is off hook, the SEND key will works as SEND instead of
REDIAL;
By default, # can be used as SEND to dial the number out. Users could disable it by setting "User # as
Dial Key" to "No" from Web GUI->Account X->Call Settings;
For Paging/Intercom, if the SIP Server/PBX supports the feature and has Paging/Intercom feature
code set up already, users do not necessarily need toggle to paging mode in the call screen. Simply
dial the feature code with extension as a normal call.
MAKING CALLS USING IP ADDRESSES
Direct IP Call allows two phones to talk to each other in an ad-hoc fashion without a SIP proxy. VoIP calls
can be made between two phones if:
Both phones have public IP addresses; or
Both phones are on the same LAN/VPN using private or public IP addresses; or
Both phones can be connected through a router using public or private IP addresses (with necessary
port forwarding or DMZ).
To make a direct IP call, please follow the steps below:
Press MENU button to bring up main menu;
Select "Direct IP Call" using the navigation arrow keys;
Press MENU to enter the Direct IP Call mode;
Input the 12-digit target IP address (Please see example below);
Press the "More" softkey to make sure the softkey selection "IPv4" or "IPv6" is correctly selected
depending on your network environment;
Press "OK" softkey to dial.
For example:

If the target IP address is 192.168.1.60 and the port is 5062 (i.e., 192.168.1.60:5062), input the following:
192*168*1*60#5062. The * key represents the dot (.), the # key represents colon (:). Wait for about 4
seconds and the phone will initiate the call.
Quick IP Call Mode:
The GXP2120/GXP2110/GXP2100/GXP14xx also supports Quick IP Call mode. This enables the phone to
make direct IP calls using only the last few digits (last octet) of the target phone's IP address. This is
possible only if both phones are under the same LAN/VPN. This simulates a PBX function using the
CSMA/CD without a SIP server. Controlled static IP usage is recommended.
To enable Quick IP Call Mode, go to phone's Web GUI->Settings->Call Features, set "Use Quick IP Call
Mode" to "Yes". Click on "Save and Apply" on the bottom of Web GUI page to take the change. To make
Quick IP Call, take the phone off hook first. Then dial #xxx where x is 0-9 and xxx<255. Press # or SEND
and a direct IP call to aaa.bbb.ccc.XXX will be completed. "aaa.bbb.ccc" is from the local IP address
regardless of subnet mask. The number #xx or #x are also valid. The leading 0 is not required (but it's OK).
For example:
192.168.0.2 calling 192.168.0.3 -- dial #3 followed by # or "SEND";
192.168.0.2 calling 192.168.0.23 -- dial #23 followed by # "SEND";
192.168.0.2 calling 192.168.0.123 -- dial #123 followed by # "SEND";

192.168.0.2: dial #3 and #03 and #003 results in the same call -- call 192.168.0.3.
Note:
The # will represent colon ":" in direct IP call rather than SEND key as in normal phone call;
If you have a SIP server configured, direct IP call still works. If you are using STUN, direct IP call will
also use STUN;
Configure the "User Random Port" to "No" when completing direct IP calls.
ANSWERING PHONE CALLS
RECEIVING CALLS
Single incoming call. Phone rings with selected ring tone. The corresponding LINE key will flash in
red. Answer call by taking handset off hook, or using Speaker/Headset, or pressing the flashing LINE
key;
Multiple incoming calls. When another call comes in while having an active call, the phone will
produce a Call Waiting tone (stutter tone). The other LINE key will flash in red. Answer the incoming
call by pressing the flashing LINE key. The current active call will be put on hold automatically.
DO NOT DISTURB
Do Not Disturb can be enabled/disabled from phone's LCD. For GXP2120/GXP2110, press the DND
button on the phone when the phone is in idle. For GXP14xx, press the MUTE button for DND function
while the phone is in idle.

Or users could set it from phone's Menu following the steps below:
Press the Menu button and select "Preference" using navigation keys;
Press Menu button again to get into Preference options;
Select "Do Not Disturb" and press Menu button;
Use arrow keys to select and press Menu button to enable or disable "Do Not Disturb" feature.
When Do Not Disturb feature is turned on, the DND icon will appear on the right side of the LCD. The
incoming call will not be accepted or the call will directly go into voicemail.
DURING A PHONE CALL
CALL WAITING/CALL HOLD
Hold. Place a call on hold by pressing the HOLD button. The active LINE key will blink in green;
Resume. Resume call by pressing the blinking LINE key;
Multiple calls. Automatically place active call on hold or switch between calls by pressing the LINE
key. Call waiting tone (stutter tone) will be audible on new incoming call during the active call.
MUTE
During an active call, press the MUTE button to mute/unmute the microphone. The LCD will show "Talking"
or "MUTE" to indicate the mute status, with Mute icon displayed on the screen.

CALL TRANSFER
GXP2120/GXP2110/GXP2100/GXP14xx supports Blind Transfer, Attended Transfer and Auto-Attended
Transfer
Blind Transfer.
During the first active call, press TRAN key and dial the number to transfer to;
Press SEND key or # to complete transfer of active call.
Attended Transfer.
During the first active call, press LINE key. The first call will be put on hold;
Enter the number for the second call in the new line and establish the call;
Press TRAN key;
Press the other LINE key which is on hold to transfer the call.
Auto-Attended Transfer.
Set "Auto-Attended Transfer" to "Yes" under Web GUI->Settings->Call Features. And then click
"Save and Apply" on the bottom of the page;
Establish one call first;
During the call, press TRAN key. A new line will be brought up and the first call will be
automatically placed on hold;
Dial the number and press SEND or # to make a second call. (Once the number is entered, a
"Transfer" softkey will show. If "Transfer" softkey is pressed instead of SEND or #, a blind transfer
will be performed);
Press TRAN key again. The call will be transferred.

For Auto-Attended Transfer, after dialing out the number for the second call, a "Split" softkey will
show. If the second call is not established yet (ringing), pressing "Split" will hang up the second call.
If the second call is established (answered), pressing "Split" will resume the second call and keep
the first call on hold.
Note:
To transfer calls across SIP domains, SIP service providers must support transfer across SIP domains.
5-WAY CONFERENCING/3-WAY CONFERENCING
GXP2120/GXP2110/GXP2100 can host up to 5-way conference call with other parties (PCMU/PCMA);
Initiate a conference call.
Establish calls with 2 or more parties respectively;
While 1 call is active, the other call will be put on hold with its LINE key blinking in green;
Press CONF key;
Press the desired LINE key on hold, the conference will be established;
Repeat the previous 2 steps for all the other parties on hold to join the conference.
Cancel Conference.
If after pressing the CONF key, the user decides not to conference, press Cancel softkey or the

current active LINE key (LED in solid green);
This will resume the 2-way conversation with the current line.
Split and Re-conference.
During the conference, press HOLD key. The conference call will be split and the calls will be put
on hold separately with the LINE keys blinking in green;
Select 1 LINE key and press to resume the 2-way conversation;
If users would like to re-establish conference call, before 1 separate LINE is selected, press the
ReConf softkey right after the conference call is held/split;
End Conference.
Press HOLD key to split the conference call. The conference call will be ended with both calls on
hold; Or
Users could press the EndCall softkey or simply hang up the call to terminate the conference call.
GXP2120/GXP2110/GXP2100/GXP14xx supports Easy Conference Mode, which can be used combined
with the traditional way to establish the conference.
Initiate a conference call.
Establish 1 call;
Press CONF key and a new line will be brought up using the same account;
Dial the number and press SEND key to establish the second call;

Press CONF key or press the ConfCall softkey to establish the conference.
Join more parties in established conference call.
Establish conference call;
Press CONF key and a new line will be brought up using the same account;
Dial the number and press SEND key to establish the second call;
Press CONF key or press the ConfCall softkey to join the new party in the established conference.
Split and Re-conference.
During the conference, press HOLD key. The conference call will be split and both calls will be put
on hold separately with 2 LINE keys blinking in green;
Select 1 LINE key and press to resume the 2-way conversation;
If users would like to re-establish conference call, before 1 separate LINE is selected, press the
ReConf softkey right after the conference call is split.
Cancel Conference.
If users decides not to conference after establishing the second call, press EndCall softkey instead
of the ConfCall softkey/CONF key;
This will end the second call and the screen will show the first call on hold.
End Conference.

Press HOLD key to split the conference call. The conference call will be ended with both calls on
hold; Or
Users could press the EndCall softkey or simply hang up the call to terminate the conference call.
Note:
The party that starts the conference call has to remain in the conference for its entire duration, you can
put the party on mute but it must remain in the conversation. Also, this is not applicable when the
feature "Transfer on Conference Hangup" is turned on.
The option "Disable Conference" has to be set to "No" to establish conference.
When using Easy Conference Mode, use SEND key to dial out the second call instead of using #,
even when # could be used as SEND in normal phone calls.
CALL FEATURES
The GXP2120/GXP2110/GXP2100/GXP14xx supports traditional and advanced telephony features
including caller ID, caller ID with caller Name, call forward and etc.