Embed Size (px)
Citation preview

MANUAL
www.dali.dk

udiophile oudspeaker ndustries
DALI is renowned among music lovers throughout the world for itsDALI is renowned among music lovers throughout the world for itsunique speakers and cables, all constructed and build for uncompro-mising design and sound requirements. Our ultra-modern factoryin Denmark is fully equipped with facilities for development andproduction of quality speakers.
Dali's principal competence is development and optimisation ofknown and new technology in the fi eld of audio and acoustics.The result is continuous development and optimisation of new andexisting models.
We always keep our goal fi rmly in view for each and every DALIspeaker: To recreate sound experiences in your home that will carryyou away, making you forget time and place...
It is important to us that your new DALI speakers are set up and con-nected optimally. This manual contains our recommendations forsetup, connection and maintenance.
Enjoy!
DALI A/S
2English
3English
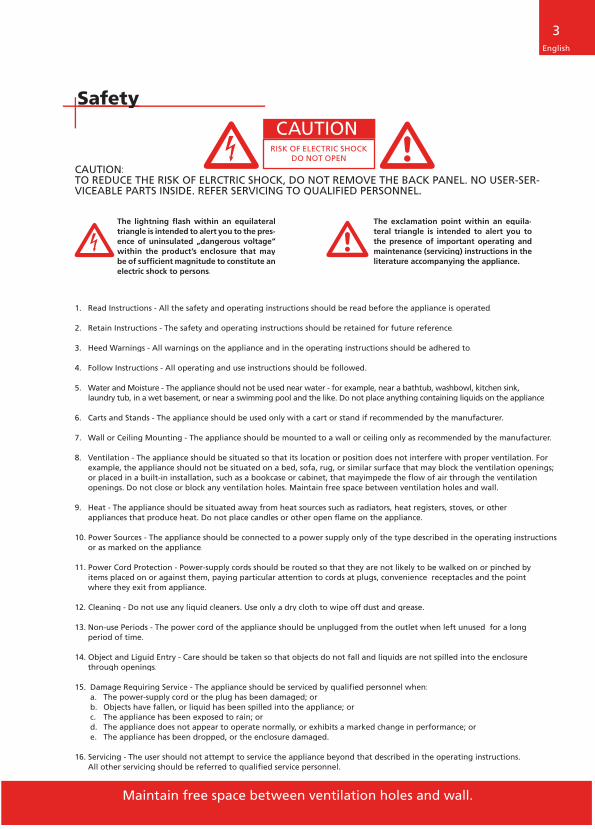
CAUTION:TO REDUCE THE RISK OF ELRCTRIC SHOCK, DO NOT REMOVE THE BACK PANEL. NO USER-SER-VICEABLE PARTS INSIDE. REFER SERVICING TO QUALIFIED PERSONNEL.
1. Read Instructions - All the safety and operating instructions should be read before the appliance is operated.
2. Retain Instructions - The safety and operating instructions should be retained for future reference.
3. Heed Warnings - All warnings on the appliance and in the operating instructions should be adhered to.
4. Follow Instructions - All operating and use instructions should be followed.
5. Water and Moisture - The appliance should not be used near water - for example, near a bathtub, washbowl, kitchen sink,laundry tub, in a wet basement, or near a swimming pool and the like. Do not place anything containing liquids on the appliance.
6. Carts and Stands - The appliance should be used only with a cart or stand if recommended by the manufacturer.
7. Wall or Ceiling Mounting - The appliance should be mounted to a wall or ceiling only as recommended by the manufacturer.
8. Ventilation - The appliance should be situated so that its location or position does not interfere with proper ventilation. For example, the appliance should not be situated on a bed, sofa, rug, or similar surface that may block the ventilation openings; or placed in a built-in installation, such as a bookcase or cabinet, that mayimpede the fl ow of air through the ventilation openings. Do not close or block any ventilation holes. Maintain free space between ventilation holes and wall.
9. Heat - The appliance should be situated away from heat sources such as radiators, heat registers, stoves, or other appliances that produce heat. Do not place candles or other open fl ame on the appliance.
10. Power Sources - The appliance should be connected to a power supply only of the type described in the operating instructions or as marked on the appliance.
11. Power Cord Protection - Power-supply cords should be routed so that they are not likely to be walked on or pinched by items placed on or against them, paying particular attention to cords at plugs, convenience receptacles and the point where they exit from appliance.
12. Cleaning - Do not use any liquid cleaners. Use only a dry cloth to wipe off dust and grease.
13. Non-use Periods - The power cord of the appliance should be unplugged from the outlet when left unused for a long period of time.
14. Object and Liguid Entry - Care should be taken so that objects do not fall and liquids are not spilled into the enclosure through openings.
15. Damage Requiring Service - The appliance should be serviced by qualifi ed personnel when: a. The power-supply cord or the plug has been damaged; or b. Objects have fallen, or liquid has been spilled into the appliance; or c. The appliance has been exposed to rain; or d. The appliance does not appear to operate normally, or exhibits a marked change in performance; or e. The appliance has been dropped, or the enclosure damaged.
16. Servicing - The user should not attempt to service the appliance beyond that described in the operating instructions. All other servicing should be referred to qualifi ed service personnel.
The lightning fl ash within an equilateral triangle is intended to alert you to the pres-ence of uninsulated „dangerous voltage“ within the product’s enclosure that may be of suffi cient magnitude to constitute an electric shock to persons.
The exclamation point within an equila-teral triangle is intended to alert you tothe presence of important operating andmaintenance (servicing) instructions in theliterature accompanying the appliance.
Safetyyy
CAUTIONRISK OF ELECTRIC SHOCK
DO NOT OPEN
Maintain free space between ventilation holes and wall.

4English
Congratulations on the purchase of your new DALI Concept speakers. In this manual, you can read about set-up, adjustment and maintenance of the Concept series speakers.
Manual
Free news letter from DALI
Sign up for the free e-mail news letter at www.dali.dk
Standard accessories
Floor-standing DALI Concept speakers comes with 4 spikes for fi ttingbeneath the speaker. It is extremely important that these spikes are fi ttedcorrectly to ensure speaker stability. Remember to tighten the lock nutwell once you have adjusted the height of the four spikes. Bookshelf and center speakers are supplied with self-adhesive rubber feetto ensure a stable and vibration-free set-up.
Clean the cabinets with a soft, dry cloth. If the cabinets are dirty, wipe witha soft cloth dipped in all-purpose cleaner and then well wrung out. Bevery careful when wiping the speaker membranes, as they are very fragile.Fabric frameworks can be vacuumed and wiped with a well-wrung, lint-free cloth and mild all-purpose cleaner
Maintenance
Use the enclosed spikes or rubber feet for a stable set-up.

5English
Always switch off your amplifi er before adjusting any of the cables!
Fig. 1. Stereo connection
Running-ingg
Like any other mechanical system, a speaker needs to be "run in", so youcan look forward to a gradual improvement in sound quality over the ini-tial period. Unlike other mechanical systems, a DALI speaker does not wearout - in fact, regular use will extend its lifetime.
Connection
The connection to your amplifi er is extremely important for your soundexperience.
Always turn off your amplifi er before connecting any cables or alteringany connections.
Always use cables of the same type and length for left and right speak-ers. We recommend using special speaker cables from DALI, available fromyour dealer.
For the perfect sound experience, the right speaker must be connected tothe output terminal marked "R" or "Right" on your amplifi er and the leftspeaker to the terminal marked "L" or "Left".
A detail that is often overlooked is connection in the correct phase, i.e. thered terminal (+) on the amplifi er should be connected to the red terminal
(+) on the speaker, and the black terminal(-) on the amplifi er should be connectedto the black terminal (-) on the speaker.(Fig. 1) If just one speaker in a stereo orsurround sound system is not connected inphase, the bass will be weak and the over-all sound will be diffuse.

6English
DALI recommends DALI White Wave cables for Concept series
The same guidelines apply irrespective of the number of speakers in yoursound system: speakers positioned to the right must be connected to theamplifi er output terminal marked "R" or "Right", and any to the left mustbe connected to "L" or "Left".
You must ensure that the cable ends arefi rmly pushed into the terminals, andthat there are no loose wires, whichcould cause a short circuit and damagethe amplifi er. (Fig. 2)
Fig. 2. Terminal connection
Once you have connected your new DALI Concept speakers, you need to begin the process of searching for the perfect location for the speakers in relation to your listening position - and adjusting the surround amplifi er, if applicable. It is worth spending a little time experimenting, as the cor-rect set-up and tuning will provide a signifi cantly better sound experience. Here are some useful pieces of advice:
Avoid placing objects between the speakers and your listening position, as obstructions can cause incorrect tonal balance.
Try to ensure that the distance between the left and right speakers is equal to the distance from your listening position to the speakers (Fig. 3). If you have surround sound, the distance between all the speakers should be sym-metrically identical.
Fig. 3. Stereo positioning
Positioninggg

7English
Even small changes in the listening room can affect the sound.
DALI Concept speakers has been designed using the Linear Directivity prin-ciple, which means that the tonal balance will be perfect, even if your lis-tening position is not quite central. It is not recommendable to angle the front speakers towards your listening position, unless the front speakers are very far apart.
Surround
Fig. 4. Surround setup
The Concept Center center channel loudspeaker is specially designed forplacement close to the large surface of a TV screen and can be placedabove or below the screen, to suit your needs. For both of these positions,we recommend that the speaker’s front edge be on a line with the TVscreen. Attachment of the enclosed rubber feet is recommended to ensurestable, non-resonant operation.
All DALI Concept models may be used as rear-channel loudspeakers. Ifyou wish to wall-mount your rear speakers, DALI Concept 1 is an excellentchoice, as it is factory-fi tted with mounting hardware.
For the ultimate surround experi-ence, a central listening positionis recommended, but, naturally,you can also enjoy fi ne surround,when not seated exactly in theideal “sweet spot” (Fig. 4).

8English
The DALI Concept series is also well-suited to a 7.1-channel surround set-up, as shown in Fig. 5.
Fig. 5. 7.1 - channel surround setup
Concept 1 is particularly suited to wall-mounting, a useful feature, for instance, when employed as rear loudspeakers in a surround system. Before wall-mount-ing, it is important to attach the enclosed rubber feet to the rear panel of the loudspeaker as shown below. The rubber feet ensure stable contact with the wall and create space for the loudspeaker cable.
Wall-Mounting Concept 1gg
Remember to attach the rubber feet when wall mounting Concept 1

9English
DALI Concept speakers are well suited for 5.1 or 7.1 surround systems.
Connecting Concept SUBg pg p
When you complement your stereo or surround sound system with the Suite series subwoofer, Concept SUB, with active crossover network and amplifi er, you have two different connection options: connection to a sur-round amplifi er subwoofer output terminal, or to a stereo amplifi er line output terminal.
Connection to surround amplifi er withseparate subwoofer output terminal (Fig. 6)
If you want to use Concept SUB for reproduction of the special subwoofer signal from a surround amplifi er with separate subwoofer output termi-nal, connect this to the LFE input terminal on Concept SUB.
If the LFE input terminal is selected, the crossover network in Concept SUB is not active. The LFE input terminal should therefore only be used together with a special subwoofer output terminal in which the signal has already been fi ltered, so the subwoofer only receives the lowest frequencies.
Fig. 6

10English
If in doubt: Ask your DALI dealer for advice.
Connection to a stereo pre-amplifi er (Fig. 7)
If you want to use Concept SUB to supplement the bass reproduction ofa stereo system, connect the subwoofer "Line in, Left/Right" to a stereosignal on the pre-amplifi er with full frequency content. The built-in cros-sover network in Concept SUB then ensures that the subwoofer only repro-duces the lowest frequencies (see section on adjustments on page 11).
In most cases you will achieve excellent results with one Concept SUB. It ispossible as a no-compromise stereo solution, or for reproduction of verypowerful sound pressure in a surround set-up in large rooms, to use twoConcept SUB. This solution is connected in the same way, but for stereoyou should only connect the left-hand channel to one input terminal onthe left-hand Concept SUB and the right-hand channel to one input termi-nal on the right-hand Concept SUB. For a surround set-up, parallel the LFE-inputs of the two Concept SUB. In all other respects, follow the instructionsabove - but use separate channels. You may wish to consult your dealer.
Note: When using two Concept SUB, the best results are normally achie-ved by positioning the two subwoofers relatively close to each other (1 - 2metres).
Fig. 7

11English
Placing Concept SUB in a corner will increase the bass level considerably.
Tuning of Concept SUBg pg p
Once you have chosen the set-up and connection you are going to use, andhave positioned the subwoofer in the desired spot, you can begin the taskof tuning the system. Please note that the actual location of the subwoofergreatly affects its contribution to the total acoustic image. For example,if you put Concept SUB in a corner, the bass will be considerably strongerthan if it had been placed midway between two corners.
You can use the procedure below to achieve excellent results. Use a pieceof music you know well, preferably containing rhythmic bass tones such asbass drum, electric bass or similar.
Begin by setting "Volume" and "Crossover" to the middle position ("12o’clock"). Place the "Phase" switch in the 180° position, and set both"Auto" and "Power" to the "ON" position.
1. Mains lead
2. Power, on/off switch
3. On/off indicator
4. Auto Stand-by
5. Fuse
6. Volume, volume control
7. Phase, 0˚ og 180˚ phase switch
8. Crossover frequency
9. Heat sink, DO NOT COVER!
10. LFE input
11. Stereo Line level, Line signal1 2
3 44
5
67 8
99
10
11
Setting level
Adjust the volume on your Concept SUB so the bass sound matches the level from the front speakers. Adjust it so that you can hear the sound contribution

12English
Take your time adjusting Concept SUB - it is well worth the effort.
from Concept SUB - but without the bass being too dominant. The bass shouldbe fi rm and precise, so that the subwoofer provides the bass that is present inthe music/sound track - neither more nor less. When connecting to a surroundsound system it may be an advantage to select a fi xed setting for Concept SUBand only adjust the level via the surround amplifi er’s separate adjustment of the subwoofer output level. If you over-modulate the subwoofer, your totalsound experience may be disturbed by distortion. Remember that the locationof Concept SUB has a major effect on the sound pressure you experience.
Choice of crossover frequency (with connection via "Line In, Left/Right")
Once the volume level is set you can tackle the equally important adjustmentof the crossover between the front speakers and Concept SUB. You do thisby adjusting "Crossover" up and down until you can hear the bass is smoothand without "holes". You may need to readjust the volume slightly for thisadjustment.
Phase setting
Use the trial-and-error method for both settings - and you may also want totry readjusting volume and crossover frequency. In all cases it is a good ideato listen to the system for a couple of days and then readjust as required. Thesame setting will not always be ideal for both surround and 2-channel stereo.It is therefore always useful to make a note of your preferred settings for eachapplication.
The "Auto" function sets Concept SUB to stand-by mode after approximately 15 minutes with no signal to the input terminal. When Concept SUB receives asignal again, the system will switch on automatically.The "Power" button is the main switch for the system. It is best to switch thesystem off completely when it is not going to be in use for long periods. Whenmaking or changing connections, always shut the system down completely.
Overloading
If Concept SUB is intensely overloaded, the built-in safety circuit may com-pletely disconnect the subwoofer. If this happens, turn down the volume and turn off SUB for a moment before turning it on again.

13English
You can infl uence the acoustics of your listening room in many ways.
Every room has its own distinctive acoustics, which infl uence the way weexperience the sound from a speaker. In actual fact, it's a matter of howthe room accommodates the sound and then dampens it. You can infl u-ence the acoustics of your listening room in various ways.
Some of the sound you hear comes not from the actual speakers but fromrefl ections from fl oor, ceiling and walls. These refl ections are dampenedby objects such as furniture, plants and carpets. If the sound is bright, softitems such as curtains and carpets can help. If the room has large windowpanes, drawing the curtains will prevent refl ections from the glass sur-faces.
Both the amount and quality of the deep bass depend on the size andshape of the room, and the position of the speakers. If positioned neara side or back wall, this will accentuate the bass. A corner location willaccentuate it even more, but will also increase the refl ections. The decisionis yours, so experiment with different positions to fi nd which provides theideal sound for you.
As a basic rule, try to avoid large, hard and refl ective areas in the imme-diate vicinity of your loudspeakers. In the same way that a mirror refl ectslight, they will refl ect sound from the speakers in almost full strength butwith a slight delay due to the relatively low speed of sound. This will dis-turb the precision and spacial effect of sound reproduction. Try hanging asoft textile surface behind the speaker, place a rug in front of it, or placea large plant to the side and experience the surprisingly large effect doingso will have on the quality and precision of the sound.
Once you are happy with the positioning of your speakers, it is importantto ensure that they are completely stable. For fl oor models it is essentialthat you use the accompanying spikes.
The listening roomgg

14English
DALI recommends that the tone controls are set to neutral position.
Power and acoustic pressure
How loud a speaker is able to play and still sound good is completely dependent on the signal it has to reproduce. So, in practice, you cannot defi ne an unequivocal level for use in comparing different speakers.
Obviously, lots of pure, undistorted outputfrom a large amplifi er is better than a distortedsignal from a small amplifi er stretched beyondits capacity. The signal from a distorting (clip-ping) amplifi er contains much more high-frequency information than an undistortedsignal, and therefore puts a heavy strain onthe tweeter. Consequently, speakers are mostoften damaged by small amplifi ers having towork too hard - and very rarely by large ampli-fi ers, which are practically running idle.
It is worth noting that when the tone controlsare turned above the neutral setting this signi-fi cantly burdens both speakers and amplifi er. On a good sound system tone controls should only be used to compensate for poor recor-dings and not to permanently compensate for weaknesses elsewhere in the system. So, DALI recommends that the tone controls generally be set to the neutral position, and you achieve your desired sound image through correct positioning of the speakers.
Ensuring that you keep the volume low enough so the sound remains clear and undistorted will minimise the strain on both speakers and amplifi er.
Enjoy your new DALI speakers!
15English
DALI - more than meets the eye
Your DALI speakers have been designed on the basis of a long successionof technical solutions based on many years' intensive development work.Most of this is not seen - but it can be heard and experienced, including:
An even frequency response ensures that your DALI speakers reproduceall tones and kinds of music faithfully and without emphasis.
Sound distribution and correct timing are among DALI's specialities, asall DALI speakers are designed for optimum performance in a real homeenvironment and not just in a specially-constructed listening room. Theperfect timing in the sound reproduction ensures that a light beat on asnare drum, for example, is reproduced as the light, sharp tap that it reallyis - without the drums fi lling and muddying the sound image.
Low loss in movable parts means that the speakers can reproduce veryfi ne details, even at low sound levels.
Internal cables and crossover networks are an important but frequently-overlooked point. The internal cables and crossover networks in your DALIspeakers are - like every component - high quality.
The loudspeaker units in your DALI speakers have been developed basedon our ultimate sound requirements. This ensures that the most delicatedetails, such as a harp string or a puff of air, will be reproduced just asconvincingly as the powerful sound of a car door slamming etc.
At DALI the cabinet is both a piece of furniture and the speaker's soundbase, and is therefore constructed from acoustically-correct materials.As with all the other components, the cabinets undergo a rigorous fi nalinspection, guaranteeing that only perfect speakers are labeled with theDALI name.

16English
Specifi cationspp
There are countless methods measuring speakers. However, none of themactually represent how a speaker really sounds. Only by listening it is pos-sible to determine whether one speaker sounds better than another. Sowe only give you the specifi cations that are of real value to you. The DALIConcept range has been designed to reproduce music as honestly as pos-sible - and we know we have succeeded. Enjoy your new speakers!
Concept 1Concept 1 Concept 2Concept 2 Concept 6Concept 6 Concept 8Concept 8 Concept 10Concept 10 Concept CenterConcept Center
Frequency Response [Hz] 62.5-22500 43-25000 41-25000 41-25000 35-25000 72-22500
Crossover Frequency [Hz] 3000 3000 3000 610 / 3500 600 / 3200 2500
Sensitivity (2,83V/1m.) [dB] 87 87 91 90 91 91
Nominal Impedance [Ohm] 8 8 8 6 6 8
Maximum SPL [dB] 106 108 110 112 114 109
Recommended Amp. Power (8 Ohm) [Watt] 25-100 40-120 30-150 40-160 50-200 25-120
High Frequency Driver 1 x 1" 1 x 1" 1 x 1" 1 x 1" 1 x 1" 1 x 1"
Midrange Driver - - - 1 x 5" 1 x 6½" -
Low Frequency Driver 1 x 5" 1 x 6½" 2 x 6½" 2 x 8" 2 x 10" 2 x 5"
Bass Refl ex System Resonanse [Hz] 58.5 42.5 38.0 36.5 29.5 55.0
Dimensions (H x W x D) [cm]
Dimensions (H x W x D) [inch]
31x17x19
12.2x6.7x7.5
39x20x26
15.4x7.9x10.2
93x20x26
36.5x7.9x10.1
103x25x36
40.5x9.8x14.0
113x30x42
44.4x11.8x16.3
16x50x23
6.3x19.7x8.9
Weight [kg]/[lb.] 4 / 8.8 6.3 / 13.9 14.2 / 31 25 / 55 34 / 75 6.6 / 14.5
Wave DALI cables for DALI speakers.
Concept SUBConcept SUB
Design Principle Active, built-in amplifi er and crossover, sealed enclosure
Low Frequency Driver 1 x 12" air-dried pulp cone
Amplifi er 160 Watt RMS
InputsStereo line signal input RCA, input impedance 20 k
LFE Line signal input RCA, input impedance 35 k
Controls Volume level, lowpass crossover 50 - 170 Hz, phase ( 0 or 180˚)
Frequency Response 29-170 Hz
Maximum SPL 110 dB
Power Consumption 115/230 VAC, 50 - 60 Hz, 330 Watt
Dimensions (H x W x D) [cm]
Dimensions (H x W x D) [inch]
41x38x42
16.2x15.0x16.6
Weight [kg]/[lb.] 21.2/46.7