Embed Size (px)
Citation preview

AIRSHIELD PRO
VISOR APPROVAL Z87+ HIGH IMPACT
AIR CIRCULATING FACE SHIELD
Please read these instructions before use.

AIR/PRO - USA
-1-
Dear Customer
Thank you for purchasing this Trend product, we hope you enjoy many years of creative and productive use.
Please remember to return your guarantee card within 28 days of purchase.
CONTENTS
INTRODUCTION ______________________ 1 SUITABILITY FOR USE ________________ 2 APPROVALS ________________________ 3 TECHNICAL DATA ____________________ 3ELECTRICAL SAFETY ______________4 - 5ADDITIONAL PRECAUTIONS ___________ 6ITEMS ENCLOSED ____________________ 6 DESCRIPTION OF PARTS ______________ 7ASSEMBLY, ADJUSTMENT & OPERATION - Battery Pack Charging and Installation ____ 8 - Visual Inspection _____________________ 9 - Functional Test ______________________ 9- Low Battery Warning __________________ 9- Fitting Procedure ____________________ 10 - Removing Faceshield ________________ 10 - Ear Defender Clips __________________ 10ACCESSORIES _____________________ 11MAINTENANCE & CARE ______________ 11 - Routine Checks _____________________ 12 - Storage ___________________________ 12 - Transportation ______________________ 12REPLACEMENT SPARE PARTS ________ 13 - Battery Pack _______________________ 13 - Air Filter ___________________________ 14 - Face Seal _________________________ 14 - Visor _____________________________ 15 - Headband _________________________ 15- Visor Overlay _______________________ 15 - Fan Motor Unit _____________________ 16 - Electronics Unit/Switch Housing ________ 16ENVIRONMENTAL PROTECTION _______ 17 GUARANTEE _______________________ 18SPARE PARTS ______________________ 19- Spare Parts List ____________________ 19- Spare Parts Diagram ________________ 20
The following symbols are used throughout this manual: Denotes risk of personal injury, loss of
life or damage to the tool in case of non-observance of the instructions in this manual.
INTRODUCTION
The Airshield Pro (AIR/PRO) is a lightweight powered unit intended for full eye and face protection from solid dust, impact and chemical liquid splash.
The Airshield Pro protects the users eyes and face from small debris such as wood particles or wood shavings.
The Airshield Pro is powered by a rechargeable battery pack held inside the unit. Air is filtered through the unit to provide a constant flow of clean air over the face. A face seal ensures that positive pressure is maintained within the unit.
The Airshield Pro has an adjustable headband and concussion cradle, ensuring a comfortable fit for most head sizes.
Wide range of applications including - woodworking, pottery, craft design and technology, DIY and building maintenance, food preparation and processing, fitting and application of insulation, dental laboratories, horticulture and pest control.
Read this manual before using the Airshield Pro. It must be fitted and used in accordance with this manual to obtain the design performance. Use as part of your maintenance program.
Denotes risk of electric shock.
For Technical Support Email: [email protected]
Carefully read through this entire instruction
Manual before using your new AIR/PRO. Pay close attention to the Safety section and the Safety Symbols. If you use your AIR/PRO properly and only for what it is intended, you will enjoy years of safe, reliable service.
Caution

AIR/PRO - USA
-2-
In the power-off state there will be a rapid build up of carbon dioxide and depletion of oxygen may occur.Without the face seal fitted no respiratory protection is to be expected. At very high work rates and peak inhalation the pressure flow in the device may become negative.
Ophthalmic spectacles may transmit impacts from high-speed particles, thus creating a hazard to the wearer.
Leave the contaminated area immediately if any of the following conditions apply:
The buzzer sounds.
Any part of the AIR/PRO becomes damaged.
Airflow into the AIR/PRO decreases or stops.
Breathing becomes difficult.
Dizziness or other physical distress or irritation occurs.
The user tastes or smells contaminants.
Never modify or alter this product, except as directed in the service tasks contained in these instructions.
Some fabric parts of the AIR/PRO which
could cause allergic reactions to susceptible individuals.
SUITABILITY FOR USE
This visor must be used strictly in accordance with these instructions. Do not use the AIR/PRO visor for protection against unknown atmospheric contaminants or when concentrations of contaminants are unknown or immediately dangerous to life or health, or in atmospheres likely to be deficient in oxygen.
Only use this AIR/PRO with the parts and accessories listed in these instructions.
The AIR/PRO is only for use by trained, competent personnel. In the power-off state little or no respiratory protection is to be expected, and this is considered to be an abnormal situation.
Not to be used if the contaminate
is potentially explosive or highly
flammable.
Please read the operating instructions
carefully and keep them together with
the AIR/PRO.
Before use fully charge the battery for
24 hours.
TransportationFor transportation purposes use the carry bag provided and protect the unit from physical or chemical damage.
Head Protection: This is NOT an industrial safety helmet.
WarningThe TREND AIRSHIELD PRO is not a RESPIRATOR nor a NIOSH approved device. Using the power visor against harmful substances may result in sickness or death. This filter will not protect your lungs against harmful vapors or toxic fumes. Misuse may result in sickness or death. For proper use, read instruction manual.
Use for:Relief from the bothersome effects of the common nuisance dusts. Provides limited eye and face protection. Users must evaluate their specific eye and face hazards and choose appropriate protective equipment such as safety glasses.
Do not use for:Protection from harmful dusts, mists, fumes or vapours. Professional/occupational applications where NIOSH approved respiratory protection is required.

AIR/PRO - USA
-3-
Battery
Type: Ni-MH
Voltage 3 Cell, nominal 3.6V
Capacity 3.5Ah
Life 8 hours (fully charged battery pack fitted)
Charging method/rate Mains Charger 14 hours from fully discharged.
Weight 0.42 lbs
Charger
Mains voltage: 120V
Consumption 4W nominal
No load output 12VDC
Nominal output 4.2V 300mA
IP20 Indoor use only EN 60335-1, 60335-2-29
Weight 0.44 lbs
Voltage 12V
Head size 20 1/2” to 24
1/2”
Protection factor Assigned (APF) 20
Motor sound level 70db
Weight: 2.21 lbs nominal
Temperature range: Charging +41°F to +104°F Use -23°F to +104°F Storage +41°F to +104°F
Airflow: Initial 7.06 cf/min (clean filter, fully charged battery)
Minimum 5.6 cf/min
Humidity 0-90% storage and use (Store out of direct sunlight)
Pressure Storage 80Kpa to 130Kpa Use 80Kpa to 130Kpa
APPROVALS
The Trend Airshield Pro has been tested to ANSI Z87.1 by ICS Laboratories, 1072 Industrial Parkway, Brunswich, Ohio 44212.
The visor, when fitted to the unit gives protection as detailed below:- ANSI Z87+ HIGH IMPACT Note that contact of the visor with your skin will not cause allergic reactions under normal conditions. It is unlikely that any contact will occur in normal conditions of use.
The frame is marked:- Trend Routing Technology Airshield ANSI Z87+ HIGH IMPACT Size range 6 - 3/8” - 7-3/4” Year of manufacture
Respiratory Protection (Reference Only): BS EN 12941:1999, respiratory devices, powered filtering devices class TH2P. For use against solid particulates only.
Eye Protection:ANSI Z87+ HIGH IMPACT.
TECHNICAL DATA
Type: Powered AIR/PRO.
This unit does not carry any respiratory approvals in North America. Record keeping should be in accordance with OSHA.

AIR/PRO - USA
-4-
Power Supply
The charger has been designed for one voltage only. Always check that the power supply corresponds to the voltage on the rating plate.
The charger is double insulated.
ELECTRICAL SAFETY
Never connect to a light socket. Never
connect the live (L) or neutral (N)
wires to the earth pin marked E or .
Safety Instructions for
Battery Charger
Before using charger, read all instructions and cautionary marking on charger, battery pack, and AIR/PRO. Only charge your batteries indoors as the charger is designed for indoor use only.
120 volts present at charging
terminal. Do not probe with
conductive objects. There is a danger
of electric shock.
If battery pack case is cracked or
damaged, do not insert into charger.
There is a danger of electric shock.
The charger and battery pack is specially designed to work together. DO NOT attempt to charge the battery pack with any other chargers.
Do not expose charger to rain or snow.
The charger is not intended for any uses other than charging AIR/PRO rechargeable batteries. Any other uses may result in risk of fire, electric shock or electrocution.
To reduce risk of damage to the charger, pull by charger body rather than cord when disconnecting charger from power supply.
Make sure cord is located so that it will not be stepped on, tripped over, or otherwise subjected to damage or stress.
An extension cord should not be used.
The charger is ventilated through slots in the housing. Do not place any object on charger that might block the ventilation slots and result in excessive internal heat. Place the charger in a position away from any heat source.
Do not operate charger with damaged cord or plug - have them replaced immediately.
Do not operate charger if it has received a sharp blow, been dropped, or otherwise damaged in any way.
Do not disassemble charger. Incorrect reassembly may result in a risk of electric shock, electrocution or fire.
To reduce risk of electric shock, unplug charger from outlet before attempting any cleaning. Removing the battery pack will not reduce this risk.
NEVER attempt to connect two chargers together.
DO NOT store or use the tool and battery pack in locations where the temperature may reach or exceed 104ºF (such as outside sheds or metal buildings in summer).
The charger is designed to operate on standard household electrical power. Do not attempt to use it on any other voltage!
Safety Instructions for
Battery Packs
The battery pack is not fully charged when first purchased. First read the safety instructions below, then follow charging notes and procedures.
Do not incinerate the battery pack even if it is severely damaged or is completely worn out. The battery pack can explode in a fire.

3. If charging problems persist, take or send the tool, battery pack and charger to your dealer.
DO NOT CONTINUE to use if the battery pack does not charge properly.
Always unplug the charger from the power supply when there is no battery pack fitted. Unplug charger before attempting to clean.
Do not freeze or immerse charger in water or any other liquid.
Do not allow any liquid to get inside
charger. Electric shock may result.
To facilitate the cooling of the battery
pack after use, avoid placing the
charger or battery pack in a warm
environment such as in a metal shed,
or an un-insulated trailer.
Never attempt to open the battery
pack for any reason. If the plastic
housing of the battery pack breaks or
cracks, do not use it.
Read all of the instructions in the
battery charger section of this manual
before attempting to charge the
battery pack for the AIR/PRO.
Always use correct battery pack (pack supplied with tool or exact replacement pack). Never install any other battery pack as it will damage the AIR/PRO and may create a hazardous condition.
AIR/PRO - USA
-5-
A small leakage of liquid from the battery pack cells may occur under extreme usage or temperature conditions. This does not indicate a failure. However, if the outer seal is broken and this leakage gets on your skin:
a. Wash quickly with soap and water.
b. Neutralize with a mild acid such as lemon juice or vinegar.
c. If battery liquid gets into your eyes, flush them with clean water for a minimum of 10 minutes and seek immediate medical attention.
Never attempt to open the battery pack for any reason. If the plastic housing of the battery pack breaks or cracks, immediately discontinue use and do not recharge it.
Do not carry extra battery packs in aprons, pockets, or toolboxes along with metal objects. Battery pack could be short-circuited causing damage to the battery pack and possibly causing severe burns or fire.
Charge the battery packs only in a Trend AIR/PRO charger.
Do not charge the tool in a damp or wet environment.
Longest life and best performance can be obtained if the battery pack is charged when the air temperature is between 64.5°F and 75°F. DO NOT charge the battery pack in an air temperature below 41°F, or above 104°F. This is important and will prevent serious damage to the battery pack.
The charger and battery pack may become warm to touch while charging. This is a normal condition, and does not indicate a problem.
To prevent overheating, do not cover the charger and do not charge battery packs in direct sunlight or near heat sources.
If the battery pack does not charge properly:-
1. Check the main supply socket by plugging in a lamp or other appliance.
2. Move charger and battery pack to a location where the surrounding air temperature is approximately 64.5°F and 75°F.

ADDITIONAL SAFETY
PRECAUTIONS FOR
AIR/PRO
Protective Equipment should be stored in a cool dry place.For adequate protection the AIR/PRO must fit or be adjusted to the size of the head.DO NOT clean with proprietary cleaning media or solvents, follow the instruction in manual. DO NOT apply paint, solvents, adhesives or self-adhesive labels which are not approved by Trend.DO NOT use AIR/PRO without filters fitted, with damaged seals and/or damaged visor.DO NOT use replacement parts except those supplied by Trend.To maintain the full efficiency of the AIR/PRO, there must be no alteration to the structure or
Toxic Dusts on the AIR/PRO or filters from usage should be handled in a safe manner in accordance with your chemical or material suppliers instructions. Used filters to be disposed of safely in the same manner.
If further information is required with regards to the AIR/PRO, please contact Trend.
AIR/PRO - USA
-6-
Charge the battery pack before use.
Ensure the AIR/PRO is correctly
assembled with the filter and a fully
charged battery pack.
ITEMS ENCLOSED
1 x Airshield Pro complete
1 x Airflow indicator
1 x Pair THP2 filters
1 x 8 Hour rechargeable battery
1 x Disposable visor overlay - clear (may be already fitted)
1 x Battery charger
1 x Pair ear defender clips (for Trend accessory Ref. AIR/P/6 only)
1 x Carry bag
1 x Instruction manual
1 x Guarantee card

AIR/PRO - USA
-7-
DESCRIPTION OF PARTS
A. Cover
B. THP2 Filter
C. Battery pack
D. Head cover & face seal
E. Switch and contact assembly
F. Motor
G. Visor lock knob
H. Head band assembly
I. Brow comfort pad
J. Visor
K. Visor overlay
L. Airflow indicator
M. Charger
N. Carry bag
O. Ear defender clip
P. Crown strap
Q. Headband knob

Charger must be disconnected from the
mains supply when not in use.
After the charging period, remove the charger from the AC supply socket. An accessory external remote battery charger cradle Ref. AIR/P/7 is also available.
Remote Battery Cradle Accessory
Ref. AIR/P/7
Remove battery pack from the AIR/PRO.
Fit the charger connector into the socket in the remote battery cradle. Connect charger to a mains AC supply.
Fit the battery into the cradle. The LED lights up to red. When charging completed LED will change to green.
After charging of battery, switch off the mains AC supply, remove the battery from the cradle and remove charger connector from the cradle.
AIR/PRO - USA
-8-
Slide the battery pack into its housing as shown below.
Fit the battery charger connector into the rear of the electronics unit and connect the charger to a mains AC supply.
After charging switch off the mains AC supply, remove the charger connector from the AIR/PRO.
Battery packs should be initially charged for 24 hours and 14 hours thereafter when fully discharged. Full working capacity of the battery will not be achieved until the battery has been through 3 or 4 complete charging cycles. Please note the light will not extinguish when a full charge has been achieved.
connected LED illuminates as green to show a live circuit. When connected to an under charged battery, in helmet or battery cradle, the LED changes to red. When battery charging is complete, the LED changes back to green and battery is on a
about 14 hours (overnight) to fully charge a battery.
The AIR/PRO has a pre-use and low battery audio signal. Leave the contaminated area if the buzzer sounds.
Battery Pack ChargingASSEMBLY, ADJUSTMENT
& OPERATION
Battery Pack InstallationThe AIR/PRO is supplied with one rechargeable battery pack for eight hours duration.
Battery pack must be initially
charged for 24 hours.
Check that the voltage shown on the charger is suitable for the mains supply. A thermal fuse protects the charger against short circuiting and overloading.
Lift the cover by pressing the forward side tabs inwards and rotating the cover rearwards as shown below:
Refit cover ensuring tabs lock the cover in position.
AIR/PRO - USA
-9-
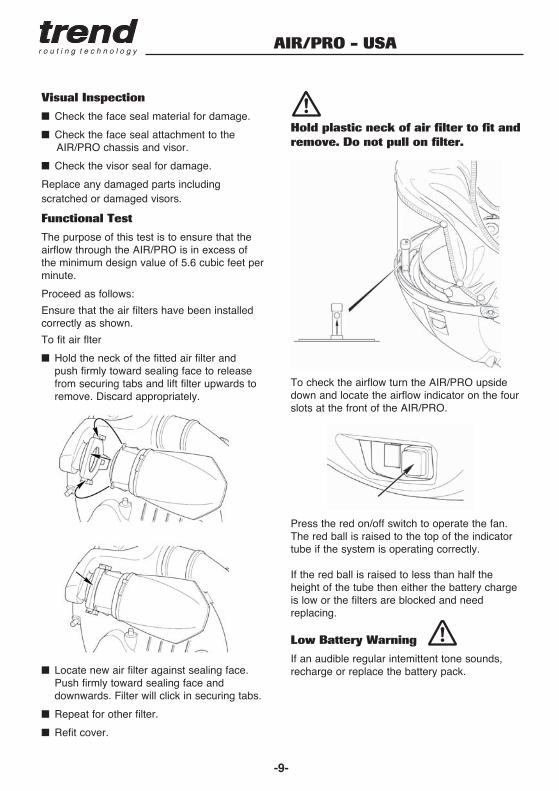
Press the red on/off switch to operate the fan. The red ball is raised to the top of the indicator tube if the system is operating correctly.
If the red ball is raised to less than half the height of the tube then either the battery charge is low or the filters are blocked and need replacing.
Low Battery Warning
If an audible regular intemittent tone sounds, recharge or replace the battery pack.
To check the airflow turn the AIR/PRO upside down and locate the airflow indicator on the four slots at the front of the AIR/PRO.
Visual Inspection
Check the face seal material for damage.
Check the face seal attachment to the AIR/PRO chassis and visor.
Check the visor seal for damage.
Replace any damaged parts including scratched or damaged visors.
Functional Test
The purpose of this test is to ensure that the airflow through the AIR/PRO is in excess of the minimum design value of 5.6 cubic feet per minute.
Proceed as follows:
Ensure that the air filters have been installed correctly as shown.
To fit air flter
Hold the neck of the fitted air filter and push firmly toward sealing face to release from securing tabs and lift filter upwards to remove. Discard appropriately.
Locate new air filter against sealing face. Push firmly toward sealing face and downwards. Filter will click in securing tabs.
Repeat for other filter.
Refit cover.
Hold plastic neck of air filter to fit and
remove. Do not pull on filter.

Ensure that the face seal around the chin and sides is pulled away from the frame and visor
and not towards it.
Check the fit of the face seal in a mirror and/or run a finger around the line of the face
seal to ensure contact.
At very high work rates, the pressure
within the AIR/PRO may momentarily
become negative at peak inhalation.
Vacate the contaminated area
immediately if the airflow is reduced
or stops, or the low battery warning
buzzer sounds.
If protective clothing is worn,
ensure the bottom of the visor is not
obstructed.
Removing Procedure
Vacate from the contaminated area
before removing the AIR/PRO.
Ear Defender Clips
Please refer to instructions supplied with accessory ref. AIR/P/6 for fitting defender clips and ear defenders to the AIR/PRO.
AIR/PRO - USA
-10-
Fitting Procedure
The crown strap has a soft pad that needs to be removed before adjustment. Adjust the
crown strap length on the headband so that the headband rests against brow.
Crown strap adjustment is made by pulling the tab out of the strap and placing the pin into the next suitable hole, once set replace pad.
Adjust headband diameter by pulling out knob and rotating for head size, push the knob in to secure as shown.
Ensure face seal is above the ears. Check that the face seal is taut so that there are no
gaps between mask and face as shown.
Switch on the fan/motor by operating the red on/off switch.
Adjusting the height will affect the fit around the chin.
Adjusting the face seal will affect the fit at the sides.
Ensure face seal is above the ears.
Raise the visor and switch the fan motor off.
Pull out the knob to release headband and lift the AIR/PRO from the head.
After finishing using the AIR/PRO follow the maintenance procedure.

AIR/PRO - USA
-11-
ACCESSORIES
Please use only Trend original accessories.
Ref. AIR/P/1 THP2 filter pack (pair)
Ref. AIR/P/3C Visor overlay - clear (pack of ten)
Ref. AIR/P/4 8 hour battery
Ref. AIR/P/5/L/USA 120V charger
Ref. AIR/P/6 Ear defenders (pair)
Ref. AIR/P/7 Remote battery charger cradle
Ref. AIR/WIPE Airwipes (100 wipes)
Ref. WP-AIR/05/USA Sweatband available for users with smaller craniums.
MAINTENANCE AND CARE
AIR/PRO Cleaning
After using the AIR/PRO follow the procedure below:
AIR/PRO should not be cleaned with
compressed air, solvents, sterilising
by heat or autoclaving, as this will
cause damage.
Precautions are to be taken to
prevent inhalation of harmful dust
or contaminant on the surface or
retained on the filters.
Carefully remove bulk contamination from the AIR/PRO and wipe down with a damp cloth
containing a mild detergent solution.
Gamma sterilisation is effective
but causes embrittlement of plastic
components and is not recommended.
Replace if deficient after the following checks.
1. Excessive abrasion and scratches on the visor.
2. The face seal for its seal to the visor and for holes.
3. Fit and fastenings to the headband.
Scratched or damaged visor may not
offer full protection and therefore
should be replaced.
Specific Instructions for Cleaning
and Disinfection of Visor
Clean with a damp cloth – do not use hydrocarbons, chemicals, cleaning fluids or solvents on the visor. If necessary, a mild solution of washing-up liquid and warm water may be used.
Clean and sterilise all parts by wiping down the visor, face seal and headband with visor
wipes (ref. AIR/WIPE) (Sodium Hypochlorite or Ethylene Oxide Gas have also been proved effective).
Do not immerse the AIR/PRO in water or any other fluids.
Do not use organic solvents or abusive cleaning agents on any part of the the
equipment.
After cleaning carry out the functional test.
Charger Cleaning
Dirt and grease may be removed from the exterior of the charger using a cloth or soft
non-metallic brush. Do not use water or any cleaning solutions.
Disconnect the charger from the AC
outlet before cleaning.
Lubrication
Your AIR/PRO requires no additional lubrication.

AIR/PRO - USA
-12-
This manual contains relevant guidance on routine maintenance; however, you may wish to introduce additional checks as required by OSHA. The following table shows the frequency of these checks.
Operation Frequency
Clean Internally and Externally DailyVisual Inspection DailyCharge Battery Pack/Packs DailyFunctional Test* Daily, Weekly and Monthly
* Remarks: Dust from wood, grain and cement may require more frequent replacement of the filter. No filter should be left in the hood/helmet for more than 1 month if in daily use or 3 months if used infrequently.
Routine Checks
The expected life of the visor is approximately 3years if well maintained and cleaned. (Care mustbe taken not to scratch the visor).
Storage
The AIR/PRO should be placed in the carry bag, stored within a temperature range of 41°F to 104°F and out of direct sunlight.
Replacement filters are to be left in air sealed bags and expiry dates to be checked regularly.
Transportation
The complete AIR/PRO should be transported in the carry bag provided. Good quality commercial packing should be used.
Symptom Cause Remedy
Reduced Cover air holes blocked Clear air flows
Filters clogged Fit a new filter
Battery flat Recharge battery or fit recharged battery pack
No airflow Unit switched OFF Press switch to ON
Switch faulty Replace switch housing
Battery pack not fitted Fit a fully charged battery pack
Battery pack discharged Fit a fully charged battery pack
Fan-motor unit failure Fit a replacement fan-motor unit
Airflow

AIR/PRO - USA
-13-
REPLACEMENT OF SPARE
PARTS
Battery Pack
Lift the cover by pressing the forward side tabs inwards and rotating the cover rearwards as shown below.Replacement parts and accessories supplied
by Trend should only be used. The use of accessories not supplied by Trend will not be guaranteed and invalidate such National approvals as held by Trend. Modifications to the AIR/PRO will make the approvals invalid and the use illegal under National Laws and Guidance.
Trend replacement parts and accessories, must only be used with the AIR/PRO.
Slide the battery pack out of its housing.Replace with new battery.Refit cover ensuring tabs lock the cover in position.

AIR/PRO - USA
-14-
Hold the neck of the fitted air filter and push firmly towards sealing face to release from securing tabs and lift filter upwards to remove. Discard appropriately.
Face Seal
Replace the face seal as shown.
Starting from the center of the visor, pop up studs on face seal. Release from front of helmet.
Precautions are to be taken to
prevent inhalation of harmful dust
or contaminant on the surface or
retained on the filter and inside the
cover.
Unfasten the crown strap on the headband and release elastic loops on each side.
Pull face seal over the headband knob and remove face seal from AIR/PRO.
Tuck edge strip of new face seal under headband and secure and close tape of AIR/PRO. Slip the elastic loops over headband knob and secure to visor pop studs.
Face seals should be stored out of direct sunlight and replaced at least every 5 years.
Air Filter
To replace air filter, lift the cover as shown.
Locate new air filter against sealing face. Push firmly toward sealing face and downwards. Filter will click in securing tabs.
Repeat for other filter.
Refit cover

AIR/PRO - USA
-15-
Headband
Remove face seal and visor as shown.
Install a new headband assembly as shown.
Visor Overlay
Peel away visor protector and ensure visor surface is clean.
Peel the backing paper from adhesive strips on replacement visor protector. Position centrally onto visor surface, press down adhesive strips and remove protective paper.
Release nuts and screw and remove the headband from the helmet.
Assemble anti-rotating cap and screw retainer to headband noting that anti-rotating caps are
Position the headband in the helmet ensuring that the tabs on the anti-rotating cap locate in the helmet.
Fit screws through retainer, anti-rotating cap and visor secure with nuts.
Visor
Remove the seven face seal pop studs from visor.
Replace the old or damaged visor assembly as shown.
Release nuts and push screws inwards, release the front tab and lift visor from the helmet.
Fit replacement visor ensuring slot in visor locates on tab and bottom edge in grooves, secure with screws and nuts.
Fit visor stiffener wire. Insert the wire ends into the outer slots provided and rotate to engage securely in the center slot.
Visors should be stored out of direct sunlight and replaced at least every 5 years.
1
2
3

AIR/PRO - USA
-16-
Fan-Motor Unit
Lift the cover. Replace fan/motor assembly as shown below:
Disconnect fan/motor electrical lead from the electronics unit.
Remove the two screws securing the front air duct. Lift the air duct from locating lip and pull fan/motor from rear air duct. Separate fan/motor from front air duct.
Fold back both seals on replacement fan/motor assembly. With electrical lead point downwards locate with front air duct and secure by unfolding seal over duct.
Connect electrical lead to electronics unit.
Locate front air duct in lip and fan/motor with rear air duct, tuck excess cable under fan/motor unit and unfold seal to secure. Secure air duct with screws.
Ensure both seals are fully engaged with ducts and are fully unfolded, failure to do so may compromise the units performance.
Electronics Unit / Switch Housing
Lift the cover and replace the electronics unit as shown below.

AIR/PRO - USA
-17-
ENVIRONMENTAL PROTECTION
Recycle raw materials instead of disposing as waste.
Accessories and packaging should be sorted for environmentally-friendly recycling.
Separate collection. This product must not be disposed of with normal household waste.
Rechargeable Batteries and the
Environment
This unit uses Nickel-Metal Hydride (Ni-MH) batteries. When the battery pack needs replacing, we recommend the following:-
Discharge the energy from the batteries by running the batteries down completely, and then remove them from the AIR/PRO.
Ni-MH cells are recyclable.
DO NOT THROW THEM AWAY WITH YOUR HOUSEHOLD WASTE.
They may end up in an incinerator or landfill, which must be avoided.
Instead, take the batteries to a Trend Service Agent, your local distributor or a local recycling station. If necessary, contact your local municipality for disposal information. The collected batteries will be disposed of properly and/or used for recycling purposes.
Ni-MH
GUARANTEE
accordance with the conditions on the enclosed guarantee registration card.

AIR/PRO - USA
-18-
AIR/PRO USA - SPARE PARTS LIST V3.0 06/2014
No. Qty Desc. Ref. 1 1 Fan/Motor WP-AIR/P/01 2 1 Airflow Indicator WP-AIR/P/02 3 1 Head Cover & Face Seal WP-AIR/P/03 4 1 Head Band WP-AIR/P/04 5 1 Switch & Contact Assembly WP-AIR/P/05 6 1 Carry Bag WP-AIR/P/06 7 1 Visor WP-AIR/P/07 8 1 Cover WP-AIR/P/08 9 - - - 10 1 Headband Comfort Pad WP-AIR/P/10 11 2 Pivot Pin Body WP-AIR/P/11 12 2 Pivot Pin Bolt WP-AIR/P/12 13 1 Anti-Rotating Caps (Pair) WP-AIR/P/13 14 2 Knob WP-AIR/P/14 15 1 Ear Defender Clip (Pair) WP-AIR/P/15 16 1 Head Band Fixing Kit (Pair) WP-AIR/P/16 17 1 Head Band Top Frame Comfort Pad WP-AIR/P/17 18 1 THP2 Filter Pack (Pair) AIR/P/1 19 0 Visor Overlay - Clear (Pack of 10) AIR/P/3C 20 1 8 Hour Battery AIR/P/4 21 1 Charger 120V USA AIR/5L/USA 22 1 Manual USA MANU/AIR/PRO/U
Please use only Trend original spare parts.

AIR/PRO - USA
-19-
AIR/PRO USA - SPA RTS DIAGRAM V3.0 06/2014

AIR/PRO - USA
-20-
NOTES

MA
NU
/AIR
/PR
O/U
v3.
0
© Copyright Trend 2014. No part of this publication may be reproduced, stored or transmitted in any form without prior permission. Our policy of continuous improvement means that specifications may change without notice. Trend Machinery and Cutting Tools
cannot be held liable for any material rendered unusable or any form of consequential loss. E&OE®All trademarks acknowledged.
RECYCLABLE
Trend Routing Technology Inc.7351 West Friendly Avenue,Suite A, Greensboro, NC 27410 Tel: (877) [email protected]