Embed Size (px)
Citation preview

6.11.2021 1/37 Making the Negative Cast
Making the Negative Cast
Making the Negative Cast with e-Cast
The plaster impression is the basis for producing a custom-made orthosis. The more precisely the
negative cast is made, the better is the final result.
This production technique describes how to make the negative cast by using the digital casting aid e-
Cast. Transferring the mechanical pivot points at ankle and knee height is an important factor in this
process.
An application example shows which effect the patient's leg position while making the negative cast
has on the final orthosis and therefore on the patient's gait.

6.11.2021 2/37 Making the Negative Cast
Preparing the Workspace
Step 1/4
The number of sensors depends on the orthosis type. For the chosen example of a KAFO you need all
three sensors (KAFO = red/yellow/green,
AFO = green/yellow, KO = yellow/red). The operator device offers different display, language, sound
and saving options. You will find further information in the manual.
6.11.2021 3/37 Making the Negative Cast
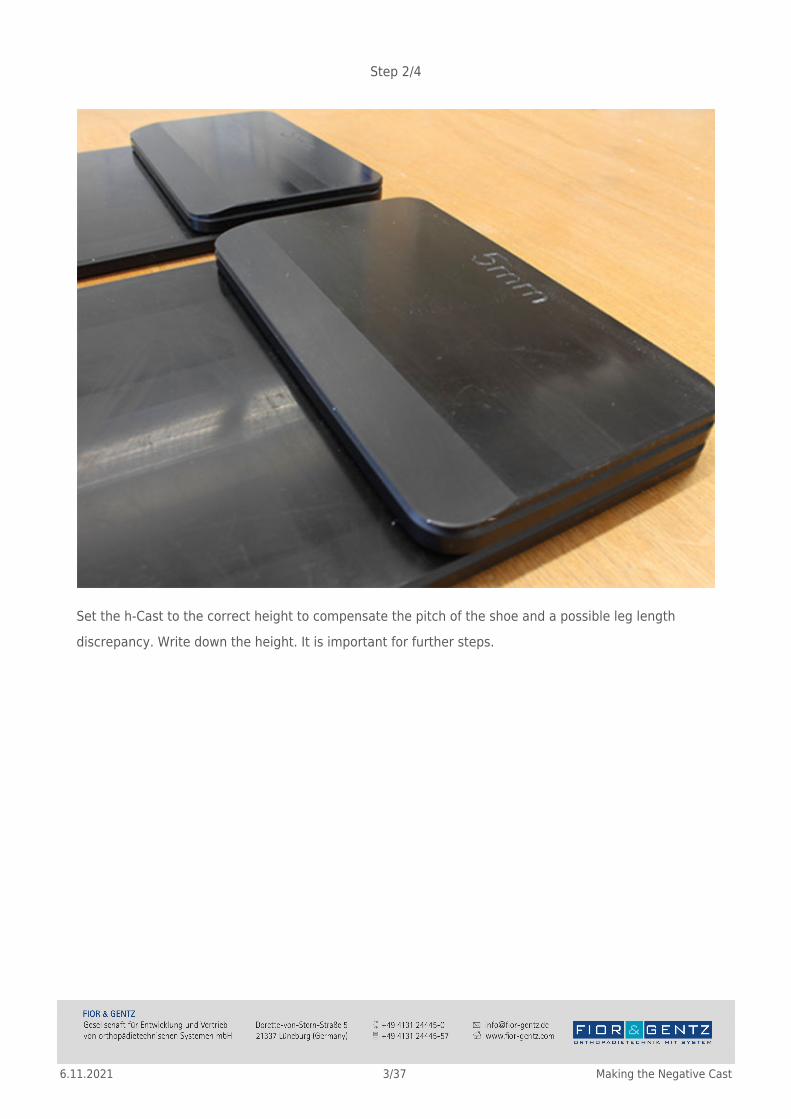
Step 2/4
Set the h-Cast to the correct height to compensate the pitch of the shoe and a possible leg length
discrepancy. Write down the height. It is important for further steps.

6.11.2021 4/37 Making the Negative Cast
Step 3/4
You need appropriate callipers to measure the joint widths. We also recommend to use a device for
checking the line of gravity. Insulate the patient's leg with compression film in order to be able to
attach the e-Cast sensors.

6.11.2021 5/37 Making the Negative Cast
Step 4/4
Connect the sensors to the operator device. Remove the protective foil on one side of the glue dots to
attach them to the sensors' centre.

6.11.2021 6/37 Making the Negative Cast
Preparing the Cast
Step 1/14
If the patient needs an orthotic fitting on both legs, proceed as follows: First, cast and insulate only
one leg as the operator device cannot be connected to more than three sensors at a time. We
recommend to use two sensor sets so that you can start with the second plaster impression
immediately after finishing the
first one.

6.11.2021 7/37 Making the Negative Cast
Step 2/14
If the patient needs an insole, insert or inner boot to be able to stand on its own, you have two
possibilities:
A) You have made this orthopaedic device beforehand. You now wrap it in compression film together
with the leg.
B) You insulate the leg in the usual way. If necessary, you have to make a temporary replacement
which you can use for the following steps.

6.11.2021 8/37 Making the Negative Cast
Step 3/14
Wrap the patient's leg loosely into compression film from distally to proximally. Then wrap it from
proximally to distally under tension. While doing so, the patient should keep the leg extended as much
as possible. Avoid furrows and do not let the film end in areas where you want to place markings or
sensors later.
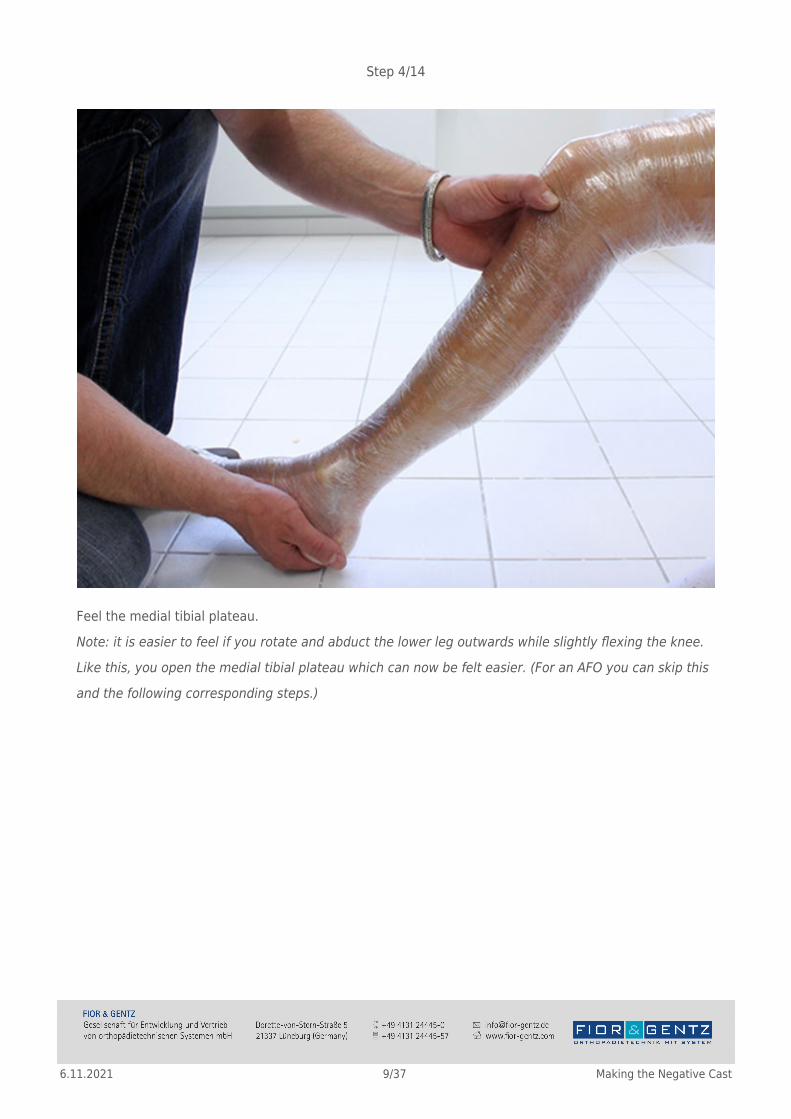
6.11.2021 9/37 Making the Negative Cast
Step 4/14
Feel the medial tibial plateau.
Note: it is easier to feel if you rotate and abduct the lower leg outwards while slightly flexing the knee.
Like this, you open the medial tibial plateau which can now be felt easier. (For an AFO you can skip this
and the following corresponding steps.)

6.11.2021 10/37 Making the Negative Cast
Step 5/14
Mark the felt medial tibial plateau.

6.11.2021 11/37 Making the Negative Cast
Step 6/14
You can find the position of the mechanical pivot point in the configuration result and mark it on the
leg. Mark the y measurement by using the printed configuration result.

6.11.2021 12/37 Making the Negative Cast
Step 7/14
You can mark the position of the mechanical pivot point in ap direction with the callipers. Mark the x
measurement by using the printed configuration result.

6.11.2021 13/37 Making the Negative Cast
Step 8/14
The mechanical pivot point can be transferred from the film to the negative cast by using the
delivered self-adhesive washer. Later, it serves as guidance for the point of the alignment aid.

6.11.2021 14/37 Making the Negative Cast
Step 9/14
Feel the distal tip of the fibula and mark it.
Attention! Do not feel the tibia. Feel laterally. (For a KO you can skip this and the following
corresponding steps.)

6.11.2021 15/37 Making the Negative Cast
Step 10/14
Place a washer on the mechanical pivot point. In ap direction, take the later run of the side bar as
guidance. It should run through the centre of the ankle area.
Note: Shifting the pivot point backwards shortens the rear foot lever, extends the forefoot lever and
vice versa.

6.11.2021 16/37 Making the Negative Cast
Step 11/14
Attach the sensors to the leg insulated with film (AFO = green/yellow, KO = red/yellow). Pay attention
to the colour of the sensors (traffic light colours). Place the sensors anterolaterally on the leg so that
you have enough room for the cutting aid and the e-Cast works optimally.
Attention! Do not attach the sensors to loose film pieces. If you only insulate the leg with a sock or oil,
the e-Cast sensors do not stick optimally on the leg.

6.11.2021 17/37 Making the Negative Cast
Step 12/14
Put the prepared longuettes under the sensors for stabilisation purposes. For a positive fit between
sensor and leg, it is necessary to fill out the space completely with plaster. Make sure not to push the
sensors away from the leg because otherwise they do not stick optimally on the film.

6.11.2021 18/37 Making the Negative Cast
Step 13/14
Form the plaster and embed the sensors in it. Repeat this procedure for all required sensors.

6.11.2021 19/37 Making the Negative Cast
Step 14/14
Bring the patient's leg in a nearly horizontal position. Follow the instructions on the operator device's
display.

6.11.2021 20/37 Making the Negative Cast
Determining the Ideal Position
Step 1/6
In order to determine the patient's individual normal posture you have to decide on the normal posture
in which you will place the patient on the h-Cast.
A – gait-related normal posture
The orthosis produced on the basis of the negative cast allows:
an improved physiological gait in comparison with an orthosis based on normal posture B;
a narrow base gait;
a minimisation of the swaying around the sagittal axis when walking.
Choose normal posture A if the patient will use the orthosis primarily for walking.

6.11.2021 21/37 Making the Negative Cast
Step 2/6
B – stance-related normal posture
The orthosis produced on the basis of the negative cast leads to:
a higher stability when standing with both feet on the ground (not in stance phase during walking!);
a deteriorated physiological gait in comparison with an orthosis based on normal posture A;
a higher energy consumption during walking.
Choose normal posture B if the patient will use the orthosis primarily for making transfers and for
standing.

6.11.2021 22/37 Making the Negative Cast
Step 3/6
In order to determine the patient’s individual normal posture (A or B), you should provide a supportive
device (e.g. crutches). Adjust them correctly, so that your patient stands in an upright and vertical
position. Check the posture.
Note: a forward bending leads to a shift of the body's centre of gravity, which results in an unsuitable
orthosis design that may impair the orthosis function.

6.11.2021 23/37 Making the Negative Cast
Step 4/6
If you should provide a device (e.g. walker) with forearm support, here also make sure that the patient
stands in an upright and vertical position. Check the posture.
Note: a forward bending leads to a shift of the body's centre of gravity, which results in an unsuitable
orthosis design that may impair the orthosis function.

6.11.2021 24/37 Making the Negative Cast
Step 5/6
Place the patient in gait-related normal posture (A) or in stance-related normal posture (B) on the h-
Cast. Make sure that the patient stands in an upright and vertical position. If the patient needs any
devices, they have to be adjusted correctly.
Note: Use a plumb laser to evaluate the posture.

6.11.2021 25/37 Making the Negative Cast
Step 6/6
Check the stance from a lateral perspective as well. Make sure that the patient stands in an upright and
vertical position. If the patient needs any devices, they have to be adjusted correctly. Save the
individual normal posture with the operater device.

6.11.2021 26/37 Making the Negative Cast
Making the Negative Cast
Step 1/11
Form the sole of the foot with a plaster longuette of at least four layers. (For a KO you can skip this and
the following corresponding steps.)

6.11.2021 27/37 Making the Negative Cast
Step 2/11
Place the cutting aid. Cast loosely over foot and ankle joint to the calf. At first, do not cast over the
sensors. Then use only one layer of plaster to fix them and thus ensure an easy removal afterwards.
Make sure the plaster is thick enough at the ankle area to secure the desired position of the ankle
joint.

6.11.2021 28/37 Making the Negative Cast
Step 3/11
Bring the patient's foot again into the previously determined position of the ankle joint by using the h-
Cast. Make sure that the external rotation is correct and adjust possible deviations in direction of
supination or pronation.
Note: Shifting the foot with the h-Cast to the front or back changes the lower leg-foot-angle (plantar
flexion and dorsiflexion).

6.11.2021 29/37 Making the Negative Cast
Step 4/11
The operator device indicates when the current position differs from the saved one. The dot on the
display moves towards plantar flexion (P) or dorsiflexion (D) if the position differs into the corresponding
direction. When the dot is in the middle, the position matches the saved one. If you have activated the
display of pronation and supination in the menu Settings, you can reconstruct this position by shifting
the knee in mediolateral direction.

6.11.2021 30/37 Making the Negative Cast
Step 5/11
Cast loosely to the desired height. If necessary, integrate a dorsal reinforcement. Minimise the number
of layers over the sensor by leaving it out in the beginning. Bring the patient's knee again into the
previously determined position of the knee joint.

6.11.2021 31/37 Making the Negative Cast
Step 6/11
The operator device indicates when the current position differs from the saved one. The dot moves
towards extension (E) or flexion (F) if the position differs into the corresponding direction. When the dot
is in the middle, the position matches the saved one. If you have activated the display of varus and
valgus in the menu Settings, you can reconstruct this position.

6.11.2021 32/37 Making the Negative Cast
Step 7/11
Draw auxiliary lines and carefully remove the cutting aid.

6.11.2021 33/37 Making the Negative Cast
Step 8/11
Cut open the negative cast with plaster shears. Open the negative cast by using your fingers and not
your thumbs, to avoid unnecessary deformations of the edges. Remove the negative cast from the
patient's leg.

6.11.2021 34/37 Making the Negative Cast
Step 9/11
The cast surface is level on the inside and you can only see the glue dot from the sensor. Like this, you
avoid that the cast loses its form.

6.11.2021 35/37 Making the Negative Cast
Step 10/11
The washer can clearly be seen in the cast. It marks the mechanical pivot point.

6.11.2021 36/37 Making the Negative Cast
Step 11/11
Join the cutting edges and check the position with the operator device. It indicates if the current
position differs from the saved one. After possible corrections, the negative cast is finished in the
desired position.

6.11.2021 37/37 Making the Negative Cast
Alignment of the Orthosis
Step 1/1
The alignment of the orthosis is based on the individual, gait-related normal posture of the patient. In
mid stance, this results in a gait pattern that is as physiological as possible.