Embed Size (px)
Citation preview

MakeCode Arcade Platformer Level DesignCreated by John Park
Last updated on 2019-08-10 08:53:30 PM UTC

Overview
Side-scrolling platformer games are some of the most popular games ever made. Where would we be without SuperMario Bros. for Nintendo Entertainment System? It's too chilling of a question to even consider!
But, here's a question we will contemplate -- how are side-scrolling platformer game levels made? In this guide, we'lllearn how to make our own levels using tile maps and sprites all inside of MakeCode Arcade. You'll then be able toplay your own levels in the browser or even on a handheld device, such as the Adafruit Pybadge or Pybadge LC.
Parts
You can create and then play the game entirely in the web browser (we recommend Chrome) or, you can upload it tothe Pybadge for an authentic handheld gaming experience!
Adafruit PyGamer Starter Kit
OUT OF STOCK
OUT OF STOCK
© Adafruit Industries https://learn.adafruit.com/makecode-arcade-platform-level Page 3 of 39

Adafruit PyBadge for MakeCode Arcade, CircuitPython orArduino
OUT OF STOCK
OUT OF STOCK
Adafruit PyBadge LC - MakeCode Arcade, CircuitPython orArduino
OUT OF STOCK
OUT OF STOCK
Pink and Purple Braided USB A to Micro B Cable - 2 meterlong
$3.95IN STOCK
ADD TO CART
Lithium Ion Polymer Battery - 3.7v 350mAh
$6.95IN STOCK
ADD TO CART
© Adafruit Industries https://learn.adafruit.com/makecode-arcade-platform-level Page 4 of 39

Adafruit Circuit Playground Lanyard
$1.95IN STOCK
ADD TO CART
© Adafruit Industries https://learn.adafruit.com/makecode-arcade-platform-level Page 5 of 39

Platformer LevelFundamentals
Screen View vs. Level Map
One of the quintessential design elements of most platformer games is the side-scrolling movement of your characterthrough the game level (also called the map). This means the player is presented with a camera view on screen that issmaller than the overall level.
By contrast, a game like Space Invaders or Pac-Man is played on a screen that represents the entire level. The player'scharacter and the camera never leave the one playing field (although flying saucers do enter and exit horizontally atthe top of the screen in the case of Space Invaders. Where are they going?)
However, in a game such as Super Mario Bros. or Sonic the Hedgehog, the level is much, much larger than what fits inthe screen's view at one time. So, by scrolling the character and camera as the player moves through the level, themap is revealed.
Here's the player's camera view seen on screen during gameplay:
© Adafruit Industries https://learn.adafruit.com/makecode-arcade-platform-level Page 6 of 39

This, on the other hand, is a view of the entire map of the same level:
Map/Level Making
In order to create a map for the level, you need to let the game engine know where the ground, platforms, obstacles,and goals are. In most 2D game engines, the level starts out as a blank grid, sort of like graph paper, and it's the leveldesigner's job to build the map of the level's gameplay on that grid.
In the early days, this would, in fact, be created first on graph paper by the level designer, and then translated intogame level code by the programmer. Here's an example from 1985's Super Mario Bros. of a level designed by ShigeruMiyamoto and Takashi Tezuka:
(This example drawing was taken from this behind-the-scenes video (https://adafru.it/ENi) by Nintendo.)
© Adafruit Industries https://learn.adafruit.com/makecode-arcade-platform-level Page 7 of 39

Here's what the level looks like in the game engine, although this is a zoomed out view, not the player's screen:
Tile Mapping and Tile Sprites
Not only does the level design indicate where the ground, walls, platforms, obstacles, and goals are located, but wecan also indicate the artwork of the level, which defines it's look. Rather than lay one huge piece of pixel art across thewhole screen, the same grid system is used to display individual tiles of sprite artwork.
You'll notice there is a lot of repetition in the visual design. This is because a limited number of small sprite images arebeing replicated across the whole level. In fact, if you look at the example above from Super Mario Bros., there are onlyfour sprites used to define the level (excluding power-ups and enemies).
This tiling is done to save memory. Here's an excellent guide page by Ladyada (https://adafru.it/ENj) on some of thedetails of tile mapping and memory usage related to the NES and the Fuzebox, but the principles apply to MakeCode
© Adafruit Industries https://learn.adafruit.com/makecode-arcade-platform-level Page 8 of 39

Arcade and the Pybadge/Pygamer as well. Here's an excerpt:
Graphic displays such as televisions, computer monitors and LCDs all display graphics made up of pixels(picture-elements). Early VGA monitors displayed 640x480 pixels. Nowadays, hi-definition(HD) (https://adafru.it/ENk) displays these days can be 1920×1080 or even higher! The Fuzebox isn't powerfulenough to drive HD but it can do pretty well for normal TV, at 240x224 pixels. Even though that doesn't soundlike much, most original 8-bit video game consoles had the same resolution & the games were pretty cool.
Since the display changes during the course of the game, that would imply that we should store the video data inRAM. If each pixel contained 8-bits (one byte) of data, that would mean we need:
240 pixels wide * 224 pixels high * 1 byte per pixel = 53760 bytes = 52 Kilobytes
to store the video map in memory. Even though that doesn't sound like a lot, it is for a small microcontroller: thetotal RAM available is only 4K! Since there's no way to cram the video data into RAM we perform a trickcalled tiling. basically, we say "OK our simple games will have a background or images that don't change much, orrepeat. So instead of having each pixel be unique, we'll use a range of predefined tiles". For example, lets look atthis screenshot of Super Mario Brothers, the best known 8-bit game
Notice how the bricks at the bottom are just copies of one 'tile'? Also the clouds are cloned-looking and the bricksalso look identical. Even tho this image has a resolution of 240x224, there's really only a grid of 15x14 tiles, eachone 16x16 pixels big (verify this by counting how many bricks run along the bottom of the screen).
The Fuzebox uses much smaller tiles, because it actually has more processing power than the original NES. Ituses 6x8 pixel tiles, for a grid of 40x28 tiles. Assuming that we reuse most of the tiles (and, in general, you'll seethat many are) we can cut down the amount of memory needed to store the video graphics. In addition, becausethe tiles don't change (they just get swapped around), we can store them in the flash memory (which is 64K large)instead of the RAM. Basically, our video memory problems are solved!
Lets say we have 6x8 px tiles and a range of maybe 512 tiles maximum. that means we need
6 *8 * 512 = 24 KB
of flash storage to keep all the tile (which is totally reasonable since we have 64K of flash available), and then inthe video RAM we will need:
40 * 28 * 2 byte address = 2240 = 2KB
of RAM memory to store the current map, about half of the 4K we have available. Now we can actually do that!
© Adafruit Industries https://learn.adafruit.com/makecode-arcade-platform-level Page 9 of 39

Level Design Example
Tile Map
Here's an example of tile mapping and level design in action. First we design the level, indicating where the ground,obstacles, platforms, and goals are. Each color index indicates a different type of object. These can also have differentconditions applied to them when the player sprite makes contact, such as points earned when the yellow tiles aretouched, or loss of health when the red tiles are touched. You can think of this as the equivalent of the graph paperversion of the level.
Tile Sprites
Pixel art sprites have been created for each different surface or object type used in the level.
We can see the correlation between the indexed color tiles and their associated sprite artwork. Wherever a tile map ofa particular color index is placed on screen, the associated sprite artwork will appear.
Here we see the level tile map with the sprite artwork applied.
© Adafruit Industries https://learn.adafruit.com/makecode-arcade-platform-level Page 10 of 39

In most cases here a 16x16 pixel sprite has been used -- the two exceptions are the pipe and flagpole which are bothlarger sprites.
Camera
You can think of the player's view of the game screen as the view through the player "camera". We have a level mapthat is larger that what we can view through this camera, and as the player moves, the camera moves with them,revealing new, unseen parts of the level.
Typically, the player sprite can move around a bit in the camera view, but most of the time, the camera stays centeredon the player, as if it is tracking along on a camera dolly.
The image here is used to illustrate this idea, but note that in a simple 2D game there isn't really a 3D model of thegame level inside the code!
Motion Parallax/Multi Plane
A great way to give the illusion of depth in 2D games is through motion parallax, which is the phenomenon of distantobjects appearing to move more slowly than nearer objects do, relative to a the changing viewpoint of a person orcamera.
You can see this in effect by simply holding up one finger in front of your face and then moving your head from side toside. The finger will appear to move a lot while objects you can see in the background will move relatively little.
This phenomenon was used to great effect in early 2D animation by Walt Disney animation studios with the inventionof the multi-plane camera system. Here's a great video explainer by Disney himself (note that the example is of acamera push, but the same applies for a horizontal dolly or crab shot):
© Adafruit Industries https://learn.adafruit.com/makecode-arcade-platform-level Page 11 of 39

Different game engines will handle motion parallax in various ways. There may be multiple depth planes, similar to theDisney example, or just two set planes for the background and the level. In this example from MakeCode Arcade, wecan think of the level tile map as being fixed in place, while the camera, character sprite, and background dolly throughthe scene.
Note, this is only used to illustrate the concept, there is not a 3D model in the MakeCode Arcade game engine!
© Adafruit Industries https://learn.adafruit.com/makecode-arcade-platform-level Page 12 of 39

Now that we have the fundamentals down, let's create a side-scrolling platformer level tile map in MakeCode Arcade!
© Adafruit Industries https://learn.adafruit.com/makecode-arcade-platform-level Page 13 of 39

Create a Tile Mapped Level in MakeCodeArcade
MakeCode Arcade
If you're not already familiar with the basics of MakeCode Arcade, check out this guide (https://adafru.it/EIc) on creatinga character sprite and moving it with controls. First, open a new Chrome browser window (Chrome works best) and goto MakeCode Arcade beta (https://adafru.it/EQg).
You can also take a look here (https://adafru.it/ENp) to learn how to set up animation for your character.
Game Prep
We'll start off with a pre-made scene in which the basics of the character sprite, animation, and movement have beencreated, just so we can focus on level design.
Open this link in the Chrome browser to get going: MCA_ruby_level_0 (https://adafru.it/ENq)
© Adafruit Industries https://learn.adafruit.com/makecode-arcade-platform-level Page 14 of 39

Game PrepWe'll start off with a pre-made scene in which the basics
of the character sprite, animation, and movement have
been created, just so we can focus on level design.
Open this link in the Chrome browser to get going:
MCA_ruby_level_0 (https://adafru.it/ENq)
Click the Show Code button.
Then, click the Edit button to open the code into the
editor.
© Adafruit Industries https://learn.adafruit.com/makecode-arcade-platform-level Page 15 of 39

Add BackgroundWe'll add a background image first. Click the Scene
category, and then add the set backround image block
to the on start block.
Click on the empty sprite block to open the sprite editor
and then paint and draw your background image. Note
that this is a 160x120 pixel sprite, which is the full screen
size of the MakeCode Arcade game screen.
It can be tricky to paint accurately on the small canvas,
but after some trial and error I came up with a
background I liked.
You can get an exact copy of the code up to this point by downloading this .png file, which has the gamecode embedded in it! Right click the image and pick "Save image as" to save it to your computer's hard drive,then drag the saved image right onto your MakeCode Arcade page in your Chrome browser window!
�
© Adafruit Industries https://learn.adafruit.com/makecode-arcade-platform-level Page 16 of 39

Create Tile MapNow we'll create the tile map, which is the foundation of
our level.
From the Scene category, drag a set tile map block from
the Tiles sub-heading into the on start block.
We'll open the sprite editor for the tile map in order to
draw out the level. The first thing we'll notice is that the
default canvas is the wrong size and shape for a side
scrolling platformer. Currently, it reads 10x8. Click on
that resolution button multiple times to get to the size
we want, which is 32x8.
Let's create a ground running across the bottom of the
level. Use the blue color index and a single pixel pencil
tool to draw the two ground layers. You can hold the
shift key on the keyboard to constrain the tool to
straight lines, which is very helpful! If you make any
errors, just use the eraser tool to correct them.
© Adafruit Industries https://learn.adafruit.com/makecode-arcade-platform-level Page 17 of 39

You can see that the tile map actually shows up in the game engine now at proper screen resolution. Before we addthe tiled sprite artwork, let's add some platforms to the tile map.
It's important to note that the tile map resolution is different than the screen resolution. We're using a 32x8pixel map where each pixel represents a 16x16 pixel tile in the final game. The screen resolution is 160x120.�
© Adafruit Industries https://learn.adafruit.com/makecode-arcade-platform-level Page 18 of 39

Add Platforms
Click on the tile map to open it again into the sprite
editor. Place purple tiles onto the map as shown, then
click the Done button.
Now we can see in the simulator the purple platforms in
the visible portion of the tile map.
Try moving the Ruby player sprite using the arrow keys
to explore more of the level.
Uh oh, we can't! Ruby walks right off the edge of the
screen!
This is because we haven't yet told the in-game camera
to follow Ruby.
© Adafruit Industries https://learn.adafruit.com/makecode-arcade-platform-level Page 19 of 39

Camera Follow SpriteFrom the Scene category, add a camera follow sprite
block to the on start block.
Pick Ruby from the variable dropdown menu.
Now, when Ruby reaches the center of the screen, the camera tracks along with her and we can walk over to thepreviously unseen portions of the tile map.
Tile Sprite Art
Now, we'll really start to put the tile map to use by adding sprites. For all of the purple tiles, we'll add a sprite of pinkblocks, and for the blue tiles, we'll add a sprite of ground blocks.
© Adafruit Industries https://learn.adafruit.com/makecode-arcade-platform-level Page 20 of 39

Add a set tile <index color> to <sprite> with wall block
from the Scene category to the on start block.
Choose purple for the index color by clicking on the
color swatch and selecting the purple swatch. This
means that whatever sprite art we create and wall state
will apply to all purple tiles in the tile map.
To create the block art, click on the sprite swatch and
then use the pencil tool in the editor. You can get
creative here, the block can look like anything you want
inside of 16x16 pixels! (You can actually use other sizes,
but for now we'll stick with this standard for most blocks
for the best fit.)
Lastly, we want to indicate that our player sprite will not
be able to overlap the purple tiles, but instead bump into
them or jump onto them. Do so by flipping the with wall
switch to on.
© Adafruit Industries https://learn.adafruit.com/makecode-arcade-platform-level Page 21 of 39

Ground BlocksLet's give the ground tiles a sprite as well. You can
duplicate the previous set tile block, then change the
index color to the same blue you used for the ground
tiles.
Create some artwork for these ground blocks in the
sprite editor, and then click Done.
Now that we've got a ground tile in place, we can add "gravity" to the scene. This will help return Ruby to earth aftershe jumps. We'll do so by setting Ruby's acceleration on the y axis to 300, instead of the zero it was previously set towhen the scene was prepared.
© Adafruit Industries https://learn.adafruit.com/makecode-arcade-platform-level Page 22 of 39

Add GravityFind the Function prepPlayer block in the scene.
In the set Ruby ay (acceleration y) block, change the
value to 300.
Now, you can try jumping with the A button and you'll see Ruby jump up, then land on the ground, since it has the"wall" flag turned on.
© Adafruit Industries https://learn.adafruit.com/makecode-arcade-platform-level Page 23 of 39

Add Tiles
Now we can fill out the level a bit more by adding more platform blocks, a question mark block, a lava pit, a pipe, and aflagpole at the end of the level. For each distinctive type of block remember to use a unique color so you can add a tilesprite to it later.
Note, we'll used four tiles for the pipe, since we want the artwork for it to be larger than a single tile.
You'll notice that I've used two different color indices for the ground now -- there are standard ground blocks on thebottom layer and a variant that has a mossy top on the top layer.
© Adafruit Industries https://learn.adafruit.com/makecode-arcade-platform-level Page 24 of 39

Here's the full set of tile sprites and their indexed colors for the tile map:
Tile Sprite SizingNote how the single green tile is placed one tile unit
above the ground and has clearance on it's right side --
this is because I created a larger, 32x32 pixel sprite for
the pipe tile.
This means that the artwork occupies the space of four
tiles and is a great way to create elements of different
sizes, which can give your game level more visual
interest than having every tile the same size.
This is what the full set of tile maps looks like inside of the on start block.
© Adafruit Industries https://learn.adafruit.com/makecode-arcade-platform-level Page 25 of 39

Tile Collisions
Another use of the tile map is to indicate when special events occur based on player sprite collisions with certain tiles.Again, the tile index color is used for this
For example, we can have a tile collision cause the player to earn points, and play an effect animation, or removeplayer lives, and even set the win condition for the game.
Collision Effects
From the Scene category, add an on sprite of kind
Player hits wall block to your canvas.
We'll set this one up to add points when the question
mark tile is hit. Going back to our tile map we can see
that the question mark tile index color is yellow, so we'll
change the index color of this collision block to yellow
as well.
© Adafruit Industries https://learn.adafruit.com/makecode-arcade-platform-level Page 26 of 39

Next, we'll add an effect block. From the Sprites
category, add a mySprite start spray effect block to the
collision block as shown.
Change the drop down menu to Ruby for the sprite and
the effect to fountain.
Lastly, click the + plus sign to have the effect only last
for 500ms.
© Adafruit Industries https://learn.adafruit.com/makecode-arcade-platform-level Page 27 of 39

Add Points
Not only will we play an effect animation when Ruby hits the question mark tile, but we'll also add points!
From the Info category, add a change score by 1 block to the collision block as shown.
© Adafruit Industries https://learn.adafruit.com/makecode-arcade-platform-level Page 28 of 39

Game OverThe last thing we'll do is set up the red tile (lava) collision
to cause a game over of type "lose" and a light blue tile
(flag pole) collision to cause a game over of type "win".
Create or duplicate two more on sprite of kind player
hits wall collision blocks. Set one to red tiles and the
other to light blue.
From the Game category add a game over block to
each of the two new collision blocks.
Set the red collision game over to type "lose" and the
light blue on to type "win" by flipping the toggle as
needed. (Depending on the version of MakeCode
Arcade you're using you may need to first click a + plus
sign to see the toggle switch in the game over blocks.)
You can now play your level! Try jumping up to the question mark for points, fall in the lava to end the game on a loss,or make it to the finish line!
© Adafruit Industries https://learn.adafruit.com/makecode-arcade-platform-level Page 29 of 39

You can download the .png with the code embedded here if you want to see the final version:
Next, we'll upload the game onto to the Pybadge!
You can get an exact copy of the final game code by downloading this .png file, which has the game codeembedded in it! Right click the image and pick "Save image as" to save it to your computer's hard drive, thendrag the saved image right onto your MakeCode Arcade page in your Chrome browser window!
�
© Adafruit Industries https://learn.adafruit.com/makecode-arcade-platform-level Page 30 of 39

Update the PyBadge/PyGamer Bootloader
You are at the bleeding edge of handheld, open source, game playing hardware and software, what with yourPyBadge/PyBadge LC or PyGamer! Congratulations! It's fun and exciting! It is also changing and improving all the time,so please update your bootloaders before proceeding to put your MakeCode Arcade games on the board!!
PyBadge/PyBadge LC BootloaderIf you have a PyBadge or PyBadge LC, please go to this
page for instructions on updating the
bootloader. (https://adafru.it/EWI)
PyGamer BootloaderIf you have a PyGamer, please go to this page for
instructions on updating the
bootloader. (https://adafru.it/EWJ)
Hardware Checks
If, after updating your board's bootloader, you still think you may have a hardware problem, here's a great way to test
Among lots of other reasons, update the bootloader to prevent a problem with MacOS 10.14.4, to fix buttonproblems, and get the thumbstick to work!�
A HUUUUUUGE number of people have problems because they pick a 'charge only' USB cable rather than a"Data/Sync" cable. Make 100% sure you have a good quality syncing cable. Srsly, I can't even express howmany times people have nearly given up due to a flakey USB cable! Enter Alert Text...
�
© Adafruit Industries https://learn.adafruit.com/makecode-arcade-platform-level Page 31 of 39

out all of the functions. From buttons, to the light sensor, thumbstick (PyGamer only), accelerometer (PyGamer andPyBadge only, not the LC), and more, we've got a super nifty set of hardware test .UF2 files you can use.
Click on the link for your board below for more info and a link to the appropriate UF2 file.
https://adafru.it/EWK
https://adafru.it/EWK
https://adafru.it/EWL
https://adafru.it/EWL
Another way to do a hardware check is with the handy, dandy MakeCode Arcade Basic Hardware Test. This wascreated with MakeCode Arcade and you can use it to check that your d-pad buttons or thumb joystick can move theyellow face around the screen, and that the A and B buttons work to play a sound (just make sure you have a speakerplugged in to the PyGamer first).
You can open this link (https://adafru.it/EWP) to get to it, or download the UF2 file below and drag it onto your board'sUSB drive in bootloader mode.
https://adafru.it/EWQ
https://adafru.it/EWQ
© Adafruit Industries https://learn.adafruit.com/makecode-arcade-platform-level Page 32 of 39

Load a MakeCode Game on PyGamer/PyBadge
Let's load a game! For example, here's a link to Run, Blinka, Run! To open the game in the MakeCode Arcade editor,first, click the share link below. This will allow you to play the game in the browser right away.
https://adafru.it/Fqf
https://adafru.it/Fqf
Then, click on the Show Code button in the upper left
corner. The shows the code for the game, and by
clicking the Edit button in the upper right corner, it'll
open into the editor where you can upload it to your
PyGamer/PyBadge.
Once you have a game working on the MakeCode
Arcade web editor, it's time to download it and flash it
onto your board.
Please only use the Google Chrome browser with MakeCode! It has WebUSB support and seems to workbest�
© Adafruit Industries https://learn.adafruit.com/makecode-arcade-platform-level Page 33 of 39

Board DefinitionIn order to load a game made in MakeCode Arcade
onto the PyBadge, first choose the proper board
definition inside of MakeCode. Click the gear icon and
then the Change Board item.
Change Board screen
Click on the image of your board, either the
PyBadge/PyBadge LC or the PyGamer
This will cause the game .uf2 file for your particular board to be saved to your hard drive. You only need to do this thefirst time you use a new board. Thereafter you can simply click the Download button on the MakeCode Arcade editorpage.
© Adafruit Industries https://learn.adafruit.com/makecode-arcade-platform-level Page 34 of 39

A HUUUUUUGE number of people have problems because they pick a 'charge only' USB cable rather than a"Data/Sync" cable. Make 100% sure you have a good quality syncing cable. Srsly, I can't even express howmany times people have nearly given up due to a flakey USB cable!
�
© Adafruit Industries https://learn.adafruit.com/makecode-arcade-platform-level Page 35 of 39
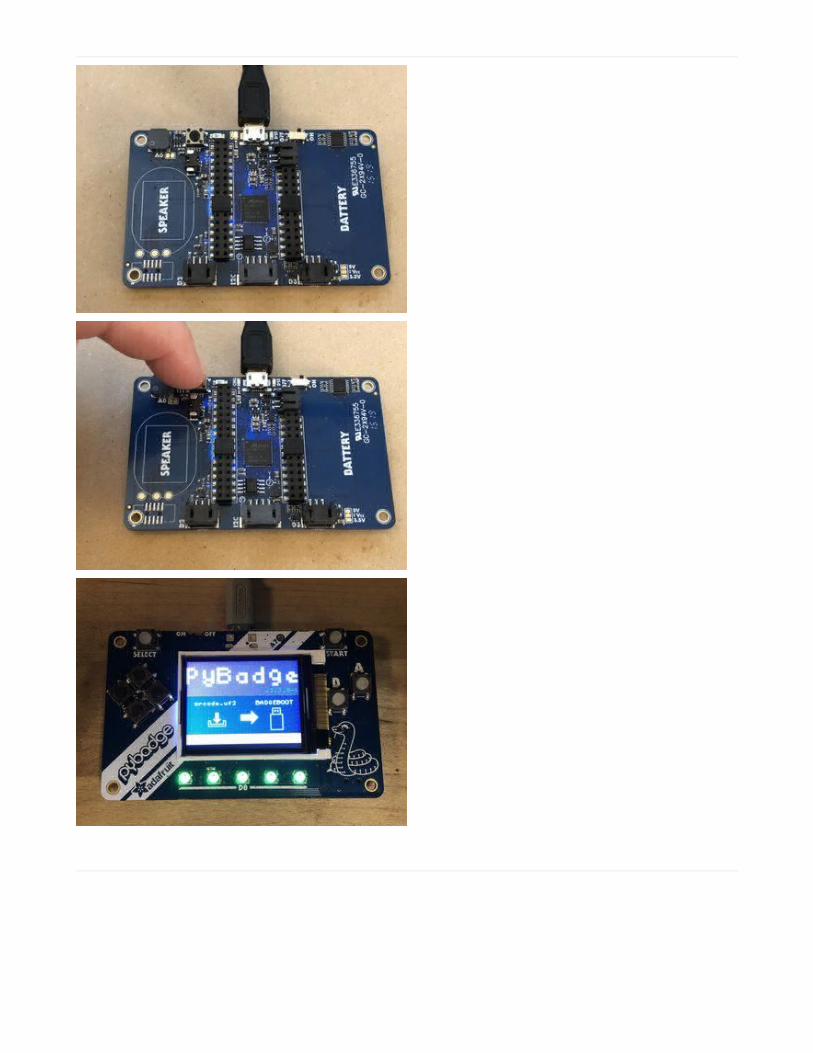
Bootloader ModeNow, we'll put the board into bootloader mode so we
can drag on the saved .uf2 file. On the back side of the
board you'll see a reset button at the top. Make sure the
board is plugged into your computer via USB with a USB
micro B to A data cable. Also, be sure the board is
turned on.
Then, press the reset button. This will initiate bootloader
mode.
When the board is in bootloader mode you'll see a
screen similar to this one show up.
© Adafruit Industries https://learn.adafruit.com/makecode-arcade-platform-level Page 36 of 39

Drag and DropNow that the board is in bootloader mode, you should
see a BADGEBOOT drive show up on your computer as
a USB flash drive. Simply drag the arcade game .uf2 file
onto the drive.
Play!
That's all there is to it! Once the file is copied over the board will restart and launch the game!
Keep an eye on Adafruit.com for additional game related content.
© Adafruit Industries https://learn.adafruit.com/makecode-arcade-platform-level Page 37 of 39

Troubleshooting MakeCodeArcade
If you run into trouble with MakeCode Arcade, here are some resources for getting help:
Microsoft MakeCode Arcade Forum (https://adafru.it/EXI)Adafruit MakeCode Forum (https://adafru.it/EXJ)Microsoft MakeCode Arcade Discord (https://adafru.it/EXK) -- look for the #arcade channelAdafruit MakeCode Discord () -- look for the #makecode channel
Only use the Google Chrome browser with MakeCode!�
© Adafruit Industries https://learn.adafruit.com/makecode-arcade-platform-level Page 38 of 39

© Adafruit Industries Last Updated: 2019-08-10 08:53:30 PM UTC Page 39 of 39