Embed Size (px)
Citation preview

P. 1Copyright © 1988-2/19/2002 Oasis Design. If this article has come to you without charge and you find it useful, please send $3.95 to www.oasisdesign.net, orOasis Design, #5 San Marcos Trout Club, Santa Barbara, CA, 93105 USA. We’ll e mail you any available update... Thanks!
Make your bearings invincible and vastly easier to serviceHow to Install Your Own Grease Fittings so Your Bearings
Vastly Outperform “Sealed” Bearings at a Fraction of the CostArt Ludwig
How bearings exclude water, or the truth about “sealed” bearings
It is not unusual to pop the seals off a one year old, $90 pair of “sealed” mountain bike hubsand find the ball bearings swimming in rusty water. Bearings need grease for lubrication, toprevent rust, and to keep out dirt and water. Every other self-respecting piece of machinery isequipped with grease fittings. Heck, a decent wheel barrow has grease fittings — why not bi-cycles?
Once installed, grease fittings (also called Zerk fittings) enable new, clean-packed grease from atube to be conveniently injected directly into bearings, with no need for disassembly or tamperingwith their adjustment.
The dirtier and wetter the ridingenvironment, the greater the benefitfrom grease fittings. Repacking all sixbearings, an otherwise expensive andinvolved maintenance procedure,takes about five minutes. Grease can beinjected as frequently as necessary tomaintain an outward ooze of greasesufficient to keep dirt and water at bayunder any conditions.
The rolling motion of the bearingsforces a slight egress of grease from thebearing. This is what actually precludesthe entry of water and crud. Seals on cartridge bearings serve largely to keep the grease from beingsqueezed out the first day (“contact seals,” which are rarely used on bicycles, actually can keepstuff out but are very stiff). The typical bearing comes from the factory with about half the airspacefilled with grease. The amount of grease left, and the pressure it exerts against attack from outside,decreases with use until the point is reached where a mere splash of water will dribble in. Themoment the force of grease flowing out is less than that of stuff trying to get in, the bearing is nolonger “sealed.”
The goal is to maintain a slight outward grease pressure which is equal to or greater than thatof contaminants trying to get in. With a little experience and a sensitive touch with the grease gun,the right balance of sufficient protection and minimum mess can be found.
Under mild conditions a couple of squirts of grease a year will keep bearings in pristinecondition. For wet conditions a little more grease is desirable, and wiping off the slight excess thatoozes out becomes part of the regular lube and cleaning ritual. For repeated stream crossings,
I rode a bike equipped with grease fittings a foot deep in sandy salt waterevery day for a year as part of my research on corrosion and bearing du-rability. Usually a bike is scrap after one such adventure; I'm still ridingthis same bike over twenty years later!

P. 2Copyright © 1988-2/19/2002 Oasis Design. If this article has come to you without charge and you find it useful, please send $3.95 to www.oasisdesign.net, orOasis Design, #5 San Marcos Trout Club, Santa Barbara, CA, 93105 USA. We’ll e mail you any available update... Thanks!
beach riding, wet-suited forays into full-blown thunderstorms or riding the bike submerged in saltwater, the bearings can be packed full of grease, so there is simply no space for water inside, evenif it could get past the copious outflow of grease which is the messy price of this highest level ofprotection.
Cleaning
With grease fittings, bearings are less likely to become contaminated and can easily be flushedif they do. Simply keep pumping in grease as the flow changes from watery black slime to puregrease, then wipe off the excess. Ooze from a bearing this full will have to be wiped off again acouple of times over the next week’s riding.
Types of grease
Ball bearing grease contains little filaments which drag it back into the greaseless furrow theballs try to form on their endless circuit. Grease for “plain bearings,” (one surface sliding againstanother), lacks these filaments. Zerk grease guns are universally available to borrow at any farm,garage or machine shop. Ask for wheel bearing grease if there is more than one type.
Greases also vary in viscosity, temperature stability, and water solubility. Boat trailer bearinggrease is best for extreme conditions, regular bearing grease for moderate conditions. The type ofgrease in a grease fitting equipped bearing is less critical, as quantity can be increased to precludethe formation of greaseless furrows or problems with water if necessary. Temperature stability ismore critical; a headset packed full of temperature-unstable grease at 50°F (10°C) can drain ratherunpleasantly at 100°F (38°C).
A note on ooze: A lot of ooze is a waste, a little ooze is best. It flushes out the metal filingswhich are a by-product of bearing wear. This extends their life as compared to the usual scenarioof an exponentially growing concentration of metal powder in the dwindling grease.
Types of bearings
The most suitable for retrofitting with grease fittings are “sealed mechanism” cup and conebearings. Regular cup and cone bearings are OK. Plastic-sealed cartridge bearings, ordinarily moredesirable because of the serviceability their pop-off seals afford, are not well-suited. It is simply tooeasy to inadvertently pop the outside seals off with grease pressure (the inner seals should beremoved to let grease in; they can be kept as spares). This can be dealt with in a variety of ways.The seals pop back in just as easily as they pop out. If they are readily accessible (not hidden in themiddle of a freewheel, behind a crank spider or dust cover) you can simply keep an eye on themand pop them back while you are learning not to pack in too much grease. Often less than onepump stroke is needed to recharge the bearings with grease. If you are committed to cartridgebearings, its probably best to treat your bike to a set of new, metal-sealed bearings when youinstall your grease fittings.

P. 3Copyright © 1988-2/19/2002 Oasis Design. If this article has come to you without charge and you find it useful, please send $3.95 to www.oasisdesign.net, orOasis Design, #5 San Marcos Trout Club, Santa Barbara, CA, 93105 USA. We’ll e mail you any available update... Thanks!
The downside
The negatives to a grease-fitting equipped bike are a couple ounces more weight, a bit moremess and slightly increased resistance from grease shear against the axle, pedal and bottombracket spindles. These costs can be brought into the optimum balance for any situation simply byadjusting the quantity, frequency and type of grease added. All bikes bearings need some greaseand grease fittings are generally the best way to get it in there.
Tools and Materials Required for installation
Drill New bearings and races if desired
Center punch Solvent
Number 3 size bit and 1/4-28 tap —or— Thread lock
5 mm drill bit and 6 mm x 1 tap Epoxy
Smaller bit for predrilling Rags
Grease fittings with corresponding thread Beer can (empty)
General installation
Disassemble the bearings and thoroughly clean the parts. Replace any worn parts. Determinethe location of the grease fittings. Clearance from moving parts and accessibility are the primaryconcerns.
To drill clean, well-positioned holes, center punch, drill with the smaller bit, and then ream thehole with the tap drill. Angled holes should be started perpendicular, then angled as soon as thereis enough of a hole to keep the angled drill from skating over the surface. There may or may not beclearance for a tap handle; to cut the threads, whatever you use, push down hard and straight. Isometimes chuck up the tap in the drill motor and go slow. Be sure to remove all metal chips fromdrilling and tapping. Using solvent, make sure all surfaces to be thread-locked or epoxied are trulygrease-free.
A garden variety grease gun possesses a tremendous amount of hydraulic leverage, enough togenerate pressures of hundreds of pounds per square inch in a sealed space — overly gonzopumping should be avoided. Frame seals should be reasonably sturdy. Grease fittings, pedal dustcaps and headset races should all be installed with thread lock. This keeps grease from oozing outaround them, or blasting them out.
Put just enough grease on the races to hold the ball bearings inplace for assembly. Allow epoxy to set overnight before applyingforce or injecting grease.
Hubs
Grease fittings can be located in the middle of the hub body,offset to one side between the flanges; or for a rear hub, on the partof the hub body extending outside the spoke flanges (see hub figurepg 4). Threading the fitting into the thicker, angled part of the hub
Greasegun’s eyeview of agrease fit-ting accessi-bility lo-cated withrespect tothe spokes

P. 4Copyright © 1988-2/19/2002 Oasis Design. If this article has come to you without charge and you find it useful, please send $3.95 to www.oasisdesign.net, orOasis Design, #5 San Marcos Trout Club, Santa Barbara, CA, 93105 USA. We’ll e mail you any available update... Thanks!
body achieves the necessary clearance without compromising thread depth. There is generally notenough clearance between the axle and hub shell to allow a grease fitting to be threaded in flush inthe middle of the hub. If necessary, you can use a spacer to create clearance. An aluminum brakebolt pad for a rear caliper brake works well. Make sure that the end of the hole is not blockedentirely by the bearing race. If it’s inside the spokes, ensure that is accessible between two widelyspaced, almost parallel spokes, not two that cross. To make it easy to find, I center it between thesame two spokes that bracket the valve. It’s far easier to get the access right if you drill the holeafter building the wheel. Having the fitting off center does not seem to affect the distribution of thegrease much. Drilling a hole in the hub shell has doesn’t seem to effect its mechanical integrity.
Pedals
Pedal bearings take the worst abuse.They benefit greatly from grease fittings.Start with new, good quality bearings ifyou care about smooth bearing action —it’s not long before a standard pedal haslost its smoothness. The ideal site for agrease fitting is in line with the pedalspindle, on the dust cap. Clean greaseflows through the outer bearing to theinner one (and from there out onto yourshoes if you put in too much). The mid-pedal body locations produce a stagnanteddy of grease at the outer bearing. Thiscan be A) ignored, since it is never thefirst bearing to fail anyway, or B) thedust cover can be removed when addingnew grease so metal dust-laden greasecan flow through and purge it.
LOCATING GREASE FITTINGS FOR HUBS
Best locationThe middle is least desirable as there is littlematerial to give the fitting threads purchase,and clearance with the axle is an issue, espe-cially if it should bend. A caliper brake washeris perfect as a spacer.
2nd best loca-tion (shown inphoto, above)
Clearance holefor grease gundrilled or filed inpedalcage
The bottom is a last resort, asthe grease fittings can getknocked off.
In a metaldust cap at theouter edge of thepedal is best.
LOCATING GREASE FITTINGS FOR PEDALS
2nd best position is on theside of the pedal.
1
3
2
1 3 2
2

P. 5Copyright © 1988-2/19/2002 Oasis Design. If this article has come to you without charge and you find it useful, please send $3.95 to www.oasisdesign.net, orOasis Design, #5 San Marcos Trout Club, Santa Barbara, CA, 93105 USA. We’ll e mail you any available update... Thanks!
With either position, use flat washers as needed to get clearance from the spindle. Pick a spotwhere the fitting is protected from being knocked off by a rock. Filing a hole in the pedal cage isoften necessary for grease gun access.
Headset
Install the grease fittingsas close to the top bearingas possible, as gravitygreatly favors the flow ofgrease through the lowerbearing. Frame tubes mustbe sealed off to preventtheir filling up with grease.This is best accomplishedwith 0.127 mm thick,radiused aluminum shimstock (beer can). Cut two1.5” (3 cm) diameter disksand epoxy them in place,using the remainder of thebeer can as a spring to jigthem in place. Alterna-tively, two 1.5 x 4 inchstrips going around theentire insidecircumference ofthe tube functionas their ownspring, holdingthemselves inplace for gluing without additional jigging (headsetfigure). A two inch length of inner tube around theouter races moderates the gravity-induced flow ofgrease out of the lower bearing.
Bottom Bracket
Bottom brackets are the most challenging installa-tion. In virtually all frames the tubes drain directly intothe bottom bracket. Here, at the lowest point, cruddislodged from the sides of the seat tube joins thesmaller streams of crud from down tube and chain staysin an abrasive, oxidative attack on the crank bearings. If
Grease fittings on bottom bracket, pedal(with nifty plastic cap)
Alternate loca-tion in case thereis brake hard-ware which in-terferes with thehigher up posi-tions
LOCATING THE HEADSET GREASE FITTING
Place grease fittings ashigh as possible on thehead tube
Cover frameholes withaluminumbeer canpatches orstrips, ep-oxied inplace.
P. 6Copyright © 1988-2/19/2002 Oasis Design. If this article has come to you without charge and you find it useful, please send $3.95 to www.oasisdesign.net, orOasis Design, #5 San Marcos Trout Club, Santa Barbara, CA, 93105 USA. We’ll e mail you any available update... Thanks!
the bike has an open-topped seat post and no fenders, a portion of the grittyditch water which flies off the tire hits the underside of the seat and dribblesdown the seat post into the crank bearings. Additionally, the welding gasrelief holes at the rear dropouts admit sandy stream crossing water into thechainstays until they are full. Once in the frame, this sludge has no egresssave by rusting its way through the bottom bracket cup threads and grindingits way through the ball bearings. After my first mountain bike race, I poureda quart of water out of my frame, and later removed a tablespoon of gravelfrom the bottom bracket.
If you don’t have a closed-top seat post, put a cork in the end of the seatpost. Also, put thread-locked fasteners in any unused water bottle braze-ons to plug the holes, andsolder or epoxy those nasty gas relief holes shut.
When you install a grease fitting on the crank shell, you come face to face with this deficiencyin bicycle frame design. The best approach is to squirt a bit of oil into the frame and seal it off thetubes completely, inside and outside.
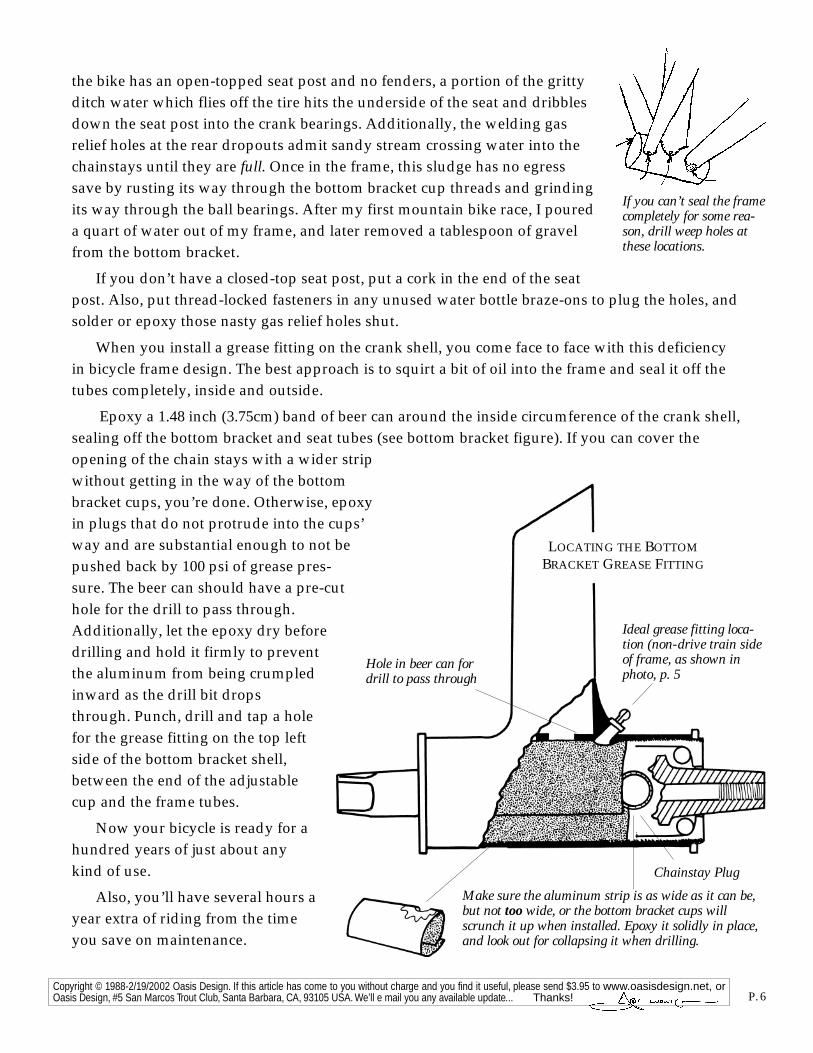
Epoxy a 1.48 inch (3.75cm) band of beer can around the inside circumference of the crank shell,sealing off the bottom bracket and seat tubes (see bottom bracket figure). If you can cover theopening of the chain stays with a wider stripwithout getting in the way of the bottombracket cups, you’re done. Otherwise, epoxyin plugs that do not protrude into the cups’way and are substantial enough to not bepushed back by 100 psi of grease pres-sure. The beer can should have a pre-cuthole for the drill to pass through.Additionally, let the epoxy dry beforedrilling and hold it firmly to preventthe aluminum from being crumpledinward as the drill bit dropsthrough. Punch, drill and tap a holefor the grease fitting on the top leftside of the bottom bracket shell,between the end of the adjustablecup and the frame tubes.
Now your bicycle is ready for ahundred years of just about anykind of use.
Also, you’ll have several hours ayear extra of riding from the timeyou save on maintenance.
If you can’t seal the framecompletely for some rea-son, drill weep holes atthese locations.
Ideal grease fitting loca-tion (non-drive train sideof frame, as shown inphoto, p. 5
LOCATING THE BOTTOMBRACKET GREASE FITTING
Make sure the aluminum strip is as wide as it can be,but not too wide, or the bottom bracket cups willscrunch it up when installed. Epoxy it solidly in place,and look out for collapsing it when drilling.
Chainstay Plug
Hole in beer can fordrill to pass through


![(Book) Michael Jackson - Invincible[1]](https://img.dokumen.tips/doc/110x75/563db8e6550346aa9a980a3b/book-michael-jackson-invincible1.jpg)
![Ebook RONNIE COLEMAN Invincible[1]](https://img.dokumen.tips/doc/110x75/5571fa294979599169917016/ebook-ronnie-coleman-invincible1.jpg)


![[Smac 2014]uet invincible team](https://img.dokumen.tips/doc/110x75/55acfa311a28ab571d8b4613/smac-2014uet-invincible-team.jpg)
