Embed Size (px)
Citation preview
Scratch Tutorial by Kristine Kopelke & Colleen Stieler-Hunt Email: [email protected] & [email protected] - Page 1 of 15
SCRATCH TUTORIAL—MAKE AN ESCAPE THE ROOM GAME IN SCRATCH
MAKE AN ESCAPE THE ROOM GAME IN SCRATCH
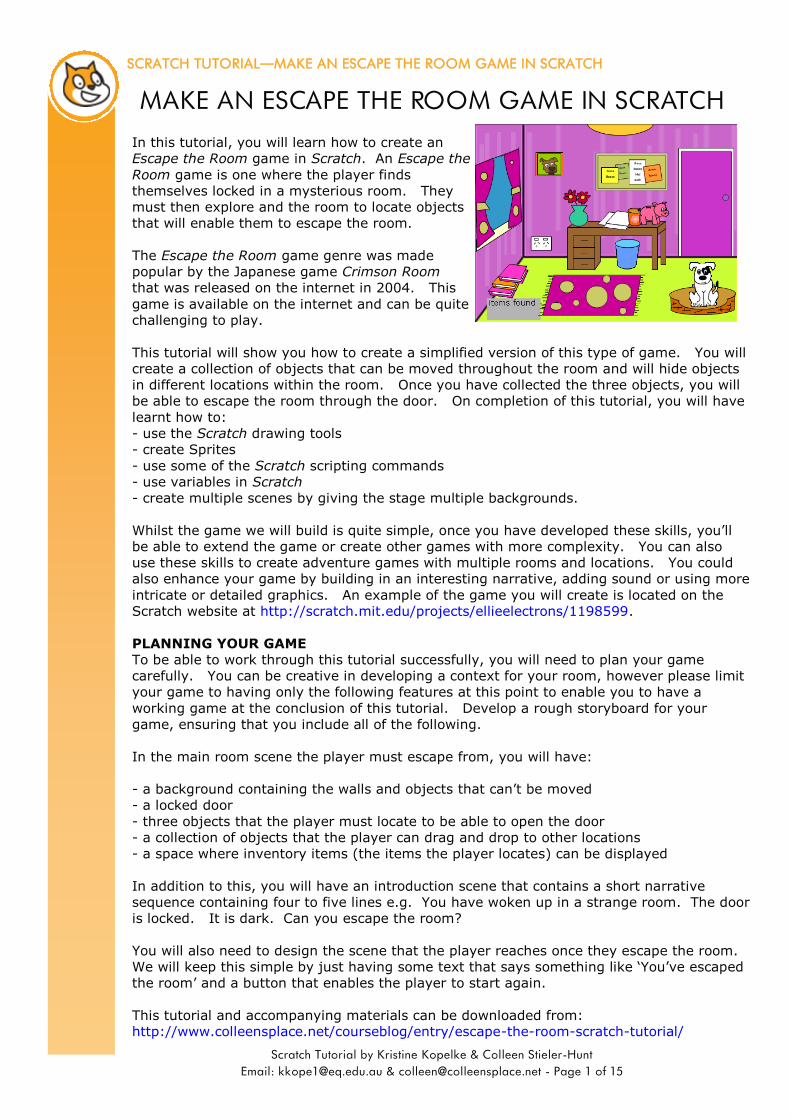
In this tutorial, you will learn how to create an
Escape the Room game in Scratch. An Escape the
Room game is one where the player finds
themselves locked in a mysterious room. They
must then explore and the room to locate objects
that will enable them to escape the room.
The Escape the Room game genre was made
popular by the Japanese game Crimson Room
that was released on the internet in 2004. This
game is available on the internet and can be quite
challenging to play.
This tutorial will show you how to create a simplified version of this type of game. You will
create a collection of objects that can be moved throughout the room and will hide objects
in different locations within the room. Once you have collected the three objects, you will
be able to escape the room through the door. On completion of this tutorial, you will have
learnt how to:
- use the Scratch drawing tools
- create Sprites
- use some of the Scratch scripting commands
- use variables in Scratch
- create multiple scenes by giving the stage multiple backgrounds.
Whilst the game we will build is quite simple, once you have developed these skills, you’ll
be able to extend the game or create other games with more complexity. You can also
use these skills to create adventure games with multiple rooms and locations. You could
also enhance your game by building in an interesting narrative, adding sound or using more
intricate or detailed graphics. An example of the game you will create is located on the
Scratch website at http://scratch.mit.edu/projects/ellieelectrons/1198599.
PLANNING YOUR GAME
To be able to work through this tutorial successfully, you will need to plan your game
carefully. You can be creative in developing a context for your room, however please limit
your game to having only the following features at this point to enable you to have a
working game at the conclusion of this tutorial. Develop a rough storyboard for your
game, ensuring that you include all of the following.
In the main room scene the player must escape from, you will have:
- a background containing the walls and objects that can’t be moved
- a locked door
- three objects that the player must locate to be able to open the door
- a collection of objects that the player can drag and drop to other locations
- a space where inventory items (the items the player locates) can be displayed
In addition to this, you will have an introduction scene that contains a short narrative
sequence containing four to five lines e.g. You have woken up in a strange room. The door
is locked. It is dark. Can you escape the room?
You will also need to design the scene that the player reaches once they escape the room.
We will keep this simple by just having some text that says something like ‘You’ve escaped
the room’ and a button that enables the player to start again.
This tutorial and accompanying materials can be downloaded from:
http://www.colleensplace.net/courseblog/entry/escape-the-room-scratch-tutorial/
Scratch Tutorial by Kristine Kopelke & Colleen Stieler-Hunt Email: [email protected] & [email protected] - Page 2 of 15
SCRATCH TUTORIAL—MAKE AN ESCAPE THE ROOM GAME IN SCRATCH
Now that you have your plans in place, we’ll start building the game in Scratch.
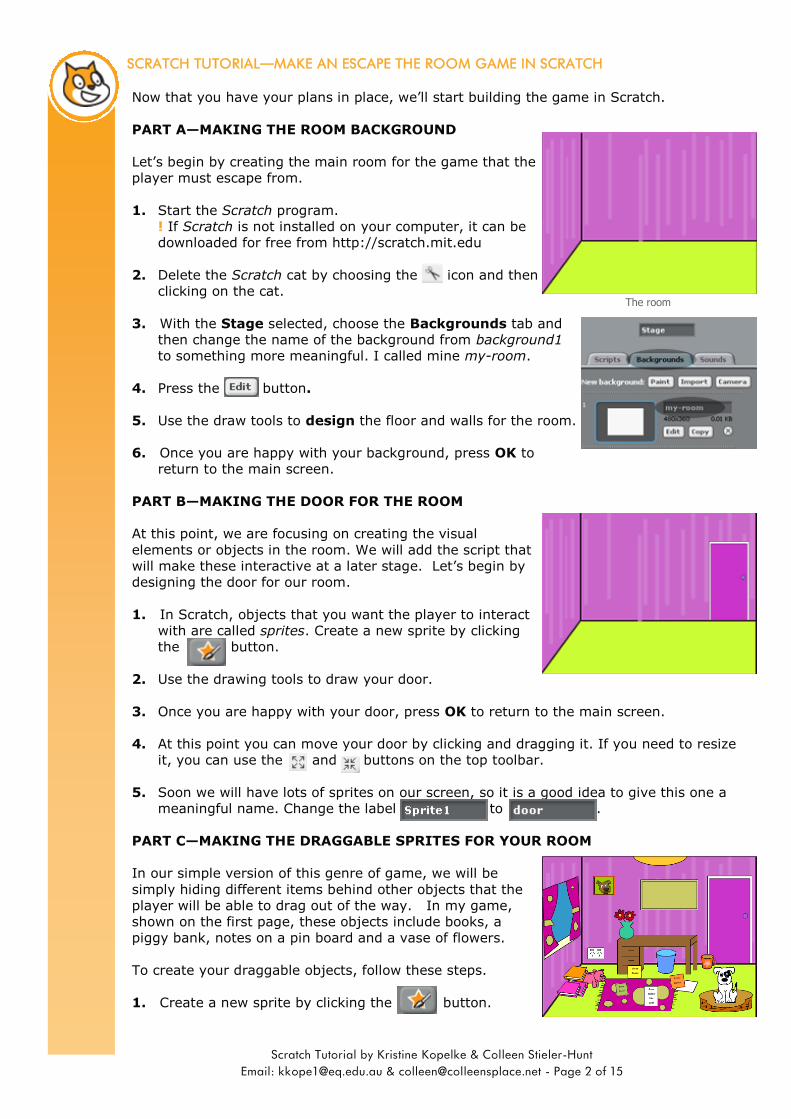
PART A—MAKING THE ROOM BACKGROUND
Let’s begin by creating the main room for the game that the
player must escape from.
1. Start the Scratch program.
! If Scratch is not installed on your computer, it can be
downloaded for free from http://scratch.mit.edu
2. Delete the Scratch cat by choosing the icon and then
clicking on the cat.
3. With the Stage selected, choose the Backgrounds tab and
then change the name of the background from background1
to something more meaningful. I called mine my-room.
4. Press the button.
5. Use the draw tools to design the floor and walls for the room.
6. Once you are happy with your background, press OK to
return to the main screen.
PART B—MAKING THE DOOR FOR THE ROOM
At this point, we are focusing on creating the visual
elements or objects in the room. We will add the script that
will make these interactive at a later stage. Let’s begin by
designing the door for our room.
1. In Scratch, objects that you want the player to interact
with are called sprites. Create a new sprite by clicking
the button.
2. Use the drawing tools to draw your door.
3. Once you are happy with your door, press OK to return to the main screen.
4. At this point you can move your door by clicking and dragging it. If you need to resize
it, you can use the and buttons on the top toolbar.
5. Soon we will have lots of sprites on our screen, so it is a good idea to give this one a
meaningful name. Change the label to .
PART C—MAKING THE DRAGGABLE SPRITES FOR YOUR ROOM
In our simple version of this genre of game, we will be
simply hiding different items behind other objects that the
player will be able to drag out of the way. In my game,
shown on the first page, these objects include books, a
piggy bank, notes on a pin board and a vase of flowers.
To create your draggable objects, follow these steps.
1. Create a new sprite by clicking the button.
The room
Scratch Tutorial by Kristine Kopelke & Colleen Stieler-Hunt Email: [email protected] & [email protected] - Page 3 of 15
SCRATCH TUTORIAL—MAKE AN ESCAPE THE ROOM GAME IN SCRATCH
2. Use the drawing tools to draw your next draggable object.
3. Once you are happy with the draggable object, press OK to return to the main screen.
4. Position the draggable object where you want it and resize as appropriate.
5. Give each draggable object a meaningful name.
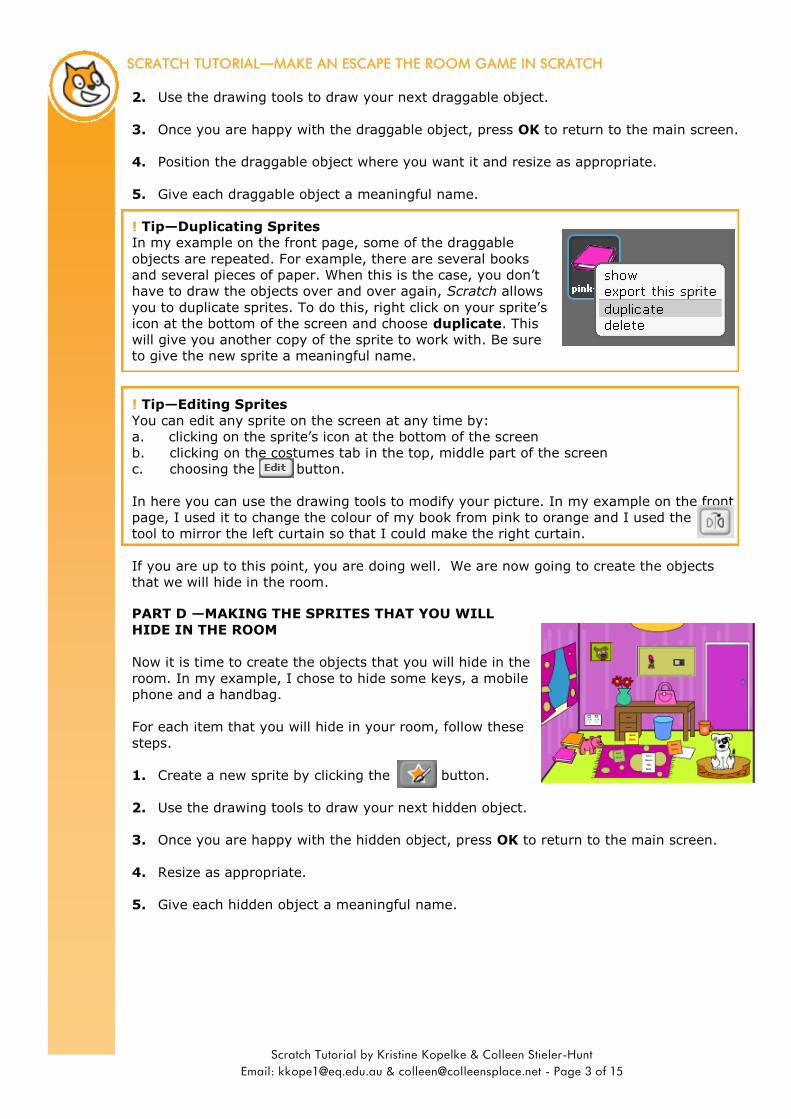
! Tip—Duplicating Sprites
In my example on the front page, some of the draggable
objects are repeated. For example, there are several books
and several pieces of paper. When this is the case, you don’t
have to draw the objects over and over again, Scratch allows
you to duplicate sprites. To do this, right click on your sprite’s
icon at the bottom of the screen and choose duplicate. This
will give you another copy of the sprite to work with. Be sure
to give the new sprite a meaningful name.
! Tip—Editing Sprites
You can edit any sprite on the screen at any time by:
a. clicking on the sprite’s icon at the bottom of the screen
b. clicking on the costumes tab in the top, middle part of the screen
c. choosing the button.
In here you can use the drawing tools to modify your picture. In my example on the front
page, I used it to change the colour of my book from pink to orange and I used the
tool to mirror the left curtain so that I could make the right curtain.
If you are up to this point, you are doing well. We are now going to create the objects
that we will hide in the room.
PART D —MAKING THE SPRITES THAT YOU WILL
HIDE IN THE ROOM
Now it is time to create the objects that you will hide in the
room. In my example, I chose to hide some keys, a mobile
phone and a handbag.
For each item that you will hide in your room, follow these
steps.
1. Create a new sprite by clicking the button.
2. Use the drawing tools to draw your next hidden object.
3. Once you are happy with the hidden object, press OK to return to the main screen.
4. Resize as appropriate.
5. Give each hidden object a meaningful name.
Scratch Tutorial by Kristine Kopelke & Colleen Stieler-Hunt Email: [email protected] & [email protected] - Page 4 of 15
SCRATCH TUTORIAL—MAKE AN ESCAPE THE ROOM GAME IN SCRATCH
PART E —MAKING THE SPRITES FOR YOUR
INVENTORY
As the player finds the hidden objects, a copy of each of the
hidden objects will appear in an Inventory box. In this
section, you will create copies of each of your hidden sprites
and create a sprite for the Inventory box.
1. For each of the sprites that will be hidden in the room:
a) Right click on its icon at the bottom of the screen
and choose duplicate.
b) Give the new sprite a name starting with INV. For example, I
named my duplicated handbag sprite, INV_handbag.
c) Resize as appropriate.
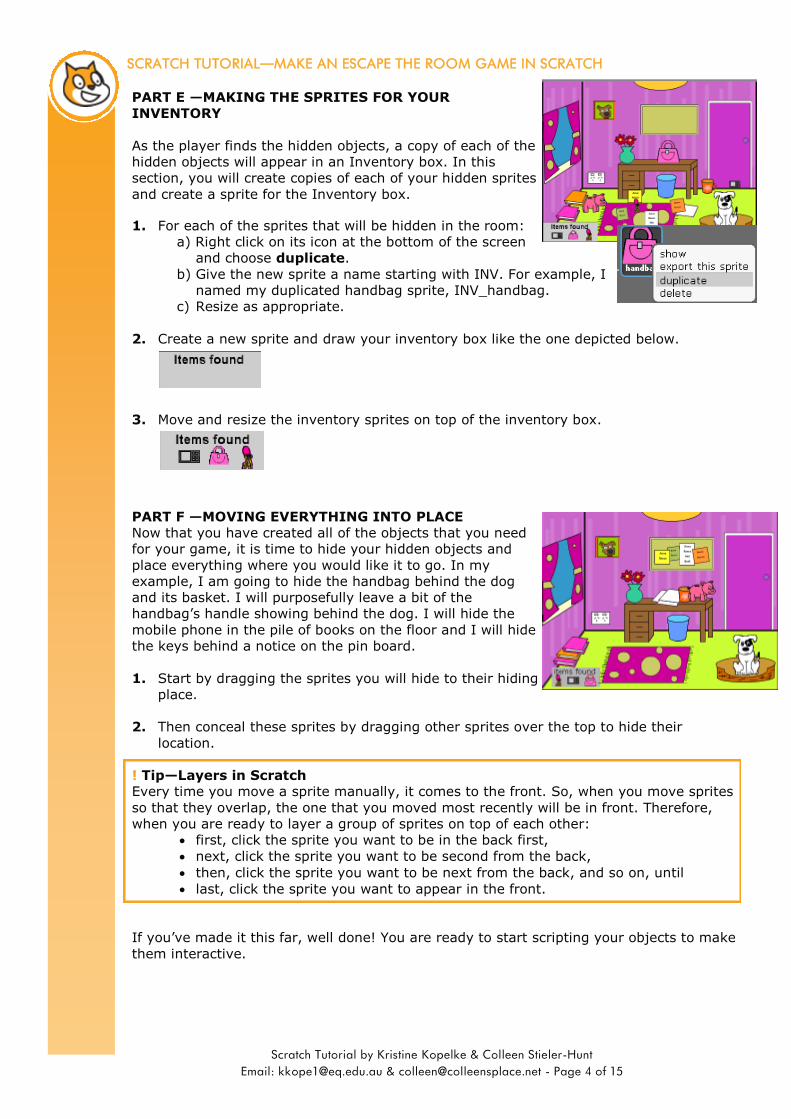
2. Create a new sprite and draw your inventory box like the one depicted below.
3. Move and resize the inventory sprites on top of the inventory box.
PART F —MOVING EVERYTHING INTO PLACE
Now that you have created all of the objects that you need
for your game, it is time to hide your hidden objects and
place everything where you would like it to go. In my
example, I am going to hide the handbag behind the dog
and its basket. I will purposefully leave a bit of the
handbag’s handle showing behind the dog. I will hide the
mobile phone in the pile of books on the floor and I will hide
the keys behind a notice on the pin board.
1. Start by dragging the sprites you will hide to their hiding
place.
2. Then conceal these sprites by dragging other sprites over the top to hide their
location.
! Tip—Layers in Scratch
Every time you move a sprite manually, it comes to the front. So, when you move sprites
so that they overlap, the one that you moved most recently will be in front. Therefore,
when you are ready to layer a group of sprites on top of each other:
first, click the sprite you want to be in the back first,
next, click the sprite you want to be second from the back,
then, click the sprite you want to be next from the back, and so on, until
last, click the sprite you want to appear in the front.
If you’ve made it this far, well done! You are ready to start scripting your objects to make
them interactive.
Scratch Tutorial by Kristine Kopelke & Colleen Stieler-Hunt Email: [email protected] & [email protected] - Page 5 of 15
SCRATCH TUTORIAL—MAKE AN ESCAPE THE ROOM GAME IN SCRATCH
PART G —HIDE THE INVENTORY SPRITES
We only want the inventory sprites to appear on the
screen after the player has found the hidden objects, so
we start by making them invisible by using the hide
command. This command will be activated when the
player presses the green flag button.
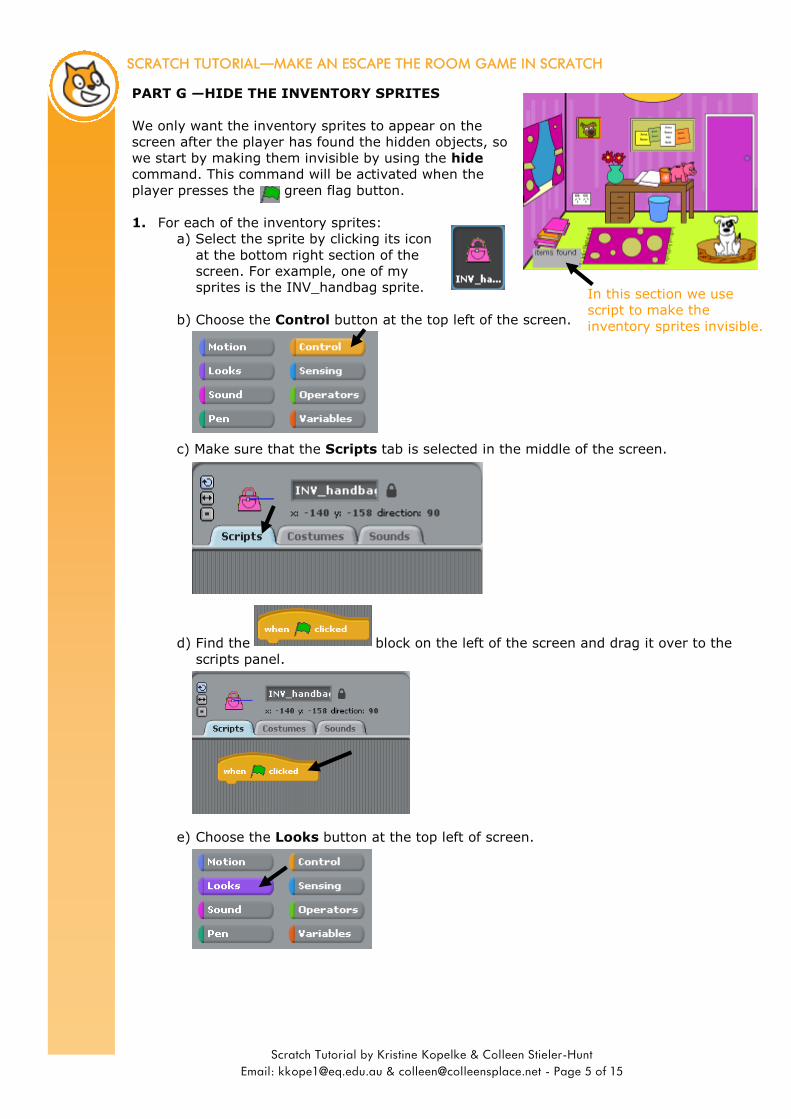
1. For each of the inventory sprites:
a) Select the sprite by clicking its icon
at the bottom right section of the
screen. For example, one of my
sprites is the INV_handbag sprite.
b) Choose the Control button at the top left of the screen.
c) Make sure that the Scripts tab is selected in the middle of the screen.
d) Find the block on the left of the screen and drag it over to the
scripts panel.
e) Choose the Looks button at the top left of screen.
In this section we use
script to make the
inventory sprites invisible.
Scratch Tutorial by Kristine Kopelke & Colleen Stieler-Hunt Email: [email protected] & [email protected] - Page 6 of 15
SCRATCH TUTORIAL—MAKE AN ESCAPE THE ROOM GAME IN SCRATCH
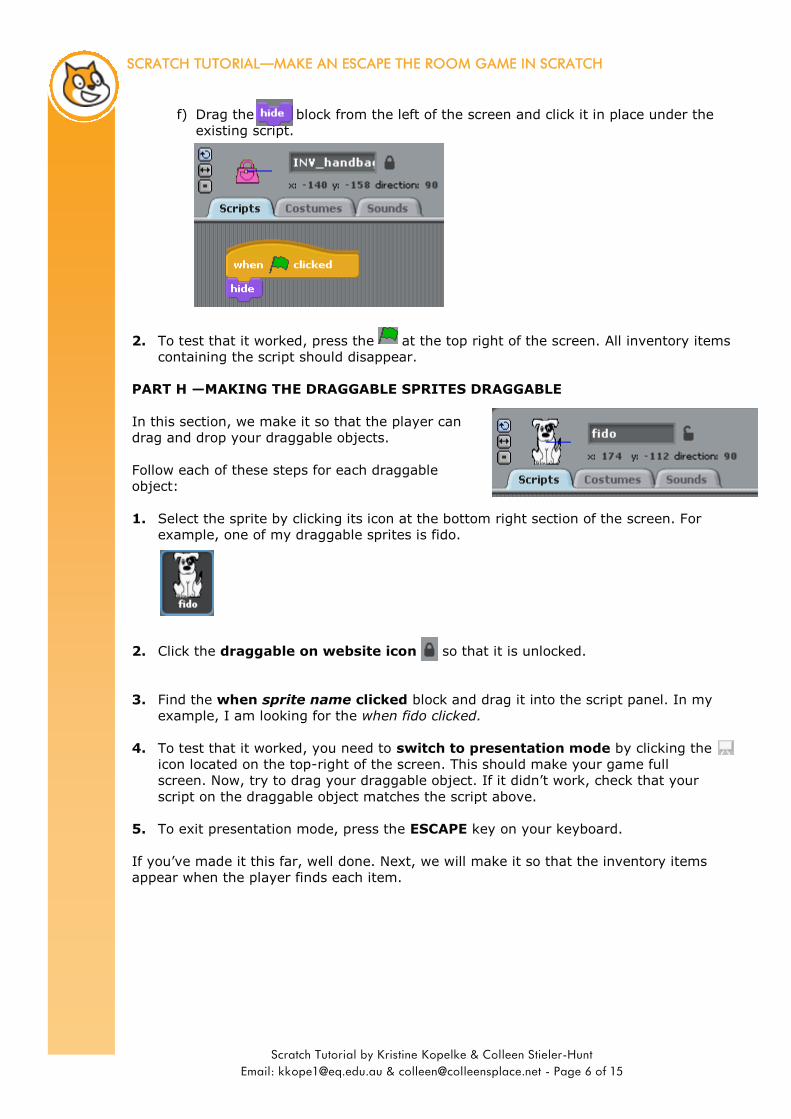
f) Drag the block from the left of the screen and click it in place under the
existing script.
2. To test that it worked, press the at the top right of the screen. All inventory items
containing the script should disappear.
PART H —MAKING THE DRAGGABLE SPRITES DRAGGABLE
In this section, we make it so that the player can
drag and drop your draggable objects.
Follow each of these steps for each draggable
object:
1. Select the sprite by clicking its icon at the bottom right section of the screen. For
example, one of my draggable sprites is fido.
2. Click the draggable on website icon so that it is unlocked.
3. Find the when sprite name clicked block and drag it into the script panel. In my
example, I am looking for the when fido clicked.
4. To test that it worked, you need to switch to presentation mode by clicking the
icon located on the top-right of the screen. This should make your game full
screen. Now, try to drag your draggable object. If it didn’t work, check that your
script on the draggable object matches the script above.
5. To exit presentation mode, press the ESCAPE key on your keyboard.
If you’ve made it this far, well done. Next, we will make it so that the inventory items
appear when the player finds each item.
Scratch Tutorial by Kristine Kopelke & Colleen Stieler-Hunt Email: [email protected] & [email protected] - Page 7 of 15
SCRATCH TUTORIAL—MAKE AN ESCAPE THE ROOM GAME IN SCRATCH
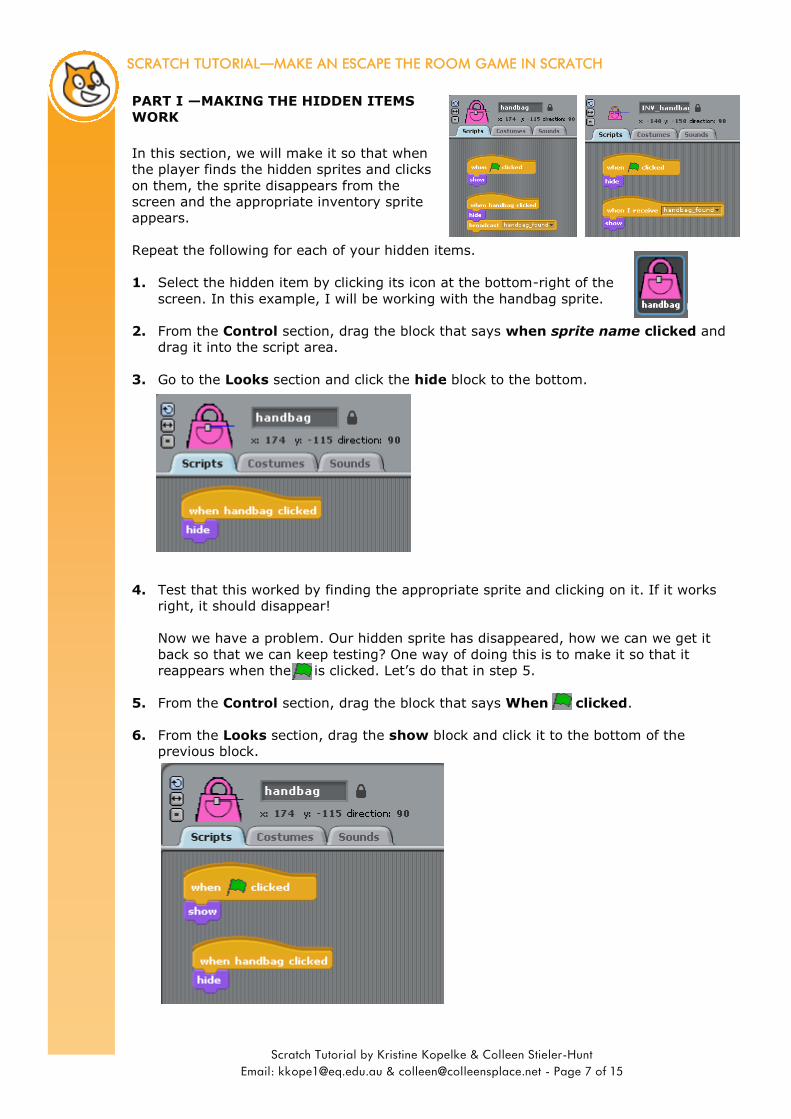
PART I —MAKING THE HIDDEN ITEMS
WORK
In this section, we will make it so that when
the player finds the hidden sprites and clicks
on them, the sprite disappears from the
screen and the appropriate inventory sprite
appears.
Repeat the following for each of your hidden items.
1. Select the hidden item by clicking its icon at the bottom-right of the
screen. In this example, I will be working with the handbag sprite.
2. From the Control section, drag the block that says when sprite name clicked and
drag it into the script area.
3. Go to the Looks section and click the hide block to the bottom.
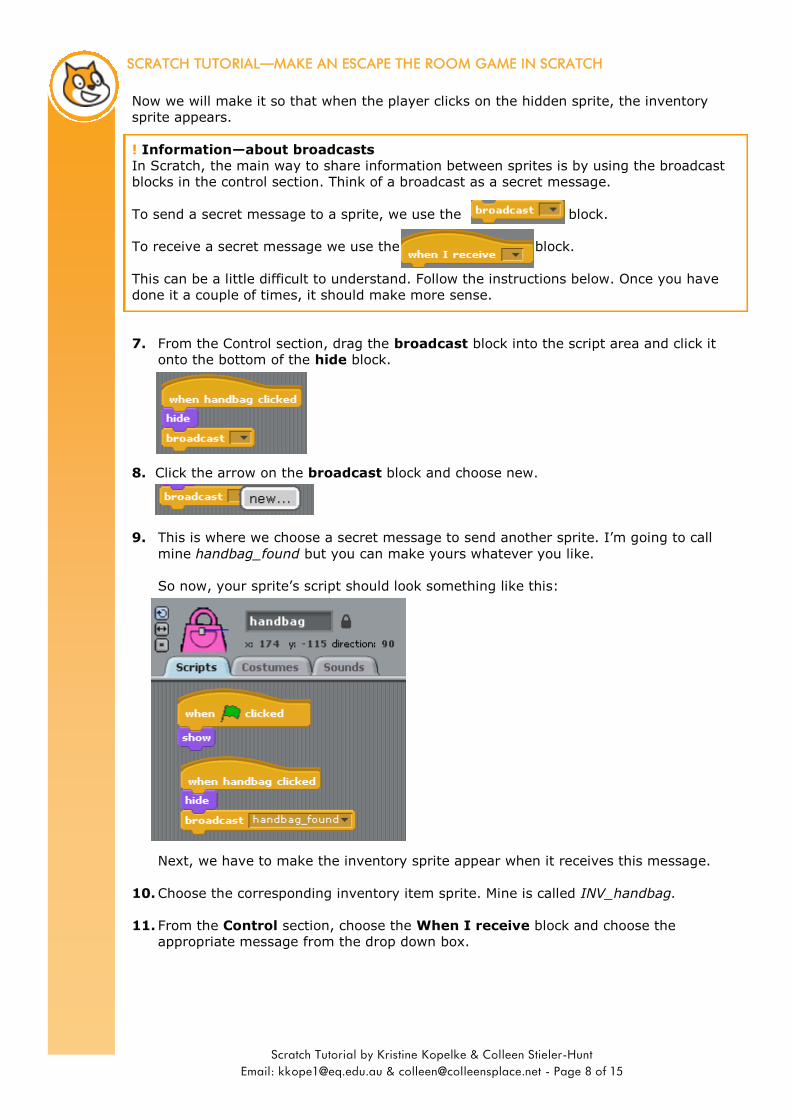
4. Test that this worked by finding the appropriate sprite and clicking on it. If it works
right, it should disappear!
Now we have a problem. Our hidden sprite has disappeared, how we can we get it
back so that we can keep testing? One way of doing this is to make it so that it
reappears when the is clicked. Let’s do that in step 5.
5. From the Control section, drag the block that says When clicked.
6. From the Looks section, drag the show block and click it to the bottom of the
previous block.
Scratch Tutorial by Kristine Kopelke & Colleen Stieler-Hunt Email: [email protected] & [email protected] - Page 8 of 15
SCRATCH TUTORIAL—MAKE AN ESCAPE THE ROOM GAME IN SCRATCH
Now we will make it so that when the player clicks on the hidden sprite, the inventory
sprite appears.
! Information—about broadcasts
In Scratch, the main way to share information between sprites is by using the broadcast
blocks in the control section. Think of a broadcast as a secret message.
To send a secret message to a sprite, we use the block.
To receive a secret message we use the block.
This can be a little difficult to understand. Follow the instructions below. Once you have
done it a couple of times, it should make more sense.
7. From the Control section, drag the broadcast block into the script area and click it
onto the bottom of the hide block.
8. Click the arrow on the broadcast block and choose new.
9. This is where we choose a secret message to send another sprite. I’m going to call
mine handbag_found but you can make yours whatever you like.
So now, your sprite’s script should look something like this:
Next, we have to make the inventory sprite appear when it receives this message.
10. Choose the corresponding inventory item sprite. Mine is called INV_handbag.
11. From the Control section, choose the When I receive block and choose the
appropriate message from the drop down box.
Scratch Tutorial by Kristine Kopelke & Colleen Stieler-Hunt Email: [email protected] & [email protected] - Page 9 of 15
SCRATCH TUTORIAL—MAKE AN ESCAPE THE ROOM GAME IN SCRATCH
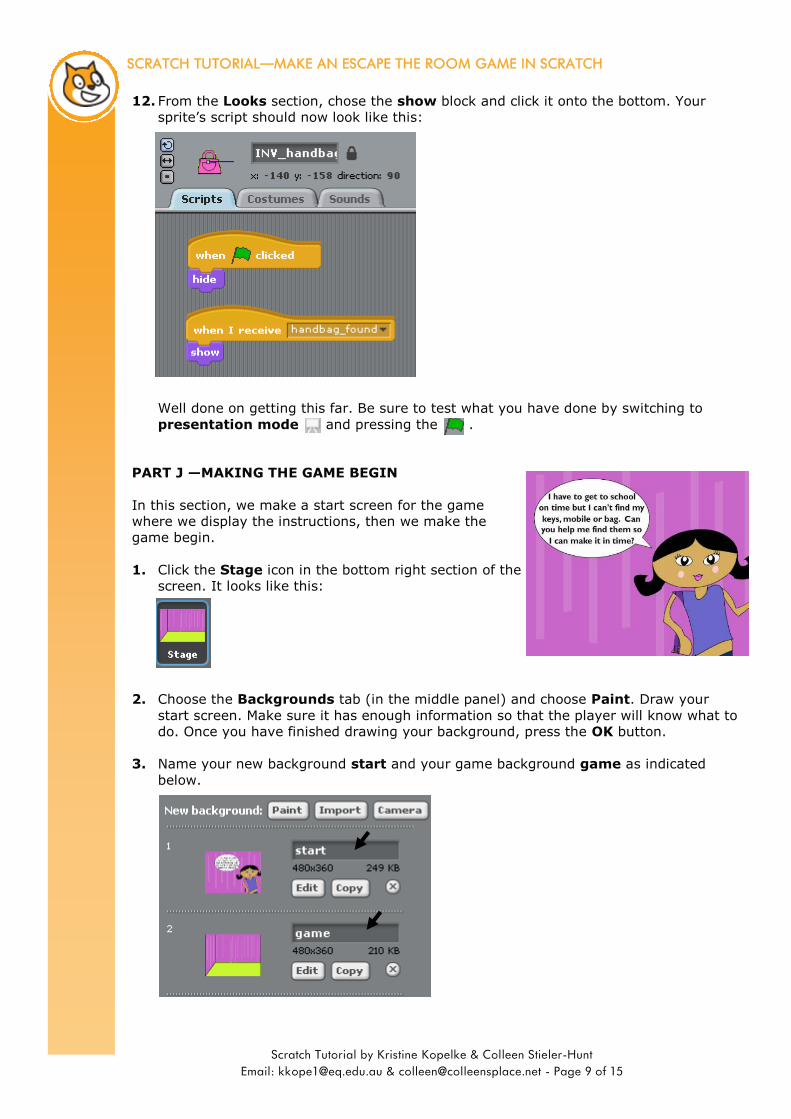
12. From the Looks section, chose the show block and click it onto the bottom. Your
sprite’s script should now look like this:
Well done on getting this far. Be sure to test what you have done by switching to
presentation mode and pressing the .
PART J —MAKING THE GAME BEGIN
In this section, we make a start screen for the game
where we display the instructions, then we make the
game begin.
1. Click the Stage icon in the bottom right section of the
screen. It looks like this:
2. Choose the Backgrounds tab (in the middle panel) and choose Paint. Draw your
start screen. Make sure it has enough information so that the player will know what to
do. Once you have finished drawing your background, press the OK button.
3. Name your new background start and your game background game as indicated
below.
Scratch Tutorial by Kristine Kopelke & Colleen Stieler-Hunt Email: [email protected] & [email protected] - Page 10 of 15
SCRATCH TUTORIAL—MAKE AN ESCAPE THE ROOM GAME IN SCRATCH
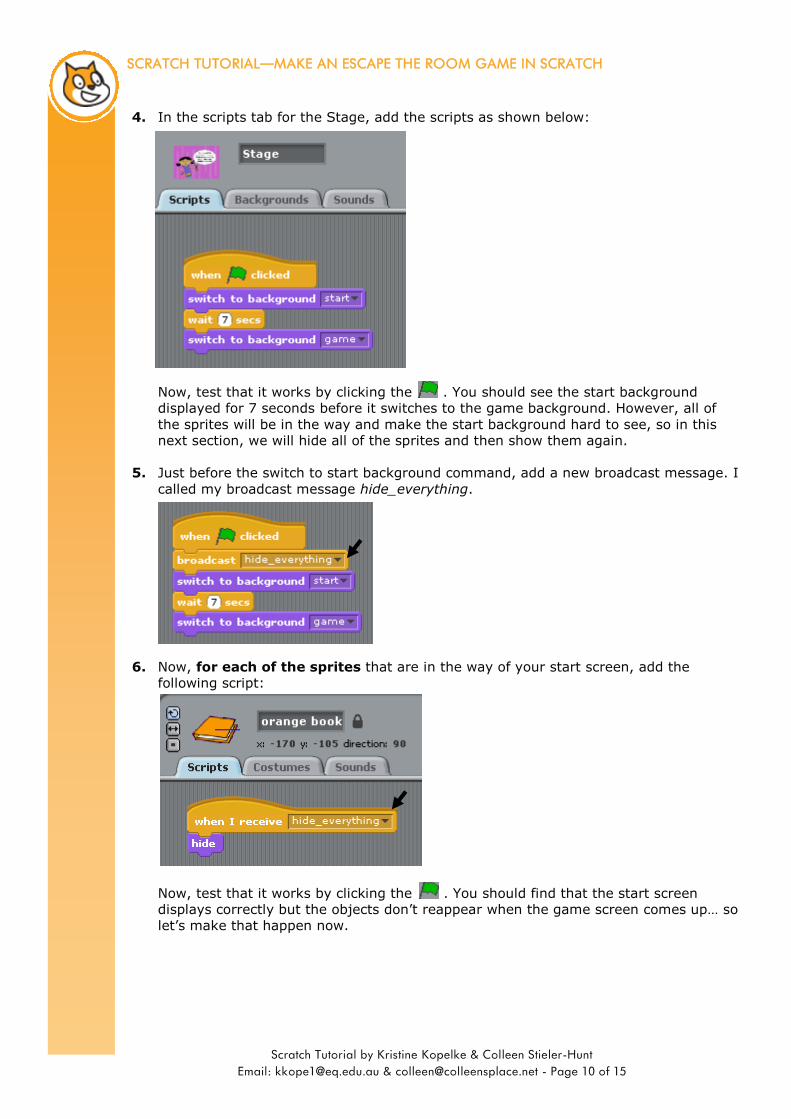
4. In the scripts tab for the Stage, add the scripts as shown below:
Now, test that it works by clicking the . You should see the start background
displayed for 7 seconds before it switches to the game background. However, all of
the sprites will be in the way and make the start background hard to see, so in this
next section, we will hide all of the sprites and then show them again.
5. Just before the switch to start background command, add a new broadcast message. I
called my broadcast message hide_everything.
6. Now, for each of the sprites that are in the way of your start screen, add the
following script:
Now, test that it works by clicking the . You should find that the start screen
displays correctly but the objects don’t reappear when the game screen comes up… so
let’s make that happen now.
Scratch Tutorial by Kristine Kopelke & Colleen Stieler-Hunt Email: [email protected] & [email protected] - Page 11 of 15
SCRATCH TUTORIAL—MAKE AN ESCAPE THE ROOM GAME IN SCRATCH
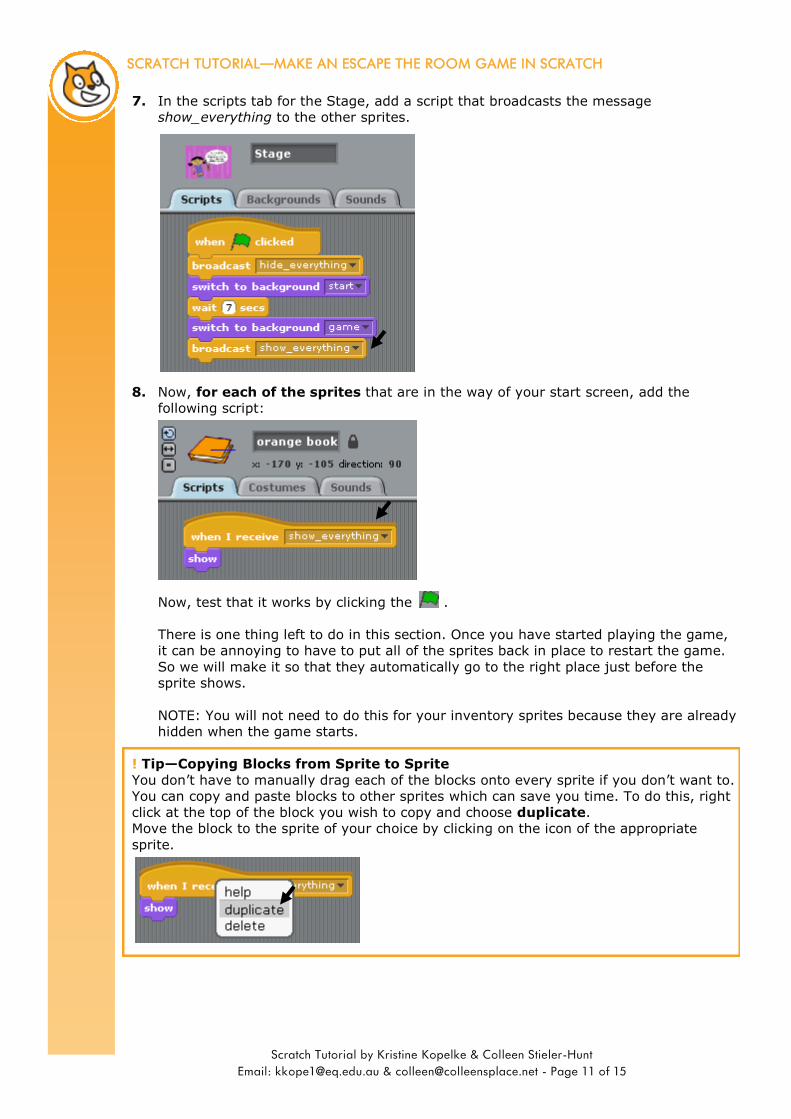
7. In the scripts tab for the Stage, add a script that broadcasts the message
show_everything to the other sprites.
8. Now, for each of the sprites that are in the way of your start screen, add the
following script:
Now, test that it works by clicking the .
There is one thing left to do in this section. Once you have started playing the game,
it can be annoying to have to put all of the sprites back in place to restart the game.
So we will make it so that they automatically go to the right place just before the
sprite shows.
NOTE: You will not need to do this for your inventory sprites because they are already
hidden when the game starts.
! Tip—Copying Blocks from Sprite to Sprite
You don’t have to manually drag each of the blocks onto every sprite if you don’t want to.
You can copy and paste blocks to other sprites which can save you time. To do this, right
click at the top of the block you wish to copy and choose duplicate.
Move the block to the sprite of your choice by clicking on the icon of the appropriate
sprite.

Scratch Tutorial by Kristine Kopelke & Colleen Stieler-Hunt Email: [email protected] & [email protected] - Page 12 of 15
SCRATCH TUTORIAL—MAKE AN ESCAPE THE ROOM GAME IN SCRATCH
9. Drag all of the sprites into the position you want them to be when the game starts.
10. For each sprite, add a go to x and y script and a go back layers script. One
example is shown in the picture below.
! Tip— x & y coordinates
In Scratch, picture the screen as an invisible grid. Each point on the grid has a unique x
and y coordinate. You can figure out what the correct coordinates are by trial and error
OR you can just make sure the sprite is in the correct place before you go to add the new
script. The default x and y coordinates that appear in the script options are the sprite’s
current location.
! Tip— go back X layers
This is a useful command for layering your sprites and hiding your hidden objects behind
them. You may need to use some trial and error to get the placement just right.
Now, test that it works by clicking the . You may need to use some trial and error to
get it just right!
Well done on making it this far! We are almost finished!
PART K —MAKING THE GAME END
In this section, we make an end screen for the game
and create a variable to keep track of how many
objects have been found.
1. Click the Stage icon in the bottom right section of
the screen and choose the Backgrounds tab (in
the middle panel) and choose Paint. Draw your
end screen. Once you have finished drawing your
background, press the OK button.
Scratch Tutorial by Kristine Kopelke & Colleen Stieler-Hunt Email: [email protected] & [email protected] - Page 13 of 15
SCRATCH TUTORIAL—MAKE AN ESCAPE THE ROOM GAME IN SCRATCH
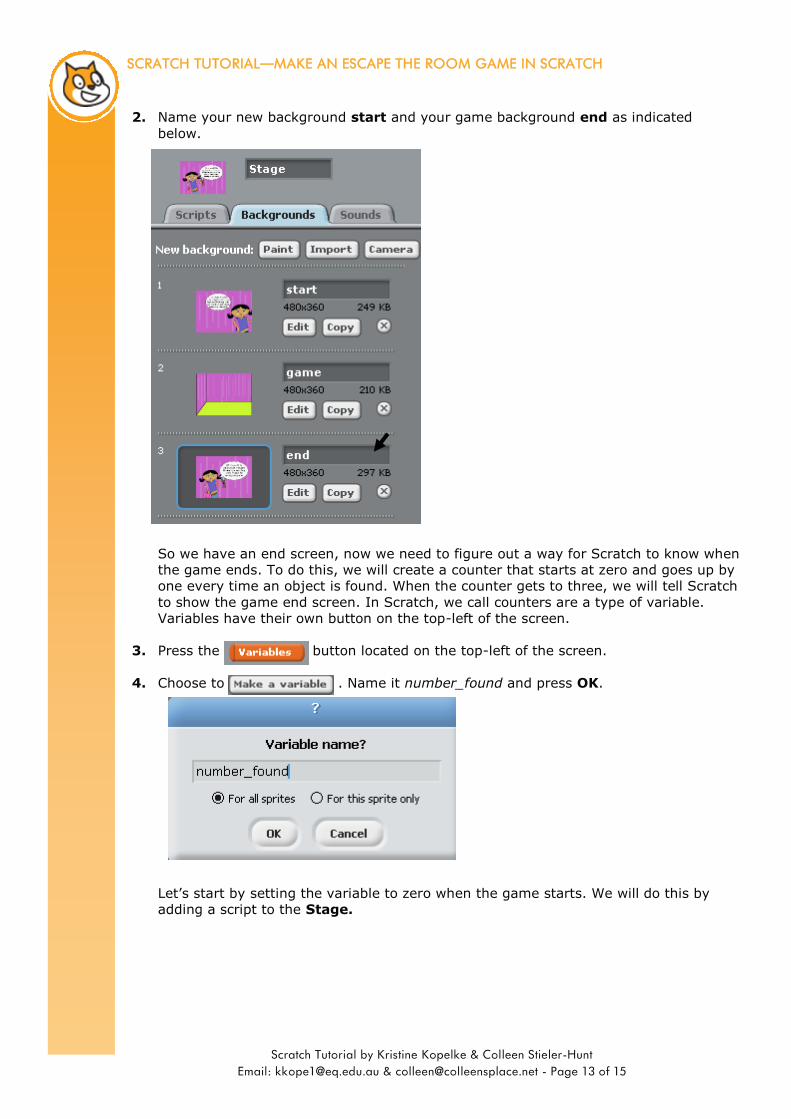
2. Name your new background start and your game background end as indicated
below.
So we have an end screen, now we need to figure out a way for Scratch to know when
the game ends. To do this, we will create a counter that starts at zero and goes up by
one every time an object is found. When the counter gets to three, we will tell Scratch
to show the game end screen. In Scratch, we call counters are a type of variable.
Variables have their own button on the top-left of the screen.
3. Press the button located on the top-left of the screen.
4. Choose to . Name it number_found and press OK.
Let’s start by setting the variable to zero when the game starts. We will do this by
adding a script to the Stage.

Scratch Tutorial by Kristine Kopelke & Colleen Stieler-Hunt Email: [email protected] & [email protected] - Page 14 of 15
SCRATCH TUTORIAL—MAKE AN ESCAPE THE ROOM GAME IN SCRATCH
5. Click on the Stage icon at the bottom of the screen and drag the set number_found
to 0 script and place it as shown below.
6. To each of the inventory sprites, add a change number_found by 1 script to the
when I receive block.
Don’t forget, you need to do this on each of the inventory sprites. In my example,
these sprites are named INV_keys, INV_handbag and INV_mobile-phone.
Now, the last thing we need to do is check make the door active.
7. Choose the door sprite and go the Scripts tab. Add the blocks as shown below.
Scratch Tutorial by Kristine Kopelke & Colleen Stieler-Hunt Email: [email protected] & [email protected] - Page 15 of 15
SCRATCH TUTORIAL—MAKE AN ESCAPE THE ROOM GAME IN SCRATCH
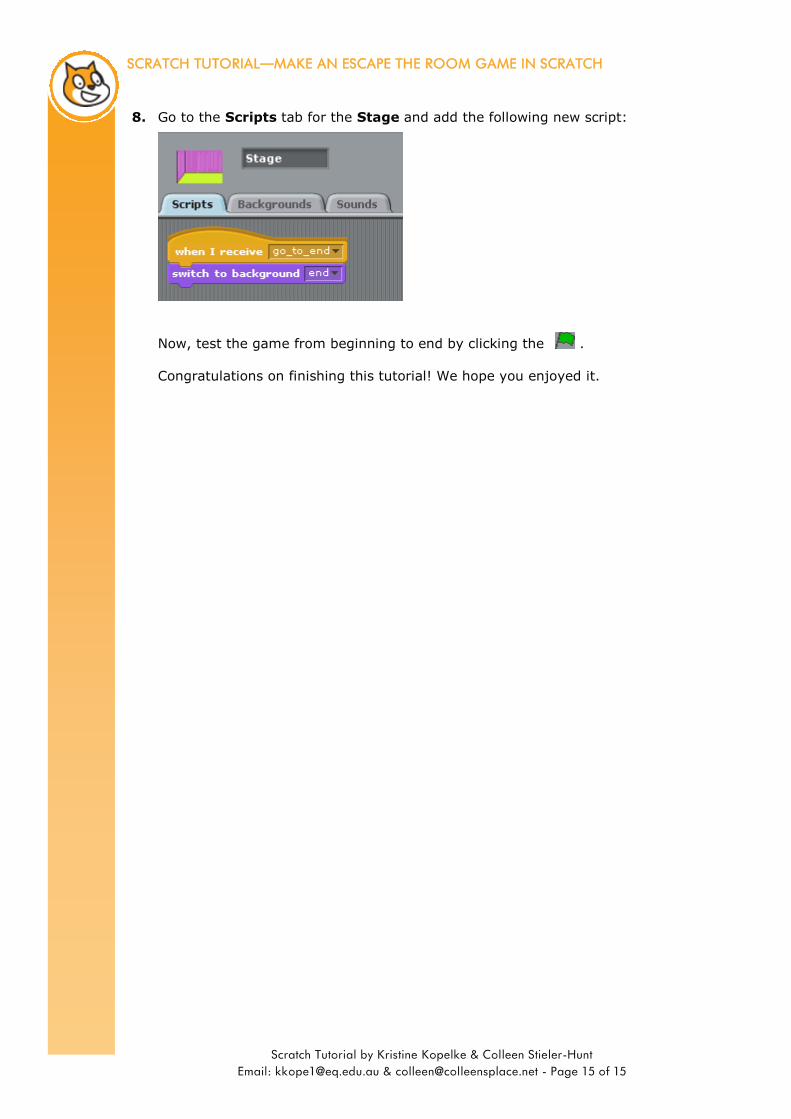
8. Go to the Scripts tab for the Stage and add the following new script:
Now, test the game from beginning to end by clicking the .
Congratulations on finishing this tutorial! We hope you enjoyed it.