Embed Size (px)
Citation preview
Major SuitRaises I
Teacher Manual
TABLE OF CONTENTS
Introduction for Teachers .................................................................................................. 2
Lesson 1—Weak Major Suit Raises ...................................................................................7 (Session 1 of Major Suit Raises I “Play” Course)
Lesson 2—Limit Raises ...................................................................................................17 (Session 2 of Major Suit Raises I “Play” Course)
Lesson 3—Game Forcing Raises .....................................................................................29 (Session 3 of Major Suit Raises I “Play” Course)
Lesson 4—Major Raises in Competition .........................................................................43 (Session 4 of Major Suit Raises I “Play” Course)
Appendix ..........................................................................................................................58 Losing Trick Count Handout
Prepared for the ACBL by Pat HarringtonCopyright © 2005
2 Introduction for Teachers
Introduction for Teachers
Teaching the Major Suit Raises I and II Play CoursesThe lesson plans in this manual accompany ACBL’s Major Suit Raises I and Major Suit Raises II “Play” Courses. These “Play” Courses can be used in conjunction with Lessons 3 and 4 of Commonly Used Conventions and Lesson 8 of More Commonly Used Conventions to provide practice on raising opener’s major with hands of all strengths, the use of Jacoby 2NT, Drury and 1NT Forcing. In addition to lessons on material covered in the ACBL courses, I have added a lesson on splinter raises to the series of eight lessons. A bonus review lesson is provided in this manual along with lessons on Two-Over-One and Bergen Raises.
The material is flexible. You might teach only the material in the Major Suit Raises I “Play” Course and later hold a more advanced course covering the material in the Major Suit Raises II “Play” Course. The first set of hands in Major Suit Raises II may be used either at the end of Major Suit Raises I or at the beginning of Major Suit Raises II. Teachers should select material that is suitable for the level of their students. These bidding conventions are used primarily by duplicate players and are not intended for new players or social players. The material is best presented to students who are becoming involved in duplicate.
Teachers are strongly encouraged to use the “Play” Course booklets as a supplementary classroom text. These booklets easily provide classroom notes and allow the students to replay lesson hands at home with their friends. “Play” Course booklets and E-Z Deal Cards are inexpensive and the cost of booklets and cards can be built into the price of your course. You might consider providing a discount for couples wanting only one “Play” Course booklet between them. You can also refer your students to the appropriate places in the primary textbooks, Commonly Used Conventions and More Commonly Used Conventions, for additional details on the conventions discussed in class.
For extra bonus lessons that are not included in the “Play” Course booklets, I have provided handouts that you may photocopy and distribute. Please note that you have my permission to copy and distribute the handouts for Lessons 9 through 11. In general, it is neither legal nor ethical to reproduce the work of another author. Teachers should not photocopy from books to make handouts for their classes without explicit permission from the author. Nor can you simply rewrite the identical material into your own computer. This applies to the actual text as well as exercise sets and answers. It is not sufficient to make a copy and give the author credit. You must have permission first. If you copy material from books, the authors don’t sell as many copies and have less incentive to write the books we teachers desperately need. However, a bridge hand can’t be copyrighted, so you may use any deal you see anywhere with your own analysis without violating copyright law.

Introduction for Teachers 3
The Lesson FormatA house is only as strong as the foundation on which it is built. This course provides a lot of practice in the use of each bid rather than one sample of how the bid is used. This practice is necessary to thoroughly prepare students to use the new conventions.
The lesson plans allow the hands to tell the story of the day’s bidding topic. You hold center stage only long enough to provide the information needed to move on to the next hand. The intent is to provide as much playing experience as possible. The length of your lesson will determine how many hands the class plays. Using this format, a three-hour lesson is not too long. We generally keep lessons shorter because the students cannot concentrate that long. But, when they are constantly involved in playing hands, they are able to maintain concentration for that time period. When I used these lessons in a large group, we usually got eight hands in during the three-hour session.
Don’t let the students dither over bidding. Give a reasonable amount of time to bid the hand (preferably without any table talk) and then announce that everyone should be playing. At that point, go to any tables that are not playing and assign them a contract based on the auction they had so far. The class does not like being held up waiting for a slow table to finish playing the hand. I hate stopping a table from completing the hand because everyone is waiting. The delay often comes in the bidding and can be averted as long as you monitor all tables carefully during the auction period.
Students sometimes learn more by reaching the wrong contract. You don’t have to require that all tables play in the same contract unless you feel that an interesting play problem in that contract warrants it.
Students keep their cards classroom-(duplicate)-style. After a deal is played, everyone places their hand face up dummy-style so you can go over key points in bidding and play to be sure that everyone understands the point of the hand.
Even experienced students relate better to seeing concrete examples using actual cards rather than looking at examples written on the board. New concepts are presented with examples using the cards. The manual uses the icon shown on the left of this paragraph to alert you to the fact that an exercise with cards is being done and to warn you to expect card changes at that point in the lesson. While your entire lesson could be taught with no board at all, you may wish to use the blackboard to make a particular
point or as a backup for the examples students have laid out on the table. Putting the same hand on the board can help those who had difficulty getting the cards on the table. Expect some students to have trouble and do everything in your power to prevent it. Use a guidecard with the compass directions on it (all guidecards with North facing in the same direction). When you call the cards for an exercise, make sure the class starts with a suited deck and specify the suit first, say “spade person are you ready?” and then give the spade cards. Repeat with each suit. Go slowly enough for the students to keep up and walk around the room to check for errors.
Instructions or information that is provided for teachers only is enclosed in a shaded box.
These lessons are set up so the entire class plays the same deal at the same time. Use the E-Z deal cards when possible. Students should be instructed on how to make up the lesson deals from the accompanying E-Z Deal Cards. When you use the bonus lessons, which are not included in the E-Z Deals, you will have to select a method of creating the lesson deals. In a small class, making boards is not that big a problem but it is far too time consuming in a large class. I use printouts

4 Introduction for Teachers
in my classes where all four hands are printed in large bold type with each hand facing the player. While these printouts can be done by hand on your computer, the Dealmaster program is suggested for easy creation of these hand records (see www.dealmaster.com).
The Teacher’s RoleEven using a prepared lesson series, your major work comes before you walk into the classroom. A good teacher spends more time preparing for a lesson than actually teaching the lesson! Read over the lesson several times to familiarize yourself with the material. Adapt the lesson plan to the level of your students and be aware that our students frequently have less bridge knowledge than we hope they will. Plan for material to omit if the lesson moves more slowly than expected. Bring the lesson plan to class to use as a guide but do not read from it. Use your own words.
Arrive at class early enough to have all materials out so that class can start right on time. Make sure that you have all the materials and copies you will need for your lesson.
During class, your job is to keep things running smoothly and to provide only as much information as is needed for the students to learn through playing. I believe that students gain more by working things out on their own and tables should have time to consider the problem or auction without your help. However, I also believe in being available to help or offer encouragement. My policy is to walk around the room and eavesdrop without appearing to do so. I feel it is okay for a teacher to step in when it is obvious that there is a problem or tension at a table. The students appreciate a friendly word of encouragement or assistance when it is truly needed, but they also appreciate being allowed to work a problem through on their own. Don’t stand and watch the action at a table or you will make the students nervous and fearful of making mistakes. Don’t let the students ask you to do their thinking for them. When a question about bidding or play is asked, help the student think along the right line; don’t simply give the answers. I find that this close contact with the students while they bid and play clues me in on the errors in their thinking and allows me to address those errors to the group as a whole without singling anyone out. Just talk like each error is a mistake that is made all the time so nobody is made to feel uncomfortable about their misconceptions.
It’s fine to pose questions to the entire class, but it is not wise to call on any individual. Let the group feel free to contribute without fear of giving the “wrong” answer. Some teachers don’t even let the students answer; they answer their own questions. Do you remember being in junior high school and trying to make yourself disappear so you wouldn’t be called on? You don’t want to make your student feel like that! Announce at the first lesson that they will never be called on so the students should not be afraid to look at the teacher. Above all, protect your student’s egos and make them feel comfortable.
Teachers differ in whether they take questions from the floor. I find that it helps me to hear these questions. Sometimes it becomes obvious that I have not made myself clear and I try to say things in a better way. Sometimes, the students ask a question on the topic that will be covered next and that reinforces me in knowing that my lesson is going in the right order. Questions are not disruptive as long as the teacher controls them. If a question is off topic or the answer would be too confusing for the class, simply say that you do not want to go there now. You can discuss the question privately after class. Never feel forced to answer a question if you are unsure of the answer. Research it and get back to the class. I believe that the main problem with questions is that some teachers let the questions run the class. Remember, you are in charge and you have a plan for the lesson. Stick to it.

Introduction for Teachers 5
Handling Uneven NumbersIn an ideal world, bridge class attendance would always be in multiples of four. Even if your registration achieves this goal, emergencies arise and you are likely to have the wrong number of people some weeks. Some teachers will make tables of three. This may work for more experienced students. Some teachers will make a table of five with the declarer sitting out after playing a hand. We have to be sensitive to the student or students who feel they are putting people out by making someone sit out a deal. We have had success with giving the extras their own table. We then bump players from another table to go visit them for one hand. That way, most tables get inconvenienced once and only once and the “extras” don’t feel uncomfortable about being the oddballs.
HumorA well-placed laugh can make it easier for your students to learn. It relaxes them and makes them more receptive to new information. The ideal time for a joke is when your class has been working hard and you need to break the tension a bit. In fact, there were a couple of lessons in this series where I found the need to tell TWO jokes. My class was working so hard on learning the new material.
Yes, you can tell jokes – even if you’ve never been able to recall a punch line in that past (trust me – I know this from personal experience). Write the joke down and review it before you tell it. Soon you will find yourself remembering jokes and being able to tell them in social circles (I never would have believed it either). Humor is very personal and a joke that one teacher is comfortable telling would embarrass another teacher, so it is wise to start a collection of jokes. Mark each one when you use it in a particular class. Don’t be discouraged if some students find the joke the most important item in your lesson plan. I once had a student request the joke from a missed lesson but not the lesson sheet. Remember, the students want to have fun while learning and it’s your job to provide it. Jokes help.
Feedback
I hope you enjoy teaching from these lesson plans. I welcome any comments or suggestions. You can contact me (Pat Harrington) at [email protected].

6 Introduction for Teachers
NOTES

LESSON 1 – Weak Major Suit Raises 7
LESSON 1 — Weak Major Suit Raises
The deals for this lesson come from Lesson 1 of the Major Suit Raises I “Play” Course. Play and discuss the lesson deals as outlined in this lesson plan.
Have your students make up the each of the deals using the Major Suit Raises I E-Z Deal cards.
Remind students of dealer and vulnerability on each deal of the lesson.
Related deals from CUC and MCUC: None
Reference sections in CUC Teacher Manual: Lesson 3, sections entitled: Opening Bids of 1 and 1, The Single Raise and Preemptive Raises.
The most popular method for opening the bidding today is Five-Card Majors, where an opening bid of either 1 or 1 shows a five-card suit and about 13-21 points. Duplicate bridge players are quite aggressive and sometimes like to open with less than 13 points even in first and second position. That’s fine as long as the hand you open is really worth opening.
How many cards in support do you need to know you have a fit after partner opens in a major? Only three. The experts agree that you usually do best to play in a major suit if you have a fit of eight or more cards. There are exceptions, of course, but over the long haul, hands with an eight-card fit win one to two tricks more when that suit is trump than when the same hand is played in notrump. Suppose your partnership has an eight-card heart fit and the 26 points suggested for game. You are likely to be able to take ten tricks with hearts as trump when you may not even be able to take nine tricks in notrump! It’s completely different when your fit is in a minor suit. It’s quite likely that you won’t be able to take the eleven tricks needed for the minor suit game when you could take the nine tricks required to make 3NT. Minor suit games require two full tricks more than notrump games. Trumps are powerful but not necessarily that powerful. The nice thing about using Five-Card Major openings is that you are easily able to find a major suit fit whether it is 5-3 or 4-4.
Today, we are going to look at how to raise opener’s major when you have a weak hand. What point range do you use for responder’s minimum? I am going to suggest you use 6-10 points. Point ranges are a guideline. That doesn’t mean you can’t choose to respond with only five points and it doesn’t mean you can’t choose to boost a 10-point hand that you like up out of the minimum category into the medium range – 6-10 is a guideline; nothing is cast in stone. Judgment plays a big role in bridge and I expect some of the things we discuss in this course to help you improve your bridge judgment.
Let’s get started with a hand.
Provide instruction on how to set up a hand using the E-Z Deal cards.

8 Major Suit Raises
N
W E
S
MAJOR SUIT RAISES I – SESSION 1: Deal #1
Dealer: North 10 7 4 Vul: None A 8 7 5 3 7 6 5 3 2 5 3 2 J 6 10 4 Q J 9 2 K 10 8 5 J 9 6 3 2 K Q J 10 A 9 A K Q 9 8 K 6 A Q 4 8 7 4
Suggested Bidding: WEST NORTH EAST SOUTH Pass Pass 1 Pass 2 Pass 4 Pass Pass Pass
North counts for the singleton to scrape up enough points to make a single raise of partner’s 1 opening bid. There are a variety of different ways to value distribution. The suggested method is for only the player who is raising partner’s major to count for shortness. The points given for shortness are called dummy points. Using dummy points, a void adds five points, a singleton adds three points and a doubleton adds one point. When you count shortness points, do not also count for length. To add dummy points, you should have good support for partner’s major – at least three cards. North’s hand totals seven points when dummy points are added.
That’s all South needs to hear. South has a maximum 19-point opening hand. A maximum opener is responsible for getting to game once partner responds.
Suggested Lead: West is likely to lead the K, top of a sequence.
Suggested Play: Declarer sees three club losers and two diamond losers. The same thing that gave dummy the strength to raise spades gives declarer the way to make 4. Ruff both diamond losers in dummy. Since drawing the opponents’ trumps also draws dummy’s trumps, the diamond losers must be ruffed before drawing trump. Declarer plays the A, ruffs a diamond, leads a heart back and ruffs a second diamond. Only then is it safe to draw trump. Declarer must avoid the temptation of finessing diamonds. Don’t make a 50% play when ruffing both diamond losers has a much greater chance of success.
LESSON 1 – Weak Major Suit Raises 9
Notice that declarer won a total of seven trump tricks – all five of declarer’s spades plus two of dummy’s spades that were used for ruffing. The fact that ruffing in dummy extends your trump suit and gives you extra trump tricks is why we add those dummy points for shortness. Dummy’s singleton diamond was certainly worth the three points we gave it. A singleton is valuable when it is opposite losers in declarer’s hand. We saw two diamond losers in South’s hand and ruffing in dummy eliminated them. In fact, 4 still would have made if declarer’s Q had been a small diamond.
Trade South’s K for West’s 4 and South’s 4 for West’s K. Can you make 4 now? No; unfortunately the short suit points dummy counted are completely useless opposite declarer’s AKQ. The defenders can win three club tricks immediately and still have a heart trick coming.
Now trade South’s K for West’s K. Will 4 make? No. Declarer can ruff the diamond loser but still has to lose three clubs and a heart. Dummy’s shortness was helpful but only for one ruff, not the two ruffs we got when declarer had two diamond losers.
Let’s summarize. Shortness is best when it’s in dummy opposite small card losers in declarer’s hand. Shortness in dummy is not as good when declarer doesn’t have losers in that suit. As these lessons go on, we will see that there are sometimes ways to discover how well your hands fit together and to find out if your shortness is in a good place or a bad place.

10 Major Suit Raises
MAJOR SUIT RAISES I – SESSION 1: Deal #2
Dealer: East A 9 5 4 2Vul: N-S Q 10 4 9 7 2 Q 6 J 8 3 6 8 6 2 A K 9 7 3 A J 6 3 K Q 5 8 5 2 A 9 7 4 K Q 10 7 J 5 10 8 4 K J 10 3
Suggested Bidding: WEST NORTH EAST SOUTH 1 Pass 2 Pass 3 Pass Pass Pass
Since we have not yet introduced a Help Suit Game Try, the auction is likely to have East rebid 3 instead of 3. Let the students bid without any help from you. The point of this deal is to illustrate an opening hand that should make a game invitation after a single raise. Deal 3 will be used to introduce the Help Suit Game Try after the students bid using their current methods.
East has 16 HCP and partner has shown a fit. While some books recommend adding extra for short suits in declarer’s hand, the suggested method is for declarer to count length instead of shortness when playing in a 5-3 fit. This brings East up to medium strength – enough to invite game but not enough to go all the way to 4. One way to invite game is to raise to three of the major. We will explore other game invitations shortly. West has only six points and does not accept East’s invitation.
Suggested Lead: South leads the K, top of touching cards in a broken sequence.
Suggested Play: Declarer counts losers: one spade, three clubs and one heart (on the most likely 3-2 trump split). Declarer can lead the top two hearts and then play diamonds, allowing North to ruff in. If North does not ruff, a club loser will be discarded on dummy’s last diamond. If North does ruff, dummy will be able to ruff declarer’s fourth club.
A single raise of opener’s major describes responder’s strength. Opener is in charge of how high to go. A minimum opening hand will pass; a medium opening hand will invite game and a maximum 19-21 point opening hand will bid game.
N
W E
S

LESSON 1 – Weak Major Suit Raises 11
MAJOR SUIT RAISES I – SESSION 1: Deal #3
Dealer: South 10 7 4 Vul: E-W K Q J 9 9 7 3 Q 6 3 A K J 5 2 Q 9 3 10 6 5 3 K J 5 2 A Q 4 A 9 8 10 5 4 2 8 6 A 8 7 4 2 10 8 6 K J 7
Suggested Bidding: WEST NORTH EAST SOUTH Pass 1 Pass 2 Pass 3 Pass 4 Pass Pass Pass
This deal introduces the Help Suit Game Try. West will probably invite game with a 3 bid. Let that happen. Some East players might accept the invitation and others might pass. When all tables have finished playing in the contract they reached, use the following discussion to introduce Help Suit Game Tries.
How many of you reached game on this deal? How many wish they had reached game? You should make 4 with no trouble. It’s getting there that could be the problem.
West has 17 points and makes a game try after East raises to 2. One way to try for game is for West to bid 3. East is looking at eight points – not the worst single raise but not the best single raise either. It’s difficult to know what to do with eight points.
Opener can make it easier on East. Rather than say only, “I have medium strength,” opener can also say, “I have medium strength and here’s where I need help.” What suit in West’s hand looks like it could have the most losers? Diamonds. A 3 rebid by West is not an attempt to find a better trump suit. Spades have been agreed on as trump. 3 is a game try, telling East to really appreciate high cards in two suits – in diamonds and in the spade suit that East-West already agreed would be trump. This bid is known as a Help Suit Game Try.
East should fully appreciate the Q and A Q after a 3 game try. All eight points are in the suits where partner wants to see them and East should definitely continue to 4.
Suggested Lead: North has a good sequence and will probably lead the K.
Suggested Play: Declarer counts losers: two clubs and one heart. The play is easy – draw trump and claim. Game bid and made on only 24 HCP! The Help Suit Game Try will help you bid some good games like this one and also help you avoid some bad games.
N
W E
S

12 Major Suit Raises
MAJOR SUIT RAISES I – SESSION 1: Deal #4
Dealer: West A K J 8 3Vul: Both A 5 3 2 A 9 6 2 5 4 10 6 10 8 7 4 3 K Q J 9 A 8 6 J 10 9 7 5 K Q J 10 3 Q 9 7 2 6 2 K Q 4 8 7 5 4
Suggested Bidding: WEST NORTH EAST SOUTH Pass 1 Pass 2 Pass 3 Pass 3 Pass Pass Pass
North has 16 HCP plus one length point. A medium opening hand invites game. South has a total of eight points (adding one for the doubleton) and will have to use judgment in deciding whether to go to game. How North invites will be very important to the outcome. North might make a general game try of 3, but a Help Suit Game Try of 3 is much more specific. 3 says that opener has losers in clubs. If responder also has several losers in that suit, game is not a good prospect.
Now South must decide the final level. While the fourth trump is good, South’s four small clubs are bad. The worst holding you can have in a suit where partner needs help is three or four small cards. South should sign off in 3.
Suggested Lead: East leads the K.
Suggested Play: Declarer counts losers: one heart, one diamond and three clubs. On a normal 3-2 club split, the fourth club will be a winner. Declarer’s work is to draw trump, promote a diamond trick and play clubs, watching to see how they split. Declarer must give up the lead twice in clubs in order to make the fourth club good. Once clubs split, declarer has nine tricks.
Trade South’s K Q for West’s two small diamonds and also trade West’s K Q for South’s 7 5. Now declarer loses only one heart and two diamonds and 4 makes. It’s not just how many points you have together. It’s where those points are that determines how many tricks you can take. As the late bridge author Max Hardy said, “points don’t take tricks, fits take tricks.”
N
W E
S

LESSON 1 – Weak Major Suit Raises 13
MAJOR SUIT RAISES I – SESSION 1: Deal #5
Dealer: North A K J 8 4Vul: N-S K Q J 10 10 Q 7 6 10 7 Q 9 A 6 3 9 8 5 K 8 7 5 Q J 9 4 2 9 8 4 2 A 5 3 6 5 3 2 7 4 2 A 6 3 K J 10
Suggested Bidding: WEST NORTH EAST SOUTH 1 Pass 2 Pass 3 Pass 4 Pass Pass Pass
With 17 total points, North makes a game try. Don’t make a Help Suit Game Try in a suit that doesn’t need help. North’s four-card side suit is not the place to look for help. North needs help in clubs, so North makes a game try by bidding 3.
South accepts the game try with eight good points – the A, the K J 10 (cards partner is looking for) plus a fourth trump. If North makes a 3 game try instead, South’s hand will not look as good and game might be missed.
Suggested Lead: East might lead the Q.
Suggested Play: Declarer’s losers are one club, one heart and possibly one spade. With no clues from the opponents’ bidding or play, declarer is likely to avoid a spade loser by following the saying “eight ever, nine never” when drawing trump. This saying applies to suits where the queen is missing. If you have a finessing position, take the finesse with eight or fewer cards and play for the queen to drop with nine or more cards in the suit. Once trumps are drawn, declarer will promote hearts and clubs to make an overtrick.
Did anyone simply bid game with North’s hand? It looks really good with the second strong side suit, so I can’t blame you too much, but you did get lucky to find partner with a good helping hand.
Leave North’s hand face up and suit the remaining cards. Take away the Q and Q J from North and put in the A 9 2 instead.
North has: A K J 8 4 A K 10 9 2 10 7 6.
Now it’s even more tempting to whirl off and bid game. They say, “five-five – come alive.“ With two strong five-card suits, a medium opener should consider bidding game rather than making a game try.
We’ve seen that high cards can be help for opener’s second suit. Do you think there is any other form of help? Shortness and the ability to trump is also help. Let’s see how responder’s judgment works on our next deal.
N
W E
S

14 Major Suit Raises
MAJOR SUIT RAISES I – SESSION 1: Deal #6
Dealer: East A Q 9 2Vul: E-W 10 5 10 9 4 2 A 8 7 6 J 8 5 3 A 9 4 3 K Q J 8 7 8 7 5 A K Q 9 6 5 4 3 2 K 10 7 4 6 2 J 6 3 K Q J 10
Suggested Bidding: WEST NORTH EAST SOUTH 1 Pass 2 Pass 2 Pass 4! Pass Pass Pass
Although West has only 4 HCP, there is a total of seven points when you add points for the singleton, so West has enough to make a single raise.
East has a medium hand and makes a game try, looking for help to avoid spade losers. It’s hard to believe that West could have enough to go to game but West’s points are perfect – the trump ace, a singleton in a suit where partner has several losers, plus an extra trump to be used for ruffing. Did West dare bid game?
Suggested Lead: South is likely to lead the K and is likely to continue leading clubs, but South really should take a moment to think about the hand. East asked for help in covering spade losers and West’s help is shortness. How does South expect declarer to make the contract? By ruffing spade losers in dummy. What can South try to do to prevent that? Lead trump! If South switches to a trump and North-South continue with another trump when they win their spade trick, declarer will end up losing two spades. If the defenders don’t lead trump, declarer will end up losing only one spade to make an overtrick. When you play duplicate bridge, those overtricks matter!
Suggested Play: East’s losers are one club and four spades. Declarer plans to ruff as many spades as possible in dummy. Declarer will give up one spade and hopes to ruff the other three spades to make an overtrick. If the defenders start leading trump, declarer will only be able to ruff two spades, but 4 still makes. Not bad with only 20 HCP! Even counting distribution, East-West have only 24 total points. But all of their points are working. When you see a game make with less than 26 points, chances are it’s because the hands fit well together with all the points working. What are some clues that your hands fit well together? High cards in your long suits, a short suit across from several losers in partner’s hand, and a bigger than eight-card trump fit.
Trade West’s 3 for South’s 3. Is 4 such a good prospect now? Not if the defenders lead a trump! Declarer will be able to ruff only one spade loser and should lose three spades and a club. Shortness is more valuable when dummy has more trumps.
N
W E
S

LESSON 1 – Weak Major Suit Raises 15
MAJOR SUIT RAISES I – SESSION 1: Deal #7
Dealer: South Q 9 8 4 2Vul: Both 9 K 10 8 5 10 3 2 7 5 J Q 7 6 3 A K 8 5 4 2 J 2 Q 9 7 4 K Q 9 8 6 A J A K 10 6 3 J 10 A 6 3 7 5 4
Suggested Bidding: WEST NORTH EAST SOUTH 1 Pass 4 ??
North could raise to 2 to show a fit and 6-10 total points. But a raise to 4 is far more effective. The “standard“ meaning of a raise to game in a major is to show this type of hand, known as a “weak freak”. The purpose of raising so high is twofold. Perhaps 4 will make because of the big fit and North’s freakish distribution. But if it doesn’t, chances are good that East-West can make something. The immediate raise preempts East-West out of the room they need to talk.
A “weak freak“ hand should have five or more cards in support of opener’s major plus a singleton or void. It should NOT have many high card points – a maximum of six or seven high card points. Opener is not expected to look for slam after a weak freak raise. That is why you should have so few high cards. With more high cards plus crazy distribution, you could easily miss a slam.
Poor East if the auction does go as suggested. It’s dangerous to bid 5. West could be completely broke and might not even have a good heart fit. But it’s also dangerous to pass when the opponents may be stealing your hand. What would you do?
Suggested Play in spades: Declarer will lose one heart, one diamond and three clubs. 4 goes down two. North-South will lose 500 points if they are doubled and only 200 if they are undoubled.
Suggested play in hearts: East’s losers are one spade and two diamonds right off the top. If East bids 5, the defenders should take all these tricks. Since North’s weak freak raise promised five trumps, South won’t try for a second spade trick and can switch to the A to get partner’s reaction. North plays an encouraging 10 and South continues diamonds to defeat 5.
Going down in 4 is a small price for North-South to pay for keeping the opponents from making 4. Without North’s preemptive raise to 4, East-West should have no trouble entering the auction. North’s immediate 4 bid could shut them out of the bidding or force them to bid too high. Isn’t preempting fun?
N
W E
S

16 Major Suit Raises
MAJOR SUIT RAISES I – SESSION 1: Deal #8
Dealer: West 8 6 4Vul: None 2 8 6 5 4 3 K 6 4 2 9 5 3 Q J 7 6 5 3 K 10 9 8 4 K Q J 10 A J 10 8 Q 9 7 5 A K Q J 10 7 2 A A 9 7 2 3
Suggested Bidding: WEST NORTH EAST SOUTH 1 Pass 4 4? 5? Pass Pass Double? Pass Pass? Pass
East can show a “weak freak“ by raising West’s opening directly to game. East hopes to either make 4 or block North-South’s bidding.
South cannot let the preemptive raise keep him from bidding with such a strong hand. 4 may not make, but South has to try.
With an 11-card trump fit and a spade void, West should compete to 5. There is a modern bidding theory called The Law of Total Tricks, which tells us that it is relatively safe to compete for as many tricks as our side has trumps. Of course, you should watch the vulnerability at this high level.
If West does go to 5, South has to decide whether to bid more or double for penalty. A penalty double is the surest way to get a plus score.
Suggested play in spades: South will lose the A and two diamonds to make 4. That will give North-South 420 points. If North-South bid on to 5, West is in charge of defeating them. West leads the K and flies up with the A when a club is led toward dummy to win three defensive tricks.
Suggested play in hearts: West’s losers are the A, the A and the K. 5 is down one. Doubled, that gives North-South 100 points. Since 4 makes, bidding 5 is a good sacrifice.
The “weak freak” raise may prevent North-South from getting their best score on this deal. Some may steal the contract for 4, some for 5, and some may even push North-South to 5 where they will go minus.
Today we’ve seen two ways to make a weak raise of opener’s major – the single raise to show a fit with 6-10 points and the “weak freak“ raise directly to game to show a minimum responding hand usually with no more than 6 or 7 HCP, but with five trumps and other distribution such as a singleton or void. Next time, we’ll look in detail at a stronger raise – the invitational limit raise to show support with a medium responding hand.
N
W E
S

LESSON 2 – Limit Raises 17
LESSON 2 — Limit Raises
The deals for this lesson come from Session 2 of the Major Suit Raises I “Play” Course. Play and discuss the lesson deals as outlined in this lesson plan.
Have your students make up the each of the deals from the Major Suit Raises I E-Z Deal cards.
Remind students of dealer and vulnerability on each deal of the lesson.
Related deals from CUC and MCUC: None
Reference sections in CUC Teacher Manual: Lesson 3, sections entitled: Limit Raise Versus Forcing Raise, Limit Raise with Three-Card Support, and Limit Raise with Four-Card Support.
We begin this lesson by playing a hand. With a minimum 13-point opening hand opposite a limit raise, some pairs will not reach game. This deal is used to launch a discussion on using an immediate jump raise as a limit raise showing four-card support. When there is a nine-card fit, opener can bid more aggressively.
Remind the class how to set up lesson deals before playing this hand.
There is a discussion of losing trick count in this lesson plan. It is not covered in the student’s “Play” Course booklet. The first page of the Appendix provides a handout discussing Losing Trick Count. You may photocopy it to distribute to your students.

18 Major Suit Raises
MAJOR SUIT RAISES I – SESSION 2: Deal #1
Dealer: North K 8 5 2Vul: None 10 9 4 3 A Q 8 4 2 A 7 6 9 4 Q 6 4 2 A K 7 5 3 A 6 2 K Q 7 5 J 7 5 6 3 Q J 10 3 J 8 J 10 9 8 K 10 9
Suggested Bidding: WEST NORTH EAST SOUTH Pass 1 Pass 3 Pass 4 Pass Pass Pass
How many of you got to game with the East-West cards? How many of you wish you’d gotten to game? We’ll learn in a minute why it is suggested that East-West bid game with only 24 total points.
Suggested Lead: South will probably lead the Q, top of the stronger sequence.
Suggested Play: Declarer counts losers: two clubs, one spade and one diamond. The diamond loser can be avoided in one of two ways. A 3-3 diamond split will make the fourth diamond good but a 4-2 split is more likely. In that case, declarer can ruff the fourth diamond in dummy late in the play. Even if trumps split 3-1, it only takes three heart leads to draw trump so dummy has a trump remaining to use on the diamond.
Let’s make a change in the deal. Trade North’s 2 for West’s 2. Does this seem like a big change? No, it doesn’t change West’s point count at all and East-West still have a heart fit. But it’s going to make a big difference in the play of the hand. Do you think East-West can still make 4? As long as South holds on to all four diamonds, there is no way for declarer to eliminate the diamond loser. When dummy had four trumps, we ruffed the diamond loser. Why can’t we ruff the fourth diamond now?
Dummy is out of trumps once trumps are drawn. If we don’t draw trumps, North is going to ruff one of our good diamonds to set the contract.
Some experts suggest adding extra points for an extra trump. It’s certainly true that possession of that fourth heart made dummy’s hand more valuable. An extra trump often means an extra trick, just as an extra ace means an extra trick!
I’m not going to change our suggested point count to add for extra trump cards, but I am going to suggest that you bid a little more aggressively when you know you have more than eight trumps. Today’s lesson focuses on raising opener’s major with a medium responding hand of around 11 points. The modern approach is to show this raise with a jump to three of opener’s suit – a limit raise. The method that used to be quite popular was for a jump raise to show opening count and be forcing to game – a forcing raise. If anyone is accustomed to playing that way, I’d like you to try limit raises during this course.
N
W E
S

LESSON 2 – Limit Raises 19
Those of you who have been using limit raises may never have differentiated between three trumps or more trumps when making a limit raise. Today we will see why many good players require a fourth trump to make an immediate limit raise. With only three trumps, responder makes some forcing bid first and then raises on the rebid.
Let’s trade the 2 and 2 back to get to the original deal we played. How will promising four-card support help us reach game? East opens 1 and West raises to 3 to show a limit raise and four trumps. Now, East knows there is not only a fit but a nine-card fit. Here’s the secret. When responder makes a limit raise, opener usually goes to game with an unbalanced hand – even with minimum points. East has 5-4-2-2 unbalanced distribution and will bid game even though there are only 13 total points!
This only works if you can be certain that partner has four trumps. Notice that all of East’s minimum strength is in the two long suits. We value high cards that are in our long suits more than we value high cards in our short suits, and that is a factor in East’s accepting the invitation.
Last time we cautioned declarer about 5-3 trump fits and said that declarer shouldn’t add points for shortness – that shortness points are called dummy points because it’s dummy who counts them. Some textbooks have both partners count shortness once a fit is found. The reality is somewhere between the two. Declarer can value shortness to some extent when there is a big fit. An unbalanced hand has shortness, so the advice I give you to accept partner’s limit raise with an unbalanced hand does actually take shortness into account.
How did our auction on this deal go again? Make sure responder has the fourth heart at all tables. 1 - 3 and opener goes to 4. Why? Because opener’s hand is unbalanced, and with the big trump fit, opener’s shortness in clubs and spades rates to be of some value.
Change East’s 5 for South’s 3. How will the auction go now? 1 opened; 3 limit raise showing 4 trumps, Pass by East because this is a balanced 13-point hand.
Put the 3 back in South and the 5 back in East. Now trade West’s 2 for North’s 2. If you are promising four-card support with a limit raise, can West raise to 3 right away? No. West first makes a forcing bid – 1 looks good to me. On the next turn West can raise to 3. A delayed raise to the three level shows a limit raise with only three trumps; an immediate raise to the three level shows a limit raise with four trumps. Opposite this two-step raise, opener resorts to adding points and only
bids game when the partnership has 26 points. Will East bid 4 or pass West’s 3 invitation with the cards as we’ve rearranged them? Pass. West has shown about 11 points and East has 13. East-West have only eight trumps between them and there is no reason to get pushy with East’s unbalanced hand.
Trade West’s 2 for North’s 2. What first response will West make now? 2. An 11-12 point hand can bid a new suit on the one or two level. West will raise hearts next time.
Agreeing that an immediate limit raise guarantees four-card support for opener’s major will let you bid and make more games – even when you don’t have the traditional 26 points between you. You will have to discuss this with your regular partners and make sure they agree to have two ways to show a limit raise. An immediate jump to three of opener’s major promises four trumps and a two-step raise shows only three trumps.
Let’s practice.
20 Major Suit Raises
MAJOR SUIT RAISES I – SESSION 2: Deal #2
Dealer: East K J 5Vul: N-S Q 10 5 2 7 3 A 6 5 2 Q 8 3 10 9 7 4 9 8 6 3 A 8 6 5 K Q J Q J 10 9 K 8 7 4 A 6 2 A K J 7 4 10 9 4 2 3
Suggested Bidding: WEST NORTH EAST SOUTH Pass 1 Pass 3 Pass 4 Pass Pass Pass
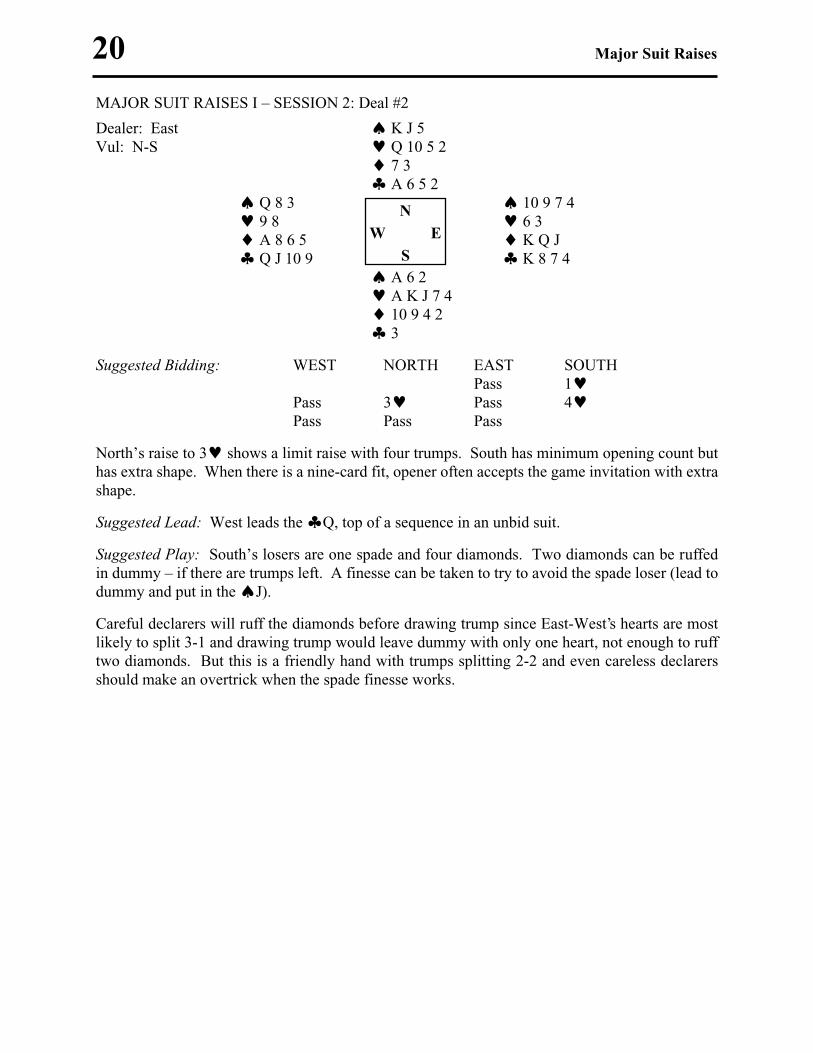
North’s raise to 3 shows a limit raise with four trumps. South has minimum opening count but has extra shape. When there is a nine-card fit, opener often accepts the game invitation with extra shape.
Suggested Lead: West leads the Q, top of a sequence in an unbid suit.
Suggested Play: South’s losers are one spade and four diamonds. Two diamonds can be ruffed in dummy – if there are trumps left. A finesse can be taken to try to avoid the spade loser (lead to dummy and put in the J).
Careful declarers will ruff the diamonds before drawing trump since East-West’s hearts are most likely to split 3-1 and drawing trump would leave dummy with only one heart, not enough to ruff two diamonds. But this is a friendly hand with trumps splitting 2-2 and even careless declarers should make an overtrick when the spade finesse works.
N
W E
S

LESSON 2 – Limit Raises 21
MAJOR SUIT RAISES I – SESSION 2: Deal #3
Dealer: South A 2Vul: E-W K 9 8 2 Q J 10 9 9 7 4 K J 10 7 3 Q 8 6 5 A J Q 6 5 8 7 3 A K 5 2 Q J 10 6 3 9 4 10 7 4 3 6 4 A K 8 5 2
Suggested Bidding: WEST NORTH EAST SOUTH Pass 1 Pass 3 Pass Pass Pass
East shows 11-12 points and four-card spade support by raising immediately to 3. Even though East has shown four trumps, West cannot find a good reason to take this balanced minimum opening hand on to game. When responder makes a four-card limit raise, a very minimum opener looks for pluses as an excuse to go on to game. There are none in West’s hand.
Suggested Lead: North leads the Q.
Suggested Play: West counts losers: one spade, one heart, one diamond and two clubs, which makes one loser too many. At first glance, it looks like a winning heart finesse is the best way to make the contract. Before taking a finesse, ask if there is a better way. There is! If the heart finesse loses, dummy’s Q will be good and declarer will be able to discard a loser. The only useful discard will be a diamond, so declarer must make certain there is still a diamond loser when the Q is good. Declarer must NOT finesse in hearts. If declarer does, the defenders will win the K and return a diamond, knocking out the second and last stopper. Declarer will want to get over to dummy to use the Q, but there is no quick entry. If declarer tries to reach dummy with a trump, the defenders can take the A and cash their diamond trick. Declarer must win the diamond opening lead and play a heart to the ace and then give up the J to the K. Now the second high diamond provides an entry to use the Q. Once the diamond loser is discarded, declarer can afford to draw trump.
It’s fun to bid games on less than the recommended number of points. Even with a big fit, we require opener to see some plus value in the hand before bidding game. You don’t automatically accept partner’s limit raise invitation to game. Usually an unbalanced hand is enough of a plus for opener to bid game, but it does matter where opener’s high cards are.
Leave West’s hand face up and suit the remaining hands.
West had: K J 10 7 3 A J 8 7 3 Q J 10.
N
W E
S

22 Major Suit Raises
Take away the A, and 10. Put in the K and Q.
Now West has: K J 10 7 3 K J Q 87 3 Q J.
Suppose you are West and open 1 and East, your partner, raises to 3. You do have an unbalanced hand. Do you think you should accept partner’s game invitation? We often accept with an unbalanced hand but where your high cards are is important. High cards in your short suits are not worth as much. The Q J is worthless as a doubleton if it is worth anything in high cards. The J is also of dubious value. Doubletons containing queens and jacks aren’t worth extra. A singleton king should count either as a king or a singleton but not both. A doubleton queen may not even be worth the two points you counted for the queen; don’t go adding extra for the doubleton. This is why many bridge books give you rules for what to count for singleton and doubleton honors. We aren’t going to add more rules but we do hope to add good judgment where you will realize that a hand containing a lot of points in short suits isn’t worth as much as a hand with those points in long suits. A good general guideline is: don’t add extra for short suits containing honors if those honors don’t have enough length behind them to stand on their own as a trick. It would be foolish for West to upgrade this hand with seven of the thirteen high card points of dubious value in short suits. And you counted the total value of this hand as 14 points, not 13! But it’s a horrible 14 points with so many high cards in your short suits. There’s no guarantee that you will win even one trick with the seven points you have in hearts and clubs.
Saying that any unbalanced opening hand accepts a four-card limit raise is an oversimplification. The actual guideline for accepting partner’s limit raise is: accept responder’s limit raise unless you have a balanced dead-minimum or a very minimum unbalanced hand with a lot of your points in short suits where they may not win any tricks.
On our next deal, remember that our immediate limit raise shows four trumps. Responder cannot immediately jump raise opener’s major with only three-card support. Responder has to do the two-step.

LESSON 2 – Limit Raises 23
MAJOR SUIT RAISES I – SESSION 2: Deal #4
Dealer: West K J 5Vul: Both A Q 8 7 3 K 9 5 4 6 10 3 9 8 2 J 9 10 6 4 Q 10 6 2 A J 8 A 9 5 4 3 K Q 7 2 A Q 7 6 4 K 5 2 7 3 J 10 8
Suggested Bidding: WEST NORTH EAST SOUTH Pass 1 Pass 1 Pass 2 Pass 3 Pass 4 Pass Pass Pass
South has a limit raise (11 points) with only three trumps. The way to show this is to temporize with a new suit bid first and raise hearts next time.
Do you think it was necessary for South to jump to 3? Could South have simply rebid 2? South’s jump was necessary. South’s first bid did not promise any more than six points. If South had rebid only 2, North might think South was weak and simply taking a preference between the two suits North offered. South had to show the right strength. The bid of an old suit on the three level shows a medium hand.
Should North accept the game invitation? North has 14 points. The partnership is very close to the 26 points suggested for game. A singleton in opener’s hand doesn’t add extra value when there is only an eight-card fit. But North should like those spade honors – in a suit bid by partner – and might decide to bid 4.
Suggested Lead: East may lead the K, top of two touching honors in the only unbid suit.
Suggested Play: Declarer counts losers: one club and four diamonds. North was right to like those fitting spade honors. Dummy’s spades will provide two discards after trumps are drawn and 4 makes.
N
W E
S

24 Major Suit Raises
MAJOR SUIT RAISES I – SESSION 2: Deal #5
Dealer: North 6 4Vul: N-S K Q J 10 9 8 7 4 Q 9 5 K 5 3 A Q J 10 7 A 9 3 8 7 6 2 A 5 3 2 6 7 6 2 A J 4 9 8 2 5 4 K Q J 10 K 10 8 3
Suggested Bidding: WEST NORTH EAST SOUTH Pass 1 Pass 2 Pass 2 Pass 2 / 3 Pass Pass Pass
West has a fit for partner’s spades but only three-card support. An immediate limit raise is best used to show four-card support. West’s forcing 2 is temporizing – part of the two-step. East doesn’t know there is a fit and shows a four-card heart suit, making another suggestion for trump. Now West must show the fit.
Do you think it’s necessary for responder to jump to 3 like on the last hand? The experts say it’s not. How is this auction different from our last auction? Write both auctions on the board. When West responded 2, it showed at least medium responding strength. West cannot have six points, so the experts feel that it’s okay to rebid only 2 here. They would treat 3 as a forcing bid. We’ll talk more about that next time. If your partnership is more comfortable jumping to 3 here, go ahead and do it. Just be aware that a new partner might misunderstand you. This is not an issue once 1NT Forcing and Two-Over-One are added to the bidding, so teachers may wish to ignore this discussion.
Whether you think West has to bid 2 or 3 to invite game, does East have enough to accept? East has only 13 points. The singleton diamond isn’t much of a plus with only an eight-card trump fit and the singleton is in partner’s bid suit to boot. With nothing extra to scrape up, East should stop in partscore.
Suggested Lead: Even though we don’t usually lead a suit bid by the opponents, South has a very strong sequence and might lead the K.
Suggested Play: East’s losers are three hearts and two clubs. One loser must be avoided. Declarer might hope for hearts to split 3-3, but that isn’t likely. There is a better way to avoid the heart loser. Play the A and another heart. Regain the lead and give it right back with another heart. By then you’ll know if the hearts split. If hearts don’t split, ruff the fourth heart in dummy high so as not to get overruffed. Then, finally, draw trump.
Declarers who reach 3 are likely to go down on this deal. The thought of ruffing in dummy when dummy doesn’t have a short suit doesn’t usually occur to us. But it can be a useful tactic. The clue that you might be able to avoid a loser by ruffing is that dummy is shorter is some suit than declarer is. Dummy has three hearts and declarer has four.
N
W E
S

LESSON 2 – Limit Raises 25
MAJOR SUIT RAISES I – SESSION 2: Deal #6
Dealer: East Q 9 5 2Vul: E-W K 10 6 4 A 9 3 5 2 J 8 10 J 7 3 2 Q 9 8 K J 7 Q 10 6 5 2 K Q 9 4 A 10 6 3 A K 7 6 4 3 A 5 8 4 J 8 7
Suggested Bidding: WEST NORTH EAST SOUTH Pass 1 Pass 3 Pass 4 Pass Pass Pass
Your students are likely to make a single raise and stop in 2. Let them play there. Of course, some may make a limit raise just because that was today’s lesson
How many of you bid game? How many took ten tricks? The deciding factor in whether or not you reached game was what type of raise North chose. North has 9 HCP plus a point for the doubleton – a total of 10 points. Last week, we included 10 points in the minimum raise range and that is often where it belongs. But some 10-point hands can be upgraded to limit raises. Did anyone make a limit raise with North’s hand? The fourth trump may be just enough to make North decide to give a limit raise.
If North raises to 3, South has an unbalanced hand and will carry on to game. But if North raises to only 2, South will probably decide to pass.
Suggested Lead: West leads the K, top of two touching honors.
Suggested Play: South can ruff one club loser in dummy and ends up losing two clubs and one diamond to easily make 4.
When you see the point ranges for minimum and medium responding hands, you will often see 10 points included in both ranges. And that is correct. Let’s see what there is about North’s hand that might bring it into the medium range.
One technique I like to use once a fit is found is to apply Losing Trick Count (LTC). In LTC, we count losers, but not the way you do as declarer. We do it looking only at one hand. Let’s all look at South’s hand. Count one loser for every missing high card – ace, king or queen – until you run out of cards in the suit. Look only at South’s cards. One spade loser, one heart loser (stop after the king with only two hearts), two diamond losers (and then we’ve run out of cards in diamonds) and three club losers for a total of seven losers. A normal minimum opening hand will typically have seven losers. A limit raise is a little worse than an opening hand, and it makes sense that it will have one more loser.
N
W E
S

26 Major Suit Raises
Let’s apply the same technique to counting losers in North’s hand. What’s missing in spades? The ace and king – two losers. What’s missing in hearts? The ace and queen – two more losers. What about diamonds? The king and queen are missing, giving another two losers. In clubs we will stop with the ace and king because North has run out of clubs by then. That makes a total of eight losers. And eight is exactly the number of losers we would expect a limit raise to have.
You can apply Losing Trick Count in any close judgment situation. If you are debating between a single raise and a limit raise, count losers. With eight losers, go for the limit raise. With more losers, settle for the single raise. LTC works best once a fit is established, but some people use it in close decisions when deciding whether to open the bidding. There are some hands that are worth opening even when they don’t have 13 points. Others should be passed. If you are in doubt and come up with more than seven losers, it’s best to pass.
If you wish, you can put the following LTC guidelines on the board:
4 losers - typical strong 2 opening 5 losers - a maximum suit opening 6 losers - a medium suit opening 7 losers - a minimum suit opening (or maximum responder) 8 losers - a typical limit raise (medium responder)
A handout on losing trick count is provided in the Appendix if you’d like to copy it to distribute.
Let’s suit all the hands but North’s. South opened 1 and what did we suggest North bid? 3.
Take away North’s 4 and put in the J.
North has : Q 9 5 2 K 10 6 A 9 3 J 5 2
Would North still want to make a limit raise with this 10-point hand? Not if you count losers. North has nine losers now. Balanced hands have more losers and you bid more cautiously with them. And jacks are overrated at one point. LTC along with those two things point me to a single raise.
Take away the J and the 2. Put in the 4 and 2.
North has : Q 9 5 K 10 6 4 A 9 3 2 5 2
South opens 1. North has 10 support points with the doubleton. What decision does North have to make? Whether to make a limit raise or a single raise. In LTC, North
has 8 losers, which leans toward the limit raise, but the doubleton is worth less because North has only three trumps. It’s a much closer call than when North had a fourth trump. Unfortunately, there is no one thing that replaces judgment. I know people who would make a limit raise and people who would not. One thing is right though. You have no right to criticize whichever choice partner might make. It’s too close to call. North would have a much easier decision if partner had opened 1. This hand is worth a limit raise in support of hearts because of the extra trump.
Our next hand has a little twist in the bidding. Let’s see if responder can put together everything we’ve discussed to handle it.

LESSON 2 – Limit Raises 27
MAJOR SUIT RAISES I – SESSION 2: Deal #7
Dealer: South 10 9 3Vul: Both J 6 A Q 8 5 Q J 10 9 K 7 Q J 5 4 K Q 8 5 4 3 A 7 2 10 6 9 2 K 7 4 A 6 5 2 A 8 6 2 10 9 K J 7 4 3 8 3
Suggested Bidding: WEST NORTH EAST SOUTH Pass 1 Pass 1 Pass 2 Pass 4 Pass Pass Pass
West’s hand is too good to open with a weak two bid. It comes to 13 points including length (and only six LTC losers). With a limit raise of hearts and only three trumps, West cannot support immediately. East must bid a new suit first. West’s 2 rebid shows a minimum 13-15 point hand with an extra heart.
East’s plan was to jump to 3 to show the limit raise. If East bids 3 now, West will not know for sure that East holds three hearts. With a total of 12 points including two aces and a known nine-card fit, East should raise to game. If East only bids 3, West probably won’t go any higher.
Here’s a tip: When you have a three-card limit raise and opener rebids a suit showing six cards, don’t invite. Go to game on your rebid.
Suggested Lead: North will lead the Q, top of a sequence.
Suggested Play: West’s losers are one club, two diamonds and one spade. Once you give up a trick to the A, there will be an extra spade winner to provide a club discard. Draw trump and get to work on the spades, using the K first. Dummy’s A will serve as the entry to the extra spade winner. Win the first club trick in declarer’s hand so that the dummy entry is still there when it’s needed.
N
W E
S

28 Major Suit Raises
MAJOR SUIT RAISES I – SESSION 2: Deal #8
Dealer: West A K 5Vul: None A K 5 4 3 3 K Q J 5 8 7 4 3 Q J 10 6 10 7 2 6 A J 7 2 Q 10 8 6 10 6 9 8 3 2 9 2 Q J 9 8 K 9 5 4 A 7 4
Suggested Bidding: WEST NORTH EAST SOUTH Pass 1 Pass 3 Pass 4NT Pass 5 Pass 6 Pass Pass Pass
South has four-card heart support and 11 points – an immediate limit raise to 3. North started with 21 total points. With the nine-card fit, North should add extra for the singleton diamond and now North-South are in slam zone.
North might use Blackwood to be sure that two aces aren’t missing. Remember that it is fine to bid slam when only one ace is missing.
Suggested Lead: Q
Suggested Play: Declarer can lose only one trick and that will be the A. The spade loser will be ruffed to make 6.
After our first two lessons, we know how to raise opener’s major suit with a weak responding hand of about six to ten points and with a medium respondng hand of about eleven to twelve points. Next time, we will learn a new bid that will allow us to raise with an even stronger responding hand.
N
W E
S

LESSON 3 – Game Forcing Raises 29
LESSON 3 — Game Forcing Raises
The deals for this lesson come from Session 3 of the Major Suit Raises I “Play” Course. The lesson covers showing a major suit raise with a game forcing hand and introduces the use of the Jacoby 2NT convention. Play and discuss the lesson deals as outlined in this lesson plan.
Have your students make up the each of the deals from the Major Suit Raises I E-Z Deal cards.
Remind students of dealer and vulnerability on each deal of the lesson.
Related deals from CUC and MCUC: CUC Lesson 3, deals 1-3.
Reference sections in CUC Teacher Manual: Lesson 3, sections entitled: Jacoby 2NT and Opener’s Rebid.
We set the scene for this lesson by playing the first lesson deal. Using limit raises without Jacoby 2NT, it is difficult for responder to describe a game-forcing raise below game level. Taking up so much bidding room makes it difficult to explore for slam. That is likely to be the case on the first lesson deal and your students could miss a good slam. Have the class bid the deals and play in whatever contract they reach. When you discuss the bidding, the students will be anxious to discover how they might have bid this good slam. That is your cue to introduce the Jacoby 2NT convention.
Remind the class how to set up lesson deals before playing this deal.

30 Major Suit Raises
MAJOR SUIT RAISES I – SESSION 3: Deal #1
Dealer: NorthVul: None K J 9 5 3 A 5 2 7 K Q 7 4 10 4 6 2 9 6 3 Q J 10 8 7 A Q 10 2 K J 8 5 10 8 6 5 9 3 A Q 8 7 K 4 9 6 4 3 A J 2
Suggested Bidding: WEST NORTH EAST SOUTH 1 Pass 2NT Pass 3 Pass 3 Pass 4 Pass Pass Pass
The above is a possible auction for North-South pairs who do not know about the Jacoby 2NT Convention forcing raise of a major. Using the methods discussed so far in this course, our students have no way to show an immediate forcing raise. Start the lessons by having the class play this deal with no discussion. While some North players might bid 4 to show first-round control after South’s forcing 3 bid, students in my class did not reach slam and you should not expect yours to get there either.
Did anyone bid a slam? Did anyone take 12 tricks? I expect everyone did. 6 is a good slam for North-South, but they only have 27 HCP between them. How is it that they can make a slam? Their hands fit so well together with North’s singleton diamond sitting across from four small diamonds in South’s hand. South’s high cards fill in the suits where North has length, right where they are needed.
REVIEW OF WEEKS 1 AND 2: In a little while, we’ll see how using a special convention could help North-South know enough to reach this wonderful slam but first let’s review a little. So far we’ve covered responder’s weak raises of opener’s major suit. We saw two raises that can be made with weak responding hands. What are they?
Use the board to illustrate each auction as you discuss it.
OPENER RESPONDER OPENER RESPONDER
1H 2H 1H 4H
A single raise and the “weak freak” raise directly to game are both weak raises that can be made with minimum strength hands. The weak freak hand is quite weak in high cards – no more than 6 or 7 HCP – but is powerful in distribution with five-card heart support and usually a singleton or void. The single raise shows about 6-10 points and guarantees at least three trumps.
N
W E
S

LESSON 3 – Game Forcing Raises 31
We also discussed limit raises. How many points do you need for a limit raise? A good 10 to 12 points. We put 10 points in both weak and limit raises. Which raise you opt to make depends on how good a 10-point hand you have. We had two kinds of limit raises, too.
OPENER RESPONDER OPENER RESPONDER
1H 3H 1H 1S 2C 3H
An immediate raise of opener’s major to the three level promises four trumps. Do you remember why we have this requirement? To help us be more aggressive in our bidding. Opener can bid game with a very minimum hand across from a limit raise as long as opener has unbalanced distribution. In effect, we let opener add extra points for shortness.
When responder has only three-card support for opener’s major, responder makes a two-step limit raise. Responder makes a forcing bid first and then raises opener’s major the next time. After a three-card limit raise, opener relies more on points and doesn’t add extra for shortness as opener would do when there are extra trumps beyond the usual eight-card fit. Notice how responder jumped to 3 in our second auction. That jump was necessary for responder to clarify the strength. Responder’s 1 bid showed six or more points. If responder rebid only 2, opener would expect responder to be minimum. The bid of an old suit at the two level usually shows a minimum hand unless responder’s bidding has already guaranteed more.
INTRODUCTION TO JACOBY 2NT: Our system of limit raises has the advantage of helping us reach more good games. Limit raises are a fairly modern innovation. In the old days, a jump raise of opener’s major was a forcing raise. It showed opening count and forced the partnership to game. Can anyone think of an advantage of using an immediate jump raise as game-forcing? You agree on the trump suit immediately and can start to explore for slam below game.
It seems that we’re going to have to give something up. If we use limit raises, we can bid more games, but it’s harder to find our slams. If we use forcing raises, we may get to more slams, but we’ll miss some good games. Modern players who are willing to add a new convention to their bidding arsenal can have it all! The convention is called the Jacoby 2NT and it allows us to make an immediate forcing raise of opener’s major. Just as we do with limit raises, we differentiate between three-card support and more cards in support.
The Jacoby 2NT shows a four-card (or longer) raise and a game-going hand – a hand just like South has. After North opens 1, guess what South bids? 2NT – the Jacoby 2NT, saying I have four trumps and at least opening strength. Let’s see if we might have a slam.
NORTH SOUTH
1S 2NT
The Jacoby 2NT convention includes a set of descriptive rebids for opener to use. These rebids will help responder know if there is a slam. Opener’s top priority is to describe distribution. Opener can show a singleton or void by bidding the short suit on the three level. Here, opener would rebid 3 to show a singleton or void in diamonds (as in the following auction ).
NORTH SOUTH
1S 2NT 3D

32 Major Suit Raises
LOOKING FOR SLAM: Now South knows that there are only 34 important high card points in the deck. The K Q J are not of as much value as high cards in other suits since partner can trump them. South is very happy that no points are wasted in diamonds. The points South does have are likely to be working points in suits where partner needs help. When all your points are working points, you are likely to make game on fewer than 26 points and slam on fewer than 33 points. After opener shows a short suit that fits well with responder’s hand, responder can probe for slam. On this deal, South might bid Blackwood to check for aces. South will bid 6 as long as two aces are not missing. Your hand has to meet certain requirements to use Blackwood. You must know what to do with partner’s answer. If an ace is missing, you still have to be prepared to bid a small slam. For that reason, we generally say the Blackwood bidder needs to have first or second round control of every suit. Does South have the needed controls? The K is considered a second-round control. The A is a first-round control. South has no control in diamonds, but the Jacoby 2NT convention told South that opener has a singleton or void, which is the necessary control. As long as the partnership has the control, you are okay.
Some players use a form of Blackwood that includes the trump king as an ace – giving five aces in all! It’s called Roman Keycard Blackwood and is very useful in helping keep you out of slam when you have a weak trump suit. We are not going to discuss Roman Keycard in this course – we have enough to discuss without it! But you should keep in mind that it is important to avoid bidding a slam in a weak trump suit.
An alternative to South using Blackwood is for South to show a control – usually an ace. 4 is the cheapest first-round control South can show. That bid says, “I still like my hand for slam. Partner, what do you think?“ North should love hearing that South likes how the two hands fit and that South has the A and may launch into Blackwood. Whether South bids Blackwood or shows a control, North-South can get to 6.
GOOD SINGLETON VERSUS BAD SINGLETON: Would South have liked this hand as well if opener had shown a singleton heart? No, four of South’s points would be useless opposite a singleton heart. You don’t need the K when partner has a singleton and South’s doubleton isn’t going to be of value when opener has no hearts to ruff. When you know partner has a singleton, you have to stop and consider whether it’s a good singleton or a bad singleton. A good singleton is across from little card losers in partner’s hand. A bad singleton is across from high cards in that suit in partner’s hand, making those high cards less useful than if they were in a different suit.
When the Jacoby 2NT raise uncovers a good singleton, you usually explore for slam. When it uncovers a bad singleton, responder usually puts on the brakes and tries to stop in game. The slams we see today may not be quite as dramatic as this one, but they’ll still be exciting. Let’s play!

LESSON 3 – Game Forcing Raises 33
MAJOR SUIT RAISES I – SESSION 3: Deal #2
Dealer: EastVul: N-S 7 A Q 10 4 6 4 3 2 10 9 7 2 K Q J 3 A 10 9 8 4 8 6 5 2 7 A 5 K 8 7 K Q 4 A J 6 3 6 5 2 K J 9 3 Q J 10 9 8 5
Suggested Bidding: WEST NORTH EAST SOUTH 1 Pass 2NT Pass 3 Pass 4NT Pass 5 Pass 6 Pass Pass Pass
West uses our new Jacoby 2NT convention to show a forcing raise with four trumps. East’s job is to describe distribution. 3 shows a singleton or void in hearts.
The heart singleton is a good singleton from West’s viewpoint – opposite small cards. West should be able to picture a slam if East has the A, the trump ace and one more trick – not an unreasonable hope for an opening hand to provide. Blackwood can be used to check for missing aces.
When East shows two aces, West signs off in 6. Don’t wait until you have all four aces to bid a slam.
Suggested Lead: South leads the Q, a nice safe sequence lead that won’t give declarer an undeserved trick.
Suggested Play: Declarer can lose one trick and it will be a heart. Declarer draws trump and eventually ruffs a diamond in dummy to make the slam.
You are often required to inform your opponents about the conventions you use. The way we do this in bridge is by alerting. The Jacoby 2NT is an alertable convention. As soon as responder bids 2NT, opener should alert. Don’t give an explanation unless an opponent asks. If asked, the player who alerted explains. You would explain the Jacoby 2NT as a game-forcing raise showing four trumps.
We’re not done alerting yet. If you didn’t know about the Jacoby 2NT, wouldn’t you think opener really had hearts? But opener is showing a singleton heart. When the bidding sounds completely different from what it really is, you usually are required to alert. Opener’s rebid after Jacoby 2NT also has to be alerted. This time it’s responder who alerts as soon as opener rebids. As we practice using Jacoby 2NT, let’s also practice alerting. Alert the 2NT response and alert opener’s rebid.
N
W E
S

34 Major Suit Raises
MAJOR SUIT RAISES I – SESSION 3: Deal #3
Dealer: SouthVul: E-W A Q 6 5 Q J 6 2 10 5 K Q 8 J 10 9 8 3 2 7 10 5 4 A 7 6 4 K 8 2 J 7 4 2 A 10 6 5 3 K 7 4 A K 9 8 3 Q J 9 3 9
Suggested Bidding: WEST NORTH EAST SOUTH 1 Pass 2NT Pass 3 Pass 4 Pass Pass Pass
North uses Jacoby 2NT to show a forcing raise and to get more information about opener’s hand. South, did you remember to alert the 2NT response?
South’s 3 bid (alerted by North) shows a singleton or void in clubs.
North’s hand goes down in value; the K and Q are wasted – two small clubs would be as useful. With a working 9 HCP, North leaps to 4, showing a hand that wants to sign off without exploring for slam. South has already painted a good picture of the hand and abides by North’s decision.
You might be wondering why North would jump rebid with a hand North doesn’t like very much. A jump bid usually sounds strong. But, when you are in a game-forcing auction, a jump to game is the weakest bid you can make. It is known as fast arrival. As long as your bid is forcing, you go slowly when you want to talk about the possibility of slam. In this auction, 3 would have been forcing because the Jacoby 2NT convention forces you to game. So 3 is stronger than 4.
Suggested Lead: West leads the J.
Suggested Play: Declarer’s losers are one club and two diamonds. Draw trump and promote diamonds to make 4.
N
W E
S

LESSON 3 – Game Forcing Raises 35
MAJOR SUIT RAISES I – SESSION 3: Deal #4
Dealer: WestVul: Both K Q 8 2 J 9 8 10 6 J 8 5 4 7 3 A 6 5 A Q 7 6 2 K 10 5 3 A Q 9 7 3 K J 4 6 K 9 7 J 10 9 4 4 8 5 2 A Q 10 3 2
Suggested Bidding: WEST NORTH EAST SOUTH 1 Pass 2NT Pass 3 Pass 4 Pass Pass Pass
The above auction is likely to occur without discussion of the proper way to bid this hand. I prefer to let the students bid the deal this way. The purpose of this deal is to introduce opener’s rebid of a second five-card suit after the 2NT response. Some teachers might prefer to teach the meaning of opener’s new suit on the four level before playing this deal.
Where did everyone end up? I’m guessing 4 was a popular contract. How many made a slam? Even though slam is there, I haven’t taught you enough to be able to reach it. So, if you missed slam, it was my fault, not yours. West probably showed the singleton club. East’s K didn’t appear to be useful and East’s hand went down in value to less than opening strength. With this knowledge, East showed good judgment in stopping below slam.
What was it that allowed these two hands to make slam? A double fit. There were two five-card suits to run. Everyone focus on East’s hand and try using your imagination. Suppose I told you that your partner had five hearts to the ace. Would you hope for five heart tricks? And suppose I also told you that partner had a five-card diamond suit with a couple of honors in it. Would you also plan on winning five diamond tricks? That makes 10 tricks already. What else has East got? The A makes trick number 11. So close to a slam. The twelfth trick is actually there in East’s hand if you really stretch your imagination. What is trick number 12? A heart used for ruffing. Since partner has five diamonds, East is going to be able to discard twice on good diamonds in West’s hand. East can discard two spades and then ruff a spade. Slam bidding is often about visualizing how well your hands fit together. The Jacoby 2NT helps us know what partner has so we can better visualize the tricks we can take.
Now, here’s what I didn’t tell you. When opener has a second fairly good five-card suit, opener should not tell responder about the singleton; opener should tell about the second long suit instead. Opener bids a second good five-card suit on the four level. Here West bids 4 over East’s 2NT raise, and that lets East see how well the hands fit together. East has a better chance of realizing there is a slam knowing about the good diamond suit.
N
W E
S

36 Major Suit Raises
Suit the North-South cards but leave East-West face up. From East’s hand, remove the 6 5 and put in the K J. Remove the K J and put in the 6 5.
West: 7 3 A Q 7 6 2 A Q 9 7 3 6
East: A K J K 10 5 3 6 5 4 K 9 7
How will the bidding go now? Exactly the same up to opener’s 4 rebid. But East’s hand doesn’t fit as well. East has no help in diamonds and at least one wasted black suit king. East is better off signing off in 4. As you see, East-West will have to lose a club and at least one diamond – perhaps more.
Let’s put East’s cards into the suited pile, leaving only West’s hand face up. When opener shows a second suit after Jacoby 2NT, it should be a fairly good suit - but not too good. It should be a suit that needs some high card help from partner to let it run.
Take away West’s A Q and both small spades. Put in the A Q and J 2.
West has: A Q A Q 7 6 2 J 9 7 3 2 6
You open 1, partner responds 2NT. What rebid should you make? Do you show the singleton or the five-card diamond suit? In this case, it’s better to show the singleton
because your suit is so poor.
Now take away the A Q and put back the 7 3. Also take away the 7 3 2. Put in the A K Q and take away the Q and put in the 9.
West has: 7 3 A 9 7 6 2 A K Q J 9 6.
Will you still open 1? You should. We open the higher ranking of two five-card suits, regardless of what cards are in those suits. Partner bids 2NT. What is your rebid? Again, it is suggested that you show the singleton club rather than bid the diamonds. Your suit is so good that you don’t need help from partner to make it run. Remember when we learned about help suit game tries? We said that you shouldn’t make a game try in a suit that didn’t need help. Bidding your five-card suit after partner’s Jacoby 2NT raise is something like a help suit slam try. You want the suit to be reasonably good – at least two of the top four honors, but you want partner to have helping high cards in that suit.
Before we play any more deals, I’d better tell you the rest of the story about opener’s rebids after a Jacoby 2NT raise. I don’t want to be the cause of your missing any more slams! After Jacoby 2NT, opener tells partner about distribution – either a second decent five-card suit bid on the four level or extreme shortness bid on the three level. When opener doesn’t have this distribution, opener shows point count instead. With more balanced hands, the level is often based on the partnership’s total points. Without a singleton or void, opener describes point count and responder decides if there is slam. The stronger opener is, the lower the bid! Does that surprise you? It’s that fast arrival again. When you are in a game-forcing auction, the faster you reach game, the less interested in slam you are. The slower you go, the more room you leave to explore for slam.
Here is how opener shows point count in response to Jacoby 2NT: Four of the agreed major = dead-minimum; no slam interest 3NT = a little extra –15-17 points (memory device: 3NT = 1NT opening count). Three of the agreed major = slam interest (18+ points).

LESSON 3 – Game Forcing Raises 37
MAJOR SUIT RAISES I – SESSION 3: Deal #5
Dealer: NorthVul: N-S A 7 2 K J 10 6 5 Q J 6 Q 5 8 6 3 10 9 5 4 9 8 3 2 A 9 8 3 2 10 7 4 10 9 7 2 A K 6 K Q J A Q 7 4 K 5 J 8 4 3
Suggested Bidding: WEST NORTH EAST SOUTH 1 Pass 2NT Pass 4 Pass Pass Pass
South’s 2NT is the alertable Jacoby 2NT. North’s immediate game rebid describes a minimum opening hand of less than 15 points and denies a singleton or void.
Slams still require 33 points unless your hands are distributional. Both North and South have fairly balanced distribution and South knows this because of North’s rebid based on the Jacoby 2NT scheme of rebids. Even though South has 17 points, there isn’t quite enough for slam. Without this weak rebid for opener, wouldn’t you still be wondering if there was a slam with South’s hand?
Suggested Lead: East leads the A.
Suggested Play: North’s losers are two clubs and a diamond. None of these should disappear. All that can be made is 4. This time your partnership has 29 HCP plus a little for distribution and can take only 10 tricks. Balanced hands don’t provide as many tricks as unbalanced hands.
N
W E
S

38 Major Suit Raises
MAJOR SUIT RAISES I – SESSION 3: Deal #6
Dealer: EastVul: E-W 6 4 3 2 10 8 4 2 A 10 8 5 3 K 8 5 2 A 7 K 7 6 4 A Q J 9 5 A Q 5 K 9 6 3 7 4 K Q Q J 10 9 10 8 3 J 7 J 9 6 2
Suggested Bidding: WEST NORTH EAST SOUTH 1 Pass 2NT Pass 3 Pass 4 Pass 4NT Pass 5 Pass 6 Pass Pass Pass
The doubleton brings West’s hand just high enough to use the Jacoby 2NT game-forcing raise. Responder needs 13 or more total points to use the Jacoby 2NT. That includes high cards and distribution. Since responder will be the dummy in opener’s major, distribution points come from short suits.
East shows a semi-balanced hand with at least 18 points.
West has nothing extra and should sign off in 4. While I use the term sign off, West’s bid is not a unilateral decision. When opener can add up to the strength needed for slam, opener takes charge of getting there and that is the case on this deal. East has 20 total points across from a partner who has shown 13. The points are there for a small slam. East might use Blackwood to be certain that two aces aren’t missing. When one ace is missing, East signs off in 6. Some players might consider 6NT for the extra points, but East knows that partner’s fourth trump could be needed to ruff the fourth diamond.
Suggested Lead: South leads the Q.
Suggested Play: Declarer’s losers are a club and a diamond. The fourth diamond can be ruffed in dummy. Isn’t it nice to have that extra trump? It wouldn’t still be there after trumps were drawn if dummy had only three hearts.
N
W E
S

LESSON 3 – Game Forcing Raises 39
MAJOR SUIT RAISES I – SESSION 3: Deal #7
Dealer: SouthVul: Both K Q 9 7 Q 8 5 A Q 7 5 4 2 10 3 2 4 K 10 3 A J 7 6 2 J 10 8 4 2 9 7 5 3 Q 9 J 10 8 A J 8 6 5 9 4 K 6 A K 6 3
Suggested Bidding: WEST NORTH EAST SOUTH 1 Pass 2NT Pass 3NT Pass 4 Pass Pass Pass
The 2NT response showed everything North has. Even though South has shown some extra (15-17), there is not enough for a slam. South must realize that the 3NT rebid was descriptive, leaving any move toward slam up to responder. North is the one who knows both partners’ point count and that the partnership point total is less than the amount required for slam.
North might consider passing 3NT, but hands with a nine-card-major fit usually play better in the major and this hand is no exception. East has a natural heart lead, which will set 3NT. Even without a heart lead, declarer has only nine tricks off the top.
Suggested Lead: West leads the J.
Suggested Play: In 4, declarer counts losers: two hearts, and – hopefully – only one club. Clubs split 3-2 so all declarer has to do is play the A K and give up a club. The fourth club is good and 4 makes.
We’ve covered a lot of new material today. Let’s recap. Jacoby 2NT is used as a forcing raise of a major suit opening bid and it guarantees four-card or longer support. Jacoby 2NT is not used to raise opener’s minor. Jacoby 2NT is not used in competition or by a passed hand. Let’s review.
N
W E
S

40 Major Suit Raises
Write the following auctions on the board as they are discussed.
Opener Responder 1 2NT Responder has a forcing raise and how many trump? Four. 3 What has opener shown? A singleton or void in clubs.
Now responder will decide how well the hand fits with opener’s. Responder can move toward slam or sign off in game. If Responder were to bid 4 right now, I would expect responder to have wasted values in clubs. Responder’s hand has probably gone down and is now worth less than 13 points with the club wastage.
How would you take a 3 rebid from responder here? It is a control bid expressing some interest in slam.
What about a 3 rebid by responder? Responder is giving opener a chance to move toward slam. Responder still has a hand worth opening in face of the singleton, but may not have any aces or wants to hear more from opener. The point is that 3 is still encouraging. Had responder’s hand gone down the tubes with wasted club values, responder would have gone right to 4, not leaving room for discussion about slam. This is known as Fast Arrival — when you are in a game-forcing auction, the less interest you have in slam, the faster you get there. Remember that the Jacoby 2NT response commits the partnership to game.
Opener Responder 1 2NT 4
Opener is showing a second fairly good five-card suit. Opener also has a short suit since there are only three cards unaccounted for. We saw that it is more important for opener to show the second good suit than to show the singleton or void.
Opener Responder 1 2NT 4
Opener has a dead-minimum 1 opening with no singleton or void. For there to be a slam, responder would need a very good 2NT response of 19 or more points. With a good hand, responder is free to move on toward slam. With any other hand, 4 will be the final contract.
Opener Responder 1 2NT 3NT
Again opener has no shortness, but this time opener’s hand is a little better – about 15-17 points, the same range as a 1NT opening.
Opener Responder 1 2NT 3
Opener again has no singleton or void. The 3 bid shows count – at least 18 points and suggests that the partnership discuss slam. Responder might go on to 4 with a dead minimum forcing raise. With a better hand, responder can show a control (usually an ace) or simply ask for aces.

LESSON 3 – Game Forcing Raises 41
That summarizes the use of Jacoby 2NT. Much of the convention revolves around knowing if opener has a short suit. Responder gets to hear where opener’s short suit is and can decide whether opener’s shortness is good – opposite losers in responder’s hand or bad – opposite strength in responder’s hand. The Jacoby 2NT raise requires responder to have at least four-card support for opener’s major. Opener’s shortness is most valuable when there is a big trump fit.
You may feel that all of opener’s rebids are too confusing for you at this point. If that is true and you don’t want to work hard enough to learn them all, you could simply agree to use the 2NT response to show four-card support and a game-going hand. Use that for a while and then add opener’s rebids later. You won’t reach all those good slams, but at least you’ll have a forcing raise that promises four trumps and leaves some room to explore for slam below game. However, you are not using Jacoby 2NT unless you also use the system of rebids. You should still alert the 2NT response but simply describe it as a game-forcing raise with four trumps.
Remember, the Jacoby 2NT guarantees four-card trump support. With only three-card support, you don’t have enough trumps to use 2NT to show a forcing raise. What do you do? The same thing you did when you had a limit raise with only three trumps – make a two-step raise.
Opener Responder 1 1 2 4
Could responder have bid 2 or 3 instead? No; the 1 response promised 6 or more points and it is now necessary to show that responder has an opening hand. 2 would show 6-10 points; 3 would show 11-12 points, the two-step raise we made to show a limit raise. Responder must go all the way to 4.
Let’s compare this auction to our next auction. Does responder still have to bid 4 to show a forcing raise?
Opener Responder 1 2 2
Many experts say no. They say you can bid 2 here to show the limit raise. Why is this different? Because responder has already bid a new suit on the two level to promise around 11 points. So the experts say that a jump to 3 here shows a game-going hand with only three hearts. What is the advantage of being able to bid 3 instead of 4? You have more room to explore for slam. That said, if you are playing with a partner who might pass your 3 bid, you had better bid 4 to at least be sure of reaching game. If you think partner might pass if you bid only 3, it’s better to use up the extra room and ensure reaching game.
The Jacoby 2NT is a very useful convention and I use it with all my partners. Even a good convention can have a downside. What is the downside of the Jacoby 2NT? You can’t use 2NT as a natural response. The traditional meaning of a 2NT response is to show a balanced 13-15. Responder doesn’t promise a heart fit let alone four-card support. Using Jacoby 2NT, you have to find a different bid for hands with only two or three hearts. You might make a forcing bid in a new suit. Another alternative is to jump directly to 3NT with only two hearts. The standard meaning of that jump is to show a balanced 16-18. I hate to give that up because it helps us get to slam. It will be your partnership’s decision whether an immediate 3NT response shows 13-15 or 16-18. The important thing is that, using the Jacoby 2NT, you cannot respond 2NT to show an opening hand unless you have four-card support for opener. Let’s play our last deal.
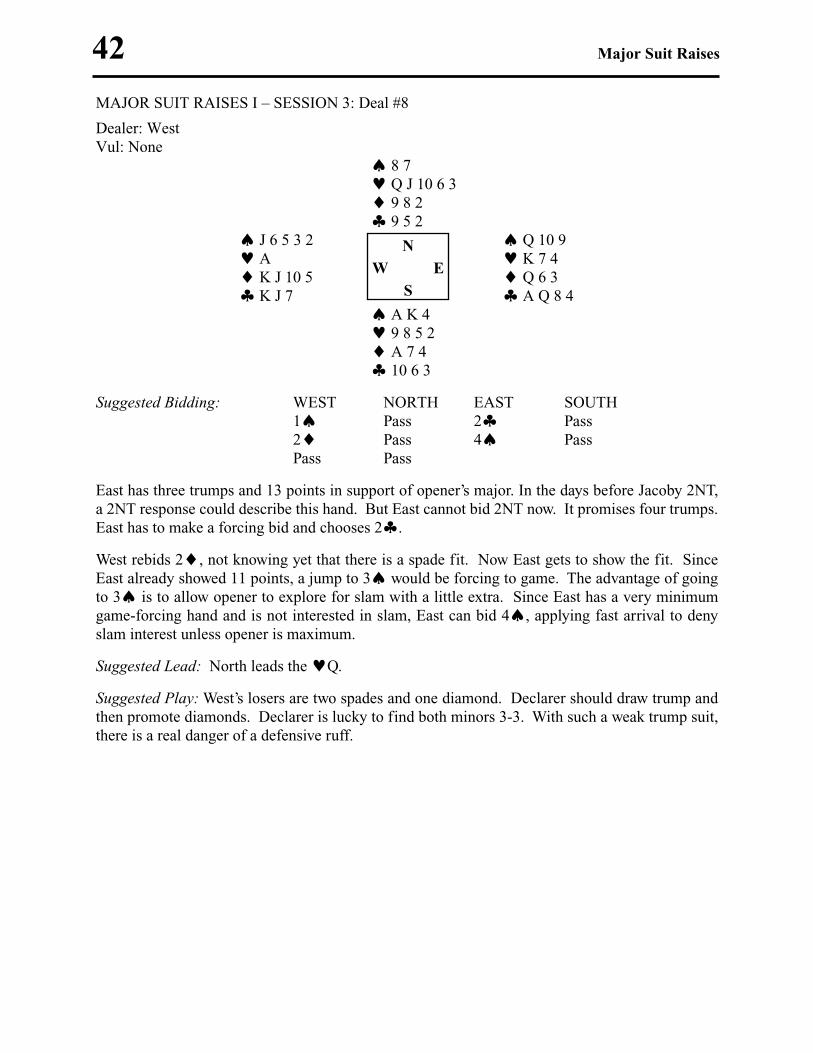
42 Major Suit Raises
MAJOR SUIT RAISES I – SESSION 3: Deal #8
Dealer: WestVul: None 8 7 Q J 10 6 3 9 8 2 9 5 2 J 6 5 3 2 Q 10 9 A K 7 4 K J 10 5 Q 6 3 K J 7 A Q 8 4 A K 4 9 8 5 2 A 7 4 10 6 3
Suggested Bidding: WEST NORTH EAST SOUTH 1 Pass 2 Pass 2 Pass 4 Pass Pass Pass
East has three trumps and 13 points in support of opener’s major. In the days before Jacoby 2NT, a 2NT response could describe this hand. But East cannot bid 2NT now. It promises four trumps. East has to make a forcing bid and chooses 2.
West rebids 2, not knowing yet that there is a spade fit. Now East gets to show the fit. Since East already showed 11 points, a jump to 3 would be forcing to game. The advantage of going to 3 is to allow opener to explore for slam with a little extra. Since East has a very minimum game-forcing hand and is not interested in slam, East can bid 4, applying fast arrival to deny slam interest unless opener is maximum.
Suggested Lead: North leads the Q.
Suggested Play: West’s losers are two spades and one diamond. Declarer should draw trump and then promote diamonds. Declarer is lucky to find both minors 3-3. With such a weak trump suit, there is a real danger of a defensive ruff.
N
W E
S

LESSON 4 – Major Raises in Competition 43
LESSON 4 — Major Raises in Competition
The deals for this lesson come from Session 4 of the Major Suit Raises I “Play” Course. The lesson covers the cuebid response after an overcall, preemptive jump raises in competition and Jordan after a takeout double.
Have your students make up the each of the deals from the Major Suit Raises I E-Z Deal cards.
Remind students of dealer and vulnerability on each deal of the lesson.
Related deals from CUC and MCUC: CUC Lesson 3, Deal 4.
Reference sections in CUC Teacher Manual: Lesson 3, sections entitled: Handling Interference and 2NT After a Takeout Double.
This is the end of the Major Suit Raises I “Play” Course. Some teachers might want to use the next lesson (the first lesson of the Major Suit Raises II “Play” Course) as a fifth lesson to end the course with a general review of the first four lessons. Others may wish to take a break and start a new course when the students are ready to learn more conventions dealing with major suit opening bids. For players who have not used any of these conventions, the two “Play” Courses include a lot of new information and it might be wise to allow things to solidify before proceeding further.
We begin this lesson with a comparison of bidding with and without interference.
We have looked at several bids so far in this series – Help Suit Game Tries, the “weak freak,” limit raises and Jacoby 2NT.
You may get to use some of those bids this week. But you also may be prevented from using them by your opponents’ bidding. Let’s compare some pairs of auctions and see if the meaning is different with competition and without competition. Write each pair of auctions on the board as you discuss them.
W N E S W N E S 1 Pass 2 1 1 2
Does East show anything different in the second auction than he does in the first auction? No. East’s 2 raise is the same with or without competition.
Let’s carry the auction a step further.
W N E S W N E S 1 Pass 2 Pass 1 1 2 2 3 3
Does West’s 3 bid show the same hand in both auctions? It does not. In our first auction, West has taken the contract from 2 up to 3. Why? West thinks there might be game. 3 is a game try. We’ve seen other ways to make a game try too and we’ll talk about them in a minute. In our second auction, West has taken the auction from 2 with North playing it back to 3 so E-W can play the hand. This is not a game try.

44 Major Suit Raises
Let’s look at something similar.
W N E S W N E S 1 Pass 2 Pass 1 1 2 2 3 3
What does West’s 3 bid mean? It should be a game try in both auctions. West is asking for help in the diamond suit.
Our next pair of auctions look similar but there is a big difference.
W N E S W N E S 1 Pass 2 Pass 1 2 2 3 3 3
3 is a game try in both auctions. In the first auction, it’s a Help Suit Game Try. What about the second auction? Since 3 would be competing, 3 is the only way to make a game try over 3. West may or may not need help in diamonds, but is inviting game.
Here’s an even worse auction:
W N E S 1 2 2 3 ?
Suppose West wants to make a game try. There’s no room! 3 is competing and any other bid takes East-West to game. West has to overbid or underbid. Or West can use a special convention called Maximal Doubles or Game Try Doubles. I’m going to use that name because that’s exactly what double would mean here – a game try. West can double to invite game and East will make the decision by bidding 3 or 4, or even passing the double when East thinks the best score will come from setting the opponents.
Who would think there would be so many problems with a simple overcall in an auction? That’s why our opponents like to overcall. They may not win the auction, but they could bring us grief.
We had one more weak raise – the “weak freak” to show five trumps and a weak responding hand.
W N E S W N E S 1 Pass 4 1 2 4
East definitely has the weak freak in our first auction. What about the second auction? East should have pretty much the same hand in both. Many players agree that a cuebid of the opponent’s suit shows a limit raise or better. Playing that way, East will first cuebid 3 with a hand that wants to be in game.
Let’s try a deal.
Remind the class how to set up the lesson deals using the E-Z Deal cards. Announce the vulnerability on each deal.
Deals 1 and 2 would be better played in reverse order. They are sequenced as they are in the course because of vulnerability constraints with the E-Z Deal cards. You might prefer to switch them in your lesson.

LESSON 4 – Major Raises in Competition 45
MAJOR SUIT RAISES I – SESSION 4: Deal #1
Dealer: NorthVul: None A K Q J 10 9 6 K Q 10 9 7 3 Q J 7 8 5 4 3 2 A 7 4 J 6 2 8 7 4 3 A K Q 10 9 4 8 2 10 9 6 2 K 8 5 3 A 5 J 6 5
Suggested Bidding: WEST NORTH EAST SOUTH 1 Pass 2 3 3 Pass 4 Pass Pass Pass
West makes North-South’s bidding more difficult with a 3 overcall. With a good, long suit, this bid is justified and not terribly dangerous. West is afraid the bidding might end at 2 without interference.
North has a good 16-point opening bid with the high cards concentrated in the long suits. North wants to try for game, but 3 would just be an attempt to buy the bid and should not be taken as a game try. North has to bid a new suit to make a game try. The only suit left is 3, so this is not the traditional Help Suit Game Try that we’ve been using. South should take it as a general game try. Is South’s hand good enough to accept? South has a total of nine points but one is the useless J, so judgment is needed. South’s fourth trump is good as is the fact that the remaining high cards are all in suits where partner will need them. South should accept the game try.
Suggested Lead: East leads the 8, top of a doubleton in partner’s bid suit.
Suggested Play: Losers appear to be one heart and two clubs but declarer must play carefully. West should overtake the opening lead (catering to East having a singleton) and continue clubs. Declarer must use a high trump to ruff the third club or the trick will be overruffed with the 7.
Leave the North-South hands face up and suit the East-West cards into four piles – one for each suit.
Remove South’s J, 2 and K. Put in the K, J and 2.
South has: J 10 9 6 8 5 3 2 A 5 K 6 5
Suppose the auction goes the same as it did up through North’s 3 game try. South still has nine points including the doubleton. Should South accept the game try? Now
the K is probably going to be useless and trapped by the opening lead. South’s judgment should tell him that the K is not likely to be worth as much and it would be reasonable for South to sign off in 3. Where your points are matters. If you have a high card in a suit where your left-hand
N
W E
S

46 Major Suit Raises
opponent is strong, that high card is less likely to be useful (unless it’s the ace).
Let’s add South’s cards to the piles in the center of the table and leave North’s hand face up. Remember the auction we had. North opened 1; partner raised to 2; and then we had a 3 overcall. North wanted to try for game. 3 would not be a game try, so North used the only suit available – diamonds. This is not specifically asking for help in diamonds; it is asking partner to go to game with a good 2 raise and to stop in 3 with a bad 2 raise.
Take all the diamonds and clubs out of North’s hand.
Put in the 7 3 and the K Q 10 9.
North has: A K Q J 10 9 6 7 3 K Q 10 9.
Again North opens 1 and South raises to 2. What if West overcalls 3? There is no room to make any kind of game try. 3 is a competitive bid and does not invite partner to carry on to game. This is where a Game Try Double comes in. If your partnership has agreed in advance, you can use double here as a game try. If you don’t use Game Try Doubles, you have three choices: underbid with 3; take a chance on finding partner with a good hand and bid 4; or make a penalty double.

LESSON 4 – Major Raises in Competition 47
MAJOR SUIT RAISES I – SESSION 4: Deal #2
Dealer: East Q 9 8 2Vul: N-S 10 4 10 9 3 K Q 8 4 6 5 A J J 6 5 A K 8 7 3 2 K Q J 7 6 5 4 10 7 5 3 9 2 K 10 7 4 3 Q 9 A 8 2 A J 6
Suggested Bidding: WEST NORTH EAST SOUTH 1 1 2 2 3 Pass Pass 3 Pass Pass Pass
South was going to open the bidding and should overcall 1. West ignores the overcall and makes a normal raise to 2. North follows the same philosophy and raises to 2. In competition, raise partner’s suit to the two level with a fit and 6-10 points. East knows there isn’t a game but wants to compete to 3 because there is a nine-card fit. In a competitive auction, it is a good policy to compete for as many tricks as your side has trumps. Players who do this are following The Law of Total Tricks. East’s 3 bid is not a game try. East would have bid a new suit to try for game.
South should pass 3. South expects there to be an eight-card spade fit and we don’t usually compete on the three level with only eight trumps. But North has the extra distribution – a fourth spade. With the nine-card fit, North competes to 3. This bid is not a strength bid; it is based on distribution. North’s 3 bid should end the auction. East-West know they can’t make 4, and plodding along like this, a 4 bid by East or West is likely to be doubled. They should hope that they have pushed North-South too high. Neither East nor West is sure of defeating 3, so it’s not likely that they will make a penalty double. It’s difficult for the defenders to make a penalty double of a partscore when they don’t hold many trumps.
Suggested Play in Spades: West will lead the K. South’s losers are a spade, two hearts and two diamonds. None should disappear so 3 goes down one to give East-West 100 points. It will be hard for them to double 3, so North-South get a good result if East-West can make 3.
Suggested Play in Hearts: South will lead 4. East’s losers are one spade, one diamond and two clubs. On a spade lead, the defenders should be able to take all these tricks before declarer can discard a loser on diamonds, so declarer should take exactly nine tricks to give 140 points to East-West. Note how foolish it would be for East-West to bid 4 over 3. Aside from the risk of being doubled, this bid turns a plus score into a minus. If you follow The Law of Total Tricks, you are more likely to come out on the plus side of competitive auction like this one.
N
W E
S

48 Major Suit Raises
MAJOR SUIT RAISES I – SESSION 4: Deal #3
Dealer: South J 5 3Vul: E-W K 10 8 7 4 8 9 7 4 2 A K 9 8 7 4 6 2 Q 2 3 4 A K 10 9 6 5 3 Q J 8 6 A 10 5 Q 10 A J 9 6 5 Q J 7 2 K 3
Suggested Bidding: WEST NORTH EAST SOUTH 1 1 4 ?
West overcalls 1 with a full opening hand. It isn’t clear to East that West’s hand is this good since a one-level overcall does not promise opening strength. The lower limit for some players is 10 points and some will go as low as 8 points.
North has a “weak freak“ raise of South’s hearts. The “weak freak” raise still applies in competitive auctions. Why give your opponents room to communicate?
East has a good hand with seven diamonds. Too bad East doesn’t know how strong partner is. The preemptive “weak freak” bid makes East guess. East might bid 5; East might double 4. It is unlikely that East will bid 4, which turns out to be the best spot.
North-South should leave their opponents wherever they land, hoping they guessed wrong.
Suggested Play in Hearts: West leads the A. South’s losers are two spades, one diamond and only one club when declarer leads toward the K. 4 goes down one.
Suggested Play in Diamonds: South doesn’t have a good opening lead. If the choice is to lead hearts, South should lead the ace, but gets away with a small heart lead this time. East must lose a heart and two diamonds and also the K. 5 goes down two.
Suggested Play in Spades: North may lead the singleton diamond instead of a heart. West’s losers are one spade, one heart and one club. 4 makes, but not many players would bid 4 with that small doubleton in East’s hand. If North bids 2 instead of 4, East can bid diamonds and West will have a chance to rebid spades to uncover the fit.
Leave the cards face up. How many East-West pairs reached 4? How many got there after North bid the “weak freak?” There’s no guarantee that North’s preemptive bid will work, but bidding a lot with North’s hand gives you the best chance of fouling up the opponents.
Expert player, teacher and writer, Mike Lawrence says, “Which opponents bother you the most? The ones who bid the most! Many bad scores are the result of lack of action. You’ll get your butt kicked a few times and then you’ll learn when to act and when not to. Look for reasons to bid, not for reasons to pass. Force your opponents into making competitive decisions.” You can only follow
N
W E
S
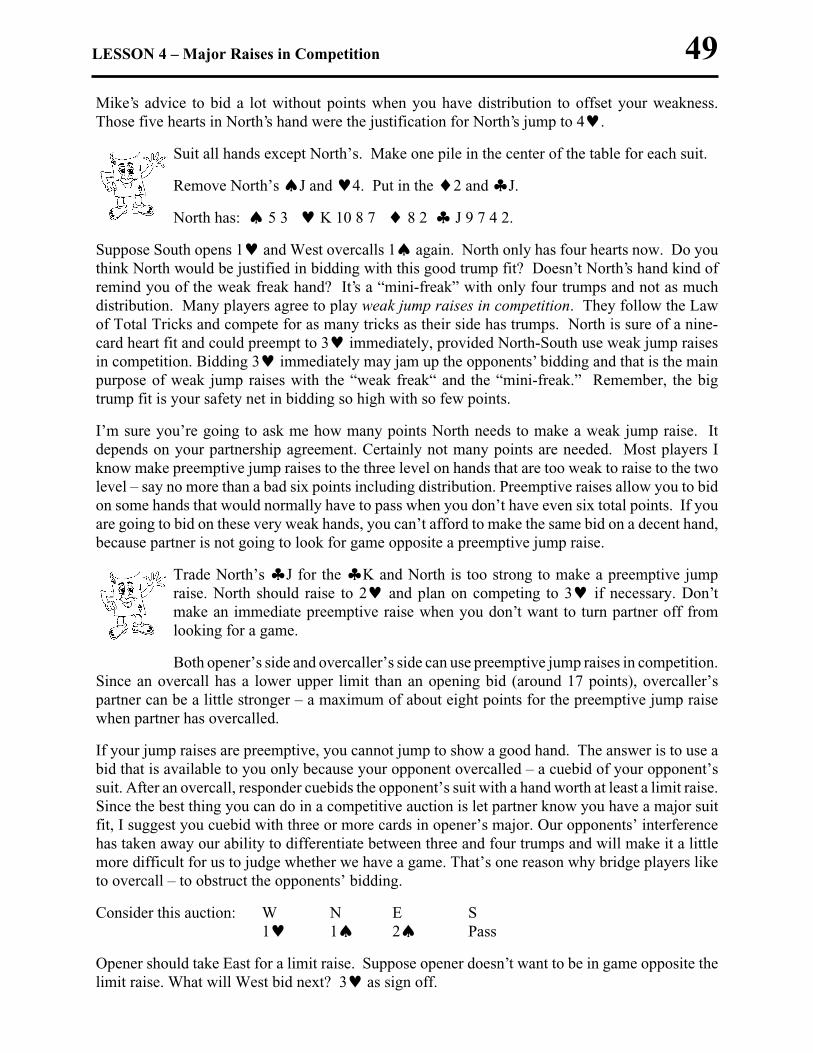
LESSON 4 – Major Raises in Competition 49
Mike’s advice to bid a lot without points when you have distribution to offset your weakness. Those five hearts in North’s hand were the justification for North’s jump to 4.
Suit all hands except North’s. Make one pile in the center of the table for each suit.
Remove North’s J and 4. Put in the 2 and J.
North has: 5 3 K 10 8 7 8 2 J 9 7 4 2.
Suppose South opens 1 and West overcalls 1 again. North only has four hearts now. Do you think North would be justified in bidding with this good trump fit? Doesn’t North’s hand kind of remind you of the weak freak hand? It’s a “mini-freak” with only four trumps and not as much distribution. Many players agree to play weak jump raises in competition. They follow the Law of Total Tricks and compete for as many tricks as their side has trumps. North is sure of a nine-card heart fit and could preempt to 3 immediately, provided North-South use weak jump raises in competition. Bidding 3 immediately may jam up the opponents’ bidding and that is the main purpose of weak jump raises with the “weak freak“ and the “mini-freak.” Remember, the big trump fit is your safety net in bidding so high with so few points.
I’m sure you’re going to ask me how many points North needs to make a weak jump raise. It depends on your partnership agreement. Certainly not many points are needed. Most players I know make preemptive jump raises to the three level on hands that are too weak to raise to the two level – say no more than a bad six points including distribution. Preemptive raises allow you to bid on some hands that would normally have to pass when you don’t have even six total points. If you are going to bid on these very weak hands, you can’t afford to make the same bid on a decent hand, because partner is not going to look for game opposite a preemptive jump raise.
Trade North’s J for the K and North is too strong to make a preemptive jump raise. North should raise to 2 and plan on competing to 3 if necessary. Don’t make an immediate preemptive raise when you don’t want to turn partner off from looking for a game.
Both opener’s side and overcaller’s side can use preemptive jump raises in competition. Since an overcall has a lower upper limit than an opening bid (around 17 points), overcaller’s partner can be a little stronger – a maximum of about eight points for the preemptive jump raise when partner has overcalled.
If your jump raises are preemptive, you cannot jump to show a good hand. The answer is to use a bid that is available to you only because your opponent overcalled – a cuebid of your opponent’s suit. After an overcall, responder cuebids the opponent’s suit with a hand worth at least a limit raise. Since the best thing you can do in a competitive auction is let partner know you have a major suit fit, I suggest you cuebid with three or more cards in opener’s major. Our opponents’ interference has taken away our ability to differentiate between three and four trumps and will make it a little more difficult for us to judge whether we have a game. That’s one reason why bridge players like to overcall – to obstruct the opponents’ bidding.
Consider this auction: W N E S 1 1 2 Pass
Opener should take East for a limit raise. Suppose opener doesn’t want to be in game opposite the limit raise. What will West bid next? 3 as sign off.

50 Major Suit Raises
MAJOR SUIT RAISES I – SESSION 4: Deal #4
Dealer: West A K Q 8 2Vul: Both 9 2 J 2 A J 6 3 9 4 6 5 A K 7 6 4 Q 10 8 3 K Q 8 5 10 3 K 4 Q 9 8 5 2 J 10 7 3 J 5 A 9 7 6 4 10 7
Suggested Bidding: WEST NORTH EAST SOUTH 1 1 3 ??
With 16 total points, North has a good 1 overcall. If East-West play preemptive jump raises in competition, East can put pressure on North-South. The three level should be safe with a nine-card heart fit.
What will poor South do with four-card spade support but only about seven points? South would be happy to raise to 2, but how will partner interpret a 3 bid? It should show a little bit more (about 8-11 points). If South does bid 3, there’s a good chance that North will bid game. If South passes, East-West may buy the contract in 3. The preemptive raise may successfully block the opponents.
Did any West players consider the possibility of game? I hope you remembered that preemptive raises are very weak. Expect no more than six total points from partner. If you cannot make game opposite that, there’s no reason to consider bidding game.
Suggested Play in Hearts: North leads the A. West’s losers are two spades, one club and three diamonds but two diamonds can be ruffed in dummy. 3 makes.
Suggested Play in Spades: East will probably lead the 3. North’s losers are two hearts, one diamond and three clubs. Two clubs can be ruffed in dummy but no other losers can be avoided. North can make 3, but not 4.
Maybe North-South got to 3 despite the preemptive raise but they were lucky to have guessed correctly. At least East’s bid made them squirm. Continue to put pressure on your opponents and you will come out ahead over the long haul.
Suit the North-South cards only. Leave the East-West hands face up.
Trade East’s Q for the A.
East has: 6 5 Q 10 8 3 10 3 A 9 8 5 2.
West opens 1 and North overcalls 1. Should East make a preemptive raise now? This hand is worth a total of eight points and is too good. East should raise to 2 and
be willing to compete to 3 if necessary. As it turns out, West might make a game try and East should accept with all good points.
N
W E
S

LESSON 4 – Major Raises in Competition 51
Trade East’s Q for the J and 5 for the 9.
East has: 6 J 10 8 3 10 9 3 A 9 8 5 2
West opens 1 and North overcalls 1. What would you do with East’s hand? It’s still too good for a preemptive raise to 3. You could bid 2 and be ready to raise to 3 later. Or if you can’t stand not preempting, bid 4 right away so you don’t risk missing a game. Generally, your decision is to compete for as many tricks as your side has trumps. East expects a nine-card heart fit. But we are also swayed by other distributional factors – especially shortness in our opponent’s suit. The singleton spade is what pushes us to bid one more. You might also want to check the vulnerability before bidding 4.
Preemptive raises in competition do not require any alert. Don’t be surprised to see players make a jump raise on almost nothing but a nine-card fit and some shape. But also don’t be surprised to see some players making preemptive raises on hands that are really too strong to do so. You need a style – and it must be a style that partner will understand, so your preemptive raises hurt your opponents but don’t make your side miss game. Preemptive raises to the three level should be made on hands that can barely scrape up a bid. If you are too strong, you might miss a game. Preemptive raises to game should be made on hands that have virtually no hope for slam even opposite a nice maximum opener. Opener needs something really special to consider slam after a weak freak raise.
Let’s change the auction: W N E S 1 1 2NT
And compare it to: W N E S 1 Pass 2NT
Without the overcall, what does East’s 2NT bid show? It’s the Jacoby 2NT, showing a game-going hand with four-card heart support. When you agree to use any convention, it’s important to know when it applies. The Jacoby 2NT is off in competition. So what is East showing in the first auction where 2NT is bid over North’s 1 overcall? In competition, 2NT by responder is a game invitation. East should have about 11 points. What else should East have? No heart fit and a spade stopper. When you introduce notrump in a competitive auction, you must have the opponent’s suit stopped.
Suppose East has a hand that was going to use the Jacoby 2NT. East can no longer do that when North overcalls. How can East show a good hand with support for opener’s major? Use the cuebid. A cuebid by responder doesn’t show exactly a limit raise. It shows a limit raise or better. With a game-going hand, responder will carry on to game even when opener tries to stop in 3.
Unfortunately, it is going to be more difficult to judge how well opener’s hand and responder’s hand fit after an opponent overcalls. The overcall interferes with some of our tools – the Jacoby 2NT and the ability to differentiate between three- and four- card trump support. A cuebid response promises support but it may only be three-card support. Preventing accurate communications is one reason why our opponents love to overcall.
Our next deals will let you practice using the cuebid response to show a limit raise or better.

52 Major Suit Raises
MAJOR SUIT RAISES I – SESSION 4: Deal #5
Dealer: North 10 6Vul: N-S 10 7 4 2 10 4 K J 6 5 3 8 7 5 3 A K Q 9 4 2 A 6 5 K 8 3 9 8 7 6 2 A Q 8 7 9 J Q J 9 A K Q J 5 3 10 4 2
Suggested Bidding: WEST NORTH EAST SOUTH Pass 1 2 3 Pass 4 Pass Pass Pass
After South overcalls East’s 1 opening, West wants to show a limit raise of spades. We cuebid the opponent’s suit to show a limit raise or better. East wants to be in game opposite a limit raise and goes directly to 4.
Suggested Lead: South leads the A, and North encourages with the 10 because North can overruff dummy.
Suggested Play: East can afford to lose three tricks. At first glance, it appears that those three tricks will be two diamonds and a heart. But things aren’t always what they appear. South’s overcall plus North’s high-low signal in diamonds should make declarer stop to think. If declarer ruffs the third diamond in dummy, North will probably be able to overruff and declarer will still have a heart to lose. What can be done? Lose that heart on the third diamond! Simply discard a heart from dummy. North won’t ruff and that trick will be lost, but it is likely to be the last trick declarer does lose. Declarer wins whatever South leads at trick four; draws trump, cashes the A and K and ruffs the heart loser in dummy. How convenient it was that declarer could discard dummy’s heart loser on a trick that had to be lost anyway!
Leave West’s hand face up and turn the other hands face down. What would West have done if, after the 3 cuebid, East had bid only 3? West’s cuebid showed a limit raise or better. East made a decision based on West having a limit raise. Since that is what West does have, West must respect partner’s decision to stop in 3. West would need an opening hand to carry on to 4.
N
W E
S

LESSON 4 – Major Raises in Competition 53
MAJOR SUIT RAISES I – SESSION 4: Deal #6
Dealer: East A 8 6Vul: E-W A J 4 2 Q J 8 5 A 8 Q J 10 9 4 7 3 6 5 9 8 K 7 10 9 4 2 K Q J 3 10 9 6 4 2 K 5 2 K Q 10 7 3 A 6 3 7 5
Suggested Bidding: WEST NORTH EAST SOUTH Pass 1 1 2 Pass 3 Pass 4 Pass Pass Pass
North was all set to use the Jacoby 2NT to get more information about opener’s hand. With 17 points across from partner’s opening bid, there could be a slam. But West overcalled and Jacoby 2NT does not apply after an overcall. It would be a disaster for North to bid 2NT over 1. South could and would pass and the pair would miss a game! After an overcall, we use the cuebid response to show a limit raise or better. North cuebids 2.
South’s rebid gives North enough information to rule out slam. South doesn’t want to be in game opposite a limit raise, so there cannot be sufficient strength for slam. North can be comfortable placing the contract in 4.
Suggested Lead: West has two sequences to lead from and might choose either the Q or the K.
Suggested Play: South’s losers are one spade, one club and one diamond. Making 4 should be easy. But a duplicate player doesn’t relax in this situation. It’s time to look for an overtrick. Played correctly, the diamond suit might provide an extra trick. Don’t expect a 3-3 split when the 4-2 split is more likely. Declarer can make the most out of the high cards in diamonds by leading toward dummy’s Q J. There is no legitimate way to avoid a diamond loser, but if both the Q and J can be turned into tricks, one of them will provide a discard for a black suit loser. Declarer wins the opening lead on the board and draws trump. Then declarer plays the A and a small diamond. It turns out West has to win this, but if West were able to play second hand low, declarer would return to the hand with the K to repeat the finesse. One loser will be discarded on dummy’s remaining high diamond. Top scores go to declarers scoring 450.
Leave North’s hand face up and turn the remaining hands face down. It’s interesting how your opponents’ bidding affects what you do. South opened 1. If West had passed, what would North do? Use the Jacoby 2NT. On the actual deal, West overcalled and the Jacoby 2NT is off after an overcall. What did North do instead? Cuebid West’s suit to show a limit raise or better. What if South had opened 1 and West had made a takeout double? The Jacoby 2NT is off after a takeout double, too. Let’s look at some possible auctions on the board and discuss what they might mean.
N
W E
S
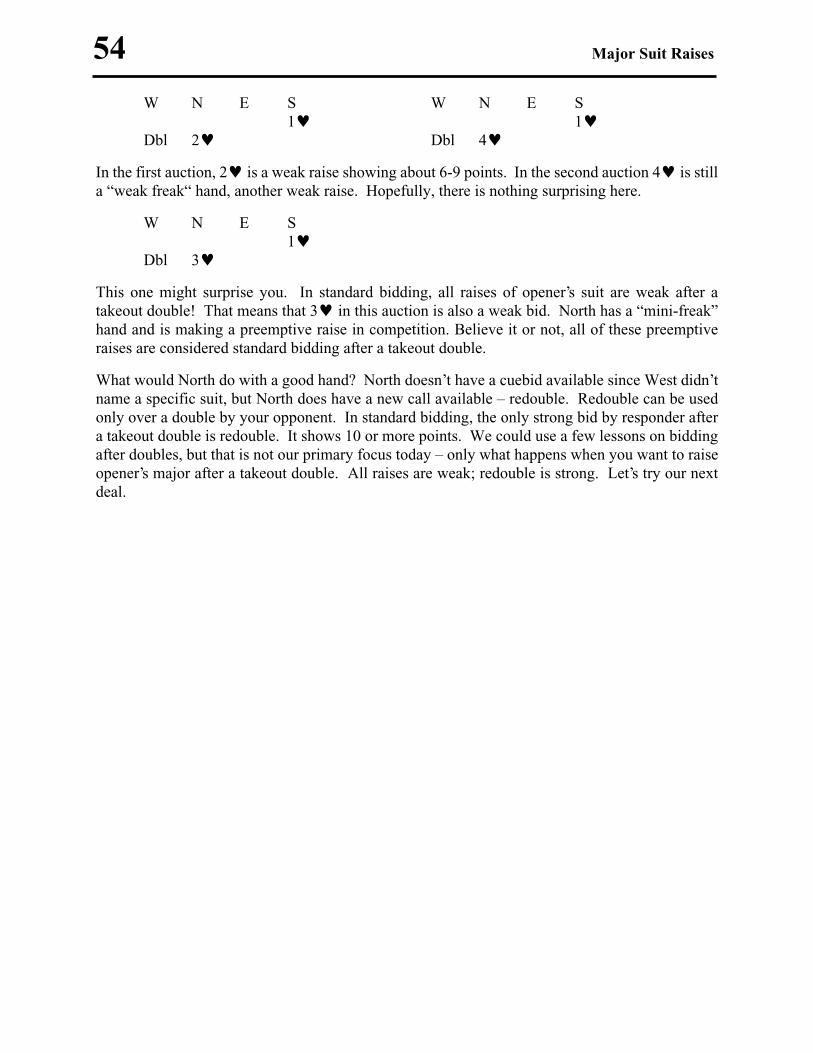
54 Major Suit Raises
W N E S W N E S 1 1 Dbl 2 Dbl 4
In the first auction, 2 is a weak raise showing about 6-9 points. In the second auction 4 is still a “weak freak“ hand, another weak raise. Hopefully, there is nothing surprising here.
W N E S 1 Dbl 3
This one might surprise you. In standard bidding, all raises of opener’s suit are weak after a takeout double! That means that 3 in this auction is also a weak bid. North has a “mini-freak” hand and is making a preemptive raise in competition. Believe it or not, all of these preemptive raises are considered standard bidding after a takeout double.
What would North do with a good hand? North doesn’t have a cuebid available since West didn’t name a specific suit, but North does have a new call available – redouble. Redouble can be used only over a double by your opponent. In standard bidding, the only strong bid by responder after a takeout double is redouble. It shows 10 or more points. We could use a few lessons on bidding after doubles, but that is not our primary focus today – only what happens when you want to raise opener’s major after a takeout double. All raises are weak; redouble is strong. Let’s try our next deal.

LESSON 4 – Major Raises in Competition 55
MAJOR SUIT RAISES I – SESSION 4: Deal #7
Dealer: South A K 10 6 5Vul: Both J 6 7 4 A K 7 6 8 4 2 7 A 10 7 4 2 K Q 9 5 A 10 8 K Q J 3 3 2 Q 9 5 4 Q J 9 3 8 3 9 6 5 2 J 10 8
Suggested Bidding: WEST NORTH EAST SOUTH Pass Pass 1 Dbl 3 ?
East’s takeout double shows opening strength and support for all unbid suits. South takes this opportunity to make life difficult for the opponents. After a takeout double, a jump raise is a preempt, showing extra trump support but not much strength. North won’t be misled by the 3 bid since redouble is the only strong bid. North knows that partner is preempting and trying to block the opponents’ communications.
West is the one with a problem. West knows there is a heart fit, but is there enough strength for game? South’s preemptive raise makes the opponents guess! If West passes, North-South may get the contract for 3; if West bids, East-West might be too high.
Suggested Play in Spades: East will lead the K from the strongest sequence. North’s losers are two hearts, two diamonds and one club. North should make only 2. Sometimes it’s not so bad to go down one.
Suggested Play in Hearts: 4 should make, losing only one spade and two clubs. Did East-West bid it? If not, the credit goes to South for preempting and making the auction get high so quickly. North-South should be happy to go down only one when East-West can make a game.
If South passes or bids only 2, West has nine total points and might even jump in response to partner’s takeout double. East’s hand values to 16 points adding for the singleton spade and game should be reached once it becomes clear that West has values.
N
W E
S

56 Major Suit Raises
Preemptive jump raises of opener’s suit are standard after a takeout double. Here’s an interesting auction. Can you guess what is happening? Before you answer, remember that there are only 40 HCP in the deck.
W N E S 1 Dbl Rdbl 4
Let’s give everyone what appears to be the minimum needed for his bid. West opened and has about 13 points. North doubled and has about 13 points. East’s redouble shows 10 or more points. So far we’ve accounted for about 36 points. Yet South is bidding 4. How many points shall we give South? If the first three bids are all to be trusted, and they should be since it’s not wise to lie to partner, South is the one who cannot have points. Why would South bid 4 without strength?
North’s double promised South a fit for any suit he liked. South has length in spades. You need some excuse to bid high. If it isn’t points, it is a long suit. This is something like the “weak freak” raise. South has long spades and not much else. Remembering that North did not promise five spades with the double, how many spades would you expect South to have? Probably six, which would have South following The Law of Total Tricks and bidding for ten tricks because South expects them to have ten spades.
Does South expect to make 4? No, but South doesn’t expect to go down too much because of the huge fit. It’s worth the penalty to jam up the opponents’ bidding and make them guess.
North, I’m expecting to hear a takeout double from you on our next deal. And South, I hope you were listening to what we just discussed. Be mean to your opponents!
The purpose of the next deal is to introduce Jordan over the opponent’s takeout double. Let the class bid and play without any help from you. If South preempts, the students will realize the need for showing support for opener’s suit before the bidding gets too high.

LESSON 4 – Major Raises in Competition 57
MAJOR SUIT RAISES I – SESSION 4: Deal #8
Dealer: West A 8 4Vul: None 10 K J 5 4 2 A 8 4 3 6 K Q K Q 7 6 4 3 A 9 8 5 A Q 10 8 7 6 Q J 5 2 K 10 6 J 10 9 7 5 3 2 J 2 9 3 9 7
Suggested Bidding: WEST NORTH EAST SOUTH 1 Double Redouble 4 ?
West opens 1 with six hearts and too much strength to open with a preempt. North is short in hearts with reasonable support for all unbid suits. A takeout double is a wiser choice than overcalling 2 on a weak suit. East might redouble to show a strong hand. South can create some action. North-South have at least 10 spades. Bidding 4 can’t fool partner. There aren’t enough points in the deck for South to have a good hand too. West knows partner has strength but does partner have hearts? East knows there is a heart fit but is there enough strength to bid 5? How did East-West guess after South’s big preempt?
Suggested Play in Hearts: North doesn’t have a good lead. If North chooses to lead a spade, it must be the ace. Leading a low diamond away from the king with such length in the suit is risky. As it turns out, it doesn’t really matter what North leads. West’s losers are one spade, one club and one diamond. Declarer shouldn’t be thinking about a diamond finesse. The missing strength rates to be with North (the doubler), so the finesse will probably fail. Luckily, there’s a parking place for the Q on dummy’s second high spade and 5 makes.
Suggested Play in Spades: West will probably lead the K. South’s losers are one spade, two hearts, two diamonds and one club. A heart loser can be ruffed in dummy and a winning diamond finesse eliminates one diamond loser. 4 goes down one and is a good sacrifice against the opponents’ game. Of course, 4 has to be doubled but minus 100 beats minus 450.
East-West, did you get your hand stolen away? The redouble didn’t work very well, did it? Because bridge players love to preempt, it’s usually best to let partner know immediately that you have a fit. The problem with redouble is that it didn’t show the heart fit. Of course, there is a convention to solve this problem. It’s called Jordan and is used to show a limit raise or better after the opponent’s takeout double. Jordan is an alternative to redouble when responder fits opener’s suit. Here’s how it works.
After 1 double or 1 double, 2NT shows a limit raise or better of opener’s major. Most books say responder promises four-card support, but I know some players who use Jordan with only three-card support. Do you think West would have any trouble bidding 5 if the auction had gone 1-Double-2NT-4? Not if West expects a 10-card heart fit and at least 11 points. Again, you and your partner have to agree in advance to use Jordan.
N
W E
S
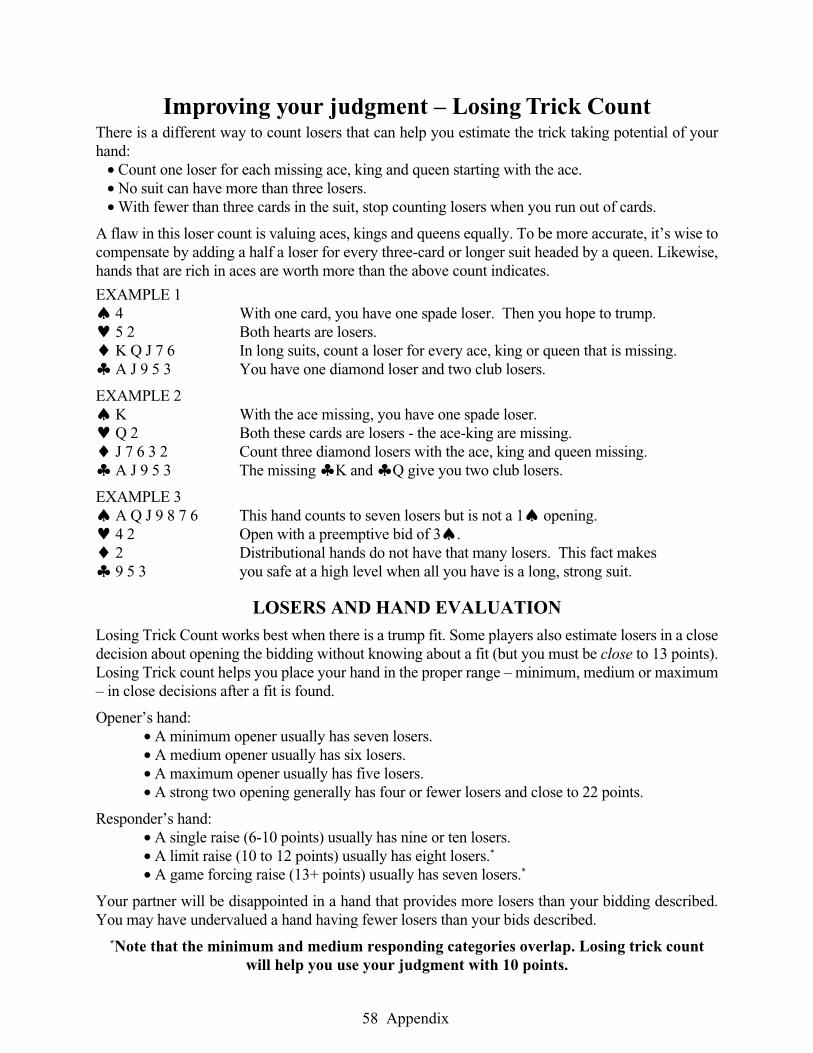
58 Appendix
Improving your judgment – Losing Trick CountThere is a different way to count losers that can help you estimate the trick taking potential of your hand: • Count one loser for each missing ace, king and queen starting with the ace. • No suit can have more than three losers. • With fewer than three cards in the suit, stop counting losers when you run out of cards.
A flaw in this loser count is valuing aces, kings and queens equally. To be more accurate, it’s wise to compensate by adding a half a loser for every three-card or longer suit headed by a queen. Likewise, hands that are rich in aces are worth more than the above count indicates.
EXAMPLE 1 4 With one card, you have one spade loser. Then you hope to trump. 5 2 Both hearts are losers. K Q J 7 6 In long suits, count a loser for every ace, king or queen that is missing. A J 9 5 3 You have one diamond loser and two club losers.
EXAMPLE 2 K With the ace missing, you have one spade loser. Q 2 Both these cards are losers - the ace-king are missing. J 7 6 3 2 Count three diamond losers with the ace, king and queen missing. A J 9 5 3 The missing K and Q give you two club losers.
EXAMPLE 3 A Q J 9 8 7 6 This hand counts to seven losers but is not a 1 opening. 4 2 Open with a preemptive bid of 3. 2 Distributional hands do not have that many losers. This fact makes 9 5 3 you safe at a high level when all you have is a long, strong suit.
LOSERS AND HAND EVALUATION
Losing Trick Count works best when there is a trump fit. Some players also estimate losers in a close decision about opening the bidding without knowing about a fit (but you must be close to 13 points). Losing Trick count helps you place your hand in the proper range – minimum, medium or maximum – in close decisions after a fit is found.
Opener’s hand: • A minimum opener usually has seven losers. • A medium opener usually has six losers. • A maximum opener usually has five losers. • A strong two opening generally has four or fewer losers and close to 22 points.
Responder’s hand: • A single raise (6-10 points) usually has nine or ten losers. • A limit raise (10 to 12 points) usually has eight losers.*
• A game forcing raise (13+ points) usually has seven losers.*
Your partner will be disappointed in a hand that provides more losers than your bidding described. You may have undervalued a hand having fewer losers than your bids described.
*Note that the minimum and medium responding categories overlap. Losing trick count will help you use your judgment with 10 points.