Embed Size (px)
Citation preview

Magic xpi 4.1 with Dynamics CRM Seminar
Self-Paced Tutorial
Book ID: UTLSDYNMI4
Edition: 1.0, March 2016
Course ID: UCLDYNMI4
Magic University Official Courseware

2
The information in this manual/document is subject to change without prior notice and does not represent a commitment on the part of
Magic Software Enterprises Ltd.
Magic Software Enterprises Ltd. makes no representations or warranties with respect to the contents hereof and specifically disclaims any
implied warranties of merchantability or fitness for any particular purpose.
The software described in this document is furnished under a license agreement. The software may be used or copied only in accordance
with the terms and conditions of the license agreement. It is against the law to copy the software on any medium except as specifically
allowed in the license agreement.
No part of this manual and/or databases may be reproduced or transmitted in any form or by any means, electronic or mechanical,
including photocopying, recording or information recording and retrieval systems, for any purpose other than the purchaser’s personal
use, without the prior express written permission of Magic Software Enterprises Ltd.
All references made to third-party trademarks are for informational purposes only regarding compatibility with the products of Magic
Software Enterprises Ltd.
Unless otherwise noted, all names of companies, products, street addresses, and persons contained herein are part of a completely
fictitious scenario or scenarios and are designed solely to document the use of Magic xpi.
Magic™ is a trademark of Magic Software Enterprises Ltd.
Btrieve® and Pervasive.SQL® are registered trademarks of Pervasive Software Inc.
IBM®, Topview™, System i5/System i™, pSeries®, xSeries®, RISC System/6000®, DB2®, WebSphere®, Domino®, and Lotus Notes® are
trademarks or registered trademarks of IBM Corporation.
Microsoft®, FrontPage®, Windows™, WindowsNT™, ActiveX™, Exchange 2007™, Dynamics® CRM, SharePoint®, Excel®, and Word® are
trademarks or registered trademarks of Microsoft Corporation.
Oracle®, JD Edwards EnterpriseOne®, JD Edwards World®, and OC4J® are registered trademarks of the Oracle Corporation and/or its
affiliates.
Google Calendar™ and Google Docs™ are trademarks of Google Inc.
Salesforce® is a registered trademark of salesforce.com Inc.
SAP® Business One and SAP® R/3® are registered trademarks of SAP AG in Germany and in several other countries.
Dynamics CRM is a trademark of Dynamics CRM in the United States, the European Union and other countries.
Linux® is a registered trademark of Linus Torvalds.
UNIX® is a registered trademark of UNIX System Laboratories.
GLOBEtrotter® and FLEXlm® are registered trademarks of Macrovision Corporation.
Solaris™ and Sun ONE™ are trademarks of Sun Microsystems Inc.
HP-UX® is a registered trademark of the Hewlett-Packard Company.
Red Hat® is a registered trademark of Red Hat Inc.
WebLogic® is a registered trademark of BEA Systems.
Interstage® is a registered trademark of the Fujitsu Software Corporation.
JBoss™ is a trademark of JBoss Inc.
GigaSpaces, GigaSpaces eXtreme Application Platform (XAP), GigaSpaces eXtreme Application Platform Enterprise Data Grid (XAP EDG),
GigaSpaces Enterprise Application Grid, GigaSpaces Platform, and GigaSpaces, are trademarks or registered trademarks of GigaSpaces
Technologies.
Clip art images copyright by Presentation Task Force®, a registered trademark of New Vision Technologies Inc.
This product uses the FreeImage open source image library. See http://freeimage.sourceforge.net for details
This product uses icons created by Axialis IconWorkShop™ (http://www.axialis.com/free/icons)
This product includes software developed by the Apache Software Foundation (http://www.apache.org/).
This product includes software developed by Computing Services at Carnegie Mellon University (http://www.cmu.edu/computing/).
Copyright © 1989, 1991, 1992, 2001 Carnegie Mellon University. All rights reserved.
This product includes software developed by the OpenSSL Project for use in the OpenSSL Toolkit (http://www.openssl.org/).
This product includes software that is Copyright © 1998, 1999, 2000 of the Thai Open Source Software Center Ltd. and Clark Cooper.
This product includes software that is Copyright © 2001-2002 of Networks Associates Technology Inc All rights reserved.
This product includes software that is Copyright © 2001-2002 of Cambridge Broadband Ltd. All rights reserved.
This product includes software that is Copyright © 1999-2001 of The OpenLDAP Foundation, Redwood City, California, USA. All Rights
Reserved.
All other product names are trademarks or registered trademarks of their respective holders.
Magic xpi 4.1 with Dynamics CRM Seminar
March 2016
Copyright © 2013-2016 by Magic Software Enterprises Ltd. All rights reserved.

3
Table of Contents
Introduction................................................................................................................... 5
About the Seminar ..................................................................................................... 5
Dynamics CRM Connector .............................................................................................. 7
Magic xpi Architecture with Dynamics CRM Connector .................................................. 8
Connecting to Dynamics CRM ..................................................................................... 8
Installation ................................................................................................................. 8
Creating a Project .................................................................................................... 11
Supported Operations .............................................................................................. 13
Summary ................................................................................................................. 14
Querying Dynamics CRM via Magic xpi ........................................................................ 15
Preview of the Flow .................................................................................................. 16
Triggering the Flow .................................................................................................. 17
Query Operation ..................................................................................................... 19
Querying Based on an Operator ................................................................................... 27
Summary ................................................................................................................. 28
Adding an Object ....................................................................................................... 29
Adding an Account .................................................................................................. 30
Adding a Contact .................................................................................................... 33
Dealing with Products .................................................................................................. 37
Create Products in Dynamics CRM ............................................................................. 38
Check Whether Products Exist ................................................................................... 39
Working with Sales Orders .......................................................................................... 43
Query Price List ........................................................................................................ 44

4
Get Price List ID ........................................................................................................ 44
Create Sales Order .................................................................................................. 45
Create Each Product ................................................................................................. 47
Summary ................................................................................................................. 48

5
Introduction
Welcome to Magic Software University’s Magic xpi 4.1 with Dynamics CRM Seminar
self-paced tutorial. We, at Magic Software University, hope that you will find this tutorial
informative and that it will assist you in getting started with this exciting product.
About the Seminar
The seminar is intended for people with a knowledge of Dynamics CRM who want to know
how to successfully use Magic Software Enterprises’ Magic xpi product, and how to integrate
Magic xpi with Dynamics CRM.
During the seminar you will learn about the Magic xpi Dynamics CRM connector and how
Magic xpi integrates with Dynamics CRM.

6
Course Prerequisites
Before you start with the course there is basic knowledge that you need to have:
Development
knowledge
Familiar with Magic xpi 4.1 or iBOLT/Magic xpi 3.x
Dynamics CRM Knowledge of Dynamics CRM
Your computer must also meet some basic requirements:
Hardware Windows XP Pro and later. The course was tested on
Windows 7
Pentium processor 1.8GHz and upwards
4Gb RAM or greater
At least 1Gb of free space
Screen resolution of at least 1024x768 pixels
Magic xpi You will need to install the following:
Magic xpi V4.1
Dynamics CRM 2015 connector from the Downloads area
License For deployment purposes, you need the IBDYCRM license from
your Magic Software Enterprises representative. This is not
required for development purposes.
Dynamics CRM This seminar has been designed using the Dynamics CRM
installation in Magic Software headquarters. The demonstration
data is based on Microsoft Dynamics® CRM 2013 SP1.
1 Lesson

7
Dynamics CRM Connector
The Magic xpi Dynamics CRM connector enables a work flow between Magic xpi and
Dynamics CRM.
Using the Dynamics CRM connector, you can query, create, update, delete, assign and
change the state of entities in Dynamics CRM.
You can also trigger a Magic xpi flow when actions such as create, update, or delete are
performed in Dynamics CRM.
As was mentioned in the Prerequisites section, for deployment purposes, to work with the
Dynamics CRM connector, you need a special Magic xpi license: IBDYCRM.
This lesson covers various topics including:
An introduction to the Dynamics CRM connector
Installing the newest version of the Dynamics CRM connector
Creating a Dynamics CRM resource
Connecting Magic xpi to Dynamics CRM

8
Magic xpi Architecture with Dynamics CRM Connector
The Magic xpi Dynamics CRM connector works with Dynamics CRM’s REST API.
The Dynamics CRM connector supports Magic xpi’s XML interface. The Dynamics CRM
connector can create, query, update, and delete data objects as well as change the stage or
assign an owner to an entity in Dynamics CRM.
Connecting to Dynamics CRM
The Dynamics CRM connector needs to be connected to a specific user in Dynamics CRM.
Therefore, before working with the Magic xpi Dynamics CRM connector, you need:
A valid Dynamics CRM resource/server
A valid Dynamics CRM user name
A valid Dynamics CRM password
Installation
This course uses Dynamics CRM 2013 SP1. Other versions will not be
demonstrated in this course. However, most of the functionality is similar.
You should already have Magic xpi 4.1 installed on your computer. Now, you’ll run the latest
version of the Magic xpi 4.1 Dynamics CRM Setup.
1. Go the Magic Downloads area (http://downloads.magicsoftware.com/) and log in.
2. Download and run the DynamicsCRM15.exe file. The following screen will open.
3. Click Next.
9
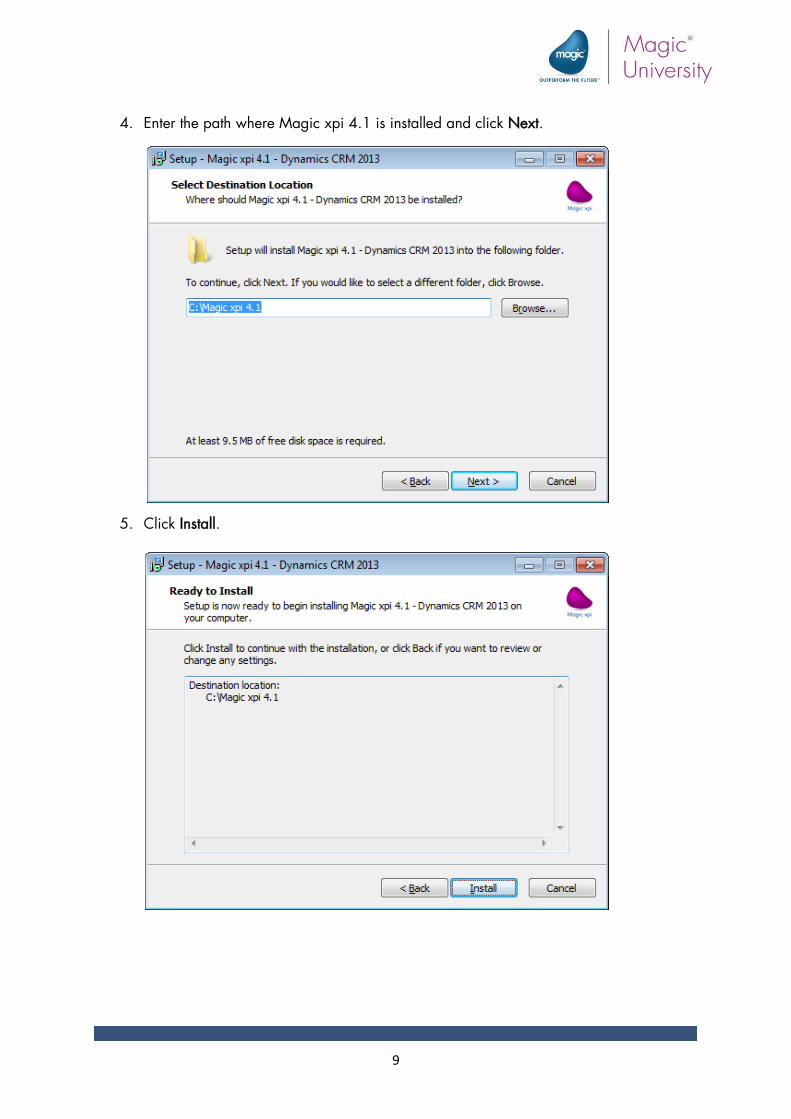
4. Enter the path where Magic xpi 4.1 is installed and click Next.
5. Click Install.

10
6. Click Finish.
7. .NET framework 4.5.2 is a prerequisite for this connector to work. If it is not already
installed on your computer, install it using the following link:
http://www.microsoft.com/en-us/download/details.aspx?id=42637.
You’re now ready to start developing.
If you want to connect to a Dynamics CRM 2013 on-premise machine you
simply make sure that the DCRM2013OnPremise flag is set to Y.

11
Creating a Project
As with any development project, the first step is to create a new Magic xpi project.
To create a new Magic xpi project:
1. Open Magic xpi.
2. Click on the File menu, and select New. The New Project dialog box will open.
3. Create a new project called Dynamics_CRM_seminar.
For the purpose of this course, data has been prepared for you.
4. Copy the course_data folder into the project’s directory. In the <Magic xpi
installation>\projects folder, you’ll see the Dynamics_CRM_seminar folder. This is
where you should copy the course_data folder.
A final version of the project is provided in the Final_Dynamics_CRM_Project
folder.
Defining a Resource
Before using the Dynamics CRM connector in a step, you need to define the Dynamics CRM
resource.
1. From the Project menu, select Resources.
2. Click New to add a
resource.
3. In the Resource Type field,
select Dynamics CRM.
4. Name the resource:
Dynamics CRM seminar.

12
There are a number of mandatory settings to be defined in the Dynamics CRM resource. These
are the settings that appear in bold.
5. Enter your Server, User Name and Password for the Dynamics CRM server. Note that
the password is case sensitive.
6. Set the Secured Connection setting to Yes.
7. You can leave the Deployment Type setting as On Premise.
8. Click the Organizations button and select the organization that you want to connect to.
9. Click the Entities button to load the information from the Dynamics CRM server.
Magic xpi needs to fetch the objects exposed by the Dynamics CRM API before
accessing them. Magic xpi connects directly to the Dynamics CRM server, retrieves the
available modules, and displays them in a list. The Entities List contains all of the
modules from the Dynamics CRM server. You can close the list for now.
10. Click the Validate button to check your connection. If all of the settings were entered
correctly, you should see the following message:
You have now successfully created a connection from Magic xpi to Dynamics CRM.

13
Supported Operations
As was stated at the beginning of this lesson, the Dynamics CRM connector comes with six
operations. These include CRUD operations: Create, Query (Read), Update and Delete, as
well as Change State and Assign.
Only the relevant operations for each entity and its privileges will be displayed.
Query
This operation is used to retrieve data from an entity. You can use the Data Mapper to retrieve
entities based on specific criteria. For example, you can retrieve all contacts with Title =
Professor. If you want to retrieve all available contacts, you do not need to supply any
mapping.
Create
This operation is used to create new entities in your organization’s data. You can use the Data
Mapper to specify new entity fields’ values.
Update
This operation is used to update a specific entity in your organization’s data. When you
update an entity, you need to know its ID. For example, you can use the Query operation
(above) to retrieve an entity ID, and then you can call the Update operation. You should use
the Data Mapper to set the entity ID, as well as the other fields that you want to update.
Delete
This operation is used to delete a specific entity from your organization’s data. If you want to
delete an entity, you need to know its ID. For example, you can use the Query operation
(above) to retrieve an entity ID, and then you can call the Delete operation. You should use the
Data Mapper to set the entity ID. This is the only value that you should set.

14
Assign
This operation is used to change the owner of a specific entity in your organization. You can
assign an entity to a user or to a team, depending on your Dynamics CRM resource’s account
privileges.
Change State
This operation is used to change an entity’s state. Each entity has a state, such as Active,
Inactive and Open, which can be changed with this operation.
When you use this operation, the Data
Mapper has two nodes:
statecode, which is the Status
statuscode, which is the Status
reason
You should provide statecodes as state strings (Active, Inactive, etc) and not as a number
representing the state. You should provide statuscodes as numeric values and not as strings.
Dynamics CRM only accepts statuscodes that are valid for a particular statecode. For
example, you can have a Lead entity with a statecode of Open (meaning 0). This statecode
can have a statuscode of 1 (meaning: New) or 2 (meaning: Contacted).
For a list of the statecodes and statuscodes, see: https://technet.microsoft.com/en-
us/library/dn531157(v=crm.7).aspx.
Summary
In this lesson:
You were introduced to the Magic xpi Dynamics CRM connector.
You installed the newest version of the Dynamics CRM connector.
You created a project for the seminar.
You created a Dynamics CRM resource and connected Magic xpi to Dynamics CRM.

15
Querying Dynamics CRM via Magic xpi
A Dynamics CRM Query operation is used to retrieve data from an object according to
specific search criteria.
This lesson covers various topics including:
A preview of the flow that will be built throughout this course
Query operation
Query operators
Lesson
2

16
Preview of the Flow
The business process logic of the Magic xpi flow that you will create is as follows:
Request is received
Does account exist in
Dynamics CRM?
Add new Dynamics
CRM account
If No
If Yes
Was account created?
Add contact
If Yes If No
If No If Yes
Do requested
products exist?
Add a Dynamics
CRM Sales Order
If Yes If No

17
Triggering the Flow
You’ll use a trigger to activate the flow. Since Microsoft Dynamics CRM does not provide
triggering as part of their API, you’ll look for new and/or updated objects using
Magic xpi’s Directory Scanner component.
1. Rename the default flow and call it Scan for New Requests.
2. From the Project menu or from the flow’s context menu, select Variables and add the
following context variable:
C.RequestXML, a BLOB variable
3. Add the flow variables listed below. When you are asked to use these variables, an
explanation about them will be provided
F.Account, a BLOB variable
F.RequestFileName, an Alpha variable of size 255
F.ContactXML, a BLOB variable
F.AccountExists, a Logical variable with a default value of 'FALSE'LOG. The
F.AccountExists variable will be used if a query returned a user record from
Dynamics CRM.
F.AccountId, an Alpha variable of size 100
IDs in the Dynamics CRM connector are GUIDs, meaning that they are 36
characters long in the following format: 8-4-4-4-12. For example:
46e58060-c617-e411-b4e7-002219a2d1e6
Therefore, the ID variables used in this course are set to 36.
If you are using an ID in a database’s SELECT statement, the ID is surrounded
by curly brackets and, therefore, is 38 characters long. To use it from the
database in the connector, you need to strip the ID of the brackets.
You will receive the request using the Directory Scanner component. There are two ways of
using the Directory Scanner component: Trigger or Step. In this example you will use the
Trigger mode.
The purpose of this flow is to scan the in folder to see if a new XML request is there.
4. Drag a Directory Scanner component to the Trigger area and name the component:
Wait for File.

18
5. Click the Configuration button. The Component Configuration: Directory Scanner
dialog box opens.
6. Click New to define the trigger.
7. Define the following:
a. Leave the Source as LAN.
b. Set the Directory to: EnvVal ('currentprojectdir')&'course_data\in\'. The
currentprojectdir environment variable contains the path to the directory where the
current project resides.
c. In the Filter property leave the default of *.*.
d. Leave the Action as Move.
e. Set the destination Directory to EnvVal ('currentprojectdir')&'course_data\out\'.
8. Click the Advanced button.
a. Set the Return file to property to C.RequestXML. This is the variable that the
Directory Scanner will return the content of the file to.
b. Set the Return destination file name to property to F.RequestFileName. This is the
name of the variable that the Directory Scanner will return the name of the file to.
You have finished defining the trigger.

19
Query Operation
You will now check whether the customer exists as an account in Dynamics CRM.
In Dynamics CRM:
An account is a company.
A contact is a person.
A customer is either a person or a company.
Query for Account
1. Drag a Dynamics CRM connector as the first step in the Scan for New Requests
flow and name the step: Query for Account.
2. Click Configuration and the Dynamics CRM Configuration dialog box opens.
In the Resource Name field, you’ll see the Dynamics CRM seminar resource. Since this is,
currently, the only Dynamics CRM resource, it is selected automatically by Magic xpi.
3. From the Entity field, click the selection button and select account.
In the Entities List you can see that there is a Display Name column. This lets you know what
the entity represents in the Dynamics CRM interface. Some are self-explanatory, but for some
you’ll find the Display Name column helpful. For example, you’ll see the asyncoperation entity
represents the System Job entity in Dynamics CRM.

20
Since you’re simply just browsing to see if an account exists in Dynamics CRM, you’ll perform
a Query. The Dynamics CRM Query operation is used to retrieve data from an entity. The rest
of the operations will be discussed later on in this seminar.
4. From the Operation field, select Query.
5. The Return Attributes option enables you to define which fields will be returned in the
result XML. Clear the Return Attributes check box and select accountid. In general, this
is recommended, because it reduces your result set, the size of the fields that are
returned.
6. The Store result in field will hold the XML retrieved from Dynamics CRM. You can select
either a file or a variable. Select Variable, and then select the F.Account variable that
you defined earlier.
7. It’s a good idea to click the Refresh XSD button to make sure that you’re using the latest
module metadata. Changes that are made in the Dynamics CRM environment –
customizations and so forth – are all pulled into the integration environment so that
when you do the data mapping, it’s all there and available to you.

21
8. Click OK. The following in progress screen will appear, showing that Magic xpi is
retrieving data from the Dynamics CRM server.
The Magic xpi Dynamics CRM connector saves the XML Schema, the XSD, in
the following directory:
[project dir]\[project name]\Dynamics CRM\XSD\[resource name]
Since the Dynamics CRM connector uses the XML interface, you will use the Data Mapper to
configure it.
After defining the properties for the Dynamics CRM connector, a new IFC Model entry was
created in the Destination section: IFC_Dynamics CRM.
You need to use the request XML that was retrieved by the Directory Scanner to check whether
the account exists in Dynamics CRM. Therefore, you need to have XML as the source.
1. Add an entry to the Source pane of the Data Mapper.

22
2. Set the name to RequestXML and the type to XML.
3. Click the Properties button.
a. In the XSD File property, select the following schema:
course_data\schemas\request.xsd
b. Set the Data Source to Variable and select the C.RequestXML variable.
4. Click OK.
The next stage is to map.
5. In the Source/Destination Management dialog box, click Map.
You need to send the customer name to Dynamics CRM to query its existence. Therefore, in
the destination, you’ll use the name node in the Dynamics CRM account entity that you
previously configured.
To expand all of the nodes, park on the top node of the Source or
Destination side and press the asterisk (*) button. You can also right
click and select Expand all.
6. In the Source pane, expand the Request > CustomerDetail node.
7. In the Destination pane, expand the Accounts > row > Attributes node.
8. Connect the AccountName node to the name node.
9. Click OK (three times) until you return to the Flow area.
Sometimes there are many options listed in a node. To easily search for
one, press Ctrl+F from one of the panes or right-click on any node and
select the Find option. Once it brings you to the first item that meets
your search criteria, you can press F3 to go to the next item.
Check If Account Exists
Now you’ll check if the variable received a True value, meaning that the account exists.
1. Drag a Data Mapper component as a child of the Check for Account step and name
the new step: Check If Account Exists.
2. Click the Configuration button.
3. Add an entry to the Source pane of the Data Mapper.
4. Set the Type to XML.

23
5. Click the Properties button.
a. In the XSD File property, select the following schema:
dynamicscrm\XSD\Dynamics CRM seminar\account.xsd
b. Set the Data Source to Variable and select the F.Account variable.
6. From the Destination pane, add an entry and set the Type to Variables.
7. Click the Properties button.
8. Scroll down to the end of the list and select both the F.AcountExists and F.AccountId
variables.
9. Click OK and then click the Map button.
10. On the Source pane, open the following node: account > row > Attributes.
11. On the Destination pane, open the Instance node if it’s not yet open.
12. Connect the accountid node to the F.AccountExists node.
13. Right click on the F.AccountExists node and select Properties.

24
14. In the Calculated value field, enter the following expression:
ISNULL ( Source/S3/account/row/Attributes/accountid ) OR NOT (
Source/S3/account/row/Attributes/accountid = '')
This expression returns True if there is a value. This means that if the accountid field is not null
or empty, then the account exists.
15. Also connect accountid to F.AccountId. This will update the F.AccountId variable with
the value of the Dynamics CRM accountid fields. This connection will be used in a later
step.
16. Click OK until you return to the Flow area.
Testing Your Project
You will want to test your flow to make sure it works.
1. From the toolbar, click the Debugger icon (or from the Debugger menu, select
Open). Magic xpi checks the project for any syntax errors. If there are syntax errors,
you will not be able to continue. There are various types of syntax errors, such as a
mandatory property that was not defined or was incorrectly defined.
If you want to create a log file for the Dynamics CRM connector, set the
DebugMDCRMCComponent flag to Y. You’ll find the flag in the ifs.ini file or
you can configure it from the Project > IFS Settings menu option. A log file
called MDCRM_Debug.log will be created in the logs directory if Magic xpi
executes a Dynamics CRM step using the server.
2. When the Debugger is opened, right click on the Check for Account step.
3. From the context menu, select Breakpoint. A red dot will appear next to the step. A
breakpoint means that processing will halt at that point.
4. In the course_data/out folder, you’ll find XML requests. Copy the request001.xml file
from the out folder to the in folder. This XML file includes an account that does not yet
exist in Dynamics CRM.

25
5. From the toolbar, click the Run/Continue Project icon (or from the Debugger
menu, select Run). When the breakpoint is reached (which can sometimes take a few
seconds), the Components pane will become the Context Tree.
6. From the Context Tree, click the Check for Account option. From the Debugger menu,
select Step. This will run the second step.
You now want to look at the F.Account variable, which is the variable that you selected in the
Store result in field.
7. From the toolbar, click the Context View icon (or select it from the Debugger
menu).
8. Find the F.Account variable and notice that it says (Zoom to the BLOB content) in the
Value column. If it says, Empty BLOB type Variable, then the flow did not successfully
execute.
9. Click the zoom button and you’ll see that the variable was filled in. However, you can
also see that the account does not exist. Later on in the seminar, you’ll see how to
handle this.

26
10. Close to go back to development mode.

27
Querying Based on an Operator
Queries are used to retrieve information from entities. You can use the Data Mapper to
retrieve entities based on specific criteria. For example, you can retrieve all contacts with
Title = Professor. If you want to retrieve all available contacts, you do not need to supply any
mapping. Currently supported comparison operators for this operation, are listed here.
Note that these operators can only be used on String fields.
Condition Operator Value
Equals x = x
Does not equal x != x
Is greater than x > x
Is greater than or equal to x >= x
Is less than x < x
Is less than or equal to x <= x
Begins with x LIKE x%
Does not begin with x NOTLIKE x%
Ends with x LIKE %x
Does not end with x NOTLIKE %x
Contains x LIKE %x%
Does not contain x NOTLIKE %x%

28
Summary
In this lesson:
You saw a preview of the flow that will be built throughout this course.
You created a trigger for the flow using the Directory Scanner component.
You learned about the Query operation.
You also were shown the Query operators that can be used.
29
Adding an Object
In the previous lessons you learned how to fetch information from Dynamics CRM.
Querying a database is not the only operation needed in a project. It is often necessary to
add an object to the database.
In this lesson, you’ll see how Magic xpi enables you to add an entry to the Dynamics CRM
database.
You’ll also learn about using entries in Dynamics CRM selection lists.
Lesson
3

30
Adding an Account
The steps needed to add an object are very similar to the steps required to query an object.
Now, you’ll add an account if the account does not exist. In other words, if the Check If
Account Exists step returns false, you’ll add the account to Dynamics CRM.
1. Park on the Scan for new requests flow.
2. Add a Dynamics CRM connector as a child of the Check If Account Exists step, name it
Add Account.
3. Click the Configuration button.
4. From the Module property, select the account entity.
5. Set the Operation field to Create.
6. From the New Entity Id property, select F.AccountId. When an object is added,
Dynamics CRM returns the object ID of the newly created object into this variable.
Dynamics CRM returns the ID of the last object created. If your step is adding
or updating multiple records or objects, make sure to take the IDs from the
result XML.
7. From the Store result in field, select the F.Account variable.
8. From the Operation success field, select the F.AccountExists variable.
9. Click OK.

31
You need to use the request XML that was retrieved by the Directory Scanner. This contains the
customer information. Therefore, you need to have an XML as the source.
1. Add an XML source and name it RequestXML.
2. Click the Properties button.
In the XSD File property, select the following schema:
course_data\schemas\request.xsd
Set the Data Source to Variable and select the C.RequestXML variable.
You are now ready to map.
1. Click Map.
2. On the Source pane, open the following node: Request > CustomerDetail.
3. On the Destination pane, open account > row > Attributes.
4. Connect the following nodes:
Source Destination
AccountName name
Street address1_line1
City address1_city
ZipCode address1_postalcode
Country address1_country
You only want this step to be executed if the customer does not exist; in other words, the
Check If Account Exists step’s result was unsuccessful.
1. Park on the Add Account step.
2. Right-click and set the following condition: NOT (F.AccountExists).
3. Once again, copy the Result001.xml file from the course_data/out folder to the in
folder.
4. Run the Debugger for this flow with a breakpoint on the Add Account step. The result
for the Create operation is stored in the Store result in variable, which in the Add
Account step is the F.Account variable.
5. When the Debugger reaches the Add Account step, click the Step option again.
6. Once the Debugger stops running, open the Context View .

32
7. Zoom from the F.Account variable and you can see the content of the variable. For
every Create operation, the returned XML contains a success or failure indication. In
the image below, you can see that the step was successful.
If there is an error, you will see the error in the returned XML.
8. In addition, open Dynamics CRM and if the process worked correctly, you should see
the new account in Dynamics CRM.

33
Although the account has been added, the contact has not yet been added.
Contacts are usually related to an account, but it is not mandatory.
Adding a Contact
1. Drop a Dynamics CRM connector as a child step of the Add Account step. Name the
step Add Contact.
2. You’ll only want a contact to be added if the account exists. So, right-click on the new
step and add the following condition: F.AccountExists.
3. Click the Configuration button.
4. From the Entity property, select the contact entity.
5. Set the Operation field to Create.
6. Store the result in the F.ContactXML variable.
7. Click OK.
8. Create a new XML source and name it FetchContactFromRequest.
9. Click the Properties button.
10. From the XSD File property, select the following: course_data\schemas\request.xsd.
11. From the Data Source property, select the C.RequestXML variable.
You are now ready to map.
1. Click Map.
2. On the Source pane, open the following node: Request > CustomerDetail.
3. On the Destination pane, open contact > row > Attributes.
4. Connect Customer_Name to the firstname and the lastname nodes.
In order to have the first name and last name appear together as the customer name, you’ll
use expressions.
5. Right click on the firstname node, click the Properties button and in the Calculated
value field, enter the following expression: StrToken (RepStr ( Trim (
Source/S4/Request/CustomerDetail/Customer_Name ),' ', '_xpi_') , 1 , '_xpi_')
In the expression above, the path Source/S4/Request/CustomerDetail/Customer_Name is
entered by clicking the Source Nodes icon at the top of the Expression Editor.
The expression first replaces the separating space with a unique separator. This is because a
space cannot be a token delimiter. In our example, we’ve used _xpi_ to ensure that the

34
separator is unique. The expression then fetches the first token.
Now you’ll do the same for the last name.
6. Right click on the lastname node, click the Properties button and in the Calculated
value field, enter the following expression: StrToken (RepStr ( Trim (
Source/S4/Request/CustomerDetail/Customer_Name ),' ', '_xpi_') , 2 , '_xpi_')
7. Connect the E-mail_Address node to the emailaddress1 node.
8. In the Destination pane, park on the parentcustomerid node and from the Calculated
value field, select F. AccountId, the ID returned by the Add Account step.
9. In the parentcustomerid node’s type attribute, go the Calculated value field and type
in: 'account'. You’re telling Dynamics CRM what type of parent to assign to your
contact.
When adding a new object to Dynamics CRM from your Internet browser, a dropdown list
provides a predefined list of available values.
For example, for a contact in Dynamics CRM, a
dropdown list enables you to select whether the
contact is Single, Married, Divorced or Widowed.
These values are provided internally by Dynamics
CRM.
1. In the Destination pane, park on the
familystatuscode node and select Properties.
2. Select the Additional XML Properties tab and you will see the available options as
defined by Dynamics CRM. You can also see these read-only options in the bottom left
of the Data Mapper screen.

35
3. Go back to the General tab and manually enter 1 as the value in the Calculated value
property.
You have now finished adding the contact.
Now you’ll check the flow.
4. Run the Debugger using the result002.xml file with a breakpoint on the Add Contact
step. This file contains an account and contact that does not yet exist in Dynamics
CRM.
5. Look in Dynamics CRM to make sure that a new account and contact were added.

36
6. Also look at the contact’s status. We set the familystatuscodename node to Single and
you’ll see in Dynamics CRM, that the Marital Status is set to Single.
As with the Query operation, the Magic xpi Dynamics CRM connector saves
the XML Schema, the XSD, in the following directory:
[project dir]\[project name]\dynamicscrm\XSD\[resource name]

37
Dealing with Products
Microsoft recommends setting up your product catalog in the following order:
Discount lists
Unit groups
Price lists
Products
In this seminar, we’ll cover the last three and then show you how to manage this all via
Magic xpi.
Lesson
4

38
Once you have determined that an account exists, you will then check whether the products in
the result XML are valid Dynamics CRM products.
Create Products in Dynamics CRM
The first thing we’ll do here is add products directly to Dynamics CRM so that we have data to
work with.
1. Go to the Settings menu and open the Product Catalog.
2. Click on Unit Groups and then click .
3. In the Name field, type in Travel Gadgets.
4. In the Primary Unit field, type in 1.
5. Click OK and then Save & Close.
6. Back in the Product Catalog, click on Price Lists and then click .
7. In the Name field, type in Gadgets and then click Save & Close.
8. Back in the Product Catalog, click on Products.

39
9. Click and add two products with the following values for the mandatory fields:
Product #1 Product #2
ID GAD014 GAD023
Product Name Bessie Gadget Carlton Gadget
Unit Group Default Unit Travel Gadgets
Default Unit Primary Unit 1
Decimals Supported 0 0
Ignore the Default Price List warning message.
10. Go back to the Price Lists.
11. In the Gadgets price list, add the two products from above with the following values:
Product #1 Product #2
Product Bessie Gadget Carlton Gadget
Unit Primary Unit 1
Amount 10 12
Check Whether Products Exist
Now you’ll check whether the products in the result XML are valid Dynamics CRM products. To
perform this you will need a separate flow that will check each product.
1. Create a flow named > Check Products.
2. Add the following context variable:
C.All_Products_Exist, a Logical variable with the default value set to 'TRUE'LOG.
3. Add the following flow variables:
F.Products, a BLOB variable. This will hold the returned data from the Dynamics
CRM query.
F.ProductAvailable, a Logical variable.
F.RequestedPrice, a Numeric variable with a size of 6.2.
F.ProductName, an Alpha variable with a size of 100
Now you will query the product entity.
1. Drop a Dynamics CRM connector as the first step of the > Check Products flow. Name
it Query Products.
2. Click the Configuration button.
3. In the Module property, select the product entity.
4. Set the Operation to Query.

40
5. Set the Store result in property to F.Products.
The next stage is to map.
1. In the Source/Destination Management dialog box, click Map.
2. In the Destination pane, expand product > row > Attributes.
3. Park on the name node and in the Calculated value property, zoom to the Expression
Editor and type in: Trim( F.ProductName ).
4. Park on the statuscode node and in the Calculated value property, type 1, which
stands for Active. In other words, you only want to access the products that are defined
in Dynamics CRM as active.
In the next step you’ll update the F.ProductAvailable and C.All_Products_Exist variables. The
flow variable is to check each product and the context variable is to check all of the products.
1. Drop a Flow Data step as a child step of the Query Products step and name it Update
variables.
2. Click New.
3. Set the Action property to Update.
4. Set the Type to Flow.
5. From the Name column, select the F.ProductAvailable variable.
6. Set the Update Expression to 'TRUE'LOG.
7. Set the following condition for this step: InStr ( F.Products ,'productid')>0. Here we are
checking if the F.Products variable contains a product ID, to determine if our product
exists in Dynamics CRM.
8. Set the Action property to Update.
9. Set the Type to Context.

41
10. From the Name column, select the C.All_Products_Exist variable.
11. Set the Update Expression to 'FALSE'LOG.
12. Set the following condition for this step: NOT F.ProductAvailable. This expression
means that if the product is not available, the order cannot be filled and we must set
the C.All_Products_Exist variable to False.
If any of the previous runs of the > Check Products flow found a product that doesn’t exist, no
further check should be performed. You can prevent the
> Check Products flow from running by conditioning the first step as follows:
13. Right click on the Query Products step and set the following condition:
C.All_Products_Exist.
Now you are ready to call the new flow.
1. Go back to the Scan for New Requests flow.
2. Drop a Data Mapper component as a child step of the Check If Account Exists step.
3. Name it Check Products.
4. Click the Configuration button.
You need to use the request XML that was retrieved by the Directory Scanner to retrieve the
request products. Therefore, you need to have an XML as the source.
1. Add an entry to the Source pane of the Data Mapper.
2. Set the name to RequestXML and the type to XML.
3. Click the Properties button.
a. In the XSD File property, select the following schema:
course_data\schemas\request.xsd
b. Set the Data Source to Variable and select the C.RequestXML variable.
You now need to call the new flow.
1. Add an entry to the Destination pane of the Data Mapper.
2. Set the name to CheckProductsFlow and the type to Call Flow.
3. Click the Properties button.
4. In the Flow Name property, select the > Check Products flow.
The next stage is to map.
1. Click Map to open the Data Mapper screen.
2. Connect Product_Name (which you can find here: Request > items > item) to
F.ProductName.
3. Connect the Request_Price node to the F.RequestedPrice node.

42
If a customer exists, the flow goes directly to the Check Products step. If the customer does not
exist, the flow will first create the customer and then the contact. You then want the flow to
move to the Check Products step.
4. Right click on the Add Contact step, select GoTo and click on the Check Products step.
You are now ready to test.
1. For testing purposes, add a NOP step under the Check Products step.
2. Run the Debugger.
3. Place the request003.xml file in the in folder. This file includes one product that you
defined in Dynamics CRM and one that you did not define in Dynamics CRM.
4. Put a breakpoint on the NOP step.
5. Click the Run/Continue Project icon.
6. When the Debugger stops on the NOP step, open the Context View. You’ll see that the
C.All_Products_Exist variable has a value of False.
7. Stop the Debugger and start it again.
8. Place the request002.xml file in the in folder before running the project.
9. When the process is finished, check that the C.All_Products_Exist variable is set to
True. If the variable returns True, the project is working as expected.
10. Delete the NOP step.

43
Working with Sales Orders
Check to see if the products in the request are valid, meaning that they exist. If the products
are valid, add the request as a Dynamics CRM sales order.
The steps for the flow order in the project are:
1. Query price list
2. Get price list ID
3. Create sales order
4. Create each product
Lesson
5

44
Query Price List
Sales orders in Dynamics CRM need to be assigned to a price list.
First you’ll add some variables.
1. Add a new context variable: C.NewSO_GUID, an Alpha variable of size 36.
2. Add the following flow variables:
F.SalesOrder, a BLOB variable
F.NameOfSO, an Alpha variable of size 30
F.PriceLevel, a BLOB variable
F.PriceListID, an Alpha variable of size 36
Now you’ll add a new step that will query the price list.
1. Add a Dynamics CRM connector as a child step of the Check Products step and name
the step: Query Price List.
2. Click the Configuration button.
3. From the Entity property, select pricelevel.
4. From the Operation property, select Query
5. Set the Return Attributes property to pricelevelid.
6. From the Store result in property, select F.PriceLevel variable.
7. Open the Mapper.
8. In the Destination pane’s name node, right click and in the Calculated value property,
enter: 'Gadgets'.
Get Price List ID
In this step, you’ll be getting the ID of the default price list.
1. Add a Data Mapper step under the Query Price List step and call it: Get Default
PriceLevel ID.
2. On the Source side, create an XML named PriceLevel and select the pricelevel.xsd file.
3. From the Data Source property, select the F.PriceLevel variable.
4. On the Destination side, create a Variables destination and name it: PriceLevelID.
5. Open its properties and select the F.PriceListID variable.
6. Open the Mapper.
7. From the Source side, open: pricelevel > rows > Attributes.
8. Expand the Destination side.
9. Map the pricelevelid node to the F.PriceListD node.

45
Create Sales Order
Now you want to create a sales order in Dynamics CRM.
1. Add a Dynamics CRM connector as a child step of the Get Default PriceLevel ID step
and name the step: Create Sales Order.
2. Click the Configuration button.
3. From the Entity property, select salesorder.
4. From the Operation property, select Create.
5. From the New Entity Id property, select C.NewSO_GUID.
6. From the Store result in property, select the F.SalesOrder variable.
7. Click OK.
You need to connect the sales order to a specific account. The AccountId is part of the XML
returned by the Account Query operation. Therefore you can use this as the source.
1. Create an XML source and name it AccountInfo.
2. Click the Properties button.
3. From the XSD File property, select: dynamicscrm\XSD\Dynamics CRM
seminar\account.xsd.
4. From the Data Source property, select F.Account.
You are now ready to map. In the Data Mapper screen:
1. In the Source pane, open: account > row > Attributes.
2. In the Destination pane, open: opportunity > row > Attributes.
3. Connect the accountid to the customerid.
4. Expand the customerid and in the type element’s Calculated Value property, enter:
'account'.
5. Connect the following nodes:
Source Destination
address1_line_1 shipto_line1
address1_line_2 shipto_line2
address1_line_3 shipto_line3
address1_name shipto_name
6. In the Destination pane’s name node, right click and from the Calculated value
property, select the F.NameOfSO variable.
7. Go the F.NameOfSO variable (Ctrl+L) and in the Default Value column, type in a
name, such as: Seminar Sales Order. This will be the name of the sales order in
Dynamics CRM.

46
You now want to add the products to the sales order. You first have to retrieve the products.
1. Create a new flow and name it: > Sales Order Products.
2. Add the following flow variables:
F.SODetail_GUID, Alpha 36
F.SODetail, Blob
F.Success, Logical 1
F.ProductName, Alpha 100
F.Product, Blob
F.Qty, Numeric 8.2
F.PriceList, Blob
3. Drag a Dynamics CRM connector onto the flow and name it: Get Product Info.
4. In the Module property, select the product entity.
5. Set the Operation to Query.
6. Set the Store result in property to F.Product.
7. Open the Mapper.
8. From the name node’s Calculated value property, select the F.ProductName variable.
You will now add the products to the sales order.
1. Drag another Dynamics CRM connector under the Get Product Info step and name it:
Add product to sales order.
2. In the Module property, select the salesorderdetail entity. This represents a line item in
a sales order in Dynamics CRM.
3. Set the Operation to Create.
4. From the New Entity Id property, select the F.SODetail_GUID variable.
5. From the Store result in property, select the F.SODetail variable.
6. From the Operation success property, select the F.Success variable.
7. Click OK.
8. In the Source/Destination Management dialog box, create an XML source and name
it: Product.
9. Open the properties and from the XSD File property, select:
dynamicscrm\XSD\Dynamics CRM seminar\product.xsd.
10. From the Data Source property, select the F.Product variable.
11. Open the Mapper.
12. Map the following nodes:
defulatuomid to uomid
price to priceperunit
productid to productid

47
13. On the destination side, from the quantity node’s Calculated value property, select the
F.Qty variable.
14. From the saleseorderid node’s Calculated value property, select the C.NewSO_GUID
variable.
14. Right-click on the Add product to sales order step and add the following condition:
InStr ( F.Product ,'productid') > 0. Here we are checking if the F.Product variable
contains a product ID, to determine if our product exists in Dynamics CRM.
Create Each Product
Now you’ll call this flow from the main flow.
1. Go back to the Scan for requests flow.
2. Add a Data Mapper step under the Create Sales Order step and call it: Create Each
Product.
3. On the Source side, create an XML named RequestXML and select the request.xsd file.
4. Set the Data Source property to C.RequestXML.
5. On the Destination side, create a Call Flow destination and name it: SOProducts.
6. Open its properties and from the Flow name property, select the > Sales Order
Products flow.
7. Open the Mapper.
8. From the Source side, open: RequestXML > request > Items > item.
9. Expand the Destination side.
10. Map the Product_Name node to the F.ProductName node.
11. Map the Qty node to the F.Qty node.
12. Add a NOP service after the Create Each Product step for debugging purposes.
You are ready to test.

48
1. Once again, place the request002.xml file in the in folder before running the project.
2. When the process is finished, you should see a screen in Dynamics CRM similar to the
one below.
Dynamics CRM automatically assigns an order ID when an order is created.
In our example above, it is: .
Summary
In this lesson, you:
Learned how to add an object to the Dynamics CRM database.
Added an account and a contact for that account.
Added a new sales order and its details


![Magic xpi 4.12.2 Release Notesftp.magicsoftware.com/ver/docs/Downloads/Magicxpi/... · the [Connectors]Overwrite flag to true in the config.ini file. Activity Log Optimization The](https://img.dokumen.tips/doc/110x75/5f3dd51bba5084307c3668d1/magic-xpi-4122-release-the-connectorsoverwrite-flag-to-true-in-the-configini.jpg)