Embed Size (px)
Citation preview

Xerox Multifunction Devices
Customer Tips … for the user dc06cc0384
September 6, 2006
Mac OS X Version 10.4.x PPD/Plugin Installation and Printer Setup Purpose This document describes printing in an environment with Apple OS X 10.4.x and a Xerox Document Centre or WorkCentre device. The audience for this document is users experienced with a Macintosh operating system.
This document contains the processes to install the PPD, add the plugin and add a printer. It also covers how to add printers in a Mac OS X Version 10.4.x environment using either the AppleTalk or IP protocols. Examples in this document use a Workcentre Pro 40 Color device.
This document applies to the Xerox products indicated in the table below. For some products, it is assumed that your device is equipped with the appropriate option to support this document.
X WC 7655/7665
Prerequisites • Mac OS X version 10.4.x installed.
• AppleTalk or TCP/IP configured on the Xerox device and the Macintosh. See the documentation included with your device for procedures to enable these protocols.
dc06cc0384
• Entirely shut down the Print Setup Utility before you install the PPD and plugins to ensure a complete installation.
x WC Pro 232/238/245/ 255/265/275
x WC 232/238/245/255/ 265/275 • Some Xerox devices do not have a PostScript interpreter in a standard model for
example, the WorkCentre M35/M45/M55 and WorkCentre M165/M175. To support the procedures described in this document, these devices must have the PostScript interpreter option installed.
x WC Pro C2128/C2636/ C3545
x WC Pro 165/175
Installing the PPD x* WC M165/M175
x WC Pro 32/40 Color Note: Examples in this document use a WorkCentre Pro 40 Color device. x WC Pro 65/75/90 1. Download the most current PPD (for example: SPWCP40_OSX_v1.4.12) for your
device from the Xerox Web site. At the top of the page at www.xerox.com, select Support & Drivers. Make selections based on your device type to access the PPD. When the PPD is on the desktop, it automatically unstuffs to a folder (for example, SPWC40_OSX_v1).
Note: If the file does not automatically unstuff, double click the file.
x WC Pro 35/45/55
x* WC M35/M45/M55
x DC 555/545/535
x DC 490/480/470/460
x DC 440/432/425/420
*See “Prerequisites”
Customer Support Page 1
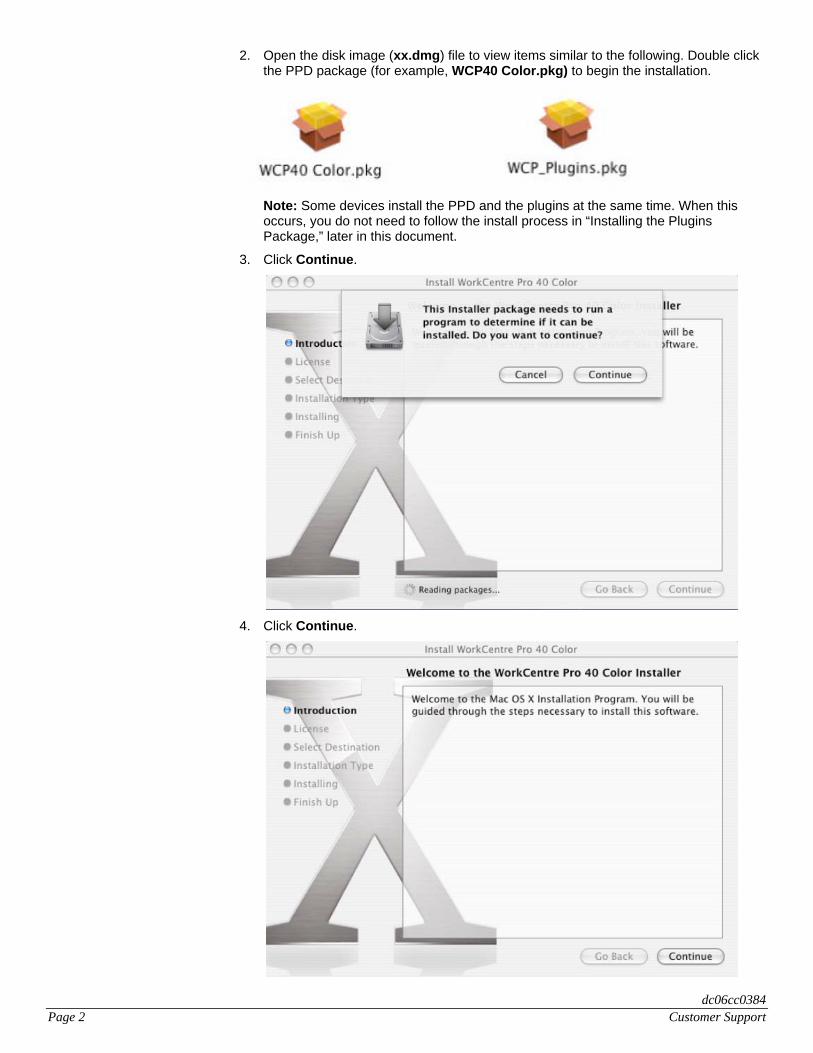
2. Open the disk image (xx.dmg) file to view items similar to the following. Double click the PPD package (for example, WCP40 Color.pkg) to begin the installation.
Note: Some devices install the PPD and the plugins at the same time. When this occurs, you do not need to follow the install process in “Installing the Plugins Package,” later in this document.
3. Click Continue.
4. Click Continue.
dc06cc0384 Page 2 Customer Support
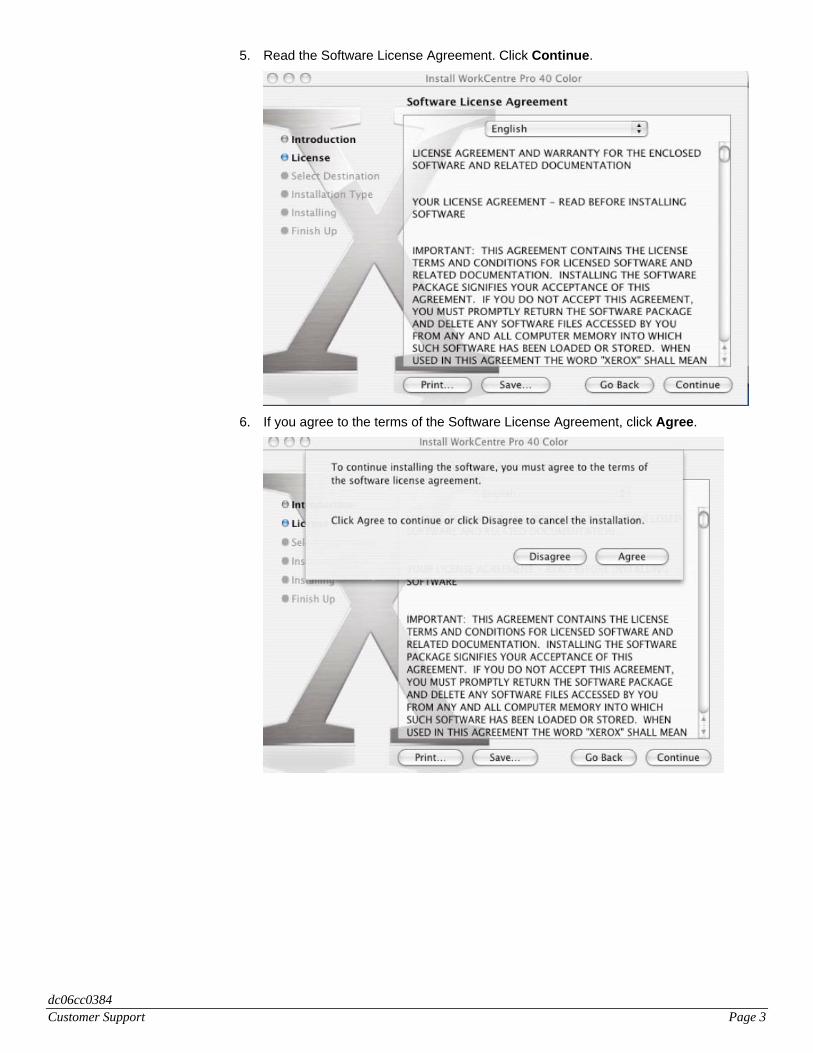
5. Read the Software License Agreement. Click Continue.
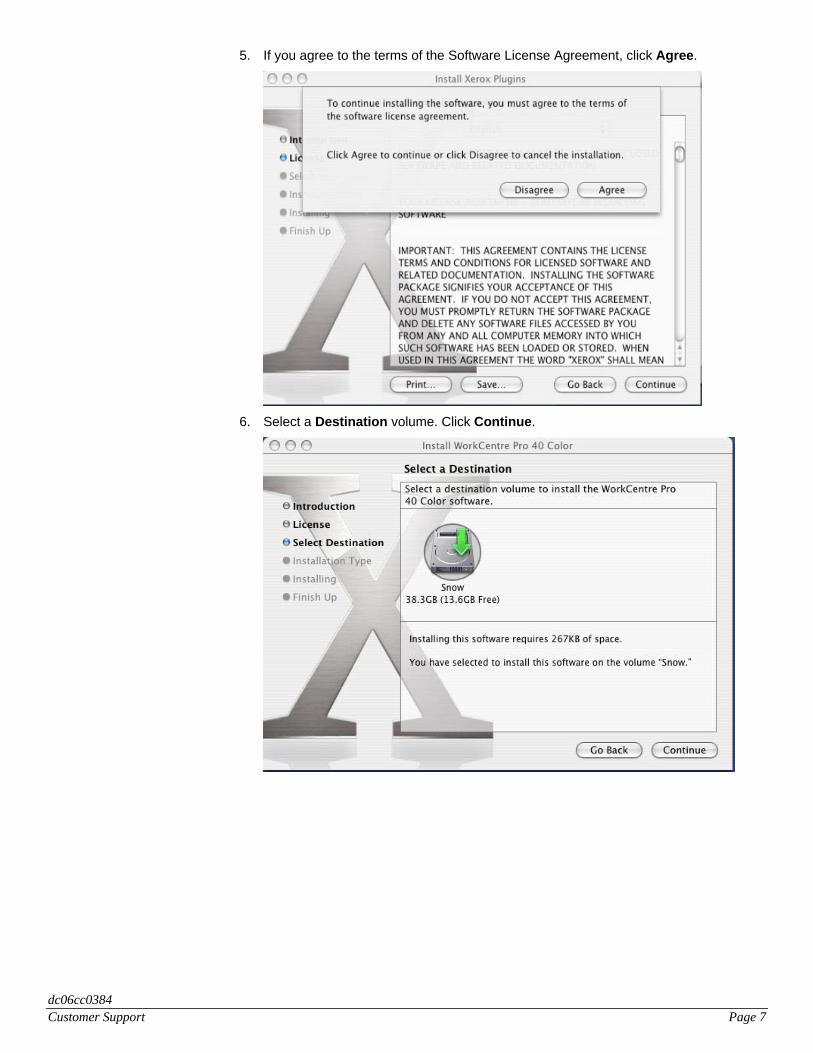
6. If you agree to the terms of the Software License Agreement, click Agree.
dc06cc0384 Customer Support Page 3
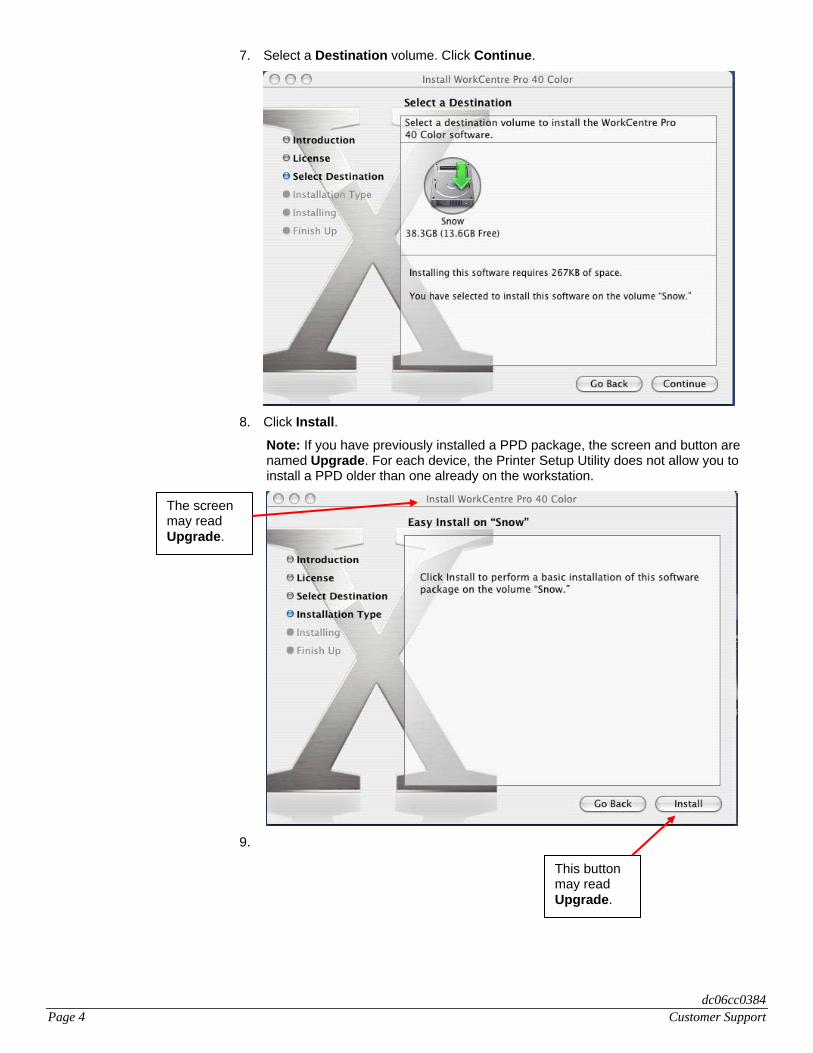
7. Select a Destination volume. Click Continue.
8. Click Install.
Note: If you have previously installed a PPD package, the screen and button are named Upgrade. For each device, the Printer Setup Utility does not allow you to install a PPD older than one already on the workstation.
The screen may read Upgrade.
9.
This button may read Upgrade.
dc06cc0384 Page 4 Customer Support
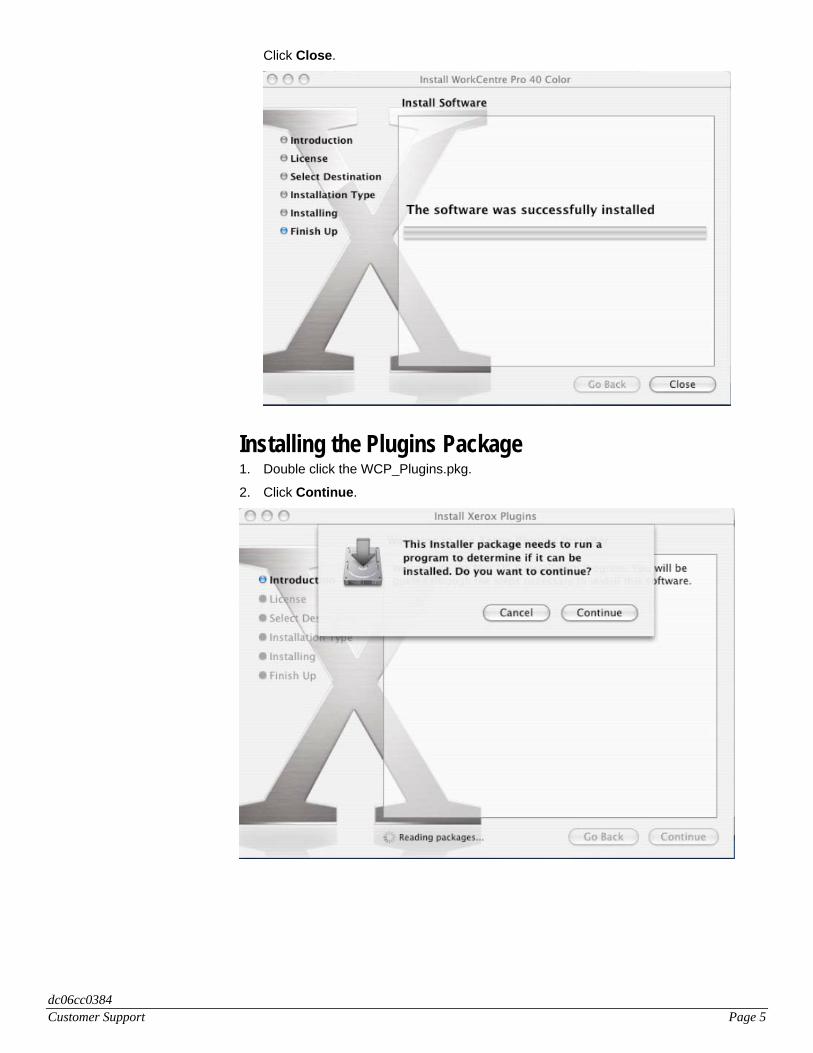
Click Close.
Installing the Plugins Package 1. Double click the WCP_Plugins.pkg.
2. Click Continue.
dc06cc0384 Customer Support Page 5

3. Select Continue.
4. Read the Software License Agreement. Click Continue.
dc06cc0384 Page 6 Customer Support
5. If you agree to the terms of the Software License Agreement, click Agree.
6. Select a Destination volume. Click Continue.
dc06cc0384 Customer Support Page 7

7. Click Install.
Note: If you have previously installed a plug-in, the screen and button are named Upgrade. For each device, the Printer Setup Utility does not allow you to install a plug-in older than one already on the workstation.
This button may read Upgrade.
The screen may read Upgrade.
8. Enter a Name and Password that has Macintosh administrative rights. Click OK.
dc06cc0384 Page 8 Customer Support

9. Click Close.
10. Completely close all applications and restart the Macintosh.
Note: For some devices, after the PPD and plugins installers run, the files automatically load into the correct folders. PPD’s are located on the hard drive in the following location: Library> Printers> PPD> Content> Resources> en.lproj. The plugins (that provide, for example, accounting, booklet, watermark and job type) are located on the hard drive in the following location: Library> Printers> PPD_Plugins.
Other devices (for example the WorkCentre Pro 232/238/245/255/265/275), place the Mac OS X PPDs and plugins in the Library>Printers>Xerox>PDEs folder and a new filter file (XeroxPSfilter) is installed in the Library>Printers>Xerox>filter folder. PPDs are located in the same directory structure as described in the previous paragraph.
Configuring Macintosh Printers Open the Printer Setup Utility 1. Select Go on the toolbar menu then select Applications.
dc06cc0384 Customer Support Page 9

2. In the Applications folder, open the Utilities folder.
3. In the Utilities folder, open the Printer Setup Utility.
dc06cc0384
4. The first time the Printer Setup Utility is opened, a message appears: You have no printers available. Would you like to add to your list of printers now? Click Add in the message screen. If you already have printers installed, select Add on the tool bar.
The Printer Browser window appears.
Note: If you cannot see the toolbar, select View from the menu then Show Toolbar.
Page 10 Customer Support
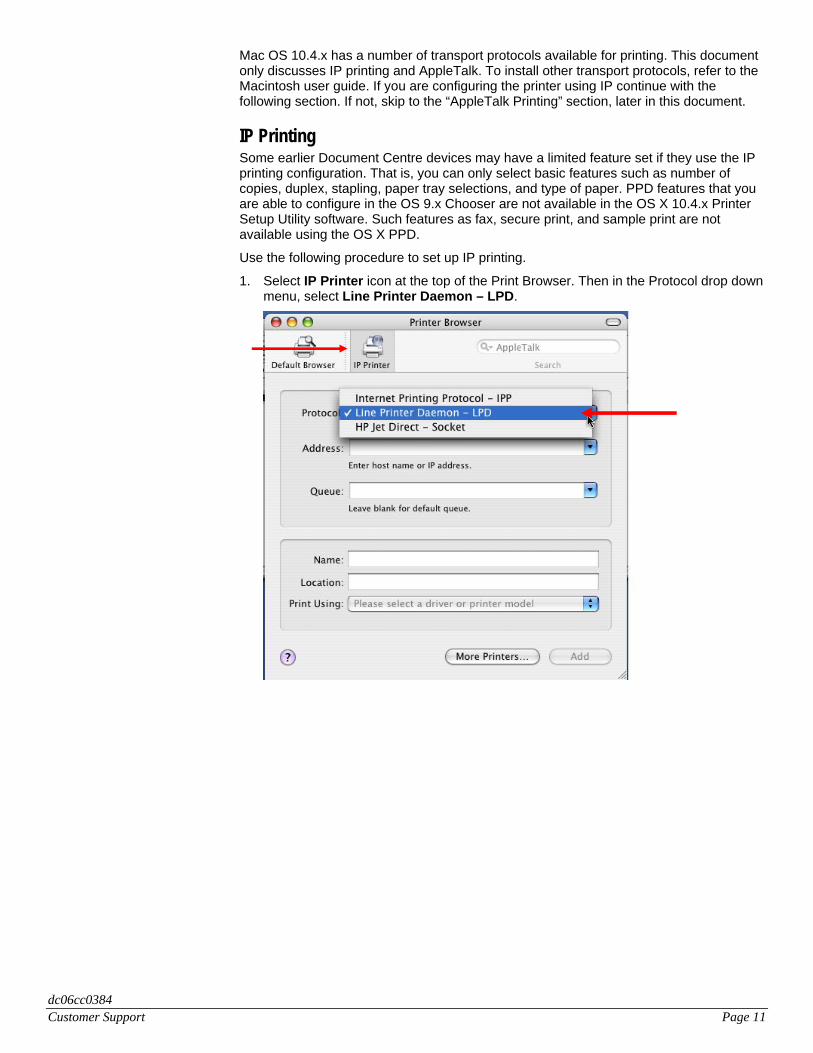
Mac OS 10.4.x has a number of transport protocols available for printing. This document only discusses IP printing and AppleTalk. To install other transport protocols, refer to the Macintosh user guide. If you are configuring the printer using IP continue with the following section. If not, skip to the “AppleTalk Printing” section, later in this document.
IP Printing Some earlier Document Centre devices may have a limited feature set if they use the IP printing configuration. That is, you can only select basic features such as number of copies, duplex, stapling, paper tray selections, and type of paper. PPD features that you are able to configure in the OS 9.x Chooser are not available in the OS X 10.4.x Printer Setup Utility software. Such features as fax, secure print, and sample print are not available using the OS X PPD.
Use the following procedure to set up IP printing.
1. Select IP Printer icon at the top of the Print Browser. Then in the Protocol drop down menu, select Line Printer Daemon – LPD.
dc06cc0384 Customer Support Page 11
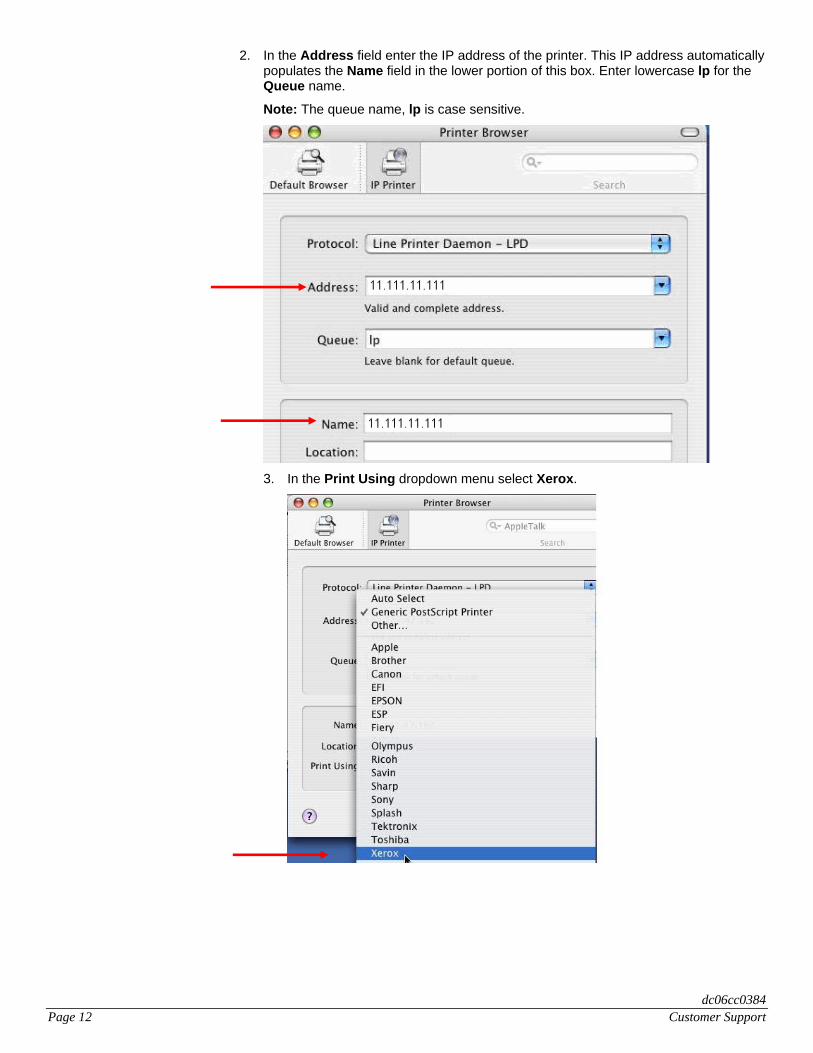
2. In the Address field enter the IP address of the printer. This IP address automatically populates the Name field in the lower portion of this box. Enter lowercase lp for the Queue name.
Note: The queue name, lp is case sensitive.
3. In the Print Using dropdown menu select Xerox.
dc06cc0384 Page 12 Customer Support
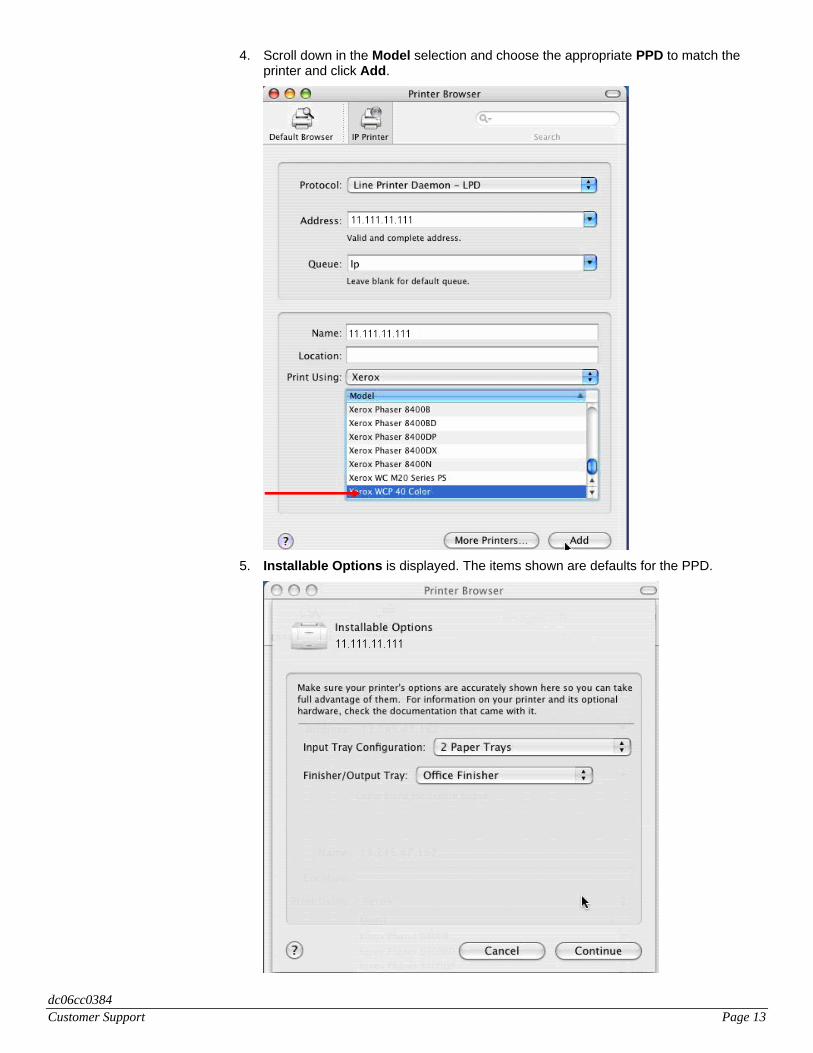
4. Scroll down in the Model selection and choose the appropriate PPD to match the printer and click Add.
5. Installable Options is displayed. The items shown are defaults for the PPD.
dc06cc0384 Customer Support Page 13
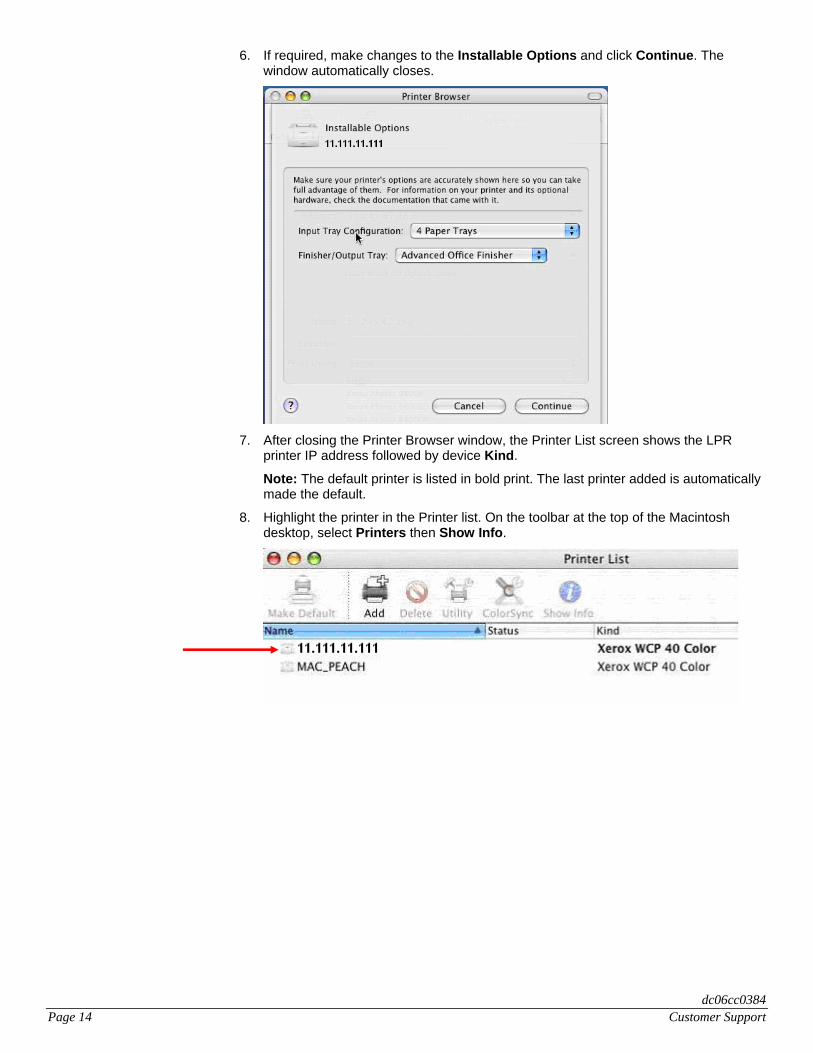
6. If required, make changes to the Installable Options and click Continue. The window automatically closes.
7. After closing the Printer Browser window, the Printer List screen shows the LPR
printer IP address followed by device Kind.
Note: The default printer is listed in bold print. The last printer added is automatically made the default.
8. Highlight the printer in the Printer list. On the toolbar at the top of the Macintosh desktop, select Printers then Show Info.
dc06cc0384 Page 14 Customer Support
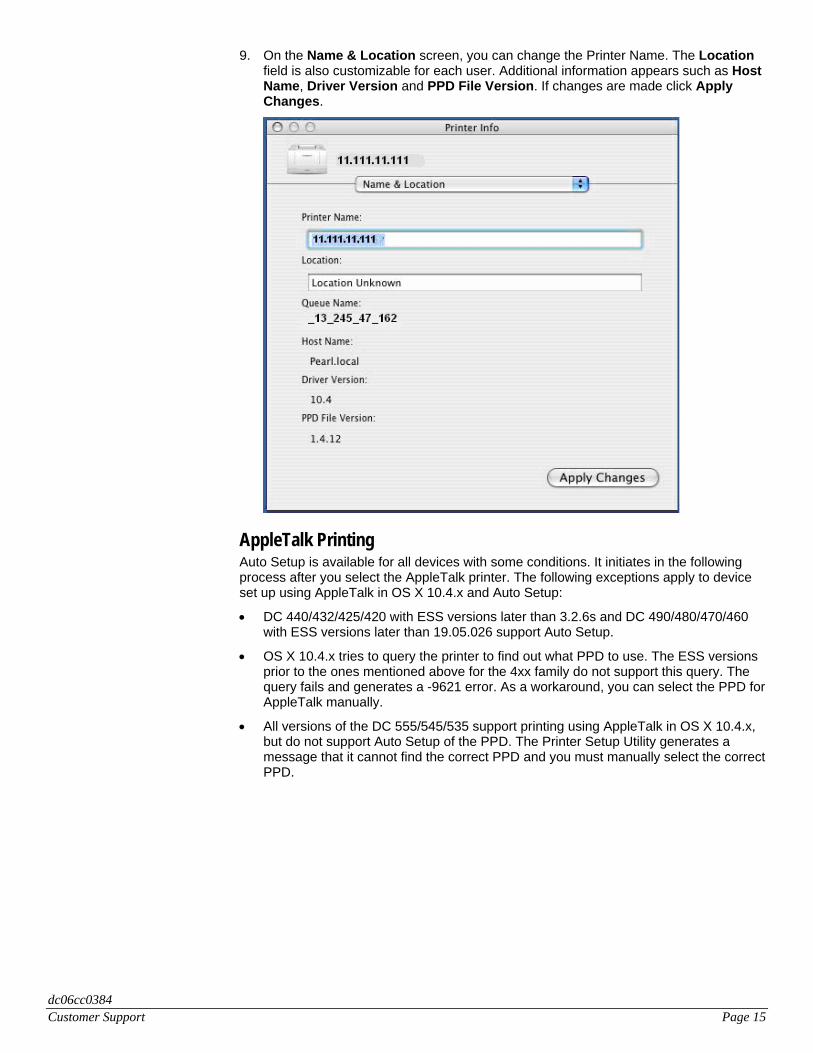
9. On the Name & Location screen, you can change the Printer Name. The Location field is also customizable for each user. Additional information appears such as Host Name, Driver Version and PPD File Version. If changes are made click Apply Changes.
AppleTalk Printing Auto Setup is available for all devices with some conditions. It initiates in the following process after you select the AppleTalk printer. The following exceptions apply to device set up using AppleTalk in OS X 10.4.x and Auto Setup:
• DC 440/432/425/420 with ESS versions later than 3.2.6s and DC 490/480/470/460 with ESS versions later than 19.05.026 support Auto Setup.
• OS X 10.4.x tries to query the printer to find out what PPD to use. The ESS versions prior to the ones mentioned above for the 4xx family do not support this query. The query fails and generates a -9621 error. As a workaround, you can select the PPD for AppleTalk manually.
• All versions of the DC 555/545/535 support printing using AppleTalk in OS X 10.4.x, but do not support Auto Setup of the PPD. The Printer Setup Utility generates a message that it cannot find the correct PPD and you must manually select the correct PPD.
dc06cc0384 Customer Support Page 15
Use the following procedure to set up AppleTalk printing.
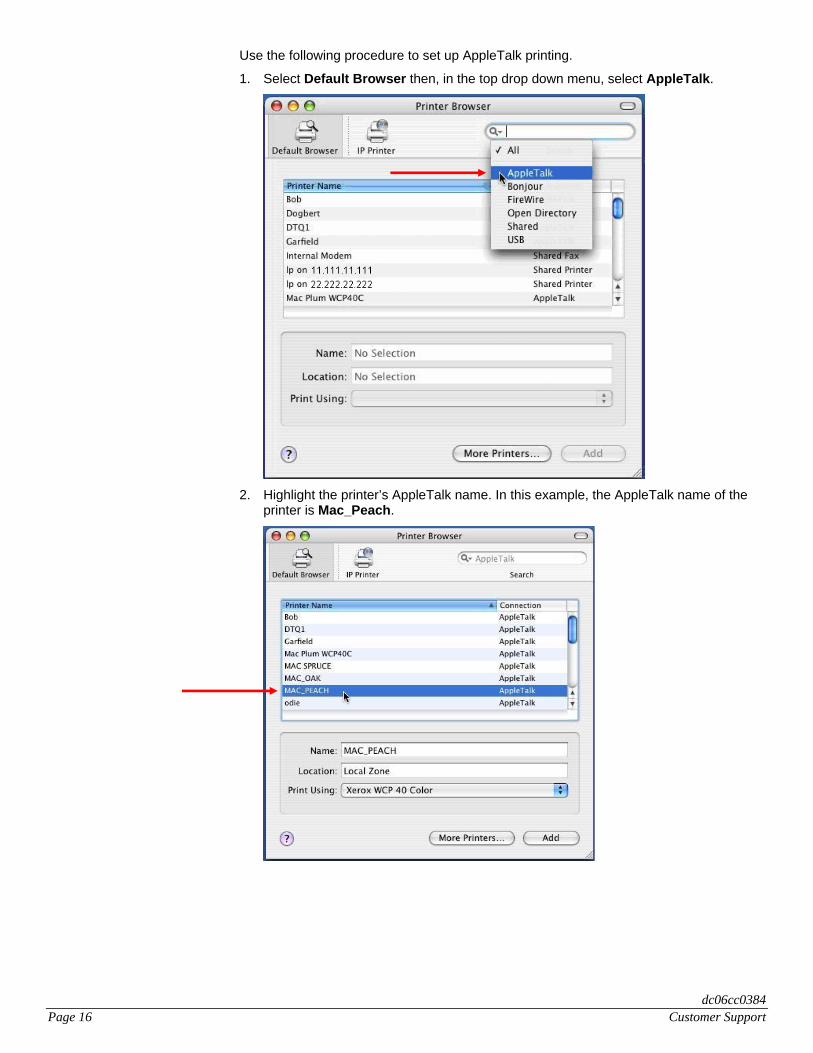
1. Select Default Browser then, in the top drop down menu, select AppleTalk.
2. Highlight the printer’s AppleTalk name. In this example, the AppleTalk name of the
printer is Mac_Peach.
dc06cc0384 Page 16 Customer Support
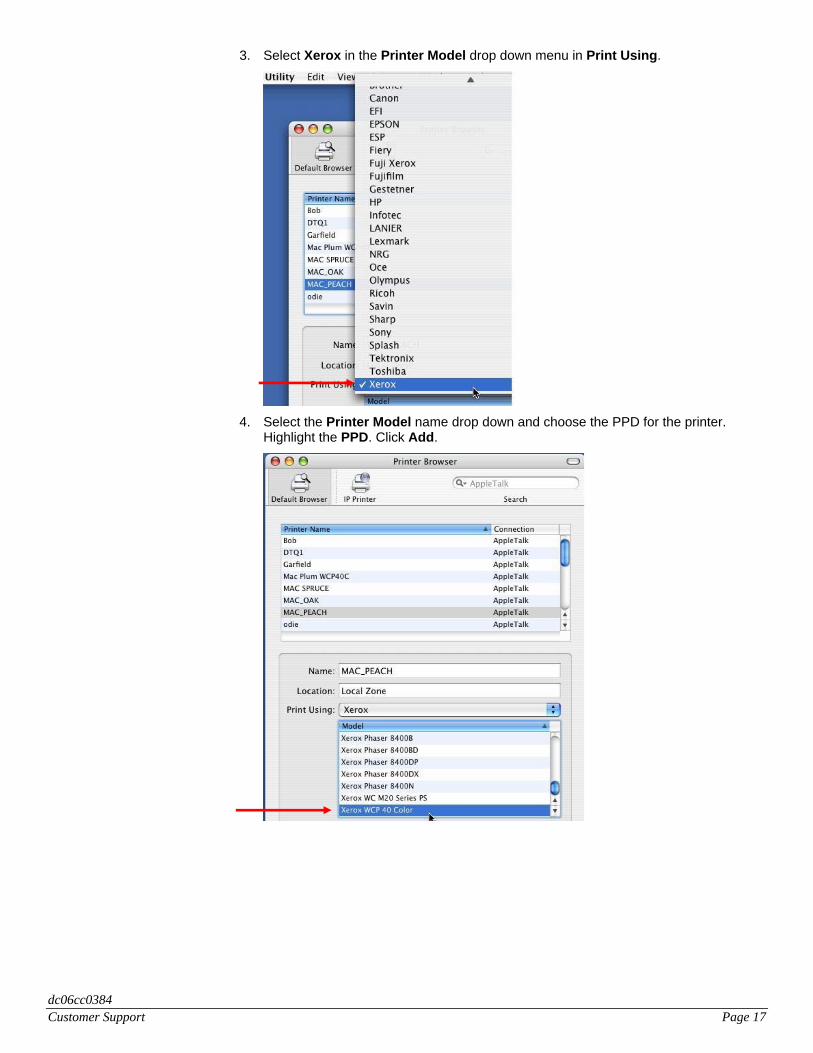
3. Select Xerox in the Printer Model drop down menu in Print Using.
4. Select the Printer Model name drop down and choose the PPD for the printer.
Highlight the PPD. Click Add.
dc06cc0384 Customer Support Page 17
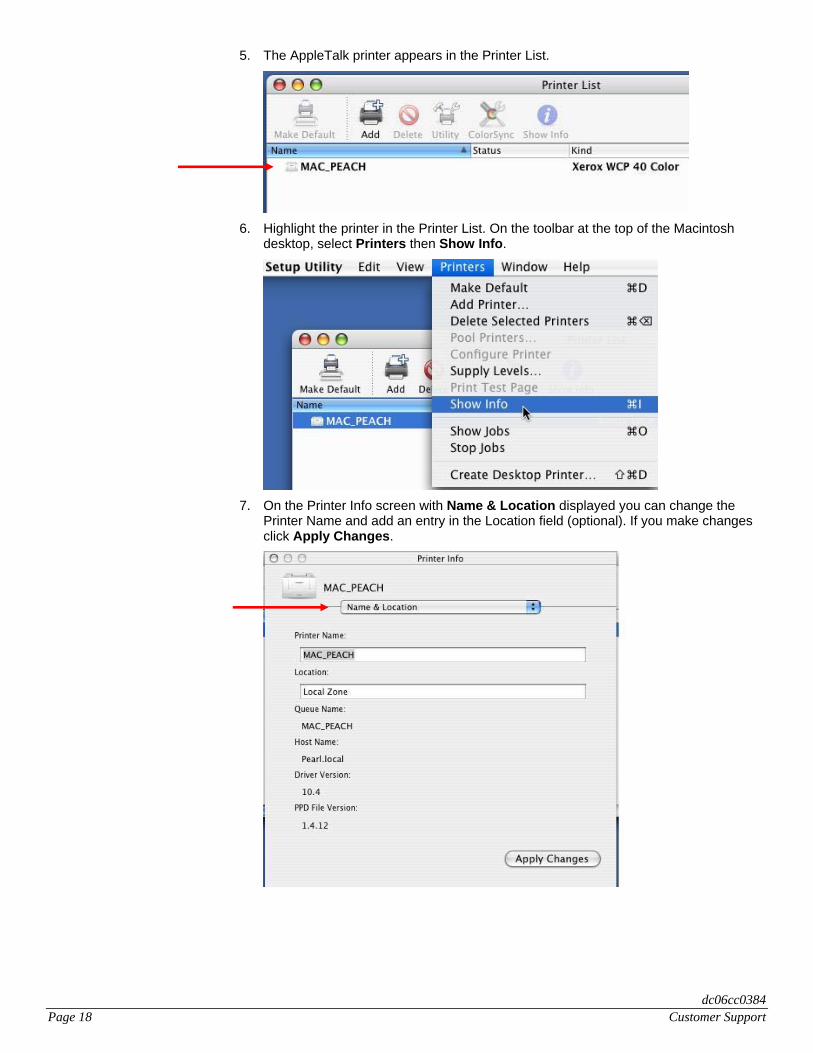
5. The AppleTalk printer appears in the Printer List.
6. Highlight the printer in the Printer List. On the toolbar at the top of the Macintosh
desktop, select Printers then Show Info.
7. On the Printer Info screen with Name & Location displayed you can change the
Printer Name and add an entry in the Location field (optional). If you make changes click Apply Changes.
dc06cc0384 Page 18 Customer Support

8. In the Name & Location drop down, select Printer Model to verify which PPD is currently selected.
9. Select Installable Options from the information dropdown menu. The Items
displayed are the default PPD settings.
dc06cc0384 Customer Support Page 19
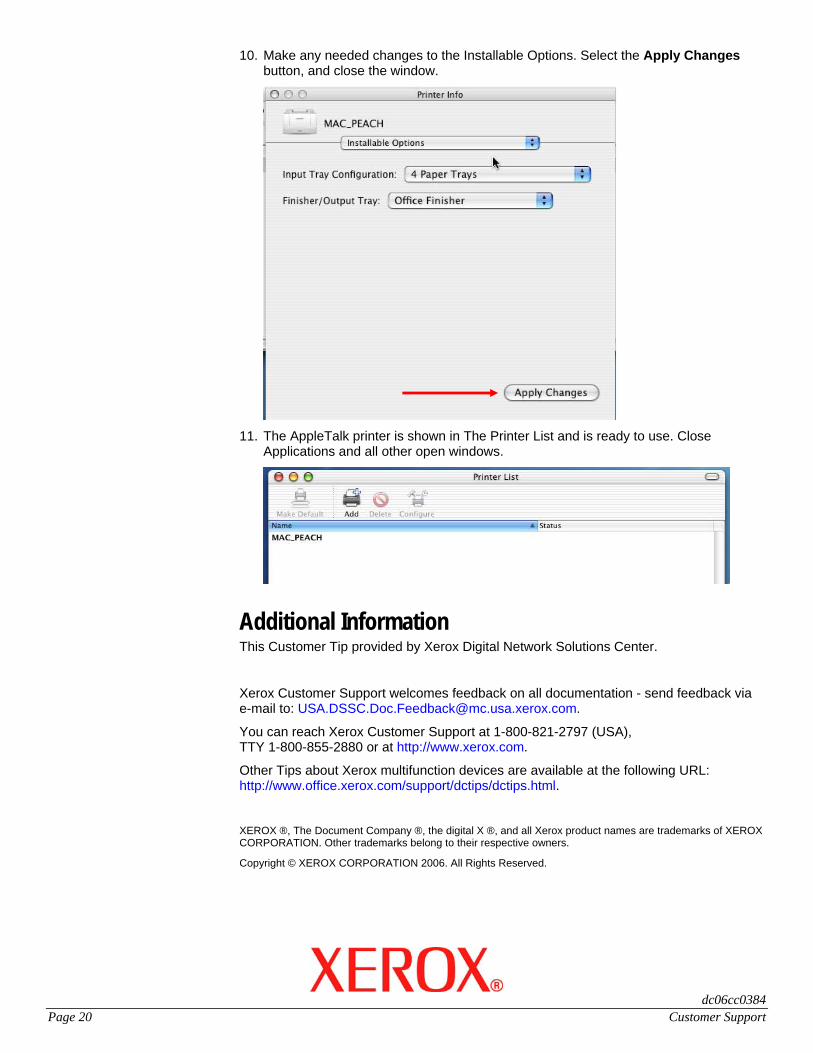
10. Make any needed changes to the Installable Options. Select the Apply Changes button, and close the window.
11. The AppleTalk printer is shown in The Printer List and is ready to use. Close
Applications and all other open windows.
Additional Information This Customer Tip provided by Xerox Digital Network Solutions Center.
Xerox Customer Support welcomes feedback on all documentation - send feedback via e-mail to: [email protected].
You can reach Xerox Customer Support at 1-800-821-2797 (USA), TTY 1-800-855-2880 or at http://www.xerox.com.
Other Tips about Xerox multifunction devices are available at the following URL: http://www.office.xerox.com/support/dctips/dctips.html.
XEROX ®, The Document Company ®, the digital X ®, and all Xerox product names are trademarks of XEROX CORPORATION. Other trademarks belong to their respective owners.
Copyright © XEROX CORPORATION 2006. All Rights Reserved.
dc06cc0384 Page 20 Customer Support