Embed Size (px)
Citation preview

Basic OperationsThis section provides an overview of the watchand explains operations that are common toall modes.
Important!
● This watch is not a special-purposemeasuring instrument.Measurement function readings areintended for general reference only.
● Whenever using the DigitalCompass of this watch for serioustrekking, mountain climbing, or otheractivities, be sure to always takealong another compass to confirmreadings. If the readings producedby the Digital Compass of this watchare different from those of the othercompass, perform bidirectionalcalibration of the Digital Compass toensure better accuracy.ー Compass readings and
calibration will not be possible ifthe watch is in the vicinity of apermanent magnet (magneticaccessory, etc.), metal objects,high-voltage wires, aerial wires, orelectrical household appliances(TV, computer, cellphone, etc.)
l Digital Compass● The watch’s Altimeter Mode
calculates and displays relativealtitude based on barometricpressure readings produced by itspressure sensor. Because of this,altitude values displayed by thewatch may be different from youractual elevation and/or sea levelelevation indicated for the areawhere you are located. Regularcalibration in accordance with thelocal altitude (elevation) indicationsis recommended.l Altitude Measurement
Note
● In this manual, the expression “timesignal” refers to a time calibrationsignal. Time signals include timeinformation.
● Note that the watch illustrations inthis manual are intended forreference only. The actual watchmay appear somewhat differentthan depicted in the illustrations.
MA1605-EB © 2015 CASIO COMPUTER CO., LTD.
General Guide③① ②
⑥⑤
④
A Hour hand
B Second hand
C Minute hand
D Mode hand
E LCD
F Crown
Indicators
① ② ③ ④ ⑤
A Appears when an alarm is turned on.
B Appears when the hourly time signal is on.
C Appears when the indicated time issummer time.
D Appears when Barometric PressureChange Indications are on.
E Shows the barometric pressuremeasurement unit.
Navigating Between ModesYour watch has the modes shown below.
B
B
B
B
B
B
A
BA BC
C
B
B
B
Receive Mode
World Time Mode
Alarm Mode
Timer ModeStopwatch Mode
Data Recall Mode
Thermometer Mode
Barometer Mode
Digital Compass ModeAltimeter Mode
Timekeeping Mode
Use the buttons in the illustration above tonavigate between modes.
Important!
● To return to the Timekeeping Modefrom any other mode, hold down the(B) button for about two seconds.
Operation Guide 5470
1

Selecting a TimekeepingMode Digital Display Format
In the Timekeeping Mode, you can use theoperation below to change the contents of thedigital displays.
p D
p DD
Day of the week, month, day
Hour, minute, second
Barometric pressure graph
Using the CrownThe watch’s crown is a screw-in (screw lock)type. To use the crown, you first need to rotateit towards you (leftwards) to loosen it.
Loosen
Crown
● Pulling Out and Pushing In the CrownPull out the crown before performing crownoperations. Do not pull the crown with toomuch force.Normal timekeeping
Pull out
Important!
● To prevent loss of water resistanceand/or damage due to impact, besure to screw the crown in by rotatingit away from you as you push it in.
Screw in
● When pushing the crown back in,take care not to apply too muchforce.
● Fast Forward/Fast ReverseAfter pulling out the crown, rotating it quicklyin succession in either direction will start a fastforward or fast reverse operation. While a fastforward operation is in progress, quicklyrotating the crown in succession again willincrease the speed even further.● The fast reverse operation speed is fixed
and cannot be changed.
● Stopping Fast Forward/Fast ReverseRotate the crown in the direction opposite thatof the ongoing operation or press any button.
Note
● If you do not perform any operationfor about two minutes after pullingout the crown, crown operations willautomatically become disabled. Ifthat happens, push the crown backin and then pull it out again.
● The message [PUSH] will appear onthe display in the cases below. If thathappens, push the crown back inand then pull it out again.ー When the crown is pulled out while
in a mode that does not supportcrown operation
ー When you do not perform anyoperation for about two minutesafter pulling out the crown
Shifting the HandsHand shift moves the hands out of the way foreasy viewing of display info.
1. While holding down (L), press (B).● All hands will move to 2 o’clock.
2. To return the hands to their normaltimekeeping positions, press (A), (B), (C),or (D).
Note
● This function can be used in anymode.ー Hand shift cannot be used while
configuring the city code or thesummer time setting, or whenmanually configuring time anddate settings.
● Shifted hands will return to theirnormal positions if no buttonoperation is performed within aboutten seconds after hands are shifted.
● In the modes below, hands that areblocking a digital display willautomatically move to 4 o’clock or 8o’clock. The hands will return to theirnormal positions after about threeseconds.ー Altimeter Modeー Barometer Modeー Thermometer Mode
Operation Guide 5470
2
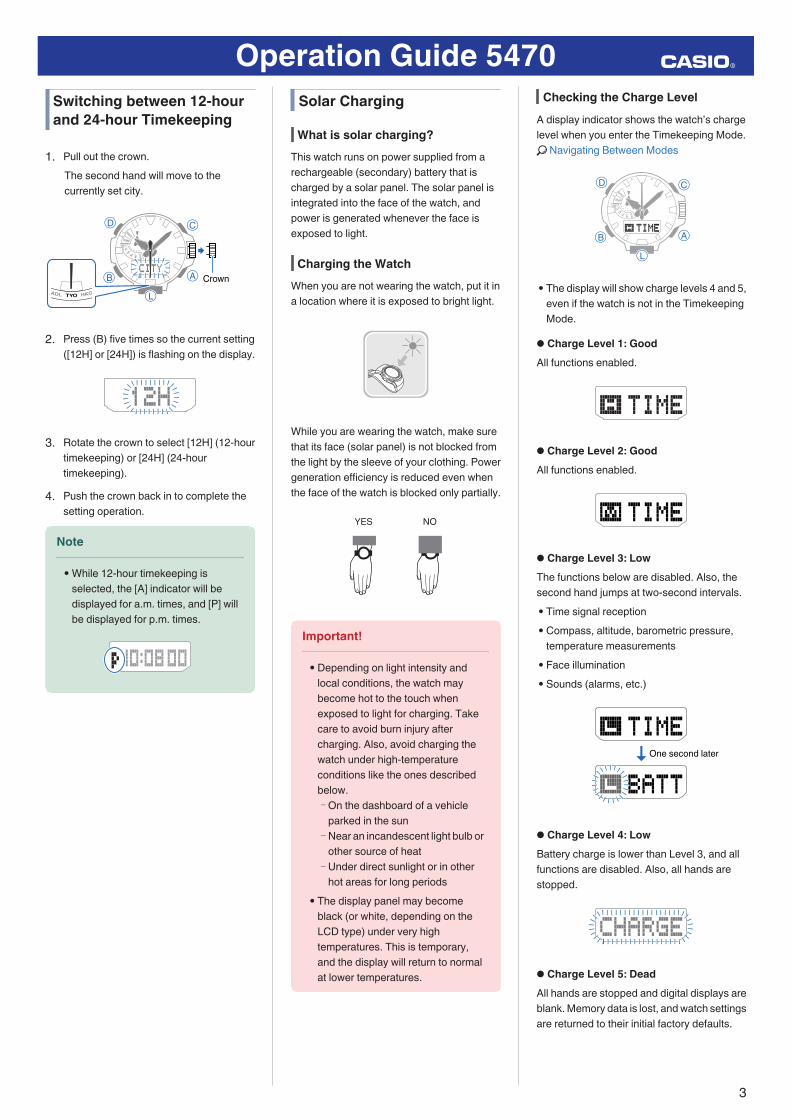
Switching between 12-hourand 24-hour Timekeeping
1. Pull out the crown.The second hand will move to thecurrently set city.
Crown
2. Press (B) five times so the current setting([12H] or [24H]) is flashing on the display.
3. Rotate the crown to select [12H] (12-hourtimekeeping) or [24H] (24-hourtimekeeping).
4. Push the crown back in to complete thesetting operation.
Note
● While 12-hour timekeeping isselected, the [A] indicator will bedisplayed for a.m. times, and [P] willbe displayed for p.m. times.
Solar Charging
What is solar charging?This watch runs on power supplied from arechargeable (secondary) battery that ischarged by a solar panel. The solar panel isintegrated into the face of the watch, andpower is generated whenever the face isexposed to light.
Charging the WatchWhen you are not wearing the watch, put it ina location where it is exposed to bright light.
While you are wearing the watch, make surethat its face (solar panel) is not blocked fromthe light by the sleeve of your clothing. Powergeneration efficiency is reduced even whenthe face of the watch is blocked only partially.
NOYES
Important!
● Depending on light intensity andlocal conditions, the watch maybecome hot to the touch whenexposed to light for charging. Takecare to avoid burn injury aftercharging. Also, avoid charging thewatch under high-temperatureconditions like the ones describedbelow.ー On the dashboard of a vehicle
parked in the sunー Near an incandescent light bulb or
other source of heatー Under direct sunlight or in other
hot areas for long periods● The display panel may become
black (or white, depending on theLCD type) under very hightemperatures. This is temporary,and the display will return to normalat lower temperatures.
Checking the Charge LevelA display indicator shows the watch’s chargelevel when you enter the Timekeeping Mode.l Navigating Between Modes
● The display will show charge levels 4 and 5,even if the watch is not in the TimekeepingMode.
● Charge Level 1: GoodAll functions enabled.
● Charge Level 2: GoodAll functions enabled.
● Charge Level 3: LowThe functions below are disabled. Also, thesecond hand jumps at two-second intervals.● Time signal reception● Compass, altitude, barometric pressure,
temperature measurements● Face illumination● Sounds (alarms, etc.)
One second later
● Charge Level 4: LowBattery charge is lower than Level 3, and allfunctions are disabled. Also, all hands arestopped.
● Charge Level 5: DeadAll hands are stopped and digital displays areblank. Memory data is lost, and watch settingsare returned to their initial factory defaults.
Operation Guide 5470
3
Important!
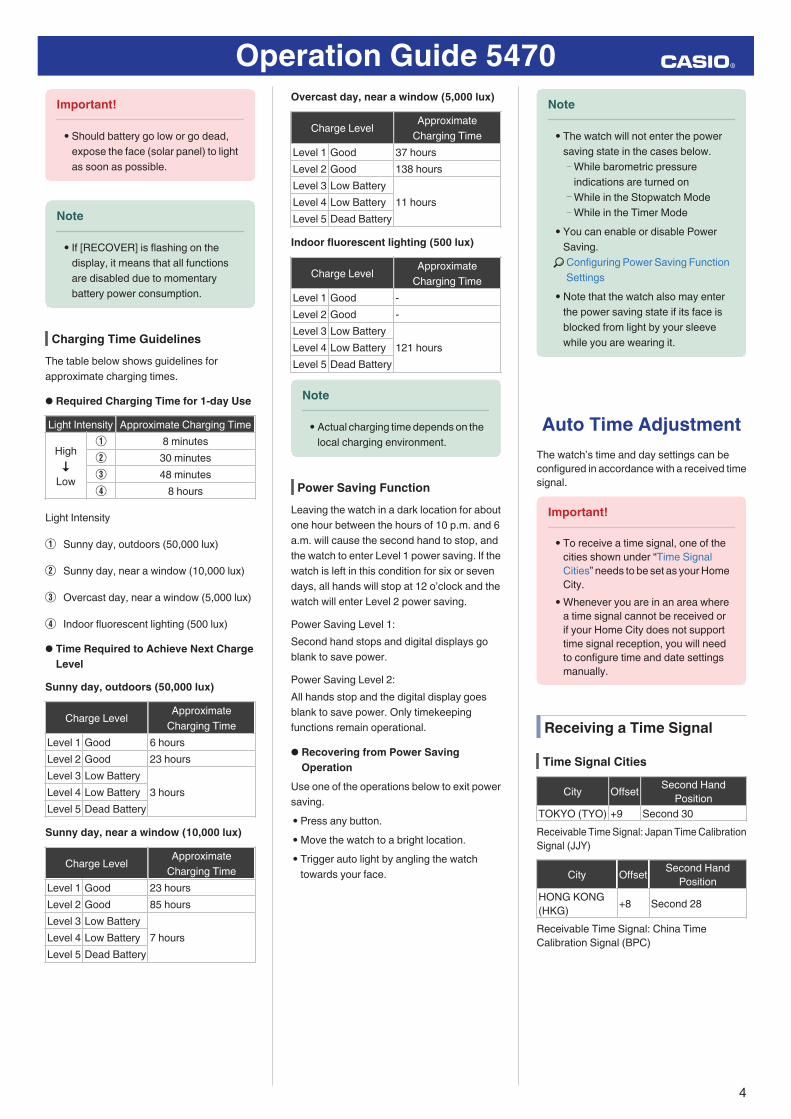
● Should battery go low or go dead,expose the face (solar panel) to lightas soon as possible.
Note
● If [RECOVER] is flashing on thedisplay, it means that all functionsare disabled due to momentarybattery power consumption.
Charging Time GuidelinesThe table below shows guidelines forapproximate charging times.
● Required Charging Time for 1-day UseLight Intensity Approximate Charging Time
Highp
Low
A 8 minutesB 30 minutesC 48 minutesD 8 hours
Light Intensity
A Sunny day, outdoors (50,000 lux)
B Sunny day, near a window (10,000 lux)
C Overcast day, near a window (5,000 lux)
D Indoor fluorescent lighting (500 lux)
● Time Required to Achieve Next ChargeLevel
Sunny day, outdoors (50,000 lux)
Charge Level ApproximateCharging Time
Level 1 Good 6 hoursLevel 2 Good 23 hoursLevel 3 Low Battery
3 hoursLevel 4 Low BatteryLevel 5 Dead BatterySunny day, near a window (10,000 lux)
Charge Level ApproximateCharging Time
Level 1 Good 23 hoursLevel 2 Good 85 hoursLevel 3 Low Battery
7 hoursLevel 4 Low BatteryLevel 5 Dead Battery
Overcast day, near a window (5,000 lux)
Charge Level ApproximateCharging Time
Level 1 Good 37 hoursLevel 2 Good 138 hoursLevel 3 Low Battery
11 hoursLevel 4 Low BatteryLevel 5 Dead BatteryIndoor fluorescent lighting (500 lux)
Charge Level ApproximateCharging Time
Level 1 Good -Level 2 Good -Level 3 Low Battery
121 hoursLevel 4 Low BatteryLevel 5 Dead Battery
Note
● Actual charging time depends on thelocal charging environment.
Power Saving FunctionLeaving the watch in a dark location for aboutone hour between the hours of 10 p.m. and 6a.m. will cause the second hand to stop, andthe watch to enter Level 1 power saving. If thewatch is left in this condition for six or sevendays, all hands will stop at 12 o’clock and thewatch will enter Level 2 power saving.Power Saving Level 1:Second hand stops and digital displays goblank to save power.Power Saving Level 2:All hands stop and the digital display goesblank to save power. Only timekeepingfunctions remain operational.
● Recovering from Power SavingOperation
Use one of the operations below to exit powersaving.● Press any button.● Move the watch to a bright location.● Trigger auto light by angling the watch
towards your face.
Note
● The watch will not enter the powersaving state in the cases below.ー While barometric pressure
indications are turned onー While in the Stopwatch Modeー While in the Timer Mode
● You can enable or disable PowerSaving.l Configuring Power Saving Function
Settings● Note that the watch also may enter
the power saving state if its face isblocked from light by your sleevewhile you are wearing it.
Auto Time AdjustmentThe watch’s time and day settings can beconfigured in accordance with a received timesignal.
Important!
● To receive a time signal, one of thecities shown under “Time SignalCities” needs to be set as your HomeCity.
● Whenever you are in an area wherea time signal cannot be received orif your Home City does not supporttime signal reception, you will needto configure time and date settingsmanually.
Receiving a Time Signal
Time Signal Cities
City Offset Second HandPosition
TOKYO (TYO) +9 Second 30Receivable Time Signal: Japan Time CalibrationSignal (JJY)
City Offset Second HandPosition
HONG KONG(HKG) +8 Second 28
Receivable Time Signal: China TimeCalibration Signal (BPC)
Operation Guide 5470
4

City Offset Second HandPosition
NEW YORK (NYC) -5 Second 52CHICAGO (CHI) -6 Second 50DENVER (DEN) -7 Second 48LOS ANGELES(LAX) -8 Second 46ANCHORAGE (ANC) -9 Second 44HONOLULU (HNL) -10 Second 42Receivable Time Signal: U.S. TimeCalibration Signal (WWVB)
City Offset Second HandPosition
LONDON (LON) ±0 Second 2PARIS (PAR) +1 Second 4ATHENS (ATH) +2 Second 6Receivable Time Signal: U.K. (MSF) andGerman (DCF77) Time Calibration Signals
Time Signal Reception RangesTime signal reception is supported in theareas shown below.
● Japan Time Calibration Signal (JJY)
500 kilometers
500 kilometers
1,000 kilometers
1,000 kilometers Tokyo
FukushimaFukuoka/
Saga
● Chinese Time Calibration Signal (BPC)
500 kilometers
1,500 kilometers
Chengdu
Shangqiu
Hong Kong
Shanghai
Beijing
Changchun
● U.S. Time Calibration Signal (WWVB)
600 miles (1,000 kilometers)
2,000 miles (3,000 kilometers)
Los AngelesDenver
Fort Collins
Chicago
New York
● U.K. (MSF) and German (DCF77) TimeCalibration Signal
The Anthorn signal is receivable within this area.
500 kilometers
1,500 kilometers
MainflingenAnthorn
Note
● Even if you are within the normalreception range of a time signal,reception may be made impossibleby the following factors: geographiccontours, weather, the season, thetime of day, wireless noise.
Setting a Home Time CityUse the procedure in this section to configureHome City (the city that is in the same timezone as your current location) and summertime settings.l Time Signal Citiesl Summer Time
Important!
● Time signal reception will not bepossible if your Home City setting isnot correct.
Getting readyEnter the Timekeeping Mode.l Navigating Between Modes
1. Pull out the crown.The second hand will move to thecurrently set city.
Crown
2. Rotate the crown to move the secondhand to the city (one that supports timesignal reception) you want to set.
3. To change the summer time setting, press(B).
● If you don’t want to change the summertime setting, push the crown back in tocomplete the setting operation.
4. Rotate the crown away from you to changethe summer time setting.
● [AUTO]The watch switches between standardtime and summer time automatically. Inmany cases, the [AUTO] setting lets youuse the watch without switchingmanually between summer time andstandard time.l Summer Time Table● [OFF]
The watch always indicates standardtime.
● [ON]The watch always indicates summertime.
5. Push the crown back in to complete thesetting operation.
Note
● If the currently indicated time issummer time, [DST] will be shownon the display.
● You cannot change the summer timesetting by rotating the crown towardsyou.
Summer TimeSummer time, which is also known as DaylightSaving Time (DST), advances the time settingone hour, 30 minutes, or some other amountof time from standard time (STD) during thesummer months. Whether or not and howsummer time is used depends on your countryor local area. Summer time is not used in somecountries and local areas.
Operation Guide 5470
5

Appropriate Signal ReceptionLocation
A time calibration signal can be received whilethe watch is near a window.● Keep metal objects away from the watch.● Do not move the watch.● Do not perform any operation on the watch.
12 o'clock
Note
● You may experience time signalreception problems in the areasdescribed below.ー Among or near buildingsー While riding in a vehicleー Near household appliances,
office machines, mobile phones,etc.
ー On a construction site, in anairport, or any other locationwhere radio wave interferenceoccurs
ー Near high-voltage linesー In mountainous areas or behind a
mountain
Auto Time Signal ReceiveAn automatic time signal receive operation isperformed and the time and day settings areadjusted between midnight and 5:00 a.m.Once a signal receive operation is successful,no more auto receive operations areperformed that day.The receive operation is performed only whilethe watch is in the Timekeeping Mode.l Navigating Between Modes
Mode hand
Place the watch near a window or some otherlocation appropriate for signal reception.● When the receive operation is successful,
the time and day settings will be adjustedautomatically.
Note
● Reception takes anywhere fromabout two minutes to about 10minutes. It can take as long as 20minutes.
● Using Auto ReceiveBefore going to bed at night, put the watch intothe Timekeeping Mode (whose settingsshould be configured correctly), and leave itnear a window.
Enabling/Disabling Auto ReceiveUse the procedure below to enable or disableAuto Receive.Getting readyEnter the Receive Mode.l Navigating Between Modes
1. Pull out the crown.2. Rotate the crown to select either [ON] or
[OFF].[ON]: Auto receive is on.[OFF]: Auto receive is off.
3. Push the crown back in to complete thesetting operation.
4. Press (B) to return to the TimekeepingMode.
Manual Time Signal ReceiveYou can use a button operation to receive thetime signal. When a receive is successful, thetime and date settings will be adjustedautomatically.Getting readyEnter the Receive Mode.l Navigating Between Modes
1. Place the watch near a window or someother location appropriate for time signalreception.
2. Hold down the (A) button for about twoseconds until [RC!] appears on the dotdisplay.This indicates that time signal receptionhas started.● To cancel an ongoing time signal
receive operation, press any button.
After time signal receive ends, the resultof the receive operation will appear on thedisplay.
2 seconds
UnsuccessfulSuccessful
3. Press (B) to return to the TimekeepingMode.
● If reception fails for some reason, checkthe surrounding reception environmentand then try again.
Operation Guide 5470
6
Note
● Reception takes anywhere fromabout two minutes to about 10minutes. It can take as long as 20minutes.
● The watch will automatically returnto the Timekeeping Mode if you donot perform any operation for abouttwo or three minutes after time signalreceive ends.
Receive LevelsThe current time signal receive level isindicated on the display. Refer to the levelindicator to determine the best location fortime signal reception.
StableUnstable
Note
● It takes about 10 seconds for timesignal reception conditions tostabilize.
● Reception conditions are affectedby weather, the time of day, thesurrounding environment, etc.
Checking the ReceiveOperation Result
Use the procedure below to check the dateand time of the last successful time signalreceive operation.
1. In the Timekeeping Mode, press (B) eighttimes.This enters the Receive Mode anddisplays the date and time of the lastsuccessful time signal receive operation.● The display will show [-:--] for the time
and [-.--] for the date if no time signalreceive operation has been successfulyet.
2. Press (B) to return to the TimekeepingMode.
Signal ReceptionPrecautions
● When the watch is unable to adjust its timein accordance with a calibration signal forsome reason, average timekeepingaccuracy is within ±15 seconds per month.
● Time signal reception is not possible whenany one of the conditions exists.ー While battery power is lowー Power Saving Level 2ー Timer countdown operation in progressー barometric pressure indications turned
on● If an alarm starts to sound while time signal
reception is in progress, reception will stop.● If the receive operation is successful, the
time and day settings will be adjustedautomatically in accordance with the HomeCity and summer time settings. Summertime will not be applied correctly in the casedescribed below.ー When the summer time start date and
time, end date and time, or other rules arechanged by authorities
● Note that an internal decoding process thewatch performs after it receives a signal maycause the time setting to be slightly off (byless than one second).
● As of December 2014, China does notobserve summer time. If China starts toobserve summer time in the future, the timedisplayed by the watch for China may not becorrect.
Manual TimeAdjustment
You can use the procedure below to adjust thetime and day settings using the watch in anarea where time signal reception is notpossible.Getting readyEnter the Timekeeping Mode.l Navigating Between Modes
Timekeeping Mode
Setting a Home Time CityUse the procedure in this section to select acity to use as your Home City. If you are in anarea that observes summer time, you can alsoenable or disable summer time.l Summer Time
Important!
● World Time times will not be correctif you select the wrong city as yourHome City.
Note
● Your watch has 29 built-in cities thatyou can select as a Home Time City.If you are using the watch in alocation that is not among the built-in cities, use the built-in city that is inthe same time zone as your location.For available city settings, see “CityCode List”.
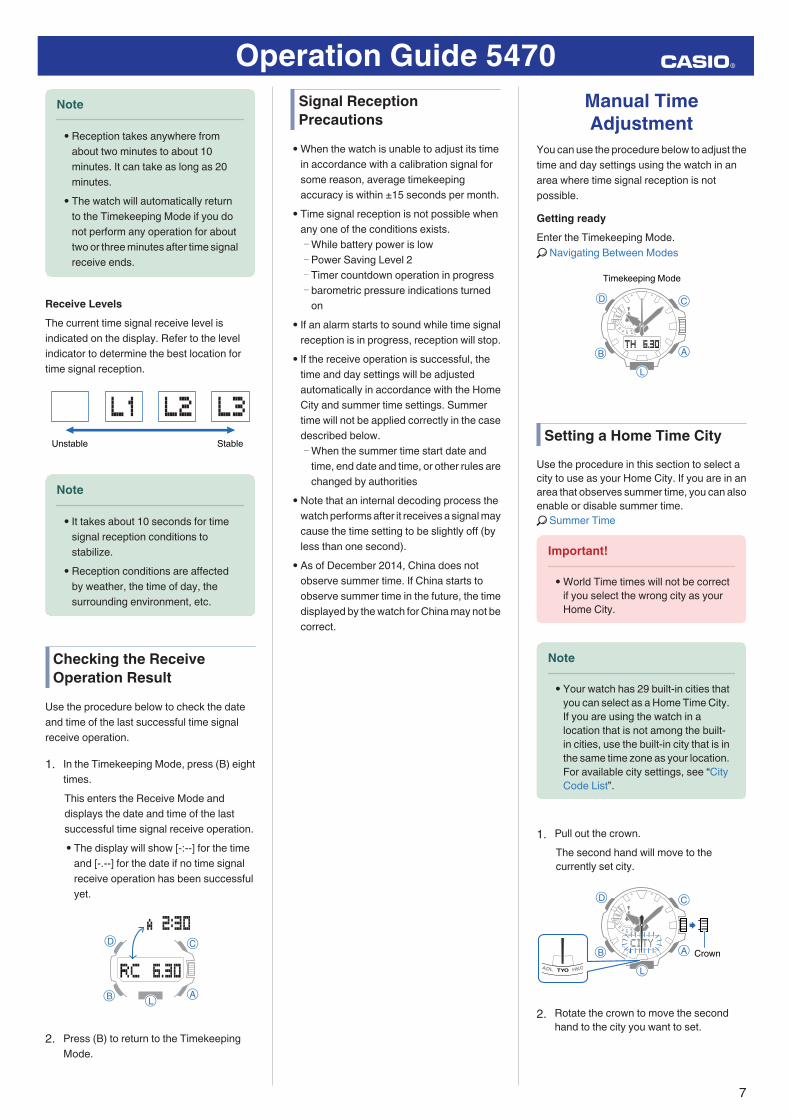
1. Pull out the crown.The second hand will move to thecurrently set city.
Crown
2. Rotate the crown to move the secondhand to the city you want to set.
Operation Guide 5470
7
3. To change the summer time setting, press(B).
● If you don’t want to change the summertime setting, push the crown back in tocomplete the setting operation.
4. Rotate the crown away from you to changethe summer time setting.
● [AUTO]The watch switches between standardtime and summer time automatically.l Summer Time Table● [OFF]
The watch always indicates standardtime.
● [ON]The watch always indicates summertime.
5. Push the crown back in to complete thesetting operation.
Note
● The [AUTO] setting works only whena Time Signal City is selected foryour Home City.
● Select [OFF] or [ON] when yourHome City is not a Time Signal City.
● Note that summer time (DST) cannotbe selected while “UTC” is selectedas the Home City.
● If the currently indicated time issummer time, [DST] will be shownon the display.
Setting the Time and Date
1. Pull out the crown.The second hand will move to thecurrently set city.
Crown
2. Press (D).● You can see if a time is a.m. or p.m. by
checking the second hand position.
PMAM
3. Rotate the crown to change the minutesetting.
● The hour hand will move in accordancewith minute hand movement.
4. Press (B).This causes [HOUR] to flash on thedisplay.
5. Rotate the crown to change the hoursetting.
6. Press (B).
7. Rotate the crown to change the yearsetting.
8. Press (B).
9. Rotate the crown to change the month andday setting.
● If you want to change the time and datesettings at this point, press (B). Next,return to the minute setting in step 3 andperform the above steps again.
10. On a time signal at the top of a minute,push the crown back in to complete thesetting operation.
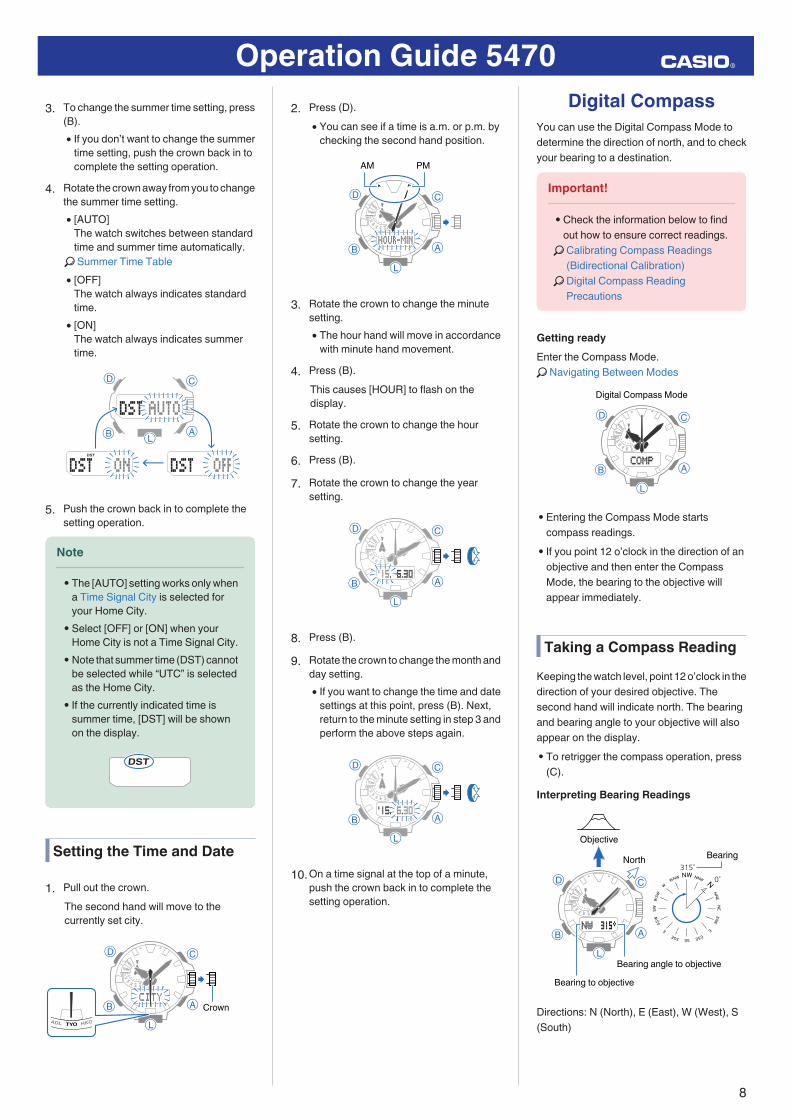
Digital CompassYou can use the Digital Compass Mode todetermine the direction of north, and to checkyour bearing to a destination.
Important!
● Check the information below to findout how to ensure correct readings.l Calibrating Compass Readings
(Bidirectional Calibration)l Digital Compass Reading
Precautions
Getting readyEnter the Compass Mode.l Navigating Between Modes
Digital Compass Mode
● Entering the Compass Mode startscompass readings.
● If you point 12 o’clock in the direction of anobjective and then enter the CompassMode, the bearing to the objective willappear immediately.
Taking a Compass ReadingKeeping the watch level, point 12 o’clock in thedirection of your desired objective. Thesecond hand will indicate north. The bearingand bearing angle to your objective will alsoappear on the display.● To retrigger the compass operation, press
(C).Interpreting Bearing Readings
315°0°
Bearing
Bearing angle to objective
Bearing to objective
North
Objective
Directions: N (North), E (East), W (West), S(South)
Operation Guide 5470
8
Note
● Normally the Compass Modeindicates magnetic north. You canalso configure settings to indicatetrue north.l Setting Up for True North Readings
(Magnetic Declination Calibration)lMagnetic North and True North● After the initial reading is displayed,
the watch will continue to takereadings about every second forabout the next 60 seconds. Thewatch will return to the TimekeepingMode automatically about 60seconds after you press (C).
● Auto Light will not illuminate the facewhile a compass operation is inprogress.
● If an alarm or other beeper sounds,or if you turn on illumination bypressing (L) while a compassoperation is in progress, thecompass operation will besuspended momentarily. Thecompass operation will resumewhen the beeper stops orillumination turns off.
● Aligning a map with actualsurroundings (setting a map)
Setting a map means to align the map so thedirections indicated on it are aligned with theactual directions of your location. Once youset a map, you can more easily get a grasp ofthe relationship between map markings andactual geographic contours. To set a map withthis watch, align north on the map with thenorth indication of the watch. Once you set themap, you can compare your bearing on themap with your surroundings, which will helpyou determine your current location anddestination.● Note that map reading skills and experience
are required to determine your currentlocation and destination on a map.
Calibrating CompassReadings
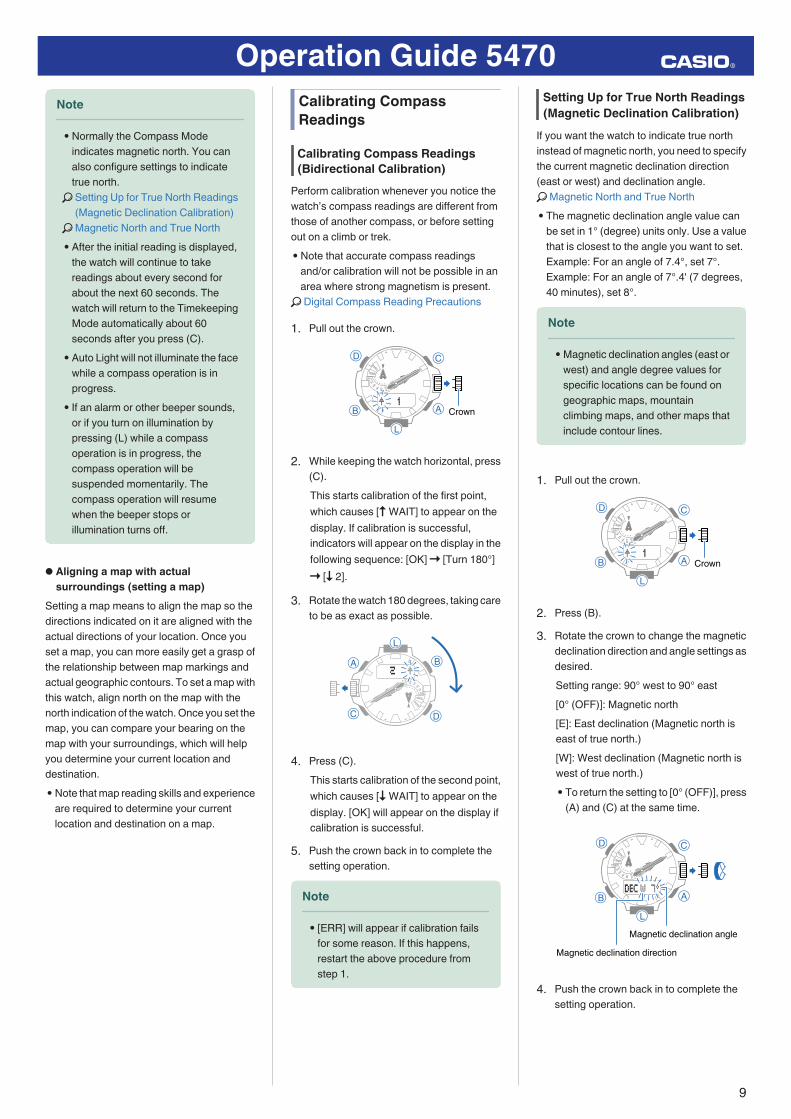
Calibrating Compass Readings(Bidirectional Calibration)
Perform calibration whenever you notice thewatch’s compass readings are different fromthose of another compass, or before settingout on a climb or trek.● Note that accurate compass readings
and/or calibration will not be possible in anarea where strong magnetism is present.l Digital Compass Reading Precautions
1. Pull out the crown.
Crown
2. While keeping the watch horizontal, press(C).This starts calibration of the first point,which causes [o WAIT] to appear on thedisplay. If calibration is successful,indicators will appear on the display in thefollowing sequence: [OK] n [Turn 180°]n [p 2].
3. Rotate the watch 180 degrees, taking careto be as exact as possible.
4. Press (C).This starts calibration of the second point,which causes [p WAIT] to appear on thedisplay. [OK] will appear on the display ifcalibration is successful.
5. Push the crown back in to complete thesetting operation.
Note
● [ERR] will appear if calibration failsfor some reason. If this happens,restart the above procedure fromstep 1.
Setting Up for True North Readings(Magnetic Declination Calibration)
If you want the watch to indicate true northinstead of magnetic north, you need to specifythe current magnetic declination direction(east or west) and declination angle.lMagnetic North and True North● The magnetic declination angle value can
be set in 1° (degree) units only. Use a valuethat is closest to the angle you want to set.Example: For an angle of 7.4°, set 7°.Example: For an angle of 7°.4' (7 degrees,40 minutes), set 8°.
Note
● Magnetic declination angles (east orwest) and angle degree values forspecific locations can be found ongeographic maps, mountainclimbing maps, and other maps thatinclude contour lines.
1. Pull out the crown.
Crown
2. Press (B).3. Rotate the crown to change the magnetic
declination direction and angle settings asdesired.Setting range: 90° west to 90° east[0° (OFF)]: Magnetic north[E]: East declination (Magnetic north iseast of true north.)[W]: West declination (Magnetic north iswest of true north.)● To return the setting to [0° (OFF)], press
(A) and (C) at the same time.
Magnetic declination angle
Magnetic declination direction
4. Push the crown back in to complete thesetting operation.
Operation Guide 5470
9

Magnetic North and TrueNorth
There are actually two types of north:magnetic north and true north.Magnetic north: North indicated by the needleof a compassTrue north: Direction to the North PoleAs shown in the illustration below, magneticnorth and true north are not the same.
Earth
Magnetic north
True north
Note
● The north indicated on commerciallyavailable maps is normally truenorth.
Digital Compass ReadingPrecautions
Location during UseTaking readings near sources of strongmagnetism can cause reading error. Keep thewatch away from the following types of items.Permanent magnets (magnetic accessories,etc.), metal objects, high-voltage wires, aerialwires, electrical household appliances (TVs,computers, cellphones, etc.)● Note that correct direction readings are not
possible indoors, especially inside ofreinforced concrete structures.
● Accurate direction readings are not possiblein motor vehicles, on boats, on aircraft, etc.
Storage LocationExposure of the watch to magnetism canaffect the accuracy of digital compassreadings. Keep the watch away from thefollowing types of items.Permanent magnets (magnetic accessories,etc.), metal objects, electrical householdappliances (TVs, computers, cellphones, etc.)
Altitude MeasurementThe watch takes altitude readings anddisplays results based on air pressuremeasurements taken by a built-in pressuresensor.
Important!
● The altitude readings displayed bythe watch are relative values that arecalculated based on barometricpressure measured by the watch’spressure sensor. This means thatbarometric pressure changes due toweather can cause altitude readingstaken at the same location to bedifferent. Also note that the valuedisplayed by the watch may bedifferent from the actual elevationand/or sea level elevation indicatedfor the area where you are located.When using the watch’s altimeterwhile mountain climbing, it isrecommended that you regularlycalibrate its readings in accordancewith local altitude (elevation)indications.l Calibrating Altitude Readings● The altitude calibration value and
barometric pressure changes mayresult in display of a negative value.
● Check the information below to findout about how to minimizedifferences between readingsproduced by the watch, and valuesprovided by local altitude (elevation)indications.l Altitude Reading Precautions
Getting readyEnter the Altitude Mode.l Navigating Between Modes
Altimeter Mode
● Entering the Altitude Mode starts altitudereadings.
Note
● When you enter the Altitude Mode,the second hand will indicate eithertimekeeping seconds, or thedifferential between altitudemeasurements (whichever wasindicated the last time you were inthe Altitude Mode). You can togglethe second hand indication betweenseconds and the measured valuedifferential by pressing (D).l Taking a Relative Altitude Reading
from Some Reference Point
Checking the CurrentAltitude
Starting an altitude measurement operationdisplays the altitude in your current location.The watch takes altitude readings everysecond for about the first three minutes. Afterthat, it takes readings according to the watch’sauto measurement interval setting.● Check the information below to find out how
to configure the auto measurement interval.l Setting the Auto Measurement Interval
Note
● To retrigger measurement, press(A).
● Measurement range: -700 m to10,000 m (-2,300 to 32,800 feet)(Measurement unit: 1 meter (5 feet))Note that calibrating altitudereadings will cause a change in themeasurement range.
● [- - -] will appear for the measuredvalue if it is outside the allowablerange.
● Press (B) to return to theTimekeeping Mode.
Interpreting Altitude Graph Contents
50 m*
Current reading6 readings ago
* 1 square (v) is 10 m.
Operation Guide 5470
10
Calibrating AltitudeReadings
To minimize the difference between locallyindicated and measured values, you shouldupdate the reference altitude value beforesetting off on and during treks or any otheractivities where you take altitude readings.You can find out the altitude at your currentlocation from signs, maps, on the Internet, etc.While mountain climbing, it is highlyrecommended that you check a map, localaltitude indications, or some other source foryour current location’s altitude and regularlycalibrate watch readings with the latestinformation.● Differences between actual altitude and
watch readings can be caused by thefactors below.ー Changes in barometric pressureー Changes in temperature caused by
variations in barometric pressure and byelevation
● Though altitude readings can be takenwithout calibration, doing so may producereadings that are very different fromindications by altitude markers, etc.
1. Pull out the crown.
Crown
2. Rotate the crown to calibrate thedisplayed value to that of a local altitude(elevation) marker.Calibration unit: 1 m (5 feet)● To return the altitude setting to its initial
factory default, press (A) and (C) at thesame time.
3. Push the crown back in to complete thesetting operation.
Taking a Relative AltitudeReading from SomeReference Point
After you set a reference altitude, the secondhand of the watch will indicate the differencebetween your current altitude and thereference altitude. This makes it easy tomeasure the altitude different between twopoints while climbing or trekking.
● Setting the Altitude DifferentialMeasurement Range
1. Pull out the crown.
Crown
2. Press (B) twice.
3. Rotate the crown to select either [100m] or[1000m].[100m]: ±100 m (±328 feet) in 5 m (16 feet)units[1000m]: ±1000m (±3280 feet) in 50m(164 feet) units
4. Push the crown back in to complete thesetting operation.
● Measuring Altitude
1. Use the contour lines on your map todetermine the difference in altitudebetween your current location and yourdestination.
2. Take an altitude reading of your currentlocation.l Checking the Current Altitude
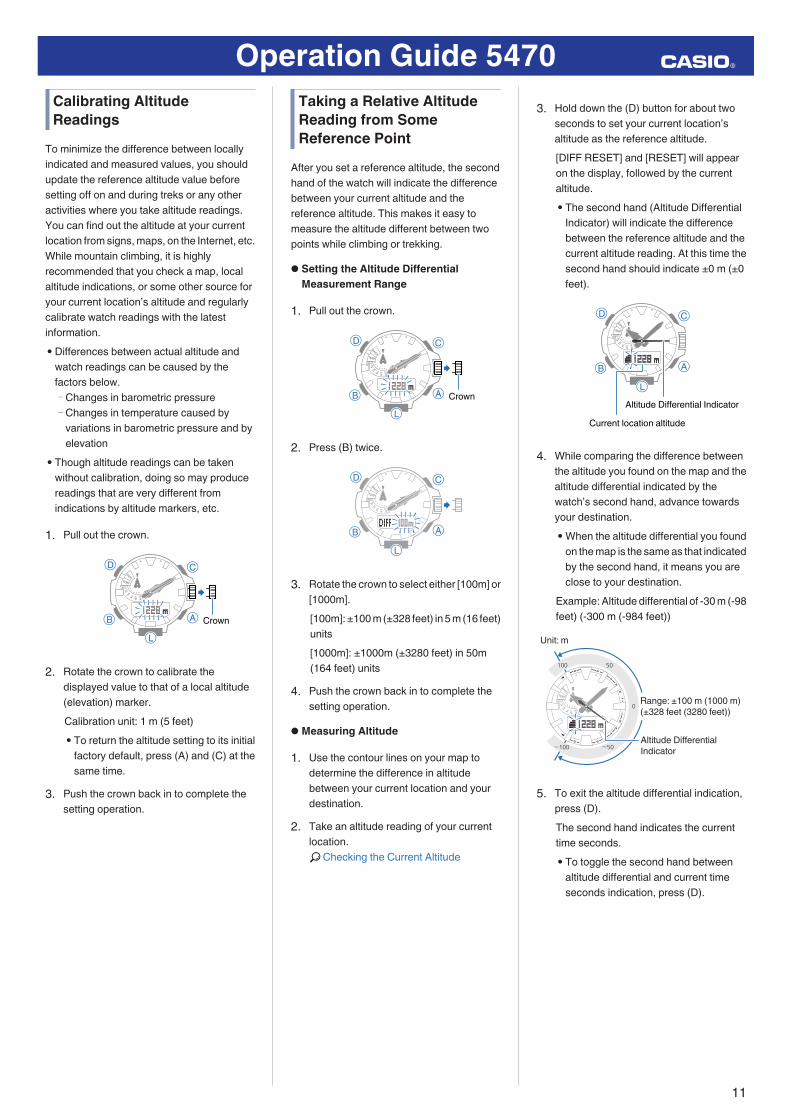
3. Hold down the (D) button for about twoseconds to set your current location’saltitude as the reference altitude.[DIFF RESET] and [RESET] will appearon the display, followed by the currentaltitude.● The second hand (Altitude Differential
Indicator) will indicate the differencebetween the reference altitude and thecurrent altitude reading. At this time thesecond hand should indicate ±0 m (±0feet).
Current location altitude
Altitude Differential Indicator
4. While comparing the difference betweenthe altitude you found on the map and thealtitude differential indicated by thewatch’s second hand, advance towardsyour destination.
● When the altitude differential you foundon the map is the same as that indicatedby the second hand, it means you areclose to your destination.
Example: Altitude differential of -30 m (-98feet) (-300 m (-984 feet))
100 50
0
-50-100Altitude Differential Indicator
Range: ±100 m (1000 m) (±328 feet (3280 feet))
Unit: m
5. To exit the altitude differential indication,press (D).The second hand indicates the currenttime seconds.● To toggle the second hand between
altitude differential and current timeseconds indication, press (D).
Operation Guide 5470
11

Note
● The second hand will point to r(over) if the current altitudedifferential is greater than the settingvalue, or s (under) if it is lower thanthe setting value.If either of these is indicated whileusing the ±100 m (328 feet)measurement range, change therange setting to ±1000 m (3280feet).
● The second hand will move to 9o’clock if a reading is outside theallowable altitude measurementrange (-700 m to 10,000 m (-2,300 to32,800 feet)), or if a reading erroroccurs.
Setting the AutoMeasurement Interval
You can select an auto measurement intervalof either five seconds or two minutes.
1. Pull out the crown.2. Press (B).
Crown
3. Rotate the crown to select [0’05] or [2’00]as the auto measurement interval.[0’05]: Readings taken every second forthe first three minutes, and then every fiveseconds for about the next one hour.[2’00]: Readings taken every second forthe first three minutes, and then every twominutes for about the next 12 hours.
4. Push the crown back in to complete thesetting operation.
Note
● The watch will automatically returnto the Timekeeping Mode if you donot perform any operation in theAltimeter Mode for about one hourwhile [0’05] is selected as themeasurement interval or about 12hours while [2’00] is selected.
Recording Altitude ReadingsUse the procedure below to record altitudemeasurements manually. Automeasurements are also recordedautomatically.● Use the Altitude Record Recall Mode to
view or delete records.l Viewing Altitude Records
● Recording Altitude Data ManuallyHold down the (A) button for about twoseconds, until [REC] stops flashing on thedisplay. This records the current altitudereading, along with the recording date andtime.● There is enough memory to hold up to 30
altitude records.● Recording altitude data when there are
already 30 records in memory automaticallydeletes the oldest record to make room forthe new one.
● Auto Altitude Data RecordingThe altitude data described below is recordedautomatically while the watch is in the AltitudeMode. One record each is maintained inmemory for each of these items.
AB
C D
F
E
End point
Start point
High Altitude (MAX): ELow Altitude (MIN): FCumulative Ascent (ASC): A+C*
Cumulative Descent (DSC): B+D*
* Cumulative ascent and cumulative descentvalues are updated whenever there is adifference of at least ±15 m (±49 feet) fromone reading to the next.
Note
● Auto recording ends when you exitthe Altimeter Mode. Re-entering theAltimeter Mode restarts recording ofcumulative values from where it wasstopped when you last exited theAltimeter Mode.
Specifying the AltitudeMeasurement Unit
You can select either meters (m) or feet (ft) asthe Altitude Mode display unit.
Important!
● When Tokyo (TYO) is set as theHome City, the altitude unit is fixedas meters (m) and cannot bechanged.
1. Pull out the crown.2. Press (B) three times.
Crown
3. Rotate the crown to select meters (m) orfeet (ft) as the measurement unit.
4. Push the crown back in to complete thesetting operation.
Operation Guide 5470
12
Altitude ReadingPrecautions
Effects of TemperatureWhen taking altitude readings, take the stepsbelow to keep the watch at as stable atemperature as possible. Changes intemperature can affect temperature readings.● Take readings with the watch on your wrist.● Take readings in an area where
temperature is stable.Altitude Readings● Do not use this watch while skydiving, hang
gliding, paragliding, gyrocopter flying, gliderflying, or engaged in other activities wherealtitude changes suddenly.
● Altitude readings produced by this watchare not intended for special-purpose orindustrial level use.
● In an aircraft, the watch measures the in-cabin pressurized air pressure, so readingswill not match altitudes announced by thecrew.
Altitude Readings (Relative Altitude)This watch uses International StandardAtmosphere (ISA) relative altitude datadefined by the International Civil AviationOrganization (ICAO). Barometric pressuregenerally becomes lower as altitudeincreases.Correct measurement may not be possibleunder the conditions below.● During unstable atmospheric conditions● During sudden temperature changes● After the watch has been subjected to
strong impact
Barometric PressureMeasurement
You can use the Barometer Mode to take areading of the barometric pressure at yourcurrent location, and to track reading changesand trends.
Important!
● Check the information below to findout how to ensure correct readings.l Barometric Pressure Reading
Precautions
Getting readyEnter the Barometer Mode.l Navigating Between Modes
Barometer Mode
● Entering the Barometer Mode startsbarometric pressure readings.
Note
● When you enter the BarometerMode, the second hand will indicateeither timekeeping seconds, or thedifferential between barometermeasurements (whichever wasindicated the last time you were inthe Barometer Mode). You cantoggle the second hand indicationbetween seconds and the measuredvalue differential by pressing (D).l Checking the Change in Barometric
Pressure between Two Readings
Checking the CurrentBarometric Pressure
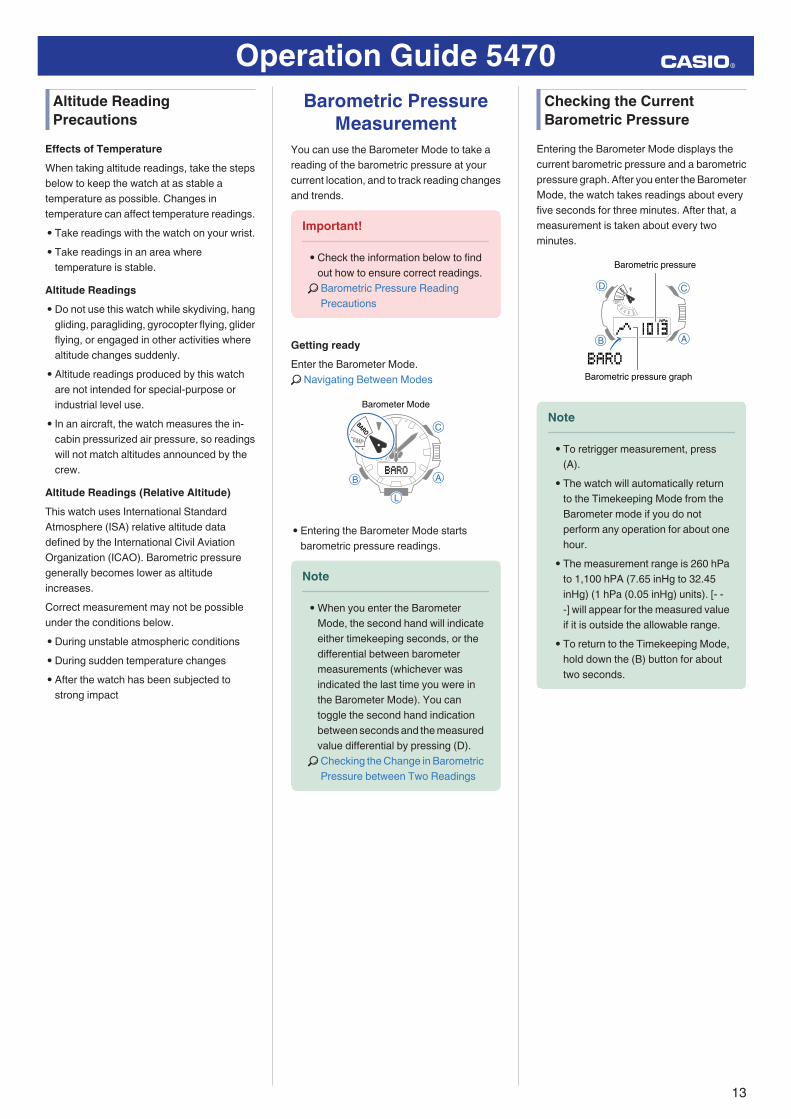
Entering the Barometer Mode displays thecurrent barometric pressure and a barometricpressure graph. After you enter the BarometerMode, the watch takes readings about everyfive seconds for three minutes. After that, ameasurement is taken about every twominutes.
Barometric pressure
Barometric pressure graph
Note
● To retrigger measurement, press(A).
● The watch will automatically returnto the Timekeeping Mode from theBarometer mode if you do notperform any operation for about onehour.
● The measurement range is 260 hPato 1,100 hPA (7.65 inHg to 32.45inHg) (1 hPa (0.05 inHg) units). [- --] will appear for the measured valueif it is outside the allowable range.
● To return to the Timekeeping Mode,hold down the (B) button for abouttwo seconds.
Operation Guide 5470
13

Checking Changes inBarometric Pressure OverTime
The watch displays a graph of 20 hours ofbarometric pressure readings taken every twohours. The square (v) at the far right of thegraph indicates the latest barometric pressurereading.
Barometric pressure (1 hPa per division)
Time (2 hours per division)
● Predicting Upcoming WeatherA trendlike this: Indicates this:
Rising barometric pressure,which indicates that upcomingweather probably will be fair.Falling barometric pressure,which indicates that upcomingweather probably will be bad.
Note
● Large changes in barometricpressure and/or temperature cancause past data readings to beplotted outside of the visible area ofthe graph. Though plots are notvisible, the data is still maintained inwatch memory.
● The barometric pressure graph isnot displayed while BarometricPressure Change Indications aredisplayed.l Barometric Pressure Change
Indications
Checking the Change inBarometric Pressurebetween Two Readings
When you perform the procedure below in theBarometer Mode, the second hand willindicate the difference between the currentbarometric pressure measurement and thelast auto measurement value (taken at two-hour intervals).
1. Press (D).The second hand will indicate thebarometric pressure differential (PressureDifferential Indicator).Example: Barometric pressure differentialof -3 hPa (approximately -0.9 inHg)
10 5
0
-5-10Pressure Differential Indicator
Range: ±10 hPa (1 hPa units)
Unit: hPa
2. To exit barometric pressure differentialindication, press (D).
● Each press of (D) toggles the secondhand between barometric pressuredifferential and current time secondsindication.
Note
● The second hand will point to r(over) if the current barometricpressure differential is greater than+10 hPa (0.3 inHg), or s (under) if itis less than -10 hPa (-0.3 inHg).
● A reading that is outside theallowable measurement range (260hPa to 1,100 hPa (7.65 inHg to 32.45inHg)) or any measurement error willcause the second hand to move to 9o’clock.
Barometric Pressure ChangeIndications
Whenever the watch detects a significantchange in air pressure readings (due tosudden ascent or descent, or to the passageof a low pressure or high pressure area), it willbeep to let you know. An arrow will also flashon the display at this time if the watch is in theBarometer Mode, or if it is in the TimekeepingMode with the barometric pressure graphdisplayed. The arrow that appears shows thedirection of the pressure change. These alertsare called “Barometric Pressure ChangeIndications”.
Thisindicator: Means this:
Sudden drop in barometricpressureSudden rise in barometricpressureSustained rise in pressure,shifting to a fallSustained fall in pressure, shiftingto a rise
Important!
● To ensure correct barometricpressure indication operation, turn iton in a location where the altitude isconstant (such as a lodge, camparea, or on the ocean).
● A change in altitude causes achange in barometric pressure.Because of this, correct readings areimpossible. Do not take readingswhile ascending or descending amountain, etc.
1. Hold down the (D) button for about twoseconds.[BARO] is displayed while BarometricPressure Change Indications are on.
2. Hold down the (D) button for about twoseconds to turn off Barometric PressureChange Indications.
Operation Guide 5470
14
Note
● If Barometric Pressure ChangeIndications are on, barometricpressure readings are taken everytwo minutes even while the watch isnot in the Barometer Mode.
● Barometric Pressure ChangeIndications turn off automatically 24hours after it is turned on.
● Time signal reception is disabledwhile Barometric Pressure ChangeIndications are turned on. Powersaving is also disabled.l Power Saving Function● You will not be able to turn on
Barometric Pressure ChangeIndications are while charge level ofthe watch’s battery is low.
● Low battery power will also causebarometric pressure trendinformation to turn off.
Calibrating BarometricPressure Readings
The watch’s pressure sensor is adjusted at thefactory and normally does not requirecalibration. However, you can calibrate thedisplayed value if you notice major errors inreadings.
Important!
● The watch will not be able to producecorrect temperature readings if youmake a mistake during thecalibration procedure. Check tomake sure that the value you use forcalibration produces correctpressure readings.
1. Pull out the crown.
Crown
2. Rotate the crown to change the value.Calibration Unit: 1 hPa (0.05 inHg)● To return the barometric pressure
setting to its initial factory default, press(A) and (C) at the same time.
3. Push the crown back in to complete thesetting operation.
Specifying the BarometricPressure Measurement Unit
You can specify either hectopascals (hPa) orinches of mercury (inHg) as the display unit forbarometric pressure values.
Important!
● When Tokyo (TYO) is set as theHome City, the barometric pressureunit is fixed as hectopascals (hPa)and cannot be changed.
1. Pull out the crown.
Crown
2. Press (B).3. Rotate the crown to select hectopascals
(hPa) or inches of mercury (inHg) as themeasurement unit.
4. Push the crown back in to complete thesetting operation.
Barometric PressureReading Precautions
● The barometric pressure graph producedby this watch can be used to obtain an ideaof upcoming weather conditions. However,this watch should not be used in place ofprecision instruments required for officialweather prediction and reporting.
● Pressure sensor readings can be affectedby sudden changes in temperature.Because of this, there may be some error inthe readings produced by the watch.
TemperatureMeasurement
The watch can be used to take current airtemperature readings.
Important!
● Check the information below to findout how to ensure correct readings.l Temperature Reading Precautions
Getting readyEnter the Temperature Mode.l Navigating Between Modes
Thermometer Mode
● Entering the Temperature Mode startstemperature readings.
Checking the CurrentTemperature
Entering the Temperature Mode displaystemperature reading results. After you enterthe Temperature Mode, the watch takesreadings about every five seconds for threeminutes. After that, a measurement is takenabout every two minutes.● To retrigger measurement, press (A).
Note
● The watch will automatically returnto the Timekeeping Mode if you donot perform any operation in theTemperature Mode for about onehour.
● The measuring range is -10.0 °C to60.0 °C (14.0 °F to 140.0 °F) (0.1 °C(0.2 °F) units). [- - .-] will appear forthe measured value if it is outside theallowable range.
● To return to the Timekeeping Mode,hold down the (B) button for abouttwo seconds.
Operation Guide 5470
15
Calibrating TemperatureReadings
The watch’s temperature sensor is adjusted atthe factory and normally does not requirecalibration. However, you can calibrate thedisplayed value if you notice major errors inreadings.
Important!
● Check to make sure that the valueyou use for calibration producescorrect temperature readings.
● Before calibrating the temperaturereading, remove the watch from yourwrist and leave it in the area whereyou plan to measure temperature forabout 20 or 30 minutes to allow thecase temperature to become thesame as the air temperature.
1. Pull out the crown.
Crown
2. Rotate the crown to calibrate thetemperature value.Calibration unit: 0.1 °C (0.2 °F)● To return the barometric pressure
setting to its initial factory default, press(A) and (C) at the same time.
3. Push the crown back in to complete thesetting operation.
Specifying the TemperatureMeasurement Unit
You can select either Celsius (°C) orFahrenheit (°F) as the temperature displayunit.
Important!
● When Tokyo (TYO) is set as theHome City, the temperature unit isfixed as Celsius (°C) and cannot bechanged.
1. Pull out the crown.
Crown
2. Press (B).3. Rotate the crown to select Celsius (°C) or
Fahrenheit (°F) as the measurement unit.
4. Push the crown back in to complete thesetting operation.
Temperature ReadingPrecautions
Body temperature, direct sunlight, andhumidity all have an effect on temperaturereadings. To help ensure more accuratetemperature readings, remove the watch fromyour wrist, wipe it dry of any moisture, andplace it in a well-ventilated location notexposed to direct sunlight. You should be ableto take temperature readings after about 20 to30 minutes.
Viewing AltitudeRecords
You can use the Altitude Record Recall Modeto view manually recorded and auto recordeddata.Getting readyEnter the Altitude Record Recall Mode.l Navigating Between Modes
Data Recall Mode
Viewing Recorded DataEntering the Altitude Record Recall Modedisplays the data type screen of an altitudedata record. Use the (A) and (C) buttons toscroll between the data top screens as shownbelow.● Holding down (A) or (C) scrolls at high
speed.
ACCA
ACCA
A
C
C*
A*
Total Descent
Total Ascent Low Altitude
High Altitude
Auto Recorded Data
Manually Recorded Data
* Each press of a button scrolls to the topscreen of the next manually recorded datarecord. There can be up to 30 records inmemory, numbered from 1 ([-01-]) to 30([-30-]).
Operation Guide 5470
16

Note
● If there is no data left in memory dueto a data delete operation, error, orsome other reason, [- - - -] or [0] willappear on the display.
● If the cumulative ascent (ASC) orcumulative descent (DSC) valueexceeds 99,999 m (327,995 feet), itwill revert to 0 and continue fromthere.
● Pressing (D) returns to the topscreen (record number, DSC, ASC,MAX, or MIN) of the data that you areviewing.
● Manually Recorded DataAfter displaying the top screen of a manuallyrecorded data record (01 through 30), you cannavigate between the record’s data screensas shown below.Example: Manually recorded Record 01
D D 2 seconds
2 seconds
1 second
Altitude Time
Recording dateRecord number
● Auto Recorded Data
High altitude and low altitudeExample: High altitude
D D
2 seconds
2 seconds
1 second
Altitude Time
Recording dateData type
Cumulative ascent and cumulativedescentExample: Cumulative ascent
D
D
2 seconds
1 second
Cumulative altitude
Date when accumulation started.Data type
Deleting a Particular Record
1. Use the (A) and (C) buttons to scrollthrough the top screens of the records anddisplay the one you want to delete .
● Note that holding down the (D) buttonfor more than five seconds in step 2below will delete all data.
2. Hold down the (D) button forapproximately two seconds. Release thebutton as soon as [CLEAR] changes fromflashing to not flashing.This deletes the record you selected.
Deleting All RecordsHold down the (D) button for about fiveseconds, until the message [CLEAR ALL]changes from flashing to not flashing. Thisdeletes all the altitude record data.
StopwatchThe stopwatch can be used to perform 1/100second elapsed time measurement up to 23hours, 59 minutes, 59.99 seconds.It can also measure split times.Getting readyEnter the Stopwatch Mode.l Navigating Between Modes
Stopwatch Mode
Note
● Elapsed time returns to zeroautomatically and timing continuesfrom there when the maximum limitis reached.
● Once started, elapsed timemeasurement continues until youpress (C) to reset the stopwatch,even if you change to a differentmode and even if the stopwatchreaches the elapsed timemeasurement limit.
● Exiting the Stopwatch Mode while asplit time is frozen on the displayclears the split time and returns toelapsed time measurement.
Operation Guide 5470
17

Measuring Elapsed Time
1. Use the operations below to measureelapsed time.
A
A
A
A
nn
n
Stop
Resume
Stop
Start
Hours, minutes, seconds, 1/100 seconds
2. Press (C) to reset the elapsed time to allzeroes.
Measuring a Split Time
1. Use the operations below to measureelapsed time.
A
C
C
A
nn
n
Stop
Split release
Split
Start
Hours, minutes, seconds, 1/100 seconds
2. Press (C) to reset the elapsed time to allzeroes.
Timing the First and SecondPlace Finishers
1. Use the operations below to measureelapsed time.
A
C
A
C
nn
nSplit release (Time of 2nd finisher)
2nd Finisher
1st Finisher (Time of 1st finisher)
Start
Hours, minutes, seconds, 1/100 seconds
2. Press (C) to reset the elapsed time to allzeroes.
TimerThe timer counts down from a start timespecified by you. A beeper sounds when theend of the countdown is reached.Getting readyEnter the Timer Mode.l Navigating Between Modes
Timer Mode
Setting the Timer Start Time
1. Pull out the crown.This will cause the timer minutes digits toflash.
Minutes
Crown
2. Rotate the crown to change the minutesvalue.The start time can be set in 1-minute unitsup to 60 minutes.
3. Push the crown back in to complete thesetting operation.
Using the TimerPress (A) to start the countdown. A beepersounds when the end of the countdown isreached.● Pressing (A) toggles the countdown
between pause and resume.● Pulling out the crown while a countdown is
in progress will reset to the countdown starttime. You can then use the crown to changethe start time.
Start/Stop
Reset
Minutes, seconds
● To stop the timer and reset it to the starttime
1. While a countdown operation is inprogress, press (A).This stops the timer.
2. Press (C).This resets the timer to the start time.
Stopping the TimerPressing any button while the timer beeper issounding stops it.
Operation Guide 5470
18

AlarmsThe watch will beep when an alarm time isreached. You can set up to five differentalarms. The hourly time signal causes thewatch to beep every hour on the hour.Getting readyEnter the Alarm Mode.l Navigating Between Modes
Alarm Mode
Configuring Alarm Settings
1. Use the (A) and (C) buttons to display thealarm ([AL1] to [AL5]) you want toconfigure.
Alarm time
OFF
a.m. (A)
Alarm number
2. Pull out the crown.This turns on the alarm.
Crown
3. Rotate the crown to change the minutesetting.
● The hour hand will move in accordancewith minute hand movement.
● To set the hour hand separately, go tostep 4 of this procedure.
4. Press (B).
5. Rotate the crown to change the hoursetting.
● If you are using 12-hour timekeeping,[A] indicates a.m., while [P] indicatesp.m.
6. Push the crown back in to complete thesetting operation.
Note
● In the Alarm Mode, hold down the (A)button to sound the alarm.
Turning an Alarm On or Off
1. Use the (A) and (C) buttons to display thealarm ([AL1] to [AL5] or [SIG]) you want toturn on or off.
Alarm number
2. Press (D) to toggle the displayed alarmbetween on and off.
Stopping an AlarmPressing any button while the beeper issounding stops it.
Finding Out an Alarm’sOn/Off Status
Turning on an alarm or the hourly time signalcauses the corresponding indicator to appearon the display.
Hourly time signal
Alarm
When any alarm is turned on:[ALM] is displayed.When the hourly time signal is enabled:[SIG] is displayed.
World TimeYou can view the current time in 29 cities (29time zones), and UTC (Coordinated UniversalTime) time.Getting readyEnter the World Time Mode.l Navigating Between Modes
Home City time
World Time Mode
World time
Checking the Time in AnotherZone
1. Pull out the crown.The second hand will move to thecurrently set World Time City.
Crown
2. Rotate the crown to move the secondhand to the city you want to set.The hour and minute hands will indicatethe current time in the selected WorldTime City.
3. Push the crown back in to complete thesetting operation.This will cause the current time in theselected Home City to appear on thedigital display.
Home City time
Time in selected city
Operation Guide 5470
19

Note
● To look up the current time in a citythat is not among the built-in cities,select a built-in city that is in thesame time zone as the city you wantto look up. For information aboutbuilt-in cities, see the “City CodeList”.
● Pressing (D) while in the World TimeMode will cause the second hand tomove to the city code of the currentlyselected World Time City.
● To check whether the currentlyselected World Time City time isa.m. or p.m., enter the World TimeMode, and then press (A). Thesecond hand will move to “A” (a.m.)or “P” (p.m.).
Configuring the SummerTime Setting
When summer time is used in a World Timecity, you can enable Summer Time for that city.l Summer Time
1. Pull out the crown.The second hand will move to thecurrently set World Time City.
Crown
2. Press (B).3. Rotate the crown to change the summer
time setting.● [OFF]
The watch always indicates standardtime.
● [ON]The watch always indicates summertime.
4. Push the crown back in to complete thesetting operation.
Swapping the World Timeand Current Location Time
Holding down the (D) button for about threeseconds will swap your World Time with yourcurrent location time (Home Time).
n
Current time
Current time
World Time
World Time
After swappingBefore swapping
Note
● This function comes in handy whenyou need to move to another timezone.l International Travel
Accessing the UTC(Coordinated UniversalTime) Zone
To select UTC as the World Time City, holddown the (A) button for about three seconds.
Display IlluminationThe face of the watch can be illuminated forreading in the dark. The watch also has anauto light function that automaticallyilluminates the display whenever the watch isangled for reading in the dark.
Note
● Illumination will turn off automaticallyif an alarm starts to sound or if youperform a crown operation.
● Display illumination is disabledwhen any one of the conditionsbelow exists. Display illumination isalso disabled while measurement bya sensor is in progress.ー While a time signal receive
operation is in progressー While a hand movement
operation is in progress
Illuminating the DisplayManually
Pressing (L) in any mode turns on faceillumination.
Operation Guide 5470
20

Auto LightIf Auto Light is enabled, display illuminationwill turn on automatically whenever the watchis positioned at an angle of 40 degrees or morewhen it is dark.
40 degrees or more
Important!
● Auto Light may not operate properlywhen the watch is at a horizontalangle of 15 degrees or greater fromhorizontal as shown in the illustrationbelow.
● Auto Light may operateunintentionally and run down thebattery if the watch is blocked fromlight by your sleeve.
● Electro-static charge or magnetismcan interfere with proper auto lightoperation. If this happens, trylowering your arm and then angle ittowards your face again.
● When moving the watch you maynote a slight rattling sound. This isdue to operation of the auto lightswitch, which determines the currentorientation of the watch. It does notindicate malfunction.
Note
● Auto Light is disabled when any oneof the conditions below exists.ー Alarm, timer alert, or other beeper
soundingー Watch in the Compass Modeー Time signal receive operation in
progressー Hand movement operation is
progress● If Auto Light is enabled, face
illumination may be delayed if youangle the watch towards your facewhile a compass, altitude,barometric pressure, or temperaturereading operation is beingperformed.
Configuring the Auto LightSetting
1. In the Timekeeping Mode, pull out thecrown.
Crown
2. Press (B) three times so [AUTO] isdisplayed.
3. Rotate the crown to turn the setting on oroff.
[ON]: Auto Light enabled.[OFF]: Auto Light disabled.
4. Push the crown back in to complete thesetting operation.
Specifying the IlluminationDuration
You can select either 1.5 seconds or threeseconds as the illumination duration.
1. In the Timekeeping Mode, pull out thecrown.
Crown
2. Press (B) four times so the current setting([LIGHT1] or [LIGHT3]) is displayed.
3. Rotate the crown to select an illuminationduration.[LIGHT1]: 1.5-second illumination[LIGHT3]: 3-second illumination
4. Push the crown back in to complete thesetting operation.
Hand AlignmentAdjustment
Strong magnetism or impact can cause thetime indicated by the analog hands to becomedifferent from the time on the digital display. Ifthis happens, correct the hand position.● The watch has a function to adjust hand
alignment automatically.
Important!
● You do not need to perform theoperation below as long as theanalog hands indicate the same timeas the digital display.
Getting readyEnter the Timekeeping Mode.l Navigating Between Modes
Timekeeping Mode
Operation Guide 5470
21

Adjusting Hand Alignment
1. Pull out the crown.2. Hold down the (A) button for about five
seconds until [HAND ADJ] flashes on thedisplay.This indicates that hand alignmentadjustment has started.● [HAND SET] will flash first on the
display about 0.5 seconds after youhold down the (A) button. Keep thebutton depressed until [HAND ADJ]flashes on the display.
● All of the hands will move to 12 o’clockwhen hand alignment adjustment iscomplete.
3. Check to make sure that all of the handsare stopped at 12 o’clock.
● Hand alignment will not be adjustedcorrectly if you advance to the next stepwhile the hands are still moving.
4. Push the crown back in to complete thesetting operation.
● After hand alignment adjustment iscomplete, check to make sure that theproper time is being indicated in theTimekeeping Mode by the hands andon the digital display. If the timeindication is not correct, adjust handalignment again.
Other SettingsGetting readyEnter the Timekeeping Mode.l Navigating Between Modes
Timekeeping Mode
Enabling the ButtonOperation Tone
Use the procedure below to enable or disablethe tone that sounds when you press a button.
1. Pull out the crown.The second hand will move to thecurrently set city.
Crown
2. Press (B) twice so the current setting([KEY♪] or [MUTE]) is displayed.
3. Rotate the crown to select either [KEY♪]or [MUTE].[KEY♪]: Operation tone is enabled.[MUTE]: Operation tone is muted.
4. Push the crown back in to complete thesetting operation.
Configuring Power SavingFunction Settings
1. Pull out the crown.The second hand will move to thecurrently set city.
Crown
2. Press (B) six times so [P.SAVE] isdisplayed.
3. Rotate the crown to turn the setting on oroff.[ON]: Power Saving enabled.[OFF]: Power Saving disabled.
4. Push the crown back in to complete thesetting operation.
Note
● For details about Power Saving, see“Power Saving Function”.
Operation Guide 5470
22

International TravelUse the procedure below to easily change dayand time settings of the watch to a destinationlocation.
● Before BoardingSelect a World Time City that corresponds toyour destination.
Destination time
Current time
lWorld Time
● After ArrivingSwap the origin time zone time with thedestination time zone time.
n
DestinationOrigin
l Swapping the World Time and CurrentLocation Time
Other Information
City Code ListThis list shows the 29 cities that are built in towatch memory.
City Code City Name OffsetLON London +0PAR Paris +1ATH Athens +2JED Jeddah +3THR Tehran +3.5DXB Dubai +4KBL Kabul +4.5KHI Karachi +5DEL Delhi +5.5KTM Kathmandu +5.75DAC Dhaka +6RGN Yangon +6.5BKK Bangkok +7HKG Hong Kong +8TYO Tokyo +9ADL Adelaide +9.5SYD Sydney +10NOU Noumea +11WLG Wellington +12PPG Pago Pago -11HNL Honolulu -10ANC Anchorage -9LAX Los Angeles -8DEN Denver -7CHI Chicago -6NYC New York -5YHZ Halifax -4RIO Rio de Janeiro -3RAI Praia -1● The information in the above table is current
as of December 2014.
Summer Time TableThis list shows the summer time periods ofTime Signal Cities. When the summer timesetting is “AT (AUTO)”, switching betweenstandard time and summer time is performedautomatically at the timing shown in the tablebelow.
City Name Summer TimeStart
Summer TimeEnd
London 01:00, lastSunday in March
02:00, lastSunday inOctober
Paris 02:00, lastSunday in March
03:00, lastSunday inOctober
Athens 03:00, lastSunday in March
04:00, lastSunday inOctober
Anchorage 02:00, secondSunday in March
02:00, firstSunday inNovember
LosAngeles
02:00, secondSunday in March
02:00, firstSunday inNovember
Denver 02:00, secondSunday in March
02:00, firstSunday inNovember
Chicago 02:00, secondSunday in March
02:00, firstSunday inNovember
New York 02:00, secondSunday in March
02:00, firstSunday inNovember
● The information in the above table is currentas of December 2014.
Operation Guide 5470
23

Troubleshooting
Auto time setting is notcorrect.
Q1 The watch cannot perform a receiveoperation.
Is the watch’s battery charged?Signal reception is not possible whilebattery power is low. Keep the watchexposed to light until it rechargessufficiently.l Solar Charging
Is the watch in the Timekeeping Mode?Time signal auto receive is performed onlywhile the watch is in the TimekeepingMode. Press (B) to enter the TimekeepingMode.● To trigger a time signal receive
operation manually, enter the ReceiveMode and then hold down the (A) buttonfor about two seconds.l Navigating Between Modesl Auto Time Adjustment
Is your Home City setting correct for yourlocation?
The watch will not indicate the correct timeif the Home City setting is wrong. Changeyour Home City setting so it correctlyreflects your location.l Setting a Home Time City
After checking the above, the watch stillcannot perform a receive operation.
Time signal reception is not possiblewhen any one of the conditions exists.● When watch is at Level 2 power saving● Barometric Pressure Change
Indications turned on● Timer countdown in progressIf successful reception is not possible forsome reason, you can adjust the time andday settings manually.
Q2 The signal receive operation alwaysfails.
Is the watch in a location that is appropriatefor signal reception?
Check your surroundings and move thewatch to a location where signal receptionis better.l Appropriate Signal Reception Location
Did you avoid touching the watch while thereceive operation was in progress?
Minimize movement of the watch and donot perform any watch operation while areceive operation is in progress.
Is there an alarm configured to soundduring the same period that the signalreceive operation is performed?
Receive stops if an alarm operation startswhile it is being performed. Disable thealarm.l Turning an Alarm On or Off
Is the signal transmitter in your areatransmitting a signal?
The transmitter of the time signal may notbe transmitting. Try again later.
Q3 Time setting is incorrect even whentime signal reception is successful.
Strong magnetism or impact may cause thehands of the watch to go out of alignment.Adjust hand alignment.l Adjusting Hand Alignment
Altitude Measurement
Q1 Readings produce different results atthe same location.Watch readings are different fromaltitude information available fromother sources.Correct altitude readings are notpossible.
Relative altitude is calculated based onchanges in barometric pressure measured bythe watch’s pressure sensor. This means thatbarometric pressure changes can causereadings taken at the same location to bedifferent. Also note that the value displayed bythe watch may be different from the actualelevation and/or sea level elevation indicatedfor the area where you are located. Whenusing the watch’s altimeter while mountainclimbing, it is recommended that you regularlycalibrate its readings in accordance with localaltitude (elevation) indications.l Calibrating Altitude Readings
Q2 Following a relative altitude reading,the watch’s second hand points to 9o’clock.
The second hand will move to 9 o’clock if areading is outside the allowable altitudemeasurement range (-700 m to 10,000 m(-2,300 to 32,800 feet)). If [ERR] is displayed,there may be a problem with the sensor.l Taking a Relative Altitude Reading from
Some Reference Point
Q3 [ERR] appears during measurement.There may be a problem with the sensor. Trytaking another measurement. If [ERR] keepsappearing after multiple measurementattempts, contact a CASIO service center.
Operation Guide 5470
24
Digital Compass
Q1 The entire display is flashing.Abnormal magnetism has been detected.Move away from any potential source ofstrong magnetism and try taking a readingagain.● If the display flashes again, it could mean
that the watch itself has becomemagnetized. Move away from any potentialsource of strong magnetism, performbidirectional calibration, and then try takinga reading again.l Calibrating Compass Readings
(Bidirectional Calibration)l Digital Compass Reading Precautions
Q2 [ERR] appears during measurement.There is a problem with the sensor or theremay be a source strong magnetic forcenearby. Move away from any potential sourceof strong magnetism and try taking a readingagain. If [ERR] keeps appearing after multiplemeasurement attempts, contact a CASIOservice center.l Digital Compass Reading Precautions
Q3 [ERR] appears followingbidirectional calibration.
If [- - -] is followed by [ERR] on the display, itcould mean there is something wrong with thesensor.● If [ERR] disappears after about one second,
try performing bidirectional calibrationagain.
● If [ERR] continues to appear even aftermultiple attempts, contact your originalretailer or CASIO service center.
Q4 Direction information indicated by thewatch is different from that indicatedby a backup compass.
Move away from any potential source ofstrong magnetism, perform bidirectionalcalibration, and then try taking a readingagain.l Calibrating Compass Readings
(Bidirectional Calibration)l Digital Compass Reading Precautions
Q5 Readings at the same locationproduce different results.Cannot take readings indoors.
Move away from any potential source ofstrong magnetism and try taking a readingagain.l Digital Compass Reading Precautions
Barometric PressureMeasurement
Q1 Following a relative barometricpressure reading, the watch’ssecond hand points to 9 o’clock.
The second hand will move to 9 o’clock if areading is outside the allowable barometricpressure measurement range (260 hPa to1,100 hPa (7.65 inHg to 32.45 inHg)). If [ERR]appears on the display, there may be aproblem with the sensor.l Checking the Change in Barometric
Pressure between Two Readings
Q2 [ERR] appears during measurement.There may be a problem with the sensor. Trytaking another measurement. If [ERR] keepsappearing after multiple measurementattempts, contact a CASIO service center.
Temperature Measurement
Q1 [ERR] appears during measurement.There may be a problem with the sensor. Trytaking another measurement. If [ERR] keepsappearing after multiple measurementattempts, contact a CASIO service center.
World Time
Q1 The time for a World Time City is notcorrect.
The summer time setting (standard time/summer time) is wrong.l Configuring the Summer Time Setting
Hand Movement andIndications
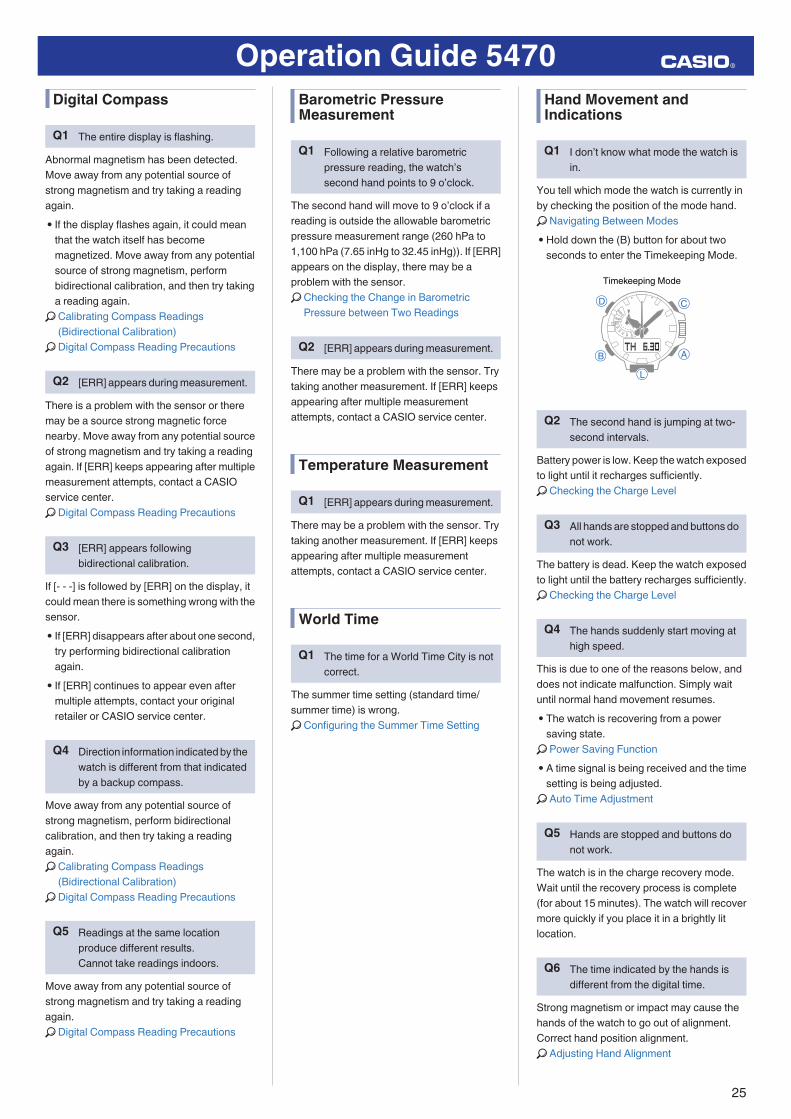
Q1 I don’t know what mode the watch isin.
You tell which mode the watch is currently inby checking the position of the mode hand.l Navigating Between Modes● Hold down the (B) button for about two
seconds to enter the Timekeeping Mode.
Timekeeping Mode
Q2 The second hand is jumping at two-second intervals.
Battery power is low. Keep the watch exposedto light until it recharges sufficiently.l Checking the Charge Level
Q3 All hands are stopped and buttons donot work.
The battery is dead. Keep the watch exposedto light until the battery recharges sufficiently.l Checking the Charge Level
Q4 The hands suddenly start moving athigh speed.
This is due to one of the reasons below, anddoes not indicate malfunction. Simply waituntil normal hand movement resumes.● The watch is recovering from a power
saving state.l Power Saving Function● A time signal is being received and the time
setting is being adjusted.l Auto Time Adjustment
Q5 Hands are stopped and buttons donot work.
The watch is in the charge recovery mode.Wait until the recovery process is complete(for about 15 minutes). The watch will recovermore quickly if you place it in a brightly litlocation.
Q6 The time indicated by the hands isdifferent from the digital time.
Strong magnetism or impact may cause thehands of the watch to go out of alignment.Correct hand position alignment.l Adjusting Hand Alignment
Operation Guide 5470
25

Crown Operations
Q1 Nothing happens when I rotate thecrown.
Leaving the crown pulled out for more than twominutes without performing any operation willautomatically disable crown operation. Pushthe crown back in to its normal position andthen pull it out again.l Using the Crown
Usage Restrictions
Q1 [RECOVER] is flashing on thedisplay.
A flashing [RECOVER] indicates that somefunctions have been temporarily disabled toprotect against a drop in battery voltage.l Checking the Charge Level
Charging
Q1 The watch does not work eventhough it is exposed to light.
The watch stops operating whenever thebattery goes dead. Keep the watch exposedto light until it recharges sufficiently.l Checking the Charge Level
Q2 [CHARGE] is flashing on the digitaldisplay.
The charge level of the watch is extremely low.Immediately expose the watch to light tocharge it.l Checking the Charge Level
Operation Guide 5470
26