Embed Size (px)
Citation preview

INSTALLATIONMANUAL
Cross Platform ControlSpecifications, Installation and Programming
M1 includes the SIA CP-01 Standards for False Alarm Reduction
TM

M1G Installation and Programming ManualPage 2
IntroductionLIMITATION
The ELK-M1G Control is designed to warn against unauthorized entry and other situations. However, it is not a guarantee of protection againstthe occurrence of burglary, fire, or other emergency. Any alarm system is subject to compromise or failure to warn for various reasons. Forexample:
- Unauthorized access can be gained through unprotected points or by disarming or bypassing protected points.- Sensing devices are power driven and do not operate without electrical power. Battery-operated devices will not work without batteries, with
dead batteries, or if the batteries are not put in properly. Devices powered solely by AC will not work if their AC power supply is cut off for anyreason, however briefly.
- Telephone lines over which alarm signals are transmitted may be out of service or rendered inoperable by an intruder.- Even if the system responds to the emergency as intended, occupants may have insufficient time to protect themselves from the emergency
situation. In the case of a monitored alarm system, authorities may not respond appropriately.- Smoke detectors have limitations and cannot detect all types of fires. According to data published by the Federal Emergency Management
Agency, while smoke detectors have played a key role in reducing residential fire deaths in the United States, they may not activate or provideearly warning for a variety of reasons in as many as 35% of all fires, . Some of the reasons some detectors used in conjunction with thisSystem may not work are as follows. Smoke detectors may have been improperly installed and positioned. Smoke detectors may not sensefires that start where smoke cannot reach the detectors, such as in chimneys, in walls, or roofs, or on the other side of closed doors. Smokedetectors also may not sense a fire on another level of a residence or building. A second floor detector, for example, may not sense a first flooror basement fire. Finally, smoke detectors have sensing limitations. No smoke detector can sense every kind of fire every time. In general,detectors may not always warn about fires caused by carelessness and safety hazards like smoking in bed, violent explosions, escaping gas,improper storage of flammable materials, overloaded electrical circuits, children playing with matches, or arson. Depending an the nature of thefire, and/or location of the smoke detectors, the detector, even if it operates as anticipated, may not provide sufficient warning to allow alloccupants to escape in time to prevent injury or death..
- Signals sent by wireless transmitters may be blocked or reflected by metal before they reach the alarm receiver. Even if the signal pathhas been recently checked during a weekly test, blockage can occur if a metal object is moved into the path.
- Wireless transmitters (used in some systems) are designed to provide long battery life under normal operating conditions. Longevity ofbatteries may be as much as 4 to 7 years, depending on the environment, usage, and the specific wireless device being used. Externalfactors such as humidity, high or low temperatures, as well as large swings in temperature, may all reduce the actual battery life in a giveninstallation. This wireless system, however, can identify a true low battery situation, thus allowing time to arrange a change of battery tomaintain protection for that given point within the system.
- Installing an alarm system may make the owner eligible for a lower insurance rate, but an alarm system is not a substitute for insurance.Homeowner, property owners and renters should continue to act prudently in protecting themselves and continue to insure their lives andproperty.
- A user may not be able to reach a panic or emergency button quickly enough.- Passive Infrared Motion Detectors can only detect intrusion within the designed ranges as diagrammed in their installation manual. Passive
Infrared Detectors do not provide volumetric area protection. They do create multiple beams of protection, and intrusion can only be detectedin unobstructed areas covered by those beams. They cannot detect motion or intrusion that takes place behind walls, ceilings, floors, closeddoors, glass partitions, glass doors, or windows. Mechanical tampering, masking, painting or spraying of any material on the mirrors, windowsor any part of the optical system can reduce their detection ability. Passive Infrared Detectors sense changes in temperature; however, as theambient temperature of the protected area approaches the temperature range of 90 to 105F (32 to 40C), the detection performance candecrease.
- Alarm warning devices such as sirens, bells or horns may not alert people or wake up sleepers if they are located on the other side ofclosed or partly open doors. If warning devices are located on a different level of the residence from the bedrooms, they are less likely towaken or alert people inside the bedrooms. Even persons who are awake may not hear the warning if the alarm is muffled by noise from astereo, radio, air conditioner or other appliance, or by passing traffic. Finally, alarm warning devices, however loud, may not warn hearing-impaired people.
- This equipment, like other electrical devices, is subject to component failure. Even though this equipment is designed to last as long as 20years, the electronic components could fail at any time.
- The most common cause of an alarm system not functioning when an intrusion or fire occurs is inadequate maintenance. This alarmsystem should be tested weekly to make sure all sensors and transmitters are working properly.
ALL RIGHTS RESERVEDNo part of this publication may be reproduced, stored in a retrieval system, or transmitted in any form or by any means, electronic, mechanical,photocopying, recording, or otherwise without the prior written permission of the manufacturer. The material in this publication is for informationpurposes and subject to change without notice. The manufacturer assumes no responsibility for any errors which may appear in this publication.Printed in U.S.A.
Use of this control for fire detection and/or annunciation may not be permitted by certain states, counties, municipalities or local jurisdiction. It isthe responsibility of the installing alarm company to check with the local A.H.J. (Authority Having Jurisdiction) or State Fire Marshal’s office priorto using this control for fire detection.

M1G Installation and Programming Manual Page 3
Table of Contents
Specifications, Features, and Benefits ..................................................................................................... 5Wiring & Hookup Diagram ........................................................................................................................... 6Section 1 - Installation and Wiring ............................................................................................................. 8
1.1 Planning the Installation ...................................................................................................................... 81.2 Parts Diagram & Descriptions ........................................................................................................... 81.3 Mounting and Wiring Preparation ....................................................................................................... 81.4 Control Wiring .................................................................................................................................... 9Data Bus E.O.L. Termination - VERY IMPORTANT! .............................................................................. 12
Section 2 - Operating the System ............................................................................................................ 142.1 Introduction ....................................................................................................................................... 142.2 Powering Up (One Keypad) ............................................................................................................. 142.3 User Codes and Authorities .............................................................................................................. 142.4 Installer Program Code and Authorities ............................................................................................ 142.5 Keypad Overview ............................................................................................................................. 15Keypad Menus ........................................................................................................................................ 16Multi-area (Partition) Operation ............................................................................................................... 20
Section 3 - Programming The Control ..................................................................................................... 213.1 Introduction ....................................................................................................................................... 213.2 Local Keypad Programming ............................................................................................................. 213.3 Local or Remote Computer Programming (ELK-RP) and Anti-Takeover ......................................... 213.4 Area Partitioning................................................................................................................................ 213.5 Communicator Setup Checklist ....................................................................................................... 223.6 Entering Installer Level Programming............................................................................................... 22Menu 01 - Bus Module Enrollment .......................................................................................................... 24Menu 02 - User Code Options ................................................................................................................ 25Menu 03 - Area Definitions ...................................................................................................................... 26Menu 04 - Keypad Definitions ................................................................................................................. 28Menu 05 - Zone Definitions ..................................................................................................................... 30Menu 06 - Alarm Duration Timers ........................................................................................................... 33Menu 07 - Global System Definitions ..................................................................................................... 34Menu 08 - Telephone Account Setup ...................................................................................................... 38Menu 09 - Area Reporting Codes ........................................................................................................... 40Menu 10 - Zone Reporting Codes ........................................................................................................... 42Menu 11 - Keypad F-Key Reporting Codes ............................................................................................ 43Menu 12 - Sys Report Code Options & Codes ...................................................................................... 44Menu 13 - User Report Codes................................................................................................................ 46Menu 14 - Wireless Definitions ............................................................................................................... 47
Section 4 - PC Programming and Automation Capabilities.................................................................... 494.1 ELK-RP Software ............................................................................................................................ 494.2 Update/Verify Firmware in the Control and Peripherals ................................................................... 504.3 Automation Rules and Attributes ...................................................................................................... 51
Appendix A - Event Codes ........................................................................................................................ 58Appendix B - Telephone Remote Control ............................................................................................... 60Appendix C - Voice Message Vocabulary *RP only * ............................................................................. 62Appendix D - Two Way “Listen-in/Talk” Interface (optional) ................................................................. 64Appendix E - SIA CP-01 Compliance ........................................................................................................ 65Appendix F - Regulatory Agency Statements .......................................................................................... 66Appendix G - Additional Keypad Information .......................................................................................... 68Index............................................................................................................................................................ 71

M1G Installation and Programming ManualPage 4
OUT3 On LED
J-16 Programmable Outputs See Note 1
& Note 2
PLC †LightingInterface
Conn.
J4
1 WAY (PL513/PSC04)Select PLC Mode
2 WAY (TW523/PSC05)
JP2
RS2
32 C
ON
N.
J5
Bell (Supervised)
Voice/Siren † †
Dry Contact Relayrated 5A @12 - 28VDCSee Note 2
OU
T 1
OU
T 3
N/C
COM
N/O
OU
T 2
Notes1. Maximum STANDBY continuous current drainfrom terminals +SAUX,+VAUX,+VKP, andconnector J16 is 1.5 Amps. Observe ULResidential Burg and Residential Fire limitations.
RED
BLACK
WHITE
GREEN
+VAUX+12VDC Auxiliary
Power (3)1.25 Amp PTC
protected
Grey
Brown
Red
Green TELCOLINE
HOUSEPHONES
Z1
NEG
Z2
Z3
NEG
Z5
NEG
Z7
Z6
Z4
NEG
Z8
Z9
NEG
Z10
Z11
NEG
Z13
NEG
Z15
Z14
Z12
NEG
Z16
+SAUX
NEG
+VAUX
NEG
+VAUX
NEG
+VAUX
NEG
AC16.5 VAC
+VKP
DATA B
DATA A
NEG
OUT 16OUT 15OUT 14OUT 13OUT 12OUT 11OUT 10OUT 9OUT 8OUT 7
+12VNEG
T1
R1
RING
TIP
Aux Data Bus †See Manual
Serial Port †for Computer/ELKRP
See Manual
J3BA-C+
Audio Network Interface †1
Keypad &Data Bus
J2 J1
16 Zones expandable to 208
Do NotConnect toa Phone
Line!
Not Used -See Note 3
BATTERYON
SW1
+ -
12V Battery7 to 18 Ah
Keypad
Testing of this system should be performedregulary. Control panel specifications are subjectto change without notice.
Complies with FCC Part 68:Reg. # US: 5K6AL03BELK-M1 REN: 0.3BUse Standard Jack: USOC RJ-31X.Serial Number located below on base.Complies with part 15 of FCC rules.
See Note 2
+SAUX+12VDC Switched
Smoke Power1.1 Amp PTC protected
NEGDATA B
+12V
JP3
Jumper to start withno AC - See Note 4.
Power
Status
ReverseBat Leads
UL Listed Transformer,Class II, 16.5VAC, 45VA
Do not connect to aswitched outlet.
ELK-TRG1640
NORMALZONE 16
JP1SMOKE2WIRE
TELCO SEIZEDDIALER ACTIVE
Set JP1 to '2WIRE SMOKE' and use 680 OhmEOL resistor, part # ELK-ER680 Use Only Compatible Detectors:System Sensor: 1151, 2100, 2100T, 2151GE: 429AT, 521BXT, 521B.Hochiki America: SLK-835.Detection Systems: DS250, DS250TH, DS282, DS282TH, DS282THS, DS282THC.
1N.C. N.O.ZONE2200
OhmEOL
2N.C. N.O.ZONE2200
OhmEOL
3N.C. N.O.ZONE2200
OhmEOL
4N.C. N.O.ZONE2200
OhmEOL
5N.C. N.O.ZONE2200
OhmEOL
6N.C. N.O.ZONE2200
OhmEOL
7N.C. N.O.ZONE2200
OhmEOL
8N.C. N.O.ZONE2200
OhmEOL
9N.C. N.O.ZONE2200
OhmEOL
10N.C. N.O.ZONE2200
OhmEOL
11N.C. N.O.ZONE2200
OhmEOL
12N.C. N.O.ZONE2200
OhmEOL
13N.C. N.O.ZONE2200
OhmEOL
14N.C. N.O.ZONE2200
OhmEOL
15N.C. N.O.ZONE2200
OhmEOL
16N.C. N.O.ZONE2200
OhmEOL
2-Wire Smoke Detector - Zone 16 ONLY
4-Wire Smoke Detector - Any Zone
2200OhmEOL
To Zone Input
U.L. Listed EOL Supervision Relay, ESL #204Aor equiv. Use 2,200 Ohm EOL resistor, part #ELK-ER2200. Set JP1 to 'Normal'.
N.O. Alarm Contacts
+
-
+- +SAUX
To Zone NEG
NEG
DATA A
+-+- See Note 2
Data Bus Terminating Resistor
See Note 1.
Data BusSee Note 1
J7
1.25 Amp PTCprotected
051205ELK PRODUCTS, INC.
HILDEBRAN, N.C., 28637, USA
1
1
Cross Platform Control
All circuits are power limited except Telco andBattery leads.
PSC05 †or
Equivalent
ELK-M1
Maximum Number = 20 Do not mix models.
StripStrip Wires to 1/4" Length
+680OhmEOL
- NEG
Z16
2. OUT 1 †† for speaker(s) ONLY (4 to 8 Ohms).If connecting more than 2, use series/parallelwiring to avoid going below a 4 ohm total load. OUT 2 Connect a UL Listed Bell or Siren (self-contained). Current limited to 1 Amp. ProgramGlobal Option 26 to Voltage. This output issupervised. Speaker(s) are only permitted fornon-UL installations. Series/parallel wire toavoid dropping below a 4 ohm total load. OUT 3 NO/NC dry contact relay rated 5A. OUT 7 through 16 are +12V switched positivevoltage outputs rated at 50mA max.3. This terminal (formerly earth gnd) not used.Do not connect any neg terminals to ground.4. If AC fails, control will shut down if batterydrops below 10.2 Volts. To start the control witha good battery and no AC, short the silver padsmomentarily. Replace Battery every 3-5 years.Test regularly with ELK-BLT Battery Life Tester.
O - I - B A +
TM
† Not Evaluated by UL†† Not for UL Listed Installations

M1G Installation and Programming Manual Page 5
General:• Large zone capacity: 16 on-board zones expandable to 208• Wireless capability † Up to 48 zones• Two Way Listen-in interface †• Flash Memory - Allows field updates to firmware electronically• RS-232 serial port to interface PCs and peripheral devices• Time/Date stamped 512 event history log• Menu driven, text keypad programming - no manual required!• Voice announcement of alarms, zone descs, status, etc.
- 500+ Word/Phrase Vocabulary- Link up to 6 words/phrases per announcement- 10 custom recordable words/phrases
• 13 On-Board Outputs: 1 voice driver/siren, 1 siren driver/voltage, 1 form “C” Relay, and 10 low current (50 mA) voltageoutputs
• Supports 4 wire (any zone) and 2 wire (zone 16) smokedetectors
• Includes Fire alarm verification routine• Can be partitioned into 8 areas and account numbers• User Codes: 99 (4 or 6 digit) with assignable authority levels• Arm levels: Away, Stay, Stay Instant, Nite, Nite Instant, Vacation• Plug-in terminal blocks make service and pre-wires a snap!• Hardware "watchdog" and nonvolatile EEPROM memory• Supervised phone line, alarm output, and aux. overcurrent
Communications• True V.22 bis Modem for fast reliable upload/download• Optional M1XEP Ethernet Interface † for user operation,
alarm reporting, programming, and more• Built-in Phone Remote Control makes any phone a keypad• Integrated Voice Dialer uses vocabulary or custom words• Communicator formats: SIA, Contact ID, 4 + 2, and Pager• Installer telephone (buttset) test feature• Elk-RP PC programming software with conflict resolution to
easily highlight differences between control and PC- Dial-up, ethernet, RS-232 port, or local house phone jack- Automatic answering machine bypass
Keypad• Backlit, Large Character LCD Display, 16 x 2 lines• Built-in Temperature Sensor• Optional Plug-in Prox Access reader (26 bit Weigand format)• Menu navigation keys and 6 programmable function keys• Plug-in connector, only 4 wires to the control• 1 Zone input and 1 Output Programmable per Keypad• Programmable display of time, date, & temperature• Displays system diagnostics and settings.• Maximum Keypads allowed: 16
Automation & Integration• Create lifestyle enhancing comfort, convenience, and security• Powerful “Whenever/And/Then” RULES Programming allows
almost any imaginable operation. No need to chain rulestogether. Any single “Whenever” event can have one or moreANDs and THENs (conditions and commands).
• Rules utilize easy to understand text based references• Control lighting using RS-232 serial or 2-way Power Line
Control (PLC) ports including On, Off, Dim, All On, All Offcommands †
• Transmit and receive custom serial ASCII strings• Read Temperature Sensors - Communicate with Thermostats• Turn on Tasks, Lights, Outputs via Keypad or Telephone
Remote• Sunset/Sunrise calculation and activation built-in
Power Supply• Heavy duty - 2.5 Amp power supply w/ 1.5 Amp continuous• Dynamic battery test• Master power switch and Low battery disconnect• PTC (fuseless) resettable overload protection• Multiple auxiliary power terminals
Part Numbers and Accessories:ELK-M1GCB M1G Gold Board Only (No Teminals Blocks)ELK-M1GOLD M1G Gold - Control in 14” metal canELK-M1GK M1G Gold Kit - No Metal Can, for use with
structured wiring systemsELK-M1SYS4 M1G Gold Kit - 14” metal can, Ctrl, Encl, Xfmr,
KP, 12V-8Ah, Spkr, RJsetELK-M1KP Keypad, LCD,16 character x 2 lineELK-M1XIN 16 Zone (input) expanderELK-M1XOVR 16 Output expander, 8 Voltage/8 RelaysELK-M1XOV 16 Output expander, Voltage onlyELK-M1RB Relay board, 8 form ”C” relaysELK-M1DBH Data bus wiring hub “Passive” †ELK-M1DBHR Data bus wiring hub “Active” for Retrofit †ELK-M1XEP Ethernet Port Exp/Interface †ELK-M1XSP Lighting, Thermostat Interface & Serial exp. †ELK-M1PR Mini prox reader for keypad †ELK-M1TWI Two Way Listen-in Int. w/3 mic inputs †ELK-M1TWS Speaker & Mic for Two Way Listen-in †ELK-M1ZTS Zone Temperature Sensor -50 to 140 F †ELK-RP PC software - Available free upon request
with Control Panel purchase
NOTE: Use of Two Way Listen-in may be regulated by local orstate laws and/or ordinance. It is the responsibility of theInstaller to check before using this feature.
Highlighted Features of the M1G (Gold)• Automation (“Whenever/And/Then”) Rules Capacity 528• Serial (RS232) Port Supported 8 w/expanders• Phone Number Capacity 8• Number of HVAC Thermostats † Supported 16• Total Number of Outputs Supported 205• Advanced Lighting † Options (Pre-set Dim, Extended, Levels, Scenes) Yes• Analog Zone Definitions Supported Yes
Specifications, Features, and Benefits
† Not evaluated by UL †† Not for use in UL Listed Installations

M1G Installation and Programming ManualPage 6
+
+SAUXNEG
+VAUXNEG
+VAUXNEG
+VAUXNEG
AC
NORMALZONE 16
JP1
SW1
16.5 V
JUMPER TO STARTWITH NO AC
POWER
TELCO SEIZED
AC
Z9NEGZ10Z11
NEG
Z13NEG
Z15Z14
Z12
NEGZ16
Z2Z3
NEG
Z5NEG
Z7Z6
Z4
NEGZ8
Auxiliary +12VDC Power Outputs protected by1.25A PTC NOTE:Maximum continuous currentdrain from +VAUX,+VKP and J16 combinedmust not exceed 900 mA or 2.5 Amps in alarm.
Test battery regularly withELK-BLT Battery Life Tester.Replace every 3-5 years
DIALER ACTIVE
SMOKE2WIRE
STATUS
REVERSEBAT LEADS
+ -
12V Battery5 to 18Ah
7N.C.
N.O.ZONE
2200OhmEOL 8
N.C.N.O.
ZONE
2200OhmEOL
5N.C.
N.O.ZONE
2200OhmEOL 6
N.C.N.O.
ZONE
2200OhmEOL
3N.C.
N.O.ZONE
2200OhmEOL 4
N.C.N.O.
ZONE
2200OhmEOL
1N.C. N.O.
ZONE
2200OhmEOL 2
N.C.N.O.
ZONE
2200OhmEOL
SealedLead AcidControl requires AC power to start. However, for testing purposes it can
be started from battery ONLY by momentarily shorting these two pads.
UL Listed Class II TransformerDO NOT CONNECT TO A SWITCHED OUTLET
16.5VAC, 45VA ELK-TRG164018AWG Min.
NEGZ1
15N.C.
N.O.ZONE
2200OhmEOL 16
N.C.N.O.
ZONE
2200OhmEOL
13N.C.
N.O.ZONE
2200OhmEOL 14
N.C.N.O.
ZONE
2200OhmEOL
11N.C.
N.O.ZONE
2200OhmEOL 12
N.C.N.O.
ZONE
2200OhmEOL
9N.C.
N.O.ZONE
2200OhmEOL 10
N.C.N.O.
ZONE
2200OhmEOL
Master Power Switch (SW1), disconnects AC and Battery power from control
This unit provides Residential fire alarm service when installed according to ANSI/NFPA 72. This unit provides Grade A Residential Burglar alarm service. Transmissionof the fire alarm signal to a fire alarm headquarters or central station shall be permittedonly with the approval of the authority having jurisdiction. The burglar alarm signal shallnot be transmitted to a police emergency number, equipment is to be installed inaccordance with NFPA (985,55.1.P)
2-WireSmoke Detector
680OhmEOL
+-
Dialer/Modem is idle. If ON, Dialer/Modem is in use (communicating).
1 blink with equal On and Off times is Normal. 2 fast blinks = Control running onbootloader only. 4 fast blinks = Control is re-initializing it's EEPROM memory aftera firmware flash. 5 fast blinks = Memory/Operation overflow
Battery is connected correctly. If ON, check battery lead connections.
AC Voltage is present and power switch is turned ON. If OFF, check AC power.
Phone line is good and house phones are connected. If ON constantly, the phoneline may be bad. During remote mode this LED will be ON since the house phonesare then disconnected from the outside line & are being powered from control.
TELCOSEIZED
DIALERACTIVE OFF
OFF
LEDSIndicators
Power
Regular 1sec. Blink
ON
BatteryReversed OFF
Status
4-WireSmoke Detector
2200OhmEOL
To Zone Input
U.L. Listed EOL Supervision Relay(ESL #204 or Equivalent).
N.O. AlarmContacts
+
-
+-
Zone 16 can be configured as a 2-wire smoke zone.Set JP1 to "2 WIRE SMOKE" and use 680 Ohm EOLresistor, part # ELK-ER680Use Only Compatible Detectors:System Sensor: 1151, 2100, 2100T, 2151GE: 429AT, 521BXT, 521B.Hochiki America: SLK-835.Detection Systems: DS250, DS250TH, DS282,DS282TH, DS282THS, DS282THC.Maximum Number = 20 Do not mix models.
Switched +12 VDC Outputprotected by 1.1A PTC.
BATTERY
To Zone NEG
(Left Side Terminals)
2-Wire Smoke Circuit
NEG
Z16
NormalState Descriptions
2200 Ohm EOLResistor Color CodePart # ELK-ER2200
All circuits are current limited except telephone line and Battery leads.
Testing of this system should be performed regularly. Control panelspecifications are subject to change without notice.
Red (2)Red (2)Red (2 x 0)
Blue (6)White (8)Brown (1 x 0)
680 Ohm EOLResistor Color CodePart # ELK-ER2200
Gold (quality) Gold (quality)
Wiring & Hookup Diagram

M1G Installation and Programming Manual Page 7
(Right Side Terminals)
OU
T1
+12V (+VAUX)NEG16151413121110
987
NEG -DATA B
+12VDATA BUS
-AB
C
J3 J4
1 WAY
PLCMode
2 WAY
JP2R
S23
2
+
J16
J5
OUT3 LED
OU
T3O
UT2
+-
+-
+VKP
DATA BDATA A
NEGNot Used
R1
TIPRINGT1
* See Auxiliary Current ratings
1 WAY (PL513/PSC04) Select PLC Mode (JP2)Selects single or bi-directionalPLC Transmissions
2 WAY (TW523/PSC05)
JP2
Voice/Siren †
TELCOLINE
HOUSEPHONES
OU
TPU
TS
AUDIO NETWORK INTERFACE
J7
Aux Data Bus (J3) †For wireless receiver. Presentlyworks with ITI / Caddx NX408E,
NX416E, or NX448E. SeeProgramming Menu 14.
Audio Network Connection (J7) †For Two-Way Listen-in and Future Use!
J1J2
NEG
+12VN
/CC
OM
N/O
Compiles with FCC Part 68Reg. Number: US:5K6AL03BELK-M1Ringer Equivalence REN: 0.3BUse USOC RJ-31X connector.Complies with the limits for class B computerdevices in accordance with the specifications ofsubpart J of part 15 of FCC rules.
Out 3 - Programmable General Purpose RelayRated at 5Amps @ 12 - 28VDC(Dry Contacts)
Terminating Jumper (JP3): Seeimportant information about DataBus Termination.
This terminal (formerly earth ground) is no longer used. Do not and neg. terminal to earth ground.
Out 1 - Voice/Siren ††Speaker output only (Interior)
Out 2 - Connect a UL Listed Bell or Siren (self-contained). For residential Fire the indicating device shallbe Wheelock 34T-12 or equiv. Current limited to 1 Amp. Program Global Option 26 to Voltage. Speaker(s)are only permitted for non-UL installations and they must be series/parallel wired to avoid dropping below a4 ohm total load.
Programmable Outputs (J16)OUT 7 - 16 are +12V switchedp os i t i ve gen era l pu rp oseoutputs rated at 50mA.
Lighting †Interface Conn.
T
R
T1
R1
RJ31X JACK(ELK-RJSET)
PC Personal Computer(Windows Based)
Serial Port (J4) †for Computer/ELKRP(This connection not
evaluated by UL)
Lighting Interface Conn. (J5) †Use Std. 4 conductor modular telephonecable to connect to a powerline Interface(PSC05, X-10 PLC or equiv.).Do not connect to a live phone line!(This connection not evaluated by UL)
N/C
COM
N/O
DATA BUS TERMINATION IS VERY IMPORTANT!!Diagram shows 2 basic (4-wire) home run cables with daisy chained devices on each. Last device on each cableMUST have a Terminating Jumper installed. Jumpers are marked JP2 on keypads, JP1 on Expanders. ControlHardware pack has two black jumpers for this purpose. Jumpers engage a 120 Ohm resistor across data A & Blines. NOTE: If there is only 1 data bus cable, install JP3 Jumper on the Control.
Temporary Connection "Plug-in" jacks for RS-485 Data Bus (J1 & J2)Local connection for Data Bus Devices ie: Keypads, etc. for testing purposes only.
5
4
8
1
Tip
RingGreen
Red
Yellow
Black
DemarkBlock
ELK-SP35 or equiv.
PSC05 orequiv.
Relay Expansion Module (ELK-M1RB)Optional module adds 8 general purposerelays. Plugs into J16 connector.Red
BlackWhiteGreenBrownBlue
YellowViolet
PinkTan
Orange
Grey
+VAUXNEGOUT 16OUT 15OUT 14OUT 13OUT 12OUT 11OUT 10OUT 9OUT 8OUT 7
+12VNEG
spliceGreen
Grey
Red
Brown
ELK-M1KP
BLACK
WHITE
GREEN
JP3
RS-485 Data Bus Max. length is 4000 ft. Max.devices vary by control. +VKP protected with 1.25A PTC
NOTE: If you want to home run more than 2 cables, run 6 or 8 conductor cable so that the data lines A & B can havea return path to series connect back out to the next device. This is best done with a ELK-M1DBH Data Bus Hubwhich accepts Cat5 or Cat6 cable with RJ45 plugs. For more information see diagram in keypad instructions.
WARNING! The RS485 Data Bus must NEVER have more that two (2) terminating jumpers installed.
RS-485 DATA BUS
DATA A
RED
ELK-M1XIN
ELK-M1XOV
JumperTerminatethese twodevices.
DO NOT JumperTerminate these devices.
Keypad 1
ELK-M1KPKeypad 2
ELK-M1KPKeypad 3
YellowGreenRed
Black
YellowGreenRed
Black
Close up view of std. 4 conductor modular phone cord. Whenviewed as shown (back to back), the pin to pin color codingdoes not reverse. Cord for PLC must be similar to above.
Endview
1 1
Pin 2 < to > 2
Pin 3 < to > 3
Pin 5 < to > 5
Pinout for Serial Port Cable (9 pin male to 9 pin female)Maximum recommended length = 50 ft.
Out 2 is supervised. If not used, install a resistor(2.2k Ohm) to avoid Output 2 trouble condition.
† Not evaluated by UL †† Not for use in UL Listed Installations
Bell (Supervised)
+
+-
-

M1G Installation and Programming ManualPage 8
1.1 Planning the InstallationThe first step in any multi-zone security system installation is planning the job.1. Read this entire manual to familiarize yourself with all system features and procedures before actually beginning the
installation. Read all the information regarding Underwriters Laboratories (UL) and NFPA requirements.2. Perform a physical survey of the installation site. Use the diagrams below as a guide in planning the installation.3. Discuss the installation requirements and applications with the customer.4. Compare the installation requirements and applications with the factory default settings to determine what customized
programming is needed to meet the specific installation requirements.5. Bench test the system prior to installation.
1.2 Parts Diagram & DescriptionsSee Wiring & Hookup Diagram on pages 6 & 7.
1.3 Mounting and Wiring PreparationControl MountingRemove all packing material and compare the system components with those in the figure above to familiarize yourself withthe part names. Mount the control in a secure, dry location where the ambient temperature inside the control box can remainat 32‘ to 120° Fahrenheit (0’ to +49' Celsius). DO NOT MOUNT THE CONTROL IN AN UNCONDITIONED ATTIC! Choose alocation that allows easy wiring to an unswitched power outlet and to a grounding conductor for the control. A central locationmakes running system wiring easier. Remove control box knockouts that best suit your wiring needs. Mount the control usingthe upper center slotted hole to level. Install and connect all necessary wiring for the power transformer, detection loops,keypads and siren outputs.
Keypad Mounting and WiringIdeal keypad height is 50-58 inches above the floor. Select a location with an ambient temperature range between 32° and120° F (0° to +49° C). Avoid direct sunlight if possible. Fasten mounting plate to electrical box (or directly to wall) using flathead screws to prevent shorts to the back of the circuit board. Keypads have a removable wiring plug for connecting to the M14-wire data bus. CAT5 or CAT6 eight (8) conductor cable is recommended for all Data Bus cables. The extra wires providedata return paths. Splice the Black, Red, White, and Green wires from the removable wiring plug to the Data Bus cable. Plugthe connector into the back of the keypad. Tuck wires neatly into back plate and install Keypad on mounting plate. Eachkeypad has connections for an optional programmable output and a programmable zone input.
Section 1 - Installation and Wiring
Legend- Main Control- Audible Alarm- Smoke Detector- Contact- Keypad
MASCK
Bedroom 1Bedroom 2
Bedroom 3Living Room
Kitchen / Dining
TYPICAL BURGLARY INSTALLATION LAYOUT
M
A
K
Bedroom 1Bedroom 2
Bedroom 3Living Room
Kitchen / Dining
TYPICAL FIRE INSTALLATION LAYOUT
M
A
K
C
C CCC C
S
S S
S
Basement
First Floor
All perimeter openings below 18" should be provided with protection.
A Smoke Detector shall be located in each sleeping area and betweenthe sleeping areas and the main living area.
Early warning fire detection is best achieved by the installation of firedetection equipment in the location shown above.
In homes basements or multiple levels at least one smoke detectorshall be on each level.

M1G Installation and Programming Manual Page 9
NOTE: Refer to the section ‘Data Bus E.O.L. Termination’ for information on multiple homerun cables. NEVER SPLICE ORCONNECT WIRE WITH CONTROL POWER ON. Minimum cabling should be four conductor 22 or 24 gauge. Maximum resistance per wire is25 Ohms. Device placement beyond 1000' is not recommended.
1.4 Control WiringZone Inputs (1 thru 16 on main board, 17 thru 208 via expanders)Zones are arranged in groups of 16, starting with Z1 thru Z16 on the main board. Each 2 zones share a common negativeterminal. A zone may be programming for EOL resistor supervision (Default), or normally closed/normally open without aresistor. In addition, Burglar and Keyswitch zones may be programmed for EOL with Security Alert on Short, or EOL withSecurity Alert on Open/Short, also referred to as a Four (4) State Zone (firmware 4.3.5 or later). If EOL resistors are used, theyshould be placed at the furthest most remote end of the detection device wiring. EOL zones permit a combination of N.C.(normally closed) or N.O. (normally open) devices. Using voltage meter probes across the zone and com terminals, a non-violated EOL zone will measures approx. 7.0 VDC. An open circuit will be approx. 13.8 VDC. A shorted circuit will be 0VDC. The Keypad also provides the ability “Menu 8 “System Diagnostics” to view zone voltage.
ELK-M1KP
1
See Note aboutData Bus
Termination
6
BLACKWHITEGREEN
RED
KeypadWiring
AssemblyData Bus CableCAT5 or CAT6 Recommended
Optional programmable Zone Input from Keypad
Hookup Diagram for KeypadSplice 6 Pin Keypad Wiring Assembly to the Data Bus cable using ELK-900-2 "B" Connectors.
BROWN
Optional programmable Output from Keypad
Keypad 1
The optional Zone Input # or Output # isdetermined by the Keypad Address.
Load (50mA max)I.E. LED, Relay-
+To BLACK (Neg) Wire
To BROWN Wire
N.C. N.O.2200OhmEOLTo BLACK (Neg) Wire
BLUE
To BLUE Wire
NOTE: The first batch of M1KP Keypads provided a switchednegative (pull to ground) output. Connect per diagram above.These units have the letter "E" at the end of the ID number on thelower back side of the board. EG: PC096E Boards with a letter"F" or later provide the output as a switched positive.
Load (50mA max)i.e. Relay, LED-
+To Red (Pos) Wire
To Brown Wire
KP Zone OutputAddress # # 1 193 193 2 194 194 3 195 195 4 196 196 5 197 197 6 198 198 7 199 199 8 200 200
KP Zone OutputAddress # # 9 201 201 10 202 202 11 203 203 12 204 204 13 205 205 14 206 206 15 207 207 16 208 208
Optional Four (4) State Zone Wiring (2 series resistors w/ N.C. contacts)
ZoneInput
Neg.
N.C. AlarmContacts
2200 OhmEOL Resistor
2200 OhmEOL Resistor
N.C. TamperContacts
Pos.
Neg.Fig 2: Powered PIR, Glassbreak, etc. with Tamper
N.C.N.O.
Contact
2200OhmEOL
Zone Input
Neg.
Tamper Contact
N.C.Alarm
Contact
Diagnostic Table
Short ~2.2k Ohms4.4k Ohms
Open ~
0 - 3.9 Volts4.0 - 7.3 Volts7.4 - 11 Volts
11.1 - 13.8 Volts
ZoneResistance
Approx. ZoneVoltage Reading
Alarm-
AlarmAlarm
Armed
Sec. Alert/TamperReady
Not ReadySec. Alert/Tamper
Disarmed
Condition When:
0 - 7273 - 159160 - 220221 - 255
A to DValue
Fig 1: N.C. Alarm Contact(Unpowered) with N.C. Tamper
Program Zone for EOL WiringType 4 - Supervisory on Open
This featurerequires Firmware
2.3.5 or later.
2200 OhmEOL
Traditional Three (3) State Zone Wiring (1 series resistor)
Wire in Series with zoneinput or use another zone.
Neg.
N.C. AlarmContacts
2200 OhmEOL Resistor
N.C. TamperContacts
Pos.
Neg.Powered Motion, PIR, Glassbreak, etc.
N.O.Contact
2200OhmEOL
Zone Input
Neg.N.C.Alarm
Contact
Diagostic Table
Short ~2.2k Ohms
Open ~
0 - 3.9 Volts4.0 - 8.8 Volts8.9 - 13.8 Volts
ZoneResistance
Approx. Rangeof Zone Voltage
Alarm-
Alarm
Armed
Not ReadyReady
Not Ready
Disarmed
Condition When:
0 - 7273 - 170171 - 255
A to DValue
ZoneInput
Alarm Contact

M1G Installation and Programming ManualPage 10
Two-Wire Smoke Zones (Zone 16)To enable the use of two-wire smoke detectors on Zone 16, move Jumper JP1 (located just below Zone 16 terminals) to theright side so that the two right hand pins are covered. Go to the installer programming mode, Menu 05 - Zone Definitions, andprogram Zone 16 as a Fire zone (Def=10). Step to the next location and program Wire Type=6. NOTE Use only compatibletwo-wire detectors as listed on the front label of the control. Do not mix brands. The maximum number of detectors isalso listed on the front label. When jumper JP1 is set for two-wire operation, a 680 Ohm EOL resistor (furnished in thehardware pack) must be used instead of the 2,200 Ohm. Maximum wire resistance must not exceed 60 Ohms.
Switched Power Connection (+SAUX)Four-wire smoke detector and other devices that require a temporary power disruption in order to reset or unlatch from thealarm state (i.e. smoke detectors, etc.) should be connected to the +SAUX 12 Volt DC switched power terminal. When asmoke reset is performed, the operating voltage to these devices is momentarily interrupted.
Auxiliary Power Connections (+VAUX)Motion detectors, glass breaks, etc. and other devices requiring unswitched 24-hour power should be connected to one of theauxiliary terminals, +VAUX. All negative terminals on the terminal strip are at the same reference and may be used whenevera common (circuit ground) negative is required. Use caution when wiring the control to distribute the load devices among thesupply and the negative terminals evenly. NOTE: Circuit ground refers to any negative terminal connection on this control.This does not refer to the earth ground terminal or to the common terminals of Relay Output 3. These terminals are not atthe same voltage potential and should not be wired so that they are electrically connected to a negative.
PTC (Positive Temperature Coefficient) Circuit BreakersThe +VAUX Auxiliary power and J16 power output terminals are protected against shorts and overloads by a 1.25A PTC. A PTCis a solid state, auto-restoring type of circuit breaker. The +SAUX Switched (Smoke) power output is protected by a 1.1A PTC.The +VKP Keypad power output is protected by a 1.25A PTC. Output 2 is protected by a 1.25A PTC. NOTE: Sometimes it maybe necessary to remove power (unplug the outputs) for approx. 20 seconds after a short, to allow the PTC to reset. Evenif the short is no longer present, the remaining residual current draw may be so high that the PTC cannot determine thatthe short is gone. If the PTC re-trips, check the field wiring and repair.
Transformer Primary Power Input (AC)The control is powered by a 16.5 VAC, 40 min. VA, UL Listed Class II (power limited) transformer (ELK-TRG1640). Thespecified sized and rated transformer must be used to operate this control. The transformer must be connected to a 120 VAC,24-hour outlet not controlled by a switch other than an approved overcurrent protection device.
Connect the transformer to the AC Terminals using 16 to 18 gauge minimun wire. Do not exceed 50 feet between thetransformer and the control or run the AC power in a multiconductor with other system circuits. Leave the transformerunplugged as well as the standby battery until all other connections have been made.
Standby Battery ConnectionConnect the BLACK wire to the Neg (-) terminal on the battery, the connect the RED wire to the Pos (+) terminal on the battery.The control is designed to operate with and recharge a 12 volt, sealed lead acid battery from 7Ah up to 18 Ah for backup of theprimary power supply. The control maintains a float charge for the battery of 13.8 VDC at 100 mA. This is in addition to thecontinuous output of 1.5 Amps that the power supply maintains (see maximum current drains for UL Listed Systems).
CAUTION: Do not reverse the battery leads! The control has special circuitry which helps protect it from battery reversaldamage for short durations. However, prolonged reversal of the battery leads may cause permanent damage. A reversebattery warning LED is located to the left of the power On/Off switch. If this light is ON, turn the power off immediatelyand correct the battery lead connections.
+VAUXNEG
AC
SW1
16.5 V
JUMPER TO STARTWITH NO AC
POWER
AC
BATTERY+ -
ELK-128012V Battery
Sealed Lead Acid
STATUS
REVERSEBAT LEADS
UL Listed Transformer,Class II, 16.5VAC, 45VA
RED BLK
+-
ELK-TRG1640

M1G Installation and Programming Manual Page 11
AC Failure, Low Battery, and Automatic Low Voltage ShutdownDuring an AC power failure the battery automatically takes over and AC Fail trouble annunciates at the keypad. Thecommunicator can be programmed to report AC Fail to the Central Station after a time delay (see Menu 12, System Option 01).
If the battery voltage falls below 11.2 VDC a Low Battery Trouble condition will occur. The communicator can be programmedto report Low Battery to the Central Station. The battery will continue to run the control until its voltage drops below 10.2 VDC,at which time the control will disconnect and shut down to prevent a false alarm and damage to the battery. The AC Failtrouble display will clear if the AC restores. However, the Low Battery Trouble requires a manual or automatic battery load testbefore it will clear. An automatic battery load test is performed every 24 hours. See Section 2.2 for powering up the control.
Telephone Line Connection (R1,T1,T,R)The telephone interface is connected by the use of an approved RJ-31X interconnect jack. This device allows the subscriberto disconnect the control/communicator from the public switched telephone network in the event of a malfunction. The controlis equipped with line seizure so that the premises telephone service is interrupted during communication to the centralstation. Connection to the approved jack is done with a RJSET cord which connects the control terminals to the RJ31X jack.
NOTE: The Telco cord can be supervised to the RJ31X or demarc block by installing an EOL resistor across the Orange andBlue wires (RJ31X terminals 2 and 7). In the control, connect the Orange and Blue leads to any 24hr Burglar zone input.
OutputsThere are 13 outputs on the main board. Outputs may be expanded utilizing output expander boards connected to the RS-4854-wire Keypad data bus. Outputs 1 & 2 trip when any alarm is activated. All others must be enabled through the RP RulesProgramming and can be triggered by multiple conditions “events”. Do not exceed the current limits on voltage only outputs.
Output 1 †† is for speakers(s) ONLY (4 to 8 Ohms). If connecting more than 2, use series/parallel wiring to avoid goingbelow a 4 ohm total load. This output is the source for voice announcements such as: Zone 1 not ready, System Armed, AlarmActivated, etc., as well as alarm siren sounds. The initial start volume and the final volume can be adjusted in programmingto suit the application.
Output 2 - Connect a UL Listed Bell or Siren (self-contained). Current limited to 1 Amp. Program Global Option 26 to Voltage.This output is supervised. Speaker(s) are only permitted for non-UL installations. Series/parallel wire to avoid droppingbelow a 4 ohm total load.
Output 3 is a Single Pole Double Throw Relay with form “C” contacts (Com, N/O, and N/C).
Outputs 7, 8, 9, 10, 11, 12, 13, 14, 15, and 16 are low current, positive (+) voltage only, for driving LEDs, relays, etc. Outputs 4,5, and 6 ARE NOT available from the main board. They can only be accessed with a data bus Output expander set toaddress 1. This expander will replicate all the main board outputs, including outputs 4, 5, and 6.
Earth GroundingTests have determined that the best results against lightning and transients are obtained by isolating the control from ground.Do NOT connect any of the terminals, especially the Neg. terminals to earth ground. Early production boards had an earthground terminal. This terminal is no longer used on circuit board revision I or later. However, ancilliary devices such as theELK-950 Surge Protector on the incoming Telephone circuit are still recommended.
Keypad & Expanders on the RS-485 Data Bus (+VKP, Data A, Data B, Neg)Keypads and data bus expander devices connect to the four terminals marked +VKP, Data A, Data B, and Neg. The keypadplug-in wire harness color code is: Red +VKP, Green Data A, White Data B, and Black (-) Neg. The +VKP power terminal isprotected by an auto reset PTC device. In the event of a short circuit or malfunction, power will be removed from all devicesuntil the problem is resolved. Two (2) quick connect header pin plugs (J1 and J2) along the bottom of the board may be usedfor temporary purposes I.E. bench testing using a four conductor ribbon cable. Do not use for permanent connections.
Using Output 7 (low current) with a sensitive relay to switch 24V AC to a Door Strike †
24V ACTransformer
+ -
DoorStrike †
ELK-924 †
POS
NEG
-T+T
N/O
CO
MN
/C
D3
24V OPEN N
/OC
OM
N/C
+12VNEG16151413121110
987
J16
OU
TPU
TS
Programmable Outputs (J16) OUT 7 - 16 are +12V switchedpositive general purpose outputs rated at 50mA.
+12V RedBlackWhiteGreenBrownBlue
YellowViolet
PinkTan
Orange
Grey
+VAUXNEGOUT 16OUT 15OUT 14OUT 13OUT 12OUT 11OUT 10OUT 9OUT 8OUT 7
† Not evaluated by UL †† Not for use in UL Listed Installations

M1G Installation and Programming ManualPage 12
Data Bus E.O.L. Termination - VERY IMPORTANT!The control features a true RS-485 “differential” data bus operating at 38,400 bits per second. This is relatively high speed byindustry standards and ensures fast, accurate communications. With this speed, EOL data bus terminating resistors arerequired to eliminate the possibility of reflection errors caused by varying cable lengths. Every data bus device; keypad, zoneexpander, etc. and the control board has a built-in bus terminating resistor (120 Ohm) which is installed (activated) via a 2 pinheader/jumper (2 Gold Pins). The hardware pack includes two black shorting caps. When one of the shorting caps is placedon the two gold pins, it installs (activates) the 120 Ohm terminating resistor across Data Lines A & B. Terminating resistorsare marked JP2 on the keypads and JP1 on the expanders. From the factory, no terminating resistors are installed (activated).
WARNING! The RS-485 Data Bus must NEVER have more than 2 terminating resistors header/jumpers installed.
Ideally, there should be no more than 2 home run cables (4 wire) with daisy chained devices along each. The last device on each cableMUST have a terminating resistor installed (activated) via the gold 2 pin header/jumpers marked JP2 on keypads, JP1 on expanders. Place ablack shorting cap (see hardware pack) onto the 2 gold pins to install a 120 Ohm resistor across data lines A & B. If there is only 1 data buscable place a shorting cap on JP3 of Main Board. See alternate hookups below.
For those that prefer to home run wires, use 6 or 8 conductor (CAT5 is ideal) cable. At each device, make a three way splice of the data A, thedevice A wire (terminal), and a return data A1 wire (using one of the extra wires). At the control, make a two way splice of the data A1 returnwire (series connection) to the outgoing data A wire of the next cable. Repeat for the data B wire. Remember to install a terminating jumper onthe last wired device and the control JP3 ONLY! Electrically the data wires are now in series. Connect the POS (+) and Neg (-) power wires ofeach device directly to the M1’s +VKP and Neg terminals. DO NOT SERIES THE POWER WIRES as this will cause unnecessary voltage loss.
The ELK-M1DBH † Data Bus Hub accepts CAT5 or CAT6 cable with RJ45 plugs on the ends and does all the work of series connecting theDATA lines A & B. Terminate at the hub using the included RJ45 Terminating Plug in the first unused jack.
+VKP
DATA BDATA A
NEGEGND
ELK-M1KP
BLACK
WHITE
GREEN
RS-485 Data Bus (Max. length is 4000 ft.Max. bus devices vary by control.)
RS-485 DATA BUS
RED
ELK-M1XIN
ELK-M1XOV
JumperTerminatethese twodevices.
DO NOT JumperTerminate these devices.
Keypad 1
ELK-M1KPKeypad 2
ELK-M1KPKeypad 3
Daisy Chain Connection of Data Bus Devices Using Two (2) Home Run Cables
Install Teminating JumperCap on this last device
AND on the control JP3.6 conductor cables
+VKPDATA ADATA BNEG
DATAA1 A
B1 B
DATAA1 A
B1 B
WHITE GREEN
BLACK
RED
A
-+
B
SPAREPAIR
See Keypad Diagram for connectionof Optional Output and Zone Input
WHITE GREEN BLACK (-) RED +12
BLUEBROWN
6Conductor
Cable
Keypad
DATAA1
B1
For futuredevices
A1
B1
Connect each device to the 6conductor cable as shown.
Diagram for Daisy Chain Connection of Data Bus Devices Using 3 or More Home Run Cables.
NOTE: The power wires are parallelconnected to the +VKP & Neg terminals.
RS-485 DATA BUS
Keypad
Keypad
Keypad
ELK-M1DBH Data Bus Hub †
Mount M1DBH inside control. Connect it to the M1Data Bus terminals using a 4 conductor cable.
J2 J4 J6 J8
J1 J3 J5 J7 J9
RJ45 Terminating Plug Insert in first unused jack and terminate thecontrol at JP3. DO NOT TERMINATE AT ANY OF THE DEVICES!
CAT5 Cables
Daisy Chain Connection using the ELK-M1DBH and CAT5 Cables.
RS-485 DATA BUS
8 - Brn/Wht7 - Wht/Brn6 - Org/Wht5 - Wht/Blue4 - Blue/Wht3 - Wht/Org2 - Grn/Wht1 - Wht/Grn
RED +12VBLACK (-)GREEN (A)WHITE (B)
BROWNPin1
RJ45 Plug
A1 Grn
/WhtA Org/Wht- W
ht/Brn+
Brn/W
ht
B Wht/OrgB1 Wht/Grn
SpareSpare
COLOR CODE for CAT5 or CAT6 Data Bus Cableto RJ45 Plugs for ELK-M1DBH Data Bus Hub.
Pin1
Frontview
Optional programmable Zone Input from Keypad
Optional programmable Output from Keypad
Load (50mA max)I.E. LED, Relay-
+To BLACK (Neg) Wire
To BROWN Wire
N.C.
N.O.
2200OhmEOLTo BLACK (Neg) Wire
To BLUE Wire
BLUE
Keypad
Keypad
CAT5or
CAT6Cable
† Not evaluated by UL †† Not for use in UL Listed Installations

M1G Installation and Programming Manual Page 13
Setting the Data Bus Address and Enrolling Device(s) into the SystemKeypads and expander devices communicate over the RS-485 4-wire data bus. Each device must have a unique addresssetting (from 1 to 16) within it's device type. Keypads are TYPE 1, input (zone) expanders TYPE 2, output expanders TYPE 3, etc.The purpose of device types is so that the address numbers can be re-used in each different device type. It’s OK to have aKeypad, Zone Expander, and Output Expander all set to address 2 and on the same data bus since each device is a differentdevice type. It is NOT OK to have duplications of addresses within the same device type. I.E. Multiple keypads on the samecontrol cannot be set to 'like' addresses.
ADDRESS: From the factory all keypads are set to address 1. Valid addresses are 1 to 16. The first keypad on the system(Keypad 1) is automatically enrolled upon power up. Each additional keypad must be assigned a unique address and thenmanually enrolled from “Menu 1 - Bus Module Enrollment”. (See Menu 01, for complete instructions on Bus Module Enrollment)
1. Press and hold the " * " key, followed by the F5 key . HOLD BOTH keys pressed for 5-10 seconds or until the LCD displays: Exit when done. F1 Set Addr. (This is Keypad setup mode)
NOTE: An alternate method is to remove power from the keypad and then power up while holding any key pressed.2. Press the F1 key to display the current address setting.3. Set the desired address (from 1 to 16) by using the Up or Down arrow keys.4. Press the Exit key twice when done.
1234567890123456789012345123456789012345678901234512345678901234567890123451234567890123456789012345123456789012345678901234512345678901234567890123451234567890123456789012345123456789012345678901234512345678901234567890123451234567890123456789012345
Auth. RequiredEnter Valid Pin
1234567890123456789012345123456789012345678901234512345678901234567890123451234567890123456789012345123456789012345678901234512345678901234567890123451234567890123456789012345123456789012345678901234512345678901234567890123451234567890123456789012345
01-Bus ModuleEnrollment
ENROLLING:1. Press the ELK key, then 9 (or scroll up) to display 9 - Installation Programming. Press the RIGHT
arrow key to select this menu. The Installer Program Code must be entered to access this menu.2. Enter the Installer Program Code. (The default code is 172839)3. The first Installer Programming menu displayed will be "Bus Module Enrollment"4. Press the RIGHT arrow key to select this menu. "Enrolling Bus Modules" will display5. After a few seconds the display will show the total Bus Modules that are enrolled. To view the
enrolled devices and/or remove a device press the RIGHT arrow key next to the word Edit.6. Press the * or Exit keys to exit Installer Programming.
1234567890123456789012345123456789012345678901234512345678901234567890123451234567890123456789012345123456789012345678901234512345678901234567890123451234567890123456789012345123456789012345678901234512345678901234567890123451234567890123456789012345
XX Bus ModulesEnrolled, Edit rrrrr
The ELK-M1DBHR † "Active" Data Bus Hub Retrofit splits the Controls' main RS-485 Data Bus into 4 managed RS-485 branches. Each branchcan have 2 parallel home run cables for a total of 8 home runs. The last (end of line) device on each home run should be jumper terminated toinsure proper operation and supervision.
JP1
Terminating Jumpers (JP1 - JP5)JP1 = Terminates Input from ControlJP2 = Terminates Branch 1JP3 = Terminates Branch 2JP4 = Terminates Branch 3JP5 = Terminates Branch 4See details about Data Bus Termination.
ELK-M1DBHR †DATA BUS HUB FOR RETROFIT
ELK
PR
OD
UC
TS, I
NC
. H
ILD
EBR
AN
, N.C
., 28
637,
USA
JP2 JP3 JP4 JP5
+VKP
DATA BDATA A
NEG
RS-485 DATA BUS
BLACK
RED
GREEN
WHITE AB
-+
INP
UT
FRO
M C
ON
TRO
L
The Maximum length of theRS-485 Data Bus or any single
Branch is 4000 ft.Max. devices varies by product.+VKP protected with 1.25A PTC
Mount M1DBHR inside control.Connect it to the Data Bus terminals
using a 4 conductor cable.
REDGREENWHITEBLACK
A+ B -DATA BUSBRANCH 1
RED
GR
EEN
WH
ITE
BLA
CK
Keypad
A+ B -DATA BUSBRANCH 2
Keypad
RED
GR
EEN
WH
ITE
BLA
CK
Keypad
Single Keypad /Bus Device:If only one (1) Keypad or Bus Deviceis connected to a branch (# 1 in thisexample), place terminating jumperon the Keypad/Bus Device AND onJP2 of the M1DBHR.
Two Keypad /Bus Devices:If two (2) Keypad/Bus Devices are connected toa branch (#2 in this example), place terminatingjumper on both Keypads/Device and REMOVEjumper JP3 on the M1DBHR.
Multiple Keypads/Bus Devices(Series Connected):If more than two (2) Keypad/BusDevices are connected to abranch (#3 in this example), theyMUST be series connected on nomore than 2 homerun wires.Place terminating jumpers onLAST device connected to eachhomerun. REMOVE jumper JP4on the M1DBHR.
ELK-M1XIN
ELK-M1XOVJumperTerminatethese twodevices.
DO NOT Jumper Terminatethese devices.
ELK-M1KP
Keypad
KeypadKeypadR
ED
GR
EEN
WH
ITE
BLA
CK
A+ B -DATA BUSBRANCH 3
A+ B -DATA BUSBRANCH 4
ELK-M1XIN
JumperTerminatethese twodevices.
One Keypad and oneZone Expander:When two (2) BusDevices are connectedto a branch (#4 in thisexample), placeterminating jumper onboth Bus Devices andREMOVE jumper JP3on the M1DBHR.
JumperTerminatethese twodevices.
Keypad
Jumper Terminatethis device AND JP2
on the M1DBHR.
DO NOT Jumper JP3. DO NOTJumper JP5
DO NOT Jumper JP4.
This diagram illustrates the M1DBHR Hub as a singlebranch on a Control. Terminate JP3 on Control and JP1on the M1DBHR. If a second hub is wired to the Controlterminate JP1 on the hubs but DO NOT terminate JP3 onControl. NEVER place more than two (2) terminatingjumpers on any branch of the RS-485 Data Bus!
Diagram for Home run wiring using M1DBHR Active Data Bus Hub
† Not evaluated by UL †† Not for use in UL Listed Installations

M1G Installation and Programming ManualPage 14
2.1 IntroductionThe control has factory default programming which make it easy to bench test prior to installation. Terminate all zones withEOL resistors, then connect a keypad, transformer, and battery. The factory (Master) user code is 3456. This code canoperate all user related features of the system. This section gives an overview of powering up and basic keypad functioning.
2.2 Powering Up (One Keypad)After all other connections have been made and checked thoroughly, the controls AC transformer and battery may beconnected. The Master Power Switch located on the lower left corner can then be turned. Upon power up the control willperform self-diagnostics and auto-enroll the first keypad (Keypad Address #1). Any additional keypads or expanders must bemanually enrolled using Installer Level Programming. See “Menu 01 - Bus Module Enrollment”.
NOTE: It is very important to make certain that every keypad, input expander, output expander, or any other data busdevice be assigned a unique data bus address within its type. See “MENU 01 - Bus Module Enrollment” for instructionson setting keypad and expander addresses.
System Startup on Battery Only (Ordinarily the control will not startup without AC power)If AC power is not available (new construction site, etc.) the control may be started on battery ONLY by shorting the two silverpads (located in the lower left corner of the circuit board) with a small blade screwdriver. This will temporarily bypass the ACsensing circuit and allow the control to startup. NOTE: The On/Off power switch must be in the On position.
2.3 User Codes and AuthoritiesThe control has 99 user codes plus one installer code. Each user code may be assigned specific authorities as to what it isallowed to do. The authorities are assigned from the Installer level programming, however the code digits and user namesare assigned from the keypad user menu 6 - Change User Codes. Only a Master authority level code or the Installer code isallowed to access keypad user menu 6. The User’s Guide contains a description of operations accessible to the user codes.Control operations accessed by the installer passcode are slightly different.
Factory Default for User Code 1 is: 3 4 5 6 (Master Code) (1 2 3 4 5 6 if the six digit code option is enabled)
User code may be used for functions in a specific area or system-wide. Some options may be performed at any time, evenwhile the control is fully or partially armed. The menu system is designed to be next-step-oriented. After a brief explanation ofthe options, the user should be able to begin operating the system immediately. For purposes of discussion, the installer andthe end consumer are both considered users, but have different capabilities.
2.4 Installer Program Code and AuthoritiesThe installer code can access all the keypad user menus and has limited arm/disarm privileges. It may be used to arm anyarea and disarm any area as long as the area WAS NOT armed by a user code. The Installer code can silence 24hr alarmsor a Burglary alarms in an area that was armed by the installer or in an area that is not armed. The installer code can silencea trouble condition in a disarmed area. See User’s Guide for a full description of arming and disarming procedures.
Factory Default for the Installer Program Code is: 1 7 2 8 3 9
Section 2 - Operating the System

M1G Installation and Programming Manual Page 15
Ready Light - This light is ON when all burglar zones are secure and the system is OK for arming. If this light is OFF, one or more zones areviolated (not secure). For maximum security, all zones should be secured before the system is armed.
If FLASHING, one or more force-armable zones are violated. Force arming temporarily excludes violated zone(s) from the system. However, ifa force armed zone becomes secure while the system is armed, it will automatically restore to service. This is handy for a garage door. Thesystem may be armed with the door up, but once the car is backed out and the door is closed, it will become secured.
Armed Light- This light will be ON when the system is armed. The mode of arm will be indicated by the LCD display and the Exit or Staylighted pushbuttons. This light will be OFF when the system is disarmed.
Exit Key - This lighted key may be programmed for single or double press arming to the AWAY (not occupied) mode. If the Exit light is ON thesystem is armed and all perimeter sensors and interior motions are active. The Away key may be pressed during the exit delay time t toconvert from Away mode to Away Vacation mode. The Away Vacation mode is primarily for use with the Whenever/And/Then Rules program-ming of Elk-RP to invoke long term energy savings.
Stay Key - This lighted key may be programmed for single or double press arming to the STAY (occupied) mode. If the Stay light is ON thesystem is armed and all interior zones are excluded (bypassed). Only perimeter doors and windows are active in the Stay mode. This keymay also be programmed to change to other Stay modes such as: Stay Instant, Stay Night, and Stay Night Instant. Since interior zones areautomatically excluded once the Stay mode is activated, the M1 allows this key to Stay arm even while one or more interior zones areviolated, provided they are programmed for “force arming”. The Stay Night mode re-activates any interior night zones. To prevent a falsealarm the control will not allow change to the Stay Night mode when a interior night zone is violated unless it is programmed for “Force arm”.
Chime Key - Chime produces an audible alert whenever certain doors, windows, or other selected zones are violated. There are fourdifferent selections: Tone only, Voice, Tone/Voice, and Off. In the programming mode this key also functions as an insert character key fortext programming. The key light indicated when Chime is On.
Bypass Key - Pressing this key followed by a zone number and the bypass key again will exclude or bypass the selected zone. Thiskey may also be used to delete a character during text programming. When the Bypass key is lit, one or more zones are bypassed.
* Key - This key serves as a clear or reset key. If an error is made while entering digits, pressing this key clears the error. Three presses isa master clear.
# Key - This key is currently a duplicate of the Bypass key.
Numerical Keys - These keys are used for entry of passcodes, programming, etc. Keys 2 - 9 also have an assigned alpha characterwhich are used for entering text.
Arrow Keys - The menu and arrow keys have powerful functionality used for both normal operation and programming. Pressing the Menukey displays relative information according to each application. The arrow keys allow scrolling through all available options. The user canactivate or select the displayed option by pressing the right arrow key. Once an option has been selected, the user may be prompted fora passcode. Additional sub-menu options may appear to assist. The user may return to the status screen by pressing the * key.
2.5 Keypad Overview

M1G Installation and Programming ManualPage 16
Access to menus 1 to 5 can be restricted via programming to only Users that have “User Code Option 8” set. Menus 6 & 8required a Master or Installer Code. Menu 9 requires the Installer Code. Press ELK to begin, then press the UP or DOWNarrow key to select a menu. Enter a code if prompted. To select a menu press the RIGHT arrow key.
Keypad Menus
Allows viewing or controlling of the automation functions such as Tasks, Lighting, Outputs,Temperature Sensor, Keypad Temperature, and Thermostats. Press the RIGHT arrow key toselect, then choose the desired function using the UP or DOWN arrow keys.
NOTE: The automation functions must be assigned and named using the ELK-RP software.In most cases they cannot do anything unless they have been written into one of the“Whenever/And/Then” automation rules.
† Tasks are like 1 button macros, performing multiple jobs with one push. To activate a taskpress the RIGHT arrow key and press UP or DOWN to scroll through the list of available tasks.To jump directly to a particular task, enter it’s two digit number. Once the task is displayed, allit takes to activate it is to press the # key. A rule to use the “Water the Lawn” task might be:WHENEVER “Water the Lawn” IS ACTIVATED THEN TURN ON Valve 19 FOR 5 MINUTES, etc.
† Lighting allows the individual control of lights and/or appliances which have been assignedthrough the ELK-RP software. Press the RIGHT arrow key to select Lighting, then press theUP or DOWN arrow keys to scroll through the list. If you know the three digit number, you mayenter it to jump directly to that Lighting/Appliance. The current state of the unit will bedisplayed. Press the # key to toggle (change) the unit from on > off or from off > on.
Outputs might be relays or voltages used to actuate something like a motor, fan, pump, etc.Outputs can be turned on or turned off from this menu. Press the RIGHT arrow key to selectOutputs, then press the UP or DOWN arrow keys to scroll through the list. If you know thethree digit number, you may enter it to jump directly to that Output. The current state of theoutput will display. Press the # key to toggle (change) the output from on > off or from off > on.
Remote “Zone” Temperature Sensors can be read from this menu. Press the RIGHT arrowkey to select this menu, then press the UP or DOWN arrow keys to scroll through the list ofavailable sensors. To jump directly to a particular sensor enter it’s two digit number. Thecurrent temperature will be displayed. Press the * key to exit.
Keypad Temperature Sensors can be read from this menu. Press the RIGHT arrow key toselect this menu, then press the UP or DOWN arrow keys to scroll through the list of availablekeypads. To jump directly to a particular keypad enter it’s two digit number. The currenttemperature at the keypad will be displayed. Press the * key to exit.
† Thermostats can be read from this menu. Press the RIGHT arrow key to select this menu,then press the UP or DOWN arrow keys to scroll through the list of available thermostats. Tojump directly to a particular thermostat enter it’s two digit number. The current temperature atthe thermostat will be displayed. Press the * key to exit.
Used for resetting latched smoke detectors after a fire alarm activation..
Press the RIGHT arrow key to actuate the Reset Smoke Detector feature. This causes thepower to smoke detectors to be removed for 5 seconds. During this time all fire zones will beignored to keep an accidental alarm from occurring.
123456789012345678901234567890123456789012345678901234567890123456789012345678901234567890123456789012345678901234567890123456789012345678901234567890123456789012345678901234567890123456789012345678901234567890123456789012345678901234567890123456789012345678901234567890123456789012345678901234567890
1-View/Control r
Automation Fncts
123456789012345678901234567890123456789012345678901234567890123456789012345678901234567890123456789012345678901234567890123456789012345678901234567890123456789012345678901234567890123456789012345678901234567890123456789012345678901234567890123456789012345678901234567890
2-Reset r
Smoke Detectors
123456789012345678901234567890123456789012345678901234567890123456789012345678901234567890123456789012345678901234567890123456789012345678901234567890123456789012345678901234567890123456789012345678901234567890123456789012345678901234567890123456789012345678901234567890123456789012345678901234567890
READY TO ARM9:00AM 08/01/03
Continued on next page..
123456789012345678901234567890123456789012345678901234567890123456789012345678901234567890123456789012345678901234567890123456789012345678901234567890123456789012345678901234567890123456789012345678901234567890123456789012345678901234567890123456789012345678901234567890
3-Outputs r123456789012345678901234567890123456789012345678901234567890123456789012345678901234567890123456789012345678901234567890123456789012345678901234567890123456789012345678901234567890123456789012345678901234567890123456789012345678901234567890123456789012345678901234567890
Pump Motor Cntrl001:=Off, # to Chg
123456789012345678901234567890123456789012345678901234567890123456789012345678901234567890123456789012345678901234567890123456789012345678901234567890123456789012345678901234567890123456789012345678901234567890123456789012345678901234567890123456789012345678901234567890
2-Lighting r
123456789012345678901234567890123456789012345678901234567890123456789012345678901234567890123456789012345678901234567890123456789012345678901234567890123456789012345678901234567890123456789012345678901234567890123456789012345678901234567890123456789012345678901234567890
1-Tasks r
123456789012345678901234567890123456789012345678901234567890123456789012345678901234567890123456789012345678901234567890123456789012345678901234567890123456789012345678901234567890123456789012345678901234567890123456789012345678901234567890123456789012345678901234567890
Water The Lawn01: # Activates
123456789012345678901234567890123456789012345678901234567890123456789012345678901234567890123456789012345678901234567890123456789012345678901234567890123456789012345678901234567890123456789012345678901234567890123456789012345678901234567890123456789012345678901234567890
Kitchen Lights001:=Off, # to Chg
123456789012345678901234567890123456789012345678901234567890123456789012345678901234567890123456789012345678901234567890123456789012345678901234567890123456789012345678901234567890123456789012345678901234567890123456789012345678901234567890123456789012345678901234567890
5 Seconds SmokeOutput Reset r
The control offers extended Menu Options via the center navigation “ELK” key. Some menusmay require a valid code to authorize. The Factory Default Code for USER Code 1 is: 3 4 5 6(1 2 3 4 5 6 if the six digit code option is enabled)
123456789012345678901234567890123456789012345678901234567890123456789012345678901234567890123456789012345678901234567890123456789012345678901234567890123456789012345678901234567890123456789012345678901234567890123456789012345678901234567890123456789012345678901234567890123456789012345678901234567890
4-Temperature rSensor
123456789012345678901234567890123456789012345678901234567890123456789012345678901234567890123456789012345678901234567890123456789012345678901234567890123456789012345678901234567890123456789012345678901234567890123456789012345678901234567890123456789012345678901234567890
OutsideS01:=032 Degrees
123456789012345678901234567890123456789012345678901234567890123456789012345678901234567890123456789012345678901234567890123456789012345678901234567890123456789012345678901234567890123456789012345678901234567890123456789012345678901234567890123456789012345678901234567890
5-Keypad rTemperature
123456789012345678901234567890123456789012345678901234567890123456789012345678901234567890123456789012345678901234567890123456789012345678901234567890123456789012345678901234567890123456789012345678901234567890123456789012345678901234567890123456789012345678901234567890
Keypad 01K01:=073 Degrees
123456789012345678901234567890123456789012345678901234567890123456789012345678901234567890123456789012345678901234567890123456789012345678901234567890123456789012345678901234567890123456789012345678901234567890123456789012345678901234567890123456789012345678901234567890
6-Thermostat rTemperature
123456789012345678901234567890123456789012345678901234567890123456789012345678901234567890123456789012345678901234567890123456789012345678901234567890123456789012345678901234567890123456789012345678901234567890123456789012345678901234567890123456789012345678901234567890
HallwayT01:=072 Degrees
† Not evaluated by UL

M1G Installation and Programming Manual Page 17
123456789012345678901234567890123456789012345678901234567890123456789012345678901234567890123456789012345678901234567890123456789012345678901234567890123456789012345678901234567890123456789012345678901234567890123456789012345678901234567890123456789012345678901234567890
3-Walk Test Area r
< Area? Name >
123456789012345678901234567890123456789012345678901234567890123456789012345678901234567890123456789012345678901234567890123456789012345678901234567890123456789012345678901234567890123456789012345678901234567890123456789012345678901234567890123456789012345678901234567890
4-View History r
Log
123456789012345678901234567890123456789012345678901234567890123456789012345678901234567890123456789012345678901234567890123456789012345678901234567890123456789012345678901234567890123456789012345678901234567890123456789012345678901234567890123456789012345678901234567890
6-Change r
User CodesRequires Master orInstaller Code
Menu 3 permits a local walk test of all zones assigned to this keypad’s area. The siren(s) andcommunicator are disabled during a walk test. Press the RIGHT arrow key to begin a WalkTest. The keypad displays the total tested zones adjacent to the total number of zones involved.When a zone is activated, it’s name is displayed across the bottom and can be audible if theChime mode is on.
Allows viewing of the past 512 activities stored in the history log. Press the RIGHT arrow key toview the History Log. History activities include: Arm, Disarm, Alarm, Trouble, etc. The top linedisplays the Log number, Mth/Day, Time, and event description.
L001 is always the most recent event. Press the UP or DOWN arrow keys to move forward andback. Event 512 will be the oldest event. The bottom line displays the event description, theextended data (zone, user, etc.) and the area number (A1-A8).
Allows viewing of the current status of all zones. Press the RIGHT arrow key to select. PressUP or DOWN to scroll through the zones or enter a three digit number to jump directly to aparticular zone. I.E. for zone 16 enter 016. Press the * key to exit.
For changing a user code and/or name for codes which have been previously enabled by theInstaller. Only a Master code OR the installer code can access this menu. Press the RIGHTarrow key to begin. Press UP or DOWN keys to locate a user, or enter 3 digits to jump. PressRIGHT arrow key to view the existing code. To change, enter the new code digits and listen for 3beeps to confirm. To edit the name, press the RIGHT arrow key once, then press the DOWNarrow key. Enter the text using the letters on the keys. I.E. For “K” press the 5 key twice. MoveRIGHT or LEFT with the arrow keys. Press Chime to insert a space. Press Bypass to erases aletter. The UP and DOWN arrow keys shift from upper to lower case letters. Press the ELK keyto save and exit..
Allows an end user to change up to 20 settings incorporated into an automation rule. Thesesettings can be: time of day, time duration (seconds), or a numeric value. Each custom settinghas a reference number (CS) and a text description: I.E. CS01: Sprkl On 00:00 [Time] implyinga time of day setting. Press the RIGHT arrow key to begin.
Press the UP or DOWN arrow keys to locate a setting, then press the RIGHT arrow key toselect. Enter the new value and press the ELK key to save and exit.
Menu 8 consists of 8 sub-menus used for advanced system settings. Press the right arrow keyand enter a valid user code. Press the UP or DOWN arrow keys to select a sub-menu or enterthe one digit number to jump directly to any sub-menu. I.E. enter 6 to jump to 86.
To set the system clock press the RIGHT arrow key, then press the UP or DOWN arrow key toselect the day. Next, press the RIGHT arrow key to move to Date/Time setting. Enter two digitsfor month, date, year, hour, and min. To exit press the * key.
To set the volume for output 1 voice messages (non-alarm) press the RIGHT arrow key and setdesired volume with the UP or DOWN keys. There are 8 settings (0-7). WARNING: PROTECTEARS! Each adjustment broadcasts a test message through Output 1. To exit press the * key.
To set keypad adjustments press the RIGHT arrow key. Then press the UP or DOWN keys to selectone of the three options.
123456789012345678901234567890123456789012345678901234567890123456789012345678901234567890123456789012345678901234567890123456789012345678901234567890123456789012345678901234567890123456789012345678901234567890123456789012345678901234567890123456789012345678901234567890
8-System r
Settings
123456789012345678901234567890123456789012345678901234567890123456789012345678901234567890123456789012345678901234567890123456789012345678901234567890123456789012345678901234567890123456789012345678901234567890123456789012345678901234567890123456789012345678901234567890
83-Keypad r
Adjustments123456789012345678901234567890112345678901234567890123456789011234567890123456789012345678901123456789012345678901234567890112345678901234567890123456789011234567890123456789012345678901123456789012345678901234567890112345678901234567890123456789011234567890123456789012345678901
1:Set Keypad r
Beep Tone123456789012345678901234567890112345678901234567890123456789011234567890123456789012345678901123456789012345678901234567890112345678901234567890123456789011234567890123456789012345678901123456789012345678901234567890112345678901234567890123456789011234567890123456789012345678901
2:Set Keypress r
Beep Volume123456789012345678901234567890112345678901234567890123456789011234567890123456789012345678901123456789012345678901234567890112345678901234567890123456789011234567890123456789012345678901123456789012345678901234567890112345678901234567890123456789011234567890123456789012345678901
3:Set Backlight r
Dim Level
123456789012345678901234567890123456789012345678901234567890123456789012345678901234567890123456789012345678901234567890123456789012345678901234567890123456789012345678901234567890123456789012345678901234567890123456789012345678901234567890123456789012345678901234567890
82-Out1 VoiceAdjust Volume r
123456789012345678901234567890123456789012345678901234567890123456789012345678901234567890123456789012345678901234567890123456789012345678901234567890123456789012345678901234567890123456789012345678901234567890123456789012345678901234567890123456789012345678901234567890
81-Set Sys Clock r
24hr format
123456789012345678901234567890123456789012345678901234567890123456789012345678901234567890123456789012345678901234567890123456789012345678901234567890123456789012345678901234567890123456789012345678901234567890123456789012345678901234567890123456789012345678901234567890
000of016 Tested r
A?-Violate Zones
123456789012345678901234567890123456789012345678901234567890123456789012345678901234567890123456789012345678901234567890123456789012345678901234567890123456789012345678901234567890123456789012345678901234567890123456789012345678901234567890123456789012345678901234567890
L001:01/01bbbbb08:00AreaArmed 103A1
123456789012345678901234567890123456789012345678901234567890123456789012345678901234567890123456789012345678901234567890123456789012345678901234567890123456789012345678901234567890123456789012345678901234567890123456789012345678901234567890123456789012345678901234567890
001:Selb b b b b Prgr
< User Name >
123456789012345678901234567890123456789012345678901234567890123456789012345678901234567890123456789012345678901234567890123456789012345678901234567890123456789012345678901234567890123456789012345678901234567890123456789012345678901234567890123456789012345678901234567890
7--Automation r
Custom Settings
123456789012345678901234567890123456789012345678901234567890123456789012345678901234567890123456789012345678901234567890123456789012345678901234567890123456789012345678901234567890123456789012345678901234567890123456789012345678901234567890123456789012345678901234567890
CS01:bbbbb00:00Timer
Sprklr On
Requires Master orInstaller Code
Requires Master orInstaller Code
123456789012345678901234567890123456789012345678901234567890123456789012345678901234567890123456789012345678901234567890123456789012345678901234567890123456789012345678901234567890123456789012345678901234567890123456789012345678901234567890123456789012345678901234567890
5-View Status r
of all zones
To set keypad beep tones press the RIGHT arrow key, then select the desired tone using the UP orDOWN keys. There are 9 settings (0-8). When done, exit by pressing the * key.
To set key-press beep volume press the RIGHT arrow key, then select the desired volume usingthe UP or DOWN keys. There are 7 volume levels (1-7) plus Off (0). To exit press the * key.
To set backlight dim level press the RIGHT arrow key, then select the desired level using the UP orDOWN keys. There are 9 backlight levels (1-9) plus Off (0). The keypad automatically dims to thissetting after 30 seconds of no activity in order to save energy. To exit press the * key.

M1G Installation and Programming ManualPage 18
To perform system tests press the right arrow key. Then press the up or down arrow keys toselect one of the three tests.
The control’s standby battery is load tested automatically every 24hrs. However, it can also bemanually load tested anytime using this option. Press the right arrow key to start the test. Thebattery is placed under load for 30 seconds and the battery voltage and system current isdisplayed. If the battery falls below a set level, a Low Battery trouble will occur. If it’s necessaryto replace the battery, this test should be used to test and clear a Low Battery Trouble condition.
To test the keypad’s LCD screen press the RIGHT arrow key. The entire screen should appearblack indicating all pixels are working. To exit press the * key.
To manually test the communicator (dialer) press the RIGHT arrow key. Testing is done usingthe first phone number that is programmed to send a test code. If there is no phone numberprogrammed to send a test code, the test will end. To exit this menu press the * key.
There are two types of test, silent and monitored. To silently send a test press the rightarrow key from this display. To hear the test using the inside speakers (OUT1) press the upor down arrow key to bring up the following display.
This unique feature permits you to hear or “monitor” a single communicator test using theinside speakers (OUT1) eliminating the need for a telephone “Butt” set. Simply press theright arrow key from this display to begin.
Similar to above, this works for multiple communicator tests. Press the right arrow key toenable. Each communicator transmission will be monitored until mode is canceled. Pressthe star (*) key three times to cancel. Canceled automatically after 24hr daily battery test.
This special option allows any pending (not reported) dialer communications to be clearedor cancelled. Typically this will be used only for initial installation and testing.
NOTE: ALWAYS NOTIFY THE MONITORING STATION BEFORE TESTING THE DIALER! If the testshould fail, a Comm Fail trouble will occur. To clear a Comm Fail the dialer must be able tocomplete a good communication.
To connect ELK’s Remote Program PC software (RP) via the user assisted method, press theRIGHT arrow key and then select the connection mode with the UP or DOWN arrow keys.
1:Seize Line Attended Mode - 1) Allows RP connection to begin on an already established voiceconnection between the control phone line and the RP Computer. 2) Also useful for manuallyanswering an incoming call from the RP Computer with programming Rings to Auto Answer.
2:Seize Line Unattended Mode - Pressing the RIGHT arrow key causes the control to dial theprogrammed RP telephone number. The RP Computer must be in the “wait for call” mode.
NOTE: UL requires that a Technician be On-Site when doing Remote Programming.
This is a collection of tools for diagnosing system problems. Press the RIGHT arrow key andenter a valid user code to begin. Press the UP or DOWN keys to select one of the four tools:
This tool is for use in conjunction with Tech Support to diagnose data bus retries and errors. Itdisplays the device type and number of retries accumulated since the last power-up. T=Devicetype, A=The Address within the device type
This tool displays the control’s voltage and average current being drawn from the power supply.
This tool allows the voltage on each zone to be displayed in real time. It changes as contactsor devices are violated. Press the RIGHT arrow key to begin.
Use the UP or DOWN keys to scroll through each zone. The displayed information consists of:the present zone voltage, the L low and H high alarm thresholds, and the analog (A to D)equivalent of the zone voltage..
This is a read only screen displaying the telephone line voltage during the last on-hookcondition. It is an approximate measurement accurate to only +-20%.
123456789012345678901234567890123456789012345678901234567890123456789012345678901234567890123456789012345678901234567890123456789012345678901234567890123456789012345678901234567890123456789012345678901234567890123456789012345678901234567890123456789012345678901234567890
85-Connect ‘RP’ r
Remote Program
123456789012345678901234567890123456789012345678901234567890123456789012345678901234567890123456789012345678901234567890123456789012345678901234567890123456789012345678901234567890123456789012345678901234567890123456789012345678901234567890123456789012345678901234567890
2:LCD Test r
123456789012345678901234567890123456789012345678901234567890123456789012345678901234567890123456789012345678901234567890123456789012345678901234567890123456789012345678901234567890123456789012345678901234567890123456789012345678901234567890123456789012345678901234567890
3:Communicator r
Manual Test
123456789012345678901234567890123456789012345678901234567890123456789012345678901234567890123456789012345678901234567890123456789012345678901234567890123456789012345678901234567890123456789012345678901234567890123456789012345678901234567890123456789012345678901234567890
1:Seize Line r
Attended Mode123456789012345678901234567890123456789012345678901234567890123456789012345678901234567890123456789012345678901234567890123456789012345678901234567890123456789012345678901234567890123456789012345678901234567890123456789012345678901234567890123456789012345678901234567890
2:Seize Line r
UnAttended Mode
123456789012345678901234567890112345678901234567890123456789011234567890123456789012345678901123456789012345678901234567890112345678901234567890123456789011234567890123456789012345678901123456789012345678901234567890112345678901234567890123456789011234567890123456789012345678901
86-System r
Diagnostics123456789012345678901234567890123456789012345678901234567890123456789012345678901234567890123456789012345678901234567890123456789012345678901234567890123456789012345678901234567890123456789012345678901234567890123456789012345678901234567890123456789012345678901234567890
1:DataBusErrors b
T2A1 Retry 00000123456789012345678901234567890123456789012345678901234567890123456789012345678901234567890123456789012345678901234567890123456789012345678901234567890123456789012345678901234567890123456789012345678901234567890123456789012345678901234567890123456789012345678901234567890
2:Sys Volt/Curr b
13.8V 0.440Amps123456789012345678901234567890123456789012345678901234567890123456789012345678901234567890123456789012345678901234567890123456789012345678901234567890123456789012345678901234567890123456789012345678901234567890123456789012345678901234567890123456789012345678901234567890
3:Zone=001 VoltsDisplay Level r
123456789012345678901234567890123456789012345678901234567890123456789012345678901234567890123456789012345678901234567890123456789012345678901234567890123456789012345678901234567890123456789012345678901234567890123456789012345678901234567890123456789012345678901234567890
4:LastOnHookTeleLine V=57,+-20%
123456789012345678901234567890123456789012345678901234567890123456789012345678901234567890123456789012345678901234567890123456789012345678901234567890123456789012345678901234567890123456789012345678901234567890123456789012345678901234567890123456789012345678901234567890
Zn=001 Volt=07.2L04.6 H09.0 A132
123456789012345678901234567890123456789012345678901234567890123456789012345678901234567890123456789012345678901234567890123456789012345678901234567890123456789012345678901234567890123456789012345678901234567890123456789012345678901234567890123456789012345678901234567890123456789012345678901234567890
1:Battery Test r
for 30 Seconds
123456789012345678901234567890123456789012345678901234567890123456789012345678901234567890123456789012345678901234567890123456789012345678901234567890123456789012345678901234567890123456789012345678901234567890123456789012345678901234567890123456789012345678901234567890
84-System r
Tests
123456789012345678901234567890123456789012345678901234567890123456789012345678901234567890123456789012345678901234567890123456789012345678901234567890123456789012345678901234567890123456789012345678901234567890123456789012345678901234567890123456789012345678901234567890
Send Test r
Silently
123456789012345678901234567890123456789012345678901234567890123456789012345678901234567890123456789012345678901234567890123456789012345678901234567890123456789012345678901234567890123456789012345678901234567890123456789012345678901234567890123456789012345678901234567890
Send Test w/ r
speaker monitor
123456789012345678901234567890123456789012345678901234567890123456789012345678901234567890123456789012345678901234567890123456789012345678901234567890123456789012345678901234567890123456789012345678901234567890123456789012345678901234567890123456789012345678901234567890
Turn Butt Set r
Monitor Mode On
123456789012345678901234567890123456789012345678901234567890123456789012345678901234567890123456789012345678901234567890123456789012345678901234567890123456789012345678901234567890123456789012345678901234567890123456789012345678901234567890123456789012345678901234567890
Clear Pending r
Dialer Reports

M1G Installation and Programming Manual Page 19
123456789012345678901234567890123456789012345678901234567890123456789012345678901234567890123456789012345678901234567890123456789012345678901234567890123456789012345678901234567890123456789012345678901234567890123456789012345678901234567890123456789012345678901234567890
9-Installation r
Programming (0)
123456789012345678901234567890123456789012345678901234567890123456789012345678901234567890123456789012345678901234567890123456789012345678901234567890123456789012345678901234567890123456789012345678901234567890123456789012345678901234567890123456789012345678901234567890
87-CustomMessage Record r
† This option is used in conjuction with a house telephone (microphone) to record up to 10custom voice messages. Each message occupies a 6 second block. Two or moreconsecutive blocks may be linked together for longer times. Total record time cannot exceed60 seconds. These messages require the Elk-RP software, which utilize these messagestogether with the built-in 500+ word vocabulary to construct voice phrases for many uses,including the voice dialer. Press the RIGHT arrow key to begin custom message record.
Selects any one of the custom messages (VM01-VM10) for playback or recording. Press theUP or DOWN arrow keys to select. To Play the selected message press the RIGHT arrow key.The message will play through Output 1 speakers. To record a new message press the LEFTarrow key. To exit press the * key.
This sets the number of consecutive 6 sec. record blocks. The default is 01 blocks which isnormally long enough for most applications. However, to create a longer message press theRIGHT arrow key and enter the number 01 to 02, etc. NOTE: Creating longer messagesreduces the total number of custom messages. This screen also allows all messages to beplayed “PlayAll” by pressing the RIGHT arrow key. When ready to record press the LEFT arrowkey.
This is the prerecord screen. To begin recording: 1) lift the house phone (off hook), 2) pressthe LEFT arrow key, 3) start speaking. To stop recording press the “0” key. If stop is notpressed, recording will automatically end after 6 sec. (or the total number of blocks times 6seconds).NOTE: A local house phone is used as the microphone. Installer programming menu 07,option 1, must be set to a 1 in order for the local phone to be recognized by the control.
This will display as soon as recording has stopped. To play the new message press theRIGHT arrow key. To record the message again press the LEFT arrow key and follow thesame procedures again. To exit press the * key.
123456789012345678901234567890123456789012345678901234567890123456789012345678901234567890123456789012345678901234567890123456789012345678901234567890123456789012345678901234567890123456789012345678901234567890123456789012345678901234567890123456789012345678901234567890
VM01b 1 Block(s)Record< Play>
123456789012345678901234567890123456789012345678901234567890123456789012345678901234567890123456789012345678901234567890123456789012345678901234567890123456789012345678901234567890123456789012345678901234567890123456789012345678901234567890123456789012345678901234567890
6 Sec Blocks=01b
Record< PlayAll>
123456789012345678901234567890123456789012345678901234567890123456789012345678901234567890123456789012345678901234567890123456789012345678901234567890123456789012345678901234567890123456789012345678901234567890123456789012345678901234567890123456789012345678901234567890
6 Sec Blocks=01b
Rec< LiftPhone!
123456789012345678901234567890123456789012345678901234567890123456789012345678901234567890123456789012345678901234567890123456789012345678901234567890123456789012345678901234567890123456789012345678901234567890123456789012345678901234567890123456789012345678901234567890
VM01b 1 Block(s)Record< Play>
Step by step summary of procedures for recording a custom message:1) Verify that a house telephone is connected to the control’s T1 and R1 terminals and that Installer menu 07, option 1
is set to a 1. This allows the control to recognize the telephone and allow it to be used as a microphone.2) Go to the user menu 8-System Settings by pressing the ELK key and entering 8. Press the r key and enter a valid
user code. Press 87 to reach the custom message record screen.3) Using the Up/Down arrow keys, select the voice message to record VM01 to VM10. There are 10 custom
messages.4) Press the l key and select the number of 6 second blocks for your message. Hint-rehearse and time the message,
if it is greater than 6 seconds then increase the number of consecutive blocks as required.5) Lift the telephone handset and press the l key to begin the recording. The recording will not start until the handset
is off-hook and the l key is pressed.6) Record your message by speaking into the handset. If the message is shorter than the amount of time selected
then press 0 to stop recording. Otherwise, recording will stop when the number of blocks is reached.7) Press the Right arrow key to play the message. The message will be heard through the telephone handset if it is
still off-hook. Otherwise the message will be directed to the amplifier connected to output 1.
RequiresInstaller
Code
From this menu you may press the RIGHT arrow to enter Installation Level Programming. Ifthe Installer Programming Code has not already been entered it will be required at this time.
REFER TO PAGE 22 FOR PROGRAMMING INSTRUCTIONS
† Not evaluated by UL
NOTE: The Remote Programming RP software can be used to lockout certain local program capabilities for “anti-takeover” purposes. The number in the lower right corner of this menu will indicate the level of lockout as follows:(0) = No lockout,(1)=Lockout Telephone number programming - view everything,(2)=Lockout ALL programming - view everything,(3)=Lockout ALL Programming and Viewing. This can only be set or removed from the ELK-RP Software.

M1G Installation and Programming ManualPage 20
This menu allows the keypad to be mapped temporarily to any other area, allowing multi-area (partitioned) operation. The mapped area can be armed, disarmed, and otherwisecontrolled just as if the keypad were permanently assigned to that area. It may also beused to display a snapshot of all areas at once, showing the status of each area at once.
Press the RIGHT arrow key to select and display the following screen.Enter a valid user code. The control does not allow (restricts) mapping or viewing ofareas that are not authorized for the user code. The following screen will be displayed:
MAPPING TO AN INDIVIDUAL AREAEnter the area number to be mapped OR scroll UP and DOWN with the arrow keys.
Pressing the Exit or * key will map the Keypad to the area shown. The keypad will nowdisplay the status, including LEDs and the LCD screen of the mapped area. For the next1 minute it will be possible to arm, disarm, bypass, etc. the mapped area from thiskeypad. The 1 minute will be extended with each keypress. The keypad will return to itsprimary assigned area after 1 minute of no keypress activity.
MAPPING TO A CONSOLIDATED DISPLAY OF ALL AREASPressing the rrrrr RIGHT arrow key will map the Keypad to a consolidated ‘snapshot’display of all areas which the user code was authorized to operate. This display permitsquick arming and disarming only. If a area is not ready to arm it will be necessary to mapindividually (see steps above) to that area to view the violated zone(s) and either secure orbypass them prior to arming.
The example at left shows that the user code was authorized for all 8 areas, as indicatedby a letter beneath each of the 8 area numbers. The letters show the status of each area.A lower case “r” means the area is Ready to Arm, a lower case “n” means Not Ready, aupper case “A” means Armed, and a upper case “X” means that area is the primary areaassigned to the Keypad which cannot be operated from the consolidated display.
The example at left shows that the user code was only authorized for areas 1, 2, and 3.The unauthorized area(s) have a “-” beneath them.
To change (toggle) the arm status of an area, press the number key representing the areanumber. IMPORTANT: The area status is not “real time”. It is a snapshot taken when therrrrr RIGHT arrow key was pressed. If a zone has since become violated the area will stillbe displaying “r”, however the letter will immediately change to “n” and the keypad will emitan error tone when an attempt is made to arm by pressing the area number.
123456789012345678901234567890123456789012345678901234567890123456789012345678901234567890123456789012345678901234567890123456789012345678901234567890123456789012345678901234567890123456789012345678901234567890123456789012345678901234567890123456789012345678901234567890
0-Select KeypadAlternate Area r
123456789012345678901234567890123456789012345678901234567890123456789012345678901234567890123456789012345678901234567890123456789012345678901234567890123456789012345678901234567890123456789012345678901234567890123456789012345678901234567890123456789012345678901234567890
Auth. RequiredEnter Valid Pin
123456789012345678901234567890123456789012345678901234567890123456789012345678901234567890123456789012345678901234567890123456789012345678901234567890123456789012345678901234567890123456789012345678901234567890123456789012345678901234567890123456789012345678901234567890
Select Area- 1 r[Area Name]
123456789012345678901234567890123456789012345678901234567890123456789012345678901234567890123456789012345678901234567890123456789012345678901234567890123456789012345678901234567890123456789012345678901234567890123456789012345678901234567890123456789012345678901234567890
READY TO Arm[Area Name]
Multi-area (Partition) Operation
123456789012345678901234567890123456789012345678901234567890123456789012345678901234567890123456789012345678901234567890123456789012345678901234567890123456789012345678901234567890123456789012345678901234567890123456789012345678901234567890123456789012345678901234567890
Select Area- 1 r[Area Name]
123456789012345678901234567890112345678901234567890123456789011234567890123456789012345678901123456789012345678901234567890112345678901234567890123456789011234567890123456789012345678901123456789012345678901234567890112345678901234567890123456789011234567890123456789012345678901
Area# 12345678Status= Xr r r r r r r
123456789012345678901234567890123456789012345678901234567890123456789012345678901234567890123456789012345678901234567890123456789012345678901234567890123456789012345678901234567890123456789012345678901234567890123456789012345678901234567890123456789012345678901234567890
Area# 12345678Status= Xr r - - - - -
NOTE: This is a new feature which became available with firmware release version 4.2.5. Thefirmware may be flash upgraded in older controls to add this capability.

M1G Installation and Programming Manual Page 21
3.1 IntroductionThe Security functionality of the M1 Control can be programmed either from an ELK-M1KP LCD Keypad OR from the ELK-RPPC Software. The keypad features a menu-driven “Text” based interface with simple Yes/No answers for most options. Afterjust a short amount of experience the average installer will not even require an instruction manual to keypad program thecontrol.
For the Automation functionality the ELK-RP PC Software is a requirement. The options and capabilities available forautomation are so unique and powerful that it takes a PC to make use of all the benefits. The M1 features a powerful“Whenever/And/Then” RULES based programming that allows almost any imaginable operation.
3.2 Local Keypad ProgrammingThere are two levels of operation for programming the control locally, user level and installer level.
- User level programming provides the ability to add, change, or delete user passcodes and names. It also allows customautomation settings to be viewed and changed. A master user code is required to access the user code and custom settingsscreens. User programming is explained in the User’s Guide.
- Installer level programming allows total customizing of the Security operating features. Only the installer code may accessthis level. If the installer code is lost or forgotten, it is impossible to program the control locally. Anyone attempting installerlevel programming should be familiar with the contents of this publication prior to programming the control panel. If remoteprogramming is used, it is possible to “lock out” or prevent takeover of a control by another installation company by selecting“Lockout Local Prog.” This prevents the installer passcode from gaining access to programming via an LCD keypad. Theinstaller passcode may still be used for the non-programming functions described in Chapter 2. Lockout Local Prog does notaffect remote programming.
3.3 Local or Remote Computer Programming (ELK-RP) and Anti-TakeoverELK-RP programming utilizes extensive error checking and security safeguards, including data encryption, password log-on,serial number, and dealer assigned RP access code. The serial # identifies the control to RP while the RP access codeidentifies the computer to the control prior to a programming session. RP loads the access code during the first connection. Itcannot be viewed or changed from local keypad programming. In addition to these safeguards, you can set an anti-takeoveroption from RP which prevents certain keypad programming. Even a total default of the panel programming cannot reset theanti-takeover option once it is set..
The Factory Default Elk-RP Access Code is: 2 4 6 8 0 1
NOTE: UL requires that a Technician be On-Site when doing Remote Programming.
3.4 Area PartitioningThe control may be divided into 1 to 8 independent areas (partitions). Each area appears as a full-featured system, allowingone control to be shared by multiple, independent departments within a common structure. Zones, User Codes, andKeypads may be assigned to any 1 area up to the maximum number available. An example is a single business divided intoseparate departments, each department occupied by different employees. Mount the control in a secure area (common utilitycloset) with dedicated and uninterrupted AC power and telephone service. Then assign zones, codes, and keypads to eachdepartment.
Output 1 siren/voice activates on all alarms, regardless of the area. The RP Software Rules can be used create additional(separate) outputs. When reporting to the central station events like AC Power Failure, Automatic tests, Low Battery, etc., areconsidered system reports and are transmitted using the Area 1 account number. If area partitioning is not desired, simplydesignate all zones to a single area (Area 1) which is the factory default setting for zones 1-16.
COMMON AREA - Another popular feature is the ability to have one or more areas made “common” to Area 1. This is oftenreferred to as a “Vestibule Feature”. Any of the Areas 2 thru 8 may be made common to Area 1. The result is: Area 1 cannot bearmed until all its common areas are armed. Once armed, Area 1 will disarm if any common area becomes disarmed. Thisis good for lobbies or vestibules shared by two or more businesses. Each business must have their own area keypad.NOTE: If you want Area 1 to automatically arm when all its common areas become armed, use a Whenever/And/Then rulefrom the RP software to do this.
Section 3 - Programming The Control

M1G Installation and Programming ManualPage 22
3.5 Communicator Setup ChecklistThe Communicator (Dialer) can dial up to 8 phone numbers plus RP. Digital reporting formats include: Pulse 4+2, SIA,Contact ID, and Pager. There is also a Voice † format which can be commanded from the RP Rules Programming to call abusiness, home, or cellphone and deliver a voice message. Use the following checklist for each required telephonenumber.
1. Under Menu 08 - Telephone Account Setup, select one of the telephone numbers and program the following:Option 01: Select the desired reporting format - 0=Disable, 1=Contact ID, 2=SIA, 3=Pulse 4+2, 4=Pager, 5=Voice †
Note: The Voice format (5) cannot be enabled from keypad programming. It can only be programmed from theElk-RP Software using the Whenever/And/Then Rules.
Option 02: Set the priority for the first (primary number) to 0 = Always Report.Option 03: Program the telephone number digits to be dialed. No special start or ending characters are required.Option 04: Set the dial attempts to greater than 0. For Digital reports 8 is suggested. For Voice the max. is 2.Option 05 Program the digits for the account number to report. Each area (partition) has its own Acct. Number.Option 13: Select Yes to have Area info, Zone Alarms, Zone Restores, and Zone Unbypasses reported to this Tel #.Option 14: Select Yes if you wish to have Zone Bypasses reported to this Tel #.Option 15: Select Yes if you wish to have Zone Troubles reported to this Tel #.Option 16: Select Yes if you wish to have User (Open/Close) Reports reported to this Tel #.Option 17: Select Yes if you wish to have Global System Events (AC Fail, Low Battery, etc.) reported to this Tel #.Option 18: Although not required, you may program a text name for each telephone number.
2. Under Menu 09 - Area Reporting Codes, select the area (partition) and program the desired options such as: DialerDelay, Alarm Abort, Auto Open/Closings, etc. then .
3. Under Menu 10 - Zone Reporting Codes, select the zone number and program the desired options such as: Zone Alarms,Restores, Bypasses, or Trouble.Option A: For Zone Alarm program a two digit code. To have the automatic SIA or Contact ID report codes transmittedsimply program a nonzero value. I.E. Program a 1 (01).Option R: For Zone Restore program a two digit code. For automatic SIA or Contact ID codes program a 1 (01).Option B: For Zone Bypass program a two digit code. For automatic SIA or Contact ID codes program a 1 (01).Option T: For Zone Trouble program a two digit code. For automatic SIA or Contact ID codes program a 1 (01).
4. Under Menu 11 - F Key Reporting Codes, select and program the alarm code for each desired Keypad Panic Key. NOTE:Keypad Panics only have Alarm report codes, they do not have restore codes. For automatic SIA or Contact ID codesprogram a 1 (01).
5. Under Menu 12 - Sys Report Code Options & Codes, select and program each desired option such as: AC Fail, LowBattery, Automatic Test, and other system wide options, including the time values for certain options. For automatic SIA orContact ID report codes program a 1 (01).
6. Under Menu 13 - User Report Codes, select and and program an Open or Close report code for any User(s) that youwish to track arm/disarm events, including arm/disarm by the Installer Code or Elk-RP computer.
3.6 Entering Installer Level Programming1. Press the center ‘ELK’ key once followed by the DOWN arrow key until display reads “9-Installation Programming”. NOTE:
The keypad may beep and display the following:
2. Enter the Installer Program Code when required.Press the right arrow key to select the “Installation Programming” option.
The Factory Default Installer Program Code is: 1 7 2 8 3 9
For security against unauthorized programming changes, the installer code should be changed from its factory default setting.This can be done from Menu 07 - Globals System Definitions, Option 42.
Once the Installer Code has been entered, the first programming menu will display and a 4 minute timer will be started.If there is no key-press activity during this time period the control will automatically exit from the programming mode. Itis easy to navigate around and between the programming menus and options using the up and down arrow keys. Whenthe correct menu or option is located, press the right arrow key to proceed into that menu.
Refer to the Quick Reference Guide on the following page to locate a particular menu or to see what optionsappear under each menu. Refer to the individual menus and their option descriptions for details about each of theprogrammable items.
123456789012345678901234567890121234123456789012345678901234567890121234123456789012345678901234567890121234123456789012345678901234567890121234123456789012345678901234567890121234123456789012345678901234567890121234123456789012345678901234567890121234123456789012345678901234567890121234123456789012345678901234567890121234123456789012345678901234567890121234123456789012345678901234567890121234123456789012345678901234567890121234
Auth. RequiredEnter Valid Pin
† Not evaluated by UL

M1G Installation and Programming Manual Page 23
ELK
-M1G
QU
ICK
REF
EREN
CE
- MEN
U P
RO
GR
AM
MIN
GM
enu
01M
enu
04M
enu
06M
enu
07M
enu
08M
enu
10M
enu
13B
us M
od E
nrol
lK
eypa
d D
efs
Cut
off
Tim
ers
Glo
bal
Opt
ions
(co
nt.)
Tele
phon
e #’
s &
Acc
tsZo
ne R
pt C
odes
Use
r R
pt C
odes
Key
pad
1(1
) B
urgl
ar(2
6) O
ut 2
Cha
nge
to V
olta
geTe
leph
one
#1Zo
ne #
1U
ser
#1En
rollin
g(1
) A
rea
Ass
gn(2
) Fi
re(2
7) O
ut 2
Del
ay T
ime
(1)
Alw
ays
Rep
ort
Ala
rm C
ode
(1) O
pen
Cod
e-D
isp
Tota
t Mod
ules
(2)
Sile
nt E
ntry
(3) M
edic
al(2
8) O
ut 2
Sgl
Ala
rm L
ocko
ut(2
) Num
ber
Res
tore
Cod
eC
lose
Cod
e-A
llow
Mod
ule
Edi
t(3
) Sile
nt E
xit
(4) P
olic
e(2
9) R
ings
til
Ans
wer
(3)
Form
atB
ypas
s C
ode
(4) S
ilent
Chi
me
(5) C
arbo
n M
on(3
0) R
ing/
Han
g/A
nsw
er(4
) A
ttem
pts
Trou
ble
Cod
eU
ser
100
Men
u 02
(5)
Dar
k in
60
sec
(6)
Em
erge
ncy
(31)
2 W
ay L
iste
n-in
Ena
ble
(5)
Acc
t #1
- In
stal
ler-
Use
r C
ode
Aut
h.(6
) S
how
Dat
e/Ti
me
(7)
Free
ze(3
2) 2
Way
Cal
lbac
k Ti
me
(6)
Acc
t #2
Men
u 11
(1) O
pen
Cod
e U
ser
1(7
) S
how
Tem
p(8
) G
as(3
3) C
S A
lm V
erify
Tim
e(7
) A
cct
#3K
eypa
d
C
lose
Cod
e(1
) A
rea
#(8
) S
how
Are
a(9
) H
eat
(34)
Bau
d R
ate
Por
t 0(8
) A
cct
#4R
epor
t C
odes
(2)
Arm
(9) B
yp R
eq C
ode
(10)
Wat
er(3
5) X
mit
Eve
nt L
og(9
) A
cct
#5 K
eypa
d 1
Use
r 10
1(3
) Dis
arm
(10)
F1
Key
Def
.(1
1) A
ux1
24hr
(36)
Xm
it Zo
ne C
hang
es(1
0) A
cct
#6(1
) F1
Key
Ala
rm- R
P C
ompu
ter
(4)
Byp
ass
(11)
F2
Key
Def
(12)
Aux
2 24
hr(3
7) X
mit
Out
put C
hang
es(1
1) A
cct
#7(2
) F2
Key
Ala
rmU
ploa
d/D
ownl
oad
(5)
Acc
ess
(12)
F3
Key
Def
(38)
Xm
it Ta
sk C
hang
es(1
2) A
cct
#8(3
) F3
Key
Ala
rm(1
) Ope
n C
ode
(6)
Tem
pora
ry(1
3) F
4 K
ey D
ef(3
9) X
mit
Ligh
t Cha
nges
(13)
Rep
ort A
rea/
Alm
(4)
F4 K
ey A
larm
Clo
se C
ode
(7)
Mas
ter
(14)
F5
Key
Def
Men
u 07
(40)
Xm
it K
eypa
d K
eys
/Res
t/Unb
ypas
s(5
) F5
Key
Ala
rm(8
) M
enu
1-5
(15)
F6
Key
Def
Glo
bal
Opt
ions
(41)
Req
Cod
e U
ser M
enus
1-5
(14)
Rep
ort
Zn B
ypas
s(6
) F6
Key
Ala
rmM
enu
14(9
) D
ures
s(1
6) [N
ame]
(1) T
el R
emot
e(4
2) L
ocal
Pro
g. C
ode
(15)
Rep
ort Z
n Tr
oubl
esW
irel
ess
Def
s(1
0) [N
ame]
(2) 1
2hr T
imeD
isp
(43)
Ser
ial N
umbe
r [R
ead
Onl
y](1
6) R
epor
t Use
r Op/
Cl
1: R
ecei
verO
ptio
ns(3
) DD
/MM
Dis
p.(4
4) S
oftw
are
Ver.
[Rea
d O
nly]
(17)
Rep
ort S
ys G
loba
ls (
1) R
ecei
ver
Siz
eM
enu
03M
enu
05(4
) C
elci
us D
isp.
(45)
Def
ault
Con
trol O
ptio
ns(1
8) [N
ame]
(2)
ZnB
ank(
Star
t Zn
)A
rea
Def
sZo
ne D
efs
(5)
DS
T O
bser
ve(8
1) D
efau
lt U
ser
Cod
es (
3) R
eg S
upv.
Hrs
.A
rea
1Zo
ne 1
(6) F
ast L
oop
Tm(8
2) D
efau
lt A
reas
Dat
aM
enu
09M
enu
12 (
4) F
ire S
upv.
Hrs
.(1
) Exi
t Del
ay 1
(1) D
efin
ition
(7)
Slo
wLo
op T
m(8
3) D
efau
lt K
eypa
ds D
ata
Are
a R
epor
t C
odes
Sys
tem
Rpt
Cod
es2:
Tra
nsm
itter
Opt
s(2
) E
ntry
Del
ay 1
(2)
Type
(8)
Cro
ss S
elfV
er(8
4) D
efau
lt Zo
nes
Dat
a A
rea
1(1
) AC
Fai
l Del
ay^
Sel
ect T
rans
mitt
er(3
) Exi
t Del
ay 2
(3)
Are
a A
ssig
n(9
) C
ross
Zn
Tm(8
5) D
efau
lt Zo
ne N
ames
(1) D
ial D
elay
Tim
e(2
) AC
Fai
l Cod
e (1
) Ena
ble
Xm
tr.(4
) E
ntry
Del
ay 2
(4) S
ilent
Ala
rm(1
0) A
ud T
rbls
(86)
Def
ault
Cut
off T
imer
s(2
) Abo
rt C
ode
(3) A
uto
Test
Cod
e (
2) S
upv.
Typ
e(5
) Aut
o St
ay(5
) Dia
ler D
elay
(11)
6 d
igit
code
s(8
7) D
efau
lt G
loba
l Dat
a(3
) Can
cel T
ime
(4) T
stTi
me
hr:m
m (3
) Ena
ble
Opt
ion
1(6
) E
xit R
esta
rt(6
) Li
sten
-In(1
2) C
odeL
ocko
ut(8
8) D
efau
lt Te
leph
one
Dat
a(4
) C
ance
l Cod
e(5
) D
ays
betw
eenT
est
(4) E
nabl
e O
ptio
n 2
(7) C
losi
ng R
ingb
ack
(7)
Byp
ass
(13)
Com
mon
Are
a(8
9) D
efau
lt Te
leph
one
Num
bers
(5)
Clo
se A
uto
(6)
Aux
Ove
rcur
rent
(5)
Key
fob
Use
r ID
(8) S
glK
ey Q
uick
arm
(8)
Forc
e A
rm(1
4) O
ut1
Yelp
to B
uz(9
0) D
efau
lt A
rea
Rep
ort C
odes
(6)
Clo
se E
arly
(7) E
xp M
odul
e Tb
l3:
Lea
rn T
rans
mitt
er(9
) Dbl
Key
Qui
ckar
m(9
) S
win
ger
(15)
Out
1 St
art V
ol.
(91)
Def
ault
Zone
Rep
ort C
odes
(7)
Clo
se E
xten
ded
(8) I
nsta
ller B
egin
^ S
elec
t Tra
nsm
itter
(10)
Sta
yKey
Scr
oll
(10)
Per
. Trip
(16)
Out
1 M
ax. A
lm.
(92)
Def
ault
Sys
tem
Rep
ort C
odes
(8) F
ail t
o C
lose
(9) I
nsta
ller E
nd (
1) X
mtr
to L
earn
(11)
Sta
y In
stan
t(1
1) F
ast L
oop
(17)
Out
1 M
ax. V
oice
(93)
Def
ault
Use
r R
epor
t Cod
es(9
) Lat
e C
lose
(10)
Log
80%
Ful
l
(2) P
ush
Xm
tr(1
2) N
ight
Scr
oll
(12)
Chi
me
(18)
Out
1 M
ax. N
onA
lm(9
4) D
efau
lt Vo
ice
Mes
sage
s(1
0) K
eysw
itch
Clo
se(1
1) L
ow B
atte
ry4:
Key
fob
Eve
nt D
ef.
(13)
Nig
ht In
stan
t(1
3) C
ross
Zn
(19)
Out
1 ‘N
o Ta
lk’
(95)
Def
ault
Wire
less
Def
initi
ons
(11)
Dur
ess
Cod
e(1
2) M
emor
y E
rror
(1) B
utto
n 1
Cod
e(1
4) S
tayC
hgA
rmed
(14)
[Nam
e](2
0) O
ut1
Say
Sys
(99)
Def
ault
Ent
ire C
ontro
l Pan
el(1
2) O
pen
Afte
r A
larm
(13)
RP
Dow
nloa
d (2
) But
ton
2 C
ode
(15)
[Nam
e](2
1) O
ut1
Say
Alm
s(1
3) O
pen
Ear
ly(1
4) T
el L
ine
Faul
t (3
) But
ton
3 C
ode
(22)
Out
1 S
ay Z
n St
atus
(14)
Fai
l to
Ope
n(1
5) O
utpu
t 2 T
bl (4
) But
ton
4 C
ode
(23)
Out
1 S
ay S
ys T
bl(1
5) O
pen
Late
(5) B
utto
n 5
Cod
e(2
4) O
ut1
Say
Zn
Tbl
(16)
Key
switc
h O
pen
(6) B
utto
n 6
Cod
e(2
5) O
ut1
Say
Chi
me
(17)
Use
r Lo
ckou
t (7
) But
ton
7 C
ode
(18)
Exi
t Err
or (8
) But
ton
8 C
ode
(19)
Fai
l to
Com
m

M1G Installation and Programming ManualPage 24
Menu 01 - Bus Module Enrollment1234567890123456789012345678901212312345678901234567890123456789012123123456789012345678901234567890121231234567890123456789012345678901212312345678901234567890123456789012123123456789012345678901234567890121231234567890123456789012345678901212312345678901234567890123456789012123123456789012345678901234567890121231234567890123456789012345678901212312345678901234567890123456789012123
01-Bus ModuleEnrollment r
Bus Module Enroll Description of Option123456789012345678901234567890121234123456789012345678901234567890121234123456789012345678901234567890121234123456789012345678901234567890121234123456789012345678901234567890121234123456789012345678901234567890121234123456789012345678901234567890121234123456789012345678901234567890121234123456789012345678901234567890121234123456789012345678901234567890121234123456789012345678901234567890121234123456789012345678901234567890121234
EnrollingBus Modules
123456789012345678901234567890121234123456789012345678901234567890121234123456789012345678901234567890121234123456789012345678901234567890121234123456789012345678901234567890121234123456789012345678901234567890121234123456789012345678901234567890121234123456789012345678901234567890121234123456789012345678901234567890121234123456789012345678901234567890121234123456789012345678901234567890121234
XX Bus ModulesEnrolled, Editr
Press the RIGHT arrow key to select this menu and automatically start the bus enrollmentprocess. ALL data bus devices which are presently connected to the data bus shouldbecome enrolled.
The enrollment process only takes a few seconds. Once complete, this summary screenwill appear displaying the total number of bus modules that were found and enrolled. Toedit and/or view the devices individually, press the RIGHT arrow key one time.
Each enrolled keypad/device can be viewed one by one. The first device will always beKeypad 1 with a T1 (for type 1) and Addr=01 (for address 01). As explained below,different kinds of devices can be identified by their device “Type”. Pressing the Up or Downarrow keys will scroll through each enrolled device.
If a device is removed from the data bus, it should be removed by repeating the enrollmentprocess. The control will only enroll the devices that are connected. It will remove anypreviously enrolled devices that it does not see.
After the last device is reviewed, the next press of the Up arrow key moves to the “EndEnrollment” screen which once again displays the total number of devices enrolled.
123456789012345678901234567890121234123456789012345678901234567890121234123456789012345678901234567890121234123456789012345678901234567890121234123456789012345678901234567890121234123456789012345678901234567890121234123456789012345678901234567890121234123456789012345678901234567890121234123456789012345678901234567890121234123456789012345678901234567890121234123456789012345678901234567890121234
Keypad T1 bAddr=01
123456789012345678901234567890121234123456789012345678901234567890121234123456789012345678901234567890121234123456789012345678901234567890121234123456789012345678901234567890121234123456789012345678901234567890121234123456789012345678901234567890121234123456789012345678901234567890121234123456789012345678901234567890121234123456789012345678901234567890121234123456789012345678901234567890121234123456789012345678901234567890121234
Keypad T1 bAddr=02 lr
123456789012345678901234567890121234123456789012345678901234567890121234123456789012345678901234567890121234123456789012345678901234567890121234123456789012345678901234567890121234123456789012345678901234567890121234123456789012345678901234567890121234123456789012345678901234567890121234123456789012345678901234567890121234123456789012345678901234567890121234123456789012345678901234567890121234
End Enrollment0x Bus Modules
NOTE: Every data bus device: Keypad, Input (Zone) Expander, Output Expander, etc. MUST have a uniqueaddress within its type. This menu is then used to enroll the device into the system. SEE DETAILS BELOW:
DATA BUS DEVICE TYPES AND ADDRESSES: Each data bus device is a specific “Device Type”. Keypads are TYPE1, Input (Zone) Expanders are TYPE 2, Output Expanders are TYPE 3, Serial Port Expanders are TYPE 5. Any newdevices designed will be assigned a Device Type. Every data bus device MUST have a unique “Address” setting withinits type. Valid Input Expanders addresses are 2 to 13, Output Expander addresses are 1 to 13. The address determinesthe starting and ending zone or output numbers for that expander. See chart below:
Addr Input Exp Output Exp Addr Input Exp Output Exp. Addr Input Exp Output Exp.1 = N/A (main bd) Outputs 1-16 6 = Zone 81-96 Output 65-80 11 = Zone 161-176 Output 161-1762 = Zone 17-32 Output 17-32 7 = Zone 97-112 Output 97-112 12 = Zone 177-192 Output 177-1923 = Zone 33-48 Output 33-48 8 = Zone 113-128 Output 113-128 13 = Zone 193-208 Output 193-2084 = Zone 49-64 Output 49-64 9 = Zone 129-144 Output 129-1445 = Zone 65-80 Output 65-80 10 = Zone 145-160 Output 145-160
INPUT AND OUTPUT EXPANDER ADDRESSES: Locate the bank of four white (DIP) switches along the top edge of theboard. Each switch has a position of Off or On (0 or 1) and a binary value (1, 2, 4, 8). The addition of the binary values(sum total) for the switches set to the On position determines the data bus address. For example: Data bus address 5is set by placing switches 1 and 4 to the On position (1 + 4 = 5). All other switches must be in the down or Off position.
KEYPAD ADDRESSES: All keypads are factory set to address 1. Valid addresses are 1 to 16. The first keypad on thesystem (Keypad 1) is automatically enrolled upon power up. Each additional keypad must be assigned a uniqueaddress and then manually enrolled from “Menu 1 - Bus Module Enrollment”. To set the address on a keypad do thefollowing:
1. Hold down a key while applying power OR press and hold the (Asterisk) “ * ” and F5 keys for 5 seconds.2. Press the F1 key, then use the UP or DOWN arrow keys to set the desired address number.3. Press the EXIT key when done.
NOTE: If a device is removed from the data bus, it should be un-enrolled to prevent a trouble. To replace adefective device, set the address to the same value as the old unit and initiate the Bus Enrollment process.
Press RIGHT arrow key to select this menu. Press UP or DOWN arrow keys to selectanother menu. The ELK key backs up one menu level. To exit press the * or Exit key.

M1G Installation and Programming Manual Page 25
1234567890123456789012345678901212312345678901234567890123456789012123123456789012345678901234567890121231234567890123456789012345678901212312345678901234567890123456789012123123456789012345678901234567890121231234567890123456789012345678901212312345678901234567890123456789012123123456789012345678901234567890121231234567890123456789012345678901212312345678901234567890123456789012123
001 09:=No r
Duress
1234567890123456789012345678901212312345678901234567890123456789012123123456789012345678901234567890121231234567890123456789012345678901212312345678901234567890123456789012123123456789012345678901234567890121231234567890123456789012345678901212312345678901234567890123456789012123123456789012345678901234567890121231234567890123456789012345678901212312345678901234567890123456789012123
001: Selb Prgr
User 11234567890123456789012345678901212312345678901234567890123456789012123123456789012345678901234567890121231234567890123456789012345678901212312345678901234567890123456789012123123456789012345678901234567890121231234567890123456789012345678901212312345678901234567890123456789012123123456789012345678901234567890121231234567890123456789012345678901212312345678901234567890123456789012123
001 01:12345678 r
Code used inArea123456789012345678901234567890121231234567890123456789012345678901212312345678901234567890123456789012123123456789012345678901234567890121231234567890123456789012345678901212312345678901234567890123456789012123123456789012345678901234567890121231234567890123456789012345678901212312345678901234567890123456789012123123456789012345678901234567890121231234567890123456789012345678901212312345678901234567890123456789012123
001 02:=Yes r
Arm with Code1234567890123456789012345678901212312345678901234567890123456789012123123456789012345678901234567890121231234567890123456789012345678901212312345678901234567890123456789012123123456789012345678901234567890121231234567890123456789012345678901212312345678901234567890123456789012123123456789012345678901234567890121231234567890123456789012345678901212312345678901234567890123456789012123
001 03:=Yes r
Disarm with Code1234567890123456789012345678901212312345678901234567890123456789012123123456789012345678901234567890121231234567890123456789012345678901212312345678901234567890123456789012123123456789012345678901234567890121231234567890123456789012345678901212312345678901234567890123456789012123123456789012345678901234567890121231234567890123456789012345678901212312345678901234567890123456789012123
001 04:=Yes r
Bypass with Code123456789012345678901234567890121231234567890123456789012345678901212312345678901234567890123456789012123123456789012345678901234567890121231234567890123456789012345678901212312345678901234567890123456789012123123456789012345678901234567890121231234567890123456789012345678901212312345678901234567890123456789012123123456789012345678901234567890121231234567890123456789012345678901212312345678901234567890123456789012123
001 05:=No r
Access with Code
Menu 02 - User Code Options
There are 99 potential User codes. User 1 (001) is the first to display. Press the rightarrow key to program, or press the up or down arrow keys to select another user. Enterthree digits to jump to a specific user. The user name is displayed along the bottom.
This option assigns the areas(s) in which this code may be used. For example: if thenumbers 1,2, & 4 are displayed, the code may be used in those areas. To assign orremove an area press the numbers keys 1 thru 8. Each press toggles the number on/off.
Selects Arm privileges. If Yes, this code can Arm it’s assigned area(s) (see option 01above) from a keypad that is also assigned to the desired area. If No, this code cannot beused to Arm.
Selects Disarm privileges. If Yes, this user code can Disarm it’s assigned area(s) (seeoption 01 above) from a keypad that is also assigned to the desired area. If No, this codecannot be used to Disarm.
A Yes allows this code to Bypass zones whenever Menu 04-Keypad Definitions, Option09, “Byp Key Req PIN” is set to Yes. Code and Keypad must be in the same area.Default value for both these options is No (code not required for bypass).
A Yes allows this code to activate the Access Keypad Events 1313-1328 for the keypadwhere code is entered. Use the Whenever/And/Then Rules from Elk-RP to assign anoutput to this event for tripping a door strike or lock. Note: If this code is enabled forarming, it will be necessary to press the Exit or Stay key to arm after the code.
If Yes, this code will be restricted from disarming whenever the control has been armed bya regular (non temporary) code. In other words: The control MUST be armed by this code(or another temporary code) in order for it to allow disarming by a temporary code. Atemporary code might be used for cleaning, repair personnel, etc.
A Master Code can be used to review, change, or delete other users, and to modifyselected system options. Only one Master code is needed per system. For securitypurposed, multiple Master codes are not recommended.
When Menu 07 - Global System Definitions, Option 41, “Require Code User Menu 1-5” isset to a Yes, this option is then used to set which codes are allowed to access Menus 1 -5. NOTE: Menus 6, 7, and 8 are only available to a Master or Installer code.
If Yes, this code will cause a silent Duress or “holdup” alarm to activate when the code isused to arm or disarm the system. CAUTION: The communicator report code MUSTalso be programmed! This feature is dangerous and should be used with caution.
To edit the User (Name) text press the left arrow key. Enter text using the number keys.I.E. For a “K” press the 5 key twice. To move the cursor, press the RIGHT or LEFT arrowkeys. The Chime key inserts a space, the Bypass key erases 1 digit. The up/down keysto toggle between upper and lower case. Press the ELK key when complete.
1234567890123456789012345678901212312345678901234567890123456789012123123456789012345678901234567890121231234567890123456789012345678901212312345678901234567890123456789012123123456789012345678901234567890121231234567890123456789012345678901212312345678901234567890123456789012123123456789012345678901234567890121231234567890123456789012345678901212312345678901234567890123456789012123
001 06:=No r
Temporary Code
1234567890123456789012345678901212312345678901234567890123456789012123123456789012345678901234567890121231234567890123456789012345678901212312345678901234567890123456789012123123456789012345678901234567890121231234567890123456789012345678901212312345678901234567890123456789012123123456789012345678901234567890121231234567890123456789012345678901212312345678901234567890123456789012123
001 07:=Yes r
Master Code123456789012345678901234567890121231234567890123456789012345678901212312345678901234567890123456789012123123456789012345678901234567890121231234567890123456789012345678901212312345678901234567890123456789012123123456789012345678901234567890121231234567890123456789012345678901212312345678901234567890123456789012123123456789012345678901234567890121231234567890123456789012345678901212312345678901234567890123456789012123
001 08:=No r
Menu 1-5 Allowed
1234567890123456789012345678901212312345678901234567890123456789012123123456789012345678901234567890121231234567890123456789012345678901212312345678901234567890123456789012123123456789012345678901234567890121231234567890123456789012345678901212312345678901234567890123456789012123123456789012345678901234567890121231234567890123456789012345678901212312345678901234567890123456789012123
02-UserCode OptnCode used to: r
User Code Options Description of Option
1234567890123456789012345678901212312345678901234567890123456789012123123456789012345678901234567890121231234567890123456789012345678901212312345678901234567890123456789012123123456789012345678901234567890121231234567890123456789012345678901212312345678901234567890123456789012123123456789012345678901234567890121231234567890123456789012345678901212312345678901234567890123456789012123
001 10:Usr Name lUser1
Press RIGHT arrow key to select this menu. Press UP or DOWN arrow keys to selectanother menu. The ELK key backs up one menu level. To exit press the * or Exit key.
Default Code for User Code 1 is: 3 4 5 6 Note: If six digit code option is enabled, thedefault will be 1 2 3 4 5 6. See Menu 07 - Global System Definitions, Option G11

M1G Installation and Programming ManualPage 26
123456789012345678901234567890121234123456789012345678901234567890121234123456789012345678901234567890121234123456789012345678901234567890121234123456789012345678901234567890121234123456789012345678901234567890121234123456789012345678901234567890121234123456789012345678901234567890121234123456789012345678901234567890121234123456789012345678901234567890121234123456789012345678901234567890121234123456789012345678901234567890121234
A1: Selb Prgr
Area 1123456789012345678901234567890121234123456789012345678901234567890121234123456789012345678901234567890121234123456789012345678901234567890121234123456789012345678901234567890121234123456789012345678901234567890121234123456789012345678901234567890121234123456789012345678901234567890121234123456789012345678901234567890121234123456789012345678901234567890121234123456789012345678901234567890121234
A1 01:=060 r
Exit Delay1 Time
123456789012345678901234567890121234123456789012345678901234567890121234123456789012345678901234567890121234123456789012345678901234567890121234123456789012345678901234567890121234123456789012345678901234567890121234123456789012345678901234567890121234123456789012345678901234567890121234123456789012345678901234567890121234123456789012345678901234567890121234123456789012345678901234567890121234
A1 02:=030 r
Entry Delay1Time123456789012345678901234567890121234123456789012345678901234567890121234123456789012345678901234567890121234123456789012345678901234567890121234123456789012345678901234567890121234123456789012345678901234567890121234123456789012345678901234567890121234123456789012345678901234567890121234123456789012345678901234567890121234123456789012345678901234567890121234123456789012345678901234567890121234123456789012345678901234567890121234
A1 03:=060 r
Exit Delay2 Time123456789012345678901234567890121234123456789012345678901234567890121234123456789012345678901234567890121234123456789012345678901234567890121234123456789012345678901234567890121234123456789012345678901234567890121234123456789012345678901234567890121234123456789012345678901234567890121234123456789012345678901234567890121234123456789012345678901234567890121234123456789012345678901234567890121234
A1 04:=030 r
Entry Delay2Time123456789012345678901234567890121234123456789012345678901234567890121234123456789012345678901234567890121234123456789012345678901234567890121234123456789012345678901234567890121234123456789012345678901234567890121234123456789012345678901234567890121234123456789012345678901234567890121234123456789012345678901234567890121234123456789012345678901234567890121234123456789012345678901234567890121234
A1 05:=No r
AutoStay No Exit
Menu 03 - Area Definitions
Of the 8 potential areas (partitions), Area 1 is the first to display. Press the right arrowkey to program, or press the up or down arrow keys to select another area. To jump to aspecific area enter the number (1-8). The area name is displayed on the bottom.
The amount of exit time in seconds for all zones programmed as Exit Delay 1. Range is045 to 255 seconds. Default value is 060. NOTE: Due to the way force arm works, ifan Exit Delay 1 zone also has force arm enabled, its exit time will be the greaterof the time values for Exit Delay 1 or Exit Delay 2. Do not enable force arm onExit Delay 1 zones if this operation is not desired.
The amount of entry delay time in seconds for zones programmed as Entry Delay 1.Range is 030 to 255 seconds. Default value is 030.
The amount of exit delay time in seconds for zones programmed as Exit Delay 2. Rangeis 045 to 255 seconds. Default value is 060. See note above regarding force armand Exit Delay 1 zones.
The amount of entry delay time in seconds for zones programmed as Entry Delay 2.Range is 030 to 255 seconds. Default value is 030.
If Yes, the control will switch from AWAY mode to STAY mode at the end of the exit delaytime if no exit zone is violated (no exit detected). NOTE: This tracks the longest of thetwo exit timers. All interior zones are bypassed in the STAY mode. Default value is No.
†† If this option is set to Yes (default), the exit procedures will be affected in three ways:
1) ADDITIONAL EXIT1 “GRACE” FEATURE - During the initial Exit Delay 1 time if thezone violates a second time and restores, the exit timer will automatically restart onetime. I.E. If the Exit1 door is opened, closed, and then opened again the timer will restart.NOTE: This only works on Exit Delay 1 zones and the timer only restarts one time.It does NOT work if the zone is enabled for force arm! This features complies withthe SIA CP-01 false alarm reduction standard.
2) SPOUSE “LEAVE FOR WORK” OR “LET PET OUT” FEATURE - If the system isarmed in one of the Stay modes, a User may press the Exit key to re-start the exit delaytime in order to open an exit/entry door and leave for work. The system remains in theStay mode for remaining family members that are still in the house. This can also beused to let a pet outdoors. When the pet is ready to come back inside the User simplypresses the Exit key again to restart the timer.
3) GOING FROM STAY MODE TO AWAY MODE - If the system is armed in one of theStay modes, a User may change the arm mode to Away. This is done by pressing theExit key twice in short succession (within 3 seconds) and leaving the building.
123456789012345678901234567890121234123456789012345678901234567890121234123456789012345678901234567890121234123456789012345678901234567890121234123456789012345678901234567890121234123456789012345678901234567890121234123456789012345678901234567890121234123456789012345678901234567890121234123456789012345678901234567890121234123456789012345678901234567890121234123456789012345678901234567890121234
A1 06:=Yes r
Exit1TimeRestart
1234567890123456789012345678901212312345678901234567890123456789012123123456789012345678901234567890121231234567890123456789012345678901212312345678901234567890123456789012123123456789012345678901234567890121231234567890123456789012345678901212312345678901234567890123456789012123123456789012345678901234567890121231234567890123456789012345678901212312345678901234567890123456789012123
03-Area r
Definitions
Area Defintions Description of Option
* SIACP-01
* SIACP-01
Press RIGHT arrow key to select this menu. Press UP or DOWN arrow keys to selectanother menu. The ELK key backs up one menu level. To exit press the * or Exit key.
Exit Error If an entry/exit zone is violated at the time the Exit Delay time expires, the Exit Error Feature will beactivated. The local siren will sound immediately and the Entry Delay warning will begin. If the control is notdisarmed before the Entry Delay expires, the communicator will report the alarm along with an Exit Error code,provided these codes are programmed. An Exit Error event flag will also be set which can be used by the“Whenever/And/Then” rules (refer to the ELK-RP software) to sound a siren, or blink a light, or whatever.Exit Error feature complies with the SIA CP-1 false alarm reduction standard.
† † Not for use in UL Listed Installations
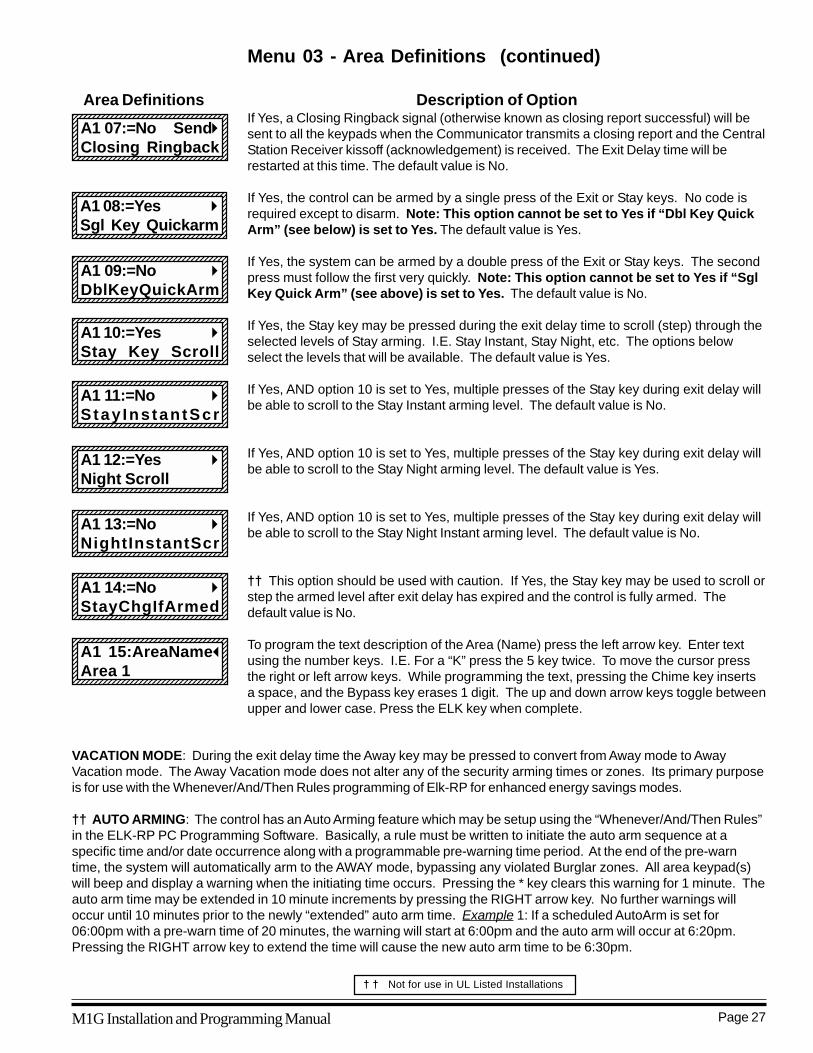
M1G Installation and Programming Manual Page 27
123456789012345678901234567890121231234567890123456789012345678901212312345678901234567890123456789012123123456789012345678901234567890121231234567890123456789012345678901212312345678901234567890123456789012123123456789012345678901234567890121231234567890123456789012345678901212312345678901234567890123456789012123123456789012345678901234567890121231234567890123456789012345678901212312345678901234567890123456789012123
A1 11:=No r
Stay InstantScr1234567890123456789012345678901212312345678901234567890123456789012123123456789012345678901234567890121231234567890123456789012345678901212312345678901234567890123456789012123123456789012345678901234567890121231234567890123456789012345678901212312345678901234567890123456789012123123456789012345678901234567890121231234567890123456789012345678901212312345678901234567890123456789012123
A1 12:=Yes r
Night Scroll1234567890123456789012345678901212312345678901234567890123456789012123123456789012345678901234567890121231234567890123456789012345678901212312345678901234567890123456789012123123456789012345678901234567890121231234567890123456789012345678901212312345678901234567890123456789012123123456789012345678901234567890121231234567890123456789012345678901212312345678901234567890123456789012123
A1 13:=No r
NightInstantScr123456789012345678901234567890121231234567890123456789012345678901212312345678901234567890123456789012123123456789012345678901234567890121231234567890123456789012345678901212312345678901234567890123456789012123123456789012345678901234567890121231234567890123456789012345678901212312345678901234567890123456789012123123456789012345678901234567890121231234567890123456789012345678901212312345678901234567890123456789012123
A1 14:=No r
StayChgIfArmed
If Yes, a Closing Ringback signal (otherwise known as closing report successful) will besent to all the keypads when the Communicator transmits a closing report and the CentralStation Receiver kissoff (acknowledgement) is received. The Exit Delay time will berestarted at this time. The default value is No.
If Yes, the control can be armed by a single press of the Exit or Stay keys. No code isrequired except to disarm. Note: This option cannot be set to Yes if “Dbl Key QuickArm” (see below) is set to Yes. The default value is Yes.
If Yes, the system can be armed by a double press of the Exit or Stay keys. The secondpress must follow the first very quickly. Note: This option cannot be set to Yes if “SglKey Quick Arm” (see above) is set to Yes. The default value is No.
If Yes, the Stay key may be pressed during the exit delay time to scroll (step) through theselected levels of Stay arming. I.E. Stay Instant, Stay Night, etc. The options belowselect the levels that will be available. The default value is Yes.
If Yes, AND option 10 is set to Yes, multiple presses of the Stay key during exit delay willbe able to scroll to the Stay Instant arming level. The default value is No.
If Yes, AND option 10 is set to Yes, multiple presses of the Stay key during exit delay willbe able to scroll to the Stay Night arming level. The default value is Yes.
If Yes, AND option 10 is set to Yes, multiple presses of the Stay key during exit delay willbe able to scroll to the Stay Night Instant arming level. The default value is No.
†† This option should be used with caution. If Yes, the Stay key may be used to scroll orstep the armed level after exit delay has expired and the control is fully armed. Thedefault value is No.
To program the text description of the Area (Name) press the left arrow key. Enter textusing the number keys. I.E. For a “K” press the 5 key twice. To move the cursor pressthe right or left arrow keys. While programming the text, pressing the Chime key insertsa space, and the Bypass key erases 1 digit. The up and down arrow keys toggle betweenupper and lower case. Press the ELK key when complete.
Menu 03 - Area Definitions (continued)
1234567890123456789012345678901212312345678901234567890123456789012123123456789012345678901234567890121231234567890123456789012345678901212312345678901234567890123456789012123123456789012345678901234567890121231234567890123456789012345678901212312345678901234567890123456789012123123456789012345678901234567890121231234567890123456789012345678901212312345678901234567890123456789012123
A1 15:AreaNamel
Area 1
123456789012345678901234567890121231234567890123456789012345678901212312345678901234567890123456789012123123456789012345678901234567890121231234567890123456789012345678901212312345678901234567890123456789012123123456789012345678901234567890121231234567890123456789012345678901212312345678901234567890123456789012123123456789012345678901234567890121231234567890123456789012345678901212312345678901234567890123456789012123
A1 09:=No r
DblKeyQuickArm1234567890123456789012345678901212312345678901234567890123456789012123123456789012345678901234567890121231234567890123456789012345678901212312345678901234567890123456789012123123456789012345678901234567890121231234567890123456789012345678901212312345678901234567890123456789012123123456789012345678901234567890121231234567890123456789012345678901212312345678901234567890123456789012123
A1 10:=Yes r
Stay Key Scroll
VACATION MODE: During the exit delay time the Away key may be pressed to convert from Away mode to AwayVacation mode. The Away Vacation mode does not alter any of the security arming times or zones. Its primary purposeis for use with the Whenever/And/Then Rules programming of Elk-RP for enhanced energy savings modes.
†† AUTO ARMING: The control has an Auto Arming feature which may be setup using the “Whenever/And/Then Rules”in the ELK-RP PC Programming Software. Basically, a rule must be written to initiate the auto arm sequence at aspecific time and/or date occurrence along with a programmable pre-warning time period. At the end of the pre-warntime, the system will automatically arm to the AWAY mode, bypassing any violated Burglar zones. All area keypad(s)will beep and display a warning when the initiating time occurs. Pressing the * key clears this warning for 1 minute. Theauto arm time may be extended in 10 minute increments by pressing the RIGHT arrow key. No further warnings willoccur until 10 minutes prior to the newly “extended” auto arm time. Example 1: If a scheduled AutoArm is set for06:00pm with a pre-warn time of 20 minutes, the warning will start at 6:00pm and the auto arm will occur at 6:20pm.Pressing the RIGHT arrow key to extend the time will cause the new auto arm time to be 6:30pm.
Area Definitions Description of Option
1234567890123456789012345678901212312345678901234567890123456789012123123456789012345678901234567890121231234567890123456789012345678901212312345678901234567890123456789012123123456789012345678901234567890121231234567890123456789012345678901212312345678901234567890123456789012123123456789012345678901234567890121231234567890123456789012345678901212312345678901234567890123456789012123
A1 08:=Yes r
Sgl Key Quickarm
123456789012345678901234567890121231234567890123456789012345678901212312345678901234567890123456789012123123456789012345678901234567890121231234567890123456789012345678901212312345678901234567890123456789012123123456789012345678901234567890121231234567890123456789012345678901212312345678901234567890123456789012123123456789012345678901234567890121231234567890123456789012345678901212312345678901234567890123456789012123
A1 07:=No Sendr
Closing Ringback
† † Not for use in UL Listed Installations

M1G Installation and Programming ManualPage 28
123456789012345678901234567890121234123456789012345678901234567890121234123456789012345678901234567890121234123456789012345678901234567890121234123456789012345678901234567890121234123456789012345678901234567890121234123456789012345678901234567890121234123456789012345678901234567890121234123456789012345678901234567890121234123456789012345678901234567890121234123456789012345678901234567890121234123456789012345678901234567890121234
KP01 03:=No r
Silent on Exit123456789012345678901234567890121234123456789012345678901234567890121234123456789012345678901234567890121234123456789012345678901234567890121234123456789012345678901234567890121234123456789012345678901234567890121234123456789012345678901234567890121234123456789012345678901234567890121234123456789012345678901234567890121234123456789012345678901234567890121234123456789012345678901234567890121234
KP01 04:=No r
Silent on Chime123456789012345678901234567890121234123456789012345678901234567890121234123456789012345678901234567890121234123456789012345678901234567890121234123456789012345678901234567890121234123456789012345678901234567890121234123456789012345678901234567890121234123456789012345678901234567890121234123456789012345678901234567890121234123456789012345678901234567890121234123456789012345678901234567890121234
KP01 05:=No r
Go dark in 60sec123456789012345678901234567890121234123456789012345678901234567890121234123456789012345678901234567890121234123456789012345678901234567890121234123456789012345678901234567890121234123456789012345678901234567890121234123456789012345678901234567890121234123456789012345678901234567890121234123456789012345678901234567890121234123456789012345678901234567890121234123456789012345678901234567890121234
KP01 06:=Yes r
Show Date & Time123456789012345678901234567890121234123456789012345678901234567890121234123456789012345678901234567890121234123456789012345678901234567890121234123456789012345678901234567890121234123456789012345678901234567890121234123456789012345678901234567890121234123456789012345678901234567890121234123456789012345678901234567890121234123456789012345678901234567890121234123456789012345678901234567890121234123456789012345678901234567890121234
KP01 07:=Yes r
Show Temperature123456789012345678901234567890121234123456789012345678901234567890121234123456789012345678901234567890121234123456789012345678901234567890121234123456789012345678901234567890121234123456789012345678901234567890121234123456789012345678901234567890121234123456789012345678901234567890121234123456789012345678901234567890121234123456789012345678901234567890121234123456789012345678901234567890121234
KP01 08:=Yes r
Show Area Name123456789012345678901234567890121234123456789012345678901234567890121234123456789012345678901234567890121234123456789012345678901234567890121234123456789012345678901234567890121234123456789012345678901234567890121234123456789012345678901234567890121234123456789012345678901234567890121234123456789012345678901234567890121234123456789012345678901234567890121234123456789012345678901234567890121234
KP01 09:=No r
Byp Key Req PIN
123456789012345678901234567890121234123456789012345678901234567890121234123456789012345678901234567890121234123456789012345678901234567890121234123456789012345678901234567890121234123456789012345678901234567890121234123456789012345678901234567890121234123456789012345678901234567890121234123456789012345678901234567890121234123456789012345678901234567890121234123456789012345678901234567890121234
KP01 01:=1 r
Area Assigned To
Menu 04 - Keypad Definitions1234567890123456789012345678901212312345678901234567890123456789012123123456789012345678901234567890121231234567890123456789012345678901212312345678901234567890123456789012123123456789012345678901234567890121231234567890123456789012345678901212312345678901234567890123456789012123123456789012345678901234567890121231234567890123456789012345678901212312345678901234567890123456789012123
04-Keypad r
Definitions
Keypad Definitions Description of OptionThe control can have up to 16 Keypads. Keypad 1 is the first display in this menu. Pressthe right arrow key to program or press the up or down arrow keys to select anotherkeypad. To jump to a specific keypad enter the number (1-16). The keypad name isdisplayed on the bottom.
A keypad can only be assigned as primary for a single area. However, it is possible to“Map” a keypad to another area. Refer to Keypad Menus for instructions. Select which“primary” area (1 to 8) that the keypad should be assigned. The default value is 1.
If Yes, the keypad will not produce an entry warning signal during entry delay time afterviolation of a delay 1 or delay 2 zone while armed. The default value is No.
If Yes, the keypad will not produce an exit warning tone during exit delay 1 or exit delay 2times upon arming. The default value is No.
If Yes, the keypad will not produce any Chime tone even though the Chime mode may beon and a chime type zone is violated. This is good for a baby’s room, etc. The defaultvalue is No.
If Yes, the keypad turns off it’s Ready and Armed lights (goes dark) and blanks armed ordisarmed indication on the LCD display 60 seconds after arming or no activity (buttonpushing). Any button press turns the indicators back on. The default value is No.
If Yes, the keypad will display the date and time on the bottom line of the LCD screen. Ifthere is too much information to display at once, the bottom line of the LCD will alternate.The default value is Yes.
If Yes, the keypad will display it’s local temperature on the bottom line of the LCD screen.If there is too much information to display at once, the bottom line of the LCD willalternate. The default value is Yes.
If Yes, the keypad will display the name of the area in which it belongs. If there is toomuch information to display at once, the bottom line of the LCD will alternate. The defaultvalue is Yes.
If Yes, the Bypass key cannot be used unless a valid user code is entered. The defaultvalue is No.
123456789012345678901234567890121234123456789012345678901234567890121234123456789012345678901234567890121234123456789012345678901234567890121234123456789012345678901234567890121234123456789012345678901234567890121234123456789012345678901234567890121234123456789012345678901234567890121234123456789012345678901234567890121234123456789012345678901234567890121234123456789012345678901234567890121234
KP01 02:=No r
Silent on Entry
123456789012345678901234567890121234123456789012345678901234567890121234123456789012345678901234567890121234123456789012345678901234567890121234123456789012345678901234567890121234123456789012345678901234567890121234123456789012345678901234567890121234123456789012345678901234567890121234123456789012345678901234567890121234123456789012345678901234567890121234123456789012345678901234567890121234123456789012345678901234567890121234
KP01: Selb Prgr
Keypad 1
Keypad F1, F2, F3, F4, F5, F6 keys Each keypad has 6 lighted function keys that may be programmed to activatespecific operations. There are 7 programming attributes for each key: 1) KeyEvent - A four digit event code for the zonedefinitions 0001 thru 0035, or the automation tasks 2001 - 2032. 2) KeyLight - A four digit event code which lights thekey when the event is active. This can be any of the Appendix A Event Codes. 3) Light Invert - A Yes/No option whichallows the light to be opposite of the event, off when active, on when not. 4) Light Blink - A Yes/No option which allowsthe light to blink when active. 5) Key Requires PIN - A Yes/No option used to prevent the key from activating unless avalid user code is entered. 6) Single Key Press - A Yes/No option which allows a single press of the key instead of thenormal double press to activate the event. NOTE: In the double press mode the key’s name is displayed on the LCDscreen as soon as the first press occurs. This serves to visually verify to the user that the correct key has beenselected prior to the second “activating” key press. 7) Key Name - A sixteen character programmable description thatdescribes the key’s function. I.E. Police Alarm, Garage Door, etc.
Press RIGHT arrow key to select this menu. Press UP or DOWN arrow keys to selectanother menu. The ELK key backs up one menu level. To exit press the * or Exit key.

M1G Installation and Programming Manual Page 29
Menu 04 - Keypad Definitions (continued)Keypad Definitions Description of Option
1234567890123456789012345678901212312345678901234567890123456789012123123456789012345678901234567890121231234567890123456789012345678901212312345678901234567890123456789012123123456789012345678901234567890121231234567890123456789012345678901212312345678901234567890123456789012123123456789012345678901234567890121231234567890123456789012345678901212312345678901234567890123456789012123
KP01 10:F1 Key r
Definitions1234567890123456789012345678901212312345678901234567890123456789012123123456789012345678901234567890121231234567890123456789012345678901212312345678901234567890123456789012123123456789012345678901234567890121231234567890123456789012345678901212312345678901234567890123456789012123123456789012345678901234567890121231234567890123456789012345678901212312345678901234567890123456789012123
F1KeyEvent=0010r
Evt=Fire Alarm
1234567890123456789012345678901212312345678901234567890123456789012123123456789012345678901234567890121231234567890123456789012345678901212312345678901234567890123456789012123123456789012345678901234567890121231234567890123456789012345678901212312345678901234567890123456789012123123456789012345678901234567890121231234567890123456789012345678901212312345678901234567890123456789012123
F1KeyLight=1001r
Evt=Fire Alarm123456789012345678901234567890121234123456789012345678901234567890121234123456789012345678901234567890121234123456789012345678901234567890121234123456789012345678901234567890121234123456789012345678901234567890121234123456789012345678901234567890121234123456789012345678901234567890121234123456789012345678901234567890121234123456789012345678901234567890121234123456789012345678901234567890121234
F1 Key:=No rLight Invert
123456789012345678901234567890121231234567890123456789012345678901212312345678901234567890123456789012123123456789012345678901234567890121231234567890123456789012345678901212312345678901234567890123456789012123123456789012345678901234567890121231234567890123456789012345678901212312345678901234567890123456789012123123456789012345678901234567890121231234567890123456789012345678901212312345678901234567890123456789012123
F1 Key:=No rLight Blink
1234567890123456789012345678901212312345678901234567890123456789012123123456789012345678901234567890121231234567890123456789012345678901212312345678901234567890123456789012123123456789012345678901234567890121231234567890123456789012345678901212312345678901234567890123456789012123123456789012345678901234567890121231234567890123456789012345678901212312345678901234567890123456789012123
F1 Key:=No rKey Requires PIN
123456789012345678901234567890121234123456789012345678901234567890121234123456789012345678901234567890121234123456789012345678901234567890121234123456789012345678901234567890121234123456789012345678901234567890121234123456789012345678901234567890121234123456789012345678901234567890121234123456789012345678901234567890121234123456789012345678901234567890121234123456789012345678901234567890121234123456789012345678901234567890121234
F1 Key:=No rSingleKeyPress
1234567890123456789012345678901212312345678901234567890123456789012123123456789012345678901234567890121231234567890123456789012345678901212312345678901234567890123456789012123123456789012345678901234567890121231234567890123456789012345678901212312345678901234567890123456789012123123456789012345678901234567890121231234567890123456789012345678901212312345678901234567890123456789012123
F1 Key Name lrF1 = Fire
To program the F1 key definitions press the right arrow key. The program will branch offinto the 7 options for this key. To select another option press the UP or DOWN arrowkeys. To jump to a specific option enter the two digit number for that option.
Key Event refers to what the key activates. F Keys can used to activate an Alarm, anAutomation Task, or by Elk-RP Whenever/And/Then Rules to activate most anything.Press the RIGHT arrow key and enter 4 digits. Enter 0000 if Elk-RP is going to beused exclusively. Enter 0001-0036 for an alarm activation (see zone Defs), or 2001-2032 for an automation task activation (see Elk-RP software). The event descriptionis displayed along the bottom. Press the RIGHT arrow key to move to the next option.
Key Light selects the event which will cause the key to light up. See Event Codes inAppendix A. Press the RIGHT arrow key and enter 4 digits. The bottom line displaysthe description of the event. Press the RIGHT arrow key to move to the next option.
Light Invert selects whether the key should be lighted when the event is On (normal) orwhen the event is Off (Inverted). Press the RIGHT arrow key and select 1 for Yes or 0for No. Press the RIGHT arrow key to move to the next option.
Light Blink selects whether the key should blink when lighted or be steady. Press theRIGHT arrow key and select 1 for Yes or 0 for No. Press the RIGHT arrow key tomove to the next option.
Key Requires PIN selects whether the F key requires a valid user code prior toactivation. Press the RIGHT arrow and select 1 for Yes or 0 for No. Press the RIGHTarrow key to move to the next option.
If this option is No, a single press of the F key will activate the event. If Yes, then twopresses OR single press and hold 2 seconds is required. Press the RIGHT arrow andselect 1 for Yes or 0 for No. Press the RIGHT arrow key to move to the next option.
The Key Name will be displayed whenever the F key is pressed. Press the LEFTarrow key and enter text using the number keys. I.E. For “K” press the 5 key twice.Move the cursor using the right or left arrow keys. The up or down arrow keys selectbetween lower and upper case. Press the ELK key when complete.
1234567890123456789012345678901212312345678901234567890123456789012123123456789012345678901234567890121231234567890123456789012345678901212312345678901234567890123456789012123123456789012345678901234567890121231234567890123456789012345678901212312345678901234567890123456789012123123456789012345678901234567890121231234567890123456789012345678901212312345678901234567890123456789012123
KP01 11:F2 Key r
Definitions1234567890123456789012345678901212312345678901234567890123456789012123123456789012345678901234567890121231234567890123456789012345678901212312345678901234567890123456789012123123456789012345678901234567890121231234567890123456789012345678901212312345678901234567890123456789012123123456789012345678901234567890121231234567890123456789012345678901212312345678901234567890123456789012123
KP01 12:F3 Key r
Definitions1234567890123456789012345678901212312345678901234567890123456789012123123456789012345678901234567890121231234567890123456789012345678901212312345678901234567890123456789012123123456789012345678901234567890121231234567890123456789012345678901212312345678901234567890123456789012123123456789012345678901234567890121231234567890123456789012345678901212312345678901234567890123456789012123
KP01 13:F4 Key r
Definitions1234567890123456789012345678901212312345678901234567890123456789012123123456789012345678901234567890121231234567890123456789012345678901212312345678901234567890123456789012123123456789012345678901234567890121231234567890123456789012345678901212312345678901234567890123456789012123123456789012345678901234567890121231234567890123456789012345678901212312345678901234567890123456789012123
KP01 14:F5 Key r
Definitions1234567890123456789012345678901212312345678901234567890123456789012123123456789012345678901234567890121231234567890123456789012345678901212312345678901234567890123456789012123123456789012345678901234567890121231234567890123456789012345678901212312345678901234567890123456789012123123456789012345678901234567890121231234567890123456789012345678901212312345678901234567890123456789012123
KP01 15:F6 Key r
Definitions
If the F2 Key is to be used, repeat the steps above.
If the F3 Key is to be used, repeat the steps above.
If the F4 Key is to be used, repeat the steps above.
If the F5 Key is to be used, repeat the steps above.
If the F6 Key is to be used, repeat the steps above.
To edit the Keypad Name press the LEFT arrow key. Enter text using the number keys.I.E. For “K” press the 5 key twice. Use the RIGHT or LEFT arrow keys to move thecursor. The UP or DOWN keys select between lower and upper case. The Chime keyinserts a space, and the Bypass key erases 1 digit. Press the ELK key when complete.
1234567890123456789012345678901212312345678901234567890123456789012123123456789012345678901234567890121231234567890123456789012345678901212312345678901234567890123456789012123123456789012345678901234567890121231234567890123456789012345678901212312345678901234567890123456789012123123456789012345678901234567890121231234567890123456789012345678901212312345678901234567890123456789012123
KP01 16:KP Namel
Keypad 1

M1G Installation and Programming ManualPage 30
123456789012345678901234567890121234123456789012345678901234567890121234123456789012345678901234567890121234123456789012345678901234567890121234123456789012345678901234567890121234123456789012345678901234567890121234123456789012345678901234567890121234123456789012345678901234567890121234123456789012345678901234567890121234123456789012345678901234567890121234123456789012345678901234567890121234123456789012345678901234567890121234
ZN001: Selb Prgr
Zone 001123456789012345678901234567890121234123456789012345678901234567890121234123456789012345678901234567890121234123456789012345678901234567890121234123456789012345678901234567890121234123456789012345678901234567890121234123456789012345678901234567890121234123456789012345678901234567890121234123456789012345678901234567890121234123456789012345678901234567890121234123456789012345678901234567890121234
ZN001 01:Def=01 r
Burg Entry/Exit1
Menu 05 - Zone Definitions1234567890123456789012345678901212312345678901234567890123456789012123123456789012345678901234567890121231234567890123456789012345678901212312345678901234567890123456789012123123456789012345678901234567890121231234567890123456789012345678901212312345678901234567890123456789012123123456789012345678901234567890121231234567890123456789012345678901212312345678901234567890123456789012123
05-Zone r
Definitions
Zone Definitions Description of OptionThere are up to 208 zones. Press the UP or DOWN arrow key to scroll and select aparticular zone. To jump to any zone, enter the number from 001 to 208. The zone namewill display along the bottom line. Press the right arrow to program the selected zone.
This first option is used to set the zone definition. To locate a different option press the upor down arrow key OR enter an option’s number to jump directly to it. Press the rightarrow key to program the selected option. The available definitions are:
00 Disabled - Used to remove any unused zone(s). No need to put a jumper or resistor across the terminals.01 Burglar Entry/Exit 1 - For perimeter entry/exit doors. Allows a time delay to enter and exit during arm and disarm.02 Burglar Entry/Exit 2 - For perimeter entry/exit doors that require more time delay during arm and disarm.03 Burglar Perimeter Instant - Windows and perimeter openings. Activates an immediate Burglary alarm if tripped
during ANY armed mode. Does not provide any exit or entry delay.04 Burglar Interior - For motion detectors, interior doors, etc. Creates an instant alarm if tripped during the AWAY arm
mode. This zone type IS NOT ACTIVE during the STAY, STAY INSTANT, NITE, and NITE INSTANT arm modes.05 Burglar Interior Follower - For motions detectors, interior doors, etc. which may be in the keypad or entry pathway.
If an entry delay zone is violated first, this zone will delay (Follow) also, otherwise it will create an instant alarm.This zone type IS NOT ACTIVE during the STAY, STAY INSTANT, NITE, and NITE INSTANT arm modes.
06 Burglar Interior Nite - For motion detectors, interior doors, etc. which are not close to sleeping areas. The primaryuse of this zone type is for increased security when the user is home. Interior Nite zones ARE ACTIVE during theNITE and NITE INSTANT arm modes as well as the AWAY arm mode and will create an instant alarm if tripped.This zone type is NOT ACTIVE during the STAY or STAY INSTANT arm modes.
07 Burglar Interior Nite Delay - For motion detectors, interior doors, etc. that are not close to sleeping areas. Sameas an Interior Nite zone except that Interior Nite Delay zones will delay for the entry/exit delay 1 time period. InteriorNite zones ARE ACTIVE during the NITE and NITE INSTANT arm modes providing increased security when theuser is home and in bed. However, if the user accidentally wanders into a Nite Delay zone the entry delay timerwill start and the tone will sound, warning the user to disarm before a false alarm occurs.
NOTE: If “Auto Stay,No Exit” is set to YES (see Area Definitions) and the system is armed in the Awaymode, all interior zones will be bypassed if no exit is detected from the premises during the exit delay time.
08 Burglar 24 hr - Intended for tamper switches, etc. Activates an immediate Burglary alarm if tripped anytime(during armed or disarmed state).
09 Burglar 24 hr Box Tamper - Intended for control, siren, and bell box tamper switches. Activates an immediateBurglary Tamper alarm if tripped anytime (armed or disarmed state).
10 Fire 24 hr Alarm - Intended for Fire alarm sensors such as smoke detectors, heat stats, pull stations, etc.Activates an immediate Fire alarm upon a short across the zone wires. A Fire Trouble will be activated if an open(break in the zone wires) should occur.
11 Fire 24 hr ‘Verified’ - For smoke detectors in high-risk false alarm areas. Upon initial activation (short across thezone), the control ignores the alarm and removes smoke power for 5 seconds to reset the detectors. During this 5seconds, and for 25 additional seconds afterwards, no alarms will be recognized from this zone. Following this isa 30 second verification time window, during which any additional activation will be regarded as verification of theinitial alarm and the control will initiate a Fire Alarm. If the 30 seconds expires with no further activations, the entireprocess is cleared (reset). A Fire Trouble will be activated if an open (break in the zone wires) occurs.
12 Fire 24 hr Supervisory - Intended for monitoring water control valves on fire sprinkler systems. Same as Fire 24hrexcept that a short across the zone activates a Fire Supervisory alarm. A Fire Trouble will be activated if an open(break in the zone wires) should occur.
13 Auxiliary1 24 hr - This zone can trip anytime (armed or disarmed) and send a communicator report, but there isno audible alarm output or keypad indication provided. It is displayed in the event log. A Whenever/And/Then rulecan be written from the RP software to do other things with this zone type. Resets upon restoral.
14 Auxiliary2 24 hr - This zone can trip anytime (armed or disarmed) and send a communicator report, but there isno audible alarm output or keypad indication provided. It is displayed in the event log. A Whenever/And/Then rulecan be written from the RP software to do other things with this zone type. Resets upon restoral.
Press RIGHT arrow key to select this menu. Press UP or DOWN arrow keys to selectanother menu. The ELK key backs up one menu level. To exit press the * or Exit key.
Def Zone Description Operating Characteristics
Away Stay Stay Instant Nite Nite InstantBurg Entry/Exit (1 or 2) Zone A A AN A AN QUICK VIEW OF ARMING MODESBurg Perimeter (Instant) Zone AN AN AN AN AN This illustrates the condition of BurgBurglar Burg Interior Zone AN - - - - zone types in the various arm modes.Burg Interior Follower Zone A - - - - Legend: A = ArmedBurg Interior Nite Zone AN - - AN AN “-” = Not Armed,Burg Interior Nite Delay Zone AN - - A AN AN = Armed, No Delay

M1G Installation and Programming Manual Page 31
123456789012345678901234567890121231234567890123456789012345678901212312345678901234567890123456789012123123456789012345678901234567890121231234567890123456789012345678901212312345678901234567890123456789012123123456789012345678901234567890121231234567890123456789012345678901212312345678901234567890123456789012123123456789012345678901234567890121231234567890123456789012345678901212312345678901234567890123456789012123
ZN001 02:Type=0r
0=EOL Supervised
1234567890123456789012345678901212312345678901234567890123456789012123123456789012345678901234567890121231234567890123456789012345678901212312345678901234567890123456789012123123456789012345678901234567890121231234567890123456789012345678901212312345678901234567890123456789012123123456789012345678901234567890121231234567890123456789012345678901212312345678901234567890123456789012123
ZN001 03:Area=1 r[Area Name]
Refers to the wiring configuration for zones. Burglar and Keyswitch zones may be set to:0, 1, 2, 3, & 4. Other non-fire zones may be set to: 0, 1 or 2 only. Fire zones may be5=EOL Supervised 4-wire detectors, 6=EOL Supervised 2-wire detectors (zone 16 ONLY!)
Enter the area (partition) number that this zone is to be assigned to. A zone can onlyreside in one area and fire zones can only reside in Area 1.
A zone programmed ‘Yes’ for Silent Alarm will not cause any audible alarm event from aprogrammable output OR from any keypad. However, a visual display will occur on thekeypad(s) which are assigned to the same area as the zone.
Menu 05 - Zone Definitions (continued)
15 † Keyfob - Used when a wireless keyfob is enrolled into a receiver at this zone ID location.16 Non Alarm - Intended for use in Whenever/And/Then rules from the Remote Programming RP software. This zone
type DOES NOT ACTIVATE any alarm and is not logged in the Event log. No reset is required.17 Carbon Monoxide 24 hr - Activates an immediate Carbon Monoxide alarm if tripped anytime (armed or disarmed).
The keypad will display the alarm as well as the event log. This type of alarm can be silenced/reset with a validUser Code. The audible alarm can be set in “Cutoff Timers”.
18 Emergency 24 hr - Similar to Def 17, this zone creates an alarm if tripped anytime (armed or disarmed).19 Freeze Alarm 24 hr - Similar to Def 17, this zone creates an alarm if tripped anytime (armed or disarmed).20 Gas Alarm 24 hr - Similar to Def 17, this zone creates an alarm if tripped anytime (armed or disarmed).21 Heat Alarm 24 hr - Similar to Def 17, this zone creates an alarm if tripped anytime (armed or disarmed).22 Medical Alarm 24 hr - Activates an immediate Medical alarm if tripped anytime (armed or disarmed).23 Police Alarm w/Indication 24 hr - Activates an audible Police (Holdup) alarm if tripped (armed or disarmed).24 Police Alarm no Indication 24 hr - Activates an non-audible Police (Silent) alarm if tripped (armed or disarmed).25 Water Alarm 24 hr - Activates an immediate Water alarm if tripped anytime (armed or disarmed).26 Keyswitch Momentary - Intended for a spring loaded momentary key switch. Toggles the armed state (disarmed/
armed) with each trip.27 Keyswitch Momentary - Away Mode - Intended for a spring loaded momentary key switch. Arms the area in the
AWAY mode with each trip.28 Keyswitch Momentary - Stay Mode - Intended for a spring loaded momentary key switch. Arms the area in the
STAY mode with each trip.29 Keyswitch Momentary - Disarm Only - For a spring loaded momentary key switch. Disarms with each trip.30 Keyswitch On/Off (Maintained) - Intended for a 2 position On/Off key switch. Arms the area in Open position.
Disarms the area in the Closed position.31 †† Mute All Area Audibles - For silencing all area audibles by a two-way listen-in module (other manufacturer).32 Power Supervisory 24 hr - For supervising an external power supply which provides alarm/trouble contacts. Wire
the power supply contacts to short the zone in a Low Battery event and open the zone in an AC Failure event.33 † Temperature - For use with ELK-M1ZTS Temperature Sensors. Requires the use of Whenever/And/Then rules
from the ELK-RP software. NOTE: This definition is for ZONES 1 thru 16 ONLY! Temperature zones must be setto FAST LOOP (less that 200ms) response.
34 † Analog - For sensors that produce a variable voltage (0 to 12 volt range). Requires the Whenever/And/Thenrules from the ELK-RP software. NOTE: This definition is only available with the ELK-M1G (Gold) control.
Def Zone Description Operating Characteristics
0 EOL Supervised, 2,200 Ohm resistor (Zones 1 - 16 are defaulted to Type=0)1 Normally Closed only. No resistor required.2 Normally Open only. No resistor required.3 EOL Supervised with SECURITY ALERT on Short. (Burglar & Keyswitch Zones Only) When control is disarmed a
Security “Day” Alert will occur if the zone wiring is SHORTED. Keypads will beep and display the alert and zonename. Press Star key to silence. User code must be entered to reset/acknowledge the alert. When control isarmed an alarm will occur regardless of whether the zone wiring is OPENED or SHORTED.
4 EOL Supervised - 4 State Wiring, with SECURITY ALERT on Open or Short. (Burglar & Keyswitch Zones Only)Effective with firmware 4.3.5 this type provides 4 State Zone Wiring option, which uses 2 series EOL resistors, 1 inseries with the loop and 1 in parallel with the alarm contacts. When control is disarmed a Security “Day” Alert willoccur if the zone wiring is OPENED (tamper switch) or SHORTED. Keypad(s) will beep and display the alert andzone name. Ideal for tampering motions, etc. Press Star key to silence. User code must be entered to reset/acknowledge the alert. When control is armed an alarm will occur regardless of whether the zone is OPENED orSHORTED. NOTE: To define additional output/options on types 3 & 4 use the ElkRP Whenever/Then rules.
5 Fire, 4-Wire Smoke Detector with 2,200 Ohm EOL resistor. Trouble on open, alarm on short. (Zones 1 to 16).6 Fire, 2-wire Smoke Detector with 680 Ohm EOL resistor. (ZONE 16 ONLY)
Type Wiring Configuration Operating Description
1234567890123456789012345678901212312345678901234567890123456789012123123456789012345678901234567890121231234567890123456789012345678901212312345678901234567890123456789012123123456789012345678901234567890121231234567890123456789012345678901212312345678901234567890123456789012123123456789012345678901234567890121231234567890123456789012345678901212312345678901234567890123456789012123
ZN001 04: =No r
Silent Alarm
† Not evaluated by UL †† Not for use in UL Listed Installations

M1G Installation and Programming ManualPage 32
123456789012345678901234567890121234123456789012345678901234567890121234123456789012345678901234567890121234123456789012345678901234567890121234123456789012345678901234567890121234123456789012345678901234567890121234123456789012345678901234567890121234123456789012345678901234567890121234123456789012345678901234567890121234123456789012345678901234567890121234123456789012345678901234567890121234
ZN001 13: =No r
In CrossZonePool
Menu 05 - Zone Definitions (continued)Zone Definitions Description of Option
Dialer delay is designed to reduce false alarm dispatches. Upon an alarm from a zonewith this option the communicator delays dialing for the “Dialer Delay” time programmed inMenu 09-Area Reporting Codes. If a valid code is entered before this delay expires, thereport will ABORT (no report). If an ‘Alarm Abort” code is programmed, (see Menu 09), thecommunicator will transmit this in place of the alarm. NOTE: The Dialer Delay Time willonly start once per alarm, regardless of additional zone trips. Default setting is No.
† Allows zone to trigger a listen-in session after alarm is reported. Control will hold theline for 60 seconds after ‘kiss-off’, allowing Central Station to enter *55* to activate listen-in. The Central Station can renew or terminate listen-in remotely. NOTE: Two-Way mustbe enabled (Menu 07-Globals) and an interface (ELK-M1TWI) with one or moremicrophone/speakers (ELK-M1TWS) must be installed. Default setting is No.
A Yes allows zone to be manually bypassed. A bypassed zone will be ignored by thesystem. Burglar zone bypasses are canceled upon a disarm. To bypass a zone: Pressthe Bypass key + [zone number] + the Bypass key once again. Default setting is Yes.
†† Force Arm allows a violated zone to be temporarily bypassed upon arming. Prior toarm, the READY light blinks if force arm zone(s) are the only zones violated. Force armrequires two entries of a user code. Quick arm cannot be used. Upon the first code entrythe keypad displays READY FORCE. The second code entry will force arm. Force armzone(s) automatically return to service if they become normal while armed. CAUTION!Force arm operates in a unique way on entry/exit zones! - Entry/Exit zones that arealso force armable can be violated during the exit delay and still become force armed.This allows a user to arm, open a garage door, back out, and then shut the door at theirleisure, without creating a false alarm and without a long exit delay time. As soon as thegarage door is closed, it will automatically return to service. Default setting is No.
†† Swinger Shutdown prevents a runaway communicator by shunting a zone after 2 trips.Zone cannot send another alarm until control is reset OR a 48 hour time period elapses.Default setting is No.
This type zone must be tripped at least once per disarm cycle*. This prevents blockedPIRs or seldom used doors from being left not secure. Keypad will display “Not Ready” ifa periodic zone has not been tripped. * NOTE: A periodic trip will not be required for adisarm period of 1 hour or less. Default setting is No.
Response is the time the zone must be violated before the system detects it. If No, thezone responds to the Slow response time. The time values are in milliseconds and theyare programmed in the Menu 07 Global Sys. Definitions menu. Default setting is No.
Each zone may be selected to be included in the Chime annunciation whenever ChimeMode is turned on from the keypad. Most zone types may be included via this option.Default setting is No.
†† Burglar zones programmed “In CrossZonePool” cannot cause an alarm unless anotherzone in the cross zone pool also activates within a time window OR unless “Cross ZoneSelf Ver“ is Menu 07 - Global System Definitions. Entry/exit zones should NOT beprogrammed as Cross zones. Default setting is No.
To program the text description of the Zone (Name) press the left arrow key. Enter textusing the number keys. I.E. For a “K” press the 5 key twice. To move the cursor pressthe right or left arrow keys. While programming the text, pressing the Chime key insertsa space and the Bypass key erases 1 digit. The up and down arrow keys move betweenupper and lower case. Press the ELK key when complete.
123456789012345678901234567890121234123456789012345678901234567890121234123456789012345678901234567890121234123456789012345678901234567890121234123456789012345678901234567890121234123456789012345678901234567890121234123456789012345678901234567890121234123456789012345678901234567890121234123456789012345678901234567890121234123456789012345678901234567890121234123456789012345678901234567890121234123456789012345678901234567890121234
ZN001 14:Namel
Zone 001
123456789012345678901234567890121234123456789012345678901234567890121234123456789012345678901234567890121234123456789012345678901234567890121234123456789012345678901234567890121234123456789012345678901234567890121234123456789012345678901234567890121234123456789012345678901234567890121234123456789012345678901234567890121234123456789012345678901234567890121234123456789012345678901234567890121234
ZN001 07: =No r
Zone Bypassable
123456789012345678901234567890121234123456789012345678901234567890121234123456789012345678901234567890121234123456789012345678901234567890121234123456789012345678901234567890121234123456789012345678901234567890121234123456789012345678901234567890121234123456789012345678901234567890121234123456789012345678901234567890121234123456789012345678901234567890121234123456789012345678901234567890121234123456789012345678901234567890121234
ZN001 10: =No r
Req PeriodicTrip
123456789012345678901234567890121234123456789012345678901234567890121234123456789012345678901234567890121234123456789012345678901234567890121234123456789012345678901234567890121234123456789012345678901234567890121234123456789012345678901234567890121234123456789012345678901234567890121234123456789012345678901234567890121234123456789012345678901234567890121234123456789012345678901234567890121234
ZN001 11: =No r
FastLoopResponse
123456789012345678901234567890121234123456789012345678901234567890121234123456789012345678901234567890121234123456789012345678901234567890121234123456789012345678901234567890121234123456789012345678901234567890121234123456789012345678901234567890121234123456789012345678901234567890121234123456789012345678901234567890121234123456789012345678901234567890121234123456789012345678901234567890121234
ZN001 08: =No r
Force Armable
123456789012345678901234567890121234123456789012345678901234567890121234123456789012345678901234567890121234123456789012345678901234567890121234123456789012345678901234567890121234123456789012345678901234567890121234123456789012345678901234567890121234123456789012345678901234567890121234123456789012345678901234567890121234123456789012345678901234567890121234123456789012345678901234567890121234
ZN001 12: =No r
Enable Chime
123456789012345678901234567890121234123456789012345678901234567890121234123456789012345678901234567890121234123456789012345678901234567890121234123456789012345678901234567890121234123456789012345678901234567890121234123456789012345678901234567890121234123456789012345678901234567890121234123456789012345678901234567890121234123456789012345678901234567890121234123456789012345678901234567890121234
ZN001 06: =No r
Enable Listen-In
123456789012345678901234567890121234123456789012345678901234567890121234123456789012345678901234567890121234123456789012345678901234567890121234123456789012345678901234567890121234123456789012345678901234567890121234123456789012345678901234567890121234123456789012345678901234567890121234123456789012345678901234567890121234123456789012345678901234567890121234123456789012345678901234567890121234
ZN001 05: =Yes r
Dialer Delay
123456789012345678901234567890121234123456789012345678901234567890121234123456789012345678901234567890121234123456789012345678901234567890121234123456789012345678901234567890121234123456789012345678901234567890121234123456789012345678901234567890121234123456789012345678901234567890121234123456789012345678901234567890121234123456789012345678901234567890121234123456789012345678901234567890121234
ZN001 09: =No r
SwingerShutdown
† Not evaluated by UL †† Not for use in UL Listed Installations

M1G Installation and Programming Manual Page 33
123456789012345678901234567890121231234567890123456789012345678901212312345678901234567890123456789012123123456789012345678901234567890121231234567890123456789012345678901212312345678901234567890123456789012123123456789012345678901234567890121231234567890123456789012345678901212312345678901234567890123456789012123123456789012345678901234567890121231234567890123456789012345678901212312345678901234567890123456789012123
CT01:=00600 secr
BurgDuration1234567890123456789012345678901212312345678901234567890123456789012123123456789012345678901234567890121231234567890123456789012345678901212312345678901234567890123456789012123123456789012345678901234567890121231234567890123456789012345678901212312345678901234567890123456789012123123456789012345678901234567890121231234567890123456789012345678901212312345678901234567890123456789012123
CT02:=00000 secr
FireDuration
Menu 06 - Alarm Duration Timers1234567890123456789012345678901212312345678901234567890123456789012123123456789012345678901234567890121231234567890123456789012345678901212312345678901234567890123456789012123123456789012345678901234567890121231234567890123456789012345678901212312345678901234567890123456789012123123456789012345678901234567890121231234567890123456789012345678901212312345678901234567890123456789012123
06-Alarm Cutoff r
Timers
Alarm Cutoff Timers Description of OptionBurglar Alarm duration time in seconds. Default time is 00600 sec. (10 min.). Burglaralways activates Siren/Voice Output (Out1) and Siren Output (Out2). Additional outputsmay be programmed using the RP software “Rules” function.
Fire Alarm duration time in seconds. Default time is 65535 sec. (never cutoff). Fire alwaysactivates Siren/Voice Output (Out1) and Siren Output (Out2). Additional outputs may beprogrammed using the RP software “Rules” function.
Medical Alarm duration time in seconds. Default time is 00600 sec. (10 min.). Medicalalways activates Siren/Voice Output (Out1) and Siren Output (Out2). Additional outputsmay be programmed using the RP software “Rules” function.
Audible Police Alarm duration time in seconds. Default time is 00600 sec. (10 min).Audible Police always activates Siren/Voice Output (Out1) and Siren Output (Out2).Additional outputs may be programmed using the RP software “Rules” function.
CO (Carbon Monoxide) Alarm duration time in seconds. The default time is 00600 sec. (10min.). This alarm type is not preassigned to any outputs. The RP software “Rules”function must be used to assign outputs.
Emergency Alarm duration time in seconds. The default time is 00600 sec. (10 min.).This alarm type is not preassigned to any outputs. The RP software “Rules” function mustbe used to assign outputs.
Freeze Alarm duration time in seconds. The default time is 00600 sec. (10 min.). Thisalarm type is not preassigned to any outputs. The RP software “Rules” function must beused to assign outputs.
Gas Alarm duration time in seconds. The default time is 00600 sec. (10 min.). This alarmtype is not preassigned to any outputs. The RP software “Rules” function must be usedto assign outputs.
Heat Alarm duration time in seconds. The default time is 00600 sec. (10 min.). This alarmtype is not preassigned to any outputs. The RP software “Rules” function must be usedto assign outputs.
Water Alarm duration time in seconds. The default time is 00600 sec. (10 min.). Thisalarm type is not preassigned to any outputs. The RP software “Rules” function must beused to assign outputs.
Aux 1 Alarm duration time in seconds. The default time is 00600 sec. (10 min.). Thisalarm type is not preassigned to any outputs. The RP software “Rules” function must beused to assign outputs.
Aux 2 Alarm duration time in seconds. The default time is 00600 sec. (10 min.). Thisalarm type is not preassigned to any outputs. The RP software “Rules” function must beused to assign outputs.
1234567890123456789012345678901212312345678901234567890123456789012123123456789012345678901234567890121231234567890123456789012345678901212312345678901234567890123456789012123123456789012345678901234567890121231234567890123456789012345678901212312345678901234567890123456789012123123456789012345678901234567890121231234567890123456789012345678901212312345678901234567890123456789012123
CT03:=00600 secr
Med Duration1234567890123456789012345678901212312345678901234567890123456789012123123456789012345678901234567890121231234567890123456789012345678901212312345678901234567890123456789012123123456789012345678901234567890121231234567890123456789012345678901212312345678901234567890123456789012123123456789012345678901234567890121231234567890123456789012345678901212312345678901234567890123456789012123
CT04:=00600 secr
Pol Duration
Each alarm type has a duration timer for cutting off the alarm after a programmable time period. Any output assigned tothe alarm type will turn on when the alarm activates and will turn off when the alarm cutoff timer expires. If multiple alarmtypes are assigned to a single output, all alarms must turn off before the output can turn off. The range in seconds is00000 to 65535. 00000=Never turn on. 65535=Never turn off NOTE: 65535 seconds is 1,092 minutes or 18.2 hours.
1234567890123456789012345678901212312345678901234567890123456789012123123456789012345678901234567890121231234567890123456789012345678901212312345678901234567890123456789012123123456789012345678901234567890121231234567890123456789012345678901212312345678901234567890123456789012123123456789012345678901234567890121231234567890123456789012345678901212312345678901234567890123456789012123
CT05:=00600 secr
CO Duration1234567890123456789012345678901212312345678901234567890123456789012123123456789012345678901234567890121231234567890123456789012345678901212312345678901234567890123456789012123123456789012345678901234567890121231234567890123456789012345678901212312345678901234567890123456789012123123456789012345678901234567890121231234567890123456789012345678901212312345678901234567890123456789012123
CT06:=00600 secr
EmerDuration123456789012345678901234567890121231234567890123456789012345678901212312345678901234567890123456789012123123456789012345678901234567890121231234567890123456789012345678901212312345678901234567890123456789012123123456789012345678901234567890121231234567890123456789012345678901212312345678901234567890123456789012123123456789012345678901234567890121231234567890123456789012345678901212312345678901234567890123456789012123
CT07:=00600 secr
FrezDuration1234567890123456789012345678901212312345678901234567890123456789012123123456789012345678901234567890121231234567890123456789012345678901212312345678901234567890123456789012123123456789012345678901234567890121231234567890123456789012345678901212312345678901234567890123456789012123123456789012345678901234567890121231234567890123456789012345678901212312345678901234567890123456789012123
CT08:=00600 secr
Gas Duration123456789012345678901234567890121231234567890123456789012345678901212312345678901234567890123456789012123123456789012345678901234567890121231234567890123456789012345678901212312345678901234567890123456789012123123456789012345678901234567890121231234567890123456789012345678901212312345678901234567890123456789012123123456789012345678901234567890121231234567890123456789012345678901212312345678901234567890123456789012123
CT09:=00600 secr
HeatDuration123456789012345678901234567890121231234567890123456789012345678901212312345678901234567890123456789012123123456789012345678901234567890121231234567890123456789012345678901212312345678901234567890123456789012123123456789012345678901234567890121231234567890123456789012345678901212312345678901234567890123456789012123123456789012345678901234567890121231234567890123456789012345678901212312345678901234567890123456789012123
CT10:=00600 secr
WatrDuration
Press RIGHT arrow key to select this menu. Press UP or DOWN arrow keys to selectanother menu. The ELK key backs up one menu level. To exit press the * or Exit key.
123456789012345678901234567890121231234567890123456789012345678901212312345678901234567890123456789012123123456789012345678901234567890121231234567890123456789012345678901212312345678901234567890123456789012123123456789012345678901234567890121231234567890123456789012345678901212312345678901234567890123456789012123123456789012345678901234567890121231234567890123456789012345678901212312345678901234567890123456789012123
CT11:=00600 secr
Aux1Duration123456789012345678901234567890121231234567890123456789012345678901212312345678901234567890123456789012123123456789012345678901234567890121231234567890123456789012345678901212312345678901234567890123456789012123123456789012345678901234567890121231234567890123456789012345678901212312345678901234567890123456789012123123456789012345678901234567890121231234567890123456789012345678901212312345678901234567890123456789012123
CT12:=00600 secr
Aux2Duration
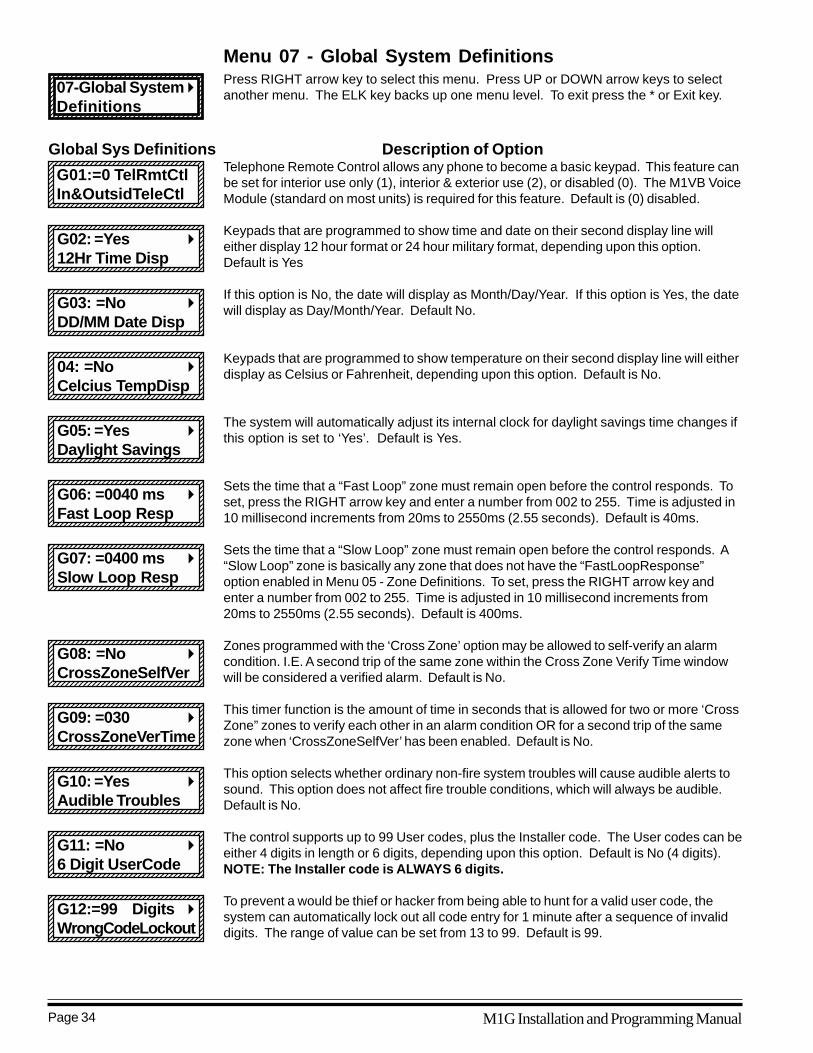
M1G Installation and Programming ManualPage 34
123456789012345678901234567890121234123456789012345678901234567890121234123456789012345678901234567890121234123456789012345678901234567890121234123456789012345678901234567890121234123456789012345678901234567890121234123456789012345678901234567890121234123456789012345678901234567890121234123456789012345678901234567890121234123456789012345678901234567890121234123456789012345678901234567890121234
G01:=0 TelRmtCtlIn&OutsidTeleCtl
123456789012345678901234567890121234123456789012345678901234567890121234123456789012345678901234567890121234123456789012345678901234567890121234123456789012345678901234567890121234123456789012345678901234567890121234123456789012345678901234567890121234123456789012345678901234567890121234123456789012345678901234567890121234123456789012345678901234567890121234123456789012345678901234567890121234123456789012345678901234567890121234
G02: =Yes r
12Hr Time Disp123456789012345678901234567890121234123456789012345678901234567890121234123456789012345678901234567890121234123456789012345678901234567890121234123456789012345678901234567890121234123456789012345678901234567890121234123456789012345678901234567890121234123456789012345678901234567890121234123456789012345678901234567890121234123456789012345678901234567890121234123456789012345678901234567890121234
G03: =No r
DD/MM Date Disp
Menu 07 - Global System DefinitionsPress RIGHT arrow key to select this menu. Press UP or DOWN arrow keys to selectanother menu. The ELK key backs up one menu level. To exit press the * or Exit key.
1234567890123456789012345678901212312345678901234567890123456789012123123456789012345678901234567890121231234567890123456789012345678901212312345678901234567890123456789012123123456789012345678901234567890121231234567890123456789012345678901212312345678901234567890123456789012123123456789012345678901234567890121231234567890123456789012345678901212312345678901234567890123456789012123
07-Global System r
Definitions
Global Sys Definitions Description of OptionTelephone Remote Control allows any phone to become a basic keypad. This feature canbe set for interior use only (1), interior & exterior use (2), or disabled (0). The M1VB VoiceModule (standard on most units) is required for this feature. Default is (0) disabled.
Keypads that are programmed to show time and date on their second display line willeither display 12 hour format or 24 hour military format, depending upon this option.Default is Yes
If this option is No, the date will display as Month/Day/Year. If this option is Yes, the datewill display as Day/Month/Year. Default No.
Keypads that are programmed to show temperature on their second display line will eitherdisplay as Celsius or Fahrenheit, depending upon this option. Default is No.
The system will automatically adjust its internal clock for daylight savings time changes ifthis option is set to ‘Yes’. Default is Yes.
Sets the time that a “Fast Loop” zone must remain open before the control responds. Toset, press the RIGHT arrow key and enter a number from 002 to 255. Time is adjusted in10 millisecond increments from 20ms to 2550ms (2.55 seconds). Default is 40ms.
Sets the time that a “Slow Loop” zone must remain open before the control responds. A“Slow Loop” zone is basically any zone that does not have the “FastLoopResponse”option enabled in Menu 05 - Zone Definitions. To set, press the RIGHT arrow key andenter a number from 002 to 255. Time is adjusted in 10 millisecond increments from20ms to 2550ms (2.55 seconds). Default is 400ms.
Zones programmed with the ‘Cross Zone’ option may be allowed to self-verify an alarmcondition. I.E. A second trip of the same zone within the Cross Zone Verify Time windowwill be considered a verified alarm. Default is No.
This timer function is the amount of time in seconds that is allowed for two or more ‘CrossZone” zones to verify each other in an alarm condition OR for a second trip of the samezone when ‘CrossZoneSelfVer’ has been enabled. Default is No.
This option selects whether ordinary non-fire system troubles will cause audible alerts tosound. This option does not affect fire trouble conditions, which will always be audible.Default is No.
The control supports up to 99 User codes, plus the Installer code. The User codes can beeither 4 digits in length or 6 digits, depending upon this option. Default is No (4 digits).NOTE: The Installer code is ALWAYS 6 digits.
To prevent a would be thief or hacker from being able to hunt for a valid user code, thesystem can automatically lock out all code entry for 1 minute after a sequence of invaliddigits. The range of value can be set from 13 to 99. Default is 99.
123456789012345678901234567890121234123456789012345678901234567890121234123456789012345678901234567890121234123456789012345678901234567890121234123456789012345678901234567890121234123456789012345678901234567890121234123456789012345678901234567890121234123456789012345678901234567890121234123456789012345678901234567890121234123456789012345678901234567890121234123456789012345678901234567890121234
04: =No r
Celcius TempDisp123456789012345678901234567890121234123456789012345678901234567890121234123456789012345678901234567890121234123456789012345678901234567890121234123456789012345678901234567890121234123456789012345678901234567890121234123456789012345678901234567890121234123456789012345678901234567890121234123456789012345678901234567890121234123456789012345678901234567890121234123456789012345678901234567890121234
G05: =Yes r
Daylight Savings123456789012345678901234567890121234123456789012345678901234567890121234123456789012345678901234567890121234123456789012345678901234567890121234123456789012345678901234567890121234123456789012345678901234567890121234123456789012345678901234567890121234123456789012345678901234567890121234123456789012345678901234567890121234123456789012345678901234567890121234123456789012345678901234567890121234123456789012345678901234567890121234
G06: =0040 ms r
Fast Loop Resp123456789012345678901234567890121234123456789012345678901234567890121234123456789012345678901234567890121234123456789012345678901234567890121234123456789012345678901234567890121234123456789012345678901234567890121234123456789012345678901234567890121234123456789012345678901234567890121234123456789012345678901234567890121234123456789012345678901234567890121234123456789012345678901234567890121234
G07: =0400 ms r
Slow Loop Resp
123456789012345678901234567890121234123456789012345678901234567890121234123456789012345678901234567890121234123456789012345678901234567890121234123456789012345678901234567890121234123456789012345678901234567890121234123456789012345678901234567890121234123456789012345678901234567890121234123456789012345678901234567890121234123456789012345678901234567890121234123456789012345678901234567890121234
G08: =No r
CrossZoneSelfVer123456789012345678901234567890121234123456789012345678901234567890121234123456789012345678901234567890121234123456789012345678901234567890121234123456789012345678901234567890121234123456789012345678901234567890121234123456789012345678901234567890121234123456789012345678901234567890121234123456789012345678901234567890121234123456789012345678901234567890121234123456789012345678901234567890121234123456789012345678901234567890121234
G09: =030 r
CrossZoneVerTime123456789012345678901234567890121234123456789012345678901234567890121234123456789012345678901234567890121234123456789012345678901234567890121234123456789012345678901234567890121234123456789012345678901234567890121234123456789012345678901234567890121234123456789012345678901234567890121234123456789012345678901234567890121234123456789012345678901234567890121234123456789012345678901234567890121234
G10: =Yes r
Audible Troubles123456789012345678901234567890121234123456789012345678901234567890121234123456789012345678901234567890121234123456789012345678901234567890121234123456789012345678901234567890121234123456789012345678901234567890121234123456789012345678901234567890121234123456789012345678901234567890121234123456789012345678901234567890121234123456789012345678901234567890121234123456789012345678901234567890121234
G11: =No r
6 Digit UserCode123456789012345678901234567890121234123456789012345678901234567890121234123456789012345678901234567890121234123456789012345678901234567890121234123456789012345678901234567890121234123456789012345678901234567890121234123456789012345678901234567890121234123456789012345678901234567890121234123456789012345678901234567890121234123456789012345678901234567890121234123456789012345678901234567890121234123456789012345678901234567890121234
G12:=99 Digits r
WrongCodeLockout

M1G Installation and Programming Manual Page 35
123456789012345678901234567890121231234567890123456789012345678901212312345678901234567890123456789012123123456789012345678901234567890121231234567890123456789012345678901212312345678901234567890123456789012123123456789012345678901234567890121231234567890123456789012345678901212312345678901234567890123456789012123123456789012345678901234567890121231234567890123456789012345678901212312345678901234567890123456789012123
G14: =No Out1&2r
Chg YelpToBuzzer1234567890123456789012345678901212312345678901234567890123456789012123123456789012345678901234567890121231234567890123456789012345678901212312345678901234567890123456789012123123456789012345678901234567890121231234567890123456789012345678901212312345678901234567890123456789012123123456789012345678901234567890121231234567890123456789012345678901212312345678901234567890123456789012123
G15:=1 Out1StartrAlarm Volum-Tstr
1234567890123456789012345678901212312345678901234567890123456789012123123456789012345678901234567890121231234567890123456789012345678901212312345678901234567890123456789012123123456789012345678901234567890121231234567890123456789012345678901212312345678901234567890123456789012123123456789012345678901234567890121231234567890123456789012345678901212312345678901234567890123456789012123
G16:=7 Out1 Maxr
Siren Volum-Tstr123456789012345678901234567890121231234567890123456789012345678901212312345678901234567890123456789012123123456789012345678901234567890121231234567890123456789012345678901212312345678901234567890123456789012123123456789012345678901234567890121231234567890123456789012345678901212312345678901234567890123456789012123123456789012345678901234567890121231234567890123456789012345678901212312345678901234567890123456789012123
G17: =5 Out1 Maxr
VoiceAlmVol-Tstr1234567890123456789012345678901212312345678901234567890123456789012123123456789012345678901234567890121231234567890123456789012345678901212312345678901234567890123456789012123123456789012345678901234567890121231234567890123456789012345678901212312345678901234567890123456789012123123456789012345678901234567890121231234567890123456789012345678901212312345678901234567890123456789012123
G18: =2 Out1 Nonr
AlmVoiceVol-Tstr
Menu 07 - Global System Definitions (continued)Global Sys Definitions Description of Option
Any of the Areas 2 thru 8 may be made common to Area 1. The result is: Area 1 cannotbe armed until all its common areas are armed. Once armed, Area 1 will disarm if anycommon area becomes disarmed. This is good for lobbies or vestibules shared by two ormore businesses. Each business must have their own area keypad. NOTE: If you wantArea 1 to automatically arm when all its common areas become armed, use aWhenever/And/Then rule from the RP software to do this.
Changes the Burglar Yelp sound on outputs 1 & 2 to a pulsing Buzzer sound. NOTE:Out1 is designed for 8 Ohm - 20 watt min. speakers (up to 4 max) and hasadjustable volume settings. Default is No.
Options G15 thru G18 set the start and final volume levels for alarms and non alarms.G15 sets the initial siren/bell volume of Output 1 upon initial alarm activation. The range ofsettings is selectable from 0 to 7 (0 = lowest, 7 = loudest).
Sets the maximum siren/bell volume of Output 1. The sound starts at the initial settingand increases (volume step) every 10 seconds until the max. is reached. Volumestepping reduces noise and confusion with user caused false alarms. Default is 7.
Sets the maximum volume of Output 1 for Voice alarm messages. Just as in G16, with alow initial setting, the voice alarm message starts low and automatically increases(volume stepping) over a period of time until the max. is reached. Default is 5.
Sets the maximum volume of Output 1 for Voice non-alarm messages. Non-alarmmessages consist of system status, zone status, and various operating helpful hints thatare produced for the user during non-alarm conditions. Default is 2.
Selects whether or not voice messages are to be spoken through Output 1. Selecting‘Yes” completely eliminates all spoken voice messages from Output 1. Selecting “No”allows voices to be spoken based upon the settings of G20 through G25. Default is No.
Selects whether System “non-alarm” messages will be spoken through Output 1. Systemmessages include: “System is Armed”, “System is Disarmed”, etc. Default is Yes.
Selects whether Alarm messages will be spoken through Output 1.
Selects whether Zone status messages will be spoken through Output 1.
Selects whether System Trouble messages will be spoken through Output 1.
Selects whether Zone Trouble messages will be spoken through Output 1.
Selects whether Chime Event messages will be spoken through Output 1.
1234567890123456789012345678901212312345678901234567890123456789012123123456789012345678901234567890121231234567890123456789012345678901212312345678901234567890123456789012123123456789012345678901234567890121231234567890123456789012345678901212312345678901234567890123456789012123123456789012345678901234567890121231234567890123456789012345678901212312345678901234567890123456789012123
G19:=No Out1 r
SuppressAllVoice123456789012345678901234567890121231234567890123456789012345678901212312345678901234567890123456789012123123456789012345678901234567890121231234567890123456789012345678901212312345678901234567890123456789012123123456789012345678901234567890121231234567890123456789012345678901212312345678901234567890123456789012123123456789012345678901234567890121231234567890123456789012345678901212312345678901234567890123456789012123
G20:=Yes Out1 r
SaySystmMessages1234567890123456789012345678901212312345678901234567890123456789012123123456789012345678901234567890121231234567890123456789012345678901212312345678901234567890123456789012123123456789012345678901234567890121231234567890123456789012345678901212312345678901234567890123456789012123123456789012345678901234567890121231234567890123456789012345678901212312345678901234567890123456789012123
G21:=Yes Out1 r
Say Alarms1234567890123456789012345678901212312345678901234567890123456789012123123456789012345678901234567890121231234567890123456789012345678901212312345678901234567890123456789012123123456789012345678901234567890121231234567890123456789012345678901212312345678901234567890123456789012123123456789012345678901234567890121231234567890123456789012345678901212312345678901234567890123456789012123
G22:=Yes Out1 r
Say Zone Status1234567890123456789012345678901212312345678901234567890123456789012123123456789012345678901234567890121231234567890123456789012345678901212312345678901234567890123456789012123123456789012345678901234567890121231234567890123456789012345678901212312345678901234567890123456789012123123456789012345678901234567890121231234567890123456789012345678901212312345678901234567890123456789012123
G23:=Yes Out1 r
SaySystemTrouble123456789012345678901234567890121231234567890123456789012345678901212312345678901234567890123456789012123123456789012345678901234567890121231234567890123456789012345678901212312345678901234567890123456789012123123456789012345678901234567890121231234567890123456789012345678901212312345678901234567890123456789012123123456789012345678901234567890121231234567890123456789012345678901212312345678901234567890123456789012123
G24:=Yes Out1 r
Say Zone Trouble1234567890123456789012345678901212312345678901234567890123456789012123123456789012345678901234567890121231234567890123456789012345678901212312345678901234567890123456789012123123456789012345678901234567890121231234567890123456789012345678901212312345678901234567890123456789012123123456789012345678901234567890121231234567890123456789012345678901212312345678901234567890123456789012123
G25:=Yes Out1 r
Say Chime
1234567890123456789012345678901212312345678901234567890123456789012123123456789012345678901234567890121231234567890123456789012345678901212312345678901234567890123456789012123123456789012345678901234567890121231234567890123456789012345678901212312345678901234567890123456789012123123456789012345678901234567890121231234567890123456789012345678901212312345678901234567890123456789012123
G13:_ _ _ _ _ _ _ _r
Common To Area1

M1G Installation and Programming ManualPage 36
Menu 07 - Global System Definitions (continued)Global Sys Definitions Description of Option
Allows Output 2 to be converted from a siren driver into a voltage only output. If set to“No” the control produces alarm sounds for use with 8 Ohm speakers. If set to “Yes” thecontrol will produce +12 Volts for use with self-contained sirens or bells. Default is No.
Ordinarily, Outputs 1 & 2 activate immediately on alarms. However, Output 2 can be timedelayed up to 255 seconds. Using Output 1 strictly for interior sounders and Output 2 foroutside sounders, a false alarm will be heard inside first, giving the user time to disarmbefore any outside sounders are activated. A “good neighbor” feature. Default is 000.
† Output 2 can be set to alarm only once per armed cycle for burglary type alarms. Thisfeature is intended for noise abatement. The dialer will continue to transmit all alarms thatmay occur. THIS ONLY LOCKS OUT AUDIBLE FROM OUTPUT 2.
The control must be set to auto answer an incoming call in order for Telephone RemoteControl or the Remote Programming (RP) to be accessed remotely. The range of ringscan be set from 1 to 15. A value of “0” disables auto answer.
A Yes enables faster connection from an outside telephone. It works as follows: Call thecontrol and hang up after 1 or 2 rings. This starts a 45 second timer. Call the control a2nd time during this 45 second time and the control will answer on the first ring. In somecases this Ring/Hang/Answer option may be the only way to get around telephonecompany provided answering services. Option 29 MUST also be set!
NOTE: If an on-site answering machine picks up, the RP software and the controlwill automatically attempt to override the machine using tone sniffing methods.
† If this option to Yes ONLY when an ELK-M1TWI Two Way Listen-In interface isinstalled. This enables the correct software commands and procedures to make the twoway functional. Refer also to the instructions that are shipped with the ELK-M1TWI
If Two Way is enabled, this timer provides a window for the CS to enter * 55 * and activatetwo way listen-in by holding the phone line off-hook for 001 to 255 seconds after a kissoff.Upon hangup, this timer re-starts to provide a window for the CS to callback and initiatetwo way. Control will answer an incoming call on the first ring. Enter 000 to disable.
Allows the Central Station alarm verification by suspending (holding) new alarms after theinitial alarm kissoff. The phone line is kept free for this time period. The time value can befrom 001 to 255 seconds. Long time periods are not recommended. Enter 000 to disable.
This location is used to select the initial (default) baud rate for the on-board RS-232 serialport which is Port 0. The available baud rates are: 0 or 1=300 baud, 2=1200, 3=2400,4=4800, 5=9600, 6=14400, 7=19200, 8=38400, and 9=115200
The control can transmit ASCII data via it’s RS-232 port to automation types of equipment.The ELK ASCII Protocol document is available upon request. This first option sets thecontrol to transmit all event log information immediately as it occurs.
This option sets the control to transmit zone status changes immediately as they occur.The ELK ASCII Protocol document is available upon request.
This option sets the control to transmit output status changes immediately as they occur.
123456789012345678901234567890121234123456789012345678901234567890121234123456789012345678901234567890121234123456789012345678901234567890121234123456789012345678901234567890121234123456789012345678901234567890121234123456789012345678901234567890121234123456789012345678901234567890121234123456789012345678901234567890121234123456789012345678901234567890121234123456789012345678901234567890121234
G29:=00 Rings r
Until AutoAnswer
123456789012345678901234567890121234123456789012345678901234567890121234123456789012345678901234567890121234123456789012345678901234567890121234123456789012345678901234567890121234123456789012345678901234567890121234123456789012345678901234567890121234123456789012345678901234567890121234123456789012345678901234567890121234123456789012345678901234567890121234123456789012345678901234567890121234123456789012345678901234567890121234
G28:=No Out2 r
SingleAlmLockout
123456789012345678901234567890121234123456789012345678901234567890121234123456789012345678901234567890121234123456789012345678901234567890121234123456789012345678901234567890121234123456789012345678901234567890121234123456789012345678901234567890121234123456789012345678901234567890121234123456789012345678901234567890121234123456789012345678901234567890121234123456789012345678901234567890121234
G35:=No XmitrEvent Log- ASCII
123456789012345678901234567890121234123456789012345678901234567890121234123456789012345678901234567890121234123456789012345678901234567890121234123456789012345678901234567890121234123456789012345678901234567890121234123456789012345678901234567890121234123456789012345678901234567890121234123456789012345678901234567890121234123456789012345678901234567890121234123456789012345678901234567890121234
G30:=No r
Ring/Hang/Answer
123456789012345678901234567890121234123456789012345678901234567890121234123456789012345678901234567890121234123456789012345678901234567890121234123456789012345678901234567890121234123456789012345678901234567890121234123456789012345678901234567890121234123456789012345678901234567890121234123456789012345678901234567890121234123456789012345678901234567890121234123456789012345678901234567890121234
G36:=No XmitrZone Chgs - ASCII
123456789012345678901234567890121234123456789012345678901234567890121234123456789012345678901234567890121234123456789012345678901234567890121234123456789012345678901234567890121234123456789012345678901234567890121234123456789012345678901234567890121234123456789012345678901234567890121234123456789012345678901234567890121234123456789012345678901234567890121234123456789012345678901234567890121234
G37:=No XmitrOutputChgs-ASCII
123456789012345678901234567890121234123456789012345678901234567890121234123456789012345678901234567890121234123456789012345678901234567890121234123456789012345678901234567890121234123456789012345678901234567890121234123456789012345678901234567890121234123456789012345678901234567890121234123456789012345678901234567890121234123456789012345678901234567890121234123456789012345678901234567890121234
G34:=9 115200r
Baud Rate Port 0
123456789012345678901234567890121234123456789012345678901234567890121234123456789012345678901234567890121234123456789012345678901234567890121234123456789012345678901234567890121234123456789012345678901234567890121234123456789012345678901234567890121234123456789012345678901234567890121234123456789012345678901234567890121234123456789012345678901234567890121234123456789012345678901234567890121234
G32:=00sec 2Wayr
C a l l b a c k T i m e
123456789012345678901234567890121234123456789012345678901234567890121234123456789012345678901234567890121234123456789012345678901234567890121234123456789012345678901234567890121234123456789012345678901234567890121234123456789012345678901234567890121234123456789012345678901234567890121234123456789012345678901234567890121234123456789012345678901234567890121234123456789012345678901234567890121234
G31:=No 2Wayr
Listen-In Enable
123456789012345678901234567890121234123456789012345678901234567890121234123456789012345678901234567890121234123456789012345678901234567890121234123456789012345678901234567890121234123456789012345678901234567890121234123456789012345678901234567890121234123456789012345678901234567890121234123456789012345678901234567890121234123456789012345678901234567890121234123456789012345678901234567890121234
G33:=000sec CSr
Verify Call Time
123456789012345678901234567890121234123456789012345678901234567890121234123456789012345678901234567890121234123456789012345678901234567890121234123456789012345678901234567890121234123456789012345678901234567890121234123456789012345678901234567890121234123456789012345678901234567890121234123456789012345678901234567890121234123456789012345678901234567890121234123456789012345678901234567890121234123456789012345678901234567890121234
G26: =No rOut2 Voltage Out
123456789012345678901234567890121234123456789012345678901234567890121234123456789012345678901234567890121234123456789012345678901234567890121234123456789012345678901234567890121234123456789012345678901234567890121234123456789012345678901234567890121234123456789012345678901234567890121234123456789012345678901234567890121234123456789012345678901234567890121234123456789012345678901234567890121234
G27:=000secOut2r
Delay Turn-On
† Not evaluated by UL †† Not for use in UL Listed Installations

M1G Installation and Programming Manual Page 37
Menu 07 - Global System Definitions (continued)
† This option sets the control to transmit automation task status changes immediately asthey occur.
† This option sets the control to transmit automation lighting status changes immediatelyas they occur.
Sets the control to transmit keypad key changes. This includes the Chime, Bypass, Exit,Stay keys, the ELK key and it’s surrounding arrow keys, and the F keys. It does nottransmit any of the numeric keys..
Allows User Menus 1 through 5 to be blocked from view until a valid User code is entered.If set to “Yes”, only User Codes which have the “Menu 1-5 Allowed” option enabled will beable to view or access Menus 1 through 5. Default is No.
This is the 6 digit Installer program code that is required in order to access the localinstaller programming mode. NOTE: Be careful when changing this code as it will beimpossible to program the panel if the code is programmed wrong or forgotten.
This is a read-only location. Each control is assigned a unique serial number foridentification of the unit regarding warranty, technical support, anti-takeover, and otherissues that may arise.
This is a read-only location displaying information about the current software andbootloader revision that the control is operating with. This will only be needed with theassistance of a factory technical support person.
Allows factory default values to be restored by individual menus/categories. Press theright arrow, then press the up or down arrow keys to scroll through the choices. To factorydefault any single category enter the displayed number. E.G., enter 81 from this screen todefault all User Codes. Be patient as it may take a minute or more to default some items.
Entering 82 from this screen causes all area definitions to be factory defaulted.
Entering 83 from this screen causes all keypad definitions to be factory defaulted.
Entering 84 from this screen causes all zone definitions to be factory defaulted.
Entering 85 from this screen causes all zone names to be factory defaulted.
Entering 86 from this screen causes all the cutoff timers to be factory defaulted.
Entering 87 from this screen causes all global system defs to be factory defaulted.
Entering 88 from this screen causes all telephone reporting setup to be factory defaulted.
Entering 89 from this screen causes all telephone numbers ONLY to be factory defaulted.
Entering 90 from this screen causes all area report codes to be factory defaulted.
Entering 91 from this screen causes all zone report codes to be factory defaulted.
Entering 92 from this screen causes all system report codes to be factory defaulted.
Entering 93 from this screen causes all user report codes to be factory defaulted.
Entering 94 from this screen causes all voice messages to be factory defaulted.
Entering 95 from this screen causes all wireless definitions to be factory defaulted.
Entering 99 from this screen causes the entire panel programming to be factory defaulted.
Global Sys Def Description of Option
1234567890123456789012345678901212312345678901234567890123456789012123123456789012345678901234567890121231234567890123456789012345678901212312345678901234567890123456789012123123456789012345678901234567890121231234567890123456789012345678901212312345678901234567890123456789012123123456789012345678901234567890121231234567890123456789012345678901212312345678901234567890123456789012123
G44:xxxxxxxxxxxxAxxxxxx Bxxxxxx
1234567890123456789012345678901212312345678901234567890123456789012123123456789012345678901234567890121231234567890123456789012345678901212312345678901234567890123456789012123123456789012345678901234567890121231234567890123456789012345678901212312345678901234567890123456789012123123456789012345678901234567890121231234567890123456789012345678901212312345678901234567890123456789012123
G45:=DefaultCtl r
81=User Codes
123456789012345678901234567890121231234567890123456789012345678901212312345678901234567890123456789012123123456789012345678901234567890121231234567890123456789012345678901212312345678901234567890123456789012123123456789012345678901234567890121231234567890123456789012345678901212312345678901234567890123456789012123123456789012345678901234567890121231234567890123456789012345678901212312345678901234567890123456789012123
G42:=172839 r
Local Prog Code
82=Areas Data83=Keypads Data84=Zones Data85=Zone Names86=CutoffTimes87=Global Data88=TeleAcct Data89=Tele #’s Only90=AreaRptCodes91=ZoneRptCodes92=SysRptCodes93=UserRptCodes94=VoiceMessages95=WirelessDef99=Entire Panel
123456789012345678901234567890121231234567890123456789012345678901212312345678901234567890123456789012123123456789012345678901234567890121231234567890123456789012345678901212312345678901234567890123456789012123123456789012345678901234567890121231234567890123456789012345678901212312345678901234567890123456789012123123456789012345678901234567890121231234567890123456789012345678901212312345678901234567890123456789012123
G43:=D1234567 r
Serial Number
1234567890123456789012345678901212312345678901234567890123456789012123123456789012345678901234567890121231234567890123456789012345678901212312345678901234567890123456789012123123456789012345678901234567890121231234567890123456789012345678901212312345678901234567890123456789012123123456789012345678901234567890121231234567890123456789012345678901212312345678901234567890123456789012123
G41:=No RequireCode UserMenu1-5
1234567890123456789012345678901212312345678901234567890123456789012123123456789012345678901234567890121231234567890123456789012345678901212312345678901234567890123456789012123123456789012345678901234567890121231234567890123456789012345678901212312345678901234567890123456789012123123456789012345678901234567890121231234567890123456789012345678901212312345678901234567890123456789012123
G39:=No XmitrLight Chgs-ASCII
1234567890123456789012345678901212312345678901234567890123456789012123123456789012345678901234567890121231234567890123456789012345678901212312345678901234567890123456789012123123456789012345678901234567890121231234567890123456789012345678901212312345678901234567890123456789012123123456789012345678901234567890121231234567890123456789012345678901212312345678901234567890123456789012123
G40:=No XmitrKeypad Key Chgs
123456789012345678901234567890121231234567890123456789012345678901212312345678901234567890123456789012123123456789012345678901234567890121231234567890123456789012345678901212312345678901234567890123456789012123123456789012345678901234567890121231234567890123456789012345678901212312345678901234567890123456789012123123456789012345678901234567890121231234567890123456789012345678901212312345678901234567890123456789012123
G38:=No XmitrTask Chgs - ASCII
† Not evaluated by UL

M1G Installation and Programming ManualPage 38
123456789012345678901234567890121234123456789012345678901234567890121234123456789012345678901234567890121234123456789012345678901234567890121234123456789012345678901234567890121234123456789012345678901234567890121234123456789012345678901234567890121234123456789012345678901234567890121234123456789012345678901234567890121234123456789012345678901234567890121234123456789012345678901234567890121234
T1: Selb Prgr
[Name for Tel#1]
123456789012345678901234567890121234123456789012345678901234567890121234123456789012345678901234567890121234123456789012345678901234567890121234123456789012345678901234567890121234123456789012345678901234567890121234123456789012345678901234567890121234123456789012345678901234567890121234123456789012345678901234567890121234123456789012345678901234567890121234123456789012345678901234567890121234123456789012345678901234567890121234
T1: 02: = 0 r
0=Always Report
Menu 08 - Telephone Account Setup1234567890123456789012345678901212312345678901234567890123456789012123123456789012345678901234567890121231234567890123456789012345678901212312345678901234567890123456789012123123456789012345678901234567890121231234567890123456789012345678901212312345678901234567890123456789012123123456789012345678901234567890121231234567890123456789012345678901212312345678901234567890123456789012123
08-Telephone r
Account Setup
Telephone Acct Setup Description of OptionThe control provides up to 8 regular phone numbers plus 1 number for ELK-RP remoteprogramming software. Each of the regular phone numbers can be used to report alarms,troubles, closings, opening, etc. in digital format as well as pager and voice formats.Using the up/down arrow keys, select the appropriate telephone number, then press theright arrow key to begin the programming options, starting with option 01.
This selects the reporting format to be used with this number. The available formats are:00 = Disable reporting 01 = Contact ID 02 = SIA03 = Pulse 4+2 04 = Pager DTMF tones 05 = † Voice Message
Note: Voice Message (Voice Dialer) Format can only be selected from the Elk-RPComputer software. The activation of a voice messages requires a Whenever/And/Then Rule from the Elk-RP software. See Section 4.3.
Two choices: 0=Always Report or 1=Backup. Always Report means the number willalways be dialed when its “report to” options are activated. Backup means the numberwill ONLY be dialed if the previous sequential number fails to complete its call. Whenbackup is selected the “report to” options will be copied from the previous number andONLY the name, number, format, and dial attempts may be edited. To edit any “report to”options you must temporarily set this value to 0. NOTE: Telephone # 1 cannot be setas a backup since it is the first number. A backup cannot have another backup.
These are the digits to dial for the selected telephone number. Up to 20 digits may beprogrammed. Valid number digits are: 0, 1, 2, 3, 4, 5, 6, 7, 8, and 9. In addition, specialcharacters may be entered such as comma (,) for 2 sec. pause, slash (/) for 125 msecwait, # and * for touchtone signaling, plus the letters A, B, C, & D. The cursorautomatically moves right each time you enter a number digit. To enter a specialcharacter place the cursor where you want the character and press the up arrow key. The1 key produces a 1, #, *, and /. The 2 key produces a 2, A, B, and C. The 3 keyproduces a 3, and a D. When finished with a special character you must press the downarrow key to return to number digits.
This sets the number of dial attempts (re-dials) that the communicator will make to thisnumber before a Comm Fail (fail to report) is logged. Valid range is 01 to 15 attempts.Default is 08.
The Account number for Area 1 (up to 6 digits) when it is reported to this telephonenumber. Since all 6 digits must be entered, enter leading zeros (0’s) if a shorter accountnumber is required.
The Account number for Area 2 (up to 6 digits) when it is reported to this telephonenumber. Since all 6 digits must be entered, enter leading zeros (0’s) if a shorter accountnumber is required.
The Account number for Area 3 (up to 6 digits) when it is reported to this telephonenumber. Since all 6 digits must be entered, enter leading zeros (0’s) if a shorter accountnumber is required.
123456789012345678901234567890121234123456789012345678901234567890121234123456789012345678901234567890121234123456789012345678901234567890121234123456789012345678901234567890121234123456789012345678901234567890121234123456789012345678901234567890121234123456789012345678901234567890121234123456789012345678901234567890121234123456789012345678901234567890121234123456789012345678901234567890121234
T1: 03:Num=
123456789012345678901234567890121234123456789012345678901234567890121234123456789012345678901234567890121234123456789012345678901234567890121234123456789012345678901234567890121234123456789012345678901234567890121234123456789012345678901234567890121234123456789012345678901234567890121234123456789012345678901234567890121234123456789012345678901234567890121234123456789012345678901234567890121234
T1: 01:Format=0 r
0=Disabled
123456789012345678901234567890121234123456789012345678901234567890121234123456789012345678901234567890121234123456789012345678901234567890121234123456789012345678901234567890121234123456789012345678901234567890121234123456789012345678901234567890121234123456789012345678901234567890121234123456789012345678901234567890121234123456789012345678901234567890121234123456789012345678901234567890121234
T1: 04: = 08 r
Dial Attempts123456789012345678901234567890121234123456789012345678901234567890121234123456789012345678901234567890121234123456789012345678901234567890121234123456789012345678901234567890121234123456789012345678901234567890121234123456789012345678901234567890121234123456789012345678901234567890121234123456789012345678901234567890121234123456789012345678901234567890121234123456789012345678901234567890121234123456789012345678901234567890121234
T1: 05:=000000r
Acct # for Area1123456789012345678901234567890121234123456789012345678901234567890121234123456789012345678901234567890121234123456789012345678901234567890121234123456789012345678901234567890121234123456789012345678901234567890121234123456789012345678901234567890121234123456789012345678901234567890121234123456789012345678901234567890121234123456789012345678901234567890121234123456789012345678901234567890121234
T1: 06:=000000r
Acct # for Area2123456789012345678901234567890121234123456789012345678901234567890121234123456789012345678901234567890121234123456789012345678901234567890121234123456789012345678901234567890121234123456789012345678901234567890121234123456789012345678901234567890121234123456789012345678901234567890121234123456789012345678901234567890121234123456789012345678901234567890121234123456789012345678901234567890121234
T1: 07:=000000r
Acct # for Area3
Press RIGHT arrow key to select this menu. Press UP or DOWN arrow keys to selectanother menu. The ELK key backs up one menu level. To exit press the * or Exit key.
† Not evaluated by UL

M1G Installation and Programming Manual Page 39
123456789012345678901234567890121234123456789012345678901234567890121234123456789012345678901234567890121234123456789012345678901234567890121234123456789012345678901234567890121234123456789012345678901234567890121234123456789012345678901234567890121234123456789012345678901234567890121234123456789012345678901234567890121234123456789012345678901234567890121234123456789012345678901234567890121234
T1: 12:=000000r
Acct # for Area8
123456789012345678901234567890121234123456789012345678901234567890121234123456789012345678901234567890121234123456789012345678901234567890121234123456789012345678901234567890121234123456789012345678901234567890121234123456789012345678901234567890121234123456789012345678901234567890121234123456789012345678901234567890121234123456789012345678901234567890121234123456789012345678901234567890121234
T1: 13:=Yes RptrAreaAlms,RestUnbp
123456789012345678901234567890121234123456789012345678901234567890121234123456789012345678901234567890121234123456789012345678901234567890121234123456789012345678901234567890121234123456789012345678901234567890121234123456789012345678901234567890121234123456789012345678901234567890121234123456789012345678901234567890121234123456789012345678901234567890121234123456789012345678901234567890121234123456789012345678901234567890121234
T1: 14:=No RptrBypasses
Telephone Acct Setup Description of OptionThe Account number for Area 4 (up to 6 digits) when it is reported to this telephonenumber. Since all 6 digits must be entered, enter leading zeros (0’s) if a shorter accountnumber is required.
The Account number for Area 5 (up to 6 digits) when it is reported to this telephonenumber. Since all 6 digits must be entered, enter leading zeros (0’s) if a shorter accountnumber is required.
The Account number for Area 6 (up to 6 digits) when it is reported to this telephonenumber. Since all 6 digits must be entered, enter leading zeros (0’s) if a shorter accountnumber is required.
The Account number for Area 7 (up to 6 digits) when it is reported to this telephonenumber. Since all 6 digits must be entered, enter leading zeros (0’s) if a shorter accountnumber is required
The Account number for Area 8 (up to 6 digits) when it is reported to this telephonenumber. Since all 6 digits must be entered, enter leading zeros (0’s) if a shorter accountnumber is required.
THE FOLLOWING 5 OPTIONS DEFINE WHAT IS REPORTED BY THIS TELEPHONE #
This YES or NO option identifies whether this telephone number should report misc.options from the AREA REPORTING CODES menu, Zone Alarms, Restores, andUnbypasses from the ZONE REPORTING CODES menu, and Keypad Alarms from theKEYPAD F-KEY REPORTING CODES menu.
This YES or NO option identifies whether this telephone number should report the ZoneBypasses from the ZONE REPORTING CODES menu.
This YES or NO option identifies whether this telephone number should report the ZoneTroubles from the ZONE REPORTING CODES menu.
This YES or NO option identifies whether this telephone number should report the useropening and closing codes from the USER REPORTING CODES menu.
This YES or NO option identifies whether this telephone number should report the globalsystem event codes from SYS REPORT OPTIONS & CODES menu.
To edit or program a text description (Name) such as “ACME Central Station” for theTelephone number press left arrow key. Spell out the text using the number keys. I.E.For a “K” press the 5 key twice. To move the cursor press the right or left arrow keys.While programming the text, pressing the Chime key inserts a space, and the Bypasskey erases 1 digit. The up and down arrow keys toggles between upper and lower case.Press the ELK key when complete.
123456789012345678901234567890121234123456789012345678901234567890121234123456789012345678901234567890121234123456789012345678901234567890121234123456789012345678901234567890121234123456789012345678901234567890121234123456789012345678901234567890121234123456789012345678901234567890121234123456789012345678901234567890121234123456789012345678901234567890121234123456789012345678901234567890121234
T1: 15:=No RptrZone Troubles
123456789012345678901234567890121234123456789012345678901234567890121234123456789012345678901234567890121234123456789012345678901234567890121234123456789012345678901234567890121234123456789012345678901234567890121234123456789012345678901234567890121234123456789012345678901234567890121234123456789012345678901234567890121234123456789012345678901234567890121234123456789012345678901234567890121234
T1: 16:=No RptrUser ReportCodes
123456789012345678901234567890121234123456789012345678901234567890121234123456789012345678901234567890121234123456789012345678901234567890121234123456789012345678901234567890121234123456789012345678901234567890121234123456789012345678901234567890121234123456789012345678901234567890121234123456789012345678901234567890121234123456789012345678901234567890121234123456789012345678901234567890121234123456789012345678901234567890121234
T1: 17:=Yes RptrGlobal SysEvents
Menu 08 Telephone Account Setup (continued)
1234567890123456789012345678901212312345678901234567890123456789012123123456789012345678901234567890121231234567890123456789012345678901212312345678901234567890123456789012123123456789012345678901234567890121231234567890123456789012345678901212312345678901234567890123456789012123123456789012345678901234567890121231234567890123456789012345678901212312345678901234567890123456789012123
T1: 18:Name l
[Name for Tel#1]
1234567890123456789012345678901212312345678901234567890123456789012123123456789012345678901234567890121231234567890123456789012345678901212312345678901234567890123456789012123123456789012345678901234567890121231234567890123456789012345678901212312345678901234567890123456789012123123456789012345678901234567890121231234567890123456789012345678901212312345678901234567890123456789012123
T1: 10:=000000r
Acct # for Area61234567890123456789012345678901212312345678901234567890123456789012123123456789012345678901234567890121231234567890123456789012345678901212312345678901234567890123456789012123123456789012345678901234567890121231234567890123456789012345678901212312345678901234567890123456789012123123456789012345678901234567890121231234567890123456789012345678901212312345678901234567890123456789012123
T1: 11:=000000r
Acct # for Area7
1234567890123456789012345678901212312345678901234567890123456789012123123456789012345678901234567890121231234567890123456789012345678901212312345678901234567890123456789012123123456789012345678901234567890121231234567890123456789012345678901212312345678901234567890123456789012123123456789012345678901234567890121231234567890123456789012345678901212312345678901234567890123456789012123
T1: 09:=000000r
Acct # for Area5
1234567890123456789012345678901212312345678901234567890123456789012123123456789012345678901234567890121231234567890123456789012345678901212312345678901234567890123456789012123123456789012345678901234567890121231234567890123456789012345678901212312345678901234567890123456789012123123456789012345678901234567890121231234567890123456789012345678901212312345678901234567890123456789012123
T1: 08:=000000r
Acct # for Area4

M1G Installation and Programming ManualPage 40
123456789012345678901234567890121234123456789012345678901234567890121234123456789012345678901234567890121234123456789012345678901234567890121234123456789012345678901234567890121234123456789012345678901234567890121234123456789012345678901234567890121234123456789012345678901234567890121234123456789012345678901234567890121234123456789012345678901234567890121234123456789012345678901234567890121234
AR1: Selb Prgr
ReportCodesArea1123456789012345678901234567890121234123456789012345678901234567890121234123456789012345678901234567890121234123456789012345678901234567890121234123456789012345678901234567890121234123456789012345678901234567890121234123456789012345678901234567890121234123456789012345678901234567890121234123456789012345678901234567890121234123456789012345678901234567890121234123456789012345678901234567890121234
AR1 01:000=Sec r
Dialer Delay Time
123456789012345678901234567890121234123456789012345678901234567890121234123456789012345678901234567890121234123456789012345678901234567890121234123456789012345678901234567890121234123456789012345678901234567890121234123456789012345678901234567890121234123456789012345678901234567890121234123456789012345678901234567890121234123456789012345678901234567890121234123456789012345678901234567890121234
AR1 02:Code= 00r
Alm Abort Code
Menu 09 - Area Reporting Codes1234567890123456789012345678901212312345678901234567890123456789012123123456789012345678901234567890121231234567890123456789012345678901212312345678901234567890123456789012123123456789012345678901234567890121231234567890123456789012345678901212312345678901234567890123456789012123123456789012345678901234567890121231234567890123456789012345678901212312345678901234567890123456789012123
09-Area ReportingCodes r
Area Report Codes Description of OptionEach of the eight (8) Areas has specific communicator reporting codes for events that onlyoccur within that area. Using the up/down arrow keys, select the appropriate area, thenpress the right arrow key to begin starting with option 01.
Dialer Delay Time is an amount of time following an alarm during which the report may beaborted if the area is disarmed by a valid user. An optional alarm abort code may beprogrammed to report. Range is 000 to 255 seconds. Default is 000 (delay disabled).NOTE: For UL Listed Installations the Dialer Delay MUST be set to 000.
Alarm Abort code is an optional code that may be reported when an alarm is abortedduring the Comm Abort Time window. Range is 00 to FF. Default is 00 (no report)..
Cancel Window Time is the time following an alarm during which a cancel code will bereported if the area is disarmed. Cancel is not the same as abort since the alarm hasalready reported. Range is 00 to FF. Default is 00 (no report).
Alarm Cancel code is the code that will be reported if the area in alarm is disarmed withinthe Cancel Window Time. Range is 00 to FF. Default is 00 (no report).
Close Automatic code will be reported anytime the area is armed automatically by a Rulefrom the RP software programming. Refer to the ELK-RP Rules Programminginstructions. Range is 00 to FF. Default is 00 (no report).
Close Early code will be reported if the area is closed prior to a programmed ExpectedArm time. Refer to the ELK-RP Rules Programming instructions. Range is 00 to FF.Default is 00 (no report).
Close Extended code will be reported if a programmed Expected Arm time is extended bya valid user. Refer to the ELK-RP Rules Programming instructions. Range is 00 to FF.Default is 00 (no report).
Fail to Close code will be reported if the area is not armed by a programmed ExpectedArm time. Refer to the ELK-RP Rules Programming instructions. Range is 00 to FF.Default is 00 (no report).
Late to Close code will be reported if the area is armed after a programmed Expected Armtime. Refer to the ELK-RP Rules Programming instructions. Range is 00 to FF. Defaultis 00 (no report).
Keyswitch Close code will be reported in place of a user code whenever the area is armedby a keyswitch. Refer to the ELK-RP Rules Programming instructions. Range is 00 toFF. Default is 00 (no report).
123456789012345678901234567890121234123456789012345678901234567890121234123456789012345678901234567890121234123456789012345678901234567890121234123456789012345678901234567890121234123456789012345678901234567890121234123456789012345678901234567890121234123456789012345678901234567890121234123456789012345678901234567890121234123456789012345678901234567890121234123456789012345678901234567890121234123456789012345678901234567890121234
AR1 03:000=Sec r
CancelWindowTime123456789012345678901234567890121234123456789012345678901234567890121234123456789012345678901234567890121234123456789012345678901234567890121234123456789012345678901234567890121234123456789012345678901234567890121234123456789012345678901234567890121234123456789012345678901234567890121234123456789012345678901234567890121234123456789012345678901234567890121234123456789012345678901234567890121234
AR1 04:Code= 00r
Alm Cancel Code123456789012345678901234567890121234123456789012345678901234567890121234123456789012345678901234567890121234123456789012345678901234567890121234123456789012345678901234567890121234123456789012345678901234567890121234123456789012345678901234567890121234123456789012345678901234567890121234123456789012345678901234567890121234123456789012345678901234567890121234123456789012345678901234567890121234
AR1 05:Code= 00r
Close Automatic123456789012345678901234567890121234123456789012345678901234567890121234123456789012345678901234567890121234123456789012345678901234567890121234123456789012345678901234567890121234123456789012345678901234567890121234123456789012345678901234567890121234123456789012345678901234567890121234123456789012345678901234567890121234123456789012345678901234567890121234123456789012345678901234567890121234
AR1 06:Code= 00r
Close Early123456789012345678901234567890121234123456789012345678901234567890121234123456789012345678901234567890121234123456789012345678901234567890121234123456789012345678901234567890121234123456789012345678901234567890121234123456789012345678901234567890121234123456789012345678901234567890121234123456789012345678901234567890121234123456789012345678901234567890121234123456789012345678901234567890121234123456789012345678901234567890121234
AR1 07:Code= 00r
Close Extended123456789012345678901234567890121234123456789012345678901234567890121234123456789012345678901234567890121234123456789012345678901234567890121234123456789012345678901234567890121234123456789012345678901234567890121234123456789012345678901234567890121234123456789012345678901234567890121234123456789012345678901234567890121234123456789012345678901234567890121234123456789012345678901234567890121234
AR1 08:Code= 00r
Fail To Close123456789012345678901234567890121234123456789012345678901234567890121234123456789012345678901234567890121234123456789012345678901234567890121234123456789012345678901234567890121234123456789012345678901234567890121234123456789012345678901234567890121234123456789012345678901234567890121234123456789012345678901234567890121234123456789012345678901234567890121234123456789012345678901234567890121234
AR1 09:Code= 00r
Late Close123456789012345678901234567890121234123456789012345678901234567890121234123456789012345678901234567890121234123456789012345678901234567890121234123456789012345678901234567890121234123456789012345678901234567890121234123456789012345678901234567890121234123456789012345678901234567890121234123456789012345678901234567890121234123456789012345678901234567890121234123456789012345678901234567890121234123456789012345678901234567890121234
AR1 10:Code= 00r
Keyswitch Close
Press RIGHT arrow key to select this menu. Press UP or DOWN arrow keys to selectanother menu. The ELK key backs up one menu level. To exit press the * or Exit key.
NOTE: Enter a two digit value to enable a particular report code. To disable a report code enter 00. When SIA orContact ID is the reporting format, the two digit value can simply be 01 since the control automatically produces thecorrect code according to the SIA or Contact ID protocol. For 4+2 pulse format, enter a value from 01 to FF. To enterthe A thru F HEX characters press the RIGHT arrow key to position the cursor under the desired digit, then press the UParrow (shift) key once. Each press of the 2 key will now produce the following: 2, A, B, C. Each press of the 3 key willnow produce the following: 3, D, E, F. Press the RIGHT arrow key to cancel shift and move to the next character. SeeAppendix for a summary of the SIA and Contact ID codes.

M1G Installation and Programming Manual Page 41
Area Report Codes Description of OptionDuress code will be reported if the area is armed or disarmed by a valid user code that isprogrammed with the duress attribute. Range is 00 to FF. Default is 00 (no report).
Open After Alarm code will be reported whenever a valid user arrives and disarms the areafollowing an alarm activation. Range is 00 to FF. Default is 00 (no report).
Open Early code will be reported if the area is disarmed prior to a programmed ExpectedDisarm time. Refer to the ELK-RP Rules Programming instructions. Range is 00 to FF.Default is 00 (no report).
Fail to Open code will be reported if the area is not disarmed by a programmed ExpectedDisarm time. Refer to the ELK-RP Rules Programming instructions. Range is 00 to FF.Default is 00 (no report).
Open Late code will be reported if the area is disarmed after a programmed ExpectedDisarm time. Refer to the ELK-RP Rules Programming instructions. Range is 00 to FF.Default is 00 (no report).
Open Keyswitch code will be reported in place of a user code whenever the area isdisarmed by a Keyswitch zone. Range is 00 to FF. Default is 00 (no report).
User Lockout code will be reported if someone repeatedly enters digits (see Menu 07 -Global System Definitions, Option 12 for the maximum number of digits allowed) in anattempt to hack out a valid user code. Range is 00 to FF. Default is 00 (no report).
Exit Error Code can be used to identify an accidental alarm caused by an error whilearming. Locally, it works as follows: If an exit delay rolls directly into entry delay as aresult of a zone being left violated, the entry delay warning AND the siren will sound. If thecontrol is not disarmed prior to the entry delay expiring, the communicator will report thealarm along with the Exit Error code. Range is 00 to FF. Default is 00 (no report).
Fail to communicate displays on the keypad and the event log when the communicatorfails to complete it’s report using the number of dial attempts. A good communicationsreport must occur in order to reset/clear the failure. If this fail to communicate report codeis enabled, it will be reported with next good communications to indicate a “past” failure.Range is 00 to FF. Default is 00 (no report).
1234567890123456789012345678901212312345678901234567890123456789012123123456789012345678901234567890121231234567890123456789012345678901212312345678901234567890123456789012123123456789012345678901234567890121231234567890123456789012345678901212312345678901234567890123456789012123123456789012345678901234567890121231234567890123456789012345678901212312345678901234567890123456789012123
AR1 13:Code= 00r
Open Early123456789012345678901234567890121231234567890123456789012345678901212312345678901234567890123456789012123123456789012345678901234567890121231234567890123456789012345678901212312345678901234567890123456789012123123456789012345678901234567890121231234567890123456789012345678901212312345678901234567890123456789012123123456789012345678901234567890121231234567890123456789012345678901212312345678901234567890123456789012123
AR1 14:Code= 00r
Fail To Open1234567890123456789012345678901212312345678901234567890123456789012123123456789012345678901234567890121231234567890123456789012345678901212312345678901234567890123456789012123123456789012345678901234567890121231234567890123456789012345678901212312345678901234567890123456789012123123456789012345678901234567890121231234567890123456789012345678901212312345678901234567890123456789012123
AR1 15:Code= 00r
Open Late
Menu 09 - Area Reporting Codes (continued)
1234567890123456789012345678901212312345678901234567890123456789012123123456789012345678901234567890121231234567890123456789012345678901212312345678901234567890123456789012123123456789012345678901234567890121231234567890123456789012345678901212312345678901234567890123456789012123123456789012345678901234567890121231234567890123456789012345678901212312345678901234567890123456789012123
AR1 16:Code= 00r
Open Keyswitch123456789012345678901234567890121231234567890123456789012345678901212312345678901234567890123456789012123123456789012345678901234567890121231234567890123456789012345678901212312345678901234567890123456789012123123456789012345678901234567890121231234567890123456789012345678901212312345678901234567890123456789012123123456789012345678901234567890121231234567890123456789012345678901212312345678901234567890123456789012123
AR1 17:Code= 00r
User Lockout1234567890123456789012345678901212312345678901234567890123456789012123123456789012345678901234567890121231234567890123456789012345678901212312345678901234567890123456789012123123456789012345678901234567890121231234567890123456789012345678901212312345678901234567890123456789012123123456789012345678901234567890121231234567890123456789012345678901212312345678901234567890123456789012123
AR1 18:Code= 00r
Exit Error
1234567890123456789012345678901212312345678901234567890123456789012123123456789012345678901234567890121231234567890123456789012345678901212312345678901234567890123456789012123123456789012345678901234567890121231234567890123456789012345678901212312345678901234567890123456789012123123456789012345678901234567890121231234567890123456789012345678901212312345678901234567890123456789012123
AR1 19:Code= 00r
Fail Communicate
1234567890123456789012345678901212312345678901234567890123456789012123123456789012345678901234567890121231234567890123456789012345678901212312345678901234567890123456789012123123456789012345678901234567890121231234567890123456789012345678901212312345678901234567890123456789012123123456789012345678901234567890121231234567890123456789012345678901212312345678901234567890123456789012123
AR1 11:Code= 00r
Duress Code123456789012345678901234567890121231234567890123456789012345678901212312345678901234567890123456789012123123456789012345678901234567890121231234567890123456789012345678901212312345678901234567890123456789012123123456789012345678901234567890121231234567890123456789012345678901212312345678901234567890123456789012123123456789012345678901234567890121231234567890123456789012345678901212312345678901234567890123456789012123
AR1 12:Code= 00r
Open After Alrm
Area RCs CID SIAAlarm Abort 406 O CAlarm Cancel 406 O CAutomatic Close 403 C AEarly Close 451 C KClosing Extended 464 C EFail To Close 454 C ILate Close 452 C JKey Switch Close 409 C SDuress 121 H A
Area RCs CID SIAOpen After Alarm 450 O REarly Open 451 O KFail To Open 453 O ILate Open 452 O JKey Switch Open 409 O SKeypad Locked Out 461 J AExit Error 457 E EFail To Communicate 354 R T
Based on the event, the CID (Contact ID) or SIA Codes for Area Reporting Codes will be:
NOTE: On CID reporting the 3 digit code will be preceded by a “1” for a new event oran opening. It will be preceded by a “3” for a restore or a closing event.

M1G Installation and Programming ManualPage 42
123456789012345678901234567890121234123456789012345678901234567890121234123456789012345678901234567890121234123456789012345678901234567890121234123456789012345678901234567890121234123456789012345678901234567890121234123456789012345678901234567890121234123456789012345678901234567890121234123456789012345678901234567890121234123456789012345678901234567890121234123456789012345678901234567890121234
Z001: Selb Prgr
[Name of Zone]123456789012345678901234567890121234123456789012345678901234567890121234123456789012345678901234567890121234123456789012345678901234567890121234123456789012345678901234567890121234123456789012345678901234567890121234123456789012345678901234567890121234123456789012345678901234567890121234123456789012345678901234567890121234123456789012345678901234567890121234123456789012345678901234567890121234
Z001:A=00 R=00 r
Byp=00 Tbl=00
Menu 10 - Zone Reporting Codes1234567890123456789012345678901212312345678901234567890123456789012123123456789012345678901234567890121231234567890123456789012345678901212312345678901234567890123456789012123123456789012345678901234567890121231234567890123456789012345678901212312345678901234567890123456789012123123456789012345678901234567890121231234567890123456789012345678901212312345678901234567890123456789012123
10-Zone ReportngCodes r
Zone Report Codes Description of OptionEach of the 208 Zones has specific communicator reporting codes for Alarm, Restore,Bypass, and Trouble. Using the up/down arrow keys, select the appropriate zone, thenpress the right arrow key to begin programming of that zone.
The cursor starts at the 00 beside A (Alarm). Enter the desired two digit reporting codeand press the right arrow key to advance to the R (Restore). To jump the cursor to anotherreport without changing this one simply press the right arrow key. The next press of theright arrow key after Tbl (Trouble) will advance the screen back to the beginning of thatzone. Range is 00 to FF. Default for all entries is 00 (no report).
NOTE: Each reporting code must be programmed according to the desired reportingformat. However, for SIA and Contact ID formats the actual reporting digits will beproduced by the control according to the type of alarm or event. The only programmingrequired to enable reporting with the SIA and Contact ID formats is to set the programmedcode to a non zero (0) value. See below:
Press RIGHT arrow key to select this menu. Press UP or DOWN arrow keys to selectanother menu. The ELK key backs up one menu level. To exit press the * or Exit key.
NOTE: Enter a two digit value to enable a report code. To disable a report code enter 00. When SIA or Contact ID is thereporting format, the two digit value can simply be 01 since the control automatically produces the correct codeaccording to the SIA or Contact ID protocol. For 4+2 pulse format, enter a value from 01 to FF. To enter the A thru FHEX characters press the RIGHT arrow key to position the cursor under the desired digit, then press the UP arrow (shift)key once. Each press of the 2 key will now produce the following: 2, A, B, C. Each press of the 3 key will now producethe following: 3, D, E, F. Press the RIGHT arrow key to cancel shift and move to the next character. See Appendix fora summary of the SIA and Contact ID codes.
Alarms Restore Bypass TroubleZone RCs CID SIA CID SIA CID SIA CID SIA01 = Burglar Entry/Exit 1 134 BA 134 B R 573 BB 370 BT02 = Burglar Entry/Exit 2 134 BA 134 B R 573 BB 370 BT03 = Burglar Perim Inst 131 BA 131 B R 573 BB 370 BT04 = Burglar Interior 132 BA 132 B R 573 BB 370 BT05 = Burglar Int Follower 132 BA 132 B R 573 BB 370 BT06 = Burglar Int Night 135 BA 135 B R 573 BB 370 BT07 = Burglar Int Nt Fllwr 135 BA 135 B R 573 BB 370 BT08 = Burglar 24 Hour 133 BA 133 B R 573 BB 370 BT09 = Burglar Box Tamper 137 TA 137 T R 573 TB 370 BT10 = Fire Alarm 110 FA 110 F R 571 FB 373 FT11 = Fire Verified 110 FA 110 F R 571 FB 373 FT12 = Fire Supervisory 200 FS 200 F R 571 FB 373 FT13 = Aux Function 1 150 UA 150 U R 572 UB ---- ----14 = Aux Function 2 150 UA 150 U R 572 UB ---- ----15 = Keyfob ---- ---- ---- ---- ---- ---- ---- ----16 = Non Alarm ---- ---- ---- ---- ---- ---- ---- ----17 = Carbon Monoxide 162 GA 162 GR 572 GB ---- ----
Based on the zone definition, the CID (Contact ID) or SIA formats for Zone Reporting Codes will be:
Alarms Restore Bypass TroubleZone RCs CID SIA CID SIA CID SIA CID SIA18 = Emergency Alarm 101 QA 101 Q R 572 QB ---- ----19 = Freeze Alarm 159 ZA 159 Z R 572 ZB ---- ----20 = Gas Alarm 151 GA 151 G R 572 GB ---- ----21 = Heat Alarm 114 KA 114 K R 572 KB ---- ----22 = Medical Alarm 100 MA 100 M R 572 MB ---- ----23 = Police Alarm 120 P A 120 P H 572 PB ---- ----24 = Police No Indication 120 P A 120 H H 572 PB ---- ----25 = Water Alarm 154 WA 154 WR 572 WB ---- ----26 = Key Mom Arm/Disarm ---- ---- ---- ---- ---- ---- ---- ----27 = Key Mom Arm Away ---- ---- ---- ---- ---- ---- ---- ----28 = Key Mom Arm Stay ---- ---- ---- ---- ---- ---- ---- ----29 = Key Mom Disarm ---- ---- ---- ---- ---- ---- ---- ----30 = Key On/Off ---- ---- ---- ---- ---- ---- ---- ----31 = Mute Audibles ---- ---- ---- ---- ---- ---- ---- ----32 = Power Supervisory 338 YT 338 YR 572 UB ---- ----33 = Temperature ---- ---- ---- ---- ---- ---- ---- ----34 = Analog Zone ---- ---- ---- ---- ---- ---- ---- ----
NOTE: On CID reporting the 3 digit code is preceded by a “1” for new events or a “3” for restore (previous reported) events.

M1G Installation and Programming Manual Page 43
Menu 11 - Keypad F-Key Reporting Codes1234567890123456789012345678901212312345678901234567890123456789012123123456789012345678901234567890121231234567890123456789012345678901212312345678901234567890123456789012123123456789012345678901234567890121231234567890123456789012345678901212312345678901234567890123456789012123123456789012345678901234567890121231234567890123456789012345678901212312345678901234567890123456789012123
11-Keypad F-Keyr
Reporting Codes
Press RIGHT arrow key to select this menu. Press UP or DOWN arrow keys to selectanother menu. The ELK key backs up one menu level. To exit press the * or Exit key.
Referring back to Menu 04-Keypad Definitions, each F Key (F1 thru F6) can be programmed to activate a specific event.If the programmed “activate event” is an alarm such as: Burg, Fire, Medical, Police Panic, etc., then it is possible to havean alarm report code transmitted when an F key is used to activate that event. Enter a two digit value for the “A” alarmreport code. To disable the alarm report code enter 00. If the reporting format is SIA or Contact ID, the value can simplybe 01 because the control will automatically produces the correct code according to alarm type using the SIA or ContactID protocol. For 4+2 pulse format, enter a value from 01 to FF. To enter the A thru F HEX characters press the RIGHTarrow key to position the cursor under the desired digit, then press the UP arrow (shift) key once. Each press of the 2key will now produce the following: 2, A, B, C. Each press of the 3 key will now produce the following: 3, D, E, F.Press the RIGHT arrow key to cancel shift and move to the next character.
123456789012345678901234567890121234123456789012345678901234567890121234123456789012345678901234567890121234123456789012345678901234567890121234123456789012345678901234567890121234123456789012345678901234567890121234123456789012345678901234567890121234123456789012345678901234567890121234123456789012345678901234567890121234123456789012345678901234567890121234123456789012345678901234567890121234123456789012345678901234567890121234
FK01: A=00 r
[KP01 FKey01]
1234567890123456789012345678901212312345678901234567890123456789012123123456789012345678901234567890121231234567890123456789012345678901212312345678901234567890123456789012123123456789012345678901234567890121231234567890123456789012345678901212312345678901234567890123456789012123123456789012345678901234567890121231234567890123456789012345678901212312345678901234567890123456789012123
FK02:A=00 r
[KP01 FKey02]
F-Key Report Codes Description of OptionEach Keypad has 6 programmable F keys. This menu displays the F keys starting atFK01 thru FK06 for Keypad 1, then FK07 thru FK13 for Keypad 2, etc. Use the UP andDOWN arrow keys to select the appropriate keypad and key, then press the RIGHT arrowkey to programming the code. It may take some experimenting but it is possible to jumpdirectly to a specific keypad and key by entering a two digit number.
To program the alarm report code press the RIGHT arrow key to move the cursor into theA= column, then enter a two digit value. Range is 00 to FF. Default is 00 (no report). Toreturn back to the left column to select another key or keypad press the ELK key
NOTE: Each reporting code must be programmed according to the desired reportingformat. However, for SIA and Contact ID formats the actual reporting digits will beproduced by the control according to the type of alarm or event. The only programmingrequired to enable reporting with the SIA and Contact ID formats is to set the programmedcode to a non zero (0) value. See below:
AlarmsKeypad Alarm RCs CID SIA00 = Disabled ---- ----01 = Burglar Entry/Exit 1 134 BA02 = Burglar Entry/Exit 2 134 BA03 = Burglar Perim Inst 131 BA04 = Burglar Interior 132 BA05 = Burglar Int Follower 132 BA06 = Burglar Int Night 135 BA07 = Burglar Int Nt Delay 135 BA08 = Burglar 24 Hour 133 BA09 = Burglar Box Tamper 137 TA10 = Fire Alarm 110 FA11 = Fire Verified 110 FA12 = Fire Supervisory 200 FS13 = Aux1 24hr Alarm 150 UA14 = Aux2 24hr Alarm 150 UA15 = Keyfob ---- ----16 = Non-Alarm ---- ----17 = Carbon Monoxide 162 GA
Based on the F Key Event definition, the CID (Contact ID) or SIA formats will be:
AlarmsKeypad Alarm RCs CID SIA18 = Emergency Alarm 101 QA19 = Freeze Alarm 159 ZA20 = Gas Alarm 151 GA21 = Heat Alarm 114 KA22 = Medical Alarm 100 MA23 = Police Alarm 120 P A24 = Police No Indication 120 P A25 = Water Alarm 154 WA26 = Key Mom Arm/Disarm ---- ----27 = Key Mom Arm Away ---- ----28 = Key Mom Arm Stay ---- ----29 = Key Mom Disarm ---- ----30 = Key On/Off ---- ----31 = Mute Audibles ---- ----32 = Power Supervisory 338 YT33 = Temperature ---- ----34 = Analog ---- ----
NOTE: On CID reporting the 3 digit code will be preceded by a “1”.
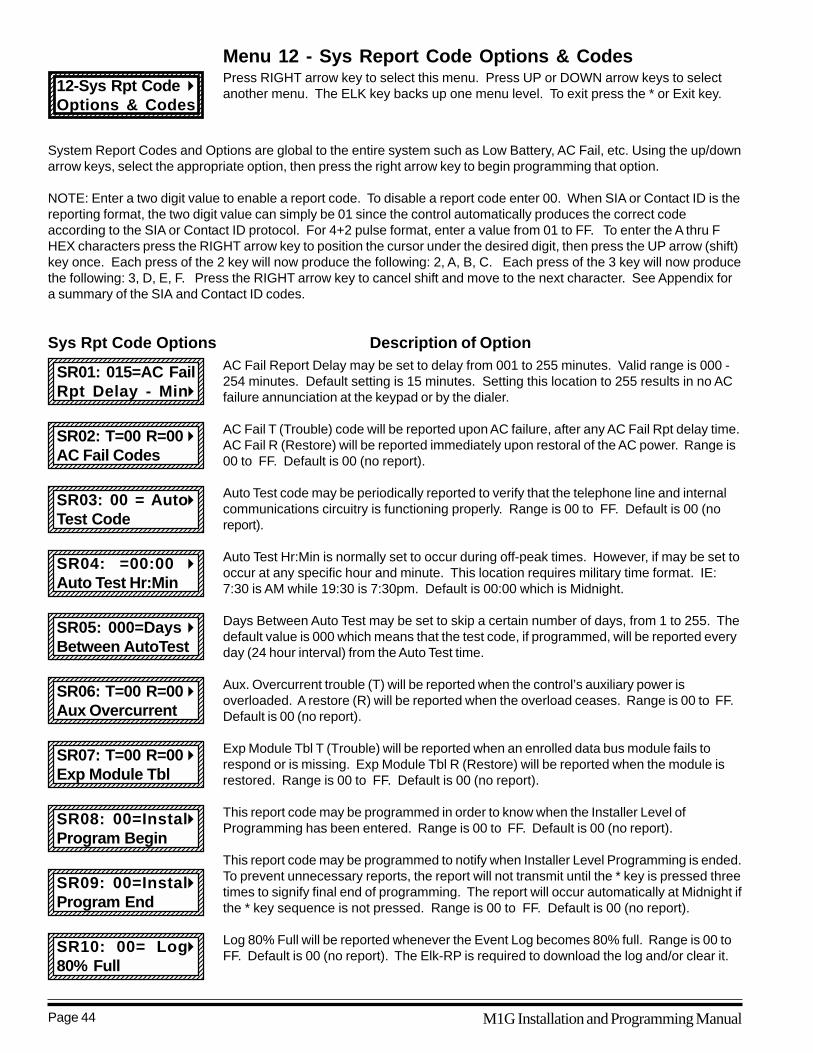
M1G Installation and Programming ManualPage 44
123456789012345678901234567890121234123456789012345678901234567890121234123456789012345678901234567890121234123456789012345678901234567890121234123456789012345678901234567890121234123456789012345678901234567890121234123456789012345678901234567890121234123456789012345678901234567890121234123456789012345678901234567890121234123456789012345678901234567890121234123456789012345678901234567890121234
SR01: 015=AC FailRpt Delay - Minr
123456789012345678901234567890121234123456789012345678901234567890121234123456789012345678901234567890121234123456789012345678901234567890121234123456789012345678901234567890121234123456789012345678901234567890121234123456789012345678901234567890121234123456789012345678901234567890121234123456789012345678901234567890121234123456789012345678901234567890121234123456789012345678901234567890121234123456789012345678901234567890121234
SR02: T=00 R=00 rAC Fail Codes
123456789012345678901234567890121234123456789012345678901234567890121234123456789012345678901234567890121234123456789012345678901234567890121234123456789012345678901234567890121234123456789012345678901234567890121234123456789012345678901234567890121234123456789012345678901234567890121234123456789012345678901234567890121234123456789012345678901234567890121234123456789012345678901234567890121234
SR03: 00 = Autor
Test Code
Menu 12 - Sys Report Code Options & Codes1234567890123456789012345678901212312345678901234567890123456789012123123456789012345678901234567890121231234567890123456789012345678901212312345678901234567890123456789012123123456789012345678901234567890121231234567890123456789012345678901212312345678901234567890123456789012123123456789012345678901234567890121231234567890123456789012345678901212312345678901234567890123456789012123
12-Sys Rpt Code r
Options & Codes
Sys Rpt Code Options Description of OptionAC Fail Report Delay may be set to delay from 001 to 255 minutes. Valid range is 000 -254 minutes. Default setting is 15 minutes. Setting this location to 255 results in no ACfailure annunciation at the keypad or by the dialer.
AC Fail T (Trouble) code will be reported upon AC failure, after any AC Fail Rpt delay time.AC Fail R (Restore) will be reported immediately upon restoral of the AC power. Range is00 to FF. Default is 00 (no report).
Auto Test code may be periodically reported to verify that the telephone line and internalcommunications circuitry is functioning properly. Range is 00 to FF. Default is 00 (noreport).
Auto Test Hr:Min is normally set to occur during off-peak times. However, if may be set tooccur at any specific hour and minute. This location requires military time format. IE:7:30 is AM while 19:30 is 7:30pm. Default is 00:00 which is Midnight.
Days Between Auto Test may be set to skip a certain number of days, from 1 to 255. Thedefault value is 000 which means that the test code, if programmed, will be reported everyday (24 hour interval) from the Auto Test time.
Aux. Overcurrent trouble (T) will be reported when the control’s auxiliary power isoverloaded. A restore (R) will be reported when the overload ceases. Range is 00 to FF.Default is 00 (no report).
Exp Module Tbl T (Trouble) will be reported when an enrolled data bus module fails torespond or is missing. Exp Module Tbl R (Restore) will be reported when the module isrestored. Range is 00 to FF. Default is 00 (no report).
This report code may be programmed in order to know when the Installer Level ofProgramming has been entered. Range is 00 to FF. Default is 00 (no report).
This report code may be programmed to notify when Installer Level Programming is ended.To prevent unnecessary reports, the report will not transmit until the * key is pressed threetimes to signify final end of programming. The report will occur automatically at Midnight ifthe * key sequence is not pressed. Range is 00 to FF. Default is 00 (no report).
Log 80% Full will be reported whenever the Event Log becomes 80% full. Range is 00 toFF. Default is 00 (no report). The Elk-RP is required to download the log and/or clear it.
123456789012345678901234567890121234123456789012345678901234567890121234123456789012345678901234567890121234123456789012345678901234567890121234123456789012345678901234567890121234123456789012345678901234567890121234123456789012345678901234567890121234123456789012345678901234567890121234123456789012345678901234567890121234123456789012345678901234567890121234123456789012345678901234567890121234
SR04: =00:00 r
Auto Test Hr:Min123456789012345678901234567890121234123456789012345678901234567890121234123456789012345678901234567890121234123456789012345678901234567890121234123456789012345678901234567890121234123456789012345678901234567890121234123456789012345678901234567890121234123456789012345678901234567890121234123456789012345678901234567890121234123456789012345678901234567890121234123456789012345678901234567890121234123456789012345678901234567890121234
SR05: 000=Days r
Between AutoTest123456789012345678901234567890121234123456789012345678901234567890121234123456789012345678901234567890121234123456789012345678901234567890121234123456789012345678901234567890121234123456789012345678901234567890121234123456789012345678901234567890121234123456789012345678901234567890121234123456789012345678901234567890121234123456789012345678901234567890121234123456789012345678901234567890121234123456789012345678901234567890121234
SR06: T=00 R=00 rAux Overcurrent
123456789012345678901234567890121234123456789012345678901234567890121234123456789012345678901234567890121234123456789012345678901234567890121234123456789012345678901234567890121234123456789012345678901234567890121234123456789012345678901234567890121234123456789012345678901234567890121234123456789012345678901234567890121234123456789012345678901234567890121234123456789012345678901234567890121234
SR07: T=00 R=00 rExp Module Tbl
123456789012345678901234567890121234123456789012345678901234567890121234123456789012345678901234567890121234123456789012345678901234567890121234123456789012345678901234567890121234123456789012345678901234567890121234123456789012345678901234567890121234123456789012345678901234567890121234123456789012345678901234567890121234123456789012345678901234567890121234123456789012345678901234567890121234
SR08: 00=InstalrProgram Begin
123456789012345678901234567890121234123456789012345678901234567890121234123456789012345678901234567890121234123456789012345678901234567890121234123456789012345678901234567890121234123456789012345678901234567890121234123456789012345678901234567890121234123456789012345678901234567890121234123456789012345678901234567890121234123456789012345678901234567890121234123456789012345678901234567890121234123456789012345678901234567890121234
SR09: 00=InstalrProgram End
123456789012345678901234567890121234123456789012345678901234567890121234123456789012345678901234567890121234123456789012345678901234567890121234123456789012345678901234567890121234123456789012345678901234567890121234123456789012345678901234567890121234123456789012345678901234567890121234123456789012345678901234567890121234123456789012345678901234567890121234123456789012345678901234567890121234
SR10: 00= Logr
80% Full
Press RIGHT arrow key to select this menu. Press UP or DOWN arrow keys to selectanother menu. The ELK key backs up one menu level. To exit press the * or Exit key.
System Report Codes and Options are global to the entire system such as Low Battery, AC Fail, etc. Using the up/downarrow keys, select the appropriate option, then press the right arrow key to begin programming that option.
NOTE: Enter a two digit value to enable a report code. To disable a report code enter 00. When SIA or Contact ID is thereporting format, the two digit value can simply be 01 since the control automatically produces the correct codeaccording to the SIA or Contact ID protocol. For 4+2 pulse format, enter a value from 01 to FF. To enter the A thru FHEX characters press the RIGHT arrow key to position the cursor under the desired digit, then press the UP arrow (shift)key once. Each press of the 2 key will now produce the following: 2, A, B, C. Each press of the 3 key will now producethe following: 3, D, E, F. Press the RIGHT arrow key to cancel shift and move to the next character. See Appendix fora summary of the SIA and Contact ID codes.

M1G Installation and Programming Manual Page 45
123456789012345678901234567890121231234567890123456789012345678901212312345678901234567890123456789012123123456789012345678901234567890121231234567890123456789012345678901212312345678901234567890123456789012123123456789012345678901234567890121231234567890123456789012345678901212312345678901234567890123456789012123123456789012345678901234567890121231234567890123456789012345678901212312345678901234567890123456789012123
SR14: T=00 R=00 rPhone Line Fault
1234567890123456789012345678901212312345678901234567890123456789012123123456789012345678901234567890121231234567890123456789012345678901212312345678901234567890123456789012123123456789012345678901234567890121231234567890123456789012345678901212312345678901234567890123456789012123123456789012345678901234567890121231234567890123456789012345678901212312345678901234567890123456789012123
SR15: T=00 R=00 rOutput 2 Trouble
123456789012345678901234567890121231234567890123456789012345678901212312345678901234567890123456789012123123456789012345678901234567890121231234567890123456789012345678901212312345678901234567890123456789012123123456789012345678901234567890121231234567890123456789012345678901212312345678901234567890123456789012123123456789012345678901234567890121231234567890123456789012345678901212312345678901234567890123456789012123
SR13: 00= Up/ r
Download End
Low Battery T (Trouble) will be reported if the battery drops below 11.2 Volts. Low BatteryR (Restore) will be eligible to report once the battery has passed a test at 11.5 Volts orhigher. Range is 00 to FF. Default is 00 (no report).
Memory Error T (Trouble) will be reported if the system memory checksum fails. Anupload or review of the programming is the only way to detect where the error occurred.To clear the error and send a R (Restore) you must enter and exit the installerprogramming mode. Range is 00 to FF. Default is 00 (no report).
Up/Download End will be reported upon completion of a Up/Download session as averification that the control was accessed. Range is 00 to FF. Default is 00 (no report).
Phone Line Fault T (Trouble) will be reported if the Voltage and Current is lost on thetelephone line. Phone Line Fault R (Restore) will report upon restoral of the telephoneline. Range is 00 to FF. Default is 00 (no report).
Output 2 T (Trouble) will be reported if an open circuit occurs on Output 2. Output 2 R(Restore) will be reported upon restoral of the connection. Range is 00 to FF. Default is00 (no report).
Menu 12 - Sys Report Code Options & Codes (continued)
Sys Rpt Code Options Description of Option1234567890123456789012345678901212312345678901234567890123456789012123123456789012345678901234567890121231234567890123456789012345678901212312345678901234567890123456789012123123456789012345678901234567890121231234567890123456789012345678901212312345678901234567890123456789012123123456789012345678901234567890121231234567890123456789012345678901212312345678901234567890123456789012123
SR11: T=00 R=00 rLow Battery
123456789012345678901234567890121231234567890123456789012345678901212312345678901234567890123456789012123123456789012345678901234567890121231234567890123456789012345678901212312345678901234567890123456789012123123456789012345678901234567890121231234567890123456789012345678901212312345678901234567890123456789012123123456789012345678901234567890121231234567890123456789012345678901212312345678901234567890123456789012123
SR12: T=00 R=00 rMemory Error
System RCs CID SIAAC Fail 301 A TAC Restore 301 A RAutomatic Test 602 R PAux Over Current 312 Y PAux Over Current Restore 312 Y QExpansion Module Trouble 333 E TExpansion Module Restore 333 E RLocal Programming Begin 627 L BLocal Programming End 628 L X
System RCs CID SIALog 80% Full 623 J LLow Backup Battery 302 Y TLow Battery Restore 302 Y RMemory Error 304 Y FRemote Programming End 412 R STelephone Line Fault 351 L TTelephone Line Restore 351 L ROutput 2 Trouble 322 Y AOutput 2 Restore 322 Y H
Based on the event, the CID (Contact ID) or SIA Codes for System Reporting Codes will be:
NOTE: On CID reporting the 3 digit code is preceded by a “1” for new eventsor a “3” for restore (previous reported) events.

M1G Installation and Programming ManualPage 46
123456789012345678901234567890121234123456789012345678901234567890121234123456789012345678901234567890121234123456789012345678901234567890121234123456789012345678901234567890121234123456789012345678901234567890121234123456789012345678901234567890121234123456789012345678901234567890121234123456789012345678901234567890121234123456789012345678901234567890121234123456789012345678901234567890121234
UR001: Selb Prgr
[Name of User]123456789012345678901234567890121234123456789012345678901234567890121234123456789012345678901234567890121234123456789012345678901234567890121234123456789012345678901234567890121234123456789012345678901234567890121234123456789012345678901234567890121234123456789012345678901234567890121234123456789012345678901234567890121234123456789012345678901234567890121234123456789012345678901234567890121234
UR001:O=00 C=00r
[Name of User]
Menu 13 - User Report Codes1234567890123456789012345678901212312345678901234567890123456789012123123456789012345678901234567890121231234567890123456789012345678901212312345678901234567890123456789012123123456789012345678901234567890121231234567890123456789012345678901212312345678901234567890123456789012123123456789012345678901234567890121231234567890123456789012345678901212312345678901234567890123456789012123
13-User ReportCodes r
User Report Codes Description of OptionEach of the 99 User Codes and the Installer has communicator reporting codes for Open(disarm) and Close (arm). Using the up/down arrow keys, select the appropriate user,then press the right arrow key to begin programming of that user’s report codes.
The cursor starts at the 00 beside O (Open). Enter the desired two digit reporting codeand press the right arrow key to advance to the C (Close). Range is 00 to FF. Default is00 (no report). To jump the cursor to the next report code without changing this onesimply press the right arrow key. The next press of the right arrow key will advance backto the beginning screen.123456789012345678901234567890121234
123456789012345678901234567890121234123456789012345678901234567890121234123456789012345678901234567890121234123456789012345678901234567890121234123456789012345678901234567890121234123456789012345678901234567890121234123456789012345678901234567890121234123456789012345678901234567890121234123456789012345678901234567890121234123456789012345678901234567890121234
UR100:O=00 C=00r
Installer Op/Close123456789012345678901234567890121234123456789012345678901234567890121234123456789012345678901234567890121234123456789012345678901234567890121234123456789012345678901234567890121234123456789012345678901234567890121234123456789012345678901234567890121234123456789012345678901234567890121234123456789012345678901234567890121234123456789012345678901234567890121234123456789012345678901234567890121234123456789012345678901234567890121234
UR101:O=00 C=00r
Up/Dnload Op/Cl
Press RIGHT arrow key to select this menu. Press UP or DOWN arrow keys to selectanother menu. The ELK key backs up one menu level. To exit press the * or Exit key.
NOTE: Enter a two digit value to enable a report code. To disable a report code enter 00. When SIA or Contact ID is thereporting format, the two digit value can simply be 01 since the control automatically produces the correct codeaccording to the SIA or Contact ID protocol. For 4+2 pulse format, enter a value from 01 to FF. To enter the A thru FHEX characters press the RIGHT arrow key to position the cursor under the desired digit, then press the UP arrow (shift)key once. Each press of the 2 key will now produce the following: 2, A, B, C. Each press of the 3 key will now producethe following: 3, D, E, F. Press the RIGHT arrow key to cancel shift and move to the next character. See Appendix fora summary of the SIA and Contact ID codes.
User RCs CID SIAOpen 401 OPClose 401 CL
The CID (Contact ID) or SIA Codes for User Reporting Codes are:
NOTE: On CID reporting the 3 digit code is preceded by a “1” for an openingevent or a “3” for a closing event.

M1G Installation and Programming Manual Page 47
Menu 14 - Wireless Definitions
WirelessDefinitions DescriptionThe Wireless Definitions menu is broken into four parts: 1:Receiver Options, 2:XmitterOptions, 3:Xmitter Enroll, and 4:Keyfob Event Definitions. To program Receiver Optionspress the right arrow key. To move to Transmitter Options, Xmitter Enroll, or KeyfobEvent Definitions press the up or down arrow keys.
R01: Receiver Size. Identifies the size of the connected Receiver so the appropriatenumber of zones may be reserved. For the NX408E 8 zone receiver enter a 0, for aNX416E 16 zone receiver enter a 1, for a NX448E 48 zone receiver enter a 2. The controlwill know these zones are wireless, starting from the ZnBank setting in the next option.
R02:ZnBank Starting Zone. Identifies where the first wireless zone begins. Using thereceiver size setting and this starting number, the M1 blocks out the required number ofzones. If another zone expander (hardwired) is encountered that results in a duplicatezone, the M1 will error tone and return to a 00 setting. To resolve the conflict: move thestarting zone to another setting, move the conflicting zone expander to another address,or reduce the receiver size setting. Valid starting zones must be increments of 16:
Example: Entering a value of 2 for receiver size and 02 for starting zone would block out48 zones from 17 thru 64 as wireless. NOTE: If an 8 zone receiver is installed, the upper8 zones are not available (wasted) as far as the control is concerned. Receivers withmultiples of 16 zones (NX416E and NX448E) are therefore better economic choices.
R03: Reg. Supervision sets the interval, in hours, for “check-in” by transmitters which areprogrammed for “Supervision Type 1”, see transmitter option 01. Valid range is 001 to255 hours, however a value lower than 4 is not recommended. Default value is 24.
R04: Fire Supervision sets the interval, in hours, for “check-in” by transmitters which areprogrammed for “Supervision Type 2” (Fire), see transmitter option 02. Valid range is 001to 255 hours, however a value lower than 4 is not recommended. Default value is 004.
12345678901234567890123456789012123451234567890123456789012345678901212345123456789012345678901234567890121234512345678901234567890123456789012123451234567890123456789012345678901212345123456789012345678901234567890121234512345678901234567890123456789012123451234567890123456789012345678901212345123456789012345678901234567890121234512345678901234567890123456789012123451234567890123456789012345678901212345
1:Rec Selb Prgr
Receiver Options
123456789012345678901234567890121234123456789012345678901234567890121234123456789012345678901234567890121234123456789012345678901234567890121234123456789012345678901234567890121234123456789012345678901234567890121234123456789012345678901234567890121234123456789012345678901234567890121234123456789012345678901234567890121234123456789012345678901234567890121234123456789012345678901234567890121234123456789012345678901234567890121234
RO2:=00 ZnBank rStartingZone xxx
12345678901234567890123456789012123451234567890123456789012345678901212345123456789012345678901234567890121234512345678901234567890123456789012123451234567890123456789012345678901212345123456789012345678901234567890121234512345678901234567890123456789012123451234567890123456789012345678901212345123456789012345678901234567890121234512345678901234567890123456789012123451234567890123456789012345678901212345
RO3:=24 Hours r
Reg. Supervision12345678901234567890123456789012123451234567890123456789012345678901212345123456789012345678901234567890121234512345678901234567890123456789012123451234567890123456789012345678901212345123456789012345678901234567890121234512345678901234567890123456789012123451234567890123456789012345678901212345123456789012345678901234567890121234512345678901234567890123456789012123451234567890123456789012345678901212345
RO4:=004 Hours r
Fire Supervision
Press RIGHT arrow key to select this menu. Press UP or DOWN arrow keys to selectanother menu. The ELK key backs up one menu level. To exit press the * or Exit key.
1234567890123456789012345678901212312345678901234567890123456789012123123456789012345678901234567890121231234567890123456789012345678901212312345678901234567890123456789012123123456789012345678901234567890121231234567890123456789012345678901212312345678901234567890123456789012123123456789012345678901234567890121231234567890123456789012345678901212312345678901234567890123456789012123
1 4 - W i r e l e s sDefinitions r
RequiresELK-W035A
Wiring Assembly Caddx Brand Receiver Board
+White (n/a)
Brown (n/a)BANEGC
J3 J4
1 WAYX-102 WAY
JP2
RS2
32+
R1
TIPRINGT1
AUX
+12V
X-10
M1 PCB
Connectto J3
-A DataGreen
RedBlack
NX-408ENX-416ENX-448E
SET ALL FOUR ADDRESSSWITCHES TO OFF!
Wiring Diagram for Caddx NX Receiver to ELK-M1
The control is compatible with the Caddx brand wireless receivers: NX408E (8 zones), NX416E (16 zones), and NX448E(48 zones) and transmitters. Only 1 Receiver may be connected to the control. A special 5 pin wiring harness (ELK-WO35A) is required and it plugs into connector J3 “Aux Data Bus” located on the upper right side of the board.
123456789012345678901234567890121234123456789012345678901234567890121234123456789012345678901234567890121234123456789012345678901234567890121234123456789012345678901234567890121234123456789012345678901234567890121234123456789012345678901234567890121234123456789012345678901234567890121234123456789012345678901234567890121234123456789012345678901234567890121234123456789012345678901234567890121234
RO1:=0 Rec Sizer
0=8 ZoneReceiver
02=(Zone 17) 04=(Zone 33) 06=(Zone 49) 08=(Zone 65) 10=(Zone 81)12=(Zone 97) 14=(Zone 113) 16=(Zone 129) 18=(Zone 145) 20=(Zone 161) 22=(Zone 177)
† Not evaluated by UL
†

M1G Installation and Programming ManualPage 48
123456789012345678901234567890121234123456789012345678901234567890121234123456789012345678901234567890121234123456789012345678901234567890121234123456789012345678901234567890121234123456789012345678901234567890121234123456789012345678901234567890121234123456789012345678901234567890121234123456789012345678901234567890121234123456789012345678901234567890121234123456789012345678901234567890121234
WZnxxx:Selr Prgr
Wireless Zone12345678901234567890123456789012123451234567890123456789012345678901212345123456789012345678901234567890121234512345678901234567890123456789012123451234567890123456789012345678901212345123456789012345678901234567890121234512345678901234567890123456789012123451234567890123456789012345678901212345123456789012345678901234567890121234512345678901234567890123456789012123451234567890123456789012345678901212345
WZnxxx 01:=No rEnable Transmitr
12345678901234567890123456789012123451234567890123456789012345678901212345123456789012345678901234567890121234512345678901234567890123456789012123451234567890123456789012345678901212345123456789012345678901234567890121234512345678901234567890123456789012123451234567890123456789012345678901212345123456789012345678901234567890121234512345678901234567890123456789012123451234567890123456789012345678901212345
WZnxxx02:=0 rSupervision Type
12345678901234567890123456789012123451234567890123456789012345678901212345123456789012345678901234567890121234512345678901234567890123456789012123451234567890123456789012345678901212345123456789012345678901234567890121234512345678901234567890123456789012123451234567890123456789012345678901212345123456789012345678901234567890121234512345678901234567890123456789012123451234567890123456789012345678901212345
WZnxxx 03:=No r
Enable Option 1
12345678901234567890123456789012123451234567890123456789012345678901212345123456789012345678901234567890121234512345678901234567890123456789012123451234567890123456789012345678901212345123456789012345678901234567890121234512345678901234567890123456789012123451234567890123456789012345678901212345123456789012345678901234567890121234512345678901234567890123456789012123451234567890123456789012345678901212345
WZnxxx 04:=No r
Enable Option 2
123456789012345678901234567890121234123456789012345678901234567890121234123456789012345678901234567890121234123456789012345678901234567890121234123456789012345678901234567890121234123456789012345678901234567890121234123456789012345678901234567890121234123456789012345678901234567890121234123456789012345678901234567890121234123456789012345678901234567890121234123456789012345678901234567890121234
WZone = xxx r
TransmtToEnroll
12345678901234567890123456789012123451234567890123456789012345678901212345123456789012345678901234567890121234512345678901234567890123456789012123451234567890123456789012345678901212345123456789012345678901234567890121234512345678901234567890123456789012123451234567890123456789012345678901212345123456789012345678901234567890121234512345678901234567890123456789012123451234567890123456789012345678901212345
4:KeyfobSelb Prgr
Event Definition123456789012345678901234567890121234123456789012345678901234567890121234123456789012345678901234567890121234123456789012345678901234567890121234123456789012345678901234567890121234123456789012345678901234567890121234123456789012345678901234567890121234123456789012345678901234567890121234123456789012345678901234567890121234123456789012345678901234567890121234123456789012345678901234567890121234
Keyfob Button=1r
1000=Event
12345678901234567890123456789012123451234567890123456789012345678901212345123456789012345678901234567890121234512345678901234567890123456789012123451234567890123456789012345678901212345123456789012345678901234567890121234512345678901234567890123456789012123451234567890123456789012345678901212345123456789012345678901234567890121234512345678901234567890123456789012123451234567890123456789012345678901212345
2:Xmit Selb Prgr
Transmitter Optr
12345678901234567890123456789012123451234567890123456789012345678901212345123456789012345678901234567890121234512345678901234567890123456789012123451234567890123456789012345678901212345123456789012345678901234567890121234512345678901234567890123456789012123451234567890123456789012345678901212345123456789012345678901234567890121234512345678901234567890123456789012123451234567890123456789012345678901212345
3:Learn Selb Prgr
WirelessTransmtr
123456789012345678901234567890121234123456789012345678901234567890121234123456789012345678901234567890121234123456789012345678901234567890121234123456789012345678901234567890121234123456789012345678901234567890121234123456789012345678901234567890121234123456789012345678901234567890121234123456789012345678901234567890121234123456789012345678901234567890121234123456789012345678901234567890121234123456789012345678901234567890121234
WZone = xxx PushTransmiterButton
12345678901234567890123456789012123451234567890123456789012345678901212345123456789012345678901234567890121234512345678901234567890123456789012123451234567890123456789012345678901212345123456789012345678901234567890121234512345678901234567890123456789012123451234567890123456789012345678901212345123456789012345678901234567890121234512345678901234567890123456789012123451234567890123456789012345678901212345
WZnxxx 05:=001 r
Keyfob User ID
Press the RIGHT arrow key to select 2:Xmit Transmitter Opt.
Use the UP and DOWN arrow keys to locate a particular wireless transmitter. Pressthe RIGHT arrow key to select and program the displayed transmitter.
This selection determines whether or not the transmitter is enabled. Whenever youenroll a new transmitter this location will be automatically set to Yes. To permanentlyor temporarily disable this transmitter program this to No.
This selection determines the “Supervision Type” for the transmitter. 0=No Supervision,1=Regular Supervision, 3=Fire Supervision. See receiver selections R02 and R03 forsupervision time values. Default is 1.
This selection corresponds to the Caddx Transmitter Option 1 which deals withenabling or disabling the internal reed switch on the individual Caddx transmitter sothat an external switch may be hardwired to the transmitter. Refer to the Caddx NXSeries Receiver Instructions, Option 1, for complete details.
This selection corresponds to the Caddx Transmitter Option 2 which deals withwhether an external switch should be normally open (N/O) or normally closed (N/C).For N/O set option to No. For N/C set option to Yes. Refer to the Caddx NX SeriesReceiver Instructions, Option 2, for complete details.
If the transmitter is a keyfob, this sets the User ID to be logged when the keyfob isused to arm or disarm. Valid range is 001 to 255. Numbers 001 to 099 mirror thekeypad user codes. To report an open/close from a keyfob, program the correspondingkeypad user code to report. A report will be sent regardless of whether it was a usercode or a keyfob that armed/disarmed the system. NOTE: Since there are no open/close report codes beyond user 99, any keyfob ID that is set higher that 99 will utilizethe opening/closing report code for User 99.
Press the RIGHT arrow key to select 3:Learn Wireless Transmitters.
Press the UP or DOWN arrow keys to locate the wireless zone that you wish to enroll.Then press the RIGHT arrow key to continue.
Go to the transmitter and press the tamper or enroll button. The keypad should emit ashort tone when the transmitter becomes enrolled.
Press the RIGHT arrow key to select 4:Keyfob Event Definition
Press the UP or DOWN arrow keys to locate the keyfob button to program. There area total of 8 programmable buttons, however only 6 of the 8 may be used on the keyfob.The valid activation events programmable for each button ranges from 0000-0030(utilizing the Zone Definitions table) and 2001-2032 (utilizing Appendix A, Event Codes).
The standard buttons are as follows: Button 1 (Lock), 2 (Unlock), 3 (Light), and 4(Asterisk). For Button 7 press a combination of buttons 1 & 2 together at the sametime. For Button 8 press a combination of buttons 3 & 4 together at the same time.
Button 3 on a keyfob can be changed to 5 by setting the transmitter Option 1 to Yes.Button 4 on a keyfob can be changed to 6 by setting the transmitter Option 2 to Yes.

M1G Installation and Programming Manual Page 49
4.1 ELK-RP SoftwareELK-RP (RP) is a Windows based software package that is compatible with Windows 98and later. It features an extremely intuitive user interface and contains all data in a centraldatabase. RP can be run on a single PC or over a local area network (LAN) with multipleoperators. In addition to the traditional security programming features, RP allows you tocreate and manage the automation functionality in the control. The following information is a brief overview includingillustrations of the various screens. Please refer to RP’s on-line help file for specific operation details.
4.1.1 RP Connection MethodsThere are 3 methods for the RP software to connect with the control. Regardless of the method, the control’s serial numberand RP access code MUST match in order for the connection to be successful. The connection methods are:
1. Direct using Com_ (PC Com port) - Requires a 9 pinserial cable from the PC’s RS-232 Com port to theM1’s on-board 9 pin serial port. Data transfer is115,200 baud. NOTE: If your computer only has aUSB port, an approved converter (USB to RS-232) isavailable from Radio Shack and from ELK (ELK-USB232).
2. Dial-up using Modem and phone line - RP iscompatible with virtually all computer modems, even 56k modems. This is due to the M1’s built-in V.22 bis “True” modem,which handles data transfer at 2,400 baud. The 6 dial-up options are:Fully Automatic - RP dials the control phone number and listens for the control to answer on it’s “rings until answer” setting.
If an answering machine answers, RP will transmit codes to override it automatically.Prompt when answer - RP dials and listens for the control to answer. It waits for a manual OK before connecting.Dial, hang up, dial again - This is faster than waiting on the control’s “rings until answer” setting. It is also useful for
reaching premises that have telephone company answer/forward services. The control must be enabled for this option.After dialing, RP leaves the PC speaker on, and prompts you to click “Hang-up” after you hear two rings. It then forces atime delay before allowing you to click OK to start the second dial. As long as the control properly detects the first tworings and subsequent hang-up, it will wait up to 45 seconds for a second call and answer that call on the first ring.
Customer will force answer - Similar to method 1 except the User must enter keypad menu 8, option 5, item 1 to force thecontrol to answer. This is necessary if the “rings until answer” or “dial/hang-up/dial” options are not programmed.
Telephone connection already established - If a voice connection is already established using the control’s phone line andthe PC’s phone line, this method can be used to take over the connection and initiate an immediate connection.
Local connection via house telephone line - Convenient way to connect locally from virtually any house phone jack that is onthe same phone line as the one attached to the control. Connect the PC modem to the phone wall jack, click on LocalConnection, and RP will pick up the line and enter the access codes required to connect with the control.
3. Network - With an optional ELK-M1XEP Ethernet Port module you can connect over a Local or Wide Area Network. (ContactELK for details)
Section 4 - PC Programming and Automation Capabilities
NOTE: UL requires that a Technician be On-Site when doing Remote Programming.

M1G Installation and Programming ManualPage 50
4.1.2 Check for ConflictsDuring the connect and disconnect process RP performs an automatic check of the data stored in the control and compares itthe database. If there are any conflicts (differences), a pop-up resolution window display them and allows corrections to bemade. ELK regards “Check for Conflicts” to be an especially important feature. It can point out any changes that haveoccurred such as a user having added or changed a code. The resolution window allows you to receive the control’s data intothe database (accept the local version) or send the RP data to the control (accept the database version). NOTE: Checking forconflicts adds considerable time to the connect/disconnect process, especially on dial-up connections. For this reason,the automatic check for conflicts may be disabled from the SETUP menu. A manual Check for Conflicts can be selectedfrom the Send/Rcv icon.
4.1.3 Sending and Receiving DataRP allows many options and groups of options to be sent or received individually, which greatly reduces the on-line connecttime if there are only a few items to be changed. However, a full send or receive occurs very quickly, thanks to the M1’s built-inV.22 bis “True” Modem. RP features easy to use menus & toolbar icons and makes extensive use of the right mouse buttonto perform operations. Try right clicking on any item or icon to see the available options.
4.2 Update/Verify Firmware in the Control and PeripheralsThe control stores it’s operating firmware in “Flash” memory. This state-of-the-art memory allows electronic field updates tothe control and its peripherals, and eliminates the old fashion method of changing IC chips or shipping boards back to thefactory. As new firmware updates become available, they will be posted on ELK’s website [www.elkproducts.com] in apassword restricted “M1 Dealers ONLY” location. NOTE: Firmware updating can only be done from a Direct to PC Com portconnection or an optional Ethernet Network connection. Due to the amount of data that has to be transferred, Dial-upconnections cannot be used to perform firmware updates.
How to Update Firmware:1. Connect a 9 pin serial cable from the Computer’s Serial Port to the 9 Pin RS232 Connector on the control.2. Start RP and open the account belonging to that particular control. Click on the Connection menu icon and establish
a connection using the Direct using Com_ option.3. Click on Update/Verify Firmware from the Send/Rcv menu icon.4. On the Update/Verify screen, select the device to be updated (Control, Keypad, etc.) along with the “Update to new
firmware” option. Then click Continue.5. The Update Firmware screen displays the device name, the current Firmware, Hardware, and Bootware version, and
a pull down window for selecting the firmware version to use on the update. Always select the latest firmware version(highest number). Be sure to save all update (.bin) files that are downloaded or received via CDROM into the~Program Files\ElkRP\Updates directory on your computer. This is where RP looks for all update files.
6. Click on the check box for “Update”. If “Reprogram” or “Rollback” is displayed the firmware file is the same as ORolder that what is in the control. Reprogramming with the same firmware is a waste of time but was included forfactory testing purposes. Rollback is not recommended except under the guidance of Elk Technical Support.
NOTE: The option for “Verify existing firmware” on the Update/Verify screen is normally not required except forfactory diagnostics. If the control has multiple keypads, expanders, etc., RP will display the details about eachone onscreen with a check box for selecting units for updating.

M1G Installation and Programming Manual Page 51
4.3 Automation Rules and AttributesThe RP Automation Programming software offers powerful, easy to setup and manage, life style enhancement features. Theautomation programming allows mixing and matching of lighting components, outputs (relays or voltage), thermostats,temperature sensors, and all the security inputs and features to integrate functions that add value and appeal to the owner/user. Lights can be set to turn on and off in response to a time or day, a certain sensor, or according to the arm/disarm statusof the security control. Outputs can be set to control door strikes, irrigation sprinklers, circulating pumps valves, etc.
The power behind the automation features is the unique RULES Engine. Rules are expressions of what you would like tohappen at a given time or in response to a set of circumstances. The following information is intended to provide an overviewof the vast automation features in the control.
† TASKS - A Task is similar to a computer macro, in that a single activation can result in multiple actions or events. Theactions and triggering of a Task must be written or developed in a Whenever/And/Then Rule. The purpose of the taskscreen is to assign each task its own 16 character description, 6 word voice phrase, and the ability to “Show” on the keypad orthe telephone remote control menu. Up to 32 Tasks can be programmed. Examples are “Water the Lawn” which could beused to turn on a series of outputs or relays to control underground water valves for a certain time duration. “WelcomeHome” could be task used to control a series of lights at a given time or day or in response to someone disarming thesecurity system. The following shows several tasks and the voice description word listing.
† Not evaluated by UL

M1G Installation and Programming ManualPage 52
† LIGHTING - The control can handle up to 256 Light (or appliance) devices. Each is assigned to one of 256 addresses.Each device is displayed in a column format with the following options and settings: Name - Each device can be given a 16character name (description) which is displayed on the keypad when the light is being controlled. Format - This pull downbox selects the protocol of the device. The available Lighting formats are: Standard, Extended, Preset dim, Compose, SerialPort. The Serial port format is for UPB, ALC, Centralite, others through an ELK-M1XSP Lighting/Thermostat/Serial ExpanderInterface. Type - This pull down box selects the whether the device is a: On/Off Switch, Dimmer, or Appliance. Show - If thisbox is checked the device will appear “show” on the keypad and telephone remote as you scroll through the automationcontrol menus. 2-way - This checkbox is used to record whether the device is capable of replying back to commands. VoiceDescription - Click on this box to pop up a window for programming a custom 6 word voice phrase. The voice is usedprimarily during a telephone remote session. NOTE: Additional lighting formats are in development, including the new Z-Wave wireless devices. Even if a lighting product is not directly supported, it is always possible to use RS-232 ASCIIstrings for communicating lighting control.
OUTPUTS - These can be in the form of voltage only, relays, or a combination of the two. Up to 208 outputs may becontrolled. The first 32 outputs have a 16 character description, 6 word voice phrase, and the “Show” on keypad or telephoneremote option. However, any output may be controlled from the keypad or telephone remote by entering its number. Outputscan be used to actuate door locks, motors, fan, pumps, etc.
SUNRISE/SUNSET - Sunrise and sunset can be used to control lighting and other entities. This section is the setup for thebuilt-in Astronomical clock, which is capable of calculating sunrise and sunset times automatically. The inputs necessary tosetup the control for sunrise/sunset are latitude, longitude, and the time zone value where the control is installed. Latitude/longitude information can often be found printed on city or state highway maps, or it can be researched on the internet. Afterentering the required information, click calculate and then send to the control.
NOTE: The TimeZone automaticallyassumes “standardtime”. Therefore, thecalculated times willreflect standard time.If the control is set for“Observe DaylightSavings Time” thesunrise/sunset timeswill be adjusted by thecontrol accordingly.
† Not evaluated by UL

M1G Installation and Programming Manual Page 53
† VOICE - This section is used to setup and customize many of the 6 word phrases that can be spoken by the controlduring a certain event or when commanded by an automation rule. The capabilities of this section are quite powerful. Thelibrary contains over 500+ words in addition to specialized speech commands for inserting conditions, current time, status/state, time delays, and even an 800hz tone. In addition, any of the 10 custom recordable messages can be included whenbuilding these 6 word phrases.
CUSTOM SETTINGS - These are 20 memory locations which may be assigned a 12 character description, a function type(one of 3), and a starting value. An authorized user can then access the custom settings from keypad user menu 7-Automation Custom Settings, and modify the value whether it be a numeric value, a timer (seconds), or a time-of-day.Incorporating custom settings in rules provides the user the ability to modify how the rule will operate. For instance, the usercan modify the time or duration for the lawn sprinklers which have been programmed to turn on automatically. The functiontypes include: A 5 digit raw number with a range of 00000 to 65,535, a 5 digit timer (seconds) with a range of 00000 to 65,535seconds, or a Time (time of day) which is formatted as 00:00 with a range of 00:00 to 23:59.
COUNTERS - These memory locations (often called flags) can be set, incremented, decremented, or compared by anautomation rule to track an event or keep up with how many times an event has occurred. There are a total of 64 counters.Each can be programmed with a 12 character description, making it easy to reference in an automation rule.
† Not evaluated by UL

M1G Installation and Programming ManualPage 54
† THERMOSTATS - HVAC Thermostats may be read and/or controlled by the control and its automation rules engine. Thismenu allows each thermostat to be assigned a 12 character description for easy reference in an automation rule. Currentlycompatible thermostats include: RCS, Aprilaire, and HAI. Due to the various data protocols, a Lighting/Thermostat/SerialInterface Expander (ELK-M1XSP) is needed to couple the data bus to HVAC thermostats. Depending on the brand ofthermostat, its wiring interface (RS-232 or RS-485), up to 16 HVAC thermostats can be controlled. Many communicatingthermostats operate stand-alone when they are not being remotely commanded by an automation controller.
TEXTS - This section allows custom text messages to be constructed and formatted. These messages can be transmittedto an LCD keypad or out one of the RS232 serial ports to a PC or some other type of equipment. I.E. Touchscreen, Lightingcenters, etc. A message to the keypad could be “Happy Birthday” or “Please Pay Your Bill”, while a message going out a serialport might be a series of ASCII characters formatted to a certain manufacturers protocol. Special options built into this menuinclude: automatic display of temperature readings from Zone Temperature Sensors (ELK-M1ZTS) and from the temperaturesensor built into an LCD Keypad. The sending or receiving of text messages is controlled by the automation rules engine.NOTE: Text messages share the same memory space as rules. The total number of text messages and rules is limitedby the M1 model that you are installing.
† Not evaluated by UL

M1G Installation and Programming Manual Page 55
RULES - This section essentially brings all the power of the control’s automation and its features together. Rules consist ofthree major elements: A WHENEVER (“triggering”) condition, one or more ANDs (“qualifiers”), and one or more THENs(“activations”). Rules utilize the various elements of the previously described sections in addition to the many controlconditions (arm, disarm, alarms, etc.), plus many of the event codes listed in Appendix A. For example: A rule might betriggered by a Task to activate a specific light and output, but only if the control is armed in a specific mode.
WHENEVER - The first element of a rule and the starting point of every rule is a triggering event. Every rule must have atriggering event in order to be started. A triggering event can be a time of day occurrence, a zone opening or closing, thesecurity system going from armed to disarmed, a light changing from on to off, or literally hundreds of other events.Below are some examples of WHENEVER elements:
Example 1 = WHENEVER THE TIME IS 08:00AMExample 2 = WHENEVER Living Rm Light [6 (A6)] IS TURNED ON
An important point to remember is that a WHENEVER gets triggered by the transition of its event from one state toanother. In example 1, the trigger occurs when the time of day goes from 07:59AM to 08:00AM. In example 2, the triggeroccurs when the living room light goes from off to on. Some WHENEVER elements may even include the word“BECOMES”, which clearly implies that the event has to change from its current condition and “become” the alternatecondition. Just remember, a rule can only be triggered by the transition of an event from one condition to another.

M1G Installation and Programming ManualPage 56
AND - The second and optional element of a rule is a qualifier. Rules can have one or more qualifiers OR none at all. Eventhough qualifiers are not required, they are ideal for filtering out actions that should not occur under certaincircumstances. A qualifier can be a time, day(s), the state of light or dark, the state of a zone, output, or light, andhundreds of other variables. The state of light or dark can be determined by the Sunrise/Sunset settings from the M1’sAstronomical Clock. Below are some examples of AND (qualifiers):
Example 3 = AND Front Door (Zn 1) IS NOT SECUREExample 4 = AND THE DAY(S) OF THE WEEK IS/ARE -M-W-F-Example 5 = AND IT IS DARK OUTSIDEExample 6 = AND John’s House (Area 1) IS ARMED AWAY
THEN - The third and final element of a rule is the action that you wish to occur as a result of the Rule being triggered andall the qualifiers being true. Below are some examples of THEN actions:
Example 7 = THEN TURN Air Cond (Out 9) OFFExample 8 = THEN TURN Living Rm Light [6 A6)] OFFExample 9 = THEN SET Main Floor (Tstat 1) OFFExample 10 = THEN TURN All Lights On
Here is an example of a rule used to turn off the air condition anytime the front door is left open by the kids. It consists of a 30second timer for the WHENEVER trigger an AND to test the door’s open/closed state, and a THEN to turn off the output thatcontrols the air condition.
WHENEVER EVERY 30 SECONDSAND Front Door (Zn 1) IS NOT SECURE
THEN TURN Air Cond (Out 9) OFF

M1G Installation and Programming Manual Page 57
Examples of Rules - Shown below are a series of rules that should help illustrate the power and results that rules canprovide. Look closely at the ones that have multiple ANDs and THENs. Rules with Multiple ANDs and THENS work asfollows: When the WHENEVER element is triggered, each one of the AND elements is evaluated to determine if the conditionits testing is true. If any one of the ANDs are not true, the rule engine stops executing the rule immediately. However, if allANDs are true then the rule engine moves on to the THEN elements, executing each one of them.
Rule 1 is an energy saving example. It automatically turns off the Porch lights at 8:00AM everyday if it is light outside.Rule 2 is a courtesy light example. It will turn on the Porch light for 5 minutes when the Front door opens (exiting the building)
provided it is dark outside and the control has been armed to the away mode.Rule 3 is a comfort example. It periodically (every 20 seconds) checks the temperature reading of the Outdoor Temp sensor
and turns on the Porch Fan if the temperature becomes greater than 90 degrees. NOTE: An additional AND elementcould be added to prevent the fan from operating on certain days or at certain times.
Rule 4 is another energy savings example. It adjusts the cooling setpoint of the Main Floor Thermostat to 85 degreeswhenever the control is armed to the away mode.
Rule 5 is especially great for a homeowner arriving home after dark. If they are equipped with an RF (wireless) Keyfob andthey press button #3, the rule will turn on the outside Flood lights and Porch lights for 5 minutes, provided it is darkoutside and the Flood lights are not already on. If the Floodlights were already on the rule would stop. This preventsthe lights from going off after 5 minutes if you intentionally had already turned them on manually.
Rule 6 shows how an ASCII string coming in from the serial port (port 0) could be used to unlock a door strike for 10 secondsand announce “Access Allowed”. This string could come from Access Control system.
In this last example, three rules are used to chirp the outsidesiren based on the input of a RF Keyfob to arm the control.
Rule 8 makes the siren chirp once if the control successfullyarms when the user presses button 1.
Rule 9 makes the siren chirp twice if the control disarms whenthe user presses button 2
Rule 10 makes the siren chirp four times (error tone) if thecontrol fails to arm when the user presses button 1.

M1G Installation and Programming ManualPage 58
0000 or 1000 =No Event N1001 = Fire Alarm TMC1002 = Fire Supervisory TMC1003 = Burglar Alarm, Any Area TMCB1004 = Medical Alarm, Any Area TMC1005 = Police Alarm, Any Area TMC1006 = Aux1 24 hr, Any Area TMC1007 = Aux2 24 hr, Any Area TMC1008 = CO Alarm, Any Area TMC1009 = Emergency Alm, Any Area TMC1010 = Freeze Alarm, Any Area TMC1011 = Gas Alarm, Any Area TMC1012 = Heat Alarm, Any Area TMC1013 = Water Alarm, Any Area TMC1014 = Alarm, Any Area TMC
1015 = Burglar Alarm in Area 1 TMC1016 = Burglar Alarm in Area 2 TMC1017 = Burglar Alarm in Area 3 TMC1018 = Burglar Alarm in Area 4 TMC1019 = Burglar Alarm in Area 5 TMC1020 = Burglar Alarm in Area 6 TMC1021 = Burglar Alarm in Area 7 TMC1022 = Burglar Alarm in Area 8 TMC
1023 = Medical Alarm in Area 1 TMC1024 = Medical Alarm in Area 2 TMC1025 = Medical Alarm in Area 3 TMC1026 = Medical Alarm in Area 4 TMC1027 = Medical Alarm in Area 5 TMC1028 = Medical Alarm in Area 6 TMC1029 = Medical Alarm in Area 7 TMC1030 = Medical Alarm in Area 8 TMC
1031 = Police Alarm in Area 1 TMC1032 = Police Alarm in Area 2 TMC1033 = Police Alarm in Area 3 TMC1034 = Police Alarm in Area 4 TMC1035 = Police Alarm in Area 5 TMC1036 = Police Alarm in Area 6 TMC1037 = Police Alarm in Area 7 TMC1038 = Police Alarm in Area 8 TMC
1039 = Aux1 24 hr in Area 1 TMC1040 = Aux1 24 hr in Area 2 TMC1041 = Aux1 24 hr in Area 3 TMC1042 = Aux1 24 hr in Area 4 TMC1043 = Aux1 24 hr in Area 5 TMC1044 = Aux1 24 hr in Area 6 TMC1045 = Aux1 24 hr in Area 7 TMC1046 = Aux1 24 hr in Area 8 TMC
1047 = Aux2 24 hr in Area 1 TMC1048 = Aux2 24 hr in Area 2 TMC1049 = Aux2 24 hr in Area 3 TMC1050 = Aux2 24 hr in Area 4 TMC1051 = Aux2 24 hr in Area 5 TMC1052 = Aux2 24 hr in Area 6 TMC1053 = Aux2 24 hr in Area 7 TMC1054 = Aux2 24 hr in Area 8 TMC
1055 = CO Alarm in Area 1 TMC1056 = CO Alarm in Area 2 TMC1057 = CO Alarm in Area 3 TMC1058 = CO Alarm in Area 4 TMC1059 = CO Alarm in Area 5 TMC1060 = CO Alarm in Area 6 TMC1061 = CO Alarm in Area 7 TMC1062 = CO Alarm in Area 8 TMC
1063 = Emergency Alm in Area 1 TMC1064 = Emergency Alm in Area 2 TMC1065 = Emergency Alm in Area 3 TMC1066 = Emergency Alm in Area 4 TMC1067 = Emergency Alm in Area 5 TMC1068 = Emergency Alm in Area 6 TMC1069 = Emergency Alm in Area 7 TMC1070 = Emergency Alm in Area 8 TMC
1071 = Freeze Alarm in Area 1 TMC1072 = Freeze Alarm in Area 2 TMC1073 = Freeze Alarm in Area 3 TMC1074 = Freeze Alarm in Area 4 TMC1075 = Freeze Alarm in Area 5 TMC1076 = Freeze Alarm in Area 6 TMC1077 = Freeze Alarm in Area 7 TMC1078 = Freeze Alarm in Area 8 TMC
1079 = Gas Alarm in Area 1 TMC1080 = Gas Alarm in Area 2 TMC1081 = Gas Alarm in Area 3 TMC1082 = Gas Alarm in Area 4 TMC1083 = Gas Alarm in Area 5 TMC1084 = Gas Alarm in Area 6 TMC1085 = Gas Alarm in Area 7 TMC1086 = Gas Alarm in Area 8 TMC
1087 = Heat Alarm in Area 1 TMC1088 = Heat Alarm in Area 2 TMC1089 = Heat Alarm in Area 3 TMC1090 = Heat Alarm in Area 4 TMC1091 = Heat Alarm in Area 5 TMC1092 = Heat Alarm in Area 6 TMC1093 = Heat Alarm in Area 7 TMC1094 = Heat Alarm in Area 8 TMC
1095 = Water Alarm in Area 1 TMC1096 = Water Alarm in Area 2 TMC1097 = Water Alarm in Area 3 TMC1098 = Water Alarm in Area 4 TMC1099 = Water Alarm in Area 5 TMC1100 = Water Alarm in Area 6 TMC1101 = Water Alarm in Area 7 TMC1102 = Water Alarm in Area 8 TMC
1103 = Any Alarm in Area 1 TMC1104 = Any Alarm in Area 2 TMC1105 = Any Alarm in Area 3 TMC1106 = Any Alarm in Area 4 TMC1107 = Any Alarm in Area 5 TMC1108 = Any Alarm in Area 6 TMC1109 = Any Alarm in Area 7 TMC1110 = Any Alarm in Area 8 TMC
1111 = Any Keypad Code-Lockout N1112 = Keypad 01 Code-Lockout N1113 = Keypad 02 Code-Lockout N1114 = Keypad 03 Code-Lockout N1115 = Keypad 04 Code-Lockout N1116 = Keypad 05 Code-Lockout N1117 = Keypad 06 Code-Lockout N1118 = Keypad 07 Code-Lockout N1119 = Keypad 08 Code-Lockout N1120 = Keypad 09 Code-Lockout N1121 = Keypad 10 Code-Lockout N1122 = Keypad 11 Code-Lockout N1123 = Keypad 12 Code-Lockout N1124 = Keypad 13 Code-Lockout N1125 = Keypad 14 Code-Lockout N1126 = Keypad 15 Code-Lockout N1127 = Keypad 16 Code-Lockout N
1128 = Fire Trouble, Any Zone TMC1129 = Burglar Trouble, Any Zone TMC1130 = Fail to Communicate Tbl N1131 = RF Sensor Low Battery Tbl N1132 = Lost ANC Module Trouble N1133 = Lost Keypad Trouble N1134 = Lost Input Expander Tbl N1135 = Lost Output Expander Tbl N1136 = EEprom Memory Error Tbl C1137 = Flash Memory Error Trouble C1138 = AC Failure Trouble N1139 = Control Low Battery Trouble N1140 = Control Over Current Trouble N1141 = Expansion Module Trouble N1142 = Output 2 Supervisory Tbl N1143 = Telephone Line Fault Tbl
1144 = Restore Fire Zone B1145 = Restore Fire Supv Zone B1146 = Restore Burglar Zone B1147 = Restore Medical Zone B1148 = Restore Police Zone B1149 = Restore Aux1 24 hr Zone B1150 = Restore Aux2 24 hr Zone B1151 = Restore CO Zone B1152 = Restore Emergency Zone B1153 = Restore Freezer Zone B1154 = Restore Gas Zone B1155 = Restore Heat Zone B1156 = Restore Water Zone B1157 = Communication Fail Restore B1158 = AC Fail Restore B1159 = Low Battery Restore B1160 = Control Over Current Restore B1161 = Expansion Module Restore B1162 = Output 2 Restore B1163 = Telephone Line Restore B
1164 = Alarm Memory A1165 = Alarm Memory in Area 1 TMC1166 = Alarm Memory in Area 2 TMC1167 = Alarm Memory in Area 3 TMC1168 = Alarm Memory in Area 4 TMC1169 = Alarm Memory in Area 5 TMC1170 = Alarm Memory in Area 6 TMC1171 = Alarm Memory in Area 7 TMC1172 = Alarm Memory in Area 8 TMC
1173 = Area Armed N1174 = Area Disarmed N1175 = Area 1 Arm State N1176 = Area 2 Arm State N1177 = Area 3 Arm State N1178 = Area 4 Arm State N1179 = Area 5 Arm State N1180 = Area 6 Arm State N1181 = Area 7 Arm State N1182 = Area 8 Arm State N
1183 = Area 1 is Armed Away N1184 = Area 2 is Armed Away N1185 = Area 3 is Armed Away N1186 = Area 4 is Armed Away N1187 = Area 5 is Armed Away N1188 = Area 6 is Armed Away N1189 = Area 7 is Armed Away N1190 = Area 8 is Armed Away N
Appendix A - Event Codes
Event Description Reset1191 = Area 1 is Armed Stay N1192 = Area 2 is Armed Stay N1193 = Area 3 is Armed Stay N1194 = Area 4 is Armed Stay N1195 = Area 5 is Armed Stay N1196 = Area 6 is Armed Stay N1197 = Area 7 is Armed Stay N1198 = Area 8 is Armed Stay N
1199 = Area 1 is Armed Stay Instant N1200 = Area 2 is Armed Stay Instant N1201 = Area 3 is Armed Stay Instant N1202 = Area 4 is Armed Stay Instant N1203 = Area 5 is Armed Stay Instant N1204 = Area 6 is Armed Stay Instant N1205 = Area 7 is Armed Stay Instant N1206 = Area 8 is Armed Stay Instant N
1207 = Area 1 is Armed Night N1208 = Area 2 is Armed Night N1209 = Area 3 is Armed Night N1210 = Area 4 is Armed Night N1211 = Area 5 is Armed Night N1212 = Area 6 is Armed Night N1213 = Area 7 is Armed Night N1214 = Area 8 is Armed Night N
1215 = Area 1 is Armed Night Instant N1216 = Area 2 is Armed Night Instant N1217 = Area 3 is Armed Night Instant N1218 = Area 4 is Armed Night Instant N1219 = Area 5 is Armed Night Instant N1220 = Area 6 is Armed Night Instant N1221 = Area 7 is Armed Night Instant N1222 = Area 8 is Armed Night Instant N
1223 = Area 1 is Armed Vacation N1224 = Area 2 is Armed Vacation N1225 = Area 3 is Armed Vacation N1226 = Area 4 is Armed Vacation N1227 = Area 5 is Armed Vacation N1228 = Area 6 is Armed Vacation N1229 = Area 7 is Armed Vacation N1230 = Area 8 is Armed Vacation N
1231 = Area 1 is Force Armed N1232 = Area 2 is Force Armed N1233 = Area 3 is Force Armed N1234 = Area 4 is Force Armed N1235 = Area 5 is Force Armed N1236 = Area 6 is Force Armed N1237 = Area 7 is Force Armed N1238 = Area 8 is Force Armed N
1239 = Zone Bypassed N1240 = All Zones Unbypassed B1241 = Burglar Zone Fault N
1242 = Burglar Status N1243 = Area 1 Burglar Status N1244 = Area 2 Burglar Status N1245 = Area 3 Burglar Status N1246 = Area 4 Burglar Status N1247 = Area 5 Burglar Status N1248 = Area 6 Burglar Status N1249 = Area 7 Burglar Status N1250 = Area 8 Burglar Status N
Event Codes are four digit numbers used to represent alarms, troubles, arm/disarms, restores, and various other conditions that occur within the control. For themost part, they are used only internally by the control’s software. For example: turning on the alarm output. However, there are cases where the installer may needthese codes. Case #1 - Keypad F key programming. Each of the Keypad F keys may be programmed to activate a particular condition such as Emergency PanicAlarm. See Menu 04 - Keypad Definitions. The activation event code can be any of the zone definition codes. The F1 key may also be programmed to light up or“illuminate” when a condition is active. The F1 key can illuminate when the Emergency Panic Alarm is active by programming the four digit event code 1011 =Emergency Alarm. Case #2 - Event History log. Each of the 512 entries in the event history log is represented by one of these 4 digits event codes, along with thetime, date, area, and/or user code. It may be necessary or helpful to have these codes handy to fully interpret the log.
Event Description Reset Event Description Reset Event Description Reset

M1G Installation and Programming Manual Page 59
“Reset” AttributeThe letter(s) displayed in Reset column indicate what condition(s) it takes toclear an event once it has been activated.For example: the letters TMC indicate the event will reset when the outputtimer ends, or when manually turned off, or when a valid user code isentered, whichever comes first.
NOTE:The reset attributes are shown only for informational purposes. They are setby the factory and cannot be altered.
N (0) Event follows the activationT (1) Event clears when output timer endsM (2) Event clears when manually turned offC (4) Event clears upon User Code entryA (16) Event clears upon ArmingD (32) Event clears upon DisarmingB (64) Event clears almost immediately “Blip”F (128) Event toggles with each activation
1251 = Area 1 Chime Mode N1252 = Area 2 Chime Mode N1253 = Area 3 Chime Mode N1254 = Area 4 Chime Mode N1255 = Area 5 Chime Mode N1256 = Area 6 Chime Mode N1257 = Area 7 Chime Mode N1258 = Area 8 Chime Mode N
1259 = Area 1 Chime Alert B1260 = Area 2 Chime Alert B1261 = Area 3 Chime Alert B1262 = Area 4 Chime Alert B1263 = Area 5 Chime Alert B1264 = Area 6 Chime Alert B1265 = Area 7 Chime Alert B1266 = Area 8 Chime Alert B
1267 = Entry Delay Active N1268 = Area 1 Entry Delay N1269 = Area 2 Entry Delay N1270 = Area 3 Entry Delay N1271 = Area 4 Entry Delay N1272 = Area 5 Entry Delay N1273 = Area 6 Entry Delay N1274 = Area 7 Entry Delay N1275 = Area 8 Entry Delay N
1276 = Exit Delay Active N1277 = Area 1 Exit Delay N1278 = Area 2 Exit Delay N1279 = Area 3 Exit Delay N1280 = Area 4 Exit Delay N1281 = Area 5 Exit Delay N1282 = Area 6 Exit Delay N1283 = Area 7 Exit Delay N1284 = Area 8 Exit Delay N
1285 - Area 1 Exit Delay Expires N1286 - Area 2 Exit Delay Expires N1287 - Area 3 Exit Delay Expires N1288 - Area 4 Exit Delay Expires N1289 - Area 5 Exit Delay Expires N1290 - Area 6 Exit Delay Expires N1291 - Area 7 Exit Delay Expires N1292 - Area 8 Exit Delay Expires N
1293 = Automatic Closing B1294 = Early Closing B1295 = Closing Time Extended B1296 = Fail to Close B1297 = Late to Close B1298 = Keyswitch Closing B1299 = Duress B1300 = Exception Opening B1301 = Early Opening B1302 = Fail to Open B1303 = Late to Open B1304 = Keyswitch Opening B
1305 = Area 1 Closing Ring Back B1306 = Area 2 Closing Ring Back B1307 = Area 3 Closing Ring Back B1308 = Area 4 Closing Ring Back B1309 = Area 5 Closing Ring Back B1310 = Area 6 Closing Ring Back B1311 = Area 7 Closing Ring Back B1312 = Area 8 Closing Ring Back B
1313 = Access Keypad 1 TM1314 = Access Keypad 2 TM1315 = Access Keypad 3 TM1316 = Access Keypad 4 TM1317 = Access Keypad 5 TM1318 = Access Keypad 6 TM1319 = Access Keypad 7 TM1320 = Access Keypad 8 TM1321 = Access Keypad 9 TM1322 = Access Keypad 10 TM1323 = Access Keypad 11 TM1324 = Access Keypad 12 TM1325 = Access Keypad 13 TM1326 = Access Keypad 14 TM1327 = Access Keypad 15 TM1328 = Access Keypad 16 TM1329 = Access, Any Keypad TM
1330 = Keypad Beep Area 1 N1331 = Keypad Beep Area 2 N1332 = Keypad Beep Area 3 N1333 = Keypad Beep Area 4 N1334 = Keypad Beep Area 5 N1335 = Keypad Beep Area 6 N1336 = Keypad Beep Area 7 N1337 = Keypad Beep Area 8 N
1338 = Area 1 Exit Error N1339 = Area 2 Exit Error N1340 = Area 3 Exit Error N1341 = Area 4 Exit Error N1342 = Area 5 Exit Error N1343 = Area 6 Exit Error N1344 = Area 7 Exit Error N1345 = Area 8 Exit Error N
1346 = Audio Amplifier Status TMC1347 = Control Power Status N1348 = Light N1349 = Dark N1350 = Security (Day) Alert TMC1351 = Dialer Abort B1352 = Dialer Cancel B1353 = Dialer Auto Test B1354 = Local Programming Begin N1355 = Local Programming End B1356 = Keyswitch Security Alert TMC1357 = Event Log is 80% Full N1358 = Telephone Line Is Ringing B1359 = Telephone Line Seized Status T1360 = Telephone Line Hook Status T1361 = Telephone Local Access T1362 = Telephone Remote Access T1363 = Remote Programming Start N1364 = Remote Programming Stop B1365 = AC Fail Tbl - Power Supv Zn N1366 = Low Batt Tbl - Pwr Supv Zn N1367 = System Start Up B1368 = Control Low Volt Shutdown N1369 = RF Keyfob Button 1 B1370 = RF Keyfob Button 2 B1371 = RF Keyfob Button 3 B1372 = RF Keyfob Button 4 B1373 = RF Keyfob Button 5 B1374 = RF Keyfob Button 6 B1375 = RF Keyfob Button 7 B1376 = RF Keyfob Button 8 B1377 = Lost Serial Port Exp Tbl N1378 = Rule Triggered Voice Dial B1379 = Dialer Report Cleared B1380 = Central Station Kissoff B1381 = Transmitter Supervision Loss N
1382 to 2000 = No Event/Not Used
Appendix A - Event Codes (cont.)
2001 = Automation Control 1 TF ~2032 = Automation Control 32 TF
2033 to 3000 = No Event/Not Used N
3001 = F1 Key on Keypad 1 F3002 = F2 Key on Keypad 1 F3003 = F3 Key on Keypad 1 F3004 = F4 Key on Keypad 1 F3005 = F5 Key on Keypad 1 F3006 = F6 Key on Keypad 1 F3007 to 3012 = F1 to F6 on KP 2 F3013 to 3018 = F1 to F6 on KP 3 F3019 to 3024 = F1 to F6 on KP 4 F3025 to 3030 = F1 to F6 on KP 5 F3031 to 3036 = F1 to F6 on KP 6 F3037 to 3042 = F1 to F6 on KP 7 F3043 to 3048 = F1 to F6 on KP 8 F3049 to 3054 = F1 to F6 on KP 9 F3055 to 3060 = F1 to F6 on KP 10 F3061 to 3066 = F1 to F6 on KP 11 F3067 to 3072 = F1 to F6 on KP 12 F3073 to 3078 = F1 to F6 on KP 13 F3079 to 3084 = F1 to F6 on KP 14 F3085 to 3090 = F1 to F6 on KP 15 F3091 to 3096 = F1 to F6 on KP 16 F
3097 = F1 Key, Any KP Is Pressed B3098 = F2 Key, Any KP Is Pressed B3099 = F3 Key, Any KP Is Pressed B3100 = F4 Key, Any KP Is Pressed B3101 = F5 Key, Any KP Is Pressed B3102 = F6 Key, Any KP Is Pressed B3103 = Any KP Key Is Pressed F3104 to 4000 = No Event
4001 to 4208 = Zone State 1 to 208 T4209 to 5000 = No Event
5001 to 5208 = Bypass State 1 to 208T5209 to 6000 = No Event
6001 to 6208 = Alm Memory 1 to 208 T6209 to 7000 = No Event
7001 to 7208 = Output State 1 to 208 N7209 to 8000 = No Event
8001 thru 9999 = No Event
Event Description Reset Event Description Reset Event Description Reset

M1G Installation and Programming ManualPage 60
Appendix B - Telephone Remote Control
There are two methods of entry:1. Local – Lift house phone off-hook. Enter ***. (To hear over the inside speakers press * 0 * instead.)
Once the control hears the pickup sequence it will go offhook and announce a welcome message. It will thenprompt the user to enter a valid user passcode.
If the User Code is validated the control will announce the main menu selections. These selections are shownbelow along with the sub menu items for each level.
Main Menu Example: FOR ARM STATUS PRESS 1, FOR AUTOMATION CONTROL PRESS 2, FOR TROUBLE STATUSPRESS 3, FOR ZONE STATUS PRESS 4, FOR AUDIO MONITOR PRESS 7, TO EXIT AND HANG-UP PRESS 9.
2. Off site – Dial phone number of control (the control must have a programmed number of rings till answer). Wait forcontrol or answering machine to pick up. If an answering machine picks up enter ***, then enter 1. A voice messagewill ask for security code. If the control answers then wait for three short beep tones and then enter your code.
Menu listing: Main menu options are underlined.For Help - press 0. A voice message will explain the function of each key.
For Arm Status - press 1. A voice message will identify whether the system is currently armed or disarmed and will allow thestate to be changed. There are two options:
If Disarmed - Press 1 for list of Arming options. There are 6 options:Press 1 for Away mode.Press 2 for Stay mode.Press 3 for Stay Instant mode.Press 4 for Armed Night mode.Press 5 for Armed Night Instant mode.Press 6 for Vacation mode.
If Armed – Press 2 to disarm.
For Automation - press 2. A voice message will prompting you to select one of the following automation options:
For Automation Task - press 1. Tasks are like computer macros. They can be programmed and named using the RPsoftware and are used to perform a chain or series of events upon activation. Upon entry into this menu, any task whichwas designated to “Show” will be announced by name and by number. To choose a task, enter its number. For fastestoperation, add a 0 in front of single digit numbers. I.E. for a 3 enter 03. NOTE: Any valid task can be selected by enteringit’s two digit number, even if it was not announced. The task name will then be repeated along with the prompt: ToActivate - press #. This should cause the events to activate.
For Light Control - press 2. This menu allows direct control any light device and can even be used for PLC appliancemodules. Lights are programmed and named using RP software. Upon entry into this menu, any light which wasdesignated to “Show” will be announced by name and number. To choose a light, enter it’s three digit number. Forfastest operation, add 0’s in front of numbers less than three digits. NOTE: Any valid light can be selected by entering it’sthree digit number, even if it was not announced. The light name will then be repeated along with it’s current status (On/Off) and the prompt: To Change - press #. The light should change state.
For Output Control - press 3. This menu allows direct control any valid output on the control. Outputs are programmedand named using RP software. Upon entry into this menu, any output which was designated to “Show” will beannounced by name and number. To choose an output, enter it’s three digit number. For fastest operation, add 0’s infront of numbers less than three digits. NOTE: Any valid output can be selected by entering it’s three digit number, even ifit was not announced. The output name will then be repeated along with it’s current status (On/Off) and the prompt: ToChange - press #. The output should change state.
For Sensor Temperature - press 4. Temperature sensors can be connected to the first 16 zones on the control. Thismenu allows you to hear the current temperature of any valid sensor. Upon entry into this menu, any sensor programmedwith a name and designated to “Show” by the RP software will be announced by name and number. To choose a sensor,enter it’s two digit number. Add 0’s in front of numbers single digits. NOTE: Any valid sensor can be selected byentering it’s two digit number, even if it was not announced. The sensor name will then be repeated along with it’scurrent reading.

M1G Installation and Programming Manual Page 61
Automation Menu continued
For Keypad Temperature - press 5. Certain models of keypads have a built-in temperature sensor. This menu allowsyou to hear the current temperature of any valid keypad sensor. Upon entry into this menu, any keypad sensorprogrammed with a name and designated to “Show” by the RP software will be announced by name and number. Tochoose a keypad sensor, enter it’s two digit number. Add 0’s in front of numbers single digits. NOTE: Any valid keypadsensor can be selected by entering it’s two digit number, even if it was not announced. The keypad sensor name willthen be repeated along with it’s current reading.
For Thermostat Temperature - press 6. Specific brands of HVAC thermostats can be connected to the control. Thismenu allows you to hear the current temperature of any valid thermostat. Upon entry into this menu, any thermostatprogrammed with a name and designated to “Show” by the RP software will be announced by name and number. Tochoose a thermostat, enter it’s two digit number. Add 0’s in front of numbers single digits. NOTE: Any valid thermostatcan be selected by entering it’s two digit number, even if it was not announced. The thermostat name will then berepeated along with it’s current reading.
For System Trouble Status press 3. Upon entry into this menu, any current system troubles will be announced by name. Thiswill deliver a voice message stating that system is normal or the first system trouble that is present. Options: Each time 3 ispressed the next system trouble is identified.
For Zone Status press 4. Upon entry into this menu, any current zone troubles will be announced by name. This will deliver avoice message stating either that “no zones violated” or “zone xx violated”. Additional presses of the 4 key will announceadditional troubled zones, if any exist.
For Audio Alert press 7. This only works if a 2 way listen-in interface is installed. (ELK-M1TWI) It will open an audio pathfrom the phone to the listen-in board and the output 1 speakers. For full operating instructions see Appendix D.
To hang-up press 9. This will deliver the good-bye voice message. The telephone remote control operation has ending.
To hear menu options press 0. This will deliver a voice message explaining the function of each key.
* NOTE: If no response or key presses are heard by the control, the item or menu will be repeated once again. If no keypresses are received within a 30 second time frame the message “Hanging Up, Good-bye” will be heard and the control willthen disconnect.
WHAT HAPPENS IF THE PHONE LINE IS BUSY?If the dialer is in use (such as during an alarm message report) then no dial tone will be heard and the offhook sequence willbe ignored. The best thing to do at that point is to try again later (when the dialer is free) or hold onto the phoneand wait till dialer hangs up. When the phone line is released (idle) dial tone will again be heard and you can then enter theoffhook sequence.
WHAT HAPPENS IF AN ALARM OCCURS?If the control is programmed to communicate alarms to a central monitoring station, it will automatically pick up the phone lineand disconnect all calls when an alarm occurs. During this time period the telephone remote control will be inoperable.However, the installer may elect to program a communicator delay before dial time which would permit the telephone remoteto function for a short time period immediately after an alarm. During this time it would be possible to enter the offhooksequence of * * * and enter all the proper codes to disarm and/silence the alarm.
Appendix B - Telephone Remote Control (cont.)

M1G Installation and Programming ManualPage 62
{Blank} = 0Zero = 21One = 22Two = 23Three = 24Four = 25Five = 26Six = 27Seven = 28Eight = 29Nine = 30Ten = 31Eleven = 32Twelve = 33Thirteen = 34Fourteen = 35Fifteen = 36Sixteen = 37Seventeen = 38Eighteen = 39Nineteen = 40Twenty = 41Thirty = 42Forty = 43Fifty = 44Sixty = 45Seventy = 46Eighty = 47Ninety = 48Hundred = 49Thousand = 50[200ms Silence] = 51[500ms Silence] = 52[800hz Tone] = 53
AA = 54Access = 55Acknowledged = 56AC power = 57Activate = 58Activated = 59Active = 60Adjust = 61Air = 62Alarm = 63Alert = 64All = 65AM = 66An = 67And = 68Answer = 69Any = 70Are = 71Area = 72Arm = 73Armed = 74At = 75Attic = 76Audio = 77Auto = 78Authorized = 79Automatic = 80Automation = 81Auxiliary = 82Away = 83
BB = 84Back = 85Barn = 86Basement = 87Bathroom = 88Battery = 89Bedroom = 90Been = 91Bell = 92Bottom = 93Break = 94Breakfast = 95Bright = 96Building = 97Burglar = 98Button = 99By = 100Bypassed = 101
CCabinet = 102Call = 103Camera = 104Cancel = 105Carbon monoxide = 106Card = 107Center = 108Central = 109Change = 110Check = 111Chime = 112Circuit = 113Clear = 114Closed = 115Closet = 116Code = 117Cold = 118Condition = 119Connect = 120Control = 121Cool = 122Cooling = 123Corner = 124Crawlspace = 125
DDanger = 126Day = 127Deck = 128Decrease = 129Defective = 130Degrees = 131Delay = 132Den = 133Denied = 134Detected = 135Detector = 136Device = 137Dial = 138Dialing = 139Dim = 140Dining room = 141Disable = 142Disarm = 143Disarmed = 144Dock = 145Door = 146
Doors = 147Down = 148Driveway = 149
EEast = 150Emergency = 151Enable = 152End = 153Energy = 154Enrollment = 155Enter = 156Entering = 157Entertainment = 158Enter the = 159Entry = 160Environment = 161Equipment = 162Error = 163Evacuate = 164Event = 165Exercise = 166Expander = 167Exit = 168Exterior = 169
FF = 170Fail = 171Failure = 172Family room = 173Fan = 174Feed = 175Fence = 176Fire = 177First = 178Flood = 179Floor = 180Followed = 181Force = 182Fountain = 183Foyer = 184Freeze = 185Front = 186Full = 187Furnace = 188Fuse = 189
GGame = 190Garage = 191Gas = 192Gate = 193Glass = 194Go = 195Good = 196Good-bye = 197Great = 198Group = 199Guest = 200Gun = 201
HHall = 202Hallway = 203Hanging up = 204Hang up = 205Has = 206
Has Expired = 207Have = 208Hear menu options = 209Heat = 210Help = 211High = 212Hold = 213Home = 214Hot = 215Hot tub = 216House = 217Humidity = 218HVAC = 219
IIf = 220Immediately = 221In = 222Inches = 223Increase = 224Inner = 225Input = 226Inside = 227Instant = 228Interior = 229In The = 230Intruder = 231Intrusion = 232Invalid = 233Is = 234Is about to expire = 235Is active = 236Is armed = 237Is canceled = 238Is closed = 239Is disarmed = 240Is low = 241Is off = 242Is OK = 243Is on = 244Is open = 245
JJacuzzi = 246Jewelry = 247
KKeep = 248Key = 249Keypad = 250Kitchen = 251
LLamp = 252Laundry = 253Lawn = 254Leak = 255Leave = 256Left = 257Less = 258Level = 259Library = 260Light = 261Lights = 262Line = 263Living room = 264Loading = 265Lobby = 266
Appendix C - Voice Message Vocabulary *RP only *
Word or Phrase Word or Phrase Word or Phrase Word or Phrase

M1G Installation and Programming Manual Page 63
Location = 267Lock = 268Low = 269Lower = 270
MM = 271Machine = 272Mail = 273Main = 274Mains = 275Manual = 276Master = 277Max = 278Media = 279Medical = 280Medicine = 281Memory = 282Menu = 283Message = 284Middle = 285Minute = 286Missing = 287Mode = 288Module = 289Monitor = 290More = 291Motion = 292Motor = 293
NNext = 294Night = 295No = 296Normal = 297North = 298Not = 299Notified = 300Now = 301Number = 302Nursery = 303
OOf = 304Off = 305Office = 306Oh = 307OK = 308On = 309On-line = 310Only = 311Open = 312Operating = 313Option = 314Or = 315Other = 316Out = 317Outlet = 318Output = 319Outside = 320Over = 321Overhead = 322
PPanel = 323Panic = 324Parking = 325Partition = 326
Patio = 327Pause = 328Perimeter = 329Personal = 330Phone = 331Place = 332Play = 333Please = 334Plus = 335PM = 336Police = 337Pool = 338Porch = 339Port = 340Pound = 341Pounds = 342Power = 343Press = 344Pressure = 345Problem = 346Program = 347Protected = 348Pump = 349
RRadio = 350Raise = 351Ready = 352Rear = 353Receiver = 354Record = 355Recreation = 356Relay = 357Remain calm = 358Remote = 359Repeat = 360Report = 361Reporting = 362Reset = 363Restored = 364Return = 365Right = 366Roof = 367Room = 368Running = 369
SSafe = 370Save = 371Screen = 372Second = 373Secure = 374Security = 375Select = 376Sensor = 377Serial = 378Service = 379Set = 380Setback = 381Set point = 382Setting = 383Shed = 384Shipping = 385Shock = 386Shop = 387Shorted = 388Shunted = 389Side = 390
Silence = 391Siren = 392Sliding = 393Smoke = 394Someone = 395South = 396Spare = 397Speaker = 398Sprinkler = 399Stairs = 400Stairway = 401Star = 402Start = 403Status = 404Stay = 405Stock = 406Stop = 407Storage = 408Storm = 409Studio = 410Study = 411Sump = 412Sun = 413Switch = 414System = 415
TTamper = 416Tank = 417Task = 418Telephone = 419Television = 420Temperature = 421Test = 422Thank you = 423That = 424The = 425Theater = 426Thermostat = 427Third = 428Time = 429Toggle = 430Top = 431Transformer = 432Transmitter = 433Trespassing = 434Trouble = 435Turn = 436Twice = 437Type = 438
UUnder = 439Unit = 440Unlocked = 441Unoccupied = 442Up = 443User = 444Utility = 445
VVacation = 446Valve = 447Video = 448Violated = 449Visitor = 450
Appendix C - Voice Message Vocabulary (cont.)Word or Phrase
WWake up = 451Walk = 452Wall = 453Warehouse = 454Warning = 455Water = 456Way = 457Welcome = 458West = 459What = 460When = 461Where = 462Will = 463Window = 464Windows = 465With = 466Work = 467
YYard = 468Year = 469You = 470
ZZone = 471Zones = 472
--------------------------Items below are special wordsand phrases which may beused to resolve unusualsituation. For example: Custom1 thru 10 are 6 second locationsthat you may custom record.The items shown in [ ] can beused to speak (say) the time, orcondition based on the systemor zone status.
‘Custom1’ = 1‘Custom2’ = 2‘Custom3’ = 3‘Custom4’ = 4‘Custom5’ = 5‘Custom6’ = 6‘Custom7’ = 7‘Custom8’ = 8‘Custom9’ = 9‘Custom10’ = 10
[Insert Condition] = 2[Insert Time] = 3[Intruder Message] = 473[Inverted Condition] = 4[Say Closed/Open] = 509[Say Down/Up] = 507[Say Locked/Unlocked] = 496[Say Not Secure/Secure] = 505[Say Number][Say Off/On] = 511[Say On/Off] = 512[Say Open/Closed] = 510[Say Secure/Not Secure] = 506[Say Unlocked/Locked] = 495[Say Up/Down] = 508
Word or Phrase Word or Phrase Word or Phrase

M1G Installation and Programming ManualPage 64
Using a Two Way Interface board (ELK-M1TWI), the control can accommodate up to 3 zones of listen-in. Each zonecan have up to 4 microphones for a total of 12 listen-in points. Talk back is delivered through the speakers connected toOutput 1. A two way session can be triggered by any number of zones when an alarm occurs. Two way can also betriggered during a Telephone Remote Control session. Instructions for the ELK-M1TWI are included with the interface.
OPERATION1. Two way Listen-in must first be enabled from Menu 07-Global System Options. There are two required options.Option 31, “2Way Listen-in Enable” (No or Yes) and Option 32, “2Way Callback Time” (000 to 255 seconds). Theseoptions are defaulted to No and 000. In addition, you must also decide which zone(s) need to activate listen-in and settheir “Enable Listen-in” programming option. Whenever a Central Station alarm message is transmitted for one of thesezones, the dialer provides two methods for initiating a listen-in session.
1a. Hold the Line - After alarm kissoff the dialer will hold the phone line open for the amount of time programmed inOption 32, “2Way Callback Time”. This can be from 001 to 255 seconds. During this time the Operator may pick up theline and press * 55 * to initiate an immediate two way session. If the control does not receive * 55 * during the timeperiod it will hang up and release the phone line.
1b. Callback - Upon hangup the control uses the same time value (Option 32, “2Way Callback Time”) to begin a call-back time window. During this time window the control will answer any incoming call on the 1st ring, and allow theOperator to press * 55 * to initiate a two way session.
2. Two way may also be initiated by calling in using the Telephone Remote Control, and pressing 7 - “Audio Monitor”.
3. Once a two way session has begun, it will continue for 3 minutes before automatically disconnecting. To extend thetwo way session for 3 additional minutes you must press command 7.
TONE COMMANDS* 55 * BEGIN LISTEN-IN Used by Operator to begin a listen-in session.
1 TALK Talk through all speakers connected to Output 1.2 LISTEN All 3 microphone zones are enabled initially. Use key 4 to change mics.3 SENSITIVITY INCREASE Raise the microphone gain.4 MICROPHONE SELECT 4+0 Selects ALL microphones, 4+1 Mic1 zone, 4+2 Mic2 zone, 4+3 Mic3 zone5 [future use]6 SENSITIVITY DECREASE Lowers the microphone gain.7 EXTEND TIME for 3 minutes
8 - 8 TERMINATE SESSION and enable 1 ring callback answer for selected time.9 - 9 TERMINATE SESSION without enabling callback answer mode.
0 [future use]* CANCEL last key-press (undo )# [future use]
Appendix D - Two Way “Listen-in/Talk” Interface (optional)
Yes
Yes
No
No
Yes
No
"CS Verify Call Time" starts, if set. (Menu-07, Option 33) Dialer will not dial additional alarmreports during this time, keeping phone line free for Central Station "Voice" Verification.
Dialer Activated (Alarm)Dialer seizes house
phone line, dialsCentral Station andsends report, thenreceives Kissoff.
Dialer remains off-hook for time setin Menu-07, Option 32, "2 Way
Callback Time" looking for command* 55 * to start a two-way session.
Dialer hangs up. Phoneline is un-seized. END
Command*55* received?
Wasthe alarm from
a listen-inZone?
Dialer hangs up. Phone line is un-seized.
Two waylisten-instarts.
It ends after3 minutes or
whencommand
99 ispressed.
Yes
No
Two way listen-in starts. It ends after 3minutes or when command 99 is pressed.
Command* 55 *
received?
End
End
Phone ringsbefore timer
expires?Phone line is seized again after 5seconds. "2 Way Callback Time"
restarts, during which time thedialer will answer any incoming
call on the 1st ring.
DialerAnswers

M1G Installation and Programming Manual Page 65
This control complies with the SIA CP-01 Control Panel Standard - Features for False Alarm ReductionPROGRAMMABLE FEATURES, SHIPPING DEFAULTS, AND RECOMMENDED PROGRAMMING
* Programming at installation may be subordinate to other UL requirements for the intended application.** Combined Entry Delay and Abort Window should not exceed 1 minute.*** Feature is pre-defined in the panel software and may not be altered.
Required
Required
REQUIREMENT
Required(programmable)
Allowed
Required Option
Required Option(except for remote arm)
Required(programmable)
Required Option
Required(programmable)
Allowed Option
Required Option
Allowed
Required(programmable)
Required Option
Required
Annunciate that no alarm was transmitted
Annunciate that a Cancel was transmitted
ALLOWABLE RANGE / PURPOSE
45 - 120 sec. (2 minutes) for full or autoarming Shall not exceed 255 seconds
Individual keypads may be disabled
Only one restart during arming.
Away arm changes to Stay Armif there is no exit detected.30 sec. to at least 240 sec.
(4 minutes) minimum **
May be disabled - by zone or zone type
15 sec. - 45 sec. **
Cannot be a 1+ or derivative of anotheruser. No duplicates with other user codesViolation of a zone defined as Cross zone
requires verification by another zone
Programmable from 1 to 255 seconds.
For all non-fire zones,shut down at 1 trip.
Depends on Panel and Sensors
Call waiting cancel prefix code may bedialed on initial attempt ONLY.
Enabled - Nodisable optionEnabled - Nodisable option
SHIPPINGDEFAULT
60 Seconds
All AudibleAnnunciators
Enabled
Enabled
30 Seconds
Enabled
30 Seconds
Disabled
Disabled
30 Seconds
Enabled
Disabled
Blank - NotProgrammed
4.2.5.1.2
4.2.5.4.1
CP-01 Std.Par. #
4.2.2.1
4.2.2.2
4.2.2.3
4.2.2.5
4.2.3.1
4.2.5.1
4.2.5.1
4.2.6.1& 4.2.6.2
4.3.1
4.3.1
4.3.2
4.3.3
4.5
Abort Annunciation ***
Cancel Annunciation ***
FEATURE
Exit Delay Time 1 & Exit Delay Time 2
Silent on Exit (Disable Exit ProgressAnnunication - ie: Silent Exit)
Exit Time Restart
Auto Interior Off (Auto "Stay" Arm onUnvacated Premises)Entry Delay Time 1 & Entry DelayTime 2Comm Abort Time (Abort Window) forNon-Fire Zones. 000 time = DisabledComm Abort Window Time - for Non-Fire Zones
Duress (Individual User Code Option)
Cross Zoned (Zone Option)
Cross Zone Verify Time
Single Alarm Lockout (SwingerShutdown)Fire Verified Zone Definitions (FireAlarm Verificatoin)
Call Waiting Cancel ***
Enabled
Enabled
RECOMMENDEDPROGRAMMING *
60 Seconds
All Audible Annunciators
Enabled
Enabled
At least 30 Seconds **
Enabled (all zones)
At least 15 seconds
Disabled
Enabled and two (ormore) zones programmedTime based on walk path
in protected premises
Enabled
Enabled unless sensorscan self-verify
Depends on User PhoneLine
Appendix E - SIA CP-01 Compliance

M1G Installation and Programming ManualPage 66
Appendix F - Regulatory Agency StatementsThis control complies with Part 68 of the FCC rules. On the front nameplate of the main control board is a label that contains, among other information, the FCCcertification number and ringer equivalence number (REN) for this equipment. If requested, this information must be provided to the telephone company. Thisequipment uses an RJ31X jack to connect to the telephone network. The REN is used to determine the quantity of devices that may be connected to the telephoneline. Excessive REN’s on the telephone line may result in the devices not ringing in response to an incoming call. Typically, the sum of REN’s should not exceed five(5.0). To be certain of the number of devices that may be connected to a line (as determined by the total RENs) contact the local telephone company.
If this equipment should happen to cause harm to the telephone network, the telephone company will notify you in advance that temporary discontinuance of servicemay be required. But if advance notice isn’t practical, the telephone company will notify the customer as soon as possible. Also, you will be advised of your right tofile a complaint with the FCC if you believe it is necessary. The telephone company may make changes in its facilities, equipment, operations, or procedures thatcould affect the operation of the equipment. If this happens, the telephone company will provide advance notice in order for you to make the necessarymodifications in order to maintain uninterrupted service. If trouble is experienced with this equipment, please contact the manufacturer for repair and warrantyinformation. Elk Products, Inc. 3266 Hwy 70 W. Hildebran, NC 28637 828-397-4200 If the trouble is causing harm to the telephone network, the telephonecompany may request you remove the equipment from the network until the problem is resolved.
There are no user serviceable components in this product. All necessary repairs must be made by the manufacturer. Other repair methods may invalidate the FCCregistration on this product. This equipment cannot be used on telephone company-provided coin service. Connection to Party Line Service is subject to state tariffs.This equipment is hearing-aid compatible.
This control complies with Part 15 of FCC Rules which are designed to provide reasonable protection against such interference in a residential installation. The FCCrequires the following statement for your information:
This equipment generates and uses radio frequency energy and if not installed and used properly, that is, in strict accordance with the manufacturer’s instructions,may cause Interference to radio and television reception. It has been type tested. However, there is no guarantee that interference will not occur in a particularinstallation. If this equipment does cause interference to radio or television reception, which can be determined by turning the equipment off and on, the user isencouraged to try to correct the interference by one or more of the following measures:
* If using an indoor antenna, have a quality outdoor antenna installed. * Reorient the receiving antenna until interference is induced or eliminated.* Move the receiver away from the security control. * Move the antenna leads away from any wire runs to the security control* Have the security control plugged into a different outlet so that it and the receiver are on different branch circuits.
If necessary, the user should consult the dealer or an experienced radio/television technician for additional suggestions. The user or installer may find a booklet titled“Interference Handbook” prepared by the Federal Communications Commission helpful: This booklet is available from the U.S. Government Printing Office,Washington, DC 20402. The user shall not make any changes or modifications to the equipment unless authorized by the Installation Instructions or Users Manual.Unauthorized changes or modifications could void the user’s authority to operate the equipment.
UNDERWRITERS LABORATORIES UL INFORMATION* For 24 hours of standby power using two (2) 8 Ah batteries, limit auxiliary power load to 330 mA.* For 4 hours of standby power using one (1) 8 Ah battery, limit auxiliary power load to 1 A.* Force Arming and Auto Arming shall not be enabled* For residential fire applications the indicating devices shall be a Wheelock 34T-12 or equivalent.* Initiating and indicating devices must be rated at 11.5 to 12.4 VDC.* For residential applications the minimum alarm cutoff time for the audible devices shall be 4 minutes.* Zone Swinger Shutdown shall not be enabled.* Total combined continuous current draw from terminals +SAUX, +VAUX, +VKP, and connector J16 is 1.5 Amps.* Remote Downloading shall not be used on UL Listed systems.* Communicator Dial Delay time shall be set to “0”.* For residential burglary applications the maximum entry delay time shall be 45 seconds and the maximum exit delay time shall be 60
seconds.* 24-hour communicator test transmission is required.* The silent keypad option shall not be enabled.
MINIMUM SYSTEM CONFIGURATIONS FOR UL INSTALLATIONS(Residential Burglary, Residential Fire)
* At least one compatible keypad is needed for all applications.* At least one bell fixture is required for all applications.

M1G Installation and Programming Manual Page 67
[Intentionally left blank]

M1G Installation and Programming ManualPage 68
ELK-M1KP LCD Keypad
ELK-M1PR
J1J2
Back (Circuit) Side of Keypad
ELK-M1PR
J1J2
Bend (arch) the 5 wires from the M1PR wiring plug asshown. This provides space between the plug and theconnector (J2) so that they may be attached.
J2Connector
M1PR Wiring Plug
Detail A
Six (6) conductor plug-in data bus cable(4 wires got to the M1 Control, 1 is a zone
input and 1 is a programmable output).
Note: Earlier versionkeypads do not have the
newer (white) polarized J2jack. For these typekeypads; the small
polarizing tabs need to becut off so the connector will
fit onto the J2 jack.
ELK-M1PR
Detail B
Built-in Temperature Sensor If the Keypad local temperature readstoo high after installation of the M1PR Mini Prox Reader, it may benecessary to adjust the keypad temperature reading to compensatefor the added heat produced by the M1PR. Refer to the M1KPInstructions or contact ELK Technical Support.
An external Prox Reader (26 bit Wiegand compatible) from anothermanufacturer may be connected to the ELK-M1KP Keypad in place of an
internal ELK-M1PR Mini Prox Reader. This requires an optional ELK-WO35ACable Assembly. Splice wires as indicated, and plug cable into connector J2.
WhiteRed
BlackGreen
Brown
WhiteRed
BlackGreen
Brown
ELK-WO35A Cable Assembly
Detail C
ExternalProx Reader
(26 bitWiegand)from other
Manufacturer
Appendix G - Additional Keypad Information
Installing a ELK-M1PR internal prox reader or an external (26 bit Wiegand) prox reader1. Turn Off the Master Power Switch.2. Remove M1KP Keypad from mounting plate, disconnect the 6 pin data bus cable, and place face down on a soft surface.3. Locate the 1" mounting hole in the lower left corner and the 5 pin connector marked J2 to the right of the mounting hole.4. Position the M1PR in the 1" mounting hole with its 5 wire female cable facing towards connector J2 on the circuit board.5. Gently lift up on the 5 wire cable, then bend the white plug down to form a slight arch in the wires.
SEE DETAIL A. This will shorten the cable enough that it can be plugged into connector J2.6. Reconnect the 6 pin data bus cable to connector J1 and install the keypad onto its mounting plate.7. Turn On the Master Power Switch and follow the instructions for enrolling cards or fobsEnrolling Prox Cards and FobsProx cards/fobs are enrolled into a User Code location using the same procedures used to add/change User Code PINs.1. Press the ELK key, then press the 6 key (or scroll up) to display 6 - Change User Codes. Press the RIGHT arrow key to
select this menu. A Master user code (PIN) must be entered to gain access to this menu.2. Enter the three digit number of the desired User Code location (001 to 099) or use the UP or DOWN arrow keys to scroll
through the codes. Then select CHG by pressing the RIGHT arrow key.3. The keypad will display any existing 4 or 6 digit code that is programmed for this user along with any programmed name.4. Place a new (not previously enrolled) prox card/fob near the Keypad's right speaker grill below the Stay key. The read range
is approximately 1/8" to 3/8". The Keypad should beep 3 times and display the card/fob 12 digit ID.5. If the card/fob is rejected, a low error tone and Code Not Authorized, Redo will display. Causes for reject include: A. The
card/fob has already been enrolled (duplicate codes are not allowed) OR B. The facility code in the card/fob does notmatch the reader facility code. A prox reader can only read cards/fobs with a matching facility code.
6. Once a prox card/fob is enrolled in a user code location, its capabilities are set by the User Code Options found in InstallerMenu 02. The commonly used options are: Arm the Control, Disarm the Control, or Access event.
A keypad access event occurs when a valid prox card/fob is read at a keypad. Nothing will happen until this event is utilized ina Whenever/And/Then Rule from the Elk-RP software. An Access event can be used to create virtually any desired reaction.i.e., turn on an output, a light, close/open a relay, etc. The following rule example turns on Output 003 for 10 seconds when avalid prox card/fob (with Access Option enabled) is read at Keypad 01. This could be used to break power to a door strike.
WHENEVER Keypad 01 Access is ActivatedTHEN Turn On Output 003 for 10 seconds.

M1G Installation and Programming Manual Page 69
KEYPAD INTERNAL TEMPERATURE SENSOREvery standard ELK-M1KP has a built-in temperature sensor, which detects the surrounding ambient temperature. Thesensor temperature may be displayed on the LCD, and read from another keypad or the telephone remote control. It mayalso be used with the Elk-RP Whenever/And/Then Rules to automatically cause an action or control something. i.e., a fan,pump, light, etc.
Viewing a Keypad temperature sensor reading1. To view a keypad temperature sensor press the ELK key once (enter code if prompted), then press the RIGHT arrow to
select the View/Control Automation menu.2. Press the 5 key (or scroll up) to display: 4-Keypad Temperature, then press the RIGHT arrow key.3. The first Keypad (Keypad 01 will be displayed along with its Name, Keypad Number, and Temperature.4. Additional Keypad Temperature sensors (if any) may be displayed by entering the 2 digit Keypad number OR by scrolling
with the UP or DOWN arrow keys. To exit from this menu press the * key.
Using a Keypad temperature reading in a Rule to create an action or outputThe following is an example of an ELK-RP Whenever/And/Then Rule to automatically turn on Output 3 (controlling a Fan, etc.)for 10 minutes whenever the Keypad temperature reading exceeds 90 degrees.1. Start RP and open an account. Click the Automation tab and the Rules tab followed by New.2. Click Trigger, then point to Time Occurrence, then Every X Seconds, and then click to select. **3. In the block beside the words Fixed Value, type in 30 and click OK.4. Click And, follwed by Temperature which is located near the bottom of the drop down list.5. Highlight the Keypad temperature sensor (by name), click the Greater than button, and change the temperature selection
number to 90. Make sure the button beside F is selected, and click OK.6. Click Then, followed by Turn Output On/Off. Highlight Output 3 (use the scroll down arrow), make sure the button beside
Turn on is selected, then select the box labeled For. Highlight the hrs:mins:secs window and enter 00:10:00 (10 min-utes). Click OK. Double check everything and click Done.
7. The completed Rule should resemble the example below.
** Numerous triggers may be used for a temperature type rule, i.e., time occurence, arming of the security system, opening of a zone, etc.However, the M1 does not allow a temperature reading to be used as a trigger. This helps prevent a false activation "runaway" that couldoccur simple because the temperature has fluctuated by a degree or fraction of a degree. Instead, the AND command is used to compare or"test" a temperature sensor reading against a target value, each time the trigger occurs. The target value is programmable and the compareoptions are "Equal to, Not equal to, Less than, and Greater than". The "Equal to" is not recommended as a compare opton because it may beimpossible for a temperature reading to be exactly at the target value when the trigger occurs.
TEMPERATURE READING ADJUSTMENTIf the Keypad internal temperature sensor appears to read higher or lower than other room thermostats/thermometers, it may bedue to the Keypad mounting location, the room conditions, or the installation of a optional Mini Prox Reader (ELK-M1PR). TheKeypad has an adjustment procedure which allows compensation for these conditions.
1. Press and hold the " * " key, followed by the F5 key . HOLD BOTH keys pressed for 5-10 seconds or until the LCD displays Exit when done. F1 Set Addr. (This is Keypad setup mode)
NOTE: This mode may also be accessed by removing power from the keypad (unplugging the data bus cable) and thenapplying power while holding any key pressed.
2. Press the F2 key and the LCD will display: Temperature Degrees F = XX.X (This is the current temperature)3. Use the UP or DOWN arrow keys to adjust the current temperature display until it approximates the desired setting. Each
press of the arrow keys changes the setting by approximately 3 tenths of a degree (00.3) It may not be possible to end upexactly on an even temperature setting.
4. Press the Exit key twice do return back to the regular operation mode.
Appendix G - Additional Keypad Information (cont.)

M1G Installation and Programming ManualPage 70
M1 LIMITED WARRANTY
The ELK-M1 and its associated component products are warranted by Elk Products, Inc. (“Manufacturer”) against defects inmaterial and workmanship for a period of two (2) years from the date of manufacture. If product is found to be defective duringthe first 180 days, manufacturer may allow an over the counter exchange, subject to inspection and approval by one of it’srepresentatives. Manufacturer’s obligations under this Limited Warranty shall be limited to repairing or replacing, at its option,free of charge, during this warranty period, any product returned to Manufacturer freight prepaid. After the expiration of thewarranty period, product will be repaired based on a fixed charge per device.
Manufacturer shall have no obligation under this Limited Warranty or otherwise if (1) the Product has been damaged bynegligence, accident, mishandling, lightning or flood, or other Acts of God, (2) the Product has not been operated inaccordance with its operating instructions, (3) the Product has been altered or repaired by anyone outside Manufacturer’sauthorized facilities (4) adaptations or accessories have been made or attached to the Product which, in Manufacturer’s soledetermination, have adversely affected its performance, safety or reliability.
If a Product should malfunction or fail during it’s warranty period, contact ELK or one of its authorized distributors for a ReturnAuthorization (RMA) number. Returned Products must include a complete description of the problem, along with the RAnumber clearly marked on outside of the package. Manufacturer will not be responsible for any unnecessary items includedwith any returned Product.
THIS WARRANTY IS THE EXCLUSIVE WARRANTY FOR ANY PRODUCT. MANUFACTURER SPECIFICALLY DISCLAIMS ANYAND ALL OTHER WARRANTIES OF ANY KIND, EXPRESS OR IMPLIED, INCLUDING ANY WARRANTIES OF FITNESS FOR APARTICULAR PURPOSE OR OF MERCHANTABILITY. MANUFACTURER SHALL NOT BE LIABLE IN TORT, INCLUDINGNEGLIGENCE OR STRICT LIABILITY, AND SHALL HAVE NO LIABILITY AT ALL FOR INJURY TO PERSONS OR PROPERTY.MANUFACTURER’S LIABILITY FOR FAILURE TO FULFILL ITS OBLIGATION UNDER THIS LIMITED WARRANTY OR ANYOTHER LIABILITY IN CONNECTION WITH A PRODUCT SHALL BE LIMITED TO THE AMOUNT OF THE PURCHASE PRICERECEIVED BY MANUFACTURER FOR THE PRODUCT. THE REMEDIES STATED IN THIS LIMITED WARRANTY ARE THECUSTOMER’S EXCLUSIVE REMEDIES AGAINST MANUFACTURER REGARDING ANY PRODUCT. UNDER NOCIRCUMSTANCES SHALL MANUFACTURER BE LIABLE FOR ANY INDIRECT, INCIDENTAL, SPECIAL OR CONSEQUENTIALDAMAGES, INCLUDING LOST PROFITS AND REVENUES, INCONVENIENCE OR INTERRUPTIONS IN OPERATIONS, OR ANYOTHER COMMERCIAL OR ECONOMIC LOSSES OF ANY KIND. THESE LIMITATIONS AND DISCLAIMERS ARE NOT MADE BYMANUFACTURER WHERE PROHIBITED BY LAW. SOME STATES PROHIBIT LIMITATIONS OF WARRANTIES AND THECUSTOMER MAY HAVE ADDITIONAL RIGHTS IN THOSE STATES.

M1G Installation and Programming Manual Page 71
IndexA
Alarm Abort 40Alarm Cutoff Timers 33Anti-Takeover 21Area Partitioning 21Area Reporting Codes 40, 41Auto Stay Option 27Automation control function 16Automation Tasks 51Auxiliary Power Connections 10
B
Battery Connection 10Bus Module Enrollment 25
C
Central Station alarm verification 36Communicator Setup Checklist 22Comparisons of M1 and M1G (Gold) 5Counters 53CrossZonePool 33CrossZoneVerTime 35Custom Settings 53Custom voice messages
Voice message recording 19
D
Data Bus Device Types/Addresses 24Daylight Savings Time 35Defaulting the Control 36Dialer Delay 33Dialer Delay Time 41Duress 24
E
Entering Installer Level Programming 22Entry delay time 26Event Codes - Appendix A 58Exit delay time 26Exit Error 26Exit TimeRestart 27Exit1TimeRestart 27
F
Force Arm 32Four (4) State Zone Wiring 9
G
Global Sys Definitions 34, 35, 36, 37
I
Input/Output Expander Addresses 24Installation and Wiring 8Installer Program Code
14, 16, 21, 22, 25
K
Keypad Addresses 24Keypad Definitions 29Keypad Menus 16
L
Lighting 52Listen-In 33
M
Menu 01 - Bus ModuleEnrollment 25Menu 02 - User Code Authorities 25Menu 03 - Area Definitions 27Menu 04 - Keypad Definitions 28Menu 05 - Zone Definitions 30Menu 06 - Alarm Cutoff Timers 33Menu 07 - Global System Definitions 34Menu 08 - Telephone Account Setup 38Menu 09 - Area Reporting Codes 40Menu 10 - Zone Reporting Codes 42Menu 11 - Sys Report Code Options &
Codes 43, 44Menu 12 - User Report Codes 47Multi-area (Partition) Operation 20
O
Operating The System 14Output 1 Delay Turn-On 36Outputs 11, 52
P
PeriodicTrip 33Prox Reader 68
Q
Quick Reference Programming Guide 23Quickarm 26
R
Regulatory Agency Statements -Appendix F 66
Ring/Hang/Answer option 36Rings Until Auto Answer 37
RP Software 49Rules 55
S
Serial Port Baud Rate 37SIA CP-01 Compliance - Appendix E 65Silent Alarm 31SingleAlmLockout 37Specifications, Features, and Benefits 5Sunrise/Sunset 52SwingerShutdown 33Sys Rpt Code Options 44, 45
T
Tasks 51Telephone Account Setup 38, 39Telephone Line Connection 11Telephone Remote Control 34, 60Temporary Code 24Texts 54Thermostats 54Transformer Power Input (AC) 10Two Way Listen-in 36
U
Update/Verify Firmware 50, 51User Code 14, 16User Code Options 24
V
Verify Call Time 37Voice Dialer 38Voice messages - Recording Custom 19Volume level adjustment 35
W
Whenever/And/Then 55WirelessDefinitions 47Wiring & Hookup Diagram 6WrongCodeLockout 35
Z
Zone Definitions 31, 32Zone Reporting Codes 42, 43Zone Wiring Types 31

www.elkproducts.comPrinted in USA M1_IM430 072005


![Lie antialgebras: Prémicesovsienko.perso.math.cnrs.fr/Publis/CommGradAlgNew.pdf · JID:YJABR AID:13139 /FLA [m1G; v 1.47; Prn:11/10/2010; 17:08] P.5(1-32) V.Ovsienko/JournalofAlgebra](https://img.dokumen.tips/doc/110x75/5fb6c3b1c4c77631a3679e05/lie-antialgebras-pr-jidyjabr-aid13139-fla-m1g-v-147-prn11102010-1708.jpg)