Embed Size (px)
Citation preview

User InstructionsM-PWR
Audiolab M-PWR english manual.in1 1 2013-3-11 12:29:02

1: Important Safety Information Page 1
IMPORTANT SAFETY INFORMATIONRead these instructions.Keep these instructions.Heed all warnings.Follow all instructions.Do not use this apparatus near water.Clean only with dry cloth.
Do not block any ventilation openings. Install in accordance with the manufacture’s instructions.
Do not install near any heat sources such as radiators, heat registers, stoves, or other apparatus (including amplifiers) that produce heat. Do not defeat the safety purpose of the polarized or
grounding plug. A polarized plug has two blades with one wider than the other. A grounding plug has two blades and a third grounding prong. The wide blade or the third prong is provided for your safety. If the provided plug does not fit into your outlet, consult an electrician for replacement of the obsolete outlet.
Protect the power cord from being walked on or pinched particularly at the plugs, convenience receptacles, and at the point where they exit from the apparatus.
Use only with the cart, stand, tripod, bracket, or table specified by the manufacturer, or sold with the apparatus. When a cart or rack is used, use caution
when moving the cart/apparatus combination to avoid injury from tip-over.
Unplug the apparatus during lightning storms or when unused for long periods of time.
Refer all servicing to qualified personnel. Servicing is required when the apparatus has been damaged in any way, such as power supply cord or plug is damaged, liquid has been spilled or objects have fallen into the apparatus has been exposed to rain or moisture, does not operate normally, or has been dropped.
CAUTION: These servicing instructions are for use by qualified service personnel only. To reduce
the risk of electric shock, do not perform any servicing other than that contained in the operating instructions unless you are qualified to do so.
Do not install this equipment in a confined or building-in space such as a book case or similar unit, and remain a well ventilation conditions at open site. The ventilation should not be impeded by covering the ventilation openings with items such as newspaper, table-cloths, curtains etc.
WARNING: For the terminals marked with symbol
of “ ” may be of sufficient magnitude to constitute
a risk of electric shock. The external wiring connected to the terminals requires installation by an instructed person or the used of ready-made leads or cords. Only use attachments/accessories specified or provided by the manufacturer.
To reduce the risk of fire or electric shock, do not expose this apparatus to rain or moisture. The apparatus shall not be exposed to dripping or splashing and that objects filled with liquids, such as vases, shall not be placed on apparatus.
The mains plug is used as disconnect device, the disconnect device shall remain readily operable.
This equipment is a Class II or double insulated electrical appliance. It has been designed in such a way that it does not require a safety connection to electrical earth.
This symbol indicates that there are important operating and maintenance instructions in the literature accompanying this unit.
This symbol indicates that dangerous voltage constituting a risk of electric shock is present within this unit.
AVIS: RISQUE DE CHOC ELECTRIQUE-NE PAS OUVRIR WARNING: SHOCK HAZARD-DO NOT OPEB
Audiolab M-PWR english manual.in2 2 2013-3-11 12:29:03

2: Getting Started Page 2
• Optimized for low distortion
• Output short protection
• High temperature protection
Unpacking
Unpack the product fully. The carton should contain:
• The Audiolab M-PWR
• Power cord suitable for your region
• Instruction manual
• Warranty Card
If an item is missing or damaged, report this to your dealer as soon as possible. Retain the packing for safe transport of your unit. If you dispose of the packing, please do so with regard to any recycling regulations in your area.
Placement
The unit is designed to run warm during normal operation but ensure you do not block any ventilation openings.
Place the unit on a sturdy shelf or table. If you use equipment racks, ensure the unit has adequate ventilation and is on its own shelf.
Ensure your mains voltage corresponds to the rating plate on the rear of the product’s power supply. If in doubt, consult your dealer. If you move to an area with a different mains voltage, seek advice from an Audiolab appointed dealer or a competent service technician.
Thank you for purchasing the Audiolab M-PWR. We, at Audiolab, have spent hundreds of hours perfecting the design of this unit so that you can enjoy hi-fi music in your home.
M-PWR is primarily designed to match with Audiolab M-DAC or Q-DAC, but is equally suitable for partnering with Audiolab 8200 CDQ using its in-built preamplifier.
Of course M-PWR can also be used in any hi-fi system where the source unit includes volume control. For example it can be connected to a pre-amplifier or control unit fed from a variety of sources.
By providing both Balanced and line inputs, M-PWR is an extremely versatile stereo power amplifier. If you already own the Audiolab M-DAC/Q-DAC or 8200 CDQ you will find that the Balanced connections bring a new level of fidelity and detail to your listening.
Whatever source you choose, M-PWR will drive your loudspeakers with a unique combination of power and finesse that we hope will bring you many hours of listening pleasure.
Signal Inputs:• RCA analog input
• XLR Balance analog input
Signal Output:• Loudspeaker output
Operating Features:• Ultra low noise gain circuit
Audiolab M-PWR english manual.in3 3 2013-3-11 12:29:03
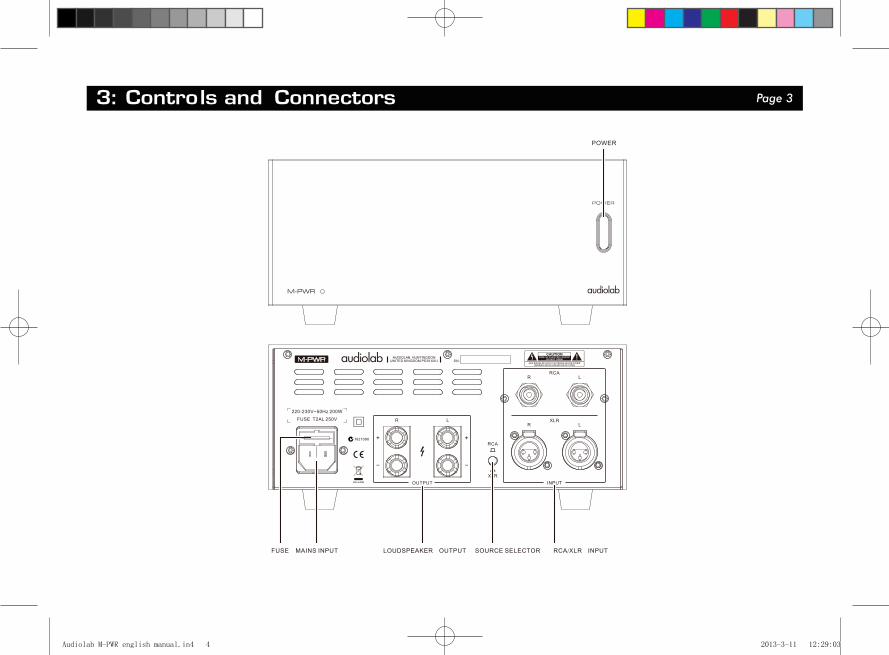
3: Controls and Connectors Page 3
Audiolab M-PWR english manual.in4 4 2013-3-11 12:29:03

4: Connections-1 Page 4
Fuse
The mains supply fuse of Audiolab M-PWR Stereo Amplifier is accessible on the rear panel after the IEC mains plug has been removed. In the rare event that the amplifier stops operating, you should first check for any obvious cause before replacing the fuse with one of the correct rating and type. The correct fuse values are:
220 - 240V (UK, EU, Korea, etc.) T2AL 20mm Slow Blow
100 - 120V (USA, Japan, etc.) T3.15AL 20mm Slow Blow
You should switch off the equipment and remove the connection to the mains power outlet before changing the fuse.
Connecting to the AC power supply
The Audiolab M-PWR Stereo Amplifier is provided with a mains cable fitted with an appropriate mains plug. This plug should not be cut from the cable. If for any reason, the plug is removed it must be safely disposed. It must never be plugged into a mains outlet.
You should read the following useful notes carefully before you begin to install and use the equipment.
There are no user adjustable parts inside the equipment. You should refer to a qualified engineer or return the equipment to either the dealer or the Audiolab distributor for any servicing requirements.
Important notice: Please do not connect loudspeakers or source components to the amplifier when switched on. Always switch M-PWR off before making connections!
The Audiolab M-PWR Stereo Amplifier will be warm when running, the actual temperature depending on the power output. A resettable current trip will automatically switch the amplifier off under gross overload or short circuit output etc. The fins of the heat sink should be kept clear of obstruction to allow adequate ventilation in normal use.
Checking the AC power supply
The Audiolab M-PWR Stereo Amplifier is supplied in four versions suitable for connection to 240V, 230V, 115V or 100V AC power supplies. Before connecting the amplifier check that you have the correct version. If the amplifier is connected to a lower voltage than marked, the maximum output power will be lower than specified.
Please check with the dealer if you have any doubt as to the voltage in your area or intend to use the equipment in regions which use different mains voltages. If you are in any doubt of the correct operational voltage, ask a qualified electrician before applying power to the equipment. The Audiolab M-PWR Amplifier will work correctly within standard tolerances of this voltage.
Audiolab M-PWR english manual.in5 5 2013-3-11 12:29:03

4: Connections-2 Page 5
In the UK a fused 13 Amps mains plug should be fitted with a fuse link rated to 13 Amps which conforms to BS1362. In other countries a value between 10 Amps and 15 Amps should be used at either the wall socket or at the mains distribution board. If you are in any doubt you should consult a qualified electrical engineer.
Use of correct connectors and cables
You should ensure that any cables which are used with Audiolab M-PWR Stereo Amplifier are properly terminated and that the cable is appropriate to the task. This is particularly important with loudspeaker cables and connections. If you are in any doubt you should consult your dealer.
Loudspeaker Cables
Loudspeaker cables should be carefully prepared. The following sketches show the preparation of a speaker cable for use with Audiolab M-PWR Stereo Amplifier and loudspeakers. When stripping the insulation, be careful not to cut into the wire. Make sure that you collect together all the strands of wire as stray wires may cause shorting which could result in damage or cause a fire.
When estimating the length, provide sufficient loudspeaker cable to enable easy access and tidy securing. Some cables are quite heavy and you should be careful to place your cables so that they do not cause undue strain on the binding posts of the amplifier or loudspeaker.
Note: Ensure that cables used with Audiolab M-PWR Stereo Amplifier are appropriate to the task and correctly terminated.
Audiolab M-PWR english manual.in6 6 2013-3-11 12:29:04

4: Connections-3 Page 6
Connecting the M-PWR Stereo Amplifier
Audiolab M-PWR english manual.in7 7 2013-3-11 12:29:04

5: Operation Page 7
The performance of amplifiers tends to stabilize after a period of use due to a number of factors associated with the physical and chemical properties of the components. We recommend that the system be run with a music signal for several hours when it is first installed. Although the changes can be quite subtle, after a few days the sound quality becomes smoother and more natural.
Switching On
The Audiolab M-PWR Stereo Amplifier Mains on/off switch is on the front panel. Press the switch to power M-PWR on/off.
The power LED will glow red when the amplifier is powered on.
The Mains On/Off switch should be switched off when the amplifier is not in use.
Amplifier Protection Trip
The Audiolab M-PWR Stereo Amplifier is protected by a thermal fuse which interrupts the audio output if the amplifier is grossly overloaded for a period of time. The LED on front panel will flash when M-PWR is in protection mode. To restore operation, simply power off unit for a while and then power on again.
Loudspeaker Phasing
Make sure that both channels are connected in phase. The positive (red) output terminal of each channel should be connected to the positive (red) terminal of the speaker. Special care should be taken when bi-wiring as phase becomes critical.
If there is a doubt about the way the loudspeakers are connected, check their phasing by playing a mono source - the sound should appear from a point midway between the two loudspeakers. If this position is unfocused, reverse the connections to one of the loudspeakers. Correctly connected loudspeakers give a defined centre sound source with fuller bodied tenor and bass registers.
Maintenance
The surface of the equipment may be cleaned with a barely damp cloth provided the power has been switched off. Solvent based cleaners should not be used.
Note: Always switch on the power amplifier after the rest of the system and switch it off before powering down any source component. Ensure the system volume control is at minimum when switching your equipment on or off.
Audiolab M-PWR english manual.in8 8 2013-3-11 12:29:04

6: Specifications Page 8
Specifications
(Measurement made with 230V supply, one channel driven and applied to either channel)
Rated Output Power 2 x 40W (8Ω)
2 x 60W (4Ω)
Total Harmonic Distortion <0.008% (10W 1kHz)
<0.05% (10W, 20Hz-20kHz)
Frequency Response -0.5dB (20Hz-20kHz, ref. 1kHz)
Input Sensitivity 600mV (RCA Line in)
Input Impedance 10kΩ (Balanced)
20kΩ (Unbalanced)
Signal to Noise Ratio (S/N) 106dB (A Weighted, ref. 40W)
Power Requirement 220-240V ~ 50-60Hz
110-120V ~ 50-60Hz
100V ~ 50-60Hz
Dimension (W x H x D) 246.5 x 114 x 252 (mm)
Net Weight 4.7kg
Audiolab M-PWR english manual.in9 9 2013-3-11 12:29:05

7: Warranty Page 9
Audiolab M-PWR english manual.in10 10 2013-3-11 12:29:07

Audiolab M-PWR english manual.in11 11 2013-3-11 12:29:09

IAG House, Sovereign Court, Ermine Business Park, Huntingdon, Cambs, PE29 6XU, UKTel: +44(0)1480 447700 Fax: +44(0)1480 431767 http://www.audiolab.co.ukIAG reserves the right to alter the design and sepcifications without noctice. All rights reserved IAG Group Ltd.Audiolab is a member of the International Audio Group. CODE: AH12-MNL012a
Audiolab M-PWR english manual.in12 12 2013-3-11 12:29:09