Embed Size (px)
Citation preview

Vectric Project Tutorial
Designed for Vectric™ by Michael Tyler
Designed by Michael Tyler - Nov-Dec 2014 www.vectric.com
Vectric Project Tutorialwww.vectric.com
Project TutorialIt is our pleasure to provideour customers with fun anduseful projects to enjoy!
Featuring compatibility with nearly all CNC MachinesFeaturing compatibility with nearly all CNC Machines
CNC Bits used for the Sample:
90 degree V-Bit 0.125 " Up-Cut End Mill (EM)0.25 " Down-Cut End Mill (EM)
Groups of Luminaria (are seen in outdoor
displays with candles set inside paper bags during various holiday seasons.
This version features a punched-tin style hole pattern through 0.25 "-thick material. The holes are part of the decorative panel designs and let light peek through from the inside. The interior is lit with a battery operated flickering tea light instead of a candle.
These luminarias are intended for indoor use to be displayed on a shelf, buffet or dining table to make a nice addition to any holiday decor. The design is not especially holiday specific and depending upon your choice of finish, the luminarias could be displayed all year long if desired.
The assembled dimensions of each luminaria are about 5.25" x " x 9.5
also known as “festival lights”) often
5.25 "
Main items you will need:
1) The Project Files (included):• Luminaria_Base.crv• Luminaria_Panels.crv
: 0.75 " x 3.5 " x 7 " Panels*: 0.25 " x 11 " x 22 " (two of these)*MDF was used for the 0.25 " -thick sample panels, but you can use any suitable material of your choice
3) Battery operated LED tea light candles, wood glue, sandpaper, wood stain and/or paint and clear finish
4) A Dremel-type rotary tool with assorted sanding wheels and bits to sand small details
2) Material with these dimensions:Base
Project TutorialIt is our pleasure to provideour customers with fun anduseful projects to enjoy!
Sample Carved with:
ShopBot Buddy
www.shopbottools.com
®
PRSalpha BT48
or
Compatible withCurrent Version of: Festive Luminaria!

STEP 1 - Open and Review the Project FilesOpen the file(s) in your V-Carve Pro or Aspire software. (fig. 1)
Carefully review all the toolpaths and make any necessary changes to suit your particular bits and machine. The toolpaths are currently set with feeds, speeds and pass depths that were used in creating the original sample. Please don’t use them directly until you review them for your own setup. It is VERY IMPORTANT to recalculate all toolpaths after making any edits/changes. Preview all toolpaths again to visually verify the project outcome on-screen.
NOTE: The panel drill holes are set at 0. depth. This is so the holes make a clean cut all the way through the 0.
28"
25"-thick material. If your spoil board is perfectly flat, this depth setting should be adequate. Otherwise, you can add a little more depth to make absolutely certain the holes make a clean cut-through. As always, make sure you recalculate all toolpaths after making any edits/changes. Preview all toolpaths again to visually verify the project outcome
(cont.)
Page 2
(cont.)
STEP 2 - Run the ProjectWhen you are satisfied with your settings, save the toolpaths to the appropriate Post Processor for your machine, place your material on your machine bed and proceed to run the files. (fig. 2a, 2b)
STEP 3 - Release Parts from MaterialSeparate the parts from the material, then sand off any tab remnants and undesirable toolmarks. (fig. 3a, 3b, 3c)
Vectric Project Tutorialwww.vectric.com
fig. 1
fig. 2a
fig. 2b
fig. 3a
Luminaria_Base.crv
Luminaria_Panels.crv
fig. 3c
fig. 3b
Festive Luminaria!
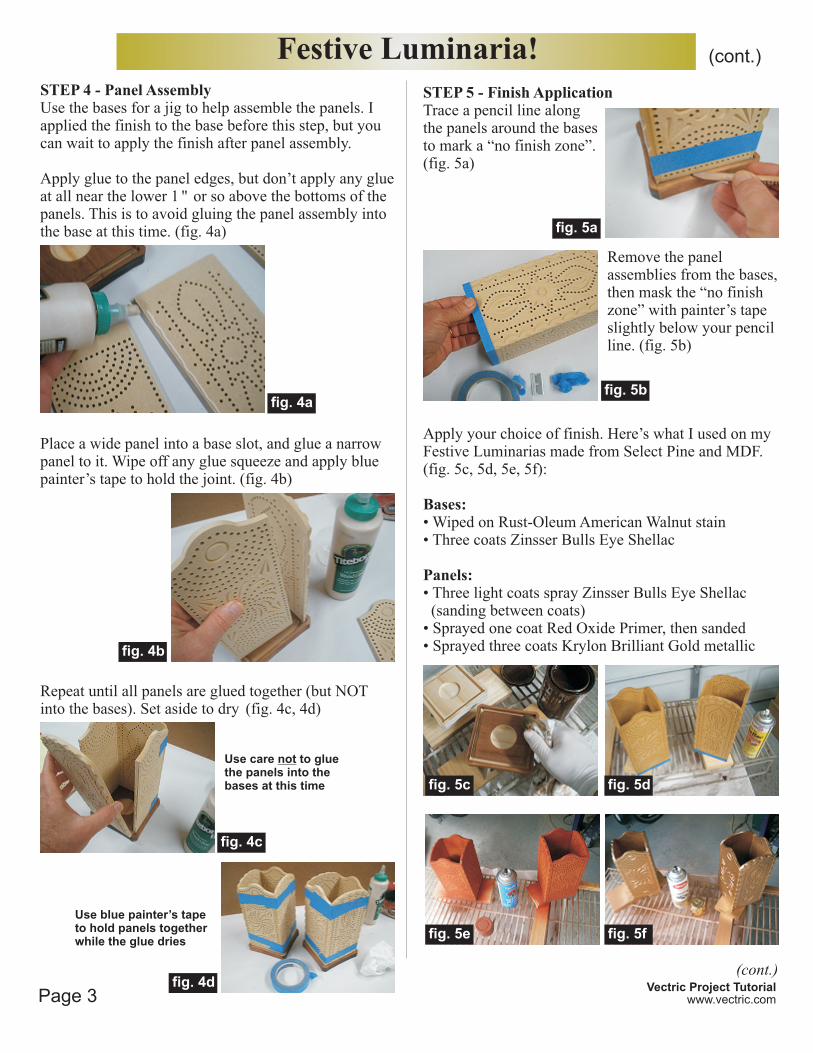
STEP 4 - Panel AssemblyUse the bases for a jig to help assemble the panels. I applied the finish to the base before this step, but you can wait to apply the finish after panel assembly.
Apply glue to the panel edges, but don’t apply any glue at all near the lower 1 " or so above the bottoms of the panels. This is to avoid gluing the panel assembly into the base at this time. (fig. 4a)
Place a wide panel into a base slot, and glue a narrow panel to it. Wipe off any glue squeeze and apply blue painter’s tape to hold the joint. (fig. 4b)
Repeat until all panels are glued together (but NOT into the bases). Set aside to dry (fig. 4c, 4d)
Page 3
STEP 5 - Finish ApplicationTrace a pencil line along the panels around the bases to mark a “no finish zone”. (fig. 5a)
Remove the panel assemblies from the bases, then mask the “no finish zone” with painter’s tape slightly below your pencil line. (fig. 5b)
Apply your choice of finish. Here’s what I used on my Festive Luminarias made from Select Pine and MDF. (fig. 5c, 5d, 5e, 5f):
Bases: • Wiped on Rust-Oleum American Walnut stain• Three coats Zinsser Bulls Eye Shellac
Panels:• Three light coats spray Zinsser Bulls Eye Shellac (sanding between coats)• Sprayed one coat Red Oxide Primer, then sanded• Sprayed three coats Krylon Brilliant Gold metallic
(cont.)
(cont.)Vectric Project Tutorial
www.vectric.com
fig. 4a
fig. 4b
fig. 4c
fig. 4d
Use blue painter’s tapeto hold panels togetherwhile the glue dries
Use care not to gluethe panels into thebases at this time
fig. 5a
fig. 5b
fig. 5d
fig. 5e fig. 5f
fig. 5c
Festive Luminaria!

Page 4Vectric Project Tutorial
www.vectric.com
STEP 6 - Final AssemblyAfter the finish is dry, remove the tape then glue the panel assemblies into the bases. (fig. 6a, 6b)
(fig. 6c)Turn on the battery operated tea lights and place inside the base of each luminaria.
IN CONCLUSIONI hope you enjoyed making your Festive Luminarias!
Happy Carving!
(cont.)
(cont.)
fig. 6a
Festive Luminaria!
fig. 6b
fig. 6c

Page 5
Materials Source Page
Vectric Project Tutorialwww.vectric.com
• 3M Radial Bristle Discs from (stack 3 discs at a time on your rotary tool mandrel) 80-grit: part # 4494A19 220-grit: part # 4494A18
www.mcmaster.com
• Zinsser Bulls Eye Spray Shellac (100% wax-free clear shellac)•
• 0.25 "-thick MDF • Sandpaper• Disposable Brushes and Paint Rags
Rust-Oleum Ultimate Wood Stain (American Walnut)• Red Oxide Spray Primer
Items Purchased at Home Depot or Lowes™™
NOTE: Direct weblinks and prices were valid at time of this writing, but can change at any time. If links don’t work, then try visiting the website’s home page and do a Search for the item to get directed to a current/valid page.
AGPtek 24 Battery Operated LED Cool White Tea Light Flickering Candles $15.99 (less than $0.67 for each light)Box of 24 Cool White Led Flameless Flickering Candles. Includes 24 CR2032 coin batteries (inside the candles)
http://www.amazon.com/AGPtek-Operated-Flickering-Decoration-Occasions/dp/B00AH83J58/ref=pd_sim_hi_1ie=UTF8&refRID=1JHXN0WX09BMYKEGMBKQ
I purchased the Cool White LED candles above. If you prefer, Warm White LED candles are also available.
AGPtek 24 Battery Operated LED Warm White Tea Light Candle Flickering $17.99Box of 24 Warm White Led Flameless Flickering Candles. Includes 24 CR2032 coin batteries (inside the candles)
http://www.amazon.com/AGPtek-Battery-Operated-Flickering-Flashing/dp/B00AH9HH1E/ref=pd_sim_hi_2ie=UTF8&refRID=0CGCFCV6M61MZ79QP0AG
Items Purchased from amazon.com
LED battery operated Flickering Tea Light Candles
Krylon Brilliant Gold
from WalMart™

Page 6Vectric Project Tutorial
www.vectric.com
The trademarks, service marks and logos used and displayed in this document are registered and unregistered Trademarks of Vectric and others.
Additional ResourcesRESOURCES...There are numerous resources for Vectric software owners to make their experience with their products more enjoyable. The Vectric website includes video tutorials and more, to provide a good overview of the software products and how to use them. Please visit the Support page for a complete listing of available resources for you.
Vectric Support: http://support.vectric.com/
Vectric User ForumEvery owner should join the Vectric User Forum (http://www.vectric.com/forum/) where fellow users share their experience and knowledge on a daily basis. It is a FREE service that you will surely appreciate. A handy Search Feature helps you find answers to any questions you may have. There are Gallery sections as well, where you can post and view photos of projects created with Vectric software.
IMPORTANT: Before outputting any toolpaths you should carefully check all part sizes and the material setup to make sure they are appropriate for your actual setup.You should also check and re-calculate all toolpaths with safe and appropriate settings for your material, CNC machine and tooling.
Terms of Use: This Project and artwork is provided on the understanding that it will only be used with Vectric software programs. You may use the designs to carve parts for sale but the Files and/or Vectors, Components or Toolpaths within them (or any derivatives) may not be converted to other formats, sold to, or shared with anyone else. This project is Copyright 2014 - Vectric Ltd.