Embed Size (px)
Citation preview

LSM Reader 3.2d ImageJ Plug-InInstructions Manual
Summary
1. ImageJ quick overview. 1
1.1. Features. 1
1.2. Installing ImageJ. 2
1.3. Useful links. 2
2. LSM Reader 3.2d overview 3
3. LSM Reader 3.2d installation instructions, step-by-step. 4
4. LSM Reader 3.2d usage. 5
5. Other useful plug-ins. 5
6. Authors info 6

LSM Reader 3.2d Instructions ManualIBMP 2003
___________________________________________________________________________- 1 -
1. ImageJ quick overview.
ImageJ is a free, open source, imaging software. For those who do not know ImageJ, it has similar features as thewell-known software NIH Image. In fact, ImageJ can be considered as the exact copy of NIH Image, but writtenin Java language, thus available on any platform supporting java virtual machine including Windows, MacOs,and UNIX.
1.1. Features.
Features taken from ImageJ’s web site ( http://rsb.info.nih.gov/ij/ ) :

LSM Reader 3.2d Instructions ManualIBMP 2003
___________________________________________________________________________- 2 -
1.2. Installing ImageJ.
To get ImageJ’s latest version go to the ImageJ’s website and select “download vx.xx ”. Simply follow theinstructions that fits you’re current platform.
Figure 1: ImageJ's home page
Figure 2 : Download page
1.3. Useful links.
ImageJ’s web site: http://rsb.info.nih.gov/ij/NIH Image’ web site: http://rsb.info.nih.gov/nih-image/CNRS-IBMP’s microscopy pages : http://ibmp.u-strasbg.fr/sg/microscopie/microscopie.html

LSM Reader 3.2d Instructions ManualIBMP 2003
___________________________________________________________________________- 3 -
2. LSM Reader 3.2d overview.
The LSM Reader 3.2d plug-in for ImageJ enhance ImageJ with the ability to open image files acquired withLSM 510 v3.2 from Carl ZEISS. It requires ImageJ version 1.30 or later.
Here are the LSM Reader 3.2d features:
LSM_ReaderReads *.lsm files of version up to 3.2Summarized CZInfo windowDetailed SCANINFO windowRecovers timestamps, z-stamps and lambda stamps, if presentRestores original acquisition color for each channelReads 8 bit and 12 bit datasetsReads 4D datasets as HypervolumesDirect interaction with helper plugins Hypervolume Browser and LUT PanelCompatibility with HandleExtraFiletypes pluginBatch conversion of lsm files to jpg, bmp, or tif format
Figure 3: LSM_Reader v3.2d, A : Channels visualization windows,
B : LSM Tools Panel, C: Summarized scan infos window.

LSM Reader 3.2d Instructions ManualIBMP 2003
___________________________________________________________________________- 4 -
Figure 6: Detailed scan infos window.
This filtered view displays only active scan parameters.
Switching to general view will show all present scaninfo in the lsm file, regardless of their activation uponacquisition. This probably means lots of useless values.
Dumping data to a text file lets you make a comprehensive printout of all present acquisition parameters. Thismight be a useful to pass over to a colleague or to a Zeiss technical advisor to assess a given microscope setupconfiguration.
3. LSM Reader 3.2d installation instructions, step-by-step.
First of all you have to get the plug-in from ImageJ’s plug-in page (http://rsb.info.nih.gov/ij/plugins/index.html).Alternatively, you can get it from the IBMP’s Confocal Microscopy Platform pages (http://ibmp.u-strasbg.fr/sg/microscopie/microscopie.html).
The plug-in file can be found in *.jar format containing the source code and all necessary classes.
Step 1
- Download LSM_Reader.jar file from ImageJ’s plug-in web pages into your local ImageJ’s plug-in folder.
Step 2
- Restart Image J and select LSM_Reader from the Plugin list.
Congratulations! You have correctly installed the LSM Reader 3.2d plug-in. Now please have a look on the“LSM Reader usage ” section.
LSM Reader 3.2d Instructions ManualIBMP 2003
___________________________________________________________________________- 5 -
4. LSM Reader 3.2d usage.
After having correctly installed the plug-in, you will have a new LSM_Reader command in the “Plug-In” menu;or in the menu specified during the plug-in installation process. Start LSM_Reader with this menu command orwith the shortcut created during the plug-in installation process.
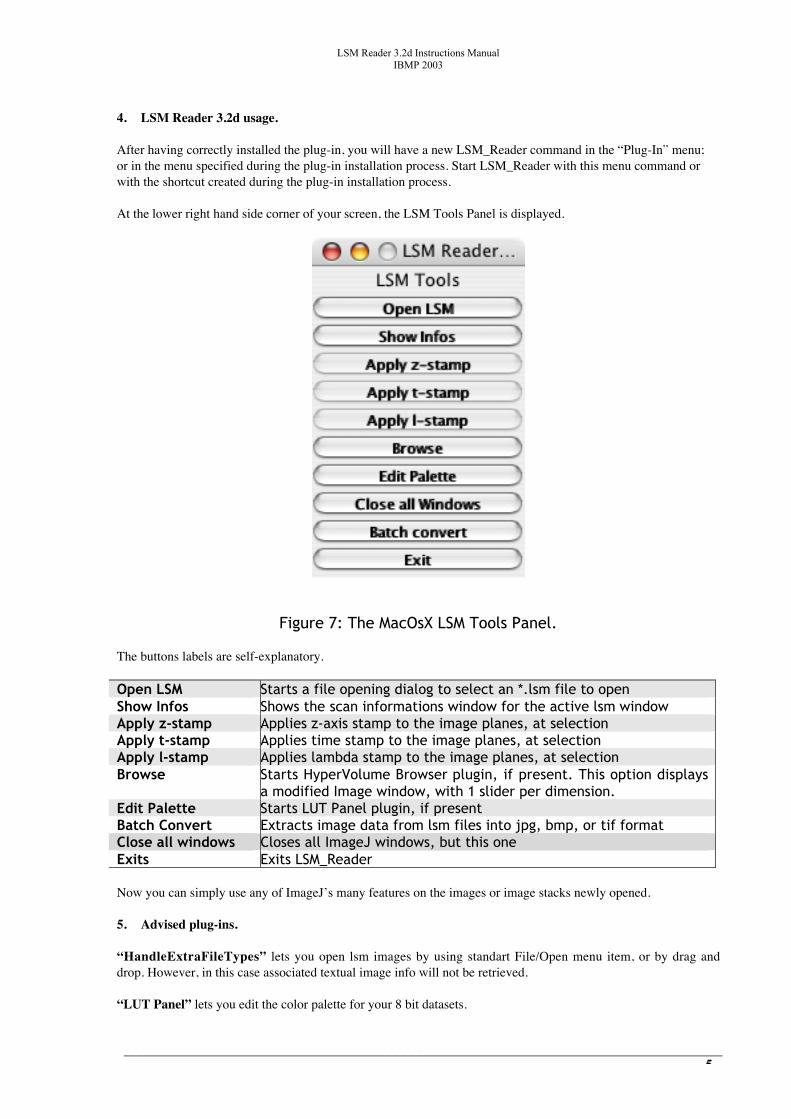
At the lower right hand side corner of your screen, the LSM Tools Panel is displayed.
Figure 7: The MacOsX LSM Tools Panel.
The buttons labels are self-explanatory.
Open LSM Starts a file opening dialog to select an *.lsm file to openShow Infos Shows the scan informations window for the active lsm windowApply z-stamp Applies z-axis stamp to the image planes, at selectionApply t-stamp Applies time stamp to the image planes, at selectionApply l-stamp Applies lambda stamp to the image planes, at selectionBrowse Starts HyperVolume Browser plugin, if present. This option displays
a modified Image window, with 1 slider per dimension.Edit Palette Starts LUT Panel plugin, if presentBatch Convert Extracts image data from lsm files into jpg, bmp, or tif formatClose all windows Closes all ImageJ windows, but this oneExits Exits LSM_Reader
Now you can simply use any of ImageJ’s many features on the images or image stacks newly opened.
5. Advised plug-ins.
“HandleExtraFileTypes” lets you open lsm images by using standart File/Open menu item, or by drag anddrop. However, in this case associated textual image info will not be retrieved.
“LUT Panel” lets you edit the color palette for your 8 bit datasets.

LSM Reader 3.2d Instructions ManualIBMP 2003
___________________________________________________________________________- 6 -
“Hypervolume Browser” gives you a second slider in your Stack winows. E.g. one for z-axis, and one for timefor your 3D timelapse datasets.
As this plug-in can open many image stack windows (one per channel) , it will rapidly become hard to handle allthe frames, and brings quite a mess on the desktop. To ease the use of this plug-in it is strongly advised to useanother plug-in together with this one. This plug-in is called “ Synchronize Windows “ and it is available onImageJ’s plug-in page.
You will also welcome a plug-in that allows you to render a 3d image of the image stacks you open. Again, thereis a plug-in to do that, called “VolumeJ”, and available on ImageJ’s plug-in page.
For the moment, that plug-in does not exists but one that could be interesting is a toll that allows you to mergeimages or image stacks. Check ImageJ’s plug-in page weekly, because I think this one will appear soon as itshould deserve a lot of people.
Finally, don’t forget that the way of thinking of ImageJ is to bring you a minimal set of tools, to ensure that all ofthem will fit any user’s needs. If you search a particular tool for your own purpose, just check the plug-in page,and you will probably find it. If not, why don’t you write a new plug-in for yourself, it’s easy!
6. Authors infos.
Authors : Patrick PIRROTTE3, Yannick KREMPP2, Jerome MUTTERER1.
(1) Institut de Biologie Moléculaire des Plantes, CNRS UPR 2357, 67084 Strasbourg, France.(2) Cellular Imaging Facility, CHUV – UNIL, University of Lausanne, Switzerland(3)Laboratoire National de Santé - Division Immunologie, L-1011 Luxembourg
Contact :
Patrick PIRROTTE patrick.pirrotte at LNS.ETAT.LUJérome MUTTERER jerome.mutterer at ibmp-ulp.u-strasbg.frYannick.Krempp at iphysiol.unil.ch