Embed Size (px)
Citation preview

LP423N / LP433N USER MANUAL
User Manual:LP4 series
Issue Date:2018/08/31
Version 4.1

LP4 USER MANUAL
- 1 -
Declaration
The content of this manual is subject to change without prior notice and cannot be
altered without written permission obtained from Wincode Technology Co., Ltd
(hereinafter referred to as “Wincode”). No part of this manual may be reproduced or
transmitted in any form by any means. This manual includes the installation instruction
and detailed description of possible questions in the operation. Wincode has reserved
the right to improve product including technology, components, software and
hardware.
Copyright The Copyright of this manual is belonged to Wincode
Ver4.0, 08. 2018.
Printed in Taiwan
Trademark
Our registered trademark:
Compliances
CE Class B
FCC Part 15, Class B
CCC, CB, BIS, KC
Comply with RoHS regulation

LP4 USER MANUAL
- 2 -
Safety Instructions
Please read the following instructions carefully.
1. Install printer on the flat and stable place. To avoid printer exposed in the
high temperature or high humidity or polluted place.
2. Do not disassemble the printer and adapter under any circumstances.
3. Please check the voltage before printer is connected with power outlet; If
printer is deemed to idle for a long time, please pull out the power cord to
avoid voltage instability to cause printer damage.
4. If printer gets water or conductive material, please shut off the power
immediately to ensure the safety of personnel and equipment.
5. To avoid printer to start printing while there is no label paper installed;
otherwise the print head and platen roller would be damaged.
6. The print head is a thermal part, please do not touch it or its peripherals
during printing or after printing.
7. Shut down the printer when connecting or disconnecting interfaces to avoid
any damage happened.
8. Please choose designated adapter model of Wincode to connect printer
accordingly.

LP4 USER MANUAL
- 3 -
Contents Declaration .......................................................................................................... - 1 -
Safety Instructions ............................................................................................... - 2 -
Contents .............................................................................................................. - 3 -
1. Product Introduction .................................................................................... - 5 -
1.1 Unpacking and checking ......................................................................... - 6 -
1.2 Appearance ............................................................................................ - 7 -
2. Setup ........................................................................................................... - 9 -
2.1 Setting up the printer ............................................................................. - 9 -
2.2 Ribbon Loading..................................................................................... - 10 -
2.3 Label Loading ....................................................................................... - 16 -
2.4 Real Time Clock Battery Installation ...................................................... - 19 -
2.5 Cutter Installation (Optional) ................................................................ - 20 -
2.5.1Label Installation ......................................................................... - 22 -
2.6 Peeler Installation (Optional) ................................................................ - 23 -
2.6.1Label Installation ......................................................................... - 26 -
3. Driver installation ....................................................................................... - 27 -
3.1 Printer Installation ................................................................................ - 28 -
3.2 Install driver with “Add a Printer” in Microsoft ...................................... - 32 -
3.2.1 Printer Installation ...................................................................... - 33 -
3.3 Printing Setup (Driver Setup) ................................................................ - 40 -
3.3.1 Page Setup ................................................................................. - 40 -
3.3.2 Media Settings ........................................................................... - 41 -
3.3.3 Sensor Calibration ............................................................... - 43 -
3.3.4 Options ...................................................................................... - 44 -
3.3.5 Image Processing ....................................................................... - 47 -
3.3.6 Tools .......................................................................................... - 48 -
3.3.7 About ........................................................................................ - 49 -
4. WinLabel tool suite .................................................................................... - 50 -
4.1 Software Introduction ........................................................................... - 50 -
4.2 Software Installation ............................................................................. - 51 -
4.3 WINLABEL Label Editing Software ......................................................... - 52 -
4.4 Update settings and update check ........................................................ - 53 -
4.5 Firmware update Tool ........................................................................... - 54 -
5. Printer Utility ............................................................................................. - 55 -
5.1 Printing Summary ................................................................................. - 57 -
5.2 Settings ................................................................................................ - 58 -

LP4 USER MANUAL
- 4 -
5.3 File Management.................................................................................. - 61 -
5.4 Send Command .................................................................................... - 62 -
6. LED indicators and button explanation ........................................................ - 63 -
7. Maintenance .............................................................................................. - 66 -
8. Appendix – LP4N series specification .......................................................... - 67 -

LP4 USER MANUAL
- 5 -
1. Product Introduction Thank you for purchasing Wincode’s LP4N series label printer, this desktop label
printer with reasonable price has reliable quality to provide user highly-efficient
printing performance. The LP4 series printer not only can print label in text or graphic
formats, but owns basic function and convenient operation interface.
In addition, LP4N series label printer with elegant bright black enclosure has cover
open buffer design to avoid hand clamped in operation; The maximum 5” outside
diameter label loading space; Dual ribbon loading design enables user to use 100m or
300m ribbon; It is also equipped 32 bit processor with highly efficient relevant
configurations to make printing action smoothly and clearly so it can be applied in the
different fields such as retailing, health care, manufacturing, logistics, warehousing
and so on.
The bundled label design program as “WinLabel” provides completed label design
tools and barcode resource for user to design ideal label format; Free database
function can be connected with Excel, Access, Text file…etc. and get required
information in the specified position of label. Standalone function can support
advanced models LP4A series to produce standalone format label.

LP4 USER MANUAL
- 6 -
1.1 Unpacking and checking
Unpacking the package, and refer to the below packing list to check whether any part
is damaged or missing in transit. If this incident has been happened, please contact
with local dealer or distributor for further assistance.
Label Printer CD Disc (Optional) Quick Installation Guide
USB Cable Adapter Power Cord
Ribbon Supply Spindle Empty Paper Core (1” core) 0.5”ribbon cap
Ribbon Take-up Spindle

LP4 USER MANUAL
- 7 -
1.2 Appearance
(Figure 1: Front View)
(Figure 2: Rear View)

LP4 USER MANUAL
- 8 -
(Figure 3: Inside View)
LP4 USER MANUAL
- 9 -
2. Setup
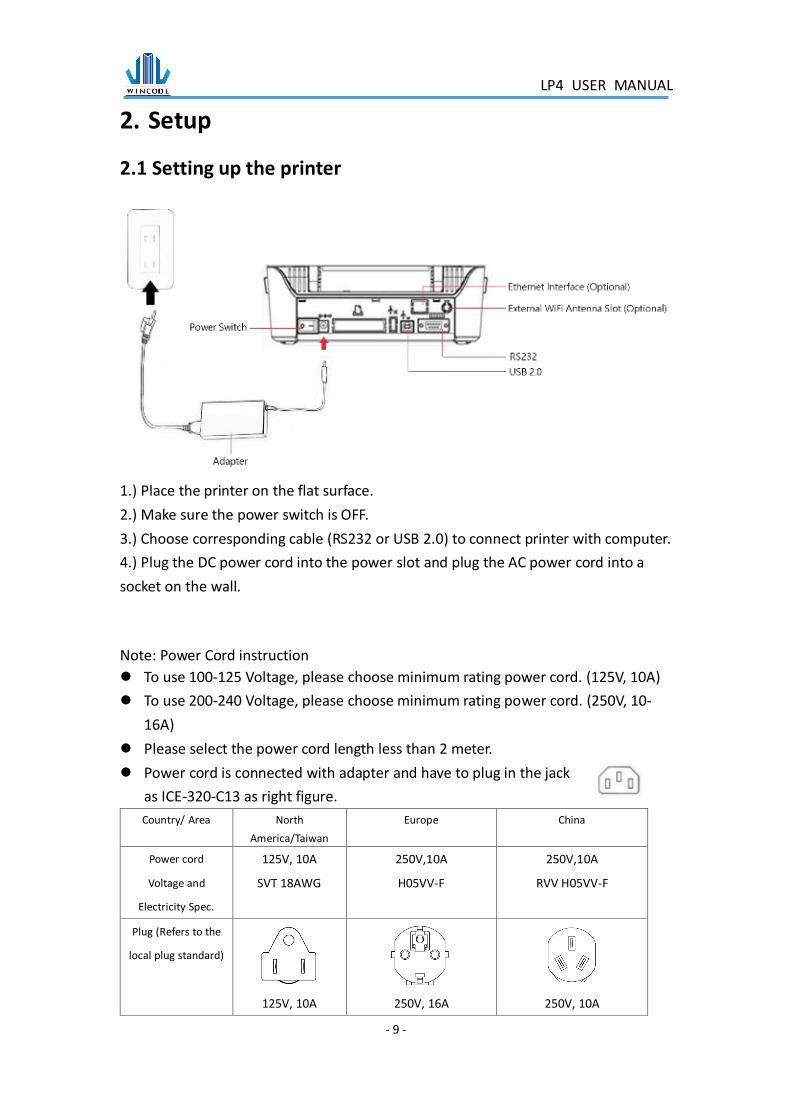
2.1 Setting up the printer
1.) Place the printer on the flat surface.
2.) Make sure the power switch is OFF.
3.) Choose corresponding cable (RS232 or USB 2.0) to connect printer with computer.
4.) Plug the DC power cord into the power slot and plug the AC power cord into a
socket on the wall.
Note: Power Cord instruction
⚫ To use 100-125 Voltage, please choose minimum rating power cord. (125V, 10A)
⚫ To use 200-240 Voltage, please choose minimum rating power cord. (250V, 10-
16A)
⚫ Please select the power cord length less than 2 meter.
⚫ Power cord is connected with adapter and have to plug in the jack
as ICE-320-C13 as right figure.
Country/ Area North
America/Taiwan
Europe China
Power cord
Voltage and
Electricity Spec.
125V, 10A
SVT 18AWG
250V,10A
H05VV-F
250V,10A
RVV H05VV-F
Plug (Refers to the
local plug standard)
125V, 10A
250V, 16A
250V, 10A

LP4 USER MANUAL
- 10 -
2.2 Ribbon Loading
1) 1” core (300m length ribbon)
Open the ribbon cover and top cover; Install an empty paper core onto the
ribbon take-up spindle; Install a ribbon onto the ribbon supply spindle.

LP4 USER MANUAL
- 11 -
0.5” core (100m length ribbon)
Open the ribbon cover and top cover; install the two 0.5" ribbon caps on the
right white holders.

LP4 USER MANUAL
- 12 -
2) Pull back the pressing lever, then load the right side of ribbon first into the
ribbon supply mechanism.
The left side of ribbon supply spindle needs to be connected with bulge part
of left supply mechanism completely (Turn the gear until the bulge part in the
notch of spindle).

LP4 USER MANUAL
- 13 -
3) Load the right side of paper core first into the ribbon take-up mechanism.
The left side of ribbon take-up spindle needs to be connected with bulge part of
take-up mechanism completely. (Turn the gear until the bulge part in the notch
of spindle).

LP4 USER MANUAL
- 14 -
4) Pull the ribbon to bypass print head and then attach the ribbon leader on the
empty paper core with tapes, then rotate the ribbon rewind wheel until ribbon
surface has no wrinkle; Close the ribbon cover to finish ribbon installation.

LP4 USER MANUAL
- 15 -
6. Ribbon Installation Path

LP4 USER MANUAL
- 16 -
2.3 Label Loading
1) Hold on each side of label holder, press the orange buttons and then arrange
the width, and place a label roll between the holders.

LP4 USER MANUAL
- 17 -
2) Pull the label paper through the rubber roller and push the both sides of label
under the label guides. Close the top cover to finish label installation.

LP4 USER MANUAL
- 18 -
3) Label installation path
LP4 USER MANUAL
- 19 -
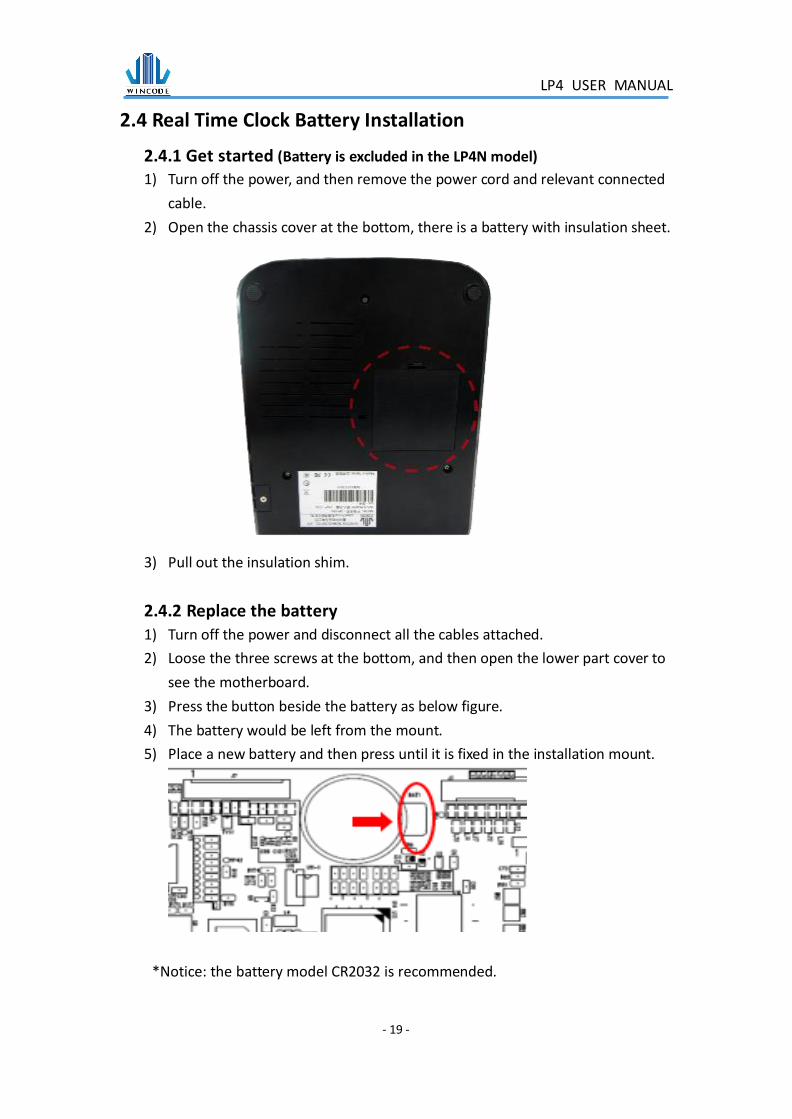
2.4 Real Time Clock Battery Installation
2.4.1 Get started (Battery is excluded in the LP4N model) 1) Turn off the power, and then remove the power cord and relevant connected
cable.
2) Open the chassis cover at the bottom, there is a battery with insulation sheet.
3) Pull out the insulation shim.
2.4.2 Replace the battery
1) Turn off the power and disconnect all the cables attached.
2) Loose the three screws at the bottom, and then open the lower part cover to
see the motherboard.
3) Press the button beside the battery as below figure.
4) The battery would be left from the mount.
5) Place a new battery and then press until it is fixed in the installation mount.
*Notice: the battery model CR2032 is recommended.
LP4 USER MANUAL
- 20 -
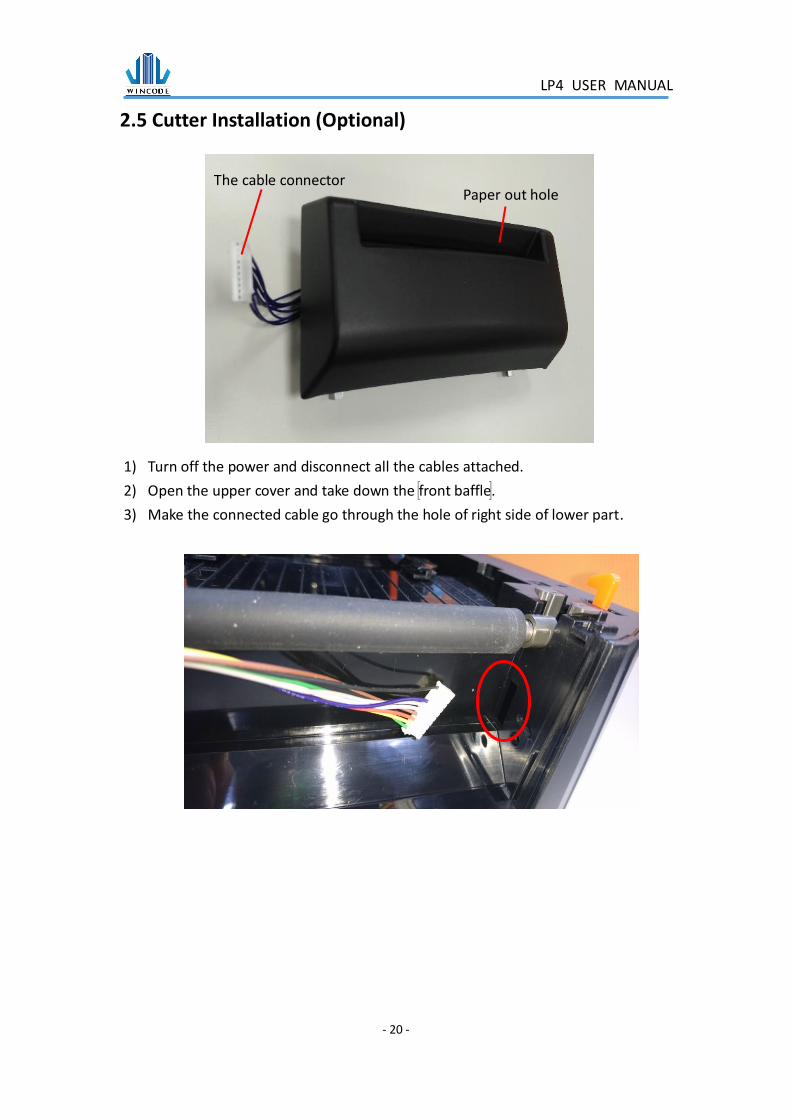
2.5 Cutter Installation (Optional)
1) Turn off the power and disconnect all the cables attached.
2) Open the upper cover and take down the front baffle.
3) Make the connected cable go through the hole of right side of lower part.
Paper out hole The cable connector

LP4 USER MANUAL
- 21 -
4) Place the cutter in the position of the front baffle, and then close the cover.
5) Open the bottom cover, and find the cable of cutter inside.

LP4 USER MANUAL
- 22 -
6) Place this cable into the slot of motherboard, and close the bottom cover.
2.5.1Label Installation
1) Follow 2.3 to load on the label.
2) Pull out the label through the paper outlet hole, and then close the cover.

LP4 USER MANUAL
- 23 -
2.6 Peeler Installation (Optional)
1) Turn off the power and disconnect all the cables attached.
2) Open the upper cover and take down the front baffle.
3) Make the connected cable go through the hole of right side of lower part.
The iron piece and a spring
The peeler module
The cable connector
LP4 USER MANUAL
- 24 -
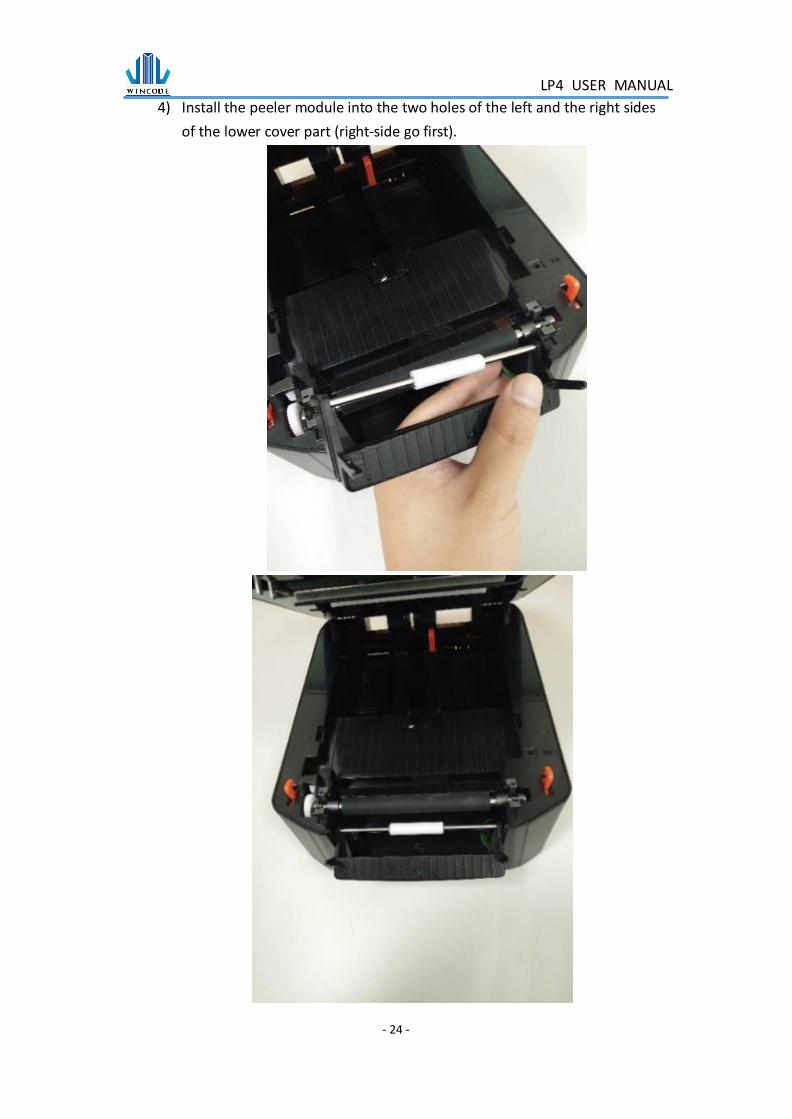
4) Install the peeler module into the two holes of the left and the right sides
of the lower cover part (right-side go first).

LP4 USER MANUAL
- 25 -
5) Place the spring part on the iron piece firstly, and install this iron piece into
the notches (spring side in the right side) and then check if the arrow mark
of iron piece pointing to the front.
6) Open the peeler module, and then close the upper cover.
7) Open the bottom cover and find the peeler cable connector.
8) Place the cable connector into the slot of motherboard and then close the
bottom cover.

LP4 USER MANUAL
- 26 -
2.6.1Label Installation
1) Follow 2.3 to load on the label.
2) Tear the first labels and leave the backing liner, pull down the backing liner and make the
label through between the iron piece and white roller.
3) Push back the peeler module, and then close the upper cover.

LP4 USER MANUAL
- 27 -
3. Driver installation The printer could support USB, RS232 and TCP/IP connection. After WinLabel
installation, the user could find and execute it in the start menu of Windows.
For the WIFI or Ethernet connection, please select "adding TCP/IP port" to install
driver.
For RS232 connection, please select COM port to install driver.

LP4 USER MANUAL
- 28 -
3.1 Printer Installation
Step1
After WinLabel installation, the user could find the "Install Driver" icon in the START
menu to execute it.
Connect printer to the computer with USB/ RS-232 / LPT cable and then press the
Next icon.
Step2
Choose the model of the printer and then click “Next”.

LP4 USER MANUAL
- 29 -
➢ USB connection: the program will select the connected port automatically.
➢ RS-232, LPT connection: please select the corresponding COM or LPT port.
➢ Ethernet or WIFI or share IP connection: please select “add a TCP/IP port”
⚫ Automatically search: this function would search the whole printers that are
ready connected to the router, it will bring a corresponding IP of each printer
automatically.
⚫ If the user selects the manual IP input, please insert the custom IP and port
(default: 9100).

LP4 USER MANUAL
- 30 -
Step3
If the showed information is correct, click “Next” to start driver installation.
Step4
The driver installation would require several minutes.

LP4 USER MANUAL
- 31 -
Step5
If a “Windows Security” window popup, please select “install this driver
software anyway”.
Step6
The driver installation is finished.
LP4 USER MANUAL
- 32 -
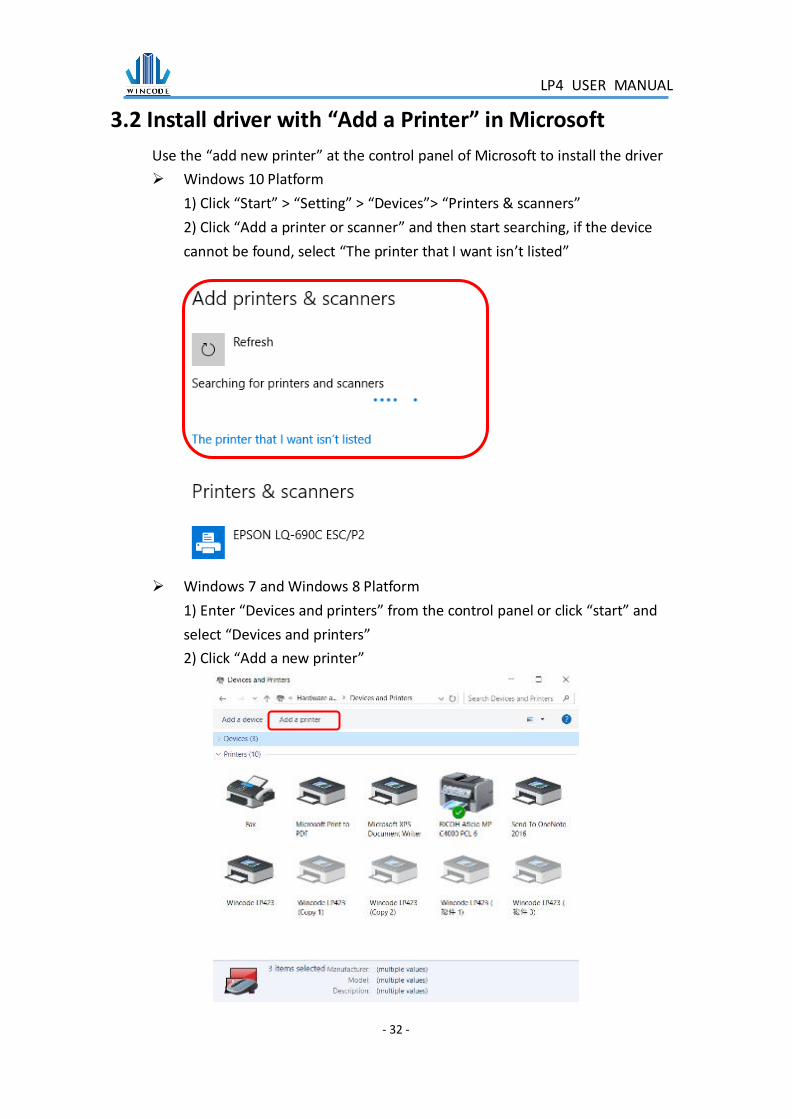
3.2 Install driver with “Add a Printer” in Microsoft
Use the “add new printer” at the control panel of Microsoft to install the driver
➢ Windows 10 Platform
1) Click “Start” > “Setting” > “Devices”> “Printers & scanners”
2) Click “Add a printer or scanner” and then start searching, if the device
cannot be found, select “The printer that I want isn’t listed”
➢ Windows 7 and Windows 8 Platform
1) Enter “Devices and printers” from the control panel or click “start” and
select “Devices and printers”
2) Click “Add a new printer”

LP4 USER MANUAL
- 33 -
➢ Windows XP Platform
1) Enter “Printers and Faxes” from the control panel or click “start” and
select “Setting” > “Printers and Faxes”
2) Click “Add a printer” > “Add a printer wizard”
3.2.1 Printer Installation
(For example: in the windows 10 platform)
1) Follow the step above, select “The printer that I want isn’t listed” > “Add a
local printer or network printer with manual settings” > “Next”

LP4 USER MANUAL
- 34 -
2) Choose a printer port
➢ For USB, COM, LPT printers, please select “Use an existing port”, choose
the corresponding port, then click “Next” (Then go to step “6)”)
➢ For TCP/IP printers, please select “Create a new port”, choose the type of
connected port, click “Next”

LP4 USER MANUAL
- 35 -
3) Key-in the IP address of the printer and then click “Next”.
4) Wait for TCP/IP port detecting.

LP4 USER MANUAL
- 36 -
5) Select “Custom” in “Settings”, and fill up the port name, printer name or IP
address. For Protocol, please select “Raw”. For Port Number, please fill up
“9100”. Select “OK” > “Next”.

LP4 USER MANUAL
- 37 -
6) Choose the printer driver that you want to install, and select the printer
manufacturer and then select the printer driver . Click “Next”.
*If the same driver has been installed, it will show the following window, select
“Replace the current driver” and click “Next”.

LP4 USER MANUAL
- 38 -
7) Enter the printer name, click “Next”.
8) Select “Do not share this printer” click “Next”.

LP4 USER MANUAL
- 39 -
9) The user may select “Set as the default printer”, click “Finish”.

LP4 USER MANUAL
- 40 -
3.3 Printing Setup (Driver Setup)
3.3.1 Page Setup
Item Description
Paper/Layout ➢ Name:Choose paper size (4 x 3 inch and 2 x 1
inch); User can also define frequently-used paper
size by adding new label format.
➢ Directions:Portrait and landscape (rotate 90
degrees); 180 degrees rotation is default settings.
Settings ➢ Copies:Each page quantity
➢ Speed:Printing speed
➢ Darkness:Adjust Printing darkness status.
Caution: If the value is higher, that would cause the
temperature of print head higher, and would make
ribbon melting and breaking easily. (Suggest value
less than 8 for wax ribbon, the value more than 10 for
resin ribbon)
➢ Measurement:inch, cm, and mm.

LP4 USER MANUAL
- 41 -
3.3.2 Media Settings
Item Description
Media
settings
Mode: Thermal Transfer and Direct Thermal.
“Thermal Transfer” mode means that printer needs to be
loaded ribbon for printing.
“Direct Thermal” mode means that printer does not require
ribbon but need to be loaded thermal paper.
Media type Label with gaps :
➢ “Gap Length” is the distance between two labels.
Label with marks:
➢ “Black Line” is the thickness in each black line.
Continuous:
➢ Continuous label type: Ignoring the gap or mark of label
➢ Stop On Last Element: Printing action will stop while
printing the last label
Sensor
settings
Sensor type:
➢ Use Current Printer Setting (by previous setting)
➢ Reflective sensor (Recommend)

LP4 USER MANUAL
- 42 -
➢ Transmissive sensor
Start Position Offset: (recommend to input number when the
printing pattern has a little bit shift up or shift down)
If selected, user could fill up the value by dot.
(+value: pattern shifts up; 203dpi: 1mm=8 dots; 300dpi:
1mm=12 dots.)
LP4 USER MANUAL
- 43 -
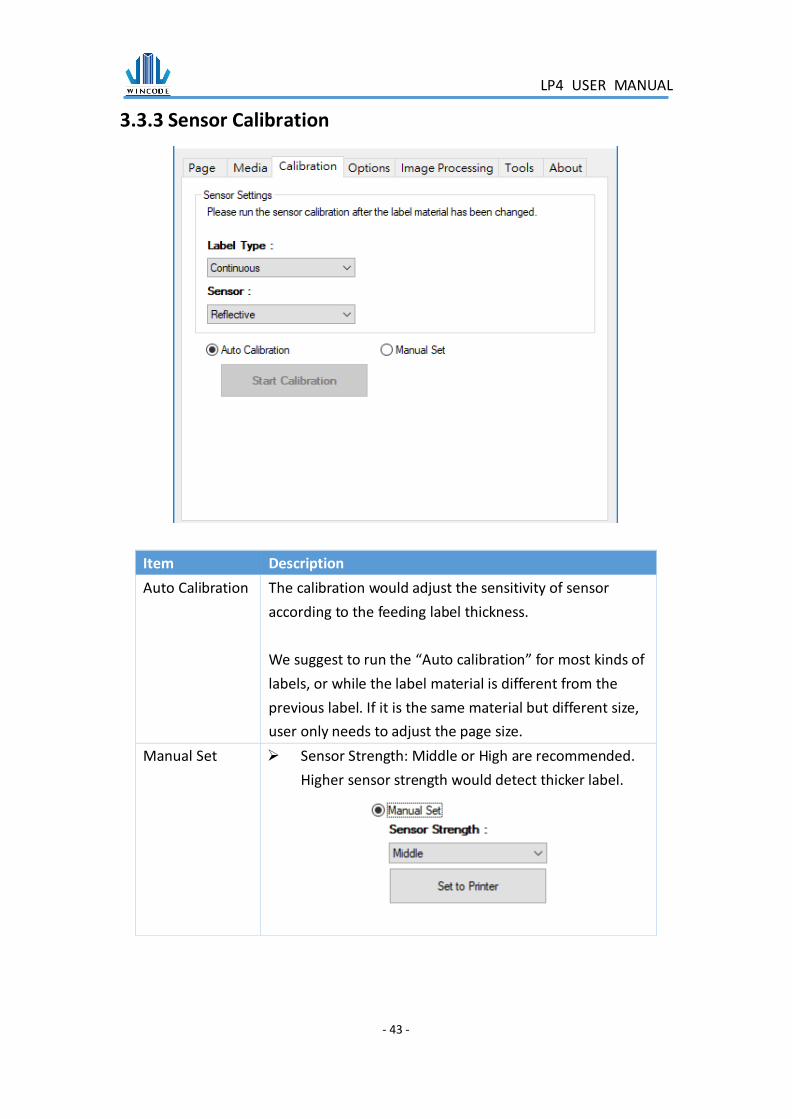
3.3.3 Sensor Calibration
Item Description
Auto Calibration The calibration would adjust the sensitivity of sensor
according to the feeding label thickness.
We suggest to run the “Auto calibration” for most kinds of
labels, or while the label material is different from the
previous label. If it is the same material but different size,
user only needs to adjust the page size.
Manual Set ➢ Sensor Strength: Middle or High are recommended.
Higher sensor strength would detect thicker label.

LP4 USER MANUAL
- 44 -
3.3.4 Options
Item Description
After Print Default: Use Current Printer Settings. The below options will show after removing the tick. ➢ None: The label will be stopped after printing the last
label.
➢ Tear off: The label gap will be stopped at the tear off position that letting user easily tear off the label.

LP4 USER MANUAL
- 45 -
The tear off position is adjustable as long as selecting the “Tear Off Position” option.
➢ Peeler: with peeler module, the labels can be peeled
continuously while printing. The printer will feed the
next label after the current label peeled.
The Peel position can be adjusted with the “Peel Off
Position” selected.
➢ Cutter: with cutter module, the cutter operates after
printing each label.
LP4 USER MANUAL
- 46 -
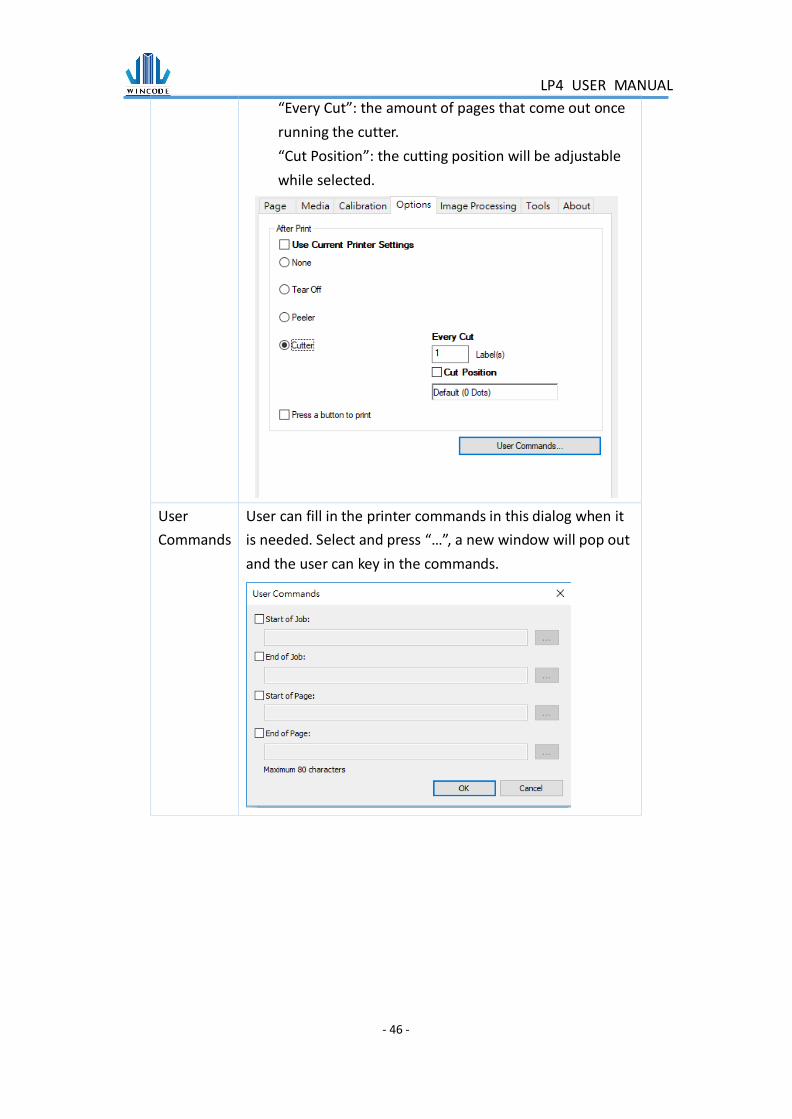
“Every Cut”: the amount of pages that come out once
running the cutter.
“Cut Position”: the cutting position will be adjustable
while selected.
User
Commands
User can fill in the printer commands in this dialog when it
is needed. Select and press “…”, a new window will pop out
and the user can key in the commands.

LP4 USER MANUAL
- 47 -
3.3.5 Image Processing
Item Description
Image Processing
➢ Load Image: The selected image will be displayed in below area.
➢ Load Default Image.
➢ Binarization:
Converts color images to different kind of black-and-white image.
➢ Invert Image: Convert image color.
➢ Flip Horizontal: Flip along X axis.
➢ Flip Vertical: Flip along Y axis.
➢ X-axis Offset: Adjust the print position in the horizontal
direction.
➢ Y-axis Offset: Adjust the print position in the vertical direction.
➢ Forced Rotate 90o (If the software with no rotation support. e.g.
Microsoft Word.): Only select when there is the printing rotation
error in landscape direction.

LP4 USER MANUAL
- 48 -
3.3.6 Tools
Item Description
Print ➢ Generic Test: ask printer to print a label with texts for testing purpose.
➢ Self-Test: ask printer to print a label with inside parameters of printer.
Action ➢ Reset Printer:Restart printer.
➢ Factory Defaults:Inside parameters to be default
➢ Label Feed:ask printer to deliver a label come out
Send to Printer ➢ Printer Command: Send commands to the printer, please refer to the WINCODE’s WPL Command Manual.
➢ Files:Select a command file (*.prn) from the stored
space of computer
Dump to File (For Debugging Purpose)
➢ Click this option to generate .prn file when use the third-party software.

LP4 USER MANUAL
- 49 -
3.3.7 About
WINCODE driver version.

LP4 USER MANUAL
- 50 -
4. WinLabel tool suite
4.1 Software Introduction
WinLabel tool suit supports the below platform: Windows XP SP3, Vista,
Windows 7, Windows 8, Windows 8.1, Windows 10, Server 2003, Server 2008,
Server 2012 and Server 2012R2 operation system (32 bit and 64 bit).
Note: The monitor resolution needs to be at least 1024 x 768 for normal use.
Icons Description
WinLabel:Label editing software
Printer Utility:Printer tool
Install Driver:Driver installation tool
Firmware Driver:Firmware update tool
Check for Update:Version check
Uninstall WinLabel: Uninstall all installed software

LP4 USER MANUAL
- 51 -
4.2 Software Installation
Click “WINLABEL_SETUP.EXE” file which could be downloaded from our official
website (http://www.wincodetek.com/service), choose a preferred language
(English, Spanish, Turkish, traditional Chinese, simplified Chinese, and Korean) and
then input a stored path to finish the software installation.

LP4 USER MANUAL
- 52 -
4.3 WINLABEL Label Editing Software
➢ The Welcome screen
➢ The main screen

LP4 USER MANUAL
- 53 -
4.4 Update settings and update check
After entering the WinLabel program, click the “Update Check” icon in “TOOLS” page
and check if it is the latest version. The program can be updated automatically.
Besides, user can click “Update Settings” icon for adjusting the update settings

LP4 USER MANUAL
- 54 -
4.5 Firmware update Tool
➢ When user receives the *.ulf FW file, please execute the file directly and the
system will open the firmware update tool automatically. After confirming the
version, please press “burn” and wait until the “update finished” information
shown.
➢ The update procedure can be run with USB、RS-232、LPT、Ethernet (USB is
recommended.)
➢ Press the “Search” button when selecting Ethernet, the system will search the
LAN network and list all the connecting printers.
Item Description
Port • Term:select the connecting way: USB, RS-232, LPT, Ethernet
• connect:select the connected printer.
Firmware file Confirm the firmware version
• The system will connect the firmware update tool automatically and
show the information while executing the *.ulf file
Burn Burn the firmware into the printer
Get information Get the serial number and the firmware version of the printer
Exit Leave the firmware update tool

LP4 USER MANUAL
- 55 -
5. Printer Utility
Item Description
Interface port Interface port selection: USB, RS232, LPT (Centronics), Ethernet.
Printer selection While the printer is connected to the computer, the program can
automatically detect the printer device. User can select a
connected printer from the pulldown list.
Port settings When RS-232 or Ethernet is connected, select for interface settings
• RS-232: bps, data bit, parity check, stop bit, flow control
selection.

LP4 USER MANUAL
- 56 -
• Ethernet: auto or manual insert selection
Download
information
The current printer setting information can be showed in the
Printer Summary area.
Upload
information
The settings in the Printer Utility will be uploaded to the printer.

LP4 USER MANUAL
- 57 -
5.1 Printing Summary
Printer
Summary
• Listing printer information
Send Command window
• Start Calibration Run the sensor calibration after the label material has changed. If it is the same material but different size, only need to adjust the “Page Setup” at WinLabel. It is recommended to use “auto detection”.
• Get Label Size: get the detected value of label size at the right table
• Get sensor value: get the detected value of the sensors at the right table
• Cutter Turning Clockwise: cutter cuts label from top to bottom (Fully cut)
• Cutter Turning Anti-Clockwise: cutter cuts from bottom to top (Not completely cut-off the label, the user can tear off the label)
• Restore Factory Defaults: restore the parameters of the printer to factory default settings.
• Printer Self Test: print out the internal settings of the printer. • Reset Printer: restart the printer
• Enter DUMP Mode: enter to the DUMP mode (Press “menu” for returning to the original mode)
Settings Please refer to the 3.5.2 Settings
File
Management
Check the detail files in the different store spaces
Send
command
Be able to send command to the printer, please refer to the Printer
Command Manual.
Unit- Tools
page
Printing measurements: millimeter (mm), centimeter (cm), inch (in).

LP4 USER MANUAL
- 58 -
5.2 Settings
1) Print Job
Item Description
Printing Speed (mm) Select required speed
Printing Darkness Select the required parameters from 0 to 15; adjust the
temperature of the print head (8 is recommended for wax
ribbon)
Device Selection Normal, tear-off, peel-off and cutter modes are selectable.
Printing Mode Direct Thermal and Thermal Transfer modes are selectable
Feed Position Offset (After
printing)
Input the required parameters. (If the printer is connected
to cutter/peeler, user may use this for offset settings.
Default: 0)
Start Position Offset
(Before printing)
Input the required parameters (Plus value feeds more
distance; minus value back feeds more distance)
* 203 dpi:8dot=1mm, 300 dpi:12dot=1mm
Feed to device after pause Close: while pressing button, printer stop printing immediately. Open: while pressing pause button, printer will stop printing after completing the current label.
Label Direction Label-out from the top or Label-out from the bottom
Mirror Drawing No effect or mirror reflection.

LP4 USER MANUAL
- 59 -
Drawing origin X axis offset Input the required parameters
Drawing origin Y axis offset Input the required parameters
2) Media
Item Description
Sensor-Label Sensor Which sensor is using; Reflective / Transmissive
selectable.
Sensor-Sensor Sensitivity Low / Middle / High selectable.
Label-Label Type Label with Gaps / Label with Black Line / Continuous
label selectable.
Label-Paper Width User can enter the parameter. (default: 4 inches)
Label-Paper Length User can enter the parameter. (default: 3 inches)
Gap-Gap Length User can enter the parameter. (default: 0.4016 inches)
Gap-Length after Gap User can enter the parameter.
Label with Black Line-Black
Line Thickness
User can enter the parameter. (default: 0.4016 inches)
(Only when it is loaded the label with black line.)
Label with Black Line-Length
after Black Line
User can enter the parameter.
(Only when it is loaded the label with black line.)
3) Others
Item Description
Characters User can adjust the parameters.
RS-232 User can adjust the parameters when the port is RS-232.
Internet Connection User can adjust the parameters while selecting
“manual”. Default: DHCP.
Bluetooth User can enter the name and PIN code.

LP4 USER MANUAL
- 60 -
4) System
Item Description
Setup-Keyboard Input
country
Default: US Keyboard
Setup-On-screen display
language
English, Traditional Chinese, Simplified Chinese, Spanish,
Italian, Vietnamese, Korean.
Setup-LCD Contrast Review the LCD contrast settings
Setup-Buzzer volume Review the Buzzer volume settings in the printer
Setup-Feed after cover
closed
Close / Open
Setup-label used up
indication
Close / Open (Optional)
Setup-label length Error
control
Close / Open, after selected, if the label size does not match
the settings, the system sends the error report.
Printer Command Printer Emulation Switch
Auto Detect (Default), detect WPL, TSPL, ZPL, EPL, DPL
automatically.
5) Time Setup
Item Description
Printer Current Time • Get the time: to get the current time of the printer.
• Synchronize the time of the computer to the printer.
• Manual setup: the user can setup the time of the printer.
Reset to manufacturer
default
Reset the printer to manufacturer default
Undo Reset all the parameters to the original parameters, will
not affect the setup in the printer.

LP4 USER MANUAL
- 61 -
5.3 File Management
Item Description
Get the file list To get the file list from C:[RamDisk], D:[FlashDisk] or
E:[SDcard]
Format the target disk Initialize the disk
Delete selected file Delete the selected files.
Download selected
file
Download the selected files.
Print selected file Print out the selected files.
Send the file to the
printer
Send the selected files or font to the assigned storage area in the printer
• File path: select the file that needed to be uploaded
• File size: show the size of the file automatically
• Storage location:select the storage location from
C:[RamDisk]、D:[FlashDisk]、E:[SDcard]

LP4 USER MANUAL
- 62 -
5.4 Send Command
Item Description
Edit Zone Edit the command
• Clear the current edit zone:to clear the command
in the current edit zone
• Clear all the edit zone:to clear all the command in
the edit zone
• Paste to the current edit zone:paste the command
to the current edit zone
• Copy the current edit zone:copy the content in the
edit zone
• Search: search the specific content in the edit zone
• Search and replace: replace the searched content
• Replace all: replace all the assigned content from the edit zone
Send Send the command to the printer Send the file Send the file to the printer
Save the file Save the command in the edit zone
Read the file Read the file at the edit zone

LP4 USER MANUAL
- 63 -
6. LED indicators and button explanation
LP423N/LP433N model equips six functional LED indicators (blue color) and a feed
button (white and red LED color), user can understand the current printer status
easily according to the LED display status. The description of each LED display status
is listed as follows.
LED Display status Possible problem Solution
LED 1
LABEL
Always on:
Label out
The label placement is
not correct or labels
been run out.
Open the cover, and confirm
the label placement and if the
label has been run out. Then
close cover and press the Feed
button.
Flash:Gap out Sensor cannot detect
the gap of label.
Run the auto calibration on
the Pinter Utility to adjust the
sensitivity of sensor.
LED 2
CUTTER
Always on:
Cutter module is
not ready
Cutter installation is
not correct
Re-install the cutter module
and check the cutter
connector connection.
Flash:Paper jam 1) Check if the label
thickness is exceeded
the spec of cutter
module.
Place label in the correct
position and press button to
start printing.
LED 1
LED 3
LED 2
LED 4
LED 5 LED 6
Feed
Button
LP4 USER MANUAL
- 64 -
2) Label placement is
not correct
LED 3
RIBBON
Always on:
No detect ribbon
Ribbon placement is
not correct or ribbon is
possibly run out.
Open top cover and ribbon
cover, re-install the ribbon and
confirm if it has been run out.
After checking, close the
ribbon cover and enter the
feed button to start printing.
Flash:Ribbon exist
but setting is in
direct thermal
mode.
Ribbon exist but printer
is in direct thermal
mode,
Remove the ribbon when the
settings in direct thermal.
Flash: Data transfer Data transfer Waiting data transfer finished
LED 5
DEMAND
Always on: Waiting
to press button to
print next label
Printing process is not
finished
Press button once to print a
label (repeat this action until
the whole printing job has
been finished)
LED 6
PAUSE
Always on:Top
cover is opened
Top cover is not closed Open the top cover and then
close it. Press feed button to
start printing.
Flash:Pause Printing process is not
finished
Press the button to start
printing
Feed
Button
Red LED flash:
Refers to all errors
Need to check if any
other LED is flash to
define the issue
Check LED 1~LED 6 whether
anyone is always on or flash. If
had, please refer to each LED
status to deal with problem. If
not, shut down the printer and
wait 1~2 mins to restart
printer.
White LED always
on:Ready
Wait for the print job
Red and White
LED flash:
1. print head error
2. adapter error
1. loosen Print
head
2. broken Adapter
1. Check the print head
connection
2. Change the adapter
Special lights:
Continuous flashing
red LED twice and
The value-added
printing length is
insufficient.
Use provided tool to add
printing lengths.

LP4 USER MANUAL
- 65 -
white LED twice
Ps: value added
function is opened
Feed button function
Printer current status Printer status after pressing Feed button once
Ready Printer will deliver a label out
Printing Printer will pause printing action
Pause Printer will cancel pause status
Error (Red LED flash) Printer will execute the remaining job if the error issue
has been solved
Error (Red LED flash) Printer will cancel the current printing job to return ready
status after pressing Feed button twice
Auto Calibration Turn on the power, the feed button will flash in 3 seconds
while power is ON. Press the feed button once, the
printer could feed labels to run the auto-calibration
procedure

LP4 USER MANUAL
- 66 -
7. Maintenance The following are some steps and methods to suggest user for proceeding the simple
maintenance of the printer.
1. Turn off the power firstly, and then open the top cover of printer.
2. Take out the ribbon then find the print head. (If the print job has just finished,
please wait until it is completely cool.)
3. If the print head is adhibited with label paper or dirt, please use a head cleaning
pen or a cotton swab with 100% ethanol to clean the surface of the print head.
Repeat the procedure until it is all cleaned.
4. Keep the regular rubber roller cleaning to maintain the printing quality and avoid
the print head damage.
5. Use compressed air or vacuum to clean the dirt from the sensor.
Note:
1.) it is suggested to clean the printhead once a week and to clean the sensor once a
month.
2.) When using a cotton swab to clean the print head, please make sure that there
are no metal fragments or hard particles attached on the cotton swab as that would
cause the damage of the print head.

LP4 USER MANUAL
- 67 -
8. Appendix – LP4N series specification Model LP423N LP433N Printing method Thermal Transfer / Direct Thermal
Resolution 203 DPI 300 DPI
Max. print speed 127 mm (5”) / second 102 mm (4”) / second
Max. print width 108 mm (4.25”) 110mm (4.32”)
Max. print length 4572mm (180”) 2032mm (80”)
Enclosure Double-walled plastic
Physical dimension 220mm(W)x198mm(H)x288mm(D)
8.66”(W)x7.8”(H)x11.3”(D)
Weight 2.5 KG
Label roll capacity 127 mm (5”)OD
Ribbon
300M length, max. OD 67 mm, 1” core
100M length, max. OD 38.25 mm, 0.5” core
Ribbon width 25.4 mm ~ 110 mm (1” ~ 4.3”)
Processor 32-bit RISC CPU
Memory 8MB Flash memory, 16MB SDRAM
Power External universal switching power supply, Input: AC 100-240V, 2.0A, 50-60Hz,
output: DC 24V, 2.5A, 60W
Operation interface 1 button, 8 LEDs
Interface USB 2.0, RS-232
Bluetooth(option), WIFI IEEE 802.11 b/g/n (option), Ethernet 10/100 Mbps (option)
Sensors Transmissive gap sensor (adjustable), Reflective gap sensor, Ribbon end sensor, Head open
sensor, Paper near end sensor(option)
Internal fonts Seven kinds of bitmap fonts
Bar code 1D bar code:Code 11, Code 39, Code 93, Code 128, Codabar, EAN/JAN-8, EAN/JAN-13, Interleaved 2-
of-5, ITF-14, MSI Pleassy, PostCode, Telepen, UPC-A, UPC-E, UCC-128
2D bar code:Code 16K, Code 49, Aztec Code, QR Code, PDF417, Micro PDF417, Data Matrix, Grid
Matrix, Micro QR Code, MaxiCode
Printer language WPL (ZPL, EPL, TSPL, DPL…auto switch)
Dealer options Cutter、Peeler Dispenser、External label stand
Media width Standard :15 ~ 120 mm (0.59” ~ 4.72”)
With Cutter: 15~117mm (0.59” ~ 4.61”)
External Label Stand: 15 ~ 115mm (0.59” ~ 4.53”)
Media thickness 0.06 ~ 0.19 mm (2.36 ~ 7.48 mil)
Media core diameter 25.4 mm (1”)
Label length 3 ~ 4,572 mm (0.12“ ~ 180“) 3 ~ 2,032 mm (0.12“ ~ 80“)
Real time clock RTC (CR2032 battery is excluded)
Safety regulation CE Class B, FCC Class B, CCC, CB, BIS, KC
Bundled software WinLabel labelling application, windows printer driver, printer utility, DLL SDK library, EXE executive AP for batch print.
Platform support: Windows XP, Vista, 7, 8, 8.1, 10 and Server 2003, 2008, 2012, 2012R2 (32/64 bit)