Embed Size (px)
Citation preview
ibm.com/redbooks
William TworekGeorge ChiesaFrederic Dahm
David HinkleAmanda MasonMatthew Milza
Amy Smith
Key security concepts and best practices
Security features of Lotus products explained
Secure implementation scenarios
Front cover


Lotus Security Handbook
April 2004
International Technical Support Organization
SG24-7017-00
© Copyright International Business Machines Corporation 2004. All rights reserved.Note to U.S. Government Users Restricted Rights -- Use, duplication or disclosure restricted by GSA ADPSchedule Contract with IBM Corp.
First Edition (April 2004)
Note: Before using this information and the product it supports, read the information in “Notices” on page xiii.
Contents
Notices . . . . . . . . . . . . . . . . . . . . . . . . . . . . . . . . . . . . . . . . . . . . . . . . . . . . . . xiiiTrademarks . . . . . . . . . . . . . . . . . . . . . . . . . . . . . . . . . . . . . . . . . . . . . . . . . . . xiv
Preface . . . . . . . . . . . . . . . . . . . . . . . . . . . . . . . . . . . . . . . . . . . . . . . . . . . . . . xvThe team that wrote this redbook. . . . . . . . . . . . . . . . . . . . . . . . . . . . . . . . . . . xviBecome a published author . . . . . . . . . . . . . . . . . . . . . . . . . . . . . . . . . . . . . . xviiComments welcome. . . . . . . . . . . . . . . . . . . . . . . . . . . . . . . . . . . . . . . . . . . . xviii
Part 1. Security concepts introduced . . . . . . . . . . . . . . . . . . . . . . . . . . . . . . . . . . . . . . . . . . . 1
Chapter 1. Fundamentals of IT security . . . . . . . . . . . . . . . . . . . . . . . . . . . . 31.1 Introduction . . . . . . . . . . . . . . . . . . . . . . . . . . . . . . . . . . . . . . . . . . . . . . . . . 4
1.1.1 Knowledge capital . . . . . . . . . . . . . . . . . . . . . . . . . . . . . . . . . . . . . . . . 41.1.2 The CSI/FBI Computer Crime and Security Survey . . . . . . . . . . . . . . 51.1.3 CERT figures. . . . . . . . . . . . . . . . . . . . . . . . . . . . . . . . . . . . . . . . . . . . 7
1.2 Important terminology . . . . . . . . . . . . . . . . . . . . . . . . . . . . . . . . . . . . . . . . 111.2.1 Computer system . . . . . . . . . . . . . . . . . . . . . . . . . . . . . . . . . . . . . . . 111.2.2 Computer network. . . . . . . . . . . . . . . . . . . . . . . . . . . . . . . . . . . . . . . 111.2.3 IT infrastructure . . . . . . . . . . . . . . . . . . . . . . . . . . . . . . . . . . . . . . . . . 121.2.4 Computer security . . . . . . . . . . . . . . . . . . . . . . . . . . . . . . . . . . . . . . . 121.2.5 Information classification. . . . . . . . . . . . . . . . . . . . . . . . . . . . . . . . . . 141.2.6 Information classification caveat . . . . . . . . . . . . . . . . . . . . . . . . . . . . 16
1.3 Computer security services . . . . . . . . . . . . . . . . . . . . . . . . . . . . . . . . . . . . 171.3.1 Data integrity . . . . . . . . . . . . . . . . . . . . . . . . . . . . . . . . . . . . . . . . . . . 181.3.2 Confidentiality . . . . . . . . . . . . . . . . . . . . . . . . . . . . . . . . . . . . . . . . . . 191.3.3 Identification and authentication . . . . . . . . . . . . . . . . . . . . . . . . . . . . 191.3.4 Access control. . . . . . . . . . . . . . . . . . . . . . . . . . . . . . . . . . . . . . . . . . 211.3.5 Non-repudiation. . . . . . . . . . . . . . . . . . . . . . . . . . . . . . . . . . . . . . . . . 21
1.4 Cryptographic techniques . . . . . . . . . . . . . . . . . . . . . . . . . . . . . . . . . . . . . 221.4.1 Cryptography. . . . . . . . . . . . . . . . . . . . . . . . . . . . . . . . . . . . . . . . . . . 221.4.2 Symmetric key algorithms . . . . . . . . . . . . . . . . . . . . . . . . . . . . . . . . . 231.4.3 Asymmetric key algorithms . . . . . . . . . . . . . . . . . . . . . . . . . . . . . . . . 301.4.4 The hybrid algorithm . . . . . . . . . . . . . . . . . . . . . . . . . . . . . . . . . . . . . 331.4.5 Digital signatures. . . . . . . . . . . . . . . . . . . . . . . . . . . . . . . . . . . . . . . . 351.4.6 Public key certificates . . . . . . . . . . . . . . . . . . . . . . . . . . . . . . . . . . . . 391.4.7 Public key cryptographic standard . . . . . . . . . . . . . . . . . . . . . . . . . . 39
1.5 Summary . . . . . . . . . . . . . . . . . . . . . . . . . . . . . . . . . . . . . . . . . . . . . . . . . . 41
© Copyright IBM Corp. 2004. All rights reserved. iii
Chapter 2. Security methodologies . . . . . . . . . . . . . . . . . . . . . . . . . . . . . . . 432.1 Approaches to IT security . . . . . . . . . . . . . . . . . . . . . . . . . . . . . . . . . . . . . 44
2.1.1 Some definitions . . . . . . . . . . . . . . . . . . . . . . . . . . . . . . . . . . . . . . . . 442.1.2 Risk mitigation. . . . . . . . . . . . . . . . . . . . . . . . . . . . . . . . . . . . . . . . . . 462.1.3 The human element . . . . . . . . . . . . . . . . . . . . . . . . . . . . . . . . . . . . . 482.1.4 Selecting a methodology. . . . . . . . . . . . . . . . . . . . . . . . . . . . . . . . . . 50
2.2 ISO17799 . . . . . . . . . . . . . . . . . . . . . . . . . . . . . . . . . . . . . . . . . . . . . . . . . 502.2.1 Some history . . . . . . . . . . . . . . . . . . . . . . . . . . . . . . . . . . . . . . . . . . . 512.2.2 What ISO 17799 contains . . . . . . . . . . . . . . . . . . . . . . . . . . . . . . . . . 522.2.3 What ISO 17799 doesn’t contain . . . . . . . . . . . . . . . . . . . . . . . . . . . 54
2.3 Common Criteria (International Standard 15408) . . . . . . . . . . . . . . . . . . . 542.4 Method for Architecting Secure Solutions (MASS) . . . . . . . . . . . . . . . . . . 56
2.4.1 Problem statement . . . . . . . . . . . . . . . . . . . . . . . . . . . . . . . . . . . . . . 562.4.2 Analysis. . . . . . . . . . . . . . . . . . . . . . . . . . . . . . . . . . . . . . . . . . . . . . . 572.4.3 System model for security. . . . . . . . . . . . . . . . . . . . . . . . . . . . . . . . . 612.4.4 Security subsystems . . . . . . . . . . . . . . . . . . . . . . . . . . . . . . . . . . . . . 622.4.5 Developing security architectures . . . . . . . . . . . . . . . . . . . . . . . . . . . 712.4.6 Business process model . . . . . . . . . . . . . . . . . . . . . . . . . . . . . . . . . . 732.4.7 Selection and enumeration of subsystems . . . . . . . . . . . . . . . . . . . . 752.4.8 Documenting a conceptual security architecture . . . . . . . . . . . . . . . 762.4.9 Integrating security into the overall solution architecture . . . . . . . . . 792.4.10 Use cases . . . . . . . . . . . . . . . . . . . . . . . . . . . . . . . . . . . . . . . . . . . . 802.4.11 MAAS Conclusions . . . . . . . . . . . . . . . . . . . . . . . . . . . . . . . . . . . . . 85
2.5 The ISSL methodology . . . . . . . . . . . . . . . . . . . . . . . . . . . . . . . . . . . . . . . 862.5.1 Brief introduction to the methodology . . . . . . . . . . . . . . . . . . . . . . . . 872.5.2 Phase 1: Assess . . . . . . . . . . . . . . . . . . . . . . . . . . . . . . . . . . . . . . . . 882.5.3 Phase 2: Build . . . . . . . . . . . . . . . . . . . . . . . . . . . . . . . . . . . . . . . . . . 912.5.4 Phase 3: Manage . . . . . . . . . . . . . . . . . . . . . . . . . . . . . . . . . . . . . . . 92
2.6 Summary . . . . . . . . . . . . . . . . . . . . . . . . . . . . . . . . . . . . . . . . . . . . . . . . . . 94
Part 2. Building a secure infrastructure . . . . . . . . . . . . . . . . . . . . . . . . . . . . . . . . . . . . . . . . 95
Chapter 3. Secure infrastructure requirements . . . . . . . . . . . . . . . . . . . . . 973.1 The need for secure infrastructures . . . . . . . . . . . . . . . . . . . . . . . . . . . . . 983.2 Infrastructure security requirements . . . . . . . . . . . . . . . . . . . . . . . . . . . . . 99
3.2.1 Data confidentiality assurance . . . . . . . . . . . . . . . . . . . . . . . . . . . . . 993.2.2 Data integrity assurance . . . . . . . . . . . . . . . . . . . . . . . . . . . . . . . . . 106
3.3 Summary . . . . . . . . . . . . . . . . . . . . . . . . . . . . . . . . . . . . . . . . . . . . . . . . . 114
Chapter 4. Security components and layers. . . . . . . . . . . . . . . . . . . . . . . 1154.1 Infrastructure components. . . . . . . . . . . . . . . . . . . . . . . . . . . . . . . . . . . . 116
4.1.1 Firewall overview. . . . . . . . . . . . . . . . . . . . . . . . . . . . . . . . . . . . . . . 1164.1.2 Firewall products . . . . . . . . . . . . . . . . . . . . . . . . . . . . . . . . . . . . . . . 121
iv Lotus Security Handbook

4.1.3 Routers, switches, and hubs . . . . . . . . . . . . . . . . . . . . . . . . . . . . . . 1234.1.4 Proxy servers . . . . . . . . . . . . . . . . . . . . . . . . . . . . . . . . . . . . . . . . . 1274.1.5 Intrusion detection systems. . . . . . . . . . . . . . . . . . . . . . . . . . . . . . . 1284.1.6 Enterprise access management and identity management systems1304.1.7 Application servers . . . . . . . . . . . . . . . . . . . . . . . . . . . . . . . . . . . . . 130
4.2 Security architecture model . . . . . . . . . . . . . . . . . . . . . . . . . . . . . . . . . . . 1344.2.1 The DMZ model: a retrospective. . . . . . . . . . . . . . . . . . . . . . . . . . . 1344.2.2 The four zone model . . . . . . . . . . . . . . . . . . . . . . . . . . . . . . . . . . . . 1374.2.3 Zone boundaries . . . . . . . . . . . . . . . . . . . . . . . . . . . . . . . . . . . . . . . 1424.2.4 Interzone connectivity: Data flow policies . . . . . . . . . . . . . . . . . . . . 1464.2.5 Data access models . . . . . . . . . . . . . . . . . . . . . . . . . . . . . . . . . . . . 1494.2.6 Data flow policies . . . . . . . . . . . . . . . . . . . . . . . . . . . . . . . . . . . . . . 151
4.3 Design validation . . . . . . . . . . . . . . . . . . . . . . . . . . . . . . . . . . . . . . . . . . . 1594.3.1 Data flow example. . . . . . . . . . . . . . . . . . . . . . . . . . . . . . . . . . . . . . 160
4.4 Summary . . . . . . . . . . . . . . . . . . . . . . . . . . . . . . . . . . . . . . . . . . . . . . . . . 163
Chapter 5. Proxies . . . . . . . . . . . . . . . . . . . . . . . . . . . . . . . . . . . . . . . . . . . 1655.1 Proxies defined . . . . . . . . . . . . . . . . . . . . . . . . . . . . . . . . . . . . . . . . . . . . 1665.2 The proxy process. . . . . . . . . . . . . . . . . . . . . . . . . . . . . . . . . . . . . . . . . . 1665.3 Types of proxies . . . . . . . . . . . . . . . . . . . . . . . . . . . . . . . . . . . . . . . . . . . 167
5.3.1 Forward proxies . . . . . . . . . . . . . . . . . . . . . . . . . . . . . . . . . . . . . . . 1675.3.2 Transparent proxies . . . . . . . . . . . . . . . . . . . . . . . . . . . . . . . . . . . . 1685.3.3 Caching proxies . . . . . . . . . . . . . . . . . . . . . . . . . . . . . . . . . . . . . . . 1685.3.4 Security proxies. . . . . . . . . . . . . . . . . . . . . . . . . . . . . . . . . . . . . . . . 1695.3.5 Reverse proxies . . . . . . . . . . . . . . . . . . . . . . . . . . . . . . . . . . . . . . . 170
5.4 Reverse proxies and Lotus technologies . . . . . . . . . . . . . . . . . . . . . . . . 1715.4.1 Domino caching considerations . . . . . . . . . . . . . . . . . . . . . . . . . . . 1715.4.2 HTTP Methods required for Domino . . . . . . . . . . . . . . . . . . . . . . . . 1725.4.3 URL mappings required for Domino and Domino-based products . 172
5.5 Lotus Sametime 3.1 proxy support . . . . . . . . . . . . . . . . . . . . . . . . . . . . . 1745.5.1 Overview of Sametime 3.1 proxy support . . . . . . . . . . . . . . . . . . . . 1745.5.2 Reverse proxy server requirements . . . . . . . . . . . . . . . . . . . . . . . . 1745.5.3 Sametime limitations when using reverse proxy servers . . . . . . . . 1765.5.4 SSL and client certification considerations and issues . . . . . . . . . . 1775.5.5 Mapping rules on the reverse proxy server to support Sametime. . 1795.5.6 Configuring Sametime 3.1 for reverse proxy support . . . . . . . . . . . 182
5.6 General reverse proxy tips . . . . . . . . . . . . . . . . . . . . . . . . . . . . . . . . . . . 1835.7 Summary . . . . . . . . . . . . . . . . . . . . . . . . . . . . . . . . . . . . . . . . . . . . . . . . . 186
Chapter 6. Public key infrastructures . . . . . . . . . . . . . . . . . . . . . . . . . . . . 1876.1 The Notes PKI . . . . . . . . . . . . . . . . . . . . . . . . . . . . . . . . . . . . . . . . . . . . . 188
6.1.1 Registration and certification. . . . . . . . . . . . . . . . . . . . . . . . . . . . . . 1886.1.2 Certification hierarchies. . . . . . . . . . . . . . . . . . . . . . . . . . . . . . . . . . 189
Contents v

6.1.3 Notes IDs . . . . . . . . . . . . . . . . . . . . . . . . . . . . . . . . . . . . . . . . . . . . 1916.1.4 Notes passwords. . . . . . . . . . . . . . . . . . . . . . . . . . . . . . . . . . . . . . . 2006.1.5 The Domino Directory . . . . . . . . . . . . . . . . . . . . . . . . . . . . . . . . . . . 2066.1.6 The Domino domain . . . . . . . . . . . . . . . . . . . . . . . . . . . . . . . . . . . . 2086.1.7 Certification hierarchies. . . . . . . . . . . . . . . . . . . . . . . . . . . . . . . . . . 2096.1.8 Notes cross-certification . . . . . . . . . . . . . . . . . . . . . . . . . . . . . . . . . 2106.1.9 Authentication . . . . . . . . . . . . . . . . . . . . . . . . . . . . . . . . . . . . . . . . . 2156.1.10 Notes authentication . . . . . . . . . . . . . . . . . . . . . . . . . . . . . . . . . . . 2176.1.11 Data integrity with digital signatures . . . . . . . . . . . . . . . . . . . . . . . 2226.1.12 Confidentiality with encryption. . . . . . . . . . . . . . . . . . . . . . . . . . . . 2246.1.13 Notes PKI summary . . . . . . . . . . . . . . . . . . . . . . . . . . . . . . . . . . . 229
6.2 The Internet PKI . . . . . . . . . . . . . . . . . . . . . . . . . . . . . . . . . . . . . . . . . . . 2296.2.1 Internet standards . . . . . . . . . . . . . . . . . . . . . . . . . . . . . . . . . . . . . . 2306.2.2 Components of a PKI . . . . . . . . . . . . . . . . . . . . . . . . . . . . . . . . . . . 2326.2.3 X.509 certificates. . . . . . . . . . . . . . . . . . . . . . . . . . . . . . . . . . . . . . . 2366.2.4 Web client authentication . . . . . . . . . . . . . . . . . . . . . . . . . . . . . . . . 2406.2.5 Secure Sockets Layer . . . . . . . . . . . . . . . . . . . . . . . . . . . . . . . . . . . 2496.2.6 The Domino Certificate Authority . . . . . . . . . . . . . . . . . . . . . . . . . . 2606.2.7 Secure Internet messaging . . . . . . . . . . . . . . . . . . . . . . . . . . . . . . . 2606.2.8 Secure messaging with PGP . . . . . . . . . . . . . . . . . . . . . . . . . . . . . 2676.2.9 Secure messaging with S/MIME . . . . . . . . . . . . . . . . . . . . . . . . . . . 2686.2.10 Using Lotus Notes 6 as an S/MIME client . . . . . . . . . . . . . . . . . . . 276
6.3 Summary . . . . . . . . . . . . . . . . . . . . . . . . . . . . . . . . . . . . . . . . . . . . . . . . . 280
Chapter 7. Single sign-on . . . . . . . . . . . . . . . . . . . . . . . . . . . . . . . . . . . . . . 2817.1 SSO methods . . . . . . . . . . . . . . . . . . . . . . . . . . . . . . . . . . . . . . . . . . . . . 283
7.1.1 Single password or SSO . . . . . . . . . . . . . . . . . . . . . . . . . . . . . . . . . 2837.2 LTPA . . . . . . . . . . . . . . . . . . . . . . . . . . . . . . . . . . . . . . . . . . . . . . . . . . . . 285
7.2.1 Authentication . . . . . . . . . . . . . . . . . . . . . . . . . . . . . . . . . . . . . . . . . 2877.2.2 Access control. . . . . . . . . . . . . . . . . . . . . . . . . . . . . . . . . . . . . . . . . 2907.2.3 Troubleshooting LTPA issues . . . . . . . . . . . . . . . . . . . . . . . . . . . . . 291
7.3 X.509 certificates. . . . . . . . . . . . . . . . . . . . . . . . . . . . . . . . . . . . . . . . . . . 2947.3.1 Authentication . . . . . . . . . . . . . . . . . . . . . . . . . . . . . . . . . . . . . . . . . 2957.3.2 Access control. . . . . . . . . . . . . . . . . . . . . . . . . . . . . . . . . . . . . . . . . 296
7.4 DSAPI . . . . . . . . . . . . . . . . . . . . . . . . . . . . . . . . . . . . . . . . . . . . . . . . . . . 2967.4.1 Authentication . . . . . . . . . . . . . . . . . . . . . . . . . . . . . . . . . . . . . . . . . 3037.4.2 Access control. . . . . . . . . . . . . . . . . . . . . . . . . . . . . . . . . . . . . . . . . 303
7.5 HTTP headers . . . . . . . . . . . . . . . . . . . . . . . . . . . . . . . . . . . . . . . . . . . . . 3037.5.1 Authentication . . . . . . . . . . . . . . . . . . . . . . . . . . . . . . . . . . . . . . . . . 3047.5.2 Access control. . . . . . . . . . . . . . . . . . . . . . . . . . . . . . . . . . . . . . . . . 304
7.6 A single sign-on scenario . . . . . . . . . . . . . . . . . . . . . . . . . . . . . . . . . . . . 3057.7 Summary . . . . . . . . . . . . . . . . . . . . . . . . . . . . . . . . . . . . . . . . . . . . . . . . . 307
vi Lotus Security Handbook
Chapter 8. Directory strategies . . . . . . . . . . . . . . . . . . . . . . . . . . . . . . . . . 3098.1 Directory fundamentals . . . . . . . . . . . . . . . . . . . . . . . . . . . . . . . . . . . . . . 310
8.1.1 LDAP directories . . . . . . . . . . . . . . . . . . . . . . . . . . . . . . . . . . . . . . . 3108.2 Multiple directories . . . . . . . . . . . . . . . . . . . . . . . . . . . . . . . . . . . . . . . . . 311
8.2.1 Authoritative sources. . . . . . . . . . . . . . . . . . . . . . . . . . . . . . . . . . . . 3128.2.2 Points of control . . . . . . . . . . . . . . . . . . . . . . . . . . . . . . . . . . . . . . . 3138.2.3 Data management. . . . . . . . . . . . . . . . . . . . . . . . . . . . . . . . . . . . . . 314
8.3 Directory synchronization . . . . . . . . . . . . . . . . . . . . . . . . . . . . . . . . . . . . 3158.3.1 Data sources . . . . . . . . . . . . . . . . . . . . . . . . . . . . . . . . . . . . . . . . . . 3168.3.2 Object classes. . . . . . . . . . . . . . . . . . . . . . . . . . . . . . . . . . . . . . . . . 3168.3.3 Attributes . . . . . . . . . . . . . . . . . . . . . . . . . . . . . . . . . . . . . . . . . . . . . 3208.3.4 Attribute and record mapping . . . . . . . . . . . . . . . . . . . . . . . . . . . . . 3218.3.5 Data flows . . . . . . . . . . . . . . . . . . . . . . . . . . . . . . . . . . . . . . . . . . . . 3258.3.6 Event-driven synchronization . . . . . . . . . . . . . . . . . . . . . . . . . . . . . 3268.3.7 Tools . . . . . . . . . . . . . . . . . . . . . . . . . . . . . . . . . . . . . . . . . . . . . . . . 326
8.4 Unified directory service . . . . . . . . . . . . . . . . . . . . . . . . . . . . . . . . . . . . . 3398.4.1 Account provisioning . . . . . . . . . . . . . . . . . . . . . . . . . . . . . . . . . . . . 3488.4.2 Enterprise access controls . . . . . . . . . . . . . . . . . . . . . . . . . . . . . . . 350
8.5 Summary . . . . . . . . . . . . . . . . . . . . . . . . . . . . . . . . . . . . . . . . . . . . . . . . . 350
Chapter 9. Server hardening . . . . . . . . . . . . . . . . . . . . . . . . . . . . . . . . . . . 3539.1 Hardening fundamentals . . . . . . . . . . . . . . . . . . . . . . . . . . . . . . . . . . . . . 354
9.1.1 Starting with the operating system . . . . . . . . . . . . . . . . . . . . . . . . . 3549.1.2 Protection and prevention tools. . . . . . . . . . . . . . . . . . . . . . . . . . . . 3569.1.3 Hardening fundamentals summary . . . . . . . . . . . . . . . . . . . . . . . . . 359
9.2 Operating system security . . . . . . . . . . . . . . . . . . . . . . . . . . . . . . . . . . . . 3599.2.1 Operating system overview. . . . . . . . . . . . . . . . . . . . . . . . . . . . . . . 3599.2.2 Windows operating system weaknesses . . . . . . . . . . . . . . . . . . . . 3629.2.3 Linux weaknesses. . . . . . . . . . . . . . . . . . . . . . . . . . . . . . . . . . . . . . 363
9.3 Hardening Windows (NT kernel-based) systems . . . . . . . . . . . . . . . . . . 3659.3.1 Hardening Windows NT 4.0 . . . . . . . . . . . . . . . . . . . . . . . . . . . . . . 3669.3.2 Hardening Windows 2000 . . . . . . . . . . . . . . . . . . . . . . . . . . . . . . . . 3749.3.3 Windows workstation hardening . . . . . . . . . . . . . . . . . . . . . . . . . . . 3799.3.4 Further reading . . . . . . . . . . . . . . . . . . . . . . . . . . . . . . . . . . . . . . . . 386
9.4 Hardening UNIX systems . . . . . . . . . . . . . . . . . . . . . . . . . . . . . . . . . . . . 3879.4.1 Common steps for hardening UNIX and Linux servers. . . . . . . . . . 3889.4.2 Partitioning for protection . . . . . . . . . . . . . . . . . . . . . . . . . . . . . . . . 3899.4.3 Disabling the extraneous inetd service . . . . . . . . . . . . . . . . . . . . . . 3909.4.4 Installing and configuring tcp_wrappers . . . . . . . . . . . . . . . . . . . . . 3919.4.5 Tighten sendmail default options . . . . . . . . . . . . . . . . . . . . . . . . . . 3929.4.6 Linux-specific tasks . . . . . . . . . . . . . . . . . . . . . . . . . . . . . . . . . . . . . 3939.4.7 Solaris-specific tasks. . . . . . . . . . . . . . . . . . . . . . . . . . . . . . . . . . . . 3959.4.8 Tweaking the network configurations for security . . . . . . . . . . . . . . 396
Contents vii
9.4.9 Remote log server. . . . . . . . . . . . . . . . . . . . . . . . . . . . . . . . . . . . . . 3999.5 Hardening the AIX operating system. . . . . . . . . . . . . . . . . . . . . . . . . . . . 399
9.5.1 Removing information from login screens. . . . . . . . . . . . . . . . . . . . 4019.5.2 Strengthening user security . . . . . . . . . . . . . . . . . . . . . . . . . . . . . . 4019.5.3 Defining access to the trusted communication path . . . . . . . . . . . . 4059.5.4 Dealing with special situations . . . . . . . . . . . . . . . . . . . . . . . . . . . . 4069.5.5 Enabling system auditing . . . . . . . . . . . . . . . . . . . . . . . . . . . . . . . . 4079.5.6 Monitoring files, directories, and programs . . . . . . . . . . . . . . . . . . . 4079.5.7 Managing X11 and CDE concerns . . . . . . . . . . . . . . . . . . . . . . . . . 4099.5.8 Disabling unnecessary services . . . . . . . . . . . . . . . . . . . . . . . . . . . 410
9.6 Summary . . . . . . . . . . . . . . . . . . . . . . . . . . . . . . . . . . . . . . . . . . . . . . . . . 411
Part 3. Security features of Lotus products . . . . . . . . . . . . . . . . . . . . . . . . . . . . . . . . . . . . 413
Chapter 10. The Notes/Domino security model . . . . . . . . . . . . . . . . . . . . 41510.1 Components of the Notes/Domino security model . . . . . . . . . . . . . . . . 41610.2 Physical security . . . . . . . . . . . . . . . . . . . . . . . . . . . . . . . . . . . . . . . . . . 41710.3 Logical security . . . . . . . . . . . . . . . . . . . . . . . . . . . . . . . . . . . . . . . . . . . 418
10.3.1 Network security . . . . . . . . . . . . . . . . . . . . . . . . . . . . . . . . . . . . . . 41810.3.2 Notes security . . . . . . . . . . . . . . . . . . . . . . . . . . . . . . . . . . . . . . . . 421
10.4 Conclusion. . . . . . . . . . . . . . . . . . . . . . . . . . . . . . . . . . . . . . . . . . . . . . . 426
Chapter 11. Domino/Notes 6 security features. . . . . . . . . . . . . . . . . . . . . 42711.1 Domino server security . . . . . . . . . . . . . . . . . . . . . . . . . . . . . . . . . . . . . 428
11.1.1 User and server access to Domino servers . . . . . . . . . . . . . . . . . 42911.1.2 Administrator access. . . . . . . . . . . . . . . . . . . . . . . . . . . . . . . . . . . 43111.1.3 Web Administrator. . . . . . . . . . . . . . . . . . . . . . . . . . . . . . . . . . . . . 43511.1.4 Programmability restrictions . . . . . . . . . . . . . . . . . . . . . . . . . . . . . 43611.1.5 Policies and policy documents . . . . . . . . . . . . . . . . . . . . . . . . . . . 43811.1.6 Internet Site security . . . . . . . . . . . . . . . . . . . . . . . . . . . . . . . . . . . 44211.1.7 Physical server security . . . . . . . . . . . . . . . . . . . . . . . . . . . . . . . . 446
11.2 HTTP server security. . . . . . . . . . . . . . . . . . . . . . . . . . . . . . . . . . . . . . . 44711.2.1 Domino Web Server API . . . . . . . . . . . . . . . . . . . . . . . . . . . . . . . . 44711.2.2 HTTP server plug-ins . . . . . . . . . . . . . . . . . . . . . . . . . . . . . . . . . . 448
11.3 Service provider environment (xSP) . . . . . . . . . . . . . . . . . . . . . . . . . . . 44911.4 Roaming users . . . . . . . . . . . . . . . . . . . . . . . . . . . . . . . . . . . . . . . . . . . 45011.5 Domino certificate authority. . . . . . . . . . . . . . . . . . . . . . . . . . . . . . . . . . 451
11.5.1 Domino server-based certification authority . . . . . . . . . . . . . . . . . 45211.6 Directory services . . . . . . . . . . . . . . . . . . . . . . . . . . . . . . . . . . . . . . . . . 457
11.6.1 Directory administration servers . . . . . . . . . . . . . . . . . . . . . . . . . . 45711.6.2 Dedicated directory servers . . . . . . . . . . . . . . . . . . . . . . . . . . . . . 45711.6.3 Directory assistance . . . . . . . . . . . . . . . . . . . . . . . . . . . . . . . . . . . 45811.6.4 Extended access control lists . . . . . . . . . . . . . . . . . . . . . . . . . . . . 462
viii Lotus Security Handbook
11.6.5 LDAP directories . . . . . . . . . . . . . . . . . . . . . . . . . . . . . . . . . . . . . . 46411.7 Internet and Notes password synchronization . . . . . . . . . . . . . . . . . . . 46711.8 Notes ID recovery . . . . . . . . . . . . . . . . . . . . . . . . . . . . . . . . . . . . . . . . . 46811.9 Web client authentication . . . . . . . . . . . . . . . . . . . . . . . . . . . . . . . . . . . 471
11.9.1 Name variation considerations . . . . . . . . . . . . . . . . . . . . . . . . . . . 47211.9.2 Multi-server session-based authentication (SSO). . . . . . . . . . . . . 47411.9.3 Web users from secondary Domino and LDAP directories . . . . . . 47611.9.4 Domino name mapping . . . . . . . . . . . . . . . . . . . . . . . . . . . . . . . . . 477
11.10 Domino Password Checking . . . . . . . . . . . . . . . . . . . . . . . . . . . . . . . . 48011.10.1 The Notes and Domino password checking system . . . . . . . . . . 48011.10.2 Gaining access to a server and the process flow . . . . . . . . . . . . 48711.10.3 Password checking events . . . . . . . . . . . . . . . . . . . . . . . . . . . . . 49211.10.4 More details. . . . . . . . . . . . . . . . . . . . . . . . . . . . . . . . . . . . . . . . . 49611.10.5 iNotes and password checking . . . . . . . . . . . . . . . . . . . . . . . . . . 498
11.11 Database access control lists (ACLs) . . . . . . . . . . . . . . . . . . . . . . . . . 49811.12 Mail security . . . . . . . . . . . . . . . . . . . . . . . . . . . . . . . . . . . . . . . . . . . . 512
11.12.1 Controlling spam . . . . . . . . . . . . . . . . . . . . . . . . . . . . . . . . . . . . . 51211.12.2 Mail policy management . . . . . . . . . . . . . . . . . . . . . . . . . . . . . . . 522
11.13 Domino Off-Line Services . . . . . . . . . . . . . . . . . . . . . . . . . . . . . . . . . . 52711.14 Notes client security . . . . . . . . . . . . . . . . . . . . . . . . . . . . . . . . . . . . . . 528
11.14.1 Smartcards . . . . . . . . . . . . . . . . . . . . . . . . . . . . . . . . . . . . . . . . . 52911.14.2 Execution Control Lists . . . . . . . . . . . . . . . . . . . . . . . . . . . . . . . . 530
Chapter 12. Security features of other Lotus products . . . . . . . . . . . . . . 53512.1 Lotus Team Workplace (QuickPlace) . . . . . . . . . . . . . . . . . . . . . . . . . . 536
12.1.1 QuickPlace and SSL . . . . . . . . . . . . . . . . . . . . . . . . . . . . . . . . . . . 53712.1.2 User directories . . . . . . . . . . . . . . . . . . . . . . . . . . . . . . . . . . . . . . . 53712.1.3 QuickPlace authentication. . . . . . . . . . . . . . . . . . . . . . . . . . . . . . . 53912.1.4 QuickPlace access control . . . . . . . . . . . . . . . . . . . . . . . . . . . . . . 54112.1.5 Server settings in the administration place . . . . . . . . . . . . . . . . . . 541
12.2 Lotus Sametime . . . . . . . . . . . . . . . . . . . . . . . . . . . . . . . . . . . . . . . . . . 54212.2.1 Securing the Sametime Connect client for desktops . . . . . . . . . . 54212.2.2 Proxy support for Sametime clients . . . . . . . . . . . . . . . . . . . . . . . 54412.2.3 Securing the Sametime Java connect client . . . . . . . . . . . . . . . . . 54412.2.4 Securing the Sametime Meeting Room client . . . . . . . . . . . . . . . . 54512.2.5 Securing the meeting server . . . . . . . . . . . . . . . . . . . . . . . . . . . . . 546
12.3 Domino Web Access (iNotes) . . . . . . . . . . . . . . . . . . . . . . . . . . . . . . . . 55012.3.1 Authentication . . . . . . . . . . . . . . . . . . . . . . . . . . . . . . . . . . . . . . . . 55012.3.2 Encrypting a mail file on a workstation . . . . . . . . . . . . . . . . . . . . . 55212.3.3 Security issues for users at a kiosk or in an Internet cafe. . . . . . . 55212.3.4 Differences between iNotes Web Access and Notes security . . . 55312.3.5 Protection against malicious code. . . . . . . . . . . . . . . . . . . . . . . . . 55412.3.6 Client-side security . . . . . . . . . . . . . . . . . . . . . . . . . . . . . . . . . . . . 554
Contents ix
12.4 Lotus Workplace . . . . . . . . . . . . . . . . . . . . . . . . . . . . . . . . . . . . . . . . . . 55612.5 IBM WebSphere Portal . . . . . . . . . . . . . . . . . . . . . . . . . . . . . . . . . . . . . 558
12.5.1 Authentication . . . . . . . . . . . . . . . . . . . . . . . . . . . . . . . . . . . . . . . . 55812.5.2 Authorization . . . . . . . . . . . . . . . . . . . . . . . . . . . . . . . . . . . . . . . . . 56212.5.3 Changing passwords. . . . . . . . . . . . . . . . . . . . . . . . . . . . . . . . . . . 56712.5.4 Securing installation and configuration information. . . . . . . . . . . . 56812.5.5 Member Services . . . . . . . . . . . . . . . . . . . . . . . . . . . . . . . . . . . . . 568
12.6 Domino Everyplace Access. . . . . . . . . . . . . . . . . . . . . . . . . . . . . . . . . . 57412.7 Sametime Everyplace . . . . . . . . . . . . . . . . . . . . . . . . . . . . . . . . . . . . . . 57612.8 Conclusion. . . . . . . . . . . . . . . . . . . . . . . . . . . . . . . . . . . . . . . . . . . . . . . 577
Part 4. A secure scenario . . . . . . . . . . . . . . . . . . . . . . . . . . . . . . . . . . . . . . . . . . . . . . . . . . . 579
Chapter 13. Sample scenario described . . . . . . . . . . . . . . . . . . . . . . . . . . 58113.1 The scenario described . . . . . . . . . . . . . . . . . . . . . . . . . . . . . . . . . . . . . 58213.2 Phase 1: Basic internal collaboration . . . . . . . . . . . . . . . . . . . . . . . . . . 58213.3 Stage 2: Remote access to e-mail . . . . . . . . . . . . . . . . . . . . . . . . . . . . 58513.4 Stage 3: Creation of a corporate directory . . . . . . . . . . . . . . . . . . . . . . 58713.5 Stage 4: Remote access to all collaboration tools. . . . . . . . . . . . . . . . . 58813.6 Stage 5: Advanced collaborative tools . . . . . . . . . . . . . . . . . . . . . . . . . 58913.7 Stage 6: Further securing remote access . . . . . . . . . . . . . . . . . . . . . . . 59013.8 Stage 7: Remote access to Online Meetings and Chat. . . . . . . . . . . . . 59113.9 Summary . . . . . . . . . . . . . . . . . . . . . . . . . . . . . . . . . . . . . . . . . . . . . . . . 591
Chapter 14. Scenario implementation details. . . . . . . . . . . . . . . . . . . . . . 59314.1 Basic internal collaboration (Domino, Sametime, and QuickPlace) . . . 594
14.1.1 Installation of the core servers . . . . . . . . . . . . . . . . . . . . . . . . . . . 59414.1.2 WEB SSO configuration/creation . . . . . . . . . . . . . . . . . . . . . . . . . 59514.1.3 Verifying the Fully Qualified Domain Name . . . . . . . . . . . . . . . . . 598
14.2 Secure Internet access to e-mail . . . . . . . . . . . . . . . . . . . . . . . . . . . . . . 59914.2.1 SSL configuration . . . . . . . . . . . . . . . . . . . . . . . . . . . . . . . . . . . . . 60014.2.2 WebSphere Edge Server configuration (Reverse proxy) . . . . . . . 60214.2.3 Firewall configuration . . . . . . . . . . . . . . . . . . . . . . . . . . . . . . . . . . 609
14.3 Introduction of an “enterprise” LDAP server . . . . . . . . . . . . . . . . . . . . . 61014.3.1 Configuration of LDAP server . . . . . . . . . . . . . . . . . . . . . . . . . . . . 61114.3.2 Pointing the Lotus Domino server to the new LDAP . . . . . . . . . . . 61114.3.3 Enabling name mapping . . . . . . . . . . . . . . . . . . . . . . . . . . . . . . . . 61414.3.4 Pointing the Sametime server to the new LDAP directory . . . . . . 61514.3.5 Pointing the QuickPlace server to the new LDAP . . . . . . . . . . . . . 618
14.4 Introduction of WebSphere Portal . . . . . . . . . . . . . . . . . . . . . . . . . . . . . 62014.4.1 Updating SSO configurations . . . . . . . . . . . . . . . . . . . . . . . . . . . . 62114.4.2 Modify the reverse proxy to support the portal . . . . . . . . . . . . . . . 623
14.5 Adding e-learning capabilities . . . . . . . . . . . . . . . . . . . . . . . . . . . . . . . . 624
x Lotus Security Handbook
14.5.1 Setting LMS up for SSO . . . . . . . . . . . . . . . . . . . . . . . . . . . . . . . . 62514.5.2 Installing the LMS portlets. . . . . . . . . . . . . . . . . . . . . . . . . . . . . . . 626
14.6 Addition of Tivoli Access Manager . . . . . . . . . . . . . . . . . . . . . . . . . . . . 62814.6.1 Installing Tivoli Access Manager . . . . . . . . . . . . . . . . . . . . . . . . . . 62814.6.2 Installing the WebSeal plug-in for Websphere Edge Server . . . . . 62914.6.3 Integrating Domino-based servers with TAM . . . . . . . . . . . . . . . . 63014.6.4 Integrating WebSphere Portal with TAM. . . . . . . . . . . . . . . . . . . . 631
14.7 Summary . . . . . . . . . . . . . . . . . . . . . . . . . . . . . . . . . . . . . . . . . . . . . . . . 632
Part 5. Appendixes . . . . . . . . . . . . . . . . . . . . . . . . . . . . . . . . . . . . . . . . . . . . . . . . . . . . . . . . 633
Appendix A. Debugging with a protocol analyzer . . . . . . . . . . . . . . . . . . 635
Appendix B. A sample DSAPI program . . . . . . . . . . . . . . . . . . . . . . . . . . . 641
Appendix C. Domino 6 HTTP plug-in hints and tips . . . . . . . . . . . . . . . . 657
Related publications . . . . . . . . . . . . . . . . . . . . . . . . . . . . . . . . . . . . . . . . . . 683IBM Redbooks . . . . . . . . . . . . . . . . . . . . . . . . . . . . . . . . . . . . . . . . . . . . . . . . 683Other publications . . . . . . . . . . . . . . . . . . . . . . . . . . . . . . . . . . . . . . . . . . . . . 684Online resources . . . . . . . . . . . . . . . . . . . . . . . . . . . . . . . . . . . . . . . . . . . . . . 684How to get IBM Redbooks . . . . . . . . . . . . . . . . . . . . . . . . . . . . . . . . . . . . . . . 685Help from IBM . . . . . . . . . . . . . . . . . . . . . . . . . . . . . . . . . . . . . . . . . . . . . . . . 685
Index . . . . . . . . . . . . . . . . . . . . . . . . . . . . . . . . . . . . . . . . . . . . . . . . . . . . . . . 687
Contents xi

xii Lotus Security Handbook

Notices
This information was developed for products and services offered in the U.S.A.
IBM may not offer the products, services, or features discussed in this document in other countries. Consult your local IBM representative for information on the products and services currently available in your area. Any reference to an IBM product, program, or service is not intended to state or imply that only that IBM product, program, or service may be used. Any functionally equivalent product, program, or service that does not infringe any IBM intellectual property right may be used instead. However, it is the user's responsibility to evaluate and verify the operation of any non-IBM product, program, or service.
IBM may have patents or pending patent applications covering subject matter described in this document. The furnishing of this document does not give you any license to these patents. You can send license inquiries, in writing, to: IBM Director of Licensing, IBM Corporation, North Castle Drive Armonk, NY 10504-1785 U.S.A.
The following paragraph does not apply to the United Kingdom or any other country where such provisions are inconsistent with local law: INTERNATIONAL BUSINESS MACHINES CORPORATION PROVIDES THIS PUBLICATION "AS IS" WITHOUT WARRANTY OF ANY KIND, EITHER EXPRESS OR IMPLIED, INCLUDING, BUT NOT LIMITED TO, THE IMPLIED WARRANTIES OF NON-INFRINGEMENT, MERCHANTABILITY OR FITNESS FOR A PARTICULAR PURPOSE. Some states do not allow disclaimer of express or implied warranties in certain transactions, therefore, this statement may not apply to you.
This information could include technical inaccuracies or typographical errors. Changes are periodically made to the information herein; these changes will be incorporated in new editions of the publication. IBM may make improvements and/or changes in the product(s) and/or the program(s) described in this publication at any time without notice.
Any references in this information to non-IBM Web sites are provided for convenience only and do not in any manner serve as an endorsement of those Web sites. The materials at those Web sites are not part of the materials for this IBM product and use of those Web sites is at your own risk.
IBM may use or distribute any of the information you supply in any way it believes appropriate without incurring any obligation to you.
Information concerning non-IBM products was obtained from the suppliers of those products, their published announcements or other publicly available sources. IBM has not tested those products and cannot confirm the accuracy of performance, compatibility or any other claims related to non-IBM products. Questions on the capabilities of non-IBM products should be addressed to the suppliers of those products.
This information contains examples of data and reports used in daily business operations. To illustrate them as completely as possible, the examples include the names of individuals, companies, brands, and products. All of these names are fictitious and any similarity to the names and addresses used by an actual business enterprise is entirely coincidental.
COPYRIGHT LICENSE: This information contains sample application programs in source language, which illustrates programming techniques on various operating platforms. You may copy, modify, and distribute these sample programs in any form without payment to IBM, for the purposes of developing, using, marketing or distributing application programs conforming to the application programming interface for the operating platform for which the sample programs are written. These examples have not been thoroughly tested under all conditions. IBM, therefore, cannot guarantee or imply reliability, serviceability, or function of these programs. You may copy, modify, and distribute these sample programs in any form without payment to IBM for the purposes of developing, using, marketing, or distributing application programs conforming to IBM's application programming interfaces.
© Copyright IBM Corp. 2004. All rights reserved. xiii
TrademarksThe following terms are trademarks of the International Business Machines Corporation in the United States, other countries, or both:
Eserver®Eserver®Redbooks (logo) ™AIX®DB2®Everyplace™Extended Services®HACMP™IBM®ibm.com®OS/2®
OS/390®OS/400®Redbooks™SecureWay®SP1®SP2®Tivoli®Tivoli Enterprise™WebSphere®zSeries™Domino Designer®
Domino™iNotes™Lotus Discovery Server™Lotus Notes®Lotus®Mobile Notes™Notes®QuickPlace™Sametime®Workplace Messaging™
The following terms are trademarks of other companies:
Intel, and Intel Inside (logos) are trademarks of Intel Corporation in the United States, other countries, or both.
Microsoft, Windows, Windows NT, and the Windows logo are trademarks of Microsoft Corporation in the United States, other countries, or both.
Java and all Java-based trademarks and logos are trademarks or registered trademarks of Sun Microsystems, Inc. in the United States, other countries, or both.
UNIX is a registered trademark of The Open Group in the United States and other countries.
Other company, product, and service names may be trademarks or service marks of others.
xiv Lotus Security Handbook
Preface
This volume is the third IBM® Redbook about Lotus® security to be published. The previous two Redbooks™, The Domino Defense: Security in Lotus Notes 4.5 and the Internet, and Lotus Notes and Domino R5.0 Security Infrastructure Revealed, focused primarily on the strong security that has always been a part of the family of Lotus products. This redbook continues down the path set by these first two books, with the exception that it goes beyond simply covering Notes and Domino™, incorporating topics pertaining to other collaborative products and solutions offered by Lotus and IBM.
Overall, this redbook provides best practices for building a secure infrastructure, not only with Lotus Notes® and Domino, but with all Lotus collaborative technologies. To meet this goal, the book is broken into four main parts.
The first part of this book introduces the basic concepts related to security, and covers a number of methodologies for architecting and deploying security from beginning to end in an organization. This part of the book is most appropriate for those looking for a broad understanding of the IT security specialty.
The second part of the book delves into the specific concepts and components involved in a secure infrastructure. This includes discussions about security zoning, single sign-on (SSO), public key infrastructure (PKI), and directory strategies. This part is most appropriate for those looking to expand their knowledge of the actual components used to build a secure infrastructure, and how Lotus technologies react and interface with such key security components.
The third part of the book discusses the specific security features in the latest versions of Lotus products. Detailed security features of Lotus Notes and Domino 6, Sametime® 3, QuickPlace™ 2.08, Domino Web Access (iNotes™), WebSphere® Portal, and other IBM/Lotus collaborative technologies are all discussed. This part is especially relevant to those readers who want to learn what is new in terms of security for specific Lotus products or are looking for hints and tips on securing specific Lotus products.
Finally, the fourth part of the book provides a real-life scenario demonstrating the secure implementation of Lotus collaborative technologies, following the guidelines and best practices provided in the first three parts. This part can help all readers pull together the rest of the material in this book, and provides some implementation details for how to actually make some of these capabilities work.
It is assumed that the reader has a good understanding of the basic concepts involved with the Lotus Notes and Domino security model, and a basic
© Copyright IBM Corp. 2004. All rights reserved. xv

understanding of the principles of IT security. For a general overview of Notes and Domino security, the reader can refer to the IBM Redbook, Lotus Notes and Domino R5.0 Security Infrastructure Revealed, SG24-5341, available for download on:
http://publib-b.boulder.ibm.com/Redbooks.nsf/RedbookAbstracts/sg245341.html
The team that wrote this redbookThis redbook was produced by a team of specialists from around the world working at the International Technical Support Organization, Poughkeepsie Center.
William Tworek is a Project Leader with the International Technical Support Organization, working out of Westford, Massachusetts. He provides management and technical leadership for projects that produce Redbooks on various topics involving IBM and Lotus Software technologies. Prior to joining the ITSO, William was an IT Architect in the consulting industry, working for Andersen Consulting/Accenture, then for IBM Software Services for Lotus. His areas of expertise include collaborative technologies and business portals, system integration, and systems infrastructure design.
George Chiesa (formally Jorge Garcia-Chiesa, also known as Giorgio) is the founder and CTO of dotNSF Inc. (http://dotNSF.com). dotNSF is an IBM Business Partner that provides tools, customized solutions, and services in the areas of design, deployment, and management of business-critical Infrastructures, high availability/clustering and security. George has a degree in Business Administration, an MBA from SDA Bocconi University, several IBM Certifications in many brands/areas, and 14 years of experience with Notes. He is a regular speaker in the “Best Practices” tracks of IBM Lotusphere/Symposium and other international events, and has published several articles.
Frederic Dahm, originally from Canada, is a Systems Architect for IBM Software Services for Lotus in Zürich, Switzerland. He has 14 years of professional IT experience, including 10 years dealing with IT security matters.
David Hinkle is a Senior IT Specialist with IBM Software Services for Lotus in Phoenix, AZ. He has 19 years of professional IT experience, with the last 8 years focused in Lotus Notes/Domino infrastructure design and deployment. His areas of expertise include Domino server architecture, directory synchronization, LDAP directories and Web-based application security. He has been a speaker at LotusSphere on the topic of automating client deployment, and currently provides consulting services on a wide variety of customer engagements involving IBM and Microsoft® products.
xvi Lotus Security Handbook

Amanda Mason is a Staff Software Engineer with Lotus Software in Austin, Texas. She is a Principal CLP in Systems Admin and Application Development, a CLS in Collaborative Solutions, and a Microsoft Certified Professional in Windows® 2000.
Matthew Milza is an Advisory I/T Specialist in New York, NY. He has several years of experience in Domino administration, and has worked with numerous companies as a Domino consultant and administrator. As a Domino consultant, he has done everything from new implementation and design of worldwide infrastructures, to messaging migration, to resolving complex server issues.
Amy Smith is a Principal Technical Writer for the Global Development Organization, Information Development group of Lotus Software, and writes primarily about Domino and Notes security. She has also written a number of articles for the Lotus Developer Domain, and authored or co-authored several white papers, including the “21CFR Part 11 Requirements for Notes and Domino.” Amy has over 20 years experience in technical and professional writing in the high-tech and financial services industries. This is her first Redbook.
The Redbook team would also like to extend their thanks to the following people for their contributions to this project:
IBM Lotus SoftwareCharlie Kaufman, Matthew Flaherty, Mike Kerrigan, Joseph Russo, Mary Ellen Zurko, Alan Eldridge, Jane Marcus, Kevin Lynch, Rich Epstein, Scott Davidson, and many others
IBM Software Services for LotusTim Speed, David Byrd, Mary LaRoche
IBM International Technical Support OrganizationJohn Bergland, Axel Buecker, Alison Chandler
Become a published authorJoin us for a two- to six-week residency program! Help write an IBM Redbook dealing with specific products or solutions, while getting hands-on experience with leading-edge technologies. You'll team with IBM technical professionals, Business Partners and/or customers.
Your efforts will help increase product acceptance and customer satisfaction. As a bonus, you'll develop a network of contacts in IBM development labs, and increase your productivity and marketability.
Preface xvii

Find out more about the residency program, browse the residency index, and apply online at:
ibm.com/redbooks/residencies.html
Comments welcomeYour comments are important to us!
We want our Redbooks to be as helpful as possible. Send us your comments about this or other Redbooks in one of the following ways:
� Use the online Contact us review redbook form found at:
ibm.com/redbooks
� Send your comments in an Internet note to:
xviii Lotus Security Handbook

Part 1 Security concepts introduced
This part introduces the basic concepts related to security, and then covers a number of methodologies for architecting and deploying security from beginning to end in an organization.
This part of the book is most appropriate for those looking for a broad understanding of the IT security specialty, or those looking for assistance in improving their organization’s overall security approach and policies.
Part 1
© Copyright IBM Corp. 2004. All rights reserved. 1

2 Lotus Security Handbook
Chapter 1. Fundamentals of IT security
In this chapter, we cover the necessary background knowledge for this Redbook. This will help the reader comprehend the terms and topics presented later on and ensure, as well, a thorough understanding of the terminology used throughout the redbook.
We define both security and IT security. We look at some interesting studies and statistics in order to show the current trends in security, and we also look at established standards.
This chapter is geared towards a wide range of readers:
� People who are new to the field of IT security and want to have a place to begin understanding IT security and all this represents
� People who already have IT security experience and wish to have a quick refresher
� People who fall somewhere in between those two categories, and above all, who like to read their Redbooks from beginning to end.
While it is possible to skip this chapter and come back to it later, we strongly encourage the reader to take a few minutes to brush up on the IT security fundamentals presented here.
1
© Copyright IBM Corp. 2004. All rights reserved. 3

1.1 IntroductionThe business world as we know it has evolved rapidly over the years and through this evolution, so has the way companies do business. As we find ourselves in this new era, it is thanks to a number of important revolutions that occurred in the previous two decades.
The first revolution occurred in the early 1980s with the advent of the IBM Personal Computer, which was the first true business microcomputer on the market. It permitted companies and individuals alike to have access to computing resources which were relatively inexpensive for their times. Connecting these machines through a local network enabled the flow of information like never before and brought forth the notion of distributed computing. This lead to an explosion of business solutions that changed significantly the way businesses operated.
The second revolution occurred in the mid 1990s, with the marriage of what was then a twenty year old collection of networks (called the Internet, originally named ARPANet) with the Web browser. This marriage made it finally easy to access information on the Internet. This was the genesis of e-Business. With the help of Web servers and a standard set of Web technologies, organizations could now offer a plethora of services and goods over the Internet. These same organizations found also that they could better communicate and exchange information with their suppliers. As well, by carefully opening up their internal networks to the Internet, these organizations could permit employees to access data and electronic mail from their personal homes, or, even more importantly, from anywhere in the world their employees happened to be, whether at remote locations or while on the road.
1.1.1 Knowledge capitalIn this new age of e-Business, information has become an important commodity. It is correctly referred to as knowledge capital, which is a form of capital many businesses depend on the same way they do on their monetary capital. As a matter of fact, businesses live and die by the measure of control they have over their knowledge capital. If this capital is stolen, disclosed, corrupted, or destroyed, a company can suffer greatly—even to the point of losing its existence.
There are individuals who make it their purpose in life to get unauthorized access to computer networks, systems, and the information they store and disseminate. In the more benign form, these individuals do it for the sheer thrill of it, to boast of their mastery of computer sciences and nothing more (they are usually referred to as white hat hackers). In worse forms, these individuals do it for malicious
4 Lotus Security Handbook
purposes, either to gain financially from it or to willfully corrupt or destroy what they find (they are usually referred to as black hat hackers, or sometimes as crackers).
No matter what their inclination, these hackers are an IT systems nightmare for organizations of all sizes. Even well-intentioned hackers can create conditions that expose the information contained in an organization’s IT systems and create the potential for this information to be destroyed, corrupted, or accessed by less scrupulous people.
Worse, it is not only white and black hat hackers that IT managers need to worry about, but also the very users that use the services of the IT infrastructure. Most of the time, the users are not malevolent; they simply make mistakes. But even innocent errors can affect an organization’s knowledge capital, and well-meaning users can be fooled into disclosing important information that exposes knowledge capital to sinister forces.
1.1.2 The CSI/FBI Computer Crime and Security SurveyTo look at how bad things are presently, here is an interesting quote:
This quote is from the CSI/FBI Computer Crime and Security Survey, which is available in electronic format directly from the Computer Security Institute (CSI) at the following URL:
http://www.gocsi.com/forms/fbi/pdf.html
The CSI and FBICSI, which was established in 1974, is a San Francisco-based association of information security professionals. It has thousands of members worldwide and provides a wide variety of information and education programs to assist practitioners in protecting the information assets of corporations and governmental organizations.
The Federal Bureau of Investigation (FBI), in response to an expanding number of instances in which criminals have targeted major components of information and economic infrastructure systems, has established the National Infrastructure
“The United States' increasing dependency on information technology to manage and operate our nation's critical infrastructures provides a prime target to would be cyber-terrorists. Now, more than ever, the government and private sector need to work together to share information and be more cognitive of information security so that our nation's critical infrastructures are protected from cyber-terrorists.”
Chapter 1. Fundamentals of IT security 5

Protection Center (NIPC) located at FBI headquarters, and Regional Computer Intrusion Squads located in selected offices throughout the United States. The NIPC, a joint partnership among federal agencies and private industry, is designed to serve as the government's lead mechanism for preventing and responding to cyber attacks on the nation's infrastructures. (These infrastructures include telecommunications, energy, transportation, banking and finance, emergency services, and government operations). The mission of Regional Computer Intrusion Squads is to investigate violations of the Computer Fraud and Abuse Act (Title 8, Section 1030), including intrusions to public switched networks, major computer network intrusions, privacy violations, industrial espionage, pirated computer software, and other crimes.
The studyOver the past seven years, the CSI and the San Francisco FBI Computer Intrusion Squad have worked together and built an annual "Computer Crime and Security Survey.” The aim of this effort is to raise the level of security awareness, as well as to help determine the scope of computer crime in the United States.
Based on responses from 503 computer security practitioners in U.S. corporations, government agencies, financial institutions, medical institutions, and universities, the findings of the "2002 Computer Crime and Security Survey" confirm that the threat from computer crime and other information security breaches continues unabated and that the financial toll is mounting.
Highlights of the "2002 Computer Crime and Security Survey" include:
� Ninety percent of respondents (primarily large corporations and government agencies) detected computer security breaches within the last twelve months.
� Eighty percent acknowledged financial losses due to computer breaches.
� Forty-four percent were willing able (and willing) to quantify their financial losses. These 223 respondents reported $455,848,000 in financial losses.
� As in previous years, the most serious financial losses occurred through theft of proprietary information (26 respondents reported $170,827,000) and financial fraud (25 respondents reported $115,753,000).
� For the fifth year in a row, more respondents (74%) cited their Internet connection as a frequent point of attack than cited their internal systems as a frequent point of attack (33%).
� Thirty-four percent reported the intrusions to law enforcement. (In 1996, only 16% acknowledged reporting intrusions to law enforcement.)
Respondents detected a wide range of attacks and abuses. Here are some examples of attacks and abuses:
� Forty percent detected system penetration from the outside.
6 Lotus Security Handbook

� Forty percent detected denial of service attacks.
� Seventy-eight percent detected employee abuse of Internet access privileges (for example, downloading pornography or pirated software, or inappropriate use of e-mail systems).
� Eighty-five percent detected computer viruses.
For the fourth year, the survey asked some questions about electronic commerce over the Internet. Here are some of the results:
� Ninety-eight percent of respondents have WWW sites.
� Fifty-two percent conduct electronic commerce on their sites.
� Thirty-eight percent suffered unauthorized access or misuse on their Web sites within the last twelve months. Twenty-one percent said that they didn't know if there had been unauthorized access or misuse.
� Twenty-five percent of those acknowledging attacks reported from two to five incidents. Thirty-nine percent reported ten or more incidents.
� Seventy percent of those attacked reported vandalism (only 64% in 2000).
� Fifty-five percent reported denial of service (compared to 60% in 2000).
� Twelve percent reported theft of transaction information.
� Six percent reported financial fraud (only 3% in 2000).
Thus, the "Computer Crime and Security Survey" has served as a reality check for industry and government. And, it’s not only the CSI who is giving a warning.
1.1.3 CERT figuresThe CERT Coordination Center (CERT/CC) was formed by the Defense Advanced Research Projects Agency (DARPA) in November 1988 in response to the needs identified during an Internet security incident. Its purpose is to work with the Internet community in detecting and resolving computer security incidents, as well as taking steps to prevent future incidents. Its specific mission is to:
� Provide a comprehensive view of attack methods, vulnerabilities, and the impact of attacks on information systems and networks; provide information on incident and vulnerability trends and characteristics
� Build an infrastructure of increasingly competent security professionals who respond quickly to attacks on Internet-connected systems and are able to protect their systems against security compromises
� Provide methods to evaluate, improve, and maintain the security and survivability of networked systems
Chapter 1. Fundamentals of IT security 7
� Work with vendors to improve the security of as-shipped products
The CERT/CC is part of the Networked Systems Survivability (NSS) Program at the Software Engineering Institute (SEI), Carnegie Mellon University. The primary goal of the NSS Program is to ensure that appropriate technology and systems management practices are used to resist attacks on networked systems and to limit damage and ensure continuity of critical services in spite of successful attacks.
For a number of years now, the CERT/CC has kept a record of security incidents and security vulnerabilities. The complete library of these reports can be found at the following URL:
http://www.cert.org/annual_rpts/index.html
As computers, networks, and related technologies have evolved, so have the methods and tools of the attackers, getting more and more sophisticated and more numerous.
The figures for the last year tabulated are sobering. From January through December 2002, the CERT/CC received 204,841 e-mail messages and more than 880 hotline calls reporting computer security incidents or requesting information. Figure 1-1 on page 9 illustrates the number of security incidents tabulated from 1988 through 2001 and the trend these figures represent.
8 Lotus Security Handbook
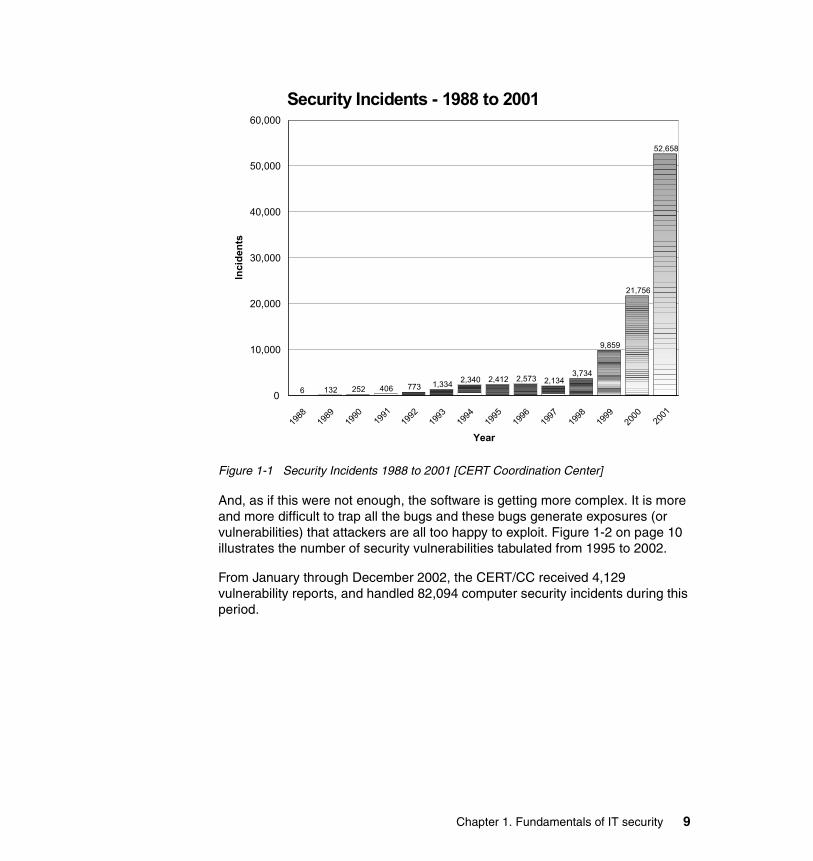
Figure 1-1 Security Incidents 1988 to 2001 [CERT Coordination Center]
And, as if this were not enough, the software is getting more complex. It is more and more difficult to trap all the bugs and these bugs generate exposures (or vulnerabilities) that attackers are all too happy to exploit. Figure 1-2 on page 10 illustrates the number of security vulnerabilities tabulated from 1995 to 2002.
From January through December 2002, the CERT/CC received 4,129 vulnerability reports, and handled 82,094 computer security incidents during this period.
6 132 252 406 773 1,334 2,340 2,412 2,573 2,1343,734
9,859
21,756
52,658
1988
1989
1990 19
9119
9219
9319
9419
9519
9619
9719
9819
9920
00 2001
Year
0
10,000
20,000
30,000
40,000
50,000
60,000
Inci
dent
s
Security Incidents - 1988 to 2001
Chapter 1. Fundamentals of IT security 9
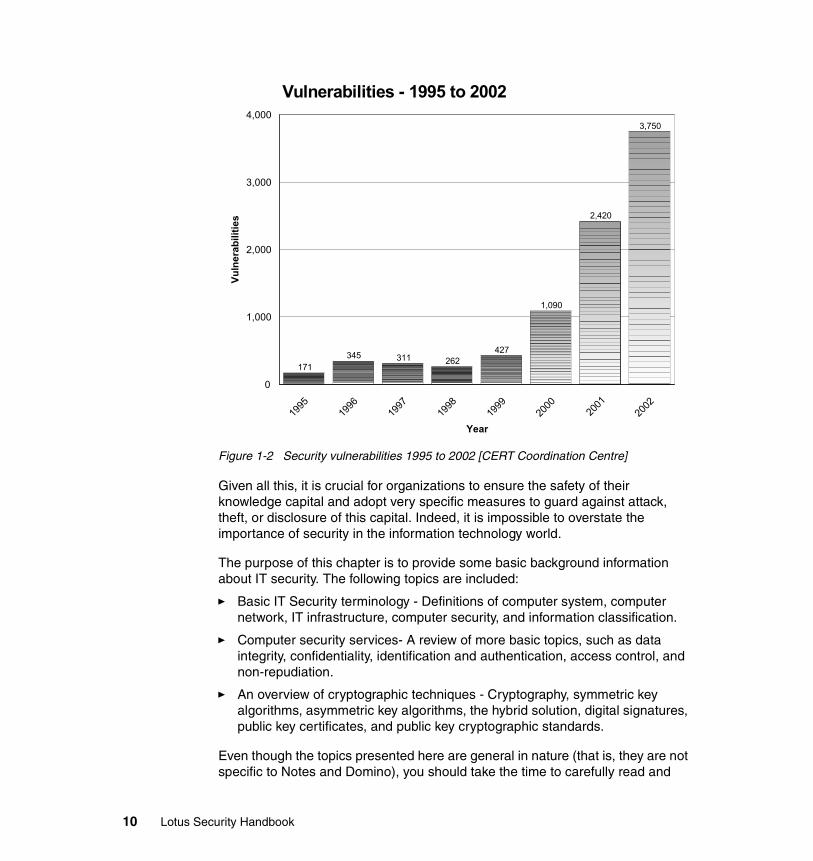
Figure 1-2 Security vulnerabilities 1995 to 2002 [CERT Coordination Centre]
Given all this, it is crucial for organizations to ensure the safety of their knowledge capital and adopt very specific measures to guard against attack, theft, or disclosure of this capital. Indeed, it is impossible to overstate the importance of security in the information technology world.
The purpose of this chapter is to provide some basic background information about IT security. The following topics are included:
� Basic IT Security terminology - Definitions of computer system, computer network, IT infrastructure, computer security, and information classification.
� Computer security services- A review of more basic topics, such as data integrity, confidentiality, identification and authentication, access control, and non-repudiation.
� An overview of cryptographic techniques - Cryptography, symmetric key algorithms, asymmetric key algorithms, the hybrid solution, digital signatures, public key certificates, and public key cryptographic standards.
Even though the topics presented here are general in nature (that is, they are not specific to Notes and Domino), you should take the time to carefully read and
Vulnerabilities - 1995 to 2002
171345 311 262
427
1,090
2,420
3,750
1995
1996
1997
1998
1999
2000
2001
2002
Year
0
1,000
2,000
3,000
4,000
Vuln
erab
ilitie
s
10 Lotus Security Handbook

understand everything, because this chapter lays the groundwork for the rest of the book.
1.2 Important terminologyTo achieve a consistent understanding of the terms and concepts used throughout this redbook, you should be familiar with the following definitions.
1.2.1 Computer systemBecause this redbook deals with more than just the new security features and facilities present in the new release of Notes and Domino (that is, version 6.0) it is important to understand that computer security applies to computer systems as whole entities.
A computer system, by definition, includes all the necessary software (meaning, the operating system and the applications that reside on top of it) and all the necessary hardware (that is, all physical aspects of the computer).
For a computer system, the definition of hardware is not limited to the computer and what it requires to process the instructions of the software and handle the data processed by the software. The hardware also includes the connectivity and telecommunication devices it needs to communicate, be it over a dedicated line or wireless network.
Finally, for the sake of brevity, the term “computer” will be used in this redbook to refer to a computer system and everything it encompasses.
1.2.2 Computer networkGiven that a computer system has the means to communicate, it’s important to look at the medium by which it can communicate.
A computer network can be defined as either:
� A network of data processing nodes that are interconnected for the purpose of data communication
� A communications network in which the end instruments are computers
A network can be defined with a bit more granularity, in that it is, by definition, an interconnection of two or more communicating entities. The traditional definition calls for three communicating entities (such as two computers and a hub or switch), but given the possibility to use a cross-connected Ethernet cable and
Chapter 1. Fundamentals of IT security 11
thus connect two machines in that manner, the minimum definition of a network is two devices.
For the purpose of this redbook, it is assumed that a network is more than two computers exchanging data over a single cable. The scope includes two or more computers utilizing any and all connectivity and telecommunication devices, such as hubs, routers, gateways, switches, and so forth.
1.2.3 IT infrastructureThe definition of IT infrastructure is broader than that of a computer system or a computer network.
The IT infrastructure includes all the components used for the processing and transmission of information in an organization. It includes also all the devices that provide additional services, for example:
� Backup devices (such as tape drives, tape robots or silos)
� Security devices (for example, proxies and firewalls)
� Special-purpose devices (printers, scanners, and so forth)
In addition, the definition of IT infrastructure also encompasses all the computer networks in the organization and includes, as well, proprietary networks that interconnect the organization with partner organizations (for instance, suppliers). This last type of network is called an extranet. Where an extranet fits into an organization’s IT infrastructure depends largely on the amount of control the organization has over it.
Finally, the definition of IT infrastructure also includes boundary networks between the internal, generally trusted network and the external, generally untrusted Internet.
1.2.4 Computer securityThe National Institute of Standards and Technology (NIST) has written a document titled “An Introduction to Computer Security: The NIST Handbook” (Special Publication 800-12). A PDF version of this document can be freely downloaded at the following URL:
http://csrc.nist.gov/publications/nistpubs/800-12/handbook.pdf
12 Lotus Security Handbook

This NIST document provides, on page 5, a definition of computer security.
This is a definition that is bit difficult to grasp, so let’s take a small step back. Let’s define in simpler terms the concepts of both security and IT security.
Security (General)Security is something that gives or assures safety, such as:
� Measures adopted by a government to prevent espionage, sabotage, or attack
� Measures adopted by a business or homeowner to prevent a crime such as burglary or assault.
Security is thus the freedom from risk or danger
Security (Information Technology)IT Security is also something that gives or assures safety, such as:
� Measures adopted by an IT department to prevent espionage, sabotage, or attack of their IT architecture
� Measures adopted by an IT department to prevent the defacement, damage or destruction of their IT architecture
IT Security is also a set of measures adopted by an IT department to prevent denial of service attacks or any attack preventing access to their IT architecture.
IT Security is thus the freedom from such security risks or dangers; safety for an IT department (and the company) in knowing that their systems are secure.
Computer security (revisited)The term computer security, which can be used interchangeably with IT security, is the facet of computer science whose primary objective is to assure safety of information and to offer measures to guard against attack, theft, or disclosure so that:
� The information is timely, accurate, complete, and consistent; and that when transmitted over a computer network, it has not been changed during transmission (integrity).
Computer Security: The protection afforded to an automated information system in order to attain the applicable objectives of preserving the integrity, availability and confidentiality of information system resources (includes hardware, software, firmware, information/data, and telecommunications).
Chapter 1. Fundamentals of IT security 13

� The information is inaccessible to anyone but the people by whom it is intended to be seen. When transmitted over a computer network, it is only accessible by the sender and receiver (privacy).
� The receiver that accesses or receives the information can have the proper assurance that it was created or was sent by the original author (authenticity).
� The sender can be sure that people accessing the information are genuine. When transmitted over a computer network, the receiver is genuine (non-fabrication and authentication).
� The author cannot deny that the information was created by him or her. When transmitted over a computer network, the sender cannot deny he or she sent the information (non-repudiation).
Along with these concepts, it is also important to understand the nature of the information you and your company possess, the concept of information classification, and what represents sensitive information.
1.2.5 Information classificationThe key to good security is to be able to segregate what needs to be secured from what doesn't need to be secured.
Information that needs to be secured is generally termed sensitive information. It is therefore important that we define properly what represents sensitive information.
A pertinent reference in matters of security is the The Computer Security Act of 1987, Public Law 100-235 (H.R. 145), January 8, 1988. An on-line electronic copy of the document is available from the Electronic Privacy Information Center (EPIC) at the following URL:
http://www.epic.org/crypto/csa/csa.html
In this document, we find the following definition of sensitive information, which can be found in Section 3, Establishment of Computer Standards Program:
Sensitive Information: (4) the term 'sensitive information' means any information, the loss, misuse, or unauthorized access to or modification of which could adversely affect the national interest or the conduct of Federal programs, or the privacy to which individuals are entitled under section 552a of title 5, United States Code (the Privacy Act), but which has not been specifically authorized under criteria established by an Executive order or an Act of Congress to be kept secret in the interest of national defense or foreign policy;
14 Lotus Security Handbook
Even though the Computer Security act has been passed in the United States and aims to protect the interests of this country, this definition and its application is global and the definition quoted applies to any country and any company in the world. In other words, sensitive information is such that it needs to be kept confidential and must be protected from unauthorized access and disclosure. Furthermore, this also means that appropriate measures must apply to prevent the destruction or alteration of this information.
For example, in a bank, some pieces of paper (for example, bank notes, paper bills, currency) are extensively protected. Other pieces, such as withdrawal and deposit slips to be filled out by customers, are not protected at all. In fact they are placed on small tables for anyone to take.
Information is the same. There is some information that does not need to be protected because it is common (or public) knowledge. On the other hand, there is information that should be well protected, because its disclosure could be damaging: it could lead to loss of an important competitive advantage, it could lead to a severe loss of reputation or customer confidence, or, depending on the type of business, it could lead to the injury (or the death) of people.
Data classification fulfills another important role. In addition to spelling out how information should be secured, it also spells out how information should be properly disclosed. The public data on a Web site may require only basic security to prevent its defacement, but it should also be available freely enough so that everyone can access it without any problems.
Depending on the type of business—public sector and governmental agencies deal in certain cases with very sensitive personal information, whereas private sector organizations deal generally with sensitive commercial information—there are different classification methods and categories in place. The following data classifications apply in public and private sector businesses and organizations.
Public or unclassifiedInformation is considered public or unclassified if its disclosure would have no impact whatsoever on a business. Data integrity is not vital. Loss of service due to malicious attacks is an acceptable danger. Examples of this type of information would be the public portion of the Web site of a business and any information available from other sources and other means about the business.
InternalEfforts should be made to keep information in the internal category within the organization, but should this information become public, the consequences will not be overly critical (there might be a loss of face, or it could be an embarrassment for the business, but not substantially more). Data integrity is important but not vital. Internal access is segregated between different groups of
Chapter 1. Fundamentals of IT security 15
people having different access levels to it. Examples of this type of information would be certain, more restricted portions of the Web site of the business, the company directory, and a significant amount of the data flowing on the company's internal network.
Confidential informationSerious efforts should be made to keep confidential information completely internal to the business and to ensure it doesn't get into the hands of people outside the company. Data integrity is vital. The disclosure of this information could give a competitor important competitive information, could result in serious financial losses for the company, or could seriously erode the confidence of customers towards the business. Examples of this type of information are employee salaries, confidential customer information (such as personal addresses and credit card information) as well as passwords and any information permitting entry in the internal systems of the business.
Secret informationExtreme efforts should be made to keep this category of information secret not only to persons outside the business, but to the majority of people within the business as well. Secret information is generally defined as being “on a need to know basis.” Data integrity is vital. Special rules and procedures must be adhered to when dealing with the disclosure of this type of information. Examples of this type of information are medical history, sealed legal documents, diplomatic information, and military information.
Top secret informationExtreme efforts should be made to keep this type of information secret at all costs to all but a few selected people. Top secret information is generally defined as being on a “highly cleared access” basis. Data integrity is vital. Disclosure of such information could result in serious physical or emotional harm to people, or even result in death. Examples are military data, diplomatic secrets, and pathological medical information.
1.2.6 Information classification caveatThere is a caveat to data classification, whereby there are some instances where public or unclassified information can be modified in a way that impacts customer confidence or the reputation of the organization.
For example, the corporate Web site could be defaced in such a way that the public information is laced with profanities or where the unclassified information can be changed so as to be misleading or misrepresentative. An example of the latter situation would be where an offer for a 30-day interest-free loan were to be
16 Lotus Security Handbook
changed for a interest-fee loan (note the lack of a time limit). In the business world, where the data on a Web site is increasingly taken to be the same as printed works on paper (as in a newspaper or trade periodical), this could require the company to offer such a thing or face stiff penalties.
1.3 Computer security servicesNow that an overview of information classification has been offered, as well as a definition of sensitive information, it is possible to define the services that enable this information to be protected.
The following definitions, which are used throughout this redbook, can be best explained using the IBM Security Architecture, which is based on the ISO Security Framework (7498-2).
The IBM Security Architecture is a model for integrating security services, mechanisms, objects, and management functions across multiple hardware and software platforms and networks. The architecture supports the strategy for providing end-to-end protection of applications and information within an organization.
The descriptions of these security services are drawn from the “Enterprise-Wide Security Architecture and Solutions Presentation Guide” (SG24-4579), which is available online by referencing the IBM redbook site. A PDF version can be downloaded via the following URL:
http://publib-b.boulder.ibm.com/Redbooks.nsf/RedbookAbstracts/sg244579.html
The computer security services can be categorized by their ability to provide:
� Data integrity (preventing information tampering)
� Confidentiality (keeping things secret)
� Identification and authentication (knowing who you are dealing with)
� Access control (controlling who can access and do things to information)
� Non-repudiation (preventing people from disavowing things they have said or written)
Keep in mind that the categories are not exclusive; for example, you cannot implement access control without also addressing questions of authentication and data integrity.
Chapter 1. Fundamentals of IT security 17

1.3.1 Data integrityData integrity can be summed up as the following:
� The condition existing when data is unchanged from its source and has not been accidentally or maliciously modified, altered, or destroyed [INFOSEC-99]
� The condition in which information is identically maintained during any operation, such as transfer, storage, and retrieval
� The preservation of information for its intended use
Specific to the IBM architecture, data integrity can also be said to provide detection of the unauthorized modification of data.
Data integrity can be compromised in a number of ways, not all of them being specifically due to an error in the security services provided as part of the IT infrastructure. For example, lack of data integrity occurs when:
� Human errors are made when information is entered
� Transmission errors occur when information is transmitted from one computer to another
� Software bugs occur or viruses actively target the information
� Hardware malfunctions, such as hard disk crashes
� Natural disasters occur, such as fires, floods, and earthquakes
To ensure data integrity, organizations must allow for the use of data by authorized users and applications, as well as the transmission of data for remote processing, while at the same time, ensuring that this information is not altered by unauthorized users. Data integrity facilities can indicate whether information has been altered.
There are many ways to minimize these threats to data integrity. These include, but are not limited to the following:
� Backing up data regularly
� Controlling access to information via security mechanisms
� Designing user interfaces that prevent the input of invalid data
� Using error detection and correction software when transmitting data
18 Lotus Security Handbook
1.3.2 ConfidentialityConfidentiality can be summed up as the following:
� Assurance that information is not disclosed to unauthorized persons, processes, or devices. [INFOSEC-99]
� In regard to classified or sensitive information, the degree to which the information has not been compromised, in that it has not been made available or disclosed to unauthorized individuals, processes, or other entities
Specific to the IBM architecture, confidentiality can be said to protect sensitive information from disclosure.
When it is stored locally, sensitive data can be protected by access controls or encryption mechanisms. For network communication security, sensitive data should be encrypted as it is transmitted from system to system.
There are specific ISO standards (8730, 8731, and 9564) relating to use of cryptography for confidentiality and data integrity.
1.3.3 Identification and authenticationIdentification and authentication (I&A) facilities verify the identity of individuals.
The basic function uniquely identifies users and programs, verifies these identities, and assures individual accountability. In other words, identification and authentication is required to ensure that users are associated with the proper security attributes (for example, identity, groups, roles, security or integrity levels).
The unambiguous identification of authorized users and the correct association of security attributes with users and subjects is critical to the enforcement of the intended security policies. The security services and facilities in this class deal with determining and verifying the identity of users, determining their authority to interact with key components of the IT Infrastructure, key components of the computer system, or key information handled by software running on the computer system (for instance, a document in a Notes database), based on the correct association of security attributes for each authorized user.
These are all dependent upon correct identification and authentication of users in order to be effective.
Authentication may take many forms, such as:
� Simple authentication, for an individual user of the computer system, which is generally based on a user ID and a password. This is generally the weakest form of authentication.
Chapter 1. Fundamentals of IT security 19
� Certificate-based authentication, for users of different components of the IT infrastructure, which is generally based on the use of a PGP or x.509 certificate. This is a stronger form of authentication and relies on an installed Public Key Infrastructure (PKI).
� Two-factor authentication, which is a security process that confirms user identities using two distinctive factors – something they have and something they know. A simple example of this form of authentication would be an automated teller machine (ATM) card and a personal identification number (PIN). The ATM card and the PIN by themselves are useless to a prospective identity thief. Only when both factors are used correctly can the person‘s identity be confirmed and access granted.
� Vouching authentication of peers (also called Web of Trust), such as two party authentication for distributed applications, or three party authentication when dealing with local authentication servers in a distributed environment.
Authentication is more important than encryption. It seems perhaps to fly in the face of logic, but only a proper authentication mechanism for user identification can provide the basis for additional security functions, such as access control and auditing. Given the authentication methods described, authentication technology may take the following forms:
� Passwords - which can be simple responses to basic authentication challenges or be used to decrypt a Notes ID as the basis of a sophisticated authentication scheme.
� Smart tokens - which are easily portable devices that do special-purpose operations for their users, in this case, generally identifying the user to a secure system. A smart token can look like any common object: a credit card, a 3 1/2" floppy disk or even a ring (like Sun's Java™ ring). The important trait of this object is that it carries some secret information for its user and performs the function required when needed. A smart token is often designed to be tamper-resistant, meaning it is difficult to take apart. It is protected with a user password, so that even if it is physically stolen, it will be difficult to impersonate the owner.
� Smart cards - which are small electronic devices about the size of a credit card. These are built a little bit like a prepaid phone card in that they contain some electronics in the form of memory and an integrated circuit (IC) for processing of some data. The main purpose of such smart cards is to store network IDs (very similar to a smart token).
To use a smart card or smart token, either to pull information from it or add data to it, you need a smart card or smart token reader, a small device into which you insert the smart card or smart token. The exception to the required token reader rule is the new USB tokens, which only require that the machine have a USB port, something that is now standard on all new machines.
20 Lotus Security Handbook
1.3.4 Access controlAccess control allows an organization to protect critical resources by limiting access to only authorized and authenticated users. In other words, access control is any mechanism by which a system grants or revokes the right to access some data, or perform some action. Normally, a user must first log in to a system, using some authentication system. Next, the access control mechanism controls what operations the user may or may not make by comparing the user ID to an access control list entry in a database.
Access control systems include a number of permissions and privileges, some of which are the following:
� File permissions, such as create, read, edit,or delete on a file server
� Program permissions, such as the right to execute a program on an application server
� Data rights, such as the right to retrieve or update information in a database
� Managerial rights, such as the ability to confer to some users new access privileges and/or revoke such privileges to some other users
Depending on the environment, access may be controlled by the resource owner, or it may be done automatically by the system through security labels.
The resource owner can specify who can access the information, how it can be accessed, when it can be accessed, and under what conditions it can be accessed (for example, when executing specific applications, programs, or transactions).
The functional goal is to assure that security is maintained for resources, whether they are in a central system, distributed, or mobile (as is the case with files and programs).
1.3.5 Non-repudiationNon-repudiation can be viewed as an extension to the identification and authentication services, since non-repudiation relies on authentication to know who someone is. Obviously, if authentication is weak, then so is the organization’s ability to know who’s doing what.
The non-repudiation service can protect a recipient against a false denial by an originator that the data has been sent, and it can protect an originator against the false denial of a recipient that the data has been received.
Chapter 1. Fundamentals of IT security 21
In general, non-repudiation applies to the transmission of electronic data, such as an order to a stock broker to buy/sell stock, a doctor's order for medication to a specific patient, or approval to pay an invoice by a company to its bank.
The overall goal is to be able to verify, with virtually 100% certainty, that a particular message can be associated with a particular individual, just as a handwritten signature on a bank check is tied back to the account owner.
1.4 Cryptographic techniquesSecurity mechanisms, be they those contained in vendor products or Internet standards, make use of a number of common cryptographic techniques. It is important to have a good understanding of these techniques and, in general, throughout the book we assume that the reader has some basic knowledge of them.
While this is a complex area, which encompasses many different and intricate facets, we’ve made an effort in this section to distill that information and present a brief overview of the important cryptographic techniques. We believe that this is a useful resource and we urge the reader not to skip it.
After defining cryptography, we take a look at the following areas related to cryptographic techniques:
� Symmetric key (or bulk) encryption
� Public key encryption
� Secure hash (or digest) functions
� Digital signatures and other combinations of the above techniques
� Certification mechanisms
To reiterate, cryptography—its techniques, applications, laws, and the mathematics behind it—is a broad and complex subject, and it is not the goal of this redbook to be a comprehensive discussion of it. Instead, we suggest that the reader wanting to know more about this topic consult the document “RSA Laboratories' Frequently Asked Questions About Today's Cryptography, Version 4.1”, which is available online at the following URL:
http://www.rsasecurity.com/rsalabs/faq/
1.4.1 CryptographyBefore we talk about the techniques, let’s first define what cryptography is.
22 Lotus Security Handbook

Cryptography, to choose the simplest of definitions, is the art or science of keeping information secret. While it appears to be an art form bordering on magic for novices, it is in reality a science for the well-versed computer expert or mathematics major. (It must be said that for those wishing to delve deep into how ciphers are built and how they work, an advanced degree in mathematics is a definite asset.)
Cryptography ensures confidentiality by encrypting information using an algorithm and one or more keys. You can have basic cryptography without keys, but that generally requires that the algorithm be kept secret, something quite difficult in this day and age. If keys are used, the scrambled version can be decrypted by someone else, provided that person has the proper encryption key. If it's the same key, that key must be secret between the two parties. (Depending on the encryption method, it can be a different key, as is explained later.) The central problem in most cryptographic applications is managing these keys and keeping them secret.
The algorithms that form the base of cryptography are ciphers. A cipher is:
1. A cryptographic system in which units of plain text are substituted according to a predetermined key.
2. Any cryptographic system in which arbitrary symbols, or groups of symbols, represent units of plain text of regular length, usually single letters; or in which units of plain text are rearranged; or both, in accordance with certain predetermined rules.
Put in a simpler manner, ciphers are the substitution of one block of text by another according to some generally applicable rule. A simple cipher would be to replace each letter arbitrarily by another.
Ciphers are either defined as being symmetric or asymmetric, based on whether they use the same key to encrypt and decrypt (symmetric ciphers) or two different keys (asymmetric ciphers).
People tend to naturally confuse symmetric and asymmetric encryption. The main reason is that symmetry is naturally associated with an even number (that is, two) and asymmetry is naturally associated with an odd number (that is, one). If this logic is applied (and it commonly is) then people get the definition wrong. We provide a easy way to remember which is which in later sections.
1.4.2 Symmetric key algorithmsSymmetric key algorithms are a grown-up version of the kind of secret code that most of us played with at some time during childhood. Usually these use a simple
Chapter 1. Fundamentals of IT security 23

character replacement algorithm; if you want to encrypt a message, you just replace each letter of the alphabet with another. For example:
Original letter: A B C D E F G H I J K L M N O P Q R S T U V W X Y Z
Replacement: G H I J K L M N O P Q R S T U V W X Y Z A B C D E F
In this case, the letters in the alphabet have just been shifted seven places to the right, so HELLO WORLD would translate to NKRRU CUXRJ. The premise on which this code is based is that both the sender and the receiver know a common key, in this case the number of places to shift the letters.
This shared secret allows the receiver of the message to reverse the encryption process and read the scrambled message.
Symmetric encryption gets its name from the fact that the same key is used to encrypt plaintext and decrypt the corresponding ciphertext. Symmetric encryption algorithms used by computers have the same elements as the simple example above, namely a mechanism to scramble the message (also known as a cipher) and a shared secret (a key) that allows the receiver to unscramble the encrypted message.
Determining the strength of a symmetric cipherThe strength of a symmetric key cipher of this kind is dictated by a number of factors. The first is that it effectively randomizes the output, so that two related clear-text messages do not produce similar encrypted results. The degree of randomness in cryptography parlance is generally called entropy.
Our childish example fails badly in this area because each letter always converts to the same encrypted result, and because it does not encrypt spaces. The kindergarten cryptanalyst can quite easily break the code by knowing that any one-letter word is likely to be an A.
Another way our example fails badly is that if for some reason the algorithm is known (in our case, the algorithm is: “Shift each letter seven places to the right”), then the person who knows that can now easily decrypt each subsequent message.
This is where the concept of a key is important. With a key-based algorithm, an effort is made to protect the key. This permits the cryptographic algorithm to be reviewed and scrutinized. A good algorithm is one that can be understood, is efficient, and cannot be used for encryption without the proper key. The algorithms we discuss later on in this chapter all share these common traits.
24 Lotus Security Handbook

Thus, for full-strength symmetric ciphers, much of the work of the cryptanalyst involves trying to find patterns in the result of the algorithm, to use as a shortcut to breaking the code.
If the encryption algorithm has no flaws of this kind, the other main factor governing its strength is the size of the key space; that is, the total number of possible shared secrets. Once again, our simple example falls short because it only has 25 possible places where we can shift the keys. We could mount a brute force attack very easily by trying each key in turn until we found a message that makes sense.
Real symmetric ciphers use numeric keys, usually of between 40 and 256 bits in size. Even for the smallest of these a brute force attack has to try, on average, 2 to the power 39, or about 550,000,000,000 possible keys. Each extra bit of key size doubles the key space.
Differentiating symmetric and asymmetric ciphersSome people have trouble remembering which type of encryption is symmetric and which type is asymmetric. To help, let's provide a tool to remember. Take a moment to look at Figure 1-3.
Figure 1-3 Symmetric versus asymmetric ciphers
In our mnemonic example, assume keys have a certain weight. A private key has a weight x and a public key has a weight x + 1 (they are thus of different weights). In the case of asymmetric encryption, two different keys are being used for encryption and decryption and thus, using a scale, the keys would not balance and the scale would be asymmetric in appearance. In contrast, symmetric encryption uses a public key, which is the same for encryption and for decryption. Thus, the keys weigh the same and, using a scale, the keys would balance and the scale would be symmetric in appearance.
Symmetric Cipher Asymmetric Cipher
Chapter 1. Fundamentals of IT security 25
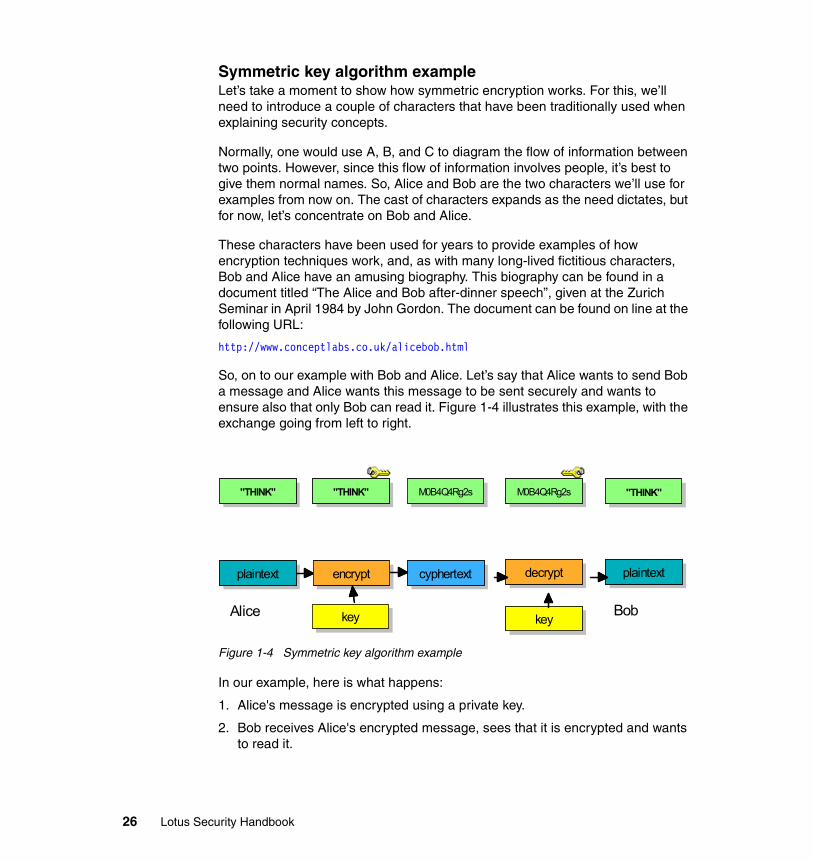
Symmetric key algorithm exampleLet’s take a moment to show how symmetric encryption works. For this, we’ll need to introduce a couple of characters that have been traditionally used when explaining security concepts.
Normally, one would use A, B, and C to diagram the flow of information between two points. However, since this flow of information involves people, it’s best to give them normal names. So, Alice and Bob are the two characters we’ll use for examples from now on. The cast of characters expands as the need dictates, but for now, let’s concentrate on Bob and Alice.
These characters have been used for years to provide examples of how encryption techniques work, and, as with many long-lived fictitious characters, Bob and Alice have an amusing biography. This biography can be found in a document titled “The Alice and Bob after-dinner speech”, given at the Zurich Seminar in April 1984 by John Gordon. The document can be found on line at the following URL:
http://www.conceptlabs.co.uk/alicebob.html
So, on to our example with Bob and Alice. Let’s say that Alice wants to send Bob a message and Alice wants this message to be sent securely and wants to ensure also that only Bob can read it. Figure 1-4 illustrates this example, with the exchange going from left to right.
Figure 1-4 Symmetric key algorithm example
In our example, here is what happens:
1. Alice's message is encrypted using a private key.
2. Bob receives Alice's encrypted message, sees that it is encrypted and wants to read it.
decrypt
key
plaintext encrypt
key
cyphertext
Alice Bob
plaintext
"THINK" "THINK" M0B4Q4Rg2s M0B4Q4Rg2s "THINK"
26 Lotus Security Handbook
3. Bob decrypts the message using the same private key that was used to encrypt it.
4. Once decrypted, the message can be read by Bob.
Types of symmetric ciphersThere are two types of symmetric ciphers: block ciphers and stream ciphers. Block ciphers operate on blocks of data and are commonly used to encrypt documents and databases. Stream ciphers encrypt bit streams and are commonly used to encrypt communication channels.
Common block ciphers� DES (Data Encryption Standard) - Federal Information Processing Standard
(FIPS) 46-3 describes the data encryption algorithm (DEA). DEA is also defined in the ANSI standard X3.92. DEA has a 64-bit block size and uses a 56-bit key during execution (8 parity bits are stripped off from the full 64-bit key).
� 3DES (Triple-DES) - Defined in the ANSI standard X9.52, 3DES is a triple application of DES, where two variants exist: DES-EDE and DES-EEE. Very simply put, DES-EDE denotes a triple application of DES where there is an Encryption, Decryption and Encryption process using three different keying options. DES-EEE denotes three consecutive encryptions.
� AES (Advanced Encryption Standard) - Issued as FIPS PUB 197 by NIST and successor to DES, AES supports key sizes of 128 bits, 192 bits, and 256 bits, in contrast to the 56-bit keys offered by DES. The Rijndael algorithm, invented by Joan Daemen and Vincent Rijmen, was selected as the standard. Over time, many implementations are expected to upgrade to AES, both because it offers a 128-bit key size, and because it is a federal standard.
� RC2 (variable-key-size encryption algorithm by Ron Rivest; “RC” stands for “Ron's Code,” although officially it stands for “Rivest Cipher.” It was meant as a replacement for DES). RC2 has a block size of 64 bits and is about two to three times faster than DES in software.
� Blowfish (by Bruce Schneier of Counterpane Systems). This is a 64-bit block cipher; the key has a variable length (with a maximum length of 448 bits) and is used to generate several subkey arrays. This cipher was designed specifically for 32-bit machines and is significantly faster than DES.
� Twofish (by Bruce Schneier of Counterpane Systems). This was a finalist of AES and is based on Schneier's algorithm Blowfish. It is a fast and versatile
Note: In this example, Alice and Bob know each other quite well. Because of that, this example assumes that Alice has provided—securely—a copy of the private key used to encrypt the message.
Chapter 1. Fundamentals of IT security 27

cipher that does not require much memory. Yet, the structure of the cipher is very complex and hence difficult to analyze.
� IDEA (International Data Encryption Algorithm, by Xuejia Lai and James Massey) - Originally this was called PES - Proposed Encryption Standard. It was later improved and named IPES and then named IDEA, or International Data Encryption Algorithm; its claim to fame is that it is part of PGP. It is a 64-bit iterative block cipher with a 128-bit key. The encryption process requires eight complex rounds, but the speed of IDEA in software is similar to that of DES.
� CAST (Canadian Algorithm by Carlisle Adams and Stafford Tavares) - This is a popular 64-bit cipher that allows key sizes up to 128 bits. The name CAST stands for Carlisle Adams and Stafford Tavares, the original inventors of CAST. CAST-128 is owned by Entrust Technologies but is free for commercial as well as non-commercial use. CAST-256 is a freely available extension of CAST-128 that accepts up to 256 bits of key size and that has a 128-bit block size. CAST-256 was one of the original candidates for the AES.
Common stream ciphers� RC4 (variable-key-size encryption algorithm created by Ron Rivest of RSA
Security) - RC4 is used for secure communications, as in the encryption of traffic to and from secure web sites using the SSL protocol. RC4 is a cipher with a key size of up to 2048 bits (256 bytes).
� SEAL (Software Efficient ALgorithm, by Phil Rogaway and Don Coppersmith of IBM in 1993) - This algorithm is covered by US Patent 5,454,039. The cipher is based on 32-bit words, encrypts at about 4 cycles per byte, and uses a 160 bit key for encryption. It is considered very safe.
� WAKE (World Auto Key Encryption algorithm by David J Wheeler). This is an encryption system for medium speed encryption of blocks and it offers high security. It is intended to be fast on most computers and relies on repeated table use and having a large state space.
Advantages of symmetric key algorithmsAs we have shown, there are a number of symmetric key ciphers in use. In addition to those already mentioned, we describe those used in Notes, Domino and other Lotus collaboration products later in this document. For now, let’s talk about the advantages that all these Symmetric Key Algorithms share in common.
They are fast and need relatively little system overhead because of the short keys which provide relatively high security. For this reason, symmetric key
Note: An interesting bit of trivia is that RC1 never went further than Rivest's notebook and RC3 was broken at RSADSI during development.
28 Lotus Security Handbook
encryption is often referred to as bulk encryption, because it is effective on large data volumes.
Disadvantages of symmetric key algorithmsThe key disadvantage of symmetric ciphers are that there is inherent difficulty with the administration of the symmetric keys used for encryption. More specifically, how can you safely get them into the hands of your counterparts without getting them compromised?
In the next section we show how this key management problem is resolved with the use of asymmetric key algorithms, but there are shortcomings with the use of asymmetric keys that still require the use of symmetric key algorithms and symmetric keys.
Commercial and export considerationsBefore we go on to the topic of asymmetric keys, let’s complete the review of important details about symmetric key algorithms.
The algorithms are published openly and there are no commercial licensing issues to be considered in implementing them.
They all fall under the control of the US National Security Agency export restrictions. The precise operation of these restrictions is not a simple matter, but in essence that means that:
� Any software incorporating cryptographic technology that is exported by a US company has to have a special export license.
� If the product includes symmetric encryption code that can be used for encrypting an arbitrary data stream, the license will only allow unrestricted export if the key size is smaller than a given, NSA-specified, value.
What this means is that to export full-strength cryptography, a company has to have a special license for each customer. Such licenses are only issued for customers that the US government considers to be friendly, such as major banks and subsidiaries of US companies.
When the previous redbook was written, the threshold key size for a general export license was 40 bits. Since then, several challenges have shown that a brute force attack can be mounted against a 40-bit key with relatively modest computing power. A government announcement opened the door to the use of larger keys, initially up to 56 bits, with the promise of unlimited key sizes when the computer industry develops effective key recovery technology. (Key recovery means that the key for a session can be discovered, given the knowledge of some other, master, key). 56 bits may not sound a lot better than 40, but in fact it is 2 to the power 16, or 65,536 times more difficult to crack.
Chapter 1. Fundamentals of IT security 29

As a follow-up to this, there was a November 18, 1998 announcement by the Bureau of Export Administration of the Commerce Department that amended the export administration regulations for exports and re-exports of strong encryption commodities and software. The key lengths are now full 56 bits for DES and “equivalent” bulk ciphers (namely RC2, RC4, RC5 and CAST) and 1,024 bits for RSA asymmetric keys to all destinations except Cuba, Iran, Iraq, Lybia, North Korea, Sudan, and Syria. This is also under the proviso that there be no key recovery possible. As well, unlimited strength crypto keys can be used by US subsidiaries, Insurance companies, health and medical firms and online merchants, provided they do not have a presence in any of the previously listed countries.
Moving forward, on June 6, 2002, the Bureau of Industry and Security (BIS) published a rule which amended the Export Administration Regulations (EAR) to reflect changes made to the Wassenaar Arrangement List of dual-use items and to update and clarify other provisions of the EAR pertaining to encryption export controls.
Mass market encryption commodities and software with symmetric key lengths exceeding 64 bits that are classified under Export Control Classification Numbers (ECCNs) 5A992 and 5D992 may be exported and reexported No License Required (NLR), following a 30-day review by the BIS. This rule updates Category 5, part II (Information Security) of the Commerce Control List (CCL), and will also allow equipment controlled under ECCN 5B002 to be exported and reexported under License Exception ENC.
For more information, here is a complete list of resources that will shed some light on export regulations and bilateral agreements currently in place:
� The Published Federal Registers - Rules affecting the Export Administration Regulations can be found at the following URL:
http://w3.access.gpo.gov/bis/fedreg/ear_fedreg.html#67fr38855
� An Encryption Fact Sheet pertaining to Commercial Encryption Export Controls can be found at the following URL:
http://www.bxa.doc.gov/encryption/EncFactSheet6_17_02.html
� Explanation of the Wassenaar arrangement and what it involves can be found at the following URL:
http://www.bxa.doc.gov/Wassenaar/Default.htm
1.4.3 Asymmetric key algorithmsA non-mathematician can intuitively understand how a symmetric key algorithm works by extrapolating from a familiar base. However, asymmetric key algorithms are much less accessible to the lay person. In fact, it sometimes
30 Lotus Security Handbook
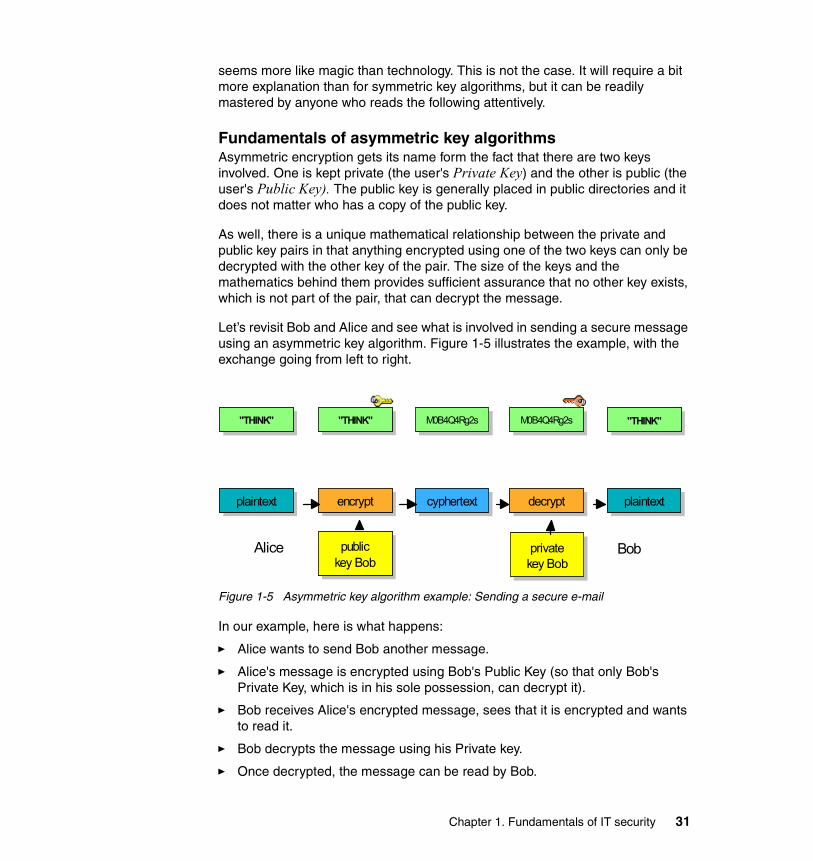
seems more like magic than technology. This is not the case. It will require a bit more explanation than for symmetric key algorithms, but it can be readily mastered by anyone who reads the following attentively.
Fundamentals of asymmetric key algorithmsAsymmetric encryption gets its name form the fact that there are two keys involved. One is kept private (the user's Private Key) and the other is public (the user's Public Key). The public key is generally placed in public directories and it does not matter who has a copy of the public key.
As well, there is a unique mathematical relationship between the private and public key pairs in that anything encrypted using one of the two keys can only be decrypted with the other key of the pair. The size of the keys and the mathematics behind them provides sufficient assurance that no other key exists, which is not part of the pair, that can decrypt the message.
Let’s revisit Bob and Alice and see what is involved in sending a secure message using an asymmetric key algorithm. Figure 1-5 illustrates the example, with the exchange going from left to right.
Figure 1-5 Asymmetric key algorithm example: Sending a secure e-mail
In our example, here is what happens:
� Alice wants to send Bob another message.
� Alice's message is encrypted using Bob's Public Key (so that only Bob's Private Key, which is in his sole possession, can decrypt it).
� Bob receives Alice's encrypted message, sees that it is encrypted and wants to read it.
� Bob decrypts the message using his Private key.
� Once decrypted, the message can be read by Bob.
encrypt
publickey Bob
cyphertext decrypt
privatekey Bob
plaintext
BobAlice
plaintext
"THINK" "THINK" M0B4Q4Rg2s M0B4Q4Rg2s "THINK"
Chapter 1. Fundamentals of IT security 31

Types of asymmetric ciphersAsymmetric ciphers are also called key-exchanged mechanisms. The most common ones are:
� Diffie-Hellman (D-H) key exchange is a cryptographic protocol that allows two communicators (conventionally named Alice and Bob, as we saw above) to agree on a secret key over an insecure communication channel. Once the shared secret key has been established, Alice and Bob can use it to conventionally encrypt their secret communication. The Diffie-Hellman key exchange was invented in 1975 or 1976 during a collaboration between Whitfield Diffie, Martin Hellman, and Ralph Merkle, and was the first practical method for establishing a shared secret over an unprotected communications channel. It had been discovered by Malcolm Williamson of GCHQ in the UK some years previously, but GCHQ chose not make it public until 1997, by which time it had no influence on research. The method was followed shortly afterwards by RSA, the first publicly announced implementation of public key cryptography using asymmetric algorithms.
� Rivest-Shamir-Adleman (RSA). This asymmetric algorithm for public key cryptography is widely used in electronic commerce. The algorithm was described in 1977 by Ron Rivest, Adi Shamir, and Len Adleman; the letters RSA are the initials of their surnames. Clifford Cocks, a British mathematician working for GCHQ, described an equivalent system in an internal document in 1973. His discovery, however, was not revealed until 1997 due to its top-secret nature. The algorithm was patented by MIT in 1983 in the United States of America. The patent expired in September 2000. Since the algorithm had been published prior to the patent application, it could not be patented in other countries. RSA is subject to the same US export restrictions as symmetric algorithms. However, the key in this case is actually a very large number. Very approximately, an RSA key size of 1024 bits corresponds to a full-strength symmetric key of 64 bits or more.
� Elliptic Curve Cryptography (ECC). Like D-H and RSA, ECC is a class of cryptographic algorithms capable of doing asymmetric encryption. As with D-H and RSA, possession of one key does not give sufficient information to determine the other key. There are several slightly different versions of elliptic curve cryptography, all of which rely on the widely believed difficulty of solving the discrete logarithm problem for the group of an elliptic curve over some finite field. ECC is widely regarded as the strongest asymmetric algorithm at a given key length, so it may become useful over links that have very tight bandwidth requirements. Key size requirements are also reduced. Case in point, NIST and ANSI X9 have set minimum keysize requirements of 1024
Note: In this scenario, there is no need to exchange a private key and thus, the whole key-involving process is made easier.
32 Lotus Security Handbook

bits for RSA and 160 bits for ECC, corresponding to a symmetric block cipher key size of 80 bits. NIST has published a list of recommended elliptic curves for protection of 5 different symmetric keysizes (namely, 80, 112, 128, 192, and 256).
Advantages of asymmetric key algorithmsAs we have shown, there are a number of asymmetric key algorithms in use. In addition to those already mentioned, we cover those used in Notes, Domino, and other Lotus collaboration products later in this book. For now, let’s talk about the advantages that all asymmetric key algorithms share in common.
Asymmetric key algorithms offer easier administration of the keys since there is no need to find a secure channel to get a copy of the key to the intended recipient. The private key stays private and the public key is public. In other words, the big advantage of this mechanism over the symmetric key mechanism is that there is no longer any secret to share. In fact, it does not matter who has the public key, because it is useless without the matching private key.
Another major advantage of asymmetric key algorithms is that they can provide digital signatures that cannot be repudiated. We discuss that in a later section.
Disadvantages of asymmetric key algorithmsThe disadvantage of asymmetric key algorithms is that they are very slow. In contrast, there are many secret-key encryption methods that are significantly faster than any currently available public-key encryption method. This is because of the fact that you need large key lengths to get comparable security of smaller symmetric keys.
1.4.4 The hybrid algorithmAn asymmetric key algorithm can be used with a symmetric key algorithm to get the best of both worlds. For encryption, the best solution is to combine both types of algorithms in order to get both the security advantages of asymmetric key algorithms and the speed advantages of symmetric key algorithms.
Thus, this is a hybrid solution which uses a symmetric key for data encryption, and asymmetric keys for symmetric key encryption. Such a marriage is called a digital envelope.
In addition, the symmetric key is generally generated every time and is called a “session” key. It is valid the whole time two people are exchanging messages with each another. This protocol is used in almost all “public key encryption” such as Notes, SSL, S/MIME. It provides fast performance and is easy to implement.
Chapter 1. Fundamentals of IT security 33
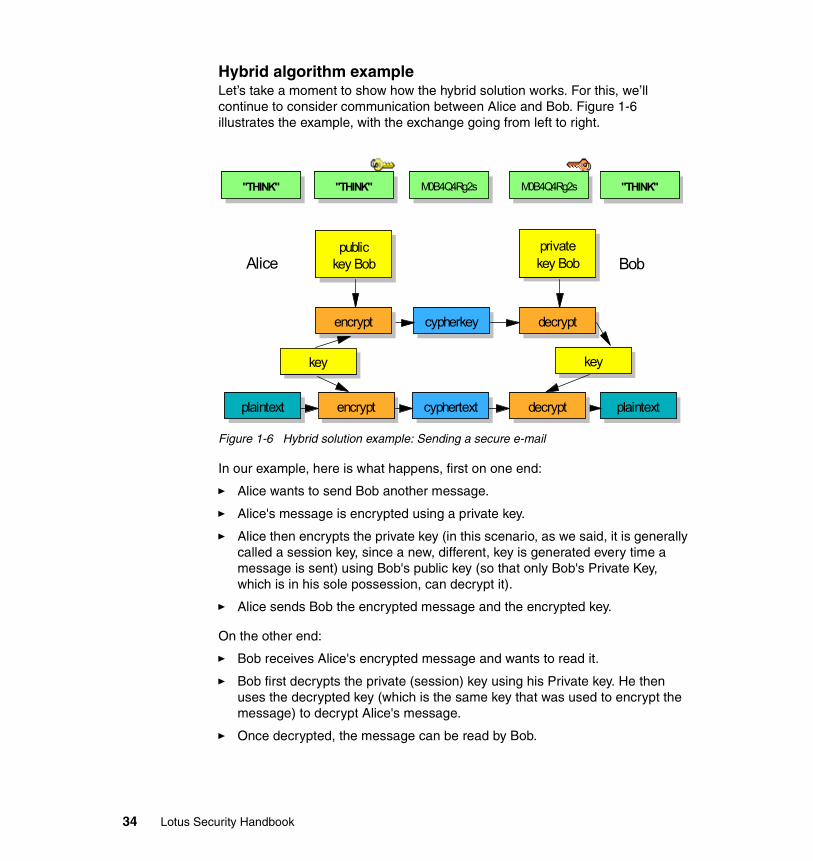
Hybrid algorithm exampleLet’s take a moment to show how the hybrid solution works. For this, we’ll continue to consider communication between Alice and Bob. Figure 1-6 illustrates the example, with the exchange going from left to right.
Figure 1-6 Hybrid solution example: Sending a secure e-mail
In our example, here is what happens, first on one end:
� Alice wants to send Bob another message.
� Alice's message is encrypted using a private key.
� Alice then encrypts the private key (in this scenario, as we said, it is generally called a session key, since a new, different, key is generated every time a message is sent) using Bob's public key (so that only Bob's Private Key, which is in his sole possession, can decrypt it).
� Alice sends Bob the encrypted message and the encrypted key.
On the other end:
� Bob receives Alice's encrypted message and wants to read it.
� Bob first decrypts the private (session) key using his Private key. He then uses the decrypted key (which is the same key that was used to encrypt the message) to decrypt Alice's message.
� Once decrypted, the message can be read by Bob.
Alice Bob
plaintextencrypt
key
privatekey Bob
key
decrypt
decryptplaintext cyphertext
cypherkey
"THINK" "THINK" M0B4Q4Rg2s M0B4Q4Rg2s "THINK"
publickey Bob
encrypt
34 Lotus Security Handbook

1.4.5 Digital signaturesThere is one further advantage that asymmetric key algorithms give us.
In the previous example, imagine that Alice uses her private key to encrypt a message and sends it to Bob. The message that is sent between them is still scrambled, but it is no longer private, because anyone with the public key can decrypt it (and we have said that we do not care who has the public key).
So, what can we use this message from Alice for? The answer is: authentication. Because only Alice has access to the private key that created the message, it can only have come from her. This is the concept of digital signatures.
Digital signatures are concerned with providing integrity, authentication and identification, and non-repudiation, whereas the symmetric and asymmetric key algorithms we have discussed thus far were only concerned with confidentiality.
Hash functionsIn order to provide these additional services, we need to introduce a new kind of cryptographic algorithm: hash functions (also called message digests).
Where you can encrypt and decrypt with symmetric and asymmetric key algorithms, hash functions only encrypt. This is why they are commonly referred to as one-way functions. You can never recover the original message from a hash function.
Also, hash functions are called “functions” because they take an input message and produce an output. More precisely, they are used to index the original value or key of a message or a block of data, and then are used later each time the data associated with the value or key is to be retrieved. A secure hash function has three main attributes:
1. It takes a message of any size and generates a small, fixed size block of data from it (called a message digest). Re-executing the hash function on the same source data will always yield the same resulting digest. This is called the fingerprint of the message.
2. It is not predictable in operation. That is to say, a small change in the source message will have an unpredictably large effect on the final digest. Put another way, even changing a single bit of the message changes half the bits of the output, if you are using a good hash function.
3. It is, for all intents and purposes, irreversible. In other words, there is no way to derive the source data, given its digested form.
Chapter 1. Fundamentals of IT security 35
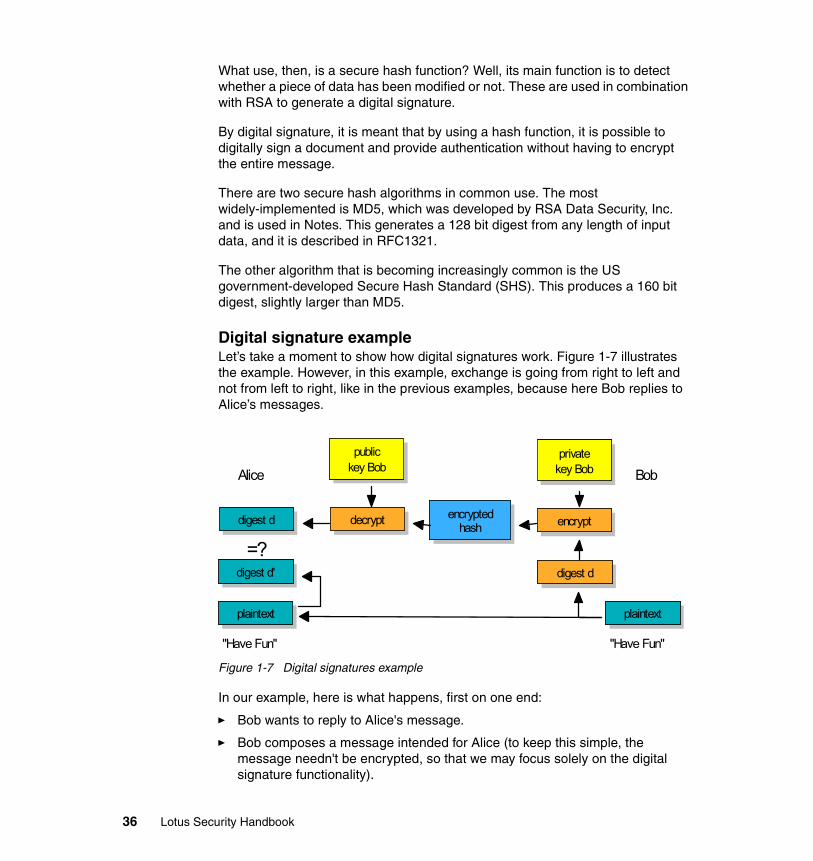
What use, then, is a secure hash function? Well, its main function is to detect whether a piece of data has been modified or not. These are used in combination with RSA to generate a digital signature.
By digital signature, it is meant that by using a hash function, it is possible to digitally sign a document and provide authentication without having to encrypt the entire message.
There are two secure hash algorithms in common use. The most widely-implemented is MD5, which was developed by RSA Data Security, Inc. and is used in Notes. This generates a 128 bit digest from any length of input data, and it is described in RFC1321.
The other algorithm that is becoming increasingly common is the US government-developed Secure Hash Standard (SHS). This produces a 160 bit digest, slightly larger than MD5.
Digital signature exampleLet’s take a moment to show how digital signatures work. Figure 1-7 illustrates the example. However, in this example, exchange is going from right to left and not from left to right, like in the previous examples, because here Bob replies to Alice’s messages.
Figure 1-7 Digital signatures example
In our example, here is what happens, first on one end:
� Bob wants to reply to Alice's message.
� Bob composes a message intended for Alice (to keep this simple, the message needn't be encrypted, so that we may focus solely on the digital signature functionality).
privatekey Bob
publickey Bob
digest d
encryptdecrypt encrypted hashdigest d
Alice Bob
=?
plaintext
"Have Fun"
plaintext
"Have Fun"
digest d'
36 Lotus Security Handbook
� Bob computes a digest of his message.
� Bob encrypts the digest with his private key.
� Bob sends the message and encrypted digest.
On the other end:
� Alice receives Bob's message and the encrypted digest (since they come together, she proceeds to separate the digest from the message).
� Alice computes a new digest of the message she received from Bob (since the hash algorithm always computes the same value of the document).
� Alice decrypts the digest with Bob's Public key (since there is a unique relationship between Bob's Private and Public keys).
� Alice compares the digest she computed with the digest she received.
Thus:
� If the two digests match, then the message is: authentic (it came from Bob) and has integrity (remember that one bit changed would change at least half the bits of the digest).
� This can be used for non-repudiation purposes as well. Because of the unique relationship between Bob's Private and Public keys, Bob cannot claim not having sent the message.
� If the digests do not match, then either the message has been modified in transit (it lacks integrity) or someone other than Bob has sent it (it is not authentic and cannot be used for non-repudiation purposes).
Types of hash functionsOf special interest to us are a number of hash functions (also called message-digest algorithms), which we describe here, namely MD5 and SHA-1. We mention MD2, MD4, and SHA as well, for historic reference and to explain the need for MD5 and SHA-1 to exist.
� MD2 and MD5 are message-digest algorithms developed by Rivest, the “R” of RSA. They are meant for digital signature applications where a large message has to be “compressed” in a secure manner before being signed with the private key. All these algorithms take a message of arbitrary length and produce a 128-bit message digest. Description and source code for these algorithms can be found in Internet RFCs 1319-1321. The Secure Hash Algorithm (SHA), in contrast, is the algorithm specified in the Secure Hash Standard (SHS, FIPS 180) and was developed by NIST.
� MD2 was developed in 1989. The message is first padded so its length in bytes is divisible by 16. A 16 byte checksum is then appended to the message, and the hash value is computed on the resulting message. It was
Chapter 1. Fundamentals of IT security 37

discovered that collisions for MD2 can be constructed if the calculation of the checksum is omitted. This is the only cryptanalytic result known for MD2.
� MD5 was developed in 1991. It is basically MD4 with “safety-belts,” and while it is slightly slower than MD4, it is more secure. The algorithm consists of four distinct rounds, which has a slightly different design from that of MD4.
� SHA-1 is a revision to SHA that was published in 1994; the revision corrected an unpublished flaw in SHA. Its design is very similar to the MD4 family of hash functions. SHA-1 is also described in the ANSI X9.30 (part 2) standard. The algorithm takes a message of less than 264 bits in length and produces a 160-bit message digest. The algorithm is slightly slower than MD5, but the larger message digest makes it more secure against brute-force collision and inversion attacks.
In regard to hash algorithms used, some questions are left begging, which we’d like to address. If MD2 and MD5 are used, does this mean that there was an MD1, MD3 and MD4? The answer is yes.
MD (the original Message Digest algorithm designed by RSADSI) was proprietary and never published. MD3 was superseded by MD4 before it was ever published or used. MD4 was created, but weaknesses were found in two of its three rounds. It didn't break the algorithm, but made Ron Rivest sufficiently nervous that he decided to strengthen it and thus, he created MD5, documented in RFC 1321.
As well, if there is a SHA-1 was there a SHA-0? The answer here is also yes. SHA is an NIST-standard hash function. It was invented by the NSA in 1993, and is largely inspired by MD4. In 1995, the NSA modified the standard (the new version is called SHA-1; the old version is now called SHA-0). The agency claimed that the modification was designed to correct a weakness, although no justification was given.
As well, you hear from time to time the term MAC being used in security circles and in security-related discussions. In this context, a MAC (message authentication code) is simply an encrypted hash. It should not be confused with the Media Access Control Layer of the OSI 7-layer networking model.
Trusting digital signaturesDigital signatures are not perfect, since there are problems of proving “who” signed, because trust is essentially placed on the computer digitally signing and not the person.
If the computer is compromised or if the private key of the person is compromised, it may be possible to impersonate that person and digitally sign in
38 Lotus Security Handbook

the place of that person. Thus, the signing component (machine, code, and so forth) must be trusted.
Given the general security of the signing device (that is, the user’s computer) and the practice of putting keys in escrow (where they are available, technically, to the administrators and managers of the organization), digital signatures have proven to have little legal value in a court of law. Thus, the trust in digital signatures, at this time, should be balanced with an understanding of their fallibility in matters of complete and absolute non-repudiation.
1.4.6 Public key certificatesWe have seen how public key cryptography overcomes the problem of having to pass a secret from sender to receiver. There is still a need to send a key, but now it is a public key, that anyone can see because it is only useful to an attacker if he also has the private key. However, this overlooks one crucial element of trust: how can you be sure that the public key really came from who you think it came from?
One answer is to only pass public keys to someone you know. Bob and Alice have known each other for a long time (in fact, people have started to talk), so they could share their public keys by exchanging diskettes. For normal cases, however, you need some way to be sure that a public key is authentic.
The mechanism for doing this is the public key certificate. This is a data structure containing a public key, plus details of the owner of the key, all digitally signed by some trusted third party. Now when Alice wants to send Bob her public key she actually sends a certificate. Bob receives the certificate and checks the signature. As long as it has been signed by a certifier that he trusts, he can accept that this really is Alice's key.
Certificates in real life are more complex than this. Descriptions of how they are used in a variety of ways are in the detailed sections about SSL and Notes security later in this Redbook.
1.4.7 Public key cryptographic standardAll these cryptographic tools and techniques are not much good without a set of related, agreed-upon, standards to provide the basis for interoperability. These are called Public Key Cryptographic Standards (PKCS).
PKCS is the set of informal inter-vendor standards developed in 1991 by RSA Laboratories with representatives of Apple, Digital, Lotus, Microsoft, MIT, Northern Telecom, Novell, and Sun. Since its publication in June 1991, PKCS
Chapter 1. Fundamentals of IT security 39
has become a part of several standards and products, including Notes and Domino.
These standards cover RSA encryption, Diffie-Hellman key agreement, password-based encryption, extended-certificate syntax, cryptographic message syntax, private-key information syntax, and certification request syntax, as well as selected attributes.
The defined standards are:
� PKCS #1: RSA Encryption Standard
� PKCS #2: See the following note
� PKCS #3: Diffie-Hellman Key-Agreement Standard
� PKCS #4: See the following note
� PKCS #5: Password-Based Encryption Standard
� PKCS #6: Extended-Certificate Syntax Standard
� PKCS #7: Cryptographic Message Syntax Standard
� PKCS #8: Private-Key Information Syntax Standard
� PKCS #9: Selected Attribute Types
� PKCS #10: Certification Request Syntax Standard
� PKCS #11: Cryptographic Token Interface Standard
� PKCS #12: Personal Information Exchange Syntax Standard
� PKCS #13: Elliptic Curve Cryptography Standard
� PKCS #15 (Draft): Cryptographic Token Information Format Standard
Of particular interest to us in this redbook are PKCS #1, PKCS #7, PKCS #10, PKCS#11, and PKCS #12.
PKCS #1 describes a method for encrypting data using the RSA public-key cryptosystem. Its intended use is in the construction of digital signatures and digital envelopes, which are described in PKCS #7. PKCS #1 also describes the syntax for RSA public and private keys. The public key syntax of PKCS #1 is identical to that of X.509.
PKCS #7 describes the Cryptographic Message Syntax Standard. It defines the syntax for several kinds of cryptographically protected messages, including encrypted messages and messages with digital signatures. PKCS #7 has become the basis for the Secure Multipurpose Internet Mail Extension (SMIME)
Note: PKCS-2 and PKCS-4 have been incorporated into PKCS-1
40 Lotus Security Handbook

standard, which provides a uniform method of encrypting browser-based e-mail. PKCS #7 has other applications, such as its use in PKCS #12.
PKCS #10 describes the syntax for certification requests. A certification request consists of a distinguished name, a public key, and an added set of optional attributes, which are all signed by the entity requesting certification. Certification requests are sent to a certification authority who transforms the request into an X.509 public-key certificate.
PKCS #12 describes an import/export syntax for personal identity information, including private keys, certificates, miscellaneous secrets, and extensions. Applications such as web browsers support this standard, which allows a user to import and export a single set of identity information. This standard also comes to the aid of importing and exporting data from smart cards and smart tokens.
Complete information on PKCS, including a detailed description of each standard, can be found at the RSA site at the following URL:
http://www.rsasecurity.com/products/bsafe/whitepapers/IntroToPKCSstandards.pdf
This is part of the excellent, broader, FAQ maintained by RSA Security Inc., titled “RSA Laboratories’ Frequently Asked Questions About Today's Cryptography, Version 4.1,” available at the following URL:
http://www.rsasecurity.com/rsalabs/faq/index.html
1.5 SummaryIn this chapter, we have gone through the basics of IT security and have covered the necessary basic topics which are fundamental for us to move confidently through the rest of the redbook.
What we covered are the following topics:
� Basic IT Security terminology, including defining basic concepts such as a computer system, a computer network, an IT infrastructure, computer security, and information classification.
� Computer security services, including the meaning of data integrity, confidentiality, identification and authentication, access control, and non-repudiation.
� Cryptographic techniques, including defining cryptography and discussing symmetric key algorithms, asymmetric key algorithms, the hybrid solution, digital signatures, public key certificates, and public key cryptographic standards.
Chapter 1. Fundamentals of IT security 41
We are now ready to examine the recipes for designing a proper security infrastructure, which are security methodologies. These methodologies are covered in complete details in the next chapter and will build upon the knowledge you have acquired in the present chapter.
42 Lotus Security Handbook
Chapter 2. Security methodologies
In this chapter we look at the processes and procedures for implementing an overall security infrastructure, from beginning to end. This is a complex undertaking since it generally involves many people and many functional areas of the IT infrastructure, and it must also address many security needs and concerns.
We first look at exactly what is important when considering the implementation of security measures in an organization, in general areas of concern.
We then look at what exists to help security practitioners: there are a number of different approaches that can be used to achieve the objective of enterprise-wide security. These are generally referred to as methodologies. Some are vendor-specific, some are considered standards. In this chapter we explain their contents and their scope.
With all this done, we complete the chapter by reviewing a sample methodology that will put this information into a practical context. We do this to provide the perspective needed to understand the ramifications of implementing enterprise-wide security.
2
© Copyright IBM Corp. 2004. All rights reserved. 43

2.1 Approaches to IT securityBefore we can delve into the methodologies, it’s important to understand what lies at their core (that is, the principles, goals, and objectives of IT security).
2.1.1 Some definitionsIn addition to the definitions provided in the previous chapter, more terminology must be clearly understood before the reader can fully appreciate the material in this chapter.
In particular, the distinction between a threat and a risk must be clearly identified. In short, threats generate risks, which need to be mitigated. The degree to which these risks can be mitigated depends on a lot of factors. All this is covered in due time, but first, let’s consider our definitions.
ThreatThe word threat takes its root from the Old English work thrat, which means oppression. There are three modern definitions for the word:
1. An expression of an intention to inflict pain, injury, evil, or punishment.
2. An indication of impending danger or harm.
3. One that is regarded as a possible danger; a menace.
For the purposes of this redbook, and in the context of the methodologies that we cover, we retain the last definition: a threat is basically a possible danger or harm, in one word, a menace.
RiskThe word risk has a number of definitions, not all of which apply because of the context in which we use the word. Here are the modern-day definitions that apply to the purposes of this chapter:
1. The possibility of suffering harm or loss; danger.
2. A factor, thing, element, or course involving uncertain danger; a hazard, as in: “the usual risks of the desert: rattlesnakes, the heat, and lack of water” (Frank Clancy).
3. To expose to a chance of loss or damage; to incur the danger of, as in: “His action risked a sharp reprisal.”
Add to that the idiom, at risk, which has this definition:
� In an endangered state, especially from lack of proper care, as in: “unsupervised children who are at risk of dropping out of school”
44 Lotus Security Handbook
In our discussion, risk has all of these meanings. It is the possibility of suffering harm (definition 1); the factor or thing presenting danger, the hazard (definition 2); and also the exposure to the possibility of loss or damage (definition 3).
For an IT department, risk is the danger or probability of loss of reputation, sensitive information, or the ability to continue doing business. It is also the quantity of each, including sums of money related to those that a company stands to lose.
A comprehensive portion of your security policy deals with the manner in which you manage the risks faced by your company's computer system.
Often, companies and their IT personnel do not understand the nature of those risks. With all the hype in the media (both printed and electronic), they assume that the real danger comes from the Internet and from people outside of the company.
After all, the portrait that is constantly painted of these individuals is that they are poorly dressed Generation X'ers who have nothing better to do in life than to scour the Internet trying to find vulnerable systems to attack, penetrate, and maliciously destroy or corrupt. A prime example of this characterization can be found in Clifford Stohl's excellent, and totally true, novel The Cuckoo's Egg: Tracking a Spy Through the Maze of Computer Espionage (Mass Market Paperback Reprint edition, July 1995, Pocket Books, ISBN: 0671726889). In this story, the cracker in question is young, wears jeans, and wreaks havoc left and right, using the computer systems of one company as the springboard to attack the systems of other companies and organizations.
Therefore, upper-level managers at various companies believe that if they properly secure their computer system from people on the outside of the company and shield access from the Internet, they have effectively secured their computer system, at which point they can cease the work of hardening and securing the system and finally sleep soundly at night.
Bad news: this view of the computer security world is incorrect and shortsighted at the same time. The sad reality is that many companies have suffered and died from attacks perpetrated by insiders, meaning people working for the company. These are usually attacks by disgruntled employees who use the newly acquired information to their advantage.
You should therefore make sure that your computer security policy includes the necessary safeguards to protect information from people on both sides of the virtual security fence.
Chapter 2. Security methodologies 45
With your security policy in hand, which provides you with an understanding of the security threats and risks involved, you will have an idea of the measures you must adopt to secure your sensitive information.
At this point, you are ready to design your computer security architecture and implement the computer security services.
2.1.2 Risk mitigationWe are now ready to move on to risk mitigation. This is the single most important objective in any work that involves the implementation of security. By mitigation, we mean anything that reduces something of a negative nature. In this case, what we wish to reduce is the risks faced by an IT system as we have defined it.
The kind of organization in which security is being implemented is irrelevant to this discussion since all organizations and their IT systems face some form of risk, and all should strive for the maximum amount of security possible. (It is true that some organizations are more at risk than others, but we leave that consideration to later in this book.)
In order for risk mitigation (and the implementation of the security architecture) to be successful, it is imperative that the overall enterprise security policy be the responsibility of the top managers of the organization. They have to decide where the major security risks for their type of business lie and how to proceed from there.
46 Lotus Security Handbook
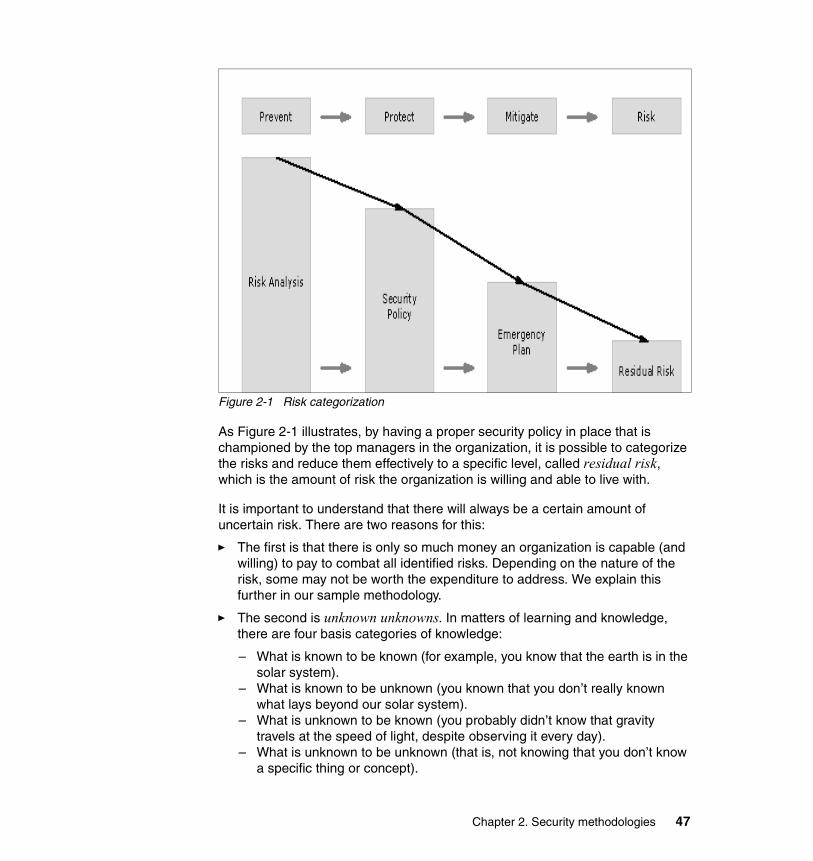
Figure 2-1 Risk categorization
As Figure 2-1 illustrates, by having a proper security policy in place that is championed by the top managers in the organization, it is possible to categorize the risks and reduce them effectively to a specific level, called residual risk, which is the amount of risk the organization is willing and able to live with.
It is important to understand that there will always be a certain amount of uncertain risk. There are two reasons for this:
� The first is that there is only so much money an organization is capable (and willing) to pay to combat all identified risks. Depending on the nature of the risk, some may not be worth the expenditure to address. We explain this further in our sample methodology.
� The second is unknown unknowns. In matters of learning and knowledge, there are four basis categories of knowledge:
– What is known to be known (for example, you know that the earth is in the solar system).
– What is known to be unknown (you known that you don’t really known what lays beyond our solar system).
– What is unknown to be known (you probably didn’t know that gravity travels at the speed of light, despite observing it every day).
– What is unknown to be unknown (that is, not knowing that you don’t know a specific thing or concept).
Chapter 2. Security methodologies 47
The same thing goes for security. What made distributed denial-of-service attacks effective at first was that people trying to combat them knew about the vulnerabilities in TCP/IP that could be used to mount a denial-of-service attack (such as SYN Floods), but they didn’t know that, through the power of distributed computing, machines connected to the Internet could be infected with a special kind of software that caused them to act as zombies and mount a coordinated denial-of-service attack which is several orders of magnitude worse than a simple denial-of-service attack. Worse, these people didn’t even known that they didn’t know this, so they could not plan for it as part of the security policy and the resulting security architecture.
Because attackers will always find new ways of attacking, there will always be some residual risk. Ideally, a proper security methodology will help us do a thorough security review and implement an appropriate security infrastructure. Before we go into this, we first complete our review of the basic steps of IT security (more complex models and methods will follow).
Looking back at Figure 2-1, mitigating risks involves a set of specific steps.
1. Analyze the major risks for the organization you are trying to secure so that you can define procedures that will help prevent these risks from happening.
2. Define a security policy to deal with assets for which it is not possible to prevent malicious actions without putting one or more protective measures in place.
3. In situations where protective measures are overcome, have in place an emergency response plan (generally called an Incident Handling procedure) that tells you what to do in those cases.
4. Finally, because all those problems are not solved just by defining a security policy, but only by investing money for certain activities and countermeasures, it is the final call of senior management as to what residual risk can be accepted. Insurance carriers can provide coverage for these residual risks.
The rate at which risk can be reduced by defining and applying a security policy varies on a case-by-case basis; our figure is for illustration purposes only.
2.1.3 The human elementTo complete our review of the basics, let’s consider the most common cause of security problems: people.
People, and not necessarily the technology in place, are the cause of security problems in the long run. Generally, security is compromised when employees make mistakes or perform activities that lay outside of their realm of permissions.
48 Lotus Security Handbook

The actual threat from hackers and viruses is much smaller than most people would anticipate.
Figure 2-2 highlights to what degree the employees in an organization affect overall security. Over 80% of security incidents are caused by insiders (the employees of the organization), in contrast to less than 20% for viruses and outsider attacks. And of that 80% of the problems generated internally, it is interesting to note that 55% are caused by employees who are not specifically intending to cause damage.
Having policies and procedures in place will help you address your risks. However, they will not directly cover all human factor errors. Managing your security and auditing it will allow you to perform checks, and discover some errors and correct them. However, by the time they are discovered, some errors may have already caused a security breach.
Figure 2-2 Insider attacks and other threats
An important, but often overlooked aspect of the human factors, is the way system administrators manage and implement the security infrastructure and follow security procedures.
Many systems are compromised because of system administrators that don’t patch the servers in the organization properly, and let them become vulnerable to known exploiters.
Another important issue is the management of user accounts and access rights. Even today, communication about a new employee or one changing from one department to another is still being implemented using mail or paper. These steps, with a lot of human interaction, are error-prone processes that can easily lead to assigning access rights that are too high, or are the wrong ones, or even keeping an account alive for somebody who left the organization a long time ago.
Human ErrorsDishonest Employees
Disgruntled Employees
VirusesOutsider Attacks
Chapter 2. Security methodologies 49

There are ways to mitigate the human factor risks, such as those we just described. These risk mitigation techniques are incorporated into most methodologies, including our sample methodology, all of which are discussed later in this chapter.
2.1.4 Selecting a methodologyBy now, it should be evident that using a security methodology is the best way to ensure organization-wide security and implement it properly.
Thanks to a continual evolution and improvement of security practices, a number of established methodologies have been created, improved, and made available from vendors, as well as from standards bodies and international organizations. Each offers a specific approach for implementing enterprise-wide security.
Depending on the particular security needs of the organization implementing security, one approach may seem more appropriate than another. It is for the reader to determine which one suits best the specific needs of the organization whose systems are to be secured. The goal of the present section and the subsequent ones is to provide an overview of some of these methodologies and a description of what their offer. With this in mind, let’s look at the first methodology, ISO17799.
2.2 ISO17799ISO17799 is produced by the International Organization for Standardization (ISO), which is a network of the national standards institutes of 146 countries, on the basis of one member per country, with a Central Secretariat in Geneva, Switzerland, that coordinates the system.
ISO is a non-governmental organization: its members are not, as is the case in the United Nations system, delegations of national governments. Nevertheless, ISO occupies a special position between the public and private sectors. This is because, on the one hand, many of its member institutes are part of the governmental structure of their countries, or are mandated by their government. On the other hand, other members have their roots uniquely in the private sector, having been set up by national partnerships of industry associations.
Therefore, ISO is able to act as a bridging organization in which a consensus can be reached on solutions that meet both the requirements of business and the broader needs of society, such as the needs of stakeholder groups like consumers and users.
50 Lotus Security Handbook
The Web site for ISO is:
http://www.iso.org
The ISO 17799 standard (more specifically identified as ISO/IEC 17799:2000) is officially titled “Information technology – Code of practice for information security management.” It is a monolingual (that is, English only) 71-page document available from the International Organization for Standardization. The document itself can be downloaded for a fee at the following URL:
http://www.iso.org/iso/en/CatalogueDetailPage.CatalogueDetail?CSNUMBER=33441&ICS1=35&ICS2=40&ICS3=
This methodology is a comprehensive set of controls comprising best practices in information security and organized into two parts. The first part is a code of practice [ISO17799]. The second part is a specification for an information security management system [BS7799-2]
ISO 17799 is an internationally recognized generic information security standard whose purpose is to give recommendations for information security management for use by those who are responsible for initiating, implementing, or maintaining security in their organization. It is intended to provide a common basis for developing organizational security standards and effective security management practice, and to provide confidence in inter-organizational dealings.
2.2.1 Some historyISO17799 has quite a history. It was first published as DTI Code of Practice in the United Kingdom (UK), and then renamed and published as Version 1 of BS 7799 in February 1995. However, BS 7799 was not widely embraced for a number of reasons, chief among them being its lack of flexibility, which made it difficult to taylor to the specific circumstances of the organizations trying to use it to secure their IT infrastructure.
In light of this lukewarm acceptance by the IT security community, a major revision of BS 7799 was undertaken, resulting in Version 2, which was published in May 1999. However, the fact that the ISO and BS standard names have the same last 4 digits has caused great confusion. We hope to clear this up with the following explanation.
BS 7799 is a two-part security management standard that was developed by the British Standards Institution (BSI) and that has been used extensively in the United Kingdom, under sponsorship of the UK government. The two parts of BS 7799 are:
� 7799-1 (Part 1): Code of Practice for Information Security Management, is a UK national standard for a code of practice for information security
Chapter 2. Security methodologies 51
management. BS 7799-1 is not a specification for an organizational information security management program, which they refer to as an “Information Security Management System” (ISMS). Therefore, BS 7799-1 cannot be used for certification purposes. Note that the current version of ISO/IEC 17799 (prior to its planned immediate revision) is entirely based on BS7799-1.
� 7799-2 (Part 2): Specification for Information Security Management Systems, a supporting checklist of security controls. The UK considers that BS 7799-2 is a specification for an ISMS and could be used as the basis for accredited certification. This document has no direct relationship to ISO/IEC 17799.
In order to make the BS 7799 methodology broader and available to a greater international audience, formal certification and accreditation schemes were launched in 1999 and a fast track ISO initiative was introduced, resulting in the first ISO standard in December 2000 and part 2 being published in 2002. The ISO 17799 Toolkit was published also in 2002.
ISO 17799 has now established itself as the major standard for information security. Many organizations have embarked upon the process of getting full certification under the ISO methodology, with a number already fully certified.
2.2.2 What ISO 17799 containsISO 17799 is a detailed security standard that provides a code of practice for information security management. However, it’s important to understand that as a general organizational information security management guide, ISO 17799 is not intended to give definitive details or “how-to’s.” Rather, it addresses topics in terms of policies and general good practices. The document specifically identifies itself as “a starting point for developing organization-specific guidance.” It states that not all of the guidance and controls it contains may be applicable and that additional controls not contained may be required. Given such caveats, the document is organized into ten major sections, each briefly covering a different topic or area. The sections and their objectives are as follows:
1. Business Continuity Planning
To counteract interruptions to business activities and to critical business processes from the effects of major failures or disasters
2. System Access Control
To control access to information; prevent unauthorized access to information systems; ensure the protection of networked services; prevent unauthorized computer access; detect unauthorized activities; ensure information security when using mobile computing and tele-networking facilities
52 Lotus Security Handbook

3. System Development and Maintenance
To ensure security is built into operational systems; prevent loss, modification, or misuse of user data in application systems; protect the confidentiality, authenticity, and integrity of information; ensure IT projects and support activities are conducted in a secure manner; maintain the security of application system software and data
4. Physical and Environmental Security
To prevent unauthorized access, damage, and interference to business premises and information; to prevent loss, damage, or compromise of assets and interruption to business activities; to prevent compromise or theft of information and information processing facilities.
5. Compliance
To avoid breaches of any criminal or civil law, statutory, regulatory, or contractual obligations, and of any security requirements; ensure compliance of systems with organizational security policies and standards; maximize the effectiveness of and minimize interference to/from the system audit process.
6. Personnel Security
To reduce risks of human error, theft, fraud, or misuse of facilities; ensure that users are aware of information security threats and concerns, and are equipped to support the corporate security policy in the course of their normal work; minimize the damage from security incidents and malfunctions and learn from such incidents
7. Security Organization
To manage information security within the company; maintain the security of organizational information processing facilities and information assets accessed by third parties; maintain the security of information when the responsibility for information processing has been outsourced to another organization
8. Computer and Network Management
To ensure the correct and secure operation of information processing facilities; minimize the risk of systems failures; protect the integrity of software and information; maintain the integrity and availability of information processing and communication; ensure the safeguarding of information in networks and the protection of the supporting infrastructure; prevent damage to assets and interruptions to business activities; prevent loss, modification, or misuse of information exchanged between organizations
9. Asset Classification and Control
To maintain appropriate protection of corporate assets and ensure that information assets receive an appropriate level of protection
Chapter 2. Security methodologies 53
10.Security Policy
To provide management direction and support for information security
Finally, with each section, there are detailed statements that comprise the standard.
2.2.3 What ISO 17799 doesn’t containISO 17799 provides general guidance on the wide variety of topics listed above, but typically does not go into depth. It takes the “broad brush” approach. ISO 17799 thus does not provide definitive or specific material on any security topic, and it does not provide enough information to support an in-depth organizational information security review, or to support a certification program. However, ISO 17799 can be useful as a high-level overview of information security topics that can help senior management to understand the basic issues involved in each of the topic areas.
2.3 Common Criteria (International Standard 15408)The Common Criteria for Information Technology Security Evaluation (CC) defines general concepts and principles of IT security evaluation and presents a general model of evaluation. It presents constructs for expressing IT security objectives, for selecting and defining IT security requirements, and for writing high-level specifications for products and systems.
The CC represents the outcome of a series of efforts to develop criteria for evaluation of IT security that are broadly useful within the international community. In the early 1980s the Trusted Computer System Evaluation Criteria (TCSEC) was developed in the United States. In the early 1990s Europe developed the Information Technology Security Evaluation Criteria (ITSEC) built upon the concepts of the TCSEC. In 1990 the Organization for Standardization (ISO) sought to develop a set of international standard evaluation criteria for general use. The CC project was started in 1993 to bring all these (and other) efforts together into a single international standard for IT security evaluation. The new Criteria was to be responsive to the need for mutual recognition of standardized security evaluation results in a global IT market. Figure 2-3 shows the roadmap to the Common Criteria.
54 Lotus Security Handbook

Figure 2-3 Roadmap to the Common Criteria
The benefits of the Common Criteria is that is provides a measure of confidence in the security of a product, system, or service. The Common Criteria can be used to build such confidence by providing a means to quantify or measure the extent to which security has been assessed in an internationally standard way. The use of the standard can assist an organization in understanding its IT security requirements and specifications.
In terms of its contents, the Common Criteria is presented as a set of distinct but related parts, namely:
� Part 1, Introduction and general model, is the introduction to the Common Criteria. It defines general concepts and principles of IT security evaluation and presents a general model of evaluation. Part 1 also presents constructs for expressing IT security objectives, for selecting and defining IT security requirements, and for writing high-level specifications for products and systems. In addition, the usefulness of each part of the CC is described in terms of each of the target audiences.
� Part 2, Security functional requirements, establishes a set of security functional components as a standard way of expressing the security functional requirements for Targets of Evaluation (TOEs). Part 2 catalogues the set of functional components, families, and classes.
Chapter 2. Security methodologies 55

� Part 3, Security assurance requirements, establishes a set of assurance components as a standard way of expressing the assurance requirements for TOEs. Part 3 catalogues the set of assurance components, families, and classes. It also defines evaluation criteria for Protection Profiles (PPs) and Security Targets (STs) and presents evaluation assurance levels that define the predefined CC scale for rating assurance for TOEs, called the Evaluation Assurance Levels (EALs).
In support of the three parts of the CC listed here, some other types of documents have been published, some being guidance documents. Other documents are planned for publication, including technical rationale material and guidance documents.
Complete information on the Common Criteria, including copies of the Common Criteria documents (available as PDF files), are available at the following URL:
http://www.commoncriteria.org/
Even though the Common Criteria has some very useful information, we will nonetheless look at other methodologies and utilize some of their contents. We recommend that you take the time to read further on the Common Criteria and assess the suitability of using it to address specific security requirements and needs unique to your organization.
2.4 Method for Architecting Secure Solutions (MASS)IBM has a method used by IBM Global Services (IGS) employees for security architecture engagements. It is call the Method for Architecting Secure Solutions (MASS). It helps analyze and categorize security-related problems and discussion in today’s e-business driven enterprise IT infrastructures. The contents of this section were originally posted in a special edition of the IBM Systems Journal on End-to-End Security, Volume 40, No 3. The article is available at the following URL:
http://www.research.ibm.com/journal/sj/403/whitmore.html
2.4.1 Problem statement A systematic approach for applying security throughout information technology solutions is necessary in order to ensure that all reasonable measures are considered by designers, and that the resulting computing systems will function and can be operated in a correct and reliable manner.
56 Lotus Security Handbook
In IBM Global Services, the requirement for a method for designing secure solutions is driven from several perspectives:
1. There is a need to “grow” the community of IT architects with a shared security focus;
2. There is a need to create synergy among the several technical disciplines within the IT architect profession relative to security issues;
3. There is a need to develop consistent designs because many businesses and organizations have similar security and privacy compliance requirements based upon statute, regulation, and industry affiliation, and many enterprises are multinational, with geographically diverse installations operating under similar security policies and practices.
To be effective, the resulting method should use existing security paradigms, integrate with other information technology architectures, and work with today's technologies.
A logical and systematic technique for designing secure solutions has potential value beyond IBM Global Services:
� To individuals, by fostering trust within computing environments that would otherwise be suspect;
� To information technology professionals, by promoting rigor within an emerging discipline of computing science;
� To enterprises, by providing a technical standard with which the effectiveness of information technology designs, and designers, can be evaluated.
2.4.2 Analysis Information technology architects rely on a wide range of techniques, tools, and reference materials in the solution design process. The results of a design activity may include an operational computing system or a set of documents that describe the system to be constructed from one or more viewpoints and at different levels of granularity. The documents provide a visualization of the system architecture.
To arrive at a system architecture, architects may use personal experience, or they may rely upon documented systematic procedures or methods. In addition to methods, architects refer to prior work and employ data collection techniques to define the problem space and the solution space. Reference materials can include a taxonomy of the problem space, a catalog of solution requirements, and documented models, patterns, or integrated solution frameworks. In general, as the definition of a given problem space matures, the taxonomy of the solution
Chapter 2. Security methodologies 57

requirements stabilizes. This leads to well-defined reference models, proven solution frameworks, and mature solution design methods.[3]
IT security architecture fits this model for limited problem spaces such as securing a network perimeter, where a set of solution requirements can be defined. A solution framework can be constructed for an enterprise firewall, and a solution architecture can be documented using known reference models for “demilitarized zones.” IT security does not, in general, fit this model, because:
1. The security problem space has not stabilized in that the number and type of threats continue to grow and change;
2. Existing security solution frameworks take a limited view of the problem space, as with firewalls[4] and network-level security;[5]
3. Methods for creating security solution architectures are generally confined to the defined solution frameworks. For ill-defined problem spaces like IT security, the path to maturity of models and methods requires a different approach.[3]
Security-specific taxonomies, models, and methodsISO (International Organization for Standardization) 7498-2[6] is a widely referenced document associated with IT security solution design. Its purpose is to extend the applicability of the seven-layer OSI (Open Systems Interconnection) system model to cover secure communication between systems. Section 5 of this document describes a set of security services and mechanisms that could be invoked at the appropriate layer within the OSI system model, in appropriate combinations to satisfy security policy requirements. Section 8 documents the need for ongoing management of OSI security services and mechanisms, to include management of cryptographic functions, network traffic padding, and event handling.
Many security practitioners use the OSI security services--authentication, access control, data confidentiality, data integrity, and non-repudiation--as the complete taxonomy for the security requirements for IT solutions. However, the preamble of ISO 7498-2 specifically states that “ ... OSI security is not concerned with security measures needed in end systems, installations, and organizations, except where these have implications on the choice and position of security services visible in OSI. These latter aspects of security may be standardized but not within the scope of OSI Recommendations.”
58 Lotus Security Handbook
Common CriteriaCommon Criteria provide a taxonomy for evaluating security functionality through a set of functional and assurance requirements. The Common Criteria include 11 functional classes of requirements:
� Security audit;
� Communication;
� Cryptographic support;
� User data protection;
� Identification and authentication;
� Management of security functions;
� Privacy;
� Protection of security functions;
� Resource utilization;
� Component access;
� Trusted path or channel.
These 11 functional classes are further divided into 66 families, each containing a number of component criteria. There are approximately 130 component criteria currently documented, with the recognition that designers may add additional component criteria to a specific design. There is a formal process for adopting component criteria through the Common Criteria administrative body, which can be found at:
http://www.commoncriteria.org
Governments and industry groups are developing functional descriptions for security hardware and software using the Common Criteria. These documents,
Security evaluation criteria: Agencies and standards bodies within governments of several nations have developed evaluation criteria for security within computing technology. In the United States the document has the designation “Trusted Computer System Security Evaluation Criteria,” or TCSEC. The European Commission has published the Information Technology Security Evaluation Criteria, also known as ITSEC, and the Canadian government has published the Canadian Trusted Computer Product Evaluation Criteria, or CTCPEC. In 1996, these initiatives were officially combined into a document known as the Common Criteria, or CC.[7] In 1999 this document was approved as a standard[7-9] by the International Organization for Standardization. This initiative opens the way to worldwide mutual recognition of product evaluation results.
Chapter 2. Security methodologies 59
known as protection profiles,[10] describe groupings of security functions that are appropriate for a given security component or technology. The underlying motivations for developing protection profiles include incentives to vendors to deliver standard functionality within security products and reduction of risk in information technology procurement. In concert with the work to define protection profiles, manufacturers of security-related computer software and hardware components are creating documentation that explains the security functionality of their products in relation to accepted protection profiles. These documents are called “security targets.” Manufacturers can submit their products and security targets to independently licensed testing facilities for evaluation in order to receive compliance certificates.
Common Criteria as a taxonomy for requirements/solutionsThe security requirements defined within the Common Criteria have international support as “best practices.” Common Criteria are intended as a standard for evaluation of security functionality in products. They have limitations in describing end-to-end security--because the functional requirements apply to individual products, their use in a complex IT solution is not intuitive.[11] Protection profiles aid in the description of solution frameworks, although each protection profile is limited in scope to the specification of functions to be found in a single hardware or software product.
Common Criteria as a reference modelThe Common Criteria introduce few architectural constructs:[8] the target of evaluation, or TOE, represents the component under design; and the TOE security functions document, or TSF, represents that portion of the TOE responsible for security. Under Common Criteria, the system or component under consideration is a “black box”; it exhibits some security functionality and some protection mechanisms for the embedded security functions.
Summary of analysisFor well-understood problem spaces, methods document the prior work and provide best practices for future analysis. For changing problem spaces such as IT security, methods can only postulate a consistent frame of reference for practitioners in order to encourage the development of future best practices. With time and experience the methods and models associated with IT security will mature.
The Common Criteria document has important value to the security community, given its history and acceptance as a standard for security requirements definition, and its linkage to available security technologies through documented protection profiles and security targets. Common Criteria do not provide all of the guidance and reference materials needed for security design.
60 Lotus Security Handbook
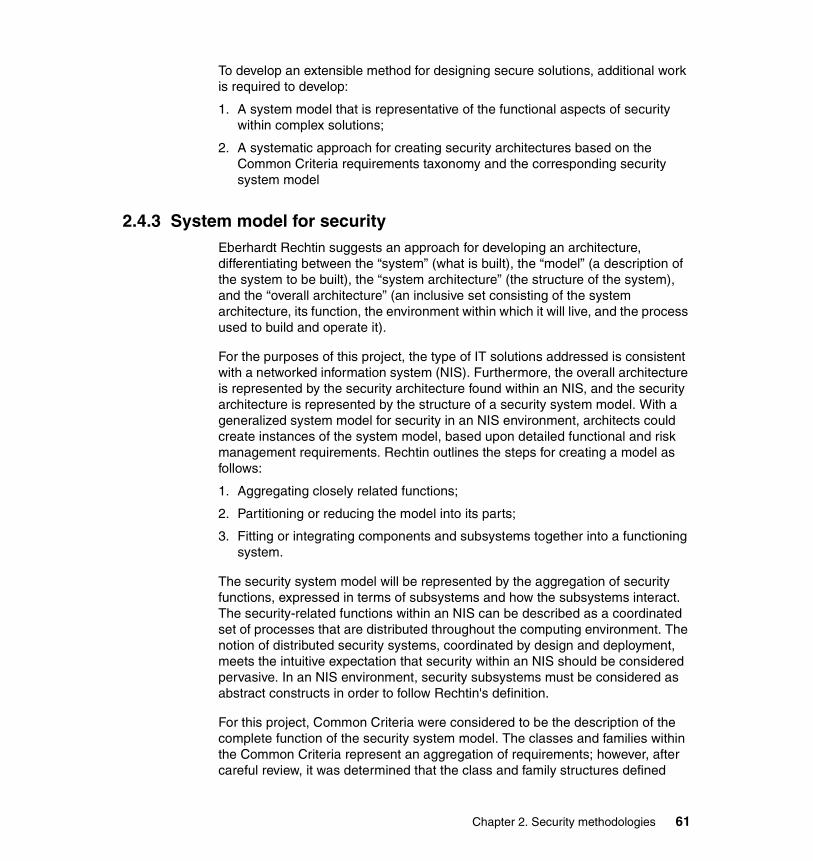
To develop an extensible method for designing secure solutions, additional work is required to develop:
1. A system model that is representative of the functional aspects of security within complex solutions;
2. A systematic approach for creating security architectures based on the Common Criteria requirements taxonomy and the corresponding security system model
2.4.3 System model for security Eberhardt Rechtin suggests an approach for developing an architecture, differentiating between the “system” (what is built), the “model” (a description of the system to be built), the “system architecture” (the structure of the system), and the “overall architecture” (an inclusive set consisting of the system architecture, its function, the environment within which it will live, and the process used to build and operate it).
For the purposes of this project, the type of IT solutions addressed is consistent with a networked information system (NIS). Furthermore, the overall architecture is represented by the security architecture found within an NIS, and the security architecture is represented by the structure of a security system model. With a generalized system model for security in an NIS environment, architects could create instances of the system model, based upon detailed functional and risk management requirements. Rechtin outlines the steps for creating a model as follows:
1. Aggregating closely related functions;
2. Partitioning or reducing the model into its parts;
3. Fitting or integrating components and subsystems together into a functioning system.
The security system model will be represented by the aggregation of security functions, expressed in terms of subsystems and how the subsystems interact. The security-related functions within an NIS can be described as a coordinated set of processes that are distributed throughout the computing environment. The notion of distributed security systems, coordinated by design and deployment, meets the intuitive expectation that security within an NIS should be considered pervasive. In an NIS environment, security subsystems must be considered as abstract constructs in order to follow Rechtin's definition.
For this project, Common Criteria were considered to be the description of the complete function of the security system model. The classes and families within the Common Criteria represent an aggregation of requirements; however, after careful review, it was determined that the class and family structures defined
Chapter 2. Security methodologies 61

within Common Criteria do not lend themselves to be used as part of a taxonomy for pervasive security. The aggregation is more reflective of abstract security themes, such as cryptographic operations and data protection, rather than security in the context of IT operational function. To suit the objective of this project, the Common Criteria functional criteria were re-examined and re-aggregated, removing the class and family structures. An analysis of the 130 component-level requirements in relation to their function within an NIS solution suggests a partitioning into five operational categories: audit, access control, flow control, identity and credentials, and solution integrity. A summary mapping of CC classes to functional categories is provided in Table 2-1 on page 62.
Table 2-1 Placing Common Criteria classes in functional categories
While redundancy is apparent at the class level, there is only a small overlap at the family level of the hierarchy defined within Common Criteria and below. Much of the overlap represents the intersection of function and interdependency among the categories.
2.4.4 Security subsystemsThe component-level guidance of Common Criteria documents rules, decision criteria, functions, actions, and mechanisms. This structure supports the assertion that the five categories described in Table 2-1 on page 62 represent a set of interrelated processes, or subsystems, for security. The notion of a security subsystem has been proposed previously; the authors of Trust in Cyberspace described functions within operating system access control components as
Functional category Common criteria functional class
Audit Audit, component protection, resource utilization
Access control Data protection, component protection, security management, component access, cryptographic support, identification and authentication, communication, trusted path/channel
Flow control Communication, cryptographic support, data protection, component protection, trusted path/channel, privacy
Identity/credentials Cryptographic support, data protection, component protection, identification and authentication, component access, security management, trusted path/channel
Solution integrity Cryptographic support, data protection, component protection, resource utilization, security management
62 Lotus Security Handbook
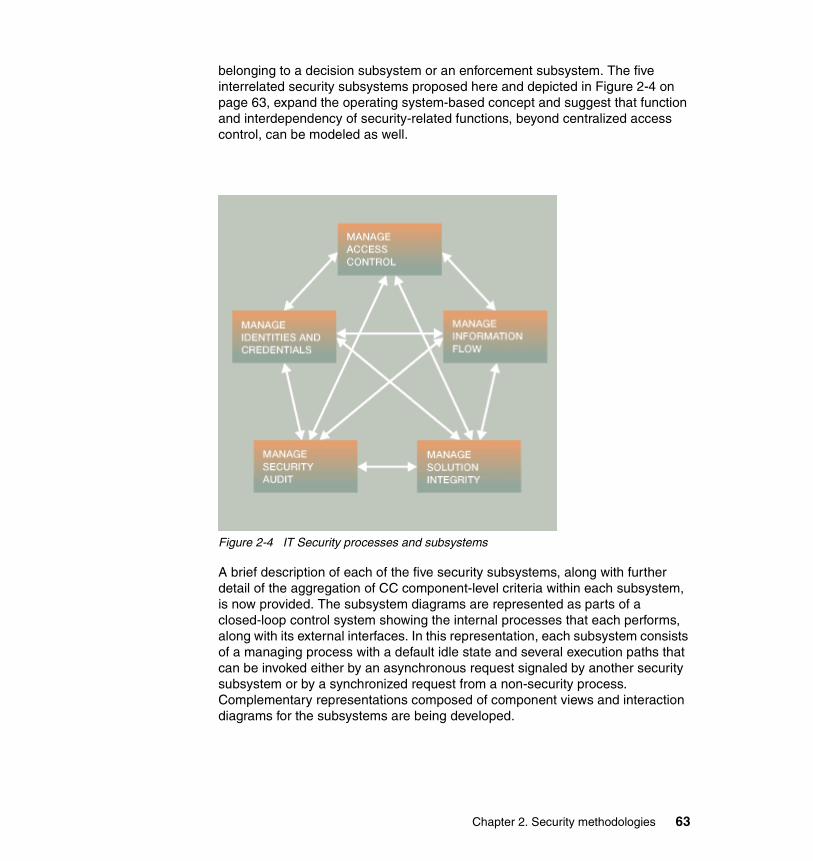
belonging to a decision subsystem or an enforcement subsystem. The five interrelated security subsystems proposed here and depicted in Figure 2-4 on page 63, expand the operating system-based concept and suggest that function and interdependency of security-related functions, beyond centralized access control, can be modeled as well.
Figure 2-4 IT Security processes and subsystems
A brief description of each of the five security subsystems, along with further detail of the aggregation of CC component-level criteria within each subsystem, is now provided. The subsystem diagrams are represented as parts of a closed-loop control system showing the internal processes that each performs, along with its external interfaces. In this representation, each subsystem consists of a managing process with a default idle state and several execution paths that can be invoked either by an asynchronous request signaled by another security subsystem or by a synchronized request from a non-security process. Complementary representations composed of component views and interaction diagrams for the subsystems are being developed.
Chapter 2. Security methodologies 63
Security audit subsystemThe purpose of the security audit system in an IT solution is to address the data collection, analysis, and archival requirements of a computing solution in support of meeting the standards of proof required by the IT environment. A security audit subsystem is responsible for capturing, analyzing, reporting, archiving, and retrieving records of events and conditions within a computing solution. This subsystem can be a discrete set of components acting alone, or a coordinated set of mechanisms among the several components in the solution. Security audit analysis and reporting can include real-time review, as implemented in intrusion detection components, or after-the-fact review, as associated with forensic analysis in defense of repudiation claims. A security audit subsystem may rely upon other security subsystems in order to manage access to audit-related systems, processes, and data, control the integrity and flow of audit information, and manage the privacy of audit data. From Common Criteria, security requirements for an audit subsystem would include:
� Collection of security audit data, including capture of the appropriate data, trusted transfer of audit data, and synchronization of chronologies;
� Protection of security audit data, including use of time stamps, signing events, and storage integrity to prevent loss of data;
� Analysis of security audit data, including review, anomaly detection, violation analysis, and attack analysis using simple heuristics or complex heuristics;
� Alarms for loss thresholds, warning conditions, and critical events.
The closed loop process for a security audit subsystem is represented in Figure 2-5 on page 65.
64 Lotus Security Handbook
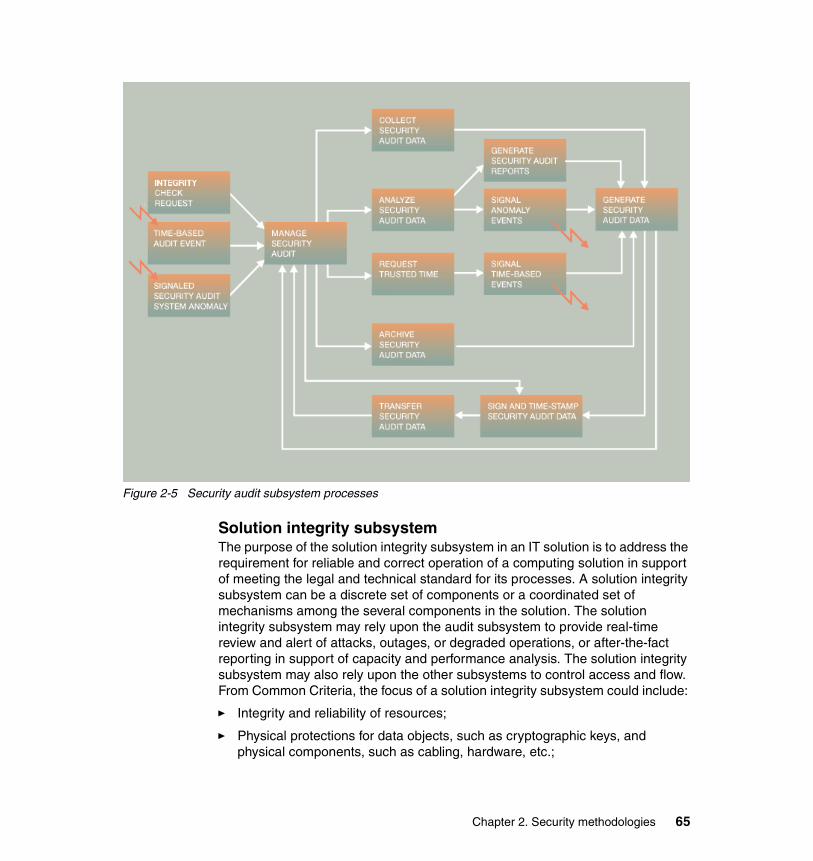
Figure 2-5 Security audit subsystem processes
Solution integrity subsystemThe purpose of the solution integrity subsystem in an IT solution is to address the requirement for reliable and correct operation of a computing solution in support of meeting the legal and technical standard for its processes. A solution integrity subsystem can be a discrete set of components or a coordinated set of mechanisms among the several components in the solution. The solution integrity subsystem may rely upon the audit subsystem to provide real-time review and alert of attacks, outages, or degraded operations, or after-the-fact reporting in support of capacity and performance analysis. The solution integrity subsystem may also rely upon the other subsystems to control access and flow. From Common Criteria, the focus of a solution integrity subsystem could include:
� Integrity and reliability of resources;
� Physical protections for data objects, such as cryptographic keys, and physical components, such as cabling, hardware, etc.;
Chapter 2. Security methodologies 65
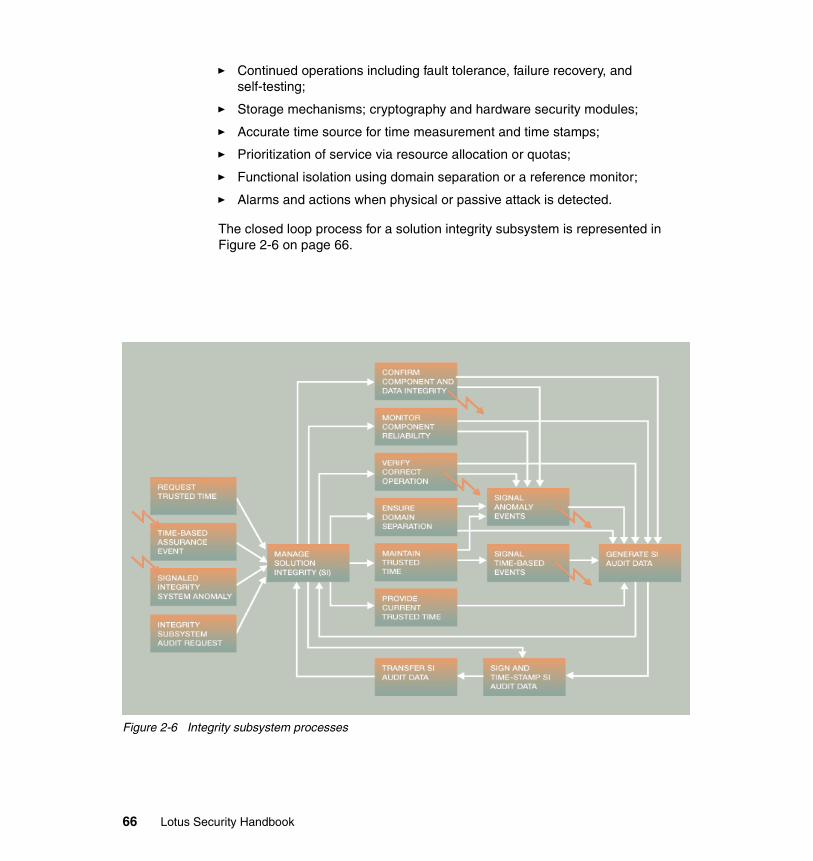
� Continued operations including fault tolerance, failure recovery, and self-testing;
� Storage mechanisms; cryptography and hardware security modules;
� Accurate time source for time measurement and time stamps;
� Prioritization of service via resource allocation or quotas;
� Functional isolation using domain separation or a reference monitor;
� Alarms and actions when physical or passive attack is detected.
The closed loop process for a solution integrity subsystem is represented in Figure 2-6 on page 66.
Figure 2-6 Integrity subsystem processes
66 Lotus Security Handbook

Access control subsystemThe purpose of an access control subsystem in an IT solution is to enforce security policies by gating access to, and execution of, processes and services within a computing solution via identification, authentication, and authorization processes, along with security mechanisms that use credentials and attributes. The credentials and attributes used by the access control subsystem along with the identification and authentication mechanisms are defined by a corresponding credential subsystem. The access control subsystem may feed event information to the audit subsystem, which may provide real-time or forensic analysis of events. The access control subsystem may take corrective action based upon alert notification from the security audit subsystem. From Common Criteria, the functional requirements for an access control subsystem should include:
� Access control enablement;
� Access control monitoring and enforcement;
� Identification and authentication mechanisms, including verification of secrets, cryptography (encryption and signing), and single- vs. multiple-use authentication mechanisms;
� Authorization mechanisms, to include attributes, privileges, and permissions;
� Access control mechanisms, to include attribute-based access control on subjects and objects and user-subject binding;
� Enforcement mechanisms, including failure handling, bypass prevention, banners, timing and time-out, event capture, and decision and logging components.
The closed loop process for an access control subsystem is represented in Figure 2-7 on page 68.
Chapter 2. Security methodologies 67

Figure 2-7 Access control and subsystem processes
Information flow control subsystemThe purpose of an information flow control subsystem in an IT solution is to enforce security policies by gating the flow of information within a computing solution, affecting the visibility of information within a computing solution, and ensuring the integrity of information flowing within a computing solution. The information flow control subsystem may depend upon trusted credentials and access control mechanisms.
This subsystem may feed event information to the security audit subsystem, which may provide real-time or forensic analysis of events. The information flow control subsystem may take corrective action based upon alert notification from the security audit subsystem. From Common Criteria, an information flow control subsystem may include the following functional requirements:
68 Lotus Security Handbook
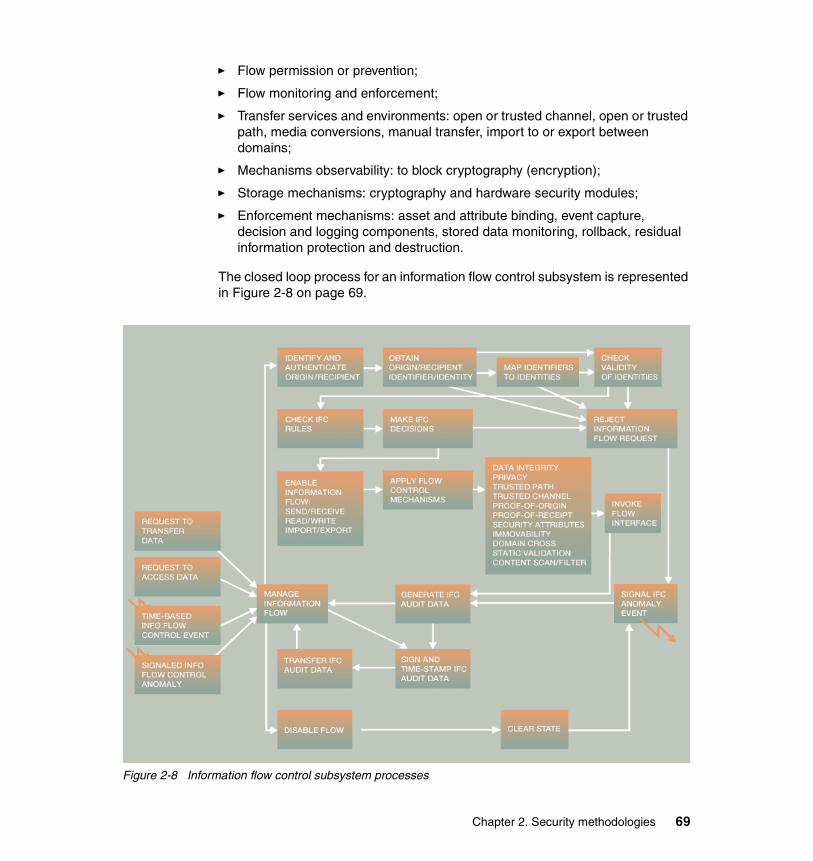
� Flow permission or prevention;
� Flow monitoring and enforcement;
� Transfer services and environments: open or trusted channel, open or trusted path, media conversions, manual transfer, import to or export between domains;
� Mechanisms observability: to block cryptography (encryption);
� Storage mechanisms: cryptography and hardware security modules;
� Enforcement mechanisms: asset and attribute binding, event capture, decision and logging components, stored data monitoring, rollback, residual information protection and destruction.
The closed loop process for an information flow control subsystem is represented in Figure 2-8 on page 69.
Figure 2-8 Information flow control subsystem processes
Chapter 2. Security methodologies 69

Identity or credential subsystemThe purpose of a credential subsystem in an IT solution is to generate, distribute, and manage the data objects that convey identity and permissions across networks and among the platforms, the processes, and the security subsystems within a computing solution. In some applications, credential systems may be required to adhere to legal criteria for creation and maintenance of trusted identity used within legally binding transactions.
A credential subsystem may rely on other subsystems in order to manage the distribution, integrity, and accuracy of credentials. A credential subsystem has, potentially, a more direct link to operational business activities than the other security subsystems, owing to the fact that enrollment and user support are integral parts of the control processes it contains. From Common Criteria, a credential subsystem may include the following functional requirements:
� Single-use vs. multiple-use mechanisms, either cryptographic or non-cryptographic;
� Generation and verification of secrets;
� Identities and credentials to be used to protect security flows or business process flows;
� Identities and credentials to be used in protection of assets: integrity or non-observability;
� Identities and credentials to be used in access control: identification, authentication, and access control for the purpose of user-subject binding;
� Credentials to be used for purposes of identity in legally binding transactions;
� Timing and duration of identification and authentication;
� Life cycle of credentials;
� Anonymity and pseudonymity mechanisms.
The closed loop process for a credential subsystem is represented in Figure 2-9 on page 71.
70 Lotus Security Handbook
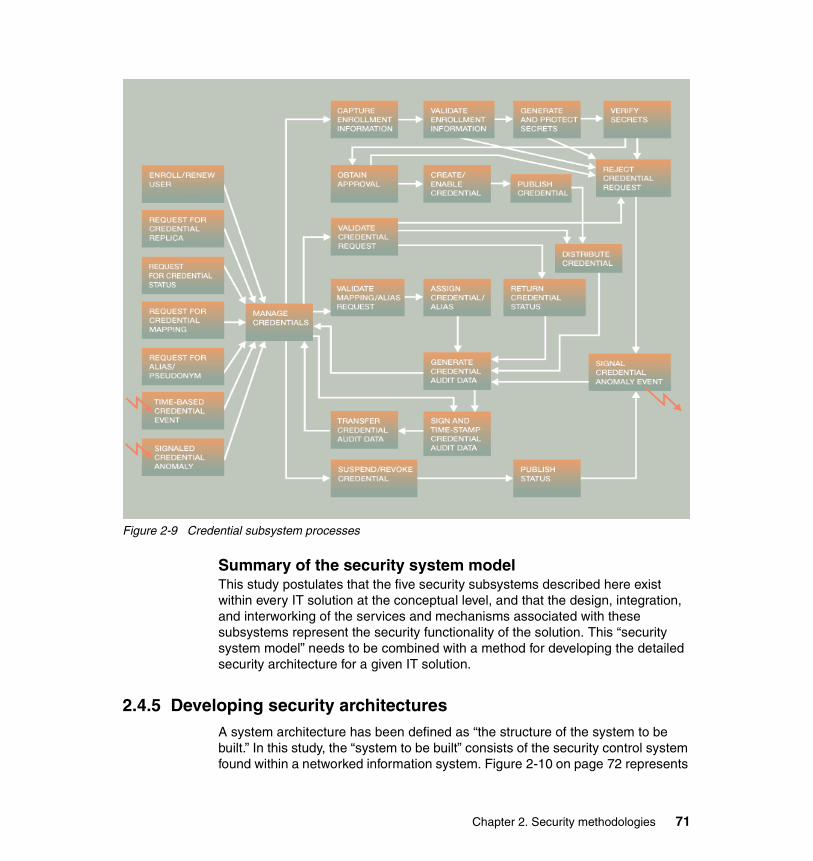
Figure 2-9 Credential subsystem processes
Summary of the security system modelThis study postulates that the five security subsystems described here exist within every IT solution at the conceptual level, and that the design, integration, and interworking of the services and mechanisms associated with these subsystems represent the security functionality of the solution. This “security system model” needs to be combined with a method for developing the detailed security architecture for a given IT solution.
2.4.5 Developing security architectures A system architecture has been defined as “the structure of the system to be built.” In this study, the “system to be built” consists of the security control system found within a networked information system. Figure 2-10 on page 72 represents
Chapter 2. Security methodologies 71

the solution environment. Here an e-business computing solution serves information or supports electronic commerce transactions via the Internet. The e-business computing solution is operated by an enterprise and provides services to one or more user communities.
Figure 2-10 Networked information system environment
The e-business computing solution can be described as a set of automated business processes supporting the business context that requires security assurances and protections. The design goal is to infuse security into the computing solution and the related IT environment.
From a business perspective, there are two objectives:
1. To ensure that the desired IT business process flow yields correct and reliable results;
72 Lotus Security Handbook
2. To ensure that the potential vulnerabilities and exception conditions (i.e., perils) within IT business process flows are addressed in ways that are consistent with the risk management objectives.
These objectives show the duality of security design: to support and assure normal flows, as well as identify and account for all illicit flows and anomalous events.
2.4.6 Business process modelFigure 2-11 on page 74 represents IT process flows for a generalized business system. The process flows reflect the events and conditions in which information assets are acted upon by processes that are invoked by users, or by processes acting on behalf of users. The left arrow represents the model business flow within a trusted environment, and the right arrow represents a more realistic view of the business flow, where perils exist in the operating environment.
Chapter 2. Security methodologies 73
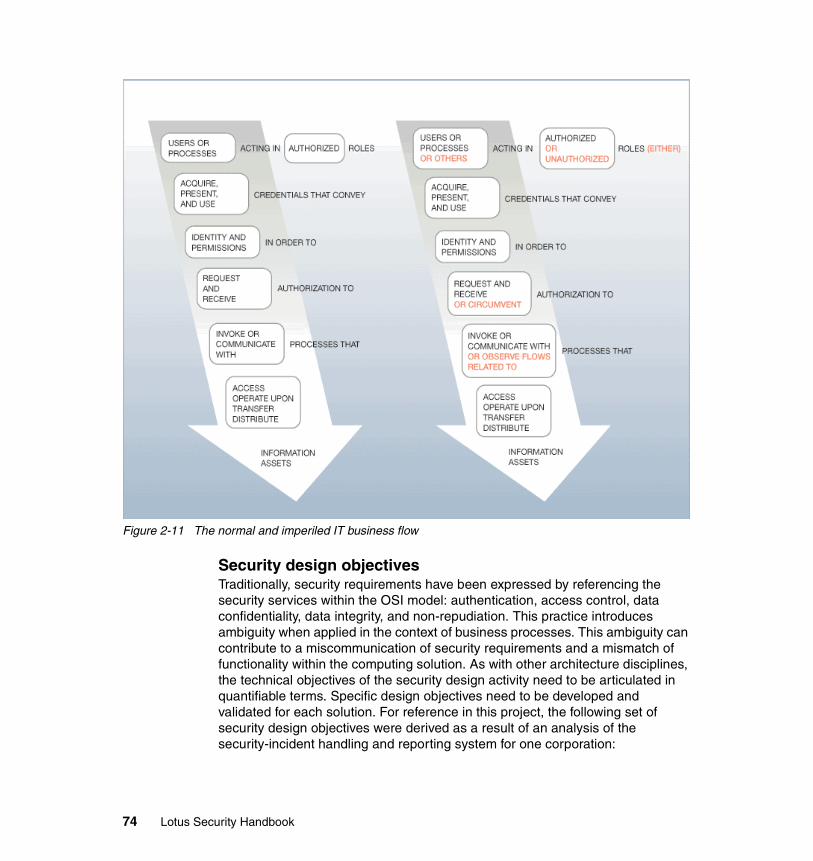
Figure 2-11 The normal and imperiled IT business flow
Security design objectivesTraditionally, security requirements have been expressed by referencing the security services within the OSI model: authentication, access control, data confidentiality, data integrity, and non-repudiation. This practice introduces ambiguity when applied in the context of business processes. This ambiguity can contribute to a miscommunication of security requirements and a mismatch of functionality within the computing solution. As with other architecture disciplines, the technical objectives of the security design activity need to be articulated in quantifiable terms. Specific design objectives need to be developed and validated for each solution. For reference in this project, the following set of security design objectives were derived as a result of an analysis of the security-incident handling and reporting system for one corporation:
74 Lotus Security Handbook

1. There is a need to control access to computer systems and their processes, consistent with defined roles and responsibilities.
2. There is a need to control access to information, consistent with information classification and privacy policies.
3. There is a need to control the flow of information, consistent with information classification and privacy policies.
4. There is a need to manage the reliability and integrity of components.
5. There is a need for protections from malicious attack.
6. There is a need for trusted identity to address the requirement of accountability of access to systems, processes, and information.
7. There is a need to prevent fraud within business processes and transactions, or to detect and respond to attempted fraud.
2.4.7 Selection and enumeration of subsystemsThe security design objectives and the solution environment have a central role in the selection and enumeration of subsystems. Table 2-2 on page 75 shows a possible mapping of the example design objectives to security subsystems. It indicates where a subsystem may be required (R) or supplementary (S) in satisfying an individual security requirement. Actual subsystem selection requires documented rationale.
Table 2-2 Mapping design objectives to security subsystems
There are many interrelated factors that determine how many instances of a given subsystem appear in the solution. Table 2-3 on page 76suggests
Security Design Objective Audit Integrity Access Control
Flow Control
Credentials / Identity
Control access to systems/processes
S S R S S
Control access to information S S S R R
Control the flow of information S S S R S
Correct and reliable component operation
S R S S S
Prevent/migrate attacks R R R R S
Accountability through trusted identity
R R S S R
Prevent/mitigate fraud R R R R R
Chapter 2. Security methodologies 75

motivations for instantiating security subsystems within a design. Actual subsystem enumeration requires documented rationale.
Table 2-3 Determining the security subsystems in a design
2.4.8 Documenting a conceptual security architectureGiven the agreed-upon design objectives, a conceptual model for security within the IT solution can be created. Figure 2-12 on page 77 and Figure 2-13 on page 78 represent a conceptual security architecture. For clarity, security functions have been grouped by design objective.
Subsystem Number in a design
Characteristics of the computing environment
Security audit subsystem Few One subsystem for archive of related critical dataOne subsystem for analysis of related anomalies One subsystem for fraud detection in the solution
Solution Integrity Few One subsystem per group of related critical components
Access Control 1 to n One subsystem per unique user-subject binding mechanism or policy rule set
Flow Control 1 to m One subsystem per unique flow control policy rule set One or more flow control functions per OSI layer service: physical, datalink, network, end-to-end transport, applicationOne or more flow control functions per domain boundary
Identity and credentials 1 to k Some number of credential systems per domainSome number of credential classes per domainSome number of disparate credentials or uses for credentials per domainSome number of aliases/pseudonyms at domain boundaries
76 Lotus Security Handbook
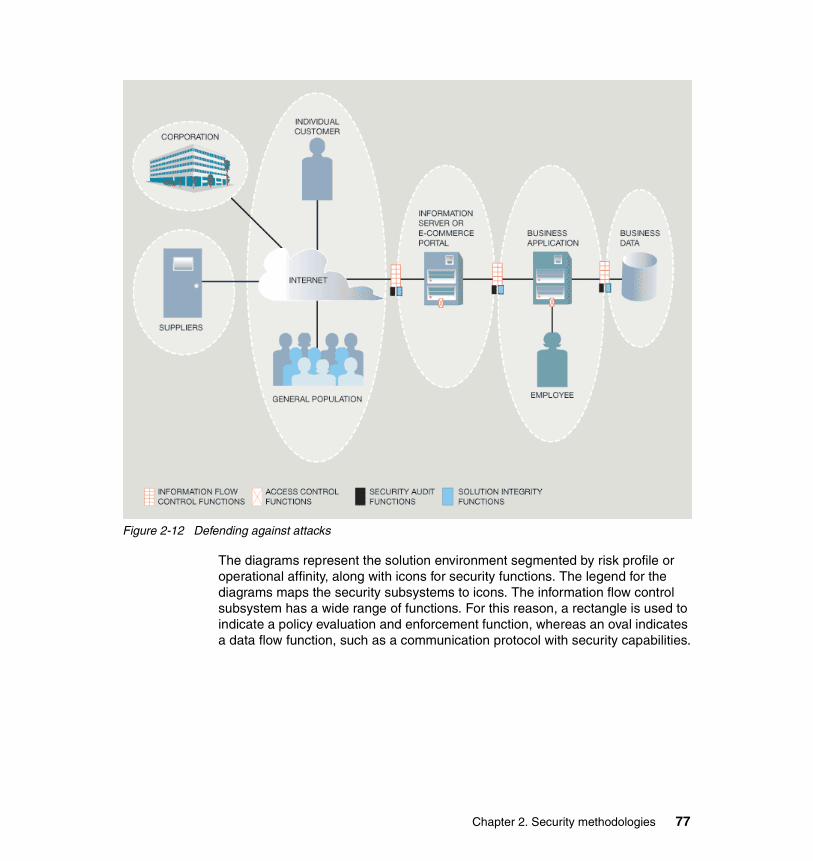
Figure 2-12 Defending against attacks
The diagrams represent the solution environment segmented by risk profile or operational affinity, along with icons for security functions. The legend for the diagrams maps the security subsystems to icons. The information flow control subsystem has a wide range of functions. For this reason, a rectangle is used to indicate a policy evaluation and enforcement function, whereas an oval indicates a data flow function, such as a communication protocol with security capabilities.
Chapter 2. Security methodologies 77

Figure 2-13 Ensuring correct and reliable operation
From the perspective of the enterprise deploying the solution, the security design objectives will dictate where security functionality is desired; however, the compliance to some or all of the security requirements may be limited by the enforceability of policies beyond the boundaries of the enterprise. Whether and how these credential subsystems and access control subsystems can be integrated into the security architecture can have a major impact on the trustworthiness of the solution as a whole. These issues and dependencies should be considered and documented within architectural decisions.
This type of conceptual model forms the baseline for developing and evaluating a “proof-of-concept” and further refinement of the functional aspects of security within the target environment.
78 Lotus Security Handbook

2.4.9 Integrating security into the overall solution architecture There are several steps involved in translating the conceptual security subsystem functions into component-level specifications and integration guidance. These include: creating models of the solution environment, documenting architectural decisions, developing use cases, refining the functional design, and integrating security requirements into component architectures.
Solution modelsCreating an initial solution model is a critical step in the design process. With skill and experience, one-of-a-kind solution models can be developed to fit a given set of requirements. For complex solutions, the practice of using templates derived from prior solutions is becoming commonplace.
The Enterprise Solutions Structure (ESS) provides a range of reference architectures for e-business solutions.
Documenting architectural decisionsPreviously, the notion of the duality of security design was described, that is, ensuring correct and reliable operation and protecting against error and maliciousness. Both motivations are based upon managing the business risks of the solution and of the environment. Risks represent the likelihood that an undesirable outcome will be realized from a malicious attack, unexpected event, operational error, etc. Risks are either accepted as a cost of operation, transferred to some other party, covered by liability insurance, or mitigated by the security architecture.
Architectural decisions will dictate how robust the security system architecture should be, which security subsystems to incorporate into the system architecture, which functions and mechanisms within each subsystem should be deployed, where the mechanisms will be deployed, and how the deployment will be managed.
Examples of architectural decisions include:
� Viability of the countermeasures, including the threats addressed, the limitations and caveats of the solution, and the resulting window of risk
� Extensibility of the design, including whether or not the design will serve the total population and if there will be separate designs for defined population segments
� Usability of the design, including whether or not the mechanisms integrate with the technology base and the extent of the burden of compliance for users
Chapter 2. Security methodologies 79

� Manageability of the design, including the extent of the burden of life-cycle management
2.4.10 Use casesArchitectural decisions will also drive the evaluation of prototypes and models of functions within the solution. One form of prototype is called a use case. Both security threats and normal interactions and flows can be validated with use cases.
Example 1: Interception of errant packet or message flow Figure 2-14 on page 80 represents several levels of detail for the operation of an information flow control subsystem that is designed to monitor send and receive operations that cross a boundary between two networks.
Figure 2-14 Boundary flow control with security subsystems
80 Lotus Security Handbook

The computer systems are represented in the physical view. In the component view, an information flow control interface, positioned between source and destination, will examine one or more aspects of packets or messages sent across the boundary. Some components of this information flow control subsystem are shown in the logic view, where the monitored conditions and the programmed actions are carried out, based upon a set of rules.
Valid packets are allowed to flow across the boundary; however, packets or messages of a specified format, or from an invalid source, or to an invalid destination, are disabled by the security subsystem. A record of the event is generated by invoking an interface to a security audit subsystem.
This example is representative of the type of filtering, analysis, and response that is performed within packet filter firewalls, or electronic mail gateways.
There are many architectural decisions to be evaluated within each iteration of the design. The effect on performance due to processing delays, plus the effect of data collection and analysis on the overall operation of the solution, are significant factors.
Example 2: Three-tier client/server input flowFigure 2-15 on page 82 illustrates an input flow for a three-tier client/server process that is typical of the integration of enterprise computing with the Internet environment.
Chapter 2. Security methodologies 81

Figure 2-15 Three-tier client/server input flow with security subsystems
Several instances of security subsystems are depicted, spread among three network security domains. An information flow control subsystem is positioned at the boundary points between networks. An access control subsystem is positioned between a receiving component and its corresponding application component. Interfaces to related credential subsystems and security audit subsystems are shown in the security subsystem logic view. No integrity subsystem functions are referenced in this example. The scenario follows:
1. The business process interface is invoked by a user or a process and the request is transferred via a sending component.
2. The request flows across a security domain in a manner that is acceptable to the sending and receiving components, based upon the defined information flow control rules.
82 Lotus Security Handbook
3. Identification, authentication, and access control decisions are made based upon the external identity associated with the request by an access control subsystem associated with the middle-tier application.
4. The middle-tier application is invoked via a user-subject binding. The actual processing is not covered here--it may include business presentation and data mapping logic, or it may be performed by an application-level information flow control subsystem, such as a proxy server.
5. The middle-tier application initiates, or relays, a request to the end-tier application. The request is scrutinized at another network boundary control point.
6. At the end-tier application, an access control decision may be performed on the request relative to the identity of the user represented by the middle-tier application, depending on the design of the application and the exchange protocols used.
7. The business process is invoked by a user-subject binding if the access control decision is positive.
This demonstrates how security functions from several subsystems are distributed throughout the solution. As with the first example, architectural decisions will guide the design of the security subsystem functions, which in turn may put constraints on the overall business flow in order to achieve the risk management objectives.
Refining the functional designWalk-throughs of complete business processes, including exception conditions and handling processes, assist in creating a viable solution outline and refining requirements and interdependencies among the solution building blocks.
Example 3: PKI digital certificate enrollmentThis example uses the credential subsystem model to describe the generalized flow for enrolling a user into an identity or credential system based upon PKI digital certificates as the first step in developing a security system architecture. The process involves combining the subsystem model with assumptions about the business environment, the business processes, the risk management requirements, the technical specifications, and possibly the legal and business compliance requirements associated with issuing PKI digital certificates.
In Figure 2-16 on page 84, the yellow blocks represent manual processes, the blue blocks map to automated processes, and the peach blocks map to automated audit data capture points. The blue data storage icons represent sensitive repositories, the pink icons map to cryptographic secrets, the white icons represent unique contents of the certificate, and the lavender icon is associated with the certificate.
Chapter 2. Security methodologies 83

Figure 2-16 Sample PKI digital certificate enrollment process flow
The enrollment process flow depicted demonstrates the exchange of sensitive user information and secrets, plus the export of the credential outside the control of the issuer. The full enrollment scenario should include processes from a corresponding information flow control subsystem. For public key credentials, the format of certificates, along with details of how the credentials are formatted, transported, and stored are important design considerations. All scenarios must be validated against existing and proposed business processes. Validation of the scenarios substantiates the architectural decisions discussed earlier. Subsequent design steps are needed to develop and map the functions of the security subsystems to Common Criteria specifications and ultimately onto the nodes and physical components.
84 Lotus Security Handbook
Integrating security requirements into the architectureThe security functions within the design need to be apportioned throughout the solution. However, many of the mechanisms and services within the IT solution that implement security functionality operate within other than security components, for example: database systems, application systems, clients, servers, and operating systems. The task of adopting security function into the network, application, middleware, security, systems management, and infrastructure architectures is shared by the several architects and integration specialists involved in the design project. The process involves a structured approach, considering the purposeful allocation of functions and requirements throughout the component architectures by:
� Mandate, based upon a legal or contractual compliance requirement
� Best practice for security, or for balance of security and business process
� Component capability, knowing the existence of a mechanism that supports the required process or action
� Location in the configuration, based upon interaction with components or flows
� Impact, considering the risk, security objective, or the component capacity to perform
� Necessity, because there may be no better alternative
Summary of the design processThis section has described the process for translating the conceptualized security solution into a set of detailed specifications, for an integrated IT security control system, using the security subsystem construct. The design is documented, refined, and validated against the business processes through use cases and scenarios. The detailed security requirements, expressed in terms of Common Criteria component-level detail, are distributed throughout the operational model for the IT solution. At this point, integration-level detail can be finalized, and the implementation plan can proceed.
2.4.11 MAAS Conclusions This section has examined the issues and circumstances that affect the design of comprehensive security functions for computing solutions. It has outlined a system model and a systematic process for security design with the Common Criteria international standard at its foundation.
Several summary observations can be made relative to this proposed model and process:
� Security is a shared responsibility among all IT design disciplines;
Chapter 2. Security methodologies 85

� Security design is linked to business objectives beyond the need for protecting against attack, and conversely, protecting against attack does not in itself meet all the business requirements for security;
� Many, if not most, security control points within IT solutions are found in portions of solutions that are not typically considered security components.
Reliable and correct operation of solutions using secure data exchange protocols, such as IPSec and secure sockets layer, is predicated on functions within all five of the security subsystems defined in the proposed model and design process. These protocols are based upon trusted identities that utilize cryptographic keys requiring storage integrity, reliable key exchange protocols, strong access control mechanisms, reliable data exchange protocols, and trusted audit trails for enrollment and key life-cycle management.
Furthermore, the proposed model provides a new perspective for viewing Common Criteria protection profiles in the context of security subsystems. For example, the protection profile for an application gateway firewall suggests the functionality of all five security subsystems. The fact that a front-line security device, such as a firewall, might fit the definition of a credential subsystem highlights the critical nature of its design, integration, and operation.
Actions and further study The concepts and the supporting detailed information presented in this section were incorporated into training for IBM Global Services architects this year. Additional work is underway to develop notations, models, and visualization techniques that enhance its adoption in related methods and architect disciplines. A patent application has been filed for the system and process, designated Method for Architecting Secure Solutions, or MASS.
In combination with our sample methodology, covered in the next section, several of the notations, models, and visualization techniques used in MAAS will be applied throughout this redbook.
2.5 The ISSL methodologyThe IBM Software Services for Lotus (ISSL) methodology, which is the methodology followed throughout the rest of this redbook, is based on a famous phrase from Bruce Schneier (Cryptographer, and creator of Blowfish and Twofish), namely: “Security is a process, not a product.”
This is where the ISSL methodology comes into play. Before embarking on the implementation and utilization of a comprehensive security infrastructure, it's important to fundamentally understand all aspects of its security. In order to do
86 Lotus Security Handbook
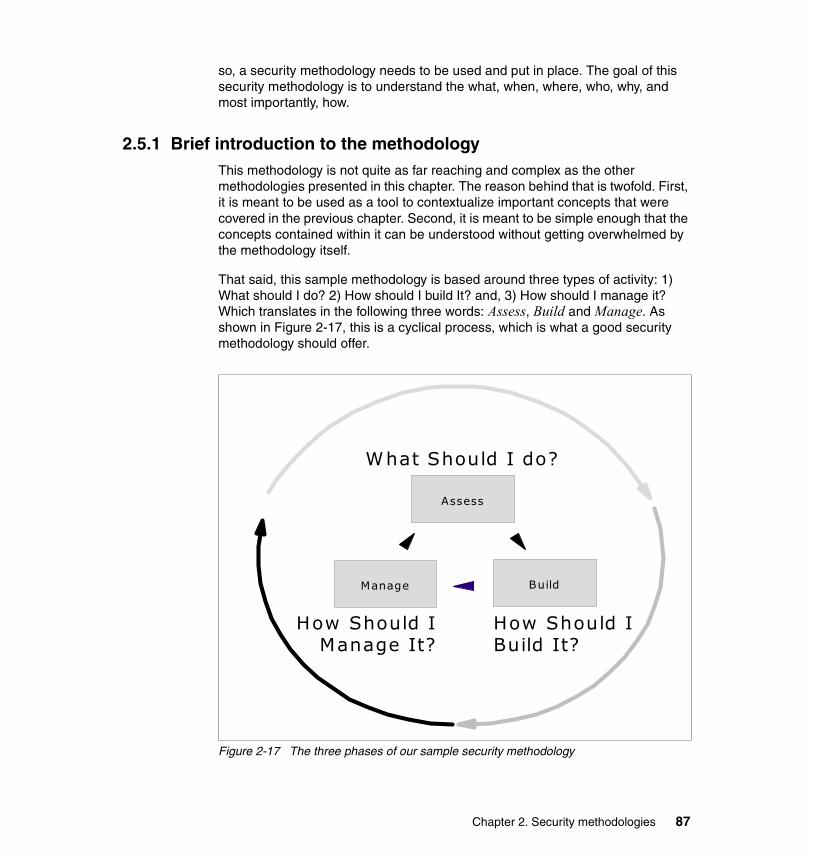
so, a security methodology needs to be used and put in place. The goal of this security methodology is to understand the what, when, where, who, why, and most importantly, how.
2.5.1 Brief introduction to the methodologyThis methodology is not quite as far reaching and complex as the other methodologies presented in this chapter. The reason behind that is twofold. First, it is meant to be used as a tool to contextualize important concepts that were covered in the previous chapter. Second, it is meant to be simple enough that the concepts contained within it can be understood without getting overwhelmed by the methodology itself.
That said, this sample methodology is based around three types of activity: 1) What should I do? 2) How should I build It? and, 3) How should I manage it? Which translates in the following three words: Assess, Build and Manage. As shown in Figure 2-17, this is a cyclical process, which is what a good security methodology should offer.
Figure 2-17 The three phases of our sample security methodology
How Should I Manage It?
What Should I do?
How Should I Build It?
Assess
Manage Build
Chapter 2. Security methodologies 87

The three phases can be broken down further into ten steps, as illustrated in Figure 2-18. The details about each step are explained in the remainder of this chapter.
Figure 2-18 The ten steps of the ISSL methodology
2.5.2 Phase 1: AssessThe first phase is where all the planning takes place. The activities in this phase involve both the evaluation of the current state of affairs and the planning of the security infrastructure to be put in place. Following is a detailed breakdown of the security-related activities that need to be performed during the assessment phase.
1. Understand the business of the clientIn this activity, we ensure that a solid understanding of the business of the client organization is developed. To determine the proper security mechanisms to put in place, you first must understand some basic things about the organization, such as the core business, the stakeholders, the demographics of the business, the vendors, the business partners (if any), the competition and the industry
What is the Customer's Business?
Who Would Attack, What are the Impacts?
What Exactly Needs to be Secured?
How Sensitive is the Information?
What are the Policies and Procedures?
How can Risks be Controlled or Prevented?
How can this be Implemented and Documented?
Do Users Know How to be Secure?
Is Everything in Place Compliant?
How are Things? Can They Be Improved?
1. Know the Business
2. Threat Analysis
3. Risk Analysis
4. Categorize the Data
5. Policies and Procedures
6. Counter-measures
7. Implement & Create Docs
8. User Training
9. Compliance Testing
10. Results Feedback
Assess
Manage
Build
88 Lotus Security Handbook
trends and standards in which the organization operates. This will establish a solid foundation upon which to do the rest of the security work.
The overall security review process can be divided into the following distinct steps:
1. Review the current state of the business
a. Identify the core business
b. Identify the stakeholders
c. Compile the demographics of the business
d. Identify the vendors
e. Identify any business partners
f. Identify the competition
g. Identify the industry trends and standards
2. Perform an initial infrastructure review
a. Review the infrastructure from a hardware point of view
b. Review the infrastructure from a software point of view
3. Perform an initial risk analysis (a more detailed one follows in a later step)
4. Review the security policy if there is one
a. Policy goals and objectives
b. Scope
c. Responsibilities
d. Physical security
e. Network security
f. Data classification
g. Access control
h. Password policies and procedures
i. Incident handling procedures
j. Acceptable use policies
k. Change control
l. Training
m. Compliance
Once this is done and reviewed, you can move on to the next steps outlined by this sample methodology. The IT people working for the organization whose
Chapter 2. Security methodologies 89
security is being reviewed may not be able to provide all the information listed, particularly about the security policy. (Indeed, there might not be a security policy in place.) This is not a big problem at this stage since the rest of the methodology calls for the creation of all these items.
2. Perform a risk analysisThe formula used in risk analysis is as follows:
Risk = Impact + Threats + Likelihood
Impact is what will happen to the business if an attack is successful, partially or completely. Threats are the people and things that can cause harm to the business. Likelihood is the degree of probability with which this can occur. The combination of the three determines how much risk the business faces on a day-to-day basis.
There are five steps in the process of doing a risk analysis:
1. Identify the assets of the business
2. Identify the threats to the business
3. Estimate the probability of occurrence
4. Analyze the applicable controls and determine their associated costs
5. Implement the appropriate countermeasures
Some security reviews include the threat analysis as an integral part of the risk analysis. In the present methodology, threat analysis is a separate activity, because threats are usually under-evaluated and not entirely and fully understood.
3. Perform a threat analysisThere are two distinct steps in the process of doing a threat analysis:
1. Identify the exposures (or vulnerabilities)
2. Identify the controls (or countermeasures)
The first step involves asking a few simple, but effective, questions: What are the vulnerabilities? Where are these vulnerabilities located? What is the likelihood of these being exploited? And, what are the impacts to the IT infrastructure and to the business?
The second step involves asking these questions: What are appropriate controls for the exposures identified? How much do these controls cost? And are these controls appropriate (in terms of effort and cost)?
90 Lotus Security Handbook

4. Categorize the informationNot all information needs to be secured in the same manner. Public information doesn't need to be secured, while “top secret” information (whose disclosure to unauthorized parties could result in the death of the business, or worse, the death of people) needs the utmost security and attention. Most information falls somewhere between these two extremes. Determining where each piece of information should be classified within these extremes, and what security to apply to each category of information, is done in this phase.
5. Define policies and proceduresThis is where the security policy is crafted for the business. The security policy contains all the organization policies and procedures in matters of security.
In most organizations, if there is a security policy, it is generally crafted from existing, non-IT policies and procedures that were defined for the business, then overlaid with information about the IT infrastructure and its security tools and work. This piecemeal approach explains why the security at these organizations is lacking.
In the ISSL methodology, security policy is based on the work that was conducted in the previous steps. If the previous steps were not done properly, the security policy will definitively be lacking. Even if the previous steps were done properly and attention was paid to details, additional questions need to be asked at this step, namely: What systems are covered and who will be affected? How will security be implemented and maintained? What will be secured, how, and with what tools? Who will be trained to ensure secure behaviors?
As well, the security policy should have the full support and full endorsement of the highest executive in the organization. The security policy should detail who is responsible for security within the organization, with roles and responsibilities being defined from the top down, starting with the organization's executives, then to the security manager, then to the owners of the different processes in the organization, then to the developers, engineers, and administrators of the IT infrastructure, all the way down to the individual users, who generally, in matters of security, are the chief troublemakers.
2.5.3 Phase 2: BuildThe activities in this phase involve the actual implementation of the security infrastructure. All of the studying, evaluation, and classifying has been done. The security policy has been built and ratified by management. It's now time for action. The following steps make up the build phase.
Chapter 2. Security methodologies 91

6. Define the countermeasuresSimply put, countermeasures are security tools and products, and services. In the category of tools and products, one can find Public Key Infrastructure (PKI) tools, directory management tools, virus scanners and removers, secure messaging and secure messaging gateway tools. In the area of services, one can find the services of security auditors, ethical hackers, security systems and tools implementors, as well as a whole range of security management services companies that help you manage the infrastructure, once implemented, and handle any incidents that do occur.
In this phase, the engineering and architecting into the infrastructure of the tools and products that are planned for use is done. This is an area where the services of specialists are often employed; if the skills are available within the organization, it is done by the local IT staff. How the system will be managed and monitored when in place is an important consideration that is also looked at during this phase.
7. Implement the security policy and document itThis is when the actual implementation of the security tools is performed, as well as when all related documentation is created.
This step can be broken in 4 key phases:
a. The definition of the goals and objectives of the project itself, which includes the final security design, its implementation and its configuration
b. The security scope of the environment, which includes the performance benchmarking and the monitoring of the secure environment
c. The plans for roll-out of the new infrastructure, which includes at least one pilot run (if not more, depending on the complexity and the breadth of the security infrastructure) which will help test all assumptions made in previous phases
d. The infrastructure roll-out, which includes defining training requirements and end-user support
2.5.4 Phase 3: ManageThe activities in this phase involve the post-implementation aspects of the security infrastructure, namely its management, the monitoring of possible security breaches, and the handling of security incidents.
8. User trainingA trained user is generally a secure user. A trained user will simply not fall so easily for social engineering attacks. A trained user will use properly formed
92 Lotus Security Handbook

passwords and will comply with the security policy since its contents will be understood and the reason for complying will make sense. The trained user will understand that the policy in place doesn't seek to reduce the user's ability to work and perform his or her duties, but that it reduces the risk of security incidents which could definitively prevent the user from perform his or her duties and could quite likely prevent the company from working properly, if at all.
The training phase is divided into two distinct steps: training the trainer and training the users. Training the trainer is the first step, of course, because you have to ensure that someone can explain things to the users. Since the security infrastructure will be unique for each organization, a custom training curriculum needs to be designed for the trainer, which explains to that person: the security infrastructure, the tools used to secure the infrastructure, the scope and limitations of the tools and of the overall security infrastructure and, perhaps more importantly, how the trainer should explain everything to the users.
Training the users should then be straightforward, although the trainer will have to ensure that some of the basics are explained, such as what are threats, what are attacks (such as social engineering), what the policies and procedures are, and why it's important to comply with them. If done properly, the training will ensure that the users are happy with the new security infrastructure and will know enough to help keep the environment secure – as opposed to being at the top of the security risk list.
9. Compliance testingCompliance can be defined as a willingness to abide by rules or regulations. In order to ensure compliance, the security policy should be enforced, very much like business rules are enforced. The security policy should also outline, insofar as compliance testing is concerned, how the rules will be applied, and finally, it should also outline the measures to be applied to ensure compliance.
Compliance testing will certainly reveal some situations where there is a failure to comply. In such an event, the security policy should detail the measures that will be taken to deal with compliance failure, such as the severity of the sanctions, steps that need to be followed in order to re-establish compliance. Finally, the policy should provide a feedback mechanism to prevent reoccurrence.
10. Results feedbackSince security is a process and just not a product, it must be understood that it is based on technology, processes and people; that it evolves over time with the business; that it also evolves over time with the technology and that, finally, it evolves over time with changing risks and threats. Thus, as mentioned at the beginning, it has to be cyclical in nature.
Chapter 2. Security methodologies 93
To ensure that this cycle can repeat itself and can offer a better instance of the security infrastructure at each new cycle, a feedback mechanism is required. This feedback mechanism is important since it ensures that security is properly implemented throughout the organization, that it works as designed, that it works for the users and not the other way around, and finally and most importantly, it ensures that the security in the organization evolves as needed.
2.6 SummaryIn this chapter, we have looked at various methodologies for designing, deploying, and managing security in any organization.
We covered are the following topics:
� The notions of threats, risks, and risk mitigation
� The human element and how it factors heavily in security
� A number of methodologies: ISO 17799, the Common Criteria, and IBM’s Method for Architecting Secure Solutions (MASS)
� The methodology used by IBM’s Software Services for Lotus.
The rest of the contents of this redbook are built upon these methodologies.
94 Lotus Security Handbook

Part 2 Building a secure infrastructure
This part delves into the specific concepts and components involved in building a secure infrastructure. Topics include security zoning, single sign-on (SSO), public key infrastructure (PKI), and directory strategies.
This part is most appropriate for those looking to expand their knowledge of the actual components involved in building a secure infrastructure, and how Lotus technologies react and interface with such key security components.
Part 2
© Copyright IBM Corp. 2004. All rights reserved. 95

96 Lotus Security Handbook

Chapter 3. Secure infrastructure requirements
Doing business on the Internet exposes an organization the possibility of attack, misuse, and errors that are well beyond those that exist in a non-Internet computing environment. Even if an organization does not do business on the Internet, there are ever increasing requirements for organizations to permit access to their internal IT systems from external networks. Even most small organizations today have a connection to the Internet to send and receive e-mail. As organizations move to provide external access to Web-based services, the security issues increase substantially as the nature of the services expand.
In this chapter we introduce principles of secure infrastructure design. By “infrastructure,” we mean:
� Network topologies, network components, and server placement
� Data flows (inter-server connections and workstation-server connections)
In the context of the security methodology described in the previous chapter, the infrastructure design affects all five security functional categories (Identity/Credential management, Access control, Flow control, Audit, and Solution Integrity). However, the primary focus of this chapter will be guidelines for implementing adequate and appropriate flow control and solution integrity between external networks (the Internet) and internal networks.
3
© Copyright IBM Corp. 2004. All rights reserved. 97

3.1 The need for secure infrastructuresJust like we might provide different barriers for protecting our personal property, we need to ensure that we have “adequate and appropriate” security barriers for our organization’s information systems. By this we mean that, in the simplest sense, there are multiple protection methods employed at various points in the infrastructure design to thwart potential attacks. These methods involve a design that provides several layers of defense. For the purpose of this discussion, the term “layer” is generic and could represent something physical or something logical.
For example, a layered-defense approach to protecting your car from theft could include keeping it in a locked garage, keeping the doors locked, and using a steering wheel immobilizing lock. But whether or not this is “adequate and appropriate” is relative. For a person who owns an older model car and lives in an isolated location, we hope you’d agree that the protection is perhaps above and beyond what is deemed adequate, so in that sense it may not be appropriate. On the other hand, the owner of a museum-worthy collectible car, living in a high-crime area, might agree our example’s layers of protection are appropriate but less than adequate.
The analogy of protecting a car is a very simplistic illustration of layers of defense. We can extend the layered-defense analogy by adding or modifying layers, such as adding alarm systems, perimeter fences, magnetic card building access, video surveillance, and so forth. However, the analogy of protecting a physical object such as a car is still overly simplistic since it is concerned with outright theft only. In the context of IT, “theft” of data is just one of many concerns, and it has a whole different meaning since data can be copied while leaving the original in place. Several additional aspects of security apply to information technology systems and the data residing and flowing within and outside the organization. These information security issues include broad concepts, such as confidentiality and integrity. For example, unauthorized access to data falls under confidentiality, while malicious alteration or deletion of data falls under integrity.
This chapter presents an overview of security requirements that an infrastructure must be capable of supporting. It also provides some common-sense guidelines for infrastructure defense measures, and a “top-down” model of layers of defense.
98 Lotus Security Handbook

3.2 Infrastructure security requirementsThe security needs of any business are traditionally based on risk assessment and management. How risks are managed is a business decision based on the business’s assessment of the risks involved in not providing various security measures as compared to the benefit achieved by those measures. The key point being made is that you must use multiple measures, or what we also refer to as “layers of defense.”
The factors that influence the choice of a particular security architecture depend mainly on the type of application the business is building and the business value of the transactions and data that the application will support, weighed against the cost of the security measures.
The security requirements for a business generally include:
� Access control
� Flow control
� Audit control
� Credential management
� Integrity
In the overall scheme of things, access control must be provided end-to-end in order to support required confidentiality. The general security requirements of an infrastructure, as well as a “best practices” infrastructure, are expected to provide both data confidentiality and data integrity.
3.2.1 Data confidentiality assuranceIn this section, we describe the following methods for providing data confidentiality:
� Encrypt confidential and sensitive information where required.
� Facilitate both physical and logical server and network separation wherever possible.
� Reduce exposure to network sniffing.
� Identify appropriate parties authorized to access and update content.
� Provide protection to back-end application and Web servers using network proxy layers.
� Protect organizational resources with monitoring utilizing intrusion detection systems (IDS).
Chapter 3. Secure infrastructure requirements 99
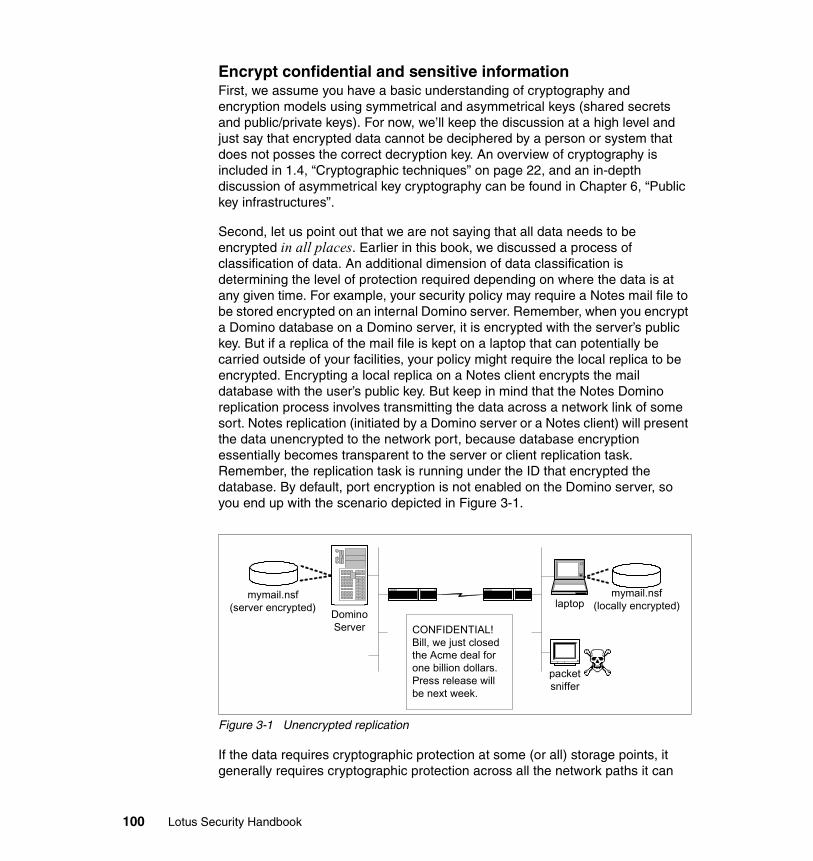
Encrypt confidential and sensitive informationFirst, we assume you have a basic understanding of cryptography and encryption models using symmetrical and asymmetrical keys (shared secrets and public/private keys). For now, we’ll keep the discussion at a high level and just say that encrypted data cannot be deciphered by a person or system that does not posses the correct decryption key. An overview of cryptography is included in 1.4, “Cryptographic techniques” on page 22, and an in-depth discussion of asymmetrical key cryptography can be found in Chapter 6, “Public key infrastructures”.
Second, let us point out that we are not saying that all data needs to be encrypted in all places. Earlier in this book, we discussed a process of classification of data. An additional dimension of data classification is determining the level of protection required depending on where the data is at any given time. For example, your security policy may require a Notes mail file to be stored encrypted on an internal Domino server. Remember, when you encrypt a Domino database on a Domino server, it is encrypted with the server’s public key. But if a replica of the mail file is kept on a laptop that can potentially be carried outside of your facilities, your policy might require the local replica to be encrypted. Encrypting a local replica on a Notes client encrypts the mail database with the user’s public key. But keep in mind that the Notes Domino replication process involves transmitting the data across a network link of some sort. Notes replication (initiated by a Domino server or a Notes client) will present the data unencrypted to the network port, because database encryption essentially becomes transparent to the server or client replication task. Remember, the replication task is running under the ID that encrypted the database. By default, port encryption is not enabled on the Domino server, so you end up with the scenario depicted in Figure 3-1.
Figure 3-1 Unencrypted replication
If the data requires cryptographic protection at some (or all) storage points, it generally requires cryptographic protection across all the network paths it can
DominoServer
laptop
packetsniffer
mymail.nsf(server encrypted)
mymail.nsf(locally encrypted)
CONFIDENTIAL!Bill, we just closedthe Acme deal forone billion dollars.Press release willbe next week.
100 Lotus Security Handbook

traverse. So in this specific, simple example, we would recommend enabling port encryption on the Domino server as one means of protecting the data while in transit. Otherwise, the data is vulnerable to packet capture (“sniffing”) while being replicated. Alternatively, you might utilize a VPN architecture that encrypts all client traffic between the workstation and the external network side of the VPN service. VPN architecture is discussed in more detail later in this redbook.
The infrastructure should be capable of enforcing encryption requirements across the various network paths (data flows). Generally speaking, data encryption at storage points (files) is handled by applications on the servers and workstations. Note that file encryption (such as Domino database encryption) does provide data confidentiality in the event the file is accessed or copied through the server or client OS. But as you have just seen, file encryption alone does not necessarily protect the confidentiality of data.
Separate physical and logical servers and networksSeparation of servers and networks can significantly reduce the breadth of potential vulnerability. To borrow from modern warfare, a single, large target is much easier to attack than several isolated smaller targets. Should a small individual target come under attack, the damage can be limited to that target alone. To clarify the analogy, the physical and logical design should strive to eliminate single points of failure, and isolate potential damage by using multiple defense mechanisms and isolation.
Physical separation requires that multiple network segments or subnets be implemented. The different networks are connected using some type of filtering devices or “firewalls.” Logical separation involves access controls and various application gateways or “proxies.” Firewalls and proxies are discussed in detail in the next several chapters.
One of the most important separations of servers, or to be more precise, services, relates to Domain Name Services (DNS). DNS is used to map IP addresses to host names and reverse lookups of IP addresses to hostnames. Most organizations have both external IP addresses and internally used, private IP addresses. Consider that there are servers you need to make available and
Tip: The protection afforded by encryption of databases on a Domino server is dependent on how secure the access is to both the encrypted database file and the server ID file at the server OS level. Since passwords are rarely used on Domino server IDs (to enable automated restarts), a compromised server ID file can be used to open a copy of an encrypted database copied from the server. So ensure the server ID file permissions are restricted to only the administrator account on Windows servers, or the Notes and root accounts on UNIX®.
Chapter 3. Secure infrastructure requirements 101

“visible” to external users. These external users need to be able to resolve your public hosts’ names and mail exchange (MX) records to your publicly available servers. Also consider that you have an internal user population that has two requirements: the ability to resolve external servers to IP addresses, and the ability to resolve all internal servers to their addresses. We describe the concept of “split DNS” in Chapter 4, “Security components and layers”.
Separation of systems lends itself to limiting the access only to the areas the user requires for their business functions or transactions. This is with regard to both end-users and administrators. As was mentioned early in this book, one of the largest threats is from your internal people, whether from malicious, intentional acts, or accidental acts. A primary goal is not to allow the actions of a single individual to introduce a single point of failure. Many IT professionals have horror stories of mishaps caused by a well-intentioned administrator who perhaps had too much authority available from a single entry point. So in some cases, we need to architect the environment to protect us from ourselves! Another way to look at this is that the burden to reduce the impact of administrative errors is your own.
Reduce exposure to network sniffingData packets on a network are susceptible to being captured and read, commonly known as “sniffing.” Normally, a host’s network interface card (NIC) ignores all packets except those with the host’s address in the destination address portion of the packet. It is possible for any machine on a given Ethernet network to capture the traffic for every machine on that network because the nature of the Ethernet is a shared bus architecture. A packet sniffer takes advantage of this characteristic to monitor all of the Ethernet frame traffic on its segment of the network, not just the frames it is supposed to receive. Numerous frame capture and analysis software packages and hardware devices are commonly available (some at little or zero cost, especially for TCPIP packet capture). So basically, if someone has physical access to a point on your network, they can potentially see data moving on the network intended for other machines.
Exposure can be significantly reduced through two principles:
1. Reduce packet visibility by limiting the physical paths the TCPIP traffic crosses. For example, an Ethernet switch does not broadcast all packets to all ports like a simple hub does. Setting host addresses and port filters on routers can limit the ability to sniff beyond the local LAN segment. TCPIP packets should be limited to the minimum number of network segments required to get from point A to point B. Virtual LAN (VLAN) capability is yet another technology becoming widely available in network switches to provide granular network segmentation with less hardware.
102 Lotus Security Handbook

2. Encrypt packets across networks that may be susceptible to unauthorized devices or sniffing activity. Application-level or session-level encryption can be used alone or in combination. Generally, session-level encryption, such as SSL, must be used to protect sensitive data where the application does not guarantee the data is encrypted once it leaves the application server (that is, it renders the data unencrypted even though it physically stores the data encrypted). Session-level encryption is also appropriate to protect user IDs and passwords being passed in an authentication dialog.
With the proliferation of 802.11 wireless Ethernet networks, network sniffing no longer requires a physical network port. Devices you can clip to a key chain are now available to detect “hot spots,” and a variety of software tools and sensitive antenna products are available. A quick visit to the netstumbler.com website provides links describing “drive-by Wi-Fi surfing” challenges, new scanning tools, and lots of other information to make a security person think twice about implementing a wireless LAN. While the highly anticipated IEEE 802.11i wireless security standard is due to be published in 2004, present security for wireless LANs is generally lacking. Wired Equivalent Privacy (WEP) encryption has been shown to be fairly easily cracked, and its successor, Wi-Fi Protected Access (WPA) encryption has been shown to be inadequate in some implementations (usually due to poorly configured systems). What is even more surprising is that even wireless products that use WEP, with its weak and outdated encryption, are sometimes disabled (or never enabled) by administrators who get tired of their users complaining about wireless card compatibility issues. As with many networking issues, implementing security is sometimes viewed as a trade-off for ease-of-use.
Identify parties and authorize accessBeing able to identify your own organization’s people is usually a straightforward task. Identification of parties (people) requires storage of data attributes that can uniquely identify and differentiate each party. Having multiple internal directories can complicate the task of implementing a single, universal internal credential system. We discuss issues with multiple directories and user credentials in-depth in Chapter 8, “Directory strategies”. But regardless of how your employee data is stored or in how many different places it is stored, you undoubtedly have procedures in your hiring process to verify the identity of each person, and to uniquely identify each person. For example, if you have two different employees named John A. Smith, you have other attributes to differentiate them, such as employee ID number, e-mail address, phone number, and so forth. Otherwise, one John A. Smith can get two paychecks and the other gets none – an intolerable (and hopefully unrealistic) situation. We are assuming that your organization has a reliable method of uniquely identifying your users, even if there are disparate systems with their own dedicated directories and distinguishing attributes.
Chapter 3. Secure infrastructure requirements 103
Once your IT infrastructure serves users outside your organization, the situation changes. The internet allows your organization to do business with people that you do not know. Your organization has to answer difficult questions:
� How can people's identities be confirmed?
� When you collect and store information about people, how is the information kept private?
� When you collect information about people, how is the information used?
Data confidentiality or data integrity mechanisms, or both, must be used to protect important data that flows through the Internet, including information that identifies people, their credit card information, order or contractual information, and so forth. Therefore, our recommendation is to treat all user identities and credentials (such as passwords, challenge question responses, certificates) as confidential information. This includes both your internal users as well as your external users. Privacy laws vary in different countries, and often dictate specific requirements for storage and safeguarding of employee, contractor, business partner, customer, and supplier information. It is your responsibility to ensure compliance with all applicable privacy laws; legal advice is well outside the scope of this book.
Once a party is identified, the second half of the equation is to determine what systems and data that user is permitted to access and what functions may be performed. Access controls are governed by three major security principles:
1. Accountability: The ability to trace all system activities to the person who initiated the action. This has the proactive result of ensuring that users know anonymous activity is not possible (greatly reducing the temptation to browse or misuse the system), and enables the reconstruction of the activities leading to a security incident.
2. Least privilege: The goal of providing users with only that set of privileges necessary to the performance of each user's authorized duties. This helps reduce the not uncommon chain of: curiosity, browsing, discovery, fascination, temptation, and ultimately improper action. “Need to know” is an aspect of least privilege.
3. Separation of duties: The goal of ensuring that no single person is in a position to perform, approve, and account for any security-critical action. The primary goal is not to allow the actions of a single individual to introduce a single point of failure.
Utilize proxy systemsUtilizing “proxy systems” can provide protection to back-end applications and Web servers. Think of a proxy as a type of firewall that goes beyond the TCPIP level. They are sometimes referred to as “application gateways,” although this
104 Lotus Security Handbook

term has been used less frequently of late. The application protocols typically supported are HTTP, FTP, and telnet, but can include virtually any TCP/IP protocol. Proxy systems are usually transparent to the end-user. We delve into the characteristics of firewalls and proxies and the specific functions performed by proxies in later chapters. The key point you should understand at this stage is that proxies are an essential component of security best practices.
Not too long ago, security experts regularly used the term “bastion host.” This term has fallen out of common use in security jargon, probably due to the original concept of a bastion host serving the role of a “sacrificial host” between the Internet and the internal network. In the past few years, the functions performed by the defense layers between the Internet and the internal network have become more sophisticated. Rather than put a host in an area vulnerable to attack (and in the worst case, “sacrificed”), the mind set today is to minimize vulnerability of all infrastructure components as well as avoid storing any data directly in externally accessible networks. So rather than be willing to sacrifice a server and potentially the data on it, we employ an architecture that uses technology and separation methods to remove data from the networks adjacent to the Internet.
Proxy systems are a valuable tool to provide a high degree of separation of resources, and provide a bridge to get selected packets from one network to another. Proxy systems disguise or hide what is on the side opposite from the end-user’s point of view, which makes reconnaissance by would-be attackers difficult if not impossible. Unlike a TCP/IP router performing simple network address translation (NATS), a proxy usually re-writes portions of the application data headers in addition to network packet header information. If proxy systems have one general weakness, it is related to performance limitations caused by the amount of overhead incurred filtering, inspecting, and rewriting data packets from one network port to another.
Utilize intrusion detectionAn intrusion is when a party (or parties) accesses, attempts to access, or attempts to disrupt a computer resource that they are not authorized to use. The party involved may be a person or a program, or a combination. The target computer resource could be a server, an application, database, network link, and so forth. Intrusion detection systems (IDS) are important security measures because they can alert you when an attack is in progress (successful or not). Early detection is an important security consideration because attempted breaches or attacks commonly begin with a “probing” of the target to look for possible weaknesses or access opportunities. This probing is usually done by scanning TCP/IP ports for responsive services in order to identify opportunities for attacks. Ideally, our intrusion detection methods will detect suspicious activity during the earliest phases of an attacker’s efforts.
Chapter 3. Secure infrastructure requirements 105

Utilizing intrusion detection can not only detect an attempted attack in progress, but it can also alert you to the fact there was a successful attack that breached some area. While some breaches are obvious, like vandalizing your corporate Web page, some attacks would easily go unnoticed.
A question we hear some clients ask, “Is [network] intrusion detection considered wiretapping?” This brings up interesting ethical questions; however, the legal concerns regarding the definition of wiretapping vary widely in different countries. In most countries, it is permissible to monitor activity on your own equipment, although there may be limitations on what content can and cannot be monitored. It may also vary depending on whether the monitoring is for internal users (employees) as opposed to external customers. In the U.S., there is legal precedence that allows an employer to monitor the usage of company-owned equipment by employees. However, we recommend that all internal monitoring of employee activity be clearly spelled out in either an employment policy or a security policy (or both).
There are four basic categories of IDS: network (NIDS), host integrity, activity monitors, and content scanners. The latter is not always viewed as an “IDS,” but since most people would agree that an e-mail virus is a type of attack, then a virus scanner can be considered a specialized type of IDS. We discuss these different types of IDS in 4.1.5, “Intrusion detection systems” on page 128.
A critical factor in the effectiveness of most intrusion detection is using current signature files. New vulnerabilities are discovered constantly, and new methods for attacking systems are also discovered all the time. Signature files provide the IDS with the latest patterns that indicate a type of attack, such as a denial of service attempt or a new virus, worm, and so forth. Note that the signature file updates are not the same as updates to the IDS code itself. We discuss application and OS code updates in “Apply security vulnerability updates” on page 110.
3.2.2 Data integrity assuranceIn this section, we describe the following methods for ensuring data integrity:
1. Ensure data remains unaltered in transit.
2. Provide integrity access controls for filtering updates and administration.
3. Support business continuity through redundancy and fail-over.
4. Utilize secure tools for maintenance activity to required subsystems.
5. Require infrastructure components to have all security vulnerability updates applied in a timely manner.
6. Utilize operational procedures that include auditing and reporting.
106 Lotus Security Handbook
7. Assess system implementation to ensure it fulfills the security requirements.
Ensure data remains unaltered in transit“Data integrity” in the simplest sense means the data is not altered. In a network context, there are two parts of concern in a packet: the header and the data payload. Preventing or detecting changes to the header information facilitates authentication and access controls from a network (IP) address standpoint. Authentication (in this context) means we can identify the source and destination address. From a network standpoint, we can apply network access controls based on IP addresses and transport protocols. But source and destination network addresses are typically unencrypted in the packet, so we need a means to prevent or detect unauthorized data alteration or forgery.
One means of providing proof that data was not altered is through the use of digital signatures, or more specifically, by including a hash of the data along with the data itself, where the hash integrity is protected by cryptography. Digital signature or other encrypted hashes are used to ensure that transmitted data has not been tampered with or otherwise altered. The sender generates a hash of the data, encrypts it, and sends it with the data itself. The recipient then decrypts both the data and the hash, produces their own hash from the received data (using the same hashing algorithm), and compares the two hashes. If the two hash values match, there is a very high degree of confidence that the data was transmitted intact and unaltered.
Non-repudiation means ensuring that data transferred has been sent and received by the parties claiming to have sent and received the data. A digital signature provides a means to confirm the identity of the originator. Since no one else (theoretically) could have created the signature, it provides proof that the data was originated by the signer. Another aspect of non-repudiation is a means to obtain proof that data (or a message) was received by the recipient. This “proof of delivery” mechanism is typically performed at the application level, not the network level. In this chapter our focus is mainly on network-level issues.
Control access to security administrationWe already mentioned a basic concern regarding administrator access in “Identify parties and authorize access” on page 103. In this section we begin by defining two categories of “authority” to distinguish what we mean by “security administration”:
� System authority: The authority given to an individual by the assignment of attributes, privileges, or access rights that are associated with operating systems, and that are required for performing system support and maintenance activities.
Chapter 3. Secure infrastructure requirements 107

� Security administrative authority: The authority given to an individual by the assignment of attributes or privileges that are associated with access control systems and that are required for setting and administering system-wide security controls.
Users with security administrative authority can improperly use their authority in a way that allows them to alter system components. Users with system authority can improperly use their authority in a way that allows them to circumvent the access control system. Either situation should be considered a misuse of authority.
Each major system platform and subsystem in the infrastructure must include an access control system. In order to ensure a reasonable level of system security, the organization’s security policy should contain:
� Identification of the standard access control systems
� Identification of the security administrative authorities associated with these access control systems
� Mandatory default control and implementation standards for these access control systems
Provide availabilityEnsure system availability meets your organization’s business requirements with redundancy and fail-over. Although system availability is not always associated with security, denial of service (DOS) attacks are very real and systems with single points of failure become extremely vulnerable. And as the redbook team experienced first-hand, a DOS attack can originate anywhere in the network through the unwitting release of a worm virus. So do not assume the redundancy should focus only on external access coming into your network.
Redundancy for the most part should be architected in a manner that hides the physical redundancy from a user’s point of view. Not only does this provide a system that is easier for the end users, it also creates an environment that makes it more difficult for an intruder to directly attack a specific component.
An additional key component of availability is system monitoring. System and network failures must be detected and responsible parties notified as rapidly as possible.
Control administrative maintenance activityAdministrative maintenance activity refers to actions performed by staff who have either system administrative or security administrative levels of access that relate to system configuration and operation. In other words, the staff has
108 Lotus Security Handbook

authority beyond that available to a general user based on a valid business need. Some questions to consider when assigning this authority are:
� Is the scope and acceptable use for such authority clearly defined?
� Are there demonstrable processes for managing authority assignments and for timely removal of authority when an individual's business need ends?
� Do staff whose job responsibilities include operating system maintenance and support have system authority assigned to their individual user IDs? If not, can all activity be traced to a specific individual with absolute certainty?
� Do staff whose job responsibility is security administration have security administrative authority assigned to their individual user IDs?
� Are service machines and agents (services, daemons, scheduled jobs) that are part of the operating system assigned to a system maintenance and support department rather than to an individual?
� Does each person who is able to log on to, or modify, the service machines and agents have a valid business need?
� Can members of administrative authority groups be individually identified and managed?
� How often will annual group membership be reviewed to ensure that access authority is removed on a timely basis when an individual's business need ends?
Activity performed using system or security administrative authority must be specifically authorized by management, by a change control process, or must be consistent with the individual's job description. The organization’s management must ensure that individuals having authority are made aware of this requirement. One of the most important procedures you should have defined in your security policy is how to remove administrative access for an individual when they are terminated or change job responsibilities.
Processes or controls must be in place for detecting and handling systematic attacks (attempts to log on) to administrative access points, or use of administrative logon accounts. A manager or a person designated by management should be notified whenever the number of invalid logon attempts exceed an installation-defined limit. On systems where intrusion detection reporting tools are available, they must be executed at least once a day if they do not provide real-time alerts. Timely follow-up action must be taken on all alerts generated by such tools.
Technical factorsAnother equally important aspect of controlling administrative access is to lock down and enforce a minimum number of methods used for accessing system configuration. For example, telnet is probably the most popular interface to
Chapter 3. Secure infrastructure requirements 109

remotely access router configuration and administer UNIX hosts. Most network routers provide a built-in telnet server that uses simple name and password authentication. There are at least two primary concerns regarding the control of telnet access to any device on your network:
– Preventing the telnet server/device from external network access attempts
– Ensuring that the login dialog where the name and password are transmitted is not in clear text on any network link
Secure Shell (SSH) provides a more secure alternative to telnet. SSH uses encryption for the login names and passwords during authentication. Most Cisco router platforms support SSH version 1, and we strongly recommend using SSH instead of telnet for router administrative access.
Disable services that are not needed. A good rule of thumb is to disable any service on your hosts that is not absolutely required. Host hardening is discussed more in Chapter 9, “Server hardening”.
Block protocols that are not needed. In addition to disabling unneeded host services, you should only permit network protocols that are absolutely necessary. We provide some guidelines for what protocols should be enabled in different areas of a typical infrastructure in Chapter 4, “Security components and layers”.
Apply security vulnerability updatesWe all know that software updates (patches, PTFs, hotfixes, service packs, upgrades, and so forth) require time and staff resources to install, test, and implement. From a security perspective, there is one compelling reason to apply updates and patches in a timely manner that can be summed up in one word: “exploits.” We define an exploit as “a gap in system security.” What a security administrator considers to be a gap or hole is often consider by a potential intruder (or hacker) to be an exploitable opportunity, or exploit. The exploit typically has the potential to provide some high level of system access that is not permitted except to the administrators responsible for that system. Other exploits might provide the potential to inflict damage or other improper system operation that results in a loss of the service, commonly referred to as a Denial of Service (DoS) exploit.
A critical aspect of host server defense is to eliminate known vulnerabilities. Vulnerabilities that are discovered by the software vendor are often fixed or patched prior to announcing the discovery of the potential exploit. Unfortunately, the software vendors are not always the first ones to discover vulnerabilities. There are many people who actively search for vulnerabilities for a variety of reasons, such as an attempt to negatively affect the software vendor’s image or reputation, to gain personal notoriety, or to simply seek to improve products for
110 Lotus Security Handbook

the “greater good.” We feel it is pointless to be concerned about the reasons people are constantly looking for new vulnerabilities. Most vendors react swiftly to provide updates to fix security vulnerabilities once they become aware of them.
Software vulnerabilities generally fall into three categories:
1. Operating system defects
2. Application software defects
3. Improper configuration
Administrators can greatly mitigate security risks by applying software updates and recommended configuration changes in a timely manner. There have been many instances in the past few years of worm attacks or outbreaks that affect large number of systems. In many cases, the worms take advantage of known exploits that the vendor may have provided fixes for months before the worm was unleashed. It is your responsibility to make a review of vendor updates part of your security routine procedures. In some organizations, the system “owner” has the responsibility to monitor relevant vendor sites for updates at least monthly.
Perhaps the biggest mistake an organization can make is to not apply updates because there is uncertainty over whether or not the exploit represents a risk in their current environment, or because the exploited feature is not being used. Should some business reason in the future cause the affected service or component to become enabled, you cannot rely on someone’s memory of reading a software product advisory that was not applicable at the time. Another strong possibility is that the affected service is enabled by default, whether you are using it or not, and the exploit uses the vulnerability as a doorway to other parts of a system. So our advice is to apply software updates regardless of whether you have the affected features implemented or not. There is always the possibility the feature in question will be enabled down the road, or already is even though you don’t use it.
In some cases, when a vulnerability is reported or announced, it might become necessary to disable the component or service affected until a fix from the vendor becomes available. This type of temporary action must be considered by weighing the potential business impact against the potential risk. In cases where the vulnerability is due to default configuration settings, these are often the easiest exploits to eliminate by following the vendor’s recommendations.
Workstations must be considered with equal importance to your servers with regard to applying updates. Human behavior is rarely predictable, therefore it becomes difficult to foresee all problems that can arise when a user connects to systems that are outside of your organization’s control. When you consider that the users’ workstations can connect to your internal systems, they easily can
Chapter 3. Secure infrastructure requirements 111
become a carrier of worms, viruses, or possibly even a conduit or bridge into your internal network. If you permit workstations connected to your internal LAN to also use dial-up services outside your control, those workstations can potentially form a network-level bridge between your internal “protected” network and the outside unfiltered Internet. So remember to include acceptable use of modems in your security policy. This is in addition to standards for workstation virus scanning software updates and personal firewalls and the means to keep the workstation security measures up to date.
Information about sources of vulnerability and updates is usually available from operating system vendors and application software vendors, but you should not rely on vendor sources as your sole source of information. One of the best resources on security vulnerability issues is the CERT Coordination Center. Get the latest information from their Web site, which is updated frequently, at:
http://www.cert.org/
The resources required to perform patch management on servers will vary depending on the size of the organization, the number of different operating systems, and the number of applications. Patch management of workstations will vary widely in the resources needed, depending on whether or not a central software distribution mechanism is implemented, among other factors. Updates, patches and other “hotfixes” can be pushed to workstations using traditional software distribution tools, or specialized patch management products, such as Patchlink Update (www.patchlink.com), BigFix Patch Manager (www.bigfix.com), Security Update Manager (www.configuresoft.com), LANguard Network (www.gfi.com), and others.
Record activity for audit and reportingNo security architecture is immune from unauthorized access attempts. Every system should anticipate attempts to circumvent the controls designed to protect the enterprise, and every subsystem should have auditing as a component.
Following are the features that should be incorporated:
1. A log of system activity must be available in case an investigation is required to determine actual use (or misuse). Logs should be stored on a system that is separate from the system generating the log, and is physically located within a protected network zone. The log must be retained and available to security administrators for a number of days determined by the organization’s business security standards and procedures. We recommend keeping activity logs for at least 60 days, as often an incident investigation needs to cover a period of several weeks.
2. All access attempts to systems should be logged. Components must have the ability to create access, system, resource, and activity logs. Exceptions to compliance should be clearly described in the organization’s security policy.
112 Lotus Security Handbook
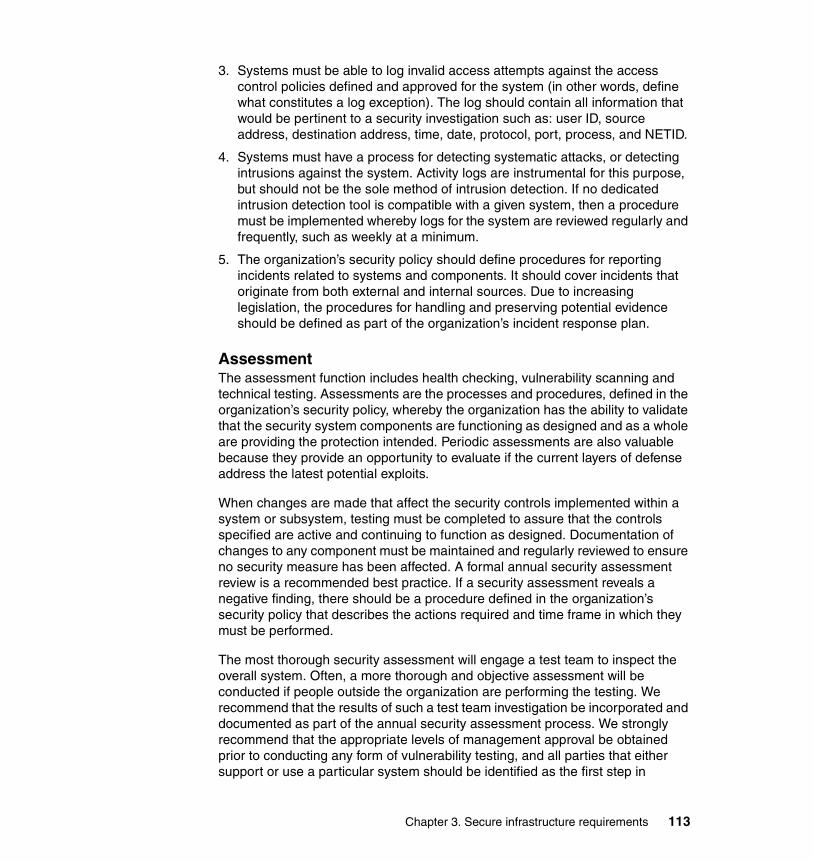
3. Systems must be able to log invalid access attempts against the access control policies defined and approved for the system (in other words, define what constitutes a log exception). The log should contain all information that would be pertinent to a security investigation such as: user ID, source address, destination address, time, date, protocol, port, process, and NETID.
4. Systems must have a process for detecting systematic attacks, or detecting intrusions against the system. Activity logs are instrumental for this purpose, but should not be the sole method of intrusion detection. If no dedicated intrusion detection tool is compatible with a given system, then a procedure must be implemented whereby logs for the system are reviewed regularly and frequently, such as weekly at a minimum.
5. The organization’s security policy should define procedures for reporting incidents related to systems and components. It should cover incidents that originate from both external and internal sources. Due to increasing legislation, the procedures for handling and preserving potential evidence should be defined as part of the organization’s incident response plan.
AssessmentThe assessment function includes health checking, vulnerability scanning and technical testing. Assessments are the processes and procedures, defined in the organization’s security policy, whereby the organization has the ability to validate that the security system components are functioning as designed and as a whole are providing the protection intended. Periodic assessments are also valuable because they provide an opportunity to evaluate if the current layers of defense address the latest potential exploits.
When changes are made that affect the security controls implemented within a system or subsystem, testing must be completed to assure that the controls specified are active and continuing to function as designed. Documentation of changes to any component must be maintained and regularly reviewed to ensure no security measure has been affected. A formal annual security assessment review is a recommended best practice. If a security assessment reveals a negative finding, there should be a procedure defined in the organization’s security policy that describes the actions required and time frame in which they must be performed.
The most thorough security assessment will engage a test team to inspect the overall system. Often, a more thorough and objective assessment will be conducted if people outside the organization are performing the testing. We recommend that the results of such a test team investigation be incorporated and documented as part of the annual security assessment process. We strongly recommend that the appropriate levels of management approval be obtained prior to conducting any form of vulnerability testing, and all parties that either support or use a particular system should be identified as the first step in
Chapter 3. Secure infrastructure requirements 113

assessment planning. Keep in mind that communication is perhaps the primary success factor when planning the assessment, conducting tests and log audits, and of course, sharing the findings.
3.3 SummaryIn this chapter, we discussed the areas of concern for implementing a secure infrastructure architecture that meets the requirements of an organization’s security policy. The two main infrastructure requirements that must be considered are:
To provide data confidentiality assurance– Encrypt confidential and sensitive information where required.
– Facilitate both physical and logical server and network separation wherever possible.
– Reduce exposure to network sniffing.
– Identify appropriate parties authorized to access and update content.
– Provide protection to back-end application and Web servers using network proxy layers.
– Protect organizational resources with monitoring utilizing intrusion detection systems (IDS)
To provide data integrity assurance– Ensure data remains unaltered in transit.
– Provide integrity access controls for filtering updates and administration.
– Support business continuity through redundancy and fail-over.
– Utilize secure tools for maintenance activity to required subsystems.
– Require infrastructure components to have all security vulnerability updates applied in a timely manner.
– Utilize operational procedures that include auditing and reporting.
– Assess system implementation to ensure it fulfills the security requirements.
In the next few chapters we describe the technologies, components, and methods utilized to meet these secure infrastructure requirements, and how they can be used to create multi-layered defenses.
114 Lotus Security Handbook
Chapter 4. Security components and layers
Metagroup defines a security architecture as “an orderly and comprehensive arrangement of security components.” So, what exactly constitutes an orderly arrangement? While there is no single answer to this question, we present some guidelines and recommendations in this chapter. Our sample policies and guidelines are based on best practices within IBM and on our experience working with customers.
This chapter focuses on the technical methods used to support the general infrastructure security requirements we described in the previous chapter. In the first part of this chapter, we describe the various types of infrastructure components and their security functions. (You may already be familiar with the security components, so for you this will be a high-level review.) Next we discuss infrastructure design from a component placement and data flow standpoint. We describe a secure architecture model for providing security by utilizing multiple network zones with data flow boundaries, policies, and controls. And last, we describe a comprehensive top-to-bottom sequence of technologies and methods to provide a high degree of security in a computing environment.
4
© Copyright IBM Corp. 2004. All rights reserved. 115
4.1 Infrastructure componentsBefore we can describe policies and models for designing a secure network infrastructure, we must define and describe the typical components available. The high-level components we describe can be categorized as:
� Firewalls
� Routers, switches, and hubs
� Proxies
� Intrusion detection systems
� Enterprise access management systems
� Application servers
Some components clearly perform network boundary functions, while others provide services within a network. Some components, such as application proxies, can perform both as boundary controls and network application servers.
4.1.1 Firewall overviewA definition from The American Heritage® Dictionary of the English Language, Fourth Edition:
Firewall 1. A fireproof wall used as a barrier to prevent the spread of fire. 2. Computer Science. Any of a number of security schemes that prevent
unauthorized users from gaining access to a computer network or that monitor transfers of information to and from the network.
The term firewall is often misused or misunderstood because, in practice, a firewall is not necessarily one device, nor does it necessarily perform one function. Perhaps the confusion stems from the early use of the term firewall to describe single hardware devices that were essentially screening routers between two different IP networks. The term firewall has evolved to describe a variety of network defenses.
For our purposes, a firewall is actually a system or a group of systems that provide some form of boundary, or more specifically, access control between two networks. A firewall provides two basic functions:
– Permit traffic flow
– Block traffic flow
116 Lotus Security Handbook
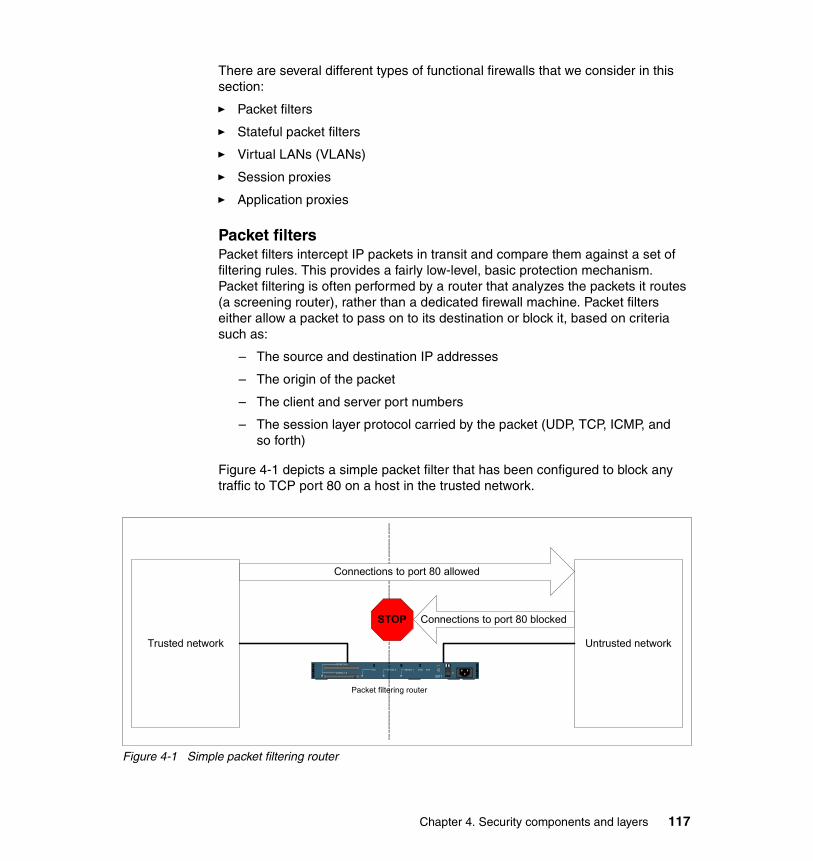
There are several different types of functional firewalls that we consider in this section:
� Packet filters
� Stateful packet filters
� Virtual LANs (VLANs)
� Session proxies
� Application proxies
Packet filtersPacket filters intercept IP packets in transit and compare them against a set of filtering rules. This provides a fairly low-level, basic protection mechanism. Packet filtering is often performed by a router that analyzes the packets it routes (a screening router), rather than a dedicated firewall machine. Packet filters either allow a packet to pass on to its destination or block it, based on criteria such as:
– The source and destination IP addresses
– The origin of the packet
– The client and server port numbers
– The session layer protocol carried by the packet (UDP, TCP, ICMP, and so forth)
Figure 4-1 depicts a simple packet filter that has been configured to block any traffic to TCP port 80 on a host in the trusted network.
Figure 4-1 Simple packet filtering router
Untrusted networkTrusted network
ASYNC 1-8
ASYNC 9-16
AUI SERIAL 0 SERIAL 1 CON AUX
2511
Packet filtering router
Connections to port 80 allowed
Connections to port 80 blockedSTOP
Chapter 4. Security components and layers 117
Note that routers capable of filtering based on the port and IP session layer protocol type can be effectively used to limit the types of traffic entering and exiting the network. The ICMP is a good example of a protocol that needs to be filtered by the request type rather than a port number because it does not use a specific IP port.
Packet filtering devices play a valuable role in network design despite the introduction of devices that are capable of much more sophisticated inspection and filtering of traffic. The main advantage of a packet filter as a form of firewall is raw performance. Because they do not do an in-depth analysis of the packet, they are in most cases simpler, cheaper, and faster than other types of firewalls. In some cases, the use of a packet filter firewall (typically a router device) in front of a higher layer firewall can improve the overall throughput by reducing the amount of packets requiring analysis by the more sophisticated firewall filter.
Stateful packet filtersSome firewall products can filter packets based on the activity or state of a connection; this capability is known as being stateful. So in addition to the basic packet filtering functions discussed previously, stateful filters apply access controls based on specific expected events occurring in a given protocol.
Each time a TCP connection is established for inbound or outbound connections through the firewall, the information about the connection is logged in a stateful session flow table. The table contains the source and destination addresses, port numbers, TCP sequencing information, and additional flags for each TCP connection associated with that particular connection. This information creates a connection object in the firewall series. Thereafter, inbound and outbound packets are compared against session flows in the connection table and are permitted through the firewall only if an appropriate connection exists to validate their passage. This connection object is temporarily set up until the connection is terminated.
Note that a stateful packet filter only inspects the packets predominantly at layer 4 (transport layer), and only inspects the packets at the start of a connection. If the router access control list (ACL) allows the connection, an entry is created in the router’s “state table,” so from that point forward the subsequent packets in the communication are passed through without inspection. By limiting the number of packets that are inspected in detail, the impact on router throughput performance can be kept relatively low.
The overhead to examine the data packets in addition to the IP packet header is significant, so the throughput is generally less than a simple packet filtering router. Because of this, stateful packet filters are usually used downstream of an initial packet filtering router. The initial router limits the amount of data packets that reach the stateful filtering router.
118 Lotus Security Handbook
Session-layer proxiesAlthough application-level proxies are considered highly secure, they require a high degree of technical configuration and support. To help solve this problem, session-layer proxies, also referred to as circuit-level proxies, were developed. Session-layer proxies are much like application-level proxies. A session-layer gateway establishes a proxy connection between an internal user and an external host. However, unlike application-level proxies, session-layer proxies control the flow of data at the session layer. Working at the session layer means that the proxy actually establishes a virtual circuit between the client and the host on a session-by-session basis. Discussions on the advantages and disadvantages of either type can be found in numerous places. For example, see the following URL:
http://www.aventail.com
It is important to note the difference between a session-layer proxy and a stateful packet filter. Unlike stateful packet filters, a session-layer proxy inspects all packets, so the throughput is generally lower.
SOCKSSOCKS is an IETF standard (RFC-1928) generic proxy protocol for TCP/IP-based applications. The SOCKS protocol provides a flexible framework for developing secure communications by supporting the integration of other security technologies.
SOCKSv5 is an IETF (Internet Engineering Task Force) approved standard (RFC 1928), generic proxy protocol for TCP/IP-based networking applications. The SOCKS protocol provides a flexible framework for developing secure communications by easily integrating other security technologies.
SOCKS consists of two components, a server and a client. The SOCKS proxy server is implemented at the application layer, while the SOCKS client is implemented between the OSI application and transport layers. It is a session-layer proxy. The basic function of SOCKS is to enable hosts on one side of a SOCKS proxy server to access hosts on the other side of a SOCKS server without requiring direct ITCP/IP connectivity. The relationship of the SOCKS proxy server to the OSI stack is shown Figure 4-2.
Chapter 4. Security components and layers 119
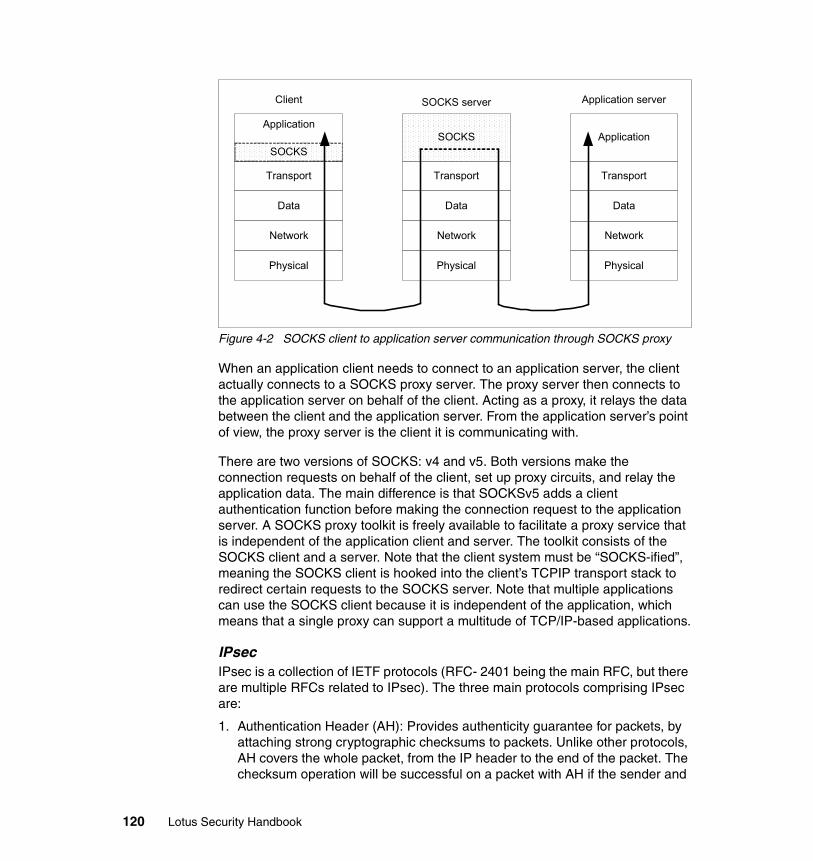
Figure 4-2 SOCKS client to application server communication through SOCKS proxy
When an application client needs to connect to an application server, the client actually connects to a SOCKS proxy server. The proxy server then connects to the application server on behalf of the client. Acting as a proxy, it relays the data between the client and the application server. From the application server’s point of view, the proxy server is the client it is communicating with.
There are two versions of SOCKS: v4 and v5. Both versions make the connection requests on behalf of the client, set up proxy circuits, and relay the application data. The main difference is that SOCKSv5 adds a client authentication function before making the connection request to the application server. A SOCKS proxy toolkit is freely available to facilitate a proxy service that is independent of the application client and server. The toolkit consists of the SOCKS client and a server. Note that the client system must be “SOCKS-ified”, meaning the SOCKS client is hooked into the client’s TCPIP transport stack to redirect certain requests to the SOCKS server. Note that multiple applications can use the SOCKS client because it is independent of the application, which means that a single proxy can support a multitude of TCP/IP-based applications.
IPsecIPsec is a collection of IETF protocols (RFC- 2401 being the main RFC, but there are multiple RFCs related to IPsec). The three main protocols comprising IPsec are:
1. Authentication Header (AH): Provides authenticity guarantee for packets, by attaching strong cryptographic checksums to packets. Unlike other protocols, AH covers the whole packet, from the IP header to the end of the packet. The checksum operation will be successful on a packet with AH if the sender and
SOCKS
Application
Transport
Data
Network
Physical
SOCKS
Transport
Data
Network
Physical
Application
Transport
Data
Network
Physical
Client SOCKS server Application server
120 Lotus Security Handbook

the receiving peer share the same secret key. A successful checksum evaluation means the packet was originated by the expected peer and the packet was not modified in transit.
2. Encapsulating Security Payload (ESP): Provides a confidentiality guarantee for packets by encrypting packets with defined encryption algorithms. A packet with ESP that is successfully decrypted means the packet was not intercepted and modified.
3. IP payload compression (IPcomp): IPcomp provides a way to compress packet before encryption by ESP. The purpose of this is to improve effective data throughput, because once the packet has been encrypted by ESP its potential for normal data compression is low or impossible.
4. Internet Key Exchange (IKE): AH and ESP need a shared secret key between peers. IKE provides for secure key negotiation and exchange between different locations.
The IPsec protocols provide security for transmission of sensitive information over unprotected IP networks. IPsec acts at the network layer, protecting and authenticating IP packets between participating peer devices. It is similar to SOCKS in that it requires a client; however, it does not require a proxy server. IPsec network gateways are used as the intermediary network proxy. It is commonly implemented in network routers, since it is essentially a network-layer proxy. As a result, it is generally more efficient than SOCKS because it is operating within only the lower three OSI layers (physical, data, and network). The primary popular use of IPsec has been as a means to provide VPN (virtual private network) access from unprotected networks (such as the Internet) into a trusted, protected network.
4.1.2 Firewall productsIn our lab scenarios in this book, we were not necessarily concerned with the firewall products themselves. Rather, we were more interested in what the Lotus and WebSphere applications were doing, or were likely to do, across a firewall. In describing the implementation of a multi-zone architecture, it should not matter which firewall products are used. It is assumed that in each case the important information for a firewall administrator is primarily the ports and protocols used. It is up to the firewall administrator to use that information to establish the appropriate firewall configuration and access control lists.
The following is a brief list of some common firewall products that provide at least stateful filtering capability and beyond, but fall short of being a full-fledged application-layer proxy. This is included only as a guide and the descriptions are based on the vendor’s own marketing material.
Chapter 4. Security components and layers 121
Check Point Firewall-1Check Point Firewall-1 is a popular firewall based on the Redbook team’s experience at client sites. A management module allows the compilation of rules to determine firewall configuration. Once installed, the default configuration allows nothing through the firewall in either direction. The rules need to be defined to start allowing traffic to flow.
Standard features of Firewall-1 include stateful inspection and address translation (NAT). Check Point has integrated products for facilities, such as virtual private network (VPN).
For more information, see the Redbook Check Point FireWall-1 on AIX: A Cookbook for Stand-Alone and High Availability, SG24-5492, or refer to Check Point’s Web site:
http://www.checkpoint.com
Cisco PIXThe Cisco PIX firewall is a dedicated firewall appliance in Cisco's firewall family. Cisco PIX is an example of a firewall that has the concept of secure and less-secure sides under the default configuration. This means that one side of the firewall is trusted by default (for example, the DMZ) and that all traffic from the trusted or more secure side can flow through the firewall. By default, all traffic in the other direction is disabled until specific rules are defined to allow traffic to flow. For more information, refer to Cisco’s Web site at:
http://www.cisco.com
Raptor FirewallRaptor Firewall is a firewall solution from Axent Technologies, a subsidiary of Symantec. Features include the Raptor Management Console (RMC) for easy management of local and remote firewalls, standards-based VPN support (IPSec and Internet Key Exchange (IKE)) for connecting to remote offices and users, and firewall-integrated content blockers for filtering WWW and Internet Usenet groups. For more information, see the Symantec product Web site at:
http://www.symantec.com
Note: We do not endorse any one firewall product and do not claim to have exhaustively tested the firewall products listed. Inclusion on this list should not be considered to imply suitability; likewise, exclusion from the list does not imply unsuitability.
122 Lotus Security Handbook

IBM SecureWay® FirewallThis firewall technology was first developed by IBM research in 1985 and has been protecting IBM and global corporations' assets for more than 10 years. The IBM SecureWay Firewall contains filtering, proxy, and circuit-level gateway, and includes VPN support based on the IPSec standard. For more information, see the Redbooks: A Secure Way to Protect Your Network: IBM SecureWay Firewall for AIX Version 4.1, SG24-5855, and Redhat Linux Integration Guide for IBM eServer xSeries and Netfinity, SG24-5853, or visit the IBM product Web site at:
http://www.tivoli.com/products/index/firewall/
TIS Firewall Toolkit (FWTK)Trusted Information Systems, Inc. (TIS) developed the TIS Internet Firewall Toolkit (FWTK), a software kit for building and maintaining internetwork firewalls. This is freely available under a noncommercial use license and is a popular solution for Linux.
For more information, refer to:
http://www.fwtk.org/
TIS merged with Network Associates in February of 1998. For more information about their commercial products, see:
http://www.tis.com/ or http://www.nai.com/
4.1.3 Routers, switches, and hubsRouters, switches, and hubs are grouped together because they are all network hardware devices that perform functions at the lower four OSI levels: physical, data, network, and transport layers. Routers and switches are active devices, whereas hubs are generally passive devices and do not provide any security functions.
Active network devices, such as switches and routers, are designed with performance, speed, and convenience as primary objectives. As a result, the security functions are somewhat unsophisticated except at the higher end of the price ranges. In addition to lacking advanced security functions, they often have limited filtering capabilities for common protocols that use multiple ports, such as FTP. The configuration of filter access lists can be cumbersome and error prone, which does not follow a “keep it small and simple” rule of security. Switches and routers have even been known to contain hard-wired back door passwords, allowing easy reconfiguration by a knowledgeable attacker. Switches and routers are usually configured by sending plain text (unencrypted) passwords over the network. These passwords could be captured, or even guessed, and are reusable. Switches and routers can be used to provide additional filtering and
Chapter 4. Security components and layers 123

alarming, but should never be relied on as a primary and dependable means of providing security to a business.
RoutersA simple description of what a router does is forward data packets from one network to another. This description conjures up images such as a ferry for passengers between two land masses. However, routers today have become extremely diverse in their range of functions and capabilities. So now the image is more sophisticated, like perhaps that of a major airline’s hub airport for passengers and cargo, with transfers to trains, buses, trucks, cars, and so forth.
Routers are always the first line of defense for network traffic coming to your organization from the Internet. They are also the last point of control for traffic from your organization bound for the Internet. The router under your control that immediately connects to your Internet service provider (ISP) is often called your border router. In the times before ISPs, the telephony world called this the demarcation point. It is where the service provider’s control (and responsibility) ends and your organization’s responsibility and control begins. Note that many large organizations have more than one Internet connection and potentially more than one border router.
As we discuss later, a router is typically performing at least basic packet filtering as a form of access control. Think of this access control as a traffic cop, deciding who can turn down different roads and who can’t. In this case we will identify the router as a type of firewall. Note that not all network routers can, nor should, perform filtering; just keep in mind that they can. Again, we are saying when we employ any filters on a router, it becomes a very basic type of firewall.
Switches and hubsSwitches and hubs provide a virtual ethernet bus, and for the most part have completely replaced ethernet using a coaxial cable physical bus architecture. The days of having to drill taps into “thick ethernet” coax are (thankfully) behind us. As previously mentioned, a security benefit of switch technology is the fact that all packets on the segment are not transmitted to all devices connected to the switch. This greatly reduces the packets that can be “seen” by a sniffer connected to one port on the switch. The exception to this is broadcast packets that some protocols use where the packets get transmitted out all the switch ports.
NATOriginally, Network Address Translation (NAT) was proposed in IETF RFC-1918 as a short-term solution to the problem of IP address depletion. In order to be assured of any-to-any communication on the Internet, all IP addresses have to be officially assigned by the Internet Assigned Numbers Authority (IANA). This is
124 Lotus Security Handbook

becoming increasingly difficult to achieve, because the number of available address ranges is now severely limited. Also, many organizations have in the past used locally assigned IP addresses, not expecting to require Internet connectivity. NAT is defined in RFC1631.
The idea of NAT is based on the fact that only a small number of the hosts in a private network are communicating outside of that network. If each host is assigned an IP address from the official IP address pool only when the host needs to communicate, then only a small number of official addresses are required.
NAT modifies the IP address of an outgoing packet and dynamically translates it to an externally routable address. NAT translation applies to the address in the IP header only; IP data is not altered. For incoming packets, it translates the external address to an internal address. From the point of view of two hosts that exchange IP packets with each other, one in a secure, private network and one in the non-secure external network, NAT looks like a standard IP router that forwards IP packets between two network interfaces. So typically we employ NAT wherever possible to hide details of the internal network’s private network addressing.
It is important to note that only TCP and UDP packets are translated by NAT. The Internet Control Message Protocol (ICMP) is used for messages and will not operate in a NAT environment. For example, ping is an ICMP service; when you ping a host from a non-NAT environment to a NAT environment, you will not get an answer back because the IP address cannot be resolved.
There is another router function related to NAT called port address translation (PAT). This allows a specific port coming from a host on one side of a router to be represented as a different port and IP address on the other side of the router. PAT is more commonly implemented as part of a session-layer firewall rather than a network router.
VLANsVirtual LANs (VLANs) are fairly recent (since around 1998) features incorporated into the higher end switch products available. Their primary purpose is to provide flexibility in partitioning switches into multiple LAN broadcast domains and to facilitate spanning a broadcast domain across multiple switches. VLANs are frequently used to improve network performance by grouping systems together that rely on broadcast-intensive protocols such as NetBIOS and IPX. Properly configured VLANs can be useful in security when they are used for separation and isolation, and can eliminate the need for large numbers of smaller, dedicated switches. They also have the advantage of not being limited to the boundaries of a single switch, allowing the grouping criteria for systems not to be limited by physical location. And another big advantage is being able to create multiple
Chapter 4. Security components and layers 125

subnets, yet have a relatively small number of physical network devices to monitor and maintain.
When improperly configured, VLANs present some security risks that do not occur when using dedicated switches to define security boundaries. Although the subnets defined on a switch are considered “virtual,” they still need a router to send and receive traffic from other subnets. If our security design requires firewall functions between two subnets, we can implement the connection between the subnets using separate (external) routers and firewalls. But most high-end switches, such as Cisco Catalyst switches, are capable of providing at least packet filtering access controls between subnets within the same switch. Because the VLANs are physically connected in the same switch, there is a risk that some configurations might permit spoofed packets to be able to “jump” from one VLAN to another and bypass the router or firewall controls between the two subnets.
Because the VLAN can span multiple switches, it provides a great deal of flexibility in being able to group systems (such as file and print servers) in the same broadcast domain despite possibly being located on different floors of a building. But this same flexibility also has the potential to provide diverse paths through a network that bypass firewall access controls if an intruder is able to “jump” between VLANs.
In order to understand the potential security vulnerability of VLANs, you need to have a basic understanding of how they work. Basically, a “tag header” is inserted in the ethernet frame immediately after the source MAC address. The tag is used to identify which VLAN a frame belongs to, and enable the VLAN to span multiple “trunked” switches. The details of VLAN “frame tagging” are defined in IEEE 802.1q, and may be found at:
http://standards.ieee.org/reading/ieee/std/lanman/802.1Q-1998.pdf
The actual vulnerability is that a frame could potentially be crafted, or spoofed, to appear to belong to a VLAN that is different from the actual source’s VLAN in the case of trunked switches. This can cause the frame to be switched to the target VLAN without the frame passing through the integral router that has access controls defined. Switch vendors point out that the VLAN functionality was designed for performance, not security. Also, the three conditions required for VLAN jumping (access to the first VLAN, use of trunked switches, and the ability to craft a frame with a spoofed tag header with an ID corresponding to the target VLAN) are an unlikely possibility except from, perhaps, someone within the organization with intimate knowledge of the VLAN configuration.
126 Lotus Security Handbook
4.1.4 Proxy servers
Application proxiesApplication-level proxies were developed to provide more sophisticated levels of security. Application-level proxies stand between two networks and relay data between clients on one network to servers in the other. Instead of a direct connection between internal and external networks, application-level proxies typically serve as a middleman for Internet services. The proxy intercepts all traffic and relays packets of data back and forth between the client application and the server-based application. Application-level proxy technology can serve important security roles in the infrastructure. Application proxies fall into two categories: reverse proxies for inbound connections, and forward proxies for outbound connections. We discuss these two types of application proxies later in this section.
Proxy servers are somewhat unique in that they perform network separation functions like a firewall, yet they might also behave like a server from a user’s point of view. As previously mentioned, a proxy can perform at either a session level (layer 4) or an application level (layer 7). Some firewall products provide session-level proxy capabilities, but as a general rule, application-level proxies are dedicated systems. Because application-layer proxies inspect all packets including the application data “payload,” the throughput performance of an application proxy will be considerably less than a packet or stateful packet filtering router.
Proxies can work in different directions, although they are usually dedicated to a single client-server data flow direction. In order to make sense of the proxy nomenclature, remember that it is based on the internal network as the reference point of view.
Reverse proxiesReverse proxies were developed to meet a need to provide access from external networks (the Internet) into corporate resources. They facilitate the elimination of data storage from outer network zones. A multi-zone architecture is discussed later in this chapter. A reverse proxy basically handles incoming requests from external clients, then performs the request against the back-end application server on behalf of the client. The client never directly connects to the destination service or application.
Forward proxiesForward proxies were developed to control access from workstations within the corporate controlled network to services on external networks. Similar to a reverse proxy, the internal client request goes to the forward proxy, which then passes the request on to the external service.
Chapter 4. Security components and layers 127

These high-level descriptions of the two types of proxy servers is sufficient for infrastructure data flow design. A more in-depth discussion of how proxies work and advanced functions they provide can be found in Chapter 5, “Proxies” on page 165.
4.1.5 Intrusion detection systemsThere are several types of intrusion detection methods or “systems.” An intrusion detection system (IDS) is a system specifically designed and implemented for detecting intrusions. An IDS will fall into one of the following four main categories:
1. Network intrusion detection systems (NIDS): These are systems, usually integrated in network hardware devices, to monitor the TCPIP packets and check for prohibited connection requests. They also can have algorithms to determine if there is a denial of service (DOS) attack. A NIDS monitors network data packets and attempts to detect the connection requests of a potential intruder. An “intrusion” can consist of a simple attempted connection or an abnormal volume of connection requests that might cause a denial of service attack. NIDs should have the ability to detect patterns of connection requests that are atypical. For example, a NIDS should detect a large number of TCP connection requests to several different ports on a target machine, and identify this event as a potential TCP port scan. A NIDS is implemented typically as an independent, dedicated machine transparently watching all network traffic. Because they are operating in network devices, such as routers, hubs, and switches, they can protect several systems. It is also possible to perform NID on a single host, and it has recently become common practice to deploy some form of NIDS on workstations to function as a “personal firewall.”
2. Host data integrity assurance: This approach monitors a host at the OS level for any changes to system files and configuration or registry settings and in some cases, application data files. The monitoring tools assure the integrity of data by establishing a baseline of system data in its desired state and then detecting and reporting any changes to the baseline. Generally, the changes are logged and the logs are used to generate reports, so these types of detection systems do not always report events in real time. Recently, products such as Tripwire have begun to support integration into real time monitoring systems, such as IBM Tivoli® Risk Manager and Tivoli Enterprise™ Console. For more information see the following URL:
http://tivoli.tripwire.com/
3. Log activity monitors: Similar to data integrity assurance monitoring, this type of monitor is designed to scan through log files and look for unusual patterns. An “unusual pattern” is determined by matching certain activities to a known signature. For example, a signature might define a potential buffer overflow
128 Lotus Security Handbook
attack attempt as a repeated series of HTTP server access attempts using very long URL “get” strings.
4. Content scanners: Although generally in a class by themselves, we are including content scanners such as virus scanners, spam filters, and Web filters as a special category of intrusion detection system. Content scanners in one sense are designed to detect passive attacks, where the intrusion is potentially embedded within the data itself. Scanning data in transit is a line of defense intended to prevent potential attacks on the destination systems, which could be servers or workstations. In the case of Web filters applied to HTTP traffic, and spam filters for e-mail, we might consider this to be more of a technique for providing some measure of access control with respect to misuse or abuse of an organization’s network bandwidth and other resources. We think you will agree that receiving unsolicited e-mail (“spam”) is indeed a type of intrusion and that you would like to detect and ideally prevent or greatly limit the extent of the disruption it causes.
A sample of an activity monitor program for detecting invalid logon attempts on a Sametime server can be found in the IBM Redbook Working with the Sametime Community Server Toolkit, SG24-6667, pp. 63-84. This simple example might be usable as a basis to create your own rudimentary host IDS for Lotus Sametime. But note that it does not contain any algorithms for detecting any patterns of failed logons. Because patterns, or signatures, indicating attacks can be complex and ever changing as new attack methods are devised, we do not recommend that you attempt to create your own IDS. A large variety of open source and commercial IDS products are available. A list of both public domain (open source) IDS and commercial IDS that appears to be kept reasonably up-to-date can be found at the Purdue University COAST (Computer Operations, Audit, and Security Technology) site at:
http://www.cerias.purdue.edu/coast/ids/ids-body.html#systems
Placement of IDS varies depending on the type used, although network IDS and content scanners tend to be most appropriate at or near network perimeters or borders. NIDS are generally not deployed on LAN segments because of the high volume of data packets that would need to be inspected. Host-based IDS and content scanning has become the “best practice” standard on most servers, and limited content scanners (such as virus scanners) have become a commonplace practice on every workstation. “Personal firewalls” are also quickly becoming the norm on workstations, allowing both an administrator and the end-user to block web site tracking cookies, “pop-up” ads, and provide inbound and outbound port/application blocking.
Chapter 4. Security components and layers 129
4.1.6 Enterprise access management and identity management systems
Ideally, organizations need a unified approach for making authorization decisions, instead of relying on individual access control services for each server, application, or environment in the enterprise. Enterprise access management systems provide a centralized identity and credential repository in conjunction with centralized application access controls. Centralized identity and access management systems are, of course, dependent on a centralized directory or credential repository strategy.
The IBM Tivoli brand provides an entire suite of identify management products, with Tivoli Access Manager providing the authorization and access control aspects. For in-depth information regarding IBM Tivoli Access Manager, and other Tivoli products, please see the following IBM publications:
� Identity Management Design Guide with IBM Tivoli Identity Manager, SG24-6996
� Enterprise Security Architecture using IBM Tivoli, SG24-6014
� IBM Tivoli Access Manager for e-business, REDP3677
4.1.7 Application serversThe term “servers” covers a broad spectrum of types of hosts and services. With the integration of core networking services, such as DNS and DHCP, into “network devices,” the concept of a server as a physical host machine has changed in the past few years. From an infrastructure standpoint, we must be concerned with both the inherent security defenses our core servers have available as well as the additional security we must provide by their placement within the overall architecture in conjunction with other defenses external to the server itself.
Core infrastructure serversThe core infrastructure servers are:
� DNS� SMTP relay hosts� FTP repository servers
They are described in detail in the following sections.
DNSThe purpose of your domain name service, or DNS, is to translate host names into IP addresses, and support the ability to do a reverse-lookup, meaning translate IP addresses into host names. Another function is to provide other
130 Lotus Security Handbook
domains with mail exchanger, or MX records that list what hosts accept SMTP mail for your domain.
An important concept that we enthusiastically consider a best practice is to have a separate DNS made available to the Internet, rather than your internal DNS. Sometimes this is called a split DNS, however, in most cases it is not really distributed, as a “split” might imply. To avoid confusion, we will say you should have a different DNS for external users and servers than the DNS you make available to internal users and servers. The internal DNS provides name services for all hosts operating within your IP domain. The external DNS only provides name services for the servers that are reachable from the Internet.
At the minimum, the external DNS will provide name and address translation for the name server itself (an NS record), and at least one MX record. After all, if you do not want to list a public mail exchanger host, then you probably would have no need for a public DNS host. In practice, most organizations will have at least two name servers that are connected to the Internet, a primary and a secondary. It is also typical to have at least two mail exchanger hosts listed. Beyond these two minimum types of hosts, the external or “public” DNS must also list all hosts that can be directly connected to from the Internet, such as Web servers, FTP servers, and proxy servers. The main idea of the external DNS is to publish the least amount of information for people to connect to the services you are making available to Internet users.
Internal DNS should be separated so that there is no visibility or access to them from the Internet. Generally, the externally reachable servers previously mentioned will not be listed in the internal DNS. The exception to this rule is limited to machines that are “dual-homed” hosts, such as proxy machines that have two network interfaces. The proxy servers should, of course, have the external network interface address listed in the external DNS, and the internally facing network interface address listed in the internal DNS.
External DNS hosts should not need to be “dual homed” since all access should be via the host’s public Internet address. An exception would be to provide administrators a means to connect to the external DNS host from an internal network. This could be done by using a second network connection on the DNS host that cannot be reached from the Internet, but can be reached from specific internal IP addresses only.
SMTP relay hostsSMTP relay hosts are dedicated servers used to handle all SMTP messages from the Internet addressed to recipients within your internal domains. Your SMTP relay hosts should not perform any functions or services other than SMTP, and a variety of SMTP servers (such as UNIX sendmail and Domino) can be used. Many different SMTP relay architectures are popular today, and the
Chapter 4. Security components and layers 131
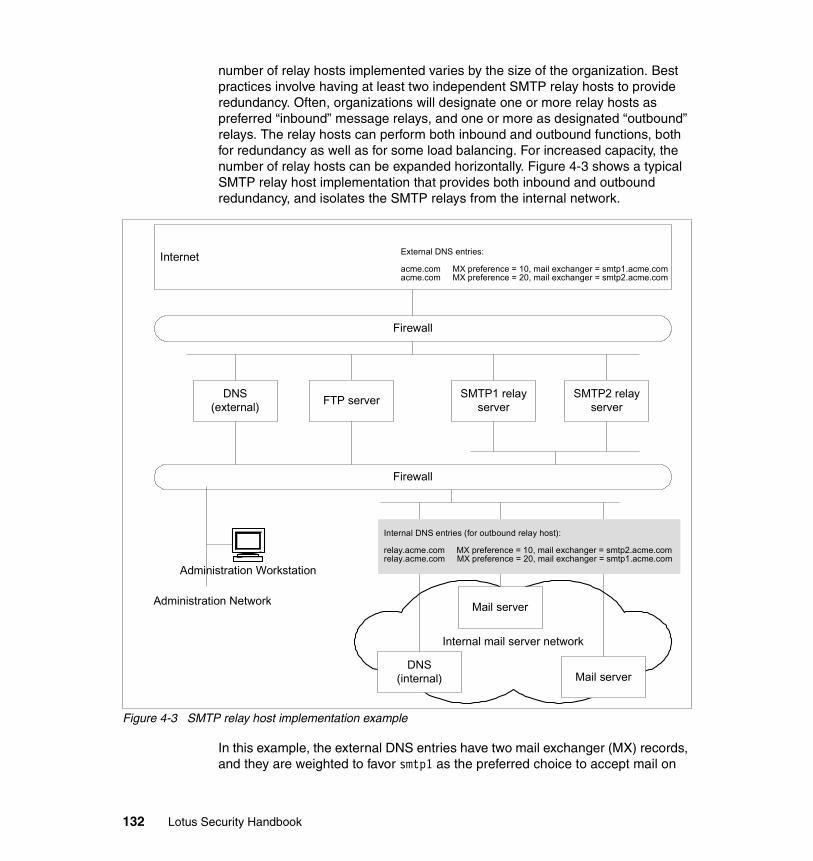
number of relay hosts implemented varies by the size of the organization. Best practices involve having at least two independent SMTP relay hosts to provide redundancy. Often, organizations will designate one or more relay hosts as preferred “inbound” message relays, and one or more as designated “outbound” relays. The relay hosts can perform both inbound and outbound functions, both for redundancy as well as for some load balancing. For increased capacity, the number of relay hosts can be expanded horizontally. Figure 4-3 shows a typical SMTP relay host implementation that provides both inbound and outbound redundancy, and isolates the SMTP relays from the internal network.
Figure 4-3 SMTP relay host implementation example
In this example, the external DNS entries have two mail exchanger (MX) records, and they are weighted to favor smtp1 as the preferred choice to accept mail on
Internal mail server network
Internet
Firewall
SMTP1 relayserver
Firewall
DNS(external)
SMTP2 relayserverFTP server
Mail server
Mail server
Administration Workstation
Administration Network
DNS(internal)
External DNS entries:
acme.com MX preference = 10, mail exchanger = smtp1.acme.comacme.com MX preference = 20, mail exchanger = smtp2.acme.com
Internal DNS entries (for outbound relay host):
relay.acme.com MX preference = 10, mail exchanger = smtp2.acme.comrelay.acme.com MX preference = 20, mail exchanger = smtp1.acme.com
132 Lotus Security Handbook
behalf of the acme.com domain. If the smtp1 host is down or unreachable, then external systems would deliver messages to smtp2. For outbound messages, we configured the mail servers in the internal network to send all messages addressed outside the internal domain to a virtual relay host called relay.acme.com. Then, within the internal DNS, we define MX records for the virtual host relay.acme.com to point to both of the actual SMTP relay hosts, with the weighting set to favor smtp2 as the preferred route. We refer to this as a virtual host because there is no host (A) record. Note there would be “A” records for smtp1 and smtp2 hosts. This scheme provides outbound redundancy and fail-over: if smtp2 is down or unreachable, the internal mail servers will deliver outbound messages to smtp1. It is important to note that the internal DNS entries should resolve to the network addresses of the internally reachable network adapters on the relay hosts. Likewise, the external DNS should resolve to the externally reachable network adapter addresses.
For detailed information on “spam” (unsolicited e-mail) prevention and relay host operation best practices, we recommend the Redbook Lotus Domino 6 spam Survival Guide for IBM e-Server, SG24-6930.
FTP serversFTP servers are servers dedicated to receiving files from the Internet using File Transfer Protocol. They are typically set up as repositories only, although depending on the business needs of the organization, they may permit certain users to have the ability to retrieve files from the Internet. FTP servers are generally required to exchange files that are too large to be sent as SMTP message attachments. The definition of “large” will vary depending on the message size limits imposed by partner organization’s SMTP relay hosts. You should ensure the accounts used by external users are highly restrictive, and anonymous FTP should be limited, or restricted to yet another dedicated host. If your FTP server supports passive mode, and you have decided to permit it, ensure the range of data IP port numbers is limited to a relatively small, finite range, with all other ports blocked by the firewall.
SSLThe primary goal of the Secure Sockets Layer (SSL) protocol is to provide privacy and reliability between two communicating applications. The protocol is composed of two layers. At the lowest level, layered on top of some reliable transport protocol, is the SSL record protocol. The SSL record protocol is used for encapsulation of various higher level protocols. One such encapsulated protocol, the SSL handshake protocol, allows the server and client to authenticate each other and to negotiate an encryption algorithm and cryptographic keys before the application protocol transmits or receives its first byte of data. One advantage of SSL is that it is application protocol independent. A higher level protocol can layer on top of the SSL protocol transparently. An
Chapter 4. Security components and layers 133
SSL session always begins with an exchange of the SSL handshake. The steps involved in the SSL handshake are as follows:
1. The client sends a request to connect.
2. The server sends a signed certificate back.
3. The client verifies the certificate signer is on its acceptable certificate authority list.
4. The client then generates a session key to be used for encryption and sends it to the server encrypted with the server’s public key (from the certificate received in step 2).
5. The server uses the private key to decrypt the client-generated session key.
6. Client HTTP request and server HTTP response are made.
4.2 Security architecture modelWithin the past three or four years, the number of services we have needed to provide public access to have grown beyond Web servers. We still have the same requirements for public Web access, but now we need to provide secure methods for trusted people (such as business partners, customers, dealers, suppliers, and so forth) to have Internet access to a variety of extranet services. And we also have employees who, for various reasons, require access to internal business systems from the Internet. In order to provide the different types of external access in a secure manner, we need a flexible model with a wide variety of access control measures as well as a great deal of compartmentalization.
In this section, we describe a security architecture model which is based loosely on the IBM global Web architecture model. The model has three high-level concepts that we will address in the next several sections:
1. Security zones
2. Zone boundaries
3. Data flow rules
4.2.1 The DMZ model: a retrospectiveAn important concept regarding data flows is the idea of multiple network zones. Historically, we have seen infrastructures described using a DMZ, or demilitarized zone. The term DMZ was used to identify the 38th parallel demilitarized zone established at the end of the Korean War in 1953 as a separation buffer between the military forces in the north and the south. It gained more widespread use in later military conflicts and grew to mean: “an area
134 Lotus Security Handbook
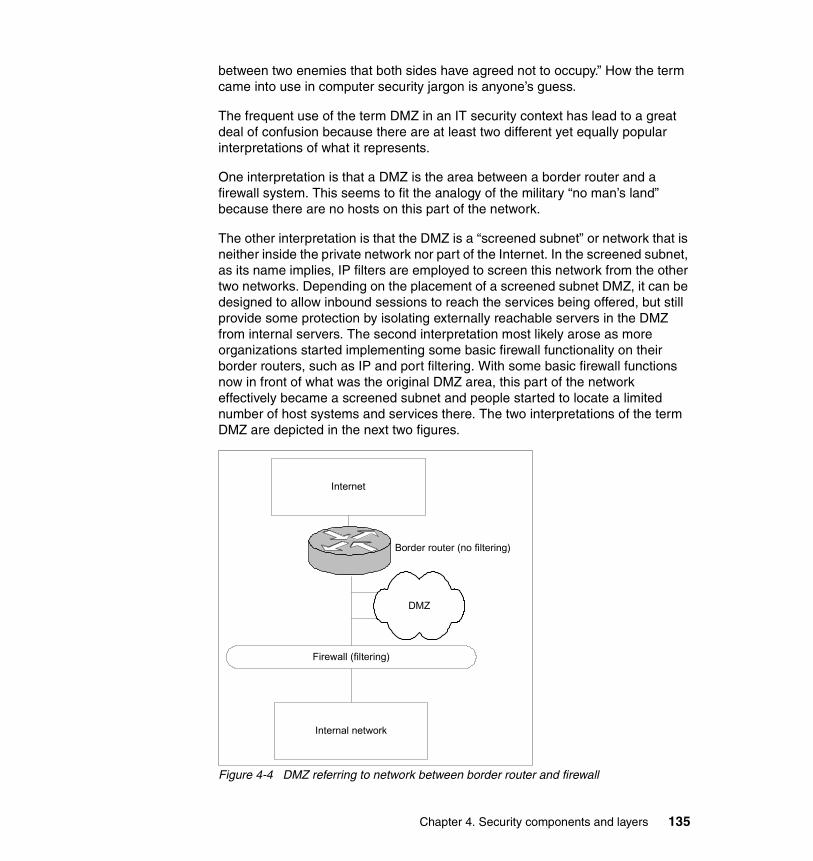
between two enemies that both sides have agreed not to occupy.” How the term came into use in computer security jargon is anyone’s guess.
The frequent use of the term DMZ in an IT security context has lead to a great deal of confusion because there are at least two different yet equally popular interpretations of what it represents.
One interpretation is that a DMZ is the area between a border router and a firewall system. This seems to fit the analogy of the military “no man’s land” because there are no hosts on this part of the network.
The other interpretation is that the DMZ is a “screened subnet” or network that is neither inside the private network nor part of the Internet. In the screened subnet, as its name implies, IP filters are employed to screen this network from the other two networks. Depending on the placement of a screened subnet DMZ, it can be designed to allow inbound sessions to reach the services being offered, but still provide some protection by isolating externally reachable servers in the DMZ from internal servers. The second interpretation most likely arose as more organizations started implementing some basic firewall functionality on their border routers, such as IP and port filtering. With some basic firewall functions now in front of what was the original DMZ area, this part of the network effectively became a screened subnet and people started to locate a limited number of host systems and services there. The two interpretations of the term DMZ are depicted in the next two figures.
Figure 4-4 DMZ referring to network between border router and firewall
Internet
Firewall (filtering)
DMZ
Border router (no filtering)
Internal network
Chapter 4. Security components and layers 135

Figure 4-5 DMZ referring to a screened subnet
In the second model, the DMZ is not completely isolated from the private network. It logically lies between the Internet and the internal, trusted private network. To secure this architecture, we must use more sophisticated firewall defenses to protect the private network. So within the DMZ we employ proxy servers and application gateways to separate the private network from the Internet. We make the inside invisible from the outside, while nonetheless allowing local users access to the outside world and external access to selected services on both the DMZ and the private network. Ingress and egress through the DMZ is carefully protected through firewall defenses. This is a simple “three zone” security model, which has been refined to various degrees over the past few years with respect to what functions need to be provided in the DMZ and at its boundaries. The firewall defenses can be distributed and replicated within the DMZ and at the boundaries to reduce potential single points of failure.
In this simple DMZ model, we have servers that are publicly available in the DMZ, and servers that are on the internal, private network. The application server separation is basically split into two corresponding categories: public and private.
The three-zone model was considered adequate when the number of services or applications made externally available was fairly limited. These services were typically Web applications (HTTP), and possibly file transfer (FTP), often using a
Internet
Border router
Internal network
Firewall (filtering)
DMZ network
Router
Firewall (filtering)
Router
136 Lotus Security Handbook

bastion (sacrificial) host. But now we are seeing business demand for additional services such as instant messaging, virtual meetings, collaborative workgroup Web spaces, extranet and intranet portals, remote employee access, and the list seems to keep growing. The three zone model with the DMZ as the middle limits the flexibility we need to improve the levels of defense required by a diverse number of services.
4.2.2 The four zone modelMoving forward, we define a zone in the simplest sense as a network segment or subnet where all devices located in the same zone can connect to each other without network or application-level filtering. Subnets provide a reliable method of separating resources because the connections between subnets can be controlled and regulated by the devices that are used to interconnect them.
By grouping our resources into security zones, we can keep resources with similar security-related characteristics together. Another way to define a security zone is: “a logical grouping of systems, networks or processes that have similar levels of acceptable risk.” We also want to separate resources with different security characteristics to limit an intruder’s potential areas of access or influence. We call this model a multi-zone architecture.
The criteria used to group and separate resources vary by factors such as the size of the organization, the number of different resources, geography, types of data and their different levels of classification or sensitivity, and of course the cost involved to build the infrastructure. In addition to dividing or segmenting the network, we may need to utilize dedicated servers for specific functions in order to provide the maximum level of separation. In this section we discuss methods to segment networks and provide recommendations regarding the separation of certain key services.
Chapter 4. Security components and layers 137
The focus of our multi-zoned architecture will be on the placement of servers, applications, and services to provide separation. As previously mentioned, determining which zone a server or service belongs in can be based on sensitivity of data and risk.
The ideal architecture can provide granularity of access to data as dictated by the requirements of the business application owners. The requirements must be consistent with corporate security policies. In order to provide granularity, flexibility, and future extensibility, we need to determine a reasonable number of security zones we can classify and locate our host systems into. The four categories, or types of security zones we define in our model are:
1. Internet zone
2. Proxy zone
3. Data access zone
4. Intranet zone
As we define these four types of security zones, note that many of their characteristics are derived from the connection restrictions we must have for a given zone type to or from another type of zone. So as we define the zone, we list some recommended guidelines that we use later for more specific policies for connecting to the zone. Also note that we use language in our policy guidelines such as “will have”, not words like “should have”. As you formulate your own policies, be aware that they must make a clear distinction between what is permitted and what is restricted, and do not allow critical restrictions to appear as if they are something optional. In other words, avoid any ambiguous language.
Note: It is theoretically possible on some platforms to provide some level of service separation in a single host by running the services under different non-root-privilege accounts. We say separation within a single host is “theoretically” possible because in reality it is complex to configure properly, meaning it is prone to errors that can lead to unintentional vulnerabilities. For example, on UNIX systems it is possible to isolate daemons (background processes or services) such as bind using chroot; however, if not configured properly, an attacker may still be able to break out of the “chroot jail” and affect other parts of the system. A simple Google search on “chroot breaking out” locates numerous Web articles, such as the following reference:
http://www.bpfh.net/simes/computing/chroot-break.html
We do not recommend using service separation on a single host as a network security method because service isolation cannot be guaranteed.
138 Lotus Security Handbook

Zone definitions and policy guidelines
1. Internet zoneThis zone is basically the Internet with no filtering. This zone is identified because we need to depict how we connect to the Internet from other zones. We accept the fact that we have no control inside this zone; however, we can (and certainly will) implement boundary controls between the Internet and the other types of zones we do have control over. Characteristics of resources in the Internet zone are:
– The Internet zone is not considered to be part of the organization’s network.
– A system in the Internet zone will only be allowed to access a Proxy zone resource through the use of pre-defined controls.
– A system in the Internet zone is not permitted to initiate communications to Data access or Intranet zone resources. Any resources controlled by the organization that directly connect to an Internet zone segment must be addressed with a non-internal address.
2. Proxy zoneAn isolated subnet where servers accessible to the public are located. This could include services we make available to users in the Internet zone, such as our external DNS, mail relay servers, content servers with public information, as well as proxy servers. Characteristics of resources in the Proxy zone are:
– The resource is under the physical control of the organization. Physical control requires the resource to be located at an organization facility, a facility operated by a subsidiary, or a facility operated by a trusted outsourced operation provider.
– The resource is permitted to be accessed from an external network.
– The resource has a domain name contained in the organization’s public domain reserved for external use only. Systems not representing themselves as the organization and not storing or processing any of the organization’s business information may use other domain names specified by contractual agreement with an external entity.
– The resource does not have an internal IP address on any network interface.
– Access to the Proxy zone and the resources in the Proxy zone may be granted to external entities.
– A resource created or contained in a Proxy zone must not store confidential information. For the purposes of this model, temporary memory caching of confidential information is not considered storage.
Chapter 4. Security components and layers 139
– The resource has a process for detecting intrusions.
– A resource in the Proxy zone must be in compliance with applicable organizational security policies.
– A resource that populates data in a Proxy zone must be in compliance with applicable organizational security policies.
– A system that is designated as a security firewall implementing a logical barrier for data flows.
– A resource creates an approved remote access facility for accessing the Intranet zone (for example, dial modems, cable modems, ISDN, ADSL, VPN, and so forth).
3. Data access zoneThis is for storage of sensitive data and servers that are not publicly available, yet are not within the internal IP network to provide compartmentalization. This zone is also used for staging public data created in the Intranet zone that needs to be moved to the publicly available servers, as well as other data that needs to be synchronized from the internal network to publicly available systems. Characteristics of resources in the Data access zone are:
– The resources must either be addressed with a non-routable address (as defined in RFC 1918) or must be addressed within a portion of the organization’s own external IP address range which is not advertised as being routable across Internet zones or Proxy zones.
– The resource is protected from foreign networks and systems by a secure perimeter managed by the organization. This secure perimeter restricts system and application data flow between the Data access zone and any Intranet zone entity. The perimeter must implement security controls, defined by the organization, which limit data flows to only those required for the services used by the resource.
– The resource is under the physical control of the organization or authorized agent. Physical control requires the resource to be located at an organization facility.
– The resource must be administered and operated by organization employees or an approved I/T provider.
– The resource must be in compliance with applicable organization security policies.
– A resource connected to a Data Access zone may transmit confidential information to another resource on the same Data Access zone without cryptographically obscuring the information.
140 Lotus Security Handbook
– The resource does not permit communications or access to (or through) the resource by any external entity (that is, routing to an Intranet zone system).
– The resource may store and process classified information in accordance with the organization’s security standards.
– Access to resources on a Data Access zone must require strong authentication of any entity requiring access to the resource or data storage.
4. Intranet zoneThis is the internal IP network. All internally reachable servers and workstations are in this zone. Characteristics of resources in the Intranet zone are:
– The resource’s IP address is within the internal IP address ranges assigned to the organization and the resource’s Domain Name is only contained in the internal domain reserved for internal use only.
– The resource is protected from foreign networks and systems by a managed secure perimeter.
– The resource is under the physical control of the organization. Physical control requires the resource to be located at an organization facility, a facility operated by a subsidiary, or a facility operated by a trusted outsourced operation provider.
– The resource must be administered and operated by organization employees, subsidiary employees, or the organization’s approved I/T provider.
– The resource must be in compliance with applicable organizational security policies.
– The resource does not permit communications or access to (or through) the resource by any non-organization entity unless designated as an infrastructure component (for example, routing to an external entity).
Note that we have four types of zones, not necessarily just four actual zones. For example, we could have multiple Proxy zones in order to separate different externally reachable services. We might include a special, dedicated Proxy zone just for administrative access. We can also have multiple intranet zones to isolate critical business systems such as financial systems and HR systems. In this model, we have a key assumption that all servers in zone types 2 through 4 must be in controlled premises and managed by trusted personnel.
Now that we have defined the four types of zones, our model appears to be relatively simple, but it is far from complete. We next need to describe the controls we will use to connect and or isolate systems in different zones.
Chapter 4. Security components and layers 141
4.2.3 Zone boundariesSecurity zones should be separated with zone boundaries. Before we can identify the specific boundary functions needed, we describe the general objectives and principles of a zone boundary. The functions of the zone boundary are to:
� Protect the organization’s data and resources from tampering, misuse, and theft
� Provide logical and physical separation of server and network resources in the environment
� Deny all traffic, by default, except that which is specifically required to facilitate application enablement for business needs
� Reduce exposure of information that indicates the structure of the architecture itself, including the hiding or obfuscation of back-end server resources and networks
� Log boundary ingress and egress activity and attempt to identify suspicious data traffic patterns where possible
Zone boundaries, from a network design point of view, consist of firewalls. Recall the literal definition of a firewall as a physical barrier to prevent the spread of fire? We will apply this metaphor to using network firewalls to block or limit an intruder’s ability to “spread” influence across zones. Also recall that there are several different types of firewalls. We will define firewalls placed throughout the architecture in terms of what functions are needed at that particular boundary. For example, a router that has IP filtering enabled is technically a firewall, at least in the strictest sense of the definition. Granted, this is a very low-level type of firewall. But perhaps we need both IP filtering and application-level proxy functions. To build this type of firewall, we might need two devices back-to-back.
The point is, we cannot simply draw a firewall as a cute cartoon of a brick wall and provide any real meaning in our network diagrams. We have to indicate the functions that are performed at the boundary, then the physical manifestation will be dictated by the functions and the products available that provide the functions and performance we require. As you document your environment with diagrams, be prepared to explode any logical firewalls and clouds into the underlying detailed network and components. Just keep in mind that a zone boundary can begin to appear as a zone itself when the number of defenses employed grows. The zone boundaries can become quite non-trivial.
One of the principles stated previously is that by default we should deny all traffic except that which is necessary. This is considered a “best practice” in IT security, but it is often a challenge to enforce. The challenge comes from being able to accurately identify all addresses, ports, and protocols in advance, then configure the various filters to allow just the things identified. In addition, some protocols
142 Lotus Security Handbook

and applications are not compatible with certain firewall functions; for example, using IPSec across a NAT firewall is highly dependent on the IPSec protocol being used and the NAT device. We realize that in most organizations, the decision to deploy an application is driven by the business departments, not the IT department. There needs to be IT security involvement in the planning stages of new applications to identify potential application dependencies that may have compatibility issues if the application access takes place across various firewall defense technologies. It is the responsibility of the IT security administrators to minimize potential security exposures and limit overall risk to business application owners and the organization.
Before we get into some detailed firewall specifications, we first provide a list of general firewall configuration specifications that we recommend. We hope you will incorporate the specifications in the following list into your organization’s security policy. Note that each recommendation can easily be converted to a policy statement by simply changing the word “should” to “will”:
– When utilizing multiple firewalls, a naming scheme should be in place to avoid conflicts with host names.
– Firewalls acting on Internet zone traffic should have vulnerability scanning and penetration-testing services performed on a frequent, regular basis.
– Intranet zone firewalls may have firewall interfaces enabled with approved monitoring protocols for use by IT firewall management teams.
– Logging and security violations should be handled according to the security policy’s Security Incident Management processes and procedures.
– Anti-spoofing filters should be enabled.
– Firewalls should be configured with “deny all” as the default rule set.
Now that we have described the recommended firewall configuration policies, we will begin describing a “best practices” set of firewall functionality that is broken down into mandatory functions, and recommended functions:
Mandatory firewall functions� IP filtering capabilities to port, host, and network specifications
� Network Address Translation (NAT)
� Logging and alert notification services
� Support Virtual Private Network (VPN) tunneling services
– SSH tunneling services (as preferred support for administration and maintenance activity)
– High-availability support for load-balancing and fail-over configurations
Chapter 4. Security components and layers 143

Recommended firewall functions (zone boundaries)� SOCKS V5
� Ease of administration, maintenance, back-up, recovery
� Field-upgradeable components
� Ability to provide stateful inspection
For our logical design purposes, we will consider the firewall functions as a single service that provides different types of filters: content monitoring and virus scanning, intrusion detection, and system monitoring and logging. From a functional standpoint, a logical representation is often sufficient.
Figure 4-6 Firewall logical depiction
Once we can map out a logical design, we then need to figure out the physical design. Just like an architect needs to convert design elevation view drawings into construction drawings or blueprints, so do we. Please understand that network engineering is outside of the scope of this book. But to illustrate what we might need to implement the logical firewall, we show one possible physical collection of components that could provide the firewall service in Figure 4-7.
Network Zone 1
Zone boundary firewall
Network Zone 2
144 Lotus Security Handbook
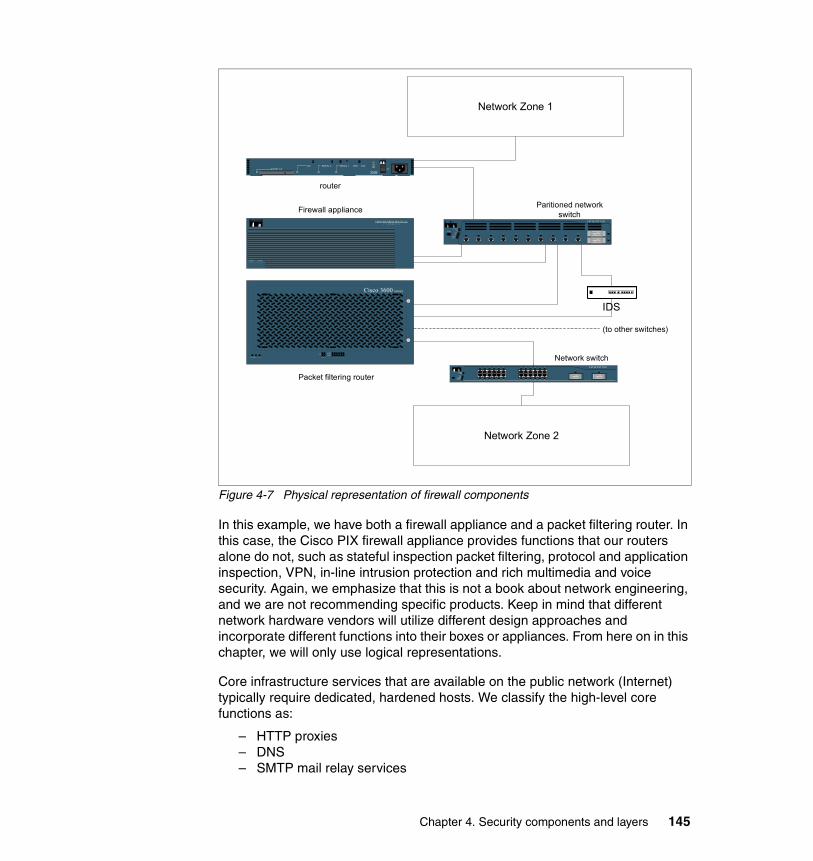
Figure 4-7 Physical representation of firewall components
In this example, we have both a firewall appliance and a packet filtering router. In this case, the Cisco PIX firewall appliance provides functions that our routers alone do not, such as stateful inspection packet filtering, protocol and application inspection, VPN, in-line intrusion protection and rich multimedia and voice security. Again, we emphasize that this is not a book about network engineering, and we are not recommending specific products. Keep in mind that different network hardware vendors will utilize different design approaches and incorporate different functions into their boxes or appliances. From here on in this chapter, we will only use logical representations.
Core infrastructure services that are available on the public network (Internet) typically require dedicated, hardened hosts. We classify the high-level core functions as:
– HTTP proxies– DNS– SMTP mail relay services
Network Zone 1
Network Zone 2
POW ER AC TIVE
CISCO SECURITY PIX 535 SERIES
F I R E W A L L
ACTIVE
READY4 5 60/10/0
FE
1 2 3PS2SYSTEM PS1
Cisco 3600 SERIES
UTILSTAT
DUPLXSPEED
SYSTEMRPS
MODE
CATALYST 3550
1 2 3 4 5 6 7 8 9 10
11
12
Packet filtering router
Firewall appliance Paritioned networkswitch
ASYNC 1-8AUI SERIAL 0 SERIAL 1 CON AUX
2509
router
Network switch
UTILSTAT
DUPLEXSPEED
SYSTEMRPS
CATALYST 35503
4
5
6
7
8
9
10
11
12
1
2
15
16
17
18
19
20
21
22
23
24
13
14
1 2
IDS
(to other switches)
Chapter 4. Security components and layers 145
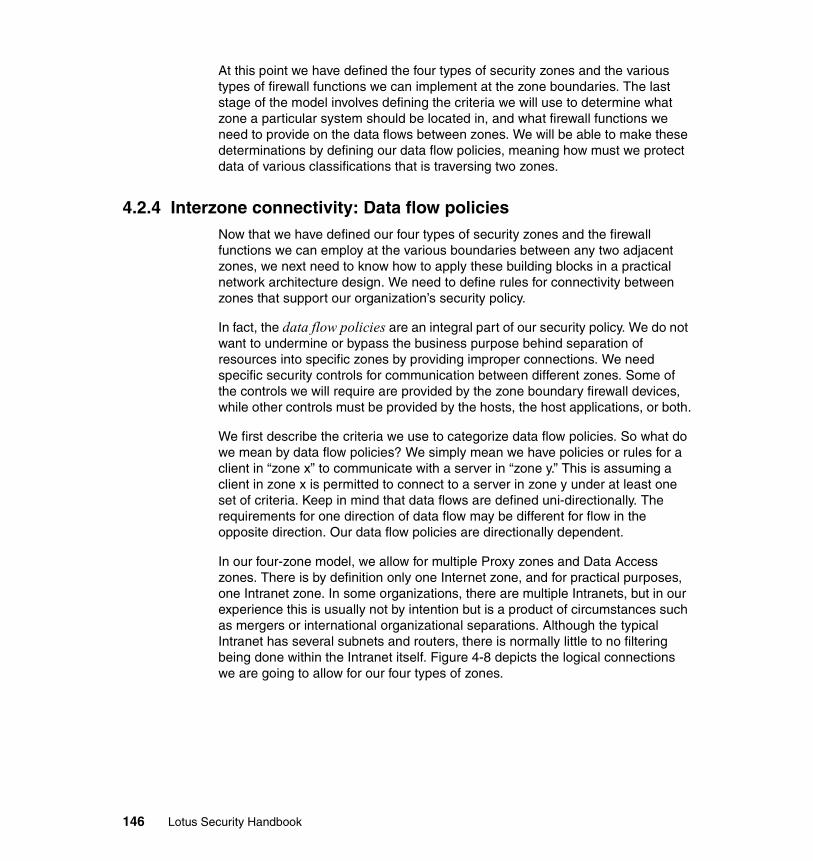
At this point we have defined the four types of security zones and the various types of firewall functions we can implement at the zone boundaries. The last stage of the model involves defining the criteria we will use to determine what zone a particular system should be located in, and what firewall functions we need to provide on the data flows between zones. We will be able to make these determinations by defining our data flow policies, meaning how must we protect data of various classifications that is traversing two zones.
4.2.4 Interzone connectivity: Data flow policiesNow that we have defined our four types of security zones and the firewall functions we can employ at the various boundaries between any two adjacent zones, we next need to know how to apply these building blocks in a practical network architecture design. We need to define rules for connectivity between zones that support our organization’s security policy.
In fact, the data flow policies are an integral part of our security policy. We do not want to undermine or bypass the business purpose behind separation of resources into specific zones by providing improper connections. We need specific security controls for communication between different zones. Some of the controls we will require are provided by the zone boundary firewall devices, while other controls must be provided by the hosts, the host applications, or both.
We first describe the criteria we use to categorize data flow policies. So what do we mean by data flow policies? We simply mean we have policies or rules for a client in “zone x” to communicate with a server in “zone y.” This is assuming a client in zone x is permitted to connect to a server in zone y under at least one set of criteria. Keep in mind that data flows are defined uni-directionally. The requirements for one direction of data flow may be different for flow in the opposite direction. Our data flow policies are directionally dependent.
In our four-zone model, we allow for multiple Proxy zones and Data Access zones. There is by definition only one Internet zone, and for practical purposes, one Intranet zone. In some organizations, there are multiple Intranets, but in our experience this is usually not by intention but is a product of circumstances such as mergers or international organizational separations. Although the typical Intranet has several subnets and routers, there is normally little to no filtering being done within the Intranet itself. Figure 4-8 depicts the logical connections we are going to allow for our four types of zones.
146 Lotus Security Handbook
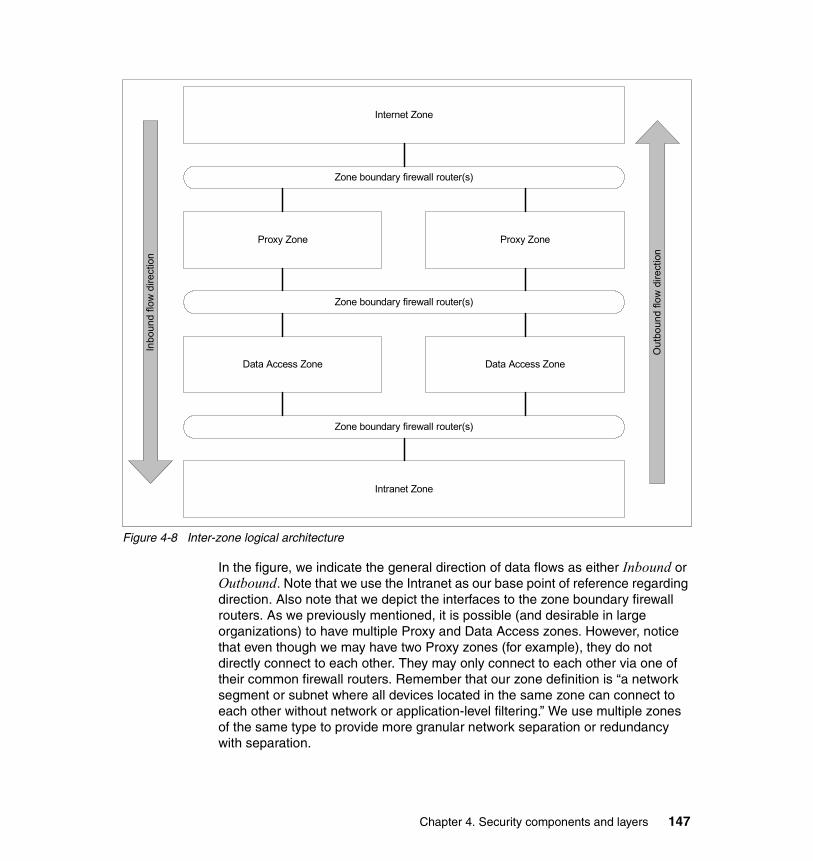
Figure 4-8 Inter-zone logical architecture
In the figure, we indicate the general direction of data flows as either Inbound or Outbound. Note that we use the Intranet as our base point of reference regarding direction. Also note that we depict the interfaces to the zone boundary firewall routers. As we previously mentioned, it is possible (and desirable in large organizations) to have multiple Proxy and Data Access zones. However, notice that even though we may have two Proxy zones (for example), they do not directly connect to each other. They may only connect to each other via one of their common firewall routers. Remember that our zone definition is “a network segment or subnet where all devices located in the same zone can connect to each other without network or application-level filtering.” We use multiple zones of the same type to provide more granular network separation or redundancy with separation.
Proxy Zone
Internet Zone
Zone boundary firewall router(s)
Proxy Zone
Zone boundary firewall router(s)
Data Access Zone Data Access Zone
Zone boundary firewall router(s)
Intranet Zone
Inbo
und
flow
dire
ctio
n
Out
boun
d flo
w d
irect
ion
Chapter 4. Security components and layers 147
One final point regarding Figure 4-8: the firewalls and depicted connections are not meant to imply that one zone cannot connect to another non-adjacent zone. For example, a workstation in the Intranet zone is going to be permitted in our model to connect “directly” to the Internet zone (or the Proxy zone). It does show, however, that this type of connection will need to traverse multiple firewall routers.
Now that we have shown the logical inter-zone connections and firewalls, we can put this together with our physical representation of the firewall routers to depict the physical inter-zone connections. We only show the physical router connections; a more detailed physical diagram would include the switches and hubs used for the actual NIC connections. In Figure 4-9, we show a single series of routers. In actual practice, redundant firewall routers would be preferred as this is a widely accepted best practice.
Figure 4-9 Firewall physical separation of Inter-zone communications
In this figure, the number of firewalls with filtering routers was arbitrarily selected. And remember from our firewall descriptions earlier, the “firewall router” may consist of more than one physical box. The important point is that all connection paths between any two adjacent zones must go through a firewall so we can
Data Access Zone 2Data Access Zone 1
Proxy Zone
Internet Zone
Public IP
Public-facing IP
Proxy ZoneHost
Intranet Zone
Proxy ZoneHost
Proxy ZoneHost
Proxy Zone IP
Data Access 1 IP
Data AccessZone Host
Data AccessZone Host
Data AccessZone Host
Intranet IP
Firewall (filtering router)
Firewall (filtering router)
Firewall (filtering router)
Data Access 2 IP
ISP router
148 Lotus Security Handbook

apply policy restrictions. Also, we only show one Proxy zone; again, there could be multiple lateral Proxy zones. In the example, we have two Data Access zones, so the host in Data Access zone 2 is isolated by a firewall from the hosts in Data Access zone 1. Another thing you should notice is that there is no direct path from the Intranet zone to the Internet. This example shows an architecture where all data flows must pass through a proxy server. Some organizations allow direct connections from Intranet workstations to Web servers in the Internet zone. If this was the case, the top-most firewall in the diagram would need a connection to one of the lower two firewall routers.
4.2.5 Data access modelsCategorizing data flows requires us to identify the authentication requirements, the authentication entity types, and data classification and access models. We need to make these distinctions to be able to formulate our final policies for inter-zone communication. We previously discussed single-factor authentication and dual-factor authentication in 1.3.3, “Identification and authentication” on page 19. You should understand these two authentication types since they are referenced as we continue to build our security architecture model.
Authentication entitiesFollowing are some additional terms needed to distinguish the authentication entity types.
Client-to-server authenticationWe define this authentication type as a user (meaning an individual) being authenticated by the server or an application or service on the server. The authentication may consist of a challenge-response dialog method, or the client may provide credentials to the server in the form of a certificate or other verifiable token. A certificate could be an X.509 user certificate or a Notes certificate. An example of a “verifiable token” would be an LTPA token HTTP session cookie. The authentication process verifies the identity of the user. Note that this authentication may or may not provide a means for the user to verify the identity or trustworthiness of the server.
Server-to-server authenticationThis type of authentication is the means by which one server can verify the identity of another server. It uses some form of certificate, such as X.509 or Notes. There is no password challenge-response method in this model. Note that this type of authentication may be uni-directional or bi-directional. In a bi-directional authentication, each server verifies the identity of the other.
Chapter 4. Security components and layers 149
Channel securityWhen we say channel security, we mean that the session communication either between a client and a server or between two servers is encrypted. This generally means that SSL is required, although we have alternatives for securing Notes client-to-Domino server and Domino server-to-Domino server using Domino port encryption.
Data classification and access modelsWe briefly discussed data classification in Chapter 1, “Fundamentals of IT security” on page 3. A key part of our interzone communication model is dependent on using three different data classifications tied to different user authentication types.
World-readable data accessThe first data access model is for data which has been identified as public or world-readable. A large portion of data falls into this category. The majority of the data within your external sites does not require any formal authentication or encryption based upon the “public” classification of the data. It does not mean we need to allow anonymous access; however, without authentication, we do not have a means to verify the identity of a user. We might want to note the IP address the client appears to connect from, but it is for tracking purposes only. There should be designated data access paths for each application. Data access controls are consistent with those in the second and third data access models except that no authentication is required and encryption is not used.
Simple authenticationThe second model is to provide a method for the application to authenticate the user using single-factor authentication. If the client is on the intranet network, no encryption will be required. If the client is in any other zone, encrypt all follow-on transactions for a session with Secure Sockets Layer (SSL). This capability is required by applications which process sensitive data. In addition to simple authentication and encryption, subsequent access to the application data is provided through proxy servers and application-level access controls.
Strong authentication, encrypted dataThe third, and most secure model, is to provide a method for the application to authenticate the user and then to encrypt all follow-on transactions for a session with Secure Sockets Layer (SSL). This capability is required by applications which process customer’s sensitive or internal confidential data on the Internet. In addition to strong authentication and encryption, subsequent access to the application data is provided through proxy servers and application-level access controls. Regardless of zone location, all confidential data will be stored on disk using encryption at the highest key strength supported by the application.
150 Lotus Security Handbook
If we consider client-to-server and server-to-server as the two connection types, that connections can be initiated in one zone to a destination in another zone, and we have defined four types of zones, we can break down the different data flow permutations into simple tables. Because our policies impose restrictions on what zones are allowed to connect directly to one another, we do not need to define tables for every possible permutation. We only need to define the permitted protocol connections between zones that we permit to have direct interconnectivity. For example, our policy does not allow a host in the Internet to connect directly to a host in the Intranet zone, so we don’t need a policy table for this. The tables in the next section represent our recommendations for best practices, taking into account the types of applications (protocols) shown. You may choose to have more or fewer protocols in your own organization’s data flow policies.
4.2.6 Data flow policiesRecall in 4.2.3, “Zone boundaries”, we stated that one of our underlying policies was “Deny all traffic, by default, except that which is specifically required...”. This means to define the policies, we must explicitly list what types of protocols and inter-zone connections using those protocols will be permitted. If a connection is not listed in one of the tables below, it is not permitted.
The permitted inter-zone connections were defined previously in 4.2.4, “Interzone connectivity: Data flow policies”. We now list our application data/port connection policies for the following permitted inter-zone connections:
1. Internet to Proxy
2. Proxy to Internet
3. Proxy to Data Access
4. Data Access to Proxy
5. Data Access to Intranet
6. Intranet to Data Access
7. Data Access to Data Access
8. Data Access to Internet
9. Intranet to Internet
In the nine tables that follow, we use the following common legend regarding each side of the zone boundary firewall:
– H - Host specific filters (only specific host network addresses permitted in the boundary filters; all others blocked)
Chapter 4. Security components and layers 151
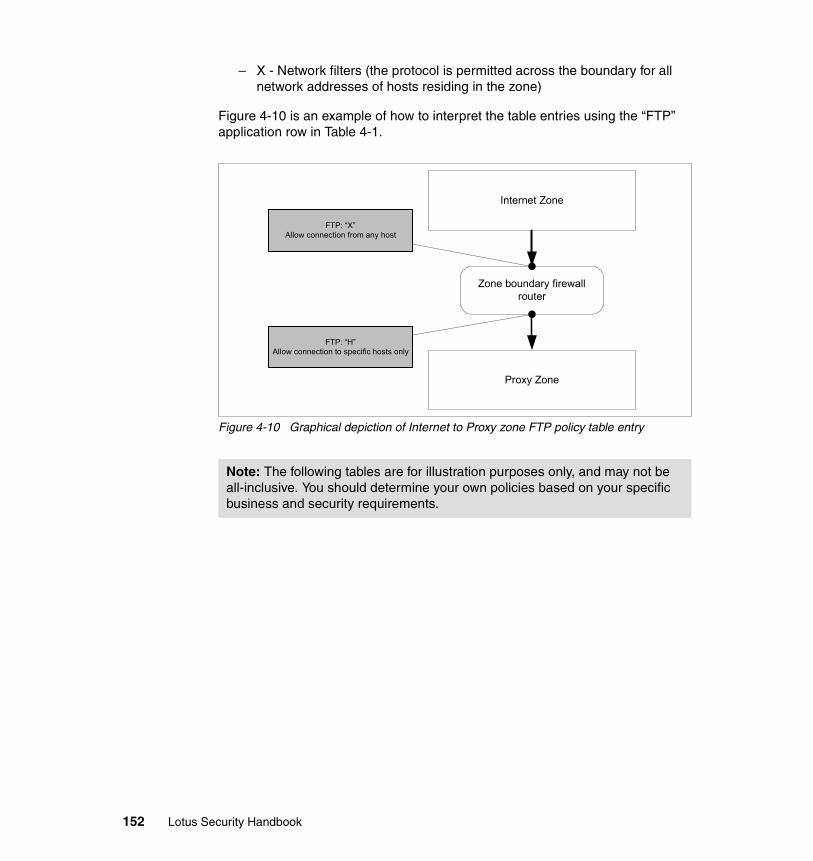
– X - Network filters (the protocol is permitted across the boundary for all network addresses of hosts residing in the zone)
Figure 4-10 is an example of how to interpret the table entries using the “FTP” application row in Table 4-1.
Figure 4-10 Graphical depiction of Internet to Proxy zone FTP policy table entry
Note: The following tables are for illustration purposes only, and may not be all-inclusive. You should determine your own policies based on your specific business and security requirements.
FTP: “X”Allow connection from any host
FTP: “H”Allow connection to specific hosts only
Proxy Zone
Internet Zone
Zone boundary firewallrouter
152 Lotus Security Handbook

1. Internet to Proxy zone policies
Table 4-1 Internet to Proxy zone flows (Inbound)
H - Host-specific filtersX - Network filters
2. Proxy to Internet zone policies
Table 4-2 Proxy to Internet zone flows (Outbound)
H - Host-specific filtersX - Network filters
Application Protocol Port Internet Proxy Comments
HTTP TCP 80 X X Denies should be in place to prevent port 80 access to non-HTTP infrastructure hosts (DNS, SMTP, etc.).
HTTPS (SSL)
TCP 443 X X Denies should be in place to prevent port 443 access to non-HTTP core infrastructure hosts (DNS, SMTP, etc.).
FTP TCP 20 X H For anonymous FTP repositories only.
FTP TCP 21 X H For anonymous FTP repositories only.
DNS UDP 53 X H
Application Protocol Port Proxy Internet Comments
SMTP TCP 25 H X Core servers (SMTP relay hosts only).
DNS UDP 53 X X Allows admins to query Internet DNS servers from any DMZ server.
HTTP TCP 80 H X Limited to NAT flows initiated from Data Access Zone.
HTTPS (SSL)
TCP 443 H X Limited to NAT flows initiated from Data Access Zone.
Chapter 4. Security components and layers 153
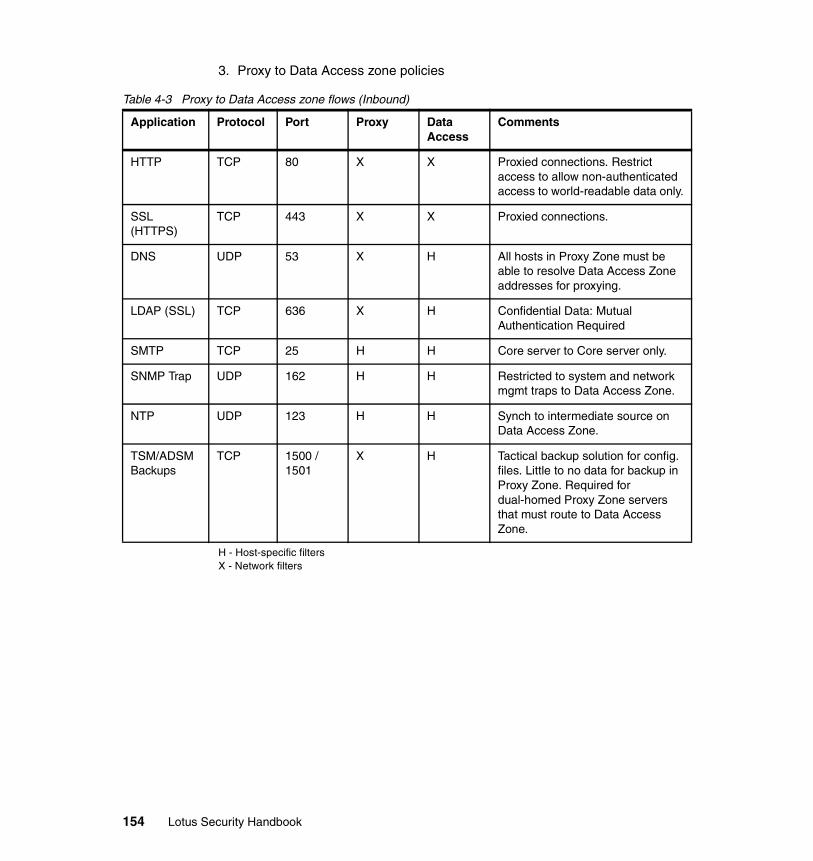
3. Proxy to Data Access zone policies
Table 4-3 Proxy to Data Access zone flows (Inbound)
H - Host-specific filtersX - Network filters
Application Protocol Port Proxy Data Access
Comments
HTTP TCP 80 X X Proxied connections. Restrict access to allow non-authenticated access to world-readable data only.
SSL (HTTPS)
TCP 443 X X Proxied connections.
DNS UDP 53 X H All hosts in Proxy Zone must be able to resolve Data Access Zone addresses for proxying.
LDAP (SSL) TCP 636 X H Confidential Data: Mutual Authentication Required
SMTP TCP 25 H H Core server to Core server only.
SNMP Trap UDP 162 H H Restricted to system and network mgmt traps to Data Access Zone.
NTP UDP 123 H H Synch to intermediate source on Data Access Zone.
TSM/ADSM Backups
TCP 1500 / 1501
X H Tactical backup solution for config. files. Little to no data for backup in Proxy Zone. Required for dual-homed Proxy Zone servers that must route to Data Access Zone.
154 Lotus Security Handbook
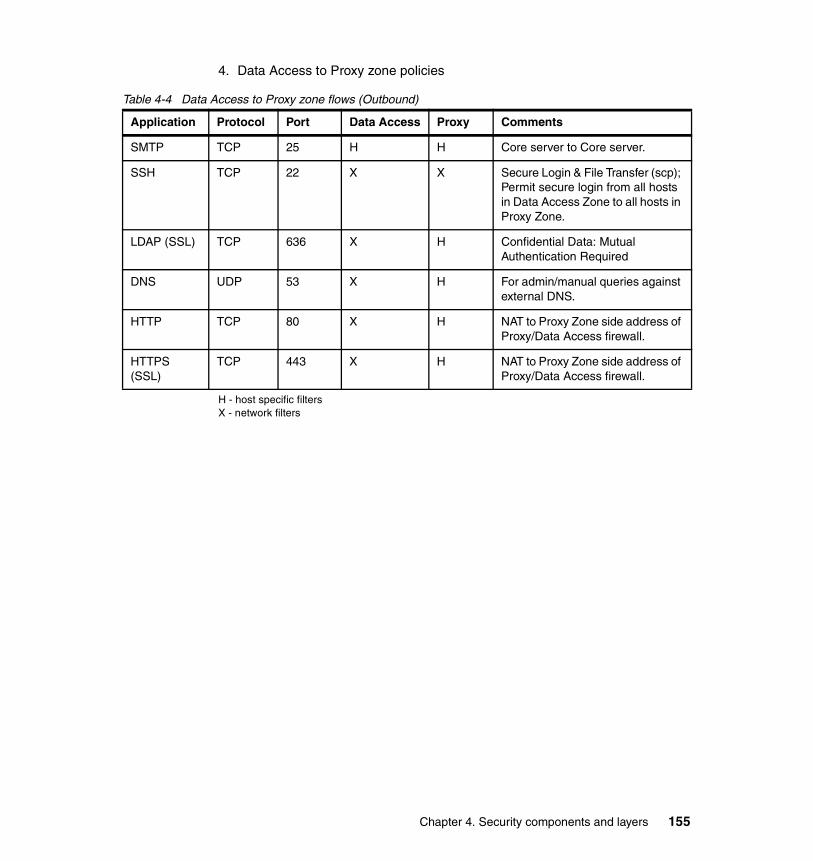
4. Data Access to Proxy zone policies
Table 4-4 Data Access to Proxy zone flows (Outbound)
H - host specific filtersX - network filters
Application Protocol Port Data Access Proxy Comments
SMTP TCP 25 H H Core server to Core server.
SSH TCP 22 X X Secure Login & File Transfer (scp); Permit secure login from all hosts in Data Access Zone to all hosts in Proxy Zone.
LDAP (SSL) TCP 636 X H Confidential Data: Mutual Authentication Required
DNS UDP 53 X H For admin/manual queries against external DNS.
HTTP TCP 80 X H NAT to Proxy Zone side address of Proxy/Data Access firewall.
HTTPS (SSL)
TCP 443 X H NAT to Proxy Zone side address of Proxy/Data Access firewall.
Chapter 4. Security components and layers 155

5. Data Access to Intranet zone policies
Table 4-5 Data Access to Intranet zone flows (Inbound)
H - host specific filtersX - network filter
Application Protocol Port DataAccess Intranet Comments
SMTP TCP 25 H H Core server to Corp. Mail Relay / Specific IP Addr
DNS UDP 53 H H DNS Forwarder needed to prevent recursive queries.
NTP UDP 123 H H Synch to source on Intranet.
SNMP Trap UDP 162 H H TMR/GW/Netview to Internal Netview. System and Network Mgmt Traps.
Domino Replication
TCP 1352 X X
MQ Series TCP 1414 H H Channel encryption/shared key
MQ (HACMP™) TCP 1415 H H Channel encryption/shared key
DB2® (JDBC-DPROPR)
TCP 37xx H H 3700-371x variances based on geography
156 Lotus Security Handbook
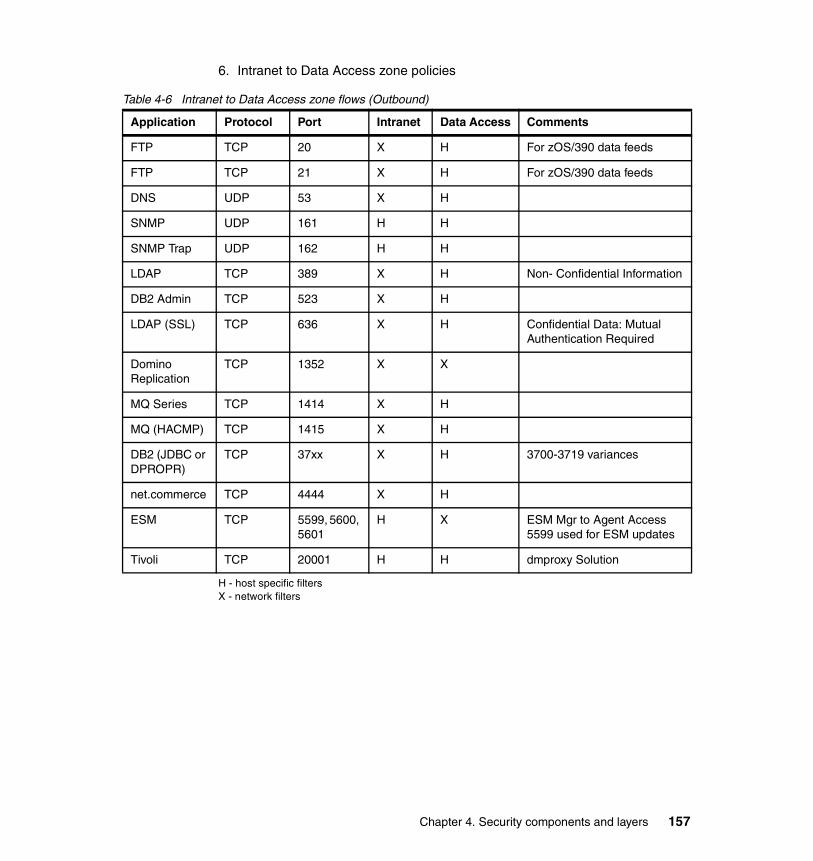
6. Intranet to Data Access zone policies
Table 4-6 Intranet to Data Access zone flows (Outbound)
H - host specific filtersX - network filters
Application Protocol Port Intranet Data Access Comments
FTP TCP 20 X H For zOS/390 data feeds
FTP TCP 21 X H For zOS/390 data feeds
DNS UDP 53 X H
SNMP UDP 161 H H
SNMP Trap UDP 162 H H
LDAP TCP 389 X H Non- Confidential Information
DB2 Admin TCP 523 X H
LDAP (SSL) TCP 636 X H Confidential Data: Mutual Authentication Required
Domino Replication
TCP 1352 X X
MQ Series TCP 1414 X H
MQ (HACMP) TCP 1415 X H
DB2 (JDBC or DPROPR)
TCP 37xx X H 3700-3719 variances
net.commerce TCP 4444 X H
ESM TCP 5599, 5600, 5601
H X ESM Mgr to Agent Access 5599 used for ESM updates
Tivoli TCP 20001 H H dmproxy Solution
Chapter 4. Security components and layers 157

7. Data Access to Data Access zone policies
Table 4-7 Data Access to Data Access zone (Site-to-Site)
H - host specific filtersX - network filters
8. Data Access to Internet zone policies
Table 4-8 Data Access to Internet zone flows (Outbound) - NAT/PAT
H - host specific filtersX - network filters
9. Intranet to Internet zone policies
The Intranet to Internet flow policies are data services that are not part of providing external access to internal resources, but are used for internal network clients accessing external resources. These are generally workstations in the Intranet zone that need to access external servers. Your policies may vary widely from what we allow within IBM. For example, some organizations only permit HTTP connections from their Intranet zone to a Proxy zone where a forward HTTP proxy resides. In this case, only the forward HTTP proxy would be permitted to connect on ports 80 and 443 to a resource in the Internet zone.
Application Protocol Port DataAccess DataAccess Comments
HTTP TCP 80 X X Inter-site Admin / XML Non-Confidential Data)
HTTPS (SSL)
TCP 443 X X Inter-site Admin / XML (Confidential Data)
LDAP TCP 389 X X Master and Replicas (Non Confidential Data)
LDAP (SSL) TCP 636 X X Master and Replicas (Confidential Data)
Domino Replication
TCP 1352 X X Master and Replicas (Non Confidential Data)
Application Protocol Port DataAccess Internet Comments
HTTP TCP 80 H X Via NAT/PAT on Data Access to Proxy firewall.
HTTPS (SSL)
TCP 443 H X Via NAT/PAT on Data Access to Proxy firewall.
158 Lotus Security Handbook

Table 4-9 is valid assuming there is no forward proxy requirement. Also note that more than a single firewall will be traversed in this flow, so the firewall interfaces referenced are not on the same firewall.
Table 4-9 Intranet to Internet zone flows (Outbound)
H - host specific filtersX - network filters
4.3 Design validationWe have now described three types of access models and our data flow rules. The last part of the secure architecture model is procedural. No matter how carefully we specify our zone placement guidelines and data flow rules, every design should be carefully analyzed and validated to ensure that it satisfies the security policy. This validation step should be mandated as part of your overall security policy.
The data flows between our four different zone categories need to have some general rules that we can then use to determine both system placement and system connectivity requirements and options. In fact, we have two methods with which we can apply these data flow rules:
1. In the case of a new application system, we can use them to determine where each subsystem or component can reside.
2. In the case of an existing application system, we can determine if we can implement the required controls, or if some of the components need to be relocated to a different zone.
We’ll look at the first of these scenarios in the next section.
Application Protocol Port Intranet Internet Comments
SMTP TCP 25 X X Corporate access of Internet SMTP resources.
DNS UDP 53 X X Corporate access of Internet (public) DNS.
HTTP TCP 80 X X Corporate access of Internet Web resources.
HTTPS TCP 443 X X Corporate access of Internet Web resources.
Chapter 4. Security components and layers 159
The last step in our design model process is to analyze the design’s possible data flows and data access to ensure the design meets our security policy. The primary focus of the design validation review is to ensure:
1. Adherence to our flow control policy tables in the previous section. This means that we need to examine all client-server and server-to-server network data flows.
2. Data access methods used match the data classification assigned to the data.
Next we will walk through an example of an application data flow review.
4.3.1 Data flow exampleIn this section we describe a fictitious infrastructure design that incorporates our different security architecture concepts. The Acme company is designing a Web portal for external suppliers. One part of the portal content is being served by a Lotus Domino application. Other content will be provided by WebSphere Application Server. The suppliers will be issued user IDs, and the credentials (passwords) will be stored in an LDAP directory. Tivoli Access Manager will be used for access controls to different portal content back-end URLs.
Based on the data classification policies at Acme, any data deemed “sensitive” that is accessed from any network other than the internal network (Intranet) must provide minimal access control of simple authentication with encryption. Data deemed “confidential” that is accessed from any network other than the internal network (Intranet) must provide minimal access control of strong authentication with encryption. We have classified the supplier directory information as “confidential,” and the portal content as “sensitive.”
Figure 4-11 depicts our logical architecture.
160 Lotus Security Handbook
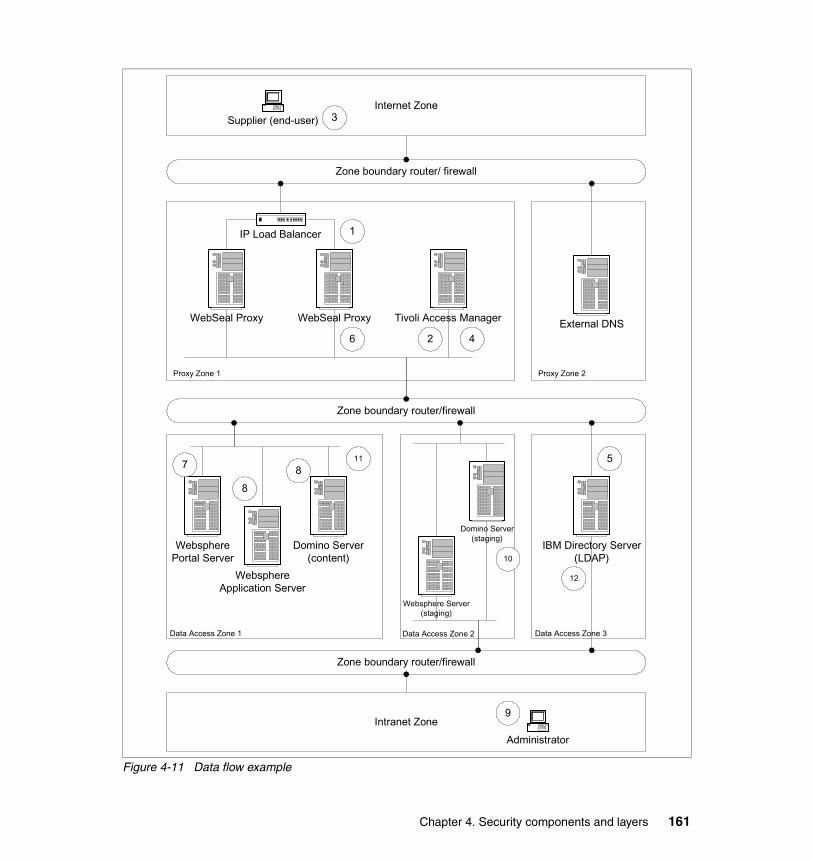
Figure 4-11 Data flow example
Internet Zone
Zone boundary router/ firewall
Zone boundary router/firewall
Zone boundary router/firewall
Intranet Zone
Supplier (end-user)
WebSeal Proxy WebSeal Proxy
IP Load Balancer
WebspherePortal Server
WebsphereApplication Server
Domino Server(content)
Tivoli Access Manager External DNS
IBM Directory Server(LDAP)
Domino Server(staging)
Administrator
1
2 4
57
3
88
9
10
11
12
Websphere Server(staging)
Proxy Zone 2Proxy Zone 1
Data Access Zone 1 Data Access Zone 3Data Access Zone 2
6
Chapter 4. Security components and layers 161

For the architecture example depicted in Figure 4-11, we must examine the data flows and ensure they meet our security policies and models. To simplify the example, we will only discuss two of the potential data flow paths.
The first data flow we examine is the data flow required for the supplier/user to initially access our portal server. Assuming the user accesses the portal using a URL, the URL is resolved by the user’s workstation using our public DNS server. We have pointed the URL to a public IP address corresponding to an IP load balancer in Proxy Zone 1. Our diagram number 1 shows the path the browser’s HTTP GET request takes to one of the two proxy servers. Since the user has not been authenticated (based on no LTPA token provided), the proxy in conjunction with the Tivoli Access Manager (number 2) challenges the user for credentials. The user returns the credentials (user ID and password, circle 3), which is provided through the proxy back to Tivoli Access Manager (circle 4). Tivoli Access Manager validates the credentials against the LDAP directory (circle 5), and assuming they are valid, the proxy server then creates an LTPA token, and passes it in the GET request (circle 6) to the portal server (circle 7). The portal server is providing content from the WebSphere Application Server and the Domino server (circles 8). Although we simplified the actual handshaking that occurs between the browser and the different servers, this provides a general description of the data flow. Now we check our data being accessed to see if we are meeting our security policies:
1. The supplier directory information cannot be directly accessed from the Internet zone. We have configured our boundary firewall between the Proxy zones and Data Access zones to only permit our Tivoli Access Manager server to connect to the Directory Server’s LDAP SSL port 636. Because the user needs to securely transmit his credentials, we will require SSL encryption between the user and the proxy servers, the proxy servers and Tivoli Access Manager, and Tivoli Access Manager and the Directory Server. Our data flow policy tables tell us we need mutual authentication for LDAP SSL from the Proxy zone to the Data Access zone. We fulfill this using server X.509 certificates for server-to-server SSL.
2. The portal Web content can be accessed from the Internet zone using simple authentication. We also must use SSL encryption since our data is deemed confidential; however, we can meet our policy by using SSL only between the proxy servers and the user. The data flow table dictates our boundary firewall between the Proxy zones and Data Access zones must only allow HTTP to specific hosts. We will only allow port 80 connections from Proxy zone 1 hosts to our three Web hosts in Data Access zone 1.
The second data flow we examine is the data flow between an internal administrator and our Domino content server and the Directory Server. The administrator (circle 9 in Figure 4-11) on an Intranet workstation makes a change to the Domino content by changing it on the Domino staging server (circle 10).
162 Lotus Security Handbook

The updated data is then replicated to the Domino content server (circle 11). Again, we check our data being accessed to see if we are meeting our security policies:
1. The administrator uses strong authentication (Notes ID and password) to access the staging server; however, our Intranet to Data Access policy does not require this flow to be encrypted. The Domino replication between the staging server and the content server meets our Data Access to Data Access policy because the data is not confidential.
Although this may appear to be a somewhat complex example, in fact it has been greatly simplified. In practice, servers are usually duplicated for redundancy. Also, we did not show in all cases how an administrator in the Intranet can access each server in the different zones. One way this is done is by using yet a fifth type of zone just for administrative access, an “Admin Zone.” And we did not attempt to depict every possible network connection. In most cases, hosts in the Proxy zones and Data Access zones are dual-homed, meaning they do, in fact, have separate network connections to the upper and lower zone boundary routers and firewalls. Remember, even though they might have physical network connections, we block all traffic at each boundary by default, except what is explicitly required and permitted by our policy tables.
4.4 SummaryIn this chapter, we have discussed several topics that comprise security architecture:
� Infrastructure components
� Using multiple network zones
� Data flow and data access policies
� Analysis of data flows to ensure policy fulfillment
We presented a multi-zone architecture model that is based on four types of network zones:
1. Internet zone
2. Proxy zone
3. Data access zone
4. Intranet zone
These zones were described in terms of what types of data we recommend locating in each, as well as the data access requirements. We also presented a
Chapter 4. Security components and layers 163
sample series of data flow policy tables that define what types of firewall filters we might require between two adjacent zones.
To put the different components and design concepts in perspective, we can summarize the best practices for security architecture using security components or measures in the following lists:
Network (IP)� Routers with filtering� Firewall (advanced filtering)� Latest SW patches on all active devices� NAT� Intrusion detection� All of the above between each segmented network zones� IPsec or SOCKS, or both, for external access to any host below Proxy zone
Application servers� Dedicated external DNS hosts with OS hardening and latest SW patches� Reverse Proxy servers with OS hardening and latest SW patches� Dedicated SMTP relay hosts with OS hardening and latest SW patches� Only proxy and core servers (Proxy Zone hosts) reachable using external IP� Dual-homed proxy servers and data access servers� Intrusion detection (specifically, DoS detection and host tampering detection)� Encryption (SSL)� Redundancy� Virus and content scanning
Workstations� Latest SW patches� Virus scanning� Intrusion detection� Forward HTTP proxies
164 Lotus Security Handbook
Chapter 5. Proxies
The separation of security zones is a key concept in the secure deployment of applications within a given infrastructure. Typically, security zones are separated by instruments like firewalls that prevent all non explicitly authorized traffic between zones. However, another method to control access in and out of trusted network zones is through the use of a proxy server.
A proxy server (also known as an application gateway) is an application that mediates traffic between a trusted network and an untrusted network. This does not remove the need for a firewall to manage the traffic at an IP level, but provides for an application-level firewall.
This chapter describes the different classes and categories of proxies, not just classifying them based on their intrinsic characteristics, but primarily by their possible usage in different topologies. It is the positioning and purpose of the proxy function that will indicate what products or instruments to use and how to configure them.
5
© Copyright IBM Corp. 2004. All rights reserved. 165

5.1 Proxies defined“Proxy,” like many other English words that have become popular computer terms, may have lost its original meaning for some of us. According to the dictionary, a proxy is somebody (or something) that is authorized to act on behalf of the user of the proxy, and that “procures” things for the user.
You can think of a proxy as an envoy or ambassador that is appointed to be somewhere where the user cannot directly be (or prefers not to be), for security or convenience reasons. Ambassadors usually know the local language and customs, and can translate a raw request from the user into a form that is acceptable locally in the other zone, and of course, then translate back the answer received. In computer terms, an ambassador could receive https (443) requests and translate them over port 80 into http requests.
Proxies, in more everyday or mundane computer terms, are processes that run on computers typically having been granted access (in the firewall) to more than one zone. It is this capability that makes them useful. Typically, a proxy will simply “get stuff” on behalf of its users, to some extent bridging zones (application wise), doing and getting things from one zone that are otherwise forbidden to be contacted or acquired by individual processes and users from another zone.
Another way to look at a proxy is as a “man in the middle.” We have seen in the previous chapters that one of the fundamental concepts in overall security–not just in cryptography–is the concept of the “(evil) man in the middle” attack, which is the interception and relay of communications between two parties by a third, uninvited, “evil” party.
Proxies can be thought of as a “good” listener or man in the middle. That is, they intercept communications, and relay them along, but with some defined and beneficial purpose to the network infrastructure.
5.2 The proxy processIn general, a computer proxy is a basic server process. This server process is a listener that “listens” to a particular port (referred to as binding to it), expecting requests in a particular protocol. When a connection from a client is established, and a valid request is received, it will “repeat” the request to another server on behalf of the client, as defined in its rules for that type of request. When a reply is received from the server, the proxy then repeats the answer back to the client user or process who originally requested it, applying any necessary translations.
166 Lotus Security Handbook

When looking at it in this simple manner, proxies really exists in many different products. For example, most portal technologies that are readily available today request content on behalf of the user and assemble the content into a single “portal view.” The Notes “passthru” that has existed in Lotus Notes for a number of years and that allowed remote access into Notes environments during the early Internet years is another example of a proxy. Nevertheless, we will focus on standalone proxy products for the rest of this section because the most generally accepted best practice today is to use standalone proxy services.
5.3 Types of proxiesThis section defines the various types of proxies that exist in the marketplace, and in the average infrastructure. As stated earlier, it is common that a given proxy product will actually implement or support multiple types of proxy services. For example, a proxy server may provide caching and authentication capabilities in addition to the basic application proxying. However, we will treat these key capabilities of proxies as separate proxy types to simplify this discussion.
The key proxy types that we define and discuss in this section are:
� Forward proxies
� Transparent proxies
� Caching proxies
� Security proxies
� Reverse proxies
5.3.1 Forward proxiesA forward proxy is a proxy that serves users from one security zone by fulfilling requests for content from the “next” zone, following a direction that is typically, but not necessarily, outbound (that is, the client is inside and the server is somewhere in the open Internet).
From a security point of view, a simple proxy has the security goal of hiding the identity (in internal network topology terms) of the requester user workstation or process. It can also be used to mask out some other attributes of the user session.
A typical example of the type is the corporate proxies that serve internal users, allowing them to access external sites for Web browsing or any other kind of Internet connectivity.
Chapter 5. Proxies 167

From a topology point of view (both generally and bandwidth-wise), forward proxies are always relatively closer in network speed terms to your users, compared to a slower (WAN) link that typically separates the forward proxy from the actual contents on the Internet.
5.3.2 Transparent proxiesTransparent proxies are proxies that “are there,” but that do not make users explicitly aware that the proxy is there. In forwarding proxies, these are typically Linux/UNIX boxes that listen to all the traffic for a particular protocol for a particular segment of a network, and intercept the traffic without the user process actually knowing about their existence. In fact, the user process is not talking to the proxy, but talking to another (the end) site, and the proxy is effectively becoming a man-in-the-middle, highjacking the connection.
A proxy is non-transparent, or declared, when users know that they are talking via a proxy, because they are talking (in proxy-speak: HTTP) to the proxy. In other words, if I declare my proxy to be proxy.mydomain.com, then my processes will talk to proxy.mydomain.com, asking “it” to contact the ultimate destination of my requests. I’m fully cognizant of the existence of the proxy, that I have to talk “proxy-speak” to it (that is, HTTP), and that I have to tell it where to go and fetch the content from.
You can have declared, non-transparent proxies that are automatically declared, are configured, or are discovered. Regardless of how they become declared, these proxies are visible and known to the requesting user or process. In other words, it does not matter how you or your process know the proxy exists, what matters is that you do know the proxy exists, and that you are talking to the proxy.
A transparent proxy is not truly a type of proxy on its own, but rather any proxy is either transparent or declared by design.
5.3.3 Caching proxiesA caching proxy, as the name indicates, is a proxy that is configured to reuse cached images of content when available and possible. When a previously cached piece of content is not available, then it fetches and serves the content but also tries to cache it.
The most important aspect of caching proxies is to ensure that caching proxies only cache what is truly cacheable. Dynamic, regularly changing content would not be a good choice to cache since this could affect the stability of the application relying on the content. In the case of HTTP content, HTTP headers indicate if it is possible to cache the content or not via the “cache” directives.
168 Lotus Security Handbook
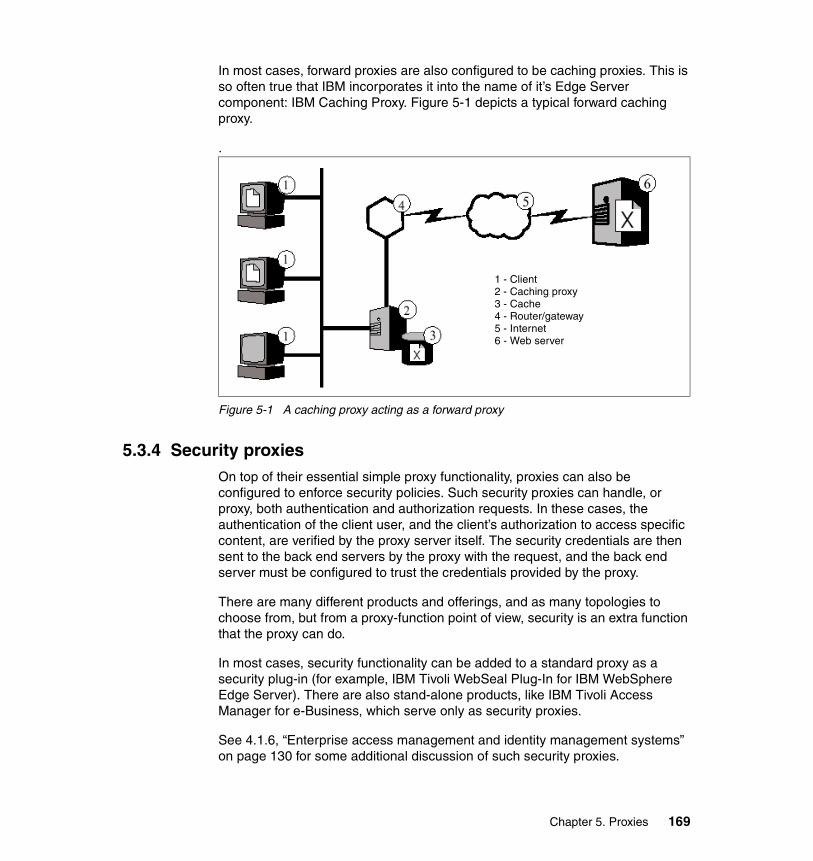
In most cases, forward proxies are also configured to be caching proxies. This is so often true that IBM incorporates it into the name of it’s Edge Server component: IBM Caching Proxy. Figure 5-1 depicts a typical forward caching proxy.
.
Figure 5-1 A caching proxy acting as a forward proxy
5.3.4 Security proxiesOn top of their essential simple proxy functionality, proxies can also be configured to enforce security policies. Such security proxies can handle, or proxy, both authentication and authorization requests. In these cases, the authentication of the client user, and the client’s authorization to access specific content, are verified by the proxy server itself. The security credentials are then sent to the back end servers by the proxy with the request, and the back end server must be configured to trust the credentials provided by the proxy.
There are many different products and offerings, and as many topologies to choose from, but from a proxy-function point of view, security is an extra function that the proxy can do.
In most cases, security functionality can be added to a standard proxy as a security plug-in (for example, IBM Tivoli WebSeal Plug-In for IBM WebSphere Edge Server). There are also stand-alone products, like IBM Tivoli Access Manager for e-Business, which serve only as security proxies.
See 4.1.6, “Enterprise access management and identity management systems” on page 130 for some additional discussion of such security proxies.
1 - Client2 - Caching proxy3 - Cache4 - Router/gateway5 - Internet6 - Web server
Chapter 5. Proxies 169
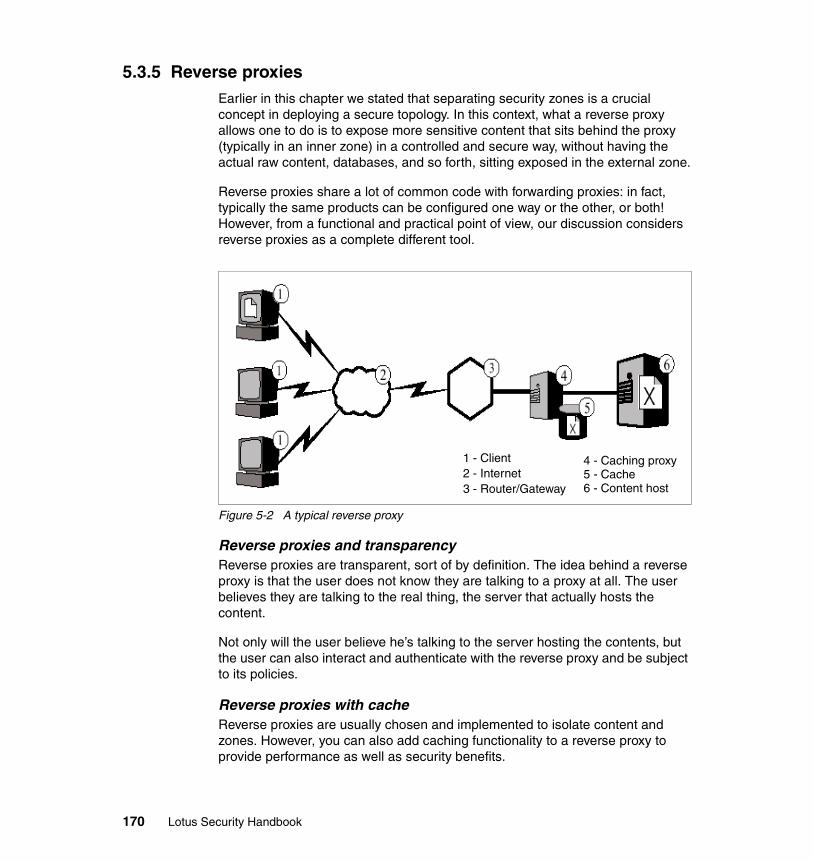
5.3.5 Reverse proxiesEarlier in this chapter we stated that separating security zones is a crucial concept in deploying a secure topology. In this context, what a reverse proxy allows one to do is to expose more sensitive content that sits behind the proxy (typically in an inner zone) in a controlled and secure way, without having the actual raw content, databases, and so forth, sitting exposed in the external zone.
Reverse proxies share a lot of common code with forwarding proxies: in fact, typically the same products can be configured one way or the other, or both! However, from a functional and practical point of view, our discussion considers reverse proxies as a complete different tool.
Figure 5-2 A typical reverse proxy
Reverse proxies and transparencyReverse proxies are transparent, sort of by definition. The idea behind a reverse proxy is that the user does not know they are talking to a proxy at all. The user believes they are talking to the real thing, the server that actually hosts the content.
Not only will the user believe he’s talking to the server hosting the contents, but the user can also interact and authenticate with the reverse proxy and be subject to its policies.
Reverse proxies with cacheReverse proxies are usually chosen and implemented to isolate content and zones. However, you can also add caching functionality to a reverse proxy to provide performance as well as security benefits.
1 - Client2 - Internet3 - Router/Gateway
4 - Caching proxy5 - Cache6 - Content host
170 Lotus Security Handbook
Note that in this kind of scenario the performance benefit of caching is network performance, since the reverse proxy is normally sitting close to the back-end server. A significant motive for caching with a reverse proxy is to offload the serving of static cacheable content from back end application servers. This leaves the often more expensive back end application servers free to focus their CPU bandwidth on more complex dynamic and transaction-oriented tasks.
However, when caching is enabled on a reverse proxy, it is important that the reverse proxy be properly protected. All content, even if it is completely static, still needs to be protected. You do not want to wake up and find that the static, non-confidential part of your Web site has been completely defaced by hackers within the reverse proxies cache.
Reverse proxies with additional security Reverse Proxies Secure Servers (RPSS) combine, in one box or product, the functions of a pure reverse proxy and the functions of a security proxy as described earlier.
Often, such RPSS products will have a plug-in component on the reverse proxy that handles access control and authorization requests, combined with a back end enterprise access system that actually verifies the access and authorization rights of the user or client. This plug-in component is sometimes referred to as a blade. For example, you may be using IBM Tivoli Access Manager as your Enterprise Security Solution; you still have the choice of what blade to use at the proxy level (WebSeal or the lighter plug-in sometimes called WebSeal-lite).
5.4 Reverse proxies and Lotus technologiesThe majority of the Lotus Domino-based technologies have supported reverse proxy scenarios for a number of years. That is with the exception of the Lotus Sametime product, which only recently gained reverse proxy support. This is described in more detail in the next section.
For the traditional Lotus Domino-based technologies (Notes/Domino, iNotes, QuickPlace, and so forth) the following reverse proxy requirements for Domino must be considered.
5.4.1 Domino caching considerationsThe first consideration for caching is that Domino-based applications, sites, and technologies can be very dynamic in nature. Based on this, any reverse proxy implementation with caching enabled should be sure to honor the HTTP header
Chapter 5. Proxies 171
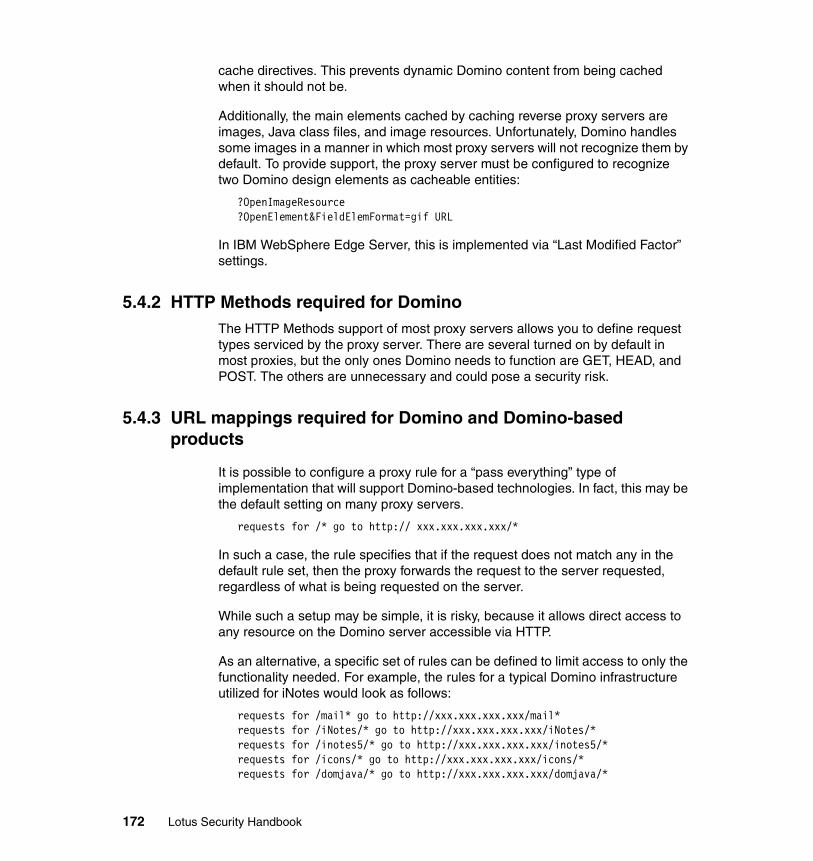
cache directives. This prevents dynamic Domino content from being cached when it should not be.
Additionally, the main elements cached by caching reverse proxy servers are images, Java class files, and image resources. Unfortunately, Domino handles some images in a manner in which most proxy servers will not recognize them by default. To provide support, the proxy server must be configured to recognize two Domino design elements as cacheable entities:
?OpenImageResource ?OpenElement&FieldElemFormat=gif URL
In IBM WebSphere Edge Server, this is implemented via “Last Modified Factor” settings.
5.4.2 HTTP Methods required for Domino The HTTP Methods support of most proxy servers allows you to define request types serviced by the proxy server. There are several turned on by default in most proxies, but the only ones Domino needs to function are GET, HEAD, and POST. The others are unnecessary and could pose a security risk.
5.4.3 URL mappings required for Domino and Domino-based products
It is possible to configure a proxy rule for a “pass everything” type of implementation that will support Domino-based technologies. In fact, this may be the default setting on many proxy servers.
requests for /* go to http:// xxx.xxx.xxx.xxx/*
In such a case, the rule specifies that if the request does not match any in the default rule set, then the proxy forwards the request to the server requested, regardless of what is being requested on the server.
While such a setup may be simple, it is risky, because it allows direct access to any resource on the Domino server accessible via HTTP.
As an alternative, a specific set of rules can be defined to limit access to only the functionality needed. For example, the rules for a typical Domino infrastructure utilized for iNotes would look as follows:
requests for /mail* go to http://xxx.xxx.xxx.xxx/mail*requests for /iNotes/* go to http://xxx.xxx.xxx.xxx/iNotes/*requests for /inotes5/* go to http://xxx.xxx.xxx.xxx/inotes5/*requests for /icons/* go to http://xxx.xxx.xxx.xxx/icons/*requests for /domjava/* go to http://xxx.xxx.xxx.xxx/domjava/*
172 Lotus Security Handbook

requests for /names.nsf go to http://xxx.xxx.xxx.xxx/names.nsf
With these rules, only content within the /mail* subdirectories is served. The rules are defined so that if sites have multiple mail subdirectories (for instance, /mail[1-3]), they are included. If you want to restrict access to only a subset of mail databases, move these to a special folder such as /pubmail/*.
The other rules allow access to supporting content needed to provide the iNotes Web Access experience to the end user. The other important rule to consider is the /names.nsf rule used for authentication. This allows access to the Domino Directory from the Internet, but none of the content is available other than the default folder list.
This is a result of how Domino builds URLs. When a user with session authentication logs into Domino, the default login screen sends a request to /names.nsf?Login. The proxy server matches this request and passes it to Domino. If, for example, a user tries to open the Groups view with /names.nsf/Groups?OpenView or /names.nsf/85255ed5006cafef852556d4006ca21c?OpenView, then both the Domino and proxy server requests fail because they do not match the rule. The user receives an error 403 message stating access is forbidden.
URL terminator considerations for DominoMost proxy servers also have the capability to consider URL terminators, which tell the proxy server that this value should be treated as part of the base URL for mapping. URL terminators (referred to as the SignificantUrlTerminator setting in IBM WebSphere Edge Server) must be created for Domino since most Domino URLs contain “?”, and thus are treated as query URLs by the proxy server for possible caching. These terminators tell the proxy server to start after this point of the URL to look for dynamic content.
The specific URL terminators required to support Domino are:
SignificantUrlTerminator ?OpenImageResourceSignificantUrlTerminator ?OpenElementSignificantUrlTerminator /?OpenImageResourceSignificantUrlTerminator /?OpenElement
Handling redirection responses from DominoThe ReversePass directive of most proxy servers intercepts the standard redirection 302 responses from Domino and rewrites them to a new location. This new location should be the valid external URL name so that when the end user requests the renew redirected page, it is still valid:
ReversePass http:// xxx.xxx.xxx.xxx/* http://proxy.formymailserver.web/*
Chapter 5. Proxies 173
For more informationMore information on configuring Domino for use behind a reverse proxy can be found in the Lotus Developer Domain article “Configuring iNotes Web Access with a WebSphere Edge reverse proxy server.” This article can be found on the LDD web site at:
http://www-10.lotus.com/ldd/today.nsf/62f62847467a8f78052568a80055b380/ff0e835068e03c3685256cda0054a213?OpenDocument&Highlight=0,reverse,proxy
5.5 Lotus Sametime 3.1 proxy supportWhile other Lotus technologies have supported reverse proxy infrastructures all along, this support just started for Lotus Instant Messaging and Web Conferencing (Sametime) with version 3.1. This section discusses the specific issues related to using reverse HTTP proxy servers with a Sametime 3.1 server because the issues are more complex and involved than with the other Lotus technologies we have discussed so far.
More details on the reverse proxy support in Sametime 3.1 can be found in the Sametime 3.1 Administrators Guide that is part of the product documentation. Product documentation is available from the Lotus Developers Domain:
http://www.lotus.com/ldd
5.5.1 Overview of Sametime 3.1 proxy supportWhen a Sametime 3.1 server is deployed on an internal network behind a reverse proxy server, the reverse proxy server operates as an intermediary between the Sametime server and the Sametime clients. All Sametime data flowing between the Sametime server and its clients passes through the reverse proxy server.
To accomplish its security objectives, a reverse proxy server manipulates the data that passes through it. The manipulation of Sametime data by the reverse proxy server imposes specific requirements and limitations on the use of reverse proxy servers with the Sametime server. That is, only certain types of proxy servers are supported, and only certain types of proxy features may be enabled.
5.5.2 Reverse proxy server requirementsThis section lists the requirements that a reverse proxy server must meet to be utilized with Sametime 3.1.
174 Lotus Security Handbook

URL specification requirement (affinity-id requirement)Only reverse proxy servers that support the use of an affinity-id (or server alias) in the URLs that are associated with internal servers can be used with Sametime. Specifically, the reverse proxy server must support this URL specification to access protected internal servers:
http[s]://hostname:port/affinity-id/
In this example, the "hostname" represents the FQDN (DNS name) of the reverse proxy server and the affinity-id is an alias for an internal server that is protected by the reverse proxy server. A specific example of this URL format is:
http[s]://reverseproxy.ibm.com/st01/stcenter.nsf
In this example, the text string "st01" is the affinity-id. The affinity-id is an alias for a specific Sametime server (such as sametime.ibm.com) that is protected by the reverse proxy server. The affinity-id is used by the reverse proxy server to direct incoming requests to the specific internal Sametime server.
Multiple reverse proxy servers environmentsIf you have deployed multiple reverse proxy servers in your network environment, and you expect users to access your Sametime servers through multiple reverse proxy servers, there are some specific requirements for your environment:
� Each of the reverse proxy servers must have the same DNS name and the same mapping configurations.
For example, if one reverse proxy server is named reverseproxy.ibm.com, all other reverse proxy servers must be named reverseproxy.ibm.com. If the reverse proxy servers have different DNS names, the Sametime clients will be unable to maintain communications with a Sametime server deployed behind the reverse proxy servers. A connection dispatching device (such as an IBM WebSphere Edge Server) should be used to distribute connections from Web browsers to the multiple reverse proxy servers.
� Multiple reverse proxy servers must have similar mapping configurations.
Each reverse proxy server must use identical mapping rules and configurations to govern the translation of URLs sent by Web browsers to the reverse proxy server for the purpose of accessing an internal Sametime server. If the translation of these URLs to the URLs of the internal Sametime servers does not occur in exactly the same way on each of the reverse proxy servers, the Sametime clients will be unable to maintain communications with a Sametime server deployed behind the reverse proxy server.
Chapter 5. Proxies 175

The reverse proxy server must use cookies for authentication.Reverse proxy servers that rewrite URLs for authentication purposes are not supported. Some reverse proxy servers append authentication and session information to the end of URLs embedded in HTML that passes through the proxy back to the client. The client will include this appended data on subsequent requests to the reverse proxy server.
When the reverse proxy server receives these subsequent requests from the client, the reverse proxy server strips the authentication data and rewrites the URL to accomplish the internal routing of requests. A Sametime server cannot operate behind a reverse proxy server that handles authentication data in this way.
Reverse proxies that utilize cookies for authentication information must therefore be utilized. Additionally, the administrator should specify a lengthy time-out value for authentication cookies generated by the reverse proxy server. Setting a lengthy time-out value for authentication cookies can prevent unexpected user disconnections due to an authentication cookie expiration. Generally, the authentication cookie should be valid for the entire length of the longest meetings that are routinely conducted on the Sametime server deployed behind the reverse proxy server.
5.5.3 Sametime limitations when using reverse proxy serversWhile Sametime 3.1 does support reverse proxy environments, there are some limitations to normal Sametime functionality.
Client limitations and JVM requirementsNot all Sametime clients can communicate with Sametime servers through a reverse proxy server. The following clients are supported:
� Sametime Meeting Room and Sametime Broadcast clients
The Sametime Meeting Room client and the Sametime Broadcast client can communicate with a Sametime server through a reverse proxy server when running with the following Web browsers and Java Virtual Machines (JVMs):
– IE 6 browser + MS VM or Sun Microsystems JVM 1.4.1 + Java Plug-in).
– Netscape 7 + Sun Microsystems JVM 1.4.1 (and associated Java Plug-in)
� Sametime Connect for browsers (the Java version of Sametime Connect) and Sametime Links applications built with Sametime developer toolkits
The Sametime Connect for browsers client and Sametime Links applications can communicate with a Sametime server through a reverse proxy server when running in an Internet Explorer 6 or Netscape 7 browser that operates with the Sun Microsystems JVM 1.4.1.
176 Lotus Security Handbook

The Sametime Connect for browsers client and Sametime Links applications may not function appropriately with other JVMs, including the native Microsoft VM provided for Internet Explorer.
Server limitationsThe following limitations apply to Sametime server features when the Sametime server is deployed behind a reverse proxy server.
� Audio/video is not available - Audio/video streams cannot be transmitted to Sametime clients that access the Sametime server through a reverse proxy server.
� TeamRoom and Discussion databases are not available - A user that connects to the Sametime server through a reverse proxy server cannot use the TeamRoom and Discussion databases on the Sametime server.
� Access to the Sametime Administration Tool is not available - A user that connects to the Sametime server through a reverse proxy server cannot access the Sametime Administration Tool. The user can open a Web browser that is installed on the Sametime server to access the Sametime Administration Tool. The user can also connect to the Sametime server from an internal network location that does not route HTTP traffic through the reverse proxy server to access the Sametime Administration Tool.
� Sametime Enterprise Meeting Server restrictions - The Sametime 1.0 Enterprise Meeting Server that operates with Sametime 3.1 servers cannot be deployed behind a reverse proxy server
5.5.4 SSL and client certification considerations and issuesSecure Sockets Layer (SSL) can be used to encrypt data transmitted between the Sametime clients and the reverse proxy server. However, SSL cannot be used to encrypt data transmitted between the Sametime servers and the reverse proxy server. Thus, the connection between the reverse proxy and the Sametime server should be secure.
Restriction: The Sametime Connect for the desktop client (that is, the Microsoft Windows version of Sametime Connect) cannot be used with a Sametime server that is deployed behind a reverse proxy server.
Tip: If SSL is used to encrypt data transmitted between Web browsers and the reverse proxy server, the administrator must perform the mapping configurations on the Sametime server necessary to map the HTTPS data received from the Web browser to the HTTP required by the Sametime server.
Chapter 5. Proxies 177
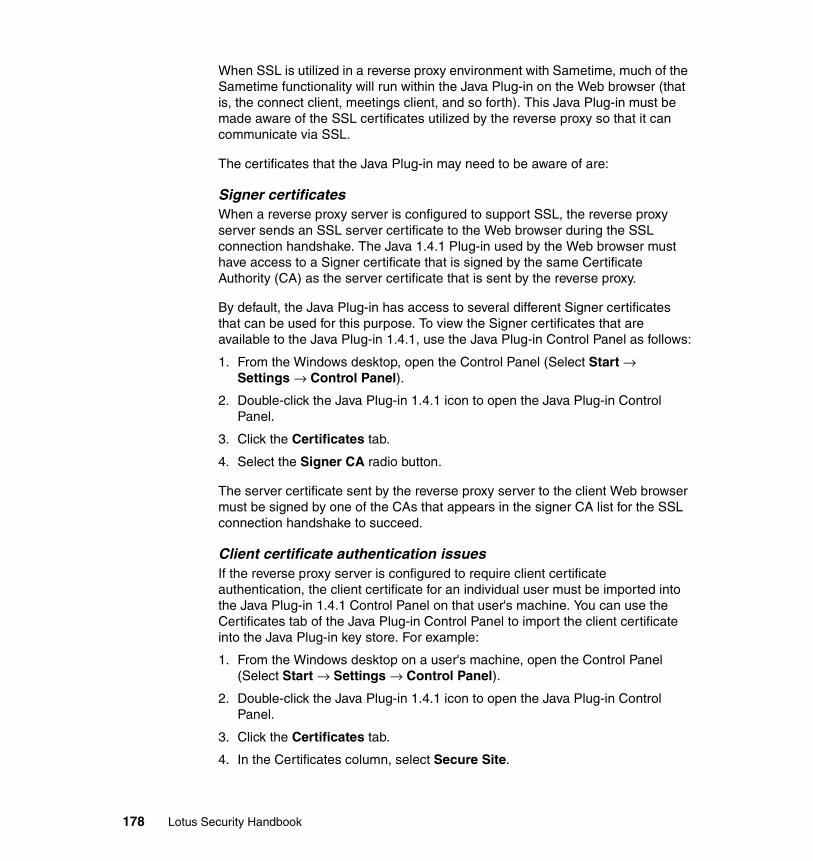
When SSL is utilized in a reverse proxy environment with Sametime, much of the Sametime functionality will run within the Java Plug-in on the Web browser (that is, the connect client, meetings client, and so forth). This Java Plug-in must be made aware of the SSL certificates utilized by the reverse proxy so that it can communicate via SSL.
The certificates that the Java Plug-in may need to be aware of are:
Signer certificatesWhen a reverse proxy server is configured to support SSL, the reverse proxy server sends an SSL server certificate to the Web browser during the SSL connection handshake. The Java 1.4.1 Plug-in used by the Web browser must have access to a Signer certificate that is signed by the same Certificate Authority (CA) as the server certificate that is sent by the reverse proxy.
By default, the Java Plug-in has access to several different Signer certificates that can be used for this purpose. To view the Signer certificates that are available to the Java Plug-in 1.4.1, use the Java Plug-in Control Panel as follows:
1. From the Windows desktop, open the Control Panel (Select Start → Settings → Control Panel).
2. Double-click the Java Plug-in 1.4.1 icon to open the Java Plug-in Control Panel.
3. Click the Certificates tab.
4. Select the Signer CA radio button.
The server certificate sent by the reverse proxy server to the client Web browser must be signed by one of the CAs that appears in the signer CA list for the SSL connection handshake to succeed.
Client certificate authentication issuesIf the reverse proxy server is configured to require client certificate authentication, the client certificate for an individual user must be imported into the Java Plug-in 1.4.1 Control Panel on that user's machine. You can use the Certificates tab of the Java Plug-in Control Panel to import the client certificate into the Java Plug-in key store. For example:
1. From the Windows desktop on a user's machine, open the Control Panel (Select Start → Settings → Control Panel).
2. Double-click the Java Plug-in 1.4.1 icon to open the Java Plug-in Control Panel.
3. Click the Certificates tab.
4. In the Certificates column, select Secure Site.
178 Lotus Security Handbook
� Click the Import button to import the client certificate.
5.5.5 Mapping rules on the reverse proxy server to support SametimeWhen a Sametime server is deployed behind a reverse proxy server, the administrator must configure mapping rules on the reverse proxy server.
These mapping rules enable the reverse proxy server to translate (or rewrite) a URL associated with the reverse proxy server to the URL of an internal Sametime server.
When a user connects to a Sametime server through a reverse proxy server, the reverse proxy server must be configured with “mapping rules” to support the following actions that enable Sametime users to attend meetings and participate in chat sessions:
� The user must be able to click on links in the Sametime server home page and navigate to the various HTML pages of the UI. This capability requires the reverse proxy server to rewrite the URLs of the HTML pages that comprise the Sametime User Interface.
� The Sametime Java applet clients that load in a user's Web browser must be able to connect to the services on the Sametime server. Since these connections must occur through the reverse proxy server, the reverse proxy server must also be able to rewrite the URLs required to establish these Java applet connections to the services on the Sametime server.
This section provides some guidelines on how mapping rules are configured on a reverse proxy server to accomplish the translation (or rewriting) of URLs when the reverse proxy operates with Sametime.
Alias considerations and multiple serversAny reverse proxy server that operates with a Sametime server must support the affinity-id (or server alias) in URLs.
For example, if the incoming URL from the Web browser is:
http[s]://reverseproxy.ibm.com/st01/stcenter.nsf
then the mapping rules on the reverse proxy server map the "st01" affinity-id to the Sametime server named "sametime.ibm.com" and the affinity-id ensures the reverse proxy server rewrites the incoming URL to:
http[s]://sametime.ibm.com/stcenter.nsf
Chapter 5. Proxies 179
If you have multiple Sametime servers deployed behind a reverse proxy server, each Sametime server must have an individual affinity-id, for example:
http://sametime2.ibm.com/* /st02/*http://sametime1.ibm.com/* /st01/*
Use wildcards to simplify the Sametime UI mappingsA single mapping rule can be used to translate all URLs associated with the Sametime server user interface.
Through the use of wildcards, the administrator can create a single mapping rule on the reverse proxy server to translate all URLs associated with the Sametime server interface. For example, the administrator can create a mapping rule that translates the following URL from the Web browser:
http[s]://reverseproxy.ibm.com/st01/*
to this Sametime server URL:
http[s]://sametime.ibm.com/*
A single mapping rule that accomplishes this type of URL translation should enable users to access all entities of the Sametime user interface through a reverse proxy server.
Four mappings are required for the three Java applet serversWhen creating URL mappings to enable the Sametime Java applet clients running in a user's Web browser, support must be provided to connect to the Community Services, Meeting Services, and Broadcast Services on the Sametime server. Four mapping rules are actually required for these three services: two for the Community Services, one for the Meeting Services, and one for the Broadcast Services.
Example mapping configuration for Community ServicesThis example illustrates the mapping configurations that enable a Java applet client to connect to the Community Services.
If the incoming URLs from the Java applet are:
http[s]://proxy.ibm.com/st01/communityCBR/http[s]://proxy.ibm.com/st01/CommunityCBR/
the mapping rules on the reverse proxy must translate these URLs to:
http://sametime.ibm.com:8082/communityCBRhttp://sametime.ibm.com:8082/CommunityCBR
180 Lotus Security Handbook
Example mapping for Meeting Services This example illustrates the mapping configurations that enable a Java applet client to connect to the Meeting Services.
If the incoming URL from the Java applet is:
http[s]://proxy.ibm.com/st01/MeetingCBR
the mapping rule on the reverse proxy must translate this URL to:
http://sametime.ibm.com:8081/MeetingCBR
Example mapping for Broadcast Services This example illustrates the mapping configurations that enable a Java applet client to connect to the Broadcast Services.
If the incoming URL from the Java applet is:
http[s]://proxy.ibm.com/st01/BroadcastCBR
the mapping rule on the reverse proxy must translate this URL to:
http://sametime.ibm.com:554/BroadcastCBR
HTTP tunneling simplifies the Java applet mappingsDuring a Sametime server installation, the administrator has the option of allowing or not allowing HTTP tunneling on port 80.
If the administrator does not allow HTTP tunneling on port 80 during the Sametime server installation, it is necessary to configure separate mapping rules for each of the three Sametime services (Community Services, Meeting Services, and Broadcast Services) as just shown.
When HTTP tunneling on port 80 is not allowed, each of the Sametime services listens for HTTP connections on a different port, and separate mapping rules must be established for each of the services. The mapping rule must specify the port on which each of the services is listening for connections.
If the administrator allows HTTP tunneling on port 80 during the Sametime server installation, the Sametime clients connect to all of the services on a single port.
Tip: The mapping configuration for the Community Services connectivity should contain two case-sensitive mapping rules as indicated here. Some pieces of the Java code contain the lowercase “c” in “communityCBR” and some pieces of the Java code use the uppercase “C” in “CommunityCBR.” This difference may prevent connections if the proxy is case-sensitive.
Chapter 5. Proxies 181

With this configuration, the single mapping rule that enables users to navigate the Sametime server user interface will also enable the Sametime clients to make connections to the Sametime services.
When HTTP tunneling on port 80 is allowed, the Community Services multiplexer on the Sametime server listens for HTTP connections on behalf of the HTTP Services, Community Services, Meeting Services, and Broadcast Services on the Sametime server. The Community Services multiplexer listens for connections to all of these services on a single port (port 80).
When the Sametime server is operating in single port mode (meaning HTTP tunneling on port 80 is allowed), the mapping rules for Java applet connectivity are much simpler. Since all connections from the Sametime Java applet clients occur on the same port, it is not necessary to specify individual ports for each service in the mapping rules.
In this scenario, the administrator would only need to ensure that this incoming URL from the Sametime Java applets:
http[s]://proxy.ibm.com/st01/*
is translated to this URL by the mapping rules on the reverse proxy server:
http://sametime.ibm.com/*
5.5.6 Configuring Sametime 3.1 for reverse proxy supportTo enable Sametime 3.1 to understand and support reverse proxy requests, the administrator must use the Sametime Administration Tool on the Sametime server to configure the Sametime server to operate with a reverse proxy server.
� Ensure Sametime is set up for HTTP tunneling
Tunneling over HTTP is required, as most reverse proxies will only support HTTP protocols.
� Enable reverse proxy support
Expand the Configuration section of the Sametime Web Admin GUI, then click Connectivity. At the bottom of the screen is a section for “Reverse Proxy Support.”
Enable reverse proxy support by checking the box, and then enter the reverse proxy “junction name” in the Server Alias box.
Tip: Server performance is not as efficient when the Sametime server is configured to support HTTP tunneling on port 80 because of the connectivity burden placed on the Community Services multiplexer.
182 Lotus Security Handbook
� Enable reverse proxy discovery on the client
Selecting the Reverse Proxy Discovery setting allows the administrator to enable or disable the reverse proxy support.
This setting enables the logic in the Sametime clients that enables them to connect to a Sametime server through the reverse proxy server. This setting is disabled by default.
5.6 General reverse proxy tipsThis section contains some general reverse proxy hints and tips that are not specific to any Lotus or IBM technology or product.
Consider performance impactsConsider the potential performance impacts when utilizing any reverse proxy. Even with caching enabled, the extra steps of URL mapping, HTTP header modification, any translations required, and so forth, by the reverse proxy can have a negative performance impact on applications which are “chatty.”
For an example of the performance impact of a reverse proxy on the Domino Web Access (iNotes) functionality, see the article “Running iNotes Web Access with reverse proxies and other security features” available at the Lotus Developer Domain Web site at:
http://www-10.lotus.com/ldd/today.nsf/62f62847467a8f78052568a80055b380/a96b7591a013173185256c79005c1af3?OpenDocument
Consider client affinityIf more than one server could be the potential target for serving a request (that is, a high availability, failover or load balancing situation), and if the requests involve dynamic content, then you must ensure that the same server is used for all the transactions coming for a particular client for a particular time interval.
Tip: Enabling this setting does not require that all users on your corporate intranet access the Sametime server through the reverse proxy server. Enabling this setting enhances the existing logic in the Sametime clients by adding the reverse proxy connection logic to the existing logic. The existing logic is still present and operable within the clients. This design enables clients that do not connect to the Sametime server through the reverse proxy server to follow the standard Sametime client connection processes when connecting to the Sametime server.
Chapter 5. Proxies 183
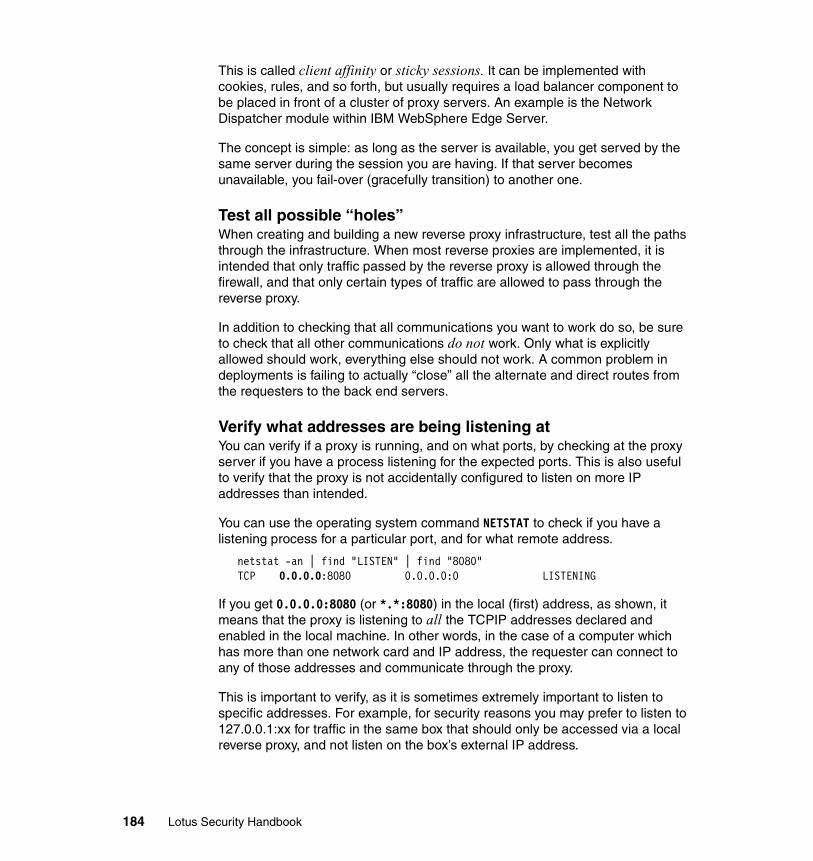
This is called client affinity or sticky sessions. It can be implemented with cookies, rules, and so forth, but usually requires a load balancer component to be placed in front of a cluster of proxy servers. An example is the Network Dispatcher module within IBM WebSphere Edge Server.
The concept is simple: as long as the server is available, you get served by the same server during the session you are having. If that server becomes unavailable, you fail-over (gracefully transition) to another one.
Test all possible “holes”When creating and building a new reverse proxy infrastructure, test all the paths through the infrastructure. When most reverse proxies are implemented, it is intended that only traffic passed by the reverse proxy is allowed through the firewall, and that only certain types of traffic are allowed to pass through the reverse proxy.
In addition to checking that all communications you want to work do so, be sure to check that all other communications do not work. Only what is explicitly allowed should work, everything else should not work. A common problem in deployments is failing to actually “close” all the alternate and direct routes from the requesters to the back end servers.
Verify what addresses are being listening atYou can verify if a proxy is running, and on what ports, by checking at the proxy server if you have a process listening for the expected ports. This is also useful to verify that the proxy is not accidentally configured to listen on more IP addresses than intended.
You can use the operating system command NETSTAT to check if you have a listening process for a particular port, and for what remote address.
netstat -an | find "LISTEN" | find "8080"TCP 0.0.0.0:8080 0.0.0.0:0 LISTENING
If you get 0.0.0.0:8080 (or *.*:8080) in the local (first) address, as shown, it means that the proxy is listening to all the TCPIP addresses declared and enabled in the local machine. In other words, in the case of a computer which has more than one network card and IP address, the requester can connect to any of those addresses and communicate through the proxy.
This is important to verify, as it is sometimes extremely important to listen to specific addresses. For example, for security reasons you may prefer to listen to 127.0.0.1:xx for traffic in the same box that should only be accessed via a local reverse proxy, and not listen on the box’s external IP address.
184 Lotus Security Handbook

Do not “over cache” when using a caching proxyFrom a security best practices point of view, the single most relevant thing you want to ensure is that the a caching proxy caches what is cacheable and does not cache what is not cacheable. The results of ignoring no-cache directives by proxy servers configured as “bandwidth-savers” can range from authentication problems, to SSO not working as expected, to key pieces of functionality such as Sametime awareness not functioning.
Lotus products actively rely on proxies not over-caching non-cacheable content, otherwise results are truly unpredictable.
Track client IP addressesBy default, many reverse proxy servers will hide the client’s original IP address when making requests to back-end servers. Thus, all requests will appear to come from the same IP address. Privacy settings of many proxy products allow additional HTTP headers to be passed along with the requests. Thus, one can enable the forwarding of the client’s IP address to a destination server. This adds an additional HTTP header value containing the requesting client’s actual IP address. Which is of great security value since it enables you to track and troubleshoot any client connections.
Turn off DNS lookupsMany proxy servers allow for DNS lookups of connecting clients. This option causes the proxy server to resolve each incoming client’s IP address with a host
Troubleshooting tip: When debugging a connection between two entities, say Alice and Bob, if you have even the remote suspicion that somebody (your friendly network people or even your ISP) could have configured a transparent proxy in the middle between Alice and Bob, then look for this clue: additional response headers that include “via.”
In many field cases, we have found (protocol analyzer in hand) that some of those transparent forward proxies over-cache or aggressively cache content, which means that they are configured to save bandwidth, no matter what. Thus, they behave as if “they know better” or “are smarter proxies,” in effect ignoring the “no-cache” and “expires” directives that the Web server may have imposed on the content.
Your security policies should specify that network administrators should never over-cache contents. Most administrators will understand and agree to a sensible policy since security must not be compromised to achieve better network performance.
Chapter 5. Proxies 185
name, resulting in processing overhead on the server. Unless there are security or logging reasons for doing so, this option should generally be turned off.
Log and monitor your proxyProxy servers are generally deployed in external zones, which leaves them open to an increased level of attack from would-be hackers. Therefore, you should regularly log and monitor your proxy systems.
Keep up with the latest system patchesWhile we understand internal deployment complexities and timing issues, having a security product installed at anything less than the latest available patch/level is an open invitation to get in trouble. There is no point in spending money maintaining sub-standard security. While you can use it to prevent certain mistakes, there is no such thing as half-secure. Malicious hackers have access to the same information about known vulnerabilities that the rest of us have, and they are quick to exploit them.
5.7 SummaryIn this chapter, we have introduced the concept of proxy servers, and described the various types of proxies utilized in current computing infrastructures. We then focused on the reverse proxy concepts, as reverse proxies provide a key building block for creating multi-zoned secure environments. Various considerations and hints were then provided for implementing reverse proxies with IBM and Lotus technologies.
The reverse proxy concept is used later in this redbook, in Part 4, “A secure scenario” on page 579, to help build a secure environment for a fictitious company.
186 Lotus Security Handbook

Chapter 6. Public key infrastructures
In this chapter, we apply all the theoretical knowledge we’ve acquired in the early chapters of this redbook and discuss public key infrastructures (PKI) and the way that they are used within Notes and Domino.
We not only look at the native implementation of the PKI in Notes and Domino, but also at the Web-oriented PKI implementation, which is aimed at offering standards-based Internet-related security services and technologies.
We define Certificate Authorities and Registration Authority and the distinctions between them. We then explain the concepts of key rings and public key certificates and see how to create them with the help of the tools that come with the Domino Server.
Once we have the proper key rings created and the certificates generated, we describe how to set up an SSL configuration and explain how SSL works. We also provide some best practices to get the most security out of SSL while at the same time reducing the impact this has on the Domino Server.
6
© Copyright IBM Corp. 2004. All rights reserved. 187

6.1 The Notes PKIWe begin our discussion with the native PKI implementation in Lotus Notes and Domino. There are two reasons for this:
� The PKI implementation is so transparent in Notes that it is easy to use and understand. This is what has made it the largest PKI implementation in the world, well ahead of anything else currently in use on the Internet.
� People who administer their Notes and Domino environment are already familiar with the terms, tools, and technologies that make PKI implementation happen.
There is a lot of information to cover. In Chapter 1, we discussed the key security services that a secure system should offer. These are: confidentiality, authentication and identification, integrity, and non-repudiation.
In this chapter we show that the public key infrastructure natively built in Notes and Domino provides these services. Since confidentiality, integrity and non-repudiation are dependant on authentication, we’ll primarily focus on this security service.
The specific enhancements for Notes version 6 are discussed in a later section.
6.1.1 Registration and certificationBefore we detail the PKI natively present in Notes and Domino, it is important to talk about registration and certification, since these are frequently confused terms.
RegistrationRegistration is the action by which a user’s details are entered in a directory. The directory in question is the Domino Directory. The work product of registration in Notes and Domino is the Notes ID.
CertificationCertification has two meanings that are pertinent to this chapter and to Notes and Domino. To certify is to confirm formally that something is true, accurate, genuine and that it meets a standard. To certify is also to issue a license or certificate to. The work product of certification in Notes and Domino is the creation of Notes certificates and their inscription in the Notes ID.
188 Lotus Security Handbook
6.1.2 Certification hierarchiesWhen Lotus was first introduced, it offered only one type of certification: Flat certification. Hierarchical certification was introduced with Release 3 of Notes. Both flat and hierarchical certification were supported, in that it was possible to generate flat and hierarchical certificates. With the advent of Release 5, it was no longer possible to perform flat certification; however, previously generated flat certificates are supported in versions 5 and 6 for backwards compatibility.
Flat certificatesFlat certificates are a remnant of the way things were done in the early days of Lotus Notes and the fact that they are still supported in version 6 shows the commitment by Lotus in regard to backwards compatibility. And, by discussing them here, we are demonstrating our commitment to addressing all aspects of security in this redbook. However, we will cover mainly differences and points of interest. Readers can consult previous documentation on Lotus Notes to acquaint themselves fully with flat certificates.
The following are the key differences between flat certificates and hierarchical certificates.
� Flat certificates generate IDs with flat names, which are stamped by one or more Notes certifier IDs. In contrast, hierarchical certificates create structured names, which include the name of the Notes certifier IDs, which are organized in a well-defined hierarchy.
� Flat certificates are stored solely in the Notes ID file, whereas hierarchical certificates are also stored in the Public Address Book.
� In regard to user authentication, with flat certificates, authentication is only performed in one direction, the server authenticating the user. A user can access any server with which they share a common certificate, provided that the certificate is trusted by the server.
� In regard to server authentication, with flat certificates, authentication is performed in both directions, as both servers have to authenticate each other. If the organization’s server and an external server share one common certificate, they can only authenticate if both servers trust that certificate. This means that one of the servers has to trust a certificate that does not belong to their organization. If this is your organization, the result is that any other server that holds that external certificate can access your server. This is a huge security risk! It means that any users or servers the external organization has also given their certificate to can now access your organization’s server. This is therefore not a viable option if the goal is to restrict who can access your organization’s server. It is far more secure to have two certificates in common, one from each organization, and to only trust the certificate your organization owns.
Chapter 6. Public key infrastructures 189
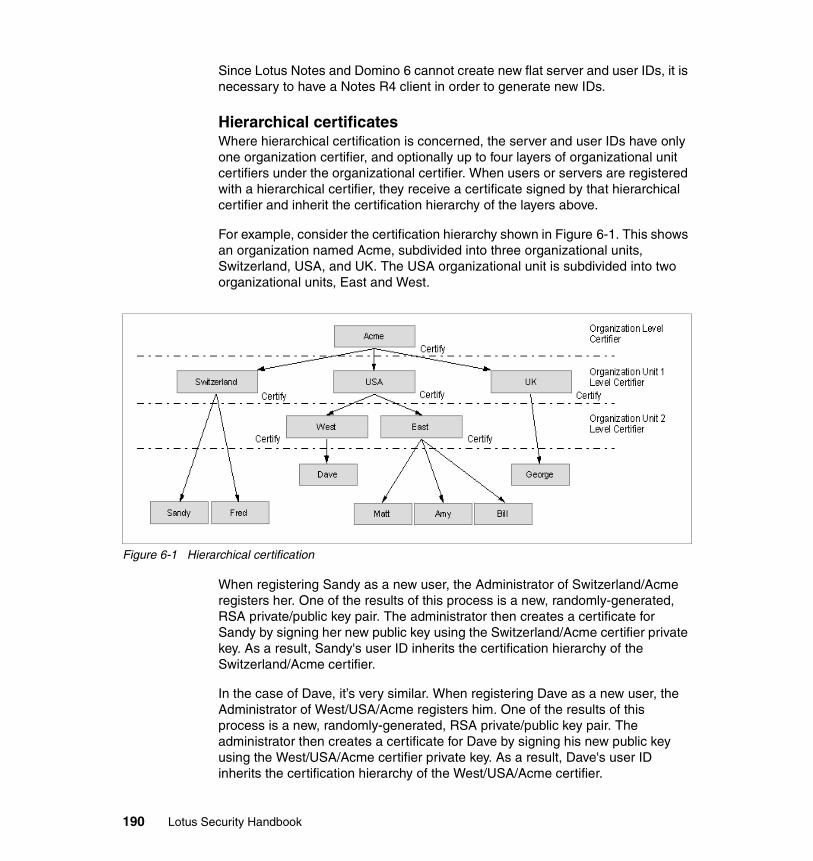
Since Lotus Notes and Domino 6 cannot create new flat server and user IDs, it is necessary to have a Notes R4 client in order to generate new IDs.
Hierarchical certificatesWhere hierarchical certification is concerned, the server and user IDs have only one organization certifier, and optionally up to four layers of organizational unit certifiers under the organizational certifier. When users or servers are registered with a hierarchical certifier, they receive a certificate signed by that hierarchical certifier and inherit the certification hierarchy of the layers above.
For example, consider the certification hierarchy shown in Figure 6-1. This shows an organization named Acme, subdivided into three organizational units, Switzerland, USA, and UK. The USA organizational unit is subdivided into two organizational units, East and West.
Figure 6-1 Hierarchical certification
When registering Sandy as a new user, the Administrator of Switzerland/Acme registers her. One of the results of this process is a new, randomly-generated, RSA private/public key pair. The administrator then creates a certificate for Sandy by signing her new public key using the Switzerland/Acme certifier private key. As a result, Sandy's user ID inherits the certification hierarchy of the Switzerland/Acme certifier.
In the case of Dave, it’s very similar. When registering Dave as a new user, the Administrator of West/USA/Acme registers him. One of the results of this process is a new, randomly-generated, RSA private/public key pair. The administrator then creates a certificate for Dave by signing his new public key using the West/USA/Acme certifier private key. As a result, Dave's user ID inherits the certification hierarchy of the West/USA/Acme certifier.
190 Lotus Security Handbook
Users and servers in the organization have fully distinguished names based on their certifiers. Each layer in the certification hierarchy inherits the fully distinguished name of the certifier used to create it, and is in turn an ancestor to the layers below it.
In this example, the organization level certifier Acme has the fully distinguished name "o=Acme". The organizational unit certifier Switzerland has the fully distinguished name “ou=Switzerland/o=ACME”. The organizational unit certifier USA has the fully distinguished name “ou=USA/o=ACME” and the organizational unit certifier East has "ou=East/ou=USA/o=ACME"
For Sandy, her fully distinguished name is “cn=Sandy/ou=Switzerland/o=Acme”. For Dave, his fully distinguished name is “cn=Dave/ou=East/ou=USA/o=Acme”.
When registering a server, the same applies, with the only difference being that a server ID is created instead of a user ID.
With regard to authentication, users and servers may authenticate with each other if they have at least one common ancestral certificate. In our example, this means that all users in the organization can authenticate with each other because they have the Acme certifier in common. Entities that don't share at least one common ancestor can still authenticate by going through a cross-certification process, which is covered later in this section.
Finally, hierarchical certification is definitively the way to go, and organizations that are still using flat certification should seriously consider converting to hierarchical certification (and thus hierarchical certifier, server, and user IDs), for the following reasons:
� Increased security
� Increased flexibility of access control
� Easier and better organized Notes ID file generation and certification
� Improved maintenance
6.1.3 Notes IDsAt the core of the Notes PKI is the Notes ID. The Notes ID is a small file (meaning it is only a few kilobytes in size), which contains many things that are necessary to use the services provided by the PKI built into the Notes client. We review these and cover the different types of Notes IDs in this section.
Chapter 6. Public key infrastructures 191

Certifier, server, and user ID filesThe Notes ID is essentially a “container” for certificates and encryption keys. There are three different types of Notes IDs, as follows:
� Certifier IDs are IDs that are used to generate other IDs. They come in two types: Organization (O) certifier IDs and Organizational Unit (OU) certifier IDs. When IDs are generated, the organization certifier ID is created first; this is the master ID for the Domain. This ID (if the organization is large enough) is used, in turn, to generate organizational unit certifier IDs. These certifiers are then used to generate the two other types of IDs: Server IDs and Notes IDs.
� Server IDs, as their name implies, are used for servers which are part of the Domino domain. They uniquely identify every server in the domain.
� User IDs are created for users who are part of the Domino domain. They uniquely identify ever user in the domain.
Because of their ability to generate user and server IDs, certifier IDs should be afforded more protection than the other types. They should be saved on floppy disks and put in a safe place, other than on the hard drive of the server. If you use Domino 6, you have the option of using the Domino 6 CA, which lets you avoid circulating Notes certifier IDs for administrators to use.
Domino uses IDs to identify users and to control access to servers. The certifier, server, and user IDs contain the following:
� The owner's name: A user ID file may also contain one alternate name. A certifier ID may contain multiple alternate names.
� A permanent license number: This number indicates that the owner is legal and specifies whether the owner has a North American or International license to run Domino or Notes.
� A pair of Notes certificates from a certifier ID: Notes certificates, which are discussed in the next section, are digital signatures added to a user ID or server ID. This signature, which is generated from the private key of a certifier ID, verifies that the name of the owner of the ID is correctly associated with a specific public key. As mentioned, there are two:
– The first certificate is for North American use, both for data encryption and for electronic signing. Each key in the key pair in this certificate is 630 bits in length. They are called the primary keys. This certificate is referred to in Notes 6 as the Notes multi-purpose certificate.
– The second certificate is for international use, solely for data encryption. Each key in the key pair in this certificate is 512 bits in length. This certificate is referred to in Notes 6 as the Notes international encryption certificate.
192 Lotus Security Handbook

� Ancestral certificates: There is a certificate for each ancestor certifier (at a minimum, one for the organization certifier and one for each additional organizational unit certifier).
� A private key: Notes uses the private key to sign messages sent by the owner of the private key, to decrypt messages sent to its owner, and, if the ID belongs to a certifier, to sign certificates.
� (Optional) One or more secret encryption keys: These are created and distributed by application developers or users with special privileges to a database, to allow other users to encrypt and decrypt fields in a document.
� (Optional, Notes client only) Internet certificates: An Internet certificate is used to secure SSL connections and encrypt and sign S/MIME mail messages. An Internet certificate is issued by a Certification Authority (CA) and verifies the identity of the user. The user's private key associated with an Internet certificate is stored with that certificate. We discuss this later in this chapter.
Finally, the private key and the encryption keys in the ID file are encrypted using a key computed from the user's password, so that only the owner can access it. Public information such as the user's name and public key are not encrypted.
Figure 6-2 illustrates the structure of a Notes ID, showing both the standard part that is created for every Notes ID, and the optional part (which can be added to the ID later on).
Figure 6-2 The Notes ID
Two things must be noted here:
1. If a user is in the process of requesting a new private key or a name change, the pending information is also stored in the ID file. If a Notes private key is changed, the obsolete information is also stored in the ID file for backwards compatibility (for example, you would need the obsolete information to read old encrypted e-mail).
2. There is some confusion on the part of certain users who download the Notes client, install it, and launch it. At that time, the client configuration process is started and a new Notes ID is generated for the user, which apparently
Chapter 6. Public key infrastructures 193
doesn’t require a Certifier ID. This is a flat Notes ID that contains little information and will not be of any use the moment the Notes client tries to connect to a server in the domain.
Notes certificatesLotus Notes authentication relies in large part on Notes certificates, which are stored in Notes IDs.
Casually speaking, a certificate is an electronic “stamp” that indicates a trust relationship among the entities in the Notes world.
More formally, a certificate is a unique, digitally signed message added by a certifier to a Notes ID file that identifies a user or server. While the client can store and work with both Notes and Internet certificates, the rest of this section refers specifically to Notes certificates.
When a Lotus Notes user attempts to connect to a Lotus Domino server, whether it is a mail server or another type of Domino server in the organization, that person needs a certificate to identify himself (or herself) to that server, and the server needs a certificate to identify that person. Thus, the Notes client and the Domino server involved in the authentication process present their certificates to each other. By examining the certificates, the Notes client will identify and authenticate the Domino server, and the Domino server will identify and authenticate the user.
In order to permit this trust relationship to be established, a number of pieces of information must be present in the certificates. A Notes certificate, like a Notes ID, contains a number of elements, such as:
� The name of the certifier that issued the certificate.
� The name of the user or server to whom the certificate was issued.
� A public key that is stored in both the Domino Directory and the ID file. Notes uses the public key to encrypt messages that are sent to the owner of the public key and to validate the ID owner's signature.
� A digital signature.
� The expiration date of the certificate.
The whole thing is then certified, meaning that it is digitally signed by the certifier using the certifier's private key, in order to prove its authenticity.
Figure 6-3 illustrates the structure of a Notes certificate within a Notes ID.
194 Lotus Security Handbook
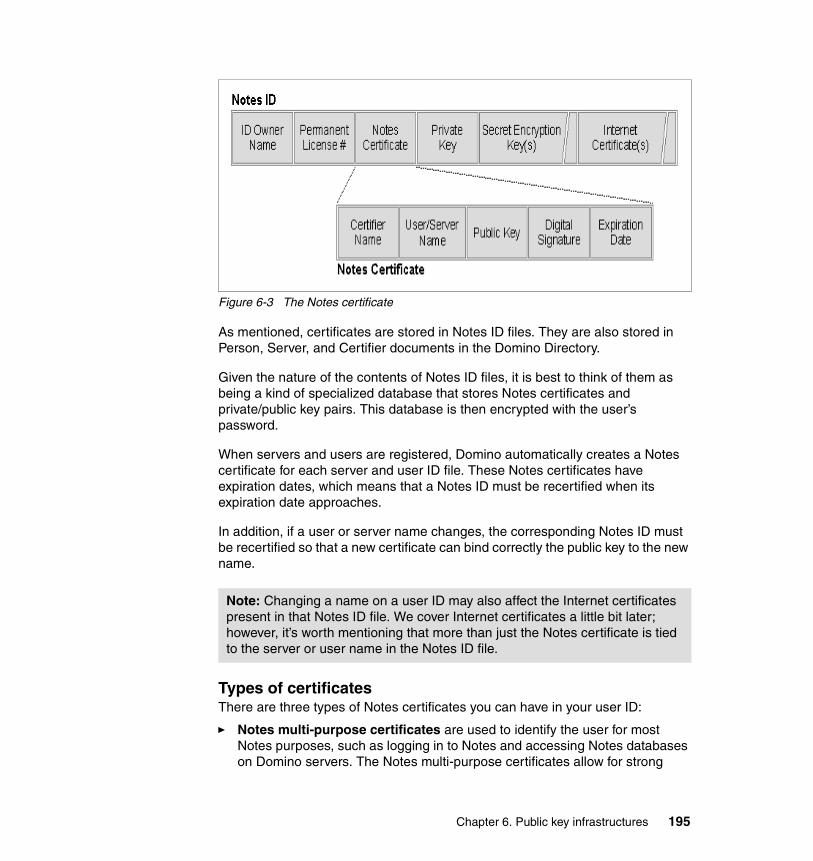
Figure 6-3 The Notes certificate
As mentioned, certificates are stored in Notes ID files. They are also stored in Person, Server, and Certifier documents in the Domino Directory.
Given the nature of the contents of Notes ID files, it is best to think of them as being a kind of specialized database that stores Notes certificates and private/public key pairs. This database is then encrypted with the user’s password.
When servers and users are registered, Domino automatically creates a Notes certificate for each server and user ID file. These Notes certificates have expiration dates, which means that a Notes ID must be recertified when its expiration date approaches.
In addition, if a user or server name changes, the corresponding Notes ID must be recertified so that a new certificate can bind correctly the public key to the new name.
Types of certificatesThere are three types of Notes certificates you can have in your user ID:
� Notes multi-purpose certificates are used to identify the user for most Notes purposes, such as logging in to Notes and accessing Notes databases on Domino servers. The Notes multi-purpose certificates allow for strong
Note: Changing a name on a user ID may also affect the Internet certificates present in that Notes ID file. We cover Internet certificates a little bit later; however, it’s worth mentioning that more than just the Notes certificate is tied to the server or user name in the Notes ID file.
Chapter 6. Public key infrastructures 195
cryptography (for example, when a user receives an e-mail protected with strong encryption where the user’s Notes multi-purpose certificate was used by another user to send that user encrypted mail). Most users use Notes multi-purpose certificates only.
� Notes international certificates are used for encryption only. They allow anyone who can't use strong encryption to send encrypted e-mails. They are generally not for the user’s personal use. Every user has an international certificate in their User ID, even if it is not used.
� Flat certificates were used in Notes 4.6 and earlier and are used to access pre-Release 5 servers that still use flat certificates to identify themselves. Flat certificates do not have hierarchical names. Since Release 5 of Notes and Domino, it is not possible to create new flat certificates, which means that in order for a user to have a flat certificate and be able to use it as the Notes login certificate in that user’s ID, that user had to have already had it when they upgraded to Notes 5 or later.
Viewing Notes certificatesYou can to view all of the certificates present in a Notes user ID by choosing File → Security → User Security (for Apple Macintosh users, the command is Notes → Security → User Security). Then enter the password that protects the Notes ID and click Your Identity → Your Certificates. There are two options for which Notes certificates to view. Choose “Your Notes Certificates,” as shown in Figure 6-4, to view the certificates that can be used to log in to Notes, to access Notes databases, and to exchange secure mail with other Notes users.
196 Lotus Security Handbook

Figure 6-4 Notes certificates in the Notes ID, “Your Notes Certificates”
For a more comprehensive list of Notes certificates choose “All Notes Certificates,” as shown in Figure 6-5 on page 198, which shows you all the Notes certificates present in your ID, including your Notes certificates as well as certificates for the Notes CAs that issued your certificates.
Chapter 6. Public key infrastructures 197
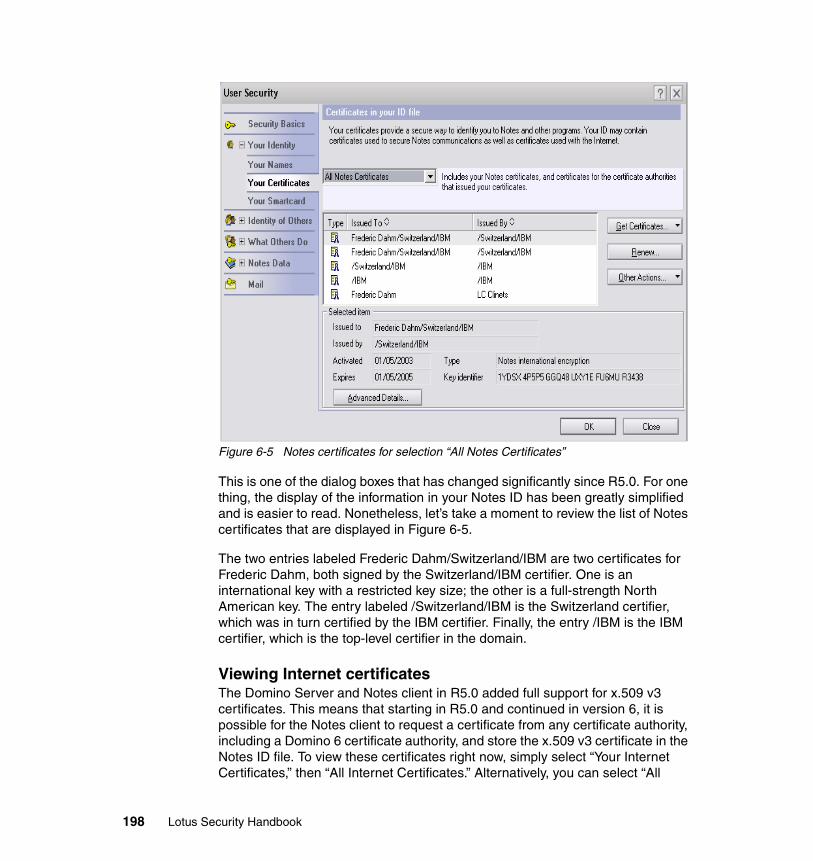
Figure 6-5 Notes certificates for selection “All Notes Certificates”
This is one of the dialog boxes that has changed significantly since R5.0. For one thing, the display of the information in your Notes ID has been greatly simplified and is easier to read. Nonetheless, let’s take a moment to review the list of Notes certificates that are displayed in Figure 6-5.
The two entries labeled Frederic Dahm/Switzerland/IBM are two certificates for Frederic Dahm, both signed by the Switzerland/IBM certifier. One is an international key with a restricted key size; the other is a full-strength North American key. The entry labeled /Switzerland/IBM is the Switzerland certifier, which was in turn certified by the IBM certifier. Finally, the entry /IBM is the IBM certifier, which is the top-level certifier in the domain.
Viewing Internet certificatesThe Domino Server and Notes client in R5.0 added full support for x.509 v3 certificates. This means that starting in R5.0 and continued in version 6, it is possible for the Notes client to request a certificate from any certificate authority, including a Domino 6 certificate authority, and store the x.509 v3 certificate in the Notes ID file. To view these certificates right now, simply select “Your Internet Certificates,” then “All Internet Certificates.” Alternatively, you can select “All
198 Lotus Security Handbook

Certificates” to see an aggregated list of Notes and x.509.v3 certificates. We revisit Internet certificates later in the chapter.
Public keysTurning our attention back to the Notes ID, the public key is also referred to as a Notes certified public key. It is stored in the Notes certificate. Its counterpart, the private key is stored in another part of the Notes ID file (as shown in Figure 6-2 on page 193) and can only be found in the Notes ID.
Public keys are not secret, hence their name. Any user can look up another user's public key and use it to send encrypted mail to or authenticate the user.
Users must be able to obtain the public key of the certifier that issued the certificate before they can authenticate the certificate's owner. If a user has a certificate issued by the same certifier as another user or server, the first user can verify the public key for the certificate and then reliably know the public key associated with the server or user name. If a user doesn't have a certificate issued by the same certifier, the user needs a cross-certificate for authentication.
Alternate namingBeginning with R5.0, it is possible to add to the Notes ID file an alternate name or alias for the Notes user. This feature allows a user to be referenced by either their primary name or their alternate name. This may be desirable in an international organization where users are registered using a standard name format but prefer to be addressed by a more convenient name in their native country.
The alternate name can then be used for mail addressing and in database ACLs. An alternate name, like a primary name, is hierarchical in format and must not be the same as any existing primary name or alternate name. During network authentication, both the primary name and the alternate name are authenticated. This means that users may be listed in ACLs, or in groups listed in ACLs, using either their primary name or their alternate name.
Alternate names are not compatible with Notes versions earlier than R5. In particular, the following limitations exist:
� Earlier versions of Notes/Domino servers are not able to authenticate with a user assigned an alias.
� Earlier versions of Notes/Domino servers and workstations are not able to validate a signature from a user assigned an alias.
� Earlier versions of Notes workstations are not able to use an ID file that contains an alternate name or alias.
Chapter 6. Public key infrastructures 199
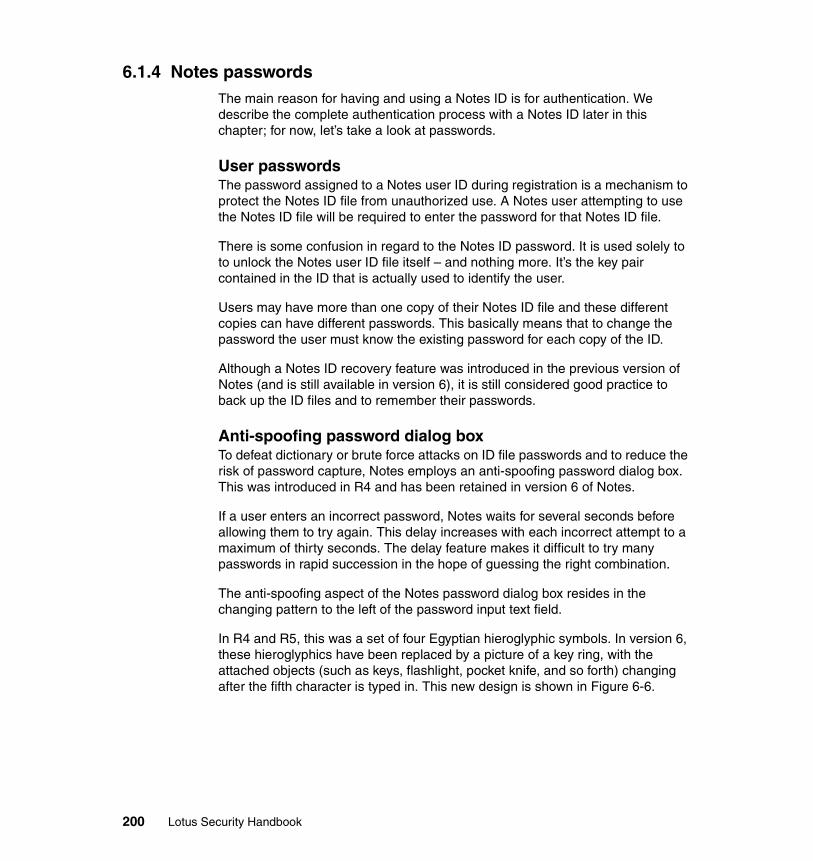
6.1.4 Notes passwordsThe main reason for having and using a Notes ID is for authentication. We describe the complete authentication process with a Notes ID later in this chapter; for now, let’s take a look at passwords.
User passwordsThe password assigned to a Notes user ID during registration is a mechanism to protect the Notes ID file from unauthorized use. A Notes user attempting to use the Notes ID file will be required to enter the password for that Notes ID file.
There is some confusion in regard to the Notes ID password. It is used solely to to unlock the Notes user ID file itself – and nothing more. It’s the key pair contained in the ID that is actually used to identify the user.
Users may have more than one copy of their Notes ID file and these different copies can have different passwords. This basically means that to change the password the user must know the existing password for each copy of the ID.
Although a Notes ID recovery feature was introduced in the previous version of Notes (and is still available in version 6), it is still considered good practice to back up the ID files and to remember their passwords.
Anti-spoofing password dialog boxTo defeat dictionary or brute force attacks on ID file passwords and to reduce the risk of password capture, Notes employs an anti-spoofing password dialog box. This was introduced in R4 and has been retained in version 6 of Notes.
If a user enters an incorrect password, Notes waits for several seconds before allowing them to try again. This delay increases with each incorrect attempt to a maximum of thirty seconds. The delay feature makes it difficult to try many passwords in rapid succession in the hope of guessing the right combination.
The anti-spoofing aspect of the Notes password dialog box resides in the changing pattern to the left of the password input text field.
In R4 and R5, this was a set of four Egyptian hieroglyphic symbols. In version 6, these hieroglyphics have been replaced by a picture of a key ring, with the attached objects (such as keys, flashlight, pocket knife, and so forth) changing after the fifth character is typed in. This new design is shown in Figure 6-6.
200 Lotus Security Handbook
Figure 6-6 Notes password dialog box
These dynamic symbols make it more difficult to substitute a false dialog box that captures passwords in place of the Notes Password dialog box. Users should be made aware of the particularities of this dialog box and of the fact that the symbols change as they enter their passwords. If they notice that the symbols do not change or are not present, they should stop entering their password and click Cancel. As well, they should memorize the last image after they’ve typed their password because the algorithm behind the symbols will always compute to the same symbol in the end. (However, the algorithm is complicated enough that it is not easy to sort out the password just by looking at the symbols and the way they change).
Multiple passwordsTo provide tighter security for certifier and server ID files, it is possible to assign multiple passwords to an existing Notes ID. By doing this, it is possible to require that more than one person, generally administrators, act together when using the Notes ID.
It is important to dispel some confusion that generally exists here. When multiple passwords are applied to a Notes ID, the original password for the Notes ID (or the previous one, if the password differs from the original password) is no longer valid. These multiple passwords replace the original password and are not cumulative (that is, they don’t add themselves to the original password).
It is also possible to specify that only a subset of the assigned passwords be required to access the Notes ID. For example, It is possible to assign four passwords to access a specific Notes ID, but to define it so that it requires only any two of the four passwords to access the Notes ID. This feature is useful when the security policy states that giving authority for a certifier ID to a single person should be avoided.
Note: We recommend that only Notes server IDs and Notes certifier IDs be assigned multiple passwords. Notes user IDs should not have multiple passwords assigned to them.
Chapter 6. Public key infrastructures 201
To set up multiple passwords on a Notes ID, it is necessary to have present all the people who will provide a password to the Notes ID. Use the following steps to set up multiple passwords:
1. From the Domino Administrator, click Configuration → Certification.
2. Select Edit Multiple Passwords.
3. Select the Notes ID to which multiple passwords are to be assigned and click Open.
4. Enter the password for the Notes ID (if required).
5. Each individual whose password is to be applied to the Notes ID should complete the following steps:
a. Enter the person’s name in the “Authorized User” field.
b. Enter the password in the “New Password” field.
c. Retype the password in the “Confirm Password” field.
d. Click the Add button. The person’s name and password is added to the Notes ID file.
6. Enter the number of passwords required to access the Notes ID. The maximum number must be less than or equal to the number of persons who assigned passwords to the Notes ID.
7. Click OK.
Password quality and lengthThe weakest part of the Notes PKI is the passwords chosen by users because – and this is a well-known fact – users simply don’t choose good passwords. The passwords most users invent are too short and too easy to guess (or worse, in some cases, they are written on a piece of paper next to the computer).
In previous releases of Notes and Domino, an administrator could, when creating or recertifying Notes ID files, specify a minimum number of characters for passwords.
However, not all passphrases of equal length are equal in strength; some are more vulnerable to passphrase guessing attacks than others. Unfortunately, choosing good passphrases can be difficult. A completely random collection of uppercase and lowercase alphabetic characters combined with numbers and punctuation marks (for example, "T3-%9&4#_6!") would be ideal, but such a passphrase is not easily remembered and may need to be written down. In contrast, a passphrase consisting of one lone word (for example, “password”) provides little security.
202 Lotus Security Handbook
Mixed-case passphrases and passphrases containing numbers and punctuation are generally stronger per character than passwords consisting entirely of lowercase characters. Passwords that contain words found in the Notes spell check dictionaries are generally much weaker per character than any other kind of password.
With Domino R5, a new feature was introduced which built upon the minimum password length feature which it replaced. Administrators of R5 systems can specify a level of password quality when registering the Notes user.
The difference between password length and quality is simple:
� Password length: The user’s password must have the number of characters shown in the “Change Password” dialog box.
� Password quality: The higher the number shown in the “Change Password” dialog box, the stronger quality the user’s password must be (0 is the lowest, 16 is the highest). The stronger the quality, the harder it is for others to guess the password. It is worth pointing out that the quality of the password is influenced by the mixture of lowercase and uppercase letters, numbers, and punctuation marks used. If the quality is set to a certain level and the user tries to enter a low-quality password, such as words found in the dictionary, common names, or repeating characters, Notes may reject the password and ask the user to enter a new one.
The password quality levels are stored in the ID file as equivalent password lengths, so that an ID file created by a Notes 6 client can be used in a previous release of Notes.
Because users are not good at generating sufficiently complex passwords to meet the quality level imposed by the system, this feature generated a lot of frustration on the part of the users and requests were made to reinstate the password length feature.
In Domino 6, Administrators can now require a minimum password length or a minimum password quality. They are no longer constrained to use password quality to enforce slightly better passwords than users generally use. This can be accomplished through policies, specifically with a security policy settings document. (For more information, consult the Lotus Domino 6 product documentation or the Lotus Domino 6 Administrator Help file).
When a user changes his or her password using Domino 6, if a minimum quality level is enforced, the quality of that password is estimated and then compared against the minimum password length specified for that ID file. If the password specified is not sufficiently complex, the user’s attempt to set that password is rejected and the user will receive a dialog box with the error message “Your Password is Insufficiently Complex.”
Chapter 6. Public key infrastructures 203
Password checkingStarting with R4.5, Notes added a password checking process to the server, which continues to be supported in version 6.
When password checking is enabled, information dependent on the user's password and the date the password was provided is kept on the server in the Person document.
The user must enter the password corresponding to the information stored in the Person document to gain access to the server. The password checking facility adds the capability to require user password change intervals and to keep the previous 50 old passwords from being reused.
This is a very good way to ensure that proper passwords are kept by the users and that they are changed periodically. If used in conjunction with the password quality/length settings, it ensures that passwords created by users meet the minimum requirements set forth in the organization’s security policy.
As we explain in our discussion of authentication later in this chapter, Lotus Notes uses the RSA key pair for authentication. This means that even if someone guessed the user's password, that person would still need to steal the user ID file to be able to impersonate the user. The information stored in the Domino Directory is not subject to dictionary attacks unless the attacker also has the ID file.
Password checking during authentication requires that both Notes clients and Domino servers run R4.5 or later. If you enable password checking on a server running a release prior to R4.5, authentication occurs without password checking. If you enable password checking on a client running a previous release, authentication fails when the client attempts to connect to a server that requires password checking. The first time a user for whom password checking is required authenticates with a server, the user ID is altered and it cannot be used with a previous release.
The Notes ID file and Notes ID recoveryThe Notes ID recovery feature was introduced in R5 and continues to be supported in version 6. It allows administrators to recover a Notes ID file if a user loses, damages, or forgets their password for the Notes ID.
Notes ID file and password recovery is a mechanism that allows a quorum of authorized administrators working in an organization to gain access to the Notes ID files of users within their domain.
204 Lotus Security Handbook

Recovery information is stored inside each ID file. Encrypted backup copies of each ID file, which do not expose any private information, user passwords, or bulk keys, are stored in a centralized location.
The certifier for a site can choose up to eight Recovery Authorities (not to be confused with Registration Authorities, or RAs), who are authorized for Notes ID file recovery, and require between one and all of the Recovery Authorities to work together to access a Notes ID file.
For example, a site could be configured with five Recovery Authorities, three of whom are needed to unlock any given ID file. No single Recovery Authority could illicitly gain access to Notes ID files, so employee and job turnover would not lead to a breach of security.
User passwords, which could be used to attack other accounts outside of the Domino servers, are not exposed. Any recovery Notes ID file will not have the same password as the original ID file. Therefore an attacker would have difficulty using a recovered Notes ID file without the legitimate user noticing a loss of service on servers that have password checking enabled.
This feature can help users who have forgotten their passwords gain access to their Notes ID files, even if they are disconnected from the corporate network.
Corrupted or lost Notes ID files can be replaced as long as an out-of-band transmission channel for physical media (such as mailing a floppy disk or CD-ROM) exists, and organizations can gain access to the encryption keys used by their employees that are not longer employed by the company for a number of reasons, such as resignation, termination, retirement, and so forth.
The Notes ID recovery feature replaces the “Escrow Agent” that was used in Notes R4.x. This is a feature by which administrators could set up an escrow account and when a new user in the organization was registered, the new Notes ID was sent (e-mailed) automatically to the escrow agent. This was a way for administrators to automatically keep backup copies of every ID they created.
The problem with this feature was that it opened a security vulnerability in the Notes security model. If an attacker succeeded in entering a user called “Escrow Agent” into the address book and had access to the mailbox the Notes IDs were mailed to, that attacker could then have all new Notes IDs and passwords send to him. Worse, this feature could be switched off. In addition, it was possible to confuse the server with a second entry under the same name but with a different address, so that it refused to send out the information.
Chapter 6. Public key infrastructures 205
Setting up Notes ID recoverySetting up Notes ID file and password recovery is fairly straightforward. The process should be completed before any administrator begins registering users because it is not possible to recover Notes IDs which are certified by a Certifier ID that does not contain recovery information.
This is detailed clearly and concisely in the “ID Recovery” section of the Lotus Domino 6 Administration documentation and in the Lotus Domino 6 Administrator Help file.
Performing Notes ID recoveryOnce Notes ID recovery has been set up and the Notes IDs have the recovery information within them, it is possible to handle situations where a Notes ID file is lost or damaged. The Recovery Authorities can retrieve the backup copy of the Notes ID from the backup Notes ID database. If the backup copy does not exist, it is simply not possible to recover the Notes ID.
As well, Notes will help when the Notes ID file is modified in certain ways, for instance, when the user acquires a new public key, accepts a name change, accepts or creates a document encryption key, or performs other types of User ID operations. In these cases, Notes automatically sends updated encrypted backup user IDs to the centralized database.
The detailed procedure for performing Notes ID recovery is in the product documentation and in the Lotus Domino 6 Administrator Help file.
6.1.5 The Domino DirectoryInformation about all Notes IDs (including every user, server, and certifier ID) is maintained on the Domino server, specifically in a Notes database called the Domino Directory.
The Directory contains a Person document for each user, which in turn contains a great deal of information about each Notes user. Table 6-1 shows how the Person document is structured.
206 Lotus Security Handbook

Table 6-1 The Person document in the Domino Directory
As a result of the registration process of servers, the Domino Directory will also contain a Server document for each server, which will include information similar to that of a Person document, but specifically geared towards the configuration and operation of a server.
The same holds true for Certifiers, which are represented in the Domino Directory by Certifier documents. This is illustrated by Figure 6-7 on page 208, which shows how the Domino Directory works to maintain or distribute all these certificates.
Tab Items
Basics First name; Middle initial; Last name; User name; Alternate name; Short name; Internet password
Mail Mail system; Mail file; Forwarding address; Internet address; Encrypt incoming mail
Certificates Notes certified public key; Internet certificate; Flat name key
Administration Administrators; Check password; Required change interval; Grace period; Last change date; Password digest; Change request; Network account name; Proposed alternate common name; Proposed alternate unique organizational unit; Proposed alternate name language;
Note: The registration process permits the Notes user ID of the registered user to be attached to the Person document. This is strongly discouraged, since the Domino directory is public by nature and Notes user IDs should be kept secure.
Chapter 6. Public key infrastructures 207
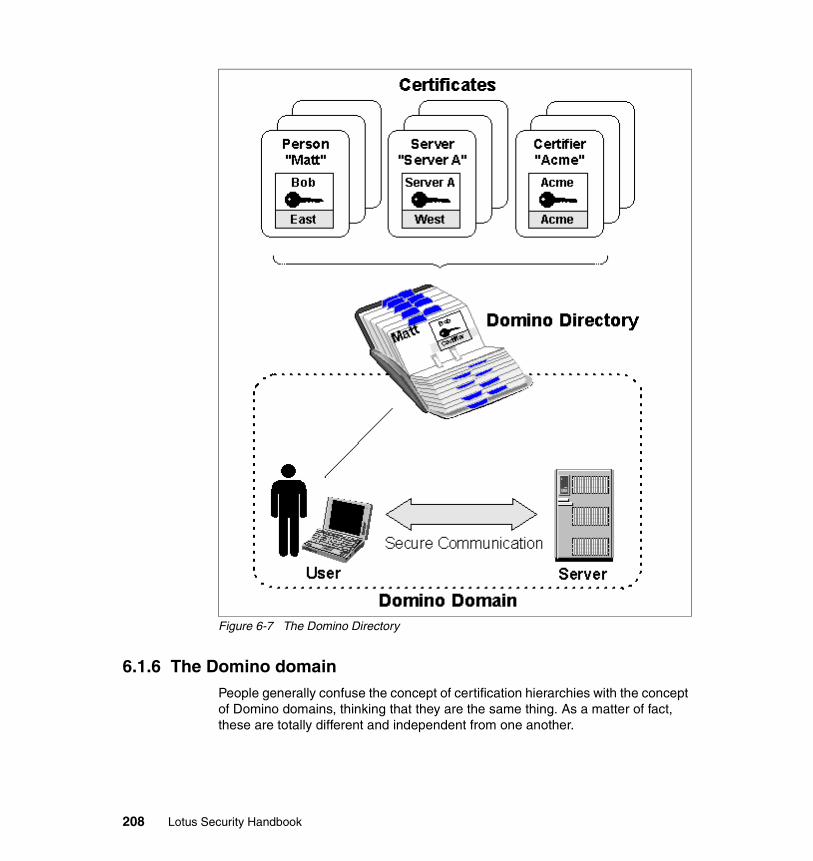
Figure 6-7 The Domino Directory
6.1.6 The Domino domainPeople generally confuse the concept of certification hierarchies with the concept of Domino domains, thinking that they are the same thing. As a matter of fact, these are totally different and independent from one another.
208 Lotus Security Handbook

To put it simply, a Domino domain corresponds to a Domino Directory. A Domino domain is a collection of Domino servers and users that share a common Domino Directory.
The Domino Directory is a directory of users, servers, groups, and other entities. In itself, the primary function of the Domino domain is mail routing. Users' domains are determined by the location of their server-based mail files.
6.1.7 Certification hierarchiesIn this section we discuss some different certification hierarchies, specifically those where there are multiple certification hierarchies or multiple domains. We first consider a model that has two certification hierarchies in one domain, then we describe a model that has one certification hierarchy split between two domains.
One domain, two certification hierarchiesBecause certification hierarchies and Domino domains are independent, it is entirely possible to manage two or more certification hierarchies within a Domino domain. In the example illustrated in Figure 6-8, the Acme and Widget corporations are being administered within one single domain.
An example of when this model might be appropriate is when two organizations or companies have newly merged. It is possible to continue operating the organizations independently, without collapsing both hierarchies into one, as shown in the figure; but, eventually, you will probably want to cross-certify the two hierarchies.
Figure 6-8 Two independent certification hierarchies
Chapter 6. Public key infrastructures 209

Two domains, one certification hierarchyAlternatively, it is possible to manage one certification hierarchy with several Domino domains, as shown in Figure 6-9. In this example, the Acme Corporation has two subsidiaries, the Sprocket Corporation and the Widget Corporation. There is one hierarchy (with Acme being the top level certifier), but this is split between two domains, Sprocket and Widget.
This one hierarchy/two domains configuration might be useful in a situation where a single domain (or Domino Directory) grows too large and you have to tune the server performance up. However, given the scalability of Domino, especially with version 6, and the power of servers available these days, this is not a likely scenario. It is possible, though, so it is worth mentioning here.
Figure 6-9 One certification hierarchy in two domains
6.1.8 Notes cross-certificationDomino uses two types of cross-certificates: Notes and Internet. We cover Notes cross-certificates in the present section and Internet cross-certificates in the Internet PKI section later in this chapter.
Notes cross-certificates permit authentication and secure messaging, in that they allow users in different hierarchically-certified organizations to access servers and to receive signed mail messages. Internet cross-certificates, on the other hand, are more focused on secure messaging, in that they allow users to receive signed mail messages and send encrypted mail messages.
210 Lotus Security Handbook
What are Notes cross-certificatesGiven the certification hierarchies model that we’ve explained, a user’s authentication of another user or server will not work should either be in a different certification hierarchy (which is often referred to as a “naming tree”).
This problem arises in dynamic organizations, which are becoming the norm these days (with mergers, acquisitions, consolidations, and reorganizations being so common).
The question that comes up on a regular basis is: “How can we merge several certification hierarchies, or naming trees?” The answer is that although it is not possible to easily and effectively merge several existing certification trees into one single certification hierarchy, it is possible to do something just as good.
Notes and Domino provide a way for people and servers to authenticate against other servers in different certification hierarchies. As well, they also provide a way for people from one certification hierarchy to effectively communicate with and trust people in a different certification hierarchy.
This is accomplished by cross-certification, which is a form of peer-to-peer trust (certification) model.
So, in short, Notes cross-certificates allow users and servers from different hierarchically-certified organizations to access servers in each other’s organizations, and to verify the digital signatures of users from the other organization. Domino servers store cross-certificates in the Domino Directory. To access Domino servers, Notes clients obtain cross-certificates for those servers and store them in their Personal Address Books. These cross-certificates can be used only by the user to whom they are issued.
Three types of cross-certificationCross-certification can occur at various levels of an organization. There are three types of cross-certification possible, as follows:
� Between two organizations (or organizational units)
� Between two users or servers
� Between an organization and a user or server.
Before we cover these in detail, there are a few concepts you need to understand:
� Two-way cross-certification does not need to be symmetric. For example, one organization can have a cross-certificate for an organizational unit certifier and another organization can have a cross-certificate for an organization certifier.
Chapter 6. Public key infrastructures 211
� Cross-certification, if done improperly, can reduce the level of security in the organization’s Domain. The most liberal cross-certification model provides for access to the organization’s servers by the people whose organization was cross-certified. This means that servers with confidential information could be accessible to these people. In light of that, it would be wise to set up server access restrictions to prevent people from the other organization from accessing the servers that contain information that is confidential in nature and meant for the people within the organization only.
� To keep things simple in the examples that follow, we have not factored in Server access lists and database ACLs and their ability to restrict access to servers and the databases on these servers.
Cross-certification between two organizationsLet’s assume a common organizational occurrence these days, in which two distinct organizations, Widget and Acme, decide to merge.
Here, the organizations want the broadest form of cross-certification, in that they want all users and servers in both organizations to authenticate with one another. The following steps will accomplish this goal:
1. The Acme organization certifier (/Acme) obtains a cross-certificate for the Widget organization certifier (/Widget) and stores it in Acme's Domino Directory.
2. The Widget organization certifier (/Widget) obtains a cross-certificate for the Acme organization certifier (/Acme) and stores it in Widget's Domino Directory.
As a result of this procedure, a special relationship (that is, “Acme and Widget trust each other”) is established. This is illustrated in Figure 6-10. In this cross-certification model, all users and servers in both organizations are now able to authenticate with each another.
212 Lotus Security Handbook

Figure 6-10 Cross-certification between two organizations
Cross-certification between two usersIn this case, the cross-certification can be for two users, two servers, or a user and a server.
Let’s assume a scenario in which the Acme and Widget organizations want to replicate a database that contains information of common interest, but don’t want to have anything but these two servers communicating with each another, as per their security policy.
Here, the organizations want the most restrictive form of cross-certification, in that they want a server in one organization to authenticate and replicate with a server in the other organization. The following steps will accomplish this:
1. The Acme server (Server/Acme) obtains a cross-certificate for the Widget server (Server/Widget) and stores it in the Acme server Personal Address Book;
2. The Widget server (Server/Widget) obtains a cross-certificate for the Acme server (Server/Acme) and stores it in the Widget server Personal Address Book.
As a result of this procedure, a special relationship (that is, “the Acme server and the Widget server trust each other”) is established. This is illustrated in Figure 6-11 on page 214. In this cross-certification model, only these two servers trust each another and can replicate with each other.
Chapter 6. Public key infrastructures 213

Figure 6-11 Cross-certification between two users (servers)
Cross-certification between an organization and a userIn this case, the cross-certification can be for a user and a whole organization or a server and an organization.
Let’s assume a scenario in which the Acme and Widget organizations want to replicate a database that contains information of common interest. The Widget organization is much smaller than the Acme organization and thus doesn’t have any problems with giving access to all their servers to the Acme organization, but because Acme deals with many organizations that are competitors to Widget, they only want to give access to a specific Domino server, as per their security policy.
Here, one of the organizations wants the most restrictive form of cross-certification and another organization is comfortable with the most liberal of cross-certification, in that they want one server in the Acme organization to authenticate and replicate with any server in the Widget organization. The following steps will accomplish this:
1. The Acme server (Server/Acme) obtains a cross-certificate for the Widget organization certifier (/Widget) and stores it in the Acme server Personal Address Book;
2. The Widget organization certifier (/Widget) obtains a cross-certificate for the Acme server (Server/Acme) and stores it in Widget's Domino Directory.
As a result of this procedure, a special relationship (that is, “the Acme server and the Widget organization trust each other”) is established. This is illustrated in Figure 6-12. In this cross-certification model, the Acme server is trusted by the
214 Lotus Security Handbook

whole Widget organization and thus, the Acme server can replicate with any server in Widget’s organization.
Figure 6-12 Cross-certification between a user and an organization
Cross-certification procedureFor more information on cross-certification and the actual steps to do the cross-certification, consult the Domino 6 product documentation or the Lotus Domino 6 Administrator Help file.
6.1.9 AuthenticationAuthentication is the most important aspect of security. It is more important than encryption. We touched upon this in Chapter 1 and it is worth taking a moment to revisit this concept.
Let’s take Alice and Bob, whom we introduced in Chapter 1. Let’s introduce Carole, who is not exchanging information with either Alice or Bob, but wants instead to eavesdrop and illicitly read the information exchanged between the two.
As we learned, Alice and Bob like to exchange data with each other and in doing so, they like to ensure that this exchange is done as securely as possible. In the present example, Alice and Bob are exchanging financial data. As security-conscientious people, they use a secure communications channel, which uses encryption to make it extremely difficult for an eavesdropper such as Carole to decipher and understand the information.
Chapter 6. Public key infrastructures 215

Encryption is important, because of the potential damage that could occur if Carole was able to get a legible copy of the information being exchanged by Alice and Bob.
However, it’s important to consider what could happen if Carole could impersonate Alice or Bob. Carole could both get more information and could also modify the information to be exchanged. The resulting damage could be far worse than what could happen with simple eavesdropping.
Authentication is thus the cornerstone of effective security. It is also the cornerstone of Notes and Domino security, because it permits the system to differentiate one user from another.
Without authentication, the following problems would occur:
� The system could not verify the identity of anyone using the services provided by the Domino server.
� Users would have to be treated equally since they would fall under one category. Therefore, there could be no granularity of access to Notes databases and services offered by the Domino Server.
Authentication is what permits administrators to permit or deny access to the resources of the system. Once a person has been granted permission to access the system, different privileges (commonly called access levels) can be conferred to that person.
Authentication is thus the key to providing restricted access to Notes and Domino resources.
The authentication procedure in Notes is generally misunderstood. People assume that it is a simple user ID/password challenge/response mechanism when, in reality, it is far more sophisticated than that.
Because the authentication procedure in Notes is dependant on the public key infrastructure natively built into the client and the server, we are taking the time now to see how the native PKI is architected and then explain how Notes authentication works.
Note: The term “Notes authentication” is used because it denotes authentication of a user using the Notes client against a Domino server. We’ll refine the term a little bit later on, but using this term helps us differentiate this type of authentication from the other types of authentication that we discuss later in this book.
216 Lotus Security Handbook
6.1.10 Notes authenticationIn this section we discuss how Lotus Notes and Domino authenticate with each another via TCP port 1352 using Notes Remote Procedure Calls (NRPC). The purpose of this discussion is to demystify the process and explain what really happens every time a user enters a password and accesses a Domino server with a Notes client.
Validation and authenticationWhen performing Notes authentication, the verification of the indentity of a user or a server is done in two distinct phases. The first phase, called validation, is the process of reliably determining the public key of the sender. In other words, the validation is the preparation phase for the actual authentication.
Notes uses the following three rules when deciding to trust a public key:
1. Trust the public key of any of the ancestors in the hierarchical name tree because they are stored in the Notes ID file.
2. Trust any public key obtained from a valid certificate issued by any of the ancestors in the hierarchical name tree.
3. Trust any public key certified by any trusted certifier and belonging to one of the certifier's descendants.
Phase 1: ValidationWe now review the validation process and how these three rules are applied during this process. Let’s use Fred as our example user. The user ID file for Fred contains everything he needs to identify himself and establish his credentials. When he requests a session with a server, the first step is to send to the server all of the certificates from the Notes ID file (both the user's own certificate and the chain of certifier's certificates that support it). The validation process is illustrated in Figure 6-13 on page 218.
Chapter 6. Public key infrastructures 217
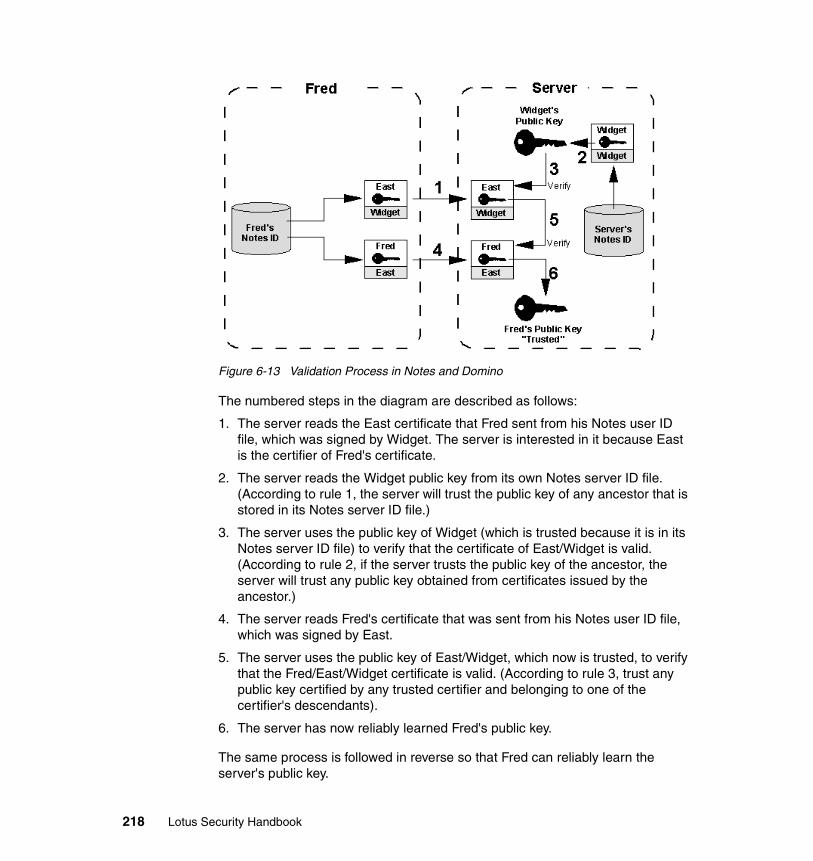
Figure 6-13 Validation Process in Notes and Domino
The numbered steps in the diagram are described as follows:
1. The server reads the East certificate that Fred sent from his Notes user ID file, which was signed by Widget. The server is interested in it because East is the certifier of Fred's certificate.
2. The server reads the Widget public key from its own Notes server ID file. (According to rule 1, the server will trust the public key of any ancestor that is stored in its Notes server ID file.)
3. The server uses the public key of Widget (which is trusted because it is in its Notes server ID file) to verify that the certificate of East/Widget is valid. (According to rule 2, if the server trusts the public key of the ancestor, the server will trust any public key obtained from certificates issued by the ancestor.)
4. The server reads Fred's certificate that was sent from his Notes user ID file, which was signed by East.
5. The server uses the public key of East/Widget, which now is trusted, to verify that the Fred/East/Widget certificate is valid. (According to rule 3, trust any public key certified by any trusted certifier and belonging to one of the certifier's descendants).
6. The server has now reliably learned Fred's public key.
The same process is followed in reverse so that Fred can reliably learn the server's public key.
218 Lotus Security Handbook
Phase 2: AuthenticationAs we mentioned in the previous section, authentication is a proof of identity. At this stage, this proof has not yet been established. This is why, now that the validation process is complete, we need to begin the authentication process.
It’s important to understand that the validation process we just described has not completely proved who each of the session partners is. What has really been done in the validation phase is simply the presentation of certificates. This mutual presentation of certificates ensures that at least one certificate is common between the user or server (or failing that, that at least one certificate shares a common ancestor).
Given that a certificate associates the user with a public key and tells the recipient that the public key can be trusted, the user and server in this example can then prove that they really are who they claim to be by showing that they hold the private key that matches the public key in the certificate.
The authentication process achieves this with a challenge/response dialog between a workstation and a server, or between two servers when either is running database replication or mail routing.
The process for authentication, which builds upon the previous example where Fred is trying to access the server, is illustrated in Figure 6-14 on page 220. While the diagram is an oversimplification of the actual process, it is intended to illustrate what happens in a manner that is easy to understand.
Chapter 6. Public key infrastructures 219

Figure 6-14 Authentication process in Notes and Domino
The numbered steps in the diagram are described as follows:
7. The server generates a random number and a session key and encrypts both with Fred's public key.
8. The server sends the encrypted random number to Fred.
9. Fred receives the challenge and decrypts it with his private key.
10.Fred sends back the decrypted number to the server.
11.The server compares Fred's response to the original random number.
12.If the result is the same as the original random number, the server can trust that Fred really is who he claims to be.
As with validation, authentication is also a two-way procedure. Fred now authenticates the server using the same challenge/response process, but this time, in reverse.
The actual algorithm is complex but efficient. It avoids any RSA operations on subsequent authentications between the same client-server pair. It also establishes a session key that can be used to optimally encrypt the messages that follow authentication.
220 Lotus Security Handbook
Switching off certificate-based authenticationIt is possible to avoid the validation and certification procedure we just described by switching off certificate-based authentication. This basically tells the server to allow anonymous access for users and servers, for which the server does not validate or authenticate them.
The downside of doing this should be obvious. A Domino server for which anonymous access is permitted does not record the database activity of the users and servers. (This is normally done in the log file and in the User Activity dialog box.) And, with anonymous access, it is never possible to know who is accessing databases on the server. It is thus not possible to use the user’s identity to control access to databases and design elements.
The upside of allowing anonymous access is that it is most useful for providing general public access to servers for users and servers that are not cross-certified with them. It is generally used to allow users and servers outside the organization to access a server without first obtaining a certificate for the organization.
All in all, given the advantages and disadvantages of permitting anonymous access to Domino servers, this type of access should only be considered when it is not necessary to know who is accessing the database or when it is not necessary to control access based on client identity. This would thus imply that the information accessible on these databases and servers is of low sensitivity, if not entirely in the public domain.
There is more to anonymous access than we can cover here. Anonymous access can also be provided for Internet/intranet users, in conjunction with session encryption. We cover this later in this chapter, in the Internet PKI section.
For now, these are the steps to allow anonymous access to a Domino server for Notes users and other Domino servers:
1. From the Domino Administrator, click the Configuration tab and open the Server document.
2. Click the Security tab.
3. In the Security Settings section, enable “Allow anonymous Notes connections.”
4. Save the document.
5. Create an entry named “Anonymous” in the ACL of all databases to which you want to allow anonymous access. Assign the appropriate access level – typically Reader access. If you don't add “Anonymous” as an entry in the ACL, anonymous users and servers get “Default” access.
6. Stop and restart the server so that the changes take effect.
Chapter 6. Public key infrastructures 221

A final word about anonymous access. If a user is in a hierarchical certification environment and attempts to connect to a server which is set for anonymous access, and the server can't authenticate the user, that person will see the following message in the status bar:
Server X cannot authenticate you because: the server's Address Book does not contain any cross-certificates capable of authenticating you. You are now accessing that server anonymously.
6.1.11 Data integrity with digital signaturesAt the beginning of the book, we discussed the security services that need to be provided. One of the them is data integrity, which is the topic of this section.
When databases are replicated or e-mail messages are routed through the network, there is the risk that they could be modified, either because of a hardware fault, or because of the actions of an unauthorized third party (commonly referred to as tampering). Because of these risks, it must be possible to tell whether the data received is the same, or in the same state, as the original version that was sent.
In order to detect any such changes, digital signatures are used. Data integrity implies the current condition of the data is equal to the original “pure” condition. It guarantees that information is not changed in transit. A digital signature can verify that the person who originated the data is the author and that no one has tampered with the data.
Originators can add their digital signature to e-mail messages and can also add their signature to fields or sections of Notes documents.
For Digital signatures applied by the Notes client, the same RSA key pair is used that was used in the validation and authentication process. The manner in which digital signatures are used in Lotus Notes is illustrated in Figure 6-15 on page 223.
Note: A database designer controls whether or not fields and sections of a database are signable. Given this facility, individual users can then choose whether to sign mail messages or not.
222 Lotus Security Handbook
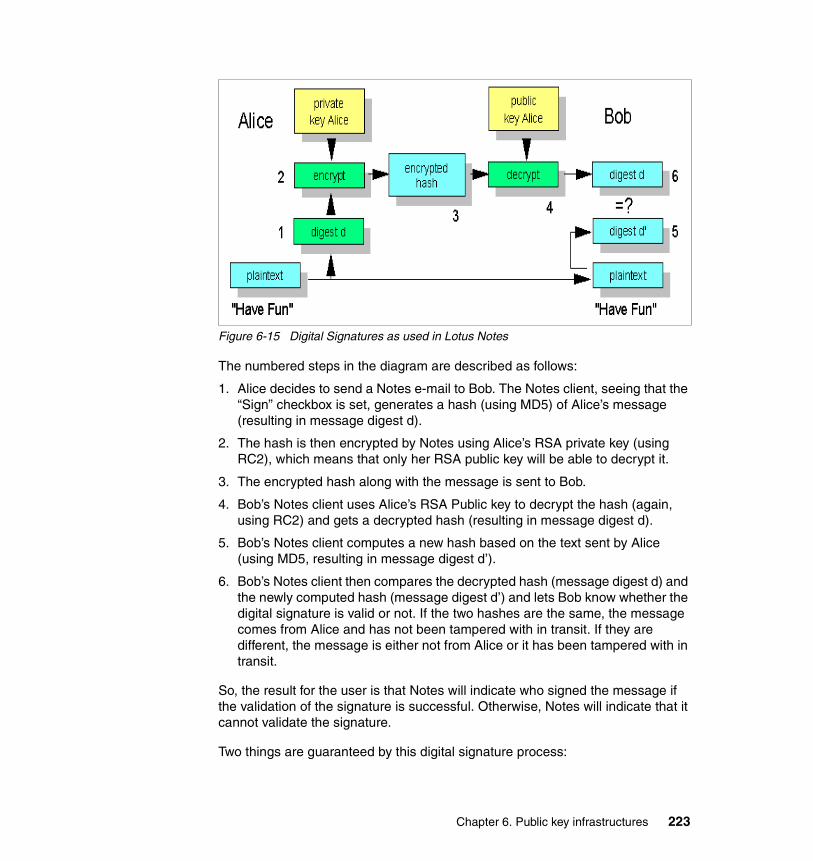
Figure 6-15 Digital Signatures as used in Lotus Notes
The numbered steps in the diagram are described as follows:
1. Alice decides to send a Notes e-mail to Bob. The Notes client, seeing that the “Sign” checkbox is set, generates a hash (using MD5) of Alice’s message (resulting in message digest d).
2. The hash is then encrypted by Notes using Alice’s RSA private key (using RC2), which means that only her RSA public key will be able to decrypt it.
3. The encrypted hash along with the message is sent to Bob.
4. Bob’s Notes client uses Alice’s RSA Public key to decrypt the hash (again, using RC2) and gets a decrypted hash (resulting in message digest d).
5. Bob’s Notes client computes a new hash based on the text sent by Alice (using MD5, resulting in message digest d’).
6. Bob’s Notes client then compares the decrypted hash (message digest d) and the newly computed hash (message digest d’) and lets Bob know whether the digital signature is valid or not. If the two hashes are the same, the message comes from Alice and has not been tampered with in transit. If they are different, the message is either not from Alice or it has been tampered with in transit.
So, the result for the user is that Notes will indicate who signed the message if the validation of the signature is successful. Otherwise, Notes will indicate that it cannot validate the signature.
Two things are guaranteed by this digital signature process:
Chapter 6. Public key infrastructures 223

1. The sender is authenticated because the digest must have been encrypted with the sender's private key.
2. The message arrived unmodified because the digests are identical.
Otherwise, the receiver knows the data has been tampered with or that the sender does not have a certificate trusted by the reader.
6.1.12 Confidentiality with encryptionAnother security service we discussed that needs to be provided is confidentiality, which is the topic of this section.
When sending data through the network, including mail messages, anyone who can intercept network packets – generally by tracing or electronic sniffing techniques – can read the data without authentication.
It might not be an issue for the organization, since the information is likely not private. But it might be an issue for the organization since it means that every piece of mail sent or received is possibly being read by others, who normally would not have the authorization to do so.
This lack of privacy is a serious problem. While the vast majority of e-mail traffic does not contain sensitive data, there is a small but important subset that does. There are only two solutions to this problem: either persuade users to take security seriously, or, treat all e-mail as containing sensitive information and encrypt everything. Experience has shown that effecting changes to an IT architecture is generally easier than modifying human nature, so often the latter approach is applied. (However, users should still take security seriously and there should be policies in place that ensure that a modicum of security is adhered to by everyone in the organization).
Implementing encryption across an entire IT infrastructure is not a trivial or simple task, except, of course, when Notes is used. Sensitive data can be encrypted into an unreadable format before transit simply by having the user pick a checkbox in the Notes e-mail Delivery Options.
The e-mail is encrypted automatically by the Notes client and sent along. After the encrypted e-mail arrives at the destination, the Notes client decrypts it so as to give the recipient the chance to read it. This method protects data from unauthorized access. Notes uses a bulk encryption mechanism, based on a secret key, to encrypt and decrypt the data. It confirms also that the data received hasn't been read by others. Given the fact that Notes clients and Domino servers process a lot of e-mails, it is important that the algorithm used be efficient. Notes uses the RC2 or RC4 algorithms for bulk encryption of data.
224 Lotus Security Handbook

Encryption strengthOne variation with respect to encryption strength is introduced by the type of Notes license a user has.
All Notes IDs contain two public/private key pairs. Prior to version 5.0.4, key lengths were restricted for the purposes of encrypting data, but not for authentication or signing. Anything over a 512-bit RSA key and 56-bit symmetric key was considered strong encryption, and the United States government prohibited its export. Customers were required to order and choose among kits of different cryptographic strengths.
With the relaxation of U.S. government regulations on the export of cryptography, the Domino server and the Domino Administrator, Domino Designer®, and Lotus Notes client products have consolidated all previous encryption strengths – North American, International, and France – into one strong encryption level resulting in a single “Global” release of the products. The Global release adopts the encryption characteristics previously known as North American. Strong encryption in Global products can be used worldwide, except in countries whose import laws prohibit it, or except in those countries to which the export of goods and services is prohibited by the U.S. government. Customers are no longer required to order Notes software according to cryptographic strength.
When an organization upgrades to a Global release of Domino and Notes, stronger cryptography will be used without a requirement to reissue existing IDs. These changes are seamless to users as well as administrators. When two different versions of software are communicating, the encryption negotiation will result in a step-down to the weaker level. Therefore, the full benefits of stronger encryption will only be realized when all software has been upgraded to the Global (release 5.0.4 and later) level. However, any mixed versions of the software will interoperate.
The “Register New User” dialog box still offers a choice between North American and International IDs. It was left this way because administrators often use the North American or International distinction for administration purposes, or there may be older versions of the software still in use in some companies. In addition, countries have their own import rules. Preserving this distinction will allow Lotus to respond to specific country changes, if required.
Chapter 6. Public key infrastructures 225
Interoperability issuesThe fact that both North American and international ID types continue to exist and be supported in Notes and Domino raises many questions and concerns. The following discussion addresses some of these questions and concerns.
� Support for ID types: Both North American and international ID types continue to be supported for the Global release. This is for backward compatibility with pre-5.0.4 clients. Lotus Notes users can keep their existing international IDs if the Global version of the software is installed. The Global version will automatically allow the use of stronger encryption. Browser users can keep their existing key ring, but users must follow the manufacturer's recommendations for upgrading the browser to stronger encryption.
� Interoperability with post-5.0.4 releases: If the organization's clients and servers are all running release 5.0.4 or later, it makes no difference whether North American or international IDs are created. Both types of ID will work the same way.
� Interoperability with pre-5.0.4 releases: Lotus Notes users, as well as Domino servers which have been upgraded to release 5.0.4 and later, can authenticate and continue day-to-day operations securely with clients and servers running on earlier releases of software. However, if the organization has clients or servers running releases earlier than Notes and Domino 5.0.4, the organization should continue to create the same types of IDs created with the earlier versions. International versions of releases prior to 5.0.4 do not allow users to switch to North American IDs, so when registering new international users, North American IDs shouldn't only be created. Similarly, North American versions of earlier releases use weaker cryptography when running with international IDs, so international IDs shouldn't only be created.
The best strategy for deciding between North American and international IDs is to continue using the decision process that was in place for earlier releases of Notes and Domino. Eventually, as you upgrade the Notes clients and Domino servers, the decision will not matter.
Note: These regulations pertain only to export from the United States. For other countries with import regulations, customers need to check the requirements of the specific country. While Lotus takes all steps to accommodate governmental encryption regulations worldwide, Lotus recommends that customers familiarize themselves with local encryption regulations to remain in compliance.
226 Lotus Security Handbook
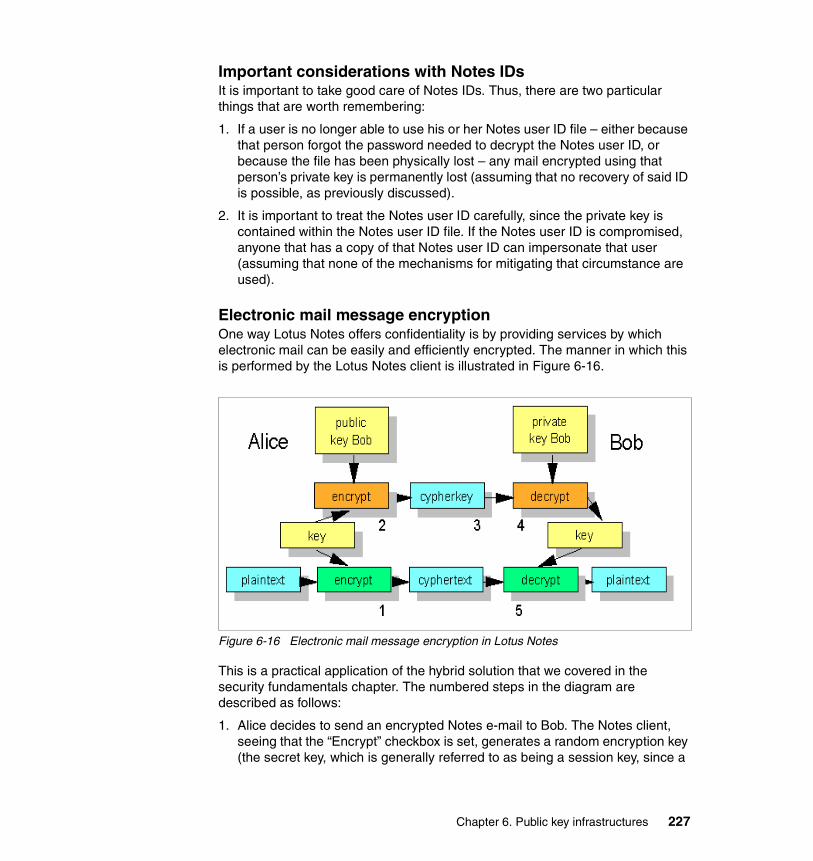
Important considerations with Notes IDsIt is important to take good care of Notes IDs. Thus, there are two particular things that are worth remembering:
1. If a user is no longer able to use his or her Notes user ID file – either because that person forgot the password needed to decrypt the Notes user ID, or because the file has been physically lost – any mail encrypted using that person’s private key is permanently lost (assuming that no recovery of said ID is possible, as previously discussed).
2. It is important to treat the Notes user ID carefully, since the private key is contained within the Notes user ID file. If the Notes user ID is compromised, anyone that has a copy of that Notes user ID can impersonate that user (assuming that none of the mechanisms for mitigating that circumstance are used).
Electronic mail message encryptionOne way Lotus Notes offers confidentiality is by providing services by which electronic mail can be easily and efficiently encrypted. The manner in which this is performed by the Lotus Notes client is illustrated in Figure 6-16.
Figure 6-16 Electronic mail message encryption in Lotus Notes
This is a practical application of the hybrid solution that we covered in the security fundamentals chapter. The numbered steps in the diagram are described as follows:
1. Alice decides to send an encrypted Notes e-mail to Bob. The Notes client, seeing that the “Encrypt” checkbox is set, generates a random encryption key (the secret key, which is generally referred to as being a session key, since a
Chapter 6. Public key infrastructures 227
new random key is generated every time an encrypted Notes message is sent) and encrypts the message with it.
2. The session encryption key is encrypted by Notes (using RC2) with the recipient’s public key, and attached to the message, which means that only Bob’s RSA public key will be able to decrypt it.
3. The encrypted text and the encrypted key are sent to Bob via Notes mail.
4. Bob’s Notes client uses Bob’s RSA private key to decrypt the encrypted key (again, using RC2) and gets a decrypted session key. Here, secrecy is guaranteed, because only Bob's private key can be used to decrypt the session key needed to decrypt the message.
5. Bob’s Notes client uses the decrypted session key to decrypt the mail message (using RC2), resulting in the decrypted, original message that was sent by Alice.
It is important to point out a couple of things:
� If Bob’s Notes client is unable to decrypt the e-mail sent by Alice – generally due to the fact that Bob may have a new Notes user ID and the public key in the Directory Alice has access to is only the old key – nothing will be displayed in the body field.
� The example is similar in nature to the way S/MIME, a secure messaging standard for the Internet, works. We cover S/MIME in the Internet PKI section of this chapter.
Other Notes encryption featuresThe previous examples apply to Notes mail, but Lotus Notes also provides other methods for encrypting information. Databases, documents, fields and transmission of data over the network can be protected using various methods of encryption:
� Databases can be encrypted with a user or server ID by using the local database encryption security option. This protects the databases which use this security feature from being accessed by an unauthorized user who has gained access to the file system of the workstation the database is stored on, or who has made a file system copy of the database via the operating system.
� Field encryption using special encryption keys created and distributed by the database designer can be used to limit access to fields by authorized users.
� Documents can be encrypted using private or public keys. Keys can be added to the form, causing every document created with the form to be encrypted, or by letting users encrypt documents with their own encryption keys.
� Network port encryption allows unencrypted data to be encrypted at the port level for safe transport through the network. Network port encryption can be
228 Lotus Security Handbook

enabled for a user's workstation or at a server by selecting File → Preferences → Ports to modify the port definition to encrypt network data.
It is important to point out that in the case of port encryption, unlike for the previously shown examples, RC4 is used instead of RC2. This is done because RC4 is a specialized cipher for the encryption of streaming data, whereas RC2 is more specialized for block encryption of data.
6.1.13 Notes PKI summaryWe have covered all important aspects of the Notes PKI and shown how Notes and Domino security is built on a robust public key infrastructure that allows for authentication, data integrity, and confidentiality for all Notes users taking advantage of these built-in facilities. Given the transparency of the PKI in Lotus Notes, it is easy to use, provides security without any of the associated difficulties of standard PKIs, and makes it the largest deployed PKI in the corporate world.
Because Notes and Domino interact also with people not using Notes and Domino, in the remaining sections of this chapter we discuss how Notes and Domino have been expanded to offer support for Internet standards in matters of public key infrastructure and the services that are made available through it.
6.2 The Internet PKIGiven the openness of the Internet and the fact that anyone can do just about anything on it, more than ever, companies need to protect themselves. There are a number of security standards, technologies, and tools available for this purpose, which we cover in this section.
As with the security in Notes, these standards, technologies, and tools are based for the most part on public key certificate technology. The two most common certificate formats are PGP and X.509. Given Domino’s broad support for X.509 certificates, we focus our attention on this format.
Since the introduction of the Domino 4.5 server in 1996, there has been support for such Internet standards built into the server. The goal has been to integrate them more and more in the core of the Domino server, and Domino 6 shows the result of these efforts. We discuss the necessary basics of Internet security technologies in conjunction with the Domino server in the rest of this chapter; a focused explanation of the new services and facilities and services is in Chapter 11, “Domino/Notes 6 security features” on page 427.
Chapter 6. Public key infrastructures 229

6.2.1 Internet standardsIt is one thing to use the Internet and it is another to perform technical work based on Internet standards. Doing the former is simple, doing the later can be daunting at times.
When doing such technical work, acronyms come up such as STDs and RFCs, each followed by a specific number. It is important to know where these acronyms come from, what they mean, and the differences between the two.
Internet standards are defined by the Internet Engineering Task Force (IETF). These are documents that start out as Internet Drafts, then become Requests for Comments (RFCs), which in some cases, after a long consultative process get approved as standards (STDs) by the Internet Engineering Steering Group (IESG).
Standards (STDs)Specifications that are intended to become Internet Standards evolve through a set of maturity levels known as the standards track. These maturity levels are Proposed Standard, Draft Standard, and Standard.
A Proposed Standard specification is generally stable, has resolved known design choices, is believed to be well-understood, has received significant community review, and appears to enjoy enough community interest to be considered valuable. However, further experience might result in a change or even retraction of the specification before it advances. Usually, neither implementation nor operational experience is required.
A specification from which at least two independent and interoperable implementations from different code bases have been developed, and for which sufficient successful operational experience has been obtained, may be elevated to the Draft Standard level.
A Draft Standard is normally considered to be a final specification, and changes are likely to be made only to solve specific problems encountered. In most circumstances, it is reasonable for vendors to deploy implementations of Draft Standards into a disruption-sensitive environment.
A specification for which significant implementation and successful operational experience has been obtained may be elevated to the Internet Standard level. An Internet Standard (which may simply be referred to as a Standard) is characterized by a high degree of technical maturity and by a generally held belief that the specified protocol or service provides significant benefit to the Internet community.
230 Lotus Security Handbook
Generally, Internet standards define interoperability of systems on the Internet by defining protocols, message formats, schemas, and languages. The most fundamental of the standards are the ones defining the Internet protocol (IP).
All Internet standards are given a number in the STD series. The first document in this series, STD 1, describes the remaining documents in the series, and has a list of proposed standards. Often, documents in the STD series are copies of RFCs or are a few RFCs collected together. STD numbers do not have version numbers since all updates are made via RFCs and the RFC numbers are unique. To clearly specify which version of a standard one is referring to, the standard number and all of the RFCs which it includes should be stated.
Request for comment (RFC)Requests for comments (RFCs) are a series, begun in 1969, of numbered Internet informational documents and standards widely followed by commercial software and freeware developers in the Internet and UNIX communities. Few RFCs are standards, but all Internet standards are recorded in RFCs. Perhaps the single most influential RFC has been RFC 822, the Internet electronic mail (e-mail) format standard.
The RFCs issued by the IETF and its predecessors are the most well-known series named “RFCs”; this series is almost always what is meant by RFC without further qualification. However, other organizations have, in the past, also issued series called RFCs.
The RFCs are unusual in that they are floated by technical experts acting on their own initiative and reviewed by the Internet at large, rather than being formally promulgated through an institution such as ANSI. For this reason, they remain known as RFCs even once adopted as standards. This tradition of pragmatic, experience-driven, after-the-fact standard writing done by individuals or small working groups has important advantages over the more formal, committee-driven process. Emblematic of some of these advantages is the existence of a flourishing tradition of “joke” RFCs. Usually at least one a year is published, usually on April Fool's Day.
The RFCs are most remarkable for how well they work; they manage to have neither the ambiguities that are usually rife in informal specifications, nor the committee-perpetrated misfeatures that often haunt formal standards, and they define a network that has grown to truly worldwide proportions.
Accessing STDs and RFCsSTDs and RFCs are available publicly and online. The easiest way to obtain them is from the IETF Web site at the following URL:
http://www.ietf.org
Chapter 6. Public key infrastructures 231
The complete RFC index in text format is available from their site at:
http://www.ietf.org/iesg/1rfc_index.txt
However, it is impractical to navigate because of its length. Instead, a better method to find and retrieve the text of a particular RFC is to enter its number via the folllowing URL:
http://www.ietf.org/rfc.html
For more details about RFCs and the RFC process, see RFC 2026, “The Internet Standards Process, Revision 3.”
Some thoughts on STDs and RFCsNot all RFCs are Internet standards documents. Many RFCs have Informational or Experimental status and do not represent any kind of standard. Instead, they contain information that may be useful or important to retain as part of the RFC document series.
This is important to understand because unscrupulous marketers and a careless trade press sometimes falsely suggest that every RFC represents a standard, or that all standards have equal weight. The relationship among Internet technical specifications is often complex. In fact, there is even an RFC that explains this! RFC 1796, titled “Not All RFCs are Standards,” can be accessed at:
http://www.faqs.org/rfcs/rfc1796.html
Keep these distinctions between STDs and RFCs in mind as you read on about the Internet technologies, tools, and services that are supported and offered by the Domino server for Internet clients.
6.2.2 Components of a PKIBefore we go into detail about the individual services a PKI offers, we use this section to describe the components of a PKI.
Originally, “PKI” was a generic term that simply meant a set of services that made use of public key cryptography. These days, a PKI is more associated with the services it provides, either in applications or protocols. Some examples of such services are:
� Secure Sockets Layer (SSL)
� Secure Multimedia Internet Mail Extensions (S/MIME)
� IP Security (IPSec)
� Secure Electronic Transactions (SET)
� Pretty Good Privacy (PGP)
232 Lotus Security Handbook
Let’s consider what is necessary for these services to be provided and the components that are required within a modern-day public key infrastructure.
The core components of a PKI, as shown in Figure 6-17 on page 234, include:
� The End-Entities (EE)
� The Certificate Authority (CA)
� The Certificate Repository (CR)
� The Registration Authority (RA)
� Digital Certificates (X.509 V3)
Detailed definitions of the components follow.
End-Entity (EE)An End-Entity is best defined as a user of PKI certificates or as an end-user system that is the subject of a certificate. In other words, in a PKI system, an End-Entity is a generic term for a subject that uses some services or functions of the PKI system. It may be a certificate owner (for example, a human being, an organization, or some other entity) or a requestor of a certificate or CRL (for example, an application).
Certificate Authority (CA)The Certificate Authority (CA) is basically the signer of the certificates. The CA, often together with the Registration Authority (describe further on), has the responsibility to ensure the proper identification of an End Entity’s certificate. The logical domain in which a CA issues and manages certificates is called a security domain, which might be implemented to cover many different groups, of various sizes, from one test user to a department to the whole organization. A CA’s primary operations include: certificate issuance, certificate renewal, and certificate revocation.
Certificate issuanceHere, a CA creates a digital certificate by applying a digital signature to it. Basically, a public and private key pair is generated by a requesting client (EE). The client then submits a request for certificate issuance to the CA.
The certificate request contains at least the client’s public key and some other information, such as the client’s name, e-mail address, mail address, or other pertinent information. When a Registration Authority (RA) is established, the CA delegates the client verification process and other management functions to the RA. After the client request is verified, the CA creates the digital certificate and signs it.
Chapter 6. Public key infrastructures 233

Figure 6-17 PKI Components
As an alternative, a CA can generate a client’s key pair and, subsequently, the signed certificate for that client. This process, however, is seldom implemented because the private key needs to be forwarded from the CA to the client, which can be a weak link. It is generally considered more secure when the clients generate their own key pairs, in which case the private keys never leave their area of authority.
In order for a public key infrastructure to work completely, the basic assumption is that any party who wishes to verify a certificate must trust its digital signer CA. In the PKI, “A trusts B” means that “A trusts the CA that signed B’s certificate.” Thus, in general terms, “A trusts CA” means that “A” holds a copy of the CA’s certificate locally.
234 Lotus Security Handbook

For example, when establishing a secure HTTP connection via SSL, mainstream Web browsers have a list of several trustworthy CA certificates (generally referred to as “Trusted Roots”, or “Trusted CAs”) already incorporated when they ship, such as, but not limited to: VeriSign, Entrust, Thawte, Baltimore, IBM World Registry, and so forth. If a Web server uses a certificate that is signed by such a trusted CA, they will implicitly trust the server, unless the user intentionally deletes the signer CA certificate from the list of Trusted CAs.
A CA is able to issue a number of different types of certificates, such as:
� User certificates: These may be issued to an ordinary user or another type of entity, such as a server or an application. These will then be, with the user certificate, trusted end-entities for the CA. If an RA is part of the infrastructure, it should also have this certificate. A user certificate may be limited to specific uses and purposes (such as secure e-mail, secure access to servers, and so forth).
� CA certificates: When a CA issues a certificate for itself, it is called a self-signed certificate, or root certificate for that CA. If a CA issues a certificate for a subordinate CA, the certificate is also called a CA certificate.
� Cross certificates: These are used for cross-certification, which is an authentication process across security domains.
Certificate renewalEvery certificate has a validity period with an expiration date associated with it. When a certificate expires, a renewal process may be initiated and, once approved, a new certificate will be issued to the End-Entity.
Certificate revocationThe maximum lifetime of a certificate is its expiration date. In some cases, however, a certificates needs to be revoked before its expiration date. When this happens, the CA posts the certificate to a Certificate Revocation List (CRL). Actually, to be more precise, the CA posts the certificate’s serial number, along with some other information, to the CRL. Clients that need to know the validity of a certificate can search the CRL for any revocation notice.
The Certificate Repository (CR)The Certificate Repository is a store of issued certificates and revoked certificates in a CRL. Although a Certificate Repository is not a required component in a public key infrastructure, it significantly contributes to the availability and manageability of the PKI.
Because the X.509 certificate format is a natural fit to an X.500 Directory, a CR is thus best implemented as a Directory, which can then be access by the most
Chapter 6. Public key infrastructures 235
common access protocol, the Lightweight Directory Access Protocol (LDAP), of which the latest version is LDAP v3.
LDAP is the most efficient and most widely accepted method for an End-Entity or a CA to retrieve or modify the certificate and CRL information stored in a CR. LDAP offers commands or procedures which do this efficiently and seamlessly, such as: bind, search or modify, and unbind. As well, the attributes and object classes to be supported by an LDAP server acting as server of a CR are defined, and are called Schemas.
There are alternative methods for obtaining certificates or CRL information if a CR is not implemented in a directory. However, these are not recommended and after considering the requirements that a CR must meet, it turns out that a Directory is actually the best place to store CR information. Such requirements include: easy accessibility, standards-based access, up-to-date information storage, built-in security (if required), data management issues and the possible merging of similar data. In the case of a Domino-based Internet PKI, the CR is the Domino Directory.
The Registration Authority (RA)The Registration Authority (RA) is an optional component in a PKI. In some cases, the CA incorporates the role of an RA. Where a separate RA is used, the RA is a trusted End-Entity certified by the CA, acting as a subordinate server of the CA. The CA can delegate some of its management functions to the RA. For example, the RA may perform personal authentication tasks, report revoked certificates, generate keys, or archive key pairs. The RA, however, does not issue certificates or CRLs.
6.2.3 X.509 certificatesA crucial part of a PKI – and one worthy of its own section – is the X.509 certificate.
While there have been several proposed formats for public key certificates, most commercial certificates available today are based on the international standard ITU-T Recommendation X.509 (formerly CCITT X.509).
X.509 certificates are commonly used in secure Internet protocols, such as those that we cover in the present chapter, namely:
� Secure Sockets Layer
� Secure Multipurpose Internet Message Extension (S/MIME)
236 Lotus Security Handbook

What is the X.509 standardOriginally, the primary intent for the X.509 standard was to specify a means to do certificate-based authentication against an X.500 directory. Directory authentication in X.509 can be done using either secret-key techniques or public-key techniques. The latter is based on public-key certificates.
At present, the public-key certificate format defined in the X.509 standard is widely used and supported by a number of protocols in the Internet world. The X.509 standard does not specify a particular cryptographic algorithm, although it appears that the RSA algorithm is the one that’s most broadly used.
A brief history of X.509 certificatesThe Internet Privacy Enhanced Mail (PEM) RFCs, published in 1993, include specifications for a public key infrastructure based on X.509 v1 certificates (see RFC 1422 for details).
The experience gained in attempts to deploy RFC 1422 made it clear that the v1 and v2 certificate formats were deficient in several respects. Most importantly, more fields were needed to carry required and necessary information. In response to these new requirements, ISO/IEC/ITU and ANSI X9 developed the X.509 version 3 (v3) certificate format. The v3 format extends the v2 format by providing for additional extension fields.
These fields grant more flexibility because they can convey supplemental information, beyond just the key and name binding. In June 1996, standardization of the basic v3 format was completed.
The contents of an X.509 certificateAn X.509 certificate consists of the following fields:
� Version of the certificate
� Certificate serial number
� Digital signature algorithm identifier (for issuer's digital signature)
� Issuer (that is, the CA) name
� Validity period
� Subject (user or server) name
� Subject public-key information: algorithm identifier and public-key value
� Issuer unique identifier - version 2 and 3 only (added by version 2)
� Subject unique identifier - version 2 and 3 only (added by version 2)
� Extensions - version 3 only (added by version 3)
� Digital signature by issuer on the above fields
Chapter 6. Public key infrastructures 237

Standard extensions include subject and issuer attributes, certification policy information, and key usage restrictions, among others. The structure of an X.509 V3 certificate is illustrated in Figure 6-18.
Figure 6-18 Structure of an X.509 certificate
Certificate data is written in abstract syntax notation 1 (ASN.1) syntax rule, as can be seen in Figure 6-19.
238 Lotus Security Handbook
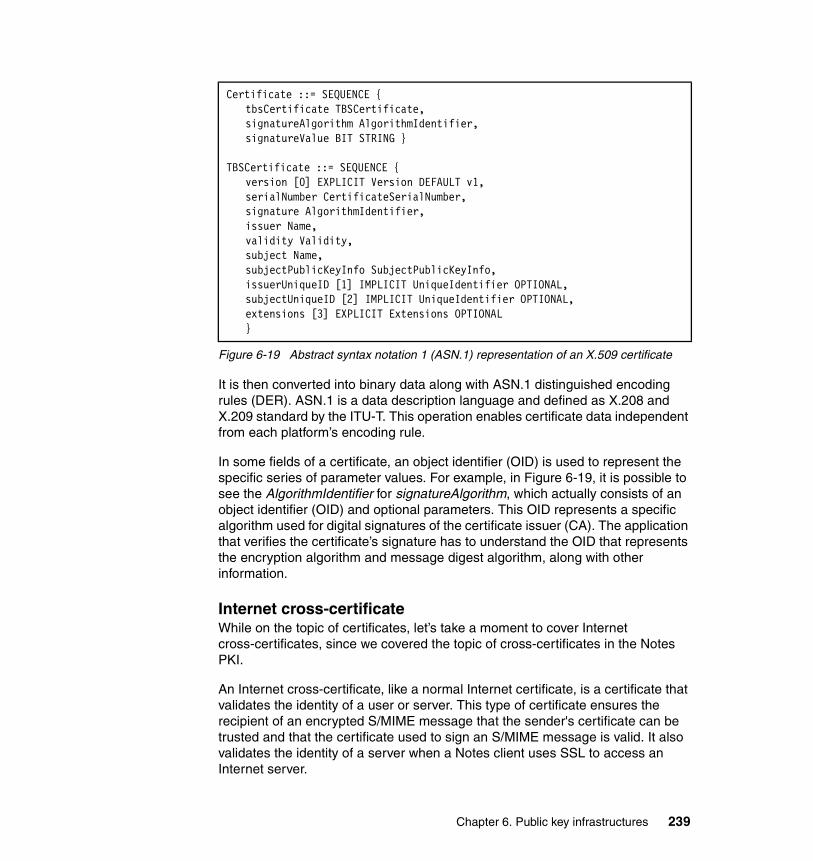
Figure 6-19 Abstract syntax notation 1 (ASN.1) representation of an X.509 certificate
It is then converted into binary data along with ASN.1 distinguished encoding rules (DER). ASN.1 is a data description language and defined as X.208 and X.209 standard by the ITU-T. This operation enables certificate data independent from each platform’s encoding rule.
In some fields of a certificate, an object identifier (OID) is used to represent the specific series of parameter values. For example, in Figure 6-19, it is possible to see the AlgorithmIdentifier for signatureAlgorithm, which actually consists of an object identifier (OID) and optional parameters. This OID represents a specific algorithm used for digital signatures of the certificate issuer (CA). The application that verifies the certificate’s signature has to understand the OID that represents the encryption algorithm and message digest algorithm, along with other information.
Internet cross-certificateWhile on the topic of certificates, let’s take a moment to cover Internet cross-certificates, since we covered the topic of cross-certificates in the Notes PKI.
An Internet cross-certificate, like a normal Internet certificate, is a certificate that validates the identity of a user or server. This type of certificate ensures the recipient of an encrypted S/MIME message that the sender's certificate can be trusted and that the certificate used to sign an S/MIME message is valid. It also validates the identity of a server when a Notes client uses SSL to access an Internet server.
Certificate ::= SEQUENCE {tbsCertificate TBSCertificate,signatureAlgorithm AlgorithmIdentifier,signatureValue BIT STRING }
TBSCertificate ::= SEQUENCE {version [0] EXPLICIT Version DEFAULT v1,serialNumber CertificateSerialNumber,signature AlgorithmIdentifier,issuer Name,validity Validity,subject Name,subjectPublicKeyInfo SubjectPublicKeyInfo,issuerUniqueID [1] IMPLICIT UniqueIdentifier OPTIONAL,subjectUniqueID [2] IMPLICIT UniqueIdentifier OPTIONAL,extensions [3] EXPLICIT Extensions OPTIONAL}
Chapter 6. Public key infrastructures 239
An Internet cross-certificate is stored in a Certificate document in the user's Personal Address Book and can be used only by the user to whom it is issued. An Internet cross-certificate can be issued for a leaf certificate – that is, a certificate issued to a user or server by a CA – or the CA itself.
Creating a cross-certificate for a leaf certificate indicates trust for only the owner of the certificate (for example, the sender of the signed message or recipient of an encrypted message). A cross-certificate for a CA indicates trust for all owners who have a certificate issued by that CA.
If a CA is cross-certified a CA, this confers trust to the CA to issue certificates to users and servers lower in the hierarchical name tree. For example, after cross-certifying Sales/Acme, trust is given to Sales/ABC to issue a certificate to Fred/Sales/Acme. Alternatively, after a cross-certificate for Fred/Sales/Acme is created, only Fred/Sales/Acme is trusted.
For detailed information on how to create an Internet cross-certificate for a CA, consult “Creating an Internet cross-certificate for a CA” in the Lotus Domino Administrator 6 Help database.
We show X.509 certificates in action shortly. Before we can do that, we need to review authentication since it is just as important on the Internet as it is in the Notes world. For a refresher as to why authentication is important, refer to “Authentication” on page 215.
6.2.4 Web client authentication In this section we describe the different methods available for the authentication of Internet and intranet users.
The application level communications protocol used by the World Wide Web is the Hypertext Transfer Protocol (HTTP). HTTP includes a simple user name and password-based authentication scheme known as basic authentication. The implementation of basic authentication is server-specific, but in general they all use it for two purposes:
� As a mechanism to identify which user is accessing the server
� To limit users to accessing specific pages (identified as Universal Resource Locators, URLs)
Once name-and-password access is set up and Person documents are created for Internet or intranet users, Domino will authenticate users when:
� They attempt to do something for which access is restricted
� Anonymous access is not allowed on the server
240 Lotus Security Handbook

For example, when a user tries to open a database that has an ACL with No Access as the default, Domino challenges the user for a valid user name and password. Authentication succeeds only if the user provides a name and password that matches the name and password stored in the user’s Person document and if the database ACL gives access to that user. Anonymous users are not authenticated.
It is possible to use name-and-password and anonymous access with TCP/IP and SSL (which we cover in detail in the next section). Name-and-password and anonymous access with TCP/IP are described here.
This section also applies to Web clients who are accessing a Domino Web server for which session authentication has been enabled.
Name-and-password authenticationName-and-password authentication, also known as basic password authentication, uses a challenge/response protocol to ask users for their names and passwords and then verifies the accuracy of the passwords by checking them against a secure hash of the passwords stored in Person documents in the Domino Directory.
When set up for this, Domino asks for a name and password only when an Internet or intranet client tries to access a protected resource on the server. Internet and intranet access differs from Notes client and Domino server access in that a Domino server asks a Notes client or Domino server for a name and password when the client or server initially attempts to access the server.
If the administrator wants to assign database access to an Internet or intranet client based upon Domino ACL security, that person must create a Person document for that client in the Domino Directory, or, optionally, in a secondary Domino directory or an external LDAP directory. Clients who do not have Person documents are considered Anonymous and can only access servers and databases that allow Anonymous access.
Name-and-password authentication allows Domino to locate the Person document (if one exists) for the client accessing the server. After the client is identified, access to server resources can then be determined. For example, if we want to give Alice Editor access to a database and all others accessing the database to have Author access, it is necessary to create a Person document for Alice. It is possible to set up the database ACL to include Alice as an Editor and Anonymous as Author.
It is possible to use name-and-password authentication with either TCP/IP or SSL on any servers that run an Internet protocol, meaning LDAP, POP3, HTTP, SMTP, IIOP, or IMAP.
Chapter 6. Public key infrastructures 241

An example of HTTP name-and-password authentication is illustrated in Figure 6-20 on page 242. The process is as follows:
1. The user clicks on a restricted access page (generally by issuing an HTTP GET operation).
2. The server checks if anonymous access to that page is permitted. Since it is not, the server rejects the request (generally by sending back an HTTP Status 401 Realm “Private” response). Upon receipt of this response from the server, the Web browser brings up the simple authentication dialog box and prompts the user for the user name and password.
3. The Web browser resends the same request, which is basically the same HTTP GET operation as in step 1, except that the user ID and password are passed (encoded in Base64 format) in the headers.
4. The server authenticates the user and if the operation is successful, presents the user with the requested information. If the authentication operation fails, the server sends an authentication failure message to the user.
Overall, what the figure shows is that the when a client requests a URL, the server checks to see if the URL requires use authentication. If it does, the server rejects the request with a 401 status code. A dialog box pops up on the user’s screen, asking for a user ID and password. When the user has provided them, the browser resends the original request, but with the addition of the following MIME element within the HTTP header:
Authorization: Basic <user ID and password block>
The user ID and password block is constructed by creating a string of the form UserID:Password and then encoding it using the Base64 algorithm.
Figure 6-20 HTTP name-and-password authentication
Users are not repeatedly prompted for a password every time a restricted page is accessed because the browser caches the user ID, password, and server name and realm name in memory, so that if it receives another 401 status code for the
242 Lotus Security Handbook
same server/realm combination, it can reissue the request using the appropriate user ID and password.
Some browsers go a step further and simply send a user ID and password for any URL that is likely to need it. Opera, Mozilla, Netscape Navigator and Internet Explorer all send the information with any URL that is in the same logical directory.
The objective of these tricks is to reduce network traffic and improve responsiveness by eliminating a number of invalid requests and 401 status code responses. They also, unfortunately, have the undesired side effect of re-transmitting the user ID and password when it may not be necessary.
However, there are ways to mitigate that. For each Internet protocol enabled on the server, it is possible to specify the method of security. For example, an Administrator might enable client certificate authentication for HTTP connections but require name-and-password security for LDAP connections that use TCP/IP. Or the Administrator might use name-and-password security with anonymous and SSL client authentication, for example, to allow users with SSL client certificates to authenticate using SSL client authentication and to allow other users to enter a name and password if they do not have an SSL client certificate.
It is possible to select the level of restriction Domino uses when authenticating users in Domino Directories and LDAP directories. This applies to all Internet protocols (HTTP, LDAP, IMAP, POP3). Using this setting makes servers less vulnerable to security attacks by refining how Domino searches for names and authenticates Internet clients. Domino also uses this setting when a Java applet hosted on a Domino server authenticates users with the Domino IIOP protocol.
Fewer name variations with higher securityThe option “Fewer name variations with higher security” is the default setting and is recommended for tighter security. This authentication method is less vulnerable to attacks because a single authentication attempt does not produce as many matches, lessening the likelihood that a guessed password matches. It requires users to enter only the items listed in Table 6-2 on page 244 for the name-and-password dialog box in a Web browser or other Internet client.
Note: Name-and-password authentication is not supported when a Domino server acts as an SMTP client – for example, when a Domino server connects to an SMTP server to route mail. Name-and-password security is supported only when a Domino server acts as an SMTP server, that is, when SMTP clients access a Domino server.
Chapter 6. Public key infrastructures 243
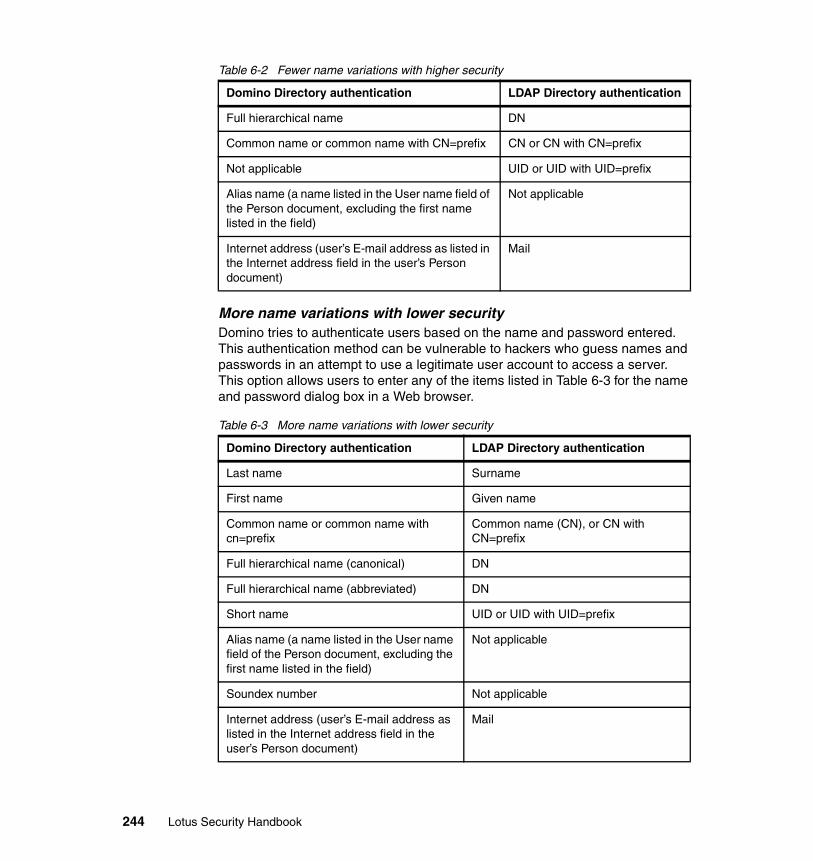
Table 6-2 Fewer name variations with higher security
More name variations with lower securityDomino tries to authenticate users based on the name and password entered. This authentication method can be vulnerable to hackers who guess names and passwords in an attempt to use a legitimate user account to access a server. This option allows users to enter any of the items listed in Table 6-3 for the name and password dialog box in a Web browser.
Table 6-3 More name variations with lower security
Domino Directory authentication LDAP Directory authentication
Full hierarchical name DN
Common name or common name with CN=prefix CN or CN with CN=prefix
Not applicable UID or UID with UID=prefix
Alias name (a name listed in the User name field of the Person document, excluding the first name listed in the field)
Not applicable
Internet address (user’s E-mail address as listed in the Internet address field in the user’s Person document)
Domino Directory authentication LDAP Directory authentication
Last name Surname
First name Given name
Common name or common name with cn=prefix
Common name (CN), or CN with CN=prefix
Full hierarchical name (canonical) DN
Full hierarchical name (abbreviated) DN
Short name UID or UID with UID=prefix
Alias name (a name listed in the User name field of the Person document, excluding the first name listed in the field)
Not applicable
Soundex number Not applicable
Internet address (user’s E-mail address as listed in the Internet address field in the user’s Person document)
244 Lotus Security Handbook
If name-and-password authentication is considered for an HTTP server, there is an additional method that can be used with name-and-password authentication: session-based authentication.
Name-and-password authentication sends the name and password in unencrypted format and it is sent with each request. Session-based authentication differs in that the user name and password is replaced by a cookie.
The user's name and password is sent over the network only the first time the user logs in to a server. Thereafter, the cookie is used for authentication.
Session-based name-and-password authentication offers greater control over user interaction than basic name-and-password authentication, and it lets the Administrator customize the form in which users enter their name and password information. It also allows users to log out of the session without closing the browser.
Name-and-password authentication over unsecured connectionsUse name-and-password authentication over unsecured connections (that is, non-SSL connections) to identify users without tightly securing access to data on the server – for example, when the Administrator wants to display different information to different users based on the user name and when the information in the database is not confidential. No information, including the name and password, sent between the user and server is encrypted. In this case, name-and-password authentication deters some types of hackers but does not prevent others from listening to network transmissions and guessing passwords.
Name-and-password authentication over SSLUsing SSL, all information, including the name and password, is encrypted. SSL provides confidentiality and data integrity for users set up for name-and-password authentication. Requiring a name and password in addition to SSL security provides security for users who do not use client certificate authentication, and allows you to identify individual users who access a database.
Customizing name-and-password authenticationThe Domino Web Server Application Programming Interface (DSAPI) is a C API that can be used to write custom extensions to the Domino Web Server. These extensions, or “filters,” permit the customization of the authentication of Web users.
For more information on DSAPI, see the Lotus C API Toolkit for Domino and Notes. The toolkit is available at the following URL:
http://www.lotus.com/techzone
Chapter 6. Public key infrastructures 245

Session-based name-and-password authenticationSession-based name-and-password authentication is the alternative to name-and-password authentication for Web clients, and includes additional functionality that is not available with basic name-and-password authentication.
A session is the time during which a Web client is actively logged onto a server with a cookie. To specify settings that enable and control session authentication, the Web Site document or the Server document should be edited, depending on the desired configuration.
Furthermore, there are two selections for enabling session-based authentication: single and multi-server options. The single server option causes the server to generate a cookie that is honored only by the server that generated it, while the multi-server option generates a cookie that allows single sign-on with any server that shares the Web SSO configuration document.
To use session-based authentication, Web clients must use a browser that supports cookies. Domino uses cookies to track user sessions.
Features of session-based name-and-password authenticationUsing session-based name-and-password authentication provides greater control over user interaction than basic name-and-password authentication. For example, it is possible to customize the form in which users enter their name and password information. It also allows users to log out of the session without closing the browser.
Customized HTML log-in formAn HTML log-in form allows a user to enter a name and password and then use that name and password for the entire user session. The browser sends the name and password to the server using the server’s character set. For HTTP session authentication, a user can enter a name using any printable characters in Unicode. The user password, however, must be entered in any printable characters in US-ASCII.
Domino provides a default HTML form ($$LoginUserForm), which is provided and configured in the Domino Configuration database (DOMCFG.NSF). You can customize the form or create a brand new one to contain additional information that can be presented to the user. For example, you can modify the form to have a look and feel consistent with the rest of your Internet or intranet site.
Note: The range of printable characters excludes control characters.
246 Lotus Security Handbook
Default logout time periodYou can specify a default logout time period to log the Web client off the server after a specified period of inactivity. This forces the cookie that Domino uses to track the user session to expire.
Automatically logging a user off the server prevents others from using the Web client to impersonate a user if the user leaves the workstation before logging off.
If session-based name-and-password authentication is enabled for a server, users can also append ?logout at the end of a URL to log off a session, for example:
http://acmeserver/sessions.nsf?logout
It is also possible to redirect the logout to a design element or URL, for example, the following URLs:
http://acmeserver/sessions.nsf?logout&redirectto=/logoutDB.nsf/logoutApp?OpenHttp://acmeserver/sessions.nsf?logout&redirectto=http://www.sales.com
It is possible to build this expression into an application (for example, using it in a button), or type it in as a URL.
Maximum user sessionsYou can specify the maximum number of concurrent user sessions allowed on the server for single-server session-based authentication only. If server performance is slow, this number can be reduced.
Internet password management Domino 6 provides features for managing Internet passwords for session-based authentication. This is detailed in the Lotus Domino 6 Administration product documentation and in the Lotus Domino Administrator 6 Help file.
Multi-server session-based authentication (SSO)Multi-server session-based authentication, also known as single sign-on (SSO), allows Web users to log in once to a Domino or WebSphere server, and then
Note: If the servers in the organization are set up for round-robin DNS, the multi-server (or single sign-on) option for session-based name-and-password authentication should be considered for use. Servers cannot store the session information in memory when using round-robin DNS with the single server cookie. In addition, if a server is restarted or crashes, session information is lost, and then users must re-enter their names and passwords. This will not occur with the multi-server session authentication option.
Chapter 6. Public key infrastructures 247
access any other Domino or WebSphere servers in the same DNS domain that are enabled for single sign-on (SSO) without having to log in again.
User Web browsers must have cookies enabled since the authentication token that is generated by the server is sent to the browser in a cookie.
Multi-server session-based authentication, or single sign-on, is setup in the folllowing manner:
� Create a domain-wide configuration document – the Web SSO Configuration document – in the Domino Directory. (You can have multiple Web SSO Configuration documents in a Domino Domain or directory.)
� Enable the “Multi-server” option for session-based authentication in the Web Site or in the Server document.
Single sign-on can be set up and enabled across multiple Domino domains.
Given the various scenarios for single sign-on across the Lotus family of products, a complete chapter has been devoted to the topic. For more information, see Chapter 7, “Single sign-on” on page 281.
Anonymous accessAnonymous access allows Internet and intranet clients to access servers without identifying themselves. Domino does not record these clients’ database activity. For example, no entries are made in the log file and in the User Activity dialog box.
As with Notes anonymous access, with Internet and Intranet anonymous access it is never possible to know who is accessing databases on the server. Therefore, it is not possible to use the client’s identity, that is, the client’s name and password, to control access to databases and design elements. Like with Notes anonymous access, Internet and Intranet anonymous access should be used when it is not necessary to know who is accessing the database and when it is not necessary to control access based on client identity.
It is possible to use anonymous access with TCP/IP or SSL on any server that runs LDAP, HTTP, SMTP, or IIOP. For each Internet protocol enabled on the server, it is possible to specify the method of security. For example, you can enable SSL for HTTP connections, but require name-and-password authentication for LDAP connections that use TCP/IP.
Are these authentication mechanisms secure?As mentioned, there are limitations in the security that these authentication mechanisms offer when used on their own. The way to overcome these limitations is to perform authentication operations over a secure encrypted
248 Lotus Security Handbook

connection. A good solution is to use SSL, which we will explore in the next section.
6.2.5 Secure Sockets LayerAs we’ve already said a couple of times, authentication is an attempt to address two of our primary security objectives, namely: access control and identity verification. Regrettably, authentication does not address our other primary security objectives, namely: confidentiality and data integrity.
Worse even, authentication is not truly secure because passwords are sent over a network in a form close to plaintext – they’re Base64 encoded. The emphasis here is on “encoded”, not “encrypted.” Base64 is an encoding algorithm, not encryption, and as such it's supposed to be easily reversible. Thus, given that passwords are generally transmitted within HTTP headers, if these are intercepted (using a packet sniffer, for example), they can be easily decoded and used by impersonators.
Thus, a protocol that uses cryptographic techniques is needed. There are several protocols that seek to meet this need, but only one is universally implemented: Secure Sockets Layer (SSL).
SSL is widely used on the Internet not only in conjunction with HTTP, but also with a number of other popular application protocols, specifically LDAP, POP3, HTTP, SMTP, IIOP, or IMAP.
What is SSL?The Secure Sockets Layer protocol was originally created by Netscape Inc., but now it is implemented in most Internet-based client/server software. SSL makes use of a number of cryptographic techniques, such as public key and symmetric key encryption, digital signatures, and public key certificates.
SSL version 3.0, which was introduced in 1996, is a security protocol that:
� Encrypts information sent over the network from client and server, providing confidentiality
� Validates that the message sent to a recipient was not tampered with, providing data integrity
Note: The current version of SSL is 3.0, however, it has been supplanted by the new Transport Layer Security (TLS), an IETF standard protocol. TLS was first defined in RFC 2246: “The TLS Protocol Version 1.0". Since there is no support in Notes and Domino for TLS -- and there aren’t any plans to support TLS in the foreseeable future, this chapter only covers SSL v3.
Chapter 6. Public key infrastructures 249

� Authenticates the server, using RSA public key methods
� Authenticates the client identity (new in version 3.0)
How SSL operatesThere are two important parts to SSL:
� The handshake, in which the session partners introduce themselves and negotiate session characteristics
� The record protocol, in which the session data is exchanged in an encrypted form
The SSL handshakeFigure 6-21 on page 251 shows a simplified version of the SSL handshake process. This is what occurs in this phase:
1. The client asks the server for a session. This is done with the “ClientHello” message to see if SSL is configured on the server. With the “ClientHello” message the client also transferred the list of encryption options supported by the client and a random number that will be used later.
2. If SSL is configured, the server responds with a “ServerHello” message and sends the list of encryption options supported by the server. At this stage, the client and the server know which encryption they have in common (with the strongest possible being chosen).
3. The server then sends its X.509 certificate to the client, which contains the server’s public key.
If client authentication is required, which implies the use of client certificates, the following occurs after the first three steps have been completed:
4. The server issues a request for the client's certificate.
5. To complete the client authentication process, the client sends its certificate to the server.
250 Lotus Security Handbook

Figure 6-21 Negotiating the SSL Session
Basically, the two hello messages are used to ensure that an SSL session can be negotiated in the first place and, if it is possible, the server provides a public key certificate. If required, the client will also provide a public key certificate. This is the method by which SSL checks identity and authenticity of the session partners. In Figure 6-21, we show both the steps for server authentication and client authentication.
Chapter 6. Public key infrastructures 251
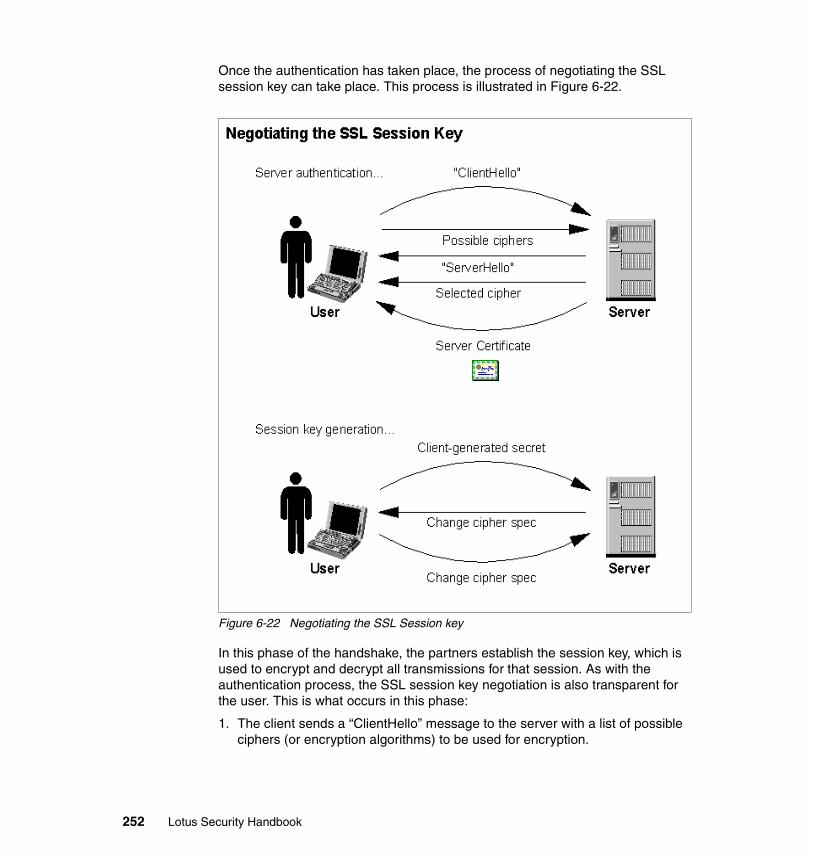
Once the authentication has taken place, the process of negotiating the SSL session key can take place. This process is illustrated in Figure 6-22.
Figure 6-22 Negotiating the SSL Session key
In this phase of the handshake, the partners establish the session key, which is used to encrypt and decrypt all transmissions for that session. As with the authentication process, the SSL session key negotiation is also transparent for the user. This is what occurs in this phase:
1. The client sends a “ClientHello” message to the server with a list of possible ciphers (or encryption algorithms) to be used for encryption.
252 Lotus Security Handbook
2. The server selects the strongest cipher that they have in common and responds with a “ServerHello” message containing the selected cipher.
3. Since the session is not yet secure, the server sends its certificates to the client for use in securing the session key. If client authentication is required, the server also requests the client's certificate, and the client sends it (this is not shown in Figure 6-22).
4. The client generates a secret (called the “pre-master” secret) based on a random-number generator and sends it to the server, encrypted with the server's public key (which was obtained from the server's certificate). This secret is a seed value that will be used to generate the session key.
5. The server and the client each use the selected algorithm (from step 2) and the randomly generated secret (from step 4) to generate the same one-time session key. It is a symmetric encryption key because it will be used to both encrypt and decrypt all traffic for the duration of this SSL session.
6. The server and the client exchange messages (called ChangeCipherSpec messages) to confirm that they are ready to communicate securely.
7. The server and the client encrypt all traffic for that session with the session key.
You can see from this example that there is significant additional overhead in starting up an SSL session compared with a normal HTTP connection. The protocol avoids some of this overhead by allowing the client and server to retain session key information and to resume that session without negotiating and authenticating a second time.
The SSL record protocolOnce the master key has been determined, the client and server can use it to encrypt application data. If client authentication is required, each exchange also includes a hash of the message contents. The hash can be used to prove the message is the original message by validating that its contents are identical to those that were sent. The hash algorithm is part of the selected ciphers. The hash is encrypted in both directions with the public key of the recipients. Each participant (client and server) has a corresponding private key that it uses to decrypt these transmissions as they are received.
Note: It is important to be mindful of the amount of SSL connections that will be allowed on the server, as SSL imposes a performance penalty during the SSL handshake phase and thus could impact adversely the performance of the Web server offering this service.
Chapter 6. Public key infrastructures 253

The SSL record protocol specifies a format for these messages. In general they include a message digest, using the MD5 algorithm, to ensure that they have not been altered and the whole message is then encrypted using a symmetric cipher.
Usually this uses the RC2 or RC4 algorithm, although DES, Triple-DES and IDEA are also supported by the specification.
It is worth pointing on that when an X.509 certificate is created, public and private keys are generated and never destroyed. By contrast, session keys are generated at the beginning of an SSL session and destroyed once it ends. The life span of a session key ranges from several seconds to several minutes. Session keys are never stored on disk and never reused.
This is an important security benefit. Cracking (or mathematically deducing) a session key would be of limited value, since that key is discarded once the SSL session ends.
SSL deployment considerationsIn practice, there are a few questions that need to be answered before deploying such a security service on an organization’s Web site. Some of these questions are:
� Will server authentication be used?
� Will client authentication be implemented and required?
� Where are the users connecting from?
� Is this an Internet site or an intranet site?
� Will the server be directly on the Internet or in a more secure zone?
� Do the Browser clients trust the Web servers present at the site?
� More importantly, does the organization trust the people that are connecting to the Web server?
These questions lead to four broad areas of concern, which we deal with next, specifically:
� Server authentication
� Client authentication
� External Certificate Authorities
� Internal Certificate Authorities
254 Lotus Security Handbook

Server authenticationIf the browser clients that connect to the Web server have a trusted certificate or root certificate common with the server, this provides the browser client with confidence that the server is who it says it is.
Nonetheless, if there is a need to control what the user can see on the secure site, it will be necessary to manage user names and passwords for each user.
From the point of view of a browser client connecting to a Web site using SSL, the whole negotiation and authentication process can be quite transparent. To establish an SSL connection, the URL prefix must change from http:// to https://.
Once the SSL connection has been established, the browser gives the user a visual indication. Generally, in most browsers, this takes the form of a closed padlock symbol at the bottom of the browser’s window.
Client authenticationWith client authentication we take authentication one step further. Here, the server will want to know if it is possible to trust the browser client, based on the user’s identity and credentials.
The browser exchanges a client certificate which is signed by a Certificate Authority (CA), which is a trusted third party or can even be an internal trusted authority. (This is explained in “Internal certificate authority” on page 258).
This provides the necessary confidence that the user represented by the certificate is the expected person. It also provides the added advantage of not having to manage passwords for these users, one less administrative burden, since their authenticity is now vouched for by the CA.
From the point of view of the web master, SSL is also quite simple. The web master needs only to generate a key pair for the server and then obtain a certificate for it.
Normally this involves providing documentation to a certifying authority and paying an annual fee, although it is also possible to generate internal certificates for testing and intranet use. It is also possible to be the Certificate Authority for the organization. The difference between using an Internal CA or a third party CA is basically a matter of trust. Within an organization it is possible to decide that it is reasonable for the employees of the organization to trust any server within the intranet, by the very nature that it is internal to the organization.
External certificate authorityIf an organization decides to deploy a Web server onto the Internet, there is the issue of how and why should a Web user on the Internet trust the organization
Chapter 6. Public key infrastructures 255
and who they are. This is particularly important if the users are actively encouraged to perform electronic transactions with the server, such as sending credit details in payment for products or services. Using an external CA (that is, a trusted third party) which your browser trusts solves this problem.
As illustrated in Figure 6-21 on page 251, which detailed the SSL handshake, the authentication in SSL depends on the client being able to trust the server's public key certificate. We’ve said it a few times already, but since it’s important, we’ll repeat it again. A certificate links the description of the owner of a key pair to the public part of the key. The validity of a certificate is guaranteed by the fact that it is signed by some trusted third party, the certificate authority (CA).
But how does a certifying authority become trusted? In the case of an SSL-capable browser, the certificates of trusted authorities are kept in a key database, sometimes called a key ring file.
The list of top-level authorities is pre-installed in the browser used. Figure 6-23 on page 257 shows the trusted root (or CA) certificates for the Opera browser, which is similar to other mainstream browsers.
This approach has the benefit of being very simple to set up. A browser can authenticate any server that obtains a public key certificate from one of the CAs in the list, without any configuration or communication with the CA required.
Nothing is perfect, though, and there are some problems that arise from using this method.
The first is that a new CA will not automatically be recognized until the browser (wherever it may be in the world) has been updated.
The second problem is that there is no way for certificate revocations to be processed. For example, if a CA determines that a public key owner is fraudulent after a certificate is issued, the certificate will remain usable until it expires, without the end user being aware of any concern.
256 Lotus Security Handbook
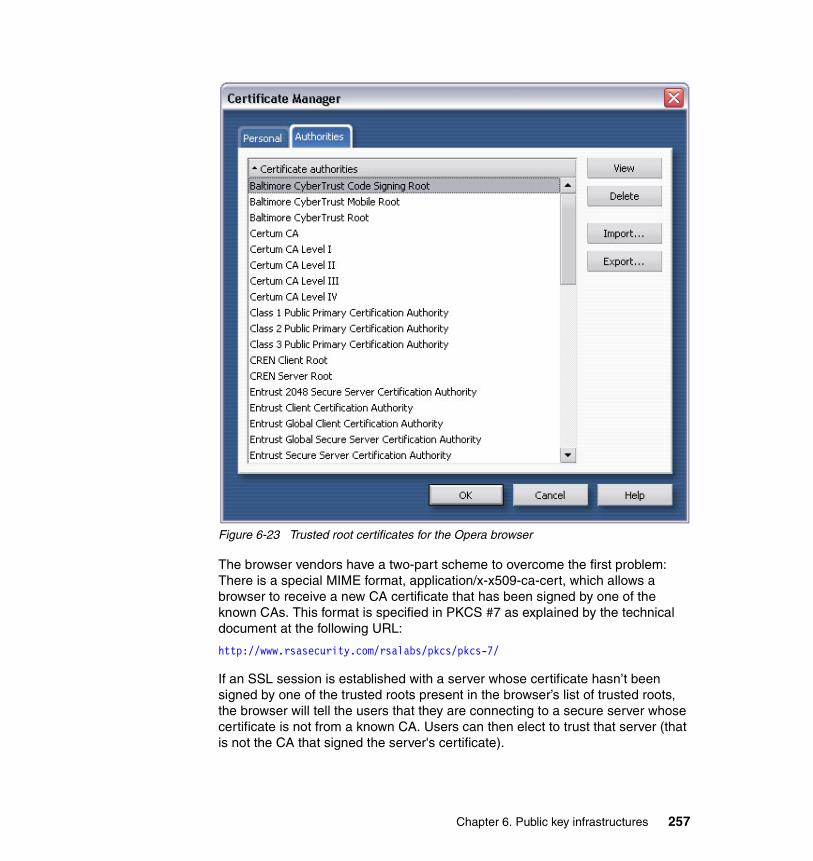
Figure 6-23 Trusted root certificates for the Opera browser
The browser vendors have a two-part scheme to overcome the first problem: There is a special MIME format, application/x-x509-ca-cert, which allows a browser to receive a new CA certificate that has been signed by one of the known CAs. This format is specified in PKCS #7 as explained by the technical document at the following URL:
http://www.rsasecurity.com/rsalabs/pkcs/pkcs-7/
If an SSL session is established with a server whose certificate hasn’t been signed by one of the trusted roots present in the browser’s list of trusted roots, the browser will tell the users that they are connecting to a secure server whose certificate is not from a known CA. Users can then elect to trust that server (that is not the CA that signed the server's certificate).
Chapter 6. Public key infrastructures 257

Internal certificate authorityThere are instances when an organization may consider becoming an internal certificate authority. This, in itself, doesn’t seem like such a big deal, since this is generally considered for users internal to the organization. In this situation, it may seem to be a small risk and so it may feel acceptable for the organization to be the CA, since the organization’s Web users will trust any server within the organization (even if getting a warning contrary to that). It will also means that the organization does not need to pay a yearly charge to the external CA.
As mentioned earlier, the browser comeswith a pre-installed list of top-level authorities, so you will have a choice to make: either have the new CA certificate for the organization installed in all the browsers used in the organization or, as explained earlier, make the users aware of the message that they will get from the browser when connecting to a site that has been signed by a CA that the browser does not recognize.
Figure 6-24 shows the warning message the Opera browser issues when connecting to an untrusted site, when trying to establish an SSL connection to it. In this situation, the user has three choices:
� View the certificate in order to sort out whether to trust it or not
� Choose not to trust it outright and cancel the access request to the server
� Trust it outright and accept the fact that there isn’t a trusted party to vouch for it
It’s worth pointing out also that the acceptance is not a permanent thing nor will it apply to all servers similarly configured in the same realm. In other words, this will not make the CA trusted, so the user will see the same warnings if a second server is accessed with a certificate signed by the same CA.
Note: It is not wise, especially for Internet sites, to establish a server that provides SSL connections, but for which the server certificate is not issued from a known CA. Given that people want to buy from people they trust, getting a warning that the site server cannot be trusted will not foster that trust. It’s generally a best practice to purchase a certificate from one of the known CAs, preferably one that is listed in all mainstream browsers.
258 Lotus Security Handbook
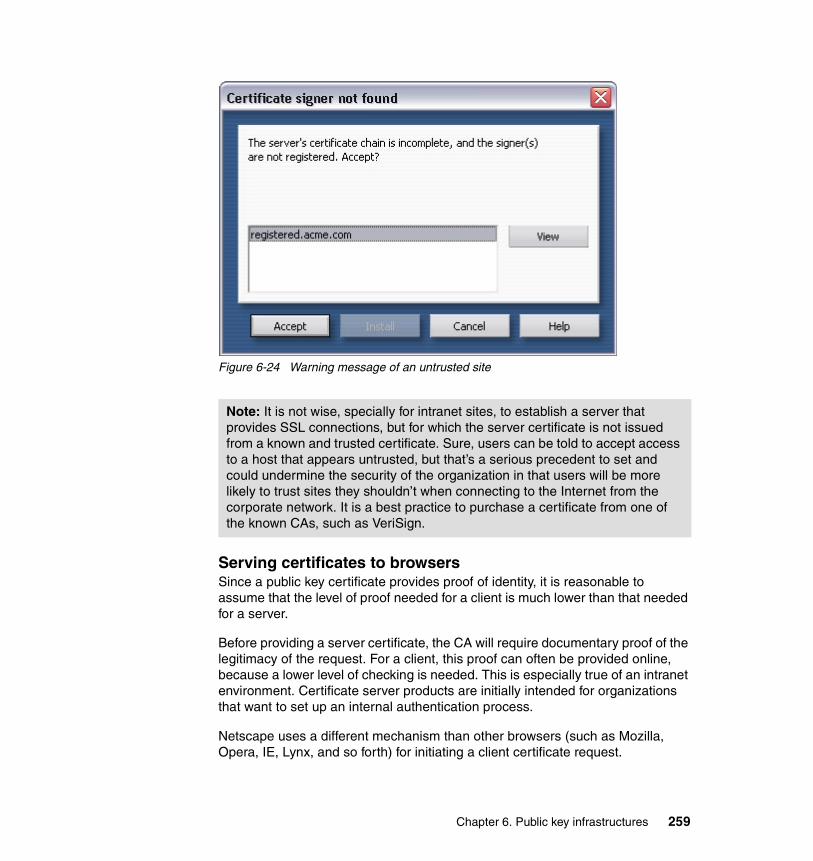
Figure 6-24 Warning message of an untrusted site
Serving certificates to browsersSince a public key certificate provides proof of identity, it is reasonable to assume that the level of proof needed for a client is much lower than that needed for a server.
Before providing a server certificate, the CA will require documentary proof of the legitimacy of the request. For a client, this proof can often be provided online, because a lower level of checking is needed. This is especially true of an intranet environment. Certificate server products are initially intended for organizations that want to set up an internal authentication process.
Netscape uses a different mechanism than other browsers (such as Mozilla, Opera, IE, Lynx, and so forth) for initiating a client certificate request.
Note: It is not wise, specially for intranet sites, to establish a server that provides SSL connections, but for which the server certificate is not issued from a known and trusted certificate. Sure, users can be told to accept access to a host that appears untrusted, but that’s a serious precedent to set and could undermine the security of the organization in that users will be more likely to trust sites they shouldn’t when connecting to the Internet from the corporate network. It is a best practice to purchase a certificate from one of the known CAs, such as VeriSign.
Chapter 6. Public key infrastructures 259
For Netscape, the key to the mechanism is the <KEYGEN> tag, an HTML extension that only applies within a form. When the browser sees this tag, it generates a key pair and returns a certificate request (in PKCS #10 format), for the key pair with the form to the CA. The CA processes the certificate request and sends it back as a signed X.509 v3 certificate in a special MIME format (known as PKCS #7 format), which the browser can accept.
With other browsers, Internet Explorer, for example, the only change to the certificate request process is that IE requires the Certificate Enrollment ActiveX™ control (CERTENR3.DLL for IE 3.0 and XENROLL.DLL for IE 4.0) to be installed. This ActiveX control generates the public/private key and encodes it in the PKCS #7 format for the CA, in exactly the same way that Netscape does.
6.2.6 The Domino Certificate AuthorityAbove and beyond the explanation of a Certificate Authority in the PKI components section, we’ve seen in the previous section that a CA is the link that allows a server and client to use SSL. A CA is also the link for exchanging secure e-mail messages (such as S/MIME, which we cover shortly).
It is possible to use a third-party, commercial certifier from one of the companies previously mentioned. Alternatively, it is possible to use a Domino Certificate Authority as an internal CA for the whole organization. For details on setting up a Domino 6 Certification Authority and for the whole process of generating key rings as well as server and client X.509 certificates (used for SSL authentication and S/MIME), consult the IBM Redpaper The Domino Certification Authority, REDP.
6.2.7 Secure Internet messagingMuch of the growth of e-mail on the Internet is due to the simplistic nature of the protocols used. This fact is a doubled-edged sword: The simplicity in operation ensures that the current messaging standards scale well for millions and millions of users; however, the simplicity in design has resulted in many open security loopholes and vulnerabilities.
X.509 v3 certificates not only help provide secure communications channels through SSL, but also for many other Internet applications, chief among them, secure messaging. Their use, along with some enhancements to existing standards, correct some of the loopholes and vulnerabilities that exist, and can even provide secure facilities for sending, receiving, and validating e-mails containing sensitive information.
In this section we describe the facilities offered to provide secure messaging between e-mail clients over the Internet, specifically how this messaging security
260 Lotus Security Handbook

is implemented when Lotus Notes is used as the Internet messaging client and Domino is the Internet Messaging server.
Before we can do this, though, let’s do a brief review of the technologies and standards involved in simple messaging on the Internet.
Commonly used mail protocolsThe following Internet protocols are typically used for sending and receiving Internet mail.
SMTPSMTP (Simple Mail Transport Protocol) specifies a protocol for sending e-mail messages between hosts, although with the use of Domain Name Service (DNS) and Mail eXchange (MX) records, it can be thought of as sending e-mail messages to users between domains.
Most e-mail systems that send mail over the Internet use SMTP to send messages from one server to another. In addition, SMTP is generally used to send messages from a mail client to a mail server. Any host that supports SMTP can also act as an SMTP relay, in which case it can forward messages to another SMTP host.
SMTP supports only 7-bit ASCII characters, meaning that is has no support for accentuated characters, foreign character sets, rich text, or anything binary in nature, such as images and video.
MIMEMIME (Multipurpose Internet Mail Extensions) is a specification for formatting non-ASCII messages so that they can be sent over the Internet.
As mentioned, one of the problems with the original SMTP specification was that it assumed e-mail messages would consist primarily of text, and thus, only plain ASCII text is supported.
MIME extends the specification by allowing binary data to be repackaged in text form and transmitted over the Internet in mail messages that are compliant with the original specification.
Comparatively speaking, an e-mail message that supports MIME would have extra header information after the Subject field. Here is an example of such a message:
From: [email protected]: [email protected]: Map of Western Canada...MIME-Version: 1.0
Chapter 6. Public key infrastructures 261

Content-Type: image/gifContent-Transfer-Encoding: base64Content-ID:Content-Description:[...JPEG data...]
Just about every e-mail client supports MIME, which enables them to send and receive graphics, audio, and video files via the messaging infrastructure on the Internet. In addition, as mentioned, MIME also supports messages in character sets other than ASCII.
POPPOP and IMAP (which we cover next) are protocols that specify protocols for accessing mail from an Internet mailbox or Post office.
The Post Office Protocol, Version 3 (POP3) is used to pick up e-mail across a network. Not all computer systems that use e-mail are connected to the Internet 24 hours a day, 7 days a week. Some users dial into a service provider on an as-needed basis, while others may be connected to a LAN with a permanent connection but may not always be powered on.
In cases such as these, the e-mail addressed to the users on these systems is sent to a central e-mail post office system where it is held for the user until they can pick it up.
POP3 allows a user to log onto an e-mail post office system across the network. The post office system authenticates the user using an ID and password, allows mail to be downloaded, and optionally allows the user to delete the mail located on the central post office system.
IMAPIMAP4 (Internet Message Access Protocol, version 4; once known as the Interactive Mail Access Protocol) is a newer protocol, used by e-mail clients to retrieve e-mail messages from a mail server and work with the mailboxes on the server.
The latest version, IMAP4, is similar to POP3 but offers additional and more sophisticated features. With IMAP, for example, it is possible to work with the e-mail on the server, and sort and manage the e-mail in server-side folders.
For more information about IMAP, see Stanford University's Web page at the following URL:
http://www-camis.stanford.edu/projects/imap/ml/imap.html
262 Lotus Security Handbook
Problems with these protocolsAs mentioned earlier, the simplicity of these protocols has meant that they create security issues for anyone sending and receiving mail across the Internet.
SMTPThe SMTP protocol does not use any authentication process when establishing communications with another SMTP host for relaying and delivering mail.
The sending host basically sends a command to the receiving SMTP host saying who it is, and that it wants to communicate. The receiving host believes who it says it is, and awaits further commands. The sending host then sends another command saying who the mail is from, which again the receiving SMTP host accepts. The sending host sends another command saying who the intended recipient of this mail is, which the receiving SMTP host accepts. The sending host then sends a command, stating that what follows is the text message, with finally an end of message string advising the completion of the message.
As can be seen, in this scenario anybody with a network sniffer could pick up this traffic over the network, since it is all sent in clear text. Even worse, it’s quite simple for anybody to spoof a message on any SMTP server. It is easy to initiate the communication with an SMTP host and pretend that the mail was sent by someone else.
The following example demonstrates how simple it is. By connecting to the SMTP host using TELNET on port 25, and sending the commands that the receiving SMTP host expects, we can spoof an e-mail message:
Telnet <SMTP host> 25HELO foobar.comMAIL FROM: <reverse-path>RCPT TO: <forward-path>DATASEND FROM: <[email protected]>
POPThe original POP3 specification does not specify any authentication methods. Similar to SMTP, the communication between a POP3 client and a POP3 server is sent in clear text. In fact, the commands USER and PASS are used for passing the user name and password for authorization to connect to a POP3 server for receiving mail. For more information on this, we recommend that you read RFC 1725 - Post Office Protocol - Version 3.
Chapter 6. Public key infrastructures 263
Improvements to these protocolsThere have been improvements made to these protocols to overcome some of the technical limitations in matters of IT security; however, things are still far from perfect, as we show in the following discussion.
POPThere have been changes to the authentication method between client and server, including newer and more secure authentication methods like S/KEY, GSSAPI, APOP, and Kerberos V4. However, these do not currently appear to have general widespread support across the Internet.
IMAPIMAP4 also provides additional authentication mechanisms, such as Kerberos V4.
SSLIt is possible to use SSL to encrypt the session when communicating using POP3 or IMAP4. This resolves the problem of weak authentication schemes that are used by POP3 and IMAP4.
SASLSASL, which stands for Simple Authentication and Security Layer, is specified in RFC 2222. It describes a method of adding authentication support to connection-based protocols. Each protocol that uses SASL includes a command for identifying and authorizing a user to a server and for optionally negotiating a security layer for subsequent protocol interactions.
Protocol designers who want to use the SASL specification to support authentication in that protocol (for example, the SMTP Extension for Authentication is a profile of SASL).
Domino employs SASL only for LDAP services. Domino uses SASL automatically if SSL – with client authentication – is set up on the server and if the LDAP client supports the protocol. No additional configuration is necessary.
Extended SMTP (ESMTP)ESMTP, or Extended Services® for Simple Mail Transport Protocol, provides a framework for extending the SMTP service by defining a means whereby an SMTP server can inform an SMTP client of the service extensions it supports.
Extensions to the SMTP service are registered with the IANA, the Internet Assigned Numbers Authority. Examples of extensions to SMTP include: SMTP over TLS/SSL and Delivery Status notifications.
264 Lotus Security Handbook
SMTP service extension for authenticationWhen a client submits a message to an SMTP server that supports the SMTP authentication extension, (AUTH=LOGIN), it will allow the client to authenticate the user to the server. Also the extension preserves the authentication identity when a message gets transferred from one SMTP server to another (assuming that both SMTP servers support the extension). However, as mentioned earlier, this user name password combination is only base64 encoded.
SMTP service extension for secure SMTP over SSL and TLSSSL and TLS are popular mechanisms for enhancing TCP communications with privacy and authentication. SSL and TLS are in wide use with the HTTP protocol, and they are also used to add security to many other common protocols that run over TCP.
TLS and SSL are very similar and are used in the same ways; the difference between them is in the encryption algorthms they use. Instead of using MD5, TLS uses the HMAC secure keyed message digest function.
When securing STMP over SSL or TLS, only the communication between the two hosts is secure. It is not an end-to-end mechanism, and the transport from the originating mail user agent to the recipient is not secured. The delivery of a single piece of mail may go between more than two SMTP servers, so adding SSL or TLS privacy to one pair of servers does not mean that the entire SMTP chain has been made private.
Enable SMTP extensions using the Lotus Domino Administrator or Lotus Notes client as follows:
1. From the Lotus Domino Administrator (or from the Domino Directory screen in the Notes client) click the Configuration tab. Select Messaging, Configurations view.
2. Click either the Add Configuration or Edit Configuration button to open the Configuration document.
3. Click the Router/SMTP tab, then the Advanced tab. This will provide access to the advanced SMTP configuration settings, as shown in Figure 6-25 on page 266.
4. From there you can configure SMTP extension features on your Domino server.
Note: The SMTP service of Domino 6 supports several SMTP extensions, including SSL negotiation over TCP/IP.
Chapter 6. Public key infrastructures 265
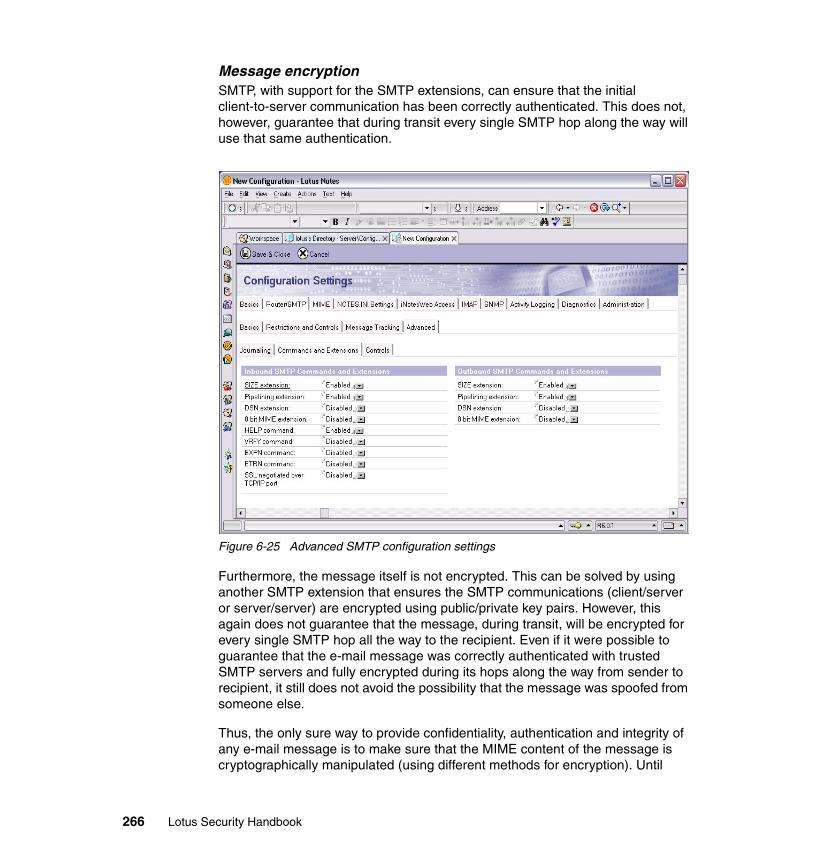
Message encryptionSMTP, with support for the SMTP extensions, can ensure that the initial client-to-server communication has been correctly authenticated. This does not, however, guarantee that during transit every single SMTP hop along the way will use that same authentication.
Figure 6-25 Advanced SMTP configuration settings
Furthermore, the message itself is not encrypted. This can be solved by using another SMTP extension that ensures the SMTP communications (client/server or server/server) are encrypted using public/private key pairs. However, this again does not guarantee that the message, during transit, will be encrypted for every single SMTP hop all the way to the recipient. Even if it were possible to guarantee that the e-mail message was correctly authenticated with trusted SMTP servers and fully encrypted during its hops along the way from sender to recipient, it still does not avoid the possibility that the message was spoofed from someone else.
Thus, the only sure way to provide confidentiality, authentication and integrity of any e-mail message is to make sure that the MIME content of the message is cryptographically manipulated (using different methods for encryption). Until
266 Lotus Security Handbook

recently there were two competing standards for achieving this: PGP and S/MIME. Let’s first discuss PGP.
6.2.8 Secure messaging with PGPPGP, which stands for “Pretty Good Privacy,” is a highly secure public key encryption system designed for sending secure mail anywhere around the world. It was developed by Mike Zimmerman in 1991, and published freely on the Internet. The client and information on PGP can be found at the following URL:
http://www.pgp.com/
Also available is GnuPG (Gnu Privacy Guard), which is a complete and free replacement for PGP. Because it does not use the patented IDEA algorithm, it can be used without any restrictions. GnuPG is an RFC2440 (OpenPGP) compliant application. Version 1.0.0 was released on September 7th, 1999. The current stable version is 1.2.2. GnuPG is free software. It can be freely used, modified and distributed under the terms of the GNU General Public License. Information on GPG can be found at the following URL:
http://www.gnupg.org/
Information on the GNU General Public License can be found at:
http://www.gnu.org/copyleft/gpl.html
PGP does not have key management capabilities. In fact, its certificate structure is a very loose one, in which, instead of having authorities issue certificates to individuals, it works on a “web of trust” model, where certificates gain authority by being signed by known and trusted people.
A newer standard, called OpenPGP, permits a hierarchical approach to accommodate certificate authorities, X.509 certificates, and other already-accepted standards. More information on OpenPGP is at the following URL:
http://www.openpgp.org/
The OpenPGP Message Format is explained in RFC2440, available at:
http://www.ietf.org/rfc/rfc2440.txt
While PGP has seen some good adoption worldwide, most corporations are keen to implement S/MIME for messaging within and outside of the organization. We cover S/MIME in the next section and detail how this works in conjunction with the Lotus Notes client and Lotus Domino server.
Chapter 6. Public key infrastructures 267
6.2.9 Secure messaging with S/MIMES/MIME, Secure Multipurpose Internet Mail Extension, is an e-mail security technology developed by RSA for encrypting and digitally signing e-mail messages.
The S/MIME working group has completed five proposed standards that comprise the S/MIME version 3 specification. These are as follows:
� Cryptographic Message Syntax (draft-ietf-smime-cms; ftp://ftp.ietf.org/rfc/rfc2630.txt)
� S/MIME Version 3 Message Specification (draft-ietf-smime-msg; ftp://ftp.ietf.org/rfc/rfc2633.txt)
� S/MIME Version 3 Certificate Handling (draft-ietf-smime-cert; ftp://ftp.ietf.org/rfc/rfc2632.txt)
� Certificate Request Syntax (draft-ietf-smime-crs; http://www.ietf.org/proceedings/98dec/I-D/draft-ietf-smime-crs-00.txt)
� Enhanced Security Services for S/MIME (draft-ietf-ietf-ess; ftp://ftp.ietf.org/rfc/rfc2634.txt)
Lotus Notes and Domino 6 fully support S/MIMEv3.
Encrypting a message takes the entire content of a message or just certain MIME parts and runs them through an encryption algorithm that uses the public key of the recipient. S/MIME uses a public-key algorithm for key exchange and for digital signatures, recommending two symmetric encryption algorithms: Triple-DES, and RC2. The adjustable key size of the RC2 algorithm makes it especially useful for applications intended for export outside the US where RSA is the required public-key algorithm.
How S/MIME worksIn this section we take a closer look at how S/MIME works. The goal is to help you understand how Notes and Domino 6 implement and support S/MIME.
S/MIME offers users the following basic features:
� Encryption for message privacy
� Tamper detection
� Signing - Authentication of the sender with digital signatures
� Interoperability with other S/MIME-compliant software
� Seamless integration into Netscape Messenger
� Cross-platform messaging
268 Lotus Security Handbook

With the help of these features, the following benefits are provided:
� From the moment the message is sent to the moment it is delivered to its final destination, no one can see the contents of the message.
� The recipient can be certain that the message came from the person that he or she thinks it came from.
� It is also certain that the message has not been tampered with or changed on the way to delivery.
Encryption for message privacyFor message privacy, or confidentiality, S/MIME uses asymmetric keys (public/private keys) to encrypt messages. This is essentially the same technique as is employed in Notes and explained in the Notes PKI section.
To send an encrypted S/MIME message, it is necessary to obtain the recipient’s public key and encrypt the message using this key. Since the only person who has its associated private key is the recipient, the message can be sent safely with the assured knowledge that only the recipient will be able to decrypt this message. This technique is exactly like the one used in Notes and shown in Figure 6-16 on page 227 and in Figure 6-26.
Figure 6-26 Electronic mail message encryption in S/MIME
This is a practical application of the hybrid solution that we covered in the security fundamentals chapter. The numbered steps in Figure 6-26 are described as follows:
1. Alice decides to send an encrypted S/MIME message to Bob. The messaging client, seeing that the messages needs to be encrypted, generates a random
Chapter 6. Public key infrastructures 269
encryption key (the secret key, which is generally referred to as being a session key, since a new random key is generated every time an encrypted S/MIME message is sent) and encrypts the message with it.
2. The session encryption key is encrypted (using either Triple-DES or RC2) with the recipient’s public key and attached to the message, which means that only Bob’s RSA public key will be able to decrypt it.
3. The encrypted text and the encrypted key are sent to Bob via SMTP.
4. Bob’s messaging client uses Bob’s RSA private key to decrypt the encrypted key (again, using RC2) and gets a decrypted session key. Here, secrecy is guaranteed, because only Bob's private key can be used to decrypt the session key needed to decrypt the message.
5. Bob’s messaging client uses the decrypted session key to decrypt the mail message (using either Triple-DES or RC2, depending on which algorithm it was encrypted with), resulting in the decrypted, original message that was sent by Alice.
If Bob’s messaging client is unable to decrypt the e-mail sent by Alice, this is probably because Bob has gotten a new X.509 certificate and the public key in the directory Alice has access to is the old key.
Looking at the process shown in Figure 6-26, this is in effect a technique in S/MIME often referred to as a “digital envelope,” whereby the message is actually encrypted using the shorter symmetric cipher and the symmetric cipher is then encrypted using the larger asymmetric key, and sent along with the encrypted message.
This method is preferred because it is far quicker to encrypt the whole message using the shorter symmetric key than to encrypt the message using the longer asymmetric key. The message is still quite safe, since this approach combines the speed of symmetric encryption with the security of asymmetric encryption.
Tamper detectionFor tamper detection, or data integrity, S/MIME provides assurance that the message can be properly validated, meaning that the message was not tampered with during transit. This utilizes a technique known a digital signatures and works in a similar manner to what we already discussed in Notes messaging.
Signing: Authenticating the sender with Digital SignaturesS/MIME provides message signing through the use of digital signatures, which permits the authentication of the message (confirming that the person who sent it is indeed the sender) as well as tamper detection (that the message itself is original and not a single bit of it was modified). This is illustrated in Figure 6-27.
270 Lotus Security Handbook

Figure 6-27 Digital Signatures as used in S/MIME
The numbered steps in the diagram are described as follows:
1. Alice decides to send an S/MIME e-mail to Bob. The messaging client, seeing that the message should be signed, generates a hash (using MD5 or SHA-1) of Alice’s message (resulting in message digest d).
2. The hash is encrypted by the messaging client using Alice’s RSA private key (using RC2), which means that only her RSA public key will be able to decrypt it.
3. The encrypted hash is sent to Bob along with the message.
4. Bob’s messaging client uses Alice’s RSA public key to decrypt the hash (again, using RC2) and gets a decrypted hash (resulting in message digest d).
5. Bob’s messaging client computes a new hash based on the text sent by Alice (using MD5, resulting in message digest d’);
6. Bob’s messaging client then compares the decrypted hash (message digest d) and the newly computed hash (message digest d’) and lets Bob know whether the digital signature is valid or not. If the two hashes are the same, the message comes from Alice and has not been tampered with in transit. If they are different, the message is either not from Alice or has been tampered with in transit.
So, the result for the user is that the messaging client will indicate who signed the message if the validation of the signature is successful. Otherwise, the messaging client will indicate that it can not validate the signature.
Chapter 6. Public key infrastructures 271

Two things are guaranteed by this digital signature process:
1. The sender is authenticated because the digest must have been encrypted with the sender's private key.
2. The message arrived unmodified, because the digests are identical. Otherwise, the receiver knows the data has been tampered with or that the sender does not have a certificate trusted by the reader.
A situation may arise where the sender may want not only to sign the message, but to encrypt the message as well. In this situation, the message goes through the encryption process of the e-mail with the recipients public key and then goes through encryption of the hash with the sender’s private key. The S/MIME specification does not specify the order in which the encryption must occur when both encrypting and signing a message. In other words, the relevant RFC says that the message can be encrypted and then digitally signed or digitally signed and then encrypted.
Details of authenticationLet's look in closer detail at how the sender, via S/MIME, actually authenticates that the message received is from whom it claims to be from.
As we said, the message is encrypted with the sender’s private key. The sender also sends his or her X.509 certificate with the signed message (the certificate itself being really nothing more than the signed public key of the sender). This certificate is signed by another party, a certificate authority.
What happens if the CA that signed the sender’s public key is not trusted? Well, S/MIME handles that by employing what is known as a chain of trust. This means that when the sender sends the encrypted message with the sender’s own certificate (which contains its public key signed by a third party CA), it also sends the third party CA's certificate. This other certificate may itself be signed by another CA or it may indeed be the root certificate. As long as it is possible to trust any of the CA certificates in that hierarchy, then the CA that signed the sender’s public key can be trusted.
So how can the CA be trusted in the first place? Well, held within the messaging client is a list of CAs and their public keys, which are all trusted; this is pre-built in the messaging client to ease distribution of CA certificates (akin to the way it is built into the browser, as we saw earlier). Thus, we now have the following:
1. The signed message
Important: This should not be confused with message encryption, where the message is encrypted with the recipient’s public key. With digital signatures, the message digest is encrypted with the sender’s private key.
272 Lotus Security Handbook

2. The sender’s certificate
3. The information on the CA that signed the sender’s certificate
By having this information, it is now possible to validate the identity of the sender, since the sender’s certificate that was sent can be decrypted with the public key of the CA that is held in the messaging client and is trusted.
If this is successful, then it is possible to vouch for the authenticity of the certificate and all the contents of this certificate, which would naturally contain the sender’s name, the sender’s public key, organization, country, and e-mail address. Now that the sender’s public key is trusted, it is possible to decrypt the message to see if the message was signed by that same person.
It’s worth noting that on the sender’s certificate there is another piece of information: the e-mail address. This information is crucial in ensuring that e-mails are not spoofed, even if the message can be correctly decrypted with the sender’s public key. If the associated certificate does not have a matching e-mail address, this would suggest that the message was sent from a different user. If this is the case, how trustworthy can the message or the sender really be?
As it happens, this may cause us a few problems in the future, as people tend to acquire multiple e-mail addresses. These people may have a work address, a personal address, and perhaps a second work address if they work temporarily at a customer location.
Does this mean that it is necessary to maintain three sets of public/private key pairs and certificates? Not necessarily, since it is possible to export S/MIME from one messaging client to another, using PKCS#12, which we cover shortly.
Clear and opaque signingIf an attempt is made to send a signed message to a recipient that does not have a messaging client capable of handling S/MIME, there are two possible outcomes, depending on the capabilities of the sending S/MIME client.
If the message is sent as opaque, that means that the signature is sent as an application/pkcs7-signature MIME type. Thus, a non-S/MIME compliant client will not be able to read the pkcs7-signature type. The S/MIME client will first split the incoming message, and then check the validity of the signature.
If the message is sent as clear, that means that the signature is inserted as part of a multipart/signed MIME object type. The signature is generated from the message by hashing it and the application/pkcs7-signature is inserted into the second part of the MIME type. This means that any receiving client will be able to receive both parts of the MIME type – the unsigned message and an attachment of application/pkcs7-signature MIME type.
Chapter 6. Public key infrastructures 273
Interoperability with other S/MIME-compliant softwareThe PKCS #12 standard specifies the format for certificate export and import. This permits the users, among other things, to make backup copies of their private key. Also, if the user needs to send S/MIME e-mails from a different machine or from a different messaging client that provides S/MIME functionality, this provides a simple way for them to take their public/private key pair with them and install it in the new messaging client.
Thus, the purpose of the PKCS #12 standard is to provide interoperability of the private/public key pair and certificates with other S/MIME-capable messaging clients. This is quite important, since otherwise, if a user requested a certificate with Internet Explorer from a Web CA like VeriSign, that user would only be able to use it in conjunction with Outlook Express. Similarly, if a user requested a certificate with Netscape Navigator, that user would only be able to use it in conjunction with Netscape Messenger.
Obtaining a client certificate for S/MIMEFor a client to be able to send signed and encrypted e-mails using S/MIME, it is necessary to have an X.509 certificate for it to use. The current generation of S/MIME-capable messaging clients provide the ability to generate a certificate request with a Web-based CA. Once a client certificate has been requested (and approved), it is installed in the S/MIME-capable messaging client so that the client can sign and encrypt any e-mail messages.
It is also necessary to make the user’s certificate available to anybody who wants to send encrypted e-mails to that user. Encrypted e-mail messages addressed to the user are encrypted with that user’s public key.
Figure 6-28 on page 275 is a high-level representation of the process of requesting and acquiring certificates, as well as sending signed and encrypted e-mails, as implemented in the current generation of SMIME-capable messaging clients.
274 Lotus Security Handbook
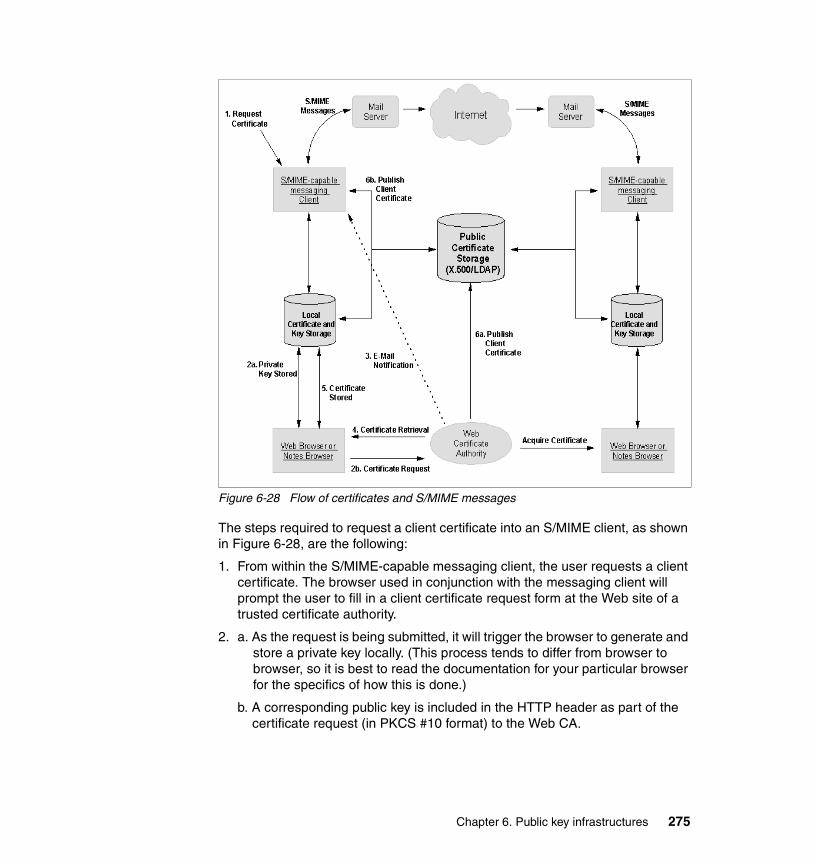
Figure 6-28 Flow of certificates and S/MIME messages
The steps required to request a client certificate into an S/MIME client, as shown in Figure 6-28, are the following:
1. From within the S/MIME-capable messaging client, the user requests a client certificate. The browser used in conjunction with the messaging client will prompt the user to fill in a client certificate request form at the Web site of a trusted certificate authority.
2. a. As the request is being submitted, it will trigger the browser to generate and store a private key locally. (This process tends to differ from browser to browser, so it is best to read the documentation for your particular browser for the specifics of how this is done.)
b. A corresponding public key is included in the HTTP header as part of the certificate request (in PKCS #10 format) to the Web CA.
Chapter 6. Public key infrastructures 275

3. The CA processes the request and returns instructions on how to pick up the certificate via e-mail. The instructions provide a URL and pickup ID where the signed client certificate can be picked up.
4. The user connects to the stated URL, enters the pickup ID and picks up the signed client certificate.
5. The signed client certificate is installed into the S/MIME-capable messaging client.
6. a. It is possible to go one step further and publish the user’s certificate by sending it to one of the public directory providers. Often the CAs themselves will have this facility available.
b. Alternatively, it is also possible to use the S/MIME-capable messaging client to publish the client certificate to one of the public directory providers.
Obtaining a recipient’s certificate for S/MIMEIn the current generation of S/MIME-capable messaging client, there are a couple of methods for obtaining a recipient’s certificate.
The first method is to have the recipient send to the user a signed message. When the user receives it, the S/MIME-capable messaging client will automatically add the sender’s certificate to the list of stored certificates. Similarly, if the user sends a signed e-mail to another e-mail user who uses an S/MIME-capable messaging client, that person will obtain a copy of the user’s certificate.
The second method is to provide access to LDAP to permit users to search online directories (such as Four11, Bigfoot, Switchboard, and so forth). If the required certificate is stored in one of these directories, the user will be able to add it to the personal address list of the S/MIME-capable messaging client.
6.2.10 Using Lotus Notes 6 as an S/MIME clientOnce there is a CA-based infrastructure in place for the benefit of the Lotus Notes user community within the organization, it is as simple for the users to send and receive S/MIME messages as it is for them to send and receive Notes mail messages. In this section, we show how well integrated the Lotus Notes 6 client and the Domino Server 6 are with S/MIME.
How Notes R5.0 implements S/MIMEFor traditional Notes users who understand Notes certificates and Notes ID files, the concepts of encrypting and signing should be nothing new.
276 Lotus Security Handbook
In version 6, the Notes ID file that contains the native Notes certificates is also used as the container for storing X.509 v3 certificates. When a certificate is requested from a Web CA (whether the Domino CA, if one is implemented within the organization, or a third-party CA), it is requested via the Notes browser. Once the request for a client certificate has been approved, it is stored in the Notes user ID file.
Notes has a facility for creating safe copies of Notes user ID files. A safe copy is basically the public key and the associated signed certificates. There are no facilities in the current version of Notes for creating safe copies of X.509 certificates. It is therefore not possible to import or export S/MIME client certificates in or out of Notes, except by using PKCS #12.
To sign e-mail messages with S/MIME, the user has to install his or her own X.509 certificate in his or her Notes ID file. It is possible for the user to use either a certificate issued by Notes, a certificate issued by the Domino CA, or a certificate issued by any other third-party, commercial CA. The procedure is exactly the same as what was described at length in the Domino CA section.
For the user to be able to verify the signature on a received S/MIME signed e-mail, the user needs a certificate of a trusted root CA for the signer or a cross-certificate to the recipient's certificate in the user’s Personal Address Book or in the Domino Directory.
Prior to being able to encrypt a message, as mentioned earlier, it is necessary for the user to obtain the recipient’s certificate. The Notes client will encrypt the message using the recipient's public key. In Lotus Notes 6, the client certificates of the recipients are stored in the Domino Directory.
Sending and receiving encrypted S/MIME messagesWhen a Lotus Notes 6 user attempts to send an encrypted message, the recipient’s X.509 certificate is used, based on the choice the user has made whether to use MIME format or Notes format for sending mail directly to the Internet or for messages that are addressed to Internet addresses. Conversely, users also can control the format of incoming mail in their user preferences. The message format determines the choice of encryption method.
Notes uses S/MIME encryption for outgoing mail in the following situations:
� The user selects “directly to Internet” in the “Send outgoing mail” field in the Mail tab of the current Location document (as shown in Figure 6-29 on page 278). Mail messages sent from this location will use MIME format.
Chapter 6. Public key infrastructures 277

Figure 6-29 The user’s current Location document, under the Mail tab
� The user selects “MIME format” in the “Format for messages addressed to Internet addresses” field in the Mail tab of the current Location document. Mail messages sent from this location to Internet addresses that cannot be found in a Personal Address Book or Domino Directory will use MIME.
� The user enables the field “When receiving unencrypted mail, encrypt before storing in your mail file” on the Basics tab of the user's Person document. Mail sent to this user will use MIME.
� The user creates a message using a form in which the Body field in the form's design has “Store contents as HTML and MIME” selected in Field Properties. If the recipient can accept either Notes or MIME format (or if Notes cannot find a Person document for the recipient), the message will use MIME format.
Above and beyond the requirements defined for S/MIME, the recipient’s X.509 certificate needs to be available in the Personal Address Book or Domino Directory. If Notes cannot find the recipient's certificate, the user will see an error message box displayed.
278 Lotus Security Handbook
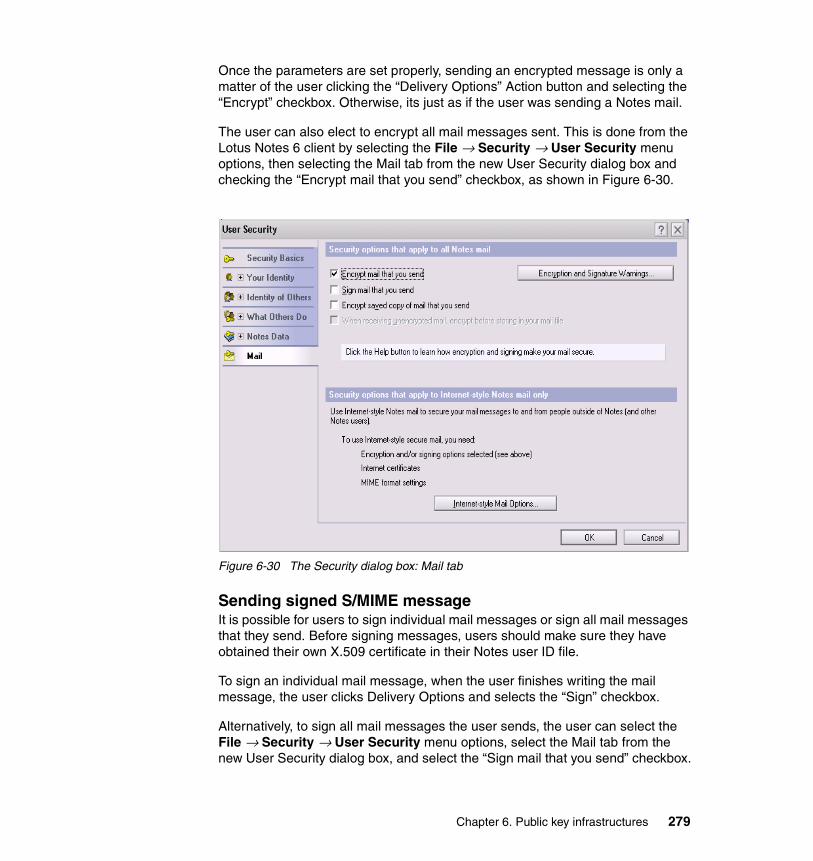
Once the parameters are set properly, sending an encrypted message is only a matter of the user clicking the “Delivery Options” Action button and selecting the “Encrypt” checkbox. Otherwise, its just as if the user was sending a Notes mail.
The user can also elect to encrypt all mail messages sent. This is done from the Lotus Notes 6 client by selecting the File → Security → User Security menu options, then selecting the Mail tab from the new User Security dialog box and checking the “Encrypt mail that you send” checkbox, as shown in Figure 6-30.
Figure 6-30 The Security dialog box: Mail tab
Sending signed S/MIME messageIt is possible for users to sign individual mail messages or sign all mail messages that they send. Before signing messages, users should make sure they have obtained their own X.509 certificate in their Notes user ID file.
To sign an individual mail message, when the user finishes writing the mail message, the user clicks Delivery Options and selects the “Sign” checkbox.
Alternatively, to sign all mail messages the user sends, the user can select the File → Security → User Security menu options, select the Mail tab from the new User Security dialog box, and select the “Sign mail that you send” checkbox.
Chapter 6. Public key infrastructures 279

Receiving signed S/MIME messagesUpon receipt of signed e-mail, Notes will try to verify the validity of the signature.
If the user trusts the signing certificate, that is, if the user has a certificate of the signer or an Internet cross-certificate to the sender, a message will be displayed in the Notes client’s status bar indicating the validity of the signature, an example of which is the following:
"Signed By: Bob, at 10:52 AM, According To: TestCertAuthority".
If the user doesn’t trust the signing certificate, the user will receive a prompt to create an Internet cross-certificate on demand. The user can select the subject name of the certificate in the message that the user wishes to trust.
Finally, it is also possible for the user to manually store the sender's address and X.509 certificates to his or her Personal Address Book. When viewing S/MIME signed mail, the user should select the Actions → Tools → Add Sender to Address Book menu options. It’s important to note here that this certificate is not an Internet cross-certificate, meaning it is not used when sending or receiving signed S/MIME e-mails, it is used to encrypt messages from the user to the sender.
6.3 SummaryWhile the Internet permits individuals and organizations to communicate like never before, at the same time, the single greatest problem with the Internet has been, and still is, the problem of “who can be trusted?”
This chapter showed the role that public key infrastructures can play in establishing this trust and ensuring its integrity. This is done through the use of X.509 certificates in conjunction with established protocols (for example, SSL) and in conjunction with established messaging standards (for example, S/MIME). As well, this chapter showed how support for X.509 certificates is implemented in Notes and Domino and how certificates are requested, approved, generated, and installed in a Notes and Domino infrastructure.
Note: Signed S/MIME messages contain the certificate chain of sender and signers. The resulting Internet cross-certificate is stored in the receiver's Personal Address Book. By creating the cross-certificate, the user is asserting that he or she trusts a certificate contained in the S/MIME signed message. Signature verification can then proceed.
280 Lotus Security Handbook

Chapter 7. Single sign-on
In this chapter we discuss single sign-on (SSO) concepts and technical methods we can use to facilitate it. Strictly speaking, single sign-on is a term to describe the end-user experience, not the technical implementation.
We start by providing a more formal definition of SSO:
“A mechanism whereby a single action of user authentication and authorization can permit a user to access all computers and systems where that user has access permission, without the need to enter multiple passwords.”
This definition is from The Open Group’s Web site at:
http://www.opengroup.org/security/l2-sso.htm
The key point is that the user is required to log in (authenticate) to an application one time, and not need to re-authenticate when accessing a second application or server within the context of a same session.
This approach implies a number of valuable benefits, but also has some drawbacks. The benefits to the end users are:
� Only one authentication mechanism to remember. For password-based authentication, this means users only have to remember one password.
� If using passwords, users only have to update one password and follow one set of password rules.
7
© Copyright IBM Corp. 2004. All rights reserved. 281
� A single sign-on for each user into the SSO domain, typically only once per day.
The benefits to security administrators include:
� A single common registry of user information to manage and secure.
� The ability to enforce common enterprise-wide password and security policies enables end-to-end security, possibly across application and system boundaries. Avoids the issues with inconsistent password complexity and change requirements on different systems.
� It is easier to verify user security information and update when necessary, rather than tracking down all individual systems the user has access to. This is particularly valuable when users move to new roles with different access levels.
The potential drawbacks of SSO are:
� The effort for initial implementation can be significant based on the number of existing disparate systems.
� A compromised user credential can provide access to a large number of applications.
� Open standard mechanisms are either non-existent or vendor support for standards may be inconsistent and incompatible with other products.
The challenge to provide SSO is working with independent security architectures, directories, and so forth, for each different existing application platform. To facilitate SSO, we need to make all our applications somehow use a common security infrastructure for authentication that can be passed seamlessly between applications. This requires some common format for representing authentication information or credentials that all the applications can understand and accept. And we need to be able to ensure the credentials are trustworthy.
From a technical perspective, there are several different methods or tools that can be used to provide an SSO user experience with WebSphere and Lotus applications. The following SSO enablement methods that IBM Software products support are described in this chapter:
� HTTP headers
� Lightweight Third Party Authentication (LTPA)
� X.509 certificates
� DSAPI
282 Lotus Security Handbook
7.1 SSO methodsAll SSO methods must address three issues:
1. Authenticating the identity of the user
2. Assigning the correct application access controls based on the user identity
3. Rendering the user credentials (identity) in a format recognized by other applications
In this section we discuss four general methods used to support SSO between different servers and applications. For each SSO method, we describe the technical functions as well as product-specific issues and dependencies related to the particular method.
7.1.1 Single password or SSONote that we are distinguishing SSO from “single password,” which is fundamentally different. Single password involves having the same user ID and password (credentials) stored in multiple places for use by different applications. In this scenario, the user would be prompted to authenticate for each different application (or server) they access, although they would ideally use the same ID and password.
In order to have a single password despite each application using a dedicated credential store, the user IDs and passwords must somehow be synchronized. So how can passwords in different credential stores (directories) be synchronized? The simplest answer is that the users can manually keep their logon names the same if they have a say in the matter, and they can manually keep their passwords the same across the different systems. Of course, this is without a doubt the most user-unfriendly approach because the burden is completely on the user. Can passwords be programatically synchronized? In some cases, they can be, although they are not truly synchronized, they are usually changed simultaneously.
Simultaneous password changesMost password “synchronization” processes are technically a simultaneous password change process occurring behind the scenes. For example, if you enable Notes and Windows password synchronization, when you change your Notes password, the new password you type is temporarily buffered, then passed automatically into a Windows password change operation behind the scenes. The process is very similar if you enable synchronization of your Notes and Domino Internet password. It is effectively a simultaneous change where you only need to type the password one time and it gets fanned out to the second password system automatically.
Chapter 7. Single sign-on 283
Password synchronizationFrom a security standpoint, being able to synchronize a password value from one credential store requires a highly undesirable vulnerability. The vulnerability would be the ability to extract the clear text version of a user’s password so it can be written to a different directory. Secure credential stores do not store the password in clear text, but rather they store a hash or an encrypted version of the password. The hash algorithm should not be reversible. So we should not be able to read the hash value from one directory and convert it to a text. And if we simply write the hashed password from one directory to another, the second directory will now have a “hash” value that cannot be reproduced, so it would never match the authentication or “bind” process.
If a directory provides access for an administrator or program to obtain a clear-text version of the password, you should not consider it secure.
Bind processTo understand the issue of passwords and the fact that “secure” directories store the hashed value of the password, you need to understand the authentication process. When a user provides a logon name (ID) and password, the password string is hashed, then compared to the stored password hash value in the directory. A good example of this process is the LDAP bind request that occurs when using an LDAP directory for credentials. If the hash from the logon matches the hash stored in the directory, the “bind” is successful. Although some directories store both the original password and the hash value, a secure directory does not provide a means of accessing the original password; you can only access the hash.
Consider the following example:
A user password is set to the string “password” and gets stored in an IBM Directory Server as the hash value “[B@7a8ea817”. If we try to synchronize this hash value into a Domino directory in the user’s person document, what happens? The hash value our Domino server generates when we log in (bind) with a password of string “password” is “355E98E7C7B59BD810ED845AD0FD2FC4”. Since this is not equal to the
Note: Domino generates an MD2-salted hash when storing the Internet password in the person documents when “Use more secure Internet Passwords” is enabled in the Directory Profile. Other directories may use different hash algorithms (for example, IBM Tivoli Directory Server uses MD5). They will also use different encryption keys, key lengths, and salt values. The hash values for the same password will be different in each directory (and different user records in the same directory if they use a salted hash). The hash value is not meant to be portable.
284 Lotus Security Handbook

hash value we synchronized in from the LDAP directory of “[B@7a8ea817”, authentication using the Domino directory will fail.
Single password and password synchronization is an approach that is marginally suited for perhaps two different clients, such as Notes and Windows passwords. It is not an approach we recommend for integrating browser-based applications. The remainder of this chapter will focus on Web client SSO.
7.2 LTPAIBM Lightweight Third Party Authentication (LTPA) tokens, or cookies, provide a means to share authentication information between Lotus, WebSphere and Tivoli application (Web) servers. A user who has been authenticated once by an application server will be automatically authenticated on other application servers in the same DNS domain providing the LTPA keys have been shared by all the applications. LTPA utilizes a token which is stored as a cookie in the user’s browser.
The LTPA token contains data that uniquely identifies the user, such as the user’s Distinguished Name (DN), and an expiration date that effectively limits the session time before the user is forced to re-authenticate.
Special notes related to use of LTPA include:
� All application servers using LTPA tokens must reside in the same DNS domain.
� All application servers must share the same user registry (LDAP directory). Supported directories include Lotus Domino (configured as an LDAP directory), IBM Directory Server, MS Active Directory, and iPlanet.
� Browsers accessing application servers must be configured to accept cookies, which are used to store a token containing authentication information.
� Optionally, SSO may be set up to work only on encrypted HTTPS connections.
� LTPA is an IBM-specific solution; other application server vendors provide limited (or no) support.
The condition that all application servers must be in the same DNS domain is not a limitation of LTPA only. LTPA is a browser session cookie, and the behavior of such cookies is defined in RFC-2965, which is available at:
http://www.ietf.org/rfc/rfc2965.txt
Chapter 7. Single sign-on 285
This RFC states that a user agent (browser) will not provide a cookie to a server in a different DNS domain than the host (server) that issued (set) the cookie. There are proxy architectures that can get around the single DNS domain limitation, but such advanced proxy architectures are beyond the scope of this Redbook.
There are some workarounds to overcome the issue of having multiple DNS domains. An important concept to understand is that the domain or realm in an LTPA session cookie is only used by the client’s browser, not the application servers. So the key is to use DNS aliases in a way that makes the browser send the cookie to all the servers involved in the LTPA trust environment, even if they are in different real domains. For example, if your Domino servers are in domain alpha.com, and you have a portal server in domain beta.com with a page where users can get their iNotes mail via an iframe, you need to configure virtual servers in Domino R5 so they behave as if in domain beta.com. With Domino 6, you use Internet Site documents for beta.com. In either case, you need to ensure there are DNS alias entries for the Domino servers in the beta.com domain.
Domino provides a cryptographic token-based mechanism to provide single sign-on support between protocols such as HTTP and DIIOP, and also with the IBM WebSphere application server. The servers that participate in single sign-on use an encrypted “Web SSO Configuration” to share secret data in the Domino Directory used for generating and validating single sign-on tokens. This secret information is used by the server to verify that the token presented by a user was generated by a server that shares the same secret. In the remainder of this chapter, we limit our focus to WebSphere-style LTPA tokens.
WebSphere uses a format called Lightweight Third Party Authentication (LTPA), which was implemented in Domino in R5.0.5 and later. Enabling Domino to interoperate with WebSphere for single sign-on requires generating the secret information within the WebSphere administration environment and then importing it into the Web SSO Configuration. Consult WebSphere product documentation for more information on configuring LTPA in WebSphere.
When interoperability with WebSphere is not required, Domino uses its own format for the Single Sign-On token that is slightly different from the one implemented by WebSphere. The servers participating in Domino Single Sign-On share a 20 byte secret that is used to generate and validate an SHA-1 hash that proves the integrity of the token. This “Domino server only” version of LTPA does not interoperate with WebSphere LTPA.
Tip: In an environment with WebSphere and Lotus or Tivoli products, or both, the LTPA keys must be generated by WebSphere and imported into the other products.
286 Lotus Security Handbook

7.2.1 AuthenticationWith LTPA as the authentication mechanism, a trusted third party server is used to authenticate the user. Depending on whether a token has already been issued to the user, there are two possible actions a Web server might perform. The two actions or mechanisms are:
1. Creation (encoding) the LTPA token by the initial server the user logs into
2. Interrogation (decoding) of an LTPA token provided by the browser in the HTTP request to a server
LTPA token creation (encoding)Users are authenticated once per session. The initial authentication using LTPA is based on a name and password stored in an LDAP directory, where the directory is trusted by all the applications that are to share the LTPA session cookie. Note that the LDAP directory server is referred to as a “trusted third party,” hence the part of the name: “Third Party Authentication.” When a user provides a logon name (ID) and password to the initial server in the LTPA environment, it provides these credentials in a bind request against the LDAP directory server. The LDAP directory server hashes the password string, then it is compared to the stored password hash value in the user’s record in the directory. If the hash from the logon matches the hash stored in the directory, the “bind” is successful. Upon a successful LDAP bind, the initial Web server (typically a portal server) will generate an LTPA token and provide this cookie back to the browser. The browser will then provide this cookie in every subsequent HTTP request by the user to servers that are within the domain listed in the cookie. The amount of information contained in the cookie is relatively minimal, hence the term “Lightweight.” The structure of an LTPA token is shown in Table 7-1.
Table 7-1 LTPA token data definition
Data Value
CookieName "LtpaToken"
CookieValue Base64Encoded(LtpaToken)
LtpaToken Encrypt(AuthenticationToken, SharedKey) using 3DES
AuthenticationToken UserData+"%"+TokenExpirationDate+"%"+ Base64Encoded(DigitalSignature)
DigitalSignature Sign (UserData, TokenExpirationDate) using PrivateKey-ltpa. (using RSA/SHA1)
Chapter 7. Single sign-on 287

Note within the encoded structure there is a digital signature. This is a signature by the issuing server using the server’s private key (in the case of a Domino server), or a pseudo-randomly generated key (in the case of a WebSphere server).
LTPA token interrogation (decoding)If the user already has an LTPA token, then the token is validated by the Web server that receives it. The Web server might in turn request the authentication mechanism to validate the credential (in this case, an LTPA token). If the token is valid, the user is considered authenticated.
The following example shows the debug log output from a Domino server performing three steps on a WebSphere-generated LTPA token it receives: decoding the Base-64 encoding, decrypting using the shared secret key (imported from WebSphere), and determining if the user name in the token should be trusted as an authenticated user.
Example 7-1
06/09/2003 05:53:39.53 PM [03071:00010-106510] SSO API> Decoding Websphere style Single Sign-On token (LTPA).06/09/2003 05:53:39.53 PM [03071:00010-106510] SSO API> Dumping memory of encoded token [364 bytes].00000000: 6C71 3150 4847 4536 3576 597A 6154 7878 'qlP1GH6Ev5zYTaxx'00000010: 6F5A 534D 4262 6D70 3746 4643 6B56 3172 'ZoMSbBpmF7CFVkr1'00000020: 5146 7045 5762 756E 6467 4532 6C68 314B 'FQEpbWnugd2EhlK1'00000030: 3138 6E47 5164 5A41 634C 3965 3258 386C '81GndQAZLce9X2l8'00000040: 2B7A 7239 7263 7976 5537 6332 4957 4F44 'z+9rcrvy7U2cWIDO'00000050: 3755 4677 586D 2B6B 3768 7A31 3767 6976 'U7wFmXk+h71zg7vi'00000060: 3672 5949 4672 7566 4C4D 636E 6236 665A 'r6IYrFfuMLnc6bZf'00000070: 6E63 6A43 6246 4476 7159 476A 2F72 5445 'cnCjFbvDYqjGr/ET'00000080: 6742 6C57 7779 7457 3671 6632 7467 3978 'BgWlywWtq62fgtx9'
PrivateKey-ltpa Private Key (corresponding to a Public Key that other servers can access) used by LtpaServer to sign the authentication data; this private key should be accessible to LtpaServer only.
SharedKey A symmetric/shared 3DES key that is shared by LtpaServer and other servers for encrypting/decrypting token.
UserData Name value pairs separated by delimiter”$”. (for example, “uid:”+user ID)
TokenExpirationDate A number representing the time and date of the token expiration. (TokenExpirationDate is the number of milliseconds to elapse since midnight (00:00:00), January 1, 1970).
Data Value
288 Lotus Security Handbook
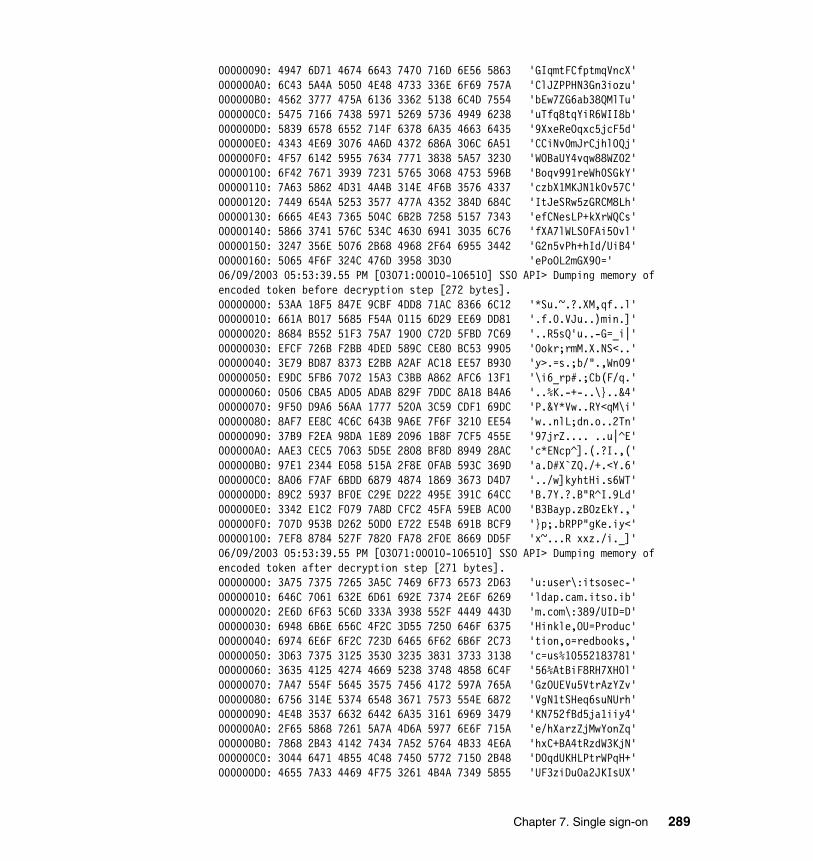
00000090: 4947 6D71 4674 6643 7470 716D 6E56 5863 'GIqmtFCfptmqVncX'000000A0: 6C43 5A4A 5050 4E48 4733 336E 6F69 757A 'ClJZPPHN3Gn3iozu'000000B0: 4562 3777 475A 6136 3362 5138 6C4D 7554 'bEw7ZG6ab38QMlTu'000000C0: 5475 7166 7438 5971 5269 5736 4949 6238 'uTfq8tqYiR6WII8b'000000D0: 5839 6578 6552 714F 6378 6A35 4663 6435 '9XxeReOqxc5jcF5d'000000E0: 4343 4E69 3076 4A6D 4372 686A 306C 6A51 'CCiNv0mJrCjhl0Qj'000000F0: 4F57 6142 5955 7634 7771 3838 5A57 3230 'WOBaUY4vqw88WZ02'00000100: 6F42 7671 3939 7231 5765 3068 4753 596B 'Boqv991reWh0SGkY'00000110: 7A63 5862 4D31 4A4B 314E 4F6B 3576 4337 'czbX1MKJN1kOv57C'00000120: 7449 654A 5253 3577 477A 4352 384D 684C 'ItJeSRw5zGRCM8Lh'00000130: 6665 4E43 7365 504C 6B2B 7258 5157 7343 'efCNesLP+kXrWQCs'00000140: 5866 3741 576C 534C 4630 6941 3035 6C76 'fXA7lWLS0FAi50vl'00000150: 3247 356E 5076 2B68 4968 2F64 6955 3442 'G2n5vPh+hId/UiB4'00000160: 5065 4F6F 324C 476D 3958 3D30 'ePoOL2mGX90='06/09/2003 05:53:39.55 PM [03071:00010-106510] SSO API> Dumping memory of encoded token before decryption step [272 bytes].00000000: 53AA 18F5 847E 9CBF 4DD8 71AC 8366 6C12 '*Su.~.?.XM,qf..l'00000010: 661A B017 5685 F54A 0115 6D29 EE69 DD81 '.f.0.VJu..)min.]'00000020: 8684 B552 51F3 75A7 1900 C72D 5FBD 7C69 '..R5sQ'u..-G=_i|'00000030: EFCF 726B F2BB 4DED 589C CE80 BC53 9905 'Ookr;rmM.X.NS<..'00000040: 3E79 BD87 8373 E2BB A2AF AC18 EE57 B930 'y>.=s.;b/".,Wn09'00000050: E9DC 5FB6 7072 15A3 C3BB A862 AFC6 13F1 '\i6_rp#.;Cb(F/q.'00000060: 0506 CBA5 AD05 ADAB 829F 7DDC 8A18 B4A6 '..%K.-+-..\}..&4'00000070: 9F50 D9A6 56AA 1777 520A 3C59 CDF1 69DC 'P.&Y*Vw..RY<qM\i'00000080: 8AF7 EE8C 4C6C 643B 9A6E 7F6F 3210 EE54 'w..nlL;dn.o..2Tn'00000090: 37B9 F2EA 98DA 1E89 2096 1B8F 7CF5 455E '97jrZ.... ..u|^E'000000A0: AAE3 CEC5 7063 5D5E 2808 BF8D 8949 28AC 'c*ENcp^].(.?I.,('000000B0: 97E1 2344 E058 515A 2F8E 0FAB 593C 369D 'a.D#X`ZQ./+.<Y.6'000000C0: 8A06 F7AF 6BDD 6879 4874 1869 3673 D4D7 '../w]kyhtHi.s6WT'000000D0: 89C2 5937 BF0E C29E D222 495E 391C 64CC 'B.7Y.?.B"R^I.9Ld'000000E0: 3342 E1C2 F079 7A8D CFC2 45FA 59EB AC00 'B3Bayp.zBOzEkY.,'000000F0: 707D 953B D262 50D0 E722 E54B 691B BCF9 '}p;.bRPP"gKe.iy<'00000100: 7EF8 8784 527F 7820 FA78 2F0E 8669 DD5F 'x~...R xxz./i._]'06/09/2003 05:53:39.55 PM [03071:00010-106510] SSO API> Dumping memory of encoded token after decryption step [271 bytes].00000000: 3A75 7375 7265 3A5C 7469 6F73 6573 2D63 'u:user\:itsosec-'00000010: 646C 7061 632E 6D61 692E 7374 2E6F 6269 'ldap.cam.itso.ib'00000020: 2E6D 6F63 5C6D 333A 3938 552F 4449 443D 'm.com\:389/UID=D'00000030: 6948 6B6E 656C 4F2C 3D55 7250 646F 6375 'Hinkle,OU=Produc'00000040: 6974 6E6F 6F2C 723D 6465 6F62 6B6F 2C73 'tion,o=redbooks,'00000050: 3D63 7375 3125 3530 3235 3831 3733 3138 'c=us%10552183781'00000060: 3635 4125 4274 4669 5238 3748 4858 6C4F '56%AtBiF8RH7XHOl'00000070: 7A47 554F 5645 3575 7456 4172 597A 765A 'GzOUEVu5VtrAzYZv'00000080: 6756 314E 5374 6548 3671 7573 554E 6872 'VgN1tSHeq6suNUrh'00000090: 4E4B 3537 6632 6442 6A35 3161 6969 3479 'KN752fBd5ja1iiy4'000000A0: 2F65 5868 7261 5A7A 4D6A 5977 6E6F 715A 'e/hXarzZjMwYonZq'000000B0: 7868 2B43 4142 7434 7A52 5764 4B33 4E6A 'hxC+BA4tRzdW3KjN'000000C0: 3044 6471 4B55 4C48 7450 5772 7150 2B48 'D0qdUKHLPtrWPqH+'000000D0: 4655 7A33 4469 4F75 3261 4B4A 7349 5855 'UF3ziDuOa2JKIsUX'
Chapter 7. Single sign-on 289

000000E0: 6A69 684A 5567 594D 4335 6266 3335 3256 'ijJhgUMY5Cfb53V2'000000F0: 6263 7034 4657 6851 6A35 7152 7636 3641 'cb4pWFQh5jRq6vA6'00000100: 6339 4662 4441 5A58 7248 744D 414A 3D '9cbFADXZHrMtJA='06/09/2003 05:53:39.56 PM [03071:00010-106510] SSO API> -LDAP Realm = itsosec-ldap.cam.itso.ibm.com\:38906/09/2003 05:53:39.56 PM [03071:00010-106510] SSO API> -Username = UID=DHinkle/OU=Production/o=redbooks/c=us06/09/2003 05:53:39.56 PM [03071:00010-106510] SSO API> -Expiration Ticks = 1055218378666 [06/10/2003 12:12:58 AM].06/09/2003 05:53:39.56 PM [03071:00010-106510] WebAuth> LOOKUP in view $Users (user='UID=DHinkle/OU=Production/o=redbooks/c=us')
In this example, note that Domino does not validate the digital signature of the issuing server when it determines it is a WebSphere-style LTPA token. It is only concerned with three aspects of the LTPA token it receives:
� The fact that the token could be decrypted using the shared secret key
� User name (LDAP distinguished name)
� Expiration date/time
Generally, WebSphere servers do not have public/private keys available to Domino, so without a common PKI in place, there is no way for Domino to validate a WebSphere server’s digital signature.
The primary security consideration for using LTPA in a WebSphere-Domino mixed environment is protecting the shared secret key. If the secret key becomes compromised, it is possible for someone knowledgeable to generate counterfeit tokens. Despite every possible measure to protect the secret key, it is still theoretically vulnerable to offline attacks if enough tokens are obtained through sampling (via network sniffing) whereby someone can determine the key through brute force cracking. For this reason, the secret key should be regenerated periodically, such as every three months, on a WebSphere server, then re-imported into the other servers.
7.2.2 Access controlAccess control using LTPA is based around the user name contained within the token. The name will be the distinguished name (DN) from the LDAP directory used for credentials. If the DN in the token does not match an access control entry (for example, a Domino database ACL entry), the user is considered authorized if the LTPA token was validated, but the user will not have access to the requested resource.
Domino 6, and specifically 6.0.2 and above, provide extremely useful features that allow the DN contained in an LTPA token to be mapped to a different name
290 Lotus Security Handbook
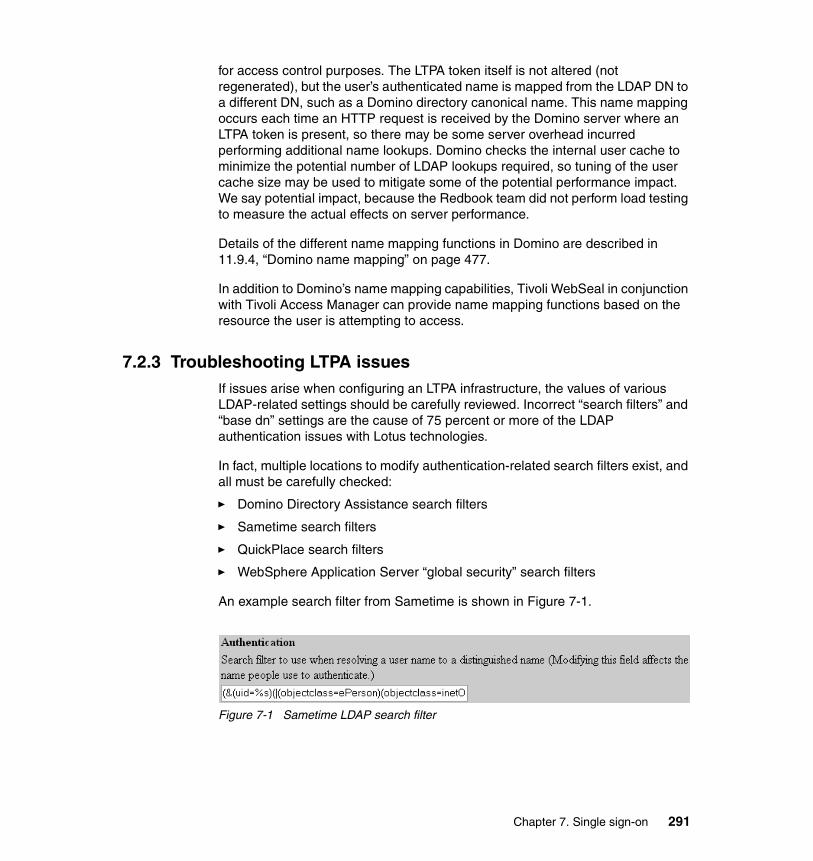
for access control purposes. The LTPA token itself is not altered (not regenerated), but the user’s authenticated name is mapped from the LDAP DN to a different DN, such as a Domino directory canonical name. This name mapping occurs each time an HTTP request is received by the Domino server where an LTPA token is present, so there may be some server overhead incurred performing additional name lookups. Domino checks the internal user cache to minimize the potential number of LDAP lookups required, so tuning of the user cache size may be used to mitigate some of the potential performance impact. We say potential impact, because the Redbook team did not perform load testing to measure the actual effects on server performance.
Details of the different name mapping functions in Domino are described in 11.9.4, “Domino name mapping” on page 477.
In addition to Domino’s name mapping capabilities, Tivoli WebSeal in conjunction with Tivoli Access Manager can provide name mapping functions based on the resource the user is attempting to access.
7.2.3 Troubleshooting LTPA issues If issues arise when configuring an LTPA infrastructure, the values of various LDAP-related settings should be carefully reviewed. Incorrect “search filters” and “base dn” settings are the cause of 75 percent or more of the LDAP authentication issues with Lotus technologies.
In fact, multiple locations to modify authentication-related search filters exist, and all must be carefully checked:
� Domino Directory Assistance search filters
� Sametime search filters
� QuickPlace search filters
� WebSphere Application Server “global security” search filters
An example search filter from Sametime is shown in Figure 7-1.
Figure 7-1 Sametime LDAP search filter
Chapter 7. Single sign-on 291
Debugging LTPA issues in DominoIf LTPA issues are still occurring after you have investigated the appropriate LDAP settings, then debug and trace files should be carefully examined.
There is a debug NOTES.INI variable that is available to assist in tracing down problems with the encoding and decoding of Single Sign-On tokens. Set DEBUG_SSO_TRACE_LEVEL=1 to get information as the Web SSO Configuration is retrieved, and also as tokens are encoded and decoded. Set DEBUG_SSO_TRACE_LEVEL=2 to get more verbose memory dumps as tokens are encoded and decoded.
292 Lotus Security Handbook

Tip: Domino 6 can have different SSO configurations for different services (Web, POP, and so forth), even on the same server, using Internet sites. However, configuring SSO in a Domino 5/6 mixed environment, you can run into problems because R5 does not recognize the Internet Site documents. The good news is that Domino 6 still supports the “R5 Web config,” so you can enable SSO in a mixed release environment. The two SSO config methods are mutually exclusive on a Domino 6 server, so for mixed environments you need to do the R5 Web config only. Do not use Internet site docs. The important points are:
1. Make sure the Domino 6 servers have Internet sites disabled on the server document Basics tab.
2. Create the SSO config doc using the Domino admin client and opening one of the server documents. From the action bar, select “Create Web (R5)...” then “SSO Configuration”, and call it “LTPAToken.”
3. Do not use an Organization name on the Web SSO config doc (this field is only used to support Internet Sites). If you do, the SSO doc will not be visible from the server Internet protocol tab.
Chapter 7. Single sign-on 293

7.3 X.509 certificatesClient authentication using X.509 certificates provides for two-way authentication between a browser user and a server using both SSL and an LDAP directory for user authentication. Multiple applications that share this same LDAP directory can use the same certificate authentication. This is not the same as using a server certificate for server authentication by a client, where the client simply needs to trust the root CA that issued the server’s certificate. We are focusing on client authentication performed by a server.
Typically, the client X.509 certificate is password protected, so in this case the use of X.509 certificates is considered a two-factor authentication method: something you have (the certificate on the workstation), and something you know (the password). Because the certificates can also be verified and the revocation or expiration checked, X.509 certificates can be a very secure method of user authentication. However, making the X.509 certificate portable (or making it exportable) so it can be installed into other applications or workstations presents both logistical issues for the user as well as potential security vulnerabilities. It is worth mentioning that Internet Explorer stores client X.509 certificates in the Windows registry. Removing a certificate permanently from a workstation may require manually removing it from the registry. Smartcards are just beginning to gain momentum as a means to provide a portable yet secure way to store client certificates, although the lack of ubiquitous smart card readers on PCs is definitely hindering their widespread use.
With client authentication, the LDAP client, specifically the browser installed on the user’s workstation, must have a digital certificate (based on the X.509 standard). In other words, the X.509 certificate contains the user’s credentials and is passed to the different Web servers that require the same X.509 authentication. The LDAP directory needs to have both the root certificate from the corresponding CA that issued the client’s certificate, and the client’s public SSL certificate (key) must be stored in their directory record. This digital certificate is used to authenticate the LDAP client (browser) to the LDAP directory being used for authentication. So in order to use X.509 certificates, there must be an Internet certificate (PKI) infrastructure implemented where users can obtain X.509 certificates that are trusted by the LDAP directory service (server) and the user’s public certificate (keys) are stored in the directory.
In addition to SSL authentication of Web browser clients, the Simple Authentication and Security Layer (SASL) can be used to add X.509 certificate authentication support to connection-based protocols. A protocol includes a command for identifying and authenticating a user to a server. It can optionally negotiate a security layer for subsequent protocol interactions. Specifically, there are at least seven different types of authentication supported by SASL, but the
294 Lotus Security Handbook

SASL authentication type of “External” uses X.509 certificates. The SASL specifications are described in RFC-2222, which may be found at:
http://www.ietf.org/rfc/rfc2222.txt
The authentication and access control descriptions in the next two sections relate to the process used by an LDAP directory for client authentication. It is a high-level overview of the process when using an LDAP directory, not necessarily a description of the X.509 support in any given Lotus product.
7.3.1 AuthenticationAfter a server receives the authentication command or any client response, it may issue a challenge or indicate failure or completion. If a client receives a challenge it may issue a response or abort the exchange, depending on the profile of the protocol.
We now describe the authentication sequence that is performed using X.509v3 certificates for SASL authentication. During the authentication protocol exchange, the SASL mechanism performs authentication, transmits an authorization identity (known as userid) from the client to the server, and negotiates the use of a mechanism-specific security layer.
When an LDAP server receives an LDAP bind request from a client, it processes the request in the following order:
1. The server parses the LDAP bind request and retrieves the following information:
– The DN that the client is attempting to authenticate as.
– The method of authentication used.
– Any credentials, such as a password, included in the request.
– If the method of authentication is SASL, the server also retrieves the name of the SASL mechanism used from the LDAP bind request.
2. The server normalizes the DN retrieved from the request.
3. The server retrieves any LDAP control included with the LDAP bind request.
4. If the method of authentication is SASL, the server determines whether or not the SASL mechanism (specified in the request) is supported. If the SASL mechanism is not supported by the server, the server sends an error return code to the client and ends the bind process.
5. If the SASL mechanism is supported (=EXTERNAL) and the SSL authentication type is server and client authentication, the server verifies that the client’s certificate is valid, was issued by a known CA, and none of the certificates on the client’s certificate chain are invalid or revoked. If the client
Chapter 7. Single sign-on 295
DN and password, as specified in the ldap_sasl_bind, are NULL, then the DN contained within the client’s x.509v3 certificate is used as the authenticated identity on subsequent LDAP operations. Otherwise, the client is authenticated anonymously (if DN and password are NULL), or the client is authenticated based on the bind information provided by the client.
6. If the method of authentication is Simple, the server checks to see if the DN is an empty string or if there are no credentials.
7. If the DN is an empty string, or if the DN or no credentials are specified, the server assumes that the client is binding anonymously and returns a good result to the client. The DN and authentication method for the connection are left as NULL and LDAP_AUTH_NONE respectively.
8. If the client has not bound beforehand, and does not present a certificate during the bind operation, the connection is refused.
7.3.2 Access controlUsing X.509 client certificates for SSL client authentication is typically very rigid regarding the authenticated name. The DN in the client certificate is the name the user is authenticated as. So the DN provided in the certificate should be the name used by application access controls.
SASL supports a feature known as “proxy authorization,” which allows an authenticated user to request that they act on the behalf of another user. This step occurs after the user has obtained an authentication DN, and involves sending an authorization identity to the server. The server will then make a decision on whether or not to allow the authorization to occur. If it is allowed, the user's LDAP connection is switched to have a binding DN derived from the authorization identity, and the LDAP session proceeds with the access of the new authorization DN.
7.4 DSAPIThe Domino Web Server Application Programming Interface (DSAPI) is a C API that lets you write your own extensions to the Domino Web Server. DSAPI extensions, or filters, are notified whenever a particular event occurs during the processing of an HTTP request. DSAPI in itself is not an SSO method, rather, it is part of a development toolkit that can be used to develop a custom SSO mechanism for Domino.
Note that several IBM Lotus Business Partners offer both standard and custom DSAPI user Web authentication solutions based on the Domino 6 C API toolkit. For more information, refer to the IBM Web site.
296 Lotus Security Handbook
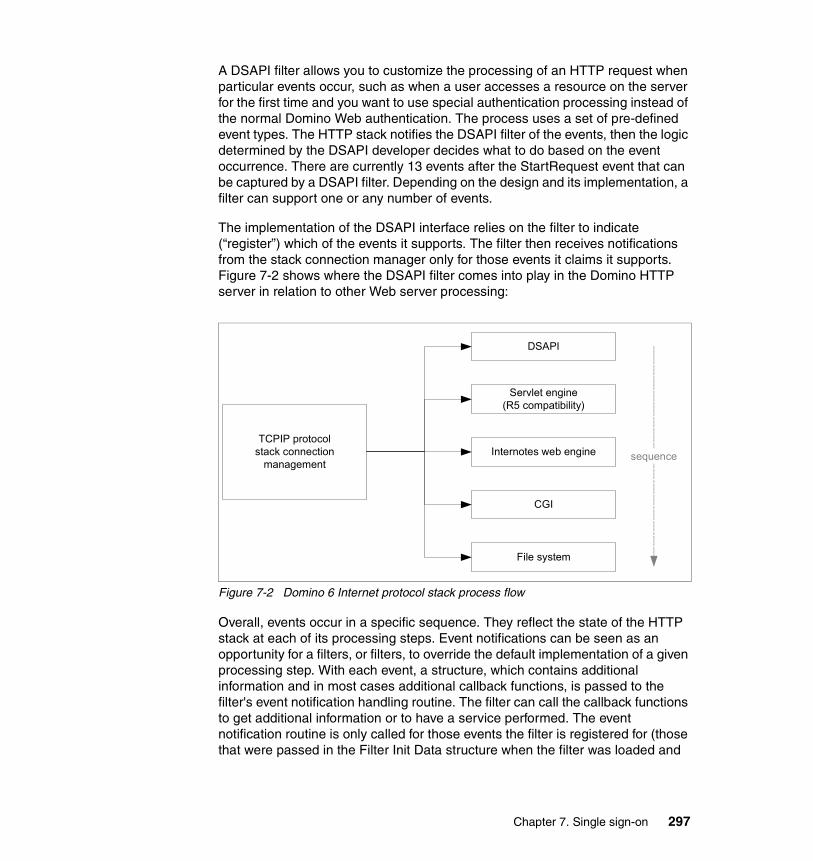
A DSAPI filter allows you to customize the processing of an HTTP request when particular events occur, such as when a user accesses a resource on the server for the first time and you want to use special authentication processing instead of the normal Domino Web authentication. The process uses a set of pre-defined event types. The HTTP stack notifies the DSAPI filter of the events, then the logic determined by the DSAPI developer decides what to do based on the event occurrence. There are currently 13 events after the StartRequest event that can be captured by a DSAPI filter. Depending on the design and its implementation, a filter can support one or any number of events.
The implementation of the DSAPI interface relies on the filter to indicate (“register”) which of the events it supports. The filter then receives notifications from the stack connection manager only for those events it claims it supports. Figure 7-2 shows where the DSAPI filter comes into play in the Domino HTTP server in relation to other Web server processing:
Figure 7-2 Domino 6 Internet protocol stack process flow
Overall, events occur in a specific sequence. They reflect the state of the HTTP stack at each of its processing steps. Event notifications can be seen as an opportunity for a filters, or filters, to override the default implementation of a given processing step. With each event, a structure, which contains additional information and in most cases additional callback functions, is passed to the filter's event notification handling routine. The filter can call the callback functions to get additional information or to have a service performed. The event notification routine is only called for those events the filter is registered for (those that were passed in the Filter Init Data structure when the filter was loaded and
TCPIP protocolstack connection
management
DSAPI
Servlet engine(R5 compatibility)
Internotes web engine
CGI
File system
sequence
Chapter 7. Single sign-on 297
initialized). The types of HTTP request methods that events can be triggered on are:
– None: No HTTP request method is provided.
– HEAD: HEAD method is often used for testing hypertext links for validity, accessibility, and recent modification.
– GET: GET method is used to retrieve whatever information (in the form of an entity) is identified by the Request-URL.
– POST: POST method requests that the origin server accept the entity enclosed in the request as a new subordinate of the resource identified by the Request-URL in the Request-Line.
– PUT: PUT method requests that the enclosed entity be stored under the supplied Request-URL.
– DELETE: DELETE method requests that the origin server delete the resource identified by the Request-URL.
– TRACE: TRACE method.
– CONNECT: CONNECT method.
– OPTIONS: OPTIONS method.
– UNKNOWN: Unknown request method.
– BAD: Bad request method. Error.
The types of events are described in the following sections in the sequence in which they happen.
kFilterStartRequest EventThis event is used to advise all filters currently loaded that an HTTP request has been received, and is about to be processed. A filter, in this step, can prepare itself for processing the request. Typically in this step, the filter should allocate its own private context data and required resources necessary to handle the processing of a request. The argument, pEventData, is not used and a NULL is passed. Any filter supporting this event should return the value, kFilterHandledEvent.
kFilterRawRequest EventAll filters currently loaded and supporting this event are notified that all the input HTTP headers have been read in. Any filter that needs to preprocess the input headers can do so at this time. Note that a filter could choose to completely service the HTTP request at this time. The argument, pEventData, is a pointer to the FilterRawRequest structure.
298 Lotus Security Handbook

kFilterParsedRequest EventAll filters currently loaded and supporting this event are notified with this event when the HTTP stack has finished pre-parsing all the HTTP input headers. Note that this reflects the same state as in the event kFilterRawRequest since the HTTP stack pre-parses the HTTP input headers before it starts calling any filter. Any filter once again can choose to process the request completely at this step. pEventData is a pointer to the structure, FilterParsedRequest. Note that only two callback functions are provided. You can only access the HTTP input headers in this step. With the kFilterRawRequest, you have the opportunity to change them as well.
kFilterRewriteURL EventAll filters currently loaded and supporting this event have the opportunity to change the URL to redirect the request to some other resource. If a filter successfully rewrites the URL to be processed, and the server processes the new URL, then the DSAPI layer stops processing this event, meaning no other filters in the list are notified. pEventData is a pointer to an instance of the structure, FilterMapURL. Note that the structure FilterMapURL is also used in the events, kFilterTranslateRequest, and kFilterPostTranslate.
kFilterAuthenticate EventThis event occurs when the HTTP stack is in the authentication phase of the process. The filter code can view the request and user credentials, authenticate the user for the HTTP stack, or completely handle the request. pEventData is a pointer to an instance of the structure.
kFilterUserNameList EventThis event occurs when the HTTP stack is about to generate the user's group name list. These are group names the user is a member of. This event follows the kFilterAuthenticate event. The filter can have the Domino server populate the list, add groups to or remove groups from the list, or completely handle the event (generate completely the group list itself). The parameter in the function, HttpEventProc, pEventData, is a pointer to the structure, FilterUserNameList.
kFilterTranslateRequest EventThis event occurs when the HTTP stack is about to translate the path URL to a target resource. The filter can translate the request using its own translation and mapping rules, or completely handle the request. pEventData points to an instance of the structure, FilterMapURL.
kFilterPostTranslate EventThis event occurs after the event, kFilterTranslateEvent, has been handled. It is an opportunity for the filter to change the target resource to be accessed. The filter can change both the target resource path and the mapping type. The filter
Chapter 7. Single sign-on 299

can also choose to completely service the request. pEventData is a pointer to the structure, FilterMapURL.
kFilterAuthorized EventThis event occurs after the authentication phase has taken place and the user's group names list has been computed. The filter can override the default implementation of the authorization phase and grant or deny access to the target resource. pEventData is a pointer to the structure, FilterAuthorize. It contains information about the target resource to serve. Note that the filter can get access to the authenticated user information by using the services via the ServerSupport callback with the flag, kGetAuthenticatedUserInfo. This will allow the user to gain access to the user's authenticated name as well as to his or her group names list.
If the filter denies access to the target resource, it must send the appropriate response to the client, and set the field, isAuthorized, in the FilterAuthorize structure to 0. It can then return either kFilterHandledRequest or kFilterHandledEvent. The DSAPI layer will then signal the HTTP stack to terminate the processing of the current request.
kFilterProcessRequest EventThis is the last step in servicing an HTTP request. This event can be used to override the default implementation of the processing of the request. In this phase the response data is computed and sent to the client. pEventData is a pointer to the structure, FilterMapURL.
kFilterEndRequest EventThis event is used to advise the filter code that it is time to clean up and release resources allocated to handle a given HTTP request. pEventData is NULL in this case.
kFilterAuthUser EventThis event is replaced with the kFilterAuthenticate event, but is still supported for compatibility with previously written DSAPI filters. In this event, the filter authenticates the Web user. pEventData is an instance of the structure, FilterAuthenticate. The usage is described in the kFilterAuthenticate event described previously.
This event allows you to customize the authentication of the Web users, which is often one part of implementing single sign-on within a corporation. In this case, the DSAPI filter is notified when Domino authenticates a user. The DSAPI filter can then parse the user name, validate user names and passwords against a legacy mainframe system, and if successful, notify the Domino Web server that it has handled the user's authentication and return to Domino the user's credentials.
300 Lotus Security Handbook
This is a guide to setting the output variables and return codes for common authentication scenarios where eventData points to the FilterAuthenticate structure:
Scenario 1: The filter was able to authenticate the user.
Set eventData → authName to the canonical name, set eventData → authType to kAuthenticBasic or kAuthenticClientCert, and the return code to kFilterHandledEvent.
Scenario 2: The filter was not able to authenticate the user, and other filters or Domino should go ahead and attempt their own authentication.
Set the return code to kFilterNotHandled.
Scenario 3: The filter was not able to authenticate the user, and other filters or Domino should not attempt their own authentication.
Set eventData → authType to kNotAuthentic, and the return code to kFilterHandledEvent.
kFilterResponse EventThis event occurs when the HTTP stack is about to send the HTTP response headers to the client. This gives a chance to the filter to change the response that is sent to the client. This is not completely implemented in the current version of DSAPI. pEventData is a pointer to an instance of the structure FilterResponse.
kFilterRawWrite EventThis event occurs when the HTTP stack is about to send the HTTP response data to the client. This gives a chance to the filter to change the response data that is sent to the client. This is not completely implemented in the current version of DSAPI. pEventData is a pointer to an instance of the structure FilterRawWrite
Of the events described here, for constructing a custom SSO implementation we are primarily concerned with kFilterAuthenticate, kFilterUserNameList, and the kFilterAuthorized. Note that the kFilterAuthUser may also be used in place of kFilterAuthenticate, although this is the R5 event that is supported in Domino 6 for backwards compatibility. New DSAPI filters should use the kFilterAuthenticate event.
Running and Programming ConsiderationsThe DSAPI functions are included in the Lotus C API Toolkit that can be downloaded from:
http://www.lotus.com/ldd
Chapter 7. Single sign-on 301
A DSAPI filter is built as a shared library under UNIX and a DLL under Win32. DSAPI is supported on all Domino server platforms. Since the filter is written in C, you can use the Notes C API to access Domino data, or other C interfaces to access other systems. The details of compiling and linking a shared library differ from platform to platform. Note that the Lotus C API toolkit for Domino 6 is not backwards compatible, meaning programs developed with the 6.x toolkit will not run on pre-6 releases of Domino. If you have an R5 or mixed R5 and Domino 6 environment, you should use the R5.x toolkit.
A DSAPI filter is a server extension, so the filter has the privileges of the server ID when accessing Domino databases through the C API.
Since filter notification functions may be called simultaneously from different server threads, all filter code must be thread-safe. When a Domino server thread receives an HTTP request, it allocates a new instance of the FilterContext structure. As the thread processes the request, it passes that instance to all filter functions it calls. FilterContext contains a pointer, privateContext, that you can use to store your own data structure. All thread-specific data that the filter needs to maintain from event to event should be stored in your privateContext structure.
You should use the AllocMem callback function to allocate dynamic memory in your filter. All memory allocated by AllocMem is automatically freed when the server thread finishes processing the request. This simplifies your filter cleanup and ensures that the memory is freed even if the thread terminates abnormally.
Install the filter by specifying the name of the filter in the Server record, in the field DSAPI filter file name in the Internet Protocols → HTTP table. You can specify just the name of the filter file if it is located in the Domino program or data directories; otherwise you must specify the fully-qualified path name. Make sure that all filter files are secured by adequate file permissions and physical security, to prevent unauthorized persons from tampering with the filter.
A sample DSAPI filter that uses either the Windows password or the UNIX system passwords for Domino Web server authentication is provided in
DSAPI and LTPAThe Domino 6 C API toolkit provides two functions for dealing with LTPA tokens:
� SECTokenValidate - Validate a Single Sign-On LTPA Token
� SECTokenGenerate - Generate a Single Sign-On LTPA Token
These two functions correspond to LTPA token decoding and encoding previously described in the section on LTPA.
302 Lotus Security Handbook
7.4.1 AuthenticationDSAPI provides enough flexibility to authenticate a Domino Web user using nearly any criteria. The criteria can be based on matching a name and password in a Domino or external LDAP directory, matching a name provided in a cookie, or some other mechanism. With great flexibility comes the burden of ensuring the mechanism used is secure. This burden falls on the DSAPI developer. Another potential issue and burden relates to performance. For example, if the DSAPI needs to connect to an exterior directory, the lookup time can drastically affect performance. The developer can opt to check the user cache, or ignore the cache and perform the external lookup with every access.
7.4.2 Access controlThe DSAPI functions do not directly control Domino access controls. However, they do allow direct setting of the user’s authorized name, which then is used for all access on that server for the HTTP request processed by the DSAPI filter.
The developer can provide complete control regarding how the login name can be transformed or mapped to a different name by setting the “authname” to whatever value and format is desired. See Scenario 1 under the kFilterAuthUser Event described previously.
7.5 HTTP headersDomino 6 supports HTTP headers for user ID and passwords that allow you to use a third party Web server as a front-end to a Domino server. This feature is often described as the “WebSphere Application Server plug-in” for Domino, which is a somewhat misleading name since it isn't the same as an authentication “plug-in” or Trust Association Interceptor (TAI) on WebSphere Application Server, nor does it involve a plug-in on Domino since it is just a notes.ini setting that tells Domino HTTP to accept the WebSphere Application Server-style user ID and passwords in the HTTP headers. The actual plug-in to support this SSO architecture is installed on the front-end HTTP server. Plug-ins for front-end HTTP servers that are compatible with Domino back-end servers are available for Microsoft IIS and the IBM HTTP Server, and plug-in support is planned for Apache and iPlanet in future Domino 6 releases.
In order to support HTTP header SSO on a back-end Domino server, add the following line to NOTES.INI:
HTTPEnableConnectorHeaders=1
This setting enables the Domino HTTP task to process the special headers added to requests by the WebSphere Application Server plug-in for IIS or IBM
Chapter 7. Single sign-on 303

HTTP Server. These headers include information about the front-end server's configuration and user authentication status.
As a security measure, the Domino HTTP task ignores these headers if the NOTES.INI setting is not enabled. This prevents an attacker from mimicking a plug-in.
Understand that under this architecture, firewalls and port restrictions on Domino must be used to secure the channel between the front-end HTTP server and Domino; otherwise, the Domino server is at risk because the HTTP headers are easily spoofed. In other words, secure the HTTP server-to-Domino HTTP channel so only the HTTP server is permitted to connect to Domino's port 80/443. The integrity of this SSO architecture is completely dependent on securing the channel between the front-end HTTP server performing authentication and the Domino server.
7.5.1 AuthenticationWhen using HTTP header plug-in support on Domino, Domino relies on the front-end HTTP server for all user authentication.
7.5.2 Access controlDomino access controls using HTTP headers for authentication is dependent on the user names provided by the plug-in on the foreign Web server. Domino database ACLs are still used to determine whether or not a user should be allowed to access a given resource. Because the user’s authenticated name in the header is typically not the user’s Notes hierarchical name, the database ACLs must contain entries that match the expected form of the user name in the header. A common approach to dealing with this issue is to allow Anonymous access to Domino databases, and rely on the front-end server’s authentication and access controls it has defined in its security registry for the Domino URLs.
The major drawback to this approach is the inability to implement document-level access controls, such as reader or writer document access. Similarly, field-level controls, such as “hide when” formulas on a Domino form that use group membership or roles, cannot be used. Because Domino documents get generated IDs (doc IDs and UNIDs), it is impractical to try and control access using the URLs.
Domino name mapping can be implemented to map the user name in the HTTP header to the Notes hierarchical name. Since usually the Notes hierarchical name is what is used in a Domino database ACL, Domino ACLs can be utilized providing the conditions required to support name mapping have been met. More information regarding how Domino can map a name in an external LDAP
304 Lotus Security Handbook
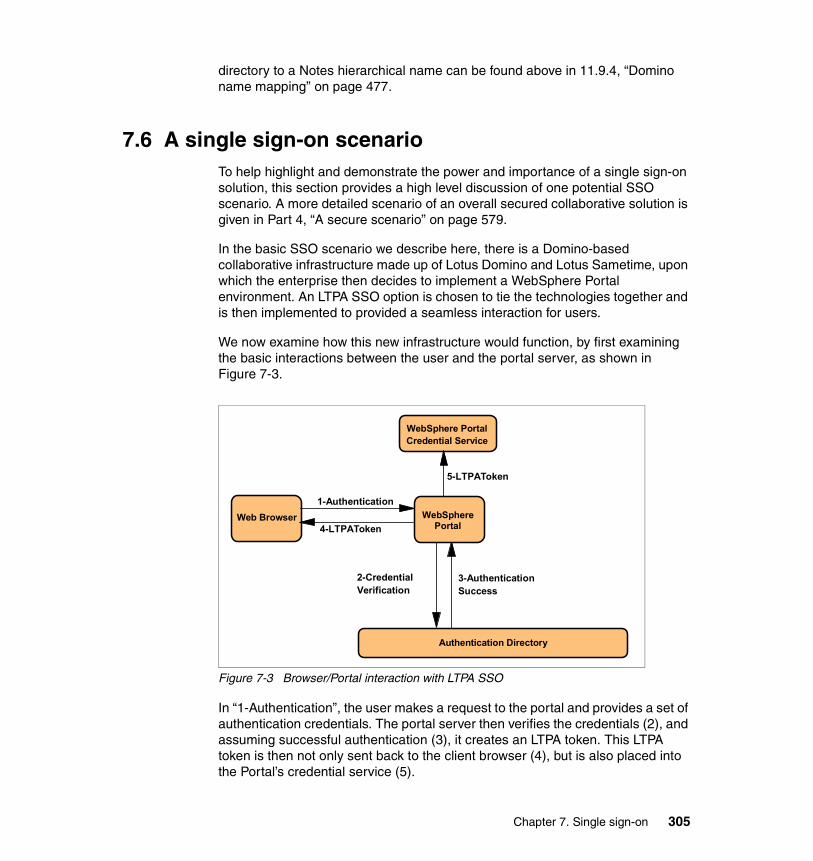
directory to a Notes hierarchical name can be found above in 11.9.4, “Domino name mapping” on page 477.
7.6 A single sign-on scenarioTo help highlight and demonstrate the power and importance of a single sign-on solution, this section provides a high level discussion of one potential SSO scenario. A more detailed scenario of an overall secured collaborative solution is given in Part 4, “A secure scenario” on page 579.
In the basic SSO scenario we describe here, there is a Domino-based collaborative infrastructure made up of Lotus Domino and Lotus Sametime, upon which the enterprise then decides to implement a WebSphere Portal environment. An LTPA SSO option is chosen to tie the technologies together and is then implemented to provided a seamless interaction for users.
We now examine how this new infrastructure would function, by first examining the basic interactions between the user and the portal server, as shown in Figure 7-3.
Figure 7-3 Browser/Portal interaction with LTPA SSO
In “1-Authentication”, the user makes a request to the portal and provides a set of authentication credentials. The portal server then verifies the credentials (2), and assuming successful authentication (3), it creates an LTPA token. This LTPA token is then not only sent back to the client browser (4), but is also placed into the Portal’s credential service (5).
Web Browser
Authentication Directory
WebSphere PortalCredential Service
1-Authentication
4-LTPAToken
2-CredentialVerification
3-AuthenticationSuccess
WebSphere Portal
5-LTPAToken
Chapter 7. Single sign-on 305
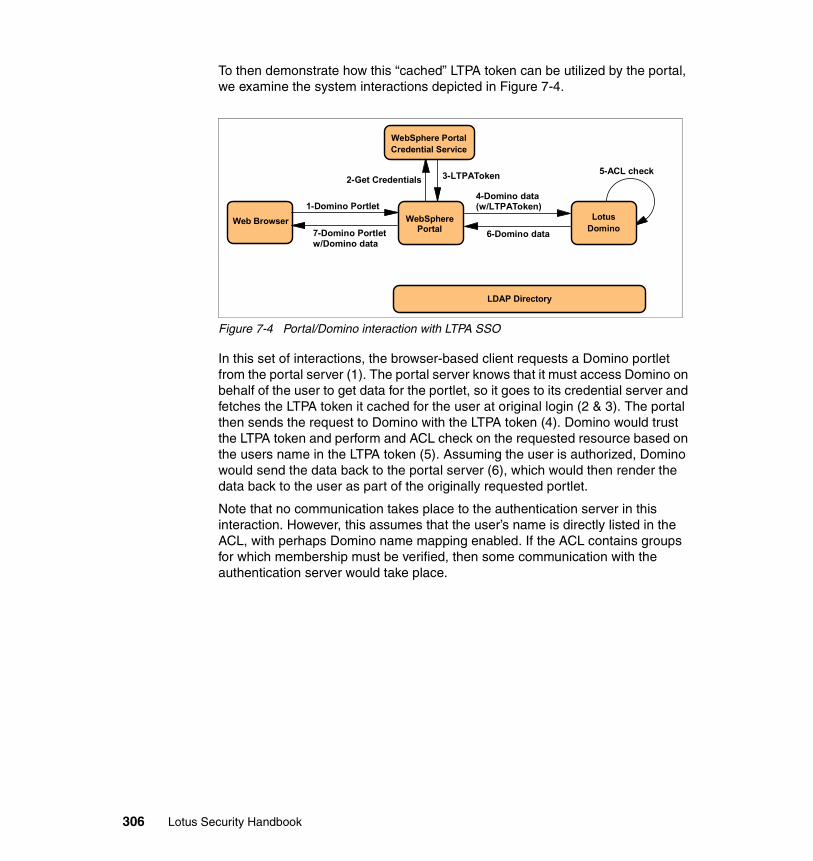
To then demonstrate how this “cached” LTPA token can be utilized by the portal, we examine the system interactions depicted in Figure 7-4.
Figure 7-4 Portal/Domino interaction with LTPA SSO
In this set of interactions, the browser-based client requests a Domino portlet from the portal server (1). The portal server knows that it must access Domino on behalf of the user to get data for the portlet, so it goes to its credential server and fetches the LTPA token it cached for the user at original login (2 & 3). The portal then sends the request to Domino with the LTPA token (4). Domino would trust the LTPA token and perform and ACL check on the requested resource based on the users name in the LTPA token (5). Assuming the user is authorized, Domino would send the data back to the portal server (6), which would then render the data back to the user as part of the originally requested portlet.
Note that no communication takes place to the authentication server in this interaction. However, this assumes that the user’s name is directly listed in the ACL, with perhaps Domino name mapping enabled. If the ACL contains groups for which membership must be verified, then some communication with the authentication server would take place.
Web Browser
LDAP Directory
1-Domino Portlet
7-Domino Portlet w/Domino data
WebSphere Portal
2-Get Credentials
LotusDomino
WebSphere PortalCredential Service
3-LTPAToken
4-Domino data (w/LTPAToken)
6-Domino data
5-ACL check
306 Lotus Security Handbook
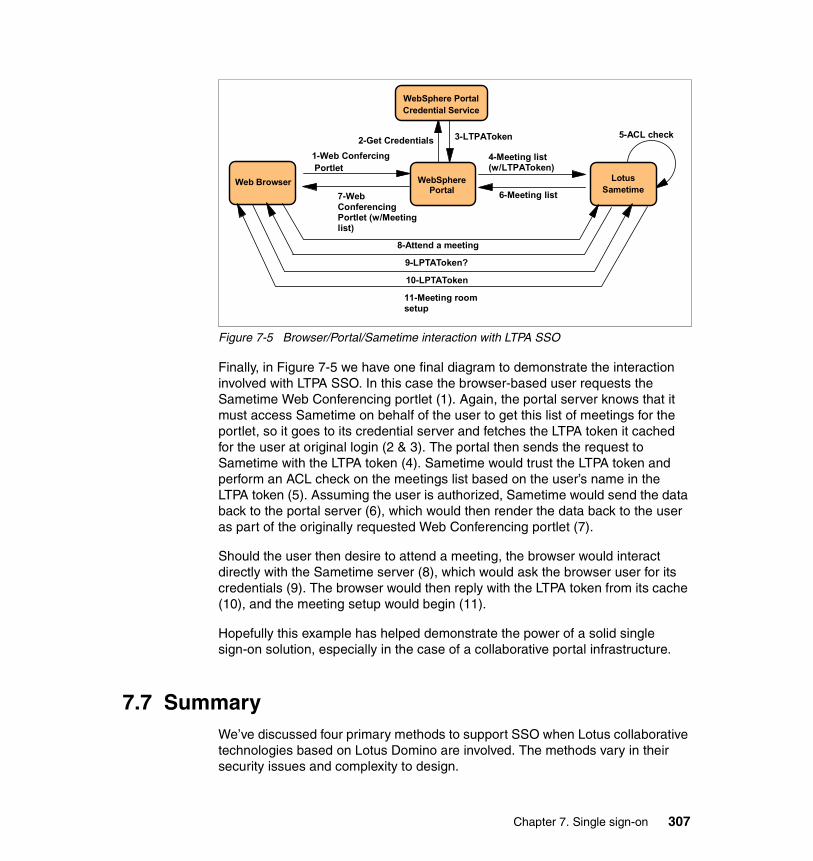
Figure 7-5 Browser/Portal/Sametime interaction with LTPA SSO
Finally, in Figure 7-5 we have one final diagram to demonstrate the interaction involved with LTPA SSO. In this case the browser-based user requests the Sametime Web Conferencing portlet (1). Again, the portal server knows that it must access Sametime on behalf of the user to get this list of meetings for the portlet, so it goes to its credential server and fetches the LTPA token it cached for the user at original login (2 & 3). The portal then sends the request to Sametime with the LTPA token (4). Sametime would trust the LTPA token and perform an ACL check on the meetings list based on the user’s name in the LTPA token (5). Assuming the user is authorized, Sametime would send the data back to the portal server (6), which would then render the data back to the user as part of the originally requested Web Conferencing portlet (7).
Should the user then desire to attend a meeting, the browser would interact directly with the Sametime server (8), which would ask the browser user for its credentials (9). The browser would then reply with the LTPA token from its cache (10), and the meeting setup would begin (11).
Hopefully this example has helped demonstrate the power of a solid single sign-on solution, especially in the case of a collaborative portal infrastructure.
7.7 SummaryWe’ve discussed four primary methods to support SSO when Lotus collaborative technologies based on Lotus Domino are involved. The methods vary in their security issues and complexity to design.
5-ACL check
Web Browser
1-Web Confercing Portlet
7-Web Conferencing Portlet (w/Meeting list)
WebSphere Portal
2-Get Credentials
LotusSametime
WebSphere PortalCredential Service
3-LTPAToken
4-Meeting list (w/LTPAToken)
6-Meeting list
8-Attend a meeting
9-LPTAToken?
10-LPTAToken
11-Meeting room setup
Chapter 7. Single sign-on 307
LTPA has the advantage of being supported by virtually all IBM Lotus, WebSphere, and Tivoli Access Manager products. It is dependent on a common, trusted directory used for user credentials. Domino’s Directory Assistance feature provides support using credentials maintained outside of the Domino directory.
X.509 certificates have the advantage of providing a two-factor authentication, but their drawback is the requirement to implement a Certificate Authority to issue certificates to each user or pay a third party for the service. Managing certificates on the client workstations can also be a challenge if users work from multiple machines.
DSAPI has the advantage of complete flexibility in determining user authentication, although it is specific to Domino. It requires a great deal of expertise to develop complex filters.
HTTP headers have the advantage of relative ease of implementation; however, they present a high degree of security risk if the channel between the front-end HTTP server and the back-end Domino server is not completely secure. They are most commonly implemented in conjunction with an Enterprise Access Management system that centrally controls all Web resource access.
Finally, when deciding upon one SSO method over another, the user should consider whether they are:
1) Trying to integrate with an existing custom-built or non-IBM SSO solution. In this case a DSAPI or HTTP header-based solution will most likely fit the bill.
2) Trying to implement a “application specific” SSO solution, or integrate with other existing IBM applications. In this case, and LTPA-based solution will make the most sense.
3) Trying to implement a enterprise-wide SSO solution covering all systems and infrastructures. In this case, an enterprise access management solution – as part of an overall identity management solution – would be the correct route to take. The IBM Tivoli “identity management” product family should be carefully reviewed and considered to satisfy these needs.
308 Lotus Security Handbook
Chapter 8. Directory strategies
In this chapter we discuss the fundamentals of directories and the most commonly used protocol to access directories, the LDAP protocol. We also discuss the issues related to using multiple directories for identity management, user credentials, and access controls. Some tools for synchronizing directories are described, along with guidelines for data synchronization and ultimately, a high-level strategy for building a unified enterprise directory service.
8
© Copyright IBM Corp. 2004. All rights reserved. 309

8.1 Directory fundamentalsA very broad definition of a directory is a repository used to hold any kind of information that may be used for different purposes by different clients. The repository is a collection of information about objects arranged in a hierarchical structure. It is a specialized database that enables users or applications to find resources that have the characteristics needed for a particular task.
If the name of an object is known, its characteristics can be retrieved. If the name of a particular individual object is not known, the directory can be searched for a list of objects that meet a certain requirement. Directories can usually be searched by specific criteria, not just by a predefined set of categories.
A directory is a specialized database that has characteristics that set it apart from general purpose relational databases. One characteristic of a directory is that it is accessed (read or searched) much more often than it is updated (written). Because directories must be able to support high volumes of read requests, they are typically optimized for read access. Because directories are not intended to provide as many functions as general-purpose databases, they can be optimized to economically provide more applications with rapid access to directory data in large distributed environments. Note that the logical object structure is hierarchical, although the physical data object storage might reside in relational database tables. This is the case with IBM Directory Server, which uses DB2 tables to store the directory data.
A directory can be centralized or distributed. If a directory is centralized, there is one directory server (or a server cluster) at one location that provides access to the directory. If the directory is distributed, there are more than one servers, usually geographically dispersed, that provide access to the directory.
8.1.1 LDAP directoriesLDAP defines a standard method of accessing a directory service. The LDAP standard is designed to provide access to directories supporting X.500 hierarchical models without the intense resource requirements of the full X.500 Directory Access Protocol (DAP), hence the term “Lightweight DAP” or LDAP. It is a client-server model of communication where the LDAP directory server is capable of serving many simultaneous client requests on the standard TCPIP port 389 or port 636 if the server supports SSL.
The “LDAP standard” consists of a collection of related IETF standards, including:
– RFC-1777 LDAPv2 standard
– RFC-2251 LDAPv3: the base LDAP version 3 standard
310 Lotus Security Handbook

– RFC-2252 LDAPv3: Attribute Syntax Definitions
– RFC-2253 LDAPv3: UTF-8 String Representation of Distinguished Names
– RFC-2254 String Representation of LDAP Search Filters
– RFC-2255 LDAP URL Format
– RFC-2849 The LDAP Data Interchange Format (LDIF)
When a directory is distributed, the information stored in the directory can be partitioned or replicated (or a combination of both). When information is partitioned, each directory server stores a unique and non-overlapping subset of the information. That is, each directory entry is stored by one and only one server. The technique to partition the directory is to use LDAP referrals. LDAP referrals allow the users to refer LDAP requests to either the same or different name spaces stored in a different (or same) server. When information is replicated, the same directory entry is stored by more than one server. In a distributed directory, some information may be partitioned, and some information may be replicated.
Detailed information on LDAP directory concepts and implementations can be found in the following IBM publications:
� IBM Redbook Understanding LDAP, SG24-4986
� IBM Redbook LDAP Implementation Cookbook, SG24-5110
� IBM Redbook Using LDAP for Directory Integration: A Look at IBM SecureWay Directory, Active Directory, and Domino, SG24-6163
� IBM Redbook Implementation and Practical Use of LDAP on the IBM e-server iSeries Server, SG24-6193
� IBM Redpaper, LDAP Directory Services in IBM WebSphere Everyplace Access V4.1.1, REDP3603
8.2 Multiple directoriesApplications deployed by organizations typically have required or provided their own dedicated user registration directories. The result is a variety of user directories and pieces of information about those users deployed throughout the organization, each with their own unique properties and different sources of data.
Data sources are typically represented by a wide variety of systems, repositories, and structures, such as:
� LDAP-capable directories (examples: Domino directory, IBM Directory Server, Microsoft Active Directory, Netscape/iPlanet/SunONE Directory Server, Novell NDS)
Chapter 8. Directory strategies 311
� Commercial X.500 directories (examples: Syntegra’s Aphelion/CDCRialto, Bomara/Isocor Global Directory Server, Nexor Directory)
� Human resource systems (examples: PeopleSoft HRMS, Siebel ERM, JD Edwards, Oracle HRMS)
� Customer relationship management systems (examples: Siebel CRM, Microsoft CRM, PeopleSoft CRM, Oracle CRM)
� Databases storing person information (for example, Oracle, DB2, SQL Server)
� Telephone private exchange system directories
� Data exchange files and syntaxes (examples: XML, SAML, LDIF or SOAP documents)
� E-mail systems that do not use LDAP-capable directories
� Electronic registries for building access control badge systems
� Stored value systems (examples: cafeteria POS systems)
Note that the examples are not meant as comprehensive lists of vendors or products. We simply wanted to point out some widely known products that are popular among large organizations, and that there are typically multiple “person” data repositories in nearly any organization.
8.2.1 Authoritative sourcesThe information stored in a user’s directory record is organized by discrete attributes or fields. The scope of information stored in a directory is often set by the requirements of an application or a set of applications that utilize it. We define an authoritative source as the highest organizational authority that generates, assigns, or validates data attribute values.
For example, consider the following attributes in a very simple directory record for a user:
� Name: The legally recognized full name of an employee or contractor. The name is likely to have been validated by an HR resource by inspecting a government-issued form of personal identification, such as a passport, driver’s license, birth certificate, and so forth.
� Employee number: A unique identification key, often a combination of alpha-numeric characters. Typically this is generated by a HR system, and is ensured to be unique against all other people in the directory, including past and present records.
� Phone number: The telephone number assigned to this person by the telecommunications or facilities staff. The number is assigned based on the
312 Lotus Security Handbook
pool of available numbers on the PBX for the employee’s work location (or some other applicable criteria).
� Organizational e-mail address: The RFC-822 (SMTP) address generated by the IT staff for the user. The address must be unique against all other SMTP addresses currently in the system used for e-mail. It might be generated algorithmically using elements of the user’s full name, department, or some other data.
In this example, note that we have three authoritative sources for the four attributes. HR is the authoritative source for the name and employee number, facility telecommunications is the authoritative source for the phone number, and IT is the authoritative source for the e-mail address. For purposes of this example, we do not need to precisely define what the “name” attribute consists of (we discuss issues related to names in the section on “Multiple identities” on page 322).
Multiple authoritative sources for data is extremely common, and the number of authorities seems to increase in direct relationship to the size of the organization. This is simply an observation based on our experiences, but anyone who has worked for a large multi-national organization would probably agree. Larger organizations require larger numbers of specialized administrative staff groups, which in turn are dedicated to specific areas or spans of control. A human resource specialist is highly unlikely to also have the expertise and responsibility for managing the company’s telephone PBX system. And note that the specialization of data administration may not be limited to internal staff groups. Some organizational systems may be outsourced and controlled by third parties. For example, the buildings and parking structure access might be controlled by an outside organization.
We are not implying that any two organizations of similar size have the same number of data authorities. We are just making the point that single, centralized authority for all person data within an organization is highly unlikely because directories have traditionally been deployed for widely different business functions. And we are not saying that single, centralized authority is “better” than multiple authorities. The real concern when there are multiple data authorities are the points of control and how the data is managed, which we discuss in the next section.
8.2.2 Points of controlA point of control is defined as an interface that provides the ability to perform write-operations on all or a portion of the person data record. A write-operation can consist of and add of a new record, modify of an existing record, or delete of an entire existing record. A read-operation is a retrieval only of data without
Chapter 8. Directory strategies 313
modification of the data. Most directories are designed for significantly higher proportions of read-operations to write-operations.
Points of control generally have access restrictions that limit or permit certain people, servers, or applications to perform write-operations. Points of control may be exclusive or non-exclusive. The levels of exclusivity can range from an entire directory to a single record, or even to a single attribute. For a point of control to be exclusive, not other point of control can overlap its scope of what data can be written.
An example of an exclusive control point would be a process that generates a unique employee number. The process must have the sole ability to determine the value of this attribute, and no other interface could provide a means to modify it. This process might fall under the control of a superior process or interface that has the sole capability to add a new employee record.
An example of a non-exclusive control point might be a person’s nickname attribute. The employee might have an interface and the ability to change it themselves, in addition to other people or groups who have interfaces and abilities to modify it, such as their manager and the HR staff.
Points of control must be identified in terms of directory, records, and attributes. Each directory provides for various points of control, and the centralization or decentralization of control is usually configurable to several degrees by the implementer.
8.2.3 Data managementIn the previous sections we discussed “who” can change data (the authoritative sources), and “where” it can be changed (the points of control). Data management is the coordination of both to avoid conflicts. Data management also includes the data administration viewed as a whole, with the goal being keeping the data accurate, current, and consistent. The challenges to achieving this goal often center around the existence of multiple, independent directories that are required to store identical or similar attributes.
Separate directories inherently provide separate points of control, so when attributes overlap between any pairs of directories, the probability of data inconsistency becomes quite high. The likelihood of data consistency problems increases when the access to the different points of control is distributed to several groups of administrators. Data consistency between any pairs of directories can be improved by limiting the access to points of control to a centralized administration group, but when the points of control are not integrated, data often needs to be manually entered at each point of control. There is always an element of human error each time data needs to be manually
314 Lotus Security Handbook
keyed, so data accuracy and consistency will still be flawed under centralized administration.
To promote better data consistency across multiple directories, the points of control for different attributes in common between different directories should be limited to one directory. This is not to say a single directory should be the point of control for all attributes belonging to a person. We mean that any given attribute should have limited points of control, although different attribute’s points of control might be scattered across different directories. For example, attribute “A” should be limited to update from a single point of control in directory “1,” while attribute “B” should be limited to update from a single point of control in directory “2,” and so forth. But with multiple directories, this implies that something should be in place to get the changes made to one attribute from a point of control in one directory over to the other directories that also need to store this attribute. We need to apply changes made in one place to all other places (directories) that the same data must be stored. This is necessary to prevent data inconsistency across different directories. The “something” that must be in place is data synchronization between different directories, which we discuss in the next section.
8.3 Directory synchronizationSynchronization of data between two or more different directories is called directory synchronization. Directory synchronization requires the exchange of data between two or more directory systems. The direction of updates, or data flow, must be consistent with the authoritative sources. Data must flow from authoritative sources to non-authoritative sources. Directory synchronization can be used as a means to consolidate the storage of credentials used for user authentication and use consistent identities for access controls. We discuss the practical applications of consolidated user credentials in Chapter 7, “Single sign-on” on page 281.
The design of directory synchronization must detail all aspects of the data exchange, or communication. The communication can be broken down into the following parts:
� Data sources: The systems and devices that are to communicate
� Attributes: What they must communicate to each other
� Data flows: How they must communicate it
� Events: When they must communicate
Chapter 8. Directory strategies 315
8.3.1 Data sourcesWe already discussed the concept of authoritative sources earlier in this chapter. In the context of directory synchronization, the data sources are the directories or repositories that we need to exchange data between.
Before you can identify the tools or methods you can use to exchange data, you must first identify the directories and the interfaces supported by each. Directories generally support some form of application programming interface (API), they might also support LDAP reads and updates, and they might support a bulk file import or export. We discuss tools for directory synchronization later in this chapter. For all practical purposes, we can use the terms “data source” and “directory” interchangeably. However, note that we must make the distinction between a source versus a target. Note that the same data can have multiple target directories, but will have only one source directory.
8.3.2 Object classesThe use of standard object classes and attributes facilitates a “universal” language for the mapping of data between one directory and another. Even if your directory synchronization doesn’t require an intermediary LDAP directory, mapping your current data types and attributes to LDAP standard object classes and attributes provides a common data definition that can be used to match up attributes between any two directories.
An object class is an LDAP term that denotes the type of object being represented by a directory entry or record. Some typical object types are “person”, “organization”, “organizational unit”, “domain component”, and “groupOfNames”. There are also object classes that define an object’s relationship to other objects, such as object class “top” that denotes the object may have subordinate objects under it in a hierarchical tree structure. Note that some LDAP object classes may be combined. For example, an object class of “organizational unit” will most often also be simultaneously defined as a “top” object class because it will have entries beneath it.
LDAP object classes define sets of standard attributes that are listed as “MUST” contain (mandatory attributes) and “MAY” contain (optional attributes). Different object classes may prescribe some attributes that overlap, or are redundant with other object classes. And it is common practice in LDAP directories to use multiple object classes to define a single directory entry. Most object classes are defined in a hierarchical order, where one object class is said to “inherit” from another superior object class.
316 Lotus Security Handbook
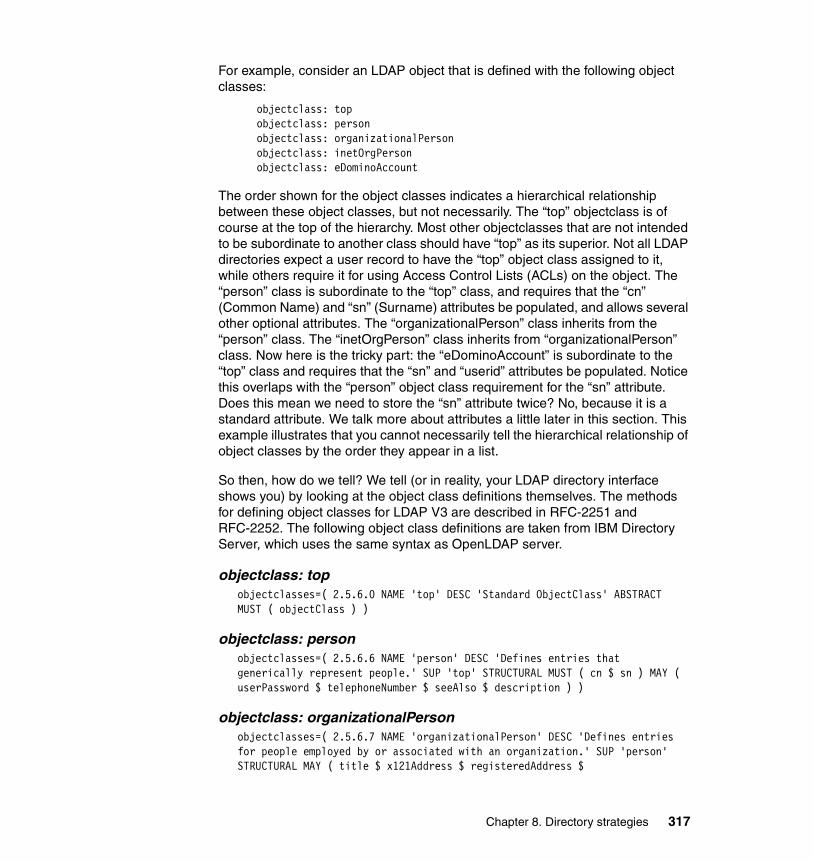
For example, consider an LDAP object that is defined with the following object classes:
objectclass: topobjectclass: personobjectclass: organizationalPersonobjectclass: inetOrgPersonobjectclass: eDominoAccount
The order shown for the object classes indicates a hierarchical relationship between these object classes, but not necessarily. The “top” objectclass is of course at the top of the hierarchy. Most other objectclasses that are not intended to be subordinate to another class should have “top” as its superior. Not all LDAP directories expect a user record to have the “top” object class assigned to it, while others require it for using Access Control Lists (ACLs) on the object. The “person” class is subordinate to the “top” class, and requires that the “cn” (Common Name) and “sn” (Surname) attributes be populated, and allows several other optional attributes. The “organizationalPerson” class inherits from the “person” class. The “inetOrgPerson” class inherits from “organizationalPerson” class. Now here is the tricky part: the “eDominoAccount” is subordinate to the “top” class and requires that the “sn” and “userid” attributes be populated. Notice this overlaps with the “person” object class requirement for the “sn” attribute. Does this mean we need to store the “sn” attribute twice? No, because it is a standard attribute. We talk more about attributes a little later in this section. This example illustrates that you cannot necessarily tell the hierarchical relationship of object classes by the order they appear in a list.
So then, how do we tell? We tell (or in reality, your LDAP directory interface shows you) by looking at the object class definitions themselves. The methods for defining object classes for LDAP V3 are described in RFC-2251 and RFC-2252. The following object class definitions are taken from IBM Directory Server, which uses the same syntax as OpenLDAP server.
objectclass: topobjectclasses=( 2.5.6.0 NAME 'top' DESC 'Standard ObjectClass' ABSTRACT MUST ( objectClass ) )
objectclass: personobjectclasses=( 2.5.6.6 NAME 'person' DESC 'Defines entries that generically represent people.' SUP 'top' STRUCTURAL MUST ( cn $ sn ) MAY ( userPassword $ telephoneNumber $ seeAlso $ description ) )
objectclass: organizationalPersonobjectclasses=( 2.5.6.7 NAME 'organizationalPerson' DESC 'Defines entries for people employed by or associated with an organization.' SUP 'person' STRUCTURAL MAY ( title $ x121Address $ registeredAddress $
Chapter 8. Directory strategies 317
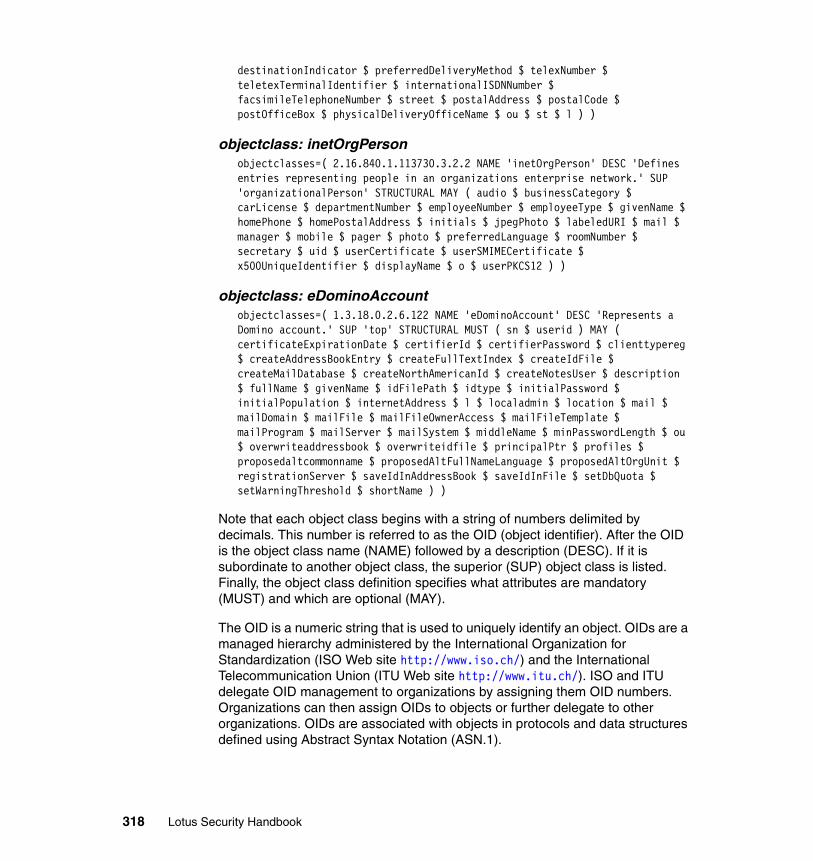
destinationIndicator $ preferredDeliveryMethod $ telexNumber $ teletexTerminalIdentifier $ internationalISDNNumber $ facsimileTelephoneNumber $ street $ postalAddress $ postalCode $ postOfficeBox $ physicalDeliveryOfficeName $ ou $ st $ l ) )
objectclass: inetOrgPersonobjectclasses=( 2.16.840.1.113730.3.2.2 NAME 'inetOrgPerson' DESC 'Defines entries representing people in an organizations enterprise network.' SUP 'organizationalPerson' STRUCTURAL MAY ( audio $ businessCategory $ carLicense $ departmentNumber $ employeeNumber $ employeeType $ givenName $ homePhone $ homePostalAddress $ initials $ jpegPhoto $ labeledURI $ mail $ manager $ mobile $ pager $ photo $ preferredLanguage $ roomNumber $ secretary $ uid $ userCertificate $ userSMIMECertificate $ x500UniqueIdentifier $ displayName $ o $ userPKCS12 ) )
objectclass: eDominoAccountobjectclasses=( 1.3.18.0.2.6.122 NAME 'eDominoAccount' DESC 'Represents a Domino account.' SUP 'top' STRUCTURAL MUST ( sn $ userid ) MAY ( certificateExpirationDate $ certifierId $ certifierPassword $ clienttypereg $ createAddressBookEntry $ createFullTextIndex $ createIdFile $ createMailDatabase $ createNorthAmericanId $ createNotesUser $ description $ fullName $ givenName $ idFilePath $ idtype $ initialPassword $ initialPopulation $ internetAddress $ l $ localadmin $ location $ mail $ mailDomain $ mailFile $ mailFileOwnerAccess $ mailFileTemplate $ mailProgram $ mailServer $ mailSystem $ middleName $ minPasswordLength $ ou $ overwriteaddressbook $ overwriteidfile $ principalPtr $ profiles $ proposedaltcommonname $ proposedAltFullNameLanguage $ proposedAltOrgUnit $ registrationServer $ saveIdInAddressBook $ saveIdInFile $ setDbQuota $ setWarningThreshold $ shortName ) )
Note that each object class begins with a string of numbers delimited by decimals. This number is referred to as the OID (object identifier). After the OID is the object class name (NAME) followed by a description (DESC). If it is subordinate to another object class, the superior (SUP) object class is listed. Finally, the object class definition specifies what attributes are mandatory (MUST) and which are optional (MAY).
The OID is a numeric string that is used to uniquely identify an object. OIDs are a managed hierarchy administered by the International Organization for Standardization (ISO Web site http://www.iso.ch/) and the International Telecommunication Union (ITU Web site http://www.itu.ch/). ISO and ITU delegate OID management to organizations by assigning them OID numbers. Organizations can then assign OIDs to objects or further delegate to other organizations. OIDs are associated with objects in protocols and data structures defined using Abstract Syntax Notation (ASN.1).
318 Lotus Security Handbook
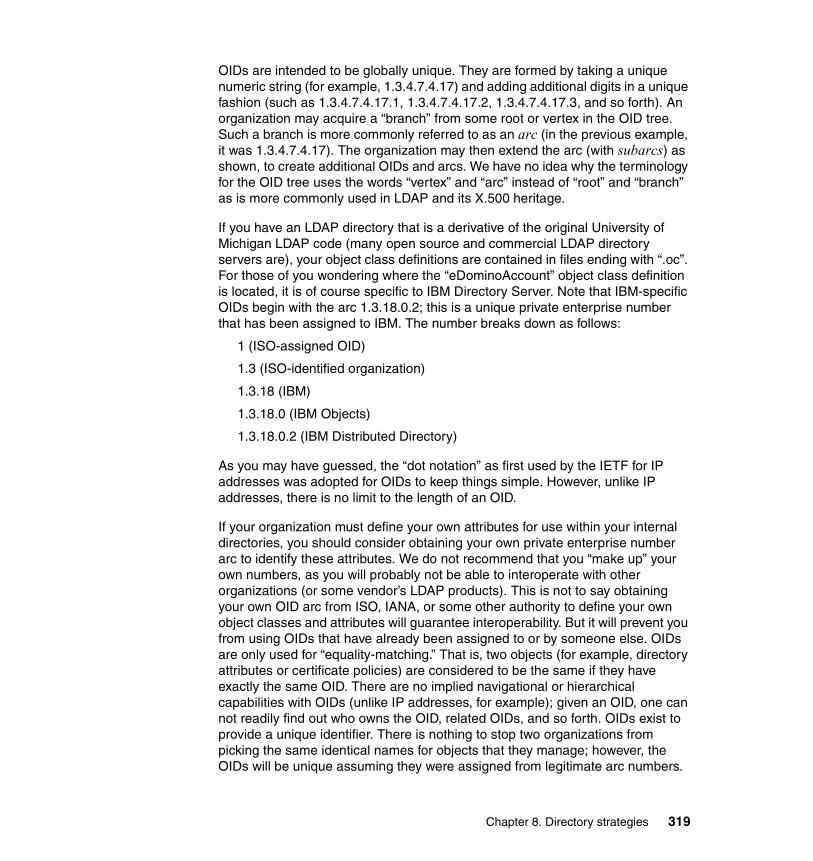
OIDs are intended to be globally unique. They are formed by taking a unique numeric string (for example, 1.3.4.7.4.17) and adding additional digits in a unique fashion (such as 1.3.4.7.4.17.1, 1.3.4.7.4.17.2, 1.3.4.7.4.17.3, and so forth). An organization may acquire a “branch” from some root or vertex in the OID tree. Such a branch is more commonly referred to as an arc (in the previous example, it was 1.3.4.7.4.17). The organization may then extend the arc (with subarcs) as shown, to create additional OIDs and arcs. We have no idea why the terminology for the OID tree uses the words “vertex” and “arc” instead of “root” and “branch” as is more commonly used in LDAP and its X.500 heritage.
If you have an LDAP directory that is a derivative of the original University of Michigan LDAP code (many open source and commercial LDAP directory servers are), your object class definitions are contained in files ending with “.oc”. For those of you wondering where the “eDominoAccount” object class definition is located, it is of course specific to IBM Directory Server. Note that IBM-specific OIDs begin with the arc 1.3.18.0.2; this is a unique private enterprise number that has been assigned to IBM. The number breaks down as follows:
1 (ISO-assigned OID)
1.3 (ISO-identified organization)
1.3.18 (IBM)
1.3.18.0 (IBM Objects)
1.3.18.0.2 (IBM Distributed Directory)
As you may have guessed, the “dot notation” as first used by the IETF for IP addresses was adopted for OIDs to keep things simple. However, unlike IP addresses, there is no limit to the length of an OID.
If your organization must define your own attributes for use within your internal directories, you should consider obtaining your own private enterprise number arc to identify these attributes. We do not recommend that you “make up” your own numbers, as you will probably not be able to interoperate with other organizations (or some vendor’s LDAP products). This is not to say obtaining your own OID arc from ISO, IANA, or some other authority to define your own object classes and attributes will guarantee interoperability. But it will prevent you from using OIDs that have already been assigned to or by someone else. OIDs are only used for “equality-matching.” That is, two objects (for example, directory attributes or certificate policies) are considered to be the same if they have exactly the same OID. There are no implied navigational or hierarchical capabilities with OIDs (unlike IP addresses, for example); given an OID, one can not readily find out who owns the OID, related OIDs, and so forth. OIDs exist to provide a unique identifier. There is nothing to stop two organizations from picking the same identical names for objects that they manage; however, the OIDs will be unique assuming they were assigned from legitimate arc numbers.
Chapter 8. Directory strategies 319

If you are interested in obtaining a private enterprise number (“arc”) for your own organization, you may apply for one (free of charge) at the Internet Assigned Numbers Authority Web site at:
http://www.iana.org/cgi-bin/enterprise.pl
For more information regarding OIDs, the trees of assigned numbers, and registration, we recommend starting at the ASN.1 frequently asked questions Web site at:
http://asn1.elibel.tm.fr/oid/faq.htm
8.3.3 AttributesAll the object class does is define the attributes, or types of data items contained in that type of object. Some examples of typical attributes are “cn” (common name), “sn” (surname), “givenName”, “mail”, “uid”, and “userPassword”. Just as the object classes are defined with unique OIDs, each attribute also has a unique OID number assigned to it.
LDAP V3 attributes follow a similar (ASN.1) notation to that of object classes. The following are examples of attribute definitions.
attribute: nameattributetypes=( 2.5.4.41 NAME 'name' DESC 'The name attribute type is the attribute supertype from which string attribute types typically used for naming may be formed. It is unlikely that values of this type itself will occur in an entry.' EQUALITY 1.3.6.1.4.1.1466.109.114.2 SUBSTR 2.5.13.4 SYNTAX 1.3.6.1.4.1.1466.115.121.1.15 USAGE userApplications )
attribute: snattributetypes=( 2.5.4.4 NAME ( 'sn' 'surName' ) DESC 'This is the X.500 surname attribute, which contains the family name of a person.' SUP 2.5.4.41 EQUALITY 2.5.13.2 ORDERING 2.5.13.3 SUBSTR 2.5.13.4 USAGE userApplications )
attribute: mail
attributetypes=( 0.9.2342.19200300.100.1.3 NAME ( 'mail' 'rfc822mailbox' ) DESC 'Identifies a users primary email address (the email address retrieved and displayed by white-pages lookup applications).' EQUALITY 2.5.13.2 SYNTAX 1.3.6.1.4.1.1466.115.121.1.15 USAGE userApplications )
Notice in the second example that the superior (SUP) of sn is the attribute “2.5.4.41”, which happens to be the “name” attribute (the first example listed). But then the “name” attribute description says “unlikely that values of this type itself will occur...”. This illustrates just one of the many peculiarities of the way the attributes have been defined. It merely provides a shorthand way of defining
320 Lotus Security Handbook
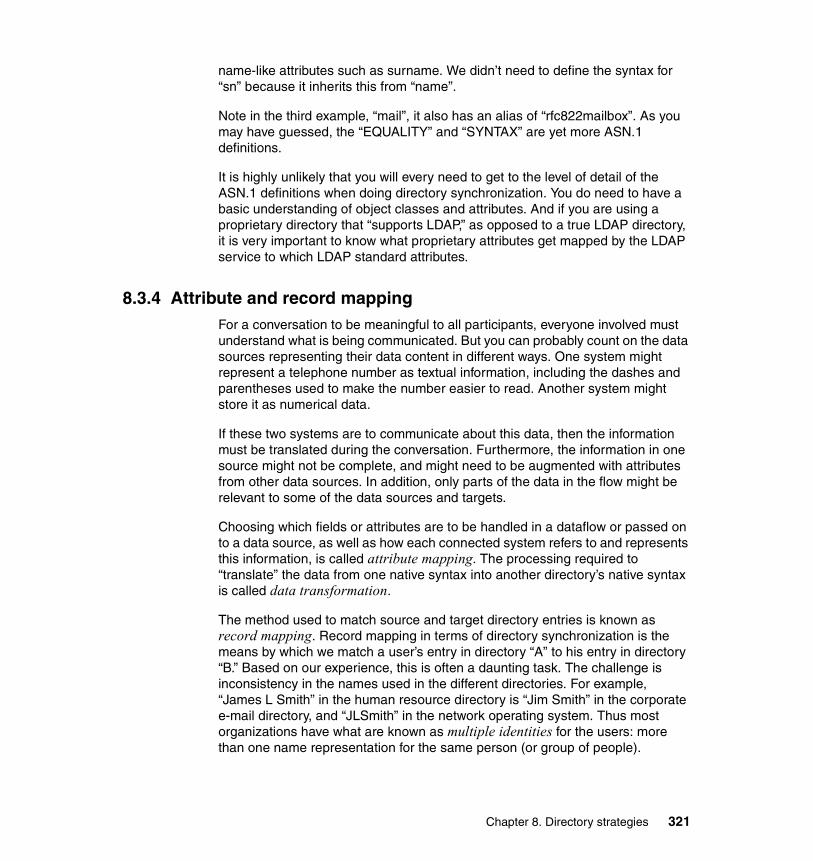
name-like attributes such as surname. We didn’t need to define the syntax for “sn” because it inherits this from “name”.
Note in the third example, “mail”, it also has an alias of “rfc822mailbox”. As you may have guessed, the “EQUALITY” and “SYNTAX” are yet more ASN.1 definitions.
It is highly unlikely that you will every need to get to the level of detail of the ASN.1 definitions when doing directory synchronization. You do need to have a basic understanding of object classes and attributes. And if you are using a proprietary directory that “supports LDAP,” as opposed to a true LDAP directory, it is very important to know what proprietary attributes get mapped by the LDAP service to which LDAP standard attributes.
8.3.4 Attribute and record mappingFor a conversation to be meaningful to all participants, everyone involved must understand what is being communicated. But you can probably count on the data sources representing their data content in different ways. One system might represent a telephone number as textual information, including the dashes and parentheses used to make the number easier to read. Another system might store it as numerical data.
If these two systems are to communicate about this data, then the information must be translated during the conversation. Furthermore, the information in one source might not be complete, and might need to be augmented with attributes from other data sources. In addition, only parts of the data in the flow might be relevant to some of the data sources and targets.
Choosing which fields or attributes are to be handled in a dataflow or passed on to a data source, as well as how each connected system refers to and represents this information, is called attribute mapping. The processing required to “translate” the data from one native syntax into another directory’s native syntax is called data transformation.
The method used to match source and target directory entries is known as record mapping. Record mapping in terms of directory synchronization is the means by which we match a user’s entry in directory “A” to his entry in directory “B.” Based on our experience, this is often a daunting task. The challenge is inconsistency in the names used in the different directories. For example, “James L Smith” in the human resource directory is “Jim Smith” in the corporate e-mail directory, and “JLSmith” in the network operating system. Thus most organizations have what are known as multiple identities for the users: more than one name representation for the same person (or group of people).
Chapter 8. Directory strategies 321
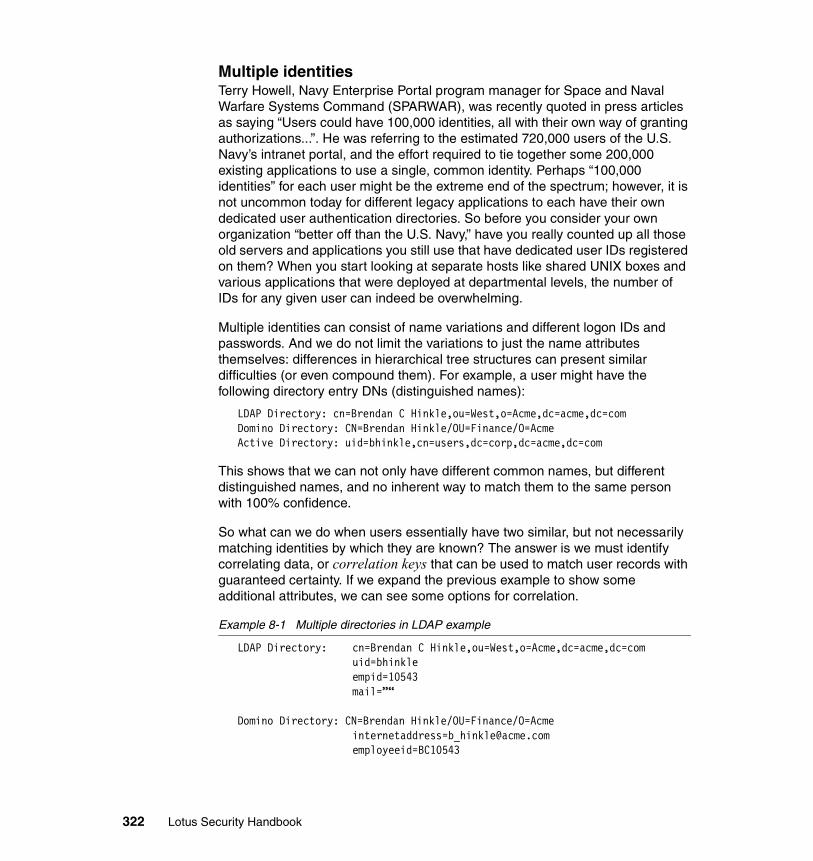
Multiple identitiesTerry Howell, Navy Enterprise Portal program manager for Space and Naval Warfare Systems Command (SPARWAR), was recently quoted in press articles as saying “Users could have 100,000 identities, all with their own way of granting authorizations...”. He was referring to the estimated 720,000 users of the U.S. Navy’s intranet portal, and the effort required to tie together some 200,000 existing applications to use a single, common identity. Perhaps “100,000 identities” for each user might be the extreme end of the spectrum; however, it is not uncommon today for different legacy applications to each have their own dedicated user authentication directories. So before you consider your own organization “better off than the U.S. Navy,” have you really counted up all those old servers and applications you still use that have dedicated user IDs registered on them? When you start looking at separate hosts like shared UNIX boxes and various applications that were deployed at departmental levels, the number of IDs for any given user can indeed be overwhelming.
Multiple identities can consist of name variations and different logon IDs and passwords. And we do not limit the variations to just the name attributes themselves: differences in hierarchical tree structures can present similar difficulties (or even compound them). For example, a user might have the following directory entry DNs (distinguished names):
LDAP Directory: cn=Brendan C Hinkle,ou=West,o=Acme,dc=acme,dc=comDomino Directory: CN=Brendan Hinkle/OU=Finance/O=AcmeActive Directory: uid=bhinkle,cn=users,dc=corp,dc=acme,dc=com
This shows that we can not only have different common names, but different distinguished names, and no inherent way to match them to the same person with 100% confidence.
So what can we do when users essentially have two similar, but not necessarily matching identities by which they are known? The answer is we must identify correlating data, or correlation keys that can be used to match user records with guaranteed certainty. If we expand the previous example to show some additional attributes, we can see some options for correlation.
Example 8-1 Multiple directories in LDAP example
LDAP Directory: cn=Brendan C Hinkle,ou=West,o=Acme,dc=acme,dc=comuid=bhinkleempid=10543mail=”“
Domino Directory: CN=Brendan Hinkle/OU=Finance/[email protected]=BC10543
322 Lotus Security Handbook

Active Directory: uid=bhinkle,cn=users,dc=corp,dc=acme,[email protected]
Although this may appear to be a very simple example, it becomes quite complex once you start asking where the attribute values came from. Remember our discussion about points of control? Consider the “mail” attribute in LDAP and AD and the “internetaddress” in Domino. Assume the user’s SMTP address gets assigned by the Domino administrator. So how reliable is this as a correlation key between Domino and AD? Between Domino and LDAP? In order to answer this question, you must know how this attribute gets populated in AD and LDAP. If there is a self-service point of control in AD for this attribute, meaning the user can enter in their own SMTP address, it is not a reliable key between Domino and AD. Upon investigation, we find out that the Domino directory receives weekly feeds from LDAP and uses this feed to populate the employee id in Domino. The one difference is the employee number is pre-pended with the user’s first and last initial. In other words, there is a data transformation, but we know what the algorithm is, and it is reversible. We now have identified a correlation key we can use for automated synchronization between our LDAP directory and Domino, and we can reliably map user records between these two directories. We can now take the user’s SMTP address from the authoritative source – Domino – and populate the “mail” field in the LDAP directory (which currently has a null value).
Identity mappingIn the previous example, we have three different directory entries for the same person. Now consider what we must do to map the identity, or distinguished name (DN), of this person within an application when one name is presented as the authenticated user, but we need to use a different name for access controls. In 7.2, “LTPA” on page 285, we discussed using a browser session cookie for user authentication. The IBM LTPA token is a specific example of a session cookie that is defined by IBM. For mapping a DN in an LTPA cookie received by a Domino HTTP server to a different DN for access control purposes, we use direct mapping. The mapping is configured in the Domino Directory Assistance configuration, assuming we are using an LDAP directory for browser authentication. The directory entries required are shown Example 8-2.
Example 8-2 Directory entries
LDAP Directory: cn=Brendan C Hinkle,ou=West,o=Acme,dc=acme,[email protected]=cn=Brendan Hinkle,OU=Finance,O=Acme
Domino Directory: CN=Brendan Hinkle/OU=Finance/O=Acme
Chapter 8. Directory strategies 323
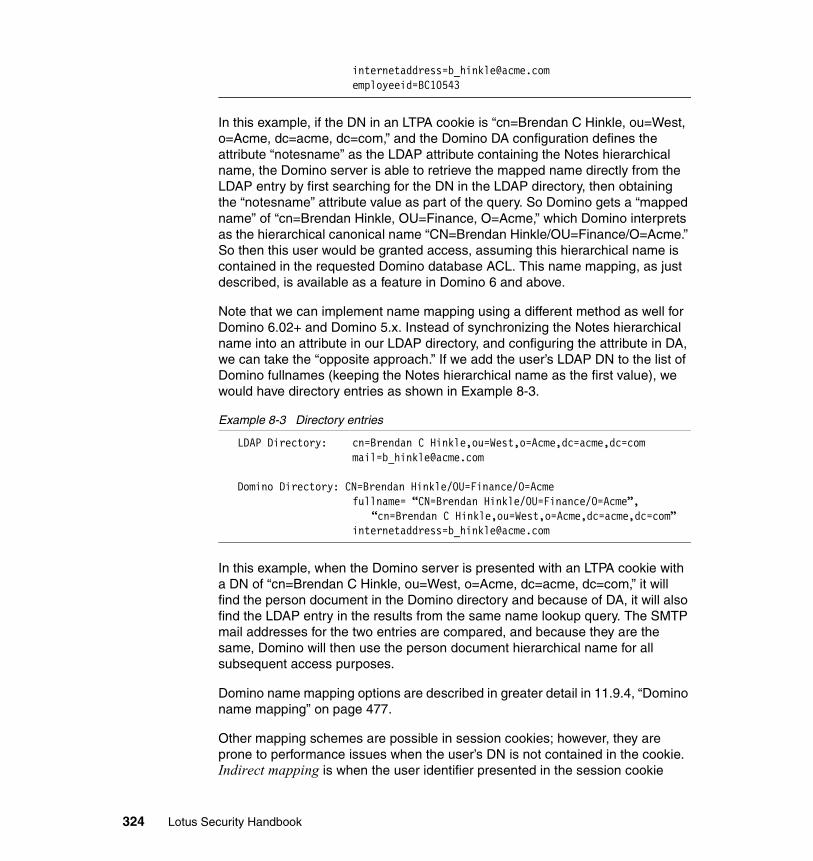
[email protected]=BC10543
In this example, if the DN in an LTPA cookie is “cn=Brendan C Hinkle, ou=West, o=Acme, dc=acme, dc=com,” and the Domino DA configuration defines the attribute “notesname” as the LDAP attribute containing the Notes hierarchical name, the Domino server is able to retrieve the mapped name directly from the LDAP entry by first searching for the DN in the LDAP directory, then obtaining the “notesname” attribute value as part of the query. So Domino gets a “mapped name” of “cn=Brendan Hinkle, OU=Finance, O=Acme,” which Domino interprets as the hierarchical canonical name “CN=Brendan Hinkle/OU=Finance/O=Acme.” So then this user would be granted access, assuming this hierarchical name is contained in the requested Domino database ACL. This name mapping, as just described, is available as a feature in Domino 6 and above.
Note that we can implement name mapping using a different method as well for Domino 6.02+ and Domino 5.x. Instead of synchronizing the Notes hierarchical name into an attribute in our LDAP directory, and configuring the attribute in DA, we can take the “opposite approach.” If we add the user’s LDAP DN to the list of Domino fullnames (keeping the Notes hierarchical name as the first value), we would have directory entries as shown in Example 8-3.
Example 8-3 Directory entries
LDAP Directory: cn=Brendan C Hinkle,ou=West,o=Acme,dc=acme,[email protected]
Domino Directory: CN=Brendan Hinkle/OU=Finance/O=Acmefullname= “CN=Brendan Hinkle/OU=Finance/O=Acme”,
“cn=Brendan C Hinkle,ou=West,o=Acme,dc=acme,dc=com”[email protected]
In this example, when the Domino server is presented with an LTPA cookie with a DN of “cn=Brendan C Hinkle, ou=West, o=Acme, dc=acme, dc=com,” it will find the person document in the Domino directory and because of DA, it will also find the LDAP entry in the results from the same name lookup query. The SMTP mail addresses for the two entries are compared, and because they are the same, Domino will then use the person document hierarchical name for all subsequent access purposes.
Domino name mapping options are described in greater detail in 11.9.4, “Domino name mapping” on page 477.
Other mapping schemes are possible in session cookies; however, they are prone to performance issues when the user’s DN is not contained in the cookie. Indirect mapping is when the user identifier presented in the session cookie
324 Lotus Security Handbook
requires more than one search and retrieval to map the token (cookie) name or identifier to the DN to be used for access purposes. If we use the same records shown in Example 8-2 on page 323, but we do not have the “notesname” attribute in the LDAP record, notice that we have an “empid” attribute that correlates to part of the “employeeid” in the Domino Directory. For this case, we will assume that a custom DSAPI filter is being used to perform the name mapping in Domino. So if our custom session cookie architecture provides us with the LDAP “empid=10543,” Domino would first need to retrieve the DN for the user, so it searches the LDAP directory for “empid=10543” and finds “cn=Brendan C Hinkle, ou=West, o=Acme, dc=acme, dc=com.”
It needs to retrieve the DN because Domino needs to verify that the DN of the pre-authenticated user matches the naming context rule defined in DA for the LDAP directory. So now our DSAPI filter knows the user credentials are valid, but it still needs to map the cookie identifier, the “empid,” to a Notes hierarchical name. So next our DSAPI filter would need to find a Domino directory entry for empid=10543. Since the format of the “employeeid” attribute in Domino is the employee ID number that has been prefixed with the user’s initials, our search in the Domino directory needs to be transformed to the “new” format, searched for, then once found, we could pass the user’s name in the form of “CN=Brendan Hinkle/OU=Finance/O=Acme.” So we needed two directory lookups to determine the mapped name to use for access control purposes.
If this example was hard to follow, you now know why we recommend against any session cookie scheme that involves indirect name mapping!
8.3.5 Data flowsData flows are the threads of the communications between directories and their content. Data flows are usually drawn as arrows which point in the direction of data movement, from source directory to target directory.
Each data flow represents a unique message being passed from one set of data sources to another. This ties back to the earlier concept of authoritative sources being defined in terms of attributes. So rather than assume all the attributes of one directory are fed into another directory, only the authoritative attributes are taken from the source, and the same source data may be applied to multiple target directories.
One exception to assignment of a data flow is user passwords. We discussed the security concerns and issues with being able to extract user passwords and write them to other target directories in “Password synchronization” on page 284.
Chapter 8. Directory strategies 325
8.3.6 Event-driven synchronizationEvents can be described as the circumstances dictate when one set of data sources communicates with another. One example is whenever an employee is added to, updated within, or deleted from the HR system. Another example is when the access control system detects a keycard being used in a restricted area. An event can also be based on a calendar or a clock-based timer, for example, starting communications at 12:00 midnight every day except Sunday. It might even be a one-off event, for example, populating a directory.
Events are usually tied to a data source, and are related to the data flows that are triggered when the specified set of circumstances arise.
8.3.7 ToolsThere are several tools available for directory synchronization. In this section, we describe three tools that are currently available from IBM that support directory synchronization between Lotus Domino and other third-party directories.
ADSyncThe Active Directory Synchronization tool, or ADSync, allows Active Directory administrators to manage (register, delete, and rename) users and groups in both Active Directory and the Domino Directory as a unified operation from the Active Directory Users and Computers Console.
To use Lotus Active Directory Synchronization, the Domino Administration client must be installed on the same workstation used to manage users and computers within your Active Directory. ADSync, despite its name, is not actually a directory synchronization tool. It is more like an administrator client “conduit” that lets Windows administrators manage both Domino Directory and AD users from a single user interface. Domino and Windows each have their own credentials, management consoles, and directories. ADSync links the two on a single machine, so changes made to AD are pushed to Domino using an installed but essentially hidden Domino Administrator client. In other words, it performs administrator functions simultaneously, and hides the secondary changes to Domino from the administrator’s screen.
ADSync is a new feature included with Domino 6. With it, you can create new users and groups in Active Directory and have those changes reflected in the Domino Directory, including the creation of person or group documents, Notes IDs, passwords, and mail files for the users. In order to accomplish these tasks, the Active Directory administrator must have a properly certified Notes ID and appropriate access to make changes in the Domino Directory. The registration server must be Domino 6 or later and the Domino Administration client must be a 6 or later client. Additionally, policies must be created that contain sub policies,
326 Lotus Security Handbook

either implicit or explicit, for all Domino certifiers where users will be created. Finally, you must have the appropriate rights in Active Directory to add users and groups, and synchronize passwords.
Details and examples of configuring and using ADSync are in the IBM RedPaper Active Directory Synchronization with Lotus ADSync, REDP0605, which is available in PDF format at:
http://www.redbooks.ibm.com/redpapers/pdfs/redp0605.pdf
LDAPSync SolutionLDAPSync Solution is a combined product-service offering from IBM Software Services for Lotus. It includes a toolkit that can be used to provide a means to synchronize data from LDAP-enabled directories into Domino databases. More specifically, it provides a means to import non-Domino corporate directory information into a Lotus environment.
Typical use of such a product is to offer a means for Notes users to have in their public address book the list of persons working for a company as well as their telephone numbers or e-mail addresses. However, more sophisticated uses are also possible because this solution can synchronize directories with any type of Domino databases.
The toolkit includes three components:
1. LDAPSync: Used to download information from an LDAP directory and import it to a Domino database
2. SynchroNSF: Used to replicate information between two Domino databases that do not share the same design (in other words, synchronize two databases that cannot be replicated with the normal Domino replication because they are not replicas of each other)
3. RunAgent: Used to launch the agents from outside of Domino
The combination of these three programs provides a powerful means of synchronization between LDAP directories and Domino.
LDAPSync can be used for various purposes. For example, it can be used to:
� Consolidate data extracted from various source directories into a single Domino database. This may be useful, for example, when two different LDAP directories are used: one might contain personal information (surname, age, and so forth) and the other one might contain phone numbers. With LDAPSync, it is possible to merge the information into a single Domino directory.
� Broadcast information stored into a single LDAP Directory towards many databases. This may, for example, be useful if the master repository for the
Chapter 8. Directory strategies 327
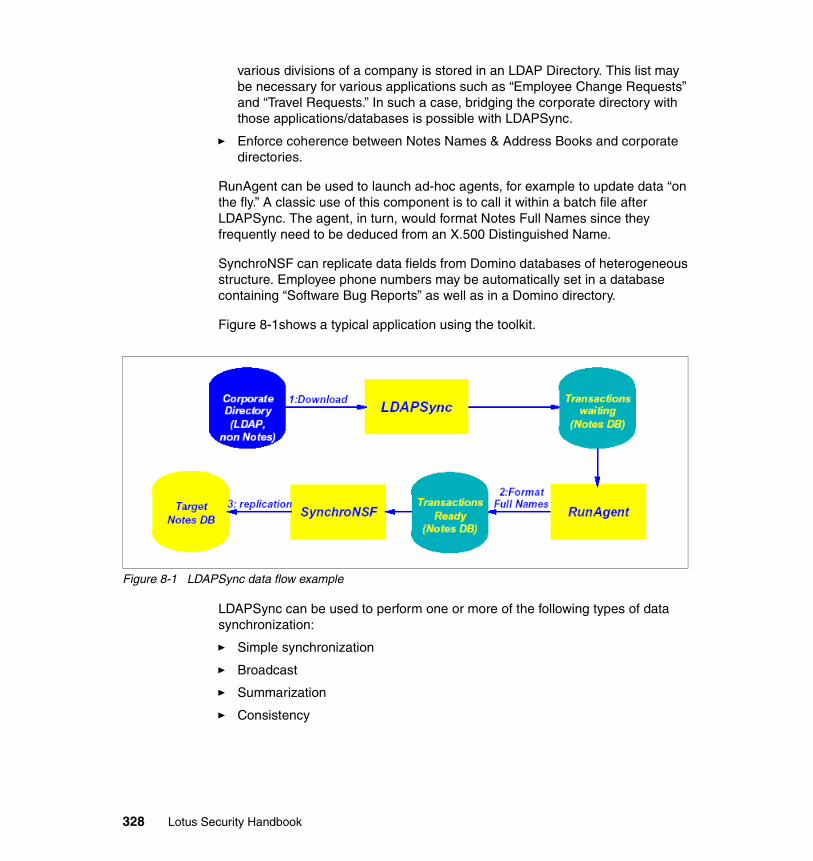
various divisions of a company is stored in an LDAP Directory. This list may be necessary for various applications such as “Employee Change Requests” and “Travel Requests.” In such a case, bridging the corporate directory with those applications/databases is possible with LDAPSync.
� Enforce coherence between Notes Names & Address Books and corporate directories.
RunAgent can be used to launch ad-hoc agents, for example to update data “on the fly.” A classic use of this component is to call it within a batch file after LDAPSync. The agent, in turn, would format Notes Full Names since they frequently need to be deduced from an X.500 Distinguished Name.
SynchroNSF can replicate data fields from Domino databases of heterogeneous structure. Employee phone numbers may be automatically set in a database containing “Software Bug Reports” as well as in a Domino directory.
Figure 8-1shows a typical application using the toolkit.
Figure 8-1 LDAPSync data flow example
LDAPSync can be used to perform one or more of the following types of data synchronization:
� Simple synchronization
� Broadcast
� Summarization
� Consistency
328 Lotus Security Handbook
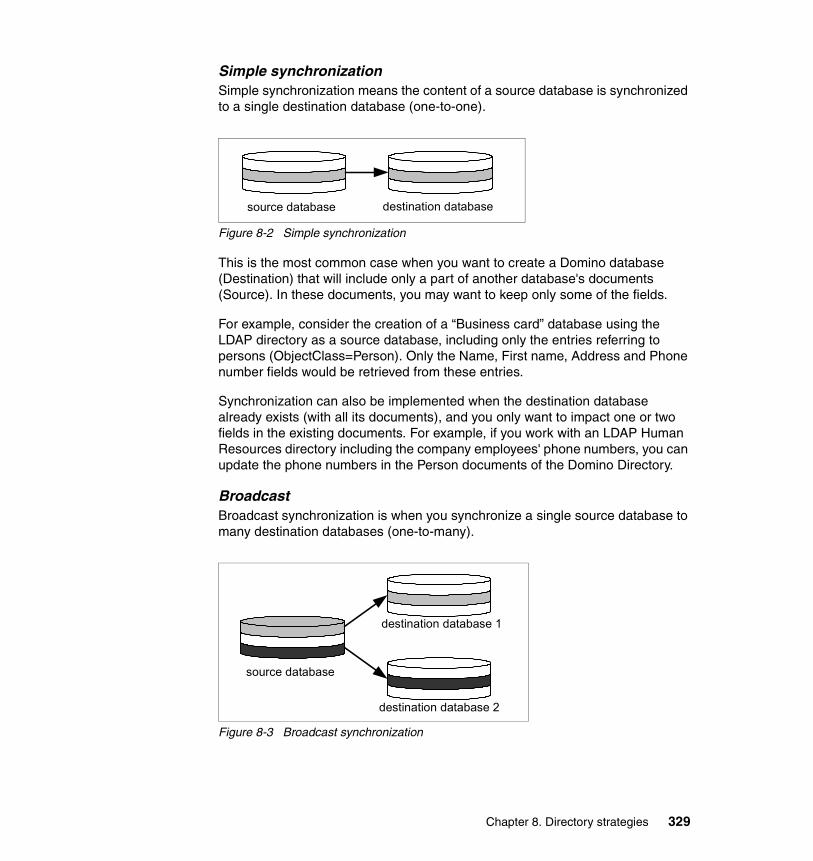
Simple synchronizationSimple synchronization means the content of a source database is synchronized to a single destination database (one-to-one).
Figure 8-2 Simple synchronization
This is the most common case when you want to create a Domino database (Destination) that will include only a part of another database's documents (Source). In these documents, you may want to keep only some of the fields.
For example, consider the creation of a “Business card” database using the LDAP directory as a source database, including only the entries referring to persons (ObjectClass=Person). Only the Name, First name, Address and Phone number fields would be retrieved from these entries.
Synchronization can also be implemented when the destination database already exists (with all its documents), and you only want to impact one or two fields in the existing documents. For example, if you work with an LDAP Human Resources directory including the company employees' phone numbers, you can update the phone numbers in the Person documents of the Domino Directory.
BroadcastBroadcast synchronization is when you synchronize a single source database to many destination databases (one-to-many).
Figure 8-3 Broadcast synchronization
source database destination database
source database
destination database 2
destination database 1
Chapter 8. Directory strategies 329
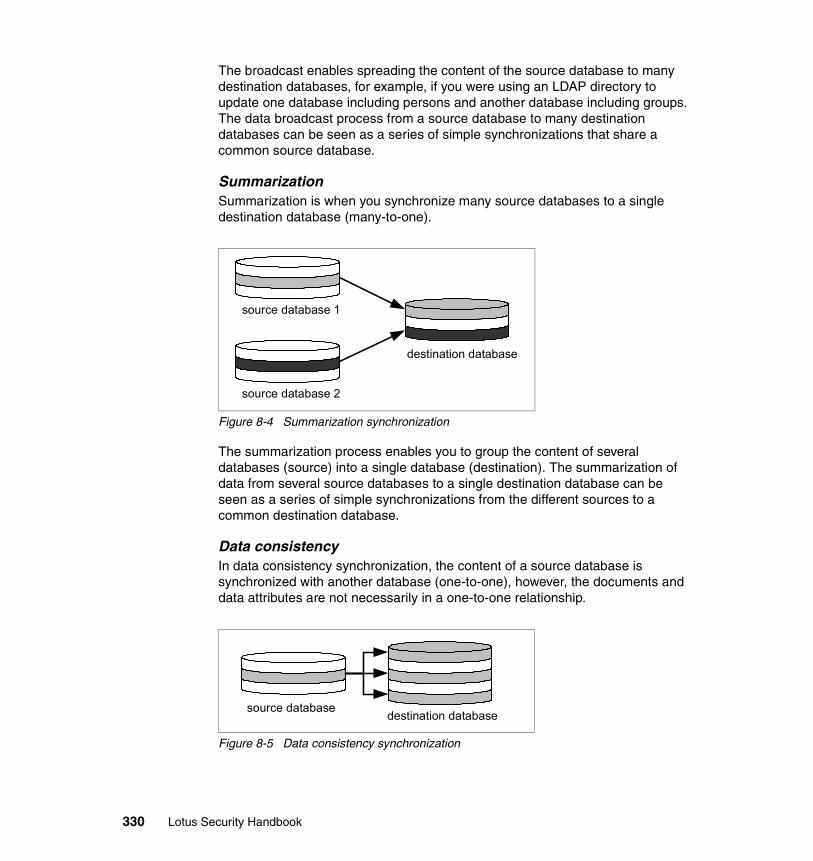
The broadcast enables spreading the content of the source database to many destination databases, for example, if you were using an LDAP directory to update one database including persons and another database including groups. The data broadcast process from a source database to many destination databases can be seen as a series of simple synchronizations that share a common source database.
SummarizationSummarization is when you synchronize many source databases to a single destination database (many-to-one).
Figure 8-4 Summarization synchronization
The summarization process enables you to group the content of several databases (source) into a single database (destination). The summarization of data from several source databases to a single destination database can be seen as a series of simple synchronizations from the different sources to a common destination database.
Data consistencyIn data consistency synchronization, the content of a source database is synchronized with another database (one-to-one), however, the documents and data attributes are not necessarily in a one-to-one relationship.
Figure 8-5 Data consistency synchronization
source database 1
destination database
source database 2
source database destination database
330 Lotus Security Handbook
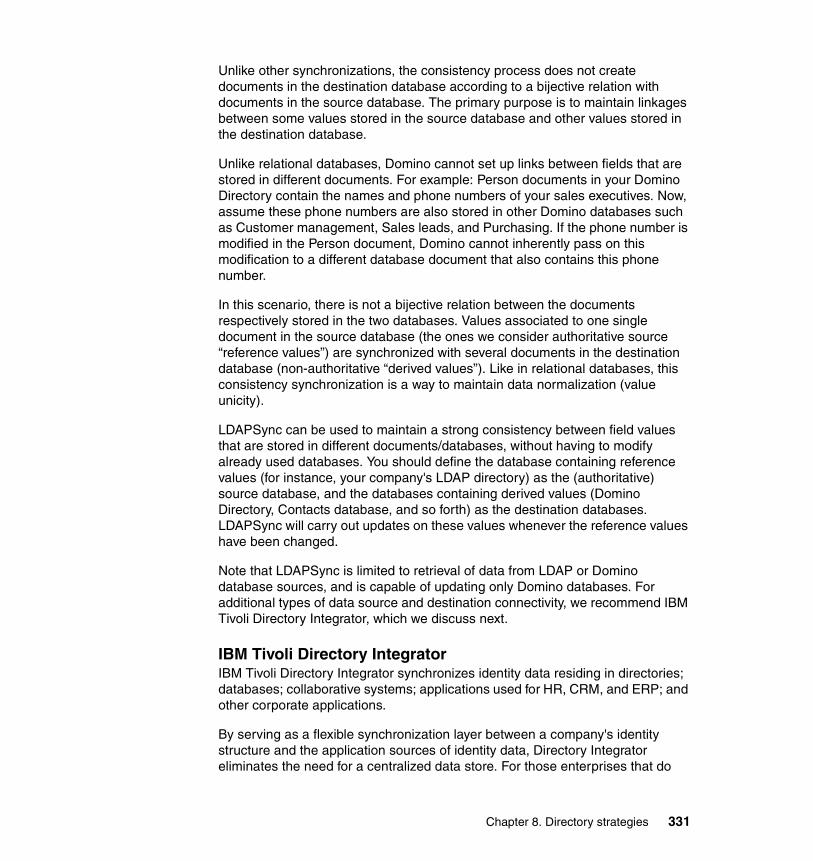
Unlike other synchronizations, the consistency process does not create documents in the destination database according to a bijective relation with documents in the source database. The primary purpose is to maintain linkages between some values stored in the source database and other values stored in the destination database.
Unlike relational databases, Domino cannot set up links between fields that are stored in different documents. For example: Person documents in your Domino Directory contain the names and phone numbers of your sales executives. Now, assume these phone numbers are also stored in other Domino databases such as Customer management, Sales leads, and Purchasing. If the phone number is modified in the Person document, Domino cannot inherently pass on this modification to a different database document that also contains this phone number.
In this scenario, there is not a bijective relation between the documents respectively stored in the two databases. Values associated to one single document in the source database (the ones we consider authoritative source “reference values”) are synchronized with several documents in the destination database (non-authoritative “derived values”). Like in relational databases, this consistency synchronization is a way to maintain data normalization (value unicity).
LDAPSync can be used to maintain a strong consistency between field values that are stored in different documents/databases, without having to modify already used databases. You should define the database containing reference values (for instance, your company's LDAP directory) as the (authoritative) source database, and the databases containing derived values (Domino Directory, Contacts database, and so forth) as the destination databases. LDAPSync will carry out updates on these values whenever the reference values have been changed.
Note that LDAPSync is limited to retrieval of data from LDAP or Domino database sources, and is capable of updating only Domino databases. For additional types of data source and destination connectivity, we recommend IBM Tivoli Directory Integrator, which we discuss next.
IBM Tivoli Directory IntegratorIBM Tivoli Directory Integrator synchronizes identity data residing in directories; databases; collaborative systems; applications used for HR, CRM, and ERP; and other corporate applications.
By serving as a flexible synchronization layer between a company's identity structure and the application sources of identity data, Directory Integrator eliminates the need for a centralized data store. For those enterprises that do
Chapter 8. Directory strategies 331

choose to deploy an enterprise (central) directory solution, Directory Integrator can help ease the process by connecting to the identity data from the various repositories throughout the organization and updating the central master directory.
With some built-in connectors, an open-architecture Java development environment to extend or modify these connectors, and tools to apply logic to data as data is processed, Directory Integrator can be used for:
� Synchronizing and exchanging information between applications or directory sources
� Managing data across a variety of repositories, providing the consistent directory infrastructure needed for a wide variety of applications including security and provisioning
� Creating the authoritative data spaces needed to expose only trustworthy data to advanced software applications such as Web services
IBM Tivoli Directory Integrator is a component of the IBM identity management solution that can help you get users, systems, and applications online and productive fast, reduce costs, and maximize return on investment. IBM identity management provides identity life cycle management (user self-care, enrollment, and provisioning), identity control (access and privacy control, single sign-on, and auditing), identity federation (sharing user authentication and attribute information between trusted Web services applications) and identity foundation (directory and workflow) to effectively manage internal users, as well as an increasing number of customers and partners through the Internet.
The Directory Integrator software architecture includes:
� An “assembly line” methodology that builds a compound information object from connected information sources, performs modifications on received data, or creates new entries altogether and adds/updates/deletes the new information object to the assigned destinations. Assembly lines receive information from various input units, perform operations on the input, and then convey the finished product through output units. Directory Integrator Assembly lines work on one item at a time, for example, one data record, directory entry, registry key, and so forth.
� Connectors to support numerous protocols and access mechanisms are included with the product or can be easily created or modified. Connectors provide the input and output units of an assembly line. Each connector is linked into a data source, and is also where data transformation and aggregation takes place.
� An Event Handler framework that adds to the flexibility of Directory Integrator by providing the ability to wait for, and react to, specific events that have taken place in the infrastructure, such as changes in a directory, arriving
332 Lotus Security Handbook

e-mails, records updated in certain databases, incoming HTML pages from a Web server or browser, arriving Web services-based Simple Object Access Protocol (SOAP) messages, as well as other types of events defined by the user.
� Parsers to interpret and translate information from a byte stream into a structured information object, where each piece of information is accessible by name. You can also translate a structured information object into a byte stream. You can select from the wide range of extensible parsers such as comma-separated values, fixed column, LDAP Data Interchange Format (LDIF), Extensible Markup Language (XML), SOAP, and Directory Services Markup Language (DSML), or you can create a new parser from scratch.
� Hooks that enable the definition of certain actions to be executed under specific circumstances, or at desired points in the execution of the AssemblyLine process.
� Link Criteria, which are the attribute matching rules between two (or more) directories. Link Criteria may be simple, such as comparing if string(a) = string(b), or complex, using scripts to perform transformation functions required for the comparison such as f(a) = (b). The built-in Directory Integrator link comparison functions are: “equals,” “not equals,” “contains,” “starts with,” and “ends with.” Any other comparison operation must be done using a custom script.
� Work Entries, which are internal variable names used to temporarily store values from directory entries. The values may be read directly from specific attributes, or may be computed by a Java or perl script that inputs multiple attributes and performs some string data manipulation or transformation.
Directory Integrator eliminates the time and expense typically required to custom develop connection interfaces for a wide variety of data repositories. The built-in connectors provided (subject to change) include:
– Btree Object DB Connector– Command Line Connector– Domino Users Connector– File System– FTP Client Connector– Old HTTP Client Connector– HTTP Client Connector– Old HTTP Server Connector– HTTP Server Connector– IBM MQ Series (JMS)– IBM Directory Changelog Connector– JMS Connector– JNDI – LDAP
Chapter 8. Directory strategies 333
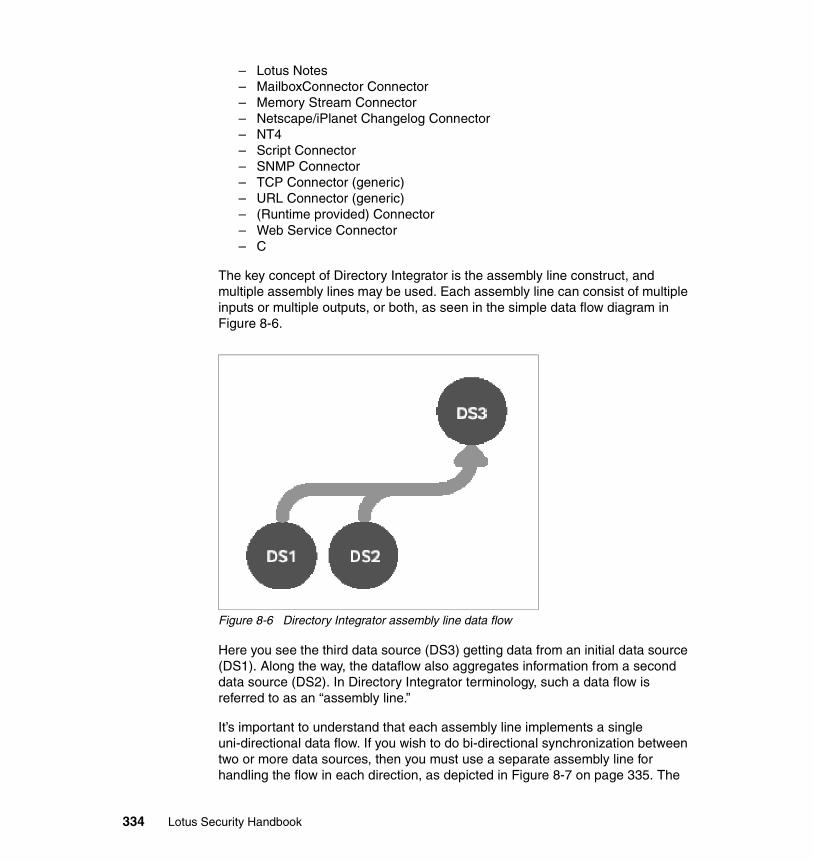
– Lotus Notes– MailboxConnector Connector– Memory Stream Connector– Netscape/iPlanet Changelog Connector– NT4– Script Connector– SNMP Connector– TCP Connector (generic)– URL Connector (generic)– (Runtime provided) Connector– Web Service Connector– C
The key concept of Directory Integrator is the assembly line construct, and multiple assembly lines may be used. Each assembly line can consist of multiple inputs or multiple outputs, or both, as seen in the simple data flow diagram in Figure 8-6.
Figure 8-6 Directory Integrator assembly line data flow
Here you see the third data source (DS3) getting data from an initial data source (DS1). Along the way, the dataflow also aggregates information from a second data source (DS2). In Directory Integrator terminology, such a data flow is referred to as an “assembly line.”
It’s important to understand that each assembly line implements a single uni-directional data flow. If you wish to do bi-directional synchronization between two or more data sources, then you must use a separate assembly line for handling the flow in each direction, as depicted in Figure 8-7 on page 335. The
334 Lotus Security Handbook
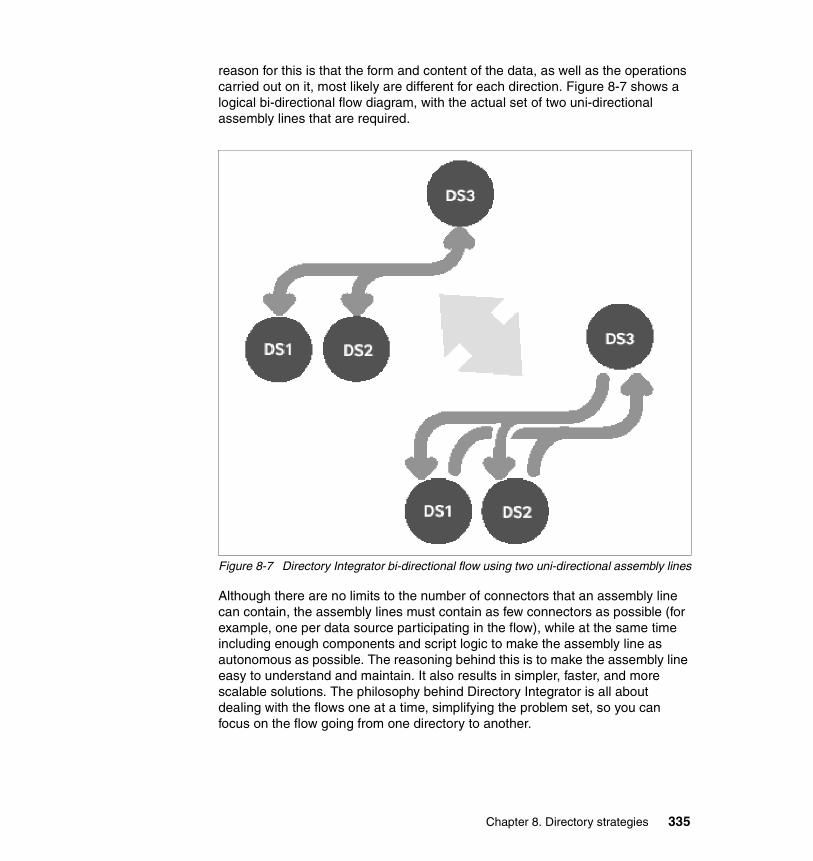
reason for this is that the form and content of the data, as well as the operations carried out on it, most likely are different for each direction. Figure 8-7 shows a logical bi-directional flow diagram, with the actual set of two uni-directional assembly lines that are required.
Figure 8-7 Directory Integrator bi-directional flow using two uni-directional assembly lines
Although there are no limits to the number of connectors that an assembly line can contain, the assembly lines must contain as few connectors as possible (for example, one per data source participating in the flow), while at the same time including enough components and script logic to make the assembly line as autonomous as possible. The reasoning behind this is to make the assembly line easy to understand and maintain. It also results in simpler, faster, and more scalable solutions. The philosophy behind Directory Integrator is all about dealing with the flows one at a time, simplifying the problem set, so you can focus on the flow going from one directory to another.
Chapter 8. Directory strategies 335

Directory Integrator provides a powerful graphical user interface (GUI) to configure the assembly lines and constituent connectors. In the next few figures, we depict some of the GUI screens from an “ldaptodom” assembly line.
Figure 8-8 Sample assembly line input connector schema discovery using administrator GUI
The input directory is an LDAP directory, and we have called the connector “readldap.” It was created using the standard LDAP connector type. The output directory will be a Domino directory, the connector is called “updatedomuser,” and it uses the Domino User connector type. Once the connection information for the LDAP directory has been configured, the automatic schema discover tool within the GUI is used to identify the LDAP attributes. Figure 8-8 shows the schema discovery using the GUI.
336 Lotus Security Handbook
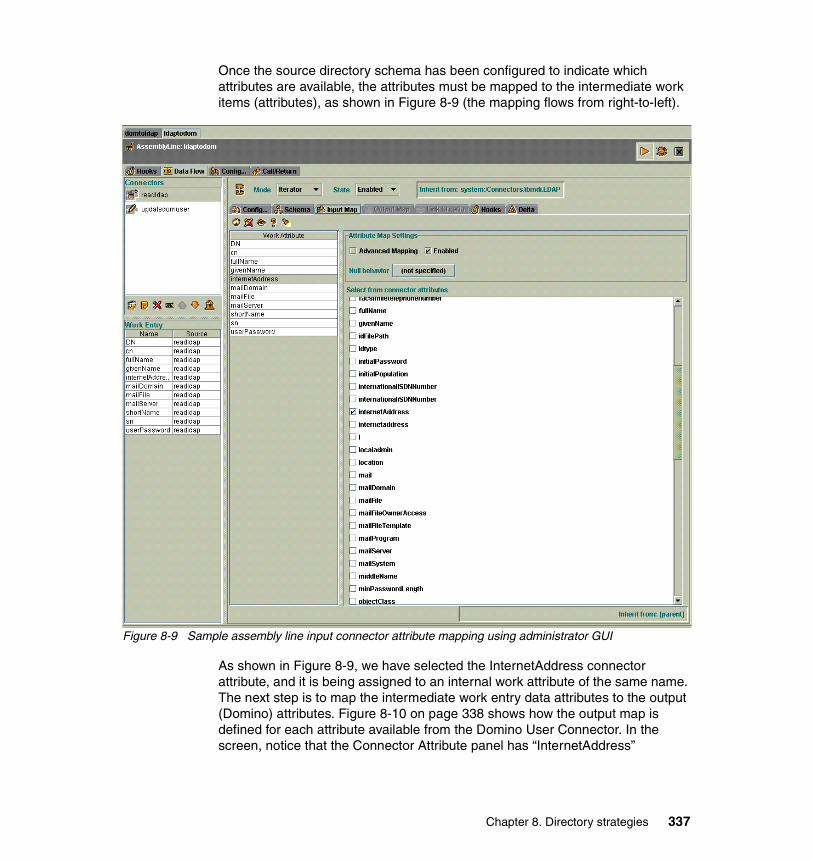
Once the source directory schema has been configured to indicate which attributes are available, the attributes must be mapped to the intermediate work items (attributes), as shown in Figure 8-9 (the mapping flows from right-to-left).
Figure 8-9 Sample assembly line input connector attribute mapping using administrator GUI
As shown in Figure 8-9, we have selected the InternetAddress connector attribute, and it is being assigned to an internal work attribute of the same name. The next step is to map the intermediate work entry data attributes to the output (Domino) attributes. Figure 8-10 on page 338 shows how the output map is defined for each attribute available from the Domino User Connector. In the screen, notice that the Connector Attribute panel has “InternetAddress”
Chapter 8. Directory strategies 337
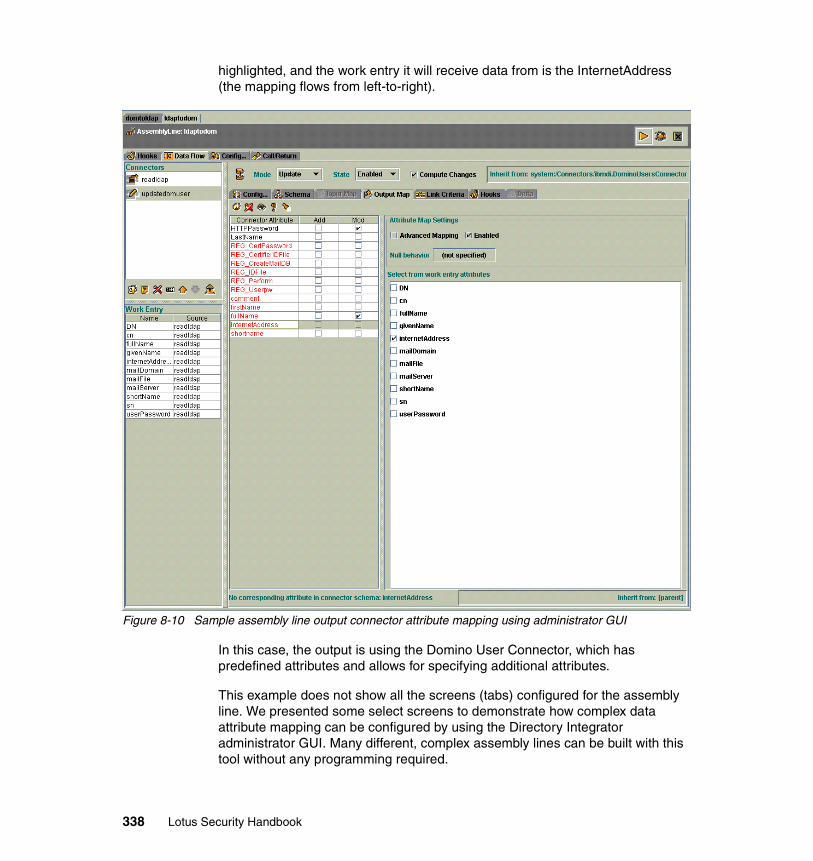
highlighted, and the work entry it will receive data from is the InternetAddress (the mapping flows from left-to-right).
Figure 8-10 Sample assembly line output connector attribute mapping using administrator GUI
In this case, the output is using the Domino User Connector, which has predefined attributes and allows for specifying additional attributes.
This example does not show all the screens (tabs) configured for the assembly line. We presented some select screens to demonstrate how complex data attribute mapping can be configured by using the Directory Integrator administrator GUI. Many different, complex assembly lines can be built with this tool without any programming required.
338 Lotus Security Handbook
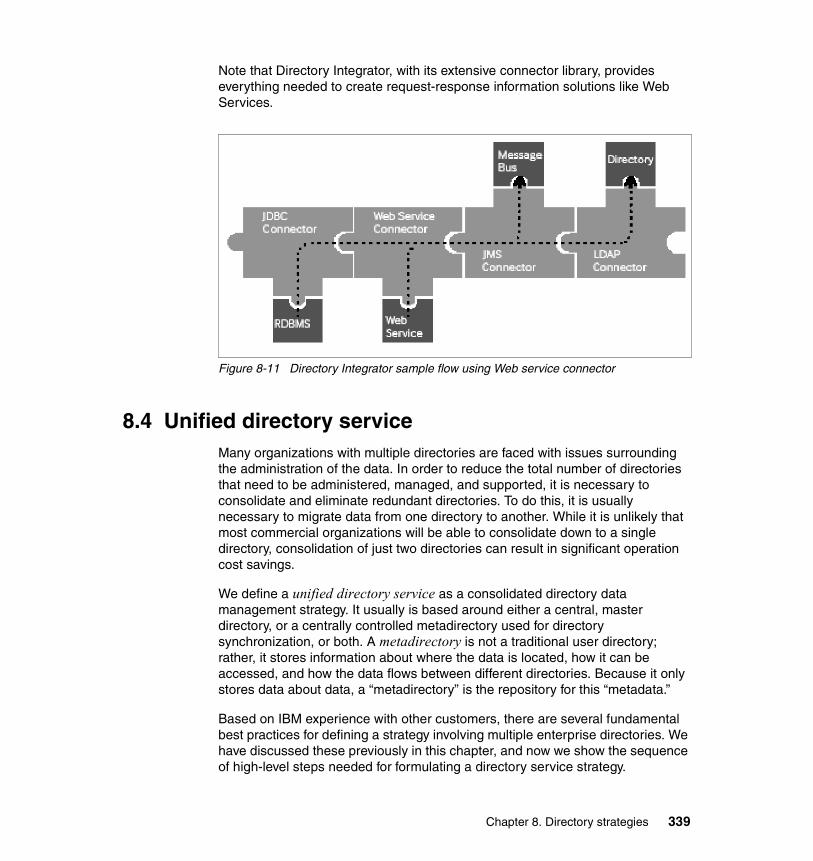
Note that Directory Integrator, with its extensive connector library, provides everything needed to create request-response information solutions like Web Services.
Figure 8-11 Directory Integrator sample flow using Web service connector
8.4 Unified directory serviceMany organizations with multiple directories are faced with issues surrounding the administration of the data. In order to reduce the total number of directories that need to be administered, managed, and supported, it is necessary to consolidate and eliminate redundant directories. To do this, it is usually necessary to migrate data from one directory to another. While it is unlikely that most commercial organizations will be able to consolidate down to a single directory, consolidation of just two directories can result in significant operation cost savings.
We define a unified directory service as a consolidated directory data management strategy. It usually is based around either a central, master directory, or a centrally controlled metadirectory used for directory synchronization, or both. A metadirectory is not a traditional user directory; rather, it stores information about where the data is located, how it can be accessed, and how the data flows between different directories. Because it only stores data about data, a “metadirectory” is the repository for this “metadata.”
Based on IBM experience with other customers, there are several fundamental best practices for defining a strategy involving multiple enterprise directories. We have discussed these previously in this chapter, and now we show the sequence of high-level steps needed for formulating a directory service strategy.
Chapter 8. Directory strategies 339

Identify authoritative sourcesThe information stored in a user's directory record is organized by discrete attributes or fields. The scope of information stored in a directory is often set by the requirements of an application or a set of applications. An authoritative source is defined as the highest organizational authority that creates, generates, or validates the data attribute values. Data validation may occur at initial data entry, or any time the data is updated or maintained. Each attribute may have been validated or generated by a different part of the organization.
An example of an authoritative source would be an HR employee directory where the unique employee ID number gets generated.
Identify unique keysUnique keys are the unique identifying attributes for each person, computer, or other resource. An attribute must be globally used and globally unique in order to be a key. If a single unique key is not used, a combination of attributes can be used to form a unique key. Note that what appears to be an ideal unique key may in fact have limitations. For example, an SMTP e-mail address is generally unique for each employee; however, not all employees might have e-mail.
A second aspect of identifying the unique keys is to define the bounds of the data the key may be applied to. While an organizational employee ID number might be unique within the U.S., it may not be present or available in other countries. When multiple keys are available in a given repository, they should be classified into primary keys and secondary keys, based on their reliability. For example, a primary key might be Employee ID, a secondary key the corporate SMTP e-mail address, and a third key the fullname combined with the telephone number and work location.
Determine the integration strategyOnce the existing data sources and correlation keys have been identified and inventoried, the next step is to select a strategy for merging (or integrating) the data. As we previously mentioned, there are basically two types of directory integration strategies:
� Metadirectory
� Central master directory
For most organizations, a metadirectory is quicker and easier to implement than a new central, multipurpose master directory. It is important to understand the distinction between a metadirectory and a central master directory.
A metadirectory defines the relationships and data flows between the different existing directories. They typically have connectors that are specifically designed for particular directories, such as Domino, Active Directory, PeopleSoft HRMS,
340 Lotus Security Handbook
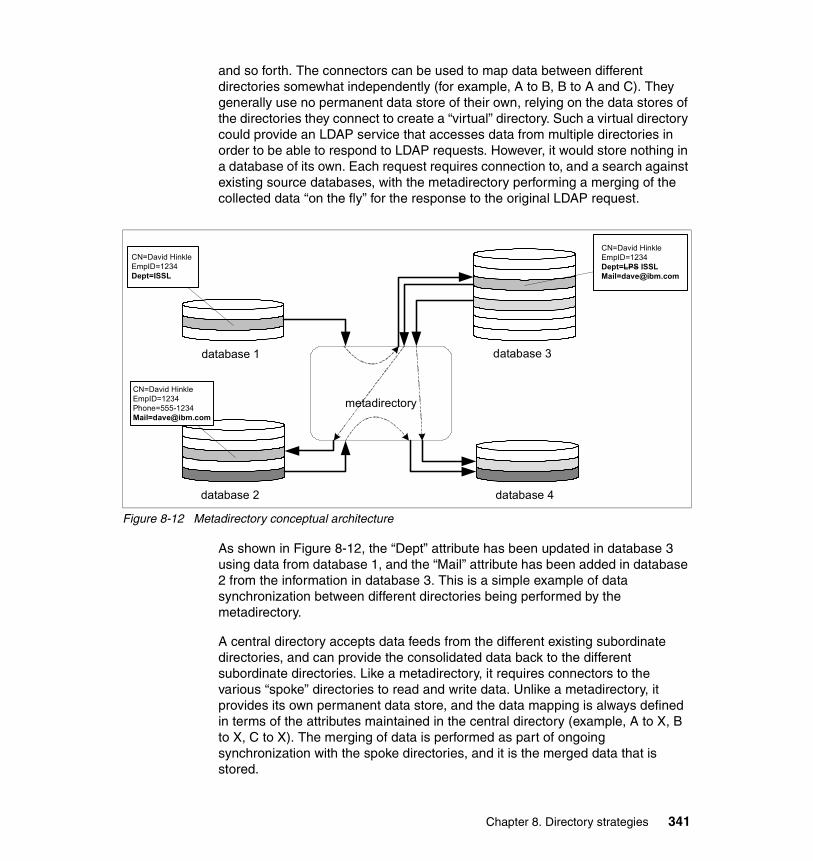
and so forth. The connectors can be used to map data between different directories somewhat independently (for example, A to B, B to A and C). They generally use no permanent data store of their own, relying on the data stores of the directories they connect to create a “virtual” directory. Such a virtual directory could provide an LDAP service that accesses data from multiple directories in order to be able to respond to LDAP requests. However, it would store nothing in a database of its own. Each request requires connection to, and a search against existing source databases, with the metadirectory performing a merging of the collected data “on the fly” for the response to the original LDAP request.
Figure 8-12 Metadirectory conceptual architecture
As shown in Figure 8-12, the “Dept” attribute has been updated in database 3 using data from database 1, and the “Mail” attribute has been added in database 2 from the information in database 3. This is a simple example of data synchronization between different directories being performed by the metadirectory.
A central directory accepts data feeds from the different existing subordinate directories, and can provide the consolidated data back to the different subordinate directories. Like a metadirectory, it requires connectors to the various “spoke” directories to read and write data. Unlike a metadirectory, it provides its own permanent data store, and the data mapping is always defined in terms of the attributes maintained in the central directory (example, A to X, B to X, C to X). The merging of data is performed as part of ongoing synchronization with the spoke directories, and it is the merged data that is stored.
database 1 database 3
database 2 database 4
metadirectory
CN=David HinkleEmpID=1234Dept=ISSL
CN=David HinkleEmpID=1234Dept=LPS [email protected]
CN=David [email protected]
Chapter 8. Directory strategies 341
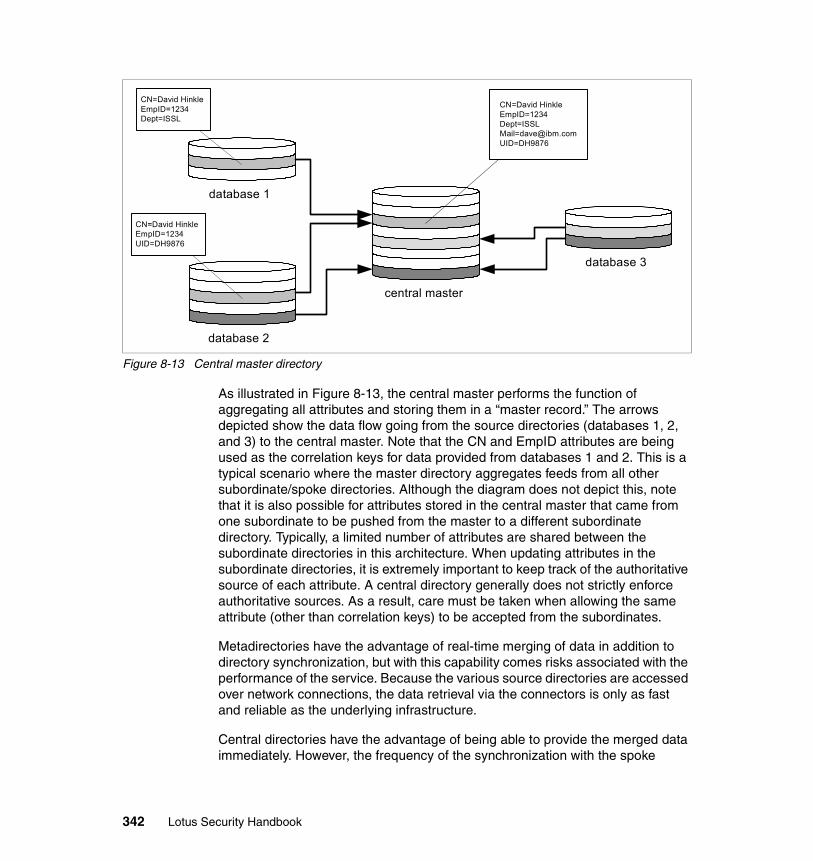
Figure 8-13 Central master directory
As illustrated in Figure 8-13, the central master performs the function of aggregating all attributes and storing them in a “master record.” The arrows depicted show the data flow going from the source directories (databases 1, 2, and 3) to the central master. Note that the CN and EmpID attributes are being used as the correlation keys for data provided from databases 1 and 2. This is a typical scenario where the master directory aggregates feeds from all other subordinate/spoke directories. Although the diagram does not depict this, note that it is also possible for attributes stored in the central master that came from one subordinate to be pushed from the master to a different subordinate directory. Typically, a limited number of attributes are shared between the subordinate directories in this architecture. When updating attributes in the subordinate directories, it is extremely important to keep track of the authoritative source of each attribute. A central directory generally does not strictly enforce authoritative sources. As a result, care must be taken when allowing the same attribute (other than correlation keys) to be accepted from the subordinates.
Metadirectories have the advantage of real-time merging of data in addition to directory synchronization, but with this capability comes risks associated with the performance of the service. Because the various source directories are accessed over network connections, the data retrieval via the connectors is only as fast and reliable as the underlying infrastructure.
Central directories have the advantage of being able to provide the merged data immediately. However, the frequency of the synchronization with the spoke
database 1
central master
database 2
database 3
CN=David [email protected]=DH9876
CN=David HinkleEmpID=1234UID=DH9876
CN=David HinkleEmpID=1234Dept=ISSL
342 Lotus Security Handbook
(source) directories can limit the accuracy of the data provided. They also can require significant server and storage resources.
An alternative approach is a combination of the two strategies. A combination approach, as shown in Figure 8-14 on page 344, uses a metadirectory to perform flexible data merging between the different source directories, and also uses a central repository directory as a nonvolatile store of the merged data to be used by applications requiring the directory service. In this hybrid approach, the central directory is a data receptor and generally does not allow direct updates, but is offered as more of a read-only LDAP service. The one area where the directory would need to permit direct updates would be for user passwords, since these cannot be synchronized (see “Password synchronization” on page 284 for more information regarding issues with passwords and synchronization). By having an LDAP directory that contains the merged data, the latency issues involved with virtual, dynamic data merging can be avoided.
This approach is ideal for an organization that wants to migrate data and applications to use a common LDAP directory, while continuing to support applications that are dependent on proprietary or legacy directories.
Chapter 8. Directory strategies 343
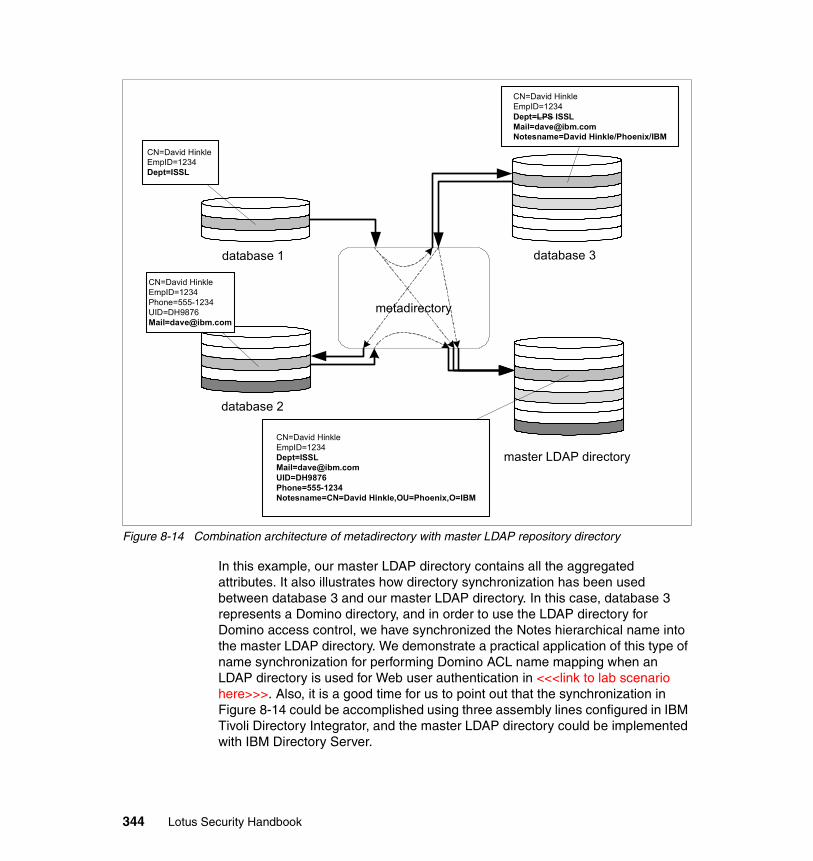
Figure 8-14 Combination architecture of metadirectory with master LDAP repository directory
In this example, our master LDAP directory contains all the aggregated attributes. It also illustrates how directory synchronization has been used between database 3 and our master LDAP directory. In this case, database 3 represents a Domino directory, and in order to use the LDAP directory for Domino access control, we have synchronized the Notes hierarchical name into the master LDAP directory. We demonstrate a practical application of this type of name synchronization for performing Domino ACL name mapping when an LDAP directory is used for Web user authentication in <<<link to lab scenario here>>>. Also, it is a good time for us to point out that the synchronization in Figure 8-14 could be accomplished using three assembly lines configured in IBM Tivoli Directory Integrator, and the master LDAP directory could be implemented with IBM Directory Server.
database 1 database 3
database 2
metadirectory
CN=David HinkleEmpID=1234Dept=ISSL
CN=David [email protected]
master LDAP directory
CN=David HinkleEmpID=1234Dept=LPS [email protected]=David Hinkle/Phoenix/IBM
CN=David [email protected]=DH9876Phone=555-1234Notesname=CN=David Hinkle,OU=Phoenix,O=IBM
344 Lotus Security Handbook
Define a schemaThe directory schema has three main components. They are:
� Object classes: This refers to the type of object being stored. An object may use multiple object classes providing the classes are not mutually exclusive. We discussed this type of component in more detail in 8.3.2, “Object classes” on page 316.
� Attributes: These are the record “fields” of data for an object. For example, an OrganizationPerson object may have a “Title” attribute value. In this case, the Title attribute is optional. Attributes can also be mandatory for a given object class, for example a Person object must have CN (common name) and SN (surname) attribute values. We discussed this type of component in more detail in 8.3.3, “Attributes” on page 320.
� Directory Information Tree (DIT): LDAP directory data uses a hierarchical tree organizational structure. As with any hierarchy, there is at least one root, with the potential for multiple branches with leaves, also known as end nodes. Each node in the tree, the root itself, branch points and leaves, is a Distinguished Name, DN. From the root, you define branches of the tree, which are either containers (for example, CN=users), or organizational units (OU=). Note that a single LDAP directory can have multiple roots with different access lists and tree structures beneath them. The actual feasibility of this is dependent on the scalability of the LDAP directory. Typically, a single root is used for all user objects to keep administration as simple as possible.
Although the DIT is not technically part of the “schema”, the hierarchical tree structure has a direct relationship to every object's Distinguished Name (DN). The DN is the fully qualified hierarchical name. For example, a DN might be “CN=john q public,OU=sales,O=acme,C=us,” or another typical form is “UID=jsmith4,CN=users,DC=acme,DC=com.” In the first example, the tree follows a more traditional X.500 structure, with a country “C=US” as the root. The second example illustrates a root that follows DNS naming conventions with domain components “DC=acme, DC=com” as the root. DNs must be unique, so “flatter” trees dictate the use of unique identifiers, such as in the second example, where the UID (user ID) is used instead of the CN (common name). Generally, our experience has been that flatter trees, despite the burden of needing methods to generate unique identifiers or names, are ultimately easier to administer. But there is a trade-off in large organizations (over 10,000 users). A flat tree structure in a large organization requires a non-intuitive user naming scheme that often forces the use of additional identifying attributes. For example, consider if there are two unique users such as the following:
DN= uid=bhinkle,cn=users,dc=acme,dc=comcn=Brendan C [email protected]
Chapter 8. Directory strategies 345

DN= uid=bhinkle2,cn=users,dc=acme,dc=comcn=Bill [email protected]
Note in the example entries that it is difficult, or even impossible, to know which user we intend to select based on the DN. Our applications, such as e-mail, need to incur extra overhead to retrieve attributes for the entry in addition to the DN so the user or application can determine the proper entry. In the example, the common name would allow us to distinguish the person we want to select. But in large organizations, duplicate or similar common names will exist with significant frequency. So another attribute, such as department or location, would then need to also be queried. So if we revisit the tree to make it “taller” (or less “flat”), we can easily create DNs that provide more granular information for the entries without the need to access additional attributes:
DN= uid=bhinkle,ou=sales,dc=acme,[email protected]
DN= uid=bhinkle2,ou=hr,dc=acme,[email protected]
Using either OU or DC branches beneath the root is typically advisable in smaller organizations (under 10,000 entries) only if the user administration is distributed. This is because access controls are easier to implement at a branch node rather than on each individual leaf (user) node. As for whether the traditional X.500 country root or a DNS domain component root is better, this is the subject of debate. Considering that an international X.500 service has never materialized to link the country roots together in a unified manner, a domain structure has become the more popular approach. In theory, using the DNS domain components might eventually support the ability to obtain someone’s X.500 public certificate for sending encrypted SMIME messages. But we feel that this will not realistically happen for at least three to five years, if it happens at all. Our experience has been that commercial organizations are unlikely to ever provide a publicly accessible directory service for their internal users. The concerns over misuse, such as SPAM, are most certainly justifiable. But given the ubiquity of DNS, we would most likely recommend a domain component DIT for organizations that are contemplating a new LDAP implementation.
Defining the DIT requires a great deal of planning. It usually involves a trade-off between granular organization and ease of administration. And it is very often difficult to change once in place and the directory populated. The DIT that proves to be a good “fit” for one organization may be completely inappropriate for another organization, even though both might be in the same industry.
346 Lotus Security Handbook
The key items to consider when designing your DIT must include:
� Size of the organization and unique naming scheme
� Data administrative structure (centralized, or distributed?)
� Diversity of geographic and functional sub-organizations
� The capabilities of the directory (such as number of leaf entries under a single node)
� Frequency of change to any of these items
So, what about your existing directories that are not native LDAP? Remember, very few LDAP-capable directories are based on X.500 or Open LDAP. While it is important to be able to define the schema in LDAP standard terms, it is more important to define the schema in terms that are specific to a given directory. While LDAP provides standard object classes and attribute labels, most LDAP-capable directories use different internal labels for user data attributes. Some products allow the mapping of their proprietary attributes to the LDAP attributes to be customized, while some have the mapping fixed. By first attempting to relate a proprietary attribute to its LDAP attribute label, the LDAP attribute names become the common language to which all the directories can be compared.
Although creating a master attribute mapping table for several directories can be time-consuming, it is a prerequisite step for any automated data synchronization and directory consolidation effort.
For organizations just starting to formulate an enterprise directory strategy, we suggest reading some of the work done within the educational community as part of the Middleware Architecture Committee for Education (MACE) directory projects. This material is available at:
http://middleware.internet2.edu/dir/
Just keep in mind that the educational community, as a whole, appears to have significantly greater common directory requirements than do commercial organizations. By their nature, commercial organizations thrive on differentiating themselves from competitors. So we have not seen comparable, enthusiastic “grass roots” efforts to build common directory services in the commercial community.
For an excellent general reference for enterprise directory strategy, planning, and design, refer to:
Charles Carrington (Editor), Timothy Speed, Juanita Ellis, and Steffano Korper, Enterprise Directory and Security Implementation Guide: Designing and Implementing Directories in Your Organization.
Chapter 8. Directory strategies 347
8.4.1 Account provisioningDirectory integration and synchronization can be used to support account provisioning. Account provisioning, from a directory perspective, means that the different system services can be enabled in some automated fashion for a given user. By automating the provisioning of accounts for common applications, the administrative resources required can be drastically reduced.
In order to support automated provisioning, directory integration must support several requisite functions:
ServiceA service is a logical collection of functions typically provided by a single application or set of integrated applications. For provisioning purposes, a service is synonymous with an application. An example is Notes e-mail.
AccountAn account is the user’s service-specific details and assigned resources on the service. For example, an e-mail address with a corresponding mailbox to receive messages would be the user-specific resources required on an e-mail service. The service would need to recognize a predefined user credential to access the service, and it would need to define access controls on the service to allow the user to send and receive messages in their mailbox, yet deny access to their mailbox to other users of the e-mail service. The relationship between authentication and access control from an account perspective is:
� The service supports the user authentication to access and use the functions provided by the service. Authentication means the act of verifying the authenticity of a user's credentials. Credentials could be a user ID and password, or a digital certificate.
� The service provides access controls to the account resources and functions. The access control is the method used to assure that authenticated users can access only the information or functions they are entitled to access.
The account is necessary because data specific to the user must be stored within the application. The types of data we are considering as part of the account are not stored in the Enterprise Directory service. Examples include e-mail mailboxes, “favorites” folders, and preferences or user options specific to a given application. We might store the location of a user’s mailbox in the directory, but the actual mailbox and its contents are stored within the application.
RegistrationRegistration is the act or process of signing up a specific user for a service. Users can self-register for IDs, subscriptions, and so forth. Alternatively, an
348 Lotus Security Handbook

administrator or the user’s management may sign up services on the user’s behalf. A third type of registration could be automatic and based on roles, where the roles are functional, related to job level, job title, corporate hierarchy, and so forth. The parameters required by the service (account details) must be provided by the party or agent performing the registration, although some parameters may be generated algorithmically based on directory attributes.
The service may provide for different levels of capabilities or functions within the service, so registration may need to provide details regarding the desired functions within the service.
EntitlementEntitlement is the act of granting a user, with a specific set of credentials, access to information or functions. A user must generally be entitled to use a service before an account on the service can be set up. Alternatively, an account can be set up without any access rights in anticipation of the entitlement, although this sequence can result in resources being reserved but then never used and would require some cleanup activities to remove the unused resources.
Automated provisioningWhile it is possible to perform automated provisioning without a central master directory, it will be limited to specific event-driven processes. For example, a new employee added to the HR system can automatically be set up with an e-mail account in Domino if a tool like Directory Integrator is being used. This type of event-driven provisioning can quickly become complex if the account entitlements are determined by multiple factors, such as job title, department, location, and so forth. For example, if employees at a certain job title or level are automatically to be given an Instant Messaging account, that can be automated. But it does not provide a means to allow exceptions, and no way to make changes to the policies for entitlements so they take effect on existing users. In other words, for an existing user there is no “event” until some change is made in the source directory for that user.
If the user’s entitlements are not explicitly stored in a central directory, the entitlements must be inferred or assumed by examining directory data in multiple systems. A central directory can maintain information regarding what systems or services a user is permitted to use and configured to use, as well as user attributes unique to each system. This offers the advantage of enabling the administrator to see and manipulate all the different entitlements in a single place for a given user. Not only does it provide a central point for entitlement administration, but changes to entitlement policy can be applied to both new and existing users. As with purely event-driven entitlement, the actual accounts for each service can be automatically set up. Because of the advantages
Chapter 8. Directory strategies 349

mentioned, we recommend that organizations that intend to automate account provisioning strongly consider implementation of a central master directory.
8.4.2 Enterprise access controlsAn overview of unified directories would not be complete without mentioning an emerging class of systems that enable consolidation of identity management and centralized access controls. In order to potentially include all enterprise applications from a variety of vendors, specialized security systems are required that manage identities and access controls. A complete SSO strategy typically includes identity management systems, consolidated directory systems, and advanced policies and procedures that are centrally managed and enforceable. Security systems that provide a central point of identity and access control management for disparate back-end systems are generically referred to as “enterprise access management systems.” Examples include IBM Tivoli Access Manager and Netegrity Siteminder.
Organizations that pursue enterprise access management system implementations typically have the following characteristics:
� Central or master LDAP directory strategy and architecture
� Commitment to a centralized security administration policy and plan
� Common access control criteria, such as standardized access group policies, standardized roles, and well-defined administration policies shared by all applications
� Strategic direction to use Web access for all enterprise applications
Large enterprises that have a large number of directories will require a significant investment in time and resource to implement a comprehensive SSO strategy using an enterprise access management system. However, the time required to provide an SSO architecture that supports a significant number of application platforms will be ultimately shorter using an enterprise access management system as opposed to taking a piecemeal approach.
A detailed overview of IBM Tivoli Access Manager is in the IBM Redpaper IBM Tivoli Access Manager for e-business, REDP3677.
8.5 SummaryMultiple directories present a challenge to many organizations today. Data inconsistency across the directories is brought about by multiple points of control of the same or similar person data. Consolidating points of control requires either
350 Lotus Security Handbook
a tactical solution, such as data synchronization, or a strategic solution, such as consolidating data into an enterprise directory service.
Multiple user identities presents the greatest challenge to the ability to design a single sign-on (SSO) architecture. Because it is not feasible to require all existing applications to migrate to use a single, common directory, directory synchronization is required to be able to map one user’s identities as known in the various directories.
The key to successful directory synchronization is thorough and accurate definition of data flows. By approaching synchronization at the data flow level, you reduce complexity. This gives you gains across the board: in deployment speed, accuracy of the solution, robustness, and maintainability.
Enterprise directory services provide a framework for managing all information assets of an organization. A common integrated framework provides a structure to manage information about employees, business partners, customers and other affiliated stakeholders across an organization’s systems.
An enterprise directory service allows an organization to provide access to relevant data about resources to both users and applications. A common service can provide interactive, dynamic content that can be reused, customized, and personalized. Enterprise directory services should be based on the specific requirements of employees, business partners, suppliers, and customers. The main keys to designing a central master directory are:
� Thorough schema design of object classes and attributes
� Careful directory information tree (DIT) design
Depending on the number of directories and authoritative sources, the effort to integrate multiple directories and person identities can be significant. The long-term benefits of this effort are: eliminating redundant services with a corresponding reduction of data administration expenses, improved data integrity, and improved security and audit processes. A consolidated directory service that supports all of an organization’s affiliations can be leveraged across the enterprise by new application services that were traditionally limited in scope to a single affiliation audience. A consolidated directory service can consist of a metadirectory, or a central master directory, or both.
In addition to the general benefits mentioned previously, implementing a central (enterprise) master directory can provide the following extra benefits:
– A data store and a publication source for corporate information
– Central directory for mail management and delivery
– Central source for application authentication and work-flow
Chapter 8. Directory strategies 351
– Potential source for credential storage for data and mail encryption
– Means to support automated account provisioning
– Means to achieve cost savings by economy of scale and reducing duplicated efforts
352 Lotus Security Handbook

Chapter 9. Server hardening
In this chapter we look at providing an additional element of security, in that we are considering the complete security of an IT system, above and beyond the applications. We look specifically at the operating system (OS) that applications and application servers run on, with keen attention to securing the OS to the greatest extent possible.
Securing an operating system is done through a process called “hardening,” which takes the configuration that comes standard “out of the box” (that is, as installed with the default settings set by the vendor for the installation process) and closes down known vulnerabilities and potential security loopholes in the file system, background services, and network services configuration.
In this chapter, we look at hardening the operating systems upon which Lotus technologies most commonly run, namely:
1. Windows (NT-kernel based) operating systems:– Win32 - Windows NT4.0, Windows 2000 and Windows XP
2. UNIX/Linux operating systems:– Sun Solaris - Version 8– Linux (2.4 kernel) - SUSE and Red Hat– IBM AIX®
Our discussion covers workstations as well as servers since security involves all aspects of the infrastructure, not just its most visible parts.
9
© Copyright IBM Corp. 2004. All rights reserved. 353

9.1 Hardening fundamentalsIn this section we explain some fundamental concepts of hardening. It is necessary to understand these basics before we can discuss actually hardening the IT systems of an organization.
9.1.1 Starting with the operating systemIf there's one best place to start the hardening process, it's the operating system. This is because the OS represents the core of the IT system. Ultimately, the OS is responsible for ensuring that users are securely authenticated and controlled. Fortunately, hardening the OS is not a difficult task, although the initial implementation can be tedious. In this section, we review the general procedures and concepts that can be used to harden any OS.
From the moment an OS install is planned, security should be a top priority. Unfortunately, this isn't often the case, which results in immature installations and ultimately leads to a compromised system. The following sections outline several steps that every administrator or user should follow during the installation process.
Do a disconnected installDuring the installation of an OS, it should remain physically disconnected from any network – especially the Internet. While statistics vary depending on who provides them, it's estimated that a default OS installation of either Windows or Linux will be scanned or hacked within an hour of being connected to the Internet. Unfortunately, it often takes longer than this to get all the correct security patches installed.
The ironic part of this is that these same operating systems need to be connected to the Internet in some way or another to be able to download the necessary security patches. A way out of this problem is to use a spare machine to download the necessary patches and then apply these downloaded patches to the machine that will be newly installed.
Lock down the OSThere is almost a 100% certainty that a default installation will result in a machine, and a configuration, that includes at least one vulnerability that could be exploited by an attacker to gain unauthorized access.
To prevent this, the administrator should be prepared to install all applicable patches and updates. This means knowing ahead of time what major updates are available for the OS. The updates are often in the form of service packs or updated releases that are available in a downloadable format to permit the
354 Lotus Security Handbook
preparation of the necessary updates on a customized CD or tape before installation.
Once the OS is installed with current updates, it is important to keep the system up to date. There are update services offered by the major OS manufacturers (such as the Red Hat up2date tool and Microsoft’s Windows Update Tool). These tools must be used carefully, and you should understand what a specific patch acquired with the tool will do to the system before you install it.
Lock down the servicesThe operating system is only a small part of an IT system. Additional services that are bolted on can provide additional functionality right out of the box, but on the other hand, they can cause some security headaches. For example, one of the most well-known services for the Windows Server OS is Internet Information Server (IIS), which has been the source of a great number of well-publicized exploits.
Just like the OS, all services and third-party programs on the computer should be checked to ensure that they are the most current versions and that they are safe to use. Oddly enough, not all System Administrators understand this principle and make efforts to remove unwanted services; some don’t even know which services their systems are running.
While we deal with specific tools and techniques in this chapter, a quick and easy way to close some vulnerabilities is to check which communication ports are listening for incoming data. This is done using the following command at the command prompt:
netstat -an
As well, tools such as Nessus, Nmap, and Stealth can quickly provide a snapshot of the IT system and what potentially vulnerable services are running in the background.
Define a proper baselineOnce the IT system is patched and locked down, an important step that should be taken before opening it to the world is to establish a proper baseline for the IT system.
This is mostly to ensure that complete documentation of the changes that were carried out on the IT system exists. Any changes made to this baseline can be verified and appropriate security measures taken. This also sets up a standard in terms of IT system configuration in the organization and any corrections that have to be applied can be done quickly and uniformly, avoiding the concept of a “weakest link.” (That is, a system that differs significantly in its base configuration
Chapter 9. Server hardening 355
and is left inadvertently with services and ports open. Such a system could be used to mount an attack against other systems in the organization.)
Furthermore, proper security relies on proper documentation. This is the reason why a proper PSPG (Policies, Standards, Procedures Guideline) document, in which the details of the baseline configurations are kept, should exist for the organization.
9.1.2 Protection and prevention toolsProtection tools are one of the major elements that provide a secure buffer between IT systems and the people who would attack them. These tools include anti-viral scanners, application filters, firewalls, and other tools.
It’s worth repeating that protection tools only reduce the likelihood of attackers successfully gaining access to an IT system. Given that there are many ways an attack can be mounted, you should limit your reliance on these tools and consider them more like delay tactics than attack prevention.
FirewallsThe details about firewalls, their architecture, and how to best use them is explained in 4.1, “Infrastructure components” on page 116. In this section we review some basic firewall concepts.
A firewall is a device that screens incoming network traffic and allows or disallows the traffic based on a set of rules. Firewalls normally sit at the perimeter of an organization's network, protecting it from the Internet, extranets, or other less secure network segments. A firewall can run on UNIX or Windows (preferably NT-kernel based) or other operating systems with software that performs packet filtering, which, at a minimum, has been hardened against attack, and has multiple network cards to connect different network segments.
Firewalls are so commonplace these days that there has been an overreliance on them, with many system administrators thinking that firewalls provide all the network security they will need. Worse, some system administrators think they can take a firewall out of the box, plug it in, never look at it again, and still have it protect their network.
Firewalls are only as effective as their rule base, their configuration, and the system administrators monitoring them. Firewalls must be configured with an appropriate rule set and must be constantly patched to address new emerging vulnerabilities. As well, they must be monitored to detect suspicious activity.
356 Lotus Security Handbook

Application filtersLike a firewall, an application filter restricts the flow of data according to a set of rules. In fact, some devices merge the firewall and application filter into one device. (An example of this is the Microsoft ISA Server, which you can find out more about by consulting http://www.microsoft.com/isaserver/).
However, firewalls and application filters are completely different because they operate on different levels of the TCP stack. Instead of monitoring and managing traffic according to IP addresses and ports (like a firewall does), the application filter controls data based on the program or communications protocol in use, or the actual data being passed in the packet.
For example, if an organization wants to restrict the use of P2P services (for example, peer-to-peer clients such as KaZaa, Morpheus, eDonkey, and so forth), it could set up an application filter between the firewall and the internal network. The application server could then be configured to block all requests for such P2P services. This would still allow regular HTTP traffic to pass, but block all file-swapping based on P2P services.
In addition to service management, application filters are often used to block users from accessing questionable or illegal Web sites, either by checking the URL against a database of restricted URLs, or by scanning every requested Web page for indicator words.
While application filters are important to controlling what data flows to and from a network, they're not foolproof. For example, web sites can change and even be accessed via an IP address, thus circumventing any URL checks. In addition, a Web site that contains no words (but only images) could easily bypass scrutiny and pass to the requesting user, regardless of what the image contains.
System policies and trainingWithin any information system, there are many devices that can be used or abused by an attacker to gain unauthorized access to data. These include unprotected hubs or switches, guest accounts, rogue wireless networks, and even Bluetooth networks.
For example, a rogue wireless network could allow a hacker to completely circumvent all other protection devices and have free reign on the internal network.
This is why system policies and training are key prevention tools.
When a company hires a new user, he is generally shown around the office or complex, given a username and password, and then told to get to work. In more
Chapter 9. Server hardening 357
security-conscious organizations, the new hire may be asked to read and sign a statement of compliance regarding the proper use of the computer system.
Regrettably, these are generally so general and devoid of meaning that users sometimes are left with the impression that as long as they don’t divulge their password, anything is fair game, including using a P2P client and using the organization’s bandwidth to share music (or other types of) files with coworkers and, if there isn’t the proper security in place, with external people.
Regardless of how well-written or comprehensive a security policy is, it's useless if the end user doesn't read and understand it. Be sure to read Chapter 2, “Security methodologies” on page 43, especially the parts about security policies, user awareness and training, and compliance testing.
Port scannersThe security scanner NMap (short for “Network Mapper”) is an excellent hardening tool that is available at the following URL:
http://www.insecure.org/nmap
NMap is an open source product available for many flavors of UNIX as well as Windows (NmapNT). It allows system administrators to use raw IP packets to determine, among a long list of things:
� What hosts are available on a target network
� What services (ports) are open
� What operating systems and OS versions are running
� What type of packet filters and firewalls are in use
Nmap also has the ability to craft and launch fragmented packets at a host. Using the -f (fragment) option, it is possible for NMap to perform a scan using fragmented IP packets. In fragment mode, Nmap splits the TCP header over several packets to make it harder for packet filters and Intrusion Detection Systems to detect the scan.
Although this method won't fool firewalls that maintain packet sequence state, many networks can't handle the performance overhead of tracking fragments, and thus don't maintain state.
Finally, tools such as Nessus use NMap at their core, making NMap even more popular.
358 Lotus Security Handbook

9.1.3 Hardening fundamentals summaryThis section has provided a very brief introduction to a few popular techniques for hardening an IT system and the things that system administrators and IT security people should be mindful of. The rest of the chapter will delve deeper into the concepts outlined and explain specifically the techniques and methods for properly hardening the IT Infrastructure.
9.2 Operating system securityThe “operating system” defines everything that can be done with an IT system and the manner in which it is done. Whether it is interacting with the file system, sending e-mail using Lotus Notes, chatting with someone via Sametime, the operating system is working behind the scenes to provide the user with a proper experience as it interprets the requests from the user into something the IT system can process.
While operating systems vary on many levels, the most common ones provide much more than a simple interface between user and machine. They include programs that provide the user with numerous extras, from simple screen savers to complex file-encryption schemes. However, it's important to understand that these programs are extras that are added to the OS and are not necessary for the computer to operate.
Many users become intimately familiar with the operating system's accessories (such as the games that come bundled with the OS), but forget about the security features that are included to help them maintain a safe and reliable operating environment. As a result, many IT systems exist in an insecure state that leaves them at risk to a virus infection or a complete compromise by an attacker.
This section is dedicated to operating system security issues. The goal is to explain these special programs in sufficient detail that the process of hardening them will be easy to understand and accomplish. This is important since it takes only one virus or Trojan horse to create a ripple effect of infected computers and compromised IT systems.
9.2.1 Operating system overviewBefore delving into the security side of an operating system, it's important to know where the OS begins and where it ends. This brief overview describes the functionality and purpose of the operating system and how it's used to create the computing experience.
Chapter 9. Server hardening 359
Operating system functionsIn short, the operating system must provide two main functions. The OS must:
� Manage the resources available to the computer system
� Provide a reliable, stable, secure, and consistent interface for applications to access the computer's resources
The first function is critical because it defines how applications access the system's resources. By controlling the various aspects of how hardware and software are used, the OS ensures that every application gets a chance to use the processor.
The second function defines the methods by which an application can access these resources. Because the OS often acts as a buffer between an executing program and the hardware, it needs to provide some means of allowing applications to access resources without needing to know the details of each and every unique computer system.
Operating system typesThere are four main types of operating systems, classified according to the types of programs they support and the way these programs interact with users:
1. Real-time operating system: This operating system is most often found in robotic machinery and scientific devices (QNX is a good example). It doesn't provide much room for user operation, with the exception of some configuration changes. Typically, this operating system contains highly polished timing mechanisms due to the impact even the slightest error could have in automated production or measurements.
2. Single-user, single task operating system: This type of operating system is used by devices such as PDAs or other miniature computers (Palm OS is a good example). It basically allows one user to operate one program at a time. If another program is needed, the user must close the currently executing application.
3. Single-user, multitasking operating system: This type of operating system is most familiar because it includes most Microsoft Windows systems. In this operating system, a user can open multiple programs and jump back and forth between applications as required. In fact, there is much debate that although Windows Server Operating Systems appear to be multiuser systems, they're actually single-user, multitasking operating systems (with the exception of Terminal Services).
4. Multi-user operating system: A true multi-user operating system allows many users to access the computer's resources simultaneously. A common example of this type of OS is Linux. In this type of system, the OS manages
360 Lotus Security Handbook
requests from numerous users, and maintains rigorous control over the resources to ensure that one user doesn't affect any other user.
Operating system tasksThe operating system is responsible for various tasks within the computing environment. These tasks are often what makes one operating system more reliable or easier to use than another. How the OS handles these tasks determines the real power of the operating system:
� Processor management: The operating system needs to ensure that each application gets a share of the processor's time, and that the processor is used efficiently to accomplish real work.
� Memory management: This defines the methods by which the operating system allocates memory to applications and operating system functions.
� Device management: Because a computer system is composed of various hardware components (hard drive, monitor, mouse, keyboard, and so on), the operating system must be able to manage how these components interact with each other.
� Storage management: The operating system not only controls active resources, but defines how files and data are stored in a reliable fashion.
� Application interface: An operating system is really a bridge between applications and the computer's resources, which means that it must provide application programming interfaces (APIs) for applications to connect.
� User interface: Whether this is via a command line or a graphical user interface (GUI), the operating system is responsible for interacting with the end user.
This is a very brief summary of the major tasks that an operating system should handle.
The following sections describe security-related issues that the operating system must deal with to maintain confidentiality, integrity, and availability of system resources. We provide an overview of the two most common operating system families and the security features they include. We also describe the most common methods by which these security features can be attacked or bypassed, and how to protect against these types of attacks.
From here on, we use as reference two key security books that every administrator of Windows or UNIX systems should have in their library, namely:
� Maximum Windows 2000 Security (Sams, 2001, ISBN 0672319659)
� Maximum Linux Security (Sams, 1999, ISBN 0672316706)
Chapter 9. Server hardening 361
These books provide a wealth of useful insights into the security strengths and weaknesses of Windows and Linux.
9.2.2 Windows operating system weaknessesMicrosoft Windows has long maintained a reputation for having inadequate security, but many security experts believe that Windows is not inherently weak. Instead, they place the blame squarely on the shoulders of the system administrators who are responsible for the systems. In other words, with proper maintenance and configuration, it should be possible to make a Windows operating system relatively secure.
Nonetheless, there are several areas in which Windows is known to be vulnerable, such as the following.
� Size/complexity: Microsoft has its foot in every software door (and even some hardware doors). While this is nice for integration, it makes it very difficult for the average system administrator to keep up with the operating system in terms of understanding: 1) Where it begins and where it ends; and, 2) How to properly use and configure it.
� Insecure installation: One of the most common reasons that Windows servers fall prey to attackers is because they're installed and forgotten. Unfortunately, Windows is infamous for having little to no default security. This includes hidden shares, blank passwords, and no protection from known vulnerabilities. In short, default installations are an open invitation to attackers and everyone is welcome, even low skilled “Script Kiddies.”
� Poor auditing: When people think of Windows server-logging capabilities, the first thought is usually the Event Viewer. While this integral part of Windows does provide some useful information, the Event Viewer has long been considered a less-than-adequate logging tool with cryptic messages and missing information.
� Features-oriented system: Windows has always been about providing the user with a feature-rich, simple, and easy operating system. The early versions didn't do much in the way of security. Like other software companies, Microsoft is always looking to add features to their product to encourage existing customers to upgrade. In addition, their commercial nature requires backward compatibility with older, less secure versions. And with each new feature and service, whole new sets of security issues arise.
� Uneducated users: Windows is an operating system for the masses. Many users don't understand or care about the security risks associated with improperly configuring the system. In addition to this rather extensive group, many businesses employ part-time system administrators, elected from existing employees, based on the fact that they know the most about
362 Lotus Security Handbook

computers. Unfortunately, this strategy often results in disaster the first time a hacker probes the gates looking for an easy target.
From this short look into Windows security issues, it is evident that it takes a diligent administrator to ensure that the operating system is secure. Everything from patches to understanding proper installation procedures to ensuring that the system's files and services are audited is key to ensuring that the Windows server (or workstation) stays secure.
It is not possible, nor is it the goal of the present chapter, to detail all the weaknesses in Windows. Instead, the reader is encouraged to consult the following sites for ongoing updates in that area:
� BugTrack from SecurityFocus
http://www.securityfocus.com/
� NT Bugtrack
http://www.ntbugtraq.com/
� CERT Advisories
http://www.cert.org/nav/index_red.html
With the information contained at those sites, weaknesses and vulnerabilities can be identified quickly and the relevant patches applied. In the spirit of fairness, it must be said that Windows isn't the only operating system with weaknesses. Linux has some as well, which we look at next.
9.2.3 Linux weaknessesLinux is considered by many to be an operating system for the computer geek. While this was true at one time, for all practical purposes Linux operating systems have evolved to the point where they're starting to attract the average user. From the basic Lindows machines to the implementation of Red Hat File Server, Linux is making some major headway into the mainstream market, gaining also the unconditional support of IBM. Unfortunately, this means that the number of inexperienced Linux users is also growing.
One of the most common blanket statements made with regard to Linux is that it's more secure than Windows. Unfortunately, this isn't exactly correct, and has misled more than one IT person into believing their IT Infrastructure is safer if they only use Linux. While it may be true that Linux can be made more secure than other operating systems, in the hands of users, Linux has many of the same
Chapter 9. Server hardening 363

problems as other operating systems. The major security issues for Linux are the following:
� Root account: The one major rule that is regularly ignored is that “the root account should not be used unless absolutely necessary.” The reason for this rule is found in the power that root access offers to the person who uses it. Like the Administrator account in Windows NT®, root is the highest-level interactive login account that exists in Linux. The danger lies in the fact that most exploited programs run with the permissions of the user who activated that program. In other words, if the root account is being used while surfing the Internet and a script is inadvertently executed on a Web page, this script would then have root access, and could conceivably access any file or even delete the entire file system. Worse, some distributions (such as Lindows) require the use of the root account during installation and operation.
� Complexity: By far the most threatening issue regarding Linux is a complex set of commands, concepts, and programs that must be understood for security to be properly implemented. In fact, this can easily be seen when Linux is installed for the first time by the newbie system administrator. While some Linux distributions (versions) have started making decisions on behalf of the person installing them, many Linux operating systems require the installer to choose between cryptically named programs – contained generally in packages and installed with rpm – or just installing the entire operating system. Unfortunately, the list of several hundred programs is often overwhelming. As a result, the person ends up installing the entire operating system, including the HTTP daemon, FTP daemon, mail daemons, and so forth – none of which are secure by default.
� Networking OS: As Maximum Linux Security states, “Although Linux is well suited to personal use (even in non-networked environments), it is still inherently a network operating system. Default Linux installations run many Internet services, and unless you take proper precautions, attackers can target these services remotely throughout the duration of your online session.” This pretty much says it all.
� Open source updates: Much of the software created for Linux is written by students, research groups, or software companies who are trying to find a way to make Linux software profitable. When this is combined with the fact that Linux is open source, it means that all the software is open to examination by the world, and there exists a potential security nightmare. The problem is not that open source software is any more insecure than proprietary software. In fact, Linux vendors are known for having updates or patches within hours of a reported security vulnerability. Instead, the problem is that system administrators never receive word about these updates. For example, Red Hat releases as many as five security bulletins a day that need to be reviewed by a system administrator to see if they're applicable. While
364 Lotus Security Handbook
many of these alerts may be irrelevant, it only takes one missed warning to leave a system open to attack.
Linux system administrators should regularly visit to the Web site of the distribution that they are using (for example, Caldera, Red Hat, SUSE, Turbolinux) for advisories on vulnerabilities and relevant patches, as well as the UNIX section of the SecurityFocus Web site (http://www.securityfocus.com/unix), also for security advisories and tools and techniques to combat vulnerabilities.
In summary, we’ve tried to present a fair and balanced overview of the potential security issues in Linux and Windows. This is to show that there are security vulnerabilities in both families of operating systems and that the security-conscious system administrator should not be lulled into a sense of comfort by using one operating system over the other.
In the next sections, we look at the specifics of hardening Windows and Linux, and Solaris and AIX as well, since these are the operating systems on which Domino runs and is supported.
Domino also runs on the zOS (OS/390®) and OS/400® Operating Systems (which are for zSeries™ mainframes and iSeries minicomputers). However, given the specialized knowledge required to administer those systems, they are considered outside the scope of this redbook.
9.3 Hardening Windows (NT kernel-based) systemsIn this section we look at the process of hardening Windows (Win32-based) systems. These are the systems that include the NT family of Windows products, namely:
� Windows NT 4.0
� Windows 2000 Server
� Windows XP Professional
We’ve included Windows XP Professional because Windows is used as a desktop environment by a majority of users (with Linux slowly catching up and getting more and more mindshare in that space) and thus, it was felt that a hardening guide for workstations would be a good idea.
Although hardening a Windows server is a tedious process, it is relatively easy to do, and should typically incur no additional software or hardware expense for the organization. As mentioned earlier on in the chapter, the process is straightforward: 1) Harden the base operating system; and, 2) Take similar
Chapter 9. Server hardening 365
precautions for any services that are intended to run on the IT system. After all, it does not help to harden the base operating system and leave gaping holes in the Web or database server installations. It’s worth repeating that every product installed on the operating system has the potential to allow intruders to gain access to that IT system.
9.3.1 Hardening Windows NT 4.0Windows NT 4.0 has been the workhorse for Microsoft for years now. And although there are more feature-rich replacements now available, there are many reasons why Windows NT 4.0 might still be deployed. The fact that most customers have established a stable and secure baseline is one of the most common ones. Therefore, hardening guidelines for the elderly flagship product are discussed first. Many options apply to newer version of Windows as well, so reading through this section is recommended.
Hardening installation guidelinesWhen installing Windows NT 4.0 Server, it is best to follow the guidelines presented here as closely as possible. Some of these changes might go so far as removing a needed functionality that an application requires. If this is the case, hard choices will have to be made. For instance, if the functionality must be kept in, the system administrators will have to work harder to protect the server, perhaps using some of the tools and techniques mentioned earlier in the chapter.
Installation do’sLet’s begin with what should be done, and save the discussion of what shouldn’t be done for a little bit later. This ensures that some best practices can be developed and that the proper things are installed. It is better to start off with a proper base than to have to correct an improper installation later.
So, for security purposes, the following are the things you should do when installing Windows NT 4.0.
� Install the NTFS file system, not FAT. NTFS provides additional security controls via access control lists (ACLs) and is a more robust file system.
� Install as a standalone server, and do not install as a domain controller (unless there are some significant reasons to). That way, there is no conceivable need to have a firewall or DMZ Web, Domino, or DNS server participate in a domain.
Note: Some system administrators prefer to install the FAT file system and then convert to the NTFS file system after installation. This is not recommended because this will not apply the default ACLs.
366 Lotus Security Handbook

� Install the most recent Service Pack and hotfixes appropriate to the platform and installation. Service Pack 6a is the most often recommended Service Pack for this platform, along with several additional hotfixes.
� Remove unnecessary services installed automatically during the install process. These services include the following:
– Remote Procedure Call (RPC)– NetBIOS– Computer Browser
Removing these services might impact the functionality of the server. The software requirements for the intended configuration should be checked, or, better yet, a lab install should be performed and the configuration tested before deploying it in a production environment.
These services can be removed by choosing: Control Panel → Network → Services:
– Workstation: May impact some services such as at. While not as important as the Server service, it should nonetheless be checked with care;
– Server: Might impact some of the server performance. This should be checked with the greatest of care and this service removed only if no negative performance impacts are noted.
� Unbind WINS from TCP/IP. Choose Control Panel → Network → Bindings. Select “All Protocols” from the drop-down menu. Click WINS Client (TCP/IP) and then Disable/Remove.
� Use a nonexistent workgroup. There is no reason for a firewall or DMZ server to participate in domain or workgroup activities.
� Ensure that the following services are disabled:
– Alerter: This is a notification service to deliver messages to users of certain administrative events.
– ClipBook: This allows clipbook contents to be seen by remote clipbooks.
– DHCP Client: This allows the network settings to be configured by remote means.
– Messenger: This sends and receives messages sent by administrators or the alerter service.
– NetBIOS Interface: This provides NetBIOS over TCP/IP.
– Net Logon: This provides pass-through (workstation) or authentication and domain security database synchronization (server) to other machines in a domain.
– Network DDE: This provides dynamic data exchange in a networked environment to remote machines.
Chapter 9. Server hardening 367

– Network DDE DSDM: This manages Dynamic Data Exchange (DDE) network shares, through the shared database of DDE connections.
– TCP/IP NetBIOS Helper: This is NetBIOS over TCP/IP, which provides name-to-IP address mapping.
Although convenient for remote server administration, it is best to not add additional services, including remote management services such as telnetd and FTP. Neither provides encryption, so accounts, passwords, and other information can be gleaned via the network. If these services must be enabled, system administrators should take other precautions, such as allowing access only through the firewall from the internal network and applying IP security filters on the servers running the services.
� Enable IP security filters on the DMZ servers. Firewalls have their own IP filtering, and do not need or require native Windows NT IP filters. Choose Control Panel → Network → Protocols → TCP/IP Protocol → Properties → Advanced. Check “Enable Security” and then select Configure. Add the inbound ports that need to be accepted.
� Remove the right for users to allow access to the server from the network; force console access only.
� Assign individual admin accounts if there is a need for multiple admin accounts. This helps the auditing process.
� Rename the Administrator account to another name.
� Create a dummy Administrator account with no privileges. As intruders try to compromise this account, they will be logged in the audit logs.
� Reduce the number of groups that have access to the server to only those necessary for operation and administration of the server. It should be possible to reduce the groups down to Administrators and Power Users.
� Enable more secure system policies. User Manager should be used to modify the Account, User Rights, and Audit system policies, namely:
– Account policies control user password and lockout settings. Passwords should expire according to the time frame set by corporate policy. Minimum password length should be at least eight characters, while 24 previous passwords should be remembered. Account lockout should occur after three bad logon attempts. The counter can be reset after 30 minutes.
– All User Rights should have the Everyone group removed. Remove all groups and users from Access This Computer From the Network, and limit the users and groups that can Log on Locally. Make sure to pay special attention to Manage Auditing and Security Log.
� Turn on auditing of success and failure of at least these events: Logon and Logoff; Security Policy Changes; and Restart, Shutdown, and System.
368 Lotus Security Handbook
� Enable the blank screen saver with a low inactivity timer (of the order of five minutes). Enable password-protection on the screen saver.
� Run the SYSKEY utility to enhance the security of the Security Accounts Manager (SAM) database. The SYSKEY utility became available with Service Pack 3, so after Service Pack 6a or newer has been applied, SYSKEY should be available.
� Remove the OS/2® and POSIX subsystems. This can be done by running the C2SECURITY tool from the Windows NT Resource Kit, or manually by editing the following Registry keys. Remove this key, which will remove all subordinate keys pertaining to the OS/2 subsystem:
HKEY_LOCAL_MACHINE\SOFTWARE\Microsoft\OS/2 Subsystem for NT
Remove the Os2LibPath value from the Environment key:
HKEY_LOCAL_MACHINE\SYSTEM\CurrentControlSet\Control\Session Manager\EnvironmentOs2LibPath
Remove the Optional, POSIX, and OS/2 keys from the Session Manager SubSystem key:
HKEY_LOCAL_MACHINE\SYSTEM\CurrentControlSet\Control\Session Manager\SubSystems
After the Registry changes, the %WINNT%\system32\os2 directory must be manually removed, along with any subdirectories below it.
This was indeed a long list of things to actually do, which is why many systems administrators get tripped up, since they don’t realize everything they should do when installing this operating system.
Installation don’tsNow, on to what should not be done. This is another longer list, although not quite as long as the what should be done list.
� Do not install any extra software that is not needed. By default, the Windows NT installation includes many accessibility support tools, accessories, multimedia applications/themes, and communication applications. The more software is installed, the more that can possibly be exploited. It’s best to follow the Tao of security: simplicity, starting with installation.
� Do not install Internet Information Server (IIS) v2.0, which comes with Windows NT, even if this server is to be a Web server. Upgrading earlier versions of IIS does not remove unused files, which are files that can still be exploited in the newer IIS installation. Until the upgrade process removes old files, it is often better to uninstall IIS and install the new version rather than upgrade in-place.
Chapter 9. Server hardening 369

� Do not install other networking protocols other than TCP/IP. Additional protocols cause additional problems. NetBEUI is not useful outside of a workgroup, and IPX is often not handled properly by firewalls. One of the biggest and most common security problems is allowing IPX to run over NetBEUI. This can let intruders through the organization’s firewall to desktop machines.
� Do not add additional services, unless the machine is slated to be a DNS server. Web servers, mail servers, and firewalls generally should not run DNS. The only service you might possibly want to add is Simple Network Management Protocol (SNMP) for remote monitoring of the firewall and DMZ services. Ensure that these ports are blocked externally, and that the read and write community strings are changed from the defaults. SNMP can easily give away more information than intended if the service is accessible from the Internet.
� Do not install WINS. If NetBIOS resolution is needed outside of DNS, it is best to use the LMHOSTS file.
� Do not do DHCP relaying. In general, there is no need for DMZ servers to relay anything (aside, of course, for any exceptions listed in the chapter on proxies).
� Do not enable IP Forwarding, unless this server will be the firewall. A firewall is not achieving its potential if it never forwards IP traffic. However, consult the chapter on layering the infrastructure for best practices surrounding firewalls.
� Do not install Internet Explorer 5 or 5.5; they provide far more additional functionality than is possibly needed on the average server. It’s worth remembering that any additional functionality can be exploited in non-obvious ways. Internet Explorer 5 and 5.5 are not single programs, but a collection of reusable components. That means that any program running on Windows NT 4.0 can reuse that functionality. As always, it’s best not to give intruders additional tools to attack the server with. If an update of Internet Explorer on the Windows NT 4.0 firewall or DMZ server is required, it’s best to install Internet Explorer 4.01 Service Pack 2.
Registry modification guidelinesThere are some functions and features of Windows NT that are controlled solely through Registry settings. Extreme care should be taken when modifying the
Note: Internet Explorer 4.01 SP1® comes on the Windows NT Option Pack CD, but Internet Explorer 4.01 SP2® is available for download.
370 Lotus Security Handbook
Registry because this can quickly and easily cripple the system. The following Registry changes make Windows NT more secure by default:
� Set this key to 1 to clear the last used username from the login dialog box:
HKEY_LOCAL_MACHINE\SOFTWARE\Microsoft\Windows NT\CurrentVersion\WinloginDontDisplayLastUserName
� Set this key to 1 to restrict anonymous connections from listing account names:
HKEY_LOCAL_MACHINE\SYSTEM\CurrentControlSet\Control\LsaRestrictAnonymous
� Create the following key to restrict network access to the Registry, so Registry modifications must be made from the local system. Service Pack 3 or higher needs to be installed for this Registry entry to work.
HKEY_LOCAL_MACHINE\SYSTEM\CurrentControlSet\Control\SecurePipeServers\winreg
� Set the following key to 1 to disable the creation of 8.3 names for compatibility on NTFS partitions. The 8.3 names are normally only used by Win16 applications so this should not be a concern. Additionally, it provides a slight performance gain by reducing the overhead of generating and writing the 8.3 name.
HKEY_LOCAL_MACHINE\SYSTEM\CurrentControlSet\Control\FileSystemNtfsDisable8dot3NameCreation
� Set this key to 0 to disable the automatic sharing of administrative shares (ADMIN$, C$, and so on). Make sure you delete the shares manually by using the net share /d command.
HKEY_LOCAL_MACHINE\SYSTEM\CurrentControlSet\Services\LanmanServer\ParametersAutoShareServer
� Set the Application, Security, and System keys to 1 to prevent Guest and null sessions (sessions with no username or password authentication) from viewing the event logs specific to that log:
HKEY_LOCAL_MACHINE\SYSTEM\CurrentControlSet\Services\Eventlog\Application\CurrentControlSet\Services\Eventlog\Security\CurrentControlSet\Services\Eventlog\SystemRestrictGuestAccess
� Set this key to 0 to prevent any caching of user credentials (credentials of the last 10 users to interactively log on to the system are normally cached locally by Windows NT):
Chapter 9. Server hardening 371

HKEY_LOCAL_MACHINE\SOFTWARE\Microsoft\Windows NT\CurrentVersion\WinlogonCachedLogonsCount
� Commonly attacked Registry keys should have their access restricted via ACLs. The following Registry keys at the very least should be protected by providing read-only access to Everyone, and Full-Control to Administrators and SYSTEM only. Creator Owner should be given Full-Owner control:
HKEY_LOCAL_MACHINE\SOFTWARE\Microsoft\Windows\CurrentVersion\Run
HKEY_LOCAL_MACHINE\SOFTWARE\Microsoft\Windows\CurrentVersion\RunOnce
HKEY_LOCAL_MACHINE\SOFTWARE\Microsoft\Windows\CurrentVersion\RunOnceEx
HKEY_LOCAL_MACHINE\SOFTWARE\Microsoft\Windows NT\CurrentVersion\AeDebug
HKEY_LOCAL_MACHINE\SOFTWARE\Microsoft\Windows NT\CurrentVersion\WinLogon
Windows NT 4.0 loggingThere are several automated logging services built in to Windows NT 4.0. Most services use the EventLogs that every good Windows system administrator should be familiar with.
If the server is running any Internet services (such as FTP, HTTP, SMTP, and so on), they are logged through a different facility. It is quite likely that the Performance Monitor application will be used to tune or troubleshoot the server. This application does not log to the Application log of the EventLog service, but rather to its own set of logs.
Finally, one of the more important aspects of the system, scheduling of automated jobs, is logged through yet another service. Because there is no normal centralized logging service in Windows NT, each must be addressed individually.
The first thing to do is to move all logs to a separate logging partition. It would be convenient, although not 100% necessary, to have this partition be a separate disk, so as to not impact performance for the data portion of the server. After a
Note: The logging features described here apply to later versions of the Windows operating system as well, but are only covered in this section.
372 Lotus Security Handbook
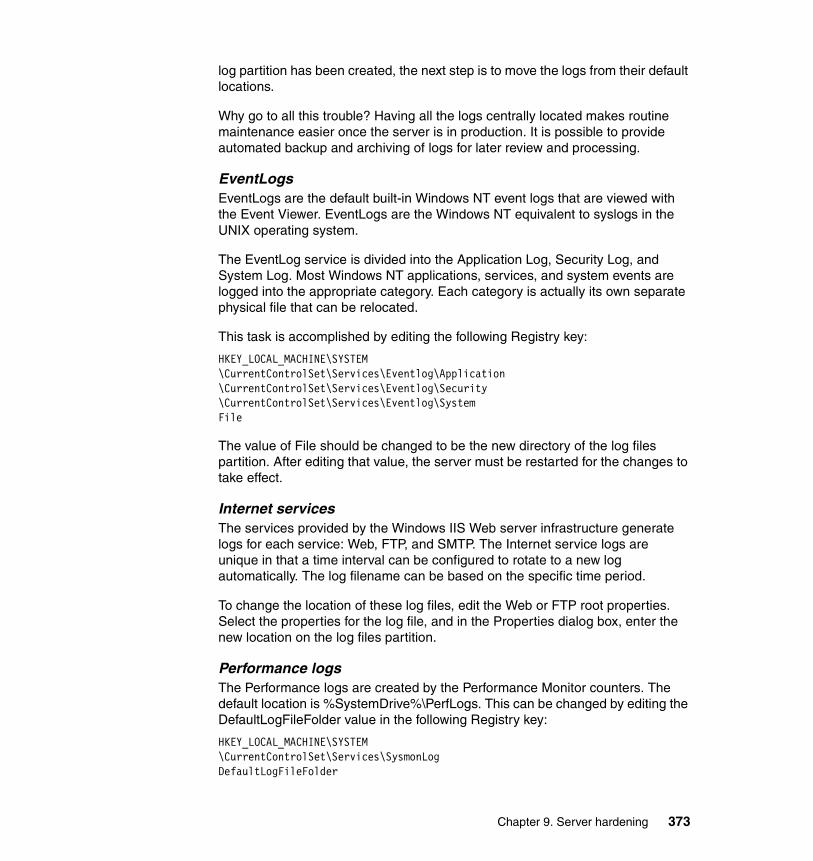
log partition has been created, the next step is to move the logs from their default locations.
Why go to all this trouble? Having all the logs centrally located makes routine maintenance easier once the server is in production. It is possible to provide automated backup and archiving of logs for later review and processing.
EventLogsEventLogs are the default built-in Windows NT event logs that are viewed with the Event Viewer. EventLogs are the Windows NT equivalent to syslogs in the UNIX operating system.
The EventLog service is divided into the Application Log, Security Log, and System Log. Most Windows NT applications, services, and system events are logged into the appropriate category. Each category is actually its own separate physical file that can be relocated.
This task is accomplished by editing the following Registry key:
HKEY_LOCAL_MACHINE\SYSTEM\CurrentControlSet\Services\Eventlog\Application\CurrentControlSet\Services\Eventlog\Security\CurrentControlSet\Services\Eventlog\SystemFile
The value of File should be changed to be the new directory of the log files partition. After editing that value, the server must be restarted for the changes to take effect.
Internet servicesThe services provided by the Windows IIS Web server infrastructure generate logs for each service: Web, FTP, and SMTP. The Internet service logs are unique in that a time interval can be configured to rotate to a new log automatically. The log filename can be based on the specific time period.
To change the location of these log files, edit the Web or FTP root properties. Select the properties for the log file, and in the Properties dialog box, enter the new location on the log files partition.
Performance logsThe Performance logs are created by the Performance Monitor counters. The default location is %SystemDrive%\PerfLogs. This can be changed by editing the DefaultLogFileFolder value in the following Registry key:
HKEY_LOCAL_MACHINE\SYSTEM\CurrentControlSet\Services\SysmonLogDefaultLogFileFolder
Chapter 9. Server hardening 373

Scheduler logsThe Scheduler service is normally located at %SystemRoot%\SchedLgU.Txt. The scheduler service log identifies all jobs scheduled and executed, as well as when each was started and stopped. The location of this file can be changed by editing the LogPath value in the Registry key:
HKEY_LOCAL_MACHINE\SOFTWARE\Microsoft\SchedulingAgentLogPath
This concludes our discussion on hardening Windows NT 4.0. As previously mentioned, many options included here apply to new versions of Windows as well. However, given the fact that advances have been made in Windows since NT 4.0, it’s important to look at the newer version and outline some of the security best practices for them, from a hardening perspective.
9.3.2 Hardening Windows 2000Windows 2000 is a much larger, more complex product than Windows NT 4.0, and as such it takes more time to fully analyze its default security stance and guard against any weaknesses. Given this, the hardening guidelines in the present chapter should be taken as a snapshot in time, and might not always be correct. Thus, the best practices here include consulting several living documents published by Microsoft in its Technet library, which will provide the most up-to-date information.
Hardening installation guidelinesWhen installing Windows 2000, it is best to follow these guidelines as closely as possible. Where applicable, use the recommendations presented in the previous section as well as the specific Windows 2000 guidelines discussed here.
When installing Windows 2000, it is a best practice to try to reduce the number of Windows 2000 components being installed. Windows 2000 offers many more features by default than does Windows NT 4.0. Many of these features it is best not to offer to insiders or (if the machine is somehow accessible from the Internet) to any external users.
By default, the Windows 2000 installation includes many accessories, utilities, multimedia applications and themes, and communication applications. It might be tempting to just install the default software selections; however, it’s best to take the time to determine what should and should not be installed. It can’t be repeated often enough: the more software is installed, the more that can possibly be exploited.
374 Lotus Security Handbook
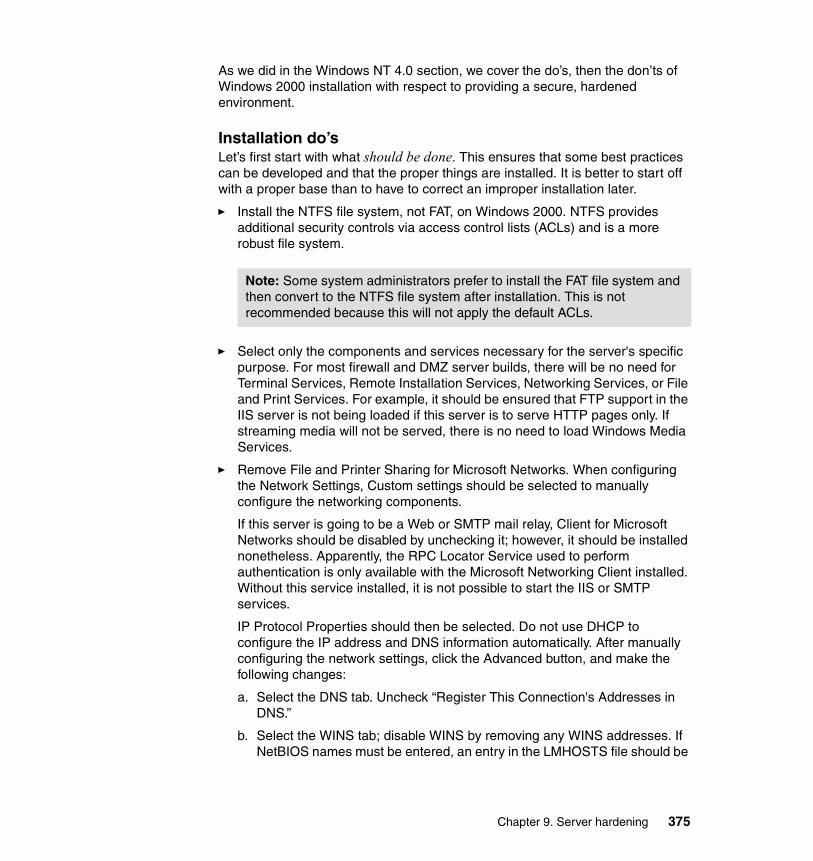
As we did in the Windows NT 4.0 section, we cover the do’s, then the don’ts of Windows 2000 installation with respect to providing a secure, hardened environment.
Installation do’sLet’s first start with what should be done. This ensures that some best practices can be developed and that the proper things are installed. It is better to start off with a proper base than to have to correct an improper installation later.
� Install the NTFS file system, not FAT, on Windows 2000. NTFS provides additional security controls via access control lists (ACLs) and is a more robust file system.
� Select only the components and services necessary for the server's specific purpose. For most firewall and DMZ server builds, there will be no need for Terminal Services, Remote Installation Services, Networking Services, or File and Print Services. For example, it should be ensured that FTP support in the IIS server is not being loaded if this server is to serve HTTP pages only. If streaming media will not be served, there is no need to load Windows Media Services.
� Remove File and Printer Sharing for Microsoft Networks. When configuring the Network Settings, Custom settings should be selected to manually configure the networking components.
If this server is going to be a Web or SMTP mail relay, Client for Microsoft Networks should be disabled by unchecking it; however, it should be installed nonetheless. Apparently, the RPC Locator Service used to perform authentication is only available with the Microsoft Networking Client installed. Without this service installed, it is not possible to start the IIS or SMTP services.
IP Protocol Properties should then be selected. Do not use DHCP to configure the IP address and DNS information automatically. After manually configuring the network settings, click the Advanced button, and make the following changes:
a. Select the DNS tab. Uncheck “Register This Connection's Addresses in DNS.”
b. Select the WINS tab; disable WINS by removing any WINS addresses. If NetBIOS names must be entered, an entry in the LMHOSTS file should be
Note: Some system administrators prefer to install the FAT file system and then convert to the NTFS file system after installation. This is not recommended because this will not apply the default ACLs.
Chapter 9. Server hardening 375
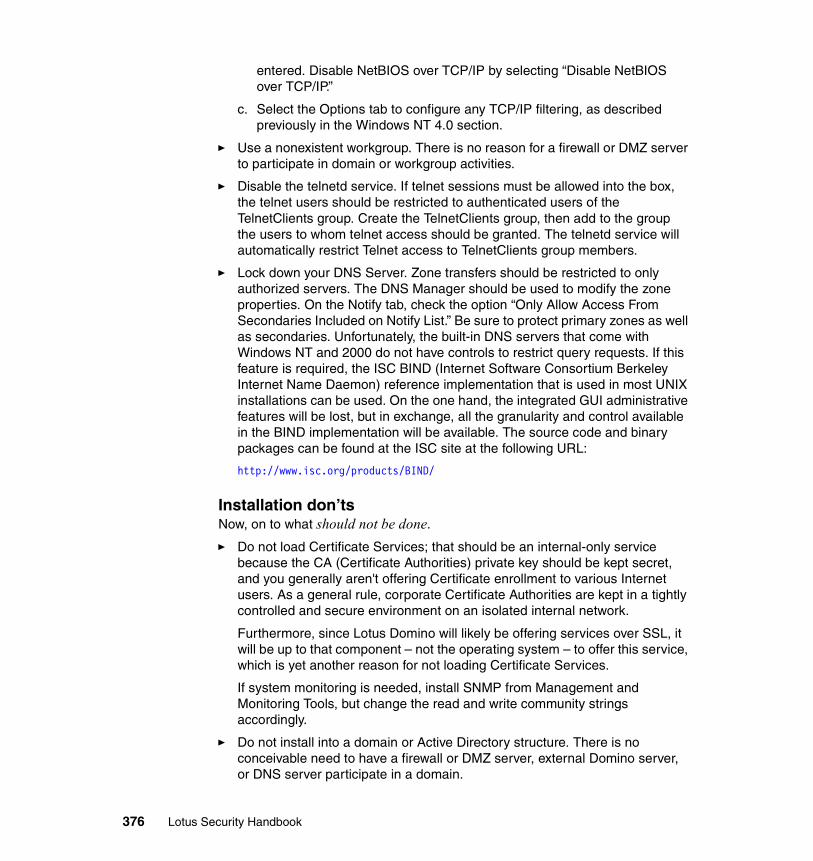
entered. Disable NetBIOS over TCP/IP by selecting “Disable NetBIOS over TCP/IP.”
c. Select the Options tab to configure any TCP/IP filtering, as described previously in the Windows NT 4.0 section.
� Use a nonexistent workgroup. There is no reason for a firewall or DMZ server to participate in domain or workgroup activities.
� Disable the telnetd service. If telnet sessions must be allowed into the box, the telnet users should be restricted to authenticated users of the TelnetClients group. Create the TelnetClients group, then add to the group the users to whom telnet access should be granted. The telnetd service will automatically restrict Telnet access to TelnetClients group members.
� Lock down your DNS Server. Zone transfers should be restricted to only authorized servers. The DNS Manager should be used to modify the zone properties. On the Notify tab, check the option “Only Allow Access From Secondaries Included on Notify List.” Be sure to protect primary zones as well as secondaries. Unfortunately, the built-in DNS servers that come with Windows NT and 2000 do not have controls to restrict query requests. If this feature is required, the ISC BIND (Internet Software Consortium Berkeley Internet Name Daemon) reference implementation that is used in most UNIX installations can be used. On the one hand, the integrated GUI administrative features will be lost, but in exchange, all the granularity and control available in the BIND implementation will be available. The source code and binary packages can be found at the ISC site at the following URL:
http://www.isc.org/products/BIND/
Installation don’tsNow, on to what should not be done.
� Do not load Certificate Services; that should be an internal-only service because the CA (Certificate Authorities) private key should be kept secret, and you generally aren't offering Certificate enrollment to various Internet users. As a general rule, corporate Certificate Authorities are kept in a tightly controlled and secure environment on an isolated internal network.
Furthermore, since Lotus Domino will likely be offering services over SSL, it will be up to that component – not the operating system – to offer this service, which is yet another reason for not loading Certificate Services.
If system monitoring is needed, install SNMP from Management and Monitoring Tools, but change the read and write community strings accordingly.
� Do not install into a domain or Active Directory structure. There is no conceivable need to have a firewall or DMZ server, external Domino server, or DNS server participate in a domain.
376 Lotus Security Handbook

Windows 2000 policiesIf hardening Windows NT 4.0 seemed a little haphazard, this is true. There is no easy way to define and apply all Registry, file system, network, and user/group policy changes. Even worse, there is no easy way to audit the changes made to ensure that the policy changes have not been undone by intruders, installed software, or applied Service Packs.
With the release of Windows 2000, Microsoft introduced a wonderful set of snap-in tools for the Microsoft Management Console (MMC). The Security Templates Tool allows system administrators to select, review, and even define custom security policy templates. The Security Configuration and Analysis Tool allows the system administrators to not only apply all those policies in one simple action, but it also allows them to audit those changes to see what has changed.
By default, the Security Templates Tool and Security Configuration and Analysis Tool are not visible in the MMC. These two snap-ins should be added to manage the server's policies and settings.
There are many bundled security templates, including High Security for Workstations, which is defined in the template HISECWS.INF. Additionally, Microsoft has made available a High Security Template targeted for Web servers. The security template includes most of the policy and Registry changes made previously for Windows NT 4.0. The HISECWEB.INF security template is available from Microsoft at the following URL:
http://support.microsoft.com/support/misc/kblookup.asp?id=Q316347
Perform the following steps to use the template:
1. Copy the template to the %windir%\security\templates directory.
2. Open the Security Templates tool, and look over the settings.
3. Open the Security Configuration and Analysis tool, and load the template.
4. Right-click the Security Configuration and Analysis tool, and choose “Analyze Computer Now” from the context menu.
5. Wait for the work to complete.
6. Review the findings, and update the template as necessary.
Take some time to browse through and read the individual templates. You can do this by using the Security Templates Tool or manually using a text editor such as WordPad. Read through the suggested changes to determine if they make sense for the deployment of the particular application intended to run on the IT system. The Security Templates Tool can be used to develop an individual security template based on an existing template. After obtaining a template that
Chapter 9. Server hardening 377
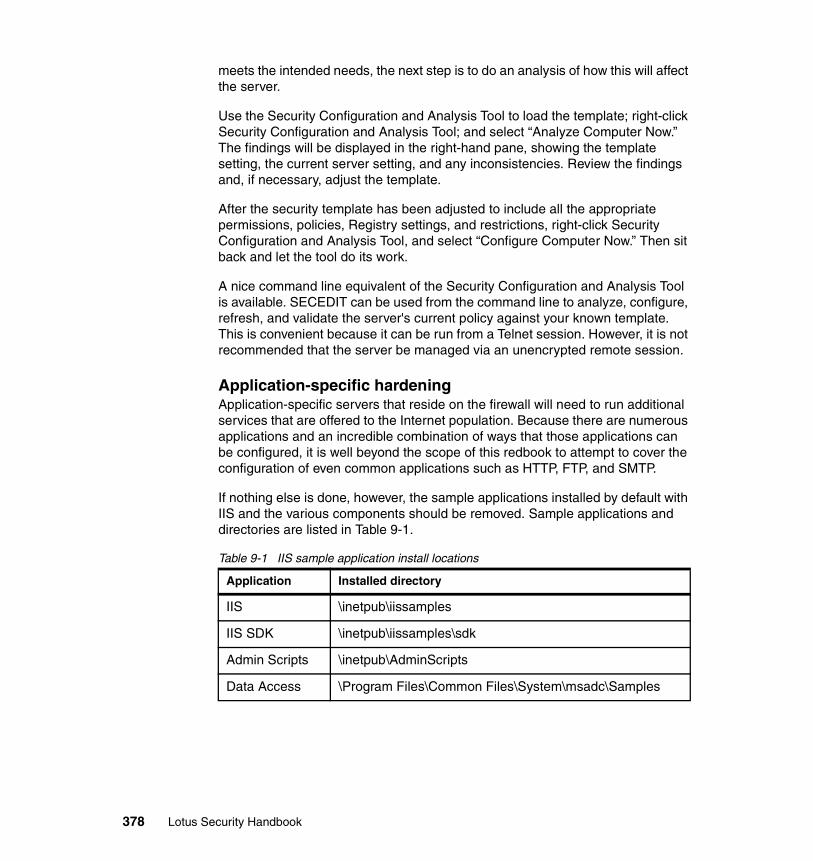
meets the intended needs, the next step is to do an analysis of how this will affect the server.
Use the Security Configuration and Analysis Tool to load the template; right-click Security Configuration and Analysis Tool; and select “Analyze Computer Now.” The findings will be displayed in the right-hand pane, showing the template setting, the current server setting, and any inconsistencies. Review the findings and, if necessary, adjust the template.
After the security template has been adjusted to include all the appropriate permissions, policies, Registry settings, and restrictions, right-click Security Configuration and Analysis Tool, and select “Configure Computer Now.” Then sit back and let the tool do its work.
A nice command line equivalent of the Security Configuration and Analysis Tool is available. SECEDIT can be used from the command line to analyze, configure, refresh, and validate the server's current policy against your known template. This is convenient because it can be run from a Telnet session. However, it is not recommended that the server be managed via an unencrypted remote session.
Application-specific hardeningApplication-specific servers that reside on the firewall will need to run additional services that are offered to the Internet population. Because there are numerous applications and an incredible combination of ways that those applications can be configured, it is well beyond the scope of this redbook to attempt to cover the configuration of even common applications such as HTTP, FTP, and SMTP.
If nothing else is done, however, the sample applications installed by default with IIS and the various components should be removed. Sample applications and directories are listed in Table 9-1.
Table 9-1 IIS sample application install locations
Application Installed directory
IIS \inetpub\iissamples
IIS SDK \inetpub\iissamples\sdk
Admin Scripts \inetpub\AdminScripts
Data Access \Program Files\Common Files\System\msadc\Samples
378 Lotus Security Handbook

As well, there are living documents that provide an excellent starting point for properly configuring the more common DMZ server application services:
� Microsoft Windows NT 4.0 and IIS 4.0:
http://www.microsoft.com/technet/security/iischk.asp
� Microsoft Windows 2000 Server and IIS 5.0:
http://www.microsoft.com/technet/security/iis5chk.asp
� Microsoft SQL Server:
http://www.microsoft.com/technet/SQL/Technote/secure.asphttp://www.sqlsecurity.com/faq.asp
This concludes our discussion of Windows 2000. While there is some overlap between hardening Windows NT 4.0 and Windows 2000, the tools and techniques have evolved over time. The result is that with the help of policies, hardening a Windows 2000 server is considerably less haphazard than hardening a Windows NT 4.0 server.
9.3.3 Windows workstation hardeningUntil now the focus has been on hardening server configurations to render them more difficult to attack. Since security is the sum of its parts and at the same time, is most vulnerable at its weakest point, it’s important to discuss hardening workstation configurations, especially those running the Windows (NT, 2000, XP) operating system, since these are, at the time of publication of this redbook, the most widely deployed desktop operating system.
As well, it's fundamental security knowledge that new vulnerabilities and weaknesses are continually discovered in all IT systems, with the Windows operating system being no exception.
The result is that if there isn’t a systematic process to keep IT system configurations (servers and workstations) up to date with vendor updates (in the form of patches or update packages), the consequences are all too predictable: these systems fall prey to attack.
This section focuses on recommending tools, methods, and technologies to harden Windows NT, 2000, and XP workstations; in particular, on how to apply patches and configure these systems to better protect them from compromise. The things we covered in the previous sections should be considered as well since there are common elements between Windows as a server operating system and Windows as a workstation operating system.
Since this book is on Lotus Collaborative products, this list is not comprehensive. As well, given the number of vulnerabilities that keep being disclosed for these
Chapter 9. Server hardening 379
versions of the Windows operating system, it is not possible to write a list that includes all configuration recommendations. The idea is to offer the base information to foster awareness and reduce the risk of compromise as much as possible.
We recommend that you read Microsoft’s 7 Steps to Personal Computing Security, which is available from their corporate site at the following URL:
http://www.microsoft.com/security/articles/steps_default.asp
Finally, here we try to focus our attention on the more secure configurations of Windows, namely those built around the Windows NT kernel (NT 4.0, 2000, and XP). This section ignores configurations built around the Windows “9x” kernel, namely: 95, 98, 98SE and ME because these are not built with security in mind and are too easy to compromise. Organizations that are serious about their IT security and have 9x kernel-based workstations should consider upgrading them to one of the Windows NT kernel-based configurations.
Using the Administrator accountTo maintain a Windows NT, 2000, or XP workstation, you need to have access to the “Administrator” account. (This differs from the case in Windows 95, 98, and ME, where all users have complete access to the entire system. In fact, this is one of the main reasons why the 9x systems are insecure by design). In this section we discuss the privileges granted to end users in relation to the Administrator account and then we discuss securing this account.
Conversely, it is best to architect Windows workstation configurations which do not provide end-users with Administrator access (or grant them Administrator privileges) to their machines. Restricting what software the end users can install on their workstations and the manner in which they can install it prevents many security vulnerabilities from creeping up and makes the whole IT infrastructure more secure.
This generally does not sit well with most users. Most of them feel they should have the same degree of freedom with their corporate workstation (or even laptop) that they do at home. This is understandable to a certain degree, but the machines are not the property of the end user, they are the property of the organization. As well, the organization should have a security policy in place whereby end users don’t have administrator access to their machines. (If the organization doesn’t, then this would be an auspicious time to review Chapter 2, “Security methodologies” on page 43 and write a set of proper security policies, as well as end user compliance documents). With this policy in place, the topic is not open for discussion and you won’t have to spend a lot of time explaining it to users.
380 Lotus Security Handbook
The Administrator account has the privileges to do anything to the Windows system. Malicious hackers will search out workstations connected to the Internet where the Administrator account has no password, or a trivial password. Once the account has been compromised the hacker can take complete control of the workstation.
Therefore, there are two choices: one is to keep the Administrator account in place, the other is get rid of it (though not entirely). Let’s take the time to cover both.
1. If the Administrator account is kept as is, it should have a non-trivial password that's difficult to guess. Some guidelines for this are:
– It should have a minimum of 8 characters. (It should be considered as a passphrase and thus, could have many more characters than that.)
– It should have at least 3 different character types (alphabetic, numeric and, if possible, punctuation characters).
– It should be as random as possible and variations on dictionary entries should be avoided.
2. A potentially more effective approach is to create an alternate administrative account, with a different name, which would be used for all administrative tasks and would have all the privileges of the Administrator account. As well, delete the original Administrator account and create a dummy Administrator account with no privileges. As intruders try to compromise this account, they will be logged in the audit logs.
Installing and maintaining anti-virus protection It is important to ensure the workstation’s configuration is clean, that no files have been compromised during the normal course of utilization, and that if any files are introduced into the system, they do no damage.
This is why it is crucial to have an anti-virus tool installed, which can perform periodic scans of the file system and the memory to spot virus, trojans, and worms that might have found a place there. Just as IT systems need continuous monitoring and improvements to keep them up to date, the anti-virus file is no different. For this security tool to be effective, it must include the most recent virus definitions. To maintain these virus definitions, the file containing them should be updated on a weekly basis.
Most organizations have a licence for Norton Anti-Virus (NAV), McAffee’s VirusScan, or other anti-virus tool that covers all workstations. There is no reason why it shouldn’t be used on all machines. Anti-Virus protection is a first line of defense for Windows workstations.
Chapter 9. Server hardening 381

Patching with the Microsoft Update Center Microsoft has tried to make patch management on Windows workstations relatively easy. The installation of hot fixes and service packs through the Microsoft Update Center involves several button clicks and often a reboot (or sometimes several reboots), so the first time through, the process it is a little tedious. However, this system has been in operation for quite a while with good success, and given the number of users, we have to conclude that it is, indeed, not difficult to use.
Follow these steps to update the configuration of a workstation:
1. Using the Administrator account or an account with similar privileges, access the Microsoft Update Center (http://windowsupdate.microsoft.com/) and click the link for “Product Updates.”
2. The site will highlight whether there are any “CRITICAL UPDATES AND SERVICES PACKS” outstanding; these should be applied right away. Select the pertinent updates and click the Download icon.
There's always a risk that a hot fix or a service pack may have undesirable effects on the configuration of the workstation. On the flipside, there is a high certainty that failing to apply a critical patch will leave the workstation open to compromise. It’s worth remembering that patches that have been out for a while have a very low risk of failure since they've been tested by other people.
Applying service packs and hot fixes may seem like a tedious and thankless job, but the reason why so many worms have spread rampantly over the Internet is because they were precisely exploiting known and published vulnerabilities. Overall, patching IT systems, and workstations in particular, is a very important line of defense.
Microsoft Baseline Security AdvisorThe Microsoft Baseline Security Advisor (MBSA) will identify the patches that ought to be applied. The URL for MBSA is:
http://www.microsoft.com/technet/security/tools/tools/MBSAhome.asp
MBSA comes as a standard install kit. It was released in April 2002 and replaces an earlier Web-based tool, called Microsoft's Personal Security Advisor (MPSA), which was targeted at workstations. MBSA is a very good tool to evaluate the security of a Windows NT 4.0, Windows 2000, or Windows XP workstation (it can also be used to evaluate the security of a server running on the same versions of the Windows operating system). It is also very helpful to evaluate the security of MS IIS and MS SQL servers.
MBSA will determine the patches (service packs and hot fixes) that should be applied. As well, MBSA will make recommendations about several important
382 Lotus Security Handbook

security settings. It works quite well, and system administrators should find it very helpful for securing IT systems that are under their control and responsibility.
It is absolutely essential to have access to the Administrator account to install the package and it is also imperative to be logged in with the Administrator account to scan a workstation or server for problems. When used to conduct a security scan, the tool will download and run content retrieved from Microsoft, which should provide the latest best advice and best configuration settings based on the findings of MBSA.
It is good practice to be of an aggressive nature when applying patches. After all, if the vendor recommends that patches be applied, it would be quite foolish – or one would need very good reasons – to ignore that advice. And, as an aside, if a vulnerability in the product is exploited and a patch had previously been released by the vendor, but not applied, it is difficult to go complaining to that vendor afterwards.
In regard to patches, it is best to try the patches on a few systems before pushing them out to other IT systems. There have been occasions where Microsoft has published a patch that failed or caused other problems. However, you can have a fair degree of confidence in any patch that has been out for several weeks since many people would have downloaded it, seen whether it caused any problems, and publicized problems if they did occur.
Recommendations from MBSA can be a little touchy to apply, but are all well worth the effort. Typically, MBSA’s recommendations are the same that would be made by other well-known security organizations.
Microsoft IIS Web server Many Windows NT 4.0, 2000, and XP systems are configured with a Web server, which is called Microsoft Internet Information Server (IIS). This has been the source of far too many exploits, the most famous being the “Code Red” worm which persists to this day, searching out IIS servers that aren't patched or are otherwise poorly configured. For any IT system running MS IIS Web server, here's what should be done:
1. Shut down the MS IIS Web server if it’s not needed.
If the end users have no need for the MS IIS Web server, or if the organization’s server configuration doesn’t require MS IIS Web server, then it’s far safer if the server isn’t run at all. The logic – and it’s a valid one – is that it’s not possible to break into a Web server (such as IIS) if it’s not running in the first place. As well, if it doesn’t run, it’s one less security concern for the system administrators. Finally, it is possible to remove the IIS subsystem from the workstation or server, but it’s probably best to just shut it down because there are too many interdependencies among the different components of the
Chapter 9. Server hardening 383

Windows operating system versions to be 100% sure that deleting the subsystem components won’t affect something else later on.
2. Patching the MS IIS Web server
Patches for the MS IIS Web Server can be found using the MBSA tool discussed earlier. As mentioned, it evolved from an earlier Web-based tool (which is no longer available). The reason for this evolution was that it didn't track hot fixes for the MS IIS Web Server. Microsoft used to recommend a “hot fix checker,” especially for IIS, which is no longer required for Windows 2000 and Windows XP.
– See the Microsoft Network Security Hot Fix Checker (Hfnetchk.exe) Tool (Q303215), which is available at the following URL: http://support.microsoft.com/default.aspx?scid=kb;EN-US;q303215
– See also the Frequently Asked Questions about the Microsoft Network Security Hot Fix Checker (Hfnetchk.exe) Tool (Q305385) at this URL: http://support.microsoft.com/default.aspx?scid=kb;en-us;Q305385
The referenced patches are all available from Microsoft Security Bulletins available on the Microsoft Technet Web site at the following URL:
http://www.microsoft.com/technet/security/current.asp
Finally, Microsoft published a tool to lock down the MS IIS Web server and close many of the common exploits. See the Microsoft IIS Lockdown Tool, which is available at the following URL:
http://www.microsoft.com/technet/security/tools/tools/locktool.asp
Microsoft SQL serverSome Windows NT 4.0, 2000, and XP systems are configured with a database server capable of processing Structure Query Language (SQL) queries. This database server is MS SQL server. As with MS IIS, this server has been the source of several exploits – the most famous being the “Slammer” worm.
With a little effort the Microsoft SQL server can be secured. If it's not secured the chances are pretty high that it will be compromised. For any IT system running MS SQL server, the techniques for securing the system are as follows:
1. Shut down the MS SQL server if it’s not needed
If the end users have no need for the MS SQL server or if the organization’s server configuration doesn’t require MS SQL server, then it’s far safer if the server isn’t run at all. The logic, again, is that it’s not possible to break into a database server (such as MS SQL server) if it’s not running in the first place. As well, if it doesn’t run, it’s one less security concern for the system administrators.
384 Lotus Security Handbook

Next, if MS SQL server is needed, it’s better to use an installed implementation of the MS SQL server on some other machine. Database applications need not be running on the same machine as the database server.
Although it is possible to remove the MS SQL server subsystem from the workstation or server, it’s probably best to just shut it down since there are too many interdependencies among the components of the Windows operating system versions to be 100% sure that deleting the subsystem components won’t affect something else that depends on it later on.
Finally, if the MS SQL server is purposefully installed it should be immediately disabled until such time as all patches and hot fixes have been applied and hardening has been completed.
2. Patching the MS SQL server
Patches (service packs and hot fixes) for MS SQL server can be found using the MBSA tool discussed earlier. All outstanding patches must be applied as soon as possible and no MS SQL server should be made available until all patches have been applied. The MBSA tool will detect several security problems that might otherwise be overlooked and should be immediately investigated.
– See the Microsoft Network Security Hot Fix Checker (Hfnetchk.exe) Tool (Q303215) mentioned previously.
– See also the Frequently Asked Questions about the Microsoft Network Security Hot Fix Checker (Hfnetchk.exe) Tool (Q305385)
The referenced patches are all available from Microsoft Security Bulletins available on the Microsoft Technet Web site.
Penetration testsMany security vendors provide free tools to evaluate IT systems (and they do, at the same time, encourage you to buy their product). These vendors check how well the IT system being tested has been hardened with the help of a “penetration test.”
For example, Symantec, makers of Norton Anti-Virus, offers “Symantec Security Check,” where it’s possible to find some very good free services. These can be found at the following URL:
http://security.symantec.com/ssc/home.asp
The free services provided include a “Scan for Security Risks” (that is, a penetration test), a “Scan for Viruses” (very much like the Norton Anti-Virus tool) and a tool to “Trace a Potential Attacker” (given an IP number). These tools are all very competent at what they do.
Chapter 9. Server hardening 385
� If the IT system needing to be tested has been hardened, the “Scan for Security Risks” is an excellent method to validate that the work was done properly. It will also determine if the IT system has unwanted services installed by some of the more common trojan horses.
� If the IT system has not been hardened – or if the system has been hardened, but only to the point before the anti-virus scanner has been installed – the “Scan for Viruses” is an excellent place to start. This will scan the IT system’s file system for infected files. Afterwards, regardless of the outcome of the scan, an anti-virus scanner should be installed and the proper hardening measures applied to the workstation.
Symantec does not have the monopoly on such services. Other security vendors provide similar tools which are just as competent in helping raise the level of security of IT systems in place. For example, Gibson Research Corporation offers the popular “ShieldsUp!” test, which is another very good penetration test. It is available at the following URL:
http://grc.com/intro.htm
9.3.4 Further readingIt is not possible to cover all aspects of Windows server and workstation hardening in this redbook.
Note: There are two important things to note.
First, Symantec tools download ActiveX content to the IT system. That's generally something that should not be accepted, except in those rare cases where the organization doing it can be trusted. In regard to the specific tools mentioned here, Symantec is a company that has worked hard in the domain of security and has earned this trust, and besides, their tools work well and will help provide better security, not undermine it.
Second, however, Symantec also makes mistakes. For example, the Symantec Security Check ActiveX Buffer Overflow of 2003/06/25 was a security problem that was discovered, and resolved, in the ActiveX component used to implement the security check. Details can be found at: http://www.sarc.com/avcenter/security/Content/2003.06.25.html
Important: The suggested tools provided here are examples and are not endorsements of, nor an advertisement for, Symantec or Gibson Research. There are other tools and security services vendors on the market and those should be looked at to ensure the proper level of hardening can be applied to the organization’s IT systems.
386 Lotus Security Handbook
To help with the hardening of IT systems, both servers and workstations, the following additional references are useful for those who want to ensure that they have applied all due diligence and have accessed the latest information regarding this topic.
1. Microsoft Security (http://www.microsoft.com/security/):
– 7 Steps to Personal Computing Security http://www.microsoft.com/security/articles/steps_default.asp
– Security Tools and Checklists http://www.microsoft.com/technet/security/tools/tools.asp
2. Windows NT Security and Configuration Resources by the CERT Coordination Center (http://www.cert.org/tech_tips/win-resources.html):
– Windows NT Configuration Guidelines http://www.cert.org/tech_tips/win_configuration_guidelines.html
– Home Network Security http://www.cert.org/tech_tips/home_networks.html
– Computer Virus Resources http://www.cert.org/other_sources/viruses.html
3. Information Security Reading Room at SANS Institute (http://www.sans.org/rr/index.php):
– Windows 2000 Issueshttp://www.sans.org/rr/catindex.php?cat_id=66
These references are just a starting point. There are many additional sites on the Web that have excellent information.
9.4 Hardening UNIX systemsIn this section, we look at hardening UNIX servers. UNIX systems and Windows systems are different enough that they require completely separate discussions.
In regard to UNIX, it has been said that the wonderful thing about standards is there are so many to choose from. UNIX comes in a number of flavors, the two predominant ones being BSD-derived and AT&T System V-derived. Some of the specific implementations of UNIX in these two categories are:
� BSD-derived UNIX systems:
– OpenBSD– FreeBSD– NetBSD– BSDi
Chapter 9. Server hardening 387

– MacOS X– SunOS 4.
� System V-derived UNIX systems:
– HP-UX– Solaris (SunOS 5)
Given this, where does Linux fit? This is a good question, in that Linux is not derived from any UNIX. However – and this depends entirely on the distribution – Linux borrows from both BSD and System V semantics.
Actually, in order not to provide an ambiguous answer, Linux itself is just the operating system kernel and some supporting drivers. Most Linux distributions use the GNU system (http://www.gnu.org), thus they are called GNU/Linux distributions. There are hundreds of available GNU/Linux distributions, but even the “top 5" differ in their default commands, startup scripts, file system layouts, included utilities, and packaging systems.
All this is to say that – unlike Windows NT, Windows 2000, and Windows XP – it is a far more complex process to describe how to harden a UNIX- or Linux-based server.
However, this section provides some common procedures that can be applied across UNIX versions and GNU/Linux distributions. Following that are some pointers to living documents on the Internet, which track available data and releases, and go into a more detailed account of how to harden a server for a particular task.
9.4.1 Common steps for hardening UNIX and Linux serversGenerally speaking, system hardening of a UNIX server (inclusive of GNU/Linux servers) is a global philosophy of system security that focuses strongly not only on detection, but also on prevention. It involves removing unnecessary services from the base operating system, restricting user access to the system, enforcing password restrictions, controlling user and group rights, and enabling system accounting.
Under the minimization procedures described in this section, the operating system components and services that are not necessary for the task at hand should be identified and disabled.
Note: AIX basically fits in either category, providing commands that will act “BSD-ish” or “System V-ish,” depending on how they are invoked. Because of this difference, we dedicate a separate section to AIX. See 9.5, “Hardening the AIX operating system” on page 399.
388 Lotus Security Handbook

For example, if a system is being used as a file server, there is little benefit in enabling electronic mail (e-mail) services. E-mail services run as root, and there is a long history of e-mail-related security breaches. Proper system-hardening procedures call for these services to be shut down, resulting in a dedicated system with the fewest opportunities for exploitation.
The process of hardening a UNIX or GNU/Linux server begins at the time of installation. Thereafter, additional activities are performed, which include:
� Eliminating points of attack by shutting down or reconfiguring services and ports as well as removing unnecessary libraries
� Adding robustness to the file system by looking at file ownership and permissions
� Properly setting up user accounts so that privileged accounts are only used when appropriate (and necessary) and that all accounts have proper, non-trivial passwords
Some common guidelines for configuring UNIX servers more securely by default are available from CERT's Web site at the following URL:
ftp://info.cert.org/pub/tech_tips/UNIX_configuration_guidelines
9.4.2 Partitioning for protectionTypically, no matter the flavor of UNIX being installed, a number of partitions are defined, each having a specific purpose, such as SWAP and /tmp. Beyond these obvious partitions, work should be done to protect against out-of-disk-space denial-of-service attacks.
Some examples of typical attacks are trying to create an excessive generation of logging data; or filling the file system of the UNIX server with large files through FTP, or, if your Domino server isn’t configured properly, by trying to send inordinately large messages that will make the mail.box file grow accordingly and allocate the needed space on the hard drive.
The best way to protect against this kind of attack is to segment the file system hierarchy into separate physical partitions:
� root partition (“/”): This partition can be small because it generally contains just the kernel, meaning the necessary files, libraries, and configuration for booting in /bin, /sbin, /etc, and /lib. Access to the attached devices is provided through the /dev and /devices directories. Many GNU/Linux distributions store kernels and symbol data in the /boot directory, whereas kernel libraries are stored under /lib.
� /usr partition: This partition is normally where user-accessible applications are stored. Normally, /usr does not contain data or configuration files that
Chapter 9. Server hardening 389
change; therefore – as an added security measure – it can be mounted as read-only.
� /var partition: This partition stores system logs and data services such as mail, Web, databases, printing, running services, package management, and so forth. If only one separate partition is created from /, /var is the one that should be created separately.
� /usr/local directory (the /opt directory in Solaris): These directories often contain locally-installed optional software, configuration files, and data. The /usr/local directory is normally not affected by operating system upgrades. Depending on how these directories are used by the UNIX system, they too can be mounted as read-only.
The details vary in different UNIX versions (and GNU/Linux distributions) so we recommend that you read the installation notes that come with the version of UNIX to be installed to determine the best manner to install them with proper security in mind.
9.4.3 Disabling the extraneous inetd serviceThe inetd service is the UNIX “Super Internet Server.” It is basically a daemon process that is invoked at boot time and reads in a flat configuration file that is normally found at /etc/inetd.conf.
The inetd service listens for incoming connections on the defined IP ports. When a connection is initiated on a defined port, it invokes a pre-configured program to service the request. After the connection is finished, the process invoked to service that request terminates. The original reason for designing this service in this manner was to lighten the load and resources required on the IT system.
There are a number of services enabled through inetd, and almost all of them should be disabled as part of a properly hardened server. Besides normally disabling FTP, TFTP, Telnet, and the Berkeley r* commands, the following should be disabled:
� The in.named service: This is the BIND name services daemon. Except for servers that are specifically defined as being the DNS servers of the organizations, DNS should not be running on a hardened UNIX server.
� The in.fingerd service: This is the finger daemon that can be used to show user information and lists of users who are logged in. On a properly hardened UNIX server, there is no reason to advertise that information that could be of help to would-be attackers.
� The daytime service: This is the service that displays the date and time on the system in a string format. Do not permit would-be attackers to get the date and time of the system, as it is useful for them to implement replay attacks.
390 Lotus Security Handbook
� The time service: This is the service that returns the time as a 32-bit value representing the number of seconds since midnight 1-Jan-1900. Do not permit would-be attackers to get the exact system time.
� The echo service: This is the diagnostic service that echoes incoming data back to the connecting machine. Do not permit would-be attackers to get information on systems that respond to such queries.
� The discard service: This is the diagnostic service that does not echo (thus discarding) the incoming data stream back to the connecting machine. Do not permit would-be attackers to send information into a black hole.
� The chargen service: This is the diagnostic service that automatically generates a stream of characters sent to the connecting machine. Do not permit would-be attackers to get a machine to generate a stream of data to be sent to another machine within or outside the organization’s network.
� The systat service: This is the service that provides a list of all processes and their status. Do not permit would-be attackers to get such vital information.
� The netstat service: This is the service that provides a list of current network connections and their status. Do not permit would-be attackers to get such vital information.
This is by no means an exhaustive list. A proper review of the UNIX system being installed should be done to sort out what services could be installed that open vulnerable access points and methods to and within the UNIX server.
9.4.4 Installing and configuring tcp_wrappersWe recommend that tcp_wrappers (created by Wietse Venema) be installed on the UNIX server to be hardened. The tcp_wrappers permit you to define access control to various services, depending on a limited set of criteria, such as, for example, the user’s name, IP address, or DNS domain. It is lightweight and extremely useful on internal servers, not just on external boxes that could be configured as firewalls, DMZ servers, or proxy servers (no matter whether they be the forward or the reserve kind). As well, it is installed and configured by default on most GNU/Linux distributions and BSD releases. For those UNIX systems that do not have tcp_wrappers installed by default, the source files can be found at the following URL (which can then be compiled and the binaries installed on the server):
ftp://ftp.porcupine.org/pub/security/index.html
The reason for installing such an additional component to the existing UNIX configuration is to avoid single points of failure and to provide security in layers. If one layer is breached or bypassed, other layers will be standing guard behind the breach.
Chapter 9. Server hardening 391
It’s useful to keep in mind that most information security breaches, intentional or accidental, happen internally. It's only the external defacements, massive distributed denial of service (DDoS) attacks, virus/worm/trojan of the day, and stolen credit card databases that grab press attention.
The tcp_wrappers additional component has two main files that allow access to the individually defined services. The following two files are checked for rules governing access to individual or wildcard services:
/etc/hosts.allow
/etc/hosts.deny
Like most machines that filter tcp/ip requests (such as firewalls or servers whose access is severely curtailed), access is granted or denied on the first matching rule. The rules are checked in order, first in hosts.allow and then in hosts.deny.
Be careful when using the KNOWN or UNKNOWN wildcards. ALL will always match whatever criteria is being tested. Read the hosts_access man page included with tcp_wrappers for further details on syntax and rules setup.
9.4.5 Tighten sendmail default optionsSendmail comes with just about every UNIX installation (including GNU/linux) as the default mail transfer agent (MTA). As a result of being so widely installed, it has been estimated that sendmail handles a majority of the e-mail on the Internet. Because it runs as suid root, the sendmail exploits affect millions of machines.
The latest version of sendmail supports new features such as STARTTLS and SMTP AUTH encryption. If an old version of sendmail is included with the UNIX operating system that is to be installed (meaning one that doesn’t support these new features), you should consider upgrading to the newest version available. At the very least, ensure that the version is no older than version 8.9.3 because of well-known security exploits.
To enable the Realtime Blackhole List feature, which will protect the system and users from spam, among other things, the following should be used in the sendmail.mc file:
FEATURE(rbl)dnl
Additionally, it’s advisable to disable the SMTP VRFY and EXPN commands in sendmail. These commands are often used by intruders to gather information about the server. Disable them using the following:
define('confPRIVACY_FLAGS', 'novrfy,noexpn')dnl
392 Lotus Security Handbook

There are several additional flags you can set to make sendmail behave in a more secure manner:
� authwarnings: The X-Authentication-Warning header should be added in messages on certain conditions that might indicate mail system spoof attempts.
� needmailhelo: Requires the sending site to use the SMTP HELO command first when connecting to send email.
� needexpnhelo: Requires the sending site to use the SMTP HELO command before allowing any EXPN usage.
� needvrfyhelo: Requires the sending site to use the SMTP HELO command before allowing any VRFY usage.
� noreceipts: Disables Delivery Status Notification (DSNs) of delivery and read receipts.
� goaway: Sets all flags except restrictmailq and restrictqrun.
� restrictmailq: Prevents users from using the mailq command to view the contents of the mail queue.
� restrictqrun: Stops users from processing the queue.
True, with the Domino server running atop the UNIX or GNU/Linux operating system, sendmail might just as well be turned off altogether and avoid this security vulnerability and concern.
9.4.6 Linux-specific tasksThere are many GNU/Linux distributions out there. At least one is so small, it fits entirely on a 1.44 MB floppy disk (and is called Minix). Each vendor has its own installation process, which usually changes between new versions of the vendor's distribution.
The forerunners of GNU/Linux distributions are Red Hat, SUSE, TurboLinux, Mandrake, Caldera, Slackware, and Debian.
While the idea is that a GNU/Linux distribution upon which Domino is supported should be used, some servers may use a different distribution altogether. This is because the high number of distributions allows vendors to tailor their GNU/Linux distributions to specific tasks such as embedded systems, routers, and firewalls. Carefully investigate the available distributions and determine which best fits the needs of the organization, given the server to be put in place and its role in the overall IT infrastructure.
With that said, two of the general distributions stand out, but for different reasons.
Chapter 9. Server hardening 393

� Red Hat: This distribution has the most name recognition and is usually the first to get any sort of corporate support in the way of commercial software or commercial technical service. Many vendors, including Oracle, IBM, and Check Point, have released products for Red Hat-specific distributions. This does not mean that those software releases will not run on other GNU/Linux distributions, but if there is a problem, the vendor might not support your installation of its product on a non-Red Hat distribution.
� Debian: This distribution also deserves mention. First, not because it is entirely free, but because it is maintained by a nonprofit organization made up entirely of volunteers. These volunteers are highly motivated by quality and pride in their efforts to make Debian the most stable and completely 100% free distribution available. Debian has proven to be extremely stable and easy to manage and upgrade remotely. The upgrade process is by far the easiest of any of the GNU/Linux distributions. Debian installations can be upgraded without the need for reboots, replacing every installed package and running process excepting the kernel. Additionally, the Debian packaging system and its front ends allow extremely fine-grained control over which packages, utilities, libraries, and files exist on your system. Debian also is currently available on six different architectures, with more than 3,900 included software packages to select from when installing.
Other noteworthy distributions are SUSE, which is the distribution of choice in Germany and sports a really good installation tool called YAST2, which makes installing the distribution incredibly easy. TurboLinux and Caldera are also on the list of supported GNU/Linux distributions upon which the Domino server will run.
For all GNU/Linux distributions that employ an installation tool, “Custom Installation” should be chosen and the individual packages needed for the server to be installed should be selected. Other than for ease of use, there should be no need to install development packages, any of the new KDE or GNOME desktops, and certainly not X Window (especially not in combination with Domino, since Domino works via a text console on the server). Unfortunately, none of the aforementioned distributions provides a minimal secure server predefined installation. It is therefore necessary to harden the server manually.
During the installation process, the “enable shadow password” file support should be chosen; likewise, MD5 hashes should be chosen for the passwords rather than the normal crypt function. If these options are not presented at install time, they can be changed after installation. In Red Hat, the setup utility should be used. In Debian, the shadowconfig utility should be used to enable or disable shadow passwords. For other distributions of GNU/Linux, check the man pages for details on this topic. To enable MD5 hashes, the appropriate files under /etc/pam.d should be edited to include md5 on the password lines.
394 Lotus Security Handbook
Support for ipchains should also be enabled, even if this is a server in the DMZ, because ipchains provides additional layers of security, and allows the server to be protected from traffic should the firewall fail for some reason.
Additionally, security and errata/updates lists should be read and monitored from the GNU/Linux distribution vendor. With Debian, it is extremely easy to automatically install security updates using the apt-get utility. For Red Hat installations starting with the 6.0 release, there is the up2date utility to retrieve updated packages for your release. Consult the GNU/Linux distribution vendor’s site for their implementation of such a tool, if it exists.
For those people who choose to install Red Hat Linux, there is a security-related project called Bastille Linux, whose aim is not just to harden your Linux installation, but to educate the administrators on how to harden the system.
Bastille Linux supports Red Hat and Mandrake Linux distributions, with project goals to become distribution, and UNIX flavor, agnostic. The Bastille Linux product is a set of scripts that asks a series of questions and then allows the installer (or administrator, which are not always the same person) to apply those modifications to the IT system. The questions describe what needs to be done, why it should be done, and why it might not be desirable to do it. It is very educational, especially for those administrators just getting familiar with Linux. Bastille Linux can be found at the following URL:
http://www.bastille-linux.org/
Another excellent source of information for administrators is the Linux Administrator's Security Guide. It covers an extremely wide array of topics related to Linux and security. The Linux Administrator's Security Guide can be found online at the following URL:
http://www.securityportal.com/lasg/
9.4.7 Solaris-specific tasksSolaris has four default install-sets: Core, End-User, Developer, and Entire Distribution. Installing any install-set higher than the Core installation will enable more services than are required for hardened servers. In reality, it is often possible to remove a significant percentage of the default Core install-set, depending on the server's application requirements.
For Solaris-based servers, there are several excellent documents from Sun in its Blueprints Online archive, which is available at the following URL:
http://www.sun.com/software/solutions/blueprints/online.html
Chapter 9. Server hardening 395
The following three papers are excellent starting points for building secure Solaris servers:
� “Solaris Operating Environment Minimization for Security: A Simple, Reproducible and Secure Application Installation Methodology” by Alex Noordergraaf and Keith Watson. Although this paper specifically covers the iPlanet Web server requirements, similar requirements are necessary for using Apache, Domino, or other Web servers.
� “Solaris Operating Environment Security” by Alex Noordergraaf and Keith Watson. This is an overview of general security options on a Solaris server. This paper includes some specifics for the SPARC architecture; however, most of the material is applicable to Intel® architectures as well.
� "Solaris Operating Environment Network Settings for Security" by Alex Noordergraaf and Keith Watson is another excellent paper on kernel tuning and application parameters that affect network security.
As a matter of fact, Sun's Blueprints Online is a wealth of whitepapers outlining best practices regarding Solaris Operating Environments, whether it is a Web server in the DMZ, a firewall, or an internal highly available Domino cluster.
Lance Spitzner also has an excellent Solaris hardening document that details the hardening process for building a Check Point FireWall-1 firewall on several recent versions of Solaris (through version 8) for the Intel and SPARC platforms. The living document resides at the following URL:
http://www.enteract.com/~lspitz/armoring.html
Finally, there is an equivalent to the Bastille-Linux hardening scripts for Solaris called TITAN. The TITAN project and documentation can be found at the following URL:
http://www.fish.com/titan/
9.4.8 Tweaking the network configurations for securityTo protect the organization’s WAN connections, firewall, and DMZ servers from common attacks, the following simple steps should be followed to disable certain TCP/IP features.
Dropping source-routed trafficThere are actually two forms of source-routed traffic: Strict Source-Routed and Loose Source-Routed. The differences aren't that important because it’s best to to drop all source-routed traffic.
396 Lotus Security Handbook
Traceroute is the most common command that uses source-routed traffic. This permits the diagnosis of trouble spots in the network by specifying the route to take.
Unfortunately, would-be attackers can use source-routed traffic to try and bypass firewall rules and TCP/IP filters. Dropping source-routed traffic should be done on the edge routers, and any capable security gateways:
� With Solaris, use the following command:
ndd -set /dev/ip ip_forward_src_routed 0
� For GNU/Linux 2.4.x, use this command:
echo 0 > /proc/sys/net/ipv4/conf/all/accept_source_route
Dropping directed broadcast trafficThe Smurf Denial of Service attack and others like it can be defeated by disabling directed broadcasts on the edge routers and servers exposed to the Internet:
� For Solaris, use the following command:
ndd -set /dev/ip ip_forward_directed_broadcasts 0
Ignoring ICMP echo request broadcastsThere is a draft RFC named draft-vshah-ddos-smurf-00, which can be found at the following URL:
http://www.ietf.org/internet-drafts/draft-vshah-ddos-smurf-00.txt
It states that if the network node is set to reply to an IP ICMP echo reply on a broadcast or multicast address, the node must check to make sure that the source address is on a local network of the network node. If the source address is not local, the reply must be discarded. Changing the behavior to not respond to ICMP broadcasts ensures that those replies are always discarded:
� With Solaris, use the following command:
ndd -set /dev/ip ip_respond_to_echo_broadcast 0
� With GNU/Linux 2.4.x, use the following command:
echo 1 > /proc/sys/net/ipv4/icmp_echo_ ignore_broadcasts
GNU/Linux has an additional control to disable all ICMP Echo Reply requests. Issuing the following command will make the Linux kernel ignore all ICMP Echo Requests:
echo 1 > /proc/sys/net/ipv4/icmp_echo_ignore_all
Chapter 9. Server hardening 397
Ignoring ICMP redirect messagesA would-be attacker might try to redirect traffic from the organization’s servers to a different gateway or a non-existent gateway. Additionally, the would-be attacker might try to inject bogus routes into the server’s routing table.
All these can be accomplished through the unassuming ICMP Redirect Message, and it is a very effective denial of service attack. In addition to blocking ICMP Redirect messages at the firewall, if the operating system supports it, the following additional layer of security of ignoring ICMP Redirect messages should be added:
� With Solaris, use the following command:
ndd -set /dev/ip ip_ignore_redirect 1
� With GNU/Linux 2.4.x, the command is:
echo 0 > /proc/sys/net/ipv4/conf/all/accept_redirects
Disable sending of ICMP Redirect messagesOnly routers need to send ICMP Redirect messages. Because the organization’s DMZ servers and firewall are not routing any packets, there should be no reason to send them:
� For Solaris, use the following command:
ndd -set /dev/ip ip_send_redirects 0
� For GNU/Linux 2.4.x, the command is:
echo 0 > /proc/sys/net/ipv4/conf/ all/send_redirects
Timestamp request broadcastAn ICMP timestamp request (ICMP type 13) allows a system to query another for the current time. The return value is the number of milliseconds since midnight.
ICMP timestamp requests have been used to synchronize clocks between systems rather than using the rdate command because the precision is better.
Individual timestamp requests are normal, but there is no need for a system to respond to a broadcast request. Finally, NTP should be looked at in order to keep time synchronized between servers because it is much better at keeping the time, and allows for authentication and peering of multiple time sources, which makes it much harder to spoof. This makes it possible to ICMP type 13 (timestamp request) and type 14 (timestamp reply) altogether:
� With Solaris, use the following command:
ndd -set /dev/ip ip_respond_to_timestamp_ broadcast 0
398 Lotus Security Handbook
9.4.9 Remote log serverOne of the many techniques would-be attackers use to cover their presence is to wipe clean any logging facilities that may (or rather should) have been enabled. This includes: account logging, system messages, error logs, traffic logs, and so forth.
One way to circumvent this problem is to log all of the organization’s servers to a remote logging machine. The remote logging machine should only accept logging traffic from those servers. That way, even if a server is compromised, the logs will still be available to perform the forensic analysis of what went on.
The appropriate packet filter should be configured on the logging server to drop all traffic except UDP/514. The logs on the logging server can additionally be archived to media such as CD-R, WORM, or tape.
UNIX has very strong centralized logging facilities. It is true that some applications use their own log files and do not use syslog. However, the file system hierarchy is designed with support for a centralized location, /var/log.
Additionally, most UNIX systems and GNU/Linux distributions come with an automated log rotation and management facility. The logs are automatically rotated, based on criteria such as size or age; and can automatically be compressed, renamed, and even archived.
To further enhance the logging capabilities of the UNIX or GNU/Linux server, the normal syslogd should be replaced with a more robust, configurable, and secure alternative known as syslog-ng. It has several enhancements over the normal syslogd, including the ability to filter messages on message content, not just facility.priority pairs.
Using regular expressions, host information could be logged into individual logs. syslog-ng might already come with the UNIX operating system or GNU/Linux distribution, but if it does not, it can be found at the following URL:
http://www.balabit.hu/en/products/syslog-ng/
This concludes the discussion on hardening UNIX operating systems and GNU/Linux distributions. While this material applies to AIX as well, AIX has some unique traits, which are covered separately in the next section.
9.5 Hardening the AIX operating systemAIX is an open UNIX operating environment that provides increased levels of integration, flexibility, and reliability that are essential for meeting the high
Chapter 9. Server hardening 399
demands of today’s e-business applications. This focus on versatility allows AIX to be used under a wide variety of workloads, from running on a symmetric multiprocessor capable of managing thousands of transactions per minute, to running on a single-node workstation used for application development.
Because one of the goals of AIX is to achieve this level of versatility and power, many services are immediately available when the installation of the operating system is finished. However, this can result in a configuration that is vulnerable to security exposures if the system is not configured appropriately.
To minimize the number of possible security exposures, the AIX system administrator must be able to identify the workload characteristics of the environment.
This section provides AIX hardening information, although it is not meant to be a singular source of information on all AIX-related security issues, such as when to use the Lightweight Directory Access Protocol (LDAP) or Internet Protocol Security (IPsec). For information on those and other issues, refer to the appropriate documentation sources listed on the IBM AIX Web page at:
http://www-1.ibm.com/servers/aix/library/index.html
The information in this section includes enforcing adequate password rules, implementing proper user-security mechanisms, enabling system auditing, and monitoring file and directory access. Also covered are important X11 and CDE security issues, as well as how to identify open communication ports and list open files.
As you consider the material that applies to the AIX server’s security needs, it’s important to identify those files that need to be modified and back them up. It is always a good idea to back up modified files because this action permits you to revert to a previous configuration if there is a need to restore the previous security settings. After the modifications are complete, have been thoroughly tested, and work as planned, the backup files should be stored in a secure place outside the newly secured system, such as on a backup server. This precaution will prevent unauthorized reinstatement of the previous configuration, which would disable all system-hardening modifications that were made.
Finally, as with other operating systems covered, all hardening procedures should be done before the system goes into production. Bringing the system down when it is in production could prove costly to the organization, even if the objective is to make it more secure.
400 Lotus Security Handbook
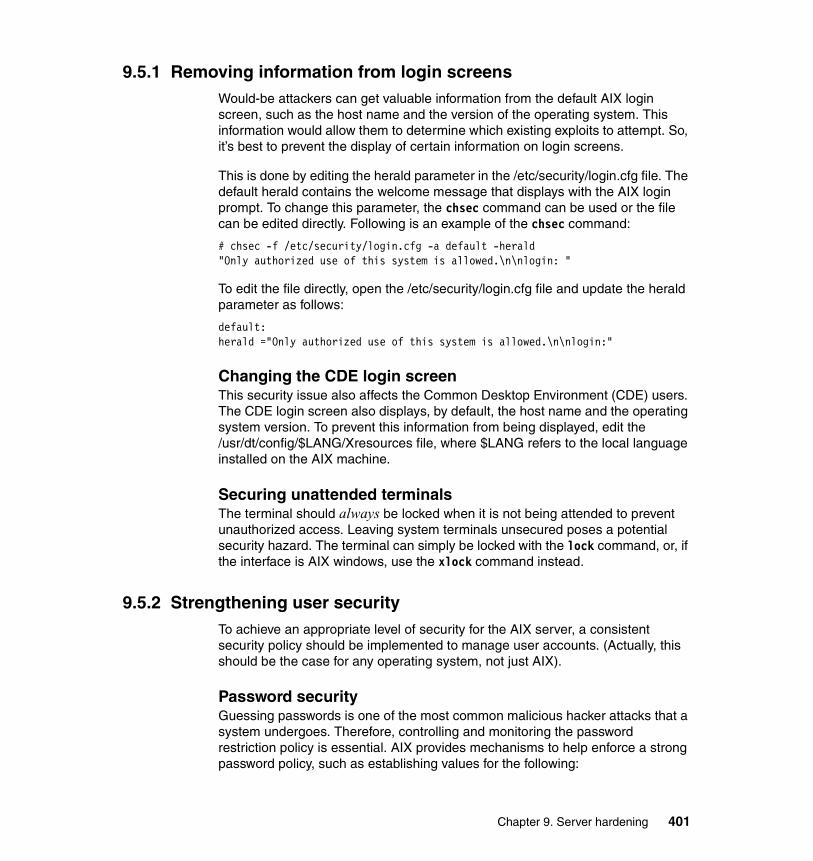
9.5.1 Removing information from login screensWould-be attackers can get valuable information from the default AIX login screen, such as the host name and the version of the operating system. This information would allow them to determine which existing exploits to attempt. So, it’s best to prevent the display of certain information on login screens.
This is done by editing the herald parameter in the /etc/security/login.cfg file. The default herald contains the welcome message that displays with the AIX login prompt. To change this parameter, the chsec command can be used or the file can be edited directly. Following is an example of the chsec command:
# chsec -f /etc/security/login.cfg -a default -herald"Only authorized use of this system is allowed.\n\nlogin: "
To edit the file directly, open the /etc/security/login.cfg file and update the herald parameter as follows:
default:herald ="Only authorized use of this system is allowed.\n\nlogin:"
Changing the CDE login screenThis security issue also affects the Common Desktop Environment (CDE) users. The CDE login screen also displays, by default, the host name and the operating system version. To prevent this information from being displayed, edit the /usr/dt/config/$LANG/Xresources file, where $LANG refers to the local language installed on the AIX machine.
Securing unattended terminalsThe terminal should always be locked when it is not being attended to prevent unauthorized access. Leaving system terminals unsecured poses a potential security hazard. The terminal can simply be locked with the lock command, or, if the interface is AIX windows, use the xlock command instead.
9.5.2 Strengthening user securityTo achieve an appropriate level of security for the AIX server, a consistent security policy should be implemented to manage user accounts. (Actually, this should be the case for any operating system, not just AIX).
Password securityGuessing passwords is one of the most common malicious hacker attacks that a system undergoes. Therefore, controlling and monitoring the password restriction policy is essential. AIX provides mechanisms to help enforce a strong password policy, such as establishing values for the following:
Chapter 9. Server hardening 401

� Minimum and maximum number of weeks that can elapse before and after a password can be changed
� Minimum length of a password
� Minimum number of alphabetic characters that can be used when selecting a password
In addition to these mechanisms, it is possible to enforce even stricter rules by restricting passwords so that they cannot include standard UNIX words, which might be hacked. This feature uses the dictionlist, which requires that the bos.data and bos.txt files be previously installed.
To implement the dictionlist, add the following line to the /etc/security/users file:
dictionlist = /usr/share/dict/words
The /usr/share/dict/words file will now use the dictionlist to prevent standard UNIX words from being used as passwords.
Disabling direct root loginA common method of would-be attackers is to obtain the super user, or root, password. To avoid this type of attack, it is possible to disable direct access to the root ID and then require the AIX system administrators to obtain super-user privileges by using the su command.
In addition to allowing the removal of the root user as a point of attack, restricting direct root access permits you to monitor which users gained super-user access, as well as the time of their action. This can be done by viewing the /var/adm/sulog file. Another alternative is to enable system auditing, which will report this type of activity.
To disable remote login access for the root user, edit the /etc/security/user file. The value “false” should be specified as the rlogin value on the entry for root.
Before disabling the remote root login, it is very important to examine and plan for situations that would prevent an AIX system administrator from logging in under a non-root user ID. For example, if a user’s home file system is full, then the user would not be able to log in. If the remote root login were disabled and the user who could su to root had a full home file system, then root could never take control of the system. This issue can be bypassed by system administrators creating home file systems for themselves that are larger than the average user’s file system.
Enforcing automatic logoffAnother valid security concern results from users leaving their accounts unattended for a lengthy period of time. This situation allows a would-be attacker
402 Lotus Security Handbook
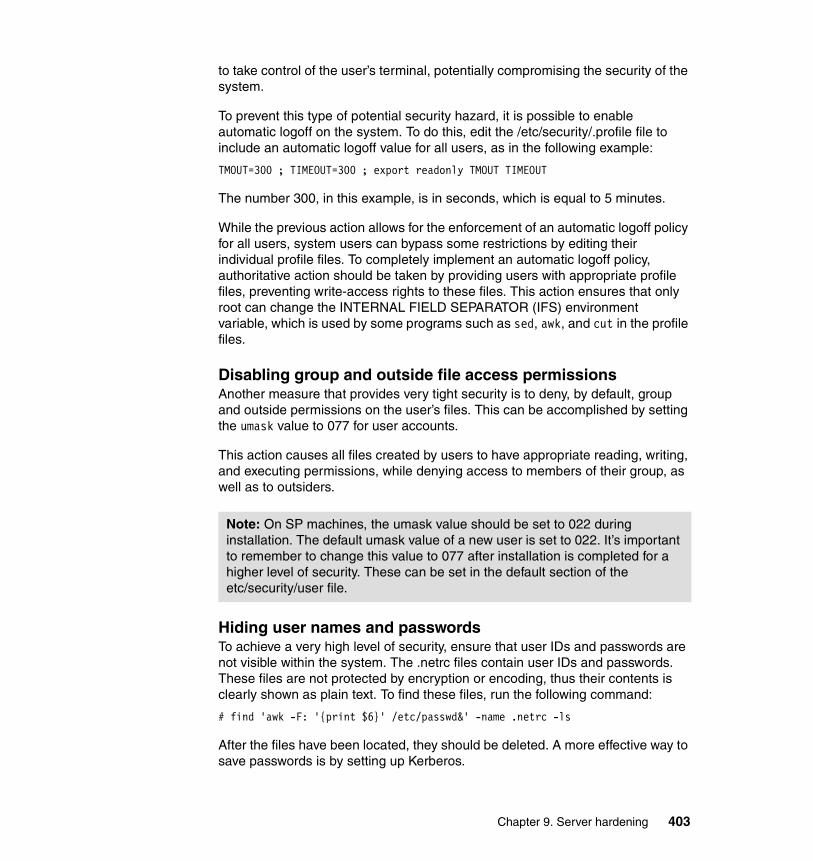
to take control of the user’s terminal, potentially compromising the security of the system.
To prevent this type of potential security hazard, it is possible to enable automatic logoff on the system. To do this, edit the /etc/security/.profile file to include an automatic logoff value for all users, as in the following example:
TMOUT=300 ; TIMEOUT=300 ; export readonly TMOUT TIMEOUT
The number 300, in this example, is in seconds, which is equal to 5 minutes.
While the previous action allows for the enforcement of an automatic logoff policy for all users, system users can bypass some restrictions by editing their individual profile files. To completely implement an automatic logoff policy, authoritative action should be taken by providing users with appropriate profile files, preventing write-access rights to these files. This action ensures that only root can change the INTERNAL FIELD SEPARATOR (IFS) environment variable, which is used by some programs such as sed, awk, and cut in the profile files.
Disabling group and outside file access permissionsAnother measure that provides very tight security is to deny, by default, group and outside permissions on the user’s files. This can be accomplished by setting the umask value to 077 for user accounts.
This action causes all files created by users to have appropriate reading, writing, and executing permissions, while denying access to members of their group, as well as to outsiders.
Hiding user names and passwordsTo achieve a very high level of security, ensure that user IDs and passwords are not visible within the system. The .netrc files contain user IDs and passwords. These files are not protected by encryption or encoding, thus their contents is clearly shown as plain text. To find these files, run the following command:
# find 'awk -F: '{print $6}' /etc/passwd&' -name .netrc -ls
After the files have been located, they should be deleted. A more effective way to save passwords is by setting up Kerberos.
Note: On SP machines, the umask value should be set to 022 during installation. The default umask value of a new user is set to 022. It’s important to remember to change this value to 077 after installation is completed for a higher level of security. These can be set in the default section of the etc/security/user file.
Chapter 9. Server hardening 403
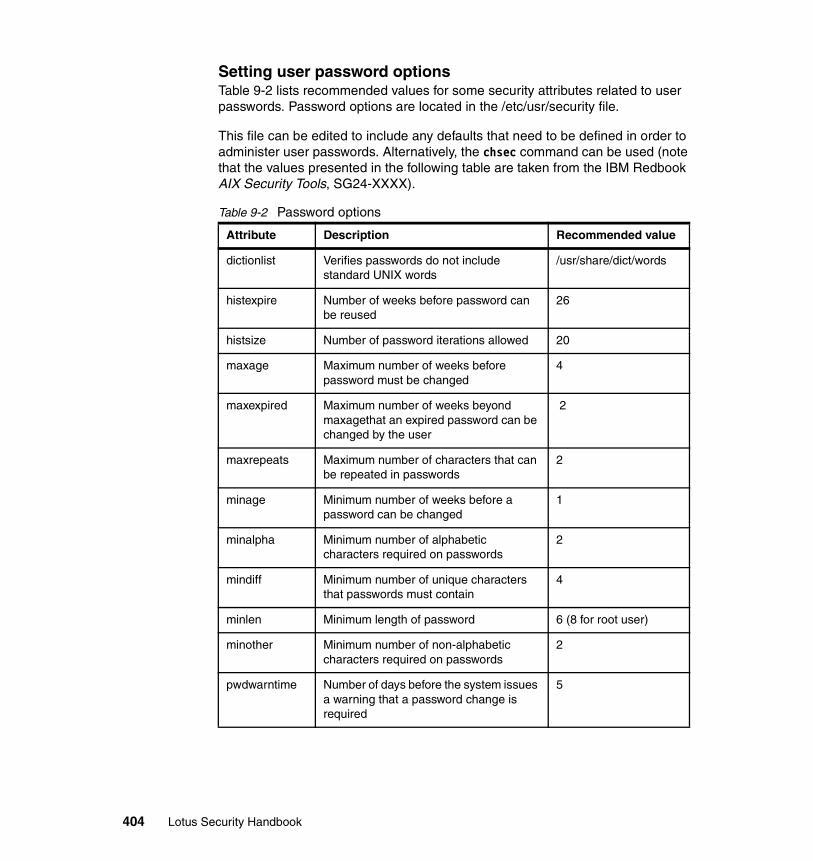
Setting user password optionsTable 9-2 lists recommended values for some security attributes related to user passwords. Password options are located in the /etc/usr/security file.
This file can be edited to include any defaults that need to be defined in order to administer user passwords. Alternatively, the chsec command can be used (note that the values presented in the following table are taken from the IBM Redbook AIX Security Tools, SG24-XXXX).
Table 9-2 Password options
Attribute Description Recommended value
dictionlist Verifies passwords do not include standard UNIX words
/usr/share/dict/words
histexpire Number of weeks before password can be reused
26
histsize Number of password iterations allowed 20
maxage Maximum number of weeks before password must be changed
4
maxexpired Maximum number of weeks beyond maxagethat an expired password can be changed by the user
2
maxrepeats Maximum number of characters that can be repeated in passwords
2
minage Minimum number of weeks before a password can be changed
1
minalpha Minimum number of alphabetic characters required on passwords
2
mindiff Minimum number of unique characters that passwords must contain
4
minlen Minimum length of password 6 (8 for root user)
minother Minimum number of non-alphabetic characters required on passwords
2
pwdwarntime Number of days before the system issues a warning that a password change is required
5
404 Lotus Security Handbook
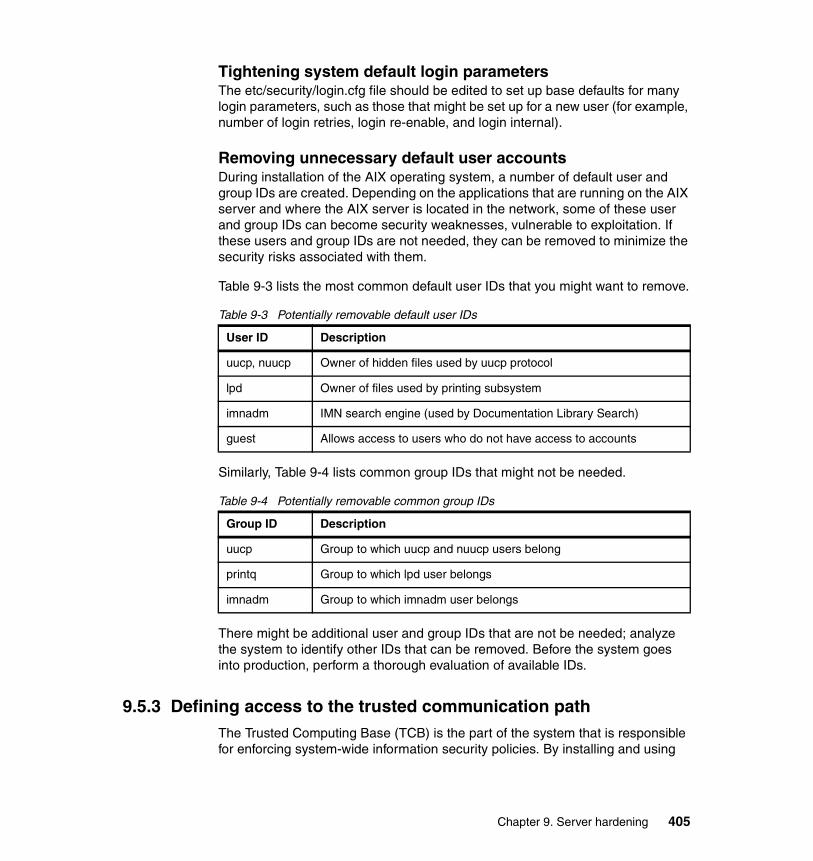
Tightening system default login parametersThe etc/security/login.cfg file should be edited to set up base defaults for many login parameters, such as those that might be set up for a new user (for example, number of login retries, login re-enable, and login internal).
Removing unnecessary default user accountsDuring installation of the AIX operating system, a number of default user and group IDs are created. Depending on the applications that are running on the AIX server and where the AIX server is located in the network, some of these user and group IDs can become security weaknesses, vulnerable to exploitation. If these users and group IDs are not needed, they can be removed to minimize the security risks associated with them.
Table 9-3 lists the most common default user IDs that you might want to remove.
Table 9-3 Potentially removable default user IDs
Similarly, Table 9-4 lists common group IDs that might not be needed.
Table 9-4 Potentially removable common group IDs
There might be additional user and group IDs that are not be needed; analyze the system to identify other IDs that can be removed. Before the system goes into production, perform a thorough evaluation of available IDs.
9.5.3 Defining access to the trusted communication pathThe Trusted Computing Base (TCB) is the part of the system that is responsible for enforcing system-wide information security policies. By installing and using
User ID Description
uucp, nuucp Owner of hidden files used by uucp protocol
lpd Owner of files used by printing subsystem
imnadm IMN search engine (used by Documentation Library Search)
guest Allows access to users who do not have access to accounts
Group ID Description
uucp Group to which uucp and nuucp users belong
printq Group to which lpd user belongs
imnadm Group to which imnadm user belongs
Chapter 9. Server hardening 405
the TCB, it is possible to define user access to the trusted communication path, which allows for secure communication between users and the TCB.
TCB features can only be enabled when the operating system is installed. To install TCB on an already installed machine, a preservation installation must be performed. Enabling TCB allows the trusted shell to be accessed, as well as trusted processes and the Secure Attention Key (SAK).
Because every device is part of the TCB, every file in the /dev directory is monitored by TCB. In addition, the TCB automatically monitors over 600 additional files, storing critical information about these files in /etc/security/syschk.cfg. If TCB is installed, immediately after installing, this file should be backed up to removable media, such as tape, CD, or disk, and the media stored in a secure place.
9.5.4 Dealing with special situationsAIX system administrators may be required to contend with many situations when strengthening their systems. This section discusses these special situations.
Special permissionsIf special permissions are set up for users and groups, the special permissions being granted should be documented and the steps outlined to deal with security issues. Unless special situations are documented, others will not be aware of those special situations and may bypass the steps that have been put in place.
Special privilegesWhen new software is installed, such as Domino server or a DB2 server, there can be issues with new accounts being created, along with special privileges for those accounts. Be aware of new IDs, their privileges and their ownership of files and directories, so that there is no inadvertent circumvention of the organization’s security policy.
Special passwords� Power-on password: The power-on password, when set, prevents someone
from rebooting the server by simply turning it off and then turning it back on again. If a bootable CD media is inserted into the CD-ROM drive, the system is rebooted, then the system will boot off the CD and therefore not adhere to its security configuration, causing a security exposure. If a system is rebooted, if the power-on password is set, the system will require that power on password during the boot cycle. This may affect the Service Level Agreements (SLAs) in place since there may be a certain lapse of time between the moment the server reboots to the point of the power on
406 Lotus Security Handbook
password being requested and allowed to continue its boot-up sequence after the password is entered. Ideally, the security policy for the organization will establish precedence (security over service agreements).
� Supervisory password: This is a password which prevents an unauthorized user from booting the server into maintenance mode using installation media (installation CD, mksysb tape/CD). Booting off of such media allows full access to files and directories without security restrictions that are in place. A supervisory password locked system, if the password is lost, will need to be serviced by IBM in order to unlock it.
� Root password: This is the super-user password which may need to be used from the time to time. It’s important to be aware of when the root account will need to be used, and plans should be in place in the organization’s security implementation to address these instances.
Security weaknessesEvery good AIX system administrator should be aware of systems in the organization’s IT infrastructure that might have security weaknesses. If a would-be intruder breaks into a machine located inside the organization’s network, access may be granted to other machines through permissions set up between the point of entry machine and other systems in the network.
Some would-be attackers scan networks for certain machine types and certain versions of operating systems to find one to break into, and they can then use that point of entry to gain access to all other machines in the network.
9.5.5 Enabling system auditingUsers regularly perform various system actions that will need to be monitored more closely. By setting up system auditing, it is possible to record security-relevant information, which can be analyzed to detect potential and actual violations of the system security policy.
Predefined audit events can be found in the /etc/security/audit/events file. Automated auditing can be set up using the cron facility to generate regular reports.
9.5.6 Monitoring files, directories, and programsOur discussion on hardening would not be complete without looking at the mechanisms that can be used to monitor access to files, directories, and executable programs.
Chapter 9. Server hardening 407
Removing obsolete filesOccasionally, there is a need to remove unwanted and unneeded files from the AIX server.
AIX provides the system administrator with the skulker command, which can automatically track and remove obsolete files. This facility works on candidate files located in the /tmp directory, executable a.out files, core files, and ed.hup files. To run the skulker command, type the following at the command prompt:
# skulker -p
You can automate the skulker command by setting up the cron facility to perform this task regularly.
Removing unowned filesWhen a user ID is removed, that user’s files then have no owner assigned to them. To identify files that have no owner, use the find command as follows:
# find / -nouser -ls
After identifying files that have no owners, determine whether the files are needed. If they are needed, they should be assigned to a different user. Alternatively, these files can be removed from the system.
Managing unauthorized remote host accessSome programs use the .rhosts file to gain access to a system. In some cases, access can be granted to unauthenticated users. To avoid this situation, the .rhosts file should be removed from the AIX server.
For HACMP clusters, .rhosts files are required. Instead of removing them from these configurations, the permissions should be set to 600 and ownership of the files should be assigned to root.system.
To find .rhosts files, run the following command:
# find / -name .rhosts -ls
Monitoring executable filesTo monitor the activity of critical executable files, a good understanding of how these files are being used is required. The executable files that need to be monitored are those that are owned by root and have either their SUID or SGID bits set.
After carefully monitoring these files during normal system activity, a report can be generated that includes a list of files that are normally executed. This report can then be validated against subsequent reports that show new files with these
408 Lotus Security Handbook
attributes that were set without the knowledge of the AIX system administrators. To create the baseline report, run the following commands:
# find / -perm -4000 -user 0 -ls# find / -perm -2000 -user 0 -ls
Managing cron and at jobsTo manage cron and at jobs, do the following:
� Make sure the only user listed in cron.allow and at.allow files is root.
� Remove the cron.deny and at.deny from the var/adm/cron directory.
� Ensure that cron and at jobs are owned and writable only by root.
9.5.7 Managing X11 and CDE concernsThis section discusses potential security vulnerabilities involved with the XII X server and the Common Desktop Environment (CDE).
Removing the /etc/rc.dt fileAlthough running the CDE graphical user interface (GUI) is convenient for users, security issues are associated with it. For this reason, CDE should not be run on servers that require a high level of security.
The best solution is to avoid installing CDE (dt) file sets. If these sets have been installed on the AIX server, their uninstallation should be considered, especially /etc/rc.dt script, which starts CDE.
Preventing unauthorized monitoring of remote X serverAn important security issue associated with the X11 server is the unauthorized silent monitoring of a remote server. The xwd and xwud commands can be used to monitor X server activity because they have the ability to capture keystrokes, which can expose passwords and other sensitive data. To solve this problem, remove these executable files unless they are necessary under the present server configuration, or, as an alternative, permit access to these commands to root only.
The xwd and xwud commands can be found in the X11.apps.clients file set.
If the xwd and xwud commands need to be retained, consider using OpenSSH or MIT Magic Cookies. These third-party applications help prevent the risks that are created by running the xwd and xwud commands.
Chapter 9. Server hardening 409
Enabling and disabling access controlThe X server allows remote hosts to use the xhost + command to connect to the AIX server. Ensured that a host name is specified with the xhost + command because it disables access control for the X server. This permits the granting of access to specific hosts, which eases monitoring for potential attacks to the X server. To grant access to a specific host, run the xhost command as follows:
# xhost + hostname
Disabling user permissions to run the xhost commandAnother way to ensure that the xhost command is being used appropriately is to restrict execution of this command to superuser authority only. To do this, use the chmod command to change the permissions of /usr/bin/X11/xhost to 744, as follows:
chmod 744/usr/bin/X11/xhost
Ensured that a host name is specified with the xhost command. This allows access to be granted to specific hosts, which simplifies monitoring for potential attacks to the X server.
9.5.8 Disabling unnecessary servicesThis section discusses open communication ports, how they can be identified, and how to close these ports.
Identifying network services with open communication portsClient-server applications open communication ports on the server, allowing the applications to listen to incoming client requests.
Because open ports are vulnerable to potential attacks, identify which applications have open ports; any ports that are open unnecessarily should be closed. This exercise is useful because it allows system administrators to understand what systems are being made available to anyone who has access to the Internet.
To determine which ports are open, do the following:
1. Identify the services with the netstat command as follows:
# netstat -af inet
Note: If a host name is not specified, access will be granted to all hosts.
410 Lotus Security Handbook

The output of the command is fairly straightforward to interpret. The last column of the netstat command output indicates the state of every service. Services that are waiting for incoming connections are in the LISTEN state.
2. After identifying which services are listening, open the /etc/services file and check it using the Internet Assigned Numbers Authority (IANA) services to map the service to port numbers within the operating system.
3. Close down the unnecessary ports by removing the running services.
Listing open filesIt is useful to identify TCP sockets that are in LISTEN state and idle UDP sockets that are waiting for data to arrive.
Use the lsof command, which is a variant of the netstat -af command, to do this. The lsof command is included with AIX 5.1 and is located on the AIX Toolbox for Linux ApplicationsCD.
For example, to display the TCP sockets in LISTEN state and the UDP sockets in IDLE state, run the lsof command as follows:
# lsof -i | egrep "COMMAND|LISTEN|UDP"
After identifying the process ID, it is possible to obtain more information about the program by executing the following command:
" # ps -fp PID#"
The output contains the path to the command name, which can be used to access the program’s man page.
9.6 SummaryIn this chapter we have reviewed the tools and techniques used to protect IT systems from and prevent attacks.
We covered operating system hardening tips, common tools and programs used to create a solid defense, and popular methods used by security professionals to gather intelligence in case an attacker breaches the outer defenses.
The information we have presented can be of benefit to any size organization, from a small home-based enterprise to a very large organization with offices around the world.
The most important thing to remember, though, is that no IT system is 100% secure 100% of the time.
Chapter 9. Server hardening 411

So, it’s important to understand that once the system – and its security – are in place, the next phase of security work must begin. That is, it’s time to monitor the IT system and determine what improvements can be brought to the system to continue and enhance its security and maintain the integrity and confidentiality of the information it contains. Then and only then, will there be proper and adequate security in place.
412 Lotus Security Handbook

Part 3 Security features of Lotus products
The part discusses the specific security features included in the latest versions of Lotus products. Detailed security features of Lotus Notes and Domino 6, Sametime 3, QuickPlace 2.08, Domino Web Access (iNotes) 6.x, WebSphere Portal 4.x, and other IBM/Lotus collaborative technologies are all discussed.
This part may be most appropriate for those looking to learn what’s new in terms of security for specific Lotus products, or those looking for some hints and tips on securing specific Lotus products.
Part 3
© Copyright IBM Corp. 2004. All rights reserved. 413

414 Lotus Security Handbook

Chapter 10. The Notes/Domino security model
This chapter outlines the overall security architecture utilized in a Notes/Domino environment. It provides a basic background as to how Domino security functions in a secure environment. Those already familiar with the Notes/Domino security model may find this chapter a bit repetitive. However, we felt it necessary to cover the basics here for those new to the Notes/Domino world.
10
© Copyright IBM Corp. 2004. All rights reserved. 415

10.1 Components of the Notes/Domino security model At its most basic, there are three components of the Notes security model: server (physical) access, database access, and data access. The server contains the database, which contains the data, as best shown in Figure 10-1.
Figure 10-1 The three components of the Notes security model
From this we can identify three types of overall security concerns which we must consider: physical security, network security and Notes security. This is illustrates in Figure 10-2.
Figure 10-2 The three types of security concerns
Here we can see that server security needs to be dealt with from a physical, network and Notes security perspective, whereas database and data protection (for the purposes of this security concept), need to be dealt with only from a Notes security perspective. In order to be as clear as possible, we look at each type of security and make recommendations and suggestions for organizations wanting to implement it.
416 Lotus Security Handbook
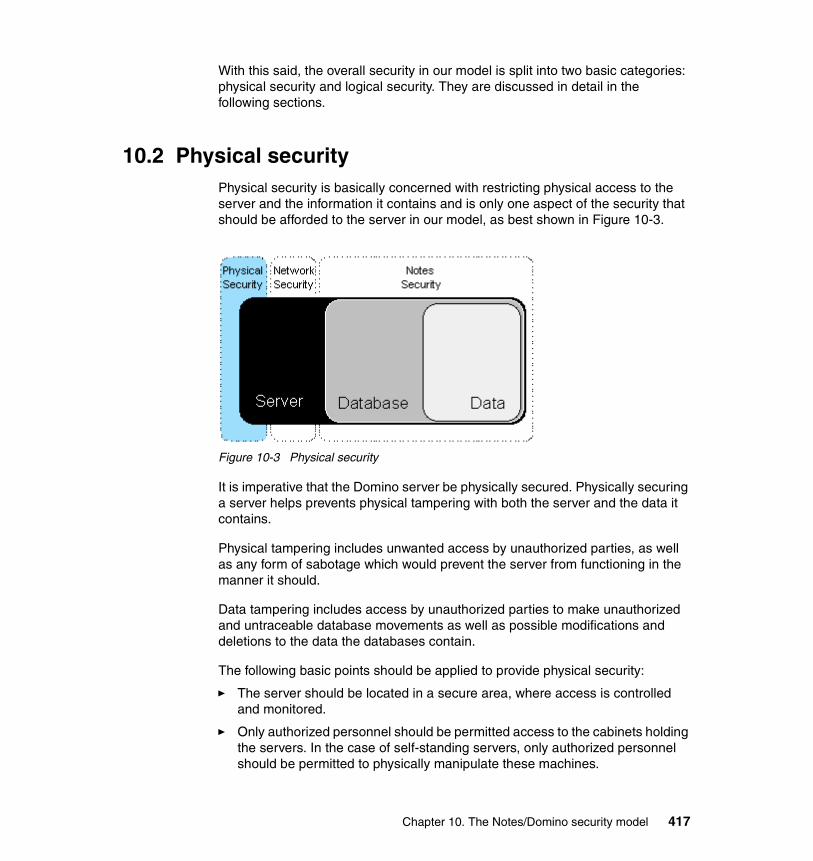
With this said, the overall security in our model is split into two basic categories: physical security and logical security. They are discussed in detail in the following sections.
10.2 Physical security Physical security is basically concerned with restricting physical access to the server and the information it contains and is only one aspect of the security that should be afforded to the server in our model, as best shown in Figure 10-3.
Figure 10-3 Physical security
It is imperative that the Domino server be physically secured. Physically securing a server helps prevents physical tampering with both the server and the data it contains.
Physical tampering includes unwanted access by unauthorized parties, as well as any form of sabotage which would prevent the server from functioning in the manner it should.
Data tampering includes access by unauthorized parties to make unauthorized and untraceable database movements as well as possible modifications and deletions to the data the databases contain.
The following basic points should be applied to provide physical security:
� The server should be located in a secure area, where access is controlled and monitored.
� Only authorized personnel should be permitted access to the cabinets holding the servers. In the case of self-standing servers, only authorized personnel should be permitted to physically manipulate these machines.
Chapter 10. The Notes/Domino security model 417

� Unauthorized users should not have the ability to use the server console.
� Domino administrators should only access the Domino servers via the Administration Tools provided by Lotus (that is, the Domino Administration 6 Client or, for administrators using a Web browser, the Web Administrator 6 tool using the WebAdmin.nsf database).
� Users should not be allowed access to the programs or data on the server via any means other than using the Notes client or a Web browser (that is, no Telnet, FTP, or file sharing access).
10.3 Logical securityLogical security is concerned with restricting access to the networking and Notes data components, as illustrated in Figure 10-4.
Figure 10-4 Logical security
We discuss network security and Notes security separately because each has specific elements that must be understood and applied for security to be effective within the new architecture.
10.3.1 Network securityNetwork security applies to the technologies and equipment that permit the communication of data between devices. This can be communications between servers; it can be also between clients and servers. In regard to the client/server communications, it can be from a Notes client to a Domino server or a Web browser to a Domino server. While networks have the ability to provide peer-to-peer services (that is, server-to-server and client-to-client), in the Notes
418 Lotus Security Handbook
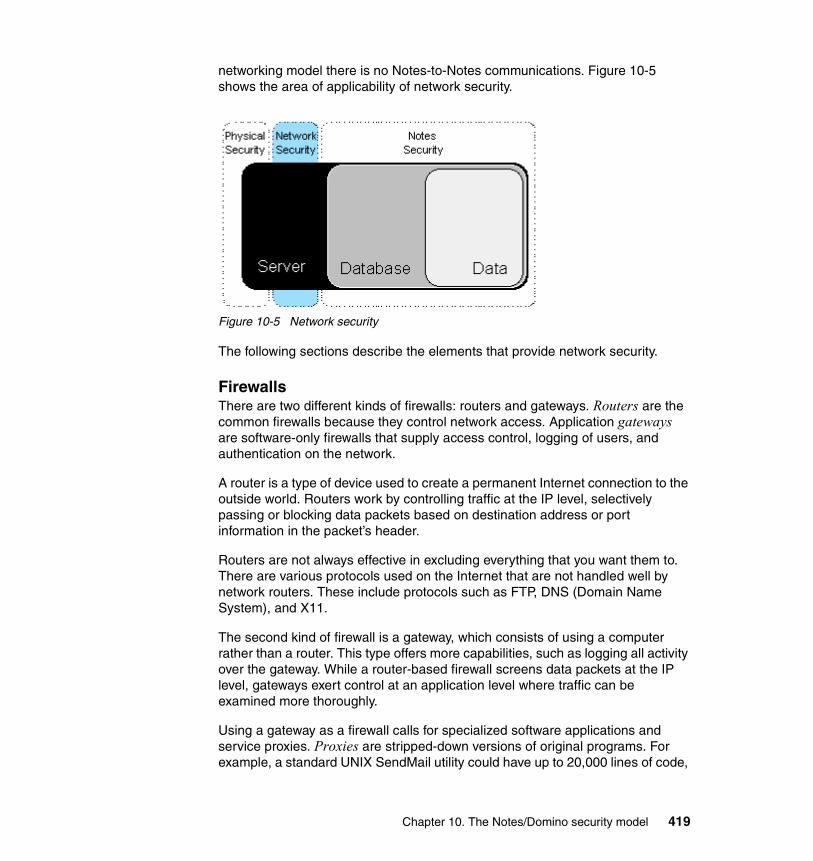
networking model there is no Notes-to-Notes communications. Figure 10-5 shows the area of applicability of network security.
Figure 10-5 Network security
The following sections describe the elements that provide network security.
FirewallsThere are two different kinds of firewalls: routers and gateways. Routers are the common firewalls because they control network access. Application gateways are software-only firewalls that supply access control, logging of users, and authentication on the network.
A router is a type of device used to create a permanent Internet connection to the outside world. Routers work by controlling traffic at the IP level, selectively passing or blocking data packets based on destination address or port information in the packet’s header.
Routers are not always effective in excluding everything that you want them to. There are various protocols used on the Internet that are not handled well by network routers. These include protocols such as FTP, DNS (Domain Name System), and X11.
The second kind of firewall is a gateway, which consists of using a computer rather than a router. This type offers more capabilities, such as logging all activity over the gateway. While a router-based firewall screens data packets at the IP level, gateways exert control at an application level where traffic can be examined more thoroughly.
Using a gateway as a firewall calls for specialized software applications and service proxies. Proxies are stripped-down versions of original programs. For example, a standard UNIX SendMail utility could have up to 20,000 lines of code,
Chapter 10. The Notes/Domino security model 419

but a SendMail application proxy could have up to 700 lines. A proxy would pass on information after verifying that it fit the programmed restrictions.
Isolation networksAn isolation network can also serve as a firewall. This is similar to a host-based system except that another subnetwork is created. This subnetwork sits between the external and internal networks. This network is configured so that both the Internet and the private network can access it, but the traffic across the isolation network is blocked. This type of firewall can simplify the establishment and enforcement of new Internet addresses. This can benefit large networks by freeing them from the need for a lot of reconfiguration.
A classic example is that of a demilitarized zone (DMZ), in which there is a network connecting the internal, private network and the external, public network (which is generally the Internet). The idea here is to provide a buffer zone in an effort to contain any outside attacks. External devices can only connect to isolation network devices, which in turn connect exclusively with the internal network. At no time does an external device connect directly to an internal device.
Network port securityNetwork port security can be used to block input to an Ethernet, Fast Ethernet, Gigabit Ethernet, or Token Ring port when the Media Access Control (MAC) address of the station attempting to access the port is different from any of the MAC addresses specified for that port.
In the event of a security violation, you can configure the port to go into shutdown mode or restrictive mode. The shutdown mode is further configurable by specifying whether the port will be permanently disabled or disabled for only a specified time. The default behavior during a security violation is for the port to shut down permanently. The restrictive mode allows you to configure the port to remain enabled during a security violation and drop only packets that are coming in from insecure hosts.
When a secure port receives a packet, the source MAC address of the packet is compared to the list of secure source addresses that were manually configured or autoconfigured (learned) on the port. If a MAC address of a device attached to the port differs from the list of secure addresses, the port either shuts down permanently, shuts down for the time you have specified, or drops incoming packets from the insecure host. The port's behavior depends on how you configure it to respond to a security violation.
Network port security also can be implemented higher in the OSI 7-layer security model, namely at the TCP/IP level (transport and network levels), where only the needed TCP and UDP ports can be opened to support the services the server is
420 Lotus Security Handbook
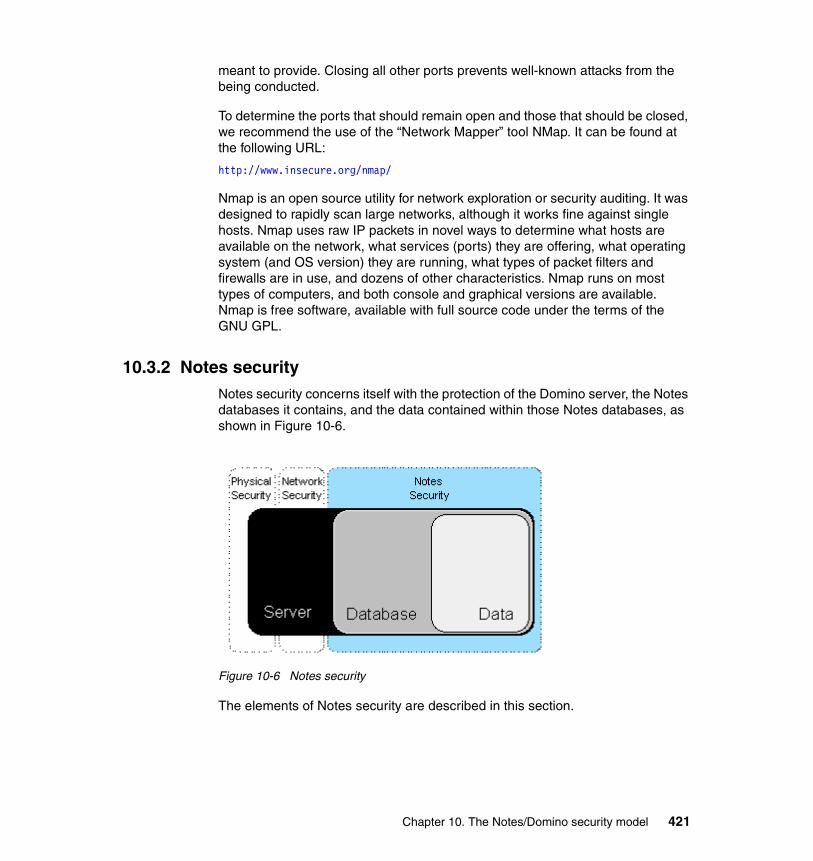
meant to provide. Closing all other ports prevents well-known attacks from the being conducted.
To determine the ports that should remain open and those that should be closed, we recommend the use of the “Network Mapper” tool NMap. It can be found at the following URL:
http://www.insecure.org/nmap/
Nmap is an open source utility for network exploration or security auditing. It was designed to rapidly scan large networks, although it works fine against single hosts. Nmap uses raw IP packets in novel ways to determine what hosts are available on the network, what services (ports) they are offering, what operating system (and OS version) they are running, what types of packet filters and firewalls are in use, and dozens of other characteristics. Nmap runs on most types of computers, and both console and graphical versions are available. Nmap is free software, available with full source code under the terms of the GNU GPL.
10.3.2 Notes securityNotes security concerns itself with the protection of the Domino server, the Notes databases it contains, and the data contained within those Notes databases, as shown in Figure 10-6.
Figure 10-6 Notes security
The elements of Notes security are described in this section.
Chapter 10. The Notes/Domino security model 421
CertificationNotes uses the concepts of Notes IDs, which are based on public key cryptography and certificates. A certificate is a unique electronic stamp that identifies a user or server. Server and user IDs contain one or more Notes certificates. In addition, user IDs may contain one or more Internet certificates that identify users when they use SSL to connect to an Internet server or send a signed or encrypted S/MIME mail message.
A certificate contains:
� The name of the certifier that issued the certificate.
� The name of the user or server to whom the certificate was issued.
� A public key that is stored in both the Domino Directory and the ID file. Notes uses the public key to encrypt messages that are sent to the owner of the public key and to validate the ID owner's signature.
� An electronic signature.
� The expiration date of the certificate.
Certificates are stored in ID files and in Person, Server, and Certifier documents in the Domino Directory.
Public keys are not secret. Any user may look up another user's public key and use it to send encrypted mail to or authenticate the user. It is important that someone looking up a public key can be confident of its reliability since Domino uses it for identification. Users must be able to obtain the public key of the certifier that issued the certificate before they can authenticate the certificate's owner. If a user has a certificate issued by the same certifier as another user or server, the first user can verify the public key for the certificate and then reliably know the public key associated with the server or user name. If a user doesn't have a certificate issued by the same certifier, the user needs a cross-certificate for authentication.
When users and servers are registered, Domino automatically creates a Notes certificate for each user and server ID. In addition, Internet certificates can be created for user IDs using either the Domino Certificate Authority (CA) or third-party Certificate Authority. Domino 6 creates Internet certificates using the x.509v3 certificate format, which include support for x.509 certificate extensions, Certificate Revocation Lists (CRLs) and Certificate Distribution Points (CDPs).
EncryptionCryptography is the art or science of secret writing, or more exactly, of storing information (for a short or long period of time) in a form which allows it to be revealed to those you wish to see it, yet hides it from all others. A cryptosystem is a method to accomplish this. Cryptanalysis is the practice of defeating such
422 Lotus Security Handbook
attempts to hide information, whether by detecting mathematical faults in such systems (such as weak entropy) or by using brute force mechanisms in new ways. Cryptology includes both cryptography and cryptanalysis.
The original information to be hidden is called “plaintext.” The hidden information is called “ciphertext.” Encryption is any procedure to convert plaintext into ciphertext. Decryption is any procedure to convert ciphertext into plaintext.
A cryptosystem, such as the one built natively into Notes and Domino, is designed so that decryption can be accomplished only under certain conditions, which generally means only by persons in possession of both a decryption engine (such as the implementation of RSA Security's BSAFE Engine in Notes and Domino) and a particular piece of information, called the decryption key, which is supplied to the decryption engine in the process of decryption.
Plaintext is converted into ciphertext by means of the internal encryption engine of Notes and Domino, whose operation is fixed and determinate (the encryption method), but which functions in practice in a way dependent on a piece of information (the encryption key) which has a major effect on the output of the encryption process.
The result of using the decryption method and the decryption key to decrypt ciphertext produced by using the encryption method and the encryption key should always be the same as the original plaintext (except, perhaps, for some insignificant differences).
In this process the encryption key and the decryption key may or may not be the same. When they are the same, the cryptosystem is called a “symmetric key” system; when they are not, it is called an “asymmetric key” system. Notes and Domino use a combination of both symmetric and asymmetric key systems for encryption. Data is encrypted using a symmetric key, then the key itself is encrypted with the public key of the intended recipient and appended to the encrypted message. When received, the recipient decrypts the symmetric key with his private key and then decrypts the message with the decyphered symmetric key.
Such use of symmetric and asymmetric key encryption systems avoids the need for an out-of-band method of disseminating symmetric keys. As well, in Notes, the encryption mechanism is totally transparent to the Notes user.
Digital signaturesDigital signatures are a by-product of encryption, except that they offer another form of security by electronically assuring the recipient of a digitally signed e-mail that the message was sent from the message signer and its contents were not altered in transit (the same can be said of a digitally signed document stored in a
Chapter 10. The Notes/Domino security model 423

database, as it assures that the document is authentic and was not tampered with in any way by anyone). In addition, digital signatures ensure that the message signer (or the document author) cannot say they did not send the message (or write the document). This is referred to as “non-repudiation.”
Like encryption, the digital signature process is essentially transparent to the user. Digital signatures (for e-mails, in this example), work in the following manner:
1. The sender's e-mail client computes a message digest of the entire message. A message digest is a one-way hash of the entire message that results in a unique fixed-length hash of the message (regardless of the message's actual length).
2. The sender's e-mail client encrypts the message digest using the sender's private key, and then attaches both the encrypted message digest and the sender's certificate (which provides the public key) to the message.
3. The recipient's e-mail client decrypts the message digest using the signer's public key, which is part of the signer's certificate.
4. The recipient's e-mail client computes its own message digest, and compares it with the one attached to the e-mail. If the two message digests are identical, the message is assured to be from the sender and unaltered in transit.
Access controlEvery database includes an access control list (ACL) which Domino uses to determine the level of access that users and servers have to that database.
When a user opens a database, Domino classifies the user according to an access level that determines privileges. The access level for a user may vary in different databases.
The access level assigned to a user determines the tasks that the user can perform in the database. The access level assigned to a server determines what information the server can replicate within a particular database. Only someone with Manager access can create or modify the ACL of a database located on a server.
Access control levels include, from least to most permissive: No Access, Depositor, Reader, Author, Editor, Designer, Manager.
Execution controlThe ECL, introduced in Notes 4.5, enables users to protect their data against the threats of e-mail bombs, viruses, Trojan horses, and unwanted application intrusions. The ECL provides a mechanism for managing whether such
424 Lotus Security Handbook
programs or code should be allowed to execute and what level of access they should be permitted.
ECLs are managed on a per-user basis and can be controlled to a very granular level. For example, a user may stipulate that when a document is digitally signed by certain trusted colleagues, programs executed by code within that document can access documents and databases and can modify environment variables but cannot access the file system or external programs.
The ECL uses digital signatures to verify executable code. When an attempt is made to execute a piece of code, Notes verifies the digital signature on the code and then looks for the user's ECL settings to determine whether the action can be executed or whether the user should be prompted. If the signer of the code is found in the user's ECL (either explicitly, as part of an organization such as */Lotus, or via Default) and the appropriate capability is enabled, the code is executed seamlessly. If the signer's name is not found in the ECL, or is found but the capability is not selected, the user will be prompted with a dialog box showing the action to be performed, who it was signed by (and how the signature was verified), and the capability that is not allowed with the current ECL settings. The user then has following options: Abort, Execute Once, or Trust Signer. If the code is not signed, the No Signature entry for the client's ECL will be used to determine allowable capabilities.
Local securityThis refers to the ability to encrypt the complete database with an ID file. On the server, the database is encrypted with the Server's Notes ID file. On a local workstation, the database is encrypted using the user's Notes ID file.
This prevents people, who for some reason or another manage to get a copy of the database, from being able to browse its contents if they don't have the Notes ID that was used to encrypt it. This is a method known as “layered security,” where security facilities and tools combine to augment the confidentiality services provided. In this case, you need the database and the Notes ID.
As mentioned, the ID file is needed to access the encrypted data of the database, except when it is on the server. If the database is encrypted with the server's Notes ID and users try to access the database through the Domino Database server engine, the database will be decrypted and served in plaintext to the users. In this case, if the information is deemed of a more confidential nature, it might be wise to encrypt data on the communication port.
Chapter 10. The Notes/Domino security model 425

10.4 Conclusion This chapter has provided a summary of the basic security concepts inherent in Lotus Notes and Domino. In the next two chapters we explain step-by-step and in greater detail the security specifics and their application.
426 Lotus Security Handbook
Chapter 11. Domino/Notes 6 security features
This chapter provides an overview of the key security features to consider in a Domino and Notes 6 environment, and offers some guidelines for their most effective use in a collaborative environment. For specific information about configuring and using these features, see the Domino 6 Administration Guide or the Notes 6 Online Help.
This chapter discusses Domino and Notes server and client security features only. For more information on application design security features in Domino Designer 6, see the IBM Redbook “Domino 6 Designer: A Developers Handbook”, SG24-6854.
Overall, the Domino security model is based on the premise of protecting resources, such as the Domino server itself, databases, workstation data, and documents. The resources, or objects, that are being protected are set up to define the rights of users to access and change the object. Information about access rights and privileges are stored with each protected resource. Thus, it is important to understand that a given user or server may have different sets of access rights, depending on the resources to which that user or server requires access.
The feature areas discussed in this chapter include:
� Domino server security
11
© Copyright IBM Corp. 2004. All rights reserved. 427

� Roaming users
� The Domino certificate authority
� Directory services
� Notes and Domino IDs and passwords
� Web client authentication
� Database ACLs
� Workstation security
11.1 Domino server securityMost Domino security server settings reside on the Security tab of the Server document. These settings allow administrators to specify and control access and rights:
� By users and other servers
� To the server’s network port
� Of Domino administrators
� Of server agents
� Passthru access to and from the server
428 Lotus Security Handbook
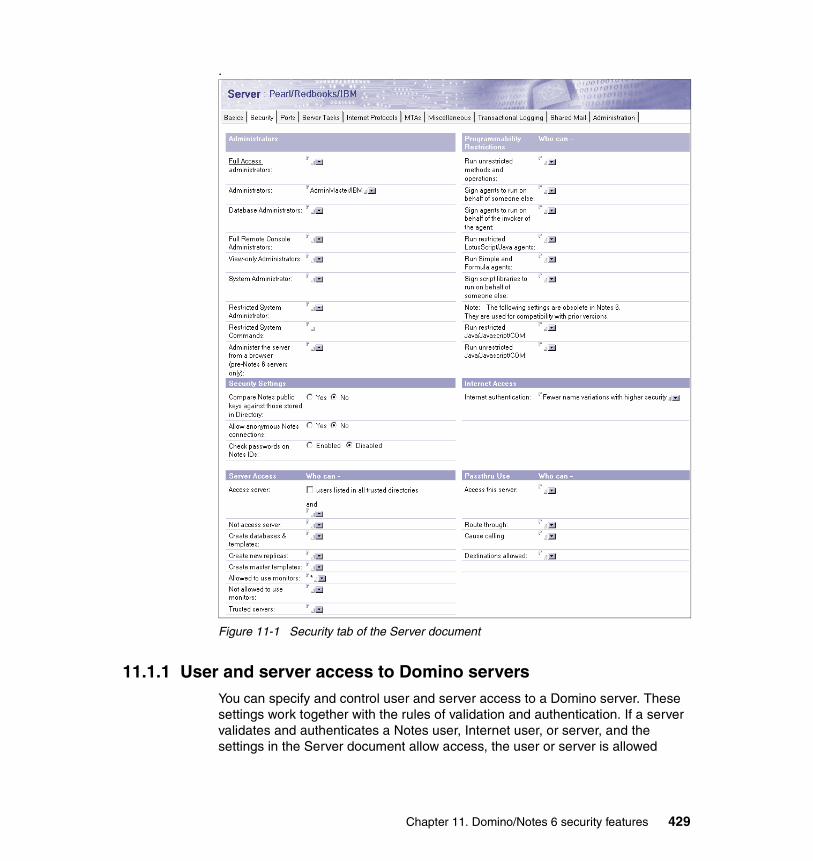
.
Figure 11-1 Security tab of the Server document
11.1.1 User and server access to Domino serversYou can specify and control user and server access to a Domino server. These settings work together with the rules of validation and authentication. If a server validates and authenticates a Notes user, Internet user, or server, and the settings in the Server document allow access, the user or server is allowed
Chapter 11. Domino/Notes 6 security features 429
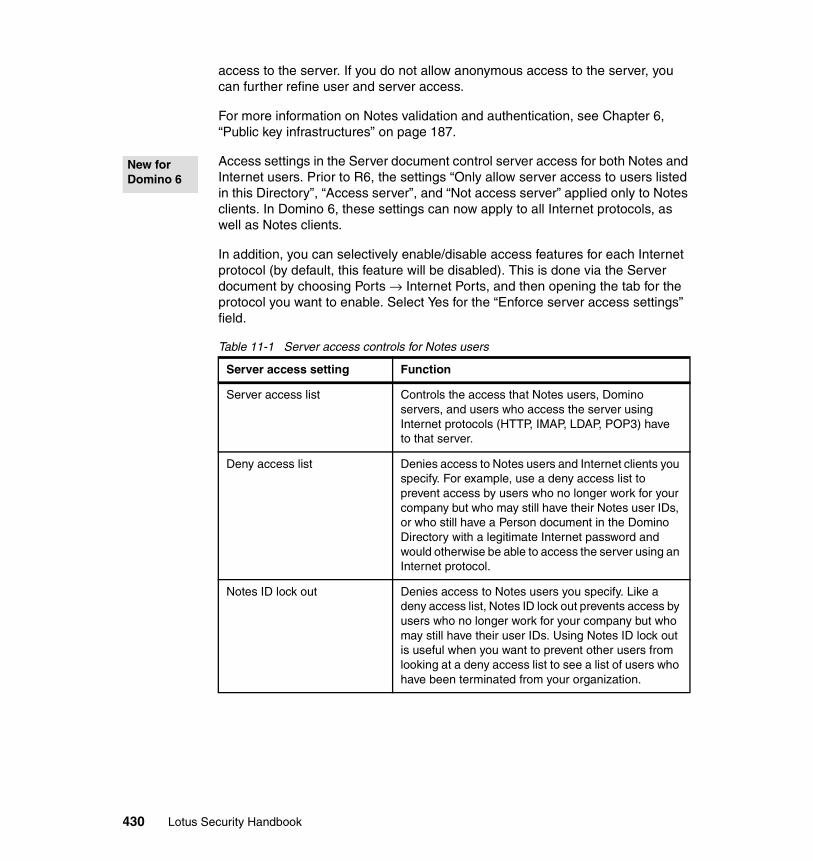
access to the server. If you do not allow anonymous access to the server, you can further refine user and server access.
For more information on Notes validation and authentication, see Chapter 6, “Public key infrastructures” on page 187.
Access settings in the Server document control server access for both Notes and Internet users. Prior to R6, the settings “Only allow server access to users listed in this Directory”, “Access server”, and “Not access server” applied only to Notes clients. In Domino 6, these settings can now apply to all Internet protocols, as well as Notes clients.
In addition, you can selectively enable/disable access features for each Internet protocol (by default, this feature will be disabled). This is done via the Server document by choosing Ports → Internet Ports, and then opening the tab for the protocol you want to enable. Select Yes for the “Enforce server access settings” field.
Table 11-1 Server access controls for Notes users
Server access setting Function
Server access list Controls the access that Notes users, Domino servers, and users who access the server using Internet protocols (HTTP, IMAP, LDAP, POP3) have to that server.
Deny access list Denies access to Notes users and Internet clients you specify. For example, use a deny access list to prevent access by users who no longer work for your company but who may still have their Notes user IDs, or who still have a Person document in the Domino Directory with a legitimate Internet password and would otherwise be able to access the server using an Internet protocol.
Notes ID lock out Denies access to Notes users you specify. Like a deny access list, Notes ID lock out prevents access by users who no longer work for your company but who may still have their user IDs. Using Notes ID lock out is useful when you want to prevent other users from looking at a deny access list to see a list of users who have been terminated from your organization.
New for Domino 6
430 Lotus Security Handbook
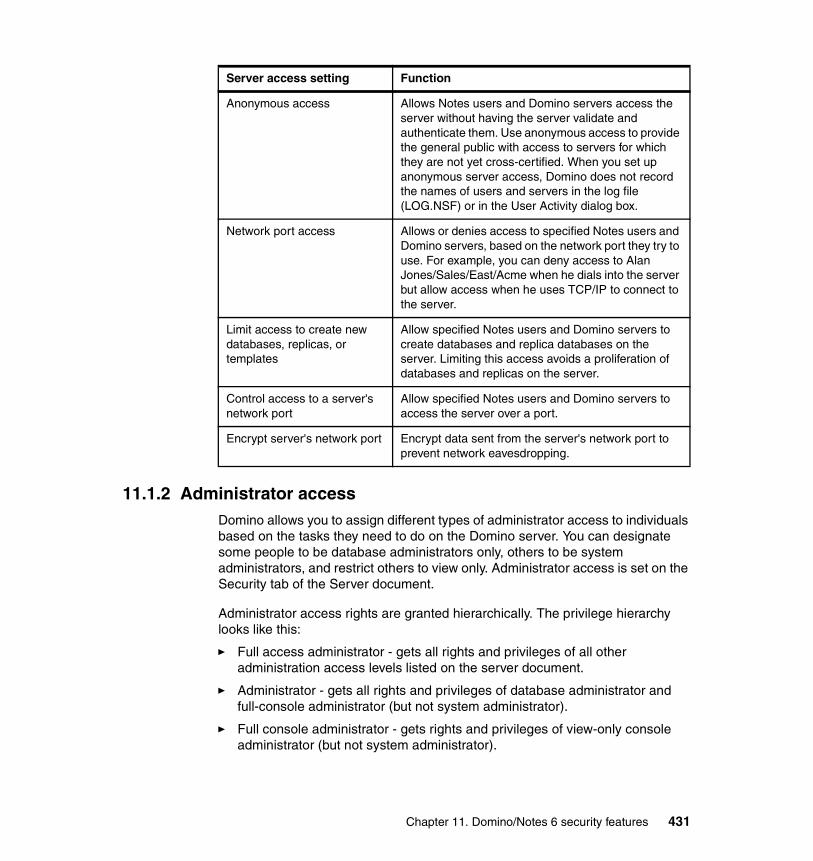
11.1.2 Administrator accessDomino allows you to assign different types of administrator access to individuals based on the tasks they need to do on the Domino server. You can designate some people to be database administrators only, others to be system administrators, and restrict others to view only. Administrator access is set on the Security tab of the Server document.
Administrator access rights are granted hierarchically. The privilege hierarchy looks like this:
� Full access administrator - gets all rights and privileges of all other administration access levels listed on the server document.
� Administrator - gets all rights and privileges of database administrator and full-console administrator (but not system administrator).
� Full console administrator - gets rights and privileges of view-only console administrator (but not system administrator).
Anonymous access Allows Notes users and Domino servers access the server without having the server validate and authenticate them. Use anonymous access to provide the general public with access to servers for which they are not yet cross-certified. When you set up anonymous server access, Domino does not record the names of users and servers in the log file (LOG.NSF) or in the User Activity dialog box.
Network port access Allows or denies access to specified Notes users and Domino servers, based on the network port they try to use. For example, you can deny access to Alan Jones/Sales/East/Acme when he dials into the server but allow access when he uses TCP/IP to connect to the server.
Limit access to create new databases, replicas, or templates
Allow specified Notes users and Domino servers to create databases and replica databases on the server. Limiting this access avoids a proliferation of databases and replicas on the server.
Control access to a server's network port
Allow specified Notes users and Domino servers to access the server over a port.
Encrypt server's network port Encrypt data sent from the server's network port to prevent network eavesdropping.
Server access setting Function
Chapter 11. Domino/Notes 6 security features 431
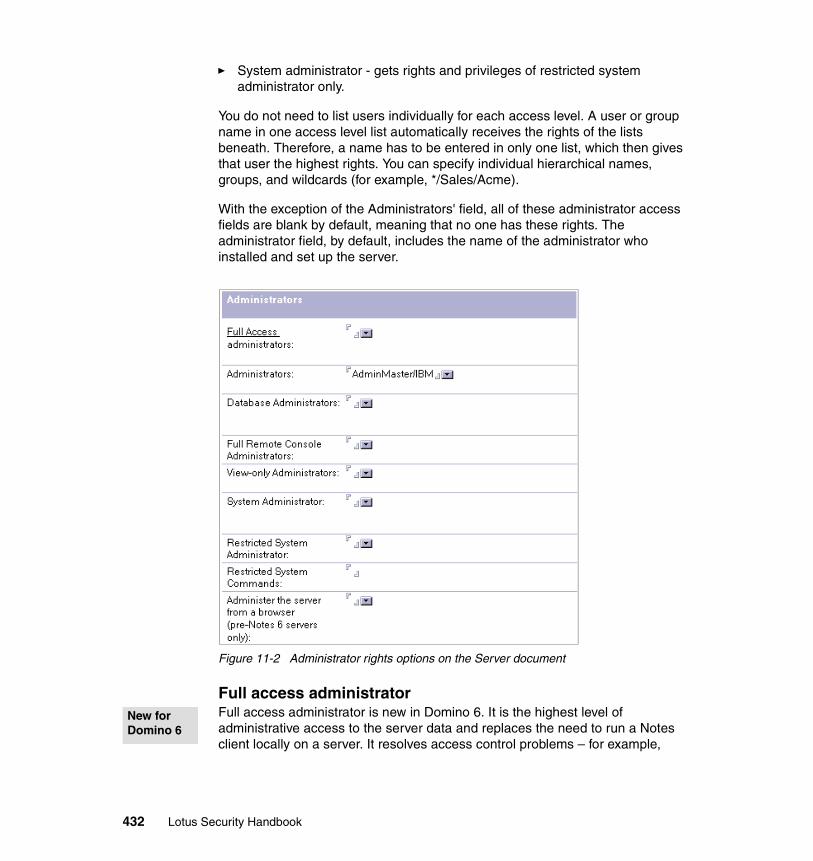
� System administrator - gets rights and privileges of restricted system administrator only.
You do not need to list users individually for each access level. A user or group name in one access level list automatically receives the rights of the lists beneath. Therefore, a name has to be entered in only one list, which then gives that user the highest rights. You can specify individual hierarchical names, groups, and wildcards (for example, */Sales/Acme).
With the exception of the Administrators' field, all of these administrator access fields are blank by default, meaning that no one has these rights. The administrator field, by default, includes the name of the administrator who installed and set up the server.
Figure 11-2 Administrator rights options on the Server document
Full access administratorFull access administrator is new in Domino 6. It is the highest level of administrative access to the server data and replaces the need to run a Notes client locally on a server. It resolves access control problems – for example,
New for Domino 6
432 Lotus Security Handbook

those caused when the only managers of a database ACL have left an organization.
Full access administrators have the following rights:
� All the rights for all other administrator access levels.
� Manager access, with all roles and access privileges enabled, to all databases on the server, regardless of the database ACL settings.
� Manager access, with all roles and access privileges enabled, to the Web Administrator database (WEBADMIN.NSF).
� Access to all documents in all databases, regardless of Reader names fields.
� The ability to create agents that run in unrestricted mode with full administration rights.
� Access to any unencrypted data on the server.
Enabling and disabling full access administrator modeIn order to work in full access administrator mode, an administrator must:
� Be listed in the Full Access Administrators field in the Administrators section of the Security tab in the Server document. By default, this field is empty.
� Enable “Full Access Administration” mode in the Administrator client by selecting Administration → Full Access Administration. If this mode is not enabled, then the users will not have full administrator access to the server, even if they are listed as a full access administrators in the Server document. They will instead be granted Administrator rights.
When full access administrator mode is enabled, the client's window title, tab title, and status bar indicate this to remind users that they are accessing the server with the highest level of privilege and should therefore proceed with caution.
If an administrator enables full administration mode in the Administration client, this mode is also enabled for the Domino Designer and for the Lotus Notes clients. Full administrator access is also reflected in their window titles, tab titles, and status bars.
Note: Full access administrator does not allow access to encrypted data. The use of the specified user's private key is required to decrypt documents that are encrypted with public keys. Similarly, a secret key is required to decrypt documents encrypted with secret keys. However, users with full access administrator privilege can still change the ACLs of a database with encrypted documents.
Chapter 11. Domino/Notes 6 security features 433

If a user attempts to switch to full access administrator mode, but is not listed as one in the Server document, the user is denied full access and a message appears in the status bar and on the server console. The client will be in full access mode, but that user will not have full administrator access to that particular server. If the user attempts to switch servers, that person's access is checked against the server document of the new server.
Disable the Full Access Administrators field by setting SECURE_DISABLE_FULLADMIN = 1 in the NOTES.INI file. This setting disables full access administrator privilege and overrides any names listed in that field in the Server document. This NOTES.INI parameter can only be set by a user with physical access to the server who can edit the NOTES.INI file for the server. This parameter cannot be set using the server console, the remote console, or in the Server document.
Managing the full access administrator featureThere are several ways to grant full access administrator access:
� Create a special Full Admin ID file – for example, “Full Admin/Sales/Acme” – and only put that name in the Full Admin field. You must then either log in with or switch to this user ID in order to gain this level of access. Optionally, you could set up this ID file to require multiple passwords.
� Create an OU-level certifier for granting full administrator access, and issue additional IDs to trusted administrators – for example, Jane Admin/Full Admin/Acme.
� Leave the Full Access Administrator field empty. Add the name of a trusted individual for emergency situations, and remove it when the situation has been resolved.
� Populate the Full Access Administrator field with a limited set of trusted administrators.
You can also track how this feature is used:
� Configure the Event Handler to send notification through EVENTS4.NSF when full access administration privileges are invoked.
� Any database activity done using full access administrator access is recorded in the database activity log, under Database Properties.
Use of the feature is also logged by the server.
Important: Administrators who are listed in the Full Access Administrators, Administrators, and Database Administrators fields on the Security tab of a Server document are allowed to delete any database on that server, even if they are not listed as managers in the database ACL.
434 Lotus Security Handbook

11.1.3 Web AdministratorIf you have a browser and want to manage and view settings for a Domino server, you can use the Web Administrator to perform most of the tasks that are available through the Domino Administrator.
The Web Administrator uses the Web Administrator database (WEBADMIN.NSF). The first time the HTTP task starts on a Web server, Domino automatically creates this database in the Domino data directory. Using the Web Administrator requires:
You must use one of these browsers with the Web Administrator:
� Microsoft Explorer 5.5 on Windows 98, Windows NT 4, Windows 2000, or Windows XP
� Netscape 4.7x on Windows 98, Windows NT 4, Windows 2000, Windows XP, or Linux 7.x
For the most current information about supported browsers, see the Domino/Notes 6 Release Notes.
You must have the following Domino server tasks running:
� The Administration Process (AdminP) server task must be running on the Web Administrator server.
� The Certificate Authority (CA) process must be running on the Domino 6 server that has the Issued Certificate List database on it to register users or servers.
� The HTTP task must be running on the Web server so that you can use a browser to access it.
Domino automatically sets up default database security when the Web Administrator database (WEBADMIN.NSF) is created for the first time. At that time, all names listed in either the Full Access Administrators or Administrators fields of the Server document are given Manager access with all roles to the Web Administrator database. In addition, the HTTP server task periodically (about every 20 minutes) updates the Web Administrator database ACL with names that have been added to the Server document in either the Full Access Administrators or Administrators fields, but only if the names are not already on the ACL list.
Default webadmin.nsf database securitySee Table 11-2 for default ACL settings for the Web Administrator database. You do not need to change these settings if the administrator's name appears in the Administrators field of the Server document.
Chapter 11. Domino/Notes 6 security features 435

Table 11-2 Default ACL for the Web Administrator database
Authenticating administratorsYou can use either an Internet password or an SSL client certificate to access the Web Administrator. The Web Administrator uses either name-and-password or SSL authentication to verify your identity. The method the Web Administrator uses depends on whether you set up the server or the Domino Web Administrator database (WEBADMIN.NSF), or both, to require name-and-password or SSL authentication.
To access the Web Administrator database, you must have name-and-password authentication or SSL client authentication set up on the server. Name-and-password authentication is enabled for the HTTP protocol by default.
11.1.4 Programmability restrictionsTo control the types of agents users can run on a server, you can set up restrictions for server agents in the Server document. As with administrator access, the list of server agents in the Server document is organized hierarchically with regard to privileges. “Run unrestricted methods and operations” has the highest level of privilege and “Run Simple and Formula agents” has the lowest. A user or group name in one list will automatically receive the rights of the lists beneath. Therefore a name has to be entered in only one list, which then gives that user the highest rights.
Run unrestricted methods and operationsUsers and groups in this category are allowed to select, on a per agent basis, one of three levels of access for agents signed with their ID. Users with this
Default name Access
User and group names listed in either of these fields on the Server document:
Full Access AdministratorsAdministrators
Manager with all roles
Name of server Manager
- Default - No access
Anonymous No access
OtherDomainServers No access
Tip: Create a group for each class of users to be used in every category.
New for Domino 6
436 Lotus Security Handbook

privilege select one of these access levels when they are using Domino Designer 6 to build an agent:
� Restricted mode
� Unrestricted mode
� Unrestricted mode with full administration rights
Only users who have this access can choose an option other than “Do not allow restricted operations.” This access is enabled by default for the current server and Lotus Notes template developers.
If users in this list are also listed as a database administrators in the Server document, they are allowed to perform database operations without having to be listed explicitly in the database ACL (for example, they can delete databases without being listed in the ACL of those databases).
Sign agents to run on behalf of someone elseEnter the names of users and groups who are allowed to sign agents that will be executed on anyone else's behalf. The default is blank, which means that no one can sign agents in this manner.
Sign agents to run on behalf of the invoker of the agentEnter the names of users and groups who are allowed to sign agents that will be executed on behalf of the invoker, when the invoker is different from the agent signer. This setting is ignored if the agent signer and the invoker are the same. This is used currently only for Web agents. The default is blank, which means that everyone can sign agents invoked in this manner (this is for backwards compatibility).
Run restricted LotusScript/Java agentsEnter the names of users and groups allowed to run agents created with LotusScript and Java features, but excluding privileged methods and operations, such as reading and writing to the file system. Leave the field blank to deny access to all users and groups.
Note: To have the ability to run agents in unrestricted mode with full administration rights, the agent signer should be listed in this field, or in the Full Access Administrator field, as well as have this mode selected in the Agent Builder. Being listed in the Full Access Administrator list alone is not sufficient to run agents in this mode.
Note: This privilege should be used with caution, as the name the agent is signed on behalf of is used to check ACL access.
Chapter 11. Domino/Notes 6 security features 437
Run simple and formula agentsEnter the names of users and groups allowed to run simple and formula agents, both private and shared. Leave the field blank to allow all users and groups to run simple and formula agents, both private and shared.
Sign script libraries to run on behalf of someone elseEnter the names of users and groups who are allowed to sign script libraries in agents executed by someone else. For the purposes of backwards compatibility, the default value is to leave the field empty, to allow all.
11.1.5 Policies and policy documentsPolicies let you control how users work with Notes. A policy is a document that identifies a collection of individual policy settings documents. Each of these policy settings documents defines a set of defaults that apply to the users and groups to which the policy is assigned. Once a policy is in place, you can easily change a setting, and it will automatically apply to those users to whom the policy is assigned.
Domino policies should not be confused with corporate security policies. A corporate security policy is a set of guidelines and standards used in an organization to establish and enforce secure information practices.
For more information on organizational security polices, see Chapter 2, “Security methodologies” on page 43.
You create policy settings documents for these administrative areas:
� Registration: Set default user registration values including user password, Internet address format, roaming user designation, and mail.
� Setup: These settings are used during the initial Notes client setup to populate the user's Location document. Setup settings include Internet browser and proxy settings, applet security settings, and desktop and user preferences.
� Desktop: Control and update the user's desktop environment or reinforce setup policy settings. For example, if a change is made to any of the policy settings, the next time users authenticate with their home server, the desktop policy settings restore the default settings or distribute new settings specified in the desktop policy settings document.
� Mail archiving: Control mail archiving. Archive settings control where archiving is performed and specify archive criteria.
New for Domino 6
438 Lotus Security Handbook
� Security: Set up administration ECLs and define password management options, including the synchronization of Internet and Notes passwords. Some password management options are:
– Allow users to change their Internet passwords over HTTP.
– Synchronize Internet passwords with Notes passwords.
For more information about Notes and Internet password synchronization, see 11.7, “Internet and Notes password synchronization” on page 467.
– Require passwords for Notes authentication.
– Enforce password expiration for Notes passwords only, Internet passwords only, or both Notes and Internet passwords. You can also specify required change intervals, grace periods, and password history (Notes only).
– ID password quality setting: Set a quality level or password length.
Note: In order to allow users to change their Internet passwords through a browser, you must have session authentication enabled for your server.
Important: For password checking, information in the Person document overrides that in the Server document. When you disable password verification for a user, Domino does not check passwords for the user even if password verification is enabled for the server. When you disable password verification for a server, Domino does not check passwords for any users who access the server, even if the user has password verification enabled.
Chapter 11. Domino/Notes 6 security features 439
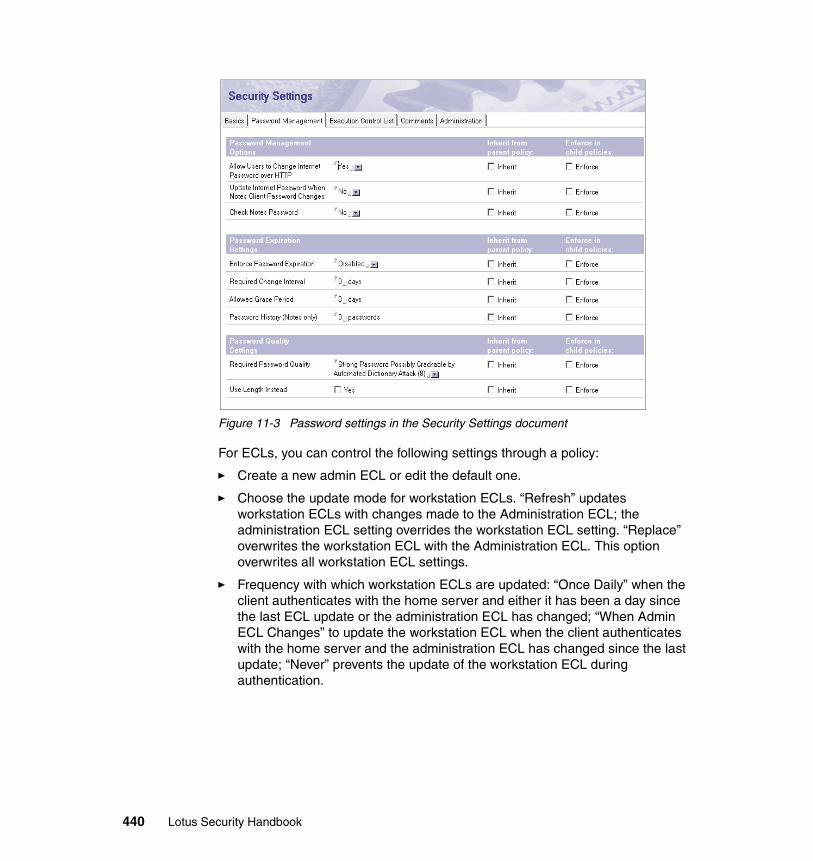
Figure 11-3 Password settings in the Security Settings document
For ECLs, you can control the following settings through a policy:
� Create a new admin ECL or edit the default one.
� Choose the update mode for workstation ECLs. “Refresh” updates workstation ECLs with changes made to the Administration ECL; the administration ECL setting overrides the workstation ECL setting. “Replace” overwrites the workstation ECL with the Administration ECL. This option overwrites all workstation ECL settings.
� Frequency with which workstation ECLs are updated: “Once Daily” when the client authenticates with the home server and either it has been a day since the last ECL update or the administration ECL has changed; “When Admin ECL Changes” to update the workstation ECL when the client authenticates with the home server and the administration ECL has changed since the last update; “Never” prevents the update of the workstation ECL during authentication.
440 Lotus Security Handbook
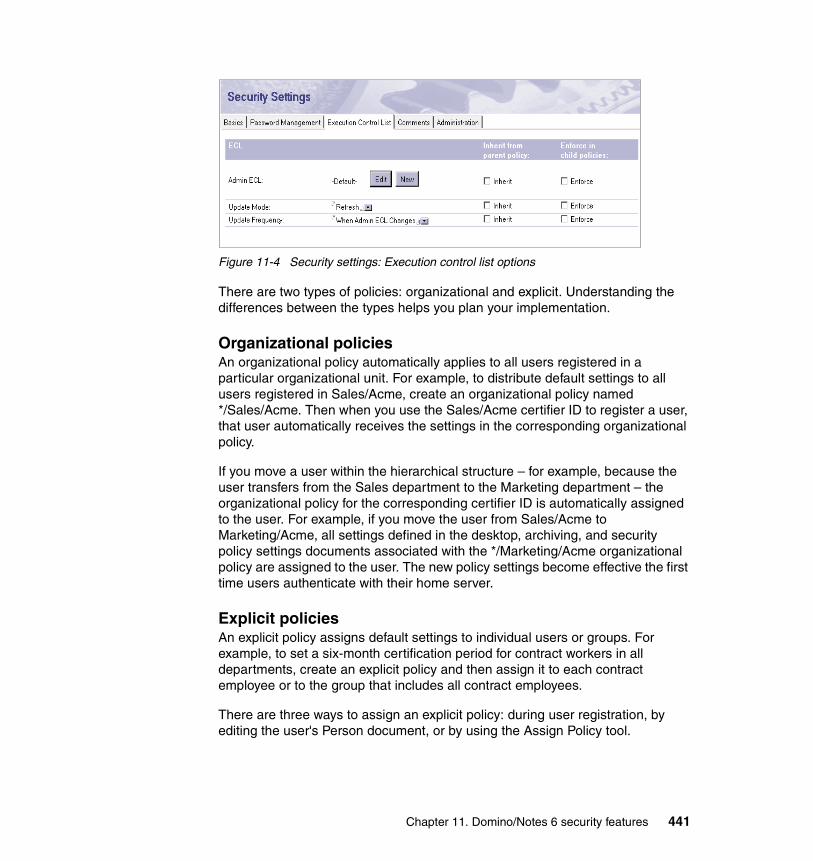
Figure 11-4 Security settings: Execution control list options
There are two types of policies: organizational and explicit. Understanding the differences between the types helps you plan your implementation.
Organizational policiesAn organizational policy automatically applies to all users registered in a particular organizational unit. For example, to distribute default settings to all users registered in Sales/Acme, create an organizational policy named */Sales/Acme. Then when you use the Sales/Acme certifier ID to register a user, that user automatically receives the settings in the corresponding organizational policy.
If you move a user within the hierarchical structure – for example, because the user transfers from the Sales department to the Marketing department – the organizational policy for the corresponding certifier ID is automatically assigned to the user. For example, if you move the user from Sales/Acme to Marketing/Acme, all settings defined in the desktop, archiving, and security policy settings documents associated with the */Marketing/Acme organizational policy are assigned to the user. The new policy settings become effective the first time users authenticate with their home server.
Explicit policiesAn explicit policy assigns default settings to individual users or groups. For example, to set a six-month certification period for contract workers in all departments, create an explicit policy and then assign it to each contract employee or to the group that includes all contract employees.
There are three ways to assign an explicit policy: during user registration, by editing the user's Person document, or by using the Assign Policy tool.
Chapter 11. Domino/Notes 6 security features 441

Using exceptionsYou can assign an exception attribute to either an organizational or explicit policy to allow the user to override a policy setting that is otherwise enforced throughout an organization. When you create an exception policy, you specify only the settings that will not be enforced. Then when you assign the exception policy, it exempts users from enforcement of those settings only.
Exception policies are a way to give someone in an organization special treatment, possibly because of their position or job requirements. For example, the */Acme policy includes a Registration policy setting that enforces a mail database quota of 60 MB. However, a small group of employees in Acme need to exceed this quota. The solution is to create an “exception” policy that includes only a Registration policy settings document that does not set a quota limitation on the mail database. When this exception policy is assigned to users, they can override the database quota setting. Because exception policies defeat the enforcement of policy settings, use them sparingly.
For specific information about setting up and assigning policies, see the Policies section of the chapter “User and Server Configuration” in the Domino 6 Administration Guide.
11.1.6 Internet Site securityInternet Site documents are used to configure the Internet protocols supported by Domino servers. A separate Internet Site document is created for each protocol – Web (HTTP), IMAP, POP3, SMTP Inbound, LDAP, and IIOP – which is then used to provide protocol configuration information for a single server, or for multiple servers in a Domino organization. Specifically, you can create:
� Web Site documents: One for each Web site hosted on the Domino server.
� LDAP Site documents: To enable LDAP access to an organization in a directory.
� IMAP, POP3, and SMTP Site documents: Create an individual Internet Site document for each mail protocol for which you enter an IP address.
� IIOP Site documents: Create one to enable the Domino IIOP (DIIOP) task on the server. This task allows Domino and the browser client to use the Domino Object Request Broker (ORB) server program.
Internet Site documents make it easier for administrators to configure and manage Internet protocols in their organizations. For example, prior to Domino 6, if you wanted to set up a Web site in your organization, it was necessary to configure each Domino server in the domain with Mapping documents, Web realms, and File Protection documents. If you had virtual servers and virtual hosts, you had to do the same thing for them. In Domino 6, you can configure a
New for Domino 6
442 Lotus Security Handbook
Web Site document so that all servers and hosts use it to get configuration information for a Web site, including mapping information, file protection information, and Web realm authentication information.
You must use Internet Site documents if you:
� Want to use Web-based Distributed Authoring and Versioning (WebDAV) on a Domino Web server
� Have enabled SSL on your server and want to use Certificate Revocation Lists to check the validity of Internet certificates used to authenticate with the server
� Are using a hosted organization configuration on your server
For more information on configuring Domino for hosted organizations, see the Domino 6 Administration Guide.
Modifications to Internet Site documents (including the creation of new Site documents) are dynamic. The server or protocol does not need to be restarted after you create a new Site document, or after you modify or delete an existing one. Changes generally take effect minutes after the change is made. The ability to dynamically create, modify, or delete Internet Site documents is especially valuable in service provider environments, so that existing hosted organizations are not interrupted when a new hosted organization is configured.
The Domino server is configured to use Internet Site documents if this option is enabled on the server document. If the option is not enabled, the server defaults to Server document settings to obtain configuration information for Internet protocols.
Internet Site documents are created in the Internet Sites view, which is used to help manage Internet protocol configuration information by listing the configured Internet Site documents for each organization in the domain.
While most protocol settings are configured in Internet Site documents, there are some settings that need to be configured in the Server document to support Internet protocol configurations. These include settings for:
� Enabling and configuring the TCP/IP port.
� Enabling and configuring the SSL port (including redirecting TCP to SSL).
Important: If you use an Internet Site document to configure one Internet protocol on a server, you must also use Internet Site documents for all Internet protocols on that server. For example, you cannot set up an LDAP Internet Site document and, on the same server, use the Server document to configure HTTP.
Chapter 11. Domino/Notes 6 security features 443

� Configuring server access – namely, who can access the server and how.
Figure 11-5 Server document security settings to support Internet protocol configurations
444 Lotus Security Handbook
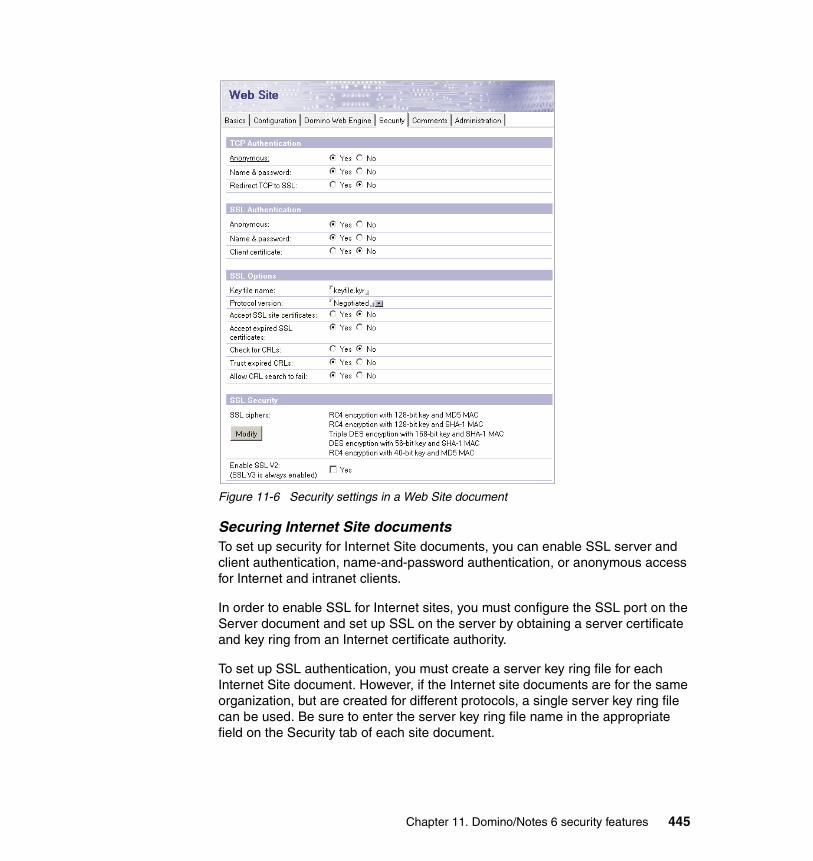
Figure 11-6 Security settings in a Web Site document
Securing Internet Site documentsTo set up security for Internet Site documents, you can enable SSL server and client authentication, name-and-password authentication, or anonymous access for Internet and intranet clients.
In order to enable SSL for Internet sites, you must configure the SSL port on the Server document and set up SSL on the server by obtaining a server certificate and key ring from an Internet certificate authority.
To set up SSL authentication, you must create a server key ring file for each Internet Site document. However, if the Internet site documents are for the same organization, but are created for different protocols, a single server key ring file can be used. Be sure to enter the server key ring file name in the appropriate field on the Security tab of each site document.
Chapter 11. Domino/Notes 6 security features 445
If you want to use Certificate Revocation Lists (CRL) for Internet certificate authentication, the server must be using a Domino server-based certification authority for issuing Internet certificates.
To enable SSL for a hosted organization, you must use the server IP address in the field “Host names or addresses mapped to this site” on the Basics tab of the Internet Site document.
For Web sites, the common name on the server key ring must match the DNS name to which the IP address in the Web Site document is mapped. The IP address must be stored in the field “Host name or addresses to map to this site,” which is located on the Web Site document. If you enable Redirect TCP to SSL in a Web Site document, both the host name and the IP address must be stored in this field.
In Domino 6, it is possible to effectively prohibit access to an Internet Site by selecting “No” for all authentication options in an Internet Site document. These options include TCP authentication, SSL authentication, and TCP anonymous access.
You cannot use Internet Site documents in a mixed-release Domino environment. Use Web Server configuration documents and Server document protocol settings instead.
For more information on setting up SSL, see Chapter 6, “Public key infrastructures” on page 187.
For more information on the Domino 6 server-based CA, see 11.5.1, “Domino server-based certification authority” on page 452.
11.1.7 Physical server securityFinally, when considering the security of any server environment, there are also the time-honored methods of physically securing the server device from those who would do it harm to consider. This include techniques such as:
� Locate the server in a secure area to prevent unauthorized access to unencrypted data and server and certifier IDs stored on the server’s hard drive.
� Password protect the server console to prevent unauthorized users from entering commands at the server console.
� Secure the server console with a Smartcard to prevent unauthorized access.
For specific information about using a Smartcard to secure the server console, see the chapter “Server access for Notes users, Internet users, and Domino servers” in the Domino 6 Administration Guide.
New for Domino 6
446 Lotus Security Handbook

11.2 HTTP server securityStarting with Domino 6, Lotus Domino has a completely new HTTP server. This new HTTP “stack” is more modern than the original code that was incorporated into Domino at the time of the introduction of support for the HTTP protocol with Domino 4.5. This new Domino 6 stack no longer incorporates legacy HTTP code components from the original IBM HTTP server (also known as ICS). This means that Domino 6 has changes in its HTTP stacks API support.
The new stack includes enhanced Web site/virtual host administration, HTTP 1.1 persistent connections, and improved session handling. From the security side of things, there is also better denial of service (DOS) attack handling, with more administrative control over the number of path segments, max header size, URL length, and so forth. One can also do IP filtering with wildcards by having access or deny lists based on IP address.
Additionally, the new stack includes improved HTTP plug-in support to allow for the ability to plug the Domino HTTP server into third-party Web servers (including putting a firewall between the Web server and Domino), and an extended/improved DSAPI plug-in to make it easier to write custom plug-ins to the Domino HTTP server. These two features (DSAPI and HTTP plug-ins) are described in more detail in the next two sections.
11.2.1 Domino Web Server APIThe Domino Web Server Application Programming Interface (DSAPI) is a C API tool that lets you write your own extensions to the Domino Web server. These extensions, or filters, let you customize the authentication of Web users.
At the time of Domino 4.6.1, the original IBM Web Server (ICS) was renamed as the Domino “GO” Web Server, and the common API for both Domino and this new Domino “GO” server was called GWAPI (Go Webserver Application Programming Interface). However, starting with Domino 5.0, a new, totally cross-platform API was provided to extend the functionality of such custom plug-ins. This Domino 5 DSAPI interacted with the “legacy” ICS HTTP stack that was still part of Domino 5, so it still provided GWAPI compatibility (though not advertised, just tolerated compatibility). This was a source of complexity and was streamlined in the new Domino 6 HTTP stack, which includes an improved DSAPI.
Given the historical changes in the DSAPI, it is important to examine any R5-based DSAPI plug-ins that may exist in your architecture when upgrading to Domino 6. Despite the fact that a DSAPI designed for Domino 5 “could” run in Lotus Domino 6, if it has not been designed to support the new HTTP stack architecture, it may not perform optimally. In other words, it may be functioning,
New for Domino 6
Chapter 11. Domino/Notes 6 security features 447

but the function that the API is performing may need or deserve to be implemented in a different architectural way to exploit the advantages of the new Domino 6 embedded HTTP stack architecture.
As an example of one change in the Domino 6 API that could be a reason to re-write an R5 DSAPI, in the R5 DSAPI your code gets called for 100% of the times the “step” of the HTTP stack is needed (that is, DSAPI intercepting authentication requests will be called 100% of the time). However, in Domino 6, DSAPIs can be declared for individual Internet sites, so they are not called 100% of the time, and therefore performance may be improved..
For more information about the use of DSAPI in a single sign-on configuration, see 7.4, “DSAPI” on page 296.
11.2.2 HTTP server plug-insDomino R6 leverages the WebSphere Web server plug-in model. This feature replaces the “Domino for IIS” architecture that was provided in Release 5. This new model allows a third-party Web server like IIS to be the one “facing” the browsers and serving up static content (which is their speciality), and have all NSF requests be forwarded to the Domino HTTP stack. The plug-ins use HTTP to communicate with the Domino server, so the third-party HTTP server can sit in the DMZ with its plug-ins communicating to a Domino HTTP server sitting inside the firewall. The plug-ins support basic Domino back end services (core Domino database functionality, Lotus iNotes Web Access, Lotus Domino Off-Line Services (DOLS), Lotus Discovery Server™), while all other HTTP traffic is ignored by the plug-in and handled by the front end HTTP server.
This new plug-in architecture applies to all supported operating system platforms on which Domino runs, because the “plug-in” is not actually installed on the Domino server itself. Rather, the “plug-in” is installed on the “front end” HTTP server. The front end servers that are supported with the 6.0 release of Domino 6 are:
� IBM HTTP Server (IHS) on AIX, Windows NT 4.0, and Windows 2000 Server
� Microsoft IIS on Windows NT 4.0 and Windows 2000 Server
Restriction: DSAPIs coded for R5 may crash the HTTP server if they allocate dynamic DSAPI memory to be used as private context outside of the new Domino 6-specific guidelines. This means that you - or your DSAPI application provider - may need to make some modifications to the R5 DSAPI application source and recompile it with the new toolkit. This is the price to be paid for the better memory stability of the R6-specific HTTP stack requirements.
New for Domino 6
448 Lotus Security Handbook
The plug-in files for these servers are packaged with the Domino 6 server, and their use is covered by your Domino license (assuming that the purpose of the plug-in installed at that other box is to access a licensed Domino 6 server).
When you install Lotus Domino 6, the install routine generates for you a sub directory called “plug-ins”, within “data/domino.” This “plug-ins” subdirectory contains the WAS 4.x and 5.x plug-ins for many front end servers, including Microsoft IIS and IBM Apache HTTP. Again, you do not install those plug-ins in Domino6, you copy/move/deploy/install them to/at other http stacks (like IIS)
After the plug-in is installed and configured appropriately on the front-end HTTP server, a notes.ini setting is made on the Domino server (HTTPEnableConnectorHeaders=1). This notes.ini setting tells Domino to begin using and trusting USER information as “passed” within the HTTP headers by the front-end plug-in.
More details on the inner workings of this new HTTP plug-in model are available in Appendix C, “Domino 6 HTTP plug-in hints and tips” on page 657.
Additional details on the Domino 6 HTTP plug-in architecture, and its use on IBM iSeries systems, can also be found in the IBM Redbook Lotus Domino 6 for iSeries Implementation, SG24-6592.
11.3 Service provider environment (xSP)A Domino service provider (application, Internet, storage, management, and so forth) delivers services to small- and medium-sized businesses, or multiple hosted organizations from a single Domino domain. To those hosted organizations, the service provider offers Internet protocol-based access to a specific set of applications running on Domino servers. By using a service provider, a company can outsource the administration of applications and services that were formerly run on the company's computer infrastructure.
The responsibilities of a service provider administrator include maintaining both the server environment at the host site and to varying degrees, the hosted organizations. First and foremost, the service provider administrator is responsible for setting up and maintaining xSP servers – that is, protocol and database servers – as well as any Domino clusters and network routers.
Although the hosted organization administrator can perform some of the user and group maintenance, the service provider administrator performs a significant amount of the administrative tasks required to maintain a hosted organization. At a minimum, the service provider administrator is responsible for registering and maintaining hosted organizations and controlling which applications the hosted
New for Domino 6
Chapter 11. Domino/Notes 6 security features 449

organization uses. In addition, the service provider administrator must create and maintain a mechanism that the hosted organization's administrators use to communicate problems and issues that require the intervention of the service provider administrator.
Securing the Domino service provider environmentThe Domino service provider environment uses all of the standard Domino security features to ensure complete security for the service provider and the hosted organizations that subscribe to the service provider’s services. An xSP environment that has multiple hosted organizations has potentially thousands of users whose access must be restricted to their own data only.
In addition, the service provider configuration uses extended ACLs in the Domino Directory to protect the data of each hosted organization from access by users in other hosted organizations. The extended ACLs required to support the xSP security model are automatically established when new hosted organizations are created. Plan and test carefully if you want to modify ACLs and extended ACLs in an xSP environment – security is extremely important.
The authentication controls in Site documents control only who can authenticate and use the Internet protocols. After authentication, ACLs and extended ACLs control the data that can be read from and written to the Domino Directory.
A user in a hosted organization cannot directly access databases in any subdirectories other than the hosted organization's directory. Exceptions are the “help” and “common” subdirectories of the Domino data directory, which contain databases accessible to users in all hosted organizations.
To provide users with access to databases outside those of the hosted organization's subdirectory, create a directory link within the hosted organization's directory.
11.4 Roaming users Users who access Notes from more than one Notes client can access their customized settings and personal information automatically from any Notes client in the domain. Data for these users, known as roaming users, replicates between the user's machine and a roaming user server, where these files are stored. When a roaming user logs on from a different Notes client, it automatically retrieves the user's ID file, Personal Address Book, bookmarks, and journal from the roaming user server. Any changes the user makes in these files replicate to the roaming user server. This enables the roaming user to have a consistent experience from any Notes client.
New for Domino 6
450 Lotus Security Handbook

You can use a registration policy settings document to set up registration settings for roaming users.
Securing roaming usersSmartcards are recommended for use with roaming users. Smartcards increase user ID security for both regular and roaming users because they enable users to lock and unlock their user IDs when logging into Notes. In addition, the user's Internet private keys can be stored on the Smartcard instead of on the workstation.
11.5 Domino certificate authorityA certificate authority (CA), or certifier, is a trusted administration tool that issues and maintains digital certificates. Certificates verify the identity of an individual, a server, or an organization, and, in the case of Internet certifiers, allow them to use SSL to communicate and to use S/MIME to exchange mail. Certificates are stamped with the certifier's digital signature, which assures the recipients of the certificate that the bearer of the certificate is the entity named in the certificate.
Certifiers can also issue trusted root certificates, which allow clients and servers with certificates created by different CAs to communicate with one another.
It is important to distinguish between Notes certifiers and Internet certifiers. When you install and set up the first Domino server in a domain, a Notes certifier is automatically set up to issue Notes certificates to Notes clients. These certificates are essential for Notes clients to authenticate with a Domino server and for Domino servers to authenticate one another. Hence Notes certifiers are important even in an environment with all Web clients. An Internet certifier, on the other hand, issues Internet (X.509) certificates, which are the standard for secure communication (SSL, TLS, and so forth) over the Internet. You set up Internet certifiers on an as-needed basis in Domino.
For example, you could set up SSL on a Domino server so that clients which connect to the server would use SSL to ensure the privacy of their communications.
To set up SSL on your server, you need a key ring containing a server certificate from an Internet certificate authority. You can request and obtain a server certificate from either a Domino or third-party certificate authority (CA) and then
Note: You set up SSL on a protocol-by-protocol basis. For example, you can enable SSL for mail protocols – such as IMAP, POP3, and SMTP – and not for other protocols.
Chapter 11. Domino/Notes 6 security features 451
install it in a key ring. A server certificate, a binary file that uniquely identifies the server, is stored on the server's hard drive and contains a public key, a name, an expiration date, and a digital signature. The key ring also contains root certificates used by the server to make trust decisions.
For more information about the Domino public-key infrastructure (PKI) and enabling SSL on Domino, see Chapter 6, “Public key infrastructures” on page 187, and the IBM Redpaper “The Domino Certificate Authority.”
11.5.1 Domino server-based certification authorityIn Domino 6, you can set up a Domino certifier that uses a server task, the CA process, to manage and process certificate requests. The CA process runs as an automated process on Domino servers that are used to issue certificates. You can enable both Notes and Internet certifiers to use the CA process. When you set up either type of certifier, you link it to the CA process on the server in order to take advantage of CA process activities. Only one instance of the CA process can run on a server; however, the process can be linked to multiple certifiers. Once you have set up a Domino server-based CA, you manage the CA process from the Domino console with a set of server Tell commands.
The advantages of the Domino 6 server-based certification authority include that it:
� Provides a unified mechanism for issuing Notes and Internet certificates.
� Supports the registration authority (RA) role, which you use to delegate the certificate approval/denial process to lower-echelon administrators in the organization.
� Does not require access to the certifier ID and ID password. After you enable certifiers for the CA process, you can assign the registration authority role to administrators, who can then register users and manage certificate requests without having to provide the certifier ID and password.
� Simplifies the Internet certificate request process through a Web-based certificate request database.
� Issues certificate revocation lists, which contain information about revoked or expired Internet certificates.
� Creates and maintains the Issued Certificate List (ICL), a database that contains information about all certificates issued by the certifier.
Note: You can enable SSL on a server when you initially register the server if you already have a Domino server-based certification authority running in the Domino domain.
New for Domino 6
452 Lotus Security Handbook
� Is compliant with security industry standards for Internet certificates, for example, X.509 and PKIX.
To set up a server-based Domino certification authority in your organization, you must configure and enable Notes and Internet certifiers to use the CA process. You can enable only one type of certifier under the CA process – for example, set up only Internet certifiers for the CA process – or you can enable all certifiers for the CA process.
If your organization has existing Domino certifiers, you can migrate them to the CA process. Migrating a certifier essentially means that you enable it to use the CA process. By doing so, you eliminate the requirement for anyone to have access to the certifier ID, and you create an ICL for certificates issued by that certifier.
Issued Certificate List (ICL)Each certifier has an Issued Certificate List (ICL) that is created when the certifier is created or migrated to the CA process. The ICL is a database that stores a copy of each unexpired certificate that it has issued, certificate revocation lists, and CA configuration documents. Configuration documents are generated when you create the certifier and sign it with the certifier's public key. CA configuration documents include:
� Certificate profiles, which contain information about certificates issued by the certifier.
� CA configuration document, which contains information about the certifier itself.
� RA/CA association documents, which contain information about the RAs who are authorized to approve and deny certificate requests. There is one document for each RA.
� ID file storage document, which contains information about the certifier ID.
Another CA configuration document, the Certifier document, is created in the Domino Directory when you set up the certifier.
Certificate Revocation List (CRL)A Certificate Revocation List (CRL) is a time-stamped list identifying revoked Internet certificates – for example, certificates belonging to terminated employees. The CA process issues and maintains CRLs for each Internet certifier. A CRL is associated with a certifier, is signed by that certifier, and resides in the certifier's ICL database. A copy of the CRL is also stored in the Domino Directory, where it is used to assert certificate validity by entities that require certificate authentication.
Chapter 11. Domino/Notes 6 security features 453

You configure the CRL when you create a new Internet certifier. You can specify the length of time for which a CRL is valid and the interval between publication of new CRLs. After CRLs are configured, the certifier issues them on a regular basis and they operate unattended.
Using CRLs, you can manage the certificates issued in your organization. You can easily revoke a certificate if the subject of the certificate leaves the organization or if the key has been compromised. HTTP servers and Web browsers check the CRLs to determine whether a given certificate has been revoked, and is therefore no longer trusted by the certifier. When you use Internet Site documents to configure Internet protocols on the Domino server, you can also enable CRL-checking for each protocol.
There are two kinds of CRLs: regular and non-regular. For regular CRLs, you configure a duration interval – the time period for which the CRL is valid – and the interval at which new CRLs are issued. Each certifier issues a CRL at the specified time, even if no certificates have been revoked since the last CRL was issued. This means that if an administrator revokes a certificate, it appears in the next scheduled CRL issued by the certifier. The CRL duration period should be greater than the time period between each CRL issuance. This ensures that the CRL remains valid. Otherwise, the CRL could expire before a new one is issued.
However, in the event of a critical security break (for example, if the administrator needs to revoke a particularly powerful certificate or the certifier certificate is compromised) you can manually issue a non-regular CRL – that is, an unscheduled CRL – to enforce the emergency revocation. This type of revocation does not affect either the timing or the content of the next scheduled CRL. You use a Tell command to issue a non-regular CRL.
Certificate Requests databaseEach Internet certifier you create requires a Certificate Requests database (CERTREQ.NSF) to manage server and client certificate requests. This database stores active certificate and revocation requests that have been submitted to the Administration Process for processing. Using a browser-based interface, servers and clients request certificates and pick up issued certificates.
You can store Certificate Requests databases on any server in the domain, including servers that reside outside of a network firewall.
Administering a server-based CAThere are a number of tasks associated with managing a certifier. If you implement a certifier that uses the CA process, you can delegate Notes and Internet certificate request approval and denial to other administrators, each of whom acts as a registration authority.
454 Lotus Security Handbook
Domino certificate authority administrator tasksThe Domino certificate authority administrator (CAA) is responsible for these tasks:
� Create and configure certifiers.
� Modify certifiers. For example, only a CA administrator can edit ID recovery information for a Notes certifier.
� Add or remove Certification and Registration Authority administrators, or change the CA and RA roles assigned to users.
The CAA must have at least Editor access to the master Domino Directory for the domain.
As a best practice, designate at least two CAAs for each certifier. You then have a backup if one leaves the organization.
Domino Registration Authority administrator tasksA registration authority (RA) administrator registers Notes users and Domino servers, approves or denies Internet certificate requests, and, if necessary, revokes Internet certificates. While a CA administrator can also be a registration authority, the main advantage of having a separate RA role is to off load these tasks from the Domino or CA administrator. Moreover, the Domino administrator can establish one or more RAs for each certifier enabled for the CA process.
An RA should approve only those requests that will be accepted by the certifier. The CA Configuration document, stored in the CA's ICL database, describes what is acceptable.
Domino administrators who register Notes users should also be listed as RAs for the Notes certifier.
If you are using the Web Administrator client, you need to set up a server-based certification authority to register Notes users. The Web administrator, as well as the server on which the Web Administrator database resides, must be listed as an RA for that certifier.
Note: Many of the manual tasks associated with managing a CA prior to Domino 6 are now automated when you use the CA process.
Note: By default, the administrator who creates a certifier is automatically designated as both a CAA and an RA for that certifier. When you create additional CAAs, they must be assigned the RA role in order to register users.
Chapter 11. Domino/Notes 6 security features 455
The Domino Registration Authority (RA) administrator is responsible for these tasks:
� Register users, servers, and additional Notes certifiers.
� Approve or deny Internet certificate requests.
� Revoke certificates if they can no longer be trusted, such as if the subject of the certificate leaves the organization, or if the key has been compromised.
Creating certifiers that use the CA processWhen you create a certifier specifically for the CA process, you must make sure that the CA process task is running on the server. Certifiers will not function if the CA process is not running. To manage the CA process, you use Tell commands at the server console.
If the CA process task is running when you create a certifier, the process automatically adds newly-created certifiers when it refreshes, which takes place every 12 hours. However, the time period in which the Administration Requests database processes CA requests will vary. You can hasten the process by using Tell commands to have AdminP process all requests, and then refresh the CA process.
The general process for creating a CA-process enabled certifier is as follows:
1. Migrate or create the certifier.
– If you are creating a new Notes certifier, you must first register the O or OU level certifier and then migrate the certifier ID to the CA process.
– If you have an existing Notes certifer, you must first migrate the certifier ID to the CA process.
– If you have an existing Internet certifier, you must first migrate the key ring to the CA process.
2. Configure the certifer.
3. Add the certifier to the CA process.
4. For Internet certifiers, create a Certificate Requests database.
Note: CAs and RAs must have at least Editor access to the master Domino Directory for the domain.
Note: To load the CA task automatically, add the parameter ca to the Server setting in the NOTES.INI file.
456 Lotus Security Handbook

For specific information about each procedure, see the chapter “Setting Up a Server-based Certification Authority” in Domino 6 Administering the Domino System.
11.6 Directory servicesThere are several aspects of Domino directory services that should be considered in securing any Domino environment.
11.6.1 Directory administration serversEach Domino domain has at least one administration server for the Domino Directory. The administration server is responsible for carrying out Administration Process requests that automate changes to the Domino Directory. By default, the first server set up in a domain is the administration server for the Domino Directory.
11.6.2 Dedicated directory serversYou can use directory servers in a Domino domain to dedicate specific servers to providing directory services. Clients and specialized servers such as mail and application servers use the directory servers to look up user, group, and similar information.
A directory server might:
� In a central directory architecture, store a primary Domino Directory that servers with Configuration Directories access remotely
� Run the LDAP service
� Run the Dircat task to build and store directory catalogs
� Store replicas of directories that are aggregated into the directory catalog
� Store replicas of secondary Domino Directories that servers in the domain access through directory assistance
You can set up Notes clients to use directory servers, rather than their mail servers, to look up names and addresses.
Chapter 11. Domino/Notes 6 security features 457
Using a central directory architecture in a Domino domainPrior to Domino 6, companies always used a distributed directory architecture in which every server in a Domino domain had a full replica of the domain's primary Domino Directory. A primary directory contains all types of documents: documents used to provide directory services such as Person and Group documents, as well as documents used to configure Domino servers.
In this release, companies can implement a central directory architecture, in which a few directory servers in a domain have a replica of the primary Domino Directory that contains the entire contents of the Domino Directory. The other servers in the domain have a Configuration Directory, which is a small, selective replica of the Domino Directory that contains only documents used for Domino configuration. A server with a Configuration Directory uses a primary Domino Directory on another server – referred to as a remote primary Domino Directory – to look up information in Person, Group, Mail-In Database, and Resource documents, and in any new types of custom documents a company has added to the directory.
A central directory architecture allows for tighter administrative control over directory management because only a few directory replicas contain user and group information. In addition, application and mail servers can run on less powerful machines than the directory servers require, since the application and mail servers don't have to store a primary Domino Directory, which can be the largest database in a company. If the user and group information in a directory changes frequently, the servers with Configuration Directories have immediate access to the changes that critical business applications and processes require, because they don't have to wait for the changes to replicate locally.
To use a central directory architecture, you must have adequate network bandwidth to support the remote primary directory lookups. For failover, it is also important that at least two servers in a domain are configured as remote primary Domino Directories.
11.6.3 Directory assistanceDirectory assistance is a feature a server can use to look up information in a directory other than a local primary Domino Directory (NAMES.NSF). You can configure directory assistance to use a particular directory for any of these services:
� Client authentication (including Web browser/HTTP clients)
� Group lookups for database authorization
� Notes mail addressing
� LDAP service searches or referrals
New for Domino 6
458 Lotus Security Handbook

You can set up directory assistance for a remote LDAP directory or a Domino directory. A remote LDAP directory can be any remote LDAP-compliant directory, either one on a foreign LDAP directory server or one on a Domino server that runs the LDAP service.
A Domino directory is a directory created from the PUBNAMES.NTF template and accessed via NAMELookup calls. Servers can use directory assistance to do lookups in either local or remote replicas of a Domino directory. A Domino directory configured for directory assistance can be a secondary Domino Directory, an Extended Directory Catalog, or a primary Domino Directory.
� A secondary Domino Directory is any Domino Directory that is not a server's primary Domino Directory. A secondary Domino Directory can be a directory associated with another Domino domain. A secondary Domino Directory can also be a Domino Directory created manually from the PUBNAMES.NTF template that is not associated with a Domino domain – used, for example, to store and track Web user information.
� An Extended Directory Catalog contains documents aggregated from multiple secondary Domino Directories. A server must use directory assistance to look up information in an Extended Directory Catalog, unless you integrate the Extended Directory Catalog directly into the primary Domino Directory.
� The primary Domino Directory is the directory a server searches first that describes the Domino domain of the server. You can set up directory assistance for a primary Domino Directory, usually to specify which replicas of primary Domino Directories servers with Configuration Directories can use.
Directory assistance and client authenticationTo authenticate a user who is accessing a database on a Domino server via any of the supported Internet protocols – Web (HTTP), IMAP, POP3, or LDAP – a server can look up the users' credentials in a directory that is configured in its directory assistance database. Servers can use X.509 certificate security or name-and-password security for the authentication.
To allow a server to use a directory for Internet client authentication that is configured in a directory assistance database, do the following in the Directory Assistance document for the directory:
� On the Basics tab, next to “Make this domain available to,” select “Notes clients and Internet Authentication/Authorization.”
� On the Naming Contexts (Rules) tab, enable at least one rule that corresponds to the distinguished names of the users in the directory to be authenticated, and next to “Trusted for Credentials,” select “Yes.”
For example, if your organization registers Web users in a foreign LDAP directory, when a Web user attempts to access a database on a Domino Web
Chapter 11. Domino/Notes 6 security features 459

server, the server can connect to the remote foreign LDAP directory server to look up the user name and password to do the authentication.
You use an Internet Site document or the Ports → Internet Ports tab of the Server document to control the types of client authentication an Internet protocol server allows.
Names accepted for name-and-password authenticationIf a server uses name-and-password security to authenticate Internet clients, you select the types of names that the server can accept from clients. On the Security → Internet Access tab of the Server document in the primary Domino Directory, select “More name variations with lower security” or “Fewer name variations with higher security” (the default). The selection applies to name and password authentication using any directory, including the primary Domino Directory.
Though a server can accept a name other than a distinguished name from a client to search for a user's entry in a directory, it is always the user's distinguished name in the directory entry that the server compares to trusted rules in the Directory Assistance document to determine whether to authenticate the client. For example, suppose a user is registered in a directory with the distinguished name cn=alice browning,o=Acme, but the user configures the name alice browning on the client. During authentication, the server searches for an entry that contains the name alice browning. When it finds the entry, it can only authenticate the client if “cn=alice browning,o=acme” matches a trusted naming rule for the directory.
A user's distinguished name is also used as the basis for access control in Domino, so you should use users' distinguished names in database ACLs, in groups used in database ACLs, in access lists in Server documents, and in Web server File Protection documents.
Encountering duplicate names during client authenticationIf a server finds more than one directory entry containing the name presented by the client that corresponds to a valid distinguished name for authentication, within one directory or across directories, the server authenticates the client using the entry with the valid password or X.509 certificate. If more than one such entry has a valid password or X.509 certificate and the same distinguished
Attention: A server can always use a Domino directory in the directory assistance database for client authentication if the directory is assigned the same domain as the server's domain, regardless how the Directory Assistance document is configured.
460 Lotus Security Handbook

name, the server authenticates the user using the first matching password or X.509 certificate it finds.
Consistent client names and passwords across protocolsIf Domino servers authenticate a client over more than one Internet protocol, for ease of directory administration, create one directory entry for the client with one name and password that applies to all the protocols. Then set up the client to use the same name and password for all protocols.
For example, if a client connects to Domino over HTTP for Web browsing and over LDAP for directory services, create one directory entry for the client with a name and password, and set up the client to use the name and password for both types of connections.
Notes client authenticationBy default, when a server authenticates a Notes client it does not use information in Domino Directory Person documents to verify the authenticity of the Notes ID. However, if you enable the option “Compare Notes public keys against those stored in Directory” on the Basics tab of the server's Server document, the server authenticates a Notes user only if the public key presented by the Notes client matches the public key in the user's Person document.
If a Notes user who connects to a server to authenticate is registered in a secondary Domino Directory rather than the server's primary Domino Directory, and the “Compare Notes public keys against those stored in Directory” option is enabled for the server to which the user connects, you must select the option “Make this domain available to: Notes clients and Internet Authentication/Authorization” on a Directory Assistance document to allow a server to do the public key comparison. This Directory Assistance document can be for:
� The secondary Domino Directory in which the Notes user is registered
� An Extended Directory Catalog that aggregates the secondary Domino Directory in which the Notes user is registered
Note: If the domain name you specify for a Domino Directory or Extended Directory Catalog is the same as the domain of the servers that use the directory assistance database, the servers can use the directory automatically for client authentication, group lookups for database authorization, and Notes mail addressing, regardless of whether you select “Make this domain available to: Notes clients and Internet Authentication/Authorization.” In addition, servers search a directory in the same domain first, regardless of the search order specified for the directory.
Chapter 11. Domino/Notes 6 security features 461
Client authentication using remote LDAP directoryThe following features are available specifically for client authentication using a remote LDAP directory:
� Configurable search filters to control the search filter used to look up names in the remote LDAP directory
� LDAP-to-Domino name mapping to enable users to authenticate using Notes distinguished names rather than LDAP distinguished names
How DA is triggered to authenticate using an LDAP directoryThe authentication process starts when a client attempts to access a Domino application or database that requires authentication. The user is presented with a password challenge dialogue and provides a user ID and a password. The authentication process then takes the userid and attempts to find a matching entry for it in the Domino Directory. If it isn't found there, it then uses the Directory Catalog (if one is present), and then checks via Directory Assistance.
If the authentication process finds a match for the userid (and it looks in several fields for the match), the authentication process returns the Distinguished Name (DN) associated with that matching person record. It then uses the DN and the password provided by the user to do an authenticated bind with the directory in which it found the entry. If the bind is successful, we know the DN/credential pair is good and the user is authenticated. If the bind fails, the authentication process continues to look for more entries with a match for the userid provided. It continues this process until it finds the first entry with a matching userid/password pair, or until it has exhausted all configured directories.
The implication for this is that you can have a Person record for the same person in both the Domino Directory and a third party directory and, if the credential is stored only in the third party directory, that is where authentication takes place. It also means that the authenticated identity for the individual is the DN as returned by the directory that contains the matching record, so if the user authenticates against a third party directory, it is the DN stored in that third party directory that has to be in the database ACL that the user is trying to access.
11.6.4 Extended access control lists An extended access control list (ACL) is an optional directory access control feature available for a directory created from the PUBNAMES.NTF template – a Domino Directory or an Extended Directory Catalog. Extended ACLs refine the database ACL and restrict user access to specific portions of a Domino Directory or Extended Directory Catalog. They also enforce database security for Notes client name lookups and for anonymous LDAP search access.
New for Domino 6
462 Lotus Security Handbook

An extended ACL is tied to the database ACL, and you access it through the Access Control List dialog box using a Notes 6 or Domino Administrator 6 client. You use an extended ACL to apply restrictions to the overall access the database ACL allows a user; you cannot use it to increase the access the database ACL allows. Use an extended ACL to set access to:
� All documents with hierarchical names at a particular location in the directory name hierarchy, for example, all documents whose names end in OU=West/O=Acme
� All documents of a specific type, for example, all Person documents
� A specific field within a specific type of document
� A specific document
An extended ACL allows you to:
� Delegate your Domino administration, for example, to allow a group of administrators to manage only documents named under a particular organizational unit
� Set access to precise portions of the directory contents
� Set access to documents and fields easily and globally at one source, rather than requiring you to control access through features such as multiple Readers and Authors fields
� Control the access of users who access the directory through any supported protocol: Notes (NRPC), Web (HTTP), LDAP, POP3, and IMAP
The access set for a user in an extended ACL can never exceed the access the database ACL, including the database ACL privileges and roles, allows the user. For example, if the database ACL allows a user only Reader access, you can't use the extended ACL to allow Write access. Or, if a user is omitted from the database ACL User Creator role, you can't use the extended ACL to allow the user Create access to Person documents.
Access set through a security feature in the database design also restricts the access you can specify in an extended ACL. For example, if a Readers field on a particular form prevents a user from reading fields in documents created with that
Note: Server processes such as the Router task do not enforce extended ACL restrictions. However, in the case of the Router task specifically, you can prevent some users from sending mail to a group by editing the Readers field for the group and including only the names of users you want to allow to send mail to the group. When users omitted from the Readers field attempt to send mail to the group, the Router won't deliver the mail.
Chapter 11. Domino/Notes 6 security features 463

form, giving a user Browse access to the form in the extended ACL does not override the access specified in the Readers field.
Planning directory access controlUse the database ACL to control the general access that users and servers have to the Domino Directory. Optionally, use an extended ACL to refine the general database ACL and further restrict access to specific portions of the directory. An extended ACL is available only for Domino Directory and Extended Directory Catalog.
Some of the questions to ask when planning directory access control include:
� Do you want to assign administrators to specific administration roles in the Domino Directory? If administrators in your company have specialized administrative duties, consider assigning the administrators only to the administration roles in the ACL that correspond to their duties. If your company administrators do all administrative tasks, assign them to all of the roles.
� Do you want to use an extended ACL? One of the reasons to use an extended ACL is to limit cross-organizational access to a directory that contains information for multiple organizations or organizational units.
� Do you want to allow Anonymous access to the directory? By default, you use the domain Configuration Settings document in the Domino Directory to control anonymous LDAP search access. By default, anonymous LDAP users have Read access to a specific list of attributes.
The Anonymous entry in the directory database ACL by default is set to “No Access” and controls anonymous access for all users other than LDAP users. If you use an extended ACL, then the Anonymous entry in database ACL and the extended ACL also control anonymous LDAP access. Typically you give the Anonymous entry no more than Reader access.
11.6.5 LDAP directoriesThe Lightweight Directory Access Protocol (LDAP) is a standard Internet protocol for searching and managing entries in a directory. Domino and Notes provides LDAP support via:
� The “LDAP service,” which enables a Domino server to function as an LDAP directory server and process LDAP requests.
� LDAP accounts on Notes clients, which enable Notes users to do LDAP-style searches for an addresses in LDAP directories.
464 Lotus Security Handbook
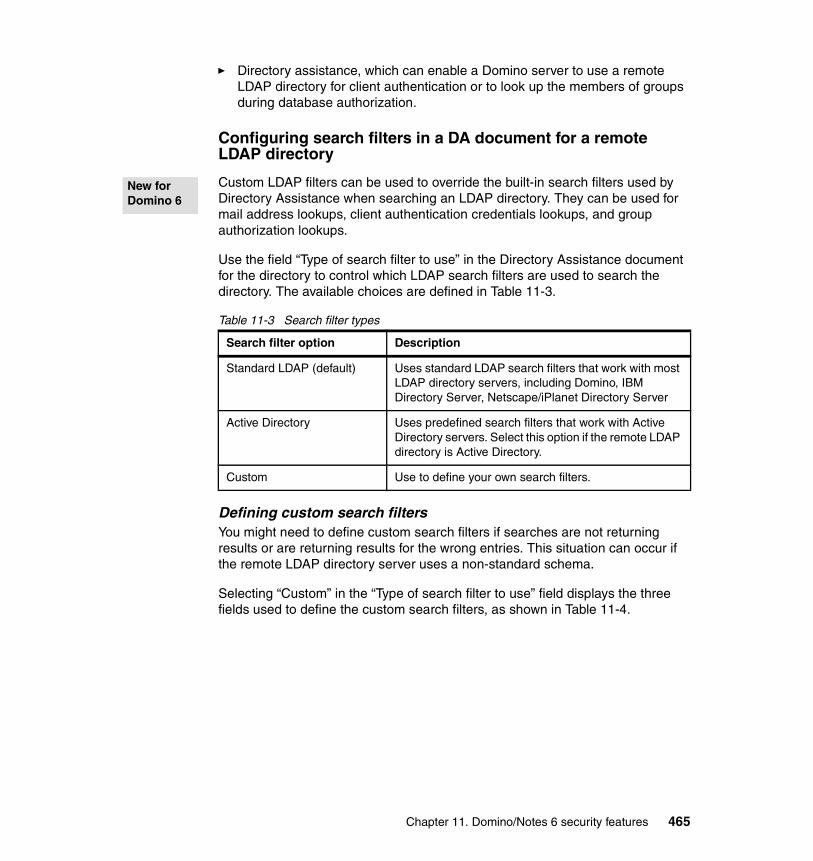
� Directory assistance, which can enable a Domino server to use a remote LDAP directory for client authentication or to look up the members of groups during database authorization.
Configuring search filters in a DA document for a remote LDAP directory
Custom LDAP filters can be used to override the built-in search filters used by Directory Assistance when searching an LDAP directory. They can be used for mail address lookups, client authentication credentials lookups, and group authorization lookups.
Use the field “Type of search filter to use” in the Directory Assistance document for the directory to control which LDAP search filters are used to search the directory. The available choices are defined in Table 11-3.
Table 11-3 Search filter types
Defining custom search filtersYou might need to define custom search filters if searches are not returning results or are returning results for the wrong entries. This situation can occur if the remote LDAP directory server uses a non-standard schema.
Selecting “Custom” in the “Type of search filter to use” field displays the three fields used to define the custom search filters, as shown in Table 11-4.
Search filter option Description
Standard LDAP (default) Uses standard LDAP search filters that work with most LDAP directory servers, including Domino, IBM Directory Server, Netscape/iPlanet Directory Server
Active Directory Uses predefined search filters that work with Active Directory servers. Select this option if the remote LDAP directory is Active Directory.
Custom Use to define your own search filters.
New for Domino 6
Chapter 11. Domino/Notes 6 security features 465
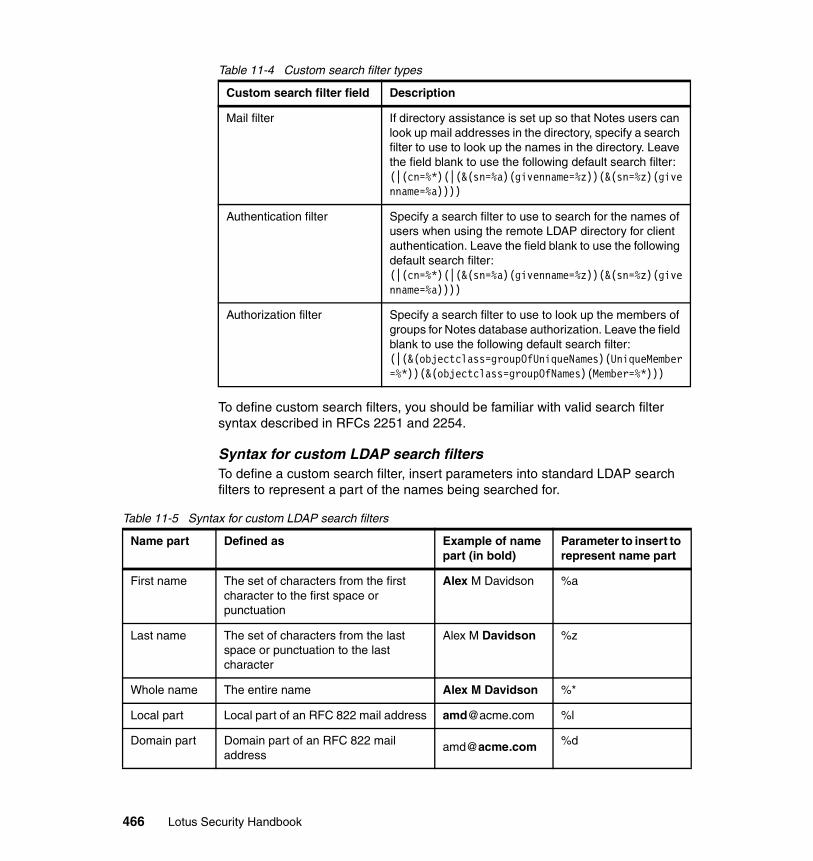
Table 11-4 Custom search filter types
To define custom search filters, you should be familiar with valid search filter syntax described in RFCs 2251 and 2254.
Syntax for custom LDAP search filtersTo define a custom search filter, insert parameters into standard LDAP search filters to represent a part of the names being searched for.
Table 11-5 Syntax for custom LDAP search filters
Custom search filter field Description
Mail filter If directory assistance is set up so that Notes users can look up mail addresses in the directory, specify a search filter to use to look up the names in the directory. Leave the field blank to use the following default search filter:(|(cn=%*)(|(&(sn=%a)(givenname=%z))(&(sn=%z)(givenname=%a))))
Authentication filter Specify a search filter to use to search for the names of users when using the remote LDAP directory for client authentication. Leave the field blank to use the following default search filter:(|(cn=%*)(|(&(sn=%a)(givenname=%z))(&(sn=%z)(givenname=%a))))
Authorization filter Specify a search filter to use to look up the members of groups for Notes database authorization. Leave the field blank to use the following default search filter:(|(&(objectclass=groupOfUniqueNames)(UniqueMember=%*))(&(objectclass=groupOfNames)(Member=%*)))
Name part Defined as Example of name part (in bold)
Parameter to insert to represent name part
First name The set of characters from the first character to the first space or punctuation
Alex M Davidson %a
Last name The set of characters from the last space or punctuation to the last character
Alex M Davidson %z
Whole name The entire name Alex M Davidson %*
Local part Local part of an RFC 822 mail address [email protected] %l
Domain part Domain part of an RFC 822 mail address
466 Lotus Security Handbook
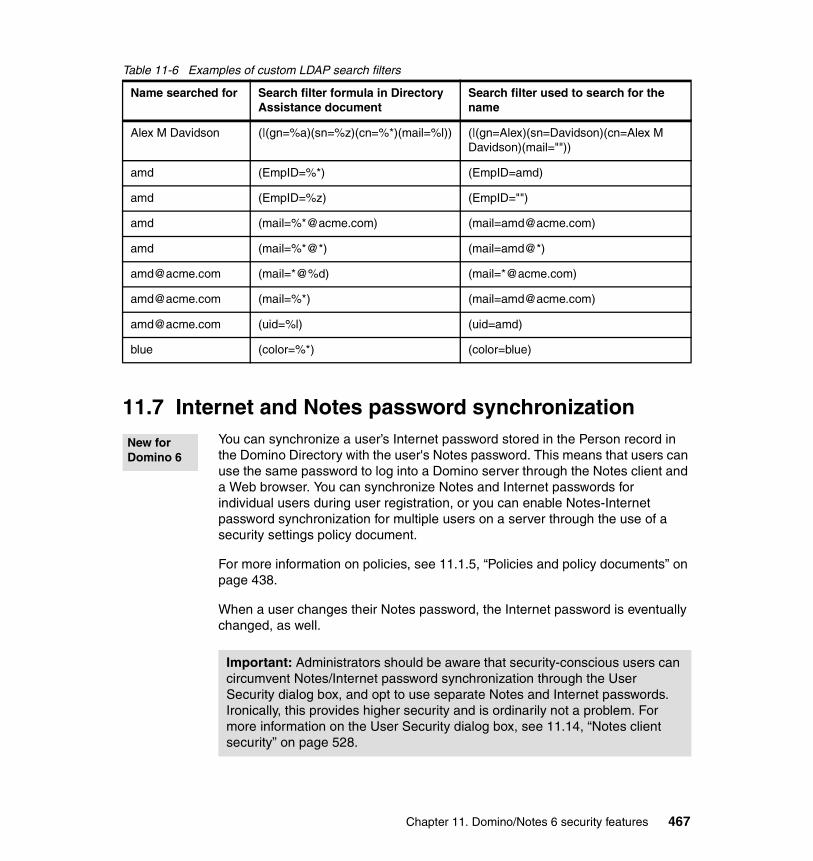
Table 11-6 Examples of custom LDAP search filters
11.7 Internet and Notes password synchronization You can synchronize a user’s Internet password stored in the Person record in the Domino Directory with the user's Notes password. This means that users can use the same password to log into a Domino server through the Notes client and a Web browser. You can synchronize Notes and Internet passwords for individual users during user registration, or you can enable Notes-Internet password synchronization for multiple users on a server through the use of a security settings policy document.
For more information on policies, see 11.1.5, “Policies and policy documents” on page 438.
When a user changes their Notes password, the Internet password is eventually changed, as well.
Name searched for Search filter formula in Directory Assistance document
Search filter used to search for the name
Alex M Davidson (|(gn=%a)(sn=%z)(cn=%*)(mail=%l)) (|(gn=Alex)(sn=Davidson)(cn=Alex M Davidson)(mail=""))
amd (EmpID=%*) (EmpID=amd)
amd (EmpID=%z) (EmpID="")
amd (mail=%*@acme.com) ([email protected])
amd (mail=%*@*) (mail=amd@*)
[email protected] (mail=*@%d) (mail=*@acme.com)
[email protected] (mail=%*) ([email protected])
[email protected] (uid=%l) (uid=amd)
blue (color=%*) (color=blue)
Important: Administrators should be aware that security-conscious users can circumvent Notes/Internet password synchronization through the User Security dialog box, and opt to use separate Notes and Internet passwords. Ironically, this provides higher security and is ordinarily not a problem. For more information on the User Security dialog box, see 11.14, “Notes client security” on page 528.
New for Domino 6
Chapter 11. Domino/Notes 6 security features 467
11.8 Notes ID recoveryThe first step in setting up Notes ID file recovery is to set up a centralized mail or mail-in database to store encrypted backups of Notes ID files. Then it is necessary to specify information about which administrators – known here as Recovery Authorities – are allowed to recover Notes IDs.
The configuration of the access control list of the centralized mail or mail-in database must be, at a minimum, as follows:
� -Default- and Anonymous must be No Access.
� All Recovery Authorities must have at least Reader access.
The proper definition of this ACL is essential in protecting the backup copies of the Notes IDs that will be stored there. Therefore, great care should be taken in defining the ACL for it.
To set up Notes ID recovery, perform the following steps:
1. From the Domino Administrator, click Configuration, and then click Certification.
2. Click Edit Recovery Information.
3. In the “Choose a Certifier” dialog box, click Server and select the registration server name from the Domino Directory (only if the correct server name does not appear).
4. Choose the certifier for which you are creating recovery information.
– If you are using a server-based certification authority, click “Use the CA process” and select a certifier from the drop-down list. You must be a Certificate Authority (CA) administrator for the certifier in order to change ID recovery information.
– If you are not using a server-based certification authority, click “Supply certifier ID and password.” If the certifier ID path and file name does not appear, click Certifier ID and select the certifier ID file and enter the password.
5. Click OK. The “Edit Master Recovery Authority List” dialog box appears.
6. Enter the number of recovery authorities that are required to recover an ID file. It is recommended that you choose at least three.
7. Click Add and select the names of the administrators who are the designated recovery authorities.
468 Lotus Security Handbook
8. Choose whether you want to use an existing mailbox for recovery information or create a new one.
– If you have a mail or mail-in database already set up for recovery information, click “I want to use an existing mailbox.” Click Address and select the database from the Domino Directory.
– If you want to create a new database to store recovery information, click “I want to create a new mailbox.” In the “Create New Mailbox” dialog box, enter the name of the server on which the database is to be created, and the database title. You can use the file name that is created from the database title, or you can create a new one.
9. Click OK.
10.If you are using a server-based certification authority, at the server console type:
load ca
This starts the CA process with the new recovery information, or refreshes it if it is already running. Then, to process the request to add recovery information to the certifier, type:
tell adminp process all
The users will then receive a Notes mail containing recovery information. Each user has to accept it, by choosing Action → Accept Recovery Information, and store the information into his or her own Notes ID file. At the same time, backup of the recovery information will be sent back to the backup ID database.
When an administrator registers a new Notes user after completing this operation, a backup copy of the Notes ID file is stored automatically to the backup ID database.
Setting up recovery information for Notes IDs with SmartcardsIf there is a plan in place in the organization to use Smartcards, recovery information for those Notes user IDs must be set up before Smartcard login is enabled.
Note: Whenever you make changes in this dialog box, the Export button is disabled. You cannot export recovery information until you save the new or updated information.
Note: If you have created additional O-level Notes certifiers, be sure to cross-certify them with the initial Notes certifier prior to setting up recovery information.
Chapter 11. Domino/Notes 6 security features 469
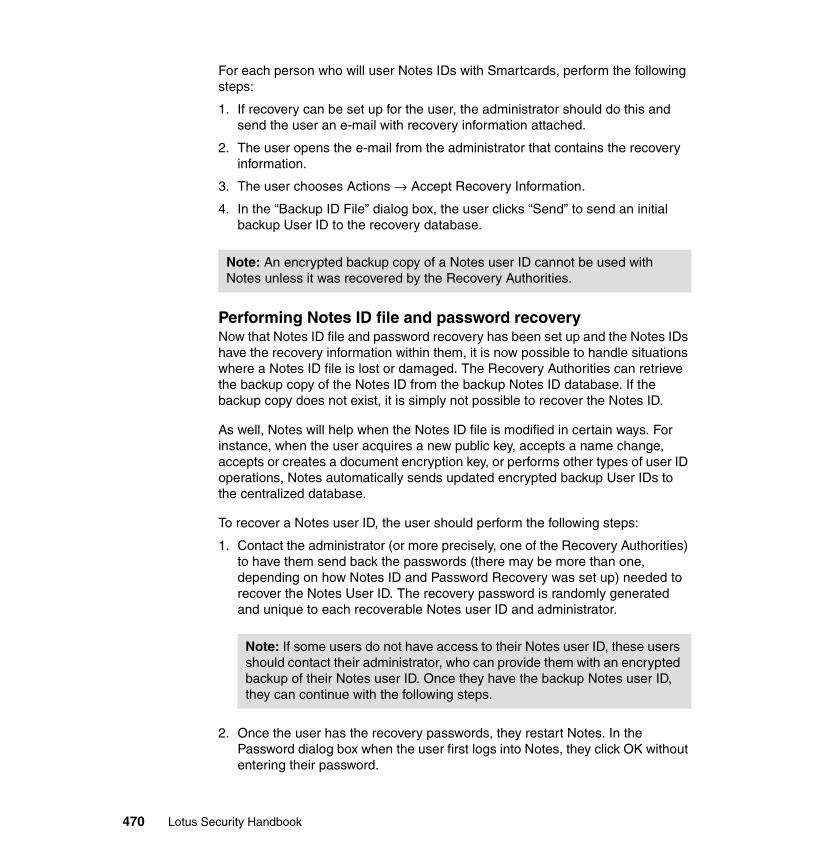
For each person who will user Notes IDs with Smartcards, perform the following steps:
1. If recovery can be set up for the user, the administrator should do this and send the user an e-mail with recovery information attached.
2. The user opens the e-mail from the administrator that contains the recovery information.
3. The user chooses Actions → Accept Recovery Information.
4. In the “Backup ID File” dialog box, the user clicks “Send” to send an initial backup User ID to the recovery database.
Performing Notes ID file and password recoveryNow that Notes ID file and password recovery has been set up and the Notes IDs have the recovery information within them, it is now possible to handle situations where a Notes ID file is lost or damaged. The Recovery Authorities can retrieve the backup copy of the Notes ID from the backup Notes ID database. If the backup copy does not exist, it is simply not possible to recover the Notes ID.
As well, Notes will help when the Notes ID file is modified in certain ways. For instance, when the user acquires a new public key, accepts a name change, accepts or creates a document encryption key, or performs other types of user ID operations, Notes automatically sends updated encrypted backup User IDs to the centralized database.
To recover a Notes user ID, the user should perform the following steps:
1. Contact the administrator (or more precisely, one of the Recovery Authorities) to have them send back the passwords (there may be more than one, depending on how Notes ID and Password Recovery was set up) needed to recover the Notes User ID. The recovery password is randomly generated and unique to each recoverable Notes user ID and administrator.
2. Once the user has the recovery passwords, they restart Notes. In the Password dialog box when the user first logs into Notes, they click OK without entering their password.
Note: An encrypted backup copy of a Notes user ID cannot be used with Notes unless it was recovered by the Recovery Authorities.
Note: If some users do not have access to their Notes user ID, these users should contact their administrator, who can provide them with an encrypted backup of their Notes user ID. Once they have the backup Notes user ID, they can continue with the following steps.
470 Lotus Security Handbook

3. Click “Recover Password” in the “Wrong Password” dialog box.
4. Select the User ID to recover in the “Choose ID File to Recover” dialog box.
5. Enter the passwords given to the user by the administrators in the “Enter Passwords” dialog box, and repeat until all of the passwords have been entered and the user is prompted to enter a new password for their User ID.
6. Enter a new password for the Notes user ID and confirm it when prompted.
7. Finally, the user should replace all backups of their Notes user ID, and copies of their Notes user ID that they are using, with the newly recovered Notes user ID.
The Notes ID and Password Recovery setup and procedure may seem quite complex and laborious. However, it’s important to consider the following:
� Once set up and once the procedure is established, it is quite straightforward and simple and can be explained quickly to users.
� It is considerably easier for administrators to help a user recover a password in this manner than to recreate a new Notes user ID for that user.
It can also help eliminate the habit users have of not setting complicated passwords (which would make them good passwords) for fear of forgetting them.
11.9 Web client authentication There are several options for authenticating Web clients who attempt to access a Domino Web server. They include:
� Name-and-password authentication
Name-and-password authentication occurs via a simple HTTP pop-up window prompt to the user. No HTML cookies are sent to the client, and authentication credentials are not cached in any manner on the server.
Note: Users may need to wait a short while until the “Backup ID File” dialog box appears.
Attention: It should be well explained to the users that if they do not enter a new password, they will have to recover their Notes user ID all over again.
Chapter 11. Domino/Notes 6 security features 471
� Session-based name-and-password authentication
Session based authentication occurs via an HTML form prompt to the user. The authentication credentials are then cached within a session that is created in Domino for the user, and a session identification cookie is passed to the browser so that the user can be identified on subsequent requests.
This authentication method allows for persistence of the user’s connection on a single server, and allows for a customized login prompt via the HTML login form. This method does not provide single sign-on support.
� Multi-server session-based authentication
Multi-server authentication is similar to basic session authentication, except an LTPA cookie is passed to the browser containing the username and verifying the users valid authentication. This LTPA “token” is then trusted by other servers for authentication. Thus, this authentication method supports single sign-on across a multi-server infrastructure.
A more detailed discussion of some of these authentication options is available in 6.2.4, “Web client authentication” on page 240, while a more detailed discussion of LTPA can be found in 7.2, “LTPA” on page 285
The rest of this section discusses the key security aspects to consider when using these various authentication options.
11.9.1 Name variation considerations
You can select the level of name restriction Domino uses when authenticating users in Domino Directories and LDAP directories. This applies to all Internet protocols (HTTP, LDAP, IMAP, POP3). Using this setting makes servers less vulnerable to security attacks by refining how Domino searches for names and authenticates Internet clients. Domino also uses this setting when a Java applet hosted on a Domino server authenticates users with the Domino IIOP protocol.
Fewer name variations with higher securityThe option “Fewer name variations with higher security” is the default setting and is recommended for tighter security. This authentication method is less vulnerable to attacks because a single authentication attempt does not produce as many matches, lessening the likelihood that a guessed password matches. Only the variations identified in Table 11-7 can be entered by the user in the name-and-password dialog box in a Web browser or other Internet client.
472 Lotus Security Handbook
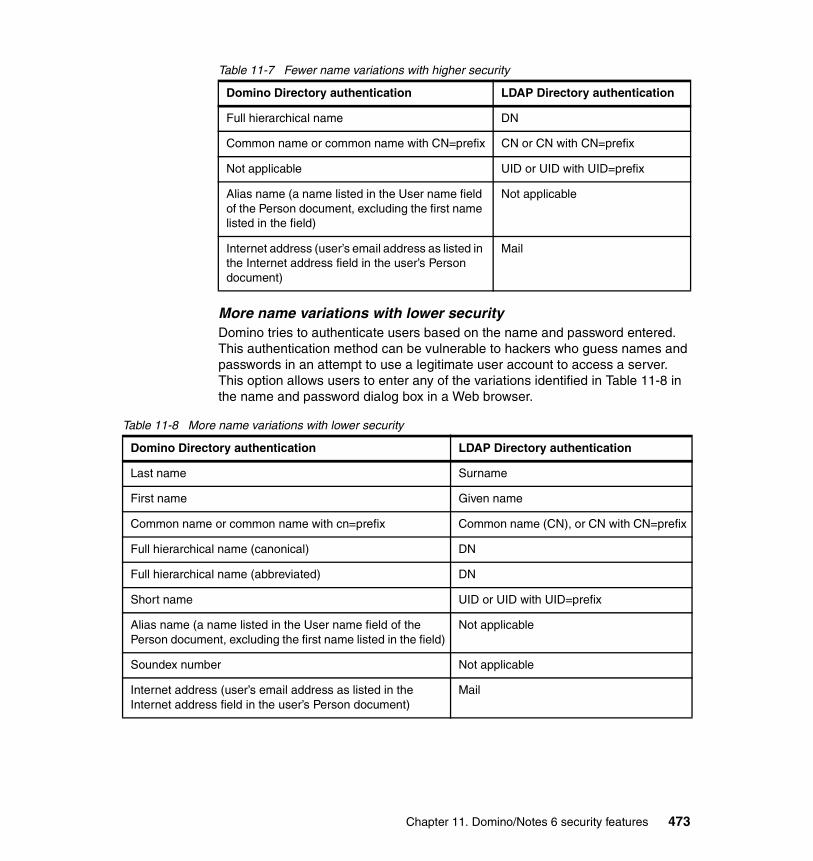
Table 11-7 Fewer name variations with higher security
More name variations with lower securityDomino tries to authenticate users based on the name and password entered. This authentication method can be vulnerable to hackers who guess names and passwords in an attempt to use a legitimate user account to access a server. This option allows users to enter any of the variations identified in Table 11-8 in the name and password dialog box in a Web browser.
Table 11-8 More name variations with lower security
Domino Directory authentication LDAP Directory authentication
Full hierarchical name DN
Common name or common name with CN=prefix CN or CN with CN=prefix
Not applicable UID or UID with UID=prefix
Alias name (a name listed in the User name field of the Person document, excluding the first name listed in the field)
Not applicable
Internet address (user’s email address as listed in the Internet address field in the user’s Person document)
Domino Directory authentication LDAP Directory authentication
Last name Surname
First name Given name
Common name or common name with cn=prefix Common name (CN), or CN with CN=prefix
Full hierarchical name (canonical) DN
Full hierarchical name (abbreviated) DN
Short name UID or UID with UID=prefix
Alias name (a name listed in the User name field of the Person document, excluding the first name listed in the field)
Not applicable
Soundex number Not applicable
Internet address (user’s email address as listed in the Internet address field in the user’s Person document)
Chapter 11. Domino/Notes 6 security features 473
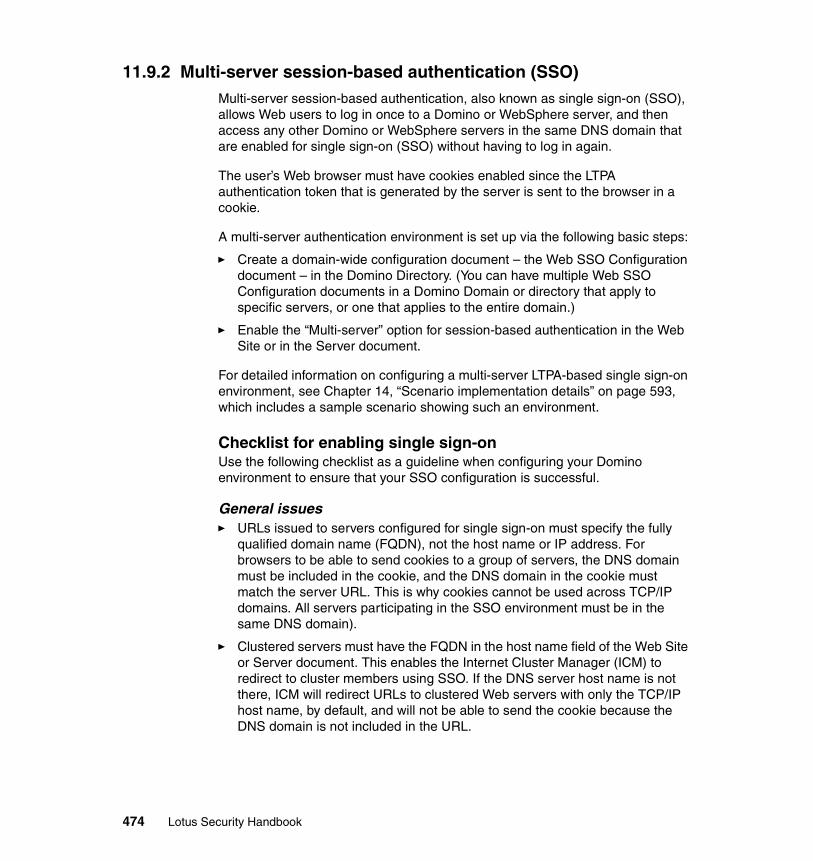
11.9.2 Multi-server session-based authentication (SSO) Multi-server session-based authentication, also known as single sign-on (SSO), allows Web users to log in once to a Domino or WebSphere server, and then access any other Domino or WebSphere servers in the same DNS domain that are enabled for single sign-on (SSO) without having to log in again.
The user’s Web browser must have cookies enabled since the LTPA authentication token that is generated by the server is sent to the browser in a cookie.
A multi-server authentication environment is set up via the following basic steps:
� Create a domain-wide configuration document – the Web SSO Configuration document – in the Domino Directory. (You can have multiple Web SSO Configuration documents in a Domino Domain or directory that apply to specific servers, or one that applies to the entire domain.)
� Enable the “Multi-server” option for session-based authentication in the Web Site or in the Server document.
For detailed information on configuring a multi-server LTPA-based single sign-on environment, see Chapter 14, “Scenario implementation details” on page 593, which includes a sample scenario showing such an environment.
Checklist for enabling single sign-onUse the following checklist as a guideline when configuring your Domino environment to ensure that your SSO configuration is successful.
General issues� URLs issued to servers configured for single sign-on must specify the fully
qualified domain name (FQDN), not the host name or IP address. For browsers to be able to send cookies to a group of servers, the DNS domain must be included in the cookie, and the DNS domain in the cookie must match the server URL. This is why cookies cannot be used across TCP/IP domains. All servers participating in the SSO environment must be in the same DNS domain).
� Clustered servers must have the FQDN in the host name field of the Web Site or Server document. This enables the Internet Cluster Manager (ICM) to redirect to cluster members using SSO. If the DNS server host name is not there, ICM will redirect URLs to clustered Web servers with only the TCP/IP host name, by default, and will not be able to send the cookie because the DNS domain is not included in the URL.
474 Lotus Security Handbook
WebSphere issues� WebSphere and Domino should both be configured for the same LDAP
directory. The authentication token used for SSO stores the full Distinguished Name of the user (DN) – for example, cn=john smith, ou=sales, o=ibm, c=us. To set up LDAP for SSO, set up Directory Assistance in Domino and configure it to point to an LDAP server that the WebSphere server uses. Or, load LDAP on the Domino Directory and configure WebSphere to use the Domino LDAP server.
� If the group of servers participating in single sign-on includes WebSphere servers that use a Domino LDAP directory, users with flat names in that directory cannot use SSO (if the participating servers are all Domino, then SSO will work with flat user names).
� The SSO token must be generated in WebSphere, and then imported into Domino. WebSphere cannot use an SSO LTPA token generated by Domino.
Setting up Web SSO for more than one Domino domainThis procedure lets you enable servers in other Domino domains for SSO with servers in your current domain, by setting up both domains to use the same key information. Two conditions must exist in order to do this:
� You must be a registered Notes user and your server must be a registered server. This gives you and the server the rights to decrypt the Web SSO Configuration document in your current domain, and the right to create documents in the Domino Directory for the new domain.
� The server document and the administrator's person document must exist in the domain for which you will be creating the Web SSO Configuration because the public keys that are used for encryption and decryption are stored in each registered person and server document.
To set up the Web SSO Configuration document for more than one Domino domain:
1. Copy the Web SSO Configuration document from the Domino Directory in which it was created, and paste it into the Domino Directory in the new domain.
2. Open the Web SSO Configuration document for the new domain and edit the “Participating Domino Servers” field to include only those servers with server documents in the new domain that will be enabled for single sign-on.
3. The client must be able to find server documents for the participating single sign-on servers. Make sure that the home server specified in your client’s location document is pointing to a server in the same domain as those servers participating in single sign-on, so that lookups will be able to find the public keys of the servers. If the home server cannot find participating servers, then the SSO document cannot be encrypted and SSO will fail.
Chapter 11. Domino/Notes 6 security features 475
4. Save the document. It is encrypted for the participating servers in the new domain, and should enable those servers in the new domain to participate in single sign-on with servers in the original domain.
11.9.3 Web users from secondary Domino and LDAP directories
When a Web client authenticates with a server, by default, the server checks the primary Domino Directory to see if the client certificate exists in the Person document. If your organization uses a secondary Domino Directory or an LDAP directory to verify client certificates, you can set up Domino to check those additional directories. To do so, you set up the secondary Domino and LDAP directories as trusted domains in the Directory Assistance database.
When you mark the domain as trusted, Domino searches the primary Domino Directory for the user and then searches the trusted secondary Domino and LDAP directories. When you set up directory assistance, you specify the order in which Domino searches the secondary directories.
In addition, Domino checks the primary Domino Directory and secondary directories you trust when you add SSL client certificates to the Domino Directory using the Domino Certificate Authority application. You cannot, however, add client certificates to an LDAP directory, even if the LDAP directory is set up on a Domino server.
It is recommended that you use SSL to secure information sent between the server and the LDAP directory server.
The hierarchical name returned by the Domino Directory or LDAP directory is checked against the trusted rule in the Directory Assistance database to verify that the organization and organizational units match the specified rule. For example, if the user name returned is Dave Lawson/Acme, the Directory Assistance document must include the rule */Acme.
Searching multiple directories is also available for authenticating users who use name-and-password authentication.
In an effort to control access to the Domino server by clients it supports, there are supplemental mechanisms available to augment the authentication mechanisms in place by default. There is Public Key Checking, as well user group “Allow Access” rights to a server. Above and beyond this, there is also Password Checking. The rest of this section focuses on that aspect of user authentication, explaining how it works and providing insight regarding its use not only with Notes clients, but also with alternate clients such as iNotes.
476 Lotus Security Handbook

11.9.4 Domino name mappingWhen an existing Domino environment is integrated with other Web technologies via a single sign-on solution, or a Domino environment leverages an external LDAP directory for authentication, Domino name mapping capabilties will often be required to allow the continued use of the fully qualified Notes/Domino names within Domino database ACLs.
Some examples of when name mapping may be needed are:
� Domino and Portal
When a Domino server is utilized as part of a WebSphere Portal implementation, the Portal will authenticate the user against the LDAP directory, and the LTPA token will be created with an LDAP hierarchical name, such as “uid=tworek,ou=users,o=redbooks,c=us”.
Now when the user accesses a mail portlet, which must access Domino data on behalf of the user, Domino is passed and reads the same LTPA token (assuming Portal and Domino are enabled with a common LTPA SSO domain). However, the ACL on the user’s mail database will contain the notes fully qualified name, “William Tworek/Cambridge/IBM”. Since the LTPA token contains the LDAP name, Domino will not see this as the same user, and will not allow access to the mail file.
� Domino and an external LDAP
When Domino Directory Assistance is enabled to trust a third-party LDAP directory for authentication, users will be authenticated against the LDAP directory, and an LDAP hierarchical name will be returned to Domino. If Domino databases then contain original Notes hierarchal names, users will not be allowed access to their databases since Domino will not understand that the LDAP name is the same.
Fortunately, Domino supports several options for working around this issue, one of which is new for Domino 6:
1. Utilizing the LDAP name in database ACLs.
2. Including the LDAP DN as an “alternate” name in Domino person documents.
This is supported in Domino 5.x and Domino 6.02+.
3. Including the Domino Fully Distinguished name in LDAP directory.
This is supported in Domino 6.x via new Directory Assistance capabilities.
Utilizing the LDAP name in database ACLsThis approach is not really a name mapping solution, but rather is a modification of the ACLs in Domino so that it trusts the LDAP names. In this approach, all
Chapter 11. Domino/Notes 6 security features 477
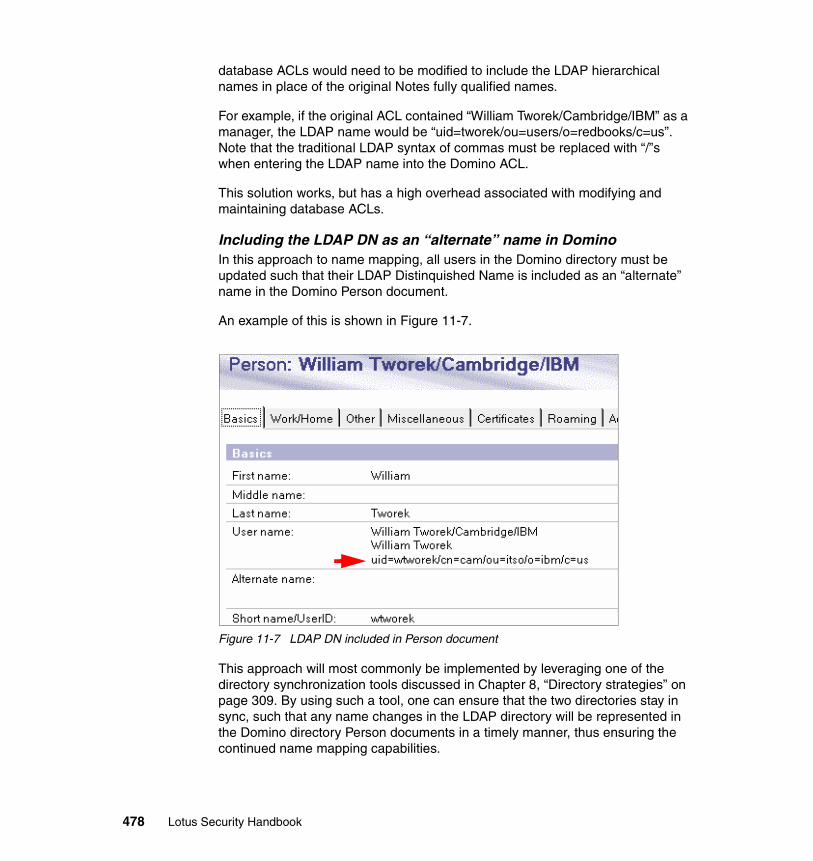
database ACLs would need to be modified to include the LDAP hierarchical names in place of the original Notes fully qualified names.
For example, if the original ACL contained “William Tworek/Cambridge/IBM” as a manager, the LDAP name would be “uid=tworek/ou=users/o=redbooks/c=us”. Note that the traditional LDAP syntax of commas must be replaced with “/”s when entering the LDAP name into the Domino ACL.
This solution works, but has a high overhead associated with modifying and maintaining database ACLs.
Including the LDAP DN as an “alternate” name in Domino In this approach to name mapping, all users in the Domino directory must be updated such that their LDAP Distinquished Name is included as an “alternate” name in the Domino Person document.
An example of this is shown in Figure 11-7.
Figure 11-7 LDAP DN included in Person document
This approach will most commonly be implemented by leveraging one of the directory synchronization tools discussed in Chapter 8, “Directory strategies” on page 309. By using such a tool, one can ensure that the two directories stay in sync, such that any name changes in the LDAP directory will be represented in the Domino directory Person documents in a timely manner, thus ensuring the continued name mapping capabilities.
478 Lotus Security Handbook
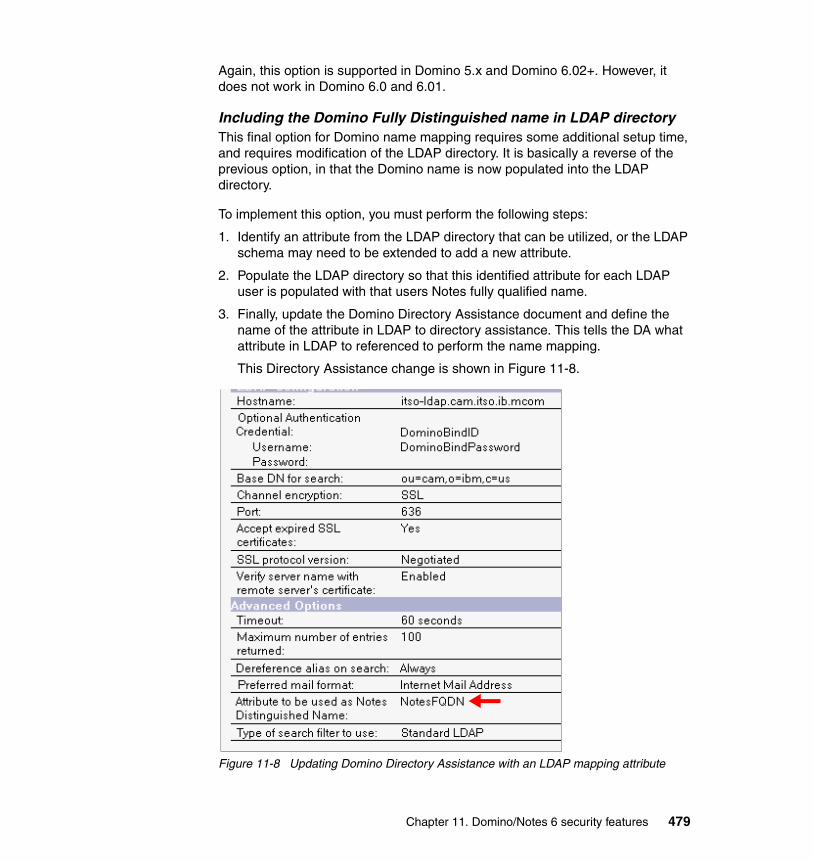
Again, this option is supported in Domino 5.x and Domino 6.02+. However, it does not work in Domino 6.0 and 6.01.
Including the Domino Fully Distinguished name in LDAP directoryThis final option for Domino name mapping requires some additional setup time, and requires modification of the LDAP directory. It is basically a reverse of the previous option, in that the Domino name is now populated into the LDAP directory.
To implement this option, you must perform the following steps:
1. Identify an attribute from the LDAP directory that can be utilized, or the LDAP schema may need to be extended to add a new attribute.
2. Populate the LDAP directory so that this identified attribute for each LDAP user is populated with that users Notes fully qualified name.
3. Finally, update the Domino Directory Assistance document and define the name of the attribute in LDAP to directory assistance. This tells the DA what attribute in LDAP to referenced to perform the name mapping.
This Directory Assistance change is shown in Figure 11-8.
Figure 11-8 Updating Domino Directory Assistance with an LDAP mapping attribute
Chapter 11. Domino/Notes 6 security features 479

Similar to the other mapping option, this option may often be supported via the implementation of a Directory synchronization tool to handle the population of the new LDAP attribute in LDAP.
This option is new to Domino 6, and thus is supported in Domino 6.x, but is not supported in Domino 5.x or earlier.
11.10 Domino Password CheckingPassword Checking is a client authentication feature that ensures that users are forced to change their passwords at regular intervals and also include protection for the user base. Consider the following example: If someone were to acquire a Notes user ID file – and, of course, be able to know the password of this Notes ID – they would normally be free to access the server using this copy of the Notes ID. However, when Password Checking is enabled, the moment the victim changes their password on their legitimate Notes ID file, it results in the server also being aware of the change. Any attacker then trying to gain access with the stolen copy of the Notes ID file will be refused access to the server.
When the administrator enables password checking, that person can specify a Required Change Interval (which is measured in days) that forces users to change the passwords on their Notes user ID files within that interval of time. The Notes client will prompt a user to change their password as the expiration date of the password draws closer. In addition to the change interval the administrator can specify a Grace Period. This is a time (again, measured in days) that indicates the interval of time (after the expiration of a password) the user has to change their password. In both R5 and Version 6, after the Change Interval + Grace Period elapses, the user will effectively be denied access to the server until the administrator resets their account in the user's Person document. This is a different behavior from that of pre-Notes R4.67 clients. The following discussion focuses on R5 and Version 6 clients.
11.10.1 The Notes and Domino password checking systemThe Notes and Domino password checking system can be split up into two main components: the Notes client and the Domino server (we integrate iNotes a little bit later). At this stage, it's important to point out that most of the work that goes into enforcing a Domino Server lockout (resulting from the application of the password checking feature) is actually carried out on the Notes client. Before we can explain the full working process, it is necessary to take the time to provide an initial explanation of the components involved.
With an enabled Notes user ID, users can be made aware of an upcoming password expiration before they have even clicked on a database icon or
480 Lotus Security Handbook

connected to a server. This is accomplished in the Notes client since the user's Notes ID file contains all the necessary information to calculate these expiration dates.
Information in a Notes user ID file for password checkingIn regard to password checking, the Notes user ID file contains the following items:
� The date of the last password change
� The number of days until the current password expires
� The maximum number of days that a user can use a current password with having to change it
� The current password
� A history of the last 49 passwords used and the dates when each password expired.
Information in the Domino Directory for password checkingIn regard to password checking, the Domino Directory contains the items identified in Table 11-9 and Table 11-10.
Table 11-9 For each server, located within the Server document
Table 11-10 For each user, located within each Person document
Parameter Description
Check passwords on Notes IDs
Used to enable/disable password checking on a server by server basis
Parameter Description
“Check password ?“ Used to enable/disable password checking on a user ID.
“Required Change Interval”
The life of the password. Defines how many days a single password should be valid for.
“Grace Period” The number of days after a Required Change Interval that the user is able to change their password before the Notes client locks them out of the server forever. (Requires administrator assistance to reset the ID on the person document.)
“Last Change Date” A server-based copy of the date the user last changed their password.
“Password Digest” An encoded version of the password that is retained by the server. When the user logs into the server the client must provide a matching password during authentication with servers that have password checking enabled.
Chapter 11. Domino/Notes 6 security features 481
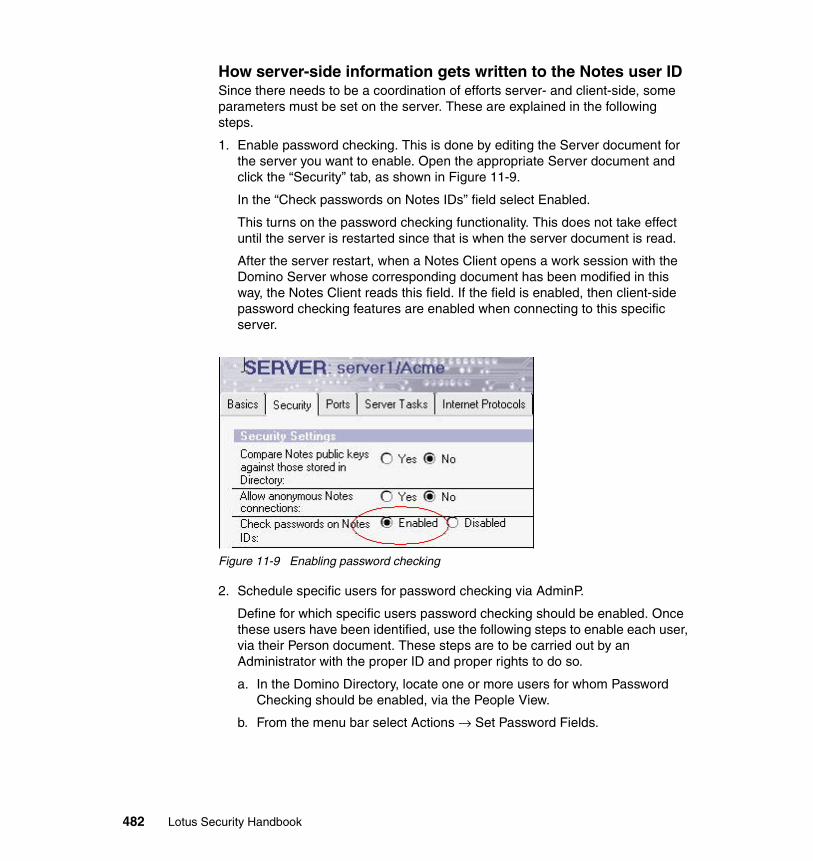
How server-side information gets written to the Notes user IDSince there needs to be a coordination of efforts server- and client-side, some parameters must be set on the server. These are explained in the following steps.
1. Enable password checking. This is done by editing the Server document for the server you want to enable. Open the appropriate Server document and click the “Security” tab, as shown in Figure 11-9.
In the “Check passwords on Notes IDs” field select Enabled.
This turns on the password checking functionality. This does not take effect until the server is restarted since that is when the server document is read.
After the server restart, when a Notes Client opens a work session with the Domino Server whose corresponding document has been modified in this way, the Notes Client reads this field. If the field is enabled, then client-side password checking features are enabled when connecting to this specific server.
Figure 11-9 Enabling password checking
2. Schedule specific users for password checking via AdminP.
Define for which specific users password checking should be enabled. Once these users have been identified, use the following steps to enable each user, via their Person document. These steps are to be carried out by an Administrator with the proper ID and proper rights to do so.
a. In the Domino Directory, locate one or more users for whom Password Checking should be enabled, via the People View.
b. From the menu bar select Actions → Set Password Fields.
482 Lotus Security Handbook
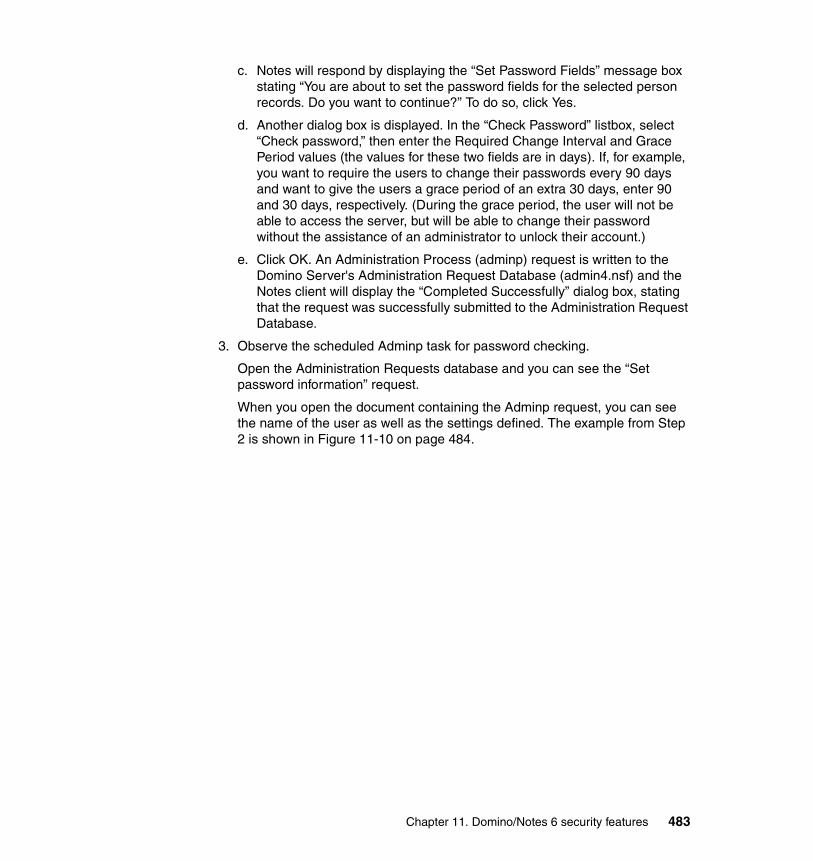
c. Notes will respond by displaying the “Set Password Fields” message box stating “You are about to set the password fields for the selected person records. Do you want to continue?” To do so, click Yes.
d. Another dialog box is displayed. In the “Check Password” listbox, select “Check password,” then enter the Required Change Interval and Grace Period values (the values for these two fields are in days). If, for example, you want to require the users to change their passwords every 90 days and want to give the users a grace period of an extra 30 days, enter 90 and 30 days, respectively. (During the grace period, the user will not be able to access the server, but will be able to change their password without the assistance of an administrator to unlock their account.)
e. Click OK. An Administration Process (adminp) request is written to the Domino Server's Administration Request Database (admin4.nsf) and the Notes client will display the “Completed Successfully” dialog box, stating that the request was successfully submitted to the Administration Request Database.
3. Observe the scheduled Adminp task for password checking.
Open the Administration Requests database and you can see the “Set password information” request.
When you open the document containing the Adminp request, you can see the name of the user as well as the settings defined. The example from Step 2 is shown in Figure 11-10 on page 484.
Chapter 11. Domino/Notes 6 security features 483

Figure 11-10 Scheduled Adminp Task for Password Checking
4. Observe the processed Adminp task for password checking
Once the Adminp task has processed the change request, a confirmation document is written into the Administration Requests Database, as shown in Figure 11-11 on page 485.
By manually checking the person document for this user, you can verify that the “Check Password,” “Change Interval” and “Grace Period” fields have been populated appropriately.
Note that the “Password digest” field in the person document is still blank. This is not an error since the user has not authenticated with the server between the time password checking was enabled and now.
When the user tries to access the server using his Notes user ID (and after certificate authentication), the Notes client checks to see if the server is enabled for password checking and, if so, then checks the person document to see if it is also enabled for password checking. In our example, these checks are returned true.
484 Lotus Security Handbook

Figure 11-11 Adminp task for password checking
In addition to these checks there is also a check carried out against the admin4.nsf database to see if there are any pending requests. In our example, the client identifies the pending Adminp request and copies the Grace Period and Change Interval into the user's Notes ID file. Once this is accepted the client creates a new change request in the admin4 database confirming that the user's Notes ID has received the Grace Period and Change Interval. This request now also includes the current password digest from the ID file and today’s date.
Using an internal tool for examining the Notes user ID, you can see that a new structure is installed, as shown in Example 11-1.
Example 11-1 New structure in the Notes ID
PWD_KEY_HDR Type: 0000 Version: 0000 LastChanged: TIMEDATE
Innards: 0025 69DC 0039 822B Text format: 22/01/2001 10:28:08
ExpirationDays: 0000 005A
Chapter 11. Domino/Notes 6 security features 485
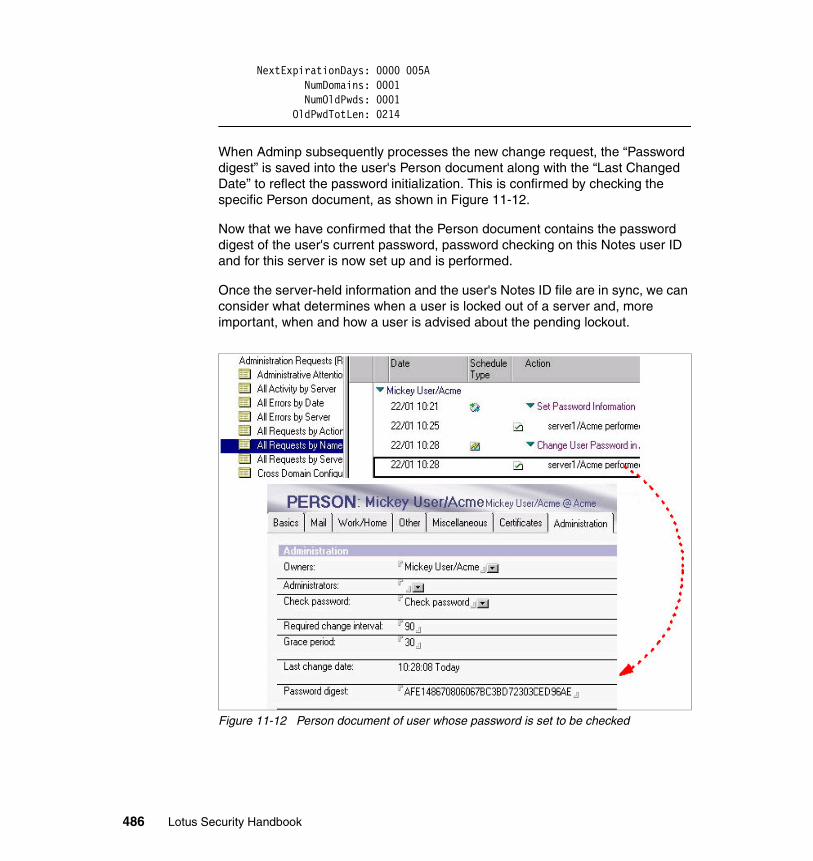
NextExpirationDays: 0000 005A NumDomains: 0001 NumOldPwds: 0001 OldPwdTotLen: 0214
When Adminp subsequently processes the new change request, the “Password digest” is saved into the user's Person document along with the “Last Changed Date” to reflect the password initialization. This is confirmed by checking the specific Person document, as shown in Figure 11-12.
Now that we have confirmed that the Person document contains the password digest of the user's current password, password checking on this Notes user ID and for this server is now set up and is performed.
Once the server-held information and the user's Notes ID file are in sync, we can consider what determines when a user is locked out of a server and, more important, when and how a user is advised about the pending lockout.
Figure 11-12 Person document of user whose password is set to be checked
486 Lotus Security Handbook
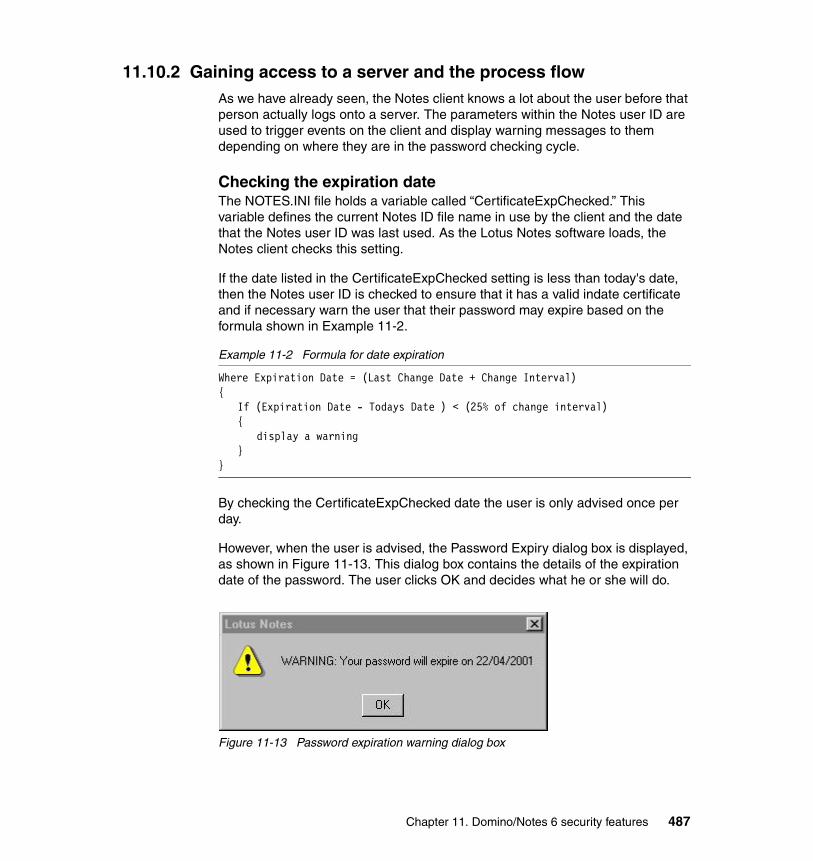
11.10.2 Gaining access to a server and the process flowAs we have already seen, the Notes client knows a lot about the user before that person actually logs onto a server. The parameters within the Notes user ID are used to trigger events on the client and display warning messages to them depending on where they are in the password checking cycle.
Checking the expiration dateThe NOTES.INI file holds a variable called “CertificateExpChecked.” This variable defines the current Notes ID file name in use by the client and the date that the Notes user ID was last used. As the Lotus Notes software loads, the Notes client checks this setting.
If the date listed in the CertificateExpChecked setting is less than today's date, then the Notes user ID is checked to ensure that it has a valid indate certificate and if necessary warn the user that their password may expire based on the formula shown in Example 11-2.
Example 11-2 Formula for date expiration
Where Expiration Date = (Last Change Date + Change Interval){
If (Expiration Date - Todays Date ) < (25% of change interval){
display a warning}
}
By checking the CertificateExpChecked date the user is only advised once per day.
However, when the user is advised, the Password Expiry dialog box is displayed, as shown in Figure 11-13. This dialog box contains the details of the expiration date of the password. The user clicks OK and decides what he or she will do.
Figure 11-13 Password expiration warning dialog box
Chapter 11. Domino/Notes 6 security features 487
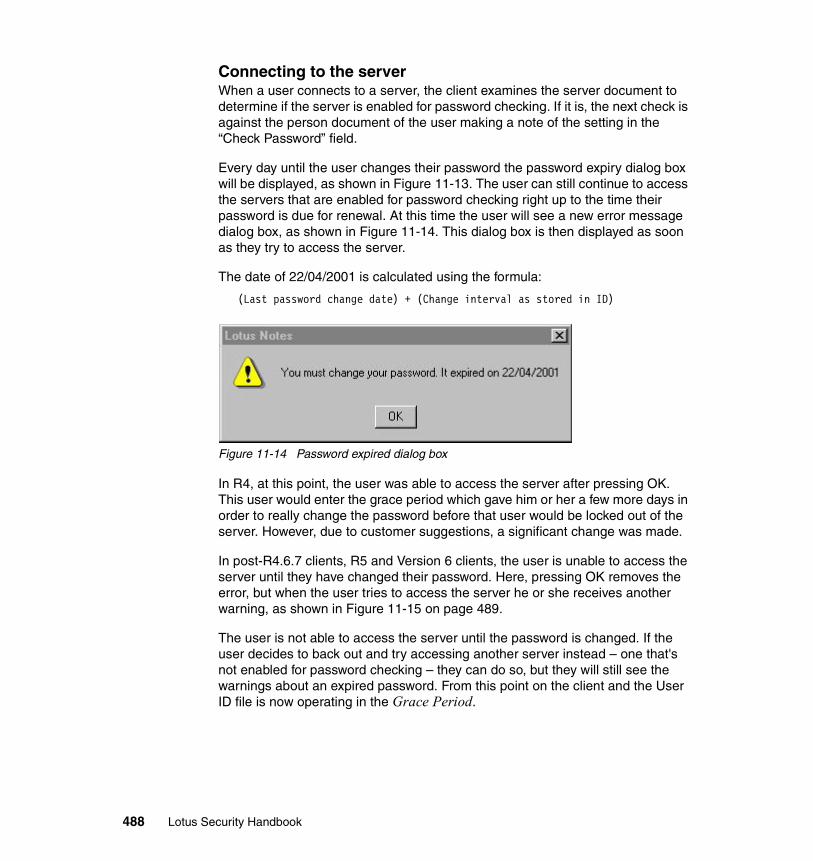
Connecting to the serverWhen a user connects to a server, the client examines the server document to determine if the server is enabled for password checking. If it is, the next check is against the person document of the user making a note of the setting in the “Check Password” field.
Every day until the user changes their password the password expiry dialog box will be displayed, as shown in Figure 11-13. The user can still continue to access the servers that are enabled for password checking right up to the time their password is due for renewal. At this time the user will see a new error message dialog box, as shown in Figure 11-14. This dialog box is then displayed as soon as they try to access the server.
The date of 22/04/2001 is calculated using the formula:
(Last password change date) + (Change interval as stored in ID)
Figure 11-14 Password expired dialog box
In R4, at this point, the user was able to access the server after pressing OK. This user would enter the grace period which gave him or her a few more days in order to really change the password before that user would be locked out of the server. However, due to customer suggestions, a significant change was made.
In post-R4.6.7 clients, R5 and Version 6 clients, the user is unable to access the server until they have changed their password. Here, pressing OK removes the error, but when the user tries to access the server he or she receives another warning, as shown in Figure 11-15 on page 489.
The user is not able to access the server until the password is changed. If the user decides to back out and try accessing another server instead – one that's not enabled for password checking – they can do so, but they will still see the warnings about an expired password. From this point on the client and the User ID file is now operating in the Grace Period.
488 Lotus Security Handbook
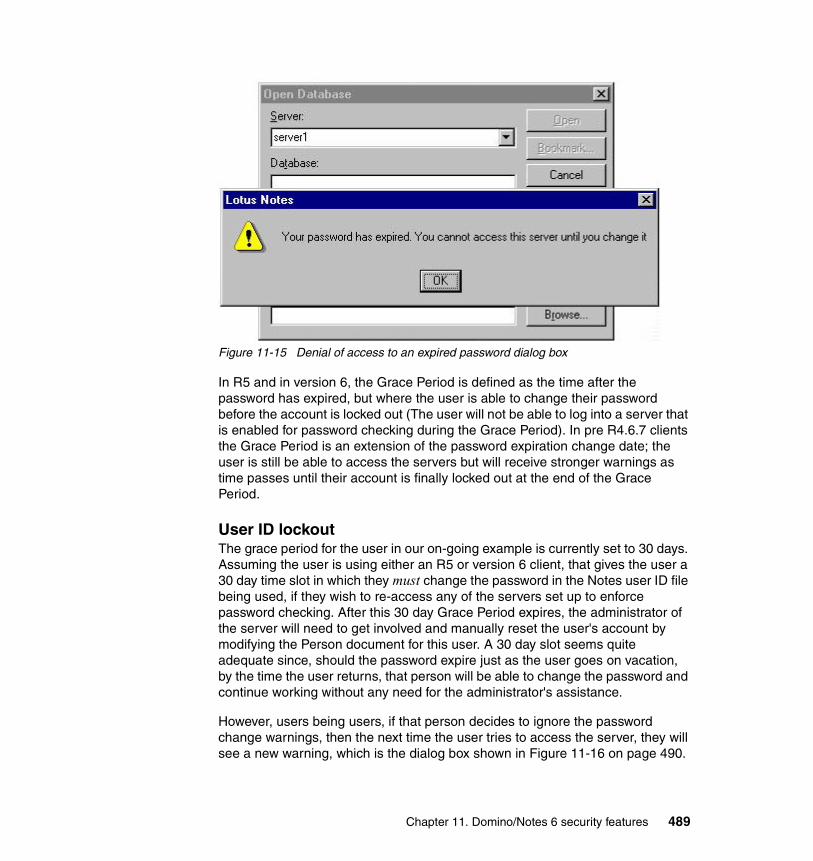
Figure 11-15 Denial of access to an expired password dialog box
In R5 and in version 6, the Grace Period is defined as the time after the password has expired, but where the user is able to change their password before the account is locked out (The user will not be able to log into a server that is enabled for password checking during the Grace Period). In pre R4.6.7 clients the Grace Period is an extension of the password expiration change date; the user is still be able to access the servers but will receive stronger warnings as time passes until their account is finally locked out at the end of the Grace Period.
User ID lockoutThe grace period for the user in our on-going example is currently set to 30 days. Assuming the user is using either an R5 or version 6 client, that gives the user a 30 day time slot in which they must change the password in the Notes user ID file being used, if they wish to re-access any of the servers set up to enforce password checking. After this 30 day Grace Period expires, the administrator of the server will need to get involved and manually reset the user's account by modifying the Person document for this user. A 30 day slot seems quite adequate since, should the password expire just as the user goes on vacation, by the time the user returns, that person will be able to change the password and continue working without any need for the administrator's assistance.
However, users being users, if that person decides to ignore the password change warnings, then the next time the user tries to access the server, they will see a new warning, which is the dialog box shown in Figure 11-16 on page 490.
Chapter 11. Domino/Notes 6 security features 489

At this point the Notes client software prevents the user from accessing the server.
Figure 11-16 Account lock out dialog box
The digest stored in the Person document is then scrambled and hence different from the copy stored in the user ID. This mechanism also provides a safety net for the administrators since – should the user have left the organization and the administrator forgotten to add them to a deny access group list – then as long as password checking remains enabled, anybody using the Notes user ID will be unable to access the server since the digests will no longer match.
However, this is still no substitute for using the Deny Access ACL groups.
Even if the user changes his or her password after this period, that user will be unable to access the server to submit the adminP password change request. Once the user has seen this error message, that person has no option but to call an administrator for assistance.
Unlocking the accountUnlocking the user's account requires assistance from an administrator who has access to modify the user's Person document.
The steps are quite straightforward but there are opportunities to make errors if the administrator doesn't complete the whole Adminp process or modifies the wrong fields by mistake.
For example, by deleting the password digest in the person document, the next time the user logs back into the server, that person will still be denied access (this is the correct behavior since the Notes user ID file still contains an expiration date that has expired). However, when the user changes their password in their ID file the password digest in the user.id file also gets updated, but since there is no digest in the person document there is no password digest check to take place and the user is now granted access. Since the last change date is more recent than that recorded in the person document, the client generates an Adminp request.
490 Lotus Security Handbook
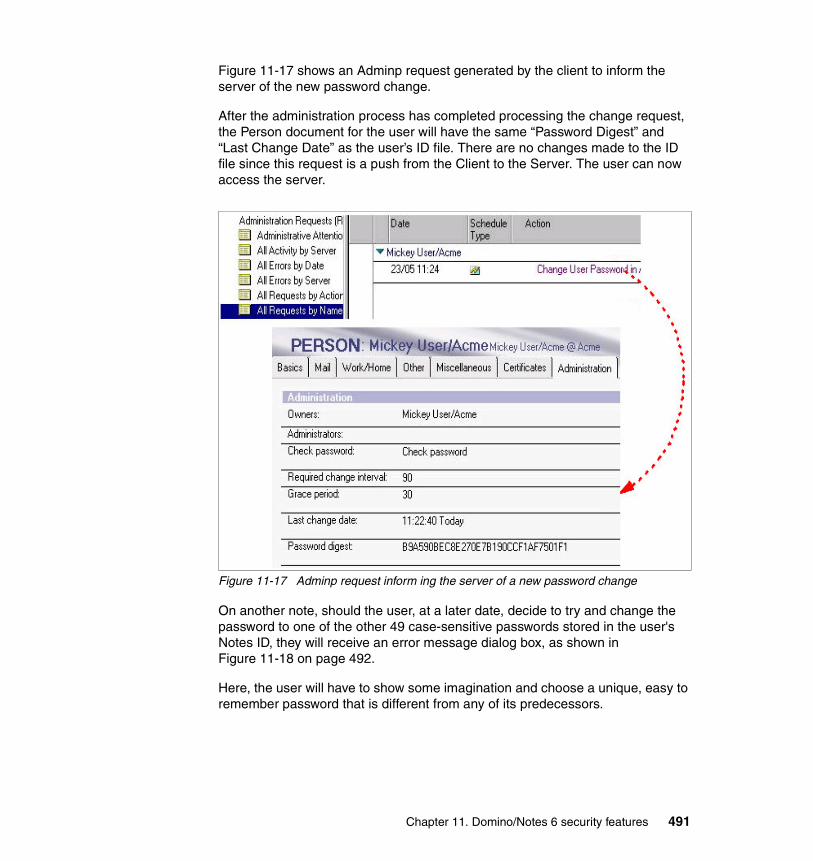
Figure 11-17 shows an Adminp request generated by the client to inform the server of the new password change.
After the administration process has completed processing the change request, the Person document for the user will have the same “Password Digest” and “Last Change Date” as the user’s ID file. There are no changes made to the ID file since this request is a push from the Client to the Server. The user can now access the server.
Figure 11-17 Adminp request inform ing the server of a new password change
On another note, should the user, at a later date, decide to try and change the password to one of the other 49 case-sensitive passwords stored in the user's Notes ID, they will receive an error message dialog box, as shown in Figure 11-18 on page 492.
Here, the user will have to show some imagination and choose a unique, easy to remember password that is different from any of its predecessors.
Chapter 11. Domino/Notes 6 security features 491
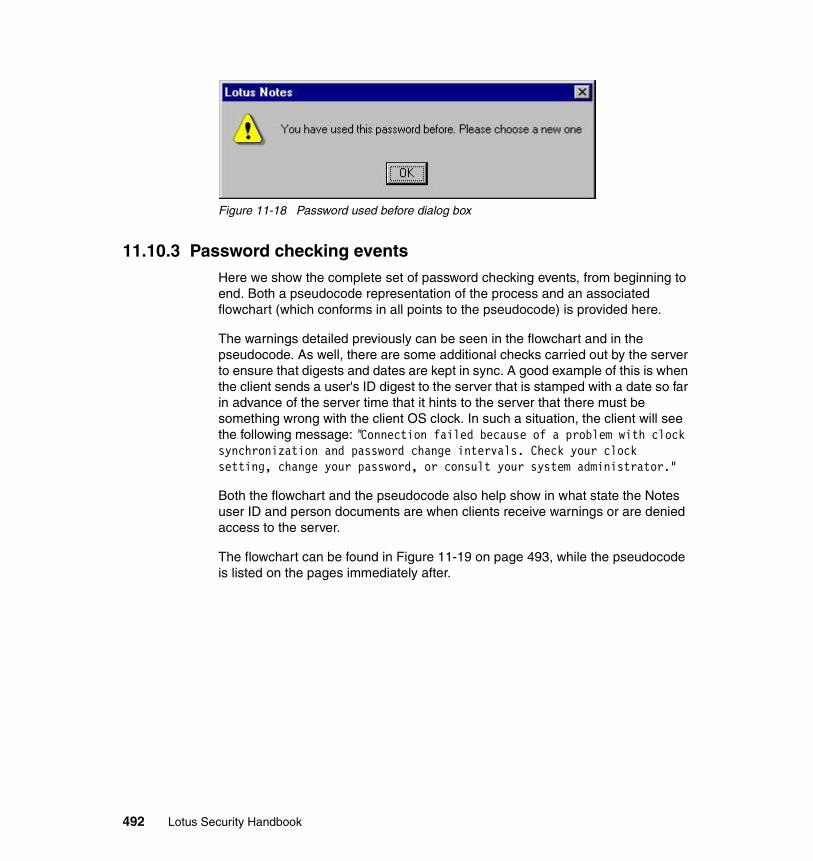
Figure 11-18 Password used before dialog box
11.10.3 Password checking eventsHere we show the complete set of password checking events, from beginning to end. Both a pseudocode representation of the process and an associated flowchart (which conforms in all points to the pseudocode) is provided here.
The warnings detailed previously can be seen in the flowchart and in the pseudocode. As well, there are some additional checks carried out by the server to ensure that digests and dates are kept in sync. A good example of this is when the client sends a user's ID digest to the server that is stamped with a date so far in advance of the server time that it hints to the server that there must be something wrong with the client OS clock. In such a situation, the client will see the following message: "Connection failed because of a problem with clock synchronization and password change intervals. Check your clock setting, change your password, or consult your system administrator."
Both the flowchart and the pseudocode also help show in what state the Notes user ID and person documents are when clients receive warnings or are denied access to the server.
The flowchart can be found in Figure 11-19 on page 493, while the pseudocode is listed on the pages immediately after.
492 Lotus Security Handbook
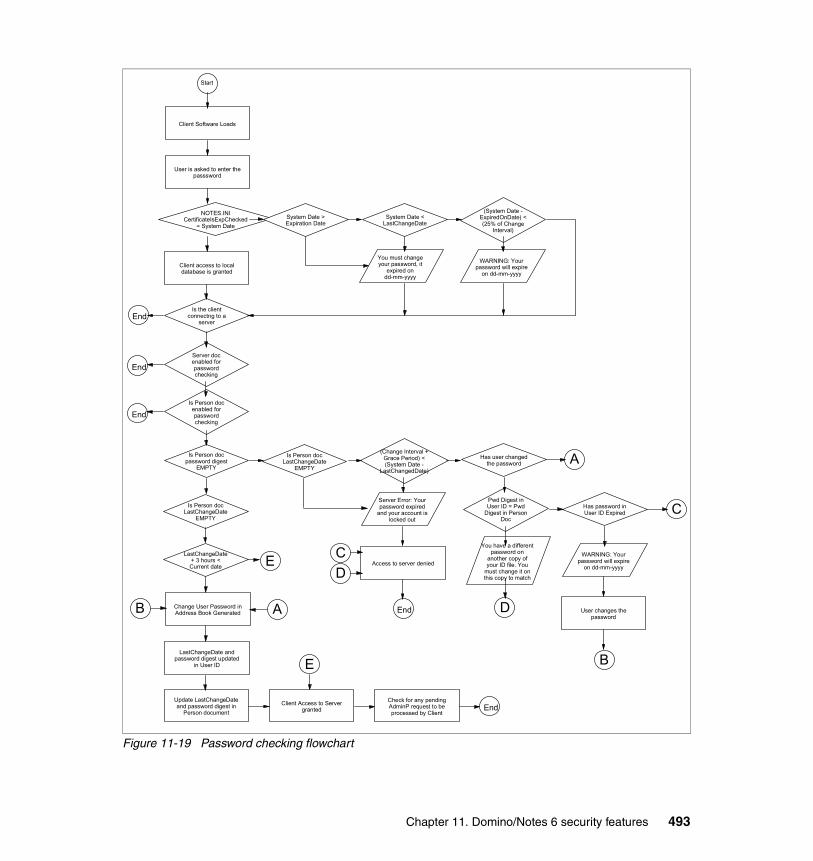
Figure 11-19 Password checking flowchart
Client Software Loads
NOTES.INI CertificateIsExpChecked
= System Date
User is asked to enter the passsword
Client access to local database is granted
System Date > Expiration Date
System Date < LastChangeDate
You must change your password, it
expired on dd-mm-yyyy
(System Date - ExpiredOnDate) < (25% of Change
Interval)
WARNING: Your password will expire
on dd-mm-yyyy
Is the client connectng to a
server
Server doc enabled for password checking
Is Person doc enabled for password checking
Is Person doc password digest
EMPTY
Is Person doc LastChangeDate
EMPTY
Change User Password in Address Book Generated
LastChangeDate and password digest updated
in User ID
Update LastChangeDate and password digest in
Person documentClient Access to Server
grantedCheck for any pending AdminP request to be processed by Client
Is Person doc LastChangeDate
EMPTY
Server Error: Your password expired
and your account is locked out
Access to server denied
(Change Interval + Grace Period) < (System Date -
LastChangedDate)
Has user changed the password A
A
Pwd Digest in User ID = Pwd
Digest in Person Doc
Has password in User ID Expired
WARNING: Your password will expire
on dd-mm-yyyy
User changes the password
B
B
C
CYou have a different
password on another copy of your ID file. You
must change it on this copy to match
D
DLastChangeDate
+ 3 hours < Current date
E
E
Start
End
End
End
End
End
Chapter 11. Domino/Notes 6 security features 493
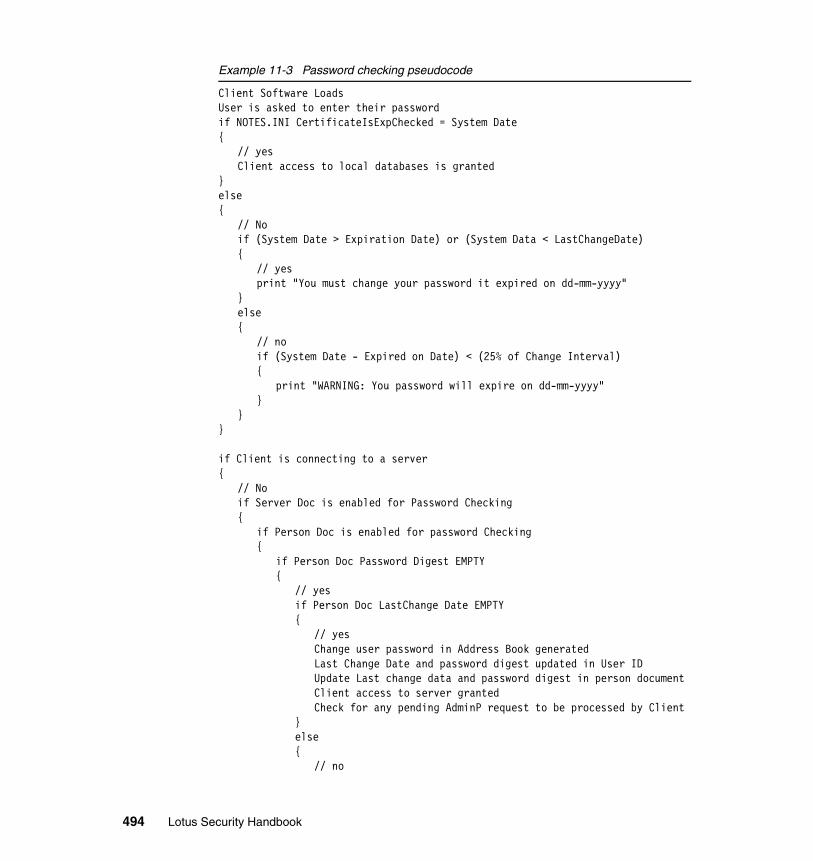
Example 11-3 Password checking pseudocode
Client Software LoadsUser is asked to enter their passwordif NOTES.INI CertificateIsExpChecked = System Date{
// yesClient access to local databases is granted
}else{
// Noif (System Date > Expiration Date) or (System Data < LastChangeDate){
// yesprint "You must change your password it expired on dd-mm-yyyy"
}else{
// noif (System Date - Expired on Date) < (25% of Change Interval){
print "WARNING: You password will expire on dd-mm-yyyy"}
}}
if Client is connecting to a server{
// Noif Server Doc is enabled for Password Checking{
if Person Doc is enabled for password Checking{
if Person Doc Password Digest EMPTY{
// yesif Person Doc LastChange Date EMPTY{
// yesChange user password in Address Book generatedLast Change Date and password digest updated in User IDUpdate Last change data and password digest in person documentClient access to server grantedCheck for any pending AdminP request to be processed by Client
}else{
// no
494 Lotus Security Handbook
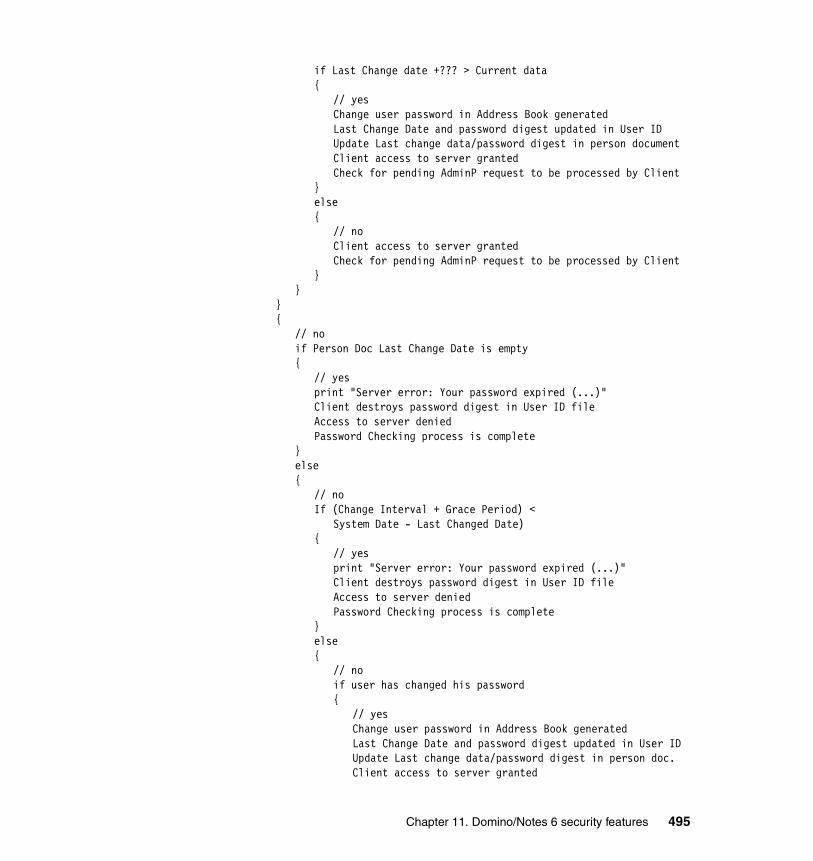
if Last Change date +??? > Current data{
// yesChange user password in Address Book generatedLast Change Date and password digest updated in User IDUpdate Last change data/password digest in person documentClient access to server grantedCheck for pending AdminP request to be processed by Client
}else{
// noClient access to server grantedCheck for pending AdminP request to be processed by Client
}}
}{
// noif Person Doc Last Change Date is empty{
// yesprint "Server error: Your password expired (...)"Client destroys password digest in User ID fileAccess to server deniedPassword Checking process is complete
}else{
// noIf (Change Interval + Grace Period) <
System Date - Last Changed Date){
// yesprint "Server error: Your password expired (...)"Client destroys password digest in User ID fileAccess to server deniedPassword Checking process is complete
}else{
// noif user has changed his password{
// yesChange user password in Address Book generatedLast Change Date and password digest updated in User IDUpdate Last change data/password digest in person doc.Client access to server granted
Chapter 11. Domino/Notes 6 security features 495
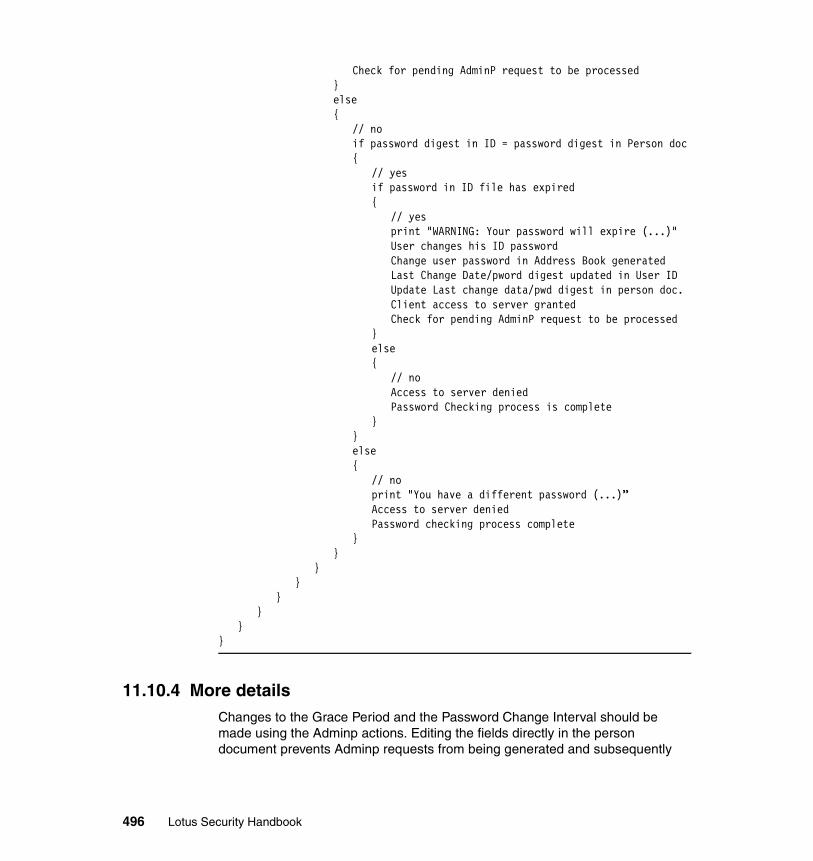
Check for pending AdminP request to be processed}else{
// noif password digest in ID = password digest in Person doc{
// yesif password in ID file has expired{
// yesprint "WARNING: Your password will expire (...)"User changes his ID passwordChange user password in Address Book generatedLast Change Date/pword digest updated in User IDUpdate Last change data/pwd digest in person doc.Client access to server grantedCheck for pending AdminP request to be processed
}else{
// noAccess to server deniedPassword Checking process is complete
}}else{
// noprint "You have a different password (...)”Access to server deniedPassword checking process complete
}}
}}
}}
}}
11.10.4 More detailsChanges to the Grace Period and the Password Change Interval should be made using the Adminp actions. Editing the fields directly in the person document prevents Adminp requests from being generated and subsequently
496 Lotus Security Handbook

gets the user's Notes ID out of sync, which in the long run will cause lockout issues for the user.
Since client-side warnings occur before the user accesses the server (for example, “Warning: Your password will expire on dd/mm/yy”) disabling password checking in the Server document will not suppress these warnings. It will, however, allow the Notes user ID to continue to gain access to the server even if the password has expired. To remove the warnings, the user should continue to change passwords at the frequency of the Last Change Date, Grace Period, and Expiration Date values stored in the ID.
Should the administrator need to lock a specific user out of the server, they can submit an adminp request to “Lockout the user.” When adminp processes the request the person document is modified so that the “Check Passwords” field is set to Lockout ID. When the user tries to access this server again they will receive an error message like the one shown in Figure 11-20.
Figure 11-20 Authentication denied dialog box (user lockout)
Throughout this example we have concentrated on a single server installation. With a multiple server install there are some “gotcha's” that may deny users access to certain servers. Since all the changes are made in the administration server’s names.nsf file, Domino relies on replication to ensure that other servers receive updates. Modifying a person document (for example, clearing the password digest) to reset a user account on one server will give the user back their access to all the other servers that have password checking enabled, but only after the Domino Directory has replicated the changes out.
In pre-rollout testing, customers may experience behavior different to that documented here. The common problems are that adminp requests do not get processed before test results are recorded. It its also not recommended to test password checking with Grace Periods and Change Intervals of only 1 or 2 days. Before each step you should confirm that the pending adminp requests for the user being accepted are being processed. This also applies to production
Note: Clearing the Last Change Date in the person document is not sufficient to unlock a user ID and allow them to log back into the server.
Chapter 11. Domino/Notes 6 security features 497

servers. For instance, if a user changes their password twice, then both adminp password change requests should be processed before recording the final result. If only the first change request is processed, the digest information will be out of sync until the second change request updates the person document.
11.10.5 iNotes and password checkingSince there are plans to use iNotes Web Access with Domino servers in place, the use of password checking begs the question: Will iNotes users' be prompted to change their passwords if they have expired because password checking is enabled?
The answer here is that since iNotes uses the Internet password for access they will not be prompted to change their password once it has expired due to password checking being enabled on the server. When this feature is enabled on the server it expires the password associated with the notes ID. If the user uses both iNotes Web Access and the Notes client, he or she will only be prompted to change his or her password in the Notes client. There currently isn't a way to force the change of a user's Internet password.
11.11 Database access control lists (ACLs)Notes databases and applications are secured through the use of database access control lists (ACLs), database encryption, and the secure use of database design elements to create the database or application. This section discusses the use of database ACLs. For more information on application design security features in Domino Designer 6 beyond that included in this section, see the IBM Redbook “Domino 6 Designer: A Developer’s Handbook”, SG24-6854.
Every Domino and Notes database has an access control list that specifies the level of access users and servers have to that database and to documents in the database. Access levels assigned to users determine the tasks that they can perform in a database, while those assigned to servers determine what information within the database the servers can replicate.
As a database administrator, you select the access level, user type, and access level privileges for each user or group in a database. For further refinement, the
Warning: Some customers have replaced the adminp task with their own custom adminp tool. This document highlights the work carried out by the adminp task to ensure password checking works, but a customized version of adminp could generate nonstandard behavior, breaking the synchronization of the userID and the person document.
498 Lotus Security Handbook

database designer can define roles. A role defines a set of users and servers and is used primarily in database design elements or functions to restrict access to those elements or functions. For example, the UserCreator role in the Domino Directory ACL must be given to those administrators who need to create Person documents.
A new database, by default, contains these entries in the ACL:
� -Default-
� Anonymous
� Database creator user name
� LocalDomainServers
� OtherDomainServers
Of the default ACL entries, Anonymous and the database creator's user name are the only entries that are defined as a Person in the ACL.
An ACL includes two special entries: Anonymous and -Default-. Anonymous specifies the default access for unauthenticated users. -Default- specifies the default database access for authenticated users and unauthenticated users if the Anonymous entry does not exist.
Anonymous and -Default- are the only entries that are specific to a database, and not related to an entry in the Domino Directory. For example, LocalDomainServers is created automatically in the Domino Directory, and added to the ACL when a database is created. Anonymous is created as an ACL entry only when the database is created.
-Default-Users and servers receive the access assigned to the -Default- entry if they have not specifically been assigned another access level, either individually or as a member of a group, or from a wildcard entry. In addition, if the database ACL does not contain an entry for Anonymous, then users accessing the database anonymously get the -Default- level of access. The default access for -Default- depends on the design of the database template and varies among the different templates.
The access level you assign to the -Default- entry depends on how secure you want the database to be. Select No Access if you want a database available to a limited number of users. Select Author or Reader access to make a database available for general use. The -Default- entry should have a user type of “Unspecified.”
You cannot delete the -Default- entry from an ACL.
Chapter 11. Domino/Notes 6 security features 499
AnonymousAnonymous database access is given to Internet users and to Notes users who have not authenticated with the server.
The default ACL entry for Anonymous for all database templates (.NTF files) has an access level of Reader, so that users or servers can successfully read from the template when creating or refreshing .NSF files based on that template.
The default ACL entry for Anonymous for database (.NSF files) files is No Access.
Database creator user nameThe database creator user name is the hierarchical user name of the person who created the database. The default access for the user who creates the database is Manager. Typically, this person retains Manager access or is granted Designer access to the database.
LocalDomainServersThe LocalDomainServers group lists the servers in the same domain as the server on which the database is stored, and is provided by default with every Domino Directory. When you create a new database, the default access for LocalDomainServers is Manager. The group should have at least Designer access to allow replication of database design changes across the domain. The LocalDomainServers group is typically given higher access than the OtherDomainServers group.
OtherDomainServersThe OtherDomainServers group lists the servers outside the domain of the server on which the database is stored, and is provided by default with every Domino Directory. When you create a new database, the default access for OtherDomainServers is No Access.
Acceptable ACL entriesWildcard entriesTo allow general access to a database, you can enter hierarchical names with a wildcard character (*) in the ACL. You can use wildcards in the common name and organizational unit components. Users and servers who do not already have a specific user or group name entry in the ACL, and whose hierarchical names include the components that contain a wildcard, are given the highest level of access specified by every one of the wildcard entries that match.
Here is an ACL entry in wildcard format:
– */Illustration/Production/Acme/US
500 Lotus Security Handbook

This entry grants the chosen access level to:
– Mary Tsen/Illustration/Production/Acme/US
– Michael Bowling/Illustration/Production/Acme/US
This entry does not grant the chosen access level to:
– Sandy Braun/Documentation/Production/Acme/US
– Alan Nelson/Acme/US
You can use a wildcard only at the leftmost portion of the ACL entry. For example, you can't use the entry:
– */Illustration/*/Acme/US
to represent these entries:
– Michael Bowling/Illustration/West/Acme/US
– Karen Richards/Illustration/East/Acme/US
When you use a wildcard ACL entry, set the user type as Unspecified, Mixed Group, or Person Group.
User namesYou can add to an ACL the names of any individuals with certified Notes user IDs or Internet users who authenticate using name-and-password or SSL client authentication.
For Notes users, enter the full hierarchical name for each user; for example, John Smith/Sales/Acme, regardless of whether the user is in the same hierarchical organization as the server that stores the database.
For Internet users, enter the name that appears as the first entry in the User name field of the Person document.
Server namesYou can add server names to an ACL to control the changes a database receives from a database replica. To ensure tighter security, use the full hierarchical name of the server – for example, Server1/Sales/Acme – regardless
Note: Many alias names can be entered in the user name field and used for authentication; however, it is the first name in the list that is used to perform the security authorization check. This is the name that should be used on all Domino database ACLs, in the security settings on the Server document, and in .ACL files.
Chapter 11. Domino/Notes 6 security features 501

of whether the name of the server being added is in a different hierarchical organization than that of the server that stores the database.
Group names You add a group name – for example, Training – to the ACL to represent multiple users or servers that require the same access. Users must be listed in groups with a primary hierarchical name or an alternate name. Groups can also have wildcard entries as members. Before you can use a group name in an ACL, you must create the group in the Domino Directory or in either a secondary Domino Directory or an external LDAP Directory that has been configured for group authorization in the Directory Assistance database.
Groups provide a convenient way to administer a database ACL. Using a group in the ACL offers the following advantages:
� Instead of adding a long list of individual names to an ACL, you can add one group name. If a group is listed in more than one ACL, modify the group document in the Domino Directory or the LDAP Directory, rather than add and delete individual names in multiple databases.
� If you need to change the access level for several users or servers, you can do so once for the entire group.
� Use group names to reflect the responsibilities of group members or the organization of a department or company.
Terminations group When employees leave an organization, you should remove their names from all groups in the Domino Directory and add them to a Deny List Only group used to deny access to servers. The Deny Access list in the Server document contains the names of Notes users and groups who no longer have access to Domino servers. You should also make sure that the names of terminated employees are removed from the ACLs of all databases in your organization. When you delete a person from the Domino Directory, you have the option to “Add deleted user to deny access group,” if such a group has been created. (If no such group exists, the dialog box displays “No Deny Access group selected or available.”)
Tip: You can also use groups to let certain users control access to the database without giving them Manager or Designer access. For example, you can create groups in the Domino Directory for each level of database access needed, add the groups to the ACL, and allow specific users to own the groups. These users can then modify the groups, but they can't modify the database design.
502 Lotus Security Handbook
Alternate namesAn alternate name is an optional alias name that an administrator assigns to a registered Notes user. You can add alternate names to an ACL. An alternate name provides the same level of security as the user's primary hierarchical name. For a user whose primary name is Sandra Brown/West/Sales/Acme, an example of an alternate name format would be Sandra Smith/ANWest/ANSales/ANAcme, where AN is an alternate name.
LDAP usersYou can use a secondary LDAP directory to authenticate Internet users. You can then add the names of these Internet users to database ACLs to control user access to databases.
You can also create groups in the secondary LDAP directory that include the Internet user names and then add the groups as entries in Notes database ACLs. For example, an Internet user may try to access a database on a Domino Web server. If the Web server authenticates the user, and if the ACL contains a group named “Web,” the server can look up the Internet user's name in the group “Web” located in the foreign LDAP directory, in addition to searching for the entry in the primary Domino Directory. Note that for this scenario to work, the Directory Assistance database on the Web server must include an LDAP Directory Assistance document for the LDAP directory with the Group Expansion option enabled. You can also use this feature to look up the names of Notes users stored in foreign LDAP directory groups for database ACL checking.
When you add the name of an LDAP directory user or group to a database ACL, use the LDAP format for the name, but use a forward slash (/) rather than a comma (,) as a delimiter. For example, if the name of a user in the LDAP directory is:
uid=Sandra Smith,o=Acme,c=US
enter the following in the database ACL:
uid=Sandra Smith/o=Acme/c=US
To enter the name of a nonhierarchical LDAP directory group in an ACL, enter only the attribute value, not the attribute name. For example, if the nonhierarchical name of the LDAP group is:
cn=managers
in the ACL enter only:
managers
Chapter 11. Domino/Notes 6 security features 503

To enter the name of a hierarchical group name, include LDAP attribute names in ACL entries. For example, if the hierarchical name of the group is:
cn=managers,o=acme
in the ACL enter:
cn=managers/o=acme
Note that if the attribute names you specify exactly correspond to those used in Notes – cn, ou, o, c – the ACL won't display the attributes.
For example, if you enter this name in an ACL:
cn=Sandra Smith/ou=West/o=Acme/c=US
because the attributes exactly correspond to those used by Notes, the name appears in the ACL as:
Sandra Smith/West/Acme/US
AnonymousAny user or server that accesses a server without first authenticating is known by the name “Anonymous” at that server. Anonymous database access is given to Internet users and to Notes users who have not authenticated with the server.
Anonymous access is generally used in databases that reside on servers available to the general public. You can control the level of database access granted to an anonymous user or server by entering the name Anonymous in the access control list, and assigning an appropriate level of access. Typically you assign Anonymous users Reader access to a database.
Table Table 11-11 on page 505 describes the different conditions for access that an anonymous user would have to a database:
Note: If you are authenticating users against an external LDAP directory, but these users also have corresponding Domino Directory entries, then name mapping can be enabled in Domino 6 such that Domino names can still be used in ACLs.
For more details on name mapping, see Chapter 8, “Directory strategies” on page 309.
504 Lotus Security Handbook

Table 11-11 Anonymous user access to a database
Anonymous users (both those who are given access to a database through the Anonymous entry and those who have access through the -Default- entry) who attempt to do something in the database that is not allowed for their access level will be prompted to authenticate. For example, if Anonymous is set to Reader, and an anonymous user tries to create a new document, that user is prompted to authenticate with a name and password.
The Domino server uses the group name Anonymous solely for access control checks. For example, if Anonymous has Author access in the database ACL, the true name of the user appears in the Authors field of those documents. The Domino server can display only the true name of anonymous Notes users, but not of anonymous Internet users, in the Authors field of the document. Authors fields are never a security feature, regardless of whether anonymous access is used; if the validity of the author's name is needed for security, then the document should be signed.
Anonymous access enabled for Internet protocol
Anonymous access not enabled for Internet protocol
Anonymous access enabled in database ACL
Users access the database with the Anonymous entry's access level. For example, if Anonymous access is set to Reader, anonymous users who access the database will be granted Reader access.
Users are prompted to authenticate when they attempt to access any resource on the server. If the user is not listed in the database (through a group entry, a wildcard entry, or if the user name is explicitly listed), then the user accesses the database with the -Default- entry's access level.
Anonymous given “no access” in database ACL
If Anonymous has been granted “No Access” (and the Read & Write public documents privileges are not enabled), Anonymous users are not allowed access to the database and they will be prompted to authenticate. When they authenticate, the name is checked in the database ACL to determine the level of database access that should be granted.
Anonymous not listed in database ACL
Anonymous users access the database with the -Default- entry's access level. For example, if -Default- access is set to Reader, and there is no Anonymous entry in the ACL, anonymous users who access the database will be granted Reader access.
Tip: If you want all users to authenticate with a database, make sure that Anonymous is in the database ACL with an access level of No Access, and be sure that Read Public Documents and Write Public Documents are not enabled. Then, add the Internet user's name to the ACL with the level of access you want them to have.
Chapter 11. Domino/Notes 6 security features 505
Replica IDsTo allow an agent in one database to use @DbColumn or @DbLookup to retrieve data from another database, enter the replica ID of the database containing the agent in the ACL of the database containing the data to be retrieved. The database containing the agent must have at least Reader access to the database containing the data to be retrieved. Both databases must be on the same server. An example of a replica ID in a database ACL is 85255B42:005A8fA4. You can enter the replica ID in uppercase or lowercase letters, but do not enclose it in quotation marks.
If you do not add the replica ID to the access control list, the other database can still retrieve data if the -Default- access level of your database is Reader or higher.
Order of evaluation for ACL entriesACL entries are evaluated in a specific order to determine the access level that will be granted to an authenticated user trying to access the database. If a user fails to authenticate with a server, and the server permits access anyway, access will be computed as though the user's name was “Anonymous.”
� The ACL first checks the user name to see if it matches an explicit entry in the ACL. The ACL checks all matching user names. For example, Sandra E Smith/West/Acme would match the entries Sandra E Smith/West/Acme/US and Sandra E Smith. In the event that two different entries for an individual have different access levels (for example, applied at different times by different administrators), the user trying to access the database would be granted the highest access level, as well as the union of the access privileges of the two entries for that user in the ACL. This can also happen if the user has alternate names.
� If no match is made on the user name, the ACL then checks to see if there is a group name entry that can be matched. If an individual trying to access the database happens to match more than one group entry – for example, if the person is a member of Sales and there are two group entries for Sales, such
Note: If you enter only the common name in the ACL (for example, Sandra E Smith), then that entry matches only if the user's name and the database server are in the same domain hierarchy. For example, if the user is Sandra E Smith, whose hierarchical name is Sandra E Smith/West/Acme, and the database server is Manufacturing/FactoryCo, then the entry Sandra E Smith will not get the correct level of access for ACLs on the server Manufacturing/FactoryCo. The name must be entered in full hierarchical format in order for the user to obtain the correct level of access to ACLs on servers in other domains.
506 Lotus Security Handbook
as Acme Sales and Sales Managers – then the individual is granted the highest access level, as well as the union of the access privileges of the two entries for that group in the ACL.
� If no match is made on the group name, the ACL then checks to see if there is a wildcard entry that can be matched. If the individual trying to access the database happens to match more than one wildcard entry, the individual is granted the highest access level, as well as the union of the access privileges of all of the wildcard entries that match.
� Finally, if no match can be made from among the database ACL entries, the individual is granted the level of access defined for the -Default- entry.
ACL logYou can display a log of all changes made to a database ACL. Each entry in the list shows when the change occurred, who made the change, and what changed. The log stores only 20 lines of changes, not the complete history. Only users who have manager access in the ACL can view the ACL log.
Maximum Internet name-and-password accessUsers who have Internet or intranet browser access to a database cannot be identified by Notes in the same way Notes users are identified. Use the “Maximum Internet name & password access” setting to control the maximum type of access that Internet or intranet browser users have to a database. The list contains the standard access levels for Notes users.
This option applies to users who use name-and-password authentication or access the server anonymously over the Internet and connect to servers using either the TCP/IP port or the SSL port. This option does not apply to users who have SSL client certificate IDs and who access the database over the Internet on the SSL port. Users with SSL client access receive the level of access specified in the database ACL.
Note: If the user matches an explicit entry in the ACL, and is a member of a group that is also listed in the ACL, then the user always gets the level of access assigned to the explicit entry, even if the group access level is higher.
Note: If you enable an ACL for Extended Access, the 20-line limit for the log is eliminated. The log also includes more details about Extended Access changes.
Chapter 11. Domino/Notes 6 security features 507

Add an entry for the group Anonymous to the database ACL, if appropriate for this database. Then select the maximum access level you want to assign to all Internet and intranet users who use name-and-password authentication for a particular database. Users who access a Notes database over the Internet, either anonymously or by using name-and-password authentication, never have an access level higher than what is specified as the “Maximum Internet name & password access” level.
For example, a user, Sandra Smith/West/Sales/Acme can use name and password to access a server using a Web browser. If Sandra Smith/West/Sales/Acme is assigned Editor access in the ACL and the “Maximum Internet name & password access” setting is Reader, the lower of the two access levels applies and Sandra is allowed only Reader access. Similarly, if Sandra Smith/West/Sales/Acme is assigned Reader access in the ACL and the “Maximum” access setting is Editor, Sandra is allowed only Reader access. However, if Sandra Smith also uses a Notes client to access the database, the “Maximum” access setting is ignored and Sandra is allowed Editor access.
The default for this option is Editor access. Tasks such as creating folders, views, and agents do not apply to Internet users.
Effective accessIThe “effective access” a person, server, or a group has to documents in a database is not always apparent. For example, if there are two groups with different levels of access to documents, and someone is a member of both groups, you may wonder what access the person actually has. With one click, you can determine a person's effective access to the documents.
The Effective Access list on a local replica of a database may differ from the Effective Access list on a server replica. You my not have the same access to the Domino Directory to read groups when working in local replicas.
Important: The “Maximum” access level overrides the access level that a user may have been explicitly given in the database ACL, but only to enforce the lower of the two access levels.
Tip: You can use this setting to prevent Internet users from accessing the database using name-and-password authentication. By setting it to “No Access,” the database would then be accessible only to Notes users or Internet users who authenticate using SSL client certificates.
New for Domino 6
508 Lotus Security Handbook
To determine the effective access that a person, group, or server has to a database, highlight the appropriate entry in the database ACL and click “Effective Access. This opens a dialog box that shows:
� The selected name's effective database access level as determined by the database ACL.
� The access rights for the selected name.
� All the individual and group name entries and roles that could potentially control the selected name's access to the documents in the database.
� “Full Access Administrator” is checked if the person, server, or group has full administrator rights to the database.
From this point, you can determine other users’ access by selecting a new name in the Names box and clicking “Calculate Access.”
“Enforce consistent ACL” and local replicationPrior to Domino 6, users who locally replicated databases that did not have “enforce consistent ACL” enabled were given full access to the database, with no roles assigned. As a result, the user might change things which ultimately would not replicate. In R6, when a user replicates a database locally, Domino propagates the user's access as it is known on the server, and enforces it when available. This happens automatically for local replication, regardless of whether “Enforce a consistent Access Control List” is enabled. The behavior relies on the nameslist which is propagated during replication. It will not take effect until after the first time the user replicates and the database acquires the user’s access from the server.
It should be noted that local replicas with “Enforce a consistent access control list” enabled attempt to honor the information in the ACL and determine who can do what accordingly. However, they have some limitations. One limitation is that group information is generated on the server, not at the local replica. When a database is replicated locally, information about the group membership of the person doing the replication is stored in the database for use in ACL checking. If a person/identity other than the one doing the replication accesses the local replica, there will be no group membership information available for that person,
Important: A user may still have access to a database by running an agent with the “Unrestricted with Full Access” privilege, even if his or her name is not listed in the database's ACL. This privilege exists, but is not reflected in Effective Access because this privilege bypasses the ACL and reader lists. For example, an administrator may want to run this type of agent on a database he or she does not have access to in order to update a full-text index on that database.
New for Domino 6
Chapter 11. Domino/Notes 6 security features 509

and the ACL can use only the person's identity, not group membership, to check access.
If “Enforce consistent ACLs” is enabled:
� If a nameslist is found in the database, the user’s local access (including roles) is enforced.
� If a nameslist cannot be found, local database access (including roles) is derived from the Domino Directory.
If “Enforce consistent ACLs” is not enabled:
� If a nameslist is found in the database, the user’s local access (including roles) is enforced.
� If a nameslist cannot be found, the user has full access (no roles).
Securing database ACLsDefault ACL entries� Set -Default- access to “No access.” Users and servers receive the access
assigned to the -Default- entry if they have not specifically been assigned another access level, either individually or as a member of a group, or from a wildcard entry. Setting -Default- to No Access limits database access to those users and groups specified in the ACL. (You cannot delete -Default- from the ACL list.)
� The default access for the user who creates the database (Database creator user name) is Manager. Confirm this is the planned access level for this person before you put the database into production. Generally, database creators are given Designer access so that they can make fixes and improvements to the application.
� When you create a new database, the default access for LocalDomainServers is Manager. The LocalDomainServers group lists the servers in the same domain as the server on which the database is stored, and is provided by default with every Domino Directory. The group should have at least Designer access to allow replication of database design changes across the domain.
Other ACL entries� To control the changes a database receives from a database replica, add
server names to an ACL. To ensure tighter security, use the full hierarchical name of the server – for example, Server1/Sales/Acme – regardless of whether the name of the server being added is in a different hierarchical organization than that of the server that stores the database.
510 Lotus Security Handbook
� Assign User types to database ACL entries. For example, assigning the Person user type to a name prevents an unauthorized user from creating a Group document with the same person name, adding his or her name to the group, and then accessing the database through the group name.
� Make sure that the names of terminated employees are removed from the ACLs of all databases in your organization. The adminp process will do this automatically for most databases. When an employee's name is removed from the Domino Directory, each server in the domain deletes the name from the ACLs of databases for which it is an administration server.
� Define ACL roles to restrict access to database design elements or functions. For example, if you have a database of new product information, you could define a role called “Designers.” If you have certain documents in the database that should be accessible only to product designers, you can assign that level of access to the document. You then grant that access, through the “Designer” role, to users by assigning that role to them in the ACL.
� If possible, add new names to existing groups in the ACL rather than listing names individually. Consider whether to include new names in any roles associated with the database. If the database does not use roles, check whether there are access lists associated with forms, views, fields, or sections, and if so, consider whether to include new names in these lists.
� Never list individual IDs for administrators directly in the ACLs of production databases. Instead, use an “Administrators” group. When administrators leave, remove their names from this group and add the names of their replacements.
General database security� As part of the design and management decision, define database access
levels before putting the database into production.
� A best practice for maintaining maximum database security is to use the server administration process to keep the ACL up to date. The Administration Process automatically renames or deletes groups, servers, users, personal views, personal folders, and private agents, and then updates the Domino Directory and any database ACLs that have named the server running the Administration Process as their administration server. This program also updates the Readers and Authors fields for all documents in a database. You can select an administration server for the Administration Process in the Access Control List dialog box for single databases or in the Multi-ACL Management dialog box for multiple databases.
� To prevent users whose access levels are Depositor or No Access from using the operating system to copy the database, encrypt the database with the server ID through the local Encryption option. This ensures that the database,
Chapter 11. Domino/Notes 6 security features 511
even when copied, is illegible to anyone who doesn't have access to the server ID.
� Select the “Enforce a consistent Access Control List” setting on a database replica whose server has Manager access to other replicas to keep the access control list the same across all server replicas of a database. However, enforcing a consistent access control list does not provide additional security for local replicas. To keep data in local replicas secure, encrypt the database.
� Require users to access a database using a secure SSL connection. Secure Sockets Layer (SSL) is a security protocol that provides communications privacy and authentication for Domino server tasks that operate over TCP/IP. You can also choose to require an SSL connection to a single database or to all databases on a server.
11.12 Mail securityThere are two primary aspects of mail security: incoming mail management and message security.
Incoming mail management features, discussed in this chapter, include spam control through inbound relay controls and blacklist filters, and mail policy management, through the use of inbound recipient controls and mail rules.
Message integrity involves securing both the transfer of the message, and the contents of the message itself. To provide secure message transfer among clients and servers, the Domino mail server supports name and password authentication and Secure Sockets Layer for SMTP mail routing, IMAP, and POP3 access. To encrypt and sign messages, Notes clients can use Notes encryption with User ID files and public-private keys or Internet mail security with X.509 certificates. Internet mail clients can use X.509 certificates. In Notes for external (Internet) mail, S/MIME is used for signatures, message encryption and message integrity.
For more information about use of digital signatures and S/MIME in Notes mail, see Chapter 6, “Public key infrastructures” on page 187.
11.12.1 Controlling spamThe term “spam” was coined in the mid-80s and has evolved in meaning over time. The original meaning refers to a behavior now known as “flooding.” In the past, spammers used open SMTP relays primarily to cloak the origin of their messages. An open relay is a mail server that accepts messages regardless of source and destination address. Controlling relaying and controlling spam go
512 Lotus Security Handbook

hand in hand. In order to limit spam, relaying needs to be put in check. There are several options in Domino for controlling who is able to relay mail from your domain.
More details on Domino spam control, beyond those included in this section, can be found in the IBM Redbook Lotus Domino 6 spam Survival Guide, SG24-6930.
Inbound relay controlAn open relay is a server that sends an e-mail message when neither the sender nor the recipient is a local user. Spammers use open relays to send spam. In order to control spam, open relays must be closed.
Use the inbound relay controls to define:
� The destination domains to which you allow and deny relays
� The originating hosts from which you allow and deny relays
To block relays to a specific domain or from a specific host, set restrictions in the inbound relay controls on the server Configuration Settings document. (Router/SMTP → Restrictions and Controls → SMTP Inbound Controls).
The inbound relay controls are set in four fields. The field names, meanings, and guidelines for entries in the fields are as follows:
� Allow messages to be sent only to the following external Internet domains
Internet domains to which Domino can relay messages. Domino relays messages to recipients in the specified domains only. Messages for recipients in other external Internet domains are denied.
For example, if you enter abc.com and xyz.com in this field, Domino accepts only messages to recipients with addresses that end in abc.com or xyz.com domains. Messages for recipients in other domains are denied.
To name a domain explicitly, prefix an @ sign to the entry. For example, if you enter @xyz.com the server relays messages only if the domain part of the address matches xyz.com exactly, such as [email protected]. Messages to addresses in other domains that end in xyz.com, such as [email protected] or [email protected], are denied.
Note: In determining whether to allow a relay, Domino checks the original sender, not just the last hop domain. This prevents people from routing from a denied source through an accepted one to your domain.
Chapter 11. Domino/Notes 6 security features 513
Prefix a percent sign (%) to specify the name of a Domino domain to which mail can be sent; for example, enter %AcmeEast to specify that the server can send mail to the Domino domain AcmeEast.
� Deny messages to be sent to the following external Internet domains
Internet domains to which Domino will not relay messages. An asterisk (*) in this field prevents Domino from relaying messages to any external Internet domain.
Domino denies only messages destined for recipient addresses in the specified domains. All other messages may relay.
For example, if you enter abc.com in the field, Domino relays messages to recipients in all external Internet domains except abc.com. Domino denies messages for recipients in the abc.com domain.
To name a domain explicitly, prefix an @ sign to the entry. For example, if you enter @xyz.com, the server rejects messages addressed to users if the domain part of the address matches xyz.com exactly, such as [email protected], but allows messages to relay to other domains that end in xyz.com, such as [email protected].
Prefix a percent sign (%) to specify a Domino domain name; for example, entering %AcmeEast specifies the Domino domain AcmeEast. This lets you prevent SMTP users from sending mail to certain internal Domino domains or even foreign domain servers, such as FAX systems.
� Allow messages only from the following Internet hosts to be sent to external Internet domains
Specifies the hosts or domains that the Domino SMTP service allows to relay outbound Internet mail. If this field contains valid entries, Domino allows only servers matching these entries to relay. Message relays from other servers are denied.
Enter host names or IP addresses to designate the sites that are authorized to use Domino to relay messages to recipients outside your local Internet domain. For example, if you enter lotus.com or ibm.com® in the field, Domino accepts messages for recipients in external Internet domains only from servers with host names that end in lotus.com or ibm.com. Domino rejects messages for external recipients from any server not listed in this field.
� Deny messages from the following Internet hosts to be sent to external Internet domains
Specifies the hosts or domains that the Domino SMTP service does not allow to relay outbound Internet mail. If this field contains valid entries, Domino denies message relays from servers matching those entries. Domino allows message relays from all other servers.
514 Lotus Security Handbook
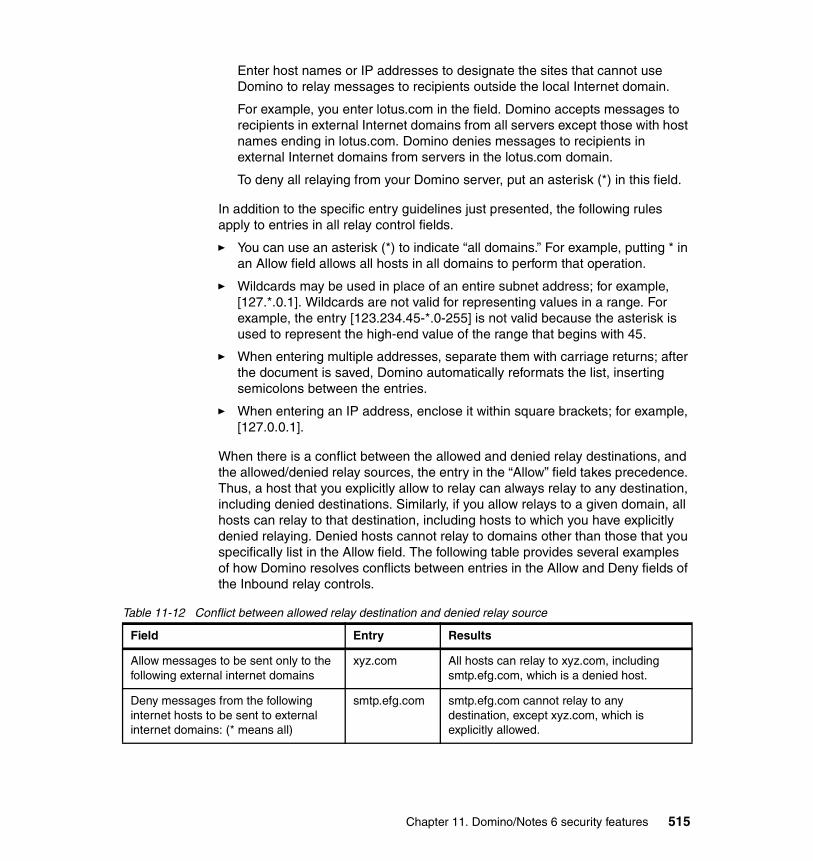
Enter host names or IP addresses to designate the sites that cannot use Domino to relay messages to recipients outside the local Internet domain.
For example, you enter lotus.com in the field. Domino accepts messages to recipients in external Internet domains from all servers except those with host names ending in lotus.com. Domino denies messages to recipients in external Internet domains from servers in the lotus.com domain.
To deny all relaying from your Domino server, put an asterisk (*) in this field.
In addition to the specific entry guidelines just presented, the following rules apply to entries in all relay control fields.
� You can use an asterisk (*) to indicate “all domains.” For example, putting * in an Allow field allows all hosts in all domains to perform that operation.
� Wildcards may be used in place of an entire subnet address; for example, [127.*.0.1]. Wildcards are not valid for representing values in a range. For example, the entry [123.234.45-*.0-255] is not valid because the asterisk is used to represent the high-end value of the range that begins with 45.
� When entering multiple addresses, separate them with carriage returns; after the document is saved, Domino automatically reformats the list, inserting semicolons between the entries.
� When entering an IP address, enclose it within square brackets; for example, [127.0.0.1].
When there is a conflict between the allowed and denied relay destinations, and the allowed/denied relay sources, the entry in the “Allow” field takes precedence. Thus, a host that you explicitly allow to relay can always relay to any destination, including denied destinations. Similarly, if you allow relays to a given domain, all hosts can relay to that destination, including hosts to which you have explicitly denied relaying. Denied hosts cannot relay to domains other than those that you specifically list in the Allow field. The following table provides several examples of how Domino resolves conflicts between entries in the Allow and Deny fields of the Inbound relay controls.
Table 11-12 Conflict between allowed relay destination and denied relay source
Field Entry Results
Allow messages to be sent only to the following external internet domains
xyz.com All hosts can relay to xyz.com, including smtp.efg.com, which is a denied host.
Deny messages from the following internet hosts to be sent to external internet domains: (* means all)
smtp.efg.com smtp.efg.com cannot relay to any destination, except xyz.com, which is explicitly allowed.
Chapter 11. Domino/Notes 6 security features 515
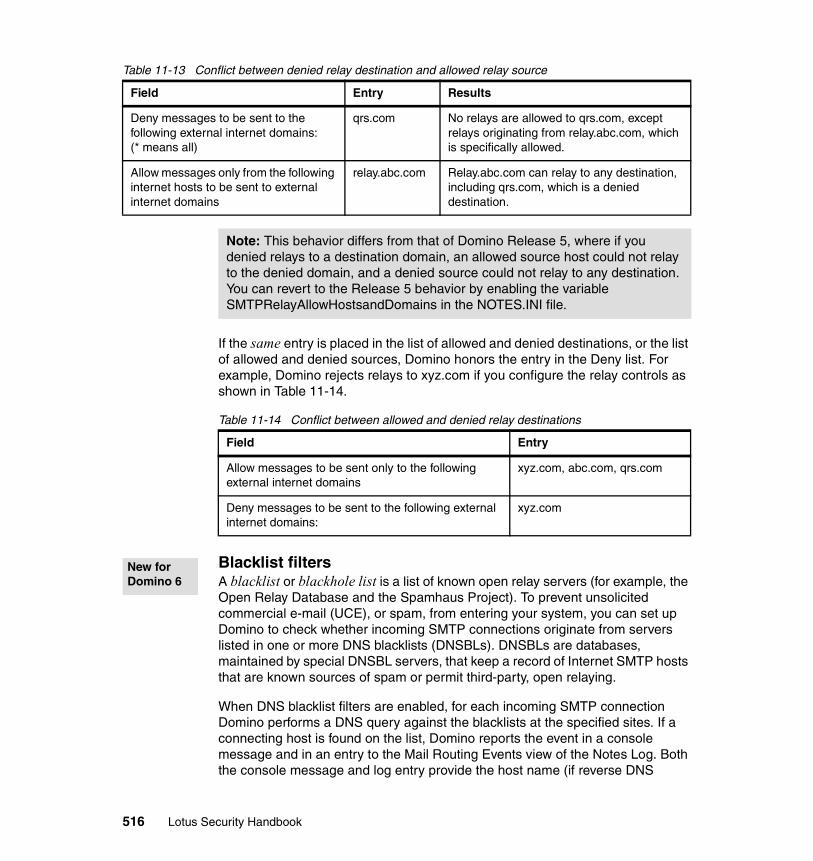
Table 11-13 Conflict between denied relay destination and allowed relay source
If the same entry is placed in the list of allowed and denied destinations, or the list of allowed and denied sources, Domino honors the entry in the Deny list. For example, Domino rejects relays to xyz.com if you configure the relay controls as shown in Table 11-14.
Table 11-14 Conflict between allowed and denied relay destinations
Blacklist filtersA blacklist or blackhole list is a list of known open relay servers (for example, the Open Relay Database and the Spamhaus Project). To prevent unsolicited commercial e-mail (UCE), or spam, from entering your system, you can set up Domino to check whether incoming SMTP connections originate from servers listed in one or more DNS blacklists (DNSBLs). DNSBLs are databases, maintained by special DNSBL servers, that keep a record of Internet SMTP hosts that are known sources of spam or permit third-party, open relaying.
When DNS blacklist filters are enabled, for each incoming SMTP connection Domino performs a DNS query against the blacklists at the specified sites. If a connecting host is found on the list, Domino reports the event in a console message and in an entry to the Mail Routing Events view of the Notes Log. Both the console message and log entry provide the host name (if reverse DNS
Field Entry Results
Deny messages to be sent to the following external internet domains: (* means all)
qrs.com No relays are allowed to qrs.com, except relays originating from relay.abc.com, which is specifically allowed.
Allow messages only from the following internet hosts to be sent to external internet domains
relay.abc.com Relay.abc.com can relay to any destination, including qrs.com, which is a denied destination.
Note: This behavior differs from that of Domino Release 5, where if you denied relays to a destination domain, an allowed source host could not relay to the denied domain, and a denied source could not relay to any destination. You can revert to the Release 5 behavior by enabling the variable SMTPRelayAllowHostsandDomains in the NOTES.INI file.
Field Entry
Allow messages to be sent only to the following external internet domains
xyz.com, abc.com, qrs.com
Deny messages to be sent to the following external internet domains:
xyz.com
New for Domino 6
516 Lotus Security Handbook
lookup is used) and IP address of the server, as well as the name of the site where the server was listed.
In addition to logging the event, you can configure Domino to reject messages from hosts on the blacklist or to add a special Notes item ($DNSBLSite) to flag messages accepted from hosts on the list.
Specifying the DNS blacklist sites After you enable the DNS blacklist filters, you can specify the site or sites the SMTP task uses to determine if a connecting host is a “known” open relay or spam source. Specify sites that support IP-based DNS blacklist queries.
If Domino finds a match for a connecting host in one of the blacklists, it does not continue checking the lists for the other configured sites. For performance reasons, it's best to limit the number of sites because Domino performs a DNS lookup to each site for each connection.
You can choose from a number of publicly available and private, paid subscription services that maintain DNS blacklists. When using a public blacklist service, Domino performs DNS queries over the Internet. In some cases, it may take a significant amount of time to resolve DNS queries submitted to an Internet site. If the network latency of DNS queries made over the Internet results in slowed performance, consider contracting with a private service that allows zone transfer, so that Domino can perform the required DNS lookups to a local host. During a zone transfer, the contents of the DNS zone file at the service provider are copied to a DNS server in the local network.
Each blacklist service uses its own criteria for adding servers to its list. Blacklist sites use automated tests and other methods to confirm whether a suspected server is sending out spam or acting as an open relay. The more restrictive blacklist sites add servers to their list as soon as they fail the automated tests and regardless of whether the server is verified as a source of spam. Other less restrictive sites list a server only if its administrator fails to close the server to third-party relaying after a specified grace period or if the server plays host to known spammers.
By searching the Internet, you can find Internet sites that provide periodic reports on the number of entries in various DNS blacklist services.
Hosts that are exempt from DNS blacklist checksTo avoid unnecessary DNS lookups, Domino performs DNS blacklist checks only on hosts that are subject to relay checks, as specified in the SMTP inbound relay restrictions. Any host that is authorized to relay is exempt from blacklist checks. For example, by default, Domino enforces the inbound relay restrictions only for external hosts (Router/SMTP → Restrictions and Controls → SMTP Inbound
Chapter 11. Domino/Notes 6 security features 517
Controls → Perform Anti-Relay enforcement for these connecting hosts). If the default setting is used, internal hosts are not subject to relay controls and thus are also exempt from blacklist checks.
Specifying how Domino handles connections from hosts found in a DNS blacklistYou can configure Domino to take one of the following actions when it finds a connecting host on one of the blacklists:
� Log only
� Log and tag message
� Log and reject message
In each case, the server records the following information in the Notes log: the host's IP address and host name (if a reverse DNS lookup can determine this information) and the name of the site that listed the host.
When tagging messages, Domino adds a special Note item to messages received from hosts found on a blacklist. After Domino determines that a connecting host is on the blacklist, it adds the Note item, $DNSBLSite, to each message it accepts from the host before depositing the message in MAIL.BOX. The value of a $DNSBLSite item is the blacklist site in which the host was found. Administrators can use the $DNSBLSite note item to provide custom handling of messages received from hosts listed in a blacklist. For example, you can test for the presence of the item through the use of formula language in an agent or view and provide conditional handling of messages that contain the item, such as moving the messages to a special database.
When considering what action to take when Domino finds a host on the blacklist, choose an action that's consistent with the policies of the DNS blacklist site you use. For instance, if the service you use is very restrictive, its blacklist may include “false positives”; that is, it may blacklist hosts that are not known sources of spam. As a result, if you take the action of rejecting mail from any host found on the blacklist, it could prevent the receipt of important messages.
DNS blacklist statisticsThe SMTP task maintains statistics that track the total number of connecting hosts that were found on the combined DNSBL of all sites combined, as well as how many were found on the DNSBL of each configured site. Because the
Note: The action you select applies to each of the specified blacklist sites. That is, you cannot configure Domino to deny connections for hosts found on one site's list and log the event only for hosts found on another site's list.
518 Lotus Security Handbook

statistics are maintained by the SMTP task, they are cumulative for the life of the task only and are lost when the task stops.
You can view the statistics from the Domino Administrator or by using the SHOW STAT SMTP command from the server console. You can further expand the statistics to learn the number of times a given IP address is found on one of the configured DNSBLs. To collect the expanded information, you set the variable SMTPExpandDNSBLStats in the NOTES.INI file on the server. Because of the large numbers generated by the expanded set of statistics, Domino does not record the expanded statistics by default.
Inbound relay enforcementWhen you first create a Configuration Settings document for a server, by default, the SMTP inbound relay controls, or anti-relay settings, apply to all external hosts only – that is, to hosts that are not located in the local Internet domain. After you set inbound relay controls, you can customize how Domino applies them by selecting inbound relay enforcement options to control to whom your relay restrictions apply.
The available options allow you to specify how strictly to enforce the relay controls by letting you exempt certain hosts from enforcement. You can exempt hosts from relay enforcement based on:
� Domain location - By default, Domino enforces relay controls for hosts outside the local Internet domain only. You can enforce stricter control by applying them to all connecting hosts or relax enforcement entirely so Domino does not perform any relay checks (not recommended).
� Authentication status - By default, Domino applies relay controls to authenticated SMTP sessions. You can relax enforcement by exempting all authenticated users from relay checks.
� Host name or IP address - By default, all external hosts are subject to relay controls. You can specify a list of hosts (by IP address or host name) to exempt from relay checks.
Applying relay restrictions for internal hostsBy default, Domino enforces anti-relay settings for external hosts only. Internal hosts are exempt from anti-relay checks so Domino does not consider an internal host as a possible relay, even if it's explicitly listed in the Inbound relay controls'
Note: Domino uses IP version 4 (IPv4) addresses when querying DNS blacklist sites to find out if a connecting host is listed. If the connecting host has an IP version 6 (IPv6) address, Domino skips the DNSBL check for that host.
New for Domino 6
Chapter 11. Domino/Notes 6 security features 519
“Deny messages from the following Internet hosts to be sent to external Internet domains” field.
Depending on your environment, you may want to extend the scope of enforcement by applying relay restrictions to both internal and external hosts. Applying relay enforcement to internal hosts lets you achieve more secure and controlled routing. For example, you can configure your Domino SMTP server so that only other Domino mail servers are allowed to relay. By doing so you can prevent internal users who run other mail clients (for example, POP or IMAP clients), as well as servers in other internal mail systems, from using the Domino SMTP server to send mail to the Internet.
You might also enable relay enforcement for internal hosts if you have a Domino SMTP server that receives mail from a dual-interface firewall server. For security purposes, some organizations may not connect their Domino SMTP servers directly to the Internet, choosing instead to set up an internal SMTP relay host or firewall to receive Internet mail destined for the organization's Internet domain. The relay or firewall then routes the mail to a Domino SMTP server, which, in turn, transfers it to the organization's internal mail servers.
A host in the local Internet domain can always relay to external Internet domains unless it is explicitly denied by an entry in the field “Deny messages from the following internet hosts to be sent to external internet domains.”
If the internal relay or the firewall does not implement its own relay controls, the Domino SMTP server may then receive mail that is not destined for a local user. If the Domino server is set up to perform anti-relay enforcement on external hosts only, then mail received from the internal relay or firewall is not subject to the Inbound Relay Controls because the sending system, the relay or the firewall, belongs to the same local Internet domain. Thus, when the Router determines that the Internet address listed in the RCPT TO command has no match in the $Users view in the Domino Directory, it routes the message back out to the Internet.
Allowing relays from authenticated users connecting from outside the local domain By default, if you deny relaying for a domain or set of domains (for example, all external domains), all hosts in the denied domains are subject to the relay controls. This level of restriction prevents remote IMAP or POP3 clients that connect to Domino by way of Internet service providers (ISPs) in external domains from sending outbound Internet mail because Domino does not recognize the source of the message as a valid relay origin.
To ensure that Domino allows POP3 or IMAP users to send outbound Internet mail, you can customize relay enforcement to allow all authenticated users to
520 Lotus Security Handbook

relay. After the Domino SMTP listener determines that a connecting host has been authenticated, it treats the connection as though it originated from a local user and exempts it from the Inbound relay controls. Use this setting in conjunction with the SMTP authentication setting on the Ports section of the Server document to allow your POP3 users to relay through you.
If you set this field to “External hosts,” your Domino server will trust all servers that are in your domain. Domino ignores the Inbound relay enforcement settings for hosts when connecting. (What happens is Domino checks with the DNS server to verify that the host is in your domain after using the information in the SMTP_Caller IP packet header.)
If you set this field to “All connecting hosts,” even systems in your own domain will be tested. This is a very useful setting; for example, if you have a store-and-forward firewall that does not do relay checking.
The final option is “None.” This setting will cause Domino to ignore inbound relay controls for all connecting hosts.
Specifying enforcement exceptions based on host name or IP address By default, after you deny relaying for a domain, all hosts in that domain are subject to the relay controls. You can customize relay enforcement to allow specific clients or servers in a domain to relay (for example, a sendmail box that relays mail to a Domino server) by entering host names or IP addresses in the field “Exclude these connecting hosts from anti-relay checks.” For each specified exception, Domino does not enforce the inbound relay controls. Use exceptions to allow hosts outside the local Internet domain to use the Domino SMTP server as a relay to send and receive their mail from the Internet, while still preventing Domino from being used as an open relay by unauthorized Internet hosts.
The last setting was designed to assist with remote users. If you have “allow authenticated users to relay” this will allow your IMAP and POP3 users who dial in using an ISP to send mail using your server.
Set to “Yes” to allow your POP3 users to send SMTP mail via your server. You have to configure the POP3 client to authenticate when sending SMTP mail.
Note: Because many ISPs use the dynamic host control protocol (DHCP) to assign IP addresses to each connecting user, a user's IP address may differ from session to session. As a result, specifying enforcement exceptions based on host name or IP address is not effective for ensuring relay access for IMAP and POP3 users who connect to Domino from an ISP. To ensure relay access for these users, enable enforcement exceptions for authenticated users.
Chapter 11. Domino/Notes 6 security features 521
11.12.2 Mail policy management Through the Configuration Settings document, Domino administrators can set limits on who sends what to whom, as well as establish mail rules on the Domino server to manage the messages entering your domain.
Inbound Intended Recipient ControlsInbound Intended Recipients Controls have been enhanced in ND6. You now have the ability to only accept messages addressed to users in your domain. This reduces the number of dead messages in your mail.box.
In the “Verify that local domain recipients exist in the Domino Directory” field, select “Enabled” for Domino to verify the name of the connecting host by performing a reverse DNS lookup. Domino checks DNS for a PTR record that matches the IP address of the connection host to a hostname. If Domino cannot determine the name of the remote host because DNS is not able or no PTR record exists, it does not allow the host to transfer mail. Although Domino accepts the initial connection, later in the SMTP transaction it returns an error to the connection host in response to the Mail From command.
You cannot use wildcards in the field “All messages intended only for the following.”
For more information, see REDP-3622.
Mail rulesYou can create content filtering rules for a server that define actions to take on certain messages. When a new message that meets a specified condition is deposited in MAIL.BOX, Domino automatically performs the designated action. Rule conditions are based on content in the message headers or in the message body.
You can use mail rules to prevent spam by:
� Refusing to accept or deliver messages that contain offensive content
� Holding messages with key phrases in mail.box
� Moving messages to a quarantine or “graveyard” database
� Changing message routing state
� Journaling messages
For example, you could create a rule that rejects mail with subjects like “make money fast” or that comes from a known spam vendor. Similarly, you can restrict users from receiving message attachments that do not have a business purpose by setting up a rule to intercept messages that contain attachments of certain file
New for Domino 6
New for Domino 6
522 Lotus Security Handbook

types (EXE, VBS, VBE, SCR, and so forth) and redirect them to a quarantine database where they could be reviewed by an administrator and optionally sent on to the intended recipient.
Except where a rule action explicitly indicates, Domino does not notify the sender or recipient if a rule prevents a message from reaching its destination. For example, if a rule results in a message being routed to a graveyard database, Domino does not generate a delivery failure report or indicate to the intended recipients that a message for them has been intercepted. By contrast, if a message triggers a rule with the specified two-part action “Don't deliver message/ Send NDR,” the sender receives a delivery failure report stating that the message was rejected for policy reasons.
Mail rules are not intended to serve as an anti-virus solution and should not be considered a replacement for anti-virus software. Although you can configure rules to quarantine messages with known virus attachments, the available rule actions do not include typical anti-virus features such as generating warnings upon detecting a virus or automatically disinfecting files.
Mail rules are controlled and configured in your Messaging Settings document. Domino stores the mail rules you create in the Configuration Settings document. On startup, each server retrieves the rules from the appropriate Configuration Settings document and registers them as monitors on each MAIL.BOX database in use.
Whenever MAIL.BOX receives a new message from any source – the SMTP process, the Router on another server, or a client depositing a message – the server evaluates the various message fields against the registered mail rules. Each message is evaluated only once. Additional updates occurring after a message is added to MAIL.BOX – such as updates to reflect the number of recipients handled – do not cause reevaluation of the rules.
Note: Although Domino does not generate a notification to the sender when a rule condition triggers the action “don't accept message,” because rules execute as mail is deposited to MAIL.BOX, the sender may still receive notification that the message was rejected. For example, when the Domino SMTP listener refuses a message because of a mail rule, the sending SMTP server receives the error indicating that the transaction was rejected for policy reasons. Typically, servers receiving this type of error generate a delivery failure report to the sending user. Similarly, when a mail rule prevents the server from accepting a message, a Notes client attempting to deposit the message in MAIL.BOX displays an error indicating that the message cannot be sent.
Chapter 11. Domino/Notes 6 security features 523

Creating mail rulesYou create Mail rules in the Messaging section of the Configuration Settings document for the servers where the rules apply. For each rule, you can specify the criteria the server uses to determine whether to apply the rule to a given message.
Table 11-15 Rule conditions
You can further modify the condition by:
� Adding more conditions
Condition components Description
Message item to examine Specifies the Notes message item that the Router examines when evaluating whether to apply a rule. Choose one of the following: Sender, Subject, Body, Importance, Delivery priority, To, CC, BCC, To or CC, Body or subject, Internet domain, Size (in bytes), All documents, Attachment name, Number of attachments, Form, Recipient count, or Any recipient.Choose “All Documents” to enable the rule to act on all messages deposited in MAIL.BOX.
Logical operator or qualifier Specifies how the Router evaluates the content of the target field. For example, if you selected the message item Attachment Name, selecting the qualifier “is” defines a rule that acts on all messages having an attached file with a name that exactly matches the name you specify. Choose one of the following:
contains (for text field values)does not contain (for text field values)isis notis less than (for numeric field values)is greater than (for numeric field values)
Value to check in message item
Specifies the content to search for in the target message item. For example, if the target message item is Attachment Name and the qualifier is “contains,” enter .VBS to create a rule that acts on all messages having an attached file with a name containing the string .VBS, including, LOVE-LETTER.VBS, CLICK-THIS.VBS.TXT, and MY.VBS.CARD.EXE. Text fields do not support wildcard values, such as the asterisk character (*). To specify a search string for a target field, use the “contains” operator and enter the search string in the accompanying text field. For example, as in the preceding example, to search for an attached file with a name that contains the string .VBS, create the condition “Attachment Name contains .VBS,” not “Attachment Name is *.VBS.”Search string text is not case sensitive.When indicating numeric values, always enter a numeral, rather than its text equivalent (that is, enter 2, not two).
524 Lotus Security Handbook
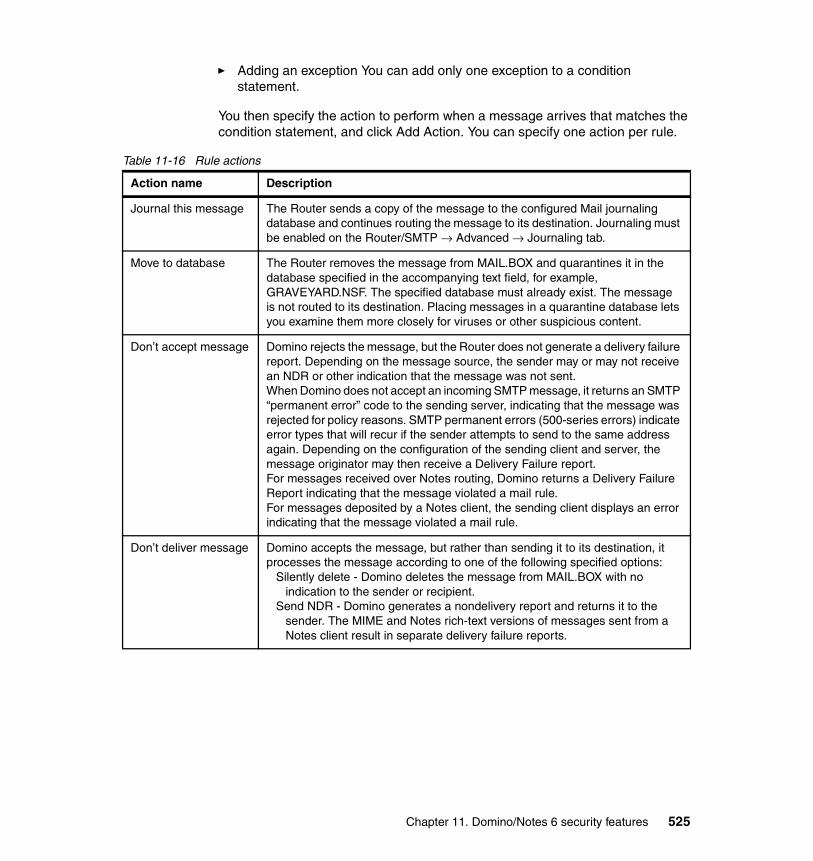
� Adding an exception You can add only one exception to a condition statement.
You then specify the action to perform when a message arrives that matches the condition statement, and click Add Action. You can specify one action per rule.
Table 11-16 Rule actions
Action name Description
Journal this message The Router sends a copy of the message to the configured Mail journaling database and continues routing the message to its destination. Journaling must be enabled on the Router/SMTP → Advanced → Journaling tab.
Move to database The Router removes the message from MAIL.BOX and quarantines it in the database specified in the accompanying text field, for example, GRAVEYARD.NSF. The specified database must already exist. The message is not routed to its destination. Placing messages in a quarantine database lets you examine them more closely for viruses or other suspicious content.
Don’t accept message Domino rejects the message, but the Router does not generate a delivery failure report. Depending on the message source, the sender may or may not receive an NDR or other indication that the message was not sent.When Domino does not accept an incoming SMTP message, it returns an SMTP “permanent error” code to the sending server, indicating that the message was rejected for policy reasons. SMTP permanent errors (500-series errors) indicate error types that will recur if the sender attempts to send to the same address again. Depending on the configuration of the sending client and server, the message originator may then receive a Delivery Failure report.For messages received over Notes routing, Domino returns a Delivery Failure Report indicating that the message violated a mail rule.For messages deposited by a Notes client, the sending client displays an error indicating that the message violated a mail rule.
Don’t deliver message Domino accepts the message, but rather than sending it to its destination, it processes the message according to one of the following specified options:
Silently delete - Domino deletes the message from MAIL.BOX with no indication to the sender or recipient.
Send NDR - Domino generates a nondelivery report and returns it to the sender. The MIME and Notes rich-text versions of messages sent from a Notes client result in separate delivery failure reports.
Chapter 11. Domino/Notes 6 security features 525

When multiple mail rules are enabled, you can set their relative priority by moving them up and down in the list. The server executes each rule in turn, beginning with the rule at the top of the list. Place rules with security implications higher in the list to ensure that the server processes them before other rules.
The Configuration Settings document displays new mail rules only if the document has been previously saved. Before adding rules to a new Configuration Settings document, save and close the document. Reopen the document to begin adding rules.
When you add a new rule, it takes effect only after the server reloads the mail rules. A reload is automatically triggered if the Server task detects a rule change when performing its routine check of the Configuration Settings document. This check occurs approximately every five minutes.
You can force the server to reload rules, using a set rules console command.
Mail rules and encrypted messagesIf MAIL.BOX receives an encrypted message (Notes encrypted, S/MIME, PGP, and so forth), the server mail rules process any rule conditions that are based on unencrypted information in the message envelope, such as the sender, importance, and recipients, but do not process conditions based on the encrypted portion of the message body. Most rule conditions are based on information in the message envelope. The server does not log instances in which rules are unable to process a message.
You can also specify which types of messages a rule acts on by specifying the message form type in the rule condition. When evaluating the form type, the server checks the Notes message form used (the Form item displayed in the Document properties); it does not use form information defined in MIME items in the message. All messages deposited in MAIL.BOX are rendered as Notes documents, including inbound Internet messages in native MIME format. By default, messages received over SMTP use the Memo form, except for SMTP
Change routing state Domino accepts the message but does not deliver it. Instead, it marks it as held, changing the value of the RoutingState item on the message to HOLD. This change to the routing state of the message causes the Router to retain the message in MAIL.BOX indefinitely, pending administrative action.Domino differentiates between messages held by a mail rule and messages held as undeliverable.Note: This action may not work properly on servers where third-party products, such as certain types of anti-virus software, also manipulate the RoutingState item.
Action name Description
526 Lotus Security Handbook
Nondelivery reports, which Domino renders using the NonDelivery Report form. Common Notes form names include:
� Appointment
� Delivery Report
� Memo
� NonDelivery Report
� Notice
� Reply
� Return Receipt
� Trace Report
11.13 Domino Off-Line ServicesDomino Off-Line Services (DOLS) provides a way for users to take IBM Lotus Domino Release 6 Web applications offline, work in them, and synchronize the changes with an online replica on the Domino server. Users are not required to have the IBM Lotus Notes 6 client because the applications are accessed with a browser.
Nearly all Notes functionality is retained when a DOLS-enabled application (called a subscription) is taken offline. Users can compose, edit, delete, sort, and categorize Notes documents, and perform full-text searches. DOLS subscriptions can make full use of Java applets, agent execution, and workflow. DOLS also supports full data replication, retains application logic, and supports the full Notes security model.
Securing DOLSUse Offline Security Policy documents to set different ID policies for users in different domains. For example, you can generate IDs automatically for users inside the company, but require users in a domain outside the company to provide IDs you have given them.
You create an Offline Security Policy Document through the Offline Services view in the Configuration of the Domino Administrator. Under Security, you have the following options for increasing security on DOLS subscriptions:
New for Domino 6
Chapter 11. Domino/Notes 6 security features 527

Table 11-17 DOLS security options
11.14 Notes client securityNotes security features allow users to protect their own workspace and data. Starting with Notes 6, most of the security features offered in Notes have been merged in one dialog box called User Security. Prior to Notes 6, users accessed these features through file menu options or through user and mail preferences. The User Security dialog enables users to:
� Synchronize their Notes password with their Windows or Domino Web/Internet passwords
� Disable the password prompt when asked for their Notes password in other Notes-based programs, and check or request changes to their password settings
� Recover user IDs
� Install and use a Smartcard reader to use Smartcards to login to Notes and store Internet private keys
� Request Notes and Internet certificates
� Use Notes and Internet certificates for mail encryption, and use digital signatures to sign mail
� Set Notes to locally encrypt all new replicas of databases they create; encrypt documents with secret keys so that only people that users send the key to can read those documents
� Set restrictions on active content that can be run on the workstation
Option Description
Tighten access to the database Open the ACL for the subscription and add the users and groups to whom you want to grant access. Anonymous must have “No Access.”
Tighten security on the configuration document
To limit who can open and edit the Offline Subscription Configuration Profile document for a particular subscription, open the subscription's “DOLS Offline Configuration” form in Lotus Domino Designer 6 and change security settings in the Form properties.
Tighten security on offline data To ensure that unsanctioned users cannot access the subscription data offline using another software product, encrypt the subscription in the Offline Subscription Configuration Profile document.
Tighten security for all subscriptions on the server
To propagate a security setting to all the existing DOLS subscriptions on a server, make sure the subscriptions are set to inherit design changes from the DOLS Resource template (DOLRES.NTF); change the setting in DOLRES.NTF; then run the Designer task.
New for Domino 6
528 Lotus Security Handbook
For specific information on how users can change client security settings in the User Security dialog, see Notes 6 Client Help.
Administrators should be aware that users can circumvent administrative security settings through this dialog box. For example, users can:
� Choose not to synchronize Notes and Internet passwords, even if the administrator has enabled this in the user’s Person document or through a security settings policy.
This is actually the more secure option, as you should not protect objects of different strengths (here the Notes and Internet IDs) with the same password; however, administrators may choose to maintain synchronized passwords, usually to simplify administrative overhead, and should be aware that users can change this option.
For more information on Notes/Internet password synchronization, see 11.7, “Internet and Notes password synchronization” on page 467.
� Install a SmartCard reader.
� Change ECL settings
Execution Security Alerts tend to irritate users and therefore, users generally opt to do the easiest thing, which is to grant access to the active content generating the ESA. Workstation ECLs can quickly become wide open. It’s a good idea to refresh workstation ECLs on a regular basis, or, ideally, disable the end user’s ability to make changes.
11.14.1 Smartcards Smartcards increase user ID security for both regular and roaming users. Smartcards enable users to lock and unlock their user IDs when logging into Notes. In addition, the user's Internet private keys can be stored on the Smartcard instead of on the workstation. Then users can take Smartcards with them when they are away from their computers. Logging into Notes with a Smartcard requires the Smartcard, the User ID, and the user's Smartcard PIN.
For information on how users can configure Smartcard readers with the Notes client, see Notes 6 Client Help.
Important: It is critical that administrators be aware of SmartCard installations, as settings for password checking, password change/grace intervals, and password expiration must all be disabled in the Smartcard user’s Person document before the Smartcard reader is installed. Otherwise, those users will eventually be locked out and unable to log in to their home server.
Chapter 11. Domino/Notes 6 security features 529

For information on securing the server console with a Smartcard reader, see the Domino 6 Administration Guide.
Requirements for effective Smartcard use� Before users can install Smartcard readers, it is critical that you disable
password checking, change/grace intervals, and password expiration in the Person documents of Smartcard users. Otherwise, those users will eventually be locked out and unable to log in to their home server.
� Ensure that user IDs are recoverable via ID File Recovery before enabling them for SmartCard use.
11.14.2 Execution Control Lists An Execution Control List (ECL) protects user workstations against active content from unknown or suspect sources, and can be configured to limit the action of any active content that is allowed to run on workstations. The ECL determines whether the signer of the code is allowed to run the code on a given workstation, and defines the access that the code has to various workstation functions. For example, an ECL can prevent another person's code from running on a computer and damaging or erasing data.
“Active content” includes anything that can be run on a user workstation, including formulas; scripts; agents; design elements in databases and templates; documents with stored forms, actions, buttons, and hot spots; as well as malicious code (such as viruses and so-called “Trojan horses”).
There are two kinds of ECLs: the Administration ECL, which resides in the Domino Directory (NAMES.NSF); and the workstation ECL, which is stored in the user's Personal Address Book (NAMES.NSF). The Administration ECL is the template for all workstation ECLs. The workstation ECL is created when the Notes client is first installed. The Setup program copies the administration ECL from the Domino Directory to the Notes client to create the workstation ECL.
A workstation ECL lists the signatures of trusted authors of active content. “Trust” implies that the signature comes from a known and safe source. For example, every system and application template shipped with Domino or Notes contains the signature Lotus Notes Template Development. Likewise, every template and database that your organization designs should contain the signature of either the application developer or the administrator. For each signature, the ECL contains settings that control the actions that active content signed with that signature can perform and the workstation system resources it can access.
If active content attempts an action that is not enabled for the signer, or if the signer is not listed in the ECL, Notes generates an Execution Security Alert
530 Lotus Security Handbook

(ESA), which specifies the attempted action, the signer's name, and the ECL setting that is not enabled. The ESA gives the user four options:
� Do not execute the action: To deny the signer access to perform the specified action.
� Execute the action this one time: To allow the signer access to perform the action only once. The ESA appears again if the same action is attempted in the future. This option does not modify the ECL.
� Start trusting the signer to execute this action: To allow the action to be performed and modify the ECL configuration to add the signature of the active content to the ECL. This grants permission for the signer to execute the specific action any time on that workstation.
� More Info: To display a dialog box that provides information about the design type, design name, Notes ID, signature status, and parent database of the code that caused the ESA.
For example, locally scheduled agents, as well as manual agents, can generate ESAs. Click “More Info” to get information about the agent that generated the alert.
In Notes 6, the workstation ECL is part of the User Security dialog box. Select “What Others Do” in the User Security dialog to see workstation, applet, and JavaScript access options.
For more information on workstation, applet, and JavaScript access options, see the chapter “Protecting User Workstations with Execution Control Lists” in the Domino 6 Administration Guide, or see the Lotus Notes 6 Client Help.
The administration ECL When you set up the first server in a domain, Domino creates a default administration ECL, which you can then customize. The administration ECL is the template for all workstation ECLs. Whenever a new Notes client is installed, the setup program copies the administration ECL from the Domino Directory to the Personal Address Book on the Notes client workstation. The user's Notes ID is added to the workstation ECL, with all access allowed. For example, when John Doe's Notes client is being set up, John Doe is automatically added to the client ECL signer list.
Note: The administration ECL has a setting that prevents users from changing their workstation ECLs. If this setting is enabled, then the user's option to trust the signer is disabled.
New for Domino 6
New for Domino 6
Chapter 11. Domino/Notes 6 security features 531

If the home server is unavailable when a Notes client is installed – for example, when a user is disconnected – the workstation ECL is created with default settings, rather than being created from the administration ECL.
You use the administration ECL to define and deploy customized ECLs for your users. You can control ECL changes or allow users to modify their own ECLs. Furthermore, you can update your users' workstation ECLs as security requirements change – automatically, through the use of a security settings document deployed through a policy; or manually, by asking users to refresh their workstation ECLs.
To create customized ECLs that can be deployed for specific groups of users, you must use a security settings document that is deployed through a server policy. For example, you can create one ECL exclusively for contract employees and another ECL for full-time employees.
For more information on configuring and deploying ECLs, see “Protecting User Workstations with Execution Control Lists” in the Domino 6 Administration Guide. For more information on configuring a security settings document for deploying ECLs, see “Using Policies” in the Domino 6 Administration Guide.
Guidelines for effective ECLsYour goal as an administrator is to limit the number of trusted signers for active content, and the access that active content has to user workstations. To accomplish this goal, limit the number of trustworthy signers in your organization and ensure that workstation ECLs trust only those signers.
Use these guidelines to create secure ECLs:
� Create an administration ECL, or several administration ECLs, as necessary, to deploy in your organization.
� Do not grant access to unsigned content. This creates a security hole that allows potentially harmful code, malicious or otherwise, to access user workstations. Keep the default access options for unsigned content.
� Do not let your users trust unsigned content. To prevent users from changing their ECLs –for example, by giving access to unsigned content, or to content
Note: Technically, when a server is initially installed, there is no Admin ECL. When a client attempts to edit the workstation ECL, or refresh it from an admin ECL that does not exist, the client creates an ECL with default settings that are coded into the client. The Admin ECL exists on disk, once an administrator modifies and saves it. Once the modified administration ECL is saved to disk, then that is the ECL that is copied to user workstations.
532 Lotus Security Handbook
signed by signers who are not listed in the ECL, deselect “Allow user to modify” in the Administration ECL.
� Know your signers. Trusting signed active content, especially from other organizations, is risky. Before adding an active content author to an ECL, decide if you trust that the author has created safe code.
� Create a separate certifier for an organizational unit to issue IDs specifically for users who must sign templates and applications – for example, Enterprise ECLApp Signer/West/Acme. Then users who create templates and applications use those IDs to sign templates and applications. You can then set up the administration ECL to trust any user in that special organizational unit, or fine-tune it on a per-user basis.
Chapter 11. Domino/Notes 6 security features 533

534 Lotus Security Handbook
Chapter 12. Security features of other Lotus products
This chapter takes the focus away from Notes and Domino security and provides an overview of the other members of the Lotus software family of collaborative products, the security mechanisms they offer, and the manner these can best be configured.
Specifically, the other Lotus products covered in this chapter are as follows:
� Lotus Team Workplace (QuickPlace)
� Lotus Web Conferencing and Instant Messaging (Sametime)
� Lotus Domino Web Access (iNotes)
� Lotus Workplace Messaging™
� WebSphere Portal Server
� Lotus Domino Everyplace™
� Lotus Sametime Everyplace
Since these products are used at times in conjunction with Notes and Domino, we also cover, when appropriate, the intersection points and how to ensure that security is maintained between the applications and Notes/Domino.
12
© Copyright IBM Corp. 2004. All rights reserved. 535
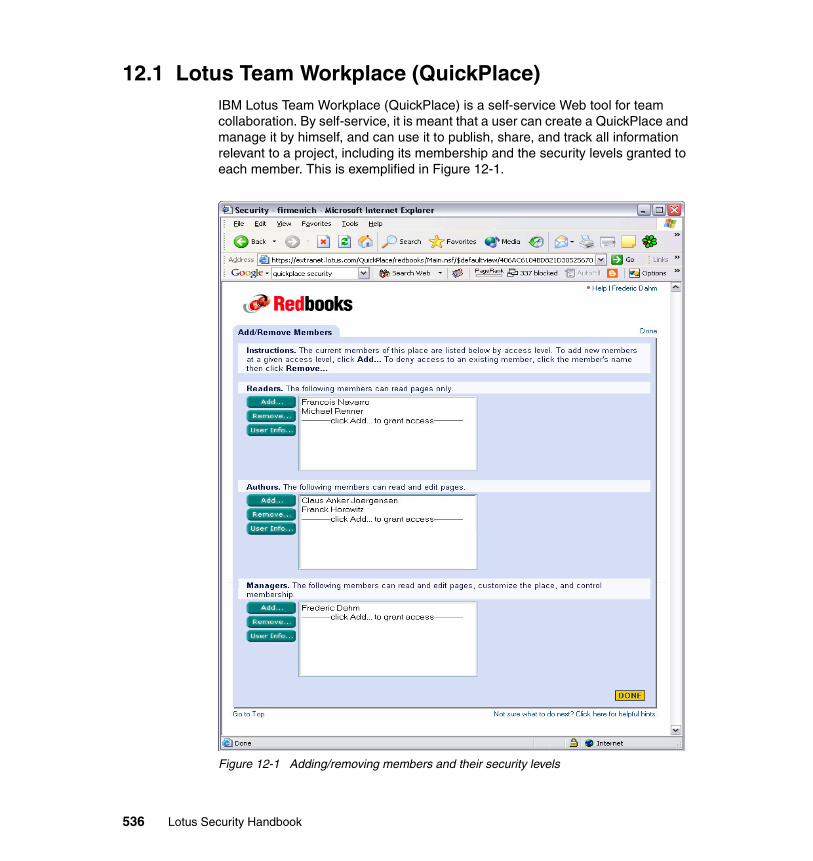
12.1 Lotus Team Workplace (QuickPlace) IBM Lotus Team Workplace (QuickPlace) is a self-service Web tool for team collaboration. By self-service, it is meant that a user can create a QuickPlace and manage it by himself, and can use it to publish, share, and track all information relevant to a project, including its membership and the security levels granted to each member. This is exemplified in Figure 12-1.
Figure 12-1 Adding/removing members and their security levels
536 Lotus Security Handbook

The manner in which the membership is built is simple and effective: the data for the people using the QuickPlace is entered in the form shown in Figure 12-1 and they are segregated into three groups (in increasing levels of access): Readers, Authors, Managers. In essence, it means that the Directory entries and the ACL entries are all handled in one place.
QuickPlace incorporates Domino components in its architecture. Specifically, the Domino Web Server (nhttp.exe) provides the HTTP stack and the Domino URL processor (ninotes.dll) provides the semantics for processing Domino URLs.
12.1.1 QuickPlace and SSLYou can configure QuickPlace to use an SSL connection to encrypt the data transferred between Web browsers and a QuickPlace server. The SSL handshake is provided by the Domino Web server, so SSL must be configured first on Domino. Then you can set up QuickPlace to use SSL to secure LDAP communications between QuickPlace and the LDAP server, as well as HTTP between browser clients and place servers.
Without SSL configured to the directory server, the information passed during the authentication process between the QuickPlace server and the Domino server will not be encrypted.
You may also want to consider port encryption for TCP/IP and Notes protocols. Encrypting ports protects replication traffic between two QuickPlace servers. For more information on enabling port encryption on the Domino server, see the Domino 6 Administration help.
12.1.2 User directoriesA QuickPlace “place” can have both local users and external users. The specific difference between local and external users is where their contact and authentication information is stored.
Local users have contact and authentication information stored in the QuickPlace-specific membership database (Contacts1.nsf) of the “place” Managers of the place can create users, change the users' access levels, and delete users. Local users can access only the place where their membership information is contained.
Important: If you configure QuickPlace to use SSL but have not configured Domino, SSL LDAP authentication will fail.
Chapter 12. Security features of other Lotus products 537
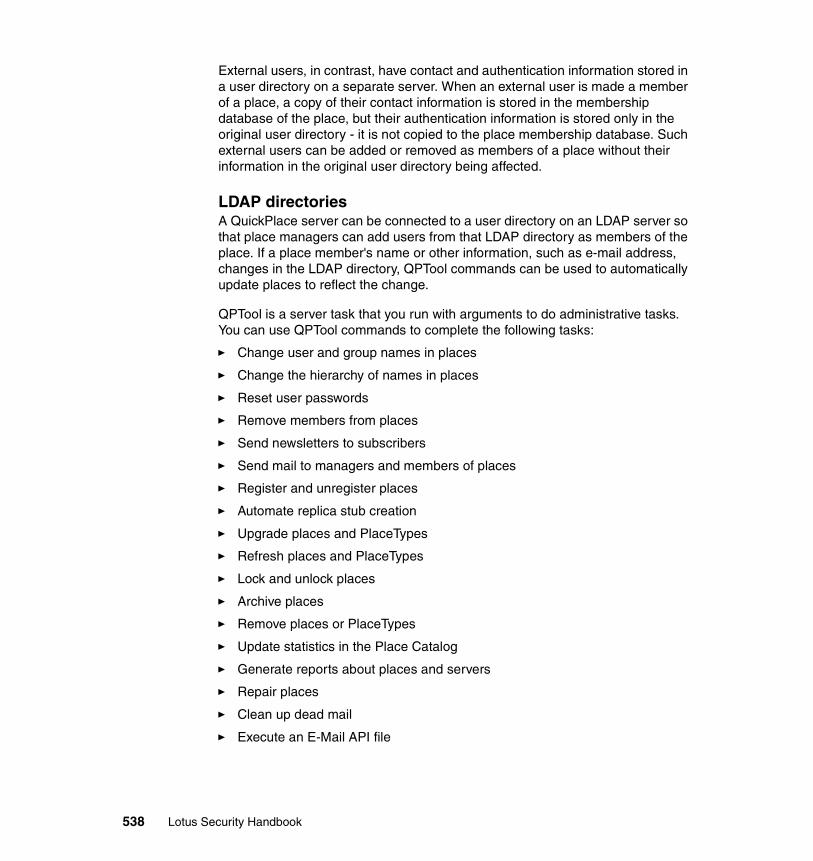
External users, in contrast, have contact and authentication information stored in a user directory on a separate server. When an external user is made a member of a place, a copy of their contact information is stored in the membership database of the place, but their authentication information is stored only in the original user directory - it is not copied to the place membership database. Such external users can be added or removed as members of a place without their information in the original user directory being affected.
LDAP directoriesA QuickPlace server can be connected to a user directory on an LDAP server so that place managers can add users from that LDAP directory as members of the place. If a place member's name or other information, such as e-mail address, changes in the LDAP directory, QPTool commands can be used to automatically update places to reflect the change.
QPTool is a server task that you run with arguments to do administrative tasks. You can use QPTool commands to complete the following tasks:
� Change user and group names in places
� Change the hierarchy of names in places
� Reset user passwords
� Remove members from places
� Send newsletters to subscribers
� Send mail to managers and members of places
� Register and unregister places
� Automate replica stub creation
� Upgrade places and PlaceTypes
� Refresh places and PlaceTypes
� Lock and unlock places
� Archive places
� Remove places or PlaceTypes
� Update statistics in the Place Catalog
� Generate reports about places and servers
� Repair places
� Clean up dead mail
� Execute an E-Mail API file
538 Lotus Security Handbook
For example, if John Smith is a user in the LDAP directory and is registered as a member of places, if you change John's e-mail address in the external LDAP directory, you can use the QPTool updatemember command to update his e-mail address in places.
For more information on the QPTool commands and the manner in which they can help administer the security of the QuickPlace, consult the Lotus QuickPlace 3.0 Adminstrator’s Guide that came with Lotus QuickPlace, or see the Web site at the following URL:
http://doc.notes.net/uafiles.nsf/docs/QP30/$File/na5d3fus.pdf
A QuickPlace server can connect to a user directory on any server configured to use Lightweight Directory Access Protocol (LDAP) version 3, including a Domino server that runs the LDAP service or any other LDAP directory server. However, its important to remember that a QuickPlace server is limited to connecting to only one external LDAP directory at any given time.
12.1.3 QuickPlace authenticationQuickPlace supports two types of authentication for Web browsers connecting to a QuickPlace server:
� Basic name-and-password authentication
� Multi-server single sign-on name-and-password authentication
Basic authentication is implemented by default in QuickPlace. An example of this authentication at work is shown in Figure 12-2 on page 540. This means that users who sign in to one “place” will be authenticated for that specific place only. Moving to another place, even if on the same server, will cause Domino to request the user’s name and password again.
Note: Distinguished names of users and groups in the user directory should be unique. If there are two distinguished names in the external LDAP directory that are the same, only one of the names can be added to a place as a member. If two distinguished names are identical, add a middle initial or other distinguishing character to one of the names to make each name unique.
Restriction: It is important to note that QuickPlace does not support the “single server session-based name-and-password authentication” option provided by Domino, as described earlier in this chapter. However, setting up multi-server sign-on authentication on a single server achieves a similar result.
Chapter 12. Security features of other Lotus products 539

Figure 12-2 Simple QuickPlace user ID and password authentication
It is possible to enable multi-server single sign-on so that Web users can log on once to a server and then automatically access any other server in the DNS domain enabled for single sign-on.
When multi-server single sign-on (SSO) authentication is enabled, a QuickPlace user receives a Lightweight third-party (LTPA) token in the form of an HTML cookie. This cookie contains an encrypted copy of the user’s distinguished name and will allow the user to access participating Domino servers for the length of the session.
540 Lotus Security Handbook

QuickPlace also supports custom authentication applications through the Domino Server API (DSAPI). This interface allows some third-party vendors to design a DSAPI filter which supports authentication for access to QuickPlace databases. More information on DSAPI filters can be found in 7.4, “DSAPI” on page 296.
12.1.4 QuickPlace access controlQuickPlace administrators, and users who manage specific content or places, control the access for users. These access controls are found in either the QuickPlace Server Settings room, for server-wide settings; or in the Members and Customize folders of each place, for place-specific settings.
Administrators of a QuickPlace server can manage a number of access rights in QuickPlace, For example, they can:
� Specify other users as administrators of the QuickPlace server.
� Change the password used when an authorized person signs in as an administrator of the QuickPlace server.
� Specify who can create places on a QuickPlace server. Access can be granted to specific local users and to specific external users and groups. Alternatively, access can be granted to all users who have access to the server to create places on it.
� Give an external user or group administrator (also known as a “super user”) access to the QuickPlace server.
A super user can enter every place that exists on a QuickPlace sever. They can enter every room as manager and can also specify administration settings in the server settings room in the administration place.
12.1.5 Server settings in the administration placeThe Server Settings room in the administration place on a QuickPlace server permits you to control a number of security-related settings. Specifically, it permits you to:
� Control whether members can use ActiveX controls and Java applets
� Control whether managers of places on a server can run agents (PlaceBots) within the places they manage
� Restrict the size of file attachments members can add to pages
� Enable or disable Sametime services
Note: The super user must be an external user, not a local user.
Chapter 12. Security features of other Lotus products 541
� Enable or disable a Domino Offline Passthru Server
� Enable or disable an Alternate Offline Download URL
� Specify an e-mail URL prefix if users access the QuickPlace server through a gateway server
� Control whether members can subscribe to receive e-mails integrated with their calendars
12.2 Lotus SametimeIBM Lotus Web Conferencing and Instant Messaging (Sametime) has three primary components: the Sametime server, the Sametime Meeting Room client, and the Sametime Connect client.
The Sametime Connect client has two interfaces: the Java connect client and the Sametime Connect client for desktops. The Sametime Connect client allows users to “chat,” or have real time interactive text conversations between two or more people, while the Meeting Room client supports the shared whiteboard, controls, and activities of an online meeting.
This section describes the key security considerations for all of these components – the server, the connect client, and the meeting room client.
12.2.1 Securing the Sametime Connect client for desktops A number of things must be done to properly secure sessions with the Sametime Connect client. They are discussed in this section.
The client authentication processThe current Sametime 3 Connect client authentication process works as follows:
1. The Sametime client sends a handshake with a public key (a 630 bit key) to the Sametime Server.
2. The server replies with a handshake acknowledgement that contains its public key (which is recreated every 10 minutes).
3. The client calculates the agreed encryption key and sends a login message to the server with the password, which is encrypted using that key.
4. The server sends the authentication message to the authentication process, which then tries to authenticate the user.
542 Lotus Security Handbook

Saved passwordsThe Sametime client password is stored in the connect.ini file if the user chooses to have the password “remembered.” Deleting this line in the connect.ini file will prompt the user for their password. It is encrypted in the connect.ini using the RSA RC2 block cipher, with an encryption key that is 40 bits long. The encryption process also uses unique information about every machine, thereby preventing the file from being used on another workstation.
Network encryption Sametime chats with Sametime users are automatically secured with encryption if all participants use Sametime 1.5 or higher.
File transfers are automatically encrypted. This encryption uses the RSA RC2 block cipher with a 128 bit key. This encryption algorithm will not work outside of the Sametime Connect client.
All chat activity between Sametime 2.5 and 3.0 clients and the Sametime 3.0x server is always encrypted, regardless of whether the “Encrypt all meetings” setting is selected on the server or not.
However, Sametime clients from releases prior to 2.5 contain settings that enable users to conduct unencrypted chats. If a Sametime client from a release prior to 2.5 connects to a Sametime 3.0 server, the chat is either encrypted or unencrypted depending on the client settings.
For instant meetings security, you need to select the “Secure meeting” option to ensure that your meeting is encrypted. Encryption ensures that no one outside your meeting can read your messages.
The Sametime user’s “buddy list” is saved in the vpuserinfo (vpuserinfo.nsf) database. This database is one of the three databases that are created at installation time and used for deploying Sametime applications. The two others are the Secrets database (stauths.nsf) and the tokens database (stautht.nsf). The VPUserInfo database stores information used to restrict whom a user can see or who can see the user. This information is configured with the Connect client.
It is important to note that the information in the buddy list is not encrypted when sent to the server.
Attention: If any participant is using an earlier version of Sametime, or is an external user (for example, AOL)), the chat is not encrypted.
Chapter 12. Security features of other Lotus products 543
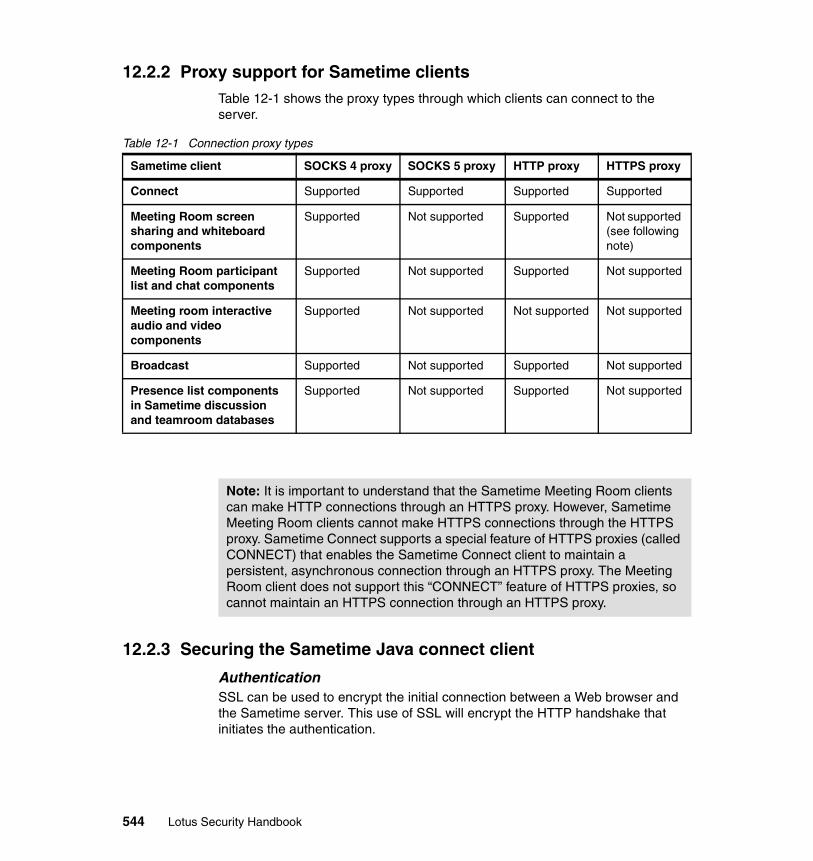
12.2.2 Proxy support for Sametime clientsTable 12-1 shows the proxy types through which clients can connect to the server.
Table 12-1 Connection proxy types
12.2.3 Securing the Sametime Java connect client
AuthenticationSSL can be used to encrypt the initial connection between a Web browser and the Sametime server. This use of SSL will encrypt the HTTP handshake that initiates the authentication.
Sametime client SOCKS 4 proxy SOCKS 5 proxy HTTP proxy HTTPS proxy
Connect Supported Supported Supported Supported
Meeting Room screen sharing and whiteboard components
Supported Not supported Supported Not supported (see following note)
Meeting Room participant list and chat components
Supported Not supported Supported Not supported
Meeting room interactive audio and video components
Supported Not supported Not supported Not supported
Broadcast Supported Not supported Supported Not supported
Presence list components in Sametime discussion and teamroom databases
Supported Not supported Supported Not supported
Note: It is important to understand that the Sametime Meeting Room clients can make HTTP connections through an HTTPS proxy. However, Sametime Meeting Room clients cannot make HTTPS connections through the HTTPS proxy. Sametime Connect supports a special feature of HTTPS proxies (called CONNECT) that enables the Sametime Connect client to maintain a persistent, asynchronous connection through an HTTPS proxy. The Meeting Room client does not support this “CONNECT” feature of HTTPS proxies, so cannot maintain an HTTPS connection through an HTTPS proxy.
544 Lotus Security Handbook

EncryptionThe encryption process works the same as the full Sametime Connect client for desktops.
12.2.4 Securing the Sametime Meeting Room client
AuthenticationTraditional SSL can be used to encrypt the initial connection between a Web browser and the Sametime server. This use of SSL will encrypt the HTTP handshake that initiates the authentication. SSL is simply enabled in Domino in the normal manner to support SSL for Sametime meetings. More details on setting up Domino SSL are available in 6.2.5, “Secure Sockets Layer” on page 249.
Securing a Sametime meetingIt is possible to protect Sametime meetings so that the information shared in meetings remains confidential. The right security options for any meeting depend on the purpose of the meeting.
For example, it might be necessary to use a password to limit attendance to a meeting, and use encryption to protect the meeting content. Any user can select multiple options on the Security tab of the New Meeting page to secure a meeting.
The options for securing a meeting are as follows:
� Selecting who will be able to participate in the meeting. Only those users listed will be able to attend the meeting.
� Securing the meeting with a password. The password is required to enter the meeting, and is required in addition to the Sametime login password. A meeting password is valid only for one meeting and applies only to the meeting. It is recommended to use an encrypted mail message to distribute the meeting password to participants.
Important: All users’ browsers must be enabled to accept cookies. Cookies are small files that Sametime stores on the hard disk of the user’s computer that tell Sametime that they are authorized to attend certain meetings. If a user’s browser does not accept cookies, that user cannot attend password-protected meetings.
Tip: It is also suggested that all scheduled meetings have a password. This option forces the end user to specify a meeting password when creating a new meeting.
Chapter 12. Security features of other Lotus products 545
� By default, meetings are listed in the Online meeting center. It is possible, however, to create an unlisted meeting that will not appear in the Meeting Center. To attend the meeting, participants must enter the meeting name. It should be ensured that users remember the name of the unlisted meeting. The only way to access the meeting in the Meeting Center will be to select “unlisted meeting” and type the name of the meeting exactly as it appears in the meeting tab.
� Finally, there is the option to secure the meeting with encryption. When this option is selected, all meeting information is encrypted when passed from client to client. Encryption slows down the meeting. It should be understand, as well, that if NetMeeting is used in the meeting, it is not possible to use encryption for reasons spelled out earlier.
12.2.5 Securing the meeting server
AuthenticationBy default, the connection from a Web browser to the Sametime server is neither authenticated nor encrypted. Authentication occurs at the time a user accesses an individual database on the Sametime server.
As discussed earlier, it is possible to configure Sametime so that all Sametime meeting HTTP traffic (including passwords and authentication tokens) that passes over the connection between the Web browser and the HTTP server be encrypted using the Secure Sockets Layer (SSL)
Access controlTo attend a meeting on the Sametime server, a user first connects to the Sametime HTTP server with a Web browser. By default, the user is not authenticated when accessing the Sametime server over this port and is able to access the Sametime server home page database (stcenter.nsf) without entering a user name and password.
After accessing the home page, a user selects links to access other databases on the Sametime server.
By using the access control list (ACL) settings of the individual Sametime databases, the Sametime administrator can force users to authenticate using basic password authentication when they attempt to access the Sametime Meeting functionality.
546 Lotus Security Handbook

The databases on the Sametime server that are accessible from the Sametime server home page, and that should be secured as needed via ACL settings, include:
� The Sametime Online Meeting Center database (STCONF.NSF), whose ACL should be set to “No Access” for anonymous users. This ensures that all online meetings are created and attended by only authenticated users.
� The Sametime Web Admin database (STADMIN.NSF) whose ACL should be modified to include the domain administrator group. The Sametime administrative roles are also selected. This ensures that the appropriate IT managers and administrators have administrative access to manage the Sametime server.
ACL considerationsThere are a few specific aspects of Domino database ACLs that should be considered when setting access rights to the Sametime meeting center databases.
If both the Anonymous entry and the Default entry are set to No Access, a user must be listed in the ACL individually or as part of a group to access the database. Setting the Anonymous and Default entries to No Access provides the strictest control over access to the database because only users and groups that are listed in the ACL are allowed to access the database.
An individual name receives precedence over the Default entry. If a user's name is entered in a database ACL and provided with an access level, the user receives the access level assigned to the user name entry in the database. Only users who are not listed individually in the database ACL receive the Default access level.
Signing Sametime databasesSome Sametime databases contain agents that access the Directory and provide authentication support for Sametime. Agents within these databases are signed by the “Sametime Development/Lotus Notes Companion Products” ID.
Note: If the Anonymous entry does not exist in the database ACL, the Default entry in the ACL must be set to "No access" to require basic password authentication to the database. When the Anonymous entry does not exist in the database ACL, anonymous users can access the database and receive the access level assigned to the Default entry in the database. If the Anonymous entry exists in the ACL and is assigned the "No access" access level, users are authenticated when accessing the database and receive the access level specified for the Default entry in the ACL.
Chapter 12. Security features of other Lotus products 547
If the security policies of the organization in which Sametime services are provided require re-signing databases with a different ID, you must re-sign the following Sametime database and templates:
� STCONF.NTF
� STDISC50.NTF
� STTEAM50.NTF
� STSRC.NSF
After re-signing these files, ensure that the signer ID that was used is listed in the Directory ACL and in the “Run unrestricted agents” field of the Sametime server Server document.
The minimal Directory ACL requirements for the signer ID are:
� Access: Reader
� Roles: Group Creator, Group Modifier, UserCreator, UserModifier
Encrypting connections to an LDAP serverThe administrator can use SSL to authenticate and encrypt all data passing over all five connections between the Sametime and LDAP servers. Encrypting all data passing between the Sametime and LDAP servers provides the highest level of security, but can have a tangible negative impact on the performance of the Sametime server.
Encrypting all data transmitted between the Sametime and LDAP servers involves three basic procedures:
1. Enabling the “Use SSL to authenticate and encrypt the connection between the Sametime and the LDAP server” setting in the Sametime Administration Tool.
2. Modifying the Directory Assistance document of the LDAP server to encrypt the connection between the servers.
3. Ensuring that the Sametime server trusts the certificate of the LDAP server.
The administrator has the following options when using SSL to encrypt the data transmitted between the Sametime and LDAP servers:
� Encrypt all data: This option encrypts all directory information (both user names and passwords) that is transmitted between the Sametime server and the LDAP server. If all data is encrypted, all five connections between the Sametime server and LDAP server are encrypted with SSL. This option provides the most security but also has the greatest effect on the server.
� Encrypt only user passwords: This option encrypts passwords but not other directory information (such as user names) passing over the connections
548 Lotus Security Handbook
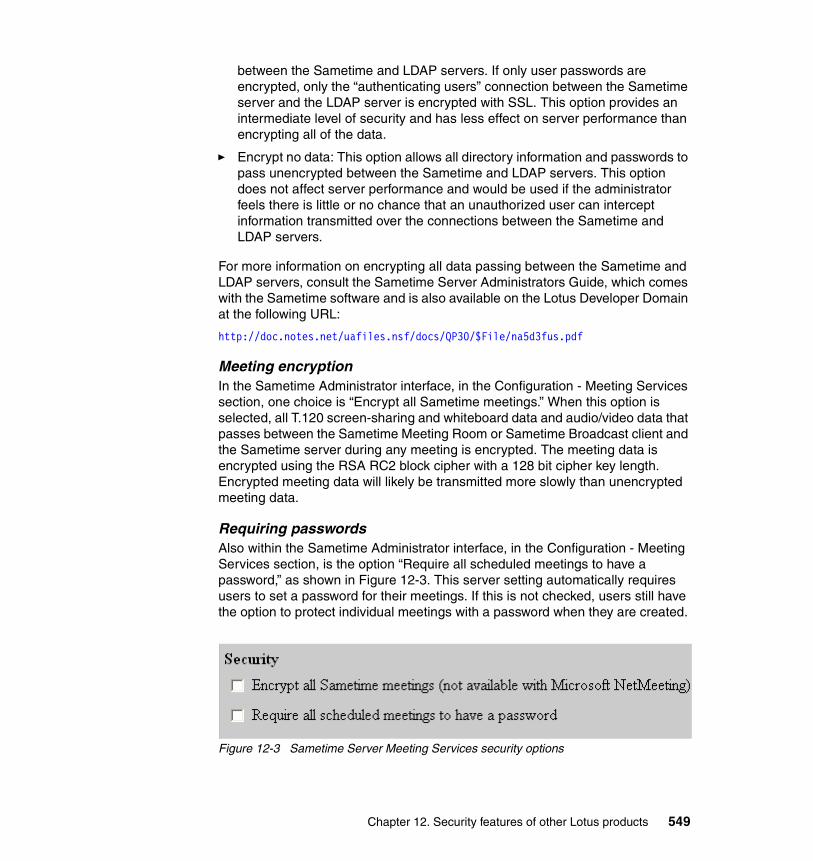
between the Sametime and LDAP servers. If only user passwords are encrypted, only the “authenticating users” connection between the Sametime server and the LDAP server is encrypted with SSL. This option provides an intermediate level of security and has less effect on server performance than encrypting all of the data.
� Encrypt no data: This option allows all directory information and passwords to pass unencrypted between the Sametime and LDAP servers. This option does not affect server performance and would be used if the administrator feels there is little or no chance that an unauthorized user can intercept information transmitted over the connections between the Sametime and LDAP servers.
For more information on encrypting all data passing between the Sametime and LDAP servers, consult the Sametime Server Administrators Guide, which comes with the Sametime software and is also available on the Lotus Developer Domain at the following URL:
http://doc.notes.net/uafiles.nsf/docs/QP30/$File/na5d3fus.pdf
Meeting encryptionIn the Sametime Administrator interface, in the Configuration - Meeting Services section, one choice is “Encrypt all Sametime meetings.” When this option is selected, all T.120 screen-sharing and whiteboard data and audio/video data that passes between the Sametime Meeting Room or Sametime Broadcast client and the Sametime server during any meeting is encrypted. The meeting data is encrypted using the RSA RC2 block cipher with a 128 bit cipher key length. Encrypted meeting data will likely be transmitted more slowly than unencrypted meeting data.
Requiring passwordsAlso within the Sametime Administrator interface, in the Configuration - Meeting Services section, is the option “Require all scheduled meetings to have a password,” as shown in Figure 12-3. This server setting automatically requires users to set a password for their meetings. If this is not checked, users still have the option to protect individual meetings with a password when they are created.
Figure 12-3 Sametime Server Meeting Services security options
Chapter 12. Security features of other Lotus products 549

12.3 Domino Web Access (iNotes)iNotes Web Access is a next-generation Web client that allows the utilization of the most popular Domino functionalities using a Web browser. It is possible for browser users to work on their mail, use their calendar for personal and group scheduling, and do some advanced task management. In addition, they have access to their contact information as well as a journal-like notebook.
In general, the key considerations for iNotes security are the same as the security considerations for Domino as a whole. However, there are several aspects specific to iNotes users that must be considered, which we cover in this section.
12.3.1 AuthenticationWhen users access a Domino server with a Notes client, they are using Notes ID files for authentication. However, when accessing the same Domino servers with iNotes Web Access through a Web browser there is no Notes user ID file available. Users thus authenticate against the Domino server using name and password authentication only. Based on this difference, and limitations in authentication compared to normal Notes mail, there are some additional security issues you must consider for iNotes authentication.
Consider the use of X.509 certificatesWhile the security available using Notes user ID files is not available to the Web browser user, a company could decide to distribute X.509 certificates to their users to use for client authentication with iNotes. Such certificates would provide a similar level of security to Notes ID files, but such an X.509 deployment would require a substantial amount of planning and administration. These certificates are described in more detail in Chapter 6, “Public key infrastructures” on page 187.
Basic authentication and saved passwordsBasic authentication is the default setting for authentication. When users attempt to authenticate, they get a dialog box asking for their user name and password. It is recommended that users do not select the option “Save this password in your password list” on the browser. If this option is enabled, the password is saved on the workstation. This could be the source of a replay attack in that other users could use this password to gain access to the user’s mail file at a later time.
The browser keeps track of user credentials based on the realm that the Domino server sends to the browser. A realm is a string, which is typically a URL path, that the server sends to indicate the location, or path, for which the user has been authenticated. In this case the top-level realm would be yourserver/mail. If
550 Lotus Security Handbook
you open another database which resides in another directory, for example yourserver/help/help5_client.nsf, you will be prompted to authenticate again since yourserver/help is not a subdirectory of yourserver/mail.
To avoid users being prompted to authenticate multiple times, and to avoid the security risk of saved passwords when using such basic authentication, you can enable session authentication on Domino.
Cached authentication credentialsMany browsers store both logon credentials and private data in memory, typically up to 30 pages, which are not reliably discarded until the browser is closed. The browser remembers the user’s authentication information while it is still open. iNotes Web Access provides a “Logout” button that closes the entire browser session, discards the in-memory files, and tries to close the browser window.
This facility aims to prevent anyone from accessing the user’s mail file by hitting the “back” button on the browser’s navigation bar to view personal information from the previous screen while their browser is open and unattended. When all browser windows are closed, cached files are removed from the browser’s cache, so that no one can access the user’s personal iNotes Web Access data. However, there are certain types of personal data that will not be removed unless the user explicitly empties the temporary Internet files folder through the appropriate menu command in the browser being used.
Access level to Forms5.nsf databaseForms5.nsf is one of the databases that is part of iNotes Web Access. It contains most of the JavaScript, pass-thru HTML and images used to implement the user interface of iNotes Web Access.
In order for iNotes Web Access to function correctly, make sure that Anonymous is assigned Reader access to the database {server’s data directory}\iNotes\Forms5.nsf. You will not see an entry for this database in the Catalog.nsf database, but you can find the database using the Domino Administrator → Files tab or by creating a bookmark into your Notes bookmarks folder.
Enabling anonymous access to this database does not present any security risk since only the common user interface components that make up the iNotes interface are contained in this database.
Attention: Users should make sure that they close all active browser windows. iNotes Web Access secure logout will close the active browser window, but not necessarily all browser windows.
Chapter 12. Security features of other Lotus products 551
12.3.2 Encrypting a mail file on a workstationWith Domino R5.09 or later it is possible to encrypt the iNotes mail file locally when the offline capabilties of iNotes are utilized. An encrypted mail file cannot be opened by others without authentication. Users can select simple, medium, or strong encryption for the offline mail file.
When selecting an encryption strength, consider the following:
� Simple encryption provides protection against casual snooping. It provides the fastest database access but is considered to be weak encryption.
� Medium encryption provides a balance between security and fast database access. This is likely the right encryption strength for most users.
� Strong encryption should be used when security requirements are paramount and the users feel that the resulting database access performance is acceptable.
To encrypt the mail file, select the Preferences menu from the iNotes interface. On the Other tab select “Encrypt mail file locally.” The mail file is then encrypted locally next time the local mail file is synchronized.
Users should understand that if they want to safeguard their offline mail by encrypting it, they must enable encryption before they create an offline copy of their mail. If they have already installed an offline copy of their mail, follow these steps:
1. Delete the offline copy using the Offline Sync Manager.
2. With iNotes Web Access, click Preferences - Other, then select “Encrypt local mail file.”
3. Click “Go Offline,” then select “Install Subscription” to reinstall the subscription (offline mail copy).
12.3.3 Security issues for users at a kiosk or in an Internet cafeiNotes Web Access lets you easily access your Notes mail, calendar, contacts, to do list, and notebook directly from anywhere either at a kiosk, in an Internet cafe, or from home.
Note: If the user does not see the “Encrypt mail file locally” option in the offline section, this feature may have been turned off by the administrator.
552 Lotus Security Handbook

The logout function in iNotes Web Access sends a logout command to the server to expire a session, if session authentication is being used. iNotes Web Access also closes the browser window to prevent another user from hitting the back button to view personal information from the previous screen. In addition to secure logout, iNotes Web Access does some sophisticated things with caching algorithms. This is to prevent the storage of information in the local browser cache in a format that someone could easily view.
It should be noted that the secure logout function does not clear the browser’s local cache. As Internet Explorer stores content in the browser’s cache, it is possible to access that information programmatically. iNotes Web Access is unable to delete those files for users; therefore, they must do it by themselves, or configure the browser to prevent the local storage of information (Temporary Internet files) after the session has terminated.
Deleting temporary Internet files automaticallyThere is an option to configure Internet Explorer to empty temporary Internet files automatically. This can be enabled in Internet Explorer 5.01 or above by making the following selections: Tools → Internet Options → Advanced tab and selecting the “Empty temporary Internet file folders when browser is closed” option.
12.3.4 Differences between iNotes Web Access and Notes securityMost of the Notes Client security features are also available for the iNotes Web Access user. However, there are some differences between Notes and iNotes security, specifically the following:
� iNotes does not support secret keys. If a Notes user ID already contains document keys, iNotes will decrypt the document. However, iNotes does not support the ability to create or import secret keys. If a user periodically receives messages that contain secret keys, the user needs to import the secret keys into their Notes user ID in Notes, then re-import the Notes user ID into iNotes.
� iNotes does not support new public keys.
� iNotes does not support requested name changes, nor is there the ability to change the default of “Auto Accept” of changes to the ID. If the Administrator has set Auto Accept of changes to ID file (name), there is no way in iNotes to override the auto accept as there is in Notes.
� In iNotes, cross-certificates are stored in the Domino Directory only.
� It is not possible to import a SmartCard-enabled Notes ID into iNotes.
Chapter 12. Security features of other Lotus products 553

12.3.5 Protection against malicious codeIn Notes client, the Execution Control List (ECL) is used to protect data on a user’s workstation. With the ECL it is possible to limit what can be done by formulas and scripts on a user’s workstation. For example, with a correctly set ECL, it is possible to prevent unauthorized code from accessing the file system, other Domino databases, and external code. For more information on ECLs, consult the Lotus Domino Administrator 6 Help.
It is possible to write code which could do damage on a user’s workstation and to attach that code to a mail message. Due to the nature of the Web client, there is no ECL available to protect the user’s machine against malicious code. Instead there is an iNotes Web Access active content filter whose purpose is to remove potentially malicious active content from the mail message before the message is delivered to the user. This filter will protect against the most common attacks. It is not designed, however, to protect against viruses, trojans, or other similar hostile code contained within attachments.
12.3.6 Client-side securityThis section describes some client-side (browser) security considerations when using iNotes Web Access.
CookiesA cookie, as we mentioned previously, is a method which is used to send session-based information from browser to server. Cookies normally contain information about the user or the user’s session, or both.
To have iNotes Web Access work properly, the browser has to allow cookies. iNotes Web Access uses one cookie with the name “Shimmer,” where all application settings are stored. This cookie is only retained in memory and never written to the user's workstation.
Tip: If the organization’s security policy requires it and it is possible to do from a security architecture point of view, providing the user’s machine with a personal firewall could be a useful additional step to improve security. At a minimum, an anti-viral program should be used to trap anything the execution control list cannot (resulting generally from a user overriding the warnings of the ECL).
554 Lotus Security Handbook
Private data and browser cacheiNotes Web Access makes a distinction between iNotes Web Access design elements and personal data, with respect to the browser’s cache. In general, the HTML in which generated personal data resides is set (using the Cache-Control HTTP response header) to a value of “no-cache”, which advises the browser that it should not store the page in the browser’s file-system cache. Design elements such as JavaScript, .gif files, and blank forms of iNotes Web Access are marked with a one-year expiration. This facilitates better performance for iNotes Web Access when used over a dial-up connection, since the browser will not attempt to download these design elements if they are already resident in the browser’s cache (assuming the browser’s setting for “Empty temporary Internet files when browser is closed” option is not set.)
One exception to this rule is that iNotes Web Access generates a .pdf file to print the user’s calendar. This .pdf file containing user data is specifically marked “private” and must be present in the cache in order for Adobe Acrobat to view it. This file is kept open for up to one minute following the close of the Adobe Acrobat Reader.
Moreover, because of an issue with Internet Explorer (see article ID: Q272359 on http://www.microsoft.com), iNotes Web Access sets Cache-Control to “none” for XML data returned when SSL is in use. This means that view data is left in the cache in this scenario. This XML data is the data used by views to show information.
Note that many browsers store both logon credentials and private data in memory, and these items are not reliably discarded until the browser is closed. For this reason, and as mentioned previously, iNotes Web Access provides a “Logout” button to close your entire browser session and discard the in-memory files. Users can also set their browser to delete all files from the Temporary Internet files folder when the browser window is closed. This would delete any code and data that may have been left in the cache.
EncryptioniNotes Web Access does not currently support reading and sending encrypted mail. When trying to read encrypted mail, you will see a message in place of the body of the message that indicates the mail has been encrypted and must be viewed using a Notes client.
iNotes Web Access also provides a user preference to set a “default copy and close” folder that will enable “one click” saving of mail messages into a folder, such as “read later with Notes,” to allow users to more effectively store these mail messages for subsequent review with the Notes client.
Chapter 12. Security features of other Lotus products 555
12.4 Lotus Workplace Lotus Workplace is the new offering from Lotus which embraces IBM’s e-business on demand strategy, which can be summed up in the following sentence:
An enterprise whose business processes — integrated end-to-end across the company and with key partners, suppliers and customers — can respond with speed to any customer demand, market opportunity, or external threat.
Lotus Workplace integrates multiple collaborative capabilities into a single secure, reliable, open platform that is easily managed. Lotus Workplace currently includes the following products, which are designed to be used in combination or separately to provide a unified collaborative environment to meet changing business needs:
� Lotus Workplace Messaging provides a cost-effective way to extend the reach of the existing messaging infrastructure to the rest of the organization and offers an affordable e-mail system for all employees. It offers an intuitive no-training user interface, as well as flexible client deployment options supporting portal or kiosk configurations, POP3, IMAP and Microsoft Outlook. Among the new features of this offering are: portlet-based user interface; integrated presence awareness and instant messaging; added printing features; end user features (for example, spell check, user preferences); user personalization through WebSphere member manager; and people finder.
� Lotus Workplace Team Collaboration provides self-service team workspaces and easy to use Web conferencing. Its goal is to help individuals, teams, and entire organizations, together with their customers, Business Partners, and suppliers, be better coordinated, better informed, and more resilient. This offering provides the following benefits: it increases productivity by connecting geographically dispersed teams; permits users to share documents; offers discussion forums; provides self-service membership controls; permits users to share presentations and meeting materials; offers presence awareness as well as instant messaging; and, finally, offers a people finder service.
� Lotus Workplace Web Content Management provides content publishing and authoring for non-technical users, in that it offers an easy way to create, manage, and publish content for an organization's Web sites. It helps resolve IT and webmaster bottlenecks by placing content creation and management in the hands of content experts for author once, publish everywhere control, reducing development and implementation time. Specifically, it provides: collaborative content creation, content management (simple to complex content), and content delivery.
� Lotus Workplace Collaborative Learning provides learning management as well as course scheduling, enrollment, and tracking. In short, it provides
556 Lotus Security Handbook

just-in-time learning and helps streamline training programs and training requirements. It allows customers to manage their entire training program, both physical classroom and e-learning based, from a single platform.
The whole Lotus Workplace architecture is best summarized in Figure 12-4, which shows all of the elements of the architecture.
Figure 12-4 Lotus Workplace architecture
Securing the Workplace architecture implies applying the security of the elements discussed in other sections of this redbook. Thus, securing this environment requires only that the security approach, methods, and recommendations outlined in the previous and subsequent sections of this book be applied.
For Workplace Messaging, the security principles, methodologies, and recommendations for Notes/Domino messaging as well as iNotes Web Access should be applied, including the WebSphere portal recommendations, which follow.
For Workplace Team Collaboration, the security principles, methodologies, and recommendations for QuickPlace and Sametime should be applied, including the WebSphere portal recommendations which follow.
Chapter 12. Security features of other Lotus products 557
12.5 IBM WebSphere PortalIBM WebSphere Portal is a comprehensive portal offering from IBM for creating successful business-to-employee (B2E), business-to-business (B2B) and business-to-consumer (B2C) portals. Many companies that have traditionally utilized the collaboration capabilities of the Lotus brand of products are now moving to the WebSphere Portal framework, which seamlessly integrates with Lotus collaborative technologies. Therefore, it is important that any Lotus technologist striving to understand Lotus product security also be intimately familiar with WebSphere Portal security concepts and considerations.
12.5.1 AuthenticationWithin the Portal Server, the security subsystem controls access to portal resources, such as themes and portlets. Authentication is one of the security component. Users can identify themselves immediately upon entry to the system or can be challenged later for authentication by the system when they attempt to access a protected resource. WebSphere Portal Server uses the IBM WebSphere Application Server for authentication. Third-party authentication proxies are also supported with the appropriate Trust Association Interceptor (TAI).
WebSphere Application Server supports authentication using a Lightweight Directory Access Protocol (LDAP) directory or an implementation of a CustomRegistry interface to access non-LDAP user registries. The WebSphere Application Server also supports third-party authentication using Trust Association Interceptors (TAIs) for Netegrity SiteMinder, Tivoli Policy Director, and Tivoli Access Manager, as well as third-party authentication using custom user registries that are plugged in to WebSphere Application Server authentication. Furthermore, WebSphere Application Server can support single sign-on with Domino servers, other WebSphere Application Servers in the same domain, Tivoli Access Director, and Policy Director WebSEAL.
WebSphere Portal Server uses the Custom Form-based Authentication mechanism of WebSphere Application Server to prompt users for identity, unless the system is configured for third-party authentication.
In the former configuration, WebSphere Application Server security is activated, and the /wps/myportal URL is protected within WebSphere Application Server, with a setting of “All Authenticated Users” and a challenge mechanism of “Custom Form-Based Challenge.”
These settings cause WebSphere Application Server to redirect any unauthenticated user requests to the login form where the user can enter an identity and password to access the Portal Server.
558 Lotus Security Handbook
It is possible to configure Application Server to use one of several user registries to verify this identity: an internal WPS database, a directory service (such as an LDAP directory), or some other user registry via a CustomRegistry implementation.
When a third-party authentication provider is configured, such as Policy Director WebSEAL, then that third-party authentication provider determines the challenge mechanism and how it does its own authentication. WebSphere Application Server and Portal Server then trust that authentication through the use of TAIs.
Portal Server authentication in a developer installationThe development installation is the only configuration that does not use WebSphere Application Server or a third-party authentication proxy to verify proof of identity. The development installation does not activate WebSphere Application Server’s Global Security, nor does it protect the /wps/myportal entry point in the WebSphere Application Server. This model relies on Portal Server to authenticate using the Portal Server database. Portal Server saves user identification and preferences to its database tables and verifies identity in this database during login. This configuration assumes a single machine set up in a development or demonstration environment only.
Using third-party authentication proxiesRather than use WebSphere Application Server authentication support, it is possible to configure a third-party authentication server such as Policy Director WebSEAL. If a third-party authentication server is used, WebSphere Application Server typically uses a trust association interceptor (TAI) to trust the external authentication proxy and set up its security context. The exception is if the third-party authentication proxy or server has been configured to provide native WebSphere Application Server identity tokens, such as an LTPA token. Currently, only Policy Director WebSEAL has this capability.
A trust association interceptor is a WebSphere Application Server function activated through the Security Center of WebSphere Application Server's Administrative Console and configured through trustedservers.properties.
Whenever a request attempts to access a secured resource, WebSphere Application Server invokes the TAI, which is asked to validate that the request is legitimate, meaning that it is received through a legitimate third-party authentication proxy, and to return that user's authenticated identity. The TAI should return either a Distinguished Name (DN) or a shortname. WebSphere Application Server then performs a registry lookup to verify the Distinguished Name or convert the shortname to a Distinguished Name before searching for group memberships for that user. It is important to understand that the Distinguished Name lookup must not fail, otherwise the WebSphere Application Server will refuse to trust the identity. If the registry lookup is a success,
Chapter 12. Security features of other Lotus products 559

WebSphere Application Server generates an LTPA token for that user and stores it as a cookie for subsequent authentication during the user's session.
The WebSphere Application Server packages TAIs for Tivoli Access Manager and Tivoli Policy Director. The WebSphere Portal Server packages a TAI for SiteMinder, so either TAI can be integrated as an alternate authentication service for Portal Server.
TAIs are used for authentication purposes only. In this scenario, the authentication proxy determines the challenge mechanism, and Portal Server relies on the authentication proxy to relay success or failure of the user identifier via the TAI or via the LTPA token. WebSphere Application Server sees all requests as authenticated, but WebSphere Application Server and Portal Server still perform a user and group lookup. Even if the authentication proxy has successfully authenticated the user, WebSphere Application Server and WebSphere Portal Server deny access if they are not able to achieve a successful query of the user’s credentials in the registry.
TAIs can also be written to allow other custom authentication services to interact with WebSphere Application Server. If you choose to use a security configuration other than SiteMinder or Tivoli Access Manager, you must provide and implement a TAI to communicate with the authentication proxy.
User repositories and authenticationThe WebSphere Portal server supports either an internal Portal Server database, an LDAP directory, or a custom registry to be used as the authentication registry (for user ID and password). The WebSphere Application Server must use a CustomRegistry to access a database or a custom registry. In the LDAP or custom registry configurations, the WebSphere Portal Server shares the same authentication registry as the WebSphere Application Server, while having a separate database for user profiles and preferences.
The user profile and preference information is referred to as user repository information to differentiate it from user registry information. Some profile information may also be stored in the same physical store as the user registry. For example, an LDAP directory may contain much more information about each user than just the name and password. The Member Services component in Portal Server, which handles such profile information, can be configured for different layouts of data in the user registry and database.
When a user logs in, WebSphere Application Server performs an authentication. This authentication may be performed against an external user registry such as an existing LDAP directory, or to a Portal-specific user registry that is supported via the WebSphere Portal Server, which provides the Customer User Registry (CUR) feature. However, the Member Services component also checks the
560 Lotus Security Handbook
database to ensure portal membership. If the user is not found in the authentication registry, authentication fails. If the user is found in the authentication registry, but not in the member database, the user is denied access to the portal. Both lookups must succeed for the user to successfully log in to WebSphere Portal Server.
Single sign-onSingle sign-on support in WebSphere Portal Server provides a mechanism that assists a portlet in retrieving one of several representations of a user's authenticated identity, which the portlet can then pass to a back-end application.
This is akin to WebSphere Portal Server and the portlet both acting as authentication proxies to the back-end application. Using single sign-on, a user can authenticate once when logging into the WebSphere Portal Server, and thereafter the user's identity is passed on to applications without requiring additional identity verification for the user. WebSphere Portal Server supports single sign-on through WebSphere Application Server as well as other authentication proxies, such as Tivoli Access Manager and SiteMinder. It also leverages the single sign-on capabilities between WebSphere Application Server and Domino.
Single sign-on with the WebSphere Portal Server has two levels. The first is a Credential Service, which encapsulates the functionality of single sign-on for the portlet writer in an object provided by the Service and for which sample code exists to make these objects easy to use and code with for the portlet writer. The second level is more flexible, but requires portlet writers to directly utilize the single sign-on functions of the WebSphere Portal Server and manage their own connections and authentication to back-end applications.
The single sign-on functions of Portal Server utilize a subset of Java Authentication and Authorization Services (JAAS). The subset is the authentication portion. WebSphere Portal Server does not support true JAAS authorization. WebSphere Portal Server builds a JAAS Subject for each user that is logged on. The Subject consists of Principals and Credentials. A Principal is a piece of data, such as the user ID or user's DN, that gives the identity of the Subject. A Credential is a piece of data, such as a password or a CORBA Credential, that can be used to authenticate as a subject. The Subject carries around the Principals and Credentials that can be used by the portlet directly or via the credential service.
Credential ServiceCredential Service objects exist to handle basic authentication, LTPA token authentication, and simple form-based user ID/password login challenges.
Chapter 12. Security features of other Lotus products 561
Credentials can take their input identity from the JAAS Subject Principals, from the portlet configuration, or from the credential vault service. Portlet writers can use the Credential Service to retrieve credentials from the Credential vault or the JAAS Subject. Credential Service objects can also be used to pass Tivoli Access Manager or SiteMinder single sign-on tokens from the JAAS subject to the back-end application in the appropriate headers.
Credential VaultThe Credential Vault is a portal service that aims to assist portlets and portal users in managing multiple identities. The Credential Vault stores credentials that allow portlets to log into applications outside the portal's realm on behalf of the user.
The WebSphere Portal Server provides one simple database vault implementation for mappings to secrets for other enterprise applications. The Default Vault comes pre-configured with an administrator-managed vault segment and a user-managed vault segment. The user-managed vault allows users to add application definitions, such as a POP3 mail account, under the user vault and store a mapping there. Administrator-managed vaults allow users to update mappings; however, users may not add new applications to this vault. By default, the default vault loads an encryption exit which encodes the passwords using base64.
It is possible to plug in additional administrator-managed vaults by writing a custom Vault Adapter for the specific vault. This should be done by editing the comments in this configuration file to specify Vault Adapter Implementations:
was_root/lib/app/config/services/VaultServices.properties
Note that plugged in vaults can be managed only by an administrator. After the vault has been plugged in, the portal should be restarted, and a Vault Segment added to the vault using the Credential Vault portlet.
WebSphere Portal Server also supports the storage and retrieval of credentials from other vault services, such as Tivoli Access Manager. Portal Server ships a vault adapter plug-in for Tivoli Access Manager, which works on AIX, Solaris, and Windows. See the appropriate product documentation for information on installing the plug-in. For details on working with vaults, see Credential Vault help.
12.5.2 AuthorizationAdministrators configure access to portal resources throughout the portal by granting permissions to users and groups using the Access Control List portlet.
562 Lotus Security Handbook
Authorization is independent of Application Server or any custom authentication proxy. Application Server protects servlets and Enterprise Java Beans (EJBs). However, WebSphere Portal Server protects all internal portal resources, such as pages, places, and portlets. WebSphere Portal Server can also pass control of resources to and from external security mechanisms, if desired.
WebSphere Portal Server does its own authorization, but it can also integrate with Tivoli Access Manager or SiteMinder to place portal resources under the control of these external security managers.
WebSphere Portal Server supports fine-grained access control over resources. During customization, users are allowed to select and view only those resources for which they have access rights. When rendering a resource, the framework verifies that the user has appropriate rights to use the requested resource. In most cases, access rights are administered through the Access Control List portlet and stored in the portal's administration database. However, it is possible to also configure an external security service, such as Tivoli Access Manager or Netegrity SiteMinder, to protect resources.
As mentioned previously, authorization is also referred to as “access control.” The Access Control List (ACL) portlet makes it possible to configure access to portal resources throughout the portal by granting permissions to users and groups. See the WebSphere Portal Server product documentation for information on managing users and groups. The Access Control List portlet also passes control of resources to and from external security mechanisms, if desired.
Before a user can be authorized to access a resource, a successful authentication must have occurred. Other than the requirement for a successful authentication, authorization is independent of WebSphere Application Server or any custom authentication proxy. WebSphere Application Server protects servlets and EJBs. However, WebSphere Portal Server protects all internal portal resources, such as pages, places, and portlets. Group memberships may give the required permissions to access an object or perform a request, but access control can also be controlled on individual users. Although J2EE roles are not supported in WebSphere Portal Server, user groups can sometimes approximate that function.
Access Control List portletThe Access Control List portlet is the interface that makes it possible to control access rights for portal resources. It is possible to search for a user or group and limit the search to a specific resource type, name, or modification date, or it is possible to choose to display all resources available to a user or group. The Access Control List portlet also makes it possible to move resources to and from
Chapter 12. Security features of other Lotus products 563
external control. See the WebSphere Portal Server product documentation and Help files for detailed instructions on using this portlet.
Access rightsThere are five simple permissions that can be assigned to resources. One of these, DELEGATE, is the permission that permits an authorized person to change access controls. The others are: VIEW, EDIT, MANAGE, and CREATE. For more complete information about these permissions, and for examples of how each permission limits control to a resource, see the WebSphere Application Server documentation. Some particularly important access rights topics are covered here.
DELEGATE permissionsDELEGATE permission is required for an administrator or subadministrator. A user, or group of users, with DELEGATE permission for a resource, such as a portlet or place, can grant users permission for that resource. Users may only grant the same level or a lower of permission (VIEW, EDIT, MANAGE, CREATE) for a resource that they themselves have for that resource. DELEGATE permission does not imply other access rights. Users with DELEGATE cannot assign a permission higher than they hold. For example, if Sandy has EDIT and DELEGATE on the Financial page and DELEGATE on the user group of which Fred is a member, then Sandy can assign VIEW or EDIT permissions for the Financial page to Fred or any other user in the same group as Fred. However, Sandy cannot assign MANAGE for that page because Sandy herself does not have MANAGE permission for that page.
Access levelsNewly created resources have a very specific initial access control state. Only the user who created the resource has any permissions for that resource. Likewise, the creator always has MANAGE and DELEGATE permissions for the new resource. If the creator also has access to the Access Control List portlet, that user can then grant other users access to that portlet within the restrictions discussed in the previous section. Portal administrators can also see the new resource and, if necessary, can grant themselves permissions which then allow them to share that resource with other users. Users must have the appropriate active or current minimum permission to access a resource. Active permissions can be inherited from the groups to which a user or user group belongs. Current
Note: When giving a user permission to deploy portlets, ensure that the user is also in the WebSphere Application Server Administrative Role. It is possible to add the user to a group that is in the Administrative Role, or it is possible to add the user to this role under Security Center in the Administration Console for Application Server.
564 Lotus Security Handbook
minimum permissions are granted to a user by name rather than group membership.
Initial access control settingsThe Access Control List portlet defines access rights after the portal is running. However, during WebSphere Portal Server installation, initial access rights are assigned for the portal administrator and several user groups. Unless a new portal administrator name and password was created during installation, the default portal administrator is wpsadmin in the user group wpsadmins.
If the Standard installation was selected and then the LDAP settings were customized, it is then possible to substitute another user for the wpsadmin user. However, that user must have a password and exist in LDAP prior to the installation. The wpsadmins user group can also be changed if the group to be substituted already exists in LDAP. If a decision is made to change the administrator or administrators user group, it is necessary to choose the Standard installation option and then choose to customize your LDAP settings and supply the necessary user and user group information when prompted by Setup Manager. When the database is first initialized, permissions for the portal administrator and administrator group are set to MANAGE PORTAL, giving these users full control over the portal.
WebSphere Portal Server also configures permissions defined in a portal configuration XML file for initial portal use. The portal administrator and administrator group have MANAGE and DELEGATE on all configured portal resources. VIEW access is set for all authenticated users. Anonymous users have VIEW access to any resource that is part of the Welcome page. It is possible to modify these access rights or assign new access rights using the Access Control List portlet.
SubadministratorsTo grant access to a resource to a user, it is necessary to have DELEGATE access rights for the resource and DELEGATE access rights for the user or for the user group of which the user is a member. Portal Server supports unlimited levels of delegation. For example, administrators can create an unlimited number of subadministrators who can also create an unlimited number of sub-subadministrators.
External security managersWebSphere Portal Server gives you the ability to move the access control for resource instances, such as specific portlets, to an external security manager. At
Note: The portal administrator and administrator group do not have MANAGE access for users or groups by default.
Chapter 12. Security features of other Lotus products 565
this time, WebSphere Portal Server supports only two external security managers: Tivoli Access Manager or Netegrity SiteMinder.
By default, portal resources are created with their security controlled internally by WebSphere Portal Server. For example, when a page is created in Work with pages, its initial ACL state for the creator is MANAGE and DELEGATE in the internal ACL database table. If an external security manager is configured and the page creator has appropriate permissions, the page creator can then use the Access Control List portlet to move control of that resource to an external security store. Permission to update the external store is granted by the external store by a mapping for a specific resource, EXTERNAL_ACL with MANAGE and DELEGATE permissions. Objects may also be moved back to internal control. However, any access rights assigned externally are reset and only the user who moved the objects has MANAGE and DELEGATE permissions.
When an object is moved to an external security manager, the access control for that object is administered only through the external security manager interface. The Access Control List portlet can no longer be used to administer security for the object. However, the Access Control List portlet can move the object back to internal control if the right permissions, specifically MANAGE and DELEGATE, exist in external security manager. Only the Access Control List portlet can return an object to internal control.
In addition, the decision to use an external security manager must be made with the understanding that the external security manager software's ACL semantics override normal portal semantics. For example, when granting anonymous user permissions on an externally controlled portlet using Tivoli Access Manager, the ACL for that portlet must be set to include the Tivoli Access Manager unauthenticated user group.
See the WebSphere Portal Server documentation for information on configuring WebSphere Portal Server resources to be moved to external control.
Permission mappingsPortal objects, when moved externally, are represented in the name space of the external security manager. Permissions are mapped into the external security manager permission model. See the WebSphere Portal Server documentation for more information on permission mapping for TAM and SiteMinder
Setting up SSLAs mentioned many times throughout this redbook, Secure Sockets Layer (SSL) provides a secure connection between a client and server. With SSL enabled, data transfers are encrypted for security. This section describes the overall tasks required to set up SSL on the portal server. Some of these tasks are performed for WebSphere Application Server and the Web server. The steps are
566 Lotus Security Handbook

summarized here; it is recommended that the related product documentation be consulted to obtain more detailed steps. The steps that are unique to WebSphere Portal are described here in detail. After completing these steps, all requests, starting with the portal login, are encrypted.
First, it is necessary to configure the Web server to support HTTPS. If this is a production environment, you need to obtain a certificate from a Certificate Authority (CA). For testing purposes, it is possible to use IKEYMAN to generate a self-signed certificate.
In configurations where the Web server and portal server reside on separate machines, requests that enter the Web server have to be rerouted to the application server. Under these circumstances, you must also configure SSL between the Web server and the application server to provide more complete security. This requires that another keyfile be created for the Web server plug-in and another keyfile using ikeyman be provided for the embedded HTTPD of the WebSphere Application Server.
For complete instructions for this step, refer to “Configuring SSL between Web server and WebSphere Application Server” in the IBM Redbook, IBM WebSphere V4.0 Advanced Edition Security, SG24-6520.
12.5.3 Changing passwordsPasswords provide an additional level of security in the portal environment. Any default passwords that are accepted during installation must be changed immediately to ensure security.
If Setup Manager is used to create users, such as the DB2 database administrator, the passwords for those user IDs are configured to expire in 42 days. The passwords should be changed after the installation has been completed.
During installation, Setup Manager allows the selection of a user ID and password to be selected for the portal administrator. If the default portal administrator user ID and password assigned by Setup Manager is accepted, it is important that both the wpsbind and wpsadmin passwords be changed in the Administrative Console to prevent unauthorized access to WebSphere Portal Server.
Chapter 12. Security features of other Lotus products 567
12.5.4 Securing installation and configuration informationIt is important to secure the install.log file and the contents of the wps_root/install directory. During installation, WebSphere Portal Server encrypts the database and LDAP administrative passwords and stores them in the following XML file:
AppServer_home/lib/app/xml/wms.xml
Here AppServer_home is the path of the Application Server. If the database or LDAP password is changed after installation, it is necessary to change the Member Services password so that it can continue to access the user registry. It is also necessary to generate an encrypted password and replace the encrypted passwords in was_root/lib/app/xml/wms.xml.
12.5.5 Member ServicesMember Services is a component of WebSphere Portal Server that manages data for users and groups of users. It keeps track of the overall attribute set of the users and groups within the system and the values of those attributes for individual users and groups. Member Services does not assign particular roles to its members. Members can take on different roles depending on the activities in which they choose to participate. Member Services allows users to be assigned to access groups, such as generic or registered, with specific permissions for access control purposes. Member Services also allows for the creation and use of member groups for calculating which content to display to users.
The following features are associated with Member Services:
� Profile management: An administrator manages user profiles and data using the Manage Users portlet.
� User repository: The user repository is a collection of profile data for users, user groups, and organizational entities. A registered user can select a user ID and password. The data in the registry can be configured for storage in a database or a directory server. See the WebSphere Portal Server product documentation for detailed information.
� Group membership: Member Services manages the group memberships of users in Portal Server. Membership in a group can be used when making Access Control decisions or other portal functionality.
Member typesMember Services supports two types of members:
� Generic users: Generic users are those users who interact with a site, yet the functions they perform do not require the system to uniquely identify them. For instance, in a commerce-related site, there can be many shoppers who are browsing product catalogs but not registering, not buying anything, and
568 Lotus Security Handbook

not putting anything into their shopping carts. The system has no need to uniquely identify such users, so all these users can share a common identity, the generic user, within the system. This member category saves on system resources.
� Registered users: After registering with the system, a user becomes a registered user. A registered user has a user ID and password stored in the user registry. The system may also request profile information from a registered user. Registered users have their preferences saved, so they may close their browser sessions and subsequently return to the site and see the Portal Server displayed with the same preferences and customization as before.
Member groupsA member group is an arbitrary collection of members, which typically consists of users who share a common interest or represent assigned roles. It is possible to use the Manage Groups portlet to create groups.
It is possible to explicitly assign or unassign users and member groups to or from another member group. Nested member groups are also supported. The user registry, either LDAP or database depending on the configuration chosen at installation time, holds member group data. Member Services queries the LDAP server or database as appropriate when searching for membership within a member group.
User repositoryThe user repository refers to the data store that holds the member profile data, which excludes authentication data, and non-registry groups. A basic user profile incorporates registration information, address, purchase history, and other miscellaneous attributes, such as news topics of interest, color preferences and more. Attributes in the profile can be multi-valued and easily set and retrieved.
For example, an employee member profile may also contain employee number, job title, and a link to the business organization to which the user belongs. It is possible to initiate basic find operations based on the attribute values.
Either a database or a directory server usually serves as a user repository. Custom options can also be defined. Profile data is typically stored in the WebSphere Portal Server database tables. When LDAP is used as the repository, the profile data is first stored in the directory server using standard object classes. Depending on the configuration, profile data that is a superset of the LDAP object classes may be stored in a database.
Chapter 12. Security features of other Lotus products 569
AuthenticationMember Services must access the user's authentication and registry group information from the Authentication component. The authentication registry refers to the data store for user authentication data and registry groups. Group information used to configure authorization is considered privileged information, and the groups are registry groups.
Typically, the authentication registry is LDAP or a database. However, the authentication registry can be a custom data store that is unknown to Member Services. Member Services does not support a Local Operating System as the authentication registry. The authentication registry is specified in WebSphere Portal Server during installation and is recorded in the following XML file:
<was_root>/lib/app/wms.xml
WebSphere Portal Server always uses WebSphere Application Server for authentication. However, WebSphere Application Server must be configured to communicate with the appropriate registry type.
Changing Member Services passwordIf the database or LDAP password is changed after installation, it is also necessary to change the Member Services password so that it can continue to access the user registry. An encrypted password must be generated and must replace the encrypted passwords.
Configuring Member ServicesDuring installation, Portal Server generates the configuration parameters for Member Services and stores them in the following XML file:
<was_root>/lib/app/xml/wms.xml
It is possible to manually edit this file to modify the initial configuration settings.
The Portal Server repository consists of either one or two data sources: a standalone database, or a combination of a database and a directory server. This directory server might be accessible only through some CustomRegistry. The configuration of the data sources is contained in the following XML file:
<was_root>/lib/app/xml/wms.xml
Mapping of user profile attributes to LDAP object classes is defined in the following XML file:
<wp_root>/wms/xml/attributeMap.xml
These files specify the names of the various data repositories, their implementation classes, and the mapping between attributes in the user object
570 Lotus Security Handbook
and the repository. By default, the mapping to the LDAP directory is based on the inetOrgPerson schema supported by most LDAP directories.
For information on the entries in the wms.xml configuration file for Member Services, see the WebSphere Portal Server documentation. Note that the whole <DIRECTORY.../> stanza is consulted only when Member Services is configured to use a directory.
Mapping LDAP attributesMember Services maps from attribute names that are exposed to Java objects representing the users to the underlying data store attributes. When the underlying registry is LDAP, member attributes are mapped to LDAP attributes through the use of the following XML file:
<wp_root>/wms/xml/AttributeMap.xml
Some LDAP attributes do not have corresponding member attributes and are not exposed to the Java objects by default, while other attributes of the Java object may map to a database instead of LDAP.
It is possible to add or delete attributes as required by the configuration, either by exposing additional attributes from the underlying LDAP data store that are not currently exposed or by extending the attribute set to include new attributes. Exposing LDAP attributes is done simply by adding a new mapping in the attributeMap.xml file. Expanding the user profile to include new attributes is more involved: the database tables that define the attribute set must be changed to include the new attribute definitions.
Nested groupsPortal Server supports nested groups to enable simple inheritance of access control. Two groups are nested if one of the groups contains the other group as a member. WebSphere Portal Server's access control system treats this as though all members of the contained group are also members of the containing group. In other words, Portal Server treats permissions for nested groups as cumulative. For example, one group, GlobalMarketing contains another group, USMarketing. Portal Server treats this as though all members of USMarketing are also members of GlobalMarketing. Members of USMarketing inherit the access rights granted to GlobalMarketing members. Therefore, if GlobalMarketing has view access to the File Server portlet, and USMarketing has view access to the World Clock portlet, USMarketing has view access to both the File Server and World Clock portlets. Specifically, Fred in GlobalMarketing can only access the File Server portlet, but Sandy in USMarketing can access the File Server portlet and the World Clock portlet.
Chapter 12. Security features of other Lotus products 571
Using Tivoli Access Manager to manage usersWebSphere Portal provides three ways of creating new users. Two are within the portal runtime:
� Self registration allows anonymous users to create their own user account for the portal
� The User/Group Manager Portlet allows Portal Administrators to create new user accounts.
� Prior to installation, the LDIF file containing the administrative users is imported directly into the LDAP Directory.
When using Tivoli Access Manager as the External Security Manager, creation of users through WebSphere Portal or through LDIF import may cause two problems:
� It may be against a company's guidelines to allow a new user account to be created without proper authorization or without going through the proper process.
� Users and groups created in WebSphere Portal Server cannot be authenticated by the Tivoli Access Manager login module (see portallogin.config) at login time, and thus, the user's login attempt will fail.
To solve the second problem, it is possible to simply import the user into Tivoli Access Manager by entering the following at a TAM command line:
pdadmin> user import wpsadmin uid=wpsadmin,cn=users,dc=yourco,dc=compdadmin> user modify wpsadmin account-valid yes
Often, users are created in a Tivoli Access Manager environment through some provisioning process that is outside of WebSphere Portal. In this case, portal user creation functions should be disabled in this environment. See the WebSphere Portal Server documentation for information on how to ensure that users are not created through WebSphere Portal interfaces.
Changing the login page By default, when unauthenticated users attempt to access /wps/myportal, they get redirected to the login screen located at /wps/portal/.scr/Login to provide username and password. When using WEBSEAL to authenticate using a TAI, you no longer need to use the Portal Server login screen. Instead the login icon should point to the /wps/myportal page.
WebSphere Portal Server offers centralized administration of users and user groups, which makes it easier to better define portal users and manage user access rights. Users can register and manage their own account information, or an administrator can provision and manage users. Group memberships give the required permissions to access an object or perform a request.
572 Lotus Security Handbook
Customize common name generationAfter installation, it is possible to change the order of common names generated by WebSphere Portal Server. The default, WebSphere Portal Server generates common names that consists of the user's first name followed by the last name. It is possible to change this order by editing the following line in the was_root\lib\app\config\puma.properties file:
puma.commonname = {0} {1}
where {0} represents the first name and {1} represents the last name. In this pattern, the numeric values of {0} and {1} represent firstname+" "+lastname. The user's first name always replaces the {0}, and the last name always replaces {1}. To generate names that consist of the last name followed by the first name, it is necessary to change the line to read puma.commonname = {1} {0}.
User and group managementWebSphere Portal Server provides a portlet for managing users and groups. For details on how to use the portlet, see the portlet online Help files.
Subscriber managementWebSphere Portal Server provides registration and self-care processes for subscriber management. Registration allows users to register for access to the portal, and information entered during registration can be modified during self-care.
RegistrationDuring registration, the user enters mandatory data, such as the user ID and first and last names. The user optionally selects the preferred language from a list of available languages. The portal uses this language in all interactions and makes this information available to all portlets so that they can adapt to the user preference. The user optionally selects an interest, and this is used by the WebSphere Portal content publishing sample portlet to customize the displayed content.
The registration process of Portal Server uses turbine actions to allow the user to register for access to the portal. The configuration file Puma.properties is used by the registration process of the Registration Servlet. The key puma.UserValidator is used to specify the class that checks user information.
The following Java Server Pages (JSPs) are used during the registration process:
� UserProfileForm.jsp is used to enter or reenter user information such as personal data.
� UserProfileConf.jsp is used to review user information such as personal data.
Chapter 12. Security features of other Lotus products 573

� Congrats.jsp confirms that the user is registered in the portal.
� RegistrationError.jsp is displayed if an error occurs.
Creating new attributes for the Registration JSPsThe Registration JSPs of WebSphere Portal Server can be expanded for anyone’s requirements by adding new attributes to them, such as attributes for creating new information input fields. When adding an attribute to the JSPs, a name such as wps.Name should be used, where Name represents the name one wishes to specify. If the attribute Name already exists in the inetOrgPerson user schema in the LDAP directory, as mapped by the attributeMap.xml discussed above, the value the user enters will be written to the LDAP directory. Otherwise, the attribute name and value will be stored in the Portal Server database, where the following limitations apply: the name cannot be longer than 64 characters and the value cannot be longer than 255 characters.
Self-careThe user uses the Self-care process to change mandatory and optional information entered by the user during registration, with the exception of the user ID. The self-care process of Portal Server uses turbine actions to allow the user to edit the account information. The file Puma.properties is used by the self-care process of the Registration Servlet. The key puma.UserValidator is used to specify the class that checks user information.
The following JSPs are used during the self-care process:
� UserProfileForm.jsp is used to change the personal data of a valid user. It is also used to reenter personal data in the event of an error. When an authorized user requests this page, the user ID is used by the servlet to retrieve the personal data and display it in the form.
� UserProfileConf.jsp is used to review personal data. Click Continue to update the user data with the new information. Click Cancel to return to the UserProfileForm.jsp to reenter the data.
� RegistrationError.jsp is displayed if an error occurs.
12.6 Domino Everyplace AccessThe Domino Everyplace Access server (DEAS) is a Domino HTTP servlet. It handles communications between Domino servers and Mobile Notes™ clients, allowing users to securely access their Notes/Domino e-mail, calendar, and Domino directory. DEAS provides wireless access to a user's mail, calendar, and Domino directories from any WAP 1.1-based micro-browser device.
574 Lotus Security Handbook
The Domino Everyplace Access server acts as a proxy for handling communications between Domino servers and mobile devices. The software accepts HTTP requests and returns responses to the micro-browser in WML. Domino Everyplace Access server returns responses based on a subset of the forms and views used to display messages, calendar, and directory information in Notes. When accessing Domino applications, DEAS acts as a transport mechanism for any Domino application that has already been written in WML.
Multiple domain considerationsIf the DEAS server and mail server are in different domains, one must have Manager access to the Domino databases that users access. For example, if users want to delete entries in their mail databases using their mobile devices, the DEAS server must have Manager access with Delete privileges in those mail databases. Otherwise the “localdomainserver” entry in the mail file is sufficient.
Domino Everyplace access controlIt is possible to control access to the server by:
� Requiring all users to log on and use a password
To start a session, users must log on to the wireless device by using their unique username and password. They can use either their full Notes name or for convenience in typing, they can use a short name. The password is created and maintained in the Internet password field in the Person document.
� Permitting access to only specific WAP gateway IP addresses, or by restricting access to specific WAP gateway IP addresses, or both
By default, any Web browser can attempt to access the DEAS. It is possible to control which service provider can gain access by listing the WAP gateway IP addresses that are allowed access in the Server document. If no WAP gateway IP addresses are listed, then all IP addresses have access by default. It is possible to specify the IP addresses that are allowed access in the “Permitted WAP gateway IP Addresses” field. The IP addresses should be specified for those who have restricted access in the “Restricted WAP gateway IP Addresses” field.
� Requiring device registration (Phone.com only)
For organizations using Phone.com browsers, it is possible to require that the devices be registered. If you indicate that devices must be registered in the Server document, it is possible to then either assign a device to an individual by modifying their Person document, or it is possible to declare it as a shared device so that it can be used by multiple people. Either way, the device must be listed, or access will be denied.
Chapter 12. Security features of other Lotus products 575
� Denying specific devices (Phone.com only)
When a device attempts to connect to the Access server or to use an application such as calendar, mail, or the address book, the server checks the Deny Device list. If the Device ID is in the list, it is denied access to the server and the user will keep getting a login prompt. If the user is already logged in when the deny list is edited, they won't be denied access until the current session times out or otherwise ends.
12.7 Sametime EveryplaceSametime Everyplace (STEP) extends the capabilities of Sametime to WAP-enabled devices such as mobile phones. It allows mobile users to chat with other Sametime users from their mobile phone, whether they are using mobile devices or Sametime Connect from their desktop.
The following components are necessary to use Sametime Everyplace:
� A wireless device that supports WAP 1.1
� A Web browser with Internet access, such as Notes; Netscape 4.5 or greater (except 4.7); or Microsoft Internet Explorer 4.01 Service Pack 2 or greater
� Access to a commercial wireless data service
STEP works with any mobile device using a WAP 1.1 browser. The device is connected to the Web via a service provider. Users set a bookmark on that device pointing to the STEP server.
STEP authenticationOnce the STEP server is contacted, it authenticates the user by making a call to Sametime. STEP calls the Sametime server to authenticate users. The Sametime server contains two databases, a Secrets database (STAUTHS.NSF) and a Tokens database (STAUTHT.NSF) that are used to authenticate STEP and Sametime users.
STEP must have access to the organization's address book to look up Sametime users. STEP must be able to route e-mail to and from the organization's address book properly.
Note: This feature is important if there are devices that are no longer used by the organization, but that are still in service.
Note: Netscape 4.7 and Netscape 6.0 are not supported at this time.
576 Lotus Security Handbook

STEP and firewallsSTEP can be installed on the same server as Sametime or on a different server. However, STEP must be installed outside your organization's firewall. For extra protection, it is possible to install the STEP server in a zone between two firewalls, one between the STEP server and the rest of the organization, the other between the STEP server and the Internet.
If the Sametime server is inside the organization's firewall, it is necessary to either move it outside the firewall, or to use a separate server for STEP. STEP must be installed on a Domino server, so if Sametime is not on a Domino server, you must use a separate server for STEP.
If STEP is on a different server than Sametime it is necessary to create a local replica of the Secrets database (STAUTHS.NSF) and the Tokens database (STAUTHT.NSF) on the STEP server.
STEP and multiple Domino domainsIf STEP is placed on a separate server from Sametime, you must next decide whether it should be in the same Domino domain. It may be wise to put the STEP server in a different Domino domain so that there is another level of separation between the Sametime server and the outside world.
If STEP is in a separate domain from the Sametime and mail servers, the following steps must be undertaken:
1. Cross-certify the STEP server with the Sametime server.
2. Create a connection document between the STEP server and the Sametime server.
3. Enable Directory Assistance so the STEP server can find your organization's address book.
12.8 ConclusionThis completes our discussion on the security features of Lotus products other than Notes and Domino. We provided an overview of these other members of the Lotus software family of collaborative products, the security mechanisms they offer, and the best manner to configure them securely.
In this chapter, we covered the following collaborative products:
� Lotus Team Workplace (QuickPlace)
� Lotus Web Conferencing and Instant Messaging (Sametime)
� Lotus Domino Web Access (iNotes)
Chapter 12. Security features of other Lotus products 577
� Lotus Workplace Messaging
� WebSphere Portal Server
� Lotus Domino Everyplace
� Lotus Sametime Everyplace
Since these products are used at times in conjunction with Notes and Domino, we have identified the intersection points and how to ensure that security is maintained between the applications, and Notes and Domino.
578 Lotus Security Handbook
Part 4 A secure scenario
This part of the book provides a real-life scenario demonstrating the secure implementation of Lotus collaborative technologies. This scenario is implemented following the guidelines and best practices provided in the first three parts of this Redbook.
This part helps the reader in pulling together the rest of the material in this book, and providing some implementation details for how to actually make some of these capabilities work.
Part 4
© Copyright IBM Corp. 2004. All rights reserved. 579

580 Lotus Security Handbook
Chapter 13. Sample scenario described
This chapter describes the evolution of a Lotus technology based collaborative solution that is implemented in a secure manner following the practices discussed in the earlier sections of this Redbook. The solution developed starts with a basic level of functionality, and adds additional functionality with the proper security checkpoints and features enabled at each step along the way.
Only the scenario itself is introduced in this chapter, the next chapter then provides the details for the implementation of this scenario.
13
© Copyright IBM Corp. 2004. All rights reserved. 581

13.1 The scenario describedThe company used in our scenario is a small publishing company called “Redbooks Company.” Redbooks has four departments: sales, production, editorial, and administration. In addition, there is an IT department. They are not included in this list because in this scenario, like in real life, they are totally taken for granted until something goes wrong.
� Sales includes all sales staff, who market and sell books to distributors.
� Production staff are in charge of printing books and shipping to distributors.
� Editorial staff are in charge of editing books written by their freelance writers.
� Administration staff includes managers and staff assistants.
They operate out of two offices: east and west.
Initially, this company has minimal to no computing capabilities, and is looking to get onto the Internet and into the modern computing age. They decide to approach this “transformation” in their technology infrastructure through a series of stages or phases.
13.2 Phase 1: Basic internal collaborationThe first thing that RedbooksCo determines they need, is a messaging and collaboration solution to allow their employees to better communicate with one another. They want their employes to read e-mail, participate in online collaborations, and communicate via secure instant messaging – all via a Web browser. Thus, they have decided to implement Lotus Domino with Domino Web Access (iNotes) for e-mail, Lotus Team Workplaces (QuickPlace) for online collaboration, and Lotus Instant Messaging (Sametime) for instant messaging.
Furthermore, RedbooksCo wants to have the users authenticate only once to read mail, participate in online collaboration, and access instant messaging. They do not want users, especially those unfamiliar with such newer technologies, to have to memorize multiple userids and passwords.
To support this, the Redbooks IT staff creates user IDs for each user based on his or her location in either the company’s east or west office. They then implement single sign-on (SSO) across all the collaboration servers.
In this phase, each user would then be set up to access their mail via a personal URL, such as the following for Matt Milza’s mail file:
http://itsosec-dom.cam.itso.ibm.com/mail/mmilza.nsf
582 Lotus Security Handbook
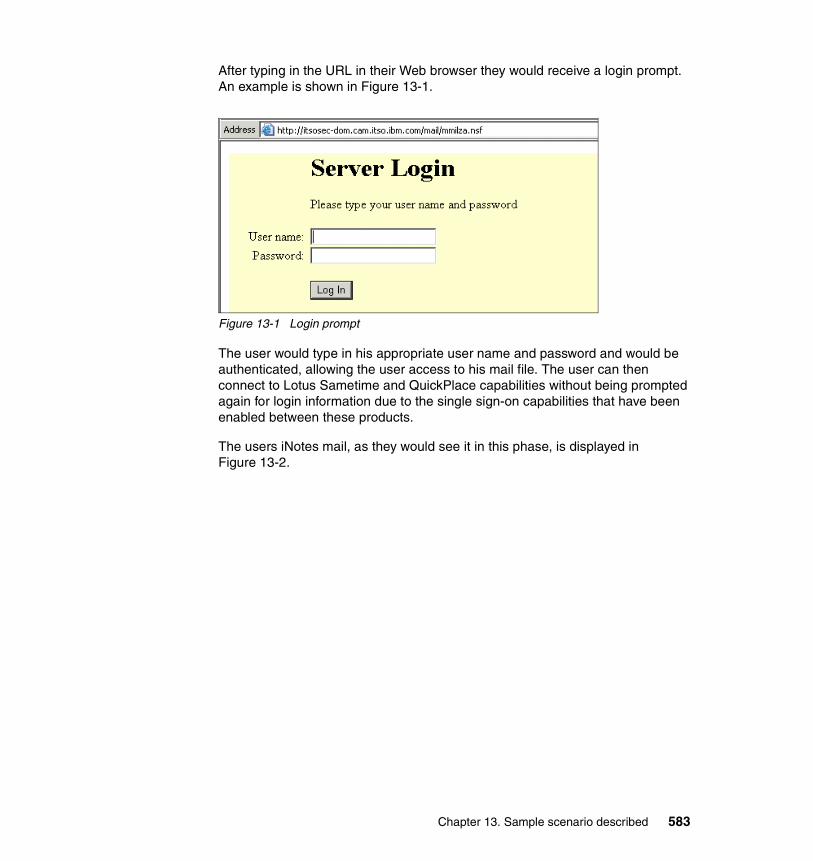
After typing in the URL in their Web browser they would receive a login prompt. An example is shown in Figure 13-1.
Figure 13-1 Login prompt
The user would type in his appropriate user name and password and would be authenticated, allowing the user access to his mail file. The user can then connect to Lotus Sametime and QuickPlace capabilities without being prompted again for login information due to the single sign-on capabilities that have been enabled between these products.
The users iNotes mail, as they would see it in this phase, is displayed in Figure 13-2.
Chapter 13. Sample scenario described 583
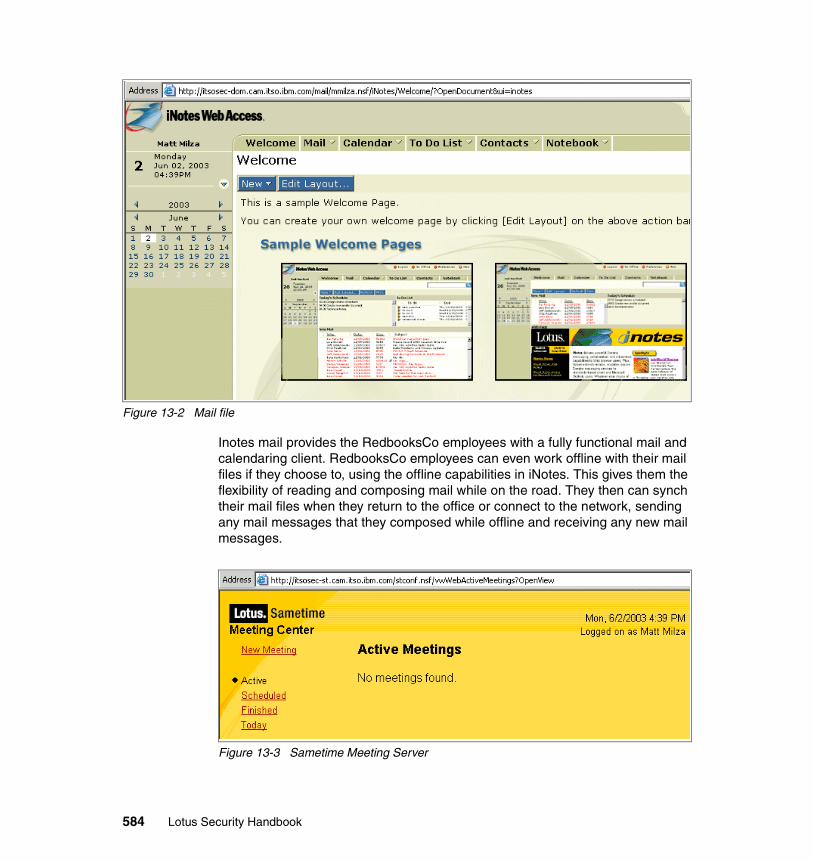
Figure 13-2 Mail file
Inotes mail provides the RedbooksCo employees with a fully functional mail and calendaring client. RedbooksCo employees can even work offline with their mail files if they choose to, using the offline capabilities in iNotes. This gives them the flexibility of reading and composing mail while on the road. They then can synch their mail files when they return to the office or connect to the network, sending any mail messages that they composed while offline and receiving any new mail messages.
Figure 13-3 Sametime Meeting Server
584 Lotus Security Handbook
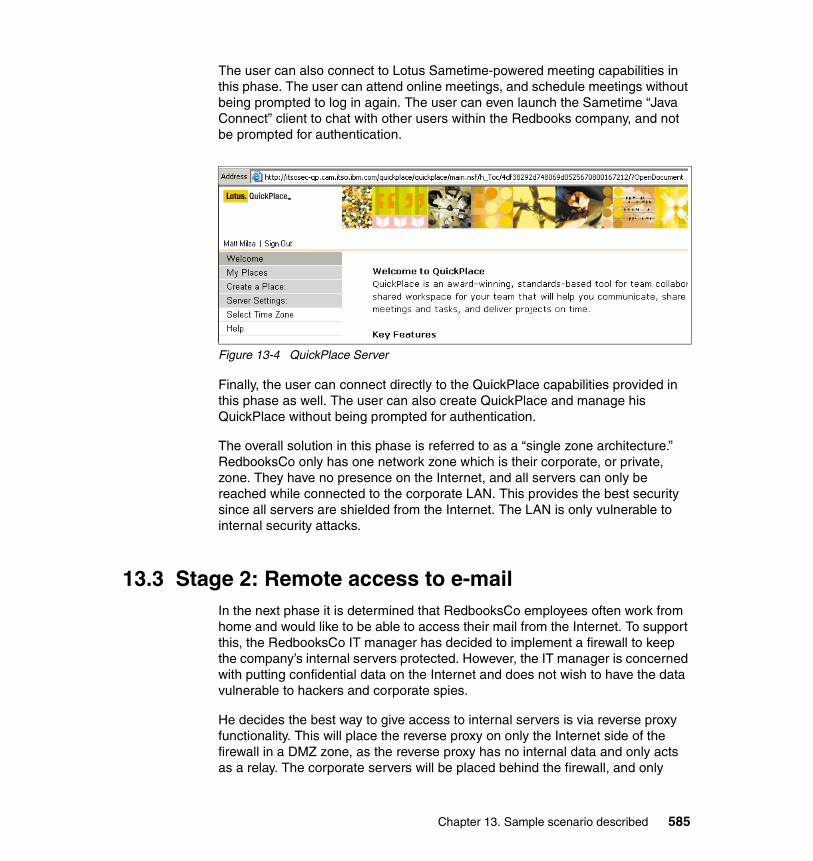
The user can also connect to Lotus Sametime-powered meeting capabilities in this phase. The user can attend online meetings, and schedule meetings without being prompted to log in again. The user can even launch the Sametime “Java Connect” client to chat with other users within the Redbooks company, and not be prompted for authentication.
Figure 13-4 QuickPlace Server
Finally, the user can connect directly to the QuickPlace capabilities provided in this phase as well. The user can also create QuickPlace and manage his QuickPlace without being prompted for authentication.
The overall solution in this phase is referred to as a “single zone architecture.” RedbooksCo only has one network zone which is their corporate, or private, zone. They have no presence on the Internet, and all servers can only be reached while connected to the corporate LAN. This provides the best security since all servers are shielded from the Internet. The LAN is only vulnerable to internal security attacks.
13.3 Stage 2: Remote access to e-mailIn the next phase it is determined that RedbooksCo employees often work from home and would like to be able to access their mail from the Internet. To support this, the RedbooksCo IT manager has decided to implement a firewall to keep the company’s internal servers protected. However, the IT manager is concerned with putting confidential data on the Internet and does not wish to have the data vulnerable to hackers and corporate spies.
He decides the best way to give access to internal servers is via reverse proxy functionality. This will place the reverse proxy on only the Internet side of the firewall in a DMZ zone, as the reverse proxy has no internal data and only acts as a relay. The corporate servers will be placed behind the firewall, and only
Chapter 13. Sample scenario described 585

certain network ports will be opened. Because the reverse proxy is in the DMZ, it will still have direct access to the internal servers, and can act as a secure relay for the users to the backend collaboration servers. This is referred to as a “three zone architecture.” The three zones are the Internet zone, which includes all Internet serves; the DMZ zone, which includes the reverse proxy; and the private/corporate zone, which includes the main collaboration servers and data.
Additionally, now that some network connections will be made via the Internet, the IT manager is concerned with hackers and corporate spies sniffing packets. If the data between the Internet user and the server is not encrypted, a hacker can read each transaction that occurs between them. Thus, the IT manager decides to implement SSL, Secure Sockets Layer, on the reverse proxy server. This will encrypt each packet that is being sent between the Internet user and the reverse proxy.
A Redbook Co. employee would connect to the Mail server from the Internet by using the same URL that they use at the office.
https://itsosec-dom.cam.itso.ibm.com/mail/mmilza.nsf
Take note that now that SSL has been configured, the URL has changed to HTTPS. The reverse proxy and the Domino server have been set up to only allow SSL connections.
After the user authenticates using the same username and password as in the first phase, the user is allowed to access their mail file remotely (and securely via SSL and proxy) from outside the corporate network.
The mail access and login prompt are no different, whether the user accesses the mail server via the reverse proxy or directly via the internal network. This is one of the benefits of a reverse proxy. All a reverse proxy does is act as a relay between the Internet user and the internal Domino server. The reverse proxy is configured to only allow access to certain destinations. For instance, a user trying to connect to the root directory of the server by typing:
https://itsosec-dom.cam.itso.ibm.com
would receive a “you are not authorized” message, as shown in Figure 13-5. By setting up the reverse proxy rules properly, the IT manager locks down what Internet users are allowed to access.
586 Lotus Security Handbook

Figure 13-5 Not authorized
13.4 Stage 3: Creation of a corporate directoryRedbooksCo starts to understand that they currently have two user directories, a Domino directory used to support this new collaborative environment, and a second legacy directory they use for older internal applications. The IT manager decides it would be best to only support authentication against one directory, to reduce administrative overhead and possible security holes. The IT manager recognizes that employees use the original legacy directory more often throughout the day, and are used to maintaining their passwords in this directory, which has more advanced password management features than those supplied via the Domino Directory currently used for the new collaborative environment.
Fortunately, this legacy directory can be LDAP-enabled to allow other environments to use the directory for authentication and directory lookups. Based on this, a move to this legacy directory as the single corporate directory is relatively easy for RedbooksCo to implement. The “directory assistance” capabilities of the Lotus collaborative products are used to point the
Chapter 13. Sample scenario described 587

Domino-based Lotus severs to this LDAP directory for authentication. After some quick configuration changes, and server reboots, authentication for the new collaborative environment is redirected to the legacy directory. The two LDAP directories are then synchronized, such that the Domino users names are included within the legacy LDAP directory to allow for minimal change to the Lotus technology Access Control Lists.
The RedbooksCo IT manager schedules these changes to occur over the weekend, and when the employees come in on Monday, they are ready to authenticate with their application user name and password. The Redbooks IT manager is pleased because Internet passwords are now more secure, and the RedbooksCo IT staff only needs to support and maintain one user directory.
13.5 Stage 4: Remote access to all collaboration toolsNext, the RedbooksCo IT manager begins receiving requests for people to be able to access more than just their mail from home. The IT manager evaluates the best way to provide remote services to employees. He decides that with some changes to the reverse proxy, he can provide access to all the Lotus collaborative capabilities via the Internet. The only function he can’t provide via the reverse proxy is Internet access to Sametime chat and meetings with the current version of Sametime that RedbooksCo is using. However, a simple upgrade to the latest version of Sametime (3.1) would solve this problem.
The IT manager also recognizes that it can become cumbersome for the users to remember the URLs for each collaborative capability. Even if users create bookmarks to each of these services (QuickPlace, Sametime, iNotes, and so forth), this is not an optimal solution. Thus, he also decides to create a basic collaborative portal based on WebSphere Portal. Such a single corporate portal can provide access to all corporate collaborative technologies and applications. This same portal would be the way users would connect into the corporate IT capabilities, whether in the office on the corporate network, or at home via the Internet.
The WebSphere Portal server is placed behind the firewall, such that RedbooksCo retains its three zone architecture. The reverse proxy is then reconfigured to allow connections to the portal server, and the portal server is enabled for SSL encryption to ensure the secure network transport of all data.
A user would simply type a URL similar to the following:
https://itsosec-wps.cam.itso.ibm.com/wps/myportal
They would then be prompted for authentication by the portal, as shown in Figure 13-6.
588 Lotus Security Handbook

Figure 13-6 WebSphere Portal Login
After the user authenticates, they will be logged into the portal and will see the corporate portal designed and configured by the RedbooksCo IT staff. Within this portal users have easy access to all of the collaborative capabilities deployed as part of this project, as well as their legacy locations, in one well-integrated interface.
The single URL to access all corporate resources, whether they are connect via the Internet or private corporate LAN, is of great value to Redbooks employees. They know that anytime they need to access their corporate environment all they have to so is type in the URL to the corporate portal and log in. Once they log in to the portal, they have access to all of the corporate IT services in a secure manner, without additional login.
13.6 Stage 5: Advanced collaborative toolsRedbooksCo next begins looking at incorporating a training software system and Web-based mail system for the production staff that do not have regular access to computers. They choose the Lotus Workplace Messaging and Lotus Learning Management System capabilities to provide these services to the production staff. These capabilities plug directly into their existing environment and connect directly to their corporate directory for a seamless, secure solution. Users will maintain their same username and password for these new systems. This is
Chapter 13. Sample scenario described 589
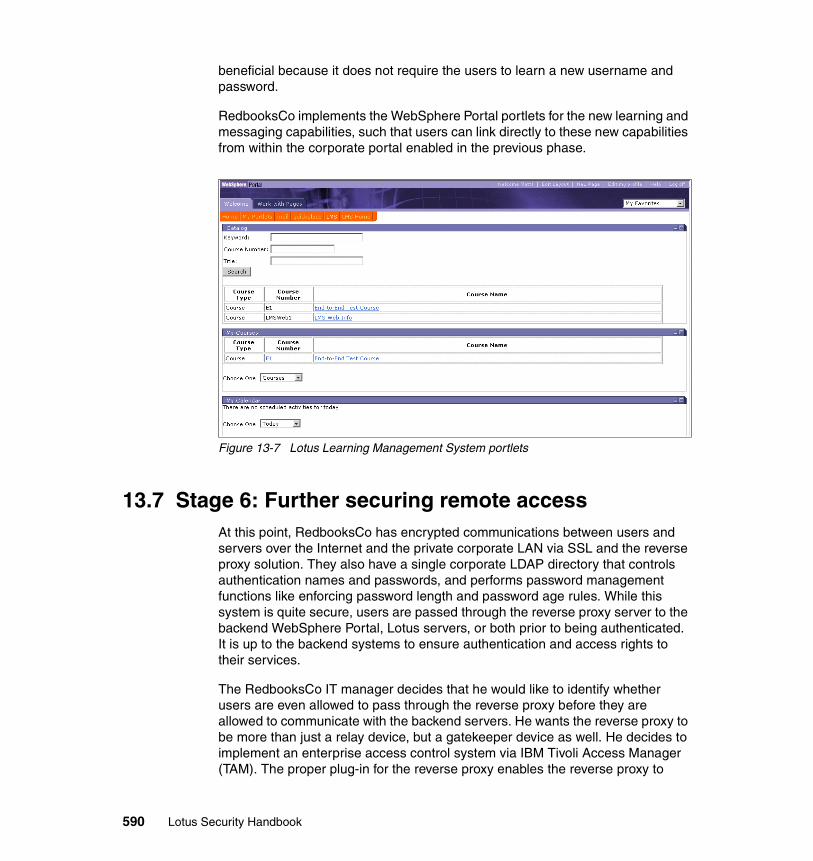
beneficial because it does not require the users to learn a new username and password.
RedbooksCo implements the WebSphere Portal portlets for the new learning and messaging capabilities, such that users can link directly to these new capabilities from within the corporate portal enabled in the previous phase.
Figure 13-7 Lotus Learning Management System portlets
13.7 Stage 6: Further securing remote accessAt this point, RedbooksCo has encrypted communications between users and servers over the Internet and the private corporate LAN via SSL and the reverse proxy solution. They also have a single corporate LDAP directory that controls authentication names and passwords, and performs password management functions like enforcing password length and password age rules. While this system is quite secure, users are passed through the reverse proxy server to the backend WebSphere Portal, Lotus servers, or both prior to being authenticated. It is up to the backend systems to ensure authentication and access rights to their services.
The RedbooksCo IT manager decides that he would like to identify whether users are even allowed to pass through the reverse proxy before they are allowed to communicate with the backend servers. He wants the reverse proxy to be more than just a relay device, but a gatekeeper device as well. He decides to implement an enterprise access control system via IBM Tivoli Access Manager (TAM). The proper plug-in for the reverse proxy enables the reverse proxy to
590 Lotus Security Handbook
become a gatekeeper. Via this plug-in, TAM first authenticates a user, and controls the destinations that a user is allowed to reach through the proxy. If the user is not identified in TAM as having access to any of the backend services, the reverse proxy does not allow that user to even communicate through the DMZ to the backend servers.
After TAM and the reverse proxy are configured, users will be prompted for authentication from the TAM server at the point they communicate with the reverse proxy server. The TAM server will authenticate the user against the corporate LDAP directory. After the user is authenticated, the user will be allowed to use the reverse proxy server as a relay. Also, once the user has authenticated with the TAM server, SSO will continue to function properly. The user will pass directly to the portal without having to authenticate.
13.8 Stage 7: Remote access to Online Meetings and Chat
In this final stage, RedbooksCo is now ready to start hosting Web conferencing meetings with external clients and vendors. To support this, the IT manager sets up an external Sametime server that is placed in the DMZ zone outside the firewall. This external server has is set up so that internal users attend meetings on the original internal Sametime server, while external users will attend meetings on the new external server. This set up retains the secure multi-zone architecture implemented by RedbooksCo, and provides for secure online-meetings with RedbooksCo clients, partners, and vendors.
13.9 SummaryIn this chapter we have presented a fictitious company called RedbooksCo. This company starts off with a basic computing environment, with very little employee communication. Through a series of phases, they establish a full set of Lotus collaborative capabilities. They then enable these capabilities for secure access by employees at home. Ultimately, they establish an employee portal to simplify and better integrate the user experience.
Note: This scenario is based on Lotus Sametime 3.0. The use of Lotus Sametime 3.1 would allow for the placement of Sametime behind the reverse proxy in a similar manner to the other Lotus collaborative servers since Sametime 3.1 provides proxy server support.
For more information on this proxy server support in Sametime 3.1, see 5.5, “Lotus Sametime 3.1 proxy support” on page 174.
Chapter 13. Sample scenario described 591

592 Lotus Security Handbook
Chapter 14. Scenario implementation details
This chapter describes how the authors of this book actually created the scenario environment introduced in the previous chapter in the Redbooks test lab. It defines the different single sign-on (SSO) implementations that were created and provides detailed instructions for the setup of each security and SSO feature, with supporting screen shots as needed.
14
© Copyright IBM Corp. 2004. All rights reserved. 593

14.1 Basic internal collaboration (Domino, Sametime, and QuickPlace)
In the first phase of our scenario, existing Lotus Domino, Sametime, and QuickPlace environments were configured for SSO functionality. Figure 14-1 shows the user login path in this initial phase. Basically, a Web user connects directly to any of the Lotus servers, and is authenticated by the Domino directory. The Lotus Domino server is running LDAP and the Lotus Sametime server is connecting to the Domino server via LDAP.
Figure 14-1 SSO Implementation
14.1.1 Installation of the core serversThe base Lotus Domino server was installed and set up as follows:
� The Linux RedHat 8 Operating System was installed. The sendmail service was disabled, and the telnet and vncserver services where enabled. This allowed us to access the machine remotely and is not required for Lotus Domino installation.
� Lotus Domino 6.01 was installed.
� The organization was defined as Redbooks, and a new OU was created for the servers, called Servers. The servers name is itsosec-dom/Servers/Redbooks.
� Two server IDs were created for the Sametime and QuickPlace servers. These servers were named itsosec-st/Servers/Redbooks and itsosec-qp/Servers/Redbooks respectively.
� Two Organizational Units (OU), East and West, were created.
594 Lotus Security Handbook

� Users were registered/created within either the East or West OU, and mail files were created using the Lotus iNotes/Domino Web Access template.
The base Lotus Sametime Server was installed and set up as follows:
� Windows 2000 Service Pack 3 was installed.
� Lotus Domino 5.010 was installed.
� Sametime 3.0 Service pack 1 was installed and configured to use an LDAP directory for authentication. The itsosec-dom/Servers/Redbooks (itsosec-dom.cam.itso.ibm.com) server hosted the LDAP directory.
� The server was upgraded to Domino 5.012 with the latest hot fix. The Domino upgrade and the hot fix were installed to resolve authentication issues. In previous releases of Domino, if a user had an entry in a Domino Directory and in an LDAP directory, the user would fail to authenticate. This was fixed in Domino 5.012. Additionally, the hot fix for Domino 5.012 resolved Sametime server issues running on a Domino 5.012 server.
The base Lotus QuickPlace Server was installed and set up as follows:
� Windows 2000 Service Pack 3 was installed.
� Domino 5.012 was installed.
� Lotus QuickPlace 3.0 was installed and configured.
14.1.2 WEB SSO configuration/creationAfter the installation and basic configuration of the core Lotus servers was completed, a Web SSO configuration document was created within the Domino Directory. The following steps were performed to create the Web SSO Configuration document, and to configure the servers to use this new Web SSO Configuration document.
1. Open the Domino Directory (names.nsf) on the Domino Server (itsosec-dom/Servers/Redbooks).
2. Expand the Configuration view.
3. Expand the Servers view.
4. Click the All Server Documents view.
5. Click the Web button and choose Create Web SSO Configuration.
Chapter 14. Scenario implementation details 595

Figure 14-2 Web SSO configuration button
6. The Web SSO Configuration form opens (Figure 14.3). We configured it with the following values for our environment:
– The token name was entered as LtpaToken.
– The domain for our test environment was cam.itso.ibm.com. This value was the DNS subdomain of all of our servers (that is, itsosec-dom.cam.itso.ibm.com, itsosec-st.cam.itso.ibm.com, itsosec-qp.cam.itso.ibm.com)
– All the Lotus servers were listed in the Domino Server names field, so that this configuration will apply to all the servers.
– The default time-out value of 30 minutes was not changed.
Figure 14-3 Web SSO configuration document
7. Click Keys → Create Domino SSO keys. This step makes Domino create the LTPA key that will be used to create and encrypt the LTPA tokens.
596 Lotus Security Handbook

Figure 14-4 Create Domino SSO Key
8. Each server document must be configured to point to the newly created Web SSO Configuration. This is done by editing the Server document and clicking the Internet Protocols → Domino Web Engine tab.
– Change the Session Authentication field to Multiple Servers (SSO).
– Change the Web SSO Configuration field to the name of the Web SSO configuration document created in Step 6. In our environment, this name was LtpaToken.
Figure 14-5 Server document
9. The Domino Directory changes are then replicated to all of the servers. This is so that this Web SSO Configuration document, and Server document changes, are available on all servers prior to enabling the changes.
Chapter 14. Scenario implementation details 597
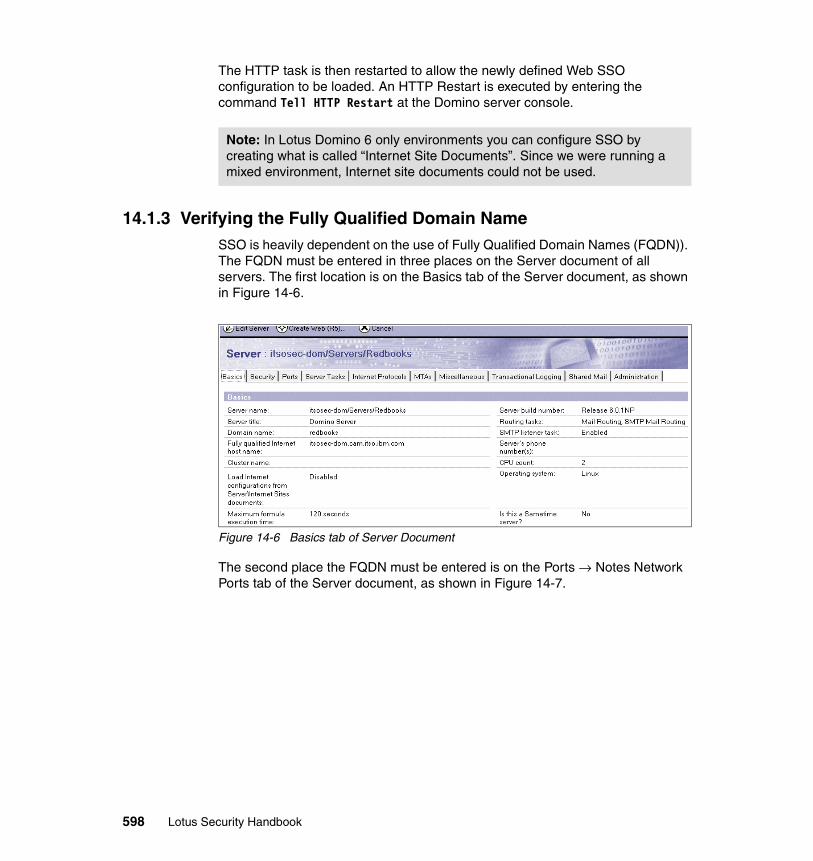
The HTTP task is then restarted to allow the newly defined Web SSO configuration to be loaded. An HTTP Restart is executed by entering the command Tell HTTP Restart at the Domino server console.
14.1.3 Verifying the Fully Qualified Domain NameSSO is heavily dependent on the use of Fully Qualified Domain Names (FQDN)). The FQDN must be entered in three places on the Server document of all servers. The first location is on the Basics tab of the Server document, as shown in Figure 14-6.
Figure 14-6 Basics tab of Server Document
The second place the FQDN must be entered is on the Ports → Notes Network Ports tab of the Server document, as shown in Figure 14-7.
Note: In Lotus Domino 6 only environments you can configure SSO by creating what is called “Internet Site Documents”. Since we were running a mixed environment, Internet site documents could not be used.
598 Lotus Security Handbook
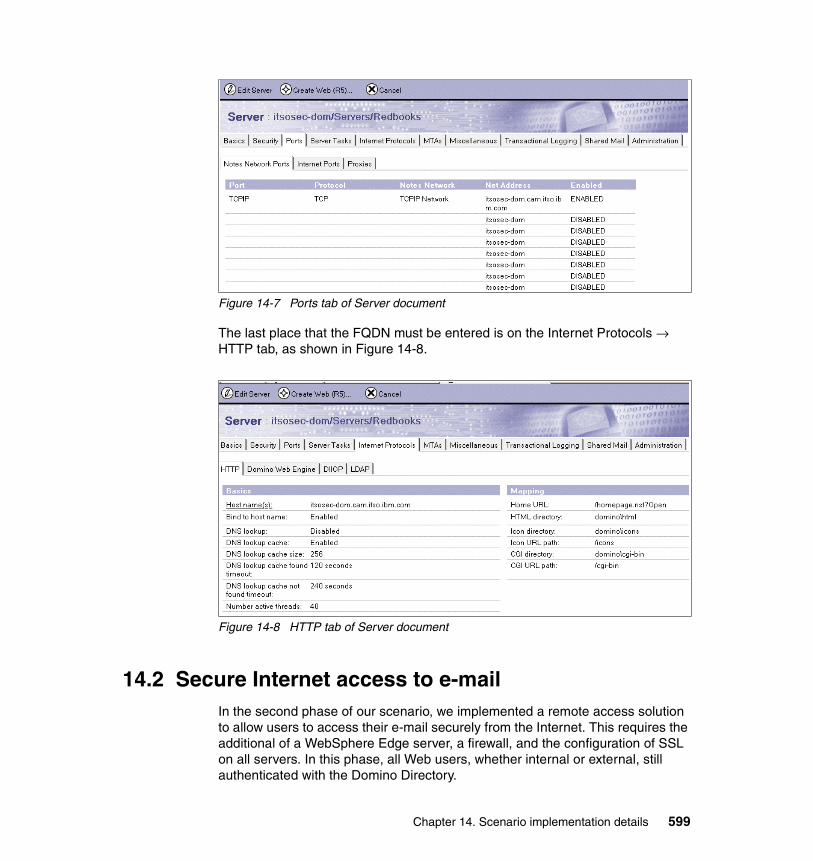
Figure 14-7 Ports tab of Server document
The last place that the FQDN must be entered is on the Internet Protocols → HTTP tab, as shown in Figure 14-8.
Figure 14-8 HTTP tab of Server document
14.2 Secure Internet access to e-mailIn the second phase of our scenario, we implemented a remote access solution to allow users to access their e-mail securely from the Internet. This requires the additional of a WebSphere Edge server, a firewall, and the configuration of SSL on all servers. In this phase, all Web users, whether internal or external, still authenticated with the Domino Directory.
Chapter 14. Scenario implementation details 599

Figure 14-9 details the different login, or authentication, paths that the different users take in this phase. Users from the Internet will pass through the reverse proxy server, and will be prompted for authentication from the Lotus Domino server since this is the only server that is allowed access from the Internet (for e-mail). Corporate/internal users will connect directly to any of the three servers and be authenticated by the servers as necessary.
Figure 14-9 Firewall and Edge server
14.2.1 SSL configurationTo enable SSL encryption of all communications, SSL keys were installed on all three Lotus Servers.
The first step in enabling SSL for any environment/technology would be to acquire a certified SSL certificate/key. In real life environments, this would normally be done through an outside trusted root certificate authority such as Verisign. However, in our test environment we utilized the Domino CA capabilities to create “untrusted” SSL keys/certificates for each of our servers.
To configure Domino to use SSL, a change to the Server document must be made for each server. The Ports → Internet Ports tab on each Server document must be changed to point to the SSL Key Ring file for the server, and SSL must then be specifically enabled.
SSL can be left at the default port of 443, or changed to another port as needed in your environment. In our test environment, we left the port setting at the default.
The changes to the Internet Ports tab are displayed in Figure 14-8 and Figure 14-9.
600 Lotus Security Handbook

Figure 14-10 Internet Ports tab - view 1
Figure 14-11 Internet Ports tab - view 2
After the server document was modified on each server, HTTP was restarted.
Chapter 14. Scenario implementation details 601
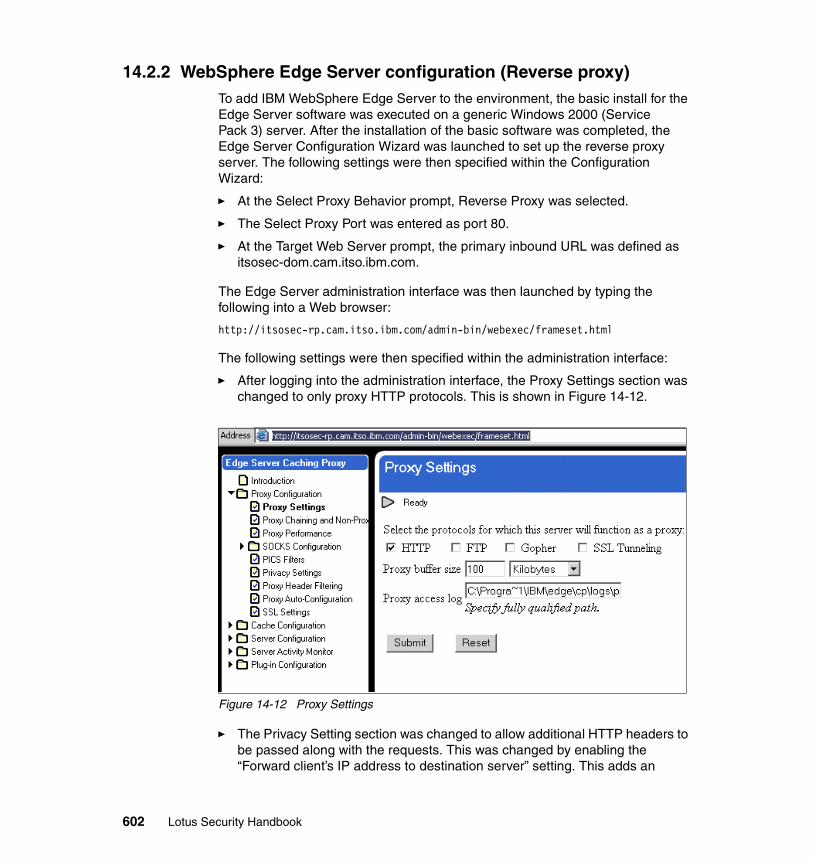
14.2.2 WebSphere Edge Server configuration (Reverse proxy)To add IBM WebSphere Edge Server to the environment, the basic install for the Edge Server software was executed on a generic Windows 2000 (Service Pack 3) server. After the installation of the basic software was completed, the Edge Server Configuration Wizard was launched to set up the reverse proxy server. The following settings were then specified within the Configuration Wizard:
� At the Select Proxy Behavior prompt, Reverse Proxy was selected.
� The Select Proxy Port was entered as port 80.
� At the Target Web Server prompt, the primary inbound URL was defined as itsosec-dom.cam.itso.ibm.com.
The Edge Server administration interface was then launched by typing the following into a Web browser:
http://itsosec-rp.cam.itso.ibm.com/admin-bin/webexec/frameset.html
The following settings were then specified within the administration interface:
� After logging into the administration interface, the Proxy Settings section was changed to only proxy HTTP protocols. This is shown in Figure 14-12.
Figure 14-12 Proxy Settings
� The Privacy Setting section was changed to allow additional HTTP headers to be passed along with the requests. This was changed by enabling the “Forward client’s IP address to destination server” setting. This adds an
602 Lotus Security Handbook
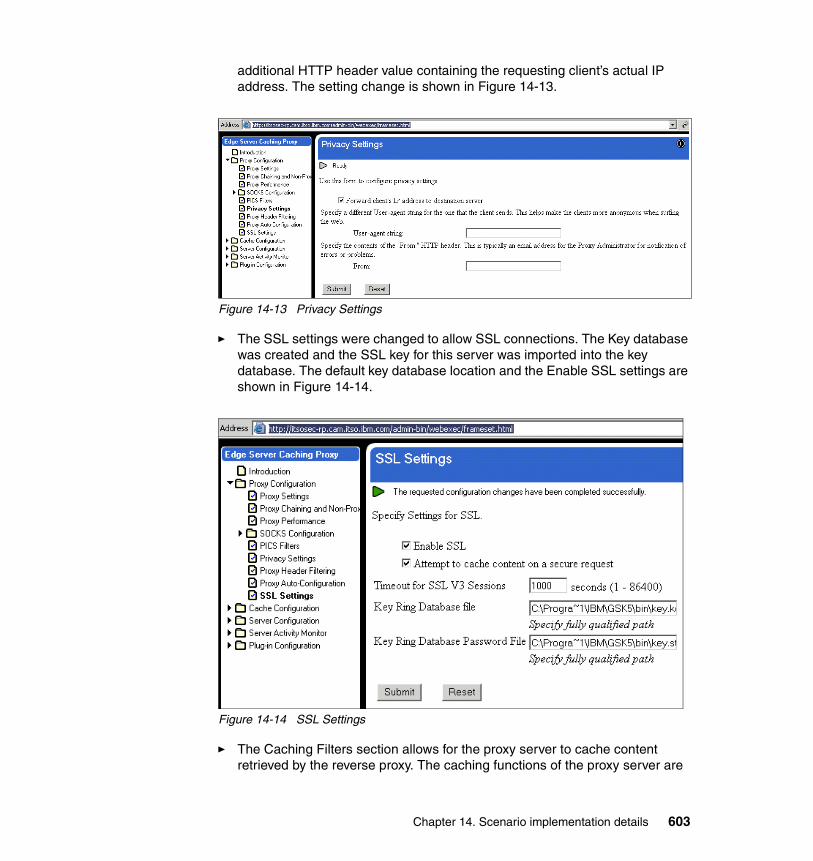
additional HTTP header value containing the requesting client’s actual IP address. The setting change is shown in Figure 14-13.
Figure 14-13 Privacy Settings
� The SSL settings were changed to allow SSL connections. The Key database was created and the SSL key for this server was imported into the key database. The default key database location and the Enable SSL settings are shown in Figure 14-14.
Figure 14-14 SSL Settings
� The Caching Filters section allows for the proxy server to cache content retrieved by the reverse proxy. The caching functions of the proxy server are
Chapter 14. Scenario implementation details 603

still bound by the expiration information contained within the HTTP header. This prevents dynamic content from being cached when it should not be. In order to maximize caching, the *//itsosec-dom.cam.itso.ibm.com/* filter was added to the WebSphere Edge Server and is shown in Figure 14-15.
Figure 14-15 Cache Filter settings
� The Last Modified Factor section allows more refined control over the expiration time of explicit Domino design elements cached locally on the Edge server. The two main items initially configured are the ?OpenImageResource and ?OpenElement&FieldElemFormat=gif URL requests. These represent images in Domino, but due to their nature the proxy server by default does not see them as images (which should be cached longer than just standard HTML). These changes are shown in Figure 14-16.
604 Lotus Security Handbook
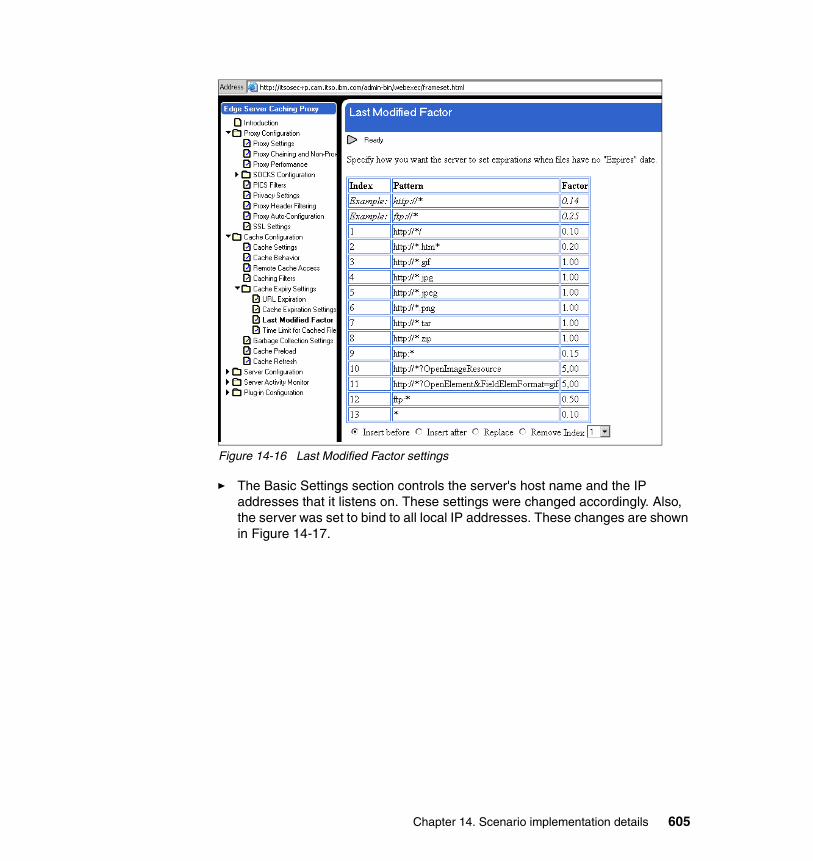
Figure 14-16 Last Modified Factor settings
� The Basic Settings section controls the server's host name and the IP addresses that it listens on. These settings were changed accordingly. Also, the server was set to bind to all local IP addresses. These changes are shown in Figure 14-17.
Chapter 14. Scenario implementation details 605
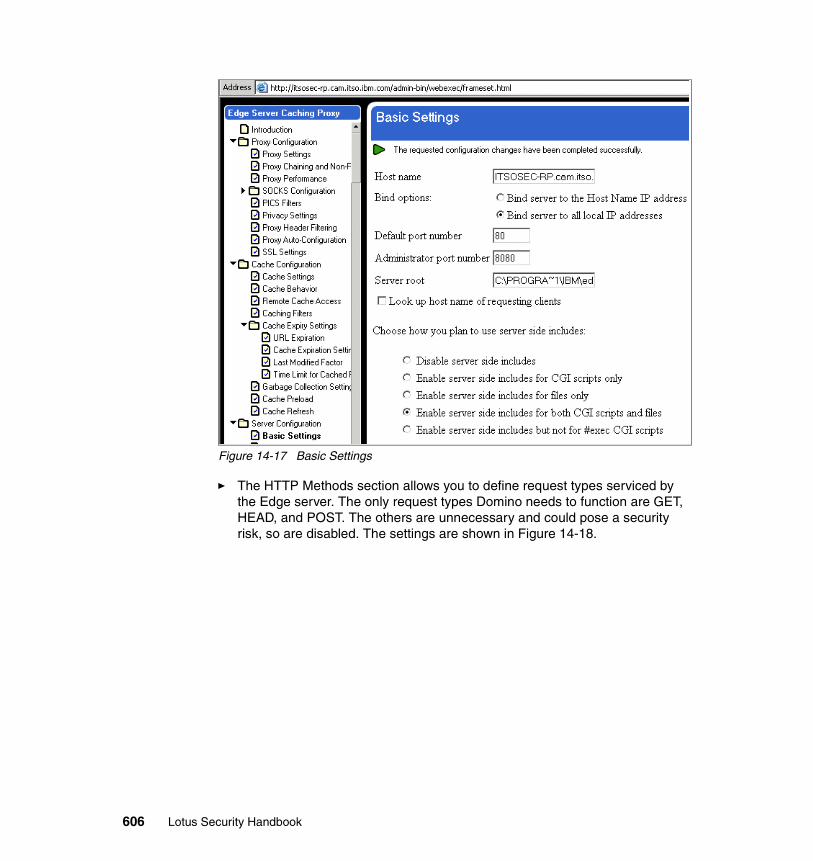
Figure 14-17 Basic Settings
� The HTTP Methods section allows you to define request types serviced by the Edge server. The only request types Domino needs to function are GET, HEAD, and POST. The others are unnecessary and could pose a security risk, so are disabled. The settings are shown in Figure 14-18.
606 Lotus Security Handbook

Figure 14-18 HTTP Methods
� The Request Routing section is where all redirection occurs. Once a request is matched to a rule, the specified action is performed. Table 14-1 documents the specific changes that were made to the Request Routing tables. Please note that 192.168.0.3 is the internal IP address of the itsosec-dom.cam.itso.ibm.com server.
What these routing tables mean is that when the Edge server receives a request with a /mail /iNotes etc. in the URL, it will route that request directly to the 192.168.0.3 internal interface for the Domino server.
Table 14-1 Request Routing
These changes are shown in Figure 14-19.
Index Action Request template
Replacement file path
1 Proxy /mail* http://192.168.0.3/mail*
2 Proxy /iNotes/* http://192.168.0.3/iNotes/*
3 Proxy /inotes5/* http://192.168.0.3/inotes5/*
4 Proxy /icons/* http://192.168.0.3/icons/*
5 Proxy /domjava/* http://192.168.0.3/domjava/*
6 Proxy /names.nsf http://192.168.0.3/names.nsf*
Chapter 14. Scenario implementation details 607

Figure 14-19 Request Routing
After the request routing tables were updated, the IBMPROXY.CONF file was edited manually. The following additions where made to the IBMPROXY.CONF file.
� SignificantUrlTerminator ?OpenImageResource
� SignificantUrlTerminator ?OpenElement
� SignificantUrlTerminator /?OpenImageResource
� SignificantUrlTerminator /?OpenElement
� fail /*
� Reversepass http://192.168.0.3/* http://itsosec-dom.cam.itso.ibm.com/*
The fail /* setting causes all connections to the root directory of the reverse proxy to fail. If a user tries to connect to the following URL:
https://itsosec-dom.cam.itso.ibm.com
The user will receive a failure message which is shown in Figure 14-20.
608 Lotus Security Handbook

Figure 14-20 Not Authorized
The reverse proxy server will only allow connections to the Domino Directory (names.nsf) and to the mail directory (/mail). The Domino Directory needs to be accessible for user authentications. By only allowing the Reverse Proxy server access to certain files and directories, it provides an added layer of security.
14.2.3 Firewall configurationThe WebSphere Edge Server reverse proxy server was placed in the DMZ of our lab’s firewall. This allows connections to be made to it from the simulated Internet, and also allows the reverse proxy server to be configured with access to the Domino server. The Domino, QuickPlace, and Sametime servers were placed inside the firewall. They are accessible to any user inside the network.
The firewall was configured to only allow port 80 and port 443 connections from the Internet into the DMZ and to the reverse proxy server. The firewall rules are shown in Figure 14-21.
The firewall was also configured to only allow connections from the reverse proxy server into the internal network to the Domino server.
Chapter 14. Scenario implementation details 609

Figure 14-21 Firewall rules
14.3 Introduction of an “enterprise” LDAP serverDuring the initial phases of this scenario, an existing Domino server and Domino Directory were enabled for LDAP, and provided authentication capabilities via LDAP. In this phase, a separate “enterprise” LDAP server is introduced, moving the authentication capabilities of this infrastructure to an independent LDAP platform in preparation for the introduction of non-Lotus technologies. While LDAP functionalities could have been left in Domino, and all additional phases would still work, the Redbook team felt that the use of a non-Lotus LDAP server would more accurately simulate most enterprise environments.
Furthermore, to demonstrate that Lotus does not require the same hierarchical naming as an LDAP server, we created a new LDAP structure (that is, OUs) for this new LDAP server. Figure 14-22 shows that corporate users will continue to connect directly to the Lotus servers but will be authenticated via the LDAP directory. Also, Internet users will continue to access the Lotus Domino server via the reverse proxy, but will also be authenticated by the internal severs via the LDAP directory.
Figure 14-22 LDAP authentication
610 Lotus Security Handbook
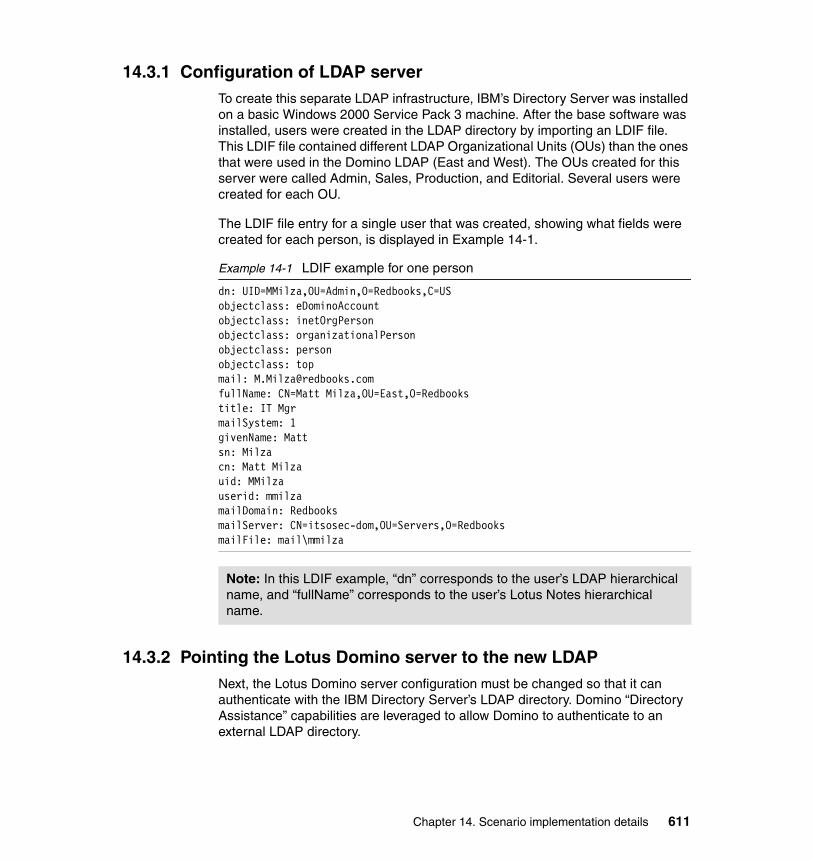
14.3.1 Configuration of LDAP serverTo create this separate LDAP infrastructure, IBM’s Directory Server was installed on a basic Windows 2000 Service Pack 3 machine. After the base software was installed, users were created in the LDAP directory by importing an LDIF file. This LDIF file contained different LDAP Organizational Units (OUs) than the ones that were used in the Domino LDAP (East and West). The OUs created for this server were called Admin, Sales, Production, and Editorial. Several users were created for each OU.
The LDIF file entry for a single user that was created, showing what fields were created for each person, is displayed in Example 14-1.
Example 14-1 LDIF example for one person
dn: UID=MMilza,OU=Admin,O=Redbooks,C=USobjectclass: eDominoAccountobjectclass: inetOrgPersonobjectclass: organizationalPersonobjectclass: personobjectclass: topmail: [email protected]: CN=Matt Milza,OU=East,O=Redbookstitle: IT MgrmailSystem: 1givenName: Mattsn: Milzacn: Matt Milzauid: MMilzauserid: mmilzamailDomain: RedbooksmailServer: CN=itsosec-dom,OU=Servers,O=RedbooksmailFile: mail\mmilza
14.3.2 Pointing the Lotus Domino server to the new LDAPNext, the Lotus Domino server configuration must be changed so that it can authenticate with the IBM Directory Server’s LDAP directory. Domino “Directory Assistance” capabilities are leveraged to allow Domino to authenticate to an external LDAP directory.
Note: In this LDIF example, “dn” corresponds to the user’s LDAP hierarchical name, and “fullName” corresponds to the user’s Lotus Notes hierarchical name.
Chapter 14. Scenario implementation details 611

The following steps are taken to enable Domino for Directory assistance, and properly configure it to point to an external LDAP directory.
1. Create a Directory Assistance Database on the Domino server using the da50.ntf template.
2. In this newly created database, create a Directory Assistance document for the new LDAP server.
3. Fill in the correct information for the LDAP server. The Directory Assistance document is shown in Figures 14-23, 14-24, and 14-25 with the LDAP settings needed.
Figure 14-23 Domino Server Directory Assistance Basics tab
Figure 14-24 Domino Server Directory Assistance Naming Contexts tab
612 Lotus Security Handbook

Figure 14-25 Domino Server Directory Assistance LDAP tab
4. After creating and configuring the Directory Assistance database and documents, the server document for the Domino server must be edited to point to the new Directory Assistance database.
To do this, the directory assistance field on the Basics tab of the Server document is changed to “da.nsf” or the name of your DA database. This is shown in Figure 14-26.
Chapter 14. Scenario implementation details 613
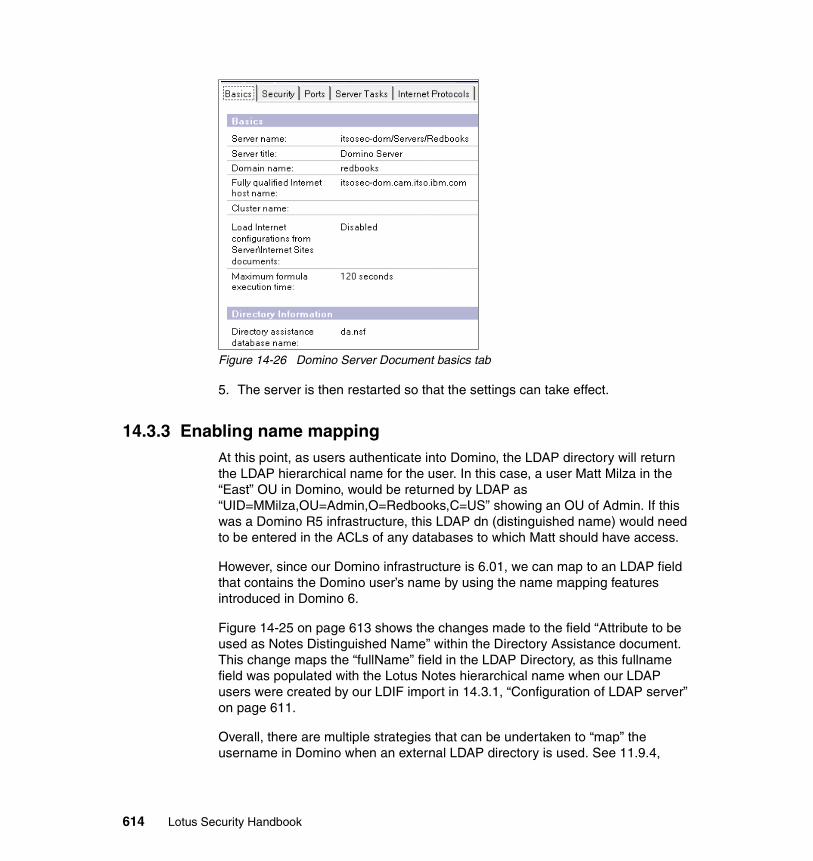
Figure 14-26 Domino Server Document basics tab
5. The server is then restarted so that the settings can take effect.
14.3.3 Enabling name mappingAt this point, as users authenticate into Domino, the LDAP directory will return the LDAP hierarchical name for the user. In this case, a user Matt Milza in the “East” OU in Domino, would be returned by LDAP as “UID=MMilza,OU=Admin,O=Redbooks,C=US” showing an OU of Admin. If this was a Domino R5 infrastructure, this LDAP dn (distinguished name) would need to be entered in the ACLs of any databases to which Matt should have access.
However, since our Domino infrastructure is 6.01, we can map to an LDAP field that contains the Domino user’s name by using the name mapping features introduced in Domino 6.
Figure 14-25 on page 613 shows the changes made to the field “Attribute to be used as Notes Distinguished Name” within the Directory Assistance document. This change maps the “fullName” field in the LDAP Directory, as this fullname field was populated with the Lotus Notes hierarchical name when our LDAP users were created by our LDIF import in 14.3.1, “Configuration of LDAP server” on page 611.
Overall, there are multiple strategies that can be undertaken to “map” the username in Domino when an external LDAP directory is used. See 11.9.4,
614 Lotus Security Handbook
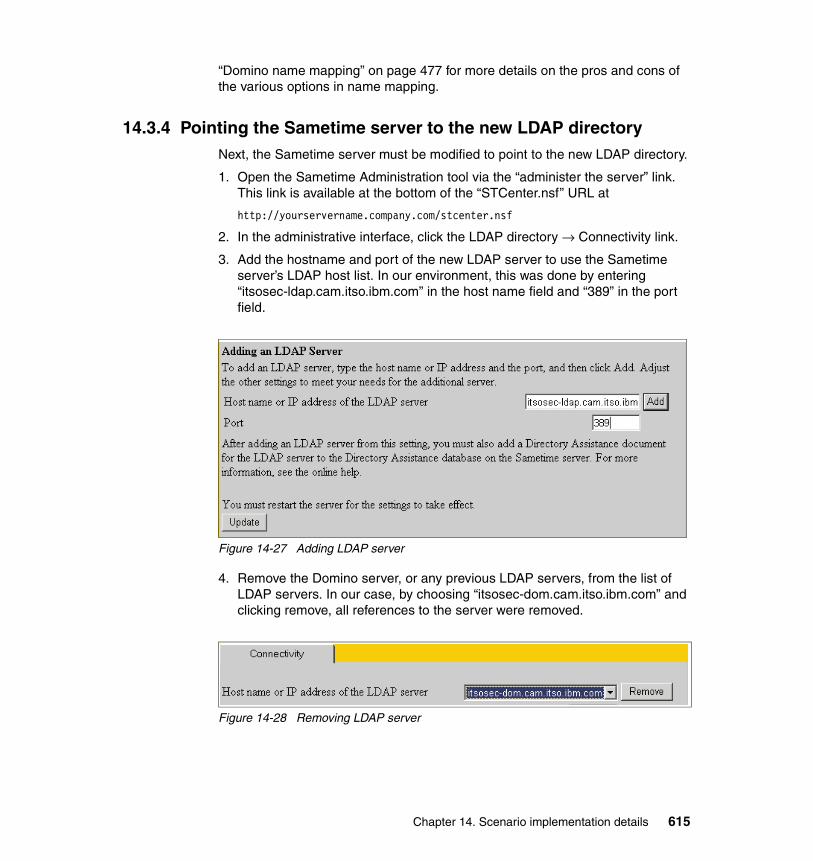
“Domino name mapping” on page 477 for more details on the pros and cons of the various options in name mapping.
14.3.4 Pointing the Sametime server to the new LDAP directoryNext, the Sametime server must be modified to point to the new LDAP directory.
1. Open the Sametime Administration tool via the “administer the server” link. This link is available at the bottom of the “STCenter.nsf” URL at
http://yourservername.company.com/stcenter.nsf
2. In the administrative interface, click the LDAP directory → Connectivity link.
3. Add the hostname and port of the new LDAP server to use the Sametime server’s LDAP host list. In our environment, this was done by entering “itsosec-ldap.cam.itso.ibm.com” in the host name field and “389” in the port field.
Figure 14-27 Adding LDAP server
4. Remove the Domino server, or any previous LDAP servers, from the list of LDAP servers. In our case, by choosing “itsosec-dom.cam.itso.ibm.com” and clicking remove, all references to the server were removed.
Figure 14-28 Removing LDAP server
Chapter 14. Scenario implementation details 615
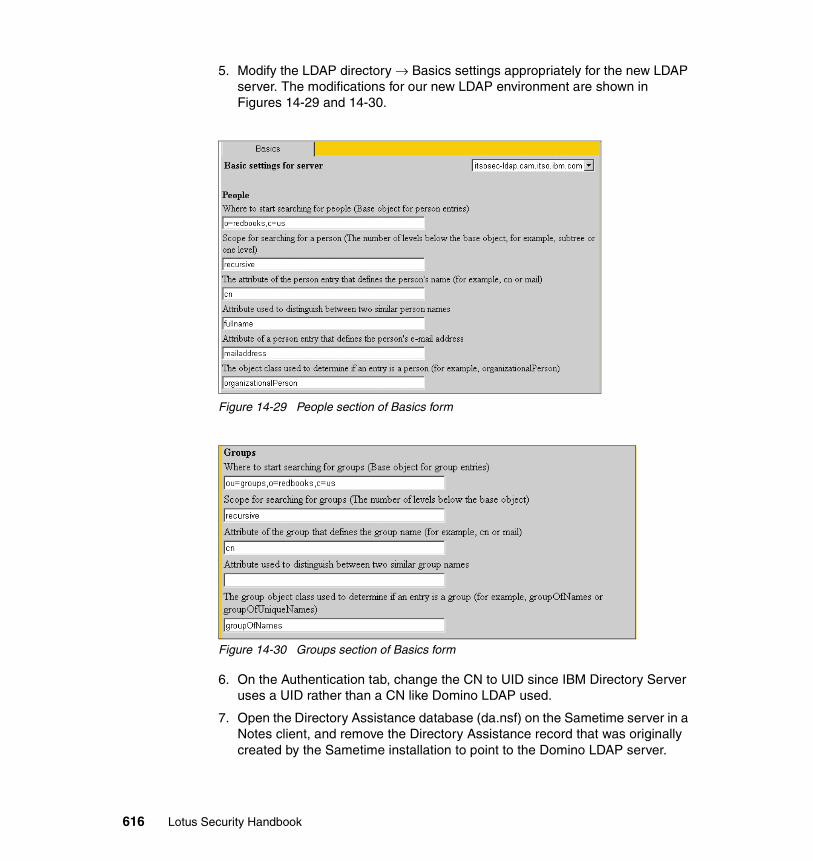
5. Modify the LDAP directory → Basics settings appropriately for the new LDAP server. The modifications for our new LDAP environment are shown in Figures 14-29 and 14-30.
Figure 14-29 People section of Basics form
Figure 14-30 Groups section of Basics form
6. On the Authentication tab, change the CN to UID since IBM Directory Server uses a UID rather than a CN like Domino LDAP used.
7. Open the Directory Assistance database (da.nsf) on the Sametime server in a Notes client, and remove the Directory Assistance record that was originally created by the Sametime installation to point to the Domino LDAP server.
616 Lotus Security Handbook
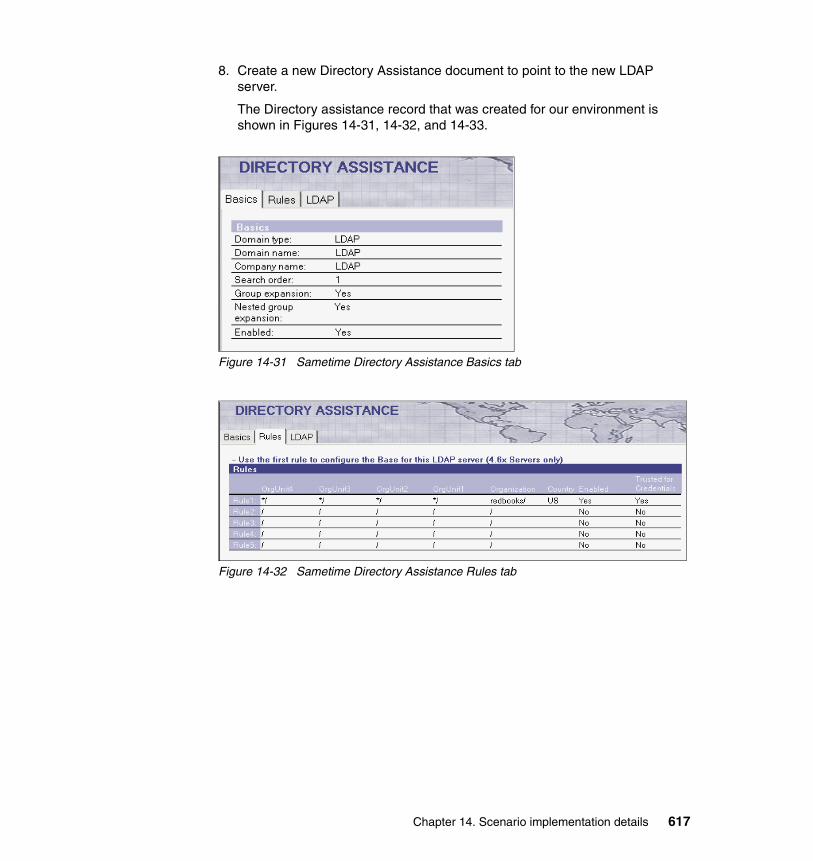
8. Create a new Directory Assistance document to point to the new LDAP server.
The Directory assistance record that was created for our environment is shown in Figures 14-31, 14-32, and 14-33.
Figure 14-31 Sametime Directory Assistance Basics tab
Figure 14-32 Sametime Directory Assistance Rules tab
Chapter 14. Scenario implementation details 617

Figure 14-33 Sametime Directory Assistance LDAP tab
9. The administrators group needs to contain the LDAP user names for the administrators. This group was edited and the LDAP user names were added.
Figure 14-34 Sametime Admin Group
14.3.5 Pointing the QuickPlace server to the new LDAPNext, the QuickPlace server must be modified to point to the new LDAP directory using these steps:
1. Make a replica of the Directory Assistance database from the Sametime server onto the QuickPlace server since all DA settings have already been specified on the Sametime server.
2. The QuickPlace servers Server document in the Domino Directory must be updated to point to this new Directory Assistance database. As earlier, this is done via the Directory Assistance field on the Basics tab of the Server document.
618 Lotus Security Handbook

3. Log into the QuickPlace server via the browser interface as an administrator.
http://itsosec-qp.cam.itso.ibm.com/quickplace
4. Click Server Settings.
5. Click User Directory.
6. Click Change Directory.
7. Choose the Type of “LDAP Server.”
8. Enter the fully qualified hostname for the LDAP server in the Name field. In our environment this was entered as itsosec-ldap.cam.itso.ibm.com
9. The Port Number was entered as 389, the default for LDAP.
10.The search base should be set to the LDAP level at which user searches should begin. In our environment, this was changed to o=redbooks,c=us.
These changes are shown in Figure 14-35.
Figure 14-35 Change User directory
11.The LDAP distinguished names for any users that will be QuickPlace administrators must then be added to the ACLs of the Main.nsf and Admin.nsf databases, with the full admin rights.
For example, Matt Milza’s full name in the Domino directory is Matt Milza/West/Redbooks and his corresponding LDAP username is uid=mmilza/ou=admin/o=redbooks/c=us. This LDAP username must be added to the Domino directory to allow Matt to continue to administrator the QuickPlace after the LDAP changes have taken affect.
This change is required because QuickPlace still runs on a Domino 5.x base; and as discussed earlier, Domino 5.x does not support any LDAP name
Chapter 14. Scenario implementation details 619
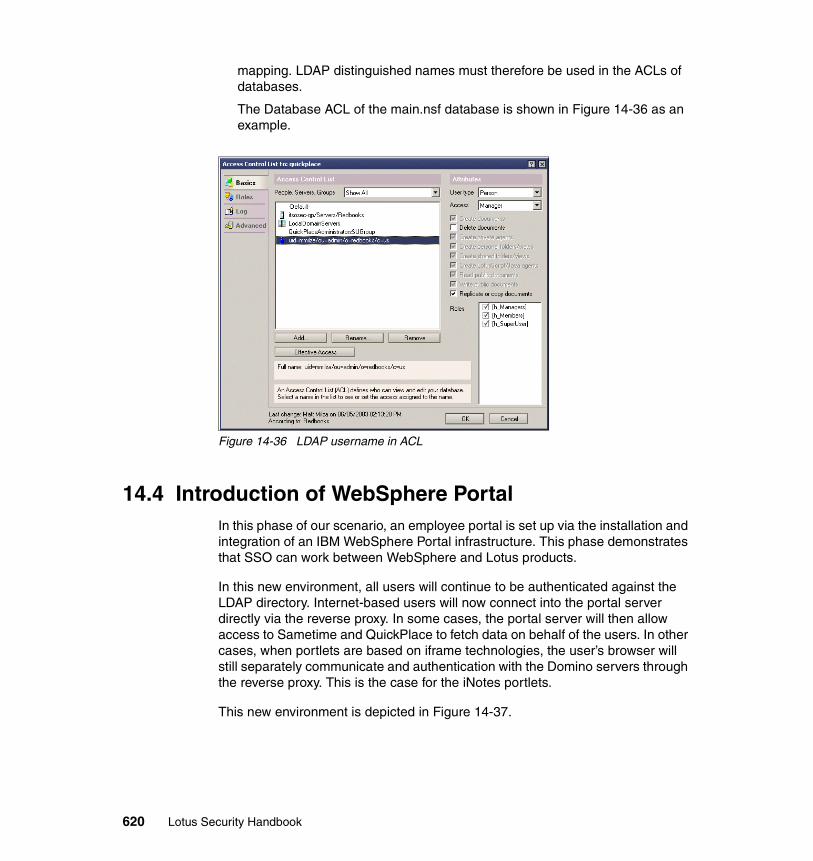
mapping. LDAP distinguished names must therefore be used in the ACLs of databases.
The Database ACL of the main.nsf database is shown in Figure 14-36 as an example.
Figure 14-36 LDAP username in ACL
14.4 Introduction of WebSphere PortalIn this phase of our scenario, an employee portal is set up via the installation and integration of an IBM WebSphere Portal infrastructure. This phase demonstrates that SSO can work between WebSphere and Lotus products.
In this new environment, all users will continue to be authenticated against the LDAP directory. Internet-based users will now connect into the portal server directly via the reverse proxy. In some cases, the portal server will then allow access to Sametime and QuickPlace to fetch data on behalf of the users. In other cases, when portlets are based on iframe technologies, the user’s browser will still separately communicate and authentication with the Domino servers through the reverse proxy. This is the case for the iNotes portlets.
This new environment is depicted in Figure 14-37.
620 Lotus Security Handbook
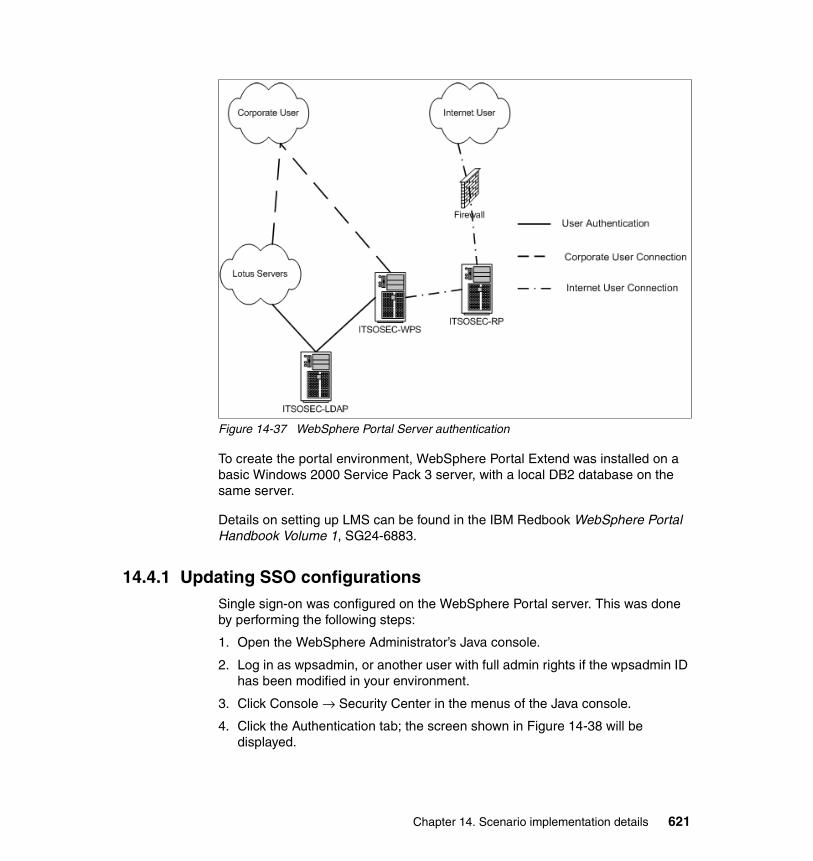
Figure 14-37 WebSphere Portal Server authentication
To create the portal environment, WebSphere Portal Extend was installed on a basic Windows 2000 Service Pack 3 server, with a local DB2 database on the same server.
Details on setting up LMS can be found in the IBM Redbook WebSphere Portal Handbook Volume 1, SG24-6883.
14.4.1 Updating SSO configurationsSingle sign-on was configured on the WebSphere Portal server. This was done by performing the following steps:
1. Open the WebSphere Administrator’s Java console.
2. Log in as wpsadmin, or another user with full admin rights if the wpsadmin ID has been modified in your environment.
3. Click Console → Security Center in the menus of the Java console.
4. Click the Authentication tab; the screen shown in Figure 14-38 will be displayed.
Chapter 14. Scenario implementation details 621
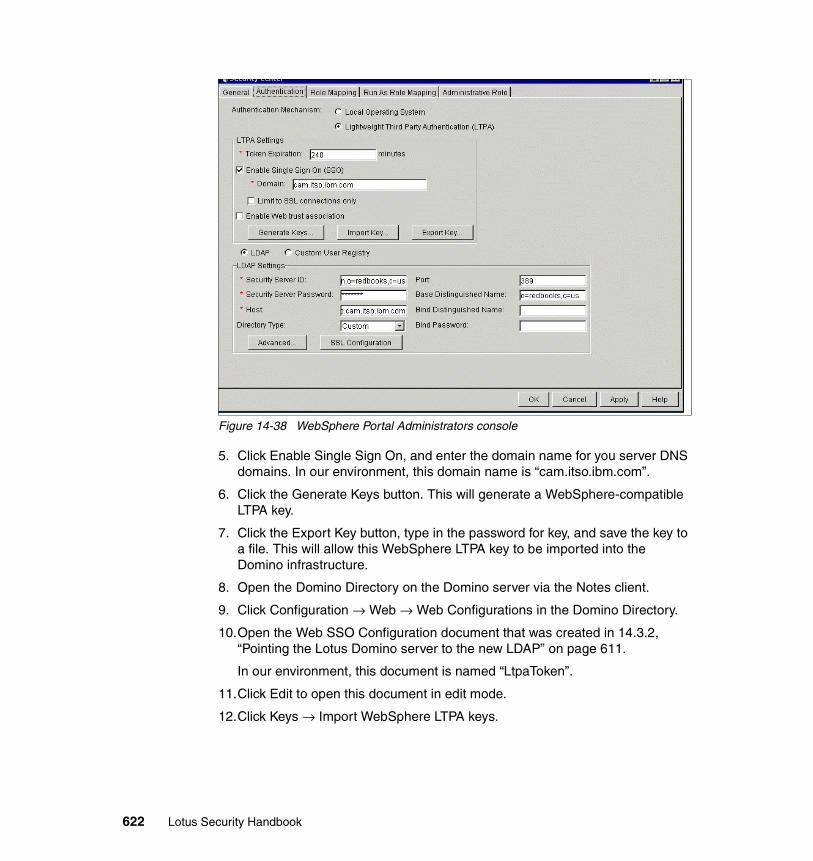
Figure 14-38 WebSphere Portal Administrators console
5. Click Enable Single Sign On, and enter the domain name for you server DNS domains. In our environment, this domain name is “cam.itso.ibm.com”.
6. Click the Generate Keys button. This will generate a WebSphere-compatible LTPA key.
7. Click the Export Key button, type in the password for key, and save the key to a file. This will allow this WebSphere LTPA key to be imported into the Domino infrastructure.
8. Open the Domino Directory on the Domino server via the Notes client.
9. Click Configuration → Web → Web Configurations in the Domino Directory.
10.Open the Web SSO Configuration document that was created in 14.3.2, “Pointing the Lotus Domino server to the new LDAP” on page 611.
In our environment, this document is named “LtpaToken”.
11.Click Edit to open this document in edit mode.
12.Click Keys → Import WebSphere LTPA keys.
622 Lotus Security Handbook
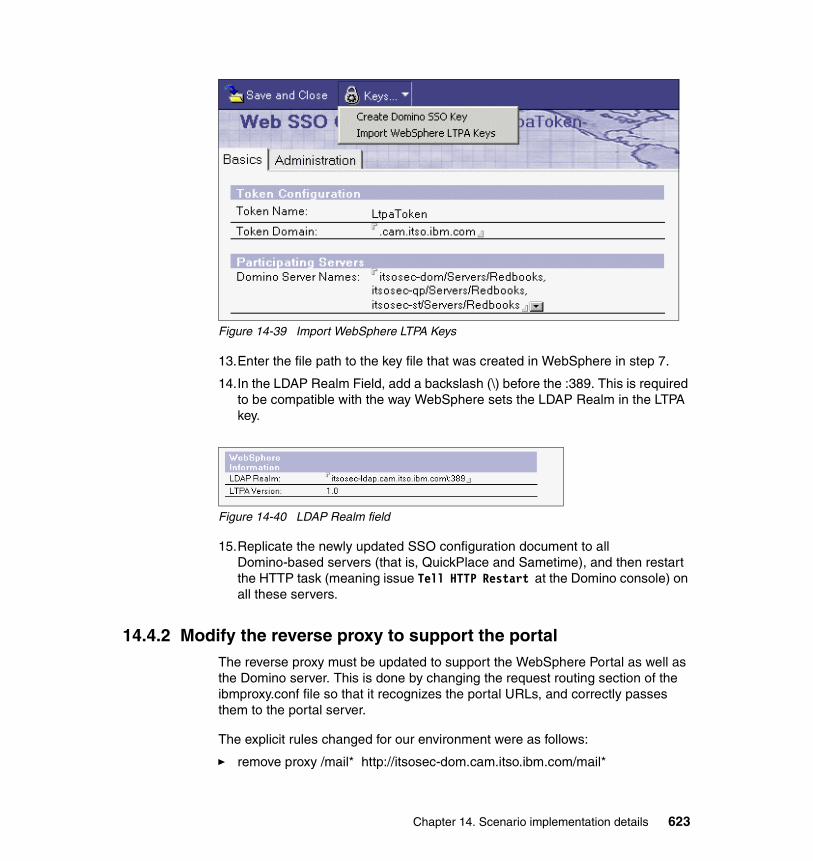
Figure 14-39 Import WebSphere LTPA Keys
13.Enter the file path to the key file that was created in WebSphere in step 7.
14.In the LDAP Realm Field, add a backslash (\) before the :389. This is required to be compatible with the way WebSphere sets the LDAP Realm in the LTPA key.
Figure 14-40 LDAP Realm field
15.Replicate the newly updated SSO configuration document to all Domino-based servers (that is, QuickPlace and Sametime), and then restart the HTTP task (meaning issue Tell HTTP Restart at the Domino console) on all these servers.
14.4.2 Modify the reverse proxy to support the portalThe reverse proxy must be updated to support the WebSphere Portal as well as the Domino server. This is done by changing the request routing section of the ibmproxy.conf file so that it recognizes the portal URLs, and correctly passes them to the portal server.
The explicit rules changed for our environment were as follows:
� remove proxy /mail* http://itsosec-dom.cam.itso.ibm.com/mail*
Chapter 14. Scenario implementation details 623

� remove proxy /iNotes/* http://itsosec-dom.cam.itso.ibm.com/iNotes/*
� remove proxy /inotes5/* http://itsosec-dom.cam.itso.ibm.com/inotes5/*
� remove proxy /icons/* http://itsosec-dom.cam.itso.ibm.com/icons/*
� remove proxy /domjava/* http://itsosec-dom.cam.itso.ibm.com/domjava/*
� remove proxy /names.nsf http://itsosec-dom.cam.itso.ibm.com/names.nsf
� Proxy /* http://192.168.0.6/*itsosec-wps.cam.itso.ibm.com
� proxy /* http://192.168.0.3/*itsosec-dom.cam.itso.ibm.com
� proxy /* http://192.168.0.4/*itsosec-qp.cam.itso.ibm.com
� Reversepass http://192.168.0.6/*http://itsosec-wps.cam.itso.ibm.com/*
� Reversepass http://192.160.0.3/*http://itsosec-dom.cam.itso.ibm.com/*
� Reversepass http://192.168.0.4/*http://itsosec-qp.cam.itso.ibm.com/*
After these changes are made to the conf file, the proxy server service must be restarted.
14.5 Adding e-learning capabilitiesIn this phase, e-learning capabilities are added to the infrastructure through the addition of the IBM Lotus Learning Management System (LMS).
To create the e-learning environment, Learning Management System 1.01 was installed on a basic Windows 2000 Service Pack 3 server. LMS was installed on a single server, with all LMS services, DB2 databases capabilities, and WebSphere 5 services installed on the box.
Details on setting up LMS can be found in the IBM Redbook IBM Lotus Learning Management System Handbook, SG24-7028.
Note: It is important to highlight the fact that LMS introduces WebSphere Application Server v5.0 to the infrastructure. This demonstrates that Lotus Domino-based technologies can successfully coexist in a secure single sign-on solution with both WebSphere 4- and WebSphere 5-based technologies.
624 Lotus Security Handbook
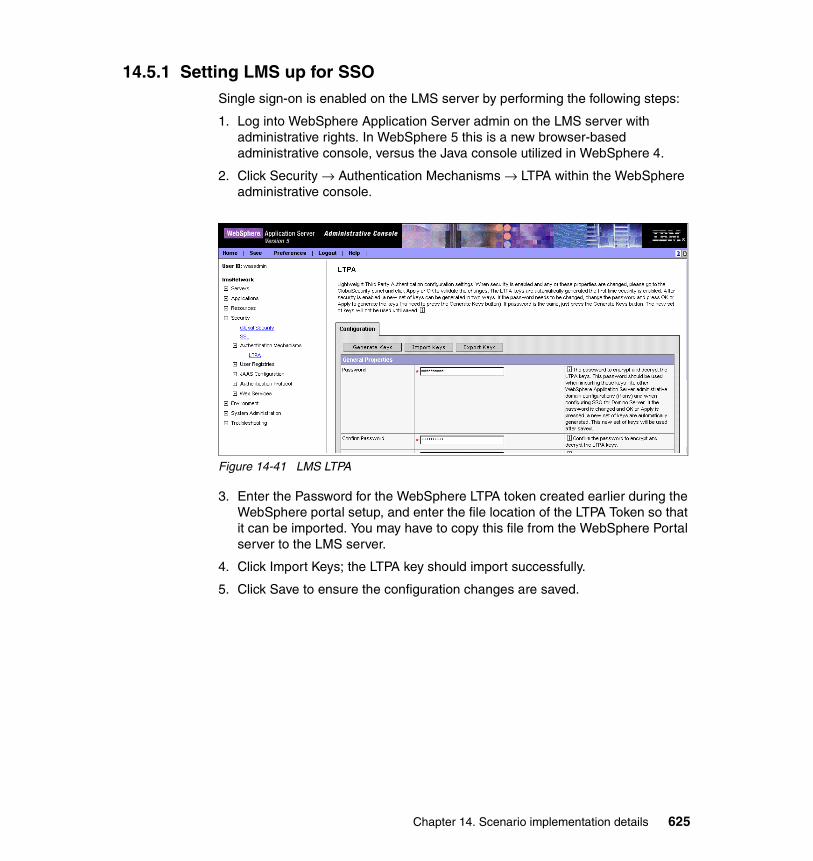
14.5.1 Setting LMS up for SSOSingle sign-on is enabled on the LMS server by performing the following steps:
1. Log into WebSphere Application Server admin on the LMS server with administrative rights. In WebSphere 5 this is a new browser-based administrative console, versus the Java console utilized in WebSphere 4.
2. Click Security → Authentication Mechanisms → LTPA within the WebSphere administrative console.
Figure 14-41 LMS LTPA
3. Enter the Password for the WebSphere LTPA token created earlier during the WebSphere portal setup, and enter the file location of the LTPA Token so that it can be imported. You may have to copy this file from the WebSphere Portal server to the LMS server.
4. Click Import Keys; the LTPA key should import successfully.
5. Click Save to ensure the configuration changes are saved.
Chapter 14. Scenario implementation details 625
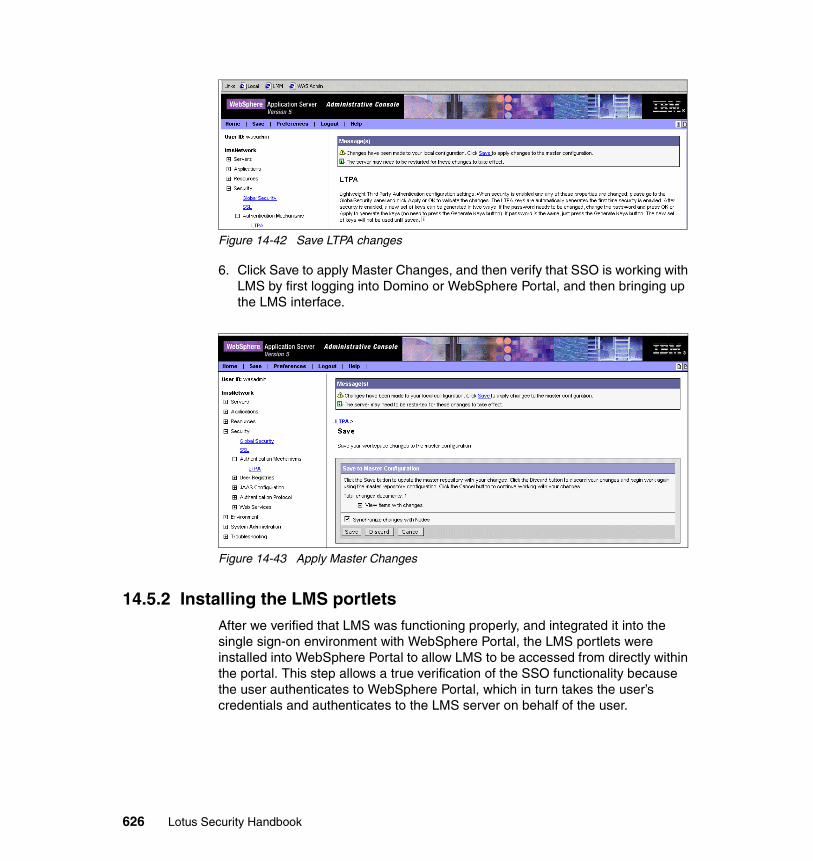
Figure 14-42 Save LTPA changes
6. Click Save to apply Master Changes, and then verify that SSO is working with LMS by first logging into Domino or WebSphere Portal, and then bringing up the LMS interface.
Figure 14-43 Apply Master Changes
14.5.2 Installing the LMS portletsAfter we verified that LMS was functioning properly, and integrated it into the single sign-on environment with WebSphere Portal, the LMS portlets were installed into WebSphere Portal to allow LMS to be accessed from directly within the portal. This step allows a true verification of the SSO functionality because the user authenticates to WebSphere Portal, which in turn takes the user’s credentials and authenticates to the LMS server on behalf of the user.
626 Lotus Security Handbook

Installing the portletsThree portlets are provided with LMS for accessing LMS from within WebSphere portal (My Courses, Search Catalog, and My Calendar). To install the portlets into WebSphere Portal, use the following steps:
1. Log into WebSphere Portal as a user with portal administration rights (wpsadmin).
2. Click the Portal Administration tab.
3. Click Install portlets.
4. Enter the file path to the “My Courses.war” file from the LMS install, and click Next.
5. A list of the portlets available in this “war” file will be displayed; click Install for those portlets to be installed into the portal server.
6. Repeat steps 4 and 5 for the “Search catalog.war” and “My Calendar.war” files.
Configuring the portletsAfter the portlets have been installed in WebSphere portal, they must be configured to point to the LMS server and the LMS server’s Web services interface through which these portlets interact with LMS. Do this with the following steps:
1. In the Portal Administration tab choose Manage portlets.
2. Choose the My course portlet from the list and choose to Modify Parameters.
Figure 14-44 Modify LMS Portlet parameters
3. Add the following parameters and values, substituting the appropriate values for your own environment as needed for the port and server parameters:
– webserviceport: 80
– webservicepath: /lms-lmm/auth-api
– webserviceserver: itsosec-lms.cam.itso.ibm.com
Chapter 14. Scenario implementation details 627

Figure 14-45 LMS Portlet parameters
4. Repeat steps 2 and 3 for both the Search Catalog Portlet and the My Calendar Portlet, adding the same parameters and values as appropriate for your environment.
14.6 Addition of Tivoli Access ManagerIn this final phase of the scenario, an enterprise access system is implemented to provide a higher level of security to the authentication and reverse proxy environment that has been implemented so far.
Unfortunately, the time alloted for the creation of this redbook did not allow us to fully implement and test this phase in our lab environment. Thus, the procedures provided here are best practices, and have not been tested fully by the Redbook team. This doesn’t mean they will not work, but that they should be carefully followed in your own test environment.
14.6.1 Installing Tivoli Access ManagerIn our scenario environment at this point, we have a WebSphere Edge Server based reverse proxy, which is handling requests to all Domino and WebSphere portal based collaborative services in our environment. We must now decide how to implement Tivoli Access Manager (TAM).
While TAM does include a security proxy component called WebSeal, this component, for all intents and purposes, is a full RPSS (Reverse Proxy with added Security components). See Chapter 5, “Proxies” on page 165 for a more detailed discussion of proxy servers and their various components. Since we already have an IBM Websphere Edge Server up and running, we would prefer
628 Lotus Security Handbook

not to have to rebuild this entire proxy setup utilizing the Tivoli WebSeal “proxy.” Thus, we would choose to install the Tivoli security plug-in for WebSphere Edge Server, also sometimes called WebSeal-Lite.
So, our first steps, before we can integrate our existing environment, is to install a new Tivoli Access Manager server, followed by an installation of the WebSeal-Lite plug-in on our reverse proxy server. For details on installing and setting up Tivoli Access Manager, see the Tivoli Information Center at:
http://publib.boulder.ibm.com/tividd/td/IBMAccessManagerfore-business4.1.html
After we have Tivoli Access Manager installed, we must integrate it in our environment such that Tivoli Access Manager handles all authentication.
14.6.2 Installing the WebSeal plug-in for Websphere Edge ServerTo install and configure the “WebSeal-Lite” plug-in on our reverse proxy server, we would perform the following:
1. Install Tivoli Access Manager plug-in for Edge Server:
a. Log into the system as a user with administrator privileges.
b. Insert the IBM Tivoli Access Manager Web Security, Version 4.1 for Windows CD. Run the setup.exe file in the following location:
cdrom_drive\windows\PolicyDirector\Disk Images\Disk1
c. From the Select Packages window, select the plug-in for Edge Server package.
2. Configure the plug-in for Edge Server:
a. Run the wslconfig.exe program.
b. When prompted, enter the following information:
• The port number for the Edge Server caching proxy. The default port number is 80.
• The Tivoli Access Manager administrative user ID and password as used when TAM was installed earlier. For example, enter sec_master and its associated password.
This configuration utility actually completes the following tasks:
� It creates registry objects for the server.
� It adds the server to the security groups, ivacld-servers and SecurityGroup.
� It creates an SSL certificate.
� It obtains an SSL-signed certificate from the Tivoli Access Manager policy server.
Chapter 14. Scenario implementation details 629

� It configures the Edge Server caching proxy to use the plug-in for Edge Server by setting directives in the Edge Server caching proxy configuration file, ibmproxy.conf.
� It restarts the Edge Server caching proxy process, ibmproxy.
Next, the configuration utility starts the plug-in for Edge Server object space manager utility, by using the wesosm command. This utility updates the Tivoli Access Manager object space to create a new object space container for the plug-in for Edge Server.
Configuration of the plug-in for Edge Server is then complete. The Edge Server caching proxy should be running with the plug-in for Edge Server loaded. The administrative user, sec_master, can be used to access the caching proxy’s home page.
14.6.3 Integrating Domino-based servers with TAMTo integrate the Lotus Domino-based services (Domino, Sametime, QuickPlace, and so forth) so that the SSO LTPA cookie can continue to be passed to Domino for single sign-on, a junction must be created from the IBM Tivoli WebSeal plug-in on the reverse proxy server to the backend Domino servers. This is done with the following steps:
1. Open the Administration Command Prompt (PDAdmin) from the AccessManager for e-business program group in the Start menu.
2. Log in as pdadmin.
3. Create a junction to the Lotus Domino server using the following arguments.
– Type of connection (-t)
– Backend host (-h)
– TCP port number backend host is bound to (-p)
– Specify Single Sign On (-A)
– The key file (-F)
– Key password (-Z)
– Ensure JavaScript is filtered correctly (-j)
– Provide the junction name (/)
Example 14-2 Creating a WebSeal junction to Domino
commands:pdadmin>loginEnter User ID:sec_masterEnter Password:
630 Lotus Security Handbook
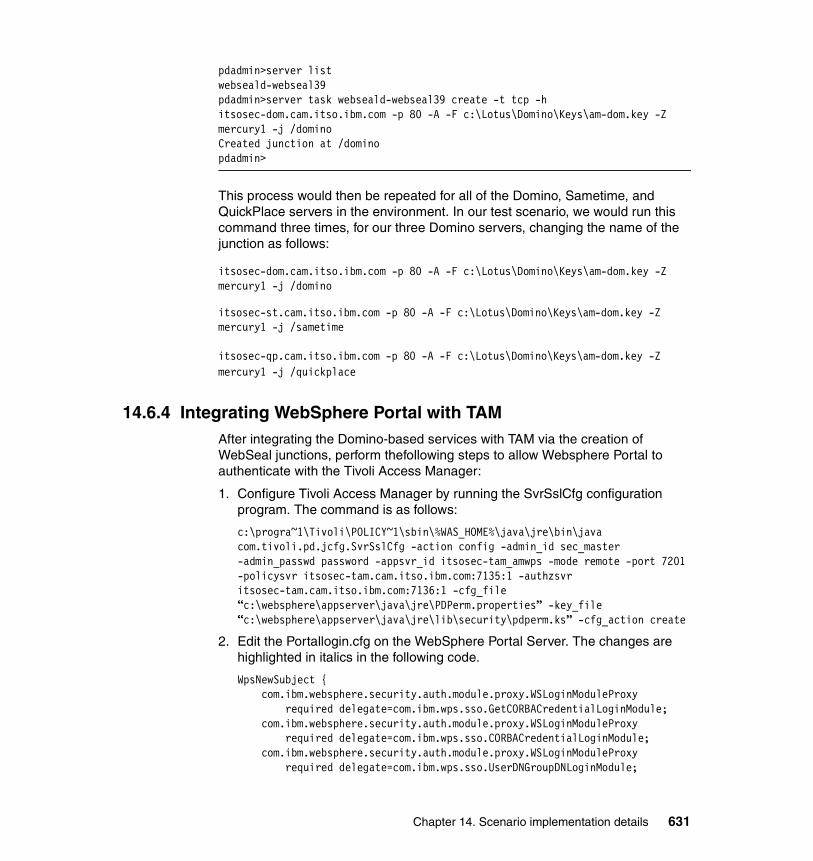
pdadmin>server listwebseald-webseal39pdadmin>server task webseald-webseal39 create -t tcp -h itsosec-dom.cam.itso.ibm.com -p 80 -A -F c:\Lotus\Domino\Keys\am-dom.key -Z mercury1 -j /dominoCreated junction at /dominopdadmin>
This process would then be repeated for all of the Domino, Sametime, and QuickPlace servers in the environment. In our test scenario, we would run this command three times, for our three Domino servers, changing the name of the junction as follows:
itsosec-dom.cam.itso.ibm.com -p 80 -A -F c:\Lotus\Domino\Keys\am-dom.key -Z mercury1 -j /domino
itsosec-st.cam.itso.ibm.com -p 80 -A -F c:\Lotus\Domino\Keys\am-dom.key -Z mercury1 -j /sametime
itsosec-qp.cam.itso.ibm.com -p 80 -A -F c:\Lotus\Domino\Keys\am-dom.key -Z mercury1 -j /quickplace
14.6.4 Integrating WebSphere Portal with TAMAfter integrating the Domino-based services with TAM via the creation of WebSeal junctions, perform thefollowing steps to allow Websphere Portal to authenticate with the Tivoli Access Manager:
1. Configure Tivoli Access Manager by running the SvrSslCfg configuration program. The command is as follows:
c:\progra~1\Tivoli\POLICY~1\sbin\%WAS_HOME%\java\jre\bin\java com.tivoli.pd.jcfg.SvrSslCfg -action config -admin_id sec_master -admin_passwd password -appsvr_id itsosec-tam_amwps -mode remote -port 7201 -policysvr itsosec-tam.cam.itso.ibm.com:7135:1 -authzsvr itsosec-tam.cam.itso.ibm.com:7136:1 -cfg_file “c:\websphere\appserver\java\jre\PDPerm.properties” -key_file “c:\websphere\appserver\java\jre\lib\security\pdperm.ks” -cfg_action create
2. Edit the Portallogin.cfg on the WebSphere Portal Server. The changes are highlighted in italics in the following code.
WpsNewSubject { com.ibm.websphere.security.auth.module.proxy.WSLoginModuleProxy required delegate=com.ibm.wps.sso.GetCORBACredentialLoginModule; com.ibm.websphere.security.auth.module.proxy.WSLoginModuleProxy required delegate=com.ibm.wps.sso.CORBACredentialLoginModule; com.ibm.websphere.security.auth.module.proxy.WSLoginModuleProxy required delegate=com.ibm.wps.sso.UserDNGroupDNLoginModule;
Chapter 14. Scenario implementation details 631

com.ibm.websphere.security.auth.module.proxy.WSLoginModuleProxy required delegate=com.ibm.wps.sso.UserIdPasswordLoginModule; com.ibm.websphere.security.auth.module.proxy.WSLoginModuleProxy required delegate=com.ibm.wps.sso.UserIdPrincipalLoginModule; com.ibm.websphere.security.auth.module.proxy.WSLoginModuleProxy required delegate=com.ibm.wps.sso.PasswordCredentialLoginModule; com.ibm.websphere.security.auth.module.proxy.WSLoginModuleProxy required delegate=com.ibm.wps.sso.LTPATokenLoginModule; com.ibm.websphere.security.auth.module.proxy.WSLoginModuleProxy required delegate=com.tivoli.mts.PDLoginModule;};WpsSubjectExists { com.ibm.websphere.security.auth.module.proxy.WSLoginModuleProxy required delegate=com.ibm.wps.sso.GetCORBACredentialLoginModule; com.ibm.websphere.security.auth.module.proxy.WSLoginModuleProxy required delegate=com.ibm.wps.sso.CORBACredentialLoginModule; com.ibm.websphere.security.auth.module.proxy.WSLoginModuleProxy required delegate=com.ibm.wps.sso.LTPATokenLoginModule; com.ibm.websphere.security.auth.module.proxy.WSLoginModuleProxy required delegate=com.tivoli.mts.PDLoginModule;};
After these steps are completed, the entire collaborative environment built during this chapter will be properly secured behind the new Tivoli Access Manager security service (via the WebSphere Edge Server plug-in) in terms of authentication.
However, in our scenario the individual applications (that is, WebSphere Portal, Lotus Domino, and so forth) continue to handle basic “authorization.” That is, they check their own ACLs to verify if a user, as authenticated by TAM, actually has access to a given resource. TAM can also be utilized to provide centralized control over authorization in addition to authentication, but that is beyond the scope of this scenario and this Redbook.
14.7 SummaryIn this chapter we have shown the actual procedures utilized by the Redbook team to implement the RedbooksCo “secure collaboration” scenario in the Redbooks test lab. These procedures can be used as a starting point for implementing a similar scenario in your own environment.
632 Lotus Security Handbook

Part 5 Appendixes
Part 5
© Copyright IBM Corp. 2004. All rights reserved. 633

634 Lotus Security Handbook
Appendix A. Debugging with a protocol analyzer
While most software products include some trouble-shooting facilities (for example, most browsers allow you to “view html source” of a page), these debugging facilities usually “pre-process” the output. For example, what you can normally see using browser-based debugging tools is just the HTML contents – already expanded/resolved – and normally you are unable to see the underlying HTTP dialogs. Thus, when debugging network and security infrastructures, it’s very useful to have a tool called a “protocol analyzer” to see what is really happening behind the scenes. The goal of this appendix is to introduce a basic protocol analyzer for network troubleshooting.
What is a protocol analyzerA protocol analyzer may be a stand-alone hardware device that you plug into the same network segments that you want to analyze, or more likely, just a software package you install on your workstation. These products allow one to capture network communication dialogs between computers and processes, apply different selection and filtering criteria, and display them in user-friendly formats. This includes interpreting the contents according to the protocols being spoken at the different layers (or example TCP, HTTP, HTML). Some of these tools allow you to code your own decoding modules for protocols that they may not understand “out of the box”.
A
© Copyright IBM Corp. 2004. All rights reserved. 635

Two options for basic protocol analyzers are:
� EtherReal: At the time of writing this book, this tool was available for free download from:
http://www.ethereal.com
� CommView: This is a relatively inexpensive commercial product available from:
http://www.tamos.com/products/commview/
The CommView product offers a remote agent that you can install in one point of the network. It captures the traffic as seen from that point and tunnels back the debugging screen to wherever you are. This feature can be extremely useful to avoid the noise and cold of server/computing rooms.
A protocol analyzer in useThe next three figures show the capture of the traffic associated with loading a simple Web page.
� Figure shows the results as seen from the browser.
� Figure A-2 shows the view of the HTML source in the same browser.
� Figure A-3 shows the same HTML via a protocol analyzer.
Figure A-1 The simple transaction to a Domino Web server, seen from browser
636 Lotus Security Handbook

Figure A-2 View source, in our IE (does not show HTTP, just HTML)
Note that when you view the “source” in a browser, what you see begins with either <HTML> or <! Doctype>. You are only looking at the beginning of the actual HTML content, in the HTTP response. Such a source view does not show the HTTP dialog between the requester (in this case a browser) and the responder (in this case a Domino server).
Appendix A. Debugging with a protocol analyzer 637
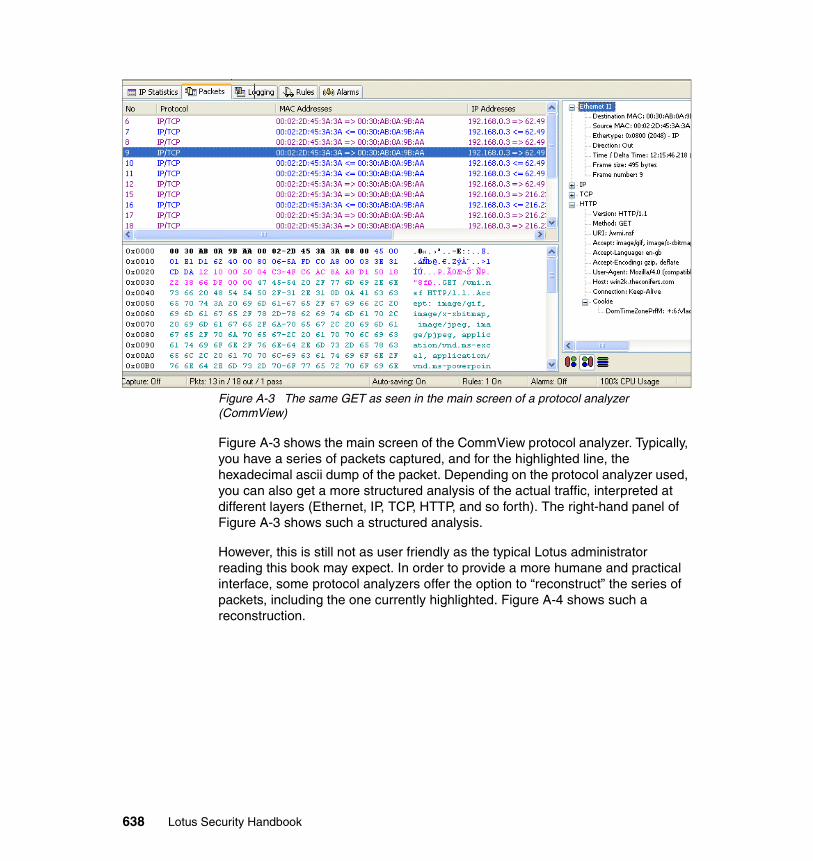
Figure A-3 The same GET as seen in the main screen of a protocol analyzer (CommView)
Figure A-3 shows the main screen of the CommView protocol analyzer. Typically, you have a series of packets captured, and for the highlighted line, the hexadecimal ascii dump of the packet. Depending on the protocol analyzer used, you can also get a more structured analysis of the actual traffic, interpreted at different layers (Ethernet, IP, TCP, HTTP, and so forth). The right-hand panel of Figure A-3 shows such a structured analysis.
However, this is still not as user friendly as the typical Lotus administrator reading this book may expect. In order to provide a more humane and practical interface, some protocol analyzers offer the option to “reconstruct” the series of packets, including the one currently highlighted. Figure A-4 shows such a reconstruction.
638 Lotus Security Handbook

Figure A-4 The session reconstructed by the protocol analyzer
By examining Figure A-4 in more detail, we can now see all of the key aspects of this HTTP communication. First, we have the ASCII dialog of the HTTP Request Headers (from the browser to the server, the first 11 lines in the figure). Then, after a blank line, the HTTP Response Headers (from the Domino Server to the browser, the next 8 lines) are shown. Finally, after the response headers, and within the response, we see the old familiar (highlighted) HTML text, the same one that we’re used to seeing in a browser “view source.” This makes it clear that “View Source” is appropriate when trying to debug a Web page by itself, but it is
Appendix A. Debugging with a protocol analyzer 639

completely useless for the purpose of debugging HTTP dialogs. You do need a protocol analyzer.
Of course, friendly protocol analyzers also allow you – given a trace known as a “capture” – to reconstruct the screen that the browser was seeing.
Figure A-5 H|TML-only display of a reconstructed captured session - like the browser
640 Lotus Security Handbook
Appendix B. A sample DSAPI program
This appendix contains a sample DSAPI program which demonstrates how to authenticate a Domino Web user through his operating system user account. It is an example of the DSAPI method of providing single sign-on, described in Chapter 7, “Single sign-on” on page 281.
Overall, this DSAPI contains code to use the user’s Windows network user ID and password if running the filter on a Windows-based Domino server. If it is used on a UNIX-based Domino server, the user ID and password from the UNIX system will be used.
The sample consists of three files: the main program. the windows-specific code, and the UNIX-specific code. The full source code, make files, and definition files can be found in the Domino 6 C API toolkit in the Samples folder inside the Admin sub-folder.
Setting up the environment1. To use this DSAPI filter it must be registered with the Domino server, as
described in “Registering the DSAPI filter with Domino” on page 642.2. The person used to test this program must have a Domino user account on
this Domino server and an Operating System (OS) user account on the machine the server is running on. To create a Domino user account for an existing OS user account see “Creating a Domino user account for existing OS user” on page 642.
B
© Copyright IBM Corp. 2004. All rights reserved. 641
3. To test this program, try to open a Domino server based database from a Web browser. Be sure the ACL of this database is correctly set. For convenience, give Reader access to default and No Access to Anonymous. The No Access=Anonymous will force authentication.
Registering the DSAPI filter with Domino1. Compile the sample program and copy the DLL to the Domino server's
program directory.2. Start the Domino server.3. From the Notes UI, open the Directory database of the Lotus Domino server
(the names.nsf database).4. From the Server → Servers view, open this server's Server Document.5. Under the Internet Protocols tab, enter the name of the DLL in the DSAPI filter
file names field.6. Save the document.
Creating a Domino user account for existing OS user1. Start the Domino server.2. Start the Domino Administrator.3. Be sure the Server field points to the server, not Local. If it points to Local,
use File - Open Server to change it to point to the Domino server.4. Highlight the People view at the left panel.5. From the People pull-down menu in the right -hand panel, click the Register
action.6. Fill in the First name, Last name, Short name, and Password. Be sure that
Short name is identical to the OS user account name.7. Click the Register button to create the Domino user.8. Close the Domino Administrator.9. Refresh the Domino server or take it down.
Running the secdom DSAPI sample
Note: (Windows servers only) To authenticate with this DSAPI filter on Windows, the OS user must have the Windows “Act as part of the operating system” user security policy enabled. If domain-level policies are defined, they must also grant this right to the user.
If the Windows user does not have this security policy set, authentication will not occur, and an error will be displayed at the server console.
To set the Windows “user security policy” for the particular user, consult your Windows documentation or contact your Windows system administrator.
642 Lotus Security Handbook

1. Bring up the Lotus Domino server and be sure the http server task is running. From the server console, you should see the following message:
DSAPI Operating System Authentication Filter Loaded successfully.2. From either this Domino server machine, or another machine, start the Web
browser.3. Enter the URL <Domino-server>/<Domino-server-database> to open the
database from the Web, where <Domino-server> is the name of the Domino server (the IP address may also be used) and <Domino-server-database> is the name of the database. For example: dserver/dsdatabase.nsf
4. From the Enter Network Password screen, enter the OS user account name and OS user account password.
– If the Domino server is running on a Windows NT/2000 machine, you should enter the user name in the following fashion:
<operating-sytem-user-name>@<operating-system-domain>
For example: jdoe@os_domain
– If the Domino server is running on a UNIX machine, you should enter the user name in the following fashion:
<operating-sytem-user-name>
For example: jdoe
5. Click OK to get authenticated.
6. You should see the content of the database.
The sample source codeThe source code for this sample DSAPI filter is provided in the following three examples.
Example: B-1 Main program
/*************************************************************************PROGRAM: SECDOM
FILE: SECDOM.C (main program)
PURPOSE: C API Sample program that illustrates how to create a library that will, from the web, authenticate a Domino user through his Operating System user account via DSAPI.
*************************************************************************/
/* Input and output include files */#include <stdlib.h>#include <stdio.h>#include <string.h>
Appendix B. A sample DSAPI program 643

/* Notes SDK include files */#include "global.h"#include "osmem.h"#include "lookup.h"#include "dsapi.h"#include "addin.h"
#define MAX_BUF_LEN 512#define USER_DOMAIN_SEPARATOR "@"
/*---* local procedure prototypes*/
/* Notes SDK unix shared library entrypoint */STATUS FAR PASCAL MainEntryPoint (void);
/* Routines with syntax dictated by the DSAPI interface */unsigned int Authenticate(FilterContext* context, FilterAuthenticate* authData);
/* Retrieval of names from Notes name and address book */int getUserNames (FilterContext* context, char *userName, char **pUserFullName, int *pUserFullNameLen, char **pUserShortName, int *pUserShortNameLen);
int getLookupInfo (FilterContext* context, char *pMatch, unsigned short itemNumber, char **pInfo, int *pInfoLen);
int doAuthenticate(char *userName, char *domain, char *password);
#ifdef UNIX
int unixAuthenticate(char *userName, char *password);#elseint separateUsernameAndDomainname(char *userName,char *separator,char **user,char**domain);int winAuthenticate(char *userName, char *domain, char *password);#endif
/*---* local procedures follow*/
STATUS FAR PASCAL MainEntryPoint (void)
644 Lotus Security Handbook
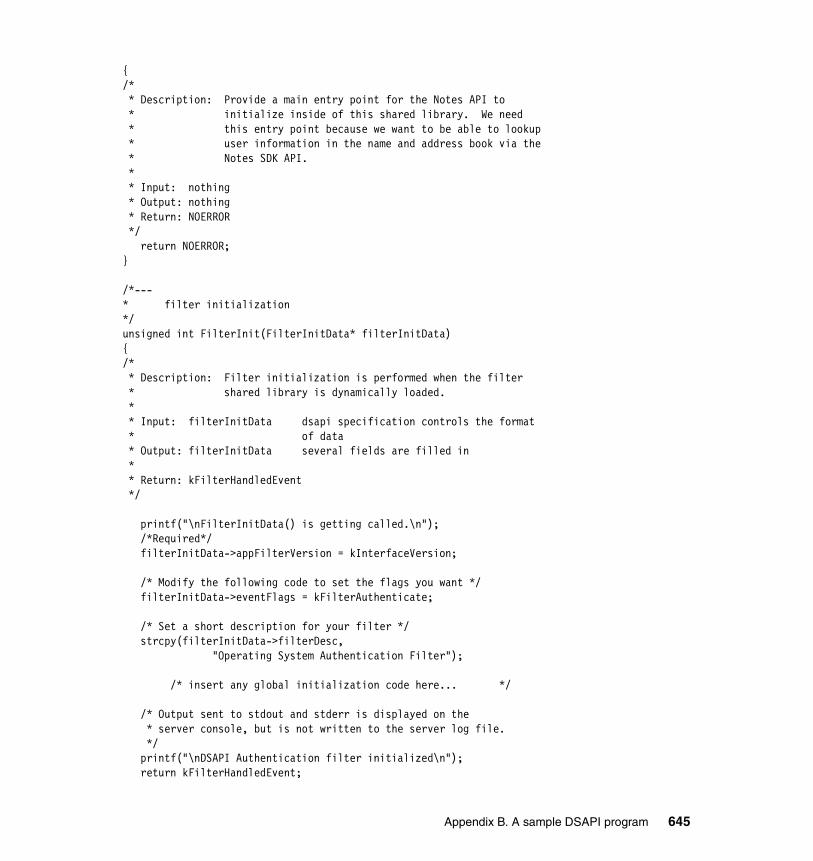
{/* * Description: Provide a main entry point for the Notes API to * initialize inside of this shared library. We need * this entry point because we want to be able to lookup * user information in the name and address book via the * Notes SDK API. * * Input: nothing * Output: nothing * Return: NOERROR */ return NOERROR;}
/*---* filter initialization*/unsigned int FilterInit(FilterInitData* filterInitData){/* * Description: Filter initialization is performed when the filter * shared library is dynamically loaded. * * Input: filterInitData dsapi specification controls the format * of data * Output: filterInitData several fields are filled in * * Return: kFilterHandledEvent */
printf("\nFilterInitData() is getting called.\n"); /*Required*/ filterInitData->appFilterVersion = kInterfaceVersion;
/* Modify the following code to set the flags you want */ filterInitData->eventFlags = kFilterAuthenticate;
/* Set a short description for your filter */ strcpy(filterInitData->filterDesc, "Operating System Authentication Filter");
/* insert any global initialization code here... */
/* Output sent to stdout and stderr is displayed on the * server console, but is not written to the server log file. */ printf("\nDSAPI Authentication filter initialized\n"); return kFilterHandledEvent;
Appendix B. A sample DSAPI program 645
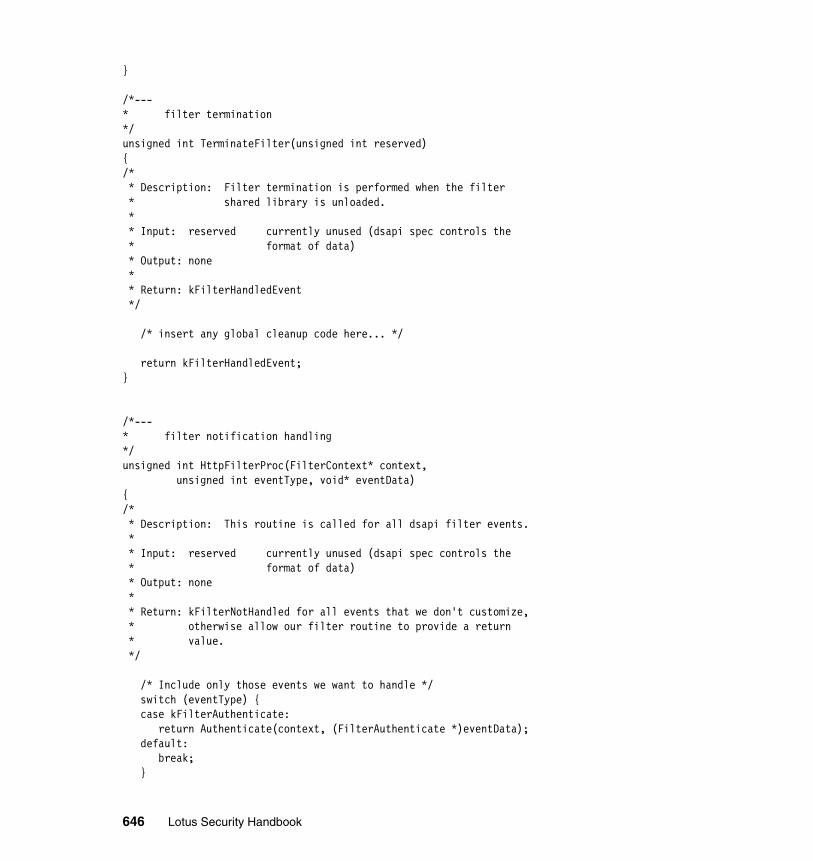
}
/*---* filter termination*/unsigned int TerminateFilter(unsigned int reserved){/* * Description: Filter termination is performed when the filter * shared library is unloaded. * * Input: reserved currently unused (dsapi spec controls the * format of data) * Output: none * * Return: kFilterHandledEvent */
/* insert any global cleanup code here... */
return kFilterHandledEvent;}
/*---* filter notification handling*/unsigned int HttpFilterProc(FilterContext* context, unsigned int eventType, void* eventData){/* * Description: This routine is called for all dsapi filter events. * * Input: reserved currently unused (dsapi spec controls the * format of data) * Output: none * * Return: kFilterNotHandled for all events that we don't customize, * otherwise allow our filter routine to provide a return * value. */
/* Include only those events we want to handle */ switch (eventType) { case kFilterAuthenticate: return Authenticate(context, (FilterAuthenticate *)eventData); default: break; }
646 Lotus Security Handbook

return kFilterNotHandled;}
/*---* handle user authentication*/unsigned int Authenticate(FilterContext* context, FilterAuthenticate* authData){/* * Description: This routine is called on a dsapi kFilterAuthUser * event. * * Input: context dsapi specification controls the format of data * * authData password field contains the password to use for * authentication * userName field contains the name * to authenticate * foundInCache field is TRUE if * user has been found in the cache and can be * authenticated on that basis. * * Output: authData authName field is filled with user's * distinguished name * authType filed is filled * with kNotAuthentic if we can't authenticate the * user kAuthenticBasic if we can * authenticate the user. * * Return: kFilterNotHandled if we do not understand the input data, * or if the user has been found in the cache, or * if we find that the user to be authenticated is * not known to OS. * kFilterHandledEvent if the user is known to OS. */
/* If the user is found in the cache, then we don't need to do * anything further. */
if (!authData || authData->foundInCache) { AddInLogMessageText ("\n user is found in the cache \n", NOERROR); return kFilterNotHandled; }
/* Attempt to verify the user's password.
Appendix B. A sample DSAPI program 647
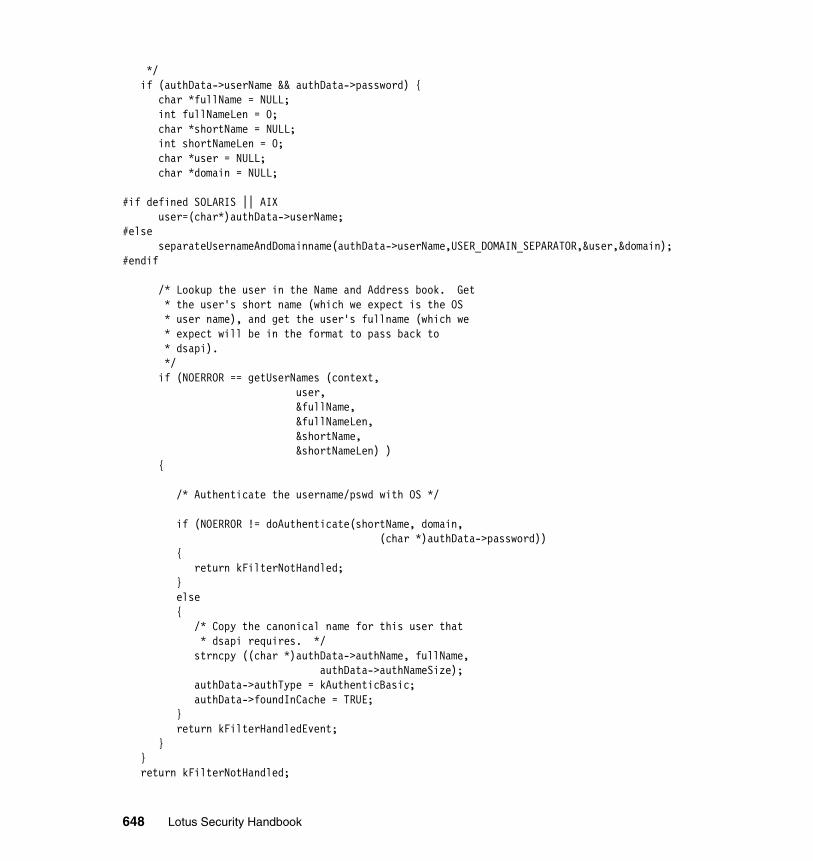
*/ if (authData->userName && authData->password) { char *fullName = NULL; int fullNameLen = 0; char *shortName = NULL; int shortNameLen = 0; char *user = NULL; char *domain = NULL; #if defined SOLARIS || AIX user=(char*)authData->userName;#else separateUsernameAndDomainname(authData->userName,USER_DOMAIN_SEPARATOR,&user,&domain);#endif
/* Lookup the user in the Name and Address book. Get * the user's short name (which we expect is the OS * user name), and get the user's fullname (which we * expect will be in the format to pass back to * dsapi). */ if (NOERROR == getUserNames (context, user, &fullName, &fullNameLen, &shortName, &shortNameLen) ) {
/* Authenticate the username/pswd with OS */
if (NOERROR != doAuthenticate(shortName, domain, (char *)authData->password)) { return kFilterNotHandled; } else { /* Copy the canonical name for this user that * dsapi requires. */ strncpy ((char *)authData->authName, fullName, authData->authNameSize); authData->authType = kAuthenticBasic; authData->foundInCache = TRUE; } return kFilterHandledEvent; } } return kFilterNotHandled;
648 Lotus Security Handbook

}
int getUserNames (FilterContext* context, char *userName, char **pUserFullName, int *pUserFullNameLen, char **pUserShortName, int *pUserShortNameLen) {/* * Description: Lookup the user and return the user's full name and short name. * * Input: context context we'll use for allocating memory * userName the name of the user to lookup * Output: pUserFullName location of the user's full name * pUserFullNameLen location to store the length of fullname * pUserShortName location of the user's shortname * pUserShortNameLen location to store the length of shortname * * Return: -1 on error, 0 on success */ STATUS error = NOERROR; HANDLE hLookup = NULLHANDLE; DWORD Matches = 0; char *pLookup; char *pName = NULL; char *pMatch = NULL; int rc = -1;
/* Initialize output */ *pUserFullName = NULL; *pUserFullNameLen = 0; *pUserShortName = NULL; *pUserShortNameLen = 0;
/* do the name lookup */ error = NAMELookup2(NULL, /* NULL means look locally */ 0, /* flags */ 1, /* number of namespaces */ "$Users", /* namespace list */ 1, /* number of names to lookup */ userName, /* list of names to lookup */ 2, /* number of items to return */ "FullName\0ShortName", /* list of items to * return */ &hLookup); /* place to receive handle of * return buffer */
if (error || (NULLHANDLE == hLookup))
Appendix B. A sample DSAPI program 649

goto NoUnlockExit;
pLookup = (char *) OSLockObject(hLookup);
/* Get a pointer to our entry. */ pName = (char *)NAMELocateNextName2(pLookup, /* name lookup * buffer */ NULL, /* start at beginning of * lookup buffer */ &Matches); /* Receives number * of times we * found the entry * (should be 1) */
/* If we didn't find the entry, then quit */ if ((pName == NULL) || (Matches <= 0)) { goto Exit; }
pMatch = (char *)NAMELocateNextMatch2(pLookup, /* name lookup * buffer */ pName, /* entry that we found */ NULL); /* no previous match */ if (NULL == pMatch) { goto Exit; }
/* Get the full name from the info we got back */
if ( getLookupInfo (context, pMatch, 0, pUserFullName, pUserFullNameLen) ) goto Exit;
AddInLogMessageText ("full name=%s,length=%d\n", 0,*pUserFullName,*pUserFullNameLen);
/* Get the short name from the info we got back */ if ( getLookupInfo (context, pMatch, 1, pUserShortName, pUserShortNameLen) ) goto Exit; else rc = 0;
650 Lotus Security Handbook

AddInLogMessageText ("short name=%s,length=%d\n", 0,*pUserShortName,*pUserShortNameLen);Exit: if ( pLookup && hLookup ) OSUnlock(hLookup);NoUnlockExit: if (NULLHANDLE != hLookup) OSMemFree(hLookup); return rc;}
int getLookupInfo (FilterContext* context, char *pMatch, unsigned short itemNumber, char **pInfo, int *pInfoLen) {/* * Description: Get the info from the lookup buffer * * Input: context context we'll use for allocating memory * pMatch the name of the lookup buffer * itemNumber where the info is stored in the lookup * buffer * Output: pInfo location of the info buffer * pInfoLen location to store the info length * * Return: -1 on error, 0 on success */
unsigned int reserved = 0; unsigned int errID; char *ValuePtr = NULL; WORD ValueLength, DataType; STATUS error; void *newSpace = NULL;
/* Initialize output */ *pInfo = NULL; *pInfoLen = 0;
/* Check the type and length of the info */
ValuePtr = (char *)NAMELocateItem2(pMatch, itemNumber, &DataType, &ValueLength);
if (NULL == ValuePtr || ValueLength == 0) {
return -1;
Appendix B. A sample DSAPI program 651
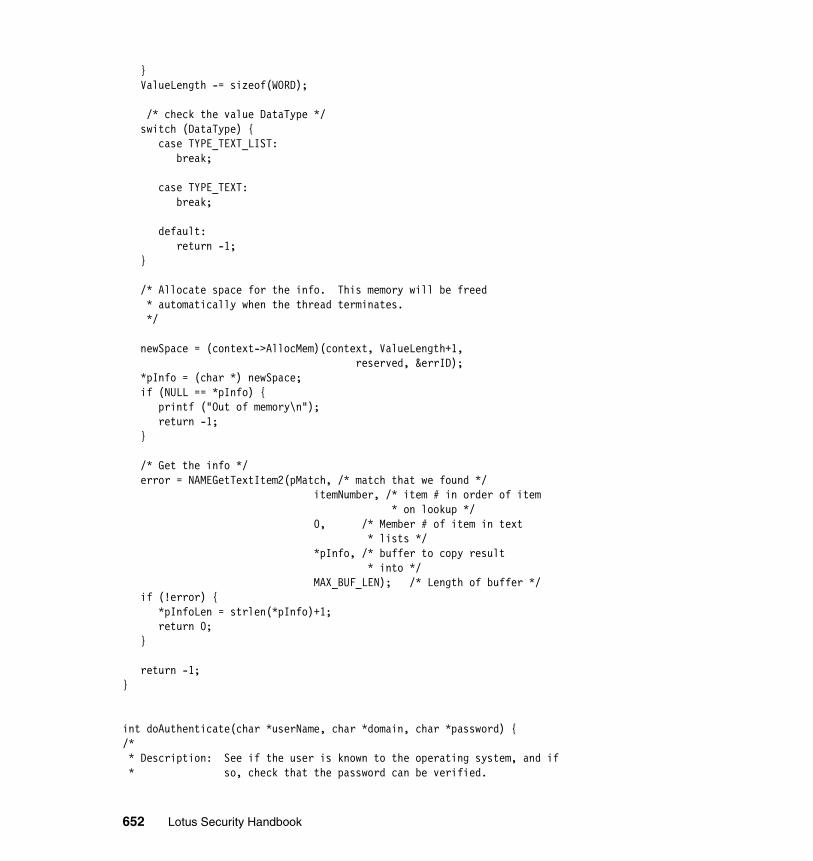
} ValueLength -= sizeof(WORD);
/* check the value DataType */ switch (DataType) { case TYPE_TEXT_LIST: break;
case TYPE_TEXT: break;
default: return -1; }
/* Allocate space for the info. This memory will be freed * automatically when the thread terminates. */
newSpace = (context->AllocMem)(context, ValueLength+1, reserved, &errID); *pInfo = (char *) newSpace; if (NULL == *pInfo) { printf ("Out of memory\n"); return -1; }
/* Get the info */ error = NAMEGetTextItem2(pMatch, /* match that we found */ itemNumber, /* item # in order of item * on lookup */ 0, /* Member # of item in text * lists */ *pInfo, /* buffer to copy result * into */ MAX_BUF_LEN); /* Length of buffer */ if (!error) { *pInfoLen = strlen(*pInfo)+1; return 0; }
return -1;}
int doAuthenticate(char *userName, char *domain, char *password) {/* * Description: See if the user is known to the operating system, and if * so, check that the password can be verified.
652 Lotus Security Handbook
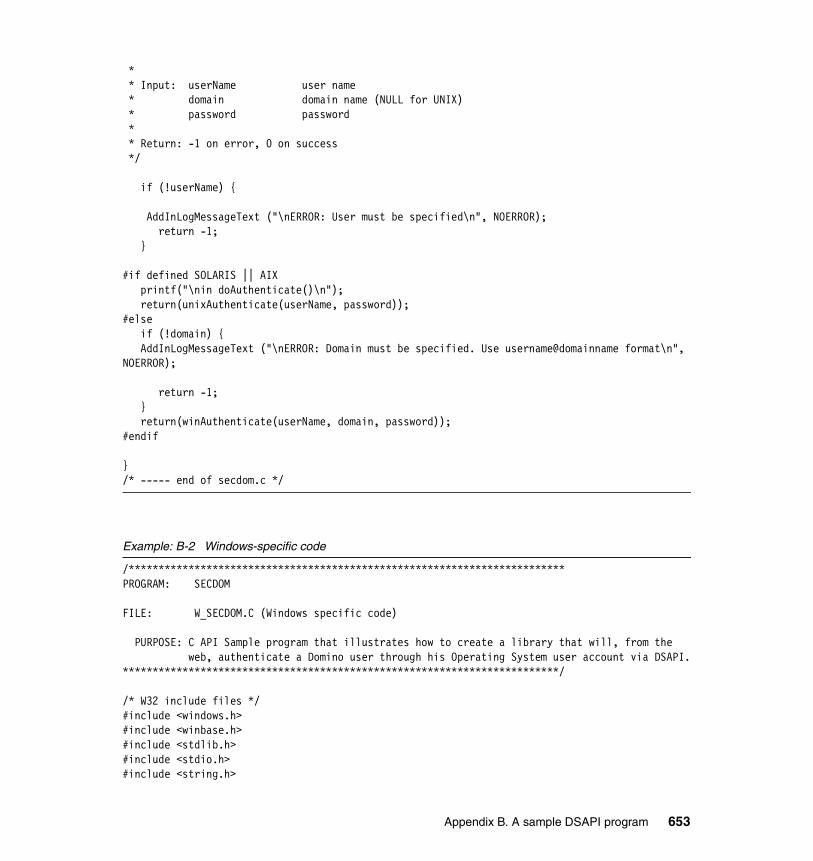
* * Input: userName user name * domain domain name (NULL for UNIX) * password password * * Return: -1 on error, 0 on success */
if (!userName) {
AddInLogMessageText ("\nERROR: User must be specified\n", NOERROR); return -1; }
#if defined SOLARIS || AIX printf("\nin doAuthenticate()\n"); return(unixAuthenticate(userName, password));#else if (!domain) { AddInLogMessageText ("\nERROR: Domain must be specified. Use username@domainname format\n", NOERROR);
return -1; } return(winAuthenticate(userName, domain, password));#endif
}/* ----- end of secdom.c */
Example: B-2 Windows-specific code
/*************************************************************************PROGRAM: SECDOM
FILE: W_SECDOM.C (Windows specific code)
PURPOSE: C API Sample program that illustrates how to create a library that will, from the web, authenticate a Domino user through his Operating System user account via DSAPI.*************************************************************************/
/* W32 include files */#include <windows.h>#include <winbase.h>#include <stdlib.h>#include <stdio.h>#include <string.h>
Appendix B. A sample DSAPI program 653
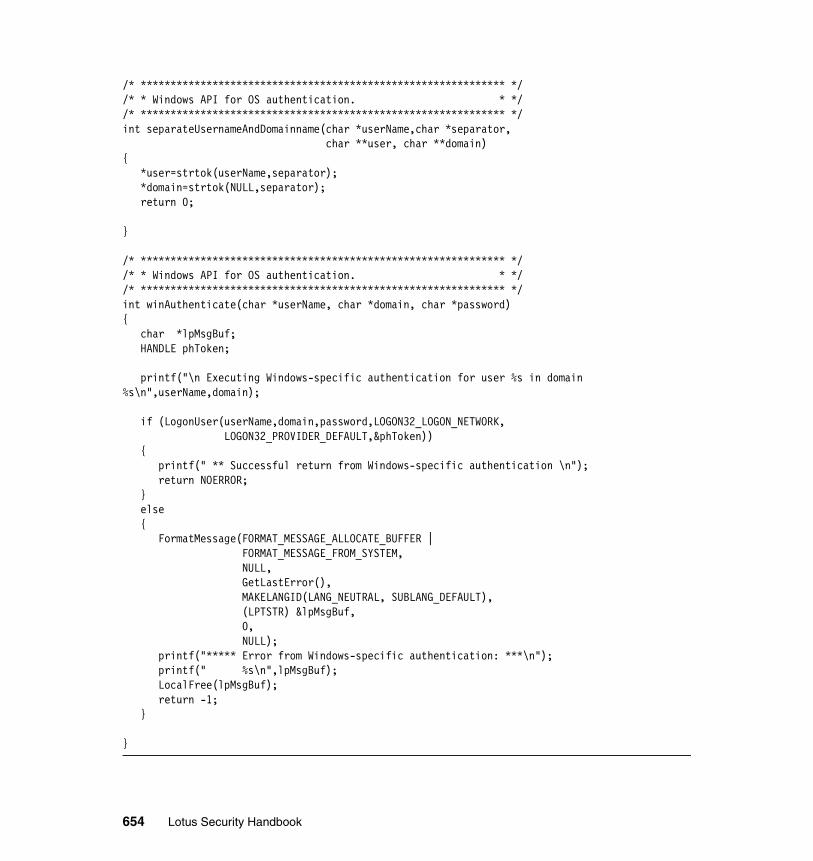
/* ************************************************************* *//* * Windows API for OS authentication. * *//* ************************************************************* */int separateUsernameAndDomainname(char *userName,char *separator, char **user, char **domain){ *user=strtok(userName,separator); *domain=strtok(NULL,separator); return 0;
}
/* ************************************************************* *//* * Windows API for OS authentication. * *//* ************************************************************* */int winAuthenticate(char *userName, char *domain, char *password){ char *lpMsgBuf; HANDLE phToken; printf("\n Executing Windows-specific authentication for user %s in domain %s\n",userName,domain);
if (LogonUser(userName,domain,password,LOGON32_LOGON_NETWORK, LOGON32_PROVIDER_DEFAULT,&phToken)) { printf(" ** Successful return from Windows-specific authentication \n"); return NOERROR; } else { FormatMessage(FORMAT_MESSAGE_ALLOCATE_BUFFER | FORMAT_MESSAGE_FROM_SYSTEM, NULL, GetLastError(), MAKELANGID(LANG_NEUTRAL, SUBLANG_DEFAULT), (LPTSTR) &lpMsgBuf, 0, NULL); printf("***** Error from Windows-specific authentication: ***\n"); printf(" %s\n",lpMsgBuf); LocalFree(lpMsgBuf); return -1; }
}
654 Lotus Security Handbook
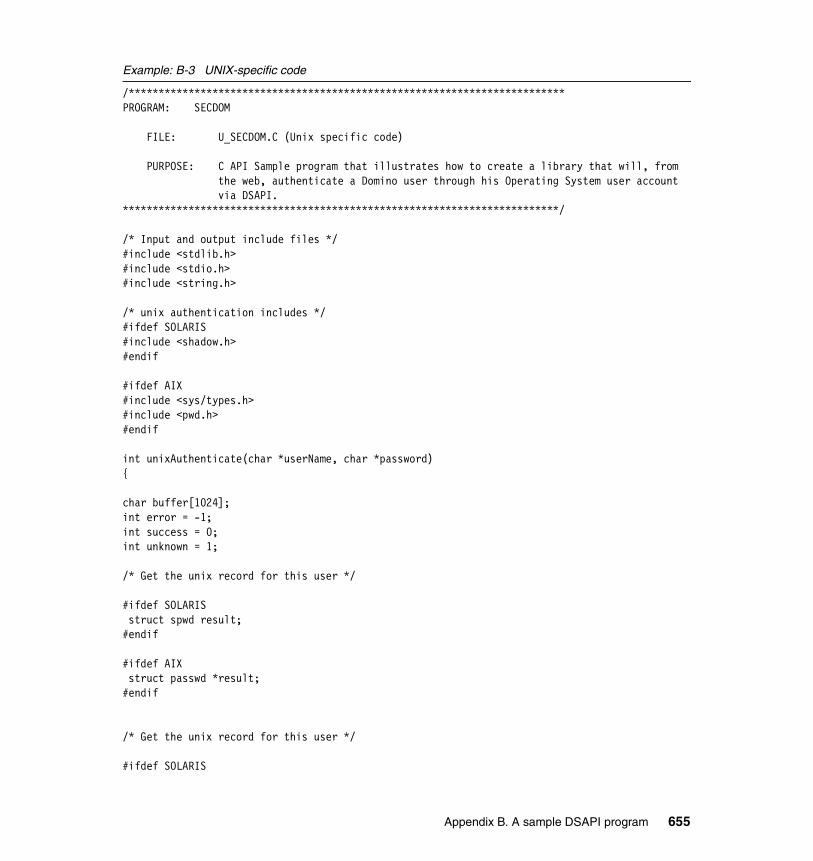
Example: B-3 UNIX-specific code
/*************************************************************************PROGRAM: SECDOM
FILE: U_SECDOM.C (Unix specific code)
PURPOSE: C API Sample program that illustrates how to create a library that will, from the web, authenticate a Domino user through his Operating System user account via DSAPI.*************************************************************************/
/* Input and output include files */#include <stdlib.h>#include <stdio.h>#include <string.h>
/* unix authentication includes */#ifdef SOLARIS#include <shadow.h>#endif
#ifdef AIX#include <sys/types.h>#include <pwd.h>#endif
int unixAuthenticate(char *userName, char *password){
char buffer[1024];int error = -1;int success = 0;int unknown = 1; /* Get the unix record for this user */
#ifdef SOLARIS struct spwd result;#endif
#ifdef AIX struct passwd *result;#endif
/* Get the unix record for this user */
#ifdef SOLARIS
Appendix B. A sample DSAPI program 655

if (getspnam_r(userName, &result, buffer, sizeof(buffer))) {/* Encrypt the password and see if it matches the * encrypted password from the user's record. */ char *thisCrypt = NULL; thisCrypt = (char *)crypt(password, result.sp_pwdp); if (strcmp (result.sp_pwdp, thisCrypt) == 0) { return success; } else { return error; } }#endif
#ifdef AIX result = getpwnam(userName); if (result && result->pw_passwd) {/* Encrypt the password and see if it matches the * encrypted password from the user's record. */ char *thisCrypt = NULL; thisCrypt = (char *)crypt(password, result->pw_passwd); if (strcmp (result->pw_passwd, thisCrypt) == 0) { return success; } else { return error; } }#endif
return unknown;}
656 Lotus Security Handbook

Appendix C. Domino 6 HTTP plug-in hints and tips
This appendix provides more details and best practices for successfully using the new Domino 6 HTTP plug-in architecture that was described in 11.2.2, “HTTP server plug-ins” on page 448.
Special HTTP headers definedAs described earlier in this Redbook, the HTTPEnableConnectorHeaders Notes.ini setting enables the Domino HTTP task to process special headers that are added to requests by a WebSphere plug-in architecture installed on front end Web servers.
When the plug-in relays an HTTP request to the Domino back end server, the plug-in adds headers that include information about the front end server's configuration and user authentication status.
The supported values for the HTTPEnableConnectorHeaders setting are:
� 0: The Domino HTTP task does not process the special headers. As a security measure, the HTTP task ignores these headers if the setting is not enabled.
� 1: The Domino HTTP task does process the special headers.
C
© Copyright IBM Corp. 2004. All rights reserved. 657
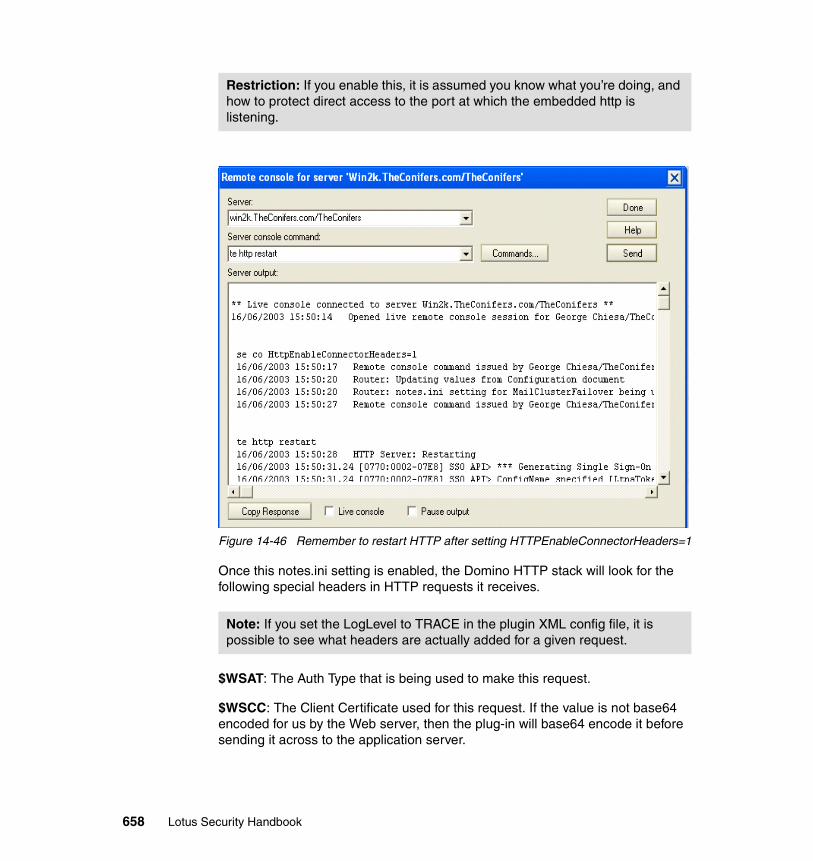
Figure 14-46 Remember to restart HTTP after setting HTTPEnableConnectorHeaders=1
Once this notes.ini setting is enabled, the Domino HTTP stack will look for the following special headers in HTTP requests it receives.
$WSAT: The Auth Type that is being used to make this request.
$WSCC: The Client Certificate used for this request. If the value is not base64 encoded for us by the Web server, then the plug-in will base64 encode it before sending it across to the application server.
Restriction: If you enable this, it is assumed you know what you’re doing, and how to protect direct access to the port at which the embedded http is listening.
Note: If you set the LogLevel to TRACE in the plugin XML config file, it is possible to see what headers are actually added for a given request.
658 Lotus Security Handbook
$WSCS: The cipher suite that the Web server negotiated with the client. This is not necessarily the cipher suite that the plug-in will use to send the request across to the application server.
$WSIS: This header will be set to either True or False depending on whether or not the request is secure (came in over SSL/TLS).
$WSSC: The scheme being used for the request. This header will normally be set to either http or https.
$WSPR: The HTTP protocol level being used for this request. The plug-in currently has support for up to HTTP/1.1 requests.
$WSRA: The remote IP address of the machine the client is running on.
$WSRH: The remote host name of the machine the client is running on. If the hostname can't be resolved, this header should be set to the IP address.
$WSRU: The remote user specified for the given request.
$WSSN: The server name used for this request. This should be the value that was specified in the HOST header of the incoming request.
$WSSP: The server port that the request was received on. This will be the port value that is used in route determination.
$WSSI: The SSL Session ID being used for this request. If the value is not base64 encoded for us by the Web server, the plug-in will base64 encode it before sending it across to the application server.
Be sure to secure the environmentWhen utilizing this new plug-in model, it is important to stress the fact that Domino “completely” trusts the information that is sent in these special HTTP headers. For example, rather than using the client IP address recorded by the Domino HTTP stack during the HTTP request, Domino will instead trust the IP address included in the special header $WSRA. Or as another example, rather than determining the users name/etc. on its own, Domino will trust the user name provided in the $WSRU special header - as Domino will assume the user has been properly authenticated and verified by the front-end server!
Thus, do not set HttpEnableConnectorHeaders=1 in your notes.ini, unless you have 100% certainty that the only traffic that can possibly arrive at your Domino server is generated by a supported front end HTTP plug-in. Otherwise, hackers can craft what appear to be authenticated requests by utilizing the special HTTP headers.
Appendix C. Domino 6 HTTP plug-in hints and tips 659

You need to ensure that your firewall and network environment limits traffic between the front-end and back-end servers, and that Domino only accepts traffic from the IP address of the Web server plug-in via the new IP filtering capabilities of Domino 6.
Installing the plug-in on an IIS server
This section provides some instructions for successfully installing the WebSphere Application Server plug-in on a Microsoft IIS server.
1. Create the following directory structure on the IIS machine (you may use any drive), and copy the sample minimal configuration file from the Domino server to the IIS server:
Copy data/domino/plug-ins/plugin-cfg.xml to c:\WebSphere\AppServer\config.
Figure C-1 Directory structure that you must create in your C drive of IIS server
2. Launch RegEdit.exe (open the Windows registry file) and create the following key path: HKEY_LOCAL_MACHINE - SOFTWARE - IBM - WebSphere Application Server - 4.0.
Important: Some early documentation on these plug-in capabilities had an extra dash in the word PlugIn (it said Plug-In) in the name of the new string to create (“Plugin Config”) in the registry editor step. This is where you tell the plug-in the name of the configuration file, which in turn contains the name of the log file to create. Please pay particular attention because if you have typos in this string NAME the plug-in will not load and your only clue – the message in EventViewer – is quite obscure.
660 Lotus Security Handbook
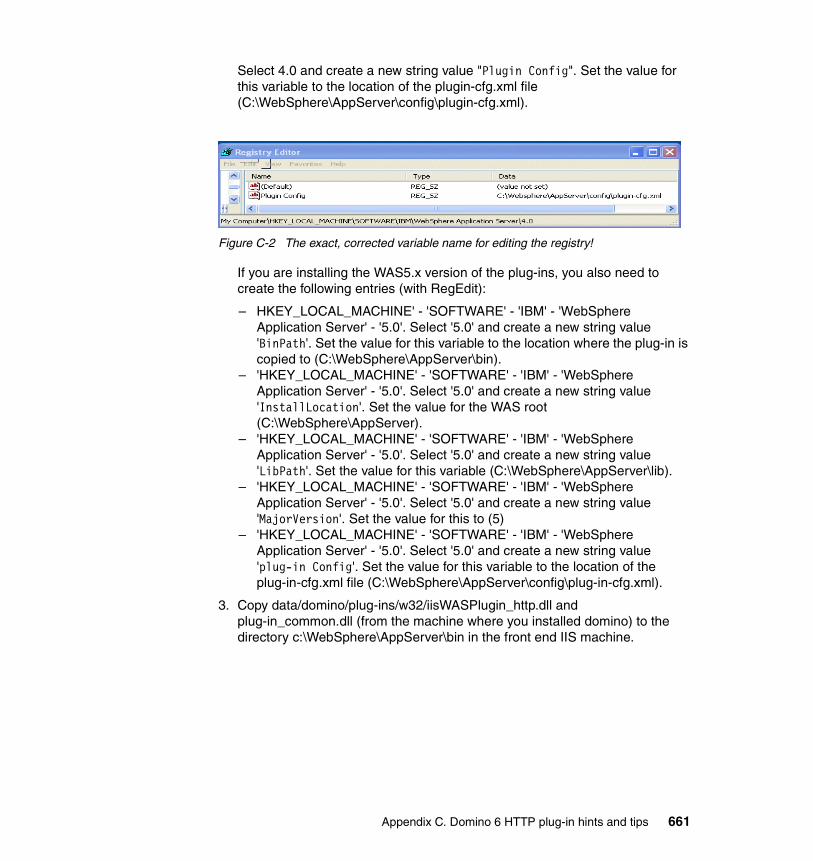
Select 4.0 and create a new string value "Plugin Config". Set the value for this variable to the location of the plugin-cfg.xml file (C:\WebSphere\AppServer\config\plugin-cfg.xml).
Figure C-2 The exact, corrected variable name for editing the registry!
If you are installing the WAS5.x version of the plug-ins, you also need to create the following entries (with RegEdit):
– HKEY_LOCAL_MACHINE' - 'SOFTWARE' - 'IBM' - 'WebSphere Application Server' - '5.0'. Select '5.0' and create a new string value 'BinPath'. Set the value for this variable to the location where the plug-in is copied to (C:\WebSphere\AppServer\bin).
– 'HKEY_LOCAL_MACHINE' - 'SOFTWARE' - 'IBM' - 'WebSphere Application Server' - '5.0'. Select '5.0' and create a new string value 'InstallLocation'. Set the value for the WAS root (C:\WebSphere\AppServer).
– 'HKEY_LOCAL_MACHINE' - 'SOFTWARE' - 'IBM' - 'WebSphere Application Server' - '5.0'. Select '5.0' and create a new string value 'LibPath'. Set the value for this variable (C:\WebSphere\AppServer\lib).
– 'HKEY_LOCAL_MACHINE' - 'SOFTWARE' - 'IBM' - 'WebSphere Application Server' - '5.0'. Select '5.0' and create a new string value 'MajorVersion'. Set the value for this to (5)
– 'HKEY_LOCAL_MACHINE' - 'SOFTWARE' - 'IBM' - 'WebSphere Application Server' - '5.0'. Select '5.0' and create a new string value 'plug-in Config'. Set the value for this variable to the location of the plug-in-cfg.xml file (C:\WebSphere\AppServer\config\plug-in-cfg.xml).
3. Copy data/domino/plug-ins/w32/iisWASPlugin_http.dll and plug-in_common.dll (from the machine where you installed domino) to the directory c:\WebSphere\AppServer\bin in the front end IIS machine.
Appendix C. Domino 6 HTTP plug-in hints and tips 661
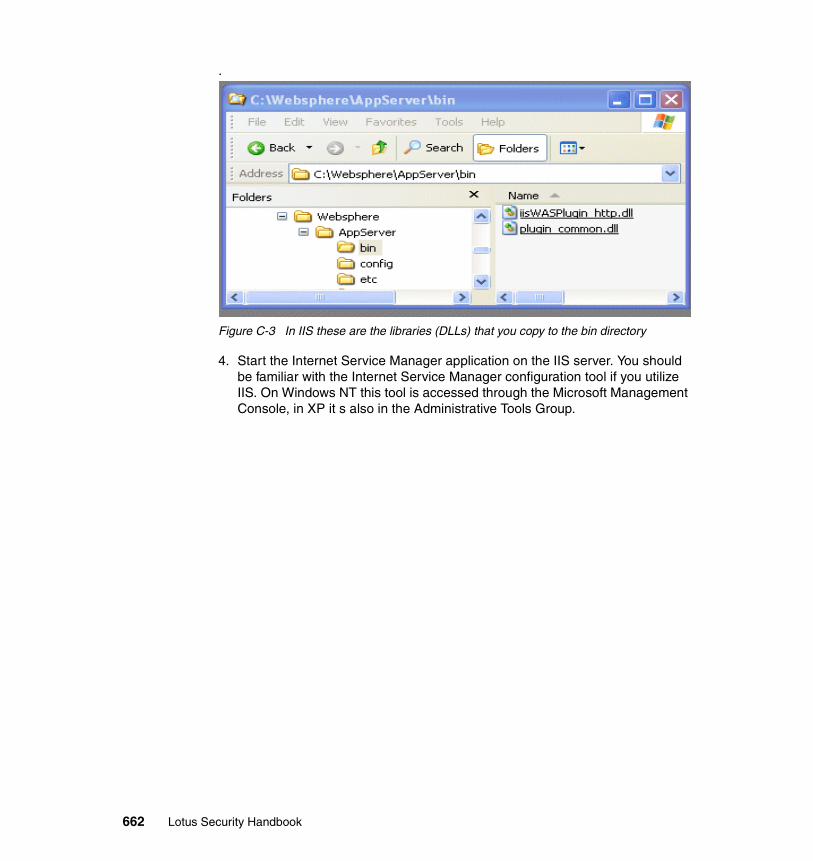
.
Figure C-3 In IIS these are the libraries (DLLs) that you copy to the bin directory
4. Start the Internet Service Manager application on the IIS server. You should be familiar with the Internet Service Manager configuration tool if you utilize IIS. On Windows NT this tool is accessed through the Microsoft Management Console, in XP it s also in the Administrative Tools Group.
662 Lotus Security Handbook
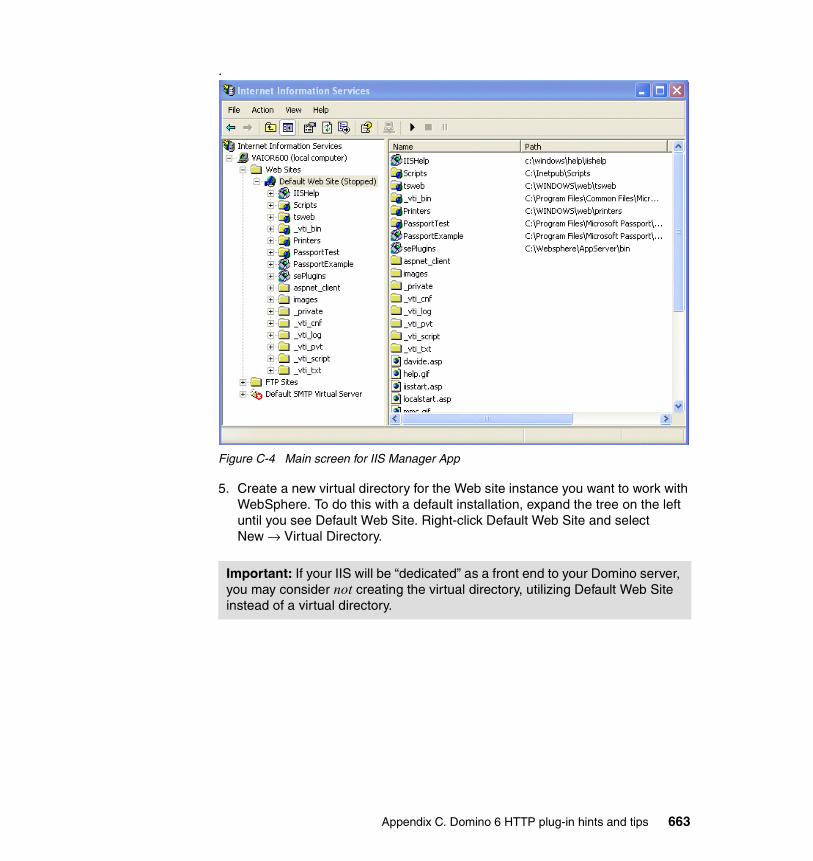
.
Figure C-4 Main screen for IIS Manager App
5. Create a new virtual directory for the Web site instance you want to work with WebSphere. To do this with a default installation, expand the tree on the left until you see Default Web Site. Right-click Default Web Site and select New → Virtual Directory.
Important: If your IIS will be “dedicated” as a front end to your Domino server, you may consider not creating the virtual directory, utilizing Default Web Site instead of a virtual directory.
Appendix C. Domino 6 HTTP plug-in hints and tips 663
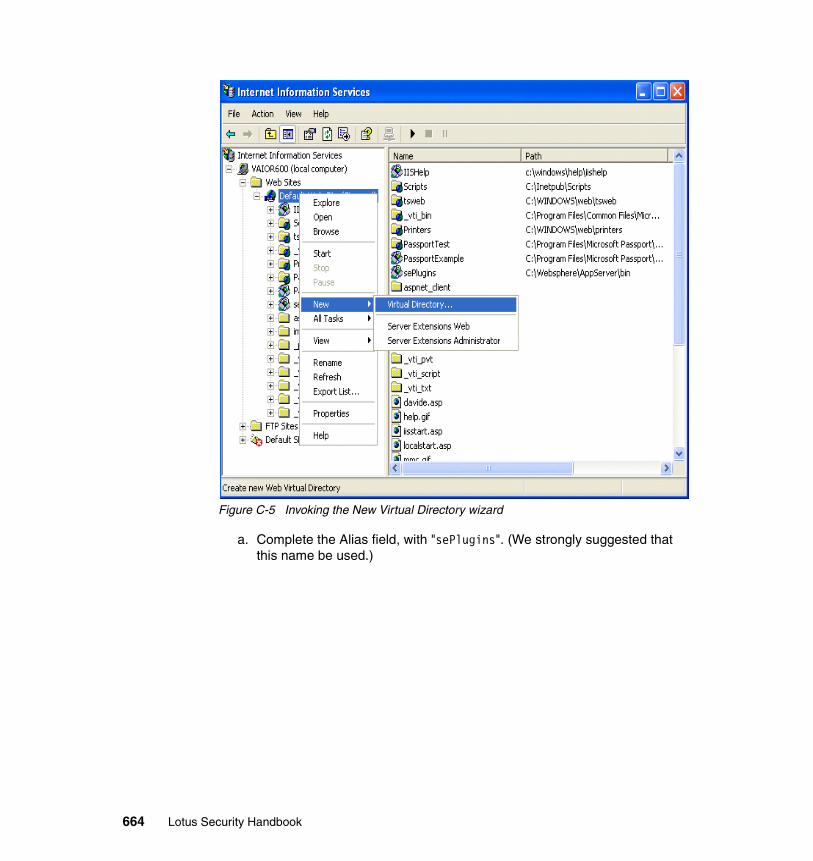
Figure C-5 Invoking the New Virtual Directory wizard
a. Complete the Alias field, with "sePlugins". (We strongly suggested that this name be used.)
664 Lotus Security Handbook
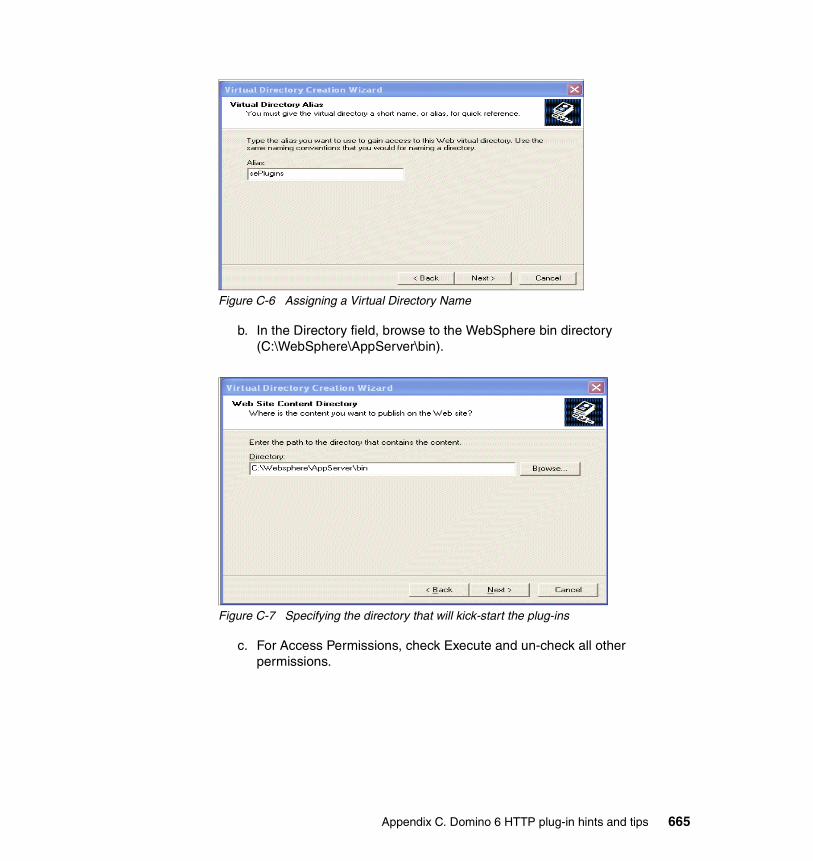
Figure C-6 Assigning a Virtual Directory Name
b. In the Directory field, browse to the WebSphere bin directory (C:\WebSphere\AppServer\bin).
Figure C-7 Specifying the directory that will kick-start the plug-ins
c. For Access Permissions, check Execute and un-check all other permissions.
Appendix C. Domino 6 HTTP plug-in hints and tips 665
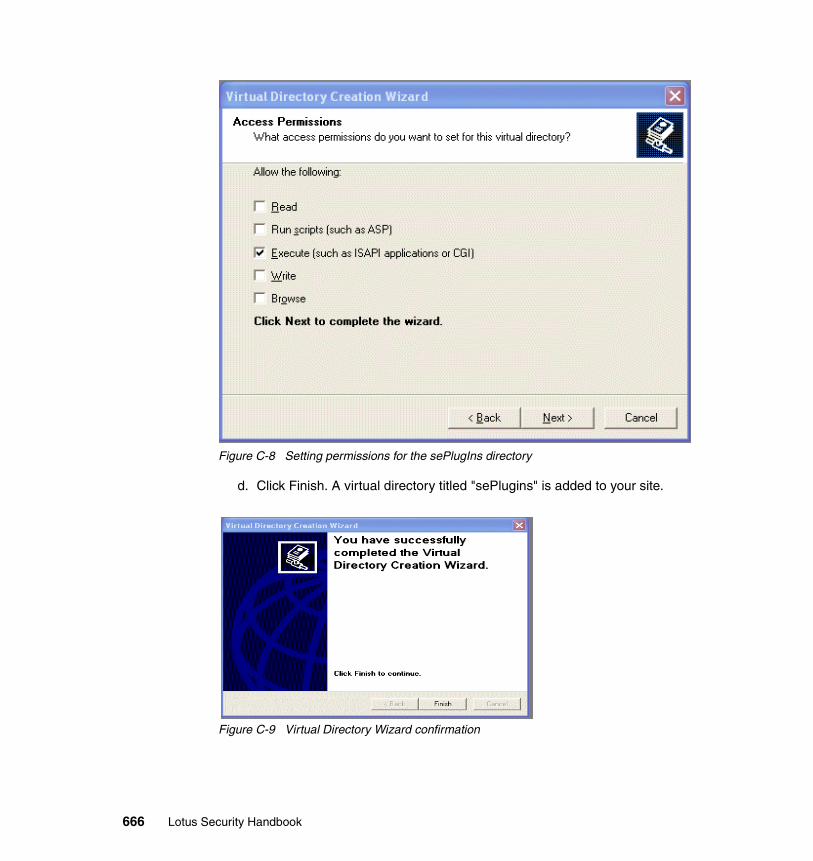
Figure C-8 Setting permissions for the sePlugIns directory
d. Click Finish. A virtual directory titled "sePlugins" is added to your site.
Figure C-9 Virtual Directory Wizard confirmation
666 Lotus Security Handbook
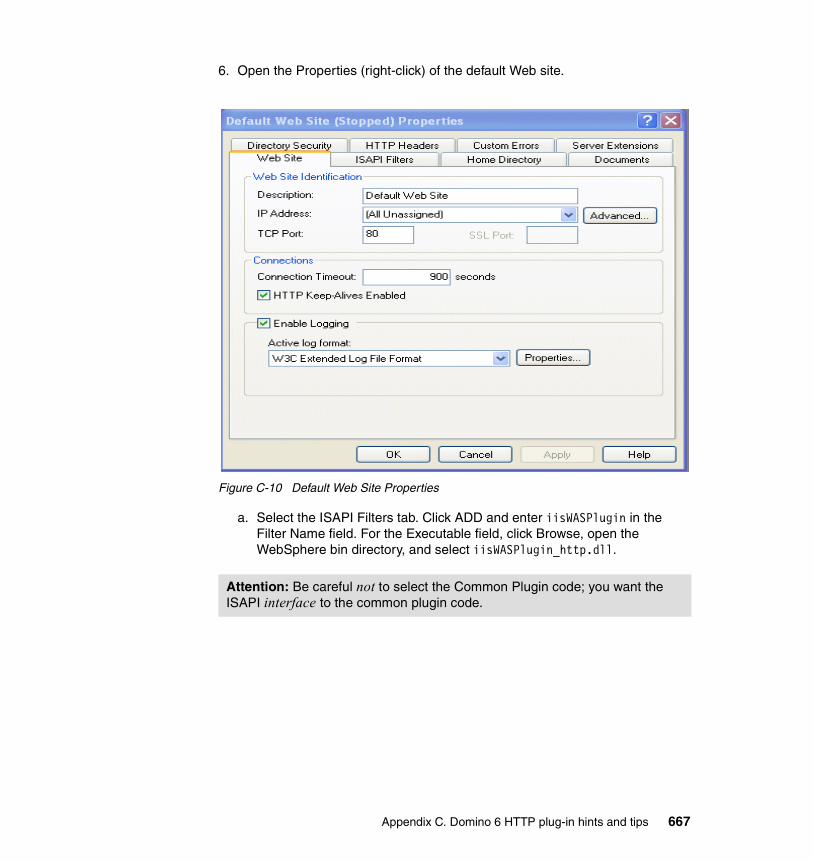
6. Open the Properties (right-click) of the default Web site.
Figure C-10 Default Web Site Properties
a. Select the ISAPI Filters tab. Click ADD and enter iisWASPlugin in the Filter Name field. For the Executable field, click Browse, open the WebSphere bin directory, and select iisWASPlugin_http.dll.
Attention: Be careful not to select the Common Plugin code; you want the ISAPI interface to the common plugin code.
Appendix C. Domino 6 HTTP plug-in hints and tips 667
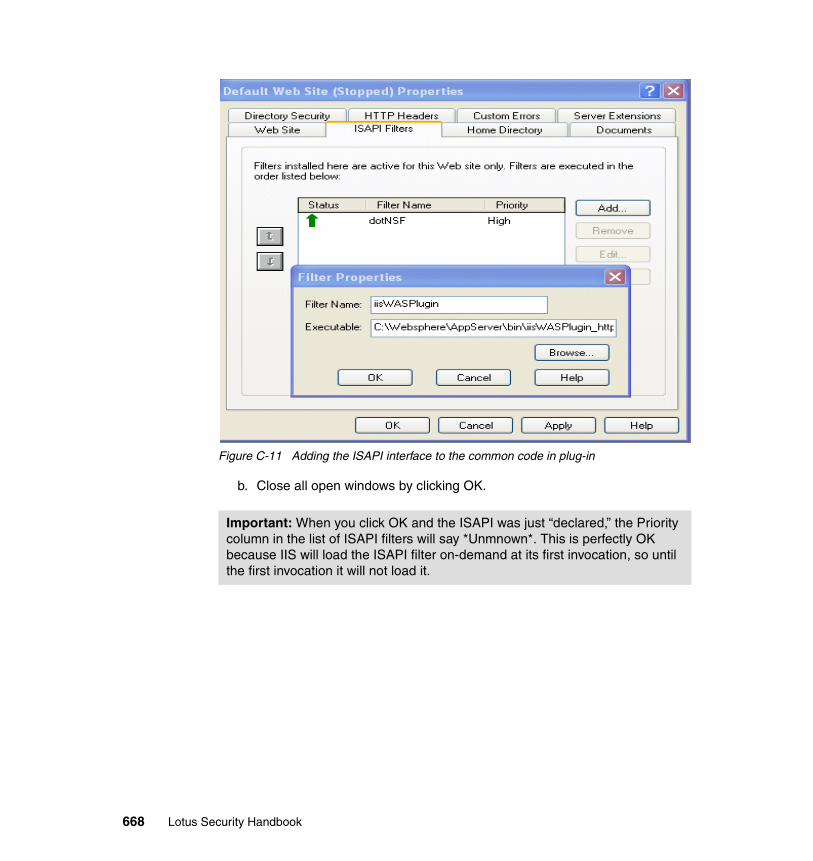
Figure C-11 Adding the ISAPI interface to the common code in plug-in
b. Close all open windows by clicking OK.
Important: When you click OK and the ISAPI was just “declared,” the Priority column in the list of ISAPI filters will say *Unmnown*. This is perfectly OK because IIS will load the ISAPI filter on-demand at its first invocation, so until the first invocation it will not load it.
668 Lotus Security Handbook
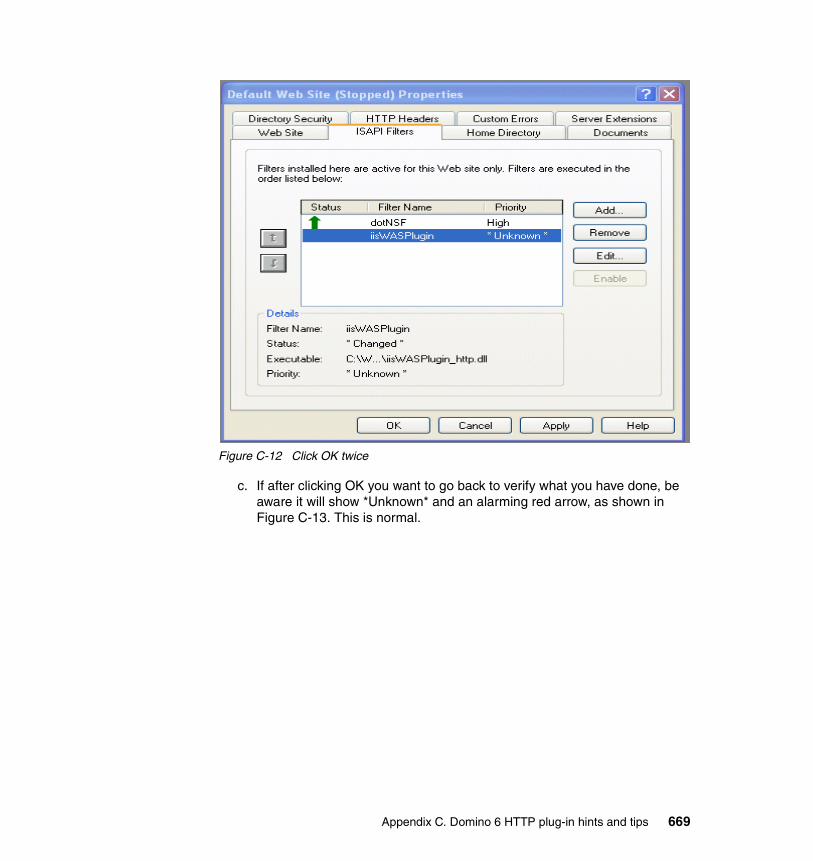
Figure C-12 Click OK twice
c. If after clicking OK you want to go back to verify what you have done, be aware it will show *Unknown* and an alarming red arrow, as shown in Figure C-13. This is normal.
Appendix C. Domino 6 HTTP plug-in hints and tips 669
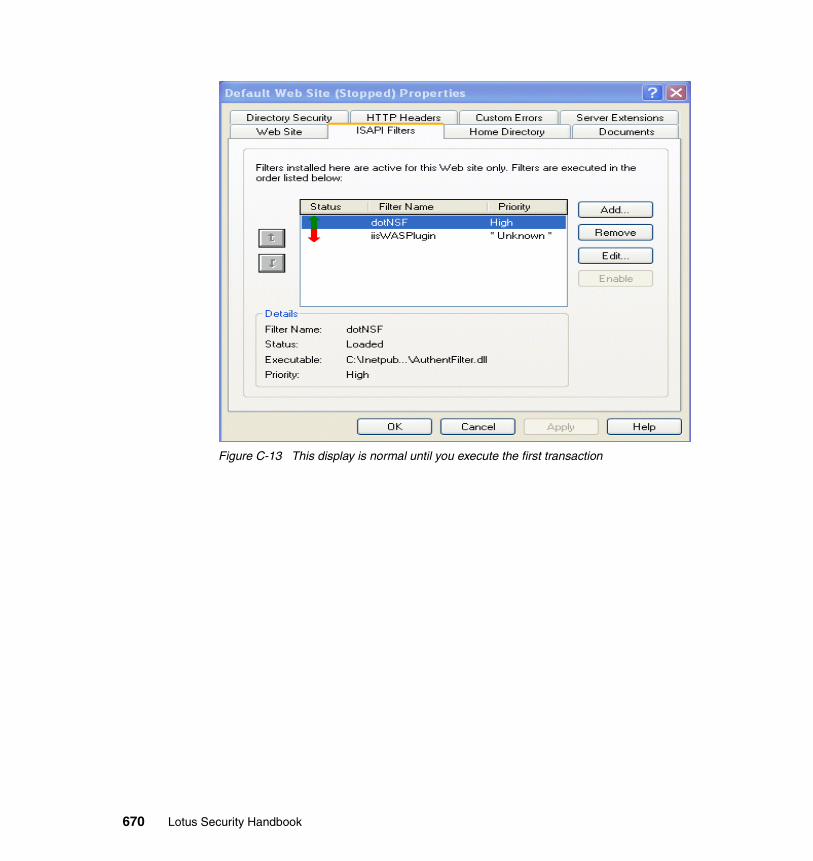
Figure C-13 This display is normal until you execute the first transaction
670 Lotus Security Handbook

Figure C-14 The plug-in must still be configured!
At this point the plug-in will be loaded when the first request for the proxied sites arrives with a pre-configured default configuration. One nice thing about the default configuration is that it instructs the code to reload the configuration file every minute, so be aware that any changes made to the configuration of the plug-in will automatically begin to work, without you telling it to re-read the configuration file.
When debugging is done, one of the things that should be considered is to change this refresh interval, from one minute to something that makes more sense.
Editing XML to configure the common plug-in code The WebSphere configuration file WebSphere\AppServer\config\plugin-cfg.xml controls the operation of the plug-in. In order for the plug-in to relay requests to the target Domino server, you must add directives to plugin-cfg.xml to define a transport route to the server, and pattern rules for the URL namespaces that identify requests which are to be relayed to Domino.
Appendix C. Domino 6 HTTP plug-in hints and tips 671
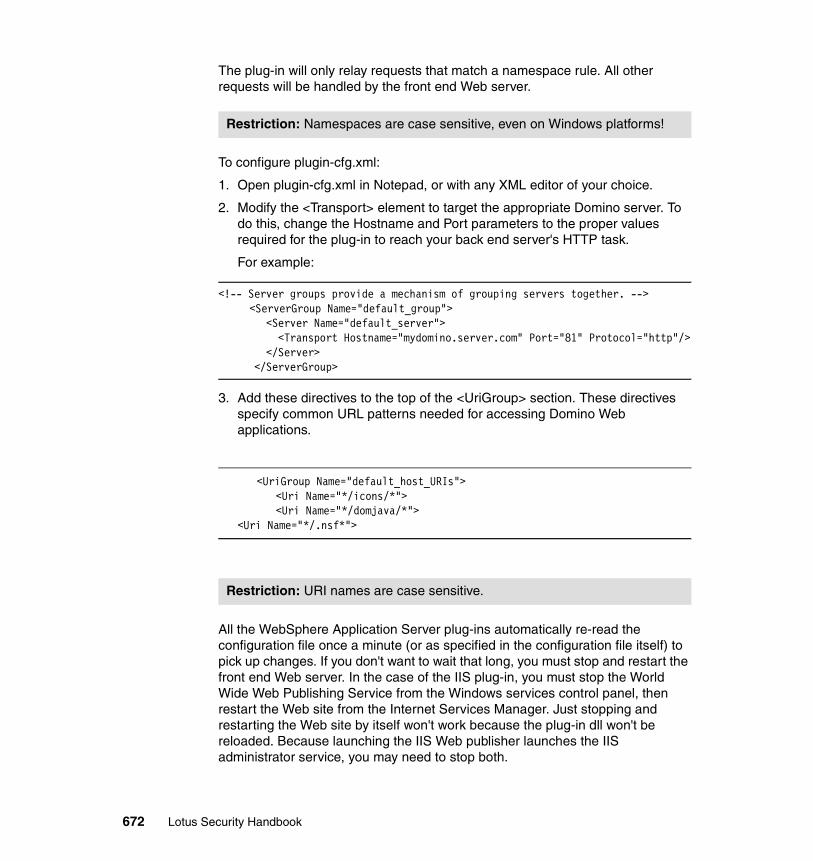
The plug-in will only relay requests that match a namespace rule. All other requests will be handled by the front end Web server.
To configure plugin-cfg.xml:
1. Open plugin-cfg.xml in Notepad, or with any XML editor of your choice.
2. Modify the <Transport> element to target the appropriate Domino server. To do this, change the Hostname and Port parameters to the proper values required for the plug-in to reach your back end server's HTTP task.
For example:
<!-- Server groups provide a mechanism of grouping servers together. --> <ServerGroup Name="default_group"> <Server Name="default_server"> <Transport Hostname="mydomino.server.com" Port="81" Protocol="http"/> </Server> </ServerGroup>
3. Add these directives to the top of the <UriGroup> section. These directives specify common URL patterns needed for accessing Domino Web applications.
<UriGroup Name="default_host_URIs"><Uri Name="*/icons/*"><Uri Name="*/domjava/*">
<Uri Name="*/.nsf*">
All the WebSphere Application Server plug-ins automatically re-read the configuration file once a minute (or as specified in the configuration file itself) to pick up changes. If you don't want to wait that long, you must stop and restart the front end Web server. In the case of the IIS plug-in, you must stop the World Wide Web Publishing Service from the Windows services control panel, then restart the Web site from the Internet Services Manager. Just stopping and restarting the Web site by itself won't work because the plug-in dll won't be reloaded. Because launching the IIS Web publisher launches the IIS administrator service, you may need to stop both.
Restriction: Namespaces are case sensitive, even on Windows platforms!
Restriction: URI names are case sensitive.
672 Lotus Security Handbook

If your Domino application requires additional namespaces, you can create <Uri> directives for those patterns also.
Expanded and commented plugin-cfg.xmlThis section contains a full plugin-cfg.xml file, which has been commented and expanded to provide some additional explanation for those who might need more advanced configurations.
Example: C-1 Commented, expanded Sample Plug-in.xml: most values defined and explained
<?xml version="1.0" encoding="ISO-8859-1"?> <!--
###############################################################################C:\Websphere\AppServer\config\plugin-cfg.xml modified by [email protected] Some parts are Copyright IBM Corp 2003. Other parts Copyright dotNSF Inc MMIII ###############################################################################Before regenerating this file automatically via WAS...
save this.xml file as a BACKUP!!!(Murphy's Law: It MAY AND WILL be over written!)
###############################################################################PLEASE if you use WAS plugin-cfg-service.xmi,
SEE THE NOTE AT THE END OF THIS FILE! ! ! ###############################################################################
-->
<ConfigIgnoreDNSFailures="true" RefreshInterval="300" > <!-- These are SECONDS !!! -->
<Log Name="C:/WebSphere/AppServer/logs/native.log" LogLevel="Trace" /> <!-- Use Error or Warn !!! -->
<VirtualHostGroup Name="DominoHosts"><!-- You can TAKE THIS OUT --><VirtualHost Name="*:*"/><!-- You can TAKE THIS OUT -->
</VirtualHostGroup><!-- You can TAKE THIS OUT -->
<UriGroup Name="DominoHostsURIs">
<Uri Name="/icons/*" /> <Uri Name="/domjava/*" />
Attention: If it is not clear why a particular configuration does not work, check that you have not violated the XML syntax. An extremely simple but effective way of checking if you have the correct balance of opening and closing “<“ and “>”, is to open the plugin-cfg.cml file with Internet explorer (locally). IE will point to the place of the offending or missing XML delimiter.
Appendix C. Domino 6 HTTP plug-in hints and tips 673
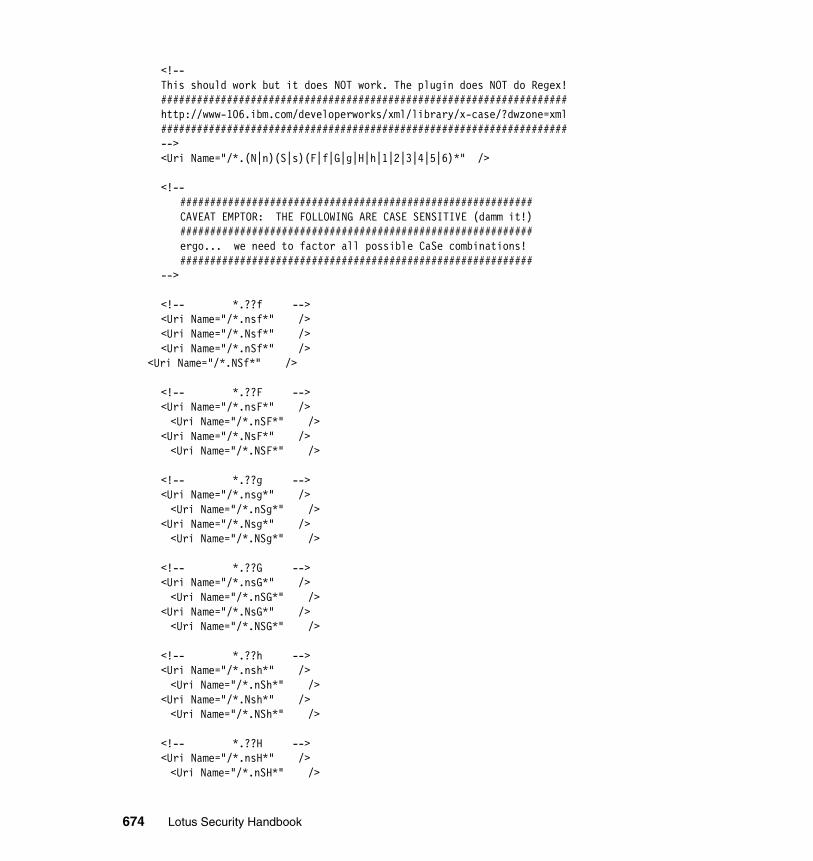
<!-- This should work but it does NOT work. The plugin does NOT do Regex!####################################################################http://www-106.ibm.com/developerworks/xml/library/x-case/?dwzone=xml ####################################################################--><Uri Name="/*.(N|n)(S|s)(F|f|G|g|H|h|1|2|3|4|5|6)*" />
<!-- ###########################################################CAVEAT EMPTOR: THE FOLLOWING ARE CASE SENSITIVE (damm it!) ###########################################################ergo... we need to factor all possible CaSe combinations!###########################################################
-->
<!-- *.??f --><Uri Name="/*.nsf*" /> <Uri Name="/*.Nsf*" /> <Uri Name="/*.nSf*" />
<Uri Name="/*.NSf*" />
<!-- *.??F --><Uri Name="/*.nsF*" />
<Uri Name="/*.nSF*" /> <Uri Name="/*.NsF*" />
<Uri Name="/*.NSF*" />
<!-- *.??g --><Uri Name="/*.nsg*" />
<Uri Name="/*.nSg*" /> <Uri Name="/*.Nsg*" />
<Uri Name="/*.NSg*" />
<!-- *.??G --><Uri Name="/*.nsG*" />
<Uri Name="/*.nSG*" /> <Uri Name="/*.NsG*" />
<Uri Name="/*.NSG*" />
<!-- *.??h --><Uri Name="/*.nsh*" />
<Uri Name="/*.nSh*" /> <Uri Name="/*.Nsh*" />
<Uri Name="/*.NSh*" />
<!-- *.??H --><Uri Name="/*.nsH*" />
<Uri Name="/*.nSH*" />
674 Lotus Security Handbook
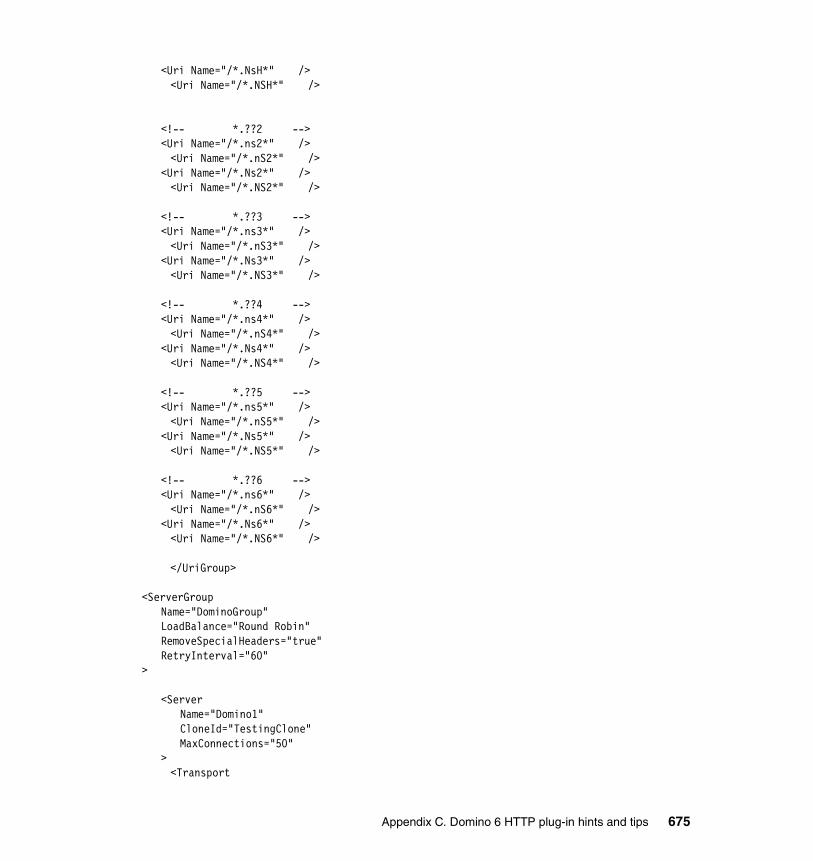
<Uri Name="/*.NsH*" /> <Uri Name="/*.NSH*" />
<!-- *.??2 --><Uri Name="/*.ns2*" />
<Uri Name="/*.nS2*" /> <Uri Name="/*.Ns2*" />
<Uri Name="/*.NS2*" />
<!-- *.??3 --><Uri Name="/*.ns3*" />
<Uri Name="/*.nS3*" /> <Uri Name="/*.Ns3*" />
<Uri Name="/*.NS3*" />
<!-- *.??4 --><Uri Name="/*.ns4*" />
<Uri Name="/*.nS4*" /> <Uri Name="/*.Ns4*" />
<Uri Name="/*.NS4*" />
<!-- *.??5 --><Uri Name="/*.ns5*" />
<Uri Name="/*.nS5*" /> <Uri Name="/*.Ns5*" />
<Uri Name="/*.NS5*" />
<!-- *.??6 --><Uri Name="/*.ns6*" />
<Uri Name="/*.nS6*" /> <Uri Name="/*.Ns6*" />
<Uri Name="/*.NS6*" />
</UriGroup>
<ServerGroup Name="DominoGroup"LoadBalance="Round Robin"RemoveSpecialHeaders="true"RetryInterval="60"
>
<Server Name="Domino1" CloneId="TestingClone" MaxConnections="50"
> <Transport
Appendix C. Domino 6 HTTP plug-in hints and tips 675
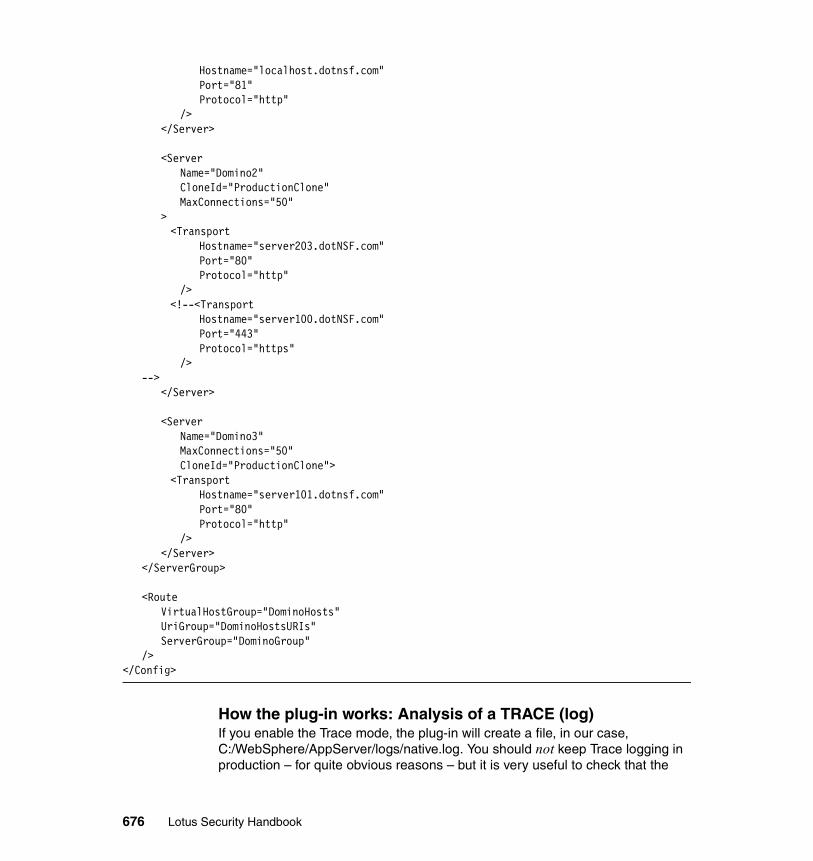
Hostname="localhost.dotnsf.com" Port="81" Protocol="http"
/></Server>
<Server Name="Domino2"CloneId="ProductionClone" MaxConnections="50"
> <Transport
Hostname="server203.dotNSF.com" Port="80" Protocol="http"
/> <!--<Transport
Hostname="server100.dotNSF.com" Port="443" Protocol="https"
/>-->
</Server>
<Server Name="Domino3"MaxConnections="50"CloneId="ProductionClone">
<Transport Hostname="server101.dotnsf.com" Port="80" Protocol="http"
/></Server>
</ServerGroup>
<Route VirtualHostGroup="DominoHosts" UriGroup="DominoHostsURIs" ServerGroup="DominoGroup"
/></Config>
How the plug-in works: Analysis of a TRACE (log)If you enable the Trace mode, the plug-in will create a file, in our case, C:/WebSphere/AppServer/logs/native.log. You should not keep Trace logging in production – for quite obvious reasons – but it is very useful to check that the
676 Lotus Security Handbook
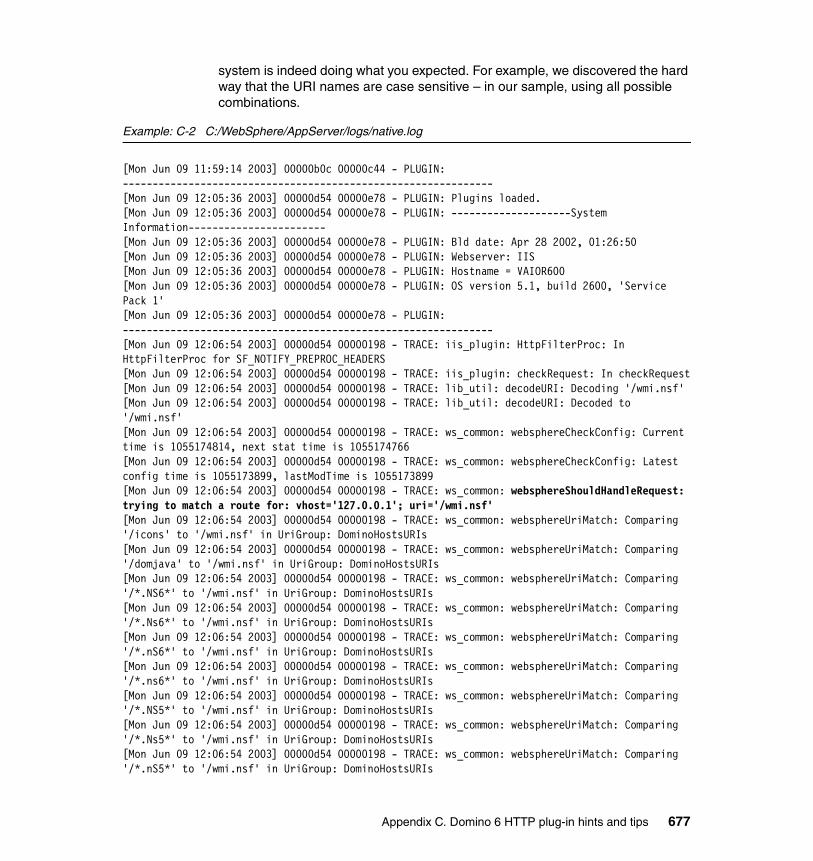
system is indeed doing what you expected. For example, we discovered the hard way that the URI names are case sensitive – in our sample, using all possible combinations.
Example: C-2 C:/WebSphere/AppServer/logs/native.log
[Mon Jun 09 11:59:14 2003] 00000b0c 00000c44 - PLUGIN: --------------------------------------------------------------[Mon Jun 09 12:05:36 2003] 00000d54 00000e78 - PLUGIN: Plugins loaded.[Mon Jun 09 12:05:36 2003] 00000d54 00000e78 - PLUGIN: --------------------System Information-----------------------[Mon Jun 09 12:05:36 2003] 00000d54 00000e78 - PLUGIN: Bld date: Apr 28 2002, 01:26:50[Mon Jun 09 12:05:36 2003] 00000d54 00000e78 - PLUGIN: Webserver: IIS[Mon Jun 09 12:05:36 2003] 00000d54 00000e78 - PLUGIN: Hostname = VAIOR600[Mon Jun 09 12:05:36 2003] 00000d54 00000e78 - PLUGIN: OS version 5.1, build 2600, 'Service Pack 1'[Mon Jun 09 12:05:36 2003] 00000d54 00000e78 - PLUGIN: --------------------------------------------------------------[Mon Jun 09 12:06:54 2003] 00000d54 00000198 - TRACE: iis_plugin: HttpFilterProc: In HttpFilterProc for SF_NOTIFY_PREPROC_HEADERS[Mon Jun 09 12:06:54 2003] 00000d54 00000198 - TRACE: iis_plugin: checkRequest: In checkRequest[Mon Jun 09 12:06:54 2003] 00000d54 00000198 - TRACE: lib_util: decodeURI: Decoding '/wmi.nsf'[Mon Jun 09 12:06:54 2003] 00000d54 00000198 - TRACE: lib_util: decodeURI: Decoded to '/wmi.nsf'[Mon Jun 09 12:06:54 2003] 00000d54 00000198 - TRACE: ws_common: websphereCheckConfig: Current time is 1055174814, next stat time is 1055174766[Mon Jun 09 12:06:54 2003] 00000d54 00000198 - TRACE: ws_common: websphereCheckConfig: Latest config time is 1055173899, lastModTime is 1055173899[Mon Jun 09 12:06:54 2003] 00000d54 00000198 - TRACE: ws_common: websphereShouldHandleRequest: trying to match a route for: vhost='127.0.0.1'; uri='/wmi.nsf'[Mon Jun 09 12:06:54 2003] 00000d54 00000198 - TRACE: ws_common: websphereUriMatch: Comparing '/icons' to '/wmi.nsf' in UriGroup: DominoHostsURIs[Mon Jun 09 12:06:54 2003] 00000d54 00000198 - TRACE: ws_common: websphereUriMatch: Comparing '/domjava' to '/wmi.nsf' in UriGroup: DominoHostsURIs[Mon Jun 09 12:06:54 2003] 00000d54 00000198 - TRACE: ws_common: websphereUriMatch: Comparing '/*.NS6*' to '/wmi.nsf' in UriGroup: DominoHostsURIs[Mon Jun 09 12:06:54 2003] 00000d54 00000198 - TRACE: ws_common: websphereUriMatch: Comparing '/*.Ns6*' to '/wmi.nsf' in UriGroup: DominoHostsURIs[Mon Jun 09 12:06:54 2003] 00000d54 00000198 - TRACE: ws_common: websphereUriMatch: Comparing '/*.nS6*' to '/wmi.nsf' in UriGroup: DominoHostsURIs[Mon Jun 09 12:06:54 2003] 00000d54 00000198 - TRACE: ws_common: websphereUriMatch: Comparing '/*.ns6*' to '/wmi.nsf' in UriGroup: DominoHostsURIs[Mon Jun 09 12:06:54 2003] 00000d54 00000198 - TRACE: ws_common: websphereUriMatch: Comparing '/*.NS5*' to '/wmi.nsf' in UriGroup: DominoHostsURIs[Mon Jun 09 12:06:54 2003] 00000d54 00000198 - TRACE: ws_common: websphereUriMatch: Comparing '/*.Ns5*' to '/wmi.nsf' in UriGroup: DominoHostsURIs[Mon Jun 09 12:06:54 2003] 00000d54 00000198 - TRACE: ws_common: websphereUriMatch: Comparing '/*.nS5*' to '/wmi.nsf' in UriGroup: DominoHostsURIs
Appendix C. Domino 6 HTTP plug-in hints and tips 677

[Mon Jun 09 12:06:54 2003] 00000d54 00000198 - TRACE: ws_common: websphereUriMatch: Comparing '/*.ns5*' to '/wmi.nsf' in UriGroup: DominoHostsURIs[Mon Jun 09 12:06:54 2003] 00000d54 00000198 - TRACE: ws_common: websphereUriMatch: Comparing '/*.NS4*' to '/wmi.nsf' in UriGroup: DominoHostsURIs[Mon Jun 09 12:06:54 2003] 00000d54 00000198 - TRACE: ws_common: websphereUriMatch: Comparing '/*.Ns4*' to '/wmi.nsf' in UriGroup: DominoHostsURIs[Mon Jun 09 12:06:54 2003] 00000d54 00000198 - TRACE: ws_common: websphereUriMatch: Comparing '/*.nS4*' to '/wmi.nsf' in UriGroup: DominoHostsURIs[Mon Jun 09 12:06:54 2003] 00000d54 00000198 - TRACE: ws_common: websphereUriMatch: Comparing '/*.ns4*' to '/wmi.nsf' in UriGroup: DominoHostsURIs[Mon Jun 09 12:06:54 2003] 00000d54 00000198 - TRACE: ws_common: websphereUriMatch: Comparing '/*.NS3*' to '/wmi.nsf' in UriGroup: DominoHostsURIs[Mon Jun 09 12:06:54 2003] 00000d54 00000198 - TRACE: ws_common: websphereUriMatch: Comparing '/*.Ns3*' to '/wmi.nsf' in UriGroup: DominoHostsURIs[Mon Jun 09 12:06:54 2003] 00000d54 00000198 - TRACE: ws_common: websphereUriMatch: Comparing '/*.nS3*' to '/wmi.nsf' in UriGroup: DominoHostsURIs[Mon Jun 09 12:06:54 2003] 00000d54 00000198 - TRACE: ws_common: websphereUriMatch: Comparing '/*.ns3*' to '/wmi.nsf' in UriGroup: DominoHostsURIs[Mon Jun 09 12:06:54 2003] 00000d54 00000198 - TRACE: ws_common: websphereUriMatch: Comparing '/*.NS2*' to '/wmi.nsf' in UriGroup: DominoHostsURIs[Mon Jun 09 12:06:54 2003] 00000d54 00000198 - TRACE: ws_common: websphereUriMatch: Comparing '/*.Ns2*' to '/wmi.nsf' in UriGroup: DominoHostsURIs[Mon Jun 09 12:06:54 2003] 00000d54 00000198 - TRACE: ws_common: websphereUriMatch: Comparing '/*.nS2*' to '/wmi.nsf' in UriGroup: DominoHostsURIs[Mon Jun 09 12:06:54 2003] 00000d54 00000198 - TRACE: ws_common: websphereUriMatch: Comparing '/*.ns2*' to '/wmi.nsf' in UriGroup: DominoHostsURIs[Mon Jun 09 12:06:54 2003] 00000d54 00000198 - TRACE: ws_common: websphereUriMatch: Comparing '/*.NSH*' to '/wmi.nsf' in UriGroup: DominoHostsURIs[Mon Jun 09 12:06:54 2003] 00000d54 00000198 - TRACE: ws_common: websphereUriMatch: Comparing '/*.NsH*' to '/wmi.nsf' in UriGroup: DominoHostsURIs[Mon Jun 09 12:06:54 2003] 00000d54 00000198 - TRACE: ws_common: websphereUriMatch: Comparing '/*.nSH*' to '/wmi.nsf' in UriGroup: DominoHostsURIs[Mon Jun 09 12:06:54 2003] 00000d54 00000198 - TRACE: ws_common: websphereUriMatch: Comparing '/*.nsH*' to '/wmi.nsf' in UriGroup: DominoHostsURIs[Mon Jun 09 12:06:54 2003] 00000d54 00000198 - TRACE: ws_common: websphereUriMatch: Comparing '/*.NSh*' to '/wmi.nsf' in UriGroup: DominoHostsURIs[Mon Jun 09 12:06:54 2003] 00000d54 00000198 - TRACE: ws_common: websphereUriMatch: Comparing '/*.Nsh*' to '/wmi.nsf' in UriGroup: DominoHostsURIs[Mon Jun 09 12:06:54 2003] 00000d54 00000198 - TRACE: ws_common: websphereUriMatch: Comparing '/*.nSh*' to '/wmi.nsf' in UriGroup: DominoHostsURIs[Mon Jun 09 12:06:54 2003] 00000d54 00000198 - TRACE: ws_common: websphereUriMatch: Comparing '/*.nsh*' to '/wmi.nsf' in UriGroup: DominoHostsURIs[Mon Jun 09 12:06:54 2003] 00000d54 00000198 - TRACE: ws_common: websphereUriMatch: Comparing '/*.NSG*' to '/wmi.nsf' in UriGroup: DominoHostsURIs[Mon Jun 09 12:06:54 2003] 00000d54 00000198 - TRACE: ws_common: websphereUriMatch: Comparing '/*.NsG*' to '/wmi.nsf' in UriGroup: DominoHostsURIs[Mon Jun 09 12:06:54 2003] 00000d54 00000198 - TRACE: ws_common: websphereUriMatch: Comparing '/*.nSG*' to '/wmi.nsf' in UriGroup: DominoHostsURIs
678 Lotus Security Handbook

[Mon Jun 09 12:06:54 2003] 00000d54 00000198 - TRACE: ws_common: websphereUriMatch: Comparing '/*.nsG*' to '/wmi.nsf' in UriGroup: DominoHostsURIs[Mon Jun 09 12:06:54 2003] 00000d54 00000198 - TRACE: ws_common: websphereUriMatch: Comparing '/*.NSg*' to '/wmi.nsf' in UriGroup: DominoHostsURIs[Mon Jun 09 12:06:54 2003] 00000d54 00000198 - TRACE: ws_common: websphereUriMatch: Comparing '/*.Nsg*' to '/wmi.nsf' in UriGroup: DominoHostsURIs[Mon Jun 09 12:06:54 2003] 00000d54 00000198 - TRACE: ws_common: websphereUriMatch: Comparing '/*.nSg*' to '/wmi.nsf' in UriGroup: DominoHostsURIs[Mon Jun 09 12:06:54 2003] 00000d54 00000198 - TRACE: ws_common: websphereUriMatch: Comparing '/*.nsg*' to '/wmi.nsf' in UriGroup: DominoHostsURIs[Mon Jun 09 12:06:54 2003] 00000d54 00000198 - TRACE: ws_common: websphereUriMatch: Comparing '/*.NSF*' to '/wmi.nsf' in UriGroup: DominoHostsURIs[Mon Jun 09 12:06:54 2003] 00000d54 00000198 - TRACE: ws_common: websphereUriMatch: Comparing '/*.NsF*' to '/wmi.nsf' in UriGroup: DominoHostsURIs[Mon Jun 09 12:06:54 2003] 00000d54 00000198 - TRACE: ws_common: websphereUriMatch: Comparing '/*.nSF*' to '/wmi.nsf' in UriGroup: DominoHostsURIs[Mon Jun 09 12:06:54 2003] 00000d54 00000198 - TRACE: ws_common: websphereUriMatch: Comparing '/*.nsF*' to '/wmi.nsf' in UriGroup: DominoHostsURIs[Mon Jun 09 12:06:54 2003] 00000d54 00000198 - TRACE: ws_common: websphereUriMatch: Comparing '/*.NSf*' to '/wmi.nsf' in UriGroup: DominoHostsURIs[Mon Jun 09 12:06:54 2003] 00000d54 00000198 - TRACE: ws_common: websphereUriMatch: Comparing '/*.Nsf*' to '/wmi.nsf' in UriGroup: DominoHostsURIs[Mon Jun 09 12:06:54 2003] 00000d54 00000198 - TRACE: ws_common: websphereUriMatch: Comparing '/*.nsf*' to '/wmi.nsf' in UriGroup: DominoHostsURIs[Mon Jun 09 12:06:54 2003] 00000d54 00000198 - TRACE: ws_common: websphereUriMatch: Found a match '/*.nsf*' to '/wmi.nsf' in UriGroup: DominoHostsURIs
When the parsings are done, the plug-in will repeat the transaction to the back end server, adding some special dialog headers that are understood by Domino when you specify HttpEnableConnectorHeaders=1.
Note that since we have documented – and enabled in our sample – the load-balancing characteristics, the plug-ins are trying to understand from session cookies and also checking the URL so see if it incorporates extra “re-written url information.”
If session information had been found, the plug-in would have maintained the sticky session, or session based upon affinity, with the same server which processed the last transaction for that sessionid.
Example: C-3
[Mon Jun 09 12:07:18 2003] 00000d54 00000198 - TRACE: lib_htrequest: htrequestSetHeader: Setting the header name |Accept| to value |image/gif, image/x-xbitmap, image/jpeg, image/pjpeg, application/vnd.ms-excel, application/vnd.ms-powerpoint, application/msword, */*|
Appendix C. Domino 6 HTTP plug-in hints and tips 679
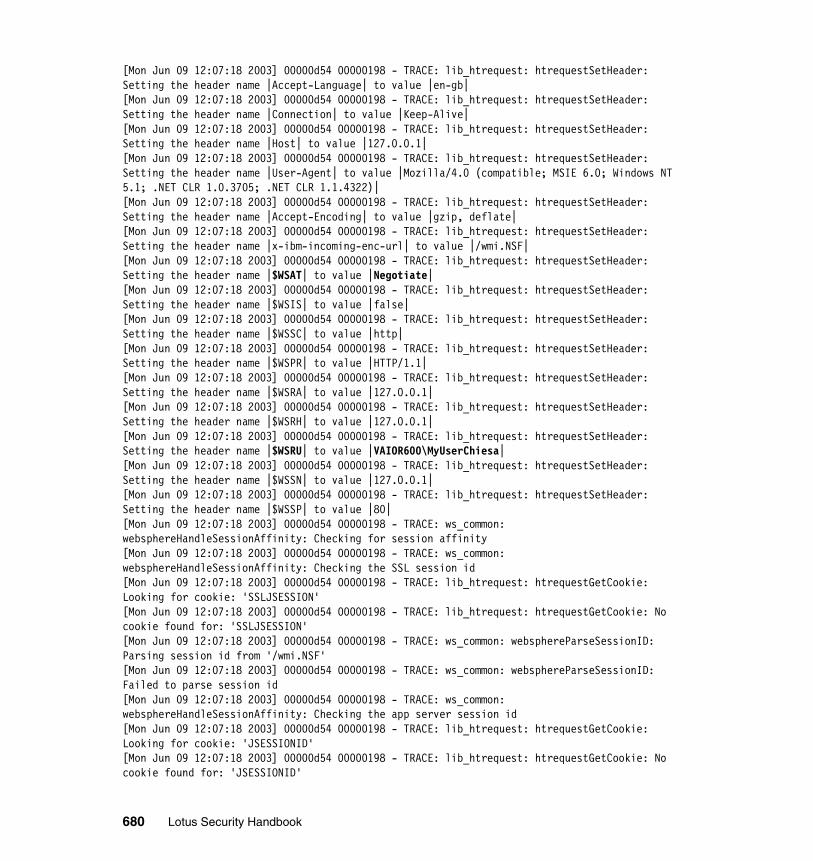
[Mon Jun 09 12:07:18 2003] 00000d54 00000198 - TRACE: lib_htrequest: htrequestSetHeader: Setting the header name |Accept-Language| to value |en-gb|[Mon Jun 09 12:07:18 2003] 00000d54 00000198 - TRACE: lib_htrequest: htrequestSetHeader: Setting the header name |Connection| to value |Keep-Alive|[Mon Jun 09 12:07:18 2003] 00000d54 00000198 - TRACE: lib_htrequest: htrequestSetHeader: Setting the header name |Host| to value |127.0.0.1|[Mon Jun 09 12:07:18 2003] 00000d54 00000198 - TRACE: lib_htrequest: htrequestSetHeader: Setting the header name |User-Agent| to value |Mozilla/4.0 (compatible; MSIE 6.0; Windows NT 5.1; .NET CLR 1.0.3705; .NET CLR 1.1.4322)|[Mon Jun 09 12:07:18 2003] 00000d54 00000198 - TRACE: lib_htrequest: htrequestSetHeader: Setting the header name |Accept-Encoding| to value |gzip, deflate|[Mon Jun 09 12:07:18 2003] 00000d54 00000198 - TRACE: lib_htrequest: htrequestSetHeader: Setting the header name |x-ibm-incoming-enc-url| to value |/wmi.NSF|[Mon Jun 09 12:07:18 2003] 00000d54 00000198 - TRACE: lib_htrequest: htrequestSetHeader: Setting the header name |$WSAT| to value |Negotiate|[Mon Jun 09 12:07:18 2003] 00000d54 00000198 - TRACE: lib_htrequest: htrequestSetHeader: Setting the header name |$WSIS| to value |false|[Mon Jun 09 12:07:18 2003] 00000d54 00000198 - TRACE: lib_htrequest: htrequestSetHeader: Setting the header name |$WSSC| to value |http|[Mon Jun 09 12:07:18 2003] 00000d54 00000198 - TRACE: lib_htrequest: htrequestSetHeader: Setting the header name |$WSPR| to value |HTTP/1.1|[Mon Jun 09 12:07:18 2003] 00000d54 00000198 - TRACE: lib_htrequest: htrequestSetHeader: Setting the header name |$WSRA| to value |127.0.0.1|[Mon Jun 09 12:07:18 2003] 00000d54 00000198 - TRACE: lib_htrequest: htrequestSetHeader: Setting the header name |$WSRH| to value |127.0.0.1|[Mon Jun 09 12:07:18 2003] 00000d54 00000198 - TRACE: lib_htrequest: htrequestSetHeader: Setting the header name |$WSRU| to value |VAIOR600\MyUserChiesa|[Mon Jun 09 12:07:18 2003] 00000d54 00000198 - TRACE: lib_htrequest: htrequestSetHeader: Setting the header name |$WSSN| to value |127.0.0.1|[Mon Jun 09 12:07:18 2003] 00000d54 00000198 - TRACE: lib_htrequest: htrequestSetHeader: Setting the header name |$WSSP| to value |80|[Mon Jun 09 12:07:18 2003] 00000d54 00000198 - TRACE: ws_common: websphereHandleSessionAffinity: Checking for session affinity[Mon Jun 09 12:07:18 2003] 00000d54 00000198 - TRACE: ws_common: websphereHandleSessionAffinity: Checking the SSL session id[Mon Jun 09 12:07:18 2003] 00000d54 00000198 - TRACE: lib_htrequest: htrequestGetCookie: Looking for cookie: 'SSLJSESSION'[Mon Jun 09 12:07:18 2003] 00000d54 00000198 - TRACE: lib_htrequest: htrequestGetCookie: No cookie found for: 'SSLJSESSION'[Mon Jun 09 12:07:18 2003] 00000d54 00000198 - TRACE: ws_common: websphereParseSessionID: Parsing session id from '/wmi.NSF'[Mon Jun 09 12:07:18 2003] 00000d54 00000198 - TRACE: ws_common: websphereParseSessionID: Failed to parse session id[Mon Jun 09 12:07:18 2003] 00000d54 00000198 - TRACE: ws_common: websphereHandleSessionAffinity: Checking the app server session id[Mon Jun 09 12:07:18 2003] 00000d54 00000198 - TRACE: lib_htrequest: htrequestGetCookie: Looking for cookie: 'JSESSIONID'[Mon Jun 09 12:07:18 2003] 00000d54 00000198 - TRACE: lib_htrequest: htrequestGetCookie: No cookie found for: 'JSESSIONID'
680 Lotus Security Handbook
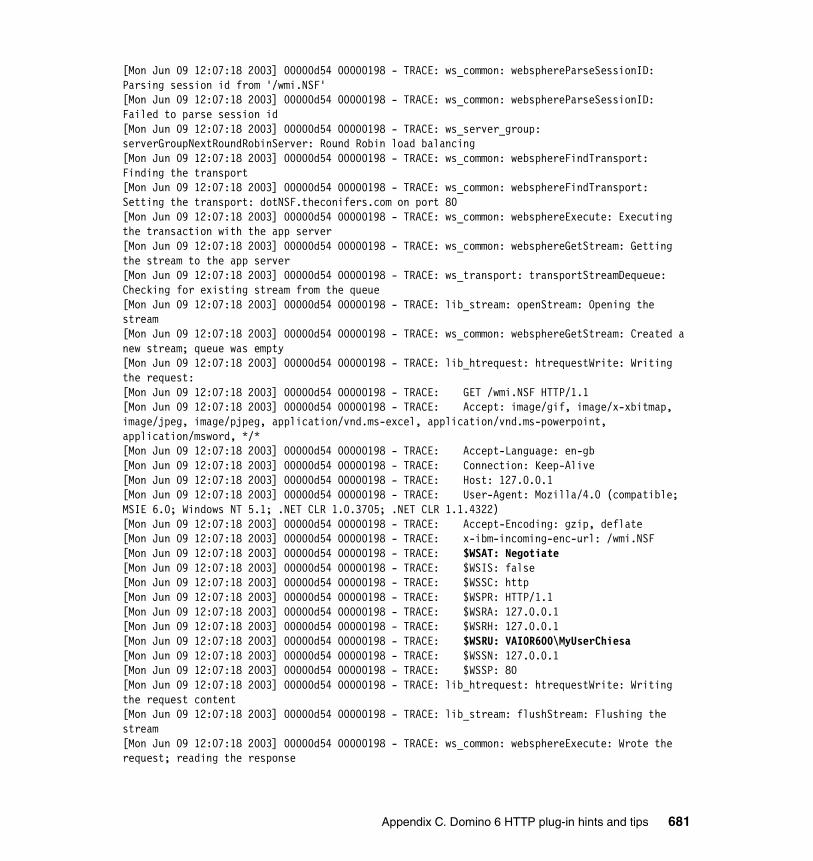
[Mon Jun 09 12:07:18 2003] 00000d54 00000198 - TRACE: ws_common: websphereParseSessionID: Parsing session id from '/wmi.NSF'[Mon Jun 09 12:07:18 2003] 00000d54 00000198 - TRACE: ws_common: websphereParseSessionID: Failed to parse session id[Mon Jun 09 12:07:18 2003] 00000d54 00000198 - TRACE: ws_server_group: serverGroupNextRoundRobinServer: Round Robin load balancing[Mon Jun 09 12:07:18 2003] 00000d54 00000198 - TRACE: ws_common: websphereFindTransport: Finding the transport[Mon Jun 09 12:07:18 2003] 00000d54 00000198 - TRACE: ws_common: websphereFindTransport: Setting the transport: dotNSF.theconifers.com on port 80[Mon Jun 09 12:07:18 2003] 00000d54 00000198 - TRACE: ws_common: websphereExecute: Executing the transaction with the app server[Mon Jun 09 12:07:18 2003] 00000d54 00000198 - TRACE: ws_common: websphereGetStream: Getting the stream to the app server[Mon Jun 09 12:07:18 2003] 00000d54 00000198 - TRACE: ws_transport: transportStreamDequeue: Checking for existing stream from the queue[Mon Jun 09 12:07:18 2003] 00000d54 00000198 - TRACE: lib_stream: openStream: Opening the stream[Mon Jun 09 12:07:18 2003] 00000d54 00000198 - TRACE: ws_common: websphereGetStream: Created a new stream; queue was empty[Mon Jun 09 12:07:18 2003] 00000d54 00000198 - TRACE: lib_htrequest: htrequestWrite: Writing the request:[Mon Jun 09 12:07:18 2003] 00000d54 00000198 - TRACE: GET /wmi.NSF HTTP/1.1[Mon Jun 09 12:07:18 2003] 00000d54 00000198 - TRACE: Accept: image/gif, image/x-xbitmap, image/jpeg, image/pjpeg, application/vnd.ms-excel, application/vnd.ms-powerpoint, application/msword, */*[Mon Jun 09 12:07:18 2003] 00000d54 00000198 - TRACE: Accept-Language: en-gb[Mon Jun 09 12:07:18 2003] 00000d54 00000198 - TRACE: Connection: Keep-Alive[Mon Jun 09 12:07:18 2003] 00000d54 00000198 - TRACE: Host: 127.0.0.1[Mon Jun 09 12:07:18 2003] 00000d54 00000198 - TRACE: User-Agent: Mozilla/4.0 (compatible; MSIE 6.0; Windows NT 5.1; .NET CLR 1.0.3705; .NET CLR 1.1.4322)[Mon Jun 09 12:07:18 2003] 00000d54 00000198 - TRACE: Accept-Encoding: gzip, deflate[Mon Jun 09 12:07:18 2003] 00000d54 00000198 - TRACE: x-ibm-incoming-enc-url: /wmi.NSF[Mon Jun 09 12:07:18 2003] 00000d54 00000198 - TRACE: $WSAT: Negotiate[Mon Jun 09 12:07:18 2003] 00000d54 00000198 - TRACE: $WSIS: false[Mon Jun 09 12:07:18 2003] 00000d54 00000198 - TRACE: $WSSC: http[Mon Jun 09 12:07:18 2003] 00000d54 00000198 - TRACE: $WSPR: HTTP/1.1[Mon Jun 09 12:07:18 2003] 00000d54 00000198 - TRACE: $WSRA: 127.0.0.1[Mon Jun 09 12:07:18 2003] 00000d54 00000198 - TRACE: $WSRH: 127.0.0.1[Mon Jun 09 12:07:18 2003] 00000d54 00000198 - TRACE: $WSRU: VAIOR600\MyUserChiesa[Mon Jun 09 12:07:18 2003] 00000d54 00000198 - TRACE: $WSSN: 127.0.0.1[Mon Jun 09 12:07:18 2003] 00000d54 00000198 - TRACE: $WSSP: 80[Mon Jun 09 12:07:18 2003] 00000d54 00000198 - TRACE: lib_htrequest: htrequestWrite: Writing the request content[Mon Jun 09 12:07:18 2003] 00000d54 00000198 - TRACE: lib_stream: flushStream: Flushing the stream[Mon Jun 09 12:07:18 2003] 00000d54 00000198 - TRACE: ws_common: websphereExecute: Wrote the request; reading the response
Appendix C. Domino 6 HTTP plug-in hints and tips 681
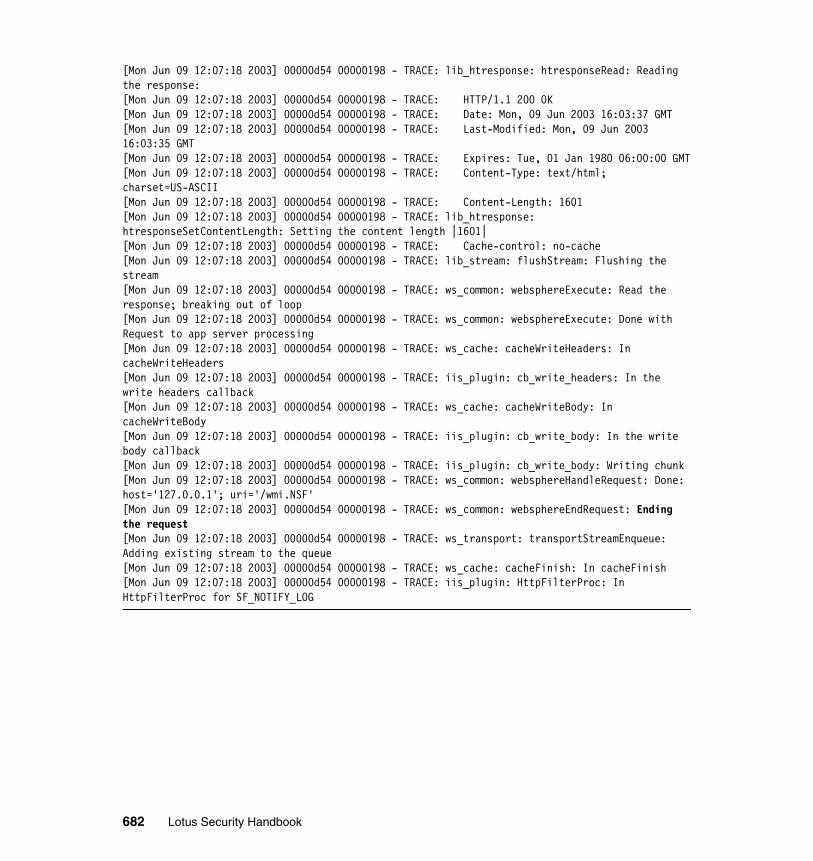
[Mon Jun 09 12:07:18 2003] 00000d54 00000198 - TRACE: lib_htresponse: htresponseRead: Reading the response:[Mon Jun 09 12:07:18 2003] 00000d54 00000198 - TRACE: HTTP/1.1 200 OK[Mon Jun 09 12:07:18 2003] 00000d54 00000198 - TRACE: Date: Mon, 09 Jun 2003 16:03:37 GMT[Mon Jun 09 12:07:18 2003] 00000d54 00000198 - TRACE: Last-Modified: Mon, 09 Jun 2003 16:03:35 GMT[Mon Jun 09 12:07:18 2003] 00000d54 00000198 - TRACE: Expires: Tue, 01 Jan 1980 06:00:00 GMT[Mon Jun 09 12:07:18 2003] 00000d54 00000198 - TRACE: Content-Type: text/html; charset=US-ASCII[Mon Jun 09 12:07:18 2003] 00000d54 00000198 - TRACE: Content-Length: 1601[Mon Jun 09 12:07:18 2003] 00000d54 00000198 - TRACE: lib_htresponse: htresponseSetContentLength: Setting the content length |1601|[Mon Jun 09 12:07:18 2003] 00000d54 00000198 - TRACE: Cache-control: no-cache[Mon Jun 09 12:07:18 2003] 00000d54 00000198 - TRACE: lib_stream: flushStream: Flushing the stream[Mon Jun 09 12:07:18 2003] 00000d54 00000198 - TRACE: ws_common: websphereExecute: Read the response; breaking out of loop[Mon Jun 09 12:07:18 2003] 00000d54 00000198 - TRACE: ws_common: websphereExecute: Done with Request to app server processing[Mon Jun 09 12:07:18 2003] 00000d54 00000198 - TRACE: ws_cache: cacheWriteHeaders: In cacheWriteHeaders[Mon Jun 09 12:07:18 2003] 00000d54 00000198 - TRACE: iis_plugin: cb_write_headers: In the write headers callback[Mon Jun 09 12:07:18 2003] 00000d54 00000198 - TRACE: ws_cache: cacheWriteBody: In cacheWriteBody[Mon Jun 09 12:07:18 2003] 00000d54 00000198 - TRACE: iis_plugin: cb_write_body: In the write body callback[Mon Jun 09 12:07:18 2003] 00000d54 00000198 - TRACE: iis_plugin: cb_write_body: Writing chunk[Mon Jun 09 12:07:18 2003] 00000d54 00000198 - TRACE: ws_common: websphereHandleRequest: Done: host='127.0.0.1'; uri='/wmi.NSF'[Mon Jun 09 12:07:18 2003] 00000d54 00000198 - TRACE: ws_common: websphereEndRequest: Ending the request[Mon Jun 09 12:07:18 2003] 00000d54 00000198 - TRACE: ws_transport: transportStreamEnqueue: Adding existing stream to the queue[Mon Jun 09 12:07:18 2003] 00000d54 00000198 - TRACE: ws_cache: cacheFinish: In cacheFinish[Mon Jun 09 12:07:18 2003] 00000d54 00000198 - TRACE: iis_plugin: HttpFilterProc: In HttpFilterProc for SF_NOTIFY_LOG
682 Lotus Security Handbook

Related publications
The publications listed in this section are considered particularly suitable for a more detailed discussion of the topics covered in this redbook.
IBM RedbooksFor information on ordering these publications, see “How to get IBM Redbooks” on page 685. Note that some of the documents referenced here may be available in softcopy only.
� Lotus Notes and Domino R5.0 Security Infrastructure Revealed, SG24-5341
� IBM WebSphere V5.0 Security WebSphere Handbook Series, SG24-6573
� Upgrading to Lotus Notes and Domino 6, SG24-6889
� Deploying QuickPlace, SG24-6535
� Enterprise Security Architecture using IBM Tivoli Security Solutions, SG24-6014
� A Deeper Look into IBM Directory Integrator, REDP-3728
� IBM Tivoli Access Manager for e-business, REDP-3677
� Enterprise Business Portals II with IBM Tivoli Access Manager, SG24-6885
� Deploying a Public Key Infrastructure, SG24-5512
� Understanding LDAP, SG24-4986
� LDAP Implementation Cookbook, SG24-5110
� Using LDAP for Directory Integration: A Look at IBM SecureWay Directory, Active Directory, and Domino, SG24-6163
� Implementation and Practical Use of LDAP on the IBM e-server iSeries Server, SG24-6193
� LDAP Directory Services in IBM WebSphere Everyplace Access V4.1.1, REDP-3603
� Active Directory Synchronization with Lotus ADSync, REDP-0605
� IBM WebSphere V4.0 Advanced Edition Security, SG24-6520
� WebSphere Portal Handbook Volume 1, SG24-6883
� IBM Lotus Learning Management System Handbook, SG24-7028
© Copyright IBM Corp. 2004. All rights reserved. 683
Other publicationsThese publications are also relevant as further information sources:
� Maximum Windows 2000 Security (Sams, 2001, ISBN 0672319659)
� Maximum Linux Security (Sams, 1999, ISBN 0672316706)
� D. Verton, “Common Ground Sought for IT Security Requirements,” Computerworld 35, No. 11, 8 (March 12, 2001)
� P. B. Checkland, Systems Thinking, Systems Practice, John Wiley & Sons, Inc., New York (1981)
� W. R. Cheswick and S. M. Bellovin, Firewalls and Internet Security: Repelling the Wily Hacker, Addison-Wesley Publishing Co., Reading, MA (1994)
� E. Rechtin, Systems Architecting: Creating and Building Complex Systems, Prentice Hall, New York (1991)
� Committee on Information Systems Trustworthiness, National Research Council, Trust in Cyberspace, National Academy Press, Washington, DC (1999)
� A. Patel and S. O. Ciardhuain, “The Impact of Forensic Computing on Telecommunications,” IEEE Communications Magazine 38, No. 11, 64-67 (November 2000)
� F. B. Schneider, “Enforceable Security Policies,” ACM Transactions on Information and System Security 3, No. 1, 30-50 (February 2000)
� P. T. L. Lloyd and G. M. Galambos, “Technical Reference Architectures,” IBM Systems Journal 38, No. 1, 51-75 (1999)
� S. McClure, J. Scambray, and G. Kurtz, Hacking Exposed: Network Security Secrets & Solutions, McGraw-Hill Publishing Company, Maidenhead, Berkshire (1999)
� Charles Carrington (Editor), Timothy Speed, Juanita Ellis, and Steffano Korper, Enterprise Directory and Security Implementation Guide: Designing and Implementing Directories in Your Organization. ISBN: 0121604527
Online resourcesThese Web sites and URLs are also relevant as further information sources:
� RFC 2316, Report of the IAB Security Architecture Workshop (April 1998)
http://www.ietf.org/rfc.html
� Digital Signature Guidelines, American Bar Association (1996), Section 1.35
http://www.abanet.org/scitech/ec/isc/dsgfree.html
684 Lotus Security Handbook
� Information Technology--Security Techniques--Evaluation Criteria for IT Security--Part 1: Introduction and General Model, ISO/IEC 15408-1 (1999); available from
http://isotc.iso.ch/livelink/livelink/fetch/2000/2489/lttf_Home/PubliclyAvailableStandards.htm
� Information Technology--Security Techniques--Evaluation Criteria for IT Security--Part 2: Security Functional Requirements, ISO/IEC 15408-2 (1999). and Information Technology--Security Techniques--Evaluation Criteria for IT Security--Part 3: Security Assurance Requirements, ISO/IEC 15408-3 (1999).
http://www.commoncriteria.org/protection_profiles/pp.html
� Guide for Development of Protection Profiles and Security Targets, ISO/IEC PDTR 15446
http://csrc.nist.gov/cc/t4/wg3/27n2449.pdf
� RFC 1825, Security Architecture for the Internet Protocol (August 1995)
http://www.ietf.org/rfc.html
� Security Architecture for Open Systems Interconnection for CCITT Applications, ITU-T Recommendation X.800/ISO 7498-2 (1991)
http://www.itu.int/itudoc/itu-t/rec/x/x500up/x800.html
� J. J. Whitmore, “Security and e-business: Is There a Prescription?” Proceedings, 21st National Information Systems Security Conference, Arlington, VA (October 6-9, 1998)
http://csrc.nist.gov/nissc/1998/proceedings/paperD13.pdf
How to get IBM RedbooksYou can search for, view, or download Redbooks, Redpapers, Hints and Tips, draft publications and Additional materials, as well as order hardcopy Redbooks or CD-ROMs, at this Web site:
ibm.com/redbooks
Help from IBMIBM Support and downloads
ibm.com/support
IBM Global Servicesibm.com/services
Related publications 685

686 Lotus Security Handbook
Index
Numerics3DES
see Triple-DES
AAccess control 17, 21, 99Access Control List 424
see ACLaccount provisioning 348ACL 424, 498
and Replica IDs 506anonymous 500-Default- 499enforce consistent ACLs 510LDAP users 503LocalDomainServers 500order of evaluation 506OtherDomainServers 500wildcard entries 500
Active Directory Synchronization toolsee ADSync
ADSync 326Advanced Encryption Standard 27AES
see Advanced Encryption StandardAH
see Authentication HeaderAIX
dictionlist 402hardening 399password options 404removing default Group IDs 405removing default User IDs 405see IBM AIXskulker 408Trusted Computing Base
Ancestral Certificates 193Anonymous access 248application gateway 165application proxies 127Asymmetric key algorithms 30
advantages 33disadvantages 33
© Copyright IBM Corp. 2004. All rights reserved.
fundamentals 31types 32
attributemail 320name 320sn 320
audit and reporting 112Audit control 99Authentication Header
IPsec 120authentication name variations 243AutoShareServer 371
BBAD 298blacklist filters 516block ciphers 27Blowfish 27Broadcast Services
and reverse proxies 181BS7799 51BSD-derived UNIX systems 387BugTrack 363bulk 22
CC2SECURITY 369CA 233
see also Domino Certificate AuthorityCachedLogonsCount 372caching proxies 168Canadian Algorithm 28CAST
see Canadian AlgorithmCC
see Common CriteriaCDE
see Common Desktop EnvironmentCDP
see Certificate Distribution PointCERT 7
advisories 363web site 112
687

Certificate authoritiesDomino 260internal 255, 258
Certificate Authority 233Certificate Distribution Points 422Certificate issuance 233Certificate repository 235Certificate Revocation 235Certificate Revocation List 422, 453CertificateExpChecked 487certificates 236Certification hierarchies 209CERTREQ.NSF 454chargen service 391Check Point Firewall-1 122Cisco PIX 122client affinity 183Common Criteria 54Common Desktop Environment 409
see CDECommon stream ciphers 28Community Services
and reverse proxies 180CommView 636Computer Crime and Security Survey 6Computer network 11Computer security 12Computer Security Act of 1987 14Computer Security Institute 5Computer system 11Confidentiality 17, 19, 224CONNECT 298Content scanners 129CR 235Credential management 99CRL 453
see Certificate Revocation ListCryptographic techniques 22
bulk encryption 22Cryptography 22
Asymmetric key algorithms 30Symmetric ciphers 24Symmetric key algorithms 23
CSI 5Customized HTML log-in form 246
DData Access to Data Access Zone Flows 158
Data Access to Internet Zone Flows 158Data Access to Intranet Zone Flows 156Data Access to Proxy Zone Flows 155Data Access Zone 140Data classification 150Data confidentiality 99Data Encryption Standard 27Data flow
authentication requirements 149example 160policies 146, 151
Data flows 97Data integrity 17–18, 106, 222daytime service 390DEAS
see Domino Everyplace AccessDEBUG_SSO_TRACE_LEVEL 292Default logout time period 247DefaultLogFileFolder 373DELETE 298denial of service attack 48DES
see Data Encryption StandardD-H 32dictionlist 402Diffie-Hellman 32Digital signatures 35
example 36trusting 38
digital signatures 222directories
a scenario implementation 611account provisioning 348authoritative sources 312data management 314fundamentals 310identity mapping 323metadirectories 339multiple identities 322
example 322point of control 313synchronization 315synchronization tools 326unified directory 339
directory 315directory assistance 458
database 476Directory Integrator
see Tivoli Directory Integrator
688 Lotus Security Handbook
discard service 391displaying TCP sockets in LISTEN state 411Distinguished Name 285, 462Distinquished Name 345DMZ 134, 585DN
see Distinquished NameDNS 130DOLS
see Domino Off-Line ServicesDomino 427
ACL, see ACLadministration ECL 531administrator access 431adminp task for password checking 485authenticating via an LDAP DIrectory 462authentication and name variation consider-ations 472certificate authority 260, 451directory assistance 458, 611directory assistance database 476directory services 457enforce consistent ACLs 510events4.nsf 434Execution Control Lists 530Internet certificates 422Internet Site documents 293LDAP service 457mail security, see email securityname mapping 477, 614name variations 243Notes ID Recovery 204password checking 204, 480programmability restrictions 436PUBNAMES.NTF 462pubnames.ntf 462registration authority 455scenario installation 594search filter syntax 466security tab 429see also Notesserver security 428TCPIP request flow 297using WebDAV 443Web administrator 435Web client authentication 471Web SSO configuration document 474, 595webadmin.nsf 433
Domino 6
and enforcing consistent ACLs 510C API toolkit 641central directory architecture 458custom LDAP search filters 465effective access list 508extended access control lists 462full access administrator 432HTTP plug-in hints and tips 657HTTP server plug-ins 448improved DSAPI 447Internet protocol access controls 430internet site documents 442mail rules 522name mapping 477password synchronization 467policies 438roaming users 450see also Dominoserver-based certification authority 452SPAM prevention, see SPAMxSP support 449
Domino 6 C API toolkit 641Domino Certificate Authority 260Domino certificate authority
certificate requests database 454changes in Domino 6 452
Domino Designer 6restricted/unrestricted modes 437
Domino Directory 206and password checking 481
Domino Domain 208Domino Everyplace Access 574Domino Off-Line Services 527
securing 527Domino URL Mappings for reverse proxies 172Domino Web Access
and password checkingsee iNotes
Domino Web Server Application Programming Inter-face
see DSAPIDontDisplayLastUserName 371DSAPI 296, 447, 641
and LTPA 302filter 297kFilterAuthenticate Event 299kFilterAuthorized Event 300kFilterAuthUser Event 300kFilterEndRequest Event 300
Index 689

kFilterParsedRequest Event 299kFilterPostTranslate Event 299kFilterProcessRequest Event 300kFilterRawRequest Event 298kFilterRawWrite Event 301kFilterResponse Event 301kFilterRewriteURL Event 299kFilterStartRequest Event 298kFilterTranslateRequest Event 299kFilterUserNameList Event 299Programming considerations 301sample 641SECTokenGenerate 302SECTokenValidate 302
EECC 32echo service 391ECL
see Execution Control ListeDominoAccount 317Elliptic Curve Cryptography 32email
mail rules 522policy management 522remote access to 585
email securitycontrolling SPAM 512
Encapsulating Security Payload 121encryption 224, 422Enterprise access management 130entropy 24ESMTP 264
see Extended SMTPESP
Encapsulating Security PayloadEtherReal 636events4.nsf 434Execution Control Lists 424, 440, 530, 554
administration ECL 531workstation ECLs 531
Extended SMTP 264External certificate authority 255
Ffile-swapping 357firewall
products 121
firewalls 356recommended functions by zone 142–143
Flow control 99Forms5.nsf 551Forward proxies 127, 167FTP servers 133Further 386FWTK 123
GGET 298
HHash functions 35
types 37HEAD 298HKEY_LOCAL_MACHINE 371HTTP headers 303HTTP request methods 298HTTP server plug-ins 448HTTPEnableConnectorHeaders 303, 449, 657hubs 123Hybrid crytopgraphic algorithms 33
IIBM AIXIBM Directory Server 311, 611IBM SecureWay Firewall 123IBM Security Architecture 17IBM Software Services for Lotus 327
security methodology 86Phase 1 - Assess 88Phase 2 - Build 91Phase 3 - Manage 92
IBM Tivoli Access Manager 350IBM WebSphere Edge Server
affinity-id 175Last Modified Factor 172ReversePass directive 173
ibmproxy.conf 630ICL 453IDEA
see International Data Encryption AlgorithmIdentification and authentication 17, 19identity management 130, 350IDI
see Tivoli Directory Integrator
690 Lotus Security Handbook
IDSalso see IBM Directory Serversee Intrusion Detection Systems
IEEE 802.1q 126IETF Web site 231IKE
see Internet Key ExchangeIMAP 264IMAP4 262in.fingerd service 390in.named service 390Inbound Intended Recipient Controls 522Inbound Relay Enforcement 519inetd 390inetOrgPerson 317Information classification 14
Confidential information 16Internal 15Public 15Secret information 16sensitive information 14Top Secret information 16Unclassified 15
iNotes 584offline 552security considerations 552see Domino Web Access
Integrity 99Internal Certificate Authority 258International Data Encryption Algorithm 28International Organization for Standardization 50International Standard 15408 54Internet Assigned Numbers Authority 320
website 320Internet certificates 422Internet Key Exchange 121Internet Message Access Protocol 262Internet password management 247Internet PKI 229
Certificate repository 235Certificate Revocation 235components 232Registration authority 236RFC 822 231standards 230
Internet to Proxy Zone Flows 153Internet Zone 139Interzone connectivity 146Intranet to Data Access Zone Flows 157
Intranet to Internet Zone Flows 159Intranet Zone 141intrusion detection 105Intrusion detection systems 128IP payload compression 121ipchains 395IPcomp
see IP payload compressionIPsec 120ISO 51
see International Organization for Standardiza-tion
ISO Security Framework 17ISO/IEC 17799
2000 51ISO17799 50Issued Certificate List 453
KKaZaa 357kFilterAuthenticate Event 299kFilterAuthorized Event 300kFilterAuthUser Event 300kFilterEndRequest Event 300kFilterParsedRequest Event 299kFilterPostTranslate Event 299kFilterProcessRequest Event 300kFilterRawRequest Event 298kFilterRawWrite Event 301kFilterResponse Event 301kFilterRewriteURL Event 299kFilterStartRequest Event 298kFilterTranslateRequest Event 299kFilterUserNameList Event 299Knowledge capital 4
LLDAP 310
attributemail 320name 320sn 320
attribute record mapping 321attributes 320defining object classes 317directory examples 311eDominoAccount 317inetOrgPerson 317
Index 691
object classes 316objectclass
eDominoAccount 318–319inetOrgPerson 318organizationalPerson 317person 317top 317
organizationalPerson 317schema 345search filter syntax 466search filters 291, 465standards 310users in ACLs 503
LDAP_AUTH_NONE 296LDAPSync 327LDIF 611Lightweight Directory Access Protocol
see LDAPLight-Weight Third Party Authentication
see LTPALindows 363Linux 353
Debian 394Red Hat 394SuSE 394vulnerabilities 365weaknesses 363
LMHOSTS file 370LMS
see Lotus Learning Mangaement SystemLocalDomainServers 500Log activity monitors 128LogPath 374Lotus C API Toolkit 301Lotus Learning Management System 589, 624
enabling SSO 626portlets 627scenario implementation 625
Lotus Team Workplacesee QuickPlace
Lotus Web Conferencing and Instant Messaging see SametimeLotus Workplace 556
architecture 557Collaborative Learning 556Messaging 556Team Collaboration 556Web Content Management 556
lsof command 411
LTPA 285and DSAPI 302importing keys 623troubleshooting 291
Mmail encryption 227mail rules 522MASS 56Maximum user sessions 247MBSA 382MD2 37MD5 38Meeting Services
and reverse proxies 181Message Digest algorithm 38Message encryption 266metadirectory 339Method for Architecting Secure Solutions 56Microsoft Active Directory 311Microsoft IIS Web Server 383Microsoft Internet Information Server 660Microsoft ISA Server 357Microsoft SQL Server 384Microsoft Windows
browser 367hardening 366
further reading 386Microsoft Baseline Security Advisor 382registry modification guidelines 370Update Tool 355weaknesses 362Windows 2000 policies 377
MIME 261Morpheus 357Multipurpose Internet Mail Extensions 261multi-server session-based authentication 247, 474multi-zone architecture 137
Nname 477name variations 243name-and-password authentication 241, 471NAMES.NSF 458NAT 124
and ICMP 125National Institute of Standards and Technology 12ndd 398
692 Lotus Security Handbook

Nessus 355, 358NetBIOS 367Netegrity Siteminder 350netstat 355, 410
service 391Network Address Translation 124Network Intrusion detection systems 128Network Mapper
see Nmapnetwork separation 101Network sniffing
reducing exposure 102Networked Systems Survivability 8NIDS
see Network Intrusion Detection SystemsNIST 12Nmap 355, 358, 421No 298Non-repudiation 17, 21, 424Notes 427
authentication process 217certificate contents 422certification 422client security 528cryptosystem 423digital signatures 423encryption 422escrow agent 205Execution Control Lists 424ID recovery 468mail encryption 227name variations 243password checking 480Recovery Authorities 468see also Domino
Notes 6see also Notesuser security dialog 528workstation ECLs 531
Notes clientViewing Internet Certificates 198viewing Notes certificates 196
Notes Cross-Certification 210Notes ID recovery 204–205
setting up 206Notes PKI 188
and the Domino Directory 206and the Domino Domain 208Authentication 217
Certification hierarchies 209Certifier, Server and User IDs 192Cross-certificates 239Flat Certificates 189Hierarchical Certificates 190Notes Cross-Certification 210Password quality and length 202Public Keys 199Registration 188Viewing Notes certificates 196
Notes user IDand password checking 481
Notes/Dominosecurity model 416
Novell eDirectory 311NSS 8NT Bugtrack 363NTFS 366NtfsDisable8dot3NameCreation 371
Oobject identifier
see OIDobjectclass
eDominoAccount 318inetOrgPerson 318organizationalPerson 317person 317top 317
objectclass-eDominoAccount 319OID 318Operating System
tasks 361types 360
operating systemsecuring 353
OPTIONS 298organizationalPerson 317OS
securing 353OSI stack 119OtherDomainServers 500
PP2P 357Packet filters 117Password checking
adminp task 485
Index 693

and iNotes 498events 492flowchart 493grace period 489impacts on Notes ID file 485
PATsee port address translation 125
Peer to Peersee P2P
PGP 232, 267secure messaging with 267
PKCS 39PKI
see Public Key Infrastructuresplugin-cfg.xml 671POP 262–264port address translation 125port scanners 358
nmap 358POST 298Post Office Protocol 262Pretty Good Privacy 232, 267Protocol Analyzer 635Proxies 104, 127, 165
defined 166types 167
Proxy to Data Access Zone Flows 154Proxy to Internet Zone Flows 153Proxy Zone 139ps
command 411identifying the process ID 411
Public key certificates 39Public Key Cryptography 39
Standards 39Public Key Infrastructures 187pubnames.ntf 462PUT 298
QQuickPlace 536, 585
and LDAP 538and SSL 537authentication 539configuring for LDAP 618QPTool 538scenario installation 594
RRA 236
see Domino Registration AuthorityRaptor Firewall 122RC2 27RC4
see variable-key-size encryption algorithmRecovery Authorities 468Recovery authorities 205Redbooks Web site 685
Contact us xviiiRedHat
up2date tool 355RedHat Linux
up2date tool 355Registration authority 236Remote Procedure Call
see RPCRestrictAnonymous 371RestrictGuestAccess 371Reverse proxies 127, 170, 586
and caching 185and Domino 171and Lotus Instant Messaging 174and Lotus technologies 171client affinity 183general tips 183handling redirection 173scenario implementation 602URL terminators for Domino 173WebSphere Edge Server 602with additional security 171
RFC 2026 232RFC- 2401 120RFC index 232RFC-1631 125RFC-1777 310RFC-1796 232RFC-1918 124RFC-1928 119RFC-2222 264, 295RFC-2246 249RFC-2251 310, 317RFC-2252 311, 317RFC-2253 311RFC-2254 311RFC-2255 311RFC-2849 311RFC-822 231, 313
694 Lotus Security Handbook

Risk 44Categorization 47mitigation 46
Rivest-Shamir-Adleman 32root account 364routers 123RPC 367RSA 32Run 372RunOnce 372
SS/MIME 232, 268
secure messaging with 268using Notes 6 client for 276
SametimeBroadcast Services 181client proxy support 544Community Services 180configuring for LDAP 615configuring for reverse proxy 182limitations with reverse proxies 176meeting encryption 549Meeting Services 181scenario installation 594securing the Java connect client 544securing the meeting room client 545securing the Meeting Server 546
Sametime 3.1proxy support 174
Sametime Everyplace 576SASL 264, 295scenario 581SEAL
see Software Efficient ALgorithmSECTokenGenerate 302SECTokenValidate 302Secure infrastructures
design 97requirements 99zoning 137
secure infrastructuresthe need 98
Secure Multimedia Internet Mail Extensions 232Secure Shell 110Secure Sockets Layer 133, 249Securing an operating system 353Security
a system model 62active content filtering 554basic authentication 550caching information 551–552cookie 554encrypting databases
locally 552logout 551–552workstation security 551–552, 554
Security architecturesdeveloping 71
Security methodologies 43security policy 160security proxies 169Security requirements 99Security subsystems 62Security zones 137
Data Access to Data Access Zone Flows 158Data Access to Internet Zone Flows 158Data Access to Intranet Zone Flows 156Data Access to Proxy Zone Flows 155data flow policies 146firewall rules 143Internet to Proxy Zone Flows 153Interzone connectivity 146Intranet to Data Access Zone Flows 157Intranet to Internet Zone Flows 159logical architecture diagram 147Proxy to Data Access Zone Flows 154Proxy to Internet Zone Flows 153zone boundaries 142
SecurityFocus 365SEI 8sendmail 392sensitive information 14Server hardening 354Service provider environments
see XSPSession-based authentication 246Session-layer proxies 119SHA-1 38Simple Authentication and Security Layer 264Simple Mail Transport Protocol 261Simple Network Management Protocol
see SNMPsingle password 283Single Sign On 582
a complex scenario 581, 593a simple scenario 305
Index 695

and WebSphere Portal 622benefits 282definition 281methods 283versus single password 283
skulker 408SMTP 261, 263
service extensions 265SMTP relay hosts 131SNMP 370SOCKS 119Software Efficient ALgorithm 28Software Engineering Institute 8SPAM 512
blacklist filters 516Inbound Intended Recipient Controls 522Inbound relay control 513Inbound Relay Enforcement 519mail rules 522
SSH 110SSL 133, 249, 264, 586
deployment considerations 254handshake 250
Stateful packet filters 118Stealth 355STEP
see Sametime EveryplaceSun Solaris 353
hardening 395SunONE Directory Server 311switches 123Symmetric 22Symmetric and Asymmetric ciphers 25Symmetric ciphers 24
types 27Symmetric key algorithms 23
advantages 28disadvantages 29example 26export considerations 29
SYN Floods 48synchronization tools 326syschk.cfg 406SysmonLog 373systat service 391System V-derived UNIX systems 388
TTAI 303TCB
see Trusted Computing BaseTCSEC 54Team Workplace see QuickPlaceThreat 44time service 391TIS Firewall Toolkit 123Tivoli Access Manager 590, 628
and the WebSeal plug-in 629and WebSphere Portal 572installing 628integrating Domino 630integrating WebSphere Portal 631
Tivoli Directory Integrator 331TLS 249TRACE 298transparent proxies 168Transport Layer Security 249Triple-DES 27Trust Association Interceptor
see TAITrusted Computing BaseTwofish 27
UUnclassified 15UNIX
hardening 387inetd 390remote log server 399tcp_wrappers 391
UNKNOWN 298
Vvariable-key-size encryption algorithm 28Virtual LANs 125VLAN 125
frame tagging 126
WWAKE
see World Auto Key Encryption algorithmWAS plug-in 303Web client authentication 240
name variation considerations 472
696 Lotus Security Handbook

web client authenticationmulti-server session-based authentication 471, 474
Web Conferencing and Instant Messagingsee Sametime
Web SSO configuration document 474webadmin.nsf 433Web-based Distributed Authoring and Versioning
see WebDAVWebDAV 443WebSEAL 628
plug-in 629WebSeal-Lite 629WebSphere
LTPA authentication with Domino 475WebSphere Edge Server 629
and the WebSeal plug-in 629configuration for Lotus technologies 602Last Modified Factor 604routing rules for Lotus techs 607
WebSphere Portal 558, 588and Tivoli Access Manager 572changing default passwords 567Credential Service & Vault 561enabling Single Sign On 622member services 568scenario implementation 620Single sign-on 561user repositories 560
Windows 2000 353see also Microsoft Windows
Windows NT4.0 353see also Microsoft Windows
Windows XP 353see also Microsoft Windows
WinLogon 372WINS 367World Auto Key Encryption algorithm 28
XX server 410X.500 310X.500 directories 312X.509 236X.509 certificates 237, 294X.509v3 certificates 260X11 409xSP 449
xwd 409xwud 409
Zzone boundaries 142
Index 697

698 Lotus Security Handbook
(1.0” spine)0.875”<->
1.498”460 <->
788 pages
Lotus Security Handbook


®
SG24-7017-00 ISBN 0738498467
INTERNATIONAL TECHNICALSUPPORTORGANIZATION
BUILDING TECHNICALINFORMATION BASED ONPRACTICAL EXPERIENCE
IBM Redbooks are developed by the IBM International Technical Support Organization. Experts from IBM, Customers and Partners from around the world create timely technical information based on realistic scenarios. Specific recommendations are provided to help you implement IT solutions more effectively in your environment.
For more information:ibm.com/redbooks
Lotus Security Handbook
Key security concepts and best practices for Lotus technologies
Security features of Lotus products explained
Secure implementation scenarios
This IBM Redbook provides best practices for building a secure collaborative infrastructure, not only with Lotus Notes and Domino, but with all the Lotus/IBM collaborative technologies.
Part 1 introduces the basic concepts related to security, and covers a number of methodologies for architecting and deploying security from beginning to end in an organization.
Part 2 delves into the specific concepts and components involved in a secure infrastructure. This includes discussions about security zoning, single sign-on (SSO), public key infrastructure (PKI), and directory strategies.
Part 3 discusses the specific security features in the latest versions of Lotus products. Detailed security features of Lotus Notes and Domino 6, Sametime 3, QuickPlace 2.08, Domino Web Access (iNotes), WebSphere Portal, and other IBM/Lotus collaborative technologies are all discussed.
Part 4 provides a real-life scenario demonstrating the secure implementation of Lotus collaborative technologies, following the guidelines and best practices provided in the first three parts of this Redbook.
Back cover