Embed Size (px)
Citation preview

Try ItLook at the inclined plane model you built for Card 2.
It’s a ramp, so it’s easy to slide or roll things up and down it. As you noticed, it is a little more difficult to move things up the ramp than down it. This is because you are working against gravity when you’re pushing something up the ramp, while gravity is helping you when you’re pushing something down it.
Inclined Plane: Distance vs. Force 1a
Materials
1 – Base (A)
1 – Block and hook (D)
1 – Large Pillar (B)
1 – Inclined plane (H)
Now, build another inclined plane with the large pillar. When you’re finished, your second model should look like this:
Push objects up the ramps on each model. Use the block that came with the kit, a coin, and a small
pulley wheel from the kit. What differences do you notice?
On a piece of paper, quickly sketch the two inclined plane models you built. Then list the differences between the two and how the differences affect the way objects moved up and down each model.
What Is Work?When force is applied to push or pull something, it’s called work. But work isn’t just the amount of effort (force) you put into moving something. It also involves the distance the object has to travel.
Even though it’s harder to move something up a steep ramp over a short distance, the same amount of work occurs when you move something to the same place up a shallow ramp over a longer distance.
© Learning Resources, Inc.LER 7442

Considering the picture and what you know about inclined planes, decide whether each of the following questions is true or false.
1. It takes more effort to climb the B side of the mountain. True or false?
2. The people climbing side B have to go farther than the people climbing side A. True or false?
3. It takes more work to climb side B than to climb side A. True or false?
4. If someone at the top of the mountain rolls a ball down each side of the mountain, and the balls are the same size and weight, the one rolled down side B will reach the bottom first. True or false?
Look at this picture of a mountain and the people carrying packs up its sides.
Inclined Plane: Work 1b
A
B
Think About ItA mountain road usually twists and turns as it climbs the side of the mountain. Why do you think mountain roads are built that way?
© Learning Resources, Inc.LER 7442

Have you every slapped the flat of your hand on the surface of the water in a pool?
If so, you would have noticed some resistance. But, if you hit the water with the tip of a finger or even the edge of your hand, there is much less resistance.
The same principle is at work when you dive into a pool or a lake.
Picture This!The bow of a ship is also a wedge. Draw a picture of a ship moving through water.After drawing the picture, answer these questions:
What does the water look like as the ship moves through it?
What is the purpose of the ship’s bow?
The bows of some ships are even used to break up ice to allow other ships to safely pass.
Wedge: Can You Be a Wedge? 2a
Why do you think a belly flop hurts, while a swan dive doesn’t?
© Learning Resources, Inc.LER 7442

Think About It Find the wedge or wedges in each picture:
Which of these wedges are used to push things apart and which are used to hold them in place?
Wedge: Find the Wedges 2b
doorstop
axe
fork
knivesnails
© Learning Resources, Inc.LER 7442
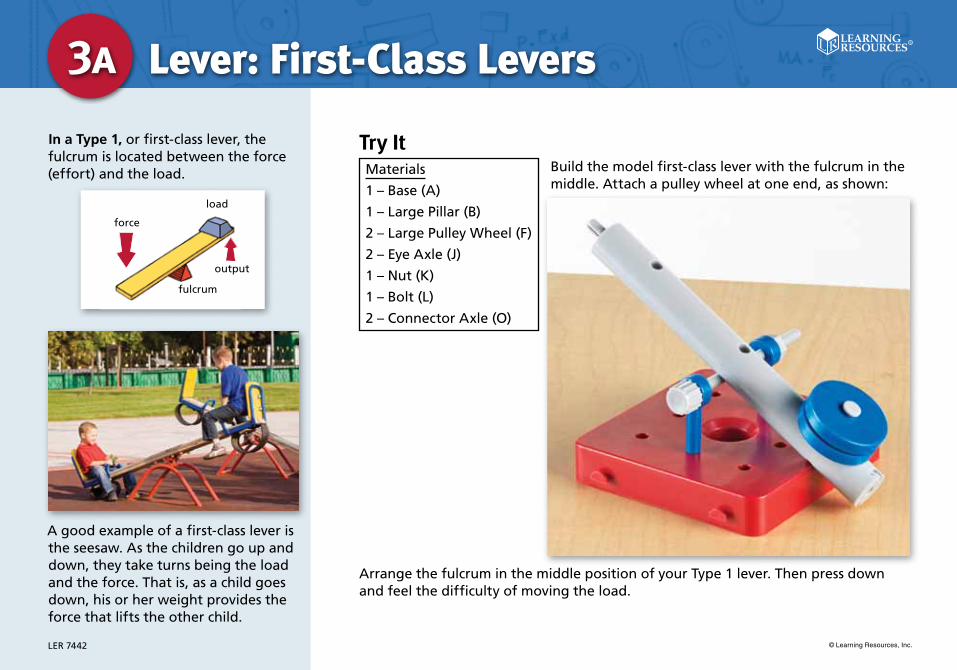
In a Type 1, or first-class lever, the fulcrum is located between the force (effort) and the load.
A good example of a first-class lever is the seesaw. As the children go up and down, they take turns being the load and the force. That is, as a child goes down, his or her weight provides the force that lifts the other child.
Lever: First-Class Levers 3a
Try It Build the model first-class lever with the fulcrum in the middle. Attach a pulley wheel at one end, as shown:Materials
1 – Base (A)
1 – Large Pillar (B)
2 – Large Pulley Wheel (F)
2 – Eye Axle (J)
1 – Nut (K)
1 – Bolt (L)
2 – Connector Axle (O)
fulcrum
output
force
load
Arrange the fulcrum in the middle position of your Type 1 lever. Then press down and feel the difficulty of moving the load.
© Learning Resources, Inc.LER 7442

Levers All Around You
Look around your home, school, and community to find first-class levers. Make a list of at least three and draw a picture of each. In the pictures, label the fulcrum, force, and load.
Next, move the fulcrum away from the load and press again. Which is easier? When does the load move farther?
What happens if you move the fulcrum right next to the load?
Think About ItWhat are the benefits of first-class levers? Which of these benefits are mechanical advantages?
Lever: Moving Fulcrums 3b
© Learning Resources, Inc.LER 7442

Title Here 1a
Recall the experiment from Card 14A. If you turn the wheel rather than the axle, because the wheel is bigger, you have to turn it farther than you had to turn the axle.
Wheel & Axle: Wheel Power 4a
Try It
Now turn a doorknob in your home. Observe what occurs as you turn it. What do you think might be happening inside the door?
Wheel or Axle?Look at these pictures of devices that use the wheel and axle. In which ones is the input force applied to the axle to turn, and in which is it applied to the wheel?
Materials
1 – Base (A)
1 – Large Pillar (B)
1 – Large Pulley Wheel (F)
2 – Axle Holders (I)
1 – Eye Axle (J)
1. 2. 3. 4.
Because the axle is much smaller than the wheel, it doesn’t revolve very far or very fast. Instead, the axle turns with greater force than you use to turn the wheel.
This same concept can be used to help move large objects. Turning the wheel instead of the axle helps provide greater force. Think about how a large truck can be moved using a steering wheel. A common example of this type of wheel and axle is the doorknob.
Build the doorknob model.
In the middle hole of the pillar on your model, insert an eye axle.
Use the large wheel to turn your model. Observe the movement of the eye axle as you turn the wheel.
© Learning Resources, Inc.LER 7442

Title Here 1a
Often more than one wheel and axle are used together in one machine. A good example is gears. Gears are special types of wheels. Think of them as wheels with teeth. As each gear moves, its teeth turn the next gear.
Look at this diagram of a waterwheel. What is the input force? Where is it applied? How is the force transferred from gear to gear? Write your ideas on a separate piece of paper.
Now, think about how gears can be used in all different types of work. On your paper, sketch your own waterwheel. Show how you would use the turning gears to perform a simple task to help something turn or move.
Wheel & Axle: Gearing Up 4b
© Learning Resources, Inc.LER 7442

Title Here 1a
Pulleys are not always used to raise and lower a load. They can also be used to make more than one wheel rotate (turn).
In belt and pulley systems, one wheel is powered, usually by a motor. As that wheel turns, the belt moves, turning the other wheel (or wheels) too.
The wheel that is powered to turn is called the driver.
Try It
Pulley: Belt and Pulley Systems 5a
Materials
1 – Base (A)
1 – Large Pillar (B)
1 – Rubber Band
2 – Large Pulley Wheel (F)
1 – Nut (K)
1 – Bolt (L)
1 – Insert Piece (M)
Think About ItSometimes, a chain is used with the pulleys instead of a belt.
Look at this picture. How is the belt and pulley used in a bicycle?
driver
Build the pulley using two large pulley wheels.
Carefully stretch a rubber band around the two wheels.
Turn one wheel, and observe how the other wheel turns at the same time and in the same direction.
Add a small pulley wheel to your model.
Carefully stretch the rubber band around all three wheels.
Turn the small wheel, and observe how both the larger wheels turn with it.
The driver in this drawing is also taking advantage of a wheel and axle!
© Learning Resources, Inc.LER 7442
Title Here 1a
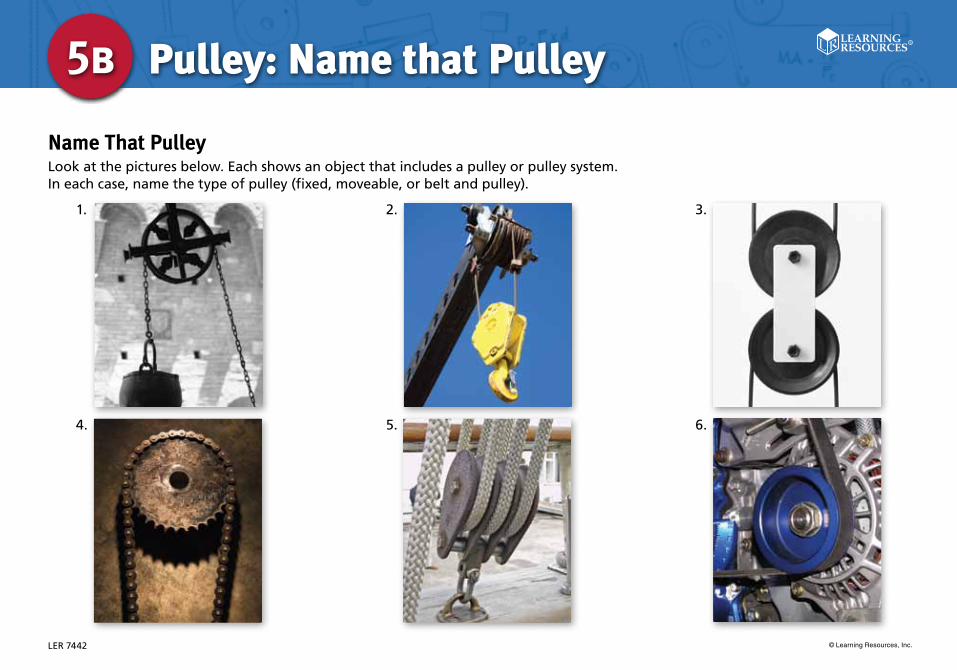
Name That PulleyLook at the pictures below. Each shows an object that includes a pulley or pulley system. In each case, name the type of pulley (fixed, moveable, or belt and pulley).
Pulley: Name that Pulley 5b
1.
4.
2.
5. 6.
3.
© Learning Resources, Inc.LER 7442