Embed Size (px)
Citation preview

Long-Term Food Storage Recipes

Knowledge is Power – Learn and Live.
Contents
3 Black Bean Burgers
5 Rice and Black Bean Salad
8 Green Bean and Corn Nut Salad
10 Pinto Beans and Savory Brown Rice
13 A Salad for Lunch
14 Finger Biscuits
17 Heidelberg Rye Bread
19 Honey Whole Wheat Bread
21 Oatmeal Bread
23 Onion Rye Bread
25 Parmesan Bubble Bread
28 Sourdough Bread
33 Sourdough French Bread
36 Sourdough Molasses Bread

Knowledge is Power – Learn and Live.
Black Bean Burgers
The cast
Mix all your rice, beans and spices together in a large bowl.
Mash your mixture together.
Recipe
2 cups cooked rice, cooled
4 cups cooked black beans, cooled
1 tablespoon curry powder
1 teaspoon onion powder
1 teaspoon garlic powder
1⁄2 teaspoon salt
1⁄2 teaspoon cummin
1⁄4 teaspoon coriander
2 teaspoon oil

Knowledge is Power – Learn and Live.
Form into patties.
Add the oil to your skillet.
Add the oil to your skillet. When your oil is hot put your patties in the skillet.
Cook on medium-low heat for 5-8 minutes or until browned and crisp.
Served up with wheat sprouts, applesauce cornbread, pickled beets and homemade catsup!
Delicious!

Knowledge is Power – Learn and Live.
Here’s what I’ll use today.
Bring 1⁄4 cup of rye berries to a boil, cover and simmer for 40 minutes until your ber-ries have increased significantly in volume and are softer to chew. Make sure you have enough water for your berries to absorb wihout your pan running dry. Rinse and drain your rye berries.
Mix in a bowl with 2 teaspoons of oil and 1⁄2 teaspoon of garlic powder.
Rice and Black Bean Salad with Wheat Sprouts and Toasted Rye Berries
Recipe1 cup wheat sprouts1 cup cooked black beans2 cups cooked white, basmati or jasmine rice1⁄2 cup rye berriesfresh green beansSalad Dressing Recipe Below

Knowledge is Power – Learn and Live.
Spread your rye berries out in a single layer.Toast in an oven @ 350° stirring every few minutes until evenly toasted. You’ll hear some popping sounds as they are toasting. When they are pretty well evenly browned, remove them from the oven and add them to your salad ingredients.
Blanche your beans in boiling water for about a minute.
Drain and completely cool.
Salad Dressing:
1⁄2 cup oil1⁄2 cup cider vinegar1⁄2 teaspoon salt1⁄4 teaspoon white pepper1⁄2 teaspoon Italian seasoning1⁄2 teaspoon basil1⁄2 teaspoon oregano1⁄2 teaspoon garlic powder1⁄2 teaspoon onion powder1⁄2 teaspoon parsley1⁄4 teaspoon thyme1⁄4 teaspoon marjoram
Whisk all ingredients together until well blended.
Pour your dressing into the salad ingredients.

Knowledge is Power – Learn and Live.
Gently toss your salad so your rice will not get mushy.
Rice and Black Bean Salad with Wheat Sprouts and Toasted Rye Berries. Served with fresh radishes and home baked whole wheat pita bread.
Delicious!

Knowledge is Power – Learn and Live.
The can contained green beans about 1⁄4” long. They appeared to be tailings from com-mercially canned green beans that need to be a required length.
A fresh piece of green bean from my garden and the tailings from Safe-Trek. The beans were hydrated 2:1 with water and simmered for 15 minutes.
We soaked the corn berries for 4 days in a cooler.Next we drained the water off and dried them between two towels.
Green Bean and Corn Nut Salad
This can gave the familiar whoosh that indicates a
good seal. The beans smelled fresh.

Knowledge is Power – Learn and Live.
Slowly dropping the corn berries into my hot oil.
The corn berries reacted when they’re first put in the oil because of the residual mois-ture in them. When the berries floated to the top they were done, nice and crunchy.
The finished nuts.
I added fresh diced cucumbers and some fresh sweet peppers. And tossed it all in a Vinaigrette dressing.
The finished salad.
It was delicious!

Knowledge is Power – Learn and Live.
Garden Salad:Green Salad Bowl MixNasturciumsPansies
Vinaigrette Dressing:2⁄3 cup vegetable oil1 teaspoon salt1 teaspoon dry mustard1 tablespoon dehydrated scallions1⁄4 teaspoon paprika1⁄3 cup red wine or cider vinegar1 teaspoon honey1⁄2 teaspoon dried basil1⁄2 teaspoon Italian seasoning1 teaspoon black pepper
Whisk all ingredients together vigorously
until blended.
Savory Brown Rice:serves 84 cups brown rice8 cups water1 teaspoon salt1 tablespoon dry parsley2 teaspoon Italian seasoning1⁄4 teaspoon black pepper2 tablespoon dehydrated scallions1 tablespoon beef bouillon powder1 cup freeze dried vegetable blend
Pinto Beans and Savory Brown Rice
Pinto Beans and Savory Brown Rice, Honey Whole Wheat Bread with re-constituted Butter Powder,Fresh Garden Salad with Vinaigrette Dressing, and Strawberry-Apple Crisp
Pinto Beans:serves 81 pound dry pinto beans, about 21⁄4 cups2 quarts water—half of which was reserved from cooking vegetables2 tablespoons vegetable oil or other fat of your choice1 tablespoon onion powder1⁄4 teaspoon black pepper1⁄2 teaspoon cayenne pepper2 teaspoons salt
Soak beans overnight, rinse, and put in a pot with 2 quarts of water to cover beans or use quick soak method. (Quick soak method: Bring beans to boil for 10 minutes. Turn off heat and cover for 1 hour.)
Bring your beans to a boil over medium high heat. Reduce the heat so your beans are simmering. Cover and simmer for 30 minutes. Add remaining ingredients. Cover again and simmer for another 45 minutes to an hour. Beans should be tender. Bite into one to see if it’s cooked through. Serve.

Knowledge is Power – Learn and Live.
When I opened the can of Perma-Pak Veg-etable Blend it had a nice whoosh consistent with a secure seal. The blend looked and smelled inviting.
Add 4 cups water to 1 cup of the vegetable blend.
Bring your vegetables to a boil and simmer until tender.
Drain the water from cooking your vegeta-bles by using a colander. Save the water from cooking the vegetables to use when you cook your rice.
Stir the seasonings and vegetables into the pot with the rice. Bring to a boil and then cover and reduce heat to simmer. Simmer for 20 - 25 minutes.

Knowledge is Power – Learn and Live.
We used Safe-Trek Freeze Dried Strawberry Apple Flakes to make the filling for our dessert crisp. It proved to be a superior product with great re-constituting, texture and flavor.
Although the lid was a little bulged on top, the can let out a whoosh of air upon open-ing and the aroma was as fragrant as fresh strawberries.
The strawberry-apple flakes were a little clumpy, but easily broke apart. 3 cups flakes filled my 12”x171⁄2” pan.
Spread the flakes to cover the bottom of your pan. Add 2 quarts boiling water.
Cover flakes with crunch topping.
Topping: 1 cup rolled oats3⁄4 cup brown sugar packed1 teaspoon cinnamon1 cup sugar1⁄2 cup flour1⁄2 cup re-constituted margarine powder1⁄4 teaspoon allspice
1⁄4 teaspoon ground cloves
Mix all ingredients together in bowl with hands. Spread evenly over top of re-constitut-ed flakes.
Bake at 350° for 30-35 minutes or until crunch topping begins to brown.

Knowledge is Power – Learn and Live.
A Salad for Lunch
First, I sprouted some organic Hard Red Winter Wheat berries.
And then I re-hydrated some green beans that I dehydrated last year and then added some reconstituted freeze dried green and wax beans along with some fresh cucumbers and roasted red peppers.
Delicious.
Knowledge is Power – Learn and Live.
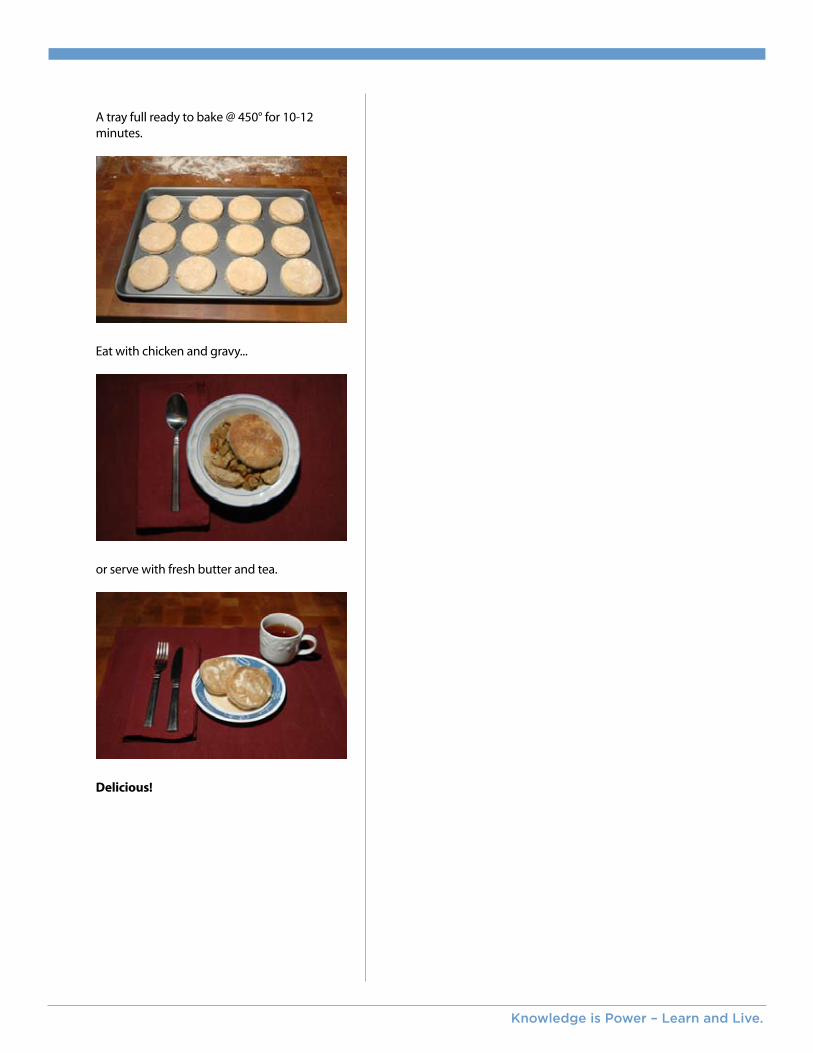
Here we go!
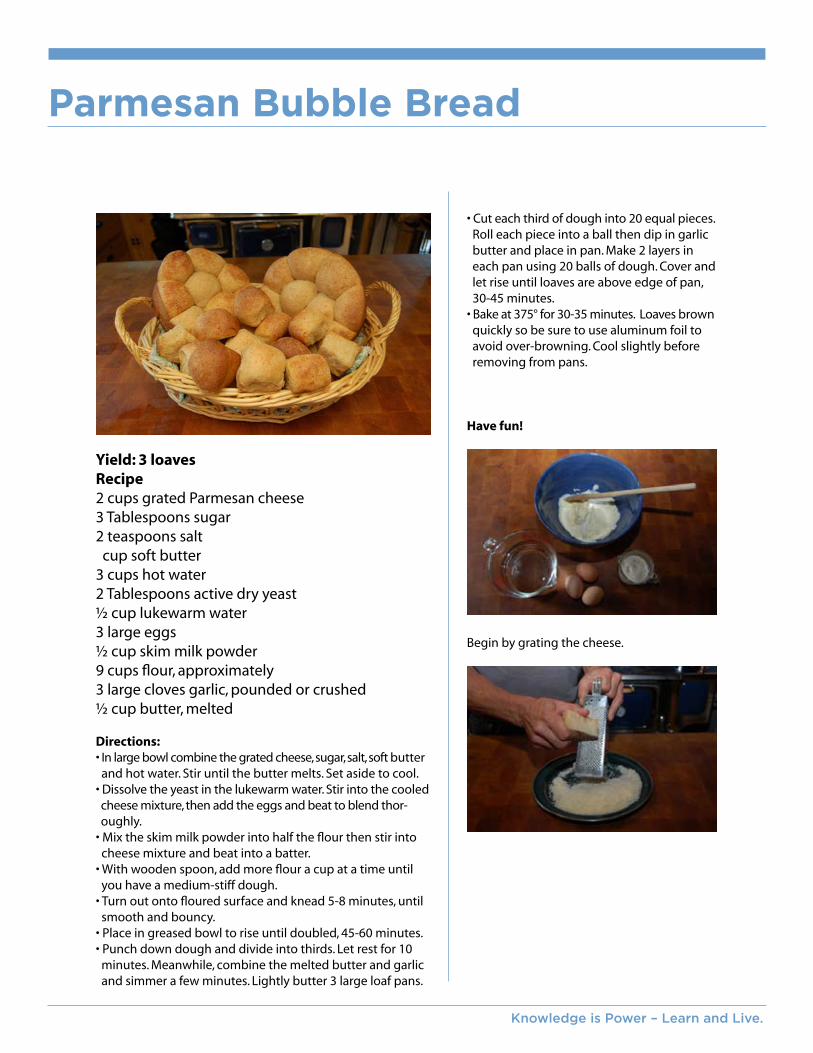
Mix all your dry ingredients together.
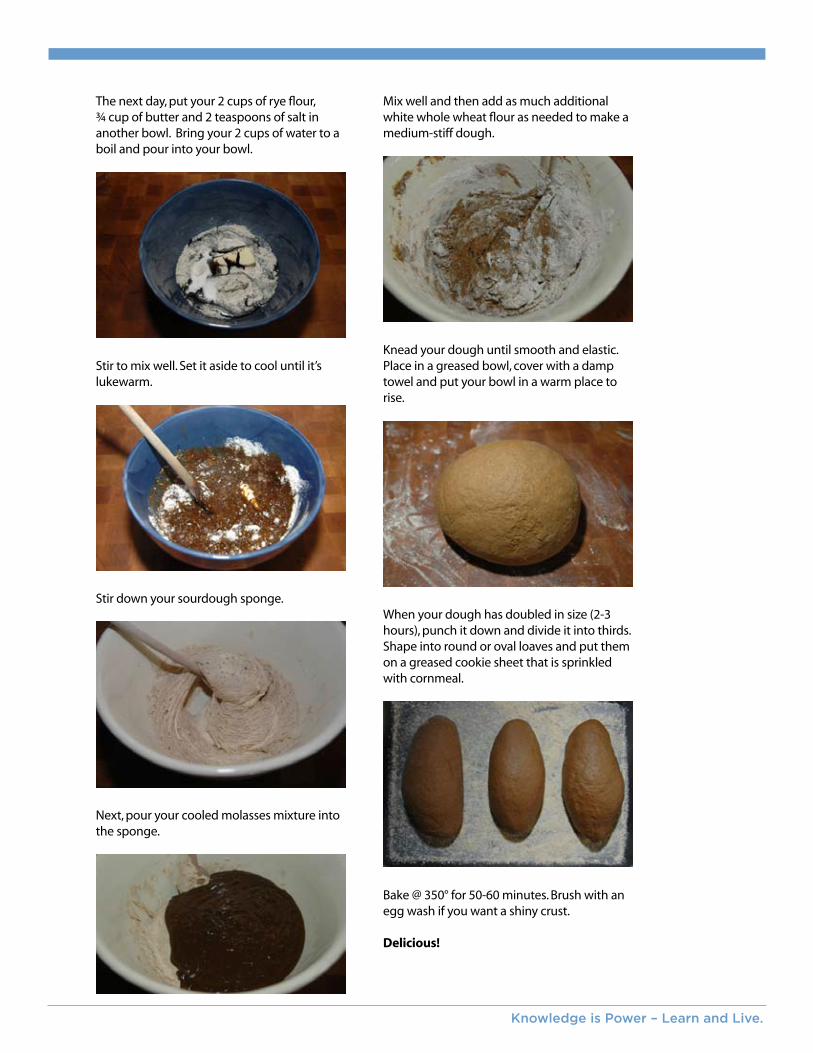
Add your shortening or lard.
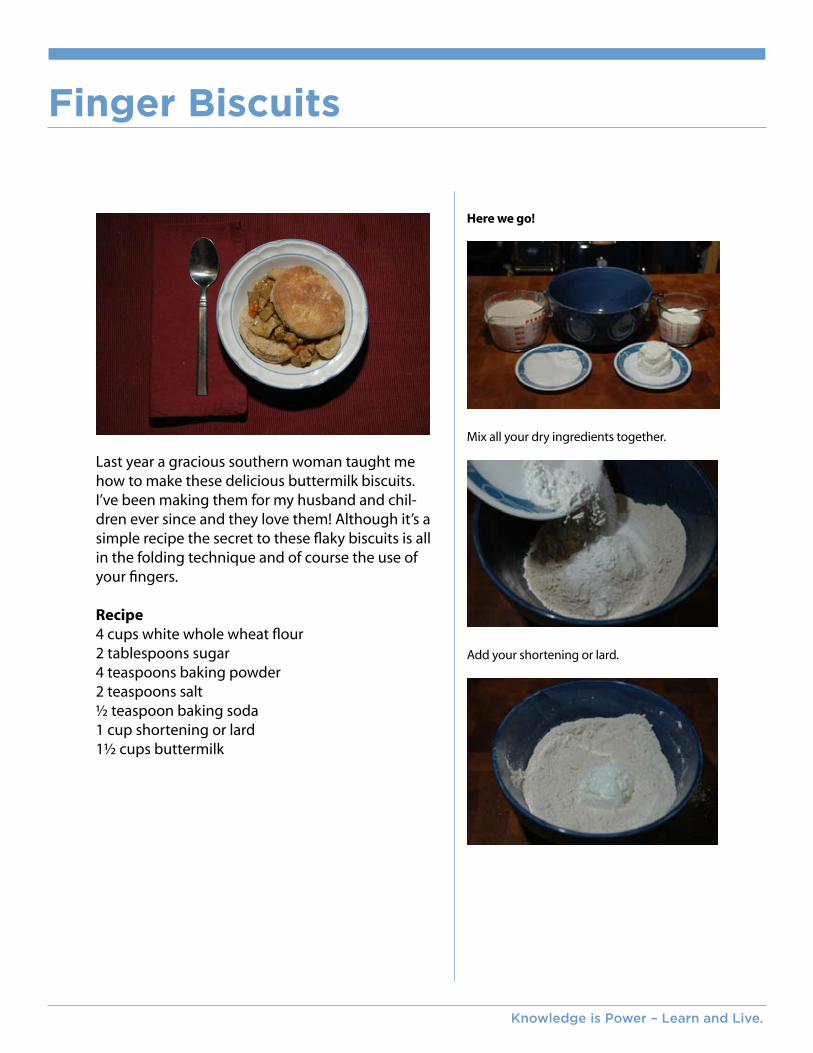
Finger Biscuits
Last year a gracious southern woman taught me how to make these delicious buttermilk biscuits. I’ve been making them for my husband and chil-dren ever since and they love them! Although it’s a simple recipe the secret to these flaky biscuits is all in the folding technique and of course the use of your fingers.
Recipe4 cups white whole wheat flour2 tablespoons sugar4 teaspoons baking powder2 teaspoons salt½ teaspoon baking soda1 cup shortening or lard1½ cups buttermilk

Knowledge is Power – Learn and Live.
Sprinkle with more flour.
Now fold your dough in half and press until ¾” to 1” thick. Repeat sprinkling with flour, folding and pressing several times.
The edges of your dough will actually look layered. Now it’s ready to cut into biscuits.
You can see the layers in this biscuit. Once baked up it will have a beautiful crack around the edge of the biscuit and will pull apart into moist layers.
Using your fingers, break the shortening up into the dry ingredients until well mixed.
Add the buttermilk and mix together...with your fingers of course!
Your dough will be very moist and sticky at this point.
Turn out onto floured surface and press until ¾” to 1” thick.
Knowledge is Power – Learn and Live.
A tray full ready to bake @ 450° for 10-12 minutes.
Eat with chicken and gravy...
or serve with fresh butter and tea.
Delicious!

Knowledge is Power – Learn and Live.
The Heidelberg Rye is a dark, rich bread.Ready to begin.
Combine your white whole wheat flour, dry yeast and dutch process cocoa in your bread bowl.
Warm your water, molasses, oil, sugar and salt.
Add your warmed liquid to your bread bowl and beat well.
Heidelberg Rye Bread
Yield: 2 loaves
3 cups white whole wheat flour2 tablespoon dry yeast¼ cup cocoa powder2 cups water⅓ cup molasses2 tablespoon oil1 teaspoon sugar1 teaspoon salt3-4 cups rye flour
1. Combine first 3 ingredients in a large bowl2. In saucepan heat water, molasses, oil, sugar and salt until warm.3. Add to dry ingredients and beat well.4. Stir in rye flour.5. Turn onto floured surface and knead until smooth and elastic, about 5 minutes. Cover and let rest 20 minutes.6. Punch down, shape into 2 oval loaves, place on greased cookie sheet sprinkled with cornmeal. Let rise until doubled.7. Slash tops and brush with cold water for a thick firm crust.8. Bake at 400° for 25-30 minutes.

Knowledge is Power – Learn and Live.
Divide your loaf in half and form 2 oval loaves.
Just before they go in the oven, slash the top of your loaves and brush with cold water.
Sprinkle a little flour on your finished loaves to give them a country look.
Delicious!
Next, gradually add your rye flour, one cup at a time, until you can work with your dough.
Turn your dough out and knead in a little flour at a time.
It’s a sticky, moist dough so I flour my hands during kneading.
Once your dough has rested for about 20 minutes punch it down.

Knowledge is Power – Learn and Live.
Ready to go.
Heat the water, honey and oil in your saucepan.
Combine the skim milk powder, 3 cups of red wheat flour, salt and yeast in your bread bowl.
Honey Whole Wheat Bread
Yield: 2 large loavesRecipe:3 cups water½ cup honey2 Tablespoons softened butter or oil½ cup skim milk powder3 cups red wheat flour1 Tablespoon salt2 Tablespoons dry yeast1 additional cup red wheat flour4 cups white wheat flour
Instructions:• In saucepan heat the water, honey, and softened butter or oil until warm.• In large bowl combine the skim milk powder, the 3 cups red wheat flour, salt, and yeast.• Pour warm (not hot) liquid over flour mixture in bowl and beat until smooth.• Stir in the 1 cup red whole wheat flour and enough of the white whole wheat flour to make a medium- soft dough. Knead 5 minutes. Place in buttered bowl and let rise until doubled.• Punch dough down and divide in half. Shape into loaves and place in buttered 5”x 10” loaf pans. Cover and let rise until 1” above rim of pan.• Bake @ 375° for 40-45 minutes. Tent with foil half way through baking time to prevent over browning

Knowledge is Power – Learn and Live.
Punch down your dough and shape into 2 loaves.
Bake in your oven 40-45 minutes @ 375°
Delicious!
Pour the warm liquid into your bowl...
and beat until smooth.
Stir in your last cup of red wheat flour along with your white wheat flour.
Turn out your dough and knead for around 5 minutes.
Let your dough rise until it doubles.

Knowledge is Power – Learn and Live.
The cast.
Combining the water, rolled oats, butter, salt and molasses.
Next add your dry yeast, skim milk powder and flour, reserving 1 cup of flour to knead with.
Oatmeal Bread
Yield: 2 large loavesRecipe:2½ cups boiling water2 cups rolled oats¼ cup butter, softened2 teaspoons salt½ cup molasses2 cups red whole wheat flour3½ cups white whole wheat flour½ cup skim milk powder4 teaspoons dry yeast
Instructions:• In large bowl combine first five ingredients. Stir until the butter melts. Set aside to cool.• When lukewarm add the dry ingredients, reserving 1 cup flour for kneading. • Mix all then turn out onto floured surface. Knead in enough of remaining flour to make a soft dough.• When dough is smooth and bouncy place in buttered bowl to rise until doubled.• Punch dough down, divide in half and shape into 2 loaves and place in buttered 5”x10” loaf pans.• Let proof until they crown 1” over rim of pans, about 1-1½ hours.• Bake @ 350° for 40-45 minutes. Tent with foil half way through baking time to prevent over browning.

Knowledge is Power – Learn and Live.
Ready to eat.
Delicious!
Knead your dough.
First rise.
Shape your loaves, place in pans and allow to rise again.
Baked to a beautiful shade of brown.

Knowledge is Power – Learn and Live.
All ready to make some Onion Rye Bread
First, scald your milk.
Pour your scalded milk over the sugar, salt and butter.
Stir until your butter melts and then set it aside to cool.
Onion Rye Bread
Yields 1 large loafRecipe1 cup scalded milk3 tablespoons sugar1 teaspoon salt3 tablespoons butter1 cake or 1 package yeast½ cup warm water3 cups white wheat flour2 tablespoons caraway seed, or fennel seed⅓ cup minced onion1½ cups rye flour
Directions
Pour the scalded milk over the sugar, salt, and butter and let cool to lukewarm. Dissolve the yeast in the warm water and add to the milk mixture. Stir in the white flour, and blend until smooth. Now stir in the caraway or fennel seed, onion, and enough rye flour (about 1½ cups) to make a firm dough. Turn out onto a lightly floured board and knead until elastic. Place in a buttered bowl, cover, and let rise until doubled. Turn out again onto a board sprinkled with rye flour and shape into a large loaf. Place the loaf in a buttered loaf pan. If desired you may shape the dough into an oval and place in on a buttered cookie sheet that has been sprinkled with cornmeal. Cover and let rise until doubled. Bake in a 350˚ oven for 45 to 50 minutes, or until browned and done. When done, brush the hot loaf with soft butter. If you prefer a shiny finish on your bread, brush with an egg wash before baking.

Knowledge is Power – Learn and Live.
Punch down your dough.Shape into loaf of your choice.
I use my pizza stone for ovals and rounds.
Golden brown and smelling good!
Delicious!
Next add your proofed yeast and the 3 cups of white whole wheat flour.
Now mix in your minced onion and the cara-way/fennel seeds.
Next, gradually add your rye flour until you have a fairly stiff dough. Knead until smooth and elastic.
Put the dough in your buttered bread bowl.Let rise until doubled.
Knowledge is Power – Learn and Live.
• Cut each third of dough into 20 equal pieces. Roll each piece into a ball then dip in garlic butter and place in pan. Make 2 layers in each pan using 20 balls of dough. Cover and let rise until loaves are above edge of pan, 30-45 minutes.• Bake at 375° for 30-35 minutes. Loaves brown quickly so be sure to use aluminum foil to avoid over-browning. Cool slightly before removing from pans.
Have fun!
Begin by grating the cheese.
Parmesan Bubble Bread
Yield: 3 loavesRecipe2 cups grated Parmesan cheese3 Tablespoons sugar2 teaspoons salt⅓ cup soft butter3 cups hot water 2 Tablespoons active dry yeast½ cup lukewarm water3 large eggs½ cup skim milk powder9 cups flour, approximately3 large cloves garlic, pounded or crushed½ cup butter, melted
Directions:• In large bowl combine the grated cheese, sugar, salt, soft butter and hot water. Stir until the butter melts. Set aside to cool.• Dissolve the yeast in the lukewarm water. Stir into the cooled cheese mixture, then add the eggs and beat to blend thor- oughly.• Mix the skim milk powder into half the flour then stir into cheese mixture and beat into a batter.• With wooden spoon, add more flour a cup at a time until you have a medium-stiff dough. • Turn out onto floured surface and knead 5-8 minutes, until smooth and bouncy.• Place in greased bowl to rise until doubled, 45-60 minutes.• Punch down dough and divide into thirds. Let rest for 10 minutes. Meanwhile, combine the melted butter and garlic and simmer a few minutes. Lightly butter 3 large loaf pans.

Knowledge is Power – Learn and Live.
Knead until smooth and bouncy: 5-8 minutes.
Place in greased bowl, cover with damp cloth and allow to rise until doubled in bulk, 45-60 min.
Meanwhile, prepare garlic butter.
The dough is ready to punch down.
In a large bowl combine the cheese, sugar, salt and soft butter. Then add the hot water and stir until the butter melts. Set this aside to cool.
Dissolve the yeast in the lukewarm water.Add to the cooled cheese mixture along with the eggs. Beat to blend thoroughly. Stir the skim milk into half of the flour.
Add the flour mix to the liquid and beat until fairly smooth.
Add enough flour to make a medium-stiff dough and then turn out onto lightly floured surface.

Knowledge is Power – Learn and Live.
Use 20 pieces for each loaf,roll into balls then dip in the garlic butter.Make 2 layers in each pan or dish. First layer…
Second layer…Allow to rise until dough is above top edge of pan. This can take as little as 30 minutes.Bake @ 375° for 30-35 minutes. This bread browns quickly so foil collars are a must at half time.
Out of the oven...
Delicious!
Turn it out onto lightly floured surface and make a single log.
Divide into thirds.
Cut each third into 20 pieces.
This bread works nicely in a variety of baking pans.

Knowledge is Power – Learn and Live.
After a recent discussion on Frugals Forums I asked my wife to teach me how to make Sourdough Bread. I’ve followed her directions which have been successful for years and it’s easy. I’m an average type of fella and when I say “It’s easy.,” it’s easy.
Here are a few things to consider before you begin your own sourdough adventure:• Use only crockery, glass or plastic to store the starter.• Never use a metal utensil for stirring; the yeast reacts to it.• When feeding your starter, use equal amounts of liquid and flour.• Do not cover tightly and leave ample head space for expansion.
Step 1 - Making the starter
water • small bunch of grapes • cheesecloth • string • crock • white spring wheat flour
Stem the grapes
Fresh baked bread, I love it!
Cooking has always been part of my life. My Dad inspired me to learn how to cook outdoors. I learned how to cook all sorts of stuff a variety of ways. The kitchen seemed like just another workshop to me.
Shortly after I was married I watched my wife bake bread one day. I was stunned at the kneading process. Here was this 105 pound woman literally subduing and conquering that huge lump of dough. To this day I’ve never seen anyone knead bread as gracefully as her. And when she had won, there was a little sweat on her brow and a glow on her face...I was in-trigued and I swept her up in my arms! romantic interlude...
The next time she baked, I asked her to teach me how to bake bread like she did. She made it easy and I reveled in the fun she had baking. I’ve spent years eating my wife’s delicious breads and learning how to bake them and it’s really quite easy. Onion breads, cheese breads, herb breads slathered in fresh butter...is your mouth watering yet?
My wife began cooking with sourdough starters over 20 years ago after reading just about everything she could find on the subject. She wanted to be able to bake with just what we had available in our area. While experimenting, she stumbled onto a key factor to being successful all the time. It simply involved making a sponge the night before baking the bread. Using a sponge allows the dough to rise in a reasonable amount of time even compared to a commercial yeast activated dough. Our sourdough starter uses native (or homegrown) grapes to begin the process.
Sourdough Bread

Knowledge is Power – Learn and Live.
Put the bag in the flour & water mixture, and stir well.
Now the bacteria need time to do their work. It may take as little as 24 hours or as long as 3 days for all the ingredients to work together to make a nice bubbly batch of starter. During this time you need to stir down the mixture regularly as it begins to rise and ferment. What’s happening is the yeast from the bruised grape skins starts to feed on the sugars in the grape juice (like in making wine) and this creates the bubbles in the flour/water mixture. When the flour mixes with the water it forms a thick elastic texture that holds the dough together.
Once the starter is working well I can begin making bread.
Good active starter!
Make a cheesecloth bag for grapes
Mix equal amounts of water and flour in crock: 2 cups each.
Over the pot, slightly crush the grapes to bruise the skins and release the juice.

Knowledge is Power – Learn and Live.
The heat melts the butter and the liquids will be warm enough to stimulate the whole dough to rise. Pour mixture into mixing bowl.
Add your sponge...
Next I beat in the flour a cup at a time so I don’t add more than the dough can absorb.
Step 2 - Making the sponge
The night before making your bread measure out the required amount of starter for the recipe (the rest I store in the fridge) and add the other ingredients to make the sponge. This recipe calls for 1 cup of starter, 1 cup of water and 1¼ cups of unbleached white flour. I use our own ground spring white wheat flour which absorbs more liquid than processed flour so I have to add an additional ¼ cup of water.Sponge • 1 cup sourdough starter • 1¼ cup unbleached white flour• 1 cup water
The sponge is measured and ready to rock.
Step 3- Making the Dough
1½ cups milk • 2 Tbls. honey • 2 Tbls. butter • 2 tsp. salt
These ingredients need to be mixed and heated to room temperature.

Knowledge is Power – Learn and Live.
Then I flip it over and cover with a slightly damp towel to prevent a crust from forming on the top.
Now it’s ready to work without me so I place it in a warm draft-free to rise.
After 2 hours the dough has doubled and it’s ready to punch down. To get a nice fine tex-ture for my bread, I let the dough rise a second time. When it has doubled again, I punch it down, divide in half and shape the loaves.
Step 5 - Shaping the loaves
Shaping the loaves is easy. Cut your dough in half. Pat out each half into an oblong shape of dough about 8”x12”. Roll it up tightly, pinch the bottom seam and ends closed and put in pans.
When the stirring gets tough I just dump the whole of it onto my board and knead in the rest of the flour.The dough takes anywhere from 5 - 6½ cups flour total.
Kneading until dough is smooth and elastic takes up to 10 minutes. An easy way to know for sure if it’s ready is to press my finger into the rounded up lump of dough to see if it springs back. If it springs back, it’s ready.
Step 4 - The Rise
Nicely rounded dough ready to use.
After the kneading I place it in a well greased bowl. I turn the top of the dough in the bottom of the bowl to grease.

Knowledge is Power – Learn and Live.
um-stiff dough (5 - 6½ cups). Allow to rest 15 minutes, then knead until smooth and elastic, about 10 - 15 minutes. Place in a greased bowl, cover and let rise until double in size, 1½ - 2 hours. Punch down, divide and shape into 2 loaves. Place in greased pans and allow to rise until double. Bake in preheated oven at 375° for 40-45 minutes. For soft crust, brush with butter and allow to cool on racks.
Note: To have a finer textured bread, repeat the first rising.
The Care and Feeding of your Starter
Once you have successfully made a starter you need to feed it regularly to keep the yeast active. Each time you use the starter it needs to be replenished by equal amounts of water and flour. One cup of each is the usual amount necessary. If you use the starter once a week and feed it, the cycle will keep it fresh and ac-tive. This replenishing should be done at least once a month. When the starter isn’t being used regularly you can do one of two things:
• Pour some off and replenish as if you used it;• Put it in a plastic container and freeze it; the starter can be reactivated by thawing and feeding as before.
Variations:• Use milk instead of water when feeding starter.• Add up to ¼ cup of sugar at feeding time.• Add a pinch of salt if you want to slow down the action.• Try red winter wheat or rye flour.
Note: Starters will eventually take on the “local flavor”. When you visit friends in other areas of the country share your starter!
The two loaves are in greased clay loaf pans ready to rise before baking. In about an hour they’ll be ready and into the oven they go...
...and come out!
Time for lunch!
Fresh Sourdough Bread slathered in local but-ter, fresh brocollii from the garden and rabbit from the barn.
Enjoy!
Sourdough Sandwich Bread
Sponge: • 1 cup sourdough starter • 1¼ cup unbleached white flour• 1 cup water
Bread: In saucepan heat, then cool until lukewarm:• 1½ cups milk• 2 T. honey• 2 T. butter• 2 tsp. salt
In bowl blend the milk mixture with the sponge and mix in enough flour for a medi-

Knowledge is Power – Learn and Live.
Going sour...
with sourdough starter.
First, put together your sponge the night before you want to bake your bread.
Mix your starter, flour and water.Cover loosely and leave it out overnight.
Sourdough French Bread
Yield: 2 loavesRecipe1 cup sourdough starter3 cups white whole wheat flour2 cups warm water2 teaspoon salt2 teaspoon white sugar3-4 cups white whole wheat flour
1. The night before, make a “sponge” by mixing the first 3 ingredients in a large bowl and beating until smooth. Cover loosely and allow to stand in a warm place for 10-24 hours.2. When ready to bake, stir into the “sponge” the salt, sugar, and enough flour to make a dough you can handle.3. Round the dough and cover with a damp towel and let it rest 15 minutes. Add enough flour to make a stiff dough then knead until smooth and elastic.4. Place in a greased bowl, cover with a damp towel and allow to rise until doubled.5. Punch dough down and shape into 2 long loaves. Place on a cookie sheet that’s been greased and sprinkled with cornmeal. Let rise until doubled.6. Preheat oven to 450°. Make three slashes across the top of loaves and brush with cold water just before baking.7. Bake 30 minutes.

Knowledge is Power – Learn and Live.
Round your dough up, cover with a damp cloth and let it rest for 15 minutes.
Uncover your resting dough after 15 minutes.
Add more flour to your board.
Knead in enough of your flour to make a stiff dough. Place in a greased bowl and cover with a damp towel to rise about 1 hour.
The next day your sponge should be big and bubbly.
Stir down your sponge.
Next add your salt, sugar and enough of your white whole wheat flour to make a dough you can handle.

Knowledge is Power – Learn and Live.
Once your dough has doubled, punch it down and turn it out onto your board.
Shape into 2 long loaves and place them on a greased cookie sheet sprinkled with cornmeal.
Bake your loaves @ 450° for 30 minutes.
Delicious Sourdough French Bread!

Knowledge is Power – Learn and Live.
again (for the finest texture) or form at once into 3 round loaves. 6. Place on greased cookie sheets that have been sprinkled with cornmeal. Let rise until doubled. Bake in a preheated 350° oven for 50-60 minutes.
Ingredients
Make your sourdough sponge:On the night before you plan to bake, stir together 1 cup of your starter with 2 cups of white whole wheat flour and 1 cup of water. Cover and let ferment overnight.
Yield: 3 round loavesfrom Baking With Sourdough, by Sara Pitzer—page 16
Quote:Sourdough Molasses Rye BreadYield: 3 round loavesRecipe1 cup sourdough starter2 cups white whole wheat flour1 cup water2 cups rye flour2 cups boiling water3/4 cup dark molasses1/3 cup butter2 teaspoon salt5 cups additional white whole wheat flour
1. Make a sponge the night before by mixing the first 3 ingredients. Stir well, cover, and let sit in a warm place overnight. 2. When you are ready to make bread, combine the rye flour, boiling water, molasses, butter and salt in a large bowl. Allow to cool until lukewarm.3. Stir into the sponge made the night before and add as much white whole wheat flour as needed to make a dough you can handle.4. Turn it out onto a floured board and work into a ball. Cover with a damp cloth and let rest 15-20 minutes, then knead until smooth and elastic. 5. Place dough in a large greased bowl and let rise until doubled in bulk (2-3 hours). Punch down and either allow to rise
Sourdough Molasses Bread
Knowledge is Power – Learn and Live.
Mix well and then add as much additional white whole wheat flour as needed to make a medium-stiff dough.
Knead your dough until smooth and elastic.Place in a greased bowl, cover with a damp towel and put your bowl in a warm place to rise.
When your dough has doubled in size (2-3 hours), punch it down and divide it into thirds.Shape into round or oval loaves and put them on a greased cookie sheet that is sprinkled with cornmeal.
Bake @ 350° for 50-60 minutes. Brush with an egg wash if you want a shiny crust.
Delicious!
The next day, put your 2 cups of rye flour, ¾ cup of butter and 2 teaspoons of salt in another bowl. Bring your 2 cups of water to a boil and pour into your bowl.
Stir to mix well. Set it aside to cool until it’s lukewarm.
Stir down your sourdough sponge.
Next, pour your cooled molasses mixture into the sponge.