Embed Size (px)
Citation preview

1
Logisuite Lite Online Help Warehouse Management System
Version 1.0

Printed Documentation


iii
Table of Contents Introduction.............................................................................................................................................................................. 3
Warehouse Receipts .................................................................................................................................................................. 7
Warehouse Receipts Entry ...................................................................................................................................................... 7
Warehouse Withdrawal ............................................................................................................................................................ 25
Warehouse Withdrawal Entry ................................................................................................................................................ 25
Pickup/ Delivery Orders ......................................................................................................................................................... 35
Warehouse Tracking Status ...................................................................................................................................................... 45
Warehouse Accounting Update ................................................................................................................................................. 49
Warehouse Maintenance .......................................................................................................................................................... 53
Units & Equipment ................................................................................................................................................................ 53
Items ................................................................................................................................................................................... 59
Warehouse & Locations ......................................................................................................................................................... 61
Services & Commodities ........................................................................................................................................................ 64
Origin & Destination .............................................................................................................................................................. 68
Customs & Hazardous Materials ............................................................................................................................................. 73
Carriers ................................................................................................................................................................................ 75
Adjustments & Reasons ........................................................................................................................................................ 77


Introduction Introduction
In this section:
Warehouse Overview
Warehouse Process Flow
Warehosue System Menu
This section provides a detailed description of the warehouse management system, which is an integral module of Logisuite Lite. It explains different functions and features, identifies resources for working with different options related to warehouse operations.
Warehouse Overview Warehouse is used by manufacturers, importers, exporters, wholesalers, transport businesses, customs, etc. They come equipped with loading docks to load and unload trucks; or sometimes are loaded directly from railways, airports, or seaports.
The warehouse management system transforms a typical warehouse operation into a totally connected logistics and fulfillment business. It can be used by warehousing companies, freight forward and shipping companies to receive goods at their docks, store them in the warehouse, prepare withdrawal receipts, shipping documents and keep control of their operations.
The module includes all of the options required to process warehouse operations from beginning to end. The rate can also be set up for automatic calculation of the charges as well as to generate invoices and transfer to various accounting software for business financial management and bookkeeping. This includes LSAccounting, QuickBooks and PeachTree to keep track of the financials of your company.
Warehouse Process Flow The diagram below shows the overall process flow for the warehouse management system. It clearly depicts the overall warehouse operation into a totally connected logistics and fulfillment business.
3

Printed Documentation
Warehouse Process Flow
The overall process flow for the warehouse management system is as follows:
1. Enter Warehouse Receipt (“W/R”): Once goods arrive at the dock, the system user (i.e. floor clerk) enters goods/ shipment data into the system such as packing, dimensions, weight, packing list to be able to generate a warehouse/dock receipt.
2. Print Warehouse Receipt: Once the shipment data have been entered, the warehouse receipt (W/R) can be printed, along with identifying labels. Moreover, if required an invoice can be generated to perform the customer billing for the services provided.
3. Warehouse Withdrawal: When goods are going to be removed from the warehouse, a pick slip has to be prepared. If necessary, more than one warehouse receipts can be linked together in a single pick slip. This linking process is very simple. Please note that this step is only used if no linking of warehouse receipts is to be made to Airwaybills or Bill of Ladings. For more details, please refer to the Logisuite Export Air User Guide and Logisuite Export Ocean User Guide.
4. Print Pick Slip: Once the pick slip has been prepared, the pick slip can be printed, along with identifying labels to stick on the pieces and an invoice for the customer, if necessary.
5. Print Reports: You can also print various reports to review the warehouse operations, billing, costs and other information. It can be used as an edit list to make corrections or adjustments before transferring transactions to the Accounting Bridge.
6. Transfer to Accounting Bridge: Once the information reports have been printed, reviewed and corrections made, transactions can be posted to the Accounting Bridge for further update to LSAccounting or export to QuickBooks and PeachTree to keep track of the financials.
4

Introduction
5
Warehouse System Menu The system menu bar on the Logisuite workspace provides the user with modules to work with different options.
To view the Warehouse menu options, click Warehouse.
Warehouse Workspace
Please refer to the Logisuite Lite user guide to know about the Logisuite workspace and the higher-level system functionality.
Logisuite Warehouse user guide is divided into the following sections:
Warehouse Receipts
Warehouse Withdrawal
Warehouse Tracking Status
Warehouse Accounting Update
Warehouse Website Tracking
Warehouse Maintenance
Warehouse Reports


Warehouse Receipts Warehouse Receipts
In this section:
Warehouse Receipts Entry
Label Printing
Cargo In Report
Cargo In Report
Cargo In Supplier Summary
Cargo Shipped Supplier Summary
This section describes the tasks related to entering the information for warehouse receipts and label printing. Moreover, it then allows the user to print various reports related to warehouse receipts.
Warehouse Receipts Overview You are provided with different options for working with warehouse receipts. Please refer to the Receipts menu on the Logisuite Warehouse workspace.
Warehouse Receipts
The subsequent sections will explain each of the menu items related to warehouse receipts.
Warehouse Receipts Entry
Warehouse Receipts Entry You can add new warehouse receipt record, remove an existing receipt and view information related to the existing receipts.
To create a new warehouse receipt;
1. Select Warehouse from the system menu toolbar.
2. Click Warehouse Receipts Entry under the [Receipts] menu.
The Warehouse Receipts dialog appears.
7

Printed Documentation
Warehouse Receipts
3. Select File>New Record.
The New Record tab is added to the Warehouse Receipts dialog.
Warehouse Receipts – New Record
4. Enter the following information:
• WR # Warehouse receipt number that uniquely identifies the record.
When creating a new warehouse receipt the system will automatically generate a new Warehouse Receipt Number when the record is saved if the automatic warehouse number option is selected in the system settings.
• DATE IN Date/ time of warehouse receipt generation.
• DIVISION Warehouse division identifier. To define new identier refer to the section “Define Warehouse Division” in this user guide.
8

Warehouse Receipts
• USER ID User name identifying the currently logged-in user.
• SHIPPING INST. # Unique code identifying the shipping instruction record.
• EXPIRED ON Date identifying the expiry.
• STORAGE Warehouse receipt storage which can be either 0-None or 1-Monthly.
• STATUS Warehouse receipt status. For example, OPEN, CLOSED, etc.
• FROM [ADDRESS] Address for Shipper/ Consignee/ Third-party or Supplier.
• MODE Mode from one of the following: AIR, OCEAN or TRUCK.
• BLDG/ WHSE Building or warehouse desription. Select <add new> from the listbox to define a new building or warehouse record.
• ORIGIN
Code identifying the origin. Click to search or define new origin record. It can be either Domestic or International.
• DESTINATION
Code identifying the destination. Click to search or define new destination record. It can be either Domestic or International.
Please refer to “Warehouse Maintenance” section for more information on setting up the Origin and Destination Airports.
• SERVICE Unique code identifying the service. Select <add new> from the listbox to define a new service record.
• CURRENCY Code identifying the currency. Select <add new> from the listbox to define a new currency record.
Setup Warehouse Details You can specify the warehouse details while defining the new warehouse receipt record. This allows the user to create the details of the cargo being received. For example, total quantity, the type of the box, the dimensions and weight. If there are items in that particular box the user will be able to create these items as well.
The figure below shows the Warehouse Details section on the Warehouse Receipts dialog.
Warehouse Details
To define new warehouse details record;
9

Printed Documentation
5. Right-click on the Warehouse Details section and select [Add] from the pop-up menu.
The New Warehouse Details dialog appears.
New Warehouse Details dialog
6. Enter the following information;
• QTY Number identifying the total quantity.
• CARGO TYPE Type of cargo received in the warehouse. Click <ADD NEW> to define a new cargo type.
• KGS/ LBS Select the measurement unit from the list of options.
• LENGTH Number identifying the length of the cargo item.
• WIDTH Number identifying the width of the cargo item.
• HEIGHT Number identifying the height of the cargo item.
• UNIT WEIGHT Unit weight of the cargo item.
• TOTAL WEIGHT Total weight of the cargo shipment.
• CUBIC Number identifying the cubic volume. This value is pertaining to the measurement of volume, for example, the cubic contents of a vessel.
• DIM FACT Dimensional Weight Factor (DIM) from the list of available options; DOM or INT. DIM is a method of compensating air freight carriers for the cubic requirements of freight that is very light yet very bulky. In most cases, a DIM factor of 194 is used for domestic shipments and 166 for international shipments. Calculation is LxWxH/194 = DIM weight. If DIM weight is greater than actual weight, the freight is rated at DIM weight.
• VOL. WEIGHT Volume weight of the cargo shipment.
• LOCATION Warehouse location/ building for the cargo shipment. Click <Add New> to define a new warehouse shipment.
• COMMENTS Additional notes for the warehouse shipment.
10

Warehouse Receipts
7. Enter the following Vehicle Details information.
• VIN# Vehicle number for the warehouse shipment.
• MAKE/ YEAR/ MODEL Vehicle details identifying the vehicle type.
• BODY/ COLOR Vehicle details identifying the vehicle type.
8. To define new item details, right-click on the Item Details section and select [Add] from the popup menu.
The New Item Details dialog appears.
New Item Details dialog
9. Enter the required item details, and then click OK to return to the Warehouse Details dialog.
10. Click OK to return to the Warehouse Receipts dialog.
Setup Warehouse Charges You can specify the warehouse charges while defining the new warehouse receipt record. This allows the user to specify charges for this transaction or allow the system to generate those charges automatically.
The figure below shows the Warehouse Charges section on the Warehouse Receipts dialog.
Warehouse Charges
Click Auto IN to allow the system to generate the charges automatically.
To specify the warehouse charges;
1. Right-click on the Warehouse Charges list and select [Add] from the popup menu.
The New Charges Details dialog appears.
11

Printed Documentation
2. Enter the following information;
• BILLING CODE
Unique code identifying the billing information. Click to search or define a new billing code.
• BILL TYPE Billing Type from the list of available options; PREPAID or COLLECT.
• BILL PARTY Bill party from the list of available options; SHIPPER, CONSIGNEE, THIRD-PARTY or OTHER.
• COMMENTS Additiona notes for the charges details.
• DETAILS [BILLING/ COST/ HISTORY] Enter the required details for billing, cost and history.
3. Click OK to return to the Warehouse Receipts dialog.
Once the charges are entered or calculated the user can click on the icon “View Invoices”. The system will show the invoices in this particular transaction or the charges that could be invoiced. From there you will be generate/ print those invoices selected or all in general.
This warehouse receipt could be used later when generating a Pickup/Delivery, Airwaybill, or Bill of Lading. The more information the user enters on the warehouse receipt, the more complete and less time that it will take to generate those transactions.
12

Warehouse Receipts
Setup Inland Info To define Inland information;
1. Click Inland tab.
The Inland tab fields appear.
2. Enter the following:
• CARRIER
Unique code identifying the carrier information. Click to define the new carrier record.
• RECEIVED BY Specify the receiver name for the item(s).
• CARRIER TERMS Terms for the inland carrier. For example, COLLECT, ON ACCOUNT/ CREDIT, or PREPAID.
• DATE Date identifying the inland record.
• FREIGHT AMOUNT $/ CHECK # Amount identifying the frienght charges along with the check number.
• COD AMOUNT $/ CHECK # Amount identifying the COD along with the check number.
Setup Airline Carrier Info To define Airline Carrier information;
1. Click Airline Carrier tab.
The Airline Carrier tab fields appear.
13

Printed Documentation
2. Enter the following;
• AGENT
Unique code identifying the agent information. Click to search or define the new agent record.
• AWB # Number identifying the AWB.
3. To define new item, rightclick and select [Add] from the popup menu.
The New Item Details dialog appears.
New Item Details dialog
Setup Pro Numbers Info To define pro numbers information;
1. Click Pro Numbers tab.
The Pro Numbers tab dialog appears.
14

Warehouse Receipts
2. To add new item, right-click and select [Add] from the popup menu.
The New PRO Number Details dialog appears.
New PRO Number Details dialog
Setup Hazardous Info To define hazardous information;
1. Click Hazardous tab.
The Hazardous tab dialog appears.
2. Enter the following information;
• CONTACT Name of the contact.
• PHONE Phone number of the contact.
3. To define new hazardous detail record, rightclick and select [Add] from the popup menu.
The New Hazardous Details dialog appears.
15

Printed Documentation
New Hazardous Details dialog
Setup Containers Info To define containers information;
1. Click Containers tab.
The Containers tab dialog appears.
2. To define new container record, rightclick and select [Add] from the popup menu.
The New Container Details dialog appears.
New Container Details dialog
Label Printing
16

Warehouse Receipts
You can print all the labels required from a particular warehouse receipt.
To print a new warehouse label;
1. Select Warehouse from the system menu toolbar.
2. Click Label Printing under the [Receipts] menu.
The Print Labels dialog appears.
Print Labels
3. Enter or select the following label details;
• TRANSACTION # Unique number identifying the transaction.
• DATE Date identifying the label date.
• DIVISION
Select the division set up for the warehouse. Click to search or define a new division record.
• FILE Unique identifier for the file reference.
• LOCATION
17

Printed Documentation
Select the location set up for the warehouse. Click to search or define a new location record.
• ORIGIN
Enter the origin set up for the warehouse. Click to search or define a new origin record.
• DESTINATION
Enter the destination set up for the warehouse. Click to search or define a new destination record.
Please refer to “Warehouse Maintenance” section for more information on setting up the Origin and Destination Airports.
• CUSTOMER
Enter the name of the customer. Click to search or define a new customer record.
• ADDRESS/ CITY/ STATE/ ZIP Customer address to be printed on the warehouse receipt.
• PIECES Number of pieces for the warehouse items.
• WEIGHT Weight measurement for warehouse items in pounds and kilograms.
• PRINT FROM Specify the range of page numbers to be printed.
• LABEL FORMAT [] Select the label format from the drop-down list to be used for the warehouse receipt.
• PRINTER [] Select the target printer from the drop-down list.
• PREVIEW Check to enable the print preview for the warehouse receipt.
4. Click Print. The Print Labels are sent to the target printer or the preview dialog.
Cargo In Report This report allows the user to view all the warehouse items that are in the warehouse. You can print a report on cargo based on the various criteria. For example, the user can specify the report filters including shipper, consignee, destination, etc.
To view/ print the cargo in report;
1. Select Warehouse from the system menu toolbar.
2. Click Cargo In Report under the [Receipts] menu.
The Warehouse Receipts Report dialog appears.
18

Warehouse Receipts
Warehouse Receipts Report 3. Enter or select the following information:
• SHIPPER
The shipper for the warehouse. Click to select or define a new shipper record.
• CONSIGNEE
The consignee for the warehouse. Click to select or define a new consignee record.
• THIRD PARTY
The third party for the warehouse. Click to select or define a new third party record.
• DESTINATION
The destination for the warehouse. Click to select or define a new destination record.
Please refer to “Warehouse Maintenance” section for more information on setting up the Shipper/ Consignee/ Third Party/ Destination.
• WAREHOUSE [] Select the warehouse from the drop-down list.
• SERVICE [] Select the service from the drop-down list.
• DIVISION Select the division from the drop-down list.
• PRINTER Select the target printer from the drop-down list of installed printers.
19

Printed Documentation
• PREVIEW Check to enable the print preview of the report.
4. Click Print. The Cargo In Report is sent to the target printer or the preview dialog.
Cargo In Summary Report This report allows the user to see all the cargo on hand in the warehouse. You can print a summary report on cargo based on the various criteria. For example, the user can specify the report filters including shipper, consignee, destination, etc.
To view/ print the cargo in summary report;
1. Select Warehouse from the system menu toolbar.
2. Click Cargo In Summary Report under the [Receipts] menu.
The Warehouse On Hand Cargo Summary dialog appears.
Warehouse On Hand Cargo Report 3. Enter or select the following information:
• SHIPPER
The shipper for the warehouse. Click to select or define a new shipper record.
20

Warehouse Receipts
• CONSIGNEE
The consignee for the warehouse. Click to select or define a new consignee record.
• THIRD PARTY
The third party for the warehouse. Click to select or define a new third party record.
Please refer to “Warehouse Maintenance” section for more information on setting up the Shipper/ Consignee/ Third Party.
• USER ID Identifier for the user.
• WAREHOUSE [] Select the warehouse from the drop-down list.
• SERVICE [] Select the service from the drop-down list.
• DIVISION [] Select the division from the drop-down list.
• STATUS Cargo status from one of the following options; OPEN, CLOSE, VOID, HOLD.
• DATE FROM/ TO Date range for the cargo summary report.
• PRINTER Select the target printer from the drop-down list of installed printers.
• PREVIEW Check to enable the print preview of the report.
4. Click Print. The Warehouse On Hold Cargo Report is sent to the target printer or the preview dialog.
Cargo In Supplier Summary This report allows the user to see all the cargo on hand for a supplier in the warehouse. You can print a summary report on cargo based on the various criteria. For example, the user can specify the report filters including shipper, consignee, destination, etc.
To view/ print the cargo in supplier summary report;
1. Select Warehouse from the system menu toolbar.
2. Click Cargo In Supplier Summary under the [Receipts] menu.
The Warehouse On Hand Supplier Summary dialog appears.
21
Printed Documentation
Warehouse On Hand Supplier Summary dialog
3. Enter or select the following information:
• SHIPPER
The shipper for the warehouse. Click to select or define a new shipper record.
• CONSIGNEE
The consignee for the warehouse. Click to select or define a new consignee record.
• THIRD PARTY
The third party for the warehouse. Click to select or define a new third party record.
Please refer to “Warehouse Maintenance” section for more information on setting up the Shipper/ Consignee/ Third Party.
• USER ID Identifier for the user.
• WAREHOUSE [] Select the warehouse from the drop-down list.
• DIVISION [] Select the division from the drop-down list.
• DATE FROM/ TO
22

Warehouse Receipts
Date range for the cargo summary report.
• GENERATE IN/ OUT CHARGES Check to enable the option for generating the cargo in/ out charges in the report.
• PRINTER Select the target printer from the drop-down list of installed printers.
• PREVIEW Check to enable the print preview of the report.
4. Click Print. The Warehouse On Hold Cargo Report is sent to the target printer or the preview dialog.
Cargo Shipped Supplier Summary This report allows the user to see all the cargo shipped by supplier. You can print a summary report on cargo based on the various criteria. For example, the user can specify the report filters including shipper, consignee, etc.
To view/ print the cargo shipped supplier summary report;
1. Select Warehouse from the system menu toolbar.
2. Click Cargo Shipped Summary under the [Receipts] menu.
The Warehouse Shipped Cargo Supplier Summary dialog appears.
Warehouse Shipped Cargo Supplier Summary dialog
3. Enter or select the following information:
• SHIPPER
The shipper for the warehouse. Click to select or define a new shipper record.
• CONSIGNEE
23

Printed Documentation
24
The consignee for the warehouse. Click to select or define a new consignee record.
• THIRD PARTY
The third party for the warehouse. Click to select or define a new third party record.
Please refer to “Warehouse Maintenance” section for more information on setting up the Shipper/ Consignee/ Third Party.
• DATE FROM/ TO Date range for the cargo summary report.
• PRINTER Select the target printer from the drop-down list of installed printers.
• PREVIEW Check to enable the print preview of the report.
4. Click Print. The Warehouse Shipped Cargo Supplier Summary Report is sent to the target printer or the preview dialog.

Warehouse Withdrawal Warehouse Withdrawal
In this section:
Warehouse Withdrawal Entry
Linking Warehouse Receipts
Pickup/ Delivery Orders
Label Printing
Cargo Out Report
This section describes the tasks related to warehouse withdrawal entry. This option allows the user to take merchandise or cargo out of the warehouse which is not going by air, ocean or pickup/ delivery. Moreover, it allows the user to print the labels and cargo out report.
Warehouse Withdrawal Overview The user is provided with different options for working with warehouse withdrawals. Please refer to the Withdrawals menu on the Logisuite Warehouse workspace.
Warehouse Withdrawals
The subsequent sections will explain each of the menu items related to warehouse withdrawals.
Warehouse Withdrawal Entry
Warehouse Withdrawal Entry You can add new warehouse withdrawal record, remove an existing receipt and view information related to the existing withdrawals.
To create a new warehouse withdrawal;
1. Select Warehouse from the system menu toolbar.
2. Click Warehouse Withdrawal Entry under the [Withdrawals] menu.
The Warehouse Withdraws dialog appears.
25

Printed Documentation
Warehouse Withdraws dialog
3. Select File>New Record.
The New Record tab is added to the Warehouse Withdraws dialog.
Warehouse Withdraws dialog – New Record
4. Enter the following information:
• RELEASE # Displays the warehouse release number for the withdrawal.
• DATE/ TIME OUT Date/ time of warehouse withdraw.
• DIVISION Warehouse division identifier. To define new identier refer to the section “Define Warehouse Division” in this user guide.
• USER ID User name identifying the currently logged-in user.
• SHIPPING INST. #
26

Warehouse Withdrawal
Unique code identifying the shipping instruction. Click to search or define a new shipping instruction record.
• MODE Mode from one of the following: AIR, OCEAN or TRUCK.
• STATUS Warehouse withdraw status from one of the following: OPEN, CLOSED, VOID, HOLD.
• DELIVER TO [ADDRESS]
Address for Customer/ Consignee/ Third-party. Click to search or define the new customer.
• ORIGIN
Code identifying the origin. Click to search or define a new origin record. It can be either Domestic or International.
• DESTINATION
Code identifying the destination. Click to search or define a new destination record. It can be either Domestic or International.
Please refer to “Warehouse Maintenance” section for more information on setting up the Origin and Destination Airports.
• SERVICE Unique code identifying the service. Select <add new> from the listbox to define a new service record.
• CURRENCY Code identifying the currency. Select <add new> from the listbox to define a new currency record.
Setup Warehouse Details You can specify the warehouse details while defining the new warehouse withdraw record. This allows the user to create the details of the cargo being received. For example, total quantity, the type of the box, the dimensions and weight. If there are items in that particular box the user will be able to create these items as well.
The figure below shows the Warehouse Details section on the Warehouse Receipts dialog.
Warehouse Details
To define new warehouse details record;
1. Right-click on the Warehouse Details section and select [Add] from the pop-up menu.
The New Cargo Release Details dialog appears.
27

Printed Documentation
New Warehouse Details dialog
2. Enter the following information;
• QTY Number identifying the total quantity.
• CARGO TYPE Type of cargo received in the warehouse. Click <ADD NEW> to define a new cargo type.
• KGS/ LBS Select the measurement unit from the list of options.
• LENGTH Number identifying the length of the cargo item.
• WIDTH Number identifying the width of the cargo item.
• HEIGHT Number identifying the height of the cargo item.
• UNIT WEIGHT Unit weight of the cargo item.
• TOTAL WEIGHT Total weight of the cargo shipment.
• CUBIC Number identifying the cubic volume. This value is pertaining to the measurement of volume, for example, the cubic contents of a vessel.
• DIM FACT Dimensional Weight Factor (DIM) from the list of available options; DOM or INT. DIM is a method of compensating air freight carriers for the cubic requirements of freight that is very light yet very bulky. In most cases, a DIM factor of 194 is used for domestic shipments and 166 for international shipments. Calculation is LxWxH/194 = DIM weight. If DIM weight is greater than actual weight, the freight is rated at DIM weight.
• VOL. WEIGHT Volume weight of the cargo shipment.
• LOCATION Warehouse location/ building for the cargo shipment. Click <Add New> to define a new warehouse shipment.
• COMMENTS Additional notes for the warehouse shipment.
3. To define new item details, right-click on the Item Details section and select [Add] from the popup menu.
The New Item Details dialog appears.
28

Warehouse Withdrawal
New Item Details dialog
4. Enter the required item details, and then click OK to return to the Warehouse Details dialog.
5. Click OK to return to the Warehouse Withdraws dialog.
Setup Warehouse Charges You can specify the warehouse charges while defining the new warehouse withdraw record. This allows the user to specify charges for this transaction.
The figure below shows the Warehouse Charges section on the Warehouse Receipts dialog.
Warehouse Charges
To specify the warehouse charges;
1. Right-click on the Warehouse Charges list and select [Add] from the popup menu.
The New Charges Details dialog appears.
29

Printed Documentation
New Charges Details dialog
2. Enter the following information;
• BILLING CODE
Unique code identifying the billing information. Click to search or define a new billing code.
• BILL TYPE Billing Type from the list of available options; PREPAID or COLLECT.
• BILL PARTY Bill party from the list of available options; SHIPPER, CONSIGNEE, THIRD-PARTY or OTHER.
• COMMENTS Additiona notes for the charges details.
• DETAILS [BILLING/ COST/ HISTORY] Enter the required details for billing, cost and history.
3. Click OK to return to the Warehouse Withdraws dialog.
Setup Carrier Info To define Carrier information;
1. Click Carrier tab.
The Carrier tab fields appear.
30

Warehouse Withdrawal
2. Enter the following;
• CARRIER
Unique code identifying the carrier information. Click to search or define the new carrier record.
Please refer to “Warehouse Maintenance” section for more information on setting up the Carrier Information.
• PRO NUMBER # Unique code identifying the PRO.
• TRACKING # Unique code identifying the tracking number.
• DRIVER
Unique code identifying the driver information. Click to search or define the new driver record.
Setup Pro Numbers Info To define pro numbers information;
1. Click Pro Numbers tab.
The Pro Numbers tab dialog appears.
2. To add new item, right-click and select [Add] from the popup menu.
The New PRO Number Details dialog appears.
31

Printed Documentation
Setup Hazardous Info To define hazardous information;
1. Click Hazardous tab.
The Hazardous tab dialog appears.
2. Enter the following information;
• CONTACT Name of the contact.
• PHONE Phone number of the contact.
3. To define new hazardous detail record, rightclick and select [Add] from the popup menu.
The New Hazardous Details dialog appears.
New Hazardous Details dialog
32

Warehouse Withdrawal
Setup Containers Info To define containers information;
1. Click Containers tab.
The Containers tab dialog appears.
2. To define new container record, rightclick and select [Add] from the popup menu.
The New Container Details dialog appears.
New Container Details dialog
Linking Warehouse Receipts You can link or take cargo from the warehouse receipts by ciking the icon Link Warehouse Receipts on the standard tool bar.
By clicking on it the system it is going to show the warehouse receipt link screen where the user can browse through the warehouse receipts or enter a particular warehouse receipt number. After selecting the warehouse receipts to withdraw, the link screen will show the user the selected warehouse receipts with a plus sign next to it. If the user clicks on the plus sign, the details of the warehouse receipts (dimension and quantity) will be shown.
33

Printed Documentation
To link warehouse receipts;
1. Select Warehouse from the system menu toolbar.
2. Click Warehouse Withdrawal Entry under the [Withdrawals] menu.
The Warehouse Withdraws dialog appears.
Warehouse Withdraws dialog
3. Select File>New Record.
The New Record tab is added to the Warehouse Withdraws dialog.
Warehouse Withdraws dialog – New Record
4. Click on the standard tool bar.
The Warehouse Linking dialog appears.
34

Warehouse Withdrawal
Warehouse Linking dialog
5. The warehouse receipts’ withdraws could be done fully or partially. If the user does a partial linking, double click on it, and the user will be able to choose how many pieces will be linked, if not, leave them marked and it will move all those pieces into the withdraw cargo section.
Warehouse Linking dialog – Partial Linking
After making the selection, Click Link Warehouses to instruct the system to update and move all the information from that linking screen to the withdraw record.
Pickup/ Delivery Orders
Pickup/ Delivery Orders When the warehouse withdraws has been completed, you may convert them into Delivery Orders by clicking on the Create P/D icon on the standard toolbar.
35

Printed Documentation
To create Pickup/Delivery Orders;
1. Click on the standard tool bar.
The Pickup/Delivery Orders dialog appears.
Pickup/Delivery dialog
2. Enter/ review the following information;
• P/D# Unique number identifying the Pickup/Delivery order.
• ORDER DATE/ TIME Order date and time.
• DIVISION Division from the list of available options.
• USER ID Unique name identifying the user.
• TYPE Type of order from the list of available options; PICKUP, DELIVERY or XDOCK.
• SCHEDULED DATE/ TIME Scheduled date and time.
• TERMINAL Terminal from the list of available options.
• STATUS Status from the list of available options; CLOSED, DELIVERED, OPEN, POSTED, or VOID.
• QUOTE#
Number identifying the pickup/delivery quotation. Click to search or define a new pickup/ delivery quotation.
• COMPLETED ON Date specifying the completion.
• SERVICE Service from the list of available services.
• WHSE Warehouse from the list of available options.
• DISPATCH ST
36
Warehouse Withdrawal
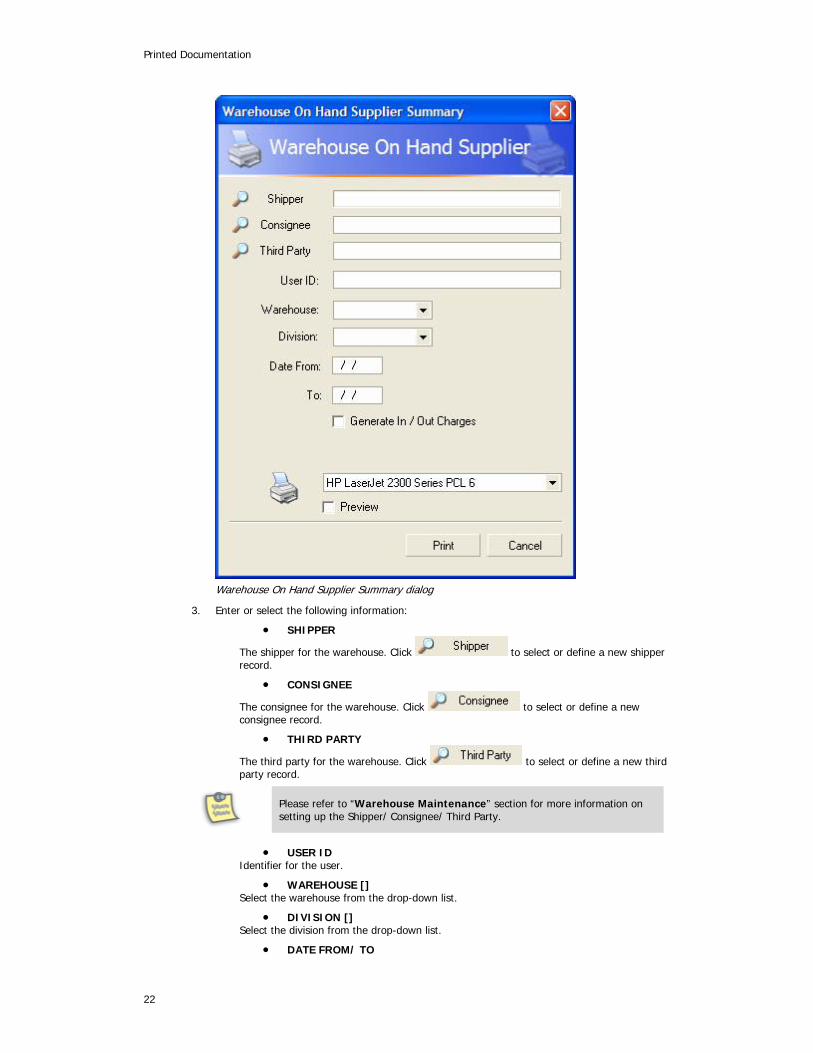
Dispatch status from the list of available options; OPEN, DISPATCH, ARRIVED, or CLOSED.
3. Specify the FROM/ SHIPPER name and address information.
4. Specify the TO/ CONSIGNEE name and address information.
5. Specify the THIRD PARTY information.
6. Specify the following additional information. This includes Caller, Freight & Cod, Marks, PO Refs,
Trailer and Irregularities Information.
7. Specify the following additional information. This includes Carrier, Appt, PRO Numbers, Hazardous
Materials, Container, and Proof of Delivery Information.
37

Printed Documentation
8. If you want to specify the Cargo Details and Pickup/Delivery Charges, please refer to next
sections.
Setup Cargo Details This would allow you to define the cargo details while creating the Pickup/Delivery Orders.
The figure below shows the Cargo Details section on the Pickup/Delivery Orders dialog.
To define the cargo details for Pickup/Delivery Orders;
1. Right-click and select [Add] from the popup menu.
The New Cargo Details dialog appears.
New Cargo Details dialog
1. Enter the following information;
• QTY
38

Warehouse Withdrawal
Number identifying the total quantity.
• CARGO TYPE Type of cargo received in the warehouse. Click <ADD NEW> to define a new cargo type.
• KGS/ LBS Select the measurement unit from the list of options.
• LENGTH Number identifying the length of the cargo item.
• WIDTH Number identifying the width of the cargo item.
• HEIGHT Number identifying the height of the cargo item.
• UNIT WEIGHT Unit weight of the cargo item.
• TOTAL WEIGHT Total weight of the cargo shipment.
• CUBIC Number identifying the cubic volume. This value is pertaining to the measurement of volume, for example, the cubic contents of a vessel.
• DIM FACT Dimensional Weight Factor (DIM) from the list of available options; DOM or INT. DIM is a method of compensating air freight carriers for the cubic requirements of freight that is very light yet very bulky. In most cases, a DIM factor of 194 is used for domestic shipments and 166 for international shipments. Calculation is LxWxH/194 = DIM weight. If DIM weight is greater than actual weight, the freight is rated at DIM weight.
• VOL. WEIGHT Volume weight of the cargo shipment.
• PCKGS Number identifying the total number of packages.
• CARGO TYPE Type of cargo from the list of available options.
• ITEM/ SKU/ DESCRIPTION Name of Item/ SKU along with the necessary description.
• LOCATION Warehouse location/ building for the cargo shipment. Click <Add New> to define a new warehouse shipment.
• COMMENTS Additional notes for the warehouse shipment.
• CUSTOMER REFERENCE Reference information for the customer. This includes Vendor name, final destination, list of PO Numbers, etc.
2. Click Save to update the new cargo details and return to the Pickup/Delivery Orders dialog.
Setup Pickup/Delivery Charges You can specify the Pickup/Delivery Charges while defining the Pickup/Delivery Orders. This allows the user to specify charges for this transaction.
The figure below shows the Pickup/Delivery Charges section on the Pickup/Delivery Orders dialog.
39

Printed Documentation
To calculate the total charges for Pickup/Delivery Orders;
1. Right-click on the Pickup/Delivery Charges list and select [Add] from the popup menu.
The New Charges Details dialog appears.
New Charges Details dialog
2. Enter the following information;
• BILLING CODE
Unique code identifying the billing information. Click to search or define a new billing code.
• BILL TYPE Billing Type from the list of available options; PREPAID or COLLECT.
• BILL PARTY Bill party from the list of available options; SHIPPER, CONSIGNEE, THIRD-PARTY or OTHER.
• COMMENTS Additiona notes for the charges details.
• DETAILS [BILLING/ COST/ HISTORY] Enter the required details for billing, cost and history.
3. Click OK to return to the Pickup/Delivery Orders dialog.
You can then calulcate the total rate by clicking the button on the Pickup/Delivery Orders dialog.
40

Warehouse Withdrawal
Label Printing You can print all the labels required from a particular warehouse receipt.
To print a new warehouse label;
1. Select Warehouse from the system menu toolbar.
2. Click Label Printing under the [Warehouse Withdrawal] menu.
The Print Labels dialog appears.
Print Labels
3. Enter or select the following label details;
• TRANSACTION # Unique number identifying the transaction.
• DATE Date identifying the label date.
• DIVISION
Select the division set up for the warehouse. Click to define a new division record.
• FILE Unique identifier for the file reference.
• LOCATION
41

Printed Documentation
Select the location set up for the warehouse. Click to define a new location record.
• ORIGIN
Enter the origin set up for the warehouse. Click to select or define a new origin record.
• DESTINATION
Enter the destination set up for the warehouse. Click to select or define a new destination record.
Please refer to “Warehouse Maintenance” section for more information on setting up the Origin and Destination Airports.
• CUSTOMER
Enter the name of the customer. Click to select or define a new customer record.
• ADDRESS/ CITY/ STATE/ ZIP Customer address to be printed on the warehouse receipt.
• PIECES Number of pieces for the warehouse items.
• WEIGHT Weight measurement for warehouse items in pounds and kilograms.
• PRINT FROM Specify the range of page numbers to be printed.
• LABEL FORMAT [] Select the label format from the drop-down list to be used for the warehouse receipt.
• PRINTER [] Select the target printer from the drop-down list.
• PREVIEW Check to enable the print preview for the warehouse receipt.
4. Click Print. The Print Labels are sent to the target printer or the preview dialog.
Cargo Out Report This report allows the user to view all the warehouse withdrawals. You can print a report on cargo based on the various criteria. For example, the user can specify the report filters including consignee, destination, etc.
To view/ print the cargo out report;
1. Select Warehouse from the system menu toolbar.
2. Click Cargo Out Report under the [Warehouse Withdrawal] menu.
The Warehouse Withdrawals dialog appears.
42

Warehouse Withdrawal
Warehouse Receipts Report 3. Enter or select the following information:
• CONSIGNEE
The consignee for the warehouse. Click to select or define a new consignee record.
• THIRD PARTY
The third party for the warehouse. Click to select or define a new third party record.
• DESTINATION
The destination for the warehouse. Click to select or define a new destination record.
Please refer to “Warehouse Maintenance” section for more information on setting up the Consignee/ Third Party/ Destination information.
• SERVICE [] Select the service from the drop-down list.
• DIVISION Select the division from the drop-down list.
• DATE FROM/ TO Date range for the Warehouse Withdrawal.
• GENERATE TURNOVER CHARGES Check to enable the option to generate the turnover charges in the report.
• PRINTER Select the target printer from the drop-down list of installed printers.
43

Printed Documentation
44
• PREVIEW Check to enable the print preview of the report.
4. Click Print. The Warehouse Cargo Out Report is sent to the target printer or the preview dialog.

Warehouse Tracking Status Warehouse Tracking Status
In this section:
Warehouse Tracking Status Update
Warehouse Tracking Status Report
This section describes the tasks related to status update in order to effectively track the warehouse goods.
Warehouse Tracking Overview The user is provided with different options for working with warehouse tracking. Please refer to the Tracking Status menu on the Logisuite Warehouse workspace.
Warehouse Tracking
The subsequent sections will explain each of the menu items related to warehouse tracking status.
Warehouse Tracking Status Update You can update the status of warehouse items using the warehouse tracking feature. The user needs to specify the warehouse receipt number to display the transaction details and the status history.
To update the tracking status;
1. Select Warehouse from the system menu toolbar.
2. Click Tracking Status Update under the [Tracking Status] menu.
The Web Status Update dialog appears.
45

Printed Documentation
3. Enter the Warehouse Receipt# to load the required transaction record. Click to search the warehouse receipt record.
4. Enter or select the following [Web Status] information:
• STATUS
Tracking status for the warehouse. Click to search or define a new tracking status.
• DATE The current system date/time information.
• COMMENTS The comments specifying the latest status for the warehouse.
5. Click Update Whse.
The Warehouse Tracking History is updated with the latest status.
Warehouse Tracking Status Report You can update the status of warehouse items using the warehouse tracking feature. The status update feature is based on the warehouse receipt number.
To update the tracking status;
1. Select Warehouse from the system menu toolbar.
2. Click Tracking Status Report under the [Tracking Status] menu.
The Warehouse Web Status dialog appears.
46

Warehouse Tracking Status
47
3. Enter or select the following information:
• STATUS
Tracking status for the warehouse. Click to search or define a new tracking status.
• DIVISION Select the division from the drop-down list.
• DATE FROM/ TO Date range for the Warehouse tracking.
• PRINTER Select the target printer from the drop-down list of installed printers.
• PREVIEW Check to enable the print preview of the report.
4. Click Print. The Warehouse Tracking Status report is sent to the target printer or the preview dialog.


Warehouse Accounting Update Warehouse Accounting Update
In this section:
Warehouse Receipts Billing Update
Warehouse Withdrawal Billing Update
This section describes the tasks related to accounting update for warehouse receipts and withdrawals for billing purpose.
Warehouse Accounting Overview The user is provided with different options for working with warehouse accounting. Please refer to the Warehouse Accounting Update menu on the Logisuite Warehouse workspace.
Warehouse Accounting
The subsequent sections will explain each of the menu items related to warehouse accounting status.
Warehouse Receipts Billing Update You can do the transaction posting to perform the warehouse billing. The bill update feature is based on the warehouse receipt number.
To perform the transaction posting;
1. Select Warehouse from the system menu toolbar.
2. Click Warehouse Receipts Billing Update under the [Warehouse Accounting Update] menu.
The Transaction Posting dialog appears.
49

Printed Documentation
Transaction Posting dialog
3. Enter or select the following information:
• WHSE RCPT # Unique number identifying the warehouse receipt.
• DATE FROM/ TO Date range for the Warehouse billing.
• PRINTER Select the target printer from the drop-down list of installed printers.
• PREVIEW Check to enable the print preview of the report.
4. Click Post. The transaction identified by the warehouse receipt is successfully posted.
Warehouse Withdrawal Billing Update You can do the transaction posting to perform the warehouse withdrawal. The withdrawal billing update feature is based on the warehouse release number.
To perform the transaction posting;
1. Select Warehouse from the system menu toolbar.
2. Click Warehouse Withdrawal Billing Update under the [Warehouse Accounting Update] menu.
The Transaction Posting dialog appears.
50

Warehouse Accounting Update
51
Transaction Posting dialog
3. Enter or select the following information:
• RELEASE # Unique number identifying the warehouse release/ withdrawal.
• DATE FROM/ TO Date range for the Warehouse billing.
• PRINTER Select the target printer from the drop-down list of installed printers.
• PREVIEW Check to enable the print preview of the report.
4. Click Post. The transaction identified by the warehouse receipt is successfully posted.

Warehouse Maintenance Warehouse Maintenance
In this section:
Units & Equipment
Items
Warehouse & Locations
Services & Commodities
Origin & Destination
Customs & Hazardous Materials
Carriers
Adjustments & Reasons
This section describes the tasks related to setting up different codes including units, equipment types, item categories, warehouse locations, etc. Moreover, you can also define the carriers, origin and destination details.
Units & Equipment
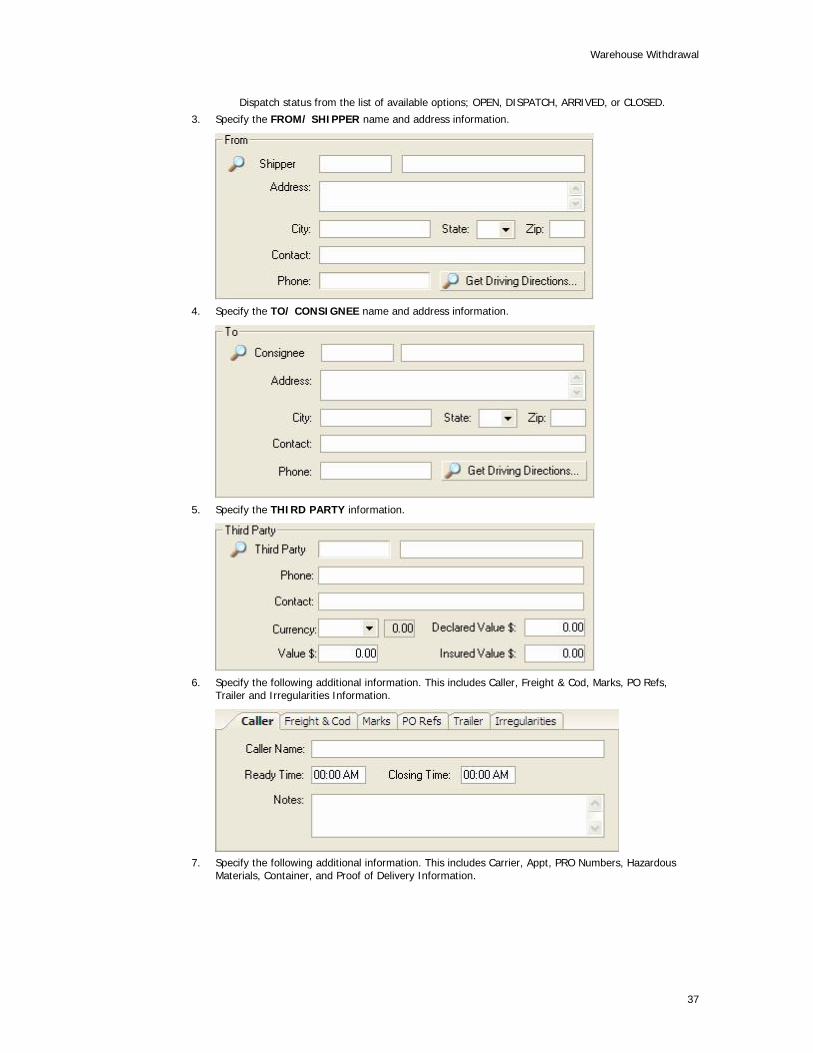
Units & Equipment You can set up different codes including units, cargo and equipments. Please refer to the [Units & Equipment] under the Warehouse Maintenance on the Logisuite workspace.
Warehouse Maintenance menu
The subsequent sections will explain each of the menu items related to units & equipment.
Define Units To define a new unit record;
1. Select Warehouse from the system menu toolbar.
2. Click Units under the [Units & Equipment] menu.
The Units dialog appears.
53

Printed Documentation
Units dialog 3. Click File->New Record or right click and select [Add New Record] from the popup menu.
Units dialog – New Record
4. Enter or select the following information:
• UNIT ID Unique number identifying the unit.
• DESCRIPTION Description for the unit.
5. Click [Save] on the standard toolbar.
The Units Confirmation messagebox appears.
54

Warehouse Maintenance
6. Click Yes.
The new record is appended to the list of records on the Units tab.
Define Cargo Types To define new cargo type;
1. Select Warehouse from the system menu toolbar.
2. Click Cargo Types under the [Units & Equipment] menu.
The Cargo Types dialog appears.
Cargo Types dialog
3. Click File->New Record or right click and select [Add New Record] from the popup menu.
55

Printed Documentation
Cargo Types dialog – New Record
4. Enter or select the following information:
• CARGO TYPE Code identifying the cargo type.
• DESCRIPTION Description for the cargo.
• DIMENSION & WEIGHT Various data pertaining to dimension & weight for the cargo type.
5. Click [Save] on the standard toolbar.
The Cargo Types Confirmation messagebox appears.
6. Click Yes.
The new record is appended to the list of records on the Cargo Types tab.
Define Cargo Irregularities To define new cargo irregularity;
1. Select Warehouse from the system menu toolbar.
2. Click Cargo Irregularities under the [Units & Equipment] menu.
The Irregularities dialog appears.
56
Warehouse Maintenance
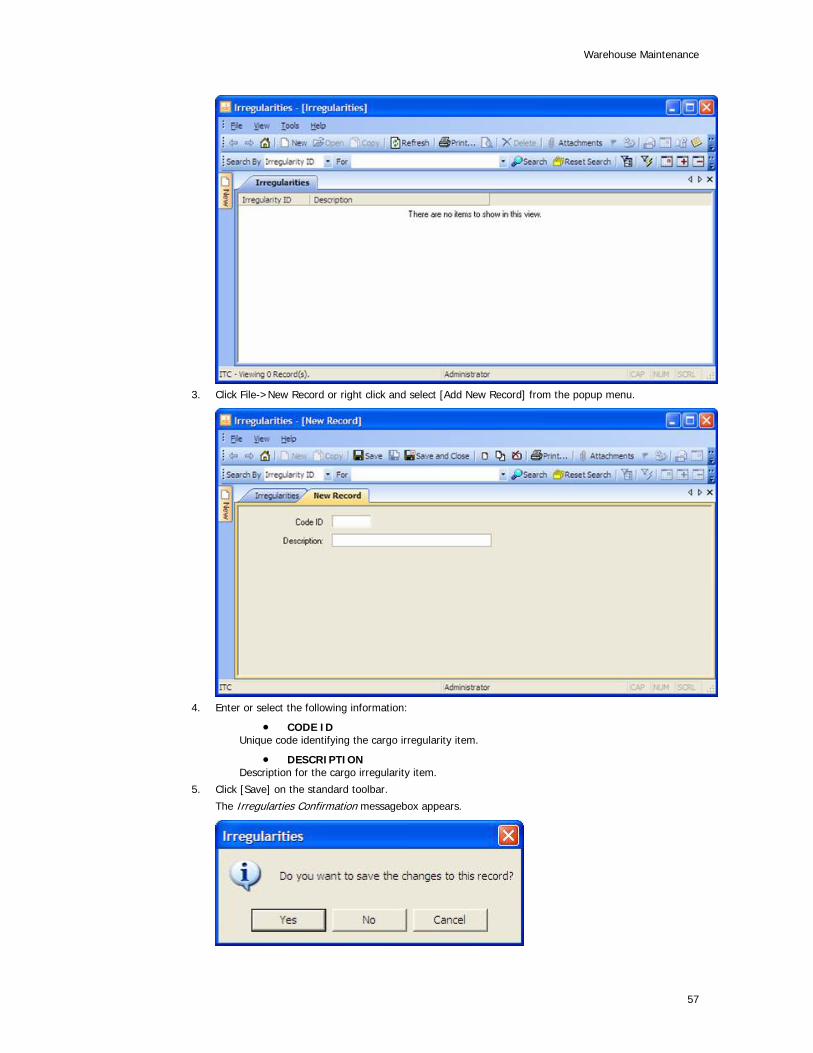
3. Click File->New Record or right click and select [Add New Record] from the popup menu.
4. Enter or select the following information:
• CODE ID Unique code identifying the cargo irregularity item.
• DESCRIPTION Description for the cargo irregularity item.
5. Click [Save] on the standard toolbar.
The Irregularties Confirmation messagebox appears.
57

Printed Documentation
6. Click Yes.
The new record is appended to the list of records on the Irregularities tab.
Define Equipment Types To define a new equipment type;
1. Select Warehouse from the system menu toolbar.
2. Click Equipment Types under the [Units & Equipment] menu.
The Equipment Types dialog appears.
Equipment Types dialog
3. Click File->New Record or right click and select [Add New Record] from the popup menu.
Equipment Types dialog – New Record
4. Enter or select the following information:
• EQUIPMENT TYPE Unique code identifying the equipment type.
• DESCRIPTION Description for the equipment.
• MAXIMUM VALUES Measurement data pertaining to equipment type including weight, volume, etc.
58

Warehouse Maintenance
5. Click [Save] on the standard toolbar.
The Equipment Types Confirmation messagebox appears.
6. Click Yes.
The new record is appended to the list of records on the Equipment Types tab.
Items
Items You can set up different codes for item categories and sub-categories. Please refer to the [Items] under the Warehouse Maintenance on the Logisuite workspace.
Warehouse Maintenance menu
The subsequent sections will explain each of the menu items related to items.
Define Item Category To define a new item category;
1. Select Warehouse from the system menu toolbar.
2. Click Items’ Category under the [Items] menu.
The Item Categories dialog appears.
59

Printed Documentation
Item Categories dialog
3. Click File->New Record or right click and select [Add New Record] from the popup menu.
Item Categories – New Record
4. Enter or select the following information:
• CATEGORY ID Unique code identifying the item category.
• DESCRIPTION Description for the item category.
5. Click [Save] on the standard toolbar.
The Item Categories Confirmation messagebox appears.
60

Warehouse Maintenance
6. Click Yes.
The new record is appended to the list of records on the Item Categories tab.
Warehouse & Locations
Warehouse & Locations You can set up different information including warehouse facilities, locations, services and origin and destination, etc. Please refer to the Warehouse Maintenance on the Logisuite workspace.
Warehouse Maintenance menu
The subsequent sections will explain each of the menu items related to warehouse & locations.
Define Warehouse Facilities To define a new warehouse facility;
1. Select Warehouse from the system menu toolbar.
2. Click Warehouse Facilities under the [Warehouse Maintenance] menu.
The Warehouse Facilities dialog appears.
61

Printed Documentation
Warehouses dialog
3. Click File->New Record or right click and select [Add New Record] from the popup menu.
Warehouses dialog – New Record
4. Enter or select the following information:
• WAREHOUSE ID Unique code identifying the warehouse.
• DESCRIPTION Description for the warehouse.
• ADDRESS/ CITY/ STATE/ ZIP Address information for the warehouse.
• CONTACT INFORMATION Contact details including Name, Phone and Fax.
5. Click [Save] on the standard toolbar.
The Warehouses Confirmation messagebox appears.
62

Warehouse Maintenance
6. Click Yes.
The new record is appended to the list of records on the Warehouses tab.
Define Warehouse Locations To define a new warehouse location;
1. Select Warehouse from the system menu toolbar.
2. Click Locations & Bins under the [Warehouse & Locations] menu.
The Locations dialog appears.
Locations dialog
3. Click File->New Record or right click and select [Add New Record] from the popup menu.
63

Printed Documentation
Locations dialog – New Record
4. Enter or select the following information:
• LOCATION ID Unique code identifying the warehouse location.
• DESCRIPTION Description for the warehouse location.
• WHSE/BLDG Select warehouse/ building from the drop-down list.
• STORAGE FREE DAYS Number of days for the warehouse storage.
5. Click [Save] on the standard toolbar.
The Locations Confirmation messagebox appears.
6. Click Yes.
The new record is appended to the list of records on the Locations tab.
Services & Commodities
Services & Commodities You can set up different codes for services & commodities. Please refer to [Services & Commodities] under the Warehouse Maintenance on the Logisuite workspace.
64

Warehouse Maintenance
Warehouse Maintenance menu
The subsequent sections will explain each of the menu items related to services & commodities.
Define Warehouse Services To define a new warehouse service;
1. Select Warehouse from the system menu toolbar.
2. Click Services under the [Services & Commodities] menu.
The Services dialog appears.
Services dialog
3. Click File->New Record or right click and select [Add New Record] from the popup menu.
65

Printed Documentation
Services dialog – New Record
4. Enter or select the following information:
• CODE ID Unique code identifying the warehouse service.
• DESCRIPTION Description for the warehouse service.
5. Click [Save] on the standard toolbar.
The Services Confirmation messagebox appears.
6. Click Yes.
The new record is appended to the list of records on the Services tab.
Define Warehouse Commodities To define a new warehouse commodity;
1. Select Warehouse from the system menu toolbar.
2. Click Commodities under the [Services & Commodities] menu.
The Commodities dialog appears.
66

Warehouse Maintenance
Commodities dialog
3. Click File->New Record or right click and select [Add New Record] from the popup menu.
Commodities dialog – New Record
4. Enter or select the following information:
• COMMODITY ID Unique code identifying the warehouse commodity.
• DESCRIPTION Description for the warehouse commodity.
5. Click [Save] on the standard toolbar.
The Commodities Confirmation messagebox appears.
67

Printed Documentation
6. Click Yes.
The new record is appended to the list of records on the Commodities tab.
Origin & Destination
Origin & Destination You can set up different codes for origin & destination. Please refer to [Origins & Destinations] under the Warehouse Maintenance on the Logisuite workspace.
Warehouse Maintenance menu
The subsequent sections will explain each of the menu items related to origin & destination.
Define Airports To define a new airport;
1. Select Warehouse from the system menu toolbar.
2. Click Airports under the [Origin & Destination] menu.
The Airports dialog appears.
68

Warehouse Maintenance
Airports dialog
3. Click File->New Record or right click and select [Add New Record] from the popup menu.
Airports dialog – New Record
4. Enter or select the following information:
• CODE ID Unique code identifying the airport record.
• AIRPORT CODE Unique code identifying the airport origin/ destination location.
• DESCRIPTION Description for the airport origin/ destination location.
• COUNTRY Code identifying the location country.
• TYPE [] Select the airport type from the following options.
• ZIP CODES
69

Printed Documentation
List of ZIP codes defined in the system. Right-click and select [Add New] to define a new zip code.
5. Click [Save] on the standard toolbar.
The Airports Confirmation messagebox appears.
6. Click Yes.
The new record is appended to the list of records on the Airports tab.
Define Ocean Ports To define a new ocean port;
1. Select Warehouse from the system menu toolbar.
2. Click Ocean Ports under the [Origins & Destinations] menu.
The Ocean Ports dialog appears.
Ocean Ports dialog
3. Click File->New Record or right click and select [Add New Record] from the popup menu.
70

Warehouse Maintenance
Ocean Ports dialog – New Record
4. Enter or select the following information:
• CODE ID Unique code identifying the ocean port record.
• DESCRIPTION Description for the ocean port origin/ destination location.
• COUNTRY Code identifying the location country.
• PORT CODE Unique code identifying the ocean port origin/ destination location.
• COMMENTS/ NOTES Comments/ notes describing the ocean port.
• PRIMARY AGENT
Click to search or define the new primary agent.
• SECOND AGENT
Click to search or define the new second agent.
5. Click [Save] on the standard toolbar.
The Ocean Ports Confirmation messagebox appears.
6. Click Yes.
The new record is appended to the list of records on the Ocean Ports tab.
Define Zip Codes To define a new zip code;
71

Printed Documentation
1. Select Warehouse from the system menu toolbar.
2. Click Zip Codes under the [Origin & Destination] menu.
The Zip Codes dialog appears.
Zip Codes dialog
3. Click File->New Record or right click and select [Add New Record] from the popup menu.
Zip Codes dialog – New Record
4. Enter or select the following information:
• ZIP CODE Unique code identifying the ZIP record.
• CITY/ COUNTRY/ STATE Address information identifying the ZIP record.
• ROUTE
Click to search or define a new route record.
• PRIMARY AGENT
72

Warehouse Maintenance
Click to search or define the new primary agent.
• SECOND AGENT
Click to search or define the new second agent.
• COMMENTS/ NOTES Additional information for the ZIP record.
5. Click [Save] on the standard toolbar.
The Zip Codes Confirmation messagebox appears.
6. Click Yes.
The new record is appended to the list of records on the Zip Codes tab.
Customs & Hazardous Materials
Customs & Hazardous Materials You can set up different information including customs & hazardous materials, carriers, adjustments and reasons, etc. Please refer to the Warehouse Maintenance on the Logisuite workspace.
Warehouse Maintenance menu
The subsequent sections will explain each of the menu items related to customs & hazardouse materials.
Define UN numbers To define a new number;
1. Select Warehouse from the system menu toolbar.
2. Click UN Numbers under the [Customs & Hazardous Materials] menu.
The UN Numbers dialog appears.
73

Printed Documentation
UN Numbers dialog
3. Click File->New Record or right click and select [Add New Record] from the popup menu.
UN Numbers dialog – New Record
4. Enter or select the following information:
• UN NUMBER Unique code identifying the UN.
• DESCRIPTION Description for the UN number.
5. Click [Save] on the standard toolbar.
The UN numbers Confirmation messagebox appears.
74

Warehouse Maintenance
6. Click Yes.
The new record is appended to the list of records on the UN numbers tab.
Carriers
Carriers You can set up information for different carriers. Please refer to [Carriers] under the Warehouse Maintenance on the Logisuite workspace.
Warehouse Maintenance menu
The subsequent sections will explain each of the menu items related to carriers.
Define Carriers To define a new carrier;
1. Select Warehouse from the system menu toolbar.
2. Click Carriers under the [Carriers] menu.
The Carriers dialog appears.
75

Printed Documentation
Carriers dialog
3. Click File->New Record or right click and select [Add New Record] from the popup menu.
Carriers dialog – New Record
4. Enter or select the following information:
• CARRIER ID Unique code identifying the carrier record.
• TYPE [] Select carrier type from the drop-down list.
• NAME Carrier name.
• ACCT # Number identifying the Carrier Acount record.
• ADDRESS/ CITY/ STATE/ ZIP Address information for the carrier location.
• PHONE Carrier phone number.
• FAX
76
Warehouse Maintenance
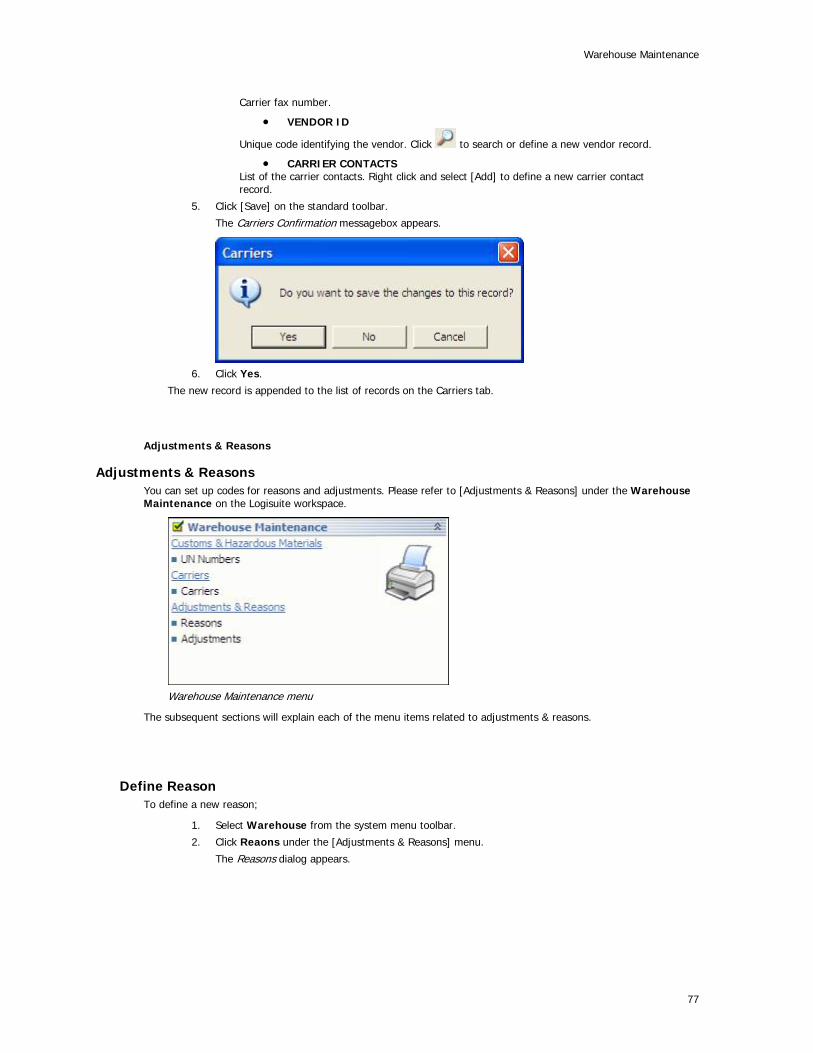
Carrier fax number.
• VENDOR ID
Unique code identifying the vendor. Click to search or define a new vendor record.
• CARRIER CONTACTS List of the carrier contacts. Right click and select [Add] to define a new carrier contact record.
5. Click [Save] on the standard toolbar.
The Carriers Confirmation messagebox appears.
6. Click Yes.
The new record is appended to the list of records on the Carriers tab.
Adjustments & Reasons
Adjustments & Reasons You can set up codes for reasons and adjustments. Please refer to [Adjustments & Reasons] under the Warehouse Maintenance on the Logisuite workspace.
Warehouse Maintenance menu
The subsequent sections will explain each of the menu items related to adjustments & reasons.
Define Reason To define a new reason;
1. Select Warehouse from the system menu toolbar.
2. Click Reaons under the [Adjustments & Reasons] menu.
The Reasons dialog appears.
77

Printed Documentation
Reasons dialog
3. Click File->New Record or right click and select [Add New Record] from the popup menu.
Reasons dialog – New Record
4. Enter or select the following information:
• REASON ID Unique number identifying the reason.
• DESCRIPTION Description for the reason.
5. Click [Save] on the standard toolbar.
The Reasons Confirmation messagebox appears.
78

Warehouse Maintenance
6. Click Yes.
The new record is appended to the list of records on the Reasons tab.
Define Adjustment To define a new adjustment;
1. Select Warehouse from the system menu toolbar.
2. Click Adjustments under the [Adjustments & Reasons] menu.
The Adjustments dialog appears.
Adjustments dialog
3. Click File->New Record or right click and select [Add New Record] from the popup menu.
79

Printed Documentation
80
Adjustments dialog – New Record
4. Enter or select the following information:
• ADJUSTMENT ID Unique number identifying the adjustment.
• DESCRIPTION Description for the adjustment.
5. Click [Save] on the standard toolbar.
The Adjustments Confirmation messagebox appears.
6. Click Yes.
The new record is appended to the list of records on the Adjustments tab.

Glossary
ASN Advanced Ship Notification. An electronic transaction set providing detailed shipment manifest information to carriers and consignee’s.
Assembly Labor-intensive warehouse work designed to put together a finished product per the specifications of individual client from several SKU’s stored in warehouse.
Bill of Lading The transportation documentation that acts as a contract of carriage between the shipper and carrier; also provides a receipt for the goods tendered to the carrier.
Carrier Any entity acting under or pursuant to its Operating Authority.
COD Collect upon Delivery. Payment is required from the consignee at the time of delivery.
Collect Billing term in which consignee receives freight invoice instead of shipper.
COFC Container of flatcar; intermodal container that ships without chassis on rail flatcars.
Consignee The receiver of a freight shipment.
Consignor The sender (shipper) of a freight shipment.
DIM Factor Dimensional Weight Factor. A method of compensating air freight carriers for the cubic requirements of freight that is very light yet very bulky. In most cases, a DIM factor of 194 is used for domestic shipments and 166 for international shipments. Calculation is LxWxH/194 = DIM weight. If DIM weight is greater than actual weight, the freight is rated at DIM weight.
Freight Bill A carrier document describing shipment with control number sometimes referred to as the “pro number”. Used by carrier for shipment tracing purposes.
LCL Less than Container Load. Typically an ocean freight term used to describe load consolidated within 20’ or 40’ ocean container.
OS&D Over, Short, Damaged. A report designed to provide all exceptions from a consolidated shipment once received by delivering carrier. This report is critical in the transfer of cargo liability.
SLC Shippers Load & Count; notation on Bill of Lading.
Wait Time Period of time allotted by Carrier for Customer to tender Property upon pick up or delivery at Customer location.
81