Embed Size (px)
Citation preview

7/30/2019 littleBits_WorkshopGuide
http://slidepdf.com/reader/full/littlebitsworkshopguide 1/22
11
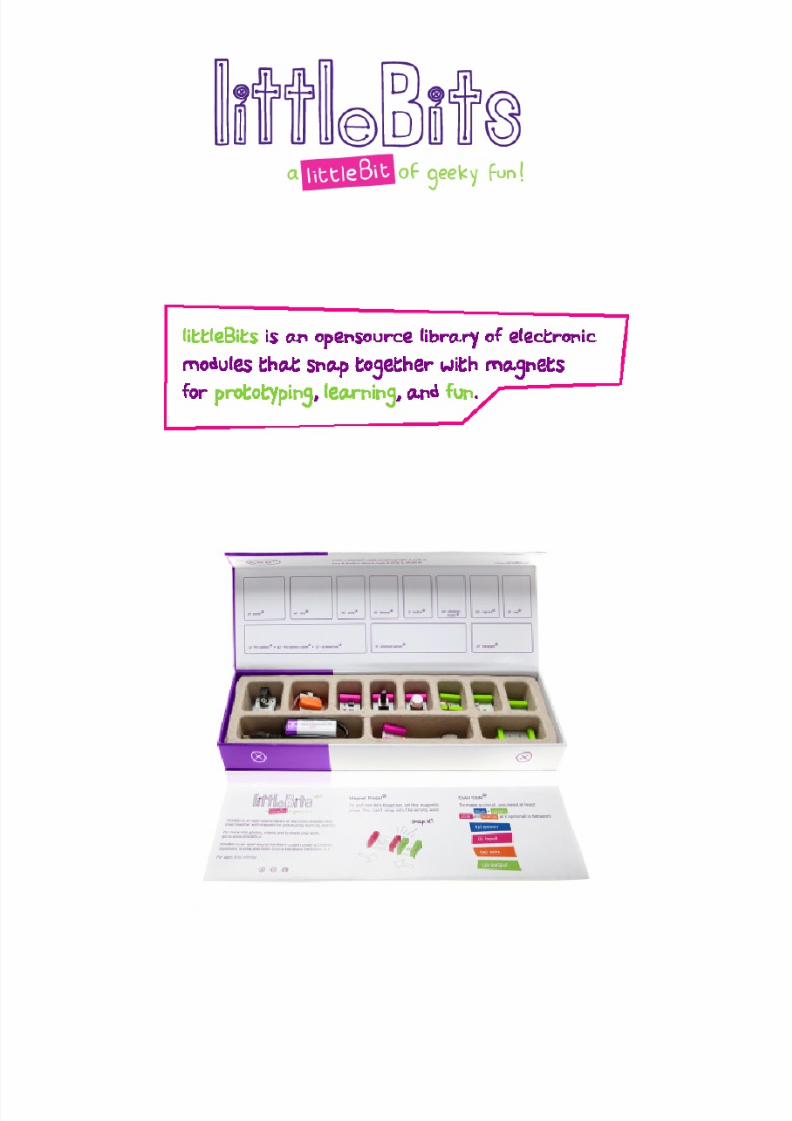
littleBits Workshop
Guide

7/30/2019 littleBits_WorkshopGuide
http://slidepdf.com/reader/full/littlebitsworkshopguide 2/22

7/30/2019 littleBits_WorkshopGuide
http://slidepdf.com/reader/full/littlebitsworkshopguide 3/22
littleBits Workshop
Guide
7/30/2019 littleBits_WorkshopGuide
http://slidepdf.com/reader/full/littlebitsworkshopguide 4/22

7/30/2019 littleBits_WorkshopGuide
http://slidepdf.com/reader/full/littlebitsworkshopguide 5/22
Table of Contents
littleBits Workshop 101 1
How to Plan a littleBits Workshop 2
How to Give a littleBits Demo 4
Sample littleBits Circuits 5
How Do I Know What Bits to Buy? 6
What Project Should I Make? 7
What is a Project Template? 8
Materials Shopping List 10
Project Tips & Tricks 11
Share Your Workshops! 12
Contact 13
Safety 14

7/30/2019 littleBits_WorkshopGuide
http://slidepdf.com/reader/full/littlebitsworkshopguide 6/22
7/30/2019 littleBits_WorkshopGuide
http://slidepdf.com/reader/full/littlebitsworkshopguide 7/22
1
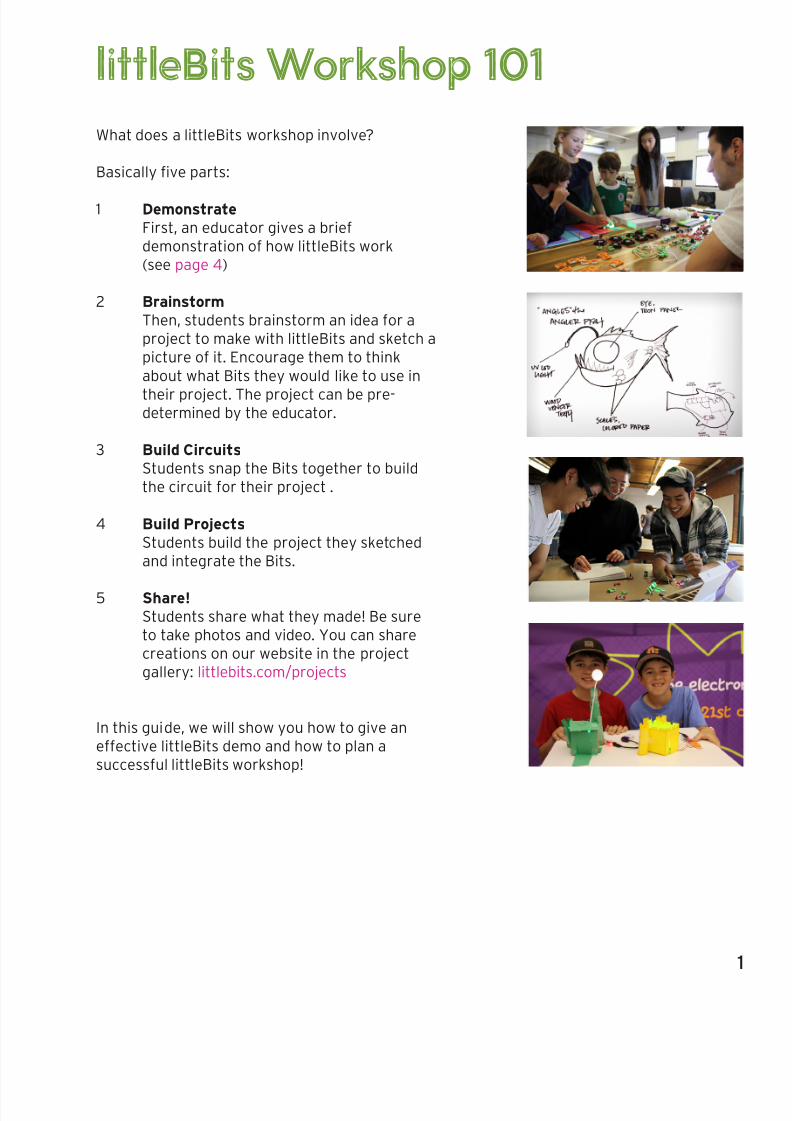
littleBits Workshop 101What does a littleBits workshop involve?
Basically ve parts:
1 Demonstrate
First, an educator gives a briefdemonstration of how littleBits work(see page 4)
2 Brainstorm
Then, students brainstorm an idea for aproject to make with littleBits and sketch apicture of it. Encourage them to thinkabout what Bits they would like to use in
their project. The project can be pre-determined by the educator.
3 Build Circuits
Students snap the Bits together to buildthe circuit for their project .
4 Build Projects
Students build the project they sketchedand integrate the Bits.
5 Share!
Students share what they made! Be sureto take photos and video. You can sharecreations on our website in the projectgallery: littlebits.com/projects
In this guide, we will show you how to give aneffective littleBits demo and how to plan asuccessful littleBits workshop!
7/30/2019 littleBits_WorkshopGuide
http://slidepdf.com/reader/full/littlebitsworkshopguide 8/22
2
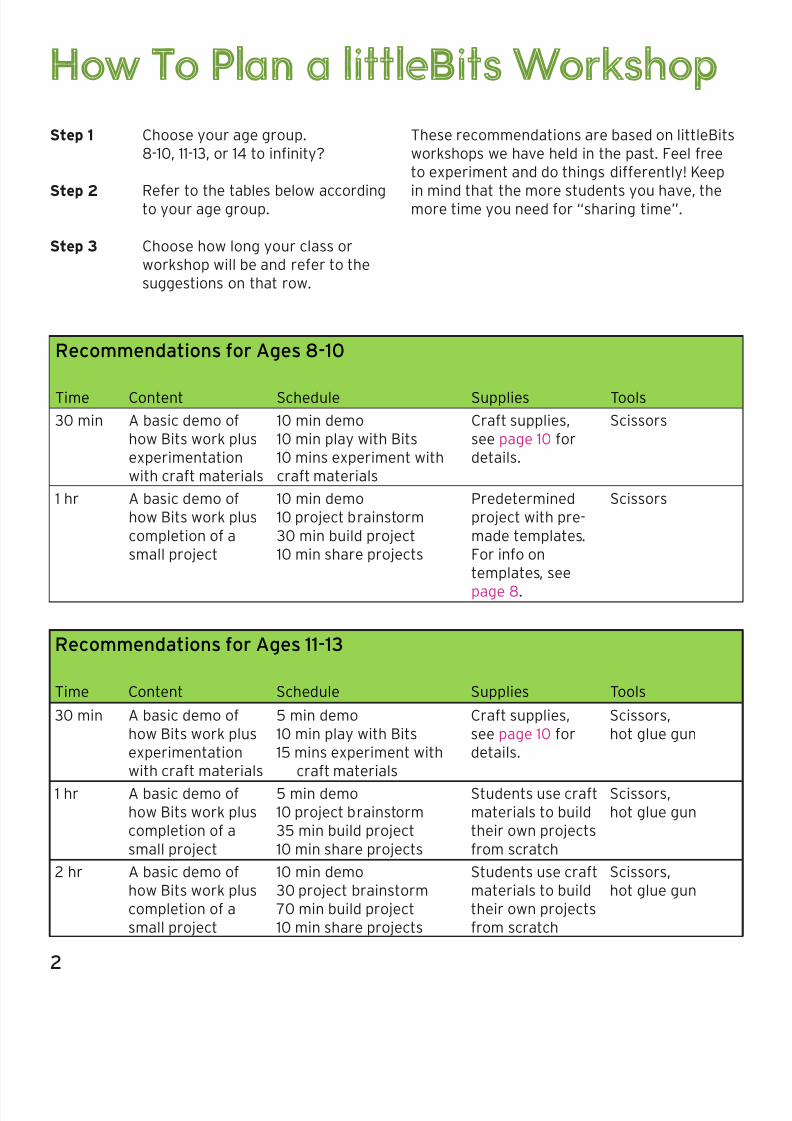
How To Plan a littleBits WorkshopStep 1 Choose your age group.
8-10, 11-13, or 14 to innity?
Step 2 Refer to the tables below accordingto your age group.
Step 3 Choose how long your class orworkshop will be and refer to thesuggestions on that row.
These recommendations are based on littleBitsworkshops we have held in the past. Feel freeto experiment and do things differently! Keep
in mind that the more students you have, themore time you need for “sharing time”.
Recommendations or Ages 8-10
Time Content Schedule Supplies Tools
30 min A basic demo ofhow Bits work plusexperimentationwith craft materials
10 min demo10 min play with Bits10 mins experiment withcraft materials
Craft supplies,see page 10 fordetails.
Scissors
1 hr A basic demo ofhow Bits work pluscompletion of asmall project
10 min demo10 project brainstorm30 min build project10 min share projects
Predeterminedproject with pre-made templates.For info ontemplates, see
page 8.
Scissors
Recommendations or Ages 11-13
Time Content Schedule Supplies Tools
30 min A basic demo ofhow Bits work plusexperimentationwith craft materials
5 min demo10 min play with Bits15 mins experiment with
craft materials
Craft supplies,see page 10 fordetails.
Scissors,hot glue gun
1 hr A basic demo ofhow Bits work pluscompletion of asmall project
5 min demo10 project brainstorm35 min build project10 min share projects
Students use craftmaterials to buildtheir own projectsfrom scratch
Scissors,hot glue gun
2 hr A basic demo ofhow Bits work pluscompletion of asmall project
10 min demo30 project brainstorm70 min build project10 min share projects
Students use craftmaterials to buildtheir own projectsfrom scratch
Scissors,hot glue gun

7/30/2019 littleBits_WorkshopGuide
http://slidepdf.com/reader/full/littlebitsworkshopguide 9/22
3
Recommendations or Ages 14 to infnity
Time Content Schedule Supplies Tools
30 min A basic demo ofhow Bits work plusexperimentationwith craft materials
5 min demo10 min play with Bits15 mins experiment with
craft materials
Craft supplies,see page 10
Scissors, X-actoknife, scissors, hotglue gun
1 hr A basic demo ofhow Bits work pluscompletion of asmall project
5 min demo10 project brainstorm35 min build project10 min share projects
Students use craftmaterials to buildtheir projects(templates opt’l)
Scissors, X-actoknife, scissors, hotglue gun
2 hr A basic demo of
how Bits work pluscompletion of aproject
10 min demo
30 min brainstorm70 min build project10 min share projects
Students use
materials to buildtheir own projectsfrom scratch
More advanced
tools like a lasercutter, 3D printer,and power tools
3 hr A basic demo ofhow Bits work pluscompletion of acomplex project
10 min demo1 hr brainstorm, sketching100 min build project10 min share projects
Students usematerials to buildtheir own projectsfrom scratch
More advancedtools like a lasercutter, 3D printer,and power tools
4 hr A basic demo ofhow Bits work pluscompletion of a
complex project
10 min demo1 hr brainstorm, sketching3 hrs build project
10 min share projects
Students usematerials to buildtheir own projects
from scratch
More advancedtools like a lasercutter, 3D printer,
and power tools
7/30/2019 littleBits_WorkshopGuide
http://slidepdf.com/reader/full/littlebitsworkshopguide 10/22
4
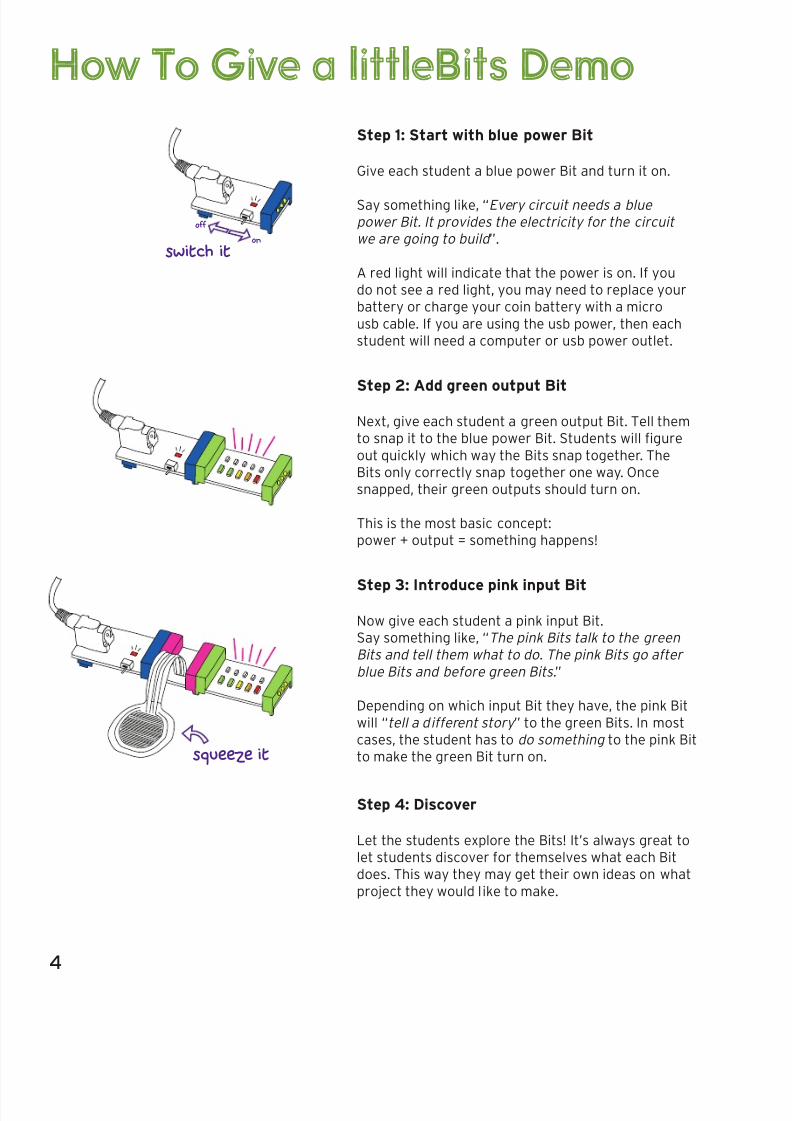
How To Give a littleBits Demo
Step 2: Add green output Bit
Next, give each student a green output Bit. Tell themto snap it to the blue power Bit. Students will gureout quickly which way the Bits snap together. TheBits only correctly snap together one way. Oncesnapped, their green outputs should turn on.
This is the most basic concept:power + output = something happens!
Step 1: Start with blue power Bit
Give each student a blue power Bit and turn it on. Say something like, “Every circuit needs a blue
power Bit. It provides the electricity for the circuit
we are going to build ”.
A red light will indicate that the power is on. If youdo not see a red light, you may need to replace yourbattery or charge your coin battery with a microusb cable. If you are using the usb power, then eachstudent will need a computer or usb power outlet.
Step 3: Introduce pink input Bit
Now give each student a pink input Bit.Say something like, “The pink Bits talk to the green
Bits and tell them what to do. The pink Bits go after
blue Bits and before green Bits.”
Depending on which input Bit they have, the pink Bitwill “tell a different story ” to the green Bits. In mostcases, the student has to do something to the pink Bitto make the green Bit turn on.
Step 4: Discover
Let the students explore the Bits! It’s always great tolet students discover for themselves what each Bitdoes. This way they may get their own ideas on whatproject they would like to make.
switch it
off
on
squeeze it
7/30/2019 littleBits_WorkshopGuide
http://slidepdf.com/reader/full/littlebitsworkshopguide 11/22
5
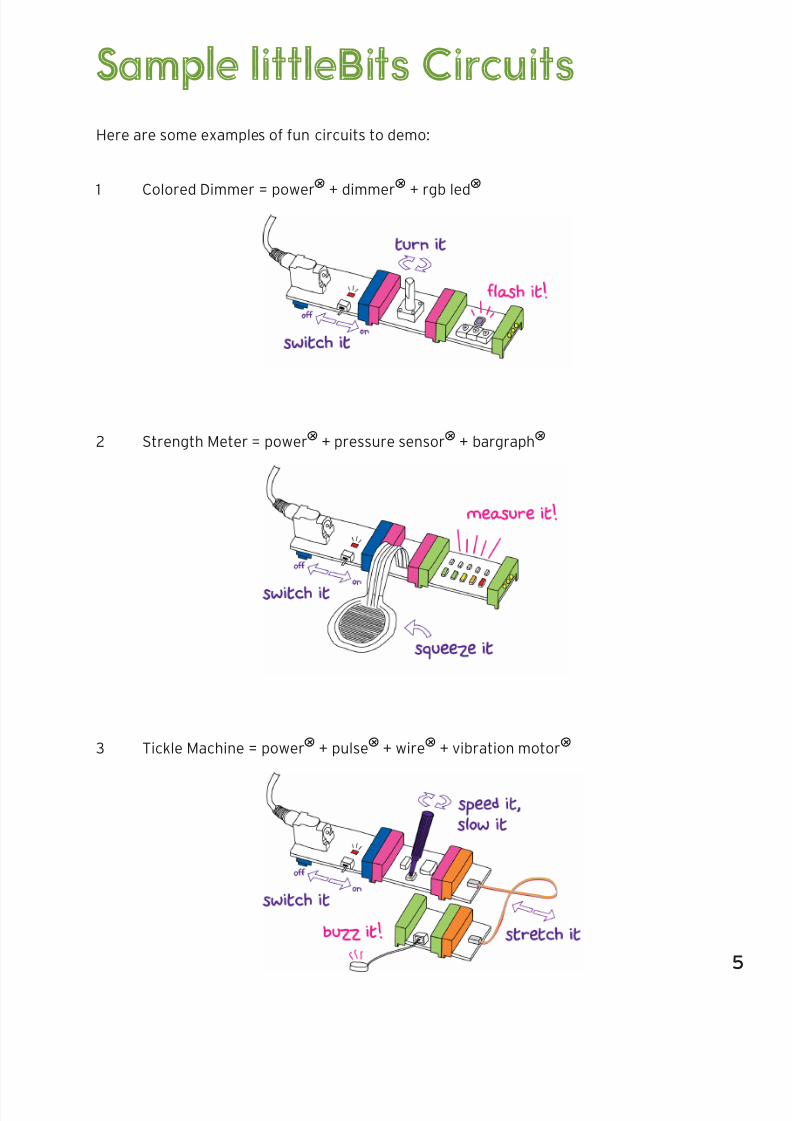
Sample littleBits CircuitsHere are some examples of fun circuits to demo:
1 Colored Dimmer = power + dimmer + rgb led
2 Strength Meter = power + pressure sensor + bargraph
3 Tickle Machine = power + pulse + wire + vibration motor

7/30/2019 littleBits_WorkshopGuide
http://slidepdf.com/reader/full/littlebitsworkshopguide 12/22
6
How Do I Know What Bits to Buy?
Educators are eligible for an educationaldiscount account! Please contact ourEducation Account Manager, Tara Noftsier,at [email protected] for more info.
When purchasing Bits you can either:
1 Buy Kits: Starter Kit, Extended Kits,
or Holiday Kits (Teaser Kit is too small)
or
2 Buy loose Bits in bulk. To see all Bitsavailable, visit our online store
Important things to know:
1 Each Kit only comes with 1 power Bit.
If you want each student to make his orher own individual project, each studentwill need a power Bit. If studentsare working in groups we recommend 2students share 1 Kit.
2 How many Bits does each student need?
The simplest circuit to make a projectinvolves: 1 blue power Bit, 1 pink input Bit,1 green output Bit, and 1 orange wire Bit.
At the very minimum each studentshould have these 4 Bits so that they canmake something. The more inputsoutputs, and wires, the more complextheir project can be!
3 Projects need lots of wires!
For project-based workshops, it is veryimportant that you buy many wire Bits.On average, small projects require 1-3wire Bits. Wire Bits are importantbecause they allow studentsto break out of the circuit line andplace Bits in different directions.
4 Kits are great for simple demos
If you are just doing a demo and not aproject-based workshop, we recommendbuying one of our Kits (Starter Kit,Extended Kit, or Holiday Kit. The TeaserKit is too small). It is also good to have
extra power Bits and back-up batteries onhand for demo tables.
Then if you’d like, you can supplementthe Kits by buying some additionalindividual Bits to expand your collection!

7/30/2019 littleBits_WorkshopGuide
http://slidepdf.com/reader/full/littlebitsworkshopguide 13/22
7
What Project Should I Make?1 Does your project revolve around a
certain littleBIts Kit?
Ornament Ice Skater New Year’s Hat
Flickering Lantern Bristle Bot
Starter Kit Projects
Treasure Chest Night Eyes Super Stirrer
Extended Kit Projects
Holiday Kit Projects
2 Is your project based on individual Bits?
Visit our Project Gallery for dozensof cool project examples.
Candy Cane
Back Massager

7/30/2019 littleBits_WorkshopGuide
http://slidepdf.com/reader/full/littlebitsworkshopguide 14/22
8
What is a Project Template?Project templates are pre-made, printed outdrawings that help students construct a projectfaster & easier. The next page has an example.
Templates are great for:
1 Short workshops
If students do not have enough time togure out how to build a structure out ofconstruction paper, templates are greatto have on hand. That way a student cansimply cut out, fold, and glue a templateand then add littleBits.
2 Young audiences
If your students are between the agesof 8-10, it may be difcult for them tocreate a project without any adult help.Templates help younger students focusmore on the interaction between Bitsand less on construction.
3 Classrooms
You can print out a stack of templates
and hand one to each student with ease.Then each student can independently workon his or her project. They can alwayscustomize their project by coloringit in and adding craft materials as aspecial touch.
4 Hacking
You don’t need a special littleBits templateto make an awesome project. There aremany websites online that have free
templates for use. For example, you cannd a template online for a house andstudents can hack this house by addinglittleBits to it. What was once a boringpaper house, now has blinking lights in itswindow! Or a buzzing doorbell on its door!
littleBits templates that are available online:
1 Monkey PDF
2 Dragon PDF
3 Igloo PDF
4 Interactive Card PDF
More templates coming soon!
igloo
roll up for
igloo entrance
tabs to
help glue
cut around the edge
& fold on inner lines

7/30/2019 littleBits_WorkshopGuide
http://slidepdf.com/reader/full/littlebitsworkshopguide 15/22
i g l o o
r o l l u pf o r
i g l o o e n t r a n c e
t a b s t o
h e l p g l u e
c u t a r o u nd t h e e d
g e
& f o l d o n i n n e r l i n e s

7/30/2019 littleBits_WorkshopGuide
http://slidepdf.com/reader/full/littlebitsworkshopguide 16/22
10
Craft Material Shopping ListCraft materials we love:
. popsicle sticks
. pipecleaners. construction paper
. tissue paper
. modeling wood/balsa wood
. tape, double-sided tape
. glue dots
. jingle bells
. plastic straws
. headbands
. styrofoam balls
. rubberbands
. cotton balls
. markers
Common tools we love:
. scissors
. hot glue gun (+ glue sticks)
. xacto knives
. wire cutters
Advanced Tools (for older ages):
. laser cutter
. 3D printer
. power tools

7/30/2019 littleBits_WorkshopGuide
http://slidepdf.com/reader/full/littlebitsworkshopguide 17/22
11
Project Tips & TricksThere are some little tricks to use when buildingwith littleBits that have really awesome results!
1 Make noiseVibration motor + bell = ringing sound(see project littlePiggy)
2 Diffuse light
LED + styrofoam ball = light diffuser
3 Create movement
Vibration motor + half of a plastic Easteregg = movement. (similar to bristle bots,see project Robo Lobo)
4 Spin things
Attach things to the DC motor to makethem spin, plastic straws work really well
5 Skip tape, use gluedots
We like using materials like poster tack andglue dots to attach Bits to projects. And ALOT of tape. You can nd them at an artsand craft store (i.e. Michaels, Blick, orUtrecht).
6 Create quick structures
Balsa wood sticks and plastic straws workwell when trying to add structure to craftyprojects made out of construction paper.
7 Use wire modules
Use the orange modules (branch, fork,wire) to help place bits exactly where youwant (if you are embedding inside a
structure).

7/30/2019 littleBits_WorkshopGuide
http://slidepdf.com/reader/full/littlebitsworkshopguide 18/22
12
Share Your Workshops!We love to see how our communityof Bitsters are using littleBits.
Visit our Project Gallery and uploadyour lesson plan or project idea toshare with the littleBits community.
7/30/2019 littleBits_WorkshopGuide
http://slidepdf.com/reader/full/littlebitsworkshopguide 19/22
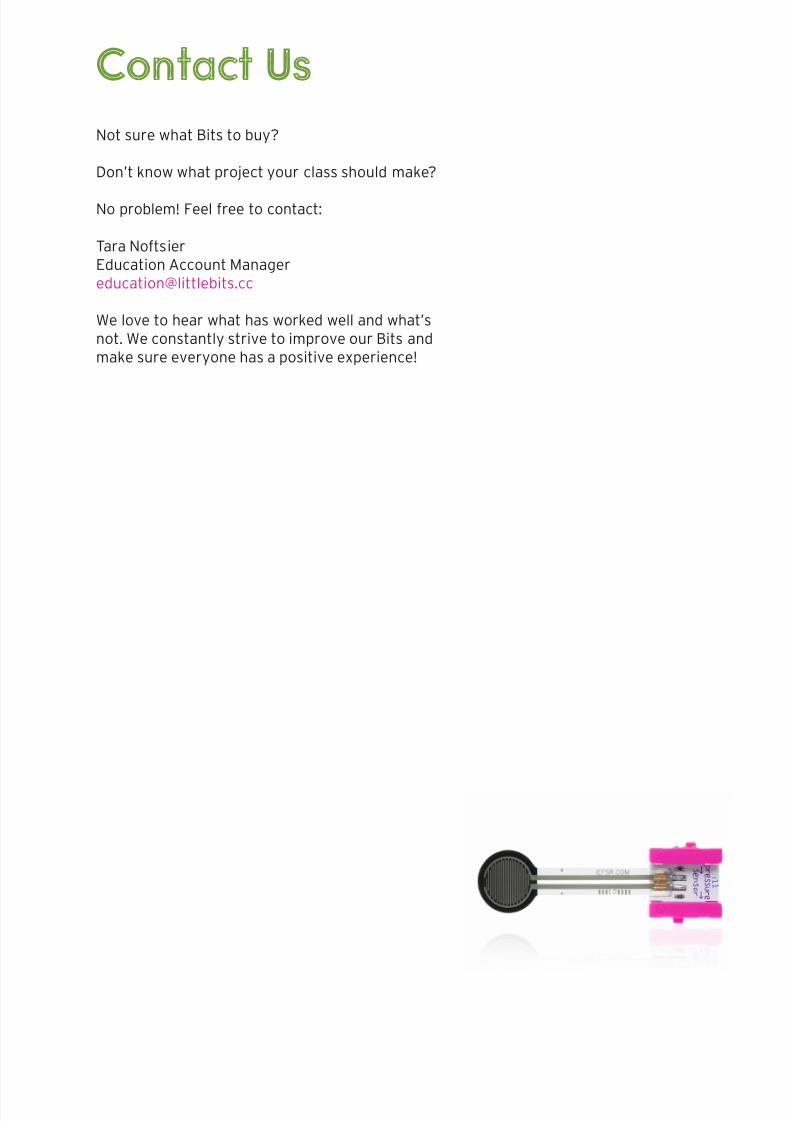
Contact UsNot sure what Bits to buy?
Don’t know what project your class should make?
No problem! Feel free to contact:
Tara NoftsierEducation Account [email protected]
We love to hear what has worked well and what’snot. We constantly strive to improve our Bits andmake sure everyone has a positive experience!

7/30/2019 littleBits_WorkshopGuide
http://slidepdf.com/reader/full/littlebitsworkshopguide 20/22
14
SafetylittleBits are low voltage, low current modules.
If you have any questions about safety, or you have
already purchased a product and would like tospeak to us, please contact us at [email protected].
Minimum age recommendation: 8 years and up
WARNING:This product contains small magnets.Swallowed magnets can stick together acrossintestines causing serious infections and death.
Seek immediate medical attention if magnets areswallowed or inhaled.
WARNING:This product contains a chemical known to theState of California to cause cancer and birthdefects or other reproductive harm.
!
!
7/30/2019 littleBits_WorkshopGuide
http://slidepdf.com/reader/full/littlebitsworkshopguide 21/22
11
now go
have some
geeky fun!

7/30/2019 littleBits_WorkshopGuide
http://slidepdf.com/reader/full/littlebitsworkshopguide 22/22


