Embed Size (px)
Citation preview

January 2009
creates the light and dark areas due to the variations in thickness. By carving away the material, an image can be formed that is visible when lighted from behind.
Like a stained glass window, a Lithopane needs to be illuminated from behind to reveal the image. Illumination may be provided by an incandescent or fluorescent light, candle light, or sunlight. Direct sunlight is not needed -- the light from an overcast day will provide adequate back illumination.
The Lithopane can be used mounted or unmounted. There are a number of mounting methods, some of them include:
• Mounted in a box with back lighting
• Attached to a suction cup to hang in a window
• As a part of a piece of stained glass art
• In the base of a lamp
• Inserted in a frame
Although the first mounting style is commonly used as a night light, the image can be viewed in normal room lighting using a 9 watt “puck” light for back illumination, available for around $10 at any home improvement store.
CarveWright TiPS & TRiCKS - JANUARY 2009www.carvewright.com
Please visit the manufacturer’s website
for more information about the CarveWright machines and see the new Pattern Depot at:
For Additional Patternsyou can add to your Designer software library, please visit:
www.carvewright.com
www.carvebuddy.com
Lithopane (Lithophane) Carving 101
Editor Preface: Jason Allen from Little Red Woodshop has graciously volunteered to outline his tried and true method for
carving lithophanes using the CarveWright machine.
What’s really great about his technique is that it is simple and
easy to create beautiful lithos with a minimum of fuss! Jason is well-known for the outstanding results he has achieved in litho making, as well as for his wonderful contributions to the CarveWright & CompuCarve community.
Lithopane 101...What is a Lithopane?by Jason Allen
History: Originally Lithopanes (lithophanes) were made as a part of a piece of porcelain, typically the bottom of a cup or mug so the user would see the image when the cup was empty. It was created as a wax
original by an artist who carved the wax to create thin and thick areas that would represent light and dark areas. This wax original went through several steps to end up as a part of the piece of porcelain.
Our modern Lithopanes are made using editing software and carving or CNC machines. The lithopane itself is carved from a sheet of translucent material (usually ¼ of an inch thick). The carving
by Jason Allen of littleredwoodshop.com - Michael Tyler, Editor

Lithopane 101 (cont.)
Size: In theory, the lithopane can be made in any size, but there are practical limits. Because the width of the CarveWright is limited, the maximum width is about 14". They look great in standard 4x6, 5x7 and 8x10 sizes but you can make whatever size you wish.
Our largest lithopane was used on the Cpl. Jason Dunham memorial and it measured 14” x 28” (fig. 1)
As long as you stay within the 14.5” maximum width of the CarveWright, you could honestly make a lithopane 8 feet in length (coming soon).
Color/Tint: The material that Lithopanes are made of comes in a variety of colors. In sunlight, using a white material, the color/tone of the Lithopane can be similar to a black and white photograph. Using a Bone or off-white color yields a sepia tone (antique-looking) photograph. The effect depends upon the color of the material being used. When used as a night light, an incandescent bulb will give the lithopane a warm tone. For larger Lithopanes, fluorescent lighting may be used and will provide a more neutral tone.
Suggestions for PhotographsNeed some ideas of how to pose your subject? Browse “stock photo” sites that are in business to sell the rights to photos. The contributors to these sites are amateurs and professionals that have uploaded their photos for use by others. It costs nothing to look --- just search by the type of subject (like “baby”, “dog” , “deer”, etc.). Looking at how the pros compose a photograph can give you some good ideas on how to compose your own photos.
Page 2
Suggestions:
Zoom in on the subject -- try to make the photo sized as close as possible to the finished product that you want to achieve.
Use a white or light-colored background -- this will make the subject stand out.
Save pictures at the highest resolution allowed -- too low of a resolution will decrease the sharpness and quality of the lithopane.
Image Requirements: To make a good lithopane, a good digital image is needed. The best source is from a digital camera, but it is also possible to scan a photograph. If you scan and/or edit an image, be certain to save it at the highest resolution possible.
Crop or Zoom In on the Subject: Cropping an image is done to draw attention to the subject. This will also eliminate a good amount of any unwanted background. (You can crop an image when you import your image into the Designer software that is included with your CarveWright machine - instructions on how to do this are outlined on pg. 4.) There are limits to how much the subject can be enlarged, depending upon the resolution of the photo -- as you zoom in, the pixels in the final image tend to become “blocky”, which reduces the sharpness of the final carving. Editor: For the “techies”, here is a general guide for the recommended maximum size litho using various megapixel settings. At different resolutions, some cameras offer an option to choose different image qualities. For the “non-techies” simply select “best” and you’ll be able achieve great looking lithos.
Lithopane (Lithophane) Carving 101
CarveWright TiPS & TRiCKS - JANUARY 2009www.carvewright.com
fig. 1
23456789
101112
1,2251,5361,6321,9442,0002,3042,4482,5982,7392,8723,000
1,6332,0482,4642,5923,0083,0723,2643,4643,6513,8304,000
xxxxxxxxxxx
4566
6.57.5
88
8.599
6789101010121313.514
xxxxxxxxxxx
Camera Resolution(megapixels)
Dimensions(in pixels)
Maximum Carving Size(in inches)

Page 3
Here’s an example of a 7.1 megapixel photo which has an original 3072 x 2304 resolution. (fig. 2a)
The more pixels in the image file, the higher the resolution. Here’s an example of a digitally scanned photo at an original 2400 x 3000 resolution (fig. 2b)
Isolating the Subject: Many times it is desirable to isolate the subject (crop) from the background. First the background is removed around the image (this can done using the Pattern Editor software that is included with the scanning probe or with any photo editing software), then it is often best to “Feather” the edge to soften it. (fig. 3)
(cont.)
Composite Images: Isolated images also make it possible to make a composite of several individual images. This is useful if two (or more) subjects are to be combined from different photos or rearranged to different locations on the same photo.
Avoid Low-Quality Images: Images that have been compressed for email or websites may have a reduced quality that may look fine for onscreen display, but are not suitable for lithos. In either of these cases, if it is necessary to use such an image it will be best to check with the original owner of the image, to see if a high-quality (hi-res) image is available. The net effect of using low-quality/low-resolution images will be that the lithopane will not be as sharp as when the original image is used, and may suffer from jpg artifacts (defects) that occur when an image has been compressed for the web or email.
Scanned Prints: As a general rule, if the lithopane image is to be made from a scanned print (photo), the image on the print should be at least the same size as the lithopane.
Professional Photographs and Artwork: The Federal Copyright Act provides protection to authors and artists for their original works, including photos and drawings. Among the protections that copyright owners have is the exclusive right to make copies of that work and prepare other works based on the original. You should “steer clear” of using material that is covered by copyright. In order to make a lithopane from a copyright protected item (regardless of whether it is marked with the © symbol or not), permission must be granted by the owner. The owner is the photographer, artist or the company that he or she works for.
CarveWright TiPS & TRiCKS - JANUARY 2009www.carvewright.com
Lithopane (Lithophane) Carving 101
fig. 2a
fig. 2b
fig. 3

Page 4
The Art of Making Lithopanes Ladies and gentlemen this is truly a simple process, every Lithopane that we have produced here at Little Red Woodshop has been created and edited using just the software that is included with our CarveWright machine and scanning probe (the scanning probe software is not necessary to make great lithopanes).
Our Process: The process starts with a digital photograph. The digital photo is imported into the Designer software, where the software will convert the image to as many as 256 shades of grey and build a “height map” (or “grey scale”) image from it. The digital information from this image provides the value of the shades of grey for each pixel in the image.
The Designer software reads the image data and converts each pixel value into a depth to be carved into the material you are using, typically it is some type of cast acrylic material (Corian®, Staron®, Meganite™). These materials are opaque at normal thicknesses, but as the thickness decreases, they becomes more and more translucent. This effect duplicates the light and dark areas in the photograph. The carving is done using the 1/16” Carving bit that came with your CarveWright machine and takes anywhere from 35 minutes to 2 hours depending on the quality setting you select (good lithopanes can be produced using the “draft” setting but for better results use “best”).
Use the following 9 steps and you will be making great Lithopanes that can be cherished for many generations to come!
STEP 1Decide on the image that you would like to make into a Lithopane.
STEP 2Start your Designer software, then click on “File” and scroll down to “Import Image” click again - this will open the “Import Image” window that asks you for the source of your image (i.e., where it is located) - you are given two options “From File” or “From Clipboard”. Select the appropriate option.
STEP 3If you click “From File”, which is common, navigate to the photo file location.
STEP 4Select the photograph you would like to edit and double click on it, or simply click “Open”.
STEP 5The Designer software will import it into the “Import Image” window - here you will be able to crop the image to select the part of the image that you would like to make your Lithopane from.
You can select any part of the photo (called cropping) by clicking and dragging on the dashed yellow box that is around the photo or image - see the photo below to get a better understanding of this.
(cont.)
CarveWright TiPS & TRiCKS - JANUARY 2009www.carvewright.com
Lithopane (Lithophane) Carving 101
Dashed YellowBox

Page 5
The Art of Making Lithopanes (cont.)
STEP 6Once you have finished the cropping of your image, simply click the “Next” button located at the bottom of the “Import Image” window - doing so will convert the window over to the “3D View” window and will also do the magic of converting your image into the “height map” that will be used to produce your Lithopane.
At this point you have some editing options “Raise”, “Lower” or “Invert” the image - we recommend you do none of these - just click the “Finish” button.
Give your image a name in the “Save Item” window and click “Save”. The image is now a CarveWright pattern (ptn) and can now be found in your pattern library by clicking on the clamshell at the top of your Designer software.
STEP 7Click on the blue clamshell to open your pattern list, find the pattern that you just created from your image, click on it, then click on your board, place the image pattern on the board as you desire.
STEP 8 - Setting Depth and HeightThe settings that we use are as follows - set your depth to .180 and the height to 450 - these settings will give you a nice, bright Lithopane that can be enjoyed at all hours of the day (it can be viewed in daylight when mounted in a backlit box).
STEP 9Save your project as an mpc file with any name you choose, then upload your project to the memory card when you're ready to run the project at the machine.
Lithopane Results:This 8x10 carving was done on in MEGANITE™ Bone acrylic. Runtime was 59 minutes on BEST quality setting.
Yes, this is the true color as it appears for Bone Acrylic when it is backlit.
The pictures here don’t do the lithos justice - you have to see one up close, and in person to appreciate the detail and marvelous backlighting effect.
(cont.)
CarveWright TiPS & TRiCKS - JANUARY 2009www.carvewright.com
Lithopane (Lithophane) Carving 101
Page 6
CONCLUSION
Making A “Sled” or “Jig” for Litho Carving
It is truly that simple folks - no extra software needed, no converting the image to black and white or “grey scale” No Muss, No Fuss! - simply using the software that the folks at CarveWright gave us. Thank you and remember “Be Safe and Happy Carving”. - Jason
Most litho carving is done on ¼” thick material, which is too thin to feed through the machine. Therefore, it is necessary to construct a jig (sled) for the material to be placed into. The jig will add to the overall thickness to meet/exceed the minimum ½” needed for the machine.
Making a jig for carving on cast acrylic is very simple. Perhaps the easiest way to make your jig is to use your CarveWright/CompuCarve.
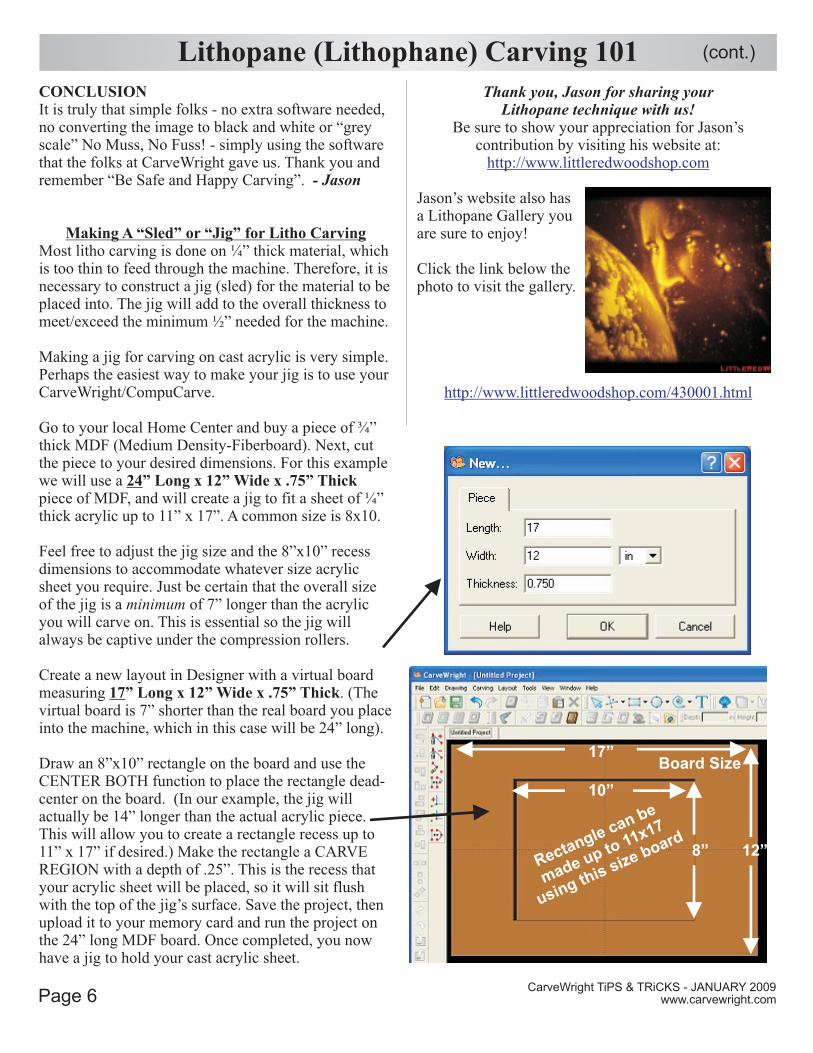
Go to your local Home Center and buy a piece of ¾” thick MDF (Medium Density-Fiberboard). Next, cut the piece to your desired dimensions. For this example we will use a 24” Long x 12” Wide x .75” Thick piece of MDF, and will create a jig to fit a sheet of ¼” thick acrylic up to 11” x 17”. A common size is 8x10.
Feel free to adjust the jig size and the 8”x10” recess dimensions to accommodate whatever size acrylic sheet you require. Just be certain that the overall size of the jig is a minimum of 7” longer than the acrylic you will carve on. This is essential so the jig will always be captive under the compression rollers.
Create a new layout in Designer with a virtual board measuring 17” Long x 12” Wide x .75” Thick. (The virtual board is 7” shorter than the real board you place into the machine, which in this case will be 24” long).
Draw an 8”x10” rectangle on the board and use the CENTER BOTH function to place the rectangle dead-center on the board. (In our example, the jig will actually be 14” longer than the actual acrylic piece. This will allow you to create a rectangle recess up to 11” x 17” if desired.) Make the rectangle a CARVE REGION with a depth of .25”. This is the recess that your acrylic sheet will be placed, so it will sit flush with the top of the jig’s surface. Save the project, then upload it to your memory card and run the project on the 24” long MDF board. Once completed, you now have a jig to hold your cast acrylic sheet.
Thank you, Jason for sharing your Lithopane technique with us!
Be sure to show your appreciation for Jason’s contribution by visiting his website at:
Jason’s website also has a Lithopane Gallery you are sure to enjoy!
Click the link below the photo to visit the gallery.
http://www.littleredwoodshop.com
http://www.littleredwoodshop.com/430001.html
(cont.)
CarveWright TiPS & TRiCKS - JANUARY 2009www.carvewright.com
Lithopane (Lithophane) Carving 101
10”
8”
17”
12”
Board Size
Rectangle can be
made up to 11x17
using this size board

Page 7
RESOURCES...There are numerous resources for the CarveWright/CompuCarve owner to make their experience with these machines much more enjoyable.
Every owner should join the where fellow users share their experiences and knowledge with these machines on a daily basis. It is a FREE service that you will surely appreciate. A handy Search Feature helps you find answers to any questions you may have.
CarveWright User Forum
Additional Resources
I hope you have found this article helpful! Please sign up on the to have the monthly newsletters automatically delivered to your email address each month. You’ll see a “Join Our Mailing List” section. Just fill in the form and you’ll be all set!
CarveWright Homepage
Special thanks to Jason Allen of
for providingthe content for this issue of
CarveWright TiPS and TRiCKS.
www.littleredwoodshop.com
CarveWright TiPS & TRiCKS - JANUARY 2009www.carvewright.com
Michael Tyler - Editor
The trademarks, service marks and logos (the “Trademarks”) used and displayed here are registered and unregistered Trademarks of LHR and others.