Embed Size (px)
Citation preview

Line Following RoboCup Robot
A step by step development guide for
Lego NXT-G
Greig TardianiRoboCup Australia

Basic Robot Configuration
• Most Lego Line Followingrobots are of theDifferential Steer type
• The geometry of Drive Wheelto Sensor varies from anequilateral triangle (as shown) to almost flat with the sensorsjust in front of the wheels
B

Simple Edge Follower
• Two Region Light Line
• Light Sensor reads 40 for Black, 50 for White

Stage 1 -Edge Following
• This program follows one side of the line

Better Edge Follower
• Three Region Light Line
• We can now go straight

Stage - A Better Edge Follower
• We can nowgo straight
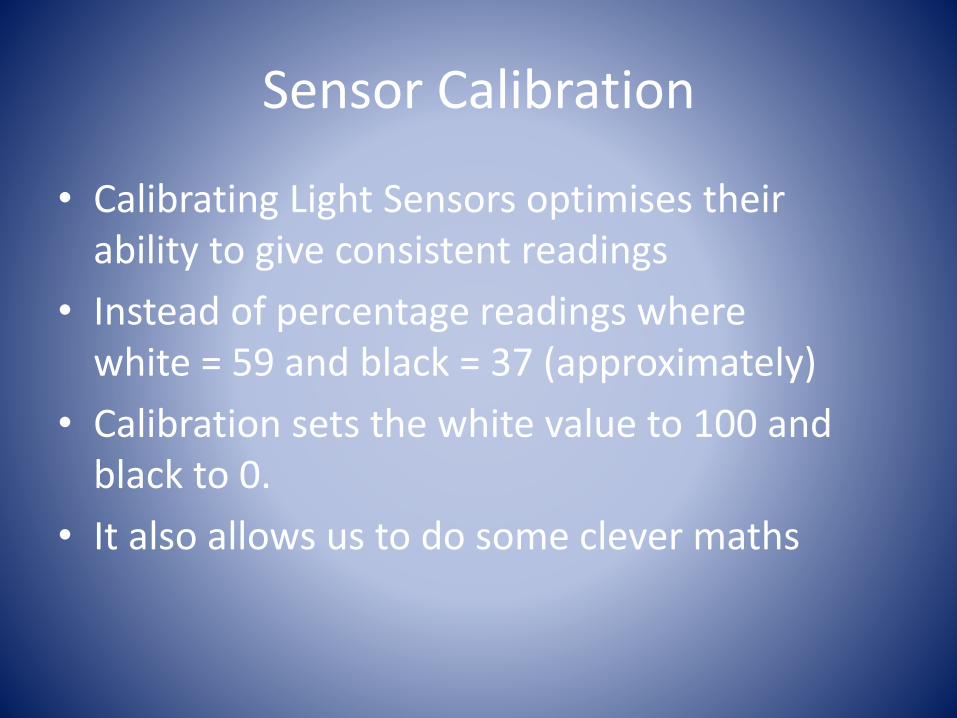
Sensor Calibration
• Calibrating Light Sensors optimises their ability to give consistent readings
• Instead of percentage readings where white = 59 and black = 37 (approximately)
• Calibration sets the white value to 100 and black to 0.
• It also allows us to do some clever maths

Multiple Options
• Now we can build in some smoothness
• Using the Switch block, uncheck Flat view
• Option = LS2 / 20
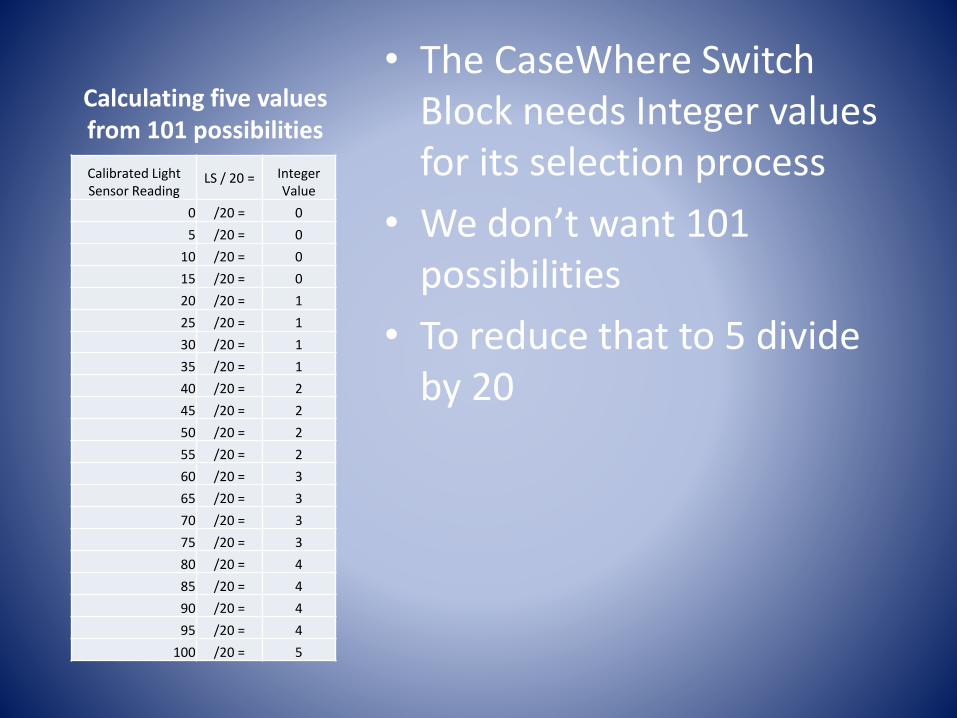
Calculating five values from 101 possibilities
• The CaseWhere Switch Block needs Integer values for its selection process
• We don’t want 101 possibilities
• To reduce that to 5 divide by 20
Calibrated Light Sensor Reading
LS / 20 = Integer Value
0 /20 = 0
5 /20 = 0
10 /20 = 0
15 /20 = 0
20 /20 = 1
25 /20 = 1
30 /20 = 1
35 /20 = 1
40 /20 = 2
45 /20 = 2
50 /20 = 2
55 /20 = 2
60 /20 = 3
65 /20 = 3
70 /20 = 3
75 /20 = 3
80 /20 = 4
85 /20 = 4
90 /20 = 4
95 /20 = 4
100 /20 = 5

More Multiple Options
• Increase the smoothness (maybe?)
• Option = LS3 / 15

Two Sensors and some Maths
• The beginning of Proportional Control
• (LS1 – LS2) /2
• Add to adjust the scale (in this case 6)
• Divide by 15 to get 7 steps

Progression to Proportional (P)
• 2-level robot can only turn left or right
• 3-level robot can also go straight
• Proportional robots have a linear relationship between the distance from the edge and the speed of the turn (motor speeds)

Calculating five values from 101
possibilities
• Now the maths gets interesting
• (LS1 - LS2) / 2 gives us a range from -50 to +50
• Divide that by 15 to get our 7 options
• However, we get to many -4’s
• Change- (LS1 – LS2) / 2 + 6 to fix the problem
Light Sensor 1 Reading
Light Sensor 2 Reading
LS1 - LS2 / 2 =6 Int value /15
100 0 56 3
95 5 51 3
90 10 46 3
85 15 41 2
80 20 36 2
75 25 31 2
70 30 26 1
65 35 21 1
60 40 16 1
55 45 11 0
50 50 6 0
45 55 1 0
40 60 -4 -1
35 65 -9 -1
30 70 -14 -1
25 75 -19 -2
20 80 -24 -2
15 85 -29 -2
10 90 -34 -3
5 95 -39 -3
0 100 -44 -3

Using Colour Sensors• Set to Light Sensor mode to follow the line
• Change to Colour Mode for the Green Turns
PID Line Follower
A step by step development guide for
Lego NXT-G

Basic Robot Configuration
• Remember our Basic Line Following Robots Design
• Most Lego Line Followingrobots are of theDifferential Steer type
B

Simple Edge Follower
• Two Region Light Line
• A calibrated Light Sensor reads 0 for Black, 100 for White (Note: Remember silver in Rescue)
0 50 100

Better Edge Follower
• Three Region Light Line
• We can now go straight
0 50 100

Progression to Proportional (P)
• 2-level robot can only turn left or right
• 3-level robot can also go straight
• Proportional robots have a linear relationship between the distance from the edge and the speed of the turn (motor speeds)

Proportional Line Follower
• Error, is the value on the blue line away from zero.
• The further into theBlack the more negative the errortherefore the fasterthe robot needs toturn to get back tothe edge of the line

Equation of a Line
• y = mx + b
• Y is the distance up or down the y axis
• X is the distance on the x axis
• M is the slope of the line
• B is where y intercepts the line when x = zero
• W know B will cross at 0,0 so the equation is
• Y = mX

Understanding Proportional Control
• Error – calculates how far away from the line edge the robot is, the X value
• Turn – How hard we need to turn to get back to the edge of the line can be the Y value
• Now we have
• Turn = m * Error

Understanding Proportional Control
• We are left with M which is the slope
• The slope is a proportionality constant and is the factor that you have to multiply the error (x value) by, to convert it into a Turn (y value)
• In PID terms this is called Kp (Konstant) remember
that mathamatians can’t spell
• Turn = Kp * Error

Pseudocode for P ControlError
• First we need to measure the values the light sensor returns for white and black
• From those two number we can calculate the Offset
• The offset is just the average of the white and black readings
• If white = 60 and black = 32Offset = 46

Pseudocode for P ControlKp & Tp
• Kp controls how fast the controller will try to get back to the line edge when it has drifted away from it. (Kontrol)
• Tp controls how fast the robot is moving along the line. (Target power) Start low, eg. 20

A PID AlgorithmKp = 10 // Initialize our three variablesoffset = 45Tp = 50
Loop foreverLightValue = read light sensor // what is the current light reading?error = LightValue - offset //calculate the error by subtracting
//the offsetTurn = Kp * error //”P” term, the amount to change
//the motors' powerpowerB = Tp + Turn //the power level for the A motorpowerC = Tp - Turn //the power level for the C motor
MOTORB.direction=forward //issue the command with theMororB.power=powerA //new power level in a MOTOR blockMOTORC.direction=forward //same for the other motor MotorB.power=powerC //but using the other power level
end loop forever //done with this loop, go back to //the beginning and do it again

How it looks in NXT-G

Acknowledgements
• J. Sluka – http://www.inPharmix.com.au
• RoboCatz - http://robocatz.com/linefollowing.htm
•

Links• My Blocks -
http://www.nxtprograms.com/help/MyBlocks/tutorial.html#fig38http://www.robocatz.com/myblocks.htm#Introduction
• Hi Tech Downloads -http://www.hitechnic.com/downloads
•