Embed Size (px)
Citation preview

Light Light SensorsSensors

Light Light SensorSensor
ss
Light Light SensorSensor
ss

Light Sensors or Dark Light Sensors or Dark Sensors?Sensors?
Light sensors measure the amount of lightamount of light impacting a photocell, photocell is basically a resistive sensor: the light effects the
amount of resistance.
The resistance of a photocell is low when it is brightly illuminated, i.e., when it is very light; it is high when it is dark.
In that sense, a light sensor is really a "dark" sensor.
In setting up a photocell sensor, you will end up using the equations we learned above you will need to deal with the relationship of the
photocell resistance Rphoto, and the resistance and voltage in your electronics sensor circuit.

What can be measured by Light What can be measured by Light Sensors?Sensors?
Of course since you will be building the electronics and writing the program to measure and use the output of the light sensor, you can always manipulate it to make it simpler and more intuitive;
for example, most people invert the values, so low means dark and high means light.
You can also be clever about what you put around a light sensor, to affect its properties.
You can shield it and position it in various ways.
If you use multiple sensors, you can arrange them in useful configurations and isolate them from each other with shields.
Just like switches, light sensors can be used in many different ways:
Light sensors can measure:
light intensity (how light/dark it is)
differential intensity (difference between photocells)
break-beam (change/drop in intensity)
Light sensors can be shielded and focused in different ways
Their position and directionality on a robot can make a great deal of difference and impact
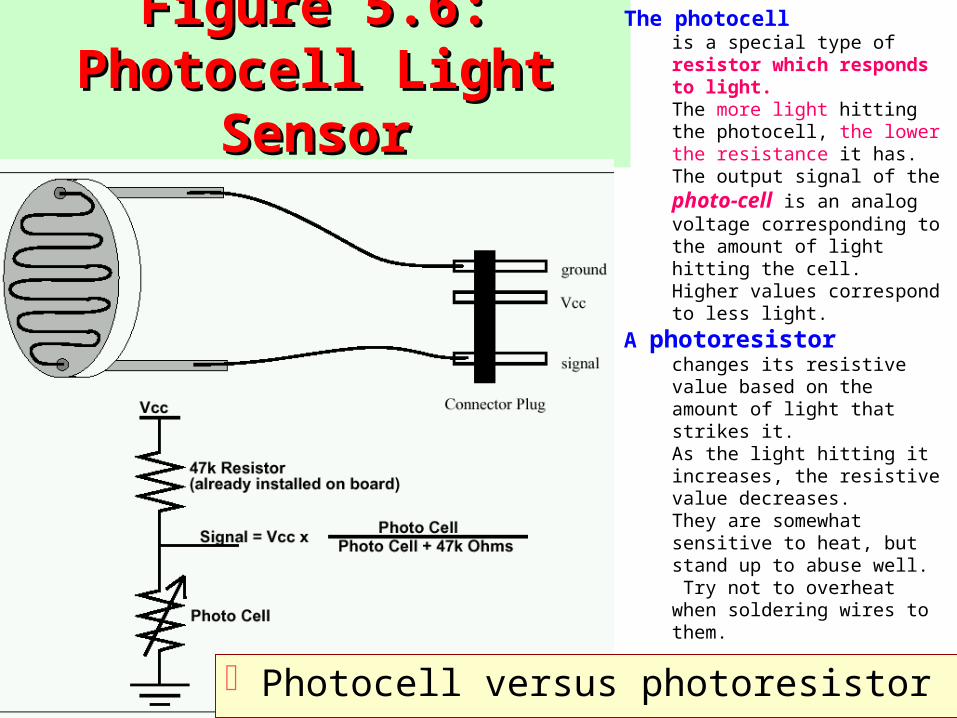
Figure 5.6: Figure 5.6: Photocell Light Photocell Light
SensorSensor
The photocell is a special type of resistor which responds to light. The more light hitting the photocell, the lower the resistance it has. The output signal of the photo-cell is an analog voltage corresponding to the amount of light hitting the cell. Higher values correspond to less light.
A photoresistor changes its resistive value based on the amount of light that strikes it. As the light hitting it increases, the resistive value decreases. They are somewhat sensitive to heat, but stand up to abuse well. Try not to overheat when soldering wires to them.
Photocell versus photoresistor

Photocells versus Photocells versus photoresistorsphotoresistors
As with all the light-sensing devices, shielding is very important. A properly shielded sensor can make the difference between valid and invalid values reported by that sensor.
The idea is simple: restrict the amount of light striking the sensor to the direction you expect the light to be coming from.
You do not want light from external sources (i.e., camera ashes or spot lights) to interfere with your robot.
Black heat shrink tubing often works well to shield the photoresistor from external light sources.
light-sensitive robotlight-sensitive robot One good way to get a feel for how these sensors
work, and how your robot and software interact, is to make a light-sensitive robot.light-sensitive robot.
With two or more photo-resistors, try to create a simple robot that can: move around a room, either avoiding light or avoiding shadows in a controlled manner.
Ambient light conditions play a major role in how to interpret the data from any light sensors.
A combination of photocells, one pointed up and one pointed down, may be used to adjust for ambient light levels, which may be useful in some applications.
These robots are easy to build and many high-school and undergraduate projects for wheeled robots were build

Photoresistors are the simplest light Photoresistors are the simplest light sensorssensors
Photoresistors are probably the only sensor required to be on your robot.
A starting light will be used to start each contest round, and the robot must be able to sense that light. This is for all wheeled robot contests.
You must place one photoresistor on the underside of your robot, probably near the center.
Be sure to shield it as much as possible from the overhead ambient light.
Write the starting codestarting code that reads the value of that sensor to start the match.

Mounting the photoresistors doesn't tend to be difficult.
You can use a small amount of hot glue to attach the photocell to a LEGO brick, or double-sticky tapedouble-sticky tape will also work.
Be inventive.
Photoresistors are the simplest light Photoresistors are the simplest light sensorssensors
Photo Transistors Photo Transistors and Infra Red Light and Infra Red Light
Emiting Diodes Emiting Diodes
Photo Transistors Photo Transistors Phototransistors are usually tuned to a
specific wavelength of light. The wavelength is usually near visible red,
or in the infrared spectrum. They have similar properties to the
photoresistors. The main difference is that the
phototransistors are usually tuned to a specific wavelength.
The other important difference is that the time delay for a change in light conditions is much smaller for a phototransistor.
This can be useful in doing fast control looking for polarized light.
The time constant for a phototransistor is much smaller than a photoresistor, so it may be used in situations where timing is critical.
Photo Transistors Photo Transistors

An IR LED is a type of diode which emits radiation in the infrared range.
This part could be used as a component in a break beam sensor or a reflectance sensor.
We used two kinds of phototransistors, each of which are packaged in cylindrical brass-colored cans with a glass lens.
The first kind is packaged individually, with no wires attached, and with three leads.
The second is surplus parts, with wires already attached, and with each phototransistor paired with an LED. (Note: surplus parts are usually overstocked or obsolete parts that
didn't sell through retail channels. See the book's appendix on ordering electronics parts.)
The individual Phototransistors cost 6.270 about $1 each, about the same as an entire surplus assembly bundle of wires and phototransistors and LEDs.
Infra Red LEDsInfra Red LEDs

How to tell apartHow to tell apart the phototransistors from the LEDs:the phototransistors from the LEDs:
Be careful to differentiate the phototransistors from the LEDs: the phototransistors have relatively flat lenses, while the LEDS lenses are more convex.
Fig 5.7 shows one of the LEDs.
Figure 5.7: The LEDsFigure 5.7: The LEDs

How to tell apartHow to tell apart the the phototransistors from the phototransistors from the
LEDs:LEDs: Also, the two different kinds of phototransistors (surplus vs
virgin manufactured) have very different characteristics, and cannot be used in sensors interchangeably.
The surplus phototransistors respond almost exclusively to infrared light They have a “resistance" of approximately 100 k when activated
and 1 M when not activated.
The individual, un-wired phototransistors, on the other hand, respond to visible light as well as infrared, and have “resistances" about one hundred times smaller.

Interfacing to the BoardInterfacing to the Board These phototransistors require pull-up resistors, a resistor
connected between Vcc and the signal line, to work properly.
In past years, all of these sensors required 47k pull-up resistors, but that is no longer the case.
Each individually packaged phototransistor now can be used with a 220k pull-up, while the “bundle of wires" phototransistors work well with 100k pull-ups.
This may present a slight problem if you have already installed RP6, one of the 47k pull-up resistor packs on your expansion boards.
Fear not! By installing the pull-up resistors on the connector as
shown in Fig 5.8. For the individually packaged phototransistors, the 2.2k resistor
on the connector will be in parallel with the 47k pull-up on the board.

Interfacing to the BoardInterfacing to the BoardSince resistors in parallel add reciprocally, the
combination of the two will electrically look like a2.2k resistor (approximately).
However, if you have the “bundle of wires" phototransistors, you will have to cut a trace on the bottom side of the expansion board to disable the 47k pull-up resistor, since it would otherwise dominate.
Warning! Once you cut a trace, that analog port should be used only for the 220k phototransistors.
This means that you will have to be sure to plug these sensors into the correct analog ports each time you use them.
Ask me or a TA before you cut this trace!
Visible Light sensorVisible Light sensorThe phototransistors respond very well to
visible (far-red, we hypothesize) light as well as infrared.
They should be wired with a 2k to 4k resistor for best results (we recommend 2.2k).
Because they respond to visible light, they are extremely susceptible to interference from ambient light.
You may be able to use them as floor-color sensors using just ambient light.
But if you want to use them for break-beam sensing, they will have to be very well-shielded.

Light sensors are used to detect the presence and Intensity of light.
These can be used to make a light seeking robot and are often used to simulate insect intelligence in robots.
Light Sensors Light Sensors

Light SensorsLight Sensors
Analog sensor -- Change resistance in response to light stimuli
CdS photocell (or other resistive sensor)

Shielding PhotocellShielding Photocell
Photocell Sensors Mounted on LEGO Technic Beam
Photocell Sensors with Light Shields
• Read photocell values:while (1) { printf("%d\n", analog(0)); msleep(100L); }
• Mounting photocell through Lego beam makes it easier to attach to robot
• Build optical shield to limit the amount of ambient light that is able to fall on the sensor

Single PhotocellSingle Photocell Light Light Sensor CircuitSensor Circuit
Photocell Sensors Mounted on LEGO Technic Beam
Photocell Sensors with Light Shields
• After building the photocell and test that it works: (port 0)
while (1) { printf("%d\n", analog(0)); msleep(100L); }
• Mount the photocell’s leads through holes of a LEGO Technic beam, making a sensor device that can easily be positioned anywhere on the robot and subsequently reused
• If your photocell easily floods from ambient room light, then the next order of business is to build an optical shield to limit the amount of ambient light that is able to fall on the sensor
Building light shields

Photocell Voltage Divider Circuit
• Photocell element is connected to the circuit ground and the HB’s sensor input line via a voltage divider circuit
• Vsens , resulting sensor voltage, varies as to the ratio between 47K and Rphoto
– When the photocell resistance is small (brightly illuminated), the Vsens ~= 0v
– When the photocell resistance is large (dark), Vsens ~= +5 v
– Continuously varying range between extremes
• Sensor will report small values when brightly illuminated and large values in the dark
• May invert the sense of the readings from the HB’s analog ports:
int light(int port) {return 255 - analog(port);}
“darksensor”
Single PhotocellSingle Photocell Light Light Sensor CircuitSensor Circuit
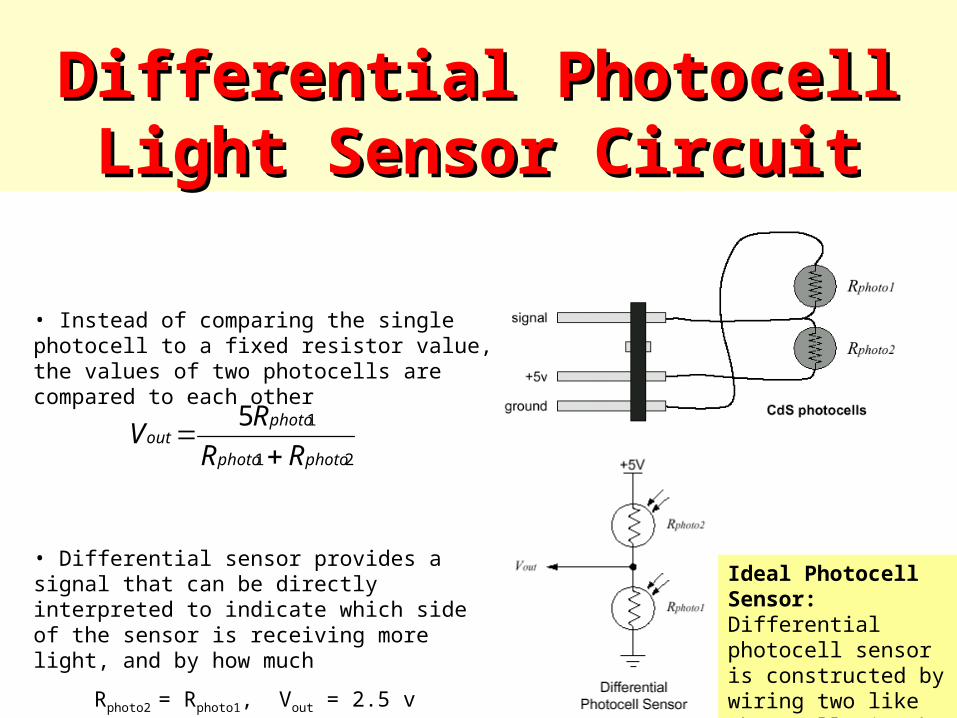
Differential PhotocellDifferential Photocell Light Sensor CircuitLight Sensor Circuit
• Instead of comparing the single photocell to a fixed resistor value, the values of two photocells are compared to each other
• Differential sensor provides a signal that can be directly interpreted to indicate which side of the sensor is receiving more light, and by how much
Rphoto2 = Rphoto1, Vout = 2.5 v
Rphoto2 << Rphoto1, Vout ~= +5 v (R2 more light)
Rphoto2 >> Rphoto1, Vout ~= gnd
21
15
photophoto
photoout
RR
RV
Ideal Photocell Sensor:Differential photocell sensor is constructed by wiring two like photocells in the voltage divider configuration

Actual Differential Photocell Sensor SchematicConsiderations:• Use photocells with small dark resistance values, e.g., 10K Otherwise 47K pull-up resistor on HB will bias sensor reading in the dark• Mount a “nose” between two sensor elements to cast shadow on one element if there is a distinct source of light off to the side
Differential PhotocellDifferential Photocell Light Sensor CircuitLight Sensor Circuit

Program tests the value of the differential light sensor to decide which way to turn
If the value is less than 128, the program causesHandyBug to take a step to the left
Otherwise, HandyBug takes a step to the right
/* stepdiff.c - Light-Seeking Program for HandyBug */int LEFT_MOTOR= 0;int RIGHT_MOTOR= 3;int DIFF_EYE= 0;void main(){ while (1) { if (analog(DIFF_EYE) < 128) {/* turn to left */ motor(RIGHT_MOTOR, 100); sleep(0.1); off(RIGHT_MOTOR); } else {/* turn to right */ motor(LEFT_MOTOR, 100); sleep(0.1); off(LEFT_MOTOR); } }}
Differential PhotocellDifferential Photocell Light Sensor CircuitLight Sensor Circuit

Polarized lightPolarized light "Normal" light emanating from a source is non-polarized, which means it
(i.e., the light waves) travels at all orientationstravels at all orientations with respect to the horizon.
However, if we put a polarizing filter in front of a light source, only the light waves of a given orientation (i.e., the characteristic plane) of the filter will pass through.
This is useful because now we can manipulate this remaining light with other filters;
if we put it through another filter with the same characteristic plane, almost all of it will get through.
But if we use a perpendicular filter (one with a 90-degree relative characteristic angle), we will block all of the light.
You can use polarized light to make specialized sensors out of simple photocells;
if you put a filter in front of a light source (i.e., an emitter) and the same or a different filter in front of a photocell, you can cleverly manipulate what and how much light you detect.
Note that polarized light, like all other sensor types we have discussed today, has its equivalent in nature; many insects and birds use polarized light.

Polarizing FilmPolarizing FilmPolarized film has printed or etched straight lines. The polarizing film allows the light to travel in
parallel perpendicular planes rather than in all directions.
Assume for this section that the lines are running up and down, and therefore the light waves will be traveling up and down.
If a second film is placed such that the lines are horizontal, the light traveling past the first filter will not pass through the second filter.

Two pieces of film which are perpendicular to each other will block out most of the light.
Parallel pieces will allow maximum light to go through. The Polarizing lm can be used to enhance the photo
transistors and photo resistors. The beacons at each end of the playing field are
emitting polarized light. One side is polarized at positive 45 degrees from the
vertical and the other side is at negative 45 degrees. You can detect the difference between one side and the
other by placing a piece of polarizing lm in front of a phototransistor or photoresistor.
Polarizing FilmPolarizing Film

Polarized Light SeekingPolarized Light Seeking for for Light Sensor CircuitsLight Sensor Circuits
• Two opposing goals consists of a light box with light filter; one has the polarization filter aligned vertically, while the other has it aligned horizontally
– If polarized light is passed through a filter at a right angle to the plane of polarization, it is completely blocked out
– At angles in between the 0 - 90 deg, light passes through proportional to the ratio of the polarization angle
• Using differential sensor with polarized shields makes it easy to tell if robot is pointed at a light beacon or not
– Sensor readings above the midpoint indicate readings from one beacon and readings below the midpoint indicate readings from the other

Polarized Polarized Light SeekingLight Seeking
for Light Sensor for Light Sensor CircuitsCircuits
Robot employs a pair of photocells, one with a +45 deg rotation (right photocell) and one with a -45 deg rotation (left photocell). Depending on the polarization of the light source, either
• light will pass equally through both photocells’ filters (no polarization)
• be blocked in the left and transmitted in the right (+45 deg polarization)
• be blocked in the right and transmitted in the left (-45deg polarization)

Use of Light SensorsUse of Light Sensors

Two Thresholds for Two Thresholds for HysteresisHysteresis
•Problem with single threshold – variances in sensor readings
• Bump on floor may spike the readings
• Shiny spots on line may reflect as well as the floor, dropping the sensor readings up into the range of the floor
Line Following performance run :Setpoint =20

Figure 5.8: Figure 5.8: PhototransistorPhototransistor
body and body and connectorconnector

Line Following performance run :Setpoint =20
int LINE_SETPOINT= 35;int FLOOR_SETPOINT= 10;void waituntil_on_the_line() { while (line_sensor() < LINE_SETPOINT);}void waituntil_off_the_line() { while (line_sensor() > FLOOR_SETPOINT);}
• Solution: two setpoints can be used
– Imposes hysteresis on the interpretation of sensor values, i.e., prior state of system (on/off line) affects system’s movement into a new state
Two Thresholds for Two Thresholds for HysteresisHysteresis

Light Sensor StatesLight Sensor States Using two sensors to keep track of one of four
states: Light-on-Left Light-on-Right Light-in-Center No light
Options: Use hysteresis on each sensor individually and
combine values into single state Combine sensor readings first and then apply
hysteresis on resulting value Try to maintain “light-in-center” state – make
closed-loop motor changes when in other states

Simple Feedback Control – Simple Feedback Control – Wall FollowingWall Following
Robot turns towards wall if distance sensor indicates too far away; turns away from wall if too close
Single threshold for “too far” and “too close” = goal variable
You can use either You can use either bend sensorbend sensor or or reflective reflective IR sensorIR sensor

Simple Feedback Control – Simple Feedback Control – Wall FollowingWall Following
void main() { calibrate(); ix= 0; while (1) { int wall= analog(LEFT_WALL); printf("goal is %d; wall is %d\n", goal, wall); if (wall < goal) left(); /* too far from wall -- turn in */ else right(); /* turn away from wall */ data[ix++]= wall; /* take data sample */ msleep(100L); /* 10 iterations per second */ }}

Hard Turns ControlHard Turns Control
Results with bend sensor:
• HandyBug oscillates around setpoint goal value
• Never goes straight
void left() {motor(RIGHT_MOTOR, 100);motor(LEFT_MOTOR, 0);}
void right() {motor(LEFT_MOTOR, 100);motor(RIGHT_MOTOR, 0);}
Hard turns

Soft Turns ControlSoft Turns Control
• Gentle Turning Algorithm:
• Swings less abrupt
• HandyBug completes run in 16 sec (vs. 19 sec in hard turn version) for same length course
• In light following we want to include a go-straight function and a random-movement-to-find-light function as well
void left() {motor(RIGHT_MOTOR, 100);motor(LEFT_MOTOR, 50);}
void right() {motor(LEFT_MOTOR, 100);motor(RIGHT_MOTOR, 50);}

Separate Sensor State Separate Sensor State Processing from ControlProcessing from Control
Functions might each make use of other sensors and functions – need to decide how to implement each

5.5.7 Reflectance Sensors5.5.7 Reflectance SensorsA reflectance sensor is made up of a combination of an
infrared or red LED and a phototransistor that is sensitive to the wavelength of light being emitted by the LED.
Over dark surfaces, the light is absorbed, whereas over light surfaces, the light is reflected back to the phototransistor.
A reflectance sensor (Figure 5.9) can be made using discrete components.
The reflectance sensors are useful for detecting what color the floor is.
They could also be used as object detectors, but they are very near sighted and quite responsive to outside lighting.

5.5.7 Reflectance Sensors5.5.7 Reflectance SensorsIn any application, good shielding is an
absolute requirement if any reliability is desired.
The sensors are very sensitive to distance from the reflecting surface.
Distances greater than an inch will give very poor reading, and distances that are too small will not allow the right to be reflected.
The angle at which the light is reflected to the surface is important and can produce better or worse results at different distances.

5.5.8 Motor-Force Sensors5.5.8 Motor-Force Sensors There are four motor force sensors built into the 6.270 Controller
board, attached to motors 0 through 3. These sensors are included to detect when the motors might be
stalled. When the motors stall, they draw a large amount of current, which
appears as a large voltage on the analog inputs to the 6811. When a motor force value increases sharply, that's a good sign, but
not guaranteed, that the motor may be stalled. The value that it reaches will depend on the load attached to the
motor. Experiment by stalling the motor yourself while printing the values
on the LCD to determine a threshold that's right for your robot. Motor force values are not very accurate when you are driving the
motors at anything less than 100%. Driving the motors at lower speeds will cause the motor force value
to oscillate wildly, so it is recommended that you only use this information when you are driving a motor at full speed.

Modulation / Modulation / Demodulation of Demodulation of
LightLightand Infra-Red and Infra-Red
SensorsSensors
Modulation / Modulation / Demodulation of Demodulation of
LightLightand Infra-Red and Infra-Red
SensorsSensors

Modulation and Demodulation of Modulation and Demodulation of LightLight
We mentioned that ambient light is a problem because it interferes with the emitted light from a light sensor.
One way to get around this problem is to emit modulated light, i.e., to rapidly turn the emitter on and off.
Such a signal is much easier and more reliably detected by a demodulator, which is tuned to the particular frequency of the modulated light.
Modulation and Demodulation of Modulation and Demodulation of LightLight
Not surprisingly, a detector needs to sense several on-flashes in a row in order to detect a signal, i.e., to detect its frequency.
This is a small point, but it is important in writing demodulator code.
The idea of modulated IR light is commonly used; for example in household remote controls.
Modulated light sensors are generally more reliable than basic light sensors.
They can be used for the same purposes: detecting the presence of an object
measuring the distance to a nearby object (clever electronics required, see your course notes)
Infra Red (IR) SensorsInfra Red (IR) Sensors
Infra red sensors are a type of light sensors, which function in the infra red part of the frequency spectrum.
IR sensors are active sensors: they consist of an emitter and a receiver.
IR sensors are used in the same ways that visible light sensors are: as break-beams and as reflectance sensors.

Infra Red (IR) SensorsInfra Red (IR) Sensors
IR is preferable to visible light in robotics (and other) applications.
This is because it suffers a bit less from ambient interference, because it can be easily modulated, because it is not visible.

IR CommunicationIR Communication Modulated infra red can be used as a serial line for
transmitting messages. This is is fact how IR modems work. Two basic methods exist:
bit frames (sampled in the middle of each bit; assumes all bits take the same amount of time to transmit)
bit intervals (more common in commercial use; sampled at the falling edge, duration of interval between sampling determines whether it's a 0 or 1)
Notes: you are strongly encouraged to pay careful attention to the
exercises and problems given in your assigned readings.
Projects, exams, homeworks and reports will use some of those, so it is in your interest to think about the answers to their questions, and work some of them out as practice.
Also the additional recitations (Fridays) problems may appear on the exams.

Elimination of the effect of the stray IR lightElimination of the effect of the stray IR light
There is a lot of infrared light that is ambient in the air. Some components of this light are at 40kHz, and straight output from the sensor would look very glitchy.
The sun produces a lot of IR light, and in the sun, the sensor output bounces all over the place.
To eliminate the effect of the stray IR light, the IR emitters are modulated at 100 or 125 Hz and the output of the IR Detectors is demodulated to look for these frequencies. (see section A.7 for more information on the IR transmission)
The 40kHz frequency is known as the carrier frequency, and the other frequency is the modulated frequency.

Noise readings in Noise readings in infrared sensors and infrared sensors and
their effect in the their effect in the Khepera Miniature Khepera Miniature
Robot’s performanceRobot’s performance

BackgroundBackground
Robots Management of hazardous waste Moving of heavy equipment Ocean and space exploration Fire extinguishing
Artificial Intelligence Knowledge-based Behavior-based

Background (cont.)Background (cont.)
Behavior-based Artificial Intelligence Subsumption Architecture (SA)
Build behaviors from smaller sub-behaviors
SA rely heavily on sensory input Noise cause disturbance in robot
operation

Problem StatementProblem Statement
Avoid negative effect of fluorescent lamps on infrared sensory readings
Oh! No!

ObjectivesObjectives
Determine the effect of noisy readings on robot performance
Determine the effect of filtered sensory on robot performance

MethodologyMethodology
Review of literatureSimulation studyHardware implementation
Real Khepera used in testingFilters designTesting-platform development
Braitenberg vehicle algorithmComparison of results

1. Build a shaft encoder using a break-beam optosensor and a perforated disk or LEGO pulley wheel. Verify the raw sensor performance—what values represent the light beam being broken vs. not broken?
2. Choose a suitable midpoint value for determining encoder transitions. Write a program in IC to implement the simple encoder counting algorithm presented in the flowchart. Use IC multi-tasking capability to display the encoder counter variable while the counting routine is running, and experiment with the encoder. Can you determine the performance limit of the algorithm in your implementation, in terms of counts per second? What is a fundamental problem with this implementation method?
3. Load a library shaft encoder routine and experiment with its performance. Capture raw data from the encoder. Based on the graph of raw encoder performance, choose suitable high and low threshold values. Explain your choices.
4. One limitation of current encoder routines, both the IC and library versions, is that they cannot determine which direction the shaft is rotating. Can you think of a different approach for determining the direction of rotation?
5. Implement the trailer wheel idea discussed in the text on your HandyBug. Write a program to make HandyBug drive around and stop, back up, and turn when the trailer wheel’s velocity is 0. Can you think of other applications for knowing the robot’s velocity, other than as a non-zero/zero (i.e., moving/not moving) quantity?
6. Instrument one of HandyBug’s drive wheels with an encoder, and write a program at attempts to maintain constant velocity on the drive wheel by varying the power level delivery to the motor. Experiment with the system by holding HandyBug in the air and applying pressure to the drive wheel. Is the system able to maintain the velocity? What happens if you suddenly remove the pressure?
Shaft Encoder ExercisesShaft Encoder Exercises

SourcesSources A. Ferworn
Saúl J. Vega Daisy A. Ortiz
Advisor: Raúl E. Torres, Ph.D., P.E.
Maja Mataric Ali Emre Turgut Dr. Linda Bushnell, EE1 M234,
[email protected] Web Site: http://www.ee.washington.edu/class/462/aut00/ Robotic Explorations: A Hands-on Introduction to
Engineering, Fred Martin, Prentice Hall, 2001.