Embed Size (px)
Citation preview

1
Life ScienceWorksheet
GRADE LEVEL: Third
Topic: Change Over Time
Grade Level Standard: 3-1 Distinguish physical and/or behavioral
characteristics and traits that enable species to adapt or survive.
Grade Level Benchmark: 1. Explain how fossils provide evidence about the nature
of ancient life. (III.4.E.1)
Learning Activity(s)/Facts/Information
Central Question:How do scientists acquire evidence about the nature ofancient life?
1. “How Can You Make a Permanent Shell Imprint?”
2. Create a diorama.
3. Guest speaker Geologist.
4. “Nippers, Rippers, and Grinders”
5. “More Fossils”
Activity is attached
Resources
Process Skills: Observing, Classifying, Communicating, Formulating hypothesis
New Vocabulary: Types of Evidence: fossil, extinct, ancient, modern life forms

2
HOW CAN YOU MAKE A PERMANENTSHELL IMPRINT?
MATERIALS NEEDED• Seashell• Pie tin• Petroleum jelly• Plaster of Paris• Water• Paper towels• Newspapers
PROCEDURE
1. Coat the bottom and sides of the pie tin with a thin layer of petroleum jelly so theplaster will release easily.
2. Coat your shell with a thin layer of petroleum jelly.
3. Lay your shell in the bottom of the pie tin. Place it with the rounded side up.(Figure 4.27-1)
4. Mix plaster with water according to the instructions on the package. Preparesufficient plaster to make a layer in the pan about 15 mm (at least ½ in.).
5. Pour the plaster carefully over the shell and let it harden (leave it at least onehour).
6. Turn the pie tin upside down on a table covered with newspaper and tap it lightly.The plaster case with shell should fall out onto the table.
7. Remove the shell, and handle the plaster cast very carefully. The plaster will bequite soft until it has had at least a day to cure (harden).
8. After at least one day of curing time, carefully wipe the excess petroleum jelly offthe plaster cast with a paper towel. Then wash the rest off lightly with warmwater.
9. You now have an imprint of the shell in plaster much like those often found inlimestone and other sedimentary rock. (Figure 4.27-2) When found in rock, thisimprint is called a fossil because it is evidence of an ancient animal.

3
For Problem Solvers: Begin a collection of fossils, especially any that might be foundin your area. Watch for opportunities to expand your collection. If you know a geologistor a rock hound, they will be able to help you get started. Find out what kind of fossilsyou have and what period of time they represent. What conditions do you think theylived in? Study about the fossils and find out if scientists agree with you.Encyclopedias will be very helpful. Share what you learn with others who are interestedin fossils.
TEACHER INFORMATIONPlaster of Paris can be obtained at a local builder’s supply store or hobby shop. It iseasy to work with, and if students follow the directions, the project should besuccessful. As the plaster cures, it will become quite warm, then will cool. It shouldbe allowed to cool completely before being removed from the mold (pie tin).
If you have an area nearby where fossils can be found, that would be an excellentfield trip. Otherwise, perhaps a few fossil samples could be borrowed from a friendor purchased from a science supply house. The experience of making a “fossil” willmake a more lasting impression on the minds of students if they can see just howsimilar their “fossil” is to the real fossil formed by nature.
The imprint resulting from the above activity is a negative imprint. If a positiveimage is desired, spread a thin layer of petroleum jelly on the entire surface of theplaster, wrap and tie a piece of cardboard around it to provide sideboards to holdplaster, and pour another layer of plaster on top of the first. After it has cured,remove the cardboard, separate the two pieces of plaster with a knife blade, andpresto—you have both a positive and negative of the shell. Clean up the petroleumjelly after the plaster has cured thoroughly, as indicated above.
An imprint of a leaf can be made following the same steps.
INTEGRATINGReading, language arts, social studies
SKILLSObserving, classifying, communicating, using space-time relationships, formulatinghypotheses, researching

4
Scientists tell us that some of the dinosaurs were meat-eaters and others were plant-eaters. But how do the scientists know? By looking at the teeth of certain dinosaurfossils, scientists can tell what those dinosaurs ate. Meat-eaters had sharp, saw-edgedteeth (figure 1), for cutting and ripping flesh. Plant-eating dinosaurs had either peg-liketeeth (figure 2), for nipping plants, or flat grinding teeth (figure 3), to munch tough twigsor leaves.
1. Match the dinosaur to its teeth by writing its name in the space provided.2. Circle either “M” for meat-eater or “P” for plant-eater.
Meat-eateror
Plant-eater
Tyrannosaurus(tie-ran-o-SAWR-us) M P
Parasaurolophus(par-uh-sawr-uh-LOW-fus) M P
Monoclonius(mah-no-KLONE-ee-us) M P
Hypsilophodon(HIP-sil-ahf-oh-don) M P
Triceratops(try-SAIR-uh-tops) M P
Fantastic Fact
The Tyrannosaurus, whose name means “king of the tyrant lizards,” was the largest meat-eater. Itweighed over 8 tons and was over 15 meters long. Its teeth were over 15 cm long and had edges like asteak knife. © 1992 Instructional Fair, Inc.
Nippers, Rippers, and GrindersName _______________________

5
Besides bone fossils, scientists have found other kinds of fossils. Below are thepictures of some of these other kinds of fossils. Draw a line from the description offossil to its picture.
Carefully study these dinosaur footprints.Draw a line from the dinosaur to its footprints.
Fantastic Fact:
Fossil eggs of the Protoceratops have been found with the skeletons of tiny babyProtoceratops inside (pro-toe-SAIR-uh-tops). © 1992 Instructional Fair, Inc.
More Fossils Name______________________
A dinosaur makes footprints in the softmud. The mud hardens and turns intorock.
Sometimes the skin of a dinosaur ischanged into a fossil.
The eggs of some dinosaurs have beenchanged into fossil eggs.

6
AssessmentGrade 3
CHANGE OVER TIME
Classroom Assessment Example SCI.III.4.E.1
The teacher will collect and redistribute cups, making sure that students do not receive their owncups. Students will open their cups by carefully tearing them down the sides. Students shouldcarefully explore the shapes and patterns that were made by their casts. With a cautious approach,students may be able to keep the molds of their specimens intact. The teacher will ask studentswhich specimens made a good impression or disintegrated, and which lived at an earlier time orlived later. Students will draw conclusions and present their findings based on their observations.
(Give students rubric before activity.)
Scoring of Classroom Assessment Example SCI.III.4.E.1
Criteria Apprentice Basic Meets Exceeds
Identification oflayers
Recognizes thatobjects wereburied at differentlevels (layers).
Locates at leasttwo distinctlayers.
Locates all layersand findsevidence offossils.
Locates all layersand explains thatfragile materialsdisintegrate andtherefore not allplants andanimals from thepast made fossils.
Demonstrationof scientificmethods
Preserves someevidence of thelayers.
Preserves layersand some of thecasts.
Preserves thelayers and thecasts.
Worksmeticulously likea paleontologistand identifies thespecimensprecisely.
Accuracy ofrelationships
Explains thatsome plants/animals lived along time ago.
Recognizes thatfossils existwithin layers ofthe Earth.
Describes therelationshipbetween layersand the age ofspecimens.
Provides evidencethat not allmembers of aspecies (i.e.,dinosaurs)became extinct atonce.-or-Links climate andother naturaldisasters withfossil findings

7
Life ScienceWorksheet
GRADE LEVEL: Third
Topic: Change Over Time
Grade Level Standard: 3-1 Distinguish physical and/or behavioral
characteristics and traits that enable species to adapt and survive.
Grade Level Benchmark: 2. Explain how physical and behavioral characteristics of
animals help them to survive in their environments. (III.4.E.2)
Learning Activity(s)/Facts/Information
Central Question:In what ways are living things adapted (suited) tosurvive in their environment?
1. “Going Places”
2. “The Thicket Game”
3. “You’ve Changed”
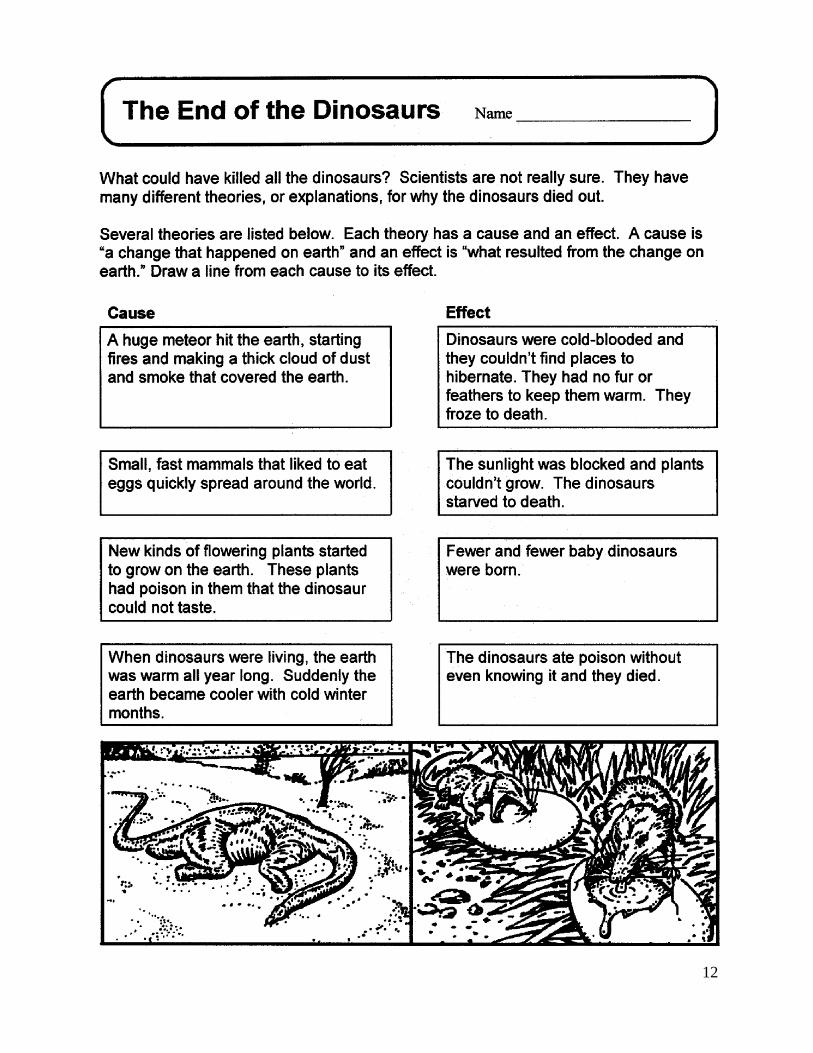
4. “The End of Dinosaurs”
Activity is attached
Resources
Process Skills: Analyzing, Observing, Describing, Application
New Vocabulary: Characteristics: adaptation, instinct, learning, habit;
Traits and their Adaptive Values: sharp teeth or claws for catching/killing prey,
color for camouflage, behaviors

8
Looking at a bird’s feet can tell you a lot about how they are used. Look at the bird’sfeet below. Unscramble the bird’s name. Write the bird’s name by the best sentence.Can you match the pictures with the names?
_________________ “My webbed feet are greatfor swimming.”
_________________ “My feet are great forwalking up trees.”
_________________ “I use my feet with longtoes to wade in the waterand mud.”
_________________ “I use my strong, powerfulfeet to catch smallanimals.”
kawh noreh ckud reckwoodep_____________ ________________ _____________ _________________
Can the shape of a bird’s bill tell you anything about what it eats? Look closely at thebills below. Unscramble the bird’s name. Write the bird’s name by the best sentence.Can you match the picture with the names?
_________________ “I pound holes in woodto find insects.”
_________________ “I use my long bill to getnectar from flowers.”
_________________ “I use my strong bill tocrack open seeds.”
_________________ “I stab at small fish withmy sharp bill.”
_________________ “I scoop up largemouthfuls of water andfish.”
noreh reckwoodep bumminghird kawh___________ ________________ _________________ _________________
panicel dinalcar_____________ ________________
Going Places Name ___________________________

9
THE THICKET GAME
OBJECTIVESStudents will be able to: 1) defineadaptation in animals; and 2) generalizethat all animals make some adaptations inorder to survive.
METHODStudents become “predator” and “prey” ina version of “hide and seek.”
BACKGROUNDAnimals are adapted to their environmentin order to survive. Animals may beadapted to changes in their habitats. Forexample, snowshoe rabbits have a whitewinter coat to blend with a snowyenvironment and a tan summer coat toblend with summer ground and vegetationcolors. Chameleons change color to blendwith their surroundings. The walking-stickinsect can look like a twig or stick. Fawnshave spotted hair that resembles dappledlight on the forest floor.
The major purpose of this activity is forstudents to understand the importance ofadaptation to animals.
NOTE: See “Seeing is Believing” and“Surprise Terrarium” for other elementary-age adaptation activities.
MATERIALSBlindfolds: outdoor area like a thicket orother vegetated area where students can
safely hide.
PROCEDURE1. Take the class to a “thicket.”2. Blindfold one student who will be the
“predator.” The predator counts to 15slowly while the others hide. Thestudents hiding must be able to seethe predator all the time.
3. After counting, the predator removesthe blindfold and looks for “prey.” Thepredator can turn around, squat, andstand on tip-toes—but not walk orchange location. The predator shouldsee how many students he or shecan find, identify them out loud anddescribe where they are. Whenidentified, they come to the predatorbecause they have been “eaten.”These prey now become predators.
4. When the original predator cannotsee any more students, all thepredators now put on blindfolds. Theoriginal predator counts aloud to ten.All the remaining prey are to move incloser, but still try to be “safe” andhidden. All the predators removetheir blindfolds and take turns namingstudents they can see.
5. Repeat the process if severalstudents are still hidden, have themstand up and identify themselves; itmay be surprising how close theseprey were to the predators—anexample of successful adaptation

10
because of how well they blend withtheir environment in order to survive.Introduce the term “adaptation.”
6. Play the game again one or two times.7. Discuss what would have made it
easier to be the last one or get veryclose to the predators. Some ideas thatmay come out are: changing color(clothes); wearing clothing that doesn’tstick to plants; being of smaller size;climbing a tree.
8. Ask the student to summarize whatthey have learned. See if the studentscan think of other examples ofadaptation in animals. Generalize thatall animals are adapted to survive.
EVALUATIONDescribe the importance of adaptation toanimals. Give at least two examples ofanimal adaptation.
Subjects: Science, Physical Education,Language ArtsSkills: analysis, application, description,discussion, generalization, kinestheticconcept development observation,psychomotor developmentDuration: 30 minutesGroup Size: minimum of five studentsSetting: outdoorsKey vocabulary: adaptation, predator,prey

11
Name _______________________________________________________
YOU’VE CHANGED . . . . . . . . . . . . . . . . . . . . . . . . . . . . .
Directions: Put a baby picture of yourself in the frame below. Then answer thequestions:
1. List at least five ways you’ve changed since that picture was taken.
_________________________________________________________________
_________________________________________________________________
_________________________________________________________________
2. What’s something you can do well now that you couldn’t do then?
_________________________________________________________________
_________________________________________________________________
3. Is there anything about yourself that you wish hadn’t changed as you got older?
_________________________________________________________________
_________________________________________________________________
4. What about yourself do you most want to change in the future?
_________________________________________________________________
_________________________________________________________________
12

13
TO THE TEACHER
Ecology is both interdisciplinary and intradisciplinary. It is interdisciplinary because it involvescontent from the biological, physical, and earth sciences, plus all areas of the social sciences. Itis intradisciplinary because the ecologist attempts to use information from many sources toproduce a unique field.
Many of the ecological problems we read about, see on TV, or hear on the radio are globalin nature. Some are highly sensitive and fall in the political realm. National and internationalrelations often deteriorate over ecologically-based issues. This section does not attempt to dealwith moral, economic, or political issues. It deals with some basics of the science of ecologyand attempts to help students realize their place, as individuals, in the ecological system.
The first portion of the area deals in very simple ways with nature’s balance, food cycles,and food webs. They cycles of soil, water, and air are alluded to but not introduced formally. Ifyou care to pursue these in greater depth, your library can provide ample resources.
People are introduced into an ecological system in this section. Liberties are taken with theterm ecosystem to generalize it to apply to the student and his or her interaction with theimmediate environment. Human interaction with the immediate environment becomes the focalpoint. Conservation, cooperation, and individual responsibility are emphasized. You may betempted, as many are, to become preachy at this point; however, the effectiveness will begreatly increased if students are helped to discover these ideas on their own.
As is the case throughout the book, discovery/inquiry and verbal responses areemphasized. In this section, pictures, charts, and written work should be saved for a final,culminating activity.
Many of these activities could be enhanced by the use of movies on nature and wildlife.Teachers of young children should be aware that some movies show predators killing prey andportray life and death as they occur in a true ecosystem. Be sure to preview the movies anduse only those you consider to be appropriate for your students.
Try to include as much art, music, poetry, and aesthetic experience as you can.Opportunities for enrichment are almost limitless.
Regarding the Early GradesWith verbal instructions and slight modifications, many of these activities can be used withkindergarten, first grade, second grade students. In some activities, steps that involveprocedures that go beyond the level of the child can simply be omitted and yet offer the chid anexperience that plants the seed for a concept that will germinate and grow later on.
Teachers of the early grades will probably choose to bypass many of the “For ProblemSolvers” sections. That’s okay. These sections are provided for those who are especiallymotivated and want to go beyond the investigation provided by the activity outlined. Use theoutlined activities, and enjoy worthwhile learning experiences together with your youngerstudents. Also consider, however, that many of the “For Problem Solvers” section can be usedappropriately with young children as group activities or as demonstrations, still giving studentsthe advantage of an exposure to the experience, and laying groundwork for connections thatwill be made at a later time.
Teachers of young children should be aware that some movies show predators killing preyand portray life and death as they occur in a true ecosystem. Be sure to preview the moviesand use only those you consider to be appropriate for your students.

14
AssessmentGrade 3
CHANGE OVER TIME
Classroom Assessment Example SCI.III.4.E.2
Each student will invent an animal and design an environment (2D or 3D) that will support theinvented animal. Students will develop and explain three physical adaptations and one behavioraladaptation that the animal uses to survive in the environment. Each student will then present themodel in class with a two-minute presentation.
(Give students rubric before activity.)
Scoring of Classroom Assessment Example SCI.III.4.E.2
Criteria Apprentice Basic Meets Exceeds
Design ofenvironment
Designs (withteacher supper) anenvironment thatpartiallycamouflages theanimal.
Designs (withteacher support)an environmentthat camouflagesthe animal.
Designs (withoutteacher support)an environmentthat camouflagesthe animal.
Designs (withoutteacher support)an environmentthat camouflagesthe animal inmore than oneway.
Design ofphysicaladaptations
Designs one ortwo physicaladaptations.
Designs threephysicaladaptations.
Designs andexplains threephysicaladaptations.
Designs andexplains morethan threephysicaladaptations.
Explanation ofbehavioraladaptations
Explains abehavioraladaptation.
Develops abehavioraladaptation.
Develops andexplains onebehavioraladaptation.
Comparesbehavioraladaptation to realanimals.
Effectiveness oforal presentation
Gives an oralpresentation withteacher support.
Gives a two-minute oralpresentation withorganizedinformation andteacher support.
Gives a two-minute oralpresentation withorganizedinformation.
Gives a two-minute oralpresentation witheye contact,appropriatevolume, goodposture, andorganizedinformation.

15
Life ScienceWorksheet
GRADE LEVEL: Third
Topic: Ecosystems
Grade Level Standard: 3-2 Identify patterns of interdependence and
interrelationships in various ecosystems.
Grade Level Benchmark: 1. Identify familiar organisms as part of a food chain or
food web and describe their feeding relationships within the web. (III.5.E.1)
Learning Activity(s)/Facts/Information
Central Question:How are parts of an ecosystem related and how do theyinteract?
1. “What is a Simple Plant-Animal Community?”
2. “What is a Pond Community?”
3. “What is a Simple Ecosystem?”
4. “How is Energy Transferred in an Ecosystem?”
5. “Where do People Fit into an Ecosystem?”
6. Create a food chain/web poster.
Activity is attached
Resources
AIMS
Process Skills: Observing, Communicating, Classifying, Predicting
New Vocabulary: producer, consumer, predator, prey, decomposer, habitat,
community

16
WHAT IS A SIMPLE PLANT-ANIMAL COMMUNITY?
MATERIALS NEEDED• 24" x 36" labeled poster of Figure 5.1-1• 8 ½” x 11" unlabeled copy of Figure 5.1-1 for each student• Crayons• Pencils
PROCEDURE1. Compare your picture with the one on the bulletin board. This is a basic
grassland community. It has six important elements. As your teacher explainsthe function of each, color it on your paper.
2. Energy from the sun in the form of heat and light is the very first ingredient.Without it, nothing else could happen. Label and color the sun.
3. Air must be present in order for life to exist. Since air is colorless, write “air” on ablank spot somewhere below the sun.
4. Moisture in some form must also be present. How do you think this grassland isgetting moisture? Label and show it in some way on your picture.
5. Good soil is necessary for grassy or woody plants. Soil has dead leaves andsticks (humus) in it. There are also small animals called scavengers, such asworms, bugs, and beetles. Scavengers feed on dead plant and animal materialsin the soil and break it down into smaller parts. Tiny bacteria and fungi calleddecomposers further break down materials into minerals that plants need inorder to grow. Color and label the humus, scavengers, and decomposers.
6. Plants of many kinds grow above the ground. They all depend on energy fromthe sun, air, moisture, and rich soil. In turn they remove carbon dioxide from, andrelease oxygen into, the air. They give off moisture. Most plants use energyfrom, and release oxygen into, the air. They give off moisture. Most plants useenergy from the sun combined with moisture and rich soil to produce food. Theyare the primary producers of food on the earth. Without them, other forms of lifecould not exist. Color the plants and flowers in your picture.
7. Your grassland community is now working. Save it for use later on.

17

18
TEACHER INFORMATIONIn the study of this portion of ecology we will consider groups or types of living andnonliving things interacting with each other as communities. When we add animalsas primary and secondary consumers, we will then have an ecosystem.
Ecosystems can be as simple as a balanced aquarium in a classroom or as complexas an entire region, or country, or the world. Our studies will be confined to smallcommunities and ecosystems to provide simple examples with which the studentscan relate.
As people are introduced into the ecosystem, students will begin to understand howcomplex the problems can become.
SKILLSObserving, communicating, comparing and contrasting, using space-timerelationships

19
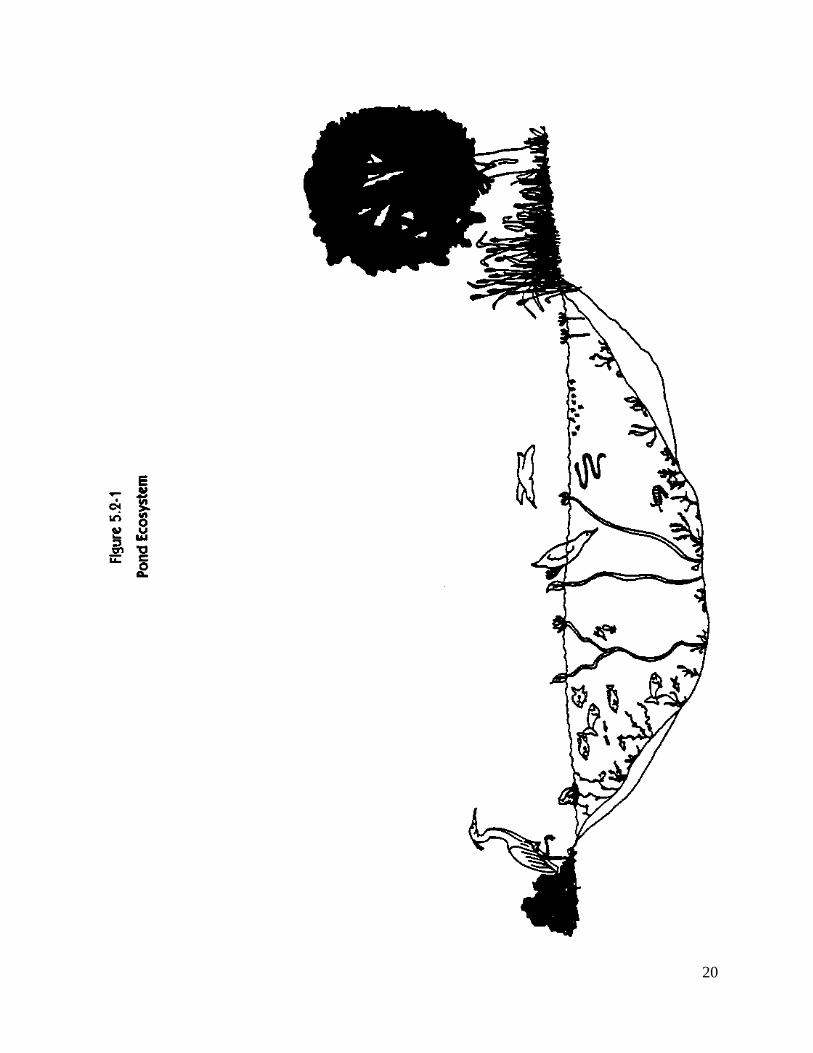
WHAT IS A POND COMMUNITY?
MATERIALS NEEDED• Student copies of grassland picture from Activity 5.1• Unlabeled copy of Figure 5.2-1 for each student• Crayons• Pencil
PROCEDURE1. Compare the picture you made of the grassland community and the new
picture you have.
2. This is a picture of a pond community. It is sometimes called an ecosystem.Label and color all the nonliving elements as you did in your last picture. Ifthere are any new nonliving things, label and color them.
3. Use your picture from the last activity to label as many other similar things(grasses, scavengers, decomposers) as you can.
4. What new things are unlabeled and uncolored?
5. The animals in the picture do not produce food; they consume it. They arecalled consumers.
6. Animals that feed on primary producers (plants, grasses, and algae) are calledprimary consumers. Animals that usually feed on other animals are calledsecondary consumers.
7. In your picture, the small animals (shrimp, water flea, and snail) are primaryconsumers feeding on plants and algae. Label and color them.
8. The fish and frog are secondary consumers in this instance, since they feed onsmall primary consumers. Label and color them.
9. The snake is a higher-level secondary consumer that may eat either the frog ofthe fish. Label and color it.
10. The bird (in this case a blue heron) is an even higher level of secondaryconsumer because it may eat the fish, frog, or snake. Label and color it.
11. Whether an animal is a primary or a secondary consumer depends on what iteats, not on its size. The elephant is a primary consumer. A ladybug beetle isa secondary consumer.
12. Turn your paper over and draw a picture of the plants and animals in yourclassroom aquarium. Can you find both producers and consumers?
20

21
TEACHER INFORMATIONIf you do not have a freshwater aquarium or a good terrarium and have notdeveloped one earlier in the year, this would be an excellent time. As students learnmore about ecosystems, they will be able to have first-hand experience with asimple model.
As we add primary and secondary consumers to the model, the system becomes farmore complex. Up to this point, the terms herbivore (plant eater), carnivore (animaleater), and omnivore (eats both plants and animals) have not been introduced.They are not necessary to the understanding of ecosystems.
SKILLSObserving, inferring, classifying, communicating, comparing and contrasting, usingspace-time relationships

22
WHAT IS A SIMPLE ECOSYSTEM?
MATERIALS NEEDED• Picture of grassland community developed in Activity 5.1• Pencil• Crayons• Pictures of animals shown in Figure 5.3-1, 5.3-2, and 5.3-3
PROCEDURE1. Figures 5.3-1 and 5.3-2 show animals that might live in a grassland community.
Some are primary consumers and some are secondary consumers. Draw theground animals on your picture of a grassland community. Color them.
2. Some birds are primary consumers. They eat berries and seeds. Others aresecondary consumers who prey on primary consumers. Can you tell which is which?Hint: Look at their beaks and claws.
3. Now that we have added consumers, our grassland ecosystem is complete.However, we have two new kinds of animals. The smaller bird is a migratory animalwho joins the ecosystem for a period of time when certain seeds or berries are ripeand then moves on to another location. On your picture of a grassland community,draw a migratory bird. Color it.
4. The second, larger bird is a predator. It preys on smaller animals. Notice its large,powerful claws and sharp beak. Some predators are migratory but many arepermanent residents, depending on the food supply. Draw the predator on yourpicture of a grassland community. Color it.
5. Figure 5.3-3 shows some larger animals that might be found in grasslandcommunity. Two are primary consumers. One is a predator, or secondaryconsumer. If you know what they eat, then you know which is a primary consumerand which is a secondary consumer. On your grassland community draw the newanimals. Color them.
6. Now that you have developed both a pond and a grassland ecosystem, can you thinkof the reason why plants and animals live together and are dependent on eachother?
TEACHER INFORMATIONAs consumers and migratory animals are added to an ecosystem, it becomesincreasingly complex. Younger children may need to see colored pictures similar to thepictures of the animals they are asked to color. (Otherwise you may get purple groundsquirrels!)
The existence of an ecosystem is directly related to energy and its transfer. The sun isthe major source of energy. Lower forms of plants and animals spend most of their livesin producing and consuming energy. Reproducing the species, in many cases, is theonly other function they perform. Some more advanced species do spend time in play.

23

24

25

26
HOW IS ENERGY TRANSFERREDIN AN ECOSYSTEM?
MATERIALS NEEDED• Complete grassland ecosystem from Activity 5.3• Simple food chain chart (Figure 5.4-1)• Simple food web (Figure 5.4-2)
PROCEDURE1. Study the picture of the grassland ecosystem. Energy from the sun is the basis
of life in the system. Why? Discuss this with your teacher and other members ofthe group.
2. Figure 5.4-1 is a diagram of a simple food chain showing how energy from thesun is used and stored in food molecules manufactured by the producers fromnonliving materials. In turn, they are consumed by primary and secondaryconsumers. The waste products remains of dead animals and plants arereturned to the soil, where the scavengers and decomposers complete the cycleso that it can begin again.
3. There are many different ways food chains can work. Some consumers eat onlycertain producers. Other consumers eat both primary and secondary consumers.Ecologists call these many variables the food web. Just as a spider spins a webone strand at a time, food webs are made up of many food chains. Compare thefood web (figure 5.4-2) with the food chain (figure 5.4-1).

27
4. Weather and chemicals produced from the nonliving portions of the ecosystem(air, water, soil) influence the conditions within the system. Can you think ofother factors that might change the food web? What would happen if there wereno mice?
5. Ecosystems are very complex. Can you see why ecology is an interesting andexciting science?
TEACHER INFORMATIONFigures 5.4-1 and 5.4-2 are simple, but should still give students a feeling for thehighly complex interrelationships that occur in nature. Also, chance is always a partof the interplay.
Using charts may convey a feeling of static process. Ecosystems are actually highlydynamic, with countless variables. Students may need additional experience inconstructing ecosystems and applying them to life situations. Later in the section,parks, vacant lots, and even back-alley ecosystems will be discussed.The next activity introduces the most complex variables in ecology-people.
SKILLSObserving, inferring, classifying, communicating, comparing and contrasting, usingspace-time relationships.

28
WHERE DO PEOPLE FIT INTO AN ECOSYSTEM?
MATERIALS NEEDED• 3' x 6' poster of Figure 5.5-1• Cutouts of plants and animals, such as Figure 5.3-1, 5.3-2 and 5.3-3• Colored pencils• Pictures of people, houses, stores, domestic animals, and so on• Thumbtacks• Drawing paper
PROCEDURE1. Study the picture on the large bulletin board. This is the way your community may
have looked before the settlers came.
2. Identify the nonliving and living elements that make up the ecosystem.
3. Add a family to the system. What will they need to survive? Where will they getwhat they need?
4. Put a house and yard in the picture. Add a barn and barnyard. What animals willlive in the barnyard? Where will the people get food? Where will they plant crops?
5. Add a second family with all the things the first family has.
6. What is happening to the ecosystem?
7. Add a third house, family, and barn.
8. Build a general store, church, school, and post office near the homes.
9. Is this still an ecosystem?
10. What changes could you make it? Discuss planning as part of urban and suburbanchange.
For Problem Solvers: How has the ecosystem of your community changed with time? Doyou know how and when your town or city actually began? What was the area like beforethat? What animals and plants were common in the area? Which of these are no longerfound there? Which ones were forced out of the ecosystem because of loss of naturehabitat? Was it covered by forest, grassland, marshes, or what? Why did people settle inthis area? Do you know anyone who has been there for many, many years? If so ask themto tell you what they know about the early days of this community. Think of some questionsyou want to ask before you begin and write them down. Perhaps you could record theinterview and share the information with your class. Ask the public library for informationabout the story of your town.
Before you begin your search for information about your town or city, write a briefdescription of what you think the area might have been like, who you think the first settlersmight have been, and why you think they came. Draw a picture showing what you think itmight have looked like at that time. Compare your picture with what you learn about theway it really was.

29

30
MANAGEMENT SUGGESTIONS1. Find an area with well defined boundaries for this outdoor activity.
2. Stress safety and demonstrate the proper way to tag. Make sure studentsunderstand the rules before going outside.
3. Use the activity sheet after the final round of play.
PROCEDURE1. Discuss food chains and feed webs. Refer to science texts or study prints to
illustrate this idea. Discuss predator/prey relationships.
2. Tell the students they are going to play a tag game that will simulate a naturalfood chain and illustrate a biomass pyramid.
3. Divide the class into 3 even groups. Each group will be assigned a differentcolor of yarn. Pass out the yarn and have each student tie the yarn around hisor her wrist in a bow, so that they are easy to remove at the end of the game.
4. The animals the students simulate are represented by the colors of yarn.brown = grasshoppers yellow = lizards red = hawks
5. Explain the predator/prey relationships in this chain.Hawks hunt only lizards.Lizards hunt only grasshoppers.Grasshoppers eat only grass ( which is represented by the popcorn)
6. Pass out a baggie to each student which will be used as a stomach. Thestudents playing grasshoppers will put popcorn gathered from the ground intotheir baggies. The students playing lizards will try to tag the grasshoppers. Ifthey are successful, the grasshopper is “dead” and the contents of the baggieare emptied into the lizard’s bag (the empty baggie stays with the grasshopperto be used again in the next round). Lizards and hawks may not pick uppopcorn from the ground. Hawks may only tag lizards and if successful, get thecontents of the lizards’ baggies.
7. For the animals to survive, they must not be tagged during the game and theirstomachs (baggies) must be filled as follows by the game’s end.grasshoppers 1/3 fulllizards 2/3 fullhawks full
8. Go outdoors and select an area to be the ecosystem. For the first round, thearea should be small, so that the students can experience the effects ofcrowding on animal populations. Students may not leave the area during thegame.
9. Set up two or three safe zones within the area. Animals may not prey on eachother in these zones. Select an area for the “dead” animals (those who aretagged) to wait for the next rounds.
10. Spread out a large bag of popped popcorn over the ecosystem.

31
11. Signal the primary consumers, the grasshoppers, to begin eating grass(gathering popcorn). After 30 seconds, allow the lizards to enter the area.After 30 more seconds, allow the hawks to enter the ecosystem. Allow thestudents to play for several minutes or until there are no more prey. At the endof play all remaining animals must have the right amount of food in theirbaggies, or they too are dead. Note the length of time the game lasted.
12. After round one, ask why the game only lasted a few minutes. Discusscrowding and the number of predators vs. number of prey. Write down thenumber and kinds of animals that are still alive.
13. The second round can be played in the same area as round one, with thefollowing changes, half the students will play grasshoppers (brown), the otherhalf should be divided so that two-thirds of them are lizards and one-third arehawks. Play the game again. Discuss the effects of changing the populationnumbers had on the time the game lasted.
14. For the third round, leave the animal populations as they were in round two butgreatly enlarge the area in which the game is played. Discuss the effects ofthe larger area on the time the game lasted.
15. Return to the classroom. Use the activity sheet to illustrate the numbers ofpredators and prey in an ecosystem and to make a biomass mobile. Discussthe energy flow from the producers to the higher level consumers. Emphasizethat the energy in a food chain originates from the sun. A biomass pyramidcould also be made by centering and gluing the pieces, one on top of another.
DISCUSSION QUESTIONS1. Why did the game end? How long should it last?
2. What numbers of predators and prey worked the best?
3. How does an area affect predator/prey relationships?
4. How is this game related to a real ecosystem?
5. Create a food chain and discuss.
6. Where does grass get energy?
7. How is the biomass mobile related to the predator/prey game? Why are greenplants so important to the food chain?
EXTENDED ACTIVITIES1. Mix some cheese popcorn with the large bag. Have it represent a pesticide.
Do not point this out to the students until the end of the game. An animal withthree or more cheese corn kernels in their stomach would have died from toxicpoisoning.
2. Create a variety of food chains using other animals.
3. Play the game introducing predator/prey behaviors such as camouflage,hunting techniques, decoying, running speed, freezing and playing dead.

32
CURRICULUM COORDINATESGeographyResearch various geographical areas and list several food chains.
ArtDesign a poster illustrating food chains and food webs.

33

34
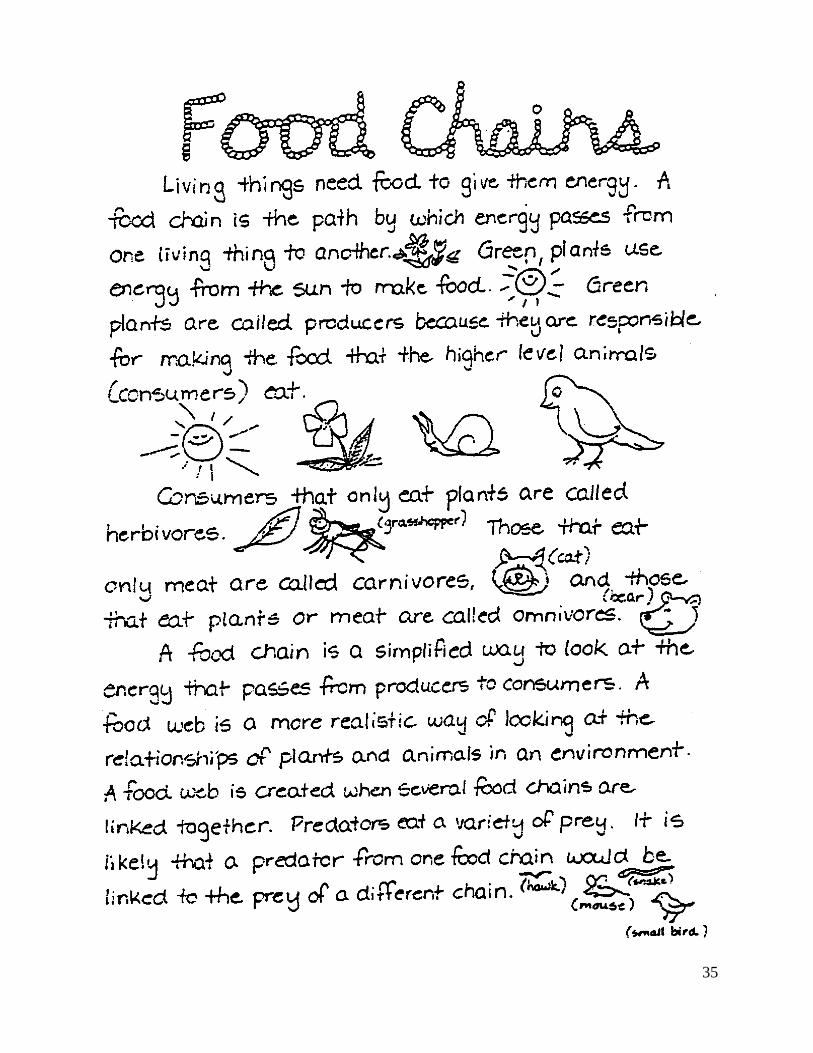
35

36
AssessmentGrade 3
ECOSYSTEMS
Classroom Assessment Example III.5.E.1
Give each student a poster (teacher-created using words or pictures) with six organisms circled.At least one of each of the following is represented on the poster: producer, consumer, predator,and decomposer.
Using his or her poster, each student will choose four out of the six organisms and use them toconstruct a food chain. Each student will explain the feeding relationship within the new chain.
Place students in groups of three. Each student will contribute the four organisms from his or herfood chain for a total of twelve organisms. Each group will then create a food web showing theinterrelationships of the food chains.
Next, each student will choose one organism from his or her group’s web to eliminate. Eachstudent will write a list of predictions about what will happen to the food web if the chosenorganism is eliminated. (For example, if a hawk is eliminated from the "corn, field mouse,red-tailed hawk" food chain, the mouse population will increase and the amount of grain willdecrease, because more grain will be consumed by the mice, making less available forconsumption by livestock and humans…) Students will share their predictions and the reasonsfor each prediction with the entire class.
(Give students rubric before activity.)
Scoring of Classroom Assessment Example SCI.III.5.E.1
Criteria Apprentice Basic Meets Exceeds
Identification offeedingrelationships
Recognizes thatthere are feedingrelationshipsbetweenorganisms, butdoes not identifythem specifically.
Identifies one ormore feedingrelationships.
Identifies at leastthree commonfeedingrelationships.
Identifiescommon feedingrelationships andalso providesevidence of lesserknownrelationships.
Accuracy ofpredictions
Writes oneprediction/consequence butis unclear on thesequence ofevents/thereasons.
Writes one or twopredictions/consequences andaccurate reasons.
Writes threepredictions/consequences andaccurate reasons.
Writes four ormore predictions/consequences andprovides accuratereasons.

37
Life ScienceWorksheet
GRADE LEVEL: Third
Topic: Ecosystems
Grade Level Standard: 3-2 Identify patterns of interdependence and
interrelationships in various ecosystems.
Grade Level Benchmark: 2. Describe the basic requirements for all living things to
maintain their existence. (III.5.E.2)
Learning Activity(s)/Facts/Information
Central Question:How is energy distributed to living things in anecosystem?
1. Study/describe a rotting log.
2. Study/describe backyard.
Resources
Process Skills: Observing, Classifying, Predicting, Theories
New Vocabulary: food, habitat, water, shelter, air, light, minerals
38
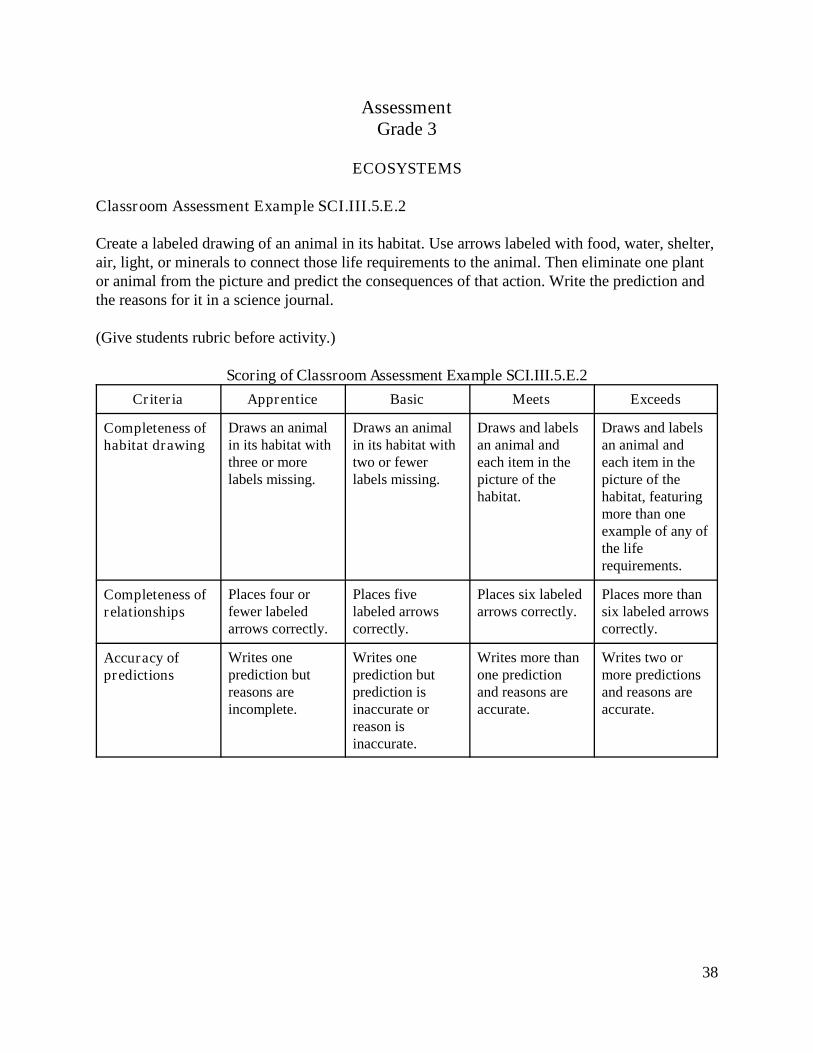
AssessmentGrade 3
ECOSYSTEMS
Classroom Assessment Example SCI.III.5.E.2
Create a labeled drawing of an animal in its habitat. Use arrows labeled with food, water, shelter,air, light, or minerals to connect those life requirements to the animal. Then eliminate one plantor animal from the picture and predict the consequences of that action. Write the prediction andthe reasons for it in a science journal.
(Give students rubric before activity.)
Scoring of Classroom Assessment Example SCI.III.5.E.2
Criteria Apprentice Basic Meets Exceeds
Completeness ofhabitat drawing
Draws an animalin its habitat withthree or morelabels missing.
Draws an animalin its habitat withtwo or fewerlabels missing.
Draws and labelsan animal andeach item in thepicture of thehabitat.
Draws and labelsan animal andeach item in thepicture of thehabitat, featuringmore than oneexample of any ofthe liferequirements.
Completeness ofrelationships
Places four orfewer labeledarrows correctly.
Places fivelabeled arrowscorrectly.
Places six labeledarrows correctly.
Places more thansix labeled arrowscorrectly.
Accuracy ofpredictions
Writes oneprediction butreasons areincomplete.
Writes oneprediction butprediction isinaccurate orreason isinaccurate.
Writes more thanone predictionand reasons areaccurate.
Writes two ormore predictionsand reasons areaccurate.

39
Life ScienceWorksheet
GRADE LEVEL: Third
Topic: Ecosystems
Grade Level Standard: 3-2 Identify patterns of interdependence and
interrelationships in various ecosystems.
Grade Level Benchmark: 3. Design systems that encourage the growing of
particular plants or animals. (III.5.E.3)
Learning Activity(s)/Facts/Information
Central Question:In what ways are various kinds of living things adapted(suited) to survive in their environment?
1. Create an aquarium and/or terrarium.
2. Aquatic/land ecosystem project.
Activity is attached
Resources
AIMS
Process Skills: Observing, Classifying, Predicting, Developing models/theories
New Vocabulary: food, habitat, water, shelter, air, light, minerals

40
ECOSYSTEM PROJECTMaking and Cutting Bottles
1. Mark bottles by turning them in a circle while holding a permanent pen in thecardboard boxes’ pre-cut slot.
Bottle 1-AquariumThis bottle is marked with slot A. Write A bottle,mark with pen, and cut.
Bottle 2–ConnectorThis bottle with the base removed is marked with aslot C and B. Write C on the bottle, mark and cuttwice.
Bottle 3–TerrariumThis bottle with the baseremoved is marked with slot B.Write T on the bottle, mark andcut. Keep the base to coverthe terrarium.
Completed EcocolumnInsert bottles A, C, and T. Use a small piece of tapeto secure the parts together.

41
SETTING UP PLANTS FOR THEAQUATIC ECOSYSTEM
1. Obtain the bottle marked A. The base is attached.
2. Place one cup of gravel in the bottle. This becomes the floor.
3. Add water to the bottle until it is about 8 centimeters (cm) from the top. Measure thenumber of cms from the gravel floor to the top of the waterline. (If you use tap water,fill a water container the night before and let stand, or use tap water conditioner thatremoves chlorine; it can be purchased at most pet stores.) Record this data in yourjournal.
4. Add plant life. Three kinds of plants are:• 2 sprigs of Elodea
Measure the size of each sprig. Record the measurements. Place in AquaticEcosystem bottle.
• 10-15 Duckweed plantsScoop out the plants and record the number. Place in Aquatic Ecosystem bottle.
• 4 droppers of algaeRecord what the algae looks like.
5. Compare the plants and record the data on the Aquatic Ecosystem on the sheetprovided. Use a hand lens to “get close up.” Record observations in your journal.

42
ADDING ANIMALS TO THE AQUATIC ECOSYSTEM
1. Fill a clear plastic cup about ½ ful of water from the holding tank.
2. Spoon two snails into your cup.
3. Net two guppies and place them with the snails. (Don’t dump the animals into theecosystem until completing step 4 and 5).
4. Use the hand lens to observe how the animals look, their movement, and how theyact.
5. Use a dropper to slowly add water from your ecosystem to the plastic cup. Fill thedropper up and add the water until about half full. This slowly changes the water theanimals aren’t put into shock.
6. Gently pour the animals into the bottle.
7. Draw and label the parts of your Aquatic Ecosystem on the sheet provided. Makecertain to show the details of the plant life. Use a hand lens to “get a close up.”Record observations in your journal.

43
SETTING UP THE LAND ECOSYSTEM
1. Use part T for the land ecosystem. Bottle C with a base canbe used as a stand.
2. Remove the cap from part T. Rubber band a square ofnylon to cover the bottle mouth.
3. Place part T with neck down in part C. Add two cups of soil.Don’t muddy the sides.
4. Divide the soil surface into four equal parts (see picturebelow). Use toothpicks to set up grid.
5. In three of the parts, seeds are to be planted.
• To begin with, count out 20-30 seeds and record thenumber of alfalfa seeds. Drop the seeds evenly on to the surface of the soil.Next, with your toothpick, spread the seeds and press them into the soil.
• After the alfalfa is planted in the proper section, do the same with the grass andmustard seed.
• To wet the soil use the water dropper. Count the drops of water added to thesoil. Do this until it begins to leak from the bottom. Then replace the cap. Everytime water is added, record the number of drops before it runs out the bottom.
6. In the last section add material such as a small rock, leaves, twigs, or other plantlitter.
7. Draw and label the parts of your Land Ecosystem in your journal. Make certain toshow the details of where sown, the plant materials added, etc.

44
ADDING ANIMALS TO THE LAND ECOSYSTEM
ISOPODS1. Scoop up two isopods into a plastic cup. Watch them in the cup for about five
minutes. Record observations in your journal. Draw the isopods. Include color,shape, body parts, etc.
2. Place the isopods into the vegetation growing in the top of the land bottle.Watch them for a few minutes and record your observations.
CRICKETS1. Capture two crickets and place them in a plastic cup.
2. Cover the cup with an index card. Take the cricket to a comfortable place toobserve with a hand lens.
3. Write down any questions that you might have about the cricket. Record yourobservations in your journal. Include color, shape, body parts, etc. Draw thecricket.
4. Place the crickets in the Land Ecosystem. Cover them quickly. Observe theirbehavior for three minutes. Record your observations.

45
PUTTING THE AQUATIC AND LAND ECOSYSTEMTOGETHER TO FORM AN ECOCOLUMN
1. Remove the cap from the base of the land column.Get four strips of tape.
2. Stack the bottle/columns together.
3. Use two pieces of tape on each section as shown.Fold the top of one piece of tape over so that thetwo sticky sides touch. This will allow you to re-enter your column if necessary.

46
ECOSYSTEM PROJECT
Look at the pictures of the animals from the two ecosystems. Answer the questionsbelow.
Guppy in an Aquatic Ecosystem Cricket in a Land Ecosystem
1. How are these two animals alike?
2. What non-living things do these animals need to live? (List as many as you can)
3. What do these animals give to their ecosystem?
By observing the two plants below, answer the following questions.
Duckweed Bean
4. To live, what do the plants need? (List at least four things)
5. How do they contribute to their ecosystems?

47
6. Based upon the aquatic and land ecosystem combination and the drawing below,answer the following.
a. Explain three things that might happen if theproducers in the ecosystem did not getsunlight. Explain.
b. What do the algae, duckweed and Elodeacompete for? Circle Two.
1. light2. space3. snails4. guppies
c. What is the original source of energy for all theliving things in the ecosystem?
1. water2. air3. soil4. sunlight
d. Water, air, and sunlight are all examples of?
1. living things2. nonliving things3. food4. once living things
e. Which from the ecosystem is a producer?
1. snail2. algae3. soil minerals4. leaf litter

48
7. Draw a picture of a land ecosystem that you know of. Then, answer the questionsbelow based on your drawing.
Drawing:
a. Draw a food chain found in your ecosystem.
b. List three nonliving things found in your ecosystem.
c. List the producers and consumers found in your ecosystem.

49
AssessmentGrade 3
ECOSYSTEMS
Classroom Assessment Example SCI.III.5.E.3
Research the ecosystem needed to support life for a specific plant or animal. Design anecosystem that will include everything needed to sustain life for that specific plant or animal.Then present a model of the environment with a written report that includes the seven needs oflife (see Key Concepts). This report may include information about the environmental studies ofRachel Carson, Grace Chow, Aldo Leopold, or another field biologist.
(Give students rubric before activity.)
Scoring of Classroom Assessment Example SCI.III.5.E.3
Criteria Apprentice Basic Meets Exceeds
Completeness ofecosystem model
Identifies fewneeds of life.
Identifies someneeds of life.
Identifies allneeds of life.
Portrays all needsof life with manydetails.
Accuracy ofscientificinformation
Includes at leastone fact related tothe scientist whowas researched.
Includes at leasttwo facts relatedto the scientistwho wasresearched.
Includes at leastthree facts relatedto the scientistwho wasresearched.
Includes at leastfour facts relatedto the scientistwho wasresearched.
Correctness offormat
Writes a reportwith manygrammaticalerrors thatinterfere with theinterpretation ofcontent.
Writes a reportwith fewgrammaticalerrors thatinterfere withinterpretation ofcontent.
Writes a reportwith fewgrammaticalerrors that do notinterfere with theinterpretation ofcontent.
Writes a reportusing completesentences and noerrors incapitalization,punctuation,spelling, orindentation.
Completeness ofpresentation/replica
Reflects researchand some lifeneeds.
Reflects researchand most lifeneeds.
Reflects researchand all life needs.
Reflects researchand all life needs,as well as a clearexplanation oftheir relationshipin the ecosystem.

50
Life ScienceWorksheet
GRADE LEVEL: Third
Topic: Ecosystems
Grade Level Standard: 3-2 Identify patters of interdependence and
interrelationships in various ecosystems.
Grade Level Benchmark: 4. Describe positive and negative effects of humans on
the environment. (III.5.E.4)
Learning Activity(s)/Facts/Information
Central Question:How do communities of living things change over aperiod of time?
1. Use resources from the local waste water plant todescribe and diagram process of water treatment andwaste process.
2. “What are Some Environmental Problems which areCaused by Man?”
3. Discussion of household wastes/school wastes.
4. “Every Breath You Take”
Activity is attached
Resources
Waste waterPlant Information(front local plant)
Process Skills: Observing, Inquiring, Predicting, Communicating, Classifying
New Vocabulary: garbage, habitat destruction, land management, renewable
and nonrenewable resources

51
WHAT ARE SOME ENVIRONMENTAL PROBLEMSWHICH ARE CAUSED BY MAN?
SUBJECTEcologyNon-biodegradable materials
GROUP SIZE2-4 students
TIMEMotivator: 30 minutesProcedure: five weeks for 30 minutes each
TEACHING STRATEGIESGameGuided PracticeObservationLaboratory Experiment
VOCABULARYbiodegradable, decompose, litter, organic compounds, recycling, solid waste
CONCEPTS/OUTCOMESMan-made, litter is an environmental problem. Litter, which is made on non-biodegradablematerials, decomposes more slowly, if at all.
PROCESSESObserving, Sequence/Ordering, Measuring, Predicting, Interpreting Data, ControllingVariables
SAFETY TIPUse forceps to pick up samples to prevent injury to fingers.
CAREERSSanitation Engineer, Ecologist, Environmentalist
RESOURCES1. Our Land Needs Your Help, University of Arizona. $9.25 rental, grades 3-7, 16mm.
2. The Balance of Nature, Creative Learning Filmstrip, Color, Sound, grades 1-6.
3. Pollution, Creative Filmstrip, Color, Sound, grades 1-6
4. Operation Salvage: Paper as a Reusable Resource. American Forest Institute. Colorfilmstrip, 17 minutes. $26.00 with record.
GENERAL OBJECTIVESThe learner will know that the Earth’s environmental balance can be easily disturbed.

52
OVERVIEWMan’s environment is being endangered by man himself. Landfills with materials whichcannot be recycled or will not break down (non-biodegradable) are causing many problems.To heighten the awareness of the various types of trash left by man, a random survey ofschool yard litter will be conducted. To understand the concept that man-made productsdecompose more quickly, a tiny “landfill” will be developed. Students will observe thequickness with which natural (organic) products decompose over some man-made items.
SOME KEY DEFINITIONS ARE1. Decompose – a chemical reaction which splits up a substance into simpler substances.
2. Organic compounds - carbon containing compounds.
3. Recycling – to extract useful material from garbage or waste.
LESSON OBJECTIVESThe learner will:1. Understand about the various kinds of litter found in a school yard.
2. Design an experiment which will demonstrate the rate at which materials decompose.
3. Develop an appreciation for the concept of recycling vs. use of landfills.
MATERIALS FOR MOTIVATORgram scale or bathroom scale, stop watch, plastic garbage bags.
MOTIVATORAnnounce that students are to collect as many different kinds of litter as they can in tenminutes. The team which collects the most items will be declared the winter. The secondtype of winner is the team with the greatest weight of items. Tell them that they are notcleaning the school year, but collecting data for an experiment.
Take students out into the school yard. Give them a plastic bag for their collections. Thestudents will have ten minutes in which to pick up as much and as many types of litter aspossible. (No fair getting anything from the dumpster!) At the end of ten minutes, weigheach team’s bag and declare a winner. Students should then bring their collections backinto the room and:1. Take five small sample squares of various types of litter (25 total samples) to be used in
the general procedure. Students may sweep materials to make a better samplingpopulation.
2. Materials may include any or all of the following: wax coated cups, Styrofoam cups, fastfood boxes, candy wrappers, cigarette packages, notebook, paper, plastic utensils, gymsocks, nylon hose, pencils, bottle caps, etc.
MATERIALS FOR PROCEDUREplastic bag, 18" x 24" paper to make chart, 1 growing tray with drain holes or a shoe boxlined with plastic bag, water, soil sufficient to fill the “growing” container to a depth of 2inches, scissors, forceps (tweezers), glue

53
PROCEDURE1. Place 2 inches of garden soil (do not use commercial products such as potting soil or
manure, as they tend to be sterile and will not work) on the bottom of the box or tray.
2. At one inch intervals, “plant” your 5 samples of litter 1 inch deep in rows.
3. Label the front of the rows with the name of the material.
4. Cover the samples with soil and water to keep it from drying out.
5. Every week for five weeks, ask the students to “unbury” one of their samples from eachrow and paste them on a chart. Label the five weeks across the top of the chart andlabel the item down the left side. Place the sample in the correct square.
EXTENSIONS/FOLLOW-UP/HOMEWORK1. At the end of 5 weeks, students will have a chart which demonstrates the effects/non
effects of soil and water on the decompostion of littered materials.
2. Visit the local land fill or disposal plant and discuss with the sanitation manager how thetrash is handled; the recycling program associated with it; rates of decomposition;scavenger problems, rodent control, etc. Ask the students to take notes for discussionin the classroom.
3. Questions:a. What was the most commonly found litter form?b. What was the least commonly found litter form?c. Which litter forms decomposed the greatest in 5 weeks?/ the least?d. What effects would massive amounts of decomposing matter have on the soil, air,
pest population?e. Should a landfill or disposal plant be classified as an environmental problem? Why
or why not?
APPLICATION1. Have students visit a landfill or disposal plant.
2. Collect data on solid waste at school. Determine its composition and source.Determine each person’s contribution. Determine where it goes. Discuss whatproblems it may cause. Discuss how it can be reduced or recycled.
3. Why has the plastic industry developed biodegradable materials?

54
STUDENT ACTIVITY SHEETName ______________________ Class ______________ Period ______ Date ___________
WHAT ARE SOME ENVIRONMENTAL PROBLEMS
WHICH ARE CAUSED BY MAN?
CONTINUATION FROM MOTIVATOR1. Bring your collections into the classroom and choose 5 items to be tested.2. Take five sample squares from each item. These squares will be used in the
PROCEDURE. Before taking the samples, make sure that you have enough of eachtype to conduct the experiment. You may swap materials with other students to make abetter sampling.
3. Materials may include any or all of the following: wax coated cups, Styrofoam cups, fastfood boxes, candy wrappers, cigarette packages, notebook, paper, plastic utensils, gymsocks, nylon hose, pencils, bottle tops.
MATERIALS FOR PROCEDUREplastic bag, 1 pc. 18" x 24" art paper, Elmer’s glue, paste, markers, crayons, 1 growing traywith drain holes or a shoe box lined with plastic bag, water, soil sufficient to fill the “growing”container to a depth of 2 inches, scissors, forceps (tweezers).
PROCEDURE1. Place 2 inches of garden soil (do not use commercial products such as potting soil or
manure, as they ten to be sterile and will not work) on the bottom of the box or tray.2. At one inch intervals, “plant” your 5 samples of litter 1 inch deep in rows (see drawing).
3. Label the front of the rows with the name of the material. Example: Styrofoam, nylon,waxed paper, etc.
4. Cover the samples with soil. Water the soil to keep the soil from drying out.5. Every week for five weeks, “unbury” one of your samples from each row and paste them
on a chart. Label the five weeks across the top of the chart and label the item down theleft side. Place the sample in the correct area on the chart.
EXTENSION/FOLLOW-UP/HOMEWORK1. At the end of 5 weeks, your chart will demonstrate the effects/non effects of water on
the decomposition of littered materials.a. Which items decomposed the most?b. Which items decomposed the least?c. Which items did not decompose at all?
55
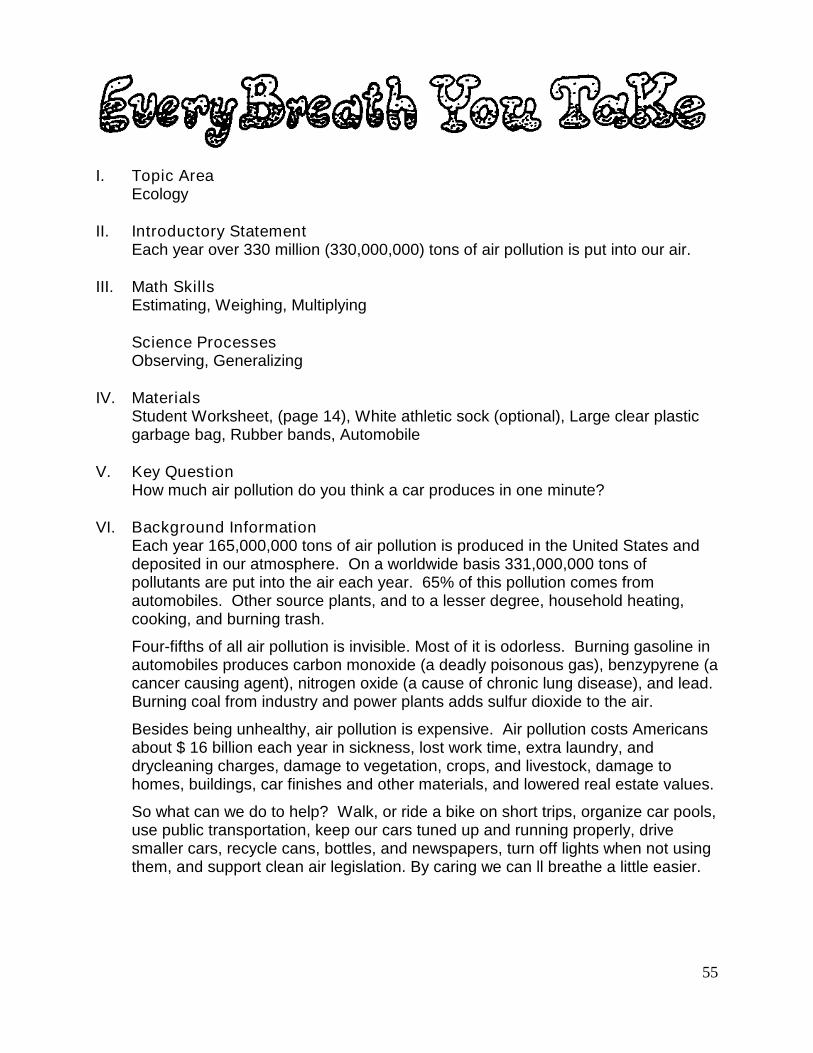
I. Topic AreaEcology
II. Introductory StatementEach year over 330 million (330,000,000) tons of air pollution is put into our air.
III. Math SkillsEstimating, Weighing, Multiplying
Science ProcessesObserving, Generalizing
IV. MaterialsStudent Worksheet, (page 14), White athletic sock (optional), Large clear plasticgarbage bag, Rubber bands, Automobile
V. Key QuestionHow much air pollution do you think a car produces in one minute?
VI. Background InformationEach year 165,000,000 tons of air pollution is produced in the United States anddeposited in our atmosphere. On a worldwide basis 331,000,000 tons ofpollutants are put into the air each year. 65% of this pollution comes fromautomobiles. Other source plants, and to a lesser degree, household heating,cooking, and burning trash.
Four-fifths of all air pollution is invisible. Most of it is odorless. Burning gasoline inautomobiles produces carbon monoxide (a deadly poisonous gas), benzypyrene (acancer causing agent), nitrogen oxide (a cause of chronic lung disease), and lead.Burning coal from industry and power plants adds sulfur dioxide to the air.
Besides being unhealthy, air pollution is expensive. Air pollution costs Americansabout $ 16 billion each year in sickness, lost work time, extra laundry, anddrycleaning charges, damage to vegetation, crops, and livestock, damage tohomes, buildings, car finishes and other materials, and lowered real estate values.
So what can we do to help? Walk, or ride a bike on short trips, organize car pools,use public transportation, keep our cars tuned up and running properly, drivesmaller cars, recycle cans, bottles, and newspapers, turn off lights when not usingthem, and support clean air legislation. By caring we can ll breathe a little easier.

56
VII. Management SuggestionsEstimated time for investigation is about 20 minutes. You will want to allow moretime for discussion.
VIII. Procedure1. Ask key question.2. Weight empty garbage bag.3. Attach empty garbage bag to exhaust pipe of car with heavy rubber band.
Wrap some clothing around tailpipe prior to attachment to prevent bag frommelting.
4. Start car and time how long it takes to fill bag with exhaust. A clear bag isdramatic, as children can actually see the pollutants.
IX. What the Students Will Do1. Subtract weight of empty bag from weight of pollutant-filled bag to determine
weight of pollutants.2. Divide time needed to fill bag into 60 seconds, then multiply times weight of
pollutant produced per minute.3. Count how many cars pass in one minute.4. Multiply number of cars per minute times weight of pollutants produced in one
minute.5. Multiply by 60 to determine weight of pollutants per hour.6. Multiply by 24 for pollutants per day.7. Multiply by 365 for pollutants per year.8. Covert grams to pounds by multiplying grams by .0022.
X. Discussion1. What was produced in the bag?2. What effect did seeing the pollution have on you? How did you feel? What
effect did weighing it have on your attitudes?3. How does this pollution affect our health? Our property?4. What can we do about air pollution?
XI. Extension1. Brainstorm for pollution solutions.2. Write letters to government officials concerning air pollution.3. Make pollution traps from cotton balls or waxed paper or heavy paper coated
with Vaseline and place around the school or community.4. Role play a problem-solving situation with students acting as representatives of
the automobile industry, motorists, environmentalists, physicians, andgovernment.
5. Attach a white athletic sock to the car exhaust pipe with a rubber band andallow the car to run for a specific length of time. Compare this demonstrationwith the results of the garbage bag investigation.

57
XII. Curriculum Coordinates1. Health - research the effects of air pollution on health.2. Language - write letters to government and industry; debate the issue of air
pollution.3. Social Studies - design a community where there would be no need for
automobiles; conduct a community air pollution survey

58
Weight of BagWeight of Bag
& PollutionWeight ofPollution
Time Requiredto Fill Bag
Pollution PerMinute
g g g
Number of Cars Pollution in Grams Pollution in Pounds
Per Minute ________________ ______________ x .0022 =___________
______________ x .0022 =___________
______________ x .0022 =___________
______________ x .0022 =___________
Per Hour ________________
Per Day ________________
Per Year ________________

59
AssessmentGrade 3
ECOSYSTEMS
Classroom Assessment Example SCI.III.5.E.4
Working alone, students will evaluate areas of their community suitable for a park, select a site,and create a map. In writing, students will justify their area and evaluate environmentalinfluences in a multi-media presentation to the class. The class will vote for the most suitableplan and will present it to the local city council or another appropriate community governmentalunit.
(Give students rubric before activity.)
Scoring of Classroom Assessment Example SCI.III.5.E.4
Criteria Apprentice Basic Meets Exceeds
Completeness ofhabitat map
Draws map withno key and notitle.
Draws map thatincludes anincomplete keyand/or anincomplete title.
Draws map thatincludes acomplete key anda complete title.
Draws map thatincludes acomplete key, acomplete title,and an accuratescale.
Justification ofarea selection
Writes one reasonwithoutsupporting data.
Writes one reasonwith supportingdata.
Writes tworeasons withsupporting data.
Writes three ormore reasons withsupporting data.
Explanation ofinfluences
Explains aninfluence withoutdistinction ofpositive ornegative.
Explains apositive ornegativeinfluence.
Explains onepositive and onenegativeinfluence.
Explains two ormore positive andtwo or morenegativeinfluences.
Accuracy ofpresentation
Presents writtenand oral reportsinaccurately.
Presents writtenand oral reportswith onetechnologyenhancementaccurately.
Presents writtenand oral reportswith more thanone technologyenhancementaccurately.
Presents writtenand oral reportswith more thanone technologyenhancement.Uses color andpicturesaccurately.

60
Physical ScienceWorksheet
GRADE LEVEL: Third
Topic: Motion of Objects
Grade Level Standard: 3-3 Compare the common forces and the motion of
objects.
Grade Level Benchmark: 1. Describe or compare motions of common objects in
terms of speed and direction. (IV.3.E.1)
Learning Activity(s)/Facts/Information
Central Question:How do speed and direction affect the motion ofobjects?
1. “Changing Motion”
2. “Rolling Along”
3. Communicate how to find a hidden object and describeits position by writing specific directions.
4. “Slow Down”
5. “What is Motion?”
Activity is attached
Resources
Process Skills: Observing, Recording data, Communicating
New Vocabulary: east, west, north, south, right, left, up, down, fast, slow, faster,
slower

61
CHANGING MOTION
What do you have to do to change the movement of an object? In this activity, you willexplore what is necessary to change motion.
MATERIALSMasking Tape, Paper Clips, Scissors, String, Washers
WHAT TO DO1. Cut four pieces of string that are as long as the width of your desk. Knot the
ends of the four strings together so the strings make a big X. Tie a paper clip tothe loose end of each string. Bend each paper clip to make a hook.
2. Mark the center of the desk with a small piece of masking tape. Place the bigknot in the middle of the desk with one string hanging off each edge of the desk.
3. Have one person hold the center knot in place while another person hangs twowashers on one paper clip. Predict what will happen if you let go of the centerknot. Then test your prediction.
4. Take the two washers off. Make sure the knot is back in the center. Hold theknot in place. Add one washer to each of the four paper clip hooks.
5. Mark the starting position of the center knot on the diagram on your desk.Record how many washers are on each paper clip. Predict what to do to movethe center knot near one corner of the desk.
6. Test your prediction. Hand one washer at a time on a paper clip. After youplace each washer, mark the new position of the center knot with tape. Recordthe knot position and the number of washers on each clip on the diagram. Dothis until you have moved the knot to one corner of the desk.
WHAT HAPPENED?1. How did the position of the center knot compare when there were two washers
on each paper clip?
2. Why did the center knot move when you added the first washer? Why didn’t thecenter knot move when you added a washer to each paper clip?
WHAT NOW?1. How many washers were needed to move the center knot to a corner? Where
were they placed? Compare results with another group. How were they alike?Different?
2. Why do you think the center knot move to a corner?
3. How could you move the knot back to the middle?

62
ROLLING ALONG
WHAT YOU NEEDtable tennis ball
Using a force, you can change the direction of motion. Roll a table-tennis ball acrossyour desk. While the ball is rolling, have another person blow on it from the side. Makea drawing of what happens. Now, roll the ball again and blow from the front and thenthe back. What happens? Record your observations.
McMillian/McGraw Hill, Pushes and Pulls

63
SLOW DOWN!
MICHIGAN ESSENTIAL GOALS AND OBJECTIVESC 1 : Generate reasonable questions about the world, based on observation.PMO 1: Describe or compare motions of common objects in terms of speed and
direction.
PMO2: Describe how forces (pushes or pulls) speed up, slow down, stop, orchange the direction of a moving object.
KEY QUESTIONHow do different surfaces affect the motion of objects?
TEACHER BACKGROUNDFriction is a force that slows down or stops moving objects. When two surfacescome in contact with each other, the forces between the particles on the surfacespull the objects together. The more the surfaces are pushed together, the greaterthe force of friction. Also, the rougher the surface, the greater the force of friction.Friction can be reduced by increasing the smoothness between the two surfaces.Lubricants are commonly used to reduce friction. Lubricants fill in the rough spotsbetween the two surfaces, decreasing the contact between the rough edges whichdecreases the friction.
Friction is not a force you always want to reduce. Friction is necessary when youwant to remove a lid from a jar, move a car on ice or start walking on the sidewalk. Itwould be impossible to move objects without friction.
OBJECTIVETo observe and compare motions of objects on different surfaces.
SCIENCE PROCESS SKILLSObserving, Communicating, Experimenting, Comparing
KEY TERMSmotion, direction, speed
MATERIALS• wooden blocks• rulers• sandpaper• wax paper• worksheet, Slow Down!
Teacher Provided• construction paper• masking tape• textbooks

64
TIME30-45 minutes
PROCEDURE1. Ask the students to lightly rub their hands together. Then, have them rub their
hands together while pressing down firmly. Ask: What differences did younotice? (it is harder to rub hands when pressing down firmly)
2. Ask: How is sliding down a hill similar to rubbing your hands together? (twosurfaces are rubbing against each other) Write their ideas on the board.
3. Divide the students into teams of 2-3 students. Give each team a piece ofconstruction paper, wax paper and sandpaper (about the size of the front of atextbook). Ask the students to feel the texture of each material. Have thempredict which material they think an object will slide on most easily.
4. Give each team a piece of masking tape, a wooden block, a ruler, and atextbook. The students will test each surface type to observe how the surfacetype affects the movement of objects. Surfaces to test: plain textbook cover,construction paper, sandpaper and wax paper. Tape one surface on the front ofthe textbook. Place the block on the top of the book. Lift one end of the bookslowly until the block starts to move. Have them measure the distance betweenthe raised end of the book and the top of the table. Have them record thedistance in the chart on the worksheet Slow Down!
5. Repeat step #5 for all four surfaces. Discuss the results.
DISCUSSION1. What surface allowed the block to move the easiest? hardest?
2. What other surfaces could make the block move easily?
3. How is an object's motion affected by the surface it moves on?
4. How did the different surfaces change the direction of the moving block?
5. Why did raising one end of the book cause the block to move?
6. Do you think that the size of the block could affect its movement? (yes, thedifferent weight of each block pushes with differing amounts of force)

65
SLOW DOWN!
Test the movement of the wooden block for each surface listed below. Measure thedistance between the top of the raised book and the table. Record your measurementsin the chart below.
Surface Type Distance Between the Top of Bookand the Table (cm.)
Cover of the textbook
Sandpaper
Construction paper
Wax Paper
Which Surface allowed the block to move the easiest? Explain your answer.
_____________________________________________________________________
_____________________________________________________________________
_____________________________________________________________________
_____________________________________________________________________

66
WHAT IS MOTION?
MICHIGAN ESSENTIAL GOALS AND OBJECTIVESC 1: Generate reasonable questions about the world, based on observation.
PMO 1 : Describe or compare motions of common objects in terms of their speed anddirection.
PMO2: Describe how forces speed up, slow down, stop, or change the direction of amoving object.
KEY QUESTIONWhat is motion?
TEACHER BACKGROUNDWithout motion, all objects would be stuck in the same place. Without motion, cars wouldnot move, the earth would not rotate, and birds could not fly. Machines require motion to dowork.
OBJECTIVE
To observe and compare moving objects.
SCIENCE PROCESS SKILLSexperimenting, observing, comparing, communicating
MATERIALS• Hot Wheels vehicles• ping pong balls• marbles
TIME15-20 minutes
PROCEDURE
1. Divide the students into teams of 4 students. Give each team one marble, ping pong balland toy car. Let the objects sit on the table. Ask: Are your toys moving?
2. Next, ask the teams to start moving their toys. Ask: What makes the toys move? Leadthe students into telling you that they either pushed or pulled the toys to get themmoving.
3. On the board, write down some of the movements of the toys. Use descriptivemovement terms.
DISCUSSION1. Did any teams move their toys the same way? If so, what ways were similar?2. What evidence do you have that the toys moved? (They were found in a different place)
JOURNAL ENTRYHave the students write about the motions of the toys. Encourage them to use directionwords such as: up, down, turn, left, right, slow, fast, etc.

67
AssessmentGrade 3
MOTION OF OBJECTS
Classroom Assessment Example SCI.IV.3.E.1
Students will describe the motion of a ball that has been kicked, rolled, and thrown in terms ofspeed, direction, and change of direction using precise description. Each student will draw apicture of the motion with labels or arrows to show the descriptions. Vocabulary should includethe following: fast, faster, slow, slower, left, right, up, down, north, south, east, and west.Students will compare their pictures in small groups and discuss differences they observe.
Each student will choose two pictures of the same motion that show different labels and arrows.Then the student will write a paragraph explaining the differences and identifying whichdescription is the most accurate.
(Give students rubric before activity.)
Scoring of Classroom Assessment Example SCI.IV.3.E.1
Criteria Apprentice Basic Meets Exceeds
Completeness ofpicture
Createsincompletepictures; missingmany labels andarrows showingspeed anddirection.
Createsincompletepictures; missingsome labels andarrows showingspeed anddirection.
Createsincompletepictures; missinga few labels andarrows showingspeed anddirection.
Completespictures; missingno labels orarrows showingspeed anddirection.
Accuracy ofevaluation
Evaluates picturesof motion usingeither direction orspeed vocabulary.
Evaluates picturesof motion usingboth direction andspeed vocabulary,but uses fewaccurate details indescribingdifferences.
Evaluates picturesof motion usingboth direction andspeed vocabulary,and uses someaccurate details indescribingdifferences.
Evaluates picturesof motion usingboth direction andspeed vocabulary,and uses manyaccurate details indescribingdifferences.

68
Physical ScienceWorksheet
GRADE LEVEL: Third
Topic: Motion of Objects
Grade Level Standard: 3-3 Compare the common forces and the motion of
objects.
Grade Level Benchmark: 2. Explain how forces (pushes or pulls) are needed to
speed up, slow down, stop, or change direction of a moving object. (IV.3.E.2)
Learning Activity(s)/Facts/Information
Central Question:What forces are needed to impact the motion of amoving object?
1. “Changing Speed and Direction”
2. “What is Force?”
3. Tug of War Games. (Balance pencil on finger)
Activity is attached
Resources
Pushes and PullsMacMillan/McGraw Hill
Process Skills: Observation, Communication, Predicting
New Vocabulary: Changes in motion: speeding up, slowing down, turning;
Common forces: push, pull, friction, gravity

69
CHANGING SPEED AND DIRECTION
MICHIGAN ESSENTIAL GOALS AND OBJECTIVES
C 1: Generate reasonable questions about the world, based on observation.PMO 1: Describe or compare motions of common objects in terms of speed and
direction.PMO 2: Describe how forces (pushes or pulls) speed up, slow down, stop, or change the
direction of a moving object.
KEY QUESTIONHow do moving objects change speed and direction?
OBJECTIVETo observe and compare motions of objects.
SCIENCE PROCESS SKILLSobserving, communicating, experimenting, comparing
MATERIALS marbles straws
Teacher Provided pencils
TIME
20-30 minutes
PROCEDURE1. Discuss the different directions objects can move. Make a class list of words that
describe motion: fast, slow, left, right, up, down, etc.2. Explain that the students will be using materials to observe motions of objects. Divide
the class into teams of 2. Give each team two straws, a pencil, a 12" piece of yarn and amarble.
3. Have the students roll their marble slowly across the floor or a desk. They should try tochange the motion of the marble using a pencil (their hands should not be used to movethe marble during this activity). The teams should use the pencil to make the marblemove slower, faster, and change the direction of its motion.
4. The teams should repeat step #3 by blowing air through a straw instead of hitting it withthe pencil.
DISCUSSION1. What directions did the marbles travel? How did you make the marble slow down?
speed up? turn?2. What is needed to change the speed and direction of a moving object? (a push or pull is
needed to change an object's motion)

70
WHAT IS FORCE?
A force is any push or pull. A force changes the way objects move. Changingthe direction of the forces causes objects to move in different directions. Forcescan change the speed of an object. An object will move faster if you use moreforce.
You need different amounts of force to move different things. The heavier theobjects, the more force you need to move it. Would you need more force to movea book or a desk?
What happens to objects if you throw them in the air? They are pulled to theground. What force pulls all objects down? The earth’s gravity is a force thatpulls objects towards the center of the earth.
Another kind of force is friction. Imagine rolling a ball across the floor. Howwould the ball stop moving? Friction is the force that makes all moving objectsslow down or stop. Two objects rubbing against each other cause friction. Thefriction between the ball and floor would make the ball stop moving.

71
FORCESActivity Cards
A batter hitting a baseball. A tennis player hitting a tennis
ball.
A person pushing a door
shut.
A person pulling a door
open.
A person pushing a bike. A game of tug-of-war.
Pulling a wagon. A person hitting a golf ball
with a golf club.

72
AssessmentGrade 3
MOTION OF OBJECTS
Classroom Assessment Example SCI.IV.3.E.2
Using the data from the Instructional Example, students will write answers to the followingquestions:
1. Which surface required the most force? Why?2. Which force (push or pull) took less effort in the sand?3. If you were pulling a heavy load, which surface would you like to travel on? Why?4. Why are bowling alleys smooth and hard?
(Give students rubric before activity.)
Scoring of Classroom Assessment Example SCI.IV.3.E.2
This is pass/fail. If the student answers three of the four questions correctly, then he or she passes:
1. The answer to Question #1 reflects the need to include sand and more friction.2. The answer to Question #2 reflects the need to include pull.3. The answer to Question #3 reflects the need to include concrete as well as reduced friction and
force.4. The answer to Question #4 reflects the need to include less force and very little friction.

73
Physical ScienceWorksheet
GRADE LEVEL: Third
Topic: Motion of Objects
Grade Level Standard: 3-3 Compare the common forces and the motion of
objects.
Grade Level Benchmark: 3. Describe the patterns of interaction of magnetic
materials with other magnetic and non-magnetic materials. (IV.3.E.3)
Learning Activity(s)/Facts/InformationCentral Question:
How do magnetic objects interact with other magneticor non magnetic material?1. “Amazing Magnets Unit”
a. Magnetic hunt.
b. What can a magnet attract?
c. Magnetic forces field.
d. Magnet strengths.
e. Attraction/repulsion.
f. Magnetism travels through objects.
g. The earth’s core is magnetic.
h. Finding the earth’s magnetic pole.
i. Making/using a compass.
j. How do we use magnets every day.
Unit lessons attached
Resources
What Makes a Magnet?Branley, F.M. Harper CollinsPublishers
Process Skills: Hypothesizing, Predicting, Observing, Classifying, Interpreting data, Drawingconclusions
New Vocabulary: magnetic poles, magnetic attraction and repulsion, magnetic
compass

74
AMAZING MAGNETS!
Presented By: Rona Brown-Smith and Sally Crescioli, Templeton Elementary School
Length of Unit: 11-13 sessions
ABSTRACTThe overall goal of this unit is to provide students with hands on experiences, while learningabout magnets. This unit shows you how to engage students in experiments which exploremagnet force and compass use. Using constructive techniques, this course of studyfocuses on asking thoughtful, open-ended questions which, in turn, encourage students toask questions of each other.
OVERVIEWScience skills to be taught: Hypothesizing, predicting, observing, classifying, comparing and
contrasting, interpreting data, drawing conclusions.Student learning goals: As a result of this unit, students will demonstrate a deeper
understanding of magnets and properties of magnetism, knowledge of the earth' smagnetic field and how a compass works, and practical uses of magnets in today'sworld.
BACKGROUND KNOWLEDGE1. Hirsch, E.D., Jr. The Dictionary of Cultural Literacy. Houghton Mifflin Company, 1993.
ISBN 0-395-65597-82. Hirsch, E.D., Jr. What Your Second Grader Needs to Know. Dell Publishing, 1991 ISBN
0-385-31027-73. Kapit, Wynn. The Geography Coloring Book. Harper Collins Publishers, 1996. ISBN 0-
06-043482-14. Science Framework. California State Board of Education, 1990. ISBN 0-8011-0870-5
RESOURCES1. Branley, Franklyn M. What Makes a Magnet? Harper Collins Publishers, 1996. ISBN 0-
06-026441-12. Feravolo, Rocco V. Junior Science Book of Magnets. Garrard Publishing Company,
1960.3. Freeman, Mae. The Book of Magnets. Four Winds Press, 1967.4. Haduch, Bill. Magnetude, Hours of Sticky Fun Without the Gooey Mess. Scholastic
Company, 1996. ISBN 0-590-96835-15. Smith, Norman F. How to do Successful Science Projects. Julian Messner, 1982 ISBN
0-671- 70685-36. Van Cleave, Jancice. 200 Gooey, Slippery, Slimy, Weird and Fun. John Wiley and Sons,
Inc., 1993. ISBN 0-471-57921-17. Whalley, Margaret. Experiment With Magnetism and Electricity. Scholastic,
Incorporated, 1992. ISBN 0-590-46090-08. Hands on Science. Instructional Fair, Inc., 1989.9. Adventures in Science Series: Magnetism. (Kit) Educational Insights, 1988.

75
MAGNETIC HUNTLESSON ONE
OBJECTIVES/GOALSTo illustrate that magnets produce an invisible force, and that some things respond tomagnetic force or pull, others do not
MATERIALSChart paper and markers10 to 15 horseshoe magnetsScience journals
KEY VOCABULARYMagnetMagnetic Force
PROCEDURES/ACTIVITIES1. Introduce the unit of study. Display chart paper with the heading, "What we already
know about magnets. " As students offer responses, record them on the chart. Do notcorrect the students' inaccurate responses. This will be helpful in ascertaining thestudents' prior knowledge, including accurate and inaccurate assumptions. This chartcan be referred throughout the unit of study as a way for students to reflect upon theirlearning and to rethink inaccurate ideas.
2. The study of magnets begins with an open exploration of magnetic and nonmagneticobjects. Provide each pair of students with a horseshoe magnet. Have the studentswork with a partner to go on a "magnetic hunt. " They explore the room, predicting whatobjects are magnetic and what objects are not magnetic. As they test their hypotheses,they record their findings in their science journals. **IMPORTANT: It might be a goodidea to tell students which objects they should not test with magnets, i.e., computerscreens, computer disks, audio cassette tapes, etc.
3. Have students come back together to share their findings. Discuss any objects thestudents found in common. Allow students to share any other observations or thingsthey noticed in experimenting with the magnets.
4. Evaluation/ Assessment: Teacher evaluates student responses and science journals.

76
WHAT CAN A MAGNET ATTRACT?LESSON TWO
OBJECTIVES/GOALS1. To illustrate that magnets produce an invisible force and that some things respond to
magnetic force or pull; others do not2. To classify objects and formulate hypotheses regarding materials and their magnetic
properties
MATERIALS FOR EACH COOPERATIVE GROUP1. A bag of objects containing: a pencil, eraser, paper clip, butter knife, keys,2. coins, piece of cloth, piece of paper, small comb or other plastic object, nail, an
aluminum can, tin can, marble3. A bar magnet4. Two pieces of construction paper, different colors, labeled "Magnetic" and "Non-
Magnetic"5. For each student: science journal
PRIOR KNOWLEDGE FOR STUDENTSMagnetic, Hypothesis, conclusion
KEY VOCABULARYMagnetic, Hypotheses, Conclusion
PROCEDURES/ACTIVITIES1. Pass out bags of materials to each group. As a class, ask students to predict which
objects will be attracted to the magnet. Record their predictions on the board or chartpaper. From these predictions, ask the students to formulate a hypothesis, i.e., "Metalobjects are attracted to magnets." Also record the hypothesis on the board so that itmay be referred to at the end of the lesson.
2. Each group experiments with the objects in the bag to determine if they are magnetic ornot. As each item is tested, students sort the objects into two groups by placing them onthe appropriately labeled construction paper.
3. As each object is classified, the students record the results in their science journals. Thestudents then record what material the object is made of (wood, plastic, metal, glass,etc. ).
4. After the groups have completed the activity, bring the class together for discussion:Were more objects magnetic or nonmagnetic? Were there any objects that surprisedyou? Why? Do you see anything in common among the objects that are magnetic?Were all the metal objects magnetic? Was our hypothesis correct? What conclusionscan we draw from our observations?
5. Following discussion, have the students write about the conclusions they can make fromtheir observations.
EVALUATION/ASSESSMENTTeacher evaluates student responses and science journals.

77
MAGNETIC FORCE FIELDLESSON THREE
OBJECTIVE/GOALSTo illustrate: magnetic pull is greatest when the object is closest to the magnet; magneticpower passes through objects it attracts, however the magnetic force decreases withdistance; a magnetic force can hold a limited amount of weight.
MATERIALSFor each pair of students: a horseshoe magnet, straight pins, steel ball bearings, paperclips, hairpins, staplesFor each student: Science journal
KEY VOCABULARYMagnetic force field
PROCEDURES/ACTIVITIES1. Introduce the lesson by asking students to consider how far magnetic force reaches,
and introduce the vocabulary, "force field." Model the procedure for the lesson. Askstudents to predict which items the magnet will be able to hold the most (straight pins,ball bearings, paper clips, hairpins, or staples). Ask students to explain their hypothesesfor their predictions ( explain why they made that prediction). Have students record theirown hypothesis in a personal science journal.
2. Each pair of students works together to explore the strength of the horseshoe magnetby picking up a straight pin with the end of the magnet. Then add another pin to the first,then another and another. Then keep adding pins in a dangling string from the magnetuntil the last one no longer sticks. How many pins could the horseshoe magnet hold?They record their findings in their science journals.
3. The students repeat the procedure with each of the objects, recording their findings.
4. When students have completed their experimentation, bring the class together todiscuss their findings: Which object did the magnet hold the most? The least? Were ourpredictions correct? Were our hypotheses correct? Did everyone get the sameanswers? Why did the magnet hold more (staples) than (ball bearings)? Whatconclusions can we make?
5. Have students write their conclusions in their science journals.
EVALUATION/ASSESSMENTTeacher evaluates student responses and science journals.

78
MAGNET STRENGTHSLESSON FOUR
OBJECTIVES/GOALSTo illustrate: Magnets come in many different shapes and sizes; magnets possess varyingdegrees of strength.
MATERIALSFor each pair of students: horseshoe magnet, disk magnet, bar magnet, a paperclipFor each student: science journal
PRIOR KNOWLEDGE FOR STUDENTSLessons One through Three
KEY VOCABULARYhorseshoe magnetdisk magnet, bar magnet
PROCEDURES/ACTIVITIES1. Discuss the concept that magnets come in different shapes and sizes. Introduce the
three different types of magnets that the students will be using in the activity.
2. Ask students to predict which magnet they think is the strongest and hypothesize whythey made that prediction. Have students record their hypothesis in their sciencejournals.
3. Students experiment with a partner to determine which magnet has the strongestmagnetic pull. Students record their results in their science journals.
4. Bring the class together to discuss and compare results: Which magnet was the closestwhen it "grabbed" the paperclip? Which magnet was the farthest when it "grabbed" thepaperclip? What conclusions can we make? (Which magnet was the weakest?Strongest?)
5. Have students record conclusions in science journals.
EVALUATION/ASSESSMENTTeacher evaluates student responses and science journals.

79
ATTRACTION AND REPULSIONLESSON FIVE
OBJECTIVE/GOALSTo illustrate that every magnet has a north pole and south pole; unlike poles attract eachother; like poles repel each other.
MATERIALSFor each pair of students: two bar magnets with poles marked, 12-inch piece of string, two2-inch strips of electrical tapeFor each student: Science journal
PRIOR KNOWLEDGE FOR STUDENTSLessons One Through Four
KEY VOCABULARYPolesAttractRepel
PROCEDURES/ACTIVITIES1. Introduce the vocabulary. Demonstrate the north and south poles on a bar magnet.
2. Ask students to form a hypothesis: What will happen when two like poles are puttogether? What will happen when two unlike poles are put together? Have studentswrite their hypotheses in their science journals.
3. Demonstrate how to set up the experiment (without actually demonstrating the results;this is for the students to discover): Tie the string around the center of one of the barmagnets. Hold the string in the air, so that the magnet dangles below. Have your partnertake the other bar magnet and move the north pole towards the north pole of thedangling magnet. What happens? Tell the students to experiment in this way; also trythe unlike poles, putting together a south pole and a north pole.
4. Have students record results in their science journals.
5. Bring the class together for discussion: What happened? Were our hypotheses correct?What conclusions can we make? (Unlike poles repel, while like poles attract).
6. Have students write about their conclusions in their science journals (Appendix G).
7. Next, with this new knowledge, have students cover the poles of one of their barmagnets with the strips of electrical tape. Have them experiment with the magnets tosee if they can predict which is the north pole and which is the south pole. After, theycan remove the tape to check their predictions.
EVALUATION/ASSESSMENTTeacher evaluates student responses and science journals.

80
MAGNETISM TRAVELS THROUGH OBJECTSLESSON SIX
OBJECTIVES/GOALSTo demonstrate that magnets can exert force through various materials; thicker materialslessen the magnetic force.
MATERIALSFor each cooperative group: Paper plate, Plastic margarine tub, Playing card, Piece ofcardboard, Piece of flat cork board, Magazine, Plastic lid (to coffee can), Thin sheet ofplywoodFor each student: a science journal
KEY VOCABULARYReview of previously learned terms
PROCEDURES/ACTIVITIESI. Ask students whether they think magnetic force can travel through objects.
2. For example, if a magnet is placed on top of a paper plate, will another magnet held onthe underneath side be able to move it? Ask students to write their hypotheses in theirscience journals.
3. Pass out materials to cooperative groups and have students work together to.
4. Test their hypotheses with the variety of objects. Students record observations in theirscience journals.
5. Bring class together to share observations: What happened? Did each group get thesame results? Why? Why not? Were our hypotheses correct? What conclusions can wemake?
6. Students record conclusions in their science journals.
EVALUATION/ASSESSMENTTeacher evaluates student responses and science journals.

81
THE EARTH’S CORE IS MAGNETICLESSON SEVEN
OBJECTIVE/GOAL1. To emphasize prior knowledge about the Earth.2. To illustrate that the Earth's core generates a magnetic field
MATERIALSJournal, Magnets, Tissue paper, Newspaper, Starch and paint (optional)
PRIOR KNOWLEDGE FOR STUDENTS1. Lodestones are rocks which are naturally magnetic.2. Knowledge about magnets and magnetic pull as learned in earlier lessons.
KEY VOCABULARYCoreLayersMagnetsEarth
PROCEDURES/ACTIVITIES1. Children are questioned on prior knowledge about the Earth learned in first grade.2. A magnet is handed out to each child.3. Explain to the children that the Earth's core generates a magnetic field like the bar
magnet.4. Hand each child a piece of tissue paper.5. Imagining that the bar magnet represents the core of the Earth, ask the children how
they could use the tissue paper to create a layer of Earth to cover the core.6. After they have found they could wrap the magnet in the tissue paper, pass out 10
more pieces to continue layering the "core." Walk around and question each child tofind out if they understood the concept of core and layers of the Earth.
7. Again reviewing, ask children what they know about the top layer of the Earth, i.e., 75%of the earth's surface is water, the differing habitats (1st grade Core Knowledge ), etc.
8. Demonstrate a top layer of the Earth by taking strips of newspaper dipped in starch tocover the tissue layers of the Earth (if time permits, painting the paper-mache Earthonce it has dried would make an excellent art project).
9. After each child has completed the activity, have them draw an Earth on the back ofAppendix H, labeling the core, differing layers and top layer of the Earth.
10. Pull the children together in a circle for discussion. Ask questions such as "Were yousurprised the Earth's core is magnetic? Why or why not. Have you ever had anexperience seeing the different layers of the Earth? What have you noticed about thetop layer of the Earth? What conclusions can you draw from this activity? Do you haveany predictions about tomorrow's lesson which will focus on the Earth's North Pole?"
EVALUATION/ASSESSMENTTeacher evaluates students’ participation in discussion and reviews work in the sciencejournal.
82
FINDING THE EARTH'S MAGNETIC POLELESSON EIGHT
OBJECTIVES/GOALSStudents will use a bar magnet to find the direction of the Earth's magnetic north pole.
MATERIALSA bar magnet, thread, several heavy books, tape, ruler and chart paper, globe, map
KEY VOCABULARYPole, balanced, force
PROCEDURES/ACTIVITIES1. Review the knowledge of magnetism gained through lessons 1-7 by asking open-
ended questions.
2. Ask students if they know where the North Pole is. Allow students time to look at a mapor globe to find their answers. Tell students there is also a magnetic north pole, andask for predictions of what that might mean. Write their predictions on a piece of chartpaper. Tell students they will find the magnetic north pole by the end of this lesson.
3. Have students mark the north pole of the magnet using information from Lesson Five.Finding the middle of the magnet, have students wind a 7"-8" piece of thread aroundthe magnet and tie into a knot. When the children hold the other end of the thread, themagnet should be balanced and parallel to the ground. Take the free end of the threadand tape it to the end of the ruler.
4. Place five books on the edge of a counter, sliding the ruler between the top two books.The magnet will be hanging down and able to move about.
5. Once the magnet comes to rest, where does the north pole of the magnet point? Movethe magnet again to find if it settles in the same spot. Move about the room as well asoutside. Does the pole continually point the same direction?
6. Allow ample time for students to experiment then gather in a group. What did thestudent's experiments find? Were their results consistent?
EVALUATION/ASSESSMENTStudents record their findings in Appendix I, teacher evaluates students’ findings.

83
MAKING AND USING A COMPASSLESSON NINE
OBJECTIVES/GO ALS1. Students will create their own magnetized compass.2. Students will be able to use their created compasses and find the directions of north,
south, east and west.
MATERIALSHorseshoe magnet, Sewing needle, Iron filings, Flat piece of cork, Plastic bowl with water,Tape, Chalk, Paved area, Journals, Pencil and real compass
KEY VOCABULARYCompass
PROCEDURES/ACTIVITIESI. Stroke the needle on the north pole of horseshoe magnet from the center to the tip,
always moving in one direction. Stroke the needle up to 30 times. Repeat thesedirections going from the center of the needle to the eye of the needle on the south poleof the magnet. Check its magnetism with iron filings. If the needle picks the filings up, itis magnetized.
2. Tape the center of the needle to the flat piece of cork and place it in a plastic bowl filledwith water. What happens to the needle? Move the cork; what happens to the needlenow?
3. Have students write in their journals, and hypothesize why the needle is continuing toturn in a north/south direction. Students should remember in Lesson Five that oppositepoles attract, therefore, the north pole of the compass will face the South Pole of ourEarth and the south pole of the magnets will face North Pole of our Earth.
4. Allow plenty of time for students to experiment with their compasses and write in theirjournal. Once each child has completed the above, bring the class outside to an openarea. Using a real compass, mark north, south, east and west on the pavement withchalk. Encourage students to find northeast, southeast, northwest and southwest.
5. Have student’s try their created compasses with the "pavement compass."
6. What happens when they stand in the middle with their needle compasses? Havestudents write about their findings in their science journals.
7. Students should be given enough time to experiment with their compass and the realcompass. Students should be able to record north, south, east and west in theirjournals.
EVALUATION/ASSESSMENTTeacher reviews journals and assesses their performance for understanding.

84
FIND THE MAGNETIC NAILLESSON TEN
OBJECTIVES/GOALSTo magnetize a nail and compare its properties to nonmagnetized nails.
MATERIALSHorseshoe magnetNailsPaper clipsTacks
KEY VOCABULARYPrior vocabulary
PROCEDURES/ACTIVITIES1. Each child magnetizes a nail as learned in Lesson Nine.
2. Each child also has three nails which are not magnetized.
3. Children test the nails with paper clips to assure their nail has become magnetized.
4. Students put their four nails on their desk and mix them up.
5. Ask students if they can tell by looking which nail is the magnetized nail. Ask studentshow they can figure out which nail is magnetized.
6. Students trade places with another student and try to find the magnetized nail.
7. When students have tried this with a variety of partners, students gather together in agroup to discuss their findings: Did the magnetized nails look different from thenonmagnetized nails? Did they feel different? How could you tell the difference betweenthe magnetized and nonmagnetized nails? (Only by testing them with a magneticmaterial, because magnetism, like gravity, is a force that cannot be seen).
8. Students may be invited to create a game they could play with a partner usingmagnetized and nonmagnetized materials. Students may document this game in theirjournals, Appendix J .
9. If time permits, allow students to play their game with a partner, or save it for anotherperiod of time.

85
HOW DO WE USE MAGNETS EVERY DAY?LESSON ELEVEN
OBJECTIVES/GOALSTo expose students to the roles magnets play in our everyday life.
MATERIALSJournal, pencil, chart paper, objects (or pictures of objects) that utilize magnetism:refrigerator magnets, can opener, computer diskettes, cassette recorder and tape,speakers, VCR and VCR tape, clothes dryer, refrigerator, etc.
KEY VOCABULARYPrior vocabulary
PROCEDURES/ ACTIVITIES1. Students gather together in a group. Teacher begins discussion. We have learned a lot
about magnetism. What can you tell me that you have learned? Teacher writes on achart paper headed with "What we have learned about magnets. " This paper should beposted next to chart paper completed in Lesson One. After completing, discuss withstudents the similarities and differences of their responses then and now. Why havesome theories changed? Allow students to lead the discussion and question each other.
2. Ask students, now knowing what magnets are and what they attract, to brainstorm (onchart paper) ways we use magnets every day. Allow all thoughts to be put on paper.
3. Now show students items or pictures (can opener, diskettes, etc.). As you display eachitem, ask students to predict whether or not that item utilizes magnetism to work.
4. After all items have been displayed, point out that all these objects use magnetism inone way or another.
5. Students write and draw in journals, Appendix K, explaining ways in which magnets areused every day.
6. Students are directed to take home journals and find at least two more ways they usemagnets at home.
EVALUATION/ASSESSMENTTeacher will assess student's understanding based on contributions to class discussionsand journal entries.

86
OTHER SUGGESTED ACTIVITIES
CENTERS1. The study of magnets lends itself to many hands-on center activities that the students
can work on independently. Refer to resources for great center ideas.
CULMINATING ACTIVITYThe culminating activity of this unit is the student's own creation using magnets. Theircreation must reflect knowledge attained from Lessons 1-10 of the magnet unit. Studentsshould be given plenty of time and materials to create an invention. Partner or group work isacceptable as long as all children have participated equally. This process may take one tothree sessions of science. This activity may also be done as a take home assignment.

87
AssessmentGrade 3
MOTION OF OBJECTS
Classroom Assessment Example SCI.IV.3.E.3
Using marked magnets, students will arrange magnets in different patterns. Each student willcircle his or her predictions on the chart and then test each prediction. Each student will circle theresult of each test on the chart.
Magnets Prediction Tests (circle one)
Bar 1 Bar 2 Attract Repel Attract Repel
NS NS Attract Repel Attract Repel
SN SN Attract Repel Attract Repel
SN NS Attract Repel Attract Repel
NS SN
Each student will write a paragraph describing the patterns created when two magnets react toeach other.
(Give students rubric before activity.)
Scoring of Classroom Assessment Example SCI.IV.3.E.3
Criteria Apprentice Basic Meets Exceeds
Completeness ofchart
Creates anincomplete chartwith manyinaccuracies.
Creates acomplete chartwith someinaccuracies.
Creates acomplete chartwith fewinaccuracies.
Creates acomplete chartwith noinaccuracies.
Accuracy ofdescription
Does not describethe patternsformed bymagnets.
Describes thepatterns formedby magnets withsomeinaccuracies.
Describes thepatterns formedby magnets with afew inaccuracies.
Describes thepatterns formedby magnets withno inaccuracies.