Embed Size (px)
Citation preview

Aria 130c/130/300/600 DECT
Wireless Terminal User Guide
MODEL : GDC-345H (GAP)
LG-Nortel systems
895 Wellington Rd
Rowville 3178
ABN : 22 090 723 925

Aria 130c/130/300/600 DECT Wireless Terminal (GDC-345H) User Guide
LG-Nortel systems i Issue 2.3
REVISED HISTORY
DATE ISSUE CONTENTS OF CHANGES REMARK 2002.10 2002.11 2003.03 2003.09 2004.03 2006.08
ISSUE 1.0 ISSUE 1.1 ISSUE 2.0 ISSUE 2.1 ISSUE 2.2 ISSUE 2.3
-. Initial Release -. Added the notice of Ear-Mic. -. Revision -. Added the ARIA-600 feature -. Added Best Base selection function. -. LG-Nortel systems Release Revision
LGE LGE LGE LGE LGE WS.
CONFIDENTIALITY
The information contained in this manual is the property of Aria Communications Pty. Ltd. Trading as LG-Nortel systems. The contents of this manual must not be copied, distributed or made available to any third party without the prior written consent of Aria Communications Pty. Limited.
Every effort has been made to ensure that this manual documents the operation of the GDC-345H Digital Key Telephone System. However, due to the on-going improvement and update of software, Aria Communications cannot guarantee the accuracy of printed material after the date of publication, nor can Aria Communications accept responsibility for errors or omissions. Revised manuals will be published as needed. This manual replaces all previous issues.

Aria 130c/130/300/600 DECT Wireless Terminal (GDC-345H) User Guide
LG-Nortel systems i Issue 2.3
CONTENTS 1. GENERAL DESCRIPTION ......................................................................................................1
1.1 PURPOSE ..............................................................................................................................1 1.2 CONTENTS ............................................................................................................................1 1.3 PREPARATION .......................................................................................................................2
2. WIRELESS TERMINAL TOOL KIT .........................................................................................2
2.1 WIRELESS TERMINAL (GDC-345H) .......................................................................................3 2.2 SINGLE-SLOT CHARGER (345H-SSC)....................................................................................3 2.3 BATTERY (1.2V RECHARGEABLE NIMH AAA SIZE 2 CELL).....................................................4 2.4 ADAPTER (330-HAP) ............................................................................................................4 2.5 INSTALLATION(BATTERY AND BELT CLIP) ............................................................................5
3. MAINTENANCE.......................................................................................................................5
3.1 WIRELESS TERMINAL (GDC-345H) .......................................................................................6 3.2 CHARGER (345H-SSC) .........................................................................................................6 3.3 BATTERY (1.2V RECHARGEABLE NIMH AAA SIZE 2 CELL).....................................................7
4. USER INTERFACE..................................................................................................................7
4.1 LCD DISPLAY .......................................................................................................................8 4.1.1 ANTENNA ICON & RSSI ICON ..........................................................................................8 4.1.2 PHONE ICON .................................................................................................................8 4.1.3 KEY LOCK ICON............................................................................................................9 4.1.4 MESSAGE ICON ............................................................................................................9 4.1.5 MUTE ICON ....................................................................................................................9 4.1.6 BATTERY ICON .............................................................................................................9 4.1.7 TONE MODE ICON.........................................................................................................9 4.1.8 SILENT MODE/VIBRATOR MODE ICON .......................................................................10
4.2 BUTTONS & FUNCTIONS ....................................................................................................10 4.3 TONE ................................................................................................................................12 4.4 MESSAGE DISPLAY............................................................................................................13 4.5 CALL READY STATE ..........................................................................................................13
5. TELEPHONE FEATURES ...................................................................................................14
5.1 BASIC FEATURES ..............................................................................................................14 5.1.1 POWER ON/OFF.........................................................................................................14 5.1.2 CALL FUNCTION..........................................................................................................14
5.2 KEY SYSTEM FEATURES....................................................................................................15 5.2.1 CALL SERVICE FUNCTION............................................................................................15

Aria 130c/130/300/600 DECT Wireless Terminal (GDC-345H) User Guide
LG-Nortel systems ii Issue 2.3
5.2.2 KEY SYSTEM SUPPORT FUNCTION...............................................................................23 5.3 DECT FEATURES ..............................................................................................................42
5.3.1 MOBILITY MANAGEMENT FUNCTION.............................................................................42 5.3.2 WIRELESS TERMINAL SERVICE FUNCTION....................................................................44
6. INSTALLATION OF WIRELESS TERMINAL......................................................................58
6.1 SYSTEM ID & AUTHENTICATION CODE ...............................................................................58 6.2 SUBSCRIPTION ..................................................................................................................59 6.3 DE-SUBSCRIPTION - I .........................................................................................................63 6.4 DE-SUBSCRIPTION - II ........................................................................................................64 6.5 AUTHENTICATION ..............................................................................................................66 6.6 CHANGE OF SUBSCRIBED SYSTEM.....................................................................................67
8. SPECIFICATIONS ...............................................................................................................69
8.1 SYSTEM SPECIFICATION ....................................................................................................69 8.2 HAND-HELD TYPE WIRELESS TERMINAL (GDC-345H) SPECIFICATION................................70 8.3 CHARGER(345-SSC) SPECIFICATION.................................................................................70
APPENDIX. A USER MENU TREE .........................................................................................71
APPENDIX. B FUNCTION SHORT-KEY TABLE....................................................................72
APPENDIX. C THE LCD MESSAGES RELATED TO A CALL...............................................76

Aria 130c/130/300/600 DECT Wireless Terminal (GDC-345H) User Guide
LG-Nortel systems 1 Issue 2.3
1. GENERAL DESCRIPTION 1.1 Purpose The purpose of this manual is to provide the correct instructions as to the GDC-345H wireless terminal functionality and its accessories. This manual lists programming and troubleshooting techniques and explains the features of the wireless terminal as a terminal connected to the Aria 130, 300 & 600 systems (may also apply to the following discontinued systems Aria 20W, 34e, 100, 186.) The features which are explained in this manual describe the user-interface for the Aria series DECT key system of local sale. Also it illustrates the specifications of the terminal and its accessories. The wireless terminal, GDC-345H (GAP), is designed and manufactured for interface with Aria series DECT key systems and LG-Nortel systems does not guarantee inter-operability between any other GAP system and GDC-345H (GAP). Please, refer to ‘Aria System Installation Manuals’ about applicable peripheral items. 1.2 Contents
The wireless terminal tool kit contains the following items. Please be sure all of the listed items are contained.
Wireless Terminal User Guide : 1 GDC-345H, Wireless Terminal : 1 345H-SSC, Single-slot Charger : 1 Standard Rechargeable Battery : 2 Cell 330-HAP, AC/DC Adapter : 1 Belt Clip : 1 EAR/MIC Phone : Optional A leather case : Optional
Note ) The above figure is illustrative purpose only. The actual products may look different.
Leather Case
Rechargeable battery
330-HAP
345H-SSC
Belt Clip
GDC-345H EAR/MIC Phone

Aria 130c/130/300/600 DECT Wireless Terminal (GDC-345H) User Guide
LG-Nortel systems 2 Issue 2.3
1.3 Preparation
Below table shows the maximum cell number, maximum registrable terminal number, and maximum simultaneous wireless call number in different configurations of ARIA-186/100/34e/20W & ARIA 130/300/600 system and the applicable S/W version of GDC-345H handset. Please note that only one(1) WTIB(with WTIU) board can be installed in ARIA-186/100/34e/20W system, two(2) WTIB(with WTIU) boards can be installed in ARIA 130 system and three(3) WTIB(with WTIU) board can be installed in ARIA 300/600 system. (The WTIU board is not available in the ARIA-20W system.)
The wireless terminal should be subscribed before using it. (Please refer to ‘6. Installation of
Wireless Terminal’) A call may be failed even when free channels exist due to unexpected changes of radio
environment. When all channels are occupied, no more call can be made. In this case, a user should wait
until a channel becomes free. The S/W of a wireless terminal can be updated by the manufacturer. The working area of your hand-held type wireless terminal is limited to the domain of the
coverage area of a wireless system, which may be adjusted to a premise of an organization, an office, or a company. Using a terminal outside of this area will bring unsatisfied results.
A hand-held type wireless terminal is not specified as intrinsically safe. So do not use it in hazardous area or intent.
If a user doesn’t use matched configuration, the normal operation can’t be guaranteed. If you are out from the range of a base station for a long time with your handset power-
on, it may fail to find the base station again when you are in the range. In that case, refresh the power of the handset or press “[MENU key] + [3] + [OK key]”
2. WIRELESS TERMINAL TOOL KIT
Items System Name
1. Board Name
2. Max. Cell Number (Base Station
Num.)
3. Channels/ Cell
4. Registrable Max.
Terminal Number
5. Max. Simultaneous Wireless Call
6. Applicable SW version (GDC-345H)
WTIB 3 5 8~96 by step 8 15 ARIA-186 With WTIU 6 5 8~96 by step 8 30
All version
WTIB 4 5 8~64 by step 8 16 ARIA-100
With WTIU 8 5 8~64 by step 8 32 All version
WTIB 4 5 8~32 by step 8 16 ARIA-34e
With WTIU 8 5 8~32 by step 8 16 All version
MBU 1 4 20 4 ARIA-20W
WTIB 3 4 20 12 All version
WTIB (MAX. 2)
4 ( x 2 ) 5 8~80 by step 8 32 ARIA 130
With WTIU (MAX. 2)
8 ( x 2 ) 5 8~80 by step 8 64 All version
WTIB (MAX. 3)
4 ( x 3 ) 5 8~192 by step 8 48 ARIA 300/600
With WTIU (MAX. 3)
8 ( x 3 ) 5 8~192 by step 8 96 All version

Aria 130c/130/300/600 DECT Wireless Terminal (GDC-345H) User Guide
LG-Nortel systems 3 Issue 2.3
2.1 Wireless Terminal (GDC-345H)
The GDC-345H is a DECT business wireless terminal that communicates with a ARIA-186/100/34e/20W & ARIA 130/300/600 WOTS (Wireless Office Telephone System) via radio channels. A cell is an area effected by the antenna of a fixed part of the system. A Cell of the same wireless system is overlapped with other cells. The coverage area of a wireless system consists of these cells. A user can make calls within this area. As a user moves, the effecting cell of the terminal will be switched over.
Hand-held Type Wireless Terminal : GDC-345H
The hand-held type wireless terminal (GDC-345H) is designed for ease and portable use. Note: The above and the following figures are just for illustrative purposes only. An actual product may look
different.
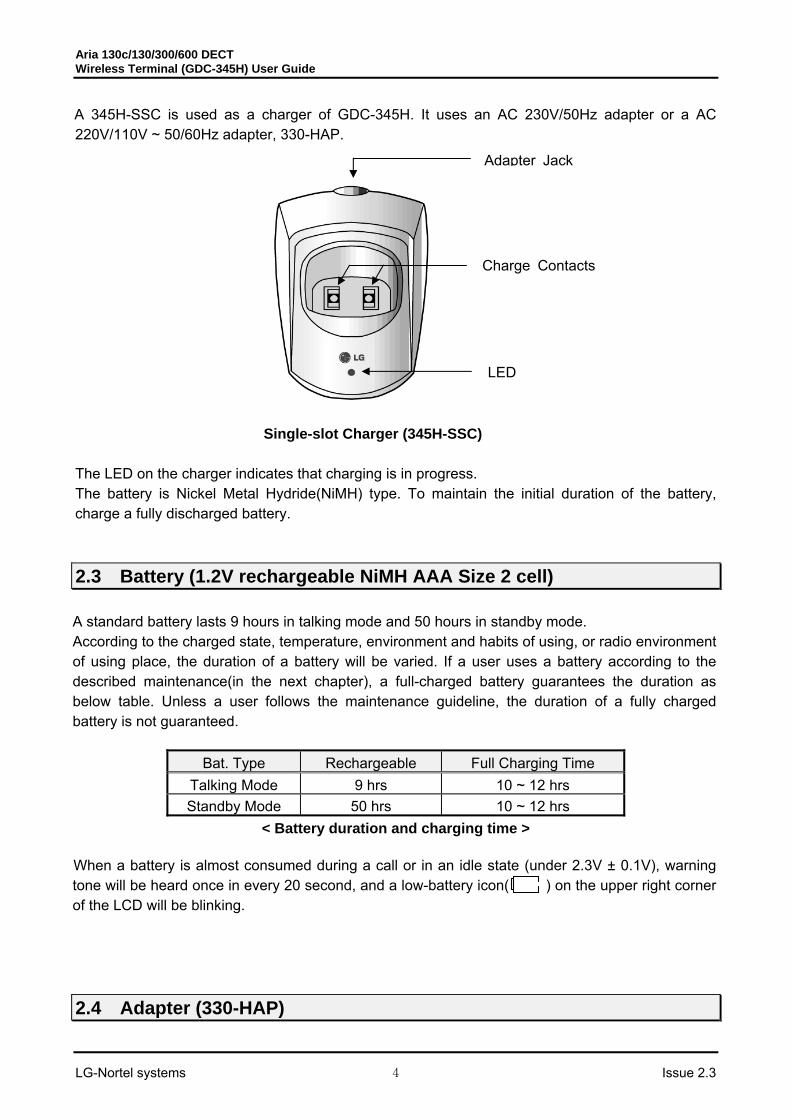
2.2 Single-slot Charger (345H-SSC)
Buzzer
Battery cover
Battery Terminal
Belt Clip
Battery
Charging Terminal
Aria 130c/130/300/600 DECT Wireless Terminal (GDC-345H) User Guide
LG-Nortel systems 4 Issue 2.3
A 345H-SSC is used as a charger of GDC-345H. It uses an AC 230V/50Hz adapter or a AC 220V/110V ~ 50/60Hz adapter, 330-HAP.
Single-slot Charger (345H-SSC)
The LED on the charger indicates that charging is in progress. The battery is Nickel Metal Hydride(NiMH) type. To maintain the initial duration of the battery, charge a fully discharged battery. 2.3 Battery (1.2V rechargeable NiMH AAA Size 2 cell) A standard battery lasts 9 hours in talking mode and 50 hours in standby mode. According to the charged state, temperature, environment and habits of using, or radio environment of using place, the duration of a battery will be varied. If a user uses a battery according to the described maintenance(in the next chapter), a full-charged battery guarantees the duration as below table. Unless a user follows the maintenance guideline, the duration of a fully charged battery is not guaranteed.
Bat. Type Rechargeable Full Charging Time Talking Mode 9 hrs 10 ~ 12 hrs Standby Mode 50 hrs 10 ~ 12 hrs
< Battery duration and charging time > When a battery is almost consumed during a call or in an idle state (under 2.3V ± 0.1V), warning tone will be heard once in every 20 second, and a low-battery icon( ) on the upper right corner of the LCD will be blinking.
2.4 Adapter (330-HAP)
Adapter Jack
Charge Contacts
LED

Aria 130c/130/300/600 DECT Wireless Terminal (GDC-345H) User Guide
LG-Nortel systems 5 Issue 2.3
330-HAP adapter is used for the charger, 340-SSC. There are two types of adapter. It is dependent on country adaptation.
Type - Input : Only AC 230V/50Hz 50mA Output : DC12V 200mA 2.4VA
Type -
Input : AC 220V or 110V 50/60Hz Output : DC 12V 200mA
2.5 Installation(Battery and Belt Clip) Note :
1. Before the inserting the battery, check the convex pictogram(+ - )compartment in the base and connect the dry cell according to the convex pictogram.
2. Push the dry cell until you hear “clicks” sound. Note : 1. Put belt clip into Handset’s one side slot. 2. Push belt clip into the other side slot until it “clicks” sound.
3. MAINTENANCE This chapter mentions what a user has to do and should avoid in order that a user may treat the
How to disassemble the battery cover and insert the battery.
How to put the belt clip into Handset.

Aria 130c/130/300/600 DECT Wireless Terminal (GDC-345H) User Guide
LG-Nortel systems 6 Issue 2.3
wireless terminal and its accessories to keep them in good condition. The user is responsible for the result caused by violating the below warnings.
3.1 Wireless Terminal (GDC-345H)
A user should keep the followings to use wireless terminal GDC-345H without any harm to the user or to the product.
Do not expose it to direct sunlight for long period. For operational temperature range, refer to
the section of ‘8. Specifications’. Spilling or being wet may result impossible condition to be repaired. Do not remove the rubber lid attached on the left side of GDC-345H. The hole on the side part
is used for ear-microphone and is covered with a rubber lid. Do not insert any external substance except ear-microphone for GDC-345H in the hole.
Inserting anything except for ear-microphone provided by LGE may cause severe damage to the terminal.
Do not try to disassemble it. Disassembling the terminal may damage it electronically. Do not try to alter the external or internal. Trying to alter the terminal may damage severely. Clean a hand-held type wireless terminal only with a soft and dry cloth. Using soap or any
other cleansing materials may damage it. Avoid shocks and keep in safe place when it is not used. Keep it away from any flammable thing or excessive heat. For operational temperature range,
refer to the section of ‘8. Specifications’. When not used for long period, remove a battery from it and keep separately. Before initial use, charge fully the battery.
Warning The ear cap region of this telephone may attract and retain small metal objects.
3.2 Charger (345H-SSC)
For right use of 345H-SSC, keep the followings:
LEFT SIDE VIEW
Rubber lid for ear-microphone ♣ A ear-microphone is optional.

Aria 130c/130/300/600 DECT Wireless Terminal (GDC-345H) User Guide
LG-Nortel systems 7 Issue 2.3
Do not use it in high temperature or in high humidity area. Spilling or being wet may result
impossible condition to be repaired. Do not try to disassemble or alter the external or internal. Avoid shocks and keep in safe place when it is not used. Keep it away from any flammable thing or excessive heat. Use only designated adapter, 330-HAP (230V-50Hz or 220V/110V-50/60Hz). Don’t harm LED, contacting parts to a battery or jointing part to an adapter. Don’t make a short circuit on contacts.
3.3 Battery (1.2V rechargeable NiMH AAA Size 2 cell)
For right use and keep in good condition of the battery, keep the followings:
Do not use it in high temperature or high humidity area. Spilling or being wet may result
impossible condition to be repaired. Charge and keep in room temperature. High temperature or low temperature prevents a
battery from full charging. Even enough charging time does not guarantee good using duration.
Avoid shocks and keep in safe place when it is not used. Shocks or dropping may cause damage or decreasing duration.
Keep it away from any flammable thing, and do not place it in hot place such as in a car in summer.
Keep it away from kids. The battery contains environmental pollutants. If damaged, return it to a collecting point. Duration of using a battery is decreased gradually, and purchase a new one when the
duration becomes half comparing with initial use. Once a month, charge fully a discharged battery with the charger (340-SSC). It will
enhance the decreased duration of the battery. Notice 1. Please use only the rechargeable AAA size battery that is recommended. 2. If you use non-chargeable battery, higher voltage may damage phone seriously. 3. Do not use disposable battery like Alkaline Battery. (It may cause battery leakage) 4. This rechargeable battery may be dischargeable.
In case the rechargeable battery discharge, please use it after you charge the battery.
4. USER INTERFACE This chapter explains the function of buttons, state of the LCD, displayed message on the LCD and

Aria 130c/130/300/600 DECT Wireless Terminal (GDC-345H) User Guide
LG-Nortel systems 8 Issue 2.3
the features as the wireless terminal of ARIA-186/100/34e/20W & ARIA 130/300/600 system. 4.1 LCD Display The LCD of GDC-345H GAP has eight icons and 2 x 12 Dot matrix. The LCD shows different wireless states and displays visual feedback for the actions performed by user.
1) The display provides a user with visual feedback for all the actions performed by user. 2) The displayed status icons and messages are as the followings;
4.1.1 ANTENNA Icon & RSSI Icon
1) : Antenna Icon 2) : RSSI Icon
Icon Description
Blinking : When the icon is blinking, the terminal is still not locked to a base station and the location registration is not finished either. Steady : When it stops blinking, the terminal is locked to a base station but the location registration is not finished.
Location registration is finished. Even though user may make a call or receive a call, may hear very severe noise. (Below -86dBm)
Even though user may make a call or receive a call, may hear severe noise. (-85dBm~-80dBm)
User may make a call or receive a call and may hear some noise. (-79dBm~-75dBm)
User may make a call or receive a call and the call quality is normal. (-74dBm~-65dBm)
User may make a call or receive a call and the call quality is good. (Upper -64dBm)
4.1.2 PHONE Icon
Icon Description

Aria 130c/130/300/600 DECT Wireless Terminal (GDC-345H) User Guide
LG-Nortel systems 9 Issue 2.3
- Blinking : Indicates that a call connection is being tried. - Steady : Indicates that a traffic channel is established.
4.1.3 KEY LOCK Icon
Icon Description
Indicates that the phone is set to lock mode.
4.1.4 MESSAGE Icon
Icon Description
The icon indicates that the system has at least one new message for the wireless terminal. The message information is updated every 3 minute. The disconnection with the subscribed system makes impossible to update the message information and the icon is disappeared. And if the wireless terminal is connected with the system, this icon is displayed again on the LCD. If the station message is left, the reserved call is made by using CALLBACK button and this icon will be disappeared after the call. In case of voice message through DVU, press FLASH button to delete a message after checking the message. When all messages are deleted, the message icon will be disappeared. Otherwise, this icon will be still remained. Applicable message: DVU message, CLI message, Station message
4.1.5 MUTE Icon
Icon Description
Indicates that during a call, you can prevent the other party from hearing any background noise or conversations, by pressing the DOWN button longer than 1 second.
4.1.6 BATTERY Icon
Icon Description
Indicates charge level of the battery.
4.1.7 TONE MODE Icon
Icon Description
Indicates that the phone is pulse tone mode.

Aria 130c/130/300/600 DECT Wireless Terminal (GDC-345H) User Guide
LG-Nortel systems 10 Issue 2.3
4.1.8 SILENT MODE/VIBRATOR MODE Icon
4.2 Buttons & Functions The wireless terminal has 10 digit buttons and 10 feature buttons.
1) Digit Buttons 0, 1, 2, 3, 4, 5, 6, 7, 8, 9
2) Feature Buttons *, #, [ON/OFF], [FLASH/CLEAR], [REDIAL/PAUSE], [OK/SPEED/FUNCTION], [TRANSFER/INTERCOM/INTERNAL/HOLD], [PWR/CALLBACK], [UP/MENU] , [DOWN/MENU] The function of button is as follows;
Button
Icon Function Description
[ON/OFF] - Try to make/release call
[FLASH/CLEAR]
- Talking Mode : Register recall - Flash a call and retry next call - When using pre-dial :
Pressing longer than 1 second : All digits are cleared
Pressing shorter than 1 second : 1 digit backspace
When using local functional operation : Function cancel
(It should be pressed longer than 1 second)
[REDIAL/PAUSE]
- Pressing shorter than 1 second Pre-dial : Redial number saved in handset. Post-dial : Redial number saved in system.
- Pressing longer than 1 second Pause(pre-dial, post-dial and during CO-line call).
[OK/SPEED/ FUNCTION]
- Menu Mode : Pressing shorter than 1 second :
Select / Finish a local function(OK). - Idle Mode :
Pressing longer than 1 second : Enter the silent mode.
- Post-Dial : Pressing shorter than 1 second :
System speed dial(SPEED). Pressing longer than 1 second :
Start / Finish a system function(FUNCTION).
Icon Description
Indicates that the phone mode is silent mode or vibrator mode.

Aria 130c/130/300/600 DECT Wireless Terminal (GDC-345H) User Guide
LG-Nortel systems 11 Issue 2.3
Button Icon Function Description
[TRANSFER/ INTERCOM/ INTERNAL/ HOLD]
- Talking Mode : Pressing shorter than 1 second :
Transfer a call to the other station(TRANS). Pressing longer than 1 second :
Hold a call / release a holding call(HOLD). - In an idle state :
Home DECT : Internal call Key-telephone DECT : Trying to make a CO line call
or an intercom call
[POWER/ CALL BACK]
- Power-on - Pressing longer than 1 second : Power Off - Pressing shorter than 1 second :
Leave a call back or a message
[UP/DOWN/ MENU]
- When using local functional operation : Start a local function, upper / lower scroll
- Talking Mode : Up / Down the level of Rx volume, Call by name, CLIP
- Navigate and select among function items in a menu or submenu
- Go to Pulse (Pressing longer than 1 second) - ‘#’ Display (Pressing shorter than 1 second)
- Talking Mode (Only when the Camp-On function is supported by ARIA & ARIA series) : Camp-On - Standby Mode :
‘*’ is displayed (Pressing shorter than 1 second) Go to DTMF (Pressing longer than 1 second)
0~9 - Standard dial button
When pressing any digit buttons, key tone will be heard.
any feature buttons, key tone will be heard.
[PWR] to turn off the wireless terminal, keep pressing more than 3 seconds until a tone is heard.
Note :
The above table is available only for the wireless terminal which is subscribed to ARIA & ARIA series system. Therefore, LGE may not guarantee normal key functions as described on the above table when a user operates the wireless terminal which is subscribed to the other system.

Aria 130c/130/300/600 DECT Wireless Terminal (GDC-345H) User Guide
LG-Nortel systems 12 Issue 2.3
4.3 Tone The wireless terminal supports many kinds of indication tones. These tones sound through the buzzer installed in the wireless terminal. The situation which tone is generated is as the followings;
Keypad Tone When pressing a key, the tone sounds.
Warning Tone and Conformation Tone In many situations, these tones are provided as indication or warning to a user according to each situation. Error indication tone
When a user does invalid operation, it is generated. There is no message displayed on the LCD.
Low battery warning tone If battery voltage level is decreased to less than 2.3V±0.1, it is generated. A block in a low battery icon on the LCD is blinking in every second and this tone is generated once in every 20 second until battery voltage level reaches over 2.3V±0.1 by recharging the battery. When a user puts the wireless terminal on the charger provided by LGE, this tone and the blinking low battery icon are disappeared. If battery voltage level is under 2.2V±0.1V, power will be turned off automatically to protect circuits of the wireless terminal without low battery warning tone as soon as pressing the power button to turn on (It is called by ”Auto-power-off” function). It should be recharged.
Out of range warning tone When a user is about to get out of a coverage of the subscribed system, “OUT RANGE” message will be shown shortly on the LCD with warning tone.
Call-connection confirmation tone When an wireless channel between the wireless terminal and the subscribed system is established, it is generated. Once pressing button, the wireless terminal tries to get a wireless channel. At this time, Phone( ) icon will be blinking. When a wireless channel is established, this tone is heard and phone( ) icon will be shown steadily.
Power-off conformation tone When the wireless terminal is turned off, it is generated.
Ring Tone
When a wireless terminal gets an incoming call, it is generated. A user can make the volume level up and down from level 1 to level 7 in an idle state. The incoming call ring rhythm (CO line call and intercom call, separately) can be selected by a user among 9 ring rhythms. The default ring rhythm is selected to normal ring rhythm. In the state that vibrator function is enabled, when a call is reached to the wireless terminal, ring tone can’t be heard but a user recognizes the phone’s ringing by phone vibration.

Aria 130c/130/300/600 DECT Wireless Terminal (GDC-345H) User Guide
LG-Nortel systems 13 Issue 2.3
4.4 Message Display
Message Description Display Duration STA xxx Station number Standby Mode INVALID Indicate not available operation 3 seconds NO CHANNEL There is no channel for connection 3 seconds CALL FAIL A call try is failed 3 seconds KEY LOCK Indicate key locked state Until restored to key-unlock state LN XX Connected CO line number During holding CO line 00:00 Call time While maintaining a call CALL FROM STA xxx
When a call is received from intercom, it indicates a call paging from station xxx
During ringing and until cutting off a Call
CALL TO STA xxx
When a call is made to intercom, it indicates a call paging to station xxx
During ringing and until cutting off a Call
LN XX RINGING
When received from CO line, it indicates a paging from CO line x
During ringing
The parts filled with will be explained in detail in Appendix C.
4.5 Call Ready State
1) When a wireless terminal is received a signal from a base station and synchronized with dummy bearer(Sync.), RSSI(Radio Signal Strength Indicator) icon( ) is displayed.
2) ‘STA xxx’ will be displayed if it is subscribed. The RSSI icon stops blinking when it is locked and that means the terminal is ready to make or receive a call.
3) If the RSSI icon is blinking, it indicates that a wireless terminal is still trying to synchronize with the base station of the ARIA-186/100/34e/20W & ARIA 130/300/600 system that it is subscribed to.
Display Area GDC-345H
S T A X X X

Aria 130c/130/300/600 DECT Wireless Terminal (GDC-345H) User Guide
LG-Nortel systems 14 Issue 2.3
5. TELEPHONE FEATURES 5.1 Basic Features A subscribed wireless terminal to a ARIA-186/100/34e/20W & ARIA 130/300/600 system can use various telephone features. 5.1.1 Power ON/OFF When pressing POWER( ) button, the power is turned on and the wireless terminal goes to an idle state. The following describes the sequence of power-on;
Press POWER button. Initialize S/W and H/W variables. Check for station number if subscribed, and display station number : ”STA xxx”, else
display “UNREGISTERED” Only if subscribed to ARIA & ARIA series, the above message is displayed on the LCD.
Search for system to which it is subscribed and try to do location registration while blinking Antenna Icon and RSSI level.
If Antenna Icon and RSSI level stop blinking, it means all procedures for initial setup are completed. And you can make or received a call.
To turn off the wireless terminal, press POWER( ) button for longer than 3 seconds. Confirmation tone is heard. And then release POWER( ) button. 5.1.2 Call Function There are two kinds of calls, a CO line call and an intercom call. The details are described in ‘5.2 Key System Features’ and ‘5.3 DECT Features’. Please refer to ‘Digital Key Telephone System Programming Manual’ about detail functions and additional functions related to key system.

Aria 130c/130/300/600 DECT Wireless Terminal (GDC-345H) User Guide
LG-Nortel systems 15 Issue 2.3
5.2 Key System Features 5.2.1 Call Service Function The following features are available only for ARIA & ARIA series system. So these functions may not be operated properly with any other system. Placing an Outside Call TALK ON/OFF ( ) button is used to make a call or receive a call. To make a call can be done by either pre-dialing or post-dialing. 1) Pre Dial
-. ARIA-186/100/34e, ARIA 130 CO Line Access Code (9, 8+XX or 88+XX) → Phone Number → → Connection
-. ARIA-20W CO Line Access Code (9, 8+X or 88+X) → Phone Number → → Connection
-. ARIA 300/600 CO Line Access Code (9, 8+XX or 88+XXX) → Phone Number → → Connection
You may dial telephone number in an idle state before pressing button (up to 24 digits). Since it is displayed only 12 digits per line on the LCD. If you dial a wrong digit, a user can erase last 1 digit by pressing once and if you want to erase all digit dialed, press for longer than 1 seconds. If you want to insert dialing pause among dial numbers, press button for longer than 1 second. Then “P” is displayed on the LCD.
Dial phone number. Press .
Phone( ) icon is blinking on the LCD .
The LCD message is displayed as the left figure and connection tone is heard when connection is completed.
9 X X X X X X X X X
S T A X X X
X X X X X X X X X X
0 0 : 0 0
*
1 2 34 5 67 8 9
0 #

Aria 130c/130/300/600 DECT Wireless Terminal (GDC-345H) User Guide
LG-Nortel systems 16 Issue 2.3
2) Post Dial -. ARIA-160/100/34e, ARIA 130 → CO Line Access Code (9, 8+XX or 88+XX) → Phone number → Connection ; (XX means CO line number)
-. ARIA-20W → CO Line Access Code (9, 8+X or 88+X) → Phone number → Connection ;
(X means CO line number) -. ARIA–300/600
→ CO Line Access Code (9,8+XX or 88+XXX) → Phone number → Connection ; (XX means CO Group Number, XXX means CO line number)
You may dial telephone number after pressing button. When pressing CO line access code (9, 8 + XX, or 88 + XX), CO line dial tone is heard. Every time pressing each button, it is displayed on the LCD. If you dial a number late, “DIALING TOO LATE” message is displayed on the LCD. It is displayed up to 10 digits.
Note : In case of ARIA-20W and ARIA 130/300/600 system, if handset was registered by ‘TYPE 3’, it is displayed 12 digits per line on the LCD (This feature is available when MPB version of ARIA 130/300/600 is 1.0Ba above and when MPB version of ARIA-20W is 3.0Aa above. Please refer to ‘6.2 Subscription’ for details.
Press button. Connection tone is heard and phone( ) icon is displayed on the LCD.
Dial CO line access code. -. ARIA-186/100/34e, ARIA 130 (9, 8 + XX, or 88 + XX) -. ARIA-20W (9,8 + X, or 88 + X) -. ARIA 300/600 (9,8 + XX, or 88 + XXX)
Dial the desired phone number.
3) Call Release To release a call, press button. The phone( ) icon will be disappeared and the wireless terminal will goes to an idle state.
4) Assign CO Line/CO Line Group Available CO lines can be grouped and the accessible CO line groups can be assigned to a station by Admin programming (For detail programming, refer to “CO LINE GROUPS” and “CO LINE ACCESS” of “Digital Key Telephone System Programming Manual”). All available CO lines are assigned to Group 01 by default. Accessing a CO line is done in three ways as above; (9, 8+CO line group # or 88+CO line #) And they are;
9 (CO line Access Code) : Connect an available CO line of the assigned CO line group to the station. CO line selecting method is programmable by Admin programming.
8 + CO line group # : Connect an available CO line of the CO line group. The CO line group should be assigned to the station before by Admin programming. CO line selecting method is programmable by Admin programming.
88+CO line # : Connect the CO line directly. The CO line should be allowed to the station before by Admin programming.
S T A X X X
X X X X X X X X X X
0 0 : 0 0
*
1 2 34 5 67 8 9
0 #

Aria 130c/130/300/600 DECT Wireless Terminal (GDC-345H) User Guide
LG-Nortel systems 17 Issue 2.3
Receiving an Incoming Call Incoming CO ring → → Connection
1. Incoming CO ring is heard and a message is displayed on the LCD. Notes: If an Ear-Mic is attached to a GDC-345H, it can receive an incoming call by pressing a button on the Ear-Mic while a ring sounds.
Press button and answer the call.
If pressing UP( ),DOWN( ) button during conversation, the receiving voice level is controlled.
To hang up the call; When conversation is over, press button again to release the call. Then the phone( ) icon will be disappeared and the call will be cut off. Notes: When you release a call, you can do it by pressing a button on Ear-Mic. Making an Intercom Group Call 1) Pre-Dial : Intercom group number → → Connection
Dial the intercom group number (ex. ARIA-186: 620~649). Press button. Connection tone is heard and phone( ) icon is displayed on the LCD.
2) Post-Dial : → Intercom group number → Connection
Press button.
Connection tone is heard and phone( ) icon is displayed on the LCD.
Dial the intercom group number (ARIA-186:620~649,ARIA-100:620~634, ARIA-34e:620~627,ARIA-20W:61~64, ARIA 130: 620~634 ARIA 300/600: 620~667) .
*
1 2 34 5 67 8 9
0 #
R I N G I N G
L N X X X
C A L L X X
V I A H U N T
*
1 2 34 5 67 8 9
0 #

Aria 130c/130/300/600 DECT Wireless Terminal (GDC-345H) User Guide
LG-Nortel systems 18 Issue 2.3
To transfer a CO line; Press TRANS( )button shorter than 1 second. Dial the intercom group number. Press button or when the called extension answers, inform the transfer and
press button to complete the transfer. Caution: Intercom line transfer isn’t supported by ARIA-186/100/34e/20W WOTS system.
But it is supported by ARIA 130/300/600 system. Making an Intercom Call 1) Pre-Dial : Intercom number → → Connection
Dial the intercom number. Press button. Connection tone is heard and phone( ) icon is displayed on the LCD.
2) Post-Dial : → Intercom number → Connection
Press button.
Connection tone is heard and phone( ) icon is displayed on the LCD.
Dial intercom number.
According to the ICM answer mode of a called station (in case of a key station), different tone will be heard in the wireless terminal.
1. TN(Tone) mode : Ring back tone. Wait until the called station answers. 2. HF(Hands-free) / PV(Privacy) mode : 3 bursts of tone. Talk after the tone.
*
1 2 34 5 67 8 9
0 #
S T A X X X

Aria 130c/130/300/600 DECT Wireless Terminal (GDC-345H) User Guide
LG-Nortel systems 19 Issue 2.3
Receiving an Intercom Call Intercom ringing → → talk
Intercom ring is heard and a message is displayed on the LCD.
Press button and answer the call.
Pressing UP( ),DOWN( ) during conversation, the receiving voice level is controlled.
To hang up the call; When a talk is over, press button again. Then the phone( ) icon will be disappeared and the call will be cut off.
Call Transfer
This function is to transfer a received call to another user. Talk → (Press shorter than 1 second) → Intercom number →
While connected to a CO call (not intercom call), Press TRANS( ) button shorter than 1 second and then
the call is put on hold state
Dial intercom station number
(ex.ARIA-186: 100~291, ARIA-100:100~235, ARIA-34e: 100~177,ARIA-20W: 100~133, ARIA 130: 100~227 ARIA-300: 100~399, ARIA-600: 1000~1599)
At this point, a user can make either a screened or unscreened the transfer.
Caution: Intercom line transfer isn’t supported by ARIA-186/100/34e/20W WOTS system.
But, it is supported by ARIA 130/300/600 system.
C A L L F R O M
S T A X X X
9 X X X X X X X X X
0 0 : 0 0
C A L L T O
S T A X X X
*
1 2 34 5 67 8 9
0 #
*
1 2 34 5 67 8 9
0 #

Aria 130c/130/300/600 DECT Wireless Terminal (GDC-345H) User Guide
LG-Nortel systems 20 Issue 2.3
Screened Transfer When the called station answers, inform the transfer.
Press button to complete the transfer.
Unscreened Transfer When the called station begins to ring,
Press button to complete the transfer after ring back tone is heard. Then, a message is displayed on the LCD of the called station. If the call is not answered within 30 seconds, recall ring is ringing at both stations. At this time, press button then a user will be connected with the transferred call again.
Answering Screened Transfer
A user will hear intercom ring. Answer intercom call and receive transfer notice.
If the transferring party hangs up, the outside call will be connected.
Executive/Secretary Transfer If a station is designated as an Executive station and the station is busy or in DND(Do Not
Disturb), all calls will go to its Secretary station. If a station is designated as a Secretary station, it may signal its Executive station which is
in DND by using the Call Wait feature. * This feature is not available in ARIA-20W.
Placing a CO Call on Hold While you use a wireless terminal through CO line, you can use this function when you want to let the outside caller wait for a moment. Talk → (Press longer than 1second)
While connected to a CO call (not intercom call),
Press HOLD( ) button longer than 1 second for exclusive hold. (Dial tone will be heard)
A message is displayed on the LCD as shown, and the hold music is heard to the outside caller. You have two kinds of choice, one is to retrieve a call and the other is to make another call.
X F E R F R O M
S T A X X X
X X X X X X X X X X
0 0 : 0 0
H O L D I N G
L N X X X

Aria 130c/130/300/600 DECT Wireless Terminal (GDC-345H) User Guide
LG-Nortel systems 21 Issue 2.3
1) To retrieve the call,
Press HOLD( ) button longer than 1 second, then the held outside call will be connected.
2) To make another call,
Press button if you want to make another intercom or
CO call. The wireless terminal goes to an idle state. Press button again to make a call.
Caution: Intercom line hold isn’t supported by ARIA-186/100/34e/20W WOTS system. But, it is supported by ARIA 130/300/600 system. Flash During conversation (through CO line or intercom), releasing current call and entering dialing mode can be done at once by Flash. The FLASH button is also used to transfer a CO line call through a PABX.
If you are talking with intercom line, press button to release a call. Then, dial tone will be heard and you may make another call or do the other operation, for example, programming using system function and so on.
If you are talking with CO line, press button to release a call. Then, dial tone will be heard and you may make another CO call.
If you want to transfer a CO call to a PABX, dial an internal station number of a PABX. When ring back tone is heard, hang up the call for unscreened transfer, or inform the transfer when the called party answers, then hang up the call for screened transfer.
H O L D I N G
L N X X X
X X X X X X X X X X
0 0 : 0 0
H O L D I N G
L N X X X
S T A X X X
*
1 2 34 5 67 8 9
0 #

Aria 130c/130/300/600 DECT Wireless Terminal (GDC-345H) User Guide
LG-Nortel systems 22 Issue 2.3
Call Park A user can park using CO line to CO line parking location.
Call Park While connected to an outside call;
Press TRANS( ) button shorter than 1 second. Dial a parking location. The CO line being used is on hold and the wireless terminal goes to an idle state.
Retrieving a parked call
Press button. Dial the parked location.
Parking Location Number
SYSTEM PARKING LOCATION NUMBER ARIA-186 601~619 ARIA-100 601~610 ARIA-34e 601~605 ARIA-20W 601~606 ARIA 130 601~610
ARIA 300/600 601~619

Aria 130c/130/300/600 DECT Wireless Terminal (GDC-345H) User Guide
LG-Nortel systems 23 Issue 2.3
M S G : S T A ( X )
5.2.2 Key System Support Function Call Back When you dial to a station that is busy or in DND mode, you can leave a call back indication message up to 5.
Call Back in case of Dialing to a Station in Busy State
After receiving intercom busy tone, press CALL BACK( ) button. NOTE: If the busy station earlier goes to an idle state before pressing button, the called station will have a message from the system. About the message, see the below “Answer a Message Waiting Indication”.
When the busy terminal is idle, a reserved user’s terminal for call back will be ringing. Answer the ring by pressing .
Call Back in case of Dialing to a Station in DND Mode or No Answer
If you receive intercom busy tone or there is no answer after dialing to a station, press CALL
BACK( ) button. Then, if DVU is installed in the system, a voice message is heard. Press button to
leave a message. If you want to stop leaving a message, press button. And if DVU is not installed in the system, only a station message is left in the system for the called station.
A message icon is displayed in 3 minutes on the LCD of a reserved user’s station for call back.
If a call back message is displayed on the LCD, press or TRANS( ) button shorter than 1 second and then press CALL BACK( )button to make a call to a station leaving a message.
Answering a Message Waiting Indication If a message is displayed on the LCD, it indicates that a message is left to you. The first left message will be answered at first.
Press button. Press CALL BACK( ) button. The station that has left a message will be ringing if a
station message has left.
If DVU message has left, the first left DVU message is heard. Press HOLD ( )button longer than 1 second to hear the next DVU message again or press CALL BACK( ) button to hear the same DVU message. After checking a message, if you want to erase the checked message, press FLASH ( )button.
B U S Y : X X X

Aria 130c/130/300/600 DECT Wireless Terminal (GDC-345H) User Guide
LG-Nortel systems 24 Issue 2.3
Pick-up
This function is to pick up a call instead of another subscriber who is called. It can be used after programming at the attendant station.
Group Call Pick-up When you hear an unattended phone ring,
Press button. Press .
(ARIA 130/300/600 : Press )
Caution: 1) A station should be in the same pick-up group with the ringing station.
2) This feature should be programmed at the Admin. station before using. (See the pick-up function programming method at the ARIA-186/100/34e & ARIA 130/300/600 WOTS programming manual)
3) All stations are in the same pick-up group in case of ARIA-20W system.
Directed Call Pick-up You hear intercom or transferred outside line ring at a particular station. (This feature is not available in ARIA-20W.) Press button. Press and the station number of the ringing station. It will be connected to the calling party.
Speed Dial
Storing Speed Dial Numbers
Press button. Press FUNCTION ( ) button longer than 1 second. Press SPEED button( ) button shorter than 1second. Dial speed bin number. (ARIA-186/100/34e: 00~19, ARIA-
20W: 01~20, ARIA 130/300/600: 000~099) (Only available speed bin is displayed on the LCD. And only one speed bin number is displayed at every time using this function.)
Dial a phone number to be stored. Press FUNCTION ( ) button longer than 1 second. Enter the dial name.
( Refer to “PROGRAMMING A NAME INTO DISPLAY”) Press FUNCTION ( ) button longer than 1 second. Press button. You can store speed dials by repeating the above procedure.
A user can use speed dial numbers stored personally in a station speed bin. One speed dial number can be dialed up to 24 digits.
C A L L X X X
P I C K L N X X
C A L L X X X
P I C K L N X X
E N T E R S P D
B I N ( X X )

Aria 130c/130/300/600 DECT Wireless Terminal (GDC-345H) User Guide
LG-Nortel systems 25 Issue 2.3
STOP! If all speed bins are stored, speed bin number is displayed as ‘000’ on the LCD. You can newly edit speed bin that is already used.
Using Station Speed Bin Numbers
Press button. Press SPEED ( ) button shorter than 1 second. Dial speed bin number(ARIA-186/100/34e: 00~19,
ARIA-20W: 01~20,ARIA 130/300/600: 000~099). Caution: S(#) is not displayed in the ARIA-20W.
Erasing Station Speed Bin Numbers
Press button. Press FUNCTION ( ) button longer than 1 second. Press SPEED ( ) button shorter than 1 second.
Dial speed number bin to be erased. Press FUNCTION ( ) button longer than 1 second.
(Confirmation tone will be heard) Press button.
Storing System Speed Bin Numbers
You can use commonly speed dial numbers stored in the system. Storing system speed dial number can be done only at the admin station. Available CO line can be assigned at that time storing system speed dial number.
Using System Speed Numbers
Press button. Press SPEED ( ) button shorter than 1 second. Dial speed bin number.
(ARIA-186: 200~999, ARIA-100/34e: 200~399, ARIA-20W: 21~99, ARIA 130: 2000~3499,
ARIA-300: 2000~4999, ARIA-600: 2000~6999). Caution : S(#) is not displayed in the ARIA-20W.
STOP! When a user makes a call to some exclusive subscribers or all CO line are reserved, error
tone is heard. A speed dial number can be programmed as one that there is no limit about a long distance
call. (Refer to “Digital Key Telephone System Installation and Programming Manual”)
S P D _ N O
L ( * ) S ( # )
E N T E R S P D
B I N ( X X )
S P D _ N O
L ( * ) S ( # )

Aria 130c/130/300/600 DECT Wireless Terminal (GDC-345H) User Guide
LG-Nortel systems 26 Issue 2.3
Redial
To Redial Saved Number,
Press button. Press SPEED ( ) button shorter than 1 second. Press .
Caution: 1) This feature doesn’t work at the intercom call.
2) S(#) is not displayed in the ARIA-20W.
To Redial Last Number,
The last dialed number to outside lines is saved automatically. To redial the number (ARIA-186/100/34e/20W),
Press button. Press SPEED ( )button shorter than 1 second and
press .(Or press just REDIAL( )
To redial the number (ARIA 130/300/600),
Press button. Press SPEED ( ) button shorter than 1 second and press .(Or press just
REDIAL( ) Press UP( ),DOWN( ) to find a phone number. (Max. 10 last dialed number can be
stored in the directory) To make a call, press HOLD( ) button longer than 1 second when the phone number
is displayed.
Caution: 1) This feature doesn’t work at the intercom call.
2) S(#) is not displayed in the ARIA-20W.
Save a Current Number for Later Use (This feature is not available in the ARIA-20W) To save a number dialed for the next use;
Press SPEED button (Press button shorter than 1 second) twice during a call. If a used CO line is busy, a redial call is made through available another CO line out of the
same group lines.
Caution: This feature doesn’t work at the intercom call.
S P D _ N O
L ( * ) S ( # )
S P D _ N O
L ( * ) S ( # )

Aria 130c/130/300/600 DECT Wireless Terminal (GDC-345H) User Guide
LG-Nortel systems 27 Issue 2.3
Call Forward When a user can’t receive calls, a user can forward all user’s calls to another subscriber’s station.
1) ARIA-186/100/34e/20W Press button. Press . Press the call forward type:
Call Forward Type ARIA-186/100/34e ARIA-20W 0 Follow me 1 Unconditional Unconditional 2 Busy calls Busy calls 3 No answer calls No answer calls 4 Busy/No answer calls Busy/No answer calls 5 Station off-net Station off-net
7 DVU(Transferred after 4 seconds - default time)
DVIB(Transferred after a programmed time: Main Menu6-Sub menu2 –Terminal menu1)
8
DVU(Transferred after a programmed time. The admin programming code is “43 + flex24”. The range is 4 to 40 seconds.)
9 (This feature is dependant on
system version)
DVU forward for busy (When the terminal is busy, it is forwarded to DVU)
Dial station number, or intercom group where calls are to be received. (Confirmation tone
will be heard.) Press button.
2) ARIA 130/300/600
Press button. Press . Press the call forward type:
Call Forward Type Call Forward Condition Call Forward Destination 0 Follow me Station No. 1 Unconditional Station, Intercom Group, or DVU (#) 2 Busy calls Station, Intercom Group, or DVU (#) 3 No answer calls Station, Intercom Group, or DVU (#) 4 Busy/No answer calls Station, Intercom Group, or DVU (#) 5 Station off-net (Unconditional) Speed Bin 6 Station off-net (No Answer) Speed Bin # Remove

Aria 130c/130/300/600 DECT Wireless Terminal (GDC-345H) User Guide
LG-Nortel systems 28 Issue 2.3
Dial station number, intercom group, or # for DVU where calls are to be received. (Confirmation tone will be heard.)
Press button.
* In case of DVU forward, recording a greeting message should be preceded. * In case of follow-me, dial Authorization Code after station number.
To hear voice message wait on DVIB in ARIA-20W,
Press button. Press CALL BACK( ) ( Voice message is heard.) Press HOLD ( ) button longer than 1 second to hear next voice message. Press FLASH ( ) to delete current message.
STOP!
This feature lasts until canceled. This feature can’t be used in DND mode.(ARIA-186/100/FP II & ARIA 130/300/600) (DND is reset by call forward in the ARIA-20W.)
This feature can be used by a subscriber that has permission This feature should be programmed at the admin station before using.
To Cancel Call Forward,
Press button. Press Call forward code(Confirmation tone will be heard.).
-. ARIA-186/100/34e : . -. ARIA-20W : .
-. ARIA 130/300/600 : or .

Aria 130c/130/300/600 DECT Wireless Terminal (GDC-345H) User Guide
LG-Nortel systems 29 Issue 2.3
Do Not Disturb (DND) When a user doesn’t want to receive a call, this function can be used.
To Program Do Not Disturb (DND),
Press button. Press (ARIA-186/100/34e/20W) or (ARIA 130/300/600)
(Confirmation tone will be heard)
- Talk - - Idle -
To Cancel Do Not Disturb (DND),
Press button. Press or (ARIA-186/100/34e/20W),
Or or (ARIA 130/300) (Confirmation tone will be heard.) (Only 53 is available in ARIA-20W)
5 3
I N D N D S T A X X X
D N D
5 3
S T A X X X

Aria 130c/130/300/600 DECT Wireless Terminal (GDC-345H) User Guide
LG-Nortel systems 30 Issue 2.3
Authorization Code This feature is not available in ARIA-20W.
To Register Access Authorization Code, To prevent unauthorized outside call (DISA access or Trunk Access), a user can lock/unlock a station with an access authorization code.
Press button. Press FUNCTION( ) button longer than 1 second and
press (ARIA-186/100/34e) or (ARIA 130/300/600). Dial the station’s 5-digit Access Authorization code.
The AC code for a terminal should be unique, if the code entered is already used by another terminal, error tone is heard and the message “INVALID” is displayed on the LCD.
Press FUNCTION( )button longer than 1 second. (Confirmation tone will be heard.)
NOTE: An access authorization code should be registered.
To Change Access Authorization Code, Press button. Press FUNCTION( ) button longer than 1 second and press (ARIA-
186/100/34e) or (ARIA 130/300/600).
Dial the current Access Authorization code. (Confirmation tone will be heard.)
Dial a new 5-digit Access Authorization code. Press FUNCTION( )button longer than 1 second.
(Confirmation tone will be heard.)
NOTE : An access authorization code should be registered.
E N T E R N E W
P A S S W O R D
E N T E R
P A S S W O R D
E N T E R N E W
P A S S W O R D

Aria 130c/130/300/600 DECT Wireless Terminal (GDC-345H) User Guide
LG-Nortel systems 31 Issue 2.3
Temporal COS (Class Of Service) Change When a user is in a situation that a user can’t receive a call, can make a user’s station possible to make only intercom call by changing service of class. It prevents another one from making a call. (This feature is not available in ARIA-20W)
Blocking Outside Calls
Press button. Press FUNCTION ( ) button longer than 1 second and press (ARIA-
186/ 100/34e) or (ARIA 130/300/600). Press FUNCTION( )button longer than 1 second.(Confirmation tone will be heard.)
NOTE : An access authorization code should be registered.
Restoring Outside Calls
Press button. Press FUNCTION( )button longer than 1 second and press (ARIA-186/
100/34e) or (ARIA 130/300/600). Dial the current Access Authorization code. Press FUNCTION( )button longer than 1 second.(Confirmation tone will be heard.)
NOTE : An access authorization code should be registered.
STOP! If a user forgets the access authorization code, only the admin station can restore it.
Universal Night Answer When the system is in universal night answering mode, the subscriber’s station which is not ringing can receive a CO line call.
Press button. Press (ARIA-186/100/34e/20W) or (ARIA 130/300/600).
A user will be connected to ringing outside line.

Aria 130c/130/300/600 DECT Wireless Terminal (GDC-345H) User Guide
LG-Nortel systems 32 Issue 2.3
Call Wait / Voice Over (Camp-on) When an intercom call is busy, alerting the busy station can be done by CALL WAIT. During the conversation (internal call or CO line call), the busy station is heard alerting tone (camp-on tone) which alerting another call is waiting. Voice over between two callers can be done by VOICE OVER.
If a user dials a busy station, CALL WAIT alerts call waiting to a busy station.
After receiving intercom busy tone, press or the last digit of the called station number.
The called station will hear camp-on tone. Then the called party can answers to a new call by pressing HOLD ( ) button longer than 1 second.
When a busy terminal engaged an internal or external call is called through camp-on by a new caller,
Press HOLD ( ) button longer than 1 second to connect to the other calling station. The former calling party is on hold. (If first call is internal call, this call is released in ARIA-20W)
Press HOLD( ) button longer than 1 second to voice over back to the former calling party .
C A M P - O N
B Y X X X
B U S Y : X X X
C A L L T O
S T A X X X
V O I C E O V E R
T O X X X
V O I C E O V E R
T O X X X

Aria 130c/130/300/600 DECT Wireless Terminal (GDC-345H) User Guide
LG-Nortel systems 33 Issue 2.3
Answering a Call Wait with Voice Over
A user hears camp-on tone.
Press HOLD( )button longer than 1 second to connect to the second call. The first call is placed on hold. A user will be connected to the first call when the second call is released. (If first call is internal call, this call is released in ARIA-20W)
Wake-up Call
To Register Wake-up Call, The system automatically sends ring signal to a station that already registered a wake-up time. Two kinds of wake-up call exist; effective for one-day or effective until canceled.
To Register Wake-up Time,
Press button. Press FUNCTION ( ) button longer than 1 second. Press and 4 digits wake-up time (HHMM) in 24-hour mode.
(HH = 00~23, MM = 00~59) Press for permanent use. Otherwise it is set for just one time use.
Press FUNCTION( )button longer than 1 second.
(Confirmation tone will be heard)
To Cancel Wake-up Call, Press button. Press FUNCTION( ) button longer than 1 second. Press .
Press FUNCTION( ) button longer than 1 second.
(Confirmation tone will be heard)
C A M P - O N
B Y X X X
V O I C E O V E R
T O X X X
W A K E U P
H H : M M
D E L W A K E U P
P r e s s F N C

Aria 130c/130/300/600 DECT Wireless Terminal (GDC-345H) User Guide
LG-Nortel systems 34 Issue 2.3
Step Call
Call the desired intercom party. After hearing ICM busy tone, dial the last digit of desired intercom party in the same 10’s
group.(e.g. If you dialed a busy station ‘112’, press to call station ‘114’.) This feature can be used for external call by pressing “SPEED + last digit”.
* This feature is not available in ARIA-20W. Paging
To page, Press button. Dial page zone. (See the below table. Confirmation tone will be heard.) After the tone, speak in a normal tone of voice. Press button.
Page Zone ARIA-186/100/34E ARIA-20W
All Call 49 #0
Internal Zone 1~n 401~420 (ARIA-186), 401~415 (ARIA-100), 401~405 (34e)
#1 ~ #2
Internal All Call 43 - External Zone 1 46 #3 External Zone 2 47 - External All Call 48 -
Page Zone ARIA 130 ARIA 300/600
All Call 549 549 Internal Zone 1~n 501~510 501~530 Conference Page
Zone 511~515 531~535
Internal All Call 543 543 External Zone 1 545 545 External Zone 2 546 546 External Zone 3 547 547 External All Call 548 548
Answering Paging Press button. Press (ARIA-186/100/34e), (ARIA-20W) or (ARIA
130/300), and the paging party will be connected.

Aria 130c/130/300/600 DECT Wireless Terminal (GDC-345H) User Guide
LG-Nortel systems 35 Issue 2.3
Programming a Name into Display
A user can store program user’s station name. The name will be displayed instead of ICM station number on the LCD of DKTU or EKTU station. (This feature is not available in ARIA-20W.)
1) ARIA-186/100/34e
Press button. Press FUNCTION ( ) button longer than 1 second. Press SPEED ( ) button shorter than 1 second.
Press . Press SPEED ( ) button shorter than 1 second. Enter the station’s name. (See the below table. Up to 7
characters can be entered.) Press FUNCTION ( ) button longer than 1 second.
(Confirmation tone will be heard.) Press button.
2) ARIA 130/300/600 Press button. Press FUNCTION ( ) button longer than 1 second. Press . Enter the station’s name. (See the below table. Up to 7 characters can be entered.)
Press FUNCTION ( ) button longer than 1 second. (Confirmation tone will be heard.)
A = [2][1] B = [2][2] C = [2][[3] D =[3][1] E = [3][2] F =[3][3] G = [4][1] H = [4][2] I = [4][[3] J =[5][1] K = [5][2] L =[5][3] M = [6][1] N = [6][2] O = [6][[3] P =[7][1] Q = [1][1] R =[7][2] S = [7][3] T = [8][1] U = [8][[2] V =[8][3] W = [9][1] X =[9][2] Y = [9][3] Z = [1][2] . = [1][[3] , =[*][3] : = [*][2]
BLANK =[*][1] 0 = [0][0] 1 = [1][0] 2 = [2][0] 3 =[3][0] 4 = [4][0] 5 =[5][0] 6 = [6][0] 7 = [7][0] 8 = [8][0] 9 =[9][0]
STOP!
The keyset making an intercom call should have the LCD display.
B I N ( 0 0 )
E N T E R N A M E
X X X X X X X
E N T E R N A M E

Aria 130c/130/300/600 DECT Wireless Terminal (GDC-345H) User Guide
LG-Nortel systems 36 Issue 2.3
Station Program Recovery This function is to recover the previously programmed data. It will be certified by LCD display. The followings are programmed data to be recovered. 1) Station number. 2) Idle LCD message. 3) Message icon. 4) FORWARD message format. 5) DND message format.
Press button. Press FUNCTION ( ) button longer than 1 second. Press (ARIA-186/100/34e/20W) or (ARIA 130/300/600).
- Confirmation tone will be heard. - Station number and idle message will be displayed on the LCD. - FORWARD and DND message format will be displayed on the LCD, if programmed.
The wireless terminal may be changed in the following situation after the above procedure. 1) When board configuration is changed. 2) When numbering plan is changed at ADMIN 01.
(ARIA-186/100/34e : ADMIN 01. ARIA-20W : ADMIN Main Menu 9, ARIA 130/300/600 : ADMIN 104)
STOP!
To display idle message again on the LCD, do the following procedure(ARIA-186/100/34e). Press button. Press FUNCTION ( ) button longer than 1 second. Press .

Aria 130c/130/300/600 DECT Wireless Terminal (GDC-345H) User Guide
LG-Nortel systems 37 Issue 2.3
Pre-selected Messages A user can select a pre-assigned message to be displayed on the LCD of the calling terminal. (This feature is not available in ARIA-20W.)
Press button. Press FUNCTION ( ) button longer than 1 second. Press (ARIA-186/100/34e) or (ARIA 130/300/600).
Dial the number of desired message. Date, time or station number if required. (See the below table.)
Press FUNCTION ( ) button longer than 1 second. (Confirmation tone will be heard.)
No. Description 0 0 User Custom Message (See Programming User Custom Message) 0 1 LUNCH TILL / hh:mm 0 2 VACATION / mm dd 0 3 RETURN AT / hh:mm 0 4 RETURN ON / mm dd 0 5 OUT OF OFFICE 0 6 T) (Telephone No. up to 17 digits) 0 7 IN OFFICE / STA xxx 0 8 MEETING / TILL hh:mm 0 9 AT HOME 1 0 AT BRANCH / OFFICE # Cancel code
1 1~2 0 are used for customized messages which are programmed by an attendant. (See “Creating Customized Messages”)
E N T E R
M S G N O

Aria 130c/130/300/600 DECT Wireless Terminal (GDC-345H) User Guide
LG-Nortel systems 38 Issue 2.3
Programming User Custom Message A user may program a custom message to be displayed on the LCD of calling terminal. (This feature is not available in ARIA-20W)
Press Button. Press FUNCTION ( ) button longer than 1 second. Press (ARIA-186/100/34e) or (ARIA 130/300/600).
(Confirmation tone will be heard.)
Enter the message. (Up to 10 letters can be entered by using codes shown in the above “Programming A Name Into Display”)
Press FUNCTION( ) button longer than 1 second. (Confirmation tone will be heard.)
Functions Related with DVU (EDVU) – ARIA-186/100/34e * This feature is not available in ARIA-20W. Time Prompt:
Press button. Press .
Time prompt will be heard; “Time is XX : XX PM”. Date Prompt:
Press button. Press .
Date prompt will be heard; “Date is July, 20th”.
Station Number Prompt: Press button. Press .
Station number prompt will be heard; “This is station XXXX”
To record a greeting: Press button. Press (for no answer FWD) or (for busy FWD). To stop recording, press or HOLD button.
HOLD ( ) button longer than 1 second : To leave a greeting message until canceled. ON/OFF ( ) : To erase a greeting message automatically after 48 hours.
M S G N O : X

Aria 130c/130/300/600 DECT Wireless Terminal (GDC-345H) User Guide
LG-Nortel systems 39 Issue 2.3
In case of using , a caller will hear the greeting message when the called part does not answer the call within a default time (4 sec.). In case of using , a caller will hear the greeting message when the called
part does not answer the call within a programmed time. The programming is done at an admin station. The admin programming code is “43 + flex24”. The time range is 4 to 40 seconds.
To delete the greetion:
Press button. Press (for no answer FWD) or (for busy FWD).
To play back the greeting:
Press button. Press (for no answer FWD) or (for busy FWD).
The greeting message will be heard.
Station status prompt: Press button. Press .
A user will hear below items, (a-h). (c-g) items will not be heard unless they are activated. a) Station number XXXX b) Listed message X c) Wake-up time XXXX AM or PM d) Do not disturb e) Forwarded to station XXXX f) Forwarded to speed bin XXX g) Locked (temporary COS change) h) COS X
To record a paging message:
Press button. Press , then record a paging message. To stop recording, press or HOLD ( ) button longer than 1 second.
Caution: 1. pressing one more time, erase the recorded message. 2.This feature should be programmed at the attendant station before using.

Aria 130c/130/300/600 DECT Wireless Terminal (GDC-345H) User Guide
LG-Nortel systems 40 Issue 2.3
Functions Related with VMIB – ARIA 130/300/600 Date & Time Prompt:
Press button. Press FUNCTION ( ) button longer than 1 second. Press .
Station Number Prompt:
Press button. Press FUNCTION ( ) button longer than 1 second. Press .
Station status prompt:
Press button. Press FUNCTION ( ) button longer than 1 second. Press . A user will hear below items, (a-h). (c-g) items will not be heard unless they are activated. a) Station number XXXX b) Listed message X c) Wake-up time XXXX AM or PM d) Do not disturb e) Forwarded to station XXXX f) Forwarded to speed bin XXX g) Locked (temporary COS change) h) COS X
To record a greeting:
Press button. Press FUNCTION ( ) button longer than 1 second. Press . Press # to start recording. Press FUNCTION ( ) button longer than 1 second or button.
To delete the greeting:
Press button. Press FUNCTION ( ) button longer than 1 second. Press .
To record a paging message:
Press button. Press FUNCTION ( ) button longer than 1 second.

Aria 130c/130/300/600 DECT Wireless Terminal (GDC-345H) User Guide
LG-Nortel systems 41 Issue 2.3
Press . Press # to start recording. Press FUNCTION ( ) button longer than 1 second or button.
Caution: This feature should be programmed at the admin station before using. To delete a paging message:
Press button. Press FUNCTION ( ) button longer than 1 second. Press .
Date / Time Display * This feature is not available in ARIA-20W & ARIA 130/300/600. A current date and time will be displayed as;
Press button. Press FUNCTION ( ) button longer than 1 second. Press .
Linked Station Pairs * This feature is not available in ARIA-20W. Two stations can be linked with each other by programming. When two stations are linked, the following functions are supported;
When a station is busy, the other idle linked station will not receive ring for CO lines,
transferred ring or ICM calls. If one of two linked stations receives ICM/DISA/DID calls, then the other linked station will
receive ring together. If any one station in a linked pair goes to DND state or pre-selected message display state,
then the other goes to the same state automatically. Also, if any one station in a linked pair comes out of these state, then the other becomes to come out.
If one of two linked station is busy, the LCD of the other station will display “ IN USE AT LINK STA ”.
If you have set DND function, you should be sure that the wireless terminal be in DND state by pressing button after setting DND function. Otherwise, because the system sends setting information related to message of the wireless terminal about every 3 minutes, you should wait about 3 minutes. When you canceled DND function, you should be sure that the wireless terminal be not in DND state by pressing button after canceling DND function for the same reason, too.

Aria 130c/130/300/600 DECT Wireless Terminal (GDC-345H) User Guide
LG-Nortel systems 42 Issue 2.3
5.3 DECT Features 5.3.1 Mobility Management Function Hand-Over Once a call has been made, it is still necessary to change physical channels without release of the call. Frequency band or time slot can be changed due to quality degradation or interference, the associated base stations can be changed due to the mobility of a user in a multi-cell environment.
Out of Range Indication
If the wireless terminal is getting too far from the base
station to which it locks, then soft mute is occurred and warning tone will be heard once during a call or in an idle state. Then, “OUT RANGE” message is displayed on the LCD as the left.
To maintain a call, move closer to the base station. Bear in mind that walls, buildings, and especially large metal surfaces have strong screening effects.
When pressing [ON/OFF] button in out of range, the wireless terminal generates 1 beep with “OUT RANGE” message on the LCD and goes to an idle state.
Pressing [ON/OFF] button is ignored in state the wireless terminal is not locked.
Call-Drop Warning Indications Apart form the above out of range indication, there are two more indications to warn call-drop.
Radio interference: When a cell is fully occupied and there is sudden heavy radio interference, one call is dropped and three beeps will be heard with no message.
Entering fully occupied range: When a user is moving to a fully occupied cell, one beep is heard with no message with two seconds interval. The closer to the cell, the more unstable the call is. Try to move toward other cell.
Authentication
When the system requests authentication to a wireless terminal, a user should follow the following sequence to reply to the authentication. The authentication is requested by an attendant and the wireless terminal should have its authentication code (password) to answer the request. Refer to ‘Authentication Code’ to register or change the password. “ENTER UPI” message is displayed on the LCD of the wireless terminal when the attendant requests the authentication, a user should follow the bellowing sequence.
Enter the password. The storing and changing method of the password may be different according to the subscribed system.
Press FUNCTION ( ) button longer than 1 second.
O U T R A N G E

Aria 130c/130/300/600 DECT Wireless Terminal (GDC-345H) User Guide
LG-Nortel systems 43 Issue 2.3
Select FP Whenever a user wants to know which systems’ the wireless terminal is subscribed to, this function can be used. Also, if a user wants to use another system instead of the system in use, this function can be used, too. However, if a user wants to use another system, the wireless terminal should be subscribed to it. Please refer to ‘6.6 Change of Subscribed System’ for details. Subscription & Desubscription This function is to subscribe the wireless terminal to the system and to desubscribe it. Please refer to ‘6.2 Subscription’, ‘6.3 Desubscription I’ and ‘6.4 Desubscription II’ for details.

Aria 130c/130/300/600 DECT Wireless Terminal (GDC-345H) User Guide
LG-Nortel systems 44 Issue 2.3
5.3.2 Wireless Terminal Service Function These features give a user convenience to use the wireless terminal more powerfully. These features include the functions operated by each feature button and the functions operated by User Menu. Please refer to ‘5.3.3 User Menu’ about operation. Go to Pulse Function This function is that the pressed digit signal from the wireless terminal to C.O. is generated to pulse. Use this function in case that the outside PBX or phone(e.g. mechanical switching gear) requests pulse tone. However, according to capability of the subscribed system, this function may be operated or not. This function will be used for Home DECT inter-operability, not for ARIA & ARIA series.
Press button for longer than 1 second during pre-dialing or post-dialing. The dial tone is transferred to pulse tone.
Go to DTMF Function This function is that the pressed digit signal from the wireless terminal to C.O. is generated to DTMF. Use this function in case that the outside PBX or phone requests DTMF tone. However, according to capability of the subscribed system, this function may be operated or not. This function will be used for Home DECT inter-operability and for ARIA & ARIA series.
Press button for longer than 1 second during pre-dialing or post-dialing. The dial tone is transferred to DTMF tone.
Vibrator/Ring Selecting Function A user can select the one mode among Vibrator (=Ring off), Ring (=Vibrator off) and Vibr & Ring. This function is set by Vibr/Ring setting operation in HS Setting menu of User Menu. When a Vibrator is selected, ring tone can’t be generated. But for being conscious of incoming call there is phone vibration. When Vibr & Ring is selected, there are ring tone and vibration at the same time. The initial state is Ring. Silent Mode Setting Function A user can make silent mode of the phone. Silent mode is set by pressing the OK ( ) button more than 1 second when the phone is in idle state, then there is one time vibration. In silent mode, there aren’t beep tones, key tones and rings. But for being conscious of incoming call there is phone vibration To cancel the silent mode, pressing the OK( )button more than 1 second when the phone is in idle state, then confirmation tone is heard and silent mode function is disabled.

Aria 130c/130/300/600 DECT Wireless Terminal (GDC-345H) User Guide
LG-Nortel systems 45 Issue 2.3
Ring Type Selection & Ring Volume Setting Function The intercom ring melody and the CO(outside) ring melody can be selected among 9 different types. A user can adjust the intercom ring volume level and the CO ring volume level from level 0 to level 6. Melody and volume are set by ExtRing, IntRing setting operation in HS Setting menu of User Menu. The initial melody is 1, normal ring, and the initial volume setting is 3, middle volume. Key Click and Buzzer Volume Setting Function A user can adjust key tone volume from level 0 to level 6. The initial setting is 3, middle volume. Also, a user can adjust buzzer volume from level 0 to level 6. The initial setting is 3, middle volume. Key click volume and buzzer volume are adjusted by KeyTone, Buzzer setting operation in HS Setting menu of User Menu. Cradle On and Off Function (Charger Answer On/Off Function) When the terminal is on the charger and an intercom or CO ring is heard, just lift up the terminal, then a call will be connected. To hang up, just put the terminal on the charger, then a call will be disconnected. This function is set to Enable or Disable by Chrg Ans setting operation in HS Setting menu of User Menu. The initial state is Disable. Headset Ring On and Off Function If a headset is attached on the handset when an incoming call is received, user can also hear the ringing tone through the headset. This function is set to Enable or Disable by Headset setting operation in HS Setting menu of User Menu. The initial state is Disable. Auto Answer On and Off Function When the terminal receives an intercom or CO call, if this function is enabled, then connection will be made automatically after 9~10 seconds (This time is same as three times ringing when the melody type is set to “TYPE 1”). This function is set to Enable or Disable by Auto Ans setting operation in HS Setting menu of User Menu. The initial state is Disable. Battery Level Display / Low Battery Indication This function is to see how much battery voltage level is remained.
If battery voltage level is decreased to less than 2.3V±0.1V, low battery indication is generated. The block in a low battery icon ( ) in blinking in every second and the low battery warning tone is generated in every 20 second until the voltage level reaches over 2.3V±0.1V by re-charging the battery. When a user
puts the wireless terminal on the charger provided by LGE, the low battery warning tone and the blinking low battery icon ( ) are disappeared.
S T A X X X

Aria 130c/130/300/600 DECT Wireless Terminal (GDC-345H) User Guide
LG-Nortel systems 46 Issue 2.3
Direct Call A user can make a direct call at urgent state. 1) Storing / Display Function.
This function is to store a direct call number. Direct call number is stored by DirectCall setting operation in main menu of User Menu. The initial state is Disable.
2) Direct Call ENABLE/DISABLE Function. This function is to enable or disable a direct call function. This function is set to ENABLE or DISABLE by DirectCall setting operation in main menu of User Menu. The initial state is Disable.
3) Making an Direct Call. This function is to make a direct call. There are several conditions to make a direct call. At first, direct call function should be enabled. Second, the wireless terminal should be operated in available range. Third, a user should store the number that is available in system. And it is impossible to make an external call in when intercom class is 7. Please refer to DirectCall menu in User Menu about this function.
Key Lock This function is to prevent from pressing any key unconsciously. In key-lock mode, when a user receives a call, the mode is changed to the key-unlock mode automatically. When hanged up a call, the mode is returned to the key-lock mode. A user can only receive an incoming call in this mode. This function is set to ENABLE or DISABLE by KeyLock setting operation in User Menu. The initial state is DISABLE. Once this function is set to ENABLE, any key operation is not available except for for key-unlock procedure. While setting this function, a user can receive a call if there is an incoming call. Phone Book
This feature, Phone Book can make it possible to store a series telephone numbers with matching names and to retrieve them to make phone calls. Up to 30 pairs of telephone numbers and names can be stored. A telephone number is made up with up to twenty-four digits and a name is consist of up to 12 characters. 1) Storing Memory dial
Follow the below steps to add telephone numbers with numbers and names. Press MENU(UP( ) or DOWN( ) button. Main Menu is displayed on the LCD. Press (or set ‘>’ mark to ‘7 Phonebook’ by pressing UP( ) button or DOWN( )
button and press OK button). Phonebook Menu is displayed on the LCD. Press (or set ‘>’ mark to ‘2 Edit’ by pressing UP( ) button or DOWN( ) button and
press OK ( )button. “Enter No” message will be shown. Enter No
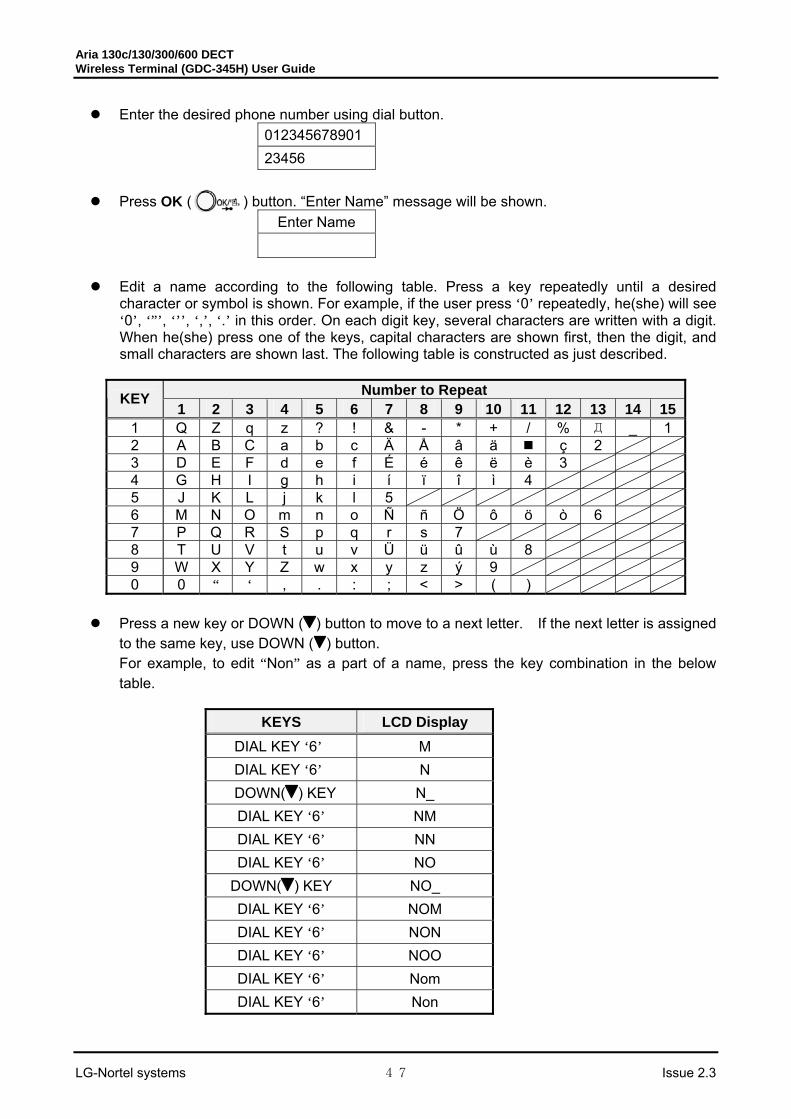
Aria 130c/130/300/600 DECT Wireless Terminal (GDC-345H) User Guide
LG-Nortel systems 47 Issue 2.3
Enter the desired phone number using dial button. 012345678901 23456
Press OK ( ) button. “Enter Name” message will be shown.
Enter Name
Edit a name according to the following table. Press a key repeatedly until a desired character or symbol is shown. For example, if the user press ‘0’ repeatedly, he(she) will see ‘0’, ‘”’, ‘’’, ‘,’, ‘.’ in this order. On each digit key, several characters are written with a digit. When he(she) press one of the keys, capital characters are shown first, then the digit, and small characters are shown last. The following table is constructed as just described.
Number to Repeat KEY
1 2 3 4 5 6 7 8 9 10 11 12 13 14 15 1 Q Z q z ? ! & - * + / % Д _ 1 2 A B C a b c Ä Å â ä ç 2 3 D E F d e f É é ê ë è 3 4 G H I g h i í ï î ì 4 5 J K L j k l 5 6 M N O m n o Ñ ñ Ö ô ö ò 6 7 P Q R S p q r s 7 8 T U V t u v Ü ü û ù 8 9 W X Y Z w x y z ý 9 0 0 “ ‘ , . : ; < > ( )
Press a new key or DOWN ( ) button to move to a next letter. If the next letter is assigned
to the same key, use DOWN ( ) button. For example, to edit “Non” as a part of a name, press the key combination in the below table.
KEYS LCD Display
DIAL KEY ‘6’ M DIAL KEY ‘6’ N DOWN( ) KEY N_
DIAL KEY ‘6’ NM DIAL KEY ‘6’ NN DIAL KEY ‘6’ NO
DOWN( ) KEY NO_ DIAL KEY ‘6’ NOM DIAL KEY ‘6’ NON DIAL KEY ‘6’ NOO DIAL KEY ‘6’ Nom DIAL KEY ‘6’ Non

Aria 130c/130/300/600 DECT Wireless Terminal (GDC-345H) User Guide
LG-Nortel systems 48 Issue 2.3
To correct an edited letter during editing, Flash ( ) button, then last edited letter is deleted. The deletion takes place from right to left. For example,
Enter Name Non
Flash ( ) button make the message as the follow. Enter Name NO_
Hold the Flash ( ) button for over one second to back to the pre-dialing state. But the telephone number is still there. Up to ten characters for a name can be written.
Press the Function ( ) button to save the editing, then the following message will be shown.
SavePosition [XX]
If there is no more space to save, the below message be displayed.
SavePosition Memory Full
To overwrite one of the saved numbers, assign a position from 1 to 30 then the following
message will be shown. SavePosition
[XX]
Then press OK ( ) button and the following message will be shown. Cell used Replace?
Then press Function button to replace the old one with the new one. If the Flash ( ) button is pressed instead of the Function button, the new number and the name will be canceled and it will go back to phone book edit state.
2) Retrieving and Calling Using Phonebook menu procedure.
Press MENU(UP( ) or DOWN( ) button. Main Menu is displayed on the LCD. Press (or set ‘> mark to ‘7 Phonebook’ by pressing UP( ) button or DOWN( )
button and press OK ( ) button. Phonebook Menu is displayed on the LCD. Press (or set ‘>’ mark to ‘1 Dial’ by pressing UP( ) button or DOWN( ) button and
press OK button). Name and number displayed as follow,
01] ABCDEFGH XXXXXXXXXXXX

Aria 130c/130/300/600 DECT Wireless Terminal (GDC-345H) User Guide
LG-Nortel systems 49 Issue 2.3
Using UP( ) button or DOWN( ) button, move cursor in desired number. Press button or Intercom button (INT) to make a call when a wanted name or
number is found.
Using Speed dial procedure. In idle state, user can make an outgoing call by pressing number saved in memory more
than 1 second. Available speed dial number is from 1 to 30.
3) Deleting Press MENU (UP( ) or DOWN( ) button. Main Menu is displayed on the LCD. Press (or set ‘>’ mark to ‘7 Phonebook’ by pressing UP( ) button or DOWN( )
button and press OK ( ) button). Phonebook Menu is displayed on the LCD. Press (or set ‘>’ mark to ‘3 Delete’ by pressing UP( ) button or DOWN( ) button
and press OK ( ) button). Name and number displayed as follow,
01] ABCDEFGH XXXXXXXXXXXX
Using UP( ) button or DOWN( ) button, move cursor in desired number. Press OK ( ) button. Confirm tone will be heard, and then handset goes to idle
state. Local Redial The last ten called telephone numbers are stored in the wireless terminal. If the numbers are the same, the same numbers are saved.
To store redial number, The last ten called phone numbers are automatically stored.
To use the local redial,
Press REDIAL( ) button. After selected redial is displayed, press UP( ) button, DOWN( ) button or
REDIAL( ) button in order to scroll redial numbers until the desirable number is displayed on the LCD.
Press button to make a call.
STOP! After pressing REDIAL( ) button, a user may edit a displayed number by pressing
numeric keys and FLASH( ) button.

Aria 130c/130/300/600 DECT Wireless Terminal (GDC-345H) User Guide
LG-Nortel systems 50 Issue 2.3
RX Volume This function is used when received voice volume is very small or very loud. To use this function during a call,
Press UP( ) button to be up voice volume or DOWN( ) button to be down. Since key click tone is different at Max. level and Min. level, a user can recognize that the level is reached to Min. level or Max. level without any display on the LCD. Pin Code Change A user can change PIN code. The initial PIN code is 0000. Ear-Mic If an Ear-Mic, which is an optional accessory, is attached to a GDC-345H, it can receive or release a call. Press the button on the Ear-Mic to receive the call while a ring sounds, and do the same action to release the call. Making a call by using the Ear-Mic is not supported, and pressing the button except ringing and call-connecting situations do not change anything. To attach an Ear-Mic to a GDC-345H, refer to the figure in ‘3.1 Wireless terminal (GDC-345H)’. Notice:
-. Using noise canceling or unidirectional Ear-Mic/headset, whose Mic impedance is below 1 KΩ, may cause the abnormal operation (Self-answering without press button when incoming call and similar on-hook when if put Ear-Mic in/off in the middle of talking). In general, Mic impedance is 1~2.2 KΩ.
5.3.3 USER MENU

Aria 130c/130/300/600 DECT Wireless Terminal (GDC-345H) User Guide
LG-Nortel systems 51 Issue 2.3
The User Menu consists of 7 sub-menus and each menu will be described in detail in the followings. Refer to Appendix A for menu structure. Generally each operating procedure is processed by using the following key functioned as described. 1) Button : This key functions that when pressing this key, it makes one step backward or
one digit erased. And pressing longer than 1 second, the current function is canceled or all digits are erased.
2) Button : Pressing this key makes the current function state saved. And it makes the current function ended.
HS Setting(Handset Setting Menu) 1) Vibr/Ring
Press MENU(UP( ) or DOWN( ) button. Main Menu is displayed on the LCD. Press (or set ‘>’ mark to ‘1 HS Setting’ by pressing UP( ) button or DOWN( )
button and press OK button.). HS Setting Menu is displayed on the LCD. Press (or set ‘>’ mark to ‘1 Vibr/Ring’ by pressing UP( ) button or DOWN( )
button and press OK button.). The current setting is displayed on the LCD. The initial state is Ring. To scroll setting, press UP( ) button or DOWN( ) button. To deactivate ringing, choose
Vibrator. Press OK button to change the status or press FLASH button to maintain the current
status and to return to HS Setting Menu. While operating, a user can receive a call when there is an incoming call.
2) ExtRing
Ring Type Selection Press MENU(UP( ) or DOWN( ) button. Main Menu is displayed on the LCD. Press (or set ‘>’ mark to ‘1 HS Setting’ by pressing UP( ) button or DOWN( )
button and press OK button). HS Setting Menu is displayed on the LCD. Press (or set ‘>’ mark to ‘2 ExtRing’ by pressing UP( ) button or DOWN( ) button
and press OK button). The ExtRing menu is displayed on the LCD. Press (or set ‘>’ mark to ‘1 Melody’ by pressing UP( ) button or DOWN( ) button
and press OK button). The current ring type is displayed on the LCD. The initial setting is ‘Type 1’. Press UP( ) button or DOWN( ) button to select a preferable ring rhythm. Press OK button to change the setting or press FLASH button to maintain the current
setting and to return to ExtRing Menu. While operating, a user can receive a call when there is an incoming call.
Ring Volume Selection

Aria 130c/130/300/600 DECT Wireless Terminal (GDC-345H) User Guide
LG-Nortel systems 52 Issue 2.3
Press MENU(UP( ) or DOWN( ) button. Main Menu is displayed on the LCD. Press (or set ‘>’ mark to ‘1 HS Setting’ by pressing UP( ) button or DOWN( )
button and press OK button). HS Setting Menu is displayed on the LCD. Press (or set ‘>’ mark to ‘2 ExtRing’ by pressing UP( ) button or DOWN( ) button
and press OK button). The ExtRing menu is displayed on the LCD. Press (or set ‘>’ mark to ‘2 Volume’ by pressing UP( ) button or DOWN( ) button
and press OK button). The current ring volume level is displayed on the LCD. The initial setting is level 3. Press UP( ) button or DOWN( ) button to select a preferable ring volume level(0~6). Press OK button to change the setting or press FLASH button to maintain the current
setting and to return to ExtRing Menu. While operating, a user can receive a call when there is an incoming call.
3) IntRing
Ring Type Selection Press MENU(UP( ) or DOWN( ) button. Main Menu is displayed on the LCD. Press (or set ‘>’ mark to ‘1 HS Setting’ by pressing UP( ) button or DOWN( )
button and press OK button). HS Setting Menu is displayed on the LCD. Press (or set ‘>’ mark to ‘3 IntRing’ by pressing UP( ) button or DOWN( ) button
and press OK button). The IntRing menu is displayed on the LCD. Press (or set ‘>’ mark to ‘1 Melody’ by pressing UP( ) button or DOWN( ) button
and press OK button). The current ring type is displayed on the LCD. The initial setting is ‘Type 1’. Press UP( ) button or DOWN( ) button to select a preferable ring rhythm. Press OK button to change the setting or press FLASH button to maintain the current
setting and to return to IntRing Menu. While operating, a user can receive a call when there is an incoming call.
Ring Volume Selection
Press MENU(UP( ) or DOWN( ) button. Main Menu is displayed on the LCD. Press (or set ‘>’ mark to ‘1 HS Setting’ by pressing UP( ) button or DOWN( )
button and press OK button). HS Setting Menu is displayed on the LCD. Press (or set ‘>’ mark to ‘3 IntRing’ by pressing UP( ) button or DOWN( ) button
and press OK button). The IntRing menu is displayed on the LCD. Press (or set ‘>’ mark to ‘2 Volume’ by pressing UP( ) button or DOWN( ) button
and press OK button). The current ring volume level is displayed on the LCD. The initial setting is level 3. Press UP( ) button or DOWN( ) button to select a preferable ring volume level(0~6).

Aria 130c/130/300/600 DECT Wireless Terminal (GDC-345H) User Guide
LG-Nortel systems 53 Issue 2.3
Press OK button to change the setting or press FLASH button to maintain the current setting and to return to IntRing Menu.
While operating, a user can receive a call when there is an incoming call.
4) Key Tone Press MENU(UP( ) or DOWN( ) button. Main Menu is displayed on the LCD. Press (or set ‘>’ mark to ‘1 HS Setting’ by pressing UP( ) button or DOWN( )
button and press OK button). HS Setting Menu is displayed on the LCD. Press (or set ‘>’ mark to ‘4 KeyTone’ by pressing UP( ) button or DOWN( )
button and press OK button). The current key volume level is displayed on the LCD. The initial setting is level 3. Press UP( ) button or DOWN( ) button to select a preferable ring volume level(0~6). Press OK button to change the status or press FLASH button to maintain the current
status and to return to HS Setting Menu. While operating, a user can receive a call when there is an incoming call.
5) Buzzer Volume
Press MENU(UP( ) or DOWN( ) button. Main Menu is displayed on the LCD. Press (or set ‘>’ mark to ‘1 HS Setting’ by pressing UP( ) button or DOWN( )
button and press OK button). HS Setting Menu is displayed on the LCD. Press (or set ‘>’ mark to ‘5 Buzzer’ by pressing UP( ) button or DOWN( ) button
and press OK button). The current buzzer volume level is displayed on the LCD. The initial setting is level 3. Press UP( ) button or DOWN( ) button to select a preferable ring volume level(0~6). Press OK button to change the status or press FLASH button to maintain the current
status and to return to HS Setting Menu. While operating, a user can receive a call when there is an incoming call.
6) Charger Answer
Press MENU(UP( ) or DOWN( ) button. Main Menu is displayed on the LCD. Press (or set ‘>’ mark to ‘1 HS Setting’ by pressing UP( ) button or DOWN( )
button and press OK button). Setting Menu is displayed on the LCD. Press (or set ‘>’ mark to ‘6 Chrg Ans.’ by pressing UP( ) button or DOWN( )
button and press OK button). The current setting is displayed on the LCD. The initial state is Disable. To scroll setting, press UP( ) button or DOWN( ) button. To activate this function,
choose Enable. Press OK button to change the status or press FLASH button to maintain the current
status and to return to Setting Menu. While operating, a user can receive a call when there is an incoming call.

Aria 130c/130/300/600 DECT Wireless Terminal (GDC-345H) User Guide
LG-Nortel systems 54 Issue 2.3
7) Headset Ring Press MENU(UP( ) or DOWN( ) button. Main Menu is displayed on the LCD. Press (or set ‘>’ mark to ‘1 HS Setting’ by pressing UP( ) button or DOWN( )
button and press OK button). Setting Menu is displayed on the LCD. Press (or set ‘>’ mark to ‘7 Headset’ by pressing UP( ) button or DOWN( ) button
and press OK button). The current setting is displayed on the LCD. The initial state is Disable. To scroll setting, press UP( ) button or DOWN( ) button. To activate this function,
choose Enable. Press OK button to change the status or press FLASH button to maintain the current
status and to return to Setting Menu. While operating, a user can receive a call when there is an incoming call.
8) Auto Answer
Press MENU(UP( ) or DOWN( ) button. Main Menu is displayed on the LCD. Press (or set ‘>’ mark to ‘1 HS Setting’ by pressing UP( ) button or DOWN( )
button and press OK button). Setting Menu is displayed on the LCD. Press (or set ‘>’ mark to ‘8 Auto Ans.’ by pressing UP( ) button or DOWN( )
button and press OK button). The current setting is displayed on the LCD. The initial state is Disable. To scroll setting, press UP( ) button or DOWN( ) button. To activate this function,
choose Enable. Press OK button to change the status or press FLASH button to maintain the current
status and to return to Setting Menu. While operating, a user can receive a call when there is an incoming call.

Aria 130c/130/300/600 DECT Wireless Terminal (GDC-345H) User Guide
LG-Nortel systems 55 Issue 2.3
KeyLock (Key Lock Function)
Press MENU(UP( ) or DOWN( ) button. Main Menu is displayed on the LCD. Press (or set ‘>’ mark to ‘2 KeyLock’ by pressing UP( ) button or DOWN( ) button and
press OK button). Confirmation tone will be heard and displayed “KEY LOCK” and key lock icon.
(The initial state is disable)
When key lock mode is set, “KEY LOCK” is displayed on the LCD and Key Lock Icon is displayed. In key lock mode, all keys can’t be entered except for key-unlock procedure (MENU + ) SelFP (Select FP) The wireless terminal, GDC-345H(GAP), can be subscribed to up to 4 GAP systems. However, the wireless terminal can’t use all systems at the same time. Only one system selected by a user is available for using the wireless terminal. This function is to select system that a user wants to use. Please refer to ‘6.6 Change of Subscribed System’ for details. Call Log (Caller ID) When incoming call arrived, handset stores the caller ID. User can check the caller ID in call log menu.
Review caller ID and dialing form caller ID
Press MENU(UP( ) or DOWN( ) button. Main Menu is displayed on the LCD. Press (or set ‘>’ mark to ‘4 Call Log’ by pressing UP( ) button or DOWN( ) button
and press OK button). Check new messages and all received messages. The number of new means receive
number after last checking. Press OK button and check recent received message.
(Displaying the name of caller doesn’t support.) Phone number is displayed on LCD and then searched using UP or DOWN button.
(When over 20 messages, the oldest data is updated) Press OK button and then detailed information of received number is displayed.
(If same messages are received, only received the number of times are displayed) If you want to make a call using this number, press button during display.
Notice
This feature is supported on ARIA 130/300 (MPB version 1.0Ba above and WTIB version 1.0G above) and ARIA-20W (MPB version 3.0Aa above). ARIA-186/100/34e doesn’t support this feature. ARIA 130/300/600 supports this feature with both external and internal call, but ARIA-20W supports this feature with external call only.

Aria 130c/130/300/600 DECT Wireless Terminal (GDC-345H) User Guide
LG-Nortel systems 56 Issue 2.3
HS PIN(Handset PIN code Change Function)
Press MENU(UP( ) or DOWN( ) button. Main Menu is displayed on the LCD. Press (Or set ‘>’ mark to ‘5 System’ by pressing UP( ) button or DOWN( ) button and
press OK button). System menu is displayed on the LCD. Press (Or set ‘>’ mark to ‘4 HS PIN’ by pressing UP( ) button or DOWN( ) button and
press OK button). Enter the current PIN code. Press OK button. Enter new PIN code.
(If over 8 digits, buzzer tone will be heard and the input can’t be displayed any more) Press OK button. Enter new PIN code for confirmation. Press OK button to save new PIN code or press FLASH( ) button to maintain the current
PIN code and to return to System Menu. UnRegister (Desubscription) This function is to desubscribe the wireless terminal from the subscribed system. Please refer to ‘6.3 Desubscription I’ for details. Register (Subscription) This function is to subscribe a wireless terminal to the system. Please refer to ‘6.3 Desubscription I’ for details. Memory Clear This function is to clear redial number, direct call number and call log.
Press MENU(UP( ) or DOWN( ) button. Main Menu is displayed on the LCD. Press (Or set ‘>’ mark to ‘5 System’ by pressing UP( ) button or DOWN( ) button and
press OK button). System menu is displayed on the LCD. Press (Or set ‘>’ mark to ‘3 ResetHS ’ by pressing UP( ) button or DOWN( ) button
and press OK button). ResetHS menu is displayed on the LCD. Press (Or set ‘>’ mark to ‘1 MemClear ’ by pressing UP( ) button or DOWN( ) button
and press OK button). Confirm message is displayed on the LCD. Press OK button. Redial number, direct call number and call log is deleted with success tone.

Aria 130c/130/300/600 DECT Wireless Terminal (GDC-345H) User Guide
LG-Nortel systems 57 Issue 2.3
Handset Reset This function is to set handset’s all setting value in default such as phone book, call log, redial number and direct call number..
Press MENU(UP( ) or DOWN( ) button. Main Menu is displayed on the LCD. Press (Or set ‘>’ mark to ‘5 System’ by pressing UP( ) button or DOWN( ) button and
press OK button). System menu is displayed on the LCD. Press (Or set ‘>’ mark to ‘3 ResetHS ’ by pressing UP( ) button or DOWN( ) button
and press OK button). ResetHS menu is displayed on the LCD. Press (Or set ‘>’ mark to ‘2 H-Reset ’ by pressing UP( ) button or DOWN( ) button
and press OK button). Confirm message is displayed on the LCD. Press OK button. Enter the current PIN code. Press OK button. Handset is reset to default with success tone.
Notice : This function erases all registration value. DirectCall(Making an Direct Call)
Press MENU(UP( ) or DOWN( ) button. Main Menu is displayed on the LCD. Press (or set ‘>’ mark to ‘6 DirectCall’ by pressing UP( ) button or DOWN( ) button and
press OK button). The current setting is displayed on the LCD. The initial state is OFF. To scroll setting, press UP( ) button or DOWN( ) button. To activate this function choose ON. Press OK button. ‘Direct No’ is displayed in LCD. Enter the phone number in Direct No and press OK button. “DIRECTCALL” is displayed on the LCD and an direct call is set up
When direct call mode is set, “DIRECTCALL” is displayed on the LCD. In this mode, all keys can be made a call except for Menu key.

Aria 130c/130/300/600 DECT Wireless Terminal (GDC-345H) User Guide
LG-Nortel systems 58 Issue 2.3
6. INSTALLATION OF WIRELESS TERMINAL
A user should do subscription procedure to use a wireless terminal with key system. The procedure is an auto mode subscription. A user has to get only AC from the system before
subscription processing. The details are described in ‘6.2 Subscription’. The wireless terminal is allowed to be subscribed to up to 4 GAP systems. If a user want to subscribe to over 4 systems, the wireless terminal should be desubscribed from one of the previous subscribed systems. The subscription procedure can be used for that by a user. Two kinds of method are provided to desubscribe the wireless terminal from the key system.
The first is a desubscription in the system and the wireless terminal at the same time. The details are described in ‘6.3 De-subscription I’.
The second is a local desubscription in the system or in the wireless terminal separately. The first procedure is recommended for a normal desubscription.
Warning If a local desubscription is inevitably used by a user, this should be informed to the attendant station in order to get rid of subscription information of a local desubscribed terminal in the system. The details are described in ‘6.4 Desubscription II’. 6.1 System ID & Authentication Code System ID is given to the ARIA & ARIA system attached the wireless terminal for identification. System ID, which is PARK(Portable Access Rights Key), is written on the WTIB Board(System ID of ARIA system, which is PARK, is written on the MPB Board). The detailed information is described in ‘Installation & Maintenance Manual’. Please, refer to the manual. Authentication code is entered at only attendant station, before you begin to subscribe GDC-345H(GAP) to ARIA & ARIA-WOTS system or Home-DECT base station. You should get AC and PARK from a system manager. The detailed information is described in ‘Installation & Maintenance Manual’.
In addition to the above, you should get station number of the wireless terminal to be subscribed from a system manager.

Aria 130c/130/300/600 DECT Wireless Terminal (GDC-345H) User Guide
LG-Nortel systems 59 Issue 2.3
6.2 Subscription
This procedure is for subscribing the wireless terminal to ARIA-186/100/34e/20W & ARIA 130/300/600 WOTS system. To Subscribe GAP,
VOLUME
At the Attendant Station, TRANS/PGM + ## + Flex. Button 1 + Station No. + Phone Type + HOLD/SAVE
1) Press [TRAS/PGM] button. ([TRANS/PGM] LED flashes, and [MON] LED lights
steady.) 2) Press ‘##’. ( ‘0’,’#’ in case of ARIA 130/300/600 ) 3) Press Flexible button 1. 4) Enter the station number. 5) Enter the phone type.
6) Press [HOLD/SAVE] button and confirmation tone is heard.
Caution: Don’t press [MON] button until subscription procedure at the wireless terminal is finished and subscription confirmation tone is heard.
C/R
2ABC 3DEF
4GHI 5JKL 6MNO
8TUV
£ª 0 ££
INT
OK PWR
LG
1QZ
7PRS 9WXY
At the Wireless Terminal,
Two mode are provided for subscription procedure.
1. MANUAL MODE
ARIA (LG-GAP)
Press ‘1’ button
Press ‘1’ button Below 3.0Aa MPB s/w version ARIA-20W
Press ‘3’ button Above 3.0Aa MPB s/w version
Press ‘1’ button Below 1.0Ba MPB s/w version or below 1.0G WTIB s/w version. ARIA
130/300/600 Press ‘3’ button Above 1.0Ba MPB s/w version and 1.0G WTIB
s/w version

Aria 130c/130/300/600 DECT Wireless Terminal (GDC-345H) User Guide
LG-Nortel systems 60 Issue 2.3
MENU(UP or DOWN) key + 5 + 1 + PARK + REDIAL( ) + AC code + REDIAL( ) + FT # + OK ( ) key
GDC-345H 1) Press MENU(UP( ) or DOWN( ) button. 2) Main Menu is displayed on the LCD. 3) Press (or set ‘>’ mark to ‘5 System’ by pressing UP( ) button or DOWN( )
button and press OK button). 4) System menu is displayed on the LCD. 5) Press (Or set ‘>’ mark to ‘1 Register’ by pressing UP( ) button or DOWN( )
button and press OK button). 6) Enter PARK length and PARK value. 7) Press REDIAL ( ) key. 8) Enter AC code. 9) Press REDIAL ( ) key. 10) ‘1’, ‘2’, ‘3’, ‘4’ or ‘_’ are displayed on the LCD. A number means FT number that it is not
occupied yet. The under-bar means the wireless terminal is already subscribed to the system. Therefore, the number of ‘_’ means the number of subscribed system. If 4 under-bar are displayed on the LCD, that means no subscription is allowed any more. Enter FT number by pressing numeric key if any number exists. After selecting, it is possible to re-select FT number by pressing FLASH button on cancel selection.
11) Press OK button 12) Success or failure of the subscription is notified with confirmation tone to the attendant
and the wireless terminal. 13) If succeeded in subscription, the wireless terminal goes to an idle state and its station
number is displayed. 14) If failed, repeat 3) ~ 6) steps of the attendant and 1) ~ 7) steps of wireless terminal.
GDC-345H
2. AUTO MODE
U N R E G I S T E R E D
S T A X X X
S U B S C R I B I N G

Aria 130c/130/300/600 DECT Wireless Terminal (GDC-345H) User Guide
LG-Nortel systems 61 Issue 2.3
MENU(UP or DOWN)key + 5 + 1 + REDIAL( ) + AC code + REDIAL( ) + FT # + OK ( ) key
GDC-345H
1) Press MENU(UP( ) or DOWN( ) button. 2) Main Menu is displayed on the LCD. 3) Press (or set ‘>’ mark to ‘5 System’ by pressing UP( ) button or DOWN( )
button and press OK button). 4) System menu is displayed on the LCD. 5) Press (Or set ‘>’ mark to ‘1 Register’ by pressing UP( ) button or DOWN( )
button and press OK button). 6) Press REDIAL ( ) key. 7) In Auto mode, a user needs not to input PARK value. The wireless terminal tries to search
for the registrable system and “SEARCHING” is displayed on the LCD. After locking into the system, “ENTER AC” is displayed on the LCD.
8) Enter AC code. 9) Press REDIAL ( ) key. 10) ‘1’, ‘2’, ‘3’, ‘4’ or ‘_’ are displayed on the LCD. A number means FT number that it is not
occupied yet. The under-bar means the wireless terminal is already subscribed to the system. Therefore, the number of ‘_’ means the number of subscribed system. If 4 under-bar are displayed on the LCD, that means no subscription is allowed any more. Enter FT number by pressing numeric key if any number exists. After selecting, it is possible to re-select FT number by pressing FLASH button on cancel selection.
11) Press OK button 12) Success or failure of the subscription is notified with confirmation tone to the attendant and
the wireless terminal. 13) If succeeded in subscription, the wireless terminal goes to an idle state and its station
number is displayed. 14) If failed, repeat 3) ~ 6) steps of the attendant and 1) ~ 7) steps of wireless terminal.
GDC-345H
U N R E G I S T E R E D

Aria 130c/130/300/600 DECT Wireless Terminal (GDC-345H) User Guide
LG-Nortel systems 62 Issue 2.3
Note 1 : According to the system or radio channel environment, the system or the wireless terminal may not recognize that the system has the subscribed wireless terminal or the wireless terminal is subscribed to the system. Once a user have done subscription, try to make a call first. Then, if a user can’t make a call, try to subscribe the wireless terminal again after doing local desubscription that is described in the following chapter.
Note 2 : If a user wants to subscribe the wireless terminal in Auto mode, it is recommended to remove
all DECT systems except the system which the user want to subscribe to. Note 3 : When a user tries to subscribe the wireless terminal continuously (in case of multiple
subscription) in Auto mode or when the wireless terminal is reset (power reset or change of subscribed system), it is recommended to wait about 20 seconds, after that the wireless terminal is locked to the system and RSSI icon stops blinking, in order to try next subscription.
S E A R C H I N G
S T A X X X
S U B S C R I B I N G

Aria 130c/130/300/600 DECT Wireless Terminal (GDC-345H) User Guide
LG-Nortel systems 63 Issue 2.3
6.3 De-subscription - I
De-subscription makes a wireless terminal loose access right to the ARIA-186/100/34e/20W & ARIA 130/300/600 WOTS. To de-subscribe the wireless terminal, it should be in an idle state. To De-subscribe;
VOLUME
At the Attendant Station, ARIA-186/100/34e/20W TRANS/PGM + ## + Flex. Button 2 + Station No. + HOLD/SAVE
1) Press [TRANS/PGM] button. ([TRANS/PGM] LED flashes and [MON] LED lights steady.) 2) Press ‘##’. ( ‘0’,’#’ in case of ARIA 130/300/600 ) 3) Press Flexible button 2. 4) Enter the station number. 5) Press [HOLD/SAVE] button and confirmation tone is heard. 6) Success or failure of the de-subscription is notified with tone to the both attendant and the
wireless terminal. 7) If succeeded in de-subscription, the below LCD message will be displayed. Power-off the
wireless terminal.
GDC-345H
D E S U B S C R I B
P R E S S P W R

Aria 130c/130/300/600 DECT Wireless Terminal (GDC-345H) User Guide
LG-Nortel systems 64 Issue 2.3
6.4 De-subscription - II Warning There is another way to de-subscribe locally. The subscription data of the wireless terminal (stored in MPB and WTIB or the wireless terminal) should be erased separately at both sides. The, you should be more careful in doing this procedure.
(1) To De-subscribe users locally in the system;
VOLUME
At the Attendant Station,
To de-subscribe all of subscribed wireless terminal at once,
ARIA-186/100/34e TRANS/PGM + 2 9 + Flex. Button 1 + Password(147*) + HOLD/SAVE
ARIA-20W TRANS/PGM + ## + Flex. Button 7 + Password (147*) + HOLD/SAVE
ARIA 130/300/600 TRANS/PGM + 0 #+ Flex. Button 7 + Password (147*) + HOLD/SAVE Please, refer to ‘Installation & Maintenance Manual’ about “Password” in detail. To de-subscribe one subscribed wireless terminal,
ARIA-186/100/34e
TRANS/PGM + 2 9 + Flex. Button 2 + Station No + HOLD/SAVE
ARIA-20W
TRANS/PGM + ## + Flex. Button 8 + Station No + HOLD/SAVE ARIA 130/300/600
TRANS/PGM + 0 # + Flex. Button 8 + Station No + HOLD/SAVE
1) Press [TRANS/PGM], then it will be the User Programming Mode(you will see the flashing [TRANS/PGM] LED (60 IPM Flash) and [MON] LED on ).
2) Press ‘2, 9’. ( ‘#, #’ in ARIA-20W, ‘0, #’ in ARIA 130/300/600) 3) Press Flexible button 1 or 2. ( 7 or 8 in ARIA-20W and ARIA 130/300/600) 4) Enter password or a station number. 5) Press [HOLD/SAVE] button, and confirmation tone is heard.

Aria 130c/130/300/600 DECT Wireless Terminal (GDC-345H) User Guide
LG-Nortel systems 65 Issue 2.3
(2) To De-subscribe locally in the wireless terminal;
C/R
2ABC 3DEF
4GHI 5JKL 6MNO
8TUV
£ª 0 ££
INT
OK PWR
LG
1QZ
7PRS 9WXY
At the Wireless Terminal,
MENU(UP or DOWN)key + 5 + 2 + PIN Code + OK key + or (To select FP#)+ OK key
1) Press MENU(UP or DOWN) button. 2) Press (Or set ‘>’ mark to ‘5 System’ by pressing UP( ) button or DOWN( ) button
and press OK button). 3) Press (Or set ‘>’ mark to ‘2 UnRegister’ by pressing UP( ) button or DOWN( )
button and press OK button). 4) Enter PIN code(0,0,0,0) If a user has changed PIN code before, the changed one should
be entered. 5) Press OK button. 6) If necessary, press UP( ) button or DOWN( ) button to select FT number which is
desubscribed. If the desubscribed FT number is displayed on the second line of LCD, stop pressing UP( ) button or DOWN( ) button.
7) Press OK button. GDC-345H
D E S U B
P r e s s P w r

Aria 130c/130/300/600 DECT Wireless Terminal (GDC-345H) User Guide
LG-Nortel systems 66 Issue 2.3
6.5 Authentication
The process by which the identity of a user of the wireless terminal is checked by the system. The User Personal Identification (UPI), manually entered by a user, is used for user authentication. (This feature is not available in ARIA-20W)
To Authenticate a User,
VOLUME
At the Attendant Station, ARIA-186/100/34e
TRANS/PGM + ## + Flex. Button 5 + Station No + HOLD/SAVE ARIA 130/300/600 TRANS/PGM + 0 # + Flex. Button 5 + Station No + HOLD/SAVE
1) Press [TRANS/PGM], then it will be the User Programming Mode (A user will see the
flashing [TRANS/PGM] LED (60 IPM Flash) and [MON] LED on ). 2) Press ‘# #’ (‘0 #’ in ARIA 130/300/600). 3) Press Flexible button 5. 4) Enter a station number to be authenticated. 5) Press [HOLD/SAVE] button and confirmation tone is heard.
C/R
2ABC 3DEF
4GHI 5JKL 6MNO
8TUV
£ª 0 ££
INT
OK PWR
LG
1QZ
7PRS 9WXY
At the Wireless Terminal, When the attendant presses [HOLD/SAVE], a message for authentication will be displayed on the wireless terminal with confirmation tone.
UPI (5 digit) + FUNCTION
1) Enter five-digit UPI. 2) Press FUNCTION ( )button longer than 1 second. 3) Authentication result(fail or success) will be informed on the attendant's LCD with
confirmation tone.

Aria 130c/130/300/600 DECT Wireless Terminal (GDC-345H) User Guide
LG-Nortel systems 67 Issue 2.3
6.6 Change of Subscribed System
The wireless terminal may have subscription information for 4 systems at the same time. The last subscribed system information or the subscribed system information which is selected as the following steps is only available system information currently.
Press MENU(UP or DOWN) button. Press (Or set ‘>’ mark to ‘3 Select BS’ by pressing UP( ) button or DOWN( ) button
and press OK button). The current FT number and PARK value are displayed on the LCD. If necessary, press UP( ) button or DOWN( ) button to select FT number and press OK
button when the FT number and PARK value of system that a user want to use is displayed on the LCD.
And then, the wireless terminal searches for the selected system.
! Notice 1. FT numbers are displayed together with ‘)’ except for the current locked system number. It uses ‘*’ instead of ‘)’. So a user recognized easily the locked system by different display.
2. When you choose the Best Base, the base station of closest system is automatically detected as soon as the signal of the previously selected base station is lost. 3. A user can recognize easily Best Base is enabled by ‘*’ in front of Best Base.
Press MENU(UP or DOWN) button. Press (Or set ‘>’ mark to ‘3 Select BS’ by pressing UP( ) button or DOWN( )
button and press OK button). The current FT number and PARK value are displayed on the LCD. Press UP( ) button or DOWN( ) to select Best Base and press OK button. And then, the wireless terminal will beep to confirm that it is now searching for the
base station of closest system among the subscribed systems.

Aria 130c/130/300/600 DECT Wireless Terminal (GDC-345H) User Guide
LG-Nortel systems 68 Issue 2.3
7. TROUBLESHOOTING GUIDE
Problem Reason Solution
LCD is empty. No power Check the battery then, press the [PWR] button.
“NO CHANNEL” is displayed when pressing [ON/OFF] button.
No free channel Wait until a free channel is released.
Small Voice Small voice level While connected to a call, Press UP( ) button.
Small Ring Small ring volume level Adjust Ring volume level; Refer to ‘HS Setting’.
“UNREGISTERED” is displayed on the LCD. Not subscribed Subscribe the terminal.
Refer to ‘6.2 Subscription’. Low battery icon( ) is flashing on LCD with warning tone.
Low battery level Recharge the battery.
Power-off right after power-on Almost fully discharged battery Recharge the battery.
No Base Lock State Wait until Base Locked or move to a place with good RSSI1. No tone is heard when pressing
a digit. Tone Volume is off
Adjust Key tone level; In an idle state
Refer to ‘HS Setting’
Unexpected call disconnect or call failure
Bad radio Environment
Radio environment is changed unexpectedly even in the same place. Move to another place with good RSSI or wait until RSSI is recovered.
Different battery duration from the battery duration table
Bad charging habit or kept the battery inadequate place.
Charge and keep the battery according to the suggested ways.
Refer to ‘3. Maintenance’.
Subscript can’t be done.
1. There is interference of other systems with
subscription. 2. A station is too far from
the terminal. 3. Wrong PARK value or (and) wrong AC code 4. There is no available wireless channel.
1. Remove other systems. 2. Be sure a batation is close to the
terminal. 3. Be sure PARK value and AC code are correct. 4. Wait unan available wireless
channel is free. If the subscription still fails, retry of the power reset.
When pressing TALK button, Phone icon( ) is blinking several times and disappeared.
Subscription Disagreement
Do desubscribe locally in both sides, the system and the terminal and subscribe the terminal in the system again.
When pressing TALK button, nothing is happened. Out of Range
1. Be sure the terminal is locked to a base station.
2. Be sure the system is operating properly.
1 RSSI : Radio Signal Strength Indication. Always a user can see RSSI icon while the terminal is operating.

Aria 130c/130/300/600 DECT Wireless Terminal (GDC-345H) User Guide
LG-Nortel systems 69 Issue 2.3
8. SPECIFICATIONS 8.1 System Specification Standard: DECT / GAP Frequency band: 1880~1900MHz Typical distance from a base station to a wireless terminal: 70 meters
Items
System Name
1. Board Name
2. Max. Cell Number (Base Station Num.)
3. Channels /Cell
4. Registrable Max. Terminal Number
5. Max. Simultaneous Wireless Call
6. Applicable W version GDC-345H)
WTIB 3 5 8~96 by step 8 15 ARIA-186
With WTIU 6 5 8~96 by step 8 30 All version
WTIB 4 5 8~64 by step 8 16 ARIA-100
With WTIU 8 5 8~64 by step 8 32 All version
WTIB 4 5 8~32 by step 8 16 ARIA-34e
With WTIU 8 5 8~32 by step 8 16 All version
MBU 1 4 20 4 ARIA-20W
WTIB 3 4 20 12 All version
WTIB (MAX. 2)
4 ( x 2 ) 5 8~80 by step 8 32 ARIA 130
With WTIU (MAX. 2)
8 ( x 2 ) 5 8~80 by step 8 64
All version
WTIB (MAX. 3)
4 ( x 3 ) 5 8~192 by step 8 48 ARIA
300/600 With WTIU (MAX. 3)
8 ( x 3 ) 5 8~192 by step 8 96
All version

Aria 130c/130/300/600 DECT Wireless Terminal (GDC-345H) User Guide
LG-Nortel systems 70 Issue 2.3
8.2 Hand-held Type Wireless Terminal (GDC-345H) Specification
Size: 131mm ×49mm ×32mm(H ×W ×D) Weight: 102g Color: Warm gray Maximum power: 250mW Modulation method: GFSK Battery
Talking Mode: 9 hours Standby Mode: 50 hours Type: DC 2.4V/600mAh(NiMH)
Programmable Ring Type: CO, INT ring: each 9 kind Display feature
Icon: 8 Lines: 2 Characters/line: 12 Type: LCD
Dialing mode: DTMF Speed dial numbers: Phonebook(local) : 30 System : Refer to ‘Speed Dial’ of ‘5.2.2 KEY SYSTEM SUPPORT FUNCTION’. Re-dial numbers: Local : 10 Operating temperature: 0 ~ +40°C
8.3 Charger(345-SSC) Specification
Size: 92mm ×74mm ×45mm( L ×W ×D) Color: Warm gray Mounting: Desk mount Charging port: 1 Battery type: DC 2.4V , 600mAh(NiMH) Operating temperature: 0 ~ +40°C Input power: From 330-HAP
Type - AC 230V 50Hz 50mA input, DC 12V 200mA 2.4VA output Type - AC 220V/110V 50/60Hz input DC 12V 200mA output Charging current: nominal 40mA Indication: Red color LED

Aria 130c/130/300/600 DECT Wireless Terminal (GDC-345H) User Guide
LG-Nortel systems 71 Issue 2.3
Appendix. A USER MENU TREE
Menu Key
Key Lock2
Select BS3
System5
Direct Call6
HS Setting1
Phonebook7
Edit2
D elete3
D ial1
Notes : 1. When you go back to previous menu, press 'C/R' key. 2. When you go back to 'Idle State', press 'C/R' key more than 1 second.
UnRegister2
Register1
Reset HS3
HS PIN4
Call Log4
Vibr/Ring1
KeyTone4
B uzzer 5
ExtR ing2
IntR ing3 Melody1
Volume2
Volum e2
M elody1
C hrg Ans.6
H eadset7
Auto Ans.8
Each number means the numeric key.

Aria 130c/130/300/600 DECT Wireless Terminal (GDC-345H) User Guide
LG-Nortel systems 72 Issue 2.3
Appendix. B Function Short-Key Table 1. Function Short-Key Table related to Key System Call Service * ARIA-186/100/34e
FEATURE INPUT KEY Call Transfer (During a call) [TRANS] + STA # + ON/OFF( ) Call Waiting/Camp On ON/OFF( ) + STA # + (if busy tone is heard) Call Back ON/OFF( ) + STA # + [CALL BACK] Attendant Call ON/OFF( ) + 0 or ON/OFF( ) + 9
Internal Zone ON/OFF( ) + 4 + digit ( Refer to ‘5.2.2. Paging’. ) Internal All Zone ON/OFF( ) + 4 + 3 Meet-me Page ON/OFF( ) + 4 + 4 External Zone 1 ON/OFF( ) + 4 + 6 External Zone 2 ON/OFF( ) + 4 + 7 External All Zone ON/OFF( ) + 4 + 8
Paging
All Zone ON/OFF( ) + 4 + 9 DND (Do Not Disturb) ON/OFF( ) + 5 + 3
Follow Me ON/OFF( ) + 5 + 4 + 0 + STA # (only the station which has its password can activate this function)
Unconditional ON/OFF( ) + 5 + 4 + 1 + STA # Busy Calls ON/OFF( ) + 5 + 4 + 2 + STA # No Answer Calls ON/OFF( ) + 5 + 4 + 3 + STA # Busy/No Answer Calls ON/OFF( ) + 5 + 4 + 4 + STA # Station Off-net ON/OFF( ) + 5 + 4 + 5 + SPD BIN # DVU ON/OFF( ) + 5 + 4 + 7 (default time transfer)
Call Forward
DVU ON/OFF( ) + 5 + 4 + 8 (programmed time transfer) DND(toggle)/Call Forward Cancel ON/OFF( ) + 5 + 9 or 5 + 3/ ON/OFF( ) + 5 + 9 or 5 + 4 + #
Call Parking Locations ON/OFF( ) + 6 + digit (01~19) Call Pilot Number ON/OFF( ) + 6 + digit (20~49)
Group Call Pick Up ON/OFF( ) + 6 + 6 Pick Up Direct Call Pick Up ON/OFF( ) + 7 + STA #
Record Greeting ON/OFF( ) + 6 + 7 + 0 (transferred after a programmed time)
Current Time Prompt ON/OFF( ) + 6 + 7 + 1 Current Date Prompt ON/OFF( ) + 6 + 7 + 2 Station Number Prompt ON/OFF( ) + 6 + 7 + 3
Record Greeting ON/OFF( ) + 6 + 7 + 4 (transferred after the default time, 4 seconds)
Delete Greeting ON/OFF( ) + 6 + 7 + 5 Play Back Greeting ON/OFF( ) + 6 + 7 + 6 Station Status ON/OFF( ) + 6 + 7 + 7 Record Paging Message (toggle) ON/OFF( ) + 6 + 7 + 8
DVU
Retrieve Paging Message ON/OFF( ) + 6 + 7 + 9 Universal Night Answer ON/OFF( ) + 6 + 9 CO Line Access ON/OFF( ) + 8 + digit (01~48) Individual CO Line Access ON/OFF( ) + 8 + 8 + digit (01~96) Station Speed Dial ON/OFF( ) + [SPEED] + digit (00~19)
Saved Number ON/OFF( ) + [SPEED] + #
Redial Last Number
1. ON/OFF( ) + [SPEED] + or [REDIAL]( ) (This case is available only for CO line call.)
2. [REDIAL]( ) + [ON/OFF]( ) Last Tel. Number Display ON/OFF( ) + [SPEED] + Saved Tel. Number Display ON/OFF( ) + [SPEED] + # Station Program Recovery ON/OFF( ) + [FUNCTION] + 2 + 5

Aria 130c/130/300/600 DECT Wireless Terminal (GDC-345H) User Guide
LG-Nortel systems 73 Issue 2.3
FEATURE INPUT KEY Date/Time Display ON/OFF( ) + [FUNCTION] + 2 + *
Set function ON/OFF( ) + [FUNCTION] + 4 + 1 + Time(hh:mm) + (# for permanent use) + [FUNCTION] Wake-Up Call
Reset function ON/OFF( ) + [FUNCTION] + 4 + 2 + [FUNCTION]
Register ON/OFF( ) + [FUNCTION] + 4 + 4 + Password (5digits) + [FUNCTION] Authorization Code
(Password) Change ON/OFF( ) + [FUNCTION] + 4 + 5 + The current Password
(5digits) + New password + [FUNCTION]
Change ON/OFF( ) + [FUNCTION] + 4 + 6 + [FUNCTION] Temporal Station COS Change (a password is necessary for this function) Recovery ON/OFF( ) + [FUNCTION] + 4 + 7 + The current Password (5
digits) + [FUNCTION] Programming User Custom Message
ON/OFF( ) + [FUNCTION] + 4 + 8 + Input Message(within 23 characters) + [FUNCTION]
Pre-Selected Message Display ON/OFF( ) + [FUNCTION] + 7 + 7 + Digits(00~19, #) + [FUNCTION]
Programming A Name Into Display
ON/OFF( ) + [FUNCTION] + [SPEED] + 0 + 0 + [SPEED] + Station Name + [FUNCTION] + ON/OFF( )
Call-by-Name ON/OFF( ) + [SPEED] + [SPEED] Save Last Tel. Number (During a call) [SPEED] + [SPEED] Entering CLI Message Display ON/OFF( ) + [CALL BACK] + [UP/DOWN] ( or )
Clear CLI Message Display ON/OFF( ) + [CALL BACK] + [UP/DOWN] ( or ) + [FLASH](C/R) * ARIA-20W
FEATURE INPUT KEY Call Transfer (During a call) [TRANS] + STA # + ON/OFF( ) Call Waiting/Camp On ON/OFF( ) + STA # + (if busy tone is heard) Call Back ON/OFF( ) + STA # + [CALL BACK] Attendant Call ON/OFF( ) + 0 or ON/OFF( ) + 9
All Call ON/OFF( ) + # + 0 Internal Zone 1 ON/OFF( ) + # + 1 Internal Zone 2 ON/OFF( ) + # + 2 External ON/OFF( ) + # + 3
Paging
Meet-me Page ON/OFF( ) + # + 6 DND (Do Not Disturb, Toggle) ON/OFF( ) + 5 + 3
Unconditional ON/OFF( ) + 5 + 4 + 1 + STA # Busy Calls ON/OFF( ) + 5 + 4 + 2 + STA # No Answer Calls ON/OFF( ) + 5 + 4 + 3 + STA # Busy/No Answer Calls ON/OFF( ) + 5 + 4 + 4 + STA # Station Off-net ON/OFF( ) + 5 + 4 + 5 + SPD BIN #
Call Forward
DVIB ON/OFF( ) + 5 + 4 + 7 Call Forward Cancel ON/OFF( ) + 5 + 4 + # Call Pilot Number ON/OFF( ) + digit (61~64) Group Call Pick Up ON/OFF( ) + 6 + 6 Universal Night Answer ON/OFF( ) + 6 + 9 CO Group Access ON/OFF( ) + 8 + digit (1~4) Individual CO Line Access ON/OFF( ) + 8 + 8 + digit (1~8) Station Speed Dial ON/OFF( ) + [SPEED] + digit (01~19)
Last Number Redial ON/OFF( ) + [SPEED] + or [REDIAL]( ) (This case is available only for CO line call.) [REDIAL]( ) + [ON/OFF]( )
Station Program Recovery ON/OFF( ) + [FUNCTION] + 2 + 5
Set function ON/OFF( ) + [FUNCTION] + 4 + 1 + Time(hh:mm) + (# for permanent use) + [FUNCTION] Wake-Up Call
Reset function ON/OFF( ) + [FUNCTION] + 4 + 2 + [FUNCTION]
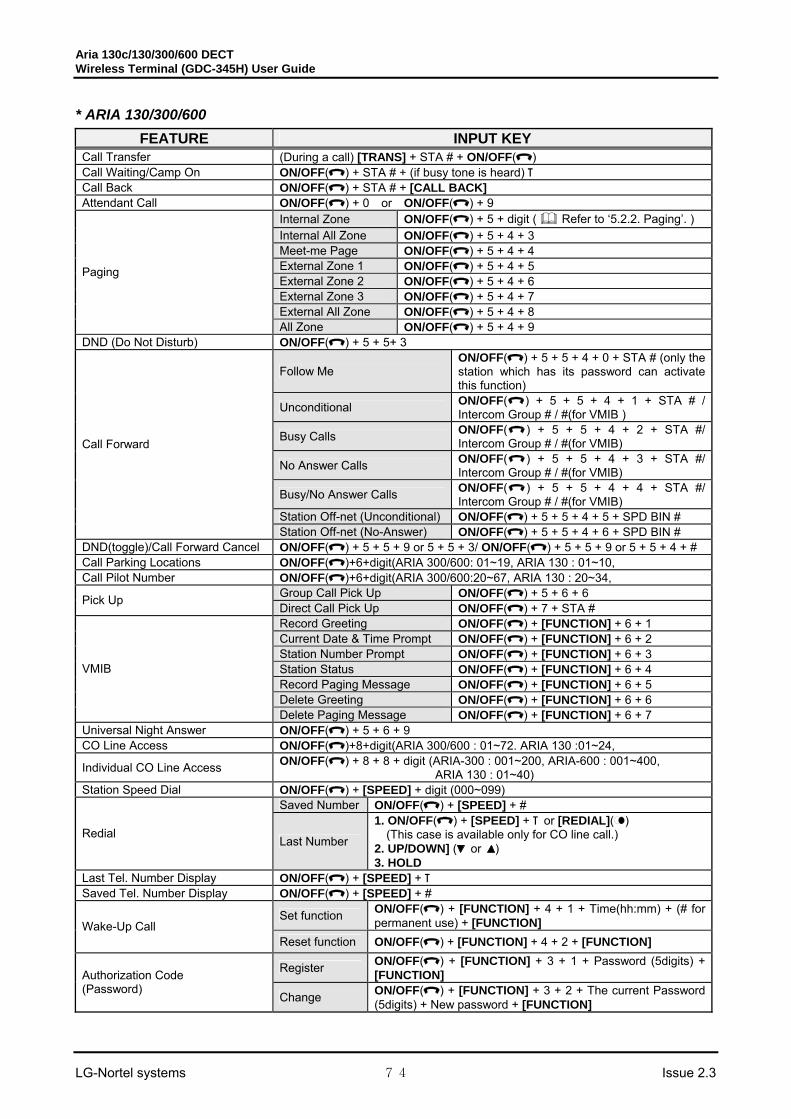
Aria 130c/130/300/600 DECT Wireless Terminal (GDC-345H) User Guide
LG-Nortel systems 74 Issue 2.3
* ARIA 130/300/600 FEATURE INPUT KEY
Call Transfer (During a call) [TRANS] + STA # + ON/OFF( ) Call Waiting/Camp On ON/OFF( ) + STA # + (if busy tone is heard) Call Back ON/OFF( ) + STA # + [CALL BACK] Attendant Call ON/OFF( ) + 0 or ON/OFF( ) + 9
Internal Zone ON/OFF( ) + 5 + digit ( Refer to ‘5.2.2. Paging’. ) Internal All Zone ON/OFF( ) + 5 + 4 + 3 Meet-me Page ON/OFF( ) + 5 + 4 + 4 External Zone 1 ON/OFF( ) + 5 + 4 + 5 External Zone 2 ON/OFF( ) + 5 + 4 + 6 External Zone 3 ON/OFF( ) + 5 + 4 + 7 External All Zone ON/OFF( ) + 5 + 4 + 8
Paging
All Zone ON/OFF( ) + 5 + 4 + 9 DND (Do Not Disturb) ON/OFF( ) + 5 + 5+ 3
Follow Me ON/OFF( ) + 5 + 5 + 4 + 0 + STA # (only the station which has its password can activate this function)
Unconditional ON/OFF( ) + 5 + 5 + 4 + 1 + STA # / Intercom Group # / #(for VMIB )
Busy Calls ON/OFF( ) + 5 + 5 + 4 + 2 + STA #/ Intercom Group # / #(for VMIB)
No Answer Calls ON/OFF( ) + 5 + 5 + 4 + 3 + STA #/ Intercom Group # / #(for VMIB)
Busy/No Answer Calls ON/OFF( ) + 5 + 5 + 4 + 4 + STA #/ Intercom Group # / #(for VMIB)
Station Off-net (Unconditional) ON/OFF( ) + 5 + 5 + 4 + 5 + SPD BIN #
Call Forward
Station Off-net (No-Answer) ON/OFF( ) + 5 + 5 + 4 + 6 + SPD BIN # DND(toggle)/Call Forward Cancel ON/OFF( ) + 5 + 5 + 9 or 5 + 5 + 3/ ON/OFF( ) + 5 + 5 + 9 or 5 + 5 + 4 + # Call Parking Locations ON/OFF( )+6+digit(ARIA 300/600: 01~19, ARIA 130 : 01~10, Call Pilot Number ON/OFF( )+6+digit(ARIA 300/600:20~67, ARIA 130 : 20~34,
Group Call Pick Up ON/OFF( ) + 5 + 6 + 6 Pick Up Direct Call Pick Up ON/OFF( ) + 7 + STA # Record Greeting ON/OFF( ) + [FUNCTION] + 6 + 1 Current Date & Time Prompt ON/OFF( ) + [FUNCTION] + 6 + 2 Station Number Prompt ON/OFF( ) + [FUNCTION] + 6 + 3 Station Status ON/OFF( ) + [FUNCTION] + 6 + 4 Record Paging Message ON/OFF( ) + [FUNCTION] + 6 + 5 Delete Greeting ON/OFF( ) + [FUNCTION] + 6 + 6
VMIB
Delete Paging Message ON/OFF( ) + [FUNCTION] + 6 + 7 Universal Night Answer ON/OFF( ) + 5 + 6 + 9 CO Line Access ON/OFF( )+8+digit(ARIA 300/600 : 01~72. ARIA 130 :01~24,
Individual CO Line Access ON/OFF( ) + 8 + 8 + digit (ARIA-300 : 001~200, ARIA-600 : 001~400, ARIA 130 : 01~40)
Station Speed Dial ON/OFF( ) + [SPEED] + digit (000~099) Saved Number ON/OFF( ) + [SPEED] + #
Redial Last Number
1. ON/OFF( ) + [SPEED] + or [REDIAL]( ) (This case is available only for CO line call.)
2. UP/DOWN] ( or ) 3. HOLD
Last Tel. Number Display ON/OFF( ) + [SPEED] + Saved Tel. Number Display ON/OFF( ) + [SPEED] + #
Set function ON/OFF( ) + [FUNCTION] + 4 + 1 + Time(hh:mm) + (# for permanent use) + [FUNCTION] Wake-Up Call
Reset function ON/OFF( ) + [FUNCTION] + 4 + 2 + [FUNCTION]
Register ON/OFF( ) + [FUNCTION] + 3 + 1 + Password (5digits) + [FUNCTION] Authorization Code
(Password) Change ON/OFF( ) + [FUNCTION] + 3 + 2 + The current Password
(5digits) + New password + [FUNCTION]

Aria 130c/130/300/600 DECT Wireless Terminal (GDC-345H) User Guide
LG-Nortel systems 75 Issue 2.3
FEATURE INPUT KEY Change ON/OFF( ) + [FUNCTION] + 2 + 1 + [FUNCTION] Temporal Station COS
Change (a password is necessary for this function) Recovery ON/OFF( ) + [FUNCTION] + 2 + 2 + The current Password (5 digits) +
[FUNCTION] Programming User Custom Message
ON/OFF( ) + [FUNCTION] + 5 + 2 + Input Message(within 23 characters) + [FUNCTION]
Pre-Selected Message Display ON/OFF( ) + [FUNCTION] + 5 + 1 + Digits(00~19, #) + [FUNCTION]
Programming A Name Into Display ON/OFF( ) + [FUNCTION] + 7 + 4 + Station Name + [FUNCTION] + ON/OFF( )
Call-by-Name ON/OFF( ) + [SPEED] + [SPEED] Save Last Tel. Number (During a call) [SPEED] + [SPEED] Entering CLI Message Display ON/OFF( ) + [CALL BACK] + [UP/DOWN] ( or )
Clear CLI Message Display ON/OFF( ) + [CALL BACK] + [UP/DOWN] ( or ) + [FLASH](C/R) 2. Function Short-Key Table related to The Wireless Terminal Feature
To enter the programming mode, press [MENU(UP or DOWN)] button. FEATURE INPUT KEY
Subscription 5 + 1 + [UP/DOWN] ( or ) + AC code + [OK] + [OK] Local Desubscription 5 + 2 + PIN code + [OK] + [UP/DOWN] ( or ) + [OK] Ring/Vibrator 1 + 1 + UP/DOWN] ( or ) + [OK] Internal Call Ring Rhythm Select 1 + 3 + 1 + [UP/DOWN] ( or ) + [OK] or [FLASH](C/R)
External Call Ring Rhythm Select 1 + 2 + 1 + [UP/DOWN] ( or ) + [OK] or [FLASH](C/R)
Internal Call Ring Volume Adjust 1 + 3 + 2 + [UP/DOWN] ( or ) + [OK] or [FLASH](C/R)
External Call Ring Volume Adjust 1 + 2 + 2 + [UP/DOWN] ( or ) + [OK] or [FLASH](C/R)
Buzzer Volume Adjust 1 + 5 + [UP/DOWN] ( or ) + [OK] or [FLASH](C/R) Key Volume Adjust 1 + 4 + [UP/DOWN] ( or ) + [OK] or [FLASH](C/R) Charger Answer Select 1 + 6 + [UP/DOWN] ( or ) + [OK] or [FLASH](C/R) Headset Ring Select 1 + 7 + [UP/DOWN] ( or ) + [OK] or [FLASH](C/R) Auto Answer Select 1 + 8 + [UP/DOWN] ( or ) + [OK] or [FLASH](C/R) Key Lock (Toggle) 2 + [UP/DOWN] ( or ) + [OK] or [FLASH](C/R) Select System 3 + [UP/DOWN] ( or ) + [OK] Review Call Log 4 + [OK] + [UP/DOWN] ( or ) + [OK] or [FLASH](C/R) Memory Clear 5 + 3 + 1 + [OK] Reset Handset 5 + 3 + 2 + [OK] + PIN code + [OK] Change PIN Code 5 + 4 +The current PIN code + [OK] + New PIN code + [OK] Direct Call(Enable) 6 + Select “ON” + [OK] + Telephone number + [OK] Direct Call(Disable) 6 + Select “OFF” + [OK]
Save 7 + 2 + Number + [OK] + Name + [OK] + [UP/DOWN] ( or ) + [OK] Use 7 + 1 + [UP/DOWN] ( or ) + ON/OFF( ) or [OK] Phonebook Delete 7 + 3 + [UP/DOWN] ( or ) + [OK]
Local Redial 1. [REDIAL]( ) + [UP/DOWN] ( or ) + ON/OFF( ) 2. [REDIAL]( ) + [REDIAL]( ) + ON/OFF( )
Notice: TRANS : Press button shorter than 1 second.
FUNCTION : Press button longer than 1 second.
SPEED : Press button shorter than 1 second.
CALL BACK : Press button.
HOLD : Press button longer than 1 second.

Aria 130c/130/300/600 DECT Wireless Terminal (GDC-345H) User Guide
LG-Nortel systems 76 Issue 2.3
Appendix. C The LCD Messages Related To a Call The followings describe messages displayed on the LCD of an attendant station and the wireless terminal in Talking Mode.
VOLUME
At the DKTU,
(1) NO RESPONSE CT Description : After key system requests a call to the wireless terminal, if there is no
response from the wireless terminal, this message is displayed on the LCD of DKTU.
A. Called station : Power-off B. Called station : Out-of-svc area
(2) NO CHANNEL
Description : There is not enough system resource. If the message is displayed frequently on the LCD of DKTU, the system should be installed more.
There is no available RF channel ; WTIB side - The reason is brought by WTIB. - All RF channels are fully used.
There is no available PCM Hi-way ; MPB side
- The reason is brought by MPB.
(3) INVALID Description : When a station not subscribed is called. The reason is brought by MPB.
(4) NO RESPONSE : STA xxx
Description : After key system requests a call to DKTU, if there is no response from the wireless terminal, this message is displayed on the LCD of DKTU.
When a called DKTU does not respond; - The reason is brought by MPB. - It is not applicable to attendant station.
STOP! The attendant station is not applicable for this case. When time-out is occurred, the call is released.
(5) RELEASED : STA xxx
Description : After key system requests a call to the wireless terminal, if there is no response from the wireless terminal, this message is displayed on the LCD of DKTU.
When a called WHTU does not respond; - The reason is brought by WTIB.
(6) DESUB. Fail

Aria 130c/130/300/600 DECT Wireless Terminal (GDC-345H) User Guide
LG-Nortel systems 77 Issue 2.3
Description : While the wireless terminal is desubscribed at the attendant station, the desubscription processing is really failed in MPBCOMM, DPS or WHTU.
C/R
2ABC 3DEF
4GHI 5JKL 6MNO
8TUV
£ª 0 ££
INT
OK PWR
LG
1QZ
7PRS 9WXY
At the Wireless Terminal,
(1) NO CHANNEL Description : There is not enough system resource. If the message is displayed frequently
on the LCD of DKTU, the system should be installed more. There is no available RF channel.
There is no available PCM Hi-way ; MPB side
- The reason is brought by MPB.
(2) INVALID Description : When a not subscribed station is called. The reason is brought by MPB.
(3) NO ANSWER STA xxx Description : When a call made to the wireless terminal, there is no response from the
wireless terminal in the below case. - Called station : When there is no answer for ringing, - The reason is brought by MPB.
(4) NO RESP. STA xxx
Description : When a call made to the wireless terminal, there is no response from the wireless terminal in the below case.
- Called station : Power-off - Called station : In Out-of-Service area
(5) DESUB. Fail Description : While the wireless terminal is desubscribed at the attendant station, the desubscription processing is really failed in MPBCOMM, DPS or WHTU.